


®
MixPre-3
Audio Recorder | Mixer | USB Audio Interface
User Guide

Legal Notices
Product specifications and features are subject to change without prior notification.
Copyright © 2017 Sound Devices, LLC. All rights reserved.
This product is subject to the terms and conditions of a end-user license agreement provided in this guide, and may be used in accordance with the license agreement.
This document is protected under copyright law. An authorized licensee of this product may reproduce this publication for the licensee’s own personal use. This document may not be reproduced or distributed, in whole or in part, for commercial purposes, such as selling copies or providing educational services or support.
This document is supplied as a technical guide. Special care has been taken in preparing the information for publication; however, since product specifications are subject to change, this document might contain omissions and technical or typographical inaccuracies. Sound Devices, LLC does not accept responsibility for any losses due to the user of this guide.
Trademarks
The “wave” logo is a registered trademark and Kashmir is a trademark of Sound Devices, LLC. iPad, iPhone, Mac and OS X are trademarks of Apple Inc., registered in the U.S. and other countries. Windows is a registered trademark of Microsoft Corporation in the U.S. and other countries. Bluetooth Smart is a registered trademark of Bluetooth SIG, Inc. All other trademarks herein are the property of their respective owners.
WEEE Statement
If you wish to discard a Sound Devices product in Europe, contact Sound Devices (Germany) for further information.
MixPre-3 User Guide • May 30, 2017
This document is distributed by Sound Devices, LLC in online electronic (PDF) format only. E-published in the USA.
Revision History
This table provides the revision history for this guide.
Rev# |
Date |
Firmware |
Description |
|
|
Version |
|
1-A |
April 2017 |
v1.00 |
Initial release |
1-B |
April 2017 |
v1.00 |
Fixed some doc |
|
|
|
errors & added File |
|
|
|
Transfer information |
1-C |
April 2017 |
v1.00 |
Specs updated |
1-D |
May 2017 |
v1.00 |
Fixed some doc errors |
1-E |
May 2017 |
v1.00 |
Made edits to Inputs |
|
|
|
& USB chapters, |
|
|
|
Specs and Appendix |
|
Sound Devices, LLC |
|
www.sounddevices.com |
E7556 Road 23 and 33 |
|
Reedsburg, Wisconsin 53959 USA |
||
support@sounddevices.com |
Direct: +1 |
(608) 524-0625 |
|
Toll Free: |
(800) 505-0625 |
|
Fax: +1 |
(608) 524-0655 |
|
|
|

Table of Contents
Intro
Powering
Flexible Powering Options. . . . . . . . 7
Panels
Front Panel . . . |
. . |
. |
. . |
. |
. . |
. |
. |
9 |
Right Side Panel.. |
. |
. . . . . |
. |
. |
. |
9 |
Left Side Panel.. |
. . |
. |
. . |
. |
. . |
. |
. |
9 |
Back Panel.. . . |
. |
. . . . . |
. |
. |
. |
10 |
Touch Screen
Home Screen.. . . |
. . . . . |
. |
. |
. |
11 |
Channel Screen. . . . . . . . . . . 13 |
Main Menu Screen . . |
. . . . . |
. |
. |
. |
12 |
|
Modes and Presets
Setting the Mode. . . . . . . . . . |
15 |
Custom Mode.. . . . . . . . . . . 16 |
Basic Mode . . . . . . . . . . . . |
15 |
User Presets. . . . . . . . . . . 17 |
Advanced Mode. . . . . . . . . . |
. 16 |
|
Inputs
Channel Inputs. . . . . . . . . . 19 Inputs Menu . . . . . . . . . . . . 20
Outputs
Stereo Outs.. . . . . . . . . . . 23 Headphone Out. . . . . . . . . . . 23
Metering
LEDs and Meter Views. . . . . . . . 25
Recording and Playback
Formatting SD Cards. . . . . . |
. |
. |
. |
27 |
Record Menu. . . . . . . . . . . . 29 |
Transport Controls. . . . . . . |
. |
. |
. |
28 |
|
USB
USB Audio Interface.. . . . . . . . |
31 |
USB Keyboard. . . . . . . . . . . |
33 |
Low-latency Monitoring.. . . . . . . |
32 |
USB-C Mode . . . . . . . . . . . |
. 33 |
USB File Transfer. . . . . . . . . . |
32 |
|
|
Timecode
Timecode Modes . . . . . . . . . . |
35 |
Time of Day (TOD). . . . . . . . |
. |
36 |
HDMI TC In.. . . . . . . . . . |
. 36 |
Timecode Frame Rate Auto-Detection . . |
. |
36 |
Aux In 1, Aux In 2.. . . . . . . . |
36 |
Timecode Stamp. . . . . . . . . . |
|
37 |

User Guide
Files, Projects
File Name Format.. . . . . . . . . |
39 |
Undo, Trash File. . |
. |
. . . . . |
. |
. |
. |
40 |
Naming a Recording.. . . . . . . . |
39 |
Projects.. . . . |
. |
. . . . . |
. |
. |
. |
40 |
Track Names and Notes . . . . . . . |
. 40 |
|
|
|
|
|
|
|
Remote Control
Wingman Application. . . . . . . . |
. |
43 |
Linear Timecode (LTC) Record Trigger. . |
. |
45 |
Connecting to a MixPre Recorder. . . |
. |
44 |
Keyboard.. . . . . . . . . . . . |
|
46 |
HDMI Record Trigger. . . . . . . . |
|
45 |
USB Keyboard Shortcuts. . . . . . |
. |
46 |
Appendix A
Basic/Advanced Mode Differences. . . . 47 System Settings.. . . . . . . . . . 48
Specifications
Audio Inputs. . . . . . . . . . . |
. 49 |
Timecode. . . . . . . . . . . . |
|
51 |
||
Audio Outputs . . . . . . . . . . . |
|
50 |
Remote Control. . . . . . . . . . . |
51 |
||
Recorder. . . . . . . . . . . . . |
|
50 |
Power. . . . . . . . . . . . . . |
|
51 |
|
USB . . . . . . . . . . . . . . . |
50 |
Environmental .. . . . . . . . . . |
|
51 |
||
Touch Screen.. . . . . . . . . . |
|
. |
50 |
Dimensions and Weight . . . . . . . |
. |
52 |
Glossary of Terms
Notes . . . . . . . . . . . . . . 54
Software License
FCC Compliance Statement
4

 Intro
Intro
Hello and thank you for buying the MixPre-3! At Sound Devices, we are freaks about audio. We’ve unleashed our design and engineering team (most of whom are musicians) and let them create a device that we want to own ourselves. We think that you’ll find the unique mix of performance, ease-of-use, design and build quality to be an invaluable part of your life and creative passion for many years to come.
The MixPre-3 has been meticulously-engineered to offer extreme flexibility and sound quality, operating in three basic ways:
•3 mic/line input, 2 channel output mixer with our exclusive Kashmir™ discrete mic preamplifiers with user-selectable analog limiters and low-cut filters.
•SD card recording and playback of individual channels and the main mix simultaneously at 44.1, 48, 96 kHz, 16, 24-bit files.
•5-in, 2-out USB computer audio interface
The possible uses for the MixPre-3 are virtually unlimited, but a few common ones might be:
•Paired with a DSLR camera recording high-quality audio for video, complete with timecode and HDMI record triggering.
•Podcast or music recording using up to three high-quality voice-over microphones (or other sources) interfacing via USB to a computer.
•Stand-alone audio recorder for House-of-Worship, mixing a direct feed from the PA system with a stereo feed of ambient congregational response, singing and music from a stereo microphone.
The MixPre-3’s application flexibility is augmented by the various powering options. Whether you wish to power the MixPre-3 from a USB connection, AA batteries, L-mount batteries or an optional AC wall plug adapter, it’s ready, willing and able to go anywhere, anytime - always handling your audio needs with grace.
We’ve designed the MixPre-3 to be easy to use for the novice without taking away truly professional-level features for the seasoned pro user. With that in mind, the MixPre-3 ships from the factory in Basic mode - this is ideal for less experienced users and will satisfy the majority of audio applications. If you want to dive straight into the full array of professional features, we recommend setting to Advanced mode. See Modes and Presets for more information.
We sincerely hope that you enjoy working with the MixPre-3 as much as we’ve enjoyed creating it! Please drop us an email at support@sounddevices.com and share your experiences as we’d love to see how the MixPre-3 is furthering your passion!

User Guide
6

 Powering
Flexible Powering Options
In designing the MixPre-3, we felt that it was important for it to be able to operate in a wide array of applications and environments. To support that goal, power can be supplied from several possible sources. Some possible powering scenarios are:
•Four AA alkaline or NiMH rechargeable batteries installed in the provided 4-AA battery sled.
•Eight AA alkaline or NiMH rechargeable batteries installed in the optional
8-AA battery sled accessory.
•One or two Sony-type L-mount batteries installed in the optional L-mount battery sled accessory.
•USB-C to USB-C cable connected to a USB-C host computer or AC wall adapter.
•USB-A to USB-C cable connected to a USB-A host computer or AC wall adapter.
•Dual USB-A to USB-C cable (included) connected to a USB-A host computer. Use this cable option if your computer is unable to provide adequate power for the MixPre-3 with only one USB-A port.
•Optional MX-CHARGE AC wall adapter to USB-C power supply.
The master power switch for the MixPre-3 is located in the upper right corner of the left side panel.
Power Switch
To preserve battery power, USB-C power sources take priority over batteries if both are connected with one exception - if the USB-C power source does not meet the full power requirements of the MixPre-3, you can choose to power from battery or continue to power from USB-C. We have designed the MixPre-3 so that even with an under powered USB-C source, you will still be able to use

User Guide
two of the three channels with 48V phantom mics. The third channel can still be used with dynamic mics and line, aux, or USB sources. To achieve this we automatically do the following:
•Dim LCD and LED Brightness
•Disable USB-A port
•Disable HDMI TC port
For protection against accidental loss of power (not something you particularly want to happen during recording), the MixPre-3 incorporates circuitry to automatically switch over from USB-C to batteries if the USB-C power source accidentally gets pulled.
8

 Panels
Front Panel
Power light, Recorder transport controls, Channel knobs, Channel knob ring LEDs, Touch screen
Recorder Transport Controls
Power Light
|
|
|
LCD |
|
Channel |
|
|
Knobs |
|||
Channel Knob Ring LEDs |
|
||
Left Side Panel
USB connections, XLR inputs 1-2, 3.5mm stereo output, Power switch
USB-A Port |
USB-C Port |
Power Switch |
||||
|
|
|
|
|
|
|
|
|
|
|
|
|
|
|
|
|
|
|
|
|
|
|
|
|
|
|
|
XLR Inputs |
3.5 mm Stereo Output |
Right Side Panel
3.5mm headphone output, 3.5mm Mic/Aux input, XLR input 3, Headphone volume encoder, micro HDMI TC input

User Guide
3.5 mm Headphone Output |
3.5 mm Aux/Mic Input |
XLR Input |
||||||||
|
|
|
|
|
|
|
|
|
|
|
|
|
|
|
|
|
|
|
|
|
|
|
|
|
|
|
|
|
|
|
|
|
|
|
|
|
|
|
|
|
|
|
|
|
|
|
|
|
|
|
|
|
|
|
|
|
|
|
|
|
|
|
|
|
|
HP Encoder |
micro HDMI TC Input |
Back Panel
Battery mounts, SD memory card slot, Allen wrench (for ¼-inch-20-thread captive screw), anti-rotational pin
Battery Mounts
|
|
|
|
|
|
|
|
|
|
|
|
|
|
|
|
|
|
|
|
|
|
|
|
|
|
|
SD Memory Card Slot |
||
Allen wrench |
||||
10
 Touch Screen
The MixPre-3 has a sunlight-viewable, high-resolution, touch-screen-based user interface, which consists of the Home screen, Main Menu screen, and Channel screen views. As you will notice, there are several touch zones on the touch screen for controls. As you become familiar with the user interface, changing settings for inputs, outputs, recording and metering will become fast and intuitive.
|
|
Current |
|
|
File Name |
|||||||
File List Icon |
|
|
|
|
|
|
|
|
|
Power Status Icon |
||
|
|
|
|
|
|
|
|
|
||||
|
|
|
|
|
|
|
|
|
||||
|
|
|
|
|
|
|
|
|
||||
Time Counter |
|
|
|
|
|
|
|
|
Menu Icon |
|||
|
|
|
|
|
|
|
||||||
|
|
|
|
|
|
|
||||||
|
|
|
|
|
|
|
||||||
|
|
|
|
|
|
|
|
|
|
|
||
|
|
|
|
|
|
|
|
|
|
|
|
Meter View |
|
|
|
|
|
|
|
|
|
|
|
|
|
|
|
|
|
|
|
|
|
|
|
|
|
|
|
|
|
|
|
|
|
|
|
|
|
|
|
|
|
|
|
|
|
|
|
|
|
|
|
|
|
|
|
|
|
|
|
|
|
|
|
|
|
|
|
|
|
|
|
|
|
|
|
|
|
|
|
|
|
SD Card Remaining |
Record Time |
Current |
|
|
Headphone Preset |
||
|
|
||||||
Home Screen
The Home screen view is the default view that appears on the touch screen when the device is powered up. On it, you will find items such as:
•File list icon and current file name
•File elapsed time counter (timecode if LTC or HDMI timecode is enabled)
•Power status icon
Power Status Icon Description
 USB power source is ideal. (Green USB)
USB power source low. Brightness dimmed, HDMI & USB-A
ports disabled, 48v phantom on 2 channels only.
(Orange USB)
Healthy battery. Plan to change batteries when green level
drops to about ¼ full.
(Green Battery)
 Battery power is critically low. Change batteries. (Flashing Red Battery)
•Menu icon
•Meter view (cycle views by touching) ◦◦ Two channel mix track meters
◦◦ Two channel mix track meters, three individual track view
◦◦ Two channel mix track meters, two USB input meters, two aux input meters

User Guide
•Status bar
◦◦ SD card available recording time ◦◦ Headphone preset
◦◦ Sample rate and bit depth ◦◦ Date and time
Main Menu Screen
The Menu screen is where most of the features and functions are selected and set up.
To enter the Menu screen:
XX Tap  on the Home screen.
There are three Menu screen views. These views are indicated by the Dots icon
 . Tapping it will toggle between the three Menu views.
The Menu has its own submenus that may be displayed by tapping them.
To return to the main Menu from a submenu at any time:
XX Tap  .
.
To return directly to the Home screen from the main Menu:
XX Tap  .
.
12
|
|
|
TOUCH SCREEN |
|
|
|
|
|
|
|
|
|
Page |
Sub-menu |
Description |
|
1 |
Presets |
Lets you save and recall preset user settings to and from SD cards |
|
|
|
and internal memory. Also allows resetting all settings to factory |
|
|
|
default. |
|
1 |
Project |
Provides the ability to create new, open and trash existing projects. |
|
1 |
Inputs |
Provides settings for the Aux/Plug-in-power Mic/Timecode input/ |
|
|
|
Camera. |
|
1 |
Outputs* |
Provides routing and gain settings for the stereo output. |
|
2 |
Timecode* |
Lets you select timecode mode. |
|
2 |
Tone |
Provides test tone settings. |
|
2 |
Record** |
Provides record settings for LR mix gain, sample rate, bit depth, LR |
|
|
|
linking, and HDMI record trigger. |
|
2 |
SD Card |
Displays current SD card information and allows for format and |
|
|
|
empty trash card functions. |
|
3 |
Date/Time |
Sets current date/time and format. |
|
3 |
System |
Provides settings for Basic/Advanced/Custom mode, Custom mode |
|
|
|
setup, limiters, USB-C, File Transfer, Bluetooth®, Wingman App |
|
|
|
password, adjusting LCD/LED brightness, updating firmware, and |
|
|
|
viewing version and regulatory information. |
|
3 |
Power |
Select the type of batteries being used (Alkaline, NiMH, L-Mount) to |
|
|
|
ensure that the Power Status icon on the Home screen accurately |
|
|
|
displays remaining battery level. |
|
|
|
*Sub-menu/setting appears in Advanced mode only |
|
|
|
** Some Record sub-menu options are only available in Advanced mode |
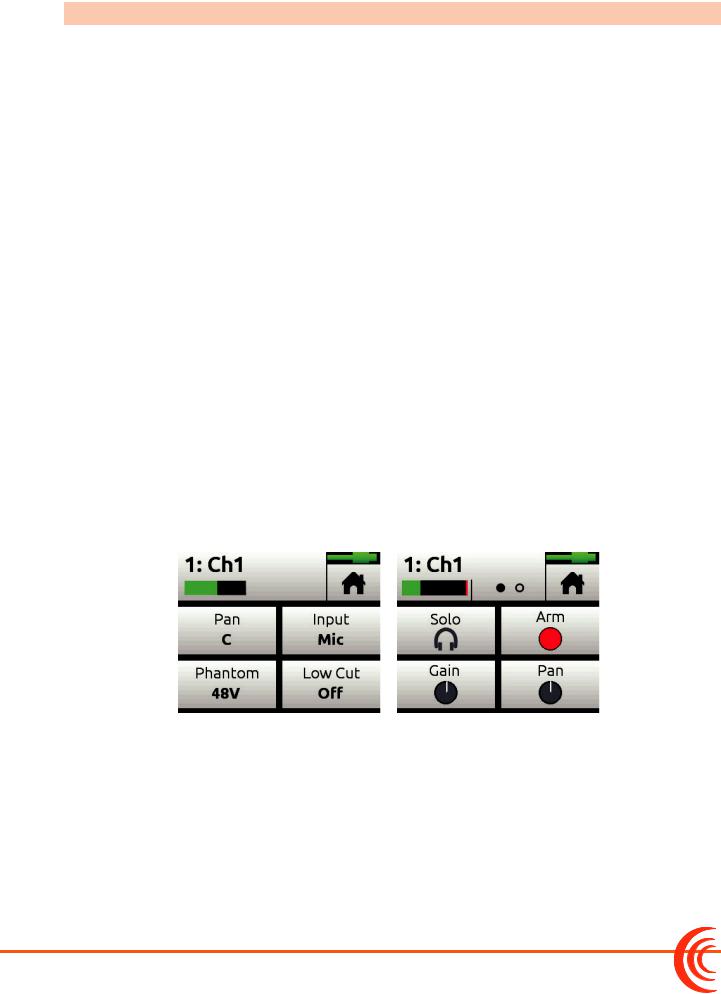
Channel Screen
The Channel screen is where you will find channel-specific settings, such as Channel name, Input selection, Pan, 48v phantom power and Low Cut filtering.
In Advanced mode, additional settings are available via a second channel page accessed by tapping the Dots icon.
LL The top left corner of the Channel screen displays an editable Channel name. Touch this region to give the channel an easy to identify name, like Vocals or Bob. Below the Channel name is a Channel meter to aid in setting audio levels.

User Guide
Page |
Sub-menu |
Description |
1 |
Solo* |
Lets you solo the selected channel in the headphone output. Soloing |
|
|
by default is Individual (exclusive) in that only one input at a time |
|
|
will be soloed. When a channel is soloed, its light ring will flash |
|
|
orange. Soloing can be set to Multiple (non-exclusive) in the HP |
|
|
Preset submenu. |
1 |
Arm* |
Allows pre-fade recording of the channel to its own isolated (ISO) |
|
|
track on the SD card. |
1 |
Gain* |
Sets the sensitivity of the input. Generally, the gain should be set |
|
|
so that the loudest parts of the audio signal just touch the red |
|
|
segments of the meters. |
1 |
Pan |
Lets you position the channel’s audio in the stereo image of the LR |
|
|
mix and stereo out. |
2 |
Input |
Lets you select one of the available Mic, Line, or USB inputs to route |
|
|
to the chosen channel. |
2 |
Phantom |
Lets you apply full 48v phantom power to the channel’s mic or line |
|
|
input. |
2 |
Low Cut |
Sometimes referred to as a high pass filter (HPF), the Low Cut filter |
|
|
can be set up to roll off bass frequencies or reduce mic handling |
|
|
noise, wind noise, and other undesirable low frequencies. The filter |
|
|
has a carefully crafted 18 dB/octave slope. |
2 |
Linking* |
Lets you link channels 1 and 2, either as a stereo pair or mid-side |
|
|
pair. |
|
|
* Sub-menu/setting appears in Advanced mode only |
To enter the Channel screen:
XX Press the associated Channel knob.
14

 Modes and Presets
Setting the Mode
We’ve designed the MixPre-3 to be easy to use for the novice without taking away truly professional-level features for the seasoned pro user. We want both the newcomer and the career professional to enjoy a quick, easy setup and foolproof results. To accommodate this, we’ve incorporated three modes of operation into the MixPre-3: Basic, Advanced and Custom.
To set the mode:
1.Turn all channel knobs to Off (at full counter-clockwise position).
2.Tap  .
.
3.Tap System > Mode. Options include: Basic, Advanced, and Custom.
Basic Mode
Basic mode is intended for hassle-free, plug-and-play use. This mode is ideal for the new user and amateur needing only the basic functionality of the MixPre-3.
|
Screen |
Sub-menu |
Description |
|
|
Menu |
Presets |
Save and load user presets to and from SD card and internal |
|
|
|
|
memory. Also allows resetting all settings to factory default. |
|
|
Menu |
Project |
Create new projects, or open and trash existing projects. |
|
|
Menu |
Inputs |
Provides settings for the 3.5 mm Aux/Mic In. |
|
|
Menu |
Timecode |
Select Time of Day or HDMI TC from a DSLR as timecode |
|
|
|
|
source. Off is also an option. |
|
|
Menu |
Tone |
Turn the test tone on or off. By default, the test tone is a 1kHz |
|
|
|
|
sine wave at -20dBFS. |
|
|
Menu |
Record |
Choose to auto start/stop recording via HDMI from a DSLR. |
|
|
Menu |
SD Card |
Displays SD card info and allows for formatting SD cards and |
|
|
|
|
and emptying their trash folder. |
|
|
Menu |
Date/Time |
Sets current date/time and format. |
|
|
Menu |
System |
Provides settings for Basic/Advanced/Custom mode, Custom |
|
|
|
|
mode setup, limiters, USB-C, File Transfer, Bluetooth®, |
|
|
|
|
Wingman App password, adjusting LCD/LED brightness, |
|
|
|
|
updating firmware, and viewing version and regulatory |
|
|
|
|
information. |
|
|
Menu |
Power |
Select the type of batteries being used (Alkaline, NiMH, |
|
|
|
|
L-Mount) to ensure that the Power Status icon on the Home |
|
|
|
|
screen accurately displays remaining battery level. |
|
|
Menu |
HP Preset |
Select LR Stereo or USB 1,2 as headphone sources. |
|
|
|
|
|
|

User Guide
Screen |
Sub-menu |
Description |
Channel |
Pan |
Pan the channel’s signal Left, Center or Right in the stereo LR |
|
|
mix and Stereo Out. |
Channel |
Input |
Select one of the available Mic, Line, Aux (only available if Aux |
|
|
In Mode is Mic or Line) or USB inputs to route to the selected |
|
|
channel. |
Channel |
Phantom |
Turn on 48V phantom power when using a condenser |
|
|
microphone in the selected channel. |
Channel |
Low Cut |
Select the frequency at which a low cut filter will be placed. |
|
|
The filter has a carefully-crafted 18db/octave slope. Low |
|
|
options are only On/Off in Basic mode. |
Advanced Mode
Advanced mode is intended for use by professionals and users who wish to have every available setting and option at their disposal. All settings available to Basic Mode apply to Advanced Mode in addition to:
Screen |
Sub-menu |
Description |
Menu |
Outputs |
Provides routing and gain settings for the Stereo Out. |
Menu |
Tone |
Provides additional Tone mode (Continuous and Left Identify) |
|
|
and Tone Level settings. |
Menu |
Record |
Provides additional record settings for gain, sample rate, bit |
|
|
depth and LR linking. |
Menu |
HP Preset |
Provides additional HP presets for LR Mono, User Presets 1-4, |
|
|
Edit HP Preset utility and HP Solo mode selection. Camera |
|
|
Stereo and Camera Mono are also available when Aux In Mode |
|
|
is set to Camera. |
Menu |
System > |
Lets you turn limiters on or off. |
|
Limiters |
|
Channel |
Solo |
Lets you “solo” the selected channel in the headphone output. |
|
|
Solo mode can be set to “Individual” or “Multiple” in the HP |
|
|
Preset menu. When a channel is soloed, its light ring will flash |
|
|
orange. |
Channel |
Arm |
Allows pre-fade recording of the channel to an individual track |
|
|
on the SD card. |
Channel |
Gain |
Sets the sensitivity of the input. Generally, the Gain should be |
|
|
set so that the loudest parts of the audio signal just touch the |
|
|
red segments of the meters. |
Channel |
Pan |
Lets you position the audio of the channel anywhere between |
|
|
Left and Right in the stereo image of the LR mix and Stereo |
|
|
Out. |
Channel |
Linking |
Lets you link channels 1 and 2 either as a stereo pair, mid side |
|
|
pair, or turn linking off. |
Custom Mode
Custom mode is intended for users who want to customize the features and functionality available to them. This mode grants access to different sections of Advanced Mode features, turning them on or off in the user interface as desired.
16

MODES AND PRESETS
To configure Custom Setup:
1. Tap  .
.
2.Tap System > Custom Setup. Custom Setup options are:
Page |
Sub-menu |
Description |
1 |
Channel |
Lets you access Solo, Track Arm, extended Pan, Input Select, |
|
|
Phantom and Low Cut, which is selectable by frequency. |
1 |
Gain |
Lets you access to Channel Gain controls. |
1 |
Headphone |
Lets you access extended headphone source select options |
|
|
including factory and user headphone presets, preset editing |
|
|
and Solo setup for Individual/Multiple channels. |
1 |
Record |
Provides additional record settings for gain, sample rate, bit |
|
|
depth and LR linking. |
2 |
Metadata |
Adds ability to change track name, rename files, add notes and |
|
|
undo recordings. |
2 |
Outputs |
Provides routing and gain settings for the Stereo Out. |
User Presets
Flexibility is the MixPre-3’s M.O. To make it easy for you to use the MixPre-3 in a wide variety of situations, we created a slick feature where you can store and recall snapshots of all of the MixPre-3’s settings. There are four internal Preset slots available. Also, the SD card can store virtually unlimited Presets.
Here are three common examples:
•You might want to use the MixPre-3 as recorder, mixer, and USB audio interface in a podcasting rig with specific microphones.
•The next day, you need to have the MixPre-3 handle audio duties for you while you’re shooting video on your DSLR camera.
•On Sunday, you might need to use your trusty MixPre-3 to record worship services, mixing a direct line from the PA with a stereo microphone feed.
Using Presets, you can optimize settings for each of these scenarios and then simply save each setup to one of four internal preset locations or to the SD card. Once saved, simply load the appropriate preset and BOOM! You’re ready to go in a jiffy! We think that you’ll really appreciate this functionality.
To save a Preset:
1.Tap  .
.
2.Tap Presets > Save to Internal 1-4 or SD Card
3.Enter a Preset Name and tap OK.

User Guide
To recall a Preset
1.Tap  .
.
2.Tap Presets > Load Preset.
3.Select preset with encoder.
4.Tap OK.
18
 Loading...