

Sony MHC-GR5 Operating Instructions Manual
3-860-000-11(1)
Mini Hi-Fi
Component System
Operating Instructions
EN
f
MHC-GR5
©1997 by Sony Corporation
English
EN
WARNING
To prevent fire or shock hazard, do not
expose the unit to rain or moisture.
To avoid electrical shock, do not open the cabinet. Refer servicing to
qualified personnel only.
Do not install the appliance in a confined space, such as a bookcase
or built-in cabinet.
Laser component in this product is capable of emitting radiation
exceeding the limit for Class 1.
This appliance is classified as a
CLASS 1 LASER PRODUCT
LUOKAN 1 LASERLAITE
KLASS 1 LASERAPPARAT
INVISIBLE LASER RADIATION WHEN OPEN.
CAUTION
ADVARSEL
VARO!
2
VARNING
ADVARSEL
;
AVOID EXPOSURE TO BEAM.
USYNLIG LASERSTRÅLING VED ÅBNING NÅR
;
SIKKERHEDSAFBRYDERE ER UDE AF FUNKTION.
UNDGÅ UDS ÆTTELSE FOR STRÅLING.
AVATTAE SSA JA SUOJALUKITUS OHITETTAESSA
;
DLET ALTTIINA LASERSÄTEIL YLLE.
LASERSTRÅLING NÄR DENNA DEL ÄR OPPNÅD
;
OCH SPÄRREN ÄR URXOPPLAD.
USYNLIG LASERSTRÅLING NÅR DEKSEL ÅPNES
;
UNNGÅ EKSPONERING FOR STRÅLEN.
CLASS 1 LASER product.
The CLASS 1 LASER
PRODUCT MARKING is
located on the rear exterior.
This caution
label is located
inside the unit.
Welcome!
Thank you for purchasing the Sony Mini Hi-Fi Component System.
This series is packed with fun features. Here are just a few:
•DBFB (Dynamic Bass Feedback) system that boosts low frequency
range audio provide deep, powerful bass sound
•A preset feature that lets you store and recall up to 40 of your
favourite radio stations
•An amplifier that lets you adjust the audio quality to fit a variety of
music types and environments
•A timer that lets you set the CD player, tape player or radio to turn
on and off whenever you want
•A dual tape deck that lets you record from the radio, CD player or
from the other tape deck and relay play from both decks
•A remote that lets you control your system from your seat
•A loop play feature that lets you play a CD with sound effect like
sampler play
•The MHC-GR5 consists of following things
– Main unit : HCD-RX50
– Speaker system : SS-L50H

Table of
Contents
Chapter 1: Setting Up
Connecting the Stereo 4
Inserting the Batteries 6
Setting the Clock 6
Chapter 2: the CD Player
Playing CDs (normal play) 7
Playing Tracks in Random Order (shuffle play) 8
Playing Tracks in the Desired Order (program play) 8
Playing Tracks Repeatedly (repeat play) 9
Playing Tracks: Repeating a Specified Portion (loop play) 9
Chapter 3: the Radio
Listening to the Radio 10
Presetting Radio Stations 11
Playing Preset Radio Stations 11
Chapter 4: the Tape Player
Playing a Tape 12
Recording a CD 13
Recording a CD: Selecting Tape Length Automatically (tape select edit) 13
Recording a CD: Specifying Tape Length (time edit) 14
Recording a CD: Specifying Track Order (program edit) 15
Recording From the Radio 15
Recording From Another Tape (dubbing) 16
EN
3
Chapter 5: Sound Adjustment
Adjusting the Sound 17
Selecting the Audio Emphasis 17
Adjusting the Audio Emphasis 18
Making a Personal Audio Emphasis File (personal file) 18
Chapter 6: Additional Features
Falling Asleep to Music 19
Waking Up to Music 19
Timer-Recording Radio Programs 20
Microphone Mixing 21
Karaoke: Singing Along 21
Connecting Optional Equipment 22
For Your Information
Precautions 23
Troubleshooting Guide 23
Maintenance 24
Specifications 25
Index to Parts and Controls 26
Index 27
EN
Chapter 1:
Setting
Up
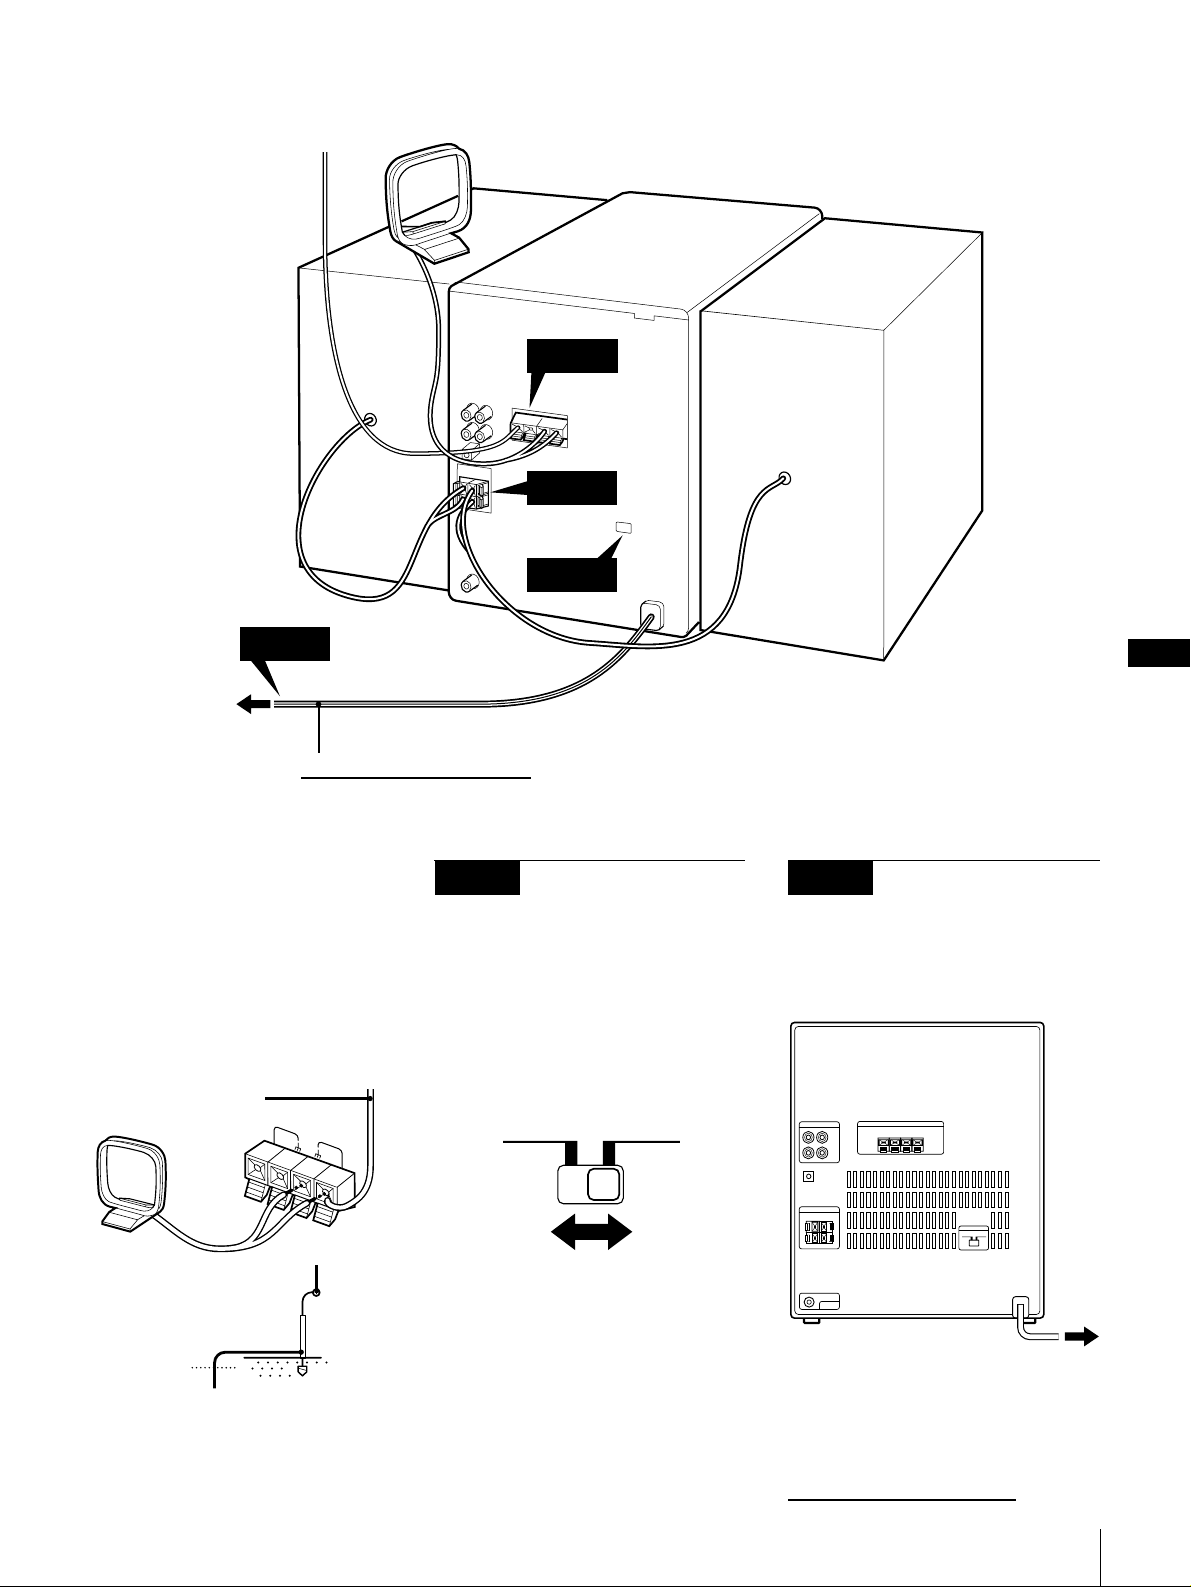
Connecting the Stereo
Inserting the Batteries
Setting the Clock
Connecting the
Stereo
Use the illustrations below to connect your
stereo.
If you want to connect any optional
components to the stereo, see “Connecting
Optional Equipment” in Chapter 6.
STEP 1
Connecting the
Speakers
To connect the front speakers
Connect the right front speaker to the
SPEAKER R connectors and the left front
speaker to the SPEAKER L connectors with
the red cords to ‘ and the black cords to
’.
R
‘
’
L
‘
’
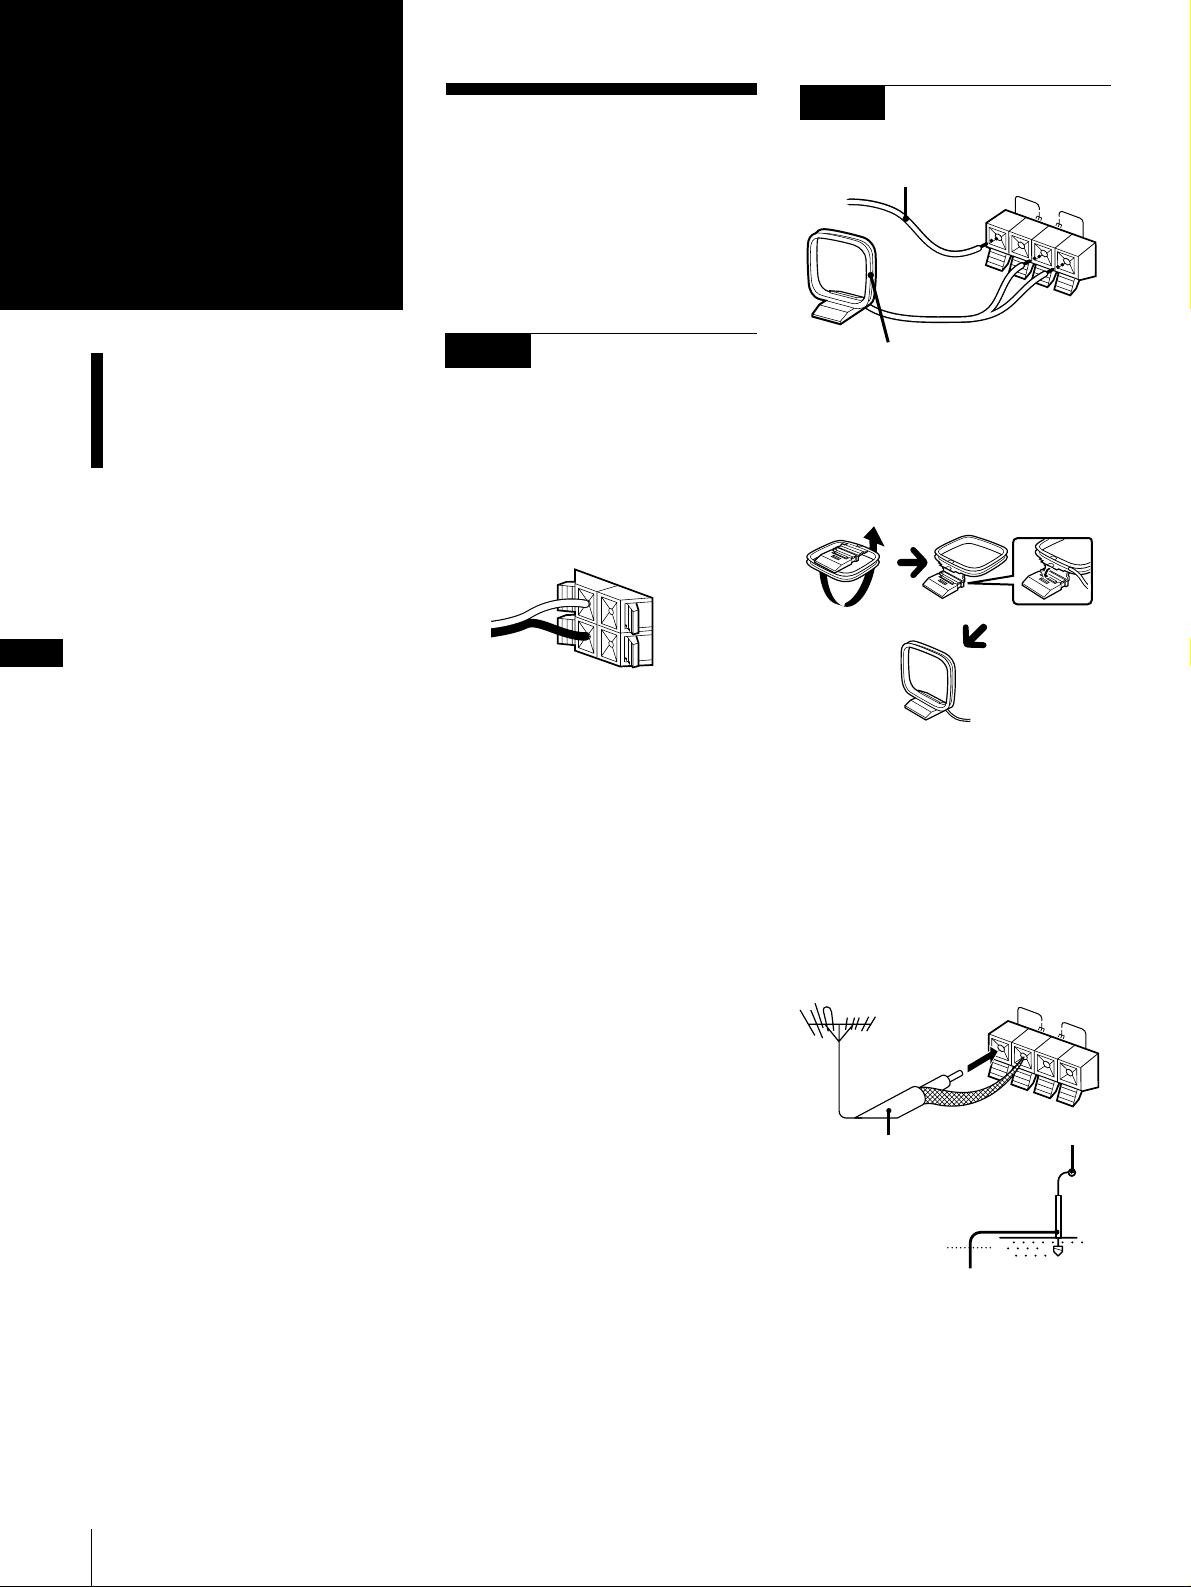
STEP 2
Connecting the
Antennas
FM lead antenna* (supplied)
AM loop antenna (supplied)
* Note: Extend it horizontally
AM loop antenna connection
Connect the supplied loop antenna to the
AM and the y terminals.
FM 75
Ω
AM
4
To improve the FM reception
Connect an external FM antenna to the
FM 75 Ω and y terminals, using a
75-ohm coaxial cable.
Important
Ground the external antenna from y
terminal against lightning with the screw
clamp. To prevent a gas explosion, do not
connect the ground wire to a gas pipe.
FM 75Ω
AM
75-ohm coaxial cable
(not supplied)
Screw clamp
y
Chapter 1: Setting Up
Ground wire
(not supplied)
FM lead antenna
(supplied)
AM loop antenna
(supplied)
Right speaker
Left speaker
STEP 2
STEP 1
STEP 3
STEP 4
to a wall outlet
!Do this connection last!
To improve the AM reception
After you connect the AM antenna, connect
a 6- to 15-meter insulated wire to the AM
terminal. Connect the y terminal to earth.
Important
Ground the external antenna against
lightning from the y terminal. To prevent a
gas explosion, do not connect the ground
wire to a gas pipe.
Insulated wire
(not supplied)
FM 75
Ω
AM
STEP 3
Adjusting the
Operating Voltage (for
customers outside
Malaysia and Singapore)
Before connecting the power, set
VOLTAGE SELECTOR to the position of
the local power line voltage.
VOLTAGE SELECTOR
110-120V
220-240V
STEP 4
Connecting the
Power
Connect the AC Power cord to a wall outlet
after you have made all the above
connections.
EN
5
Ground wire
(not supplied)
Screw clamp
y
to a wall outlet
continue to next page ➔
Chapter 1: Setting Up

➔ continued
Plug Adapter
If the plug of this unit does not fit your wall
outlet, attach the supplied adapter on to the
plug.
Setting the Clock
The built-in clock shows the time in the
display even if the power is off. You need
to set the clock to utilize the timer-activated
features of your stereo system.
Use the buttons on the unit to do this
operation.
DISPLAY
6 Press ENTER/NEXT.
The clock starts running and the upper
dot flashes. Use the time signal to set the
clock accurately.
The upper dot flashes for the first half of
a minute (0 to 29 seconds), and the
lower dot flashes for the last half of a
minute (30 to 59 seconds).
EN
Inserting the Batteries
Install two R6 (size AA) batteries in the
supplied remote for remote control.
1Open the lid.
2Insert two R6 (size AA) batteries.
6
Match the + and – indications to the
diagram in the battery compartment.
]
}
}
]
1
4,6
2
3,5
1 Press TIMER.
2 Press CLOCK SET.
The ˝AM˝ and hour indication begin
flashing.
flashing
3 Set the current hour by turning the jog
dial until the correct hour appears.
flashing
To check the time
Press DISPLAY a few times.
The current time is displayed for eight
seconds.
To correct the clock setting
Repeat steps 1 through 6.
3Close the lid.
Battery life
You can expect the remote to operate for
about six months (using Sony SUM-3 (NS)
batteries) before the batteries run down.
When the batteries no longer operate the
remote, replace all the batteries with new
ones.
To avoid battery leakage
If you are not going to use the remote for a
long time, remove the batteries to avoid
damage caused by corrosion from battery
leakage.
flashing
4 Press ENTER/NEXT.
The minutes indication begins flashing.
flashing
5 Set the current minute by turning the jog
dial until the correct minute appears.
flashing
Chapter 1: Setting Up
Chapter 2:
the CD
Player
Playing CDs (normal play)
Playing Tracks in Random
Order (shuffle play)
Playing Tracks in the
Desired Order (program
play)
Playing Tracks Repeatedly
(repeat play)
Playing Tracks: Repeating a
Specified Portion
(loop play)
Playing CDs (normal
play)
You can play CDs in four modes: normal,
shuffle, program and repeat. The mode
decides which tracks (songs) you will listen
to, in which order and whether or not they
will repeat.
You can play 12 cm and 8 cm CDs. If the
CD is supplied with an adaptor, remove it
before playing the CD.
Before you play the CD, decrease the sound
level by turning the VOLUME control
counterclockwise, to prevent damage to the
speakers.
Use the buttons both on the unit and the
remote to do this operation.
POWERnON
jog dial
2
1
DISPLAY
/
/
2
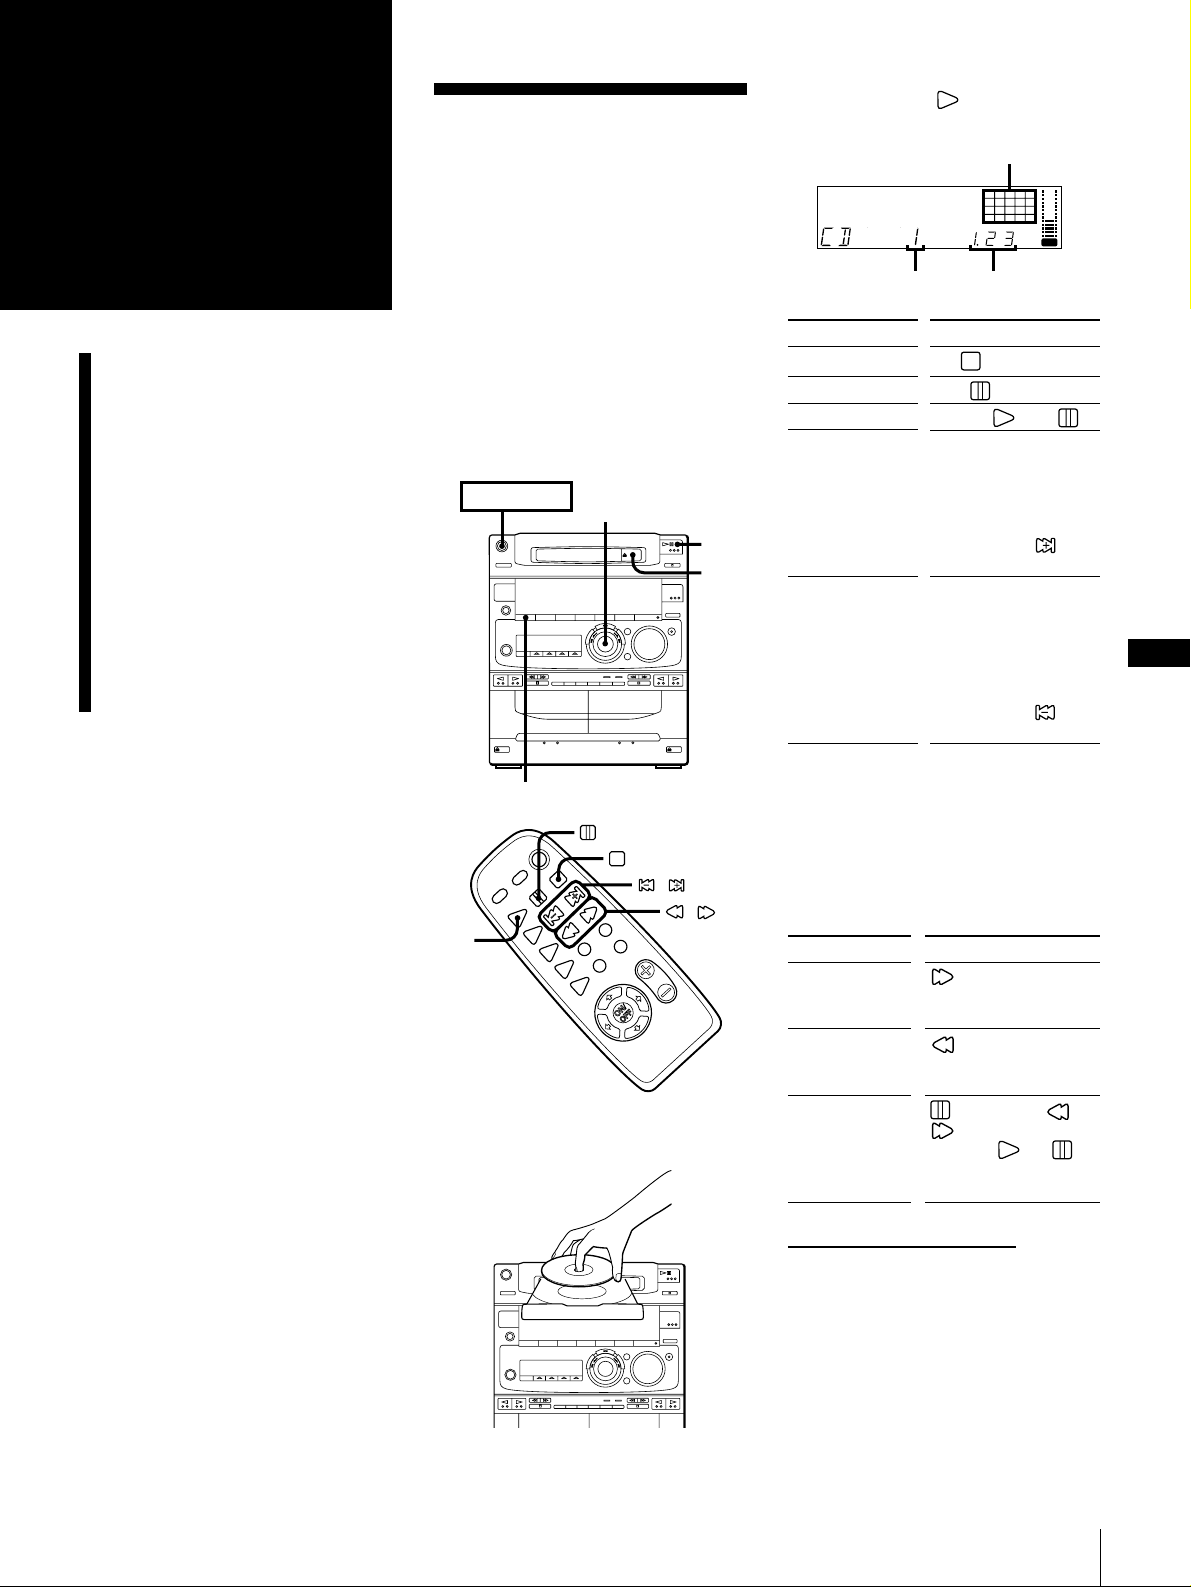
1Press § OPEN/CLOSE and place a CD
on the disc tray.
2
Press fl (or CD on the remote).
The disc tray closes and play starts.
Music calendar
NRDOLBY
OFF
Track number
To
Stop play
Pause
Resume play
Go forward to
another track
Go back to a
previous track
*1Remote
*2Automatic Music Sensor
To find a point in a track
You can find a particular point in a track
while the track is playing or while it’s in
pause mode.
Use the buttons on the remote to operate
this feature.
To
Go forward
quickly in a track
Go backwards
quickly in a track
Search quickly
without listening
Press
release it at the desired
point.
release it at the desired
point.
Press CD or
again at the desired
point.
12345
678
VOL
Playing time
Press
p ( *1)
fl ( *1)
fl (CD *1 or *1)
During play or pause,
rotate the jog dial
clockwise. Release
when you reach the
track you desire.
Or use AMS*
the remote.
During play or pause,
rotate the jog dial
counterclockwise.
Release when you
reach the track you
desire.
Or use AMS*
the remote.
on the remote and
on the remote and
, then press or
on the remote.
2
2
on
EN
7
on
continue to next page ➔
Chapter 2: the CD Player
EN
7
2
5
3
1
4
POWERnON
➔ continued
To check the remaining time during
playback
Press DISPLAY repeatedly.
Each time you press the button, the
display changes as follows:
m Playing time on the current track
µ
Remaining time on the current track
µ
Remaining time on the CD
µ
Clock display (for eight seconds)
µ
Effect (or P FILE) name or
“EFFECT ON (OFF)”
To check the total playing time and
the total number of tracks
Press DISPLAY in stop mode. When you
press DISPLAY again, the display shows
the clock display for eight seconds and
returns to the previous indication.
Notes
•You cannot check the total playing time
8
during program play.
•The total playing time and number of
tracks also appear in the display when
you press § OPEN/CLOSE to close the
disc tray.
•“--.--” appears in the display when the
total playing time is 100 minutes or more.
One Touch Play feature
Press fl on the CD player (or CD on
the remote) when the power is off. When a
CD is in the player, you will be able to start
listening to the CD without pressing any
other buttons.
The Music Calendar Display
This display lights according to the number
of tracks on the CD. As each track is played,
the corresponding number disappears.
Tracks numbered in excess of 20 are not
displayed.
Automatic Source Selection
If the CD player has been in the normal
play mode, you can select the CD player
just by pressing fl (or CD on the
remote).
If the CD player has been in the program
play or the shuffle play mode, only fl can
be used for this function.
If there is no CD in the player
“CD no dISC” appears in the display.
Press fl (or CD on the remote) while
the indication is on, then the disc tray will
open automatically.
Playing Tracks in Random Order (shuffle play)
You can play all the tracks on the CD in
random order.
Use the buttons on the unit to do this
operation.
POWERnON
jog dial
p
4
2
3
CONTINUE
1
1Press FUNCTION repeatedly until “CD”
appears in the display.
2Press § OPEN/CLOSE and place a CD
on the disc tray. Then, press
§ OPEN/CLOSE again to close the disc
tray.
3Press SHUFFLE.
“SHUFFLE” appears in the display.
NRDOLBY
OFF
DISC SHUFFLE
12345
678
VOL
4Press fl.
“ J ” appears and then all the tracks
play in random order.
To stop shuffle play
Press p on the CD player.
To cancel shuffle play
Press CONTINUE so that “SHUFFLE”
disappears from the display. The tracks
continue playing in their original order.
To skip an undesired track
Turn the jog dial clockwise (or press
on the remote).
Playing Tracks in the Desired Order (program play)
You can program up to 32 tracks to play in
any order you choose.
CHECK
CLEAR
1
1 Press FUNCTION repeatedly until “CD”
appears in the display.
2 Press § OPEN/CLOSE and place a CD
on the disc tray. Then, press
§ OPEN/CLOSE again to close the disc
tray.
3 Press PROGRAM.
“PROGRAM” and ”DISC” appear in the
display.
NRDOLBY
OFF
DISC
PROGRAM
12345
678
VOL
4 Turn the jog dial to choose a track.
The track number and the total playing
time appear in the display.
Track number
NRDOLBY
OFF
DISC
Total playing time
PROGRAM
8
VOL
5 Press ENTER/NEXT.
The chosen track number lights up in
the music calendar. If the track number
and the total playing time disappear
before you press ENTER/NEXT, go
back to step 4.
Chapter 2: the CD Player
6 Repeat steps 4 and 5 to program the
4
2
3,5
1
POWERnON
remaining tracks you want to play in the
order you want them to play.
7 Press fl.
All the tracks play in the order you
choose.
To
Check the
program
Program a pause
Stop play
Cancel program
play
Erase a track
from the end
Erase a specific
track
Erase the entire
program
*1After the last track appeared “CHECK
END” appears in the display.
*2“P” appears and the total playing time is
reset to 0.00.
*3The program is erased.
To change the order of
programmed tracks
To change the order, erase the entire
program and create a new one.
Press
CHECK on the remote
repeatedly*
p ( on the remote)
CONTINUE*
CLEAR on the remote in
stop mode
CHECK on the remote
repeatedly so that the
number of the track
lights up, and press
CLEAR on the remote
p ( on the remote)
once in stop mode or
twice while playing
1
on the remote*
3
2
POWERnON
2
1
Repeating all the tracks
1 Press REPEAT once so that “REPEAT”
appears in the display.
NRDOLBY
123
2 Press fl.
Repeating a single track (in normal
play mode only)
Press REPEAT repeatedly while playing the
desired track until “REPEAT 1” appears in
the display.
123
To cancel repeat play
Press REPEAT so that “REPEAT” or
“REPEAT 1” disappears from the display.
OFF
NRDOLBY
OFF
1DISC
REPEAT
REPEAT
1
12345
678
12345
678
VOL
VOL
1 Press FUNCTION repeatedly until “CD”
appears in the display.
2 Press § OPEN/CLOSE and place a CD.
Then, press § OPEN/CLOSE again to
close the disc tray.
3 Press LOOP repeatedly to select
NORMAL or RHYTHM (as for
NORMAL and RHYTHM, see “What is
the difference between NORMAL and
RHYTHM?” for details).
NORMAL or RHYTHM has five modes
respectively, depending on the interval
you want. The display changes as
follows:
NORMAL1.....NORMAL5
RHYTHM5.....RHYTHM1
The interval (about 0.25 to 1.00 second)
becomes longer as the number gets
bigger.
EN
9
Notes
•The program you made remains in the CD
player even after it has been played back.
Press fl to play the same program again.
•If “--.--” appears instead of the total
playing time during programming, this
means:
– you have programmed a track number
which exceeds 20, or
– the total playing time has exceeded 100
minutes.
Playing Tracks Repeatedly (repeat play)
You can choose between two different
repeat play modes. One repeats all the
tracks in the current play mode; the other
repeats a single track.
Use the buttons on the unit to do this
operation.
Playing Tracks: Repeating a Specified Portion (loop play)
You can use the loop function to record
from a CD to a tape with the sampler play.
Use the buttons both on the unit and
remote to do this operation.
EXAMPLE
Original song:
“Hey, come on everybody!”
When you use the loop function:
“Hey, come come come come come on
everybody!”
4 Press fl.
5 Press and hold down LOOP when a
portion you want to repeat is played
and release when you want to stop
repeating it.
What is the difference between
NORMAL and RHYTHM?
There is a difference between NORMAL
and RHYTHM in restarting point of normal
play when the loop effect ends.
Select NORMAL or RHYTHM while stop
playing or pause playing.
NORMAL
Normal CD play resumes from the same
point as you have started the loop play
when you release LOOP button.
RHYTHM
The portion over-ridden by the loop effect
will be skipped and then normal play
resumes.
Chapter 2: the CD Player
 Loading...