

Page 1

Mini Hi-Fi
Component
System
4-236-762-42(1)
Operating Instructions
Mode d’emploi
Manual de Instrucciones
MHC-DP1000D
GB
FR
ES
MHC-DP900D
© 2001 Sony Corporation
Page 2
WARNING
To prevent fire or shock hazard, do not
expose the unit to rain or moisture.
To avoid electrical shock, do not open the cabinet.
Refer servicing to qualified personnel only.
Do not install the appliance in a confined space,
such as a bookcase or built-in cabinet.
This appliance is
classified as a CLASS 1
LASER product. The
CLASS 1 LASER
PRODUCT MARKING
is located on the rear
exterior.
U.S.A. model
This label is located on the rear exterior.
European model
The following caution label is located inside the
apparatus.
To prevent fire, do not Cover the ventilation of the
apparatus with news papers, table-cloths, curtains,
etc. And don’t place lighted candles on the apparatus.
To prevent fire or shock hazard, do not place objects
filled with liquids, such as vases, on the apparatus.
Don’t throw a battery, dispose it as
the injurious wastes.
GB
2
Page 3

This system incorporates Dolby* Digital, Pro Logic
Surround, DTS**, and the DTS Digital Surround
System.
* Manufactured under license from Dolby
Laboratories.
“Dolby”, “Pro Logic” and the double-D symbol are
trademarks of Dolby Laboratories.
Confidential unpublished works. © 1992-1997
Dolby Laboratories. All rights reserved.
**Manufactured under license from Digital Theater
Systems, Inc. US Pat. No. 5,451,942, 5,956,674,
5,974,380, 5,978,762 and other world-wide patents
issued and pending. “DTS” and “DTS Digital
Surround” are registered trademarks of Digital
Theater Systems, Inc. © 1996, 2000 Digital
Theater Systems, Inc. All rights reserved.
IMPORTANT NOTICE
Caution: This system is capable of holding a
still video image or on-screen display image on
your television screen indefinitely. If you leave
the still video image or on-screen display
image displayed on your TV for an extended
period of time, you risk permanent damage to
your television screen. Projection televisions
are especially susceptible to this.
GB
3
Page 4

Table of Contents
This system can play the following discs .....
Parts Identification
Main unit ............................................... 7
Remote control ......................................8
digipad operations ................................. 9
Getting Started
Hooking up the system ........................ 10
Inserting two size AA (R6) batteries
into the remote .............................. 12
Setting up your speakers for
Dolby Pro Logic* .......................... 13
Specifying the speaker parameters ...... 14
Setting the time.................................... 15
Saving the power in standby mode...... 16
Setting Up for DVD/VIDEO CD/
CD
Using the Setup Display ...................... 17
Setting the display or sound track
language
— LANGUAGE SETUP .............. 18
Settings for the display
— SCREEN SETUP ..................... 19
Custom settings
— CUSTOM SETUP .................... 20
Speaker settings
— SPEAKER SETUP................... 21
6
DVD/VIDEO CD/CD
Playing discs:
Loading a disc ..................................... 23
Playing a disc
— Normal Play/Shuffle Play/
Slow-motion Play/Freeze Frame... 23
Playing DVDs using the menu ............ 25
Playing VIDEO CDs with PBC functions
(Ver. 2.0)
— PBC Play .................................. 25
Creating your own program
— Program Play ............................26
Resuming playback from the point you
stopped the disc
— Resume Play............................. 28
Playing repeatedly
— Repeat Play .............................. 28
Viewing information about the disc:
Checking the playing time and
remaining time .............................. 29
Checking the playback information
— ADVANCED ...........................31
Sound adjustments:
Changing the sound ............................. 32
Enjoying movies:
Searching for a title/chapter/track/
index/scene ....................................34
Changing the angles ............................ 35
Displaying the subtitles .......................35
Using various additional functions:
Locking discs
— CUSTOM PARENTAL
CONTROL/PARENTAL
CONTROL ....................................36
GB
4
Page 5

Tuner
Presetting radio stations....................... 40
Listening to the radio
— Preset Tuning ........................... 40
Using the Radio Data System
(RDS)** ........................................ 41
Tape
Loading a tape .....................................42
Playing a tape ...................................... 42
Recording to a tape
— CD Synchro Recording/
High-Speed Dubbing/Recording
Manually/Program Edit ................. 43
Timer-recording radio programs ......... 45
Sound Adjustment
To listen to multi channel sound ......... 46
About indicators ..................................46
Adjusting the sound ............................. 46
Selecting the preset effect file ............. 47
Adjusting the sound effects ................. 47
Creating a personal audio effect file
— Personal file.............................. 48
Hooking Up the Optional
Components
Connecting audio components ............ 52
Additional Information
Precautions .......................................... 53
Troubleshooting................................... 54
Specifications ...................................... 59
Glossary............................................... 62
Language code list ............................... 64
Control Menu Item List ....................... 65
Setup Display Item List ....................... 66
* MHC-DP1000D only.
** European model only.
***Except for North American and European models.
GB
Other Features
Changing the spectrum analyzer
display ...........................................49
To adjust the brightness of the display...
Singing along: Karaoke*** ................. 49
Falling asleep to music
— Sleep Timer .............................. 50
Waking up to music
— Daily Timer .............................. 50
49
GB
5
Page 6
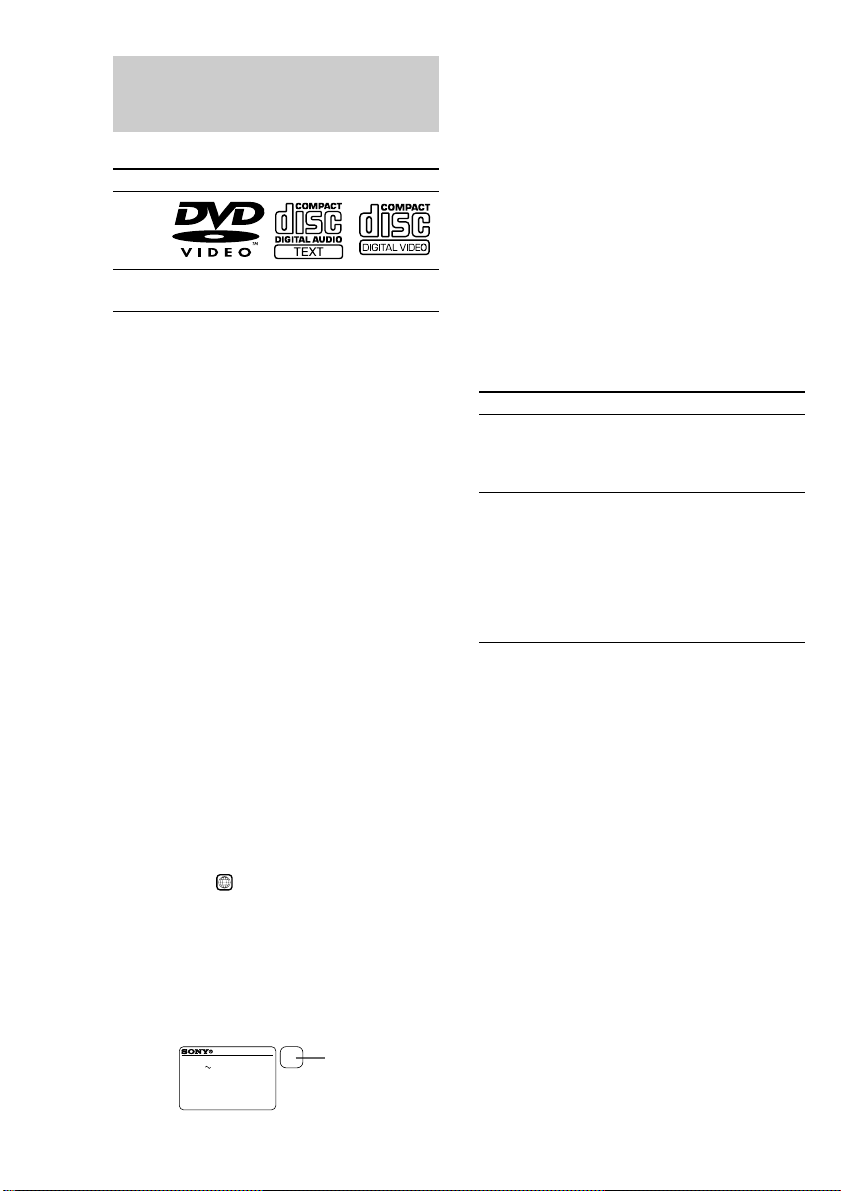
This system can play the following discs
DVD VIDEOs Audio CDs VIDEO CDs
Disc
logo
Contents Audio + Audio Audio +
The “DVD VIDEO” logo is a trademark.
Discs that this system
cannot play
• CD-ROMs (PHOTO CDs included)
• All CD-Rs other than music and VCD format
• Data part of CD-Extras
• DVD-ROMs
• DVD Audio discs
• HD layer on SACDs
• 8 cm CDs
Note
Some CD-Rs/CD-RWs or DVD-Rs/DVD-RWs
cannot be played on this system depending upon the
format or the recording quality or physical condition
of the disc, or the characteristics of the recording
device.
Furthermore, the disc will not play if it has not been
correctly finalized. For more information, see the
operating instructions for the recording device.
Region code of DVDs you can
play on this system
Your system has a region code printed on the
back of the unit and will only play DVDs
labeled with identical region code.
DVDs labeled
system.
If you try to play any other DVD, the message
“Playback prohibited by area limitations.” will
appear on the TV screen.
Depending on the DVD, no region code
indication may be labeled even though playing
the DVD is prohibited by area restrictions.
GB
6
Video Video
CD-Rs
ALL
will also be played on this
MODEL NO. HCD-DPXXXX
DVD DECK RECEIVER
AC: 00V 00Hz 00W
SERIAL NO.
XXXXX
X
Region code
Note on playback operations of
DVDs and VIDEO CDs
Some playback operations of DVDs and
VIDEO CDs may be intentionally set by
software producers. Since this system plays
DVDs and VIDEO CDs according to the disc
contents the software producers designed, some
playback features may not be available. Also,
refer to the instructions supplied with the
DVDs or VIDEO CDs.
Note on PBC (Playback Control)
(VIDEO CDs)
This system conforms to Ver. 1.1 and Ver. 2.0
of VIDEO CD standards. You can enjoy two
kinds of playback depending on the disc type.
Disc type
VIDEO CDs
without PBC
functions
(Ver. 1.1 discs)
VIDEO CDs
with PBC
functions
(Ver. 2.0 discs)
You can
Enjoy video playback (moving
pictures) as well as music.
Play interactive software
using menu screens displayed on
the TV screen (PBC Playback), in
addition to the video playback
functions of Ver. 1.1 discs.
Moreover, you can play highresolution still pictures, if they are
included on the disc.
Copyrights
This product incorporates copyright protection
technology that is protected by method claims
of certain U.S. patents, other intellectual
property rights owned by Macrovision
Corporation, and other rights owners. Use of
this copyright protection technology must be
authorized by Macrovision Corporation, and is
intended for home and other limited viewing
uses only unless otherwise authorized by
Macrovision Corporation. Reverse engineering
or disassembly is prohibited.
Page 7
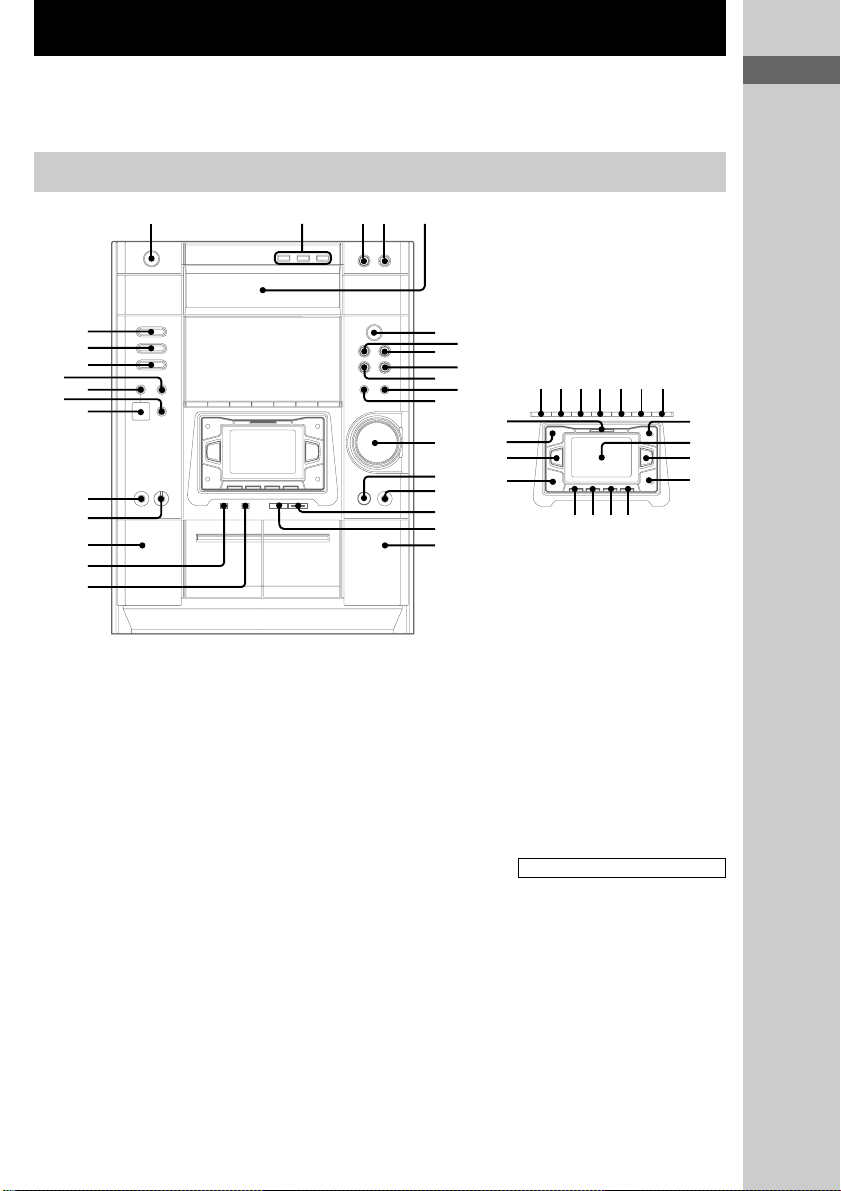
Parts Identification
The items are arranged in alphabetical order.
Refer to the pages indicated in parentheses ( ) for details.
Main unit
12345
e;
wl
wk
wj
wh
wg
wf
wd
ws
wa
w;
ql
2CH/MULTI rs (24, 46)
CD SYNC HI-DUB qj (43, 44)
CLOCK/TIMER SET ed (15, 45,
51)
DECK A Z wa (42)
DECK B Z qk (42)
digipad el (9, 24, 40, 47)
DIGITAL wh (52)
DIGITAL IN (OPTICAL) jack
wf (52)
DIRECTION eg (42–44, 50)
DISC 1–3 2 (23, 24)
DISC SKIP EX-CHANGE 3
(23, 24)
Disc tray 5 (23)
DISPLAY ea (16, 29, 30)
DOLBY NR eh (42–44)
DSP EDIT rj (47)
DVD e; (12, 25, 26, 34, 43, 44)
DVD DISPLAY eg (17, 28, 30)
DVD MENU ql (25)
EFFECT rd (47)
ENTER r; (14, 15, 25–27, 31,
32, 34–41, 44, 45, 47, 51)
FM MODE eh (41)
GAME wg (52)
GAME MODE rh (47)
GROOVE rf (46)
IR receptor qf
KARAOKE PON (Except for
North American and European
models) es (49)
MD (VIDEO) wj (52)
MIC jack (Except for North
American and European
models) wd (49)
MIC LEVEL control (Except for
North American and European
models) ws (49)
MOVIE MODE ek (47)
MULTI CHANNEL DECODING
indicator rl (46)
MUSIC MODE rk (47)
P FILE rg (48)
PHONES jack qg
PLAY MODE ej (23, 26, 27, 44)
PTY (European model only) eg
(41)
REC PAUSE/START qh (43, 44,
50)
REPEAT eh (28, 29)
6
8
q;
qs
qd
qf
qg
qh
qj
qk
7
9
qa
eaesedefegeh
rl
rk
rj
rh
rfrdrs
rg
SPECTRUM (North American
and European models only) es
(49)
TAPE A/B wk (42, 43)
TIMER SELECT ef (45, 51)
TITLE w; (25)
TOOL MODE ra (47)
TUNER/BAND wl (40)
TUNER MEMORY ej (40)
VOLUME control qd
BUTTON DESCRIPTIONS
@/1 (power) 1
Z OPEN/CLOSE (disc tray) 4
nN (play) 6
X (pause) 7
x (stop) 8
. (go back) q;
> (go forward) 9
m/– (rewind) qs
M/+ (fast forward) qa
ej
ek
el
r;
ra
Parts Identification
GB
7
Page 8
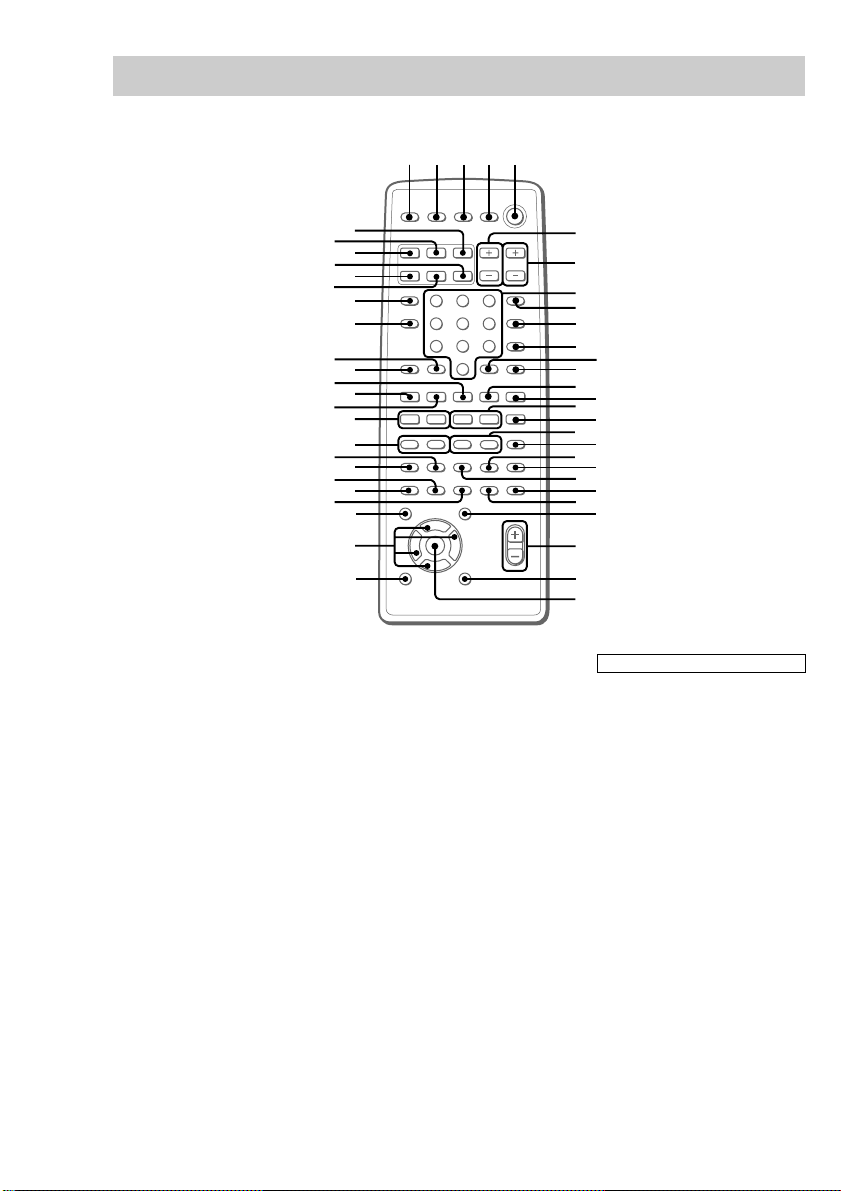
Remote control
1234 5
2CH/MULTI qa (24, 46)
AMP MENU es (14, 49)
ANGLE eg (35)
AUDIO ws (32)
CLEAR rs (21, 27, 28, 34)
CLOCK/TIMER SELECT 2
(45, 51)
CLOCK/TIMER SET 3 (15, 45,
51)
D.SKIP qs (23, 24, 28)
DIGITAL rj (52)
DISPLAY rg (16, 29, 30)
DSP EDIT ef (47)
DVD rl (12, 16, 25, 26, 34, 43,
44)
DVD DISPLAY wd (17, 28, 30–
32, 34–36)
DVD MENU wa (25)
DVD SET UP ql (18, 22, 37)
EFFECT ON/OFF qd (47)
ENTER wk (14, 15, 17, 25–27,
31, 32, 34–41, 44, 45, 47, 49,
51)
GAME rh (52)
GAME MODE wl (47)
MD (VIDEO) rk (52)
GB
8
ta
t;
rl
rk
rj
rh
rg
rf
rd
rs
ra
r;
el
ek
ej
eh
eg
ef
ed
es
ea
e;
v
bB
V
wl
MOVIE MODE wg (47)
MUSIC MODE ea (47)
NEXT el (24, 25)
Numeric buttons 8 (26)
P FILE ed (48)
PREV r; (24, 25)
REPEAT q; (28, 29)
RETURN O ra (25, 37, 38)
SLEEP 1 (50)
SLOW t/T qk (24)
SPEAKER LEVEL wf (14)
SPECTRUM rf (49)
STEP c/C ej (24)
SUB TITLE eh (35)
TAPE A/B ta (42, 43)
TITLE w; (25)
TOOL MODE wj (47)
TUNER/BAND t; (40, 41)
TV @/1 4 (12)
TV CH +/– 7 (12)
TV/VIDEO 9 (12)
TV VOL +/– 6 (12)
VOL +/– wh
6
7
8
9
q;
qa
qs
qd
x
O
nN
Mm>.
X
TtCc
qf
qh
qk
w;
ws
wf
qg
qj
ql
wa
wd
wg
wh
wj
wk
BUTTON DESCRIPTIONS
@/1 (power) 5
nN (play), SELECT qf
X (pause) qg
x (stop) qj
m/M (rewind/fast forward),
TUNING –/+ qh
./> (go back/go forward),
PRESET –/+ ek
v/V/b/B e;
>10 rd
Page 9
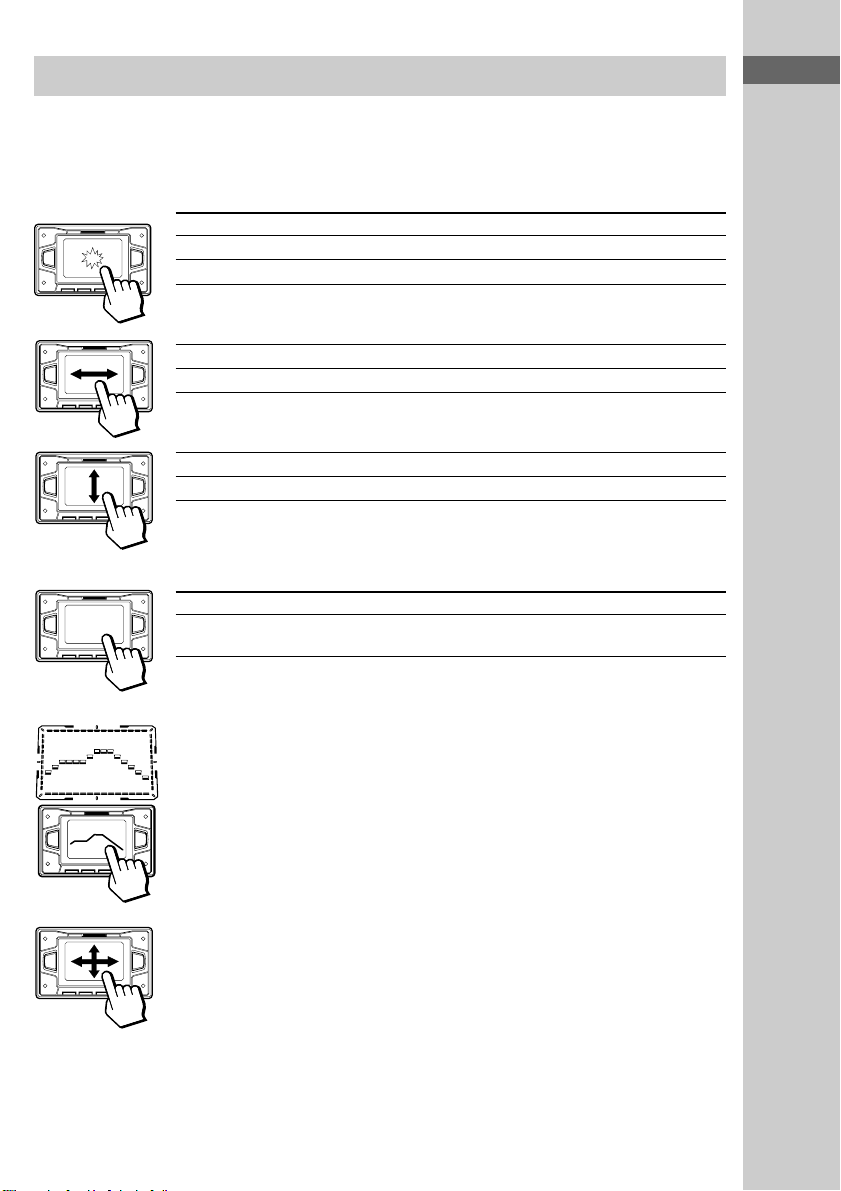
digipad operations
This model is equipped with an unique digipad multi controlling device. You can control various
operations with this digipad.
DVD (When OSD does not appear in the screen), TUNER, TAPE
A/B functions
Basic operation DVD, TUNER, TAPE A/B
Tap once nN (Start playback)*
Tap twice x (Stop playback)
* When you tap the digipad while playing a DVD/VIDEO CD/CD, playback pauses. Tap
again to resume playback.
Slide from the left to the right > (AMS +, preset +)**
Slide from the right to the left . (AMS –, preset –)**
Slide from lower side to upper side M (Fast forward, tuning +)**
Slide from upper side to lower side m (Rewind, tuning –)**
**If you keep on moving, you can operate as pressing and holding these
buttons.
DVD function (When OSD appears in the screen)
v
bB
V
Basic operation DVD
Slide to the top, buttom, left side, or v/V/b/B (same as the cursor buttons on the
right side of the digipad remote)
Parts Identification
Adjusting the equalizer curve in EQ EDIT operations (page 47)
The curve made by sliding the finger is reflected in the display.
Selecting parameters in DSP EDIT and other adjustments
(page 47)
Slide in the direction until you reach the value you want (refer to each of the
operations).
Notes
• Do not use utensil whose end is sharpened.
• When this unit does not respond to the digipad operations, press the digipad a little harder.
GB
9
Page 10
3
Getting Started
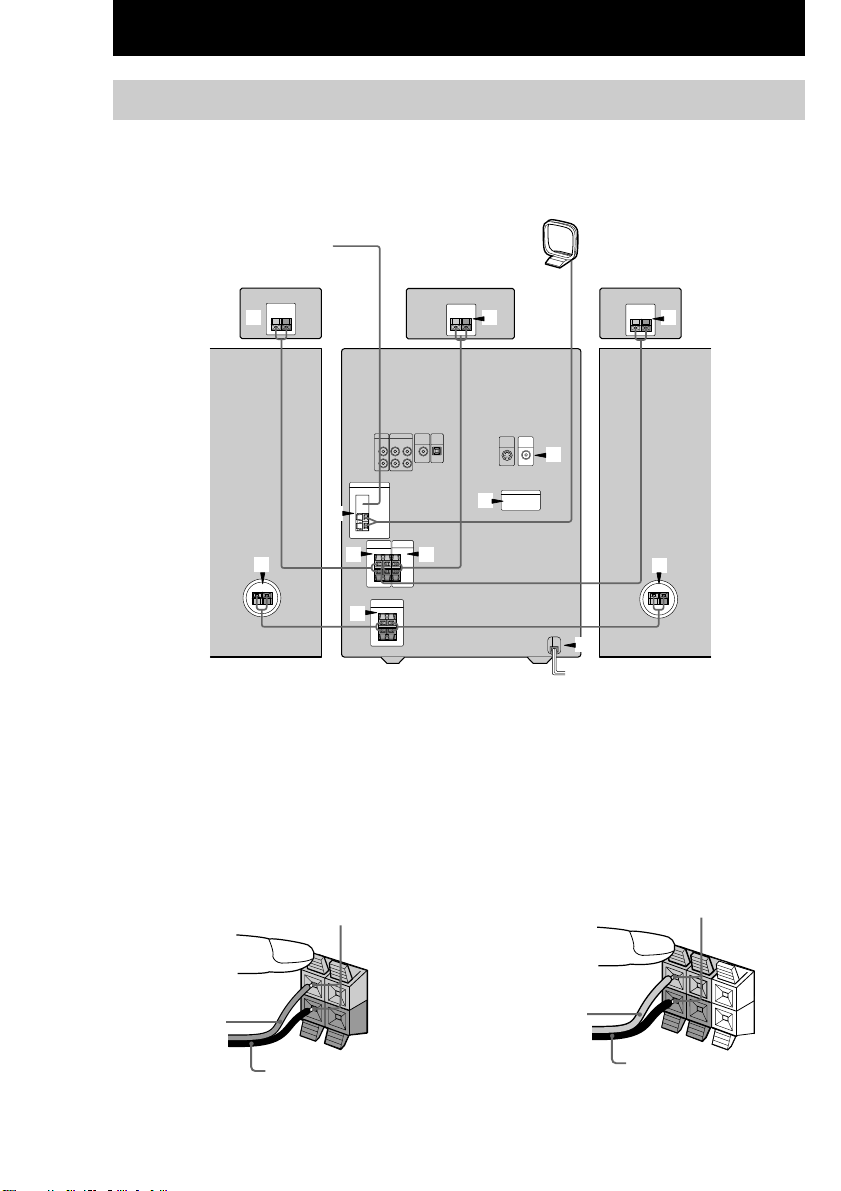
Hooking up the system
Do the following procedure 1 to 8 to hook up your system using the supplied cords and
accessories.
AM loop antenna
FM antenna
Rear speaker*
(Right)
Center speaker*
Rear speaker*
(Left)
2 2
4
1 1
2
1
Front speaker
(Right)
1 Connect the front speakers.
Connect the speaker cords to the FRONT
SPEAKER jacks (MHC-DP1000D) or
SPEAKER jacks (MHC-DP900D).
Insert only the stripped portion.
R
L
+
Red/Solid (3)
–
3
5
6
3
7
Front speaker
(Left)
* MHC-DP1000D only.
2 Connect the rear speakers.
(MHC-DP1000D only)
Connect the speaker cords to the REAR
SPEAKER jacks.
Insert only the stripped portion.
+
Gray/Solid (3)
R
L
+
–
10
GB
Black/Stripe (#)
Black/Stripe (#)
Page 11

3 Connect the center speaker.
(MHC-DP1000D only)
Connect the speaker cords to the CENTER
SPEAKER jacks.
Insert only the stripped portion.
Gray/Solid (3)
R
L
+
Black/Stripe (#)
+
–
4 Connect the FM/AM antennas.
Set up the AM loop antenna, then connect
it.
5 Connect the video input jack of your TV
to the VIDEO OUT jack with the video
cable.
VIDEO
OUT
When using a TV
Turn on the TV and select the video input so you can
view the pictures from this system.
Tip
For even higher quality video images, you can use an
optional S-video cable to connect the S VIDEO input
jack on your TV to the S VIDEO OUT jack.
6 For models with a voltage selector, set
VOLTAGE SELECTOR to the position of
your local power line voltage.
Getting Started
Jack type A
AM loop antenna
Jack type B
Extend the FM lead
antenna horizontally.
Extend the FM lead
antenna horizontally.
FM75
AM
AM loop antenna
F
M
7
5
C
O
A
X
A
M
The plug of the FM antenna may vary according
to the model you purchased.
VOLTAGE SELECTOR
220V 230-240V120V
7 Connect the power cord to a wall outlet.
The demonstration appears in the display.
When you press ?/1, the system turns on
and the demonstration automatically ends.
If the supplied adaptor on the plug does not
fit your wall outlet, detach it from the plug
IA
L
(only for models equipped with an adaptor).
continued
1111
GB
Page 12
Hooking up the system (continued)
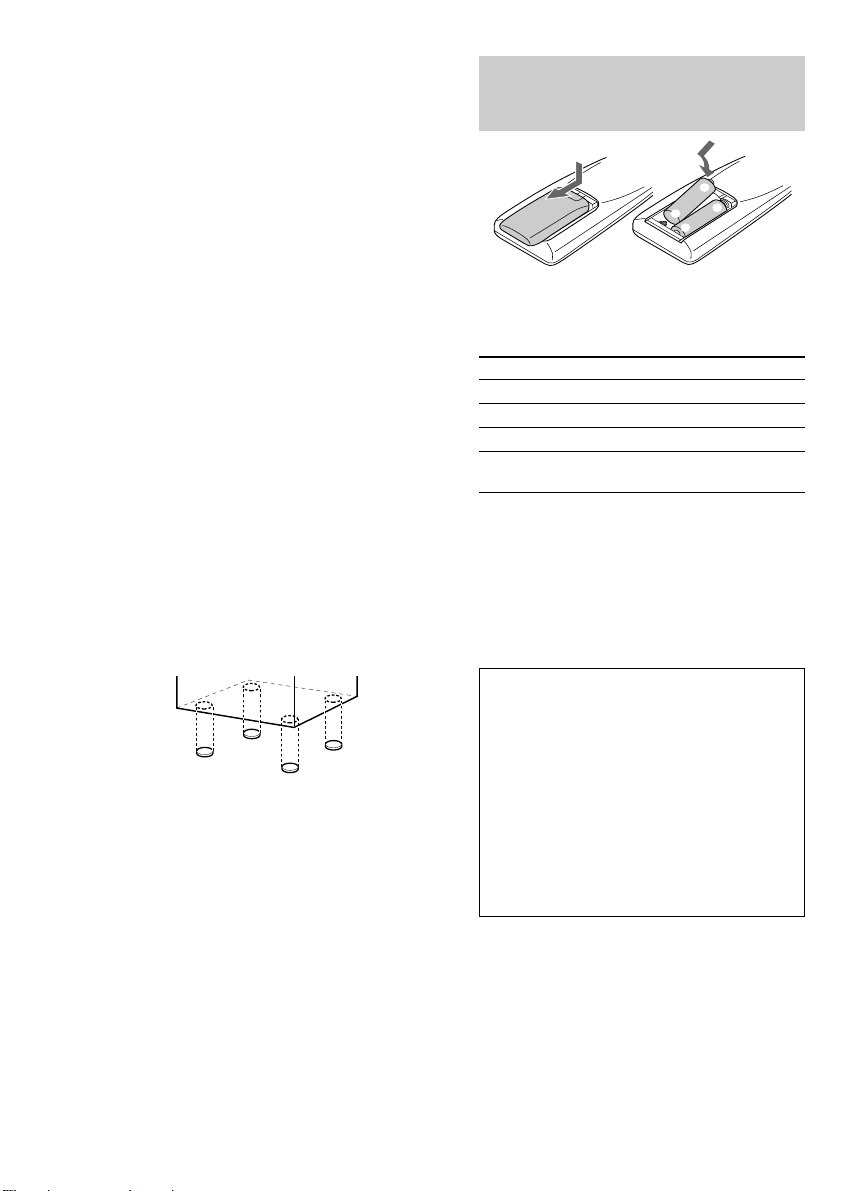
Inserting two size AA (R6)
8 (Except for Pan American and
European models)
Set the color system according to your
TV.
The color system is factory set to NTSC for
region code 3 models, and PAL for other
region code models. Each time you perform
the procedure below, the color system
changes as follows:
NTSC y PAL
Use the buttons on the unit.
1 Press ?/1 to turn on the system.
2 Press DVD.
3 Press x.
4 Press ?/1 while holding down X.
The system turns off.
5 Press ?/1 to turn on the system.
The system turns on and the color system is
changed.
To attach the speaker pads
Attach the supplied speaker pads to the bottom
of the speakers to stabilize the speakers and
prevent them from slipping.
Notes
• Keep the speaker cords away from the antennas to
prevent noise.
• The type of speakers supplied vary according to the
model you purchased (see “Specifications” on page
59).
• Do not place the rear speakers on top of a TV. This
may cause color distortion in the TV screen.
• For MHC-DP1000D, be sure to connect both left
and right rear speakers. Otherwise, the sound will
not be heard.
• When you play a VIDEO CD recorded in the
different color system from the one you set to the
system, the picture image may be distorted.
batteries into the remote
]
}
}
]
Operating a Sony TV
You can use the following buttons on the
remote to operate a Sony TV.
To Press
Turn the TV on or off TV ?/1.
Switch the TV’s video input TV/VIDEO.
Change the TV channels TV CH +/–.
Adjusts the volume of the TV TV VOL +/–.
speaker(s)
Tip
When the remote no longer operates the system,
replace both batteries with new ones.
Note
If you do not use the remote for a long period of time,
remove the batteries to avoid possible damage from
battery leakage.
Notice for carrying this system
Do the following to protect the DVD
mechanism.
1 Turn on the system, then press DVD.
Make sure that all discs are removed
from the unit.
2 Hold down DVD, then press ?/1 until
“LOCK” appears.
3 Release ?/1 first, then release DVD.
4 Unplug the AC power cord.
12
GB
Page 13
Setting up your speakers for Dolby Pro Logic
(MHC-DP1000D only)
Dolby Pro Logic Surround improves the sound
image by using four separate channels. These
channels manipulate the sound to be heard and
enhance the action on the screen.
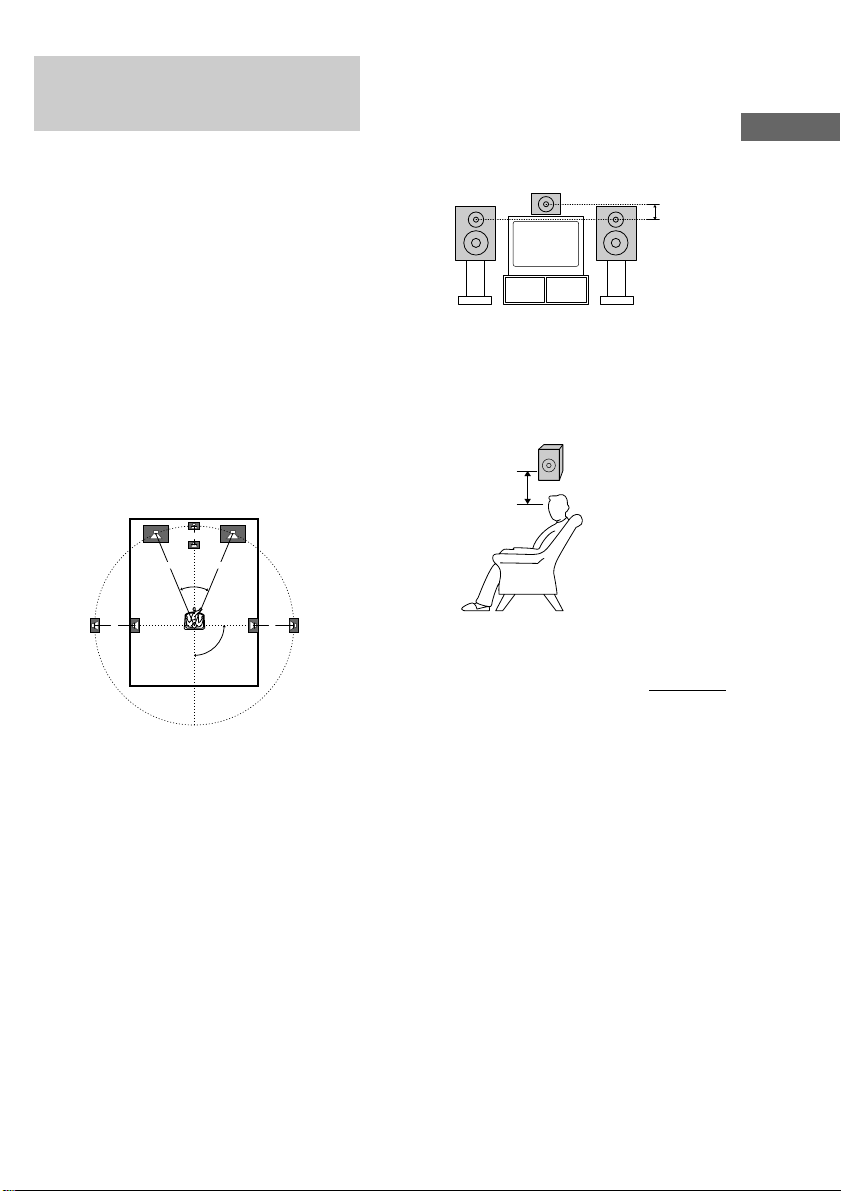
Positioning the speakers
For the best possible surround sound, all
speakers should be the same distance from the
listening position (A). However, this unit lets
you to place the center speaker up to 1.5 meters
(5 feet) closer (B) and the rear speakers up to
4.5 meters (15 feet) closer (C) to the listening
position. The front speakers can be placed from
1.0 to 12.0 meters (3 to 40 feet) from the
listening position (A).
B
A A
45°
CC
90°
Setting the center speaker
Place the center speaker at about the
same height as the front speakers. Align the
center speaker with the front speakers or place
it slightly behind the front speakers.
Setting the rear speakers
Place the rear speakers facing each other at
about 60 to 90 cm above your listening
position.
Rear speaker
60 to 90 cm
continued
Getting Started
Note
Do not place the center speaker farther away from the
listening position than the front speakers.
1313
GB
Page 14

Setting up your speakers for Dolby
Pro Logic (continued)
Specifying the distance of
the speakers
Use the remote for the operation.
1 Press AMP MENU.
2 From your listening position, press v
or V repeatedly to select the parameter.
Adjustable parameters are described below.
3 Press b or B repeatedly to select the
setting you want.
4 Repeat steps 2 to 3 to set other
parameters.
5 Press ENTER.
Tips
• You can use the digipad instead of the cursor
buttons (v/V/b/B).
• You can use “SPEAKER SETUP” in the Setup
Display to specify the distance of the speakers
(page 21).
Note
If each of the front or rear speakers is not placed at an
equal distance from your listening position, set the
distance of the closest speaker.
Adjustable parameters
The default settings are in the parentheses.
• FRONT: 1.0 meter to 12.0 meters (2.4 meters)
(3 feet to 40 feet (8 feet))*
Front speakers distance.
• CENTER: FRONT to 1.5 meters (2.4 meters)
(FRONT to 5 feet (8 feet))*
Center speaker distance.
• REAR: FRONT to 4.5 meters (1.5 meters)
(FRONT to 15 feet (5 feet))*
Rear speakers distance.
* North American model only.
Notes
• To enjoy Dolby Pro Logic surround with 2 channel
PCM or analog input sources, select “NORMAL
SURR” from the sound effect options (see page 47).
• If you press AMP MENU while adjusting
parameters using OSD, the OSD turns off.
Specifying the speaker parameters
Use the remote for the operation.
1 From your listening position, press
SPEAKER LEVEL.
Adjustable menus and parameters are
described below.
2 Press v or V repeatedly to select the
parameter.
3 Press b or B repeatedly to select the
setting you want.
4 Repeat steps 2 to 3 to set other
parameters.
5 Press ENTER.
Tips
• You can use the digipad instead of the cursor
buttons (v/V/b/B).
• You can use “SPEAKER SETUP” in the Setup
Display to specify the balance, level, and test tone
parameters (page 21).
Adjustable parameters
The default settings are in the parentheses.
x BALANCE
• FRNT L___R: (center)
Balance between the front left and right
speakers.
• (MHC-DP1000D only)
REAR L___R: (center)
Balance between the rear left and right
speakers.
Range: 6 dB (L) to 6 dB (R), 1 dB steps
x LEVEL (MHC-DP1000D only)
• REAR ** dB: (0 dB)
Level of the rear speakers.
Range: –6 dB to 6 dB, 1 dB steps
• CTR ** dB: (0 dB)
Level of the center speaker.
Range: –6 dB to 6 dB, 1 dB steps
• SW ** dB: (10 dB)
Level of the sub woofer.
Range: –10 dB to 10 dB, 1 dB steps
14
GB
Page 15

x LFE
• LFE
Level of the LFE (Low Frequency Effect)
channel output.
Range: OFF, –20 dB to 0 dB, 1 dB steps
“OFF” cuts the sound of the LFE channel.
However, the low frequency sound of the
speakers are output from the sub woofer.
“–20 dB” to “0 dB” settings allow you to
attenuate the LFE signal. “0 dB” outputs the
full LFE signal at the mix level determined by
the recording engineer.
x D.COMP.
• D.COMP.: (STD)
Dynamic range compression.
Range: OFF, 0.1 to 0.9, STD, MAX
“OFF” does not compress the dynamic range.
“0.1” to “0.9” settings allow you to compress
the dynamic range in small steps. “STD”
reproduces the sound track with the dynamic
range intended by the recording engineer.
“MAX” provides a great compression of the
dynamic range.
x T.TONE (MHC-DP1000D only)
• T.TONE: (OFF)
Test tone output.
Range: OFF, ON
“ON” outputs the test tone from each speaker in
sequence. Adjust the LEVEL and BALANCE
parameters so that the volume level of the test
tone from each speaker sounds the same using
the remote from your listening position. Select
“OFF” to turn off the test tone.
Notes
• When you adjust the level of the subwoofer, set
T.TONE to “OFF”.
• Dynamic range compression is possible with Dolby
Digital sources only.
• If you press SPEAKER LEVEL while adjusting
parameters using OSD, the OSD turns off.
*****
: (0 dB)
Setting the time
1 Turn on the system.
2 Press CLOCK/TIMER SET.
When you set the time for the first time,
proceed to step 5.
3 Press . or > repeatedly to select
“CLOCK SET”.
4 Press ENTER.
5 Press . or > repeatedly to set the
hour.
6 Press ENTER.
7 Press . or > repeatedly to set the
minutes.
8 Press ENTER.
Tip
If you have made a mistake or want to change the
time, start over from step 2.
Note
The clock settings are canceled when you disconnect
the power cord or if a power failure occurs.
Getting Started
1515
GB
Page 16

Saving the power in standby mode
Press DISPLAY repeatedly when the
power is off.
Each time you press the button, the system
switches cyclically as follows:
Demonstration t Clock t Power Saving
Mode
To cancel the Power Saving mode
Press DISPLAY once to show the
demonstration, twice to show the clock display.
Tips
• ?/1 indicator lights up even in the Power Saving
Mode.
• The timer functions during the Power Saving Mode.
Note
During the Power Saving Mode, the following
functions do not work:
– Setting the time.
– Changing the AM tuning interval (except for
European and Middle Eastern models).
– Pressing a function button to turn the power on.
– Switching the function of MD (VIDEO).
– Switching the color system.
16
GB
Page 17

Setting Up for DVD/VIDEO CD/CD
Using the Setup Display
By using the Setup Display, you can make
various adjustments to items such as picture
and sound. You can also set a language for the
subtitles and the Setup Display, among other
things. For details on each Setup Display item,
see pages 18–22. For an overall list of Setup
Display items, see page 66.
The North American model is the model used
for OSD (on-screen display) illustration
purposes in this section.
Use the remote for the operation.
1 Press DVD.
2 When the playback is stopped, press
DVD DISPLAY.
The Control Menu appears.
If you press DVD SET UP, you can go to
step 4 directly.
3 Press v or V repeatedly to select
“SETUP”, then press ENTER.
The options for “SETUP” appear.
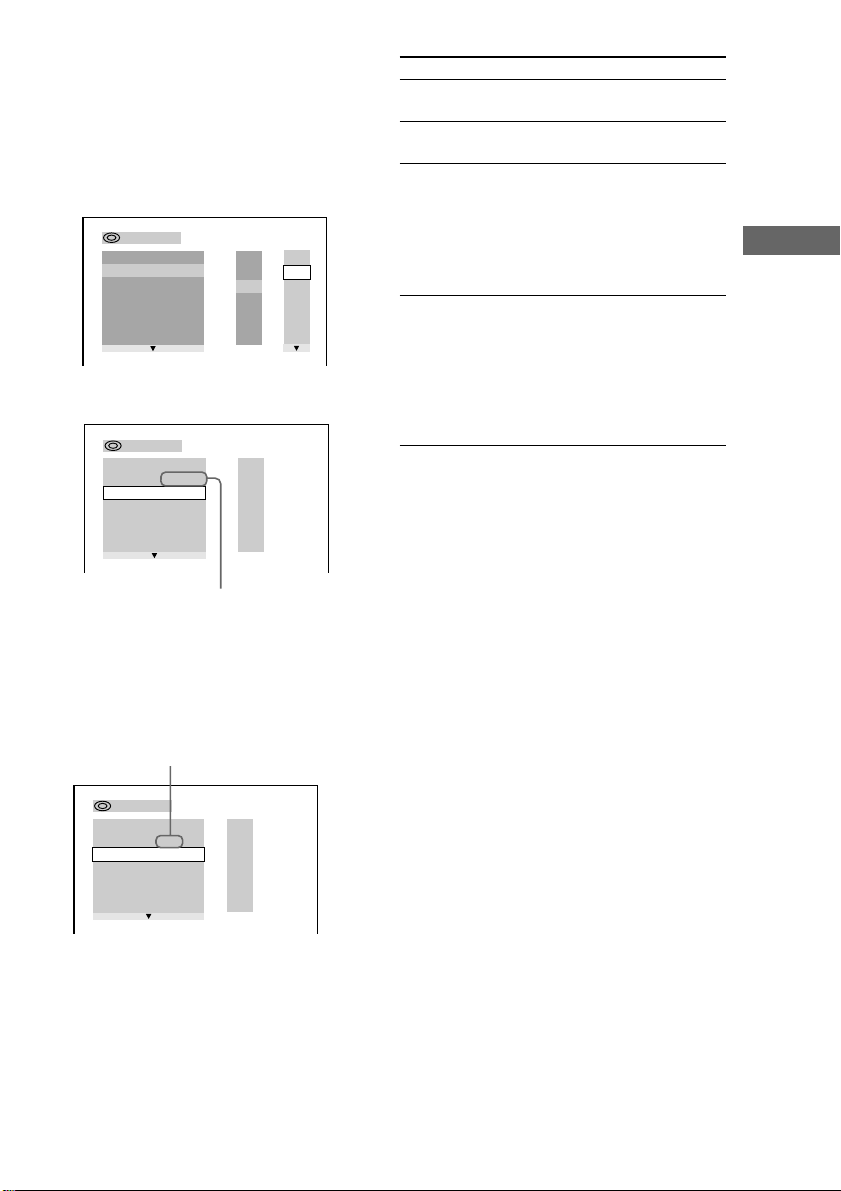
4 Press v or V repeatedly to select
“CUSTOM”, then press ENTER.
The Setup Display appears.
Main
items
)
( 47
: :
CUSTOM
RESET
CUSTOM
LANGUAGE SETUP
OSD:
DVD MENU:
AUDIO:
SUBTITLE:
DVD
ENGLISH
ENGLISH
ORIGINAL
ENGLISH
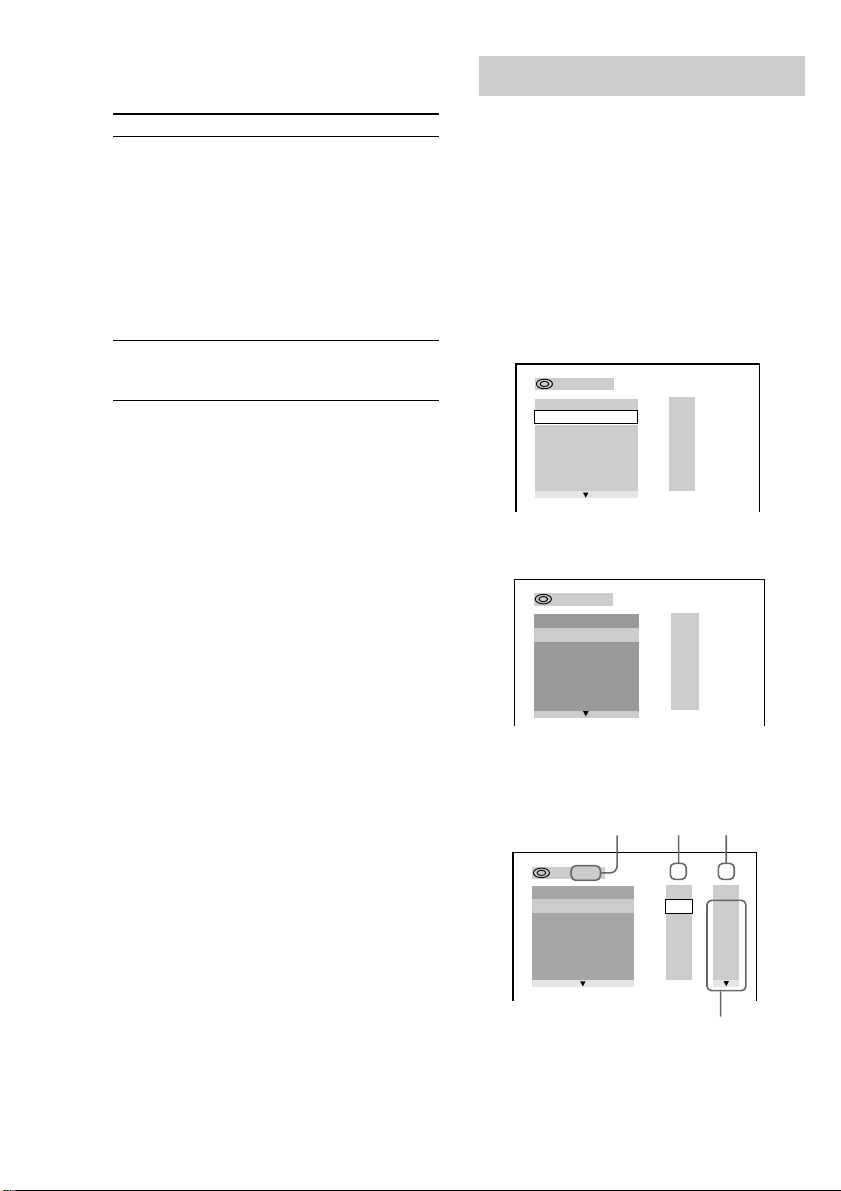
5 Press v or V repeatedly to select the
setup item from the displayed list, then
press ENTER.
The selected setup item appears.
Example: “SCREEN SETUP”
Selected item
SCREEN SETUP
TV TYPE:
SCREEN SAVER:
Setup
items
BACKGROUND:
JACKET PICTURE
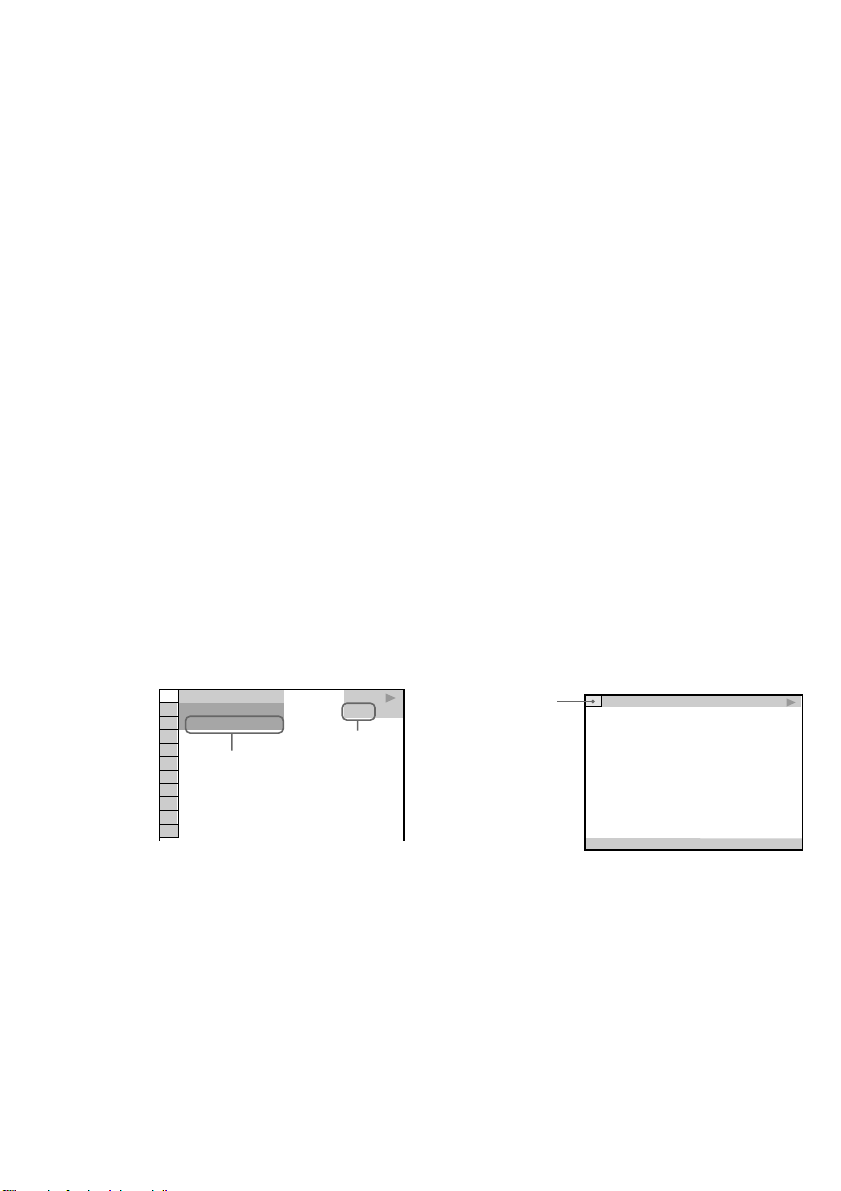
6 Press v or V repeatedly to select an
item, then press ENTER.
The options for the selected item appear.
Example: “TV TYPE”
SCREEN SETUP
TV TYPE:
SCREEN SAVER:
BACKGROUND:
4:3 LETTER BOX
4:3 PAN SCAN
Options
7 Press v or V repeatedly to select a
setting, then press ENTER.
The setting is selected and the setup is
completed.
Example: “4:3 PAN SCAN”
SCREEN SETUP
TV TYPE:
SCREEN SAVER:
BACKGROUND:
Selected setting
4:3 PAN SCAN
JACKET PICTURE
Setting Up for DVD/VIDEO CD/CD
16:9
ON
16:9
16:9
ON
continued
17
GB
Page 18
Using the Setup Display (continued)
To turn off the Setup Display
Press DVD SET UP or DVD DISPLAY
repeatedly until the Setup Display is turned off.
Tips
• If you select “RESET” in step 4, you can reset all of
the “SETUP” settings on pages 18–22 (except for
PARENTAL CONTROL) to the default settings.
After you select “RESET” and press ENTER, select
“YES” to reset the settings (it takes a few seconds
to complete), or select “NO” and press ENTER to
return to the Control Menu. Do not press ?/1 when
resetting the system.
• You can use the digipad instead of cursor buttons
(v/V/b/B) when DVD is selected as the current
function and OSD appears on the screen.
Setting the display or sound track language
— LANGUAGE SETUP
“LANGUAGE SETUP” allows you to set
various languages for the on-screen display or
sound track.
Select “LANGUAGE SETUP” in the Setup Display.
x SUBTITLE (DVD only)
Switches the language of the subtitle.
Select the language from the displayed list.*
When you select “AUDIO FOLLOW”, the
language for the subtitles changes according to
the language you selected for the sound track.
* If you select “OTHERS t” in “DVD MENU”,
“AUDIO”, or “SUBTITLE”, select and enter the
language code from the list using the numeric
buttons (page 64). After you selected, the language
code (4 digits) is displayed the next time you select
“OTHERS t”.
Note
When you select a language that is not recorded on
the DVD, one of the recorded languages will be
automatically selected (except for “OSD”).
18
LANGUAGE SETUP
OSD:
DVD MENU:
AUDIO:
SUBTITLE:
x OSD (on-screen Display)
Switches the display language on the screen.
Select the language from the displayed list.
x DVD MENU (DVD only)
Select the language for the DVD menu.*
x AUDIO (DVD only)
Switches the language of the sound track.
Select the language from the displayed list.*
When you select “ORIGINAL”, the language
given priority in the disc is selected.
GB
ENGLISH
ENGLISH
ORIGINAL
ENGLISH
Page 19
Settings for the display
— SCREEN SETUP
Select settings according to the connected TV.
Select “SCREEN SETUP” in the Setup Display.
SCREEN SETUP
TV TYPE:
SCREEN SAVER:
BACKGROUND:
JACKET PICTURE
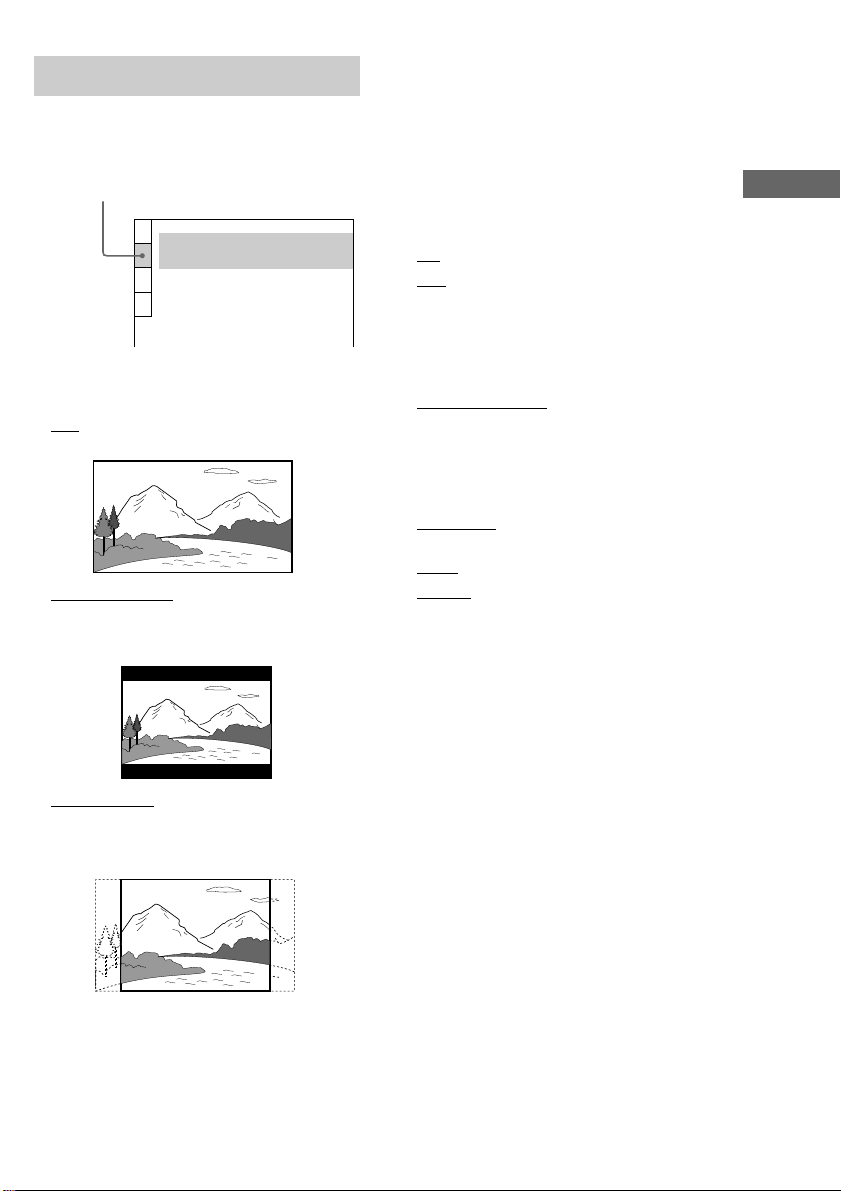
x TV TYPE (DVD only)
Select the aspect ratio of the connected TV.
• 16:9: Select this when you connect a widescreen TV or a TV with a wide mode function.
• 4:3 LETTER BOX: Select this when you
connect a 4:3 screen TV. This setting displays a
wide picture with bands displayed on the upper
and lower portions of the screen.
16:9
ON
x SCREEN SAVER
Turn on and off the screen saver. If you turn on
the screen saver, the screen saver image
appears when you leave the player in pause or
stop mode for 15 minutes or when you play a
CD for more than 15 minutes. The screen saver
will help prevent your display device from
becoming damaged (ghosting). Press nN to
turn off the screen saver.
• ON: Turns on the screen saver.
• OFF: Turns off the screen saver.
x BACKGROUND
Select the background color or picture on the
TV screen when the playback is stopped or
while playing a CD.
• JACKET PICTURE: The jacket picture (still
picture) appears in the background, but only
when the jacket picture is already recorded on
the disc (CD-EXTRA, etc). If the disc does not
contain a jacket picture, the “GRAPHICS”
picture appears.
• GRAPHICS: The preset picture stored in the
system appears in the background.
• BLUE: The background color is blue.
• BLACK: The background color is black.
Setting Up for DVD/VIDEO CD/CD
• 4:3 PAN SCAN: Select this when you connect
a 4:3 screen TV. This setting displays the wide
picture on the entire screen and cuts off the
portions that do not fit.
Note
Depending on the DVD, “4:3 LETTER BOX” may be
selected automatically instead of “4:3 PAN SCAN”
or vice versa.
19
GB
Page 20

Custom settings
— CUSTOM SETUP
Select “CUSTOM SETUP” in the Setup Display.
CUSTOM SETUP
PAUSE MODE:
PARENTAL CONTROL
TRACK SELECTION: OFF
x COLOR SYSTEM (Except for Pan
American and European models)
Select the color system when you play a
VIDEO CD.
• AUTO: Outputs the video signal in the system
of the disc, either PAL or NTSC. If your TV
uses a DUAL system, select AUTO.
• PAL: Changes the video signal of an NTSC
disc and outputs it in the PAL system.
• NTSC: Changes the video signal of a PAL disc
and outputs it in the NTSC system.
Notes
• You cannot change the color system of the disc
itself.
• Except for Pan American and European models,
you can change the color system of this unit
according to the connected TV. See page 12.
x PAUSE MODE (DVD only)
Select the picture in pause mode.
• AUTO: A picture including subjects that move
dynamically is output with no jitter. Normally
select this position.
• FRAME: A picture including subjects that do
not move dynamically is output in high
resolution.
AUTO
x PARENTAL CONTROL t (DVD only)
Set a password and playback limitation level
for DVDs with playback limitation for
children. For details, see “Limiting playback by
children (Parental Control)” on page 37.
x TRACK SELECTION (DVD only)
Gives the priority to the sound track which
contains the highest number of channels when
you play a DVD on which multiple audio
formats (PCM, DTS, MPEG audio, or Dolby
Digital format) are recorded.
• OFF: No priority given.
• AUTO: Priority given.
Notes
• When you set to “AUTO”, the language setting may
change. The “TRACK SELECTION” setting has
higher priority than the “AUDIO” setting in
“LANGUAGE SETUP” (page 18).
• If PCM, DTS, MPEG audio, and Dolby Digital
sound tracks have the same number of channels, the
system selects PCM, DTS, MPEG audio, and Dolby
Digital sound tracks in this order.
• Depending on the DVD, the audio channel with
priority may be predetermined. In this case, you
cannot give priority to the DTS, MPEG audio, or
Dolby Digital audio format by selecting “AUTO”.
20
GB
Page 21
Speaker settings
— SPEAKER SETUP
Set up your speaker system for playback of
5.1CH DVDs.
Select “SPEAKER SETUP” in the Setup Display.
SPEAKER SETUP
DISTANCE:
BALANCE:
LEVEL:
TEST TONE:
To return to the default setting
Select the item, then press CLEAR.
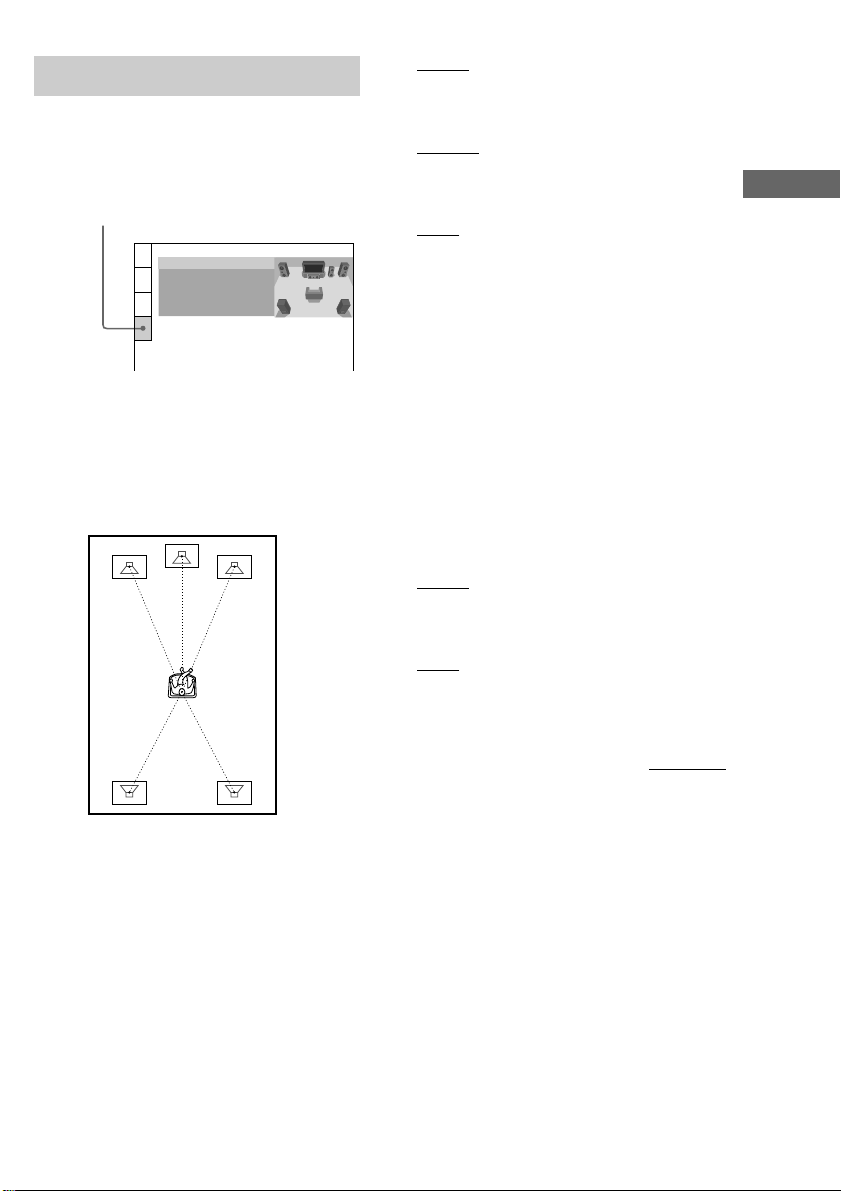
x DISTANCE (MHC-DP1000D only)
The default distance settings for the speakers in
relation to the listening position is shown
below.
2.4m
(8ft)
2.4m
(8ft)
1.5m
(5ft)
2.4m
(8ft)
1.5m
(5ft)
• FRONT : Front speaker distance from the
listening position can be set in 0.1 meter
(1 foot) steps from 1.0 to 12.0 meters (3 to
40 feet).
• CENTER: Center speaker distance can be
moved up to 1.5 meters (5 feet) closer to the
listening position, from the front speakers in
0.1 meter (1 foot) steps.
• REAR: Rear speaker distance can be moved up
to 4.5 meters (15 feet) closer to the listening
position, from the front speakers in 0.1 meter
(1 foot) steps.
Notes
• When you select an item, the sound cuts off for a
moment.
• If each of the front or rear speakers is not placed at
an equal distance from your listening position, set
the distance of the closest speaker.
• Do not place the rear speakers farther away from
your listening position than the front speakers.
x BALANCE
You can vary the balance of the left and right
speakers as follows. Be sure to set “TEST
TONE” to “ON” for easy adjustment.
The default settings are in parentheses.
• FRONT (0 dB): Adjust the balance between
the front left and right speakers (6 dB (L) to
6 dB (R), 1 dB steps).
• (MHC-DP1000D only)
REAR (0 dB): Adjust the balance between the
rear left and right speakers (6 dB (L) to 6 dB
(R), 1 dB steps).
continued
Setting Up for DVD/VIDEO CD/CD
Be sure to change the value in the Setup
Display when you move the speakers.
21
GB
Page 22

Speaker settings (continued)
x LEVEL (MHC-DP1000D only)
You can vary the level of each speakers as
follows. Be sure to set “TEST TONE” to “ON”
for easy adjustment.
The default settings are in parentheses.
• CENTER (0 dB): Adjust the level of the center
speaker (–6 dB to +6 dB, 1 dB steps).
• REAR (0 dB): Adjust the level of the rear
speakers (–6 dB to +6 dB, 1 dB steps).
• SUBWOOFER (10 dB): Adjust the level of the
subwoofer (–10 dB to +10 dB, 1 dB steps).
x TEST TONE (MHC-DP1000D only)
The speakers will emit a test tone to adjust
“BALANCE” and “LEVEL”.
• OFF: The test tone is not emitted from the
speakers.
• ON: The test tone is emitted from each speaker
in sequence while adjusting balance or level.
When you select one of the “SPEAKER
SETUP” items, the test tone is emitted from
both left and right speakers simultaneously.
Note
When you adjust the level of the subwoofer, set
T.TONE to “OFF”.
To adjust the volume of all the
speakers at once
Turn VOLUME (or press VOL +/– on the
remote).
Adjusting the speaker volume
and level
1 When the playback is stopped, press
DVD SET UP, then select “SPEAKER
SETUP”.
2 Select “TEST TONE” and set “TEST
TONE” to “ON”.
You will hear the test tone from each
speaker in sequence.
3 From your listening position, select
“BALANCE” or “LEVEL”, then press b
or B repeatedly to adjust the value of
“BALANCE”, or press v or V
repeatedly to adjust the value of
“LEVEL”.
The test tone is emitted from both left and
right speakers simultaneously.
4 Select “TEST TONE” and set “TEST
TONE” to “OFF” to turn off the test
tone.
Notes
• When you adjust the speaker settings, the sound
cuts off for a moment.
• If you adjust these parameters using OSD while
adjusting the speaker parameters using AMP
MENU or SPEAKER LEVEL (pages 14–15), the
display on the unit turns off.
22
GB
Page 23

DVD/VIDEO CD/CD
Playing discs
Loading a disc
1 Press Z OPEN/CLOSE.
The disc tray slides out.
2 Place a DVD/VIDEO CD/CD with the
label side up on the disc tray.
To insert additional discs, press DISC SKIP
EX-CHANGE (or D.SKIP on the remote) to
rotate the disc tray.
3 Press Z OPEN/CLOSE to close the disc
tray.
Playing a disc
— Normal Play/Shuffle Play/
Slow-motion Play/Freeze Frame
You can play up to three discs (DVD, VIDEO
CD, CD) in a row. Depending on the DVD or
VIDEO CD, some operations may be different
or restricted. Refer to the operating instructions
supplied with the disc.
When playing a DVD:
Chapter number
Disc tray
number
Title
number
DVD TITLE CHAPTER HOUR MIN SEC
DVD
MUSIC MOVIE
21
3
Disc presence indicator
Playing time
AB
When playing a VIDEO CD or CD:
Track number Playing timeDisc tray number
DVD
1 DISC
Disc presence indicator
VCD
MUSIC MOVIE
21
3
MIN SEC
AB
1 Turn on your TV and select the video
input.
Refer to the operating instructions supplied
with your TV if you need help.
2 Press DVD.
3 When playback is stopped, press PLAY
MODE repeatedly until the mode you
want appears in the display.
Select
ALL DISCS
1 DISC
ALL DISCS
SHUFFLE
1 DISC
SHUFFLE
PROGRAM
To play
All discs in the disc tray
continuously.
The disc you have selected in
the original order.
The tracks on all discs in
random order.
The tracks on the disc you have
selected in random order.
The tracks on all discs in the
order you want them to be
played (see “Creating your own
program” on page 26).
4 Press one of the DISC 1–3 buttons.
If you press nN when DVD is selected
as the function (press DVD) and the disc
tray is closed, playback starts from the
selected disc.
Tips
• You cannot change the play mode during playback.
• You can change the play mode between 1 DISC and
ALL DISCS using the on-screen display as follows:
1 When playback is stopped, press DVD DISPLAY.
The Control Menu appears.
2 Press v or V to select “ONE/ALL DISCS”, then
press ENTER.
3 Press v or V to select either “ONE DISC” or
“ALL DISCS”, then press ENTER.
DVD/VIDEO CD/CD
continued
23
GB
Page 24

Playing a disc (continued)
Other operations
To
Stop playback
Pause playback
Select a track or
chapter
Find a point in
a track title or
chapter
(Lock
Search function)
Change the
playback speed
(Slow-motion play)
Playing the disc
frame by frame
changing the
playback speed
(Freeze Frame)
Select a disc when
playback is stopped
Switch to DVD
function from
another source
Exchange other
discs during
playback
Remove the disc
Do this
Press x. The playback stops at
the point x is pressed (Resume
Play). Press x again to cancel
the Resume Play (see page 28).
Press X*1.
Press again to resume playback.
During playback or pause, press
> (or NEXT on the remote)
(to go forward) or . (or
PREV on the remote) (to go
back).
Press M or m during
playback. Each time you press
the button, the speed changes as
follows:
1 (slow) y 2 (faster than 1)
Press nN to stop searching at
the desired point.
During playback, press SLOW
*2
t or T*3 on the remote. Each
time you press the button, the
speed switches between two
slowed playback speeds. To
return to normal playback, press
nN.
During playback, press STEP
c or C*3 on the remote.
Each time you press the button,
*2
playback is advanced a single
frame in the desired direction.
To return to normal playback,
press nN.
Press one of the DISC 1–3
buttons or DISC SKIP EXCHANGE (or D.SKIP on the
remote).
Press one of the DISC 1–3
buttons (Automatic Source
Selection).
Press DISC SKIP
EX-CHANGE.
Press Z OPEN/CLOSE.
*1
There may be some disturbance in the video
image.
*2
DVD and VIDEO CD only.
*3
SLOW t and STEP c are not available during
playback of VIDEO CDs.
Tips
• You can use the digipad for DVD/VIDEO CD/CD
operations.
• You can use the digipad instead of cursor buttons
(v/V/b/B) when DVD is selected as the current
function and OSD appears on the screen.
Notes
• Depending on the DVD or VIDEO CD, some
operations may be prohibited.
• VIDEO CDs cannot be viewed slowly or frame by
frame in the reverse direction.
• Under the following circumstances, 2CH/MULTI is
automatically set to “2CH”.
– When recording.
– When TAPE B is in REC PAUSE mode.
– When recording using TAPE B.
• When using headphones, the sound from
headphones is 2 channel.
• Switch the channel mode to “2CH” by pressing
2CH/MULTI when making an analog recording
using a component connected to the MD OUT jacks
on this unit. There is no audio output from the MD
OUT jacks in the multi channel mode.
• Depending on the DVD, digital recording may not
be done. In this case, perform analog recording.
Press 2CH/MULTI to switch the channel mode to
“2CH” on this system when making an analog
recording.
• Set the sound to “STEREO” using the AUDIO
button when you play DTS sound tracks on a CD
(page 32).
24
GB
Page 25

Playing DVDs using the
Playing VIDEO CDs with
menu
Some discs have a “title menu” or a “DVD
menu”. On some DVDs, this may simply be
called a “menu” or “title”.
Using the title menu
A DVD is divided into long sections of a
picture or a music feature called “titles”. When
you play a DVD which contains several titles,
you can select the title you want using the title
menu.
1 Press DVD.
2 Press TITLE.
The title menu appears on the TV screen.
The contents of the menu vary from disc to
disc.
3 Press v/V/b/B or the numeric buttons
to select the title you want to play.
4 Press ENTER.
The playback starts from the selected title.
Using the DVD menu
Some DVDs allow you to select the disc
contents using a menu. When you play these
DVDs, you can select items such as the
language for the subtitles and the language for
the sound using the DVD menu.
1 Press DVD.
2 Press DVD MENU.
The DVD menu appears on the TV screen.
The contents of the menu vary from disc to
disc.
3 Press v/V/b/B or the numeric buttons
to select the item you want to change.
4 To change other items, repeat step 3.
5 Press ENTER.
Tip
You can use the digipad instead of cursor buttons
(v/V/b/B) when DVD is selected as the current
function and OSD appears on the screen.
PBC functions (Ver. 2.0)
— PBC Play
You can use menus on your TV screen to enjoy
the disc’s interactive software. The menu
format and structure may differ depending on
each disc.
1 Press DVD.
2 Press nN to start playing a VIDEO
CD with PBC functions (Ver. 2.0).
The VIDEO CD and PBC indicators light
and a PBC menu appears on your TV.
The PBC indicator lights during PBC
playback of a PBC compatible VIDEO CD
(Ver. 2.0).
3 Press v or V repeatedly to select a
number from the menu, then press
ENTER.
4 Continue playback according to the
instructions on the menus to enjoy
interactive playback.
To
Stop playback
See the rest of the
menu
Go back to the
top of the menu
Go back to the
previous menu
Do this
Press x.
Press NEXT on the remote.
Press PREV on the remote.
Press RETURN O on the
remote.
continued
DVD/VIDEO CD/CD
25
GB
Page 26
Playing VIDEO CDs with PBC
functions (Ver. 2.0) (continued)
Creating your own program
To
Cancel playback
with PBC functions
(Ver. 2.0)
Do this
When the playback is
stopped, press . or >
repeatedly to select the track
you want, then press ENTER
(or press the numeric buttons
on the remote).
The PBC indicator turns off
and playback starts from the
selected track. Still images,
such as the menu screens, will
not be shown.
Select a menu
number using the
remote
Note
Press the numeric buttons,
then press ENTER.
To enter 0, press 10/0.
Depending on the VIDEO CD, “Press ENTER” in
step 3 may appear as “Press SELECT” in the
operating instructions supplied with the disc.
— Program Play
You can make a program of up to 25 steps from
all the discs in the order you want them to be
played.
1 Press DVD.
2 When the playback is stopped, press
PLAY MODE repeatedly until
“PROGRAM” appears in the front panel
display.
The Program Display appears on the screen.
PROGRAM
–
– – – –
:
ALL CLEAR
– – – –
1.
– – – –
2.
– – – –
3.
– – – –
4.
– – – –
5.
– – – –
6.
T
ALL
3 Press ENTER, then press v or V
repeatedly to select the disc.
PROGRAM
– – – –
3 :
ALL CLEAR
– – – –
1.
– – – –
2.
– – – –
3.
– – – –
4.
– – – –
5.
– – – –
6.
T
ALL
26
GB
4 Press B.
The cursor moves to the title or track (in
this case, “01”).
Disc type*
PROGRAM
3 : DVD
ALL CLEAR
– – – –
1.
– – – –
2.
– – – –
3.
– – – –
4.
– – – –
5.
– – – –
6.
* “?” appears when the system has not loaded the disc
information in the memory.
Title Chapter
C
T
ALL
ALL
01
01
02
02
03
03
04
04
05
05
06
Chapters recorded
on the disc
Page 27
5 Select the title, chapter, or track you
want to program.
x When programming a DVD
For example, select chapter “03” of title
“02”.
Press v/V or the numeric buttons to select
“02” under “T”, then press ENTER.
PROGRAM
3
:
DVD
ALL CLEAR
– – – –
1.
– – – –
2.
– – – –
3.
– – – –
4.
– – – –
5.
– – – –
6.
Next, press v/V or the numeric buttons to
select “03” under “C”, then press ENTER.
PROGRAM
–
– – – –
:
ALL CLEAR
1. DVD
2.
3.
4.
5.
6.
–
–
0 2
– – – –
– – – –
– – – –
– – – –
– – – –
Selected title and chapter
x When programming a VIDEO CD or
CD
For example, select track “02”.
Press v/V or the numeric buttons to select
“02” under “T”, then press ENTER.
Selected track
0 3
T
ALL
01
02
03
04
05
T
ALL
C
ALL
01
02
03
04
05
06
To
Return to normal
Do this
Press CLEAR during playback.
playback
Turn off the Program
Display
Change the program
Press PLAY MODE when the
playback is stopped.
To change the disc, select the
program number you want to
change using v/V after step 2
or 5, then press ENTER.
To change the title, chapter, or
track, select the one you want
in step 5.
Cancel the
programmed order
To cancel all the titles,
chapters, or tracks in the
programed order, press v, and
select “ALL CLEAR” in step
3. To cancel the selected
program, select the program
using v/V in step 3, then press
CLEAR.
Tip
The program you made remains in the system’s
memory even after it has been played back. Press
nN to play the same program again.
Notes
• The program is canceled when you change the
function to TUNER or turn the system off.
• You may not be able to do Program Play depending
on the DVD.
• You cannot make a program while playing a disc.
• When you switch the play mode to “PROGRAM”
while “REPEAT 1” is selected, “REPEAT 1” is
automatically canceled.
DVD/VIDEO CD/CD
PROGRAM
–
– – – –
:
ALL CLEAR
–
1. CD
– – – –
2.
– – – –
3.
– – – –
4.
– – – –
5.
– – – –
6.
02
T
ALL
6 To program other discs, titles,
chapters, or tracks, repeat steps 3 to 5.
7 Press nN to start Program Play.
Program Play starts.
27
GB
Page 28

Resuming playback from
Playing repeatedly
the point you stopped the
disc
— Resume Play
This system memorizes the point where you
stopped the disc so you can resume from that
point.
1 While playing a disc, press x to stop
playback.
“RESUME” appears in the display. If
“RESUME” does not appear, Resume Play
is not available.
2 Press nN.
The player starts playback from the point
you stopped the disc in step 1.
To view from the beginning of the
disc
When “RESUME” appears in the display, press
x, then press nN.
Notes
• Depending on where you stopped the disc, the
system may resume playback from a different point.
• Resume play is canceled when:
– you press numeric buttons, x, D.SKIP, or
./>.
– you remove the disc.
– you unplug the unit’s AC power cord.
– you change the settings of “DVD MENU”,
“AUDIO”, or “SUBTITLE” in “LANGUAGE
SETUP” in the setup display.
– you change the settings of “TV TYPE” in
”SCREEN SETUP” in the setup display.
– you change the settings of “PARENTAL
CONTROL” in ”CUSTOM SETUP” in the setup
display.
— Repeat Play
You can play all the titles/tracks or a single
title/chapter/track on a disc.
In Shuffle or Program Play mode, the system
repeats the titles or tracks in the shuffled or
programmed order.
1 Press DVD DISPLAY.
The Control Menu appears.
2 Press v or V repeatedly to select
“REPEAT”, then press ENTER.
If you do not select “OFF,” the “REPEAT”
indicator lights in green.
3 Select the Repeat Play setting.
x When playing a DVD and when
Program Play is set to OFF
• OFF: does not play repeatedly.
• DISC: repeats all the titles.
• TITLE: repeats the current title on a disc.*
• CHAPTER: repeats the current chapter.
x When playing a VIDEO CD/CD and
when Program Play is set to OFF
• OFF: does not play repeatedly.
• DISC: repeats all the tracks on a disc.
• TRACK: repeats the current track.*
x When Program Play is set to ON
• OFF: does not play repeatedly.
• ON: repeats Program Play.
* When ALL DISCS SHUFFLE is selected, you can
select the Repeat Play of TITLE or TRACK only.
To cancel Repeat Play
Press CLEAR.
28
GB
Page 29

Tips
• You can set Repeat Play when the playback is
stopped. After selecting the “REPEAT” item, press
nN. The Repeat Play starts.
• You can quickly display the “REPEAT” status.
Press REPEAT.
Notes
• You cannot perform Repeat Play during PBC
playback of VIDEO CDs (page 25).
• You may not be able to perform Repeat Play
depending on the DVD.
• If you select DISC repeat (with or without Program
Play), the program is repeated up to 5 times.
Viewing information about the disc
Checking the playing time and remaining time
You can check the remaining time of the
current track or that of the disc.
When a DVD/CD TEXT disc is loaded, you
can check the information stored on the disc,
such as the titles.
When the system detects DVD/CD TEXT
discs, the “DVD TEXT” (or “CD TEXT”)
indication appears in the display.
Using the front panel display
Press DISPLAY.
Each time you press the button, the display
changes cyclically as follows:
During normal playback
When playing a DVD:
Playing time of the current title t Remaining
time of the current title t Playing time and the
current chapter t Remaining time of the
current chapter t Text*
(for 8 seconds) t Effect status
When playing a VIDEO CD (without PBC
functions) or CD:
Playing time and current track number t
Remaining time of the current track t Playing
time of the disc t Remaining time of the disc
t Text*
1
t Clock display (for 8 seconds) t
Effect status
VIDEO CDs with PBC functions (Ver. 2.0):
Playing time of the current scene*
t Clock display (for 8 seconds) t Effect
status
1
t Clock display
2
t Text*
1
DVD/VIDEO CD/CD
continued
29
GB
Page 30
Checking the playing time and
remaining time (continued)
When the playback is stopped
DVDs:
Total number of titles*
3
t Title name of the
disc*1 t Clock display (for 8 seconds) t
Effect status
VIDEO CDs or CDs:
Total number of tracks and the total playing
3
time*
t Title name of the disc*1 t Clock
display (for 8 seconds) t Effect status
*1With DVD/CD TEXT discs only (certain characters
cannot be displayed). Depending on the disc, DVD/
CD text does not appear and “NO TEXT” appears.
*2May not appear with still images, etc.
*3When the playback is stopped and “RESUME”
appears on the front panel display, the point where
playback was stopped is displayed.
Using the on-screen display
1 Press DVD DISPLAY during playback.
The Control Menu appears.
2 Press DISPLAY repeatedly to change
the time information.
The display and the kinds of time that you
can change depend on the disc you are
playing.
)
1 2 ( 2 7
)
1 8 ( 3 4
T
1 : 3 2 : 5 5
Time information
DVD
Disc type
x When playing a VIDEO CD (with PBC
functions)
•**:
**
Playing time of the current scene
x When playing a VIDEO CD (without
PBC functions) or CD
• T **:
**
Playing time of the current track
• T–**:
**
Remaining time of the current track
• D **:
**
Playing time of the current disc
• D–**:
**
Remaining time of the current disc
To turn off the Control Menu
Press DVD DISPLAY repeatedly until the
Control Menu is turned off.
Checking the text
information of the disc
Press DISPLAY repeatedly while playing a
DVD or a TEXT-CD.
The “TIME/TEXT” information is displayed at
the top of the screen. When the elapsed time of
the chapter, or track is displayed, text
information is displayed at the bottom of the
screen.
TIME/TEXT
T
0 1 : 3 2 : 5 5
30
x When playing a DVD
• T **:**:
Playing time of the current title
• T–**:**:
Remaining time of the current title
• C **:**:
Playing time of the current chapter
• C–**:**:
Remaining time of the current chapter
GB
BRAHMS SYMPHONY NO – 4
Notes
**
**
• Only DVD TEXT in English is displayed.
• When there is no text recorded on the disc, “NO
TEXT” is displayed.
• If DISPLAY is not pressed for 2 seconds, the
display disappears.
**
**
Page 31

Checking the playback information
— ADVANCED
(DVD only)
You can check information such as the bit rate
or the disc layer that is being played.
While playing a disc, an approximate bit rate of
the playback picture is always displayed as
Mbps (Mega bit per second) and the audio as
Kbps (Kilo bit per second).
1 Press DVD DISPLAY during playback.
The Control Menu appears.
2 Press v or V repeatedly to select
“ADVANCED”, then press ENTER.
The options for “ADVANCED” appear.
)
1 2 ( 2 7
)
1 8 ( 3 4
T
1 : 3 2 : 5 5
OFF
BIT RATE
LAYER
BIT RATE
DVD
BIT RATE
05
384
kbps
Mbps
10
Displays of each item
By pressing DVD DISPLAY repeatedly, you
can display either “BIT RATE” or “LAYER”,
whichever was selected in “ADVANCED”.
BIT RATE
BIT RATE
05
384
10
kbps
Mbps
When playing MPEG audio sound tracks:
BIT RATE
0
05
1000
10
kbps
Mbps
Bit rate refers to the amount of video/audio
data per second in a disc. The higher the bit
rate, the larger the amount of data. When the
bit rate level is high, there is a large amount of
data. However, this does not always mean that
you can get higher quality pictures or sounds.
LAYER
Appears when the DVD
has dual layers
Audio
Video
Audio
Video
DVD/VIDEO CD/CD
3 Press v or V repeatedly to select the
item.
For each item, see “Displays of each item”.
• BIT RATE: Displays the bit rate.
• LAYER: Displays the layer and the
pick-up point.
4 Press ENTER.
To close the “ADVANCED” display
Select “OFF” in step 3.
To turn off the Control Menu
Press DVD DISPLAY repeatedly until the
Control Menu is turned off.
This item indicates the approximate point
where the disc is playing. When the DVD has
dual layers, the system indicates which layer is
being read (“Layer 0” or “Layer 1”). For details
on the layers, see page 62 (DVD).
31
GB
Page 32

Sound adjustment
Changing the sound
If a DVD is recorded with multilingual tracks,
you can select the language you want while
playing the DVD. If the DVD is recorded in
multiple audio formats (PCM, Dolby Digital,
MPEG audio, or DTS), you can select the audio
format you want while playing the DVD.
With stereo CDs or VIDEO CDs, you can
select the sound from the right or left channel
and listen to the sound of the selected channel
through both the right and left speakers. (In this
case, the sound loses its stereo effect.) For
example, when playing a disc containing a song
with the vocals on the right channel and the
instruments on the left channel, you can select
the left channel and hear only the instruments
from both speakers.
1 Press DVD DISPLAY during playback.
The Control Menu appears.
2 Press v or V repeatedly to select
“AUDIO”, then press ENTER.
3 Press v or V repeatedly to select the
audio signal you want.
x When playing a DVD
Depending on the DVD, the choice of the
language varies. When 4 digits are
displayed, they represent the language code
(see the language code list on page 64).
When the same language is displayed two
or more, the DVD is recorded in multiple
audio formats.
x When playing a VIDEO CD or CD
• STEREO: The standard stereo sound.
• 1/L: The sound of the left channel
(monaural).
• 2/R: The sound of the right channel
(monaural).
4 Press ENTER.
To turn off the Control Menu
Press DVD DISPLAY repeatedly until the
Control Menu is turned off.
Tip
You can select “AUDIO” directly by pressing
AUDIO on the remote. Each time you press the
button, the item changes.
Notes
• For discs not in multiple audio format, you cannot
change the sound.
• During DVD playback, the sound may change
automatically.
Displaying the audio
information of the disc
(DVD only)
When you select “AUDIO”, the channels being
played are displayed on the screen.
For example, in Dolby Digital format, multiple
signals ranging from monaural to 5.1 channel
signals can be recorded on a DVD. Depending
on the DVD, the number of the recorded
channels may differ.
Current audio format*
)
1 2 ( 2 7
)
1 8 ( 3 4
T
1 : 3 2 : 5 5
1: ENGLISH
* “PCM”, “MPEG”, “DTS”, or “DOLBY DIGITAL”
is displayed.
For “DOLBY DIGITAL”, the channels in the
playing track are displayed numerically as follows:
For Dolby Digital 5.1 ch:
DOLBY DIGITAL
Front component 2 +
Center component 1
PROGRAM FORMAT
DOLBY DIGITAL 3/2.1
LRC
LS RS
Current playing program format**
Rear component 2
3 / 2 . 1
DVD
LFE
LFE (Low Frequency
Effect) component 1
32
GB
Page 33

**The letters in the program format display mean the
following sound component:
L: Front (left)
R: Front (right)
C: Center
LS: Rear (left)
RS: Rear (right)
S: Rear (monaural): The rear component of the
Dolby Surround processed signal or the
Dolby Digital signal.
LFE: LFE (Low Frequency Effect)
The display examples are as follows:
• PCM (stereo)
PROGRAM FORMAT
PCM 48kHz 24bit
• Dolby Surround
PROGRAM FORMAT
DOLBY DIGITAL 2/0
DOLBY SURROUND
L RC
Note
When the signal contains rear signal components such
as LS, RS, or S, the DSP effect is enhanced (page 48).
DVD/VIDEO CD/CD
S
• Dolby Digital 5.1ch
When an LFE signal component is output,
“LFE” is enclosed in a solid line. When an LFE
signal component is not output, “LFE” is
enclosed in a broken line.
PROGRAM FORMAT
DOLBY DIGITAL 3/2.1
LRC
LFE
LS RS
• DTS
“LFE” is always enclosed in a solid line
regardless of the LFE signal component being
output.
PROGRAM FORMAT
DTS 3/2.1
LRC
LFE
LS RS
33
GB
Page 34

Enjoying movies
Searching for a title/ chapter/track/index/scene
You can search a DVD disc by title or chapter,
and you can search a VIDEO CD or CD by
track, index, or scene. As titles and tracks are
assigned unique numbers on the disc, you can
select the desired one by entering its number.
Or, you can search for a scene using the time
code (TIME SEARCH).
1 Press DVD.
2 Press DVD DISPLAY.
The Control Menu appears.
3 Press v or V repeatedly to select the
search method.
x When playing a DVD
“TITLE”, “CHAPTER”, or “TIME/TEXT”
Select “TIME/TEXT” for TIME SEARCH.
x When playing a VIDEO CD
“TRACK” or “INDEX”
x When playing a VIDEO CD with PBC
functions
“SCENE”
x When playing a CD
“TRACK” or “INDEX”
4 Press ENTER.
)
“
” changes to “--
** (**
The number in parentheses indicates the
total number of titles, chapters, tracks,
indexes, or scenes.
5 Press v or V repeatedly, or press the
numeric buttons to select the title,
chapter, track, index, or scene number
you want to search.
If you make a mistake
Press CLEAR to cancel the number, then
select another number.
6 Press ENTER.
The playback starts from the selected
number.
(**)
”.
To search for a scene using
the time code (TIME SEARCH)
(DVD only)
1 In step 3, select “TIME/TEXT”.
“T **:**:**” (playing time of the current
title) is selected.
2 Press ENTER.
“T
**:**:**
” changes to “T --:--:--”.
3 Input the time code using the numeric
buttons, then press ENTER.
For example, to find the scene at 2 hours,
10 minutes, and 20 seconds after the
beginning, just enter “2:10:20”.
To turn off the Control Menu
Press DVD DISPLAY repeatedly until the
Control Menu is turned off.
Note
The displayed number of title, chapters, or tracks is
the same number of title, chapters, or tracks recorded
on the disc.
34
GB
Page 35

Changing the angles
Displaying the subtitles
(DVD only)
When playing a DVD on which various angles
(multi-angles) for a scene are recorded, the
“ANGLE” indicator lights in green. This means
that you can change the viewing angle. For
example, while playing a scene of a train in
motion, you can display the view from either
the front of the train, the left window of the
train or from the right window without having
the train’s movement interrupted.
1 Press DVD DISPLAY during playback.
The Control Menu appears.
2 Press v or V repeatedly to select
“ANGLE”.
The angle number appears. The number in
parentheses indicates the total number of
angles.
3 Press ENTER.
The angle number changes to “–”.
4 Select the angle you want using the
numeric buttons or v/V, then press
ENTER.
The angle is changed to the selected angle.
To turn off the Control Menu
Press DVD DISPLAY repeatedly until the
Control Menu is turned off.
Tip
You can select the angle by pressing ANGLE on the
remote. Each time you press the button, the angle
changes.
Note
Depending on the DVD, you may not be able to
change the angles even if multi-angles are recorded
on the DVD.
(DVD only)
With DVDs on which multilingual subtitles are
recorded, you can change the subtitle language
while playing a DVD, or turn the subtitles on or
off whenever you want. For example, you can
select the language you want to master and turn
the subtitles on for better understanding.
1 Press DVD DISPLAY during playback.
The Control Menu appears.
2 Press v or V repeatedly to select
“SUBTITLE”, then press ENTER.
The options for “SUBTITLE” appear.
3 Press v or V repeatedly to select the
language you want, then press ENTER.
The subtitles are displayed in the selected
language.
To cancel the SUBTITLE setting
Select “OFF” in step 3.
To turn off the Control Menu
Press DVD DISPLAY repeatedly until the
Control Menu is turned off.
Tip
You can select the subtitle by pressing SUBTITLE on
the remote. Each time you press the button, the
language changes.
Notes
• When 4 digits are displayed in step 3, they indicate
the language code. Refer to the language code list
on page 64 to see the language the code represents.
• Depending on the DVD, you may not be able to
change the subtitles even if multilingual subtitles
are recorded on the DVD.
DVD/VIDEO CD/CD
35
GB
Page 36

Using various additional functions
Locking discs
— CUSTOM PARENTAL CONTROL/
PARENTAL CONTROL
You can set two kinds of playback restrictions
for the disc.
• Custom Parental Control
You can set the playback restrictions so that
the system will not play inappropriate discs.
You can set the same Custom Parental
Control password for up to 50 discs. When
you set the fifty-first disc, the playback
restriction for the first disc is canceled.
• Parental Control
You can limit the playback of some DVDs
according to a predetermined level such as
the age of the users. The limited scene is not
played, or replaced by a different scene.
The same password is used for both Custom
Parental Control and Parental Control.
4 Press v or V repeatedly to select “ON
t”, then press ENTER.
x If you have not entered a password
The display for registering a new password
appears.
CUSTOM PARENTAL CONTROL
Enter a new 4-digit password, then
ENTER
press
.
Enter a 4-digit password using the numeric
buttons, then press ENTER.
The display for confirming the password
appears.
x When you have already registered a
password
The display for entering the password
appears.
36
Custom Parental Control
1 Insert the disc you want to lock.
If the disc is playing, press x to stop
playback.
2 When the playback is stopped, press
DVD DISPLAY.
The Control Menu appears.
3 Press v or V repeatedly to select
“CUSTOM PARENTAL CONTROL”, then
press ENTER.
The “CUSTOM PARENTAL CONTROL”
display appears.
GB
CUSTOM PARENTAL CONTROL
Enter password, then press
ENTER
.
5 Enter or re-enter your 4-digit password
using the numeric buttons, then press
ENTER.
“Custom parental control is set.” appears
and the screen returns to the Control Menu
Display.
If you make a mistake entering your
password
Press b before you press ENTER and input
the correct number.
Page 37

If you make a mistake
Press RETURN O, then start from step 3
again.
To turn off the Control Menu
Press RETURN O, then press DVD
DISPLAY repeatedly until the Control Menu is
turned off.
To turn off the Custom Parental
Control function
1 In step 4, select “OFF t”, then press
ENTER.
2 Enter your 4-digit password using the
numeric buttons, then press ENTER.
To change the password
1 In step 4, Press v or V repeatedly to select
“PASSWORD t”, then press ENTER.
The display for entering the password
appears.
2 Enter your 4-digit password using the
numeric buttons, then press ENTER.
3 Enter a new 4-digit password using the
numeric buttons, then press ENTER.
4 To confirm your password, re-enter it using
the numeric buttons, then press ENTER.
Playing the disc for which
Custom Parental Control is set
Limiting playback by children
(Parental Control)
(DVD only)
1 When the playback is stopped, press
DVD SET UP.
The Control Menu appears.
2 Press v or V repeatedly to select
“CUSTOM SETUP”, then press ENTER.
The “CUSTOM SETUP” display appears.
3 Press v or V repeatedly to select
“PARENTAL CONTROL t”, then press
ENTER.
CUSTOM SETUP
PAUSE MODE:
PARENTAL CONTROL
TRACK SELECTION
x If you have not entered a password
The display for registering a new password
appears.
CUSTOM SETUP
PARENTAL CONTROL
Enter a new 4-digit password, then
ENTER
.
press
AUTO
OFF
DVD/VIDEO CD/CD
1 Insert the disc
Parental Control is set
for which Custom
.
The “CUSTOM PARENTAL CONTROL”
display appears.
2 Enter your 4-digit password using the
numeric buttons, then press ENTER.
The system is ready for playback.
Tip
If you forgot your password, enter the 6-digit number
“199703” using the numeric buttons when the
“CUSTOM PARENTAL CONTROL” display asks
you for your password, then press ENTER. The
display will ask you to enter a new 4-digit password.
Enter a 4-digit password using the numeric
buttons, then press ENTER.
The display for confirming the password
appears.
x When you have already registered a
password
The display for entering the password
appears.
CUSTOM SETUP
PARENTAL CONTROL
Enter password, then press
ENTER
.
continued
37
GB
Page 38

Locking discs (continued)
4 Enter or re-enter your 4-digit password
using the numeric buttons, then press
ENTER.
The display for setting the playback
limitation level and changing the password
appears.
CUSTOM SETUP
PARENTAL CONTROL
LEVEL:
STANDARD:
CHANGE PASSWORD
OFF
USA
5 Press v or V repeatedly to select
“STANDARD”, then press ENTER.
The options for “STANDARD” appears.
CUSTOM SETUP
PARENTAL CONTROL
LEVEL:
STANDARD:
CHANGE PASSWORD
OFF
USA
USA
OTHERS
6 Press v or V repeatedly to select a
geographic area as the playback
limitation level, then press ENTER.
The area is selected.
When you select “OTHERS t”, select and
enter the standard code in the table on page
39 using the numeric buttons.
7 Press ENTER.
The options for “LEVEL” appears.
8 Press v or V repeatedly to select the
level you want, then press ENTER.
The Parental Control setting is completed.
CUSTOM SETUP
PARENTAL CONTROL
LEVEL:
STANDARD:
CHANGE PASSWORD
The lower the value, the more strict the
limitation.
If you make a mistake
Press RETURN O to go back to the previous
screen.
To turn off the Control Menu
Press DVD DISPLAY repeatedly until the
Control Menu is turned off.
To turn off the Parental Control
function and play the DVD after
entering your password
Set “LEVEL” to “OFF” in step 8.
To change the password
1 In step 5, press V to select “CHANGE
PASSWORD t”, then press ENTER.
The display for entering the password
appears.
2 Follow step 3 to enter a new password.
4: PG13
USA
38
GB
CUSTOM SETUP
PARENTAL CONTROL
LEVEL: OFF
STANDARD:
CHANGE PASSWORD
8:
7:
6:
5:
OFF
NC17
R
Page 39

Playing the disc for which
Parental Control is set
1 Insert the disc
The “PARENTAL CONTROL” display
appears.
and press nN
.
2 Enter your 4-digit password using the
numeric buttons, then press ENTER.
The playback starts.
Tip
If you forgot your password, remove the disc and
repeat steps 1 to 5 of “Limiting playback by
children”. When you are asked to enter your
password, enter “199703” using the numeric buttons,
then press ENTER. The display will ask you to enter
a new 4-digit password. After you enter a new 4-digit
password in step 3, replace the disc in the system and
press
nN
display appears, enter your new password.
Notes
• When you play DVDs which do not have the
Parental Control function, playback cannot be
limited on this system.
• Depending on the DVD, you may be asked to
change the parental control level while playing the
disc. In this case, enter your password, then change
the level. If the Resume Play mode is canceled, the
level returns to the original level.
. When the “PARENTAL CONTROL”
Area code
Standard Code
number
Argentina 2044
Australia 2047
Austria 2046
Belgium 2057
Brazil 2070
Canada 2079
Chile 2090
China 2092
Denmark 2115
Finland 2165
France 2174
Germany 2109
Hong Kong 2219
India 2248
Indonesia 2238
Italy 2254
Japan 2276
Standard Code
Korea 2304
Malaysia 2363
Mexico 2362
Netherlands 2376
New Zealand 2390
Norway 2379
Pakistan 2427
Philippines 2424
Portugal 2436
Russia 2489
Singapore 2501
Spain 2149
Sweden 2499
Switzerland 2086
Taiwan 2543
Thailand 2528
United Kingdom
number
2184
DVD/VIDEO CD/CD
39
GB
Page 40

Tuner
Presetting radio stations
You can preset 20 stations for FM and
10 stations for AM.
1 Press TUNER/BAND repeatedly to
select FM or AM.
2 Press and hold m or M until the
frequency indication starts to change,
then release.
Scanning stops when the system tunes in a
station. “TUNED” and “STEREO” (for a
stereo program) appear.
TUNED
STEREO
MHz
3 Press TUNER MEMORY.
A preset number appears in the display. The
stations are stored from preset number 1.
Preset number
4 Press ENTER.
The station is stored.
5 Repeat steps 1 to 4 to store other
stations.
To tune in a station with a weak
signal
Press m or M repeatedly to tune in the
station manually.
To set another station to an existing
preset number
Start over from step 1. After step 3, press .
or > repeatedly to select the preset number
where you want to store a new station, then
proceed to step 4.
Tips
• Pressing TUNER/BAND while the power is off
automatically turns the power on.
• You can use the digipad instead of ./>.
• The preset stations are retained for half a day even
if you unplug the power cord or if a power failure
occurs.
To change the AM tuning interval
(Except for European and Middle
Eastern models)
The AM tuning interval is factory set to 9 kHz
(10 kHz in some areas). To change the AM
tuning interval, tune in any AM station first,
then turn off the power. While holding down
the ENTER button, turn the power back on.
When you change the interval, AM preset
stations will be erased. To reset the interval,
repeat the same procedure.
Listening to the radio
— Preset Tuning
Preset radio stations in the tuner’s memory first
(see “Presetting radio stations”).
1 Press TUNER/BAND repeatedly to
select FM or AM.
2 Press . or > repeatedly to tune in
the preset station you want.
Preset number Frequency
MHz
To Do this
Turn off the radio Press ?/1.
To listen to non-preset radio stations
In step 2, press m or M repeatedly (Manual
Tuning) or press and hold m or M
(Automatic Tuning).
Notes
• When the TUNER function is selected, the OSD
does not appear on the screen.
• When DVD is selected as the current function and
TUNER/BAND is pressed to select the TUNER
function, some time may be necessary before the
function can be switched.
• When you change the function from DVD to
TUNER, “WAIT” may flash on the front panel
display. While this flashes, there is no audio output.
40
GB
Page 41

Tips
• Pressing TUNER/BAND while the power is off
automatically turns the power on.
• You can use the digipad instead of ./>.
• When an FM program is noisy, press FM MODE so
that “MONO” appears in the display. There will be
no stereo effect, but the reception will improve.
• To improve broadcast reception, reorient the
antennas.
Using the Radio Data System (RDS)
(European model only)
What is the Radio Data
System?
Radio Data System (RDS) is a broadcasting
service that allows radio stations to send
additional information along with the regular
program signal. This tuner offers convenient
RDS features like station name display and
location of stations by program type. RDS is
available only for FM stations.
Note
RDS may not work properly if the station you are
tuned to is not transmitting the RDS signal properly
or if the signal is weak.
Receiving RDS broadcasts
Simply select a station from the FM band.
When you tune in a station that provides RDS
services, the station name appears in the
display.
To check the RDS information
Press DISPLAY.
Each time you press the button, the display
changes cyclically as follows:
Station name* t Frequency t Program
type* t Clock display t Effect status
* If the RDS broadcast is not received, the station
name and program type may not appear in the
display.
Locating a station by
program type (PTY)
You can locate a station you want by selecting
a program type. The tuner tunes in the type of
programs currently being broadcast from the
RDS stations stored in the tuner’s preset
memory.
The types of programs include NEWS,
AFFAIRS (current news), INFO, SPORT,
EDUCATE (education programs), DRAMA,
CULTURE, SCIENCE, VARIED (interviews,
games and comedy), POP M, ROCK M, EASY
M, LIGHT M, CLASSICS, OTHER M,
WEATHER, FINANCE, CHILDREN,
SOCIAL, RELIGION, PHONE IN, TRAVEL,
LEISURE, JAZZ, COUNTRY (country music),
NATION M (nation’s popular music),
OLDIES, FOLK M, DOCUMENT
(investigative features), TEST (test signal for
emergency broadcast), ALARM (emergency
broadcast) and NONE (any programs not
defined above).
1 Press PTY while listening to the radio.
2 Press . or > repeatedly to select
the program type you want.
3 Press ENTER.
“PTY SEARCH” and the selected program
type appear alternately in the display.
When the tuner receives a program, the
preset station name flashes.
4 Press . or > repeatedly to
continue searching for the station
name you want.
5 Press ENTER while the preset station
name you want is flashing.
To cancel the PTY search
Press PTY again.
Tip
You can use the digipad instead of ./>.
Note
“NOT FOUND” appears when the program type you
selected is not currently being broadcast.
Tuner
41
GB
Page 42

Tape
Loading a tape
1 Press TAPE A/B repeatedly to select
deck A or B.
2 Press DECK A Z or DECK B Z.
3 Insert a tape in deck A or B.
Insert with the
side you want
to play/record
facing forward.
Playing a tape
You can use TYPE I (normal) or TYPE II
(CrO2) tapes. The deck automatically detects
the tape type.
1 Load a tape.
2 Press DIRECTION repeatedly to select
g to play one side, j to play both
sides, or RELAY* (Relay Play) to play
both decks in succession.
3 Press nN.
The tape starts playing.
Press nN again to play the reverse side.
When you select j or RELAY, the deck
stops automatically after repeating the
sequence 5 times.
MUSIC
DSP EDIT
MOVIE
AB
To
Stop playback
Pause playback
Fast-forward
Rewind
Tips
• You can use the digipad for tape operations.
• Pressing TAPE A/B while the power is off
automatically turns the power on.
• When you want to reduce the hiss noise in low-level
high-frequency signals, press DOLBY NR so that
“DOLBY NR” appears in the display.
• When a tape is inserted, corresponding presence
indicator lights up.
Searching for the beginning of a
track (AMS*)
Do this
Press x.
Press X.
Press again to resume playback.
Press M while playing the front
side or press m while playing the
reverse side.
Press m while playing the front
side or press M while playing the
reverse side.
During playback, press . or > repeatedly
for the number of songs you want to skip
forward (or backward).
The search direction, + (forward) or – (back),
and number of songs being skipped (1–9)
appear in the display.
Example: searching forward 2 songs
* Automatic Music Sensor
Note
The AMS function may not operate correctly under
the following circumstances:
– When the unrecorded space between songs is less
than 4 seconds long.
– When the unit is placed near a television.
42
GAME
* Relay Play always follow this cyclic sequence:
Deck A (front side) t Deck A (reverse side) t
Deck B (front side) t Deck B (reverse side)
GB
TOOL
Tape presence
indicator
Page 43

Recording to a tape
— CD Synchro Recording/High-Speed Dubbing/Recording Manually/Program
Edit
You can record from a DVD, VIDEO CD, CD, tape, radio or other connected component. You can
use TYPE I (normal) or TYPE II (CrO2) tapes. The recording level is adjusted automatically.
Recording from a VIDEO CD/CD
Steps
(CD Synchro Recording)
Insert a recordable tape into deck B.
1
Press DVD. Press a function button
2
Insert the disc you want to
3
record.
Press CD SYNC HI-DUB.
4
Deck B stands by for recording.
The REC PAUSE/START button flashes.
To reduce the hiss noise in low-level high-frequency signals, press DOLBY NR so that “DOLBY
NR” appears in the display (except when recording from a tape).
Press DIRECTION repeatedly to select g to record on one side.
5
Select j (or RELAY) to record on both sides.
Press REC PAUSE/START.
6
Recording starts.
7
To Press
Stop recording x.
Pause recording* REC PAUSE/START.
* Only when recording manually.
Tips
• If you want to record from the reverse side, press
TAPE A/B to select deck B and press nN to
start playback of the reverse side after step 1. Press
x where you want to start recording.
• When you record on both sides, be sure to start
from the front side. If you start from the reverse
side, recording stops at the end of the reverse side.
• (High-Speed Dubbing only)
If you set direction to j when the tapes have
different lengths, the tapes in each deck reverses
independently. If you select RELAY, the tapes in
both decks reverse together.
Recording from a tape
(High-Speed Dubbing)
Press TAPE A/B repeatedly
to select TAPE A function.
Insert the tape you want to
record into deck A.
Notes
• You cannot listen to other sources while recording.
• You cannot use the digipad during recording.
• If you change the setting of sound, such as changing
the preset effect file, while recording, the recording
sound is interrupted at the point.
• If you start recording with the 2CH/MULTI set to
“V.SEMI M.D.”, “MULTI”, or “V.M.DIMENS.”,
the setting automatically changes to “2CH”.
• CD synchro recording is not available with DVDs.
Recording Manually
for the recording
source.
Insert the disc, tape, or
tune in the station you
want to record.
Press REC PAUSE/
START.
Start playing the
recording source.
continued
Tape
43
GB
Page 44

Recording to a tape (continued)
–
:
– – – –
Recording a VIDEO CD/CD by
specifying the track order
— Program Edit
When programming, make sure the playing
times for each side do not exceed the length of
one side of the tape.
1 Insert a recordable tape into deck B,
then press DVD.
2 When the playback is stopped, press
PLAY MODE repeatedly until
“PROGRAM” appears in the front panel
display.
The Program Display appears on the screen.
PROGRAM
–
– – – –
:
ALL CLEAR
– – – –
1.
– – – –
2.
– – – –
3.
– – – –
4.
– – – –
5.
– – – –
6.
T
ALL
3 Press ENTER, then press v or V
repeatedly to select the disc.
PROGRAM
– – – –
3 :
ALL CLEAR
– – – –
1.
– – – –
2.
– – – –
3.
– – – –
4.
– – – –
5.
– – – –
6.
T
ALL
5 Select the track you want to program.
For example, select track “02”.
Press v/V or the numeric buttons to select
“02” under “T”, then press ENTER.
Selected track
PROGRAM
ALL CLEAR
1. CD
– – – –
2.
– – – –
3.
– – – –
4.
– – – –
5.
– – – –
6.
–
02
T
ALL
6 To program additional steps, repeat
steps 3 to 5.
7 Press CD SYNC HI-DUB.
Deck B stands by for recording. To reduce
the hiss noise in low-level high-frequency
signals, press DOLBY NR so that “DOLBY
NR” appears in the display. The REC
PAUSE/START button flashes.
8 Press DIRECTION repeatedly to select
g to record on one side.
Select j (or RELAY) to record on
both sides.
9 Press REC PAUSE/START.
Recording starts.
To cancel Program Edit
Press PLAY MODE repeatedly until “1 DISC”
or “ALL DISCS” appears in the display.
44
4 Press B.
The cursor moves to the track (in this case,
“01”).
Disc type* Track
PROGRAM
3 : CD
ALL CLEAR
– – – –
1.
– – – –
2.
– – – –
3.
– – – –
4.
– – – –
5.
– – – –
6.
* “?” appears when the system has not loaded the disc
information in the memory.
GB
T
ALL
01
02
03
04
05
Page 45

Timer-recording radio programs
To timer-record, you must set the clock (see
“Setting the time” on page 15) and preset the
radio stations (see “Presetting radio stations”
on page 40) beforehand.
1 Tune in the preset radio station (see
“Listening to the radio” on page 40).
2 Press CLOCK/TIMER SET.
“DAILY1 SET” appears.
3 Press . or > repeatedly to select
“REC SET”, then press ENTER.
“ON” appears and the hour indication
flashes.
4 Set the time to start recording.
Press . or > repeatedly to set the
hour, then press ENTER.
The minute indication flashes.
Press . or > repeatedly to set the
minutes, then press ENTER.
The hour indication flashes again.
5 Set the time to stop recording following
step 4.
The start time appears, followed by the stop
time, the preset radio station to be recorded
(e.g., “TUNER FM 5”), then the original
display appears.
6 Insert a recordable tape into deck B.
7 Turn off the power.
When the recording starts, the volume level
is set to the minimum.
To
Check the setting
Change the setting
Cancel the
Timer-recording
Notes
• If the power is on at the preset time, the Timerrecording does not work.
• When you use the Sleep Timer, the Timer-recording
will not turn on the system until the Sleep Timer
turns it off.
• The power turns on 15 seconds before the preset
time.
Do this
Press TIMER SELECT (or
CLOCK/TIMER SELECT on
the remote) and press . or
> repeatedly to select
“REC SELECT”, then press
ENTER.
Start over from step 1.
Press TIMER SELECT (or
CLOCK/TIMER SELECT on
the remote) and press . or
> repeatedly to select
“TIMER OFF”, then press
ENTER.
Tape
45
GB
Page 46

Sound Adjustment
To listen to multi channel sound
Press 2CH/MULTI.
Each time you press the button, the display
changes cyclically as follows:
2CH t V.SEMI M.D. t MULTI* t
V.M.DIMENS.*
2CH: The sound is output in 2-channel stereo.
V.SEMI M.D. (Virtual Semi Multi
Dimension): Uses 3D sound imaging to
create virtual rear speakers from the sound of
the front speakers without using actual rear
speakers. This mode creates 5 sets of virtual
speakers surrounding the listener at a 30° angle
of elevation.
MULTI*: The sound is output in multi channel.
V.M.DIMENS. (Virtual Multi Dimension)*:
Uses 3D sound imaging to create an array of
virtual rear speakers positioned higher than the
listener from a single pair of actual rear
speakers. This mode creates 5 sets of virtual
speakers surrounding the listener at
approximately a 30° angle of elevation.
* MHC-DP1000D only.
Notes
• When using headphones, this setting is fixed to
“2CH”. You cannot select other settings.
•
While decoding DTS signals, you cannot select the
sound effect option of MUSIC MODE together with
“V.SEMI M.D.” or “V.M.DIMENS.” simultaneously.
About indicators
MULTI CHANNEL DECODING indicator:
Lights up when the unit is decoding signals
recorded in a multi channel format.
PRO LOGIC indicator (in the display):
Lights up when the unit applies Dolby Pro
Logic processing to 2 channel signals in order
to output the center and rear channel signals.
; DIGITAL indicator (in the display):
Lights up when the unit is decoding signals
recorded in the Dolby Digital format.
dts indicator (in the display): Light up when
DTS signals are input.
Adjusting the sound
Press GROOVE.
Each time you press the button, the display
changes cyclically as follows:
GROOVE ON t V-GROOVE ON t
GROOVE OFF
GROOVE: The volume switches to power
mode and the equalizer curve changes.
V-GROOVE: The volume switches to power
mode, the lower bass frequencies of the sound
you are listening to is powerfully reinforced,
and the equalizer curve changes.
46
GB
Page 47

Selecting the preset
Adjusting the sound
effect file
Press one of the DSP buttons (MUSIC
MODE, MOVIE MODE, GAME MODE, or
TOOL MODE) repeatedly to select the
preset effect you want.
The preset effect name appears in the display.
See “Sound effect options” below.
To cancel
Press EFFECT (or EFFECT ON/OFF on the
remote) to select “EFFECT OFF”. All the
parameters become flat.
Sound effect options
You can enjoy surround sound simply by
selecting one of the preset effect according to
the program you want to listen to.
DSP Options
MODE
MUSIC LIVE HOUSE
MODE HALL
S.ENHANCE (SOUND ENHANCE)
RADIO SOUND
MOVIE C.STUDIO A (CINEMA STUDIO A)
MODE C.STUDIO B (CINEMA STUDIO B)
C.STUDIO C (CINEMA STUDIO C)
NORMAL SURR (NORMAL SURROUND)
GAME ARCADE
MODE RACING
ADVENTURE
BATTLE
TOOL PAN
MODE FLANGER
KEY CONTROL
EXCITER
COMPRESSOR
REVERB
EARLY RFLC. (EARLY REFLECTION)
CINEMA STUDIO A: Reproduces the sound
characteristics of Sony Pictures Entertainment’s
classic editing studio.
CINEMA STUDIO B: Reproduces the sound
characteristics of Sony Pictures Entertainment’s
mixing studio which is one of the most up-to-date
facilities in Hollywood.
CINEMA STUDIO C: Reproduces the sound
characteristics of Sony Pictures Entertainment’s
BGM recording studio.
effects
Before operation, first select the audio effect
you want for your basic sound.
1 Press DSP EDIT.
Each time you press the button, the display
changes as follows:
DSP EDIT* (to adjust DSP) y EQ EDIT
(to adjust equalizer)
* This menu does not appear depending on the
audio effect.
2 Use the digipad to adjust the
parameters.
The parameter is adjusted according to the
curve your finger slides on the digipad.
Adjustable parameters are described on
page 48. After the curve your finger slides
is displayed for a while, then the curve
automatically adjusted by the unit is
displayed. For DSP EDIT, the adjustable
parameters vary depending on the preset
effect.
3 Press ENTER.
To cancel
Press EFFECT (or EFFECT ON/OFF on the
remote) to select “EFFECT OFF”. The
adjustment for the selected parameter is
canceled.
continued
Sound Adjustment
47
GB
Page 48

Adjusting the sound effects
(continued)
Adjustable parameters
Menu Right/Left Up/Down
(X) (Y)
DSP EDIT (See the chart below)
EQ EDIT Frequency Level
Tips
• You can use the cursor buttons (v/V/b/B) on the
remote instead of the digipad. You can press
2 buttons simultaneously to move obliquely.
Example: Press v and B simultaneously to move
upper right direction.
• You can store the adjusted effect in a personal file
(see “Creating a personal audio effect file”).
Adjustable DSP parameters
Sound effect Right/Left Up/Down
options (X) (Y)
LIVE HOUSE Time Wall type
HALL Time Wall type
S.ENHANCE Time Level
RADIO SOUND Time Level
C.STUDIO A Level —
C.STUDIO B Level —
C.STUDIO C Level —
NORMAL SURR ——
ARCADE Time Level
RACING Shape —
ADVENTURE Frequency Level
BATTLE Time Wall type
PAN Position Position
FLANGER Frequency Level
KEY CONTROL Key Time
EXCITER Frequency Level
COMPRESSOR Time Level
REVERB Time Wall type
EARLY RFLC. Shape —
Wall type: This parameter lets you control the level of
the high frequencies to alter the sonic character of
your listening environment by simulating a softer or
harder wall.
The adjustable DSP parameters are shown by
the indicator on the upper left corner in the
display. You can adjust in the direction the
cursor lights. Slide your finger on the digipad
to adjust the parameters.
Creating a personal audio effect file
— Personal file
You can store the adjusted audio effects in the
system’s memory. You can create up to
5 audio effect files.
1 Obtain the sound effect you want to
store to P FILE.
2 Press and hold P FILE.
The personal file number appears in the
display.
3 Touch the digipad to select the file
number where you want to store the
effect.
4 Press ENTER.
To call up a personal file
Press P FILE repeatedly to select the file.
Note
When using personal files, the adjustable DSP EDIT
parameters depend on the original preset effect.
48
GB
Up/Down
(Y)
Right/Left
(X)
Page 49

Other Features
Changing the spectrum analyzer display
Press SPECTRUM on the remote.
Each time you press the button, the display
changes cyclically as follows:
PATTERN 1 t PATTERN 2 t
PATTERN 3 t PATTERN OFF
To adjust the brightness of the display
Use the remote for the operation.
1 Press AMP MENU.
2 Press v or V repeatedly to select
“DIMMER”.
3 Press b or B repeatedly to select the
setting you want.
DIMMER 1 y DIMMER 2 y
DIMMER 3
4 Press ENTER.
Singing along: Karaoke
(Except for North American and
European models)
You can sing along with any disc or tape by
turning down the singer’s voice. You need to
connect an optional microphone.
1 Turn MIC LEVEL to MIN to turn down
the microphone volume.
2 Connect an optional microphone to MIC
jack.
3 Press KARAOKE PON.
Each time you press the button, the display
changes cyclically as follows:
KARAOKE PON t MPX R t
MPX L t Effect status*
* KARAOKE PON is cancelled.
To sing karaoke by decreasing the vocal
level of a disc or a tape, select “KARAOKE
PON”. To sing karaoke of multiplex CD,
select “MPX R” or “MPX L”.
4 Start playing the music and adjust the
volume.
5 Adjust the microphone volume by
turning MIC LEVEL.
When you use DVDs or VIDEO CDs
Turn on your TV and select the video input.
Refer to the operating instructions supplied
with your TV for details.
After you have finished
Turn MIC LEVEL to MIN and disconnect the
microphone from MIC jack, then press
KARAOKE PON repeatedly until “m”
disappears.
Notes
• With some songs, vocals may not be canceled when
you select “KARAOKE PON”.
• If you recall a sound effect, the karaoke mode is
canceled.
• During “KARAOKE PON”, “MPX R” or “MPX
L”, DSP effect switches to “KEY CONTROL”.
When the karaoke effect is canceled, the DSP effect
before entering the karaoke effect is applied again.
• The instrumental sound may be reduced as well as
the singer’s voice when the sound is recorded in
monaural.
• The singer’s voice may not be reduced when:
— only a few instruments are playing.
— a duet is being played.
— the source has strong echoes or chorus.
— the singer’s voice deviates from the center.
— the voice on the source is singing in high
soprano or tenor.
continued
Other Features
49
GB
Page 50

Singing along: Karaoke (continued)
Falling asleep to music
Mixing and recording sound
1 Do the procedure for “Singing along”
(steps 1 through 5). Then, load a
recordable tape in deck B.
2 Press the function button of the source
you want to record (e.g. DVD).
When you want to record from TAPE A,
press TAPE A/B repeatedly until TAPE A
is selected.
3 Press REC PAUSE/START.
Deck B stands by for recording.
4 Press DIRECTION repeatedly to select
g to record on one side. Select j
(or RELAY) to record on both sides.
5 Press REC PAUSE/START.
Recording starts.
6 Press nN to start playing the source
to be recorded.
Start singing along the music.
To stop recording
Press x.
Tips
• If acoustic feedback (howling) occurs, move the
microphone away from the speakers or change the
direction of the microphone.
• If you want to record your voice through the
microphone only, you can do so by selecting the
DVD function and not playing the disc.
• When high level sound signals are input, the unit
automatically adjusts the recording level to prevent
distortion of the recorded sound signal (Auto Level
Control Function).
— Sleep Timer
You can set the system to turn off at a preset
time, so you can fall asleep to music.
Press SLEEP on the remote.
Each time you press the button, the minute
display (the turn-off time) changes as follows:
AUTO* t 90 t 80 t 70 t … t
10 t OFF
* The power turns off when the current disc or tape
finishes playback (for up to 100 minutes).
To
Check the remaining
time
(Except for AUTO)
Change the time to
turn off
Cancel the Sleep
Timer
Press
SLEEP once.
SLEEP repeatedly to select
the time you want.
SLEEP repeatedly until
“SLEEP OFF” appears.
Waking up to music
— Daily Timer
You can wake up to music at a preset time
every day. Make sure you have set the clock
(see “Setting the time” on page 15).
1 Prepare the music source you want to
play.
• DVD/VIDEO CD/CD: Load a disc.
• Tape: Load a tape with the side you
want to play facing forward.
• Radio: Tune in the preset station you
want (see “Listening to the radio” on
page 40).
50
GB
Page 51

2 Adjust the volume.
3 Press CLOCK/TIMER SET.
“DAILY1 SET” appears.
4 Press . or > repeatedly to select
“DAILY1 SET (or DAILY2 SET)”, then
press ENTER.
“ON” appears and the hour indication
flashes.
5 Set the time to start playback.
Press . or > repeatedly to set the
hour, then press ENTER.
The minute indication flashes.
Press . or > repeatedly to set the
minutes, then press ENTER.
The hour indication flashes again.
6 Set the time to stop playback following
step 5.
7 Press . or > repeatedly until the
music source you want appears.
The indications change as follows:
t TUNER y DVD PLAY T
t TAPE PLAY T
8 Press ENTER.
The type of timer (“DAILY 1” or “DAILY
2”), followed by the start time, stop time
and the music source, appears, then the
original display appears.
9 Turn off the power.
To
Check the setting
Change the setting
Cancel the Daily
Timer
Notes
• If the power is on at the preset time, the Daily
Timer does not work.
• When you use the Sleep Timer, the Daily Timer
will not turn on the system until the Sleep Timer
turns it off.
• The power turns on 15 seconds before the preset
time.
• The program is canceled when you change the
function to TUNER or turn off the system.
Do this
Press TIMER SELECT (or
CLOCK/TIMER SELECT on
the remote) and press . or
> repeatedly to select the
respective mode (“DAILY 1”
or “DAILY 2”), then press
ENTER.
Start over from step 1.
Press TIMER SELECT (or
CLOCK/TIMER SELECT on
the remote) and press . or
> repeatedly to select
“TIMER OFF”, then press
ENTER.
Other Features
51
GB
Page 52

Hooking Up the Optional Components
Connecting audio components
To the analog
output jacks of
a video game To subwoofer
To the analog
output jacks of
an MD deck/
VCR
To the digital
output jack of
an MD deck
To the analog
input jacks of
an MD deck/
VCR
To the digital
input jack of
an MD deck
To
Make a digital
recording from DVD/
VIDEO CD/CD to
MD
Listen to the digital
sound of a
connected MD deck
Listen to the analog
sound of a
connected MD deck
Listen to the analog
sound of a connected
VCR
Listen to the analog
sound of a connected
video game
Tips
• Pressing DIGITAL, MD (VIDEO) or GAME while
the power is off automatically turns the power on.
• When you remove the optical cover, keep it for
future use.
Notes
• Make sure to match the color of the plugs and the
connectors.
• If the sound is distorted or too loud when VIDEO
function is selected, or you want to switch back to
MD function, repeat the operation described above
to switch to MD function.
• Digital signals are output from DIGITAL OUT jack
during DVD or DIGITAL function only. Besides,
the sound output from the DIGITAL OUT jack is
not affected by the sound adjustment.
• This unit is not compatible with 96 kHz sampling
frequencies and SACD format.
Do This
Connect an optional optical
cable.
Press DIGITAL.
Press MD (VIDEO).
Hold down MD (VIDEO) and
press ?/1 while the power is
on. Release ?/1 first, then
release MD (VIDEO). This
switches the function from
MD to VIDEO. Once you
switched to the VIDEO
function, just press MD
(VIDEO).
Press GAME.
52
GB
Page 53

Additional Information
Precautions
On operating voltage
Before operating the unit, check that the operating
voltage of your unit is identical with the voltage of
your local power supply.
On safety
• The unit is not disconnected from the AC power
source (mains) as long as it is connected to the wall
outlet, even if the unit itself has been turned off.
• Unplug the unit from the wall outlet (mains) if it is
not to be used for an extended period of time. To
disconnect the cord (mains lead), pull it out by the
plug. Never pull the cord itself.
• Should any solid object or liquid fall into the
component, unplug the unit and have the
component checked by qualified personnel before
operating it any further.
• The AC power cord must be changed only at a
qualified service shop.
On placement
• Do not place the unit in an inclined position.
• Do not place the unit in locations where it is:
— extremely hot or cold.
— dusty or dirty.
— very humid.
— vibrating.
— subject to direct sunlight.
On heat buildup
• Although the unit heats up during operation, this is
not a malfunction.
• Place the unit in a location with adequate
ventilation to prevent heat build-up in the unit.
If you continuously use this unit at a large volume,
the cabinet temperature of the top, side and bottom
rises considerably. To avoid burning yourself, do not
touch the cabinet.
To prevent a malfunction, do not cover the ventilation
hole for the cooling fan.
On operation
• If the unit is brought directly from a cold to a warm
location, or is placed in a very damp room, moisture
may condense on the lens inside the DVD player.
Should this occur, the unit will not operate properly.
Remove the disc and leave the unit turned on for
about an hour until the moisture evaporates.
• When you move the unit, take out any discs.
If you have any questions or problems concerning the
unit, please consult your nearest Sony dealer.
Notes on discs
• Before playing, clean the disc with a cleaning cloth.
Wipe the disc from the center out.
• Do not use solvents such as benzene, thinner,
commercially available cleaners or anti-static spray
intended for vinyl LPs.
• Do not expose the disc to direct sunlight or heat
sources such as hot air ducts, nor leave it in a car
parked in direct sunlight.
• Do not use discs encircled with a protection ring.
This may cause a malfunction to the system.
• When using discs that have glue or similar tacky
substance on the label side of the disc or that used a
special ink when the label was printed, there is a
chance that the disc or label may become attached
to parts inside this unit. When this occurs, it may
not be possible to remove the disc, and may also
cause this unit to malfunction. Be sure to check that
the label side of the disc is not sticky before using.
The following types of disc should not be used:
— Rental or used discs with attached seals where
the glue extends beyond the seal. The perimeter
of the seal on the disc is tacky.
— Discs that have labels printed using a special ink
that feels tacky when touched.
• Discs with non-standard shapes (e.g., heart, square,
star) cannot be played on this unit. Attempting to do
so may damage the unit. Do not use such discs.
Note on CD-R/CD-RW playback
Discs recorded on CD-R/CD-RW drives may not be
played back because of scratches, dirt, recording
condition or the drive's characteristics. Besides, the
discs, which are not yet finalized at the end of
recording, cannot be played back.
Cleaning the cabinet
Use a soft cloth slightly moistened with mild
detergent solution.
continued
Hooking Up the Optional Components/Additional Information
Additional Information
53
GB
Page 54

Precautions (continued)
To save a tape permanently
To prevent a tape from being accidentally recorded
over, break off the cassette tab from side A or B as
illustrated.
If you later want to reuse the tape for recording, cover
the broken tab with adhesive tape. However, be
careful not to cover the detector slots which allow the
tape player to automatically detect the type of tape.
Detector slots
Tab of side B Tab of side A
Tape type:
Normal
Break off the
cassette tab of
side A
Tape type:
2
/METAL
CrO
Detector slots
Demagnetizing the tape heads
Demagnetize the tape heads and the metal parts that
have contact with the tape every 20 to 30 hours of use
with a separately sold demagnetizing cassette. For
details, refer to the instructions of the demagnetizing
cassette.
In case color irregularity is observed
on nearby a TV screen
With the magnetically shielded type of speaker
system, the speakers can be installed near a TV set.
However, color irregularity may still be observed on
the TV screen depending on the type of your TV set.
If color irregularity is observed…
Turn off the TV set once, then turn it on after 15 to 30
minutes.
If color irregularity is observed
again…
Place the speakers farther away from the TV set.
Troubleshooting
If you run into any problem using this unit, use
the following check list.
First, check that the power cord is connected
firmly and the speakers are connected correctly
and firmly.
Should any problem persist, consult your
nearest Sony dealer.
54
Before placing a cassette in the tape
deck
Take up any slack in the tape. Otherwise the tape may
get entangled in the parts of the tape deck and become
damaged.
When using a tape longer than
90 minutes
The tape is very elastic. Do not change the tape
operations such as play, stop, and fast-winding etc.
frequently. The tape may get entangled in the tape
deck.
Cleaning the tape heads
Clean the tape heads after every 10 hours of use.
Make sure to clean the tape heads before you start an
important recording or after playing an old tape. Use
a separately sold dry-type or wet-type cleaning
cassette. For details, refer to the instructions of the
cleaning cassette.
GB
General
The display starts flashing as soon as you plug
in the power cord even though you haven’t
turned on the power.
• The demonstration mode started. Press ?/1 (see
step 7 on page 11).
The clock setting/timer is canceled.
• The power cord is disconnected or a power
failure occurs. Redo “Setting the time” (page
15). If you have set the timer, redo “Waking up
to music” (page 50) and/or “Timer-recording
radio programs” (page 45).
Page 55

The radio presetting is canceled.
• The power cord is disconnected or a power
failure occurs for longer than half a day. Redo
“Presetting radio stations” (page 40).
There is no sound.
• Turn VOLUME clockwise.
• The headphones are connected.
• Insert only the stripped portion of the speaker
cord into the SPEAKER jack. Inserting the vinyl
portion of the speaker cord will obstruct the
speaker connections.
• The protective device on the amplifier has been
activated because of a short circuit.
(“PROTECT” and “PUSH POWER” flash
alternately.) Turn off the power, eliminate the
short-circuit problem and turn on the power
again.
• The system is in pause mode or in Slow-motion
Play mode. Press nN to return to normal play
mode.
• There is no audio output during Timer-recording.
The sound loses stereo effect when you play a
VIDEO CD, or a CD.
• Set “AUDIO” to “STEREO” in the Control
Menu (page 32).
• Make sure you connect the system
appropriately.
The surround effect is difficult to hear when you
are playing a Dolby Digital or MPEG audio sound
track.
• Make sure the DSP effect is on (page 47).
• Check the speaker connections and settings
(pages 14, 21).
• Depending on the DVD, the output signal may
not be the entire 5.1 channel but monaural or
stereo even if the sound track is recorded in
Dolby Digital or MPEG audio format.
There is severe hum or noise.
• A TV or VCR is placed too close to the unit.
Move the unit away from the TV or VCR.
The sound from the component connected to the
MD (VIDEO) jacks is distorted.
• If “VIDEO” appears in the display when you
press MD (VIDEO), switch to “MD” function
(see “Note: Connecting audio components” on
page 52).
“--.--” lights up in the display.
• A power interruption occurred. Set the clock and
timer settings again.
The timer does not function.
• Set the clock correctly.
• You cannot activate the Daily timer and the
Timer-recording simultaneously.
“DAILY 1”, “DAILY 2”, or “REC” does not appear
when you press TIMER SELECT (or CLOCK/
TIMER SELECT on the remote).
• Set the timer correctly.
• Set the clock.
The remote does not function.
• There is an obstacle between the remote and the
unit.
• The remote is not pointing in the direction of the
unit’s sensor.
• The batteries have run down. Replace the
batteries.
There is acoustic feedback.
• Decrease the volume level.
• Move the microphone away from the speakers or
change the direction of the microphone.
The color irregularity on a TV screen persists.
• Turn off the TV set once, then turn it on after
15 to 30 minutes. If the color irregularity still
persists, place the speakers farther away from the
TV set.
“PROTECT” and “PUSH POWER” appear
alternately.
• A strong signal is input. Turn off the power,
leave the system turned off for a while, then turn
on the power again. If “PROTECT” and “PUSH
POWER” still appear alternately, check the
speaker cords.
Additional Information
continued
55
GB
Page 56

Troubleshooting (continued)
DVD/VIDEO CD/CD Player
Speakers
Sound comes from only one channel or
unbalanced left and right volume.
• Check the speaker connection and speaker
placement.
• The source being played back is monaural.
• Adjust the balance parameters (pages 14, 21).
The sound comes from the center speaker only.
(MHC-DP1000D only)
• Depending on the disc, the sound may come
from the center speaker only.
There is no sound from the center speaker.
(MHC-DP1000D only)
• Set the center speaker level to the appropriate
level.
• 2CH/MULTI is set to “2CH”.
• Make sure the DSP effect is on (page 47).
There is no sound from the rear speakers.
(MHC-DP1000D only)
• Set the rear speakers level to the appropriate
level.
• 2CH/MULTI is set to “2CH”.
• The software being played back has limited
sound effects. Check the volume with the test
tone.
No sound or only a very low-level sound is heard
from the rear speakers.
• Make sure the DSP effect is on (page 47).
Sound lacks bass.
• Check that the speaker’s + and – terminals are
connected correctly.
The disc tray does not close.
• The disc is not placed properly.
The disc does not play.
• The disc is not lying flat in the disc tray.
• The disc is dirty (see page 53).
• The disc is inserted label side down.
• Moisture condensation has built up.
• The system cannot play CD-ROMs, etc. (page 6).
• The region code on the DVD does not match the
system.
The disc does not start playback from the
beginning.
• Program Play, Shuffle Play, or Repeat Play has
been selected (pages 23, 24, 26, 28). Press
CLEAR to cancel these functions before playing
a disc.
• Resume Play has been selected. When the
playback is stopped, press x, then start DVD
playback (page 28).
• The title, DVD or PBC menu automatically
appears on the screen.
Playback starts automatically.
• The DVD features an auto playback function.
Playback stops automatically.
• Some discs may contain an auto pause signal.
While playing such a disc, the playback stops at
the auto pause signal.
You cannot perform some functions such as
Stop, Search, Slow-motion Play, Repeat Play,
Shuffle Play, or Program Play.
• Depending on the disc, you may not be able to
do some of the operations above. Refer to the
operating instructions supplied with the disc.
56
GB
Page 57

Picture
There is no picture.
• Press DVD.
• Check that the system is connected securely.
• The video cable is damaged. Replace it with a
new one.
• Make sure you connect the system to the video
input jack of your TV (page 11).
• Make sure you turn on the TV.
• Make sure you select the video input on the TV
so that you can view the pictures from the
system.
The picture noise appears.
• Clean the disc.
• If video from your DVD player has to go through
your VCR to get to your TV, the copy-protection
applied to some DVD programs could affect
picture quality. If you still experience problems
after checking your connections, please try
connecting your DVD player directly to your
TV’s S video-input, if your TV is equipped with
this input (page 11).
• Except for Pan American and European models,
the color system is different. Set the color system
to match your TV (pages 12, 20).
The aspect ratio of the screen cannot be
changed even though you set “TV TYPE” in
“SCREEN SETUP” in the Setup Display when
you play a wide picture.
• The aspect ratio is fixed on your DVD.
• If you connect the system with the S-video cable,
connect directly to the TV. Otherwise, you may
not change the aspect ratio.
• Depending on the TV, you may not change the
aspect ratio.
Messages do not appear on the screen in the
language you want.
• Select the language you want for the on-screen
display in “OSD” under “LANGUAGE SETUP”
in the Setup Display (page 18).
The language for the sound track cannot be
changed.
• Multilingual tracks are not recorded on the DVD
being played.
• The DVD prohibits changing the language for
the sound track.
The subtitle language cannot be changed.
• Multilingual subtitles are not recorded on the
DVD being played.
• The DVD prohibits changing the subtitles.
The subtitle cannot be turned off.
• The DVD prohibits turning off subtitles.
The angles cannot be changed.
• Multi-angles are not recorded on the DVD being
played. The angle can be changed only when the
“ANGLE” indicator lights up on the front panel
display.
• The DVD prohibits changing the angles.
A 5-character service number is displayed on
the screen and on the front panel display.
• The self-diagnosis function is activated. (See the
table on page 58.)
The disc tray does not open and “LOCKED”
appears on the front panel display.
• Contact your Sony dealer or local authorized
Sony service facility.
continued
Additional Information
57
GB
Page 58

Troubleshooting (continued)
Tape Deck
The tape does not record.
• The tab has been removed from the cassette (see
“To save a tape permanently” on page 54).
• The tape has reeled to the end.
The tape does not record nor play, or there is a
decrease in sound level.
• The heads are dirty (see “Cleaning the tape
heads” on page 54).
• The record/playback heads are magnetized (see
“Demagnetizing the tape heads” on page 54).
The tape does not erase completely.
• The record/playback heads are magnetized (see
“Demagnetizing the tape heads” on page 54).
There is excessive wow or flutter, or the sound
drops out.
• The capstans or pinch rollers are dirty (see
“Cleaning the tape heads” on page 54).
Noise increases, or the high frequencies are
erased.
• The record/playback heads are magnetized (see
“Demagnetizing the tape heads” on page 54).
After pressing nN or Z, there is a mechanical
noise, “EJECT” appears in the display, and the
unit enters standby mode automatically.
• The cassette tape has not inserted correctly.
If other troubles not described above
occur, reset the system as follows:
1 Press x, DISPLAY and DISC 1 at the
same time.
2 Unplug the power cord.
3 Plug the power cord back in.
4 Press ?/1 to turn on the power.
The system is reset to the factory settings
except for DVD settings. All the settings other
than DVD settings you made, such as the preset
stations, clock, and timer are cleared. You
should set them again.
Self-diagnosis function
(When letters/numbers appear in the
display)
When the self-diagnosis function is activated to
prevent the system from malfunctioning, a fivecharacter service number (e.g., C 13 00) with a
combination of a letter and digits appears on
the screen. In this case, check the following
table.
C:13:00
58
Tuner
There is severe hum or noise (“TUNED” or
“STEREO” flashes in the display).
• Adjust the antenna.
• The signal is too weak. Connect an external
antenna.
A stereo FM program cannot be received in
stereo.
• Press FM MODE so that “MONO” disappears.
GB
First three
characters of
the service
number
C 13
C 31
E XX
(XX is a number)
Cause and/or Corrective
Action
The disc is dirty
, Clean the disc with a soft
cloth (page 53).
The disc is not inserted correctly.
, Re-insert the disc correctly.
To prevent a malfunction, the
system has performed the selfdiagnosis function.
, Contact your nearest Sony
dealer or local authorized
Sony service facility and give
the 5-character service
number.
Example: E 61 10
Page 59

Specifications
AUDIO POWER SPECIFICATIONS:
(MHC-DP1000D USA model only)
POWER OUTPUT AND TOTAL
HARMONIC DISTORTION
with 8 ohm loads both channels driven, from
120 Hz – 10 kHz; rates 100 watts per channel
minimum RMS power, with no more than 10%
total harmonic distortion from 250 milliwatts to
rated output.
Continuous RMS power output
Center speaker: 30 watts
Rear speakers: 30 + 30 watts
Amplifier section
Canadian model:
MHC-DP1000D
Continuous RMS power output (reference)
Front speaker: 100 + 100 watts
Center speaker: 30 watts
Rear speakers: 30 + 30 watts
Total harmonic distortion less than 0.07%
European model:
MHC-DP1000D
DIN power output (rated) 60 + 60 watts
Continuous RMS power output (reference)
Front speaker: 80 + 80 watts
Center speaker: 30 watts
Rear speakers: 30 + 30 watts
Music power output (reference)
Front speaker: 150 + 150 watts
Center speaker: 60 watts
Rear speakers: 60 + 60 watts
(8 ohms at 1 kHz, 10%
THD)
(8 ohms at 1 kHz, 10%
THD)
(8 ohms at 1 kHz, 70 W)
(8 ohms at 1 kHz, DIN)
(8 ohms at 1 kHz, 10%
THD)
(8 ohms at 1 kHz, 10%
THD)
Other models:
MHC-DP900D
The following measured at AC 120, 220, 240 V,
50/60 Hz
DIN power output (rated) 130 + 130 watts
Continuous RMS power output (reference)
MHC-DP1000D
The following measured at AC 120, 220, 240 V,
50/60 Hz
DIN power output (rated) 90 + 90 watts
Continuous RMS power output (reference)
Front speaker: 120 + 120 watts
Center speaker: 40 watts
Rear speakers: 40 + 40 watts
Inputs
GAME IN: voltage 250 mV,
(phono jacks) impedance 47 kilohms
MD (VIDEO) IN: voltage 450 mV/250 mV,
(phono jacks) impedance 47 kilohms
OPTICAL IN:
(Square optical connector jacks, front panel)
wavelength ——
MIC: sensitivity 1 mV,
(Except for North impedance 10 kilohms
American and
European models)
(phone jack)
Outputs
MD (VIDEO) OUT: voltage 250 mV
(phono jacks) impedance 1 kilohms
VIDEO OUT: max. output level
(phono jack) 1 Vp-p, unbalanced,Sync
S-VIDEO OUT: Y: 1 Vp-p, unbalanced,
(4-pin/mini-DIN jack) Sync negative,
PHONES: accepts headphones of
(stereo mini jack) 8 ohms or more
SPEAKER: accepts impedance of 6 to
(MHC-DP900D only) 16 ohms
FRONT SPEAKER : accepts impedance of 8 to
(MHC-DP1000D only) 16 ohms
REAR SPEAKER: accepts impedance of 8 to
(MHC-DP1000D only) 16 ohms
CENTER SPEAKER: accepts impedance of 8 to
(MHC-DP1000D only) 16 ohms
SUB WOOFER: Voltage 1 V,
(6 ohms at 1 kHz, DIN)
180 + 180 watts
(6 ohms at 1 kHz, 10%
THD)
(8 ohms at 1 kHz, DIN)
(8 ohms at 1 kHz, 10%
THD)
negative, load impedance
75 ohms
C: 0.286Vp-p,
load impedance 75 ohms
impedance 1 kilohms
Additional Information
continued
59
GB
Page 60

60
Specifications (continued)
DVD player section
Laser Semiconductor laser
Frequency response DVD (PCM 48 kHz):
Signal-to-noise ratio More than 90 dB
Dynamic range More than 90 dB
Video color system format
DIGITAL OUT OPTICAL
(Square optical connector jack, rear panel)
Wavelength 660 nm
Tape player section
Recording system 4-track 2-channel stereo
Frequency response 40 – 13,000 Hz (±3 dB),
(DOLBY NR OFF) using Sony TYPE I
Wow and flutter ±0.15% W.Peak (IEC)
Tuner section
FM stereo, FM/AM superheterodyne tuner
FM tuner section
Tuning range 87.5 – 108.0 MHz
Antenna FM lead antenna
Antenna terminals 75 ohm unbalanced
Intermediate frequency 10.7 MHz
AM tuner section
Tuning range
Pan American model: 530 – 1,710 kHz
European and Middle Eastern models:
Other models: 531 – 1,602 kHz
Antenna AM loop antenna
Antenna terminals External antenna terminal
Intermediate frequency 450 kHz
GB
(DVD: λ=650 nm,
CD: λ=780 nm)
Emission duration:
continuous
2 Hz – 22 kHz = (±1 dB)
CD: 2Hz – 20 kHz =
(±1 dB)
NTSC, PAL
cassette,
40 – 14,000 Hz (±3 dB),
using Sony TYPE II
cassette
0.1% W.RMS (NAB)
±0.2% W.Peak (DIN)
(with the interval set at
10 kHz)
531 – 1,710 kHz
(with the interval set at
9 kHz)
531 – 1,602 kHz
(with the interval set at
9 kHz)
(with the interval set at
9 kHz)
530 – 1,710 kHz
(with the interval set at
10 kHz)
Speaker
Front speaker
SS-DP1000DW for MHC-DP1000D (North
American and European models)
Speaker system 2-way, bass-reflex type,
Speaker units
Woofer: 17 cm, cone type
Tweeter: 5 cm, cone type
Nominal impedance 8 ohms
Dimensions (w/h/d)
Mass Approx. 4.0 kg net per
SS-DP1000D/DP900D for MHC-DP1000D/
DP900D (Other models)
Speaker system 3-way, 3-unit,
Speaker units
Woofer: 15 cm, cone type
Subwoofer: 15 cm, cone type
Tweeter: 5 cm, cone type
Nominal impedance
SS-DP900D 6 ohms
SS-DP1000D 8 ohms
Dimensions (w/h/d)
Mass Approx. 6.5 kg net per
Rear speaker SS-RS270 for MHC-DP1000D
Speaker system 1-way, 1-unit,
Speaker units
Full-range: 8 cm, cone type
Nominal impedance 8 ohms
Dimensions (w/h/d)
Mass Approx. 0.65 kg net per
Center speaker SS-CT270 for MHC-DP1000D
Speaker system 1-way, 2-unit,
Speaker units
Full-range: 8 cm, cone type
Nominal impedance 8 ohms
Dimensions (w/h/d)
Mass Approx. 1.2 kg net
For the customers in Canada
(MHC-DP1000D only)
Use only the supplied SS-RS270 rear speakers for
connection to the REAR SPEAKER jacks, and only
the supplied SS-CT270 center speaker for connection
to the CENTER SPEAKER jacks on the
MHC-DP1000D.
magnetically shielded type
Approx. 230 x 360 x 260 mm
speaker
bass-reflex type,
magnetically shielded type
Approx. 250 x 360 x 335 mm
speaker
bass-reflex type
Approx. 180 x 95 x 100 mm
speaker
bass-reflex type,
magnetically shielded type
Approx. 225 x 95 x 100 mm
Page 61

General
Power requirements
North American model: 120 V AC, 60 Hz
European model: 230 V AC, 50/60 Hz
Australian model: 230 – 240 V AC,
Mexican model: 120 V AC, 60 Hz
Thailand model: 220 V AC, 50/60 Hz
Indian, Pakistani, Moroccan and Tunisian models:
Other models: 120 V, 220 V or
Power consumption
U.S.A. model:
MHC-DP1000D 205 watts
Canadian model:
MHC-DP1000D 205 watts
European model:
MHC-DP1000D 190 watts
Other models:
MHC-DP900D 210 watts
MHC-DP1000D 225 watts
Dimensions (w/h/d)
Mass
North American and European models:
MHC-DP1000D Approx. 11.0 kg
Other models:
MHC-DP900D Approx. 12.5 kg
MHC-DP1000D Approx. 12.0 kg
Supplied accessories: AM loop antenna (1)
Design and specifications are subject to change
without notice.
50/60 Hz
220 V AC, 50/60 Hz
230 – 240 V AC,
50/60 Hz
Adjustable with voltage
selector
0.5 watts (at the Power
Saving Mode)
Approx. 280 x 360 x 365 mm
FM lead antenna (1)
Remote commander (1)
Batteries (2)
Video cable (1)
Front speaker pads (8)
Center and rear speaker
pads (MHC-DP1000D
only, 12)
Additional Information
61
GB
Page 62

Glossary
Bit Rate
Value indicating the amount of video data
compressed in a DVD per second. The unit is
Mbps (Mega bit per second). 1 Mbps indicates
that the data per second is 1,000,000 bits. The
higher the bit rate is, the larger the amount of
data. However, this does not always mean that
you can get higher quality pictures.
Chapter
Sections of a picture or a music piece on a
DVD that are smaller than titles. A title is
composed of several chapters. Each chapter is
assigned a chapter number enabling you to
locate the chapter you want.
Dolby Digital
This sound format for movie theaters is more
advanced than Dolby Pro Logic Surround. In
this format, the rear speakers output stereo
sound with an expanded frequency range and a
subwoofer channel for deep bass is
independently provided. This format is also
called “5.1” because the subwoofer channel is
counted as 0.1 channel (since it functions only
when a deep bass effect is needed). All six
channels in this format are recorded separately
to realize superior channel separation.
Furthermore, since all the signals are processed
digitally, less signal degradation occurs.
Dolby Pro Logic Surround
As one method of decoding Dolby Surround,
Dolby Pro Logic Surround produces four
channels from two-channel sound. Compared
with the former Dolby Surround system, Dolby
Pro Logic Surround reproduces left-to-right
panning more naturally and localizes sounds
more precisely. To take full advantage of
Dolby Pro Logic Surround, you should have
one pair of rear speakers and a centre speaker.
The rear speakers output monaural sound.
DTS
Digital audio compression technology that the
Digital Theater Systems, Inc. developed. This
technology conforms to 5.1-channel surround.
The rear channel is stereo and there is discrete
subwoofer channel in this format. DTS
provides the same 5.1 discrete channels of high
quality digital audio. The good channel
separation is realized because the all channel
data is recorded discrete and processed in
digital.
DVD
A disc that contains up to 8 hours of moving
pictures even though its diameter is the same as
a CD.
The data capacity of a single-layer and singlesided DVD, at 4.7 GB (Giga Byte), is 7 times
that of a CD. Furthermore, the data capacity of
a dual-layer and single-sided DVD is 8.5 GB, a
single-layer and double-sided DVD 9.4 GB,
and a dual-layer and double-sided DVD 17 GB.
The picture data uses the MPEG 2 format, one
of the worldwide standards of digital
compression technology. The picture data is
compressed to about 1/40 of its original size.
The DVD also uses the variable rate coding
technology that changes the data to be allocated
according to the status of the picture.
The audio data is recorded in Dolby Digital as
well as in PCM, allowing you to enjoy more
real audio presence. Furthermore, various
advanced functions such as the multi-angle,
multilingual, and Parental Control functions are
provided with the DVD.
Index (CD) / Video Index (VIDEO CD)
A number that divides a track into sections to
easily locate the point you want on a VIDEO
CD or a CD. Depending on the disc, no indexes
may be recorded.
62
GB
Page 63

Multi-angle function
Various angles, or viewpoints of the video
camera, for a scene are recorded on some
DVDs.
Multilingual function
Several languages for the sound or subtitles in a
picture are recorded on some DVDs.
Parental Control
A function of the DVD to limit playback of the
disc by the age of the users according to the
limitation level in each country. The limitation
varies from disc to disc; when it is activated,
playback is completely prohibited, violent
scenes are skipped or replaced with other
scenes and so on.
Playback Control (PBC)
Signals encoded on VIDEO CDs (Version 2.0)
to control playback. By using menu screens
recorded on VIDEO CDs with PBC functions,
you can enjoy playing simple interactive
programs, programs with search functions, and
so on.
Region Code
This system is used to protect copyrights. A
region number is allocated on each DVD
system or DVD disc according to the sales
region. Each region code is shown on the
system as well as on the disc packaging. The
system can play the discs that match its region
code. The system can also play discs with the
ALL
“
” mark. Even when the region code is not
shown on the DVD, the region limit may still
be activated.
Scene
On a VIDEO CD with PBC functions (page
25), the menu screens, moving pictures, and
still pictures are divided into sections called
“scenes”. Each scene is assigned a scene
number enabling you to locate the scene you
want.
Title
The longest sections of a picture or a music
piece on a DVD; a movie, etc., for a picture
piece on video software; or an album, etc., for a
music piece on an audio software. Each title is
assigned a title number enabling you to locate
the title you want.
Track
Sections of a picture or a music piece on a CD
or VIDEO CD. Each track is assigned a track
number enabling you to locate the track you
want.
DVD
structure
VIDEO CD
or CD
structure
VIDEO CD
Title
Chapter
Track
Index
Disc
Disc
A compact disc that contains moving pictures.
The picture data uses the MPEG 1 format, one
of the worldwide standards of digital
compression technology. The picture data is
compressed to about 1/140 of its original size.
Consequently, a 12 cm VIDEO CD can contain
up to 74 minutes of moving pictures.
VIDEO CDs also contain compact audio data.
Sounds outside the range of human hearing are
compressed while the sounds we can hear are
not compressed. VIDEO CDs can hold 6 times
the audio information of conventional audio
CDs.
There are 2 versions of VIDEO CDs.
• Version 1.1: You can play only moving pictures
and sounds.
• Version 2.0: You can play high-resolution still
pictures and enjoy PBC functions.
This system conforms to both versions.
Additional Information
63
GB
Page 64

Language code list
For details, see pages 18, 32 and 35.
The language spellings conform to the ISO 639: 1988 (E/F) standard.
Code Language Code Language Code Language Code Language
1027 Afar 1186 Scots Gaelic 1350 Malayalam 1513 Siswati
1028 Abkhazian 1194 Galician 1352 Mongolian 1514 Sesotho
1032 Afrikaans 1196 Guarani 1353 Moldavian 1515 Sundanese
1039 Amharic 1203 Gujarati 1356 Marathi 1516 Swedish
1044 Arabic 1209 Hausa 1357 Malay 1517 Swahili
1045 Assamese 1217 Hindi 1358 Maltese 1521 Tamil
1051 Aymara 1226 Croatian 1363 Burmese 1525 Telugu
1052 Azerbaijani 1229 Hungarian 1365 Nauru 1527 Tajik
1053 Bashkir 1233 Armenian 1369 Nepali 1528 Thai
1057 Byelorussian 1235 Interlingua 1376 Dutch 1529 Tigrinya
1059 Bulgarian 1239 Interlingue 1379 Norwegian 1531 Turkmen
1060 Bihari 1245 Inupiak 1393 Occitan 1532 Tagalog
1061 Bislama 1248 Indonesian 1403 (Afan) Oromo 1534 Setswana
1066 Bengali; Bangla 1253 Icelandic 1408 Oriya 1535 Tonga
1067 Tibetan 1254 Italian 1417 Punjabi 1538 Turkish
1070 Breton 1257 Hebrew 1428 Polish 1539 Tsonga
1079 Catalan 1261 Japanese 1435 Pashto; Pushto 1540 Tatar
1093 Corsican 1269 Yiddish 1436 Portuguese 1543 Twi
1097 Czech 1283 Javanese 1463 Quechua 1557 Ukrainian
1103 Welsh 1287 Georgian 1481 Rhaeto-Romance 1564 Urdu
1105 Danish 1297 Kazakh 1482 Kirundi 1572 Uzbek
1109 German 1298 Greenlandic 1483 Romanian 1581 Vietnamese
1130 Bhutani 1299 Cambodian 1489 Russian 1587 Volapük
1142 Greek 1300 Kannada 1491 Kinyarwanda 1613 Wolof
1144 English 1301 Korean 1495 Sanskrit 1632 Xhosa
1145 Esperanto 1305 Kashmiri 1498 Sindhi 1665 Yoruba
1149 Spanish 1307 Kurdish 1501 Sangho 1684 Chinese
1150 Estonian 1311 Kirghiz 1502 Serbo-Croatian 1697 Zulu
1151 Basque 1313 Latin 1503 Singhalese 1703 Not specified
1157 Persian 1326 Lingala 1505 Slovak
1165 Finnish 1327 Laothian 1506 Slovenian
1166 Fiji 1332 Lithuanian 1507 Samoan
1171 Faroese 1334 Latvian; Lettish 1508 Shona
1174 French 1345 Malagasy 1509 Somali
1181 Frisian 1347 Maori 1511 Albanian
1183 Irish 1349 Macedonian 1512 Serbian
64
GB
Page 65

Control Menu Item List
Control Menu Items
TITLE (DVD only)
SCENE (VIDEO CD
in PBC Playback only)
TRACK (VIDEO CD only)
CHAPTER (DVD only)
INDEX (VIDEO CD only)
TRACK (CD only)
INDEX (CD only)
TIME/TEXT
AUDIO
SUBTITLE (DVD only)
ANGLE (DVD only)
ONE/ALL DISCS
REPEAT
ADVANCED (DVD only)
CUSTOM PARENTAL CONTROL
SETUP
Tips
• Each time you press DVD DISPLAY, the Control Menu display changes cyclically as follows.
Control Menu display t “ADVANCED” display (Appears if you select any setting other than “OFF”. See page
31.) t Control Menu display off
The Control Menu items differ depending on the disc.
• The Control Menu icon indicator lights in green when you select any item except for “OFF” (“REPEAT” only).
The “ANGLE” indicator lights in green only when the angles can be changed.
Function
Selects the title (DVD), the scene (VIDEO CD in PBC Playback), or the
track (VIDEO CD) to be played.
Selects the chapter (DVD) or the index (VIDEO CD) to be played.
Selects the track to be played.
Selects the index to be played.
Checks the elapsed time and the remaining playback time.
Input the time code for picture and music searching.
Displays the DVD/CD text.
Changes the audio setting.
Displays the subtitles.
Changes the subtitle language.
Changes the angle.
Plays one disc or all discs in the disc tray.
Plays the entire disc (all titles/all tracks) repeatedly or one title/chapter/track
repeatedly.
Checks the information (bit rate or layer) on the disc while playing a DVD.
Sets the disc to prohibit playback.
CUSTOM Setup
Adjusts the image and sound quality, Parental Control, and other various
settings.
RESET
Returns the settings in “SETUP” to the default setting.
Additional Information
65
GB
Page 66

Setup Display Item List
You can set the following items in the Setup Display.
The order of the displayed items may be different from the actual display.
LANGUAGE
– OSD (Select the language you
want to use from the
displayed language list.)
– DVD MENU (Select the language you
want to use from the
displayed language list.)
– AUDIO (Select the language you
want to use from the
displayed language list.
When you select
ORIGINAL, you can enjoy
the language given
priority on the disc.)
– SUBTITLE (Select the language you
want to use from the
displayed language list.
When you select AUDIO
FOLLOW, the setting is
automatically switched to
the language selected in
AUDIO.)
SCREEN
– TV TYPE 16:9
– 4:3 LETTER BOX
– 4:3 PAN SCAN
– SCREEN SAVER ON
– OFF
– BACKGROUND JACKET PICTURE
– GRAPHICS
– BLUE
– BLACK
CUSTOM
– COLOR AUTO
SYSTEM
*1
– PAUSE AUTO
MODE – FRAME
–
PARENTAL
CONTROL
–
TRACK
SELECTION – AUTO
SPEAKER
–
DISTANCE*2FRONT
– CENTER
– REAR
– BALANCE FRONT 6 steps
– REAR
– LEVEL
*2
– REAR
–
– TEST OFF
*2
TONE
*1
Except for Pan American and European models.
*2
MHC-DP1000D only.
– ON
– PAL
– NTSC
LEVEL OFF
– 8.
– 7. NC17
– 6. R
– 5.
– 4. PG13
– 3. PG
– 2.
– 1. G
– STANDARD USA
– OTHERS
– CHANGE PASSWORD
OFF
1m – 12m/
3ft – 40ft
FRNT – 1.5m/
FRNT – 5ft
FRNT – 4.5m/
FRNT – 15ft
*2
left or right
6 steps
left or right
CENTER
–6 dB – +6 dB
–6 dB – +6 dB
SUBWOOFER
–10 dB – +10 dB
66
GB
Page 67

Additional Information
67
GB
Page 68

AVERTISSEMENT
Afin d’éviter tout risque d’incendie ou
d’électrocution, ne pas exposer cet
appareil à la pluie ou à l’humidité.
Afin d’écarter tout risque d’électrocution, garder le
coffret fermé. Ne confier l’entretien de l’appareil qu’à
un personnel qualifié.
N’installez pas l’appareil dans un espace confiné
comme dans une bibliothèque ou un meuble
encastré.
Cet appareil est classé
produit LASER DE
CLASSE 1. L’étiquette
PRODUIT LASER DE
CLASSE 1 se trouve à
l’arrière de l’appareil.
Modèle commercialisé aux Etats-Unis
Cette étiquette se trouve à l’arrière de l’appareil.
Modèle commercialisé en Europe
Cette étiquette se trouve à l’intérieur de l’appareil.
Afin d’éviter tout risque d’incendie, ne pas couvrir les
ailettes de ventilation de cet appareil avec des papiers
journaux, des nappes, des rideaux, etc. Ne pas poser
de bougies allumées sur l’appareil.
Afin d’éviter tout risque d’incendie et d’électrocution,
ne pas poser de vase sur l’appareil.
Ne pas jeter les piles. Les déposer
aux endroits prévus à cet effet.
FR
2
Page 69

Cette chaîne intègre les systèmes Dolby* Digital, Pro
Logic Surround, DTS** et DTS Digital Surround
System.
* Fabriqué sous licence de Dolby Laboratories.
“Dolby”, “Pro Logic” et le symbole double D sont
des marques de commerce de Dolby Laboratories.
Œuvres confidentielles, non publiées. ©1992-1997
Dolby Laboratories. Tous droits réservés.
**Fabriqué sous licence de Digital Theater Systems,
Inc. Brevet enregistré sous les No. 5.451.942,
5.956.674, 5.974.380, 5.978,762 aux Etats-Unis et
brevets enregistrés ou en cours d’homologation
dans d’autres pays. “DTS” et “DTS Digital
Surround” sont des marques déposées de Digital
Theater Systems, Inc. © 1996, 2000 Digital
Theater Systems, Inc. Tous droits réservés.
REMARQUE IMPORTANTE
Attention: Cette chaîne peut afficher une image
fixe ou un menu indéfiniment sur l’écran du
téléviseur. Si vous laissez une image ou un
menu trop longtemps affiché, l’écran de
télévision risque d’être endommagé. Les
téléviseurs à rétroprojection sont
particulièrement sensibles aux brûlures d’écran.
FR
3
Page 70

Table des matières
Cette chaîne peut lire les disques suivants....
Nomenclature
Appareil principal ..................................7
Télécommande ...................................... 8
Fonctionnement du digipad ................... 9
Informations préliminaires
Raccordement de la chaîne .................. 10
Insertion des deux piles AA (R6) dans
la télécommande............................ 12
Réglage des enceintes pour le Dolby
Pro Logic* ..................................... 13
Spécification des paramètres des
enceintes ........................................ 14
Réglage de l’heure............................... 15
Economie d’énergie en mode de veille ...
Configuration pour la lecture
de DVD/VIDEO CD/CD
Utilisation de l’écran de configuration...
Sélection de la langue de l’affichage
ou de la bande son
— LANGUAGE SETUP .............. 18
Sélection du type d’écran
— SCREEN SETUP ..................... 19
Réglages personnalisés
— CUSTOM SETUP .................... 20
Réglages des enceintes
— SPEAKER SETUP................... 21
16
17
6
DVD/VIDEO CD/CD
Lecture de disques:
Insertion d’un disque ........................... 23
Lecture d’un disque
—
Lecture normale/Lecture aléatoire/
Lecture au ralenti/Arrêt sur image...
Lecture de DVD à l’aide du menu....... 25
Lecture de VIDEO CD avec fonctions
PBC (Ver. 2.0)
— Lecture PBC ............................. 25
Création d’un programme
— Lecture de programme ............. 26
Poursuite de la lecture au point d’arrêt
— Reprise de la lecture ................. 28
Lecture répétée
— Répétition de la lecture............. 28
Affichage des informations
concernant le disque:
Vérification du temps de lecture et du
temps restant ................................. 29
Vérification des informations
concernant la lecture
— ADVANCED ...........................31
Réglage du son:
Changement du son .............................32
Visionnage de films:
Recherche de titre/chapitre/plage/
index/scène ....................................34
Changement des angles .......................35
Affichage des sous-titres .....................35
Autres fonctions:
Verrouillage de disques
— CUSTOM PARENTAL
CONTROL/PARENTAL
CONTROL ....................................36
23
FR
4
Page 71

Tuner
Préréglage de stations radio................. 40
Ecoute de la radio
— Accord de stations préréglées... 40
Utilisation du système de données
radio (RDS)** ............................... 41
Raccordement d’appareils en
option
Raccordement d’appareils audio ......... 52
Informations
complémentaires
Cassette
Insertion d’une cassette ....................... 42
Lecture d’une cassette ......................... 42
Enregistrement d’une cassette
— Enregistrement synchro de CD/
Copie rapide/Enregistrement
manuel/Montage de programme ... 43
Enregistrement programmé
d’émissions de radio...................... 45
Réglage sonore
Pour écouter un son multicanaux ........ 46
A propos des indicateurs ..................... 46
Réglage du son .................................... 46
Sélection d’un fichier d’effet préréglé ...
Réglage des effets sonores .................. 47
Création d’un fichier d’effet sonore
personnalisé
— Fichier personnalisé ................. 48
Autres caractéristiques
Changement d’affichage de
l’analyseur de spectre .................... 49
Pour ajuster la luminosité de l’afficheur...
Chanter en karaoke*** ........................ 49
S’endormir en musique
— Minuterie sommeil ...................50
Se réveiller en musique
— Minuterie quotidienne .............. 50
47
49
Précautions .......................................... 53
En cas de problème.............................. 54
Spécifications ...................................... 59
Glossaire .............................................. 62
Liste des codes de langues................... 64
Liste des paramètres du menu de
commande ..................................... 65
Liste des paramètres de l’écran de
configuration ................................. 66
* MHC-DP1000D seulement.
** Modèle européen seulement.
***Sauf modèles nord-américain et européen.
FR
FR
5
Page 72

Cette chaîne peut lire les disques suivants
DVD VIDEO CD audio VIDEO CD
Logo du
disque
Contenu Son + Son Son +
Le logo “DVD VIDEO” est une marque de fabrique.
Cette chaîne ne peut pas lire
les disques suivants
• CD-ROM (CD PHOTO compris)
• Tous les CD-R autres que musicaux et CD-R de
• Les parties “données” des CD-Extras
• DVD-ROM
• Disques audio DVD
• Couche HD des SACD
• CD de 8 cm
Remarque
Certains CD-R/CD-RW et DVD-R/DVD-RW ne
peuvent pas être lus sur cette chaîne car le format, la
qualité de l’enregistrement, l’état du disque ou les
caractéristiques de l’enregistreur ne le permettent pas.
En outre, ces disques ne peuvent pas être lus s’ils
n’ont pas été correctement finalisés. Pour un
complément d’informations, voir le mode d’emploi
de l’enregistreur.
Code régional des DVD
pouvant être lus sur cet
appareil
Un code régional est imprimé à l’arrière de cet
appareil. Seuls les DVD ayant le même code
pourront être lus par le lecteur.
Les DVD désignés par
lus sur la chaîne.
Si vous essayez de lire d’autres DVD, le
message “Playback prohibited by area
limitations” s’affiche à l’écran du téléviseur.
Sur certains DVD, aucun code régional n’est
indiqué bien que la lecture du DVD soit
interdite pour une région.
FR
6
Image Image
format VCD
ALL
MODEL NO. HCD-DPXXXX
DVD DECK RECEIVER
AC: 00V 00Hz 00W
SERIAL NO.
XXXXX
peuvent aussi être
X
Code régional
Remarque sur la lecture des DVD et
VIDEO CD
Certaines opérations peuvent être
intentionnellement spécifiées par le producteur
pour la lecture de DVD et VIDEO CD. Comme
cette chaîne lit les DVD et les VIDEO CD tels
qu’ils ont été conçus par le producteur, il se
peut que certaines fonctions soient absentes.
Reportez-vous à la brochure fournie avec les
DVD ou les VIDEO CD pour un complément
d’informations.
Remarque sur les fonctions PBC
(commandes de lecture) (VIDEO CD)
Cette chaîne est conforme aux normes des
VIDEO CD Ver. 1.1 et Ver. 2.0. Vous pouvez
utiliser les deux types de disques.
Type de disque
VIDEO CD sans
fonctions PBC
(disques Ver. 1.1)
VIDEO CD avec
fonctions PBC
(disques Ver. 2.0)
Fonction disponible
Lecture vidéo (images animées) et
audio.
Lecture interactive avec affichage
de menus à l’écran du téléviseur
(lecture PBC), outre les fonctions
de lecture normales des disques
Ver. 1.1. En plus, vous pouvez
afficher des images fixes de haute
résolution, si le disque en contient.
Copyrights
Cet appareil contient un système antipiratage
qui est protégé par des droits de licences et
d’autres droits de propriété intellectuelle aux
Etats-Unis, détenus par Macrovision
Corporation et d’autres détenteurs. L’emploi de
ce système antipiratage doit être autorisé par
Macrovision Corporation. Il est conçu pour le
visionnage dans le cercle de la famille ou dans
un cercle limité seulement, sauf autorisation de
Macrovision Corporation. La rétrotechnique et
le démontage sont interdits.
Page 73

Nomenclature
Les éléments de la chaîne sont indiqués dans l’ordre alphabétique.
Reportez-vous aux pages entre parenthèses ( ) pour le détail.
Appareil principal
12345
e;
wl
wk
wj
wh
wg
wf
wd
ws
wa
w;
ql
2CH/MULTI rs (24, 46)
CD SYNC HI-DUB qj (43, 44)
CLOCK/TIMER SET ed (15, 45,
51)
Commande MIC LEVEL (sauf
modèles nord-américain et
européen) ws (49)
Commande VOLUME qd
DECK A Z wa (42)
DECK B Z qk (42)
digipad el (9, 24, 40, 47)
DIGITAL wh (52)
DIRECTION eg (42–44, 50)
DISC 1–3 2 (23, 24)
DISC SKIP EX-CHANGE 3
(23, 24)
DISPLAY ea (16, 29, 30)
DOLBY NR eh (42–44)
DSP EDIT rj (47)
DVD e; (12, 25, 26, 34, 43, 44)
DVD DISPLAY eg (17, 28, 30)
DVD MENU ql (25)
EFFECT rd (47)
ENTER r; (14, 15, 25–27, 31,
32, 34–41, 44, 45, 47, 51)
FM MODE eh (41)
GAME wg (52)
GAME MODE rh (47)
GROOVE rf (46)
Indicateur MULTI CHANNEL
DECODING rl (46)
KARAOKE PON (sauf modèles
nord-américain et européen) es
(49)
MD (VIDEO) wj (52)
MOVIE MODE ek (47)
MUSIC MODE rk (47)
P FILE rg (48)
Plateau de disque 5 (23)
PLAY MODE ej (23, 26, 27, 44)
Prise DIGITAL IN (OPTICAL)
wf (52)
Prise MIC (sauf modèles nord-
américain et européen) wd (49)
Prise PHONES qg
PTY (Modèle européen
seulement) eg (41)
Récepteur IR qf
REC PAUSE/START qh (43, 44,
50)
REPEAT eh (28, 29)
6
8
q;
qs
qd
qf
qg
qh
qj
qk
7
9
qa
eaesedefegeh
ej
rl
rk
rj
rh
rfrdrs
rg
SPECTRUM (modèles
nord-américain et européen
seulement) es (49)
TAPE A/B wk (42, 43)
TIMER SELECT ef (45, 51)
TITLE w; (25)
TOOL MODE ra (47)
TUNER/BAND wl (40)
TUNER MEMORY ej (40)
DESCRIPTION DES TOUCHES
@/1 (alimentation) 1
Z OPEN/CLOSE (plateau de
disque) 4
nN (lecture) 6
X (pause) 7
x (arrêt) 8
. (arrière) q;
> (avant) 9
m/– (rembobinage) qs
M/+ (avance) qa
ek
el
r;
ra
Nomenclature
FR
7
Page 74

Télécommande
1234 5
2CH/MULTI qa (24, 46)
AMP MENU es (14, 49)
ANGLE eg (35)
AUDIO ws (32)
CLEAR rs (21, 27, 28, 34)
CLOCK/TIMER SELECT 2
(45, 51)
CLOCK/TIMER SET 3 (15, 45,
51)
D.SKIP qs (23, 24, 28)
DIGITAL rj (52)
DISPLAY rg (16, 29, 30)
DSP EDIT ef (47)
DVD rl (12, 16, 25, 26, 34, 43,
44)
DVD DISPLAY wd (17, 28, 30–
32, 34–36)
DVD MENU wa (25)
DVD SET UP ql (18, 22, 37)
EFFECT ON/OFF qd (47)
ENTER wk (14, 15, 17, 25–27,
31, 32, 34–41, 44, 45, 47, 49,
51)
GAME rh (52)
GAME MODE wl (47)
MD (VIDEO) rk (52)
FR
8
ta
t;
rl
rk
rj
rh
rg
rf
rd
rs
ra
r;
el
ek
ej
eh
eg
ef
ed
es
ea
e;
v
bB
V
wl
MOVIE MODE wg (47)
MUSIC MODE ea (47)
NEXT el (24, 25)
P FILE ed (48)
PREV r; (24, 25)
REPEAT q; (28, 29)
RETURN O ra (25, 37, 38)
SLEEP 1 (50)
SLOW t/T qk (24)
SPEAKER LEVEL wf (14)
SPECTRUM rf (49)
STEP c/C ej (24)
SUB TITLE eh (35)
TAPE A/B ta (42, 43)
TITLE w; (25)
TOOL MODE wj (47)
Touches numériques 8 (26)
TUNER/BAND t; (40, 41)
TV @/1 4 (12)
TV CH +/– 7 (12)
TV/VIDEO 9 (12)
TV VOL +/– 6 (12)
VOL +/– wh
6
7
8
9
q;
qa
qs
qd
x
O
nN
Mm>.
X
TtCc
qf
qh
qk
w;
ws
wf
qg
qj
ql
wa
wd
wg
wh
wj
wk
DESCRIPTION DES TOUCHES
@/1 (alimentation) 5
nN (lecture), SELECT qf
X (pause) qg
x (arrêt) qj
m/M (rembobinage/avance),
TUNING –/+ qh
./> (arrière/avant),
PRESET –/+ ek
v/V/b/B e;
>10 rd
Page 75

Fonctionnement du digipad
Ce modèle est équipé d’un dispositif multicontrôle original, de type digipad, qui permet d’effectuer
différentes opérations.
Fonctions DVD (quand l’affichage OSD n’apparaît pas), TUNER,
TAPE A/B
Opération de base DVD, TUNER, TAPE A/B
Une frappe nN (commencement de la lecture)*
Deux frappes x (arrêt de la lecture)
* Si vous appuyez sur le digipad pendant la lecture d’un DVD/VIDEO CD/CD, la lecture
s’arrête. Appuyez une nouvelle fois pour reprendre la lecture.
Glissement de gauche à droite > (AMS +, préréglage +)**
Glissement de droite à gauche . (AMS –, préréglage –)**
Glissement de bas en haut M (avance rapide, accord +)**
Glissement de haut en bas m (recul, accord –)**
**Si vous continuez de bouger le doigt, vous obtiendrez le même effet que lorsque vous
appuyez sur ces touches et maintenez la pression.
Fonction DVD (quand l’affichage OSD apparaît)
v
bB
V
Opération de base DVD
Glissez vers le haut, le bas, le côté v/V/b/B (même fonction que les touches de
gauche ou le côté droit du digipad curseur de la télécommande)
Nomenclature
Réglage de la courbe d’égalisation dans les opérations EQ
EDIT (page 47)
La courbe obtenue par le glissement du doigt est visible sur l’afficheur.
Sélection des paramètres dans DSP EDIT et autres réglages
(page 47)
Glissez le doigt dans la direction appropriée jusqu’à ce que vous atteigniez la
valeur souhaitée (voir plus loin pour chaque opération).
Remarques
• Ne pas utiliser d’ustensiles pointus.
• Si la chaîne ne répond pas au toucher du digipad, appuyez un peu plus fort.
FR
9
Page 76

3
Informations préliminaires
Raccordement de la chaîne
Effectuez les opérations 1 à 8 pour relier les divers éléments de la chaîne avec les cordons et les
accessoires fournis.
Antenne cadre AM
Antenne FM
Enceinte arrière*
(droite)
Enceinte centrale*
Enceinte arrière*
(gauche)
2 2
4
1 1
2
1
Enceinte avant
(droite)
1 Raccordez les enceintes avant.
Raccordez les cordons d’enceinte aux prises
FRONT SPEAKER (MHC-DP1000D) ou
SPEAKER (MHC-DP900D).
Insérez seulement la partie dénudée.
R
L
+
Rouge/Uni (3)
–
3
5
6
3
7
Enceinte avant
(gauche)
* MHC-DP1000D seulement.
2 Raccordez les enceintes arrière.
(MHC-DP1000D seulement)
Raccordez les cordons d’enceinte aux prises
REAR SPEAKER.
Insérez seulement la partie dénudée.
+
Gris/Uni (3)
R
L
+
–
10
FR
Noir/Rayé (#)
Noir/Rayé (#)
Page 77

3 Raccordez l’enceinte centrale.
(MHC-DP1000D seulement)
Raccordez les cordons d’enceinte aux prises
CENTER SPEAKER.
Insérez seulement la partie dénudée.
Gris/Uni (3)
R
L
+
Noir/Rayé (#)
+
–
4 Raccordez les antennes FM/AM.
Installez l’antenne cadre AM, puis
raccordez-la.
Type de prise A
Antenne cadre
AM
Type de prise B
Antenne cadre
AM
La fiche de l’antenne FM dépend du modèle
acheté.
Déployez l’antenne
fil FM à l’horizontale.
Déployez l’antenne
fil FM à l’horizontale.
FM75
AM
F
C
A
5 Raccordez la prise d’entrée vidéo de
votre téléviseur à la prise VIDEO OUT
avec le câble vidéo.
VIDEO
OUT
Informations pr
Lorsque vous utilisez un téléviseur
Allumez le téléviseur et sélectionnez l’entrée vidéo
pour voir les images transmises par la chaîne.
éliminaires
Conseil
Pour que l’image soit de meilleure qualité, utilisez un
câble S-vidéo en option et reliez la prise d’entrée S
VIDEO du téléviseur à la prise S VIDEO OUT de la
chaîne.
6 Sur les modèles avec sélecteur de
tension, réglez VOLTAGE SELECTOR
sur la tension du courant secteur local.
VOLTAGE SELECTOR
220V 230-240V120V
7 Raccordez le cordon d’alimentation à
une prise secteur.
La démonstration des fonctions de la chaîne
apparaît sur l’afficheur. Lorsque vous
appuyez sur ?/1, la chaîne s’allume et la
M
7
5
O
A
X
IA
L
M
démonstration s’arrête. Si l’adaptateur de
fiche fourni ne peut pas être inséré dans la
prise secteur, détachez-le de la fiche
(modèles équipés d’un adaptateur
seulement).
voir page suivante
11
FR
Page 78

Raccordement de la chaîne (suite)
Insertion des deux piles AA
8 (Sauf modèles panaméricain et
européen)
Réglez le système couleur selon le
téléviseur.
La chaîne est réglée en usine sur le standard
couleur NTSC pour les modèles avec code
régional 3, et sur le standard couleur PAL
pour les modèles avec un autre code
régional. Chaque fois que vous effectuez la
procédure suivante, le système couleur
change comme suit:
NTSC y PAL
Utilisez les touches de la chaîne.
1 Appuyez sur ?/1 pour allumer la chaîne.
2 Appuyez sur DVD.
3 Appuyez sur x.
4 Appuyez sur ?/1 tout en tenant X
enfoncée.
La chaîne s’éteint.
5 Appuyez sur ?/1 pour allumer la chaîne.
La chaîne s’allume et le système couleur
change.
Fixation des patins
Fixez les patins d’enceinte fournis sous les
enceintes pour les stabiliser et les empêcher de
glisser.
Remarques
• Les cordons d’enceinte doivent être à l’écart des
antennes pour éviter tout ronflement.
• Le type d’enceintes fournies dépend du modèle de
chaîne acheté (voir “Spécifications” page 59).
• Ne pas poser les enceintes arrière sur un téléviseur.
Les couleurs des images de télévision ne seront pas
bonnes.
• Les enceintes arrière gauche et droite de la
MHC-DP1000D doivent être raccordées, sinon
aucun son ne sera audible.
• Lorsque vous regardez un VIDEO CD enregistré
dans un autre système couleur que celui qui a été
spécifié sur la chaîne, de la distorsion peut
apparaître sur l’image.
(R6) dans la télécommande
]
}
}
]
Fonctionnement d’un téléviseur Sony
Vous pouvez utiliser les touches suivantes pour
la commande d’un téléviseur Sony.
Pour Appuyez sur
Allumer et éteindre le téléviseur TV ?/1.
Commuter l’entrée vidéo du TV/VIDEO.
téléviseur
Changer de chaîne TV CH +/–.
Régler le volume des TV VOL +/–.
haut-parleurs du téléviseur
Conseil
Quand la télécommande ne permet plus de piloter la
chaîne, remplacez les deux piles par des neuves.
Remarque
Si vous prévoyez de ne pas utiliser la télécommande
pendant longtemps, enlevez les piles pour éviter les
dommages causés par une fuite des piles.
Remarque sur le transport de la
chaîne
Protégez le mécanisme du lecteur DVD de
la façon suivante.
1 Allumez la chaîne, puis appuyez sur
DVD. Assurez-vous que tous les
disques ont été retirés de la chaîne.
2 Appuyez en continu sur DVD, puis sur
?/1 jusqu’à ce que “LOCK” apparaisse.
3 Relâchez d’abord ?/1 puis DVD.
4 Débranchez le cordon d’alimentation.
12
FR
Page 79

Réglage des enceintes pour le Dolby Pro Logic
(MHC-DP1000D seulement)
Le Dolby Pro Logic Surround améliore l’image
sonore en utilisant quatre canaux indépendants.
Ces canaux manipulent la sortie sonore et
renforcent l’action des films.
Réglage de l’enceinte
centrale
Placez l’enceinte centrale à peu près à la même
hauteur que les enceintes avant. Alignez
l’enceinte centrale sur les enceintes avant ou
placez-la légèrement en retrait des enceintes
avant.
Informations pr
Positionnement des enceintes
Pour obtenir un son surround optimal, toutes
les enceintes doivent être placées à égale
distance de la position d’écoute (A). Toutefois,
cette chaîne permet de rapprocher l’enceinte
centrale de 1,5 mètre (5 pieds) (B) et les
enceintes arrière de 4,5 mètres (15 pieds) (C)
de la position d’écoute. Les enceintes avant
peuvent être placées de 1,0 à 12,0 mètres (3 à
40 pieds) de la position d’écoute (A).
B
A A
45°
CC
90°
Remarque
Ne placez pas l’enceinte centrale plus loin de la
position d’écoute que les enceintes avant.
éliminaires
Réglage des enceintes
arrière
Placez les enceintes arrière en vis à vis à
environ 60 à 90 cm de votre position d’écoute.
Enceinte arrière
60 à 90 cm
voir page suivante
13
FR
Page 80

14
Réglage des enceintes pour le Dolby
Pro Logic (suite)
Spécification de la distance
des enceintes
Utilisez la télécommande pour effectuer ces
réglages.
1 Appuyez sur AMP MENU.
2 Depuis votre position d’écoute,
appuyez plusieurs fois sur v ou V pour
sélectionner le paramètre.
Les paramètres pouvant être réglés sont
décrits ci-dessous.
3 Appuyez plusieurs fois sur b ou B pour
sélectionner un réglage.
4 Répétez les opérations 2 à 3 pour régler
d’autres paramètres.
5 Appuyez sur ENTER.
Conseils
• Vous pouvez utiliser le digipad au lieu des touches
de curseur (v/V/b/B).
• Vous pouvez utiliser “SPEAKER SETUP” sur
l’écran de configuration pour spécifier la distance
des enceintes (page 21).
Remarque
Si les enceintes avant ou arrière ne sont pas placées à
égale distance de votre position d’écoute, réglez la
distance de l’enceinte la plus proche.
Paramètres réglables
Les réglages par défaut sont indiqués entre
parenthèses.
• FRONT: 1,0 mètre à 12,0 mètres (2,4 mètres)
• CENTER: FRONT à 1,5 mètre (2,4 mètres)
• REAR: FRONT à 4,5 mètres (1,5 mètre)
* Modèle nord-américain seulement.
Remarques
• Pour écouter un signal PCM Dolby Pro Logic
• Si vous appuyez sur AMP MENU tout en réglant
FR
(3 pieds à 40 pieds (8 pieds))*
Distance des enceintes avant.
(FRONT à 5 pieds (8 pieds))*
Distance de l’enceinte centrale.
(FRONT à 15 pieds (5 pieds))*
Distance des enceintes arrière.
Surround à deux voies ou des sources analogiques,
sélectionnez “NORMAL SURR” dans les effets
sonores (voir page 47).
les paramètres sur l’affichage OSD, l’affichage
s’éteint.
Spécification des paramètres des enceintes
Utilisez la télécommande pour ces réglages.
1 Depuis votre position d’écoute,
appuyez sur SPEAKER LEVEL.
Les menus et paramètres réglables sont
indiqués ci-dessous.
2 Appuyez plusieurs fois sur v ou V pour
sélectionner le paramètre.
3 Appuyez plusieurs fois sur b ou B pour
sélectionner le réglage.
4 Répétez les opérations 2 à 3 pour régler
d’autres paramètres.
5 Appuyez sur ENTER.
Conseils
• Vous pouvez utiliser le digipad au lieu des touches
de curseur (v/V/b/B).
• Sur l’écran de configuration vous pouvez spécifier
la balance, le niveau et le signal de test avec
“SPEAKER SETUP” (page 21).
Paramètres réglables
Les réglages par défaut sont indiqués entre
parenthèses.
x BALANCE
• FRNT L___R: (centre)
Balance entre les enceintes avant gauche et
droite.
• (MHC-DP1000D seulement)
REAR L___R: (centre)
Balance entre les enceintes arrière gauche et
droite.
Plage: 6 dB (G) à 6 dB (D), paliers de 1 dB
x LEVEL (MHC-DP1000D seulement)
• REAR ** dB: (0 dB)
Niveau des enceintes arrière.
Plage: –6 dB à 6 dB, paliers de 1 dB
• CTR ** dB: (0 dB)
Niveau de l’enceinte centrale.
Plage: –6 dB à 6 dB, paliers de 1 dB
• SW ** dB: (10 dB)
Niveau de l’extrême-grave.
Plage: –10 dB à 10 dB, paliers de 1 dB
Page 81

x LFE
• LFE
Niveau de sortie du canal LFE (Effet de basse
fréquence).
Plage: OFF, –20 dB à 0 dB, paliers de 1 dB
“OFF” coupe le son du canal LFE. Mais le son
de basse fréquence des enceintes est fourni par
le caisson de grave.
Les réglages “–20 dB” à “0 dB” permettent
d’atténuer le signal LFE. “0 dB” fournit le
signal LFE complet au niveau de mixage voulu
par l’ingénieur du son.
x D.COMP.
• D.COMP.: (STD)
Compression de la plage dynamique.
Plage: OFF, 0,1 à 0,9, STD, MAX
“OFF” désactive la compression dynamique.
Les réglages “0,1” à “0,9” permettent de
compresser la plage dynamique par petits
paliers. “STD” reproduit la bande sonore au
niveau voulu par l’ingénieur du son. “MAX”
fournit une compression maximale de la plage
dynamique.
x T.TONE (MHC-DP1000D
seulement)
• T.TONE: (OFF)
Sortie du signal de test.
Plage: OFF, ON
“ON” active le signal de test successivement
sur chaque enceinte. Ajustez les paramètres
LEVEL et BALANCE avec la télécommande
de sorte que le signal soit au même niveau sur
chaque enceinte depuis votre position d’écoute.
Sélectionnez “OFF” pour désactiver le signal de
test.
Remarques
• Lorsque vous ajustez le niveau du caisson de grave,
réglez T.TONE sur “OFF”.
• La compression dynamique est possible avec les
sources Dolby Digital seulement.
• Si vous appuyez sur SPEAKER LEVEL tout en
réglant des paramètres sur l’affichage OSD,
l’affichage s’éteint.
*****
: (0 dB)
Réglage de l’heure
1 Allumez la chaîne.
2 Appuyez sur CLOCK/TIMER SET.
La première fois que vous réglez l’heure,
passez à l’étape 5.
3 Appuyez plusieurs fois sur . ou >
pour sélectionner “CLOCK SET”.
4 Appuyez sur ENTER.
5 Appuyez plusieurs fois sur . ou >
pour régler l’heure.
6 Appuyez sur ENTER.
7 Appuyez plusieurs fois sur . ou >
pour régler les minutes.
8 Appuyez sur ENTER.
Conseil
Si vous vous trompez d’heure ou si vous voulez
changer l’heure, recommencez depuis l’étape 2.
Remarque
Les réglages de l’horloge sont annulés lorsque le
cordon d’alimentation est débranché ou en cas de
coupure de courant.
Informations pr
éliminaires
15
FR
Page 82

Economie d’énergie en mode de veille
Appuyez plusieurs fois sur DISPLAY
lorsque la chaîne est éteinte
A chaque pression de la touche, la chaîne
change de mode comme suit:
Démonstration t Horloge t Economie
d’énergie
Pour annuler le mode d’économie
d’énergie
Appuyez une fois sur DISPLAY pour activer la
démonstration et deux fois pour afficher
l’heure.
Conseils
• L’indicateur ?/1 s’allume dans le mode
d’économie d’énergie.
• La minuterie fonctionne dans le mode d’économie
d’énergie.
Remarque
Dans le mode d’économie d’énergie, les fonctions
suivantes sont désactivées:
– Réglage de l’heure.
– Changement de l’intervalle d’accord AM (sauf
modèles européen et du Moyen-Orient).
– Mise sous tension par une touche de fonction.
– Commutation de la fonction MD (VIDEO).
– Changement du système couleur.
16
FR
Page 83

Configuration pour la lecture de DVD/ VIDEO CD/CD
Utilisation de l’écran de configuration
L’image et le son, ainsi que d’autres
paramètres, peuvent être réglés sur l’écran de
configuration. Vous pouvez aussi spécifier la
langue des sous-titres et de l’écran de
configuration. Pour des informations détaillées
sur chaque paramètre de l’écran de
configuration, reportez-vous aux pages 18 à 22.
La liste complète des paramètres se trouve à la
page 66.
Le modèle commercialisé en Amérique du
Nord est le modèle utilisé pour la
représentation des affichages OSD.
Pour l’exploitation du menu, utilisez la
télécommande.
1 Appuyez sur DVD.
2 Si la lecture est à l’arrêt, appuyez sur
DVD DISPLAY.
Le menu de commande apparaît.
Si vous appuyez sur DVD SET UP, vous
pouvez passer directement à l’étape 4.
3 Appuyez plusieurs fois de suite sur
v ou V pour sélectionner “SETUP”,
puis appuyez sur ENTER.
Les options “SETUP” apparaissent.
)
( 47
: :
CUSTOM
RESET
CUSTOM
4 Appuyez plusieurs fois de suite sur
v ou V pour sélectionner “CUSTOM”,
puis appuyez sur ENTER.
L’écran de configuration apparaît.
LANGUAGE SETUP
OSD:
DVD MENU:
Paramètres
principaux
AUDIO:
SUBTITLE:
DVD
ENGLISH
ENGLISH
ORIGINAL
ENGLISH
5 Appuyez plusieurs fois de suite sur v
ou V pour sélectionner le paramètre de
configuration dans la liste, puis
appuyez sur ENTER.
Le paramètre de configuration sélectionné
apparaît.
Exemple: “SCREEN SETUP”
Paramètre sélectionné
SCREEN SETUP
TV TYPE:
SCREEN SAVER:
Paramètres de
configuration
BACKGROUND:
JACKET PICTURE
6 Appuyez plusieurs fois de suite sur v
ou V pour sélectionner un paramètre,
puis appuyez sur ENTER.
Les options du paramètre sélectionné
apparaissent.
Exemple: “TV TYPE”
SCREEN SETUP
TV TYPE:
SCREEN SAVER:
BACKGROUND:
4:3 LETTER BOX
4:3 PAN SCAN
7 Appuyez plusieurs fois de suite sur v
ou V pour sélectionner un réglage, puis
appuyez sur ENTER.
Le réglage est sélectionné et la
configuration est terminée.
Exemple: “4:3 PAN SCAN”
Réglage sélectionné
SCREEN SETUP
TV TYPE:
SCREEN SAVER:
BACKGROUND:
4:3 PAN SCAN
JACKET PICTURE
Options
Configuration pour la lecture de DVD/VIDEO CD/CD
16:9
ON
16:9
16:9
ON
voir page suivante
17
FR
Page 84

Utilisation de l’écran de configuration
(suite)
Pour éteindre l’écran de
configuration
Appuyez plusieurs fois de suite sur DVD SET
UP ou DVD DISPLAY jusqu’à ce que l’écran
de configuration s’éteigne.
Conseils
• Si vous sélectionnez “RESET” à l’étape 4, vous
pouvez rétablir tous les réglages “SETUP” par
défaut des pages 18–22 (sauf PARENTAL
CONTROL). Après avoir sélectionné “RESET” et
appuyé sur ENTER, sélectionnez “YES” pour
rétablir les réglages (cela prend quelques secondes)
ou sélectionnez “NO” et appuyez sur ENTER pour
revenir au menu de commande. N’appuyez pas sur
?/1 pendant la réinitialisation de la chaîne.
• Vous pouvez utiliser le digipad au lieu des touches
de curseur (v/V/b/B) lorsque la fonction DVD
est sélectionnée et l’affichage OSD apparaît à
l’écran.
Sélection de la langue de l’affichage ou de la bande son
— LANGUAGE SETUP
x SUBTITLE (DVD seulement)
Commutation de la langue des sous-titres.
Sélectionnez la langue des sous-titres dans la
liste qui apparaît.*
Lorsque vous sélectionnez “AUDIO
FOLLOW”, la langue des sous-titres change
selon la langue sélectionnée pour la bande son.
* Si vous sélectionnez “OTHERS t” dans “DVD
MENU”, “AUDIO” ou “SUBTITLE”, sélectionnez
et entrez le code de la langue dans la liste à l’aide
des touches numériques (page 64). Après la
sélection d’une langue, le code de cette langue
(4 chiffres) est indiqué lorsque vous sélectionnez
“OTHERS t”.
Remarque
Si vous sélectionnez une langue qui n’est pas
enregistrée sur le DVD, une des langues du disque
sera automatiquement sélectionnée (sauf pour les
affichages OSD).
18
“LANGUAGE SETUP” permet de sélectionner
la langue des affichages ou de la bande son.
Sélectionnez “LANGUAGE SETUP” sur l’écran de
configuration.
LANGUAGE SETUP
OSD:
DVD MENU:
AUDIO:
SUBTITLE:
x OSD (Affichage sur écran)
Commutation de la langue d’affichage.
Sélectionnez la langue dans la liste qui apparaît.
x DVD MENU (DVD seulement)
Sélectionnez la langue du menu DVD.*
x AUDIO (DVD seulement)
Commutation de la langue de la bande son.
Sélectionnez la langue dans la liste qui apparaît.*
Lorsque vous sélectionnez “ORIGINAL”, la
FR
langue originale du disque est utilisée.
ENGLISH
ENGLISH
ORIGINAL
ENGLISH
Page 85

Sélection du type d’écran
— SCREEN SETUP
Sélectionnez le type d’écran ici, selon le
téléviseur raccordé.
Sélectionnez “SCREEN SETUP” sur l’écran de
configuration.
SCREEN SETUP
TV TYPE:
SCREEN SAVER:
BACKGROUND:
JACKET PICTURE
x TV TYPE (DVD seulement)
Sélectionnez le format de l’écran du téléviseur
raccordé.
• 16:9: Sélectionnez cette option si vous
raccordez un téléviseur grand écran ou un
téléviseur muni d’un mode grand écran.
16:9
ON
x SCREEN SAVER
L’économiseur d’écran peut être activé ou
désactivé. S’il est activé, l’image de
l’économiseur apparaît lorsque le lecteur reste
en pause ou à l’arrêt plus de 15 minutes ou
lorsque vous écoutez un CD pendant plus de 15
minutes. L’économiseur protège l’écran du
téléviseur contre les brûlures dues à l’affichage
continu d’une image. Appuyez sur nN pour
désactiver l’économiseur d’écran.
• ON: Activation de l’économiseur d’écran.
• OFF: Désactivation de l’économiseur d’écran.
x BACKGROUND
La couleur ou l’image de fond de l’écran du
téléviseur peut être sélectionnée en mode
d’arrêt ou pendant la lecture de CD.
• JACKET PICTURE: L’image de la pochette
(image fixe) apparaît à l’arrière-plan seulement
si elle est enregistrée sur le disque (CDEXTRA, etc.). Si la pochette du disque n’a pas
d’image, l’image “GRAPHICS” apparaît.
• GRAPHICS: L’image programmée apparaît à
l’arrière-plan.
• BLUE: Couleur de fond bleue.
• BLACK: Couleur de fond noire.
Configuration pour la lecture de DVD/VIDEO CD/CD
• 4:3 LETTER BOX: Sélectionnez cette option
si vous raccordez un téléviseur de format 4:3.
Ce réglage affiche une image grand écran avec
des bandes dans les parties inférieure et
supérieure de l’écran.
• 4:3 PAN SCAN: Sélectionnez cette option
lorsque vous raccordez un téléviseur de format
4:3. Ce réglage affiche une image grand écran
en partie tronquée.
Remarque
Avec certains DVD, l’option “4:3 LETTER BOX”
est automatiquement sélectionnée au lieu de “4:3
PAN SCAN” ou vice versa.
19
FR
Page 86

Réglages personnalisés
— CUSTOM SETUP
Sélectionnez “CUSTOM SETUP” sur l’écran de
configuration.
CUSTOM SETUP
PAUSE MODE:
PARENTAL CONTROL
TRACK SELECTION: OFF
x COLOR SYSTEM (sauf modèles
panaméricain et européen)
Sélectionnez le système couleur lors de la
lecture d’un VIDEO CD.
• AUTO: Restitue le signal vidéo dans le
système utilisé pour ce disque, PAL ou NTSC.
Si le téléviseur a les deux (DUAL) systèmes,
sélectionnez AUTO.
• PAL: Convertit le signal vidéo d’un disque
NTSC en signal PAL.
• NTSC: Convertit le signal vidéo d’un disque
PAL en signal NTSC.
Remarques
• Le système couleur du disque proprement dit ne
peut pas être changé.
• Vous pouvez régler le système couleur de la chaîne
sur celui du téléviseur, sauf sur les modèles
panaméricain et européen. Voir page 12.
x PAUSE MODE (DVD seulement)
Sélectionnez l’image pendant la pause.
• AUTO: L’image d’un sujet très rapide est
restituée sans scintillement. Normalement,
sélectionnez cette position.
• FRAME: L’image d’un sujet bougeant peu est
restituée en haute résolution.
AUTO
x PARENTAL CONTROL t (DVD
seulement)
Un mot de passe et le niveau de verrouillage
peuvent être désignés pour les enfants. Pour de
plus amples informations, voir “Limitation de
la lecture pour les enfants (Contrôle parental)”
à la page 37.
x TRACK SELECTION (DVD seulement)
La bande son contenant le plus grand nombre
de voies a priorité lors de la lecture d’un DVD
sur lequel plusieurs formats audio ont été
enregistrés (format PCM, DTS, audio MPEG
ou Dolby Digital).
• OFF: Priorité désactivée.
• AUTO: Priorité activée.
Remarques
• Lorsque vous sélectionnez “AUTO”, le réglage de
la langue peut changer. Le réglage “TRACK
SELECTION” a priorité sur le réglage “AUDIO”
dans “LANGUAGE SETUP” (page 18).
• Si des pistes sonores PCM, DTS, audio MPEG et
Dolby Digital ont le même nombre de canaux, les
pistes sonores sont sélectionnées dans l’ordre PCM,
DTS, audio MPEG et Dolby Digital.
• Sur certains DVD, le canal audio prioritaire est
spécifié. Dans ce cas, il n’est pas possible de donner
la priorité au format DTS, audio MPEG ou Dolby
Digital en sélectionnant “AUTO”.
20
FR
Page 87

Réglages des enceintes
— SPEAKER SETUP
Réglez votre système acoustique pour la lecture
des DVD 5.1CH.
Sélectionnez “SPEAKER SETUP” sur l’écran de
configuration.
SPEAKER SETUP
DISTANCE:
BALANCE:
LEVEL:
TEST TONE:
Pour rétablir les réglages par défaut
Sélectionnez le paramètre, puis appuyez sur
CLEAR.
x DISTANCE (MHC-DP1000D seulement)
Les réglages de distance par défaut des
enceintes par rapport à la position d’écoute sont
comme suit.
2.4m
(8ft)
2.4m
(8ft)
1.5m
(5ft)
2.4m
(8ft)
1.5m
(5ft)
• FRONT : La distance des enceintes avant
depuis la position d’écoute peut être réglée par
paliers de 0,1 mètre (1 pied) de 1,0 à 12,0
mètres (3 à 40 pieds).
• CENTER: La distance de l’enceinte centrale
peut être rapprochée de 1,5 mètre (5 pieds) des
enceintes avant vers la position d’écoute, par
paliers de 0,1 mètre (1 pied).
• REAR: La distance des enceintes arrière peut
être rapprochée de 4,5 mètres (15 pieds) par
rapport aux enceintes avant vers la position
d’écoute, par paliers de 0,1 mètre (1 pied).
Remarques
• Lorsque vous sélectionnez un paramètre, le son est
momentanément coupé.
• Si les enceintes avant ou arrière ne sont pas placées
à égale distance de la position d’écoute, réglez la
distance de l’enceinte la plus proche.
• Ne placez pas les enceintes arrière plus loin de la
position d’écoute que les enceintes avant.
x BALANCE
Vous pouvez changer la balance des enceintes
gauche et droite de la façon suivante. Veillez à
régler “TEST TONE” sur “ON” pour simplifier
le réglage. Le réglage par défaut est indiqué
entre parenthèses.
• FRONT (0 dB): Réglage de la balance entre les
enceintes avant gauche et droite (6 dB (gauche)
à 6 dB (droite), par paliers de 1 dB).
• (MHC-DP1000D seulement)
REAR (0 dB): Réglage de la balance entre les
enceintes arrière gauche et droite (6 dB
(gauche) à 6 dB (droite), par paliers de 1 dB).
voir page suivante
Configuration pour la lecture de DVD/VIDEO CD/CD
Si vous déplacez les enceintes, changez la
valeur sur l’écran de configuration.
21
FR
Page 88

Réglages des enceintes (suite)
x LEVEL (MHC-DP1000D seulement)
Le niveau de chaque enceinte peut être changé
de la façon suivante. Veillez à régler “TEST
TONE” sur “ON” pour que le réglage soit plus
simple.
Les réglages par défaut sont indiqués entre
parenthèses.
• CENTER (0 dB): Réglage du niveau de
l’enceinte centrale (–6 dB à +6 dB, par paliers
de 1 dB).
• REAR (0 dB): Réglage du niveau des enceintes
arrière (–6 dB à +6 dB, par paliers de 1 dB).
• SUBWOOFER (10 dB): Réglage du niveau de
l’extrême grave (–10 dB à +10 dB, par paliers
de 1 dB).
x TEST TONE (MHC-DP1000D seulement)
Les enceintes émettent un signal de test pour
ajuster les paramètres “BALANCE” et
“LEVEL”.
• OFF: Le signal de test n’est pas émis par les
enceintes.
• ON: Le signal de test est émis par chacune des
enceintes dans l’ordre pendant le réglage de la
balance ou du niveau. Lorsque vous
sélectionnez un des paramètres “SPEAKER
SETUP”, le signal de test est émis
simultanément par les enceintes droite et
gauche.
Remarque
Lorsque vous réglez le niveau de l’extrême grave,
réglez T.TONE sur “OFF”.
Pour ajuster le volume de toutes les
enceintes à la fois
Tournez VOLUME (ou appuyez sur VOL+/–
de la télécommande.)
Réglage du volume et du
niveau des enceintes
1 Pendant l’arrêt de la lecture, appuyez
sur DVD SET UP, puis sélectionnez
“SPEAKER SETUP”.
2 Sélectionnez “TEST TONE” et réglez
“TEST TONE” sur “ON”.
Le signal de test sort successivement de
chaque enceinte.
3 De votre position d’écoute,
sélectionnez “BALANCE” ou “LEVEL”,
puis appuyez plusieurs fois de suite
sur b ou B pour régler la valeur de
“BALANCE”, ou appuyez plusieurs fois
de suite sur v ou V pour régler la
valeur de “LEVEL”.
Le signal de test est émis simultanément par
les enceintes gauche et droite.
4 Sélectionnez “TEST TONE” et réglez
“TEST TONE” sur “OFF” pour arrêter le
signal de test.
Remarques
• Lorsque vous effectuez les réglages d’enceintes, le
son est momentanément coupé.
• Si vous réglez ces paramètres sur l’affichage OSD
pendant le réglage des paramètres des enceintes
avec AMP MENU ou SPEAKER LEVEL (pages
14–15), l’affichage s’éteint.
22
FR
Page 89

DVD/VIDEO CD/CD
Lecture de disques
Insertion d’un disque
1 Appuyez sur Z OPEN/CLOSE.
Le plateau de disque sort.
2 Posez un DVD/VIDEO CD/CD sur le
plateau de disque avec la face
imprimée dirigée vers le haut.
Pour insérer d’autres disques, appuyez sur
DISC SKIP EX-CHANGE (ou D.SKIP de
la télécommande) pour faire tourner le
plateau de disque.
3 Appuyez sur Z OPEN/CLOSE pour
fermer le plateau de disque.
Lecture d’un disque
— Lecture normale/Lecture aléatoire/
Lecture au ralenti/Arrêt sur image
Trois disques au maximum (DVD, VIDEO CD,
CD) peuvent être lus à la suite. Selon le DVD
ou le VIDEO CD, certaines opérations peuvent
être différentes ou impossibles. Consultez la
brochure fournie avec le disque pour le détail.
Lecture d’un DVD:
Numéro de
plateau du
disque
MUSIC MOVIE
Indicateur de présence de disque
Numéro du chapitre
Numéro
du titre
DVD TITLE CHAPTER HOUR MIN S EC
DVD
21
3
Temps de lecture
AB
Lecture d’un VIDEO CD ou CD
Numéro de
plateau du disque
DVD
1 DISC
MUSIC MOVIE
21
Indicateur de présence de disque
Numéro de plage
VCD
3
:
Temps de
lecture
MIN SEC
AB
1 Allumez le téléviseur et sélectionnez
l’entrée vidéo.
Consultez le mode d’emploi du téléviseur,
si nécessaire.
2 Appuyez sur DVD.
3 Lorsque le lecteur est à l’arrêt, appuyez
plusieurs fois sur PLAY MODE jusqu’à
ce que le mode souhaité apparaisse sur
l’afficheur.
Sélectionnez
ALL DISCS
1 DISC
ALL DISCS
SHUFFLE
1 DISC
SHUFFLE
PROGRAM
4
Appuyez sur une des touches DISC 1–3.
Si vous appuyez sur nN lorsque la
fonction DVD est sélectionnée (par une
pression de DVD) et le plateau de disque
fermé, la lecture commence par le disque
sélectionné.
Conseils
• Vous ne pouvez pas changer de mode de lecture
pendant la lecture.
• Vous pouvez commuter le mode de lecture entre 1
DISC et ALL DISCS en utilisant l’affichage OSD
de la façon suivante:
1 Lorsque la lecture est arrêtée, appuyez sur DVD
DISPLAY.
Le menu de contrôle apparaît.
2 Appuyez sur v ou V pour sélectionner “ONE/
ALL DISCS”, puis appuyez sur ENTER.
3
Appuyez sur v ou V pour sélectionner “ONE
DISC” ou “ALL DISCS”, puis appuyez sur ENTER.
Pour écouter
Tous les disques insérés en continu.
Le disque sélectionné dans
l’ordre original.
Les plages de tous les disques
dans un ordre aléatoire.
Les plages du disque sélectionné
dans un ordre aléatoire.
Les plages de tous les disques dans
l’ordre souhaité (voir “Création
d’un programme” page 26).
voir page suivante
DVD/VIDEO CD/CD
FR
23
Page 90

Lecture d’un disque (suite)
Autres opérations
Pour
Arrêter la lecture
Faire une pause
Sélectionner une
plage ou un
chapitre
Localiser un
passage d’un titre
ou d’un chapitre
(Recherche
verrouillée)
Changer la vitesse
de la lecture
(lecture au ralenti)
Lire le disque
image par image en
changeant la
vitesse de lecture
(arrêt sur image)
Sélectionner un
disque lorsque la
lecture est à l’arrêt
Sélectionner la
fonction DVD
depuis une autre
source
Changer de disque
pendant la lecture
Retirer un disque
Il faut
Appuyer sur x. La lecture
s’arrête à l’endroit où vous avez
appuyé sur x (Reprise de la
lecture). Appuyer à nouveau sur
x pour annuler la reprise de la
lecture (voir page 28).
Appuyer sur X*1.
Appuyer une nouvelle fois pour
continuer la lecture.
Pendant la lecture ou la pause,
appuyer sur > (ou NEXT de
la télécommande) (avant) ou
. (ou PREV de la
télécommande) (arrière).
Appuyer sur M ou m
pendant la lecture. A chaque
pression de la touche, la vitesse
change comme suit:
1 (lent) y 2 (plus rapide que 1)
Appuyer sur nN pour arrêter
la recherche à l’endroit souhaité.
Pendant la lecture, appuyer sur
*2
SLOW t ou T*3 de la
télécommande.
A chaque pression de la touche,
la vitesse passe d’une vitesse à
l’autre. Pour revenir à la lecture
normale, appuyez sur nN.
Pendant la lecture, appuyer sur
STEP c ou C*3 de la
télécommande. A chaque
*2
pression de la touche, l’image
précédente ou suivante est
affichée. Pour revenir à la
lecture normale, appuyez sur
nN.
Appuyer sur une des touches
DISC 1–3 ou DISC SKIP EXCHANGE (ou D.SKIP de la
télécommande).
Appuyer sur une des touches
DISC 1–3 (Sélection
automatique de la source).
Appuyer sur DISC SKIP
EX-CHANGE.
Appuyer sur Z OPEN/CLOSE.
*1
L’image peut être parasitée.
*2
DVD et VIDEO CD seulement.
*3
SLOW t et STEP c ne sont pas disponibles
pendant la lecture de VIDEO CD.
Conseils
• Le digipad peut être utilisé pour la lecture de DVD/
VIDEO CD/CD.
• Le digipad peut être utilisé au lieu des touches de
curseur (v/V/b/B) lorsque la fonction DVD est
sélectionnée et que l’affichage OSD est à l’écran.
Remarques
• Avec certains DVD ou VIDEO CD, certaines
fonctions sont interdites.
• Les VIDEO CD ne peuvent pas être vus au ralenti
ou image par image en sens arrière.
• Dans les circonstances suivantes, 2CH/MULTI se
règle automatiquement sur “2CH”.
– Pendant l’enregistrement.
– Lorsque TAPE B est en mode REC PAUSE.
– Pendant l’enregistrement sur TAPE B.
• Lorsqu’un casque est utilisé, le son transmis au
casque est celui du canal 2.
• Réglez le mode de canaux sur “2CH” en appuyant
sur 2CH/MULTI lors d’un enregistrement
analogique sur un appareil raccordé aux prises MD
OUT de la chaîne. Aucun son n’est transmis aux
prises MD OUT en mode multicanaux.
• L’enregistrement numérique de certains DVD peut
être impossible. Dans ce cas, faites un
enregistrement analogique. Appuyez sur 2CH/
MULTI pour régler le mode de canaux sur “2CH”
sur la chaîne.
• Réglez le son sur “STEREO” avec la touche
AUDIO lorsque vous écoutez des pistes sonores
DTS d’un CD (page 32).
24
FR
Page 91

Lecture de DVD à l’aide
Lecture de VIDEO CD avec
du menu
Certains disques ont un “menu de titres” ou
un “menu DVD”. Sur certains DVD, il y
simplement un “menu” ou un “titre”.
Utilisation du menu de titres
Un DVD se divise en plusieurs sections assez
longues contenant des images et du son et
appelées “titres”. Lors de la lecture de DVD
contenant plusieurs titres, le titre souhaité peut
être sélectionné sur le menu de titres.
1 Appuyez sur DVD.
2 Appuyez sur TITLE.
Le menu de titres apparaît à l’écran du
téléviseur. Le contenu du menu dépend du
disque.
3 Appuyez sur v/V/b/B ou sur les
touches numériques pour sélectionner
le titre que vous voulez voir.
4 Appuyez sur ENTER.
La lecture commence à partir du titre
sélectionné.
Utilisation du menu DVD
Certains DVD permettent de sélectionner le
contenu du disque sur un menu. Par exemple,
la langue des sous-titres et de la bande son
peuvent être sélectionnées sur le menu de ces
DVD.
1 Appuyez sur DVD.
2 Appuyez sur DVD MENU.
Le menu du DVD apparaît à l’écran du
téléviseur. Le contenu du menu dépend du
disque.
3 Appuyez sur v/V/b/B ou sur les
touches numériques pour sélectionner
le paramètre qui doit être changé.
4 Pour changer d’autres paramètres,
répétez l’étape 3.
5 Appuyez sur ENTER.
Conseil
Vous pouvez utiliser le digipad au lieu des touches de
curseur (v/V/b/B) lorsque la fonction DVD est
sélectionnée et l’affichage OSD apparaît à l’écran.
fonctions PBC (Ver. 2.0)
— Lecture PBC
Les menus de video CD affichés à l’écran de
télévision permettent une lecture interactive de
ces disques. Le format et la structure des menus
dépendent de chaque disque.
1 Appuyez sur DVD.
2 Appuyez sur nN pour activer la
lecture d’un VIDEO CD avec fonctions
PBC (Ver. 2.0).
Les indicateurs VIDEO CD et PBC
s’allument et un menu PBC apparaît à
l’écran du téléviseur.
L’indicateur PBC s’allume pendant la
lecture PBC d’un VIDEO CD compatible
avec les fonctions PBC (Ver. 2.0).
3 Appuyez plusieurs fois de suite sur v
ou V pour sélectionner un nombre sur
le menu, puis appuyez sur ENTER.
4 Continuez la lecture en suivant les
instructions qui apparaissent sur le
menu pour profiter des fonctions
interactives.
Pour
Arrêter la lecture
Voir le reste du menu
Revenir au début du
menu
Revenir au menu
précédent
Il faut
Appuyer sur x.
Appuyer sur NEXT de la
télécommande.
Appuyer sur PREV de la
télécommande.
Appuyer sur RETURN O de
la télécommande.
voir page suivante
DVD/VIDEO CD/CD
FR
25
Page 92

Lecture de VIDEO CD avec fonctions
PBC (Ver. 2.0) (suite)
Création d’un programme
Pour
Annuler la lecture
avec fonctions PBC
(Ver. 2.0)
Il faut
Appuyer plusieurs fois sur
. ou > pendant l’arrêt
de la lecture, pour
sélectionner la plage
souhaitée, puis appuyer sur
ENTER (ou appuyer sur les
touches numériques de la
télécommande).
L’indicateur PBC s’éteint et
la lecture commence à partir
de la plage sélectionnée.
Les images fixes, comme
les écrans de menu,
n’apparaissent pas.
Sélectionner un
numéro de menu
avec la télécommande
Appuyer sur les touches
numériques puis appuyer sur
ENTER.
Pour introduire 0, appuyer sur
10/0.
Remarque
Selon le VIDEO CD, “Press ENTER” à l’étape 3 peut
être remplacé par “Press SELECT” dans la brochure
fournie avec le disque.
— Lecture de programme
Vous pouvez créer un programme de 25 parties
à partir de tous les disques, dans l’ordre de
lecture souhaité.
1 Appuyez sur DVD.
2 Pendant l’arrêt de la lecture, appuyez
plusieurs fois de suite sur PLAY MODE
jusqu’à ce que “PROGRAM” apparaisse
sur le panneau avant.
L’écran de programmation apparaît à
l’écran.
PROGRAM
–
– – – –
:
ALL CLEAR
– – – –
1.
– – – –
2.
– – – –
3.
– – – –
4.
– – – –
5.
– – – –
6.
T
ALL
3 Appuyez sur ENTER, puis plusieurs
fois de suite sur v ou V pour
sélectionner le disque.
PROGRAM
– – – –
3 :
ALL CLEAR
– – – –
1.
– – – –
2.
– – – –
3.
– – – –
4.
– – – –
5.
– – – –
6.
T
ALL
26
FR
4 Appuyez sur B.
Le curseur se positionne sur le titre ou la
plage (dans ce cas, “01”).
Type de disque*
PROGRAM
3 : DVD
ALL CLEAR
– – – –
1.
– – – –
2.
– – – –
3.
– – – –
4.
– – – –
5.
– – – –
6.
* “?” apparaît si les informations du disque ne sont
pas enregistrées dans la mémoire.
Titre Chapitre
C
T
ALL
ALL
01
01
02
02
03
03
04
04
05
05
06
Chapitres enregistrés
sur le disque
Page 93

5 Sélectionnez le titre, le chapitre ou la
plage que vous voulez programmer.
x Lors de la programmation d’un DVD
Par exemple, sélectionnez le chapitre “03”
du titre “02”.
Appuyez sur v/V ou sur les touches
numériques pour sélectionner “02” sous
“T”, puis appuyez sur ENTER.
PROGRAM
3
:
DVD
ALL CLEAR
– – – –
1.
– – – –
2.
– – – –
3.
– – – –
4.
– – – –
5.
– – – –
6.
Appuyez ensuite sur v/V ou sur les touches
numériques pour sélectionner “03” sous
“C”, puis appuyez sur ENTER.
PROGRAM
–
– – – –
:
ALL CLEAR
1. DVD
2.
3.
4.
5.
6.
–
–
0 2
– – – –
– – – –
– – – –
– – – –
– – – –
Titre et chapitre sélectionnés
x Lors de la programmation d’un
VIDEO CD ou d’un CD
Par exemple, sélectionnez la plage “02”.
Appuyez sur v/V ou sur les touches
numériques pour sélectionner “02” sous
“T”, puis appuyez sur ENTER.
Plage sélectionnée
0 3
T
ALL
01
02
03
04
05
T
ALL
C
ALL
01
02
03
04
05
06
Pour
Revenir à la lecture
normale
Eteindre l’affichage
de programmation
Il faut
Appuyer sur CLEAR pendant
la lecture.
Appuyer sur PLAY MODE
pendant l’arrêt de la lecture.
de programme
Changer de
programme
Pour changer de disque,
sélectionner le numéro de
programme devant être changé
à l’aide de v/V après l’étape 2
ou 5, puis appuyer sur ENTER.
Pour changer de titre, chapitre
ou plage, sélectionner le
numéro souhaité à l’étape 5.
Annuler l’ordre de
la programmation
Pour annuler tous les titres,
chapitres ou plages dans
l’ordre programmé, appuyer
sur v, puis sélectionner “ALL
CLEAR à l’étape 3. Pour
annuler le programme
sélectionné, sélectionner le
programme avec v/V à l’étape
3, puis appuyer sur CLEAR.
Conseil
Le programme créé reste mémorisé après la lecture. Il
suffit d’appuyer sur nN pour le revoir.
Remarques
• Le programme est annulé si vous sélectionnez la
fonction TUNER ou éteignez la chaîne.
• La lecture de programme peut être impossible avec
certains DVD.
• Il n’est pas possible de créer un programme pendant
la lecture d’un disque.
• Si le mode de lecture est commuté sur
“PROGRAM” lorsque “REPEAT 1” est
sélectionné, “REPEAT 1” est automatiquement
annulé.
DVD/VIDEO CD/CD
PROGRAM
–
– – – –
:
ALL CLEAR
–
1. CD
– – – –
2.
– – – –
3.
– – – –
4.
– – – –
5.
– – – –
6.
02
T
ALL
6 Pour programmer d’autres disques,
titres, chapitres ou plages, répétez les
étapes 3 à 5.
7 Appuyez sur nN pour lire le
programme.
La lecture du programme commence.
27
FR
Page 94

Poursuite de la lecture au
Lecture répétée
point d’arrêt
— Reprise de la lecture
Le point où le disque a été arrêté est mémorisé
par la chaîne si bien qu’il est possible de
poursuivre la lecture exactement à partir de ce
point.
1 Pendant la lecture d’un disque,
appuyez sur x pour arrêter la lecture.
“RESUME” apparaît sur l’afficheur. Si
“RESUME” n’apparaît pas, c’est que cette
fonction n’est pas disponible.
2 Appuyez sur nN.
La lecture reprend à l’endroit où elle a été
arrêtée à l’étape 1.
Pour revenir au début du disque
Lorsque “RESUME” est affiché, appuyez sur
x, puis sur nN.
Remarques
• Selon l’endroit où le disque a été arrêté, le point de
reprise peut être décalé.
• La reprise de la lecture est annulée lorsque:
– vous appuyez sur les touches numériques, x,
D.SKIP, ou ./>.
– vous retirez le disque.
– vous débranchez le cordon d’alimentation
secteur.
– vous changez les reglages de “DVD MENU”,
“AUDIO” ou “SUBTITLE” dans “LANGUAGE
SET UP” sur l’ecran de reglage.
– vous changez les réglages de “TV TYPE” dans
“SCREEN SETUP” sur l’écran de réglage.
– vous changez les réglages “PARENTAL
CONTROL” dans “CUSTOM SETUP” sur
l’écran de réglage.
— Répétition de la lecture
Tous les titres/plages ou un seul titre/chapitre/
plage d’un disque peuvent être répétés.
En mode de lecture aléatoire ou de programme,
les titres ou plages sont répétés chaque fois
dans un nouvel ordre ou dans l’ordre du
programme.
1 Appuyez sur DVD DISPLAY.
Le menu de commande apparaît.
2 Appuyez plusieurs fois de suite sur v
ou V pour sélectionner “REPEAT”, puis
appuyez sur ENTER.
Si vous ne sélectionnez par “OFF”,
l’indicateur “REPEAT” s’allume en vert.
3 Sélectionnez la lecture répétée.
x Pendant la lecture de DVD et lorsque
la lecture de programme est désactivée
• OFF: Pas de lecture répétée.
• DISC: Répétition de tous les titres.
• TITLE: Répétition du titre actuel d’un
disque.*
• CHAPTER: Répétition du chapitre actuel.
x Pendant la lecture d’un VIDEO CD/
CD lorsque la lecture de programme est
désactivée (OFF)
• OFF: Pas de lecture répétée.
• DISC: Répétition de toutes les plages d’un
disque.
• TRACK: Répétition de la plage actuelle.*
x Lorsque la lecture de programme est
activée (ON)
• OFF: Pas de lecture répétée.
• ON: Répétition du programme.
28
* Lorsque ALL DISCS SHUFFLE est sélectionné,
vous pouvez sélectionner la lecture répétée de
TITLE ou TRACK seulement.
Pour annuler la lecture répétée
Appuyez sur CLEAR.
FR
Page 95

Conseils
• Vous pouvez activer la lecture répétée pendant
l’arrêt de la lecture. Après avoir sélectionné
“REPEAT”, appuyez sur nN. La lecture répétée
commence.
• Vous pouvez rapidement afficher le type de
répétition. Appuyez simplement sur REPEAT.
Remarques
• La lecture répétée n’est pas possible pendant la
lecture PBC de VIDEO CD (page 25).
• La lecture répétée de certains DVD n’est pas
possible.
• Si vous sélectionnez l’option de répétition DISC
(avec ou sans lecture de programme), le programme
se répète 5 fois au maximum.
Affichage des informations
concernant le disque
Vérification du temps de lecture et du temps restant
Vous pouvez vérifier le temps restant de la
plage actuelle ou celui du disque.
Lorsqu’un disque DVD/CD TEXT est inséré,
les informations enregistrées sur le disque,
titres ou autres, peuvent être affichées.
Lorsque des disques DVD/CD TEXT sont
détectés, l’indication “DVD TEXT” (ou “CD
TEXT”) apparaît à l’écran.
Utilisation de l’afficheur du
panneau avant
Appuyez sur DISPLAY.
A chaque pression de la touche, l’affichage
change comme suit:
Pendant la lecture normale
DVD:
Temps de lecture du titre actuel t Temps
restant du titre actuel t Temps de lecture du
chapitre actuel t Temps restant du chapitre
actuel t Texte*
(pendant 8 secondes) t Type d’effet
VIDEO CD (sans fonctions PBC) ou CD:
Temps de lecture et numéro de la plage actuelle
t Temps restant de la plage actuelle t
Temps de lecture du disque t Temps restant
du disque t Texte*
(pendant 8 secondes) t Type d’effet
VIDEO CD avec fonctions PBC (Ver. 2.0):
Temps de lecture de la scène actuelle*
Texte*1 t Indication de l’heure (pendant 8
secondes) t Type d’effet
1
t Indication de l’heure
1
t Indication de l’heure
2
t
DVD/VIDEO CD/CD
voir page suivante
29
FR
Page 96

Vérification du temps de lecture et du
temps restant (suite)
Lorsque la lecture est à l’arrêt
DVD:
Nombre total de titres*
disque*1 t Indication de l’heure (pendant 8
secondes) t Type d’effet
VIDEO CD ou CD:
Nombre total de plages et temps total de
3
lecture*
t Titre du disque*1 t Indication de
l’heure (pendant 8 secondes) t Type d’effet
*1Avec les DVD/CD TEXT seulement (certains
caractères ne pourront pas être affichés
correctement). Avec certains disques, le texte
DVD/CD n’apparaîtra pas et “NO TEXT” sera
affiché.
*2Peut ne pas apparaître sur les images fixes, etc.
*3Lorsque la lecture est arrêtée et “RESUME”
apparaît sur l’afficheur du panneau avant, le point
où la lecture a été arrêtée est indiqué.
3
t Nom du titre du
x Pendant la lecture d’un VIDEO CD
(avec fonctions PBC)
•**:
**
Temps de lecture de la scène actuelle
x Pendant la lecture d’un VIDEO CD
(sans fonctions PBC) ou d’un CD
•T **:
**
Temps de lecture de la plage actuelle
•T–**:
**
Temps restant de la plage actuelle
•D **:
**
Temps de lecture du disque actuel
•D–**:
**
Temps restant du disque actuel
Pour désactiver le menu de
commande
Appuyez plusieurs fois de suite sur DVD
DISPLAY jusqu’à ce que le menu de
commande soit désactivé.
30
Utilisation de l’affichage OSD
1 Appuyez sur DVD DISPLAY pendant la
lecture.
Le menu de commande apparaît.
2 Appuyez plusieurs fois de suite sur
DISPLAY pour changer les
informations horaires.
L’affichage et les types d’informations
horaires qui peuvent être changées
dépendent du disque lu.
)
1 2 ( 2 7
)
1 8 ( 3 4
T
1 : 3 2 : 5 5
Type de
Informations
horaires
x Pendant la lecture d’un DVD
•T **:**:
**
Temps de lecture du titre actuel
•T–**:**:
**
Temps restant du titre actuel
•C **:**:
**
Temps de lecture du chapitre actuel
•C–**:**:
FR
**
Temps restant du chapitre actuel
disque
DVD
Vérification des informations
concernant le disque
Appuyez plusieurs fois de suite sur
DISPLAY pendant la lecture d’un DVD ou
d’un TEXT-CD.
Les informations “TIME/TEXT” apparaissent
dans la partie supérieure de l’écran. Lorsque le
temps écoulé du chapitre ou de la plage est
indiqué, les informations apparaissent dans la
partie inférieure de l’écran.
TIME/TEXT
Remarques
• Le texte du DVD affiché est en anglais seulement.
• Si aucun texte n’est enregistré sur le disque, “NO
TEXT” s’affiche.
• Si la pression de DISPLAY n’est pas de 2 secondes,
l’affichage disparaît.
T
0 1 : 3 2 : 5 5
BRAHMS SYMPHONY NO – 4
Page 97

Vérification des informations concernant la lecture
— ADVANCED
(DVD seulement)
Vous pouvez voir d’autres informations telles
que le débit binaire ou la couche lue du disque.
Pendant la lecture d’un disque, le débit binaire
approximatif de l’image est toujours indiqué en
Mbps (Mégabits par seconde) et le débit binaire
du son en Kbps (Kilobits par seconde).
1 Appuyez sur DVD DISPLAY pendant la
lecture.
Le menu de commande apparaît.
2 Appuyez plusieurs fois de suite sur
v ou V pour sélectionner
“ADVANCED”, puis appuyez sur
ENTER.
Les options “ADVANCED” apparaissent.
)
1 2 ( 2 7
)
1 8 ( 3 4
T
1 : 3 2 : 5 5
OFF
BIT RATE
LAYER
BIT RATE
3 Appuyez plusieurs fois de suite sur
v ou V pour sélectionner le paramètre.
Pour chaque paramètre, voir “Affichage de
chaque paramètre”.
• BIT RATE: Affichage du débit binaire.
• LAYER: Affichage de la couche et du
point relevé.
4 Appuyez sur ENTER.
Pour fermer l’écran “ADVANCED”
Sélectionnez “OFF” à l’étape 3.
Pour éteindre le menu de commande
Appuyez plusieurs fois de suite sur DVD
DISPLAY jusqu’à ce que le menu de
commande s’éteigne.
DVD
BIT RATE
05
384
kbps
Mbps
10
Affichages de chaque
paramètre
Vous pouvez afficher soit “BIT RATE” soit
“LAYER” en appuyant plusieurs fois de suite
sur DVD DISPLAY, selon ce qui a été
sélectionné dans “ADVANCED”.
BIT RATE
BIT RATE
05
384
10
kbps
Mbps
Pendant la lecture d’une bande son en MPEG:
BIT RATE
0
05
1000
10
kbps
Mbps
Le débit binaire désigne la quantité de données
vidéo/audio enregistrées sur un disque en une
seconde. Il y a d’autant plus de données
enregistrées sur le disque que le débit binaire
est élevé. En principe, lorsque le niveau du
débit binaire est élevé, il y a une grande
quantité de données, mais cela ne signifie pas
toujours que la qualité de l’image ou du son est
meilleure.
LAYER
Apparaît lorsque le DVD
a deux couches
Ce paramètre indique le point de lecture
approximatif du disque. Lorsque le DVD a
deux couches, la couche actuellement lue est
indiquée (“Layer 0” ou “Layer 1”). Pour le
détail sur les couches, voir page 62 (DVD).
Son
Image
Son
Image
DVD/VIDEO CD/CD
31
FR
Page 98

Réglage du son
Changement du son
Si le DVD contient des pistes multilingues,
vous pouvez sélectionner la langue souhaitée
pendant la lecture du DVD. Si le DVD a été
enregistré dans plusieurs formats audio (PCM,
Dolby Digital, audio MPEG ou DTS), vous
pouvez sélectionner le format pendant la
lecture du DVD.
Avec les CD ou VIDEO CD, vous pouvez
sélectionner le son de la voie droite ou gauche
et écouter le son de la voie sélectionnée par les
enceintes droite et gauche (dans ce cas, l’effet
stéréo est perdu). Par exemple, pendant la
lecture d’un disque comportant une partie
vocale sur la voie droite et une partie
instrumentale sur la voie gauche, vous pouvez
sélectionner la voie gauche et écouter
seulement les instruments par les deux
enceintes.
1 Appuyez sur DVD DISPLAY pendant la
lecture.
Le menu de commande apparaît.
2 Appuyez plusieurs fois de suite sur
v ou V pour sélectionner “AUDIO”,
puis appuyez sur ENTER.
3 Appuyez plusieurs fois de suite sur
v ou V pour sélectionner le signal
audio souhaité.
x Pendant la lecture d’un DVD
Le choix de langues dépend du DVD. Les 4
chiffres affichés représentent le code de
langue (voir la liste des codes de langues à
la page 64). Si la même langue est indiquée
plusieurs fois, c’est que le DVD est
enregistré dans plusieurs formats audio.
x Pendant la lecture d’un VIDEO CD ou
CD
• STEREO: Son stéréo ordinaire.
• 1/L: Son de la voie gauche (mono).
• 2/R: Son de la voie droite (mono).
4 Appuyez sur ENTER.
Pour éteindre le menu de commande
Appuyez plusieurs fois de suite sur DVD
DISPLAY jusqu’à ce que le menu de
commande s’éteigne.
Conseil
Vous pouvez sélectionner “AUDIO” directement en
appuyant sur AUDIO de la télécommande. A chaque
pression de la touche, le paramètre change.
Remarques
• Il n’est pas possible de changer de son avec les
disques enregistrés dans un seul format audio.
• Pendant la lecture de DVD, le son peut changer de
lui-même.
Affichage des informations
audio concernant le disque
(DVD seulement)
Lorsque vous sélectionnez “AUDIO”, les voies
reproduits sont indiqués à l’écran.
Par exemple, dans le format Dolby Digital,
plusieurs types de signaux, monophoniques à
5.1 canaux, peuvent être enregistrés sur un
DVD. Selon le DVD, différents nombres de
voies peuvent être enregistrées.
Format audio actuel*
)
1 2 ( 2 7
)
1 8 ( 3 4
T
1 : 3 2 : 5 5
1: ENGLISH
Format du programme de lecture actuel**
* “PCM”, “MPEG”, “DTS” ou “DOLBY DIGITAL”
s’affiche.
Pour “DOLBY DIGITAL”, les voies de la plage lue
sont indiquées par des nombres comme ci-dessous:
Dolby Digital 5.1 canaux:
DOLBY DIGITAL
Composante avant 2 +
Composante centre 1
PROGRAM FORMAT
DOLBY DIGITAL 3/2.1
LRC
LS RS
Composante arrière 2
3 / 2 . 1
Composante LFE (effet
basse fréquence) 1
DVD
LFE
32
FR
Page 99

**
Les lettres dans l’affichage de format de programme
correspondent aux composantes sonores suivantes:
L: Avant (gauche)
R: Avant (droite)
C: Centre
LS: Arrière (gauche)
RS: Arrière (droite)
S: Arrière (mono): La composante arrière d’un
signal traité en Dolby Surround ou d’un
signal Dolby Digital.
LFE: LFE (Effet basse fréquence)
Exemples d’affichages:
• PCM (stéréo)
PROGRAM FORMAT
PCM 48kHz 24bit
• Dolby Surround
PROGRAM FORMAT
DOLBY DIGITAL 2/0
DOLBY SURROUND
L RC
Remarque
Lorsque le signal contient des composantes des
signaux arrière, telles que LS, RS ou S, l’effet DSP
est accentué (page 48).
DVD/VIDEO CD/CD
S
• Dolby Digital 5.1 canaux
Lorsqu’une composante de signal LFE est transmise,
“LFE” est entouré d’un cadre à lignes continues.
Lorsque la composante du signal LFE n’est pas
fournie, “LFE” est entouré d’un cadre en pointillés.
PROGRAM FORMAT
DOLBY DIGITAL 3/2.1
LRC
LFE
LS RS
• DTS
“LFE” est entouré d’un cadre à lignes continues
même si le signal LFE n’est pas transmis.
PROGRAM FORMAT
DTS 3/2.1
LRC
LFE
LS RS
33
FR
Page 100

Visionnage de films
Recherche de titre/ chapitre/plage/index/ scène
Pour localiser une scène en
utilisant le code horaire
(TIME SEARCH)
(DVD seulement)
34
Vous pouvez localiser un passage d’un DVD
d’après le titre ou le chapitre, et un passage
d’un VIDEO CD ou CD d’après la plage,
l’index ou la scène. Les titres et les plages sont
désignés par des numéros uniques, qui peuvent
être sélectionnés. Vous pouvez aussi localiser
un passage en indiquant le code horaire (TIME
SEARCH).
1 Appuyez sur DVD.
2 Appuyez sur DVD DISPLAY.
Le menu de commande apparaît.
3 Appuyez plusieurs fois de suite sur
v ou V pour sélectionner la méthode
de recherche.
x Pendant la lecture d’un DVD
“TITLE”, “CHAPTER” ou “TIME/TEXT”
Sélectionnez “TIME/TEXT” pour TIME
SEARCH.
x Pendant la lecture d’un VIDEO CD
“TRACK” ou “INDEX”
x Pendant la lecture d’un VIDEO CD
avec fonctions PBC
“SCENE”
x Pendant la lecture d’un CD
“TRACK” ou “INDEX”
4 Appuyez sur ENTER.
)
“
”
est remplacé par
** (**
Le nombre entre parenthèses indique le
nombre total de titres, chapitres, plages,
index ou scènes.
“--
(**)
5 Appuyez plusieurs fois de suite sur
v ou V, ou appuyez sur les touches
numériques, pour sélectionner le
numéro de titre, chapitre, plage, index
ou scène recherché.
En cas d’erreur
Appuyez sur CLEAR pour annuler le
nombre, puis sélectionnez un autre nombre.
6 Appuyez sur ENTER.
La lecture commence au nombre
FR
sélectionné.
1 A l’étape 3, sélectionnez “TIME/TEXT”.
“T **:**:**” (temps de lecture du titre
actuel) est sélectionné.
2 Appuyez sur ENTER.
“T
**:**:**
”
est remplacé par
“T --:--:--”.
3 Indiquez le code horaire par les
touches numériques, puis appuyez sur
ENTER.
Par exemple, pour localiser la scène à 2
heures, 10 minutes et 20 secondes du début
du disque, indiquez simplement “2:10:20”.
Pour éteindre le menu de commande
Appuyez plusieurs fois de suite sur DVD
DISPLAY jusqu’à ce que le menu de
commande s’éteigne.
Remarque
Les numéros de titre, chapitres ou plages affichés sont
les mêmes que ceux qui sont enregistrés sur le disque.
”.
 Loading...