

Page 1

MiniDisc Deck
3-759-467-21(1)
Operating Instructions
MDS-S35
1995 by Sony Corporation
Page 2
WARNING
To prevent fire or shock hazard,
do not expose the unit to rain
or moisture.
This s\'nilx>l is intended tt> nlerl the user
to the presence of uninsulated
"dangerous udtage" within the product':enclosure that ma\ be t>t ^utticii’nt
magiTitude \o anwVUnte a rwk ol eleclric
shiK'k to per^oiw.
This sviTilx)! is intended to alert the user
ttf the presence ot important tfperating
and maintenance (servicing) instructions
in the literature accompaming the
appliance.
INFORMATION
I hi-^ e<.|ui}''ment h.is been te-^tt'd and
found to ct'tnpK with the limits Un- a
C las>^ b digital di’\ ice, pursuant t<' I'art I
of the ['XT’ Rules,
rhese liniits are designed to pvo\ ide
reasonable prote'Ctiem against harmful
mterterence' in a residential installation.
I his i\|uif'’iiu'nt geiu'rates, uses, and can
radiate radio tret]uenc\' energ\' and, it not
msfalled and iwed in accordance with the
instrucliems, ma\’ cause harmtul
mterterence to radio ccMnmunications.
I hn\ e\ er. there is no guarantee that
interference will not occur in a particular
inslallatKm. It this equipment dries cause
harmful interference to radio or television
reception, which can be determined bv
turning the equipment riff and on, the
user is encouraged to tr\’ to correct the
interlerence b\' one cir mifre ot the
friilowing measures:
- Rernient or rekicate the recei\’ing
antenna.
- increase the separatirin between
the equipment and receix er.
- C'iinnect the equipment intr» an
outlet (in a circuit different froni
that t(i which the receix'er is connected.
- Consult the dealer or an
experienced radio/TV technician
for help.
Welcome!
1 hank \ oil tor puivhasing the Sonv
\linil)isi. I\'(k. Ix'lore (iiir'rating the
deck, please tx-ad this manual thciroughlv
and retain it tor future reference.
About This Manual
Th(‘ mstriktions in this manual arc' fiir
model
Conventions
• C.'ontr('ls in tlu' instructions nre those
(>n the deck; these mav, howex’er, be
substituted b\’ amtrols (>n the renxite
that are similarK' named or, when
different, appear in the instructions
within brackets,
• 'I he lolk'wing icons are used in this
nxmual:
Indicates a procedure that
requires use of the remote.
Indicates tips for making the task
easier and hints.
Caution
The use of optical instruments with this
product will increase eve hazard.
Owner's Record
The model and serial numbers are located
on the rear of the unit. Record the serial _
number in the space prox ided belox\’.
Refer to these numbers whenex'er x’ou call
upon vour Sonv dealer regarding this
product.
Model .No. MDS-S33
Serial No.
_______________
CAUTION
You are cautioned that anv changes or
modifications not expressly approx-ed in
this manual could x'oid vour authoritv to
(operate this equipment.
IN NO HVhNT SI lAhl. SBLLEK Bh
IdABlT: FOR ANY DIRF.CT,
INC'IDHN FAR OR CONSRQUENTl AL
DAMAOHS OF ANY NATURFR OR
LOSSES OR rxrf:nsf:s RESUL ITNC
FROM ANY DEFFX TIVE PRODUCT
OR FI IE USE OF ANY OXhDUC F.
Page 3

Table of contents
Getting Started
Unpacking......................................................................................................................4
r !• u'king Up the System ..............................................................................................4
Recording on MDs
Recording on nn MD.....................................................................................................5
Notes on Recording ..................................................................................................... 7
Useful Tips for Recording ............................................................................................8
Adjusting the Recording Level......................................................................................8
Marking Track Numbers While Recording (Track Marking).......................................9
Sv'iichro-Recording With a Sony CD I’laver...............................................................10
Playing MDs
Playing an MD..............................................................................................................11
Using the Display..........................................................................................................12
Locating a Specific Track.............................................................................................13
Locating a Particular Point in a Track..........................................................................13
Playing Tracks Repeatedly........................................................................................... 14
Playing in Random Order (Shuffle Play)......................................................................14
Creating Your Own Programme (Programme Play)
Repeating a Specific Portion (A-B Repeat)..................................................................16
, Useful Tips When Recording From MDs to Tape
...................................................
..........................................................
15
16
Editing Recorded MDs
Notes on Editing...........................................................................................................17
Erasing Recordings (Erase Eunction)...........................................................................17
Dividing Recorded Tracks (Divide Eunction)..............................................................18
Combining Recorded Tracks (Combine Function)
Moving Recorded Tracks (Move Function) ...............................................................20
Labelling Rerordings (Title Function)........................................................................21
Additional Information
Precautions...................................................................................................................23
Display Messages........................................................................................................23
System Limitations .....................................................................................................24
Troubleshooting.......................................................................................................... 25
Specifications...............................................................................................................25
Beep Output During Operations..................................................................................25
Guide to the Serial Copy Management System...........................................................27
Index....................................................................................................................................29
......................................................
19
Page 4

Getting Started
Unpacking
Clu'L'k that \ ou rocei\'cd tho tolKnving items:
• Audio eonneetini; cords (2)
• Remote commander (remote) (KM-D4M) (I)
• Sony SUM-o (NS) batteries (2)
Inserting batteries into the remote
You can control the recorder using the supplied
remote.
Insert two R6 (size AA) batteries by matching the +
and ~ on the batteries. When using the remote, point
it at the remote sensor IE on the deck.
Hooking Up the System
Overview
This section describes how to hook up the MD deck to
an amplifier or other components such as a CT3 player
or DAT deck. Be sure ti' turn off the power of each
component before crmnection.
When to replace batteries
With normal use, the batteries should last for about six
months. When the remote no longer operates the deck,
replace all the batteries with new ones.
Notes
• Do Tiot leave the remote near an extremely hot or humid
place.
• Do not drop any foreign object into the remote casing,
particularly when replacing the batteries.
• Do not expose the remote sensor to direct sunlight or
lighting apparatuses. Doing so may cause a malfunction.
• If you don't use the remote for an extended perir>d of time,
remove the batteries to avoid possible damage from battery
leakage and corrosion.
'Signal flow
What cords will I need?
• Audio connecting cords (supplied) (2)
' Optical cable (not supplied) (2)
■dh-------------------------
Page 5
Getting Started
Hookups
Connecting the deck to an amplifier
Connect the amplifier to the hlNi' IN,/C')UT jacks usiiii; the
audio coni’tectiiv^ ct>rds (supplied), making sure tti match the
colour-coded cord the appropriate jacks on the
components: red (right) to red and white (left) to white.
Be sure to make connectimis firmlv tc^ prex ent huin and
noise.
MD deck
LINE
Connecting the deck to a digital component such as a CD player, DAT deck, digital amplifier, or another MD deck
Connect the component through the DIGITAL l.N/OUT
connectors using the optical cable (not supplied). Take ott
the cap and plug in the optical cable.
Amplifier
TAPE / MD
Connecting the AC power cord
Conned the AC pi)wer cord to a wall outlet or ti' the
outlet ot a timer.
Note
With the exception ot a timer outlet, do not eonneet the AC
power ei'rd to a swithed outlet.
Where do I go next?
Ninu i/oii'ir mail/ to i/sc t/oiir dock.
Before usi}if; the MD deek, turn 0}i the iiiiifilifier and eelect
the MD deek u’ith the soni ee eeleelor on the amplifier.
MD deck
DIGITAL
IN OUT
Signal flow
Notes
• Digital programme sources vedth ditferent sampling
trequencies cannot be recorded through the digital iiipuL
jack.
Only CD, MD (premastered) and DAT sources with a
sampling frequency ot 44.1 kHz can be recorded through the
digital input connector. "Din Unlock" appears in the
display when you attempt to record digital programme
sources with a sampling trequency ditferent from that of the
MD (such as 32- or 43-kHz DAT or BS). To record these
programme srrurces on an MD vou must connect them
through the analogue LINE IN jacks and set INPUT to
ANALOG.
• If "Cannot Copy" appears in the display, recording through
the digital jack is not possible.
In this case, record the programme source through the LINE
IN and OUT jacks with INPUT set to ANALOG.
• When recording through the DIGITAL IN connector, you
cannot adjust the recording lewd.
Digital component
C_ DIGITAL
IN
OUT
.......
\?/
Page 6
Recording on MDs
Recording on an MD
lu'toro \ (HI begin, make sure \ ou ha\ e een reeth' and
tiniiK' eonneeted the deek to an audio component such
as an amplitier or Cdi) plaver as indicated on page a.
Set INl’LiT according to the input terminal
connected to tlie programme source.
When you want to record through Set INPUT to
LINE (ANALOU) IN
Dlc;ri AL IN niCilTAL
ANALOG
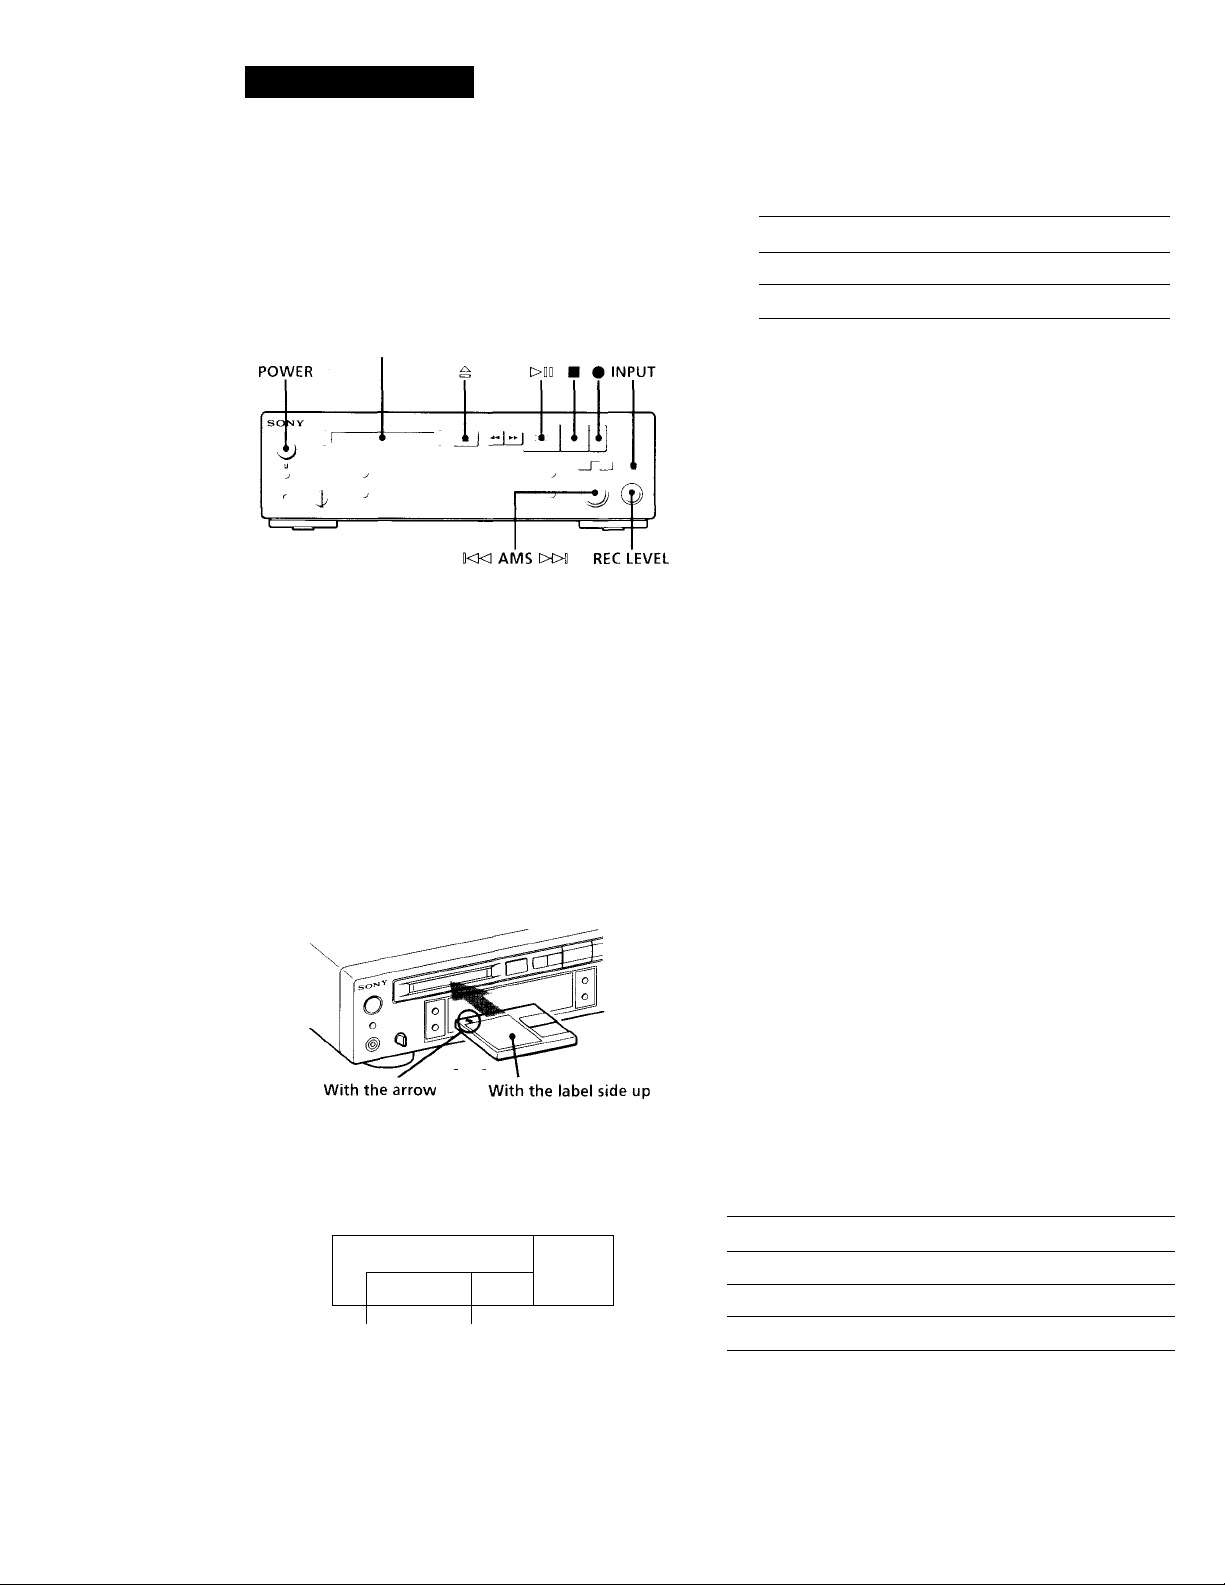
Disc compartment
1 Turn on the amplifier and the programme source,
and set the prt'gramme selector on the amplifier to
the programme source.
2 Press POVVFR to turn on the deck.
The ON/STANDBY indicator goes oft.
3 Insert the recordable MD with the label side up and
the arrow pointing toward the opening into the disc
compartment until the deck grips it.
If YOU insert the MD while the deck is off, the deck
will turn on automatically and "Welcome" will
appear in the display.
5 Locate the position on the MD where you want to
start recording.
• l o record on a new (blank) recrrrdable MD, skip
this step, and go to Step h.
• To start recording from the end of the last
recorded traek, go to Step h, or turn AMS (or press
or ►►!) until "Hnd" appears.
• To record o\'er an existing track, turn AMS (or
press or ►►!) until the number of the track
to be recxrrded o\ er appears.
6 Press •.
The deck is now ready for recording.
• If you are recording from the end of the last
recorded track, or using a new recordable MD,
"New" alternates with the remaining time
indication in the display.
• If you are recording ov'er an existing track,
"TRACK" flashes and "Overwrite" alternates with
the remaining time indication in the display.
7 When you've set INPUT to ANALOG in Step 4, turn
REC LEVEL to adjust the recording level. (The
fourth dot is satisfactory for most purposes.
I low'ever, for a more precise adjustment, see
"Adjusting the Recording Level" on page 8.)
pointing this way
The total number of recorded tracks, total recorded
time, and music calendar without a grid appear in
the display.
DISC
1 2 3
,3Tr, ,18m 3 6 s,
i =.
Total number of Total recorded Music calendar
recorded tracks time without a grid
8 Press MD (or ►) to start recording.
9 Start playing the programme source you want to
record.
10 After finishing; press ■ to stop recording. Then
press = to remove tlie MD or press POWER to
cliange the deck to standby.
To
Pause*
Resume recording after pause
Remove the Mf4
VVhumw’or yoe pause recording, the track number increases
bv one. h’or example, it vxni paused recording while
recording on track 4, the track nuniber increases by one and
rxvording continues on the new track when restarted.
Press
Mt (or
>011
(or ► or
ZN
II )
II )
Page 7
Recording on MDs
To protect a MiniDisc against accidental erasure
lo nic'iko \l impossible record on an MO, slide the tab in the
direction i>l arrow , opening; the ->lot. I o alii,n\’ recording, liosi-
the slot.
Rear of the disc
Record-protect tab
'Q' You can start recording from the middle of a recorded
track in Step 5
Press I>DD (or ►) to start playback, press 1>0D (or
where vcm want tc^ start recording, and then do the
procedure starting from Step 6 on page 6, I lowewr, you
will not be able to record from the middle ot a recorded
track it "Id^CiRAM" or "SHUFFLE” appears in the
display.
II )
• When recording from source connected through 1 l\'F
(ANAI.tx:) l\ with INPUT at ANALOG, and "LiA'F.LS^’\C" does not light up (sot- "Marking Track Numbers
While Keci>rding'' on page “-Ь i>r when ivcordiiig fri>m I )/\ !
connected thix'ugh DIGITAL IN with INPU i at DIGH AL:
The source will be recorded as a single track, ^'ou can di\’idt.'
the track afterwards using the Di\ ide l-uncticai (see
"Dix'iding Rect)i'ded Tracks" (>n page LS) or mark track
numbers during recording by using the Track Marking
I'unction on page
It "LFVI-.L SYNC" appears in the display, the deck
automaticalK' marks track numbers when recording analog
source or digital recording of DAT (see "Marking track
numbers automatically" on page ‘-h.
If "TRACK" flashes in the display
The deck is recording twer an existing track. "TRACK" lights
continuously when the recorder reaches the end ol the
preyiously recorded portion.
When "TOC" flashes in the display
The deck is currently updating the Table of Contents O'OC).
Do move the recorder or pull out the AC power cord.
Changes to an MD made through recording are sawed only
vyhen you update the TOC by ejecting the MD or changing the
deck to standby by pressing POWER.
Notes on Recording
If "Protected" appears in the display
The MD is record-protected. Close theAlot to record on the
disc (see "To pnTect a N4iniDisc against accidental erasure" on
this page).
If "Din Unlock" appears in the display
• The programme source is not connected to DIGITAL IN
even though you've selected DIGITAL in Step 4 or the
sampling frequency of the programme source does not
match that of the MD deck (44.1 kl Iz). To continue, connect
the programme source through DIGITAL IN or select
ANALOG in Step 4 to record through LINE (ANALOCA IN.
• The digital signal has been interrupted (stopped) while you
were recording. To continue recording, restart the digital
programme source. To stop recording, press ■ on the MD
deck.
Depending on source being recorded, track numbers are marked in following ways:
• When recording from a CD or MD w ith INPUT at DIGITAL
and the source connected thixfiigh DlCilTAL IN;
The deck automaticalK' marks track numbers in the same
sequence ,is the original. If, however, a track is repeated tw'o
or more times (e.g. b\ single-track repeal play) or two or
mori' tracks with the same track number (e.g. from different
MDs or CDs) are played, the track or tracks are recorded as
part ot a single, continuous track with a single track number.
It the soLirci' is an .MI), track numbers may not be marked for
tracks of k‘ss th.m 4 st.'eoiKls.
The MD deck uses the SCMS (Serial Copy Management System on page 27)
MDs recorded through DIGITAL IN cannot be copied onto
other MDs through DIGITAL IN.
Page 8
Recording on MDs
Useful Tips for Recording
SONY
sj
.................................................
__
>10 DISPLAY
Checking the remaining recordable time on the MD
• When you press DISPLAY while recording, the
remaining recordable time on the MD appears.
• When you press DISPLAY repeatedly while the
recorder is stopped, the display changes as follows:
total recorded time, remaining recordable time on
the MD, disc name (see page 12).
If "Auto Cut" appears in the display
The Auto Cut Function has been activated. This
happens when there is no sound input for more than
30 seconds while INPUT is at DIGITAL and the source
connected through DIGITAL IN. The deck changes to
recording pause and the 30 seconds of silence are
replaced by a blank of about 3 seconds.
L_J
1.1.Ì
1 rl
' lUi o
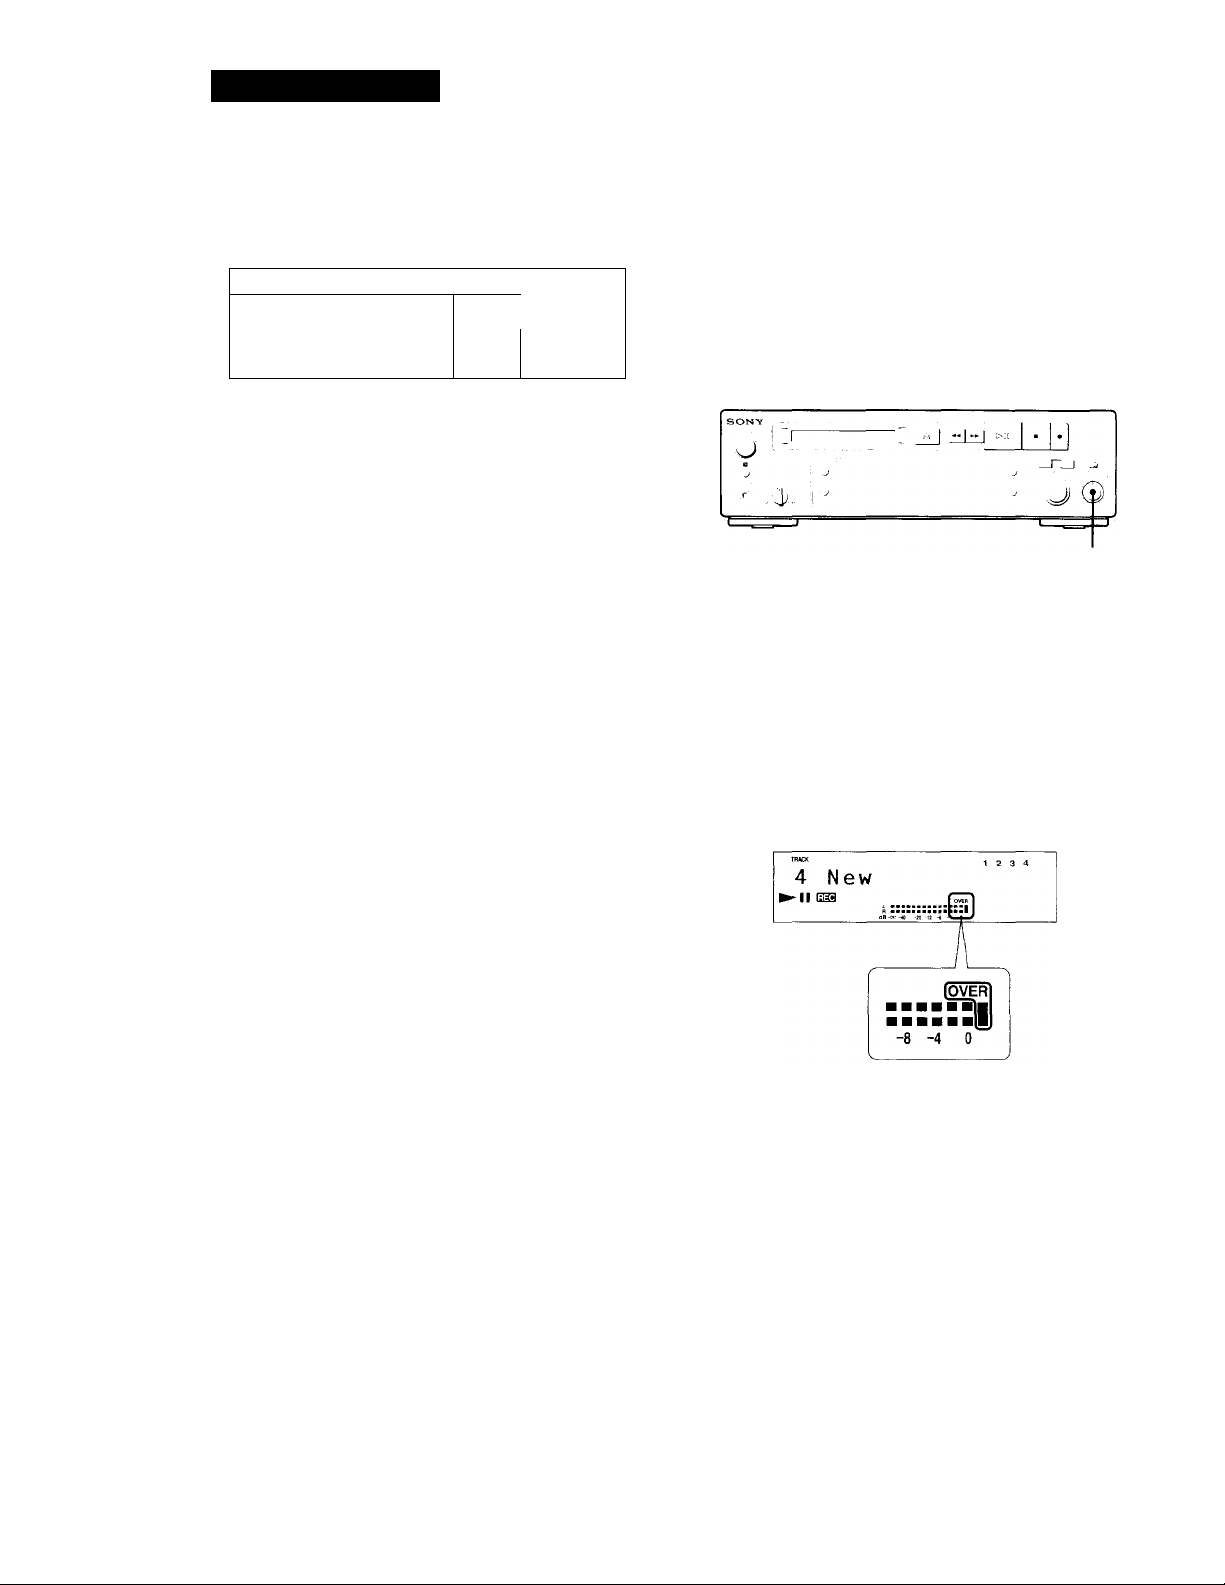
Adjusting the Recording Level
When recording a sound source while INPUT is at
ANALOG and the source connected through LINE
(ANALOG) IN, use RFC I.FV'EL to adjust the
recording level before starfing recording.
You cannot adjust the recording level during digital
recording.
REC LEVEL
1
Do Steps 1 to (r in "Recording on an MD" on page 6.
2
Play the portion of the programme source with the
strongest signal level.
3 While mcanitoring the sound, turn REC LEVEL to
adjust the recording level so that the peak level
meters reach their highest point without turning on
the OVER indication. Occasional lighting of
"OVER" is acceptable.
If "Smart Space" appears in the display
The Smart Space Function has been activated. This
happens when there has been an extended silence (of
not more than 30 seconds) between two input signals
when INPUT is at DIGITAL and the source connected
through DIGITAL IN. The Smart Space Function
instantaneously replaces the silence with a blank of
about 3 seconds even as the deck continues recording.
Playing back tracks just recorded
Do this procedure to immediately playback tracks that
have just been recorded.
Press I>DB (or ►-) immediately after stopping
recording.
Playback starts from the first track of the material just
recorded.
To play from the first track of the MD after recording
1 Press H again after stopping recording.
2 I’ress >DD (or ►).
Playback starts from the first track of the ML).
4 Stop playing the programme source.
5 To start recording, do the procedure starting from
Step 8 of "Recording on an MD" on page 6.
8
Page 9
Marking Track Numbers While Recording (Track Marking)
You can mark track numbers either manuallv t>r
automaticallv. Bv marking track numbers at specific
points, \’ou can c]Liickl\' locate the points later using the
AMS Functit>n or Editing Functions.
Recording on MDs
To cancel Automatic Track Marking
1 I’ress FDIT/NO during recording or recording pause.
"1 ew'lSvnc f" appears in the display.
2 I’ressVFS.
3 I’ress HniT/\0.
"1 .eyelSx'ncOFF" appears in the display.
* rhe signal level most remain krw hrr 2 trr more seconds
betöre a new track number is written.
EDIT/NO
YES
Marking track numbers manually (Manual Track Marking)
You can mark track numbers at any time while
recording on an MD.
Press 9 at the place you want to add a track mark
while recording.
Marking track numbers automatically (Automatic Track Marking)
The deck adds track marks differently in the following
cases:
• When recording from CDs or MDs with INPUT at
DIGITAL and the source connected through
DIGITAL IN:
The deck marks track numbers automatically. When
you record from a CD or MD, the track numbers are
written as they are found on the original.
• When recording with INPUT at ANALOG and the
source connected through LINE (ANALOG) IN, or
when recording from DAT with INPUT at DIGITAL
and the DAT connected through DIGITAL IN:
The deck marks a new track number wlienever the
signal level drops and rises to a certain point”
(Automatic Track Marking). If "LEVEL-SYNC" does
not light up, set the LewelSync to ON as follows:
When you want to mark track numbers after you've done the recording
Use the Divide Function (see "Dividing Recorded Tracks"
on page.18).
Note
It vou turn off the deck or disconnect the AC power cord, the
deck will recall the last setting (Le\ elSvnc ON or OFF) of the
Automatic' Track Marking Function the next time vou turn on
the deck.
1 Press EDlT/NO to display "LevelSync ?"during
recording or recording pause.
Press YES twice to display "l.,e\ elSync ON."
"EEVEE-SYNC" appears in the display.
Page 10

Recording on MDs
Synchro-Recording With a Sony
CD Player r
B\ coniK'clin;^ \ (lur dock to a Sonv CD plavor or 1 li-l i
Coniponont S\ stem, \ ou can oasilv dub CDs onto MIX
Lisinn tlio CD SMichro buttons on tiu' remote. If viuir
deck is connected to a Son\ CD pla\ er bv the optical
cable throuc;li DICITAk IN (digilal input), track
numbers are automaticallv marked as appear on the
original regardless r'f whether "l ,e\'elSvnc C>N" or
"I,e\ elS\’ncOFI'" is selected. If vour deck is connected
to a Sonv CD plaver by audio connecting cords
through LINE (A.NALOG) IN (analogue input), track
numbers are automaticalh’ marked when vrui select
"Le\'c'lS\ nc ON" (see "Marking Track Numbers While
Recording" on page 9).
As the same remote controls both the CD plaver and
the deck, vou mav have trouble operating both units if
they are far from each other. If vou do, place the CD
plaver close to this deck.
7 Press STOP to skip svnchro-recording
To pause recording
Pros'; STANDBY or C D PI A^ I R
l o restart recording;, press ST.AR i or C l) PI.A)'ld<
,\ new track number is created each time \'ou pause recording
You can use the remote of the CD player during synchro-recording
W’Ik'H \'oii press ■, thi' CD pl.u'or stop and the dock
pauses tor recording.
When \'ou press
pauses tor rrvording.
You can change CDs during synchro-recording
Do the following steps instead of Sigp 7 aho\ e.
1 I’ress ■ on the remote oi the CD plaver.
The deck pauses tor recording.
2 Change the CD.
3 Press ► on the remote ot the CD phwer.
Synchro-recording restarts.
II .
the CD pla\ er pauses and the deck
II .
II .
STANDBY
CD PLAYER II
1
Set the sr)urce selector on the amplifier to CD.
2
Do Steps 2 to 5 in "Recording on an MD" on page 6
to prepare the deck for recording.
3 Insert a CD into the CD player.
4 Select the playback mode (shuffle play, prr)gramme
plav, etc.) on the CD plaver.
5 Press STANDBY.
The CD plaver pauses for playing and the deck
pauses for rea)rding.
■ You can also do synchro-recording with a Sony video CD player
Using the procedure for synchro-recording with a Sonv
CD plaver, you can do synchro-recording with a Sonv
video C'D pilayer also.
To select the video CD pilaver, press button number 2
while pressing down the POWER button on the remote
before starting the procedure.
To select the CD plaver again, press button number 1
while pressing down the POWER button on the remote.
The deck is factory set to a CD plaver lor Synchrorecording.
■Q' You can check the remaining recordable time on the MD
Press DISPI .AY (see page 8).
10
i’ress STAlCr.
The deck starts recording and the CD plaver starts
playback.
The track number and elapsed recording time of the
track apipear in the display.
If the CD player does not start playing
Some C D plavc-r morlels mav not respond when voti pass
ST.AR I on the rr'inote ot the dry k. Press
of tlu' ( Í) plaver mstrcul
II
on the remofr'
Page 11

Playing MDs
Playing an MD
Befon' \ iHi begin, iviiike sure wni hux e conneeted [he
deck to an amplifier correctlv and firmix' as indicated
on page b.
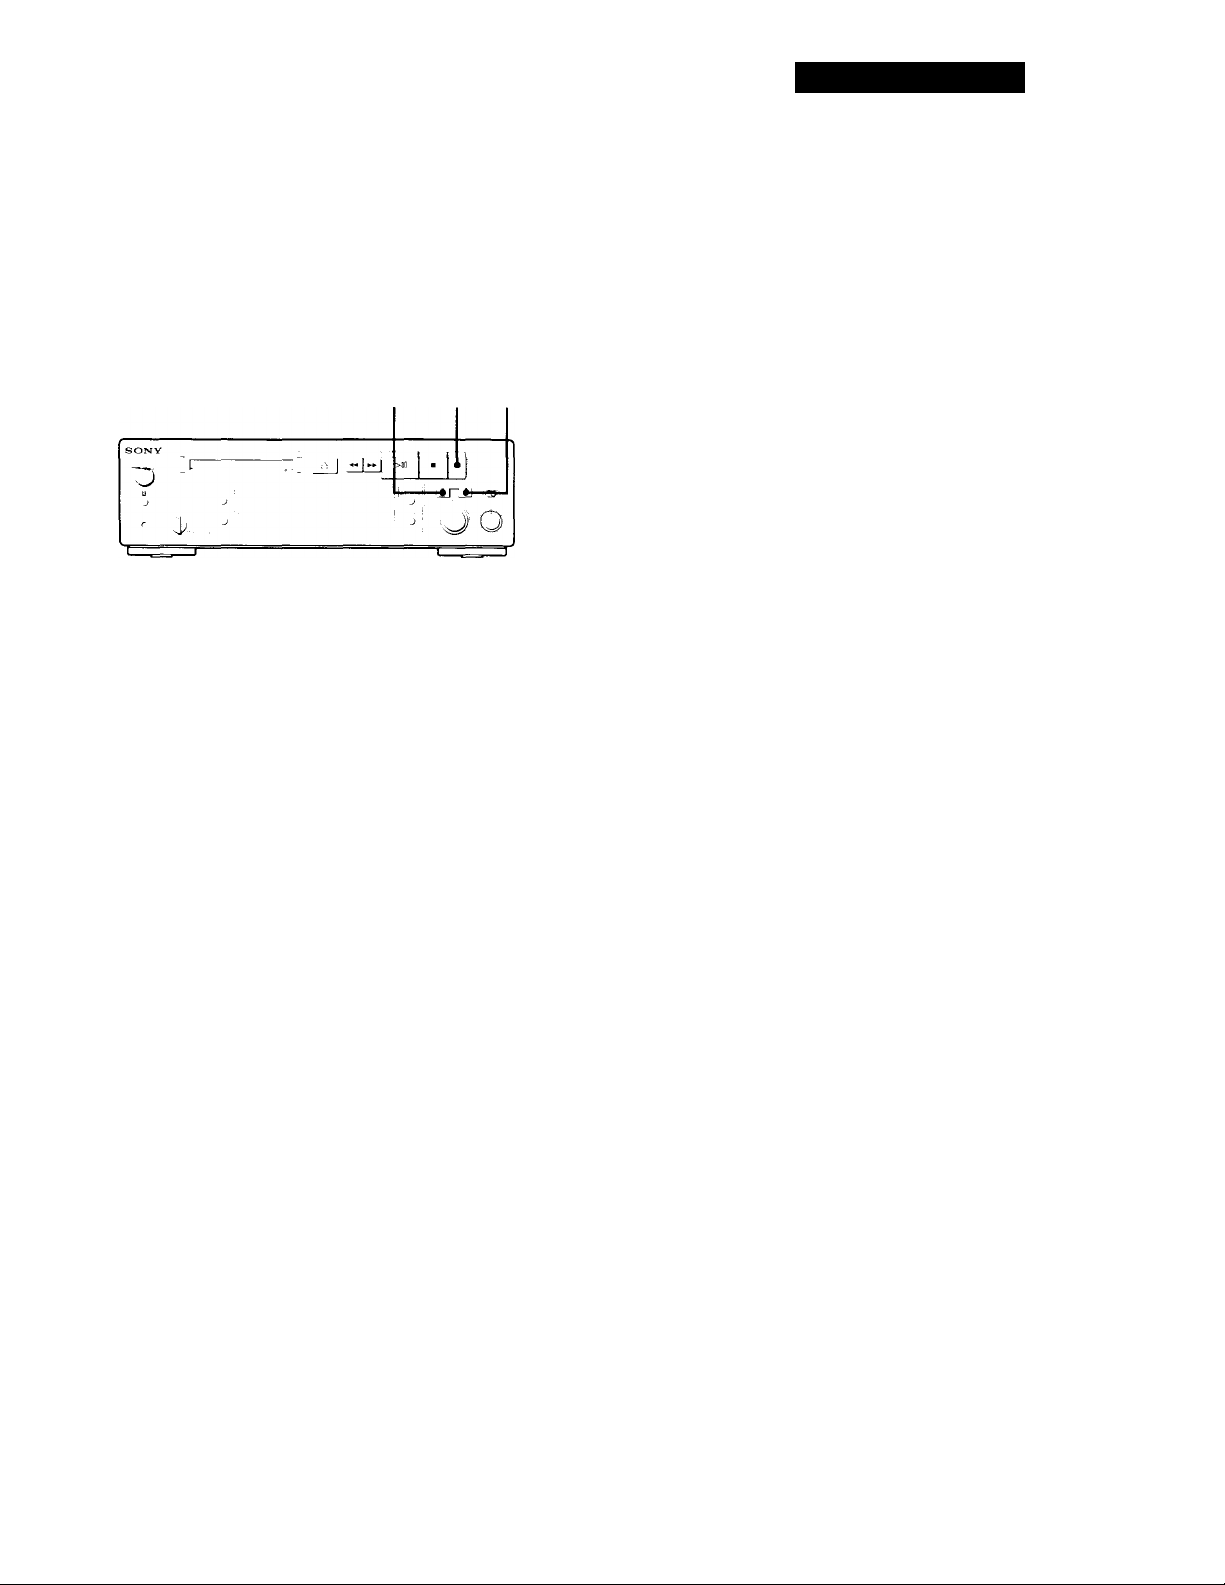
POWER Disc compartment
ME
If the total track number exceeds 2h, ► appears to
the right x)t number 25 in the music calendar,
l o label a recordable disc and its tracks, sex'
"l abelling Recx'rdings" on page 21.
4 Press >Dfl (or ►).
file MD starts playing.
The current track number, track title (if labelled),
and elapsed playing time of the current track light
up m the display.
To stop playback
1 Turn on the amplifier and set the source selector to
MD deck.
2 Press POWER to turn on the deck.
The ON/STANDBY indicator goes off.
3 Insert the MD with the label side up and the arrow-
pointing toward the opening into the disc
compartment until the deck grips it.
If you insert the MD vx'hile the deck is off, the deck
will turn on automatically.
"Welcome" appears in the display.
pointing this way
The disc name appears, followed by the total
number of tracks (Tr) and total disc playing time.
A music calendar shoxving all the track numbers
appears within a grid if the MD is a premastered
disc, or xc'ithout a grid if the MD is a recordable
disc.
When you want to
raiiso
Rosiinio plav aitcr pause Press >00 (or II or ►)
iiei to the next track Turn AMS clockwise {or
Cki back to the precediiig track
Remox'e the MD Press ^
'Q' You can locate and play back a track while the deck is
stopped
1 Turn AMS (or press or ►►!) until the number of
the track you xx-ant to plnx' appears.
2 Press AMS or >00 (or ►).
*Q' When you listen with headphones
Connect the lu-adpliones to the IIHADPHONES jack. You
can adjust the x'olume with the LEVEL control.
Do the following:
Ih'ess [>0[] (or II)
press on the remote)
Turn AMS
eounterckx'kwise (or
press on the remote)
Disc name
SONGS
Total number of tracks Total disc playing time
Music calendar
J
__
'1 5T,' '68m 07s'
11
Page 12

Playing MDs
Using the Display
^\ni Clin uso the JispliU' to chock disc und track
information such as tho total track numbor, total
plaving timo of tho tracks, remaining recordable time
of tho disc, and disc name in tho display.
Checking the total track number, total disc
playing time, remaining recordable time of
the disc and the title of the disc
Each time \'ou press DISPLAY while the deck is
stopped, you can change tho display as follows:
Checking remaining time and the title of a
track
Each timo you press D1SPL,Л^ while playing an MD,
\ ou can change tho displ.n' as show n below . I he track
numbers in the music calendar disappear after tiuw are
played.
tr
Track number and playing time of the current track
02m 33s = ' « "
Press
Track number and remaining time of the current track
2 3 4 5
01m 25s =
Press
Total track number and total playing time of all
recorded tracks
15Tr 46m 08s
Press
Remaining recordable time of the disc
(Recorded MDs only)
2 7m 17s « ^ e Э ,0
The remaining recordable time of the disc is
not shown tor premastered MDs.
Press '{y
Disc name
LOVERS
Press
D:
11 12 13 14 15
11 12 13 14 15
I 2 3 4 5
6 7 8 9 10
II 12 13 14 15
1 2 3 4 5
1 2 3 4 5
Track name
DIARY
If no title is recorded, "No Name" appears
followed hy the elap>sed playing time.
Press
You can check the track name at any time while playing an MD by pressing SCROLL
Since the disphiy shows up to 12 diameters at a time, press
SCROLL again to see the rest of tlie track title it tlie title
has 13 characters or more.
I’ress SCROLL again to pause scTolling,. and again to
continue scrolling.
Note
When vou insert a new MD or turn fiff the deck and turn it on
again, the last item displaved will reappear.
If, howex er, vou disconnect the AC power cortl, the display
will show the track number and playing time ol the current
track the next time vou turn on the deck, no matter what the
last displa\' v\'as.
12
Note
When you insert a new MD or turn oft the deck and turn it on
again, the last item displayed will reappear.
If, hovvex'er, you disconnect the AC’ powtT cord, the display
will shov\’ the total track number and total playing timeol all
recorded tracks thi' next time vou turn on the deck, no matter
what the last display was.
Page 13

Playing MDs
Locating a Specific Track
You can quickK' locato am track while plavinj; a disc
b\' using AMS (.Automatic Music Sensc'r), and
number butti)ns or M.SCAN on the remote.
To locate
The next or
succeeding tracks
The current <_)r
preceding tracks
A specific track
directly' "i i
By scanning each
track for 6 seconds
(music scan)
To pause playing at the beginning of a track
Turn AMS (or press or ►►!) after pausing playback.
To go quickly to the beginning of the last track
Turn AMS counterclockwise (or press ) while the display
shows the total track number and total disc playing time (page
12).
I .
Do the following:
Turn AMS clockwise or press
repeatedly until you find the track
l urn AMS counterckickwise or press
repeatedly until you find the
track
Press number buttonsgo enter the
track number
1 Press M.SCAN before you start
playing. *
2 When you find the track you want,
press ► to start playing.
Locating a Particular Point in a
Track
^'ou Ccin also use MM and ►► to locate a particular
point in a track while plavin^^ an MD or during
playback pause.
While monitoring the
stHind
Quickly by observing
the display during
playback pause
'Q' If "OVER" appears in the display while you are
pressing ►► during playback pause
The disc has reached the end. Press MM (tfr ) or turn
AMS counterclocku’ise to go hack.
Notes
• It the disc reaches the end while you are pressing ►► during
sound monitoring, the deck stops.
• Tracks that are only a few seconds long may be too short to
scan using the search function. For such tracks, it is better to
play the MD at normal speed.
►► (forward) or M^ (backward)
and keep pressing until voii find
the pciint
►► or MM and keep pressing until
you find the point. There is no
sound output during this
operation.
'Q* When you directly locate a track with a number over 25
You must press >25 first, before entering the
corresponding digits.
Press >25 once it it is a 2-digit track number, and twice it it
is a 3-digit track number.
To enter "0/' press button ]().
Rxamples: • To play track number 30
Press >25 once, then 3 and 10.
• To play track number 100
Press >25 twice, then 1, 10 and 10.
'Q' You can extend the playing time during music scan
While thk“ deck is stopped, press .M.SCAN repeatedly until
the playing time you want (6, 10 or 20 seconds) appears in
the displny, Fach press changes the time in order ol 0 to
20, then from ft again.
13
Page 14

Playing MDs
Playing Tracks Repeatedly
^ ou c.in pla\ tracks rcpoatodh’ in am pla\ motlo.
REPEAT
Press REPEAT while plaving an MD.
"REPEAT" appears in the display. The deck repeats
the tracks as follows:
When the MD is played in The recorder repeats
Continuous pla\ (page 11) All the tracks
SluiHie pkiv (this
I’mgriimmo pla\’ (pai;o Ih) The same proe;ramme
To cancel repeat play
Press RHPPAT se\ oral times until "REPEAT" disappears.
The deck returns to the original playing mode.
All the tracks in random t'rder
Playing in Random Order (Shuffle Play)
'iTui can have the deck "shuffle" tracks and plav them
in random order.
1 Press PLAY MCTDE repeatedly (or SHUFFLE once)
until "SHUFFTE" appears in the display.
2 Press I>llD (or ►) to start Shuffle Pla\'.
i" appears in the display while the deck is
"shuffling" the tracks.
Repeating the current track
While the track you want to repeat is playing in
continuous pla\’, press REPEAT several times until
"REl’EAT 1" appears in the display.
Note
If you turn off the deck or disconnect the AC power cord, the
deck will recall the last setting of the Repeat Function the next
time \'ou turn on the deck.
To cancel Shuffle Play
Press PI,AT' MODE repeateclK' (or CONTINUE once) until
"St lUFFEH" disappears.
'Q' You can specify tracks during Shuffle Play
• To plav the next track, turn AMS clockwise (or press
►►I)
• To plav from the beginning ot the eurrenl track again,
turn AMS eounterclockwise (or press ). You cannot
use AMS (or ) to go to tracks that ha\'c already
been played.
Note
If you turn off the deck or disconnect the At power cord while
the Slniftle Plav Eunction is selected, the Shuffle Hay Eunction
will be still selected the next time \'Oii turn on the deck.
14
Page 15

Creating Your Own Program (Program Play)
Playing MDs
The program remains even after Program Play ends
When \'ou press MB (or ►). \'ou can pla\' the same
¡rrograin again
You can spociiv tlio playback order of tire tracks oir an
MDand create voiir own programs containing up to 2a
tracks.
MO ■
tJ TiwJ “
PLAY MODE
hi
IKM M
LM
j o
J\S >{>fl
>
>25
PROGRAM
Number
buttons
CLEAR
1 Press PLAY MODE repeatedly (or PROGRAM once)
until "PROGRAM" appears in the display.
2 Do either a) or b):
a) When using the remote
Press the number buttons to enter the tracks you
want to program in the order you'want.
To program a track with a number over 25, use
the >25 button (see page 13).
If you've made a mistake
Press Cl .PAR, then press the right number button.
b) When using the controls tm the deck
1 Turn AMS until the track number you want
appears in the display.
2 Press AMS or PLAY MODE.
Note
• the dispLn' shows "
wlien the total pkwing timeol the program e\ceeds 100
minutes.
• the program created b\' the I’rogram Play Eunction is lost
when \'OLi turn ott the deck or disamnect the At pt>wt'r
cord. The program is, howev er, ivcalled during timer
pkwback.
------
" instead ol the total pkwing time
Checking the track order
can chock the ttrdor ot tracks in your program
during playback or playback pause.
Turn AMS (or press l-<^ or ►►!) cturing play back or
pilav'back pause. The track numbers appear in the order
the\' were programmed.
Changing the track order
You can change the order of the tracks in your
program before you start playing.
To
Erase the last track in the
program
Add tracks to the end of the
program
Cliange tire u’hole
program completely
Do the following:
Press CLEAR. Each time vou
press the button, the last track
will be cleared.
Do the procedure on this
page starting fnnrr Step 2
1 Press ■ while the deck is
‘'topped.
2 Do the procedure on this
page starting frcim Step 2.
3 Repeat Step 2 to enter other tracks. Each time you
enter a track, the total prcigram time is added up
and appears m the display.
4 Press >I1D (or ►) to start Program Play.
To cancel Programme Play
Pre.ssPLAY MODE repeatedly (or CONTINUE once) until
" I ’ROC i R A M " d isa ppea rs.
You cdn program the same track repeatedly
While the trai k number appears in the display, press A.VIS
as many tinu> as \'ou vwint.
15
Page 16

Playing MDs
Repeating a Specific Portion (A-B Repeat) T
'i ou c.in pKu' ii spoailc portion ot a track ropcatodh’.
This might be usetul when \'ou want to memori/e
lyrics.
Note that \’ou can onl\- repeat a portion within tiie
boundaries of a single track.
ID □ a
CD CD CD ^ a
D1 'CD CD U3 CD
CD D1 CD CD CD
DD CD CD CD ED
ZJ ^ zi)
■_jJ ZZI ZD ZD ZD
ZD ZD ÜB Q CZ^
Z3 ZD ^ CZj
Ltü QD aj
CD ZD ZD
►►
rr<> fi»~l rit I [i^ f»^
1 While playing a disc, press A-B at the starting point
(point A) of the portion to be played repeatedly.
"A-B" of "REPEAT A-B" flashes in the display.
2 Continue playing the track or press ►► until you
reach the ending point (point B), then press A-B
again.
"A-B" of "R-EPEAT A-B" lights continuously. The
deck starts to play the specified portion repeatedly.
To cancel A-B Repeat
[Vess REPEAT.
Setting new starting and ending points
You can repeat the portion immediately after the
currently specified portion by changing the starting
and ending points.
1 Press A-B while "REPEAT A-B" appears.
The current ending point B becomes the new
starting point A and "A-B" of "REPEAT A-B"
flashes in the display.
2 Continue playing the track or press ►► until you
reach the new ending point (point B), then press A-B
again.
"A-B" of "REPEAT A-B" lights continuously and
the deck starts playing repeatedly the newly
specified portion.
■A-B
Useful Tips When Recording From
MDs to Tape f
The Auto Space and Auto Pause Functitms described in
this secticMi make recording trom MDs to tape more
eas\s
ZD ZD
ZD CD ZD .
LD CD ZD A.SPACE
i^D CÍD ZD )
CiZJ LiD C£J _U
H±s] ^ ZD ZD ZD
S] LiiJ ^
Inserting blank spaces while recording to tape (Auto Space)
The Auto Space Function inserts a .S-second blank
space betv\ een each track while recording from MDs to
tapes, allowing you to use the AMS function during
later playback.
Before the start of recording, press A.SPACE
repeatedly until "A.SPACE" appears in the display.
To cancel Auto Space
Press A.SPACE repeatedly until "A.Sl'ACE" disappears.
Note
If the Auto Space Eunction is on while recording a selection
containing multiple track numbers, (for example, a medley or
symphony), blank spaces will he inserted within the selection
vvheneyer the track number changes.
Pausing after each track (Auto Pause)
When the Auto Pause Function is on, the deck pauses
after playing each track. Auto Pause is conyenient
when recording single tracks or multifile, nonconsecutic'e tracks.
Press A.SPACE repeatedly until "A.PAUSE" appears
in the display.
To restart playback
Press I>I1D (or
To cancel Auto Pause
Press A.SPACE repeatedly until "A.PAUSE" disappears.
Note
It \'OU turn oft the deck or diseonneet the AC power cord, the
deck will recall the- last setting ot the Auto Space and Auto
Pause I'unetions the next time you turn on the deck.
II ).
16
Page 17

Editing Recorded MDs
Notes on Editing
1 Turn AMS until the track number vou want to erase
appears in the displav.
If "Protected" appears in the display
I lu' deck i.4>uld not СГ.Ы' tho ^poi.'iticd track because the rectn'dprotect sK>t on the Ml) open, h.rase the track after closin^^ the
slot.
When "TOC" flashes in the display
Do not nio\ e the deck t>r pull i>ut the mains lead. After editilpц,
'' ГОС' iiphts c4>ntinuouslv until YOU eject the MD tir turn oti
the p(.n\ er. ''TOC" flashes while the deck is updatiiv^ the 'IXX'.
When the deck finishes updating the 'ГОС, "TOC'goes off.
Erasing Recordings (Erase Function)
Do tlio procedures belou to erase following:
• A single track
• All tracks
• Parts of a track
Note, however, that once erased, MD data cannot
be recovered.
2 Press PDIT/NO repealedlv until ''Prase ?" appears
in the displav.
The track number vou selected starts flashing in the
music calendar.
3 Press YPS.
When the track selected in Step I has been erased,
"Complete" apapears for a tew seconds and the total
number of tracks in the musie calendar decreases bv
one.
If vou erase a track ciuring pilavback, the track
following the deleted track begins palaying
afterwards.
4 Repeat Stepas 1 to 3 to erase more tracks.
To cancel the Erase Function
Press EDIT/N'O, ■, or turn AMS to change the track number.
Note
If "Prase!! ?"appeais in the display, the track was recorded or
edited on another MD deck and is record-parotected. If this
indication apapears, paress YES to erase the track.
Erasing a single track
You can erase a track simply by specifying the
respective track number. When vou erase a track, the
total number of tracks on the MD decreases by one and
all tracks following the erased one are renumbered.
Since erasing merelv updates the TOC, there is no need
to record over material.
I() avoid contusiini when erasing multiple tracks, you
should proceed in order of high to low track number to
prevent the renumbering of tracks that have not been
erased \'et.
Example: Erasing В
Track _
number
Erasing
1 2
A
---
t
В
^
В is erased ,
2
3
C
4
D
/ 3
D
Erasing all tracks on an MD
Erasing a recordable MD deletes the disc name, all
reexarded tracks and titles (see page 22).
1 While the eteck is stopped, press EDIT/NO
repaeatedly until "All Erase ?" appears in the display.
2 Press YES.
All tracks in the music calendar start flashing.
3 Press YES again.
When the disc name, all recorded tracks and titles
on the MD have been erased, "Complete" appears
for a few seconds anci the music calendar
disappears.
To cancel the Erase Function
I’ress HDlT/NOor ■.
17
Page 18

Editing Recorded MDs
Erasing a part of a track
1>\ usinj; the I'>iviJo (--co this page), hrase (see page 17)
and Cenibine (see page 1^>) l imetions, \xui can erase
speciiic portions ot a track.
Example: Erasing a part of track A
T rack
number
Dividing
o
Erasing
Combining
Part to be erasect
1
r 1
1 2 3
A
#1
1
A
#1
1
A (#1+#3)
A
#2
—^
/ 2 ,'3 /4 /
#3
A
#3
----
/'#2 is
A
#1 and #3 are
combined >
2 \ 3
A is divided
into 3 parts
4
B
erased
B
B C
----
J—
5 !
c
C
Dividing Recorded Tracks (Divide
Function)
With the Divide Function von can assign a track
number at places that vou want to randomlv access
atteru aids. Use this tunction to add tracks to MI3s
recorded Irom an analogue source (and therefore
contain no track numbers), or to divide an existing
track into multiple portions. When vou di\ ide a track,
the total number ot tracks on the MD increases bv one
and all tracks following fhe divided track are
renumbered.
Example: Dividing track 2 to create a new track for C
Track
number
Dividing
1
A B
A
C
Track 2 is divided and a
new track is created for C
3 4
B
C
D
D
1 While playing the MD, press I>I1!1 (or II) at the point
where vou \c'ant to create a new track.
The deck pauses playing.
2 Press EDIT/NO repeatedly until "Divide ?" appears
in the display.
3 Press YES to divide-the track.
"Rehearsal" alternates with "Position ok?" in the
display, the track to be divided starts flashing in the
music calendar, and the starting portion of the new
track begins playing repeatedly.
4 If the starting position is incorrect, press EDIT/NO.
(If it is correct, go to Step 7.)
tIC-s
AMS
6 7 8 9 10
11 12 13 14 15
16 17 18
18
Page 19

5 Whik’ monitoring the sound, turn AMS to find the
starting position i)f the new track.
rile starting portion of the new track is played back
repeatedly.
"Rehearsal" alternates with "i’osition ok?" in the
display.
The starting position can be moved within a
maximum range of -128 fo +127 steps of ahouf O.Oh
second each vvifhin a track.
6 If the starting position is still incorrect, repeat Step .8
until it is correct.
Editing Recorded MDs
Combining Recorded Tracks (Combine Function)
Use the Combine Function while the deck is stopped,
pla\ ing or in pause to combine consecutii'e tracks on a
recorded MD. This function is useful for combining
sei eral songs into a single medlev, or sev eral
independently recorded portions into a single track.
When vou combine two tracks, the total number of
tracks decrease bv one and all tracks following the
combined tracks are renumbered.
7 Press YRS or AMS when the position is correct.
When the track has been divided, "Complete"
appears for a few seconds and the newly created
track begins playing. The new track will have no
track title even if the original track was labelled.
To cancel the Divide Function
Press ■.
'Ç' You can undo a track division
Combine the tracks again (see "Combining Recorded
Tracks" on this page), then redivide the tracks if
necessary.
'Ç' You can divide a track while recording
U.se the Track Marking Function (see page 9).
Example: Combining B and C
Track 12 3 4
number
Combining
o
SONY -
O ~
a
y J
A B C
1 2
A B c
IKW AMS OM
[
B and C are combined
^ 1 V
D
into one track !
EDIT/NO YES
3 I
D
H
J
1 Turn AMS until the second track of the two to be
combined appears.
For example, when combining tracks ^ and 4, turn
AMS until 4 appears.
2 Press EDIT/NO repeatedly until "Combine ?"
appears in the display.
3 Press YFS.
"Rehearsal" alternates with "Track ok?" in the
display and the two tracks to be combined start
flashing in the music calendar. The place where the
two tracks will join (i.e., the end of the first track and
the beginning of the second track) repeatedly plays
back.
4 If the place is correct, press YES.
When the tracks have been combined, "Complete"
appears for a few seconds and the total number of
tracks in the music calendar decreases by one.
If both of fhe combined tracks have track titles, the
title of fhe second track is erased.
19
Page 20

Editing Recorded MDs
2 Sokxi IIk't hanK'ter t\ po as tollou s:
To select
j ,n\ urC.lSt’ ll'ttt'l'' C'.M’S ivpc.itcdU' until "Selected
1 [’j'(‘11, li'Ucr-'
XiimbfV^ \UM repeatedly until "Selected
Press
nbe" nppear-' in the dispLu'
(.'.ATS repentt'dK' until "Selected
.AIK'" appears in the displav
123" appears in the displa\'
3 Inlet tme ehatactor at a time.
Allet \ lui enter a eiaaracter, the cursor shifts
I le hfu ,ird anti waits for the injaut of the next
ehaiai ler.
4 Kepe.il Steps 2 and .3 until \'ou have entered the
enlire lllle.
If you entered the wrong character
rie-.-. o\ ►► vuUil Iho chavt^ctor to bo corrootoci starts
(l.f-hiiii;
j V«-'.'. < ) )' A)\ It* iMOsi“ tho incorroot character, then enter
1 hr 11 >1 fet'l oiu'.
Erasing all titles on a disc (Name Erase Function)
Use this funclit'n to erase all titles on an MO
siniultaneoush ,
Note that once erased, titles cannot be recovered.
1 Keep pressing EDIT/\0 while the deck is stopped
until ".-Ml Erase ?" appears in tire displax'.
2 Tress EDI I/NOagain. "Name Erase ?" appears in
the displav.
3 Tress YES.
,\ll titles are erased.
To cancel the Name Erase Function
I’re‘^s ■.
*Q' You can erase all recorded tracks and titles
See "Erasing all tracks on an ME)" on page 17.
5 I’n'ss N/\ME again.
The enteivd title .ippears on the left side of the
displ.ix- w indow after the label has been recorded.
To ranu'l labelling
Changing an existing title
1 I ’less N/\ME, then do the followdng:
To change
A ll.a k lllle
A .h'-« n.nne
Make sure that the deck is
Playing or pausing the track
whose title is to be changed
Stopped
2 Keep pressing Ci.EAR (or EDIT/NO on the
lei Ol
der) until the current title is erased.
3 I ntel the new title.
I to Slops 1 to ,3 ol "Labelling Recordings" on page
.’ I, oi SU'[ts 2 to 4 of "Labelling tracks and MDs whth
Ihe remote" on this page.
4 Ti,'ssNAME.
22
Page 21

Additional Information
Precautions
On safety
• 1 he iisi' i>ptie<il instruments \\'ith this pixKiiiet will
increiise eve
• Should cin\’ solid object tir liquid hill into the cabinet, unplug
the deck and ha\ e it checked bv qualified personnel before
tiperating it any further.
On power sources
• Before operating the deck, check that the operating \’oltage
t>f tlic^leck is identical with \'our local power supply. The
operating x’oltage is indicated on the nameplate at the rear of
the deck.
• I he deck is not disconnected from the mains as long as it is
connected to the wall outlet, e\'en if the deck itself has been
turned off.
• It you are not going to use the deck for a long time, be sure
to disccmnect the deck from the wall outlet. Vo discemnect
the AC po\\'er cord, grasp the plug itself; never pull the
cord.
• The AC power cord must be changed only at the qualified
service shop.
On operation
If the deck is brought directly from a cold to a warm location,
or is placed in a very damp room, moisture may condense on
the lenses inside the deck. Should this occur, the deck may not
operate properly. In this case, remove the MD and leave the
deck turned on for abcnit an hour until the moisture
evapora tes.
On the MiniDisc cartridge
• Do not open the shutter to expose the MD.
• Do not place the cartridge where it will be subject to
extremes ol sunlight, temperature, moisture or dust.
On cleaning - -
Clean the cabinet, panel and controls with a soft cloth slightly
moistened with a mild detergent solution. Do not use any type
of abrasive pad, scouring powder or solvent such as alcohol or
benzine.
Display Messages
The followin;
appear in the
Message Meaning
Wank Disc A new (blank) or ora.sed V1D has been
(. cinnot C.'op\'
Cannot HDIT An attempt was made to edit the MD
Di.sc luTOr
Disc Full The MD is full (see "System Limitations"
Impossible An attempt was made to combine tracks
Name Full The titling capacity of the MD has reached
NO DISC There is no MD in the recorder.
No Track The inserted MD has a disc title but no
Protected The inserted MD is record-protected.
Retry The first recording attempt failed due to a
Retry Error Due to vibrations to the recorder or
Sorry
STANDBY
(flashing)
g table explains the \ arious messages that
' display.
inserted.
An attempt was made to make a second
copy from a digitally dubbed MD (see
page 27).
during ITogramme or Shuffle Play or
the inserted disc contains lapanese
characters.
The MD is scratched or missing a TOC.
on page 24).
while playing back the first track.
its limit (about 1,792 characters).
tracks.
disturbance or scratch on the MD, and a
second attempt is being made.
scratches on the MD, several recording
attempts were made but with no success.
An attempt was made to combine tracks
that cannot he combined.
The latest material recorded was not saved
cfmrectly on the MD, or certain data, such
as the previous playback conditions, were
not saved.
If you have any questions or problems concerning your
recorder, please consult your nearest Sony dealer.
23
Page 22

Additional Information
System Limitations
The recording s\ steni in \ our MiniDisc deck is
rndicnlK’ ditterenl from those used in enssette and DAT
decks and is characteri/ed b\- the limitaticms described
below. Note, howex er, that these limitatiiMis are due to
the inherent nature of the MD recording sx stem itself
and not to meclianical causes.
"Disc Full" lights up even before the MD has reached the
maximum recording time (60 or 74 minutes)
When 235 tmeks hax’o been rea>rded on the MD, "Disc Full"
lights up regardless of the total recorded time. More than 233
tracks cannot be recorded im the MD. To continue recording,
erase unnecessarv tracks or use another recordable MD,
"Disc Full" lights up before the maximum number of tracks
is reached
Fluctuations in emphasis within tracks are sometimes
interpreted as track interx als, incrementing the track count and
causing "Disc Full" to light up.
Limitations when recording over an existing track
• The correct remainirig recording time max' not be displax'cd.
• 3 ou max tmd U impossible to record ox er a track it that track
has been recorded ox'er sex eral times alreadx'. It this
happens, erase the track using tlie F’.rase Function (see page
• I'he remaining recording time max' be shortened oui ot
pia''portion to the tiital recitrded time.
• Recording ox'cr a track to eliminate noise is not
iwranmended since this max' shorten Iheduratiini the
track.
• 3’ou max' tind it impossible to label a track xvhik' recording
ox er it.
The correct recorded/playing time may not be displayed
during playback of monoaural-format MDs.
The remaining recording time does not increase even after
erasing numerous short tracks
Tracks under 12 seconds in length are not counted and sei
erasing them mav not lead an increase in the recording time.
Some tracks cannot be combined with others
Track combination max' become impossible when tracks are
edited.
The total recorded time and the remaining time on the MD
may not total the maximum recording time (60 or 74
minutes)
Recording is done in minimum units of 2 seconds eacir, no
matter how shxirt the material. The contents recorded mav
tluis be shorter than the maximum recording capacity. Disc
space may also be further reciuced by scratches.
Tracks created through editing may exhibit sound dropout
during search operations.
Track numbers are not recorded correctly
Incorrect assignment or recording of track numbers may result
(I) when CD tracks are dix ided into several smaller tracks
during digital recording, or (2) while recording certain CDs
with the "1-FVEL'SY.NC" indication on (i.e., the automatictrack marking function on).
24
"TOC Reading" appears for a long time
If the inserted recordable MD is brand new, "TOC Reading"
appears in the displax' longi’r than for MDs that have bei‘n
used.
Page 23

Additional Information
Troubleshooting
If \’(tu experience anv of the following; difficulties while
using the recorder, use this troubleshooting guide tet
help vt)u remedy the problem. Should any problem
persist, consult your nearest Sony dealer.
The deck does not operate or operates poorly.
■^The MD mav be damaged ("Disc Error” appears).
Take the MD out and insert it again. If "Disc Error”
remains, replace the MD.
The deck does not play back.
^^Moistiire has formed inside the deck. Take the MD out
and lea\ e the deck in a warm place for sex erai hours
until the moisture evaporates.
■^The deck is not on. Press l^OVVER to turn the deck on.
^►The MD is inserted in the wrong direction. Slide the
MD into the disc compartment with the label side up
and the arrow pointing towards the opening until the
deck grips it.
^►The MD may not be recorded (the music calendar does
not appear). Replace the disc with one that has been
recorded.
The deck does not record.
^►The MD is record-protecteci ("Protected” appears).
Close the record-protect slotisee page 7).
^►The deck is not connected properly to the sound
source. Make connections properly to the sound
source.
H^The recording level is not adjusted properly (in case of
input through LINE IN), Turn REC LEVEL to adjust
the recording level properly (see page 8),
■^A premastered MD is inserted. Replace it with a
recordable MD,
^^There is not enough time left on the MD. Replace it
with another recordable MD with fewer recorded
tracks, or erase unnecessary tracks.
^•There has been a power failure or the mains lead has
been disconnected. Data recorded to that point may be
lost. Repeat the recording procedure.
An incompletely inserted MD cannot be pulled out.
^^When the MD is inserted half-way, the mechanism
locks onto the MD and the « button will not operate.
To rem(,)ve the MD, first insert the completely, then
press the = buttcMi.
The sound has a lot of static.
^►Strong magnetism from a television or a similar device
is interfering with operations. Move the deck awav
from the source i>f strong magi’ietism.
Note
If the recorder does not operate properly e\'en after you've
attempted the prescribed remedies, turn off the power, then
reinsert the plug into llu' power (Uitk't.
Specifications
MD deck section
System
Disc
Laser
Laser output power
Laser diode properties
Revolutions
Error correction
Sampling frequency
Modulation system
Number of channels
Frequency response
Signal-to-noise ratio
Wow and flutter
Inputs
Jack
type
LINE IN
DIGITAL IN
Outputs
LINE OUT
DIGITAL OUT
HEADPHONES
Fhomi
jacks
Square
optical
connector
jack
Jack
type
Lhono
jacks
Squa re
optical
connector
jack
StLTL'O
mini
l<u k
MiniDisc digital audio svstem
MiniDisc
Semiconductor laser (a- 7S0 nm)
Fmissu>n duration: continuous
Less than 44.6
“^This output is the x'alue measured at a
distance of 200 mm from the objectix’e
lens surface on the optical pick-up
block with 7 mm aperture.
Material: CiaAIAs
Emissi(m duration; continuous
Laser output: less than 44.6 pVV
(This output is the x'alue measured
at a distance of 200 mm frt)m the
lens surface on the optical pick-up
block.)
400 rpm to 900 rpm (CLV)
Advanced Cross Interleax'c Reed
Solomon Code (ACIRCT
44.1 kHz
EFM (Eight-to-Fourteen Modulation)
2 stereo channels
5 to 20,000 11/ ±0.5 dB
Over 98 dB (during playback)
Below measurable limit
Input
impedance
Over 47
kiloh ms
Rated input Minimum
input
500 mVrms 158 mVTms
-
Optical
wave
ienghth
660 nm
Rated
output
2 Vrms
Load
impedance
Over 10 kilohms
(at 50 kilohms)
-18 dBm
10 mVV
Wave length: 660 nm
52 ohms
25
Page 24

Additional Information
General
Power requirements
I20\' AC, Mill/
Beep Output During Operations
Power consumption
Dimensions (approx)
(w/h/d)
Mass (approx)
Supplied accessories
Audio connecting cords (2 phono plugs - 2 phono
plugs) (2)
Remote commander (remote) RM-D4M (i)
Sony SUM-3 (NS) batteries (2)
Optional accessories
Recordable MDs: MDW-(A1 ((lO min), MDVV-74
(74 min)
Optical cable: POC-15A
U S. and foreign patents licensed from Dolby Laboratories
1 acensing Corporation.
Design and specifications are subject to change without
notice.
O \ V
280 X 82.5 X 288.5 mm
ind. pro)octiiii; part.x
2.4 kp
Your deck can output varic'us beeps to allow \ rru to
\ erifv deck operations bv sound.
The beeps are output from both the deck itself and the
headphones.
Rear of the recorder
Switch BEEP to ON.
A high- or low-pitcheci beep is output to indicate the
following operations.
Operation
The deck has been turned on. One short beep (high)
The deck has been turned off.
An operation butU)n was
pressed with no MD loaded.
Beep sound
Two short beeps (high)
Three short beeps (high),
followed bv one continuous
beep (high)
# was pressed but the MD is
full.
# was pressed and the deck
has changed to recording
pause.
>DD (or ► or II) was pressed
and the deck has started
recording.
The deck is recording or in '
recorciing pause and the peak
level meter le\ el has exceeded
the recommended le\’eC
("OVRR" lights up).
I he deck is recording and
the remaining time on the
MD has dropped below 3
minutes*"^.
[>DD (or ► or II) was pressed
and the dc’ck has started
playing.
B was pressed.
One continuous beep (high)
Consecutive beeps (low) are
emitted, one for each 10
minutes of remaining time on
the MD"^, followed bv single
beeps ex’erv few seconds.
One short beep (high)
One continuous beep (low)
Sex'eral short beeps (high)
One short beep (high)
One short beep (low)
26
Page 25

Additional Information
IM.A3 MOni- wiis prossod
while the deek is stopped, cind
eontiiUKuis (normcil) pKw
iiKKle hcis been seleeted
(cancelling Shuffle or
Programme Tlav miKle).
bI3[T/NO was pressed while
the deck is stopped, and "All
hrase i*" has appeared in the
displa\'.
TDII ,/NCO was pressed while
the deck is recording, and
"l,e\'elS\ nc ?" has appeared in
thedis^v'^A -
kDI I / NO was pressed while
the deck is playing, and
"Hrase ?" has appeared in the
display.
One beep for cncli 10 minutes of remaining time (e.g., one
beep for 10 to 20 minutes, two beeps for 20 to 30 minutes,
and three beeps for 30 to 40 minutes. No beep is output for a
remaining time of 10 minutes or less.
' This beep is output onlv through the headphones; no beep is
output from the deck.
(.Ine shiM’t beep (kn\’)
One short beep (high)
C)ne short beep (high)
One short beep (high)
Guide to the Serial Copy Management System
Tliis MI5 dock uses tlio Serial Copy Mangomont System
which allows onlv a first-generation digital copy to he
made of prerecorded software via the MD deck's
digital input/output jacks. An outline of this system
appears below:
1 You can record from digital progiamme sources (CDs,
prerecorded MDs, and DAT equipment with a sampling
frequency of 44.1 kHz) onto a recordable VID via the MD
deck's digital input jack. You cannot, however, record
from the recorded MD onto another recordable MD via
the MD deck's digital output jack.
CD player
MD deck
Playing
Optical cable
DAT deck
Digital output jack
Digital input jack
Recording
Playing
Digital
output jack
Optical cable
Digital
input jack
Recording
Note
There are no copy generation restrictions on recording
between two VID decks connected via their respectix'e
analogue input/output jacks.
MD deck
A recordable MD
recorded through the
digital input jacks
MD deck
Line (analogue)
output jacks
Audio connecting
cord
Line (analogue)
Input jacks
MD deck
27
Page 26

Additional Information
2 You can record from an MD recorded via the MD deck's
analogue input jacks to another recordable MD via the
MD deck's digital output jack.
You cannot, however, make a second-generation MD copy
via tha MD deck's digital output jack.
Turntable
CD player
DAT deck
Playing
Audio connecting cord
Recording
Playing
Optical cable
Tuner
Cassette deck
Microphone
amplifier
MD deck
Line (analogue)
output jacks
Line (analogue)
input jacks
Digital output jack
Digital input jack
28
Recording
Playing
Digital
output jack
Optical cable
Digital input
jack
Recording
Line (analogue)
output jacks
Audio connecting
cord
Line (analogue)
input jacks
MD deck
Page 27

Index
A-B repeat 16
AMS (Automatic Music
Sensor) 13
Auto cut 8
Auto space 16
Auto pause 16
B
_Egep output 26
Cable
audio (AU) bus 4,5
optical 4,5
CD synchro-recording 10
Changing
an existing title 22
order of programmed tracks
15
Checking
order of programmed
tracks 15
remaining recordable time on
the MD 8
Cleaning 23
Combining 19
Cord
audio connecting 4,5 _
Display messages 23
Dividing 18
E, F,G
Ejecting an MD 6,11
Erasing
all titles 22
all tracks 17
a part of a track 18
a single track 17
M, N
Moving 20
Music scan 13
Optional accessories 26
P,Q
Pausing
playback 11
recording 6
Playing an MD
normal play 11
programme play 15
repeat play 14
shuffle play 14
Premastered MD 11,12
Recordable MD 6,11
Recording on an MD 6
Recording level 8
Record-protect tab 7
Remote commander (remote) 4
Sampling frequency 5,25
SCMS (Serial Copy Management
System) 7,27
Smart space 8
Specifications 25
Supplied accessories 4, 26
System limitations 24
T, U, V, W, X, Y, Z
TOC (Table Of Contents) 7,17
Track marking
automatic track marking 9
manual track marking 9
Troubleshooting 25
Names of controls
Buttons
A-B 16
Alphabet/Number 13,15,21
A.SPACE 16
CD PLAYER 11 10
CLEAR 15,21
DISPLAY 8,12
EDIT/NO/YES 9,17 to 21
M.SCAN 13
PLAY MODE 14,15
PROGRAM 15
REPEAT 14
SCROLL 12
SHUFFLE 14
STANDBY 10
START 10
STOP 10
= (eject) 6
t>D0 (play/pause) 6, 8,11,14,15,
18
# (recording) 6,9
■ (stop) 6,15
!/►► 13,16,21
(/►►I 11,13,15
> 25 13,15
Switches
BEEP 26
INPUT 6
POWER 6,11
Connectors
DIGITAL IN 4,5
DIGITAL OUT 4,5
Controls
IKK AMS »ll 6,11,13,15,
17 to 21
LEVEL 11
REG LEVEL 6,8
Indicator
ON/STANDBY 6,11
H
Hooking up
an analogue component 5
a digital component 5
I, J,K
Inserting an MD 6,11
Labelling
a track 21
an MD 21
Locating
a particular point in a track 13
a specific track 13
LEVEL-SYNC 9
Jacks
LINE IN 4, 5
LINE OUT 4,5
HEADPHONES 11
Others
Disc compartment 6,11
Display 12
Music calendar 6,11
li 4
29
Page 28

Sony Corporation Printed in Japan
 Loading...