

Sony HDR-SR11E, HDR-SR12E Operating Guide
3-286-590-13(1)
Digital HD Video Camera Recorder
Handycam Handbook
HDR-SR11E/SR12E
Enjoying your
camcorder
Getting Started 15
Recording/Playback
Editing 48
Utilizing recording media 62
Customizing your
camcorder
Troubleshooting 89
Additional
Information
Reference
Quick
25
66
102
112
9
© 2008 Sony Corporation
Read this before operating your camcorder
Before operating the unit, please read this
Handbook thoroughly, and retain it for
future reference.
Notes on use
In “Handycam Handbook” (this
Handbook)
The operations and handling of your
camcorder are explained. Refer also to
“Operating Guide” (the separate volume).
Handling the images recorded on your
camcorder on the computer
Refer to “PMB Guide” stored on the
supplied CD-ROM.
Types of “Memory Stick” you can use
in your camcorder
• For recording movies, it is recommended
that you use a “Memory Stick PRO Duo”
of 1 GB or larger marked with:
– (“Memory Stick
PRO Duo”)*
– (“Memory Stick
PRO-HG Duo”)
* Marked with Mark2 or not, either can be
used.
• See page 24 for the recordable time of a
“Memory Stick PRO Duo.”
“Memory Stick PRO Duo”/“Memory Stick
PRO-HG Duo”
(This size can be used with your
camcorder.)
“Memory Stick”
(You cannot use it in your camcorder.)
• “Memory Stick PRO Duo” and “Memory
Stick PRO-HG Duo” are both referred to
as “Memory Stick PRO Duo” in this
manual.
• You cannot use any type of memory card
other than those mentioned above.
• “Memory Stick PRO Duo” can be used
only with “Memory Stick PRO”
compatible equipment.
• Do not attach a label or the like on a
“Memory Stick PRO Duo” or a Memory
Stick Duo adaptor.
• Insert the “Memory Stick PRO Duo” into
the Memory Stick Duo adaptor when
using a “Memory Stick PRO Duo” with
“Memory Stick” compatible equipment.
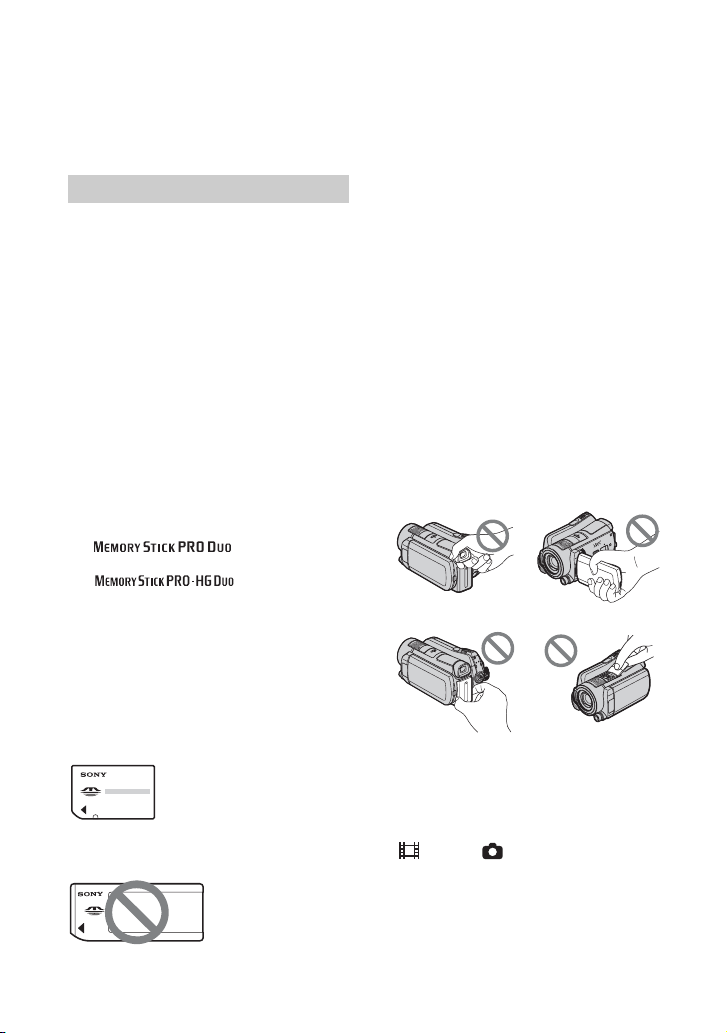
Using the camcorder
• Do not hold the camcorder by the
following parts, and also do not hold the
camcorder by the jack covers.
Viewfinder LCD screen
Battery pack Shoe cover
• The camcorder is not dustproofed,
dripproofed or waterproofed. See “About
handling of your camcorder” (p. 108).
• Do not do any of the following when the
(Movie)/ (Still) mode lamps
(p. 20) or the ACCESS lamps (p. 29) are
lit or flashing.
Otherwise, the media may be damaged,
recorded images may be lost or other
malfunctions could occur.
2

– Eject the “Memory Stick PRO Duo” from
the camcorder
– Remove the battery pack or AC Adaptor
from the camcorder
– Apply mechanical shock or vibration to
the camcorder
• When connecting your camcorder to
another device with a cable, be sure to
insert the connector plug in the correct
way. Pushing the plug forcibly into the
terminal will damage the terminal and
may result in a malfunction of your
camcorder.
• Connect cables to the connectors of the
Handycam Station when using your
camcorder attached to the Handycam
Station. Do not connect the cables to both
the Handycam Station and your
camcorder.
• Disconnect the AC Adaptor from the
Handycam Station holding both the
Handycam Station and the DC plug.
• Be sure to turn the POWER switch to
OFF (CHG) when you insert the
camcorder into the Handycam Station or
remove the camcorder from it.
About menu items, LCD panel,
viewfinder, and lens
• A menu item that is grayed out is not
available under the current recording or
playback conditions.
• The viewfinder and the LCD screen are
manufactured using extremely highprecision technology, so over 99.99% of
the pixels are operational for effective
use. However, there may be some tiny
black points and/or bright points (white,
red, blue, or green in color) that appear
constantly in the viewfinder and on the
LCD screen. These points are normal
results of the manufacturing process and
do not affect the recording in any way.
Black point
White, red, blue or
green point
• Exposing the LCD screen, the viewfinder,
or the lens to direct sunlight for long
periods of time may cause malfunctions.
• Do not aim at the sun. Doing so might
cause your camcorder to malfunction.
Take images of the sun only in low light
conditions, such as at dusk.
About changing the language setting
• The on-screen displays in each local
language are used for illustrating the
operating procedures. Change the screen
language before using your camcorder if
necessary (p. 21).
On recording
• Before starting to record, test the
recording function to make sure the image
and sound are recorded without any
problems.
• Compensation for the contents of
recordings cannot be provided, even if
recording or playback is not possible due
to a malfunction of the camcorder, storage
media, etc.
• TV color systems differ depending on the
country/region. To view your recordings
on a TV, you need a PAL system-based
TV.
• Television programs, films, video tapes,
and other materials may be copyrighted.
Unauthorized recording of such materials
may be contrary to the copyright laws.
3

On playing back recorded images on
other devices
• Your camcorder is compatible with
MPEG-4 AVC/H.264 High Profile for
HD (high definition) image quality
recording. Therefore, you cannot play
back images recorded with HD (high
definition) image quality on your
camcorder with the following devices;
– Other AVCHD format compatible
devices which are not compatible with
High Profile
– Devices which are not compatible with
the AVCHD format
About this Handbook
• The images of the viewfinder and the
LCD screen used in this Handbook for
illustration purposes are captured using a
digital still camera, and therefore may
appear different.
• In this Handbook, the hard disk of your
camcorder and “Memory Stick PRO Duo”
are called “media.”
• Design and specifications of your
camcorder and accessories are subject to
change without notice.
About the Carl Zeiss lens
Your camcorder is equipped with a Carl
Zeiss lens, which was developed jointly by
Carl Zeiss, in Germany, and Sony
Corporation, and produces superior images.
It adopts the MTF measurement system for
video cameras and offers a quality typical
of a Carl Zeiss lens. Also, the lens for your
camcorder is T -coated to suppress
unwanted reflections and faithfully
reproduce colors.
MTF= Modulation Transfer Function. The
number value indicates the amount of light
from a subject coming into the lens.
4

Notes on using the Hard Disk Drive Handycam
Save all your recorded image data
• To prevent your image data from being lost,
save all your recorded images on external media
periodically. It is recommended that you save
the image data on a disc such as a DVD-R using
your computer (p. 47). Also, you can save your
image data using a VCR, or a DVD/HDD
recorder (p. 58).
Do not apply shock or vibration to your
camcorder
• The hard disk of the camcorder may not be
recognized, or recording or playback may not be
possible.
• Especially, during recording/playback, do not
apply shock. After recording, do not apply
vibration or shock to the camcorder, while the
ACCESS lamp is lit.
• When using a shoulder belt (optional), do not
crash the camcorder against an object.
• Do not use your camcorder in very loud areas.
On the drop sensor
• To protect the internal hard disk from shock by
dropping, the camcorder has a drop sensor
function (p. 81). When a drop occurs, or under a
non-gravity condition, the block noise made
when this function is activated by the camcorder
may also be recorded. If the drop sensor catches
a drop repeatedly, recording/playback may be
stopped.
Notes on battery pack/AC Adaptor
• Be sure to remove the battery pack or the AC
Adaptor after turning off the POWER switch.
When the camcorder is connected to a
computer
• Do not try to format the hard disk of the
camcorder using a computer. If you do so, your
camcorder may not operate correctly.
Note on using the camcorder at high
altitudes
• Do not turn on the camcorder in a low-pressure
area, where the altitude is more than 3,000
meters (9,800 feet). Doing so may damage the
hard disk drive of your camcorder.
Note on disposal/transfer
• Even if you perform [MEDIA FORMAT]
(p. 63) or formatting the hard disk of the
camcorder, you may not delete data from the
hard disk completely. When you transfer the
camcorder, it is recommended that you perform
[ EMPTY] (p. 64) to prevent the recovery of
your data.
Also, when you dispose of the camcorder, it is
recommended that you destroy the actual body
of the camcorder.
If you cannot record/play back
images, perform [MEDIA FORMAT]
• If you repeat recording/deleting images for a
long time, fragmentation of data occurs on the
media. Images cannot be saved or recorded. In
such a case, save your images on some type of
external media first, and then perform [MEDIA
FORMAT] (p. 63).
Fragmentation 1 Glossary (p. 120)
Note on operating temperatures
• When the temperature of the camcorder
becomes extremely high or extremely low, you
may not be able to record or play back on the
camcorder, due to the protection features of the
camcorder being activated in such situations. In
this case, a message appears in the viewfinder or
on the LCD screen (p. 98).
5

Table of Contents
Read this before operating your
camcorder .................................... 2
Notes on using the Hard Disk Drive
Handycam .................................... 5
Subject examples and solutions ..... 8
Enjoying your camcorder
Operation flow ................................ 9
“ HOME” and “ OPTION”
- Taking advantage of two types of
menus ......................................... 12
Getting Started
Step 1: Checking supplied items
.................................................... 15
Step 2: Charging the battery pack
.................................................... 16
Step 3: Turning the power on and
setting the date and time ............ 20
Changing the language setting ... 21
Step 4: Making setting adjustments
before recording ......................... 21
Step 5: Selecting the media ......... 22
Recording/Playback
Recording and playback with ease
(Easy Handycam operation) ....... 25
Recording ..................................... 29
Zooming ...................................... 31
Recording sound with more
presence (5.1ch surround
recording) ................................. 31
Starting shooting quickly (QUICK
ON) ........................................... 32
Recording high quality still images
during movie recording (Dual Rec)
................................................... 32
Recording in dark places
(NightShot) ................................ 32
Adjusting the exposure for backlit
subjects .................................... 33
Recording in mirror mode ........... 33
Recording fast action in slow-motion
(SMTH SLW REC) ..................... 33
Controlling the image settings
manually with the CAM CTRL dial
................................................... 34
Playback .......................................35
Searching for desired scene by
pinpoint (Film Roll Index) .......... 37
Searching for desired scene by face
(Face Index) .............................. 37
Searching for desired images by
date (Date Index) ...................... 38
Using PB zoom ............................ 39
Playing back a series of still images
(Slide show) .............................. 39
Playing the image on a TV ........... 40
Saving images .............................. 47
Editing
(OTHERS) category .................48
Deleting images ............................ 49
Capturing a still image from a movie
.....................................................51
Dubbing/copying images to a
“Memory Stick PRO Duo” with your
camcorder ...................................52
Dividing a movie ...........................54
Creating the Playlist .....................55
Dubbing to other devices ..............58
Printing recorded still images
(PictBridge compliant printer) ..... 60
Utilizing recording media
(MANAGE MEDIA) category
.....................................................62
Checking the media information
.....................................................62
6

Deleting all images (Formatting) ...63
Preventing data on the hard disk of
the camcorder from being recovered
.....................................................64
Repairing the image database file
.....................................................65
Customizing your camcorder
What you can do with the
(SETTINGS) category of the
HOME MENU ........................66
Using the HOME MENU .............. 66
List of the (SETTINGS) category
items ......................................... 67
MOVIE SETTINGS .......................68
(Items for recording movies)
PHOTO SETTINGS ......................73
(Items for recording still images)
VIEW IMAGES SET .....................75
(Items to customize the display)
SOUND/DISP SET .......................77
(Items to adjust the sound and the
screen)
OUTPUT SETTINGS ....................78
(Items for when connecting other
devices)
CLOCK/ LANG ..........................79
(Items to set clock and language)
GENERAL SET ............................80
(Other setup items)
Activating functions using the
OPTION MENU ......................82
Using the OPTION MENU ............ 82
Recording items on the OPTION
MENU ....................................... 83
Viewing items on the OPTION MENU
................................................... 83
Functions set in the OPTION
MENU ......................................... 84
Troubleshooting
Troubleshooting ............................89
Self-diagnosis display/Warning
indicators .................................. 98
Additional Information
Using your camcorder abroad ....102
File/folder structure on the camcorder
hard disk and “Memory Stick PRO
Duo” ..........................................104
Maintenance and precautions .....105
About the AVCHD format .......... 105
About the “Memory Stick” ......... 105
About the “InfoLITHIUM” battery
pack ........................................ 106
About x.v.Color ......................... 107
About handling of your camcorder
................................................. 108
Quick Reference
Identifying parts and controls ......112
Indicators displayed during recording/
playback ....................................117
Glossary ......................................120
Index ...........................................121
7
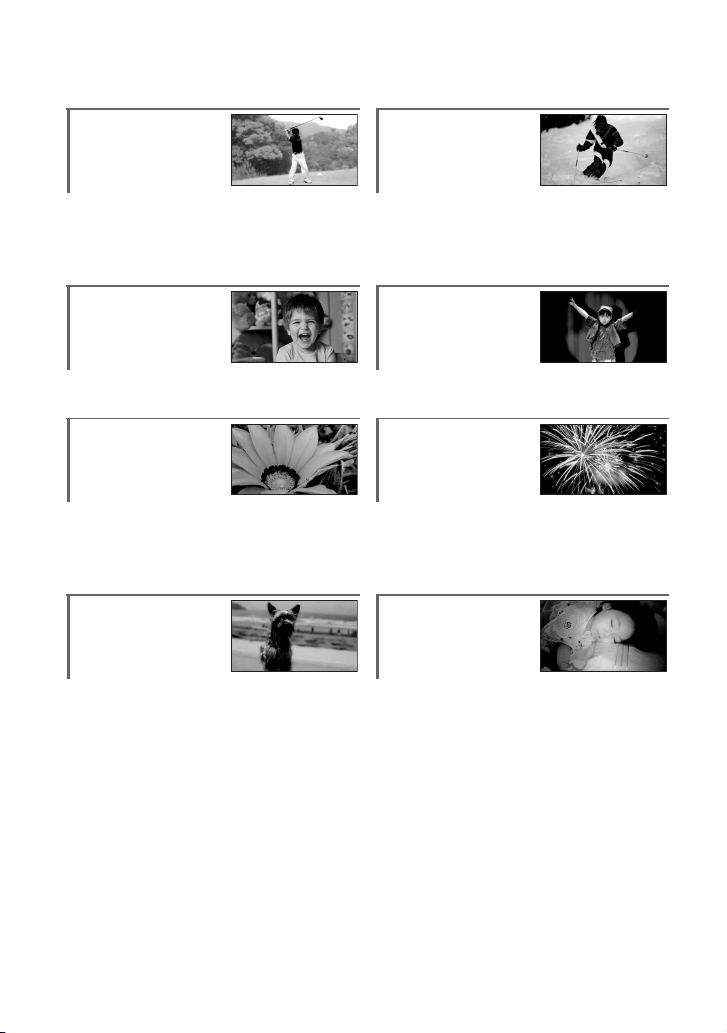
Subject examples and solutions
Checking your golf
swing
Getting a good
shot of a ski slope
or beach
B SMTH SLW REC ....................... 33 B Backlight ...................................33
B BEACH.......................................86
B SNOW .......................................86
Capturing still
images during
movie recording
B Dual Rec ................................... 32 BSPOTLIGHT ...............................86
Flowers in closeup
B PORTRAIT ................................ 86
B FOCUS ...................................... 84
B TELE MACRO............................ 84
Focusing on the
dog on the left
A child on the
stage under a spot
light
Fireworks with all
its splendor
B FIREWORKS..............................85
B FOCUS.......................................84
A sleeping child
under dim light
side of the screen
B FOCUS ...................................... 84
B SPOT FOCUS ............................ 84
B NightShot ..................................32
B COLOR SLOW SHTR .................87
8
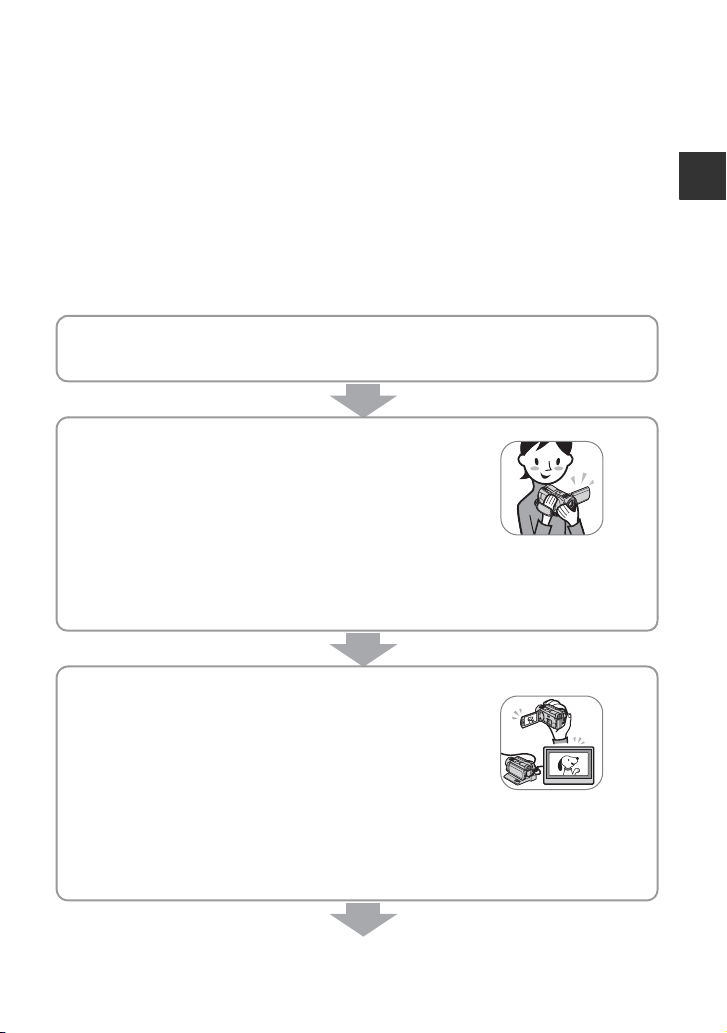
Enjoying your camcorder
Operation flow
You can select the media (hard disk or “Memory Stick PRO Duo”) separately for movie
recording and still image recording (p. 22).
b Notes
• When you select the media for movies, select the image quality (HD (high definition) or SD (standard
definition)) as well.
• The default setting is as follows:
– Movies are recorded on the hard disk with HD (high definition) image quality.
– Still images are recorded on the hard disk.
• The media and the image quality you select are effective for recording/playback/editing operations.
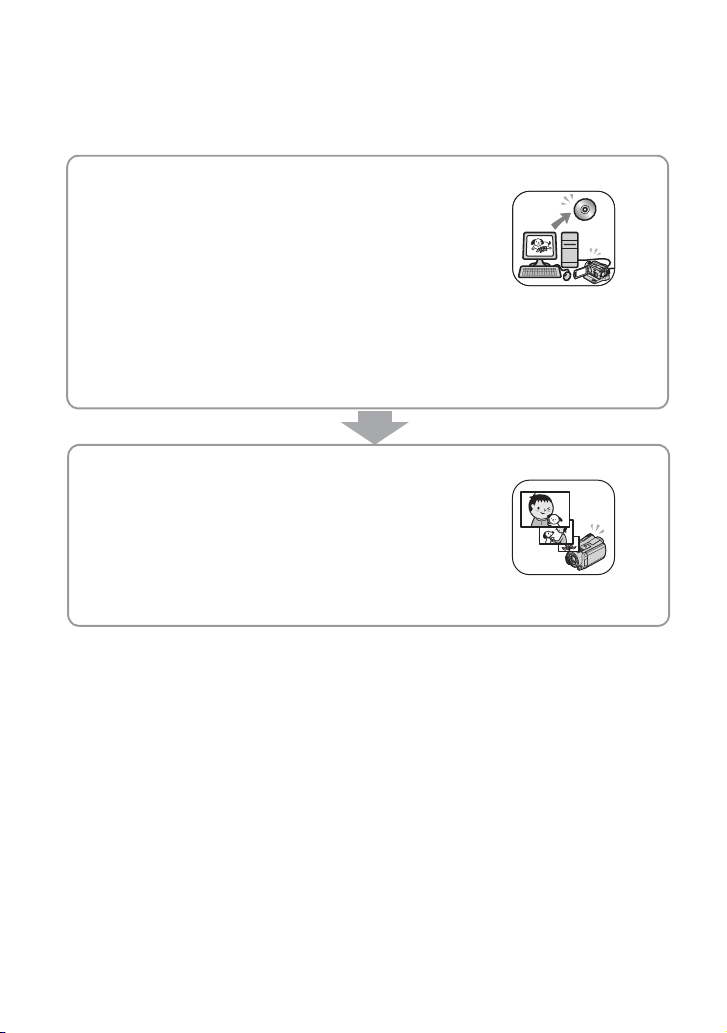
B Get ready (p. 15).
x Selecting the media (p. 22)
B Record with HD (high definition) image quality
(p. 29).
Your camcorder is compatible with AVCHD format
“1920 × 1080/50i” (p. 105), which provides highlydetailed, beautiful images.
b Notes
• The default setting is [HD SP] which is AVCHD format “1440 × 1080/50i” (p. 68).
• “AVCHD 1080i format” is abbreviated as “AVCHD” in this manual, except when it must be
described in more detail.
Enjoying your camcorder
B Play back the images.
x Viewing on the LCD screen of your camcorder (p. 35)
x Viewing on a high definition TV (p. 42)
You can enjoy highly-detailed, brilliant quality HD
(high definition) movies.
z Tips
• You can consult the [TV CONNECT Guide] (p. 40) displayed on the screen on connecting your TV
and camcorder.
• You can play back the images on a SD (standard definition) image quality TV.
9
B Save recorded images.
x Dubbing images from the internal hard disk to a
“Memory Stick PRO Duo” (p. 52)
x Dubbing to other devices (p. 58)
The dubbing image quality (HD (high definition)/SD
(standard definition)) varies depending on the
connected device. For details, see page 58.
x Editing on a computer (p. 47)
You can import images with HD (high definition) image quality to a computer, or
save images on a disc. Refer to “PMB Guide.”
B Delete images.
If the media is full, you cannot record new images.
Delete the image data that has been saved on your
computer or a disc. If you delete the images, you can
record new images on the free media space again.
x Deleting the selected images (p. 49)
x Deleting all the images ([MEDIA FORMAT], p. 63)
10
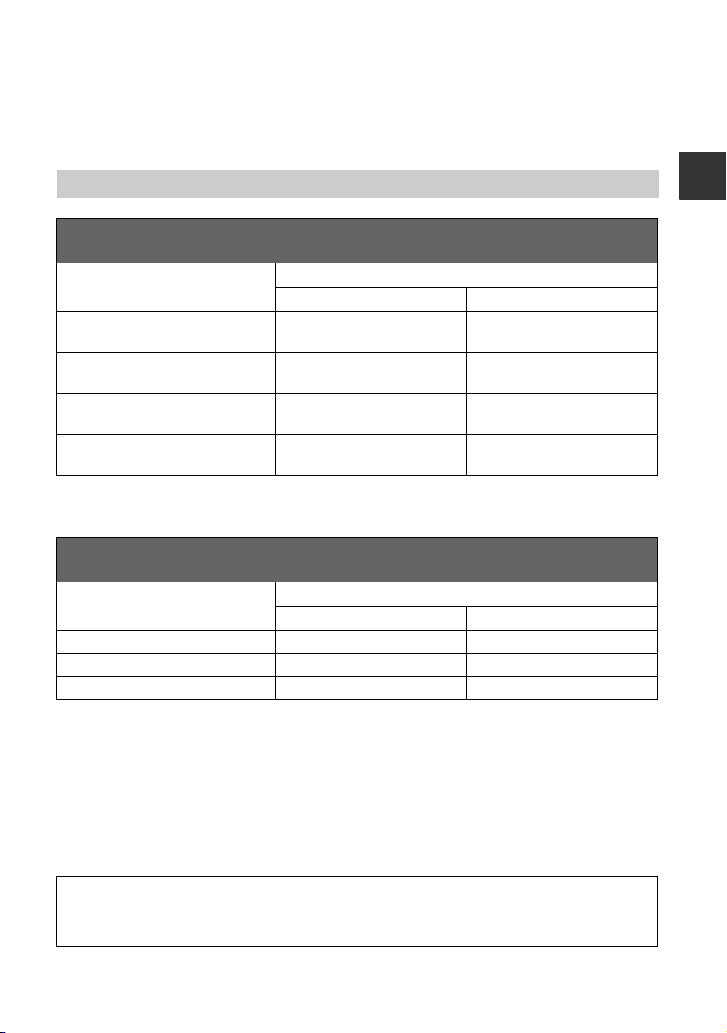
Recording time of movies (internal hard disk)
HD (high definition) image quality
AVCHD format
Recording mode Approximate recordable time (hour minute)
HDR-SR11E HDR-SR12E
AVC HD 16M (FH)
(highest quality)*
AVC HD 9M (HQ)
(high quality)**
AVC HD 7M (SP)
(standard quality)**
AVC HD 5M (LP)
(long play)**
* Movies are recorded with AVCHD 1920 × 1080/50i format.
** Movies are recorded with AVCHD 1440 × 1080/50i format.
SD (standard definition) image quality
MPEG2 format
Recording mode Approximate recordable time (hour minute)
SD 9M (HQ) (high quality) 14 h 40 m 29 h 40 m
SD 6M (SP) (standard quality) 21 h 50 m 44 h
SD 3M (LP) (long play) 41 h 50 m 84 h 20 m
z Tips
• Figures such as 16M in the table show the average bit rate. M stands for Mbps.
• For the recordable time of the “Memory Stick PRO Duo,” see page 24.
• You can record movies of a maximum of 3,999 scenes with HD (high definition) image quality, and 9,999
scenes with SD (standard definition) image quality.
• You can record the maximum 9,999 still images on the hard disk. For the “Memory Stick PRO Duo,” see
page 74.
• The maximum continuous recordable time is approximately 13 hours.
7 h 10 m 14 h 40 m
14 h 40 m 29 h 40 m
17 h 50 m 36 h
22 h 50 m 48 h
HDR-SR11E HDR-SR12E
Enjoying your camcorder
Your camcorder uses the VBR (Variable Bit Rate) format to automatically adjust image quality to suit the
recording scene. This technology causes fluctuations in the recording time of the media.
Movies containing quickly moving and complex images are recorded at a higher bit rate, and this reduces
the overall recording time.
11
Enjoyi
ng your camcorder
“ HOME” and “ OPTION”
- Taking advantage of two types of menus
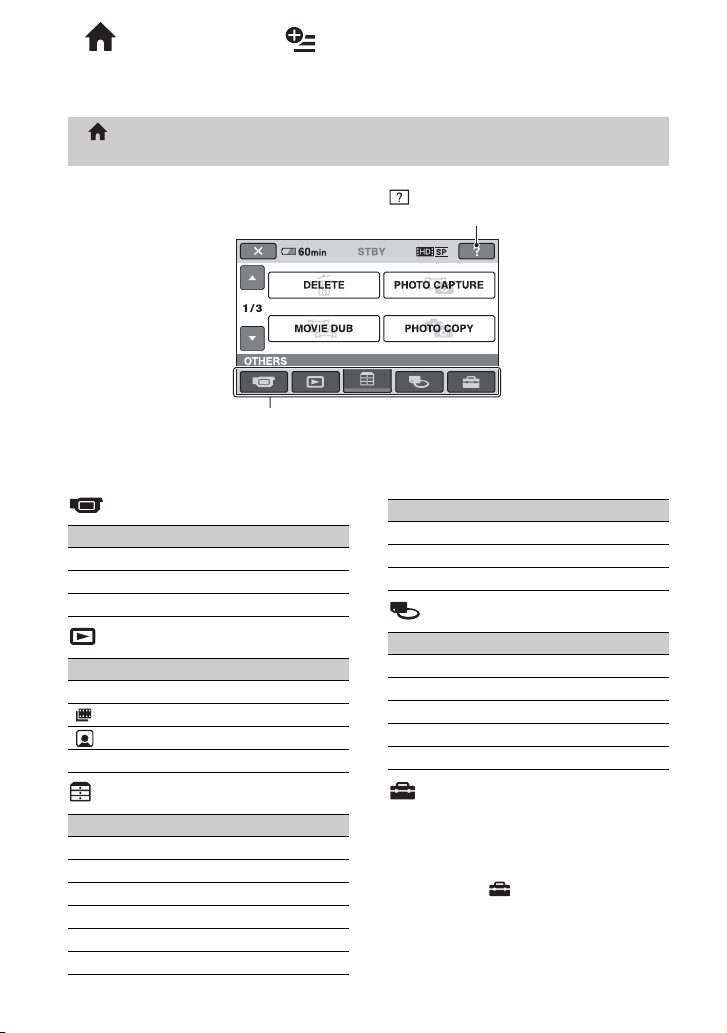
“ HOME MENU” - the starting point for operations with your
camcorder
(HELP)
Displays a description of the item (p. 13)
Category
B Categories and items of the HOME MENU
(CAMERA) category
Item Page
MOVIE* 30
PHOTO* 30
SMTH SLW REC 33
(VIEW IMAGES) category
Item Page
VISUAL INDEX* 35
INDEX* 37
INDEX* 37
PLAYLIST 55
(OTHERS) category
Item Page
DELETE* 49
PHOTO CAPTURE 51
MOVIE DUB 52
PHOTO COPY 53
EDIT 54
PLAYLIST EDIT 55
12
Item Page
PRINT 60
USB CONNECT 48
TV CONNECT Guide* 41
(MANAGE MEDIA) category
Item Page
MOVIE MEDIA SET* 22
PHOTO MEDIA SET* 23
MEDIA INFO 62
MEDIA FORMAT* 63
REPAIR IMG.DB F. 65
(SETTINGS) category
To customize your camcorder (p. 66)*.
* You can also set these items during Easy
Handycam operation (p. 25). For the items
available in the (SETTINGS) category, see
page 67.
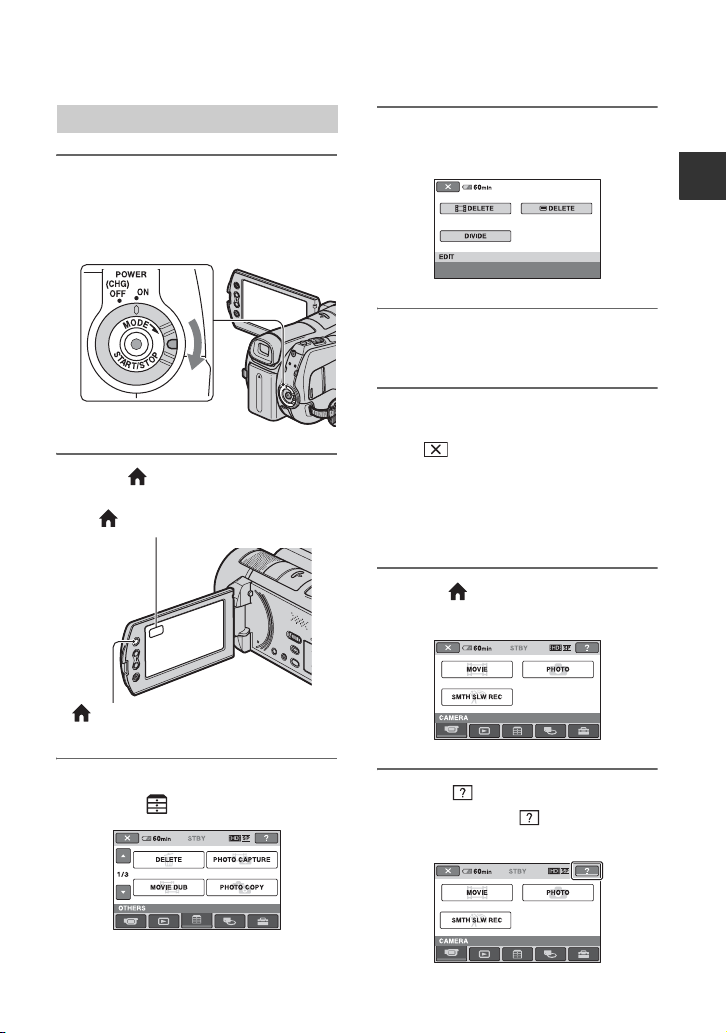
Using the HOME MENU
1 While pressing the green button,
turn the POWER switch in the
direction of the arrow to turn on
the power.
2 Press (HOME) A (or B).
(HOME) B
4 Touch the desired item.
Example: [EDIT]
Enjoying your camcorder
5 Follow the guide on the screen for
further operation.
To hide the HOME MENU screen
Touch .
B When you want to know something
about the function of each item on
the HOME MENU - HELP
1 Press (HOME).
The HOME MENU appears.
(HOME) A
3 Touch the desired category.
Example: (OTHERS) category
2 Touch (HELP).
The bottom of the (HELP) turns
orange.
13
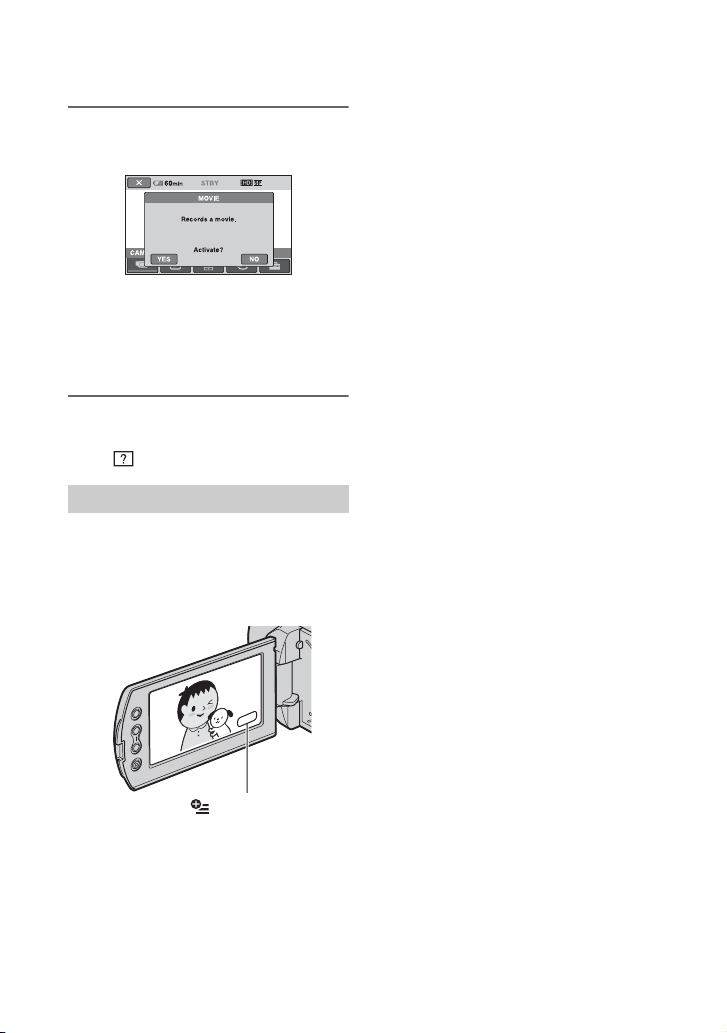
3 Touch the item you want to learn
more about.
When you touch an item, its explanation
appears on the screen.
To apply the option, touch [YES],
otherwise, touch [NO].
To deactivate the HELP
Touch (HELP) again in step 2.
Using the OPTION MENU
Just a touch on the screen during shooting
or playback displays the functions available
at that moment. You will find it easy to
make various settings. See page 82 for
further details.
14
(OPTION)
Getting Started
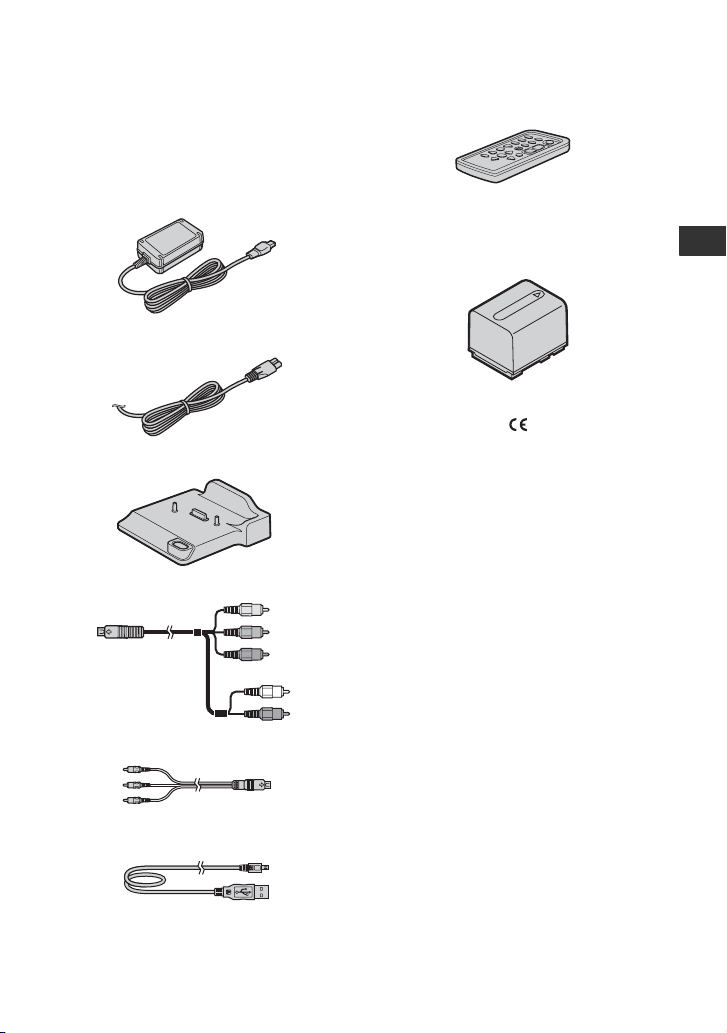
Step 1: Checking supplied items
Make sure that you have the following
items supplied with your camcorder.
The number in the parentheses indicates the
number of that item supplied.
AC Adaptor (1) (p. 16)
Power cord (Mains lead) (1) (p. 16)
Handycam Station (1) (p. 16, 115)
Component A/V cable (1) (p. 42)
Wireless Remote Commander (1) (p. 116)
A button-type lithium battery is already installed.
Rechargeable battery pack NP-FH60 (1)
(p. 16, 106)
21-pin adaptor (p. 45)
For the model with the mark printed on their
bottom surfaces only.
CD-ROM “Handycam Application
Software” (1)
– Picture Motion Browser (Software)
–PMB Guide
– Handycam Handbook (This Handbook)
“Operating Guide” (1)
Getting Started
A/V connecting cable (1) (p. 44, 58)
USB cable (1) (p. 59, 60)
15
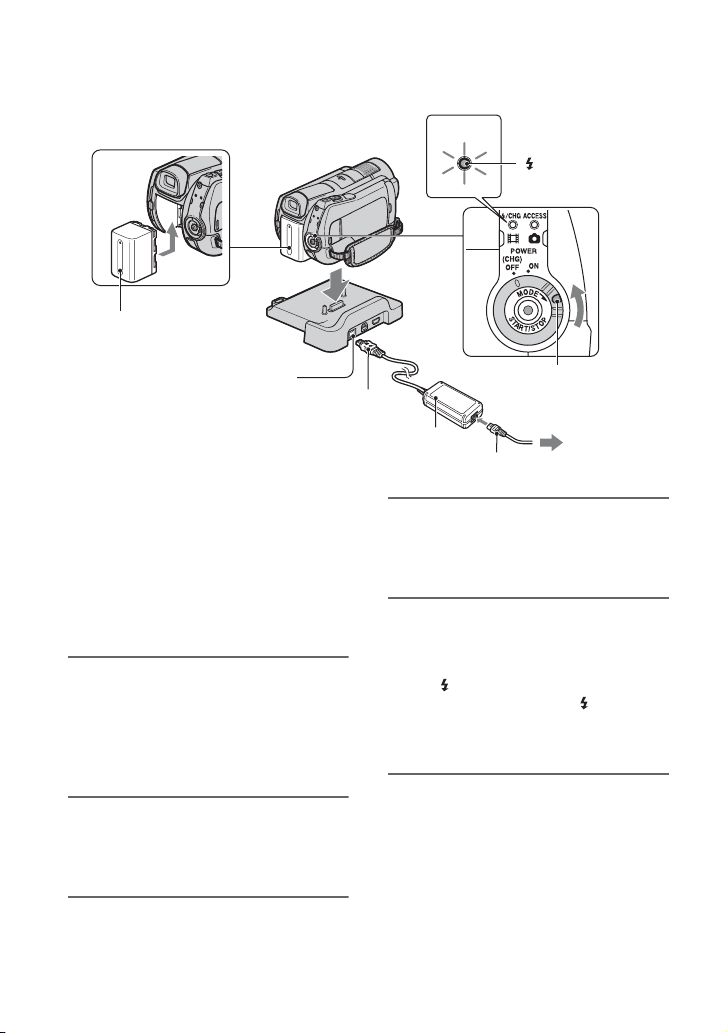
Step 2: Charging the battery pack
5
4
5
Battery pack
1
DC IN jack
DC plug
AC Adaptor
Power cord (Mains lead)
2
/CHG
(charge) lamp
3
POWER switch
To the wall outlet
(wall socket)
You can charge the “InfoLITHIUM”
battery pack (H series) (p. 106) after
attaching it to your camcorder.
b Notes
• You cannot attach any “InfoLITHIUM” battery
pack other than the H series to your camcorder.
1 Connect the AC Adaptor to the
DC IN jack on the Handycam
Station.
Be sure that the v mark on the DC plug
is facing up.
2 Connect the power cord (mains
lead) to the AC Adaptor and the
wall outlet (wall socket).
3 Turn the POWER switch in the
direction of the arrow to OFF
(CHG) (the default setting).
16
4 Attach the battery pack by sliding
it in the direction of the arrow
until it clicks.
5 Insert the camcorder into the
Handycam Station securely, all
the way to the bottom.
The /CHG (charge) lamp lights up and
charging starts. When the /CHG
(charge) lamp turns off, the battery is
fully charged.
b Notes
• When inserting the camcorder into the
Handycam Station, close the DC IN jack cover.
To remove your camcorder from the
Handycam Station
Turn off the power, then remove the
camcorder from the Handycam Station
holding both your camcorder and the
Handycam Station.
To charge the battery pack using only
the AC Adaptor
Turn off the power, then connect the AC
Adaptor to the DC IN jack on your
camcorder.
POWER switch
With the v mark
on the right
DC plug
DC IN jack
Open the
jack cover
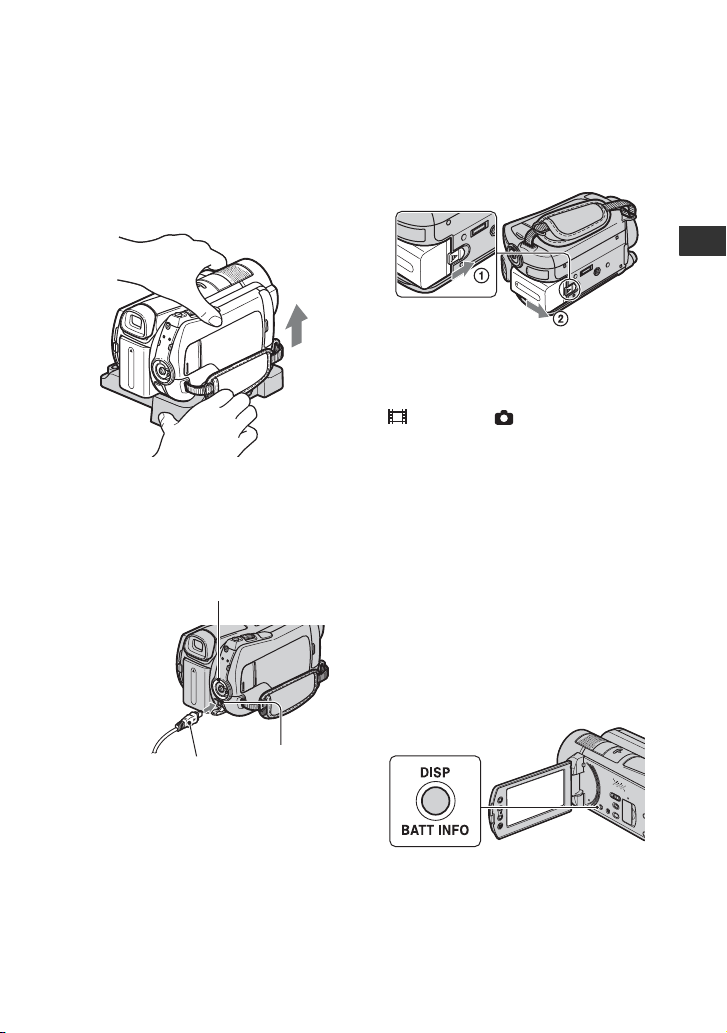
To remove the battery pack
Turn the POWER switch to OFF (CHG).
Slide the BATT (battery release) lever and
remove the battery pack.
BATT (battery
release) lever
b Notes
• When you remove the battery pack or
disconnect the AC Adaptor, make sure that the
(Movie) lamp/ (Still) lamp (p. 20)/
ACCESS lamps (p. 29) are turned off.
• When you store the battery pack, fully discharge
the battery before storing it for an extended
period (see page 107 for the details of storage).
To use a wall outlet (wall socket) as a
power source
Make the same connections as you do when
charging the battery pack. The battery pack
will not lose its charge in this case.
To check the remaining battery
(Battery Info)
Set the POWER switch to OFF (CHG), then
press DISP/BATT INFO.
Getting Started
b Notes
• Disconnect the AC Adaptor from the DC IN
jack holding both the camcorder and the DC
plug.
17
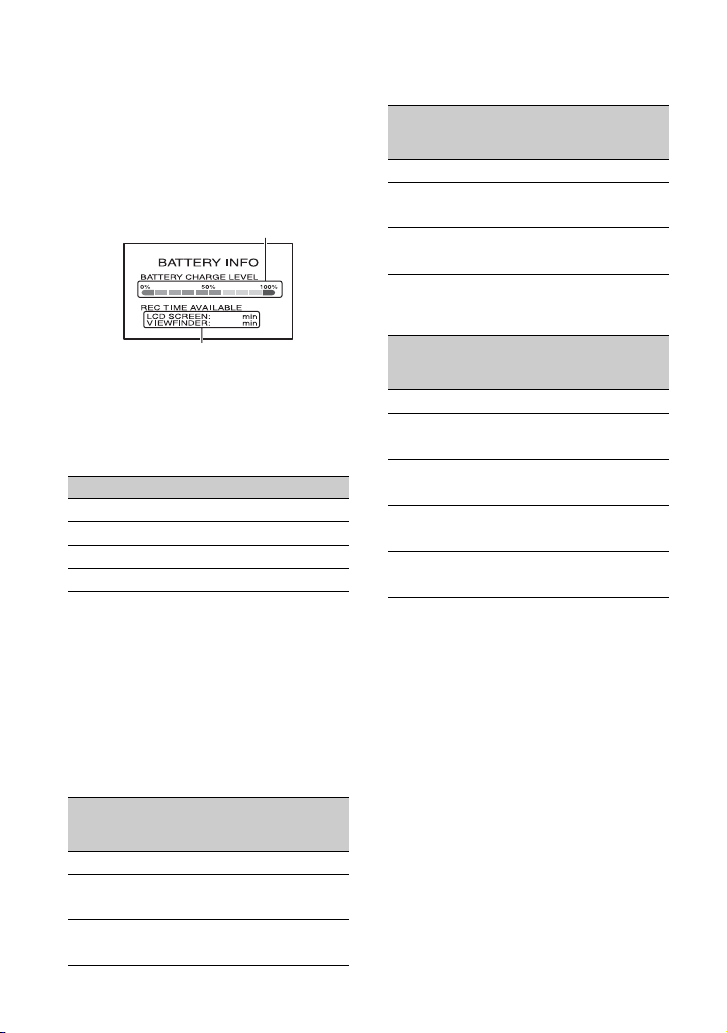
After a while, the approximate recordable
time and battery information appear for
about 7 seconds. You can view the battery
information for up to 20 seconds by
pressing DISP/BATT INFO again while the
information is displayed.
Remaining battery (approx.)
60
65
Recording capacity (approx.)
Charging time
Approximate time (min.) required when
you fully charge a fully discharged battery
pack.
Battery pack Charging time
NP-FH50 135
NP-FH60 (supplied) 135
NP-FH70 170
NP-FH100 390
Recording time
Approximate time (min.) available when
you use a fully charged battery pack.
“HD” stands for high definition image
quality, and “SD” stands for standard image
quality.
When the hard disk is selected as
the media:
Battery pack
Continuous
recording
time
Image quality HD SD HD SD
NP-FH50 70 80 30 40
75 85 30 40
NP-FH60
(supplied)
90 110 40 50
100 115 50 50
Typical
recording
time*
Battery pack
Continuous
recording
time
Typical
recording
time*
Image quality HD SD HD SD
NP-FH70 150 180 70 90
160 190 80 90
NP-FH100 340 405 170 200
370 430 180 210
When the “Memory Stick PRO Duo”
is selected as the media:
Battery pack
Continuous
recording
time
Typical
recording
time*
Image quality HD SD HD SD
NP-FH50 70 80 30 40
75 90 30 40
NP-FH60
(supplied)
90 110 40 50
100 120 50 60
NP-FH70 150 180 70 90
160 195 80 90
NP-FH100 340 405 170 200
370 440 180 220
* Typical recording time shows the time when
you repeat recording start/stop, turning the
power on/off and zooming.
b Notes
• All times measured under the following
conditions:
– [REC MODE]: SP
– Top: When the LCD backlight turns on
Bottom: When recording with the viewfinder
while the LCD panel is closed
Playing time
Approximate time (min.) available when
you use a fully charged battery pack.
“HD” stands for high definition image
quality, and “SD” stands for standard image
quality.
18

Battery pack
Image
LCD panel
opened*
HD SD HD SD
LCD panel
closed
quality
NP-FH50 95 95 100 100
105 105 115 115
NP-FH60
(supplied)
130 130 135 135
140 140 150 150
NP-FH70 200 200 205 205
230 230 245 245
NP-FH100 470 470 500 500
515 515 555 555
• Top: When the media is set to the hard disk
Bottom: When the media is set to the “Memory
Stick PRO Duo”
* When the LCD backlight is on.
On the battery pack
• When you remove the battery pack or the AC
Adaptor, turn the POWER switch to OFF
(CHG) and turn off the (Movie) lamp/
(Still) lamp (p. 20)/ACCESS lamp (p. 29).
• The /CHG (charge) lamp flashes during
charging, or Battery Info (p. 17) will not be
correctly displayed under the following
conditions:
– The battery pack is not attached correctly.
– The battery pack is damaged.
– The battery pack is worn-out (For Battery
Info only).
• The power will not be supplied from the battery
as long as the AC Adaptor is connected to the
DC IN jack of your camcorder or the Handycam
Station, even when the power cord (mains lead)
is disconnected from the wall outlet (wall
socket).
• When attaching an optional video light, it is
recommended that you use an NP-FH70 or NPFH100 battery pack.
• We do not recommend using an NP-FH30,
which only allows short recording and playback
times, with your camcorder.
• The recording and playback time will be shorter
when you use your camcorder in low
temperatures.
• The recording and playback time will be shorter
depending on the conditions under which you
use your camcorder.
On the AC Adaptor
• Use the nearby wall outlet (wall socket) when
using the AC Adaptor. Disconnect the AC
Adaptor from the wall outlet (wall socket)
immediately if any malfunction occurs while
using your camcorder.
• Do not use the AC Adaptor placed in a narrow
space, such as between a wall and furniture.
• Do not short-circuit the DC plug of the AC
Adaptor or battery terminal with any metallic
objects. This may cause a malfunction.
• Even if your camcorder is turned off, AC power
source (mains) is still supplied to it while
connected to the wall outlet (wall socket) via the
AC Adaptor.
Getting Started
On the charging/recording/playback time
• Times measured when using the camcorder at
25 °C (77 °F) (10 °C to 30 °C (50 °F to 86 °F) is
recommended).
19
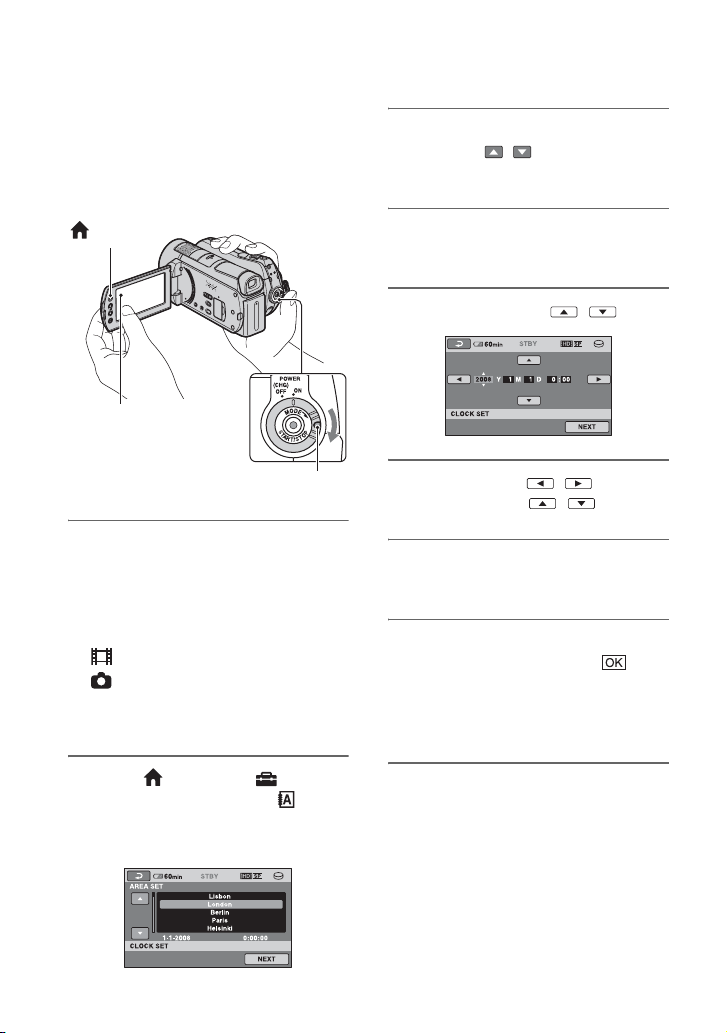
Step 3: Turning the power on and setting the date and time
Set the date and time when using this
camcorder for the first time. If you do not
set the date and time, the [CLOCK SET]
screen appears every time you turn on your
camcorder or change the POWER switch
position.
(HOME)
Touch the button
on the LCD
screen.
POWER switch
3 Select the desired geographical
area with / , then touch
[NEXT].
4 Set [SUMMERTIME], then touch
[NEXT].
5 Set [Y] (year) with / .
6 Select [M] with / , then set
the month with / .
1 While pressing the green button,
turn the POWER switch
repeatedly in the direction of the
arrow until the respective lamp
lights up.
(Movie): To record movies
(Still): To record still images
Go to step 3 when you turn on your
camcorder for the first time.
2 Touch (HOME) t
(SETTINGS) t [CLOCK/
LANG] t [CLOCK SET]
The [CLOCK SET] screen appears.
20
7 Set [D] (day), hour and minute in
the same way, then touch [NEXT].
8 Make sure that the clock is
correctly set, then touch .
The clock starts.
You can set any year up to the year
2037.
To turn off the power
Turn the POWER switch to OFF (CHG).
b Notes
• If you do not use your camcorder for about 3
months, the built-in rechargeable battery gets
discharged and the date and time settings may
be cleared from the memory. In that case,
charge the built-in rechargeable battery and then
set the date and time again (p. 110).

• It takes a few seconds for your camcorder to be
ready to shoot after the power is turned on. You
cannot operate your camcorder during this time.
• The lens cover opens automatically when the
power is turned on. It closes when the playback
screen is selected, or the power is turned off.
• In the setting at the time of purchase, the power
turns off automatically if you leave your
camcorder without any operation attempted for
approximately 5 minutes, to save battery power
([A.SHUT OFF], p. 80).
z Tips
• The date and time does not appear during
recording, but they are automatically recorded
on the media, and can be displayed during
playback (see page 75 for [DATA CODE]).
• Refer to page 103 for information concerning
“World time difference.”
• If the buttons on the touch panel do not work
correctly, adjust the touch panel
(CALIBRATION) (p. 109).
Changing the language setting
You can change the on-screen displays to
show messages in a specified language. To
select the screen language, touch
(HOME) t (SETTINGS) t [CLOCK/
LANG] t [ LANGUAGE SET]
(p. 79).
Step 4: Making setting adjustments before recording
Adjusting the LCD panel
Open the LCD panel 90 degrees to the
camcorder (1), then rotate it to the best
angle to record or play (2).
190 degrees to the
290 degrees
(max.)
2180 degrees
(max.)
To turn off the LCD backlight to make
the battery last longer
Press and hold DISP/BATT INFO for a few
seconds until appears.
This setting is practical when you use your
camcorder in bright conditions or you want
to save battery power. The recorded image
will not be affected by the setting. To turn
on the LCD backlight, press and hold DISP/
BATT INFO for a few seconds until
disappears.
b Notes
• Do not press the buttons on the LCD frame
accidentally when you open or adjust the LCD
panel.
z Tips
• If you rotate the LCD panel 180 degrees, you
can close the LCD panel with the LCD screen
facing out. This is convenient during playback
operations.
• Touch (HOME) t (SETTINGS) t
[SOUND/DISP SET] t [LCD BRIGHT]
(p. 77), and adjust the brightness of the LCD
screen.
camcorder
DISP/BATT INFO
Getting Started
21
• The information is displayed or hidden (display
y no display) each time you press DISP/
BATT INFO.
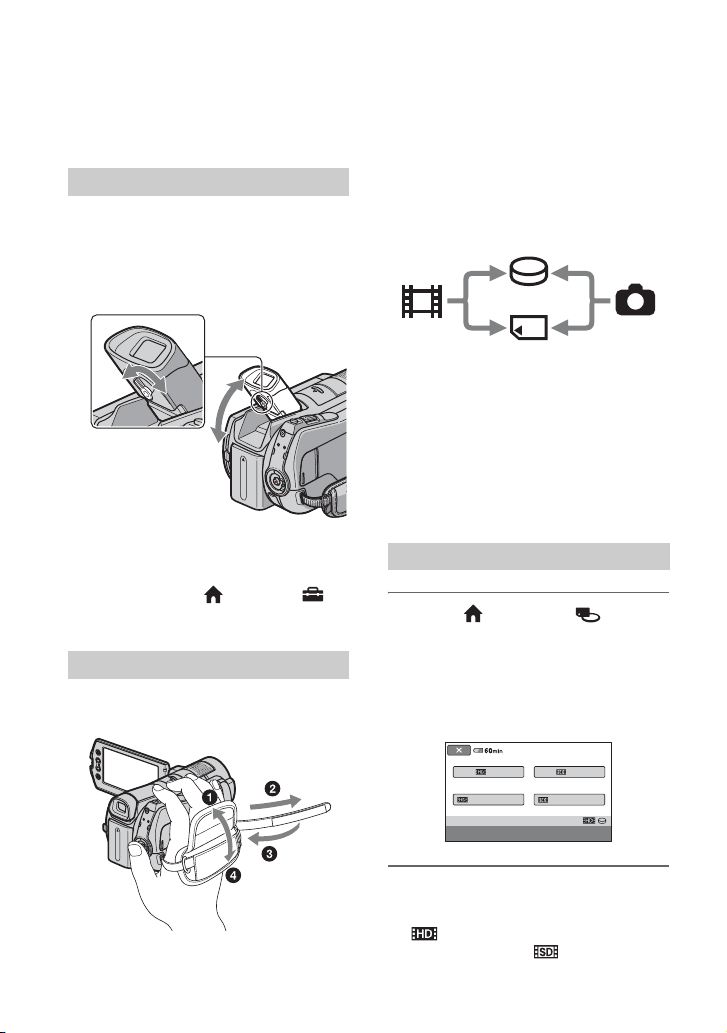
Adjusting the Viewfinder
You can view images using the viewfinder
with the LCD panel closed to avoid wearing
down the battery, or when the image seen
on the LCD screen is poor.
Viewfinder
Viewfinder lens
adjustment lever
Move it until the
image is clear.
Step 5: Selecting the media
You can select the hard disk or “Memory
Stick PRO Duo” as the recording/playback/
editing media on your camcorder. Select the
media for movies and still images
separately.
The default setting is hard disk for movies
and still images.
Hard disk
“Memory Stick”
Movie Still
b Notes
• You can do recording/playback/editing
operations for the selected media. When you
want to change media, reselect the media.
z Tips
• See pages 11 and 24 for the recordable time.
• See page 52 on dubbing/copying between two
media.
image
z Tips
• You can adjust the brightness of the viewfinder
backlight by touching (HOME) t
(SETTINGS) t [SOUND/DISP SET] t [VF
B.LIGHT] (p. 77).
Fastening the grip belt
Fasten the grip belt and hold your
camcorder correctly.
22
Selecting the media for movies
1 Touch (HOME) t
(MANAGE MEDIA) t [MOVIE
MEDIA SET] on the LCD screen of
your camcorder.
The media setting screen for movies
appears.
HDD HDD
MEMORY STICK
MOVIE MEDIA SET
Select the media and image quality.
MEMORY STICK
2 Touch the desired media and
image quality.
indicates HD (high definition)
image quality, and indicates SD
(standard definition) image quality.

3 Touch [YES] t .
The media for movies is changed.
Selecting the media for still
images
Inserting a “Memory Stick PRO
Duo”
Prepare a “Memory Stick PRO Duo” if
“Memory Stick PRO Duo” has been
selected as the media.
For types of “Memory Stick” you can use in
your camcorder, see page 2.
Getting Started
1 Touch (HOME) t
(MANAGE MEDIA) t [PHOTO
MEDIA SET] on the LCD screen of
your camcorder.
The media setting screen for still images
appears.
HDD
PHOTO MEDIA SET
Select the media.
MEMORY STICK
2 Touch the desired media.
3 Touch [YES] t .
The media for still images is changed.
To check the media setting
1 Turn the POWER switch repeatedly to light
up the (Movie)/ (Still) lamp
depending on which media you want to
check.
2 Check the media icon on the screen.
1 Insert the “Memory Stick PRO
Duo.”
1 Open the Memory Stick Duo cover in
the direction of the arrow.
2 Insert the “Memory Stick PRO Duo”
into the Memory Stick Duo slot in the
right direction until it clicks.
3 Close the Memory Stick Duo cover.
ACCESS lamp (“Memory
Stick PRO Duo”)
2 If you have selected “Memory
Stick PRO Duo” as the movie
media, turn the POWER switch
until the (Movie) lamp lights
up.
If the POWER switch is set to OFF
(CHG), turn it on while pressing the
green button.
: Hard disk
: “Memory Stick PRO Duo”
Media icon
23

The [Create a new Image Database
File.] screen appears on the LCD screen
when you insert a new “Memory Stick
PRO Duo.”
3 Touch [YES].
To record only still images on a
“Memory Stick PRO Duo,” touch [NO].
To eject the “Memory Stick PRO Duo”
Open the Memory Stick Duo cover and
lightly push the “Memory Stick PRO Duo”
in once.
b Notes
• Do not open the Memory Stick Duo cover
during recording.
• If you force the “Memory Stick PRO Duo” into
the slot in the wrong direction, the “Memory
Stick PRO Duo,” the Memory Stick Duo slot, or
image data may be damaged.
• If [Failed to create a new Image Database File.
It may be possible that there is not enough free
space.] is displayed in step 3, format the
“Memory Stick PRO Duo” (p. 63). Note that
formatting will delete all data recorded on the
“Memory Stick PRO Duo.”
• When inserting or ejecting the “Memory Stick
PRO Duo,” be careful so that the “Memory
Stick PRO Duo” does not pop out and drop.
The capacity and approximate
recordable time of the “Memory Stick
PRO Duo” (Unit: min.)
The number in ( ) is the minimum
recordable time.
HD (high definition) image quality
AVC
AVC
AVC
HD
HD
16M
9M
(FH)
(HQ)
1GB 6
(6)10(9)15(10)20(15)
2GB 10
(10)25(20)30(20)40(35)
4GB 25
(25)55(40)65(45)85(70)
8GB 55
SD (standard definition) image quality
(55)
SD 9M
(HQ)
115
(80)
SD 6M
(SP)
1GB 10
(10)
(10)
2GB 25
(25)
(25)
4GB 55
(50)
8GB 115
(100)
(50)
170
(100)
b Notes
• Numbers in the table are based on using a
“Memory Stick PRO Duo” made by Sony
Corporation. The recordable time may vary
depending on the recording and subject
conditions, [REC MODE] (p. 68), and the type
of “Memory Stick.”
z Tips
• For the number of recordable still images, see
page 74.
HD
7M
(SP)
140
(100)
20
40
80
AVC
HD
5M
(LP)
180
(145)
SD 3M
(LP)
(25)
(50)
160
(105)
325
(215)
35
80
24
Recording/Playback
Recording and playback with ease (Easy Handycam operation)
Easy Handycam operation makes nearly all settings automatic so that you can perform
recording or playback operation without detailed settings. It also makes the screen font size
larger for easy viewing. The images are recorded on the selected media (p. 22).
If the POWER switch is set to OFF (CHG),
turn it while pressing the green button.
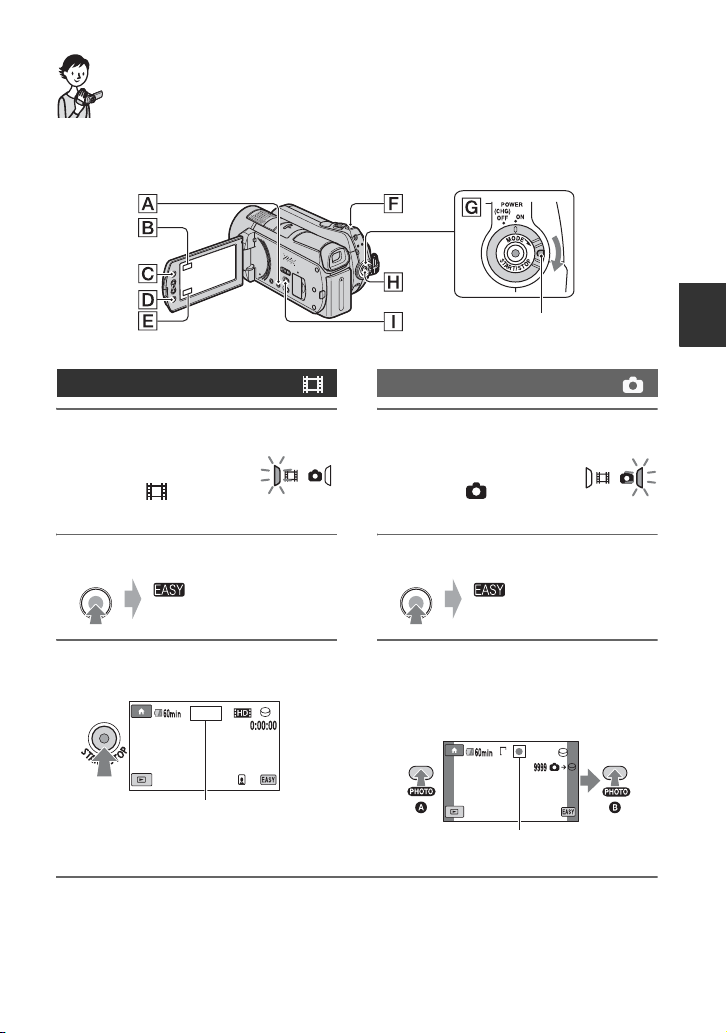
Recording/Playback
Recording movies
1 Turn the POWER
switch G in the
direction of the arrow
until the (Movie)
lamp lights up.
2 Press EASY A.
EASY
appears on
the LCD screen.
3 Press START/STOP H (or D) to
start recording.*
REC
[30min]
[STBY] b [REC]
To stop recording, press START/STOP
again.
* The [REC MODE] is fixed to [HD SP] or [SD SP] (p. 68).
z Tips
• During Easy Handycam operation, faces are detected with frames ([FACE DETECTION], p. 72).
Recording still images
1 Turn the POWER
switch G in the
direction of the arrow
until the (Still) lamp
lights up.
2 Press EASY A.
EASY
3
Press PHOTO F lightly to adjust
the focus
press it fully
sounds).
appears on
the LCD screen.
A
(a beep sounds), then
B
(a shutter click
10.2
M
Flashing b Lights up
25
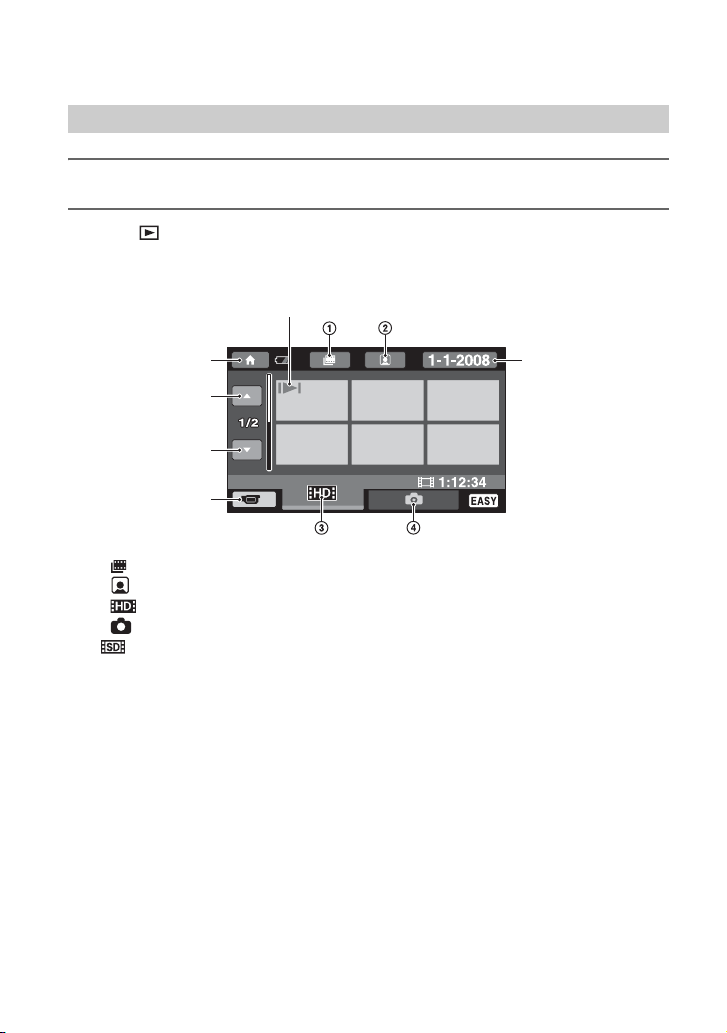
Playing back recorded movies/still images
1 Turn the POWER switch G to turn on your camcorder.
2 Press (VIEW IMAGES) I (or E).
The VISUAL INDEX screen appears on the LCD screen (It may take some seconds).
Appears with the image on each of the tab that was lastly played back/
recorded (B for the still image recorded on a “Memory Stick PRO Duo”)
HOME MENU
Previous 6 images
Next 6 images
Returns to the
recording screen
1 :Goes to the Film Roll Index screen.
2 :Goes to the Face Index screen.
3 :Displays movies with HD (high definition) image quality.*
4 :Displays still images.
* appears when you select the movie with SD (standard definition) image quality in [MOVIE
MEDIA SET] (p. 22).
HDD
Searches for images
by date (p. 38)
26
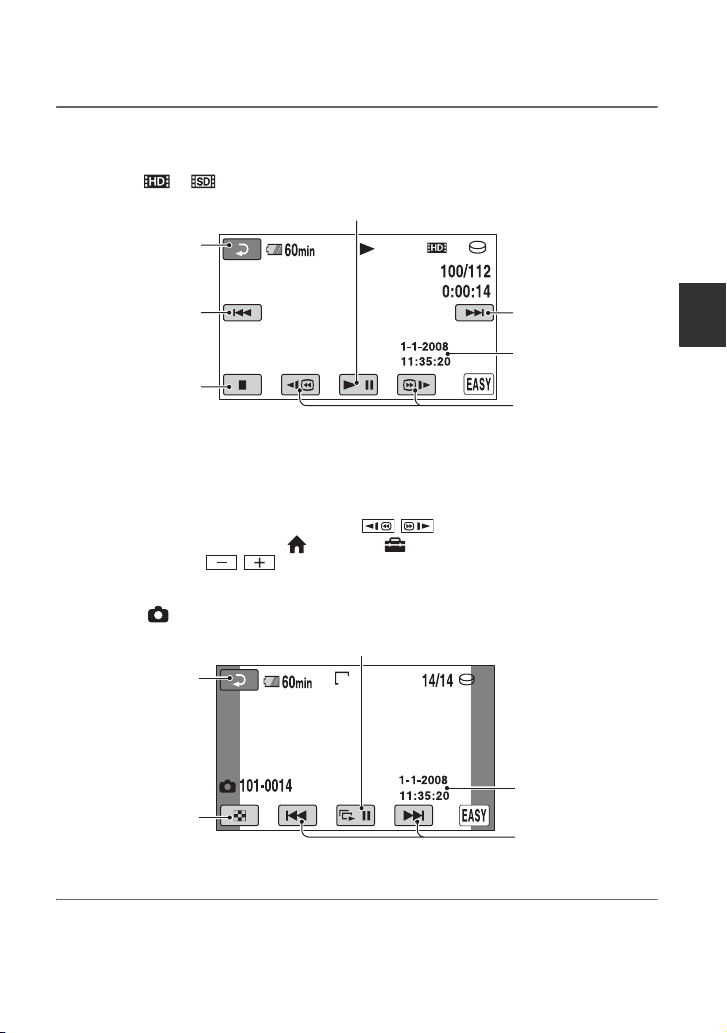
3 Start playback.
Movies:
Touch the or tab, then select the desired movie to play back.
Returns (to the
VISUAL INDEX
screen)
Toggles Play or Pause as you touch
Beginning of the
movie/previous
movie
Stops (goes to the
VISUAL INDEX
screen)
* The setting of [DATA CODE] is fixed to [DATE/TIME] (p. 75).
z Tips
• When playback from the selected movie reaches the last movie, the screen returns to the VISUAL INDEX
screen.
• You can slow down the playback speed by touching / during pause.
• You can adjust the volume by touching (HOME) t (SETTINGS) t [SOUND SETTINGS] t
[VOLUME], then touch / .
Next movie
The recording
date/time*
Reverse/Forward
Still images:
Touch the tab, then select the desired still image to play back.
Returns (to the
VISUAL INDEX
screen)
Goes to the VISUAL
INDEX screen
Slide show (p. 39)
10.2
M
The recording
date/time*
Previous/Next
Recording/Playback
* The setting of [DATA CODE] is fixed to [DATE/TIME] (p. 75).
z Tips
• To change the media, select the media on [MOVIE MEDIA SET]/[PHOTO MEDIA SET] (p. 22).
27

To cancel Easy Handycam operation
Press EASY A again. disappears
from the LCD screen.
Menu settings during Easy Handycam
operation
Press (HOME) C (or B) to display
the menu items available for setup changes
(p. 12, 66).
b Notes
• Most of the menu items automatically return to
the default settings. The settings of some menu
items are fixed. For details, see page 90.
• You cannot use the (OPTION) MENU.
• Cancel Easy Handycam operation if you want to
add effects to images or change settings.
Invalid buttons during Easy Handycam
operation
You cannot use some buttons/functions
during Easy Handycam operation since
they are automatically set (p. 90). If you set
an invalid operation, [Invalid during Easy
Handycam operation] may appear.
28
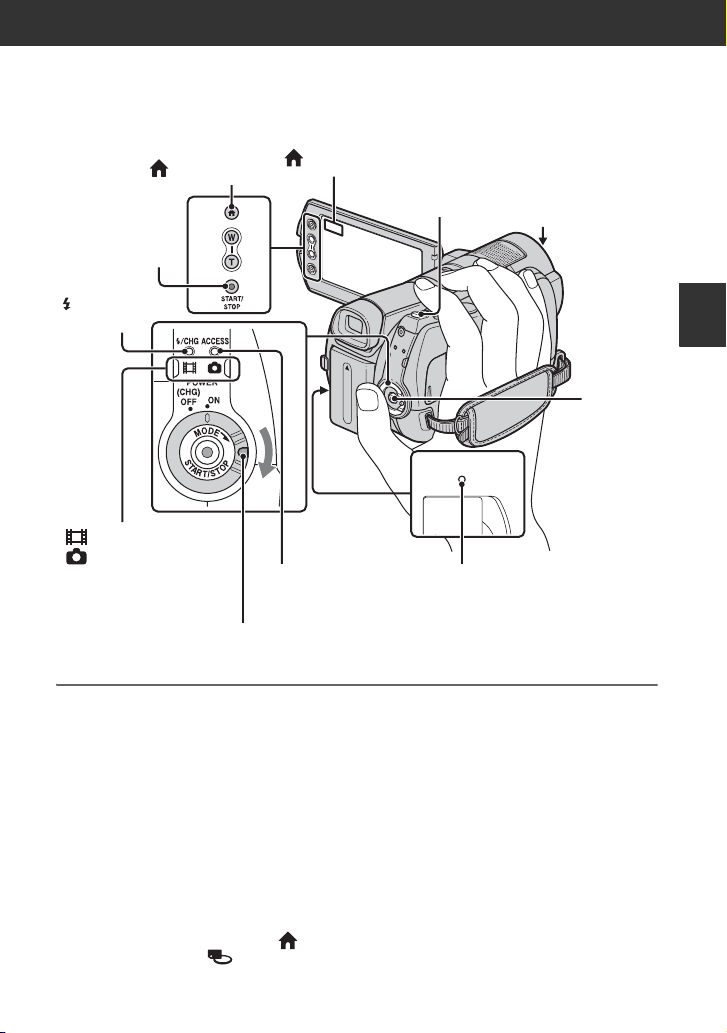
Recording
The images are recorded on the media selected in the media setting (p. 22).
In the default setting, both movies and still images are recorded on the hard disk.
START/STOP B
/CHG (charge)
lamp
(Movie) lamp/
(Still) lamp
POWER switch C
If the POWER switch is set to OFF (CHG), turn it while pressing the green button.
(HOME) A
(HOME) D
ACCESS lamp
(Hard disk)
PHOTO E
ACCESS lamp (“Memory
Stick PRO Duo”)
Lens cover
Opens automatically
when the power is
switched on.
Recording/Playback
START/
STOP F
b Notes
• If the ACCESS lamp is lit or flashing after
recording is finished, it means data is still being
written onto the media. Do not apply shock or
vibration to your camcorder, and do not remove
the battery or AC Adaptor.
• When a movie file exceeds 2 GB, the next
movie file is created automatically.
z Tips
• For types of “Memory Stick” you can use in
your camcorder, see page 2.
• You can check the recordable time and the
remaining capacity, etc., by touching
(HOME) A (or D) t (MANAGE
MEDIA) t [MEDIA INFO] (p. 62).
29
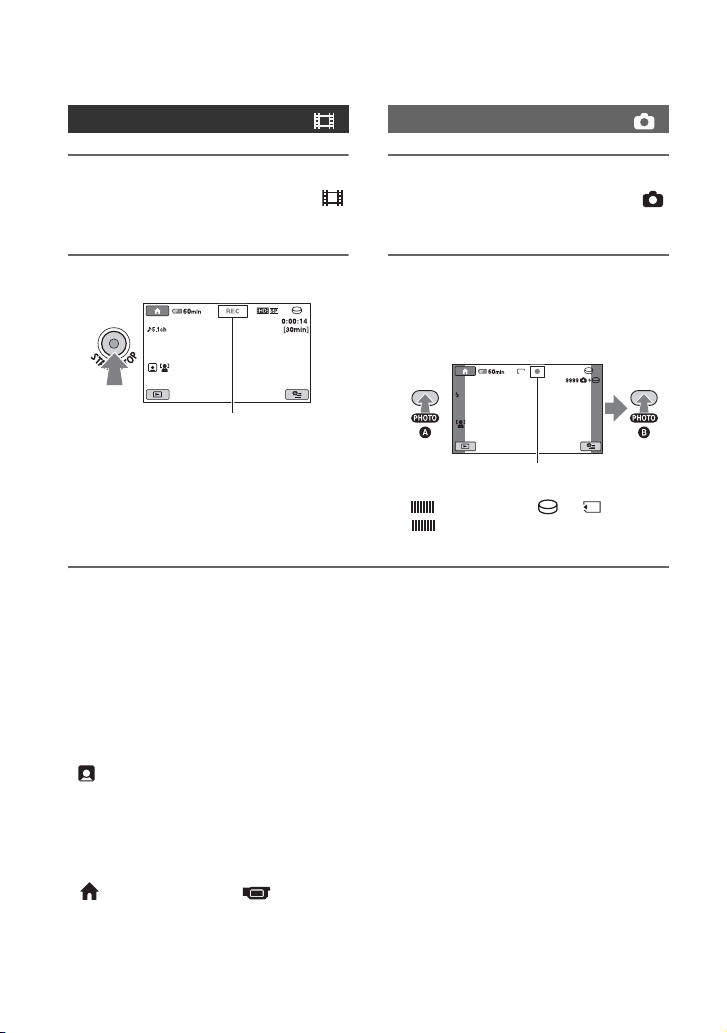
Recording movies
Recording still images
1 Turn the POWER switch C in the
direction of the arrow until the
(Movie) lamp lights up.
2 Press START/STOP F (or B).
[STBY] b [REC]
To stop recording, press START/STOP
F (or B) again.
z Tips
• For the recordable time and the number of
recordable images, see pages 11, 24 and 74.
• You can record still images during movie
recording by pressing PHOTO E ([Dual Rec],
p. 32).
• A frame is shown on the detected face, and the
detected face image is optimized automatically
([FACE DETECTION], p. 72).
• When a face is detected during movie recording,
flashes and the detected face is stored in the
index. You can search for a desired scene by a
face image when playing back ([Face Index],
p. 37).
• You can capture still images from recorded
movies (p. 51).
• You can switch the shooting mode by touching
(HOME) A (or D) t (CAMERA)
t [MOVIE] or [PHOTO].
1 Turn the POWER switch C in the
direction of the arrow until the
(Still) lamp lights up.
2 Press PHOTO E lightly to adjust
the focus A (a beep sounds),
then press it fully B (a shutter
click sounds).
10.2M
Flashing b Lights up
appears beside or . When
disappears, the image has been
recorded.
• The LCD screen of your camcorder can display
recording images across the entire screen (full
pixel display). However, this may cause slight
trimming of the top, bottom, right, and left
edges of images when played back on a TV
which is not compatible with full pixel display.
In this case, set [GUIDEFRAME] to [ON]
(p. 70), and record images using the outer frame
displayed on the screen as a guide.
30
 Loading...