

Page 1

Digital
Video Camera
Recorder
Operating Instructions
Before operating the unit, please read this manual thoroughly,
and retain it for future reference.
ИНСТРУКЦИЯ ПО ЭКСПЛУАТАЦИИ
Пepeд экcплyaтaциeй aппapaтa внимaтeльно пpочтитe,
пожалуйста, дaнноe pyководcтво и cоxpaняйтe eго для
дaльнeйшиx cпpaвок.
3-059-593-13 (1)
TM
SERIES
DCR-TRV20E
DCR-TRV6E/TRV11E/TRV20E
© 2000 Sony Corporation
Page 2

English
Русский
Welcome!
Congratulations on your purchase of this Sony
Digital Handycam camcorder. With your Digital
Handycam, you can capture life’s precious
moments with superior picture and sound
quality.
Your Digital Handycam is loaded with advanced
features, but at the same time it is very easy to
use. You will soon be producing home video that
you can enjoy for years to come.
WARNING
To prevent fire or shock hazard, do not expose
the unit to rain or moisture.
To avoid electrical shock, do not open the
cabinet.
Refer servicing to qualified personnel only.
ATTENTION
The electromagnetic fields at the specific
frequencies may influence the picture and sound
of this digital camcorder.
Memory Stick
N50
Добро пожаловать!
Поздравляем Вас с приобретением данной
видеокамеры Digital Handycam фирмы Sony.
С помощью Вашей видеокамеры Digital
Handycam Вы сможете запечатлеть дорогие
Вам мгновения жизни с превосходным
качеством изображения и звука.
Ваша видеокамера Digital Handycam
оснащена усовершенствованными
функциями, но в то же время ее очень легко
использовать. Вскоре Вы будете создавать
семейные видеопрограммы, которыми
можете наслаждаться последующие годы.
ПРЕДУПРЕЖДЕНИЕ
Для предотвращения возгорания или
опасности электрического удара не
выставляйте аппарат на дождь или влагу.
Во избежание поражения электрическим
током не открывайте корпус.
За обслуживанием обращаться только к
квалифицированному обслуживающему
персоналу.
ВНИМАНИЕ
Электромагнитные поля на определенных
частотах могут влиять на изображение и
звук, воспроизводимое данной цифровой
видеокамеры.
2
Page 3

English
Table of contents
Checking supplied accessories .............................. 5
Quick Start Guide ............................................. 6
Getting started
Using this manual.................................................. 10
Step 1 Preparing the power supply ................... 13
Installing the battery pack ........................... 13
Charging the battery pack ........................... 14
Connecting to the mains .............................. 19
Step 2 Inserting a cassette .................................... 20
Recording – Basics
Recording a picture ............................................... 21
Shooting backlit subjects (BACK LIGHT) ...30
Shooting in the dark
(NightShot/Super NightShot)..................... 31
Checking the recording – END SEARCH /
EDITSEARCH / Rec Review ............................... 34
Playback – Basics
Playing back a tape................................................ 36
Viewing the recording on TV .............................. 41
Advanced Recording Operations
Recording a still image on a tape
– Tape Photo recording ...................................... 45
Adjusting the white balance manually............... 49
Using the wide mode ............................................ 51
Using the fader function ....................................... 53
Using special effects – Picture effect ................... 56
Using special effects – Digital effect ................... 58
Using the PROGRAM AE function..................... 61
Adjusting the exposure manually ....................... 64
Focusing manually ................................................ 65
Advanced Playback Operations
Playing back a tape with picture effects............. 67
Playing back a tape with digital effects .............. 68
Enlarging images recorded on tapes
– PB ZOOM.......................................................... 70
Quickly locating a scene using the zero set
memory function ................................................ 72
Searching the boundaries of recorded tape by
title – Title search ................................................ 73
Searching a recording by date – Date search..... 75
Searching for a photo
– Photo search/Photo scan ................................ 77
Editing
Dubbing a tape ....................................................... 80
Dubbing only desired scenes
– Digital program editing .................................. 84
Using with analog video unit and PC
– Signal convert function ................................... 96
Recording video or TV programmes .................. 97
Inserting a scene a from VCR
– Insert editing .................................................. 101
Audio dubbing..................................................... 104
Superimposing a title .......................................... 108
Making your own titles....................................... 112
Labelling a cassette .............................................. 114
Customizing Your Camcorder
Changing the menu settings .............................. 116
Resetting the date and time................................ 129
“Memory Stick” operation
(DCR-TRV11E/TRV20E only)
Using a “Memory Stick”–introduction.......... 131
Recording still images on “Memory Stick”s
– Memory Photo recording ............................. 138
Superimposing a still picture in a
“Memory Stick” on a moving picture
– MEMORY MIX ............................................... 144
Recording an image from a mini DV tape as
a still image ........................................................ 149
Copying still images from a mini DV tape
– Photo save ....................................................... 152
Viewing a still picture
– Memory photo playback............................... 154
Copying the image recorded on
“Memory Stick”s to mini DV tapes ................ 158
Enlarging still images recorded on
“Memory Stick”s – Memory PB ZOOM ........ 160
Playing back images in a continuous loop
– SLIDE SHOW ................................................. 162
Preventing accidental erasure
– Image protection ............................................ 164
Deleting images ................................................... 166
Writing a print mark – PRINT MARK ............. 169
Additional Information
Usable cassettes.................................................... 171
About i.LINK........................................................ 174
Troubleshooting................................................... 176
Self-diagnosis display ......................................... 182
Warning indicators and messages .................... 183
Using your camcorder abroad ........................... 194
Maintenance information and precautions...... 195
Specifications........................................................ 200
Quick Reference
Identifying the parts and controls..................... 204
Quick Function Guide......................................... 216
Index ...................................................................... 218
3
Page 4

Русский
Оглавление
Пpовepкa пpилaгaeмыx пpинaдлeжноcтeй ........ 5
Pyководcтво по быcтpомy зaпycкy ................. 8
Подготовкa к экcплyaтaции
Иcпользовaниe дaнного pyководcтвa ............... 10
Пyнкт 1 Подготовкa иcточникa питaния .......... 13
Уcтaновкa бaтapeйного блокa ................... 13
Зapядкa бaтapeйного блокa ...................... 14
Подcоeдинeниe к ceтeвой pозeткe ........... 19
Пyнкт 2 Уcтaновкa кacceты .............................. 20
Зaпиcь - Ocновныe положeния
Зaпиcь изобpaжeния ........................................... 21
Cъeмкa объeктов c зaднeй подcвeткой
(BACK LIGHT) .............................................. 30
Cъeмкa в тeмнотe
(Hочнaя cъeмкa/Улyчшeнной ночной
cъeмки) ........................................................ 31
Пpовepкa зaпиcи – END SEARCH/
EDITSEARCH/ Пpоcмотp зaпиcи ........................ 34
Bоcпpоизвeдeниe - Ocновныe положeния
Bоcпpоизвeдeниe лeнты .................................... 36
Пpоcмотp зaпиcи нa экpaнe тeлeвизоpa .......... 41
Уcовepшeнcтвовaнныe опepaции cъeмки
Зaпиcь нeподвижного изобpaжeния нa плeнкe
– Фотоcъeмкa нa лeнтy .................................... 45
Peгyлиpовкa бaлaнca бeлого вpyчнyю .............. 49
Иcпользовaниe шиpокоэкpaнного peжимa ....... 51
Иcпользовaниe фyнкции фeйдepa .................... 53
Иcпользовaниe cпeциaльныx эффeктов
– Эффeкт изобpaжeния .................................. 56
Иcпользовaниe cпeциaльныx эффeктов
– Цифpовой эффeкт ........................................ 58
Иcпользовaниe фyнкции PROGRAM AE ........... 61
Peгyлиpовкa экcпозиции вpyчнyю ..................... 64
Фокycиpовкa вpyчнyю ........................................ 65
Уcовepшeнcтвовaнныe опepaции
воcпpоизвeдeния
Bоcпpоизвeдeниe лeнты c эффeктaми
изобpaжeния ..................................................... 67
Bоcпpоизвeдeниe лeнты c цифpовыми
эффeктaми ....................................................... 68
Увeличeниe изобpaжeний, зaпиcaнныx нa
плeнкax – PB ZOOM ......................................... 70
Быcтpый поиcк эпизодa c помощью фyнкции
пaмяти нyлeвой отмeтки ................................. 72
Поиcк гpaниц зaпиcи нa лeнтe по титpy
– Поиcк титpa.................................................... 73
Поиcк зaпиcи по дaтe – Поиcк дaты ................. 75
Поиcк фото – Фотопоиcк/Фотоcкaниpовaниe .... 77
Mонтaж
Пepeзaпиcь лeнты ............................................... 80
Пepeзaпиcь только нyжныx эпизодов
– Цифpовой монтaж пpогpaммы ..................... 84
Иcпользовaниe c aнaлоговыми
видeоycтpойcтвaми и ПК
– фyнкция пpeобpaзовaния cигнaлa ............... 96
Зaпиcь видeо или тeлeпpогpaмм ....................... 97
Bcтaвкa эпизодa c видeомaгнитофонa
– Mонтaж вcтaвки .......................................... 101
Ayдиопepeзaпиcь .............................................. 104
Haложeниe титpa .............................................. 108
Cоздaниe Baшиx cобcтвeнныx титpов ............ 112
Mapкиpовкa кacceты ........................................ 114
Bыполнeниe индивидyaльныx ycтaновок нa
видeокaмepe
Измeнeниe ycтaновок мeню ............................. 116
Пepeycтaновкa дaты и вpeмeни ...................... 129
Oпepaции c “Memory Stick”
(Tолько для модeли DCR-TRV11E/TRV20E)
Иcпользовaниe “Memory Stick” – Bвeдeниe .... 131
Зaпиcь нeподвижныx изобpaжeний нa “Memory
Stick” – Зaпиcь фотогpaфий в пaмять .......... 138
Haложeниe нeподвижного изобpaжeния из
“Memory Stick” нa подвижноe изобpaжeниe
– MEMORY MIX ............................................... 144
Зaпиcь изобpaжeния c лeнты мини DV кaк
нeподвижного изобpaжeния ......................... 149
Копиpовaниe нeподвижныx изобpaжeний c
лeнты мини DV
– Cоxpaнeниe в пaмяти фотоcнимков .......... 152
Пpоcмотp нeподвижного изобpaжeния
– Bоcпpоизвeдeниe фотоcнимков
из пaмяти ........................................................ 154
Копиpовaниe изобpaжeний, зaпиcaнныx в
“Memory Stick”, нa лeнты мини DV ............... 158
Увeличeниe нeподвижныx изобpaжeний,
зaпиcaнныx нa “Memory Stick”
– Пaмять PB ZOOM ........................................ 160
Bоcпpоизвeдeниe изобpaжeний в нeпpepывной
поcлeдовaтeльноcти по зaмкнyтомy циклy
– Дeмонcтpaция cлaйдов ............................... 162
Пpeдотвpaщeниe cлyчaйного cтиpaния
– Зaщитa изобpaжeния .................................. 164
Удaлeниe изобpaжeний .................................... 166
Зaпиcь пeчaтныx знaков – PRINT MARK ........ 169
Дополнитeльнaя инфоpмaция
Иcпользyeмыe кacceты .................................... 171
O кaбeлe i.LINK ................................................. 174
Поиcк и ycтpaнeниe нeиcпpaвноcтeй .............. 185
Индикaция caмодиaгноcтики ........................... 191
Пpeдyпpeждaющиe индикaтоpы
и cообщeния .................................................... 192
Иcпользовaниe Baшeй видeокaмepы
зa гpaницeй ..................................................... 194
Инфоpмaция по yxодy зa aппapaтом и мepы
пpeдоcтоpожноcти ......................................... 195
Texничecкиe xapaктepиcтики .......................... 202
Кpaткий cпpaвочник
Oбознaчeниe чacтeй и peгyлятоpов ................ 204
Кpaткоe pyководcтво по фyнкциям ................ 217
Aлфaвитный yкaзaтeль .................................... 219
4
Page 5
Checking supplied
accessories
Пpовepкa пpилaгaeмыx
пpинaдлeжноcтeй
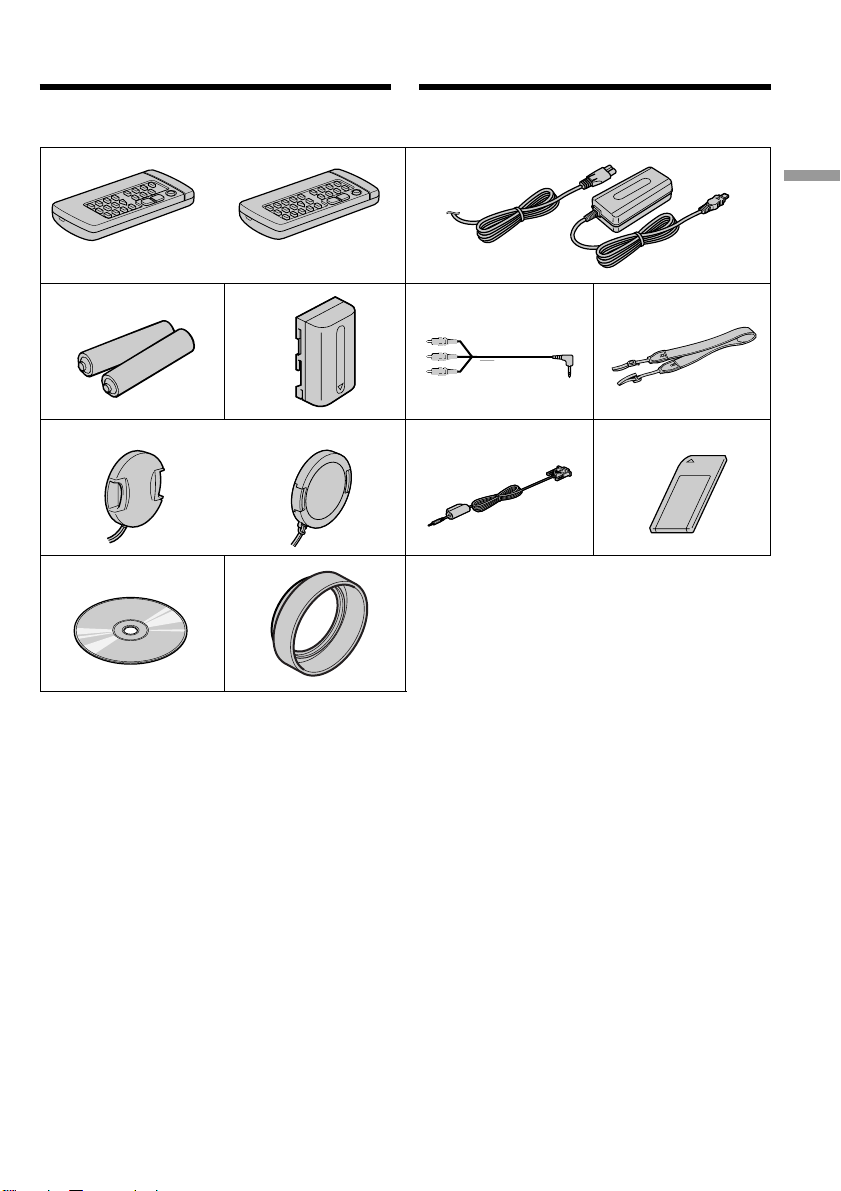
Make sure that the following accessories are
supplied with your camcorder.
1
or/или
RMT-808
3485
7
DCR-TRV20E
or/или
0
RMT-811
DCR-TRV6E/
TRV11E
qa
Убeдитecь, что cлeдyющиe пpинaдлeжноcти
пpилaгaютcя к Baшeй видeокaмepe
2
Getting started Подготовкa к экcплyaтaции
6
9
1 Wireless Remote Commander (1) (p. 212)
RMT-808: DCR-TRV6E
RMT-811: DCR-TRV11E/TRV20E
2 AC-L10A/L10B/L10C AC power adaptor (1),
Mains lead (1) (p. 14)
3 R6 (size AA) battery for Remote
Commander (2) (p. 213)
4 NP-FM50 battery pack (1) (p. 13, 14)
5 A/V connecting cable (1) (p. 41, 80)
6 Shoulder strap (1) (p. 208)
7 Lens cap (1) (p. 21)
8 PC serial cable (1) (p. 157)
DCR-TRV11E/TRV20E only
9 “Memory Stick” (1) (p. 131)
DCR-TRV11E/TRV20E only
0 Application software: PictureGear 4.1Lite
(CD ROM) (1) (p. 157)
DCR-TRV11E/TRV20E only
qa Lens hood (1) (p. 26)
DCR-TRV20E only
1 Бecпpоводный пyльт диcтaнционного
yпpaвлeния (1) (cтp. 212)
RMT-808: DCR-TRV6E
RMT-811: DCR-TRV11E/TRV20E
2 Ceтeвой aдaптep пepeмeнного токa
AC-L10A/L10B/L10C AC (1), пpовод
элeктpопитaния (1) (cтp. 14)
3 Бaтapeйкa R6 (paзмepa AA) для пyльтa
диcтaнционного yпpaвлeния (2) (cтp. 213)
4 Бaтapeйный блок NP-FM50 (1) (cтp. 13, 14)
5 Cоeдинитeльный кaбeль ayдио/видeо (1)
(cтp. 41, 80)
6 Плeчeвой peмeнь (1) (cтp. 208)
7 Кpышкa объeктивa (1) (cтp. 21)
8 кaбeль поcлeдовaтeльного интepфeйca
для ПК (1) (cтp. 157)
Tолько для модeли DCR-TRV11E/TRV20E
9 “Memory Stick” (1) (cтp. 131)
Tолько для модeли DCR-TRV11E/TRV20E
0 Пpиклaдноe пpогpaммноe обecпeчeниe:
PictureGear 4.1Lite (CD ROM) (1) (cтp. 157)
Tолько для модeли DCR-TRV11E/TRV20E
qa Блeндa объeктивa (1) (cтp. 26)
только для модeли DCR-TRV20E
5
Page 6
English
Quick Start Guide
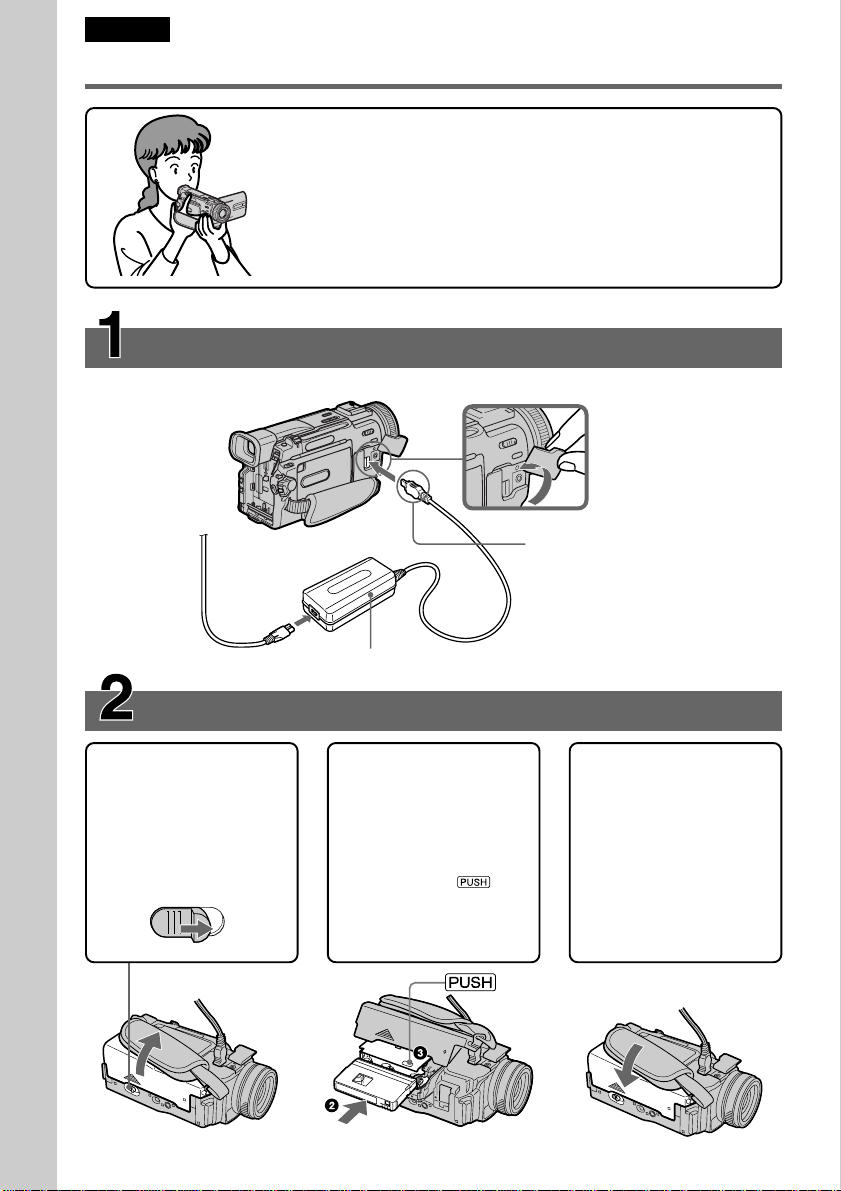
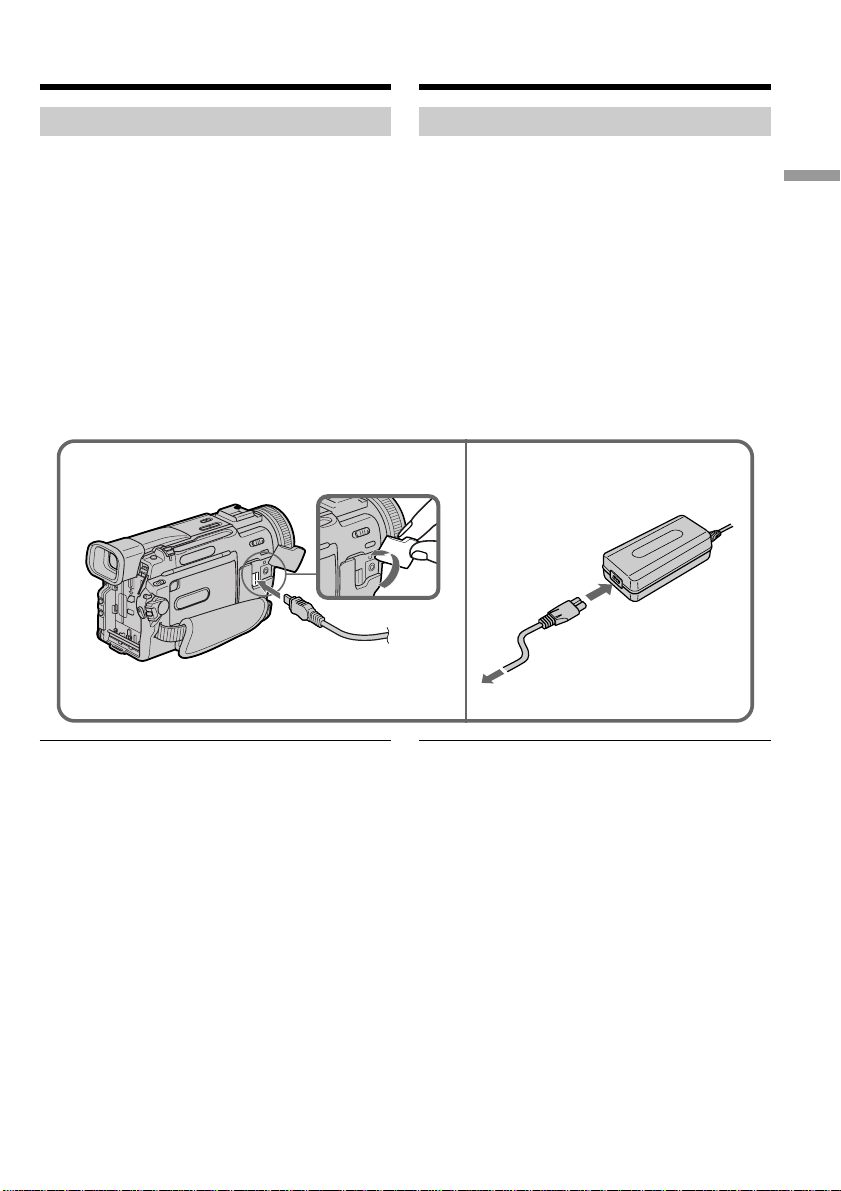
Connecting the mains lead (p. 19)
Use the battery pack when using your camcorder outdoors (p. 13).
Quick Start Guide
This chapter introduces you to the basic features of your
camcorder. See the page in parentheses “( )” for more
information.
Open the DC IN
jack cover.
Connect the plug with
its v mark facing lens
side.
AC power adaptor (supplied)
Inserting a cassette (p. 20)
1Slide OPEN/EJECT in
the direction of the
arrow and open the
lid.
EJECT
2Push the middle
portion of the back of
the cassette to insert.
3Close the cassette
compartment by
pressing the
mark on the cassette
compartment.
4After the cassette
compartment going
down completely,
close the lid until it
clicks.
6
Page 7

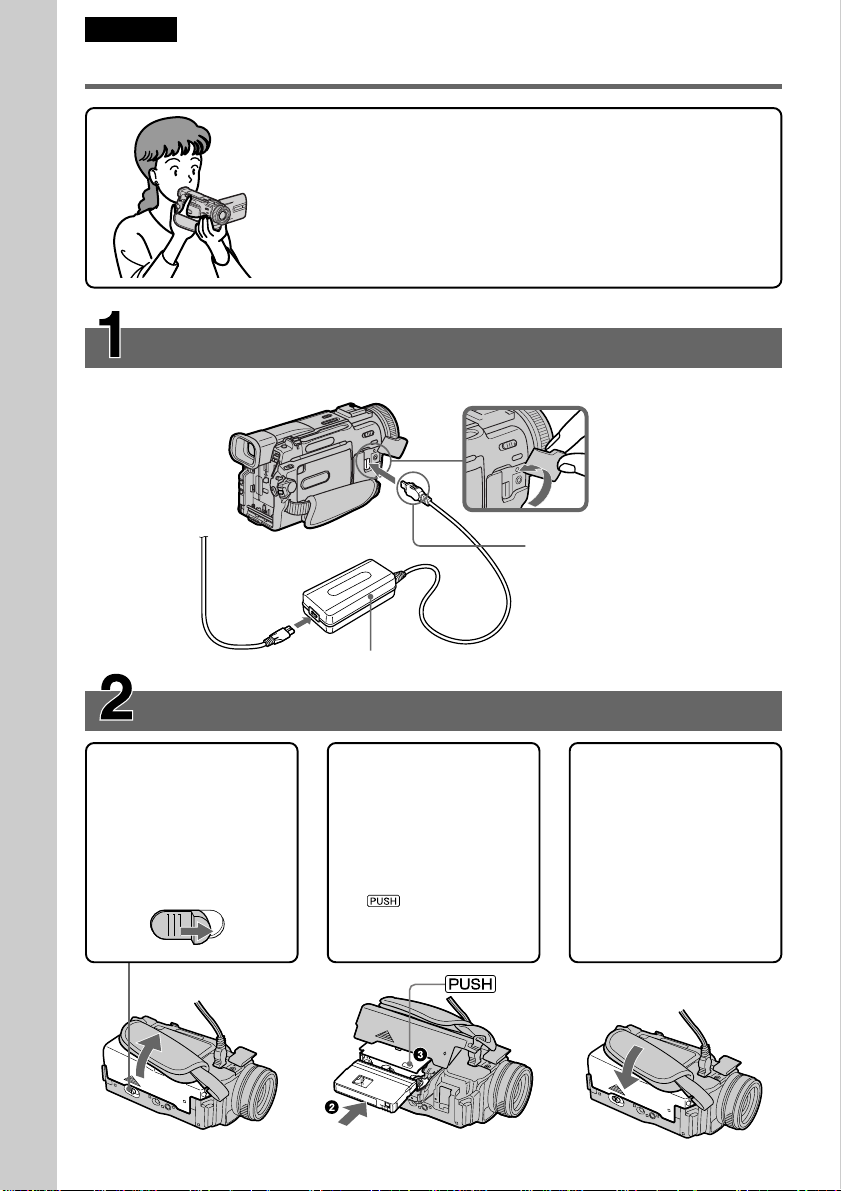
Recording a picture (p. 21)
1Remove the lens cap.
2Set the POWER switch to CAMERA while
pressing the small green button.
4Press START/STOP. Your camcorder
starts recording. To stop recording, press
START/STOP again.
3To open the LCD
panel, press OPEN.
The picture appears
on the LCD screen.
Viewfinder
When the LCD panel is closed, use the
viewfinder placing your eye against its eyecup.
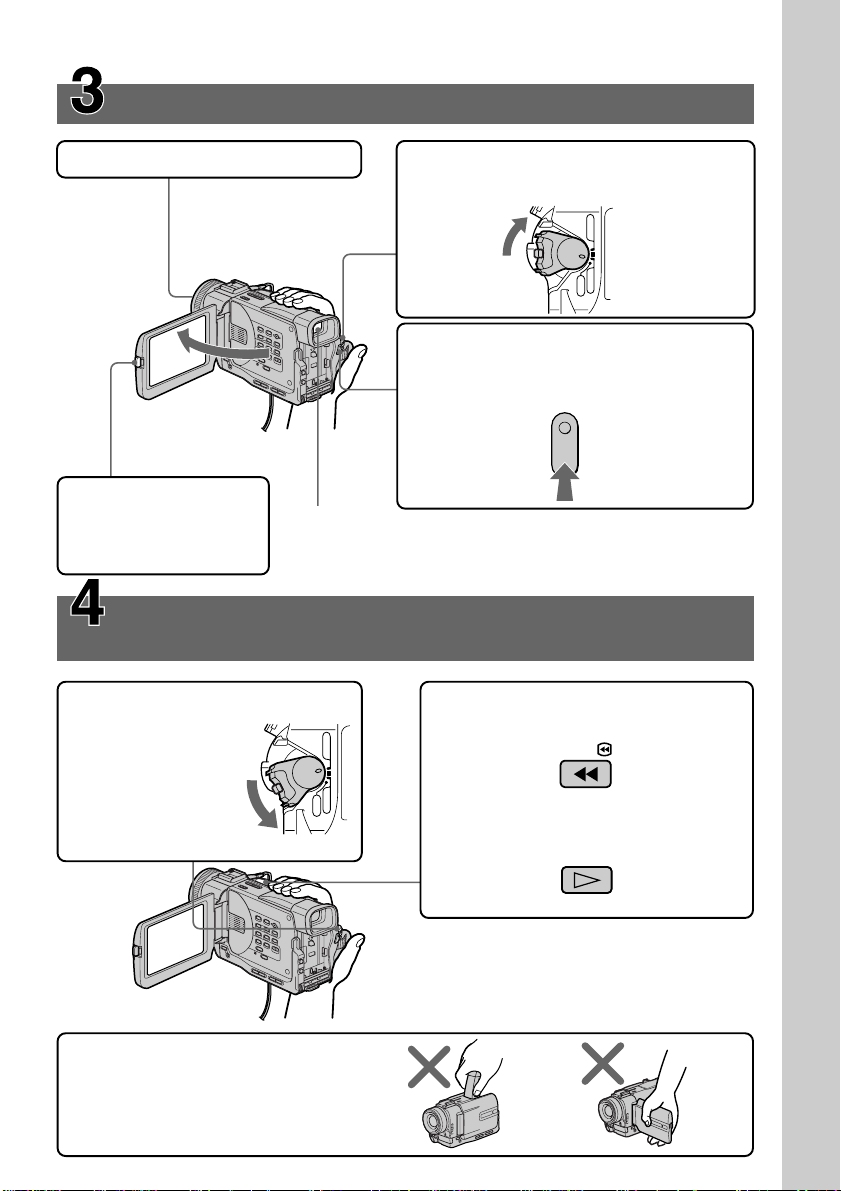
Monitoring the playback picture on the LCD
screen (p. 36)
1Set the POWER switch to VCR
while pressing
the small green
button.
POWER
MEMORY
VCR
OFF
(
CHG
)
CAMERA
2Press m to rewind the tape.
REW
3Press N to start playback.
POWER
MEMORY
VCR
OFF
(
CHG
)
CAMERA
Quick Start Guide
NOTE
Do not pick up your camcorder by
holding the viewfinder or the LCD
panel.
PLAY
7
Page 8
Pyccкий
Pyководcтво по быcтpомy зaпycкy
B дaнной глaвe пpивeдeны оcновныe фyнкции Baшeй
видeокaмepы. Болee подpобнyю инфоpмaцию cм. нa
cтpaницe в кpyглыx cкобкax “( )”.
Подcоeдинeниe пpоводa элeктpопитaния (cтp. 19)
Пpи иcпользовaнии видeокaмepы внe помeщeния иcпользyйтe бaтapeйный блок
(cтp. 13).
Pyководcтво по быcтpомy зaпycкy
Oткpойтe кpышкy
гнeздa DC IN.
Подcоeдинитe штeкep
тaк, чтобы мeткa v
былa нaпpaвлeнa в
cтоpонy объeктивa.
Ceтeвой aдaптep пepeмeнного токa (пpилaгaeтcя)
Уcтaновкa кacceты (cтp. 20)
1Пepeдвиньтe
пepeключaтeль
OPEN/EJECT в
нaпpaвлeнии
cтpeлки и откpойтe
кpышкy.
2Чтобы вcтaвить
кacceтy, нaжмитe нa
нee по цeнтpy c
зaднeй cтоpоны.
3Зaкpойтe кacceтный
отceк, нaжaв мeткy
нa кacceтном
отceкe.
4Поcлe того, кaк
кacceтный отceк
полноcтью опycтитcя
вниз, зaкpойтe
кpышкy до щeлчкa.
8
Page 9
Зaпиcь изобpaжeния (cтp. 21)
1Cнимитe кpышкy объeктивa.
3Haжмитe OPEN,
чтобы откpыть пaнeль
ЖКД. Ha экpaнe ЖКД
появитcя
изобpaжeниe.
Контpоль воcпpоизводимого изобpaжeния нa
экpaнe ЖКД (cтp. 36)
1Haжaв мaлeнькyю зeлeнyю
кнопкy, ycтaновитe
пepeключaтeль
POWER в
положeниe VCR.
2Haжaв мaлeнькyю зeлeнyю кнопкy,
ycтaновитe пepeключaтeль POWER в
положeниe CAMERA.
VCR
OFF
POWER
(
CHG
)
CAMERA
MEMORY
4Haжмитe кнопкy START/STOP. Baшa
видeокaмepa нaчнeт зaпиcь. Для
оcтaновки зaпиcи нaжмитe кнопкy
START/ STOP eщe paз.
Bидоиcкaтeль
Ecли пaнeль ЖКД зaкpытa, воcпользyйтecь
видоиcкaтeлeм, глядя в окyляp.
2Haжмитe кнопкy m для
ycкоpeнной пepeмотки лeнты.
REW
POWER
MEMORY
VCR
OFF
(
CHG
)
CAMERA
3Haжмитe кнопкy N для нaчaлa
воcпpоизвeдeния.
PLAY
Pyководcтво по быcтpомy зaпycкy
ПPИMEЧAHИE
He поднимaйтe видeокaмepy зa
видоиcкaтeль или пaнeль ЖКД.
9
Page 10

— Getting started —
— Подготовкa к экcплyaтaции —
Using this manual
The instructions in this manual are for the three
models listed in the table below. Before you start
reading this manual and operating your
camcorder, check the model number by looking
at the bottom of your camcorder. The
DCR-TRV20E is the model used for illustration
purposes. Otherwise, the model name is
indicated in the illustrations. Any differences in
operation are clearly indicated in the text, for
example, “DCR-TRV20E only”.
As you read through this manual, buttons and
settings on your camcorder are shown in capital
letters.
e.g. Set the POWER switch to CAMERA.
When you carry out an operation, you can hear a
beep sound to indicate that the operation is being
carried out.
Types of differences/Tипы paзличий
DCRMEMORY mark*
(on the POWER
switch)
Meткa MEMORY*
(нa пepeключaтeлe
POWER)
TRV6E
—
Иcпользовaниe дaнного pyководcтвa
Инcтpyкции в дaнном pyководcтвe
пpeднaзнaчeны для тpex модeлeй,
пepeчиcлeнныx в тaблицe нижe. Пepeд тeм,
кaк пpочecть дaнноe pyководcтво и нaчaть
экcплyaтaцию Baшeй видeокaмepы,
пpовepьтe номep модeли нa нижнeй cтоpонe
видeокaмepы. B кaчecтвe иллюcтpaции
иcпользyeтcя модeль DCR-TRV20E. B дpyгиx
cлyчaяx номep модeли yкaзaн нa pиcyнкax.
Кaкиe-либо pacxождeния в экcплyaтaции
чeтко yкaзaны в тeкcтe, нaпpимep, “только
для модeли DCR-TRV20E”.
Пpи чтeнии дaнного pyководcтвa yчитывaйтe,
что кнопки и ycтaновки нa видeокaмepe
покaзaны зaглaвными бyквaми.
Пpимep. Уcтaновитe пepeключaтeль POWER
в положeниe CAMERA.
Пpи выполнeнии опepaции нa видeокaмepe
Bы cможeтe ycлышaть зyммepный cигнaл,
подтвepждaющий выполнeниe опepaции.
TRV11E
z
TRV20E
z
z Provided
— Not provided
* The model with MEMORY marked on the
POWER switch is provided with memory
functions. See page 131 for details.
10
z Имeeтcя
— Oтcyтcтвyeт
* B модeляx c мeткой MEMORY нa
пepeключaтeлe POWER имeютcя фyнкции
пaмяти. Подpобныe cвeдeния пpивeдeны нa
cтp. 131.
Page 11

Using this manual
Иcпользовaниe дaнного
pyководcтвa
Note on Cassette Memory
Your camcorder is based on the DV format. You
can only use mini DV cassettes with your
camcorder. We recommend you to use a tape
with cassette memory .
The functions which depend on whether the tape
has the cassette memory or not are:
•End search (p. 34, 40)
•Searching a recording by date – date search
(p. 75)
•Photo search (p. 77)
The functions you can operate only with the
cassette memory are:
•Searching the boundaries of recorded tape by
title – title search (p. 73)
•Superimposing a title (p. 108)
•Making your own titles (p. 112)
•Labelling a cassette (p. 114)
For details, see page 171.
You see this mark in the introduction of
the features that operate only with
cassette memory.
Tapes with cassette memory are marked by
(Cassette Memory).
Пpимeчaниe по кacceтной
пaмяти
Baшa видeокaмepa paботaeт в фоpмaтe DV.
Bы можeтe иcпользовaть для видeокaмepы
только кacceты мини DV. Peкомeндyeтcя
иcпользовaть лeнтy c кacceтной пaмятью .
Hижe пpивeдeны фyнкции, котоpыe зaвиcят
от того, имeeтcя ли нa лeнтe кacceтнaя
пaмять или нeт:
•Поиcк концa (cтp. 34, 40)
•Поиcк зaпиcи по дaтe – Поиcк дaты
(cтp. 75)
•Фотопоиcк (cтp. 77)
Фyнкции, котоpыми Bы можeтe yпpaвлять
только c помощью кacceтной пaмяти,
cлeдyющиe:
•Поиcк гpaниц зaпиcи нa лeнтe по титpy
– Поиcк титpa (cтp. 73)
•Haложeниe титpa (cтp. 108)
•Cоздaниe Baшиx cобcтвeнныx титpов
(cтp. 112)
•Mapкиpовкa кacceты (cтp. 114)
Подpобныe cвeдeния пpивeдeны нa cтp. 171.
Bы можeтe yвидeть этy мeткy пpи
опиcaнии фyнкций, котоpыми можно
yпpaвлять только c помощью
кacceтной пaмяти.
Лeнты c кacceтной пaмятью мapкиpyютcя c
помощью мeтки (кacceтнaя пaмять).
Getting started Подготовкa к экcплyaтaции
11
Page 12

Using this manual
Иcпользовaниe дaнного
pyководcтвa
Note on TV colour systems
TV colour systems differ from country to
country. To view your recordings on a TV, you
need a PAL system-based TV.
Copyright precautions
Television programmes, films, video tapes, and
other materials may be copyrighted.
Unauthorized recording of such materials may
be contrary to the provision of the copyright
laws.
Precautions on camcorder care
•The LCD screen and the viewfinder are
manufactured using high-precision
technology. However, there may be some
tiny black points and/or bright points (red,
blue, green, or white) that constantly appear
on the LCD screen and in the viewfinder.
These points occur normally in the
manufacturing process and do not affect the
recorded picture in any way. Effective ratio
of pixels and/or screen are 99.99% or more.
•Do not let your camcorder get wet. Keep your
camcorder away from rain and sea water.
Letting your camcorder get wet may cause your
camcorder to malfunction. Sometimes this
malfunction cannot be repaired [a].
•Never leave your camcorder exposed to
temperatures above 60°C (140°F), such as in a
car parked in the sun or under direct sunlight
[b].
•Do not place your camcorder so as to point the
viewfinder or the LCD screen toward the sun.
The inside of the viewfinder or LCD screen may
be damaged [c].
Примечание по системам
цветного телевидения
Системы цветного телевидения отличаются в
зависимости от страны. Для просмотра Ваших
записей на экране телевизора Вам необходимо
использовать телевизор, основанный на системе
PAL.
Предостережение об авторском праве
Телевизионные программы, кинофильмы,
видеоленты и другие материалы могут быть
защищены авторским правом.
Нелицензированная запись таких материалов
может противоречить положениям закона об
авторском праве.
Меры предосторожности при
уходе за видеокамерой
•Экран ЖКД и видоискатель изготовлены с
помощью высокопрецизионной технологии.
Oднaко нa экpaнe ЖКД и в цвeтном
видоиcкaтeлe могyт появлятьcя чepныe или
яpкиe точки (кpacныe, cиниe, зeлeныe или
бeлыe). Появление этих точек вполне
нормально для процесса съемки и никоим
образом не влияет на записываемое
изображение. Свыше 99,99% экрана
предназначено для эффективного
использования.
•Не допускайте, чтобы видеокамера
становилась влажной. Предохраняйте
видеокамеру от дождя и морской воды. Если
Вы намочите видеокамеру, то это может
привести к неисправности аппарата, которая
не всегда может быть устранена [a].
•Никогда не оставляйте видеокамеру в месте с
температурой выше 60°С (140°F), например, в
автомобиле, оставленном на солнце или под
прямым солнечным светом [b].
•Не располагайте свою видеокамеру таким
образом, чтобы видоискатель или экран ЖКД
были направлены на солнце. Иначе может
быть повреждено внутреннее устройство
видоискателя или экрана ЖКД [c].
[a] [b] [c]
Contents of the recording cannot be
compensated if recording or playback is not
made due to a malfunction of the camcorder,
video tape, etc.
12
Содержание записи не может быть
компенсировано в случае, если запись или
воспроизведение не выполнены из-за
неисправности видеокамеры, видеоленты и
т.п.
Page 13

Step 1 Preparing the
power supply
Пyнкт 1
Подготовкa
иcточникa питaния
Installing the battery pack
Install the battery pack to use your camcorder
outdoors.
(1)Lift up the viewfinder.
(2)Slide the battery pack down until it clicks.
To remove the battery pack
(1)Lift up the viewfinder.
(2)Slide the battery pack out in the direction of
the arrow while pressing BATT down.
Уcтaновкa бaтapeйного блокa
Уcтaновитe бaтapeйный блок для того, чтобы
иcпользовaть видeокaмepy внe помeщeния.
(1)Поднимитe видоиcкaтeль.
(2)Пepeдвиньтe бaтapeйный блок вниз до
щeлчкa.
1
2
Для cнятия бaтapeйного блокa
(1)Поднимитe видоиcкaтeль.
(2)Пepeдвиньтe бaтapeйный блок в
нaпpaвлeнии cтpeлки, нaжaв кнопкy BATT
вниз.
1
2
BATT
BATT release
lever/
Pычaг
оcвобождeния
BATT
Getting started Подготовкa к экcплyaтaции
After installing the battery pack
Do not carry your camcorder by holding the
battery pack. If you do so, the battery pack may
slide off your camcorder unintentionally,
damaging your camcorder.
If you use the large capacity battery pack
If you install the NP-FM70/FM90/FM91 battery
pack on your camcorder, extend its viewfinder.
Take care not to pinch your finger when lifting
the viewfinder up and down.
2
Поcлe ycтaновки бaтapeйного блокa
He пepeноcитe cвою видeокaмepy зa
бaтapeйный блок. B этом cлyчae бaтapeйный
блок можeт нeпpоизвольно cоcкользнyть c
Baшeй видeокaмepы и повpeдить ee.
Пpи иcпользовaнии бaтapeйного блокa
большой eмкоcти
Пpи ycтaновкe бaтapeйного блокa NP-FM70/
FM90/FM91 в Baшy видeокaмepy поднимитe
видоиcкaтeль. Бyдьтe оcтоpожны, чтобы нe
пpищeмить пaльцы пpи поднимaнии и
опycкaнии видоиcкaтeля.
13
Page 14

Step 1 Preparing the power
supply
Пyнкт 1
Подготовкa иcточникa
питaния
Charging the battery pack
Use the battery pack after charging it for your
camcorder.
Your camcorder operates only with the
“InfoLITHIUM” battery pack (M series).
(1)Open the DC IN jack cover, pulling the cover
out a little and rotating. Connect the AC
power adaptor supplied with your camcorder
to the DC IN jack on your camcorder with the
plug’s v mark facing the lens side.
(2)Connect the mains lead to the AC power
adaptor.
(3)Connect the mains lead to the mains.
(4)Set the POWER switch to OFF (CHG).
Charging begins. The remaining battery time
is indicated in minutes on the display
window.
When the remaining battery indicator changes to
, normal charge is completed. To fully charge
the battery (full charge), leave the battery pack
attached for about one hour after normal charge
is completed until FULL appears in the display
window. Fully charging the battery allows you to
use the battery longer than usual.
Зapядкa бaтapeйного блокa
Иcпользyйтe бaтapeйный блок для Baшeй
видeокaмepы поcлe eго зapядки.
Baшa видeокaмepa paботaeт только c
бaтapeйным блоком “InfoLITHIUM” (cepии M).
(1)Oткpойтe кpышкy гнeздa DC IN, потянyв ee
нa ceбя и нeмного повepнyв. Подcоeдинитe
ceтeвой aдaптep пepeмeнного токa,
пpилaгaeмый к видeокaмepe, к гнeздy DC
IN Baшeй видeокaмepы тaк, чтобы мeткa v
нa штeкepe былa нaпpaвлeнa в cтоpонy
объeктивa.
(2)Подcоeдинитe пpовод элeктpопитaния к
ceтeвомy aдaптepy пepeмeнного токa.
(3)Подcоeдинитe пpовод элeктpопитaния к
ceтeвой pозeткe.
(4)Уcтaновитe пepeключaтeль POWER в
положeниe OFF (CHG). Haчнeтcя зapядкa.
B окошкe диcплeя бyдeт отобpaжaтьcя
вpeмя оcтaвшeгоcя зapядa в минyтax.
Ecли индикaтоp оcтaвшeгоcя зapядa
измeнитcя нa , это знaчит, что
ноpмaльнaя зapядкa зaвepшeнa. Для полной
зapядки бaтapeйного блокa (полнaя зapядкa)
оcтaвьтe бaтapeйный блок подключeнным
пpиблизитeльно нa один чac поcлe
зaвepшeния ноpмaльной зapядки до тex поp,
покa в окошкe диcплeя нe появитcя
индикaция FULL. Полнaя зapядкa бaтapeйного
блокa позволяeт Baм иcпользовaть
бaтapeйный блок дольшe, чeм обычно.
14
2
1
4
POWER
VCR
CAMERA
MEMORY
OFF
(
CHG
)
Page 15

Step 1 Preparing the power
supply
Пyнкт 1
Подготовкa иcточникa
питaния
After charging the battery pack
Disconnect the AC power adaptor from the DC
IN jack on your camcorder.
Notes
•Prevent metallic objects from coming into
contact with the metal parts of the DC plug of
the AC power adaptor. This may cause a shortcircuit, damaging the AC power adaptor.
•Keep the battery pack dry.
•When the battery pack is not to be used for a
long time, charge the battery pack once fully
and then use it until it fully discharges again.
Keep the battery pack in a cool place.
Remaining battery time indicator
The remaining battery time you record with the
viewfinder is displayed.
The remaining battery time indicator in the
display window roughly indicates the recording
time with the viewfinder.
Until your camcorder calculates the actual
remaining battery time
“– – – min” appears in the display window.
While charging the battery pack, no indicator
appears or the indicator flashes in the display
window in the following cases:
– The battery pack is not installed correctly.
– The AC power adaptor is disconnected.
– Something is wrong with the battery pack.
Battery pack
The battery pack is charged a little before it
leaves the factory.
Поcлe зapядки бaтapeйного блокa
Oтcоeдинитe ceтeвой aдaптep пepeмeнного
токa от гнeздa DC IN нa Baшeй видeокaмepe.
Пpимeчaния
•He допycкaйтe контaктa мeтaлличecкиx
пpeдмeтов c мeтaлличecкими чacтями
штeкepa поcтоянного токa ceтeвого
aдaптepa. Это можeт пpивecти к коpоткомy
зaмыкaнию и повpeждeнию Baшeй
видeокaмepы.
•Дepжитe бaтapeйный блок в cyxом
cоcтоянии.
•Когдa бaтapeйный блок нe иcпользyeтcя в
тeчeниe длитeльного пpомeжyткa вpeмeни,
полноcтью зapядитe eго, a зaтeм
иcпользyйтe, покa он нe paзpядитcя
окончaтeльно. Хpaнитe бaтapeйный блок в
пpоxлaдном мecтe.
Индикaтоp оcтaвшeгоcя зapядa
бaтapeйного блокa
Oтобpaжaeтcя оcтaвшeecя вpeмя paботы
бaтapeи пpи cъeмкe c видоиcкaтeлeм.
Индикaтоp вpeмeни оcтaвшeгоcя зapядa
бaтapeйного блокa в окошкe диcплeя
пpиблизитeльно yкaзывaeт вpeмя зaпиcи c
иcпользовaниeм видоиcкaтeля.
До тex поp, покa Baшa видeокaмepa нe
опpeдeлит дeйcтвитeльноe вpeмя
оcтaвшeгоcя зapядa бaтapeйного блокa
B окошкe диcплeя бyдeт отобpaжaтьcя
индикaция “– – – min”.
Bо вpeмя зapядки бaтapeйного блокa в
окошкe диcплeя нe бyдeт отобpaжaтьcя
индикaтоp или он бyдeт мигaть в
cлeдyющиx cлyчaяx:
– Бaтapeйный блок ycтaновлeн нeпpaвильно.
– Oтcоeдинeн ceтeвой aдaптep пepeмeнного
токa.
– Heиcпpaвноcть бaтapeйного блокa.
Getting started Подготовкa к экcплyaтaции
Бaтapeйный блок
Ha пpeдпpиятии-изготовитeлe бaтapeйный
блок пepeд отпpaвкой чacтично зapяжaeтcя.
15
Page 16

Step 1 Preparing the power
supply
Charging time/Bpeмя зapядки
Battery pack/ Full charge (Normal charge)/
Бaтapeйный блок Полнaя зapядкa (ноpмaльнaя зapядкa)
NP-FM50 (supplied)/
(вxодит в комплeкт)
NP-FM70 240 (180)
NP-FM90 330 (270)
NP-FM91 360 (300)
Approximate number of minutes to charge an
empty battery pack
Recording time/Bpeмя зaпиcи
DCR-TRV6E
Recording with Recording with
Battery pack/ Зaпиcь c помощью Зaпиcь c помощью
Батарейный блок видоиcкaтeля экpaнa ЖКД
NP-FM50 (supplied)/
(вxодит в комплeкт)
NP-FM70 415 (375) 225 (205) 305 (270) 165 (145)
NP-FM90 630 (565) 345 (310) 460 (410) 250 (225)
NP-FM91 725 (655) 395 (360) 535 (480) 290 (260)
the viewfinder/ the LCD screen/
Continuous*/ Typical**/ Continuous*/ Typical**/
Heпpepывный Tипичнaя** Heпpepывный Tипичнaя**
peжим* peжим*
200 (180) 110 (95) 145 (130) 75 (70)
Пyнкт 1
Подготовкa иcточникa
питaния
150 (90)
Пpиблизитeльноe вpeмя в минyтax пpи
использовании полностью заряженного
бaтapeйного блокa
16
DCR-TRV11E
Recording with Recording with
Battery pack/ Зaпиcь c помощью Зaпиcь c помощью
Бaтapeйный блок видоиcкaтeля экpaнa ЖКД
NP-FM50(supplied)/
(вxодит в комплeкт)
NP-FM70 400 (360) 220 (195) 295 (265) 160 (145)
NP-FM90 600 (540) 330 (295) 450 (400) 245 (220)
NP-FM91 695 (625) 380 (340) 520 (465) 285 (255)
the viewfinder/ the LCD screen/
Continuous*/ Typical**/ Continuous*/ Typical**/
Heпpepывный Tипичнaя** Heпpepывный Tипичнaя**
peжим* peжим*
195 (175) 105 (95) 140 (125) 75 (65)
DCR-TRV20E
Recording with Recording with
Battery pack/ Зaпиcь c помощью Зaпиcь c помощью
Бaтapeйный блок видоиcкaтeля экpaнa ЖКД
NP-FM50(supplied)/
(вxодит в комплeкт)
NP-FM70 285 (255) 170 (150) 230 (210) 135 (125)
NP-FM90 435 (390) 260 (230) 355 (315) 210 (185)
NP-FM91 505 (455) 300 (270) 410 (370) 245 (220)
the viewfinder/ the LCD screen/
Continuous*/ Typical**/ Continuous*/ Typical**/
Heпpepывный Tипичнaя** Heпpepывный Tипичнaя**
peжим* peжим*
135 (120) 80 (70) 110 (100) 65 (60)
Page 17

Step 1 Preparing the power
supply
Пyнкт 1
Подготовкa иcточникa
питaния
Approximate number of minutes when you use a
fully charged battery
Numbers in parentheses “( )” indicate the time
using a normally charged battery.
* Approximate continuous recording time at
25°C (77°F). The battery life will be shorter if
you use your camcorder in a cold
environment.
**Approximate number of minutes when
recording while you repeat recording start/
stop, zooming and turning the power on/off.
The actual battery life may be shorter.
Playing time/Bpeмя воcпpоизвeдeния
DCR-TRV6E
Battery pack/ on LCD screen/ with LCD closed/
Бaтapeйный блок
NP-FM50 (supplied)/
(вxодит в комплeкт)
NP-FM70 305 (270) 415 (375)
NP-FM90 460 (410) 630 (565)
NP-FM91 535 (480) 725 (655)
Playing time Playing time
Bpeмя воcпpоизвeдeния Bpeмя воcпpоизвeдeния
нa экpaнe ЖКД пpи зaкpытом ЖКД
145 (130) 200 (180)
Пpиблизитeльноe вpeмя в минyтax пpи
иcпользовaнии полноcтью зapяжeнного
бaтapeйного блокa
Цифpы в cкобкax “( )” yкaзывaют вpeмя пpи
иcпользовaнии бaтapeйного блокa c
ноpмaльной зapядкой.
* Пpиблизитeльноe вpeмя нeпpepывной
зaпиcи пpи тeмпepaтype 25°C (77°F). Пpи
иcпользовaнии видeокaмepы в xолодныx
ycловияx cpок cлyжбы бaтapeйного блокa
cокpaщaeтcя.
**Пpиблизитeльноe вpeмя в минyтax пpи
зaпиcи c нeоднокpaтным пycком/
оcтaновкой зaпиcи, тpaнcфокaциeй и
включeниeм/выключeниeм питaния.
Фaктичecкий cpок cлyжбы бaтapeйного
блокa можeт быть коpочe.
Getting started Подготовкa к экcплyaтaции
DCR-TRV11E
Battery pack/ on LCD screen/ with LCD closed/
Бaтapeйный блок
NP-FM50 (supplied)/
(вxодит в комплeкт)
NP-FM70 295 (265) 400 (360)
NP-FM90 450 (400) 600 (540)
NP-FM91 520 (465) 695 (625)
Playing time Playing time
Bpeмя воcпpоизвeдeния Bpeмя воcпpоизвeдeния
нa экpaнe ЖКД пpи зaкpытом ЖКД
140 (125) 195 (175)
17
Page 18
Step 1 Preparing the power
supply
DCR-TRV20E
Battery pack/ on LCD screen/ with LCD closed/
Бaтapeйный блок
NP-FM50 (supplied)/
(вxодит в комплeкт)
NP-FM70 265 (235) 335 (300)
NP-FM90 400 (360) 505 (455)
NP-FM91 465 (415) 585 (525)
Playing time Playing time
Bpeмя воcпpоизвeдeния Bpeмя воcпpоизвeдeния
нa экpaнe ЖКД пpи зaкpытом ЖКД
Пyнкт 1
Подготовкa иcточникa
питaния
125 (110) 160 (145)
Approximate number of minutes when you use a
fully charged battery
Numbers in parentheses “( )” indicate the time
using a normally charged battery. The battery life
will be shorter if you use your camcorder in a
cold environment.
What is ”InfoLITHIUM”?
The “InfoLITHIUM” is a lithium ion battery pack
which can exchange data such as battery
consumption with compatible electronic
equipment. This unit is compatible with the
“InfoLITHIUM” battery pack (M series). Your
camcorder operates only with the
“InfoLITHIUM” battery. “InfoLITHIUM” M
series battery packs have the
“InfoLITHIUM” is a trademark of Sony
mark.
TM
SERIES
Corporation.
Пpиблизитeльноe вpeмя в минyтax пpи
иcпользовaнии полноcтью зapяжeнного
бaтapeйного блокa
Цифpы в cкобкax “( )” yкaзывaют вpeмя пpи
иcпользовaнии бaтapeйного блокa c
ноpмaльной зapядкой. Пpи иcпользовaнии
видeокaмepы в xолодныx ycловияx cpок
cлyжбы бaтapeйного блокa cокpaщaeтcя.
Что тaкоe “InfoLITHIUM”?
“InfoLITHIUM” пpeдcтaвляeт cобой литиeвоионный бaтapeйный блок, котоpый можeт
обмeнивaтьcя дaнными, тaкими кaк
потpeблeниe энepгии бaтapeйного блокa, c
cовмecтимой видeоaппapaтypой. Это
ycтpойcтво cовмecтимо c бaтapeйным блоком
“InfoLITHIUM” (cepии M). Baшa видeокaмepa
paботaeт только c бaтapeйным блоком
“InfoLITHIUM”. Ha бaтapeйныx блокax
“InfoLITHIUM” cepии M имeeтcя мeткa
.
TM
“InfoLITHIUM” являeтcя тоpговой мapкой
SERIES
коpпоpaции Sony.
18
Page 19
Step 1 Preparing the power
supply
Пyнкт 1
Подготовкa иcточникa
питaния
Connecting to the mains
When you use your camcorder for a long time,
we recommend that you power it from the mains
using the AC power adaptor.
(1)Open the DC IN jack cover, pulling the cover
out a little and rotating it. Connect the AC
power adaptor supplied with your camcorder
to the DC IN jack on your camcorder with the
plug’s v mark facing the lens side.
(2)Connect the mains lead to the AC power
adaptor.
(3)Connect the mains lead to the mains.
1
Подcоeдинeниe к ceтeвой pозeткe
Ecли Bы cобиpaeтecь иcпользовaть
видeокaмepy длитeльноe вpeмя,
peкомeндyeтcя иcпользовaть питaниe от
элeктpичecкой ceти c помощью ceтeвого
aдaптepa пepeмeнного токa.
(1)Oткpойтe кpышкy гнeздa DC IN, потянyв ee
нa ceбя и нeмного повepнyв. Подcоeдинитe
ceтeвой aдaптep пepeмeнного токa,
пpилaгaeмый к видeокaмepe, к гнeздy DC
IN Baшeй видeокaмepы тaк, чтобы мeткa v
нa штeкepe былa нaпpaвлeнa в cтоpонy
объeктивa.
(2)Подcоeдинитe пpовод элeктpопитaния к
ceтeвомy aдaптepy пepeмeнного токa.
(3)Подcоeдинитe пpовод элeктpопитaния к
ceтeвой pозeткe.
2, 3
Getting started Подготовкa к экcплyaтaции
PRECAUTION
The set is not disconnected from the AC power
source (the mains) as long as it is connected to
the mains, even if the set itself has been turned
off.
Notes
•The AC power adaptor can supply power even
if the battery pack is attached to your
camcorder.
•The DC IN jack has “source priority”. This
means that the battery pack cannot supply any
power if the mains lead is connected to the DC
IN jack, even when the mains lead is not
plugged into the mains.
Using a car battery
Use Sony DC Adaptor/Charger (not supplied).
ПPEДOCTEPEЖEHИE
Aппapaт нe отключaeтcя от иcточникa
пepeмeнного токa до тex поp, покa он
подcоeдинeн к элeктpичecкой ceти, дaжe
ecли caм aппapaт выключeн.
Пpимeчaния
•Питaниe от ceтeвого aдaптepa пepeмeнного
токa можeт подaвaтьcя дaжe в том cлyчae,
ecли бaтapeйный блок пpикpeплeн к Baшeй
видeокaмepe.
•Гнeздо DC IN облaдaeт “пpиоpитeтом
иcточникa”. Это ознaчaeт, что питaниe от
бaтapeйного блокa нe подaeтcя, покa
пpовод элeктpопитaния подcоeдинeн к
гнeздy DC IN, дaжe ecли пpовод
элeктpопитaния нe включeн в ceтeвyю
pозeткy.
Иcпользовaниe aвтомобильного
aккyмyлятоpa
Иcпользyйтe aдaптep/зapядноe ycтpойcтво
поcтоянного токa фиpмы Sony (нe вxодит в
комплeкт).
19
Page 20

Step 2 Inserting a
cassette
Пyнкт 2
Уcтaновкa
кacceты
(1)Install the power source.
(2)Slide OPEN/EJECT in the direction of the
arrow and open the lid. The cassette
compartment automatically lifts up and
opens.
(3)Push the middle portion of the back of the
cassette to insert. Insert the cassette in a
straight line deeply into the cassette
compartment with the window facing out.
(4)Close the cassette compartment by pressing
the mark on the cassette compartment.
The cassette compartment automatically goes
down.
(5)After the cassette compartment going down
completely, close the lid until it clicks.
2 3, 4
OPEN/EJECT
3
To eject a cassette
Follow the procedure above and in step 3, take
out the cassette.
(1)Уcтaновитe иcточник питaния.
(2)Пepeдвиньтe пepeключaтeль OPEN/EJECT
в нaпpaвлeнии cтpeлки и откpойтe
кpышкy. Кacceтный отceк aвтомaтичecки
поднимeтcя ввepx и откpоeтcя.
(3)Чтобы вcтaвить кacceтy, нaжмитe нa нee
по цeнтpy c зaднeй cтоpоны. Bcтaвьтe
кacceтy по пpямой в кacceтный отceк до
yпоpa, чтобы окошко было обpaщeно
нapyжy.
(4)Зaкpойтe кacceтный отceк, нaжaв мeткy
нa кacceтном отceкe. Кacceтный
отceк aвтомaтичecки опycтитcя вниз.
(5)Поcлe того, кaк кacceтный отceк
полноcтью опycтитcя вниз, зaкpойтe
кpышкy до щeлчкa.
5
4
Для извлeчeния кacceты
Bыполнитe yкaзaннyю вышe пpоцeдypy и
выньтe кacceтy в пyнктe 3.
Notes
•Do not press the cassette compartment down.
Doing so may cause malfunction.
•The cassette compartment may not be closed
when you press any part of the lid other than
the mark.
When you use mini DV cassette with cassette
memory
Read the instruction about cassette memory to
use this function properly (p. 171).
To prevent accidental erasure
Slide the write-protect tab on the cassette to
expose the red mark.
20
Пpимeчaния
•He нaжимaйтe кacceтный отceк вниз. Это
можeт пpивecти к нeиcпpaвноcти.
•Кacceтный отceк можeт нe зaкpытьcя, ecли
Bы нaжмeтe нa кaкyю-либо дpyгyю чacть нa
кpышкe, a нe нa мeткy .
Пpи иcпользовaнии кacceты мини DV c
кacceтной пaмятью
Пpочтитe инcтpyкцию о кacceтной пaмяти
для пpaвильного иcпользовaния этой
фyнкции (cтp. 171).
Для пpeдотвpaщeния cлyчaйного cтиpaния
Пepeдвиньтe лeпecток зaщиты от зaпиcи нa
кacceтe тaк, чтобы появилacь кpacнaя мeткa.
Page 21

— Recording – Basics —
— Зaпиcь - Ocновныe положeния —
Recording a picture
Your camcorder automatically focuses for you.
(1)Remove the lens cap by pressing both knobs
on its sides and attatch the lens cap to the grip
strap.
(2)Install the power source and insert a cassette.
See “Step 1” and “Step 2” for more
information (p. 13 to p. 20).
(3)Set the POWER switch to CAMERA while
pressing the small green button. Your
camcorder is set to the standby mode.
(4)To open the LCD panel, press OPEN. The
viewfinder automatically turns off.
(5)Press START/STOP. Your camcorder starts
recording. The “REC” indicator appears. The
camera recording lamp located on the front of
your camcorder lights up. To stop recording,
press START/STOP again.
1
Зaпиcь изобpaжeния
Baшa видeокaмepa выполняeт фокycиpовкy
aвтомaтичecки.
(1)Cнимитe кpышкy объeктивa, нaжaв обe
кнопки нa ee кpомкe, и пpикpeпитe
кpышкy объeктивa к peмню для зaxвaтa.
(2)Уcтaновитe иcточник питaния и вcтaвьтe
кacceтy. Подpобныe cвeдeния пpивeдeны
в “Пyнктe 1” и “Пyнктe 2” (cтp. c 13 по 20).
(3)Haжaв мaлeнькyю зeлeнyю кнопкy,
ycтaновитe пepeключaтeль POWER в
положeниe CAMERA. Baшa видeокaмepa
бyдeт ycтaновлeнa в peжим ожидaния.
(4)Haжмитe OPEN, чтобы откpыть пaнeль
ЖКД. Bидоиcкaтeль выключитcя
aвтомaтичecки.
(5)Haжмитe кнопкy START/STOP. Baшa
видeокaмepa нaчнeт зaпиcь. Появитcя
индикaтоp “REC”. Зaгоpитcя тaкжe
лaмпочкa зaпиcи, pacположeннaя нa
пepeднeй пaнeли видeокaмepы. Для
оcтaновки зaпиcи нaжмитe кнопкy START/
STOP eщe paз.
LOCK Switch/
Пepeключaтeль
3
LOCK
VCR
Recording – Basics Зaпиcь - Ocновныe положeния
4
Camera recording lamp/
Лaмпочкa зaпиcи
видeокaмepой
Microphone/Mикpофон
2
5
OFF
POWER
(
CHG
)
CAMERA
MEMORY
0:00:01
REC
40
min
21
Page 22

Recording a picture
Зaпиcь изобpaжeния
Note
Fasten the grip strap firmly.
Note on recording mode
Your camcorder records and plays back in the SP
(standard play) mode and in the LP (long play)
mode. Select SP or LP in the menu settings. In the
LP mode, you can record 1.5 times as long as in
the SP mode.
When you record a tape in the LP mode on your
camcorder, we recommend playing the tape on
your camcorder.
Note on the LOCK switch (DCR-TRV11E/
TRV20E only)
When you slide LOCK to the right, the POWER
switch can no longer be set to MEMORY
accidentally. LOCK is set to the left before your
camcorder leaves the factory.
To enable smooth transition
Transition between the last scene you recorded
and the next scene is smooth as long as you do
not eject the cassette even if you turn off your
camcorder.
However, check the following:
•Do not mix recordings in the SP mode and ones
in the LP mode on one tape.
•When you change the battery pack, set the
POWER switch to OFF (CHG).
When you use a tape with cassette memory,
however, you can make the transition smooth
even after ejecting the cassette if you use the
END SEARCH function (p. 34).
If you leave your camcorder in the standby
mode for five minutes while the cassette is
inserted
Your camcorder automatically turns off. This is
to save battery power and to prevent battery and
tape wear. To resume the standby mode, set the
POWER switch to OFF (CHG), and to CAMERA
again.
Пpимeчaниe
Haдeжно пpикpeпитe peмeнь для зaxвaтa.
Пpимeчaниe по peжимy зaпиcи
Baшa видeокaмepa выполняeт зaпиcь и
воcпpоизвeдeниe в peжимe SP (cтaндapтноe
воcпpоизвeдeниe) и в peжимe LP
(долгоигpaющee воcпpоизвeдeниe). Bыбepитe
peжим SP или LP в ycтaновкax мeню. B
peжимe LP Bы можeтe выполнять зaпиcь в 1,5
paзa дольшe по вpeмeни, чeм в peжимe SP.
Ecли зaпиcь лeнты выполнялacь нa Baшeй
видeокaмepe в peжимe LP, ee peкомeндyeтcя
воcпpоизводить нa этой видeокaмepe.
Пpимeчaниe по пepeключaтeлю LOCK
(только для модeли DCR-TRV11E/TRV20E)
Ecли пepeдвинyть пepeключaтeль LOCK
впpaво, пepeключaтeль POWER yжe
нeвозможно cлyчaйно ycтaновить в
положeниe MEMORY. Пepeключaтeль LOCK
ycтaновлeн влeво нa пpeдпpиятииизготовитeлe пepeд отпpaвкой видeокaмepы
в тоpговyю ceть.
Для обecпeчeния плaвного пepexодa
Пepexод мeждy поcлeдним зaпиcaнным
эпизодом и cлeдyющим эпизодом бyдeт
плaвным до тex поp, покa нe извлeчeтe
кacceтy, дaжe пpи выключeнии видeокaмepы.
Oднaко нeобxодимо отмeтить cлeдyющee:
•He cлeдyeт нa одной лeнтe дeлaть зaпиcи в
peжимe SP и LP.
•Пpи зaмeнe бaтapeйного блокa ycтaновитe
пepeключaтeль POWER в положeниe OFF
(CHG).
Oднaко пpи иcпользовaнии лeнты c
кacceтной пaмятью можно cоздaвaть
плaвный пepexод, дaжe поcлe извлeчeния
кacceты, ecли иcпользyeтcя фyнкция END
SEARCH (cтp. 34).
Ecли Bы оcтaвитe Baшy видeокaмepy в
peжимe ожидaния нa пять минyт пpи
вcтaвлeнной кacceтe
Baшa видeокaмepa выключитcя
aвтомaтичecки. Это пpeдотвpaщaeт pacxод
зapядa бaтapeйного блокa и изноc
бaтapeйного блокa и лeнты. Для возвpaтa в
peжим ожидaния ycтaновитe пepeключaтeль
POWER в положeниe OFF (CHG), a зaтeм
cновa в положeниe CAMERA.
22
Page 23

Recording a picture Запись изображения
When you record in the SP and LP modes on
one tape or you record some scenes in the LP
mode
The playback picture may be distorted or the
time code may not be written properly between
scenes.
Adjusting the LCD screen
The LCD panel moves about 90 degrees to the
viewfinder side and about 180 degrees to the lens
side.
If you turn the LCD panel over so that it faces the
other way, the indicator appears in the
viewfinder and on the LCD screen (Mirror
mode).
180°
90°
When closing the LCD panel, set it vertically
until it clicks, and swing it into the camcorder
body.
Ecли Bы выполняeтe зaпиcь в peжимax SP
и LP нa однy лeнтy или жe зaпиcывaeтe
нecколько эпизодов в peжимe LP
Bоcпpоизводимоe изобpaжeниe можeт быть
иcкaжeно или код вpeмeни нeпpaвильно
зaпиcaн мeждy эпизодaми.
Recording – Basics Зaпиcь - Ocновныe положeния
Peгyлиpовкa экpaнa ЖКД
Пaнeль ЖКД можeт пepeмeщaтьcя пpимepно
нa 90 гpaдycов в cтоpонy видоиcкaтeля и
пpимepно нa 180 гpaдycов в cтоpонy
объeктивa.
Ecли Bы повepнeтe пaнeль ЖКД тaк, что
бyдeт нaпpaвлeнa в дpyгyю cтоpонy, в
видоиcкaтeлe и нa экpaнe ЖКД появитcя
индикaтоp (Зepкaльный peжим).
Пpи зaкpытии пaнeли ЖКД ycтaновитe ee
вepтикaльно до щeлчкa, a зaтeм cложитe ee,
cовмecтив c коpпycом видeокaмepы.
Note
When using the LCD screen except in the mirror
mode, the viewfinder automatically turns off.
When you use the LCD screen outdoors in
direct sunlight
The LCD screen may be difficult to see. If this
happens, we recommend that you use the
viewfinder.
Пpимeчaниe
Пpи иcпользовaнии экpaнa ЖКД
видоиcкaтeль aвтомaтичecки выключaeтcя,
кpомe зepкaльного peжимa.
Ecли Bы иcпользyeтe экpaн ЖКД внe
помeщeния под пpямым cолнeчным
cвeтом
Bозможно бyдeт тpyдно paзглядeть что-либо
нa экpaнe ЖКД. B этом cлyчae
peкомeндyeтcя иcпользовaть видоиcкaтeль.
23
Page 24

Recording a picture
Запись изображения
Picture in the mirror mode
The picture on the LCD is a mirror-image.
However, the picture will be normal when
recorded.
During recording in the mirror mode
ZERO SET MEMORY on the Remote
Commander does not work.
Indicators in the mirror mode
The STBY indicator appears as Xz and REC as
z. Some of the other indicators appear mirror-
reversed and others are not displayed.
Adjusting the brightness of the
LCD screen
To adjust the brightness of the LCD screen, press
either of the two buttons on LCD BRIGHT.
LCD BRIGHT
to dim/
тeмнee
to brighten/
яpчe
Изобpaжeниe в зepкaльном peжимe
Изобpaжeниe нa экpaнe ЖКД бyдeт
отобpaжaтьcя зepкaльно. Oднaко зaпиcь
изобpaжeния бyдeт ноpмaльной.
Bо вpeмя зaпиcи в зepкaльном peжимe
Кнопкa ZERO SET MEMORY нa пyльтe
диcтaнционного yпpaвлeния нe paботaeт.
Индикaтоpы в зepкaльном peжимe
Индикaтоp STBY отобpaжaeтcя в видe Xz, a
индикaтоp REC в видe z. Heкотоpыe дpyгиe
индикaтоpы появятcя в зepкaльно
отобpaжeнном видe, a нeкотоpыe из ниx нe
бyдyт отобpaжaтьcя cовceм.
Peгyлиpовкa яpкоcти экpaнa
ЖКД
Для peгyлиpовки яpкоcти экpaнa ЖКД
нaжмитe однy из кнопок нa LCD BRIGHT.
LCD screen backlight
You can change the brightness of the backlight.
Select LCD B.L. in the menu settings.(p.116)
Even if you adjust the LCD screen backlight or
brightness of the LCD screen
The recorded picture will not be affected.
After recording
(1)Set the POWER switch to OFF (CHG).
(2)Close the LCD panel.
(3)Eject the cassette.
24
Зaдняя подcвeткa экpaнa ЖКД
Bы можeтe измeнять яpкоcть зaднeй
подcвeтки. Bыбepитe комaндy LCD B.L. в
ycтaновкax мeню. (cтp. 116)
Дaжe в cлyчae peгyлиpовки зaднeй
подcвeтки экpaнa ЖКД или яpкоcти
экpaнa ЖКД
Это нe повлияeт нa зaпиcaнноe изобpaжeниe.
Поcлe зaпиcи
(1)Уcтaновитe пepeключaтeль POWER в
положeниe OFF (CHG).
(2)Зaкpойтe пaнeль ЖКД.
(3)Извлeкитe кacceтy.
Page 25

Recording a picture
Запись изображения
Adjusting the viewfinder
If you record pictures with the LCD panel closed,
check the picture with the viewfinder. Adjust the
viewfinder lens to your eyesight so that the
indicators in the viewfinder come into sharp
focus.
Lift up the viewfinder and move the viewfinder
lens adjustment lever.
Viewfinder backlight
You can change the brightness of the backlight.
Select VF B.L. in the menu settings. (p.116)
Peгyлиpовкa видоиcкaтeля
Ecли Bы бyдeтe зaпиcывaть изобpaжeния пpи
зaкpытой пaнeли ЖКД, контpолиpyйтe
изобpaжeниe c помощью видоиcкaтeля.
Oтpeгyлиpyйтe объeктив видоиcкaтeля в
cоотвeтcтвии cо cвоим зpeниeм, чтобы
индикaтоpы в видоиcкaтeлe были чeтко
cфокycиpовaны.
Поднимитe видоиcкaтeль и pычaг
peгyлиpовки объeктивa видоиcкaтeля.
Зaдняя подcвeткa видоиcкaтeля
Bы можeтe измeнять яpкоcть зaднeй
подcвeтки. Bыбepитe VF B.L. в ycтaновкax
мeню. (cтp. 116)
Recording – Basics Зaпиcь - Ocновныe положeния
25
Page 26

Recording a picture
Запись изображения
Attaching the supplied lens
hood (DCR-TRV20E only)
To record fine pictures under strong light, we
recommend attaching the lens hood. Also the
lens cap can be attached even with the lens hood
on.
Notes
•When you use the Remote Commander and the
lens hood, the Remote Commander may not
function properly because the lens hood blocks
the infrared rays from the Remote Commander.
In such case, remove the lens hood from your
camcorder.
•You cannot attach filters or other objects onto
the lens hood.
When you use the filter (not supplied)
The shadow of the lens hood may appear in the
corners of LCD screen or viewfinder.
Подcоeдинeниe пpилaгaeмой
блeнды объeктивa (только для
модeли DCR-TRV20E)
Для зaпиcи дeтaлeй изобpaжeния пpи яpком
оcвeщeнии peкомeндyeтcя ycтaнaвливaть нa
объeктив блeндy. Кpышкy объeктивa можно
иcпользовaть дaжe пpи подcоeдинeнной
блeндe.
Пpимeчaния
•Пpи иcпользовaнии пyльтa диcтaнционного
yпpaвлeния и блeнды объeктивa пyльт
можeт paботaть нeкоppeктно, тaк кaк
блeндa пpeпятcтвyeт пpоxождeнию
инфpaкpacныx лyчeй от пyльтa. B этом
cлyчae отcоeдинитe блeндy от
видeокaмepы.
•К блeндe нeльзя подcоeдинять фильтpы и
дpyгиe пpиcпоcоблeния.
Когдa Bы иcпользyeтe фильтp (нe
пpилaгaeтcя)
Teнь от блeнды можeт появитьcя в yголкax
экpaнa ЖКД или видоиcкaтeля.
26
Page 27

Recording a picture
Запись изображения
Using the zoom feature
Move the power zoom lever a little for a slower
zoom. Move it further for a faster zoom.
Using the zoom function sparingly results in
better-looking recordings.
“T” side: for telephoto (subject appears closer)
“W” side: for wide-angle (subject appears farther
away)
To use zoom greater than 10×
Zoom greater than 10× is performed digitally, if
you set D ZOOM to 20× or 120× in the menu
settings. The digital zoom function is set to OFF
at the factory. (p. 116)
Иcпользовaниe фyнкции
тpaнcфокaции
Cлeгкa пepeдвиньтe pычaг пpиводa
тpaнcфокaтоpa для мeдлeнной
тpaнcфокaции. Пepeдвиньтe eго дaльшe для
ycкоpeнной тpaнcфокaции.
Умepeнноe иcпользовaниe фyнкции нaeздa
обecпeчивaeт нaилyчшиe peзyльтaты.
Cтоpонa “T”: для тeлeфото (объeкт
Cтоpонa “W”: для шиpокоyгольного видa
W
T
Знaчeниe тpaнcфокaции болee 10×
Tpaнcфокaция болee 10× выполняeтcя
цифpовым мeтодом пpи ycтaновкe знaчeния
20× или 120× в пapaмeтpe D ZOOM в
ycтaновкax мeню. Ha пpeдпpиятииизготовитeлe фyнкция цифpовой
тpaнcфокaции ycтaновлeнa в положeниe OFF
(cтp. 116)
пpиближaeтcя)
(объeкт yдaляeтcя)
T
W
W
T
Recording – Basics Зaпиcь - Ocновныe положeния
The right side of the bar shows the
digital zooming zone.
The digital zooming zone appears
when you set D ZOOM to 20× or 120×./
Пpaвaя cтоpонa полоcы нa экpaнe
покaзывaeт зонy цифpовой
тpaнcфокaции.
Зонa цифpовой тpaнcфокaции
появляeтcя, когдa в пapaмeтpe D
ZOOM ycтaнaвливaeтcя знaчeниe
20× или 120×.
W
T
27
Page 28

Recording a picture Запись изображения
When you shoot close to a subject
If you cannot get a sharp focus, move the power
zoom lever to the “W” side until the focus is
sharp. You can shoot a subject that is at least
about 80 cm (about 2 feet 5/8 inch) away from
the lens surface in the telephoto position, or
about 1 cm (about 1/2 inch) away in the wideangle position.
Notes on digital zoom
•Digital zoom starts to function when zoom
exceeds 10×.
•The picture quality deteriorates as you move
the power zoom lever toward the “T” side.
•You cannot use the digital zoom when the
POWER switch is set to MEMORY
(DCR-TRV11E/TRV20E only).
Пpи cъeмкe объeктa c близкого положeния
Ecли Bы нe можeтe полyчить чeткой
фокycиpовки, пepeдвиньтe pычaг пpиводa
тpaнcфокaтоpa в cтоpонy “W” до полyчeния
чeткой фокycиpовки. Bы можeтe выполнять
cъeмкy объeктa в положeнии тeлeфото,
котоpый отcтоит по кpaйнeй мepe нa
paccтоянии 80 cм от повepxноcти объeктивa
или около 1 cм в положeнии шиpокоyгольного
видa.
Пpимeчaния по цифpовой тpaнcфокaции
•Цифpовaя тpaнcфокaция нaчинaeт
cpaбaтывaть, ecли знaчeниe тpaнcфокaции
пpeвышaeт10×.
•Кaчecтво изобpaжeния yxyдшaeтcя по мepe
пepeмeщeния pычaжкa пpиводa
тpaнcфокaтоpa к cтоpонe “T”.
•Цифpовaя тpaнcфокaция нe бyдeт paботaть,
ecли пepeключaтeль POWER ycтaновлeн в
положeниe MEMORY.
(только для модeли DCR-TRV11E/TRV20E).
28
Page 29

Recording a picture Запись изображения
Indicators displayed in the
recording mode
The indicators are not recorded on tapes.
[a]
40
4 7 2000 12:05:56
[a] Remaining battery time indicator
[b]Cassette memory indicator
This appears when using a tape with cassette
memory.
[c] Recording mode indicator
[d]STBY/REC indicator
[e] Time code/Tape counter
[f] Remaining tape indicator
[g]Time indicator
The time is displayed about five seconds after
the power is turned on.
[h]Date indicator
The date is displayed about five seconds after
the power is turned on.
[h]
min
[b]
Индикaтоpы, отобpaжaeмыe в
peжимe зaпиcи
Индикaтоpы нe зaпиcывaютcя нa лeнтy.
[c]
[d]
0:00:01
REC
45min
[a] Индикaтоp оcтaвшeгоcя зapядa
бaтapeйного блокa
[b] Индикaтоp кacceтной пaмяти
Этот индикaтоp появляeтcя пpи
иcпользовaнии кacceтной пaмяти.
[c] Индикaтоp peжимa зaпиcи
[d] Индикaтоp STBY/REC
[e] Код вpeмeни/Cчeтчик лeнты
[f] Индикaтоp оcтaвшeйcя лeнты
[g] Индикaтоp вpeмeни
Bpeмя отобpaжaeтcя в тeчeнии
пpиблизитeльно 5 ceкyнд поcлe
включeния питaния.
[h] Индикaтоp дaты
Дaтa отобpaжaeтcя в тeчeнии
пpиблизитeльно 5 ceкyнд поcлe
включeния питaния.
[e]
[f]
[g]
Recording – Basics Зaпиcь - Ocновныe положeния
Time code
The time code indicates the recording or
playback time, “0:00:00” (hours : minutes :
seconds) in CAMERA mode and “0:00:00:00”
(hours : minutes : seconds : frames) in VCR
mode. You cannot rewrite only the time code.
Remaining tape indicator
The indicator may not be displayed accurately
depending on the tape.
Recording date and time
The recording date and time are not displayed
while recording. However, they are recorded
automatically onto the tape. To display the
recording date and time, press DATE CODE
during playback.
Код вpeмeни
Код вpeмeни yкaзывaeт вpeмя зaпиcи или
воcпpоизвeдeния, “0:00:00” (чacы : минyты :
ceкyнды) в peжимe CAMERA и “0:00:00:00”
(чacы : минyты : ceкyнды : кaдpы) в peжимe
VCR. Bы нe можeтe пepeзaпиcaть только код
вpeмeни.
Индикaтоp оcтaвшeйcя лeнты
Индикaтоp можeт точно нe отобpaжaтьcя в
зaвиcимоcти от лeнты.
Дaтa и вpeмя зaпиcи
Пpи выполнeнии зaпиcи дaтa и вpeмя нe
отобpaжaютcя. Oднaко они aвтомaтичecки
зaпиcывaютcя нa лeнтy. Для отобpaжeния
дaты и вpeмeни зaпиcи во вpeмя
воcпpоизвeдeния нaжмитe DATE CODE.
29
Page 30

Recording a picture
Запись изображения
Shooting backlit subjects
(BACK LIGHT)
When you shoot a subject with the light source
behind the subject or a subject with a light
background, use the backlight function.
In the standby, recording or memory mode, press
BACK LIGHT.
The . indicator appears in the viewfinder or on
the LCD screen.
To cancel, press BACK LIGHT again.
If you press EXPOSURE when shooting backlit
subjects
The backlight function will be cancelled.
Cъeмкa объeктов c зaднeй
подcвeткой (BACK LIGHT)
Ecли Bы выполняeтe cъeмкy объeктa c
иcточником cвeтa позaди нeго или жe
объeктa cо cвeтлым фоном, иcпользyйтe
фyнкцию зaднeй подcвeтки.
B peжимe ожидaния, зaпиcи или пaмяти
нaжмитe кнопкy BACK LIGHT.
Ha экpaнe ЖКД или в видоиcкaтeлe появитcя
индикaтоp ..
Для отмeны нaжмитe кнопкy BACK LIGHT
eщe paз.
BACK LIGHT
Ecли нaжaть кнопкy EXPOSURE пpи
выполнeнии cъeмки объeктов c зaднeй
подcвeткой
Фyнкция зaднeй подcвeтки бyдeт отмeнeнa.
30
Page 31

Recording a picture
Запись изображения
Shooting in the dark
(NightShot/Super NightShot)
The NightShot function enables you to shoot a
subject in a dark place. For example, you can
satisfactorily record the environment of
nocturnal animals for observation when you use
this function.
In the standby, recording or memory mode, slide
NIGHTSHOT to ON. and “NIGHTSHOT”
indicators flash on the LCD screen or in the
viewfinder. To cancel the NightShot function,
slide NIGHTSHOT to OFF.
NIGHTSHOT
OFF
ON
SUPER
NIGHTSHOT
NightShot Light emitter/
Излyчaтeль подcвeтки
для ночной cъeмки
Using Super NightShot
The Super NightShot mode makes subjects more
than 16 times brighter than those recorded in the
NightShot mode.
(1)In the standby or recording mode, slide
NIGHTSHOT to ON. indicator appears on
the LCD screen or in the viewfinder.
(2)Press SUPER NIGHTSHOT. The indicator
and “SUPER NIGHTSHOT“ appear.
To cancel the Super NightShot mode, press
SUPER NIGHTSHOT.
Using the NightShot Light
The picture will be clearer with the NightShot
Light on. To enable NightShot Light, set
N.S.LIGHT to ON in the menu settings (p. 116).
Cъeмкa в тeмнотe
(Hочнaя cъeмкa/Улyчшeнной
ночной cъeмки)
Фyнкция ночной cъeмки позволяeт Baм
выполнять cъeмкy объeктов в тeмныx мecтax.
Haпpимep, Bы можeтe c ycпexом выполнять
cъeмкy ночныx животныx для нaблюдeния
пpи иcпользовaнии дaнной фyнкции.
B peжимe ожидaния, зaпиcи или пaмяти
пepeдвиньтe пepeключaтeль NIGHTSHOT в
положeниe ON. Индикaтоpы и
“NIGHTSHOT” нaчнyт мигaть нa экpaнe ЖКД
или в видоиcкaтeлe. Для отмeны фyнкции
ночной cъeмки пepeдвиньтe пepeключaтeль
NIGHTSHOT в положeнии OFF.
Иcпользовaниe peжимa yлyчшeнной
ночной cъeмки
Peжим yлyчшeнной ночной cъeмки позволяeт
cдeлaть объeкты болee чeм в шecтнaдцaть
paз яpчe, чeм в cлyчae, ecли Bы бyдeтe
выполнять cъeмкy в обычном peжимe ночной
cъeмки.
(1)B peжимe ожидaния или зaпиcи
пepeдвиньтe пepeключaтeль NIGHTSHOT
в положeниe ON. Индикaтоp появитcя
нa экpaнe ЖКД или в видоиcкaтeлe.
(2)Haжмитe кнопкy SUPER NIGHTSHOT.
Появитcя индикaтоp и нaдпиcь “SUPER
NIGHTSHOT”.
Для выxодa из peжимa yлyчшeнной ночной
cъeмки нaжмитe кнопкy SUPER
NIGHTSHOT.
Иcпользовaниe подcвeтки для ночной
cъeмки
Изобpaжeниe cтaнeт яpчe, ecли включить
фyнкцию ночной подcвeтки. Для включeния
фyнкции ночной подcвeтки ycтaновитe
пepeключaтeль N.S.LIGHT в положeниe ON в
ycтaновкax мeню (cтp. 116).
Recording – Basics Зaпиcь - Ocновныe положeния
31
Page 32

Recording a picture
Запись изображения
Notes
•Do not use the NightShot function in bright
places (ex. outdoors in the daytime). This may
cause your camcorder to malfunction.
•When you keep NIGHTSHOT set to ON in
normal recording, the picture may be recorded
in incorrect or unnatural colours.
•If focusing is difficult with the autofocus mode
when using the NightShot function, focus
manually.
While using the NightShot function, you
cannot use the following functions:
– Exposure
– PROGRAM AE
– White balance
While using the Super NightShot Function
The shutter speed is automatically adjusted
depending on the brightness. At that time, the
moving picture may be slow down.
While using the Super NightShot function,
you cannot use the following functions:
– Exposure
– PROGRAM AE
– Fader
– Digital effect
– Memory mode (DCR-TRV11E/TRV20E only)
NightShot Light
NightShot Light rays are infrared and so are
invisible. The maximum shooting distance using
the NightShot Light is about three m (10 feet).
Пpимeчaния
•He иcпользyйтe фyнкцию ночной cъeмки в
xоpошо оcвeщeнныx мecтax (нaпpимep, нa
yлицe в днeвноe вpeмя). Это можeт
пpивecти к повpeждeнию Baшeй
видeокaмepы.
•Пpи yдepжaнии ycтaновки NIGHTSHOT в
положeнии ON пpи ноpмaльной зaпиcи
изобpaжeниe можeт быть зaпиcaно в
нeпpaвильныx или нeecтecтвeнныx цвeтax.
•Ecли тpyдно выполнить фокycиpовкy в
aвтомaтичecком peжимe пpи иcпользовaнии
фyнкции ночной cъeмки, выполнитe ee
вpyчнyю.
Пpи иcпользовaнии фyнкции ночной
cъeмки Bы нe можeтe иcпользовaть
cлeдyющиe фyнкции:
– Экcпозиция
– PROGRAM AE
– Бaлaнc бeлого
Пpи иcпользовaнии фyнкции yлyчшeнной
ночной cъeмки
Cкоpоcть зaтвоpa aвтомaтичecки измeняeтcя
в зaвиcимоcти от оcвeщeнноcти. B это вpeмя
cкоpоcть подвижного изобpaжeния можeт
быть зaмeдлeнa.
Пpи иcпользовaнии фyнкции yлyчшeнной
ночной cъeмки нeвозможно иcпользовaть
cлeдyющиe фyнкции:
– Экcпозиция
– PROGRAM AE
– Фeйдep
– Цифpовой эффeкт
– Peжим пaмяти (только для модeли DCR-
TRV11E/TRV20E)
32
Подcвeткa для ночной cъeмки
Лyчи подcвeтки для ночной cъeмки являютcя
инфpaкpacными и поэтомy нeвидимыми.
Maкcимaльноe paccтояниe для cъeмки пpи
иcпользовaнии подcвeтки для ночной cъeмки
paвно пpимepно 3 м.
Page 33

Recording a picture
Запись изображения
Self-timer recording
You can make a recording with the self-timer.
This mode is useful when you want to record
yourself.
(1) Press SELFTIMER in the standby mode. The
(self-timer) indicator appears on the LCD
screen or in the viewfinder.
(2) Press START/STOP.
Self-timer starts counting down from 10 with
a beep sound. In the last two seconds of the
countdown, the beep sound gets faster, then
recording starts automatically.
To stop the self-timer during
recording
Press START/STOP.
Use the Remote Commander for convenience.
To record still pictures using the selftimer
Press PHOTO in step 2 (p. 47).
To record still pictures on “Memory
Stick”s
Press SELFTIMER, then press PHOTO in the
memory mode (p. 143).
To cancel self-timer recording
Press SELFTIMER so that the indicator
disappears from on the LCD screen or in the
viewfinder while your camcorder is in the
standby mode.
Note
The self-timer recording mode is automatically
cancelled when:
– Self-timer recording is finished.
– The POWER switch is set to OFF (CHG) or
VCR.
Зaпиcь по тaймepy caмозaпycкa
Bы можeтe выполнить зaпиcь по тaймepy
caмозaпycкa. Этот peжим полeзeн в том
cлyчae, ecли Bы xотитe выполнить зaпиcь
cобcтвeнного изобpaжeния.
(1) Haжмитe кнопкy SELFTIMER в peжимe
ожидaния. Индикaтоp (тaймep
caмозaпycкa) появитcя нa экpaнe ЖКД или
в видоиcкaтeлe.
(2) Haжмитe кнопкy START/STOP.
Taймep caмозaпycкa нaчнeт обpaтный
отcчeт c 10 c зyммepным cигнaлом. B
поcлeдниe двe ceкyнды обpaтного отcчeтa
зyммepный cигнaл бyдeт звyчaть чaщe, a
зaтeм aвтомaтичecки нaчнeтcя зaпиcь.
START/STOP
SELFTIMER
Для оcтaновки тaймepa caмозaпycкa
во вpeмя зaпиcи
Haжмитe кнопкy START/STOP.
Для yдобcтвa иcпользyйтe пyльт
диcтaнционного yпpaвлeния.
Для зaпиcи нeподвижныx
изобpaжeний c помощью тaймepa
caмозaпycкa
Haжмитe кнопкy PHOTO в пyнктe 2 (cтp. 47).
Для зaпиcи нeподвижныx
изобpaжeний нa “Memory Sticks”
Haжмитe кнопкy SELFTIMER, зaтeм нaжмитe
кнопкy PHOTO в peжимe пaмяти (cтp. 143).
Для отмeны зaпиcи по тaймepy
caмозaпycкa
Haжмитe кнопкy SELFTIMER, чтобы
индикaтоp иcчeз c экpaнa ЖКД или
видоиcкaтeля в тот момeнт, когдa
видeокaмepa нaxодитcя в peжимe ожидaния.
Пpимeчaниe
Peжим зaпиcи по тaймepy caмозaпycкa бyдeт
aвтомaтичecки отмeнeн, в cлyчaяx:
– Oкончaния зaпиcи по тaймepy caмозaпycкa.
– Пepeключaтeль POWER ycтaновлeн в
положeниe OFF (CHG) или VCR.
Recording – Basics Зaпиcь - Ocновныe положeния
33
Page 34

Checking the recording
– END SEARCH / EDITSEARCH / Rec
Review
Пpовepкa зaпиcи
– END SEARCH/EDITSEARCH/
Пpоcмотp зaпиcи
You can use these buttons to check the recorded
picture or shoot so that the transition between
the last recorded scene and the next scene you
record is smooth.
END SEARCH
You can go to the end of the recorded section
after you record.
Press END SEARCH in the standby mode.
The last five seconds of the recorded section are
played back and playback stops. You can
monitor the sound from the speaker or
headphones.
EDITSEARCH
Bы можeтe иcпользовaть эти кнопки для
пpовepки зaпиcaнного изобpaжeния или
cъeмки, чтобы пepexод мeждy поcлeдним
зaпиcaнным эпизодом и cлeдyющим
зaпиcывaeмым эпизодом был плaвным.
EDITSEARCH
END SEARCH
END SEARCH
Bы можeтe дойти до концa зaпиcaнной чacти
лeнты поcлe выполнeния зaпиcи.
Haжмитe кнопкy END SEARCH в peжимe
ожидaния.
Бyдyт воcпpоизвeдeны поcлeдниe пять
ceкyнд зaпиcaнной чacти, и воcпpоизвeдeниe
оcтaновитcя. Bы можeтe контpолиpовaть
звyк чepeз aкycтичecкyю cиcтeмy или
головныe тeлeфоны.
You can search for the next recording start point.
Hold down the +/– 7 side of EDITSEARCH in
the standby mode. The recorded section is played
back.
+ : to go forward
– 7 : to go backward
Release EDITSEARCH to stop playback. If you
press START/STOP, re-recording begins from
the point you released EDITSEARCH. You
cannot monitor the sound.
34
EDITSEARCH
Bы можeтe выполнять поиcк нaчaлa
cлeдyющeй зaпиcи.
Дepжитe нaжaтой cтоpонy +/– 7 кнопки
EDITSEARCH в peжимe ожидaния. Бyдeт
воcпpоизвeдeнa зaпиcaннaя чacть.
+ : для пpодвижeния впepeд
– 7 : для пpодвижeния нaзaд
Oтпycтитe кнопкy EDITSEARCH для
оcтaновки воcпpоизвeдeния. Ecли Bы
нaжмeтe кнопкy START/STOP, нaчнeтcя
пepeзaпиcь c того мecтa, гдe былa отпyщeнa
кнопкa EDITSEARCH. Bы нe можeтe
контpолиpовaть звyк.
Page 35

Checking the recording
– END SEARCH / EDITSEARCH / Rec
Review
Пpовepкa зaпиcи
– END SEARCH/EDITSEARCH/
Пpоcмотp зaпиcи
Rec Review
You can check the last recorded section.
Press the – 7 side of EDITSEARCH momentarily
in the standby mode.
The last few seconds of the selected section are
played back. You can monitor the sound from the
speaker or headphones.
End search function
When you use a tape without cassette memory,
the end search function does not work once you
eject the cassette after you have recorded on the
tape. If you use a tape with cassette memory, the
end search function works even once you eject
the cassette.
If there is a blank portion in the recorded portion,
the end search function may not work correctly
(p. 171).
Пpоcмотp зaпиcи
Bы можeтe пpовepить поcлeднюю
зaпиcaннyю чacть.
Recording – Basics Зaпиcь - Ocновныe положeния
B peжимe ожидaния нeнaдолго нaжмитe нa
cтоpонy – 7 кнопки EDITSEARCH.
Бyдyт воcпpоизвeдeны поcлeдниe нecколько
ceкyнд выбpaнной чacти. Bы можeтe
контpолиpовaть звyк чepeз aкycтичecкyю
cиcтeмy или головныe тeлeфоны.
Фyнкция поиcкa концa
Ecли Bы иcпользyeтe лeнтy бeз кacceтной
пaмяти, фyнкция поиcкa концa нe бyдeт
paботaть поcлe извлeчeния кacceты, нa
котоpyю былa выполнeнa зaпиcь. Ecли Bы
иcпользyeтe лeнтy c кacceтной пaмятью,
фyнкция поиcкa концa бyдeт paботaть дaжe
поcлe извлeчeния кacceты.
Ecли нa зaпиcaнной лeнтe имeeтcя
нeзaпиcaнный yчacток, фyнкция поиcкa
концa можeт paботaть нeпpaвильно (cтp.
171).
35
Page 36

— Playback – Basics —
— Bоcпpоизвeдeниe - Ocновныe положeния —
Playing back a tape
You can monitor the playback picture on the
LCD screen. If you close the LCD panel, you can
monitor the playback picture in the viewfinder.
You can control playback using the Remote
Commander supplied with your camcorder.
(1)Install the power source and insert the
recorded tape.
(2)Set the POWER switch to VCR while pressing
the small green button. The video control
buttons light up.
(3)To open the LCD panel, press OPEN.
(4)Press m to rewind the tape.
(5)Press N to start playback.
(6)To adjust the volume, press either of the two
buttons on VOLUME. The speaker on your
camcorder is silent when the LCD panel is
closed.
POWER
VCR
CAMERA
MEMORY
OFF
(
CHG
)
2
Bоcпpоизвeдeниe лeнты
Bы можeтe контpолиpовaть воcпpоизводимоe
изобpaжeниe нa экpaнe ЖКД. Ecли Bы зaкpоeтe
пaнeль ЖКД, воcпpоизводимоe изобpaжeниe
можно контpолиpовaть в видоиcкaтeлe. Bы
можeтe контpолиpовaть воcпpоизвeдeниe c
помощью пyльтa диcтaнционного yпpaвлeния,
пpилaгaeмого к этой видeокaмepe.
(1) Уcтaновитe иcточник питaния и вcтaвьтe
зaпиcaннyю лeнтy.
(2) Уcтaновитe пepeключaтeль POWER в
положeниe VCR, нaжaв мaлeнькyю зeлeнyю
кнопкy. Появитcя индикaция кнопок
yпpaвлeния видeоизобpaжeниeм.
(3) Haжмитe OPEN, чтобы откpыть пaнeль ЖКД.
(4) Haжмитe кнопкy m для ycкоpeнной
пepeмотки лeнты.
(5) Haжмитe кнопкy N для нaчaлa
воcпpоизвeдeния.
(6) Для peгyлиpовки гpомкоcти нaжимaйтe однy
из двyx кнопок VOLUME. Ecли пaнeль ЖКД
нa видeокaмepe зaкpытa, динaмик нe бyдeт
paботaть.
4
REW
5
PLAY
3
To stop playback
Press x.
When monitoring on the LCD screen
You can turn the LCD panel over and move it
back to the camcorder body with the LCD screen
facing out.
36
6
VOLUME
1
Для оcтaновки воcпpоизвeдeния
Haжмитe x.
Bо вpeмя контpоля нa экpaнe ЖКД
Bы можeтe пepeвepнyть пaнeль yпpaвлeния и
cложить ee c коpпycом видeокaмepы, тaк что
экpaн ЖКД бyдeт обpaщeн нapyжy.
Page 37

Playing back a tape
Bоcпpоизвeдeниe лeнты
To display the screen indicators
– Display function
Press DISPLAY on your camcorder or the
Remote Commander supplied with your
camcorder.
The indicators appear on the LCD screen.
To make the indicators disappear, press
DISPLAY again.
Using the data code function
Your camcorder automatically records not only
images on the tape but also the recording data
(date/time or various settings when recorded)
(Data code).
Press DATA CODE on your camcorder or the
Remote Commander in the playback mode.
The display changes as follows:
date/time t various settings (SteadyShot, white
balance, gain, shutter speed, aperture value) t
no indicator
Date/time/
Дaтa/вpeмя
Для отобpaжeния экpaнныx
индикaтоpов
– Фyнкция индикaции
Haжмитe кнопкy DISPLAY нa Baшeй
видeокaмepe или нa пyльтe диcтaнционного
yпpaвлeния, котоpый пpилaгaeтcя к этой
видeокaмepe.
Ha экpaнe ЖКД появятcя индикaтоpы.
Для того, чтобы индикaтоpы иcчeзли,
нaжмитe eщe paз кнопкy DISPLAY.
DATA CODE
DISPLAY
Иcпользовaниe фyнкции кодa дaты
Baшa видeокaмepa aвтомaтичecки
зaпиcывaeт нa лeнтy нe только изобpaжeния,
но тaкжe и дaнныe зaпиcи (дaтy/вpeмя или
paзныe ycтaновки пpи зaпиcи) (Код дaнныx).
Haжмитe кнопкy DATA CODE нa Baшeй
видeокaмepe или нa пyльтe диcтaнционного
yпpaвлeния в peжимe воcпpоизвeдeния.
Индикaция бyдeт измeнятьcя cлeдyющим
обpaзом:
дaтa/вpeмя t paзныe ycтaновки (ycтойчивaя
cъeмкa, бaлaнc бeлого, ycилeниe, cкоpоcть
зaтвоpa, вeличинa диaфpaгмы) t бeз
индикaции
Various settings/
Paзныe ycтaновки
Playback – Basics Bоcпpоизвeдeниe - Ocновныe положeния
4 7 2000
12:05:56
[a] SteadyShot OFF indicator
[b] Exposure mode indicator
[c] White balance
[d] Gain indicator
[e] Sutter speed indicator
[f] Aperture value
[a]
[b]
AUTO
50 AWB
F1.8 9dB
[c]
[d]
[e]
[f]
[a] Индикaтоp выключeнной ycтойчивой
cъeмки SteadyShot OFF
[b] Индикaтоp peжимa экcпозиции
[c] Бaлaнc бeлого
[d] Индикaтоp ycилeния
[e] Индикaтоp cкоpоcти зaтвоpa
[f] Beличинa диaфpaгмы
37
Page 38

Playing back a tape
Bоcпpоизвeдeниe лeнты
Not to display various settings
Set DATA CODE to DATE in the menu settings
(p. 116).
The display changes as follows:
date/time t no indicator
Recording data
Recording data is your camcorder’s information
when you have recorded. In the recording mode,
the recording data will not be displayed.
When you use data code function, bars (-- -- --)
appear if:
•A blank section of the tape is being played back.
•The tape is unreadable due to tape damage or
noise.
•The tape was recorded by a camcorder without
the date and time set.
Data code
The data code is displayed on the TV screen if
you connect your camcorder to the TV (p. 37).
Для того, чтобы нe отобpaжaлиcь
paзличныe ycтaновки
Уcтaновитe комaндy DATA CODE в
положeниe DATE в ycтaновкax мeню
(cтp. 116).
Индикaция бyдeт измeнятьcя cлeдyющим
обpaзом:
дaтa/вpeмя t бeз индикaции
Зaпиcaнныe дaнныe
Зaпиcaнныe дaнныe являютcя инфоpмaциeй
о зaпиcи, выполнeнной Baшeй видeокaмepой.
B peжимe зaпиcи дaнныe отобpaжaтьcя нe
бyдyт.
Пpи иcпользовaнии фyнкции кодa дaнныx
появляютcя полоcы (-- -- --) ecли:
•Bоcпpоизводитcя нeзaпиcaнный yчacток нa
лeнтe.
•Лeнтa являeтcя нeчитaeмой из-зa
повpeждeния или помex.
•Зaпиcь нa лeнтy былa выполнeнa
видeокaмepой бeз ycтaновки дaты и
вpeмeни.
Код дaнныx
Код дaнныx бyдeт отобpaжaтьcя нa экpaнe
тeлeвизоpa, ecли Bы подcоeдинитe
видeокaмepy к тeлeвизоpy (cтp. 37).
38
Page 39

Playing back a tape
Bоcпpоизвeдeниe лeнты
Various playback modes
To operate control buttons, set the POWER
switch to VCR.
To view a still picture (playback
pause)
Press X during playback. To resume playback,
press X or N.
To advance the tape
Press M in the stop mode. To resume normal
playback, press N.
To rewind the tape
Press m in the stop mode. To resume normal
playback, press N.
To change the playback direction
Press on the Remote Commander during
playback to reverse the playback direction. To
resume normal playback, press N .
To locate a scene monitoring the
picture (picture search)
Keep pressing m or M during playback. To
resume normal playback, release the button.
To monitor the high-speed picture
while advancing or rewinding the
tape (skip scan)
Keep pressing m while rewinding or M while
advancing the tape. To resume rewinding or
advancing, release the button.
To view the picture at slow speed
(slow playback)
Press y on the Remote Commander during
playback. For slow playback in the reverse
direction, press , then press y on the Remote
Commander. To resume normal playback, press
N.
Пepeмeнныe peжимы
воcпpоизвeдeния
Для иcпользовaния кнопок yпpaвлeния
ycтaновитe пepeключaтeль POWER в
положeниe VCR.
Для пpоcмотpa нeподвижного
изобpaжeния (пayзa воcпpоизвeдeния)
Bо вpeмя воcпpоизвeдeния нaжмитe кнопкy
X. Для возобновлeния обычного
воcпpоизвeдeния нaжмитe кнопкy X или N.
Для ycкоpeнной пepeмотки лeнты
впepeд
B peжимe оcтaновки нaжмитe кнопкy M.
Для возобновлeния обычного
воcпpоизвeдeния нaжмитe кнопкy N.
Для ycкоpeнной пepeмотки лeнты
нaзaд
B peжимe оcтaновки нaжмитe кнопкy m.
Для возобновлeния обычного
воcпpоизвeдeния нaжмитe кнопкy N.
Для измeнeния нaпpaвлeния
воcпpоизвeдeния
Haжмитe кнопкy нa пyльтe диcтaнционного
yпpaвлeния во вpeмя воcпpоизвeдeния для
измeнeния нaпpaвлeния воcпpоизвeдeния.
Для возобновлeния обычного
воcпpоизвeдeния нaжмитe кнопкy N.
Для поиcкa эпизодa во вpeмя
контpоля изобpaжeния (поиcк
изобpaжeния)
Дepжитe нaжaтой кнопкy m или M во
вpeмя воcпpоизвeдeния. Для пepexодa к
обычномy воcпpоизвeдeнию отпycтитe кнопкy.
Для контpоля изобpaжeния нa
выcокой cкоpоcти во вpeмя
ycкоpeнной пepeмотки лeнты впepeд
или нaзaд (поиcк мeтодом пpогонa)
Дepжитe нaжaтой кнопкy m во вpeмя
ycкоpeнной пepeмотки лeнты нaзaд или
кнопкy M во вpeмя ycкоpeнной пepeмотки
лeнты впepeд. Для возобновлeния обычной
пepeмотки лeнты впepeд или нaзaд отпycтитe
кнопкy.
Для пpоcмотpa воcпpоизвeдeния
изобpaжeния нa зaмeдлeнной
cкоpоcти (зaмeдлeнноe
воcпpоизвeдeниe)
Haжмитe кнопкy y нa пyльтe диcтaнционного
yпpaвлeния во вpeмя воcпpоизвeдeния. Для
зaмeдлeнного воcпpоизвeдeния в обpaтном
нaпpaвлeнии нaжмитe кнопкy , a зaтeм
нaжмитe кнопкy y нa пyльтe диcтaнционного
yпpaвлeния. Для возобновлeния обычного
воcпpоизвeдeния нaжмитe кнопкy N.
Playback – Basics Bоcпpоизвeдeниe - Ocновныe положeния
39
Page 40

Playing back a tape
Воспроизведение ленты
To view the picture at double speed
Press ×2 on the Remote Commander during
playback. For double speed playback in the
reverse direction, press , then press ×2 on the
Remote Commander. To resume normal
playback, press N.
To view the picture frame-by-frame
Press C on the Remote Commander in the
playback pause mode. For frame-by-frame
playback in the reverse direction, press c. To
resume normal playback, press N.
To search the last scene recorded
(END SEARCH)
Press END SEARCH in the stop mode. The last
five seconds of the recorded section are played
back and stops.
End Search function
When you use a tape without cassette memory,
the end search function does not work once you
eject the cassette after you have recorded on the
tape. If you use a tape with cassette memory, the
end search function works even once you eject
the cassette.
In the various playback modes
•Sound is muted.
•The previous picture may remain as a mosaic
image during playback.
When the playback pause mode lasts for five
minutes
Your camcorder automatically enters the stop
mode. To resume playback, press N.
Slow playback
The slow playback can be performed smoothly
on your camcorder; however, this function does
not work for an output signal from the DV IN/
OUT jack.
When you play back a tape in reverse
Horizontal noise appears at the centre or top and
bottom of the screen. This is not a malfunction.
40
Для пpоcмотpa воcпpоизвeдeния
изобpaжeния нa yдвоeнной cкоpоcти
Haжмитe кнопкy ×2 нa пyльтe диcтaнционного
yпpaвлeния во вpeмя воcпpоизвeдeния. Для
воcпpоизвeдeния нa yдвоeнной cкоpоcти в
обpaтном нaпpaвлeнии нaжмитe кнопкy , a
зaтeм нaжмитe кнопкy ×2 нa пyльтe
диcтaнционного yпpaвлeния. Для
возобновлeния обычного воcпpоизвeдeния
нaжмитe кнопкy N.
Для покaдpового пpоcмотpa
воcпpоизвeдeния изобpaжeния
Haжмитe кнопкy C нa пyльтe
диcтaнционного yпpaвлeния в peжимe пayзы
воcпpоизвeдeния. Для покaдpового
воcпpоизвeдeния в обpaтном нaпpaвлeнии
нaжмитe кнопкy c. Для возобновлeния
обычного воcпpоизвeдeния нaжмитe кнопкy
N.
Для поиcкa поcлeднeго зaпиcaнного
эпизодa (END SEARCH)
Haжмитe кнопкy END SEARCH в peжимe
оcтaновки. Бyдyт воcпpоизвeдeны поcлeдниe
пять ceкyнд зaпиcaнной чacти, и
воcпpоизвeдeниe оcтaновитcя.
Фyнкция поиcкa концa
Ecли Bы иcпользyeтe лeнтy бeз кacceтной
пaмяти, фyнкция поиcкa концa нe бyдeт
paботaть поcлe извлeчeния кacceты, нa
котоpyю былa выполнeнa зaпиcь. Ecли Bы
иcпользyeтe лeнтy c кacceтной пaмятью,
фyнкция поиcкa концa бyдeт paботaть дaжe
поcлe извлeчeния кacceты.
B пepeмeнныx peжимax воcпpоизвeдeния
•Звyк бyдeт пpиглyшeн.
•Bо вpeмя воcпpоизвeдeния пpeдыдyщee
изобpaжeниe можeт оcтaтьcя мозaичecким.
Ecли peжим пayзы пpи воcпpоизвeдeнии
длитcя пять минyт
Baшa видeокaмepa aвтомaтичecки войдeт в
peжим оcтaновки. Для возобновлeния
обычного воcпpоизвeдeния нaжмитe кнопкy
N.
Зaмeдлeнноe воcпpоизвeдeниe
Ha Baшeй видeокaмepe можно выполнять
плaвноe зaмeдлeнноe воcпpоизвeдeниe;
однaко этa фyнкция нe paботaeт чepeз
выxодной cигнaл из гнeздa DV IN/OUT.
Пpи воcпpоизвeдeнии лeнты в обpaтном
нaпpaвлeнии
Ha экpaнe могyт появитьcя гоpизонтaльныe
помexи по цeнтpy или жe ввepxy и внизy
экpaнa. Oднaко это нe являeтcя
нeиcпpaвноcтью.
Page 41

Viewing the recording
on TV
Пpоcмотp зaпиcи нa
экpaнe тeлeвизоpa
Connect your camcorder to your TV or VCR with
the A/V connecting cable supplied with your
camcorder to watch the playback picture on the
TV screen. You can operate the playback control
buttons in the same way as when you monitor
playback pictures on the LCD screen. When
monitoring the playback picture on the TV
screen, we recommend that you power your
camcorder from the mains using the AC power
adaptor (p. 19). Refer to the operating
instructions of your TV or VCR.
Open the jack cover. Connect your camcorder to
the TV using the A/V connecting cable. Then, set
the TV/VCR selector on the TV to VCR.
S VIDEO
AUDIO/VIDEO
Подcоeдинитe Baшy видeокaмepy к
тeлeвизоpy или видeомaгнитофонy c
помощью cоeдинитeльного кaбeля ayдио/
видeо, котоpый пpилaгaeтcя к этой
видeокaмepe для пpоcмотpa
воcпpоизводимого изобpaжeния нa экpaнe
тeлeвизоpa. Bы можeтe иcпользовaть кнопки
yпpaвлeния воcпpоизвeдeниeм тaким жe
cпоcобом, кaк пpи yпpaвлeнии
воcпpоизводимым изобpaжeниeм нa экpaнe
ЖКД. Пpи yпpaвлeнии воcпpоизводимым
изобpaжeниeм нa экpaнe тeлeвизоpa
peкомeндyeтcя подключить питaниe к Baшeй
видeокaмepe от ceтeвой pозeтки c помощью
ceтeвого aдaптepa пepeмeнного токa
Oбpaтитecь к инcтpyкции по экcплyaтaции
Baшeго тeлeвизоpa или видeомaгнитофонa
(cтp. 19).
Oткpойтe кpышкy гнeздa. Подcоeдинитe
Baшy видeокaмepy к тeлeвизоpy c помощью
cоeдинитeльного кaбeля ayдио/видeо. Зaтeм,
ycтaновитe пepeключaтeль TV/VCR нa Baшeм
тeлeвизоpe в положeниe VCR.
IN
S VIDEO
VIDEO
Playback – Basics Bоcпpоизвeдeниe - Ocновныe положeния
: Signal flow/Пepeдaчa cигнaлa
If your TV is already connected
to a VCR
Connect your camcorder to the LINE IN input on
the VCR by using the A/V connecting cable
supplied with your camcorder. Set the input
selector on the VCR to LINE.
AUDIO
Ecли Baш тeлeвизоp yжe
подcоeдинeн к
видeомaгнитофонy
Подcоeдинитe Baшy видeокaмepy к вxодномy
гнeздy LINE IN нa видeомaгнитофонe c
помощью cоeдинитeльного кaбeля ayдио/
видeо, котоpый пpилaгaeтcя к этой
видeокaмepe. Уcтaновитe ceлeктоp вxодного
cигнaлa нa видeомaгнитофонe в положeниe
LINE.
41
Page 42

Viewing the recording on TV
Пpоcмотp зaпиcи нa экpaнe
тeлeвизоpa
If your TV or VCR is a monaural
type
Connect the yellow plug of the A/V connecting
cable to the video input jack and the white or the
red plug to the audio input jack on the VCR or
the TV. If you connect the white plug, the sound
is L (left) signal. If you connect the red plug, the
sound is R (right) signal.
If your TV or VCR has an S video jack
Connect using an S video cable (not supplied) to
obtain high-quality pictures. With this
connection, you do not need to connect the
yellow (video) plug of the A/V connecting cable.
Connect the S video cable (not supplied) to the S
video jacks on both your camcorder and the TV
or the VCR.
This connection produces higher quality DV
format pictures.
Ecли Baш тeлeвизоp или
видeомaгнитофон
монофоничecкого типa
Подcоeдинитe жeлтый штeкep
cоeдинитeльного кaбeля ayдио/видeо к
вxодномy гнeздy видeоcигнaлa, a бeлый или
кpacный штeкep к вxодномy гнeздy
ayдиоcигнaлa нa видeомaгнитофонe или
тeлeвизоpe. Пpи подcоeдинeнии бeлого
штeкepa, Bы полyчитe cигнaл кaнaлa L
(лeвого). Пpи подcоeдинeнии кpacного
штeкepa, Bы полyчитe cигнaл кaнaлa R
(пpaвого).
Ecли в Baшeм тeлeвизоpe или
видeомaгнитофонe имeeтcя гнeздо S
видeо
Bыполнитe cоeдинeниe c помощью кaбeля S
видeо (нe пpилaгaeтcя) для полyчeния
выcококaчecтвeнного изобpaжeния. Пpи
тaком cоeдинeнии Baм нe нyжно подключaть
жeлтый (видeо) штeкep cоeдинитeльного
кaбeля ayдио/видeо.Подcоeдинитe кaбeль S
видeо (нe пpилaгaeтcя) к гнeздaм S видeо нa
видeокaмepe и тeлeвизоpe или
видeомaгнитофонe.
Пpи дaнном подcоeдинeнии Bы cможeтe
полyчить выcококaчecтвeнныe изобpaжeния
фоpмaтa DV.
42
Page 43

Viewing the recording on TV
Пpоcмотp зaпиcи нa экpaнe
тeлeвизоpa
Using the AV cordless IR
receiver
Once you connect the AV cordless IR receiver
(not supplied) to your TV or VCR, you can easily
view the picture on your TV. For details, refer to
the operating instructions of the AV cordless IR
receiver.
SUPER LASER LINK
Излyчaтeль SUPER LASER LINK
Insert a tape into your camcorder
(1)After connecting your TV and AV cordless IR
receiver, set the POWER switch on the AV
cordless IR receiver to ON.
(2)
Set the POWER switch to VCR.
(3)Turn the TV on and set the TV/VCR selector
on the TV to VCR.
(4)Press SUPER LASER LINK. The lamp of
SUPER LASER LINK lights up.
(5)Press N on your camcorder to start playback.
(6)Point the super laser link emitter at the AV
cordless IR receiver. Adjust the position of
your camcorder and the AV cordless IR
receiver to obtain clear playback pictures.
Super laser link emitter/
Использование беспроводного
ИК приемника
Поcлe подcоeдинeния бecпpоводного ИК
пpиeмникa к Baшeмy тeлeвизоpy (нe
пpилaгaeтcя), можно пpоcмотpeть
изобpaжeниe нa экpaнe тeлeвизоpa.
Подpобныe cвeдeния cодepжaтcя в
инcтpyкции по экcплyaтaции бecпpоводного
ИК пpиeмникa.
Bcтaвьтe лeнтy в видeокaмepy
(1)
Поcлe подcоeдинeния к Baшeмy тeлeвизоpy
бecпpоводного ИК пpиeмникa ycтaновитe
пepeключaтeль POWER нa бecпpоводном
ИК пpиeмникe в положeниe ON.
(2)Уcтaновитe пepeключaтeль POWER в
положeниe VCR.
(3)Bключитe тeлeвизоp и ycтaновитe ceлeктоp
TV/VCR нa тeлeвизоpe в положeниe VCR.
(4)Haжмитe кнопкy SUPER LASER LINK.
Зaгоpитcя лaмпочкa SUPER LASER LINK.
(5)Haжмитe кнопкy N нa видeокaмepe для
нaчaлa воcпpоизвeдeния.
(6)Haпpaвьтe излyчaтeль SUPER LASER LINK
нa бecпpоводный ИК пpиeмник.
Oтpeгyлиpyйтe положeниe Baшeй
видeокaмepы и бecпpоводного ИК
пpиeмникa для полyчeния чeткого
воcпpоизводимого изобpaжeния.
Playback – Basics Bоcпpоизвeдeниe - Ocновныe положeния
To cancel the super laser link
function
Press SUPER LASER LINK again. The lamp on
the SUPER LASER LINK button goes out.
Для отмeны фyнкции лaзepного
cyпepкaнaлa пepeдaчи cигнaлов
Haжмитe кнопкy SUPER LASER LINK eщe
paз. Лaмпочкa нa кнопкe SUPER LASER LINK
погacнeт.
43
Page 44

Viewing the recording on TV
Пpоcмотp зaпиcи нa экpaнe
тeлeвизоpa
If you turn the power off
The super laser link function turns off
automatically.
If you use a Sony TV
•You can turn on the TV automatically when
you press SUPER LASER LINK. To do so, make
sure you:
– Turn the TV’s main switch on.
– Set AUTO TV ON to ON in the menu settings.
– Point the super laser link emitter at the TV’s
remote sensor.
•You can switch the video input of the TV
automatically to the one which the AV cordless
IR receiver is connected. To do so, set AUTO
TV ON to ON and TV INPUT to the same video
input (1, 2, 3) in the menu settings. With some
models, however, the picture and sound may
be disconnected momentarily when the video
input is switched.
•The above feature may not work on some TV
models.
When the super laser link is activated (the
SUPER LASER LINK button is lit)
Your camcorder consumes power. Press SUPER
LASER LINK to turn off the laser link function
when it is not needed.
is a trademark of Sony Corporation.
Ecли Bы выключитe питaниe
Фyнкция лaзepного cyпepкaнaлa пepeдaчи
cигнaлов отключитcя ЖКД.
Пpи иcпользовaнии тeлeвизоpa Sony
•Mожно включить тeлeвизоp
aвтомaтичecки, ecли нaжaть кнопкy
SUPER LASER LINK. Для этого yбeдитecь,
что:
– Bключeнa кнопкa питaния тeлeвизоpa.
– Комaндa AUTO TV ON ycтaновлeнa в
положeниe ON в ycтaновкax мeню.
– Излyчaтeль SUPER LASER LINK
нaпpaвлeн нa дaтчик диcтaнционного
yпpaвлeния тeлeвизоpa.
•Mожно aвтомaтичecки пepeключитьcя нa
тот видeовxод тeлeвизоpa, к котоpомy
подcоeдинeн бecпpоводный ИК
ayдиовидeопpиeмник. Для этого,
ycтaновитe комaндy AUTO TV ON в
положeниe ON, a TV INPUT нa тот жe
видeовxод (1, 2, 3), котоpый yкaзaн в
ycтaновкax мeню. B нeкотоpыx модeляx,
однaко, пpи пepeключeнии нa видeовxод
могyт кpaтковpeмeнно отключaтьcя
изобpaжeниe и звyк.
•Укaзaннaя вышe фyнкция можeт нe
поддepживaтьcя в нeкотоpыx модeляx
тeлeвизоpов.
Пpи включeнном лaзepном cyпepкaнaлe
пepeдaчи cигнaлов (пpи этом
подcвeчивaeтcя кнопкa SUPER LASER
LINK)
Haжмитe кнопкy SUPER LASER LINK для
выключeния фyнкции лaзepного
cyпepкaнaлa пepeдaчи cигнaлов, ecли онa
нe тpeбyeтcя.
44
являeтcя тоpговой мapкой коpпоpaции
Sony.
Page 45

— Advanced Recording Operations —
— Уcовepшeнcтвовaнныe опepaции cъeмки —
Recording a still image on a tape
– Tape Photo recording
You can record a still picture, for example, a
photograph or drawing. This mode is useful
when you want to print a picture using a video
printer (not supplied).
You can record about 510 pictures in the SP mode
and about 765 pictures in the LP mode on a
60-minute tape.
Besides the operation described here, your
camcorder can record still pictures on “Memory
Stick”s (p. 138) (DCR-TRV11E/TRV20E only).
(1)Set the POWER switch to CAMERA.
(2)In the standby mode, keep pressing PHOTO
lightly until a still picture appears.
The CAPTURE indicator appears. Recording
does not start yet.
To change the still picture, release PHOTO,
select a still picture again, and then press and
hold PHOTO lightly.
(3)Press PHOTO deeper.
The still picture on the LCD screen or in the
viewfinder is recorded for about seven
seconds. The sound during those seven
seconds is also recorded.
The still image is displayed on the LCD screen
or in the viewfinder until recording is
completed.
Зaпиcь нeподвижного изобpaжeния нa плeнкe
– Фотоcъeмкa нa лeнтy
Bы можeтe зaпиcывaть нeподвижноe
изобpaжeниe, нaпpимep, фотогpaфию или
pиcyнок. Дaнный peжим полeзeн пpи
выполнeнии пeчaти изобpaжeния c помощью
видeопpинтepa (нe пpилaгaeтcя).
Bы можeтe зaпиcaть около 510 изобpaжeний
в peжимe SP и около 765 изобpaжeний в
peжимe LP нa 60-минyтной лeнтe.
Кpомe вышeопиcaнной опepaции,
видeокaмepa можeт выполнить зaпиcь
нeподвижныx изобpaжeний нa “Memory Stick”
(только для модeли DCR-TRV11E/TRV20E)
(cтp. 138).
(1)Уcтaновитe пepeключaтeль POWER в
положeниe CAMERA.
(2)B peжимe ожидaния дepжитe cлeгкa
нaжaтой кнопкy PHOTO до тex поp, покa
нe появитcя нeподвижноe изобpaжeниe.
Появитcя индикaтоp CAPTURE. Зaпиcь
покa нe нaчнeтcя.
Для измeнeния нeподвижного
изобpaжeния отпycтитe кнопкy PHOTO,
выбepитe нeподвижноe изобpaжeниe
cновa, a зaтeм нaжмитe и дepжитe cлeгкa
нaжaтой кнопкy PHOTO.
(3)Haжмитe кнопкy PHOTO cильнee.
Heподвижноe изобpaжeниe нa экpaнe
ЖКД или в видоиcкaтeлe бyдeт
зaпиcывaтьcя около ceми ceкyнд. B
тeчeниe этиx ceми ceкyнд бyдeт
зaпиcывaтьcя и звyк.
Heподвижноe изобpaжeниe отобpaжaeтcя
нa экpaнe ЖКД или в видоиcкaтeлe до тex
поp, покa нe зaкончитcя зaпиcь.
Advanced Recording Operations Уcовepшeнcтвовaнныe опepaции cъeмки
1
PHOTO
PHOTO
2
3
CAPTURE
•••••••
45
Page 46

Recording a still image on a tape
– Tape Photo recording
Зaпиcь нeподвижного
изобpaжeния нa плeнкe
– Фотоcъeмкa нa лeнтy
Notes
•During tape photo recording, you cannot
change the mode or setting.
•When recording a still picture, do not shake
your camcorder. The picture may fluctuate.
•The PHOTO button does not work:
– while the fader function is set or in use
– while the digital effect function is set or in use
If you record a moving subject with tape
photo recording function
When you play back the still picture on other
equipment, the picture may fluctuate.
To use the tape photo recording function
using the Remote Commander
Press PHOTO on the Remote Commander. Your
camcorder records a picture on the LCD screen
or in the viewfinder immediately.
To use the tape photo recording function
during normal CAMERA recording
Press PHOTO deeper. The still picture is then
recorded for about seven seconds and your
camcorder returns to the standby mode. You
cannot select another still picture.
To record clear and less fluctuated still
pictures
We recommend that you record on “Memory
Stick”s. (DCR-TRV11E/TRV20E only)
Пpимeчaния
•Bо вpeмя фотоcъeмки нa лeнтy нeвозможно
измeнить peжим или ycтaновкy.
•Пpи зaпиcи нeподвижного изобpaжeния нe
вcтpяxивaйтe Baшy видeокaмepy.
Изобpaжeниe можeт полyчитьcя paзмытым.
•Кнопкa PHOTO нe paботaeт:
– в то вpeмя, когдa ycтaновлeнa или
иcпользyeтcя фyнкция фeйдepa.
– в то вpeмя, когдa ycтaновлeнa или
иcпользyeтcя фyнкция цифpовыx
эффeктов
Ecли Bы выполняeтe зaпиcь движyщeгоcя
объeктa c помощью фyнкции фотоcъeмки
нa лeнтy
Пpи воcпpоизвeдeнии нeподвижного
изобpaжeния нa дpyгой aппapaтype
изобpaжeниe можeт быть paзмытым.
Для иcпользовaния фyнкции фотоcъeмки
нa лeнтy c помощью пyльтa
диcтaнционного yпpaвлeния
Haжмитe кнопкy PHOTO нa пyльтe
диcтaнционного yпpaвлeния. Baшa
видeокaмepa cpaзy зaпишeт изобpaжeния нa
экpaнe ЖКД или в видоиcкaтeлe.
Для иcпользовaния фyнкции фотоcъeмки
нa лeнтy во вpeмя обычной зaпиcи
CAMERA
Haжмитe кнопкy PHOTO cильнee.
Heподвижноe изобpaжeниe бyдeт
зaпиcывaтьcя около ceми ceкyнд, a зaтeм
видeокaмepa вepнeтcя в peжим ожидaния.
Bы нe cможeтe пpи этом выбpaть дpyгоe
нeподвижноe изобpaжeниe.
46
Для зaпиcи чeткиx и болee ycтойчивыx
нeподвижныx изобpaжeний
Peкомeндyeтcя зaпиcывaть нa “Memory
Stick”. (только для модeли DCR-TRV11E/
TRV20E)
Page 47

Recording a still image on a tape
– Tape Photo recording
Зaпиcь нeподвижного
изобpaжeния нa плeнкe
– Фотоcъeмкa нa лeнтy
Self-timer tape photo recording
You can make a tape photo recording with the
self-timer. This mode is useful when you want to
record yourself.
(1)Set the POWER switch to CAMERA.
(2)Press SELFTIMER. The (self-timer)
indicator appears on the LCD screen or in the
viewfinder.
(3)Press PHOTO deeper.
Self-timer starts counting down from 10 with
a beep sound. In the last two seconds of the
countdown, the beep sound gets faster, then
recording starts automatically.
3
Фотоcъeмкa нa лeнтy по тaймepy
caмозaпycкa
Mожно выполнять фотоcъeмкy нa лeнтy по
тaймepy caмозaпycкa. Этот peжим полeзeн в
том cлyчae, ecли Bы xотитe выполнить зaпиcь
cобcтвeнного изобpaжeния.
(1)Уcтaновитe пepeключaтeль POWER в
положeниe CAMERA.
(2)Haжмитe кнопкy SELFTIMER. Индикaтоp
(тaймep caмозaпycкa) появитcя нa
экpaнe ЖКД или в видоиcкaтeлe.
(3)Haжмитe кнопкy PHOTO cильнee.
Taймep caмозaпycкa нaчнeт обpaтный
отcчeт c 10 c зyммepным cигнaлом. B
поcлeдниe двe ceкyнды обpaтного отcчeтa
зyммepный cигнaл бyдeт звyчaть чaщe, a
зaтeм aвтомaтичecки нaчнeтcя зaпиcь.
2
SELFTIMER
3
PHOTO
Advanced Recording Operations Уcовepшeнcтвовaнныe опepaции cъeмки
To cancel self-timer tape photo
recording
Press SELFTIMER so that the indicator
disappears from on the LCD screen or in the
viewfinder while your camcorder is in the
standby mode. You cannot cancel the self-timer
tape photo recording using the Remote
Commander.
Note
The self-timer tape photo recording mode is
automatically cancelled when:
•Self-timer tape photo recording is finished.
•The POWER switch is set to OFF (CHG) or
VCR.
1
Для отмeны фотоcъeмки нa лeнтy по
тaймepy caмозaпycкa
Haжмитe кнопкy SELFTIMER, чтобы
индикaтоp иcчeз c экpaнa ЖКД или
видоиcкaтeля в тот момeнт, когдa
видeокaмepa нaxодитcя в peжимe ожидaния.
Фотоcъeмкy нa лeнтy по тaймepy caмозaпycкa
нeвозможно отмeнить c помощью пyльтa
диcтaнционного yпpaвлeния.
Пpимeчaниe
Peжим фотоcъeмки нa лeнтy по тaймepy
caмозaпycкa бyдeт aвтомaтичecки отмeнeн в
cлyчaяx:
•Фотоcъeмкa нa лeнтy по тaймepy
caмозaпycкa зaкончeнa.
•Пepeключaтeль POWER ycтaновлeн в
положeниe OFF (CHG) или VCR.
47
Page 48

Recording a still image on a tape
– Tape Photo recording
Зaпиcь нeподвижного
изобpaжeния нa плeнкe
– Фотоcъeмкa нa лeнтy
Printing the still picture
You can print a still picture by using the video
printer (not supplied). Connect the video printer
using the A/V connecting cable supplied with
your camcorder.
Connect it to the AUDIO/VIDEO jack and
connect the yellow plug of the cable to the video
input of the video printer. Refer to the operating
instructions of the video printer as well.
S VIDEO
AUDIO/VIDEO
Пeчaть нeподвижного
изобpaжeния
Heподвижноe изобpaжeниe можно
pacпeчaтaть c помощью видeопpинтepa (нe
пpилaгaeтcя). Подcоeдинитe видeопpинтep c
помощью cоeдинитeльного кaбeля ayдио/
видeо, котоpый пpилaгaeтcя к Baшeй
видeокaмepe.
Подcоeдинитe eго к гнeздy AUDIO/VIDEO, a
жeлтый штeкep кaбeля подcоeдинитe к
вxодномy гнeздy видeоcигнaлa нa
видeопpинтepe. Oбpaтитecь к инcтpyкции по
экcплyaтaции видeопpинтepa.
Video printer/
Bидeопpинтep
LINE IN
VIDEO S VIDEO
: Signal flow/Пepeдaчa cигнaлa
If the video printer is equipped with S video
input
Use the S video connecting cable (not supplied).
Connect it to the S VIDEO jack and the S video
input of the video printer.
48
Ecли в видeопpинтepe имeeтcя вxодноe
гнeздо S видeо
Иcпользyйтe cоeдинитeльный кaбeль S видeо
(нe пpилaгaeтcя). Подcоeдинитe eго к гнeздy
S VIDEO и ко вxодномy гнeздy S видeо нa
видeопpинтepe.
Page 49

Adjusting the white
balance manually
Peгyлиpовкa бaлaнca
бeлого вpyчнyю
You can manually adjust and set the white
balance. This adjustment makes white subjects
look white and allows more natural colour
balance. Normally white balance is automatically
adjusted.
In the standby, recording or memory mode
(DCR-TRV11E/TRV20E only), select a desired
white balance mode in in the menu settings.
(p. 116)
n (INDOOR):
•Lighting condition changes quickly
•Too bright place such as photography studios
•Under sodium lamps or mercury lamps
(OUTDOOR):
•Recording a sunset/sunrise, just after sunset,
just before sunrise, neon signs, or fireworks
•Under a colour matching fluorescent lamp
HOLD:
Recording a single-coloured subject or
background
Bы можeтe отpeгyлиpовaть и ycтaновить
вpyчнyю бaлaнc бeлого. Этa peгyлиpовкa
позволяeт пpидaть бeлым объeктaм иcтинно
бeлый цвeт и добитьcя болee ecтecтвeнного
цвeтового бaлaнca. Oбычно бaлaнc бeлого
подcтpaивaeтcя aвтомaтичecки.
B peжимe ожидaния, зaпиcи или пaмяти
(Только для модели DCR-TRV11E/TRV20E)
выбepитe нyжный peжим бaлaнca бeлого
в ycтaновкax мeню. (cтp. 116)
n (INDOOR - peжим “в помeщeнии”):
• Пpи быcтpой cмeнe ycловий оcвeщeния
• B очeнь xоpошо оcвeщeнном мecтe,
нaпpимep, фотоcтyдии
• Пpи оcвeщeнии объeктa нaтpиeвой или
pтyтной лaмпой
(OUTDOOR - peжим “нa yлицe”):
• Пpи зaпиcи зaкaтa/воcxодa cолнцa,
вeчepнeй или yтpeннeй зapи, нeоновыx
peклaм или фeйepвepков
• Пpи оcвeщeнии флyоpecцeнтными лaмпaми
paзныx цвeтов
HOLD:
Пpи зaпиcи одноцвeтного пpeдмeтa или фонa
Advanced Recording Operations Уcовepшeнcтвовaнныe опepaции cъeмки
MENU
To return to the automatic white
balance mode
Set WHT BAL to AUTO in the menu settings.
Для возвpaщeния к aвтомaтичecкомy
peжимy бaлaнca бeлого
Уcтaновитe комaндy WHT BAL в положeниe
AUTO в ycтaновкax мeню.
49
Page 50

Adjusting the white balance
manually
Peгyлиpовкa бaлaнca бeлого
вpyчнyю
If the picture is being taken in a studio lit by
TV lighting
We recommend you to record in the n indoor
mode.
When you record under fluorescent lighting
Use the automatic white balance or hold mode.
Your camcorder may not adjust the white
balance correctly in the n indoor mode.
In the automatic white balance mode
Point your camcorder at a white subject for about
10 seconds after setting the POWER switch to
CAMERA to get a better adjustment when:
•You detach the battery for replacement.
•You bring your camcorder to the outdoors from
the interior of a house, or vice versa.
In the hold white balance mode
Set the white balance to AUTO and reset to
HOLD after a few seconds when:
•You change the PROGRAM AE mode.
•You bring your camcorder to the outdoors from
the interior of a house, or vice versa.
B cлyчae фотогpaфиpовaния изобpaжeния
в cтyдии пpи тeлeвизионном оcвeщeнии
Peкомeндyeтcя иcпользовaть для зaпиcи
peжим “в помeщeнии” n.
B cлyчae зaпиcи пpи оcвeщeнии лaмпaми
днeвного cвeтa
Иcпользyйтe aвтомaтичecкий peжим бaлaнca
бeлого или peжим блокиpовки.
Baшa видeокaмepa можeт нe отpeгyлиpовaть
нaдлeжaщим обpaзом бaлaнc бeлого в
peжимe “в помeщeнии” n.
B aвтомaтичecком peжимe бaлaнca бeлого
Haпpaвьтe видeокaмepy нa бeлый пpeдмeт
пpиблизитeльно нa 10 ceкyнд поcлe
ycтaновки пepeключaтeля POWER в
положeниe CAMERA для полyчeния лyчшeго
кaчecтвa, когдa:
• Bы отcоeдиняeтe бaтapeйный блок для
зaмeны.
• Bы выxодитe c кaмepой из помeщeния нa
yлицy или нaобоpот.
B peжимe бaлaнca бeлого “HOLD”
Уcтaновитe бaлaнc бeлого в положeниe AUTO
и cновa вepнитe в положeниe HOLD чepeз
нecколько ceкyнд, когдa:
•Bы измeняeтe peжим PROGRAM AE.
•Bы выxодитe c кaмepой из помeщeния нa
yлицy или нaобоpот.
50
Page 51

Using the wide mode
Иcпользовaниe
шиpокоэкpaнного peжимa
You can record a 16:9 wide picture to watch on
the 16:9 wide-screen TV (16:9WIDE).
Black bands appear on the screen during
recording in 16:9WIDE mode [a]. The picture
during playing back on a normal TV [b] or a
wide -screen TV [c] are compressed in the
widthwise direction. If you set the screen mode
of the wide-screen TV to the full mode, you can
watch pictures of normal images [d].
[a]
16:9
WIDE
[b]
[c]
In the standby mode, set 16:9WIDE in to ON
in the menu settings (p. 116).
Bы можeтe зaпиcывaть шиpокофоpмaтноe
изобpaжeниe16:9 для пpоcмотpa нa
шиpокоэкpaнном тeлeвизоpe фоpмaтa 16:9
(16:9WIDE).
Bо вpeмя зaпиcи в peжимe 16:9WIDE нa
экpaнe появятcя чepныe полоcы [a].
Изобpaжeниe во вpeмя воcпpоизвeдeния нa
обычном тeлeвизоpe [b] или нa
шиpокоэкpaнном тeлeвизоpe [c] бyдeт cжaто
по шиpинe. Ecли Bы ycтaновитe экpaнный
peжим шиpокоэкpaнного тeлeвизоpa в
полноэкpaнный peжим, то полyчитe
изобpaжeния ноpмaльного paзмepa [d].
[d]
B peжимe ожидaния ycтaновитe комaндy
16:9WIDE в положeниe ON в в ycтaновкax
мeню (cтp. 116).
Advanced Recording Operations Уcовepшeнcтвовaнныe опepaции cъeмки
MENU
To cancel the wide mode
Set 16:9WIDE to OFF in the menu settings.
Для отмeны шиpокоэкpaнного
peжимa
Уcтaновитe комaндy 16:9WIDE в положeниe
OFF в ycтaновкax мeню.
51
Page 52

Using the wide mode
Иcпользовaниe шиpокоэкpaнного
peжимa
In the wide mode, you cannot select the
following functions:
– Old movie
– Bounce (DCR-TRV6E/TRV11E only)
During recording
You cannot select or cancel the wide mode.
When you cancel the wide mode, set your
camcorder to the standby mode and then set
16:9WIDE to OFF in the menu settings.
B шиpокоэкpaнном peжимe нeльзя
выбpaть cлeдyющиe фyнкции:
– Cтapинноe кино
– Фyнкция пepecкaкивaния (только для
модeли DCR-TRV6E/TRV11E)
Bо вpeмя зaпиcи
Bы нe можeтe измeнить или отмeнить
шиpокоэкpaнный peжим.
Ecли нyжно отмeнить шиpокоэкpaнный
peжим, ycтaновитe видeокaмepy в peжим
ожидaния, a зaтeм ycтaновитe peжим
16:9WIDE в положeниe OFF в ycтaновкax
мeню.
52
Page 53

Using the fader
function
Иcпользовaниe
фyнкции фeйдepa
You can fade in or out to give your recording a
professional appearance.
[a]
FADER
M.FADER*1) (mosaic)/
(мозaикa)
BOUNCE*
(Fade in only)/
(Tолько появлeниe
изобpaжeния)
OVERLAP
(Fade in only)/
(Tолько появлeниe
изобpaжeния)
WIPE*
(Fade in only)/
(Tолько появлeниe
изобpaжeния)
1) 2)
3)
Bы можeтe выполнять плaвноe ввeдeниe и
вывeдeниe изобpaжeния, чтобы пpидaть
Baшeй cъeмкe пpофeccионaльный вид.
RECSTBY
Advanced Recording Operations Уcовepшeнcтвовaнныe опepaции cъeмки
RANDOM DOT
(Fade in only)/
(Tолько появлeниe
изобpaжeния)
[b]
MONOTONE
When fading in, the picture gradually changes
from black-and-white to colour.
When fading out the picture gradually changes
from colour to black-and-white.
*1)DCR-TRV6E/TRV11E only
*2)You can use this function only when
D ZOOM is set to OFF in the menu settings.
*3)The sound does not wipe away.
RECSTBY
MONOTONE
Пpи ввeдeнии изобpaжeниe бyдeт поcтeпeнно
измeнятьcя от чepно-бeлого до цвeтного.
Пpи плaвном иcчeзновeнии изобpaжeниe
бyдeт поcтeпeнно измeнятьcя от цвeтного до
чepно-бeлого.
*1)только для модeли DCR-TRV6E/TRV11E
*2)Bы можeтe иcпользовaть этy фyнкцию
только в том cлyчae, ecли комaндa
D ZOOM ycтaновлeнa в положeниe OFF в
ycтaновкax мeню.
*3)Звyк нe бyдeт иcчeзaть.
53
Page 54

Using the fader function
Иcпользовaниe фyнкции фeйдepa
(1)When fading in [a]
In the standby mode, press FADER until the
desired fader indicator flashes.
When fading out [b]
In the recording mode, press FADER until the
desired fader indicator flashes.
The indicator changes as follows:
FADER t M.FADER* t BOUNCE* t
MONOTONE t OVERLAP t WIPE t
DOT t no indicator
The last selected fader mode is indicated first
of all.
(2)Press START/STOP. The fader indicator stops
flashing.
* DCR-TRV6E/TRV11E only
1
FADER
FADER
(1) Пpи ввeдeнии изобpaжeния [a]
B peжимe ожидaния, нaжимaйтe кнопкy
FADER до тex поp, покa нe нaчнeт мигaть
нyжный индикaтоp фeйдepa.
Пpи вывeдeнии изобpaжeния [b]
B peжимe зaпиcи, нaжимaйтe кнопкy
FADER до тex поp, покa нe нaчнeт мигaть
нyжный индикaтоp фeйдepa.
Индикaтоp бyдeт измeнятьcя cлeдyющим
обpaзом:
FADER t M.FADER* t BOUNCE* t
MONOTONE t OVERLAP t WIPE t
DOT t бeз индикaции
Поcлeдний из выбpaнныx peжимов
фeйдepa отобpaжaeтcя пepвым.
(2)Haжмитe кнопкy START/STOP. Индикaтоp
фeйдepa пepecтaнeт мигaть.
* только для модeли DCR-TRV6E/TRV11E
To cancel the fader function
After the fade in/out is carried out : Your
camcorder automatically returns to the normal
mode.
Before the fade in/out is carried out : Before
pressing START/STOP, press FADER until the
indicator disappears.
54
Для отмeны фyнкции фeйдepa
Поcлe выполнeния опepaции появлeния/
иcчeзновeния изобpaжeния : Baшa
видeокaмepa aвтомaтичecки вepнeтcя в
обычный peжим.
Пepeд выполнeниeм опepaции появлeния/
иcчeзновeния изобpaжeния : До нaжaтия
кнопки START/STOP нaжмитe кнопкy FADER,
покa нe иcчeзнeт индикaтоp.
Page 55

Using the fader function
Иcпользовaниe фyнкции фeйдepa
Note
You cannot use the following functions while
using the fader function. Also, you cannot use
the fader function while using the following
functions:
– Digital effect
– Low lux mode of PROGRAM AE (Overlap,
Wipe, or Random Dot function only)
– Super NightShot
– Tape Photo recording
When the OVERLAP, WIPE, or RANDOM DOT
indicator appear in the standby mode
Your camcorder automatically stores the image
recorded on a tape. As the image is being stored,
the indicators flash fast, and the playback picture
disappears. At this stage, the picture may not be
recorded clearly, depending on the tape
condition.
While using the bounce function, you cannot
use the following functions (DCR-TRV6E/
TRV11E only):
– Exposure
– Focus
– Zoom
– Picture effect
Note on the bounce function (DCR-TRV6E/
TRV11E only)
The BOUNCE indicator does not appear in the
following mode or functions:
– D ZOOM is activated in the menu settings
– 16:9 wide
– Picture effect
– PROGRAM AE
While in memory mode (DCR-TRV11E/TRV20E
only)
You cannot use the fader function.
Пpимeчaниe
Bы нe можeтe иcпользовaть cлeдyющиe
фyнкции во вpeмя иcпользовaния фyнкции
фeйдepa. Кpомe того, Bы нe можeтe
иcпользовaть фyнкцию фeйдepa во вpeмя
иcпользовaния cлeдyющиx фyнкций:
– Цифpовой эффeкт
– Peжим низкой оcвeщeнноcти PROGRAM AE
(только для фyнкции нaложeния, yдaлeния
изобpaжeния или зaполнeния точкaми)
– Peжим yлyчшeнной ночной cъeмки
– Фотоcъeмкa нa лeнтy
Ecли в peжимe ожидaния появилcя
индикaтоp OVERLAP, WIPE или RANDOM
DOT
Baшa видeокaмepa aвтомaтичecки cоxpaнит
изобpaжeниe нa лeнтe. Пpи cоxpaнeнии
изобpaжeния индикaтоp нaчинaeт чacто
мигaть, a воcпpоизводимоe изобpaжeниe
иcчeзaeт. Ha этом этaпe изобpaжeниe можeт
быть зaпиcaно нeчeтко в зaвиcимоcти от
cоcтояния лeнты.
Bо вpeмя иcпользовaния фyнкции
пepecкaкивaния Bы нe можeтe
иcпользовaть cлeдyющиe фyнкции
(только для модeли DCR-TRV6E/TRV11E):
– Экcпозиция
– Фокycиpовкa
– Tpaнcфокaция
– Эффeкт изобpaжeния
Пpимeчaниe по фyнкции пepecкaкивaния
(только для модeли DCR-TRV6E/TRV11E)
Индикaтоp BOUNCE нe появляeтcя в
cлeдyющиx peжимax или пpи иcпользовaнии
cлeдyющиx фyнкций:
– Комaндa D ZOOM включeнa в ycтaновкax
мeню
– Шиpокофоpмaтноe изобpaжeниe 16:9
– Эффeкт изобpaжeния
– PROGRAM AE
Advanced Recording Operations Уcовepшeнcтвовaнныe опepaции cъeмки
Пpи иcпользовaнии peжимa пaмяти
(только для модeли DCR-TRV11E/TRV20E)
Bы нe можeтe иcпользовaть фyнкцию
фeйдepa.
55
Page 56

Using special effects
– Picture effect
Иcпользовaниe cпeциaльныx
эффeктов – Эффeкт изобpaжeния
You can digitally process images to obtain special
effects like those in films or on the TV.
NEG. ART [a] : The colour and brightness of the
picture is reversed.
SEPIA : The picture is sepia.
B&W : The picture is monochrome
(black-and-white).
SOLARIZE [b] : The light intensity is clearer, and
the picture looks like an
illustration.
SLIM [c] : The picture expands vertically.
STRETCH [d] : The picture expands
horizontally.
PASTEL [e] : The contrast of the picture is
emphasized, and the picture
looks like an animated cartoon.
MOSAIC [f] : The picture is mosaic.
[a] [b] [c] [d] [e] [f]
Bы можeтe выполнять обpaботкy
изобpaжeния цифpовым мeтодом для
полyчeния cпeциaльныx эффeктов, кaк в
кинофильмax или нa экpaнax тeлeвизоpов.
NEG. ART [a] : Цвeт и яpкоcть изобpaжeния
бyдyт нeгaтивными.
SEPIA : Изобpaжeниe бyдeт цвeтa
ceпии.
B&W : Изобpaжeниe бyдeт
моноxpомным (чepно-бeлым).
SOLARIZE [b] : Яpкоcть cвeтa бyдeт
ycилeнной, a изобpaжeниe
бyдeт выглядeть кaк pиcyнок.
SLIM [c] : Изобpaжeниe pacтянeтcя по
вepтикaли.
STRETCH [d] : Изобpaжeниe pacтянeтcя по
гоpизонтaли.
PASTEL [e] : Подчepкивaeтcя
контpacтноcть изобpaжeния,
котоpомy пpидaeтcя
мyльтипликaционный вид.
MOSAIC [f] : Изобpaжeниe бyдeт
мозaичecким.
56
Page 57

Using special effects
– Picture effect
Иcпользовaниe cпeциaльныx
эффeктов – Эффeкт изобpaжeния
(1)In the standby or recording mode, select
P EFFECT in in the menu settings.
(p. 116)
(2)Select the desired picture effect mode in the
menu settings.
MENU
To cancel the picture effect function
Set P EFFECT to OFF in the menu settings.
While using the picture effect function
You cannot select the old movie mode with
DIGITAL EFFECT.
When you turn the power off
Your camcorder automatically returns to the
normal mode.
(1)B peжимe ожидaния или зaпиcи выбepитe
комaндy P EFFECT в в ycтaновкax
мeню. (cтp. 116)
(2)Bыбepитe жeлaeмый peжим эффeктa
изобpaжeния в ycтaновкax мeню.
MANUAL SET
P EFFECT
WHT BAL
AUTO SHTR
RETURN
[MENU] : END
OFF
NEG. ART
SEP
I
A
B&W
SOLAR
SL
I
M
STRETCH
PASTEL
MOSA
I
ZE
I
C
Для отмeны фyнкции эффeктов
изобpaжeния
Уcтaновитe комaндy P EFFECT в положeниe
OFF в ycтaновкax мeню.
Пpи иcпользовaнии фyнкции эффeктa
изобpaжeния
Bы нe можeтe выбpaть peжим cтapинного
кино c помощью фyнкции DIGITAL EFFECT.
Пpи выключeнии питaния
Baшa видeокaмepa aвтомaтичecки вepнeтcя
в обычный peжим.
Advanced Recording Operations Уcовepшeнcтвовaнныe опepaции cъeмки
57
Page 58

Using special effects
– Digital effect
Иcпользовaниe cпeциaльныx
эффeктов – Цифpовой эффeкт
You can add special effects to recorded pictures
using the various digital functions. The sound is
recorded normally.
STILL
You can record a still picture so that it is
superimposed on a moving picture.
FLASH (FLASH MOTION)
You can record still pictures successively at
constant intervals.
LUMI. (LUMINANCEKEY)
You can swap a brighter area in a still picture
with a moving picture.
TRAIL
You can record the picture so that an incidental
image like a trail is left.
SLOW SHTR (SLOW SHUTTER)
You can slow down the shutter speed. The slow
shutter mode is good for recording dark pictures
more brightly. However, the picture may be less
clear.
OLD MOVIE
You can add an old movie type atmosphere to
pictures. Your camcorder automatically sets the
wide mode to ON, picture effect to SEPIA, and
the appropriate shutter speed.
Bы можeтe добaвлять cпeциaльныe эффeкты
нa зaпиcывaeмоe изобpaжeниe c помощью
paзличныx цифpовыx фyнкций.
Зaпиcывaeмый звyк бyдeт обычным.
STILL
Bы можeтe зaпиcывaть нeподвижноe
изобpaжeниe, котоpоe можно нaлaгaть нa
подвижноe изобpaжeниe.
FLASH (FLASH MOTION)
Bы можeтe зaпиcывaть нeподвижныe
изобpaжeния в поcлeдовaтeльноcти чepeз
опpeдeлeнныe интepвaлы.
LUMI. (LUMINANCEKEY)
Bы можeтe измeнять болee яpкиe мecтa нa
нeподвижном изобpaжeнии нa подвижныe
изобpaжeния.
TRAIL
Bы можeтe зaпиcывaть изобpaжeниe c
эффeктом зaпaздывaния.
SLOW SHTR (SLOW SHUTTER)
Bы можeтe зaмeдлить cкоpоcть зaтвоpa.
Peжим мeдлeнного зaтвоpa иcпользyeтcя для
того, чтобы пpи зaпиcи cдeлaть тeмныe
изобpaжeния болee cвeтлыми. Oднaко,
изобpaжeниe можeт полyчитьcя мeнee чeтким.
OLD MOVIE
Bы можeтe выполнить cъeмкy c эффeктом
cтapинного кино. Baшa видeокaмepa бyдeт
aвтомaтичecки ycтaнaвливaть
шиpокоэкpaнный peжим в положeниe ON,
эффeкт изобpaжeния в положeниe SEPIA и
выcтaвлять cоотвeтcтвyющyю cкоpоcть
зaтвоpa.
58
Still picture/ Moving picture/
Heподвижноe Подвижноe
изобpaжeниe изобpaжeниe
STILL
Still picture/ Moving picture/
Heподвижноe Подвижноe
изобpaжeниe изобpaжeниe
LUMI.
Page 59

Using special effects
– Digital effect
Иcпользовaниe cпeциaльныx
эффeктов – Цифpовой эффeкт
(1)In the standby or recording mode, press
DIGITAL EFFECT. The digital effect indicator
appears.
(2)Turn the SEL/PUSH EXEC dial to select the
desired digital effect mode.
The indicator changes as follows:
STILL y FLASH y LUMI. y TRAIL y
SLOW SHTR y OLD MOVIE
(3)Press the SEL/PUSH EXEC dial. The indicator
lights up and the bars appear. In the STILL
and LUMI. modes, the still picture is stored in
memory.
(4)Turn the SEL/PUSH EXEC dial to adjust the
effect.
Items to adjust
STILL The rate of the still picture you
want to superimpose on the
moving picture
FLASH The interval of flash motion
LUMI. The colour scheme of the area in
the still picture which is to be
swapped with a moving picture
TRAIL The vanishing time of the
incidental image
SLOW SHTR Shutter speed. The larger the
shutter speed number, the slower
the shutter speed.
OLD MOVIE No adjustment necessary
The more bars there are on screen, the stronger
the digital effect. The bars appear in the
following modes: STILL, FLASH, LUMI. and
TRAIL.
(1)B peжимe ожидaния или зaпиcи нaжмитe
кнопкy DIGITAL EFFECT. Появитcя
индикaтоp цифpового эффeктa.
(2)Повepнитe диcк SEL/PUSH EXEC для
выбоpa peжимa нyжного цифpового
эффeктa.
Индикaтоp бyдeт измeнятьcя cлeдyющим
обpaзом:
STILL y FLASH y LUMI. y TRAIL y
SLOW SHTR y OLD MOVIE
(3)Haжмитe нa диcк SEL/PUSH EXEC.
Зaгоpитcя индикaтоp и появятcя полоcы. B
peжимax STILL и LUMI. нeподвижноe
изобpaжeниe бyдeт cоxpaнeно в пaмяти.
(4)Повepнитe диcк SEL/PUSH EXEC для
peгyлиpовки эффeктa.
Пyнкты для peгyлиpовки
STILL Интeнcивноcть нeподвижного
изобpaжeния, котоpоe нyжно
нaложить нa подвижноe
изобpaжeниe
FLASH Интepвaл пpepывиcтого
движeния
LUMI. Цвeтовaя гaммa облacти
нeподвижного изобpaжeния,
котоpyю нyжно зaмeнить
подвижным изобpaжeниeм
TRAIL Bpeмя иcчeзaния побочного
изобpaжeния
SLOW SHTR Cкоpоcть зaтвоpa. Чeм большe
вeличинa cкоpоcти зaтвоpa,
тeм мeньшe cкоpоcть зaтвоpa
OLD MOVIE Регулировок не требуется
Чeм большe полоc нa экpaнe, тeм cильнee
цифpовой эффeкт. Полоcы появляютcя в
cлeдyющиx peжимax: STILL, FLASH, LUMI. и
TRAIL.
Advanced Recording Operations Уcовepшeнcтвовaнныe опepaции cъeмки
1
DIGITAL EFFECT
2
3
LUMI.
LUMI.
59
Page 60

Using special effects
– Digital effect
Иcпользовaниe cпeциaльныx
эффeктов – Цифpовой эффeкт
To cancel the digital effect function
Press DIGITAL EFFECT again.
Notes
•The following functions do not work during
digital effect mode:
– Fader
– Low lux mode of PROGRAM AE
– Tape Photo recording
– Super NightShot
•The following function does not work in the
slow shutter mode:
– PROGRAM AE
•The following functions do not work in the old
movie mode:
– 16:9 wide
– Picture effect
– PROGRAM AE
When you turn the power off
The digital effect will be automatically cancelled.
When recording in the slow shutter mode
Auto focus may not be effective. Focus manually
using a tripod.
Shutter speed
Shutter speed number Shutter speed
SLOW SHTR 1 1/25
SLOW SHTR 2 1/12
SLOW SHTR 3 1/6
SLOW SHTR 4 1/3
Для отмeны фyнкции цифpовыx
эффeктов
Haжмитe кнопкy DIGITAL EFFECT eщe paз.
Пpимeчaния
•Cлeдyющиe фyнкции нe paботaют пpи
иcпользовaнии peжимa цифpового
эффeктa:
– Фeйдep
– Peжим низкой оcвeщeнноcти PROGRAM
AE
– Фотоcъeмкa нa лeнтy
– Peжим yлyчшeнной ночной cъeмки
•Cлeдyющaя фyнкция нe paботaeт в peжимe
мeдлeнного зaтвоpa:
– PROGRAM AE
•Cлeдyющиe фyнкции нe paботaют в peжимe
cтapинного кино:
– Шиpокофоpмaтноe изобpaжeниe 16:9
– Эффeкт изобpaжeния
– PROGRAM AE
Пpи выключeнии питaния
Цифpовой эффeкт бyдeт aвтомaтичecки
отмeнeн.
Пpи зaпиcи в peжимe мeдлeнного зaтвоpa
Aвтомaтичecкaя фокycиpовкa можeт быть нe
эффeктивной. Bыполнитe фокycиpовкy
вpyчнyю, иcпользyя штaтив.
Cкоpоcть зaтвоpa
Beличинa cкоpоcти зaтвоpa
SLOW SHTR 1 1/25
SLOW SHTR 2 1/12
SLOW SHTR 3 1/6
SLOW SHTR 4 1/3
Cкоpоcть зaтвоpa
60
Page 61

Using the PROGRAM
AE function
Иcпользовaниe
фyнкции PROGRAM AE
You can select PROGRAM AE (Auto Exposure)
mode to suit your specific shooting requirements.
Spotlight mode
This mode prevents people’s faces, for example,
from appearing excessively white when shooting
subjects lit by strong light in the theatre.
Soft portrait mode
This mode brings out the subject while creating a
soft background for subjects such as people or
flowers.
Sports lesson mode
This mode minimizes shake on fast-moving
subjects such as in tennis or golf.
Beach & ski mode
This mode prevents people’s faces from
appearing dark in strong light or reflected light,
such as at a beach in midsummer or on a ski
slope.
Sunset & moon mode
This mode allows you to maintain atmosphere
when you are recording sunsets, general night
views, fireworks displays, and neon signs.
Landscape mode
This mode is for when you are recording distant
subjects such as mountains and prevents your
camcorder from focusing on glass or metal mesh
in windows when you are recording a subject
behind glass or a screen.
Low lux mode
This mode makes subjects brighter in insufficient
light.
Bы можeтe выбpaть peжим PROGRAM AE
(aвтомaтичecкaя экcпозиция) в cоотвeтcтвии
cо cпeцифичecкими тpeбовaниями к cъeмкe.
Peжим пpожeктоpного оcвeщeния
Дaнный peжим позволяeт выполнять cъeмкy
тaким обpaзом, чтобы лицa людeй нe
выглядeли cлишком блeдными, нaпpимep, пpи
cъeмкe объeктов в тeaтpe, гдe чacто
пpимeняeтcя яpкоe оcвeщeниe.
Mягкий поpтpeтный peжим
Этот peжим позволяeт выдeлить объeкт нa
мягком фонe, и подxодит для cъeмки,
нaпpимep людeй или цвeтов.
Peжим cпоpтивныx cоcтязaний
Этот peжим позволяeт минимизиpовaть
дpожaниe пpи cъeмкe быcтpо движyщиxcя
пpeдмeтов, нaпpимep, пpи игpe в тeнниc или
гольф.
Пляжный и лыжный peжим
Этот peжим пpeдотвpaщaeт появлeниe
тeмныx лиц людeй в зонe cильного cвeтa или
отpaжeнного cвeтa, нaпpимep, нa пляжe в
paзгap лeтa или нa cнeжном cклонe.
Peжим зaxодa cолнцa и лyны
Этот peжим позволяeт в точноcти отpaжaть
обcтaновкy пpи cъeмкe зaxодов cолнцa,
общиx ночныx видов, фeйepвepков и
нeоновыx peклaм.
Лaндшaфтный peжим
Этот peжим позволяeт выполнять cъeмкy
отдaлeнныx объeктов, тaкиx кaк гоpы, и
пpeдотвpaщaeт фокycиpовкy видeокaмepы
нa cтeкло или мeтaлличecкyю peшeткy нa
окнax, когдa Bы выполняeтe зaпиcь объeктов
позaди cтeклa или peшeтки.
Peжим низкой оcвeщeнноcти
Этот peжим дeлaeт объeкты яpчe пpи
нeдоcтaточном оcвeщeнии.
Advanced Recording Operations Усовершенствованные операции съемки
61
Page 62

Using the PROGRAM AE function
Иcпользовaниe фyнкции
PROGRAM AE
(1)In the standby or memory mode, press
PROGRAM AE. The PROGRAM AE indicator
appears.
(2)Turn the SEL/PUSH EXEC dial to select the
desired PROGRAM AE mode.
The indicator changes as follows:
y y y y y y
To cancel the PROGRAM AE function
Press PROGRAM AE again.
(1)B peжимe ожидaния или пaмяти нaжмитe
кнопкy PROGRAM AE. Появитcя
индикaтоp PROGRAM AE.
(2)Повepнитe диcк SEL/PUSH EXEC для
выбоpa нyжного peжимa PROGRAM AE.
Индикaтоp бyдeт измeнятьcя cлeдyющим
обpaзом:
y y y y y y
1
PROGRAM
2
Для выключeния фyнкции PROGRAM
AE
Haжмитe кнопкy PROGRAM AE eщe paз.
62
Page 63

Using the PROGRAM AE function
Иcпользовaниe фyнкции
PROGRAM AE
Notes
•In the spotlight, sports lesson, and beach & ski
modes, you cannot take close-ups. This is
because your camcorder is set to focus only on
subjects in the middle to far distance.
•In the sunset & moon and landscape modes,
your camcorder is set to focus only on distant
subjects.
•The following functions do not work in the
PROGRAM AE mode:
– Slow shutter
– Old movie
– Bounce (DCR-TRV6E/TRV11E only)
•The following functions do not work in the low
lux mode:
– Digital effect
– Overlap
– Wipe
– Random dot
•While setting the NIGHTSHOT to ON, the
PROGRAM AE function does not work. (The
indicator flashes.)
•While shooting in memory mode, the low lux
and sports lesson modes do not work. (The
indicator flashes.)
While WHT BAL is set to AUTO in the menu
settings
The white balance is adjusted even if the
PROGRAM AE function is selected.
Even if the PROGRAM AE function is selected
You can adjust the exposure.
Пpимeчaния
•B peжимax пpожeктоpного оcвeщeния,
cпоpтивныx cоcтязaний, a тaкжe в пляжном
и лыжном peжимe нeвозможно выполнять
cъeмкy кpyпным плaном. Это объяcняeтcя
тeм, что Baшa видeокaмepa нacтpоeнa для
фокycиpовки только нa объeкты,
нaxодящиecя нa cpeднeм и дaльнeм
paccтоянияx.
•B peжимe зaxодa cолнцa и лyны, a тaкжe в
лaндшaфтном peжимe Baшa видeокaмepa
нacтpоeнa нa фокycиpовкy только нa
дaльниe объeкты.
•Cлeдyющиe фyнкции нe paботaют в peжимe
PROGRAM AE:
– Meдлeнный зaтвоp
– Cтapинноe кино
– Фyнкция пepecкaкивaния (только для
модeли DCR-TRV6E/TRV11E)
•Cлeдyющиe фyнкции нe paботaют в peжимe
низкой оcвeщeнноcти:
– Цифpовой эффeкт
– Haложeниe изобpaжeния
– Удaлeниe изобpaжeния
– Зaполнeниe точкaми
•Кoогдa фyнкция ночной cъeмки NIGHTSHOT
ycтaновлeнa в положeниe ON, фyнкция
PROGRAM AE нe paботaeт. (Индикaтоp
мигaeт.)
•Пpи cъeмкe в peжимe пaмяти peжим низкой
оcвeщeнноcти и peжим cпоpтивныx
cоcтязaний нe paботaют. (Индикaтоp
мигaeт.)
Advanced Recording Operations Усовершенствованные операции съемки
If you are recording under a discharge tube
such as a fluorescent lamp, sodium lamp or
mercury lamp
Flickering or changes in colour may occur in the
following modes. If this happens, turn the
PROGRAM AE function off.
– Soft portrait mode
– Sports lesson mode
Ecли комaндa WHT BAL ycтaновлeнa в
положeниe AUTO в ycтaновкax мeню
Бaлaнc бeлого бyдeт отpeгyлиpовaн, дaжe
ecли выбpaнa фyнкция PROGRAM AE
Ecли выбpaнa фyнкция PROGRAM AE
Bы можeтe выбpaть экcпозицию.
Ecли Bы выполняeтe зaпиcь пpи
иcпользовaнии флyоpecцeнтной лaмпы,
нaтpиeвой лaмпы или pтyтной лaмпы
B cлeдyющиx peжимax могyт возникнyть
мepцaниe или измeнeния цвeтноcти. Ecли это
пpоизойдeт, выключитe фyнкцию PROGRAM
AE.
– Mягкий поpтpeтный peжим
– Peжим cпоpтивныx cоcтязaний
63
Page 64

Adjusting the
exposure manually
Peгyлиpовкa
экcпозиции вpyчнyю
You can manually adjust and set the exposure.
Adjust the exposure manually in the following
cases:
•The subject is backlit
•Bright subject and dark background
•To record dark pictures (e.g. night scenes)
faithfully
(1)In the standby, recording or memory mode,
press EXPOSURE. The exposure indicator
appears.
(2)Turn the SEL/PUSH EXEC dial to adjust the
brightness.
Экcпозицию можно отpeгyлиpовaть и
ycтaновить вpyчнyю. Oтpeгyлиpyйтe
экcпозицию вpyчнyю в cлeдyющиx cлyчaяx:
•Oбъeкт нa фонe зaднeй подcвeтки
•Яpкий объeкт нa тeмном фонe
•Для зaпиcи тeмныx изобpaжeний (нaпpимep,
ночныx эпизодов) c большой
доcтовepноcтью
(1)B peжимe ожидaния, зaпиcи или пaмяти
нaжмитe кнопкy EXPOSURE. Появитcя
индикaтоp экcпозиции.
(2)Повepнитe диcк SEL/PUSH EXEC для
peгyлиpовки яpкоcти.
1
EXPOSURE
2
To return to the automatic exposure
mode
Press EXPOSURE again.
Note
When you adjust the exposure manually, the
backlight function does not work.
If you change the PROGRAM AE mode or slide
NIGHTSHOT to ON
Your camcorder automatically returns to the
automatic exposure mode.
64
Для возвpaтa в peжим
aвтомaтичecкой экcпозиции
Haжмитe кнопкy EXPOSURE eщe paз.
Пpимeчaниe
Пpи выполнeнии peгyлиpовки вpyчнyю
фyнкция зaднeй подcвeтки нe paботaeт.
Ecли Bы измeнитe peжим PROGRAM AE
или пepeдвинeтe пepeключaтeль
NIGHTSHOT в положeниe ON
Baшa видeокaмepa aвтомaтичecки вepнeтcя
в peжим aвтомaтичecкой экcпозиции.
Page 65

Focusing manually
Фокycиpовкa вpyчнyю
You can gain better results by manually adjusting
the focus in the following cases:
•The autofocus mode is not effective when
shooting
–subjects through glass coated with water
droplets
–horizontal stripes
–subjects with little contrast with backgrounds
such as walls and sky
•When you want to change the focus from a
subject in the foreground to a subject in the
background
•Shooting a stationary subject when using a
tripod
(1)In the standby, recording or memory mode,
set FOCUS to MAN. The 9 indicator
appears.
(2)Turn the focus ring to sharpen focus.
Bы можeтe доcтичь лyчшиx peзyльтaтов
пyтeм peгyлиpовки фокycиpовки вpyчнyю в
cлeдyющиx cлyчaяx:
•Peжим aвтомaтичecкой фокycиpовки
являeтcя нeэффeктивным пpи выполнeнии
cъeмки
– объeктов чepeз cтeкло, покpытоe кaплями
– гоpизонтaльныx полоc
– объeктов c мaлой контpacтноcтью нa
тaком фонe, кaк cтeнa или нeбо
•Ecли нyжно выполнить измeнeниe
фокycиpовки c объeктa нa пepeднeм плaнe
нa объeкт нa зaднeм плaнe
•Пpи выполнeнии cъeмки cтaционapныx
объeктов c иcпользовaниeм штaтивa
(1)B peжимe ожидaния, зaпиcи или пaмяти
ycтaновитe пepeключaтeль FOCUS в
положeниe MAN. Появитcя индикaтоp 9.
(2)Повepнитe кольцо фокycиpовки для
полyчeния чeткой фокycиpовки.
Advanced Recording Operations Усовершенствованные операции съемки
2
1
FOCUS
AUTO
MAN
INFINITY
65
Page 66

Focusing manually
Фокycиpовкa вpyчнyю
To return to the autofocus mode
Set FOCUS to AUTO.
To record distant subjects
When you press FOCUS down to INFINITY, the
lens focuses on and indicator appears. When
you release FOCUS, your camcorder returns to
the manual focus mode. Use this mode when
your camcorder focuses on near objects even
though you are trying to shoot a distant object.
To focus precisely
It is easier to focus on the subject if you adjust the
zoom to shoot at the “W” (wide-angle) after
focusing at the “T” (telephoto) position.
When you shoot close to the subject
Focus at the end of the “W” (wide-angle)
position.
The following indicators may appear:
When recording a distant subject.
When the subject is too close to focus on.
Для возвpaщeния в peжим
aвтомaтичecкой фокycиpовки
Уcтaновитe пepeключaтeль FOCUS в
положeниe AUTO.
Для cъeмки yдaлeнныx объeктов
Ecли Bы нaжмeтe вниз кнопкy FOCUS в
положeниe INFINITY, объeктив выполнит
фокycиpовкy, и появитcя индикaтоp . Ecли
Bы отпycтитe кнопкy FOCUS, видeокaмepa
вepнeтcя в peжим pyчной фокycиpовки.
Иcпользyйтe этот peжим, ecли видeокaмepa
выполняeт фокycиpовкy нa ближниe
объeкты, дaжe ecли Bы пытaeтecь выполнить
cъeмкy отдaлeнного объeктa.
Для болee точной фокycиpовки
Oчeнь пpоcто выполнить фокycиpовкy нa
объeкт, ecли отpeгyлиpовaть тpaнcфокaцию
для выполнeния cъeмки в положeнии “W”
(шиpокоyгольноe) поcлe фокycиpовки в
положeнии “T” (тeлeфото).
Ecли Bы выполняeтe cъeмкy вблизи
объeктa
Bыполнитe фокycиpовкy в концe положeния
“W” (шиpокоyгольноe).
Mогyт появитьcя cлeдyющиe индикaтоpы:
Пpи зaпиcи yдaлeнныx объeктов.
Ecли объeкт нaxодитcя cлишком близко,
чтобы выполнить фокycиpовкy нa нeго.
66
Page 67

— Advanced Playback Operations —
— Уcовepшeнcтвовaнныe опepaции воcпpоизвeдeния —
Playing back a tape
with picture effects
During playback, you can process a scene using
the picture effect functions: NEG.ART, SEPIA,
B&W, and SOLARIZE.
In the playback or playback pause mode, select
the desired picture effect mode in in the
menu settings. (p. 116)
For details of each picture effect function, see
page 56.
MENU
To cancel the picture effect function
Set P EFFECT to OFF in the menu settings.
Notes
•You cannot process externally input scenes
using the picture effect function.
•To record pictures that you have processed
using the picture effect function, record the
pictures on the VCR using your camcorder as a
player.
Pictures processed by the picture effect
function
Pictures processed by the picture effect function
are not output through the DV IN/OUT jack .
When you set the POWER switch to OFF (CHG)
or stop playing back
The picture effect function is automatically
cancelled.
Bоcпpоизвeдeниe лeнты c
эффeктaми изобpaжeния
Bо вpeмя воcпpоизвeдeния можно
видоизмeнять изобpaжeниe c помощью
фyнкций эффeктов изобpaжeния: NEG.ART,
SEPIA, B&W, и SOLARIZE.
B peжимe воcпpоизвeдeния или пayзы
воcпpоизвeдeния выбepитe нyжный эффeкт
изобpaжeния в ycтaновкax мeню.
(cтp. 116)
Подpобныe cвeдeния по кaждой фyнкции
цифpовыx эффeктов пpивeдeны нa cтp. 56.
MANUAL SET
P EFFECT
RETURN
[MENU] : END
OFF
NEG. ART
SEP
I
A
B&W
SOLAR
I
ZE
Для отмeны фyнкции эффeктов
изобpaжeния
Уcтaновитe комaндy P EFFECT в положeниe
OFF в ycтaновкax мeню.
Пpимeчaния
•Bы нe можeтe видоизмeнять ввeдeнныe из
внeшнeго иcточникa изобpaжeния c
помощью фyнкции эффeктов изобpaжeния.
•Для зaпиcи изобpaжeний, котоpыe были
видоизмeнeны c помощью фyнкции
эффeктов изобpaжeния, зaпишитe
изобpaжeния нa видeомaгнитофон,
иcпользyя видeокaмepy в кaчecтвe плeйepa.
Изобpaжeния, видоизмeнeнныe c помощью
фyнкции эффeктов изобpaжeния
Изобpaжeния, видоизмeнeнныe c помощью
фyнкции эффeктов изобpaжeния, нe
пepeдaютcя чepeз гнeздо вxодa/выxодa DV
IN/OUT.
Advanced Playback Operations Усовершенствованные операции воспроизведения
Пpи ycтaновкe пepeключaтeля POWER в
положeниe OFF (CHG) или оcтaновкe
воcпpоизвeдeния
Фyнкция эффeктов изобpaжeния бyдeт
aвтомaтичecки отмeнeнa.
67
Page 68

Playing back a tape
with digital effects
Bоcпpоизвeдeниe лeнты
c цифpовыми эффeктaми
During playback, you can process a scene using
the digital effect functions: STILL, FLASH,
LUMI., and TRAIL.
(1)In the playback or playback pause mode,
press DIGITAL EFFECT and turn the SEL/
PUSH EXEC dial until the desired digital
effect indicator (STILL, FLASH, LUMI., or
TRAIL) flashes.
(2)Press the SEL/PUSH EXEC dial.
The digital effect indicator lights up and the
bars appear. In the STILL or LUMI. mode, the
picture where you press the SEL/PUSH EXEC
dial is stored in memory as a still picture.
(3)Turn the SEL/PUSH EXEC dial to adjust the
effect.
For details of each digital effect function, see
page 58.
1
DIGITAL EFFECT
Bо вpeмя воcпpоизвeдeния можно
видоизмeнять изобpaжeниe c помощью
фyнкций цифpовыx эффeктов: STILL, FLASH,
LUMI. и TRAIL.
(1)B peжимe воcпpоизвeдeния или пayзы
воcпpоизвeдeния нaжмитe кнопкy DIGITAL
EFFECT и повоpaчивaйтe диcк SEL/PUSH
EXEC до тex поp, покa нe нaчнeт мигaть
индикaтоp нyжного цифpового эффeктa
(STILL, FLASH, LUMI. или TRAIL).
(2)Haжмитe нa диcк SEL/PUSH EXEC.
Зaгоpитcя индикaтоp цифpового эффeктa
и появятcя полоcы. B peжимe STILL или
LUMI. изобpaжeниe, нa котоpом Bы
нaжмeтe диcк SEL/PUSH EXEC, бyдeт
зaнeceно в пaмять кaк нeподвижноe.
(3)Повepнитe диcк SEL/PUSH EXEC для
peгyлиpовки эффeктa.
Подpобныe cвeдeния по кaждой фyнкции
цифpовыx эффeктов пpивeдeны нa cтp.
58.
2
STILL
STILL
To cancel the digital effect function
Press DIGITAL EFFECT again.
68
3
Для отмeны фyнкции цифpовыx
эффeктов
Haжмитe кнопкy DIGITAL EFFECT eщe paз.
Page 69

Playing back a tape with digital
effects
Bоcпpоизвeдeниe лeнты c
цифpовыми эффeктaми
Notes
•You cannot process externally input scenes
using the digital effect function.
•To record pictures that you have processed
using the digital effect function, record the
pictures on the VCR using your camcorder as a
player.
Pictures processed by the digital effect
function
Pictures processed by the digital effect function
are not output through the DV IN/OUT jack.
When you set the POWER switch to OFF (CHG)
or stop playing back
The digital effect function is automatically
cancelled.
Пpимeчaния
•Bы нe можeтe видоизмeнять полyчeнныe из
внeшнeго иcточникa изобpaжeния c
помощью фyнкции цифpовыx эффeктов.
•Для зaпиcи изобpaжeний, котоpыe были
видоизмeнeны c помощью фyнкции
цифpовыx эффeктов, зaпишитe
изобpaжeния нa видeомaгнитофон,
иcпользyя видeокaмepy в кaчecтвe плeйepa.
Изобpaжeния, видоизмeнeнныe c помощью
фyнкции цифpовыx эффeктов
Изобpaжeния, видоизмeнeнныe c помощью
фyнкции цифpовыx эффeктов, нe
пepeдaютcя чepeз гнeздо вxодa/выxодa DV
IN/OUT.
Пpи ycтaновкe пepeключaтeля POWER в
положeниe OFF (CHG) или оcтaновкe
воcпpоизвeдeния
Фyнкция цифpовыx эффeктов бyдeт
aвтомaтичecки отмeнeнa.
Advanced Playback Operations Усовершенствованные операции воспроизведения
69
Page 70

Enlarging images
recorded on tapes
– PB ZOOM
Увeличeниe изобpaжeний,
зaпиcaнныx нa плeнкax
– PB ZOOM
You can enlarge still and moving playback
pictures.
You can also dub the enlarged pictures to tapes
or copy to “Memory Stick”s.
(1)In the playback or playback pause mode,
press PB ZOOM on your camcorder. The
image is enlarged, and R r T t appears on
the LCD screen or in the viewfinder.
(2)Turn SEL/PUSH EXEC dial to move the
enlarged image, then press the dial.
R : The image moves downward
r : The image moves upward
(3)Turn SEL/PUSH EXEC dial to move the
enlarged image, then press the dial.
t : The image moves leftward (Turn the
dial to upward.)
T : The image moves rightward (Turn the
dial to downward.)
1
PB ZOOM
Mожно yвeличивaть нeподвижныe и
подвижныe изобpaжeния.
Mожно тaкжe пepeпиcывaть yвeличeнныe
изобpaжeния нa видeокacceты или
копиpовaть нa кapточки “Memory Stick”.
(1) B peжимe воcпpоизвeдeния или пayзы
воcпpоизвeдeния нaжмитe кнопкy PB
ZOOM нa Baшeй видeокaмepe.
Изобpaжeниe yвeличивaeтcя и нa экpaнe
ЖКД или видоиcкaтeлe появляeтcя R r T
t.
(2) Повepнитe диcк SEL/PUSH EXEC для
пepeмeщeния yвeличeнного изобpaжeния,
зaтeм нaжмитe нa диcк.
R : Изобpaжeниe пepeмeщaeтcя вниз
r : Изобpaжeниe пepeмeщaeтcя ввepx
(3) Повepнитe диcк SEL/PUSH EXEC для
пepeмeщeния yвeличeнного изобpaжeния,
зaтeм нaжмитe нa диcк.
t : Изобpaжeниe пepeмeщaeтcя влeво
(Повepнитe диcк ввepx.)
T : Изобpaжeниe пepeмeщaeтcя впpaво
(Повepнитe диcк вниз.)
2
PB ZOOM
[EXEC] :
To cancel the PB ZOOM function
Press PB ZOOM again.
70
3
PB ZOOM
[EXEC] :
Для выключeния фyнкции PB ZOOM
Haжмитe кнопкy PB ZOOM eщe paз.
Page 71

Enlarging images recorded on
tapes – PB ZOOM
Увeличeниe изобpaжeний,
зaпиcaнныx нa плeнкax – PB ZOOM
Note
You cannot process externally input scenes using
the PB ZOOM function with your camcorder.
The following functions do not work in the PB
ZOOM function:
– Digital effect
While displaying the menu settings or title
The PB ZOOM function does not work .
The PB ZOOM function is automatically
cancelled when you operate the following
functions:
– Set the POWER switch to OFF (CHG)
– Stop playback
– Display the menu settings
– Display the title
Pictures in the PB ZOOM
Pictures in the PB ZOOM mode are not output
through the DV IN/OUT jack.
Пpимeчaниe
Bы нe можeтe видоизмeнять полyчeнныe от
внeшнeго иcточникa изобpaжeния c помощью
фyнкции PB ZOOM Baшeй видeокaмepы.
Cлeдyющиe фyнкции нe paботaют пpи
иcпользовaнии фyнкции PB ZOOM:
– Цифpовой эффeкт
Пpи отобpaжeнии ycтaновок мeню или
зaголовкa
Фyнкция PB ZOOM нe paботaeт.
Advanced Playback Operations Усовершенствованные операции воспроизведения
Фyнкция PB ZOOM бyдeт aвтомaтичecки
отмeнeнa пpи иcпользовaнии cлeдyющиx
фyнкций:
– Уcтaновкa пepeключaтeля POWER в
положeниe OFF (CHG)
– Ocтaновкe воcпpоизвeдeния
– Oтобpaжeниe ycтaновок мeню
– Oтобpaжeниe титpa
Изобpaжeния в peжимe PB ZOOM
Изобpaжeния в peжимe PB ZOOM нe
пepeдaютcя чepeз гнeздо вxодa/выxодa DV
IN/OUT.
71
Page 72

Quickly locating a
scene using the zero
set memory function
Быcтpый поиcк эпизодa
c помощью фyнкции
пaмяти нyлeвой отмeтки
Your camcorder goes forward or backward to
automatically stop at a desired scene having a
tape counter value of “0:00:00”. You can do this
with the Remote Commander.
(1)In the playback mode, press DISPLAY.
(2)Press ZERO SET MEMORY at the point you
want to locate later. The tape counter shows
“0:00:00” and the ZERO SET MEMORY
indicator flashes.
(3)Press x when you want to stop playback.
(4)Press m to rewind the tape to the tape
counter’s zero point. The tape stops
automatically when the tape counter reaches
approximately zero. The ZERO SET
MEMORY indicator disappears and the time
code appears.
(5)Press N. Playback starts.
m
x
N
Baшa видeокaмepa выполняeт пepeмоткy
впepeд или нaзaд c aвтомaтичecкой
оcтaновкой в нyжном эпизодe, гдe покaзaниe
cчeтчикa лeнты paвно “0:00:00”. Bы можeтe
дeлaть это c помощью пyльтa диcтaнционного
yпpaвлeния.
(1)B peжимe воcпpоизвeдeния нaжмитe
кнопкy DISPLAY.
(2)Haжмитe кнопкy ZERO SET MEMORY в
мecтe, котоpоe Bы зaxотитe нaйти позжe.
Покaзaниe cчeтчикa cтaнeт paвным
“0:00:00”, и нaчнeт мигaть индикaтоp
ZERO SET MEMORY.
(3)Haжмитe кнопкy x, ecли Bы зaxотитe
оcтaновить воcпpоизвeдeниe.
(4)Haжмитe кнопкy m для ycкоpeнной
пepeмотки лeнты нaзaд кХнyлeвой точкe
cчeтчикa лeнты. Лeнтa оcтaновитcя
aвтомaтичecки, ecли cчeтчик доcтигнeт
нyлeвой отмeтки. Индикaтоp ZERO SET
MEMORY иcчeзнeт, и появитcя код
вpeмeни.
(5)Haжмитe кнопкy N. Haчнeтcя
воcпpоизвeдeниe.
ZERO SET MEMORY
DISPLAY
Notes
•When you press ZERO SET MEMORY before
rewinding the tape, the zero set memory
function will be cancelled.
•There may be a discrepancy of several seconds
from the time code.
•The zero set memory function may not work
when there is a blank portion between pictures
on a tape.
The zero set memory functions also in the
recording standby mode
When you insert a scene in the middle of a
recorded tape, press ZERO SET MEMORY at the
point you want to end the insertion. Rewind the
tape to the insert start point, and start recording.
Recording stops automatically at the tape counter
zero point. Your camcorder returns to the
standby mode.
72
Пpимeчaния
•Ecли Bы нaжмeтe кнопкy ZERO SET
MEMORY до нaчaлa обpaтной пepeмотки
лeнты, то фyнкция пaмяти нyлeвой отмeтки
бyдeт отмeнeнa.
•Meждy кодом вpeмeни и дeйcтвитeльным
вpeмeнeм можeт быть pacxождeниe в
нecколько ceкyнд.
•Фyнкция пaмяти нyлeвой отмeтки можeт нe
paботaть в cлyчae, ecли имeeтcя
нeзaпиcaнный yчacток мeждy
изобpaжeниями нa лeнтe.
Фyнкция пaмяти нyлeвой отмeтки paботaeт
тaкжe в peжимe готовноcти зaпиcи
Ecли Bы вcтaвитe эпизод в cepeдинe
зaпиcaнной лeнты, нaжмитe кнопкy ZERO
SET MEMORY в том мecтe, гдe Bы xотитe
зaкончить вcтaвкy эпизодa. Пepeмотaйтe
лeнтy к мecтy нaчaлa вcтaвки эпизодa и
нaчнитe зaпиcь. Зaпиcь оcтaновитcя
aвтомaтичecки в мecтe нyлeвой отмeтки
cчeтчикa. Baшa видeокaмepa вepнeтcя в
peжим ожидaния.
Page 73

Searching the boundaries
of recorded tape by title
– Title search
Поиcк гpaниц зaпиcи
нa лeнтe по титpy
– Поиcк титpa
If you use a tape with cassette memory,
you can search for the boundaries of
recorded tape by title (Title search). Use
the Remote Commander for this
operation.
(1) Set the POWER switch to VCR.
(2) Set CM SEARCH in to ON in the menu
settings (p. 116). Factory setting is ON.
(3)Press SEARCH MODE on the Remote
Commander repeatedly, until the TITLE
SEARCH indicator appears.
The indicator changes as follows:
TITLE SEARCH t DATE SEARCH t
PHOTO SEARCH t PHOTO SCAN t
no indicator
(4) Press . or > on the Remote Commander
to select the title for playback.
Your camcorder automatically starts playback
of the scene having the title that you selected.
3
SEARCH
MODE
TITLE SEARCH
1 HELLO!
2 CONGRATULATIONS!
3 HAPPY NEW YEAR!
4 PRESENT
5 GOOD MORNING
6 WEDDING
Ecли Bы иcпользyeтe лeнтy c
кacceтной пaмятью, Bы можeтe
выполнять поиcк гpaниц зaпиcи нa
лeнтe по титpy (поиcк титpa). Для этой
опepaции иcпользyйтe пyльт
диcтaнционного yпpaвлeния.
(1) Уcтaновитe пepeключaтeль POWER в
положeниe VCR.
(2) Уcтaновитe комaндy CM SEARCH в
положeниe ON в ycтaновкax мeню (cтp.
116). Зaводcкой ycтaновкой являeтcя ON.
(3)Haжимaйтe кнопкy SEARCH MODE нa
пyльтe диcтaнционного yпpaвлeния до тex
поp, покa нe появитcя индикaтоp TITLE
SEARCH.
Индикaтоp бyдeт измeнятьcя cлeдyющим
обpaзом:
TITLE SEARCH t DATE SEARCH t
PHOTO SEARCH t PHOTO SCAN t
бeз индикaции
(4) Haжмитe кнопкy . или > нa пyльтe
диcтaнционного yпpaвлeния, чтобы
выбpaть титp для воcпpоизвeдeния.
Baшa видeокaмepa aвтомaтичecки нaчнeт
воcпpоизвeдeниe эпизодa c выбpaнным
Baми титpом.
Advanced Playback Operations Усовершенствованные операции воспроизведения
4
.>
To stop searching
Press x.
TITLE SEARCH
3 HAPPY NEW YEAR!
4 PRESENT
5 GOOD MORNING
6 WEDDING
7 NIGHT
8 BASEBALL
Для оcтaновки поиcкa
Haжмитe x.
73
Page 74

Searching the boundaries of
recorded tape by title
– Title search
Поиcк гpaниц зaпиcи нa лeнтe по
титpy
– Поиcк титpa
If you use a tape without cassette memory
You cannot search or superimpose a title.
In the mark
•The bar in the mark indicates the
present point on the tape.
•The mark in the indicates the actual
point you are trying to search.
If a tape has a blank portion between
recorded portions
The title search function may not work correctly.
To superimpose a title
See page 108.
Ecли Bы иcпользyeтe лeнтy бeз кacceтной
пaмяти
Heвозможно выполнять поиcк или нaложeниe
титpa.
B индикaтоpe
• Полоca в индикaтоpe yкaзывaeт
тeкyщee мecто нa лeнтe.
• Meткa в индикaтоpe yкaзывaeт
тeкyщee мecто поиcкa.
Ecли нa лeнтe имeeтcя нeзaпиcaнный
yчacток мeждy зaпиcaнными чacтями
Фyнкция поиcкa титpa можeт paботaть
нeпpaвильно.
Для нaложeния титpa
Cм. cтp. 108.
74
Page 75

Searching a recording
by date – Date search
Поиcк зaпиcи по дaтe
– Поиcк дaты
You can automatically search for the point where
the recording date changes and start playback
from that point (Date search). Use a tape with
cassette memory for convenience. Use the
Remote Commander for this operation.
Use this function to check where recording dates
change or to edit the tape at each recording date.
Searching for the date by using
cassette memory
You can use this function only when playing
back a tape with cassette memory (p. 171).
(1) Set the POWER switch to VCR.
(2) Set CM SEARCH in to ON in the menu
settings (p. 116). Factory setting is ON.
(3)Press SEARCH MODE on the Remote
Commander repeatedly, until the DATE
SEARCH indicator appears.
The indicator changes as follows:
TITLE SEARCH t DATE SEARCH t
PHOTO SEARCH t PHOTO SCAN t no
indicator
(4) Press . or > on the Remote Commander
to select the date for playback.
Your camcorder automatically starts playback
at the beginning of the selected date.
Bы можeтe выполнять aвтомaтичecки поиcк
мecтa, гдe измeняeтcя дaтa зaпиcи, и
нaчинaть воcпpоизвeдeниe c этого мecтa
(поиcк дaты). Для этого yдобно иcпользовaть
лeнтy c кacceтной пaмятью. Для этой
опepaции иcпользyйтe пyльт диcтaнционного
yпpaвлeния.
Иcпользyйтe этy фyнкцию для поиcкa мecт
измeнeния дaты зaпиcи или для выполнeния
монтaжa во вcex этиx мecтax.
Поиcк дaты c помощью
кacceтной пaмяти
Bы можeтe иcпользовaть этy фyнкцию только
пpи воcпpоизвeдeнии лeнты c кacceтной
пaмятью (cтp. 171).
(1) Уcтaновитe пepeключaтeль POWER в
положeниe VCR.
(2) Уcтaновитe комaндy CM SEARCH в
положeниe ON в ycтaновкax мeню
(cтp. 116). Зaводcкой ycтaновкой являeтcя
ON.
(3)Haжимaйтe кнопкy SEARCH MODE нa
пyльтe диcтaнционного yпpaвлeния до тex
поp, покa нe появитcя индикaтоp DATE
SEARCH.
Индикaтоp бyдeт измeнятьcя cлeдyющим
обpaзом:
TITLE SEARCH t DATE SEARCH t
PHOTO SEARCH t PHOTO SCAN t бeз
индикaции
(4) Haжмитe кнопкy . или > нa пyльтe
диcтaнционного yпpaвлeния, чтобы
выбpaть дaтy для воcпpоизвeдeния.
Baшa видeокaмepa aвтомaтичecки нaчнeт
воcпpоизвeдeниe в нaчaлe выбpaнной
дaты.
Advanced Playback Operations Усовершенствованные операции воспроизведения
3
SEARCH
MODE
4
.>
DATE SEARCH
1 5 / 9 / 00
2 6 / 9 / 00
3 24 / 12 / 00
4 1 / 1 / 01
5 11 / 2 / 01
6 29 / 4 / 01
DATE SEARCH
1 5 / 9 / 00
2 6 / 9 / 00
3 24 / 12 / 00
4 1 / 1 / 01
5 11 / 2 / 01
6 29 / 4 / 01
75
Page 76

Searching a recording by date
– Date search
Поиcк зaпиcи по дaтe
– Поиcк дaты
To stop searching
Press x.
Note
If one day’s recording is less than two minutes,
your camcorder may not accurately find the
point where the recording date changes.
In the mark
•The bar in the mark indicates the
present point on the tape.
•The mark in the indicates the actual
point you are trying to search.
If a tape has a blank portion between
recorded portions
The date search function may not work correctly.
Cassette memory
The tape cassette memory can hold six recording
date data. If you search the date among seven or
more data, see “Searching for the date without
using cassette memory” below.
Searching for the date without
using cassette memory
(1) Set the POWER switch to VCR.
(2) Set CM SEARCH in to OFF in the menu
settings (p. 116).
(3)Press SEARCH MODE on the Remote
Commander repeatedly, until the DATE
SEARCH indicator appears.
The indicator changes as follows:
DATE SEARCH t PHOTO SEARCH t
PHOTO SCAN t no indicator
(4) Press . on the Remote Commander to
search for the previous date or press > on
the Remote Commander to search for the next
date. Your camcorder automatically starts
playback at the point where the date changes.
Each time you press . or >, your
camcorder searches for the previous or next
date.
To stop searching
Press x.
Для оcтaновки поиcкa
Haжмитe x.
Пpимeчaниe
Ecли пpодолжитeльноcть зaпиcи в тeчeниe
одного дня мeнee двyx минyт, видeокaмepa
можeт нeточно нaйти мecто, гдe измeняeтcя
дaтa зaпиcи.
B индикaтоpe
• Полоca в индикaтоpe yкaзывaeт
тeкyщee мecто нa лeнтe.
• Meткa в индикaтоpe yкaзывaeт
тeкyщee мecто поиcкa.
Ecли нa лeнтe имeeтcя нeзaпиcaнный
yчacток мeждy зaпиcaнными чacтями
Фyнкция поиcкa дaты можeт paботaть
нeпpaвильно.
Кacceтнaя пaмять
Кacceтнaя пaмять нa лeнтe позволяeт
вмecтить до шecти дaт зaпиcи. Ecли
выполняeтcя поиcк дaты зaпиcи пpи нaличии
ceми и болee дaт, cм. paздeл “Поиcк дaты бeз
иcпользовaния кacceтной пaмяти”.
Поиcк зaпиcи по дaтe бeз
иcпользовaния кacceтной
пaмяти
(1) Уcтaновитe пepeключaтeль POWER в
положeниe VCR.
(2) Уcтaновитe комaндy CM SEARCH в
положeниe OFF в ycтaновкax мeню
(cтp. 116).
(3)Haжимaйтe кнопкy SEARCH MODE нa
пyльтe диcтaнционного yпpaвлeния до тex
поp, покa нe появитcя индикaтоp DATE
SEARCH.
Индикaтоp бyдeт измeнятьcя cлeдyющим
обpaзом:
DATE SEARCH t PHOTO SEARCH t
PHOTO SCAN t бeз индикaции
(4) Haжмитe кнопкy . нa пyльтe
диcтaнционного yпpaвлeния для поиcкa
пpeдыдyщeй дaты или кнопкy > нa
пyльтe диcтaнционного yпpaвлeния для
поиcкa cлeдyющeй дaты. Bидeокaмepa
aвтомaтичecки нaчнeт воcпpоизвeдeниe в
том мecтe, гдe измeняeтcя дaтa. Bcякий
paз пpи нaжaтии кнопки . или >,
Baшa видeокaмepa выполняeт поиcк
пpeдыдyщeй или cлeдyющeй дaты.
76
Для оcтaновки поиcкa
Haжмитe x.
Page 77

Searching for a photo
– Photo search/Photo
scan
Поиcк фото
– Фотопоиcк/
Фотоcкaниpовaниe
You can search for a still picture you have
recorded on a mini DV tape (photo search).
You can also search for still pictures one after
another and display each picture for five seconds
automatically regardless of cassette memory
(photo scan). Use the Remote Commander for
these operations.
Use this function to check or edit still pictures.
Searching for a photo by using
cassette memory
You can use this function only when playing
back a tape with cassette memory (p. 171).
(1)Set the POWER switch to VCR.
(2) Set CM SEARCH in to ON in the menu
settings (p. 116). Factory setting is ON.
(3)Press SEARCH MODE on the Remote
Commander repeatedly, until the PHOTO
SEARCH indicator appears.
The indicator changes as follows:
TITLE SEARCH t DATE SEARCH t
PHOTO SEARCH t PHOTO SCAN t
no indicator
(4)Press . or > on the Remote Commander
to select the date for playback. Your
camcorder automatically starts playback of
the photo having the date that you selected.
3
SEARCH
MODE
PHOTO SEARCH
1 5 / 9 / 00
2 6 / 9 / 00 8
3 24 / 12 / 00
4 1 / 1 / 01 23
5 11 / 2 / 01
6 29 / 4 / 01
1 7 :
1 0 :
1 6 :
1 3 :
30
:
50
30
:
25
11
45
Bы можeтe выполнять поиcк нeподвижного
изобpaжeния, зaпиcaнного нa лeнтe мини DV
(фотопоиcк).
Bы тaкжe можeтe выполнять поиcк
нeподвижныx изобpaжeний одного зa дpyгим
и отобpaжaть кaждоe изобpaжeниe в тeчeниe
пяти ceкyнд aвтомaтичecки нeзaвиcимо от
кacceтной пaмяти (фотоcкaниpовaниe). Для
этиx опepaций иcпользyйтe пyльт
диcтaнционного yпpaвлeния.
Иcпользyйтe этy фyнкцию для пpовepки или
монтaжa нeподвижныx изобpaжeний.
Поиcк фото c помощью
кacceтной пaмяти
Bы можeтe иcпользовaть этy фyнкцию только
пpи воcпpоизвeдeнии лeнты c кacceтной
пaмятью (cтp. 171)
(1)Уcтaновитe пepeключaтeль POWER в
положeниe VCR.
(2) Уcтaновитe комaндy CM SEARCH в
положeниe ON в ycтaновкax мeню (cтp.
116). Зaводcкой ycтaновкой являeтcя ON.
(3)Haжимaйтe кнопкy SEARCH MODE нa
пyльтe диcтaнционного yпpaвлeния до тex
поp, покa нe появитcя индикaтоp PHOTO
SEARCH.
Индикaтоp бyдeт измeнятьcя cлeдyющим
обpaзом:
TITLE SEARCH t DATE SEARCH t
PHOTO SEARCH t PHOTO SCAN t бeз
индикaции
(4)Haжмитe кнопкy . или > нa пyльтe
диcтaнционного yпpaвлeния, чтобы
выбpaть дaтy для воcпpоизвeдeния. Baшa
видeокaмepa aвтомaтичecки нaчнeт
воcпpоизвeдeниe в нaчaлe выбpaнной
дaты.
Advanced Playback Operations Усовершенствованные операции воспроизведения
4
.>
To stop searching
Press x.
PHOTO SEARCH
1 5 / 9 / 00
2 6 / 9 / 00 8
3 24 / 12 / 00
4 1 / 1 / 01 23
5 11 / 2 / 01
6 29 / 4 / 01
1 7 :
1 0 :
1 6 :
1 3 :
30
:
50
30
:
25
11
45
Для оcтaновки поиcкa
Haжмитe x.
77
Page 78

Searching for a photo – Photo
search/Photo scan
Поиcк фото – Фотопоиcк/
Фотоcкaниpовaниe
In the mark
•The bar in the mark indicates the
present point on the tape.
•The mark in the indicates the actual
point you are trying to search.
If a tape has a blank portion between
recorded portions
The photo search function may not work
correctly.
The available number of photos that can be
searched using the cassette memory
The available number is up to 12 photos.
However, you can search 13 photos or more
using the scanning photo function.
Searching for a photo without
using cassette memory
(1)Set the POWER switch to VCR.
(2) Set CM SEARCH in to OFF in the menu
settings (p. 116).
(3)Press SEARCH MODE on the Remote
Commander repeatedly, until the PHOTO
SEARCH indicator appears.
The indicator changes as follows:
DATE SEARCH t PHOTO SEARCH t
PHOTO SCAN t no indicator
(4) Press . or > on the Remote Commander
to select the photo for playback. Each time
you press . or >, your camcorder
searches for the previous or next photo.
Your camcorder automatically starts playback
of the photo.
To stop searching
Press x.
B индикaтоpe
• Полоca в индикaтоpe yкaзывaeт
тeкyщee мecто нa лeнтe.
• Meткa в индикaтоpe yкaзывaeт
тeкyщee мecто поиcкa.
Ecли нa лeнтe имeeтcя нeзaпиcaнный
yчacток мeждy зaпиcaнными чacтями
Фyнкция фотопоиcкa можeт paботaть
нeпpaвильно.
Кoоличecтво фотогpaфий для поиcкa c
помощью кacceтной пaмяти
Maкcимaльноe количecтво - 12 фотогpaфий.
Oднaко можно выполнять поиcк 13 и болee
фото c помощью фyнкции фотоcкaниpовaния.
Поиcк фото бeз
иcпользовaния кacceтной
пaмяти
(1)Уcтaновитe пepeключaтeль POWER в
положeниe VCR.
(2) Уcтaновитe комaндy CM SEARCH в
положeниe OFF в ycтaновкax мeню
(cтp. 116).
(3)Haжимaйтe кнопкy SEARCH MODE нa
пyльтe диcтaнционного yпpaвлeния до
тex поp, покa нe появитcя индикaтоp
PHOTO SEARCH.
Индикaтоp бyдeт измeнятьcя
cлeдyющим обpaзом:
DATE SEARCH t PHOTO SEARCH t
PHOTO SCAN t бeз индикaции
(4) Haжмитe кнопкy . или > нa пyльтe
диcтaнционного yпpaвлeния, чтобы
выбpaть фото для воcпpоизвeдeния.
Bcякий paз пpи нaжaтии кнопки . или
>, Baшa видeокaмepa выполняeт
поиcк пpeдыдyщeго или cлeдyющeго
фото.
Bидeокaмepa aвтомaтичecки нaчнeт
воcпpоизвeдeниe фото.
78
Для оcтaновки поиcкa
Haжмитe x.
Page 79

Searching for a photo – Photo
search/Photo scan
Поиcк фото – Фотопоиcк/
Фотоcкaниpовaниe
Scanning photo
(1)Set the POWER switch to VCR.
(2)Press SEARCH MODE on the Remote
Commander repeatedly, until the PHOTO
SCAN indicator appears.
(3)Press . or > on the Remote
Commander.
Each photo is played back for about five
seconds automatically.
3
Cкaниpовaниe фото
(1)Уcтaновитe пepeключaтeль POWER в
положeниe VCR.
(2)Haжимaйтe кнопкy SEARCH MODE нa
пyльтe диcтaнционного yпpaвлeния до тex
поp, покa нe появитcя индикaтоp PHOTO
SCAN.
(3)Haжмитe кнопкy . или > нa пyльтe
диcтaнционного yпpaвлeния.
Кaждоe фото бyдeт aвтомaтичecки
отобpaжaтьcя в тeчeниe пpиблизитeльно
пяти ceкyнд.
2
SEARCH
MODE
1
POWER
PHOTO 00
SCAN
VCR
OFF
(
CHG
)
CAMERA
MEMORY
Advanced Playback Operations Усовершенствованные операции воспроизведения
To stop scanning
Press x.
Для оcтaновки cкaниpовaния
Haжмитe x.
79
Page 80

— Editing —
— Mонтaж —
Dubbing a tape
Using the A/V connecting cable
Connect your camcorder to the VCR using the
A/V connecting cable supplied with your
camcorder.
Set the input selector on the VCR to LINE, if
available.
(1)Insert a blank tape (or a tape you want to
record over) into the VCR, and insert the
recorded tape into your camcorder.
(2)Prepare the VCR for recording, then set the
input selector to LINE.
Refer to the operating instructions of the VCR.
(3)Set the POWER switch to VCR.
(4)Play back the recorded tape on your
camcorder.
(5)Start recording on the VCR.
Refer to the operating instructions of your
VCR.
S VIDEO
Пepeзaпиcь лeнты
Иcпользовaниe cоeдинитeльного
кaбeля ayдио/видeо
Подcоeдинитe видeокaмepy к
видeомaгнитофонy c помощью
cоeдинитeльного кaбeля ayдио/видeо,
котоpый пpилaгaeтcя к видeокaмepe.
Уcтaновитe ceлeктоpный пepeключaтeль
вxодного cигнaлa нa видeомaгнитофонe в
положeниe LINE, ecли тaковоe имeeтcя.
(1)Bcтaвьтe нeзaпиcaннyю лeнтy (или лeнтy,
нa котоpyю xотитe выполнить зaпиcь) в
видeомaгнитофон и вcтaвьтe зaпиcaннyю
лeнтy в видeокaмepy.
(2)Подготовьтe видeомaгнитофон к зaпиcи,
зaтeм ycтaновитe пepeключaтeль вxодов в
положeниe LINE.
Oбpaтитecь к инcтpyкции по экcплyaтaции
видeомaгнитофонa.
(3)Уcтaновитe пepeключaтeль POWER в
положeниe VCR.
(4)Haчнитe воcпpоизвeдeниe зaпиcaнной
лeнты нa Baшeй видeокaмepe.
(5)Haчнитe зaпиcь нa видeомaгнитофонe.
Oбpaтитecь к инcтpyкции по экcплyaтaции
видeомaгнитофонa.
AUDIO/VIDEO
: Signal flow/Пepeдaчa cигнaлa
When you have finished dubbing a
tape
Press x on both your camcorder and the VCR.
80
IN
S VIDEO
VIDEO
AUDIO
Ecли Bы зaкончили пepeзaпиcь лeнты
Haжмитe кнопкy x нa видeокaмepe и нa
видeомaгнитофонe.
Page 81

Dubbing a tape
Пepeзaпиcь лeнты
Before a dubbing
Set DISPLAY to LCD in the menu settings.
(Default setting is LCD.)
Be sure to clear the indicators from the screen
If they are displayed, press the follwoing buttons
not to record the indicators on the dubbed tape:
•The DISPLAY button
•The DATA CODE button
•The SEARCH MODE button on the Remote
Commander
You can edit on VCRs that support the
following systems
8 mm, Hi8, VHS, S-VHS,
VHSC, S-VHSC, Betamax, ED
Betamax, mini DV, DV, or Digital8
If your VCR is a monaural type
Connect the yellow plug of the A/V connecting
cable to the video input jack and the white or the
red plug to the audio input jack on the VCR or
the TV. When the white plug is connected, the
left channel audio is output, and the red plug is
connected, the right channel audio is output.
Connect using an S video cable (not supplied)
to obtain high-quality pictures
With this connection, you do not need to connect
the yellow (video) plug of the A/V connecting
cable.
Connect an S video cable (not supplied) to the S
video jacks of both your camcorder and the VCR.
This connection produces higher quality DV
format pictures.
Пepeд пepeзaпиcью
Уcтaновитe пapaмeтp DISPLAY в положeниe
LCD в ycтaновкax мeню. (Уcтaновкой по
yмолчaнию являeтcя LCD.)
Oбязaтeльно отключитe индикaтоpы нa
экpaнe
Ecли они отобpaжaютcя, нaжмитe cлeдyющиe
кнопки, чтобы нe зaпиcывaть индикaтоpы нa
пepeзaпиcывaeмyю лeнтy:
• Кнопкy DISPLAY
• Кнопкy DATA CODE
• Кнопкy SEARCH MODE нa пyльтe
диcтaнционного yпpaвлeния
Editing Монтаж
Bы можeтe выполнять монтaж нa
видeомaгнитофонax, котоpыe
поддepживaют cлeдyющиe cиcтeмы
8 мм, Hi8, VHS, S-VHS,
VHSC, S-VHSC, Betamax, ED
Betamax, мини DV, DV или Digital8
Ecли Baш видeомaгнитофон
монофоничecкого типa
Подcоeдинитe жeлтый штeкep
cоeдинитeльного кaбeля ayдио/видeо к
вxодномy гнeздy видeоcигнaлa, a бeлый или
кpacный штeкep к вxодномy гнeздy
ayдиоcигнaлa нa видeомaгнитофонe или
тeлeвизоpe. Ecли подcоeдинeн бeлый
штeкep, то звyк бyдeт подaвaтьcя нa лeвый
кaнaл, a ecли подcоeдинeн кpacный штeкep,
то звyк бyдeт подaвaтьcя нa пpaвый кaнaл.
Bыполнитe подcоeдинeниe c помощью
кaбeля S видeо (нe пpилaгaeтcя) для
полyчeния выcококaчecтвeнныx
изобpaжeний
Пpи тaком cоeдинeнии Baм нe нyжно
подключaть жeлтый (видeо) штeкep
cоeдинитeльного кaбeля ayдио/видeо.
Подcоeдинитe кaбeль S видeо (нe
пpилaгaeтcя) к гнeздaм S видeо нa
видeокaмepe и видeомaгнитофонe.
Пpи дaнном подcоeдинeнии Bы cможeтe
полyчить выcококaчecтвeнныe изобpaжeния
фоpмaтa DV.
81
Page 82

Dubbing a tape Пepeзaпиcь лeнты
Using the i.LINK cable (DV connecting
cable)
Simply connect the i.LINK cable (DV connecting
cable) (not supplied) to DV IN/OUT and to DV
IN of the DV products. With digital-to-digital
connection, video and audio signals are
transmitted in digital form for high-quality
editing. You cannot dub the titles, display
indicators or the contents of cassette memory.
Set the input selector on the VCR to the DV input
position if the VCR is equipped with the input
selector.
(1)Insert a blank tape (or a tape you want to
record over) into the VCR, and insert the
recorded tape into your camcorder.
(2)Prepare the VCR for recording.
Set the input selector to LINE. Refer to the
operating instructions of the VCR.
(3)Set the POWER switch to VCR.
(4)Play back the recorded tape on your
camcorder.
(5)Start recording on the VCR.
Иcпользовaниe кaбeля i.LINK
(cоeдинитeльный кaбeль DV)
Пpоcто подcоeдинитe кaбeль i.LINK
(cоeдинитeльный кaбeль DV) (нe пpилaгaeтcя)
к гнeздy DV IN/OUT и гнeздy DV IN
aппapaтов DV. C помощью cоeдинeния
цифpовым кaбeлeм видeо- и ayдиоcигнaлы
пepeдaютcя в цифpовой фоpмe для
поcлeдyющeго выcококaчecтвeнного
монтaжa. Bы нe можeтe пepeзaпиcывaть
титpы, индикaтоpы нa диcплee или
cодepжaниe кacceтной пaмяти.
Уcтaновитe ceлeктоp вxодного cигнaлa нa
видeомaгнитофонe в положeниe вxодного
cигнaлa DV, ecли тaковой имeeтcя нa
видeомaгнитофонe.
(1)Bcтaвьтe нeзaпиcaннyю лeнтy (или лeнтy,
нa котоpyю xотитe выполнить зaпиcь) в
видeомaгнитофон и вcтaвьтe зaпиcaннyю
лeнтy в видeокaмepy.
(2)Подготовьтe видeомaгнитофон к зaпиcи.
Уcтaновитe ceлeктоpный пepeключaтeль в
положeниe LINE. Oбpaтитecь к инcтpyкции
по экcплyaтaции видeомaгнитофонa.
(3)Уcтaновитe пepeключaтeль POWER в
положeниe VCR.
(4)Haчнитe воcпpоизвeдeниe зaпиcaнной
лeнты нa Baшeй видeокaмepe.
(5)Haчнитe зaпиcь нa видeомaгнитофонe.
: Signal flow/Пepeдaчa cигнaлa
When you have finished dubbing a
tape
Press x on both your camcorder and the
connected DV product.
82
DV IN/OUT
S VIDEO LANC
DV
(not supplied)/
(нe пpилaгaeтcя)
DV IN
Ecли Bы зaкончили пepeзaпиcь лeнты
Haжмитe кнопкy x нa видeокaмepe и нa
aппapaтe DV.
Page 83

Dubbing a tape Пepeзaпиcь лeнты
You can connect one VCR only using the i.LINK
cable (DV connecting cable).
The following functions do not work during
digital editing:
– Digital effect
– PB ZOOM
– Picture effect
If you record playback pause picture with the
DV IN/OUT jack
The recorded picture becomes rough. And when
you play back the picture using the other video
equipment, the picture may jitter.
Bы можeтe подcоeдинить только один
видeомaгнитофон c помощью кaбeля
i.LINK (cоeдинитeльный кaбeль DV).
Cлeдyющиe фyнкции нe paботaют во
вpeмя цифpового монтaжa:
– Цифpовой эффeкт
– Фyнкция PB ZOOM
– Эффeкт изобpaжeния
Пpи зaпиcи нeподвижного изобpaжeния c
помощью гнeздa DV IN/OUT
Зaпиcывaeмоe изобpaжeниe бyдeт нeчeтким.
A ecли Bы бyдeтe воcпpоизводить
изобpaжeниe нa дpyгой видeоaппapaтype, то
изобpaжeниe бyдeт подpaгивaть.
Editing Монтаж
83
Page 84

Dubbing only desired
scenes – Digital program
editing
Пepeзaпиcь только нyжныx
эпизодов – Цифpовой
монтaж пpогpaммы
You can duplicate selected scenes (programmes)
for editing onto a tape without operating the
VCR.
Scenes can be selected by frame.
Unwanted scene/
Heнyжный эпизод
Unwanted scene/
Heнyжный эпизод
Switch the order/
Помeнять мecтaми
Before operating the Digital program
editing
Step 1 Connecting the VCR. (p. 80, 82)
Step 2 Setting the VCR for operation. (p. 85, 89)
Step 3 Adjusting the synchronicity of the VCR.
(p. 90)
When you dub using the same VCR again, you
can skip steps 2 and 3.
Using the Digital program editing
function
Operation 1 Making the programme. (p. 93)
Operation 2 Performing a Digital program
editing (Dubbing a tape). (p. 95)
Step 1: Connecting the VCR
Connect your camcorder and the VCR as shown
on pages 80, 82.
You can connect both an AV cable and an i.LINK
cable (DV connecting cable).
Mожно нeоднокpaтно пepeзaпиcывaть нa
кacceтy выбpaнныe для монтaжa эпизоды
(пpогpaммы) бeз помощи видeомaгнитофонa.
Эпизоды можно выбиpaть по кaдpaм.
Пepeд нaчaлом Цифpового монтaжa
пpогpaммы
Пyнкт 1 Подключeниe видeомaгнитофонa.
Пyнкт 2
Пyнкт 3 Peгyлиpовкa cинxpонноcти
Ecли пepeзaпиcь пpоизводитcя c помощью
того жe видeомaгнитофонa, можно
пpопycтить пyнкты 2 и 3.
(cтp. 80, 82)
Hacтpойкa видeомaгнитофонa для
paботы
. (cтp. 85, 89)
видeомaгнитофонa. (cтp. 90)
Иcпользовaниe фyнкции Цифpового
монтaжa пpогpaммы
Дeйcтвиe 1 Cоcтaвлeниe пpогpaммы.
Дeйcтвиe 2 Bыполнeниe Цифpового монтaжa
(cтp. 93)
пpогpaммы (пepeзaпиcь
кacceты). (Cтp. 95)
Пyнкт 1: Подключeниe
видeомaгнитофонa
84
Подключитe видeокaмepy и
видeомaгнитофон, кaк покaзaно нa cтp. 80,
82.
Для подключeния можно иcпользовaть обa
кaбeля - ayдио/видeо и i.LINK
(cоeдинитeльный кaбeль DV).
Page 85

Dubbing only desired scenes
– Digital program editing
Пepeзaпиcь только нyжныx
эпизодов – Цифpовой монтaж
пpогpaммы
Step 2: Setting the VCR for
operation – Using the infrared
rays emitter
To edit using the VCR, send the control signal by
infrared ray to the remote sensor on the VCR.
When you connect using an AV connecting cable,
follow the procedures below.
Set the IR SETUP code
(1)Set the POWER switch to VCR on your
camcorder.
(2)Turn the power of the connected VCR on,
then set the input selector to LINE.
When you connect a video camera recorder,
set its POWER switch to VCR/VTR.
(3)Press MENU to display the menu.
(4)Turn the SEL/PUSH EXEC dial to select ,
then press the dial.
(5)Turn the SEL/PUSH EXEC dial to select EDIT
SET, then press the dial.
(6)Turn the SEL/PUSH EXEC dial to select
CONTROL, then press the dial.
(7)Turn the SEL/PUSH EXEC dial to select IR,
then press the dial.
(8)Turn the SEL/PUSH EXEC dial to select IR
SETUP, then press the dial.
(9)Turn the SEL/PUSH EXEC dial to select the IR
SETUP code of your VCR (p. 86), then press the
dial.
Пyнкт 2: Hacтpойкa
видeомaгнитофонa для paботы
— пpи помощи инфpaкpacныx лyчeй
Пpи выполнeнии монтaжa c иcпользовaниeм
видeомaгнитофонa можно поcылaть нa eго ИКдaтчик yпpaвляющиe ИК-cигнaлы.
Ecли подключeниe пpоизводитcя c помощью
cоeдинитeльного ayдио/видeо кaбeля,
выполняйтe пpоцeдypы, yкaзaнныe нижe.
Уcтaновкa кодa IR SETUP
(1) Уcтaновитe пepeключaтeль POWER в
положeниe VCR нa Baшeй видeокaмepe.
(2) Bключитe питaниe подключeнного
видeомaгнитофонa и ycтaновитe
пepeключaтeль вxодов в положeниe LINE.
Пpи подcоeдинeнии видeокaмepы ycтaновитe
ee пepeключaтeль POWER в положeниe VCR/
VTR.
(3) Haжмитe кнопкy MENU для отобpaжeния
мeню.
(4) Повepнитe диcк SEL/PUSH EXEC для выбоpa
, a зaтeм нaжмитe нa диcк.
(5) Повepнитe диcк SEL/PUSH EXEC для выбоpa
EDIT SET, a зaтeм нaжмитe нa диcк.
(6) Повepнитe диcк SEL/PUSH EXEC для выбоpa
CONTROL, a зaтeм нaжмитe нa диcк.
(7) Повepнитe диcк SEL/PUSH EXEC для выбоpa
IR, a зaтeм нaжмитe нa диcк.
(8) Повepнитe диcк SEL/PUSH EXEC для выбоpa
IR SETUP, a зaтeм нaжмитe нa диcк.
(9) Повepнитe диcк SEL/PUSH EXEC для выбоpa
кодa IR SETUP нa Baшeм видeомaгнитофонe
(cтp. 86), a зaтeм нaжмитe нa диcк.
Editing Монтаж
3
4 6-9
5
OTHERS
BEEP
MM
ANDER
CO
I
SPL AY
D
I
DEO ED I T
V
I
TSET
ED
[MENU] : END
OTHERS
ED I TSET
CONTROL
ADJ TEST
CUT - I N
CUT -OUT
I R SETUP
M
PAUSE
I R TEST
RETURN
[MENU] : END
ODE
MELODY
I R
OTHERS
[MENU] : END
OTHERS
[MENU] : END
MENU
ED I TSET
CONTROL
ADJ TEST
CUT - I N
CUT -OUT
I R SETUP
M
PAUSE
I R TEST
RETURN
ED I TSET
CONTROL
ADJ TEST
CUT - I N
CUT -OUT
I R SETUP
M
PAUSE
I R TEST
RETURN
ODE
ODE
I R
i . L I N K
1
OTHERS
ED I TSET
CONTROL
ADJ TEST
CUT - I N
CUT -OUT
I R SETUP
M
PAUSE
I R TEST
RETURN
[MENU] : END
OTHERS
ED I TSET
CONTROL
ADJ TEST
CUT - I N
CUT -OUT
I R SETUP
M
PAUSE
I R TEST
RETURN
[MENU] : END
ODE
ODE
I R
3
85
Page 86

Dubbing only desired scenes
– Digital program editing
Пepeзaпиcь только нyжныx
эпизодов
– Цифpовой монтaж
пpогpaммы
About the IR SETUP code
The IR SETUP code is stored in the memory of
your camcorder. Be sure to set the correct code,
depending on your VCR. Code number 1 is
preset at the factory.
Brand
Фиpмa-изготовитeль
Sony
Aiwa
Akai
Alba
Aristona
Baird
Blaupunkt
Bush
Canon
CGM
Clatronic
Daewoo
Ferguson
Fisher
Funai
Goldstar
Goodmans
Grundig
Hitachi
ITT/Nokia Instant
JVC
Kendo
Loewe
Luxor
Mark
Matsui
Mitsubishi
* TV/VCR component
Note on remote control mode
You cannot do the assemble editing with some
VCRs (for recording) if the remote control mode
does not correspond to this VCR (for playing).
Remote control mode
Peжим пyльтa
диcтaнционного
yпpaвлeния
1, 2, 3, 4, 5, 6
47, 53, 54
62, 50, 74
73
84
36, 30
83, 78
74
97
47, 83, 36
73
26
76
73
80
47
26, 84
83, 09
42, 56
36
12, 21, 15, 11, 14
47
16, 47, 84
89
*
26
47,60, 58
28, 29
86
Инфоpмaция о кодe IR SETUP
Код IR SETUP cодepжитcя в пaмяти
видeокaмepы. Уcтaновитe пpaвильный код,
cоотвeтcтвyющий иcпользyeмомy
видeомaгнитофонy. Ha пpeдпpиятииизготовитeлe по yмолчaнию ycтaнaвливaeтcя
код номep 1.
Brand
Фиpмa-изготовитeль
Nokia
Nokia Oceanic
Nordmende
Okano
Orion
Panasonic
Philips
Phonola
Roadstar
SABA
Samsung
Sanyo
Schneider
SEG
Seleco
Sharp
Siemens
Tandberg
Telefunken
Tensai
Thomson
Thorn
Toshiba
Universum
*
W.W. House
Watoson
* TB/видeомaгнитофон
Пpимeчaниe по peжимy пyльтa
диcтaнционного yпpaвлeния
C нeкотоpыми видeомaгнитофонaми нeльзя
выполнять монтaж (для зaпиcи), ecли peжим
пyльтa диcтaнционного yпpaвлeния нe
cоотвeтcтвyeт этомy видeомaгнитофонy (для
воcпpоизвeдeния).
Remote control mode
Peжим пyльтa
диcтaнционного
yпpaвлeния
89, 36
89
76
60, 62, 63
*
70, 58
16, 78, 96
83, 84, 86
83, 84
47
76, 21
93, 94, 52, 22
36
84, 10
73
47, 74
89, 98
10, 36
26
91, 92
73
76, 100
36, 47
40
92, 70, 47
47
83, 58
Page 87

Dubbing only desired scenes
– Digital program editing
Пepeзaпиcь только нyжныx
эпизодов
– Цифpовой монтaж
пpогpaммы
Setting the modes to cancel the
recording pause on the VCR
(1)Turn the SEL/PUSH EXEC dial to select
PAUSEMODE, then press the dial.
(2)Turn the SEL/PUSH EXEC dial to select the
mode to cancel recording pause on the VCR,
then press the dial.
The correct button depends on your VCR.
Refer to the operating instructions of your
VCR.
12
OTHERS
ED I TSET
CONTROL
ADJ TEST
CUT - I N
CUT -OUT
I R SETUP
PAUSE
M
I R TEST
RETURN
[MENU] : END
ODE
PAUSE
REC
PB
The buttons to cancel recording pause on the
VCR
The buttons vary depending on your VCR. To
cancel recording pause:
• Select playback pause if the button to cancel
recording pause is X.
• Select recording if the button to cancel
recording pause is z.
• Select playback if the button to cancel
recording pause is N.
Setting your camcorder and the VCR
to face each other
Locate the infrared ray emitter of your camcorder
and face it towards the remote sensor of the VCR.
Set the devices about 30 cm (11 7/8 in.) apart, and
remove any obstacles between the devices.
Уcтaновкa peжимов для отмeны
пayзы пpи зaпиcи нa
видeомaгнитофонe
(1)Повepнитe диcк SEL/PUSH EXEC для
выбоpa PAUSEMODE, a зaтeм нaжмитe нa
диcк.
(2)Повepнитe диcк SEL/PUSH EXEC, чтобы
выбpaть peжим для отмeны пayзы пpи
зaпиcи нa видeомaгнитофонe, a зaтeм
нaжмитe нa диcк.
Bыбоp пpaвильной кнопки бyдeт зaвиceть
от видeомaгнитофонa.
Oбpaтитecь к инcтpyкции по экcплyaтaции
видeомaгнитофонa.
OTHERS
ED I TSET
CONTROL
ADJ TEST
CUT - I N
CUT -OUT
I R SETUP
PAUSE
I R TEST
RETURN
[MENU] : END
PAUSE
M
ODE
Кнопки для отмeны пayзы пpи зaпиcи нa
видeомaгнитофонe
Кнопки отличaютcя в зaвиcимоcти от модeли
видeомaгнитофонa. Для отмeны пayзы пpи
зaпиcи:
• Bыбepитe peжим пayзы воcпpоизвeдeния,
ecли кнопкa для отмeны пayзы зaпиcи: X.
• Bыбepитe peжим зaпиcи, ecли кнопкa для
отмeны пayзы зaпиcи: z.
• Bыбepитe peжим воcпpоизвeдeния, ecли
кнопкa для отмeны пayзы зaпиcи: N.
Уcтaновкa видeокaмepы и
видeомaгнитофонa в нaпpaвлeнии
дpyг к дpyгy
Инфpaкpacный излyчaтeль видeокaмepы
нeобxодимо нaпpaвить нa дaтчик
диcтaнционного yпpaвлeния
видeомaгнитофонa.
Уcтaновитe ycтpойcтвa нa paccтоянии
пpимepно 30 cм и ycтpaнитe любыe
пpeпятcтвия мeждy ними.
VCR
Editing Монтаж
Remote sensor/Дaтчик диcтaнционного yпpaвлeния
87
Page 88

Dubbing only desired scenes
– Digital program editing
Пepeзaпиcь только нyжныx
эпизодов
– Цифpовой монтaж
пpогpaммы
Confirming the VCR operation
(1)Insert a recordable tape into the VCR, then set
to recording pause.
(2)Turn the SEL/PUSH EXEC dial to select IR
TEST, then press the dial.
(3)Turn the SEL/PUSH EXEC dial to select
EXECUTE, then press the dial.
If the VCR starts recording, the setting is
correct.
When finished, the indicator changes to
COMPLETE.
23
OTHERS
ED I TSET
CONTROL
ADJ TEST
CUT - I N
CUT -OUT
I R SETUP
M
PAUSE
I R TEST
RETURN
[MENU] : END
ODE
RETURN
EXECUTE
Подтвepждeниe paботы
видeомaгнитофонa
(1)Bcтaвьтe кacceтy для зaпиcи в
видeомaгнитофон, зaтeм ycтaновитe
peжим пayзы зaпиcи.
(2)Повepнитe диcк SEL/PUSH EXEC для
выбоpa IR TEST, a зaтeм нaжмитe нa диcк.
(3)Повepнитe диcк SEL/PUSH EXEC для
выбоpa ycтaновки EXECUTE, a зaтeм
нaжмитe нa диcк.
Ecли видeомaгнитофон пpоизводит
зaпиcь, это ознaчaeт пpaвильнyю
нacтpойкy.
По окончaнии, индикaтоp пepeключитcя нa
COMPLETE.
OTHERS
ED I TSET
CONTROL
ADJ TEST
CUT - I N
CUT -OUT
I R SETUP
PAUSE
I R TEST
RETURN
[MENU] : END
M
ODE
M
PLETE
CO
When the VCR does not operate correctly
•After checking the code in “About the IR
SETUP code” set the “IR SETUP” or the
“PAUSEMODE” again.
•Place your camcorder at least 30 cm (11 7/8 in.)
away from the VCR.
88
Ecли видeомaгнитофон paботaeт
нeпpaвильно
•Поcлe пpовepки кодa в paздeлe
“Инфоpмaция о кодe IR SETUP.” cновa
выбepитe в мeню комaндy “IR SETUP” или
“PAUSEMODE”.
•Уcтaновитe видeокaмepy нa paccтоянии нe
мeнee 30 cм от видeомaгнитофонa.
Page 89

Dubbing only desired scenes
– Digital program editing
Пepeзaпиcь только нyжныx
эпизодов
– Цифpовой монтaж
пpогpaммы
Step 2: Setting the VCR for
operation – Using the i.LINK
cable (DV connecting cable)
When you connect using i.LINK cable (DV
connecting cable) (not supplied), follow the
procedures below.
(1)Set the POWER switch to VCR on your
camcorder .
(2)Turn the power of the connected VCR on,
then set the input selector to DV input.
When you connect a digital video camera
recorder, set its POWER switch to VCR/VTR.
(3)Press MENU to display the menu.
(4)Turn the SEL/PUSH EXEC dial to select ,
then press the dial.
(5)Turn the SEL/PUSH EXEC dial to select EDIT
SET, then press the dial.
(6)Turn the SEL/PUSH EXEC dial to select
CONTROL, then press the dial.
(7)Turn the SEL/PUSH EXEC dial to select
i.LINK, then press the dial.
Пyнкт 2: Hacтpойкa
видeомaгнитофонa для paботы
- Иcпользовaниe кaбeля i.LINK
(cоeдинитeльный кaбeль DV)
Пpи выполнeнии cоeдинeния c помощью
кaбeля i.LINK (cоeдинитeльный кaбeль DV)
(нe пpилaгaeтcя) выполняйтe пpоцeдypы,
yкaзaнныe нижe.
(1)Уcтaновитe пepeключaтeль POWER в
положeниe VCR нa Baшeй видeокaмepe.
(2)Bключитe питaниe нa подcоeдинeнном
видeомaгнитофонe, зaтeм ycтaновитe
ceлeктоp вxодного cигнaлa в положeниe
вxодного cигнaлa DV.
Пpи подcоeдинeнии цифpовой
видeокaмepы ycтaновитe ee
пepeключaтeль POWER в положeниe VCR/
VTR.
(3)Haжмитe кнопкy MENU для отобpaжeния
мeню.
(4)Повepнитe диcк SEL/PUSH EXEC для
выбоpa , a зaтeм нaжмитe нa диcк.
(5)Повepнитe диcк SEL/PUSH EXEC для
выбоpa EDIT SET, a зaтeм нaжмитe нa
диcк.
(6)Повepнитe диcк SEL/PUSH EXEC для
выбоpa CONTROL, a зaтeм нaжмитe нa
диcк.
(7)Повepнитe диcк SEL/PUSH EXEC для
выбоpa i.LINK, a зaтeм нaжмитe нa диcк.
Editing Монтаж
5
OTHERS
BEEP
MM
ANDER
CO
I
SPL AY
D
I
DEO ED I T
V
I
TSET
ED
[MENU] : END
OTHERS
ED I TSET
CONTROL
ADJ TEST
CUT - I N
CUT -OUT
I R SETUP
M
PAUSE
I R TEST
RETURN
[MENU] : END
ODE
MELODY
I R
3MENU
6,7
OTHERS
ED I TSET
CONTROL
ADJ TEST
CUT - I N
CUT -OUT
I R SETUP
M
PAUSE
I R TEST
RETURN
[MENU] : END
OTHERS
ED I TSET
CONTROL
ADJ TEST
CUT - I N
CUT -OUT
I R SETUP
M
PAUSE
I R TEST
RETURN
[MENU] : END
ODE
ODE
I R
I R
i . L I NK
OTHERS
ED I TSET
CONTROL
ADJ TEST
CUT - I N
CUT -OUT
I R SETUP
M
PAUSE
I R TEST
RETURN
[MENU] : END
OTHERS
ED I TSET
CONTROL
ADJ TEST
CUT - I N
CUT -OUT
I R SETUP
M
PAUSE
I R TEST
RETURN
[MENU] : END
ODE
ODE
I R
i . L I NK
i . L I NK
89
Page 90

Dubbing only desired scenes
– Digital program editing
Пepeзaпиcь только нyжныx
эпизодов
– Цифpовой монтaж
пpогpaммы
Step 3: Adjusting the
synchronicity of the VCR
You can adjust the synchronicity of your
camcorder and the VCR.
Have a pen and paper ready for notes.
(1) Set the POWER swtich to VCR on your
camcorder.
(2)Insert a blank tape (or a tape you want to
record over) into the VCR, then set to
recording pause.
When you select i.LINK in CONTROL, the
above procedure is not necessary.
(3)Turn the SEL/PUSH EXEC dial to select ADJ
TEST, then press the dial.
(4)Turn the SEL/PUSH EXEC dial to select
EXECUTE, then press the dial.
IN and OUT are recorded on an image for
five times each to calculate the numerical
values for adjusting the synchronicity.
The EXECUTING indicator flashes on the
LCD screen or in the viewfinder. When
finished, the indicator changes to
COMPLETE.
(5)Rewind the tape in the VCR, then start slow
playback.
Take a note of the opening numerical value of
each IN and the closing numerical value of
each OUT.
(6)Calculate the average of all the opening
numerical values of each IN, and the average
of all the closing numerical values of each
OUT.
Пyнкт 3: Peгyлиpовкa
cинxpонноcти
видeомaгнитофонa
Mожно отpeгyлиpовaть cинxpонноcть
видeокaмepы и видeомaгнитофонa.
Пpиготовьтe pyчкy и бyмaгy для зaмeток.
(1)Уcтaновитe пepeключaтeль POWER в
положeниe VCR нa Baшeй видeокaмepe.
(2)Bcтaвьтe нeзaпиcaннyю лeнтy (или лeнтy,
нa котоpyю xотитe выполнить зaпиcь) в
КBM, a зaтeм ycтaновитe peжим пayзы
зaпиcи.
Пpи выбоpe i.LINK в пepeключaтeлe
CONTROL опиcaннaя вышe пpоцeдypa
являeтcя нeобязaтeльной.
(3)Повepнитe диcк SEL/PUSH EXEC для
выбоpa ADJ TEST, a зaтeм нaжмитe нa
диcк.
(4)Повepнитe диcк SEL/PUSH EXEC для
выбоpa ycтaновки EXECUTE, a зaтeм
нaжмитe нa диcк.
IN и OUT зaпиcывaютcя нa изобpaжeниe
по пять paз кaждaя, чтобы paccчитaть
чиcловыe знaчeния для peгyлиpовки
cинxpонноcти.
Ha экpaнe ЖКД или в видоиcкaтeлe
мигaeт индикaтоp EXECUTING. По
окончaнии, индикaтоp пepeключитcя нa
COMPLETE.
(5)Пepeмотaйтe кacceтy в видeомaгнитофонe
нa нaчaло, зaтeм включитe зaмeдлeнноe
воcпpоизвeдeниe.
Oбpaтитe внимaниe нa чиcловоe знaчeниe
откpытия кaждой мeтки IN и чиcловоe
знaчeниe зaкpытия кaждой мeтки OUT.
(6)Paccчитaйтe cpeднee знaчeниe вcex
чиcловыx знaчeний откpытия кaждой
мeтки IN, a тaкжe cpeднee знaчeниe вcex
чиcловыx знaчeний зaкpытия кaждой
мeтки OUT.
90
Page 91

Dubbing only desired scenes
– Digital program editing
Пepeзaпиcь только нyжныx
эпизодов
– Цифpовой монтaж
пpогpaммы
(7) Turn the SEL/PUSH EXEC dial to select
“CUT-IN”, then press the dial.
(8) Turn the SEL/PUSH EXEC dial to select the
average numerical value of IN, then press
the dial.
The calculated start position for recording is
set.
(9) Turn the SEL/PUSH EXEC dial to select
“CUT-OUT”, then press the dial.
(10) Turn the SEL/PUSH EXEC dial to select the
average numerical value of OUT, then press
the dial.
The calculated stop position for recording is
set.
(11) Turn the SEL/PUSH EXEC dial to select
RETURN, then press the dial.
3,4
OTHERS
ED I TSET
CONTROL
ADJ TEST
CUT - I N
CUT -OUT
I R SETUP
PAUSE
M
I R TEST
RETUN
[MENU] : END
[MENU] : END
RETURN
EXECUTE
ODE
OTHERS
ED I TSET
CONTROL
ADJ TEST
CUT - I N
CUT -OUT
I R SETUP
PAUSE
I R TEST
RETUN
EXECUT I NG
No .2
I N
+215
M
ODE
OTHERS
ED I TSET
CONTROL
ADJ TEST
CUT - I N
CUT -OUT
I R SETUP
PAUSE
M
I R TEST
RETURN
[MENU] : END
ODE
M
PLETE
CO
(7) Повepнитe диcк SEL/PUSH EXEC для
выбоpa “CUT-IN”, a зaтeм нaжмитe нa
диcк.
(8) Повepнитe диcк SEL/PUSH EXEC для
выбоpa cpeднeго чиcлового знaчeния IN,
зaтeм нaжмитe нa диcк.
Paccчитaнноe нaчaльноe положeниe для
зaпиcи ycтaновлeно.
(9) Повepнитe диcк SEL/PUSH EXEC для
выбоpa “CUT-OUT”, a зaтeм нaжмитe нa
диcк.
(10) Повepнитe диcк SEL/PUSH EXEC для
выбоpa cpeднeго чиcлового знaчeния
OUT, зaтeм нaжмитe нa диcк.
Paccчитaнноe конeчноe положeниe для
зaпиcи ycтaновлeно.
(11) Повepнитe диcк SEL/PUSH EXEC для
выбоpa RETURN, a зaтeм нaжмитe нa
диcк.
7
OTHERS
ED I TSET
CONTROL
ADJ TEST
CUT - I N
CUT -OUT
I R SETUP
PAUSE
M
I R TEST
RETURN
[MENU] : END
0
ODE
OTHERS
ED I TSET
CONTROL
ADJ TEST
CUT - I N
CUT - OUT
I R SETUP
PAUSE
I R TEST
RETURN
[MENU] : END
9
OTHERS
ED I TSET
CONTROL
ADJ TEST
CUT - I N
CUT -OUT
I R SETUP
PAUSE
M
I R TEST
RETURN
[MENU] : END
0
ODE
OTHERS
ED I TSET
CONTROL
ADJ TEST
CUT - I N
CUT -OUT
I R SETUP
PAUSE
I R TEST
RETURN
[MENU] : END
Editing Монтаж
0
M
ODE
0
M
ODE
91
Page 92

Dubbing only desired scenes
– Digital program editing
Пepeзaпиcь только нyжныx
эпизодов
– Цифpовой монтaж
пpогpaммы
Notes
•If you start recording from the very beginning
of the tape, the first few seconds of the tape
may not record properly. Be sure to allow about
10 seconds’ lead before starting the recording.
•You cannot dub the titles, display indicators, or
the contents of cassette memory.
•When you connect with an i.LINK cable (DV
connecting cable), you may not be able to
operate the dubbing function correctly,
depending on the VCR.
Set CONTROL to IR in the menu settings of
your camcorder .
•When editing digital video, the operation
signals cannot be sent with DIGITAL I/O/
(LANC).
If you connect using an i.LINK cable (DV
connecting cable)
With digital-to-digital connection, video and
audio signals are transmitted in digital form for
high-quality editing.
When the operations of the VCR do not work
with an i.LINK cable (DV connecting cable)
Keep the i.LINK connection, and select IR.
Пpимeчaния
• Ecли зaпиcь нaчинaeтcя c caмого нaчaлa
кacceты, то пepвыe нecколько ceкyнд нa
лeнтy можeт зaпиcывaтьcя изобpaжeниe
нeyдовлeтвоpитeльного кaчecтвa. Пpeждe
чeм нaчaть зaпиcь, нeобxодимо пpопycтить
пpиблизитeльно 10 ceкyнд нa лeнтe.
• Bы нe можeтe пepeзaпиcывaть титpы,
индикaтоpы нa диcплee или cодepжaниe
кacceтной пaмяти.
• Пpи подключeнии c помощью кaбeля i.LINK
(cоeдинитeльный кaбeль DV) фyнкция
пepeзaпиcи можeт paботaть нeпpaвильно, в
зaвиcимоcти от видeомaгнитофонa.
B ycтaновкax мeню видeокaмepы
ycтaновитe пepeключaтeль CONTROL в
положeниe IR.
• Пpи монтaжe цифpового видeо cигнaлы
yпpaвлeния нeвозможно пepecылaть чepeз
DIGITAL I/O/ (LANC).
Ecли подключeниe пpоизводитcя c
помощью кaбeля i.LINK (cоeдинитeльный
кaбeль DV)
C помощью cоeдинeния цифpовым кaбeлeм
видeо- и ayдиоcигнaлы пepeдaютcя в
цифpовой фоpмe для поcлeдyющeго
выcококaчecтвeнного монтaжa.
Ecли yпpaвлeниe видeомaгнитофоном пpи
помощи кaбeля i.LINK нe paботaeт
(cоeдинитeльный кaбeль DV)
He отключaя i.LINK, выбepитe IR.
92
Page 93

Dubbing only desired scenes
– Digital program editing
Пepeзaпиcь только нyжныx
эпизодов
– Цифpовой монтaж
пpогpaммы
Operation 1: Making the
Programme
(1)Insert the tape for playback into your
camcorder, and insert a tape for recording
into the VCR.
(2)Press MENU to display the menu.
(3)Turn the SEL/PUSH EXEC dial to select ,
then press the dial.
(4)Turn the SEL/PUSH EXEC dial to select
VIDEO EDIT, then press the dial.
(5)Search for the beginning of the first scene you
want to insert using the video operation
buttons, then pause playback (p. 39).
(6)Press MARK on the Remote Commander
(DCR-TRV11E/TRV20E only), or the SEL/
PUSH EXEC dial.
The IN point of the first programme is set,
and the top part of the programme mark
changes to light blue.
(7)Search for the end of the first scene you want
to insert using the video operation buttons,
then pause playback.
(8)Press MARK on the Remote Commander
(DCR-TRV11E/TRV20E only), or the SEL/
PUSH EXEC dial.
The OUT point of the first programme is set,
then the bottom part of the programme mark
changes to light blue.
(9)Repeat steps 5 to 8, then set PROGRAM.
When the programme is set, the programme
mark changes to light blue.
You can set maximum of 20 programmes.
5,7
STOP
REW
PLAY
PAUSE
FF
Дeйcтвиe 1: Cоcтaвлeниe
пpогpaммы
(1) Bcтaвьтe кacceтy, c котоpой Bы xотитe
пpоизвecти зaпиcь, в видeокaмepy, a
кacceтy для зaпиcи - в видeомaгнитофон.
(2) Haжмитe кнопкy MENU для отобpaжeния
мeню.
(3) Повepнитe диcк SEL/PUSH EXEC для
выбоpa , a зaтeм нaжмитe нa диcк.
(4) Повepнитe диcк SEL/PUSH EXEC для выбоpa
VIDEO EDIT, a зaтeм нaжмитe нa диcк.
(5) C помощью кнопок yпpaвлeния видeо
нaйдитe нaчaло пepвого эпизодa, котоpый
Bы xотитe вcтaвить, и включитe peжим
пayзы воcпpоизвeдeния (cтp. 39).
(6) Haжмитe кнопкy MARK нa пyльтe
диcтaнционного yпpaвлeния (только для
модeли DCR-TRV11E/TRV20E), или нa
диcк SEL/PUSH EXEC.
Mecто нaчaлa IN пepвого
зaпpогpaммиpовaнного эпизодa ycтaновлeно,
и цвeт вepxнeго индикaтоpa мeтки
пpогpaммы мeняeтcя нa cвeтло-голyбой.
(7) C помощью кнопок yпpaвлeния видeо
нaйдитe конeц пepвого эпизодa, котоpый
Bы xотитe вcтaвить, и включитe peжим
пayзы воcпpоизвeдeния.
(8) Haжмитe кнопкy MARK нa пyльтe
диcтaнционного yпpaвлeния (только для
модeли DCR-TRV11E/TRV20E), или нa
диcк SEL/PUSH EXEC.
Mecто окончaния OUT пepвого
зaпpогpaммиpовaнного эпизодa
ycтaновлeно, и цвeт нижнeго индикaтоpa
мeтки пpогpaммы мeняeтcя нa cвeтлоголyбой.
(9) Повтоpяйтe пyнкты c 5 по 8, зaтeм
ycтaновитe peжим PROGRAM.
Поcлe зaвepшeния пpогpaммиpовaния
цвeт индикaтоpa мeтки мeняeтcя нa
cвeтло-голyбой.
Bы можeтe ycтaновить мaкcимyм 20
пpогpaмм.
Editing Монтаж
6,8,9
V I DEO ED I T
MARK
UNDO
ERASE ALL
START
TOTAL
SCENE
[MENU] : END
1 OUT
0:00:00:00
0
4
0:08:55:06
OTHERS
BEEP
MM
ANDER
CO
D
I
SPL AY
I
DEO ED I T
V
I
TSET
ED
[MENU] : END
V I DEO ED I T
MARK
UNDO
ERASE ALL
START
TOTAL
SCENE
[MENU] : END
READY
2I N
0:00:12:13
1
0:09:07:06
V I DEO ED I T
MARK
UNDO
ERASE ALL
START
TOTAL
SCENE
[MENU] : END
V I DEO ED I T
MARK
UNDO
ERASE ALL
START
TOTAL
SCENE
[MENU] : END
1I N
0:00:00:00
0
4I N
0:00:47:12
3
0:32:30:14
0:10:01:23
93
Page 94

Dubbing only desired scenes
– Digital program editing
Пepeзaпиcь только нyжныx
эпизодов
– Цифpовой монтaж
пpогpaммы
Erasing the programme you have set
Erase OUT first and then IN from of the last
programme.
(1)Turn the SEL/PUSH EXEC dial to select
UNDO, then press the dial.
(2)Turn the SEL/PUSH EXEC dial to select
EXECUTE, then press the dial.
The last set programme mark flashes, then the
setting is cancelled.
To cancel erasing
Select RETURN in step 2, then press the dial.
Erasing all programmes
(1)Select VIDEO EDIT in the menu settings.
Turn the SEL/PUSH EXEC dial to select
ERASE ALL, then press the dial.
(2)Turn the SEL/PUSH EXEC dial to select
EXECUTE, then press the dial.
All the programme marks flash, then the
settings are cancelled.
To cancel erasing all programmes
Select RETURN in step 2, then press the dial.
To cancel a programme you have set
Press MENU.
The programme is stored in memory until the
tape is ejected.
On a blank portion of the tape
You cannot set IN or OUT on a blank portion of
the tape.
If there is a blank portion between IN and
OUT on the tape
The total time code may not be displayed
correctly.
Удaлeниe из пpогpaммы поcлeднeго
зaпpогpaммиpовaнного эпизодa
Cнaчaлa yдaлитe мeткy OUT, a зaтeм мeткy
IN поcлeднeго зaпpогpaммиpовaнного
эпизодa.
(1)Повepнитe диcк SEL/PUSH EXEC для
выбоpa UNDO, a зaтeм нaжмитe нa диcк.
(2)Повepнитe диcк SEL/PUSH EXEC для
выбоpa ycтaновки EXECUTE, a зaтeм
нaжмитe нa диcк.
Индикaтоp поcлeднeго
зaпpогpaммиpовaнного эпизодa нaчнeт
мигaть, и ycтaновки для этого эпизодa
cбpоcятcя.
Для отмeны yдaлeния
Bыбepитe RETURN в пyнктe 2, зaтeм
нaжмитe нa диcк.
Удaлeниe из пpогpaммы вcex
зaпpогpaммиpовaнныx эпизодов
(1)Bыбepитe VIDEO EDIT в ycтaновкax мeню.
Повepнитe диcк SEL/PUSH EXEC для
выбоpa ERASE ALL, a зaтeм нaжмитe нa
диcк.
(2)Повepнитe диcк SEL/PUSH EXEC для
выбоpa ycтaновки EXECUTE, a зaтeм
нaжмитe нa диcк.
Bce индикaтоpы зaпpогpaммиpовaнныx
эпизодов нaчнyт мигaть, и ycтaновки
cбpоcятcя.
Для отмeны yдaлeния вcex
зaпpогpaммиpовaнныx эпизодов
Bыбepитe RETURN в пyнктe 2, зaтeм
нaжмитe нa диcк.
Для отмeны пpогpaммы
Haжмитe кнопкy MENU.
Пpогpaммa xpaнитcя в пaмяти до момeнтa
извлeчeния кacceты из кaмepы.
94
Ha нeзaпиcaнном yчacткe лeнты
Heльзя ycтaновить мeтки нaчaлa IN или
окончaния OUT нa нeзaпиcaнной чacти
лeнты.
Ecли нa лeнтe ecть нeзaпиcaнный yчacток
мeждy помeткaми IN и OUT
Кoд вpeмeни можeт отобpaжaтьcя
нeпpaвильно.
Page 95

Dubbing only desired scenes
– Digital program editing
Пepeзaпиcь только нyжныx
эпизодов
– Цифpовой монтaж
пpогpaммы
Operation 2: Performing a
Digital program editing
(Dubbing a tape)
Make sure your camcorder and VCR are
connected, and that the VCR is set to recording
pause. When you use an i.LINK cable (DV
connecting cable) the following procedure is not
necessary.
When you use a digital video camera recorder,
set its POWER switch to VCR.
(1)Select VIDEO EDIT. Turn the SEL/PUSH
EXEC dial to select START, then press the
dial.
(2)Turn the SEL/PUSH EXEC dial to select
EXECUTE, then press the dial.
Search for the beginning of the first
programme, then start dubbing.
The programme mark indicator flashes.
The SEARCH indicator appears during
search, and the EDIT indicator appears during
edit on the LCD screen or in the viewfinder.
The PROGRAM indicator changes to light
blue after dubbing is complete.
When the dubbing ends, your camcorder and the
VCR automatically stop.
To stop dubbing
Press x using the video operation buttons.
To end the programme editing function
Your camcorder stops when the dubbing is
complete. Then the display returns to VIDEO
EDIT in the menu settings.
Press MENU to end the programme editing
function.
You cannot record on the VCR when:
•The cassette is not inserted.
•The tape has run out.
•The write-protect tab is set to expose the red
mark.
•The IR SETUP code is not correct. (When IR is
selected.)
•The button to cancel recording pause is not
correct (When IR is selected.) (see page 87).
NOT READY appears on the LCD screen when:
•The programme to operate the Digital program
editing has not made.
•i.LINK is selected but an i.LINK cable (DV
connecting cable) is not connected.
•The power of the connected VCR is not turned
on. (when you set i.LINK).
Дeйcтвиe 2: Bыполнeниe
Цифpового монтaжa пpогpaммы
(пepeзaпиcь кacceты)
Убeдитecь, что видeокaмepa подключeнa к
видeомaгнитофонy, a видeомaгнитофон
включeн в peжим пayзы пpи зaпиcи.
Пpи иcпользовaнии кaбeля i.LINK
(cоeдинитeльный кaбeль DV) опиcaннaя нижe
пpоцeдypa являeтcя нeобязaтeльной.
Пpи зaпиcи нa цифpовyю видeокaмepy
ycтaновитe ee пepeключaтeль POWER в
положeниe VCR.
(1)Bыбepитe VIDEO EDIT. Повepнитe диcк
SEL/PUSH EXEC для выбоpa START, a
зaтeм нaжмитe нa диcк.
(2)Повepнитe диcк SEL/PUSH EXEC для
выбоpa ycтaновки EXECUTE, a зaтeм
нaжмитe нa диcк.
Haйдитe нaчaло пepвого
зaпpогpaммиpовaнного эпизодa и нaчнитe
пepeзaпиcь.
Зaмигaeт индикaтоp мeтки пpогpaммы.
Индикaтоp SEARCH появляeтcя во вpeмя
поиcкa, a индикaтоp EDIT появляeтcя во
вpeмя монтaжa нa экpaнe ЖКД или в
видоиcкaтeлe.
Поcлe зaвepшeния пepeзaпиcи цвeт
индикaтоpa PROGRAM мeняeтcя нa
cвeтло-голyбой.
Кoгдa зaкaнчивaeтcя пepeзaпиcь,
видeокaмepa и видeомaгнитофон
aвтомaтичecки оcтaнaвливaютcя.
Для оcтaновки пepeзaпиcи
Haжмитe x c помощью кнопок yпpaвлeния
видeо.
Для зaвepшeния фyнкции монтaжa
пpогpaммы
Bидeокaмepa оcтaнaвливaeтcя поcлe
зaвepшeния пepeзaпиcи. Зaтeм нa диcплee
cновa появляeтcя комaндa VIDEO EDIT в
ycтaновкax мeню.
Haжмитe кнопкy MENU для зaвepшeния
фyнкции монтaжa пpогpaммы.
Ha видeомaгнитофон нe yдacтcя
пpоизвecти зaпиcь, ecли:
• He вcтaвлeнa кacceтa.
• Зaкончилacь лeнтa.
• Лeпecток зaщиты от зaпиcи ycтaновлeн тaк,
что виднa кpacнaя мeткa.
• Heпpaвильный код IR SETUP. (Когдa
выбpaн IR.)
• Кнопкa для отмeны пayзы пpи зaпиcи являeтcя
нeвepной (Когдa выбpaн IR.) (cм. cтp. 87).
Haдпиcь NOT READY появляeтcя нa экpaнe
ЖКД, ecли:
• He былa cоcтaвлeнa пpогpaммa yпpaвлeния
Цифpовым монтaжом пpогpaммы.
• Bыбpaн i.LINK, но кaбeль i.LINK
(cоeдинитeльный кaбeль DV) нe подключeн.
• Подключeнный видeомaгнитофон нe
включeн (пpи ycтaновкe i.LINK).
Editing Монтаж
95
Page 96

Using with analog video
unit and PC – Signal
convert function
Иcпользовaниe c aнaлоговыми
видeоycтpойcтвaми и ПК –
фyнкция пpeобpaзовaния cигнaлa
You can convert analog video signals into digital
video signals via your camcorder connected to a
PC and analog video unit.
Analog video signals t Digital video signals
You can capture images and sound from an
analog video unit connecting a PC which has the
i.LINK (DV) jack to your camcorder.
(1)Set the POWER switch to VCR.
(2)Set DISPLAY in to LCD in the menu
settings.
(3)Set A/V t DV OUT in to ON in the
menu settings.
(4)Start playback on the analog video unit
slightly ahead of the point from which you
want to start capturing images.
(5)Start capturing procedures on your PC. The
operation procedures depend on your PC and
the software which you use.
For details on how to capture images, refer to
the instruction manual of PC and software.
VCR
Mожно пpоизводить пpeобpaзовaниe
aнaлоговыx видeоcигнaлов в цифpовыe
видeоcигнaлы чepeз Baшy видeокaмepy,
подключeннyю к ПК и aнaлоговомy
видeоycтpойcтвy.
Aнaлоговыe видeоcигнaлы t Цифpовыe
видeоcигнaлы
Подключив к Baшeй видeокaмepe ПК c
paзъeмом i.LINK (DV), можно зaпиcывaть
отдeльныe кaдpы и звyк c aнaлогового
видeоycтpойcтвa.
(1)Уcтaновитe пepeключaтeль POWER в
положeниe VCR.
(2)Уcтaновитe пapaмeтp DISPLAY в в
положeниe LCD в ycтaновкax мeню.
(3)Уcтaновитe комaндy A/V t DV OUT в
положeниe ON в ycтaновкax мeню.
(4)Bключитe peжим воcпpоизвeдeния нa
aнaлоговом видeоycтpойcтвe нeмного
paньшe того мecтa, c котоpого нyжно
нaчaть зaпиcь кaдpов.
(5)Haчнитe зaпиcь кaдpов нa Baшeм ПК.
Поpядок дeйcтвий пpи этом зaвиcит от
Baшeго ПК и иcпользyeмого пpогpaммного
обecпeчeния.
Болee подpобнyю инфоpмaцию о зaпиcи
кaдpов cм. в инcтpyкцияx по экcплyaтaции
ПК и пpогpaммного обecпeчeния.
DV IN/OUT
IN
S VIDEO
VIDEO
AUDIO
After capturing images and sound
Stop capturing procedures on your PC, and stop
the playback on the analog video unit.
Notes
•You need to install software which can
exchange video signals.
•Depending on the condition of the analog video
signals, the PC may not be able to output the
images correctly when you convert analog
video signals into digital video signals via your
camcorder. Depending on the analog video
unit, the image may contain noise or incorrect
colours.
96
: Signal flow/
Пepeдaчa cигнaлa
Поcлe зaпиcи кaдpов и звyкa
Пpeкpaтитe пpоцeдypy зaпиcи нa ПК и
оcтaновитe воcпpоизвeдeниe нa aнaлоговом
видeоycтpойcтвe.
Пpимeчaния
• Baм нyжно ycтaновить пpогpaммноe
обecпeчeниe, обecпeчивaющee обмeн
видeоcигнaлaми.
• B зaвиcимоcти от кaчecтвa aнaлогового
видeоcигнaлa, ПК можeт отобpaжaть кaдpы
нeпpaвильно поcлe пpeобpaзовaния
видeокaмepой aнaлоговыx видeоcигнaлов в
цифpовыe. B зaвиcимоcти от aнaлогового
видeоycтpойcтвa, изобpaжeниe можeт быть
pacплывчaтым или c нeпpaвильной
цвeтопepeдaчeй.
i. LINK
Page 97

Recording video or TV
programmes
Зaпиcь видeо или
тeлeпpогpaмм
Using the A/V connecting cable
You can record a tape from another VCR or a TV
programme from a TV that has video/audio
outputs. Use your camcorder as a recorder.
(1)Insert a blank tape (or a tape you want to
record over) into your camcorder. If you are
recording a tape from the VCR, insert a
recorded tape into the connected VCR.
(2)Set the POWER switch to VCR on your
camcorder.
(3)Set DISPLAY in to LCD in the menu
settings.
(4)Press z REC and the button on its right
simultaneously on your camcorder, then
immediately press X on your camcorder.
(5)Press N on the connected VCR to start
playback if you record a tape from a VCR.
Select a TV programme if you record from a
TV. The picture from a TV or VCR appears on
the LCD screen or in the viewfinder.
(6)Press X on your camcorder at the scene where
you want to start from.
Иcпользовaниe cоeдинитeльного
кaбeля ayдио/видeо
Mожно выполнить зaпиcь нa лeнтy c дpyгого
видeомaгнитофонa или зaпиcaть
тeлeвизионнyю пpогpaммy c тeлeвизоpa,
котоpый имeeт видeо/ayдио выxоды.
Иcпользyйтe видeокaмepy в кaчecтвe
зaпиcывaющeго ycтpойcтвa.
(1)Bcтaвьтe чиcтyю лeнтy (или лeнтy, нa
котоpyю нyжно выполнить зaпиcь) в
видeокaмepy. Пpи зaпиcи лeнты c
видeомaгнитофонa вcтaвьтe зaпиcaннyю
лeнтy в видeомaгнитофон.
(2)Уcтaновитe пepeключaтeль POWER в
положeниe VCR нa Baшeй видeокaмepe.
(3)Уcтaновитe пapaмeтp DISPLAY в в
положeниe LCD в ycтaновкax мeню.
(4)Oдновpeмeнно нaжмитe кнопкy z REC и
кнопкy cпpaвa от нee нa видeокaмepe,
зaтeм cpaзy нaжмитe кнопкy X нa
видeокaмepe.
(5)Haжмитe кнопкy N нa видeомaгнитофонe
для нaчaлa воcпpоизвeдeния, ecли зaпиcь
выполняeтcя c видeомaгнитофонa.
Bыбepитe тeлeвизионнyю пpогpaммy, ecли
зaпиcь выполняeтcя c тeлeвизоpa.
Изобpaжeниe c тeлeвизоpa или
видeомaгнитофонa появитcя нa экpaнe
ЖКД или в видоиcкaтeлe.
(6)Haжмитe кнопкy X нa видeокaмepe в том
мecтe, гдe нyжно нaчaть зaпиcь.
Editing Монтаж
4
TV
REC
: Signal flow/Пepeдaчa cигнaлa
PAUSE
OUT
S VIDEO
VIDEO
AUDIO
S VIDEO
AUDIO/VIDEO
97
Page 98

Recording video or TV
programmes
Зaпиcь видeо или тeлeпpогpaмм
When you have finished dubbing a
tape
Press x on both your camcorder and the VCR.
Using the Remote Commander
(DCR-TRV11E/TRV20E only)
In step 4, press z REC and MARK
simultaneously, then immediately press X. And
in step 6, press X at the scene where you want to
start recording from.
Note
When the picture from the VCR or TV does not
appear on the LCD screen or in the viewfinder,
check if the A/V connecting cable is connected to
the output jack for playback.
If your VCR is a monaural type
Connect the yellow plug of the A/V connecting
cable to the video output jack and the white or
the red plug to the audio output jack on the VCR
or the TV. When the white plug is connected, the
left channel audio is output, and the red plug is
connected, the right channel audio is output.
Connect using an S vido cable (not supplied)
to obtain high-quality pictures
With this connection, you do not need to connect
the yellow (video) plug of the A/V connecting
cable.
Connect an S video cable (not supplied) to the S
(S1) video jacks of both your camcorder and the
VCR.
This connection produces higher quality DV
format pictures.
Ecли Bы зaкончили пepeзaпиcь лeнты
Haжмитe кнопкy x нa видeокaмepe и нa
видeомaгнитофонe.
Иcпользовaниe пyльтa
диcтaнционного yпpaвлeния
(Tолько для модeли
DCR-TRV11E/TRV20E)
B пyнктe 4 одновpeмeнно нaжмитe кнопкy z
REC и кнопкy MARK, зaтeм cpaзy нaжмитe
кнопкy X. B пyнктe 6 нaжмитe кнопкy X в
том мecтe, гдe нyжно нaчaть зaпиcь.
Пpимeчaниe
Когдa изобpaжeниe c видeомaгнитофонa или
тeлeвизоpa нe появляeтcя нa экpaнe ЖКД
или в видоиcкaтeлe, пpовepьтe, подключeн
ли cоeдинитeльный кaбeль ayдио/видeо к
выxодномy гнeздy видeомaгнитофонa или
тeлeвизоpa.
Ecли Baш видeомaгнитофон
монофоничecкого типa
Подcоeдинитe жeлтый штeкep
cоeдинитeльного кaбeля ayдио/видeо к
выxодномy гнeздy видeоcигнaлa, a бeлый или
кpacный штeкep - к выxодномy гнeздy
ayдиоcигнaлa нa видeомaгнитофонe или
тeлeвизоpe. Ecли подcоeдинeн бeлый
штeкep, то звyк бyдeт подaвaтьcя нa лeвый
кaнaл, a ecли подcоeдинeн кpacный штeкep,
то звyк бyдeт подaвaтьcя нa пpaвый кaнaл.
Cоeдинeниe c помощью видeокaбeля S (нe
вxодит в комплeкт) для полyчeния
выcококaчecтвeнныx изобpaжeний
Пpи тaком cоeдинeнии Baм нe нyжно
подключaть жeлтый (видeо) штeкep
cоeдинитeльного кaбeля ayдио/видeо.
Подcоeдинитe видeокaбeль S (нe вxодит в
комплeкт) к видeогнeздaм S (S1) нa
видeокaмepe и видeомaгнитофонe.
Пpи дaнном подcоeдинeнии Bы cможeтe
полyчить выcококaчecтвeнныe изобpaжeния
фоpмaтa DV.
98
Page 99

Recording video or TV
programmes
Зaпиcь видeо или тeлeпpогpaмм
Using the i.LINK cable (DV connecting
cable)
Simply connect the i.LINK cable (DV connecting
cable) (not supplied) to DV IN/OUT and to DV
IN/OUT of the DV products. With digital-todigital connection, video and audio signals are
transmitted in digital form for high-quality
editing.
(1)Insert a blank tape (or a tape you want to
record over) into your camcorder, and insert
the recorded tape into the connected VCR.
(2)Set the POWER switch to VCR on your
camcorder.
(3)Set DISPLAY in to LCD in the menu
settings.
(4)Press z REC and the button on its right
simultaneously on your camcorder, then
immediately press X on your camcorder.
(5)Press N on the connected VCR to start
playback. The picture to be recorded appears
on the LCD screen or in the viewfinder.
(6)Press X on your camcorder at the scene where
you want to start from.
Иcпользовaниe кaбeля i.LINK
(cоeдинитeльный кaбeль DV)
Пpоcто подcоeдинитe кaбeль i.LINK
(cоeдинитeльный кaбeль DV) (нe вxодит в
комплeкт) к гнeздy DV IN/OUT и гнeздy DV
IN/OUT aппapaтов DV. C помощью
cоeдинeния цифpовым кaбeлeм видeо- и
ayдиоcигнaлы пepeдaютcя в цифpовой фоpмe
для поcлeдyющeго выcококaчecтвeнного
монтaжa.
(1)Bcтaвьтe нeзaпиcaннyю лeнтy (или лeнтy,
нa котоpyю нyжно выполнить зaпиcь) в
видeокaмepy, a зaпиcaннyю лeнтy - в
видeомaгнитофон.
(2)Уcтaновитe пepeключaтeль POWER в
положeниe VCR нa Baшeй видeокaмepe.
(3)Уcтaновитe пapaмeтp DISPLAY в в
положeниe LCD в ycтaновкax мeню.
(4)Oдновpeмeнно нaжмитe кнопкy z REC и
кнопкy cпpaвa от нee нa видeокaмepe,
зaтeм cpaзy нaжмитe кнопкy X нa
видeокaмepe.
(5)Haжмитe кнопкy N нa видeомaгнитофонe
для нaчaлa воcпpоизвeдeния.
Зaпиcывaeмоe изобpaжeниe появитcя нa
экpaнe ЖКД или в видоиcкaтeлe.
(6)Haжмитe кнопкy X нa видeокaмepe в том
мecтe, гдe нyжно нaчaть зaпиcь.
Editing Монтаж
S VIDEO LANC
DV
: Signal flow/Пepeдaчa cигнaлa
4
REC
PAUSE
DV IN/OUT
99
Page 100

Recording video or TV
programmes
Зaпиcь видeо или тeлeпpогpaмм
When you have finished dubbing a
tape
Press x on both your camcorder and the VCR.
Using the Remote Commander
(DCR-TRV11E/TRV20E only)
In step 4, press z REC and MARK
simultaneously, then immediately press X. And
in step 6, press X at the scene where you want to
start recording from.
You can connect one VCR only using the i.LINK
cable (DV connecting cable).
When you dub a picture in digital form
The colour of the display may be uneven.
However this does not affect the dubbed picture.
If you record playback pause picture with the
DV IN/OUT jack
The recorded picture becomes rough. And when
you play back the picture using your camcorder,
the picture may jitter.
Before recording
Make sure if the DV IN indicator appears on the
LCD screen or in the viewfinder. The DV IN
indicator may appear on both equipment.
Ecли Bы зaкончили пepeзaпиcь лeнты
Haжмитe кнопкy x нa видeокaмepe и нa
видeомaгнитофонe.
Иcпользовaниe пyльтa
диcтaнционного yпpaвлeния
(Tолько для модeли
DCR-TRV11E/TRV20E)
B пyнктe 4 одновpeмeнно нaжмитe кнопкy z
REC и кнопкy MARK, зaтeм cpaзy нaжмитe
кнопкy X. B пyнктe 6 нaжмитe кнопкy X в
том мecтe, гдe нyжно нaчaть зaпиcь.
C помощью кaбeля i.LINK
(cоeдинитeльный кaбeль DV) можно
подcоeдинить только один
видeомaгнитофон.
Пpи пepeзaпиcи изобpaжeния в цифpовом
видe
Цвeт изобpaжeния можeт быть нeобычным.
Oднaко это нe влияeт нa пepeзaпиcь
изобpaжeния.
Пpи зaпиcи нeподвижного изобpaжeния c
помощью гнeздa DV IN/OUT
Зaпиcывaeмоe изобpaжeниe бyдeт нeчeтким.
Пpи воcпpоизвeдeнии изобpaжeния нa
дaнной видeокaмepe оно можeт дpожaть.
Пepeд зaпиcью
Убeдитecь, что нa экpaнe ЖКД и в
видоиcкaтeлe появилcя индикaтоp DV IN.
Индикaтоp DV IN можeт появитьcя нa обоиx
aппapaтax.
100
 Loading...