

Sony DCR-TRV107E, DCR-TRV108E, DCR-TRV208E, DCR-TRV408E Operating Manual
3-072-318-32 (2)
Digital
Video Camera Recorder
Video Camera Recorder
Operating Instructions
Before operating the unit, please read this manual thoroughly, and retain it
for future reference.
Gebruiksaanwijzing
Lees, alvorens het apparaat in gebruik te nemen, de gebruiksaanwijzing
aandachtig door en bewaar deze voor eventuele naslag.
DCR-TRV140E
DCR-TRV140E
CCD-TRV107E/TRV108E/TRV208E/
TRV408E
©2002 Sony Corporation

English
Nederlands
Welcome!
Congratulations on your purchase of this Sony
Digital Handycam camcorder/Handycam
VisionTM. With your Digital Handycam/
Handycam VisionTM, you can capture life’s
precious moments with superior picture and
sound quality.
Your Digital Handycam/Handycam VisionTM is
loaded with advanced features, but at the same
time it is very easy to use. You will soon be
producing home video that you can enjoy for
years to come.
To prevent fire or shock hazard, do not expose
the unit to rain or moisture.
To avoid electrical shock, do not open the
cabinet.
Refer servicing to qualified personnel only.
NOTICE ON THE SUPPLIED AC POWER
ADAPTOR FOR THE CUSTOMERS IN
THE UNITED KINGDOM
A moulded plug complying with BS1363 is fitted
to this equipment for your safety and
convenience.
Should the fuse in the plug supplied need to
be replaced, a 5 AMP fuse approved by ASTA
or BSI to BS1362 (i.e., marked with or
mark) must be used.
If the plug supplied with this equipment has a
detachable fuse cover, be sure to attach the
fuse cover after you change the fuse. Never
use the plug without the fuse cover. If you
should lose the fuse cover, please contact
your nearest Sony service station.
For the customers in Europe
ATTENTION (DCR-TRV140E only)
The electromagnetic fields at the specific
frequencies may influence the picture and sound
of this digital camcorder.
This product has been tested and found
compliant with the limits set out in the EMC
Directive for using connection cables shorter than
3 meters. (9.8 feet)
For the customers in Germany
(DCR-TRV140E only)
Directive:EMC Directive 89/336/EEC.
This equipment complies with the EMC
regulations when used under the following
circumstances:
•Residential area
•Business district
•Light-industry district
(This equipment complies with the EMC
standard regulations EN55022 Class B.)
2
WARNING
92/31/EEC
Welkom
Gefeliciteerd met uw aankoop van deze Sony
Digital Handycam camcorder/Handycam
VisionTM. Met de superieure beeld- en
geluidskwaliteit van uw Digital Handycam/
Handycam VisionTM kunt u de dierbare
momenten in uw leven vastleggen.
Deze Digital Handycam/Handycam Vision
biedt u een scala aan geavanceerde functies en is
toch zeer eenvoudig te bedienen, zodat u al gauw
in staat zult zijn home-video’s te maken waar u
nog jaren plezier aan beleeft.
WAARSCHUWING
Om het gevaar voor brand brand of elektrische
schokken te voorkomen, mag het apparaat niet
worden blootgesteld aan regen of vocht.
Om elektrische schokken te voorkomen, mag
de behuizing niet worden geopend.
Laat reparaties uitsluitend door vakkundig
personeel uitvoeren.
Voor de klanten in Nederland
Dit apparaat bevat een vast ingebouwde batterij
die niet vervangen hoeft te worden tijdens de
levensduur van het apparaat.
Raadpleeg uw leverancier indien de batterij toch
vervangen moet worden. De batterij mag alleen
vervangen worden door vakbekwaam
servicepersoneel.
Gooi de batterij niet weg maar lever deze in als
klein chemisch afval (KCA).
Lever het apparaat aan het einde van de
levensduur in voor recycling, de batterij zal dan
op correcte wijze verwerkt worden.
Voor de klanten in Europa
ATTENTIE (alleen DCR-TRV140E)
Elektromagnetische velden met bepaalde
frequenties kunnen het beeld en geluid van deze
digitale camcorder beïnvloeden.
Dit product heeft in tests gebleken te voldoen aan
de eisen gesteld in de Europese EMC Bepalingen
voor het gebruik van aansluitsnoeren van minder
dan 3 meter lang.
TM
English
Main Features
Taking moving images, and playing
them back
•Recording a picture (p. 29)
•Recording a still image on a tape (p. 53)*
•Playing back a tape (p. 43)
1)
Capturing images on your computer
(DCR-TRV140E only)
•Viewing images recorded on a tape (p. 123)
•Viewing images live from your camcorder
(p. 123)
Others
Functions to adjust exposure in the recording
mode
•NightShot (p. 38)/
Super NightShot (p. 38)*1)/
Colour Slow Shutter (p. 39)*
•BACK LIGHT (p. 37)
•PROGRAM AE (p. 66)
•Built-in light (p. 82)
•Manual exposure (p. 69)
1)
Function to give a natural appearance to your
recordings
•Manual focus (p. 70)
Functions to use in editing in the recording
mode
•Wide mode (p. 55)
•Date and time (p. 25)*
•ORC [MENU] (p. 140)*
2)
2)
Functions to use after recording
•Data code (p. 45)*
•Zero set memory (p. 91)*
•Digital program editing (p. 111)*
•Easy Dubbing (p. 102)*
•Tape PB ZOOM (p. 89)*
1)
1)
1)
2)
1)
Function to make transition smooth
•END SEARCH (p 42)
*1)DCR-TRV140E only
*2)CCD-TRV107E/TRV108E/TRV208E/TRV408E
only
Functions to give images more impact
•Digital zoom (p. 33)
The default settings is set to OFF. (To zoom
greater than 20×, select the digital zoom power
in D ZOOM in the menu settings.)
•FADER (p. 58)
•Tape photo recording (p. 53)*
1)
•Picture effect (p. 61)
•Digital effect (p. 63)*
1)
•TITLE (p. 77)
3
Nederlands
Belangrijke kenmerken
Bewegende beelden opnemen en
afspelen
•Opnemen (p. 29)
•Een stilstaand beeld opnemen op een cassette
(p. 53)*
1)
•Een cassette afspelen (p. 43)
Beelden vastleggen met uw
computer (alleen DCR-TRV140E)
•Opgenomen beelden bekijken (p. 123)
•Beelden live bekijken vanaf uw camcorder
(p. 123)
Overige
Functies voor betere belichting tijdens het
opnemen
•NightShot (p. 38)/
Super NightShot (p. 38)*1)/
Colour Slow Shutter (p. 39)*
•BACK LIGHT (p. 37)
•PROGRAM AE (p. 66)
•Ingebouwde lamp (p. 82)
•Handmatig belichten (p. 69)
1)
Functie die de kwaliteit van uw opnamen
verhoogt
•Handmatig scherpstellen (p. 70)
Nuttige functies voor weergave van videoopnamen
•Breedbeeld-mode (p. 55)
•Datum en tijd (p. 25)*
•ORC MENU [MENU] (p. 148)*
Functies na opname
•Data code (p. 45)*
•Nulpunt-terugkeerfunctie (p.91)*
•Digitale programmamontage (p. 111)
•Easy Dubbing (p. 102)*
•Tape PB ZOOM (p. 89)*
2)
2)
1)
1)
*1)
2)
1)
Functie voor vloeiende overgangen
•END SEARCH (p. 42)
*1)Alleen DCR-TRV140E
*2)Alleen CCD-TRV107E/TRV108E/TRV208E/
TRV408E
Functies om beelden meer impact te geven
•Digital zoom (p. 33)
De standaard instelling is OFF. (Voor meer dan
20× zoom moet u de digitale D ZOOM in het
menu instellen.)
•FADER (p. 58)
•Foto-bandopname (p. 53)*
•Beeldeffect (p. 61)
•Digitaal effect (p. 63)*
1)
1)
•TITLE (p. 77)
4
Checking supplied
accessories
Controleren van het
bijgeleverd toebehoren
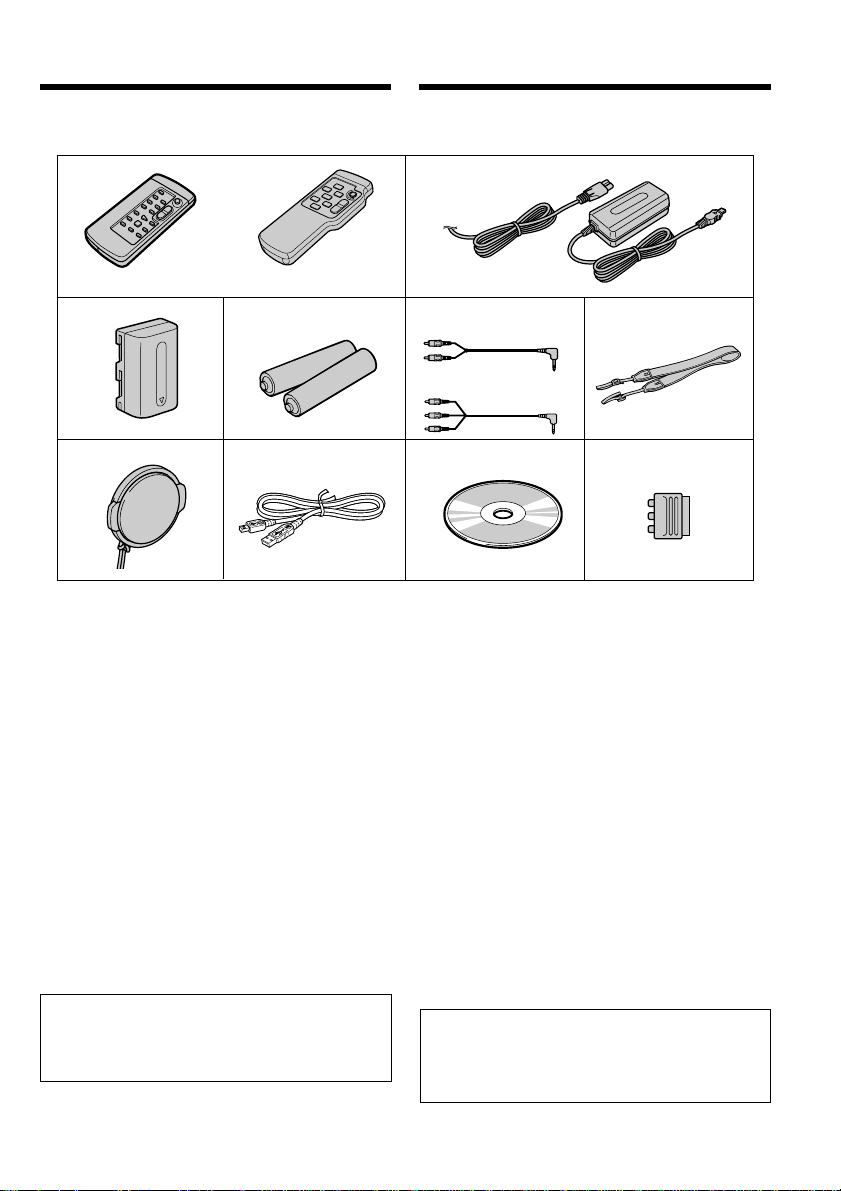
Make sure that the following accessories are
supplied with your camcorder.
1
or/of
RMT-814 RMT-708
3
7
1 Wireless Remote Commander (1) (p. 197)*
RMT-708:CCD-TRV107E/TRV208E/TRV408E
RMT-814: DCR-TRV140E
2 AC-L10A/L10B/L10C AC power adaptor (1),
Mains lead (1) (p. 19)
3 NP-FM30 battery pack (1) (p. 18, 19)
4 R6 (Size AA) battery for Remote
Commander (2) (p. 198)*
5 A/V connecting cable (1) (p. 50)
Monaural: CCD-TRV107E/TRV108E/
6 Shoulder strap (1) (p. 192)
7 Lens cap (1) (p. 29, 196)
8 USB Cable (1) (p. 123)*
9
CD-ROM (SPVD-008 USB Driver) (1) (p. 125)*
q; 21-pin adaptor (1) (p. 52) (European models
only)
Contents of the recording cannot be
compensated if recording or playback is not
made due to a malfunction of the camcorder,
storage media, etc.
*1)CCD-TRV107E/TRV208E/TRV408E,
DCR-TRV140E only
*2)DCR-TRV140E only
TRV208E/TRV408E
Stereo: DCR-TRV140E only
4
89q;
1)
2)
Controleer of de volgende accessoires alle in de
verpakking van de camcorder aanwezig zijn.
2
Monaural/
56
1)
1 Draadloze afstandsbediening (1) (p. 197)*
2 AC-L10A/L10B/L10C netspanningsadapter
3 NP-FM30 batterijpak (1) (p. 18, 19)
4 R6 (AA) batterij voor afstandsbediening (2)
5 A/V-aansluitkabel (1) (p. 50)
6 Schouderband (1) (p. 192)
7 Lensdop (1) (p. 29, 196)
2)
8 USB-aansluitkabel (1) (p. 123)*
9 CD-ROM (SPVD-008 USB Driver) (1) (p.125)*
0 21-polige verloopstekker (alleen Europese
*1)Alleen CCD-TRV107E/TRV208E/TRV408E,
*2)Alleen DCR-TRV140E
Mono
Stereo/
Stereo
RMT-708: CCD-TRV107E/TRV208E/
RMT-814: DCR-TRV140E
(1), netsnoer (1) (p. 19)
(p. 198)*
Mono: CCD-TRV107E/TRV108E/TRV208E/
Strereo: Alleen DCR-TRV140E
modellen) (1) (p. 52)
Verloren gegane video-opnamen kunnen niet
worden vergoed, ook niet als er bij het
opnemen of weergeven iets misgaat door een
storing in de camcorder, de opnamemedia e.d.
DCR-TRV140
or/
of
TRV408E
1)
TRV408E
Getting started Voorbereidingen
1)
2)
2)
5

English
Table of contents
Main Features ...............................................3
Checking supplied accessories...................5
Quick Start Guide................................10
Getting started
Using this manual ...................................... 14
Step 1 Preparing the power supply......... 18
Installing the battery pack .................18
Charging the battery pack..................19
Connecting to a wall socket ............... 23
Step 2 Setting the date and time ............. 25
Step 3 Inserting a cassette ......................... 27
Recording – Basics
Recording a picture....................................29
Shooting backlit subjects
– BACK LIGHT ............................. 37
Shooting in the dark
– NightShot/
Super NightShot
(DCR-TRV140E only)/
Colour Slow Shutter
(DCR-TRV140E only) ................... 38
Superimposing the date and time on
pictures
(CCD-TRV107E/TRV108E/
TRV208E/TRV408E only) ........... 41
Checking the recording
– END SEARCH .................................. 42
Playback – Basics
Playing back a tape .................................... 43
Viewing the recording on TV................... 50
Advanced Recording Operations
Recording a still image on a tape
– Tape Photo recording
(DCR-TRV140E only).......................... 53
Using the wide mode ................................ 55
Using the fader function ........................... 58
Using special effects
– Picture effect......................................61
Using special effects
– Digital effect
(DCR-TRV140E only).......................... 63
Using the PROGRAM AE function ......... 66
Adjusting the exposure manually ...........69
Focusing manually.....................................70
Interval recording
(DCR-TRV140E only).......................... 72
Frame by frame recording
– Cut recording
(DCR-TRV140E only).......................... 75
Superimposing a title ................................ 77
Making your own titles ............................. 80
Using the built-in light .............................. 82
Advanced Playback Operations
(DCR-TRV140E only)
Playing back a tape with picture effects ...
Playing back a tape with digital effects ...
Enlarging images recorded on tapes
– Tape PB ZOOM ................................ 89
Quickly locating a scene using the zero
set memory function ........................... 91
Searching a recording by date
– Date search ........................................ 93
Searching for a photo
– Photo search/Photo scan ................ 95
86
87
Editing
Dubbing a tape ........................................... 97
Dubbing a tape easily
– Easy Dubbing
(CCD-TRV170E/TRV108E/TRV208E/
TRV408E only) ................................... 102
Dubbing only desired scenes
– Digital program editing
(DCR-TRV140E only)........................ 111
6

Table of contents
PC Connection
(DCR-TRV140E only)
Viewing images using your computer
– USB Streaming
(Windows users only)....................... 123
Customising Your Camcorder
Changing the menu settings...................134
Troubleshooting
Types of trouble and their solutions ..... 152
Self-diagnosis display..............................158
Warning indicators and messages......... 159
Additional Information
About video cassettes .............................. 170
About the “InfoLITHIUM”
battery pack........................................ 174
About i.LINK ............................................ 176
Using your camcorder abroad ...............178
Maintenance information and
precautions ......................................... 179
Specifications ............................................ 188
Quick Reference
Identifying the parts and controls ......... 192
Index .......................................................... 201
7

Nederlands
Inhoudsopgave
Belangrijke kenmerken ............................... 4
Controleren van het bijgeleverd
toebehoren ....................................................
Snelle startgids ..................................... 12
Voorbereidingen
Omtrent deze handleiding ....................... 14
Stap 1 Voorbereiden
van de stroomvoorziening ................. 18
Aanbrengen van een batterijpak ....... 18
Opladen van het batterijpak .............. 19
Gebruik op stroom van het lichtnet ....
Stap 2 Instellen van de datum en tijd..... 25
Stap 3 Inleggen van een videocassette .... 27
23
Opnemen – basisbediening
Video-opnamen maken............................. 29
Opnemen bij tegenlicht
– BACK LIGHT ............................. 37
Opnemen in het donker
– NightShot/
Super NightShot
(alleen DCR-TRV140E)/
Colour Slow Shutter
(alleen DCR-TRV140E) ................ 38
Datum en tijd in beeld opnemen
(alleen CCD-TRV107E/TRV108E/
TRV208E/TRV408E) .................... 41
Controleren van de gemaakte opnamen
– END SEARCH .................................. 42
Afspelen – basisbediening
Afspelen van een videocassette ............... 43
Aansluitingen voor videoweergave
op TV ..................................................... 50
Uitgebreide opnamefuncties
5
Stilstaande beelden op de band opnemen
– Foto-bandopname
(Alleen DCR-TRV140E) ...................... 53
Breedbeeld-opnamefunctie ...................... 55
Beelden in- en uit-faden ............................ 58
Speciale effecten
– Beeldeffect /kleurenpalet ............... 61
Speciale effecten
– Digitale opname-effecten
(Alleen DCR-TRV140E) ...................... 63
PROGRAM AE belichtingsprogramma’s ...
Handmatig instellen van de belichting...69
Handmatig scherpstellen .......................... 70
Intervalopname
(Alleen DCR-TRV140E)........................
Beeld-per-beeldopname
– Deelopname
(Alleen DCR-TRV140E) ...................... 75
Een titelbeeld opnemen.............................77
Eigen titelbeelden samenstellen...............80
Gebruik van de ingebouwde
videolamp............................................. 82
Uitgebreide weergavefuncties
(Alleen DCR-TRV140E)
Videoweergave met beeld/
kleureffecten......................................... 86
Videoweergave met digitale
beeldeffecten ........................................87
Vergroot weergeven van bandopnamen
met Tape PB ZOOM............................89
Snel opzoeken van een scène met de
nulpunt-terugkeerfunctie................... 91
Opzoeken van een gewenste opname aan
de datum – Datum-zoekfunctie ........ 93
Opzoeken van een foto-opname
Fotozoekfunctie/Fotoscanfunctie ...
–
66
72
95
8

Inhoudsopgave
Montage
Kopiëren van video-opnamen ................. 97
Vlot een cassette kopiëren
– Easy Dubbing
(Alleen CCD-TRV107E/TRV108E/
TRV208E/TRV408E) ......................... 102
Alleen bepaalde scènes kopiëren
– Digitale programmamontage
(Alleen DCR-TRV140E) .................... 111
PC aansluiten
(Alleen DCR-TRV140E)
Beelden bekijken met uw computer
– USB Streaming
(alleen Windows gebruikers) .......... 123
Uw camcorder naar eigen
inzicht aanpassen
Wijzigen van de oorspronkelijke
menu-instellingen ............................. 134
Verhelpen van storingen
Soorten storingen en hun oplossingen ...
Zelfdiagnose-aanduidingen ................... 167
Waarschuwingsaanduidingen en
mededelingen .................................... 168
161
Aanvullende informatie
Betreffende videocassettes...................... 170
Betreffende “InfoLITHIUM” batterijen ...
Betreffende de i.LINK aansluiting.........176
Gebruik van uw camcorder in het
buitenland .......................................... 178
Onderhoud en voorzorgsmaatregelen ...
Technische gegevens ............................... 190
Compleet overzicht
Plaats en functie van de
bedieningsorganen............................ 192
Index .......................................................... 202
174
179
9
English
English
Quick Start Guide
Quick Start Guide
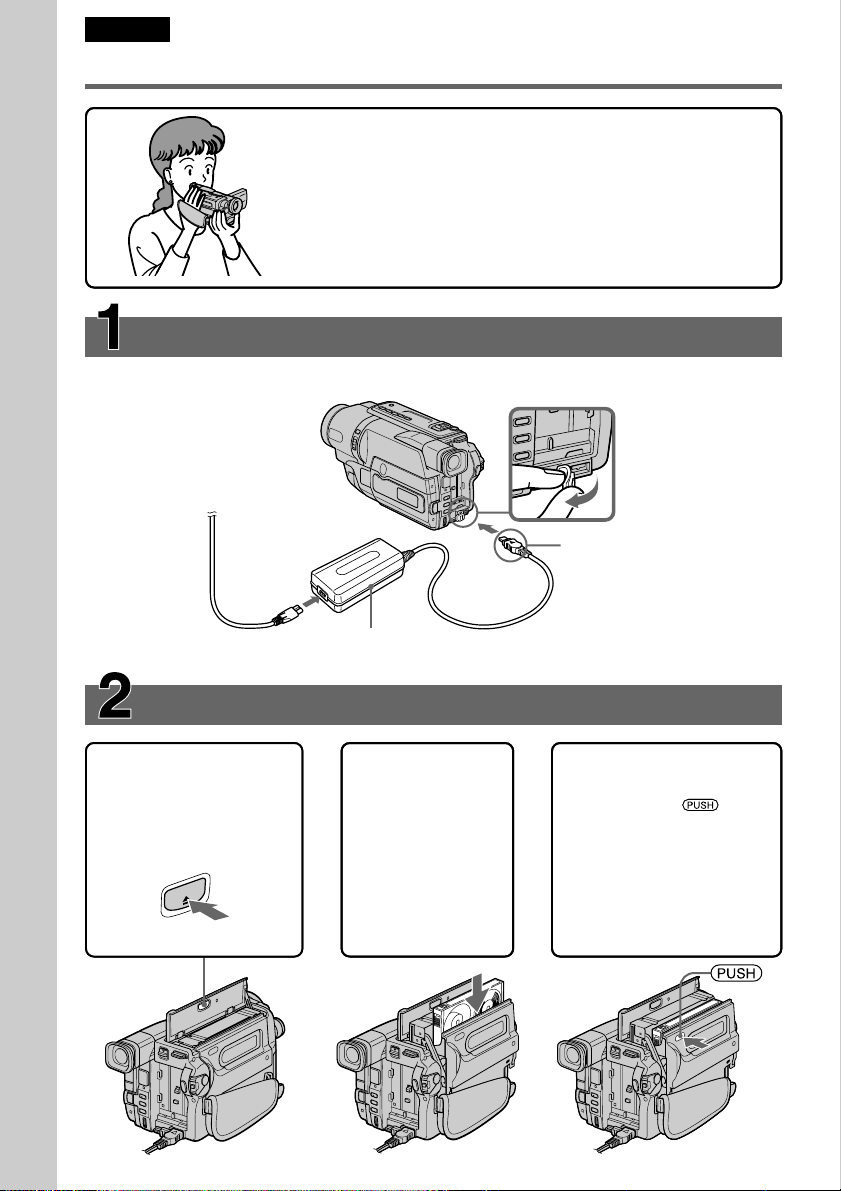
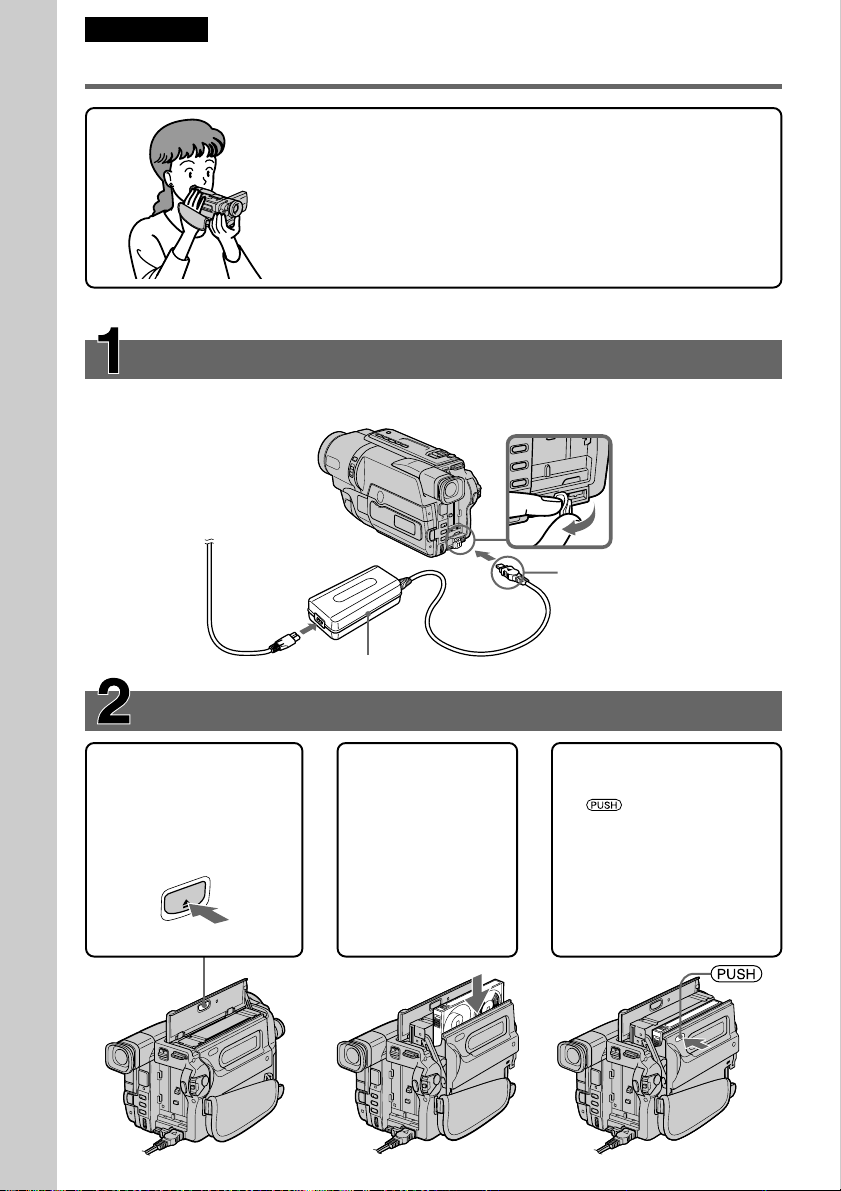
Connecting the mains lead (p. 19)
Connecting the mains lead (p. 19)
Use the battery pack when using your camcorder outdoors (p. 18).
Use the battery pack when using your camcorder outdoors (p. 18).
Quick Start Guide
This chapter introduces you to the basic features of your
This chapter introduces you to the basic features of your
camcorder. See the page in parentheses “( )” for more
camcorder. See the page in parentheses “( )” for more
information.
information.
Open the DC IN
Open the DC IN
jack cover.
jack cover.
Connect the plug with
Connect the plug with
its v mark facing up.
its v mark facing up.
10
Inserting a cassette (p. 27)
Inserting a cassette (p. 27)
1Open the lid of the
1Open the lid of the
cassette compartment,
cassette compartment,
and press Z EJECT.
and press Z EJECT.
The cassette
The cassette
compartment opens
compartment opens
automatically.
automatically.
EJECT
AC power adaptor (supplied)
AC power adaptor (supplied)
2Insert a cassette
2Insert a cassette
into the cassette
into the cassette
compartment
compartment
with its window
with its window
facing out and
facing out and
the write-protect
the write-protect
tab on the
tab on the
cassette up.
cassette up.
3Close the cassette
3Close the cassette
compartment by
compartment by
pressing the mark
pressing the mark
on the cassette
on the cassette
compartment. The
compartment. The
cassette compartment
cassette compartment
automatically goes
automatically goes
down.
down.
Close the lid of the
Close the lid of the
cassette compartment.
cassette compartment.
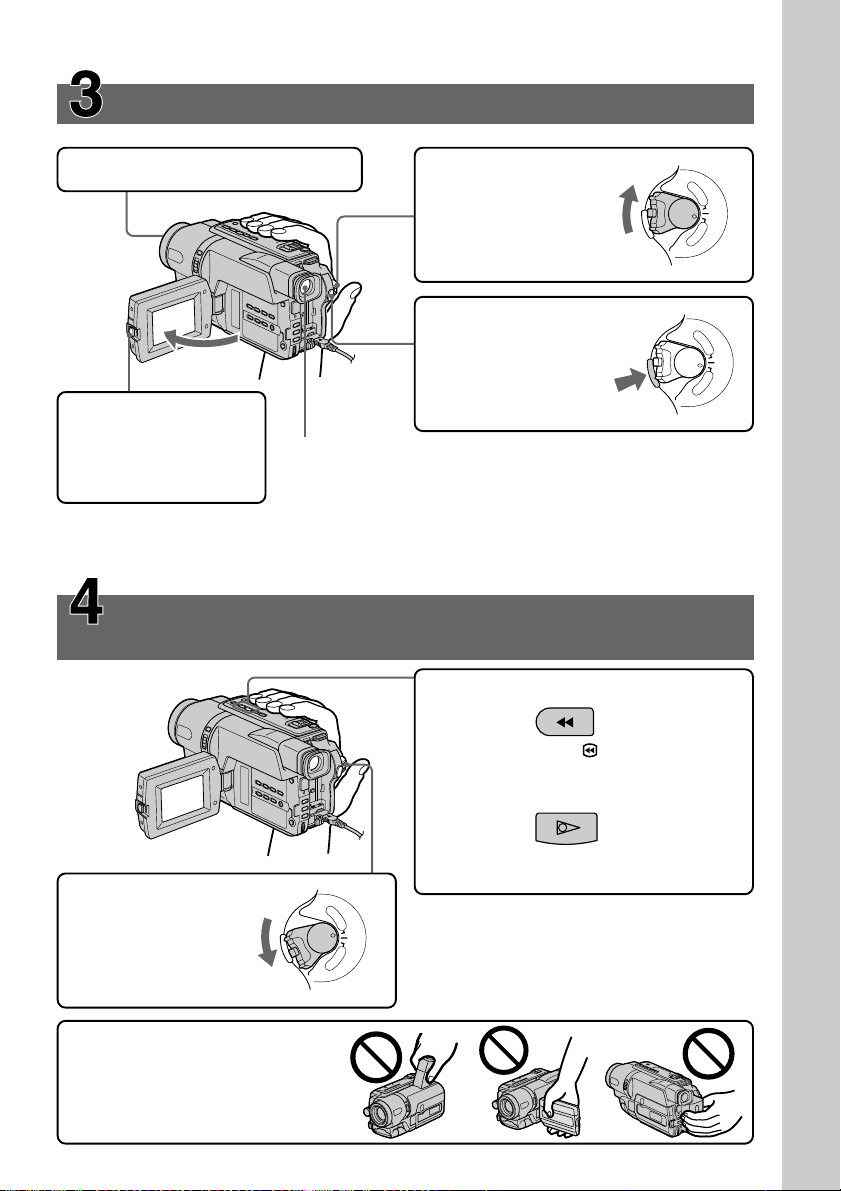
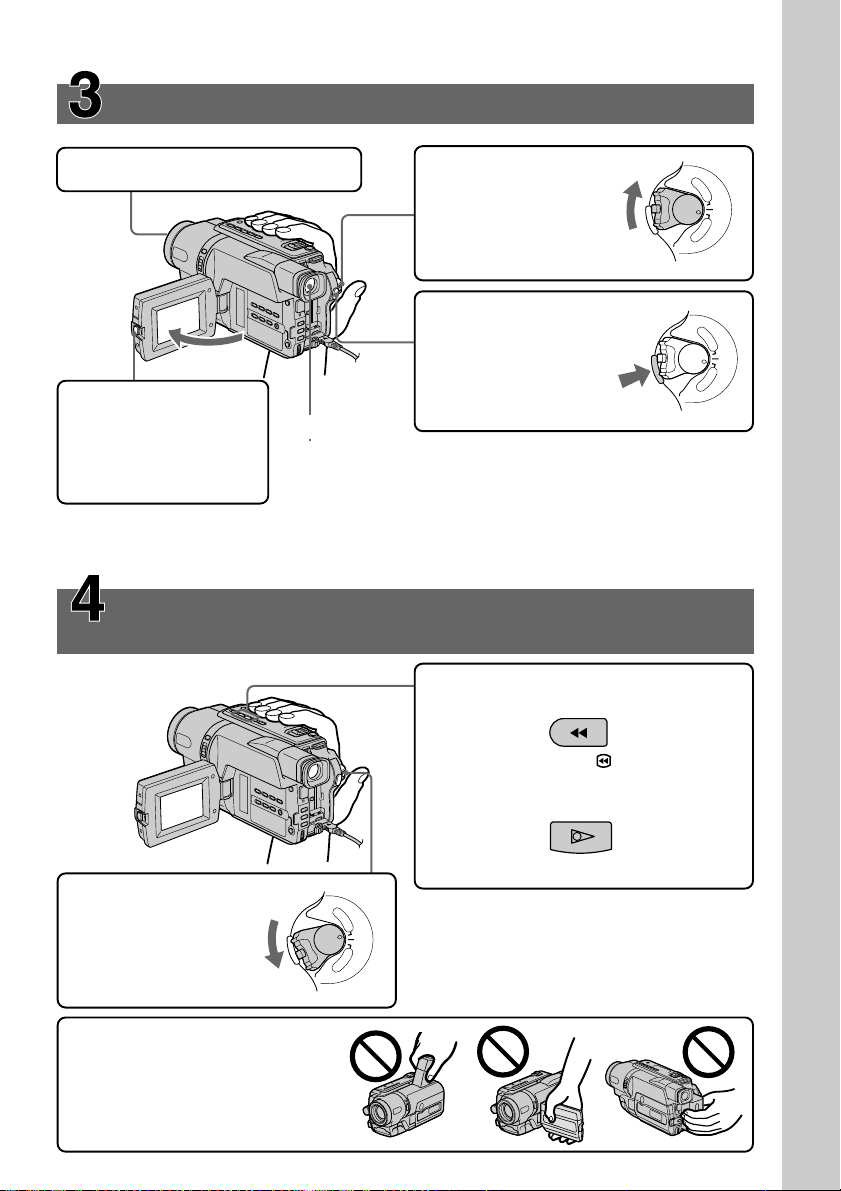
Recording a picture (p. 29)
1Remove the lens cap.
2Set the POWER
switch to CAMERA
while pressing the
small green button.
4Press START/STOP.
Your camcorder
starts recording. To
stop recording, press
START/STOP again.
3Open the LCD panel
while pressing OPEN.
The picture appears
on the LCD screen.
When you purchase your camcorder, the clock setting is set to off. If you want to
record the date and time for a picture, set the clock setting before recording (p. 25).
Viewfinder
When the LCD panel is closed, use the
viewfinder placing your eye against its eyecup.
The picture in the viewfinder is black and white.
Adjust the viewfinder lens to your eyesight (p. 34).
Monitoring the playback picture on the LCD
screen (p. 43)
2Press m to rewind the tape.
P
L
A
Y
E
R
O
F
F
P
(
O
C
W
E
R
H
G
C
)
A
M
E
R
A
P
L
A
Y
E
R
O
F
F
PO
(
C
W
ER
H
G
C
)
A
M
E
R
A
Quick Start Guide
1Set the POWER
switch to PLAYER
while pressing the
small green button.
NOTE
Do not pick up your camcorder by
the viewfinder, the LCD panel or the
battery pack.
REW
3Press N to start playback.
PLAY
P
L
A
Y
E
R
O
F
F
(
C
R
E
W
H
O
P
G
C
)
A
M
E
R
A
11
Nederlands
Snelle startgids
Aansluiten van het netsnoer (p. 19)
Voor gebruik buitenshuis dient u een batterijpak aan te brengen (p. 18).
Snelle startgids
In dit hoofdstuk vindt u de eerste stappen voor het gebruik van
uw camcorder kort beschreven. Zie voor nadere bijzonderheden
de bladzijden waarnaar tussen haakjes “( )” wordt verwezen.
Open het klepje
van de DC IN
aansluiting.
Sluit de stekker aan met
het v driehoekje boven.
12
Netspanningsadapter (bijgeleverd)
Inleggen van een videocassette (p. 27)
1Open de klep van de
cassettehouder en druk
op Z EJECT. De
cassettehouder opent
automatisch.
EJECT
2Plaats een
videocassette in de
houder met de
vensterzijde naar
buiten gericht en
het wispreventie
nokje op de
cassette omhoog.
3Druk op de kant van de
cassettehouder waar
staat aangegeven
om deze te sluiten. De
cassettehouder gaat
automatisch omlaag.
Vervolgens sluit u het
deksel van de
cassettehouder.
Maken van een video-opname (p. 29)
1Verwijder de lensdop.
2Druk het kleine
groene knopje op de
POWER schakelaar in
en zet de schakelaar in
de CAMERA stand.
4Druk op START/
STOP. De camcorder
begint dan met
opnemen. Om te
stoppen met opnemen
3Houd de OPEN toets
ingedrukt en klap het
LCD scherm open.
Het beeld dat u kunt
opnemen verschijnt
op het LCD scherm.
Bij aankoop van uw camcorder is de tijd nog niet ingesteld. Als u de
Zoeker
Wanneer het LCD scherm gesloten is kunt u de opgenomen
beelden in de zoeker zien, door de oogkap tegen uw oog te
plaatsen.
In de zoeker verschijnen alle beelden in zwart/wit.
Regel de beeldzoekerlens volgens uw gezichtsvermogen (p. 34).
drukt u nogmaals op
START/STOP.
opnamedatum en -tijd voor beelden wilt vastleggen, zult u voor de opname
eerst de klok op de juiste tijd gelijk moeten zetten (p. 25).
Controleren van de laatste opnamen op het LCD
scherm (p. 43)
2Druk op de m toets om de band terug
te spoelen.
P
L
A
Y
E
R
O
F
F
P
(
O
C
W
E
R
H
G
C
)
A
M
E
R
A
P
L
A
Y
E
R
O
F
F
PO
(
C
W
ER
H
G
C
)
A
M
E
R
A
Snelle startgids
1Druk het kleine groene
knopje op de POWER
schakelaar in en zet de
schakelaar in de
“PLAYER” stand.
Opmerking
Til de camcorder nooit aan de
beeldzoeker, het LCD-paneel of het
batterijpak op.
REW
3Druk op de N toets om de weergave
te starten.
PLAY
P
L
A
Y
E
R
O
F
F
(
C
R
E
W
H
O
P
G
C
)
A
M
E
R
A
13
— Getting started —
— Voorbereidingen —
Using this manual
The instructions in this manual are for the five
models listed in the table below (p. 15). Before
you start reading this manual and operating your
camcorder, check the model number by looking
at the bottom of your camcorder. The
DCR-TRV140E is the model used for illustration
purposes. Otherwise, the model name is
indicated in the illustrations. Any differences in
operation are clearly indicated in the text, for
example, “DCR-TRV140E only.”
As you read through this manual, buttons and
settings on your camcorder are shown in capital
letters.
e.g. Set the POWER switch to CAMERA.
When you carry out an operation, you can hear a
beep sound to indicate that the operation is being
carried out.
Before using your camcorder
(DCR-TRV140E only)
With your digital camcorder, we recommend
using Hi8 /Digital8 video cassettes. Your
camcorder records and plays back pictures only
in the Digital8 system. You cannot play back
tapes recorded in the Hi8 /standard 8 mm
(analogue) system.
Note on TV colour systems
TV colour systems differ from country to
country. To view your recordings on a TV, you
need a PAL system-based TV.
Omtrent deze handleiding
De instructies in deze handleiding zijn van
toepassing op de vijf modellen in de
onderstaande tabel (p. 16). Controleer voor het
doorlezen van deze handleiding en het in
gebruik nemen van uw camcorder eerst even uw
modelnummer, dat aan de onderkant van de
camcorder vermeld staat. De afbeeldingen in
deze gebruiksaanwijzing tonen het model
DCR-TRV140E, tenzij er bij de afbeelding een
ander modelnummer staat aangegeven.
Verschillen in bediening tussen de modellen
worden in de tekst duidelijk aangegeven, als
bijvoorbeeld “alleen voor de DCR-TRV140E”.
De namen van toetsen of regelaars en instellingen
op de camcorder worden in deze handleiding in
hoofdletters vermeld.
Bijvoorbeeld: Zet de POWER schakelaar in de
CAMERA stand.
Bij bepaalde bedieningsfuncties kunnen er één of
meer pieptonen klinken, om u op het
overschakelen te attenderen en vergissingen te
voorkomen.
Aanwijzingen voor het gebruik
van de camcorder (alleen
DCR-TRV140E)
Wij raden aan Hi8 /Digital8
videocassettes te gebruiken met uw digitale
camcorder. Uw camcorder is alleen geschikt voor
opname en weergave met het Digital8 systeem.
Alleen cassettes opgenomen met het Hi8 /
Standard 8 mm (analoog) systeem kunnen
worden afgespeeld.
14
Verschillende televisiekleursystemen
Televisie-kleursystemen verschillen van land tot
land. Om de videobeelden van deze camcorder
op uw TV te bekijken, moet het TV-toestel
werken met het PAL kleursysteem.

English
Using this manual
Types of differences
Model name
System Hi8 Hi8 Hi8 Hi8 Digital8
Playback Hi8/8 Hi8/8 Hi8/8 Hi8/8 Digital8
Digital Zoom 450× 460× 560× 560× 560×
Remote Sensor z — zzz
SteadyShot ———zz
Date and time zzzz—
DNR
(Digital Noise Reduction)
Easy Dubbing zzzz—
ORC
(Optimizing the Recording zzzz—
Condition)
TBC
(Time Base Corrector)
Data Code ————z
TRV107E TRV108E TRV208E TRV408E TRV140E
zzzz—
zzzz—
CCD- DCR-
Getting started Voorbereidingen
Digital effect ————z
Digital program editing ————z
DV OUT jack ————z
Frame recording ————z
Hifi SOUND ————z
Interval recording ————z
Super Nightshot/
Colour Slow Shutter
Tape Photo recording ————z
USB Streaming ————z
Zero set memory ————z
z Provided
— Not provided
————z
15

Nederlands
Omtrent deze handleiding
Verschillen tussen de uitvoeringen
Modelnaam
Systeem Hi8 Hi8 Hi8 Hi8 Digital8
Weergave Hi8/8 Hi8/8 Hi8/8 Hi8/8 Digital8
TRV107E TRV108E TRV208E TRV408E TRV140E
CCD- DCR-
Digital Zoom
Afstandsbedieningssensor z — zzz
SteadyShot ———zz
Datum en tijd zzzz—
DNR
(Digital Noise Reduction)
Easy Dubbing zzzz—
ORC
(Optimizing the Recording zzzz—
Condition)
TBC
(Time Base Corrector)
Data Code ————z
Digitaal effect ————z
Digitale programmamontage ————z
DV OUT aansluiting ————z
Beeldopname ————z
Hifi SOUND ————z
450
×
zzzz—
zzzz—
460
×
560
×
560
×
560
×
Intervalopname ————z
Super Nightshot/
Colour Slow Shutter
Tape Photo-opname ————z
USB Streaming ————z
Nulpunt-terugkeerfunctie ————z
z Voorzien
— Niet voorzien
————z
16

Using this manual
Omtrent deze handleiding
Precautions on camcorder care
Lens and LCD screen/finder
(on mounted models only)
•The LCD screen and the finder are
manufactured using extremely highprecision technology so over 99.99% of the
pixels are operational for effective use.
However, there may be some tiny black
points and/or bright points (white, red, blue
or green in colour) that constantly appear on
the LCD screen and the finder. These points
are normal in the manufacturing process and
do not affect the recording in any way.
•Do not let your camcorder get wet. Keep your
camcorder away from rain and sea water.
Letting your camcorder get wet may cause your
camcorder to malfunction. Sometimes this
malfunction cannot be repaired [a].
•Never leave your camcorder exposed to
temperatures above 60°C (140°F), such as in a
car parked in the sun or under direct sunlight
[b].
•Be careful when placing the camera near a
window or outdoors. Exposing the LCD screen,
the finder or the lens to direct sunlight for long
periods may cause malfunctions. [c].
•Do not directly shoot the sun. Doing so might
cause your camcorder to malfunction. Take
pictures of the sun in low light conditions such
as dusk [d].
[a] [b]
Voorzorgen bij gebruik van de
camcorder
Lens en LCD-scherm/beeldzoeker
(alleen op gemonteerde modellen)
•Het LCD scherm en de zoeker zijn
vervaardigd met hoogstaande
precisietechnologie, met als resultaat dat
meer dan 99,99% van de beeldpunten actief
is voor effectief gebruik. Er kunnen echter
enkele kleine zwarte puntjes en/of heldere
puntjes (wit, rood, blauw of groen van
kleur) in op het LCD-scherm of de zoeker
zichtbaar blijven. Deze puntjes zijn een
normaal gevolg van het fabricageproces en
hebben geen enkele invloed op de
opgenomen beelden.
•Laat de camcorder niet nat worden. Zorg dat er
geen regen of opspattend water, vooral
zeewater, op het apparaat komt. Water in de
camcorder kan storingen veroorzaken, soms
zodanig dat reparatie niet meer mogelijk is [a].
•Laat de camcorder nooit achter op plaatsen
waar de temperatuur tot boven de 60°C kan
oplopen, zoals op een vensterbank in de volle
zon of in een auto die in de zon geparkeerd
staat [b].
•Wees voorzichtig wanneer u de camera bij een
venster of buiten neerzet. Indien het LCDscherm, de zoeker of de lens langdurig wordt
blootgesteld aan direct zonlicht, kan dit tot
defecten leiden [c].
•Richt de camcorder niet op de zon. Direct
zonlicht kan storing in de werking van de
camcorder veroorzaken. Alleen bij
zonsondergang, als het licht niet meer zo fel is,
mag u de zon in beeld nemen [d].
Getting started Voorbereidingen
[c]
[d]
17
Step 1 Preparing the
power supply
Stap 1
Voorbereiden
van de
stroomvoorziening
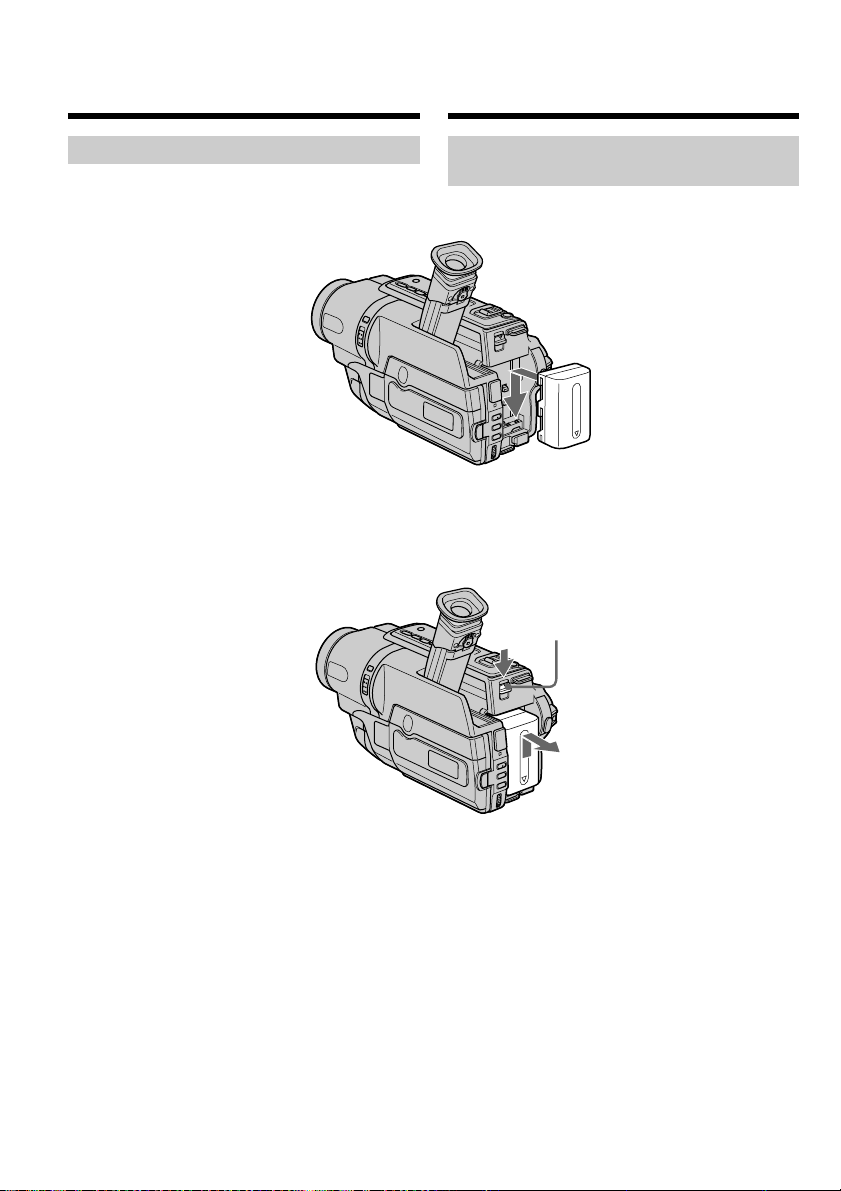
Installing the battery pack
Slide the battery pack down until it clicks.
To remove the battery pack
Slide the battery pack out in the direction of the
arrow while pressing V BATT down.
Aanbrengen van een
batterijpak
Schuif het batterijpak omlaag tot het vastklikt.
Losmaken van het batterijpak
Hou V BATT ingedrukt en schuif het batterijpak
in de richting van de pijl omhoog en los.
V BATT release lever/
V Batterijvrijmaakknop
18
Step 1 Preparing the power
supply
Stap 1 Voorbereiden van de
stroomvoorziening
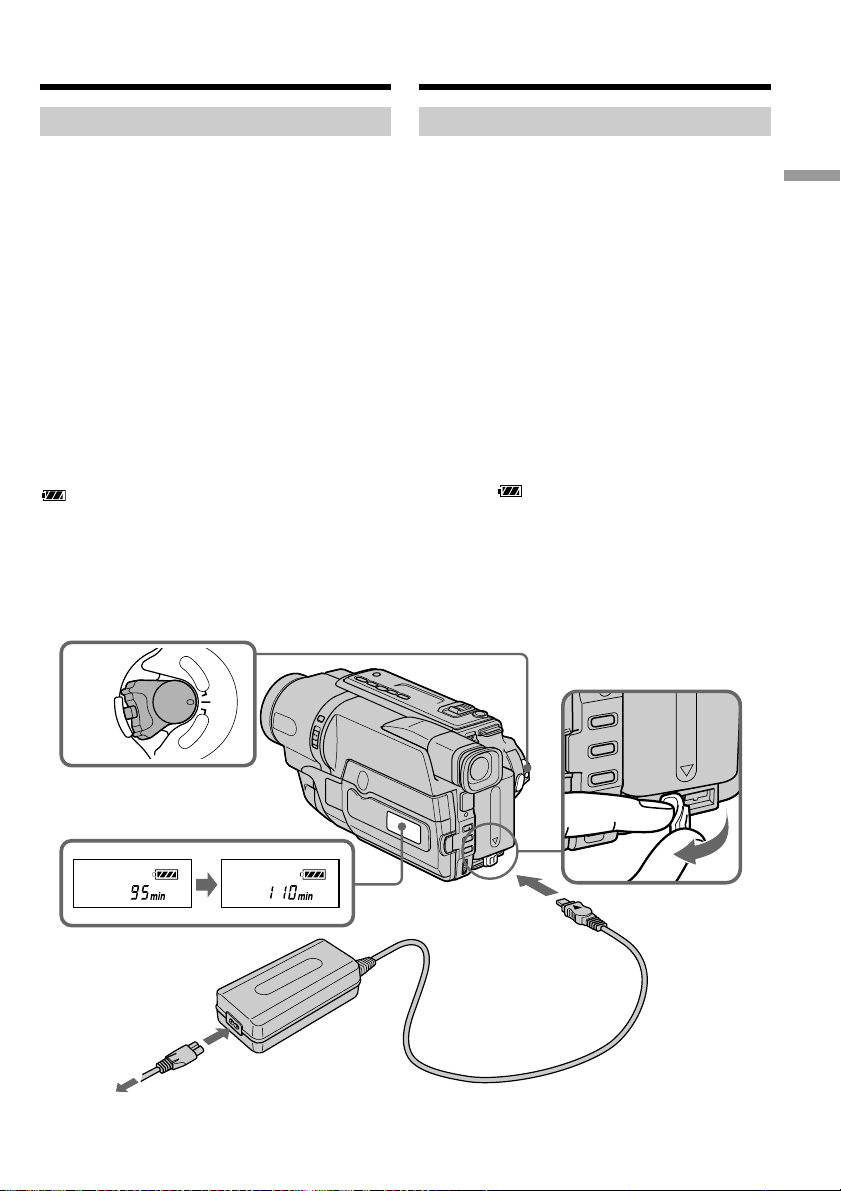
Charging the battery pack
Use the battery pack after charging it for your
camcorder.
Your camcorder operates only with the
“InfoLITHIUM” battery pack (M series).
See page 174 for details of the “InfoLITHIUM”
battery pack.
(1)Open the DC IN jack cover and connect the
AC power adaptor supplied with your
camcorder to the DC IN jack with the plug’s v
mark facing up.
(2)Connect the mains lead to the AC power
adaptor.
(3)Connect the mains lead to a wall socket.
(4)Set the POWER switch to OFF (CHG).
Charging begins. The remaining battery time
is indicated in minutes on the display
window.
When the remaining battery indicator changes to
, normal charge is completed. To fully charge
the battery (full charge), leave the battery pack
attached for about one hour after normal charge
is completed until “FULL” appears in the display
window. Fully charging the battery allows you to
use the battery longer than usual.
P
L
A
Y
POWER
E
R
O
F
F
(
C
H
G
C
)
A
M
E
R
A
4
Opladen van het batterijpak
Voordat u de camcorder kunt gebruiken, dient u
eerst het batterijpak op te laden.
Deze camcorder werkt alleen met
“InfoLITHIUM” batterijen (van de M-serie).
Meer details over het “InfoLITHIUM” batterijpak
vindt u op pagina 174.
(1)Open het DC IN aansluitdeksel en sluit de
meegeleverde netspanningsadapter aan met v
op de stekker omhoog.
(2)Sluit het netsnoer aan op de
netspanningsadapter.
(3)Steek de stekker in een stopcontact.
(4)Zet de POWER schakelaar in de OFF (CHG)
stand. Het opladen begint. In het
uitleesvenster verschijnt de resterende
batterijspanning in minuten.
Wanneer de batterijspanningsindicator volledig
oplicht als , is het batterijpak grotendeels
opgeladen (normale lading). Om het batterijpak
nog verder op te laden (volledige lading), laat u
het batterijpak nog ongeveer één uur op de
netspanningsadapter zitten totdat de aanduiding
FULL in het uitleesvenster verschijnt. Na
volledig opladen zult u het batterijpak langer dan
gemiddeld kunnen gebruiken.
Getting started Voorbereidingen
FULL
2,3
The number in the illustration of the display
window may differ from that on your camcorder.
1
Het afgebeelde cijfer in het uitleesvenster kan
verschillen van dat op uw camcorder.
19

Step 1 Preparing the power
supply
Stap 1 Voorbereiden van de
stroomvoorziening
After charging the battery pack
Disconnect the AC power adaptor from the DC
IN jack on your camcorder.
Note
Prevent metallic objects from coming into contact
with the metal parts of the DC plug of the AC
power adaptor. This may cause a short-circuit,
damaging the AC power adaptor.
Remaining battery time indicator
The remaining battery time you record with the
viewfinder is displayed.
The remaining battery time indicator in the
display window roughly indicates the recording
time with the viewfinder.
Until your camcorder calculates the actual
remaining battery time
“– – – – min” appears in the display window.
While charging the battery pack, no indicator
appears or the indicator flashes in the display
window in the following cases:
– The AC power adaptor is disconnected.
– The battery pack is not installed properly.
– Something is wrong with the battery pack.
We recommend charging the battery pack in
an ambient temperature of between 10°C to
30°C (50°F to 86°F.)
If the power goes off although the battery
remaining indicator indicates that the battery
pack has enough power to operate
Charge the battery pack fully again so that the
indication on the battery remaining indicator is
correct.
Na het opladen van het batterijpak
Trek de stekker van de netspanningsadapter uit
de DC IN gelijkstroomingang van de camcorder.
Opmerking
Zorg dat er geen metalen voorwerpen tegen de
metalen contactvlakken van de
gelijkstroomstekker van de netspanningsadapter
komen. Dit kan kortsluiting veroorzaken en de
netspanningsadapter beschadigen.
Aanduiding van de resterende batterijspanning
De resterende batterijlading verschijnt in de
beeldzoeker.
De batterijspanningsindicator in het
uitleesvenster geeft bij benadering de resterende
opnameduur met de beeldzoeker.
Voordat de resterende batterijspanning wordt
aangegeven
“– – – – min” verschijnt in het uitleesvenster.
Tijdens het opladen van het batterijpak kan
de indicator in het uitleesvenster knipperen of
helemaal niet oplichten in de volgende
gevallen:
– De netspanningsadapter is niet stevig
aangesloten.
– Het batterijpak is niet juist geïnstalleerd.
– Als er iets mis is met het batterijpak.
Wij raden u aan het batterijpak te laden bij
een omgevingstemperatuur van 10°C tot 30°C.
Als het toestel uitschakelt, ook al geeft de
batterijrestladingsindicator aan dat het
batterijpak nog voldoende is opgeladen.
Laad het batterijpak opnieuw helemaal op zodat
de resterende batterijduur correct wordt
aangegeven.
20

Step 1 Preparing the power
supply
Charging time/Vereiste oplaadtijd
Battery pack/ Full charge (normal charge)/
Batterijpak Volledige (normale lading)
NP-FM30
(supplied)/(meegeleverd)
NP-FM50 150 (90)
NP-FM70 240 (180)
NP-QM71 260 (200)
NP-FM90 330 (270)
NP-FM91/QM91 360 (300)
Approximate number of minutes to charge an
empty battery pack at 25°C (77°F)
Recording time/Beschikbare opnameduur
CCD-TRV107E/TRV108E/TRV208E/TRV408E
Recording with Recording with
Battery pack/ Opname met Opname met
Batterijpak beeldzoeker LCD-scherm
NP-FM30
(supplied)/(meegeleverd)
NP-FM50 265 145 195 105
NP-FM70 540 295 400 220
NP-QM71 640 350 465 255
NP-FM90 820 450 600 330
NP-FM91/QM91 955 525 695 380
the viewfinder/ the LCD screen/
Continuous*/ Typical**/ Continuous*/ Typical**/
Continu* Typisch** Continu* Typisch**
165 90 120 65
Stap 1 Voorbereiden van de
stroomvoorziening
145 (85)
Aantal minuten bij benadering om een leeg
batterijpak op te laden bij 25°C.
Getting started Voorbereidingen
DCR-TRV140E
Recording with Recording with
Battery pack/ Opname met Opname met
Batterijpak beeldzoeker LCD-scherm
NP-FM30
(supplied)/(meegeleverd)
NP-FM50 180 100 140 75
NP-FM70 370 205 295 160
NP-QM71 430 235 340 185
NP-FM90 560 310 450 245
NP-FM91/QM91 645 355 520 285
the viewfinder/ the LCD screen/
Continuous*/ Typical**/ Continuous*/ Typical**/
Continu* Typisch** Continu* Typisch**
110 60 85 45
Approximate number of minutes when you use a
fully charged battery pack
Dit is ongeveer het aantal minuten dat u kunt
opnemen met een volledig opgeladen batterijpak.
21

Step 1 Preparing the power
supply
Stap 1 Voorbereiden van de
stroomvoorziening
* Approximate continuous recording time at
25°C (77°F). The battery life will be shorter if
you use your camcorder in a cold
environment.
** Approximate number of minutes when
recording while you repeat recording start/
stop, zooming and turning the power on/off.
The actual battery life may be shorter.
Playing time/Вeschikbare speelduur
CCD-TRV107E/TRV108E/TRV208E/TRV408E
Battery pack/
Batterijpak
NP-FM30
(supplied)/(meegeleverd)
NP-FM50 195 285
NP-FM70 400 570
NP-QM71 465 675
NP-FM90 600 865
NP-FM91/QM91 695 1010
DCR-TRV140E
Battery pack/
Batterijpak
NP-FM30
(supplied)/(meegeleverd)
NP-FM50 140 185
NP-FM70 295 385
NP-QM71 340 445
NP-FM90 450 580
NP-FM91/QM91 520 670
on LCD screen/ with LCD closed/
on LCD screen/ with LCD closed/
* Gebruiksduur in minuten bij benadering, bij
ononderbroken opnemen bij een temperatuur
van 25°C. Het batterijpak zal minder lang
meegaan bij gebruik van de camcorder in een
koude omgeving.
** Gebruiksduur in minuten bij benadering, bij
filmen met herhaaldelijk starten/stoppen van
het opnemen, in/uit-zoomen en in/
uitschakelen van de stroom. De gebruiksduur
van het batterijpak kan in werkelijkheid korter
uitvallen.
Playing time Playing time
Speelduur op Speelduur met
LCD-scherm LCD-scherm gesloten
120 175
Playing time Playing time
Speelduur op Speelduur met
LCD-scherm LCD-scherm gesloten
85 115
Approximate number of minutes when you use a
fully charged battery pack
22
Dit is ongeveer het aantal minuten dat u videoopnamen kunt afspelen met een volledig
opgeladen batterijpak.
Step 1 Preparing the power
supply
Stap 1 Voorbereiden van de
stroomvoorziening
Approximate continuous playing time at 25°C
(77°F).
The battery life will be shorter if you use your
camcorder in a cold environment.
The recording and playing time of a normally
charged battery are about 90% of those of a fully
charged battery.
What is the ”InfoLITHIUM”?
The “InfoLITHIUM” is a lithium ion battery pack
which can exchange data such as battery
consumption with compatible electronic
equipment. This unit is compatible with the
“InfoLITHIUM” battery pack (M series). Your
camcorder operates only with the
“InfoLITHIUM” battery pack. “InfoLITHIUM” M
series battery packs have the mark.
“InfoLITHIUM” is a trademark of Sony
Corporation.
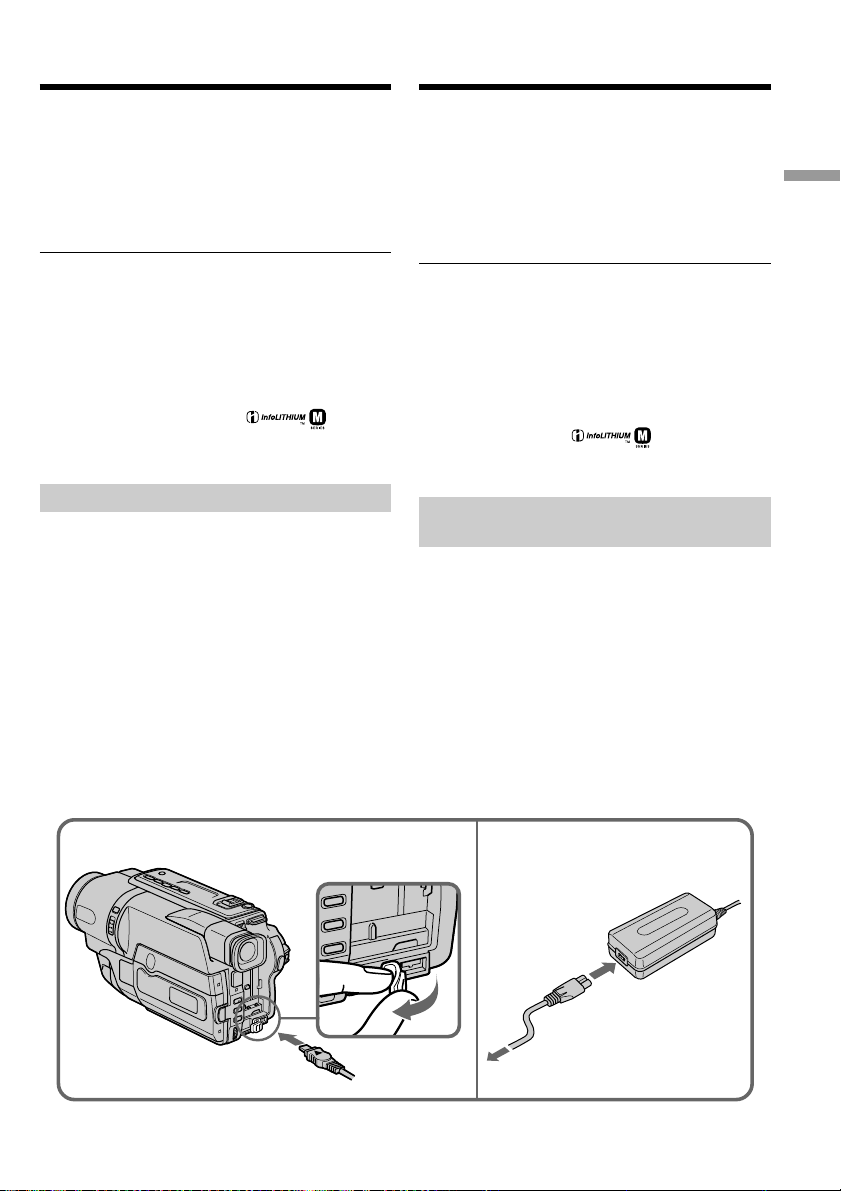
Connecting to a wall socket
When you use your camcorder for a long time,
we recommend that you power it from a wall
socket using the AC power adaptor.
(1)Open the DC IN jack cover, and connect the
AC power adaptor to the DC IN jack on your
camcorder with the plug’s v mark facing up.
(2)Connect the mains lead to the AC power
adaptor.
(3)Connect the mains lead to a wall socket.
Continu speelduur (bij benadering) bij een
temperatuur van 25°C.
Het batterijpak zal minder lang meegaan bij
gebruik van de camcorder in een koude
omgeving.
De opname-en weergaveduur van een normaal
geladen batterij bedraagt ongeveer 90% van die
van een volledig geladen batterij.
What is ”InfoLITHIUM”?
Het “InfoLITHIUM” batterijpak is een lithiumionen batterijpak dat geschikt is voor het
doorgeven van het gebruikstempo van de batterij
aan de hiervoor geschikte elektronische
apparatuur. Deze camcorder is geschikt voor elk
“InfoLITHIUM” batterijpak van de M-serie. Deze
camcorder werkt alleen met “InfoLITHIUM”
batterijen. “InfoLITHIUM” M-serie batterijen zijn
te herkennen aan het beeldmerk.
“InfoLITHIUM” is een handelsmerk van Sony
Corporation.
Gebruik op stroom van het
lichtnet
Als u de camcorder geruime tijd achtereen wilt
gebruiken, is het aanbevolen het apparaat op het
lichtnet aan te sluiten via de bijgeleverde
netspanningsadapter.
(1)Open het DC IN aansluitklepje en sluit de bij
uw camcorder geleverde
netspanningsadapter aan op de DC IN
gelijkstroomingang, met het v driehoekje van
de stekker boven.
(2)Sluit het netsnoer aan op de
netspanningsadapter.
(3)Steek de stekker van het netsnoer in het
stopcontact.
Getting started Voorbereidingen
1
2,3
23

Step 1 Preparing the power
supply
Stap 1 Voorbereiden van de
stroomvoorziening
PRECAUTION
The set is not disconnected from the AC power
source (wall socket) as long as it is connected to a
wall socket, even if the set itself has been turned
off.
Notes
•The AC power adaptor can supply power even
if the battery pack is attached to your
camcorder.
•The DC IN jack has “source priority”. This
means that the battery pack cannot supply any
power if the mains lead is connected to the DC
IN jack, even when the mains lead is not
plugged into the wall socket.
•Place the AC power adaptor near the wall
socket. While using the AC power adaptor, if
any trouble occurs with this unit, disconnect the
plug from the wall socket as soon as possible to
cut off the power.
Using a car battery
Use Sony DC Adaptor/Charger (optional). Refer
to the operating instructions of the DC adaptor/
charger for further information.
VOORZICHTIG
Zolang de stekker in het stopcontact zit, blijft de
stroomtoevoer naar het apparaat intact, ook al is
de camcorder zelf uitgeschakeld.
Opmerkingen
•U kunt uw camcorder ook op stroom van de
netspanningsadapter gebruiken wanneer er een
batterijpak op de camcorder is aangesloten.
•De DC IN gelijkstroomingang heeft voorrang
bij de stroomvoorziening. Dat wil zeggen dat
het batterijpak géén stroom kan leveren zolang
het snoer van de netspanningsadapter is
aangesloten op de DC IN aansluiting, ook al zit
de stekker van de netspanningsadapter niet in
het stopcontact.
•Plaats de netspanningsadapter in de buurt van
een stopcontact. Als er tijdens gebruik van de
netspanningsadapter iets mis gaat, trekt u dan
zo spoedig mogelijk de stekker uit het
stopcontact.
Gebruik op stroom van een auto-accu
Gebruik van de Sony gelijkstroomadapter/lader
(niet bijgeleverd). Zie voor nadere
bijzonderheden de gebruiksaanwijzing van de
netspanningsadapter/lader.
24
Step 2 Setting the
date and time
Stap 2
Instellen van de
datum en tijd
Set the date and time settings when you use your
camcorder for the first time.
“CLOCK SET” will be displayed each time when
you set the power switch to CAMERA unless you
set the date and time settings.
If you do not use your camcorder for about 6
months, the date and time settings may be
released (bars may appear) because the built-in
rechargeable battery in your camcorder will have
been discharged.
First, set the year, then the month, the day, the
hour and then the minute.
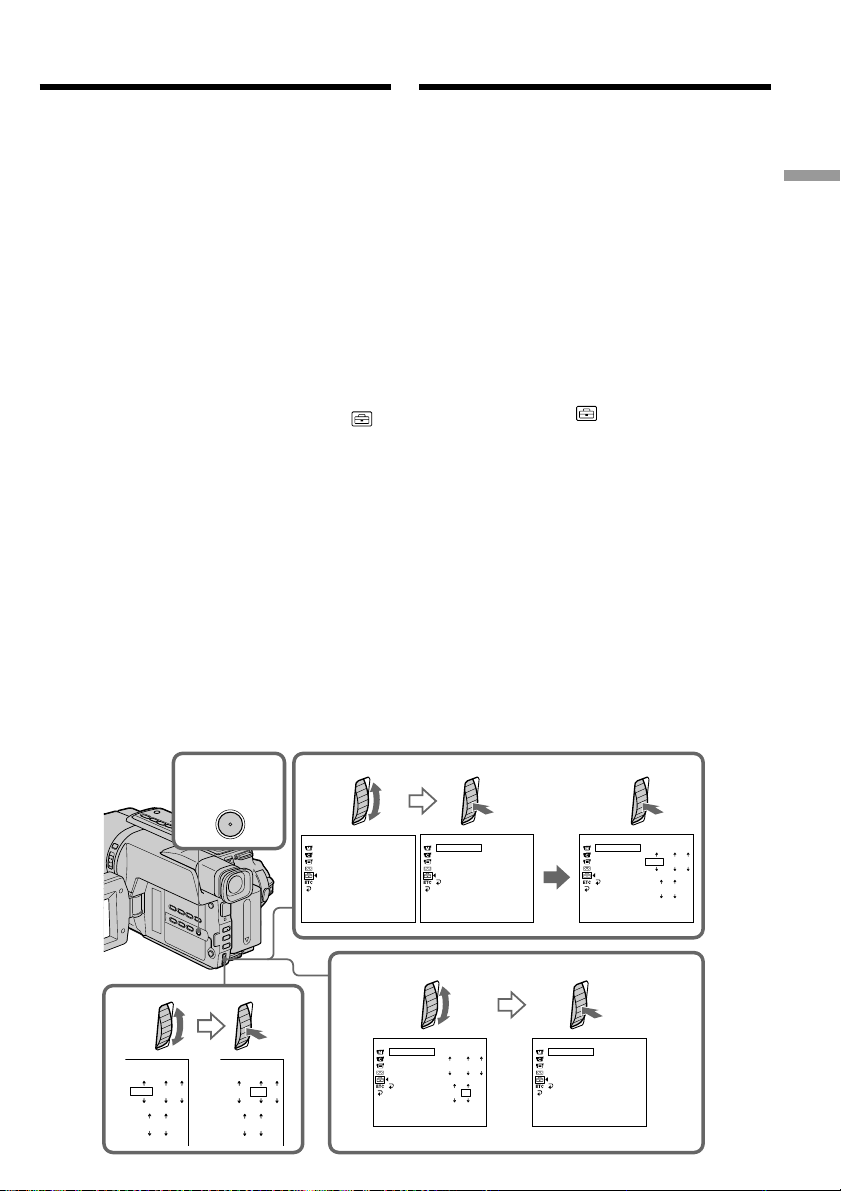
(1)While your camcorder is in CAMERA mode,
press MENU to display the menu.
(2)Turn the SEL/PUSH EXEC dial to select ,
then press the dial.
(3)Turn the SEL/PUSH EXEC dial to select
CLOCK SET, then press the dial.
(4)Turn the SEL/PUSH EXEC dial to adjust the
desired year, then press the dial.
(5)Set the month, day and hour by turning the
SEL/PUSH EXEC dial and pressing the dial.
(6)Set the minute by turning the SEL/PUSH
EXEC dial and pressing the dial by the time
signal. The clock starts to operate.
(7)Press MENU to make the menu disappear.
The time indicator appears.
Voor het eerste gebruik van uw camcorder zult u
de datum en tijd moeten instellen.
“CLOCK SET” verschijnt telkens wanneer u de
hoofdschakelaar op CAMERA zet en datum en
tijd niet zijn ingesteld.
Als u de camcorder ongeveer 6 maanden lang
niet hebt gebruikt, kan de tijd- en
datuminstelling zijn vervallen (zodat er slechts
streepjes verschijnen) omdat de oplaadbare
batterij in de camcorder is uitgeput.
Dan stelt u eerst het jaar in, dan de maand, de
dag, het uur en ten slotte de minuten.
(1)Druk op MENU om het menu te laten
verschijnen met de camcorder in de CAMERA
stand.
(2)Draai aan de SEL/PUSH EXEC regelknop om
in te stellen op het pictogram en druk de
regelknop in.
(3)Draai aan de SEL/PUSH EXEC regelknop om
in te stellen op “CLOCK SET” en druk de
regelknop in.
(4)Draai weer aan de SEL/PUSH EXEC
regelknop om in te stellen op het juiste jaartal
en druk de regelknop in.
(5)Draai steeds aan de SEL/PUSH EXEC
regelknop om de maand, het dagnummer en
het juiste uur in te stellen en druk tussendoor
telkens op de regelknop om de instelling vast
te leggen.
(6)Draai aan de SEL/PUSH EXEC regelknop om
in te stellen op de juiste minuut, en druk de
regelknop in tegelijk met het tijdsignaal. De
klok begint dan te lopen.
(7)Druk weer op de MENU toets om het
instelmenu uit beeld te laten verdwijnen.
De tijdsaanduiding verschijnt.
Getting started Voorbereidingen
4
000
1,7
112002
MENU
000
2
SETUP MENU
CLOCK SET
USB S TREAM
LTR S IZE
LANGU AG E
DEMO MOD E
[
MENU
SETUP MENU
] :
END
[
CLOCK SET
USB S TREAM
LTR S IZE
LANGU AG E
DEMO MODE
RETURN
] :
MENU
END
:––:
––
––
3
SETUP MENU
CLOCK SET
USB S TREAM
LTR S IZE
LANGU AG E
DEMO MODE
[
RETURN
MENU
112002
000
] :
END
6
SETUP MENU
CLOCK SET
USB S TREAM
LTR S IZE
LANGU AG E
DEMO MOD E
112002
RETURN
[
MENU
7
42002
17 30
] :
END
SETUP MENU
CLOCK SET
USB S TREAM
LTR S IZE
LANGU AG E
DEMO MOD E
RETURN
[
] :
MENU
END
4 7 2002
1
7:30:00
25

Step 2 Setting the date and time
Stap 2 Instellen van de datum en
tijd
The year changes as follows:
t 1995 T
. . . .
t 2002 T
To check the preset date and time
(CCD-TRV107E/TRV108E/TRV208E/
TRV408E only)
Press DATE to display the date indicator.
Press TIME to display the time indicator.
Press DATE (or TIME) and then press TIME (or
DATE) to simultaneously display the date and
time indicator.
Press DATE and/or TIME again. The date and/
or time indicator disappears.
Auto date function
When you use your camcorder for the first time,
turn it on and set the date and time to your local
time before you start recording (p. 25). The date
is automatically recorded for 10 seconds after
you start recording (Auto date function). This
function works only once a day.
Note on the time indicator
The internal clock of your camcorder operates on
a 24-hour cycle.
Note on the auto date function
(CCD-TRV107E/TRV108E/TRV208E/TRV408E
only)
You can change the AUTO DATE setting by
selecting ON or OFF in the menu settings. The
auto date function automatically displays the
date once a day.
However, the date may automatically appear
more than once a day if:
– you set the date and time.
– you eject and insert the tape again.
– you stop recording within 10 seconds.
– you set AUTO DATE to OFF once and set it
back to ON in the menu settings.
De jaaraanduiding verspringt als volgt:
. . . .
t 2079 T
Controleren van de ingestelde datum
en tijd (alleen CCD-TRV107E/TRV108E/
TRV208E/TRV408E)
Druk op de DATE toets om de ingestelde datum
te zien.
Druk op de TIME toets om de tijd te controleren.
Druk na de DATE toets ook de TIME toets in (of
omgekeerd) om zowel de datum als de
tijdsaanduiding te zien.
Druk na afloop nogmaals op de DATE en/of
TIME toets. De datum en/of tijdsaanduiding
verdwijnt.
Automatische datumopname
Wanneer u de camcorder voor het eerst gebruikt,
moet u hem aanschakelen en de lokale datum en
tijd instellen voor u begint op te nemen (p. 25).
Wanneer u begint met opnemen, zal de
ingestelde datum automatisch mee worden
opgenomen, zodat deze aan het begin
10 seconden lang in beeld verschijnt
(automatische datumopname). Deze functie
treedt normaal slechts eenmaal per dag in
werking.
Betreffende de tijdsaanduiding
De ingebouwde klok van deze camcorder geeft
de tijd aan volgens een 24-uurs cyclus.
Opmerking betreffende de automatische
datumopname (alleen CCD-TRV107E/TRV108E/
TRV208E/TRV408E)
De AUTO DATE instelling voor de automatische
datumopname kunt u in het instelmenu naar
wens op ON of OFF instellen. Bij inschakelen
werkt de AUTO DATE opnamefunctie
automatisch eenmaal per dag.
In de volgende gevallen is het mogelijk dat de
datum automatisch meer dan eenmaal per dag
wordt opgenomen:
– Stel datum en tijd in.
– als u de videocassette uitneemt en weer insteekt
– als u de eerste opname binnen 10 seconden
beëindigt
– als u de AUTO DATE instelling in het
instelmenu eenmaal op OFF en dan weer op
ON zet.
26
Step 3 Inserting a
cassette
Stap 3
Inleggen van een
videocassette
We recommend using Hi8 /Digital8
video cassettes.*
When you want to record in the Hi8 system, use
Hi8 video cassettes.*
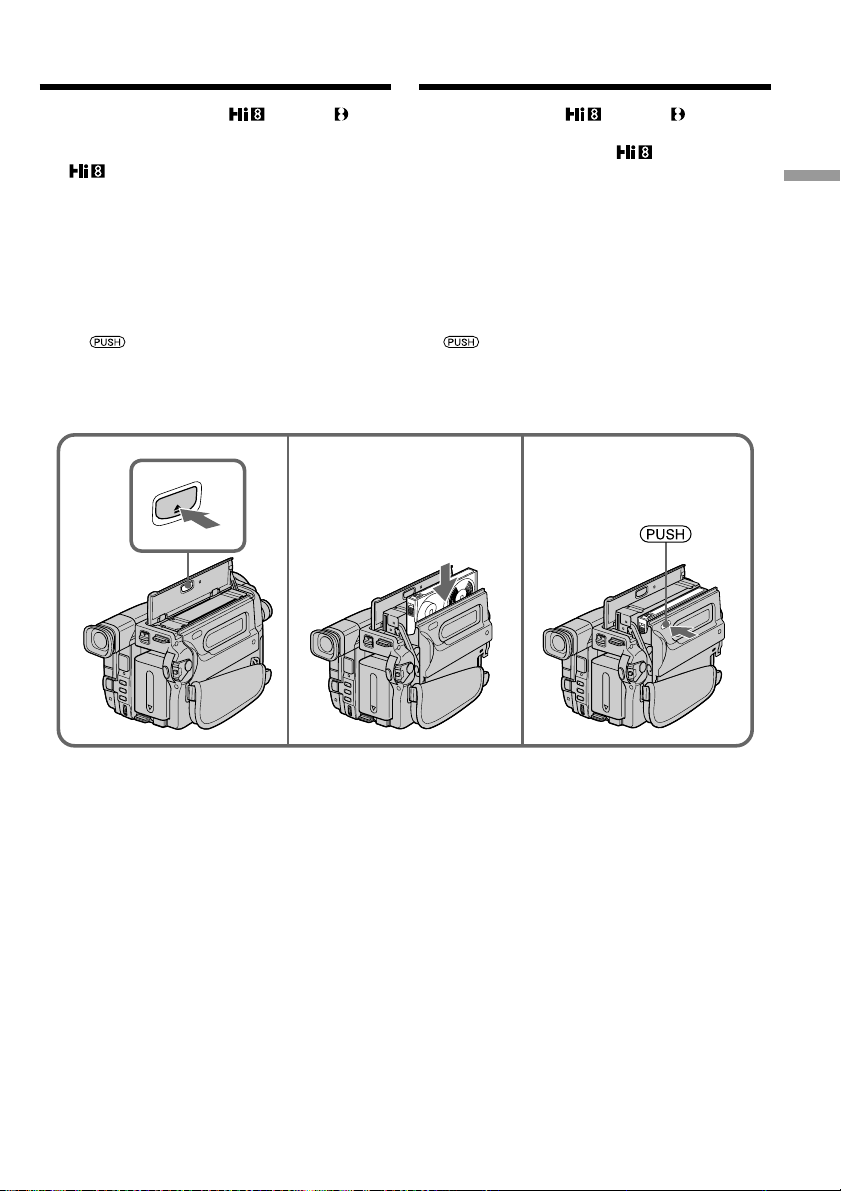
(1)Prepare the power supply (p. 18).
(2)Open the lid of the cassette compartment, and
press Z EJECT. The cassette compartment
opens automatically.
(3)Insert a cassette into the cassette compartment
with its window facing out and the writeprotect tab on the cassette up.
(4)Close the cassette compartment by pressing
the mark on the cassette compartment.
The cassette compartment automatically goes
down.
(5)Close the lid of the cassette compartment.
1)
2)
2 3
T
C
JE
E
Wij raden u aan Hi8 /Digital8
videocassettes te gebruiken.*
Gebruik Hi8 videocassettes om op te nemen
met het Hi8 systeem.*
(1)Maak de spanningsbron klaar (p. 18).
(2)Open de klep van de cassettehouder en druk
op Z EJECT. De cassettehouder opent
automatisch.
(3)Plaats de cassette in de cassettehouder met het
venster naar buiten toe en het
wispreventienokje van de cassette naar boven.
(4)Druk op de kant van de cassettehouder waar
staat aangegeven om deze te sluiten. De
cassettehouder gaat automatisch omlaag.
(5)Vervolgens sluit u het deksel van de
cassettehouder.
1)
2)
4
Getting started Voorbereidingen
To eject a cassette
Follow the procedure above, and eject the
cassette in step 3.
*1)DCR-TRV140E only
*2)CCD-TRV107E/TRV108E/TRV208E/TRV408E
only
Uitnemen van de videocassette
Volg de bovenstaande aanwijzingen en neem in
stap 3 de cassette uit de houder.
*1)Alleen DCR-TRV140E
*2)Alleen CCD-TRV107E/TRV108E/TRV208E/
TRV408E
27
Step 3 Inserting a cassette
Stap 3 Inleggen van een
videocassette
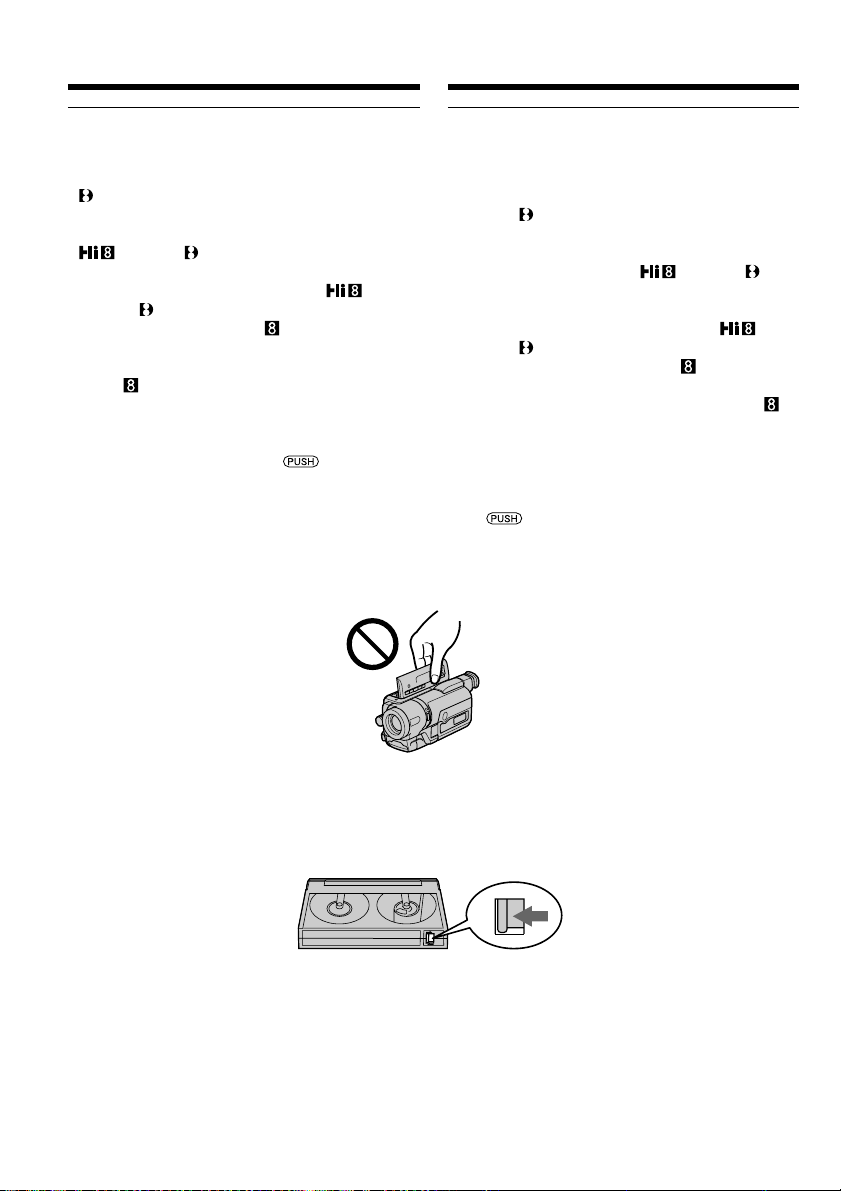
Notes
•Do not press the cassette compartment down.
Doing so may cause a malfunction.
•Your camcorder records pictures in the Digital8
system.*
1)
•The recording time when you use your
camcorder is half of the indicated time on Hi8
/Digital8 tape. If you select the LP
mode in the menu settings, the recording time
is 3/4 of the indicated time on Hi8 /
Digital8 tape.*
1)
•If you use standard 8 mm tape, be sure to
play back the tape on this camcorder. Mosaic
noise may appear when you play back standard
8 mm tape on other camcorders (including
other DCR-TRV140E).*
1)
•The cassette compartment may not be closed
when you press any part of the cassette
compartment other than the mark.
•Do not pick up your camcorder by the lid of the
cassette compartment.
Opmerkingen
•Druk de cassettehouder niet met de hand
omlaag. Hierdoor zou u het apparaat kunnen
beschadigen.
•Deze camcorder neemt beelden op met het
Digital8 system.*
1)
•De opnametijd bij gebruik van uw
videorecorder bedraagt de helft van de tijd die
vermeld staat op een Hi8 /Digital8
cassette. Wanneer u de LP stand kiest in het
instelmenu, bedraagt de opnameduur 3/4 van
de duur die vermeld staat op de Hi8 /
Digital8 cassette.*
1)
•Wanneer u een standard 8 mm cassette
gebruikt, moet u die afspelen met deze
camcorder. Wanneer u een standard 8 mm
cassette afspeelt met andere camcorders (ook
een andere DCR-TRV140E), kan er mozaïekruis
optreden.*
1)
•De cassettehouder kan niet dicht gaan wanneer
u op een ander punt van de cassettehouder dan
het teken drukt.
•Til de camcorder nooit aan het deksel van de
cassettehouder op.
To prevent accidental erasure
Slide the write-protect tab on the cassette to
expose the red mark.
*1)DCR-TRV140E only
28
Voorkomen van per ongeluk wissen
Schuif het wispreventienokje van de
videocassette opzij, zodat het rode vlakje
zichtbaar wordt.
*1)Alleen DCR-TRV140E

— Recording – Basics —
— Opnemen – basisbediening —
Recording a picture
Your camcorder automatically focuses for you.
(1)Remove the lens cap by pressing both knobs
on its sides and attach the lens cap to the grip
strap.
(2)Install the power source and insert a cassette.
See “Step 1” to “Step 3” for more information
(p. 18 to 28).
(3)Set the POWER switch to CAMERA while
pressing the small green button. Your
camcorder is set to the standby mode.
(4)Open the LCD panel while pressing OPEN.
The viewfinder automatically turns off.
(5)Press START/STOP. Your camcorder starts
recording. The REC indicator appears. The
recording lamp located on the front of your
camcorder lights up. To stop recording, press
START/STOP again.
The recording lamp lights up in the
viewfinder when you record with the
viewfinder.
1
Video-opnamen maken
Uw camcorder zal vanzelf op uw onderwerp
scherpstellen.
(1)Verwijder de lensdop door de klemmetjes aan
weerszijden in te drukken en maak de
lensdop aan de handgreepband vast.
(2)Sluit een stroombron aan en plaats een
videocassette. Zie voor nadere aanwijzingen
“Stap 1” tot “Stap 3” (op p. 18 tot 28).
(3)Druk het kleine groene knopje op de POWER
schakelaar in en schuif de schakelaar in de
“CAMERA” stand. Uw camcorder wordt in
de wachtstand gezet.
(4)Houd de OPEN toets ingedrukt en klap het
LCD scherm open. De beeldzoeker wordt
automatisch uitgeschakeld.
(5)Druk op de START/STOP toets. De
camcorder begint dan met opnemen. De REC
indicator licht op. Het opnamelampje vooraan
op de camcorder gaat branden. Om te stoppen
met opnemen drukt u nogmaals op START/
STOP.
Wanneer u opneemt met de zoeker
ingeschakeld, gaat in het zoekerbeeld het
opnamelampje branden.
3
POWER
P
L
A
Y
E
R
O
F
F
(
C
H
G
C
)
A
M
E
R
A
Recording
– Basics
Opnemen
– basisbediening
Recording lamp/
Opnamelampje
Microphone
(R)*1)/
Microfoon (R)*
1)
Microphone (L)
Microfoon (L)
4
2
5
POWER
REC
P
L
A
Y
E
R
A
40min
E
R
O
F
F
(
C
H
G
C
)
A
M
0:00:01
/
29

Recording a picture
Video-opnamen maken
Notes
•Fasten the grip strap firmly.
•Do not touch the built-in microphone during
recording.
Note on Recording mode
Your camcorder records and plays back in the SP
(standard play) mode and in the LP (long play)
mode. Select SP or LP in the menu settings
(p. 140). In the LP mode, you can record 1.5
times*1)/twice*2) as long as in the SP mode. When
you record a tape in the LP mode on your
camcorder, we recommend that you play back
the tape on your camcorder.
To enable smooth transition
You can make the transition between the last
scene you recorded and the next scene smooth as
long as you do not eject the cassette even if you
turn off your camcorder. When you change the
battery pack, set the POWER switch to OFF
(CHG).
If you leave your camcorder in the standby
mode for 3 minutes*1) /5 minutes*2) while the
cassette is inserted
Your camcorder automatically turns off. This is
to save battery power and to prevent battery and
tape wear. To resume the standby mode for
recording, set the POWER switch to OFF (CHG)
once, then set it to CAMERA, or press START/
STOP without changing the POWER switch
again to start recording. If your camcorder is in
the standby mode, with no cassette inserted, it
does not turn off automatically.
When you record in the SP and LP modes on
one tape or you record some scenes in the LP
mode
The playback picture may be distorted.
The time code may not be written properly
between scenes.*
Recording date and time (DCR-TRV140E only)
The recording date and time are not displayed
while recording. However, they are recorded
automatically onto the tape. To display the
recording date and time, press DATA CODE on
the Remote Commander during recording.
1)
Opmerkingen
•Trek de handgreepband stevig aan.
•Let op dat u tijdens het opnemen de
ingebouwde microfoon niet aanraakt.
Betreffende de opnamesnelheid
Deze camcorder kan opnemen en afspelen met
de SP (standaard) opnamesnelheid of de LP
(langspeel) snelheid. Kies de stand SP of LP in
het instelmenu (p. 148). Met de LP
langspeelsnelheid kunt u 1,5 keer*1)/ twee*2) keer
zo lang opnemen als met de SP snelheid. Een
videoband die is opgenomen met de LP
langspeelsnelheid op deze camcorder, kunt u
beter ook afspelen op deze camcorder.
Voor soepel aansluitende opnamen
Het begin van een nieuwe video-opname zal
altijd direct aansluiten op het eind van de
voorgaande opnamen, mits u de videocassette
niet uit de camcorder verwijdert. Als u tijdens het
opnemen het batterijpak moet verwisselen, zet u
dan eerst de POWER schakelaar in de “OFF
(CHG)” stand.
Als u de camcorder, met een cassette erin,
langer dan 3 minuten*1) / 5 minuten*2) in de
opnamepauzestand laat staan
Uw camcorder schakelt automatisch uit. Zo
voorkomt u onnodig uitputten van het
batterijpak en slijtage aan de cassetteband. Om
terug te keren naar de opnamewachtstand, zet u
de POWER schakelaar op OFF (CHG) en
vervolgens op CAMERA, of drukt u op START/
STOP zonder de POWER schakelaar opnieuw te
verplaatsen om de opname te starten. Als uw
camcorder zich in de wachtstand bevindt en er
geen cassette is ingebracht, schakelt hij niet
automatisch uit.
Als u op een enkele videocassette zowel met
de SP als de LP snelheid opneemt of als u
bepaalde scènes tussendoor opneemt met de
LP snelheid
Het weergavebeeld kan vervormd zijn.
De tijdcode kan niet goed tussen scènes zijn
aangebracht.*
Opnamedatum en -tijd (alleen DCR-TRV140E)
De opnamedatum en -tijd worden tijdens het
opnemen niet aangegeven. Deze gegevens
worden echter wel automatisch op de band
vastgelegd. Om later de opnamedatum en -tijd in
beeld te zien, drukt u tijdens afspelen op de
DATA CODE toets van de afstandsbediening.
1)
30
 Loading...