

Page 1
3-866-436-11 0)
Digital
Video Camera
Digital
Video
Recorder“iv
Operating Instructions
I5ofore operating the unit, please read this manual thorougliK ,
and retain it for future reference.
Owner's Record
The model and serial numbers are located on the bottom. Record the
serial number in the space provided below. Refer to these numbers
whenever you call upon vour Sonv dealer regarding this product.
Model No. DCR-TRV-
Serial No.
____________
Model No. AC-_
Serial No.
Cassette
_______
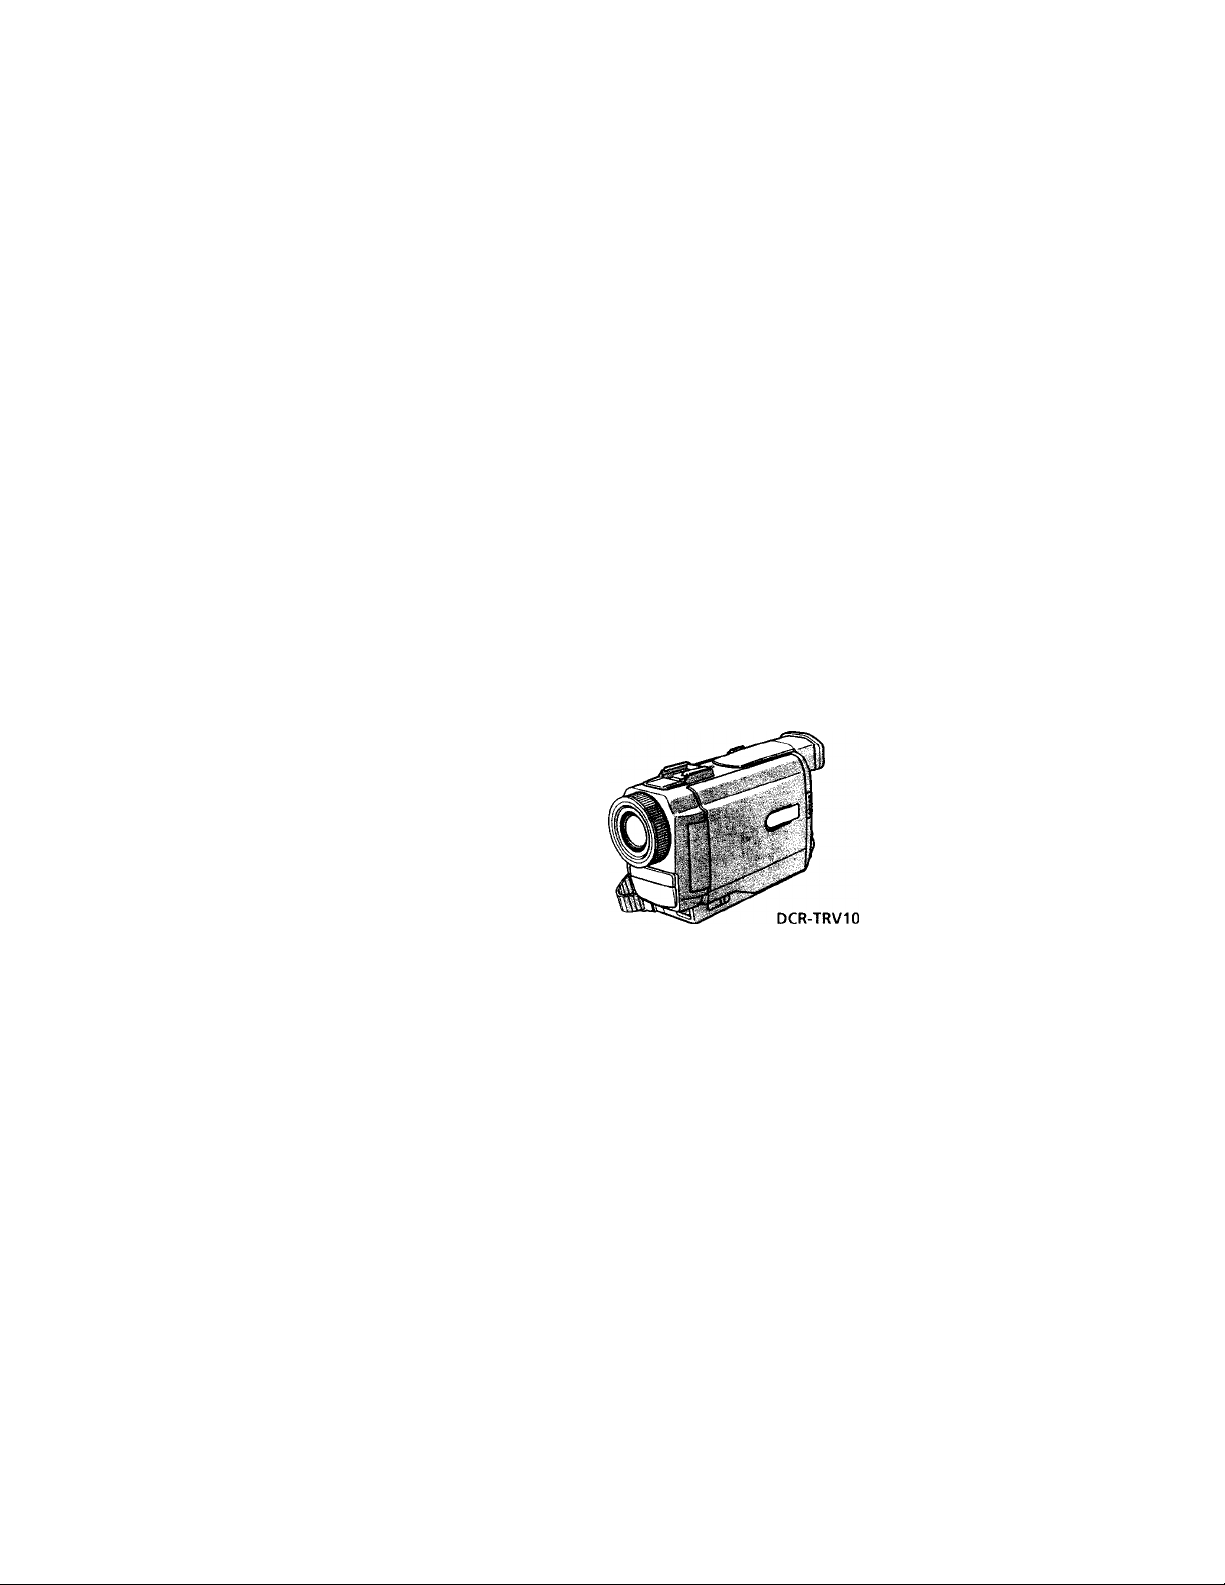
DCR-TRV8/TRV10
©1999 by Sony Corporation
Handycam
(|3 InfoLITHIUM o
nil Cassette ■
\.l I Memory iV
MemdryStick
Page 2
Congratulations on your purchase of this Sony Oigital Handycam camcorder. With your Digital
Welcome!
Handycam, you can capture life's precious moments with superior picture and sound quality. Your [digital
Haruiycam is loaded with advaiKed features, but at the same time it is very easy to use. You will soon be
producing home video that you can ei^y for years to come.
WARNING
To prevent fire or shock hazard, do
I not expose the unit to rain or
moisture.
CAUnON: TO flEDUCe ™e RISK OF ELECTWC SMOCK.
DO NOT REMOVE COVER (OR BACtQ.
NO USER-SERVICEAB(E PARTS MSIOE.
REFER SERVICING TO (XIAUFIED SERVICE PERSONNEL.
This symbol is intended to alert
the user to the presence of
uninsulated “dangerous voltage"
within the product's enclosure
that may be of sufficient
magnitude to constitute a risk of
electric shock to persons.
/•\ the user to the presence of
■ \ important operating and
I
\ mainteitance (servicing)
Never expose the battery pack to temperatures
above 140°F (60°C) such as in a car parked in
the sun or imder direct sunlight.
DISPOSAL OF LITHIUM ION BATTERY.
LITHIUM ION BATTERY.
DISPOSE OF PROPERLY.
You can return your unwanted lithium ion batteries
to your nearest Sony Service Center or Factory
Service Center.
Note: In some areas the disposal of lithium ion
batteries in household or business trash may
be prohibited.
For the Sony Service Center nearest you call
1-800-222-SONY (United States only)
For the Sony Factory Service Center rrearest you call
416-499«)NY (Canada only)
Caution; Do not handle damaged or leaking lithium
For customers in CANADA CAUTION
TO PREVENT ELECTRIC SHOCK, MATCH WIDE
BLADE OF PLIX; TO WIDE SLOT, FULLY INSERT.
This symbol is intended to alert
' instructions in the literatiue
accompanying the appliance.
km battery.
For customers in the U.S.A. CAUTION
You are cautioned that any changes or modifications
not expressly approved in this manual could void
your authority to operate this equipment.
Declaration of Cordormity
Trade Name:
Model No.:
Responsible Party:
Address:
Telephone No.:
This device complies with PartlS of the FCC
Rules. Operation is subject to the following two
conditior\s.: (l)This device nuiy not cause
harmful interference, and (2)this device must
accept any interference received, including
interference that may cause undesired operation.
Note:
This equipment has been tested and found to comply
with the limits for a Class B digital device, pursuant
to Part 15 of the FCC Rules. These limits are desired
to provide reasoruble protection against hamduf
interference in a residential installation. This
equipment generates, uses, and can radiate radio
frequency energy and, it not installed and used in
accordance with the instructions, ttuy cause harmful
interference to radio communications. However,
there is no guarantee that interference will not occur
in a partici^r installation. If this equipment does
cause harmful interference to radio or television
reception, which can be determined by turning the
equipment off and on, the user is encouraged to try to
correct the interference by one or more of the
following measures:
— Reorient or relocate the receiving anterma.
— Increase the separation between the equipment
and receiver.
— Cormect die equipment into an outlet on a circuit
different from that to which the receiver is
connected.
— Corrsult die dealer or an experienced radio/TV
technician for help.
SONY
DCR-TRV8, DCR-TRVIO
Sony Elecfrortics Inc.
1 Sony Drive, Park Ridge,
NJ, 07656 USA
201-930.6970
Memory Stick
For customers in CANADA
This Class 6 digital apparatus complies with
Canadian ICES-003.
For customers in the U.S.A.
This device complies with Part 15 of the FCC Rules.
Operation is subject to the following two conditions:
(1) This device may not cause harmrul interference/
and (2) this device must accept any interference
received/ including interference that may cause
undesired operation.
Page 3

Table of contents
Quick Start Guide..............................................................................4
Getting started
Using this manual..............................................................................6
Checking supplied accessories.........................................................8
Step 1 Preparing the power supply...................................................9
Installing the battery pack.......................................................9
Charging the battery pack
Connecting to a wall outlet
St^ 2 Inserting a cassette
...................................................
.................................................
.................................................................
Recording - Basics
Recording a picture
Shooting backlit subjects (BACK LIGHT)... 21
Shooting in the dark (NightShot)
Checking the recording - END SEARCH
.........................................................................
..................................................
/ EMTSEARCH / Rec Review .... 24
Playback - Basics
Playing back a tape..........................................................................25
Viewing the recording on TV..........................................................28
Advanced Recording Operations
Photo recording
Using the wide mode.......................................................................32
Using the fader function
Using special effects - Picture effect.. 36
Using special effects - Digital effect... 38
Adjusting the white balance manually... 41
Using the PRCXiRAM AE function.... 42
Adjusting the expostue manually..................................................44
Focusing memually..........................................................................45
...............................................................................
.......................................................................
Advanced Playback Operations
Playing back a tape with picture effects... 46
Playing back a tape with digital effects'... 47
Quickly locating a scene using the zero
set memory function..............................................................48
Searching a recording by date - Date search .. 49
Searching the boundaries of recorded
tape by title - Title search
Searching for a photo - Photo search/
Photo scan..............................................................................52
...................................................
Making your own titles....................................................................68
Labeling a cassette...........................................................................70
Customizing Your Camcorder m
Changing the MENU settings..............................................................72 g.
Resetting the date and time..................................................................78 §
Memory Stick operations g
10
(DCR-TRVIO only) I
13
14
15
21
30
Using a Memory Stick-introduction.. 79
Recording still images on Memory Sticks
- Memory photo recording
Recording an image from a mini DV
tape as a still image............................................................... 89
Copying still images from a mini DV
tape - Photo save...................................................................91
Viewing a still picture - Memory photo
plajTjack................................................................................93
Superimposing a still picture in a Memory Stick
on a moving picture - M. CHROM/
M.LUMI/C.CHROM
Preventing accidental erasure
- Image protection.............................................................100
Writing a print mark - PRINT MARK ... 101
Deleting images.............................................................................102
Copying the image recorded on Memory
33 '
Sticks to mim DV tapes
Playing back images in a continuous
loop - SLIDE SHOW..........................................................107
...............................................
............................................................
......................................................
Additional information
Usable cassettes
Troubleshooting...............................................................................Ill
Self-diagnosis display....................................................................116
Warning indicators and messages.... 117
Using your camcorder abroad....................................................119
Maintenance information and
Specifications.................................................................................124
.............................................................................
precautions
..........................................................................
Quick Reference
51
Identifying the parts and controls .... 125
Quick Fimction Guide...................................................................135
Index
......................................................................
Back cover
85
97
105
109
120
* •
Editing
Dubbing a tape.................................................................................54
Editing partially on a DV t^ - DV
synchro-editing (DCR-TRVIO only) .. 56
Recording video or TV programs
Inserting a scene from a VCR
• Audio dubbing..................................................................................61
Superimposing a title.......................................................................65
.................................................
.........................................................
• Windows is registered trademarks licensed to
Microsoft Corporation, registered in d\e U.S.A. and
other countries.
• All other product names mentioned herein may be
58
the trademarks or registered trademarks of their
59
respective companies.
Furtttermore, " ™ " and are not mentioned in each
case in this manual.
Page 4
Quick Start Guide
This chapter intrcxiuces you to the basic features of your
camcorder. See the page in parentheses "( )" for more
information.
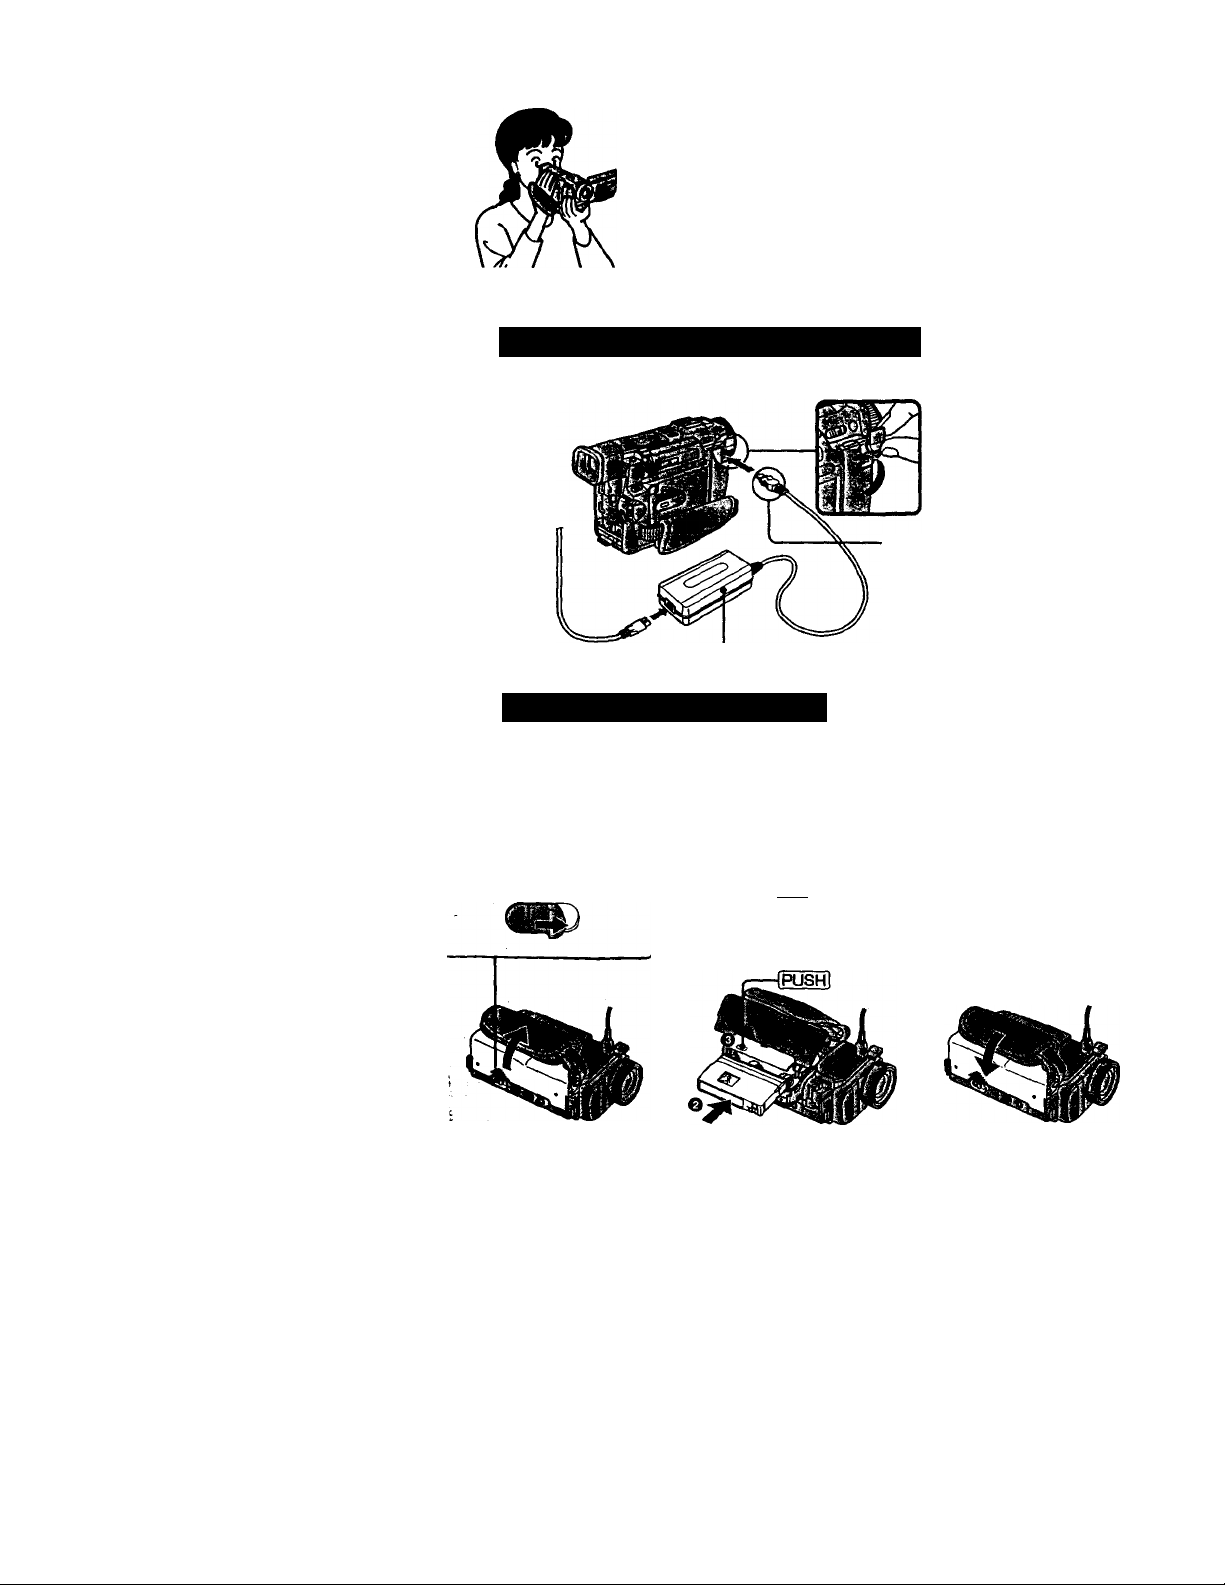
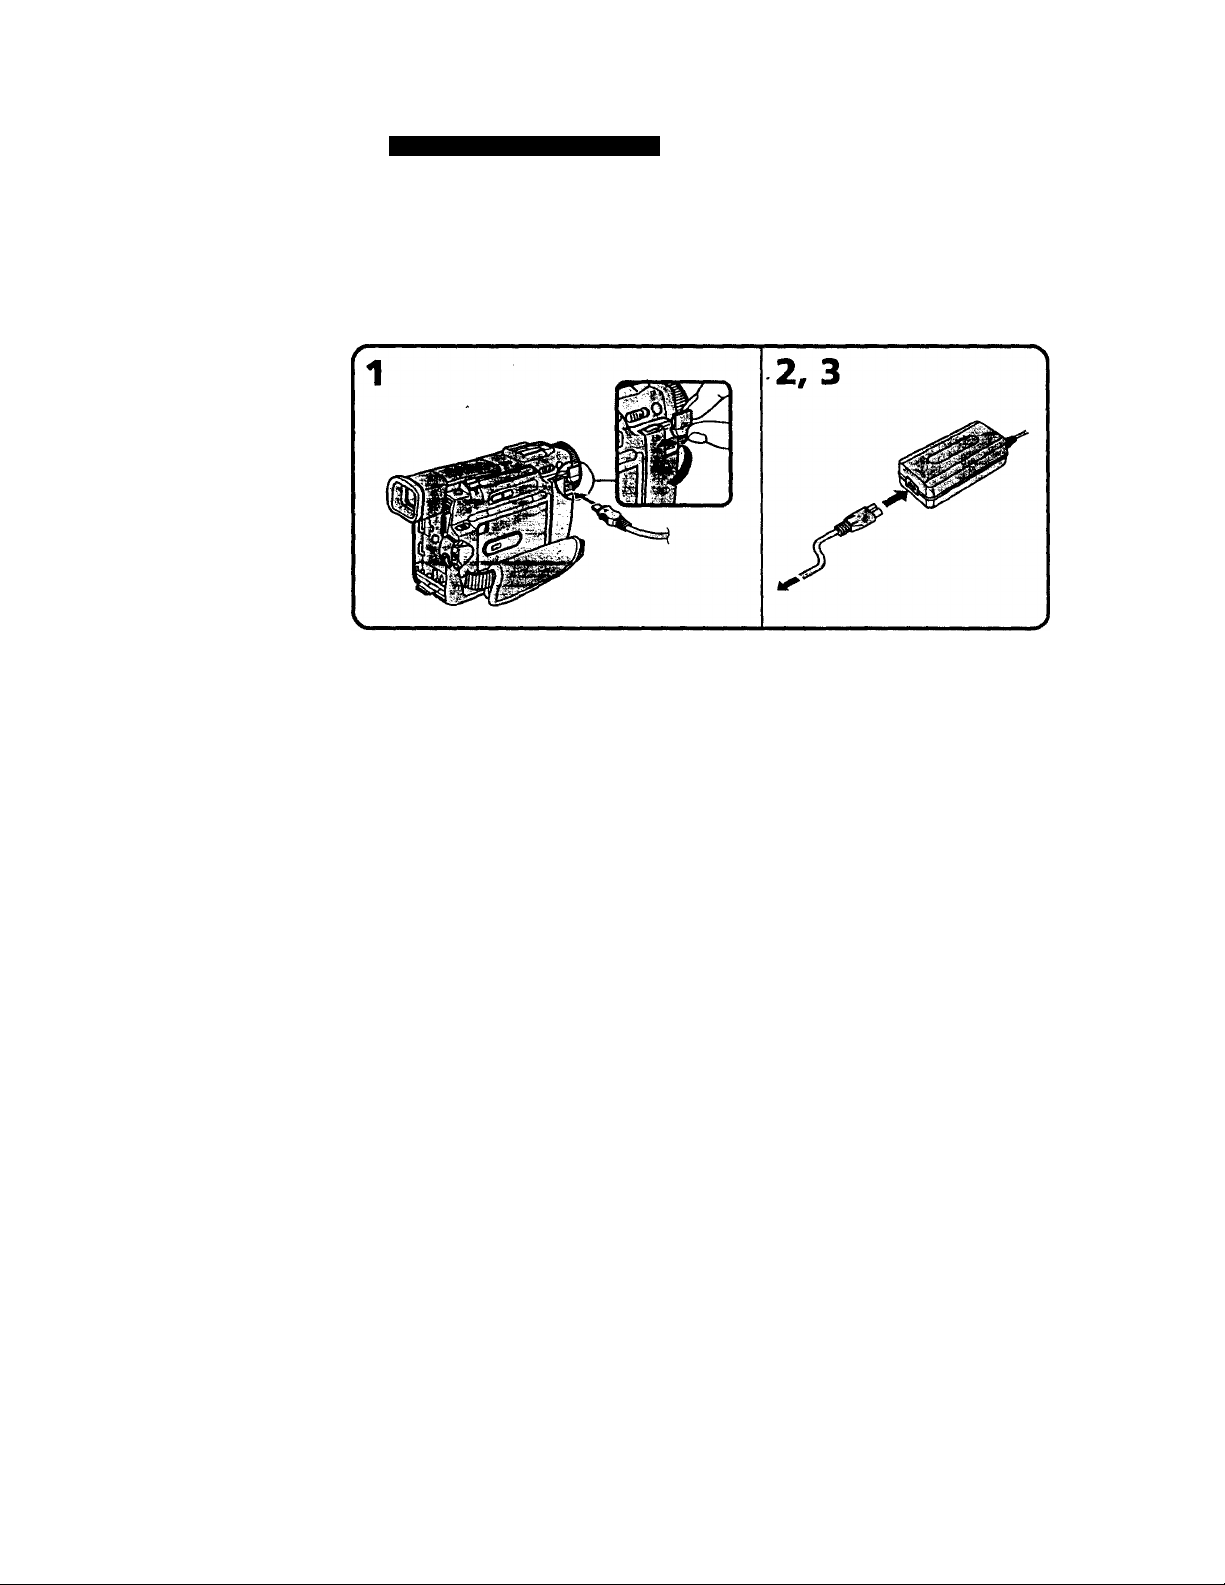
Connecting the power cord (p. 13)
Use the battery pack when using.your camcorder outdoors (p. 9).
Open the DC IN
jack cover.
Connect the plug with
its À mark facing up.
Inserting a cassette (p. 14)
OsUdeAOPEN/
EJECT in the
direction of the
arrow and open the
Ed.
AC power adaptor (supplied)
Push the middle
portion of the back of
the cassette to insert.
e Close the cassette
compartment by
pressing the fpiisHl
mark on the cassette
compartment.
After the cassette
compartment going
down completely,
close the Ed until it
cEcks.
Page 5
r
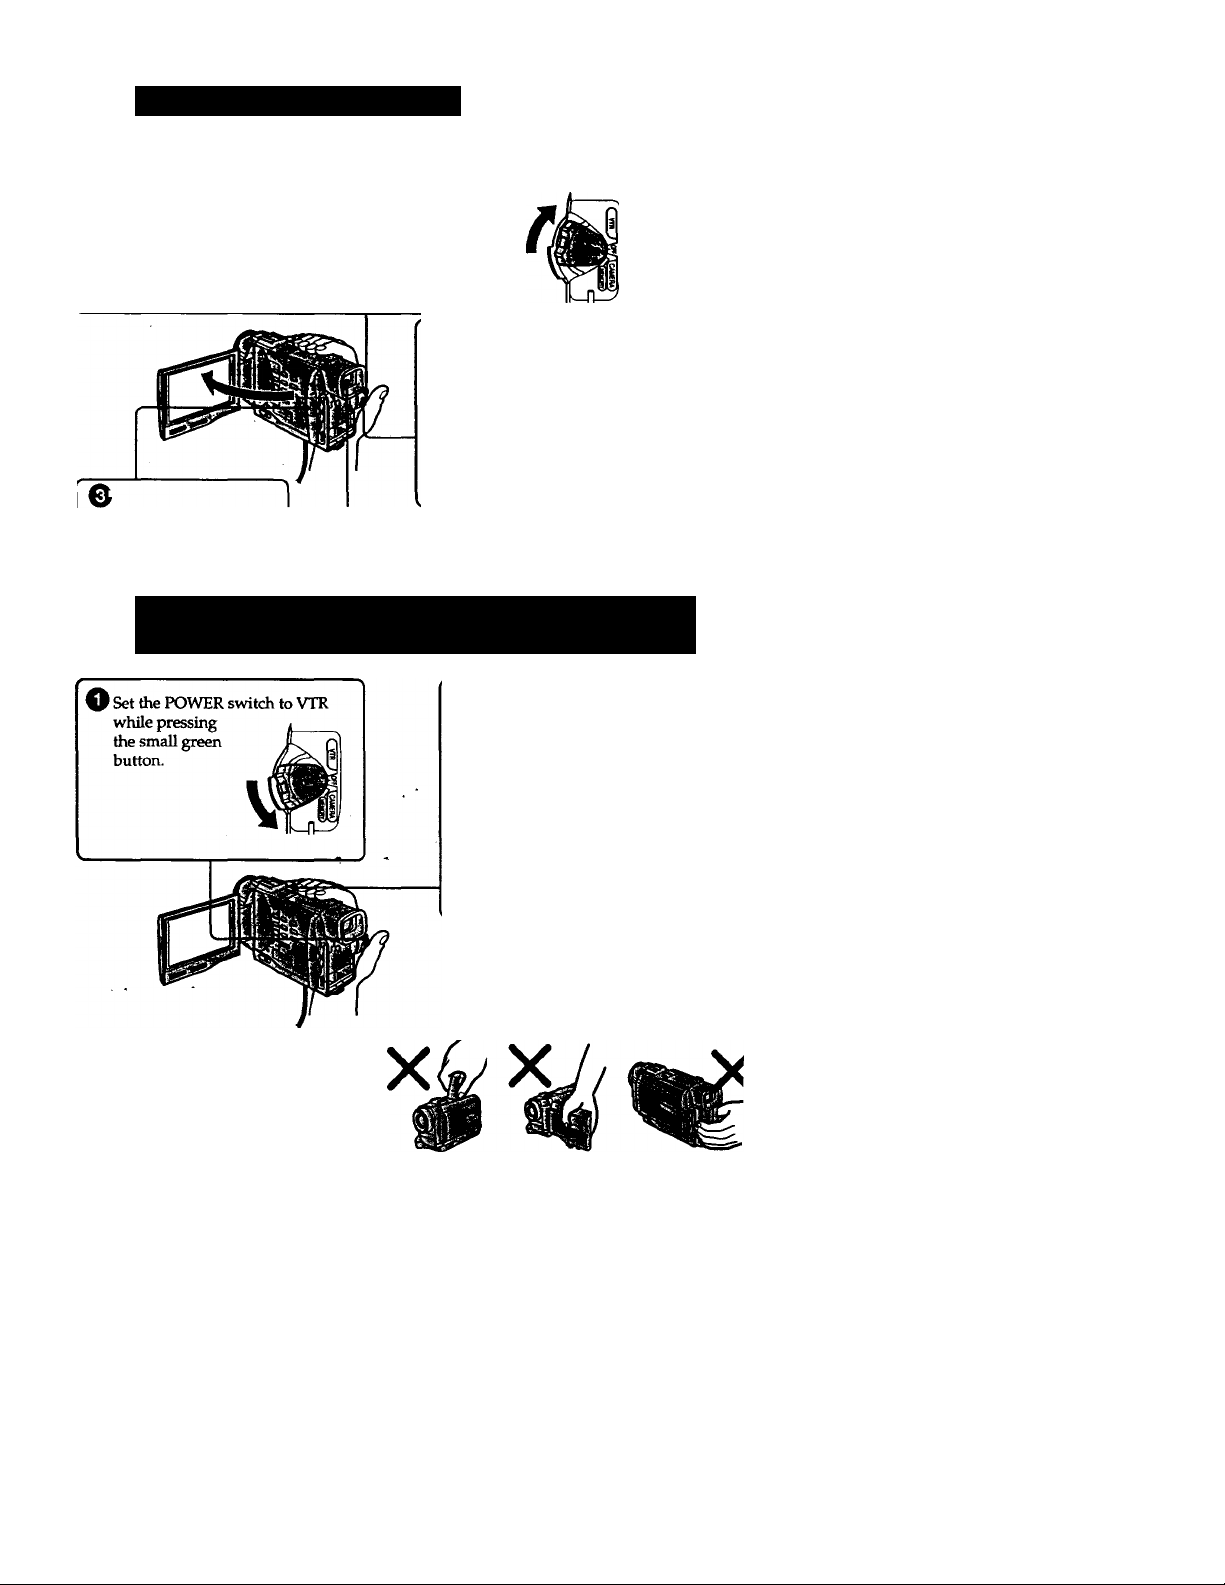
Recording a picture (p. is)
[ O Remove the lens cap.
Set the POWER switch to CAMERA while pressing
the small green button.The pictiue appears on the
LCD screen.
‘ Slide OPEN in the
direction of the ►
mark. Then, open the
LCD panel.
Press START/STOP. Your camcorder
starts recording. To stop recording, press
START/STOP again.
Viewfinder
When the LCD panel is closed, use the
viewfinder placing your eye against its eyecup.
Monitoring the playback picture on the LCD
screen (p. 25)
© Press to rewind the tape.
REW0
€> Press ►- to start playback.
PLAY
NOTE
Do not pick up your camcorder by
holding the viewfinder, the LCD
panel or the battery pack.
Page 6

Getting started —
Ising this manual
The instructions in this manual are for the two models listed in the table below. Before
you start reading this manual and operating your camcorder, check the model number
by looking at the bottom of your camcorder. The tXTR-TRVlO is the model used for
illustration purposes. Otherwise, the model name is indicated in the illustrations. Any
differences in operation are clearly indicated in the text, for example, "DCR-TRVIO
only."
As you read through this manual, buttons and settings on your camcorder are shown in
capital letters.
e.g. Set the POWER switch to CAMERA.
When you carry out an operation, you can hear a beep sound to indicate that the
operation is being carried out.
Types of differences
DCRDV synchro-editing
MEMORY mark»
(on the POWER switch)
• Provided
— Not provided
* The model with MEMORY marked on the POWER switch is provided with memory
functions. See page 79 for details.
'
TRV8 TRVIO
—
—
V
Your camcorder is based on the DV format. You can oitiy use mini DV cassettes with
your camcorder. We recommend you to use a tape with cassette memory Ci</.
The functions which depend on whether the tape has the cassette memory or not are:
• End search (p. 24,27)
• Searching a recording by date - date search (p. 49)
• Photo search (p. 52).
The functions you can operate only with the cassette memory are:
• Searching tiie boundaries of recorded tape by title - title search (p. 51)
• Superimposing a title (p. 65)
• Making your own titles (p. 68)
• Labeling a cassette (p. 70).
For details, see page 109.
You see this mark in the introduction of the features that operate only with
cassette memory.
Tapes with cassette memory are marked by Cl'l (Cassette Memory).
•
•
Page 7
Using this manuai
'Rv'i •li'' V/"!v4»\'Vi
TV color systems differ from country to country. To view your recordings on a TV, you
tveed an NTSC system-based TV.
r ^ • I t •)'* U*i I
Television programs, films, video tapes, and other materials may be copyrighted.
Unauthorized recording of such materials may be contrary to the provision of the
. copyright laws.
• The LCD screen and/or the color viewfinder are manufactured using highprecision technoiogy. However, there may be some tiny black spots and/or
bright spots (red, blue or green in color) that constantly appear on the LCD
screen and/or in the color viewfinder. Iliese spots occur normally in the
manufacturing process and do not affect the recorded picture in any way.
Effective number of pixels is 99.99% or more.
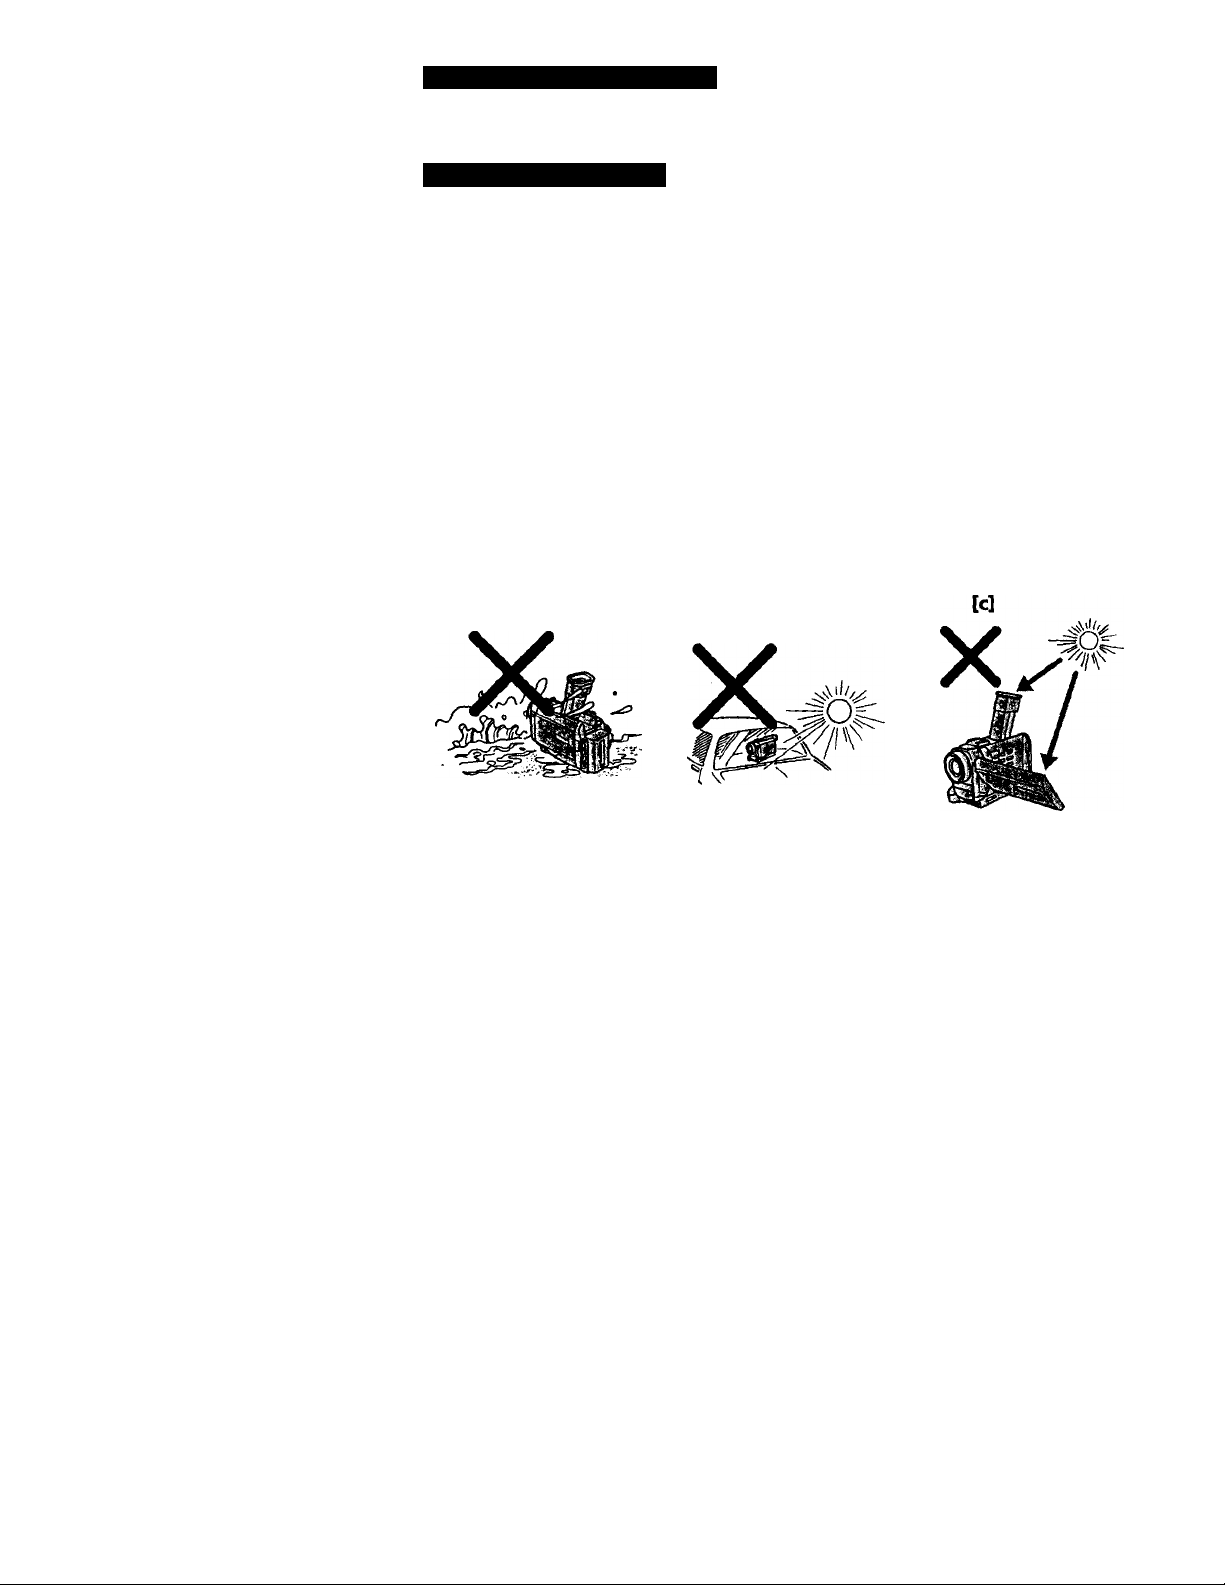
• Do not let your camcorder get wet. Keep your camcorder away from rain and sea
water. Letting your camcorder get wet may cause your camcorder to malfunction.
Sometimes this malfunction cannot be repaired
• Never leave your camcorder exposed to temperatures above 140°F (60°C), such as in a
car parked in the sun or imder direct sunlight [b].
• Do not place your camcorder so as to point the viewfinder or the LCD screen toward
the sun. The inside of the viewfinder or LCD screen may be damaged [c].
[a]
(a].
Eb]
<a
3
Contents of the recording cannot be compensated if recording or playback is not made due to a
malfunction of the camcorder, video tape, etc.
Page 8
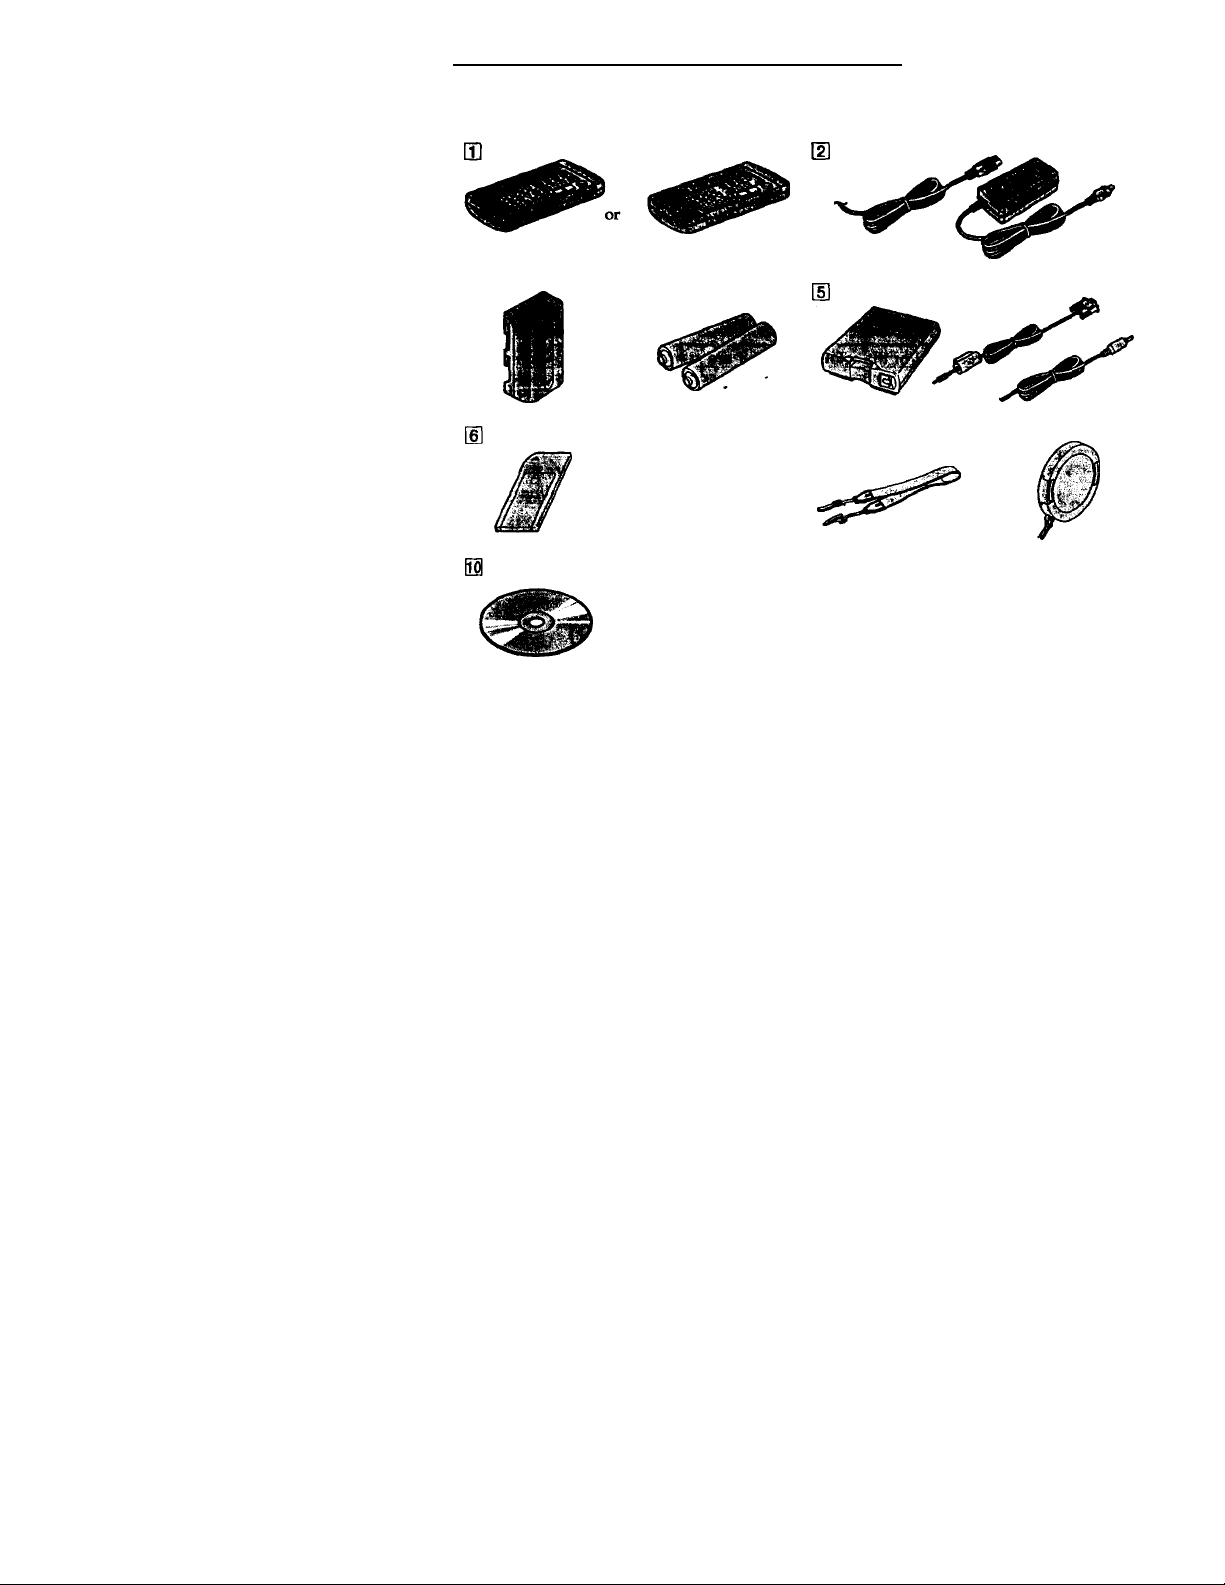
Checking supplied accessories
Make sure that the folloWmg accessories ate supplied with your camcorder.
RMT-611 RMT-808
a
___________
m
[T] Wireless Remote Commander (1)
(P-132)
RMT-811; DCR-TRVIO
RMT-808: DCR-TRV8
¡2} AC-L10A/L10B/L10C AC power adaptor
(1), Power cord (1) (p. 10)
d] NP-FM50 battery pack (1) (p. 9,10)
[2 Size AA (R6) battery for Remojte
Commander (2) (p. 132).
d] Serial port adaptor for Memory Stick
(1), PC serial cable (1), AC power
adaptor for Serial port adaptor (1)
(p. 96)
DCR-TRVIO only
[g Memory Stick (1) (p. 79)
DCR-TRVIO only
@ A/V connecting cable (1) (p. 28,54)
[S
[g Shoulder strap (1) (p. 129)
[g Lens cap (1) (p. 15)
Application software: PictureGear
3.2Ute (CD ROM) (1) (p. 96)
DCR-TRVIO only
8
Page 9
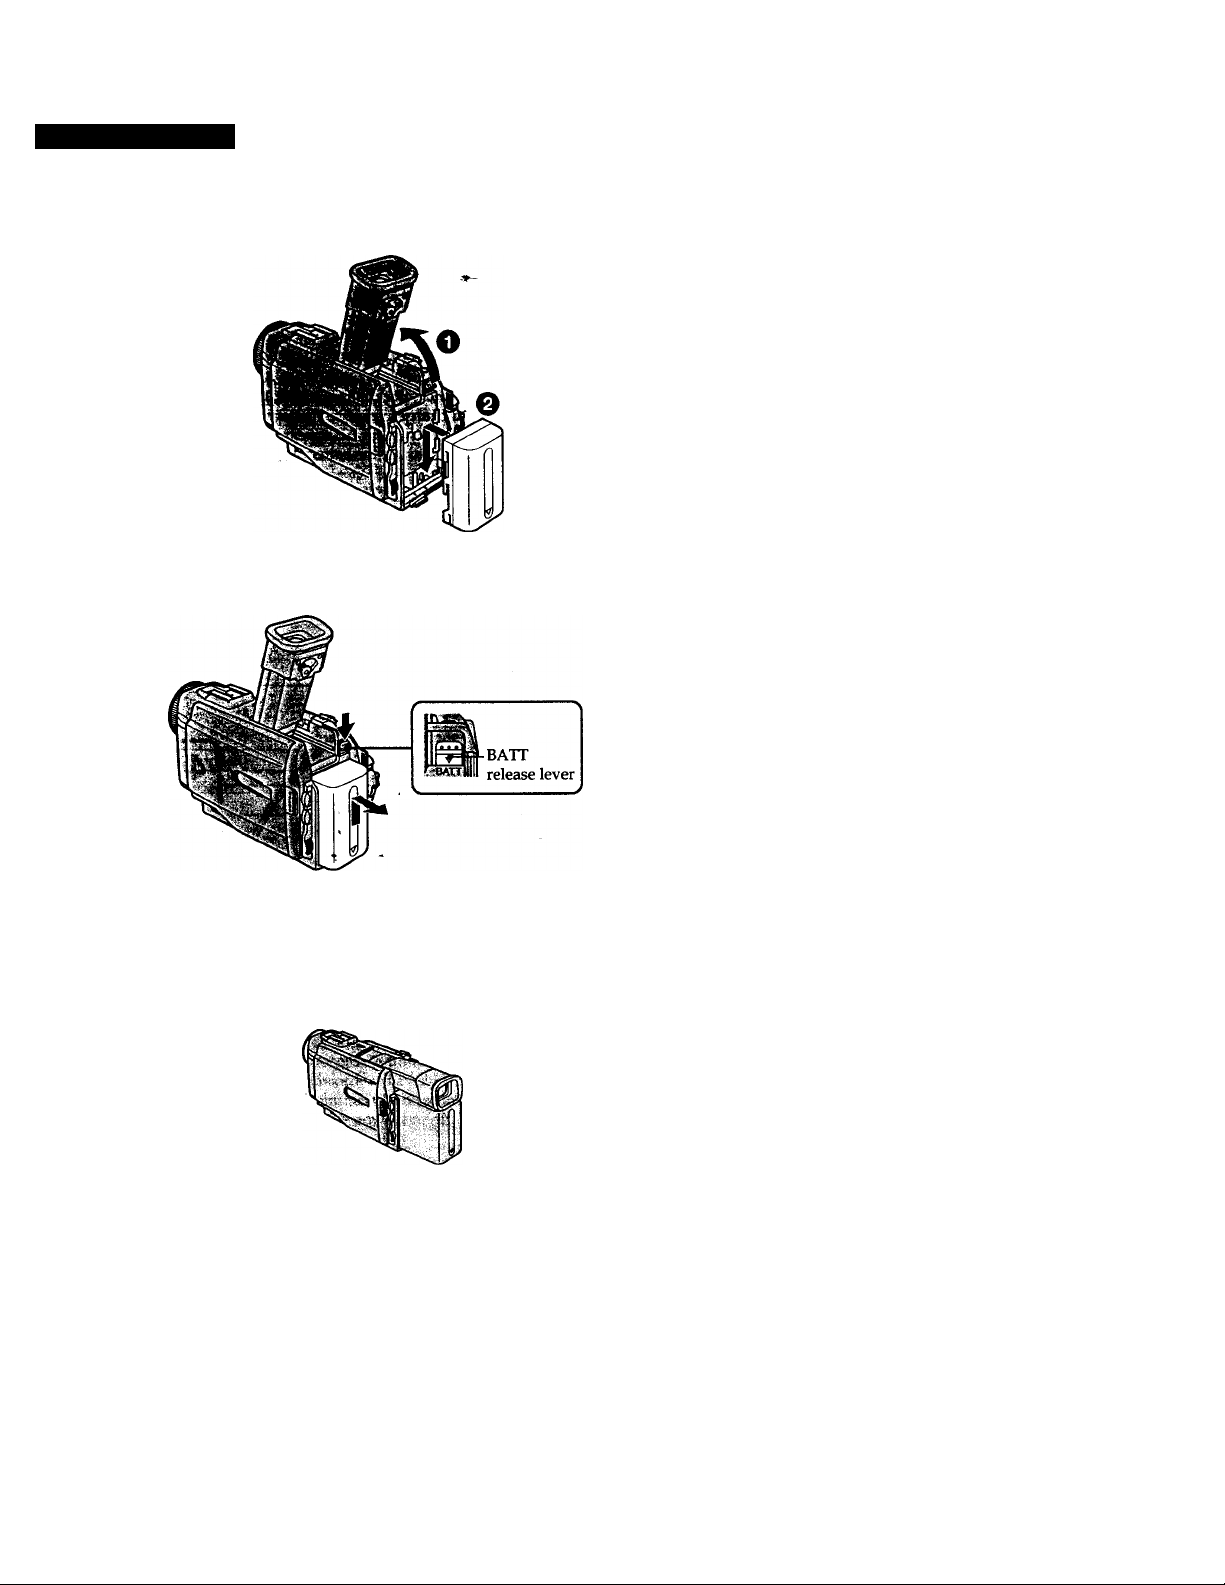
step 1 Preparing the power supply
ГГ-3'jHl'il?!
Install the battery pack to use your camcorder outdoors.
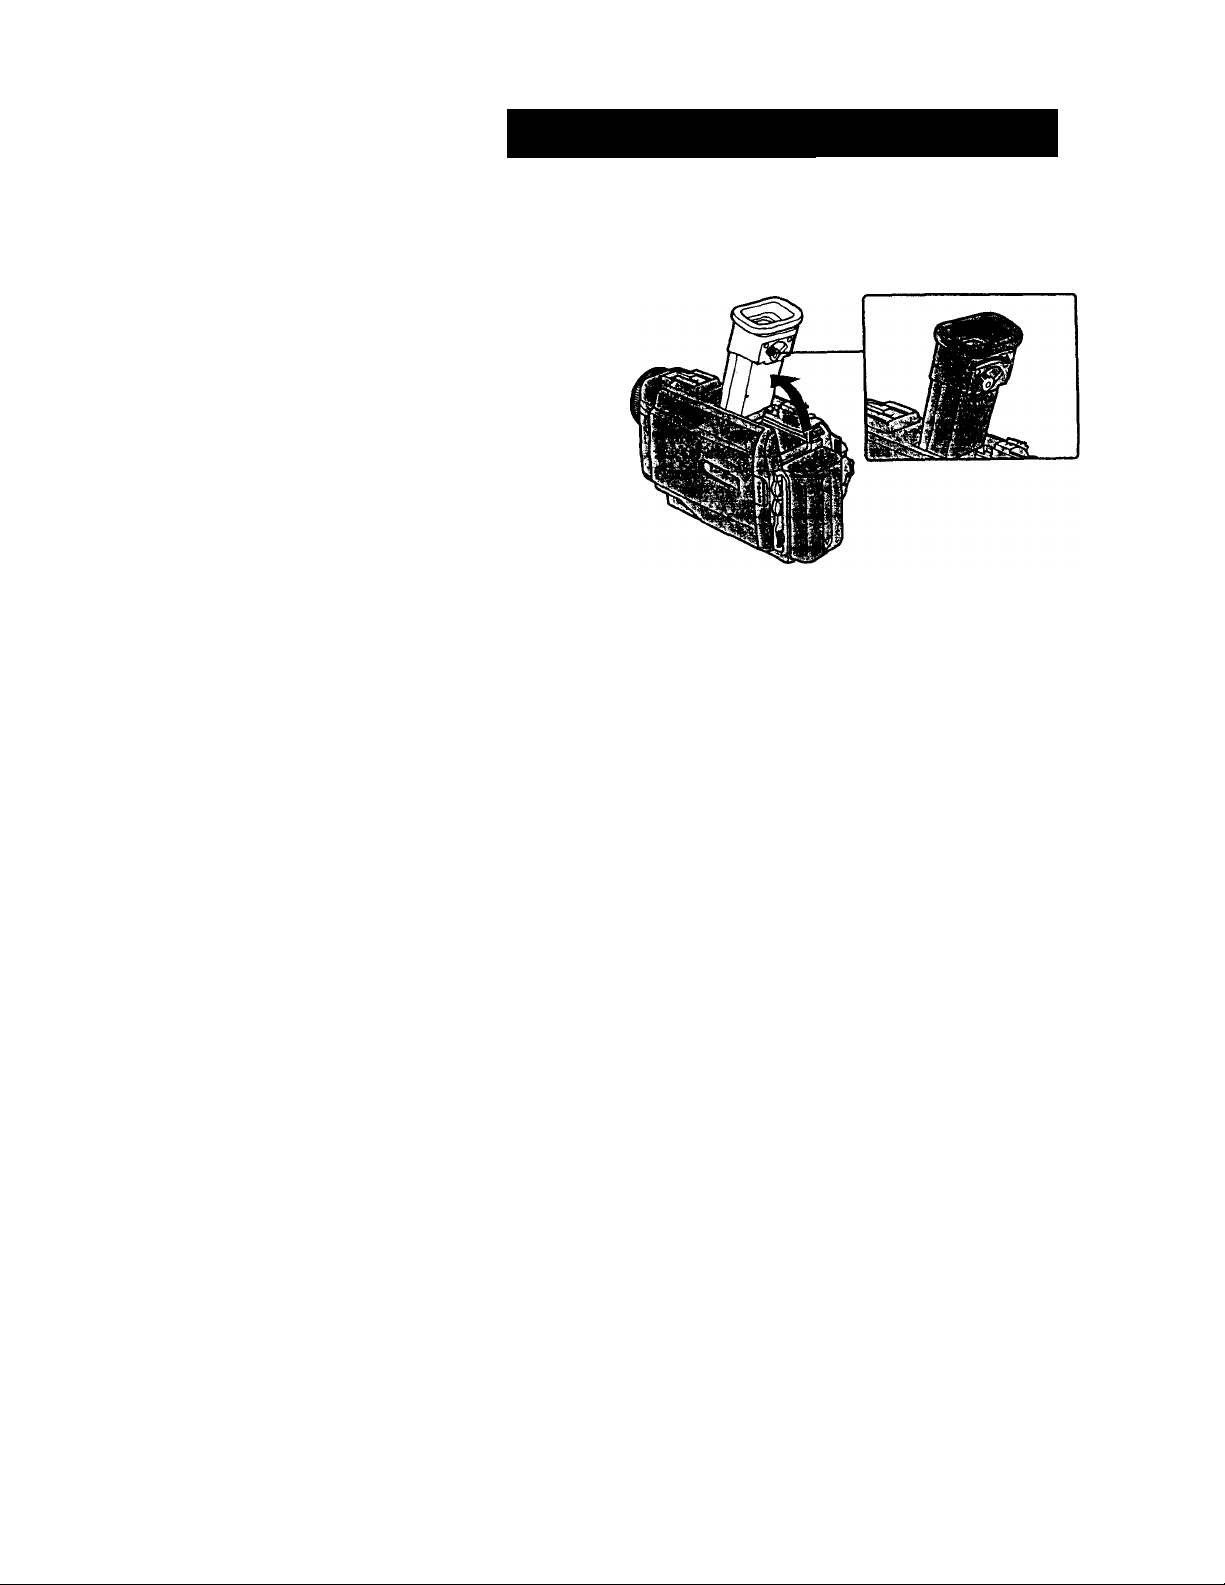
(1) Lift up the viewfinder.
(2) Slide the battery pack down until it clicks.
To remove the battery pack
Lift up the viewfinder.
Slide the battery pack out in the direction of the arrow while pressing ВАТТ down.
0
e
B.
Э
<Q
§
1
After installing the battery pack
Do not carry your camcorder by holding the battery pack. If you do so, the battery pack
may slide off your camcorder unintentionally, damaging your camcorder.
|f you use the large capacity battery pack
If you install the NP-FM70/FM90 battery pack on your camcorder, extend its
viewfinder. Take care not to pinch your finger when lifting the viewfinder up and
down.
Page 10
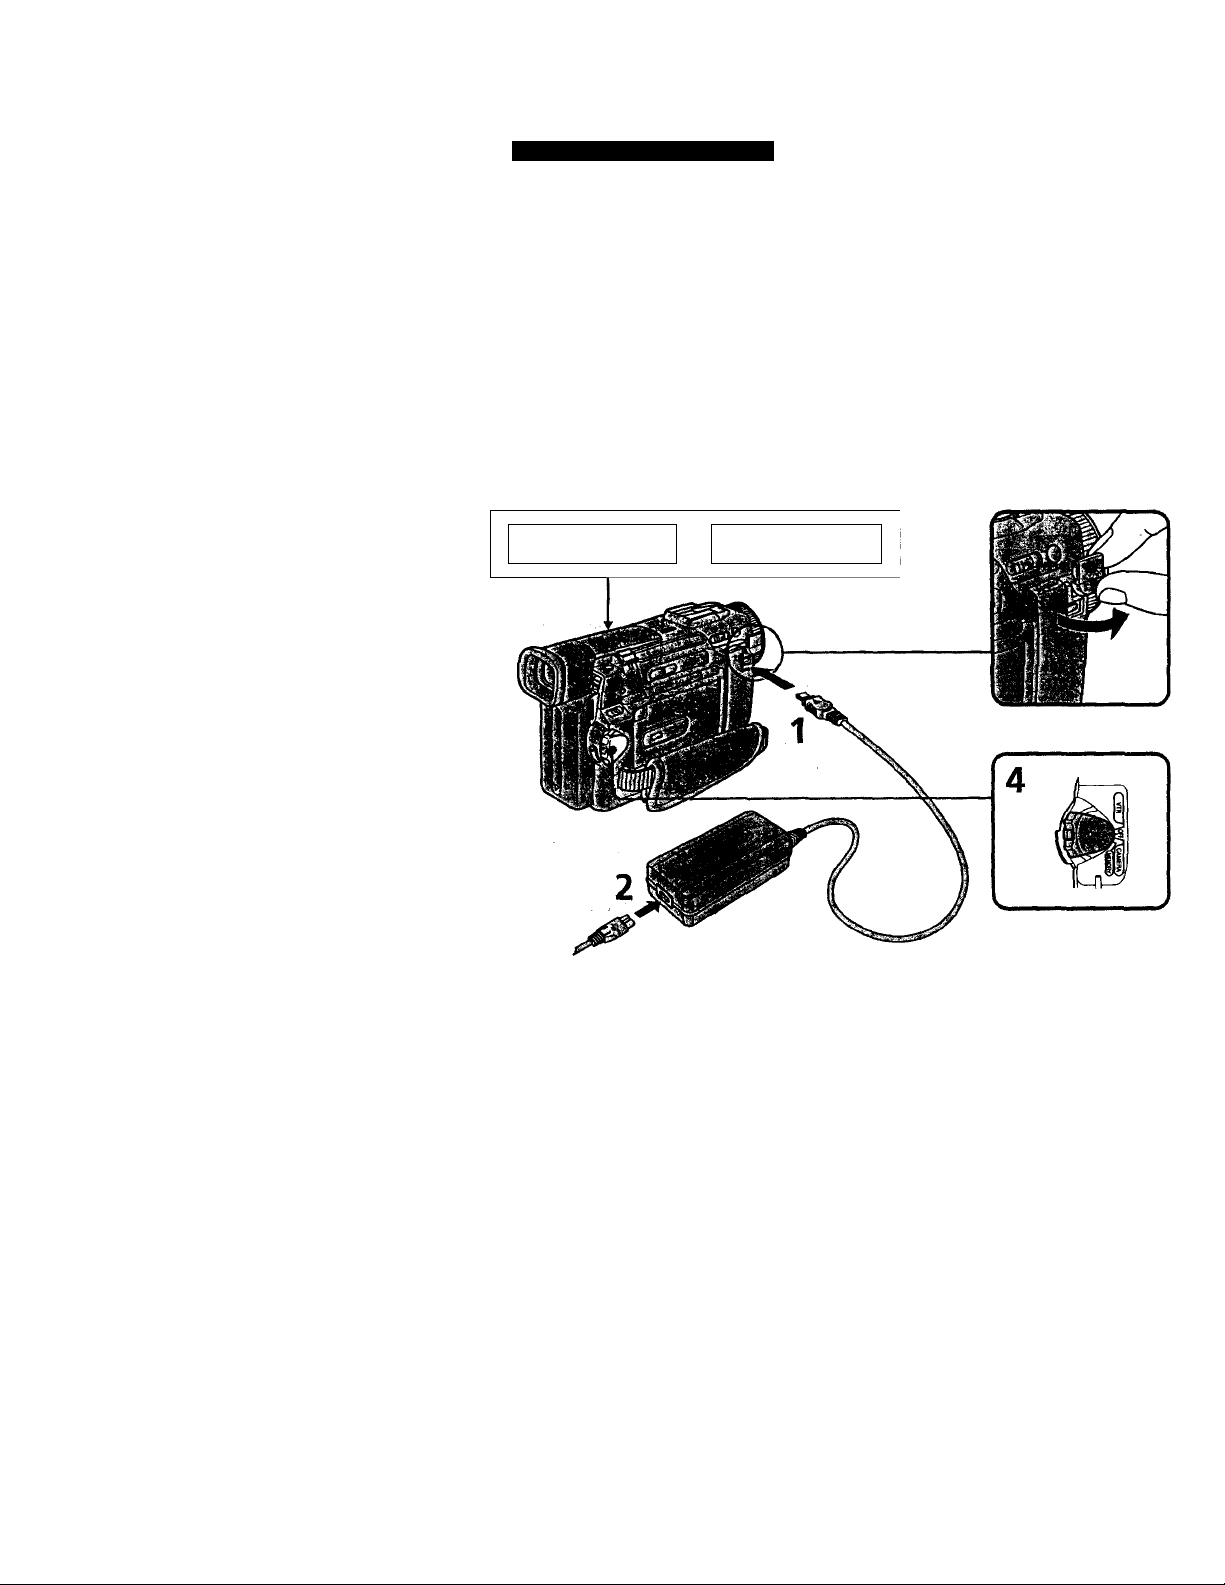
Step 1 Preparing the power supply
Use the battery pack after chargmg It for your camcorder.
Your camcorder operates only with the "InfoLITHIUM" battery pack (M series).
"IidoUTHIUM" is a trademark of Sony Corporation.
(1) Open the DC IN jack cover and connect the AC power adaptor supplied with
your camcorder to the DC IN jack with the plug's A mark facing up.
(2) Connect the power cord to the AC power adaptor.
(3) Connect the power cord to a wall outlet.
(4) Set the POWER switch to OFF. Charging begins. The remaining battery time is
indicated in minutes on the_display window.
When the remaining battery indicator changes to normal charge is completed. To
fully charge the battery (full charge), leave the battery pack attached for about 1 hour
after normal charge is completed until FULL appears in the display window. Fully
charging the battery allows you to use the battery longer than usual.
4
1
10
Page 11

step 1 Preparing the power supply
Note
Prevent metallic objects from coming into contact with the metal parts of the DC plug of
the AC power adaptor. This may cause a short-circuit, damaging the AC power
adaptor.
Remaining battery time indicator
The renraining battery time indicator in the display window roughly indicates the
recording time.
Until your camcorder calculates the actual remaining battery time
"
---------
min" appears in the display window.
While charging the battery pack, no indicator appears or the indicator flashes in the display window in the following cases
- The battery pack is not mstalled correctly.
- The AC power adaptor is disconnected.
-Something is wrong with the battery pack.
Charging time
Battery pack
NP-FM50 (supplied)
NP-FM70
NP-FM90
Approximate number of minutes to charge an empty battery pack
Full charge (Normal charge)
Recording time
DCR-TRV8
Battery pack
Continuous* Typical**
NP-FM50 (supplied) 170(155)
NP-FM70
NP-FM90
355(320)
540(485) •
150(90)
240 (180)
330 (270)
Recording with
the viewfinder
90(80)
190(170) 285 (255)
290 (260) 435 (390)
Recording with
the LCD screen
Continuous*
135 (120)
Cl
Q.
Typical**
70(60)
150 (135)
230 (210)
DCR-TRV10
T Recording with
Battery pack
NP-FM50 (supplied) 170(155)
NP-FM70
NP-FM90
Approximate number of minutes when you use a fuUy charged battery
Numbers in parentheses "( )" indicate the time using a normally charged battery.
* Approximate continuous recording time at 77°F (25°C). The battery life will be
shorter if you use your camcorder in a cold environment.
** Approximate number of minutes when recording while you repeat recording start/
stop, zooming and turning the power on/off. The actual battery life may be shorter.
the viewfinder
Continuous*
355 (320)
540(485)
Typical** Continuous* Typical**
90(80) 130 (115)
190 (170) 270 (245)
290 (260) 410 (370)
Recording with
the LCD screen
70(60)
145 (130)
220 (195)
Page 12

Preparing the power supply
Playing time
DCR-TRV8
Battery pack
NP-FM50 (supplied)
NP-FM70
NP-FM90
Playing time
on LCD screen
140 (125)
295 (265)
450(400)
DCR-TRV10
Battery pack
NP-FM50 (supplied)
Playing time
on LCD screen
135 (120)
NP-FM70 275 (250)
NP-FM90 425 (380) 560(505)
Approximate number of minutes when you use a fully charged battery
Numbers in parentheses "( )" indicate the time using a normally charged battery.
The battery life will be shorter if you use your camcorder in a cold environment.
After charging the battery pack
Discormect the AC power adaptor from the DC IN jack on your camcorder.
Note on the remaining battery time indicator during recording
The indicator may not be correct, depending on the conditioits in which you are
recording. When you close the LCD panel and open it again, it takes about 1 minute for
the correct remaining battery time to be displayed.
Playing time
with LCD closed
180(160)
370(330)
560(505)
Playing time
with LCD closed
180 (160)
370(330)
What is "InfoUTHiUM"?
The "InfoUTHiUM" is a lithium ion battery pack which can exchange data such as
battery consumption with compatible video equipment. This unit is compatible with the
"InfoLITHIUM" battery pack (M series). Your camcorder operates only with the
"InfoLITHIUM" battery. "InfoLITHIUM" M series battery packs have the
mark.
"InfoLITHIUM" is a trademark of Sony Corporation.
Page 13
step 1 Preparing the power supply
When you use your camcorder for a long time, we recommend that you power it from a
wall outlet usii^ the AC power adaptor. ■
(1) Open the DC IN jack cover, pulling the cover out a little and rotating it, gi
Connect the AC power adaptor to the DC IN jack on your camcorder with the 3.
plug's A mark facing up. «>
(2) Connect the power cord to the AC power adaptor. S
(3) Connect the power cord to a wall outlet.
* •
WARNING
The power cord must only be changed at a qualified service shop.
PRECAUTION
The set is not disconnected from the AC power source (house current) as long as it is
"connected to the wall outlet, even if the set itself has been turned off.
Notes
• The AC power adaptor can supply power even if the battery pack is attached to your
camcorder.
• The DC IN jack has "source priority". This means that the battery pack cannot supply
any power if the power cord is connected to the DC IN jack, even when the power
cord is not plugged into a wall outlet.
• Keep the AC power adaptor away from your camcorder if the picture is disturbed.
Using a car battery
Use Sony DC Adaptor/Charger (not supplied).
13
Page 14
step 2 Inserting a cassette
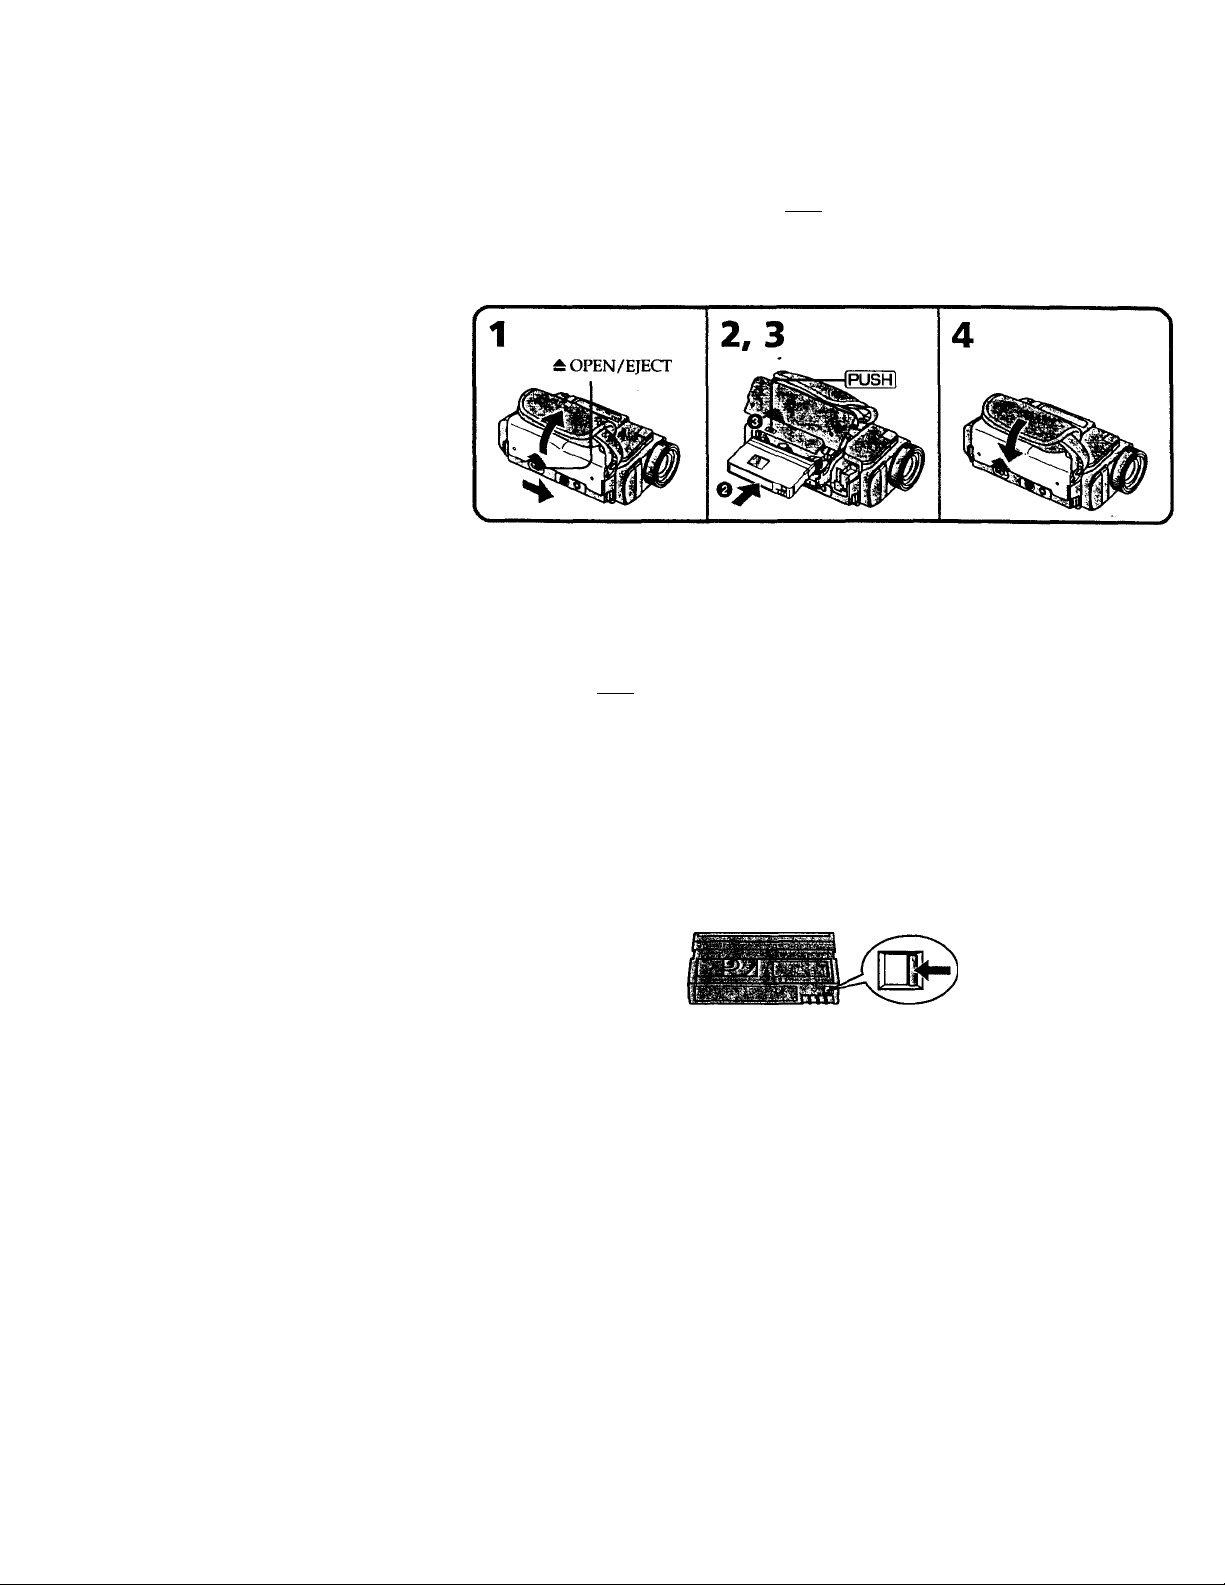
(1) Slide OPEN/EJECT in the direction of the arrow and open the lid. The
cassette compartment automatically lifts up and opens.
(2) Push the middle portion of the back of the cassette to insert.
Insert the cassette in a straight line deeply into the cassette compartment with
the window facing out.
(3) Close the cassette compartment by pressing the [pushI mark on the cassette
compartment. The cassette compartment automatically goes down.
(4) After the cassette compartment going down completely, close the lid until it
clicks.
To eject a cassette
Follow the procedure above and in step 2, take out the cassette.
Notes
• Do not press the cassette compartment down. Doing so may cause malfunction.
• The cassette compartment may not be closed when you press any part of the lid other
than the IKiSHi mark.
When you use mini DV cassette with cassette memory
Read the instruction about cassette memory to use this function properly (p. 109).
To prevent misoperation of your camcorder
Set the POWER switch to OFF when you insert and eject a cassette.
To prevent accidental erasure
SUde the write-protect tab on the cassette to expose the red mark.
Page 15
Recording - Basics —
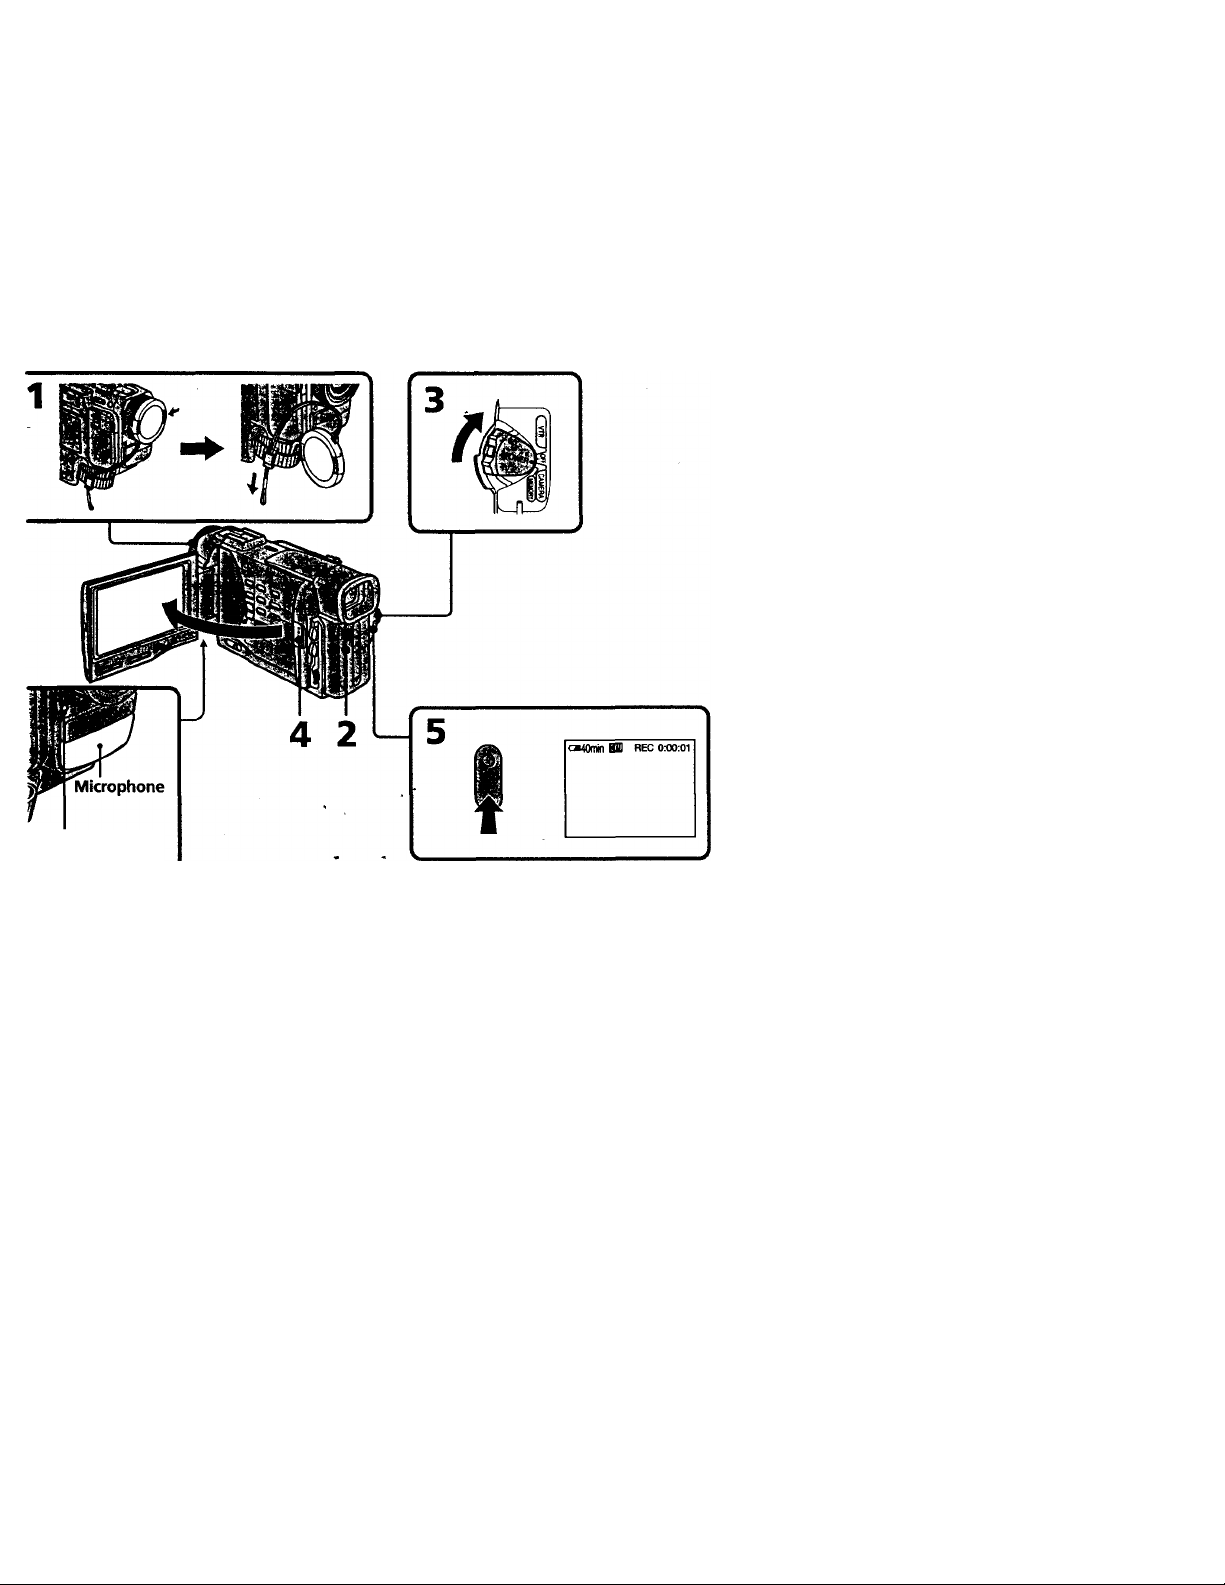
ecording a picture
Your camcorder automatically focuses for you.
(1) Remove the lens cap by pressing bottt knobs on its sides and attatch the lens
cap to the grip strap.
(2) Install the power source and insert a cassette. See "Step 1" and "Step 2" for
more information (p. 9 to p. 14).
(3) Set the POWER switch to CAMERA while pressing the small green button.
Your CiUncorder is set to the standby mode.
(4) Slide OPEN in the direction of the ► mark. Then, open the LCD panel. The
viewfinder automatically turns off.
(5) Press START/STOP. Your camcorder starts recording. The "REC" indicator
appears. The caniera recording lamp located on the front of your camcorder
lights up. To stop recording, press START/STOP again.
<Q
I
Camera recording
lamp
Page 16

Recording a picture
Note
Fasten the grip strap firmly. Do not touch the built-in microphone during recording.
Note on Recording mode
Your camcorder records and plays back in the SP (standard play) mode and in the IP
(long play) mode. Select SP or LP in the MENU settings. In the LP mode, you can record
1.5 times as lottg as in the SP mode.
When you record a tape in the LP mode on your camcorder, we recommend playing the
tape on your camcorder.
Note on the lock (DCR-TRV10 only)
When you slide the lock to the right, the POWER switch can no longer be set to
MEMc3rY accidentally. The lock is set to the left before your camcorder leaves the
factory.
To enable smooth transition
Trat\sition between the last scene you recorded and the next scene is smooth as long as
you do not eject the cassette even if you turn off your camcorder. When you change the
battery pack, set the POWER switch to OFF. When you use a tape with cassette
memory, however, you can make the transition smooth even after ejecting the cassette if
you use the END SEARCH function (p. 24).
If you leave your camcorder in the standby mode for 5 minutes while the cassette
is inserted
Your camcorder automatically turns off. This is to save battery power and to prevent
battery and tape wear. To resume the standby mode, set the TOWER switch to OFF, and
to CAMERA again.
16
When you record in the SP and LP modes on one tape or you record some scenes in the LP mode
The playback picture may be distorted or the time code may not be written propjerly
between scenes.
Page 17
tecording a picture
mU! u:*>
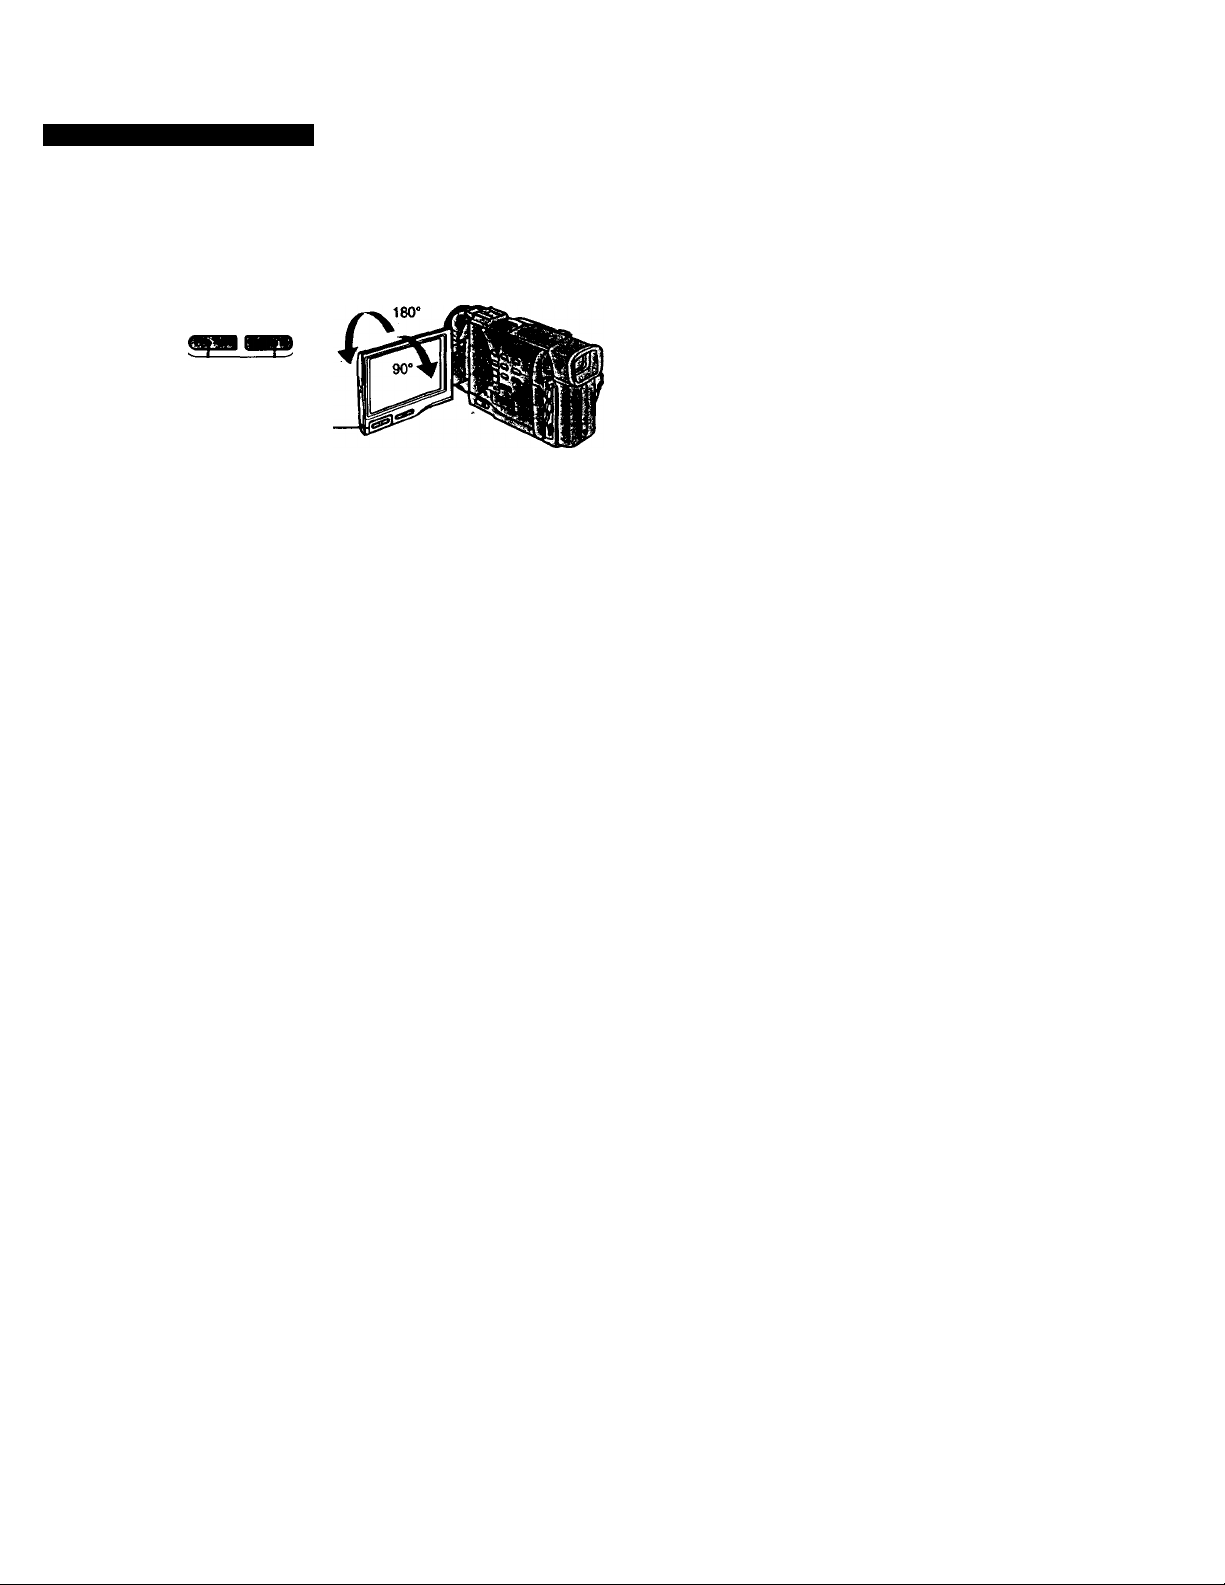
To adjust the brightness of the LCD screen, press either of the two buttons on LCD
BRIGHT.
The LCD panel moves about 90 degrees to the viewfinder side and about 180 degrees to
the letts side.
If you turn the LCD panel over so that it faces the other way, the O indicator appears
in the viewfinder and on the LCD screen (Mirror mode).
When closing the LCD panel, set it vertically until it clicks, and swing it into the
camcorder body.
Note
When using the LCD screen except in the mirror mode, the viewfinder automatically
turns off.
When you use the LCD screen outdoors in direct suniight
The LCD screen may be difficult to see. If this happens, we recommend that you use the
viewfinder.
-|LCOBnGHTj+
to dim to brighten
LCD screen backlight
You can change the brightness of the backlight. Select LCD B.L. in the MENU settings.
Even if you adjust the LCD screen backlight or brightness of the LCD screen
The recorded picture will not be affected.
Picture in the mirror mode
The picture on the LCD is a mirror-image. However, the picture will be normal when
recorded.
During recording in the mirror mode
2ERO SET MEMORY on the Remote Commander does not work.
Indicators in the mirror mode
The STBY indicator appears as II# and REC as •. Some of the other indicators appear
mlrror-revetsed and others are not displayed.
(1) Set the POWER switch to OFF.
(2) Close the LCD panel.
(3) Eject the cassette.
Page 18
Recording a picture
!’•'! cMv.li• 1 ;)tni'.!'.ri.-- 'if
VtAViJliV.tAV ■ -■
If you record pictures with the LCD panel closed, check the picture with the viewfindei
Adjust the viewfinder lens to your eyesight so that the indicators in the viewfinder
come into sharp focus.
Lift up the viewfinder and move the viewfinder lens adjustment lever.
Page 19
Recording a picture
•iifi'.'f Ml-' • Ir‘--l
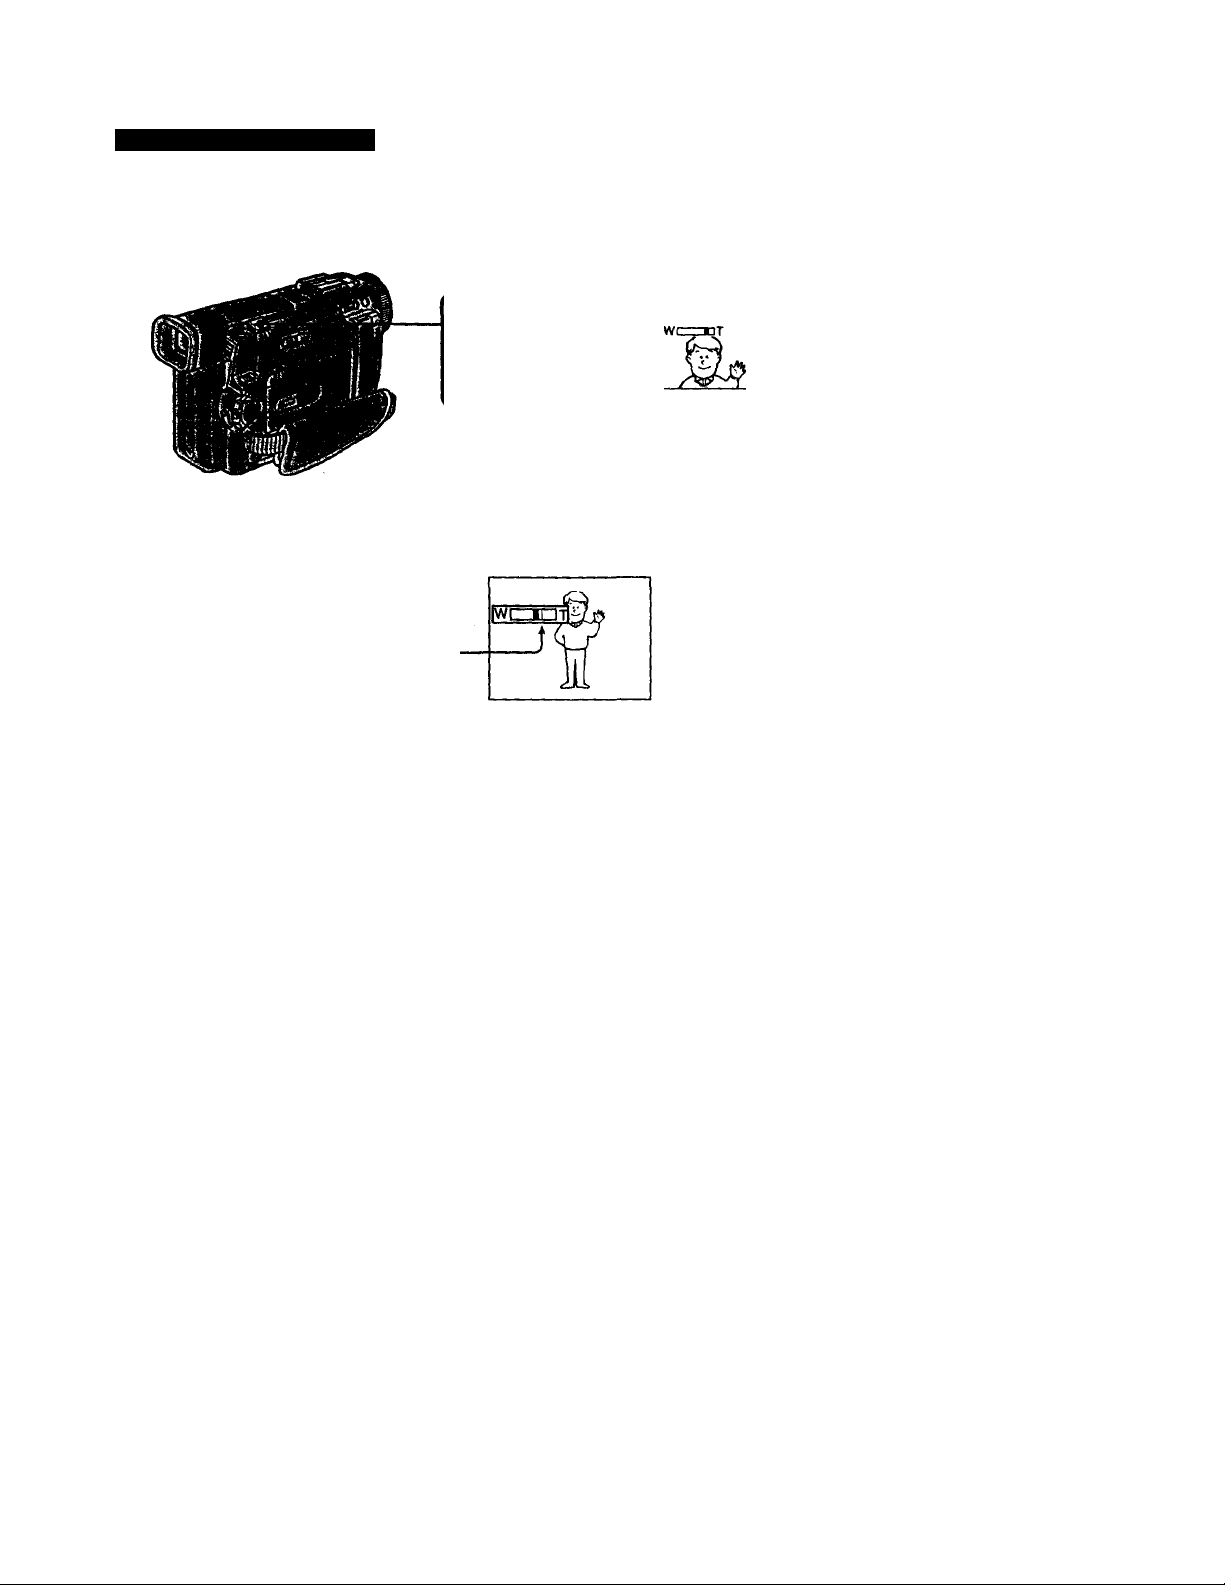
Move the power zoom lever a little for a slower zoom. Move it further for a faster zoom.
Using the zoom function sparingly results in better-looking recordings.
"T" side: for telephoto (subject appears closer)
"W" side; for wide-angle (subject appears farther away)
Zoom greater than lOx is performed digitally, if you set D ZOOM to ON in the MENU
settings. The digital zoom function is set to OFF at the factory, (p. 72)
The right side of the bar shows
the digital zooming zone.
The digital zooming zone appears
when you set D 2iOOM to ON.
W3=OT
f
W T
o
a.
When you shoot close to a subject
If you cannot get a sharp focus, move the power zoom lever to the "W" side until the
focus is sharp. You can shoot a subject that is at least about 2 feet 5/8 inch (about 80 cm)
away from the lens surface in the telephoto position, or about 1/2 inch (about 1 cm)
away in the wide-angle position.
Notes on digital zoom
• Digital zoom starts to function when zoom exceeds lOx.
• The picture quality deteriorates as you go toward the "T" side. Set D ZOOM to OFF in
the MENU settings. Otherwise the digital zoom activates without notice (p."72).
19
Page 20
Recording a picture
A: Recording starts when you press START/STOP, and stops when you press it
again (factory setting).
ANTI GROUND SHOOTING ±.:
Your camcorder records otUy while you press START/STOP. Use this mode to
avoid recorditrg unnecessary scenes.
5SEC: When you press use this mode to START/STOP, your camcorder records for 5
seconds and then stops automatically.
¿.-.A.
------------
D
ANTI GROUND
SHOOTING
Notes
• You cannot use the fader function in the 5SEC or mode.
• The time code does not appear in the 5SEC mode.
To extend the recording time in the 5SEC mode
Five dots (99#9#) appccir, emd then disappear at a rate of one per second. To extend
the recording time, press START/STOP again before all the dots disappear. Recording
continues for about 5 seconds from the moment you press START/STOP.
5SEC
START/STOP
MODE
20
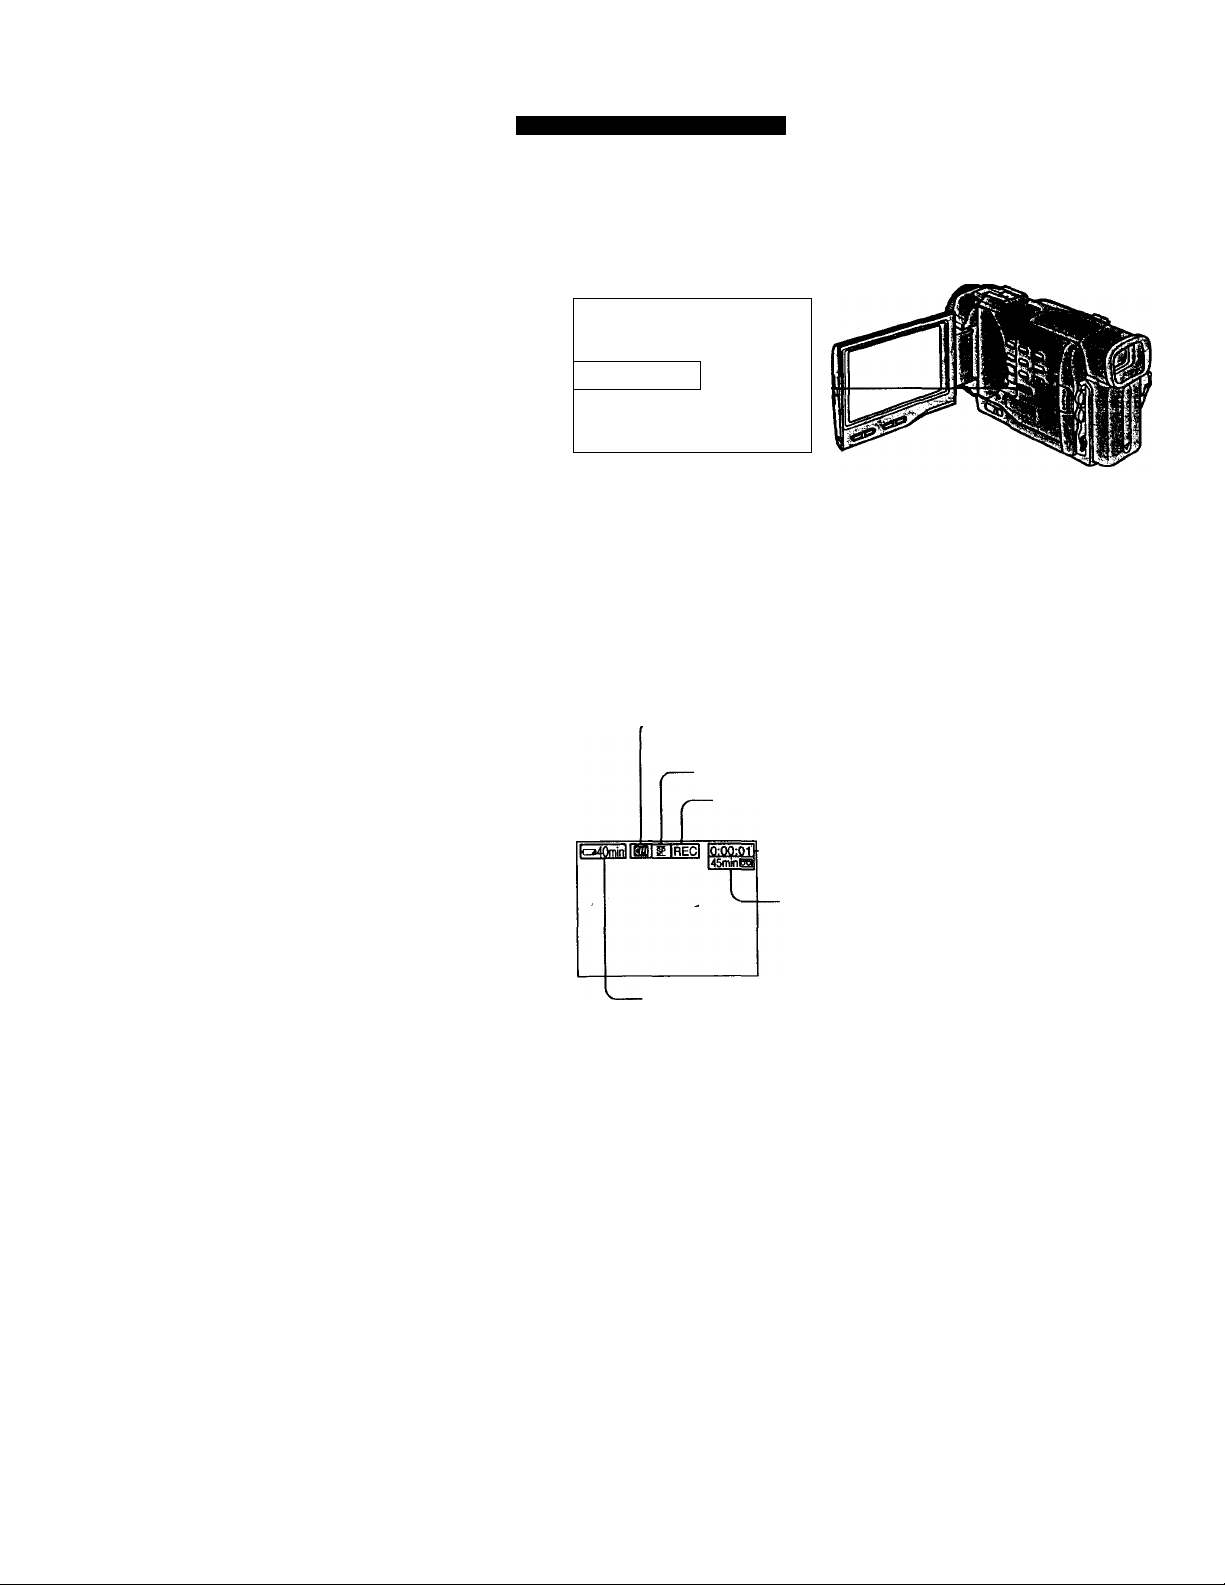
The indicators are not recorded on tape.
' Cassette memory indicator
This appears when using a tape with cassette memory.
Recording mode indicator
• STBY/REC indicator
■ Time code/Tape counter
Remaining tape indicator
This appears after you insert a cassette and record or play
back for a while.
Remaining battery time indicator
Time code
The time code indicates the recording or playback time, "0:00:00" (hours : minutes :
seconds) in CAMERA mode and "0:00:00:00" (hours : minutes: seconds : frames) in
VTR mode. You cannot rewrite only the time code.
Your camcorder uses the drop frame mode.
Remaining tape indicator
The indicator may not be displayed accurately depending on the tape.
Page 21
Recording a picture
When you shoot a subject with the light source behind the subject or a subject with a
light background, use the backlight function.
Press BACK LIGHT in the recording or standby mode.
The S indicator appears in the viewfinder or on the LCD screen.
To cancel, press BACK LIGHT again.
If you press EXPOSURE when shooting backlit subjects
The backlight function will be canceled.
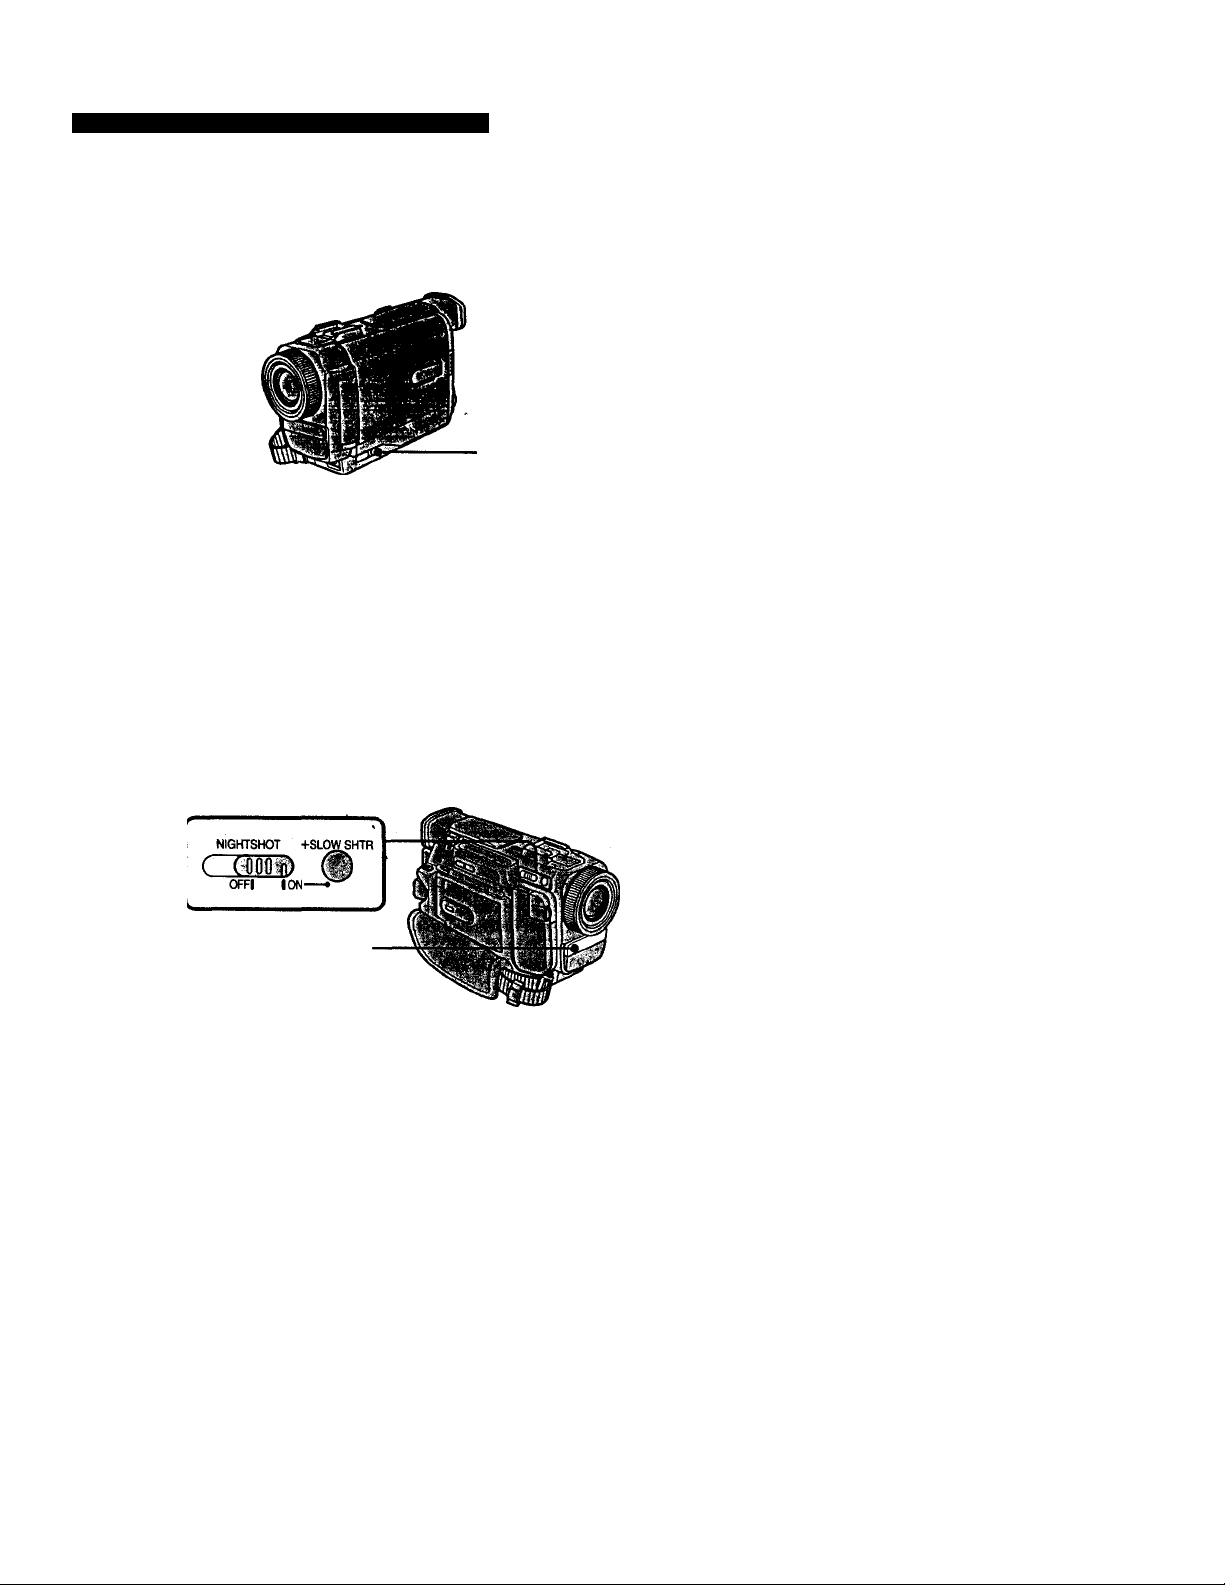
The NightShot function enables you to shoot a subject in a dark place. For example, you
can satisfactorily record the environment of nocturnal aiümals for observation when
you use this function.
a
BACK UGHT
(1) While your camcorder is in the standby mode, slide NIGHTSHOT to ON.
(2) Press START/STOP to start recording.
® and "NIGHTSHOT" indicators ñash on the LCD screen or in the
viewfinder. To cancel the NightShot function, slide NIGHTSHOT to OFF.
NightShot Light emitter
21
Page 22

Recording a picture
Using +SLOW SHTR
The NightSiot +Slow shutter mode makes subjects more than four times brighter than
those recorded in the NightShot mode.
(1) Slide NIGHTSHOT to ON in the standby or recording mode. ® indicator
appears.
(2) Press +SLOW SHTR until the desired NIGHTSHOT indicator fliishes.
The indicator changes as follows:
@ (NIGHTSHOT) -► @1 (NlGHTSHOTl) -♦ @2 (NIGHTSHOT2) -► @
(NIGHTSHOT)
To cancel the NightShot +Slow shutter mode, slide NIGHTSHOT to OFF.
Using the NightShot Light
The picture will be dearer with the NightShot Light on. To enable NightShot Light, se
N.S.LIGHT to ON in the MENU settings (p. 72).
Notes
• Do not use the NightShot function in bright places (ex. outdoors in the daytime). Th
may cause your camcorder to malfunction.
• When you keep NIGHTSHOT set to ON in normal recording, the picture may be
recorded in incorrect or unnatural colors.
• If focusing is difficult with the autofocus mode when using the NightShot function,
focus manuiilly.
While using the NightShot function, you cannot use the following functions:
-Exposure
-PROGRAM AE
-White balance
-Fader*
-Digital effect*
• You caimot use these functions only in the NightShot +Slow shutter mode.
22
Shutter speed in the NightShot -t-Slow shutter mode
Indicator
@1 (NlGHTSHOTl)
@2 (NIGHTSHOT2)
Shutter speed
1/15
1/4
The +SLOW SHTR button does not work:
- while the fader function is set or in use
- while the digital effect function is in use
- when NIGHTSHOT is set to OFF
- in the MEMORY mode (DCR-TRVIO only)
NightShot Light
NightShot Light rays are infrared and so are invisible. The maximum shooting dista:
using the NightShot Light is about 10 feet (3 m). The shooting distance wiU be twice
more in the NightShot +Slow shutter mode.
Page 23
Recording a picture
You can make a recording with the self-timer. This mode is useful when you want to
record yourself.
(1) Ptks SELFTIMER in the standby mode. The O (self-timer) indicator appears
on the LCD screen or in the viewfinder.
(2) Press START/STOP.
Self-timer starts coimting down from 10 with a beep sound. In the last two
seconds of the countdown, the beep sound gets faster, then recording starts
automatically.
SELFTIMER
To stop the self-timer during recording
Press START/STOP.
Use the Remote Commander for convenience.
To record still pictures using the self-timer
Press PHOTO in step 2.
START/STOP
To cancel self-timer recording
Press SELFTIMER so that the 0 indicator disappears from the LCD or viewfinder
screen while your camcorder is in the standby mode.
Note
The self-timer recording mode is automatically cancelled when
- Self-timer recording is finished.
- The POWER switch is set to OFF or VTR.
Page 24

Checking the recording
- END SEARCH / EDITSEARCH / Rec Review
You can use these buttons to check the recorded picture or shoot so that the transition
between the last recorded scene and the next scene you record is smooth.
You can go to the end of the recorded section after you record.
Press END SEARCH in the standby mode.
The last 5 seconds of the recorded section are played back and playback stops. You can
monitor the sound from the speaker or headphones.
You can search for the next recording start point.
Hold down the +/- side of EDITSEARCH in the standby mode. The recorded section is
played back.
+ : to go forward
- : to go backward
Release EDITSEARCH to stop playback. If you press START/STOP, re-recording begins
from the point you released EDITSEARCH. You cannot monitor the soimd.
You can check the last recorded section.
Press the - side of EDITSEARCH momentarily in the standby mode.
The last few seconds of the recorded section are played back. You can monitor the
sound from the speaker or headphones.
End search function
When you use a tape without cassette memory, the end search function does not work
once you eject the cassette after you have recorded on the tape. If you use a tape with
cassette memory, the end search function works even once you eject the cassette.
If there is a blank portion in the recorded portion, the end search function may not
work correctly, (p. 109)
Page 25
PlaylMck - Basics —
laying back a tape
You can monitor the playback picture on the LCD screen. If you close the LCD panel,
you can monitor the playback picture in the viewfinder. You can control playback using
the Remote Commander supplied with your camcorder.
(1) Install the power source and insert the recorded tape.
(2) Set the POWER switch to VTR while pressing the small green button. The
video control buttons light up.
(3) Slide OPEN. Then, open the LCD panel.
(4) Press to rewind the tape.
(5) Press ► to start playback.
(6) To adjust the volume, press either of the two buttons on VOLUME. The
speaker on your camcorder is silent when the LCD panel is closed.
To stop playback
Press ■.
When monitoring on the LCD screen
You can turn the LCD panel over and move it back to the camcorder body with the
LCD screen facing out.
25
Page 26
Playing back a tape
'ri-) 1*.' l)¿1 t'iV i'à'iKHOi*
Press DISPLAY on your camcorder or the Remote Conunander supplied with your
camcorder.
The indicators appear on the LCD screen.
To make the indicators disappear, press DISPLAY again.
Using the data code function
Your camcorder automatically records not only images on the tape but also the
recording data (date/time or various settings when recorded) (Data code).
You can only operate with the Remote Commander.
Press DATA CODE on the Remote Commander in the playback mode.
The display changes as follows:
date/time —► various settings (SteadyShot, white balance, gain, shutter speed, aperture
value) —► no indicator
DISPLAY
JUL 4 IMS
12H)S:S6 AM
^ AUTO
Not to display various settings
Set DATA CODE to DATE in the MENU settings (p. 72).
The display changes as foEows:
date/time —► no indicator
Note
The pictures taken on the Memory Stick are not recorded with various settings.
Recording data
Recording data is your camcorder's mformation when you have recorded. In the
recording mode, the recording data wiU not be displayed.
When you use data code function, bars (
• A blank section of the tap>e is being played back.
• The tape is unreadable due to tape damage or noise.
• The tape was recorded by a camcorder without the date and time set.
----------
) appear if:
Data code
The data code is displayed on the TV screen if you connect your camcorder to the TV
(p. 28).
so AWB
Page 27

’laying back a tape
‘ i y I y. \\ • > 11 ■,
To operate control buttons, set the POWER switch to VTR.
To view a still picture (playback pause)
Press II durmg playback. To resume playback, press II or ►.
To advance the tape
Press in the stop mode. To resume normal playback, press BH
To rewind the tape ^
Press in the stop mode. To resume normal playback, press ►. '§■
To change the playback direction 7
Press < on the Remote Commander during playback to reverse the playback direction. Ç
To resume normal playback, press ► . g'
To locate a scene monitoring the picture (picture search)
Keep pressing or ►► during playback. To resume normal playback, release the
button.
To monitor the high-speed picture while advancing or
rewinding the tape (skip scan)
Keep pressing while rewinding or ►► while advancing the tape. To resume
rewinding or advancing, release the button.
To view the picture at slow speed (slow playback)
Press !► on the Remote Commander during playback. For slow playback in the reverse
direction, press <, then press !► on the Remote Commander. To resume normal
playback, press
To view the picture at double speed
Press x2 on the Remote Commander during playback. For double speed playback in the
reverse direction, press <, then press x2 on the Remote Commander. To resume
normal playback, press ►.
To view the picture frame-by-frame
Press !!► on the Remote Commander in the playback pause mode. For frame-by-frame
playback in the reverse direction, press ^M. To resume normal playback, press ►.
To search the last scene recorded (END SEARCH)
Press END SEARCH in the stop mode. The last
5 seconds of the recorded section plays back and stops.
End Search '
When you use a tape without cassette memory, the end search function does not work
once you eject the cassette after you have recorded on the tape. ^
When you use a tape with cassette memory, the end search function works even once
you eject the cassette.
In the various playback modes
Sound is muted.
When the playback pause mode fasts for S minutes
Your camcorder automatically enters the stop mode. To resume playback, press ►.
Slow playback
The slow playback can be performed smoothly on your camcorder; however, this
function does not work for an output signal from the g DVIN/OUT jack.
When you play back a tape in reverse
Horizontal noise appears at the center or top and bottom of the screen. This is not a 27
malfunction. - . -
Page 28
ewing the recording on TV
Connect your camcorder to your TV or VCR with the A/V cormectmg cable supplied
with your camcorder to watch the playback picture on the TV screen. You can operate
the playback control buttons in the same way as when you monitor playback pictures
on tt\e LCD screen. When monitoring the playback picture on the TV screen, we
reconunend that you power your camcorder from a wall outlet using the AC power
adaptor (p. 13). Refer to the operating irwtructions of your TV or VCR.
Open the jack cover. Connect your camcorder to the TV using the A/V connecting
cable. Then, set the TV/VCR selector on the TV to VCR.
S VIDEO
AUDIO/VIDEO
Coimect your camcorder to the LINE IN input on the VCR by using the A/V connecting
cable supplied with your camcorder. Set the input selector on the VCR to LINE.
Cormect the yellow plug of the A/V connecting cable to the video input jack and the
white or die red plug to the audio input jack on the VCR or the TV. If you connect the
white plug, the sound is L (left) signal. If you connect the red plug, the sound is R
(right) signal.
If your TV or VCR has an S video jack
Connect using an S video cable (not supplied) to obtain high-quality pictures. With this
connection, you do not need to connect the yellow (video) plug of the A/V connecting
cable.
Coimect the S video cable (not supplied) to the S video jacks on both your camcorder
and the TV or the VCR.
Refer to the operating instructions of your TV.
This connection produces higher quality DV format pictures.
Page 29
Viewing the recording on TV
Once you connect the AV cordless IR receiver (not supplied) to your TV or VCR, you
can easily view the picture on your TV. For details, refer to the operating instructions of
the AV cordless IR receiver.
LASER UNK
LASER LINK emitter
(1) After connecting your TV and AV cordless IR receiver, set the POWER switch
on the AV cordless IR receiver to ON.
(2) Turn the TV on and set the TV/VCR selector on the TV to VCR.
(3) Press LASER LINK. The lamp of LASER LINK lights up.
(4) Press ► on your camcorder to start playback.
(5) Point the LASER LINK emitter at the AV cordless IR receiver. Adjust the
position of your camcorder and the AV cordless IR receiver to obtain clear
playback picliues.
To cancel the laser link function
Press LASER LINK. The lamp on the LASER LINK button goes out.
If you turn the power off
Laser link turns off automaticaU'y.
2
ai
•<
O'
0>
a
If you use a Sony TV ' '
• You can turn on the TV automatically when you press LASER LINK or ►•. To do so,
set AUTO TV ON to ON in the MENU settings and turn the TV's main switch on, then
do either of the following:
- Point the LASER LINK emitter at the TV's remote sensor and press LASER LINK.
- Turn on LASER LINK and press
• You can switch the video input of the TV automatically to the one which the AV
cordless IR receiver is connected. To do so, set AUTO TV ON to ON and TV INPUT to
the same video input (1,2,3) in the MENU settings. With some models, however, the
picture and sound may be disconnected momentarily when the video input is
switched.
• The above feature may not work on some TV models.
Note
When laser link is activated (die LASER LINK button is lit), your camcorder consumes
power. Press LASER LINK to turn off the laser link function when it is not needed.
Page 30
— Advanced Recording Operations —
Photo recording
You can record a still picture like a photograph. This mode is useful when you want to
record a picture such as a photograph or when you print a picture using a video printer
(not supplied).
You can record about 510 pictures in the SP mode and about 765 pichues in the LP
mode on a 60-minute tape.
Besides the operation described here, your camcorder can record still pichues on :
Memory Sticks (p. 85) (DCR-TRVIO only).
(1) Set the POWER switch to CAMERA.
(2) In the standby mode, keep pressing PHOTO lightly until a stiU picture
appears. The CAPTURE indicator appears. Recording does not start yet.
To change the still picture, release PHOTO, select a still picture again, and then
press and hold PHOTO lightly.
(3) Press PHOTO deeper.
The still picture in the viewfinder or on the LCD screen is recorded for about
seven seconds. The sound during those seven seconds is also recorded.
During recording, the still image you are shooting appears in the viewfinder or
on the LCD screen.
30
Notes
• During photo recording, you caimot change the mode or setting.
• During photo recording, you cemnot hun your camcorder off or press the PHOTO
button.
• When recording a still picture, do not shake your camcorder. The picture may
fluctuate.
• The photo recording function does not work:
- while the fader function is set or in use
- while the digital effect function is set or in use
• When i flashes, the appropriate brightness may not be obtained.
• When you start photo recording, from normal CAMERA recording, the video flash
light (not supplied) does not work (4 does not appear).
If you record a moving subject with photo recording function
When you play back the still picture on other equipment, the picture may fluctuate.
Page 31

Photo recording
To use the photo recording function using the Remote Commander
Press PHC3TO on the Remote Commander. Your camcorder records a picture on the
LCD screen or in the viewfiitder immediately.
To use the photo recording function during normai CAMERA recording
Press PHOTO deeper. The still picture is tiien recorded for about seven seconds and
your camcorder returns to the standby mode. You cannot select another still picture.
iLVV*îiIî'| >jI-> ■)
You can print a stiU picture by using the video printer (not supplied). Coimect the video
printer using the A/V coimecting cable supplied with your camcorder.
Cormect it to the AUDIO/VIDEO jack and connect the yellow plug of the cable to the
video input of the video printer. Refer to the operating instructions of the video printer
as well.
S VIDEO
AUDIO/VIDEO
>
o.
<
№
s
s.
o
S.
5'
IQ
o
■D
: Signal flow
If the video printer is equipped with S video input
Use the S video connecting cable (not supplied). Connect it to the S VIDEO jack and the
S video input of the video printer.
Page 32

Using the wide mode
You can record a 16:9 wide picture to watch on the 16:9 wide-screen TV (16:9WIDE).
Black bands appear on the screen during recording in 16:9WIDE mode [a]. The picture
during playing back on a normal TV [b] or a wide -screen TV [c] are compressed in the
widthwise direction. If you set the screen mode of the wide-screen TV to the full mode,
you can watch pictures of normal images [d].
In the standby mode, set 16;9W1DE to ON in the MENU settings (p. 72).
MENU
To cancel the wide mode
Set 16:9WIDE to OFF in the MENU settings.
In the wide mode
You cannot select the old movie function with DIGITAL EFFECT and the bounce
function with FADER.
During recording
You caimot select or cancel the wide mode. When you cancel the wide mode, set your
camcorder to the standby mode aind then set 16:9WIDE to OFF.
Connection for a TV
Pictures recorded in the 16;9WIDE mode automatically appear on the TV screen at full
size when you connect your camcorder to a TV that is compatible with the video ID
(ID-l/ID-2) system.
ID-2 system
The IE>-2 system sends a copyright protection signal with ID-1 signals inserted between
video signals when you cormect your camcorder to other equipment by an A/V
connecting cable.
Page 33

Jsing the fader function
You can fade in or out to give your recording a professional appearance.
(a]
FADER
M.FADER
(mosaic)
BOUNCE*
(Fade in only)
OVERLAP
(Fade in only)
[b] ^
MONOTONE
When fading in, the picture gradually changes from black-and-white to color.
When fading out the picture gradually changes from color to black-and-white.
* You cannot use this function when D ZCXDM is set to ON in the MENU settings.
S '
o.
30
o
o
•D
*
33
Page 34

Using the fader function
(1) When fading in [a]
In the standby mode, press FADER until the desired fader indicator flashes.
When fading out [b]
In the recording mode, press FADER imtil the desired fader indicator flashes.
The indicator changes as follows:
FADER -* M.FADER -► BOUNCE MONOTONE -► OVERLAP -►
no indicator
The last selected fader mode is indicated first of all.
(Z) Press START/STOP. The fader indicator stops flashing.
1
iTiTTT^
FADER-
FADER
To cancel the fader function
After the fade in/out is carried out: Your camcorder automatically retunrs to the
normal mode.
Before the fade in/out is carried out: Before pressing START/STOP, press FADER until
the indicator disappears.
Page 35

Using the fader function
Note
You cannot use the following functions while using the fader function. Also, you cannot
use the fader function while using the following functions.
-Digital effect
- Low lux mode of PRCX5RAM AE (Overlap function only)
- NightShot +SI0W shutter
- Photo recording
When the OVERLAP indicator appears
Your camcorder automatically stores the image recorded on a tape. As the image is
being stored, the OVERLAP indicator flashes fast, and the playback picture is
displayed. At this stage, the picture may not be recorded clearly, depetuling on the tape
condition.
>
a.
When START/STOP MODE is set to 1. or SSEC
You cannot use the fader function.
While using the bounce function, you cannot use the following functions:
-Exposure
- Focus
-Zoom
- Picture effect
Note on the bounce function
The BOUNCE indicator does not appear in the following mode or functions:
- D ZOOM is set to ON in the MENU settings
-Wide mode
- Picture effect
- PROGRAM AE
o,
5.
5'
(C
O
■o
a
s
d“.
o
Page 36

Using special effects - Picture effect
You can digitally process images to obtain special effects like those in films or on the
TV.
NEG. ART la]: The color and brighmess of the picture is reversed.
SEPIA: The picture is sepia.
B&W: The picture is monochrome (black-and-white).
SOLARIZE [b]: The light intensity is clearer, and the picture looks like an illustration.
SUM [c]: The picture expands vertically.
STRETCH [d]: The picture expands horizontally.
PASTEL [e]: The contrast of the picture is emphasized, and the picture looks like an
animated cartoon.
MOSAIC [f]: The picture is mosaic.
[b] [c]
Select the desired picture effect mode in the MENU settings (p. 72).
MENU
[d]
To turn the picture effect function off
Set P EFFECT to OFF in the MENU settings.
During playback, you can process a scene using the picture effect function
The available picture effects are NEG. ART, SOLARIZE, SEPIA and B&W.
36
Page 37

Ising special effects - Picture effect
While using the picture effect function
You cannot select the old movie mode with DIGITAL EFFECT.
When you turn the power off
Your camcorder automatically rehuns to the normal mode.
If you select the picture effect mode in the recording mode
Pictures processed by the picture effect function will be recorded.
When the POWER switch is set to VTR
The SLIM, STRETCH, PASTEL and MOSAIC indicators do not appear in the MENU
settings.
>
Q.
<
O
Q.
5"
ic
O
■o
n
37
Page 38

Using special effects - Digital effect
You can add special effects to recorded pictures using the various digital functions. The
sound is recorded normally.
STILL
You can record a still picture so that it is superimposed on a moving picture.
FLASH (FLASH MOTION)
You can record still pictures successively at constant intervals.
LUMI. (LUMINANCEKEY)
You can swap a brighter area in a still picture with a moving picture.
TRAIL
You can record the picture so that an incidental image like a trail is left.
SLOW SHTR (SLOW SHUTTER)
You can slow down the shutter speed. The slow shutter mode is good for recording
dark pictures more brightly. However, the picture may be less clear.
OLD MOVIE
You can add an old movie type atmosphere to pictures. Your camcorder automatically
sets the wide mode to ON, picture effect to SEPIA, and the appropriate shutter speed.
STILL
LUMI.
Still picture
Still picture
Moving picture
Moving picture
Page 39

ing special effects - Digital effect
(1) While your camcorder is in the standby or recording mode, press DIGITAL
EFFECT. The digital effect indicator appears.
(2) Turn the SEL/PUSH EXEC dial to select the desired digital effect mode.
The indicator changes as follows:
STILL FLASH LUMI. TRAIL SLOW SHTR OLD MOVIE
(3) Press the SEL/PUSH EXEC dial. The indicator lights up and the bars appear.
In the STILL and LUMI. modes, the still picture is stored in memory.
(4) Turn the SEL/PUSH EXEC dial to adjust the ef^t.
Items to adjust
STILL
FLASH The interval of flash motion
LUMI.
TRAIL The vanishing time of the incidental image
SLOW SHTR
OLD MOVIE No adjustment necessary
The more bars there are on screen, the stronger the digital effect. The bars appear in the
following modes: STILL, FLASH, LUMI. and TRAIL.
The rate of the still picture you want to superimpose on the moving
picture
The color scheme of the area in the still picture which is to be swappjed
with a moving picture
Shutter speed. The larger the shutter speed number, the slower the
shutter speed.
i
3
r\
»
O.
3D
<0
r»
o
a
3*
(C
O
DIGITAL EFFECT
\li 1 i/^
IIHMl -
/(III''
To cancel the digital effect
Press DIGITAL EFFECT. The digital effect indicator disappears.
39
Page 40

Using special effects - Digital effect
Notes
• The following functions do not work during digital effect;
- Fader
- Low lux mode of PRCXIRAM AE
- Photo recording
- NightShot +SI0W shutter
• The following function does not work in the slow shutter mode:
- PROGRAM AE
• The following functions do not work in the old movie mode:
-Wide mode
- Picture effect
- PROGRAM AE
When you turn the power off
The digital effect will be automatically canceled.
When recording in the slow shutter mode
Auto focus may not be effective. Focus manually using a tripod.
Shutter speed
Shutter speed number
SLOWSHTRl
SLOWSHTR2 1/15
SLOWSHTR3 1/8
SLOWSHTR4 1/4
Shutter speed
1/30
40
Page 41

\djusting the white balance manually
You can RUinually adjust and set the white balance. This adjustment makes white
subjects look white and allows more natural color balance. Normally white balance is
automatically adjusted.
In the standby or recording mode, select the desired white balance mode in the MENU
settings, (p. 72)
The selected white balance indicator appears.
AUTO (Automatic white balance mode): no indication
HOLD (Hold mode): HOLD
OUnXX)R (Outdoor mode):
INDOOR (Indoor mode):
MENU
To return to the automatic white balance mode
Set WHT BAL to AUTO in the MENU settings.
>
a
<
u
Q.
3)
«
n
O
a
5*
(fi
O
T3
Cases that you can obtain better results by adjusting the white balance manually
Examples of picture-taking
conditions
• If the lighting conditions, like those at a party, aie changing.
• If the picture is being taken in a studio lit by TV lighting.
• If the subject is being lit by sodiunj- or mercury-vapor lamps.
• At night-time with neon or fireworks in the picture
• At sumise or sunset
• Under daytime-fluorescent light
• If the subject or background is all the same color.
White balance
indicator
\l/
'1'
HOLD
If the picture is being taken in a studio lit by TV lighting
We recommend you to record in the indoor mode.
When you record under fluorescent lighting
Use the automatic white balance or hold mode.
Your camcordgr may not adjust the white balance correctly in the indoor mode.
To record when lighting conditions change
• When you move from indoors to outdoors, or vice versa, or detach the battery for
replacement while recording in the automatic white balance mode, point your
camcorder at a white subject for about 10 seconds after setting the POWER switch to
CAMERA.
• When you move from indoors to outdoors, or vice versa, or change the PROGRAM
AE mode while recording in the hold mode, set the white balance to AUTO and reset
to HOLD after few seconds.
41
Page 42

Using the PROGRAM AE function
You can select PROGRAM AE (Auto Exposure) mode to suit your specific shooting
requirements.
Q Spotlight mode
This mode prevents people's faces, for example, from appearing excessively white
when shooting subje^ lit by strong light at weddings or in the theater.
Soft portrait mode
This mode brings out the subject while creating a soft background for subjects such as
jjeople or flowers, and faithfully reproduces skin color.
Sports lesson mode
This mode minimizes shake on fast-moving subjects such as in tennis or golf.
T Beach & ski mode
This mode prevents people's faces from app>earing dark in strong light or reflected light,
such as at a beach in midsummer or on a ski slope.
^ Sunset & moon mode
This mode allows you to maintain atmosphere when you are recording sunsets, general
night views, fireworks displays and neon signs.
Bl Landscape mode
This mode is for when you are recording distant subjects such as mountains and
prevents your camcorder from focusing on glass or metal mesh in windows when you
are recording a subject behind glass or a screen.
Low lux mode
This mode makes subjects brighter in insufficient hght.
42
Page 43

ing the PROGRAM AE function
(1) Press PRCX5RAM AE in the standby mode. The PROGRAM AE indicator
appears.
(2) Turn the SEL/PUSH EXEC dial to select the desired PROGRAM AE mode.
The indicator changes as follows:
@ <—► Sgi <—► 'jf <—► T' <—► # *—* QD ■*—► 8
To turn the PROGRAM AE function off
Press PROGRAM AE.
Notes
• In the spotlight, sports lesson and beach & ski modes, you cannot take close-ups. This
is because your camcorder is set to focus only on subjects in the middle to far distance.
• In the surrset & moon and landscape modes, your camcorder is set to focus only on
distant subjects.
• The following functions do not work in the PROGRAM AE mode;
-Slow shutter
-Old movie
-Bounce
• The following functions do not work in the low lux mode:
- Digital effect > t
-Overlap
• If you press PROGRAM AE when using the NightShot function, the PROGRAM AE
indicator flashes and the PROGRAM AE function does not work.
1 mi
'Mg;
>
O.
<
0)
o
“T
a
5‘
«fi
O
While WHT BAL is set to AUTO in the MENU settings
The white balance is adjusted even if the PROGRAM AE function is selected.
Even if the PROGRAM AE function is selected
You can adjust the exposure.
If you are recording under a discharge tube such as a fluorescent lamp, sodium lamp or mercury lamp
Flickering or changes in color may occur in the following modes. If this happens, turn
the PROGRAM AE fimction off.
- Soft portrait mode
-Sports lesson mode
43
Page 44

Adjusting the exposure manually
You can numually adjust and set the exposure. Adjust the exposure manually in the
following cases:
• The subject is backlit
• Bright subject and dark backgroimd
• To record dark pictures (e.g. night scenes) faithfully
(1) Press EXPOSURE in the standby or recording mode.
The exposure indicator appears.
(2) Turn the SEL/PUSH EXEC dial to adjust the brightness.
____________
44
To return to the automatic exposure mode
Press EXPOSURE again.
Note
When you adjust the exposure manually, the backlight function does not work.
If you change the PROGRAM AE mode or slide NIGHTSHOT to ON
Your camcorder automatically returns to the automatic exposure mode.
Page 45

Focusing manually
You can gain better results by manually adjusting the focus in the following cases:
•The autofocus mode is not effective when shooting
- subjects through glass coated with water droplets
- horizontal stripes
- subjects with little contrast with backgrounds such as walls and sky
•When you want to change the focus from a subject in the foreground to a subject in the
background
«^hooting a stationary subject when using a tripod
(1) Set FOCUS to MANUAL in the standby or recording mode. The indicator
appears.
(2) Turn the focus ring to sharpen focus.
£
a
a
la
tti
a
5'
lO
O
•o
a
S
Î*.
o
3
FOCUS
To return to the autofocus mode
Set FOCUS to AUTO.
To record distant subjects
When you press FOCUS down to INFINITY. The lens focuses on and tk, indicator
appears. When you release FOCUS, your camcorder returns to the manual focus mode.
Use this mode when your camcorder focuses on near objects even though you are
trying to shoot a distant object.
Not to make subjects out of focus when using zoom function
Focus after forcusing at the "T" (telephoto) position.
It will be harder to focus on when using digital zoom function.
Shooting in reiatively dark places or shooting fast-moving subjects in relatively bright places
Shoot at the "W" (wide-angle) position after focusing at the "T" (telephoto) position.
When you shoot close to the subject
Focus at the end of the "W" (wide-angle) position.
The following indicators may appear
ik when recording a distant subject. ' '
£ when the subject is too close to focus on.
45
Page 46

— Advanced Playback Operations —
Playing back a tape with picture effects
During playback, you can process a scene using the picture effect functions: NEG.ART,
SOLARIZE, SEPIA and B&W.
During playback, select the desired picture effect mode in the MENU settings (p. 72).
For details of each picture effect function, see page 36.
MENU
MANUAL SET
atygFFEcmoFF
«♦WTIIWJ liRi.WI 1
e SEPIA
O B&W
■ SOLAPIZE
ea
&
tic
9
(MENU): END
To cancel the picture effect function
Set P EFFECT to OFF in the MENU settings.
Notes
• You cannot process externally input scenes using the picture effect function.
• To record pictures that you have processed using the picture effect function, record
the pictures on the VCR using your camcorder as a player.
Pictures processed by the picture effect function
Pictures processed by the picture effect function are not output through the i DV IN/
OUT jack.
When you set the POWER switch to OFF or stop playing back
The picture effect function is automatically canceled.
Page 47

Playing back a tape with digital effects
During playback, you can process a scene using the digital effect functions: STILL,
FLASH, LUMI. and TRAIL
(1) During playback, press DIGITAL EFFECT and turn the SEL/PUSH EXEC dial
until the desired digital effect indicator (STILL, FLASH, LUMI. or TRAIL)
flashes.
(2) Press the SEL/PUSH EXEC dial.
The digital effect indicator lights up and the bars appear. In the STILL or
LUMI. mode, the picture where you press the SEL/PUSH EXEC dial is stored
in memory as a still picture.
(3) Turn the SEL/PUSH EXEC dial to adjust th^ffect.
For details of each digital effect function, see page 38.
DIGITAL EFFECT
«•Q.
Will/-
limw -
/1 1
P '
<
Q.
2
ST
»<
o*
r»
K*
O
t)
(t
s
o
To cancel the digital effect function
Press DIGITAL EFFECT.
Notes
• You cannot process externally input scenes using the digital effect function.
• To record pictures that you Iwve processed using the digital effect, record the pictures
on the VCR using your camcorder as a player.
Pictures processed by the digital effect function
Pictures processed by the digital'effect fimction are not output through the g DV IN/
OUT jack.
When you set the POWER switch to OFF or stdp playing back
The digital effect function is automatically canceled.
Page 48

Quickly locating a scene using the zero
set memory function___________________________
Your camcorder goes forward or backward to automatically stop at a desired scene
having a tape counter value of "0:00KK)". You can do this with the Remote Commander.
Use this function, for example, to view a desired scene later on during playback.
(1) In the playback mode, press DISPLAY.
(2) Press ZERO SET MEMORY at the point you want to locate later. The tape
counter shows "0:00:00" and the ZERO SET MEMORY indicator flashes.
(3) Press ■ when you want to stop playback.
(4) Press to rewind the tape to tihe tape counter's zero point. The tape stops
automatically when the tape counter reaches approximately zero. The ZERO
SET MEMORY indicator disappears and the time code appears.
(5) Press ►. Playback starts.
ZERO SET MEMORY
DISPLAY
Notes
• When you press ZERO SET MEMORY before rewinding the tape, the zero set memory
function will be canceled.
• There may be a discrepancy of several seconds from the time code.
• The zero set memory function may not work when there is a blank portion between
pictures on a tape.
ZERO SET MEMORY functions also in the recording standby mode
When you insert a scene in the middle of a recorded tape, press ZERO SET MEMORY at
the point you want to end the insertion. Rewind the tape to the insert start point, and
start recording. Recording stops automatically at the tape counter zero point. Your
camcorder returns to the standby mode.
Page 49

îarching a recording by date Date search
You can automatically search for the point where the recording date changes and start
playback from that point (Date search). Use a tape with cassette memory for
convenience. You can do this with the Remote Commander.
Use this function to check where recordmg dates change or to edit the tape at each
recording date.
You can use this function only when playing back a tapewith cassette memory (p. 109).
(1) Set the POWER switch to VTR.
(2) Set CM SEARCH in BH to ON in the MENU settings (p. 72). Factory'setting is
ON.
(3) Press SEARCH MODE repeatedly, until the date search indicator appears.
The indicator changes as follows:
TITLE SEARCH -* DATE SEARCH -♦ PHOTO SEARCH -» PHOTO SCAN
—► no indicator
(4) Press F44 or to select the date for playback.
Your camcorder automatically starts playback at the beginning of the selected
date.
<
o
•o
»
To stop searching
Press ■.
49
Page 50

Searching a recording by date
(1) Set the POWER switch to VTR.
(2) Set CM SEARCH in BD to OFF in the MENU settings (p. 72).
(3) Press SEARCH MODE repeatedly, until the date search indicator appears.
The indicator changes as follows:
DATE SEARCH -► PHOTOSEARCH -» PHOTO SCAN no indicator
(4) Press to search for the previous date or press ►>< to' search for the next
date. Your camcorder automatically starts playback at the point where the date
changes. Each time you press K4 or your camcorder searches for the
previous or next date.
To stop searching
Press ■.
Notes
• If one day's recording is less than two minutes, your camcorder may not accurately
find the point where the recording date changes.
• The cursor in the log l mark indicates the present point on the tape.
If a tape has a blank portion between recorded portions
The date search function may not work correctly.
Cassette memory
The tape cassette memory can hold six recording date data.
50
Page 51

Searching the boundaries of recorded tape by title - Title search
If you use a tape with cassette memory, you cai\ search for the boundaries of
recorded tape by title (Title search). Use the Remote Commander for this
operation.
(1) Set the POWER switch to VTR.
(2) Set CM SEARCH in QQ to ON in the MENU settings (p. 72). Factory setting is
ON.
(3) Press SEARCH MODE repeatedly, imtil the title search indicator appears.
(4) Press K4 or to select the title for playb^k.
Your camcorder automatically starts playback of the scene having the title that
you selected.
TITLE SEARCH
t HELLO!
2
CONGRATULATIONSI
3 HAPPY NEW YEAR!
4 PRESEtfT
5 0000 MORNNQ
6 WEOOMG
A
TITLE SEARCH
HAPPY NEW YEAR!
PRESENT
>
Q.
<
01
S ■
s.
»<
o*
0)
0)
o
To stop searching
Press ■.
If you use a tape without cassette memory
You caimot superimpose or search a title.'
To superimpose a title
See page 65. ■
If a tape has a blank portion between recorded portions
The title search function may not work correctly-.
51
Page 52

Searching for a photo - Photo search/ Photo scan
You can search for a still picture you have recorded on a mmi DV tape (photo search).
You can also search for stiU pictures one after another and display each picture for five
seconds automatically regardless of cassette memory (photo scan). Use the Remote
Commander for these operations.
Use this function to check or edit still pictures.
Ct?) •)‘V
You can use this hmction only when playing back a tape with cassette memory (p. 109).
(1) Set the POWER switch to VTR.
(2) Set CM SEARCH in QQ to ON in the MENU settings (p. 72). Factory setting is
ON.
(3) Press SEARCH MODE repeatedly, until the photo search indicator appears.
The indicator changes as follows;
TITLE SEARCH -♦ DATE SEARCH PHOTO SEARCH -» PHOTO SCAN
—* no indicator
(4) Press K4 or to select the date for playback. Your camcorder
automatically starts playback of the photo having the date that you selected.
SEARCH
MODE
_____________________________________
PHOTO 8EAACH
1 8EP/ S/M 17:30
t SEP/
S/SS
S DEC/24/M 10:30
4 JAN/ 1/00 23:25
5 PE8/11/0O 16:11
6 APn/20 / 00 1 3:45
4
S:S0
52
PHOTO SEARCH
1 SEP/ S/M 17:30
2 SEP/ e/M 8.SO
3 DEC/24/M 10:30
-4_jy</U0Q 23i2S
f s №8/11/00 tg-TT
6 APB/29 / 00 1 3746
To stop searching
Press ■.
If a tape has a blank portion between recorded portions
The photo search function may not work correctly.
Page 53

Searching for a photo - Photo search/Photo scan
(1) Set the POWER switch to VTR.
(2) Set CM SEARCH in QQ to OFF in the MENU settings (p. 72).
(3) Press SEARCH MODE repeatedly, until the photo search indicator appears.
(4) Press or to select the photo for playback. Each time you press or
►W, your camcorder searches for the previous or next photo.
Your camcorder automatically starts plajjback of the photo.
To stop searching
Press ■.
£
(1) Set the POWER switch to VTR.
(2) Press SEARCH MODE repeatedly, until the photo scan indicator appears.
(3) Press or MM.
Each photo is played back for about 5 seconds automatically.
To stop scanning
Press ■.
2
SEARCH
MODE
L If'—n
----------------------------
ff _ili)
PHOTO 00
SCAN
^
a
2
ftl
»<
o*
01
n
O
*D
53
Page 54

— Editing —
Dubbing a tape
Using the A/V connecting cabie
Connect your camcorder to the VCR using the A/V cormecting cable supplied with
your camcorder.
Set the input selector on the VCR to LINE, if available.
(1) Insert a blaidc tape (or a tape you want to record over) into the VCR, and insert
the recorded tape into your camcorder.
(2) Set the POWER switch to VTR.
(3) Play back the recorded tape on your camcorder.
(4) Start recording on the VCR.
S VIDEO
AUDIO/VIDEO
; Signal flow
© S VIDEO
® VIDEO
Iaudio
54
When you have finished dubbing a tape
Press ■ on both your camcorder and the VCR.
If you have displayed the screen indicators on the TV
Make the indicators disappear by pressing SEARCH MODE or DATA CODE on the
Remote Commander or DISPLAY so that they will not be superimposed on the edited
tape.
You can edit on VCRs that support the following systems
El 8 mm, Hi@ Hi8,» DigitalS, im VHS, SIMIS-VHS, TOSB VHSC, SIWEW S-VHSC,
IB Betamax, latiBetai ED Betamax, “IV mini DV or IV DV
If your VCR is a monaural type
Connect the yellow plug of the A/V connecting cable to the video input jack and the
white or the red plug to the audio input jack on the VCR or the TV. When the white
plug is connected, the left channel audio is output, and the red plug is connected, the
right channel audio is output.
Connect using an S video cable (not supplied) to obtain high-quality pictures
With this connection, you do not need to connect the yellow (video) plug of the A/V
cormecting cable.
Cormect an S video cable (not supplied) to the S video jacks of both your camcorder and
the VCR.
This cormection produces higher quality DV format pictures.
Page 55

Dubbing a tape
Using the ¡.LINK cable (DV connecting cable)
Simply connect the VMC-IL4435/2DV/4DV LUNK cable (DV connecting cable) (not
supplied) to ^ DV IN/OUT and to DV IN/OUT of the DV products. With digital-todigital connection, video and audio signals are transmitted in digital form for highquality editing. You cannot dub the titles, display indicators or the contents of cassette
memory.
(1) Insert a blattk tape (or a tape you want to record over) into the VCR, and insert
the recorded tape into your camcorder.-»-
(2) Set the POWER switch to VTR.
(3) Play back the recorded tape on your camcorder.
(4) Start recording on the VCR.
.; Signal flow
iDV IN/OUT
(not supplied)
a.
?+
5'
When you have finished dubbing a tape
Press ■ (STOP) on both your camcorder and the VCR.
You can connect one VCR only using the i.UNK cable (DV connecting cable).
During digital editting
You cannot use DIGITAL EFFECT button functions.
You can also use your camcorder as a recorder
You can use your camcorder as a player or recorder without changing the connection.
When you use your camcorder as a recorder, the DV IN indicator appears in the
viewfinder or on the LCD screen. The DV IN indicator may appear on both equipment.
If you record playback pause picture with the L DV IN/OUT jack
The recorded picture becomes rough. And when you play back the picture using the
other video equipment, the picture may jitter.
To perform a more precise editing (DCR-TRV10 only)
Use DV s)mchro-editmg hmction (p. 56).
55
Page 56

Dubbing a tape
Using the ¡.LINK cable (DV connecting cable)
Simply connect the VMC-IL4435/2DV/4DV i.UNK cable (DV connecting cable) (not
supplied) to g DV IN/OUT and to DV IN/OUT of the DV products. With digital-todigital connection, video and audio signals are transmitted in digital form for highquality editing. You cannot dub the titles, display indicators or the contents of cassette
memory.
(1) Insert a blank tape (or a tape you want to record over) into the VCR, and insert
the recorded tape into your camcorder.
(2) Set the POWER switch to VTR. ^
(3) Play back the recorded tape on your camcorder.
(4) Start recording on the VCR.
: Signal flow
i,DV IN/OUT
(not supplied)
When you have finished dubbing a tape
Press ■ (STOP) on both your camcorder and the VCR.
You can connect one VCR only using the i.UNK cable (DV connecting cable).
During digital editting
You cannot use DIGITAL EFFECT button functions.
You can also use your camcorder as a recorder
You can use your camcorder as a player or recorder without changing the connection.
When you use your camcorder as a recorder, the DV IN indicator appears in the
viewfinder or on the LCD screen. The DV IN indicator may appear on both equipment.
If you record playback pause picture with the ft DV IN/OUT jack
The recorded picture becomes rough. And when you play back the picture using the
other video-equipment, the picture may jitter.
To perform a more precise editing (DCR-TRV10 oniy)
Use DV synchro-editing function (p. 56).
Page 57

Editing pamaiiy on a uv
- DV synchro-editing (DCR-TRV10 only)
By simply selecting the scenes to edit, you can duplicate the desired portion on a tape,
using other equipment connected with an i.LINK cable (DV connecting cable). The
scenes can be selected by frame. Since your camconier exchanges digital signals, you
can edit with little audio and video deterioration.
You cannot duplicate titles, display indicators, or the contents of cassette memory.
The connection is the same as on page 55.
(1) Insert a recorded tape into your camcorder and insert a blank tape (or a tape
you want to record over) into the DV product.
(2) Set the POWER switch of your camcorder to VTR.
(3) Set the input selector to DV input on the DV product. If the DV product is
another DV camcorder, set its POWER switch to VTR.
(4) Press MENU to display the menu.
(5) Turn the SEL/PUSH EXEC dial to select S, then press the dial.
(6) Turn the SEL/PUSH EXEC dial to select DV EDITING, then press the dial.
(7) Using the video control bjuttons, locate the point where you want to start
editing, then press II to set your camcorder in the playback pause mode
(p. 130).
(8) Press the SEL/PUSH EXEC dial or MARK on the Remote Commander to set
DV EDITING IN.
(9) Using the video control buttons, locate the point where you want to end
editing, then press II to set your camcorder in the playback pause mode.
(10) Press the SEL/PUSH EXEC dial or MARK on the Remote Commander to set
DV EDITING OUT. The editing process starts. When the process ends, your
camcorder and the DV product automatically set to pause mode.
Page 58

Editing partially on a DV tape - DV synchro-editing (DCR-TRV10 only)
MARK
OTHERS
or BEEP
«r COMMANDER
e DISPLAY
O DV EDITING
MO : 23 ; 12 : 01
OTHERS
fV BEEP
V COMMANDER
e DISPLAY ^
g IDV EDITINGI READY
■ PRETURN
CMENUl '• END
ITINGI «-110:25:20:05
8,10
[MARK] EXEC IMENUI END
Notes
• If you use other than Sony equipment with the i DV jack, you cannot perform DV
synchro-editing.
• If a tape has a blank portion between recorded portions, DV synchro-editing may not
work correctly.
Errors in duplicating
If you connect your camcorder to Sony'equipment with DV jack, the range of errors is
within +/- 5 frames. The range may become wider in the following conditions.
• The interval between DV EDITING IN and OUT is less than five seconds.
• DV EDITING IN or OUT is set at the beginning of the tape.
If you do not make connections with ¡.LINK cable (DV connecting cable)
The screen shows NOT READY, and you cannot select DV EDITING.
|MARK1:EXEC IMENUI end
On a blank portion of the tape
You cannot set DV EDIT ING IN or OUT.
Page 59

Recording video or TV programs
You can record a tape from another VCR or a TV program from a TV that has video/
audio outputs. Use your camcorder as a recorder. Turn down the volume of your
camcorder. Otherwise, the picture may be distorted.
(1) Insert a blank tape (or a tape you want to record over) into your camcorder. If
you are recordirig a tape from the VCR, insert a recorded tape into the VCR.
(2) Set the POWER switch to VTR.
(3) Set DISPLAY to LCD in the MENU settings (p. 72). The picture from a TV or
VCR appears in the viewfinder or on the LCD screen.
(4) Press • REC and the button on its right simultaneously on your camcorder,
then immediately press II on your camcorder.
(5) Press on the VCR to start playback if you are recording a tape from VCR.
Select a TV program if you are recording from TV.
(6) Press II on your camcorder at the scene where you want to start recording
from.
A
^ PAUSE
'
• REC —^
S VIDEO
: Signal flow
Note
If you fast-forward or slow-playback on the other equipment, die image being recorded
may turn black and white. When recording from other equipment, be sure to play back
the original tape at normal speed.
If your VCR is a monaural type
Connect the yellow plug of the A/V connecting cable to the video output jack and the
white or the red plug to the audio output jack on the VCR or the TV. When the white
plug is connected, the left channel audio is output, and the red plug is connected, the
right channel audio is output.
Connect using an S video cable (not supplied) to obtain high-quality pictures
With this connection, you do not need to connect the yellow (video) plug of the A/V
connecting cable.
Connect an S video cable (not supplied) to the S video jacks of both your camcorder and
the VCR.
This connection produces higher quality DV format pictures.
Page 60

Inserting a scene from a VCR
îi'AX/il-l'tî’l *'•' •> -■ VÊir.liMiL')
You can insert a new scene from a VCR onto your originally recorded tape by
specifying the insert start and end points. Use the Remote Commander for this
operation. Connections are the same as on page 54 or 55.
Insert a cassette containing the desired scene to insert into the VCR.
a
H
a
59
Page 61

Inserting a scene from a VCR
(1)Set the POWER switch to VTR.
(Z)On the VCR, locate just before the insert start point [a], then press II to set the VCR
to the playback pause mode.
(3) On your camcorder, locate the insert end point [cj by pressing or Then
press II to set it to the playback pause mode.
(4) Press ZERO SET MEMORY on the Remote Commander. The ZERO SET MEMORY
indicator flashes and the end point of the insert is stored in memory.
(5) On your camcorder, locate the insert start point [b] by pressing •♦4, then press
two • REC buttons at same time to set your camcorder to the recording pause
mode.
(6) First press II on the VCR, and after a few seconds press II on your camcorder to
start inserting the new scene.
Inserting automatically stops near the zero point on the tape counter. Your
camcorder automaticallyrotums to the recording pause mode.
60
ZERO SET
MEMORY
0:00:00
''feROSET'
f, MEMORY,
To change the insert end point
Press ZERO SET MEMORY again after step 5 to erase the ZERO SET MEMORY
indicator and begin from step 3.
Note
The picture and sound recorded on the section between the insert start and end points
will be erased when, you insert the new scene.
When the inserted picture is piayed back
The picture and sound may be distorted at the end of the inserted section. This is not a
malhmction.
To insert a scene without setting the insert end point
Skip step 3 and 4. Press ■ when you want to stop inserting.
Page 62

Audio dubbing
You can record an audio sound to add to the original sound on a tape by cormecting
audio equipment or a microphorre. If you connect the audio equipment, you can add
soimd to your recorded tape by specifying startirrg and ending points. The original
sound will not be erased.
Use the Remote Commander for this operation.
amBMMaa
a*
5'
: Signal flow
You can check the recorded picture and sound by connecting the AUDIO/VIDEO jack
to a TV.
The recorded sound is not output from a speaker. Check the sound by using the TV or
headphones.
Microphone (not supplied)
----------1--------------
Microphone (not supplied)
6'
Page 63

Audio dubbing
Audio equipment
I
LINE OUT
LO OR
AUDIO L
AUDIO/
VIDEO
. A/V connecting cable
------------1________
I; Signal flow
Note
The picture is not output from the AUDIO/VIDEO jack. Check the recorded picture on
the LCD screen or in the viewfinder, as well as check the recorded sound by using a
speaker or headphones.
No coimection is necessary.
Note
The pictiue is not output from the AUDIO/VIDEO jack. Check the recorded picture on
the LCD screen or in Ae viewfinder, as well as check the recorded sound by using a
speaker or headphones.
fl n AUDIO R
Do not connect the
video (yellow) plug.
Page 64

Audio dubbing
Adding an audio sound on a recorded tape
(1) Insert vour recorded tape into vour camcorder.
(2) Set the POWER switch of your camcorder to VTR.
(3) LtKate the recording start point by pressing ►. Then press II at the point
where you want to start recording to set your camcorder to playback pause
mode.
(4) Press AUDIO DUB on the Remote Commander .
(5) Press II on the Remote Commander and at the same time start playing back
the audio you want to record.
(6) Press ■ on the Remote Commander at the point where you want to stop
recording.
The new sound is recorded in stereo 2 (ST2) during playback.
Monitoring the new recorded sound
To play back the sound
Adjust the balance between the original sound (STl) and the new sound (ST2) by
selecting AUDIO MIX in the MENU settings (p. 72).
V7FI SET
Cr HiFi SOUND
ICTIAUDIO MIX 1 C3C
13 PRETURN STl
a
E
&
rrc
P
(MENU) : END
Five minutes after when you disconnect the power source or remove the battery pack,
the setting of AUDIO MIX returns to the original sound (STl) only. The factory setting
is original sound only.
k ST2
Page 65

Audio dubbing
Notes )
• Now sound cannot bo recordod on a tape already recorded in the 16-bit mode (32 kl i
44.1 kHz or 48 kHz) (p. 76).
• When an external microphone is not connected, the recording will be made through
the built-in microphone of your camcorder.
• New sound cannot be recorded on a tape already recorded in the LP mode.
• You cannot add audio w'ith the DV IN/OUT jack.
If you make all the connections
The audio input to be recorded will take precedence o\'er others in the following ordei
• MIC (PLUG IN POWER) jack
• Intelligent accessory shoe
• AUDIO/VIDEO jack
• Built-in microphone
If an i.LINK cable (DV Connecting cable) is connected to your camcorder
You cannot add a sound to a recorded tape.
To add new sound more precisely
Press ZERO SET MEMORY at the point where you want to stop recording later in the
playback mode.
Carry out steps 3 to 5. Recording automatically stops at the point where ZERO SET
MEMORY was pressed.
We recommend you to add new sound on a tape recorded with your camcorder
If you add new sound on a tape recorded with another camcorder (including
DCR-TRV8/TRV10), the sound quality may become worse.
If you disconnect or connect the i.LINK cable (DV connecting cable) to your
camcorder during recording
The recording may stop.
Page 66

Superimposing a title
If you use a tape with cassotto moiiiorv, you can suporiiuposc tho title while
reeorifing or after reeording. When \ ou pta)’ back the tape, the title is displnved
for fi\ e seeonds from the point whore you superimposed it.
You can select one of eight preset titles and tu o custom titles (p. hS), You can also select
the color, size and position of titles.
(1) Press TITLE to display the title'menu.
(2) Turn the SEL/PUSH EXEC dial to select Cl, then press the dial.
(3) Turn the SEL/PUSH EXEC dial to select the desired title, then press the dial.
The title is flashing.
(4) Change the color, size, or position, if necessary.
© Turn the SEL/PUSH EXEC dial to select the color, size, or position, then
press the dial. The item appears,
@ Turn the SEL/PUSH EXEC dial to select the desired item, then press the
dial.
© Repeat steps ® and @ until the title is laid out as desired.
(5) Press the SEL/PUSH EXEC dial again to complete the setting.
In the playback, playback pause or recording mode:
The "TITLE SAVE" indicator appears on the screen for 5 seconds and the
title is set.
In the standby mode:
The "TITLE" indicator appears. And when you press START/STOP to start
recording,
"TITLE SAVE" appears on the screen for 5 seconds and the title is set.
IM
Page 67

Superimposing a title
TITLE
______
TITLE ■
HELLO
HAPPY BIRTHOAY
HAPPY HOLIDAYS
OONOAATULATIONSI
OUR SWEET BABY
WEDOHC
VACATION
THE END
lTITLE]:ENO
HELLO
IMPPY aiRTHOAY
. HAPPYHOUOAYS
9 CONQRATULATIONSI
OUR SWEET BABY
WEOONG
VACATION
THE END
rnTLE]:ENO
PRESET TITLE ■
□ HELLO
IB HAPPY BIRTHDAY
HAPPY HOLIDAYS
9 CONQRATULATIONSI
OUR SWEET BABY
TiTL£ ■
О
О
ТТТЦ
HAPPY HOLIDAYS
9 OONORATUATONSI
OUR SWEET BABY
WEDDING
VACATION
THE END
9RETURN
{TITLE]: END
rriTLE I
— VACATXm —
'■/II I'"
lEXEC): SAVE triTLE) END
If you use a cassette set to prevent accidental erasure
You cannot superimpose or erase the title. Slide the write-protect tab so that the red
portion is not visible.
To use the custom title
If you want to use the custom title, select IS in step 2.
If you have not made any custom title, "------------------------------------------..." appears on the display.
Title setting
• The title color changes as follows :
WHITE «-► YELLOW VIOLET RED CYAN GREEN BLUE
• The title size changes as follows :
SMALL ^ LARGE
If you input 13 characters or more for a LARGE title, the title is automatically reduced
in size after its position is set.
• The title position changes as follows :
1<—► 2<—► 3-* *—► 4<—► 5<—► 6<—► 7<—► 8<—► 9
The larger the position number, the lower the title is positioned.
When you select the title size "LARGE", you cannot choose position 9.
66
One cassette can have up to about 26 titles, if one title consists of 5 characters
However, if the cassette memory is full with date, photo and cassette label data, one
cassette can have only up to about 15 titles with 5 characters each.
Cassette memory capacity is as follows:
• 6 date data (maximum)
• 12 photo data (maximum)
• 1 cassette label (maximum)
Page 68

Superimposing a title
ifirpilllll
(1) Set the POWER switch to VTR.
(2) Press MENU to display the menu.
(3) Turn the SEL/PUSH EXEC dial to select BH> then press the dial.
(4) Turn the SEL/PUSH EXEC dial to select TITLEERASE, then press the dial.
Title erase display appears.
(5) Turn the SEL/PUSH EXEC dial to select the title you want to erase, then press
the dial.
"ERASE OK ?" indicator appears.
(6) Make sure the title is the one you want to erase, and turn the SEL/PUSH EXEC
dial to select ERASE, then press the dial.
2
MENU
(C^J
To erase the menu display
Press MENU.
3,4
CM SET
VM CM SEARCH
® TITLEERASE
TITLE DSPL
TAPE TITLE
§
ra ERASE ALL
1. HELLO!
2 CONGRATULATIONS!
3 .HAPPY NEW YEAR!_
« [MENU]: END
CM SET
qr CM SEARCH
13 IT ITLEERASEI
TITLE DSPL
TAPE TITLE
a
ERASE ALL
(MENU]: END
0
TITLE ERASE
4 PRESENT
ERASE OK? IRETURN ~l
[MENU]: END
ERASE
Page 69

Making your own titles
You can make up to two titles and store them in the cassette memory. Each title
can hax’e up to 20 characters.
(1) Press TITLE in the standby or VTR mode.
(2) Turn the SEL/PUSH EXEC dial to select V, then press the dial.
(3) Turn the SEL/PUSH EXEC dial to select the first line (CUSTOMl) or second
line (CUSTOM2), then press the dial.
(4) Turn the SEL/PUSH EXEC dial to select the column of the desired character,
then press the dial.
(5) Turn the SEL/PUSH EXEC dial to select the desired character, then press the
dial.
(6) Repeat steps 4 and 5 until you have selected all characters and completed the
title.
(7) To finish making your own titles, turn the SEL/PUSH EXEC dial to select
[SET], then press the dial.'The title is stored in memory.
(8) Press TITLE to make the title menu disappear.
TITLE
PHESer TITVE
a HELLOl
15 HAPPY BIHTHOAY
V HAPPY HOLIDAYS
P CONGflATULATIONSi
OUR SWEET BABY
WEDDING
VACATION
THE END
{TITLEJ END
D CUSTOM! •-
C3|
^ PRETURN
TITLE SET
1 CUSTOM2'-
----------------------------
P
(TITLE): END
at
-
.............
.........
—— j
m
I
TITLE SET
ABODE
FGHI J
KLMNO
PORST
UVWXY ISETl
Z6 7 !
m
12345
I
*■ )
END
mua
4o
i
©
ABODE t234S
FOHIJ 67890
KLMNO ■ - /-
Pdf© I *■ 1
UVWXY ISETl
26 ? •
(TITLE]: END
ABODE 12345
FGHIJ 67690
KLUNO '
0DRST I «• )
TITLE SET
S
_ _ _ _ _ _ _ _ _
ABODE 12345
FQHIJ 67890
KLMNO ■ . /POf®- 1 4- 1
UVWXY ISETl
26 ’
(TITLE) END
BE)
_ _
Page 70

Making your own titles
To change a title you have stored
In step 3, select CUSTOMl or CUSTOM2, depending on which title you want to change,
then press the SEL/PUSH EXEC dial. Turn the SEL/PUSH EXEC dial to select [«•], then
press the dial to delete the title. The last character is erased. Enter the new title as
desired.
If you take 5 minutes or longer to enter characters in the standby mode while a cassette is in your camcorder ^
The power automatically goes off. The characters you have entered remain stored in
memory. Set the POWER switch to OFF once and then to CAMERA again, then proceed
from step 1.
We reconunend setting the POWER switch to VTR or removing the cassette so that your
camcorder does not automatically turn off while you are entering title characters.
To delete the title
Select [♦■]. The last character is erased.
a
E
3
69
Page 71

Labeling a cassette
If you use a tape with cassette memory, you can label a cassette. The label can
consist of up to 10 characters and is stored in cassette memory. When you insert
the labeled cassette and turn the power on, the Label is displayed on the LCD
screen, in the viewfinder, or on the TV screen.
(1) Insert the cassette you want to label.
(2) Set the POWER switch to VTR.
(3) Press MENU to make the menu display appear.
(4) Turn the SEL/PUSH EXEC dial to select BUS, then press the dial.
(5) Turn the SEL/PUSH EXEC dial to select TAPE TITLE, then press the dial.
(6) Turn the SEL/PUSH EXEC dial to select the column of the desired character,
then press the dial.
(7) Turn the SEL/PUSH EXEC dial to select the desired character, then press the
dial.
(8) Repeat steps 6 and 7 until you finish the label.
(9) Turn the SEL/PUSH EXEC dial to select [SET], then press the dial.
The label is stored in memory.
6-8
0
70
CM SET
O CM SEARCH
W TITLEEHASE
© TITLE DSPL
TAPE TITLE
ERASE ALL
a
CM SET
© CM SEARCH
ST Jill
0(1^
TITLEERASE
LE DSPL
F.T I Tia -
lABCDEI 12345
FQHIJ 67390
KLMNO ' .
PORST ( 4- 1
UVWXY [SET]
Z& ? 1
TAPE TITLE BE]
ABODE I234S ABODE 12345
FGHIJ 67890
|Kl MN9I ' . .
PORST 1 1
UVWXY (SET) UVWXY ¡SET]
ZA ? 1 ZA ? !
iMENUl: END iMENUl: END
TAPE TITLE I
ABODE 12345
FGHIJ 67890
KljM^O ■ . /-
PQRST (
*■ Ì
UVWXY (SET)
Z&
FGHIJ 67890
(kI-MNO ' ..
PQRST t 4- )
-►
M
________
ABODE 12345
FQHIJ 67690
Kl®IO • . ,
PQflST I )
UVWXY iSET)
ZA ? !
TAPE TITLE SD
Page 72

i
Labeling a cassette
To erase a character
In step 6 turn the SEL/PUSH EXEC dial to select then press the dial. The last
character is erased.
To change the label you have made
Insert the cassette to change the label, and operate in the same way to make a new label.
If you use a cassette set to prevent accidental erasure
You cannot label it. Slide the write-protect tab ^ that the red portion is not visible.
If the mark appears in step 5
The cassette memory is full. If you erase the title in the cassette, you can label it.
If you have superimposed titles in the cassette
When the label is displayed, up to 4 titles also appear.
When the "
The cassette memory is full.
Tire "------" indicates the number of characters vou can select for the label.
-----
" indicator has fewer than 10 spaces
m
71
Page 73

— Customizing Your Camcorder —
Changing the MENU settings
To change the mtxle settings in the MENU settings, select the menu items with the
SEL/PUSH EXEC dial. The factory settings can be partially changed. First, select the
icon, then the menu item and then the mode.
(1) In the standby or VTR mode, press MENU.
(2) Turn the SEL/PUSH EXEC dial to select the desired icon, then press the dial to
set.
(3) Turn the SEL/PUSH EXEC dial to select the desired item, then press the dial to
set.
(4) Turn the SEL/PUSH EXEC dial to select the desired mode, and press the dial
to set.
(5) If you want to change other items, select <3 RETURN and press the dial, then
repeat steps from 2 to 4.
For details, see "Selecting the mode setting of each item" (p. 73).
Page 74

Changing the MENU settings
To make the MENU display disappear
Press MENU.
Menu items are displayed as the following icons:
® MANUAL SET
@ CAMERA SET
SI VTR SET
® LCD/VF SET
O MEMORY SET (DCR-TRVIO only)
CM SET
^ TAPE SET
SETUP MENU
^ OTHERS
' Selecting the mode setting of each item • is the factory setting.
Menu items differ depending on the position of the POWER switch.
Icon/item Mode Meaning
® P EFFECT To add special effects like those in films or on
WHT BAL To adjust the white balance (p. 41)
AUTOSHTR OON
OFF To not automatically activate the electronic
H D ZOOM ON To activate digital zoom. More than lOx to 120x
• OFF To deactivate digital zoom. Up to lOx zoom is
16:9W1DE »OFF
ON To record a 16:9 wide picture (p. 32)
STEADYSHOT • ON To compensate for camera-shake
OFF
N.S. LIGHT «ON To use the NightShot Light function (p. 22)
OFF To cancel the NightShot Light function
the TV to images (p. 36)
To automatically activate the electronic shutter
when shooting in bright conditions
shutter even when shooting in bright
conditions
zoom is performed digitally (p. 19)
carried out.
__
To cancel the SteadyShot function. Natural
pictures are produced when shooting a
stationary object with a tripod.
POWER
switch
CAMERA
VTR
CAMERA
MEMORY
CAMERA
MEMORY
CAMERA
MEMORY
CAMERA
CAMERA
■ MEMORY
CAMERA
■ MEMORY
m
n
QJ
B
ey
g
Q.
Notes on the SteadyShot function
• The SteadyShot function will not correct excessive camera-shake.
• Attachment of a conversion lens (not supplied) may influence the SteadyShot
function.
If you cancel the SteadyShot function
The SteadyShot off indicator appears. Your camcorder prevents excessive
compensation for camera-shake.
73
Page 75

Changing the MENU settings
Icon/item
O CONTINUOUS • OFF
(DCR-TRVIO
only)
QUALITY
(DCR-TRVIO
only)
FLD./FRAME
(DCR-TRVU)
only)
PRINT MARK
(DCR-TRVIO
only)
PROTECT
(DCR-TRVIO
only)
SLIDE SHOW
(DCR-TRVIO
only)
DELETE ALL
(DCR-TRVIO
only)
FORMAT
(DCR-TRVIO
only)
PHOTO SAVE
(DCR-TRVIO
only)
BQ CM SEARCH
TITLEERASE
TITLE DSPL
TAPE TITLE
ERASE ALL
Mode
• FINE
• FIELD
• OFF
• OFF
• ON
• ON
ON
MULTI SCRN
STANDARD
FRAME
ON
ON
OFF
OFF
Meaning
Not to record continuously
To record 3 or 4 pictures continuously (p. 8ti)
To record 9 picuturos continuously (p. 86)
To record still pictures in the fine image quality
mode, using the Mcmor)' Stick
To record still pictures in tlie standard image
quality mode, usijiR the Memory Stick
To record mo\'ing subjects
To record stopping subjects in high quality
To write a print mark on the recorded still
images you want to print out later
Not to write print marks on still pictures
To protect selected still pictures against
accidental erasure (p. 100)
Not to protect still pictures
To play back images in a continuous kx)p
(p. 107)
To delete all the images (p. 102)
To format Memory Sticks
To duplicate still pictures (p. 91) VTR
To search using cassette memory (p. 49) VTR
To search without using cassette memory
To erase the title you have superimposed
(p-67) ■
To display the title you have superimposed VTR
, Not tp display the title
To label a cassette (p. 70) VTR
To erase all the data in cassette memory VTR
POWER
switch
MEMORY
VTR
MEMORY
MEMORY
VTR
MEMORY _
VTR
MEMORY
MEMORY
MEMORY
MEMORY
VTR
CAMERA
CAMERA
CAMERA
m
n
ft)
3
n
O
a.
75
Page 76

Changing the MENU settings
Icon/item
^ REC MODE
AUDIO MODE •12B1T
ES3 REMAIN
DATA CODE
Notes on the LP mode
• When you record a tape in the LP mode on your camcorder, we recommend playing
the tape on your camcorder. When you play back the tape on other camcorders or
VCRs, noise may occur in pictures or sound.
• When you record in the LP mode, we recommend using a Sony Excellence/Master
mini DV cassette so that you can get the most out of your camcorder.
• You cannot make audio dubbing on a tape recorded in the LP mode. Use the SP moc
for the tape to be audio dubbed.
• When you record in the SP and LP modes on one tape or you record some scenes in
the LP mode, the playback picture may be distorted or the time code may not be
written projserly between scenes.
Mode
• SP
LP To inrease the recording time to 1.5 times the
16B1T To record in the 16-bit mode (the one stereo
• AUTO
ON To always display the remaining tape indicator
• DATE/CAM To display date, time and various settings
DATE To display date and time during playback
Meaning
To record in the SP (Standard Play) mode
SP mode
To record in the 12-bit mode (two stereo
sounds)
sound with high quality)
To display the remaining tape bar:
• for about 8 seconds after your camcorder is
turned on and calculates the remaining
amount of tape
• for about 8 seconds after a cassette is inserted
and your camcorder calculates the remaining
amount of tape
• for about 8 seconds after ►- is pressed in
VTR mode
• for about 8 seconds after DISPLAY is pressed
to display the screen indicators
• for the period of tape rewinding, forwarding
or picture search in the VTR mode
during playback
POWER
switch
VTR
CAMER/
VTR
CAMER/
VTR
CAMER/
VTR
76
Notes on AUDIO MODE
• You cannot dub audio sound on a tape recorded in the 16BIT mode.
• When playing back a tape recorded in the 16-bit mode, you carmot adjust the balanc.
in AUDIO MIX.
Page 77

Changing the MENU settings
Icon/item
IS) CLOCK SET
AUTO TV ON • OFF
Mode Meaning
To reset the date or time (p. 78)
—
ON To automatically turn on the Sony TV when
using the laser link function
TV INPUT
• VlDEOl
VIDE02
VIDEOS
OFF
LTR SIZE • NORMAL
2x
To switch the video input on a Sony TV when
using the laser link fwnction (p. 29)
—
To display selected menu items in normal size
To display selected menu items at twice the
normal size
DEMO MODE • ON
OFF
To make the demonstration appear
To cancel the demonstration mode
^ WORLD TIME To set the clock to the local time. Turn the SEL/
PUSH EXEC dial to set a time difference. The
clock changes by the time difference you set
here. If you set the time difference to 0, the
dock returns to the originally set time.
BEEP • MELODY
To output the melody when you start/stop
recording or when an unusual condition occurs
on your camcorder
NORMAL To output the beep instead of the melody
OFF To cancel the melody and beep sound
COMMANDER • ON To activate the Remote Commander supplied
with your camcorder
OFF To deactivate the Remote Commander to avoid
remote control misoperation caused by other
VCR's remote control
DISPLAY • LCD
To show the display on the LCD screen and
viewfinder
V-OUT/LCD To show the display on the TV screen, LCD
screen andViewfinder
REC LAMP • ON To light up the camera recording lamp at the
front of your camcorder
OFF ■ To turn the camera recording lamp off so that
the subject is not aware of the recording
DV EDITING
(DCR-TRVIO
only)
To duplicate the desired portion on a tape by
simply selecting the scenes to edit, Using other
equipment connected with an i.LINK cable (DV
connecting cable) (p. 56)
Notes on DEMO MODE
• You farmot select DEMO MODE when a cassette is inserted in your camcorder.
• DEMO MODE is set to STBY (Standby) at the factory and the demonstration starts
about 10 minutes after you have set the POWER switch to CAMERA without a
cassette inserted.
Note that you cannot select STBY of DEMO MODE in the MENU settings.
• When NIGHTSHOT is set to ON, the NIGHTSHOT indicator appears in the
viewfinder or on the LCD screen and you cannot select DEMO MODE in the MENU
settings.
In more than 5 minutes after removing the power source
The "AUDIO MIX", "COMMANDER" and "HiFi SOUND" items are returned to their
factory settings.
The other menu items are held in memory even when the battery is removed.
POWER
switch
CAMERA
MEMORY
VTR
CAMERA
VTR
CAMERA
VTR
CAMERA
MEMORY
CAMERA •
CAMERA
MEMORY
VTR
CAMERA
MEMORY
VTR
CAMERA
MEMORY
VTR
CAMERA
MEMORY
CAMERA
MEMORY
VTR
-<
o
c
n
Of
3
O
2.
Page 78

Resetting the date and time
The clock is set to East Coast Standard Time at the factory.
If you do nof use your camcorder for about a half year, the date and time settings may
be released (bars may appear) because the vanadium-lithium battery installed in your
camcorder will have been discharged.
First, set the year, then the month, the day, the hour and then the minute.
(1) While your camcorder is in the standby mode, press MENU to display the
MENU settings.
(2) Turn the SEL/PUSH EXEC dial to select ©, then press the dial.
(3) Turn the SEL/PUSH EXEC dial to select CLOCK SET, then press the dial.
(4) Turn the SEL/PUSH EXEC dial to adjust the desired year, then press the dial.
(5) Set the month, day and hour by turning the SEL/PUSH EXEC dial and
pressing the dial.
(6) Set the minute by turning the SEL/PUSH EXEC dial and pressing the dial by
the time signal. The clock starts to move.
(7) Press MENU to make .the MENU settings disappear.
___________________
MANUAL SET
CLOCK SET
W AUTO TV ON
© TV INPUT
B LTR SIZE
m DEMO MODE
© AUTO TV ON
® TV INPUT i
IB LTR SIZE
m DEMO MODE
@ PRETURN
SETUP MENU
r TV INPUT
B LTR SIZE
□ OEMO MODE
i PRETURN
The year changes as follows:
1999
L_
2000
If you do not set the date and time
"—:—is recorded on the tape and the Memory Stick (tXTR-TRVlO only).
Note on the time indicator
The internal clock of your camcorder operates on a 12-hour cycle.
• 12:00 AM stands for midnight.
• 12:00 PM stands for noon.
2029
SETUP MENU
vr ìcl^kJetI
© AUTO TV ON
© TV INPUT D
B LTR SIZE
n DEMO MODE
@ PRETURN
gfcLTOK^lT^JUL 4 2000
g ÀUTO tv ON 5;3O:0OPM
r TV INPUT
i LTR SIZE
S3 DEMO MODE
“i PRETURN
Page 79

i — Memory Stick operations —
Using a Memory Stick-introduction
- DCR-TRV10 only
You can record and play back still images on a Memory Stick supplied with your
camcorder. You can easily play back, re-record or delete still images. You can also
record images from a mini DV tape on a Memory Stick or vice versa. You can exchange
image data with other equipment such as a personal computer etc., using the Serial port
adaptor for Memory Stick supplied with your camcorder or MSAC-PCl PC card
adaptor for Memory Stick (not supplied).
Still images
Record the still image on a Memory Stick. Playjiack the picture with your PC. See page
96 for details.
Using a Memory Stick
When you use a Memory Stick
Terminal
Labeling position
• You carmot record or erase still images when the write-protect tab on the Memory
Stick is set to LOCK.
• You can format Memory Sticks. You can also protect still images and write print
marks on still images in Memory Sticks.
• We recommend backing up important data.
• When the ACCESS lamp is flashing, never remove the Memory Stick.
•Image data may be damaged in the following cases:
- If you remove the Memory Stick or turn the power off when the ACCESS lamp is
flashing
- If you use Memory Sticks near magnets or magnet fields such as those of speakers
and televisions.
On file format (JPEG) .
Your camcorder compresses image data in JPEG format (extension .jpg).
Typical image data file name
DSC00001.jpg.
79
Page 80

Using a Memory Stick-introduction
Notes
• Prevent metallic objects or your finger from coming into contact with the metal parts
of the connecting section.
• Stick its label on the labeling position.
• Do not bend, drop or apply strong shock to Memory Sticks.
• Do not disassemble or modify Memory Sticks.
• Do not let Memory Sticks get wet.
• Do not use or keep Memory Sticks in locations that are:
- Extremely hot such as in a car parked in the sun or under the scorching sun
- Under direct sunlight
-Very humid or subject to corrosive gases
• When you carry or store a Memory Stick, put it in its case.
Note on image data compatibility
Image data files recorded on Memory Sficks by your camcorder conform with the
Design Rules for Camera File Systems universal standard established by the JEIDA
Oapan Electronic Industry Development Association). You camiot play hack on \ our
camcorder still images recorded on other equipment (DCR-TRV900*, DSC-DyOO*) that
does not conform w'ith this uni\’ersal standard.
• These models are not sold in some areas.
Memory Stick is a trademark of Sony Corporation.
30
Page 81

Using a Memory Stick-introduction
inserting a Memory Stick
(1) Slide MEMORY OPEN in the direction of the arrow. The Memory Stick
compartment opens.
(2) Insert a Memory Stick in as far as it can go with its rounded corner facing up.
Tlien, close the Memory Stick compartment.
MEMORY OPEN
o
Memory Stick compartment
To eject a Memory Stick
Open the Memory Stick compartment in step 1, press MEMORY EJECT. The Memory
Stick comes out.
MEMORY EJECT
S
n>
3
o
•3
When the ACCESS lamp is lit or flashing
Never shake or strike your camcorder. Do not turn the power off, eject a Memory£tick
or remove the battery pack. Otherwise, the irtrage data breakdown may occur.
81
Page 82

Using a Memory Stick-introduction
Selecting image guality mode
You can select image quality mode in still picture recording. If you do not make anv
selection, the unit automatically records in FINE mode.
(1) Set the POWER switch to MEMORY. Make sure that the lock is set to the left
(unlock) position.
(2) Press MENU to make the MENU display appear.
(3) Turn the SEL/PUSH EXEC dial to select Q, then press the dial.
(4) Turn the SEL/PUSH EXEC dial to select QUALITY, then press the dial.
(5) Turn the SEL/PUSH EXEC dial to select the desired image quality, then press
the dial,
(6) Press MENU to erase the menu display.
Page 83

Using a Memory Stick-introduction
(mage quality settings
Setting
FINE (FINE)
STANDARD (STD)
Differences in image quality mode
Recorded images are compressed in JPEG format before being stored into memory. The
memory capacity allotted to each image varies depending on the selected image quality
mode. Details are shown in the table below. (The number of pixels is 640 x 480,
regardless of image qualify mode. The data size before compression is about 600 KB.)
Image quality mode Memory capacity
FINE
STANDARD
Approximate number of images you can record on a Memory Stick
The number of images you can record varies depending on which image quality mode
you select and the complexity of the subject.
4MB type:
FINE (FINE) 40 images (maximum)
STANDARD (STD) 60 images (maximum)
Meaning
Use this mode when you want to record high quality
images. The image is compressed to about 1/6.
This is the standard image quality. The image is
compressed to about 1/10.
About 100 KB
About 60 KB
>2
3
o
SMB type:
FINE (FINE)
STANDARD (STD)
16MB type:
FINE (FINE)
STANDARD (STD)
81 images (maximum)
122 images (maximum)
164 images (maximum)
246 images (maximum)
Note
In some cases, changing the image quality mode may not affect the image quality,
depending on the types of images you are shooting.
83
Page 84

Using a Memory Stick-introduction
Formatting (initializing) a Memory Stick
(1) Insert a Memory Stick into your camcorder.
(2) Set the POWER switch to MEMORY. Make sure that the lock is set to the left
(unlock) position.
(3) Press MENU to make the MENU display appear.
(4) Turn the SEL/PUSH EXEC dial to select O, then press the dial.
(5) Turn the SEL/PUSH EXEC dial to select FORMAT, then press the dial.
(6) Turn the SEL/PUSH EXEC dial again to select OK, then press the dial. The
display shows "EXECUTE."
(7) Press the SEL/PUSH EXEC dial. The display shows "FORMATTING," and
formatting procedure begins. When formatting is finished, the display shows
"COMPLETE."
Notes
• Formatting erases all information on the Memory Stick, including the protected image
data. Check the contents of the Memory Stick before formatting.
• Do not turn the POWER switch or press any button while the display shows
"FORMATTING".
• You cannot format the Memory Stick if the write-protect tab on the Memory Stick is
set to LOCK.
* •
84
Page 85

Recording still images on Memory Sticks
- Memory photo recording
- DCR-TRV10 only
You can select the FIELD or FRAME mode in still picture recording. Your camcorder
compensates tor camera-shake when recording mo\'ing subjects in the FIELD mode.
Your camcorder records still images in high quality in the FRAME mode. Select the
FIELD or FRAME in the MENU settings (p. 72).
Before operation
Insert a Memory Stick into your camcorder.
(1) Set the POWER switch to MEMORY. Mifke sure that the lock is set to the left
(unlock) position.
(2) Keep pressing PHOTO lightly. The picture freezes and "CAPTURE" appears
on the LCD screen or in the viewfinder. Recording does not start yet.
(3) Press PHOTO deeper. The image displayed on the screen will be recorded on a
Memory Stick. Recording is complete when the bar scroll indicator disappears.
>2
S
3
fD
3
o
•
. Notes .
• When recording fast-moving subjects in the FRAME mode, the recorded image blurry.
• When recording in the FRAME mode, your camcorder may not correct camera-shake.
We recommend that you shoot objects with a tripod.
When the POWER switch is set to MEMORY
The following functions do not work:
wide TV mode, digital effect, picture effect, title.
8
Page 86

Recording still images on Memory Sticks - Memory photo
recording
When you are recording a still image
You can neither turn off the power nor press PHOTO.
When you press the PHOTO button on the Remote Commander
Your camcorder immediately records the image that is on the screen when you press
the button.
Recording images continuously
You can record still pictures continuously. Select one of the two modes described below
before recording.
Continuous mode [a]
You can record 3 or 4 pictures continuously.
Multi screen mode [b]
You can record 9 still pictures continuously on a single page.
[a]
№]
Page 87

Recording stiff images on Memory Sticks - Memory photo
recording
(1) Set the POWER switch to MEMORY. Make sure that the lock is set to the left
(unlock) position.
(2) Press MENU to make the MENU display appear.
(3) Turn the SEL/PUSH EXEC dial to select <□/ then press the dial.
(4) Turn the SEL/PUSH EXEC dial to select CONTINUOUS, then press the dial.
(5) Turn the SEL/PUSH EXEC dial to select the desired setting, then press the
dial.
(6) Press MENU to erase the menu display.
r~'
..........................
2# 6 MENU
3
1 ^
MEMORY SET ,
VS ISiJriNIJOUSl OFF
« WAUTY
£ FLO./FRAME
O PRINT MARK
® PROTECT
«« SLIDE SHOW
? DELETE ALL
FORMAT
9RETURN
{MENUl: END
I'
MEMORY SET
Cr CONTINUOUS
e QUALITY
€T FLD .' FRAME
Q FRINT MARK
Ж PROTECT
m SLIDE SHOW
9 DELETE ALL
FORMAT
(MENU! END
giO^INUOUSlBFFr
« QUMTtTY W
& FLO./FRAME MULTI 8CRN
Q PRINT MARK
© PROTECT
m SLIDE SHOW
9 DELETE ALL
U6MQRY SET
FORMAT
PRETURN
[MENUl: END
___________________
5
% ^
1»-
MEMORY SET
OlOafriNUQUSION
m oOw-iTY
er PLO . / FRAME
Q PRINT MARK
© PROTECT
SLIDE SHOW
9 DELETE ALL
R3RMAT
^RETURN
(MENU): END
Page 88

Recording still images on Memory Sticks - Memory photo
recording
Continuous shooting settings
Setting
OFF Your camcorder shrxits one image at a time, (no indicator)
ON Your camcorder shoots 3 or 4 still images at about 0.8 sec interv als.
MULTI SCRN
Number of images in continuous shooting
The number of images you can sluxrt continiu>usly \ aries depending on the image
quality mode.
FINE:
STANDARD: 4 image's
Note on using the video flash light (not suppiied)
The \'ideo flash light does not work in tlie continuous or multi screen mode if you
install it to the accessory shoe.
Meaning (indicator on the screen)
( Ф )
Your camcorder shoots 9 still images at about 0.3 sec intervals and
displays the images on a single page divided into 9 boxes. ( Q )
3 images
Page 89

Recording an image from a mini DV tape as a still image
- DCR-TRV10 only
■^ oiir cnmcoalor can road nio\ ing pictiiro data rocordod on a mini DV tapo and rtvord it
as a still imago on a Momor\ Stick, ^'oul■ camcorder can also take in mo\ ing picture
data throngli the input connector and revord it as a still image on a Memor\' Stick.
Before operation
Insert a recorded mini DV tape and a Memorv Stick into yonr camcorder.
(1) Set the POWER switch to VTR.
(2) Press The picture recorded on the miniOV tape is played back.
(3) Keep pressing PHOTO lightly until the picture from the mini DV tape freezes.
“CAPTURE" appears on the LCD screen or in the viewfinder. Recording does
not start yet,
(4) Press PHOTO deeper. The image displayed on the screen will be recorded on a
Memory Stick. Recording is complete when the bar scroll indicator disappears.
________________________________
^ REW0 PLAY
.......
0 FF '
3
CAPTURE
4
iimiiio
/fs
W
(photo)
When the ACCESS lamp is lit or flashing
Never shake or strike the unit. As well do not turn the power off, eject a Memory Stick
or remove the battery pack. Otherwise, the image data breakdown may occur.
If "SS" appears on the LCD screen or in the viewfinder
An incompatible Memory Stick is inserted. Be sure to use proper Memory Stick.
If you press PHOTO lightly in the playback mode
Your camcorder stops mementarily.
Sound recorded on a mini DV tape
You cannot record the audio from a mini DV tape.
Titles have already recorded on mini DV tapes
You cannot record the titles on Memory Sticks. The title does not appear while you are
recording a still picture with PHOTO.
(photo)
8<
Page 90

Recording an image from a mini DV tape as a still image
Recording a still image from other equipment
(1) Set the POWER switch to VTR and set DISPLAY in ® to LCD in the MENU
settings.
(2) Play back the recorded tape, or turn the TV on to see the desired program.
(3) Follow the steps 3 and 4 on page 89.
When recording the image through the AUDIOA/IDEO jack
Connect the yellow plug of the A/V connecting cable to the video jack on the VCR oi
the TV.
When recording the image through the DV IN/OUT jack
: Signal flow
90
DVOUT
J “ (, DV IN/OUT
VMC-IL4435/2DV/4DV i.LINK cable (not supplied)
: Signal flow
Connect using an S video cable (not supplied) to obtain high-quality pictures
With this connection, you do not need to connect the yellow (video) plug of the A/V
connecting cable.
Connect an S video cable (not supplied) to the S video jacks of both your camcorder a
the VCR,
This connection produces higher quality DV format pictures.
Page 91

Copying still images from a mini DV tape
- Pnoto save
- DCR-TRV10 only
Using the search function, you can automatically take in only still images from mini DV
fapes and record fhem on a Memory Sfick in sequence.
Before operation
• Inserf a recorded mini DV fape and rewind fhe tape.
• Insert a Memory Stick into your camcorder.
(1) Set the POWER switch to VTR.
(2) Press MENU to make the MENU display appear.
(3) Turn the SEL/PUSH EXEC dial to select O, then press the dial.
(4) Turn the SEL/PUSH EXEC dial to select PHOTO SAVE, then press the dial.
"PHOTO BUTTON" appears on the LCD screen or in the viewfinder.
(5) Press PHOTO deeper. The still image from fhe mini DV tape is recorded on a
Memory Stick. The number of sfill images copied is displayed. "END" is
displayed when copying is completed.
isi a
p ^ I-
MEMORY SET
B QUALITY
W
PRINT MARK
5 4
6
(photo)
MEMORY SET
Ur QUALITY
«r PR4NT MARK
€ PROTECT
Q PHOTO SAVE
C3
p
(menu! : END
0
PHOTO SAVE M»0 : 00 : 00 : 00
SAVING
0
[MENU]: ENO
PHOTO SAVE 0 : 00 : 00 : 00
PHOTO BUTTON
IPHOTO] : START (MENU) : END
</150
FINE
PHOTO SAVE 0:30 00.00
END
4
IMENU]: ENO
8/150
FINE
Page 92

Copying still images from a mini DV tape - Photo save
To stop copying
Press MENU to stop copying.
When the memory of the Memory Stick is full
"MEMORY FULL" appears on the LCD screen, anti the copying stops. Insert another
Memory Stick anti repeat the procedure from step 2.
When the ACCESS lamp is lit or flashing
Never shake or strike your camcorder. As well do not turn the power off, eject a
Memory Stick or remove the battery pack. Otherwise, the image data breakdown may
occur.
To record ail the images recorded on the mini DV tape
Rewind the tape all thp way back and start copying.
If the write-protect tab on the Memory Stick is set to LOCK
"NOT READY" appears when you select the item in the MENU settings.
When you change Memory Sticks in the middle of copying
Your comcorder resumes copying from the last image recorded on the previous
Memory Stick.
Page 93

I /iewinq a still picture - Memory photo ^ ilayback
! You can play back still images recordetl on a Memory Stick. You can also play hack 6
i images at a time by selecting the index screen.
I Insert a Memory Stick into your camcorder.
I
Before operation
(1) Set the POWER switch to MEMORY or VTR. Make sure that the lock is set to
the left (unlock) position.
(2) Slide OPEN in the direction of the ► mark. Then, open the LCD panel.
(3) Press MEMORY PLAY. The last recorded image is displayed.
(4) Press MEMORY +/- to select the desired still image. To see the previous
image, press MEMORY -. To see the next image, press MEMORY +.
- DCR-TRV10 only
3
o
To stop memory photo playback
Press MEMORY PLAY again.
93
Page 94

Viewing a stili picture - Memory photo playback
To play back recorded images on a TV screen
• Connect your camcorder to the TV with the A/V connecting cable supplied with your
camcorder before the operation.
• When operating memory photo playback on a TV or the LCD screen, the image
quality may appear to have deteriorated. This is not a malfunction. The image data is
as good as ever.
• Turn the audio volume of the TV down before operation, or noise (howliirg) may be
output from the TV speakers.
Image data modified with personal computers or shot with other equipment
You may not be able to play them back with your camcorder.
94
You can play back 6 recorded images at a time. This function is especially useful when
searching for a particular image.
MEMORY INDEX
Press MEMORY INDEX.
A red ► mark appears above the image that is displayed before changing to the index
screen mode.
Page 95

Viewing a still picture - Memory photo playback
1
_______
4
DSC00006 6/ toon
_______
2
5
_______
---------^
a
- ► mark
•To display the following 6 images, keep pressing MEMORY +.
• To display the prex’ious 6 images, keep pressing MEMORY
To return to the normal playback screen (single screen)
Press MEMORY +/- to move the ► mark to the image you want to display on full
screen, then press MEMORY PLAY.
Note ^
When displaying the index screen, the number appears above each image. This re
indicates the order in which images are recorded on the Memory Stick. These numbers o
are different from the data file names.
The image quality mode indicator
The indicator may show a mode different to the one in which you recorded. This is not
a malfunction. The indicator shows the size of the data file. For instance, if the size of
FINE image is small enough, it may be displayed as STD. Or if the size of image is large
enough, it may be displayed as SFN.
Files modified with personal computers
These files may not be displayed on the index screen. Image files shot with other
equipment may not be displayed on the index screen either.
95
Page 96

Viewing a still picture - Memory photo playback
Viewing the recorded images using a personal computer
The image data recorded with your camcorder is compressed in the JPEG format, if vor
use the application software, “PictureGear 3.2Lite" supplied with your camcorder, you
can see images recorded on a Memory Stick on a computer screen. Use the serial port
adaptor for Memory Stick supplied with your camcorder, the MSAK1T-PC4A Memory
Stick/PC card kit or MSAC-PCl PC card adaptor for Memory Stick (not supplied) for
this operation. For detailed instructions on operation, refer to the operating instructions
of the serial port adaptor. Memory Stick/PC card kit or PC card adaptor and
application software.
Serial port
adaptor for
Memory
Stick
Memory
Stick
Serial port
adaptor for
Memory
Stick
Memory—
Stick
— PC card
adaptor
(not
supplied
Memory
Stick
Page 97

Superimposing a still picture in a
Memory Stick on a moving picture
- M. CHROM/M. LUMI/C. CKROM
- DCR-TRV10 only
You can suporimpose a still picture \ ou have recorded on a Memory Stick on top of the
mox'ing picture you are recording.
M. CHROM (Me niorv chroma key)
You can swap a blue area of a still picture such as an illustration or a frame with a
moving picture.
M. LUMI (Memory luminance key)
You can swap a brighter area of a sfill picfure such as a handwritten illustlation or title
with a moying picture. Record a title on a Memory Stick before a trip or e\'ent for
conyenience.
C. CHROM (Camera chroma key)
You can superimpose a mot'ing picture on top of a still picture such as a picture can be
used as background. Shoot the subject against a blue background. The blue area of fhe
moving picture will be swapped with a still picture.
___________
M. CHROM
M. LUMI
C. CHROM
Still picture
Blue
Still picture
Mo\'ing picture
Moving picture
HAPPY
BNm«}AY
Still picture Moving picture
Blue
o
><
97
Page 98

Superimposing a still picture in a Memory Stick on a moving picture
- M. CHROM/M. LUMI/C. CHROM
Before operation
Insert ii recorded Memor\- Stick on vour camcorder.
(1) Set the POWER switch to CAMERA.
(2) Press MEMORY PLAY in the standby mode.
The last recorded or last composed image appears on the lower part of the
screen as a thumbnail image.
(3) Turn the SEL/PUSH EXEC dial to select the desired mode, then press the dial
to set.
The mode changes as follows:
M. CHROM -*• M. LUMI —► C. CHROM
(4) Press the SEL/PUSH EXEC dial.
The still picture is superimposed on the mo\ ing picture.
(5) Press MEMORY+/- to select the still picture vou want to superimpose.
To see the previous imflge, press MEMORY -. To see the next image, press
MEMORY+.
(6) Turn the SEL/PUSH EXEC dial to adjust the effect.
(7) Press START/STOP to start recording.
-------------------------------------------------
----------------------
-
-I
Page 99

Superimposing a still picture in a Memory Stick on a moving picture
- M. CHROM/M. LUMI/C. CHROM
Items to adust
M. CHROM Tlie color (blue) scheme of the area in the still picture which is to be
M, LUMI The color (bright) scheme of the area in the still picture which is to be
____________________
C. CHROM The color (blue) scheme of the area in the mo\’ing picture which is to be
____________________
The fewer bars there are on the screen, the stronger the effect.
swapped with a moving picture
swapped with a moving picture
swapped with a still picture
______________________________________________________________________
___________________________________________________________________
To change the still picture to superimpose
Do either of the following:
- Press MEMORY+/- before step 7.
- Press the SEL/PUSH EXEC dial before step 7, and repeat the procedure from step 3.
To change the mode setting
Press the SEL/PUSH. EXEC dial before step 7, and repeat the procedure from step 3.
To cancel M. CHROM/M. LUMI/C. CHROM
Press MEMORY PLAY.
The Memory Stick supplied with your camcorder stores 30 images
- For M. CHROM: 26 images (such as a frame) DSC00001~DSC00026
- For C. CHROM: 4 images (such as a background) DSCO(X)27~DSC00030
Sample images stored before leaving the factory
Sample images are protected (p. 100).
3
o
•3
If you format the Memory Stick
Sample images will be deleted.
During recording
You caimot change the mode setting.
99
Page 100

Preventing accidental erasure
- Image protection
- DCR-TRV10 only
To prevent accidental erasure of important images, you can protect selected images.
Before operation
Insert a Memory Stick into your camcorder.
(1) Play back the image you want to protect.
(2) Press MENU to make the MENU display appear.
(3) Turn the SEL/PUSH EXEC dial to select O, then press the dial.
(4) Turn the SEL/PUSH EXEC dial to select PROTECT, then press the dial.
(5) Turn the SEL/PUSH EXEC dial to select ON, then press the dial.
(6) Press MENU to erase the menu display. The "o-n" mark is displayed beside
the data file name of the protected image.
or CONTINUOUS
2# 6 MENU
3
1^)
% ^
S QUALITY
SL FLD / FRAME
□ PRINT MARK
S PROTECT
m SLIDE SHOW
? DELETE ALL
MEMORY SET
FORMAT
■MENU] : END
)0
MEMOflYSET
or CONTINUOUS
4 p
5
« QUALITY
® FLO /FRAME
Sl^BoFF
*TC SLIDE SHOW
1 ^
? DELETE ALL
FORMAT
♦¡RETURN
tMENUl: END
0 1-
MEMORYSET ^0l^2tD
or CONTINUOUS
or QUALITY
JsL FLO . / FRAME
ii»“
? DELETE ALL
FORMAT
^RETURN
[MENU] : END
MEMORYSET 10/120
or CONTINUOUS
19 QUALITY
JS FLD.fFRAME
D|PR^NTj<^
TC *SUDE SHOw'lOFF ~~1
P DELETE ALL
FOWAAT
PRETURN
(MENU]: END
To cancel image protection
Select OFF in step 5, then press the SEL/PUSH EXEC dial.
Note
Formatting erases all information on the Memory Stick, including the protected image
data. Check the contents of the Memory Stick before formatting.
If the write-protect tab on the Memory Stick is set to LOCK
You cannot carry out image protection.
 Loading...