


DAV-HDX265
DVD Home Theatre
System
Operating Instructions
.,_.-U[F,.,T,O.M_.LTmM[D,A,<ER_ACE Twin£TriveSubwoot_r 'DAV-HDX265/HDX267W only
DIGITAL AUDIO
DAV-HDX265/HDX266/HDX26 7W
02007 Sony Corporation
To reduce the risk of fire or electric
shock, do not expose this apparatus to
rain or moisture.
Caution - The use of optical instruments
with this product will increase eye
hazard.
Do not install the appliance in a confined space, such
as a bookcase or built-in cabinet.
To prevent fire, do not cover the ventilation of the
apparatus with news papers, table-cloths, curtains, etc.
And don't place lighted candles on the apparatus.
To prevent fire or shock hazard, do not place objects
filled with liquids, such as wtses, on the apparatus.
Do not expose the battel T to excessive heat such as
direct sunlight, fire, or the like.
This symbol is intended to alert the user to
the presence of uninsulated "dangerous
voltage" within the product's enclosure that
may be of sufficient magnitude to constitute a risk of
electric shock to persons.
This symbol is intended to alert the user to
the presence of important operating and
maintenance (servicing) insmlctions ill the
literature accompanying the appliance.
The model and serial numbers are located at the rear
exterior of the control unit. Record the serial number in
the space provided below. Reli:r to them whenever you
call upon your Sony dealer regarding this product.
Model No. DAV-HDX265/DAV-HDX266/DAV-
HDX267W
Serial No.
WARNING
This equipment has been tested and found to comply
with the limits for a Class B digital device, pursuant to
Part 15 of the FCC Rules. These limits are designed to
provide reasonable protection against harmAfl
interlk.rence in a residential installation. This
equipment generates, uses, and can radiate radio
fi-cquency energy and, if not inst dled and used in
accordance with the instructions, may cause harmful
interference to radio communications. However, there
is no guarantee that interference will not occur in a
particular installation. If this equipment does cause
harmlhl interference to radio or television receptiom
which can be determined by turning the equipment off
and on, the user is encouraged to try to correct the
interference by one or more of the following measures:
Reorient or relocate the receiving antenna (aerial).
Increase tile separation between the equipment and
receiver.
Connect the equipment into an outlet on a circuit
diflk:rent from that to which the receiver is
connected.
Consult the dealer or an experienced radio_V
technician for help.
CAUTION
You m: cautioned theft any changes or modifications
not expressly approved in this manual could void your
authority to operate this equipment.
Important Safety Instructions
1) Read these instructions.
2) Keep these instructions.
3) Heed all warnings.
4) Follow all instructions.
5) Do not use this apparatus near water.
6) Clean only with dry cloth.
7) Do not block any ventilation openings. Install in
accordance with the manuf¢_cturer's instructions.
8) Do not install near any heat sources such as
radiators, heat registers, stoves, or other apparatus
(including amplifiers) that produce heat.
9) Do not defeat the salk.ty purpose of the polarized or
grounding-type plug. A polarized plug has two
blades with one wider than the other. A grounding
type plug has two blades and a third grounding
prong. The wide blade or the third prong are
provided for your safety. If the provided plug does
not fit into your outleL consult all electrician lk)r
replacement of the obsolete outlet.
10) Protect the power cord from being walked on or
pinched particularly at plugs, convenience
receptacles, and the point where they exit fiom the
apparatus.
2 GB
11) Only use attachments/accessories specified by the
manufacturer.
12) Use only with the carl stan& tripod, bracket, or
table specified by the manufacturer, or sold with
the apparatus When a cart is used, use caution
when moving the cart/apparatus combination to
avoid injury from tip-over.
13) Unplug this apparatus during lightning storms or
when unused for long periods of time.
14) Refer all servicing to qualified service personnel
Servicing is required when tile apparatus has been
damaged in any way, such as power-supply cord or
plug is damage& liquid has been spilled or objects
have fallen into the apparatus, Ihe apparatus has
been exposed to rain or moisture, does not operate
normally, or has been dropped
Note to CATV system installer:
This reminder is 1)rovided to call tile CATV system
installer's attention to Article g20-411 of the NEC that
provides guidelines lbr proper grounding and, ill
particular, specifies that the cable ground shall be
connected to the grounding system of the building, as
close to the point of cable entry as practicah
Don't throw away the battery with
general house waste, dispose of it
correctly as chemica] waste.
Thank you for purchasing Sony DVD Home
Theatre System. Bet_)reoperating this system,
please read this manual thoroughly and retain it
lot Rmlre reference.
This appliance is
classified as a CLASS I
LUOKAN I LASKRLAITE
KLASS I LASKRAPPAIt_f
II LASS 1 LASER PRODUCT II
LASER product. This
marking islocated on the
rear exterior
Precautions
On power sources
• AC power cord/nladns lead) must be changed only at
the qualified serx ice shop
• Tile unit is not disconnected from the AC power
source/mains) as hmg as it is connected to the wall
outlet ImainsX even if Ibe unit itself has been turned
off
• Install this system so that the AC power con (mains)
can be unplugged from tile wall socket immediately
in the event of trouble
3 GB
Welcome! ................................................ 3
About This Manual ................................. 6
This System Can Play the Following
Discs ................................................. 7
Getting Started - BASIC-
Step 1 : Connecting the System and
TV .............................................. 10
Step 2: Positioning the System ...14
Step 3: Performing the Quick
Setup ........................................ 15
Getting Started
- ADVANCED -
Turning off tile Demonstration ............. 18
Installing the Speakers on a Wall .......... 19
Connecting the TV (Advanced) ............ 20
Connecting Other Components ............. 24
Basic Operations
Playing Discs ................................. 26
Enjoying the Radio or Other
Components ............................ 28
Enjoying TV or VCR Sound from All
Speakers .................................. 29
Selecting the Movie or Music
Mode ......................................... 29
Sound Adjustments
Enjoying Surround Sound by Using Sound
Fiekt ................................................ 30
Various Functions for Playing
Discs
Searching for a Particular Point on
a Disc .............................................. 32
(Scan, Slow-motion Play, Freeze
Frame)
Searching for a Title/Chapter/Track/
Scene, etc ........................................ 33
Searching by Scene ............................... 34
(Picture Navigation)
Resuming Playback from the Point Where
You Stopped the Disc ..................... 34
(Resume Play)
Creating Your Own Program ................ 35
(Program Play)
Playing in Random Order ..................... 37
(Shuffle Play)
Playing Repeatedly ............................... 38
(Repeat Play)
Using the DVD's Menu ........................ 39
Changing the Sound ............................. 39
Selecting ]ORIGINAL] or [PLAY LIST]
on a DVD-R/DVD-RW .................. 41
Viewing Information About the Disc ... 42
Changing the Angles ............................ 44
Displaying the Subtitles ........................ 45
Adjnsting the Delay Between the Picture
and Sound ....................................... 45
(A/V SYNC)
About MP3 Audio Tracks and JPEG
hnage Files ..................................... 46
Playing DATA CDs or DATA DVDs with
MP3 Audio Tracks and JPEG hnage
Files ................................................ 48
Playing Audio Tracks and hnages as a
Slide Show with Sound .................. 50
Enjoying DivX® Videos ...................... 52
(Except for United Kingdom and
North American models)
Playing VIDEO CDs with PBC Functions
(Ver.2.0) ......................................... 54
(PBC Playback)
Tuner Functions
Presetting Radio Stations ...................... 55
Listening to the Radio .......................... 56
Other Operations
Controlling the TV w,ith the Supplied
Remote ........................................... 58
Using the THEATRE SYNC
Function .......................................... 58
Using the Sound Effect ......................... 59
Using the Sleep Timer .......................... 60
Changing the Brightness of the Front
Panel Display .................................. 60
Using the DIGITAL MEDIA PORT
Adapter ........................................... 61
Deactivating the Buttons on the Unit ... 62
(Chikt Lock)
4 GB
Advanced Settings and
Adjustments
Locking Discs ....................................... (,3
(CUSTOM PARENTAL
CONTROL, PARENTAL
CONTROL)
Getting Optimal Surround Sound for a
Room .............................................. 66
(SPEAKER FORMATION)
Calibrating the Appropriate Settings
Automatically ................................. 68
(AUTO CALIBRATION)
Using the Setup Display ........................ 70
Setting the Display or Sound Track
Language ..........................................
[LANGUAGE SETUP]
Settings for the Display ......................... 72
[SCREEN SETUP]
Custom Settings .................................... 74
]CUSTOM SETUP]
Settings for the Speakers ....................... 76
[SPEAKER SETUP1
Returning to the Default Settings .......... 78
Additional Information
Precautions ............................................ 79
Notes about the Discs ............................ 80
Troubleshooting .................................... 80
Self-diagnosis Function ........................ 84
(When letters/nmnbers appear in
the display)
Specifications ........................................ 85
Glossary ................................................ 87
Language Code List .............................. 91
Index to Parts and Controls ................... 92
Guide to the Control Menu Display ...... 95
DUD Setup Display List ....................... 98
System Menu List ................................. 99
Index ................................................... 100
5 GB

• The instructions ill tllis manual describe the
comrols on the remote. You cm_ also use the
comrols on the unit if they have the same or
similar names as those on the remote.
• The instructions in this manual are for DAV-
HDX265. DAV-HDX266, and DAV-
HDX267W. DAV-HDX265 is the model used
for illustration purposes. Any dil]i_rence in
operation is clearly indicated in the text. for
example, "DAV-HDX265 only."
• The Control Menu items may vary depending
Oil the area.
• "DVD" may be used as a general term for
DVD VIDEOs, DVD+RWs/DVD+Rs. and
DVD-RWs/DVD-Rs.
• Measurements are expressed in feet (ft) for
North American models.
• The l\_llowing symbols are used in tiffs
nlauuah
Symbol Meaning
Functions available for DVD
VIDEOs, DVD-Rs/DVD-RWs in
video mode, and DVD+Rs/
DVD+RWs
Functions available for DVD-Rs/
DVD-RWs in VR (Vide()
Recording) mode
Functions available for VIDEO
CDs (including Super VCDs or CD-
Rs/CD-RWs in video CD formal or
Super VCD forma0
Functions ivailable for music CDs
or CD-Rs/CD-RWs in music CD
formal
Functions available for DATA CDs
(CD-ROMs/CD-Rs/CD-RWs/
conlainmg MP__ audio Iracks,
JPEG image files, and DIvX- "
- _)3)4)
video files
Functions a;_ailable for DATA
DVDs (DVD-ROMs/DVD-Rs/
DVD-RWs/DV D+Rs/DV D+RWs/
conlainm_ MP__ audio Iracks,
JPEG " • 2)3)4)
image hies, and DlvX -
video files
I)MP3 (MPEGI Audio Layer 3) is a staMard format
defined by ISO/MPEGwhich compresses audio data.
2)Except for United Kingdom and Norlh American
models.
3)DivX00is a vide() file compression technology,
developed by DivX, Inc.
4)DivX. DivX Cel_ified, and associated logos are
trademarks of DivX, Inc. and are used under license.
6GB
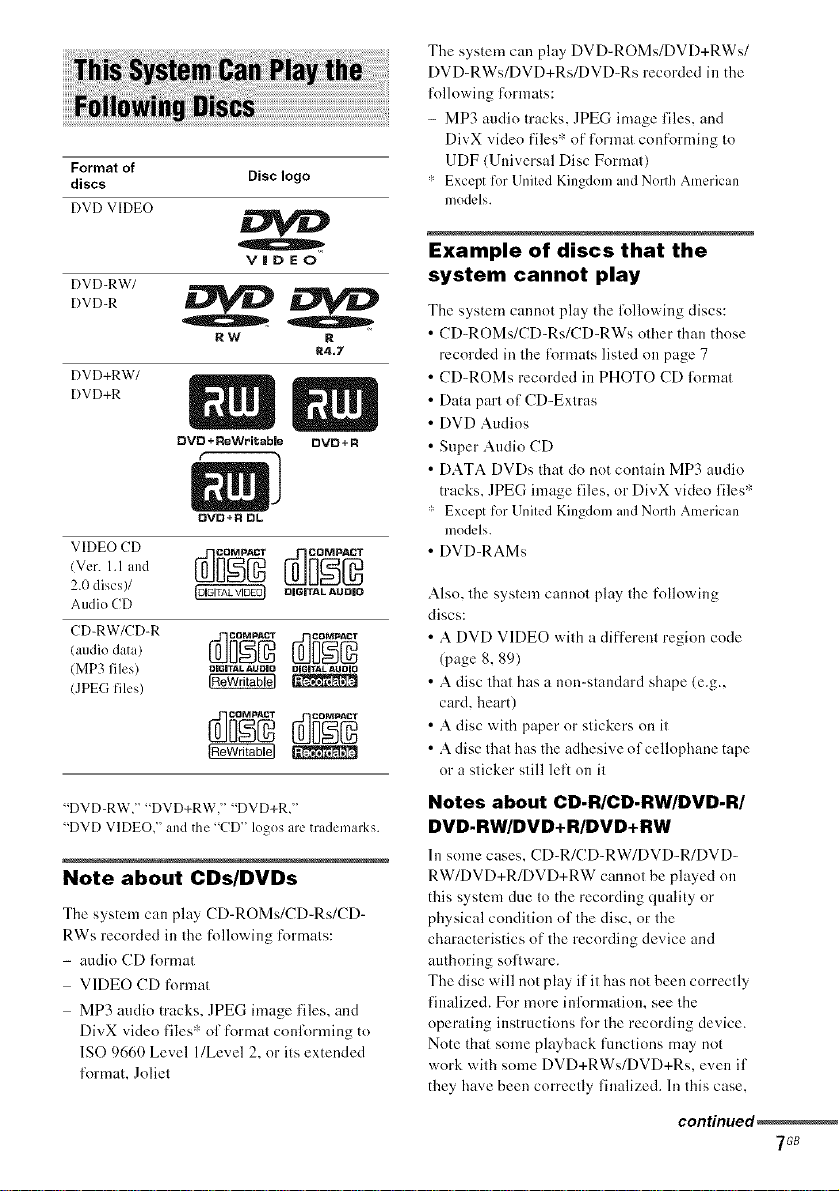
Format of
discs
Disclogo
The system can play DVD-ROMs/DVD+RWs/
DVD-RWs/DVD+Rs/DVD-Rs recorded in the
lollowing tbrmats:
- MP3 audio tracks, JPEG image files, and
DivX video tiles_'_of t\wmat conforming to
UDF (Universal Disc Format)
* Exceptfor UnitedKingdomandNorthAmerican
models.
DVD VIDEO
VIDEO
DVD-RW/
DVO
RW R
DVD+RW/
DVD+R
DVD+R OL
VIDEO CD
2.(t discs)/
Audio CD
(audio data)
(MP3 files/ OIQITALaUOIOolCITaLaUOiO
(JPEG files) _
"DVD-RW," "DVD+RW," "DVD+R,"
"DVD VIDEO," and the "CD" logos are trademarks.
Note about CDs/DVDs
The system can play CD-ROMs/CD-Rs/CD-
RWs recorded in the ff)llowillg formats:
- audio CD l'ormat
VIDEO CD format
MP3 audio tracks, JPEG image files, and
DivX video t'iles '_ of format conl\_rming to
1SO 9660 Level l/Level 2, or its extended
lormat. Joliet
R4.7
DIGITAL AUDIO
Example of discs that the
system cannot play
The system cannot play the lbllowing discs:
• CD-ROMs/CD-Rs/CD-RWs other than those
recorded in the formats listed on page 7
• CD-ROMs recorded in PHOTO CD lbnnat
• Data part of CD-Extras
• DVD Audios
• Super Audio CD
• DATA DVDs that do not contain MP3 audio
tracks. JPEG image files, or DivX video files*
* Except for UnitedKingdom and NorthAmerican
models.
• DVD-RAMs
Also, the system cannot play the following
discs:
• A DVD VIDEO with a different region code
(page 8.89)
• A disc that has a non-standard shape (e.g.,
card. heart)
• A disc with paper or stickers on it
• A disc that has the adhesive of cellophane tape
or a sticker still lel: on it
Notes about CD-R/CD-RW/DVD-R/
DVD-RW/DVD+R/DVD+RW
In some cases. CD-R/CD-RW/DVD-R/DVD-
RW/DVD+R/DVD+RW cannot be played on
this system due to the recording quality or
physical condition of the disc, or the
characterisOcs of the recording device and
authoring software.
The disc will not play if it has not been correctly
t'inalized. For more inl\_rmation, see the
operating instructions for the recording device.
Note that some playback functions may not
work with some DVD+RWs/DVD+Rs, even if
they have been correctly finalized. In this case.
con_nued_
7G8
view the disc by normal playback. Also some
DATA CDs/DATA DVDs created inPacket
Write format cannot be played.
Music discs encoded with
copyright protection
technologies
This product is designed to play hack discs that
conlorm to the Compact Disc (CD) standard.
Recently, various nmsic discs encoded with
copyright protection technologies are marketed
by some record companies. Please be aware that
among those discs, there are some that do not
contk_rmto the CDstandard and may not be
playable by this product.
Note on DualDiscs
A DualDisc is a two sided disc product which
mates DVD recorded material on one side with
digital audio material on the <)tilerside.
However, since the audio material side does m)t
contk_rmto the Compact Disc (CD) standard,
playback on this product is m)t guaranteed.
About Multi Session CD
• This system can play Multi Session CDs when
an MP3 audio track is contained in tile first
session. Any subsequent MP3 audio tracks
recorded in later sessions can also be played
back.
• This system can play Multi Session CDs when
a JPEG inmge file is contained in tile first
session. Any subseqnent JPEG image files
recorded in later sessions can also be played
back.
• If audio tracks and images in music CDl\_rmal
or video CD l\)rmat are recorded in the first
session, only the first session will be played
back.
Region code
lfyou try to play any other DVD VIDEO, the
message [Playback prohibited by area
limitations.] will appear on the TV screen.
Depending on tim DVD VIDEO, m) region code
indication may be given even though playing the
DVD VIDEO is prohibited by area restrictions.
Note about playback
operations of DVDs and
VIDEO CDs
Some playback operafious of DVDs and VIDEO
CDs may be intentionally set by soflware
producers. Since this system plays DVDs and
VIDEO CDs according to the disc contents the
software producers designed, some playback
li:atures may not be available. Be sure to read the
operating instructions supplied with the DVDs
or VIDEO CDs.
Copyrights
This product incorporates copyright protection
technology that is protected by U.S. patents and
other intellectual property rights. Use of this
copyright protection technology nmst be
authorized by Macrovisiou, and is intended l\_r
home and other limited viewing uses only unless
otherwise authorized by Macrovisiou. Reverse
engineering or disassembly is prohibited.
This system incorporates with Dolby a Digital
and Dolby Pro Logic (11) adaptive matrix
snrround decoder and tile DTS ':" Digital
Surround System.
" Manufacturedunderlicense from Dolby
Laboratories.
"Dolby", "Pro Logic'L and the double-D symbol are
trademarks of Dolby Laboratories.
"" Manufactured under license from DTS, Inc.
"DTS" and "DTS Digital Surround" are registered
trademarks of DTS, Inc.
Your system has a region code printed on tile
rear of the unit and will only play DVDs labeled
with the same region code.
DVD VIDEOs labeled _ will also play on this
system.
8GB
See Unpacking ill Specifications, page 85.
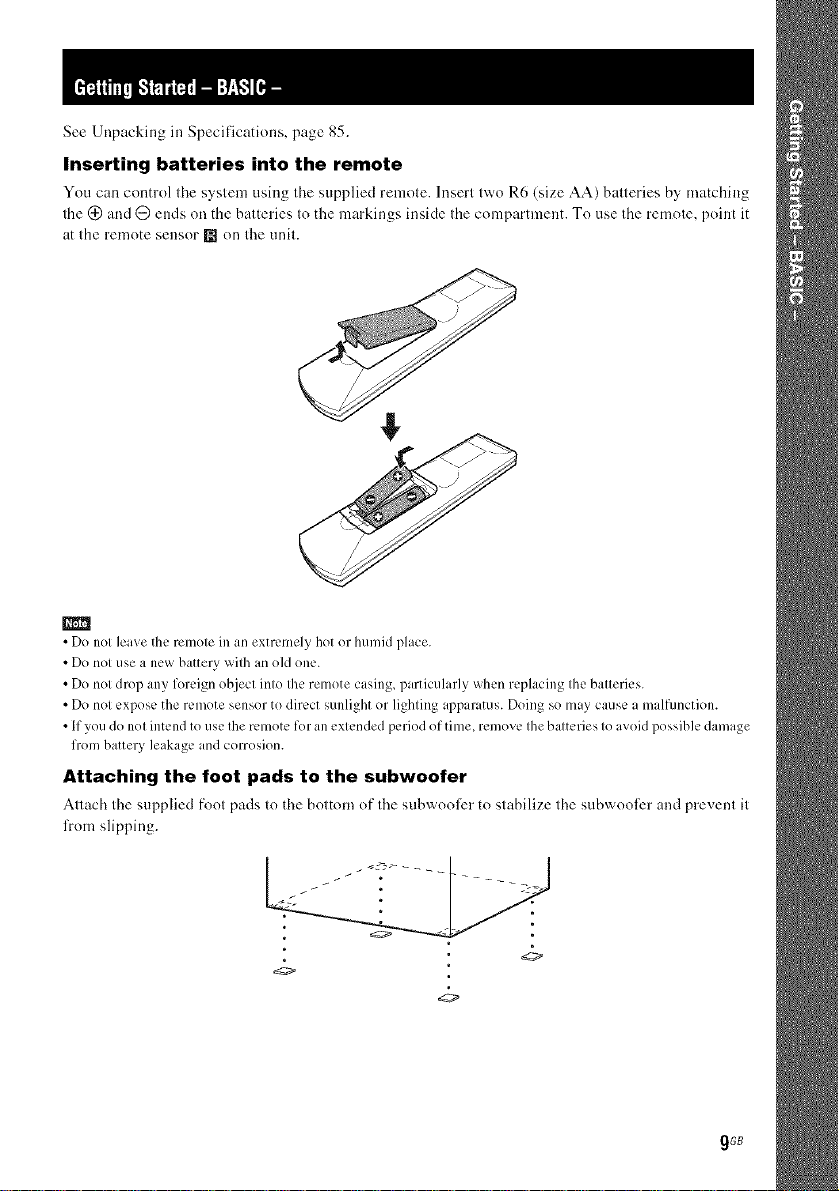
Inserting batteries into the remote
You can control tire system using tire supplied remote. Insert two R6 (size AA) batteries by matching
the (_ and G ends on the batteries to the markings inside the compartment. To use the remote, point it
at the remote sensor [] on the unit.
m
• Do not leave the remote in an extremely hot or humid place.
• Do not use a new battery with an old one.
• Do not drop any foreign object into the remote casing, particularly when replacing the batteries.
• Do not expose the remote sensor to direct sunlight or lighting apparatus. Doing so may cause a m dfunction.
• If you do not intend to use the remote for an extended period of time, remove the batteries to avoid possible damage
from battery leakage and corrosion.
Attaching the foot pads to the subwoofer
Attach the supplied foot pads to the bottom of the subwool_2r to stubilize the subwool_2r and prevent it
from slipping.
<9
gGB
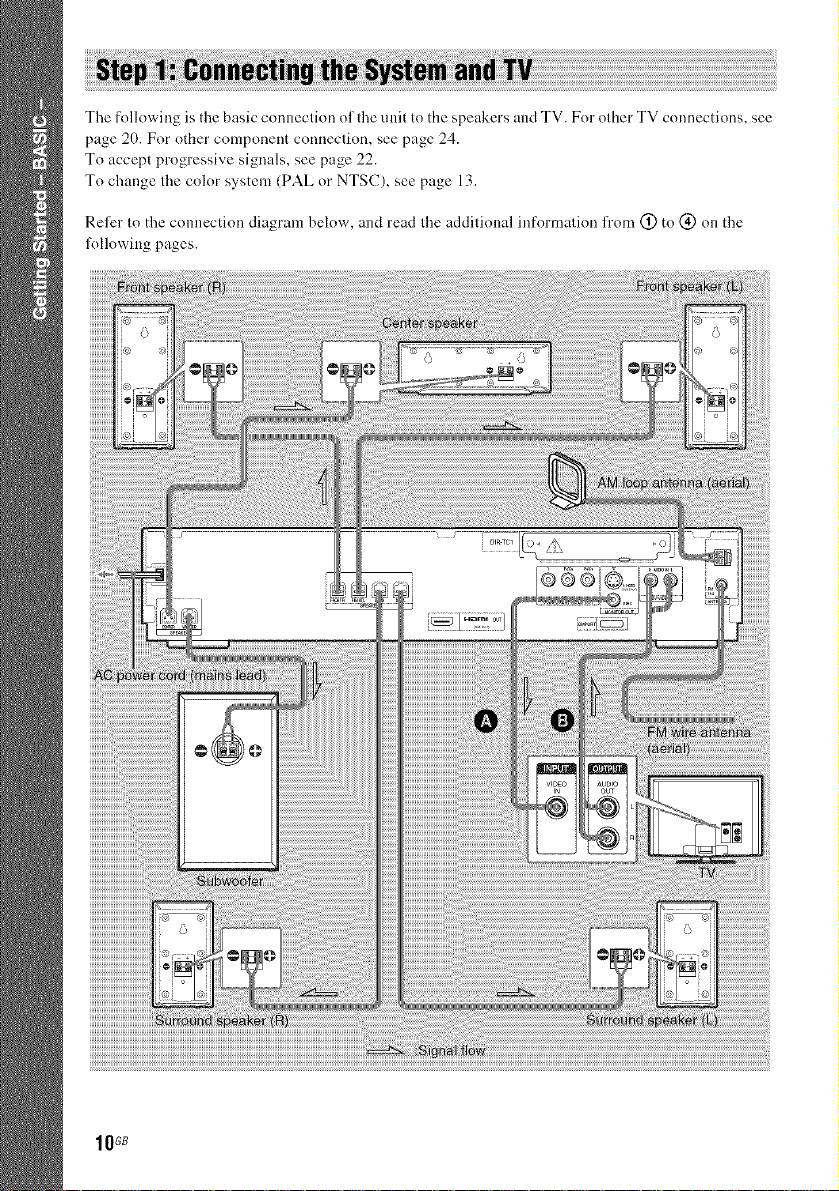
The following is the basic connection of the unit to the speakers andTV. Forother TV connections, see
page 20. For other component connection, see page 24.
To accept progressive signals, see page 22.
To change the color system (PAL or NTSC), see page 13.
Reler to the c(mnection diagram below, and read the additional information fl'om (_) to (_) on the
l\)llowing pages.
_GB
• When you install the wireless kit WAHT-SDI (supplied with DAV-HDX267W only) in the DIR-TCI slot, you can
enjoy wireless perlk)rnmnce. For details, see "Connecting Other Components" (page 24) and the operating
instructions of the WAHT-SDI.
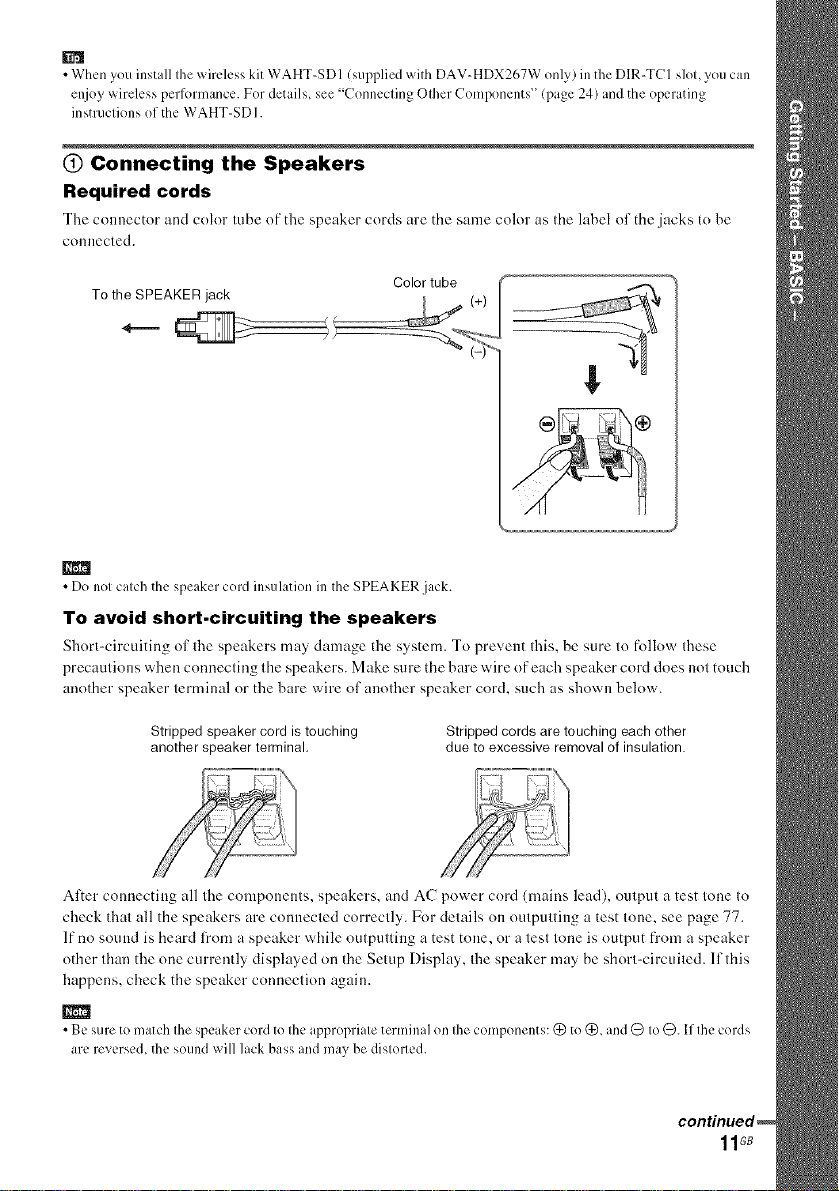
(_) Connecting the Speakers
Required cords
Tile connector arm color tube of tile speaker cords are the same color as the label of the jacks to he
connected.
To the SPEAKER jack
m
• Do not catch the speaker cord insulation in the SPEAKER jack.
To avoid short-circuiting the speakers
Short-circuiting of tile speakers may danmge tile system. To prevent this. be sure to follow these
precautions when connecting tile speakers. Make sure the hare wire of each speaker cord does not touch
another speaker terminal or the bare wire of another speaker cord, such as shown below.
Stripped speaker cord is touching
another speaker terminal.
Alter connecting all the components, speakers, and AC power cord (mains lead), output a test tone to
check that all tile speakers are connected correctly. For details on outputtiug a test tone, see page 77.
If no sound is heard l?om a speaker while outputting a test tone, or a test tone is output fl'om a speaker
other than the one currently displayed on tile Setup Display, the speaker may he short-circuited, lfthis
happens, check tile speaker connection again.
• Be sure to match the speaker cordto the appropriate terminal on the components: (_ to(_, and Q toQ. If the cords
are reverse& the sound will lack bass and may be distol_ed.
Stripped cords are touching each other
due to excessive removal of insulation.
11GB

@ Connecting the TV
Required cords
_) Video cord
_) Audio cord (not supplied)
@ _ Yellow
_ hite (Uaudio)
• When you _r{ln[ [O oulpul the TV sound or sleIeo sound of a 2 channel source from the 6 spe &els, selecl the "Dolby
Pro Logic," "Dolb3 Pro Logic II MOVIE " or "Dolbv Pro Logic II MUSIC _sound field (page 3//).
Red (R/audio)
@ Connecting the Antenna (Aerial)
To connect the AM loop antenna (aerial)
The shape and d_c lcnglh of the urltcnnu (aerial) is designed Io receive AM signals. Do not dismantle
or roll up lhe antenna (aerial).
1 Remove only the loop part from the plastic stand.
2 Set up the AM loop antenna (aerial).
3
Connect the cords to the AM antenna (aerial) terminals.
Cord (A) or cord (B) cun be connected to either lcrrninal.
¢C-__1/ pushing
_%Jl_ _ down the terminalclamp.
B
\_ I_sert untilthis
Insert the cord
m
• Do not place the AM loop antenna (aerial) near the unit or other AV equipment, as noise may result.
• A_!iustthe direction of the AM loop antenna (aerial) lbr best AM broadcast sound.
4
Make sure the AM loop antenna (aerial) is connected firmly by pulling softly.
12GB
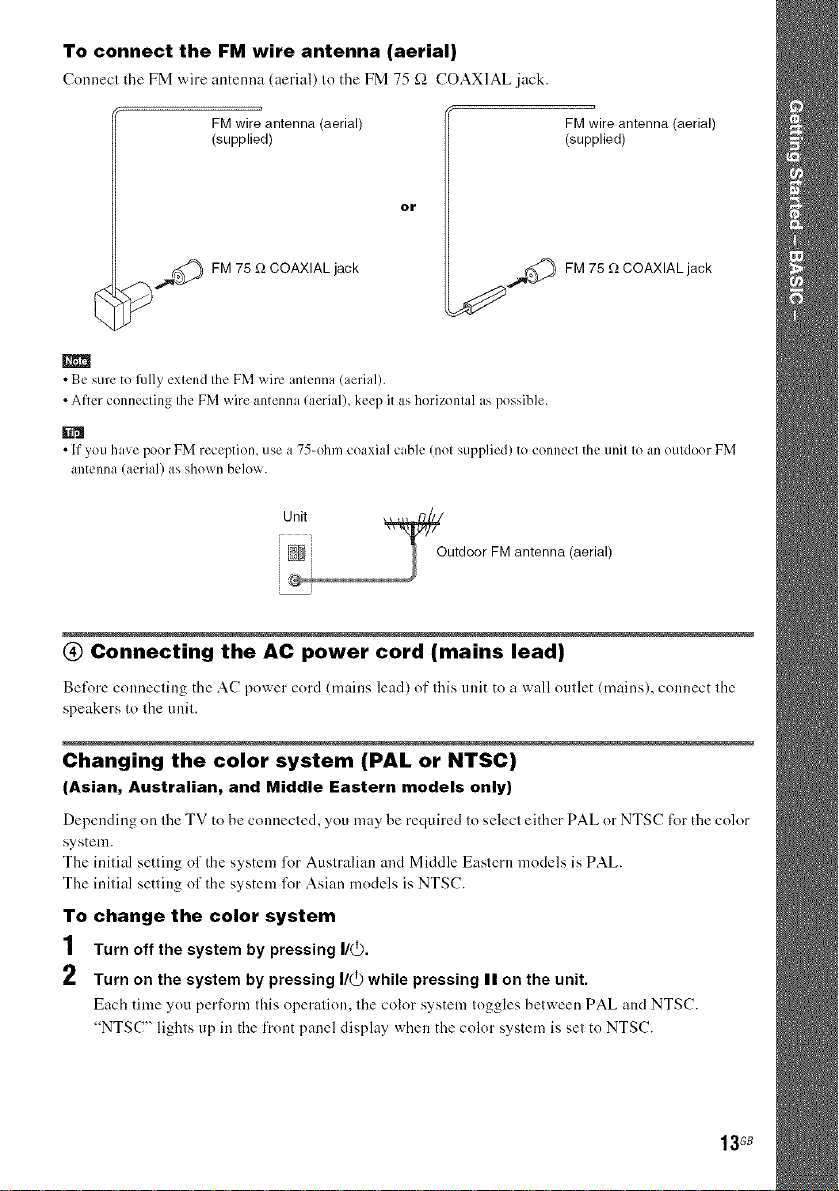
To connect the FM wire antenna (aerial)
FM wire antenna (aerial)
(supplied)
or
_ cor_ FM 75 _ COAXIAL jack
FM wire antenna (aerial)
(supplied)
,¢_ FM 75 _:_COAXIAL jack
m
•Be sure teIMly exlend Ihe FM wire anlenna (aerial).
• After connecting Ihe FM _.x,rireantenna (aerial), keel) it as horizontal aspessible.
• If you have peer FM reception, use a 75-ehm coaxial cable (nel supplied) te connect the unil le an outdoor FM
antenna (aerial) as sll()_.x,'[]below.
Unit
'_Outdoor FM antenna (aerial)
@ Connecting the AC power cord (mains lead)
Before connecling the AC power cord (mains lead) of Ihis unit to a wall outlet (mains), connect the
speakers tolheunit.
Changing the color system (PAL or NTSC)
(Asian, Australian, and Middle Eastern models only)
Depending on the TV to be connected, you may be required to select either PAL or NTSC lor the color
system.
The initial setting of the system lor Australian and Middle Eastern models is PAL.
The initial setting of the system for Asian models is NTSC.
To change the color system
1 Turn off the system by pressing I/_.
2 Turn on the system by pressing I/_ while pressing II on the unit.
Each time you perR_rm this operation, the color system toggles between PAL and NTSC.
"NTSC" lights up in the front panel display when the color system is set to NTSC.
13G8
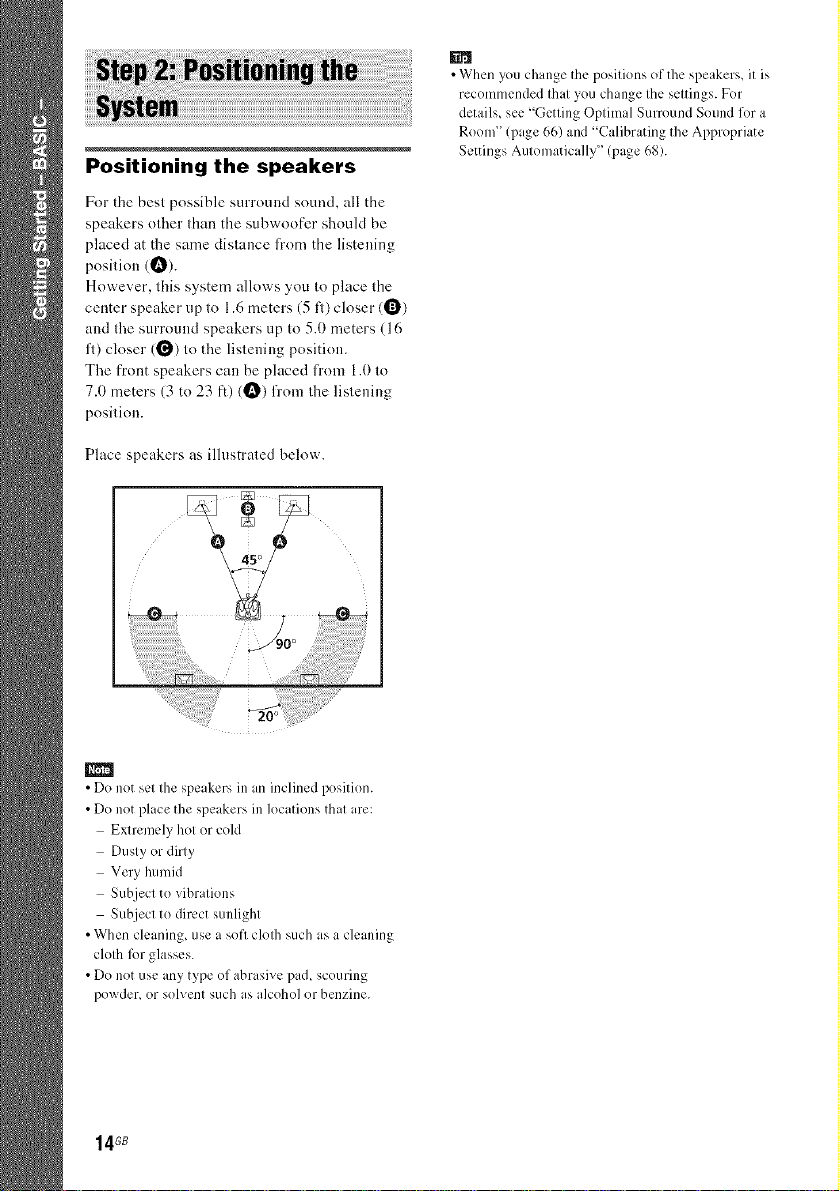
Positioning the speakers
Fnr the best possible surround sound, all the
speakers other than the subwonfer should be
placed at the same distance from the listening
position (1_).
However, this system allows yon to place the
center speaker up to 1.6 meters (5 fl) closer ((_)
and the surround speakers up to 5.0 meters (16
fl) closer (_) to the listening positinn.
The front speakers can be placed from 1.0 to
7.0 meters (3 to 23 ft) (t_) from the listening
position.
Place speakers as illustrated below.
{
• When you change the positions of the speakers, it is
recommended that you change the settings. For
details, see "Getting Optimal Surround Sound for a
Room" (page 66) and "Calibrating the Appropriate
Settings Automatically" (page 68).
• Do not set the speakers in m inclined position
• Do not place the speakers inlocations that are:
Extremely hot or cold
Dusty or dirty
Very humid
Subject to vibrations
Subject to direct sunlight
• When cleaning, use a soil clofll such as a cleaning
cloth li)r glasses
• Do not use any type of abrasive pa& scouring
powder_ or solvent such as a]coho] or benzine.
14 GB
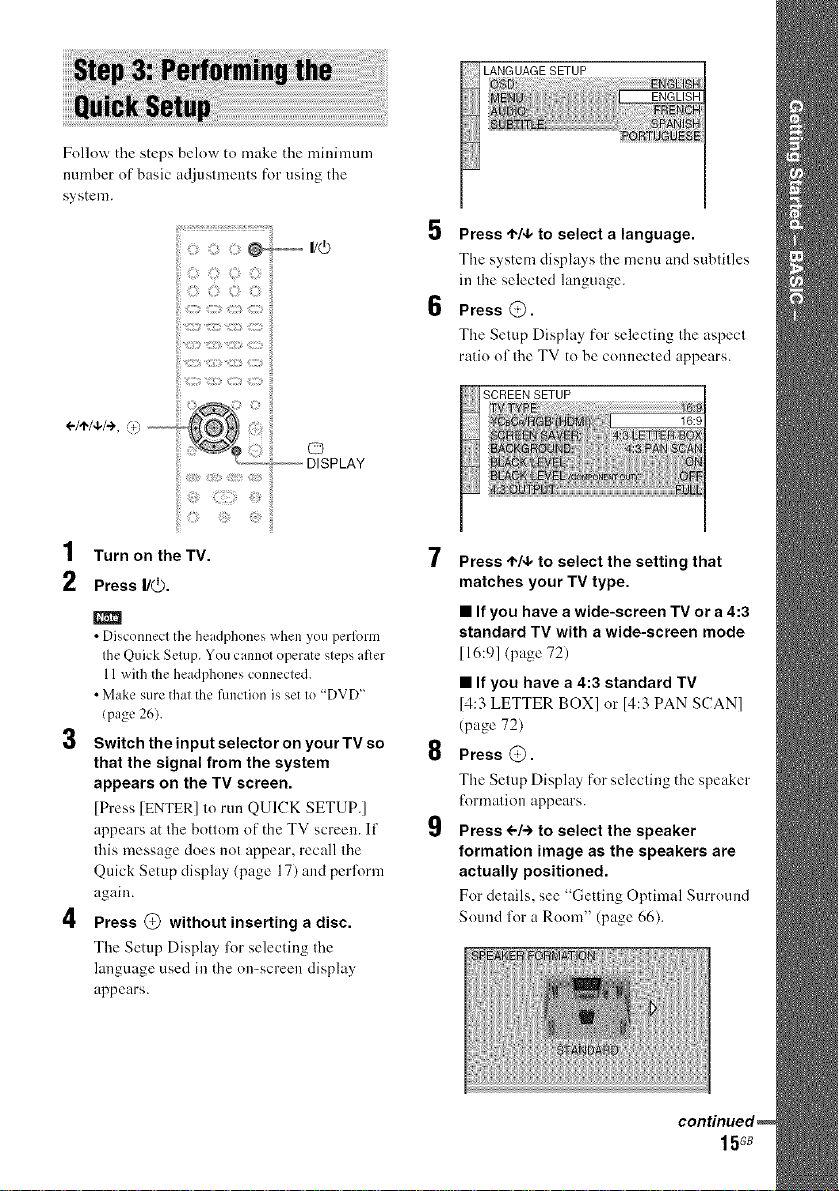
Follow the steps below to nmke the mhfimum
number of basic adjustn_ents for using the
system.
ii i;:_O@ --I/@
ii :ii: ,ii ii:
÷/÷/+/+,<) i{
ii ............... ©
ii i:iiil;
ii ii!!
'1 Turn on theTV.
2 Press I/(_.
• Disconnect the headphones when you perfi)rm
the Quick Setup. You cannot operate steps after
11with the headphones connected.
• Make sure that the flmction is set to "DVD"
(page 26).
3 Switch the input selector on your TV so
that the signal from the system
appears on the TV screen.
[Press [ENTER] to run QUICK SETUP.]
appears at the bottom of the TV screen. If
tiffs message does not appear, recall the
Quick Setup display (page 17) and perl\)rm
again.
_ DISPLAY
4 Press @ without inserting a disc.
The Setup Display for selecting the
language used in the on-screen display
appears.
Press ,t./4, to select a language.
The system displays the menu and subtitles
in the selected language.
Press @.
The Setup Display for selecting the aspect
ratio of the TV to be connected appears.
Press ,t,/4, to select the setting that
matches your TV type.
• If you have a wide-screen TV or a 4:3
standard TV with a wide-screen mode
116:91 (page 72)
• If you have a 4:3 standard TV
14:3 LETTER BOX] or 14:3 PAN SCAN]
(page 72)
Press @.
The Setup Display for selecting the speaker
tk)rmation appears.
Press ÷/+ to select the speaker
formation image as the speakers are
actually positioned.
For details, see "Getting Optinml Surround
Souud Jk)r a Room" (page 66).
15GB
• When the wireless kil WAHT-SD 1(supplied
wilh DAV-HDX267W only) is inslalled,
]STANDARD (WIRELESS)] appears instead.
10Press®.
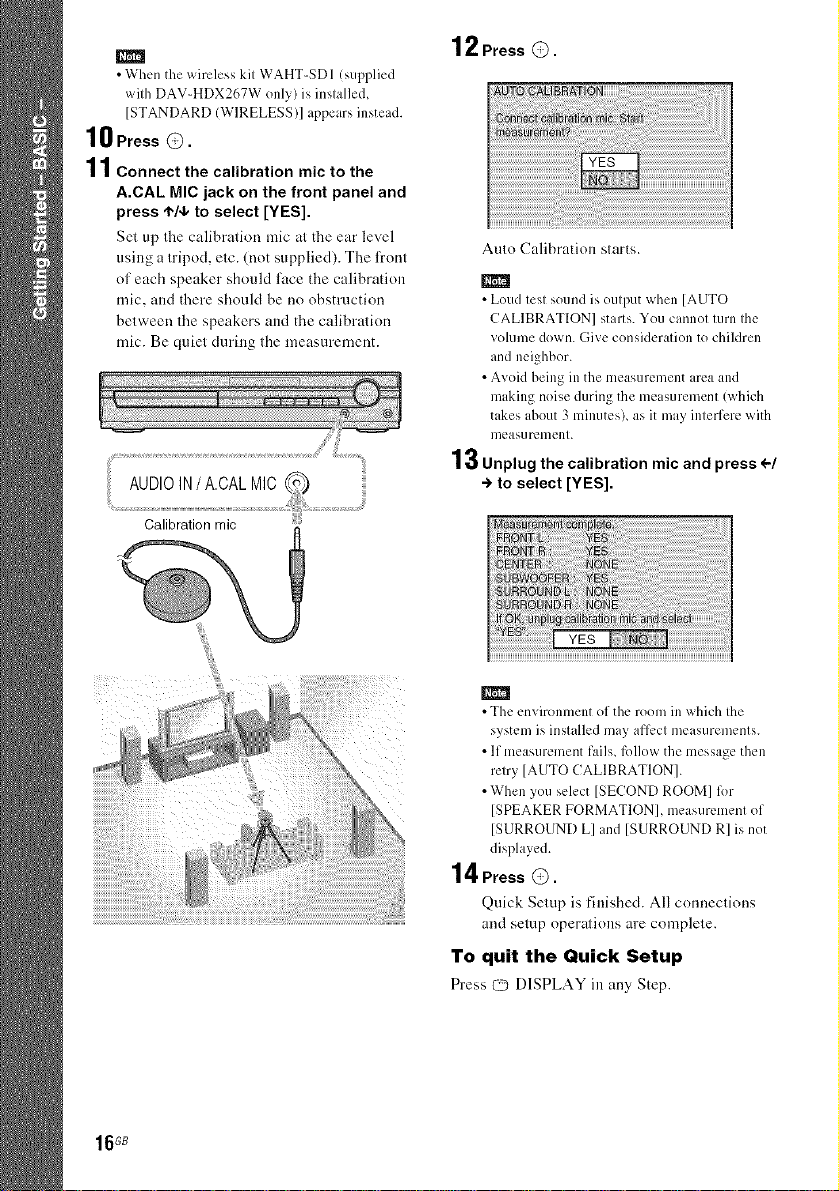
11Connect the calibration mic to the
A.CAL MIC jack on the front panel and
press ,I,/4, to select [YES].
Set up Ihe calibralion mic at the ear level
using a It(pod, etc. (not supplied). The front
ol each speaker should l?tce the calibration
mic, and there should be no obstruction
between the speakers and the calibralion
mic. Be quiet during the measurement.
Calibration mic
12Press@.
Aulo Calibration starts.
• Loud test sound is output when [AUTO
CALIBRATION] starts. You cannot turn the
volume down. Give consideration to children
and neighbor.
• Avoid being in the measurement irea and
making noise during the measurement (which
takes about 3 minutes), as it may inteflcre with
meas/ircment.
13Unplug the calibration mic and press <,-/
-) to select [YES].
16GB
m
• The environment of the room in which Ihe
system is inslalled may afl_,cl measuremenls.
• If measurement fails, R)IIow the message then
retry [AUTO CALIBRATION].
• When you select [SECOND ROOM[ 12)r
[SPEAKER FORMATION], measuremenl of
[SURROUND L] and [SURROUND R] is not
displayed.
14Press @.
Quick Setup is finished. All connections
and setup operations are complele.
To quit the Quick Setup
Press C_ DISPLAY in any Step.
• If you change the position of the speakers, reset Ihe
speaker settings. See "Getting Optimal Surround
Sound lbr a Room '' (page 66) and "Calibrating the
Appropriate Settings Automatically" (page 68).
• If you want to change any of the settings, see "Using
the Setup Display" (page 70).
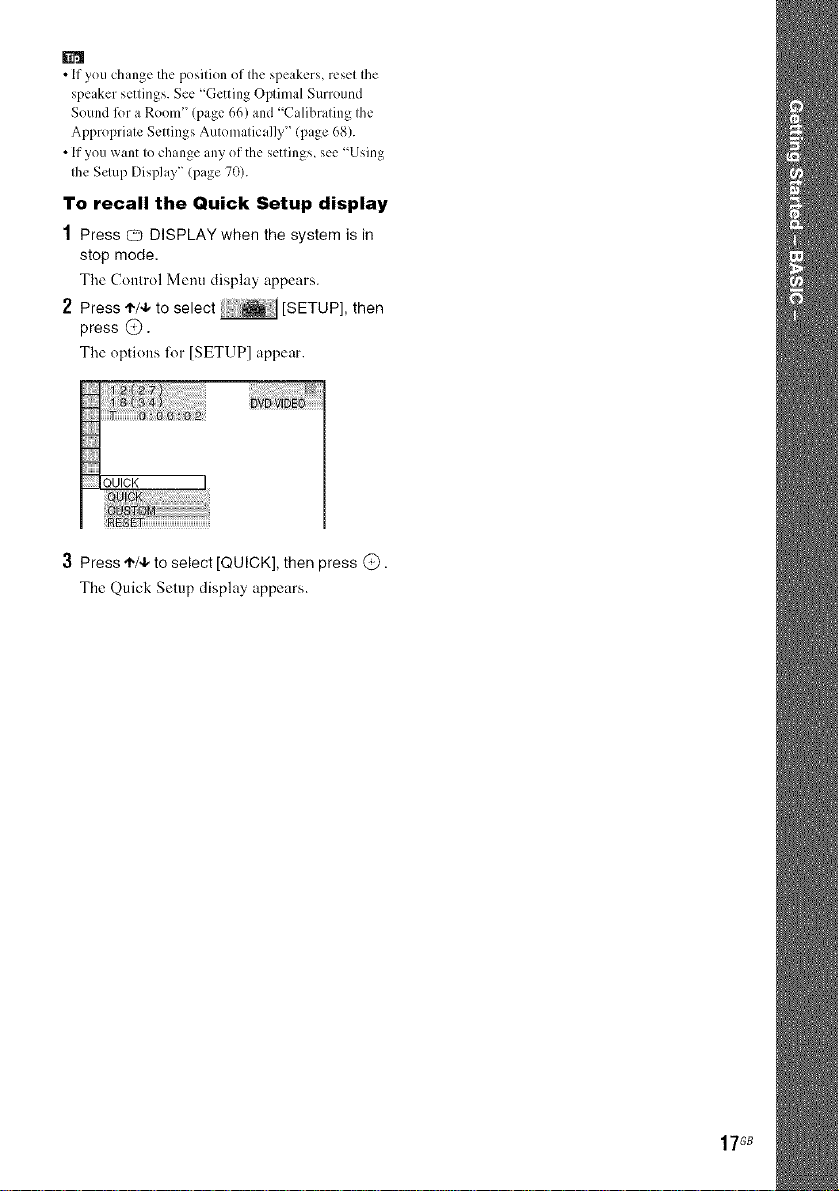
To recall the Quick Setup display
1 Press Q DISPLAY when the system is in
stop mode,
The Control Menu display appears.
2 Press ,I,/4, to se ect [SETUP], then
press @.
The options R_r [SETUP] appear.
3 Press ,I,/4, to select [QUICK], then press @.
The Quick Setup display appears.
17GB
Z:;_ _ii171]_ iii:i
iii17:7 ZIIIII) CZ:I
;7:11:_i::ii17!i::7_71ii;ili
fi _ilfii7 {iiiiTf
iiJ
1 7 ii:
::ii
_::,>L;:; MENU
7¢+ :71 +
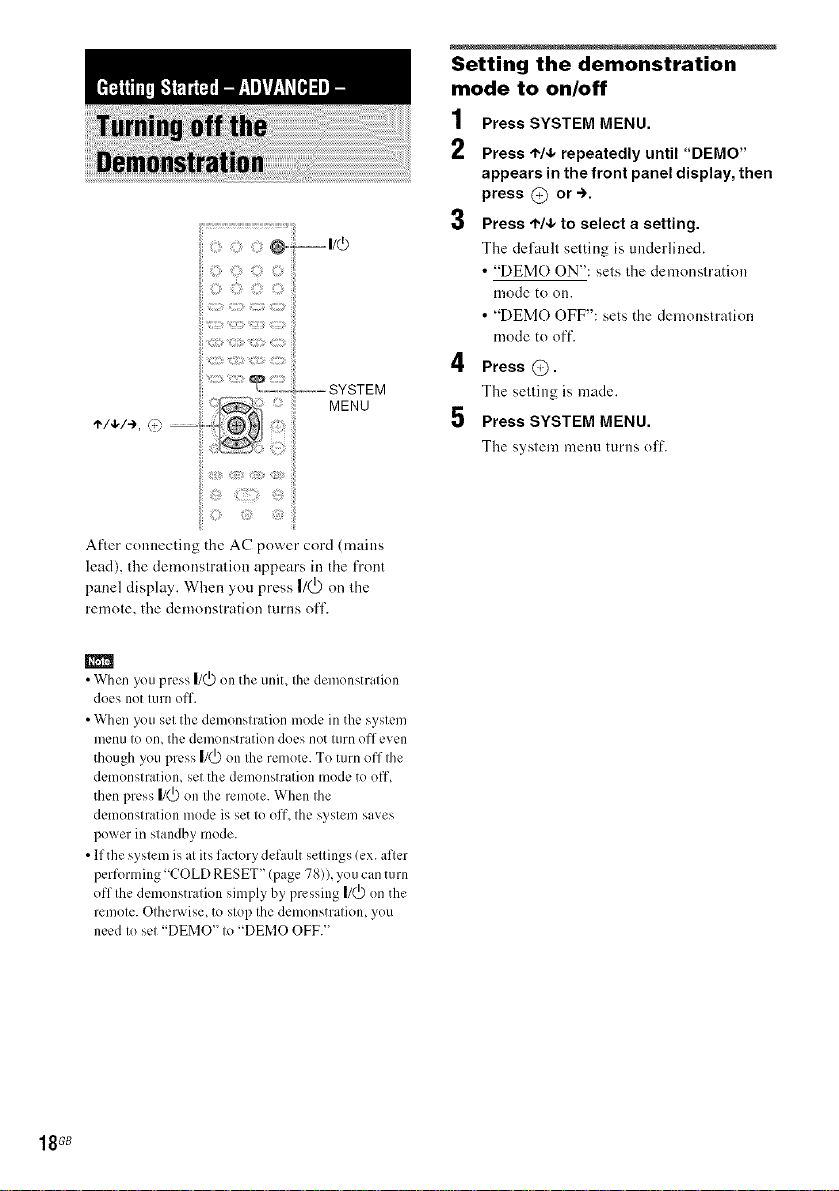
After COllneclillg the AC power cord (lniiills
lead), the demonstration appears in the front
panel display. When you press |/(_) on lhe
remole, the demonslration lurns off.
Setting the demonstration
mode to on/off
1
Press SYSTEM MENU.
2
Press ,t,/4, repeatedly until "DEMO"
appears in the front panel display, then
press @ or-).
Press ,I,/4,to select a setting.
The default setting is tmdeHined.
• "DEMO ON": sets the demonstration
mode to on.
• "DEMO OFF": sets the demonstration
mode to off.
4 Press C).
The selling is made.
5 Press SYSTEM MENU.
The syslem menu turns off.
m
• When you press I/_ onthe uniL the demonstration
does not turn off.
• When yotl set the demonstration mode in the system
Illen/I to (in, tile demonstration does not turn off even
though you press |1(_) on the remote. To turn off the
demonstration, set the demonstration mode to off,
then press |1(_)on the remote. When the
demonstration mode is set to off, the system saves
power in standby mode.
• lfthe system is atits factory defauh settings (ex. after
performing "COLDRESET" (page 78)), you can turn
off the demonstration simply by pressing |1(_)on the
remote. Otherwise, to stop the demonstration, you
need to set "DEMO"to "DEMO OFF."
18GB
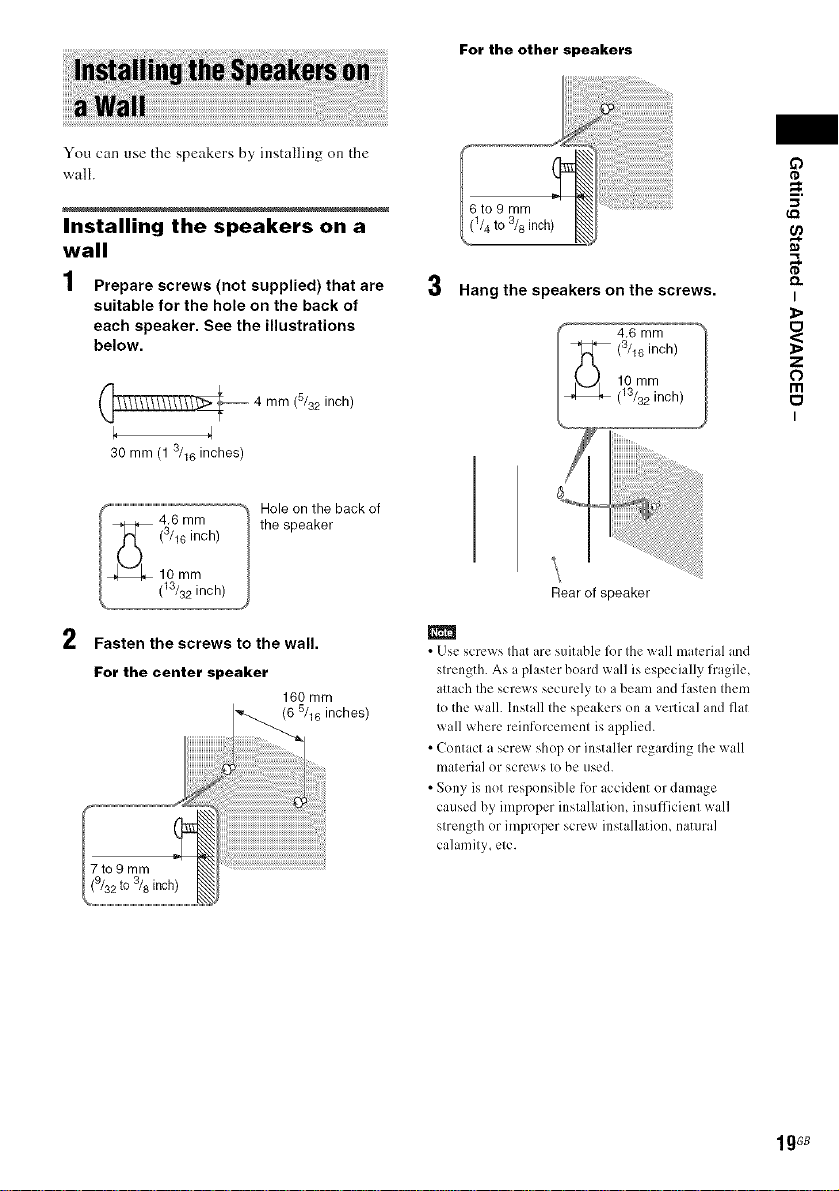
For the other speakers
You can use the speakers by installing on the
wall.
Installing the speakers on a
wall
1 Prepare screws (not supplied) that are
suitable for the hole on the back of
each speaker. See the illustrations
below.
4 mm (5/32 inch)
30 mm (13/16 inches)
Hole on the back of
the speaker
2
Fasten the screws to the wall.
For the center speaker
160 mm
(6 511Ginches)
i_!!iiiiiiiii!iiiiii!ii{iiiiiiiiiiiii!i
I (1/4to3/8inch)
Hang the speakers on the screws.
4,6 mm
(3/lC inch)
10 mm
(13/32inch)
_i!!!_!!!_!_!i_ii_iiiii_iiiiii!!!!!_iii_i_ii_!!!!!_iiiii_iiiiii!!!!!_iiiii_iiiiiiii!!!!!!_iiiii_iiiii!!!!!!_iiiii_iiiii!!!_!
Rear of speaker
• Use screws thatare suitable lk)rthe wall material and
strength. As a plaster board wall is especially fragile,
attach the screws securely to a beam and fasten them
to the wall. Install the speakers on a vertical and fiat
wall where reinforcement is applied.
• Contact a screw shop or installer regarding the wall
materia] or screws to be used.
• Sony is not responsible for accident or dam _ge
caused by improper installation, insufficient wall
strength or improper screw installation, natural
calamity, etc.
iiiiiiiiiiiiiiiiiiiiiiiiiiiiiiiiiiii!!!iiiiiiiiiiiiiiiiii{
_Q
£3
_=.
I
_>
z
0
m
I
1gGB
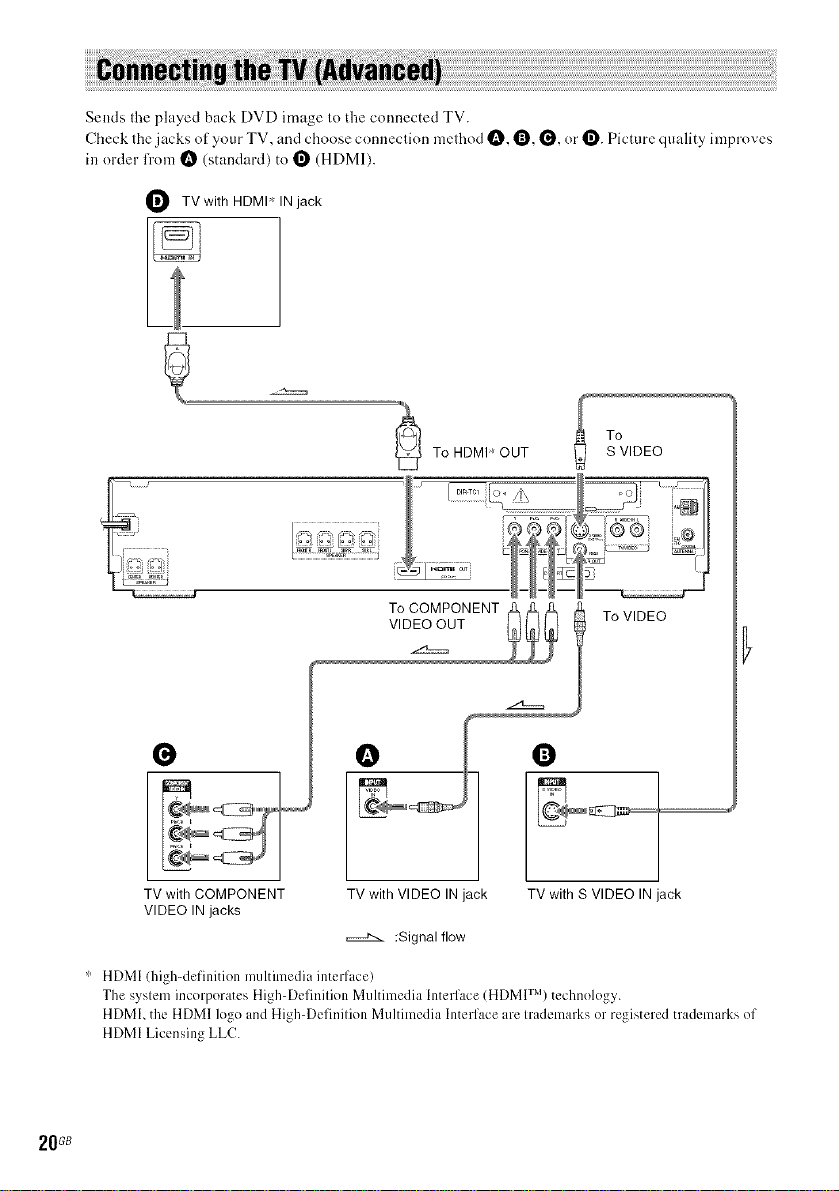
Sends fileplayed back DVD image lo tl_econnected TV.
Check lhe jacks of your TV, and choose connection melhod t_, O, _, or _. Picture quality improves
in order lron_ t_ (standard) to 1_ (HDMI).
O TVwith HDMP' IN jack
To
To HDMP' OUT
r............
S VIDEO
O
TV with COMPONENT
VIDEO IN jacks
" HDMI (high-definition multimedia interface)
The system incorporates High-Definition Multimedia Interface (HDMI TM) technology.
HDML the HDMI logo and High-Definition Multimedia Interface are trademarks or registered trademarks of
HDMI Licensing LLC.
20G8
VIDEO OUT
To COMPONENT _ l
TV with VIDEO IN jack
:Signal flow
To VIDEO
O
TV with S VIDEO IN jack
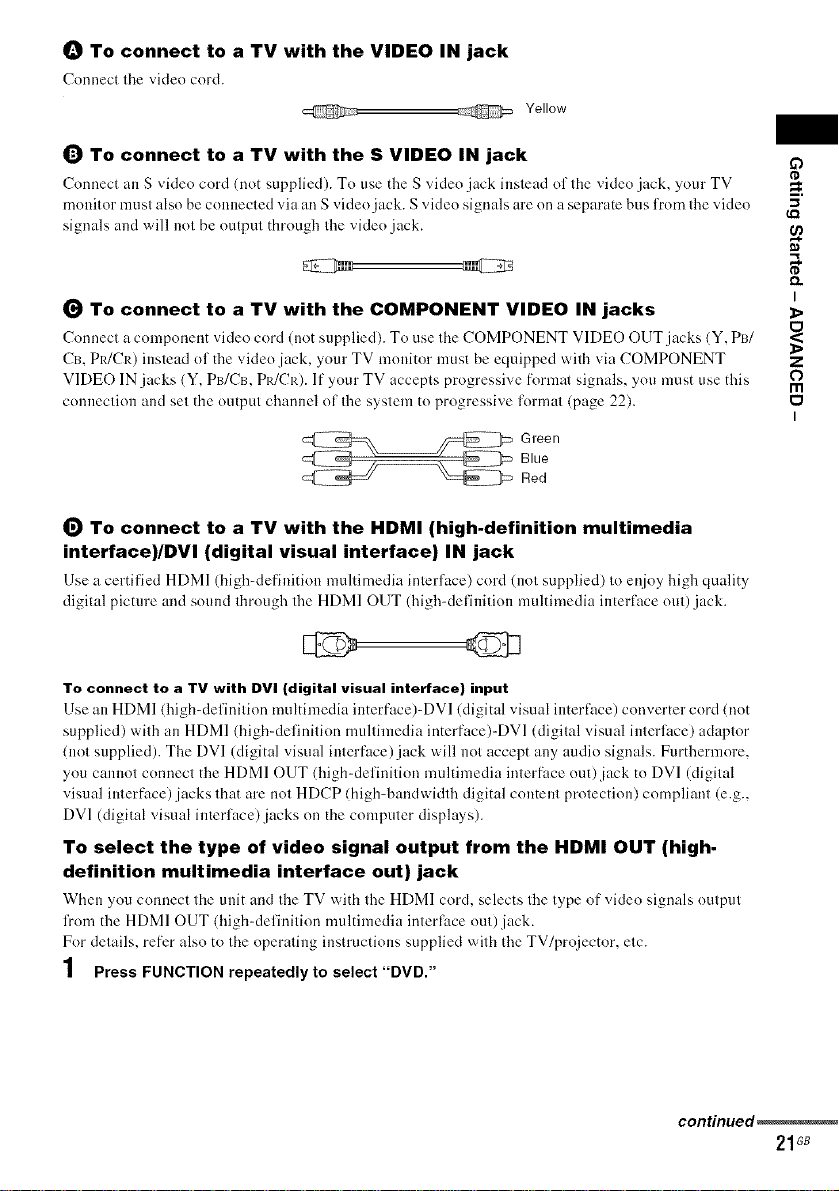
_) To connect to a TV with the VIDEO IN jack
Connect tile video cord.
_ Yellow
_) To connect to a TV with the S VIDEO IN jack
Cnnnect an S video cord (not supplied). To use the S ;iden jack instead nf the video jack, your TV
mnnilor musl also be connected xia an S video jack. S viden signals are nn a separate bus from Ihevideo
signals and will notbe output through Ihe video jack.
(_ To connect to a TV with the COMPONENT VIDEO IN jacks
Connect a cnmponent video cord (not supplied). To use tire COMPONENT VIDE() OUT jacks (Y, PI3/
Cm PR/CR) instead of the "_iden jack, ynur TV monitor must be equipped wifll via COMPONENT
VIDEO IN jacks (Y, PB/Cm PR/CR). If ynur TV accepts prngressi'_ e formal signals, you must use this
couueclion and set the output channel ol Ihe system to progressive lormat (page 22).
_ reen
Blue
Red
(_ To connect to a TV with the HDMI (high-definition multimedia
interface)/DVI (digital visual interface) IN jack
Use a certified HDMI (high-definition multimedia irrlerface) cord (uol supplied) Inenjoy high quality
digital picture arm sound through tile HDMI OUT (high-defiuitinn multimedia interface out) jack.
To connect to a TV with DV| (digital visual interface) input
Use an HDMI (high-definition multimedia iuterface)-DVl (digital visual irrterface) converter cord (not
supplied) with an HDMI (high-definition multimedia interfuce)-DVl (digital visual irrterl'._ce)adaptnr
(not supplied). The DVI (digital visual irrterface) jack will not accept any audit>signals. Furthermore.
ynu cannot connect the HDMI OUT (high-definition multimedia irrterface nut)jack tn DVI (digital
visual interface) jacks that are nnt HDCP (high-bandwidthdigital content protection) compliant (e.g.,
DV1(digital visual interface)jacks on the computer displws).
To select the type of video signal output from the HDMI OUT (high-
definition multimedia interface out) jack
When ynu connect the unit and the TV \vith the HDMI coM, selects tile type of video signals output
from the HDMI OUT (high-definition multimedia interlitce out)jack.
Fnr details, refer alsn to tire operating instructions supplied with tile TV/projectnr, etc.
1 Press FUNCTION repeatedly to select "DVD."
O
_=.
I
z
o
rn
I
continued_
21G8
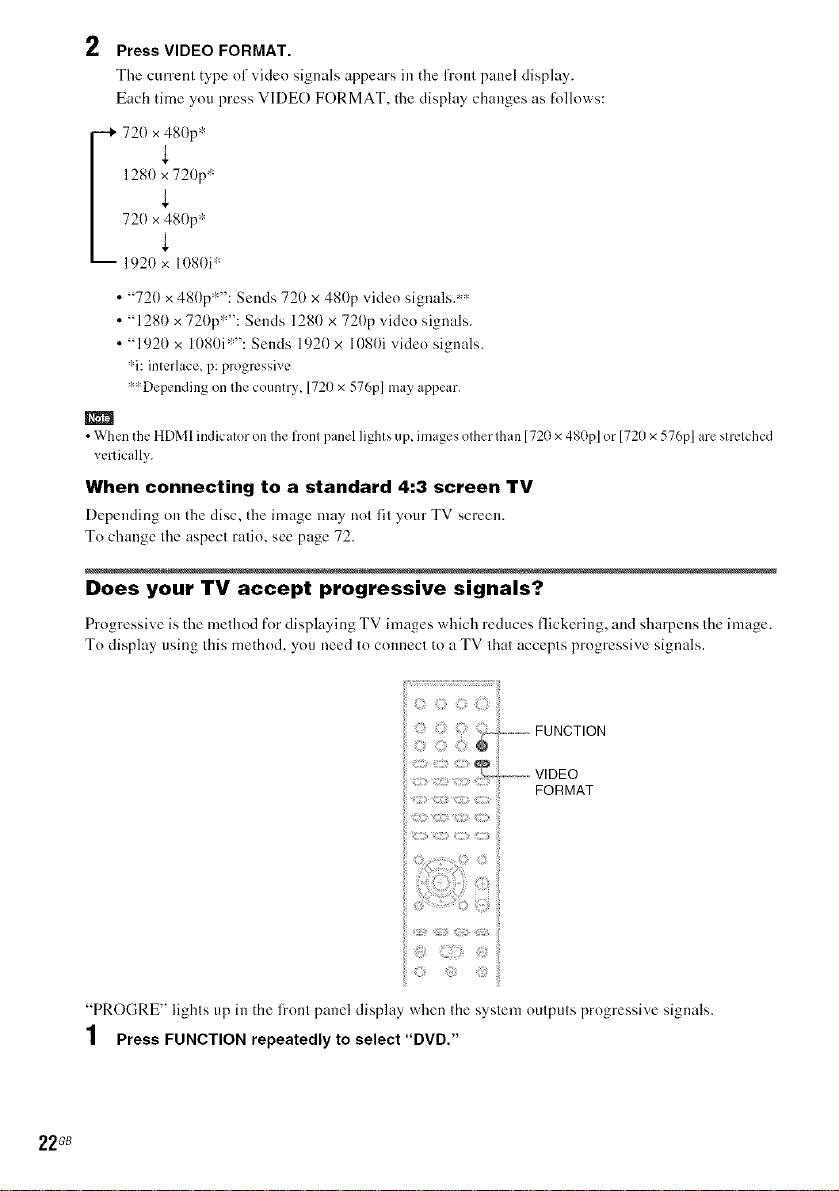
2 Press VIDEO FORMAT.
The current type of'_ideo signals appears ill tile front panel display.
Each time you press VIDEO FORMAT, the display changes as tbllows:
128(1 _ 720p 'r:
4,
• "720 x 480p":": Sends 72(1 x 480p video signals/''
• "1280 x 720p"% Sends 128(t x 720p video signals.
• "1920 x 1080i'>': Sends 1920 x 1080i video signals.
"i: interlace, p: progressive
"'Depending on the country, [720 x 576p1 may appear.
• When the HDMI indicator on the front panel lights up, images other than [720 x 480p1 or [720 x576p1 are stretched
vertically.
When connecting to a standard 4:3 screen TV
Depending on tile disc, the image may not fit your TV screen.
To change tile aspect ratio, see page 72.
Does your TV accept progressive signals?
Progressive is the melhod for displaying TV images which reduces flickering, and sharpells Ihe image.
To display using Ibis method, you need Io colmecl to a TV thai accepts progressive signals.
FUNCTION
VIDEO
FORMAT
ii
"PROGRE" lighls up ill the lronl panel display when die syslenl oulpu{s progressive signals.
1 Press FUNCTION repeatedly to select "DVD."
22GB
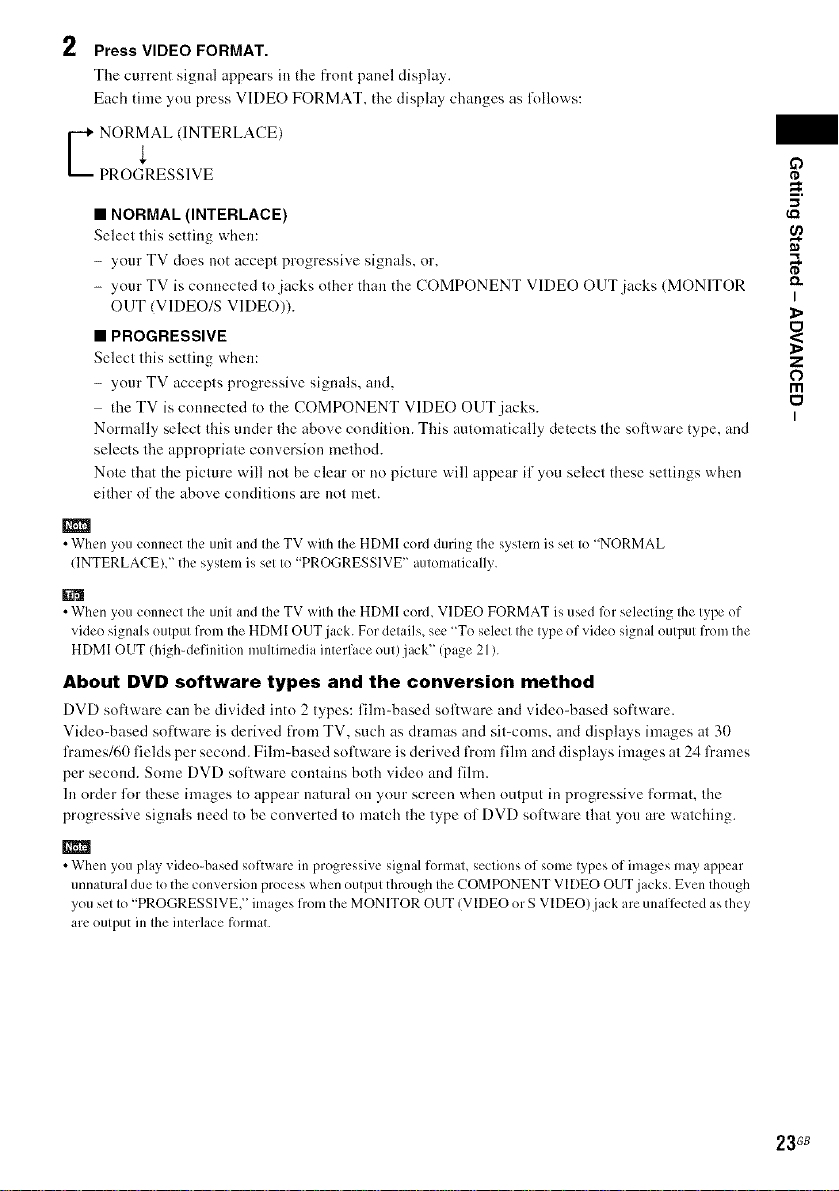
2 Press VIDEO FORMAT.
The current signal appears inthe flout panel display.
Each time you press VIDEO FORMAT, tile display changes as lk)llows:
E ORMAL (INTERLACE)
PROGRESSIVE
• NORMAL (INTERLACE)
Select this setting when:
- your TV does not accept progressi'_e signals, or, _,
- your TV is connecled Io jacks odler than the COMPONENT VIDEO OUT jacks (MONITOR _'
OUT (V1DEO/S VIDEO)).
• PROGRESSIVE
Select this setting where Z
your TV accepts progressixe signals, and, 0
- I'll
the TV is com*ected to tile COMPONENT VIDEO OUT jacks.
Normally select tiffs under file abo'_e condition. This automatically detects Ihe s<)fiware type, and
selects the appropriate con'_ersion method.
Note that tile picture will not be clear or no piclure will appear if you selecl these settings v,,rhen
either of tile above conditions are not met.
• When you connect the unit and Ihe TV wilh fileHDMI cord during the system is sel Io "NORMAL
(INTERLACE)," the syslem is sel Io "PROGRESSIVE" automatically.
• When you connect the unit and the TV with the HDMI cord, VIDEO FORMAT is used lk)rselecting the type of
video signals output from the HDMI OUTjack. For details, see "To select the type of video sigmd output from the
HDMI OUT (high-definition multimedia interface out)jack" (page 211.
About DVD software types and the conversion method
DVD sofiware cml be divided into 2 types: Iihnd)ased software mid ;'ideoq_ased software.
Video-based sot'iware is derived from TV, such as dramas and sit-corns, and displays images at 30
frames/6I) fields per second. Film-based so0;,vare is derived from fihn and displays images at 24 frames
per second. Some DVD software contains both video and film.
In order l\)r these images to appear natural on your screen when output ill progressive lormat, tile
progressive signals need to be converted to match the type of DVD sof);,vare that you are watching.
O
I'D
I
I
• When you play video-based software in progressive signal format, sections of some types of images may appear
unnatural due to the conversion process when output through the COMPONENT VIDEO OUTjacks. Even though
you set to "PROGRESSIVE," images from the MONITOR OUT (VIDEO or S VIDEO)jack are unafli:cted as they
are output in the interlace format.
23G8
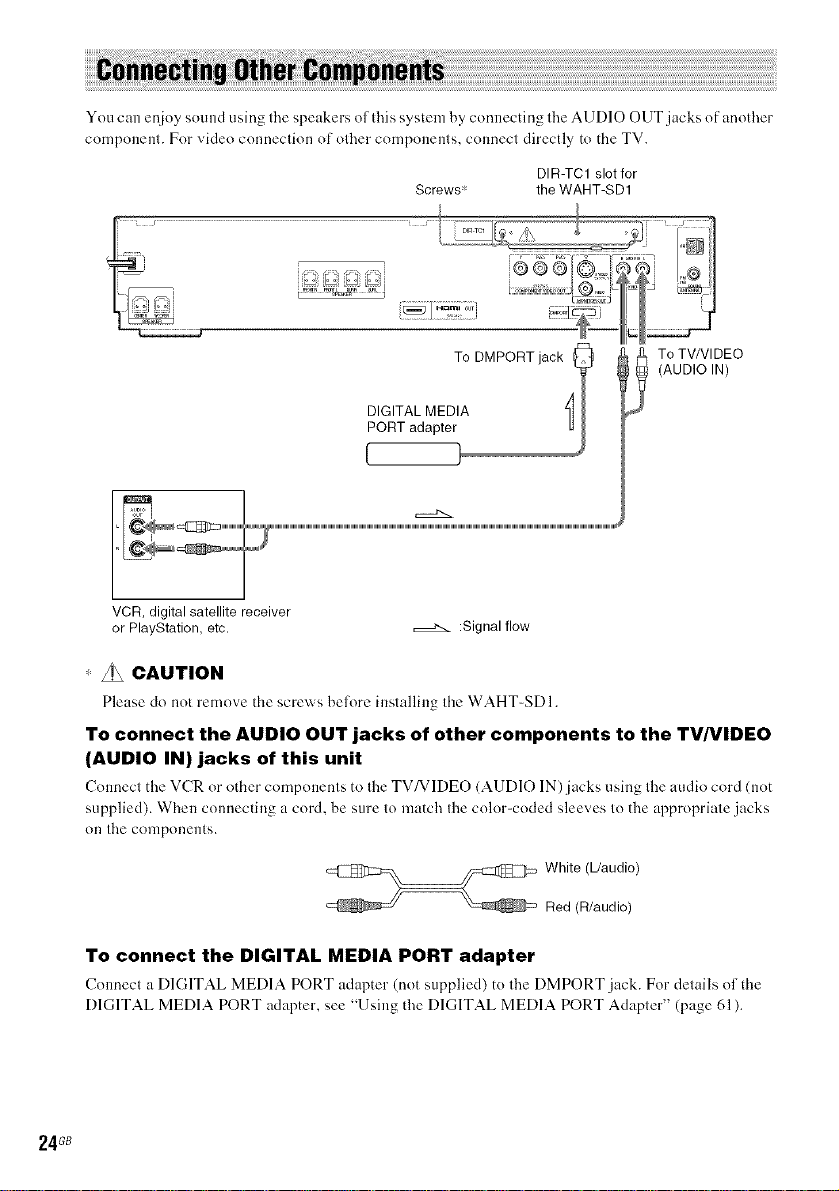
You can enioy sound using fire speakers ol this system by connecting fire AUDIO OUT jacks of anofller
componem. For video conneclion of olher componems, connecl directly to the TV.
Screws _' the WAHT-SD1
VCR, digital satellite receiver
or PlayStation, etc. :Signal flow
DIR-TCl slot for
To TV/VI DEO
(AUDIO IN)
" _ CAUTION
To connect the AUDIO OUT jacks of other components to the TV/VIDEO
(AUDIO IN) jacks of this unit
(_onnect the VCR or other components to the TV/VIDEO (AUDIO IN)jacks using the audio cord (m_t
supplied). When connecting a cord, be sure to match the color-coded sleeves to the appropriate jacks
on the components.
_ hite (L/audio)
Red (R/audio)
To connect the DIGITAL MEDIA PORT adapter
Connecl a DIGITAL MEDIA PORT adapter (not supplied) to lhe DMPORT jack. For delails ol the
DIGITAL MEDIA PORT adapter, see "Using tl_e DIGITAL MEDIA PORT Adapler" (page 61 ).
24G8

To listen to the portable audio source sound through the system
Connect file audio output jacks of the portable uudio source to tile AUDIO 1N jack on the front panel
of the unit with the stereo mini-plug cord (not supplied).
• When listening to MP3 fimnat recordings using a portable audio source, you can enhance the sound.
Press FUNCTION to select "AUDIO." Connect the portable audio source. Press SOUND FIELD repeatedly until
"A.F.D. STD" appears in the front panel display.
To cancel select other than "A.F.D. STD."
Wireless system option
When you install the WAHT-SD 1 (supplied with DAV-HDX267W only) in the DIR-TC 1 slot, you can
enjoy wireless perf_)rmance by transmission of the sound to the surround speakers. For details, see the
operating instructions of the WAHT-SD 1.
• Be sure to nlake connections securely to avoid ]]ulil and noise.
• When you connect another component with avolume control, turn up the volume of the other components to a level
where sound is not distorted.
O
¢D
D,.
Z
O
m
t_
I
I
25 GB
m_m
I/_ _ I_ FUNCTION
Adjust the
volume
4
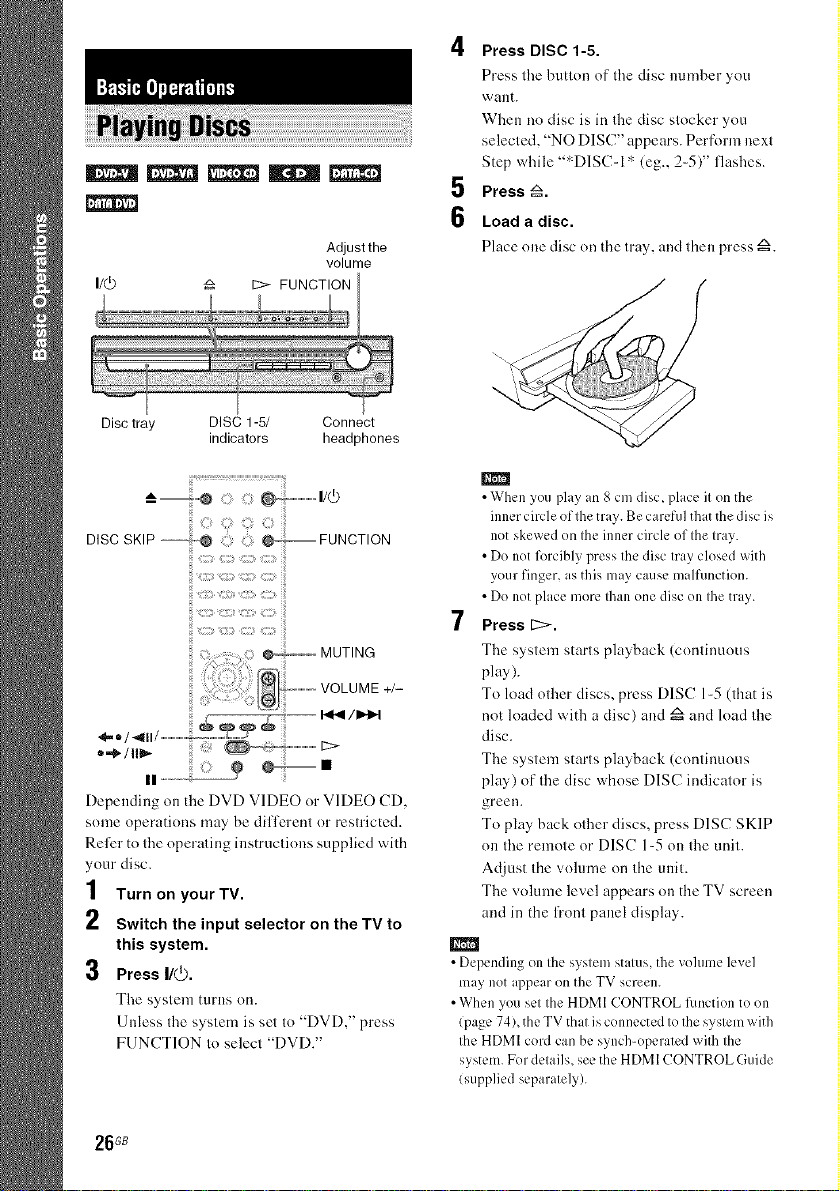
Press DISC 115i
Press tire button of the disc euulber you
want.
When no disc is in the disc stocker you
selected, "NO DISC" appears. Per fbrm next
Step while ":_D1SC-1 '_(eg., 24)" flashes.
5
Press _1
6
Load a disc.
Place ()lie disc on the tray, and then press A.
Disc tray DISC 1-5/ Connect
indicators headphones
DISCSKIP--'_@ !i!iii_i:i@' FUNCTION
C:7 S C;
ili _i;;9 i:;ii i::ii %2_i
MUTING
II...............:o:oooo_ _--- •
Depending on the DVD VIDEO or VIDEO CD.
some operations may be differenl or reslricted.
Refer to fire operaling instruclions supplied with
your disc.
1 Turn on your TV.
2 Switch the input selector on the TV to
this system.
3 Press I/(_.
The system turns on.
Unless Ihe syslern is set Io "DVD," press
FUNCTION Io selecl "DVD."
IIIIII
• When you play an g cmdisc, place it on the
inner circle of the tray. Be careful that the disc is
not skewed on the inner circle of the tray.
• Do not l\_rcibly press the disc tray closed with
your finger, as this may cause malRmction.
• Do notplace morethan onedisc onthe tray.
7 Press [2>1
The system starts playhack (continuous
play).
To load other discs, press DISC 1-5 (that is
not loaded with a disc) and z_ and load the
disc.
The system starts playback (continuous
play) of the disc whose DISC indicator is
green.
To play back other discs, press DISC SKIP
on tire remote or DISC 1=5 on the unit.
Adjust the volume on the unit.
The volume level appears on the TV screen
and in the front panel display.
• Depending on the system status, the vohune level
may not appear on the TV screen.
• When you set the HDMI CONTROL fonction to on
(page 74), the TV that is connected tothe system with
the HDMI cord can be synch-operated wilh the
system. Fordetails, see the HDMI CONTROL Guide
lsupplied separately).
26G8
• When you connect the system and TV with the HDMI
cord, you can operate them simply, using the HDMI
CONTROL function. Fordetails, see the HDMI
CONTROL Guide (supplied separately).
• The DISC 1-5 indicators change color as follows:
green: the disc isselected, or the disc is being
played back.
off: there isno disc.
orange: a disc is loaded inthe disc stocker but not
selected.
The indicator turns off if an unplayable disc is
inserted.
To save the power in standby
mode
Press I/(_) while the sys(em lurns on. To cancel
slandby mode, press I/(J) once.
To turn on/off the DISC 1-5
indicators' illumination
When yon do not operate the system for more
than 30 minutes, the illumination of the DISC 1-
5 indicators starts automatically. You can turn
the illumination on nr off.
1 Press SYSTEM MENU.
2 Press ,I,1,1,repeatedly until "ILLUM MODE"
appears in the front panel display, then
press @ or e.
Press ,I,/4, to select a setting.
The default setting is underlined.
•"ILLUM ON": sets the ilhnnination mode
to on.
• "ILLUM OFF": sets fl_eillumination mode
to nff.
4 Press @.
The setting is made.
5 Press SYSTEM MENU.
The system menu turns off.
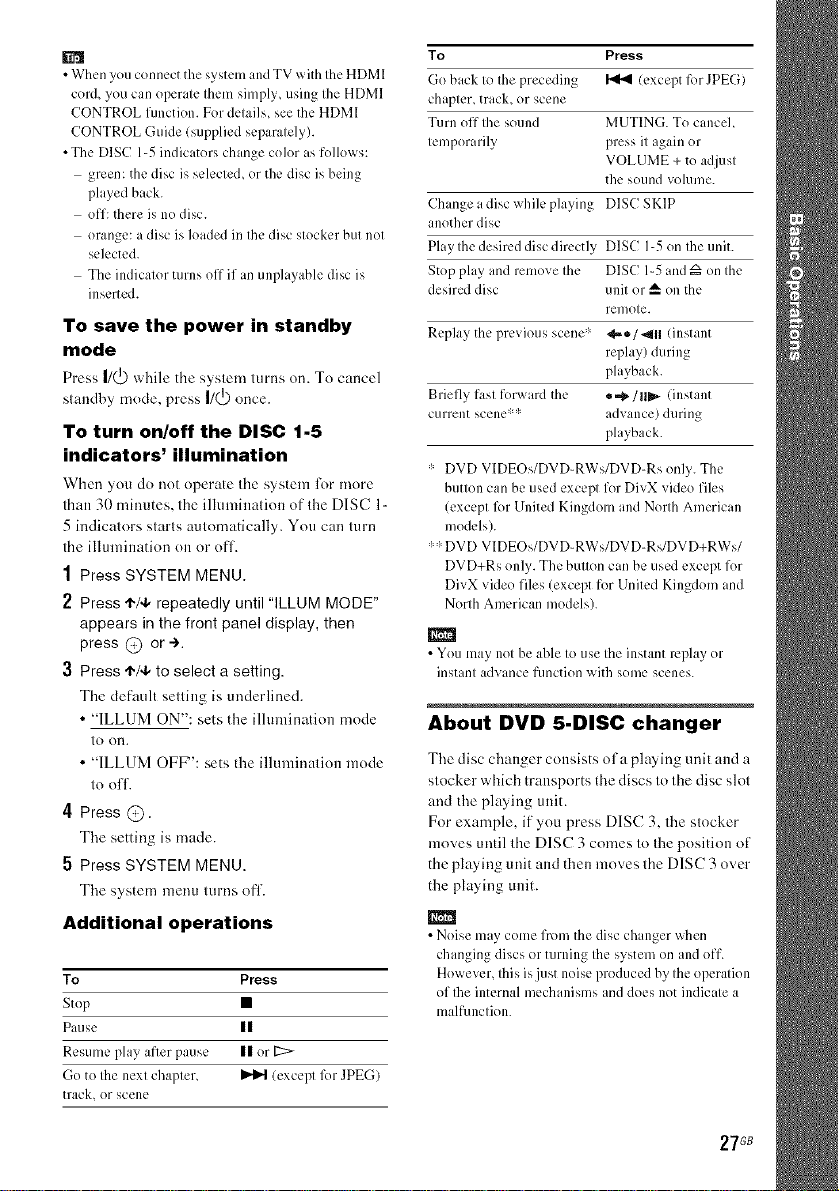
Additional operations
To Press
Stop •
Pause II
Rcsulnc phly after pa[Isc II or D>
Go to the next chapter, _ lexcepl lbr JPEG)
track, or scene
To Press
Go back to the preceding _ (except for JPEG)
chapter, track, or scene
Turn off the sound MUTING. To cancel
temporarily press it again or
VOLUME + to adjust
the sound volume.
Change a disc while playing DISC SKIP
another disc
Play the desired disc directly DISC I-5 on the unit.
Stop play and remove the DISC 1-5 and _ on the
desired disc unit or A, on the
remote.
Replay the previous scene '_ <,-e/_ll linstant
replay) during
playback.
Briefly fast R)rward the _,,a_./ IIm_-(instant
current SCelle ml: advance) during
playback.
* DVD V[DEOs/DVD-RWs/DVD-Rs only. The
button can beused except for DivX video files
(except lbr United Kingdom and North American
models).
*" DVD VIDEOs/DVD-RWs/DVD-Rs/DVD+RWs/
DVD+Rs only. The button can be used except for
DivX video files (except for United Kingdom and
North American models).
• You may not be able to use the instant replay or
instant advance f/lnction with some scenes.
About DVD 5-DISC changer
The disc changer consists nfa playing unit and a
stocker which transports the discs to the disc slot
and the playing unit.
Fnr example, if you press DISC 3. the stocker
moves until the DISC 3 comes tn the position of
the playing unit and then moves the DISC 3 over
the playing unit.
• Noise may come from the disc ch roger when
changing discs or turning the system on and off.
However, this isjust noise produced by the operation
of Ihe internal mechanisms and does not indicate a
mall)ruction.
27G8
iiiiiiO C_<ili_o iiil
: :: _IIIIIIIIIIIIIIIII'FUNCTION
iiiiiii::::_::i_;f::i_;;i_¸i;:!;¸:;¸_::::t_
MENU
_l,/€./e, _.:,
P
i!
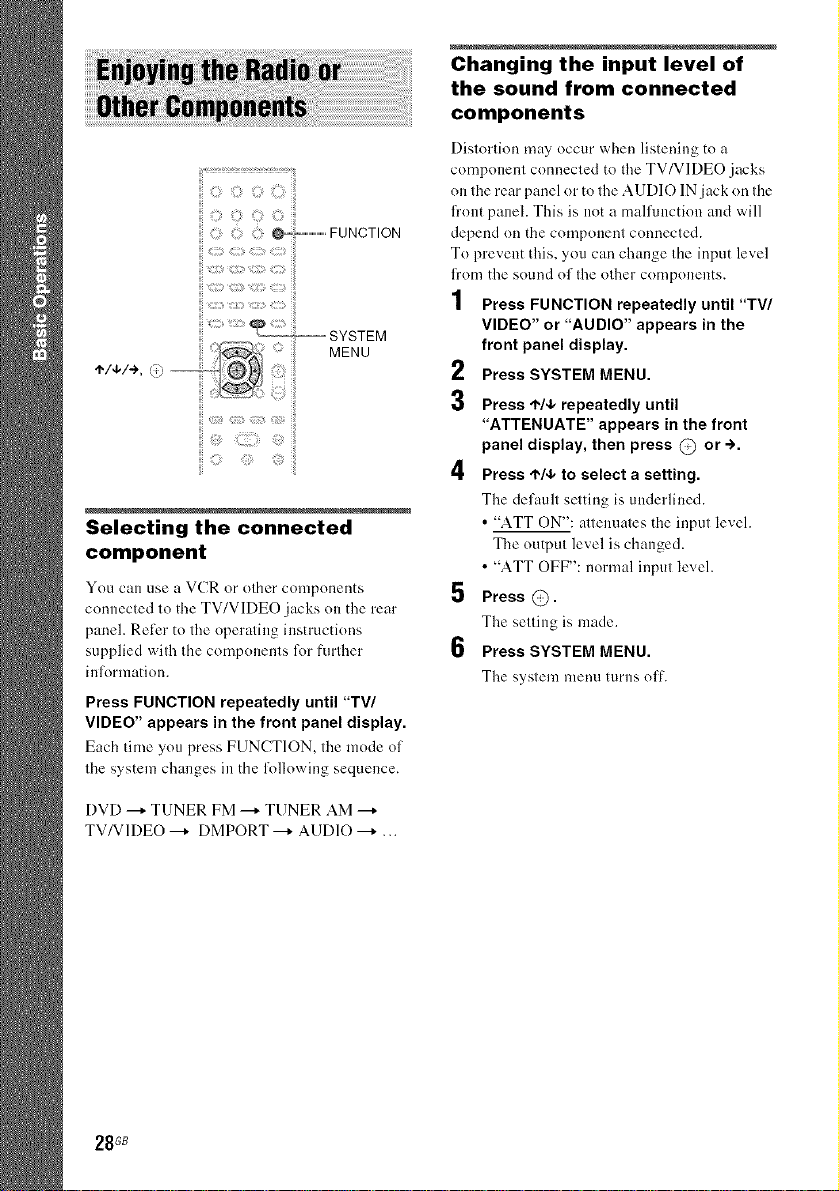
Selecting the connected
component
You can use a VCR or other components
connected to the TV/VIDEO jacks on the rear
panel. Reli:r to the operating instructions
supplied with the components for further
inl;armation.
Press FUNCTION repeatedly until "TV/
VIDEO" appears in the front panel display.
Each time you press FUNCTION, the mode of
the system changes in the l\41owing sequence.
Changing the input level of
the sound from connected
components
Distortion may occur when listening to a
component connected to the TV/VIDEO jacks
on the rear panel or to the AUDIO IN jack on the
fl'ont panel. This is not a malfunction and will
depend on the component connected.
To prevent tl_is, you can change the input level
li'om the sound of the other components.
1 Press FUNCTION repeatedly until "TV/
VIDEO" or "AUDIO" appears in the
front panel display.
2
Press SYSTEM MENU.
3 Press ,I,/4, repeatedly until
"ATTENUATE" appears in the front
panel display, then press @ or -).
4 Press t'/,1, to select a setting.
The default setting is underlined.
• "ATT ON": allennales the inpul level.
The outpul level is changed.
• "ATT OFF": normal inpul level.
5 Press @.
The selling is made.
6 Press SYSTEM MENU.
The system menu turns olT.
DVD --+ TUNER FM --+ TUNER AM --*
TV/V1DEO --+ DMPORT --+ AUDIO --+ ...
28 GB
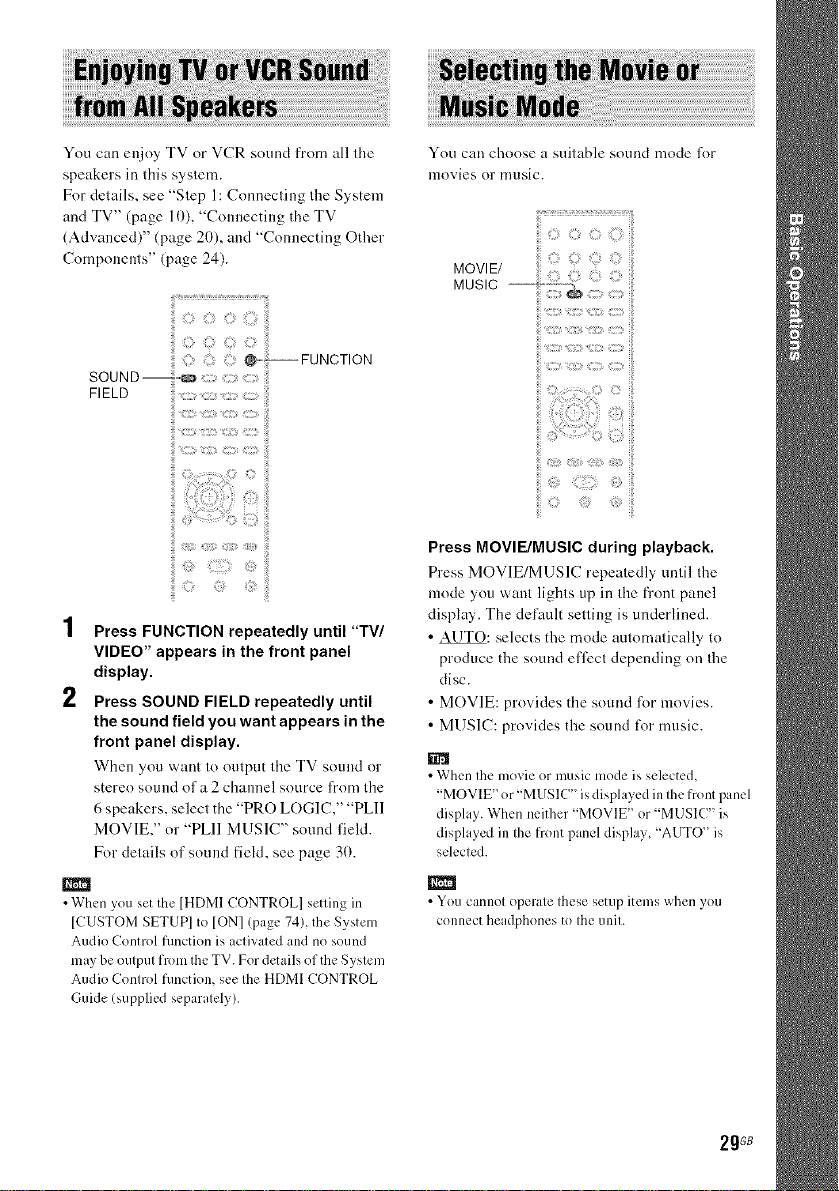
You can enjoy TV or VCR sound from all tile
speakers in this system.
For details, see "Step 1:Connecting the System
and TV" (page 10), "Connecting the TV
(Advanced)" (page 20), and "Connecting Other
Components" (page 24).
{{_7¸'¸'..........................."..............................ii_ii
_FUNCTION
FIELD
You can choose a suitable sound mode fi)r
movies or nlllSiC.
:i{{;i ilii? iil
<_ :]ii!:::i]!_i
:::ii ::: _i:::_i_
'4
I Press FUNCTION repeatedly until "TV/
VIDEO" appears in the front panel
display.
2 Press SOUND FIELD repeatedly until
the sound field you want appears in the
front panel display.
When you want to output the TV sound or
stere() sound of a 2 channel source from the
6 speakers, select the "PRO LOGIC," "PLll
MOVIE," or "PLII MUSIC" sound field.
For details of sound field, see page 31).
• When you set the [HDMI CONTROL] setting in
[CUSTOM SETUP] to ION] (page 74), the System
Audio Control function is activated and no sound
may be output from the TV. For details of the System
Audio Control function, see the HDMI CONTROL
Guide (supplied separately).
Press MOVIE/MUSIC during playback.
Press MOVIE/MUSIC repeatedly until the
mode you want lights up in the front panel
display. Tile delhult setting is underlined.
• AUTO: selects the mode automatically to
produce the sound effect depending on the
disc.
• MOVIE: provides the sound liar movies.
• MUSIC: provides the sound t_)r music.
• When the movie or music mode is selected,
"MOVIE ' or"MUSIC" is displayed in the front panel
display. When neither "MOVIE ' or "MUSIC" is
displayed in the front panel display, "AUTO" is
selected.
m
• You cannol operate Ihese setup itelns when yOtl
connect headphones to Ihe unit.
2gGB
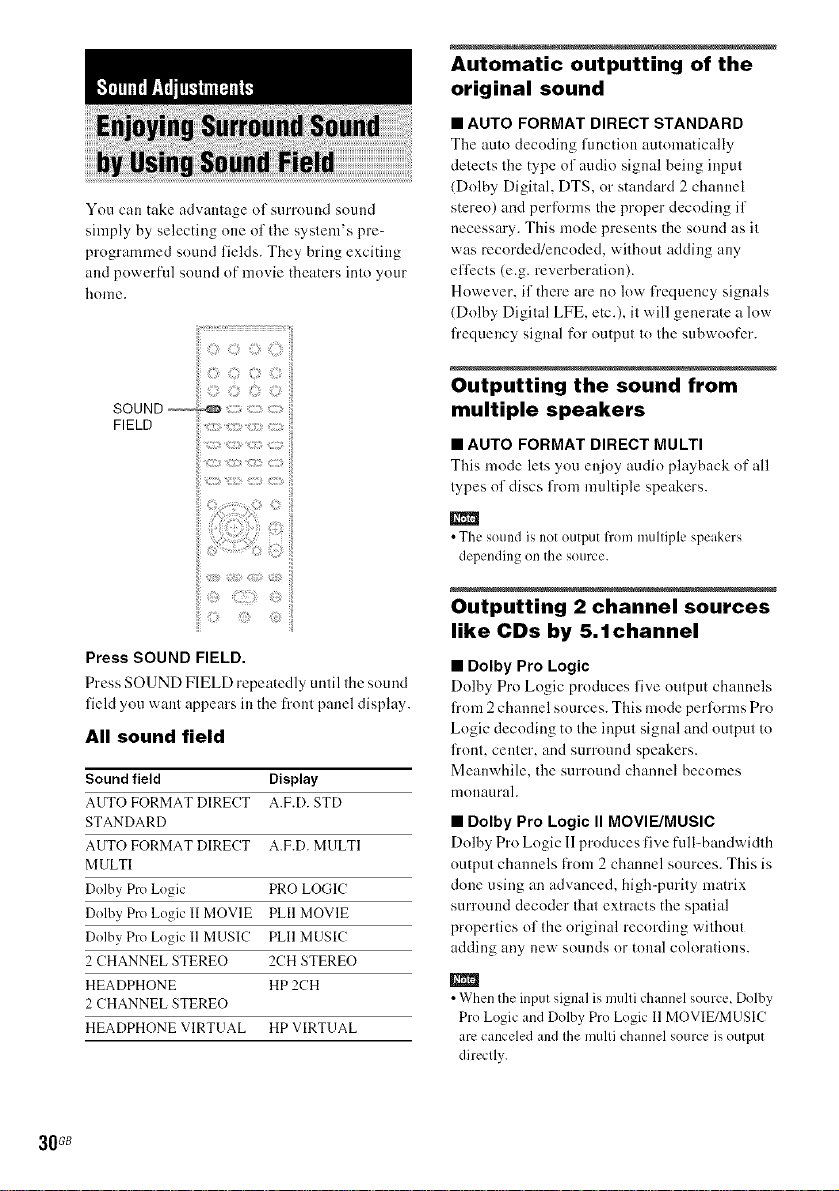
You can take advantage nf surround snund
simply by selecting one of the system's pre=
programmed sound fields. They bring exciting
and powerfnl sound nf movie theaters into your
honle.
FIELD
Automatic outputting of the
original sound
• AUTO FORMAT DIRECT STANDARD
The auto decoding fimction automatically
detects the type of audio signal being input
(Dolby Digital, DTS, or standard 2 channel
stereo) and perlorms the proper decoding if
necessary. This mode presents the sound as it
was recorded/encoded, without adding any
effects (e.g. reverberation).
However, if there are no low t>equency signals
(Dolby Digital LFE, etc.), it will generate a low
fl'equency signal fk)routput tothe subwoofcr.
Outputting the sound from
multiple speakers
• AUTO FORMAT DIRECT MULTI
This mode lets you enjoy audio playback of all
types of discs from muldple speakers.
• The sound is not output from multiple speakers
depending on the source.
ii; ;ii;ii !i
Press SOUND FIELD.
Press SOUND FIELD repeatedly until the sound
field you want appears in the fl'ont panel display.
All sound field
Sound field Display
AUTO FORMAT DIRECT A.F.D. ST[)
STANDARD
AUTO FORMAT DIRECT A.F.D. MULTI
MULTI
Dolby Pro Logic PRO LOGIC
Dolby Pro Logic II MOVIE PLII MOVIE
Dolby Pro Logic I1MUSIC PLII MUSIC
2 CHANNEL STEREO 2CH STEREO
HEADPHONE HP 2CH
2 CHANNEL STEREO
HEADPHONE VIRTUAL HP VIRTUAL
30G8
Outputting 2 channel sources
like CDs by 5.1channel
• Dolby Pro Logic
Dolby Pro Logic produces five output channels
from 2 channel sources. This mode perlorms Pro
Logic decoding to the input signal and output to
front, center, and surround speakers.
Meanwhile, the surround channel becomes
nlonaurah
• Dolby Pro Logic II MOVIE/MUSIC
Dolby Pro Logic II produces five full-bandwidth
output channels frnm 2 channel snurces. This is
done using an advanced, high=purity matrix
surround decoder that extracts the spatial
properties of the original recording without
adding any new sounds or tonal colorations.
• When the input signal is multi channel source, Dolby
Pro Logic and Dolby Pro Logic 11MOVIE/MUSIC
arc canceled and the multi channel source isoutput
directly.
 Loading...