

Page 1
SONY.
3-856-814-21 (1)
Video Camera
Recorder Hli
Operating Instructions
Before operating the unit, please read this manual thoroughly,
and retain it for future reference.
Manual de instruedones
Antes de utilizar la unidad, lea este manual por completo y
consérvelo para consultar.
Owner's Record
The model .ind serial numbers are located on the bottom. Record
the serial number in the space provided below. Refer to these
numbers whenever you call upon your Sony dealer regarding this
product.
.Model No. CCD-TRV101
Serial No.
____________
Model No. AC-V615
Serial No.
__________
video Hi8
CCD-TRV101
©1996 by Sony Corporation
Handycam
Page 2
English
WARNING
To prevent fire or shock hazard, do
not expose the unit to rain or
moisture.
CAUTION
CAUTION TO REDUCE THE RISK OF ELECTRIC SHOCK,
DO NOT REMOVE COVER (OR BACK).
NO USER'SERVICEABLE PARTS INSIDE
REFER SERVICING TO QUALIFIED SERVICE PERSONNEL
This symbol is intended to alert tlie
user to the presence of uninsulated
"dangerous vtiltage" within Hie
product's enclosure that mav be ot
sidhcient magnitude to constitute a
risk of electric shock to persons.
This symbol js mlendcd to alert the
user to the presence of important
operating and maintenance
tser\'icing) instructions in the
terature accompanyiiig tlie
appliance.
For the customers in the
United States and Canada
For the Customers in the U.S.A.
WARNING
This equipment has been tested and found to comply
with the limits for a Class B digital device, pursuant \o
Part 15 of the FCC Rules. These limits are designed to
provide reasonable protection against harmful
interference in a residential installation. This equipment
generates, uses, and can radiate radio frequency energ\’
and, if not installed and used in accordance with the
instructions, may cause harmful interference to radio
communicatitms. However, th<‘re is no guarantee that
interference will not occur in a particular installation, h
this equipment does cause harmful interference to radio
or television reception, which can be determined bv
turning the equipment off and on, the user is
encouraged to try to correct tiu’ interference by ono cm
more of the following measure's:
— Reorient or relocate tlie recei\'ing antenna.
— Increase the separation between the equipment and
receiver.
— Connect the equipment into an outlet on a circuit
different from that to which tlie receiver is connectrd
— Consult the dealer or an experienced radio/T\
technician tor help.
CAUTION
You are cautioned that an\’ changes or modiIicati<'n" no:
expressly appren'ed in tins manual could void \ann'
authority to operate this equipment.
For the Customers in CANADA
CAUTION
TO PREVENT EI.ECri RlC SHOOK, EX) NOT US[; 11 fp.
POLARIZED AO PLUO UTI H AN E.XTENSION (. ()RI >
RECKPTAOPE OR OTHER OUl'EET UNLl-'.SS I'i ii:
BLADES OAN BE E'L^EIA' INSEIOI ED TO PREA’IEN I
BLADE EXPOSURE,
DISPOSAL OF LITHIUM ION BATTERY
AND VANADIUM-LITHIUM BATTERY.
LITHIUM ION BATTERY AND VANADIUMLITHIUM BATTERY.
DISPOSE OF PROPERLY.
Ylhi can return vour unwanted lithium ion batteries and
N'cinadunn-lithium batterie'' to your nearest Sonv Service
Center or Factt>rv ber\ ice C'enter.
Note; In "(Mne areas t;ic disposal uJ iithuim ion batliTies
and 'canadium-lithium batteries in lionstbold or
hu'-iness trash mav be prohibited,
f'or the Son\ Ser\nce c v'nfer nearest vou call
ì-.sUì''-222-bL'»\'i (Unitcd States onh ).
For the s(F\V IÀKtor\' Ser\'Ke CentiT nearest V'ou call
4 I e-4ao-SC).\^' (C.inada imiIv).
Caution; 14,) not handle damaged or leaking litliium ion
batteries .and v anadium-lithium battenes.
Español
ADVERTENCIA
ÍYirti evitar riesgos Je incendio o desuarg.i''
exponga la unidad a la IKix'ia ni a l.i
hvimedad.
l’ara ex'itar descargas eléctricas, no abra la
unidad V solicite asistencia tecnka sb'lo a
personal cua li fie ad(M
Page 3

Table of contents
Indice
Before you begin
Using this manual 4
Checking supplied accessories 6
Getting started
Charging and installing the battery pack 7
Inserting a cassette 11
Basic operations
Camera recording 12
Using the zoom feature 16
Shooting with the LCD screen 18
Hints for better shooting 19
Checking the recorded picture 22
Playing back a tape 23
Displaying the date or time when you
recorded - data code function 26
Searching for the end of the picture 28
Advanced operations
Using alternative pmver sources 29
Using tl^e house current 29
Changing the mode settings 32
—for camera recording—
Letting the subject monitor the shot 37
Recordii'ig with the date or time 39
Fade-in and fade-out 40
1-njoving picture eltect 42
Using the wide mode (unction 44
Shooting scenery in several short takes 46
Superimposing a title 47
Making your owm original titles St)
Releasing the STF:ADYSHOT function 32
Using the PROGRAM AL function 34
Focusing manually 56
•Xdjusting the exposure 58
Shooting with backlighting 60
Rerecording a picture in the middle of a recorded
tape 61
Optimizing the tape condition before recording 63
—for playing back/editing—
A'alching on a TV screen 63
searching the boundaries of recorded tape 67
\eturning to a pre-registered position 64
-ocating the marking position 71
Vriting the RC time code on a recorded tape 77
Editing onto another tape 79
According from a VCR or TV 8)
Additional Information
barging file vanadium-iithium batlervin the
camcordiT 83
tesetting the date and time 84
sable’cassettes and p!avb<ick me'des 8e
ips for using tile battery pack 87
Liinlenance information and precautions 4]
Miig \'our e'amcorder abreiad 4s
roubk’check 4f-,
pecifications !()6
lentiiving the parts !()S
v'.irnmg indicators IIS
ulex 114
Antes de empezar
Uso del manual 4
Comprobación de accesorios suministrados 6
Puesta en marcha
Carga e instalación del paquete de baterías 7
Inserción de videocassettes 11
Operaciones básicas
Grabación con la cámara 12
Uso de la función de zoom 16
Videofilmación con la pantalla LCD 18
Consejos para videofilmar mejor 19
Comprobación de imágenes grabadas 22
Reproducción de cintas 23
Visualización de la fecha u hora de grabación -
función de código de datos 26
Búsqueda del final de la imagen 28
Operaciones avanzadas
Uso de fuentes de alimentación alternativas 29
Uso de corriente doméstica 29
Cambio de los ajustes de modo 32
— para grabación con la cámara—
Control de videofilmación por el sujeto 37
Grabación con fecha u hora 39
Aparición y desaparición gradual de imágenes 40
Uso del efecto de imagen 42
Uso do la función de niodo panorámico 44
Videofilmación de escenarios en varias tomas cortas
46
5obreimpresi()n de títulos 47
Creación de títulos originales 30
Desactivación de la función STEADYSHOL 52
Uso de la fundón PROGKAVi AL 34
Enfoque manual 36
Ajuste de la exposición 38
Videofilmaci(')n con iluminación a contraluz 60
Grabación de una imagen en el medio de una cinta
grabada 61
Optimización de las condiciones de la cinta antes de
grab.ir 63
—para reproducción/edición—
Keproducci('m en pantallas de televÍMor 63
Búsqueda de kw límites de la fecha de grabación 67
Localización de posiciones registradas de antemano 64
Localización de posiciones marcadas 71
Escritura del código de tienipos RC' en cintas
grabadas 77
Edición en otra cinta 79
Grahaci(Sn desde una videograbadora o un telec'isor 81
Información adicional
Carga de la pila de \ anadio-litio en la videocámara 83
Reajuste de k\ba v bora 84
\ ideocassettes utili/ables v modos de leproducción 8h
C'onsejos para usar el paquete’ de bate’rías 87
información v precauciones cié mantenimiento 91
Uso de’ la \'ideoe'amai a en el cxfrmaje’ro 93
Conqmibaciefn de errores 101
l.'specificaoones 107
Identilicacion do i'oinponentes 108
Indicaeiore's do a'Ciso 118
Ineiice’ l .ii''a po-.te'rior
Page 4

I Before you begin
Antes de empezar
Using this manual
Welcome to Video
him
Congratulations on your purchase of this
Sony Handycam® camcorder. With vour
Handycam you can capture life's precious
moments with superior picture and sound
quality.
Your Handycam is loaded with advanced
features, hut at the same time it is very easy
to use. You will soon be producing home
video that you can enjoy for years to come.
As you read through this manual, buttons and
settings on the camcorder are shown in capital
letters.
e g.. Set the POWER switch to CAMERA.
As indicated with S' in the illustrations, you can
hear the beep sound to confirm your operation.
Note on TV color systems
TV color systems differ from country to countrw
To view your recordings on a TV, vou need an
NTSC system-based TV.
Uso del manual
Bienvenido al Video
hvm
Enhorabuena por haber adquirido esta
videocámara Sony Handycam®. Con ella
podrá captar los momentos más preciados de
su vida con una imagen superior y gran
calidad de sonido.
Esta Handycam está provista de funciones
avanzadas, pero a la vez resulta muy fácil de
usar. Pronto podrá grabar sus vídeos
domésticos y disfrutarlos durante muchos
años.
Al leer este manual observará que los botones \’
ajustes de la videocámara se indican en
mayúsculas.
Por ejemplo. Ajuste el interruptor POWER en
C A.MERA.
Tal como se indica con eii las ilustracione*^, la
cámara emitirá un pitido para confirmar la
operación.
Nota sobre sistemas de color de
televisión
Precaution on copyright
Television programs, films, video tapes, and
other materials may becopyrighted.
Unauthorized recording of such materials ma\
be contrary to the prox'ision c)i the copyright
laws.
Los sistemas de colkir de televisión difieren de un
país a otro. Para x'isualizar las grabaciones en un
tek'N'isor, este debe basarse en el sistema NTSC.
Precauciones sobre ios derechos de autor
Los derechos de autor de programas Je
te!e\’isi('n, películas, cintas de \’ídeo otr(w
materitiles puedem (‘star registrados, i.a
grabación no «mlorizada de dichos matcriaK'i'
puedo iniringir Ici'. disposiciones de la legislación
sobre' derechos de autor.
Page 5
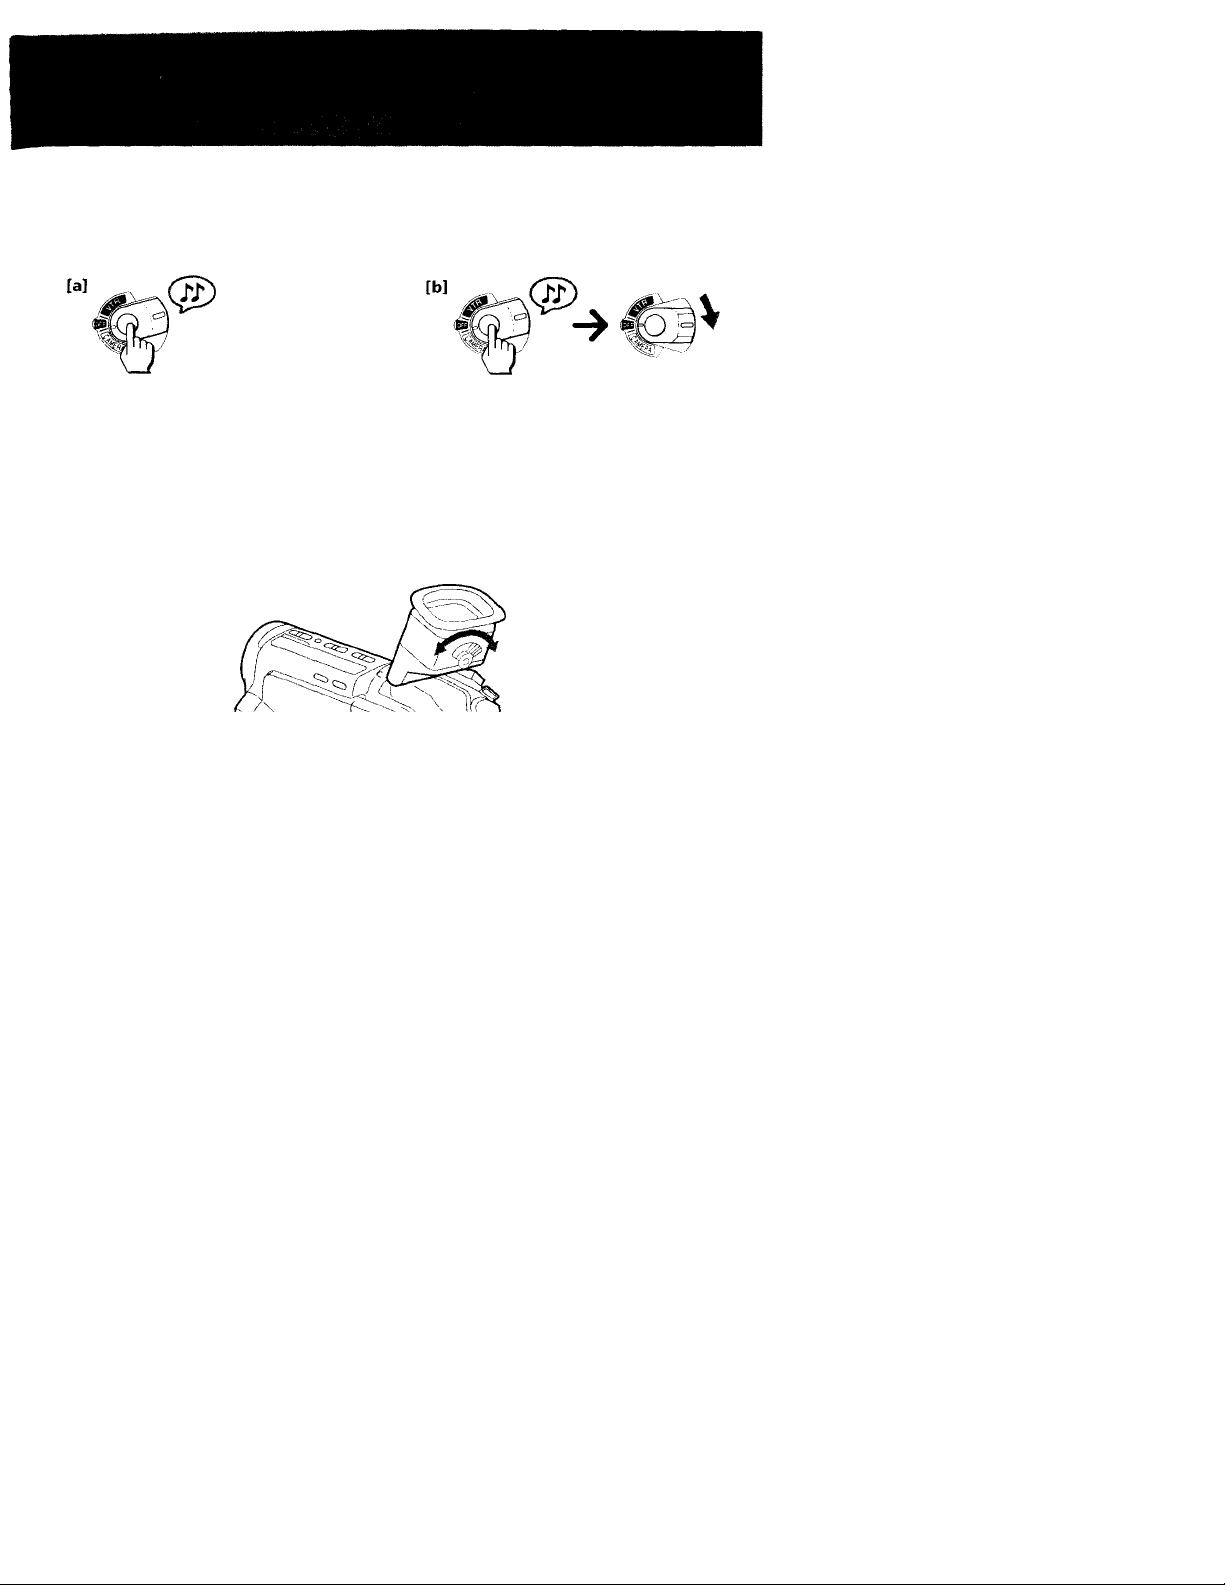
Precautions on camcorder care
> Do not let sand get into the camcorder.
When you use the camcorder on a sandy
beach or in a dusty place, protect it from the
sand or dust. Sand or dust may cause the
unit to malfunction, and sometimes this
malfunction cannot be repaired [a].
> Do not let the camcorder get wet. Keep the
camcorder away from rain and sea water.
Letting the camcorder get wet may cause
the unit to malfunction, and sometimes this
malfunction cannot be repaired [b].
> Never leave the camcorder exposed to
temperatures above 140°F (60“C), such as in
a car parked in the sun or under direct
sunlight [c].
Precauciones sobre el cuidado de la videocámara
• Impida que entre arena en la videocámara. Si
utiliza la videocámara en playas de arena o
en lugares polvorientos, protéjala de la
arena y el polvo. La arena y el polvo pueden
provocar anomalías en el funcionamiento de
la unidad que a veces no pueden repararse
[a].
• Impida que la videocámara se moje.
Manténgala alejada de la lluvia y el agua del
mar. El agua puede ocasionar anomalías en
el funcionamiento de la unidad que a veces
no pueden repararse [b].
• No deje nunca la videocámara expuesta a
temperaturas superiores a 140°F (60°C),
como en un automóvil aparcado al sol o bajo
la luz solar directa [c].
[a]
Contents ot the recording cdnnot be
compensated it recL>rding or pla\'b<ick is not
made due to a maltunctuin ol the camcorder,
video tape, etc.
[b]
[c]
\l\ contenidt) de la grabacicSn no puede
corregirse si no es posible grabar o
rL‘prt)ducir debidc) al mal funcionamiento de
la \'ideoL ámam, la cinta de \’ídeo, etc.
Page 6
Comprobación de
Checking supplied
accessories
Check that the following accessories are supplied Compruebe que con la cámara se suministran los
with your camcorder. siguientes accesorios.
accesorios
suministrados
[XJ Wireless Remote Commander (1) (p. 112)
l21 NP-F530 battery pack 0) (p. 7)
[3j AC-V615 AC power adaptor (1) (p. 7, 29)
Size AA (R6) battery for Remote
Commander (2) (p. 113)
; 5i Shoulder strap (Dip 111)
6j A/V connecting cable (1) (p 63)
;7j ETA-26 Handycam Station adaptor (1)
(p.113)
;8j DK-626 connecting cord ( Dip. 29)
¡Ti Mando a distancia inalámbrico (1) (p. 112)
[2] Paquete de baterías NP-F530 (1) (p 7)
¡íl Adaptador de alimentación de CA AC-V615
(l)(p. 7, 29)
[4] Pilas de tamaño AA (R6) para el mando a
distancia (2) (p, 113)
[5j Asa de hombro (1) (p. Ill)
[6j Cable de conexión A/V (1) (p. 63)
[7J Adaptador ETA-26 Handycam Station 0 )
(p. 113)
18 ' Cable de connexión DK-626 (1)
(p. 29)
Page 7
I
Getting started
Charging and installing
the battery pack
Before using your camcorder, you first need to
charge and install the battery pack. To charge
the battery pack, use the supplied AC power
adaptor.
This camcorder operates with the InfoLlTHIUM
battery pack NP-F530. If you use any other
battery pack to operate your camcorder, the
camcorder may not operate or battery life may be
shorten.
"InfoLlTHIUM'
Corporation.
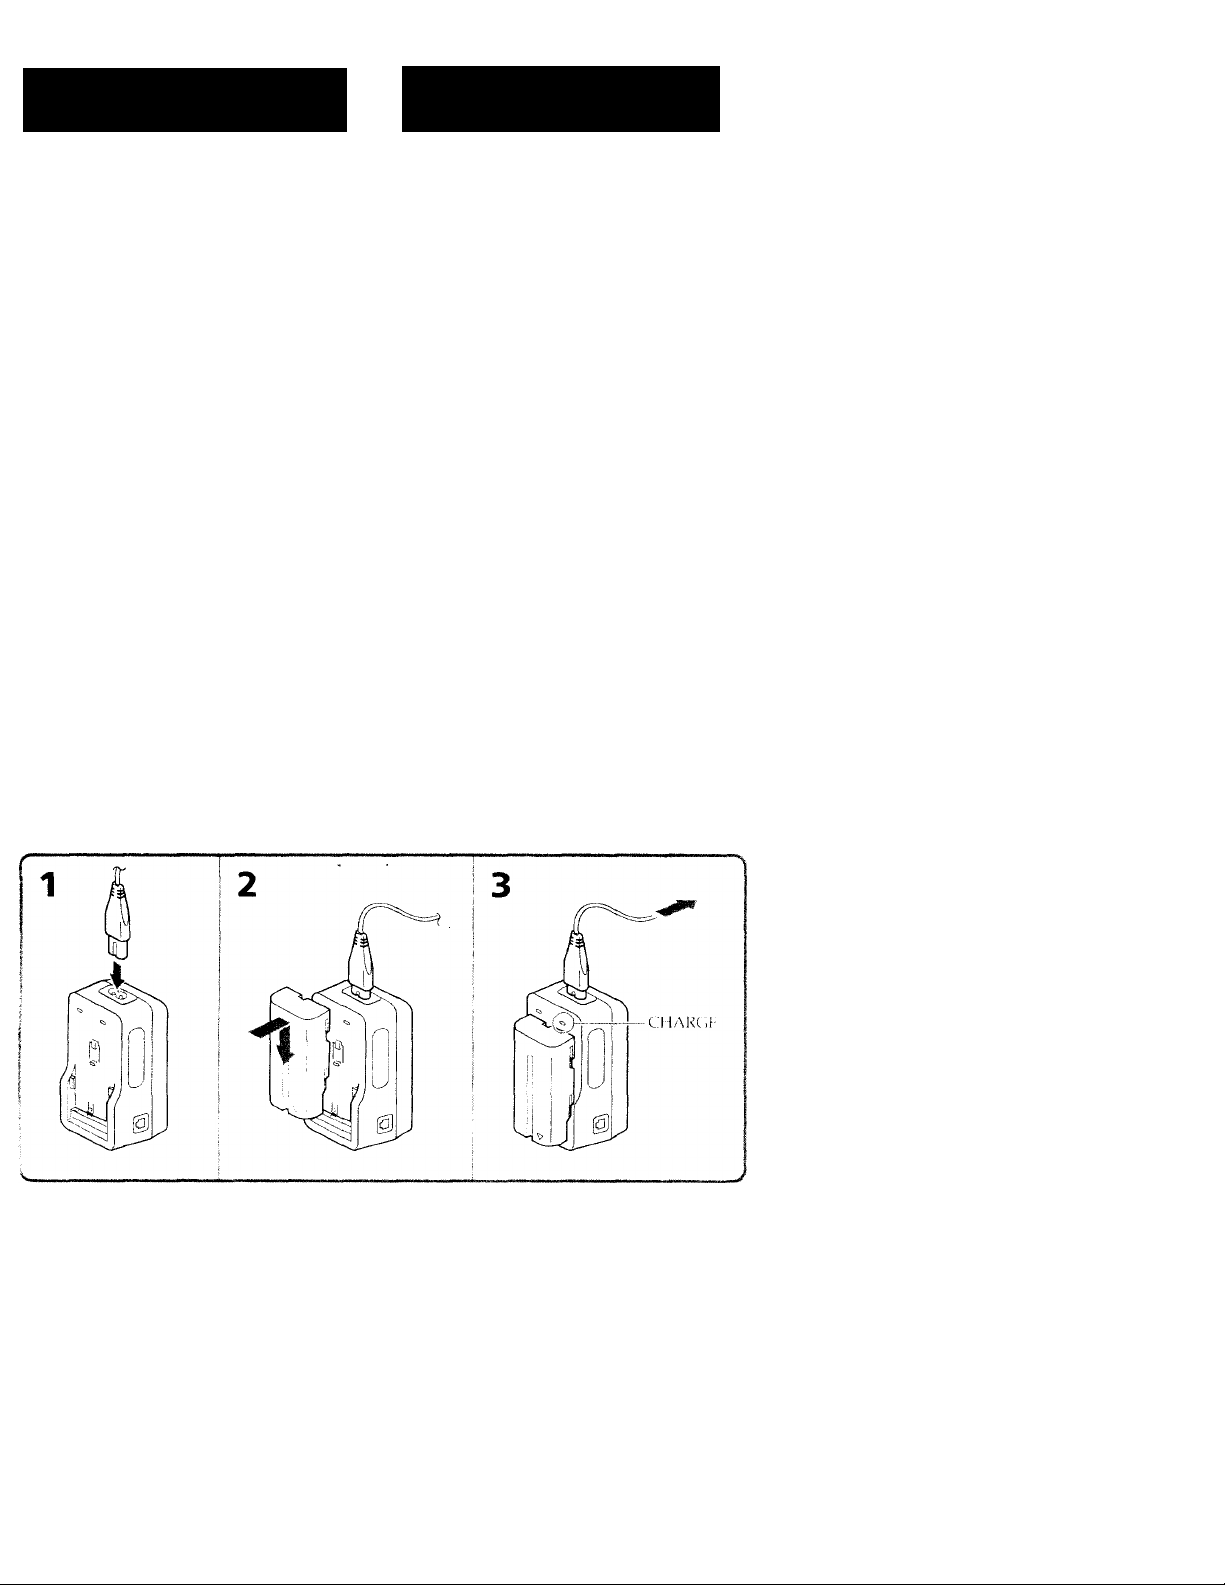
Charging the battery pack
(1) Connect the wall outlet lead to the AC power
adaptor.
(2) Align the surface of the battery pack indicated
h\- the ► mark with the edge of the terminal
shutter of the AC power adaptor. Then fit
and slide the battery pack in the direction of
the arrow.
(3) Connect the AC power cord to wall outlet.
The CHARGE lamp (orange) lights up.
Charging begins.
When the Cl lARGE lamp goes out, normal
charge is completed (Normal charge). For a full
charge, which allows you to use the battery
longer than usual, leave the battery pack in place
tor approximately one hour (Full charge).
Unplug the cord from the wall outlet, then
remove the battery pack and install it into the
camcorder. You can also use the battery pack
before it is completely charged.
is a trademark of Sony
Carga e instalación del
paquete de baterías
Antes de emplear la videocámara, primero es
necesario cargar e instalar el pac]uete de baterías.
Para cargarlo, utilice el adaptador de
alimentación deCA suministrado.
Esta videocámara funciona con el paquete de
baterías InfoLlTHIUM NP-F.530. Si empilea la
videocámara con otro tipo de paquete de
baterías, es posible que dicha videocámara no
funcione o que la duración de la batería se
reduzca.
"InfoLlTHIUM" es una marca comercial de Sony
Corporation.
Carga del paquete de baterías
(1) Conecte el cable de alimentación al adaptador
de alimentación de CA.
<2) Alinee la s\iperficie del paquete de baterías
indicada por la marca ► con el borde del
terminal del obturador situado en el
adaptador de alimentación de CA. A
continuación ajuste y deslice el paquete de
baterías en la dirección de la flecha.
(3)Conecte el cable de alimentación de CA a una
toma de red. Se iluminará el indicador
CHAKCil: (naranja) v comenzará la carga,
H1 indicador CH ARCH se apaga cuando el
proceso normal de carga finaliza (carga normal).
Para una carga tota!, que permite usar la batería
durante más tiempo del habitual, deje el paquete
de baterías cargando durante aproximadamente
una hora (carga total). Desenchufe el cable de la
toma de red, retire el paquete de baterías e
instálelo en la x ideocámara. Hi paquete di'
haterías también puede utilizarse antes de estar
totalmente cargadfx
Page 8

NP-F530 (supplied) 170(110)
NP-F530 (suministrado)
170(110)
Numbers in parentheses indicate the time for a
normal charge. (Normal charge)
Approximate number of minutes to charge an
empty battery pack fully using the supplied AC
power adaptor. (Full charge) (Lower
temperatures require a longer charging time.)
Battery life (using the viewfinder)
Battery
pack
Nl’-F330
(suppüt'd)
Continuous Typical
recording time recording time
* * * * *
0^(120) «n (70)
Battery life (using the LCD screen)
Battery
pack
NL-FMO
(supplied)
Numbers
\'<ni Use a normal charged battery pack.
Note on remaining battery time indication during recording
Remaining batter\- time is dispLu-ed in the
\’iewti]ider or on the LCI.) screem It may not be
dispia\’ed properly, however, depending on thi.'
conditions and circumstances ot iwe.
Continuous
recording
time **
(S3)
Typical Playing
recording time on
time *** LCD
,7a (70) 40 (80)
in parentheses indicate the time when
.Apprciximale number o1 minutes to record
i.V)ntinuous]\’ indoors
Approximate number of minutes when
recording with repeated recording start/stop,
standby, zooniing and turning the power on/
ott. The actual battery life may be shi'rter.
L.OS números entre paréntesis indican el tiempc»
de carga normal. (Carga normal)
Minutos aproximados necesarios para cargar
un paquete de baterías agotado mediante el
adaptador de alimentación de CA
suministrado. (Carga total) (A temperaturas
mas bajas es preciso un tiempo de carga más
prolongado.)
Duración de la batería (uso del visor electrónico)
Paquete Tiempo de
de grabación
baterías continua **
NL-1A30
{suminis
i20)
trado)
Tiempo de
grabación típica
(70)
Duración de la batería (uso de la pantalla LCO)
Paquete Tiempo de Tiempo de Tiempo de
de grabación grabación reproducción
baterías continua ** típica *** con LCD
(suminis
; (^U)
trado)
l.os númoro'- outre paréntesis indi*, an el tiempo
cuandc' ‘-e utih/.i un paquete dv' baterías con
carga normal
Minutos aproxim.idos de grabanón continua
en iníenoro"^
Número aimoximado de minutos cuando
graba con operaciones repetidas de inicio.detención de !a gvabavT^n, nnxiv' de e-.pera,
zoom, \ eneemiido v apagado di' la unidad.
La duración real de l<i baten,¡ puede ser
intenor.
MO(SO)
Nota sobre la indicación de tiempo restante de batería durante la grabación
hl tiempo ri'-'taníe de battaua aparen-' en el \ o» >r
electrc'niieo o en la pantalla LLO ^in onibare.o. la
indicai u'n puede -^er nvoia ocia '-ogun laconihi ¡('lies \ , ircinwt.us ta^ >de u-'O.
Page 9
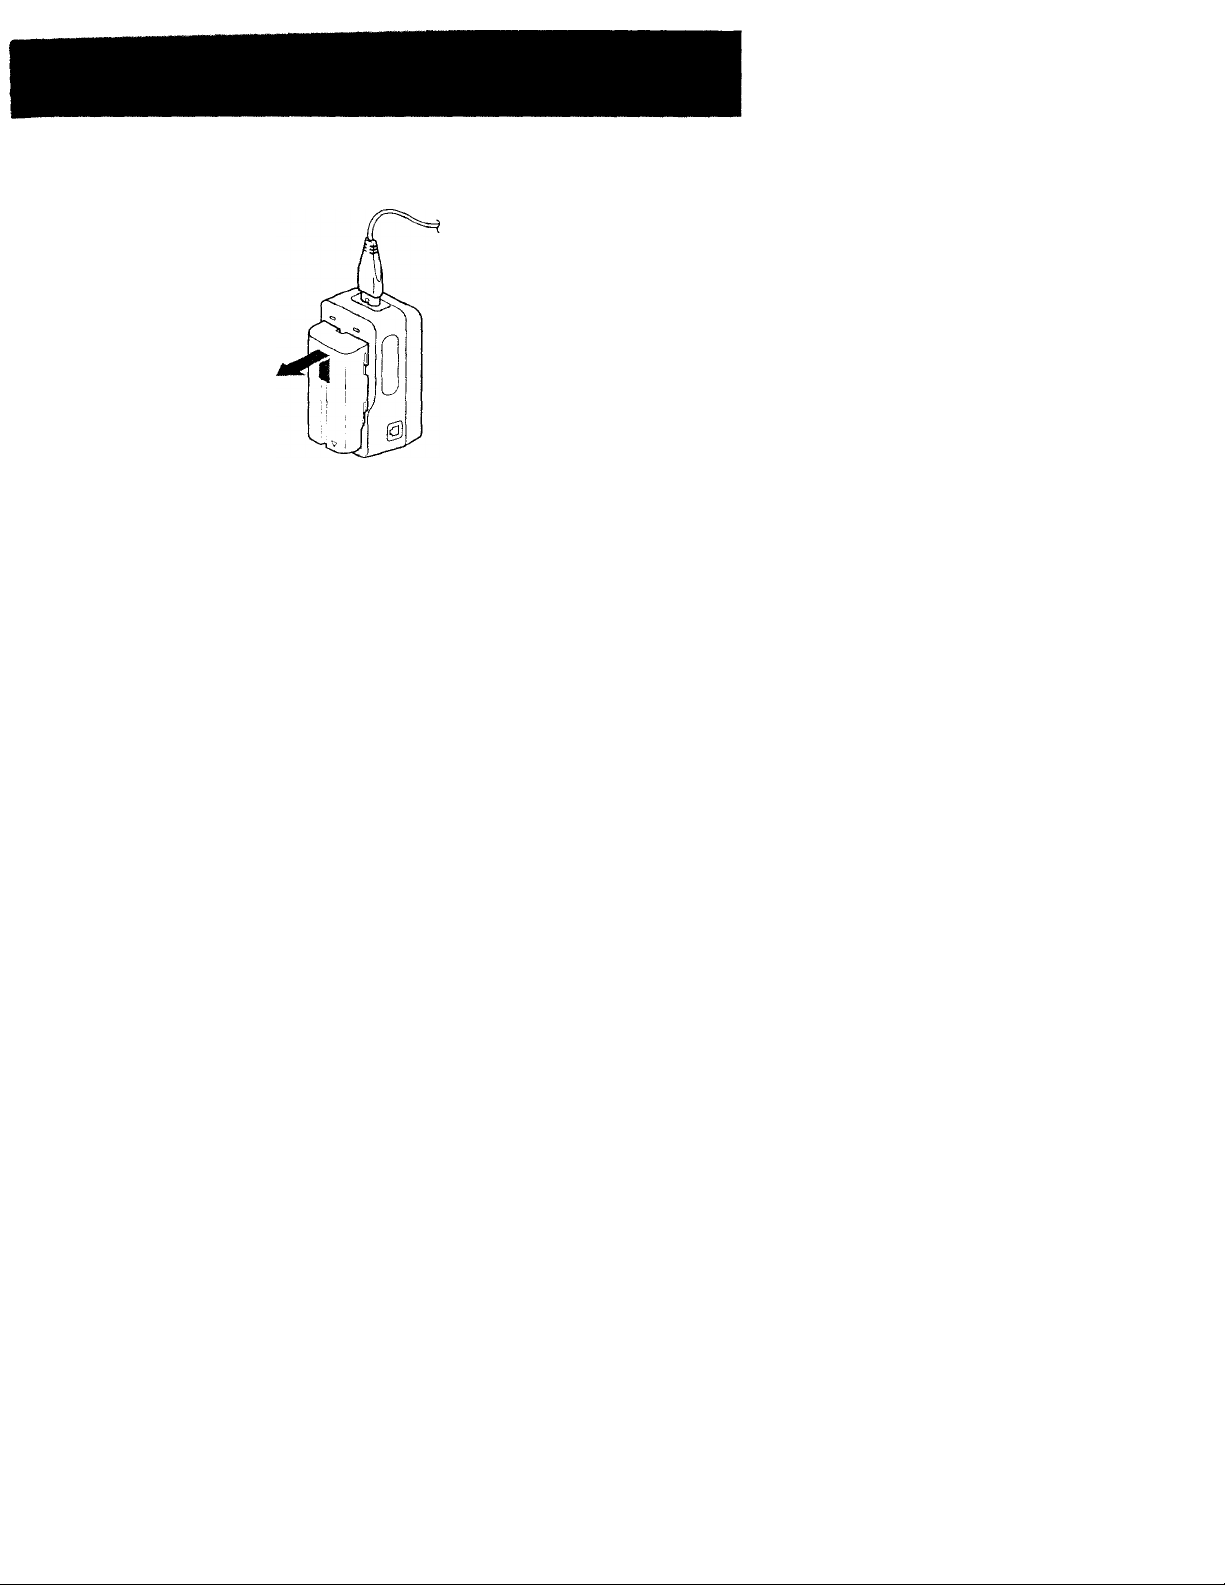
To remove the battery pack
Slide the battery pack in the direction of the
arrow.
Para retirar el paquete de baterías
Deslice el paquete de baterías en la dirección de
la flecha.
waim
lotes on charging~the battery pack
The CHARGE lamp will remain lit for a while
even if the battery pack is removed and the
power cord is unplugged after charging the
battery pack. This is normal.
If the CHARGE lamp does not light, disconnect
the power cord. After about one minute,
reconnect the power cord again.
You cannot charge the battery pack while
operating the camcorder using the AC po\ver
adaptor.
When a fully charged battery pack is installed,
the CHARGE lamp will light once, then go out.
Notas sobre la carga del paquete de baterías
• El indicador CHARGE permanece iluminado
unos momentos incluso si se ha retirado el
paquete de balerías y se lia desenchufado el
cable de alinientadón después de cargar el
paquete de haterías. Es norma!.
• Si el indicador CHARGE no se ilumina,
desconecte el cable de alimentación. Vuelva a
conectarlo después de aproximadamente un
minuto.
• No es posible cargar el paquete de baterías
mediante el adaptador de alimentación de CA
mientras se utiliza la videoCcámara.
• Cuando se instala un paquete de baterías
totalmente cargado, el indicador CHARGFs se
ilumina una vez v luego se apaga.
Page 10

Charging and installing the
battery pack
Carga e instalación del
paquete de baterías
Installing the battery pack
(1) Set the POWER switch to OFF to prevent
misoperation of the camcorder.
(2) To open the lid of the battery compartment,
slide down the OPEN (ВАТТ) release lever.
(3) Insert the battery pack in the direction of the
arrow.
(4) Close the lid until it clicks.
To remove the battery pack
Open the lid of the battery compartment. Then
release the ВАТТ release lever, and remove the
battery pack. When removing the batterypiack,
keep the lid of the battery compartment upinght
so that the battery pack does not fall out.
Instalación del paquete de baterías
(1) Ajuste el interruptor POWER en OFF para
evitar el funcionamiento incorrecto de la
videocámara.
(2) Deslice la palanca de liberación OPEN (BATI)
hacia abajo para abrir la tapa del
compartimiento de la batería.
(3) Inserte el paquete de baterías en la dirección
de la flecha.
(4) Cierre la tapa hasta que oiga un chasquido.
Extracción del paquete de baterías
Abra la tapa del compartimiento de la batería.
Sneltc la palanca de liberación ВЛТТ y retire el
paquete de baterías. Al retirarlo, mantenga la
tapa de! compartimiento de la balería en posición
vertical piara evitar que se caiga el paquete de
baterías.
10
Page 11
Inserting a cassette
Inserción de
videocassettes
Make sure that the power source is installed.
When you want to record in the Hi8 system, use
Hi8 video cassette HiH.
(1) Set the POWER switch to OFF.
(2) Slide OPEN/EJECT on the bottom of the
camcorder in the direction of the arrow. The
cassette compartment automatically lifts up
and opens.
(3) Insert a cassette with the window facing out.
(4) Close the cassette compartment bv pre.ssing
the [PUEZffl mark on the cassette compartment.
The cassette compartment automaticallv goes
down.
(5) Close the lid until it clicks.
Cerciórese de haber instalado la fuente de
alimentación. Cuando desee grabar en el sistema
Hi8, utilice videocassettes HI0.
(1) Ajuste el interruptor POWER en OFE.
(2) Deslice OPEN/EJECT, situado en la parte
inferior de la videocámara, en la dirección de
la flecha. El compartimiento del videocassette
se elevará y se abrirá automáticamente.
(3) Inserte un videocassette con la ventana hacia
afuera.
(4) Cierre el compartimiento del videocassette
presionando la marca del
compartimiento del videocassette. Este
descenderá automáticamente.
(5) Cierre la tapa hasta que oiga un chasquido.
To eject the cassette
Slide OrHN/EIECT outward.
To prevent accidental erasure
Slide tile tab on the cassette to expOM.' the red
mark, if you insert the cassette w ith the red
nark exposed and close the ca>>ettk'
ompartment, the beeps se*und tor a while, h
.'ou try to record with the red mark exposed, "
he trC and ^ indicators flash in the r'iewtindc'r
>r on the LCD screen, and you cannot record. 1\
e-record on this tape, slide the tab ba^ k out
ox'ering the red mark.
b_ ___
Para extraer el videocassette
Deslice OLEN7EJHCT hacia afuera.
Para evitar borrados accidentales
Deslice la lengüeta del videocassette hasta que la
marea roja quede al descubierto. Si inserta el
x'ideoeassotte con la marca roja al descubierto y
cierra el compartimiento del videocassette,
sonará un pitisio durante unos momentos. Si
intenta grabar con la marca roja al descubierto,
los indicadores 77 v — parpadearán en e! visor
electrónico o en la pantalla LCD, v no será
posible grabar. l’ara volver a grabar en esta cinta,
deslice la lengiieta otra ve?: hacia afuera hasta
ocultar la marc<i rtija.
m3
...W.-.í jf>.
11
Page 12
■ Basic operations
Operaciones básicas
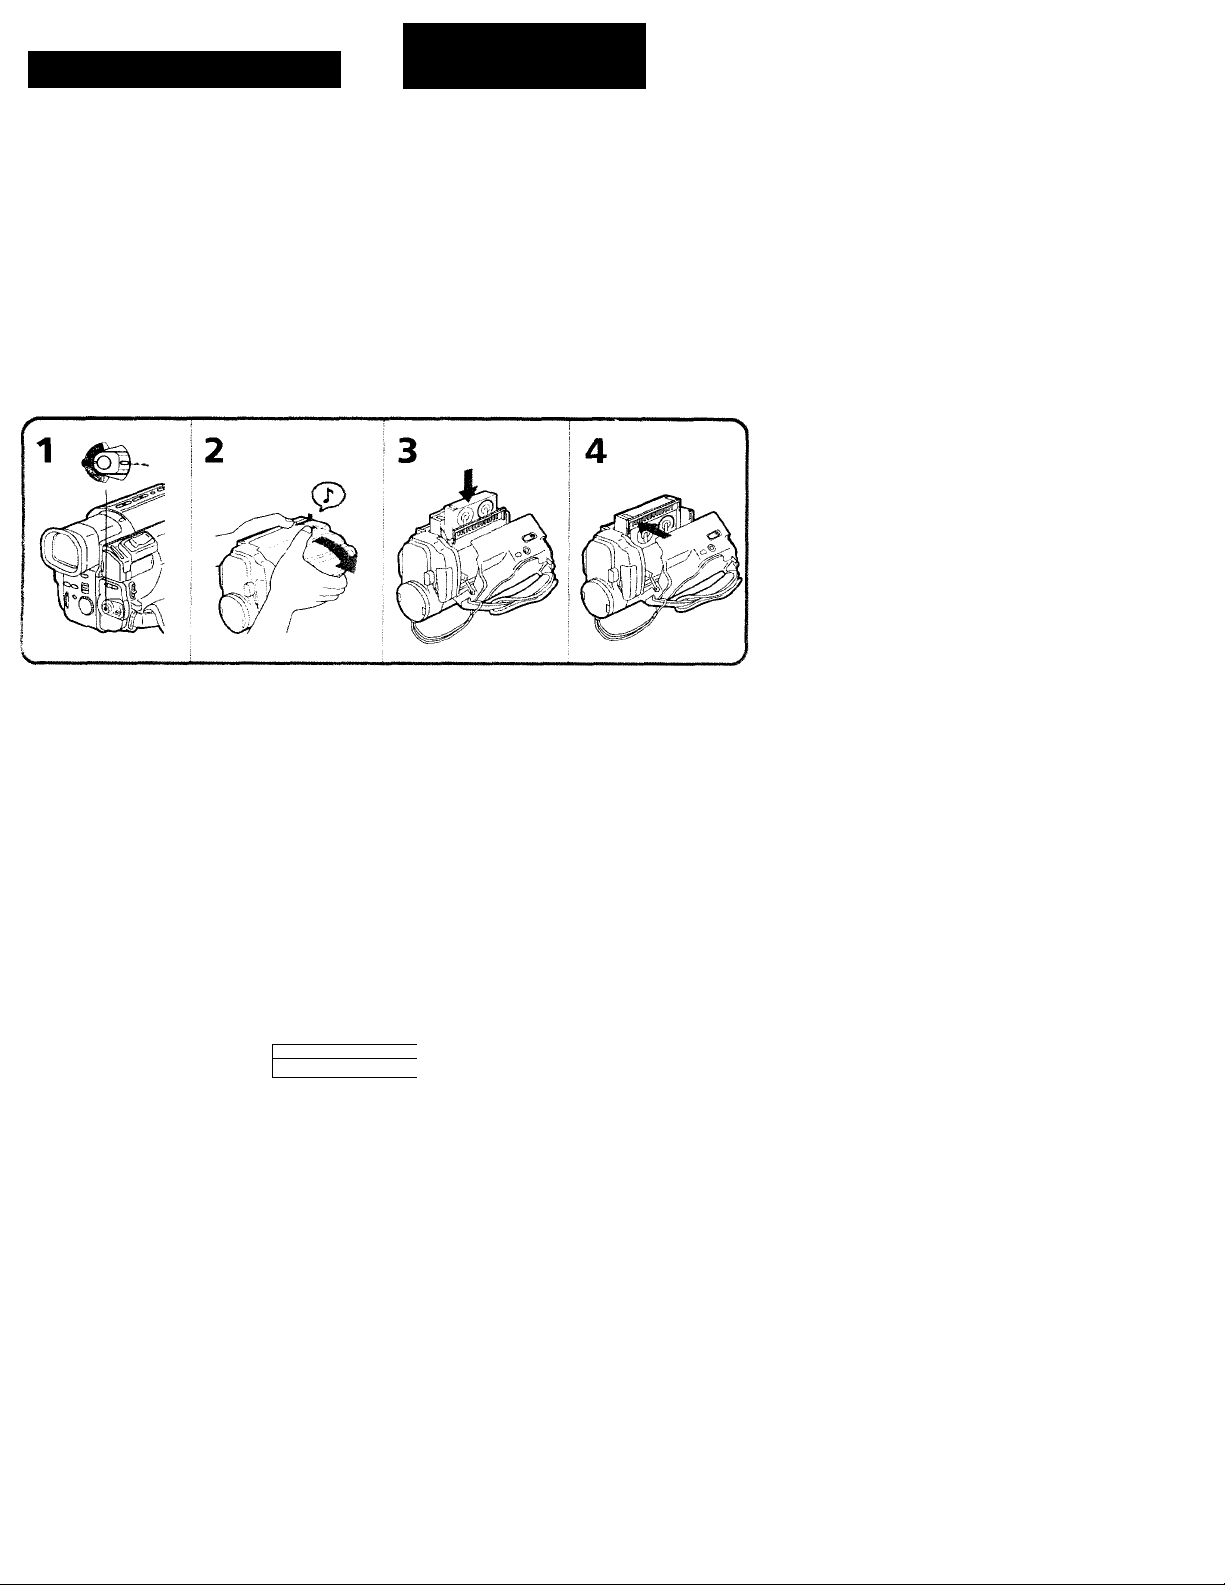
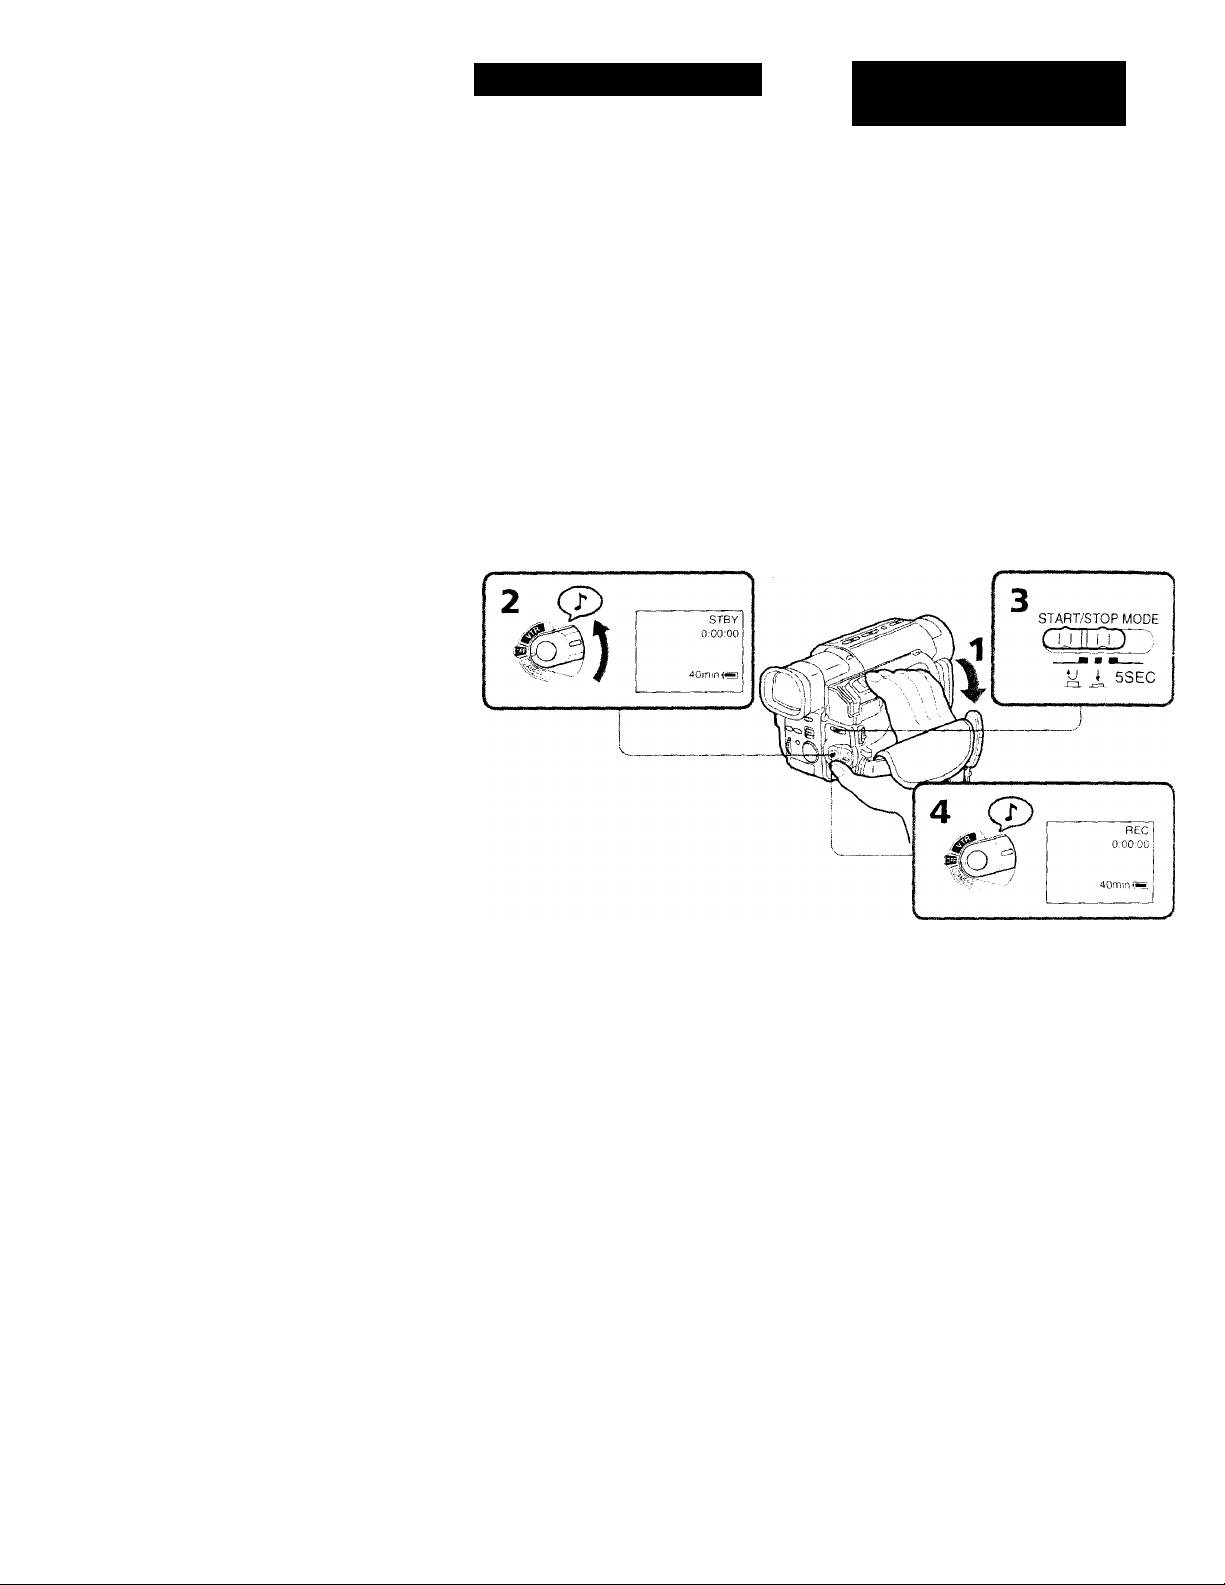
Camera recording
Make sure that the power source is installed and
a cassette is inserted. When you use the
camcorder for the first time, power on it and
reset the date and time before you start recording
(p.84).
Before you record one-time events, you may
want to make a trial recording to make sure that
the camcorder is working correctly.
To save battery power, the picture in the
viervfinder appears only when you bring your
face clo.se to the viewfinder (Finder power save).
(1) Remove the lens cap.
(2) While pressing the small green button on the
BOWER switch, set it to CAMERA. The
camcorder is set to Standby mode.
(3) Slide START/STOB MODE to K.
(4) Tress START/STOP. The camcorder starts
recording. "REC" appears in the viewfinder.
Grabación con la
cámara
Cerciórese de haber instalado la fuente de
alimentación v de haber insertado un
videocassette. Cuando utilice la videocámara por
primera vez, enciéndala y reajuste la fecha y la
hora antes de empezar a grabar (p. 84).
Antes de grabar eventos únicos, quizá desee
realizar una grabación de prueba para asegurarse
deque la videocámara funciona correctamente.
Con el fin de ahorrar la energía de la bateria, la
imagen del visor electrónico aparece sólo al
acercar el rostro al mismo (Ahorro de energía
del visor electrónico)
(1) Retire la tapa del objetivo.
(2) Ajuste el interruptor POWER en CAMERA
mientras pulsa e! botón verde pequeño del
interruptor. I,a videocámara quedará ajustada
en modo de espera.
(3) Deslice START/.STOP MODE hasta K.
(4) Pulse START/STOP. La videocámara
comenzará a grabar y "REC" aparecerá en el
visor electrónico.
To stop recording momentarily [a]
I’ress START/STOP. The "STBY" indicator
appears in the \’iei\ finder (Standby mode).
12
Para detener momentáneamente la grabación [a]
Pulse START/S1X)P. El indicador "STB'i"'
aparecerá en el visor electrónico (modo de
espera)
Page 13
To finish recording [b]
press START/STOP again to stop recording. Set
the POWER switch to OFF. Then, eject the
cassette and remove the battery pack.
STBY
0:35:20
Para finalizar la grabación [b]
Vuelva a pulsar START/STOP para detener la
grabación. Ajuste cl interruptor POWER en OFF.
A continuación extraiga el videocassette y retire
el paquete de baterías.
To focus the viewfinder lens
If you cannot see the indicators in the viewfinder
clearly, or after someone else has used the
camcorder, focus the viewfinder lens. Move the
viewfinder lens adjustment lever so that the
indicators in the viewfinder come into sharp
focus.
Note on Standby mode
if vou leave the camcorder in Standby mode for s
minutes while the cassette is inserted, the
camcorder turns off automatically. I'his prevents
wearing down the battery and wearing out the
tape. To resume Standby mode, while pressing
the small green button on the POWER switch, set
it to OFF once, and then to CAMERA. To start
recording, press START/STOl’.
Note on recording
When vou record from the beginning of a tape.-,
run the tape for about 15 seconds betöre starting
the actual recording. This will ensure that you
will not miss any start-up scenes when \sni plav
back the tape.
You can record tapes in SP (standard plav) nmde
tmK'.
Para enfocar el objetivo del visor electrónico
Si no puecie ver con claridad los indicadores del
visor electrónico, o si alguien ha empleado la
videocámara, enfoque el objetivo de! visor
electrónico. Desplace la palanca de ajuste del
objetivo del visor electrónico de forma que kw
indicadores de éste queden nítidamente
enfocados.
Nota sobre el modo de espera
Si deja la videocámara en modo de espera
durante 5 minutos mientras el vddeocassette e^insertado, la videocámara se ap.igará
automáticamente para evitar que se desg.btvn
batería v la cinta. Para reanudar el modo de
espera, ajuste el interruptor POWER en Ol-'F
mienlras pulsa el botón \-erde pequeño di'l
interruptor; a continuación, ajustelo en
CAMERA. ÍCra comenzara grabar, pulse
START/STOP.
Nota sobre la grabación
Cuando grabe desde c’! principio de una cint.i.
deje que ésta gire durante unos 15 segimdc's
antes de empezar la grabación propiamente
dicha. F)e este’ modo ru' perdi'rá la^ escena-'
iniciales al reproducir la einta.
Sólo es posible grabar cintas en el modo SP
(reproducción estándar).
13
Page 14

Camera recording
Grabación con la cámara
Notes on the tape counter
• The tape counter indicates the recording or
playback time. Use it as a guide. There will be
a time lag of several seconds from the actual
time. To set the counter to zero, press
COUNTER RESET.
• If the tape is recorded in SP and LP modes
mixed, the tape counter shows incorrect
recording time. When vou intend to edit the
tape using the tape counter, record in same (SP
or LP) mode.
Note on the beep sound
As indicated with J' in the illustrations, a beep
sounds when vou turn the power on or when
you start recording, and tiso beeps sound when
you stop recording, confirming the operation.
Several beeps also sound as a warning of any
unusual condition of the camcorder.
Note that the beep sounci is not recorded on the
tape. If vou do not want to hear the beep sound,
select "OFF" in the menu s\'steni.
Notes on finder power save
• The recording continues even when the picture
in the viewfinder disappears during recording,
• It you set VF PW-SAVF to OFF in the menu
system, the picture in the viewfiiicier does not
disappear even ivhen vini turn your face away
from the vieivtinder.
• The finder power save function sometimes does
not operate due to the effects of sunlight or
fluorescent light
Notas sobre el contador de cinta
• El contador de cinta indica el tiempo de
grabación o reproducción y sirve de
orientación. Suele marcar una diferencia de
varios segundos con respecto al tiempo real.
Para poner el contador a cero, pulse COUNTER
RESET.
• Si la cinta se graba mezclando los modos SP y
I,P, el contador de cinta mostrarcá un tiempo de
grabación incorrecto. Cuando desee editar la
cinta utilizando el contador de cinta, grabe
siempre en el mismo modo (SP o LP).
Nota sobre el pitido
Como indica el signo en las ilustraciones,
cuando se enciende la unidad o se empieza a
grabar suena un pitido que confirma la
operación; al detener la grabación suenan dos
pitidos. También suenan varios pitidos como
aviso de cualquier condición anormal en la
videocámara.
Observe que el pitido no se graba en la cinta. Si
no desea oírlo, seleccione "OFF" en el sistema de
Notas sobre el ahorro de energía del visor
electrónico
• La grabación seguirá realizándose aunque la
imagen del visor electrónico desaparezca
durante la grabación.
•Si ajusta VF PW-SAVH en OF'F en el sistema de
meniis, la imagen del \ásor electrónico no
desaparecerá aunque retire el rostro de dicho
visor.
• La función de ahorro de energía del visor
eIeetró}iico no se activa an determinadas
oe<isiones debido al efecto causado por la luz
solar o las luces fluorescentes.
14
Page 15
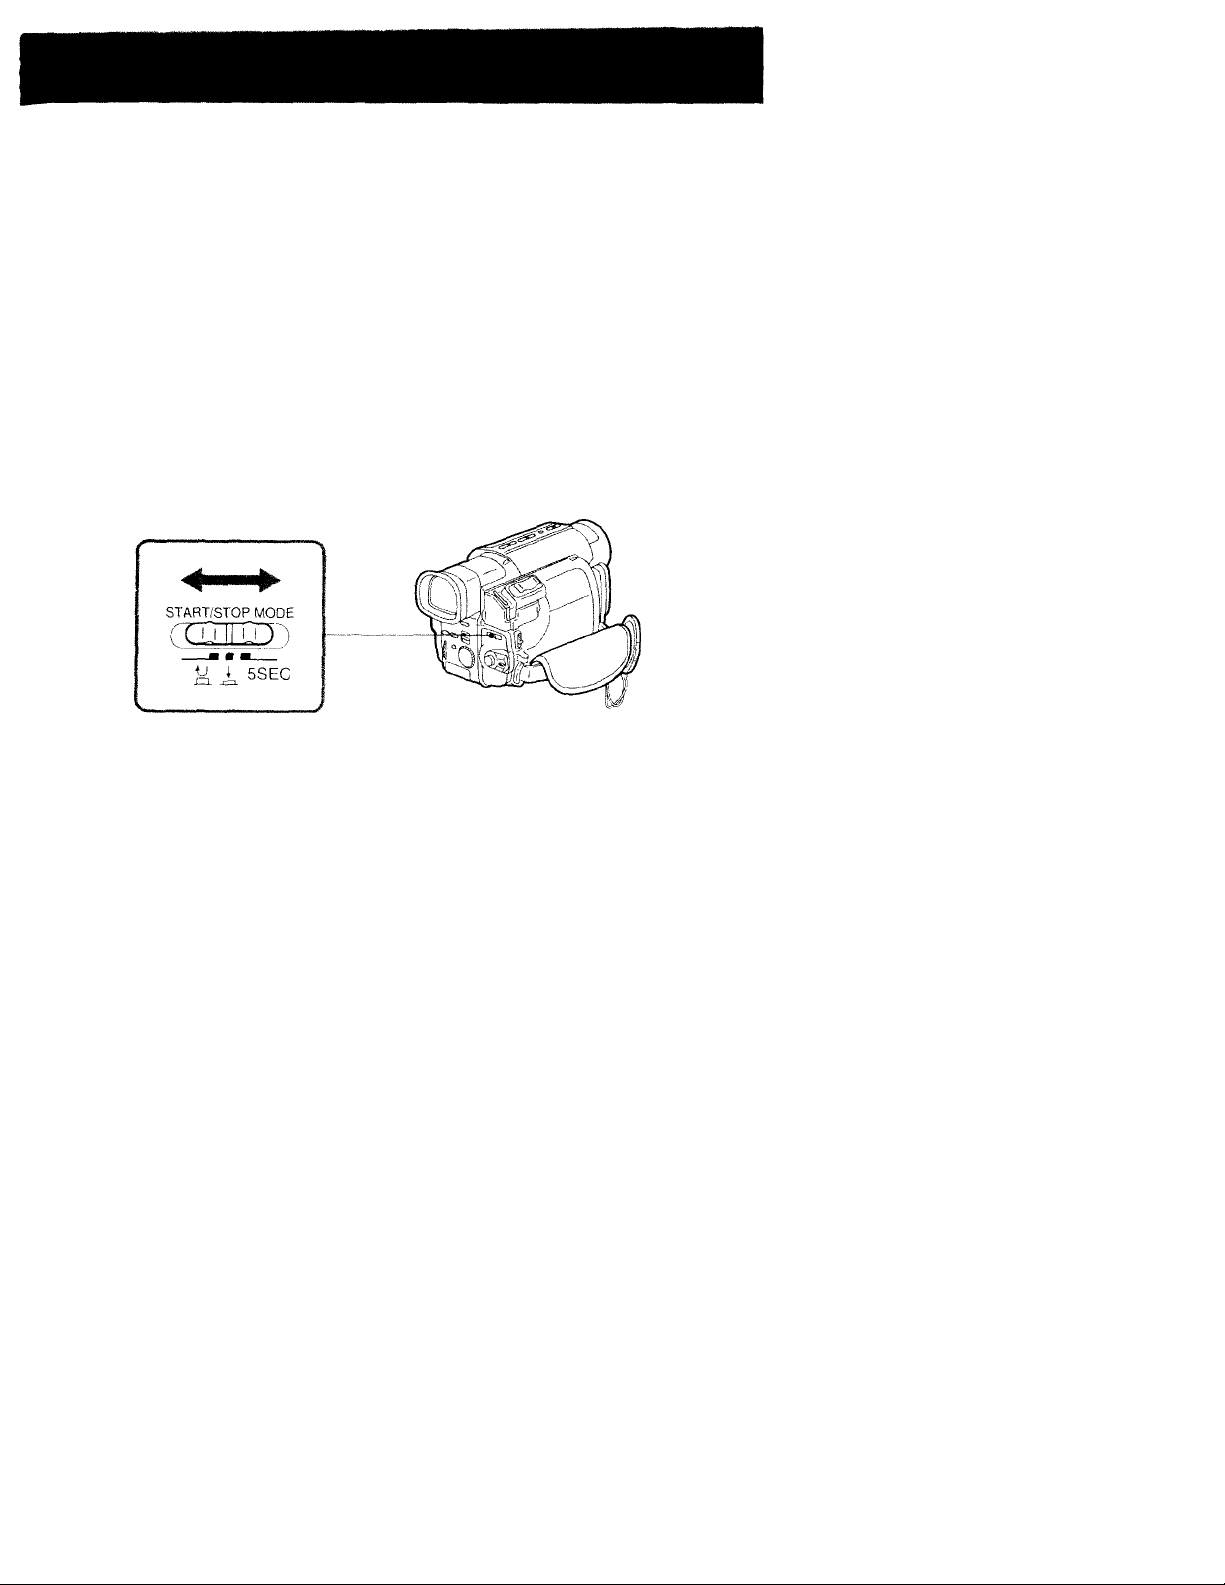
Selecting the start/stop mode
K : When you press START/STOP, the
camcorder starts recording. When you press
the button again, the camcorder stops
recording, (factory setting)
i : As long as you keep pressing START/STOP,
the camcorder records. When you release the
button, the camcorder stops recording.
5SEC: When you press START/STOP, the
camcorder records for 5 seconds and stops.
(p. 46)
When you select A or 5SEC, you cannot use the
fade-in/fade-out function.
When you select 5SEC, the remaining tape
indicator is not displayed.
Selección dei modo de inicio/ detención
ü : La videocámara empieza a grabar cuando se
pulsa START/STOP. La videocámara detiene
la grabación cuando se vuelve a pulsar este
botón, (ajuste de fábrica)
Á : La videocámara graba mientras se mantiene
pulsado el botón START/STOP. La
videocámara deja de grabar cuando se suelta
el botón.
5SEC: Cuando se pulsa START/STOP, la
videocámara graba durante 5 segundos y se
detiene, (p. 46)
Si selecciona Á o 5SEC, no podrá utilizar la
función de aparición y desaparición gradual.
Si selecciona 5SEC, el indicador de cinta restante
no aparecerá.
15
Page 16
Camera recording
Grabación con la cámara
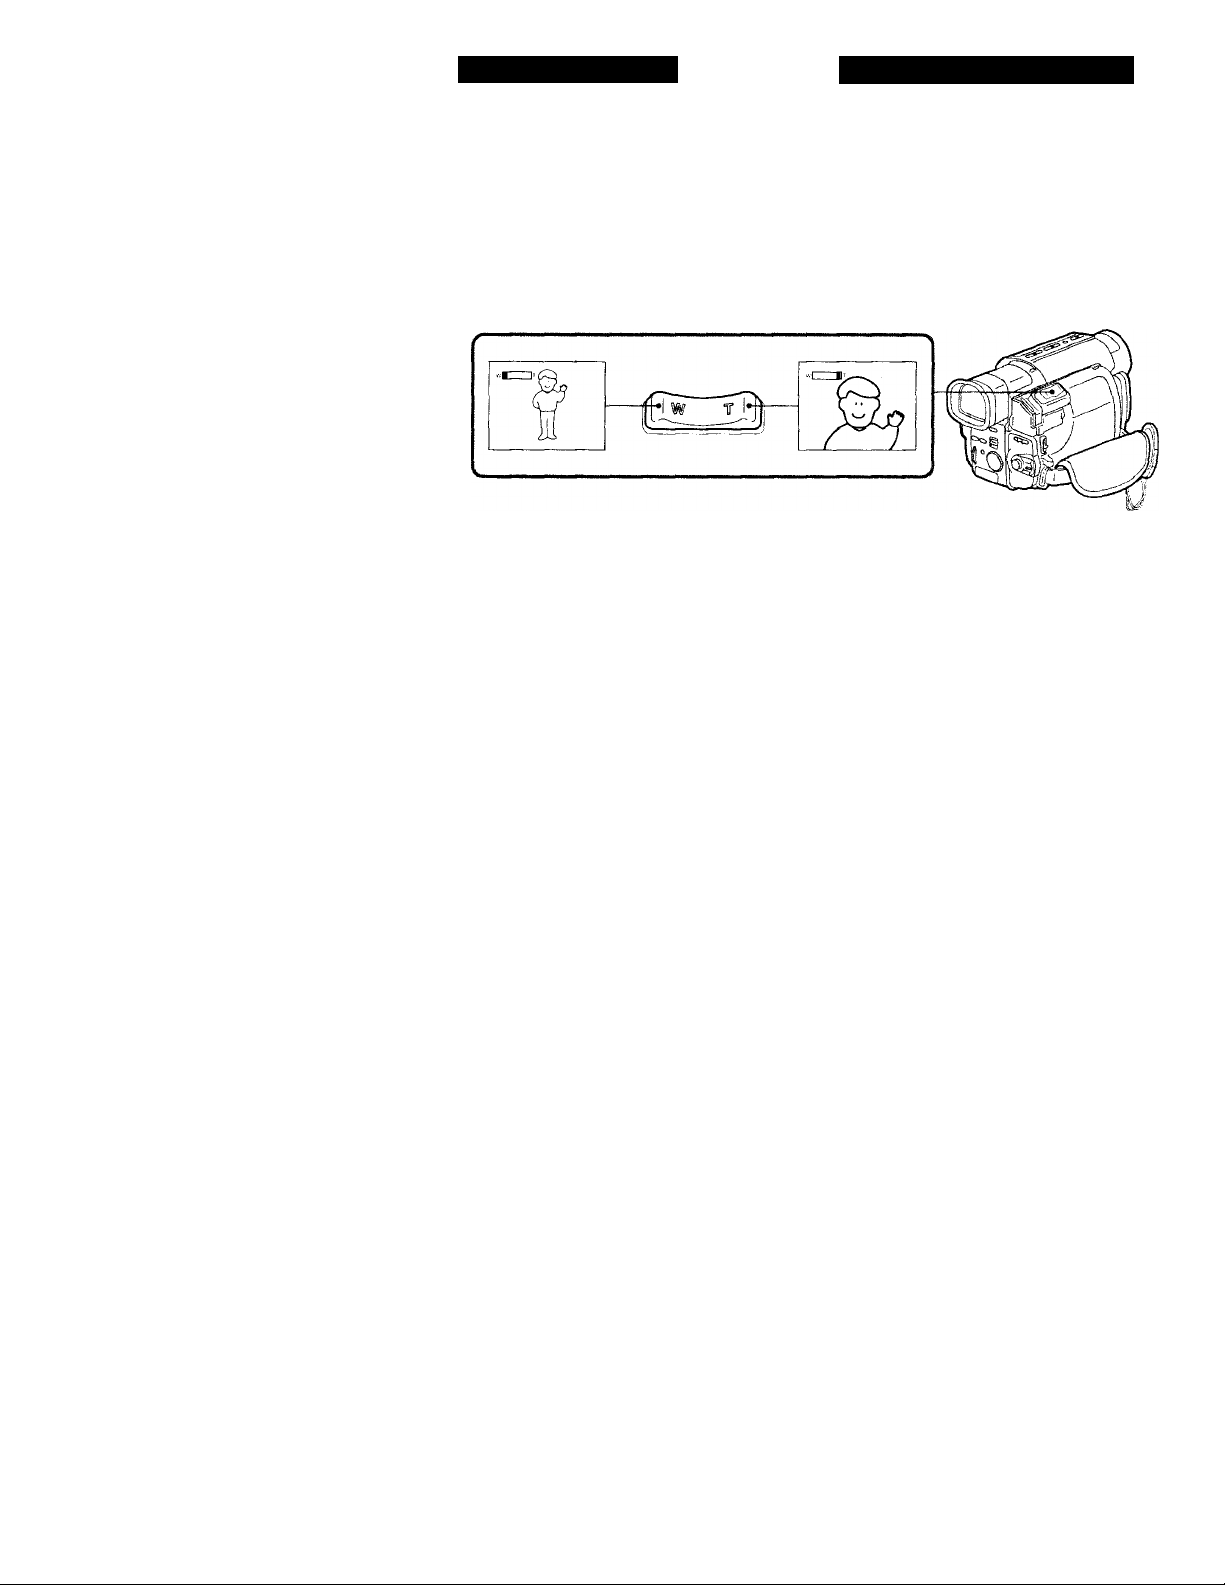
Using the zoom feature
Zooming is a recording technique that lets you
change the size of the subject in the scene.
For more professional-looking recordings, use
the zoom function sparingly.
"T" side: for telephoto (subject appears closer)
"W" side: for wide-angle (subject appears farther
away)
Zooming speed (Variable speed zooming)
Press the power zoom lever a little for a relatively
slow zoom; press it still more for a high-speed
zoom
When you shoot a subject using a telephoto zoom
If \'0u cannot get a sharp focus while in extreme
telephoto zoom, press the "W" side of the power
zoom lever until the focus is sharp. You can
shoot a subject that is at least about 3-1 /4 feet
(about 100 cm) away from the lens surface in the
teleplioto position, or about 1 /2 inch (about 1
cm) aivav in the wide-angle position.
Uso de la función de zoom
El zoom es una técnica de grabación que pernute
cambiar el tamaño del sujeto de la escena.
Para grabaciones de aspecto más profesional, no
utilice apenas la función de zoom.
l..ado "T": para telefoto (el sujeto aparece más
cerca)
Lado "W": para gran angular (el sujeto aparece
más lejos)
Velocidad de zoom (zoom de velocidad variable)
Presione levemente la palanca de alimentación
del zoom para obtener un efecto relativamente
lento y paresiónela más para que el zoom hincioiic
a alta velocidad.
Cuando se videofilma un sujeto con un zoom telefoto
Si no puede enfocar nítidamente cuando utiliza el
zoom telefoto en su posición extrema, presione el
lado "W" de la palanca de alimentación del zoom
hasta que el enfoque sea nítido. Pueden
videofilmarse sujetos situados al menos a unos
100 cm de la superficie del objeti\'o en posición
de telefoto, o a 1 cni en posición de gran angular.
16
Page 17
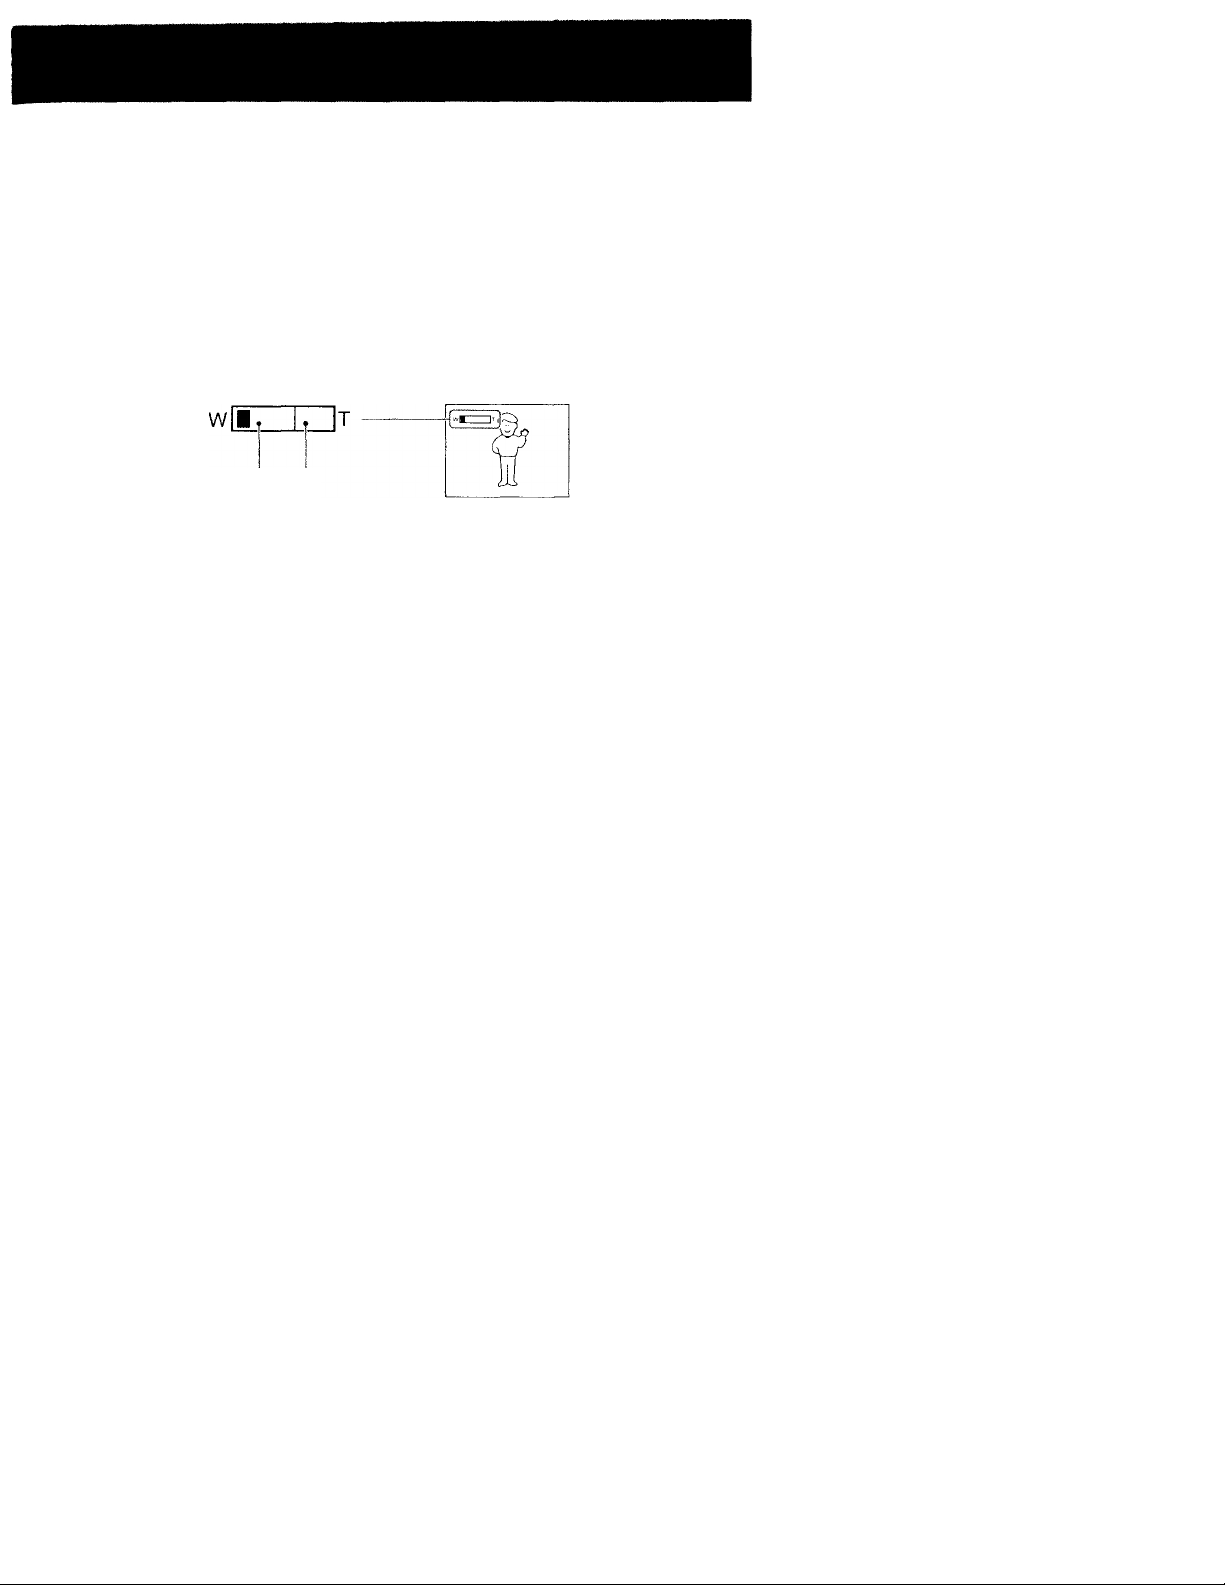
Notes on digital zoom
• More than lOx zoom is performed digitally, and
the picture quality deteriorates as you go
toward the "T" side. If you do not want to use
the digital zoom, set the D ZOOM function to
OFF in the menu system.
• The vertical bar in the power zoom indicator
separates the optical zooming zone (left of the
bar la]) and the digital zooming zone (right of
the bar [b]). If you set the D ZOOM function to
OFF, the part to the right of the bar disappears.
• When using the digital zoom function, zooming
power is up to 40x.
[a] [b]
Notas sobre el zoom digital
• El zoom de más de lOx se efectúa digitalmente
y la calidad de la imagen se deteriora a medida
que se avanza hacia el lado "T". Si no desea
usar el zoom digital, ajuste la función D ZOOM
en OFF en el sistema de menus.
• La barra vertical del indicador de alimentación
del zoom divide la zona de zoom óptico
(izquierda do la barra [a]) y la de zoom digital
(derecha [b]). Al ajustar la función D ZOOM en
OFF desaparece la parte derecha de la barra.
•Cuando se usa la función de zoom digital, la
alimentación del zoom alcanza 40x.
17
Page 18
Camera recording
Grabación con la cámara
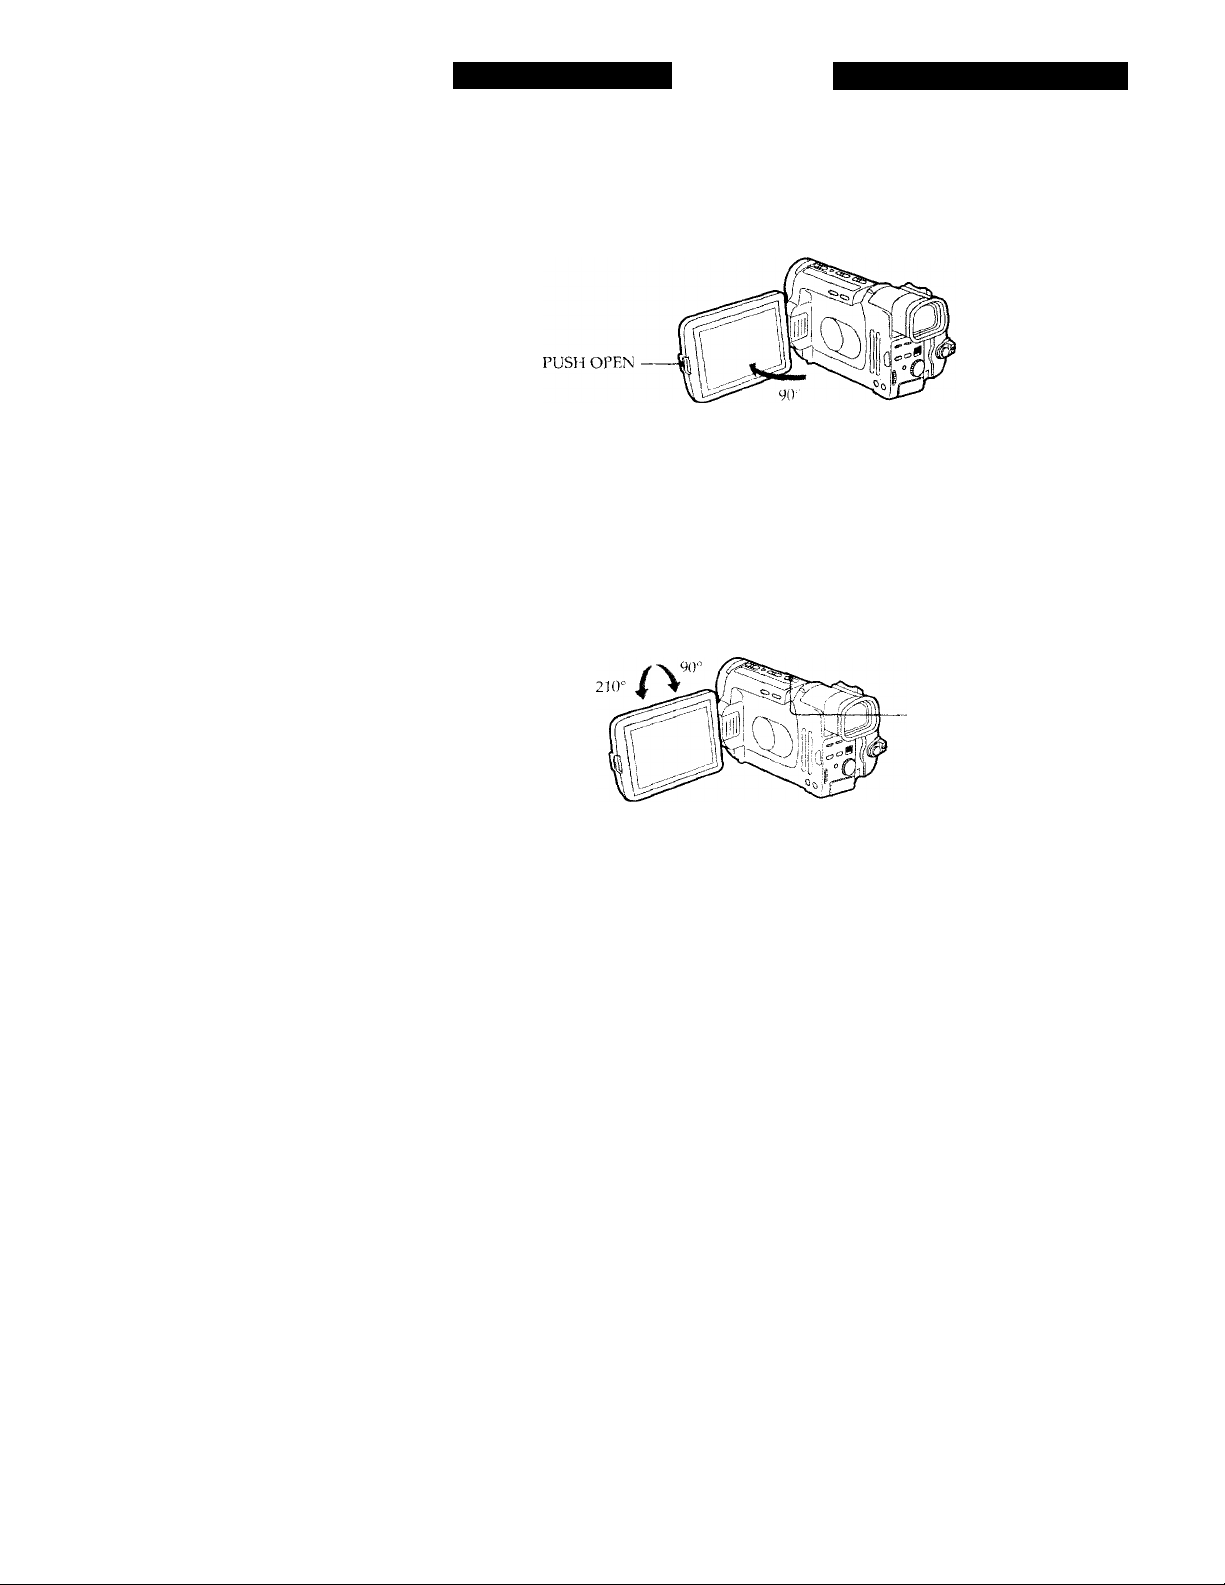
Shooting with the LCD screen
You can also record the picture while looking at
the LCD screen.
While pressing PUSH OPEN, open the LCD
panel.
Adjusting the LCD panel angle
Adjust the LCD panel to the angle you want. The
LCD panel moves about 90 degrees to this side
and about 210 degrees to the other side.
Adjusting the brightness of the LCD panel
Press LCD BRIGHT.
+ side: to brighten the LC’D screen
- side: to dim the LCD screen
Videofilmación con la pantalla
LCD
También es posible grabar la imagen mirando a
trav'és de la pantalla LCD.
Abra el panel LCD mientras pul.sa PUSH OPE.N,
Ajuste del ángulo del panel LCD
Ajuste el panel LCD en el ángulo que desee. El
panel LCD se desplaza 90 grados aprox. en la
dirección que se indica en la ilustración superior
y 210 grados aprox. en la dirección indicada en la
ilustración inferior.
Ajuste del brillo del panel LCD
Pulse LCD BRIGl IT.
lado +: aumenta el brillo de la pantalla LCD
lado oscurece la pantalla LCD
- LCD BRIGHT +
c D)
Notes on the LCD panel
• When closing the LCD panel, turn it vertically
until it clicks.
• When turning the LCD panel, turn it al\va\-s
yertically; otherwise, the camcorder body ma\’
be damaged or the LCD panel may not close
properly,
•Close the LCD panel completely when not m
use.
• Do not push nor touch the IC'D when mo\ ing
the LCD panel.
• You may Hnd it ditticuit to vieu’ the i,C'D
screen due to glare when using the c.imcorder
outdoors.
18
Notas sobre el panel LCD
• Al cerrar el paiu'I 1..CD, gírelo \'orticalmente
hasta que se oiga un clic.
• Al girar el panel LCD, hágalo siempre en
dirección vertical; en caso coiUrario, puede
LÍañarse el cuerpi^ de la videocámara, o e.s
posible que i‘l panel LCI.") no cierre
correctamente,
• C'ierre el panel LCD completamente cuando nc
utilice,
• \o presione ni tí>que la pantalla IC'D mientra-desplaza el panel LCD.
• C.'uandL> emplee la \'ideoeámara en exteriore->,
L‘.s posible' que se prexluzcan brilléis t]U('
diticiilte'n la \’isiiali/.ui(ói de ¡a pantalla l.C'l.^
Page 19
Hints for better
shooting
Consejos para
videofilmar mejor
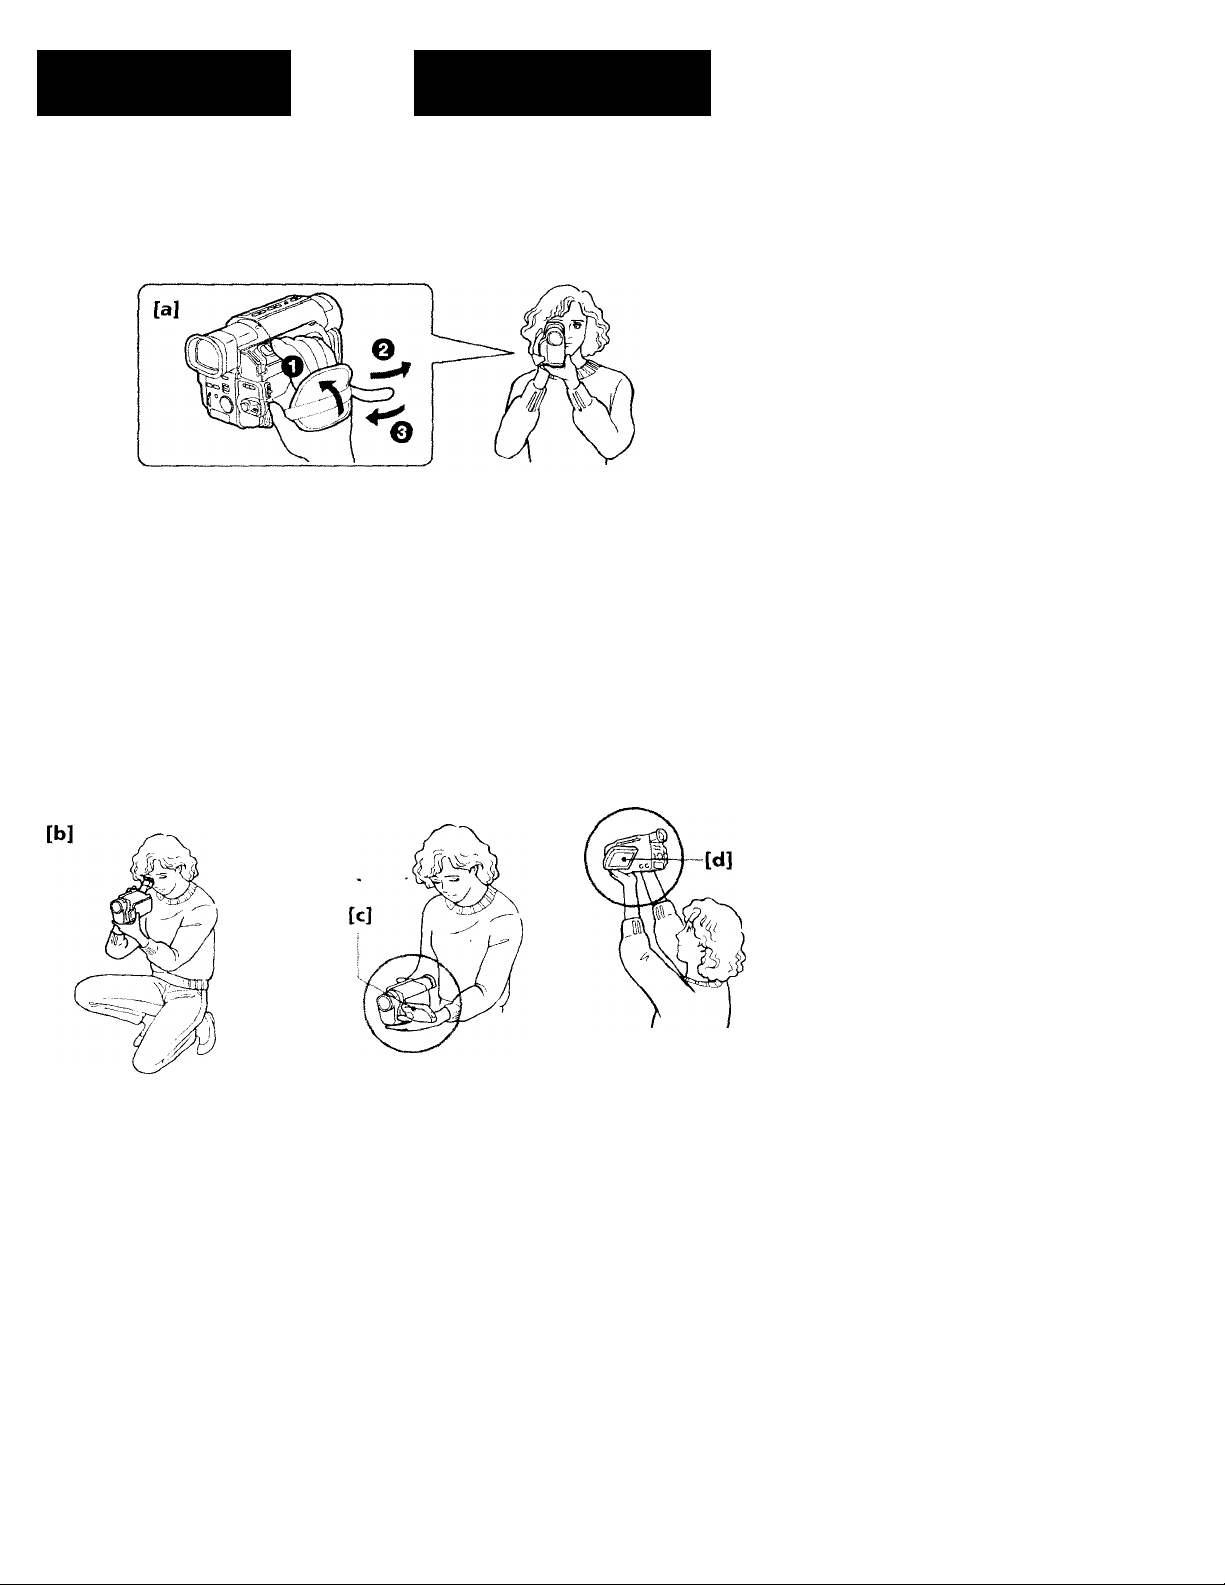
For hand-held shots, you will get better results
by holding the camcorder according to the
following suggestions;
• Hold the camcorder firmly and secure it with
the grip strap so that you can easily manipulate
the controls with vour thumb, [a]
• Place your elbows against vour side.
• Place your left hand under the camcorder to
support it. Be sure not to touch the built-in
microphone.
• Place your eye firmly against the \ iewfinder
eyecup.
' Use the viewfinder Irame as a guide to
determine the horizontal plane.
• You can record in a low position to get an
interesting recording angle. I i!t the viewfinder
up to record from a low position, [b]
»You can also record in a low position [c] or
even in a high position [d] using the l .CC)
panel.
Para videofilmaciones con la cámara en las
manos, obtendrá mejores resultados si sujeta la
videocámara según estas sugerencias;
• Sujete la videocámara firmemente y fíjela con la
correa para poder manejar los controles
fácilmente con el pulgar, [a]
•Pegue los codos a los lados del cuerpo.
• Coloque la mano izquierda debajo de la
videocámara para sostenerla. Asegúrese de no
tocar el micrófono incorporado.
• Coloque el ojo firmemente contra el ocular del
\'isor electrónico
• Use el marco del visor electrónico como
orientación para determinare! plano
horizontal.
• Si graba desde una posición baja obtendrá un
ángulo de grabación interesante. Para ello,
levante el visor electrónico, [b]
• l ambién es posible grabar en una posición de
baja altura [c], o incluso en una de gran altura
Id] utilizando ol panol LCD.
19
Page 20
Hints for better shooting
Consejos para videofilmar
mejor
Place the camcorder on a flat surface or use a tripod
Try placing tire camcorder on a table top or any
other flat surface of suitable height. If you have a
tripod for a still camera, vou can also use it with
the camcorder. When attaching a non-Sony
tripod, make sure that the length of the tripod
screw is less than 9/32 inches (6.5 mm).
Otherwise, the screw mav damage the inner
parts of the camcorder.
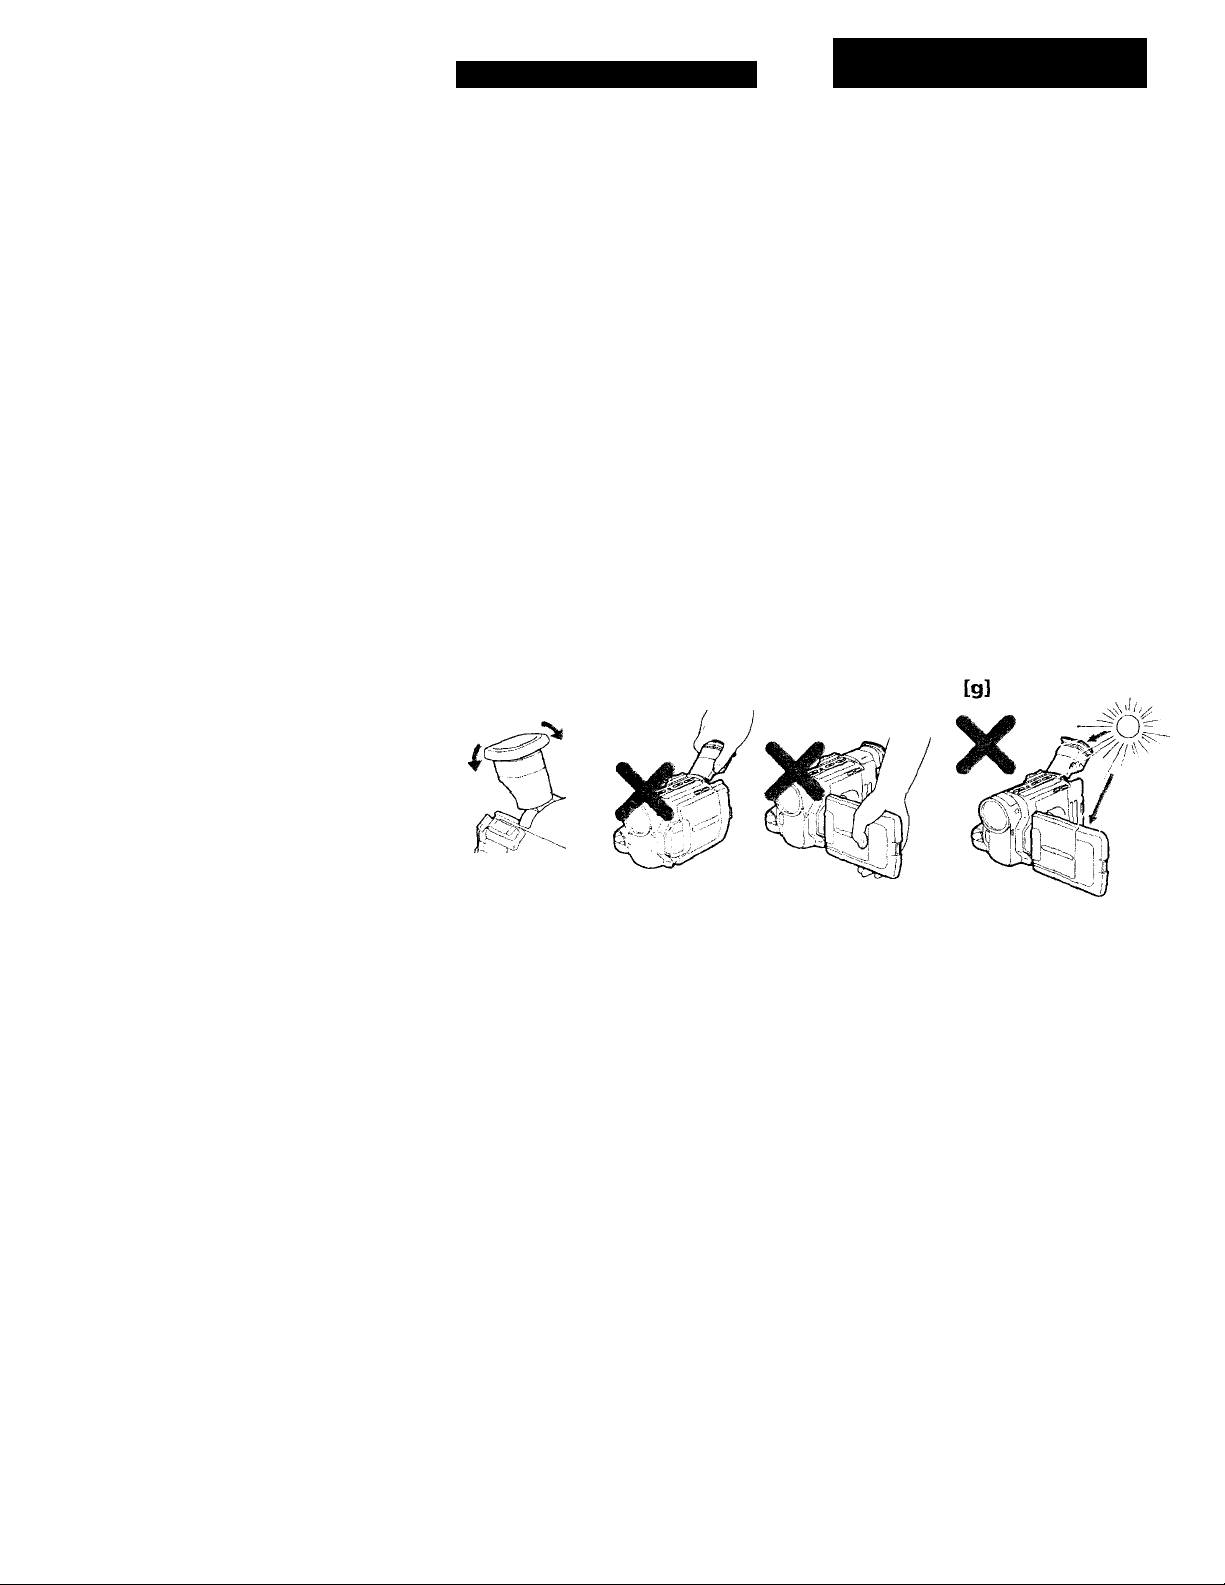
If you wear glasses
'I'ou can bend back the evecup to get a better
view of viewfinder [e]
Cautions on the viewfinder, the LCD panel and the lens
• Do not pick up the camcorder by the
viewfinder or bv the LCD panel [f]_
• Do not place the camcorder so as to point the
r iew'finder, the LC’D screen and the lens toward
the sun. The inside of the \-iewfinder, the LCD
panel and the lens ma\- be damaged. Be careful
when placing the camcorder undi-T sunlight or
bv a window [g]
[e]
[f]
Sitúe la vídeocámara en una superficie plana o use un tripode
Coloque la videocámara en la superficie de una
mesa o en otra superficie plana de la altura
adecuada. Si dispone de un tripode para una
cámara fija, también puede usarlo con la
videocámara. Cuando utilice trípodes que no
sean Sony, cerciórese de que la longitud del
tornillo del trípode es inferior a 6,5 mm, pues eu
caso contrario el tornillo puede dañar los
componentes internos de la vídeocámara.
Si lleva gafas
Puede doblar el ocular hacia atrás para visuali/at
mejore! visor electrónico [e].
Precauciones sobre el visor electrónico, el panel LCD y el objetivo
•No agarre la videocámara por el visor
electrónico o el panel LCD [f],
•Sitúe la videocámara de forma que el visor
electrónico, la pantalla LCD y el objetivo no
quede orientado hacia el sol. El interior de
dicho visor, el pane! LCD v el objetivo pueden
resultar dañados. Tenga cuidado cuando situé
la videocámara a la luz del sol o junto a una
ventana [g]
20
Page 21

Notes on the color viewfinder and the LCD screen
• The color viewfinder and the LCD screen are
made with high-precision technology.
However, black points or bright points of light
(red, blue, or green) may constantly appear on
the color viewfinder and the LCD screen.
These points are not recorded on the tape. This
is not a malfunction. (Effective dots: more than
99.997,)
• In direct sunlight, the picture in the viewfinder
looks brighter by the lighting aperture. The
color of the picture in the viewfinder is variable
in such a case.
Notas sobre el visor electrónico en color y la
pantalla LCD
• Aunque el visor electrónico en color y la
pantalla LCD están fabricados con tecnología
de alta precisión, es posible que aparezcan
puntos negros o brillantes de luz (rojos, azules
o verdes) de forma constante. Estos puntos no
se graban en la cinta y no suponen ningún fallo
de funcionamiento. (Puntos efectivos: m<ás del
99,99%)
• Con luz solar directa, el brillo de la imagen del
visor electrónico aumenta por la apertura de
iluminación. En este ca.so, el color de dicha
imagen será variable.
21
Page 22
Checking the
recorded picture
Comprobación de
imágenes grabadas
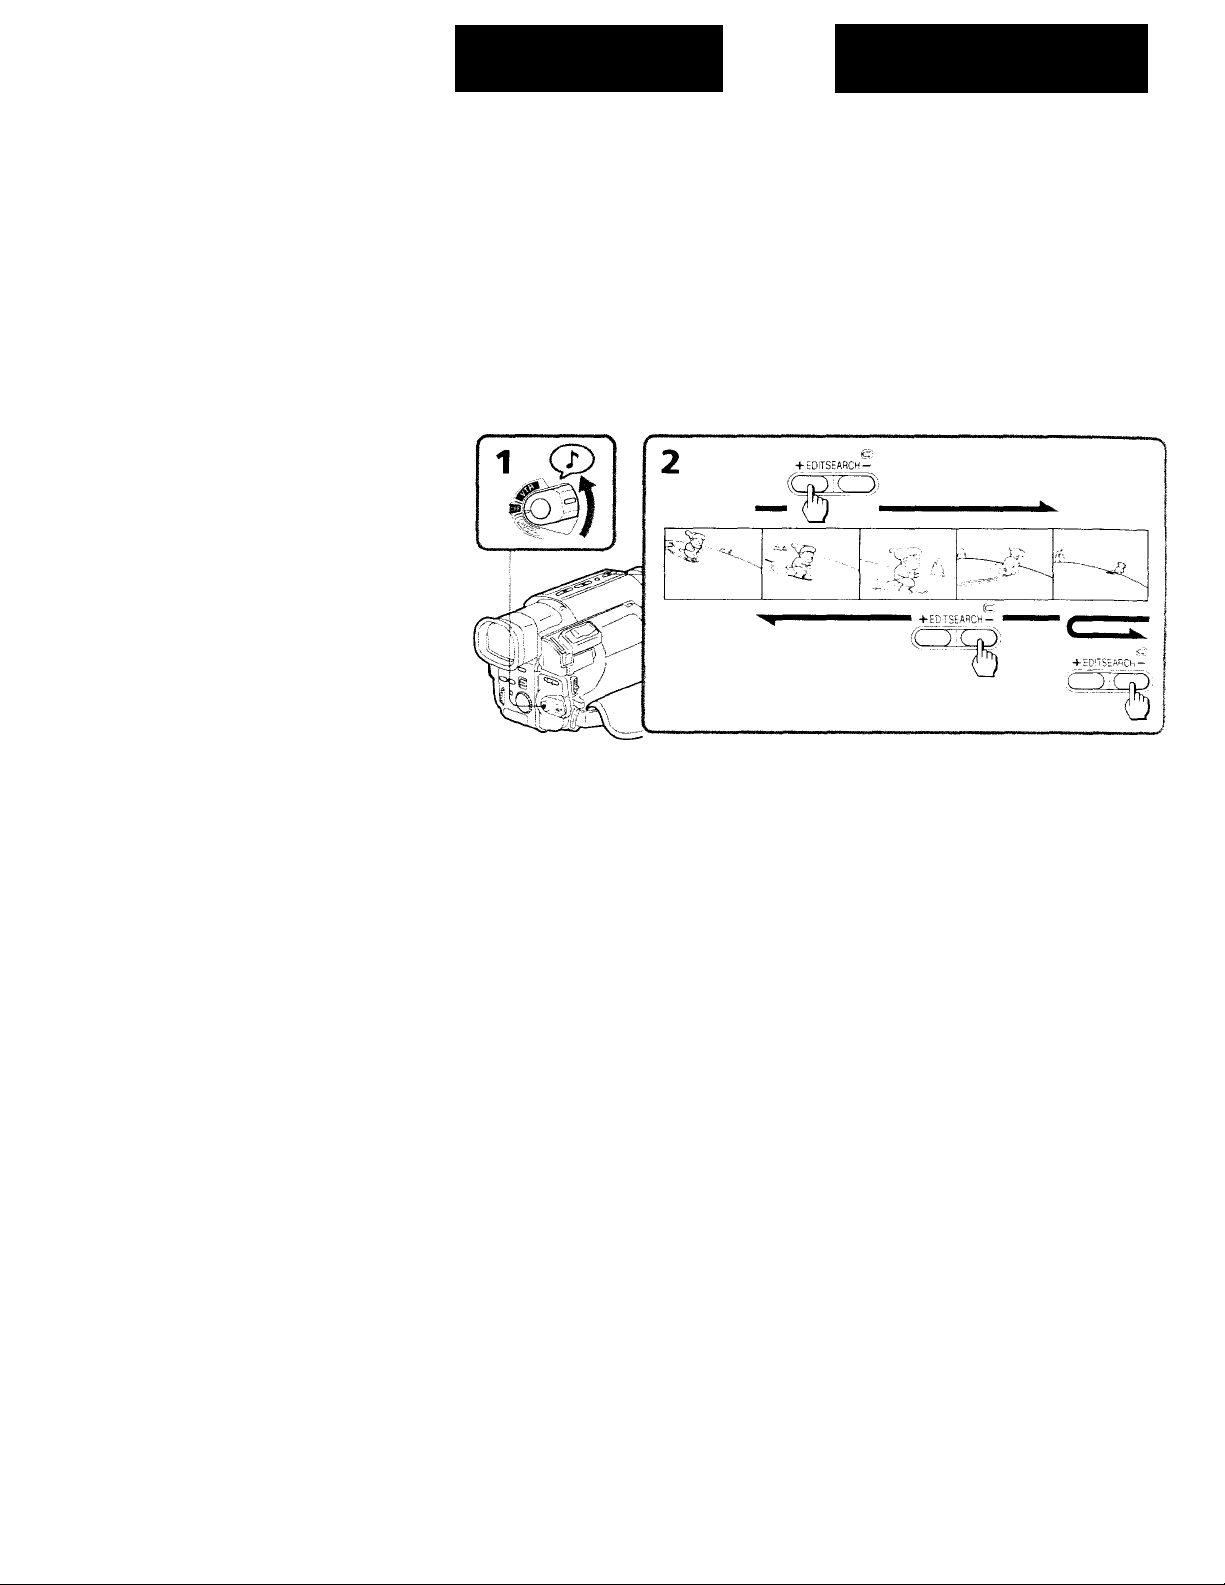
Using the EDITSEARCH, you can review the last
recorded scene or check the recorded picture in
the viewfinder.
(1) While pressing the small green button on the
POWER switch, set it to CAMERA.
(2) Press the - @ side of EDITSEARCH
momentarily; the last few seconds of the
recorded portion plays back (Rec Review).
Hold down the - side of EDITSEARCH until
the camcorder goes back to the scene you
want. The last recorded portion is played
back. To go forward, hold down the + side
(Edit Search).
Mediante EDITSEARCH, es posible revisar la
última escena grabada o comprobar la imagen
grabada en el visor electrónico.
(1) Ajuste el interruptor POWER en CAMERA
mientras pulsa el botón verde pequeño del
mismo.
(2) Pulse durante un instante el lado - © de
EDITSEARCH piara reproducir los últimos
segundos de la parte grabada (revisión de
grabación).
Mantenga pulsado el lado - de EDlTSEARt H
para que la videocámara retroceda hasta la
escena que desee. La última parte grabada so
reproducirá. Para avanzar, mantenga pulsado
el lado + (búsqueda de edición)
To stop playback
Release EDITSEARC H.
To go back to the last recorded point
after edit search
Press END SEARCH. The last recorded pniint is
pilaw’d back for about .E seconds and stops. .\ote
that this function does not work once vou c|oct
the cassette after vou recorded on the tape.
To begin re-recording
Press .ET.ART/'STOP. Re-recording begins from
tlie point \ ou roleased EEMTSE.ARCH. Provided
vou do not eject tlie tape, tlio transition between
the last scene vou recorded and the next scene
\ on record will be smooth.
22
Para detener la reproducción
Suelte EDITSEARCH.
Para retroceder al último punto grabado después de la búsqueda de edición
Pulse E.\E) SEARCH. De esta lorni.i. se
reproducirá el último prunto grabado durante
unos 3 segumios v se detendrá. Observe i.}iu‘ esta
funcuin no se activa una vez L'\pulst‘ el
vidéocassette dc'sprués de grabar en la c inta.
Para reanudar la grabación
Pulse ST.ART/STOP. I <i grabación si“ roamu
partir de! punto dundo sollo Id flTEE.ARCI 1
Siemjsro ijiie nci expulse la cinta, la traiwic ioi
entre la última escvna grabada \ la siguiente
uniforme.
Page 23
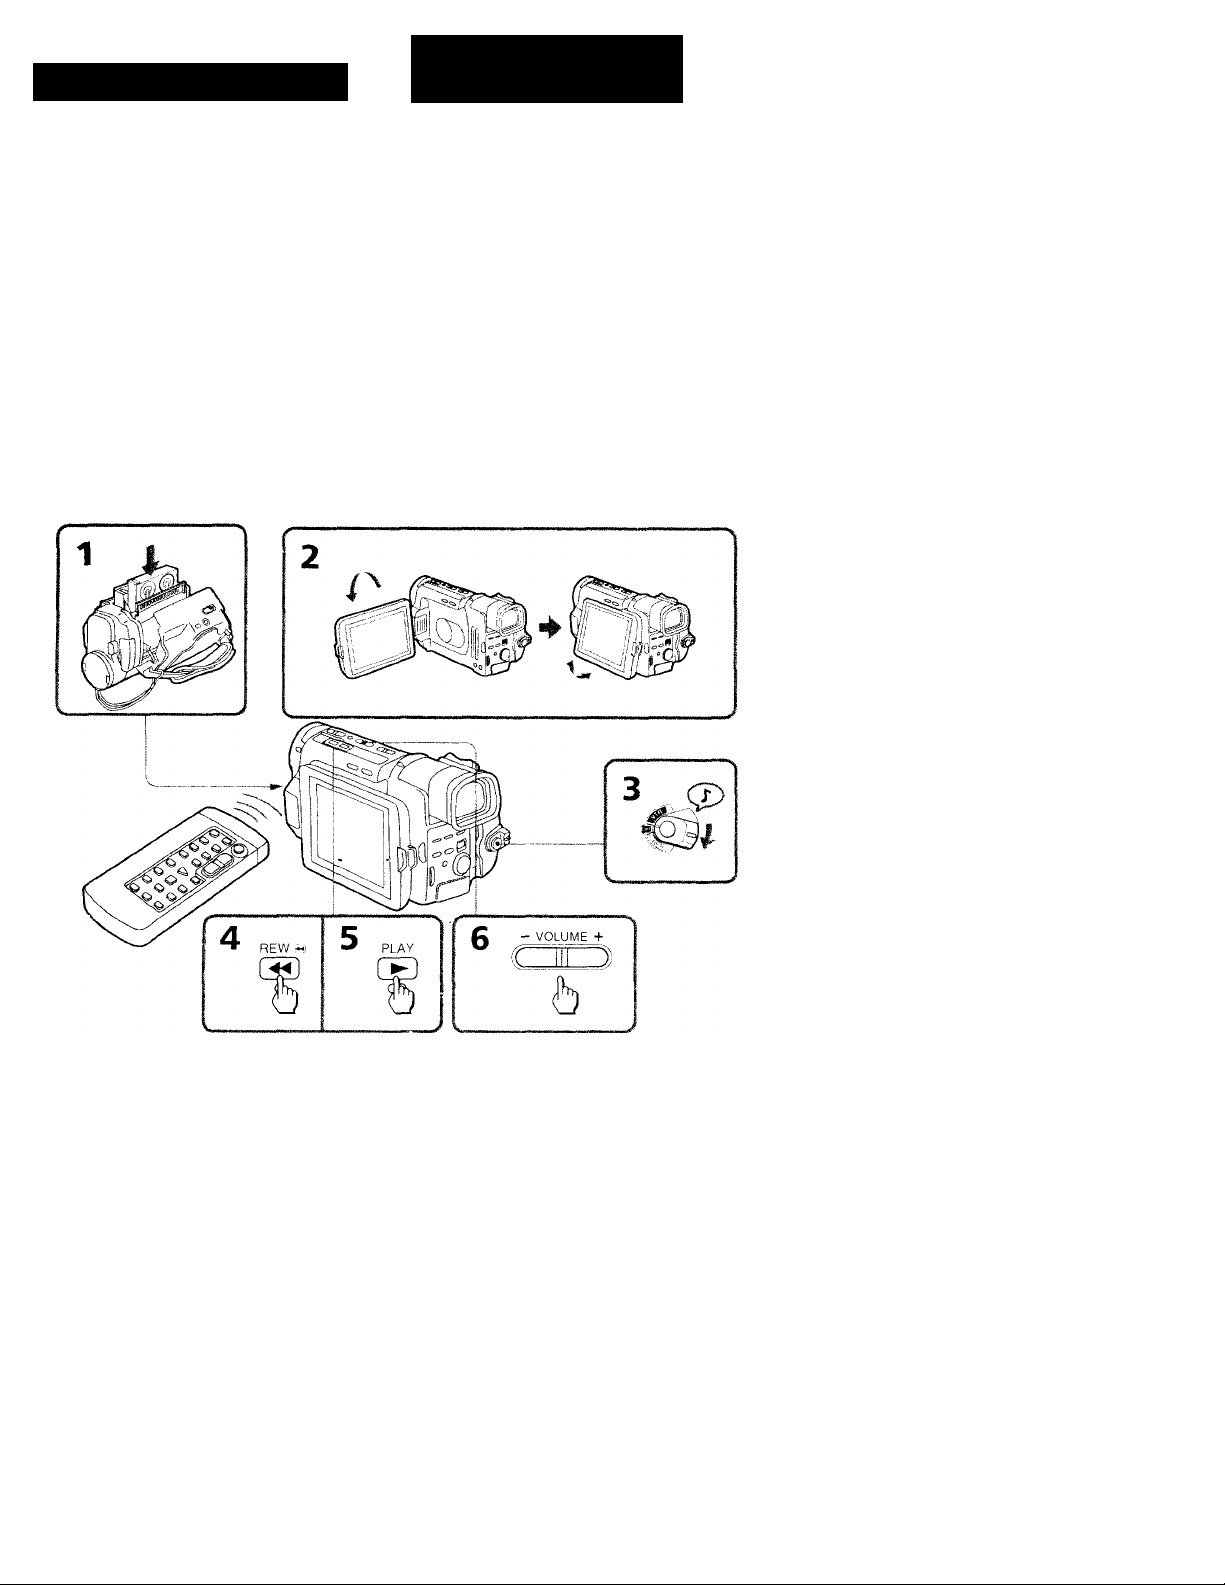
Playing back a tape
Reproducción de
cintas
You can monitor the playback picture on the
LCD screen.
You can also monitor a picture on a TV screen,
after connecting the camcorder to a TV or VCR.
(1) Insert the recorded tape with the window
facing out.
(2) While pressing PUSH OPEN, open the LCD
pane).
(3) While pressing the small green button on the
POWER switch, set it to VTR. The tape
transport buttons appears.
(4) Press to rewind the tape.
(5) Press t> to start playback.
(6) Adjust the volume using VOLUME.
You can also monitor the picture on a TV screen,
after connecting the camcorder to a TV or VCR.
Es posible controlar la imagen de reproducción
en la pantalla LCD.
También es posible controlar las imágenes en una
pantalla de televisor después de conectar la
videocámara a un televisor o videograbadora.
(1) Inserte la cinta grabada con la ventana
orientada hacia fuera.
(2) Abra el panel LCD mientras pulsa PUSH
OPEN.
(3) Ajuste el interruptor POWER en VTK
mientras pulsa el botón verde pequeño del
mismo. Aparecerán los botones de transporte
de cinta.
(4) Pu Ise para rebobinar la cinta.
(5) Pulse O para iniciar la reproducción.
(6) Ajuste el volumen con VOLUME.
La imagen también puede controlarse en una
pantalla de televisior después de conectar la
videocámara a un televisor o una
videograbadora.
To stop playback, press ■
To rewind the tape, press ◄ ◄
To fast-forward the tape rapidly, pi css ► ►
To adjust the brightness of the LCD screen,
press LCD BRIGHT.
i’ulse ■ para detener la reproducción
Pulse ■ « para rebobinar la cinta
Pulse ►► para que la cinta avance
ràpidamente
Pulse i t i) BKK ,111 para ajustar el brillo de la
pantalla LCD
23
Page 24

Playing back a tape Reproducción de cintas
Using the Remote Commander
You can control playback using the supplied
Remote Commander. Before using the Remote
Commander, insert the size AA (R6) batteries .
To display the screen indicators
Press DISPLAY.
To erase the indicators, press again.
Using headphones
Connect headphones (not supplied) to the d jack
(p ill)- You can adjust the volume of the
headphones using VOLUME.
To view the playback picture in the viewfinder
Close the LCD panel. The v'iewfinder turns on
automatically. When using the viewfinder, you
can monitor the sound only by using the
headphones.
To view on the LCD screen again, open the LCD
panel. The viewfinder turns off automatically.
Various playback modes
'I'ou can enjoy noiseless pictures on the LCD
screen during still, slow and picture search.
(Crystal-clear still/slow/picture search)
To view a still picture (playback
pause)
Press II during playback. To resume playback,
press 11 or t>.
To locate a scene (picture search)
Keep pressing or ► ► during playback. To
resume normal playback, release the button.
To monitor the high-speed picture
while advancing the tape or
rewinding (skip scan)
Keep pressing while rewinding or ► ► while
advancing the tape. To resume normal
reuanding or fast-forward, release the button.
To view the picture at 1/5 speed
(slow playback)
Press I*- on the Remote Commander during
plaN'baek, r<:> resume I'uirma] irlarTraek, press !>.
If slow playback lasts for about 1 minute, it shifts
to normal speed automatical)\'.
Uso del mando a distancia
La reproducción puede controlarse con el mando
a distancia suministrado. Antes de utilizarlo,
inserte las pilas de tamaño AA (R6).
Para visualizar los indicadores de pantalla
Pulse DISPLAY.
Para eliminar los indicadores, vuelva a pulsarlo.
Uso de auriculares
Conecte los auriculares (no suministrados) a la
toma D (p. 111 ). El volumen de los auriculares se
ajusta con VOLU.ME.
Para ver la imagen de reproducción en el visor electrónico
Cierre el panel LCD. El visor electrónico se activa
automáticamente. Cuando utilice el visor
electrónico, podrá controlar el sonidii con sólo
emplear los auriculares.
Para volver a x'isualizar la imagen en la pantalla
LCD, abra el panel LCD. El \’isor electrónico se
desactiva automáticamente.
Varios modos de reproducción
En la pantalla LCD es posible ver imágenes sin
ruido durante los modos de imagen fija,
reproducción lenta y búsqueda de imágenes,
(búsqueda de imagen/imagen fija/
reproducción lenta con nitidez)
Para ver una imagen fija (pausa de
reproducción)
Pulse II durante la reproducción. Pulse II o Co
para reanudar la reproducción.
Para buscar una escena (búsqueda de
imágenes)
Mantenga pulsado o ► ► durante la
reproducción. Suelte el botón para reanudar la
reproducción normal.
Para controlar la imagen a alta
velocidad durante el avance rápido o
el rebobinado de la cinta
(exploración de omisión)
Mantenga pulsado mientras rebobina o ► ►
durante el awinee rápido. Suelte el botón para
reanudar el rebobinado o el avance normal.
24
Page 25

To view the picture at double speed
For double speed playback in the reverse
direction, press then press x2 on the Remote
Commander during playback. For double speed
playback in the forward direction, press 2>, then
press x2 during playback. To resume normal
playback, press
Para ver la imagen a velocidad 1/5
(reproducción lenta)
Pulse !► en el mando a distancia durante la
reproducción. Pulse para reanudar la
reproducción normal. Si la reproducción lenta
dura aproximadamente 1 minuto, pasa
automáticamente a velocidad normal.
To view the picture frame-by-frame
Press or !!► on the Remote Commander in
playback pause mode. 11 vou keep pressing the
button, you can view the picture at 1 /30 speed.
To resume normal playback, press O.
To change the playback direction
Press <2 on the Remote Commander tor re\ erse
direction or on the Remote Commander for
forward directio+^dunng playback. To resume
normal playback, press
To select the playback sound
Chaiige the "HiFi SOU\D" mode setting in the
menu sv'-tem.
Notes on playback
•Streaks appear and the sound is muted m the
various pla\'back iruKles,
• When pku’back pause nKxle lasts lor minutes,
tin’ camcorder autoniaticallv enters stop mode.
• 1 lorizontal noise appears at the a'nter ot the
screen vvhi.“n vou plav back a tape m re\'erse it
the KC lime code or the Data C\uie is dis}’'!aved
on the screen. This is ivn'mal.
Para ver la imagen al doble de la
velocidad normal
Para reproducir la imagen al doble de la
velocidad normal en sentido regresivo, pulse
y, a continuación, x2 en el mando a distancia
durante la reproducción. Para reproducir la
imagen al doble de la velocidad normal en
sentido progresivo, pulse y, a continuación,
x2 durante la reproducción. Para reanudar la
reproducción normal, pulse O.
Para ver la imagen fotograma a
fotograma
Pulse o !!► en el mando a distancia en el
modo de pausa de reproducción. Si continúa
pulsando el botón, podrá ver la imagen a una
velocidad de ! /30.
Para reanudar la reproducción normal, pulse O.
Para cambiar el sentido de
reproducción
Durante la reproducción, pulse en el mando a
distancia para reproducir en sentido regresivo o
3> en el mande» a distancia para reproducir en
sentido progresivo. Para reanudar la
reproducción normal, pulso O,
Para seleccionar el sonido de
reproducción
Cambie el ajuste de modo de "HiFi SC.)L \D” en
el sistema de menús.
Notas sobre la reproducción
• Fn los distintos modos de reproducción
aparecen bandas v se omite el sonido.
•Cuando el modo de pausa de reproducción
dura 5 minutos, la videocámara entra
automáticamenti* en modo de parada.
•Cuando se reproducen cintas hacia atras,
«iparece ruido h(»ri/ontal en el t entro de la
pantalla si ésta miu'stra el codigo de tiempos
Re' (' el código de datos. Is normal.
25
Page 26
Playing back a tape
Reproducción de cintas
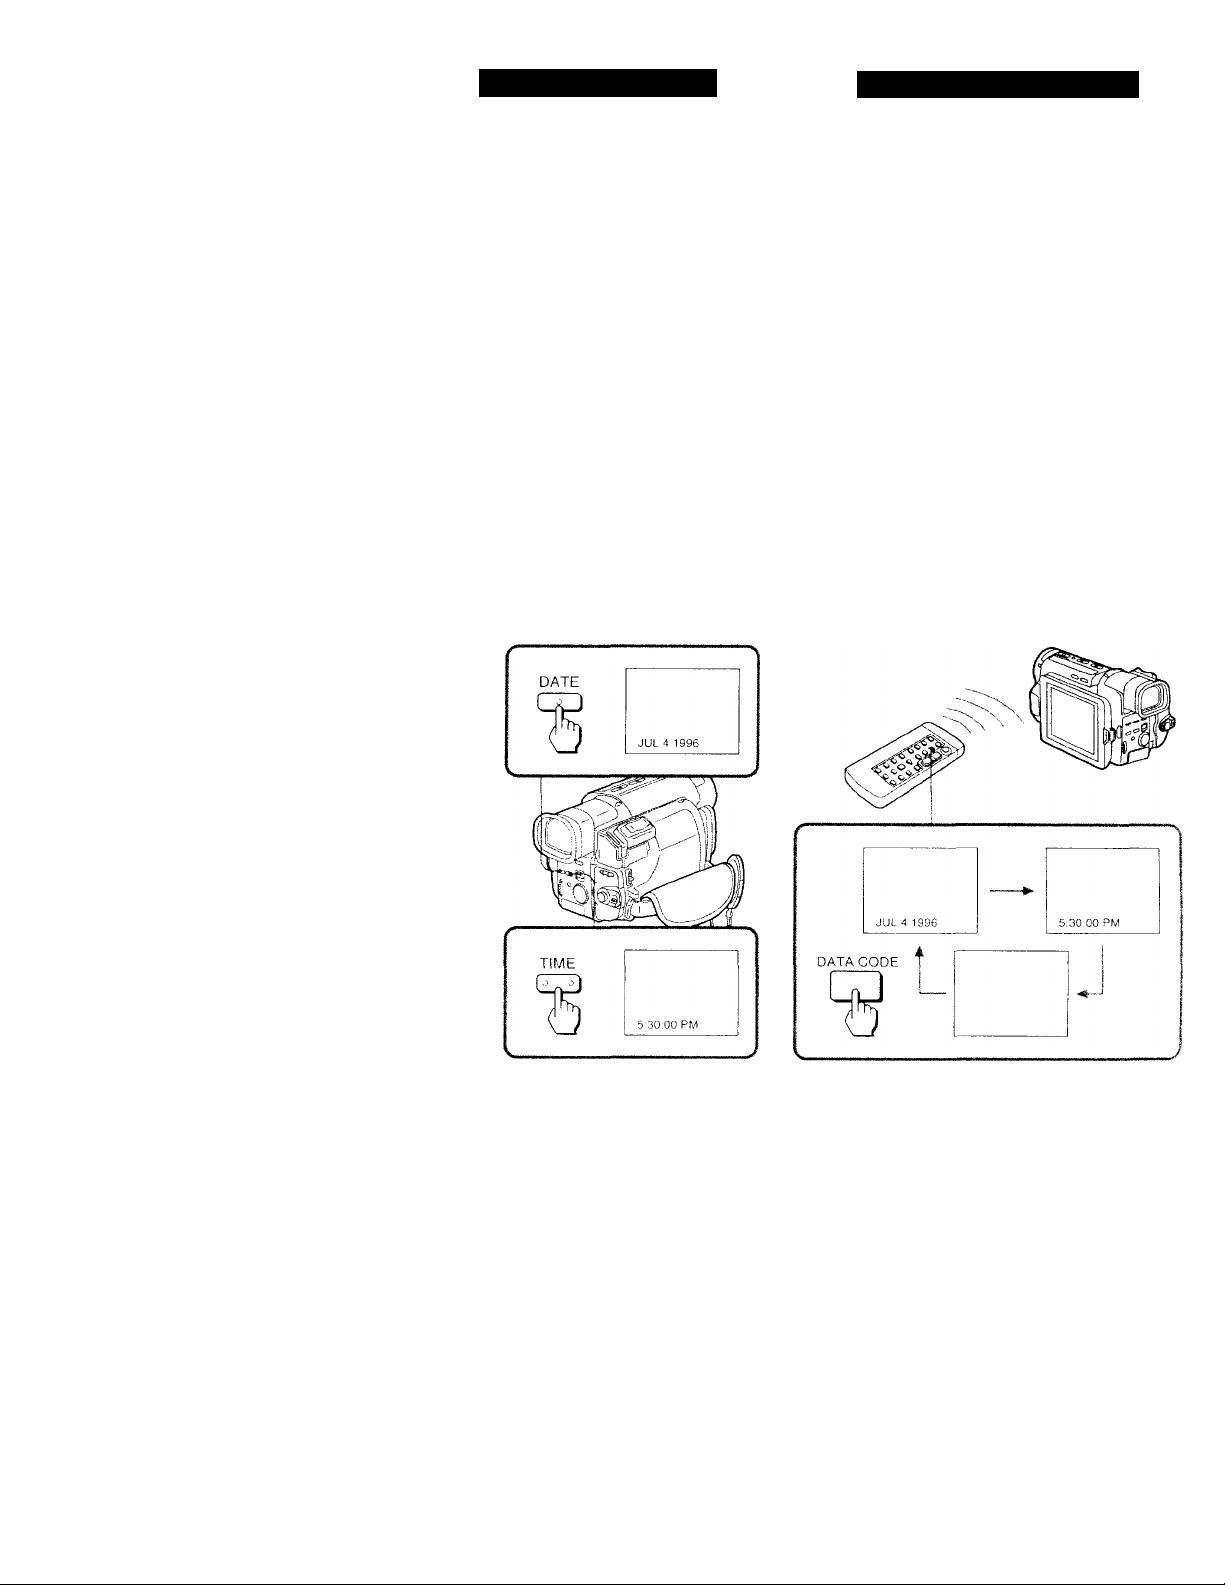
Displaying the date or time when you recorded - data code function
Even if you did not record the date or time when
you were recording, you can display the date or
time when you recorded (Data Code) on the TV
during playback or editing. The Data Code is
also displayed in the viewfinder or on the LCD
screen.
To display the date when you
recorded
I’ress DATE on the camcorder [a], or press
DATA CODE on the Remote Commander [b].
To make the date disappear, press DATE again
or DATA CODE twice.
To display the time when you recorded
Press TIME on tlie camcorder [a], or press DATA
CODE on the Remote Commander twice [b]. To
mdke the time disappear, press it again.
[a]
[b]
Vísualización de fecha u hora de grabación - función de código de datos
La fecha y hora de grabación (código de datos)
pueden visualizarse en un televisor durante la
reproducción o edición aunc^jue no se hayan
grabado durante la grabación. El código cié dato
también aparece en el visor electrónico o en la
pantalla LCD.
Para visualizar la fecha de grabación
Pulse DATE en la videocámara [a] o DATA
CODE en el mando a distancia [b]. Pulse DATE
otra vez o DATA CODE dos veces para que la
fecha desaparezca.
Para visualizar la hora de grabación
Pulse TIME en la videocámara [a] o DATA COI
dos veces en el mando a distancia [b]. Vuelva a
pulsar este botón para que la hora desaparezca
26
Page 27

When bars (—:—:—) appear
• A blank portion of the tape is being played
back.
• The tape was recorded by a camcorder without
the Data Code function.
• The tape was recorded by a camcorder without
hav'ing date and time set.
• The tape is unreadable due to tape damage or
noise.
Cuando aparecen barras (—:—;—)
•Se está reproduciendo una parte sin grabación
de la cinta.
• La cinta .se ha grabado en una videocámara que
no posee la función de código de datos.
• La cinta se ha grabado en una videocámara sin
ajustar fecha y hora.
• La cinta no es legible por estar dañada o por
ruido.
27
Page 28
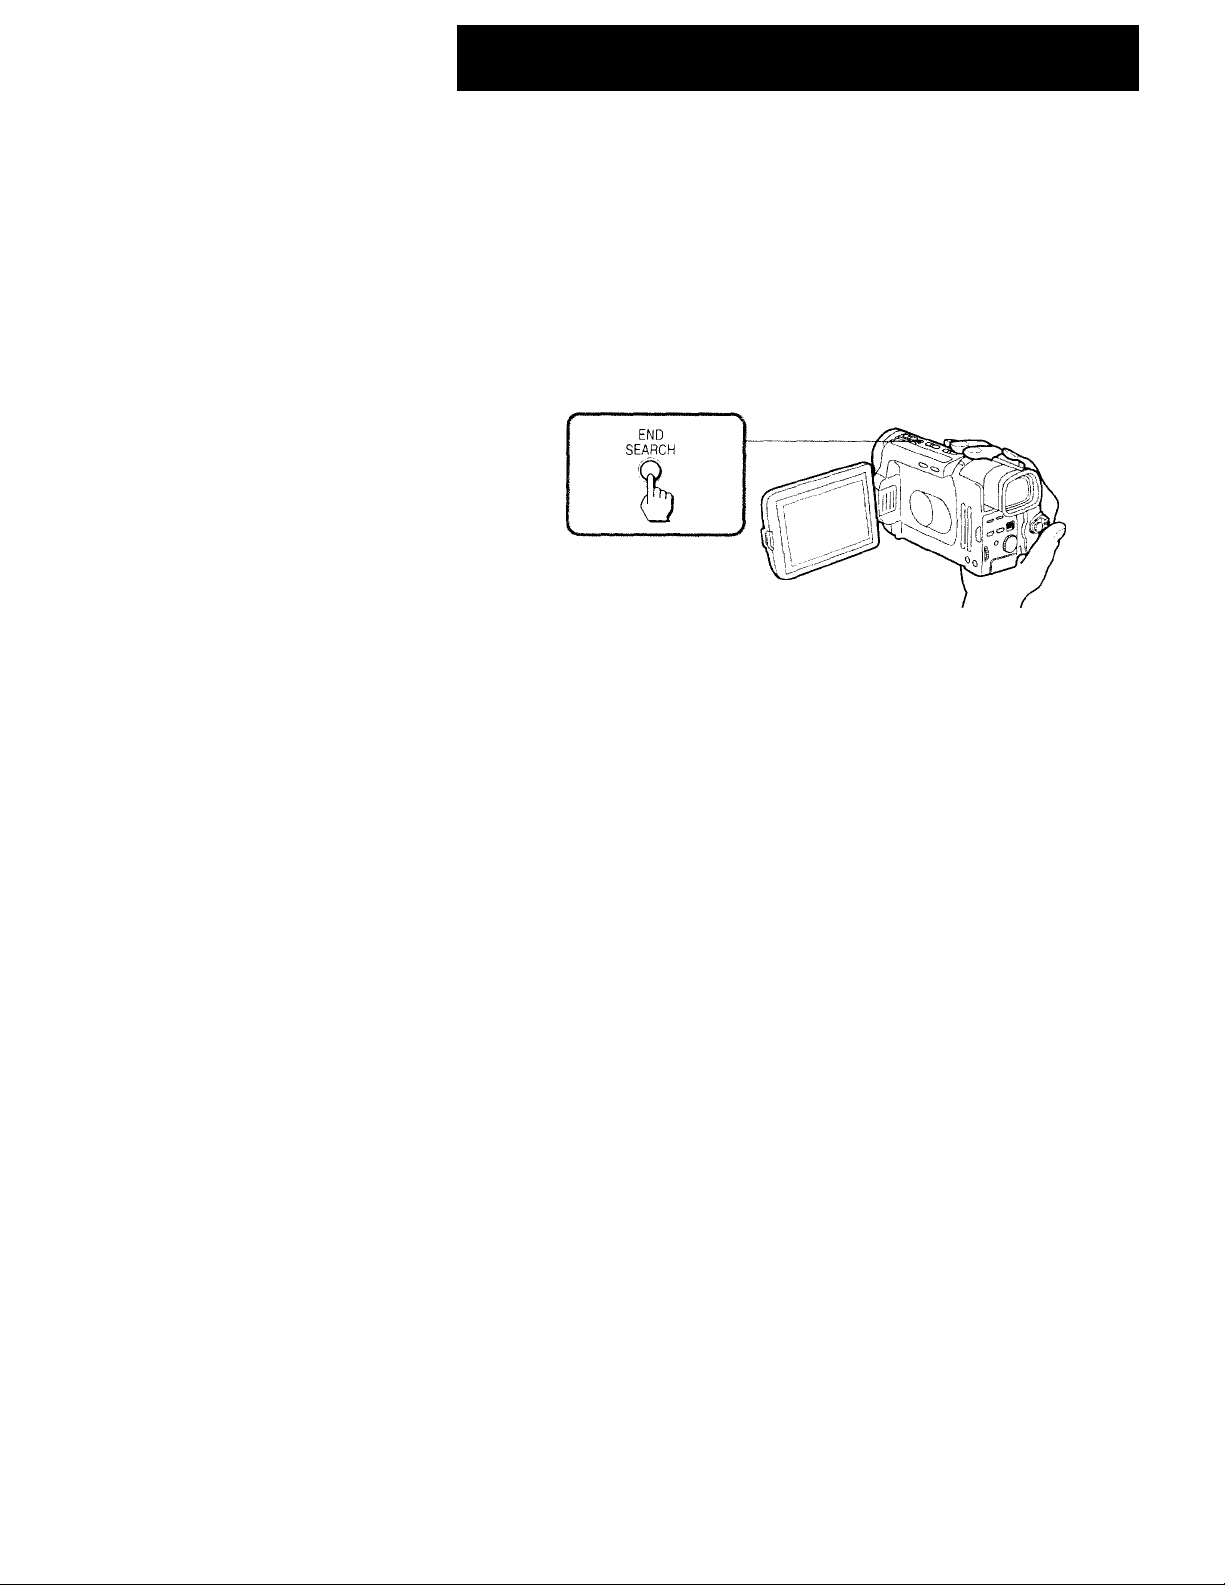
Searching for the end Búsqueda del final
of the picture de la imagen
You can go to the end of the recorded portion
after you record and play back the tape. The tape
start.s rewinding or fast-forwarding and the last 5
seconds of the recorded portion plays back. Then
the tape stops at the end of the recorded picture
(End Search).
Note that End Search function does not work
once YOU have ejected the cassette after you
recorded on the tape.
Press END SEARCH.
This function works when the POWER switch is
set to either CAMERA or VTR.
Note on the End Search function
When \'Ou re-record continuouslv after using the
End Search function, you might not be able to
obtain smooth transition between lh<' last scene
and the next scene.
Después de grabar y reproducir la cinta puede
desplazarse al final de la porción grabada. La
cinta se rebobina o avanza rápidamente v se
reproducen los últimos 5 segundos de la porción
grabada. Después la cinta se detiene al final de la
imagen grabada (búsqueda de imágenes
finales).
Ob.serve que la función de búsqueda de imágene
finales no se activa una vez extraído el
videocas.sette después de grabar en la cinta.
Pulse ENDSEAKCH.
Esta funciém se activa cuando el interruptor
POWER está ajustado en CAMERA o \TR.
Nota sobre la función de búsqueda de imágenes finales
Si vuelve a realizar grabaciones de forma
continua después de emplear esta función, es
posible que no pueda obtener una transición
uniforme entre la última escena v la siguiente
28
Page 29
I Advanced operations
Operaciones avanzadas
Using alternative
power sources
You can choose any of the following power
sources for your camcorder: battery pack, house
current, and 12/24 V car battery. Choose the
appropriate power source depending on where
vou want to use your camcorder.
Place Power
Indoors
Outdoors
In the саг
Note on power sources
[disconnecting the power source or removing the
batterv pack during recording or playback may
damage the inserted tape. If this happens,
restore the power supply again immediately.
source
House
current
Batterv Batterv pack N’T-F530
pack (supplied)
12 Vor
24 V car
batterv
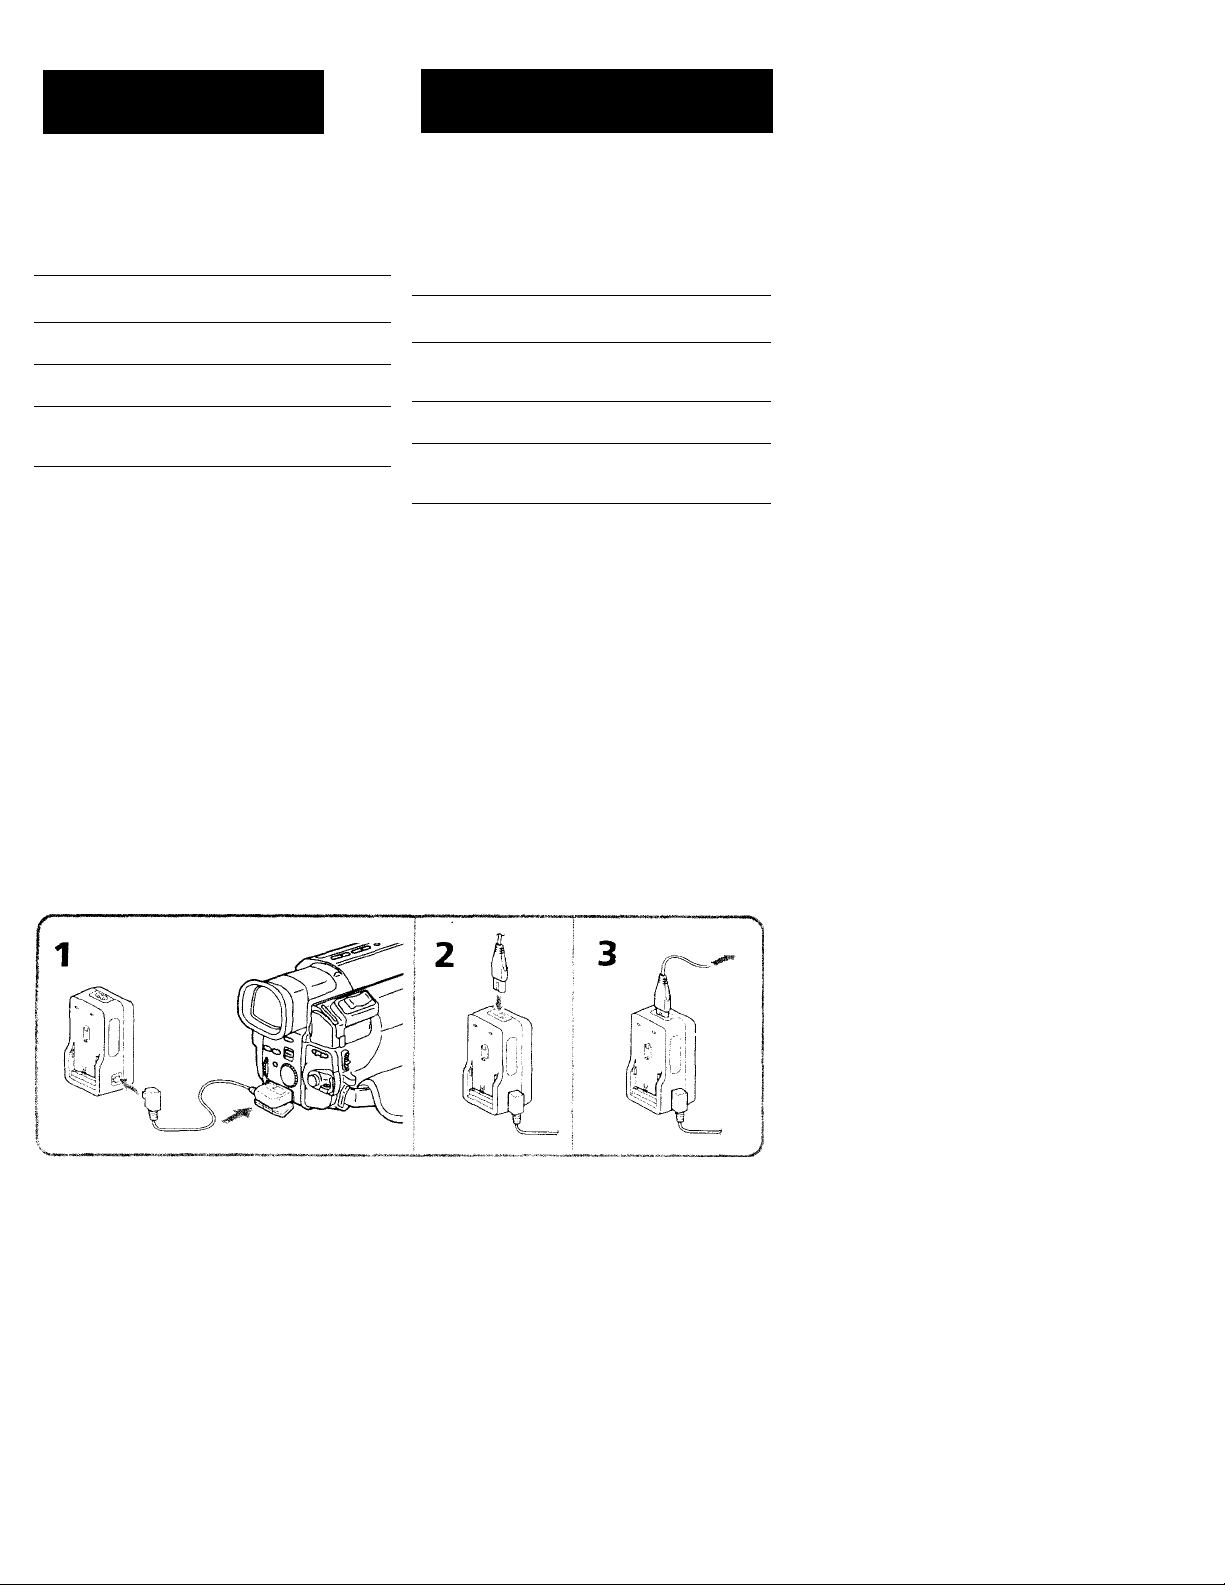
Using the house current
To use the supplied AC power adaptor;
(1) Connect the connecting plug on the
camcordiT to the DC OUT jack on the AC
power adaptor using the supplied connecting
cord.
(2) C onnect the AC power cord to the AC power
adaptor,
(3) Ccmnect the AC power cord to the w.iii outltT.
Accessory to be used
Supplied AC power adaptor
Car battery charger DC-V515
Uso de fuentes de
alimentación alternativas
Es posible elegir cualquiera de las siguientes
fuentes de alimentación para la videocámara;
paquete de baterías, corriente doméstica y batería
de automóvil de 12/24 V. Elija la fuente de
alimentación adecuada al jugaren que vaya a
usar la videocámara.
Lugar Fuente de
alimentación
Interiores Corriente
doméstica
Exteriores ICquete de
balerías
En el Batería de
automóvil autonun-il de
12 V o 24 V
Nota sobre fuentes de alimentación
La desc(>nexión de la fuente de alimentación o la
extracción del paquete de baterías durante la
grabación o reproducción puede dañar la cinta
insertada. Si c^ío sucede, restablezca
inmediatamente el suministro de alimentación.
Uso de corriente doméstica
Par.i usar el adaptador de alimentadon de CA
suministrado:
(1) C onccte el enchufe de conexión di* la
vidí'oi ámara a l.i toma DC’ OUT del
adaptador di' alimentación de C'.A con el cable
de conexión suministrado.
(2) Conecte el cabk' de alimentíici<hi al adaptculor
de alimentación de C'A.
(3) Conecte el cabk' de alimentación de CA a una
tilma de red.
Accesorio
necesario
Adaptador de
alimentación de CA
suministrado
ICquete de baterías
NP-F530 (suministrado)
Cargador de batería de
automóvil DC-V515
29
Page 30

Using alternative power
sources
Uso de fuentes de
alimentación alternativas
Charging the battery pack
You can charge the battery pack installed in the
camcorder by connecting the AC power adaptor
to the camcorder and setting the POWER switch
to OFF. The CHARGE lamp lights up, and goes
out when normal charge is completed. For a full
charge, leave the battery pack in place for
approximately one hour. Charging time of the
supplied NP-F530 battery pack is as follows;
Full charge: approx. 3 hours and 30 minutes
Normal charge: approx. 2 hours and 30 minutes
Charging two battery packs at the same time
Install one battery pack in the camcorder and
another one on the AC power adaptor. The
CHARGE lamps on the camcorder and on the AC
power adaptor light i.p, and go out when normal
charge is completed. For a full charge, leave the
battery pack in place for approximately one hour.
If either of the CHARGE lamps remains lit,
charging both battery packs is not completed.
Time taken to charge two NP-F330 batterv packs
simultaneously is as follows:
Full charge: approx. 4 hours
Normal charge: approx, 3 hours
Notes on the CHARGE lamp
• The Cl lARGF lamp will remain lit tor a u liile
even if the unit is unplugged after use. This is
normal.
• If the CHARGE lamp does not light, disconnect
the power cord. Atter about one minute,
reconnect the power cord.
Carga del paquete de baterías
El paquete de baterías instalado en la
videocámara puede cargarse conectando el
adaptador de alimentación de CA a la
videocámara y ajustando el interruptor POWER
en OFF. El indicador CHARGE se ilumina, y se
apaga cuando el proceso de carga normal
finaliza. Para una carga total, deje el paquete de
baterías insertado durante una hora
aproximadamente. El tiempo de carga del
paquete de baterías NP-F530 suministrado es vi
siguiente;
Carga total: aprox. 3 horas y 30 minutos
Carga normal; aprox. 2 horas v 30 minutos
Carga de dos paquetes de baterías a la vez
Instale un paquete de baterías en la videocáinara
V otro en el adaptador de alimentación de CA. El
indicador CHARGE de )a videocámara y del
adaptador de alimentación de CA se ilumina, \’
se apaga cuando el proceso de carga normal
finaliza. Para una carga total, deje el paquete de
baterías cargando durante aproximadamente una
hora. Si alguno de Rís indicadores CHARGE
permanece iluminado, la carga de ambos
paquetes de baterías no ha finalizado. El tiempo
de carga simultánea de dos paquetes de baterías
\P-H530 es el siguiente:
Carga total: aprox. 4 horas
Carga normal: aprox. 3 horas
Notas sobre el Indicador CHARGE
♦ El indicador CHARGE permanece iluminado
unos momentos aunque la unidad se haya
desenchufado después de usarla. Es normal.
•Si el indicador CHARGE no so ilumina,
desconecte el cable de alimentación. Vuelva a
conectarlo después de aproximadamente un
minuto.
30
Page 31

To remove the connecting cord
While pressing the button on the connecting
plug, pull out the connecting cord. Never pull
the connecting cord itself.
When you use the AC power with the connecting
cord, the battery pack installed in the camcorder
is not used because the AC power has priority
over the battery pack.
Para retirar el cable de conexión
Tire del cable mientras pulsa el botón del enchufe
de conexión. Nunca tire del cable propiamente
dicho. Cuando se usa la alimentación de CA con
el cable de conexión, no se emplea el paquete de
baterías instalado en la videocámara, ya que la
alimentación de CA tiene prioridad sobre el
paquete de baterías.
WARNING
The piower cord must only be changed at a
qualified service shop.
PRECAUTION
The set is not disconnected from the AC power
source (mains) as long as it is connected to the
wall outlet, even if the set itself has been turned
off.
Using a car battery
Use a car battery charger such as the DC-Vaha
(not supplied). Connect the car batterv cord to
the cigarette lighter socket of a car (12 \' or 24 V).
Connect the car battery charger and the
camcorder using the supplied DK-o26 connecting
cord.
This mark indicates that this
product is a genuine accessorv tor
Sony video product.
When purchasing S(m\’ \’ideo
products, Son\’ recommends that
you purchase accessories with this
"GENUINE VIDEO
ACCESSORIES" mark.
AVISO
El cable de alimentación sólo debe cambiarse en
una tienda de servicio técnico autorizada.
PRECAUCION
El aparato no se desconecta de la fuente de
alimentación de CA (corriente doméstica)
mientras esté enchufado a la toma de red, aunque
el aparato en sí esté apagado.
Uso de baterías de automóvil
Utilice un cargador de balería de automó\'il
como el DC-\'3I5 (no suministrado). Conecte el
cable de la batería de auíomkn’il a la clavija del
encendedor de un automóvil (12 V o 24 \').
Conecto el cargador de batería de automóvil y la
videocámara con el cable de conexión
suministrado DK--Ó2U.
Esta marca indica que este
pr(.)ducto es un accesorio genuino
p.ira un producto de vídeo Sonv.
Cuando se adquieren productos de
vídeo Sony, se recomienda (.¡ue los
accesorios adquiridos lleven la
marca "GENUINE VIDEO
AC'CESSORIES".
31
Page 32

Changing the mode
settings
Cambio de los ajustes
de modo
You can change the mode settings in the menu
system to further enjoy the features and
functions of the camcorder.
(1) Press MENU to displa\- the menu on the LCD
screen.
(2) Turn the CONTROL dial to select the desired
item, then press the CONTROL dial. Only the
selected item is displax ed.
(3) Turn the CO.NTROL dial to select the desired
mode, then press the CONTROL dial. If you
want to change the other modes, repeat steps
2 and 3.
(4) Press MP\'U to emse the menu display.
Los ajustes de modo pueden cambiarse en el
sistema de menus para obtener mayor provecho
de las características y funciones de la
videocámara.
(1) Pulse MENU para visualizar el menú en la
pantalla LCD.
(2) Gire el dial CONTROL para seleccionar el
elemento que deseo y, a continuación, pulse
dicho dial. Sólo aparecerá el elemento
seleccionado.
(3) Gire el dial CONTROL para seleccionar el
modo que desee y, a continuación, pulse
dicho dial. Si desea cambiar los otros modos,
repita los pasos 2 v 3.
(4) Pulse MHNU para que el menú desaparezca
de la pantalla.
...........
V
2
flì
Í.Í
4.
IO
S SEL'
-J PUSH
M EXEC
MtiNU
l'w IN D A 0 P F
COMMAÑOLH
COUNTER
A
MENU
L
1
MENU
COMMANDER ÌQN
WIND
.COMMANDER.> ON
CÒUNTFR
MENU
t'-'lND
CL'MMANDFR
COUNTFF- 'U'NORM.Al.
Notes on changing the mode settings
• Menu iftMii" dillur'' dt'penJme; tm tl'to oi
tiv Pt 1\ ■ switi. h it' \ j l\ or C .AM i".K \
• W iit'n \'iHi lot tilt' ^iiioot t nomilo!' i'u' -ht)l, Iho
nit'iiu di-'P]a\' gith'-s iio: ri:-"Ot',ir
32
Notas sobre el cambio de los ajustes de modo
• l.os ('lemeiUos dv memi \'anan en iuni.ion del
.ìjii-'tt' del interrii}'’U'r ÌATVI Jn cn \’TK i> en
C.AMIK.A.
• (. nandtì t'I NUieto i ontrola la \'kie<^lilmaeion,, i'I
menu no apareee en pantalla
Page 33

Selecting the mode setting of each item
Selección del ajuste de modo de cada elemento
Items for both CAMERA and VTR
modes
COUNTER* <NORMAL/TIME CODE>
• Normally select NORMAL.
• Select Tl.ME CODE to display the RC time code
in order to edit more precisely.
COMMANDER <ON/OFF>
• Select O.N when using the supplied Remote
Commander for the camcorder.
•Select OFF when not using the Remote
Commander.
BEEP* <ON/OFi>
• Select ON so that beeps sound when you start/
stop recording, etc.
• Select OEE when you do not want to hear the
beep sound.
LCD COLOR*
Select this item and change the level of the
indicator bv turning the CONTROL dial to adjust
the cokir intensity of the picture.
LCD HUE*
Select this item and change the le\'el of the
indicator bv turning the CONTROL, dial to adjust
the tint ot the picture.
" These settings are retained even when the
battery is removed, as long as the vanadiumlithiuni battery is charged. As far as the items
without an asterisk are concerned, their settings
return to the default minutes or more alter the
batterc' is removed.
Elementos para los modos CAMERA y
VTR
COUNTER* <NORMAL/TIME CODE>
• Normalmente se selecciona NORMAL.
• Seleccione TIME CODE si desea ver el código
de tiempos RC para editar con más precisión.
COMMANDER <ON/OFF>
• Seleccione ON cuando utilice el mando a
distancia con la videocámara.
• Seleccione OEE cuando no utilice el mando a
distancia.
BEEP* <ON/OFF>
• Seleccione ON para que suene un pitido al
iniciar/detener la grabación, etc.
• Seleccione OEE cuando no desee que suene el
pitido.
LCD COLOR*
Seleccione estt“ elemento y cambie el nivel de!
indicador girando el dial CON TROL con el tin di*
ajustar la intensid<id del color de la imagen.
LCD HUE*
Seleccione este elemento y cambie el nivel dt'l
indicador girando el dial CONTROL con el lin de
ajustar el niatiz de la imagen.
Estos ajustes se conservan aum]ue se extraiga la
batería, siempre que la pila de vanaditi-lilio esté
cargada. Con respecto a los elementos que no
llevan asterisco, recuperan los aju'^tes por
cimisión transcurridos 3 minutos o más después
de retirar la batería.
Continued to the next page
Continúa en la página siguiente
33
Page 34

Changing the mode settings
Cambio de los ajustes de
modo
VF BRIGHT*
Close the LCD panel.
Select this item to adjust the brightness of the
viewfinder. The viewfinder becomes brighter
when you turn the CONTROL dial up (+), and
darker when you turn if down (-).
VF PW-SAVE* <ON/OFF>
• Select ON to activate "finder power save"
(page 14).
• Select OFF to disactivate "finder power save".
Items for CAMERA mode only
WIND <ON/OFF>
•Select ON to reduce wind noise when recording
in strong wind.
• Normally select OFF.
D ZOOM* <ON/OFF>
• Select ON to activate digital zooming.
• Select OFF not to use thi' digital zoom. The
camcorder goes back to lOx optical zoom.
REC LAMP* <ON/OFF>
•Select OFF when vou do not want the camera
recordiiig/batterv lamp at the front of the unit
to light up.
• .Normallv select ON.
When recording a close subject
When REC LAMP is set to ON, the red camera
recording lamp on the front of the camcorder
may reflect on the .subject if it is close. In this
case, we recommend you set REC LAMP to OFF.
CLOCK SET*
Select this item to reset the date or time.
ORC TO SET*
Select this item to automatically adjust the
recording condition of the tape to get the best
possibli' recording (page 63).
If vr)u have already performed this function,
"ORC ON" is displayed.
VF BRIGHT*
Cierre el panel LCD.
Seleccione este elemento para ajustar el brillo d»
visor electrónico. El brillo de éste aumentará al
girar el dial CONTROL hacia arriba (+) y
disminuirá al girarlo hacia abajo (-).
VF PW-SAVE* <ON/OFF>
• Seleccione ON para activar el "ahorro de
energía del visor electrónico" (página 14).
• Seleccione OFF para desactivar el "ahorro de
energía del visor electrónico".
Elementos sólo para modo CAMERA
WIND <ON/OFF>
• Seleccione ON para reducir el ruido de viento
al grabar con viento fuerte.
• Normalmente se selecciona OFF.
D ZOOM* <ON/OFF>
•Seleccione ON para activar el zoom digital.
• Seleccione OFF para no usar el zoom digital. 1
videocámara vuelve al zoom óptico de lOx.
REC LAMP* <ON/OFF>
• Seleccione OFF cuando no desee que se ilumii
el indicador de grabación/batería situado en 1,
parte frontal de la unidad.
• Normalmente se selecciona ON.
Cuando se graba un sujeto cercano
Cuando RFC LAMP está ajustado en C)N, es
posible que el indicador rojo de grabación con 1.
cámara situado en la parte frontal de la
\'ideocámara se refleje en el sujeto si éste está
cerca. Fn tal caso, se recomienda ajustar REC
LAME en OFF,
CLOCK SET*
Seleccione este elemento para reajustar la fecha ■
la hora.
ORC TO SET*
Seleccione este elemento para ajustar
automáticamente la condición de grabación de 1
cinta y obtener la mejor grabación posible
(página 63).
Si va ha utilizado ('sta función, aparecerá ”OR(
ONC
34
Page 35

TITLE COL* <WHITE/YELLOW/VIOLET/RED/ CYAN/GREEN/BLUE>
Select the color of the title.
TITLE COL* <WHITE/YELLOW/VIOLET/RED/ CYAN/GREEN/BLUE>
Seleccione el color del título.
TITLE POS* <CENTER/BOTTOM>
• Select CENTER to center the title in the picture.
• Select BOTTOM to position the title at the
bottom of the picture.
TITLE LANG* <ENGLISH/FRANgAIS/ESPANOL/
PORTUGUES>
Select the language of the preset titles.
TITLE1 SET*/TITLE2 SET*
Store your own titles.
STEADYSHOT* <ON/OFF>
• Normally ii«lect ON.
• Select OFF when you do not have to worry
about camera-shake.
Items for VTR mode only
EDIT <ON/OFF>
•SelectON to minimize picture deteriorcUiun
when editing.
• Normally select OFF.
HiFi SOUND <STEREO/1/2>
• Normally select STERFO.
• Select 1 or 2 to play back a dual soundtrack
tape.
These settings are n'tained even when the
battery is removed, as long as the \’anadiumlithium battery is charged. As far as the itenis
without an asterisk are concerned, thtnr settings
return to the default 5 minutes or more after tin'
battery is removed.
Continued to the next page
TITLE POS* <CENTER/BOTTOM>
• Seleccione CENTER para centrar el título en la
imagen.
• Seleccione BOTFOM para situar el título en la
parte inferior de la imagen.
TITLE LANG* <ENGLISH/FRANgAIS/ESPAÑOL/
PORTUGUÉS>
Seleccione el idioma de los títulos predefinido*^.
TITLEl SET*/TITLE2 SET*
Almacene sus propios títulos
STEADYSHOT* <ON/OFF>
• Normalmente se selecciona ON.
• Seleccione (')F'F cuando no vayan a producirse
sacudidas de la cámara.
Elementos sólo para modo VTR
EDIT<ON/OFF>
• Seleccione O.N para minimizar el deterioro d«.' la
imagen al editar.
• Normalmente se selecciona OFF.
HiFi SOUND <STEREO/1/2>
• Normalmente se selecciona STEREO.
• Seleccione 1 o 2 para reprcíducir cintas aai pi^ta
de sonido dual.
• Estos ajustes se conservcìn aunque se extraig.i la
batería, siempre que la pila de wmadio-iitio c'-tc
cargada. Con respecto a los elementos que no
llevan asterisco, recuper.m los ajustes por
(iinisión transcurridos 5 minutos o más despue*de retirar la batería.
(ó)ntinúa en la página siguiente
d-.
o
35
Page 36

Changing the mode settings
Cambio de ios ajustes de
modo
TBC* <ON/OFF>
• Normally select ON, to correct for jitter.
• Select OFF to not correct for jitter. The picture
mav not be steady when played back.
Note on TBC setting
Set TBC to OFF when playing back
• A tape recorded when the camcorder was
shaking.
• A tape on which vc»u recorded a low quality TV
signal.
• A tape vou have dubbed o\'er.
• A tape which vou recorded the signal ol a
\’ideo game or similar machine.
DNR* <ON/OFF>
• .NormalK' select 0,\ to reduce picture noise.
•Select OFF if the picture has a lot of movement,
causing a conspicuous afterimage.
• These settings are retained e\’en when the
batterx' is renio\'ed, as long as the wmadiumlithium batterv is charged. As tar as the items
without an asterisk are amcerned, tln'ir settings
return to the default a minutes or more aftiT the
batterv is removed.
TBC* <ON/OFF>
• Normalmente se selecciona ON para corregii
vibraciones.
• Seleccione OFF para no corregir vibraciones
posible que la imagen sea inestable al
reproducirla.
Nota sobre el ajuste TBC
Ajuste ТБС en OFF cuando reproduzca
• Cintas grabadas con vibraciones de la
videocamara.
• Cantas en que se ha grabado una señal de
f('ie\'isjón de baja calidad.
• Cintas copiadas.
• Cintas en que so ha grabado la señal de un
juego tle televisión c> máquina similar.
DNR* <ON/OFF>
• Normalmente se selecciona ON para reducir
ruidos de imagen.
• Si'leccume OFF si la imagen tiene mucho
mo\'imienlo v produce imágenes secundariavisibles.
" h.stos ajustes se conser\'.in aunque so extraig..
batería, siempre que la pila de vanadio-lUio
cargad.!. Con respecto a k)s elemenfi'ts que
1кч'<ш asterisco, recuperan los ajustes por
omisión lranscurrid(cs minutos o más despi
de retirar la batería.
36
Page 37

Letting the subject
monitor the shot
Control de videofil
mación por el sujeto
You can turn the LCD panel over so that it faces
the other way and you can let the subject monitor
the shot.
Open the LCD panel until it clicks first and then
turn it over. The Q indicator appears on the
LCD screen
counter and remaining tape indicators disappear.
You can also use the Remote Commander.
To cancel mirror mode
Turn the LCD panel to this way until it dicks,
and clo.se.
Notes on mirror mode
• The battery life is shorter in mirror mode
• When you turn the LCD panel to the other wav,
the camcorder enters mirror mode.
• Using the mirror mode, you can rec<.)rd vourseli
while watching yourself on the LCD screen.
(mirror mode) and the date, tape
Es posible dar la vuelta al panel LCD para que el
sujeto la vea desde el otro lado y pueda controlar
la videofilmación.
Abra el panel LCD hasta que oiga un clic y, a
continuación, dele la vuelta. La pantalla LCD
mostrará el indicador C> (modo espejo) y
desaparecerán los indicadores de fecha, contador
de cinta y de cinta restante.
También puede utilizarse el mando a distancia.
Para cancelar el modo espejo
Gire el panel IX'D hacia abajo en esta dirección
hasta que se cierre haciendo un clic.
Notas sobre el modo espejo
•La duración de las baterías es inferior en el
modo espejo.
•Al girar el panel LCD en la dirección contraria,
la videocámara activa el modo espejo.
•Con el modo espejo es posible grabarse
personalmente mientras se mira uno mismo en
la pantalla LCD.
Continued to the next page
Continúa en la página siguiente
37
Page 38

Letting the subject monitor
the shot
Control de videofil-mación
por el sujeto
• The picture on the LCD screen appears as a
mirror-image while recording in mirror mode,
lie appears in Standby mode, and # during
recording.
• The END SEARCH and FADER indicators
appear as a mirror-image.
• "PICTURE EFFECT," "WIDE" and battery
remaining time in minutes indications are not
displayed.
• While recording in mirror mode, you cannot
operate the following functions: MENU, TITLE,
DATE, TIME, COUNTER RESET.
• Durante la grabación en modo espejo, la
imagen de la pantalla LCD aparece como una
imagen espejo. En modo de espera aparece !!•
y durante la grabación aparece •.
> Los indicadores END SEARCH y FADER
aparecen como una imagen espejo.
• Las indicaciones "PICTURE EFEECT", "WIDE"
y la de tiempo de batería restante en minutos
no aparecen.
• Mientras se graba en modo espejo no es posible
utilizar las siguientes funciones: MENU, TlTl.l-
DATE, TIME, COUNTER RESET.
38
Page 39

Recording with the
date or time
Grabación con fecha
u hora
Before you start recording or during recording,
press DATE or TIME. You can record the date or
time displayed in the viewfinder or on the LCD
screen with the picture. You cannot record the
date and the time at the same time. Except for
the date or time indicator, no indicator is
recorded.
The clock is set to East Coast Standard Time at
the factory. You can reset the clock in the menu
system.
Press DATE or TIME before you start recording.
Notes on recording with the date or time
• You cannot record the date and the time at the
same time.
• Once you record the date or time, vou cannot
erase it.
During recording in WIDE CINEMA mode
When displaving the date or time, the date/time
and remaining battery indicator slide up.
Antes de comenzar la grabación o durante ésta,
pulse DATE o TIME. Es posible grabar la fecha o
la hora mostrada en el visor electrónico o en la
pantalla LCD junto con la imagen. No es posible
grabar simultáneamente la fecha y la hora. No se
grabará ningún indicador del visor electrónico,
excepto el de fecha o el de hora.
El reloj se ha ajustado en fábrica con la hora de
Aunque el reloj está ajustado de fábrica al huso
horario de la costa este de EE.UU., es posible
volver a ajustarlo en el sistema de menus.
Pulse DATE o TIME antes de empezar a grabar.
Notas sobre la grabación con fecha u hora
• No es posible grabar la fecha y la hora a la vez.
• Una vez grabada la fecha o la hora, no es
posible borrarla.
Durante grabaciones en modo WIDE CINEMA
Cuando se visualiza la fecha o la hora, el
indicador de fecha/hora y el de la batería
restante se deslizan hacia arriba.
To stop recording with the date or time
Press DATE or TIME again. The date or tinje
indicator di.sappears. The recording continues.
Para detener la grabación con fecha u hora
Vuelva a pulsar DATE o TIME. Desaparecerá el
indicador de techa u hora v la grabación
continuará.
39
Page 40

Aparición у desaparición
Facie-in and fade-out gradual de imágenes
You caafade in or out to give your recording a
professional appearance.
When fading in, the picture gradually fades in
from black or mosaic while the sound increa.ses.
When fading out, the picture gradually fades to
black or mosaic while the .sound decreases.
When fading in [a]
(1) While the camcorder is in Standby mode,
press FADER. The fade indicator starts
flashing.
(2) Press START/STOP to start recording. The
fade indicator stops flashing.
When fading out [b]
(1) During recording, press FADER. The fade
indicator starts flashing.
(2) Press START/STOP to stop recording. The
fade indicator stops flashing, and then
recording stops.
FADER
La función de aparición у desaparición gradual
se utiliza para dar a la grabación un aspecto
profesional.
Con la aparición gradual la imagen aparece poco
a poco desde el negro o mosaico mientras
aumenta el sonido. Con la desaparición gradual
la imagen se funde poc(> a poco en negro o
mosaico mientras disminuye el sonido.
Aparición gradual [a]
(1) Pulso FADER con la videocámara on modo do
espera. El indicador de atenuación comenzará
a parpadear.
(2) Pulse START/STOP para empezar a grabar.
El indicador de atenuación dejará de
parpadear.
Desaparición gradual [b]
(DPu Ise FADHK durante la grabación. El
indicador de atenuación comenzará a
parpadear.
(2) Pulse STAR T/STOP para detener la
grabación. El indicador de atenuación dejará
de parpadear v la grabación se detendrá.
40
M.FADER
i ír'
Page 41

To cancel the fade-in/fade-out function
Before pressing START/STOP, press FADER
until the fade indicator disappears.
When the date or time indicator is displayed
The date or time indicator does not fade in or
out.
When the START/STOP MODE control is set to
i or 5SEC
You cannot use the fade-in/fade-out function.
Notes on titles
• While fading in or fading out, \ ou cannot
superimpo.se a title.
• While a title is displayed, the picture does not
fade in or out
Para cancelar la función de aparición/ desaparición gradual
Antes de pulsar START/STOP, pulse FADER
hasta que desaparezca el indicador de
atenuación.
Cuando aparece el indicador de fecha u hora
El indicador de fecha u hora no aparece ni
desaparece gradualmente.
Cuando el control START/STOP MODE está ajustado en Á o 5SEC
No se puede utilizar la función de aparición/
desaparición gradual.
Notas sobre los títulos
• Durante una aparición o desaparición gradual
no es posible sobreimprimir títulos.
• Mientras aparece un título, la imagen no puede
aparecer ni desaparecer gradualmente.
41
Page 42

mm
_ SO del efecto de
imagen
Selecting picture effect
You can make pictures like those of television
with the Picture Effect function.
[a]
MOSAIC [a]
The picture is mosaic.
SOLARIZE [b]
The light intensity is clearer, and the picture
looks like an illustration.
B&W
The picture is monochrome (black and white).
SEPIA
I he picture is sepia.
NEC. ART [c]
The color of the picture is reversed,
PASTEL[d]
The picture is in pastel tones.
[b]
[c]
Selección del efecto de imagen
Con la función de efecto de imagen es posible
obtener imágenes como las de la televisión.
[d]
[e]
íf]
nca
MOSAIC [a]
l.a imagen es un mosaico.
SOLARIZE [b]
La intensidacd de luz es más clara y la imagen
parece una ilustración,
B&W
l.a imagen es monocroma (blanco y negro).
SEPIA
La imagen es sepia.
NEG. ART [c]
Se invierte el color de la imagen.
PASTEL [d]
La imagen aparece en tonos pastel.
SLIM [e]
The picture expands \ erticallv.
STRETCH [f]
The picture expands horizontalKc
42
SLIM [e]
La imagen se expande verticalmente.
STRETCH [f]
La imagen se expande horizontalmente.
Page 43

Using picture effect function
While in Standby mode, press EFFECT to select
the desired Picture Effect mode.
Uso de la función de efecto de
imagen
Pulse EFFECT en modo de espera para
seleccionar el modo de efecto de imagen que
desee.
Returning to normal mode
Press FH-PCT repeatedly until the Picture Htfect
indicator disappears.
Note on the picture effect
When vou turn the power otp the camcorder
returns automaticallv to normal mode.
Restablecimiento del modo normal
Pulse EFFECT repetidamente hasta que
de.saparezca el indicador de efecto de imageii.
Nota sobre el efecto de imagen
Cuando se apaga la unidad, la videoeámara
vuelve automáticamente a modo normal.
43
Page 44

Using the wide mode Uso de la función de
function modo panorámico
Selecting the desired mode
You can record a cinemalike picture (CINEMA)
or a 16:9 wide picture to watch on the 16:9 wide
screen TV n6:9FULL).
CINEMA
[b]
EMAV V
[a]
[c]
16:9FULL
[e]
9FULLi
[d]
[f]
CINEMA
Black bands appear at the top and the bottom of
the screen. The vit'vvfinder or the LCD scrt'en [a]
and a normal TV screen [b] look wide. You can
also watch the picture without black bands on a
wide-screen TV [c].
16;9FULL
1 ho picture in the viewfinder or on the LCD
screen [d] or on a normal TV [e] is horizontally
compressed. You can watch the picture of
ncirmal images on a wide-screen TV [f]
Continued to the next page-
Selección del modo deseado
Es posible grabar imágenes tipo cine (CINEMA
o imágenes panorámicas de 16:9 para
visualizarlas en televisores de pantalla
panorámica de 16:9 (16:9FULL),
CINEMA
Aparecen bandas negras en la parte superior e
inferior de la pantalla. El visor electrónico o la
pantalla LCD [a] y una pantalla do T\' normal
[b] muestran imágenes panorámicas. También
posible ver la imagen sin bandas negras en
teIe\'!Sores de pantalla panorámica [c].
16;9FULL
La iiTiagen del \’isor electrónico o de la pantalla
1 CD [d], o de un telec'isor normal [e] se
comprime horizontalmente. La imagen puede
\'crse con nornialidad en tc]e\’isores de pantalK'
panorámica [f]
44
Page 45

Using the wide mode function
While the camcorder is in Standby mode, press
WIDE TV repeatedly so that the desired mode
indicator appears in the vnewfinder.
Uso de la función de modo panorámico
Mientras la videocámara se encuentra en el modo
de espera, pulse WIDE TV varias veces hasta que
el visor electrónico muestre el indicador de modo
que desee.
To cancel wide mode
Press WIDE TV repeatedly until the wide modi'
indicator disappears.
To watch the tape recorded in wide mode
To watch the tape recorded in CINP'MA nuide,
set the screen mode of the wide-screen TV to
zoom mode. To watch the tape rec<irded in
16:9FULL mode, set it to full mode, Ftir detaiis,
refer to the instruction manual of voiir TV.
Note that the picture recorded in 16:91-U1J. mode
looks compressed on a normal TV.
Notes on wide mode
• If wide mode is sot to 16:9FU1.P, tlu' SteadvShol
function does not work and the S' indicator
flashes.
• When you record in 1(S;9FUI-L mode, the date
or time indicator will be widened on the wide
screen TV.
• If vou dub a tape, the tape is copied in tlu' same
mode as the original recording,
• The wide mode is cancelled automaticallv ^
minutes alter vou remove the power source.
• ^"cui cannot select or cancel the wide nuide
diiriiw recording.
Para cancelar el modo panorámico
Pulse Wini: TV repí'tidamente hasta que
desaparezca el indicador de mod<i paiKirámico.
Para ver la cinta grabada en modo panorámico
ISira ver la cinta grabada en modo CINEMA,
ajuste el modo de pantalla del televisor de
pantalla panorámica en modo Z('om. Para \’er la
cinta grabada en modo 16;9FL1.1.,, ajústí'lo en
modo tot<il (1-ULP), Para más detalle^, consulte {'1
manual de instrucciones del tele\ isor.
La imagt'n gmbada en modo U-):9l-Ul.L p.irere
comprimida en un televisor normal.
Notas sobre el modo panorámico
• Si el modo panorámico se ajusta en 1 (s:9LULL,
la función SteadvShot no se activa \' el
indicador ■ ^ parpadea.
•Cuando So graba en modo lh:9í-L'ü.., e!
indic<uk>r d<- L'cha u hora se amplia en e)
.televisor de iiantalla panorámica.
•S] so duplica una cinta, ésta se copia en el
mismo nu'do cjue la gr<ibación original.
• 11 mcxio ]''an('iamico se cancela
automaticamontí' ^ minutos después de iiaber
retiniiio la luonte de aümentat ion.
• M modt' {■ 'annramico no puet.ic seleccionarse ni
ancL'lai'so durante la grabaciám.
45
Page 46

Shooting scenery in
several short takes
Videofilmación de
escenarios en varias
tomas cortas
Long, continuous shots of scenery tend to be
dull, and have to be edited to make an interesting
video. With 5SEC. REC (5-second recording)
mode, the camcorder records for only 5 seconds
and then switches to Standby mode, so that you
will automatically take a series of quick shots
resulting in a lively video.
(1) Set START/STOP MODE to 5SEC. Five dots
appear in the viewfinder.
(2) Press S TART/STOP. Recording starts.
The dots disappear at a rate of one per second.
When 5 seconds elapse and all the dots
disappear, the camcorder switches to Standby
mode autoniaticallv.
Las tomas largas y continuas de escenarios
tienden a ser aburridas y hay que editarlas para
que el vídeo sea interesante. Con el modo 55EC.
REC (grabación de 3 segundos), la videocámara
graba sólo durante 5 segundos y después pasa a
modo de espera para obtener automáticamente
varias tomas rápidas que compongan un video
con ritmo.
(1) Ajuste START/STOP MODE en 5SEC.
Aparecerán cinco piuntos en el visor
electrónico.
(2) PuLse START/STOP. Empezará la grabación.
Los puntos desaparecen uno por segundo.
Cuando transcurren 5 segundos y todos los
puntos desaparecen, la videocámara pasa
automáticamente a modo de espera.
To extend the recording time
Press START/STOP again before all the dots
disappear. Recording continues for 5 seconds
from the moment vou press START/STOP.
To cancel 5-second recording
Set START/STOP MODE to K. If vou set the
switch while recording, recording continues.
Note on 5-second recording
You cannot use F.ADER tunction during .E-second
recording
46
Para ampliar el tiempo de grabación
Pulse SI AR'l /STOP otra vez antes de que
desaparezcan todos los puntos. La grabación
continuará durante otros 3 segundos desde el
momento en que se pulse START/STOP.
Para cancelar la grabación de 5 segundos
Ajuste START/STOP .VIODE en M. Si el
interruptor se ajusta durante la grabación, ésta
continúa.
Nota sobre la grabación de 5 segundos
La funcíém EADHR no puedt' usarse durante la
grabación de 3 segundos.
Page 47

Superimposing a title
Sobreimpresión de
títulos
You can select from eight preset titles and two
titles you made to superimpose o\'er the picture
while recording.
Each time you press TITLE while the camcorder
is in Standby mode, the titles appear one by one.
When you do not make titles, they are not
displayed.
Selecting the language
(1) While the camcorder is in Standby mode,
press MENU to display the menu on the LCD
screen.
(2) Turn the CONTROL dial to select "TITLE
LANG", then press the CONTROL dial.
(3) Tum the CONTROL dial to select the desired
language, then press the CO.NTROL dial.
(4) Press MENU to erase the menu display.
MENU
t
COUN-^ER
ORC TO SET
TITLE COL
^ITLE POS
TITÏ F ¡ ANG T>
■1TLE1 SET
TITLE2 SET
i
'VENU END
Es posible seleccionar entre ocho títulos
predefinidos y dos títulos creados para
sobreimprimirlos en la imagen durante la
grabación.
Cada vez que se pulsa TITLE con la videocámara
en modo de espera, los títulos van apareciendo
uno a uno. Cuando no se han creado títulos, no
aparecen.
Selección del idioma
(1) Pulse MENU con la videocámara en modo de
espera para ver el menú en la pantalla LCD.
(2) Gire el dial CONTROL para seleccionar
"TITLE LANG" y, a continuación, pulse el
dial CONTROL.
(3) Gire el dial CONTROL para seleccionar el
idioma que desee y, a continuación, pulse el
dial CONTROL.
(4) Pulse MENU para que el menú desaparezca
de la pantalla.
MENU
ENGLISH
TITLE LANG
iMENUj END
íéñglish' 1
FRANÇAIS
ESPAÑOL
PORTUGUÉS
ENGLiSH
FRANÇAIS
^LSPANCi""
PORrUGuis
MENU
t
COUNTER
GRC TO SET
TITLE COL
TITLE POS
TiTIFlANG
TITIEI SET
T'TLE2 SET
i
iMENUi.END
ESPAÑO-
47
Page 48

Superimposing a title Sobreimpresión de títulos
Using titles
To superimpose from the beginning
(1) Set the POWER switch to CA\4ERA.
(2) Press TITLE repeatedly in Standby mode until
the desired title appears. The title stops
flashing and then stays lit. This means that
the title is selected.
(3) Press START/STOP to start recording.
(4) Press TITLE when you want to turn oft the
title. The title disappears.
To superimpose on the way of
recording
(1) Press TITLE repeatedly in Standby mode until
the desired title appears. The title flashes.
(2) When the title stops flashing, press TITLE.
The title disappears.
(3) Press START/STOP to start recording.
(4) Press TITLE when you want to superimpose
the title.
(5) 1 ’’ress TITl.H \^’hon vou Wcint to turn otl tlu’
title.
Uso de títulos
Para sobreimprimir desde el
principio
(1) Ajuste el interruptor POWER en CAMERA.
(2) Pulse TITLE repetidamente en modo de
espera hasta que aparezca el título que desee
El título deja de parpadear y permanece
encendido, lo cual indica que se ha
seleccionado dicho título.
(3) Pulse START/STOP para empezar a grabar.
(4) Pulse TITLE cuando desee desactivar el título.
Este desaparecerá.
Para sobreimprimir en medio de la
grabación
(1) Pulse TITLE repetidamente en modo de
espera hasta que aparezca el título c^ue desee.
Este parpadeará.
(2) C liando el titulo deje de parpadi'ar, pulse
TlTLt:. Hl título desaparecerá.
(3) Pulse START/STOP para empezar a grabar.
(4) Pulse 'flTLH cuando desee sobreimprimir el
título.
(5) Pulse TiTl.T cuando desee desactivar el título.
Titles cycle as follows:
Original title I —► Original titU' 2 —► iibl.l.O! —*■
HAPTY BIKTIIDAY -h- I lARPY HOLIDAY'S -h.
('OXGRATUl.ATlONS' — OUR SWliHT BABY
— WUlbDiXCi — X’AC'ATR^N mb KXP
When \'ou pres^ III I .h with " I"! Ih I XI)"
displaced, the titles disappear. Wln-n \'ou pres-TlTl J: once again, the titles begin tiaen
"i IJ-.hhO'" {»r \’oiir f>rigin<il title.
Tlie titles are dispKwed in tlu' language vou
>eltH ted in llie iru'nu s\^ii'in.
If you have not stored any original titles
The titles Ix'gin Inan "I I hi I O’".
48
Los títulos siguen este ciclo:
'! itolo originai I —*• Título originai 2 —* l lUhl ( )!
HAPR’y BIRTIIHAY MAUrV f iOl .IDA/S
C'OXCRATUhATIOXS' QUR SW1.ÍUT
BABY-* vvHl2niX(i —^ \ ACATiOX — THK
bXD
.-\l pulsar TITl ,h mientras el \ásor muestra " I l II
h'XD", el titulo des<iparece. Si vueh’e a piils.ir
Ti l 1 los títulos comienzan desde "i ih.l I (.)'" <'
desdi“ el título original.
l.ns títulos ap.mecen i‘n el idioma seleccionadii < r.
el sisti'ma de menus.
Si no se han almacenado títulos originales
I os íItolos empie/an desde "Mi l 1 ( )'"
Page 49

Notes on titles
• You cannot select a title during recording.
• While a title is displayed, the picture does not
fade in or out.
• While fading in or fading out, you cannot
superimpose a title.
• You cannot record a title and the date at the
same time.
• You cannot record a title and the time at the
same time.
• While the menu is displayed, the titles are not
recorded.
Notas sobre los títulos
• No se pueden seleccionar títulos durante la
grabación.
• Mientras se visualiza un título la imagen no
puede aparecer ni desaparecer gradualmente.
• Mientras aparece o desaparece gradualmente
una imagen no es posible sobreimprimir títulos.
• No es posible grabar un título y la fecha a la
vez.
• No es posible grabar un título y la hora a la vez.
• Los títulos no se graban mientras el menú se
encuentra en pantalla.
To select the title color
(1) Press MHNU to display the nienu on the LCD
screen.
(2) Turn the CONTROL, dial to select "TITLE
COL", then press the CONTROL dial.
(3) Tu rn the CONTROL dial to select the desired
color, then^^ess the CON t ROL. dial.
You can choose from the following 7 colors:
WHITE — YELLOW ^ VIOLET RED
CYAN ^ GREEN -h— BLUE
(4) Press MILNU to erase the memi display.
To select the title position
(1) Pre ss VIE.NU to dispia\‘ the menu on the LC'D
screen,
(2) Turn the CONTROL dial to select "T1T1_E
POS", then press the CONTROi. dial.
(3) Tiirn the CONTROL dial to select "CENTER"
[a] or "BOTTOM" [b], then press the
CONTROL dial.
(4) Press MhNU to erase the menu displav.
[a]
Para seleccionar el color del título
(1) Pu Lse MENU para ver el menú en la pantalla
LCD.
(2) Gire el d ial CONTROL para .seleccionar
"TITLE COL" y, a continuación, pulse el dial
CONTROL.
(3) Gire el dial CON TROL para seleccionar el
color pue desee y, a continu.ición, pulse el dial
CONTROL
Puede elegir entre los 7 colores siguientes;
WHITL YHLI.OW — VIOLET s— RED
.o-» CY.A.N GREEN — BLLl.:
(4) Puls(' .MENU p,ira cjiie el menú desaparezca
de la pantalla.
Para seleccionar la posición del título
(1) Pulse MENU para ver el menú en la pantalla
LCD.
(2) Gire el dial C'ONTKOl. para seleccionar
"TITEE PC)S" y, a continuación, puLe el dial
CONTROL.
(3) Giro ol dial CONTROL, para seleccionar
"CHNTLR" [a] o "BOTIOM” [b] \ , a
ctíntinuación, pulse' i'l dial GONTR('>L.
(4) ÍTilse .VIHNL ]>ara c¡ue el menu de's.ípart'/ca
de l<i pantalla.
[b]
49
Page 50

Making your own
original titles
Creación de títulos
originales
You can make two titles of up to 22 characters
each, and store them in memory.
(1) While the camcorder is in Standby mode,
press MENU to display the menu on the LCD
screen.
(2) Turn the CONTROL dial to select TITLEl SET
or TITLE2 SET, then press the CONTROL
dial.
(3) Turn the CONTROL dial to select the desired
character, then press the CONTROL dial.
(4) Repeat step 3 until you finish the title.
(5) Turn the CONTROL dial to select then
press the CONTROL dial. I'he title is stored
in memory.
(6) Press MENU to erase the menu display.
Es posible crear dos títulos de hasta 22 caracteres
cada uno y almacenarlos en la memoria.
(1) Pulse MENU con la videocámara en modo d<.
espera para ver el menú en la pantalla LCD.
(2) Gire el dial CONTROL para seleccionar
TITLE] SET o TITLE2 SET y, a continuación,
pulse el dial CONTROL.
(3) Gire el dial CONTROL para seleccionar el
carácter que desee y, a continuación, pulse el
dial CONTROL.
(4) Repita el paso 3 hasta que termine el título.
(5) Gire el dial CONTROL para seleccionar J v, <
continuación, pulse el dial CONTROL. El
título se almacena en memoria.
(6) Pulse MENU para que el menú desaparezca
de la pantalla.
50
Page 51

To erase the title you have made
Press MENU, select the title vou want to erase,
and press the CONTROL dial. Select J at the
leftmost character, then press the CONTROL
dial.
Do not select the blank to erase a character.
Otherwise, the blank is stored as a title in
memory.
Para borrar el título creado
Pulse MENU, seleccione el título que desee
borrar y pulse el dial CONTROL. Seleccione J en
el carácter del extremo izquierdo y después pulse
el dial CONTROL.
No seleccione espacios en blanco para borrar un
carácter, pues se almacenarán como títulos en la
memoria.
To change the title you have made
In step 2, select TITLE 1 SET or T1TLF.2 SET,
depending on which title vou want to change,
then press the CONTROL dial. Select the desired
characters again.
If you enter 22 characters in step 4
The title is stored immediately (and you can skip
step 3).
If it takes more than 5 minutes to make a title
If the Standby mode lasts for more than 5
minutes with a cassette inserted, the power will
be turned off autoniaticallv. If it takes more than
3 minutes to make a title, remove the cassette.
The power will not be turned off If the power is
turned off while vou are making a title, set the
POWER switch to OFF i.mce, then to CAMF.RyX.
The title you have made remains stored in
memorv.
Advancing the characters rapidly
Keep pressing the CON FROL dial.
Making a blank
Select a blank. It is counted as a character.
Para cambiar el título creado
En el paso 2, seleccione TITLE! SET o TITLH2
SET, según el título que desee modificar, y
después pulse el dial CONTROL. Seleccione otra
vez los caracteres que desee.
Si introduce 22 caracteres en el paso 4
El titulo se almacenará inmediatamente (y podrá
saltarse el paso 3).
Si tarda más de 5 minutos en crear un título
Si el modo de espera dura más de 3 minutos con
un videocassette insertado, la alimentación se
apaga automáticamente. Si tarda más de 3
minutos en crear un título, retire el videocassette.
La alimentación no se apagará. Si se apaga la
alimentación mientras crea un título, ajuste una
vez el interruptor POWER en OFF v luego en
CAMERA. El título creado permanecerá
almacenado en la memoria.
Avance rápido de caracteres
Mantenga pulsado el dial CO.NTROL.
Creación de un espacio en blanco
Seleccione un espacio en blanco. Se contará como
un carácter.
51
Page 52

Releasing the Desactivación de la
STEADYSHOT function función STEADYSHOT
When you shoot, the "O' indicator appears in the
viewfinder. This indicates that the SteadyShot
function is working and the camcorder
compensates for camera-shake.
You can release the SteadyShot function when
you do not need to use the SteadyShot function.
Do not use the SteadyShot function when
shooting a stationary object with a tripod.
(1) Press MENU to display the menu on the LCD
screen.
(2) Turn the CONTROL dial to .select
STEADYSHOr, then press the CONTROL
dial.
(3) Turn the CO.NTROL dial to select OFF, then
press the CONTROL dial.
(4) Press ME.NU to erase the menu display.
El indicador "O' aparece en el visor electrónico
durante una videofilmación. Esto indica que la
función SteadyShot está activa y que la
videocámara compensa las sacudidas de la
cámara.
La función SteadyShot puede desachvarse
cuando no sea necesaria. No utilice la función
SteadyShot cuando videofilme un objeto
estacionario con un trípode.
(1) Pulse MENU para ver el menú en la pantalla
LCD.
(2) Gire el dial CONTROL para seleccionar
STEADYSHOT y, a continuación, pulse el dial
CONTROL.
(3) Gire el dial CONTROL para seleccionar OFF
v, a continuación, pulse el dial CONTROL.
(4) Pulse MENU para que el menú desaparezca
de la pantalla.
52
Page 53

To activate the SteadyShot function again
Select ON in step 3, then press the CONTROL
Ual.
Para volver a activar la función SteadyShot
Seleccione ON en el paso 3 v después pulse el
dial CONTROL.
'Jotes on the SteadyShot function
• The SteadyShot function will not correct
excessive camera-shake.
• When you switch the SteadyShot function on or
off, the exposure may fluctuate.
• When you record in 16;9FULL mode, the
SteadyShot function does not work and the O'
indicator flashes.
• When the SteadyShot function is released, the
O' indicator does not appear.
Notas sobre la función SteadyShot
• La función SteadyShot no corrige sacudidas
excesivas de la cámara.
• La exposición puede fluctuar al encender o
apagar la función SteadyShot.
• Cuando se graba en modo 16;9FULl., la función
SteadyShot no funciona y el indicador O'
parpadea.
• Cuando se desactiva la función SteadyShot, el
indicador O" no aparece.
53
Page 54

Using the PROGRAM Uso de la función
AE function PROGRAM AE
You can select from six PROGRAM AE (Auto
Exposure) modes to suit your shooting situation.
When you use PROGRAM AE, you can get a
Portrait effect (the subject is in focus and the
background is out of focus), capture high-speed
action, record night views, etc.
Selecting the best mode
Select a proper PROGRAM AE mode referring to
the following description.
(§>: Spotlight mode
Recording, a subject spotlighted on a stage or at a
wedding ceremony, etc.
m-: ; Soft portrait mode
I o recc>rd
• A still subject such as a person or flower
• A softened picture
• A person in clearer flesh tones
: Sports lesson mode
Ccjpturing high-speed action in sports such as
golf or tennis
Hay seis modos PROGRAM AE (exposición
automática) entre los que puede seleccionarse el
que se adapte mejor a la situación de
v'idcofilmación. Con PROGRAM AE es posible
obtener un efecto retrato (el sujeto está enfocado
y el fondo está desenfocado), captar acciones de
alta velocidad, grabar vistas nocturnas, etc.
Selección del mejor modo
Seleccione el modo PR(X"¡RAM AI: adecuado
consultando la siguiente descripción.
^ : Modo de foco
Grabación de un sujeto en loco en un escenario o
en una ceremonia de bod<i, etc.
mr,: Modo retrato suave
Para grabar
•Sujetos estables, como una persona o una flor
• Imágenes suavizadas
• Personas Cíin tono.s más claros de piel
'X : Modo deportivo
Captación de acciones en alta velocidad de
deporte'- C(.imo goll o tenis
T ; Beach & Ski mode
Recording a person in a place such on the
beach or in the ski slopes where there is a lot of
reflection
^ : Sunset & Moon mode
Recording sunset, night views, fireworks or neon
signs
H : Landscape mode
Recording a landscape through a window or
\s'ire net
54
T : Modo playa y esquí
Grabación de personas en lugares como playas o
pistas de esquí donde iia\’ mucluis reflejos
^ : Modo ocaso y luna
Grabacuhi de puestas de sol, vistas ncK'turnas,
tuegos artificiales v señales de neón
SI ; Modo paisaje
Grabación de p<iisajes a tra\ és de una \’entana o
una red
Page 55

Notes on focus setting
• In the Spotlight, Sports lesson nnd Beach & Ski
modes, you cannot take close-ups because tlie
camcorder is set to focus only on subjects in the
middle to far distance.
• In the Sunset & Moon and Landscape modes,
the camcorder is set to focus only on distant
subjects.
Notas sobre el ajuste del enfoque
• En los modos de foco, deportivo y playa y esquí
no pueden tomarse primeros planos porque la
videocámara está ajustada para enfocar
únicamente sujetos situados a media distancia o
lejos.
• En el modo ocaso y luna y el modo paisaje, la
videocámara está ajustada para enfocar sólo
sujetos distantes.
-o,
Using the PROGRAM AE
function
While the camcorder is in recording or Standby
mode, turn the PROGRAM AE dial so that the
symbol of the desired PROCR.AM ,<\E mode
matches the indication on the camcorder. The
indicator of the-selectcd mode appears in the
viewfinder.
To return to automatic adjustment mode
Turn the PROGRAM AH dial so that the # ,
matches the indication on the camcorder. The
indicator of the I’ROGRAM AH mode disappear.^
Uso de la función PROGRAM AE
Gire el dial l'ROGRAM AB con la videocámara
en modo de grabación o modo de espera para
que el símbolo del modo PRCXIRAM AH que
desee se adapte a la indicación de la
videocámara. fd indicadordel modo
seleccionado aparecerá en el visor electrónico.
Para restablecer el modo de ajuste automático
Ciire el dial l'^ROGRAM AH para que • se adapte
a la indicaciíin de la x'ideocámara. El indicador
deí modo PROGR.AM .AH desaparecerá.
Note on shutter speed
The shutter speed in eadi l^ROGRAV! .AH mode
is as tolicnvs;
Soft Portrait mode ~ lrt>m I to I
Sports lesson mode - Irom 1 /2a' to 1 AiiOO
iieach & Ski nKnic- - from 1 'hO to ] 2^'''
Nota sobre la velocidad del obturador
1 .a \'elocidad del cib(uradt>r de cada nnxU)
PROGRA.M Al: es la siguiente:
Modi> retrato e de 1 .AiO a 1 /300
Mfxio do]'^orti\ o de 1/250 a 1/4000
.Modo pla\ <i \-e-f¡ní-de 1/60 a 1/2.30
55
Page 56

Focusing manually
Enfoque manual
When to use manual focus
in the following cases you should obtain better
results by adjusting the focus manually.
'y
► Insufficient light [a]
► Subjects with little contrast — walls, skv, etc.
[b]
► Too much brightness behind the subject [c]
► Horizontal stripes [d]
► Subjects through frosted glass
► Subjects beyond nets, etc.
* Bright subject or subject reflecting light
► Shooting a stationary .subject uiien using a
tripod
□
Uso del enfoque manual
Deben obtenerse mejores resultados mediante el
ajuste manual del enfoque en los siguientes
casos:
[c]
k
► Iluminación insuficiente [a]
• Sujetos con poco contraste, como muros, el
cielo, etc. [b]
► Demasiado brillo detrás del sujeto [c]
► Rayas horizontales [d]
► Sujetos detrás de vidrios escarchados
► Sujetos detrás de redes, etc.
► Sujetos brillantes o que reflejen luz
» Videofilmación de objetos estacionarios al
utilizar un trípode
[d]
56
Page 57

Focusing manually
When focusing manually, first focus in telephoto
before recording, and then reset the shot length.
(DShde AUTO LOCK down.
(2) Press FOCUS. The © indicator appears in the
viewfinder.
(3) Turn the CO.NTROL dial to focus on the
subject.
Enfoque manual
Cuando realice el enfoque manual, enfoque en
primer lugar en modo de telefoto antes de grabar
y, a continuación, ajuste la distancia de
videofilmación.
(1) Deslice AUTO LOCK hacia abajo.
(2) Pulse FOCUS. El indicador © aparecerá en el
visor electrónico.
(3) Cire el dial CO.NTROL para enfocar el sujeto.
To return to the autofocus mode
I’ress FOCUS to turn off © indicator. Or, slide
AUTO LOCK up.
Shooting in relatively dark places
Shoot at wide-angle after focusing in the
telephoto position.
Note on the CONTROL dial
Fhe CONTROL dial does not have a stop
position.
Para volver al modo de enfoque
automático
Pulse FOCUS piara desactivar el indicador ©, o
deslice AUTO LOCK hacia arriba.
Videofilmación en lugares relativamente oscuros
Videofilme en modo de gran angular después de
enfocar en la piosición de telefoto.
Nota sobre el dial CONTROL
Este dial no dispone de posición de parada.
57
Page 58

Adjusting the
exposure
Ajuste de la
exposición
when to adjust the exposure
Adjust the exposure manually under the
following cases.
[a]
CONTROL
[a] Turn the CONTROL dial up {+) when:
• The background is too bright (backlighting)
• Insufficient light: most of the picture is dark
[b] Turn the CONTROL dial down (-) when:
• Bright subject and dark background
• To record the darkness faithfullv
Cuándo ajustar la exposición
Ajuste manualmente la exposición en los
siguientes casos:
[b]
CONTROL
[a] Gire el dial CONTROL, hacia arriba (+) si:
• LI fondo es demasiado brillante
(retroiluminadón)
• La iluminación es insuficiente y, pr)r tanto, la
mayor parte de la imagen está oscura
[b] Gire el dial CONTROL hacia abajo (-) si:
• El sujeto es brillante v el fondo es oscuro
• Desea grabar la oscuridad fielmente
58
Page 59

Adjusting the exposure
Ajuste de la exposición
(1) Slide AUTO LOCK down.
(2) Press EXPOSURE. The exposure indicator
appears in the viewfinder. The exposure is
locked at the actual brightness.
(3) Turn the CONTROL dial to adjust the
exposure. The exposure is locked at the
adjusted brightness.
To return to automatic exposure mode
Press EXPOSURE to turn off the exposure
indicator. Or, slide AUTO LCXfK up.
Shooting with the sun behind you
11 the light source is behind your subject, or in the
following situation, the subject will be recorded
too dark.
• The subject is indoors and there is a window
behind the subject.
• Bright light sources are included in the scene,
• When shooting a person wearing white or ,
shiny clothes in front of a while background,
the face will be recorded too dark.
Shooting in the dark
We recommend you to use a video light (not
supplied). To get the best color, vou must
maintain a sufficient light level.
Note on the CONTROL dial
The CONTROL dial does not have a stop
position.
(1) Deslice AUTO LOCK hacia abajo.
(2) Pulse EXPOSURE. El indicador de exposición
aparecerá en el visor electrónico y la
exposición se bloqueará en el brillo real.
(3) Gire el dial CONTROL para ajustar la
exposición. Esta se bloqueará en el brillo
ajustado.
í'fíi
Para volver al modo automático de
exposición
Pulse HXPOSURH p.ira desactix'ar el indicador de
exposición, o deslice AUTO LOCK hacia arriba.
Videofilmación con luz solar detrás del sujeto
Si la fuente de iluminación se encuentra detrás
del sujeto, o bien en las siguientes situaciones,
dicho sujeto se grabará con demasiada oscuridad.
• H1 sujeto se encuentra en interiores v hay una
ventana detrás de él.
• La escena presenta fuentes de iluminación
brillante.
• Al videofilmar una persona v'estida con
prendas blancas o brillantes con un fondo
blanco, la cara se grabará con demasiada
oscuridad.
Videofilmación en la oscuridad
Se recomienda emplear una lámpara de vídeo
(no suministrada). Con el fin de obtener la mejor
calidad posible de color, es necesario mantener
un nivel de iluminación adecuado.
Nota sobre el dial CONTROL
Pste dial no disp(,>ne de po'-ición de parada.
59
Page 60

Shooting with
backlighting
Videofilmación con
iluminación a contraluz
When you shoot a subject with the light source
behind the subject or a subject with a light
background, use the BACK LIGHT function.
Press BACK LIGHT. The E3 indicator appears in
the viewfinder.
[a] Subject is too dark because of backlight.
[bjSubject becomes bright with backlight
compensation.
After shooting
Be sure to release tliis adjustment condition by
pressing BACK EIGHT again. The ^ indicator
disapptMrs, Otherwise, the picture will be too
bright under normal lighting condition.
This function is also effective under the following conditions:
• A subject with a light source nearby or a mirror
reflecting light
• A white subject against a white background.
EspecialK’ when vou shoot a person wearing
shiny clothes made of silk or synthetic fibre, his
or her face tends to become dark if vou do not
'use this function.
Cuando videofilme un sujeto con una fuente de
luz detrás o un sujeto con fondo claro, use la
función БАСК LIGHT.
Pulse БАСК LIGHT. El indicador Ш aparecerá en
el visor electrónico.
la] El sujeto es demasiado oscuro por la
iluminación a contraluz.
[b] El sujeto cobra brillo con la compensación de
la iluminación a contraluz.
Después de la videofilmacíón
Cerciórese de cancelar condición de ajuste
pulsando otra vez BACK L1GV4T. Desaparecerá el
indicador Si no lo cancela, la imagen será
demasiado brillante en condiciones normales de
iluminación.
Esta función también es útil en las siguientes
condiciones:
• Sujetos con una fuente de luz cercana o un
espejo que refleje la luz
• Sujetos blancos con un fondo blanco. En
especial, cuando se x'ideofilma a una persona
que lleva un atuendo brillante de seda o fibra
sintética, su rostro tiende a oscurecerse si no se
usa esta luncion.
60
Page 61

Re-recording a Grabación de una
picture in the middle imagen en el medio
of a recorded tape de una cinta grabada
You can insert a scene in the middle of a
recorded tape by setting the starting and ending
points. The previous recorded portion will be
erased. If the RC time code appears in the
viewfinder, set COUNTER to NORMAL in the
menu system to display the tape counter.
(1) While the camcorder is in standby mode, keep
pressing the + (forward playback) or (reverse playback) side of EDITSEARCH, and
release the button where you want to end the
insertion
mode again.
(2) Press COUNTER RESET. The counter resets
to zero.
(3) Keep pressing the - side of EDITSE.ARCH and
release the button at the point where you
want to start the insertion [a].
(4) Press ZERCTMEM on the Remote
Commander. The ZERO MEM indicator
flashes,
(5) Press START/STOP to start recording. The
recording stops automatically at the counter
zero point.
lb).
The camcorder enters standby
[a]-
Es posible insertar una escena en el medio de una
cinta grabada mediante el ajuste de los puntos de
inicio y finalización. La parte previamente
grabada se borrará. Si el código de tiempos RC
aparece en el visor electrónico, ajuste COUNTER
en NORMAL en el sistema de menú para que
aparezca el contador de cinta.
(1) Mientras la videocámara .se encuentra en el
modo de espera, mantenga pulsado el lado +
(reproducción progresiva) o - (reproducción
regresiv'a) de EDITSEARCH; suelte el botón
donde desee finalizar la inserción
videocámara vuelve a introducir el modo de
espera.
(2) Pulse COUNTER RESET. El contador se
reajustará a cero.
(3) Mantenga pulsado el lado - de EDITSEARCH
y suelte el botón en el punto donde desee
iniciar la inserción [a],
(4) Pu Ise ZERO MEM en el mando a distancia. El
indicador ZERO MEM parpadeará.
(5) Pulse START/STOP para iniciar la grabación.
Esta se detendrá automáticamente en el punto
cero del contador.
[bj.
La
-[b]
61
Page 62

Re-recording a picture in the
middle of a recorded tape
Grabación de una imagen
en el medio de una cinta
grabada
To change the end point
Press ZERO MEM to erase the ZERO MEM
indicator, then repeat steps 2 to 5.
Note on re-recording
The picture and the sound may be distorted at
the end of the inserted portion when it is played
back.
Para cambiar el punto de finalización
Pulse ZERO MEM para que desaparezca el
indicador ZERO MEM; a continuación, repita los
pasos 2 a 5.
Nota sobre la grabación
Es posible que la imagen y el sonido se
distorsionen al final de la parte insertada al
realizar la reproducción:
62
Page 63

Optimizina the tape Optimización de las
condition before condiciones de la
recording cinta antes de grabar
Set the ORC TO SET in the menu to
automatically adjust the recording condition of
the tape to get the best possible recording.
(1) Insert a cassette, and press MENU to display
the menu on the LCD screen before starting
recording.
(2) Turn the CONTROL dial to select the ORC TO
SET, then press the CONTROL dial.
"START/STOP KEY" appears on the LCD
screen.
(3) Press START/STOP. "ORC" blinks for about
9 seconds on the LCD screen. If "ORC"
disappears, it means that setting is completed.
Once you eject a cassette, the setting returns to
the default.
If you haye already performed this function,
"ORC ON" is displayed when you select ORC
TO SET in tlie~menu system.
Ajuste ORC TO SET en el menú para ajustar
automáticamente la condición de grabación de la
cinta V obtener la mejor grabación posible.
(1) Inserte un yideocassette y pulse MENU para
visualizar el menú en la pantalla LCD antes
de iniciar la grabación.
(2) Gire el dial CONTROL para seleccionar ORC
TO SET y, a continuación, pulse dicho dial.
"START/STOP KEY" aparecerá en la pantalla
LCD.
(3) Pulse START/STOP. "ORC" parpadeará en la
pantalla LCD durante 9 segundos
aproximadamente. Si "ORC" desaparece
significa que el ajuste ha finalizado. A!
expulsar el videocassette se restablecerá el
ajuste por omisión.
Si ya ha realiz.ado esta función, "ORC ON"
aparece cuando se selecciona ORC TO SET en e!
sistema de menus.
63
Page 64

Optimizing the tape
condition before recording
Optimización de las
condiciones de la cinta antes
de grabar
Note on ORC TO SET setting
When you eject a cassette, the ORC TO SET
setting is released. Set ORC TO SET when you
insert a cassette. When you set ORC TO SET, tlic
recording on the tape is erased for about 0.1
second so that the camcorder can check the tape
condition. Be careful when you use a recorded
tape. The 0.1 second blank is erased if you record
from the point where you set ORC TO SEl for
more than 2 seconds, or if you record over the
blank. You cannot set ORC TO SET for a cassette
with its tab out (red).
Nota sobre el ajuste ORC TO SET
Cuando se expulsa el videocassette, el ajuste de
ORC TO SET desaparece. Ajuste ORC TO SET
cuando inserte un vhdeocassette. Al ajustar ORC
TO SET, la grabación de la cinta se interrumpe
durante aproximadamente 0,1 segundos para eque
la videocámara pueda comprobar el estado de la
cinta. Preste atención cuando utilice cintas
grabadas, va c]ue el espacio en blanco de 0,1
segundos se borrará si graba durante más de 2
segundos a partir del punto donde ajustó ORC
TO SET, o si graba sobre dicho espacio en blanco.
ORC TO SET no puede ajustarse con
videocassettes que tengan la lengüeta fuera
(roja).
64
Page 65

Watching on a TV
screen
Reproducción en
pantallas de televisior
You can use the camcorder as a VCR. Connect
the camcorder to the inputs on the TV using the
supplied A/V connecting cable. Set the TV/VCR
selector on the TV to VCR. Procedure to play
back is the same as when playing back on the
LCD screen. Turn down the volume of the
camcorder.
While playing back on a TV screen, close the
LCD panel to reduce noise during various
playback.
If vou are going to connect the camcorder using S
video cable (not supplied) [a], you do not need to
connect the yellow' (video) plug of the A/V
connecting cable [b].
If your VCR is already connected to a TV
Connect the camcorder to the LINE IN inputs on
the VCR bv using the A/\' connecting cable. Set
the input selector on the \'CR to LINE. Set the
TV/VCR selector on the T\'' to VCR.
La videocámara puede utilizarse como
videcrgrabadora. Conecte la videocámara a las
entradas del televisor con el cable de conexión
A/V suministrado. Ajuste el selector TV/VCR
del televisor en VCR. El procedimiento de
reproducción es el mismo que para reproducir en
la pantalla LCD. Baje el volumen de la
videocámara.
Mientras reproduce en una pantalla de TV, cierre
el panel LCD para reducir el ruido en diferentes
reproducciones.
Si va a conectar la videocámara con un cable de
vídeo S (no suministrado) [a], no es necesario
conectar el enchufe amarillo (vídeo) del cable de
conexión A/V Ib].
Si la videograbadora ya está conectada a un
televisor
Conecte la videocámara a las entradas LINE l.\
de la videograbadora con el cable de conexión
A/\'. Ajuste el selector de entrada de la
videograbadora en UNE. Ajuste el selector TV/
65
Page 66

Watching on a TV screen
Reproducción en pantallas
de televisíor
If your TV or VCR is a monaural type
Connect the yellow plug of the A/V connecting
cable for \'ideo to the TV or VCR. Connect only
the white or red plug for audio fo the TV or VCR.
If you connect the white plug, the sound is 1.
(left) signal. If vou connect the red plug, the
.sound is R (right) signal.
Monitoring the picture from a TV or VCR
You can monitor the picture on the LCD screen.
Connect the camcorder to the outputs on the TV
or VCR.
Si el televisor o la videograbadora son del tipo monofònico
Conecte el enchufe amarillo para vadeo del cable
de conexión A/V al felevisor o la
v'ideograbadora. Conecte sólo el enchufe blanco o
rojo para audio al televisor o la videograbadora.
Si conecta el enchufe blanco, el sonido es la señal
L (izquierda). Si conecta el rojo, el sonido es la
señal R (derecha).
Control de la imagen desde un televisor o una videograbadora
La imagen puede controlarse en la pantalla LCD.
Conecte la videocámara a las salidas del televi.sor
o de la videograbadora.
66
Page 67

Searching the
boundaries of
recorded tape
Búsqueda de los
límites de la fecha de
grabación
You can search for the boundary between
recording dates using the Data Code
automatically recorded on the tape.
There are two modes:
• Searching for the beginning of a specific date,
and playing back from there (Date Search)
• Searching for the beginning of all days, one
after another and playing back about 10
seconds of each
Each time you press DATE SEARCH, the mode
changes as follows:
Date Search
t______________________________I
To search for the beginning of a
specific date
(1) Set the TOWER switch to VTR.
(2) Press DATE SEARCH.
(3) When the current position is [b], press to
search towards [a] or press ► ► to search
towards [c].
To scan the beginning of all days
(1) Set the POWER switch to VTR.
(2) Press DATE SEARCH twice.
(3) Press or Date Scan starts.
-----
► Date Scan
(Date Scan)
----
► Nothing —i
Usando el código de datos grabado
automáticamente en la cinta es posible buscar los
límites entre fechas de grabación.
Hay dos modos:
• Buscar el principio de una fecha específica y
reproducir desde aquí (búsqueda de fecha).
• Buscar el principio de todos los días, uno detrás
del otro, V reproducir aproximadamente 10
segundos de cada uno (exploración de fecha).
Cada vez que se pulsa DATE SEARCH, el modo
cambia de la siguiente manera:
Búsqueda de fecha
^^
Para buscar el principio de una fecha
específica
(1) Ajuste el interruptor POWER en VTK.
(2) Pulse DATE SEARCH.
(3) Cuando la posición actual sea [b], pulse
para buscar hacia [a] O pulso ► ► pcira buscar
hada [c]
Para explorar el principio de todos
los días
(1) Ajuste el interruptor POWER en VI R.
(2) Pulse DATE SFARCI I dos veces.
(3) Pu Ise o ► ► . Empezara la exploración de
fecha.
JUL4 1996- ■JUL5 1996- ■DEC 31 1996
----------
-----
► Exploración de fecha —>
Nada ■ <
------------------------
'
67
Page 68

Searching the boundaries of
recorded tape
Búsqueda de los límites de la
fecha de grabación
To Stop searching or scanning
Press one of the following tape transport buttons:
[>, ■ , « or
To view pictures during searching or scanning
i^ress O and then press or
Notes on Date Search and Date Scan mode
• If a day's recording is not longer than 2
minutes, the camcorder may not accurately find
its boundaries.
• Date Search and Date Scan do not function on a
tape recorded by a camcorder without the Data
Code function.
Para detener la búsqueda o la exploración
Pulse uno de los siguientes botones de transporte
de cinta: t>, ■ , o
Para ver imágenes durante la búsqueda o
exploración
Pulse V luego o
Notas sobre los modos de búsqueda de fecha
y exploración de fecha
• Si la grabación de un día no es superior a 2
minutos, es posible que la videocámara no
pueda encontrar los límites con exactitud.
• La búsqueda de fecha y la exploración de fecha
no funcionan en cintas grabadas en
x'ideoccimaras que no posean la función de
código de datos.
68
Page 69

Returning to a pre
registered position
Localización de
posiciones registradas de
antemano
Using the Remote Commander, you can easily go
back to the desired point on a tape after
playback. Use the tape counter. When the RC
time code appears on the LCD screen, set
COUNTER to NORMAL in the menu svstem to
display the tape counter.
(1) During playback, press COUNTER RESET at
the point you later want to locate. The
counter shows "0:00:00" on the LCD screen.
(2) Press M when you want lt> stop playback.
(3) Press ZERO MEM on the Remote
Commander. The ZERO MEA1 indicator
flashe's on the LCD screen.
(4) Press to rewind or press ► ► fast-
forward the tape to the counter's zero point.
The tape stops automatically when the
counter reaches approximately zerc^
Mediante el uso del mando a distancia, es posible
retroceder con facilidad al punto que desee de
una cinta después de la reproducción. Emplee el
contador de cinta. Si el código de tiempos RC
aparece en la pantalla LCD, ajuste COUNTER en
.NORMAL en el sistema de meniis para que
aparezca el contador de cinta.
(1) Pulse COUNTER RESET durante la
reproducción en el punto que desee localizar
más adelante. El contador muestra "0:00:00"
en la pantalla LCD.
(2) Pulse Ш cuando desee detener la
reproducción.
(3) Pulse ZERO MEM en el mando a distancia. El
indicadtm ZERO MEM parpadea en la
pantalla LCD.
(4) Pulse para rebobinar o ► ► para que la
cinta ayanco rápidamente hasta el punto cero
del contador. La cinta se detendrá
automáticamente cuando el contador se
ponga aproximadamente a cero.
69
Page 70

Returning to a pre-registered
position
Localización de posiciones
registradas de antemano
Notes on the tape counter
• Something must bo recorded on the tape in
order for the tape counter to function. Tape
counter does not work on a blank tape.
• There may be a discrepancy of several seconds
from the actual time.
Notes on ZERO MEM
• When you press ZERO MEM, the counter's
zero point is memorized. Press ZERO MEM
again to cancel the memory.
•This function is cancelled automatically once
the tape is rewound or advanced to the point
you pre-registered.
• ZERO MEM does not function during playing
back.
• ZERO MEM does not function when
COU.\'TER is set to TIME COOF:! in the menu
system.
Notas sobre el contador de cinta
• Para que el contador funcione la cinta debe
contener alguna grabación. El contador de cinta
no funciona con cintas vírgenes.
• Puede darse una discrepancia de varios
segundos con respecto a la hora real.
Notas sobre ZERO MEM
• Cuando se pulsa ZERO MEM se memoriza el
punto cero del contador. Vuelva a pulsar ZERO
MEM para cancelar la memoria.
• Esta función se cancela automáticamente
después de rebobinar o avanzar la cinta
rápidamente al punto registrado de antemano.
•ZERO MEM no funciona durante la
reproducción.
• ZERO MEM no funciona si COUNTER está
ajustado en TIME CODE en el sistema de
menus.
70
Page 71

Locating the marking Localización de
position posiciones marcadas
If you mark an index signal during recording or
playback, you can easily locate the beginning of a
desired program later.
Marking an index signal
You can mark an index signal during recording
or playback with the Remote Commander.
When you see on a TV, press DISPLAY.
When marking at the beginning of
recording or playback
press INDEX MARK on the Remote Commander
in Standby or playback pause mode. The INDEX
MARK indicator appears on the LCD screen with
the MARK indicator flashing. When recording or
playback starts, the MARK indicator stops
flashing. This shows that the index signal is
being marked. Then the INDEX MARK indicator
will di.sappear.
When marking during recording or playback
Press INDEX MARK on the Remote Commander
at the point you want to locate later.
Si inserta una señal de índice durante la
grabación o la reproducción, posteriormente
podrá localizar con facilidad el inicio del
programa deseado.
Marcado de una señal de índice
Pueden marcarse señales de índice durante la
grabación o reproducción con el mando a
distancia.
Cuando utilice el televisor para ver las imágenes,
pulse DISPLAY.
Cuando se marca al principio de la grabación o reproducción
Pulse INDEX MARK en el mando a distancia en
el modo de espera o de pausa de reproducción.
El indicador INDEX MARK aparece en la
pantalla LCD con el indicador MARK
parpadeando. Cuando empiece la grabación o
reproducción, el indicador MARK dejará de
parpadear. Esto significa que la señal de índice
ya está marcada. A continuación desaparecerá el
indicador INDEX MARK.
Cuando se marca durante la grabación o reproducción
Pulse INDEX MARK en el mando a distancia en
el punto que desee localizar más tarde.
71
Page 72

Locating the marking
position
Localización de posiciones
marcadas
Notes on marking
• Make sure you mark index signals at more than
two-minute intervals. Otherwise, you may not
be able to search tor them correctly.
• It you stop recording while the index signal is
being marked (the INDEX MARK indicator
lights on the LCD screen), the search mav not
be completed correctly.
• If you mark an index signal on the tape with
the Data Code, the Data Code will bt> erased at
the point on which the index signal is marked.
When playing back this tape, the camcorder
keeps displaving the Data Code immediately
before the erased one.
• A black band appears when you mark the
index signal during playback, and you cannot
hear the sound. This does not affect the picture
and the sound that are already recorded.
• An index signal is marked automatically wlien
V(H] start recording with the LOWER su'itch to
VTR. When vou start recording from recording
pause mode, however, an index signal is not
marked.
• \’ou cannot mark an index signal on a tape v\'ith
the red mark on the cassette exposed.
• ^'oLi cannot mark an index v\'ht‘n you set
S'l ART/STOL modi: to i or 5SEC.
Notas sobre el marcado
• Cerciórese de marcar señales de índice a
intervalos de más de dos minutos. En caso
contrario no podrá buscarlas correctamente.
• Si detiene la grabación mientras se marca la
señal de índice (el indicador INDEX MARK se
ilumina en la pantalla ECD), es posible que la
búsqueda no se realice correctamente.
• Si marca en la cinta una señal de índice con el
código de datos, éste se borrará en el punto en
que sc‘ ha marcado la señal de índice. Al
reproducir esta cinta, la videocámara siempre
mostrará el código de datos inmediatamente
anterior ai borrado.
• Cuando se marca una señal de índice durante l<i
reproducción, aparece una banda negra v no
puede escucharse el sonido. Esto no afecta a la
imagen y al sonido ya grabados.
• Con el interruptor POWER ajustado en \' I R, se
marcará automáticamente una señal de índice
a! iniciar l<i grabación. Nt> obstante, si inicia la
grabación desde el modo de pausa de grabaciisi
no se marcará ninguna señal de índice.
• No es posible marcar señales de índice en cintas
c<.)n la marca roja dcd c’ideocassette al
di-scubierto.
• .No es posible insertar un índice cuando
START/STOP MOláE se ajusta en Á o 5SEC.
72
Page 73

Scanning the beginning of each marking position - index scan
When you see on a TV, press DISPLAY.
(1) Press INDEX on the Remote Commander
during normal playback or stop.
(2) Press or ► ► . The tape rewinds or
advances rapidly and plays back for
approximately 10 seconds from the point on
which the index signal was marked. If you
want to continue playback, press I>. When
you do not press any button, the tapie is
automatically scanned to the next program.
Exploración del principio de cada posición de marcado - exploración de índice
Cuando utilice el televisor para ver la.s imágenes,
pulse DISPLAY.
(1) Pulse INDEX en el mando a distancia durante
la reproducción nornial o parada.
(2) Pulse o La cinta se rebobinará o
avanzará rápidamente v se reproducirá
durante aproximadamente 10 segundos desde
el punto en que se bava marcado la señal do
índice. Pulse [> si desea continuar la
reproducción. Si no pulsa ningún botón, la
cinta se explora automáticamente hasta el
siguiente programa.
To cancel index scan mode
Press t> . Normal ¡alavback resumes.
Para cancelar el modo de exploración de índice
Pulse O. Se reanudará la reprodiieeión normal.
73
Page 74

Locating the marking
position
Localización de posiciones
marcadas
Locating the desired marking
position - index search
When you see on a TV, press DISPLAY.
(1) Press INDEX on the Remote Commander
during stop or playback mode.
(2) Press INDEX repeatedly until the index
number of the desired program is displayed
on the LCD screen.
(3) Press or ► ► . Playback starts from the
beginning of the desired program.
[a] the current position
[b] the index number
Localización de la posición de marcado deseada - búsqueda de índice
Cuando utilice el televisor para ver las imágenes,
pulse DISPLAY.
(1) Pulse INDEX en el mando a distancia en
modo de parada o reproducción.
(2) Pulse INDEX varias veces hasta que el visor
electrónico muestre el número de índice del
programa deseado.
(3) Pulse o La reproducción comenzará
desde el principio del programa que desee.
[a] posición actual
[b] núniero de índice
To stop index search mode
Pr(‘s^ . Normal pia\’back regimes.
Note on the index number
1 he indi'x number ( L 2, etc.) indicate“' the
di'^tanck“ from the point vou are now \’iewing [a]
ro'Zardlf^-'S ot the directum.
74
Para detener el modo de búsqueda de índice
l’uLe . Se reanudará la reproducción normal.
Nota sobre el número de índice
El número de índice (1,2, etc.) indica la distancia
con respecto al punto que se está rnsualizando en
est‘ im'nionto
dirección.
(a], independientemente de la
Page 75

Erasing an index signal
(1) 1 ^acate the index signal to be erased using the
index scan or index search function.
(2) Press INDEX ERASE on the Remote
Commander within 2 to 10 seconds while the
desired program plays back. After the index
signal is era.sed, the camcorder returns to
index scan or index search mode, whichever
was used in step 1.
Borrado de una señal de índice
(1) Localice la señal de índice que va a borrar
con la función de exploración de índice o de
búsqueda de índice.
(2) Pulse INDEX ERASE en el mando a distancia
de 2 a 10 segundos mientras reproduce el
programa que desee. Una vez borrada la señal
de índice, la videocámara volverá a modo de
exploración de índice o de búsqueda de
índice, según el que se haya usado en el paso
1.
Notes on erasing
• Press INDEX ERAS!: more than 2 seconds after
the playback of the desired program begins.
•You cannot erase the index signal on a tape
with the red mark on the cassette exposed.
• While the index signal is being erased, the
sound cannot be heard <md a black band
appears at the bottinn ot the picture. This will
not affect the recorded sound or picture.
•The camcorder can detect index signals marked
with VCRs, but may not erase them. \'CJ\s
with an index function can detect index signals
marked with this camo.>rder but cannot erase
them.
• An index signal mav be erased when making
PCVl after recording on anotlu'r \’CR in the
portion where the index signal is marked
Notas sobre el borrado
• Pulse INDEX ERASE más de 2 segundos
después de que comience la reproducción del
programa que desee.
• No es posible borrar señales de índice en cintas
que tengan la marca roja del videocassette al
descubierto.
• Mientras se borra una señal de índice, no es
posible oír el sonido y aparece una banda negra
en la parte inferior de la imagen. Esto no afecta
al sonido ni la imagen grabados.
• La \'ideocámara puedo detectar señales d('
índice niarcadas con videograbadoras, pero no
borrarlas. Las videograbadoras con función de
índice pueden detectar señales de índice
marcadas con esta videocámara, pero no
b(^rraiTis.
• Es posible borrar señ.iles de índice durante
reproducciones PCM después de grabar en otra
xádeograbadora en la porción donde se ha
marcad».' la señal de índice.
75
Page 76

Locating the marking
position
Localización de posiciones
marcadas
Note on RC time code and Data Code
When an index signal is erased, the RC time code
and Data Code on the same portion of the tape is
also erased. Bars (-) appear in place of the RC
time code when the portion is played back. To
use that tape for editing using an editing
controller (not supplied), rewrite the RC time
code.
Nota sobre el código de tiempos RC y sobre el
código de datos
Al borrar una señal de índice, el código de
tiempos RC y el de datos de la misma parte de la
cinta también se borranán. Aparecerán barras (-)
en lugar del código de tiempos RC al reproducir
dicha parte. Si desea emplear esta cinta para
c'ditar mediante un controlador de edición (no
suministrado), vuelva a escribir el código de
tiempos RC.
76
Page 77

Writing the RC time
code on a recorded
tape
de tiempos RC en*^
cintas grabadas
You can write the RC time code on a recorded
tape. Use the Remote Commander.
(1) While pressing the small green button on the
POWER switch, set it to VTR.
(2) Set COUNTER to TIME CODE in the menu
system.
(3) Rewind the tape to the beginning and set the
camcorder to playback pause mode.
(4) Press TIME CODE WRITE on the Remote
Commander. The TIME CODE WRITE
indicator appears on the LCD screen with the
WRITE indicator flashing.
(5) Press О or II to start playback. The WRITE
indicator stops flashing and the RC time code
writing starts from 0:00:00:00.
El código de tiempos RC puede escribirse en
cintas grabadas. Use el mando a distancia.
(1) Ajuste el interruptor POWER en VTR
mientras pulsa el botón pequeño verde del
interruptor.
(2) Ajuste COUNTER en TIME CODE en el
sistema de menus.
(3) Rebobine Ici cinta hasta el principio y ajuste la
videocámara en modo de pausa de
reproducción.
(4) Pulse TIME CODP WRITH en el mando a
distancia. H! indicador í (MP CODP WRITb
aparecerá en la pantalla iX'D con el indicador
WRITE parpadeando.
(5) Pulse olí para empezar la reproducción.
El indicador WRITE dejará de parpadear v la
escritura del código de tiempos RC empezará
a partir de 0:00:00:00.
(Tit^
s
To Stop writing the RC time code
Press ■ (or anv tape transport button).
Para detener la escritura del código de tiempos RC
Pulse ■ (o I ualquier botPm de Ir.jnsporfe de
cinta).
77
Page 78

Writing the RC time code on
a recorded tape
Escritura del código de
tiempos RC en cintas grabadas
To write the RC time code from the
end of the RC time code recorded
portion
Rewind the tape to the portion on which the RC
time code has been written and set the camcorder
to playback pause mode. Then follow steps 4
and 5 on the previous page. The RC time code is
written continuously-
Notes on writing the RC time code
• The RC time code writing stops when:
- you press TIMH CODi: WRU H again before
starting playback.
- you press INDTX before starting playback.
- you change from playback mode to another
mode.
• When you are writing the RC time code from
the middle of a tape without the time code
written, writing starts several frames before the
current picture.
• If vou write the RC time code on a recorded
tape, the Data Code and index signal are
erased.
•You cannot mark the RC tiiru' code on a tape
with its record protect tab out (red).
• When you are writing the i'^C time code, the
sound cannot be heard and a black band
appears at the bottom of the picture. This does
not aftect the picture and sound that are
already recorded.
Note on indicator
The indicator appears during playback if;
• nothing is recorded.
• the RC time code is unreadable because of the
damage ot the tape or because of the noise.
• you recorded using anotiier VCR without RC
time code function.
• you erase the index signal or make PCM after
recording on another VX7R in the portiiin on
which the RC time code is written.
In this case, we recommend you t(' rewrite the
RC time code.
Para escribir el código de tiempos RC
desde el final de la porción grabada
del código de tiempos RC
Rebobine la cinta hasta la porción en que se haya
escrito el código de tiempos RC y ajuste la
yideocámara en modo de pausa de reproducción.
Después siga los pasos 4 y 5 de la página
anterior. El código de tiempos RC se escribirá
continuamente.
Notas sobre la escritura del código de tiempos RC
• La escritura del código de tiempos RC se
detiene cuando;
- se vuelve a pulsar TIME CODE WRITE antes de
empezar la reproducción
- se pulsa INDEX antes de empezar la
reproducción.
- se cambia de modo de reproducción a otro
modo.
• Cuando se escribe el código de tiempos RC
desde el medit) de una cinta que no contiene el
código de tiempos escrito, la escritura comienza
varios fotogramas antes de la imagen actual.
• Si escribe el código de tiempos RC en una cinta
grabada, el código de datos \' la señal de índice
se borrarán.
• El código de tiempos RC no puede marcarse en
cintas con la lengüeta de protección contra
graban ión al descubierto (roja).
• Ai escribir el código de tiempos RC, el sonido
no se escuchará v aparecerá una banda negra en
la parte interior de la imagen. Esto no afecta a la
imagen ni al sonido va grabados.
Nota sobre el indicador
El indicador aparece durante la
reproducción si;
• no se graba nada.
• el código de tiempos RC e^ ilegible por i'star la
cinta dañada o por ruidos.
• ha grabado con otra vide(>grabadora que no
posee función de código Je tiempos RC.
• ha borrado la señal de índice o ha realizado un<i
reproducción ECM después de grabar en otra
\ádeograbadora en la porción en que se ha
escrito ei codígo de tiempos RC.
En este cas(\ es recomendable \‘oh'er a escribir el
código de tiempti^ RC'.
78
Page 79

Editing onto another
tape
Edición en otra cinta
You can create your own video program by
editing with any other 0 8 mm, Hi0 Hi8, VHS:
VHS, SVHS S-VHS, yjISH VHSC, SYHSH S-VHSC,
fS Betamax or Ha Beta] ED Betamax VCR that has
audio/video inputs.
Before editing
Connect the camcorder to the VCR using the
supplied A/V connecting cable. Set the TV/VCR
selector on the TV to VCR. Set the input selector
on the VCR to LINE, if available.
(1) While pressing the small green button on the
POWER switch, set it to VTR.
(2) Set EDIT to ON in the menu svstem.
Puede crear su propio programa de vídeos
editando con otras videograbadoras 0 de 8 mm,
Hi0 Hi8, VHS VHS, SVHSi S-VHS, viisR
VHSC, S.VHSH S-VHSC, ra Betamax o ED
Betamax que tengan entradas de audio/vídeo.
Antes de editar
Conecte la videocámara a la videograbadora con
el cable de conexión A/V suministrado. Ajuste el
selector TV/VCR del televisor en VCR. Ajuste el
selector de entrada de la videograbadora en
LINH, si está disponible.
(1) Ajuste el interruptor POWER en VTR
mientras pulsa el botón verde pequeño del
interruptor.
(2) Ajuste EDI’] en O.N en el sistema de menus.
If your TV or VCR is a monaural type
Connect the velk)\v plug ol the .A/\' connecting
cable for video to the TV or VCR. C\innect onlv
the white or red plug for audio to the TV or VCR.
It vou connect the white plug, the ‘^ound is 1.
(left) signal, if vou connect the red plug, the
sound is R (right) signal.
Si el televisor o la videograbadora son del tipo monofònico
Conecte el enchute amarillo para \’ídeo del cable
de conexión de .V/V ai telex'isor o la
\'ideograbadora. Conecte sólo el enchufe blanco ci
rojo para audio al televisor o la xideograbady^ra.
Si conecta el blanco, el sonido es la señal L
(izquierda). Si a>necta el rojo, el sonido es la
señal R (derecha).
79
Page 80

Editing onto another tape
Edición en otra cinta
starting editing
Turn down the volume of the camcorder while
editing. Otherwise, picture distortion may occur.
(1) Insert a blank tape (or a tape you want to
record o\’cr) into the VCR, and insert your
recorded tape into the camcorder.
(2) Plav back the recorded tape on the camcorder
until vou locate the point where you want to
start editing, then press II to set the
camcorder in plax’back pause mode.
(3) On the VCR, locate the recording start point
and set the \'CR in recording pause mode.
(4) Press II on the camcorder and VCR
simultaneouslv to start editing.
To edit more scenes
Repeat steps 2 to 4.
To stop editing
Press ■ on both the camcorder and the VCR.
Inicio de la edición
Baje el volumen de la videocámara durante la
edición. Hn caso contrario, puede distorsionárse
la imagen.
(1) Inserte una cinta virgen (o una sobre la que
desee grabar) en la videograbadora, e inserte
la cinta grabada en la videocámara.
(2) Reproduzca la cinta grabada en la
vicfeocámara hasta que localice el punto
donde desee iniciar la edición; a continuación,
pulse II para ajustar la videocámara en modo
de pausa de reproducción.
(3) En la videograbadora, localice el punto de
inicio de grabación y ajuste dicha
vidoograbadora en modo de pausa de
grabación.
(4) Pulse simultáneamente II en la videocámara v
en la videograbadora para iniciar la edición.
Para editar más escenas
Repita los pasos 2 a 4,
Para detener la edición
Pulse ■ en la videocámara v en la
vid eograbad ora.
80
Page 81

Recording from a
VCR or TV
Grabación desde una
videograbadora o un
televisor
You can record a tape from another VCR or a TV
program from a TV that has video/audio
outputs. Connect the camcorder to the VCR or
TV. Turn down the volume of the camcorder
while editing. Otherwise, picture distortion may
occur.
(1) While pressing the small green button on the
POWER switch, set it to VTR.
(2) Press the two • REC buttons at the same
time, then press II to set the camcorder to
recording pause mode.
(3) Start playing hack a tape on the VCR or tune
in the TV program you want to record. The
pictures on the VCR or TV appear in the
viewfinder screen of the camcorder.
(4) Press II at the point where you w'ant to start
recording.
S VIDEO and ATJDIO/VIDEO jacks
automaticallv work as input jacks.
: Signal flow/ Flujo de señales
f----------------------------------------------------------------------------------------------------------«
PAUSE REC
-----------------
f ® m a qn ® o
i o o ^ o o
r
V
...........................
.........
s____________________________________________________________________________________________________^
AUDlO/VlDEO
[a]
Es posible grabar cintas desde otras
videograbadoras y programas de televisión de
televisores que tengan salidas de vídeo/audio.
Conecte la videocámara a la videograbadora o al
televisor. Baje el volumen de la videocámara
durante la edición. En caso contrario, puede
distorsionarse la imagen.
(1) Ajuste el interruptor POWER en VTR
mientras pulsa el botón pequeño verde del
interruptor.
(2) Pulse k)s dos botones 9 REC a la vez y
después pulse II para ajustar la videocámara
en modo de pausa de grabación.
(3) Empiece a reproducir una cinta en la
vñdeograbadora o sintonice el programa de
televisión que desee grabar. Las imágenes de
la videograbadora o del televisor aparecerán
en el visor electrónico de la videocámara.
(4) Pulse II en el punto donde desee empezar a
grabar.
Las tomas S VIDEO y AÜDIO/VIDEO funcionan
automáticamente como tomas de entrada.
D PAUSE REC-----------------------------------------1
S VIDEO
a» ' tei——
It \ our VCR or TV is a monaural type, connect
only the white plug for audio on the VCK or TV.
If you are going to connect the camcorder using
the S \ideo cable (not supplied) [b], vou do not
need to connect the yellow (video) plug of the A/
\’ connecting cable
Note on the S video plug
If the 5 \'ideo plug is not provided on the TV or
\'CR, d(' not connect the S \’ideo cable to the
camcorder, Picture will not appear.
[a].
To check the picture from a VCR or TV before recording
Press II after pressing •. You can check the
picture' on llte LC-'i.) screen.
[b]
HSC33 Bs-VIOEOOUT
Si la vidoograbadora o el televisor son del tipo
monofònico, conecte sólo el enchufe blanco para
audio a la videograbadora o el televisor.
Si \-a a conectar la videocámara con el cable de S
vídeo (no suministrado) [b], no es necesario
conectar el enchufe amarillo (vídeo) del cable de
conexión de A/V [a].
Nota sobre el enchufe de S vídeo
Si el televisor o la videograbadore no poseen un
enchufe do S vídeo, no conecte el cable de S vídeo
a la videocámara. Las imágenes no aparecerán.
Para comprobar la imagen de una vídeograbadora o televisor antes de grabar
Pulse II después de pulsar #. De esta forma,
podrá comprobar la imagen en la pantalla PCD.
81
Page 82

Recording from a VCR or TV
Grabación desde una
videograbadora о un
televisor
То stop recording
Press H.
Replacing recording on a tape (insert editing)
You can insert a new scene from a VCR onto your
originally recorded tape by specifying starting
and ending points.
Connections are the same as in "Recording from
a VCR or TV” on the previous page.
(1) While pressing the small green button on the
POWER switch, set it to VTR.
(2) On the VCR, locate the start point to be
inserted and set it to playback pause mode.
(3) On the camcorder, press to stH it to
playback mode, and then locate the point
where the insert should end by pressing
or Then press
pause mode.
(4) Press DISPLAY to display the counter, and
then press COUNTER RESET to set the
counter to zero.
(5) On the camcorder, locale the point where the
insert should begin by pressing then
press # RHC to set it to recording pause
mi'de.
(6) Press ZERO MEM on the Remote
Commander. The ZERO MEM indicator
flashes and the end point of the insert is stored
in memory.
(7) Press II on the camcorder and the VCR
simiiltaneouslv to start insert editing.
The insert editing stops automaticallv near the
counter s zero point. Press ■ to set the
camcorder to stop mode.
To change the end point
Press ZERO \4EM on the Remote Commander so
tlrat the ZERO MEM indicator disappears and
begin frc'm step 3.
II to set it to playback
Para detener la grabación
Pulse ■ .
Sustitución de una grabación en una cinta (edición de inserción)
Es posible insertar escenas nuevas procedentes
de videograbadoras en cintas grabadas
originalmente especificando los puntos inicial y
final.
Las conexiones son las mismas que en
"Grabación desde una videograbadora o un
televisor" en la página anterior.
(1) Ajuste el interruptor POWER en VTR
mientras pulsa ei botón verde pequeño del
interruptor.
(2) Localice en la videograbadora el punto inicial
que va a insertar v ajústela en modo de pausa
de reproducción.
(3) ÍTilse O en la \'ideocámara para ajustarla en
el modo de reprcKiucción v, a continuación,
localice el punto linal de la inserción con los
botones o ► ► . Después, pulse II para
ajustarla en el modo de pausa de
reproducción.
(4) Pu Ise DISPLAY para que aparezca el contador
V, a continuación, pulse COUNTER RESET
para ajustar el contador a cero.
(5) Pu Ise en la x ideocámara para localizar el
punto donde debe comenzar la inserción y
después pulse • REC para ajustarla en modo
de pausa de grabación.
(6) i\tl.se ZEKO MEM en el mando a distancia. Ei
indicador ZERO MEM parpadeará v el punto
final de la inserci(>n se almacenará en la
memoria,
(7) Pulse 11 simultáneamente en la videocámara \
la videograbadora para comenzar la edición
de inserción.
La edición de inserción se dc'tiene
automáticamente cerca del punto cero del
contador. Pulse ■ para ajustar la \’ideocámara vii
el modo de parada.
Notes on the inserted picture
• The picture mav be distorted at the end of the
inserted portion wiien it is played back.
• 'I'ou cannot use the insert editing function when
COUNTER Is set to TIME CODE in the menu
system.
82
Para cambiar el punto final
Puis(> ZERO MEM en el mando a distancia para
que desaparezca el indicador ZERO MEM y
comience desde el paso 3.
Notas sobre la imagen insertada
• l.,a imagen puede distorsik'iiarse al tiiial dv la
porción insertada al reproducirla.
• N'o es posible emplear la timcion de edición de
in-^erción M COL’\ FER está ajustado en IIMI:
C('>l.)E en el si^tem.i de menus.
Page 83

Additional information
Información adicional
Charging the vanadium- Carga de la pila de
lithium battery in the vanadio-litio en la
camcorder videocamara
Your camcorder is supplied with a vanadium-
lithium battery installed so as to retain the date
and time, etc., regardless of the setting of the
POWER switch. The vanadium-lithium battery
is always charged as long as you are using the
camcorder. The battery, however, will get
discharged gradually if you do not use the
camcorder. It will be completely discharged in
about 1 year if you do not use the camcorder at
all. Even if the vanadium-lithium battery is not
charged, it will not affect the camcorder
operation. To retain the date and time, etc.,
charge the battery if the battery is discharged.
The following are charging methods:
• Connect the camcorder to a w'all outlet using
the suppliecTAC power adaptor, and leave the
camcorder with the POWER switch turned off
for more than 24 hours.
• Or, install the fully charged battery pack in the
camcorder, and leave the camcorder with the
POWER switch turned off for more than 24
hours.
When disposing of the camcorder
Remove the vanadium-lithium batterv, and
dispose of the camcorder and the vanadiumlithium battery according to the disposal svstem
in your country. The vanadium-lithium battery is
installed in the cassette compartment,
(1) Unscrew the screws tightening the battery
cover with a screwdriver.
(2) Pick out the vanadium-lithium battery.
La videocámara se suministra con una pila de
vanadio-litio para conservar la fecha y hora, etc.,
independientemente del ajuste del interruptor
POWER. La pila de vanadio-litio està siempre
cargada siempre que se use la videocámara. No
obstante, la pila se descarga gradualmente si no
emplea la videocámara. Si no emplea dicha
videocámara en absoluto, la pila se descargará
por completo en un período de 1 año
aproximadamente. El funcionamiento de la
\’ide(H'ámara no se ve afectado aunque la pila de
vanadio-litio no esté cargada. Para conservar la
hora V la fecha, etc., cargue la pila si está
descargada. Los métodos de carga son los
siguientes:
•Conecte la videocámara a una toma mural con
el adaptador de alimentación de CA
suministrado v deje la videocámara con el
interruptor POWER apagado durante más de
24 horas.
• Instale el paquete de baterías totalmente
cargado en la videix'ámara y déjela con el
interruptor POWER apagado durante más de
24 horas.
Cuando desee desechar la videocámara
Retire la pila de vanadio-litio y deseche la
\'ideocámara v la pila según el sistema
establtvido en su país. La pila de vanadio-litio se
encuentra instalada en el compartimiento de
videc^cassettes.
(1) Desatornille los tornillos de la tapa del
compartimii'nto de las batena.s con un
destornillador.
(2) Saque la pila de vanadio-litiix
>
Q,
a.
83
Page 84

and time
:F?ii
eajuste ae recna y
hora
The date and time are set at the factory. Set the
time according to the local time in vour country.
If you do not use the camcorder for about a year,
the date and time settings may be released (bars
may appear) because the yanadium-lithium
battery installed in the camcorder will have been
discharged. In this case, first charge the
\ anadium-lithium battery, then reset the date
and time.
(1) While pressing the small green button on the
POWhR switch, set it to CAMliRA.
(2) Press MHNU to display the menu on the LCD
screen.
(3) Select CLOCK SHT, then press the CONTROL
dial.
(4) Turn the CONTROL dial to adjust the year,
and then press the CONTROL dial.
(5) Set the month, day, hour and minutes by
turning and pressing the CONTROL dial.
(6) Press MF:j\U to erase the menu display.
La fecha y la hora se ajustan en fábrica. Ajuste la
hora según el horario local de su país. Si no
utiliza la videocámara durante un año, la fecha y
la hora pueden borrarse (aparecen barras) debido
a que la pila de vanadio-litio instalada se ha
descargado. En ese caso, cargue en primer lugar
la pila de vanadio-litio y, a continuación, vuelva
a ajustar la fecha y la hora.
(1) Ajuste el interruptor POWER en CAMERA
mientras pulsa el botón verde pequeño del
interruptor.
(2) Pulse MENU para visualizar el menú en la
pantalla LCD.
(3) Seleccione CLOCK SET y, a continuación,
pulse el dial CONTROL.
(4) Gire el dial CONTROL para ajustar el año y, a
continuación, pulse dicho dial.
(5) Ajuste el mes, día, hora y minutos girando v
pulsando el dial CONTROL.
(6) Pulse MENU para que el menú desaparezca
de la pantalla.
84
Page 85

To correct the date and time setting
Repeat steps 2 to 5.
To check the preset date and time
Press DATE to display the date indicator on the
LCD screen.
I’re.ss TIME to display the time indicator.
When you press the same button again, the
indicator goes off.
The year indicators changes as follows:
1996 -
Note on the time indicator
The internal clock of this camcorder operates on a
12-hour cycle.
» 12:00 AM stands for midnight.
• 12.00 PM stands for noon.
•1997-
t
__
. 2000 ...
«2029
Para corregir los ajustes de fecha y hora
Repita los pasos 2 a 5.
Para comprobar la fecha y hora predefinidas
Pulse DATE para visualizar el indicador de fecha
en la pantalla LCD.
Pulse TIME para ver el indicador de hora.
El indicador desapareceriá cuando vuelva a
pulsar el mismo botón.
Los indicadores de año cambian de la
siguiente manera:
1996
----
«1997
-----
t
_____________________________
Nota sobre el indicador de hora
El reloj interno de esta videocámara funciona con
sistema de 12 lloras.
• 12:00 A.M representa la medianoche.
• 12:01) PV1 represi-nta el mediodía.
«... 2000 ...
----
«2029
I
85
Page 86

Usable cassettes and utilizables y modos
playback modes de reproducción
Selecting cassette types
This F“li8 system is an extension of the standard 8
mm systems, and was dex'cloped for higherquality pictures.
You can use Hi8 video and standard 8 mm
cassettes. When you want to record in the Hi8
system, use only Hi<S video cassettes. You cannot
record on standard 8 mm cassettes in the Hi8
s\'stem.
When you play back
The plavbiick mode (SP/LP mode or Hi8/
standard 8 mm) is selected automatically
according to the format in whidi the tape has
been recorded. The quality of the recorded
picture in 1-P mode, however, will not be as good
as that in SP mode.
Note on AFM Hi-Fi stereo
When you play back a tape, the sound will be in
monaural if;
• you record the tape using this camcorder, then
play it back on an AFM Hi-Fi monaural \'ideo
recorder,/player.
• you record the tape on an AFM Hi-Fi monauml
yideo recorder, then play it back on this
camcorder.
Selección de los tipos de videocassettes
Este sistema Hi8 es una ampliación de los
sistemas de 8 mm estándar y se ha creado para
obtener imágenes de más alta calidad,
í’ueden utilizarse videocassettes para Hi8 v 8 inm
estándar. Cuando desee grabar en el sistema Hi8,
utilice sólo videocassettes para Hi8. No es posible
grabar en vidéocassettes de 8 mm estándar en
sistema Hi8.
Al reproducir
El modo de reproducción (modo SP/Lí’ o Hi8/8
mm estándar) se selecciona automáticamente
según el formato en que se ha grabado la cinta.
Sin embargo, la calidad de la imagen grabada en
modo LP no es tan alta como en modo SP.
Nota sobre AFM Hi-Fi estéreo
El sonido es monolónico al reproducir un.i cinta
si;
• la cinta se graba con esta videocámara y luego
se reproduce en una videograbadora/
reproductora monofònica AFM Hi-Fi.
• la cinta se graba en una x'ideograbadora AFM
Hi-Fi monofonica v luego se reproduce en esta
videocámara.
Foreign 8 mm video
You cannot play back tapes recorded on a
difh'rent rv color system. Because the TV color
systems differ from countr\- to country, you may
not be able to play back foreign pre-recorded
tapes. Refer to the list ol "Using vour camcorder
abroad" to check the TV colcir system of foreign
countries.
86
Vídeo de 8 mm extranjero
,\o se pueden reproducir cintas grabadas en un
sistema de color de televisión diíerente. Los
sistemas de color difieren de un país a otro, por
lo que quizá no sea posible reproducir cintas
pregrabadas en el extranjero. Consulte la lista de
"Uso de la xidcocámara en el extranjero" para
comprobar el sistema de color de telex’isión de
otr(ís países.
Page 87

Tips for using the
battery pack
Consejos para usar el
paquete de baterías
This section shows you how you can get the most
out of your battery pack.
Preparing the battery pack
Always carry additional batteries
Have sufficient battery pack power to do 2 to 3
times as much recording as you have planned.
Battery life is shorter in a cold environment
Batterv efficiency is decreased, and the battery
will be used up more quickly, if you are
recording in a cold environment.
To save battery power
Do not leave the camcorder in Standby mode
when not recording to save the battery power.
A smooth transition between scenes can be made
even if recording is stopped and started again.
While vou are positioning the subject, selecting
in angle, looking through the viewfinder, or
looking at the LCD screen, the lens moves
lutomaticallv and the battery is used. The
lattery is also used when a tape is inserted or
emoved.
Esta sección muestra cómo aprovechar al
máximo el paquete de baterías.
Preparación del paquete de baterías
Lleve siempre pilas de repuesto
Intente que el paquete de baterías disponga de
suficiente potencia para realizar de 2 a 3 veces las
grabaciones que haya planeado.
La duración de la batería es más corta en ambientes fríos
La eficiencia de la batería disminuye y la batería
se agota antes cuando se graba en ambientes
fríos.
Para ahorrar potencia de la batería
No dejo la videocámara en modo de espera
mientras no graba para ahorrar potencia de la
batería.
La transición entre escenas puedo ser uniformo
incluso deteniendo y reanudando la grabación.
AI enfocar el objeto, seleccionar un ángulo, mirar
a través del visor electrónico o de la pantalla
LCO, el objetivo se desplaza automáticamente, dt‘
modo que hace uso de la batería. Esta también se
agota al insertar o expulsar una cinta.
87
Page 88

Tips for using the battery
pack
Consejos para usar el
paquete de baterías
The life of the battery pack
If the battery indicator flashes rapidly just after
turning on the camcorder with a fully charged
battery pack, the battery pack should be replaced
with a new fully charged one.
Charging temperature
You should charge batteries at temperatures from
30°F to 86^F (fromlO°C to 30°C). Lower
temperatures require a longer charging time.
Notes on charging
A brand-new battery pack
A brand-new battery pack is not charged. Before
using the battery pack, charge it completely.
Recharge the battery pack whenever you like
You do not ha\ e to discharge it before
recharging. If vou charged the battery pack fully
but you did not use it for a long time, it becomes
discharged. Then recharge the battery pack
before use.
Notes on the terminals
If the terminals (metal parts on the back)
are not clean, the battery charge duration
will be shortened.
When the terminals are not clean or rvhen the
battery pack has not been used for a long time,
repeatedly install and remove the battery pack a
few times. This improves the contact condition.
Also, wipe the * and - terminals with a soft cloth
or paper.
Be sure to observe the following
• Keep the batter\' pack away from fire.
• Keep the batterv pack dry.
• Do not open nor try to disassemble the batterv
pack.
• Do not expose the batterv pack to an\'
mechanical shock
Duración del paquete de baterías
Si el indicador de la batería parpadea
rápidamente inmediatamente después de
encender la videocámara con un paquete de
baterías totalmente cargado, el paquete debe
sustituirse por uno nuevo totalmente cargado.
Temperatura de carga
Las baterías deben cargarse a temperaturas de
50°F a 86°F (10°C a 30°C). Temperaturas
inferiores requieren un mayor período de carga.
Notas sobre la carga
Paquetes de baterías totalmente
nuevos
Los paquetes nuevos no están cargados.
Cárguclos completamente antes de usarlos.
Recargue el paquete de baterías siempre que lo desee
No es necesario descargarlo antes de recargarlo.
El paquete se descarga si se ha cargado
totalmente pero no se ha utilizado durante un
largo período. Por lo tanto, recargúelo antes de
usarlo.
Notas sobre ios conectores
Sí los conectores (componentes metálicos
de la parte trasera) no están limpios, la
duración de la carga de la batería será
más corta.
Cuando los conectores no están limpios o no ha
utilizado el paquete de baterías durante un largo
período de tiempo, instalo y retire repetidamente
el paquete varias v’eces. De este modo mejorará
las condiciones de contacto. Limpie también los
conectores + v - con un papel o un trapo suave.
Observe lo siguiente
• Mantenga el paquete de baterías alejado del
fuego.
• Mantenga e) paquete de baterías seco.
• .\c) abra ni intente desmontar el paquete de
baterías.
• No expoiiga el paquete de baterías a golpes
mecánicos.
90
Page 89

Información y
Maintenance information precauciones de
and precautions mantenimiento
Moisture condensation
If the camcorder is brought directly from a cold
place to a warm place, moisture may condense
inside the camcorder, on the surface of the tape,
or on the lens. In this condition, the tape may
stick to the head drum and be damaged or the
camcorder may not operate correctly. To prevent
possible damage under these circumstances, the
camcorder is furnished with mihsture sensors.
Take the following precautions.
Inside the camcorder
If there is moisture inside tlio camcorder, the
beep sounds and the SJ indicator flashes. If this
happens, none of the function except cassette
ejection will wc+fic. Open the cassette
compartment, turn off the camcorder, and leave
it about 1 hour. When ^ indicator flashes at the
same time, the cassette is inserted in the
camcorder. Eject the cassette, turn otf the
camcorder, and leave also the cassette about 1
hour.
On the lens
If moisture condenses on the lens, no indicator
appears, but the picture becomes dim. Turn off
the power and do not use the camcorder h)r
about I liour.
How to prevent moisture condensation
When bringing the camcorder from a cold place
to a warm place, put the camcorder in a plastic
bag and allow it to adapt to room conditions ovtT
a period of time.
(1) Be sure to tightly seal the plastic bag
containing the camcorder.
(2) Remove the bag when the air temperature
inside it has reached the temperature
surrounding it (after about 1 hour)
Condensación de humedad
Si la videocámara se traslada directamente de un
lugar frío a uno cálido, puede condensarse
humedad en su interior, en la superficie de la
cinta o en el objetivo. En tales condiciones, la
cinta puede quedarse pegada al tambor del
cabezal y dañarse, o quizá la videocámara no
funcione correctamente. Para evitar posibles
daños en estas circunstancias, la videocámara
está provista de sensores de humedad. Tome las
precauciones siguientes.
Dentro de la videocámara
Cuando hay humedad dentro de la videocámara
suena un pitido v el indicador SI parpadea. Si
esto ocurre, ninguna función estará activa
excepto la de extracción de la cinta. Abra el
ctnnpartimiento del videocassette, apague la
videokámara v déjela durante una hora
aproximadamente. Cuando el indicador di
parpadea a la vez, el videocassette está insertado
í’n la videocámara. Extráigalo, apague la
videocámara deje también el videocassette
durante una hc^ra aproximadamente.
En el objetivo
Cuando se condensa humedad en el objetive' no
aparece ningún indicador, v la imagen se
oscurece. .Apague el aparato y no lo utilice
durante 1 hora aproximadamente.
Cómo evitar la condensación de humedad
Cuande> traslade la videocámara de un lugar frío
a une' cálido, métala en una bolsa do plástico y
deje que se* adapte a las condiciones de la sala
durante un periodi' de tiempo.
(1) C erciorese de cerrar la bolsa de plástico
herméticamente.
(2) Retire la bi'lsa cuando la temperatura del aire
dentro de ella bava alcanzado la temperatura
que la rodea (transcurrida aproximadamente
1 lu'ra).
91
Page 90

Maintenance information
and precautions
Información y precauciones
de mantenimiento
Video head cleaning
To ensure normal recording and clear pictures,
clean the video heads. When the © indicator and
'■ & CLEANING CASSETTE" message appear
one after another in the viewfinder or on the LCD
screen, or plavback pictures are "noisy" or hardly
visible, the \ ideo heads may be dirty.
[a]
[a] Siightlv dirt\-
[b] \’erv dirtv
li this happens, dean the videii heads with the
Stmv \\S-23CLH cleaning cassette (not supplied).
.•\tter checking tlie picture, if it is still "noisy,"
repeat the cleaning. (Do not repeat cleaning
more than ^ time's in one session.)
Caution
D(^ nt^t use' a commercially available wet-tvpe
cleaning ca-ssette. It mav damage the video
he.Kd.
Note
l! the \'8-2aC'Li 1 cleaning cassette is not awiilable
in wHir area, consult vour nearest Sony dealer.
Limpieza de los cabezales de vídeo
Limpie los cabezales de vídeo para garantizar
una grabación normal e imágenes claras. Si el
indicador o y el mensaje " & CLEANING
CASSETTE" aparecen uno tras otro en el visor
electrónico o Ja pantalla LCD, o si la imagen de
reproducción presenta "ruido" o es difícil de ver,
es posible que los cabezales de vídeo estén
^ [b]
[a] 1-igerameiìte sucios
[b] Muy sucios
Si esto ocurre, limpie los cabezales de vídeo con
el cassette limpiador Sonv V8-23C1.11 (no
suministrado). Si después de comprobar la
imagen esta aún es "ruidosa", repita la limpieza.
(No repita la limpieza más di‘ .3 veces en una
sesión.)
Precaución
No use cassettes limpiadores de tipo húmedo
disponibles conierdalmente. Pueden dañar los
cabezales de x’ídeo.
Nota
Si í‘l cassette limpiador V8-23CLH no está
dispoiiible en su zona, consulte al proveedor
Son\’ más cercano.
92
Page 91

Precautions
Precauciones
Camcorder operation
• Operate the camcorder on 7.2 V (battery pack)
or 8.4 V (AC power adaptor).
• Should any solid object or liquid get inside the
casing, unplug the camcorder and have it
checked by Sony dealer before operating it any
further.
• Avoid rough handling or mechanical shock. Be
particularly careful of the lens.
• Keep the POWER switch set to OFF when not
using the camcorder.
• Do not wrap up the camcorder and operate it
since heat may build up internally.
• Keep the camcorder away from strong
magnetic fields or mechanical vibration.
• Do not push tbe-LCD screen.
• If the camcorder is used in a cold place, a
residual image may appear on the LCD screen.
This is not a malfunction.
• While using the camcorder, the back of the LCC)
screen may heat up. This is not a malfunction
On handling tapes
Do not insert anything in the smali iioles on the
rear of the cassette. These holes are used to sense
the type of tape, thickness of tape and if tlte
recording tab is in or out.
Camcorder care
• When the camcorder is not to be used tor a long
time, disconnect the power source and remove
the tape. Pcriodicallv turn on the power,
operate the camera and piaver sections and
piav back a tape for about 3 minutes.
•Clean the lens with a soft brush to remove dust.
If there are fingerprints on the lens, remove
them with a soft cloth.
• If fingerprints or dust are on the LCD screen,
we recommend vou remov’e them using the
LCD cleaning kit {not supplied).
•Clean the camcorder bodv with a drv soft cLuh,
or a soft cloth lightly moistened with a mild
detergent solutimv Do not use anv tvpe ot
solvent which mav damage' (he finish.
Funcionamiento de la videocámara
• Maneje la videocámara a 7,2 V (paquete de
baterías) o 8,4 V (adaptador de alimentación de
CA).
• Si entra algún objeto sólido o líquido al interior
de la videocámara, desenchúfela y llévela al
proveedor Sony para su comprobación antes de
manejarla otra vez.
• Evite el manejo descuidado y los golpes
mecánicos. Tenga especial cuidado con el
objetivo-
• Mantenga el interruptor POWER ajustado en
OEE cuando no utilice la videocámara.
• No envuelva la videocámara para usarla,
puesto que puede acumularse calor
internamente.
• Mantenga la videocámara alejada de campos
magnéticos fuertes o vibraciones mecánicas.
• .No presione la pantalla LCD,
•Si la videocámara se usa en lugares fríos, puede
aparecer una imagen residual en la pantalla
I.CE). No se trata de un mal fundonamient(v
• La parte trasera de la pantalla i.>CO puede
calentarse' mientras se usa la videocámara. No
se trata de un mal funcionamiento.
Manejo de cintas
.No inserte nada en los pequeñeís (‘rificios
situados en la parte trasera del viJeocassette.
Estos orificios sirven para identilicar el tip(’ de
cinta, su grosor v si la lengüeta de grabación está
tuera o dentnv
Cuidados de la videocámara
•Si no va a usar la videe>cámara durante' un large)
período, dose'onecte la fuemte de alimentación v
retire la cinta. Encienda el aparato
periódicamente, ponga en funcieinamiento las
seccie>ne's de cámara y reproductor v
repreiduzca una cinta durante unos 3 minutéis.
• !.impie el eibjetivei cení un e'epillo suave par.i
retirar el polve). Si hav huellas dactilares eii el
e)b)etivo. límpiedas cení un trapo suaw.
• Si hay huellas e.i ací i la re's o peiK’o e'n la pantalla
LCD, es ree'omendable retirarkis con e.-l kit de
limpie'za LCD (no suministrade)).
• l..impie e'l cuerpei de la vieleoi'ámara v e>n un
trape) ^uave y sece) o un trapo ligerarne.'nte'
hume'de'cido con un detergente suav».'. .\()
utilice ningún tipo de diseilvento e]ue puoeia
dañar el aeubade).
93
Page 92

Maintenance information
and precautions
Información y precauciones
de mantenimiento
AC power adaptor
Charging
• Use only a lithium ion type battery pack.
• Place the battery pack on a flat surface without
vibration during charging.
• The battery pack will get hot during charging.
This is normal.
Others
• Unplug the unit from the mains when not in
use for a long time. To disconnect the mains
lead, pull it out by the plug. Never pull the
cord itself.
• Do not operate the unit with a damaged cord or
if the unit has been dropped or damaged.
• Do not bend the AC power cord forcibly, or put
a heavy object on it. This will damage the cord
and may cause a fire or an electrical shock.
• Be sure that nothing metallic comes into contact
with the metal parts of the connecting plate. If
this happens, a short may occur and the unit
may be damaged.
• Always keep the metal contacts clean.
• Do not disassemble the unit.
• Do not apply mechanical shock or drop the
unit.
• While the unit is in use, particularly during
charging, keep it away from AM receivers and
video equipment because it will disturb AM
reception and video operation.
•The unit becomes warm while in use. This is
normal.
• Do not place the unit in locations that are:
- Extremely hot or cold
- Dusty or dirty
-- Very humid
- Vibrating
Adaptador de alimentación de CA
Carga
• Use sólo paquetes de baterías tipo iones de litio.
• Durante la carga coloque el paquete de baterías
• El paquete de baterías se calentará durante la
Otros
• Desenchufe la unidad de la toma de red cuando
• No ponga en marcha la unidad con un cable
• No fuerce el cable de alimentación de CA para
• Asegúrese de que no entra nada metálico en
• Vlantcmga siempre k^s contactos metálicos
• No desmonte la unidad.
• No dé golpes mecánicos a la unidad ni la deje
• Mientras la unidad esté en uso, especialmente
• La unidad se calienta durante su uso. Es
• No coloque la unidad en lugares que sean;
If any difficulty should arise, unplug the unit and
contact vour nearest Sony dealer.
sobre una superficie plana sin vibraciones.
carga. Es normal.
no vaya a usarla durante un largo perkxio. Para
desenchufar el cable de alimentación, tire del
enchufe, nunca del cable propiamente dicho.
deteriorado o si la unidad se ha caído o dañado.
doblarlo ni coloque objí*tos pesados sobre él.
Podría dañar el cable y causar un incendio o
una descarga eléctrica.
contacto con los ccímponentes metálicos de la
placa de conexión, pues puede producirse un
cortocircuito y dañar la unidad.
limpios.
caer.
durante la carga, manténgala alejada de
receptores de A.M y equipos de \’ídeo, ya que
puedo perturbarse la recepción de AM y el
tuncionamiento del vídeo.
norm.ú.
- Extremadamente cálidos o tríos
- Polvorientos o sucios
- Muv húmedos
- Que vibren
94
Si surge alguna dilicuitad, desenchufe la unidad
V pongase en contacto con el proveedor Sony
mas cercano.
Page 93

Using your camcorder Uso de la videocámara
abroad en el extranjero
Each country has its own electric and TV color
systems. Before using your camcorder abroad,
check the following points.
Power sources
You can use your camcorder in any country with
the supplied AC power adaptor within 100 V to
240 V AC, 50/60 Hz.
Use a commercially available AC plug adaptor
(aj, if necessary, depending on the design of the
wall outlet [b].
Difference in color systems
This camcorder is an NTSC svstem-based
camcorder. If vou want to view the playback
picture on a TV, it must be an NTSC' svstembased TV.
Check the following list.
NTSC system countries
Bahama Islands, Bolivia, Canada, Central
America, Chile, Colombia, Ecuador, Jamaica,
Japan, Korea, Mexico, Peru, Surinam, Taiwan, the
Philippines, the U S.A., Venezuela, etc.
PAL system countries
Australia, Austria, Belgium, China, Denmark,
Finland, Germany, Great Britain, Holland, 1 long
Kong, Italy, Kuwait, Malaysia, .New Zealand,
Norway, Portugal, Singapore, Spain, Sweden,
Switzerland, Thailand, etc.
PAL-M system country
Brazil
PAL-N system countries
.Argentina, Paraguay, Uruguay
SECAM system countries
Bulgaria, Czech Republic, France, Guiana,
Hungary, Iran, Iraq, .Monaco, Poland, Russia,
Slovak Republic, Ukraine, etc.
Cada país tiene su propio sistema eléctrico y de
color de televisión. Antes de usar la videocámara
en el extranjero, compruebe los puntos
siguientes.
Fuentes de alimentación
La videocámara puede usarse en cualquier país
con el adaptador de alimentación de CA
suministrado entre 100 V y 240 V CA, 50/60 Hz.
Si es necesario, u.se adaptadores de enchufe de
CA disponibles comercialmente [a] que se
adapten a la toma de red [b].
[a]
Diferencia entre los sistemas de
color
Esta videocámara está basada en el sistema
NTSC. Si desea visualizar la reproducción en un
televisor, éste debe estar basado en el sistema
NTSC.
Compruebe la lista siguiente.
Países con sistema NTSC
Bolivia, Canadá, Centroamérica, Chile, Colombia,
Corea, Ecuador, Estados Unidos de América,
Islas Bahamas, Islas Filipinas, Jamaica, Japón,
.México, Perú, Surinam, Taiwàn, Venezuela, etc.
Países con sistema PAL
Alemania, Australia, Austria, Bélgica, China,
Dinamarca, España, Finlandia, Gran Bretaña,
Holanda, Hong Kong, Italia, Kuwait, Malasia,
Noruega, Nueva Zelanda, Portugal, Singapur,
Suecia, Suiza, Tailandia, etc.
Países con sistema PAL-M
Brasil
Países con sistema PAL-N
Argentina, Paraguay, Uruguay
Países con sistema SECAM
Bulgaria, Francia, Guayana, Hungría, Irán, Iraq,
.Mònaco, Polonia, República Checa, República
Fslowica, Rusia, Ucrania, etc.
95
Page 94

I
English
Trouble check
if you run into any problem using the camcorder, use the following table to troubleshoot the problem.
Should the difficulty persist, disconnect the power source and contact your Sony dealer or local
authorized Sony service facility.
Camcorder
Power
Symptom
1'he power is not on.
The power goes off.
The battery pack is quickly discharged.
Cause and/or corrective actions
The battery pack is not installed.
-> Install the balter\' pack. (p. 10)
The battery i‘> dead.
-> Use a charged battery pack. (p. 7)
Tlie AC power adaptor is not connected to mains.
Connect the AC power adaptor to mains, (p. 29)
!l the power i>. still not on alter you tried the corrective actions
above, press the RUSUT button on the back of the battery
compartment lid using a sharp-pointed object. (If you press
the RESET button, all the settiiigs including the date and time
return to the default.)
White being oj^erated in CAMERA mode, the camct>rder has
been in standby mode lor more than 5 minutes.
Set thu i’OWER switch to OFF, then to CAMERA, (p. 12)
The battery is dead.
-> Use a charged battery pack. (p. 7)
ll \'F I’W-SAVi-' is set to 0\ in the menu system, the picture
disappears autt)maticallv when you turn your face away from
the viewfinder.
bring vour lace close It) thi‘ vicnvtinder within I /2 inch (1
cm). t.)r set Vr PW'-SAVE to OF!" in thi.' menu system, (p. 32)
Thf' ambuMit temj'ter.hure is liio low. (p. <S7)
Fhe battery p.iek has not been charged fully.
-> Charge the Ivatterv pack again, (p. 7)
The ballerv pack is completely dead, and cannot be recharged.
l.’se another battery pack. (p. 29)
Tile camcorder does not <iperate wlien using a battery that is
n(ii an infol .ITHIUM battery pack.
l.Ae an Intol .ITl HUM battery pat k. (p. 7)
Operation
Symptom
ST.ART/STOP does not t)perate.
Five cassotte cannot be remi>\ed frivni
the lioldor.
96
Cause and/or corrective actions
The lape is sUu k to th<' driini.
l:'ieet Iho tape. (p. l I I
i'he tape has riin oiit.
Revv’ind the tape or usn a ne\v' oius
The suatch i"- sig lo \'’IÍ\.
Set it loC.AMPRA. (p. 12)
i he tab t'H tlie c.■ ls-^(.‘Ul,■ is ou( (rt'd 1.
U'^t' a neu' lape shde thr (al'>. (p.
Uea^l.
Use a I
Ip. 7. 3
i\\ bal ter\ pat. k or
. 23)
' .'\C' power adapte
Page 95

peration
mptom
and ^ indicators flash and no function
jept for cassette ejection works.
e date or time indicator displays bars
Cause and/or corrective actions
Moisture condensation has occurred.
Remove the cassette and leave the camcorder for at
least 1 hour. {p. 91)
Reset the date and time. (p. 84)
e End Search function does not
ivate.
le tape does not move when a tape
msport button is pressed.
le SteadvShot function does mU actix’ate.
id or only a low sound is heard
aving back a tape.
cessive high-piched sound is heard
cording stops in a few seconds.
le autofocus function does not actu ate.
le title display position shifts.
le fader function does not wxirk.
The cassette was ejected after you recorded on it.
The End Search function will not activate until you
make a new recording after reinserting the cassette.
The POWER switch is set to CAMERA or OEE.
SetittoVTR. (p.23)
The tape has run out.
"> Rewind the tape or use a new one. (p. 23)
STEADVSHOT is set to OFF in the menu system.
Set it to ON. (p. 52)
The Stead vShot function does not work when the wide
mode is set to 16:9FULL.
The stereo tape is played back with HiFi SOUND set to 1
i>r 2 in the menu system.
Set it to STEREO, (p. 32)
The picture has been recorded with WIND set to ON in
the menu system.
-> When there is no wind, set it to OFF. (p. 32)
The START/S rOP MODE switch is set to 5SEC or À
Set it to (p. IS)
FcK'us is set to the manual mode.
-> Set it to autofocus, (p. 57)
Shooting conditions are not suitable for autotocus.
Set focus to manual mode to focus manually, (p. 57)
There are unwanted blanks before or after the title.
Delete them, then select J. (p. 50)
The STAKT/STOP MODE switch is set to 5SEC or ±
^ Set it tt)K. (p. 15)
A title is displayed.
3’uni off the title, (p. 4S)
mtinued to the next page
97
Page 96

1 Trouble check
Picture
Symptom
The image on the viewfinder screen is not
clear.
A vertical band appears when a subject
such as lights or a candle flame is shot
against a dark background.
The playback picture is not dear.
The picture is “noisv"-
The picture on the LCD screen is lot) dark.
The picture in the viewfinder is too bright
or too dark.
A vertical band appears when shooting a
verv bright subject.
The picture does not appear on the LCD
screen.
The picture dties n(,>f appear in the
\iewfinder.
The picture in the v iewfinder does not
disappear even \’I- IAV-s.A\'L is set to OFF
in the menu svstem.
The picture jitters.
.An unknown picture di^plaved.
Cause and/or corrective actions
•
The viewfinder lens is not adjusted.
-> Adjust the viewfinder lens. (p. 13)
•
The contrast between the subject and background is
too high. The camcorder is not malfunctioning.
Change locations.
•
EDIT is set to ON in the menu system.
Set it to OFF. (p. 32}
•
The video heads may be dirty.
Clean the heads using the Sony V8-25CLH cleaning
cassette, (p. 42)
•
The LCD BRIGHT button is set to the minimum.
"> Press + to obtain the brightness you want. (p. 18)
•
VF BRIGHT is set in the menu system.
Set it to the center position, (p. 32)
•
The camcorder is not malfunctioning.
incorporated fluorescent tube is worn out.
Please contact vour nearest Sony dealer.
It VF PW-SAVL is .set to ON in the menu system, tiie
picture disappears automatically when you turn vour
face awav from the viewfinder.
Bring vour face close to the viewfinder within 1 /2
inch (1 cm). Or, set VF PVV-SAVE to OFF. (p. 32)
•
A tape in a poor condition, such as a tape recorded
repeatedlv, is played back with TBC set to ON in the
menu system.
^ Set TBC to OFF. (p. 32)
•
The LCD panel is open.
Close the LCD panel.
•
Sunlight or tile incandescent lamp ma\- prevent the
viewtinder sensor from working correctiv. This is not
a malfunction.
•
A tape where video game pictures are recorded is
plaved back with 'FBC set to ON in the menu system.
^ SetTBCtoOFF. (p. 32)
•
.A tape in a poor condition, such as a tape recorded
repeatedly, is played back with 'FBC set [o ON in the
menu svstem.
Set TBC to Ol-F. (p. 32)
•
Tht' camcorder is operating in Demo mode.
Fxit Dem(> mode. (p. 112)
98
Page 97

others
.ymptom
he supplied Remote Commander does
lOt work.
he CH ARCH lamp flashes after von
hargo the batter\' pack installed in tlu*
amcorder.
xo function works though the power is
'll.
AC power adaptor
Cause and/or corrective actions
•
COMMANDER is set to OFF in the menu system.
Set it to ON. (p. 32)
•
Something is blocking the infrared rays.
Remove the obstacle.
•
The battery is not inserted with the correct polaritv.
Insert the battery with the correct polarity, (p. 113)
The batteries are dead.
'
Insert new ones. (p. 113)
•
The camcorder is not malfunctioning.
•
Discc^mect the coimection plug on the batterv pack or
on the AC power adaptor, then reconnect it in about 1
minute. Turn the power on. If the functions still do
not work, press the RESET button on the back of the
battery compatment lid using a sharp-pointed object.
(If you press the RESET button, all the settings
including the date and time return to the default.)
■ymptom
he VTR ■ CAMi-.RA or CHARCih lamp •
^oes not light.
'he CM ARCH lamp flashe.s.
'ontinued to tho next page
Corrective actions
Disconnect the AC power cord. After about 1 minute.
reconnect the AC' power cc'rd. (p. 7)
«
See the chart on the next page.
99
Page 98

Trouble check
When the CHARGE lamp flashes
Check through the following chart.
Remo\ e the battery pack frona the AC
po\ver adaptor. Then install the same
battery pack again.
When the CHARGE lamp flashes
again
Install another battery pack.
When the CHARGE lamp flashes
again
The problem is with the AC power
adaptor.
Please contact \-our nearest Sony dealer
in connection with the product with the
problem.
When the CHARGE lamp does not
flash again
If the CHARGE lamp lights up and
goes out after a while, there is no
problem. *
When the CHARGE lamp does not
flash again
If the CHARGE lamp lights up and
goes out after a while, the problem is
with the battery pack installed first.
If \ oil loe c l\e.tor\ pack winch yon liaec ¡us( bought or v\ lnch Ino been k‘it unused tr'r a long time, the CH.-XRGb
lamp n'..n hash at the tirst charging. This docs not indicate a probir-m. Repeat again to eliarge witlr same batterr-
park
100
Page 99

Comprobación de errores
surge algún problema con la videocámara, consulte la tabla siguiente para solucionarlo. Si la
ficultad persiste, desconecte la fuente de alimentación y póngase en contacto con el proveedor Sony o
servicio técnico Sony local autorizado.
^ideocámara
jente de alimentación
ttoma
unidad no se activa.
unidad se apaga.
paquete de baterías se descarga
ndamente.
Causa y/o medidas correctivas
• El paquete de baterías no estcí instalado.
Instale el paquete de baterías, (p. 10)
• La batería está agotada.
Use un paquete de baterías cargado, (p. 7)
• El adaptador de alimentación de CA no estcí conectado a una
toma de red.
Conecte el adaptador de alimentación de CA a una toma de
red. (p. 29)
• Si la unidad no se activa una ve/ realizadas las medidas
correctivas anteriores, pulse el botón RESET de la parto trajera
de la tapa del compartimiento de la batería con un objeto
puntiagudo. (Cuando se pulsa el botc'm RESHT, se restablecen
todos los ajustes por omisión, incluidos fecha v hora.)
• La videocámara ha pernianecido en modo de espera durante
más de 3 minuto^ mientras se usaba en modo C.AMERA,
Ajuste el interruptor POWER en (.í|'F v después en
CAMERA, (p. 12)
• La batería está agolada.
4 Use un pac|uete de baterías cargado, (p. 7)
• Si Vd- Í’W-SAVE está ajustado en ON en el sistema de menus,
la imagiMi desaparecerá automalicainc'nte cuando retire la cara
dei visor electrónico.
Acerque la cara al x'isor electrónico a una distancia de 1 cm,
o bien ajuste \'l- PW-SAV'l; en OLL en el sistema de menus.
(p. 32)
• La temperatura ambiente es demasiado baja. (p. S7)
• El paquete de baterías no esta argado totalmente.
Cargue oír.i \'e/. el paquete df' baterías, (p. 7)
• El p.iquete de baterías t'slá completamente agotado \' no puede
recargarse.
Use otro paqiu'tf.' de baterías, (p. 2‘-ó
• La videocámara lu) Kincionara si emplea un yiaipiete de
baterías que no sea IníolJTHiUM.
Emplee un paquete de baterías Intol.ÍTHIUM. (p. 7)
incionamiento
toma
ART/STC')P lU) funciiina.
ntinúa an la págin.i Mguionta
Causa y/o medidas correctivas
• La cintel se ha atascado en el t.imbor
I-\traiga la cinta, 'p. 11'
• Se ha terminado la cinta.
Rebobine la cinta o utilice una nueva, 'p. 23)
• El interriiptfir PU'WHR esta ajusí.uio c u \'TI\,
Ajiisíelo en C. .'\MLR.A. 1 p. ¡2)
• La lengiieta del \’ideoca>sf‘tte c"'ia íiuTa do|<'’
L.'se una cinta nue\'a o de-iie«.' la Ic’ngiiet.i, ( p 1 S )
101
Page 100

Comprobación de errores
Funcionamiento
Síntoma
El videocassette no puede retirarse del
portacassette.
Los indicadores E y ^ parpadean y no
puede usarse ninguna función excepto la
de extracción del videocassette.
El indicador de fecha u hora muestra
barras
La función de búsqueda de imágenes
finales no se activa.
La cinta no se mueve cuando se pulsa un
botón de transporte de cinta.
La función SteadvShot no se adiva. STHADYSHOT està ajustado on OFF en el sistema de
No se ove sonido o se ove muy ba)o al
reproducir una cinta.
Se oven demasiados sonidos de alta
frecuencia.
La grabación se detiene en unos segundos.
La función de eiúoque automático no se
acli\a.
La posición de los títulos en la pantalla se
mueve.
-La fundón de atenuación no se acíi\ a.
Causa y/o medidas correctivas
•
La batería esteá agotada.
Use un paquete de baterías cargado o el adaptador de
alimentación deCA. (p. 7, 29)
•
Se ha condensado humedad.
Extraiga el videocassette y no utilice la videocámara
durante al menos 1 hora. (p. 9i)
•
Reajuste la fecha y hora. (p. 84)
•
Se ha extraído el videocassette después de grabar en él.
^ La función de búsqueda de imágenes finales no se
activa hasta que se graba algo nuevo despiiés de
reinsertar el \'ide(.)cassette.
•
El interruptor POWER está ajustado en CAMERA u OFF.
4 Ajústelo en VTR. (p. 25)
•
Se ha terminado la cinta.
Rebobínela o utilice una nueva, (p. 23)
menus.
-> Ajiistelo en C)N. (p. 52)
La función SteadvSl-u>t no funciona cuando el mi>do
panoràmico está ajustado en lò;9FULL.
•
Las cintas estéreo se reproducen con HiFi SOUNO
ajustadi) en 1 2 en el sistema de menús.
Ajusteio en STEREO, (p. 32)
•
l.a imagen se ha grabado con WiND ajustado en ON en
e! sistema de menús.
->
Ajusteio en OFF cuando no ha\’a viento, (p. 32)
•
El interruptor START/5TOP MODE está ajustado en
SSECo 1.
Ajúsfelo en K-(p. ¡5)
•
F! enfoque está aiustadc» en el modo manual.
Ajústelo en el modo de enfoque auti>mático. (p. 57)
•
Las condiciones de \'ideofilmacióíi no son adecuadas
para el enfoque automático.
A|Uste el enfoque en el modo manual para enfocar
manualmente, (p. 57)
•
Hav espacios en blanco antes o después del títuk>l
Bórrelos V seleccione J. (p. 50)
•
id interruptor STAÍ\3’/S7‘OP MODE está ajustado en
SSECo Á
A]ústelo en ^ . tp. 15)
•
Aparece un titulo
Apague el titulo, (p, 48)
102
 Loading...