

Page 1

Video Camera Recorder
CCD-TR9
Operation Manual
Before operating this unit, please read this manual thoroughly
and retain it for future reference.
3-753-980-21 (3)
Videos Handycam
Page 2

WARNING
To prevent fire or shock hazard, do
not expose the unit to rain or
moisture.
CAUTION
\ AisK Of ececTftic shock
I
/
\ I 00 HOT OPEN I
CAUTION TO REDUCE THE RISK OF ELECTRIC SHOSK.
00 NOT REMOVE COVER (OR BACK)
NO USER SERVICEABLE PARTS INSIDE
REFER SERVICING TO QUALIFIED SERVICE PERSONNEL
This symbol is intended to
alert the user to the presence
of uninsulated “dangerous
voltage” within the product’s
A
enclosure that may be of
sufficient magnitude to
constitute a risk of electric
shock to persons.
This symbol is intended to
alert the user to the presence
I
of important operating and
maintenance (servicing)
instructions in the literature
accompanying the appliance.
/!
Information for the customers In the U.SA
This equipment generates and uses radio
frequency energy and if not installed and used
properly, that is, in strict accordance with the
manufacturer’s instructions, may cause
interference to radio and television reception. It
has been type tested and found to comply with
the limits for a Class B computing device in
accordance with the specifications in Subpart J
of Part 15 of FCC Rules, which are designed to
provide reasonable protection against such
interference in a residential installation.
However, there is no guarantee that interference
will not occur in a particular installation. If this
equipment does cause interference to radio or
television reception, which can be determined
by turning the equipment off and on, the user
is encouraged to try to correct the interference
by one or more of the following measures:
Reorient the receiving antenna
Relocate the equipment with respect to the
receiver
Move the equipment away from the receiver
Plug the equipment into a different outlet so
that equipment and receiver are on different
branch circuits.
If necessary, the user should consult the dealer
or an experienced radlo/televislon technician for
addition^ suggestions. The user may find the
following booklet prepared by the Federal
Communications Commission helpful:
“How to Identify and Resolve Radio-TV
Interference Problems”.
This booklet is available from the U.S.
Government Printing Office, Washington, DC
20402, Stock No. 0040004X)3454.
Notice for the customers in Canada
This apparatus complies with the Class B
limits for radio noise emissions set out in
Radio Interference Regulations.
Owner’s Record
The model and serial numbers are located on
the bottom. Record the serial number in the
space provided on the right hand. Refer to
these numbers whenever you call upon your
Sony dealer regarding this product.
Model No. CCD-TR9
Serial No.
Page 3

Table of Contents
Before You Begin
Chapter 1:
Getting Started
Chapter 2:
Basic Operation
Chapter 3:
Advanced Operation
About This Manual......................................................................................................................... 4
Checking Supplied Accessories..................................................................................................... 5
Before You Start............................................................................................................................ 5
Charging and Installing the Battery Pack......................................................................................... 6
Inserting the Lithium Battery........................................................................................................... 8
Setting the Date and Time............................................................................................................... 9
Inserting a Cassette...................................................................................................................... 11
Adjusting the Viewfinder Lens....................................................................................................... 12
Camera Recording........................................................................................................................ 13
Playing Back a Tape......................................................................................................................16
Using the Remote Commander......................................................................................................18
Getting the Most out of Your Battery Pack...................................................................................... 20
Alternative Power Sources.............................................................................................................23
Camera Recording........................................................................................................................ 25
Zooming....................................................................................................................................... 32
Selecting Automatic/Manuai Adjustment Mode...............................................................................33
Focusing Manually........................................................................................................................ 34
Adjusting the White Balance.......................................................................................................... 36
Compensating Backlighting...........................................................................................................38
Using the High-speed Shutter........................................................................................................ 39
Fade-in and Fade-out.................................................................................................................... 41
Close-up (Macro)........................................................................................................................... 43
Playing Back a Tape...................................................................................................................... 44
Recording..................................................................................................................................... 47
Editing.......................................................................................................................................... 50
Chapter 4:
Additional
Information
Maintenance Information............................................................................................................... 54
Tips for Better Camera Recording.................................................................................................. 57
Identifying the Parts.......................................................................................................................60
Indications inside the Viewfinder and in the Display Window...........................................................66
Trouble Check...............................................................................................................................69
Specifications............................................................................................................................... 71
Index............................................................................................................................ back cover
Before You Begin 3
Page 4

Welcome to Video @
Thank you for purchasing a Sony Handycam® camcorder. With
your H£uidycam you can capture iife’s precious moments with
superior picture and sound quaiity. Your Handycam is ioaded
with advanced features, but at the same time it is very easy
to use. You wiii soon be producing home video that you can
enjoy for years to come.
About This Manual
This manual shows you how to operate the camcorder.
To get the most out of the features of the camcorder, we recommend you read
this manual thoroughly. But if you want to shoot immediately, please read the
chapters. Getting Started and Basic Operation. Once you are familiar with basic
operations, you may want to proceed to the chapter. Advanced Operation.
• As you read through this manual, please remember that buttons and settings
on the camcorder are in capital letters:
e. g. Slide POWER to CAMERA.
• Use “Identifying the Parts” at the end of this manual as a guide to find
functions and operations printed on the camcorder itself.
Note on TV Color Systems
TV color systems are different depending on the countries.
If you view the playback picture on a TV, you need an NTSC system based TV
(as this is an NTSC system based camcordei). Please check the list on page 59
to see the TV color system of your country.
4 Before You Begin
Page 5
Please check that the following accessories are supplied with your camcorder.
• Wireless Remote
Commander (1)
AC power adaptor ACV35/V35A (1)
Shoulder strap (1)
• Remote Commander
holder (1)
Uthium Battery CR202S (2)
(for camcorder/for the
Remote Commander)
m.
• Lens cap (1) (attached
to the camcorder)
Battery pack NP-55 (1)
RFU adaptor RFU-90UC (1)
• Jack cover (1) (attached to
the camcorder)
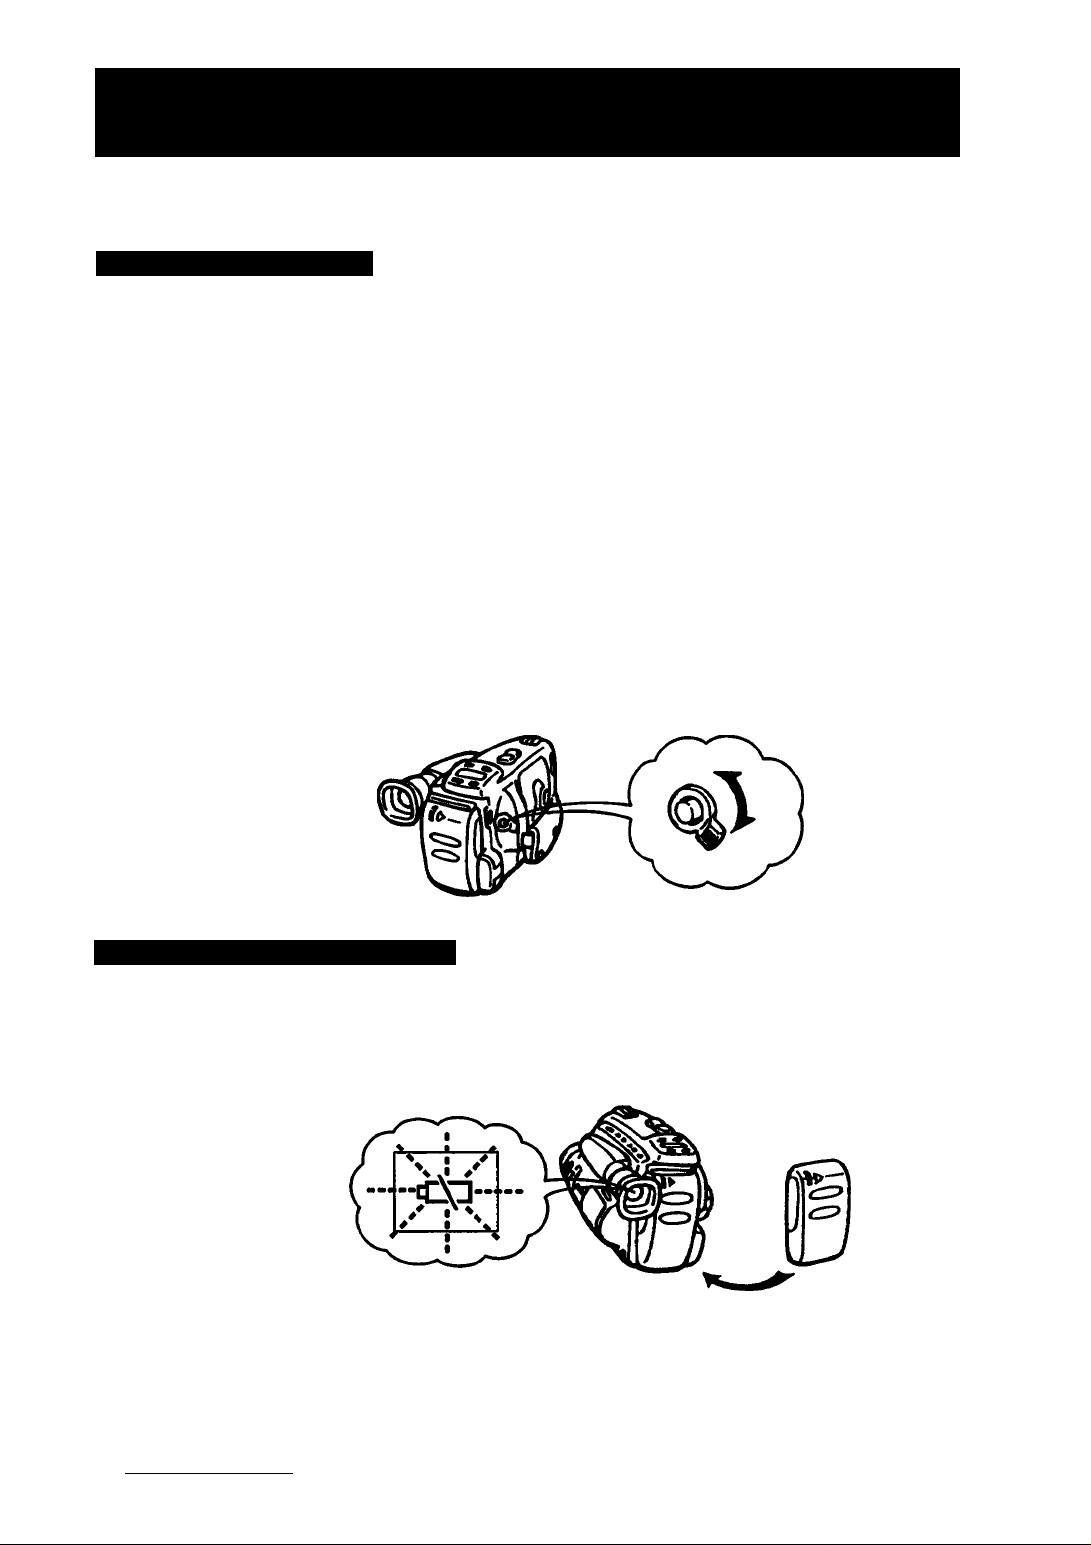
Before You Start
Before you can start recording, you need to;
1 Charge and install the battery pack.
2 Insert the lithium battery.
3 Set the date and time.
4 Insert a tape.
5 Adjust the viewfinder lens to your eyes.
f
.. 1.1. ■ . .. i-'y'., ■. ■■ 'i 3' ■' 'f: ; ‘ '•jI ' I'L.ki
Let’s go through these procedures step by step!
Before You Begin 0
Page 6

CFiapter^^Sttfng ¿tarleS
Charging and installing the Battery Pack
The first thing you need to do is to charge the battery.
To do this, we show you how to charge and instali the battery pack.
Charging the Battery Pack
First, you have to charge the battery pack.
1 Plug the AC power adaptor into a wall outlet.
2 Align the flat side of the battery pack with the line on the AC power adaptor
and slide the battery pack in the direction of the arrow.
3 Set CHARGE/VTR to CHARGE.
Charging begins.
Required charging time:
Type of
battery pack
Required
charging time
When charging is finished, the charge indicator goes out.
NP-55
(supplied)
60
NP-77HD NP-77H
140 140
NP-77
120
(approx, minutes using AC-V35/V3SA)
Important!
Use the battery completely before recharging I
Before you recharge the battery, make sure the battery has been used
(discharged) completely to avoid reducing capacity of the battery caused by
excessive charging.
To use up the battery, remove the cassette and simply slide POWER to
CAMERA with the battery attached, and leave the power on until the <Xi mark
begins flashing rapidly and a red lamp flashes inside the viewfinder.
NP-66H
110 70
NP-55H
0 Chapter 1: Getting Started
Page 7
\ ■ • •• -
‘ • ; i - - . ‘I • ' ■ • -
Installing the Battery Pack
When you have finished charging the iiattery, instaii the battery pack as foliows:
m
1 Lift up the viewfinder.
2 Aiign the right side of the battery pack with the line on the camcorder.
3 Slide the battery pack to the right.
Note
Make sure the battery is securely installed so that it does not fall. If the battery
is not installed properly, the camcorder will not record accurately.
A fully charged battery pack lasts for:
Type of
battery pack
Battery life 50
When the battery power becomes weak, the ds? indication and red lamp flash
inside the viewfinder and the dg indication flashes in the display window. Wait
until they flash rapidly, then replace the battery pack with a fully charged one.
To remove the Press ВАТТ in the direction of arrow (1), and at the same time, slide out the
battery pack battery pack to the left (2).
NP-56
(supplied)
Inside the'vlewfinder
NP-77HD NP-77H
130 130
(approx, minutes, continuous recording when used indoors)
In the display window
NP-77 NP-66H
110
.'ipi
NP-55H
90
60
Chapter 1: Getting Started 7
Page 8
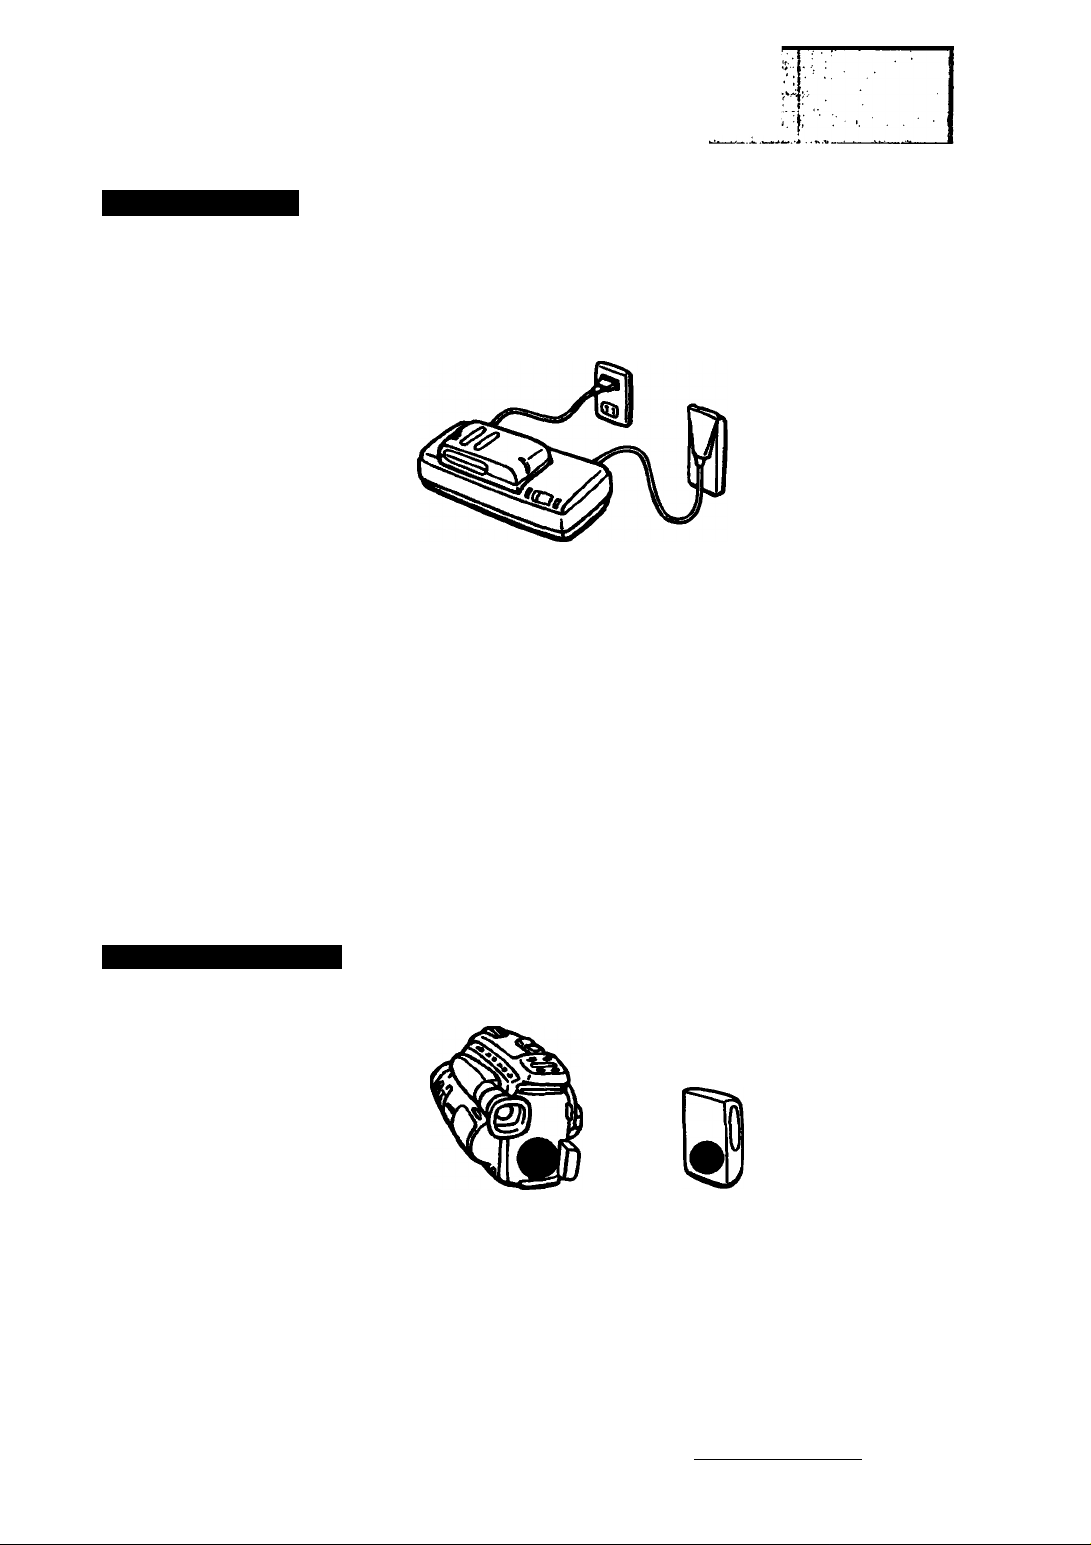
Inserting the Lithium Battery
To active the clock in memory, you need to insert a lithium battery. Make sure
you use the supplied lithium batteries.
1
Pull out the lithium battery holder from the
bottom of the camcorder.
Insert the supplied CR2025 lithium battery with
the + (plus) side facing up.
Put the lithium battery holder back into the
camcorder.
il2^.
Lithium battery life The battery lasts for approximately 1 year in normal operation. When the lithium
battery becomes weak, the time or date indication keeps flashing in the display
window and inside the viewfinder for about 5 seconds when POWER is set to
CAMERA. In this case, replace the battery with a Sony CR2025 or Ouracell
DL-2025 lithium battery. Use of any other battery may present a risk of fire or
explosion.
1
O'
-n.
n 1 MN
Inside the viewfinder
While replacing the lithium battery, keep the battery pack or other power source
attached. Otherwise, you will need to readjust the date and time.
To change the Remove the lithium battery holder from the camcorder, and pull out the lithium
lithium battery battery and insert a new one.
WARNING Battery may explode if mistreated. Do not recharge, disassemble, or dispose of in
fire.
Cautions
• Keep the lithium battery out of the reach of children.
Should the battery be swallowed, consult a doctor immediately.
• Wipe the battery with a dry cloth to assure good contact.
• Be sure to install the battery with the correct polarity.
In the display window
3 Chapter 1: Getting Started
Page 9
Now, let’s adjust the clock inside the camcorder to be able to superimpose the
date and time onto your video.
Make sure that the battery is attached and the lithium battery is inserted.
Make sure you are looking at the display window.
1While pressing the small green button on POWER,
slide POWER to CAMERA.
Turn STANDBY up.
t
Press DATE (+) and TIME (NEXT)
simultaneously for more than
3 seconds until the date indication appears
in the display window.
DATE button now functions as + (to advance
numbers) and TIME button functions as NEXT (to set).
To be
continued
icamerakP^&Tvtr
POWER
Chapter 1: Getting Started Q
Page 10
To correct the date Press NEXT repeatedly until the minute digits stop flashing,
and time settings Then repeat steps 3 to 6.
To check the preset Press DATE( + ) or TIME (NEXT). When you press the same button again, the
date and time. indication goes off.
10 Chapter 1: Getting Started
Page 11
This section shows you how to insert a cassette. Make sure that the power
source is attached.
1
Remove the grip strap.
While pressing the blue button, press EJECT.
The cassette holder will open toward you.
Insert the cassette with window facing out.
nr—
u
J
Press PUSH CLOSE on the cassette holder to
close n.
Attach the grip strap.
PUSH
Chapter 1: Getting Started 11
Page 12
•1- . ■
ùstìnq the Viewfinder Lens
This section shows you how to adjust the viewfinder iens to best fit your eyesight.
You may want to adjust the viewfinder lens when you use the camcorder for the
first time, or when you use it after someone else has.
Make sure that the power source is attached.
3
4
Pull out the viewfinder until it clicks.
1
While pressing the small green button
on POWER, slide POWER to CAMERA.
Insert a cassette.
Turn STANDBY up.
S...
Turn the viewfinder lens adjustment ring so that
the “STBY” display inside the viewfinder screen
conies into sharp focus.
Now, you are ready to
start recording.
ICAMERAhPf^TvfR
POWER
Inside the viewfinder
jgjir
12 Chapter 1: Getting Started
Page 13
Chapter lie O[Miration
Cartiei'a Recorciin '
This section shows the basic procedures for recording.
Make sure that the viewfinder is puiied out. Before you record one-time events,
you may want to make a triai recording to make sure that the camcorder is
working perfectiy.
it is very easy to start recording!
1
Hold the camcorder as illustrated.
Put your hand through the grip strap, hoid your
camcorder against your body and puii the strap
upward. Check that your thumb can easiiy touch
START/STOP.
Remove the lens cap and attach It to the
grip strap.
Chapter 2: Basic Operation 13
Page 14

Camera Recording
■: . - V. ., - I ' ■ : ^ -
While pressing the small green button on POWER,
slide POWER to CAMERA.
4 Close the AUTO LOCK cover.
This puts everything into
automatic.
Turn STANDBY up.
“STBY” and the autofocus frame appears inside
the viewfinder. Now you can see through the
viewfinder. Focus is adjusted automatically inside
the frame (autofocus adjusting range).
ICAMERAlPf& VTR I
POWER
i
Press START/STOP once.
The camcorder is now recording. The camcorder is
recording when “REC” appears and the red lamp
lights up inside the viewfinder.
Inside the viewfinder, you can see a black and white picture of what you are
recording, and information that indicates what the camcorder is doing.
To stop recording
momentarily
To finish recording Turn STANDBY down and slide POWER to OFF.
Automatic
recording
Press START/STOP again.
“STBY” appears inside the viewfinder.
When AUTO LOCK cover is closed, all the camera functions are on automatic
(i.e. autofocus, back light, auto white balance) and the shutter speed is set at
normal (1/60 second).
Inside the viewfinder
Red lamp
14 Chapter 2: Basic Operation
Page 15
iV*-’..;. - ..V-
i*
•i4 :
■«i:}5>:-1
-,.r iX'i'.vï' ”■"
Near the end of
the tape
The indication, the red iamp inside the viewfinder, and the camera
recording/battery iamp on the camcorder flash siowiy. When the tape reaches the
end, the flashing isecomes rapid.
To eject the tape
Make sure that the power source is attached.
1 Remove the grip strap.
2 Press EJECT.
The cassette compartment opens toward you.
3 Take out the cassette and press PUSH CLOSE on the cassette compartment
to ciose it.
4 Attach the grip strap.
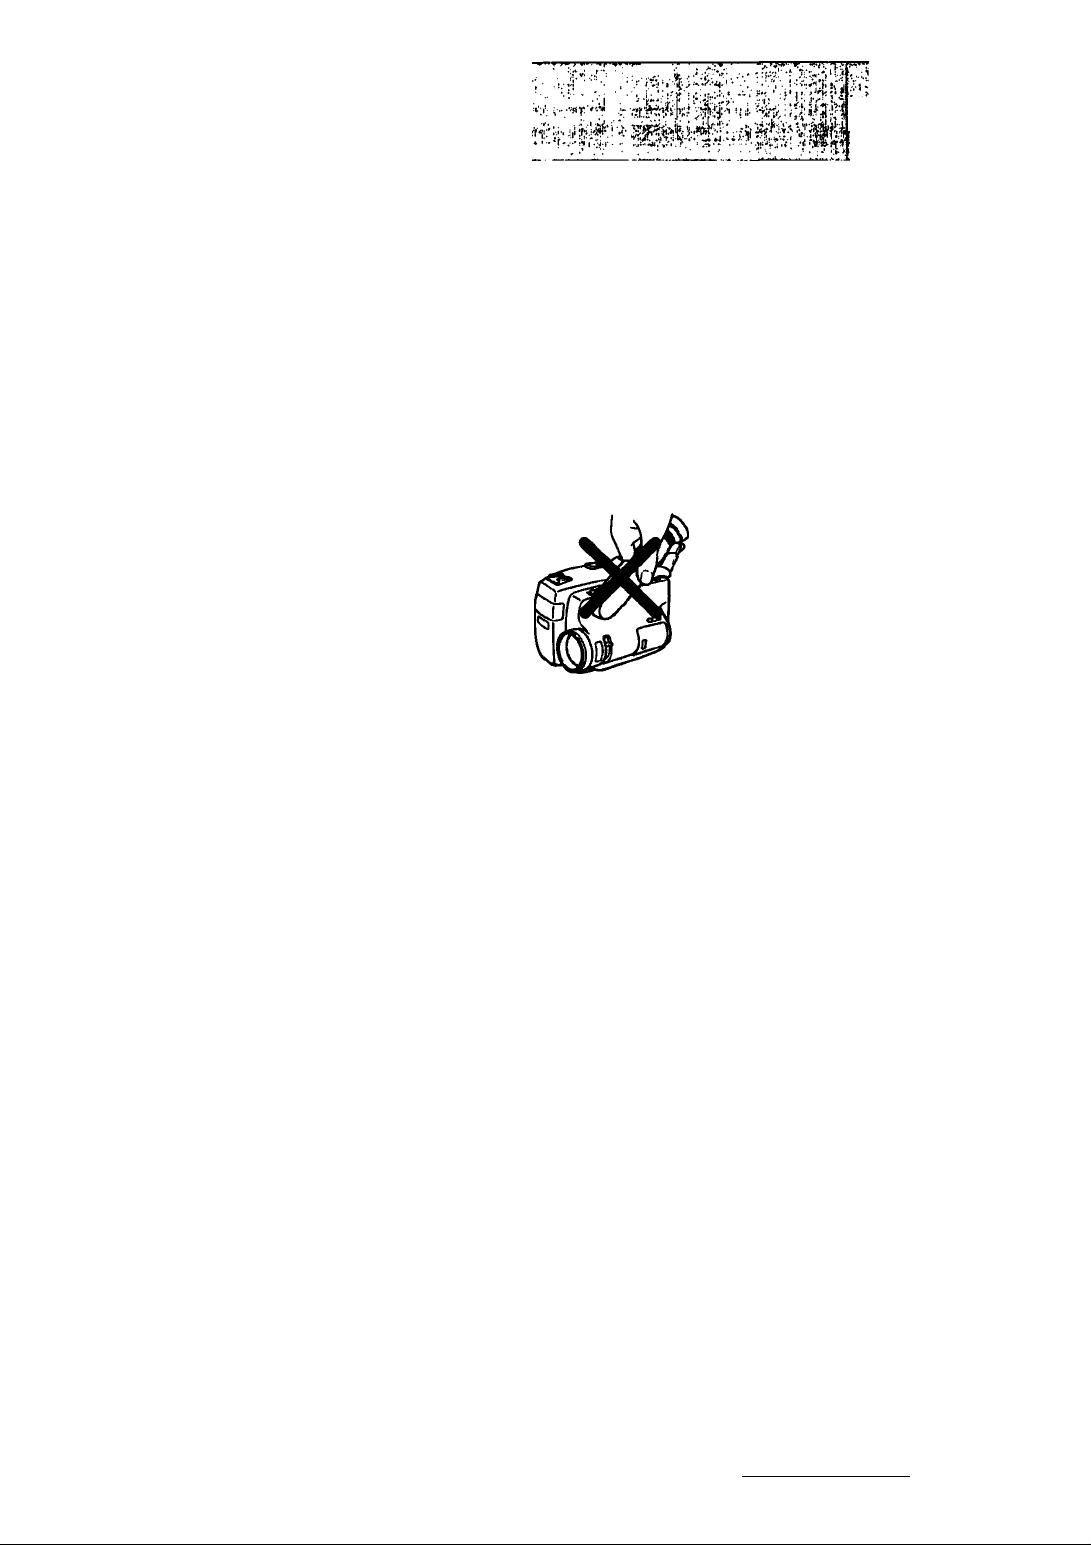
Note on handling Do not pick up the camcorder as shown in the iliustration.
If you wear glasses You can bend back the eyecup to get a better view of the viewfinder.
Notes on recording
• When you record from the beginning of the tape, run the tape for about 15
seconds before actual recording. This will ensure that you will not miss any
Start-up scenes when the tape is played back.
• If you move POWER during recording, the tape stops.
• When moving from indoors to outdoors, or vice versa, turn STANDBY up and
point the camcorder at a white object for about 15 seconds so that the white
balance is properly adjusted.
• The autofocus frame is not recorded.
If you leave the
camcorder in the
standby mode for 5
minutes or more
If the light source
changes suddenly
The camcorder goes off automatically. To re-enter standby mode, turn STANDBY
down once and turn it up again. To start recording, press START/STOP.
When you shoot a subject under bright conditions just after you shoot in a dark
place, the picture may not appear inside the viewfinder. In this case, point the
camcorder in another direction.
Chapter 2: Basic Operation 15
Page 16
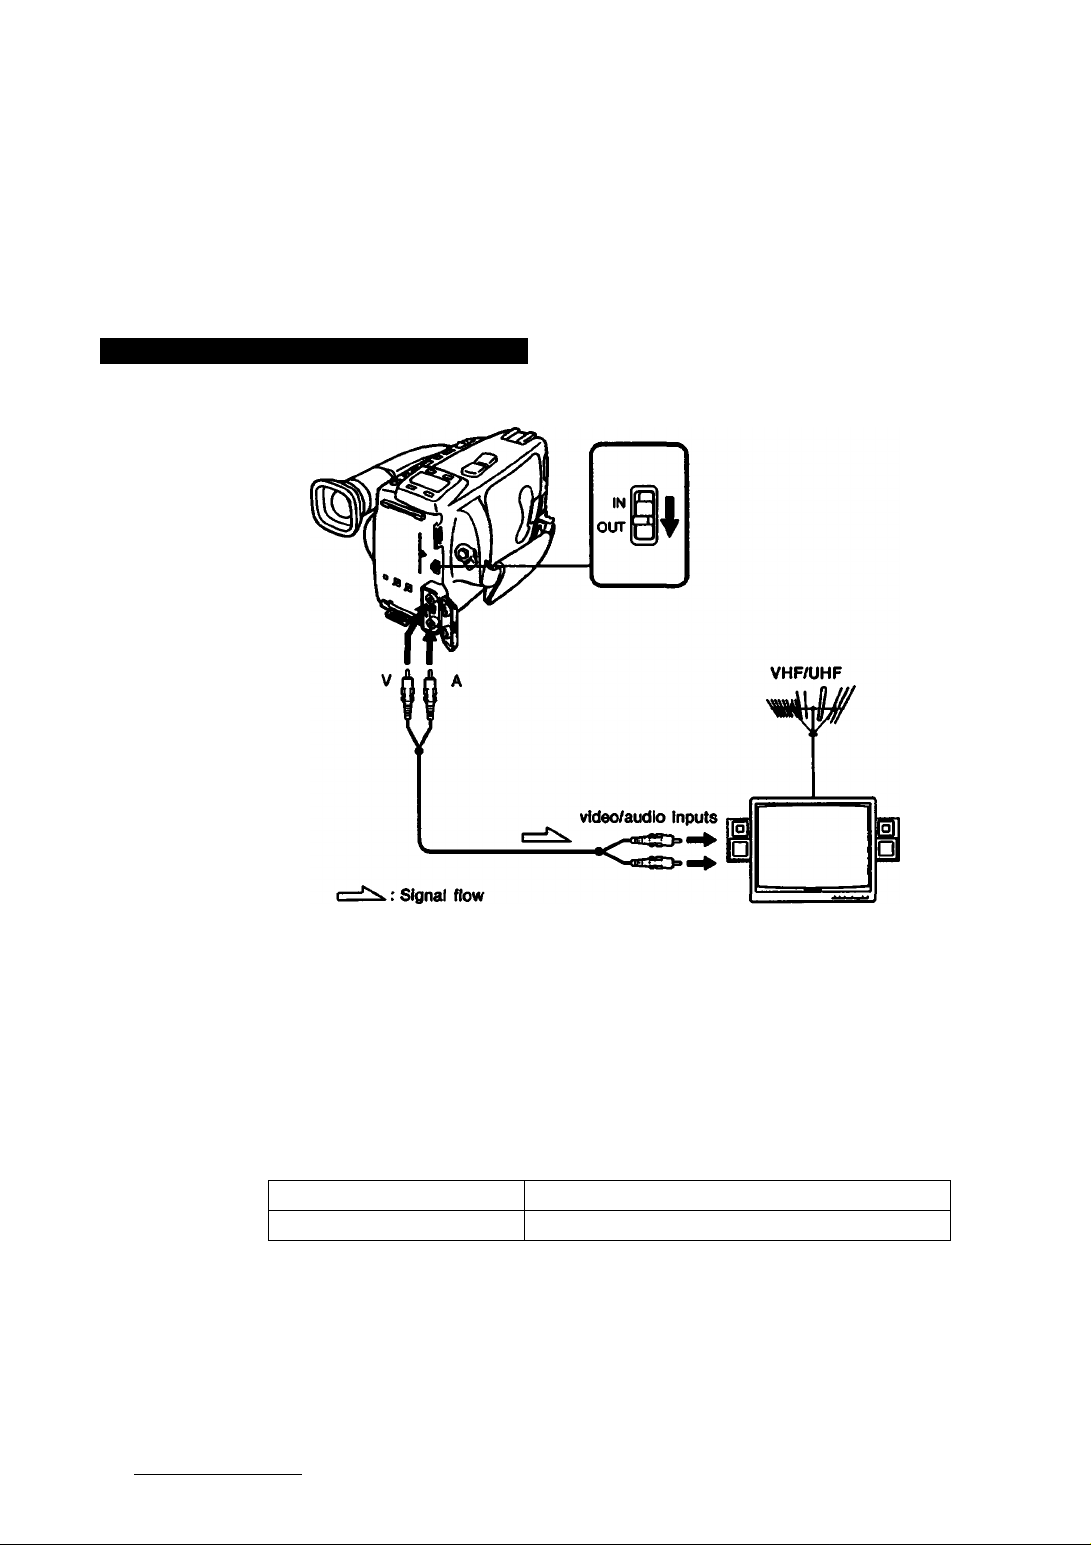
This section shows you how to use this camcorder as a VCR by connecting it
directly to your TV for playback.
There are several ways to connect the camcorder to your TV. Please check
whether your TV has video/audio inputs.
If your TV does not have video/audio inputs, see page 44.
Connecting a TV with Video/Audio Inputs
1 Connect the camcorder and the TV using the appropriate A/V connecting cable
2 Set the IN/OUT selector on the camcoder to OUT.
3 Set the TV/VCR selector on the TV to VCR.
About the
/W jacks
The A/V jacks on this camcorder work as both input and output jacks. Set the
IN/OUT selector as follows.
16 Chapter 2: Basic Operation
according to the connector type of your TV.
Sony offers you the following cables.
[a] VMC-710M/720M: for monaural TV
[b] VM0910IVIS/920MS: for stereo TV
in the OUT position
in the IN position
to view the playback tape/to edit on another VCR
to record from another VCR or a TV
Page 17
Playing Back a Tape
Now, you are ready to playback your tape.
J
1
Attach the connecting plate of the AC power adaptor to the
camcorder and connect the AC power adaptor to a wall outlet
Make sure that the IN/OUT selector on the camcorder
Is set to OUT.
2 Set CHARGEA/TR of the AC power adaptor to
VTR, when you use it as a power source.
While pressing the small green button on POWER,
slide POWER to VTR.
Insert a tape.
Set the TVAfCR selector on the TV to VCR.
If you are connecting with RFU adaptor, turn on
the TV and select the channel that you selected
for the RFU adaptor (3 OH or 4 OH).
Press > .
Playback starts.
To stop playback, press □
To rewind the tape, press
To advance the tape rapidly, press
ly, press ■
CHARGE OFF VTR
ICAMERAhP^S^ VTR I
POWER
1 I I
When you have
finished playback
1 Slide POWER to OFF.
2 Disconnect the AC power adaptor from the wall outlet.
Chapter 2: Basic Operation
17
Page 18

^-. i ■^^,. ;•*.■ —V-:, - .'s- '.
Using the Remote Commander
This section shows you how to use the supplied Remote Commander.
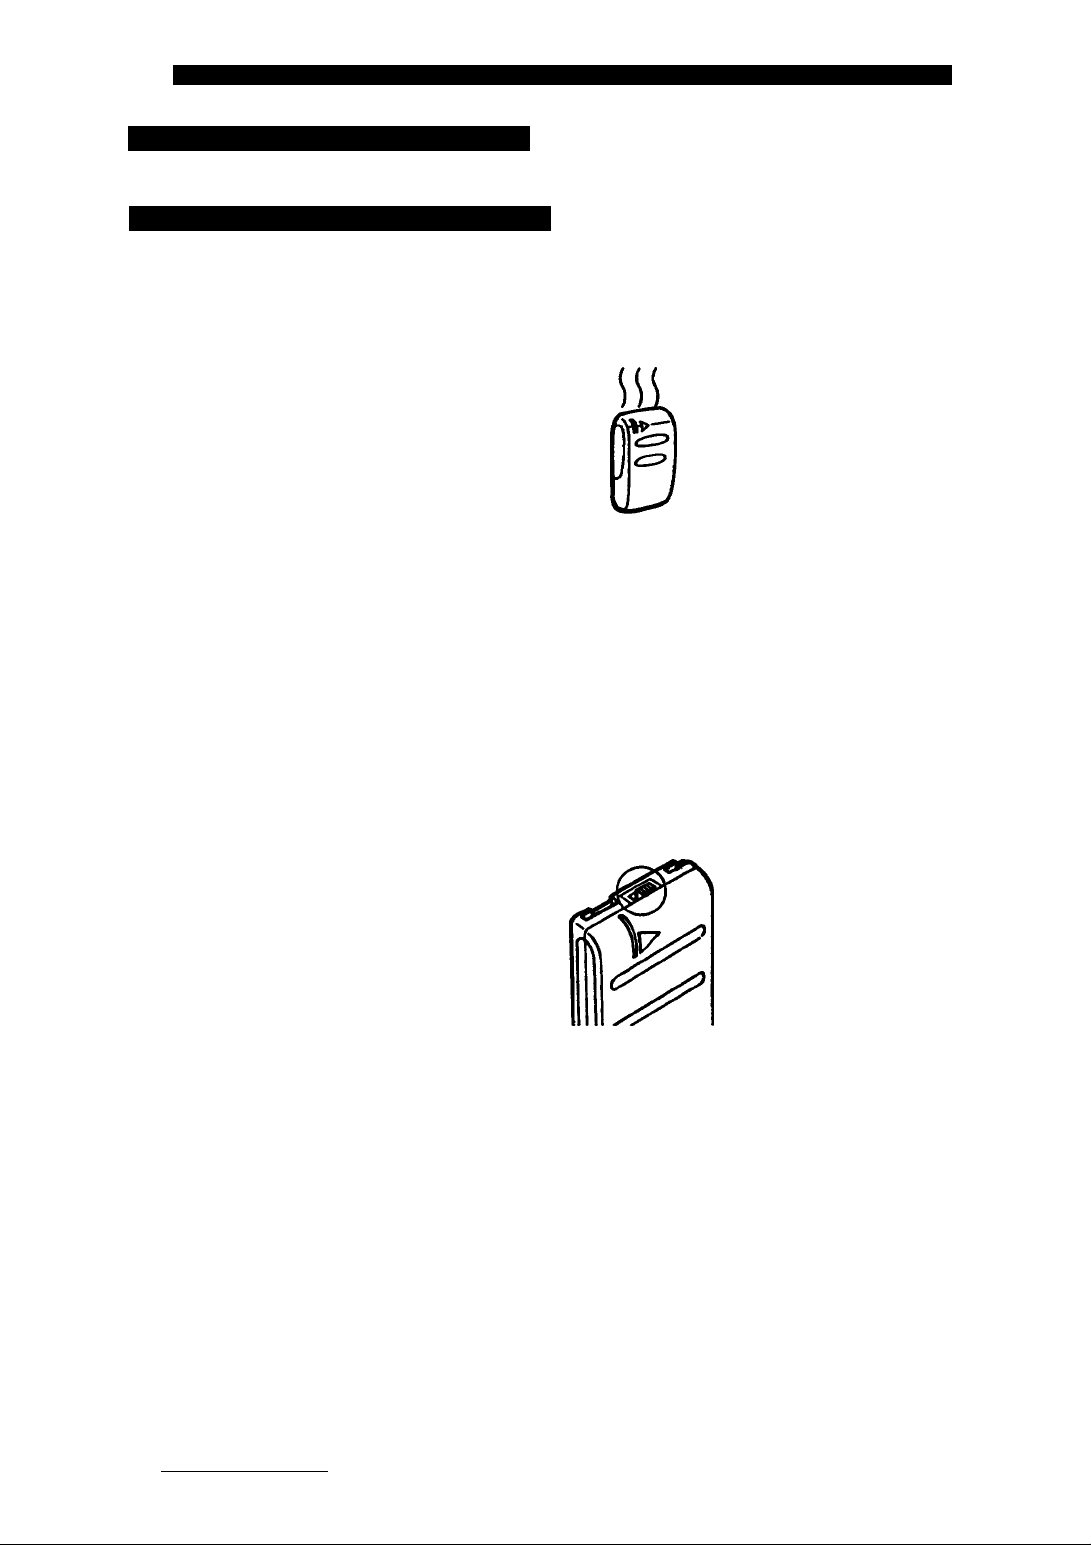
Inserting the Lithium Battery
First, you have to insert the lithium battery into the Remote Commander.
1 Pull out the IHhlum battery holder
from the Remote Commander.
Insert the supplied CR2025 lithium battery with
the + (plus) side facing up. + (plus) side
Put the lithium battery holder back into the Remote
Commander.
-It
O
e
Lithium battery life The battery lasts for approximately 6 months under normal operation.
To replace the
lithium battery
WARNING
Cautions
Attaching the
Remote
Commander to
the Remote
Commander holder
Open the lid of the lithium battery mounting surface, pull out the lithium battery,
and insert a new one. Replace the battery with a Sony CR202S or Duracell
DL>2025 lithium battery. Use of another type of battery may present a risk of fire
or explosion.
Battery may explode if mistreated. Do not recharge, disassemble, or dispose of in
fire.
• Keep the lithium battery out of the reach of children.
Should the battery be swallowed, consult a doctor immediately.
• Wipe the battery with a dry cloth to assure good contact.
• Be sure to insert the battery with the correct polarity.
You can clip the Remote Commander holder on your coat pocket or belt, or slide
it onto the shoulder belt before attaching the Remote Commander to it.
To remove the remote commander from To attach the holder to the shoulder belt
the holder
Rear
18 Chapter 2: Basic Operation
Remove this part before sliding the holder
onto the belt.
Page 19
• .'f-^'rpL
Using the Remote Commander
With the Remote Commander, you can record yourself with your friends or family,
or conveniently control the playback of your tape from a distance.
1
Set REMOTE COMMANDER ON/OFF on
the camcorder (bottom) to ON.
u a/-
.•,;,!a?s'i;
i/i^
.liiiâi ' Iffi¿Slfeí ' : '&Ú Ét-^r'^'Í - ' '
on^9Soff
■ REMOTE
COMMANDER
Note
To prevent
misoperation
Battery leakage
Notes
Set POWER on the camcorder as follows:
(a) When recording, 1) While pressing the small
green button on POWER, slide POWER to
CAMERA, 2) turn STANDBY up.
(b) When playing back. While pressing the small
green button on POWER, slide POWER to VTR.
Point the Remote Commander to the remote
sensor on the camcorder and press the
appropriate button on the Remote
Commander.
(Maximum distance and angle for remote controi)
The buttons that have the same name on the Remote Commander and on the
camcorder functions equally.
When you slide HOLD in the direction of the arrow,
none the buttons on the Remote Commander will
work to prevent any misoperation if you accidentally
press a button.
To avoid damage from possible battery leakage, remove the batteries when you
do not plan to use the Remote Commander for a long time.
• Be sure that the Remote sensor is not in sunlight or strong light. In that case,
you may not be able to operate with the Remote Commander.
• This camcorder works by the signals of VTR2 commander mode. If you use
another Sony VCR at commander mode VTR2, we recommend you to change
the commander mode or cover the remote sensor of the VCR with black paper
to avoid misoperation.
• Be sure that there are no obstructions between the Remote Commander and
the camcorder.
POWER
POWER
Remote sensor
• Be sure to insert the lithium battery with the correct polarity. Otherwise, you
cannot operate with the Remote Commander.
ICM<ERAtj>f^rVTn
Hold switch
Chapter 2: Basic Operation 19
Page 20
Getting the Most out of Your Battery Pack
This section shows you how you can get the most out of your battery pack.
Preparing the battery pack
We show you several hints that would be helpful when you prepare the battery
pack.
Always carry
additional batteries
Battery life is
shorter in a cold
environment
To save battery
power
Have sufficient battery pack power to do 2 or 3 times as much recording as you
have planned.
“Battery life” indicated in this manual is measured by the continuous recording
time of the camcorder, placed at a room temperature using a full-charged battery.
Battery efficiency is decreased and the battery will be used up more quickly if
you are recording in a cold environment.
Turn STANDBY on the camcorder down when not recording to save battery power.
A smooth transition between scenes can be made even if recording is stopped
and started again.
While positioning the subject, selecting an angle, or looking through the
viewfinder lens, the lens moves automatically and the battery is used. The battery
will be also used when a tape is inserted or removed.
When to Replace the Battery Pack
When the Csp indication inside the viewfinder changes from slow flashing to rapid
flashing while you are recording, slide POWER to OFF on the camcorder and
replace the battery pack. Leave the tape in the camcorder in order to obtain a
smooth transition scenes after the battery pack is replaced.
20 Chapter 2: Basic Operation
Page 21
• •^**'i:*'.!:\ ^;.i'-;»';-*|.‘'*rri
................
■.•!■[*** :'•■ '‘'iVi** •• •■:
'^- ■■'¡Vi - ■^■(^^v‘ •'
Notes on Charging
Now, we show you some hints for charging.
A brand-new
battery
A used battery pack • Make sure to use up the battery before recharging.
A brand-new battery pack is not charged. Before using the battery pack, charge it
sufficientiy.
• if recording is compieted before the battery indication appears inside the
viewfinder, we recommend you remove the tape, siide POWER to CAMERA, turn
up STANDBY, and ieave the camcorder untii the battery indication flashes
rapid iy.
• Charging the stiil usabie battery causes a iowering of battery capacity. Battery
capacity can be recovered if you fuily discharge and charge the battery again.
• When you use the AC-S10 AC power adaptor, we recommend you to fuliy
discharge the battery first, and then charge it completely.
2
?
s
I
I
9^
After long storage
Note on the Terminals
Recharge the battery pack after a long period of storage.
if the battery pack is charged fuliy but not used for a iong time (about 1 yeai), it
becomes discharged.
Charge it again, but in this case the battery iife wiii be shorter than normai. After
several charging and discharging cycles, the battery life will recover its original
capacity.
If the terminals (metal parts on the back) are not clean, the battery duration will
be shortened.
When the terminals are not clean or when the battery pack has not been used
for a long time, install and remove the battery pack from time to time. This
improves the contact condition. Also, wipe the + and - terminals with a soft
cloth or paper.
Chapter 2: Basic Operation 21
Page 22
■ . :’.:êoa>?r^npp|eF8i!^ sp.ï'Jfj : e. ■^r.ap.c...
Getting the Most out of Your Battery Pack
Notes on the Rechargeable Battery Pack
Battery heat up is
normal
Battery Care • Remove the battery pack from the camcorder after using it. and keep it in a
The switch on the
battery pack
During charging or recording, the isattery pack heats up. This means energy has
been generated and a chemical change has occurred inside the battery pack.
This is not dangerous.
cool place. When the battery pack is attached to the camcorder, a small
amount of current flows to the camoorder even if POWER is set to OFF. It
causes overdischarging and shortens battery life.
• The battery pack is always discharging even when it is not in use after
charging. Thus, we recommend you charge the battery right before using the
camcorder.
This switch is provided so that you can mark the charged battery. Set the switch
to the “no mark’’ position when charging is completed. Set the switch to the “red
mark’’ position when the battery is used up (or in whichever direction you want
to remind yourselO.
The life of the
battery pack
Charging
temperature
The battery pack can be fully charged and discharged about 5(X) times under
normal temperatures. If the battery dsp indication flashes rapidly just after
turning on the camcorder with a fully charged battery pack, the battery pack
should be replaced with a new fully charged one.
Lower temperatures require a longer charging time. We recommend you charge
under temperatures ranging from 10 *C to 30 °C (from 5 ®F to 85
22 Chapter 2: Basic Operation
Page 23

Chapter 3: Advanced Operation
Alternative Power Sources
This section shows your avaiiable choice of the following power sources for your
camcorder: battery pack (see page 7), house current (on this page), and 12/24 V
car battery (see page 24). Choose the appropriate power source depending on
where you want to use your camcorder.
Place Power source Accessory to be used
Outdoors
Battery pack
Battery pack NP-55 (supplied),
NP-77HD, NP-77H, NP-77, NP-66H,
NP-55H
Indoors House current
In the car
Note on power Disconnecting the power source or removing the battery pack during recording or
sources playback may damage the inserted tape. If this should happen, supply power
again immediateiy.
12 V or 24 V car
battery
AC power adaptor AC-V35/V35A
(supplied), AC-S10, AC-V55, AC-V30
DC pack DCP-77
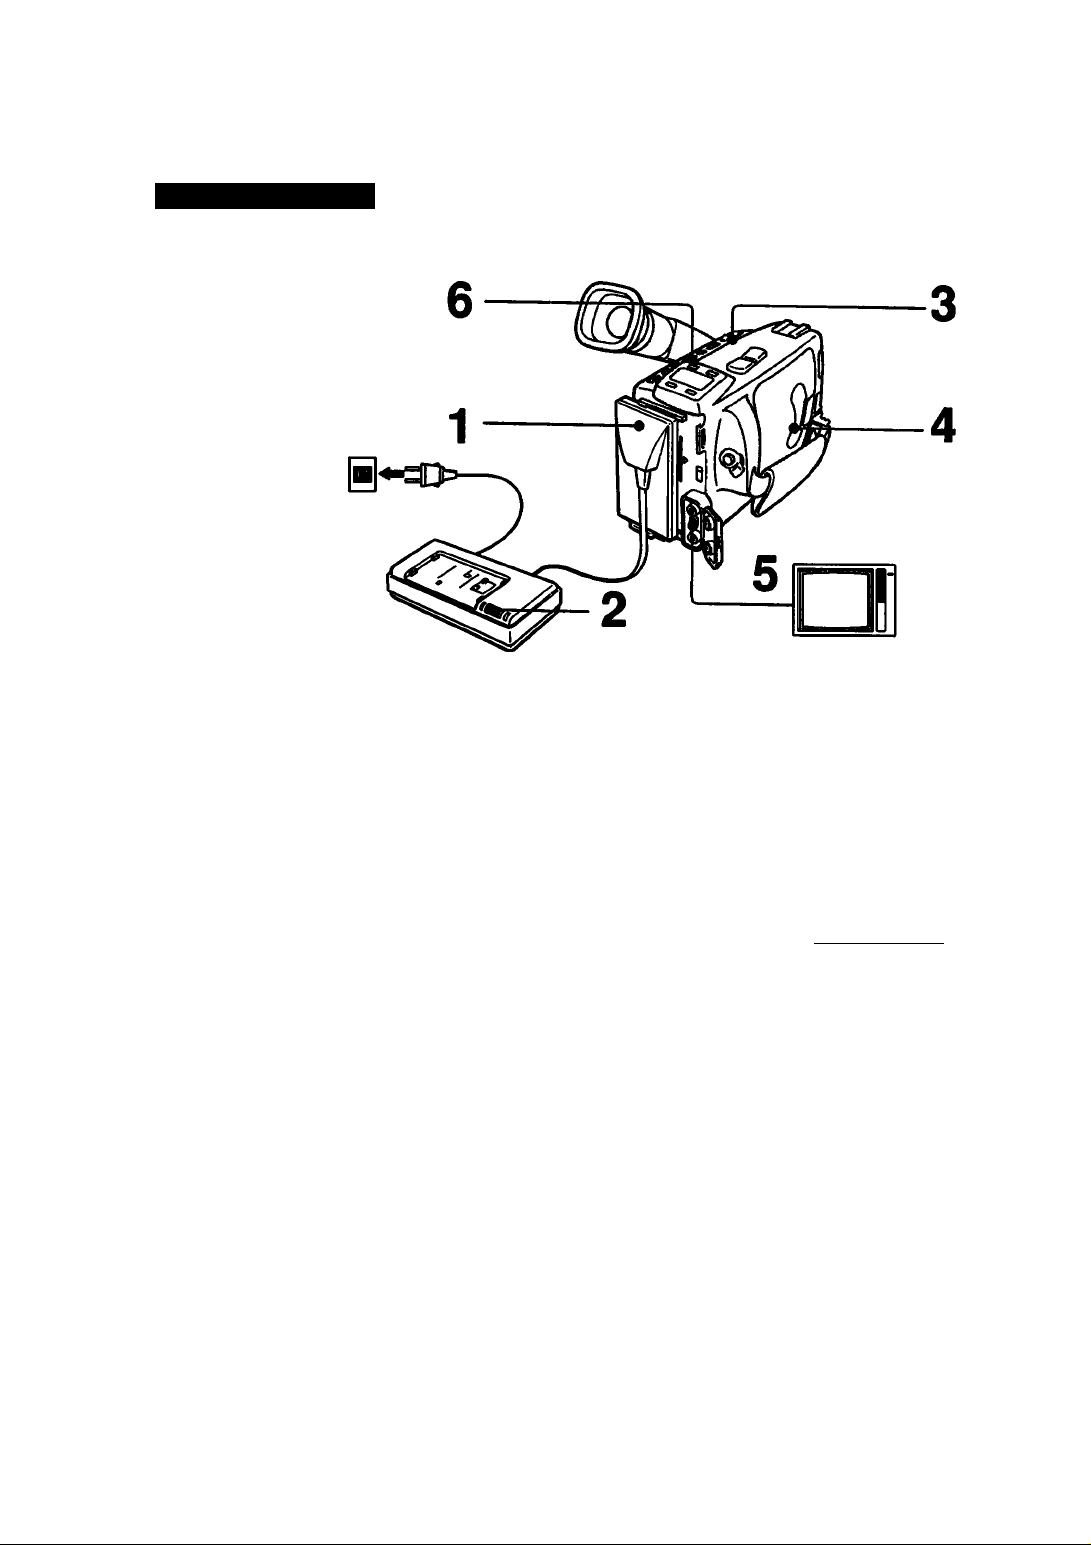
Using House Current
Use the supplied AC-V35/V35A AC power adaptor.
To remove the
connecting (Hate
1 Connect the AC power adaptor to a wall outlet.
2 Lift up the viewfinder.
3 Align the right side of the connecting piate with the line on the camcorder,
and slide it to the right.
4 Set CHARGE/VTR to VTR.
See the instruction manual of the AC power adaptor If you need additional
information about the AC power adaptor.
Proceed in the same way as the battery pack. See page 7.
Chapter 3: Advanced Operation 23
Page 24

Using a Car Battery
The DCP-77 DC pack (not supplied) is required.
1 Lift up the viewfinder.
2 Connect the cord of the DC pack to the cigarette iighter socket of the car (12
3 Aiign the right side of the DC pack with the iine on the camcorder, and siide it
V or 24 V).
to the right.
To remove the DC Proceed in the same way as the battery pack. See page 7.
pack
Options for Charging
• AC-V55 AC power adaptor:
You can charge two battery packs using this adaptor through house current.
When you connect this adaptor with the DCC-16AW car battery cord, you can
use your camcorder powered by a car battery.
• AC-S10 AC power adaptor:
You can charge a battery pack whether it is used up or not with this adaptor
because it has discharging function.
• BC-56 or BC-77 portabie battery charger:
You can charge a battery pack on 1(X)-240 V AC current, (ideal for travel.)
• DC-V30 car battery charger:
You can charge a battery pack through the cigarette lighter socket of a car.
24 Chapter 3: Advanced Operation
Page 25

Camera Recording
In the previous chapter, “Basic Operation”, you have learned the basic recording
operations. This section shows you how to record the date or time, re-record a
picture, prevent accidental erasure, and more.
Recording the Date or Time
You can superimpose the date or time on your recording
While you are recording or when the camcorder is in the recording standby, press
DATE for date indication or TIME for time indication. The date or time displayed
inside the viewfinder is recorded with the picture.
DATE(+) TIME(NEXT)
B)
To stop recording
with the date and
time
DATE(+) TIME(NEXT)
a ~
Press DATE or TIME again. The picture recording continues without the date and
time.
Chapter 3: Advanced Operation 25
Page 26

Camera Recortfing
Rec Review Using EDITSEARCH
Using EDITSEARCH, you can check the last portion of a scene you just recorded
in CAMERA mode. This is convenient for quick, on-the-spot checks.
1 Set the camcorder in the recording standby mode by pressing START/STOP.
2 Press the - (minus) side of EDITSEARCH (@) momentarily.
The last few seconds of the recorded portion is played back inside the
viewfinder. After a few seconds of playback, the camcorder goes back to
recording standby mode, ready for next recording.
26 Chapter 3: Advanced Operation
Page 27

Re-recording on a Previously Recorded Portion (EDITSEARCH)
You can reshoot a scene over the last recorded portion using EDITSEARCH. The
previously recorded portion will be erased.
2,
1
Turn STANDBY up to put die camcorder into
standby mode.
Look inside the viewfinder and find the point from
which you want to begin the recording.
Do this by continuously pressing either the -t-
(plus, fonward playback) or the - (minus,
reverse playback) side of the EDITSEARCH button.
At the desired point, release EDITSEARCH.
Press START/STOP to start recording.
1,4
EDITSEARCH
To pause
To stop
Recording begins from the point you release
EDITSEARCH. A smooth transition between
scenes can be made after the prerecorded
portion even if STANDBY is turned down and
up, or even the power is turned off and on again,
as long as your tape is not removed.
Press START/STOP again.
Turn STANDBY down.
Chapter 3: Advanced Operation 27
Page 28

Camera Recording
Inserting a Scene in the Middle of a Recorded Tape (Insert Recording)
You can insert a scene In the middle of a recorded tape. Set the starting and
ending point of the insert using EDITSEARCH. The previously recorded portion
will be replaced by the inserted scene.
1
While pressing the small green button on POWER,
slide POWER to CAMERA.
POWER
ICAMERAhPf^ VTR I
Turn STANDBY up.
3 While looking inside the viewfinder, keep pressing
the (plus, forward playback) or - (minus, reverse
playback) side of EDITSEARCH, and release the
button where you want to end the insertion.
The camcorder enters standby mode again.
Press RESET.
The counter resets to zero.
This works as an end point mark.
While looking inside the viewfinder, keep pressing +.
the - (minus) side of EDITSEARCH and release the
button at the poirtt where you want to start the insertion.
Press ZERO MEM.
The insert end point is stored
in memory.
RESET
ZERO MEM
D
<!b
EDITSEARCH
Inside the viewfinder
EDITSEARCH
Inside the viewfinder
I COMWfll»-
-0:6¥ii
__
28 Chapter 3: Advanced Operation
In the display window
Page 29

Press START/STOP.
Insert recording begins. The insert recording stops
automatically at the counter zero point.
To cancel ZERO
MEM
Note
Press ZERO MEM.
The picture may be slightly distorted at the ending point when played back.
Checking Recording inside the Viewfinder (EDITSEARCH)
You can check the recorded picture inside the viewfinder using EDITSEARCH.
1 While pressing the small green button on POWER, icAME^j-P^^TyfR
slide POWER to CAMERA. —
POWER
M
Turn STANDBY up.
Keep pressing the + (plus) or - (minus) side of
EDITSEARCH to play back the picture.
+ (plus) side: to view the playback picture
- (minus) side: to view the playback picture in reverse
To stop playback Release EDiTSEARCH.
EOrreEARCH
+(T t—T «1
Chapter 3: Advanced Operation 29
Page 30

Camera Recording
To Monitor the Sound
By using earphone (not supplied) you can monitor the sound while viewing the
playback picture inside the viewfinder.
1 Connect earphone (not supplied) to the (3> jack.
2 While pressing the small green button on POWER, slide POWER to VTR.
3 Press to rewind the tape and press □ where you want to stop.
4 Press > to start playback.
Recording with an External Microphone
You can connect an optional external microphone (monaural) to the MIC jack.
This jack also accepts a “plug-in-power” microphone.
MIC jack
30 Chapter 3: Advanced Operation
Page 31

Connecting a Wired Remote Control Unit
When you connect an optional wired remote control unit or editing controller to
the C REMOTE control jack on the camcorder, you can operate your camcorder
from a distance. In this case, be sure to set the REMOTE COMMANDER ON/OFF
switch of the camcorder (bottom) to OFF.
C REMOTE control jack
About e (LANG)
C stands for Local Application Control Bus System. The C control jack is used
for controlling the tape transport of video equipment and peripherals connected
to it. ITiis jack has the same function as the connectors indicated as CONTROL
L or REMOTE
Preventing Accidental Erasure
Slide the tab on the cassette to expose the red mark. This will prevent accidental
recording.
If you try to record with the red mark exposed, the IS and ± indications flash
inside the viewfinder and in the display window, and you cannot record. To re
record on this tape, slide the tab back out covering the red mark.
Notes on handling
Never insert anything in the small holes on the rear of the cassette. These
holes are used to sense the type and thickness of the tape, or whether the red
mark is exposed or covered, etc. Store cassettes in their cases and keep them
in an upright position to prevent intrusion of dust and uneven winding.
Store cassettes in their cases and keep them away from heat, humidity, direct
sunlight, magnetic fields, dust and mold.
Chapter 3: Advanced Operation 31
Page 32

Zooming
You can change the size of the subject in the scene. Use the zoom to focus
manually or to decide the shooting angle. Also use “zoom-ln (Telephoto)” for
dramatic close-ups. Use “zoom-out (Wide-angle)” for panoramic long shots. The
most common mistake, however, is using zoom-in or zoom-out too often while
recording. For natural recording, you may want to set the zoom first and then
start recording.
W(Wide-angle)
You can zoom using motorized power zoom or manually with zoom lever.
Power zooming Use the power zoom for smooth and constant zooming.
Press the T side of the power zoom button for telephoto (subject appears closer)
and the W side for wide-angle (subject appears farther away).
The zooming speed is faster when the power zoom button is pressed firmly, and
slower when the button is pressed lightly.
Zooming Manually Use the manual zoom to create a dramatic effect or changing zoom angle
quickly.
Turn the manual zoom lever upward for telephoto and downward for wide-angle.
T(Telephoto)
Focal length of this
camcorder
Options
The focal length is 62 mm to 62 mm (1/4 to 2 15/32 inches). This means
approximately 43 mm to 430 mm (1 3/4 to 17 inches) converted into the focal
length of a 35-mm still camera.
When you use VCL-0637 (wide conversion lens) or VCL-1437 (tele conversion
lens), you can get more wider angle or telephoto angle. For details, consult your
Sony dealer.
32 Chapter 3: Advanced Operation
Page 33

Selecting Automatic/Manu^l Adjustment Mode
This section shows you how to record manualiy. The camcorder’s automatic
functions offer you worry-free operation under most shooting conditions. But in
some circumstances, manuai adjustment is better for creative recording. You can
manuaiiy adjust the foiiowing items with this camcorder;
- Focus
- White baiance
- Back iight
- Shutter speed
For manuai adjustment, open the AUTO LOCK cover and seiect an appropriate
setting.
When you cióse the AUTO LOCK cover, the focus, white baiance, and back iight
return to automatic adjustment. The shutter speed is set to 1/60.
Functions of the
AUTO LOCK cover
When the AUTO LOCK cover is closed, white balance, back light and shutter
speed return to the normal settings regardless of the setting you made. Focus is
kept at autofocusing. Closing the AUTO LOCK cover disables these control
buttons. Opening the AUTO LOCK cover enables the control buttons to be set
manually. And you can change whatever settings you like, according to the
shooting situation.
The settings you made are retained as long as the battery is in place.
Chapter 3: Advanced Operation 33
Page 34

Focusing Manually
This section shows you how to focus manuaiiy.
When to use in the foiiowing cases you shouid obtain better resuits by adjusting the focus
manual focus manuaiiy.
Too much brightness behind the subject
Subjects with little contrast-wall, sl^, etc.
Horizontal stripes
Subject through frosted glass
• Insufficient light
• One subject is close; the other is in the center, but at a distance
• Subjects beyond nets, etc., or another subject passes in front of the camcorder
• Bright subject or subject reflecting light
• High contrast behind the subject (the background may be focused)
• When using conversion lenses or effect filters
• When shooting a stationary subject using tripod
• When you want to save battery power
• Autofocusing does not function momentarily when:
- The setting of the shutter speed is changed.
- Back light is adjusted manually.
- Lighting conditions change quickly.
- zooming is done from wide range to telephoto.
This camcorder keeps in focus by referring to the picture contrasL which is not
perfect in the above situations.
34 Chapter 3: Advanced Operation
Page 35

Focusing Manually
When adjusting focus manually, the best way is to first adjust at telephoto
position before recording, then set the desired zoom angle.
Let’s go through it step by step.
1
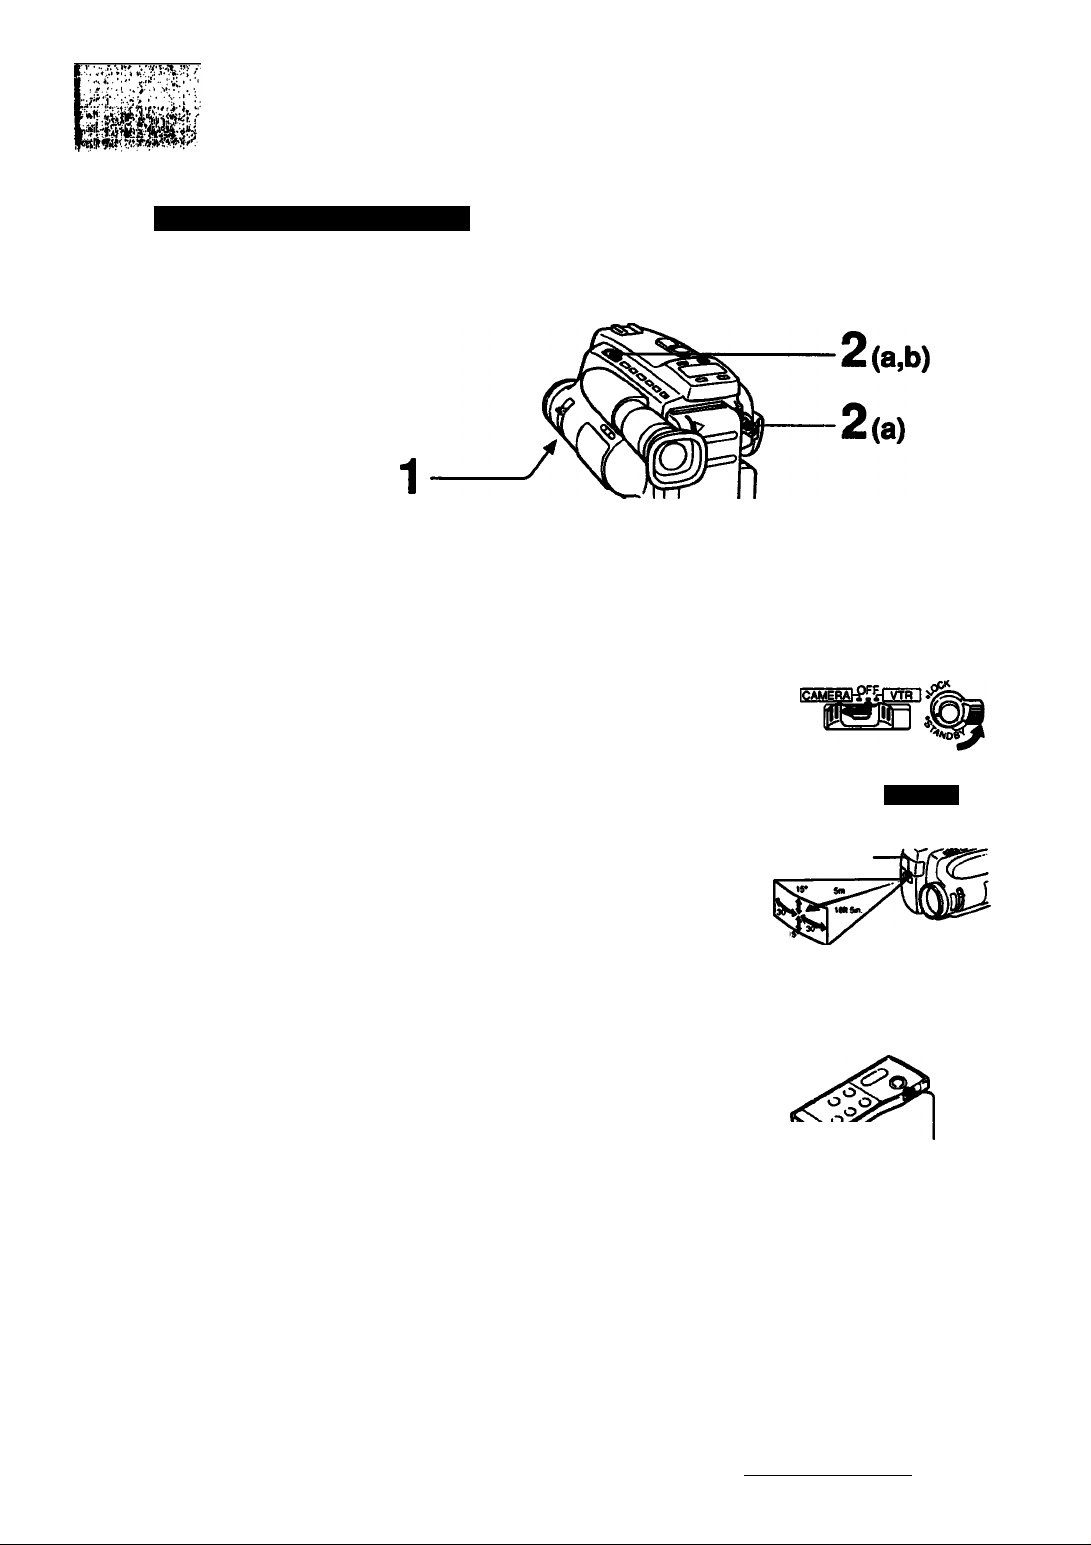
Siide open the AUTO LOCK cover.
Press FOCUS.
Make sure that the autofocus frame goes
out in the viewfinder.
1
FOCUS
To reactive
autofocusing
Shooting in
relatively daik
pieces
Inside the viewfinder
Keep pressing the T side (telephoto) of the power
zoom button until the zooming stops.
Turn the focus ring to achieve sharp focus.
Set the desired shot length using the power zoom
button.
Press FOCUS so that the autofocus frame appears inside the viewfinder.
When shooting in relatively dark places such as indoors, the depth of field
(distance range of the subject that will be In sharp focus) Is very shallow. For
best results, shoot at wide angle after focusing in the telephoto position.
Chapter 3: Advanced Operation 35
Page 36

Adjusting the White Balance
This section shows you what white baiance is and how to adjust it.
What is white White baiance adjustment is the adjustment of the camcorder to the most
baiance natural color temperature under the given lighting conditions.
In the following cases, you should obtain better results by adjusting the white
balance manually.
Conditions
Lighting conditions change quickly
Conditions too bright, such as in photography studios
Under sodium lamps
Under mercury lamps
Monochromatic subject or background
Under a color matching fluorescent lamp
Recording: • a sunset/sunrise
• just after sunset
• just before sunrise
e.g. neon signs, fireworks
White balance mode
(indication inside the
viewfinder)
HOLD
Adjusting the White Balance
There are 3 modes for manual white balance adjustment.
Indoor and outdoor modes are pre-set color temperature.
Hold mode locks in certain color temperature after automatic adjustment.
36 Chapter 3: Advanced Operation
Page 37

1
Slide open the AUTO LOCK cover.
2 Select the desired white balance mode (see page 36)
by pressing WHITE BALANCE.
Each time you press the button, the indication inside
the viewfinder changes as foiiows:
e)S5& ^№8^
O Q
•ACKuQMT raeus
o o
(indoor)
_l
Note on manual
adjustment
No indication (auto)
t
____________
WHITE
BALANCE
When moving from indoors to outdoors, or vice versa, press WHITE BALANCE
until the white balance indication inside the viewfinder disappears and adjust the
white balance in auto mode, then reset the white balance manually.
HOLD -► ^ (outdoor)
-5fC-
Inside the viewfinder
Lcxiking the White Balance Setting (HOLD Mode)
HOLD mode allows you to lock in to certain color temperatures.
What is HOLD In HOLD mode, the camcorder automatically adjusts the white balance according
mode? to the color temperature of the subject’s light source and keeps that setting
during recording. When recording some subjects with different color temperatures
(when lighting conditions change frequently), use HOLD mode. Then, you can
achieve a recording with natural colors without being affected by the
surroundings.
To enter HOLD 1 Close the AUTO LOCK cover.
nrade The white balance enters automatic mode.
2 Point the camcorder at a white, flat object such as a white wall or paper and
record it for about 15 seconds.
3 Open the AUTO LOCK cover.
4 Press WHITE BALANCE to display the HOLD indication inside the viewfinder.
When you change the battery pack, the white balance setting, or the light
source, you need to enter HOLD mode again. In this case, follow the
procedures above again.
Chapter 3: Advanced Operation 37
Page 38

Compensating Backlighting
In this camcorder, the exposure is automatically controlled.
However, when shooting a subject that is backlight, that is, if the light source is
coming in from the back of the subject, use the BACK LIGHT button to get
natural exposure.
1
2
1 Slide open the AUTO LOCK cover. C
'
-------------------------------------
1
'
WHITg SHUTTER
BALANCE ^PEEO
(O) E)
G3 О
After shooting
2 Press BACK UGHT.
The indication appears in the viewfinder.
BACK LIGHT
Be sure to release this adjustment by pressing BACK LIGHT again. (The ^
indication goes out.)
Otherwise, the picture will be too bright under normal lighting condition.
38 Chapter 3: Advanced Operation
Page 39

Using the High-speed Shutter
When you record a fast-moving subject, choose a higher shutter speed. The
movement wiil look sharper during freeze frame when played back the tape with
an 8mm recorder that has the cleam still function. Remember that you need
enough lighting to use the high-speed shutter.
Selecting the Shutter Speed
You can select the shutter speed from 1/60 to 1/4000.
Press SHUTTER SPEED repeatedly until the desired shutter
speed Indication appears Inside the viewfinder.
Each time you press the button, the indication
changes as follows:
No indication (1/60) -► 100 (1/100) -► 250 (1/250) — 1000 (1/1000)
t
---------
4000 (1/4000) 2000 (1/2000) x
SHUTTER
SPEED
Inside the viewfinder
Chapter 3: Advanced Operation 39
----------
Page 40

Using the High sjaeed Shutter
To choose the best
shutter speed
Notes on shutter
speed
Example use
• On clear days, recording golf or tennis swing (To view the
hit ball clearly in the still picture mode, set to 1/4(XX))
• Recording skiers
• On overcast days, recording a moving carousel or roller
coaster
• Recording outdoors from inside a moving vehicle (for
stable shooting)
• Instead of using the ND2 (neutral density) fiiter (To reduce
the exposure level to about halO
• Recording indoor sports (for stable shooting)
When you select shutter speed 1/250 or faster, record under sunlight or use a
video light.
When you record a TV screen with certain shutter speeds, the brightness of
the recorded picture may vary.
When you shoot a very bright subject at a faster shutter speed, a light vertical,
belt-like line ("smear”) may appear on the screen when played back.
When you record at certain shutter speeds under a discharged tube light, such
as a fluorescent lamp, sodium lamp or mercury lamp, the brightness of the
recorded picture may vary.
For your selection
VAOOOoT
1/2000
1/1000 or 1/250
1/100
40 Chapter 3: Advanced Operation
Page 41

Fade-in and Fade-out
This section shows you how to fade-in and fade-out to add a professionai touch
to your tape.
FADE
IN
Fading in
You can make the picture gradualiy appear from biack and the sound increase by
using the fade-in function.
FADE
OUT
Chapter 3: Advanced Operation 41
Page 42

Fade-in and Fade-out
Fading out
You can make the picture gradually fade to black and the sound decrease by
using the fade-out function.
1 V№ite recording, press FADER.
The “FADER” indication appears in the viewfinder.
2 Press START/STOP to stop the recording.
The recording starts fading out and stops.
To cancel the fade- Before pressing START/STOP, press FADER again.
in/fade-out
function
To use fade-in/
fade-out repeatedly
When the date is The date does not fade-in or fade-out.
displayed
Start from step 1 each time.
FADER
FADER
Inside the viewfinder
.(o
42 Chapter 3: Advanced Operation
Page 43

Close-up (Macro)
This section shows you how to shoot smali subjects such as fiowers, insects
and photographs.
Close-up
You can shoot subjects that are at ieast 10 mm (about 1/4 inch) away from the
lens surface.
1Turn the zoom lever to the MACRO position,
pressing the green macro set button.
Notes
Bring the camcorder as close as necessary to obtain the desired size of
image.
Turn the zoom lever within the MACRO range to focus sharply.
Macro range
(6.2 to MACRO)
• In the MACRO range, autofocusing does not function.
• When doing close up, the depth of field is very shallow. So play attention to
focusing. To keep the subject in focus, use a tripod.
Chapter 3: Advanced Operation 43
Page 44

Playing Back a Tape
This section shows you how to view the piayback picture on the TV screen. You
must connect the camcorder and the TV and/or VCR property.
In an earlier section (page 16), we explained the basic connection to your TV.
Here, we will show you several other methods of connection to your TV
depending on the type of TV you have.
If you connect a TV which has video/audio inputs, see page 16.
If Your TV Has Only an Antenna Input
Use the supplied RFU adaptor to connect your camcorder to the TV. Make sure
that the TV is turned off to prevent speaker damage before hooking up to your
camcorder.
UHFunrà
TV
OUT
; Signal flow
To add your camcorder connection to a TV which already has a regular TV (VHF)
antenna attached, you need to do the following procedure.
1
Unplug the antenna cable from the TV first
Rug the tail-end of the RFU adaptor marked OUT into the antenna input of
your TV. Re-wire the antenna cable you unplugged to the RFU adaptor jack
marked ANT. This way, you can switch between TV broadcasts and your
home video playback without re-wiring.
Connect the RFU adaptor to the camcorder.
Slide IN/OUT on the camcorder to OUT.
Set the channel selector on the RFU adaptor (and
your TV diannel) to 3CH or 4CH of the VHF channel,
whichever is not active (vacant) in your area.
VHF antenna
3CH-^lD~l^4CH
RFU DC OUT
A
44 Chapter 3: Advanced Operation
Page 45

Connecting to a TV via a VCR
You can connect the camcorder to a TV via a VCR.
When your TV is
without video/
audio inputs
1 Disconnect the antenna connection between
the TV and the VCR, and connect the RFU
adaptor (suppiied) to the VHF/UHF input on
the TV and VHF/UHF output on the VCR.
Siide iN/OUT on the camcorder
to OUT.
TV
When your TV has
video/audk) inputs
Set the channei seiector on the RFU adaptor (and
your TV channeO to 3CH or 4CH of the VHF channei, 3CH4|Ql]^4CH
whichever is not active (vacant) in your area.
Connect the camcorder to the VCR using the appropriate A/V connecting
cabie.
Siide iN/OUT on the camcorder to OUT.
Set the input seiector of the VCR to LiNE, if availabie.
Set the TV/VCR seiector on the TV to VCR or seiect the XH or 4CH of the
VHF channei.
Chapter 3: Advanced Operation 45
Page 46

Pfaylng Sack a Tape
Various Playback Modes
With this camcorder, you can:
• view a still picture (playback pause)
• monitor a high-spe^ picture (picture search)
• monitor a fast-moving picture (skip scan)
: r >. . -V
Still picture
(playback pause)
High-speed picture
High speed search
during fastfoward or
rewind (skip scan)
To view the still picture, press II PAUSE during playback.
II appears in the display window.
To resume nonnal playback, press > or II .
Note
When the still picture mode lasts for 5 minutes or more, the camcorder
automatically stops.
To monitor picture in high speed and locate a desired scene quickly, keep
pressing or ^ during playback.
To resume normal playback, release the button.
You can also go into high speed search during fastfoward or rewind to locate a
desired scene more quickly. Press while rewinding or while advancing
the tape.
To resume normal playback, press >.
Notes
• During the various playback modes, streaks appear on the screen.
• During the various playback modes, you cannot hear the sound.
46 Chapter 3: Advanced Operation
Page 47

This section shows you how to record from a VCR or TV.
Recording from a VCR or TV
You can record a tape from another VCR, or a TV program from the TV if both
are equipped with video/audio outputs.
Disconnect the RFU adaptor from camcorder if it has been connected.
Make connections using the appropriate AA/ connecting cable.
Sony offers you the following cables (not supplied)
[a] VMC-710M/720M: for monaural TV or VCR
[b] VM0910MS/920MS: for stereo TV or VCR
Chapter 3: Advanced Operation 47
Page 48

To record
1
Make sure that IN/OUT is set to IN.
While pressing the small green button on POWER,
slide POWER to VTR.
ICAMER/^^&T^
POWER
IN
OUT
t
Insert a tape in the camcorder.
Turn on the VCR or TV.
Play back the tape (in another VCR) or select the
TV channel to be recorded.
Slide • REC in the direction of the arrow.
Recording starts. You can monitor the picture
being recorded inside the viewfinder.
•REC-»
48 Chapter 3: Advanced Operation
Page 49

Using the Tape Counter
During recording or piayback, you can see the tape counter indicating the actual
recording or playback time.
Picture must be recorded on the tape in order for the tape counter to function.
Tape counter does not work on blank portion.
To count the whole
tape
To return to a pre>
registered point
Press RESET at the beginning of the tape so that the counter shows “0:00:00”.
Write down the counter reading at a particular point so that you can easily find
that point later by referring to the tape counter.
1
During playback, press RESET at the point you
later want to locate. RESET
The counter shows “0:00:00”.
Press □ when playback has finished, as usual.
t
-- ------- -- -
, > COUNTER
la ow€o
\__r In the displadisplay window
STOP
Note
Press ZERO MEM.
The “ ZERO MEM ” indicator flashes.
Note
The ZERO MEM does not function during
recording or playback.
ZERO MEM
4 Press or
The tape rewinds or advances and stops
automatically when the counter reaches
approximately zero.
The ZERO MEM mode is canceled automatically
once the tape is rewound or sent forward to the
point you pre-registered.
The counter reading and the point on the tape may not correspond exactly. Use
the counter as a guide. There will be a time lag of several seconds especially
when you fast-forward or rewind repeatedly and also if you play back a tape
recorded in LP (Long play) and SP (Standard Play) modes mixed.
DREW FF®
Chapter 3: Advanced Operation 49
b
Page 50

Editing
This section shows you how to edit your tape.
Editing Tap>es with a VCR
You can create your own video program by editing with any other @ 8 mm,
№ Betamax, ¡9^ VMS VCRs that has video/audio inputs.
This portion Is not edited.
Connection
Original tape
Edited tape
A/V
1 (Connect the camcorder and the VCR using the appropriate AA/ connecting
cable.
Sony offers you the following cables:
{a] VMC-710M/720M; for monaural VCR
[b] VMC-910MS/920MS: for stereo VCR
2 Set the input selector on the VCR to LINE, if available.
^ I ^ t .’N;^ *•' «'
Pause
Video/audio Inputs tt
A/V connecting
cable (not supplied)
Signal flow
50 Chapter 3: Advanced Operation
Page 51

How to edit
4
6
5
3
1Insert a tape to be recorded into the
recording VCR.
Siide EDIT on the camcorder In the direction of
the anxMw.
EDIT
Make sure that IN/OUT is set to OUT.
While pressing the small green button on POWER,
slide POWER to VTR.
Insert your recorded tape into the camcorder.
Play back tape on the camcorder until you locate
the point where you want to start editing, then set the
camcorder to the playback pause mode.
On the recording VCR, locate the recording start
point and set the VCR to the recording pause mode.
8 Press II PAUSE on the camcorder and VCR
simultaneously to start editing.
IN
OUT
ICAMERAiPf&i VTR I
POWER
|4
Chapter 3: Advanced Operation 51
Page 52

To edit more
scenes
Repeat steps 6 to 8.
To stop editing
momentarily
To stop editing
Use of the EDIT
switch
Replacing Recording on a Tape (Insert Editing)
Connection
Press II on the recording VCR.
Press □ on both the camcorder and the VCR.
When you slide EDIT in the direction of the arrow (EDIT ON), you can keep
picture and deteriorations resulting from editing to a minimum. Avoid using the
edited tape for multiple generations of editing. However, when you edit or copy
to another VCR after editing, be sure to set this switch in the opposite direction
of the arrow (EDIT OFF).
You can insert a new scene from a VCR onto your originally recorded tape by
specifying starting and ending points.
VCR (Player)
Camcorder (Recorded I
Connections are the same as in “Recording from a VCR or TV (page 47)”. Before
you begin replacing recordings, set the VCR to the playback pause mode at the
beginning of the scene to be recorded.
I
To replace
reooriHngs
1
52 Chapter 3: Advanced Operation
While pressing the small green button on POWER,
slide POWER to VTR.
The counter appears in the display window.
power! llfl
COUNTER
0:0 I SO
Page 53

Locate the end point where the insert should end
by pressing or ^ during playback.
The viewfinder screen shows a high-speed
playback picture.
®REW FF®
&
3 At the end point, press RESET.
The counter resets to “0:00:0”.
Locate the start point where the insert
should begin by pressing
5 At the start point, put the camcorder into recording
standby mode.
6 Press ZERO MEM.
The end point of the insert is stored in memory.
RESET
COUNTER
In the display window
REW®
PAUSE
15
ZETOMEM Jiigplay vvindow
0:00:00
•REC-*.
Inside the viewfinder
Press II on both the camcorder and the VCR to
start insert editing.
You can monitor the picture being inserted inside
the viewfinder screen.
The insert recording stops automatically near the
zero point on the counter.
To change the end Press ZERO MEM so that the ZERO MEM indication disappears, and begin from
point step 2.
Chapter 3: Advanced Operation 53
PAUSE
15
Page 54

Cfiapler 4; Additional Infonnatlon
Maintenance Information
This section shows you how to maintain the camcorder.
Moisture Condensation
If the camcorder is brought directly from a cold place to a warm place, moisture
may condense inside the camcorder, on the surface of the tape, or on the lens.
In this condition, the tape may stick to the head drum and be damaged or the
camcorder may not operate correctly. To prevent possible damage under these
circumstances, the camcorder is furnished with moisture sensors. However, take
the following precautions.
4.
Inside the
camcorder
On the surface of
the tape
If moisture condenses inside the camcorder, the [S indication inside the
viewfinder and in the display window flashes. When the cassette is inserted, the
± indication also flashes.
In such case, no other function but the tape ejection works.
^ect the tape, turn off the camcorder and leave It with the cassette holder open
for at least 1 hour In a dry place.
The camcorder can be used again if the IS indication does not appear when the
power is turned on again.
When the cassette is inserted and a tape transport button (>,
pressed, the ± indication in the display window flashes.
etc.) is
In such case, no other function but the tape ejection works.
^ect the tape, turn off the camcorder and leave it with the cassette holder open
for at least 1 hour In a dry place.
The camcorder can be used again if the ± indication does not appear when you
insert the cassette and press one of the tape transport buttons.
On the lens
If moisture condenses on the lens, no indication appears, but the picture
becomes dim. Turn off power and leave the camcorder unused for about 1 hour.
54 Chapter 4: Additional Information
In the display window
Page 55

Video Head Cleaning
To ensure clear pictures, clean the video heads periodically.
When playback pictures are noisy or hardly visible, the video heads may be
contaminated.
Caution
Slight contamination
1^^ Critical contamination
In such cases, follow the procedures below:
1 Clean the video heads with the Sony V8-2SCLH cleaning cassette (not
supplied), referring to its instructions.
2 After cleaning, check to see if the picture is clear by recording or playing back
with an ordinary tape.
3 If the picture is still noisy, repeat cleaning. (Do not repeat cleaning more than
5 times.)
If the V8-25CLH cleaning cassette is not available in your area, consult your Sony
service facility.
Do not use a commercially available wet-type cleaning cassette. It may damage
the video heads.
Chapter 4: Additional Information 55
Page 56

Cleaning
Viewfinder
You can remove dust from inside the viewfinder.
1
Puli out viewfinder banel untii the iiiustrated
marie appears.
Mark
2 Turn the viewfinder oounterciockwise untii it stops, 2^^
and puii it out ^
Ciean the surface of the cover wi№ a
commeiciaiiy avaiiabie biower.
if you want to remove the dust on the fens,
use an appficator.
Lens
Body
Ciean the fens with a soft brush to remove dust if there are fingerprints on it
remove them with a soft cloth.
Clean the camcorder body with a dry soft cloth, or a soft cloth lightly moistened
with a mild detergent solution. Do not use any type of solvent which may
damage the finish.
56 Chapter 4: Additional Information
You cannot remove
this part.
Page 57

Tips for Better Camera Recording
This section shows you some hints for better shooting.
Achieving Better Camera Recording
You can get better pictures foiiowing the hints beiow.
How to hold the
camcorder
For hand-heid shots, it is important to hoid the camcorder property.
• Hoid the camcorder firmly and secure it with the grip belt so that you can
easily manipulate the camcorder with your thumb.
• Place your right elbow firmly against your side.
• Place your left hand under the camcorder to support it.
When adjusting the focus manually, make sure the camcorder does not move.
• Stand opposite the subject and let your feet take a comfortable stance.
• Place your eye firmly against the viewfinder eyecup.
Use a tripod If you have a tripod for a still camera, you can also use it with the camcorder. If
a tripod is not available, try placing the camcorder on a table top or any other
flat surface of suitable height.
Less than 6.5 mm (9/32 inches)
Caution
Keep the
horbontai plane
When attaching a tripod not manufactured by Sony, the length of the camera
mounting screw must be less than 6.5 mm (9/32 inches). Otherwise, the screw
may damage the inner part of the camcorder.
You can easily determine the horizontal plane by using the viewfinder frame as a
reference.
Chapter 4: Additional Information 57
Page 58

Tips for Better Camera Recording
: -=i. 'Hç^.;r’ ' -fe'i. fV|
Plan ahead
Shoot with the
sun behind you
Use the video light
in the daitc
If you are going to edit the tape after recording, shoot the scene a little longer to
make the editing easier.
If you are not going to edit the tape after recording, use the START/STOP button
to make a smooth recording.
When the light source is behind the subject, or in the following situations, the
subject wiil be recorded too dark and the background too light.
• The subject is indoors and there is a window behind the subject.
• Bright sources such as fluorescent or incandescent lamps are included in the
scene.
• You are shooting a person wearing white or shiny clothes in front of a white
background.
In this case, the face will be recorded too dark.
If it occurs, use the manual BACK LIGHT function. (See page 38.)
To get the best colors, you must maintain a sufficient light level. Photography
lamps or halogen lamps are recommended.
For best results, use of Sony video lights are recommended since their weight
and low heat output levels allow safe and direct connection to the camcorder.
Excessive heat from another type of light may warp the casing of the camcorder.
For detailed instructions on proper use of the light, read the instruction manual
of the video light.
Precautions
On operation Operate the camcorder on 6.0 V (battery pack), 75 V (AC power adaptor).
For DC or AC operation, use the accessories recommended in this manual.
Should any solid object or liquid fall into the casing, unplug the camcorder and
have it checked by qualified personnel before operating it any further.
Do not hold the camcorder the viewfinder.
Avoid rough handling or mechanical shock. Be particularly careful of the lens.
Keep the lens cap on the lens when not using the camcorder.
Do not wrap up the catrœorder and operate it since heat may build up internally.
Keep the camcorder away from strong magnetic fields or mechanical vibration.
Do not let sand get Into the camcorder.
When you use the camcorder on a sandy beach or dusty place, protect it from
the sand or dust Sand or dust may cause the camcorder to malfunction and
sometimes the malfunction cannot be repaired.
Do not let the camcorder get wet
Keep the camcorder from rain or sea water. It may cause malfunction and
sometimes the malfunction cannot be repaired.
On care When the camcorder is not to be used for a long time, disconnct the power
source and remove the tape. Periodically turn on the power, operate the camera
and player sections and play back a tape for about 3 minutes.
On copyright Television programs, films, video tapes and other materials may be copyrighted.
Unauthorized recording of such materials may be contrary to the provision of the
copyright laws.
58 Chapter 4: Additional Information
Page 59

Using Your Camcorder Abroad
Each country has its own electricity and TV color systems.
Before using your camcorder abroad, check the following points.
Power sources
To view the
playback picture
You can use your camcorder in any country with the supplied AC power adaptor
within 100 V to 240 V AC, 50/60 Hz. If you cannot attach the power adaptor to
the wall outlet, use a power cord plug adaptor (not supplied).
You can view the playback picture inside the viewfinder. However, if you want to
view the playback picture on a TV, it must be a TV based on the NTSC system,
as this camcorder is an NTSC system based camcorder. You cannot view the
playback picture on a TV based on another TV color system. Check the following
list (in alphabetical order) for the TV color system.
NTSC system countries
Bahama Islands, Bolivia, Canada, Central America, Chile, Colombia, Ecuador,
Jamaica, Japan, Korea, Mexico, Peru, Surinam, Taiwan, the Philippines, the U.SA,
Venezuela, etc.
PAL system countries
Australia, Austria, Belgium, China, Denmark, Finland, Germany (former West
German^, Great Britain, Holland, Hong Kong, Italy, Kuwait, New Zealand, Norway,
Portugal, Singapore, Spain, Sweden, Switzerland, Thailand, etc.
PAL-M system country
Brazil
PAL-N system countries
Argentina, Paraguay, Uruguay
SECAM system countries
Bulgaria, France, Guiana, Hungary, Iran, Iraq, Monaco, Poland, Soviet Union, etc.
Chapter 4: Additional Information 59
Page 60

,. ^ -i'Si^-''.'itj ’■ ., ■' .■ yrr-rr^ •• S; • ■, I-Ja'-.. .
Identifying the Parts
For details on the use of each part, refer to the pages indicated in the circle.
V
ICAMElwfmWI
POlWERf
0
■ ijjtJilll
(D
1^1 i lOOl
m
□ POWER switch •
IT] Tape transport buttons (
t> (playback)
FF (fast forward)
REW (rewind)
□ (stop)
II (pause)
IT] • REC (recording) switch O
fT] Power zoom button #
[D MIC jack (PLUG IN POWER) (
[FI Accessory shoe
in Built-in microphone
m Remote control sensor ^
60 Chapter 4: Additional Information
Page 61

in Focus ring O
Rol Lens cap #
|T3 II REMOTE COMMANDER ON/OFF switch
R2I FADER button O
R3I Camera recording/battery lamp
|i^ EDITSEARCH © button •
Rsl Tripod receptacle •
[iil Lithium battery compartment O
RtI Macro set button ^
Ril Zoom lever #
Chapter 4: Additional Information 61
Page 62

Idenlifying the Parts
WHriE
BALANCE
|19|
|20|
WHITE BALANCE button •
^ BACK LIGHT button ф
2^ SHUTTER SPEED button ф
22] FOCUS button Ф
^ EDIT switch Ф
^ DATE and TIME buttons ф
25] Display window ф
^ ZERO MEM (zero memory) button
2^ RESET button Ф Ф
llj
BACKLIGHT
ncJ (LUI
SHUTTER
SPEED
lUi3n
FOCUS
imi
r
Г.
V
^ Hooks for shoulder strap
29] Battery mounting surface
^ ВАТТ (battery eject) knob ф
62 Chapter 4: Additional Information
Page 63

I Viewfinder •
I Viewfinder iens adjustment ring 9
I Eyecup 0
IC REMOTE controi jack (stereo mini-minijack) 0
I
® (earphone) jack (mini-jack)
I
iN/OUT (video/audio input/output) seiector switch i
0
Chapter 4: Additional Information 63
Page 64

1^ STANDBY switch •
P STAFTT/STOP button •
|39[ AA/ (audio/video) jacks •
1^ RFU DC OUT (RFU adaptor DC output) jack (special
mini-jack) •
[Ti] Jack cover
I42I Cassette holder #
|43| PUSH CLOSE button •
1^ EJECT (cassette eject) button #
|4S| Strap release knob ^
|46] Grip strap
64 Chapter 4: Additional Information
Page 65

Wireless Remote Commander
rn Power zoom button
|T| REW (rewind) button
[3] □ STOP button
[4] START/STOP button
in HOLD switch
in FF (fast forward) button
in t> PLAY (piayback) button
Ul II PAUSE button
Chapter 4: Additional Information 65
Page 66

Warning Indications
If indications flash inside the viewfinder or in the display window or a caution
lamp on the camcorder flashes, check the following table:
Battery Remaining
Slow flashing: The battery ia weak.
Fast flashing: The battery is dead.
The tape is near the end.
The tape has run out.
No tape has been inserted.
The tab on the tape is out (red).
Moisture condensation has occurred.
viewfinder
~W
IT
■M-
display window
•ttr.
Recording/Battery lamp
i
The video heads may be contaminated.
Some other trouble has occured.
Disconnect the power source and
contact your Sony dealer or
local authorized facility.
The lithium battery is weak or no
lithium battery is installed.
66 Chapter 4: Additional Information
■ibnàk
5 minutes
Page 67

Inside the Viewfinder
n~| BACK LIGHT is pressed.
f2] White balance mode /HOLD)
[51 Shutter speed
|T| FADER is pressed.
fsl “Replace battery.”
m Moisture condensation.
in Autofocus adjusting range
Goes out during manual focusing
m Shows up during recording.
When blinking: “Replace battery.”
m In the MACRO range
Ro| Tape transport and camera recording mode
[it] Tape counter
R2I ZERO MEM is pressed.
QD “Exchange tape.”
Q “Clean video heads.” or other caution (Q, ±)
^ Date or Time
Chapter 4: Additional Information 67
Page 68

In the Display Window
rn Tape counter
[2] ZERO MEM is pressed.
in Date or time/tape counter
m Tape transport
m
COUNTER
AM
PM
[3]
ZERO MEM
[t] [7] s S 0
m Caution
Moisture condensation
m Exchange tape
n Replace battery
68 Chapter 4: Additional Information
Page 69

Trouble Check
If any difficulty should arise during operation, go through the following table. Should the difficulty
persist, disconnect the power source and contact your Sony dealer or local authorized Sony service
facility.
Corrective Actions
Symptom Cause
The battery is not attached. Attach the battery.
The battery is dead. Use a charged battry.
The power does not turn on.
The power goes off.
The battery pack is quickly
discharged.
START/STOP does not operate.
The cassette cannot be
removed from the compartment.
No function except for cassette
ejection works.
The tape does not move when
a tape transport button is
pressed.
The autofocusing function does
not work.
The image on the viewfinder
screen is not clear.
The AC power adaptor is not
connected a wall outlet.
CHARGEATTR of the AC power
adaptor is set to CHARGE or
OFF.
While being operated In the
CAMERA mode, the camcorder
has been in the pause mode for
more than S minutes.
The battery is dead. Use a charged battery.
The ambient temperature is too
low.
The battery pack has not been
charged fully.
The battery pack is completely
dead, and cannot be recharged.
The tape is stuck to the drum.
The tape has run out.
POWER is set to VTR. Set it to CAMERA.
The tab on the cassette is out
(red).
The battery is dead.
Moisture condensation has
occurred.
POWER is set to CAMERA or
OFF.
The tape has run out.
The AUTO LOCK cover is not
closed tightly
Shooting conditions are not
suitable for autofocusing
operation.
The viewfinder lens is not
adjusted.
Refer to the pages Indicated in
the circle.
Connect the adaptor to a wall
outlet.
Set CHARGEAn’R to VTR.
Turn STANDBY to LOCK at
once and turn it to STANDBY
again.
—
Charge the battery pack again.
Use another battery pack.
Remove the cassette with the
cassete eject button.
Rewind the tape or use a new
one.
Use a new tape or slide the tab.
Use a charged battery or the
AC power adaptor.
Remove the cassette and leave
the camcorder at least an hour.
Set it to VTR.
Rewind the tape or use a new
one.
Close the AUTO LOCK
cover.
Open the AUTO LOCK cover
and press FOCUS to adjust the
focus manually.
Adjust the viewfinder lens.
Page
•
•
•
•
•
•
•
•
•
•
—
•
•
O.«
•
•
•
•
(To be continued)
Chapter 4: Additional Information 69
Page 70

Symptom
A vertical band appears when a
subject such as lights or a
candle flame Is shot against a
dark background.
The color of the playback
picture is not appropriate.
The playback picture is not
clear.
The picture is noisy.
Recording on another tape is
impossible.
Recording a TV program or
recording from another tape is
impossible.
The supplied Remote
Commander does not function.
The wired remote commander
(optional) does not function.
There is dust inside the
viewfinder.
Cause
The contrast between the
subject and background is too
high; The camcorder is not
malfunctioning.
The AUTO LOCK cover was not
closed tightly.
Shooting conditions were not
suitable for auto white balance
operation.
EDIT is set in the direction of
the arrow.
The channel or input for the
camcorder is not selected on
the TV.
The video heads may be
contaminated.
The INfOUT selector is set to IN.
The IN/OUT selector is set to
OUT.
The REMOTE COMMANDER
ON/OFF switch is set to OFF.
Something interrupts the
infrared rays.
The lithium battery is not
inserted with the correct
polarity.
The lithium battery is dead. Insert a new one.
The HOLD switch is working.
The REMOTE COMMANDER
ON/OFF switch is set to ON.
—
Corrective Actions Page
Change locations.
Close the AUTO LOCK Cover.
Open the AUTO LOCK cover and
press WHITE BALANCE to
adjust the white balance
manually.
Set EDIT in the opposite
direction of the arrow.
Select correctly.
Clean the heads using the Sony
V8-2SCLH cleaning cassette.
Set to OUT.
Set to IN.
Set the switch to ON.
Take off the obstacles. —
Insert the lithium battery with
the correct polarity.
Set the switch in the direction
opposite the arrow.
Set the switch to OFF.
Pull out the viewfinder and clear
the viewfinder screen cover or
viewfinder lens.
—
•
•
•
•
•
•
•
•
•
•
•
70 Chapter 4: Additional Information
Page 71

Specifications
video recording system
Two Rotary heads, Helical
Audio recording system
Video signal
Usable cassette
Tape speed
Recording time
Playback time
Fastforward/rewind time
Image device
Viewfinder
Lens
Color temperature
Minimum illumination
Illumination range
Recommended illumination
scanning FM system
Rotary head, FM system
NTSC color, EIA standards
8 mm video format cassette
SP mode: Approx. 1.43 cm (19/32
inches) /sec
LP mode: Approx. 0.72 cm (5/16
inches) /sec (playback only)
SP mode: 2 hours (P6-120)
SP mode: 2 hours (P6-120)
LP mode: 4 hours (P6-120)
Approx. 6.5 min. (P6-120)
CCD (Charge Coupled Device)
Electronic viewfinder
(monochrome)
Combined 10 x power zoom lens
f-6.2 to 62 mm (1/4 to 2 15/32
inches)
F 1.8 to 2.2
Filter diameter 37 mm (1 1/2
inches)
TTL autofocus system
Auto, HOLD, ^ (indoors) 3,200 K,
^ (outdoors) 5,800 K
4 lux (F 1.8)
4 lux to 100,000 lux
More than 100 lux
Input and output connectors
Video input/output
Selectable with IN/OUT selector
Phono jack, 1 Vp-p, 75 ohms,
unbalanced, sync negative
Audio input/output
Selectable with IN/OUT selector
Phono jacks.
Input: -7.5 dBs, input impedance
more than 47 kilohms
Output: -7.5 dBs, (at output
impedance 47 kilohms) impedance
less than 2.2 kilohms
RFU DC OUT Special mini-jack, DC 5 V
Earphone jack Minijack, impedance 8 ohms
Remote jack Stereo mini-minijack (0 2.5)
MIC jack Mini-jack, -66 dBs low impedance
with 2.5 to 3 V DC, output
impedance 6.8 kilohms (0 3.5)
General
Power requirements
On battery mounting surface
6.0 V (battery pack)
7.5 V (AC power adaptor)
Power consumption
6.0 W (camera recording) including
the viewfinder
Installation Vertically, Horizontally
Operating temperature
0 ®C to 40 °C (32 °F to 104 “F)
Storage temperature
-20 ®C to +60 “C
(14 ®F to 140 ®F)
Dimendions Approx. 127 x 122 x 185 mm
(w/h/d)
(5 x 47/8 x7 3/8 inches)
Weight Approx. 950 g (2 lb 2 oz)
excluding the battery pack, lithium
battery and cassette
Approx. 1125g (2 lb 7 oz) including
the battery pack NP-5S, lithium
battry and cassette P6-120
Microphone Electret condenser microphone,
monaural type
Supplied accessories
See page 5.
Design and specifications are subject to change
without notice.
Chapter 4: Additional Information 71
Page 72

- 1 ■
Index
A F,G, H s
AC power adaptor 23 Fade in/Fade out 41 Shoulder strap 5
Adjusting viewfinder 12
Audio input/output 16 High-speed shutter 39
Auto focus 14 Hold switch 19 Still picture 39
Auto lock 33
Auto white balance 36
A/V connecting cable 16
Fast-forward 17
1, J. K, L
Skip scan 46
Standby 14
Supplied accessories 5
B
Back light 38 LANC30
Battery 6, 23
Battery lamp 66
Battery pack 6
Built-in microphone switch 25 Troubles 69
C
Camera mode 13 MIC (microphone) jack 30
Camera recording lamp 14 Pause button 46
Car battery operation 24
Charging battery 6
Cleaning video heads 55
Clock set 9
Close-up 43
O>nnection 16
Counter reset 26, 49
D, E
Date/TIme 9
DC output 30
Edit switch 51 RFU adaptor 44
Editing 50
Editsearch 26
Ejection 15
External microphone jack 30
Eyecup IS
Indoor 36
— Insert 28
Lens cap 13
Lithium battery 8
M, N, 0, P
—
— Manual focus 34
Play 17
Playback on TV 16
Power sources 23 Zero memory 26. 49
Power zoom 32
R
Rec review 26
Record/Pause 14
— Remote (Commander 18
Remote control jack 31
Rewind 17
T, U, V
Tape counter 49
Tape speed 49
Tripod mounting 57
VCR mode 17
VHF antenna 16
w, X, Y, Z
White balance 36
Zoom 32
If you have any question about this product, you
may call;
Sony Customer tnfonnatton Center
East Coast : 201-930-7669 (Sony) NJ
Central : 708-250-7669 (Sony) IL
West Coast : 714-821-7669 (Sony) CA
Sony Corporation Printed in Japan
or write to:
Sony Customer Information Center
Sony Drive, Mail Drop #T1-11,
Park Ridge, NJ 07656
 Loading...