

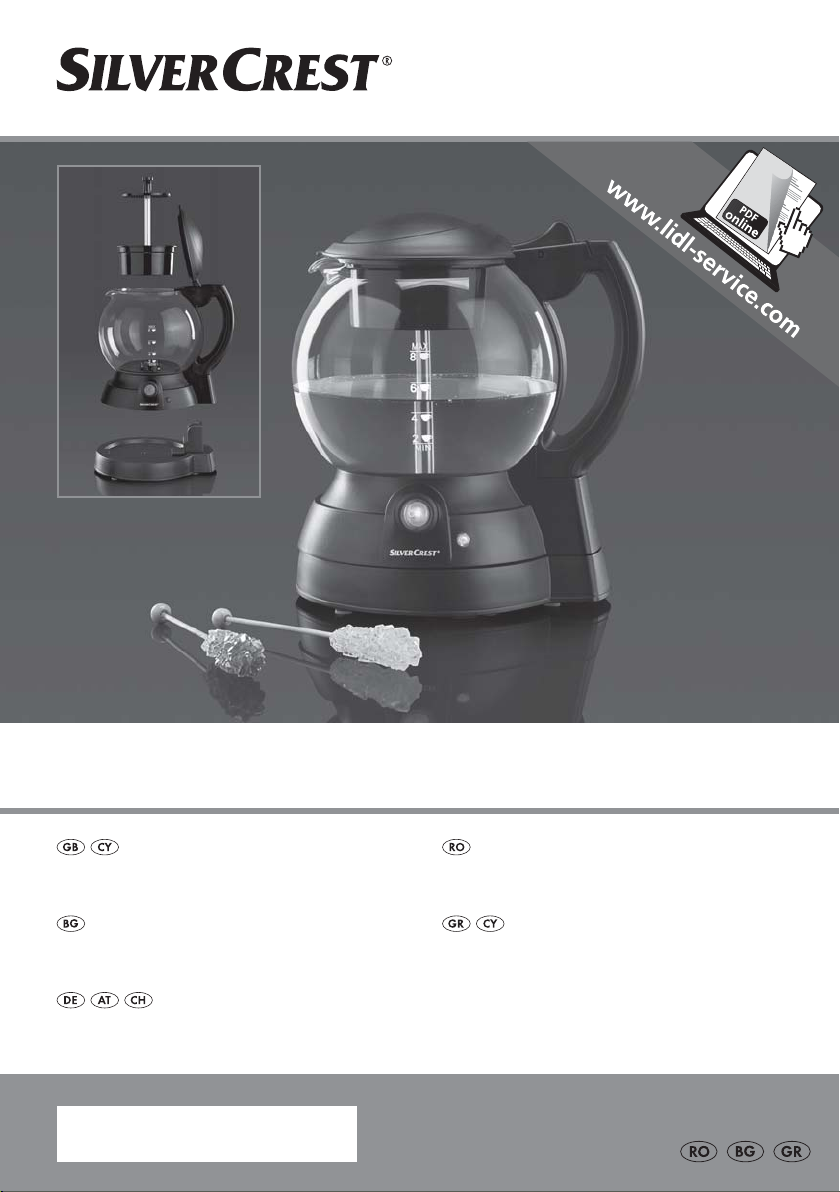
TEA MAKER STK 650 A2
TEA MAKER
Operating instructions
КАНА ЗА ЧАЙ
Ръководство за експлоатация
TEEKOCHER
Bedienungsanleitung
IAN 277007
CEAINIC ELECTRIC
Instrucţiuni de utilizare
ΒΡΑΣΤΗΡΑΣ ΤΣΑΓΙΟΥ
Οδηүίες χρήσης
Before reading, unfold the page containing the illustrations and familiarise yourself with all functions of
the device.
Înainte de a citi instrucţiunile, priviţi imaginile şi familiarizaţi-vă cu toate funcţiile aparatului.
Преди да прочетете отворете страницата с фигурите и след това се запознайте с всички функции
на уреда.
Πριν ξεκινήσετε την ανάγνωση, ανοίξτε τη σελίδα με τις εικόνες και εξοικειωθείτε με όλες τις λειτουργίες
της συσκευής.
Klappen Sie vor dem Lesen die Seite mit den Abbildungen aus und machen Sie sich anschließend mit allen
Funktionen des Gerätes vertraut.
GB / CY Operating instructions Page 1
RO Instrucţiuni de utilizare Pagina 11
BG Ръководство за експлоатация Cтраница 21
GR / CY Οδηүίες χρήσης Σελίδα 31
DE / AT / CH Bedienungsanleitung Seite 41

CONTENT PAGE
Introduction 2
Intended Usage 2
Items supplied 2
Technical data 2
Appliance description 2
Safety information 3
Before the First Use 5
Operation 5
Overheating protection 6
Cleaning and care 6
Scale removal 7
Storage 7
Disposal 8
Kompernass Handels GmbH warranty 8
Service 9
Importer 9
Read the operating instructions carefully before using the device for the first time and preserve this booklet
for later reference. Pass this manual on to whoever might acquire the device at a future date.
- 1 -

TEA MAKER
Introduction
Congratulations on the purchase of your new
appliance.
You have selected a high-quality product. The operating instructions are a constituent of this product.
They contain important information about safety,
usage and disposal. Before using the product, familiarise yourself with all of the operating and safety
instructions. Use the product only as described and
for the specified usage areas. Keep these operating
instructions in a safe place. Please also pass these
operating instructions on to any future owner(s).
Items supplied
Tea Maker
Riser tube brush
Operating instructions
Technical data
Power consumption : 550 - 650 W
Mains voltage: 220 - 240 V ~, 50 Hz
All of the parts of this appliance that come
into contact with food are food-safe.
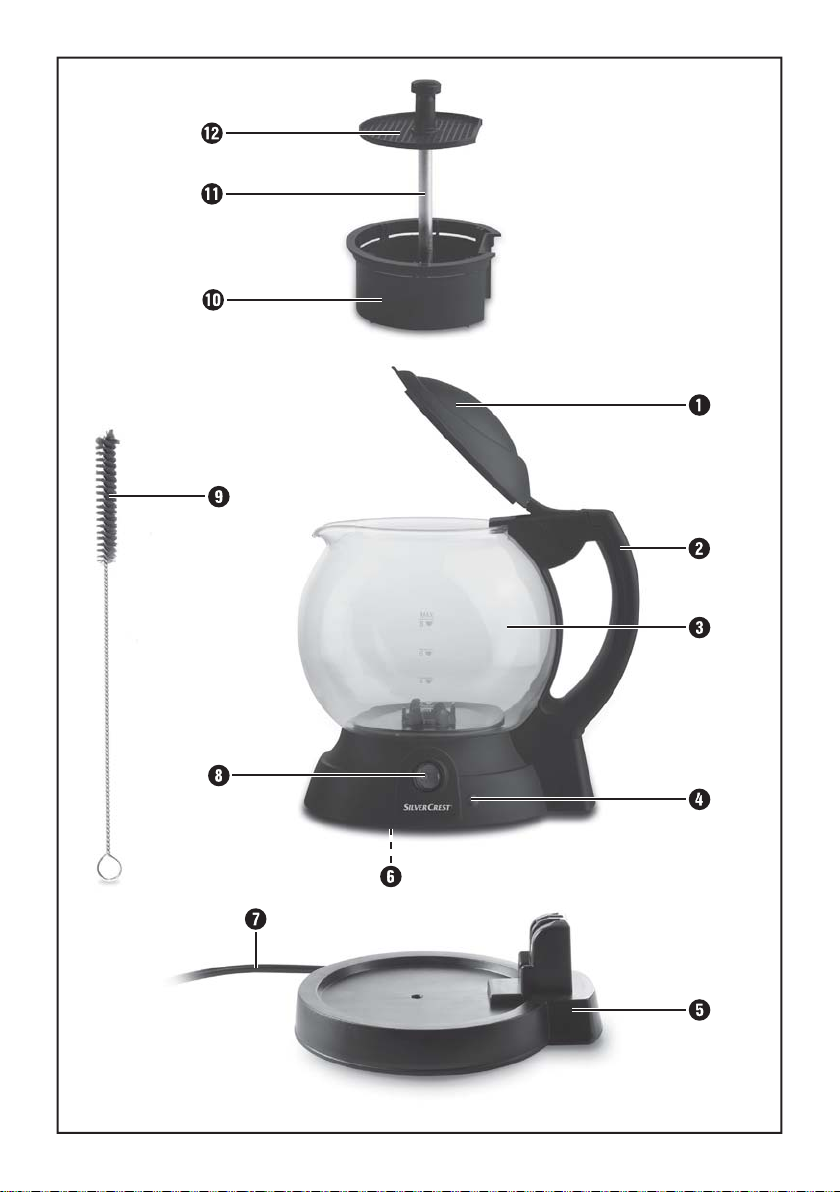
Appliance description
Intended Usage
This appliance is intended for brewing tea and then
keeping it warm. This appliance is intended for
domestic use only, it is not suitable for commercial
or industrial applications.
1 Lid
2 Grip
3 Glass pot
4 Control lamp
5 Base
6 Reset button
7 Power cable
8 On/Off switch
9 Riser tube brush
0 Brew chamber
q Water riser tube
w Sieve
- 2 -

Safety information
Danger – electric shock!
• Ensure that the base with the electrical connections does not come into
contact with water! Ensure that the base is completely dry before use,
especially if it has accidentally become wet.
• Use the appliance only with the supplied base.
• Ensure that the power cable never becomes wet or damp during operation. Lay the cable so that it cannot be trapped or otherwise damaged.
• To avoid potentially fatal risks, arrange for a defective power plug
and/or cable to be replaced at once by qualified technicians or our
Customer Service Department.
• Always remove the plug from the mains power socket after use. Simply
switching the appliance off is not sufficient, as the appliance is under
power for as long as the plug is connected to the socket.
NEVER submerse the appliance in water or other liquids! There is a
risk of electric shock!
Warning - Risk of injury!
• Always heat the water with a closed lid, otherwise the automatic cut-out
may not work. Boiling water can then spray out over the edge.
• Hot steam clouds may be released. The glass pot also becomes very hot
during use. Wear oven mitts.
• Make certain that the appliance stands firmly and vertically before switching it on. Boiling water can cause an instable kettle to fall over.
• Exercise caution with the glass pot. Broken glass can cause serious cut
wounds.
• Never fill it with more water than to the MAX marking. If you do, boiling
water may spray out and lead to scalds.
• Do not open the lid while the water is boiling.
- 3 -
• Appliances may be used by persons with reduced physical, sensory or
mental capabilities or lack of experience and/or knowledge if they are
supervised or have been instructed how to use the appliance safely and
have understood the potential risks.
• This appliance may be used by children aged 8 years or over if they are
supervised or have been told how to use the appliance safely and are
aware of the potential risks.
• Cleaning and user maintenance tasks must not be carried out by children
unless they are aged 8 years or over and under supervision.
• The appliance and its connecting cable must be kept away from children
younger than 8 years old.
• Children must not use the appliance as a plaything.
• Children should be supervised to ensure that they do not play with the
appliance.
• Do not use an external timing switch or a separate remote control system
to operate the appliance.
CAUTION: hot surfaces!
You can thus prevent the appliance from being damaged:
• Under no circumstances should you fill the appliance with cold water
immediately after a brewing process. It could form stresses in the glass,
causing it to break!
- 4 -

Before the First Use
• Remove all packaging materials from the appliance.
• Carefully rinse all parts of the brewing system
(brew chamber 0, water riser pipe q, Sieve w)
and the glass pot 3 (see chapter “Cleaning
and Care”).
Proceed as follows before the first usage:
1. Remove the glass pot 3 from the base 5.
2. Fill the glass pot 3 up to the MAX marking with
water, then add a teaspoon of lemon juice (or lemon concentrate) to it. If lemon juice is not available, you could add a teabag (or a teaspoon of
loose tea) directly into the water.
3. Replace the brew system in the glass pot 3.
4. Close the lid 1 and replace the glass pot 3 on
the base 5.
5. Switch the appliance on with the On/Off switch 8.
The control lamp 4 and the On/Off switch 8
light up. Wait until the control lamp 4 goes out.
6. Switch the appliance off with the On/Off switch 8
and then clean the appliance as described in
“Cleaning and Care”.
The Tea Automat is now ready for use.
Operation
Attention:
DO NOT put any sugar into the Tea Automat.
DO NOT heat milk or alcohol in the tea automat.
This would irreparably damage the appliance.
1. Remove the glass pot 3 from the base 5.
2. Open the lid 1 and take out the brew system.
Place the brew system on a level and even surface.
3. Pour the desired quantity of water into the glass
pot 3. NEVER fill it with more water than to the
MAX marking, and never with less than to the
MIN marking.
Danger!
To avoid scalds/burns and electric shocks, ensure
that water does not overflow from the glass pot 3.
4. Take hold of the brew system and pull the water
riser pipe q with the sieve w upwards.
5. Place the necessary amount of tea or number of
teabags in the brew chamber 0.
Note:
Ensure that no labels or teabag strings remain in the
appliance.
6. Replace the brew system in the glass pot 3.
Ensure that the water riser pipe q sits firmly in
the recess on the bottom of the glass pot 3.
The brew chamber 0 must be positioned with
the flattened side towards the handle 2.
7. Close the appliance lid 1.
8. Replace the glass pot 3 back on to the base 5.
9. Insert the plug into a wall power socket and place
the On/Off switch 8 at the position “I”. The
control lamp 4 and the On/Off switch 8 light up.
The water is now boiled and forced upwards
through the water riser pipe q to flow through the
brew chamber 0 and then back into the glass pot 3.
Note:
Green tea is not suitable for brewing in the Tea
Automat. The ideal brewing temperature for green teas
lies at around 70°C. At higher brewing temperatures,
such as those generated in the Tea Automat, tannic
acids are released. The tea will taste bitter.
- 5 -

After the water has boiled, the appliance automatically switches itself into the keep-warm function. The
control lamp 4 goes out, only the On/Off switch 8
continues to glow. As soon as the water cools, the
Tea Automat warms the water back up. The control
lamp 4 lights up again during this rewarming process.
Overheating protection
In the event of overheating, thermal protection switches
the heating element off inside the appliance. The
On/Off switch 8 remains lit, the appliance however
does not continue to heat up.
Note:
As the water is fed back through the brewing system
during the rewarming, after the first brewing process
you should remove the brew system from the glass
pot 3.
Risk of personal injury!
The brew system is very hot! There is a risk of being
burnt! Use oven gloves when you take hold of the
brew system.
Note:
The longer the brew is kept warm, the greater is
the amount of fluid evaporated, and thus the brew
becomes stronger.
We therefore recommend that the tea be drunk as
soon as possible after brewing.
You can interrupt the brew process at any time:
For this, place the On/Off switch 8 back into the
position “0”. The brew process is finished.
If you remove the glass pot 3 from the base 5,
the brew process is interrupted.
Attention:
Always first let the glass pot 3 cool down before
you pour in fresh cold water for another brewing
process! Otherwise, tension may be created in the
glass pot 3 and it could shatter.
The thermal protection is activated if no or not enough
water is in the glass pot 3 and the appliance is
switched on anyway.
If the thermal protection function has switched the
heating element off, please proceed as follows:
• Allow the appliance to cool down.
• Press the Reset button 6 in the underside of
the glass pot 3.
The appliance can now be used again.
Cleaning and care
Risk of personal injury!
ALWAYS remove the plug before cleaning the appliance. There is a risk of electric shock! Allow the
appliance to cool down. Risk of Burns!
NEVER submerse the appliance in water or
other liquids! There is a risk of electric shock!
The appliance could also be irreparably
damaged!
To obtain an optimal result with every brew process
the appliance should be cleaned after every use.
This will avoid, that:
• The combination of scale and tannins, caused by
boiling the water and the tea brewing, impair
the function of the Tea Automat;
- 6 -

• Regular use of the Tea Automat could perhaps
cause it take on aromas from strongly aromatic
teas and pass them to other tea sorts.
Clean the glass pot 3 of the Tea Automat with a
moist cloth. For stubborn soiling use a mild detergent
on the cloth. Rinse the glass pot 3 afterwards with
copious amounts of clear water to remove all detergent residues. The recess on the bottom of the glass
pot 3 can easily be cleaned using a washing-up
brush.
Attention:
Do not use abrasive cleaners or chemical or caustic
detergents. These could irreparably damage the
appliance!
Clean the brew system with warm water and a liquid
detergent:
You can clean the brew chamber 0 and the sieve w
with a washing-up brush. Clean the riser tube q with
the aid of the riser tube brush 9.
After cleaning it, rinse the entire brewing system well
with clear water to ensure that no detergent residues
remain on or in it.
Scale removal
The mineral content (hardness) in the water causes,
over a period of time, a calcification of the appliance.
This calcification impairs the appliance in its function,
diminishes the quality of the brewed tea and
increases the energy consumption.
1. Use a standard household descaling agent based
on citric acid. Follow the preparation instructions
on the packaging of the descaler.
2. Place the brew system in the glass pot 3.
3. Tip the descaler solution into the glass pot 3.
Never pour in more liquid than to the MAX marking, and never less than to the MIN marking.
4. Wait for 10 minutes and then switch the
appliance on.
5. Allow the solution to boil and wait until it has
passed through the brew system.
6. Should it be necessary, repeat the process.
You can use the descaler solution once again;
however, first let it cool down.
7. When the scale has dissolved, allow 2 - 3 fillings
of clear water to boil and then flow through the
brewing system.
8. Afterwards, clean the glass pot 3 and the
brewing system as described in chapter,
"Cleaning and Care".
Storage
• If you do not intend to use it for an extended
period, wrap the power cable anti-clockwise
around the cable winder on the underside of
the base 5 and run the end through the cable
outlet on the base 5.
• Store the appliance in a dry and dust free location.
Note:
Enquire at your local waterworks about the hardness
level of your mains water. The need for decalcification
comes early in hard water areas, somewhat later
in soft water areas. Use a decalcifier designed for
household appliances and pay heed to the usage
instructions.
- 7 -

Disposal
Do not dispose of the appliance in your
normal domestic waste. This product is
subject to the provisions of European
Directive 2012/19/EU.
Dispose of the appliance through an approved
dis-posal centre or at your community waste facility.
Observe the currently applicable regulations.
In case of doubt, please contact your waste disposal
centre.
Dispose of all packaging materials in an
environmentally friendly manner.
Kompernass Handels GmbH
warranty
Dear Customer,
This appliance has a 3-year warranty valid from the
date of purchase. If this product has any faults, you,
the buyer, have certain statutory rights. Your statutory
rights are not restricted in any way by the warranty
described below.
Warranty conditions
The validity period of the warranty starts from the
date of purchase. Please keep your original receipt
in a safe place. This document will be required as
proof of purchase.
If any material or production fault occurs within
three years of the date of purchase of the product,
we will either repair or replace the product for you
at our discretion. This warranty service is dependent
on you presenting the defective appliance and the
proof of purchase (receipt) and a short written description of the fault and its time of occurrence.
If the defect is covered by the warranty, your product
will either be repaired or replaced by us. The repair
or replacement of a product does not signify the beginning of a new warranty period.
Warranty period and statutory claims
for defects
The warranty period is not prolonged by repairs
effected under the warranty. This also applies to
replaced and repaired components. Any damage
and defects present at the time of purchase must be
reported immediately after unpacking. Repairs
carried out after expiry of the warranty period shall
be subject to a fee.
Scope of the warranty
This appliance has been manufactured in accordance
with strict quality guidelines and inspected meticulously prior to delivery.
The warranty covers material faults or production
faults. The warranty does not extend to product
parts subject to normal wear and tear or fragile
parts such as switches, batteries, baking moulds or
parts made of glass.
The warranty does not apply if the product has been
damaged, improperly used or improperly maintained. The directions in the operating instructions for
the product regarding proper use of the product
are to be strictly followed. Uses and actions that are
discouraged in the operating instructions or which
are warned against must be avoided.
This product is intended solely for private use and
not for commercial purposes. The warranty shall be
deemed void in cases of misuse or improper handling, use of force and modifications/repairs which
have not been carried out by one of our authorised
Service centres.
- 8 -
Warranty claim procedure
To ensure quick processing of your case, please
observe the following instructions:
Please have the till receipt and the item number
(e.g. IAN 12345) available as proof of purchase.
You will find the item number on the type plate, an
engraving on the front page of the instructions (bottom left), or as a sticker on the rear or bottom of the
appliance.
If functional or other defects occur, please contact
the service department listed either by telephone or
by e-mail.
You can return a defective product to us free of
charge to the service address that will be provided to
you. Ensure that you enclose the proof of purchase
(till receipt) and information about what the defect
is and when it occurred.
Service
Service Great Britain
Tel.: 0871 5000 720 (£ 0.10/Min.)
E-Mail: kompernass@lidl.co.uk
CY
Service Cyprus
Tel.: 8009 4409
E-Mail: kompernass@lidl.com.cy
IAN 277007
Importer
Please note that the following address is not the
service address. Please use the service address
provided in the operating instructions.
You can download these instructions
along with many other manuals,
product videos and software on
www.lidl-service.com.
KOMPERNASS HANDELS GMBH
BURGSTRASSE 21
44867 BOCHUM
GERMANY
www.kompernass.com
- 9 -

- 10 -

CUPRINS PAGINA
Introducere 12
Utilizarea conform destinaţiei 12
Furnitura 12
Date tehnice 12
Descrierea aparatului 12
Indicaţii de siguranţă 13
Înainte de prima utilizare 15
Operarea 15
Protecţia contra supraîncălzirii 16
Curăţarea şi îngrijirea 16
Eliminarea calcarului 17
Depozitarea 17
Eliminarea aparatelor uzate 18
GaranţiaKompenass Handels GmbH 18
Service-ul 19
Importator 19
Citiţi cu atenţie instrucţiunile de utilizare înainte de prima utilizare şi păstraţi-le pentru o consultare ulterioară.
Dacă înmănaţ iaparatul unor terţi, ataşaţi şi instrucţiunile de utilizare.
- 11 -
R
CEAINIC ELECTRIC
Introducere
Felicitări pentru cumpărarea noului dvs. aparat.
Prin aceasta v-aţi decis pentru un produs de calitate
superioară. Instrucţiunile de utilizare fac parte integrantă din acest produs. Acestea cuprind informaţii
importante pentru siguranţă, utilizare şi eliminare.
Înainte de utilizarea produsului, familiarizaţi-vă cu
toate indicaţiile privind operarea şi siguranţa.
Utilizaţi acest produs numai în modul descris şi
numai în scopurile menţionate. Păstraţi aceste instrucţiuni de utilizare. În cazul transmiterii aparatului
unei alte persoane, predaţi-i, de asemenea, documentele aferente acestuia.
Utilizarea conform destinaţiei
Acest aparat este destinat preparării şi încălzirii ceaiului.
Utilizarea aparatului este permisă numai în locuinţele
private. Utilizarea profesională sau industrială este
interzisă.
Furnitura
Ceainic electric
Perie pentru ţeava de apă
Instrucţiuni de utilizare
Date tehnice
Consum: 550 - 650 W
Tensiune: 220 - 240 V ~, 50 Hz
Toate componentele acestui aparat
care intră în contact cu alimentele, sunt
adecvate pentru uz alimentar.
Descrierea aparatului
1 Capac
2 Mâner
3 Vas de apă
4 Bec de control
5 Suport
6 Buton Reset
7 Cablu de alimentare
8 Întrerupător pornit / oprit
9 Perie pentru ţeava de apă
0 Compartiment de fierbere
q Ţeavă apă
w Filtru
R
- 12 -

Indicaţii de siguranţă
Pericol de electrocutare!
• asiguraţi-vă că suportul, care conţine conexiunile electrice, nu intră în
contact cu apa! Dacă, din greşeală suportul s-a udat, aşteptaţi să se usuce;
• utilizaţi aparatul numai împreună cu suportul livrat;
• evitaţi contactul cablului cu lichide sau umezirea acestuia atât timp cât
este în funcţiune. Ghidaţi cablul astfel încât să nu se blocheze sau să se
deterioreze într-un alt mod;
• dacă ştecărul sau cablul de alimentare se defectează, solicitaţi imediat
repar area de către personal specializat sau de către serviciul clienţi,
pentru a evita periclitările;
• după utilizare, scoateţi totdeauna ştecărul din priză. Simpla oprire nu
este suficientă, deoarece în aparat mai există încă tensiune, atât timp cât
ştecărul este în priză;
Nu introduceţi niciodată aparatul în apă sau în alte lichide. Pericol de
electrocutare!
Avertizare - Pericol de rănire!
• lăsaţi aparatul să funcţioneze numai dacă capacul este închis, în caz
contrar sistemul automat de decuplare nu va funcţiona, iar apa clocotită
poate curge astfel peste marginile vasului;
• se pot degaja aburi de apă fierbinţi. În plus, vasul este foarte fierbinte în
timpul funcţionării. De aceea se recomandă purtarea de mănuşi de bucătărie;
• înainte de a porni aparatul, asiguraţi-vă că aparatul este aşezat într-o
poziţie stabilă şi verticală. Apa care clocoteşte poate răsturna aparatul,
dacă acesta nu se află într-o poziţie stabilă;
• manipulaţi vasul cu grijă. Sticla spartă poate provoca răniri prin tăiere
grave;
• nu umpleţi vasul cu apă peste marcajul MAX. În caz contrar apa clocotită
poate curge afară şi poate provoca opăriri;
• nu deschideţi capacul în timp ce fierbe apa.
- 13 -
R

• acest aparat poate fi utilizat de persoane cu abilităţi fizice, senzoriale
sau mentale reduse sau fără experienţă şi/sau fără cunoştinţe necesare
numai dacă sunt supravegheate sau dacă au fost instruite cu privire la utilizarea sigură a acestui aparat şi au înţeles pericolele cu privire la acesta.
• acest aparat poate fi utilizat de copii începând cu vârsta de 8 ani dacă
sunt supravegheaţi sau dacă au fost instruiţi cu privire la utilizarea sigură
a acestui aparat şi au înţeles pericolele cu privire la acesta.
• curăţarea şi acţiunile de întreţinere destinate utilizatorului nu se vor efectua de către copii, cu excepţia cazului în care aceştia au vârsta peste 8
ani şi sunt supravegheaţi
• aparatul şi cablul de conexiune nu se vor păstra la îndemâna copiilor cu
vârsta sub 8 ani.
• copiilor le este interzis să se joace cu aparatul.
• copiii trebuie supravegheaţi, pentru a împiedica utilizarea aparatului ca
jucărie;
• nu utilizaţi temporizatoare externe sau sisteme separate de comandă de
la distanţă pentru operarea aparatului.
PRECAUŢIE: suprafeţe fierbinţi!
Astfel se evită defectarea aparatului:
• după fierberea apei nu umpleţi imediat aparatul cu apă rece. Se pot forma
tensiuni termice care pot sparge sticla!
R
- 14 -

Înainte de prima utilizare
• Îndepărtaţi toate ambalajele de la aparat.
• Spălaţi bine toate componentele sistemului de
fierbere (compartimentul de fierbere 0, ţeava
de apă q, filtrul w) şi vasul 3 (vezi capitolul
„Curăţarea şi îngrijirea”).
Înainte de prima utilizare procedaţi după cum
urmează:
1. Luaţi vasul 3 de pe soclu 5.
2. Umpleţi vasul 3 cu apă până la marcajul MAX
şi adăugaţi o linguriţă de suc de lămâie (sau
concentrat de lămâie). Dacă nu aveţi la îndemână lămâi, puteţi introduce în apă direct un pliculeţ de ceai (sau o linguriţă de ceai vărsat).
3. Introduceţi sistemul de fierbere în vas 3.
4. Închideţi capacul 1 şi aşezaţi vasul 3 pe
suport 5.
5. Porniţi aparatul de la întrerupătorul pornit / oprit
8. Becul de control 4 şi întrerupătorul pornit /
oprit 8 se aprind. Aşteptaţi până se stinge
becul de control 4.
6. Opriţi aparatul de la întrerupătorul pornit / oprit 8
şi curăţaţi aparatul în modul descris în capitolul
„Curăţarea şi îngrijirea”.
Acum fierbătorul de ceai poate fi utilizat.
Operarea
Atenţie:
Nu introduceţi zahăr în fierbătorul de ceai. Nu
încălziţi lapte sau alcool în fierbător. Aceasta ar
provoca defecţiuni iremediabile ale aparatului.
1. Luaţi vasul 3 de pe suport 5.
2. Deschideţi capacul 1 şi scoateţi sistemul de
fierbere. Aşezaţi sistemul pe o suprafaţă plană.
3. Umpleţi vasul 3 cu cantitatea de apă dorită. Nu
umpleţi vasul cu apă peste marcajul MAX şi nici
sub marcajul MIN.
Atenţie:
Asiguraţi-vă că din vas 3 nu se revarsă apă, pentru
a evita opăririle şi electrocutările.
4. Luaţi sistemul de fierbere şi trageţi în sus ţeava
de apă q cu filtrul w.
5. Introduceţi cantitatea dorită de ceai vărsat sau
pliculeţe de ceai în compartimentul de fierbere 0.
Indicaţie:
Asiguraţi-vă că în aparat nu vor rămâne etichete sau
fire de la pliculeţele de ceai.
6. Introduceţi sistemul de fierbere din nou în vas 3.
Asiguraţi-vă că ţeava de apă q rămâne fixă în
gaura de pe fundul vasului 3. Compartimentul de
fierbere 0 trebuie montat cu partea aplatizată
spre mâner 2.
7. Închideţi capacul 1.
8. Aşezaţi vasul 3 din nou pe suport 5.
9. Introduceţi ştecărul în priză şi mutaţi întrerupătorul pornit / oprit 8 în poziţia “I”. Becul de
control 4 şi întrerupătorul pornit / oprit 8 se
aprind.
Apa fierbe acum, este transportată în sus prin ţeava de
apă q, şi curge prin compartimentul de fierbere 0
din nou în vas 3.
Indicaţie:
Ceaiul verde nu poate fi preparat în fierbător. Temperatura ideală pentru prepararea ceaiului verde
este de cca 70 °C. La temperaturi mai mari, ca acelea
generate de fierbătorul de ceai, sunt eliberaţi tananţi.
Ceaiul va avea gust amar.
- 15 -
R

Aparatul comută după fierberea apei în funcţia de
menţinere la cald. Becul de control 4 se stinge. În-
trerupătorul pornit / oprit 8 mai este încă aprins. După
ce apa s-a răcit, fierbătorul începe din nou procesul
de fierbere a apei. Becul de control 4 se aprinde
din nou în timpul fierberii.
Protecţia contra supraîncălzirii
În caz de supraîncălzire, protecţia contra supraîncălzirii opreşte elementul de încălzire din interiorul aparatului. Întrerupătorul pornit / oprit 8 rămâne în con-
tinuare aprins, dar aparatul nu mai încălzeşte apa.
Indicaţie:
Deoarece la o nouă fierbere apa este transportată
din nou prin sistemul de fierbere, acesta ar trebui
scos din cană 3 după primul proces de fierbere.
Pericol de rănire!
Sistemul de fierbere este foarte fierbinte! Pericol de
opărire! Utilizaţi mănuşi de bucătărie, dacă atingeţ i
sistemul de fierbere.
Indicaţie:
Cu cât timpul de menţinere la cald al băuturii este
mai lung, cu atât se evaporă mai multă apă şi cu
atât băutura este mai tare.
De aceea vă recomandăm să consumaţi ceaiul
după prima fierbere.
Fierberea poate fi întreruptă în orice moment:
pentru aceasta poziţionaţi întrerupătorul pornit /
oprit 8 pe „0”. Fierberea este oprită.
Dacă luaţi vasul 3 de pe suport 5, fierberea este
întreruptă.
Atenţie:
Aşteptaţi să se răcească vasul 3 înainte de a l
umple cu apă rece! Altfel se creează tensiuni
termice, iar vasul 3 se poate sparge.
Protecţia contra supraîncălzirii este activată, dacă
porniţi aparatul când în vas 3 nu există apă sau
în cantitate insuficientă.
Dacă protecţia contra supraîncălzirii a decuplat
elementul de încălzire, procedaţi în modul următor:
• lăsaţi aparatul să se răcească;
• apăsaţi butonul Reset 6 din partea de jos
a vasului 3.
Acum, aparatul poate fi utilizat din nou.
Curăţarea şi îngrijirea
Pericol de rănire!
Înainte de curăţare scoateţi ştecărul din priză.
Pericol de electrocutare! Lăsaţi aparatul să se
răcească. Pericol de arsuri!
Nu introduceţi niciodată aparatul în apă sau
în alte lichide. Pericol de electrocutare! Aparatul se poate defecta ireparabil.
Pentru a obţine un rezultat optim de preparare al
ceaiului la fiecare fierbere, aparatul trebuie curăţat
după fiecare utilizare. Astfel se evită:
• afectarea funcţionării aparatului din cauza combinaţiei dintre calcar şi tananţii rezultaţi
în timpul fierberii apei şi preparării ceaiului;
R
- 16 -

• influenţarea gustului ceaiului din cauza aromelor
puternice rămase în fierbător de la o preparare
anterioară a unor ceaiuri foarte aromate.
Curăţaţi vasul 3 fierbătorului cu un prosop umed.
Pentru depunerile persistente turnaţi un detergent uşor
pe prosop. Clătiţi apoi vasul 3 cu apă curată din
abundenţă pentru îndepărtarea resturilor de detergent.
Decupajul din partea de jos a vasului 3 se poate
curăţa bine cu o perie de vase.
Atenţie:
Nu utilizaţi soluţii de curăţat abrazive, chimice sau
corozive. Acestea pot produce deteriorări ireparabile
ale aparatului!
Curăţaţi sistemul de fierbere cu apă caldă şi un
detergent lichid:
Compartimentul de fierbere 0 şi filtrul w pot fi
curăţate cu ajutorul unei perii de vase.
Curăţaţi ţeava de apă q cu ajutorul periei pentru
ţeava de apă 9. Apoi, clătiţi sistemul de fierbere
cu apă curată pentru a îndepărta toate resturile de
detergent.
Eliminarea calcarului
Conţinutul de calcar (gradul de duritate) din apă duce
în timp la calcifierea aparatului. Calcarul împiedică
buna funcţionare a aparatului, reduce calitatea
ceaiului preparat şi creşte consumul de curent.
1. Utilizaţi un produs obişnuit de curăţare a calcarului pe bază de lămâie. Respectaţi indicaţiile
de pe ambalajul produsului.
2. Introduceţi sistemul de fierbere în vas 3.
3. Turnaţi soluţia de decalcifiere în vas 3.
Nu umpleţ i niciodaţa vasul cu lichid peste marcajul MAX şi nici sub marcajul MIN.
4. Aşteptaţi 10 minute, iar apoi porniţi aparatul.
5. Lăsaţi soluţia să fiarbă şi aşteptaţi până ce a
trecut prin sistemul de fierbere.
6. Dacă este necesar, repetaţi procedeul. Soluţia
poate fi reutilizată; totuşi, trebuie să se răcească
înainte de a o refolosi.
7. După dizolvarea calcarului, fierbeţi apă curată de
2 - 3 şi lăsaţi-o să treacă prin sistemul de fierbere.
8. Apoi, curăţaţi vasul 3 şi sistemul de fierbere în
modul descris în capitolul „Curăţarea şi
îngrijirea“.
Depozitarea
• Dacă nu utilizaţi aparatul pentru mai mult timp,
înfăşuraţi cablul în sens antiorar pe mosorul
de sub soclu 5 şi ghidaţi capătul prin fanta
din soclu 5.
• Depozitaţi aparatul într-un loc fără praf şi uscat.
Indicaţie:
Solicitaţi informaţii despre gradul de duritate al apei
de la robinet de la furnizorul public de apă. Dacă
gradul de duritate este mare, curăţarea
calcarului trebuie să se realizeze mai devreme, iar
dacă gradul de duritate este mai mic, mai târziu.
Utilizaţi produse de curăţare a calcarului pentru
aparatele electrocasnice şi respectaţi instrucţiunile
de utilizare de pe ambalajul acestora.
- 17 -
R

Eliminarea aparatelor uzate
Nu aruncaţi aparatul sub nicio formă
în gunoiul menajer obişnuit. Acest
produs cade sub incidenţa directivei
europene 2012/19/EU.
Eliminaţi aparatul prin intermediul unei firmei specializate şi autorizate sau prin intermediul serviciului local de eliminare a deşeurilor.
Respectaţi reglementările actuale în vigoare.
Dacă aveţi nelămuriri, contactaţi serviciul dumneavoastră local de eliminare a deşeurilor.
Eliminaţi toate materialele de ambalare
într-un mod ecologic.
Garanţia
Kompernass Handels GmbH
Stimate client,
Pentru acest aparat se acordă o garanţie de 3 ani
de la data cumpărării. În cazul în care produsul
prezintă defecte, beneficiaţi de drepturi legale faţă
de vânzătorul produsului. Aceste drepturi legale nu
sunt limitate prin garanţia noastră prezentată în
cele ce urmează.
Condiţii de garanţie
Perioada de garanţie începe de la data cumpărării.
Păstraţi cu grijă bonul fiscal original. Acesta este necesar pentru a dovedi cumpărarea.
Dacă în decurs de trei ani de la data cumpărării
acestui produs apare un defect de material sau de
fabricaţie, produsul va fi reparat sau înlocuit de
către noi – la alegerea noastră – în mod gratuit.
Garanţia presupune ca în timpul perioadei de trei
ani să se prezinte apăratul defect şi dovada cump
ărării (bonul fiscal), precum şi i o scurtă descriere în
scris, în care să se specifice în ce constă defectul şi
când a apărut acesta.
Dacă defectul este acoperit de garanţia noastră,
veţi primi înapoi produsul reparat sau unul nou.
Odată cu reparaţia sau înlocuirea produsului nu
începe o nouă perioadă de garanţie.
Perioada de garanţie şi pretenţiile legale
privind defectele
Perioada de garanţie nu este prelungită după
efectuarea reparaţiilor realizate în perioada de
garanţie. Acest lucru este valabil şi pentru piesele
înlocuite ţi reparate.
Eventualele deteriorări şi deficienţe prezente deja la
cumpărare trebuie semnalate imediat după dezambalarea produsului. Reparaţiile necesare după expirarea perioadei de garanţie se efectuează contra
cost.
Domeniul de aplicare a garanţiei
Aparatul a fost produs cu grijă, în conformitate cu
orientările stricte privind calitatea şi verificat cu
rigurozitate înaintea livrării.
Garanţia se acordă în caz de defecte de material
sau de fabricaţie. Această garanţie nu se extinde
asupra componentelor produsului care sunt expuse
uzurii normale şi care, prin urmare, pot fi considerate
piese de uzură sau asupra deteriorărilor apărute la
componentele fragile, de exemplu comutatoare, acumulatori, forme de copt sau componente realizate
din sticlă.
Această garanţie se pierde în cazul în care produsul
a fost deteriorat, a fost utilizat sau întreţinut în mod
necorespunzător. Pentru utilizarea corespunzătoare
a produsului trebuie respectate cu stricteţe toate indicaţiile prezentate în instrucţiunile de utilizare. Trebuie
evitate în mod obligatoriu utilizările şi acţiunile nerecomandate sau care fac obiectul unor avertizări în
cadrul instrucţiunilor de utilizare.
Aparatul este destinat numai uzului privat şi nu utilizărilor comerciale. În cazul manevrării abuzive sau
necorespunzătoare, al uzului de forţă şi al intervenţiilor care nu au fost realizate de către filiala noastră
autorizată de service, garanţia îţi pierde valabilitatea.
R
- 18 -

Procedura de acordare a garanţiei
Pentru a se asigura prelucrarea rapidă a solicitării
dvs., urmaţi instrucţiunile de mai jos:
Pentru toate solicitările păstraţi la îndemână bonul fiscal şi numărul articolului (de exemplu IAN 12345)
ca dovadă a cumpărării.
Numărul articolului poate fi consultat pe plăcuţa de
caracteristici, pe o gravură, pe coperta instrucţiunilor
(în partea stângă, jos) sau pe autocolantul de pe
partea din spate sau de jos.
În cazul în care apar defecte funcţionale sau alte
defecţiuni, contactaţi mai întâi telefonic sau prin
e-mail departamentul de service menţionat în continuare.
Apoi puteţi expedia produsul înregistrat ca fiind
defect la adresa de service care v-a fost comunicată,
fără a plăti taxe poţtale, anexând dovada cumpărării (bonul fiscal) şi indicând în ce constă defectul şi
când a apărut acesta.
Acest manual, precum ţi multe
altele, videoclipuri cu produsele
ţi software-uri pot fi descărcate
de pe www.lidl-service.com.
Service-ul
R
Service România
Tel.: 0800896637
E-Mail: kompernass@lidl.ro
IAN 277007
Importator
Vă rugăm să aveţi în vedere faptul că următoarea
adresă nu reprezintă o adresă pentru service.
Contactaţi mai întâi centrul de service indicat.
KOMPERNASS HANDELS GMBH
BURGSTRASSE 21
44867 BOCHUM
GERMANY
www.kompernass.com
- 19 -
R

R
- 20 -

Cъдържание Cтраница
Въведение 22
Употреба по предназначение 22
Окомплектовка на доставката 22
Технически характеристики 22
Описание на уреда 22
Указания за безопасност 23
Преди първата употреба 25
Обслужване 25
Защита от прегряване 26
Почистване и поддържане 26
Отстраняване на котлен камък 27
Съхранение 27
Изхвърляне 28
Гаранция отKompernass Handels GmbH 28
Service 29
Importer 29
Прочетете внимателно ръководството за експлоатация преди да използвате уреда за първи път и го
запазете за по-нататъшна употреба. Когато предавате уреда на трети лица, предайте и това ръководство.
- 21 -

Кана за чай
Въведение
Поздравяваме ви за покупката на вашия нов уред.
Избрали сте висококачествен продукт.
Ръководството за потребителя е неразделна част от
този продукт. То съдържа важни указания относно
безопасността, употребата и предаването за
отпадъци. Преди да използвате продукта, се
запознайте с всички указания за обслужване и
безопасност. Използвайте продукта единствено
според описанието и за указаните области на
приложение. Запазете това ръководство за
потребителя. Предавайте продукта на трети лица
заедно с цялата документация.
Употреба по предназначение
Този уред е предназначен за запарване на чай
и поддържане на чая в топло състояние. Той е
предвиден само за домашна употреба и не е
проектиран за професионални или индустриални
цели.
Окомплектовка на доставката
Кана за чай
Четка за тръбата за подаване на течността
Ръководство за обслужване
Технически характеристики
Консумирана мощност: 550 - 650 W
Мрежово напрежение: 220 - 240 V ~, 50 Hz
Всички части на този уред, влизащи в
контакт с хранителни продукти, са от
материали, разрешени за контакт с
хранителни продукти.
Описание на уреда
1 Капак
2 Дръжка
3 Кана
4 Контролен индикатор
5 Основа
6 Бутон за ресет
7 Мрежов кабел
8 Бутон за включване/изключване
9 Четка за тръбата за подаване на течността
0 Камера за запарване
q Тръба за подаване на течността
w Филтър
- 22 -

Указания за безопасност
Опасност – Токов удар!
• Уверете се, че основата с електрическите съединения никога не
влиза в контакт с вода! Ако по невнимание основата се навлажни,
оставете я първо да изсъхне напълно.
• Използвайте уреда само с основата от ком-плекта на доставката.
• По време на работа внимавайте мрежовият кабел никога да не се
мокри или навлажнява. Прекарайте го така, че никога да не се
притиска или поврежда по друг начин.
• Дайте веднага повредения щепсел или кабел за смяна от
оторизиран електротехник или сервиз, за да избегнете опасности.
• След употреба изключвайте винаги щепсела от контакта. Не е
достатъчно само да го изключите от бутона, тъй като в уреда все още
има мрежо-во напрежение, докато щепселът е включен в контакта.
Никога не потапяйте уреда във вода или други течности!
Съществува опасност от токов удар!
Предупреждение – Опасност от нараняване!
• Използвайте уреда винаги само със затворен капак, в противен
случай автоматичното изключване не функционира. Тогава врящата
вода може да пръска навън.
• Възможно е да излизат горещи пари. Освен това по време на
работа каната се нагорещява силно. Затова е необходимо да използвате готварски ръкавици.
• Уверете се, че уредът е поставен стабилно и във вертикално положение, преди да го включите. Врящата вода може да преобърне
нестабилно поставен уред.
• Работете внимателно с каната. Счупеното стъкло може да причини
сериозни наранявания от порязване.
• Никога не наливайте вода над маркировката MAX. В противен случай
врящата вода може да пръска навън и да доведе до попарване.
• Не отваряйте капака, докато водата ври.
- 23 -

• Уредите могат да се използват от лица с намалени физически,
сетивни или умствени възможности или липса на опит и/или умения
само при условие че са под наблюдение или са инструктирани
относно безопасната употреба на уреда и са разбрали
опасностите, произтичащи от работата с него.
• Този уред може да се използва от деца на възраст над 8 години, ако
са под наблюдение или са инструктирани по отношение на
безопасната употреба на уреда и са разбрали опасностите,
произтичащи от работата с него.
• Почистването и поддръжката от страна на потребителя не трябва да
се извършват от деца, освен ако не са на възраст над 8 години и се
намират под наблюдение.
• Уредът и захранващият кабел трябва да се държат далече от деца на
възраст под 8 години.
• Не допускайте деца да играят с уреда.
• Децата трябва да се наблюдават, за да се гарантира, че не играят с
уреда.
• За работа с уреда не използвайте външен таймер или отделна
система за дистанционно управление.
ПОВИШЕНО ВНИМАНИЕ: горещи повърхности!
За избягване на повреди по уреда:
• След загряване на вода в никакъв случай не наливайте веднага отново
студена вода в уреда. В стъклото могат да възникнат напрежения и
то може да се счупи!
- 24 -

Преди първата употреба
• Отстранете всички опаковъчни материали от
уреда.
• Измийте внимателно всички части на запарващата система (камера за запарване 0,
вертикална тръба q, цедка w) и каната 3
(виж глава “Почистване и поддържане”).
1. Свалете каната 3 от основата 5.
2. Отворете капака 1 и извадете запарващата
система. Оставете запарващата система на
равна повърхност.
3. Напълнете желаното количество вода в
каната 3. Никога не наливайте вода над
маркировката MAX и под маркировката MIN.
Преди първата употреба постъпете както следва:
1. Свалете каната 3 от цокъла 5.
2. Напълнете каната 3 до маркировката MAX с
вода, добавете една чаена лъжичка лимонов
сок (или лимонов концентрат). Ако нямате лимон, можете да поставите едно пакетче чай
(или една чаена лъжичка насипен чай)
направо във водата.
3. Поставете запарващата система в каната 3.
4. Затворете капака 1 и поставете каната 3
върху цокъла 5.
5. Включете уреда с бутона за включване/
изключване 8. Контролният индикатор 4 и
бутонът за включване/изключване 8 светват.
Изчакайте, докато контролният индикатор 4
угасне.
6. Изключете уреда с бутона за включване/изключване 8 и почистете уреда, както е описано в
“Почистване и поддържане”.
Каната за чай е готова за употреба.
Обслужване
Внимание:
Не добавяйте захар в каната за чай. Не загрявайте
мляко или алкохол в каната за чай. Това води до
непоправими повреди на уреда.
Опасност!
Внимавайте водата да не прелива от каната 3,
за да избегнете изгаряния и електрически шокове.
4. Вземете запарващата система и издърпайте
вертикалната тръба q с цедката нагоре w.
5. Поставете желаното количество чай или
пакетчета чай в камерата за запарване 0.
Указание:
Внимавайте в уреда да не остават етикети или
конци на пакетчетата.
6. Поставете запарващата система отново в
каната 3. Внимавайте вертикалната тръба q
да влезе в отвора на дъното на каната 3.
Камерата за запарване 0 трябва да се
поставя с плоската страна към дръжката 2.
7. Затворете капака 1.
8. Поставете каната 3 отново върху основата 5.
9. Включете щепсела в контакт и поставете бутона
за включване/изключване 8 на позиция
“I”. Контролният индикатор 4 и бутонът за
включване/изключване 8 светят.
Водата завира, изтласква се нагоре през
вертикалната тръба q и преминава през
камерата за запарване 0 отново в каната 3.
Указание:
Зеленият чай не е подходящ за запарване в
каната за чай. Идеалната температура за
запарване на зеления чай е около 70 °C. При
по-високи температури на запарване, каквито се
получават в каната за чай, се извличат танини.
Чаят има горчив вкус.
- 25 -

След завиране на водата уредът се включва
автоматично във функцията за поддържане в
топло състояние. Контролният индикатор 4 угасва,
остава да свети само бутонът за включване/
изключване 8. Щом водата изстине, каната за
чай я загрява отново. Контролният индикатор 4
светва отново по време на загряването.
Указание:
Тъй като при повторното завиране водата преминава през запарващата система, след първото
запарване трябва да извадите запарващата
система от каната 3.
Защита от прегряване
При прегряване защитата от прегряване изключва
нагревателния елемент във вътрешността на уреда.
Бутонът за включване/изключване 8 продължа-
ва да свети, но уредът вече не нагрява.
Защитата от прегряване се задейства, ако в каната 3 няма или има недостатъчно вода и въпреки
това уредът се включи.
Ако защитата от прегряване е изключила
нагревателния елемент, постъпете както следва:
Опасност от нараняване!
Запарващата система се нагорещява силно!
Съществува опасност от изгаряния! Използвайте
готварски ръкавици, когато докосвате запарващата система.
Указание:
Колкото по-дълго поддържате напитката в топло
състояние и колкото повече течност се изпарява,
толкова по-силна става напитката.
Затова препоръчваме чаят да се пие по възможност
след първото запарване.
Можете да прекъснете процеса на загряване по
всяко време:
За тази цел поставете бутона за включване/изключване 8 в позиция “0”. Процесът на загряване се
прекъсва. Когато вземете каната 3 от основата 5,
процесът на загряване се прекъсва.
Внимание:
Оставяйте каната 3 винаги първо да се охлади,
преди да налеете студена вода за следващ процес
на запарване! В противен случай се получават
напрежения в стъклото и каната 3 може да се
счупи.
• Оставете уреда да се охлади.
• Натиснете бутона за ресет 6 от долната
страна на каната 3.
Сега отново можете да използвате уреда.
Почистване и поддържане
Опасност от нараняване!
Преди почистване изключвайте щепсела от
контакта. Съществува опасност от токов удар!
Оставете уреда да се охлади. Опасност от
изгаряне!
Никога не потапяйте уреда във вода или
други течности! Съществува опасност от
токов удар! Уредът може да се повреди
непоправимо.
За постигане на оптимален резултат при всяко
запарване на чай, уредът трябва да се почиства
след всяко ползване. По този начин се избягва:
• комбинацията от котлен камък и танини, която
се причинява от вренето на водата и приготвянето на чай и се отразява отрицателно на
функционирането на каната за чай;
• при редовна употреба на каната за чай
евентуално да се поеме ароматът на силно
ароматен чай и да се предаде на други
сортове чай.
- 26 -

Почиствайте каната 3 за чай с влажна кърпа.
При упорити замърсявания върху кърпата поставете мек миещ препарат. След това изплакнете
каната 3 с много чиста вода, така че да се
отстранят всички остатъци от миещия препарат.
Отворът на дъното на каната 3 можете да
почистите добре с четка за миене.
Внимание:
Не използвайте абразивни, химически или
разяждащи почистващи препарати. Те могат да
повредят уреда непоправимо!
Почиствайте запарващата система с топла вода
и течен миещ препарат:
Можете да почиствате камерата за запарване 0
и филтъра w с четка за миене.
Почиствайте тръбата за подаване на течността q
с помощта на четката за тръбата за подаване на
течността 9. След почистването изплаквайте
цялата запарваща система с чиста вода, за да
не остават полепнали остатъци от миещия
препарат.
Отстраняване на котлен камък
1. Използвайте обикновен домакински препарат
за отстраняване на котлен камък на базата на
лимонена киселина. Вземете под внимание
указанията върху опаковката на препарата за
отстраняване на котлен камък.
2. Поставете запарващата система в каната 3.
3. Налейте разтвора на препарата за
отстраняване на котлен камък в каната 3.
Никога не наливайте течност над
маркировката MAX и под маркировката MIN.
4. Изчакайте 10 минути и след това включете
уреда.
5. Оставете разтвора да заври и изчакайте,
докато премине през запарващата система.
6. Ако е необходимо, повторете операцията
още веднъж. Можете да използвате още
веднъж разтвора на препарата за отстраняване
на котлен камък; преди това обаче го
оставете да се охлади.
7. След като се разтвори котленият камък, напълнете каната 2-3 пъти с чиста вода и я оставете
да заври и да премине през запарващата
система.
8. След това измийте каната 3 и запарващата
систе-ма, както е описано в глава „Почистване
и поддържане“.
Съдържанието на варовик (степен на твърдост)
във водата води в течение на използването на
уреда до образуването на котлен камък. Котленият
камък се отразява отрицателно върху функционирането на уреда, понижава качеството на чая и
освен това повишава разхода на ток.
Указание:
Осведомете се от вашето водоснабдително
дружество за степента на твърдост на водата от
водопровода. При висока степен на твърдост
отстраняването на котления камък се налага поскоро, а при ниска степен на твърдост - по-късно.
Използвайте препарат за отстраняване на котлен
камък за домакински уреди и спазвайте
ръководството за употреба.
Съхранение
• Ако няма да използвате уреда по-дълго време,
навийте кабела обратно на часовниковата
стрелка около приспособлението за навиване
от долната страна на цокъла 5 и прекарайте
края му през прохода за кабела на цокъла 5.
• Съхранявайте уреда на защитено от прах и
сухо място.
- 27 -

Изхвърляне
В никакъв случай не изхвърляйте уреда
с битовите отпадъци. Този уред
подлежи на европейската Директива
2012/19/EU.
Изхвърляйте уреда чрез лицензирана фирма за
изхвърляне на отпадъци или общинската служба
за изхвърляне на отпадъци.
Спазвайте валидните актуални разпоредби.
В случай на съмнение се свържете със службата
за изхвърляне на отпадъци.
Предавайте опаковъчните материали за
екологично изхвърляне.
Гаранция от
Kompernass Handels GmbH
Уважаеми клиенти,
За този уред вие получавате гаранция от 3 години
от датата на закупуване. В случай на дефекти на
този продукт ви се полагат законови права спрямо
продавача на продукта. Тези законови права не
се ограничават от нашата представена по-долу
гаранция.
Гаранционни условия
Гаранционният срок започва от датата на закупуване. Моля съхранявайте добре оригиналния
касов бон. Този документ е необходим като
доказателство за покупката.
В случай че в рамките на три години от датата на
закупуване на този продукт се появи материален
или фабричен дефект, продуктът се ремонтира или
заменя – по наш избор – безплатно от нас за вас.
Условие за тази гаранционна услуга е в рамките
на тригодишния срок да ни бъдат представени
дефектният уред, касовата бележка (касовият
бон) и кратко писмено описание в какво се
състои дефектът и кога се е появил.
В случай че дефектът се покрива от нашата гаранция, вие ще получите обратно ремонтирания
или нов продукт. След ремонта или смяната на
продукта не започва нов гаранционен период.
Продължителност на гаранцията и
законови искания за отстраняване на
дефекти
Продължителността на гаранцията не се
удължава от гаранционната услуга. Това важи
и за сменени и ремонтирани части. Евентуално
наличните още при закупуването повреди и
дефекти трябва да се съобщят незабавно след
разопаковането. След като изтече гаранционният срок, ремонтите се заплащат.
Гаранционен обем
Уредът е произведен старателно съгласно строги
директиви за качество и е проверен добросъвестно преди доставката.
Даването на гаранция важи за материални или
фабрични дефекти. Гаранцията не се простира
върху части на продукта, които са изложени на
нормално износване и затова могат да се разглеждат като износващи се части, или за повреди
на чупливи елементи, напр. превключватели,
акумулаторни батерии, форми за печене или
стъклени части.
Тази гаранция отпада, когато продуктът е бил
повреден, неправилно използван или поддържан.
За правилно използване на продукта трябва
точно да се спазват всички инструкции, посочени
в ръководството за потребителя. Цели на приложение и действия, които не се препоръчват или
за които се предупреждава в ръководството за
потребителя, трябва непременно да се избягват.
Продуктът е предназначен само за лична, а не
за професионална употреба. При неправилна
и нецелесъобразна употреба, упражняване на
сила или ремонтни дейности, които не са
извършени от нашия оторизиран сервизен
филиал, гаранцията отпада.
- 28 -

Процедура в гаранционен случай
За да се гарантира бърза обработка на вашето
искане, моля следвайте следните указания:
За всички запитвания имайте готовност да
представите касовия бон и да съобщите
артикулния номер (напр. IAN 12345) като
доказателство за покупката.
Артикулният номер е посочен на фабричната
табелка, на гравюра, на заглавния лист на
ръководството (долу вляво) или като стикер на
гърба или долната страна.
В случай че се появят функционални повреди или
други дефекти, първо се свържете с долупосочения
сервизен отдел по телефона или по имейл.
След това можете да изпратите регистрирания
като дефектен продукт на съобщения ви адрес на
сервиз, като приложите касовата бележка
(касовия бон) и информация в какво се състои
дефектът и кога се е появил, без да заплащате
пощенска такса.
От www.lidl-service.com можете
да изтеглите това и много други
ръководства, видеоклипове за
продукти и софтуер.
Service
Сервизно обслужване България
Тел.:00800 111 4920
Е-мейл: kompernass@lidl.bg
IAN 277007
Importer
Моля обърнете внимание, че следващият адрес
не е адрес на сервиз. Най-напред се свържете с
посочения сервизен пункт.
KOMPERNASS HANDELS GMBH
BURGSTRASSE 21
44867 BOCHUM
GERMANY
www.kompernass.com
- 29 -

- 30 -

Περιεχόμενα Σελίδα
Eισαγωγή 32
Σκοπός χρήσης 32
Σύνολο αποστολής 32
Τεχνικές πληροφορίες 32
Περιγραφή συσκευής 32
Υποδείξεις ασφαλείας 33
Πριν από την πρώτη χρήση 35
Χειρισμός 35
Προστασία υπερθέρμανσης 36
Καθαρισμός και φροντίδα 36
Απομάκρυνση αλάτων 37
Διαφύλαξη 37
Απομάκρυνση 38
Εγγύηση της Kompernass Handels GmbH 38
Σέρβις 39
Εισαγωγέας 39
Διαβάστε το εγχειρίδιο χειρισμού πριν από την πρώτη χρήση προσεκτικά και φυλάξτε το για μια μελλοντική
χρήση. Παραδώστε το εγχειρίδιο σε όποιον παραδοθεί στη συνέχεια η συσκευή.
- 31 -

Βραστήρας τσαγιού
Eισαγωγή
Συγχαρητήρια για την αγορά της νέας σας
συσκευής.
Αποφασίσατε έτσι για την απόκτηση ενός προϊόντος
υψηλής ποιότητας. Οι οδηγίες χρήσης είναι τμήμα
αυτού του προϊόντος. Περιέχουν σημαντικές υποδείξεις
για την ασφάλεια, τη χρήση και την απόρριψη. Πριν
από τη χρήση του προϊόντος, εξοικειωθείτε με όλες τις
υποδείξεις χειρισμού και ασφάλειας. Χρησιμοποιείτε
το προϊόν μόνο όπως περιγράφεται και για τους
αναφερόμενους τομείς χρήσης. Φυλάξτε αυτές τις
οδηγίες χρήσης καλά. Παραδώστε όλα τα έγγραφα
σε περίπτωση παράδοσης του προϊόντος σε τρίτους.
Σύνολο αποστολής
Βραστήρας τσαγιού
Βούρτσα σωλήνα ανύψωσης
Οδηγία χρήσεως
Τεχνικές πληροφορίες
Μέγιστη απορρόφηση
ισχύος: 550 - 650 W
Τάση δικτύου: 220 - 240 V ~, 50 Hz
Όλα τα εξαρτήματα αυτής της
συσκευής που έρχονται σε επαφή με
τρόφιμα μπορούν να χρησιμοποιούνται
με ασφάλεια στα τρόφιμα.
Σκοπός χρήσης
Αυτή η συσκευή προορίζεται για το βράσιμο και τη
διατήρηση του ζεστού τσαγιού. Προορίζεται μόνο
για ιδιωτική οικιακή χρήση και δεν έχει σχεδιαστεί
για επαγγελματικούς ή βιομηχανικούς σκοπούς.
Περιγραφή συσκευής
1 Καπάκι
2 Λαβή
3 Kavάτa
4 Λυχνία ελέγχου
5 Υποδοχή
6 Πλήκτρο Reset (επαναφορά)
7 Καλώδιο τροφοδοσίας
8 Διακόπτης on/off
9 Βούρτσα σωλήνα ανύψωσης
0 Θάλαμος βρασίματος
q Αγωγός υγρού
w Σήτα
- 32 -

Υποδείξεις ασφαλείας
Κίνδυνος ηλεκτροπληξίας!
• Εξασφαλίστε ότι η βάση με τις ηλεκτρικές συνδέσεις δεν θα έρθει ποτέ σε
επαφή με νερό! Αφήνετε πρώτα τη βάση να στεγνώσει πλήρως εάν έχει
βραχεί κατά λάθος.
• Χρησιμοποιείτε τη συσκευή μόνο με την απεσταλμένη υποδοχή.
• Να προσέχετε το καλώδιο τροφοδοσίας να μην βρέχεται ή υγραίνεται
ποτέ κατά τη διάρκεια λειτουργίας. Να το τοποθετείτε έτσι, ώστε να μην
υφίσταται περίπτωση να μαγκωθεί ή να υποστεί άλλου είδους ζημιά.
• Τα βύσματα ή καλώδια δικτύου με βλάβη πρέπει να αντικαθίστανται
αμέσως από εξουσιοδοτημένο ειδικό προσωπικό ή από το τμήμα
εξυπηρέτησης πελατών, ώστε να αποφεύγονται κίνδυνοι.
• Τραβάτε πάντα μετά τη χρήση το βύσμα από την πρίζα. Η
απενεργοποίηση δεν αρκεί διότι υπάρχει ακόμα τάση στη συσκευή, όσο
το βύσμα βρίσκεται στην υποδοχή.
Ποτέ μη βυθίζετε τη συσκευή σε νερό ή σε άλλα υγρά! Υπάρχει
κίνδυνος ηλεκτροπληξίας!
Προειδοποίηση - Κίνδυνος τραυματισμού
• Λειτουργείτε πάντα τη συσκευή μόνο με κλειστό καπάκι, αλλιώς ο
αυτόματος απενεργοποίησης δεν λειτουργεί. Το νερό που βράζει μπορεί
τότε να πιτσιλίσει από τις άκρες.
• Ίσως διαφύγουν καυτοί ατμοί. Επίσης το δοχείο είναι πολύ καυτό κατά τη
λειτουργία. Για το λόγο αυτό φοράτε γάντια κουζίνας.
• Εξασφαλίστε ότι η συσκευή είναι σταθερή και ότι στέκεται ίσια πριν την
ενεργοποιήσετε. Το νερό που βράζει μπορεί να κάνει την ασταθή συσκευή
να πέσει κάτω.
• Να μεταχειρίζεστε προσεκτικά το δοχείο. Το σπασμένο γυαλί μπορεί να
προκαλέσει βαριούς τραυματισμούς από κοπή.
• Ποτέ μη γεμίζετε με περισσότερο νερό από την ένδειξη MAX (μέγιστο).
Αλλιώς μπορεί να πιτσιλιστεί βραστό νερό προς τα έξω και να οδηγήσει
σε εγκαύματα.
• Μην ανοίγετε το καπάκι κατά τη διάρκεια βρασίματος του νερού.
- 33 -

• Μπορεί να γίνεται χρήση των συσκευών από άτομα με μειωμένες φυσικές,
αισθητηριακές ή νοητικές δυνατότητες ή με έλλειψη εμπειρίας και/ή
γνώσεων, εφόσον επιτηρούνται ή έχουν εκπαιδευτεί αναφορικά με την
ασφαλή χρήση της συσκευής και έχουν κατανοήσει τους επακόλουθους
κινδύνους.
• Μπορεί να γίνεται χρήση αυτής της συσκευής από παιδιά άνω των 8 ετών,
εφόσον επιτηρούνται ή έχουν εκπαιδευτεί αναφορικά με την ασφαλή
χρήση της συσκευής και έχουν κατανοήσει τους επακόλουθους
κινδύνους.
• Ο καθαρισμός και η συντήρηση χρήστη δεν επιτρέπεται να διεξάγονται
από παιδιά, εκτός εάν είναι 8 ετών ή μεγαλύτερα και επιτηρούνται.
• Η συσκευή και το καλώδιο σύνδεσής της πρέπει να φυλάσσονται μακριά
από παιδιά κάτω των 8 ετών.
• παιδιά δεν επιτρέπεται να παίζουν με τη συσκευή.
• Τα παιδιά πρέπει να επιτηρούνται ώστε να εξασφαλίζεται ότι δεν παίζουν
με τη συσκευή.
• Μη χρησιμοποιείτε εξωτερικό χρονοδιακόπτη ή ξεχωριστό
τηλεχειριστήριο για να λειτουργήσετε τη συσκευή.
ΠΡΟΣΟΧΗ: καυτές επιφάνειες!
Έτσι αποφεύγετε βλάβες στη συσκευή:
• Ποτέ μη γεμίζετε μετά από μια διαδικασία βρασί-ματος αμέσως πάλι με
κρύο νερό τη συσκευή. Μπορεί να δημιουργηθούν τάσεις στο γυαλί και
το γυαλί μπορεί να σπάσει!
- 34 -

Πριν από την πρώτη χρήση
• Απομακρύνετε όλα τα υλικά συσκευασίας από τη
συσκευή.
• Ξεπλύνετε όλα τα τμήματα του συστήματος
βρασίματος (θάλαμος βρασίματος 0, αγωγός
υγρού q, σήτα w) και την κανάτα 3 προσεκτικά
(βλέπε Κεφάλαιο “Καθαρισμός και φροντίδα”).
Πριν από την πρώτη χρήση ακολουθήστε την εξής
διαδικασία:
1. Αφαιρέστε την κανάτα 3 από την υποδοχή 5.
2. Γεμίστε την κανάτα 3 έως τη σήμανση MAX με
νερό, προσθέστε ένα κουταλάκι χυμό λεμονιού
(συμπύκνωμα λεμονιού). Εάν δεν διαθέτετε
λεμόνι, μπορείτε να βάλετε ένα σακουλάκι τσάι (ή
ένα κουτάλι του γλυκού χύμα τσάι) απευθείας στο
νερό.
3. Τοποθετήστε το σύστημα βρασίματος μέσα στην
κανάτα 3.
4. Κλείστε το καπάκι 1 και τοποθετήστε την κανάτα
3 επάνω στην υποδοχή 5.
5. Ενεργοποιήστε τη συσκευή στο διακόπτη on/off 8.
Η λυχνία ελέγχου 4 και ο διακόπτης on/off 8
ανάβουν. Περιμένετε έως ότου η λυχνία ελέγχου 4
σβήσει.
6. Απενεργοποιήστε τη συσκευή στο διακόπτη on/
off 8 και καθαρίστε τη συσκευή όπως περιγράφεται
στο “Καθαρισμός και φροντίδα”.
Τώρα ο βραστήρας τσαγιού είναι έτοιμος για λειτουργία.
Χειρισμός
Προσοχή:
Μη βάζετε ζάχαρη μέσα στο βραστήρα τσαγιού.
Μη ζεσταίνετε γάλα ή αλκοολούχα ποτά στο βραστήρα
τσαγιού. Αυτό οδηγεί σε ανεπανόρθωτες βλάβες στη
συσκευή.
Υπόδειξη:
Το πράσινο τσάι δεν ενδείκνυται για βράσιμο στον
βραστήρα τσαγιού. Η ιδεώδης θερμοκρασία βρασίματος για το πράσινο τσάι βρίσκεται περίπου στους
70°C. Σε υψηλότερες θερμοκρασίες βρασίματος,
όπως τις δημιουργεί ο βραστήρας τσαγιού,
εμφανίζεται τανίνη. Το τσάι έχει πικρή γεύση.
1. Απομακρύνετε την κανάτα 3 από την υποδοχή 5.
2. Ανοίξτε το καπάκι 1 και βγάλτε έξω το σύστημα
βρασίματος. Τοποθετήστε το σύστημα βρασίματος
επάνω σε μια επίπεδη επιφάνεια.
3. Βάλτε την επιθυμητή ποσότητα νερού στην κανάτα
3. Ποτέ μη γεμίζετε με περισσότερο νερό από
την ένδειξη MAX και ποτέ λιγότερο από την
ένδειξη MIN.
Κίνδυνος!
Προσέχετε ώστε να μην υπερχειλίζει νερό από την
κανάτα 3, ώστε να αποφεύγετε καψίματα και
ηλεκτροπληξία.
4. Παίρνετε το σύστημα βρασίματος και τραβάτε τον
αγωγό υγρού q με τη σήτα w προς τα επάνω.
5. Βάλτε την επιθυμητή ποσότητα τσαγιού ή το
σακουλάκι τσάι στο θάλαμο βρασίματος 0.
Υπόδειξη:
Προσέξτε ώστε να μην παραμείνουν ετικέτες ή
υπολείμματα από το σακουλάκι στη συσκευή.
6. Τοποθετήστε πάλι το σύστημα βρασίματος στην
κανάτα 3. Προσέχετε ώστε ο αγωγός υγρού q
να πιάνει στην εγκοπή στο δάπεδο της κανάτας 3.
Ο θάλαμος βρασίματος 0 πρέπει να τοποθετείται
με την επίπεδη επιφάνεια στη λαβή 2.
7. Κλείστε το καπάκι 1.
8. Τοποθετήστε την κανάτα 3 πάλι στην υποδοχή 5.
9. Εισάγετε το βύσμα δικτύου σε μια πρίζα δικτύου
και θέστε το διακόπτη on/off 8 στη θέση “I”.
Η λυχνία ελέγχου 4, καθώς και ο διακόπτης
on/off 8 ανάβουν.
Το νερό βράζει τώρα, πιέζεται μέσα από τον αγωγό
υγρού q προς τα επάνω και περνάει μέσα από το
θάλαμο βρασίματος 0 και πάλι στην κανάτα 3.
- 35 -

Η συσκευή γυρίζει αυτόματα στη λειτουργία διατήρησης
ζεστού, αφότου το νερό έχει βράσει. Η λυχνία ελέγχου
4 σβήνει, ανάβει μόνο ο διακόπτης on/off 8. Μόλις
κρυώσει το νερό, ο βραστήρας τσαγιού βράζει
πάλι το νερό. Η λυχνία ελέγχου 4 ανάβει κατά τη
διαδικασία βρασίματος πάλι.
Υπόδειξη:
Επειδή το νερό, κατά το νέο βράσιμο οδηγείται πάλι
μέσα από το σύστημα βρασίματος, πρέπει μετά την
πρώτη διαδικασία βρασίματος να βγάλετε έξω το
σύστημα βρασίματος από την κανάτα 3.
Προστασία υπερθέρμανσης
Σε περίπτωση υπερθέρμανσης, η προστασία υπερθέρμανσης απενεργοποιεί το θερμαντικό στοιχείο στο
εσωτερικό της συσκευής. Ο διακόπτης On/off 8
συνεχίζει να ανάβει, ωστόσο η συσκευή δεν συνεχίζει
να ζεσταίνει.
Η προστασία υπερθέρμανσης ενεργοποιείται, όταν
δεν υπάρχει νερό ή δεν υπάρχει επαρκές νερό μέσα
στην κανάτα 3 και παρόλα αυτά η συσκευή
ενεργοποιείται.
Κίνδυνος τραυματισμού!
Το σύστημα βρασίματος είναι πολύ καυτό! Υπάρχει
κίνδυνος εγκαυμάτων! Χρησιμοποιείτε γάντια κουζίνας
όταν αγγίζετε το σύστημα βρασίματος.
Υπόδειξη:
Όσο πιο πολύ διατηρείτε το ρόφημα ζεστό, τόσο
περισσότερο υγρό εξατμίζεται και τόσο πιο δυνατό
γίνεται το ρόφημα. Γι' αυτό προτείνουμε να πίνετε το
τσάι εφόσον γίνεται μετά το πρώτο βράσιμο.
Μπορείτε να διακόψετε τη διαδικασία βρασίματος
ανά πάσα στιγμή:
Για αυτό θέστε το διακόπτη on/off 8 στη θέση “0”.
Η διαδικασία βρασίματος τερματίζεται.
Όταν παίρνετε την κανάτα 3 από την υποδοχή 5,
διακόπτεται η διαδικασία βρασίματος.
Προσοχή:
Αφήνετε πάντα την κανάτα 3 να κρυώνει πρώτa,
προτού γεμίσετε με κρύο νερό για μια περαιτέρω
διαδικασία βρασίματος! Αλλιώς μπορεί να
δημιουργηθούν τάσεις στο γυαλί και να σπάσει η
κανάτα 3.
Εάν η προστασία υπερθέρμανσης έχει απενεργοποιήσει
το θερμαντικό στοιχείο, ακολουθήστε την εξής
διαδικασία:
• Αφήστε τη συσκευή να κρυώσει.
• Πιέστε το πλήκτρο Reset 6 στην κάτω πλευρά
της κανάτας 3.
Η συσκευή μπορεί τώρα να χρησιμοποιηθεί πάλι.
Καθαρισμός και φροντίδα
Κίνδυνος τραυματισμού!
Πριν από τον καθαρισμό τραβάτε το βύσμα. Υπάρχει
κίνδυνος ηλεκτροπληξίας! Αφήνετε τη συσκευή να
κρυώνει. Κίνδυνος εγκαύματος!
Ποτέ μη βυθίζετε τη συσκευή σε νερό ή σε άλλα
υγρά! Υπάρχει κίνδυνος ηλεκτροπληξίας!
Η συσκευή μπορεί να πάθει ανεπανόρθωτη βλάβη.
Για να πετυχαίνετε σε κάθε διαδικασία βρασίματος ένα
βέλτιστο αποτέλεσμα στο τσάι, πρέπει η συσκευή να
καθαρίζεται μετά από κάθε χρήση. Έτσι αποφεύγεται:
• ο συνδυασμός αλάτων και τανίνης, ο οποίος
προκαλείται από το βράσιμο του νερού και την
ετοιμασία του τσαγιού και ο οποίος επηρεάζει
τη λειτουργία του βραστήρα τσαγιού.
- 36 -

• σε τακτική χρήση του βραστήρα τσαγιού, σε
ορισμένες περιπτώσεις το άρωμα δυνατού
αρωμα-τικού τσαγιού αυξάνεται και μεταδίδεται
σε άλλα είδη τσαγιού.
Καθαρίζετε την κανάτα 3 του βραστήρα τσαγιού με
ένα νωπό πανί. Σε σκληρές ακαθαρσίες βάζετε ένα
ήπιο απορρυπαντικό επάνω στο πανί. Ξεπλύνετε
την κανάτα 3 στη συνέχεια με πολύ καθαρό νερό,
έτσι ώστε να απομακρυνθούν όλα τα υπολείμματα
απορρυπαντικού. Η εσοχή στον πάτο της κανάτας 3
μπορεί να καθαριστεί καλά με μια βούρτσα καθαρισμού.
Προσοχή
Μη χρησιμοποιείτε τριβικά μέσα, χημικά ή ερεθιστικά
καθαριστικά μέσα. Αυτά μπορεί να προκαλέσουν
ανεπανόρθωτη βλάβη στη συσκευή!
Καθαρίζετε το σύστημα βρασίματος με ζεστό νερό
και με ένα υγρό απορρυπαντικό:
Ο θάλαμος βρασίματος 0 και η σήτα w
καθαρίζονται με την βούρτσα καθαρισμού.
Καθαρίζετε το σωλήνα ανύψωσης q με τη βοήθεια
της βούρτσας σωλήνα ανύψωσης 9.
Ξεπλένετε όλο το σύστημα βρασίματος μετά τον
καθαρισμό με καθαρό νερό, ώστε να μην
παραμένουν υπολείμματα απορρυπαντικού.
1. Χρησιμοποιείτε ένα προϊόν απομάκρυνσης αλάτων
του εμπορίου με βάση το λεμόνι. Προσέξτε τις
υποδείξεις στη συσκευασία του προϊόντος
απομάκρυνσης αλάτων.
2. Τοποθετήστε το σύστημα βρασίματος στην
κανάτα 3.
3. Βάλτε την επιθυμητή ποσότητα διαλύματος
προϊόντος απομάκρυνσης αλάτων στην κανάτα 3.
Ποτέ μη βάζετε περισσότερα υγρά από τη
σήμανση ΜΑΧ και λιγότερα υγρά από τη
σήμανση ΜΙΝ.
4. Περιμένετε 10 λεπτά και στη συνέχεια ενεργοποιήστε τη συσκευή.
5. Αφήστε το διάλυμα να βράσει και περιμένετε έως
ότου αυτό περάσει μέσα από το σύστημα
βρασίματος.
6. Εάν αυτό έχει επιτυχία, επαναλάβετε τη διαδικασία
άλλη μια φορά. Μπορείτε να χρησιμοποιήσετε το
διάλυμα προϊόντος απομάκρυνσης αλάτων άλλη
μια φορά. Ωστόσο αφήστε το πρώτα να κρυώσει.
7. Όταν έχουν διαλυθεί τα άλατα, αφήστε να βράσει
2 - 3 φορές νερό και να περάσει μέσα από το
σύστημα βρασίματος.
8. Καθαρίστε στη συνέχεια την κανάτα 3 και το
σύστημα βρασίματος όπως περιγράφεται στο
κεφάλαιο „Καθαρισμός και φροντίδα“.
Απομάκρυνση αλάτων
Η περιεκτικότητα αλάτων (βαθμός σκληρότητας) στο
νερό οδηγεί κατά τη χρήση, σε δημιουργία αλάτων
στη συσκευή. Τα άλατα επηρεάζουν τη συσκευή στη
λειτουργία της, μειώνουν την ποιότητα του τσαγιού
και αυξάνουν επίσης την κατανάλωση ρεύματος.
Υπόδειξη:
Ενημερωθείτε στον παροχέα νερού σχετικά με τη
σκληρότητα του νερού βρύσης. Σε υψηλό βαθμό
σκληρότητας είναι απαραίτητη η έγκαιρη απομάκρυνση
αλάτων, σε χαμηλότερο βαθμό σκληρότητας αυτό
μπορεί να γίνει αργότερα. Χρησιμοποιείστε ένα μέσο
αφαίρεσης αλάτων για οικιακές συσκευές και προσέξτε
τις οδηγίες χρήσης.
Διαφύλαξη
• Εάν δεν χρησιμοποιήσετε τη συσκευή για μεγαλύτερο
χρονικό διάστημα, τυλίξτε το καλώδιο
αριστερόστροφα γύρω από τη διάταξη τύλιξης
καλωδίου στην κάτω πλευρά της υποδοχής 5 και
οδηγήστε το άκρο μέσα από τη διέλευση καλωδίου
στην υποδοχή 5.
• Αποθηκεύετε τη συσκευή σε έναν στεγνό χώρο
χωρίς σκόνη.
- 37 -

Απομάκρυνση
Σε καμία περίπτωση μην πετάξετε τη συσκευή
στα οικιακά απορρίμματα. Αυτό το προϊόν
υπόκειται στην Ευρωπαϊκή Οδηγία
20012/19/EU.
Απομακρύνετε τη συσκευή μέσω μιας εγκεκριμένης
επιχείρησης απομάκρυνσης ή μέσω της κοινοτικής
επιχείρησης απομάκρυνσης.
Να τηρείτε τους ισχύοντες κανονισμούς.
Σε περίπτωση αμφιβολιών ελάτε σε επαφή με την
επιχείρηση απόρριψης.
Απομακρύνετε όλα τα υλικά συσκευασιών
φιλικά προς το περιβάλλον.
Εγγύηση της
Kompernass Handels GmbH
Αξιότιμη πελάτισσα, αξιότιμε πελάτη,
Η παρούσα συσκευή διαθέτει 3 χρόνια εγγύηση από
την ημερομηνία αγοράς. Στην περίπτωση ελλείψεων
στο προϊόν έχετε νομικά δικαιώματα έναντι του
πωλητή του προϊόντος. Αυτά τα νομικά δικαιώματα
δεν περιορίζονται μέσω της κατωτέρω αναφερόμενης
εγγύησης.
Προϋποθέσεις εγγύησης
Η περίοδος εγγύησης ξεκινάει κατά την ημερομηνία
αγοράς. Φυλάξτε καλά την πρωτότυπη απόδειξη
ταμείου. Αυτό το έγγραφο απαιτείται ως απόδειξη
για την αγορά.
Εάν, εντός τριών ετών από την ημερομηνία αγοράς,
προκύψει στο προϊόν αυτό σφάλμα υλικού ή
κατασκευής, κατόπιν κρίσης μας, επισκευάζουμε
ή αντικαθιστούμε το προϊόν για εσάς δωρεάν.
Η παρούσα εγγύηση προϋποθέτει ότι εντός της
περιόδου τριών ετών η ελαττωματική συσκευή και
η απόδειξη αγοράς (απόδειξη ταμείου) θα υποβληθούν μαζί με σύντομη περιγραφή σχετικά με το
που βρίσκεται η έλλειψη και πότε προέκυψε. Εάν το
ελάττωμα καλύπτεται από την εγγύησή μας, θα
λάβετε το επισκευασμένο ή ένα νέο προϊόν.
Περίοδος εγγύησης και νομικές απαιτήσεις
λόγω ελλείψεων
Ο χρόνος εγγύησης δεν παρατείνεται μέσω της παροχής εγγύησης. Αυτό ισχύει και για εξαρτήματα, τα
οποία έχουν αντικατασταθεί και επισκευαστεί.
Ενδεχόμενες ήδη υπάρχουσες ζημιές και ελλείψεις
κατά την αγορά πρέπει να γνωστοποιούνται αμέσως
μετά την αποσυσκευασία. Μετά τη λήξη του χρόνου
εγγύησης, τυχόν εμφανιζόμενες επισκευές χρεώνονται.
Εύρος εγγύησης
Η συσκευή κατασκευάστηκε σύμφωνα με αυστηρές
οδηγίες ποιότητας και ελέγχθηκε προσεκτικά πριν
από την αποστολή. Η απόδοση εγγύησης ισχύει για
σφάλματα υλικού ή κατασκευής. Η παρούσα εγγύηση
δεν εκτείνεται σε τμήματα του προϊόντος, τα οποία
εκτίθενται σε φυσιολογική φθορά και έτσι μπορεί να
θεωρούνται εξαρτήματα φθοράς ή για ζημιές σε
εύθραυστα εξαρτήματα, π.χ. διακόπτες, συσσωρευτές,
ταψιά ή εξαρτήματα που είναι κατασκευασμένα από
γυαλί.
Η παρούσα εγγύηση ακυρώνεται εάν προκληθεί
ζημιά στο προϊόν, εάν δεν γίνεται σωστή χρήση ή
συντήρηση. Για μια σωστή χρήση του προϊόντος
πρέπει να τηρούνται επακριβώς οι αναφερόμενες
υποδείξεις στις οδηγίες χειρισμού. Σκοποί χρήσης
και χειρισμοί που δεν συνιστώνται ή για τους
οποίους υπάρχει προειδοποίηση πρέπει απαραίτητα
να αποφεύγονται.
Το προϊόν προορίζεται μόνο για ιδιωτική και όχι για
επαγγελματική χρήση. Σε περίπτωση κακής
μεταχείρισης και ακατάλληλης χρήσης, χρήσης βίας
και παρεμβάσεων, οι οποίες δεν διεξήχθησαν από το
εξουσιοδοτημένο μας τμήμα σέρβις, η εγγύηση
παύει να ισχύει.
- 38 -

Διαδικασία σε περίπτωση εγγύησης
Για την εξασφάλιση γρήγορης επεξεργασίας του
ζητήματός σας, τηρείτε τις ακόλουθες υποδείξεις:
Για όλες τις ερωτήσεις έχετε έτοιμη την απόδειξη
αγοράς και τον κωδικό προϊόντος (π.χ. ΙΑΝ 12345)
ως απόδειξη για την αγορά.
Μπορείτε να βρείτε τον κωδικό προϊόντος στην
πινακίδα τύπου, χαραγμένο, στην πρώτη σελίδα των
οδηγιών σας (κάτω αριστερά) ή σε αυτοκόλλητο
στην πίσω ή κάτω πλευρά.
Εάν προκύψουν σφάλματα λειτουργίας ή άλλες
ελλείψεις, επικοινωνήστε κατ’ αρχήν με το ακόλουθο αναφερόμενο τμήμα σέρβις τηλεφωνικά ή με
E-Mail.
Ένα προϊόν που θεωρείται ελαττωματικό μπορείτε να
το αποστείλετε ατελώς στην αναφερόμενη διεύθυνση του σέρβις επισυνάπτοντας την απόδειξη
αγοράς (απόδειξη ταμείου) και αναφέροντας που
βρίσκεται η έλλειψη και πότε εμφανίστηκε.
Στην ιστοσελίδα www.lidl-service.com
μπορείτε να κατεβάσετε το παρόν και
πολλά άλλα εγχειρίδια, βίντεο προϊόντων
και λογισμικό.
Σέρβις
Σέρβις Ελλάδα
Tel.: 801 5000 019 (0,03 EUR/Min.)
E-Mail: kompernass@lidl.gr
IAN 277007
CY
Σέρβις Κύπρος
Tel.: 8009 4409
E-Mail: kompernass@lidl.com.cy
IAN 277007
Εισαγωγέας
Η ακόλουθη διεύθυνση δεν είναι διεύθυνση σέρβις.
Επικοινωνήστε, κατ’ αρχήν, με την αναφερόμενη
υπηρεσία σέρβις.
KOMPERNASS HANDELS GMBH
BURGSTRASSE 21
44867 BOCHUM
GERMANY
www.kompernass.com
- 39 -

- 40 -

INHALTSVERZEICHNIS SEITE
Einleitung 42
Bestimmungsgemäßer Gebrauch 42
Lieferumfang 42
Technische Daten 42
Gerätebeschreibung 42
Sicherheitshinweise 43
Vor dem ersten Gebrauch 45
Bedienen 45
Überhitzungsschutz 46
Reinigen und Pflegen 46
Entkalken 47
Aufbewahrung 47
Entsorgen 48
Garantie der Kompernaß Handels GmbH 48
Service 49
Importeur 49
Lesen Sie die Bedienungsanleitung vor der ersten Verwendung aufmerksam durch und heben Sie diese für
den späteren Gebrauch auf. Händigen Sie bei Weitergabe des Gerätes an Dritte auch die Anleitung aus.
- 41 -

TEEKOCHER
Einleitung
Herzlichen Glückwunsch zum Kauf Ihres neuen
Gerätes.
Sie haben sich damit für ein hochwertiges Produkt
entschieden. Die Bedienungsanleitung ist Bestandteil dieses Produkts. Sie enthält wichtige Hinweise
für Sicherheit, Gebrauch und Entsorgung. Machen
Sie sich vor der Benutzung des Produkts mit allen
Bedien- und Sicherheitshinweisen vertraut. Benutzen
Sie das Produkt nur wie beschrieben und für die angegebenen Einsatzbereiche. Bewahren Sie diese
Bedienungsanleitung gut auf. Händigen Sie alle
Unterlagen bei Weitergabe des Produkts an Dritte
mit aus.
Bestimmungsgemäßer
Gebrauch
Dieses Gerät ist dafür bestimmt, Tee aufzubrühen
und warmzuhalten. Es ist nur für den privaten Haushalt bestimmt und nicht für gewerbliche oder industrielle Zwecke konzipiert.
Lieferumfang
Teekocher
Steigrohr-Bürste
Bedienungsanleitung
Technische Daten
Leistungsaufnahme: 550 - 650 W
Netzspannung: 220 - 240 V ~, 50 Hz
Alle Teile dieses Gerätes, die mit
Lebensmitteln in Berührung kommen,
sind lebensmittelecht.
Gerätebeschreibung
1 Deckel
2 Griff
3 Kanne
4 Kontrollleuchte
5 Sockel
6 Reset-Taste
7 Netzkabel
8 Ein-/Ausschalter
9 Steigrohr-Bürste
0 Brühkammer
q Steigrohr
w Sieb
- 42 -

Sicherheitshinweise
Gefahr - elektrischer Schlag!
• Stellen Sie sicher, dass der Sockel mit den elektrischen Anschlüssen
niemals mit Wasser in Berührung kommt! Lassen Sie den Sockel erst
vollständig trocknen, wenn er versehentlich feucht geworden ist.
• Verwenden Sie das Gerät nur mit dem mitgelieferten Sockel.
• Achten Sie darauf, dass im Betrieb das Netzkabel niemals nass oder
feucht wird. Führen Sie es so, dass es nicht eingeklemmt oder anderweitig
beschädigt werden kann.
• Lassen Sie beschädigte Netzstecker oder Netzkabel sofort von autorisiertem Fachpersonal oder dem Kundenservice austauschen, um Gefährdungen zu vermeiden.
• Ziehen Sie nach Gebrauch immer den Stecker aus der Steckdose. Ausschalten alleine genügt nicht, weil noch immer Netzspannung im Gerät
anliegt, solange der Netzstecker in der Steckdose steckt.
Tauchen Sie das Gerät nie ins Wasser oder in andere Flüssigkeiten!
Es besteht die Gefahr eines elektrischen Schlages!
Warnung - Verletzungsgefahr!
• Betreiben Sie das Gerät immer nur bei geschlossenem Deckel, andernfalls funktioniert die Abschaltautomatik nicht. Kochendes Wasser kann
dann über den Rand herausspritzen.
• Es können heiße Dampfschwaden entweichen. Die Kanne ist zudem im
Betrieb sehr heiß. Tragen Sie daher Topf-Handschuhe.
• Stellen Sie sicher, dass das Gerät stabil und senkrecht steht, bevor Sie
dieses einschalten. Kochendes Wasser kann ein unstabil stehendes Gerät zum Umstürzen bringen.
• Gehen Sie vorsichtig mit der Kanne um. Zerbrochenes Glas kann schwere Schnittverletzungen verursachen.
• Füllen Sie niemals mehr Wasser als bis zur MAX-Markierung ein. Ansonsten
kann kochendes Wasser herausspritzen und zu Verbrühungen führen.
• Öffnen Sie nicht den Deckel, während das Wasser kocht.
- 43 -

• Geräte können von Personen mit reduzierten physischen, sensorischen
oder mentalen Fähigkeiten oder Mangel an Erfahrung und/oder Wissen
benutzt werden, wenn sie beaufsichtigt oder bezüglich des sicheren Gebrauchs des Gerätes unterwiesen wurden und die daraus resultierenden
Gefahren verstanden haben.
• Dieses Gerät kann von Kindern ab 8 Jahren und darüber benutzt werden,
wenn sie beaufsichtigt werden oder bezüglich des sicheren Gebrauchs
des Gerätes unterwiesen wurden und die daraus resultierenden Gefahren verstanden haben.
• Reinigung und die Wartung durch den Benutzer dürfen nicht durch Kinder
vorgenommen werden, es sei denn, sie sind 8 Jahre oder älter und werden beaufsichtigt.
• Das Gerät und seine Anschlussleitung sind von Kindern jünger als 8 Jahre
fernzuhalten.
• Kinder dürfen nicht mit dem Gerät spielen.
• Kinder sollten beaufsichtigt werden, um sicherzustellen, dass sie nicht mit
dem Gerät spielen.
• Benutzen Sie keine externe Zeitschaltuhr oder ein separates Fernwirksystem, um das Gerät zu betreiben.
VORSICHT: heiße Oberflächen!
So vermeiden Sie Schäden am Gerät:
• Füllen Sie nach einem Kochgang keinesfalls sofort wieder kaltes Wasser
in das Gerät. Es können sich Spannungen im Glas bilden und das Glas
kann brechen!
- 44 -

Vor dem ersten Gebrauch
• Entfernen Sie sämtliche Verpackungsmaterialien
vom Gerät.
• Spülen Sie alle Teile des Brühsystems (Brühkammer 0, Steigrohr q, Sieb w) und die Kanne 3
sorgfältig ab (siehe Kapitel “Reinigen und Pflegen”).
1. Nehmen Sie die Kanne 3 vom Sockel 5.
2. Öffnen Sie den Deckel 1 und nehmen Sie das
Brühsystem heraus. Stellen Sie das Brühsystem
auf einer ebenen Fläche ab.
3. Füllen Sie die gewünschte Wassermenge in die
Kanne 3. Füllen Sie nie mehr Wasser als bis zur
MAX-Markierung, und nie weniger als bis zur
MIN-Markierung ein.
Gehen Sie vor dem ersten Gebrauch wie folgt vor:
1. Nehmen Sie die Kanne 3 vom Sockel 5.
2. Füllen Sie die Kanne 3 bis zur MAX-Markierung mit Wasser, geben Sie einen Teelöffel Zitronensaft (oder Zitronenkonzentrat) dazu. Wenn
keine Zitrone verfügbar ist, können Sie einen
Teebeutel (oder einen Teelöffel losen Tee) direkt
ins Wasser geben.
3. Setzen Sie das Brühsystem in die Kanne 3 ein.
4. Schließen Sie den Deckel 1 und setzen Sie die
Kanne 3 auf den Sockel 5.
5. Schalten Sie das Gerät am Ein-/Ausschalter 8
ein. Die Kontrollleuchte 4 und der Ein-/Aus-
schalter 8 leuchten auf. Warten Sie, bis die
Kontrollleuchte 4 erlischt.
6. Schalten Sie das Gerät am Ein-/Ausschalter 8
aus und reinigen Sie das Gerät, wie unter “Reinigen und Pflegen” beschrieben.
Der Teekocher ist nun einsatzbereit.
Bedienen
Achtung:
Geben Sie keinen Zucker in den Teekocher hinein.
Erhitzen Sie keine Milch oder Alkohol im Teekocher.
Das führt zu irreparablen Schäden am Gerät.
Gefahr!
Achten Sie darauf, dass kein Wasser aus der Kanne 3
überläuft, um Verbrennungen und elektrische Schocks
zu vermeiden.
4. Nehmen Sie das Brühsystem und ziehen Sie das
Steigrohr q mit dem Sieb w nach oben.
5. Geben Sie die gewünschte Menge Tee oder
Teebeutel in die Brühkammer 0.
Hinweis:
Achten Sie darauf, dass keine Etiketten oder Beutelfäden im Gerät verbleiben.
6. Setzen Sie das Brühsystem wieder in die Kanne 3
ein. Achten Sie darauf, dass das Steigrohr q in
die Aussparung am Boden der Kanne 3 greift.
Die Brühkammer 0 muss mit der abgeflachten
Seite zum Griff 2 eingesetzt werden.
7. Schließen Sie den Deckel 1.
8. Setzen Sie die Kanne 3 wieder auf den Sockel 5.
9. Stecken Sie den Netzstecker in eine Netzsteckdose und stellen Sie den Ein-/Ausschalter 8
auf die Position “I”. Die Kontrollleuchte 4, sowie
der Ein-/Ausschalter 8 leuchten.
Das Wasser wird nun gekocht, durch das Steigrohr q
nach oben gedrückt und läuft durch die Brühkammer 0 wieder in die Kanne 3.
Hinweis:
Grüner Tee eignet sich nicht zum Aufbrühen im Teekocher. Die ideale Brühtemperatur für grünen Tee
liegt bei etwa 70°C. Bei höheren Brühtemperaturen, wie sie der Teekocher erzeugt, treten Gerbstoffe aus. Der Tee schmeckt bitter.
- 45 -

Das Gerät schaltet sich, nachdem das Wasser gekocht hat automatisch in die Warmhaltefunktion. Die
Kontrollleuchte 4 erlischt, nur noch der Ein-/Ausschalter 8 leuchtet. Sobald das Wasser erkaltet,
kocht der Teekocher das Wasser wieder auf. Die
Kontrollleuchte 4 leuchtet während des Kochvorganges wieder auf.
Hinweis:
Da das Wasser beim erneuten Aufkochen wieder
durch das Brühsystem geleitet wird, sollten Sie nach
dem ersten Brühvorgang das Brühsystem aus der
Kanne 3 heraus nehmen.
Überhitzungsschutz
Bei Überhitzung schaltet der Überhitzungsschutz
das Heizelement im Inneren des Gerätes aus. Der
Ein-/Ausschalter 8 leuchtet weiter, das Gerät heizt
jedoch nicht mehr.
Der Überhitzungsschutz wird aktiviert, wenn sich
kein oder nicht ausreichend Wasser in der Kanne 3
befindet und das Gerät trotzdem eingeschaltet wird.
Wenn der Überhitzungsschutz das Heizelement abgeschaltet hat, gehen Sie bitte wie folgt vor:
Verletzungsgefahr!
Das Brühsystem ist sehr heiß! Es besteht die Gefahr
von Verbrennungen! Benutzen Sie Topfhandschuhe,
wenn Sie das Brühsystem berühren.
Hinweis:
Je länger Sie das Getränk warm halten und je mehr
Flüssigkeit verdampft, desto stärker wird das Getränk.
Wir empfehlen daher, den Tee möglichst nach dem
ersten Aufbrühen zu trinken.
Sie können den Kochvorgang jederzeit unterbrechen:
Stellen Sie hierzu den Ein-/Ausschalter 8 in die Po-
sition “0”. Der Kochvorgang wird beendet.
Wenn Sie die Kanne 3 vom Sockel 5 nehmen,
wird der Kochvorgang unterbrochen.
Achtung:
Lassen Sie die Kanne 3 immer erst abkühlen, bevor
Sie kaltes Wasser für einen weiteren Brühvorgang
einfüllen! Ansonsten kommt es zu Spannungen im
Glas und die Kanne 3 kann zerbrechen.
• Lassen Sie das Gerät abkühlen.
• Drücken Sie die Reset-Taste 6 an der
Unterseite der Kanne 3.
Das Gerät kann jetzt wieder benutzt werden.
Reinigen und Pflegen
Verletzungsgefahr!
Ziehen Sie vor der Reinigung den Netzstecker. Es
besteht die Gefahr eines elektrischen Schlages! Lassen Sie das Gerät abkühlen. Verbrennungsgefahr!
Tauchen Sie das Gerät nie ins Wasser oder in
andere Flüssigkeiten! Es besteht die Gefahr
eines elektrischen Schlages! Das Gerät kann
irreparabel beschädigt werden.
Um bei jedem Brühvorgang ein optimales Tee-Ergebnis zu erzielen, sollte das Gerät nach jeder Benutzung
gereinigt werden. Dadurch wird vermieden, dass:
• die Kombination von Kalk und Gerbstoffen, verursacht durch das Kochen des Wassers und die
Teezubereitung, die Funktion des Teekochers
beeinträchtigt;
- 46 -

• bei regelmäßigem Gebrauch des Teekochers unter Umständen das Aroma von stark aromatischem
Tee annimmt und an andere Teesorten abgibt.
Reinigen Sie die Kanne 3 des Teekochers mit einem feuchten Tuch. Bei hartnäckigeren Verschmutzungen geben Sie ein mildes Spülmittel auf das
Tuch. Spülen Sie die Kanne 3 danach mit viel klarem Wasser ab, so dass alle Spülmittelreste beseitigt
werden. Die Aussparung am Boden der Kanne 3
können Sie gut mit einer Spülbürste reinigen.
Achtung
Benutzen Sie keine Scheuermittel, chemische oder
ätzende Reinigungsmittel. Diese können das Gerät
irreparabel beschädigen!
Reinigen Sie das Brühsystem mit warmem Wasser
und einem flüssigen Spülmittel:
Die Brühkammer 0 und das Sieb w können Sie mit
einer Spülbürste reinigen. Reinigen Sie das Steigrohr q mit Hilfe der Steigrohr-Bürste 9. Spülen Sie
das gesamte Brühsystem nach dem Reinigen mit klarem Wasser ab, damit keine Spülmittelrückstände
haften bleiben.
1. Benutzen Sie einen handelsüblichen Haushaltsentkalker auf Zitronenbasis. Beachten Sie die
Hinweise auf der Verpackung des Entkalkers.
2. Setzen Sie das Brühsystem in die Kanne 3 ein.
3. Geben Sie die Entkalker-Lösung in die Kanne 3.
Füllen Sie nie mehr Flüssigkeit als bis zur MAXMarkierung, und nie weniger als bis zur MINMarkierung ein.
4. Warten Sie 10 Minuten und schalten Sie dann
das Gerät ein.
5. Lassen Sie die Lösung aufkochen und warten
Sie, bis sie durch das Brühsystem gelaufen ist.
6. Sollte es erforderlich sein, wiederholen Sie den
Vorgang noch einmal. Sie können die EntkalkerLösung noch einmal verwenden; lassen Sie sie
jedoch vorher abkühlen.
7. Wenn sich der Kalk gelöst hat, lassen Sie 2 - 3
Füllungen klares Wasser aufkochen und durch
das Brühsystem laufen.
8. Reinigen Sie danach die Kanne 3 und das
Brühsystem wie im Kapitel „Reinigen und Pflegen“ beschrieben.
Aufbewahrung
Entkalken
Der Kalkgehalt (Härtegrad) im Wasser führt im
Laufe der Benutzung zum Verkalken des Gerätes.
Der Kalk beeinträchtigt das Gerät in seiner Funktion,
vermindert die Qualität des Tees und erhöht zudem
den Stromverbrauch.
Hinweis:
Erkundigen Sie sich bei Ihrem Wasserversorger
nach dem Härtegrad Ihres Leitungswassers. Bei hohem Härtegrad ist die Entkalkung bereits eher notwendig, bei niedrigem Härtegrad später. Verwenden Sie ein Entkalkungsmittel für Haushaltsgeräte
und beachten Sie die Gebrauchsanleitung.
• Wenn Sie das Gerät für längere Zeit nicht
verwenden, wickeln Sie das Kabel gegen den
Uhrzeigersinn um die Kabelaufwicklung an
der Unterseite des Sockels 5 und führen Sie das
Ende durch den Kabeldurchlass am Sockel 5.
• Lagern Sie das Gerät an einem staubfreien und
trockenen Ort.
- 47 -

Entsorgen
Werfen Sie das Gerät keinesfalls in den
normalen Hausmüll. Dieses Produkt
unterliegt der europäischen Richtlinie
2012/19/EU.
Entsorgen Sie das Gerät über einen zugelassenen
Entsorgungsbetrieb oder über Ihre kommunale
Entsorgungseinrichtung.
Beachten Sie die aktuell geltenden Vorschriften.
Setzen Sie sich im Zweifelsfall mit Ihrer Entsorgungseinrichtung in Verbindung.
Wenn der Defekt von unserer Garantie gedeckt ist,
erhalten Sie das reparierte oder ein neues Produkt
zurück. Mit Reparatur oder Austausch des Produkts
beginnt kein neuer Garantiezeitraum.
Garantiezeit und gesetzliche
Mängelansprüche
Die Garantiezeit wird durch die Gewährleistung
nicht verlängert. Dies gilt auch für ersetzte und reparierte Teile. Eventuell schon beim Kauf vorhandene
Schäden und Mängel müssen sofort nach dem Auspacken gemeldet werden. Nach Ablauf der Garantiezeit anfallende Reparaturen sind kostenpflichtig.
Führen Sie alle Verpackungsmaterialien
einer umweltgerechten Entsorgung zu.
Garantie der
Kompernaß Handels GmbH
Sehr geehrte Kundin, sehr geehrter Kunde,
Sie erhalten auf dieses Gerät 3 Jahre Garantie ab
Kaufdatum. Im Falle von Mängeln dieses Produkts
stehen Ihnen gegen den Verkäufer des Produkts gesetzliche Rechte zu. Diese gesetzlichen Rechte werden durch unsere im Folgenden dargestellte Garantie nicht eingeschränkt.
Garantiebedingungen
Die Garantiefrist beginnt mit dem Kaufdatum. Bitte
bewahren Sie den Original Kassenbon gut auf.
Diese Unterlage wird als Nachweis für den Kauf
benötigt.
Tritt innerhalb von drei Jahren ab dem Kaufdatum
dieses Produkts ein Material- oder Fabrikationsfehler
auf, wird das Produkt von uns – nach unserer Wahl
– für Sie kostenlos repariert oder ersetzt. Diese
Garantieleistung setzt voraus, dass innerhalb der
Drei-Jahres-Frist das defekte Gerät und der Kaufbeleg
(Kassenbon) vorgelegt und schriftlich kurz beschrieben
wird, worin der Mangel besteht und wann er aufgetreten ist.
Garantieumfang
Das Gerät wurde nach strengen Qualitätsrichtlinien
sorgfältig produziert und vor Auslieferung gewissenhaft geprüft.
Die Garantieleistung gilt für Material- oder Fabrikationsfehler. Diese Garantie erstreckt sich nicht auf
Produktteile, die normaler Abnutzung ausgesetzt
sind und daher als Verschleißteile angesehen werden können oder für Beschädigungen an zerbrechlichen Teilen, z. B. Schalter, Akkus, Backformen
oder Teile die aus Glas gefertigt sind.
Diese Garantie verfällt, wenn das Produkt beschädigt,
nicht sachgemäß benutzt oder gewartet wurde. Für
eine sachgemäße Benutzung des Produkts sind alle
in der Bedienungsanleitung aufgeführten Anweisungen
genau einzuhalten. Verwendungszwecke und Handlungen, von denen in der Bedienungsanleitung abgeraten oder vor denen gewarnt wird, sind unbedingt
zu vermeiden.
Das Produkt ist nur für den privaten und nicht fürden
gewerblichen Gebrauch bestimmt. Bei missbräuchlicher und unsachgemäßer Behandlung, Gewaltanwendung und bei Eingriffen, die nicht von unserer
autorisierten Service-Niederlassung vorgenommen
wurden, erlischt die Garantie.
- 48 -

Abwicklung im Garantiefall
Um eine schnelle Bearbeitung ihres Anliegens zu
gewährleisten, folgen Sie bitte den folgenden Hinweisen:
Bitte halten Sie für alle Anfragen den Kassenbon
und die Artikelnummer (z. B. IAN 12345) als Nachweis für den Kauf bereit.
Die Artikelnummer entnehmen Sie bitte dem Typenschild, einer Gravur, auf dem Titelblatt ihrer Anleitung
(unten links) oder als Aufkleber auf der Rück- oder
Unterseite.
Sollten Funktionsfehler oder sonstige Mängel
auftreten kontaktieren Sie zunächst die nachfolgend
benannte Serviceabteilung telefonisch oder per
E-Mail.
Ein als defekt erfasstes Produkt können Sie dann unter Beifügung des Kaufbelegs (Kassenbon) und der
Angabe, worin der Mangel besteht und wann er
aufgetreten ist, für Sie portofrei an die Ihnen mitgeteilte Service Anschrift übersenden.
Service
Service Deutschland
Tel.: 0800 5435 111
(Kostenfrei aus dem dt. Festnetz/Mobilfunknetz)
E-Mail: kompernass@lidl.de
Service Österreich
Tel.: 0820 201 222 (0,15 EUR/Min.)
E-Mail: kompernass@lidl.at
Service Schweiz
Tel.: 0842 665566 (0,08 CHF/Min.,
Mobilfunk max. 0,40 CHF/Min.)
E-Mail: kompernass@lidl.ch
IAN 277007
Importeur
Auf www.lidl-service.com können Sie
diese und viele weitere Handbücher, Produktvideos und Software herunterladen.
Bitte beachten Sie, dass die folgende Anschrift
keine Serviceanschrift ist. Kontaktieren Sie zunächst
die benannte Servicestelle.
KOMPERNASS HANDELS GMBH
BURGSTRASSE 21
44867 BOCHUM
GERMANY
www.kompernass.com
- 49 -

KOMPERNASS HANDELS GMBH
BURGSTRASSE 21
44867 BOCHUM
DEUTSCHLAND / GERMANY
www.kompernass.com
Last Information Update · Versiunea informaţiilor
Актуалност на информацията · Έκδοση των πληροφοριών
Stand der Informationen: 06 / 2016 · Ident.-No.: STK650A2-062016-1
IAN 277007
 Loading...