

Page 1
TISCHGRILL STGR 1600 A2
TISCHGRILL
Bedienungsanleitung
BARBECUE ELETTRICO DA TAVOLO
Istruzioni per l’uso
IAN 86020
BARBECUE DE TABLE
Mode d’emploi
TABLETOP BARBECUE
Operating instructions
Page 2

Klappen Sie vor dem Lesen die Seite mit den Abbildungen aus und machen Sie sich anschließend mit allen
Funktionen des Gerätes vertraut.
Avant de lire le mode d‘emploi, ouvrez la page contenant les illustrations et familiarisez-vous ensuite avec
toutes les fonctions de l‘appareil.
Prima di leggere aprire la pagina con le immagini e prendere confi denza con le diverse funzioni
dell’apparecchio.
Before reading, unfold the page containing the illustrations and familiarise yourself with all functions of
the device.
DE / AT / CH Bedienungsanleitung Seite 1
FR / CH Mode d’emploi Page 9
IT / CH Istruzioni per l’uso Pagina 17
GB Operating instructions Page 25
Page 3
A
B
C
D
Page 4

Inhaltsverzeichnis Seite
Einleitung 2
Bestimmungsgemäßer Gebrauch 2
Lieferumfang 2
Bedienelemente 2
Technische Daten 2
Sicherheitshinweise 2
Ständer montieren 4
In Betrieb nehmen 4
Handhabung des Grills 4
Thermostat-Einstellungen 5
Einige Tipps 5
Reinigen und Pflegen 6
Entsorgen 6
Garantie und Service 6
Importeur 7
Lesen Sie die Bedienungsanleitung vor der ersten Verwendung aufmerksam durch und heben Sie diese für
den späteren Gebrauch auf. Händigen Sie bei Weitergabe des Gerätes an Dritte auch die Anleitung aus.
- 1 -
Page 5

Tischgrill
Einleitung
Herzlichen Glückwunsch zum Kauf Ihres neuen
Gerätes.
Sie haben sich damit für ein hochwertiges Produkt
entschieden. Die Bedienungsanleitung ist Bestandteil dieses Produkts. Sie enthält wichtige Hinweise
für Sicherheit, Gebrauch und Entsorgung. Machen
Sie sich vor der Benutzung des Produkts mit allen
Bedien- und Sicherheitshinweisen vertraut. Benutzen
Sie das Produkt nur wie beschrieben und für die
angegebenen Einsatzbereiche. Händigen Sie alle
Unterlagen bei Weitergabe des Produkts an Dritte
mit aus.
Bedienelemente
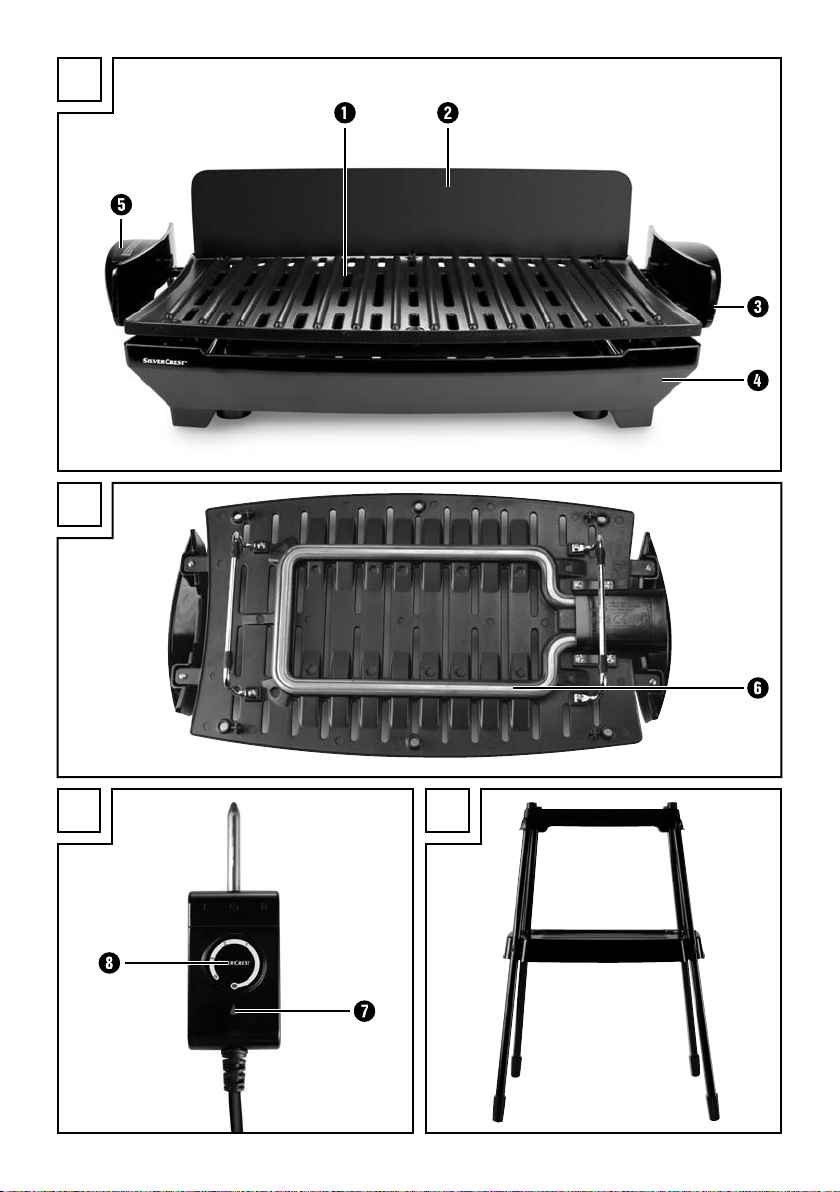
Abbildung A:
Grillrost
q
Spritzschutzschild
w
Anschluss für Netzleitung mit Thermostat
e
Auffangwanne
r
wärmeisolierte Haltegriffe
t
Abbildung B:
Heizelement
y
Abbildung C:
Kontrollleuchte
u
Thermostat
i
Technische Daten
Bestimmungsgemäßer
Gebrauch
Das Gerät ist ausschließlich zum Grillen von Grillgut
im Innenbereich oder im überdachten Außenbereich vorgesehen. Es darf nicht mit Feuchtigkeit, wie
Regen oder Nässe, in Berührung kommen. Es darf
ausschließlich Originalzubehör wie beschrieben
verwendet werden. Jede andere Verwendung oder
Veränderung gilt als nicht bestimmungsgemäß und
birgt erhebliche Unfallgefahren.
Für aus bestimmungswidriger Verwendung entstandene Schäden übernimmt der Hersteller keine Haftung.
Benutzen Sie das Gerät nicht gewerblich!
Lieferumfang
Tischgrill
Spritzschutzschild
Thermostat
Ständer: Ablageplatte, obere Platte, 4 Standbeine,
4 Standbeinfüße, 8 Schrauben, 8 Muttern
Netzspannung: 220 - 240 V ~/ 50 Hz
Nennleistung: 1600 W
Sicherheitshinweise
Um Lebensgefahr durch elektrischen
Schlag zu vermeiden:
• Lassen Sie beschädigte Netzstecker oder Netzkabel sofort von autorisiertem Fachpersonal
oder dem Kundenservice austauschen, um
Gefährdungen zu vermeiden.
• Schützen Sie die Netzleitung vor Berührungen
mit heißen Geräteteilen. Benutzen Sie das Gerät
niemals in der Nähe einer offenen Flamme, einer Heizplatte oder eines beheizten Ofens.
• Setzen Sie das Gerät nicht dem Regen aus und
benutzen Sie es auch niemals in feuchter oder
nasser Umgebung. Achten Sie darauf, dass die
Netzleitung während des Betriebs niemals nass
oder feucht wird.
- 2 -
Page 6

• Überprüfen Sie vor Inbetriebnahme und nach jeder Reinigung des Gerätes, ob die Steckkontakte
am Grillrost trocken sind.
• Das Netzkabel muss regelmäßig auf Zeichen
von Beschädigungen untersucht werden. Falls
das Netzkabel beschädigt ist, darf das Gerät
nicht mehr benutzt werden.
• Das Gerät muss über eine Fehlerstrom-Schutzeinrichtung (RCD) mit einem Bemessungsauslösestrom von nicht mehr als 30 mA gespeist werden.
• Das Gerät muss an eine Steckdose mit Schutzleiter angeschlossen werden.
Um Brandgefahr und Verletzungen
zu vermeiden:
• Das Gerät während des Betriebs niemals unbeaufsichtigt lassen.
• Stellen Sie das Gerät nicht unter Schränken oder
in der Nähe von Vorhängen oder ähnlich leicht
entzündlichem Material auf und halten Sie entsprechend brennbare Materialien fern.
• Dieses Gerät ist nicht dafür bestimmt, durch
Personen (einschließlich Kinder) mit eingeschränkten physischen, sensorischen oder
geistigen Fähigkeiten oder mangels Erfahrung
und/oder mangels Wissen benutzt zu werden,
es sei denn, sie werden durch eine für ihre
Sicherheit zuständige Person beaufsichtigt oder
erhielten von ihr Anweisungen, wie das Gerät
zu benutzen ist.
• Kinder sollten beaufsichtigt werden, um sicherzustellen, dass sie nicht mit dem Gerät spielen.
• Verbrennungsgefahr! Lassen Sie das Gerät
nach Gebrauch gut abkühlen, bevor Sie es
reinigen.
• Verbrennungsgefahr! Benutzen Sie nur die
wärmeisolierten Griffe. Die Oberflächen des
Gerätes werden während des Betriebs sehr heiß.
• Sorgen Sie für einen sicheren Stand des
Gerätes.
• Stellen Sie das Gerät möglichst in der Nähe
einer Steckdose auf. Sorgen Sie dafür, dass der
Netzstecker bei Gefahr schnell erreichbar ist
und die Netzleitung nicht zur Stolperfalle werden kann.
• Schützen Sie die Antihaftbeschichtung, indem
Sie keine metallischen Werkzeuge wie Messer,
Gabel u.s.w. benutzen. Wenn die Antihaftbeschichtung beschädigt ist, benutzen Sie das
Gerät nicht weiter.
• Benutzen Sie keine externe Zeitschaltuhr oder
ein separates Fernwirksystem um das Gerät zu
betreiben.
• Benutzen Sie keine Kohle oder ähnliche Brennstoffe, um das Gerät zu betreiben!
• Betreiben Sie das Gerät niemals ohne Wasser in
der Auffangwanne.
So verhalten Sie sich sicher:
• Ziehen Sie bei Gefahr sofort den Netzstecker
aus der Steckdose.
• Verwenden Sie das Gerät niemals zweckentfremdet.
• Vermeiden Sie einen Wärmestau. Legen Sie
keine Alufolie oder andere Grillutensilien auf
den Grillrost. Durch einen Wärmestau können
Kunststoffanteile sowie die Beschichtungen zerstört werden.
• Betreiben Sie den Grill ausschließlich mit dem
mitgelieferten Thermostat.
• Bitte nehmen Sie den Grillrost nur in Betrieb,
wenn dieser auf der Auffangwanne liegt.
• Ziehen Sie den Netzstecker sowie die Zuleitung
vom Gerät, wenn das Gerät nicht benutzt wird,
wenn Sie Teile entfernen und vor dem Reinigen.
- 3 -
Page 7
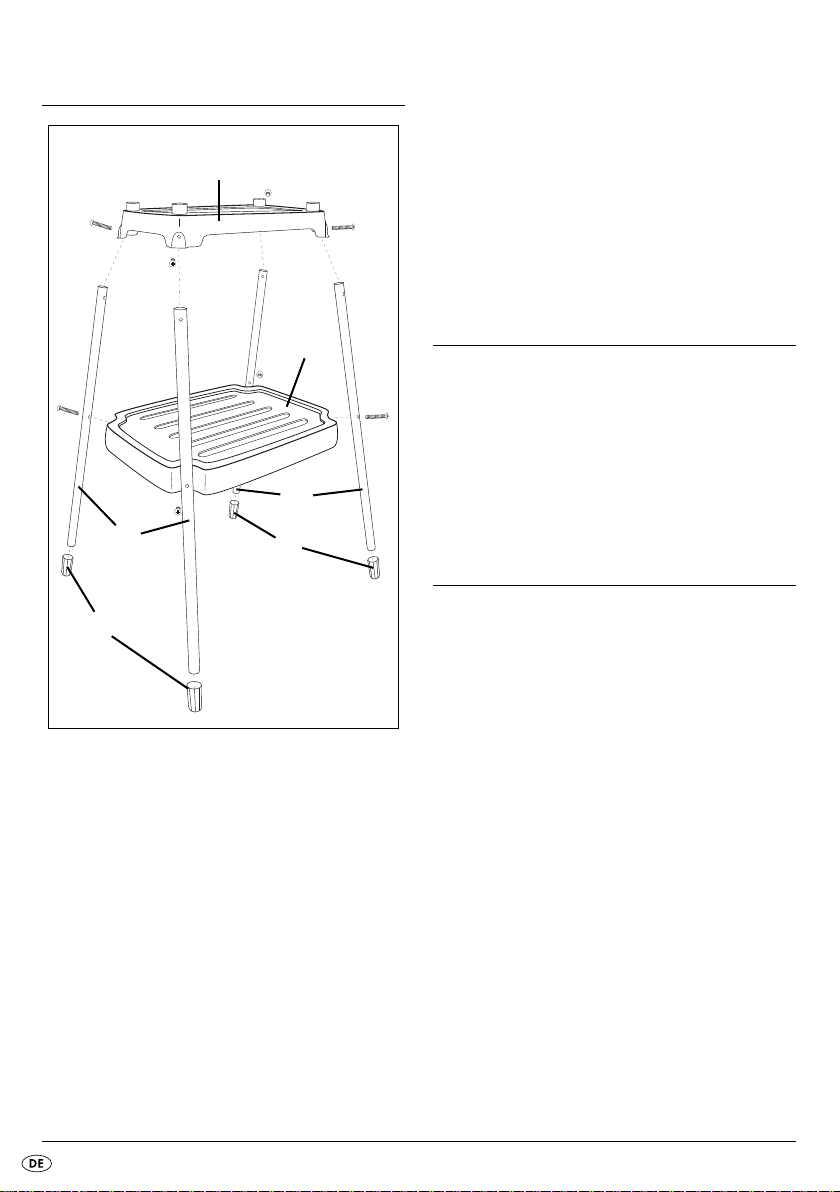
Ständer montieren
3. Setzen Sie die obere Platte auf die Standbeine , so dass die Standbeine von Innen an
den Bohrlöchern der oberen Platte anliegen.
Die vorgebohrten Löcher in der oberen Platte ,
sowie in den Standbeinen müssen übereinan-
der liegen.
4. Stecken Sie die Schrauben durch die Löcher und
kontern Sie die Schrauben mit den Muttern.
obere Platte
Ablageplatte
Standbeine
Standbeinfüße
1. Stecken Sie die Standbeinfüße auf die Seite
der Standbeine , wo sich kein Bohrloch befindet.
2. Montieren Sie die Standbeine an der Abla-
geplatte . Stecken Sie dafür die Schrauben
durch die vorgebohrten Löcher und kontern Sie
die Schrauben mit den Muttern von der Innenseite der Ablageplatte .
In Betrieb nehmen
Reinigen Sie den Grill vor der ersten Inbetriebnahme
wie im Kapitel “Reinigen und Pflegen” beschrieben.
Der Betrieb / Grillvorgang darf nur mit der dafür
vorgesehenen Auffangwanne
Die Spannung der Stromquelle muss mit den Angaben
auf dem Typenschild des Gerätes übereinstimmen.
erfolgen.
r
Handhabung des Grills
Gute und gleichmäßige Hitzeverteilung ist durch das
integrierte Heizelement
Die Reinigung wird durch die Antihaftbeschichtung
erleichtert die das Ansetzen von Grillgut verhindert.
• Stellen Sie den fertig montierten Ständer auf
eine ebene Fläche. Denken Sie daran, dass
sich eine Netzsteckdose in erreichbarer Nähe
befinden muss.
• Befüllen Sie die Auffangwanne
Markierung mit Wasser (ca. 1,3 l). Sie verhindern
so das Anbrennen von herunter tropfendem Fett
des Grillguts und erleichtern die anschließende
Reinigung des Gerätes.
• Bringen Sie das Spritzschutzschild
Seite (die spätere Rückseite) des Grillrostes
sollten Sie fetthaltiges Grillgut grillen. Zusätzlich
dient es als Windschutz. Stecken Sie die drei
Zapfen des Spritzschutzschildes
des Grillrosts
cher. Dafür müssen Sie das Spritzschutzschild
leicht biegen.
q
im Grillrost qgesichert.
y
bis zur Max-
r
an einer
w
q
an eine Seite
w
in die dafür vorgesehenen Lö-
an,
w
- 4 -
Page 8

• Legen Sie den Grillrost qauf die Auffangwanne
, so dass es fest aufliegt.
r
• Stellen Sie den Grill auf den Ständer. Die 4 Halterungsstifte auf der oberen Platte des Ständers
müssen in die Vertiefungen auf der Unterseite
des Grills greifen. Der Grill muss fest auf dem
Ständer stehen.
Hinweis:
Sie können den Grill auch ohne Ständer benutzen:
Stellen Sie den Grill auf eine absolut ebene Fläche.
Diese Fläche muss gegen Hitze unempfindlich sein.
Ansonsten kann es zu Beschädigungen an der Stellfläche kommen.
• Überprüfen Sie, ob der Grillrost
Auffangwanne
• Stecken Sie die Netzleitung mit Thermostat
am Gerät ein, dass die Kontrollleuchte
oben weist. Stecken Sie den Netzstecker danach
in eine Netzsteckdose.
• Stellen Sie am Thermostat
Temperatur ein. Der Grill fängt an sich aufzuheizen und die Kontrollleuchte
• Sobald die Kontrollleuchte
Grill die eingestellte Temperatur erreicht und ist
betriebsbereit.
platziert ist (siehe Abb. A).
r
korrekt auf der
q
die gewünschte
i
leuchtet auf.
u
erlischt, hat der
u
u
i
nach
Hinweis:
Je nach Umgebungstemperatur, kann es sein, dass
die Kontrollleuchte
“M”, nicht erlischt.
• Der Grill ist nach einer Aufheizphase von ca. 15
Minuten betriebsbereit.
Verletzungsgefahr!
Ist der Grill aufgeheizt, fassen Sie ihn nur noch an
den wärmeisolierenden Haltegriffen
, bei Thermostateinstellung
u
an.
t
Thermostat-Einstellungen
Stufe 0 Grill ausgeschaltet
Stufe 0 - 1 Grill eingeschaltet;
niedrige Temperatur
Stufe 1 - 3 Grill eingeschaltet; mittlere
Temperatur (z.B. Gemüse)
Stufe 3 - M (Max) Grill eingeschaltet; hohe
Temperatur (z.B. Fleisch)
Einige Tipps
• Zartes Fleisch eignet sich besser zum Grillen.
• Über Nacht marinierte Fleischstücke, wie z.B.
von der Schulter oder vom Hals, werden zarter.
• Vermeiden Sie es, Grillgut auf der Grillfläche zu
so
schneiden.
• Verwenden Sie immer Grillzangen und keine
Gabeln zum Wenden des Grillgutes. Dadurch
bleibt es innen saftig und trocknet nicht aus.
• Vermeiden Sie auf Grund der längeren Garzeit
die Auswahl von dickem Grillgut.
• Wenn Sie Frikadellen/Hackbällchen auf dem
Grill grillen, achten Sie darauf, dass diese nicht
dicker als 2 cm sind.
Wir empfehlen die Frikadellen/Hackbällchen
ca. 24 Minuten auf Stufe 3 zu grillen:
Wenden Sie die Frikadellen/Hackbällchen nach
jeweils 6 Minuten, so dass jede Seite 2 mal gegrillt wird.
Hinweis:
Die angegebenen Zeiten können je nach Beschaffenheit des Grillgutes und durch persönlichen Geschmack variieren!
- 5 -
Page 9
Reinigen und Pflegen
Entsorgen
Achtung!
Ziehen Sie vor der Reinigung den Netzstecker aus
der Netzsteckdose und den Thermostat
Gerät. Gefahr eines elektrischen Schlages!
Lassen Sie das Gerät vor dem Reinigen abkühlen!
Verbrennungsgefahr!
i
aus dem
Achtung!
Der Thermostat idarf zum Reinigen nicht in Wasser
getaucht werden, die Steckkontakte müssen trocken
sein, bevor das Gerät nach der Reinigung wieder
mit dem Stromnetz verbunden wird.
Achten Sie darauf, weder Netzleitung noch den
Stecker mit Wasser oder anderen Flüssigkeiten in
Berührung zu bringen. Wischen Sie den Themostat
mit einem leicht angefeuchteten Tuch ab.
Trocknen Sie alles, insbesonders die Steckkontakte,
vor der nächsten Benutzung gut ab. Ansonsten
besteht die Gefahr eines elektrischen Schlages!
• Entfernen Sie groben Schmutz mit einem angefeuchteten Tuch.
• Schützen Sie die Antihaftbeschichtung, indem
Sie keine metallischen Werkzeuge wie Messer,
Gabel u.s.w. benutzen. Wenn die Antihaftbeschichtung beschädigt ist, benutzen Sie das
Gerät nicht weiter.
• Nur der Grillrost
sind dazu geeignet, in der Spülmaschine gereinigt
zu werden. Reinigen Sie das Spritzschutzschild
in heißem Seifenwasser und trocknen Sie es
nach der Reinigung gründlich ab. Reinigen Sie
den Ständer mit einem feuchten Tuch.
• Die Steckkontakte am Grillrost
Reinigung gründlich abzutrocknen.
• Das Geräteinnere muss vor einer erneuten Verwendung vollständig trocken sein.
und die Auffangwanne
q
sind nach der
q
i
r
w
Werfen Sie das Gerät keinesfalls in den
normalen Hausmüll. Dieses Produkt
unterliegt der europäischen Richtlinie
2002/96/EC.
Entsorgen Sie das Gerät über einen zugelassenen
Entsorgungsbetrieb oder über Ihre kommunale
Entsorgungseinrichtung.
Beachten Sie die aktuell geltenden Vorschriften.
Setzen Sie sich im Zweifelsfall mit Ihrer Entsorgungseinrichtung in Verbindung.
Führen Sie alle Verpackungsmaterialien
einer umweltgerechten Entsorgung zu.
Garantie und Service
Sie erhalten auf dieses Gerät 3 Jahre Garantie ab
Kaufdatum. Das Gerät wurde sorgfältig produziert
und vor Anlieferung gewissenhaft geprüft.
Bitte bewahren Sie den Kassenbon als Nachweis
für den Kauf auf. Bitte setzen Sie sich im Garantiefall mit Ihrer Servicestelle telefonisch in Verbindung.
Nur so kann eine kostenlose Einsendung Ihrer Ware
gewährleistet werden.
Die Garantieleistung gilt nur für Material- oder
Fabrikationsfehler, nicht aber für Transportschäden,
Verschleißteile oder für Beschädigungen an zerbrechlichen Teilen, z. B. Schalter oder Akkus. Das
Produkt ist lediglich für den privaten und nicht für
den gewerblichen Gebrauch bestimmt.
Bei missbräuchlicher und unsachgemäßer Behandlung, Gewaltanwendung und bei Eingriffen, die
nicht von unserer autorisierten Service-Niederlassung vorgenommen wurden, erlischt die Garantie.
Ihre gesetzlichen Rechte werden durch diese
Garantie nicht eingeschränkt.
Die Garantiezeit wird durch die Gewährleistung
nicht verlängert. Dies gilt auch für ersetzte und reparierte Teile. Eventuell schon beim Kauf vorhandene
Schäden und Mängel müssen sofort nach dem
Auspacken gemeldet werden, spätestens aber zwei
Tage nach Kaufdatum. Nach Ablauf der Garantiezeit anfallende Reparaturen sind kostenpflichtig.
- 6 -
Page 10
Service Deutschland
Tel.: 01805 772 033 (0,14 EUR/Min. aus dem dt.
Festnetz, Mobilfunk max. 0,42 EUR/Min.)
E-Mail: kompernass@lidl.de
IAN 86020
Service Österreich
Tel.: 0820 201 222 (0,15 EUR/Min.)
E-Mail: kompernass@lidl.at
IAN 86020
Service Schweiz
Tel.: 0842 665566 (0,08 CHF/Min.,
Mobilfunk max. 0,40 CHF/Min.)
E-Mail: kompernass@lidl.ch
IAN 86020
Importeur
KOMPERNASS GMBH
BURGSTRASSE 21
44867 BOCHUM, GERMANY
www.kompernass.com
- 7 -
Page 11

- 8 -
Page 12

Sommaire Page
Introduction 10
Usage conforme 10
Accessoires fournis 10
Eléments de réglage 10
Caractéristiques techniques 10
Consignes de sécurité 10
Support 12
Mise en service 12
Utilisation du grill 12
Réglages du thermostat 13
Conseils divers 13
Nettoyage et entretien 14
Mise au rebut 14
Garantie et service après-vente 14
Importateur 15
Lisez attentivement le mode d'emploi avant la première utilisation et conservez ce dernier pour une utilisation
ultérieure. Lors du transfert de l'appareil à une tierce personne, remettez-lui également le mode d'emploi.
- 9 -
Page 13

Barbecue de table
Introduction
Toutes nos félicitations pour l'achat de votre nouvel
appareil.
Vous avez choisi un produit de grande qualité.
Le mode d'emploi fait partie de ce produit. Il contient
des remarques importantes concernant la sécurité,
l'utilisation et la mise au rebut. Veuillez vous familiariser avec l'ensemble des consignes d'opération et
de sécurité avant l'usage du produit. N'utilisez le
produit que conformément aux consignes et pour
les domaines d'utilisation prévus. En cas de transfert
du produit à un tiers, remettez-lui également tous les
documents.
Usage conforme
Cet appareil est destiné à la réalisation de grillades
à l'intérieur ou dans des espaces recouverts d'une
toiture à l'extérieur. Il faut impérativement éviter tout
contact avec de l'humidité, comme par ex. de la pluie.
Seuls des accessoires d'origine comme ceux décrits
dans ce mode d'emploi doivent être utilisés. Toute autre
utilisation ou modification de l'appareil est considérée
comme non conforme et comporte d'importants risques
d'accident.
Le fabricant n'endosse aucune responsabilité pour
tous dommages résultant d'une utilisation non conforme. Ne convient pas pour un usage commercial.
Accessoires fournis
Barbecue de table
Ecran anti-projections
Thermostat
Support : tablette, plaque supérieure, 4 pieds,
4 embouts, 8 vis, 8 écrous
Eléments de réglage
Figure A :
Grille
q
Ecran anti-projections
w
Raccord pour le cordon d'alimentation
e
avec thermostat
Lèche-frite
r
Poignées isolantes
t
Figure B :
Elément chauffant
y
Figure C :
Voyant
u
Thermostat
i
Caractéristiques techniques
Tension du secteur : 220 - 240 V ~/ 50 Hz
Puissance nominale : 1600 W
Consignes de sécurité
Afin d'éviter tout danger de mort
par électrocution :
• Faites immédiatement remplacer la fiche secteur
ou le cordon d'alimentation endommagé par un
technicien spécialisé ou par le service clientèle
afin d'éviter tout danger.
• Contrôlez avant la mise en service de l'appareil
et après l'avoir nettoyé si les contacts de la fiche
secteur sur la plaque du grill sont secs.
• Evitez tout contact d'objets brûlants avec le
cordon d'alimentation. N'utilisez jamais l'appareil à proximité d'une flamme nue, d'une plaque
chauffante ou d'un four à température élevée.
- 10 -
Page 14

• N'exposez pas l'appareil à la pluie et ne l'utilisez pas non plus à un environnement humide ou
mouillé. Assurez-vous que le cordon d'alimentation ne soit jamais mouillé ou humide en cours
d'utilisation.
• Il faut régulièrement contrôler la conduite de
raccordement au réseau pour détecter tous
signes de dommages. Si la conduite de raccordement au réseau est endommagée, il ne faut
plus utiliser l’appareil.
• L’appareil doit être alimenté par un dispositif
différentiel résiduel (DDR) avec un courant déclencheur ne dépassant pas 30mA.
• L’appareil doit être branché sur une prise avec
un conducteur de protection.
• Placez l'appareil à proximité immédiate d'une
prise. Veillez à ce que la fiche secteur soit rapidement accessible en cas de danger et que le
cordon d'alimentation ne provoque pas la chute
d'une personne.
• Protégez le revêtement antidérapant en évitant
d'utiliser des outils métalliques tels que couteau,
fourchette, etc.
• N'utilisez pas de temporisateur externe ou un
système de télécommande distinct pour opérer
l'appareil.
• N'utilisez pas de charbon ou des combustibles
similaires pour opérer l'appareil !
• N'opérez jamais l'appareil sans eau dans le
lèche-frite.
Pour éviter des risques d'incendie
et d'accidents :
• Ne jamais laisser l'appareil sans surveillance
lorsqu'il est en service.
• Ne placez pas l'appareil sous une armoire ou à
proximité de rideaux ou d'autres matériaux légèrement inflammables et éloignez-le de tout matériau inflammable.
• Cet appareil n'est pas prévu pour être utilisé
par des personnes (y compris des enfants) dont
les capacités physiques, sensorielles ou mentales
présentent des déficiences ou dont le manque
d'expérience ou de connaissances les empêchent d'opérer l'appareil en toute sécurité,
quand bien même une personne avertie surveillerait les opérations.
• Les enfants doivent être surveillés afin d'éviter
qu'ils ne jouent avec l'appareil
• Risque de brûlure ! Laissez l'appareil refroidir
convenablement avant de le nettoyer.
• Risque de brûlure ! Utilisez uniquement les
poignées isolantes. La surface de l'appareil
devient brûlante en cours d'utilisation.
• Veillez à ce que l'appareil soit posé sur une surface stable.
Comment se comporter en respectant les consignes de sécurité :
• En cas de danger, débranchez immédiatement
la fiche secteur de la prise.
• N'utilisez jamais l'appareil à d'autres fins que
celles pour lesquelles il est prévu.
• Evitez l'accumulation de chaleur. Ne placez pas
de film alu ou d'ustensile pour grill sur la grille.
L'accumulation de chaleur peut endommager les
parties en plastique et les revêtements.
• Utilisez le grill de table uniquement avec le
thermostat fourni.
• Ne mettez la plaque de grill en service que si
elle est placée sur le lèche-frite.
• Débranchez la fiche secteur ainsi que le cordon
électrique de l'appareil lorsque ce dernier n'est
pas utilisé, lorsque vous retirez des pièces et
avant le nettoyage.
- 11 -
Page 15

Support
3. Placez la plaque supérieure sur les pieds ,
afin que les pieds reposent de l'intérieur au
niveau des orifices préalablement perforés de la
plaque supérieure . Les orifices préalablement
perforés dans la plaque supérieure , ainsi que
dans les pieds doivent se superposer.
4. Insérez les vis à travers les orifices et bloquez les
vis à l'aide des écrous.
Plaque supérieure
Tablette
Pieds
Embouts des pieds
1. Insérez les embouts sur le côté des pieds où
il ne se trouve aucune perforation.
2. Assemblez les pieds sur la tablette . A cette
fin, insérez les vis à travers les orifices préalablement perforés et bloquez les vis à l'aide des
écrous par l'intérieur de ta tablette .
Mise en service
Nettoyez le grill de table avant la première utilisation,
comme indiqué au chapitre "Nettoyage et entretien".
L'appareil ne doit être utilisé et le grill ne doit être
mis en marche qu'avec le lèche-frite
La tension de la source de courant doit correspondre
aux indications figurant sur la plaque signalétique
de l'appareil.
r
prévu.
Utilisation du grill
Une bonne répartition homogène de la chaleur
est garantie par l'élément de chauffage
dans la grille
revêtement anti-adhésif qui empêche la grillade
d'adhérer.
• Installez le support monté sur une surface plane.
Veillez à ce qu'une prise secteur se trouve à
proximité pour être facilement accessible.
• Remplissez le lèche-frite
Max (env. 1,3 l). Vous évitez ainsi que la matière
grasse qui se dégage par le dessous ne brûle et
vous facilitez ensuite le nettoyage de l'appareil.
• Montez l’écran anti-projections
(le futur panneau arrière) de la grille
avez l’intention de faire des grillades avec des
aliments gras. Ce dispositif sert également de
protection anti-vent. Introduisez les trois tenons
de l'écran anti-projections
grille
nez légèrement l'écran anti-projections
. Le nettoyage est facilité par le
q
d'eau jusqu'à la marque
r
w
sur un côté de la
w
dans les orifices prévus à cet effet. Incli-
q
intégré
y
sur un côté
, si vous
q
.
w
- 12 -
Page 16

• Posez la grille qsur le lèche-frite r, de manière à ce qu’elle soit fermement positionnée.
• Installez le barbecue sur le support. Les 4 chevilles
de fixation sur la plaque supérieure du support
doivent s'enclencher dans les cannelures au bas
du barbecue. Le barbecue doit être fermement
installé sur le support.
Remarque :
Vous pouvez également utiliser le barbecue sans
support :
Installez le barbecue sur une surface absolument
plane. Cette surface doit être insensible à la chaleur.
Sinon, l'emplacement où vous posez le barbecue
peut être endommagé.
• Assurez-vous que la grille
placée sur le lèche-frite
• Insérez le câble secteur avec le thermostat
telle manière dans l'appareil que l'indicateur de
contrôle
suite la fiche secteur dans une prise électrique
secteur.
• Réglez la température choisie à l'aide du thermostat
voyant
• Le voyant
teint la température réglée et par conséquent
son stade opérationnel.
est orienté vers le haut. Enfichez en-
u
. Le barbecue commence à chauffer et le
i
s'allume.
u
s'éteint lorsque le barbecue a at-
u
est correctement
q
(voir fig. A).
r
i
Remarque :
Selon la température ambiante, il peut arriver que
le voyant de contrôle
le thermostat est réglé sur “"M".
ne s'éteigne pas lorsque
u
Réglages du thermostat
Niveau 0 Grill éteint
Niveau 0 - 1 Grill allumé ; températuree
basse
Niveau 1 - 3 Grill allumé ;
températuree moyenne
(par exemple légumes)
Niveau 3 - M (Max) Grill allumé ; température
élevée (par exemple viandes)
Conseils divers
• La viande tendre se prête mieux à la préparation
de grillades.
• Les morceaux de viande marinés pendant la
nuit, par exemple de l'épaule ou du cou, de-
de
viennent plus tendres.
• Evitez de couper l'aliment à griller sur la surface
de la grille.
• Utilisez toujours des pinces à grill mais pas de
fourchette pour retourner la pièce à griller. Elle
reste juteuse et ne sèche pas.
• Evitez les pièces épaisses à griller en raison de
la durée de cuisson plus longue.
• Si vous souhaitez griller des burgers/boulettes
de viande sur le grill, veillez à ce qu’ils ne dépassent une épaisseur de 2 cm.
Nous conseillons de faire griller les
burgers/boulettes de viande pendant env. 24
minutes à niveau 3 : retournez les burgers/boulettes après respectivement 6 minutes, afin que
chaque face soit grillée 2 fois.
• Après une phase de réchauffement d'env. 15 minutes, le barbecue est prêt à l'emploi.
Risque de blessures !
Une fois que le barbecue est chauffé, ne le manipulez
plus qu'avec les poignées isolantes
t
.
Remarque :
Les temps indiqués peuvent varier selon la texture
de l’aliment à griller et les préférences personnelles!
- 13 -
Page 17

Nettoyage et entretien
Mise au rebut
Attention !
Débranchez la fiche secteur et le thermostat ide
l'appareil avant de le nettoyer. Danger d'électrocution !
Laissez l'appareil refroidir complètement avant de
le nettoyer. Risque de brûlure !
Attention !
Pour nettoyer le thermostat i, il ne faut pas le plonger dans l'eau, il faut que les contacts d'enfichage
soient secs avant de raccorder à nouveau l'appareil
au secteur après le nettoyage.
Evitez que le cordon d'alimentation ou la fiche secteur
entre en contact avec de l'eau ou d'autres liquides.
Essuyez le thermostat
ment humecté. Séchez tout, spécialement les contacts
pour le branchement avant de réutiliser l'appareil.
Vous risquez dans le cas contraire un choc électrique !
• Eliminez les saletés les plus grosses à l'aide d'un
chiffon légèrement humecté.
• Protégez le revêtement antidérapant en évitant
d'utiliser des outils métalliques tels que couteau,
fourchette, etc. Si le revêtement anti-adhésif est
endommagé, ne réutilisez pas l'appareil.
• Seules la grille
priées au lavage en lave-vaisselle. Nettoyez le
bouclier anti-éclaboussure
chaude avec un peu de détergent et
séchez-le ensuite soigneusement. Nettoyez le
support à l'aide d'un chiffon humide.
• Séchez soigneusement les contacts de la fiche
secteur sur la grille
• L'intérieur de l'appareil doit être complètement
sec avant de réutiliser l'appareil.
à l'aide d'un chiffon légère-
i
et le lèche-frite rsont appro-
q
dans de l'eau
w
après nettoyage.
q
L'appareil ne doit jamais être jeté dans
la poubelle domestique normale. Ce
produit est assujetti à la directive européenne 2002/96/EC.
Remettez l'appareil destiné au recyclage à une
entreprise spécialisée ou au centre de recyclage
de votre commune.
Respectez la réglementation en vigueur. En cas de
doutes, contactez votre organisation de recyclage.
Eliminez l'ensemble des matériaux
d'emballage d'une manière respectueuse
de l'environnement.
Garantie et service après-vente
Cet appareil bénéficie de 3 ans de garantie à compter de la date d'achat. L'appareil a été fabriqué avec
soin et consciencieusement contrôlé avant sa distribution.
Veuillez conserver le ticket de caisse en guise de
preuve d'achat. Si la garantie devait s'appliquer,
contactez par téléphone votre interlocuteur du service
après-vente. Cette condition doit être respectée pour
assurer l'expédition gratuite de votre marchandise.
La prestation de garantie s'applique uniquement
pour les erreurs de matériaux et de fabrication, pas
pour les dommages de transport, les pièces d'usure
ou les dommages subis par les pièces fragiles, comme par ex. les interrupteurs ou les batteries. Le produit est exclusivement destiné à un usage privé et
non commercial.
La garantie est annulée en cas de manipulation
incorrecte et inappropriée, d'utilisation brutale et en
cas d'intervention qui n'aurait pas été réalisée par notre centre de service après-vente agréé. Cette garantie
ne constitue pas une restriction de vos droits légaux.
La durée de la garantie n'est pas prolongée par la
garantie du fabricant. Ceci vaut également pour les
pièces remplacées et réparées. Tous dommages et défauts présents dès l'achat doivent être notifiés dès que
le produit est déballé, et au plus tard deux jours après
la date d'achat. Toutes réparations survenant après la
période sous garantie ne seront pas prises en charge.
- 14 -
Page 18

Service France
Tel.: 0800 919270
E-Mail: kompernass@lidl.fr
IAN 86020
Service Suisse
Tel.: 0842 665566 (0,08 CHF/Min.,
mobile max. 0,40 CHF/Min.)
E-Mail: kompernass@lidl.ch
IAN 86020
Importateur
KOMPERNASS GMBH
BURGSTRASSE 21
44867 BOCHUM, GERMANY
www.kompernass.com
- 15 -
Page 19

- 16 -
Page 20

Indice Pagina
Introduzione 18
Uso conforme 18
Volume di fornitura 18
Elementi di comando 18
Dati tecnici 18
Avvertenze di sicurezza 18
Supporto 20
Messa in funzione 20
Uso del grill 20
Impostazioni termostato 21
Alcuni consigli 21
Pulizia e cura 22
Smaltimento 22
Garanzia e assistenza 22
Importatore 23
Leggere attentamente le istruzioni per l'uso prima del primo impiego e conservarle per l'impiego successivo.
In caso di cessione dell'apparecchio a terzi, consegnare anche il manuale di istruzioni.
- 17 -
Page 21

Barbecue elettrico
da tavolo
Introduzione
Congratulazioni per l'acquisto del nuovo apparecchio.
Lei ha scelto un prodotto di alta qualità. Il manuale
di istruzioni è parte integrante del presente prodotto.
Esso contiene importanti indicazioni per la sicurezza,
l'uso e lo smaltimento. Prima di utilizzare il prodotto,
si familiarizzi con tutte le indicazioni relative ai comandi e alla sicurezza.Utilizzi il prodotto solo come
descritto e per i campi di impiego indicati. In caso
di cessione del prodotto a terzi, consegni anche tutta
la documentazione relativa.
Elementi di comando
Figura A:
Griglia
q
Schermo di protezione antispruzzo
w
Connessione del cavo di rete con termostato
e
Vaschetta di raccolta
r
Maniglia di supporto termoisolante
t
Figura B:
Resistenza
y
Figura C:
Spia di controllo
u
Termostato
i
Dati tecnici
Uso conforme
L'apparecchio è previsto per arrostire alimenti in
ambienti interni o in ambienti esterni coperti. Non
deve entrare in contatto con l'umidità, come ad es.
la pioggia. Devono essere utilizzati esclusivamente
accessori originali, così come descritto. Qualunque
altro impiego o modifica dell'apparecchio è da considerarsi non conforme alla destinazione e comporta
gravi rischi di infortunio.
Il produttore non si assume alcuna responsabilità
per i danni derivanti da uso non conforme. Non
destinato all'uso commerciale.
Volume di fornitura
Barbecue elettrico da tavolo
Barriera antispruzzi
Termostato
Supporto: piano di appoggio, piano superiore,
4 piedi di supporto, 4 gambe di sostegno, 8 viti,
8 dadi
Tensione di rete: 220 - 240 V ~/ 50 Hz
Potenza nominale: 1600 W
Avvertenze di sicurezza
Per evitare il pericolo di morte a
causa di scossa elettrica:
• Fare sostituire immediatamente la spina o il cavo
di rete danneggiato da personale specializzato
autorizzato o dal centro di assistenza ai clienti,
per evitare possibili danni.
• Prima della messa in funzione e dopo ogni pulizia
dell'apparecchio, controllare se i contatti elettrici
sulla piastra grigliante siano asciutti.
• Proteggere il cavo di rete dai contatti con le parti
surriscaldate dell'apparecchio. Non utilizzare
mai l'apparecchio nelle vicinanze di fiamme
libere, piastre riscaldanti o forni accesi.
- 18 -
Page 22

• Non esporre l'apparecchio alla pioggia e non
utilizzarlo mai in ambienti umidi o bagnati. Impedire
che il cavo si inumidisca o si bagni durante il
funzionamento.
• Controllare costantemente il cavo di rete per rilevare eventuali danni. In caso di danni al cavo di
rete, l'apparecchio non deve essere riutilizzato.
• L'apparecchio deve essere alimentato attraverso
un dispositivo di protezione dalle correnti di guasto (RCD) con una corrente di apertura di misurazione non superiore a 30mA.
• L'apparecchio deve essere connesso a una presa di rete provvista di conduttore di terra.
Per evitare il pericolo di incendio e
di lesioni:
• Non lasciare mai l'apparecchio incustodito
durante il funzionamento.
• Non collocare l'apparecchio sotto pensili o nelle
vicinanze di tendine o altro materiale facilmente
infiammabile e tenere l'apparecchio lontano da
qualsiasi materiale infiammabile.
• Questo apparecchio non è indicato per l'uso da
parte di persone (inclusi bambini) con limitate
capacità fisiche, sensoriali o mentali o prive dell'
esperienza e/o della conoscenza necessaria, a
meno che tali persone non vengano sorvegliate
da un responsabile per la sicurezza o abbiano
ricevuto indicazioni sull'impiego dell'apparecchio.
• Sorvegliare i bambini per assicurarsi che non
giochino con l'apparecchio.
• Pericolo di ustioni! Fare raffreddare bene
l'apparecchio dopo l'uso e prima della pulizia.
• Pericolo di ustioni! Utilizzare unicamente la
maniglia termoisolante. Le superfici dell'apparecchio si surriscaldano durante l'uso.
• Provvedere a un posizionamento sicuro dell'
apparecchio.
• Posizionare l'apparecchio nelle immediate vicinanze della presa di corrente. Fare in modo che
la presa di corrente sia facilmente accessibile in
caso di pericolo e che il cavo non diventi un
elemento di intralcio.
• Proteggere lo strato antiaderente, evitando di
utilizzare utensili metallici come coltelli, forchette,
ecc. Se lo strato antiaderente è danneggiato,
non utilizzare più l'apparecchio.
• Non utilizzare timer esterni o un sistema di telecomando separato per azionare l'apparecchio.
• Non utilizzare carbone o altri combustibili simili
per azionare l'apparecchio!
• Non azionare mai l'apparecchio senza acqua
nella vaschetta di raccolta.
Per un utilizzo sicuro:
• In caso di pericolo staccare immediatamente la
spina dalla presa di corrente.
• Non utilizzare mai l'apparecchio per scopi non
conformi alla destinazione d'uso
• Evitare il ristagno di calore. Non collocare fogli
di alluminio o altri utensili sulla griglia. Il ristagno
di calore può distruggere le parti in plastica e i
rivestimenti.
• Utilizzare il grill da tavolo esclusivamente con
l'accluso termostato.
• Mettere in funzione la piastra grigliante solo in
presenza della vaschetta di raccolta.
• Estrarre la spina dell'apparecchio dalla presa di
corrente in caso di inutilizzo dell'apparecchio, di
rimozione degli elementi e prima della pulizia.
- 19 -
Page 23

Supporto
3. Inserire il piano superiore sulle gambe di
sostegno , in modo che le gambe di sostegno
poggino dall'interno sui fori del piano superiore . I fori preeseguiti del piano superiore ,
nonché nelle gambe di sostegno devono essere
sovrapposti.
4. Inserire le viti attraverso i fori e fissare le viti con
i dadi.
Messa in funzione
Prima della prima messa in funzione pulire il grill da
tavolo come descritto nel capitolo “Pulizia e cura”.
Il funzionamento/la grigliatura deve avere luogo
unicamente con l'impiego della apposita vaschetta
di raccolta
La tensione della sorgente di alimentazione deve
coincidere con i dati riportati sulla targhetta dell'apparecchio.
r
.
Uso del grill
Piastra superiore
Piano di appoggio
Gambe di appoggio
Piedi di supporto
1. Inserire i piedi di supporto sul lato del supporto , dove non si trova alcun foro.
2. Montare le gambe di sostegno al piano di
appoggio . Inserire a tale scopo le viti attraverso i fori preeseguiti e fissare le viti con i dadi
dall'interno del piano di appoggio .
La distribuzione ottimale e uniforme del calore viene
garantita dall'elemento riscaldante
La pulizia viene facilitata dallo strato antiaderente
che impedisce agli alimenti di attaccarsi.
• Collocare il supporto montato su una superficie
piana. Ricordare che dev'essere presente una
presa di rete nelle vicinanze.
• Riempire di acqua la vaschetta di raccolta
alla marcatura Max (ca. 1,3 l). In tal modo si
impedisce la combustione delle gocce di grasso
in fuoriuscita dai cibi in cottura e si facilita la successiva pulizia dell'apparecchio.
• Spostare la barriera antispruzzi
lato posteriore) della griglia
arrostire alimenti grassi. Esso serve inoltre come
protezione dal vento. Inserire i tre perni dello
schermo di protezione antispruzzi
della griglia
necessario piegare leggermente lo schermo di
protezione antispruzzi
- 20 -
negli appositi fori. Per farlo, è
q
w
y
, se si desidera
q
.
nella griglia q.
su un lato (il
w
w
fino
r
su un lato
Page 24

• Collocare la griglia qsulla vaschetta di raccolta
in modo da posizionarla saldamente.
r
• Collocare la griglia sul supporto. I 4 perni di fissaggio sul piano superiore del supporto devono
inserirsi negli incavi del lato inferiore. La griglia
dev'essere fissata saldamente.
Avvertenza:
È possibile utilizzare la griglia anche senza supporto:
collocare la griglia su una superficie completamente
piana. Questa superficie dev'essere insensibile al
calore. In caso contrario, essa potrebbe riportare
dei danni.
• Controllare che la griglia
correttamente sulla vaschetta di raccolta
(v. ill. A).
• Collegare il cavo di rete con il termostato
all'apparecchio in modo tale che la spia di controllo
sia rivolta verso l'alto. Inserire quindi la
u
spina in una presa di rete.
• Impostare la temperatura desiderata sul termostato
. La griglia comincia riscaldarsi e la spia
i
di controllo
• Lo spegnimento della spia di controllo
che la griglia ha raggiunto la temperatura impostata ed è pronta per l'uso.
si accende.
u
sia stata collocata
q
u
r
i
indica
Avvertenza:
A seconda della temperatura ambientale, è possibile
che la spia di controllo
postazione del termostato a “M”.
• Dopo una fase di riscaldamento di circa 15 minuti, la griglia è pronta per l'uso.
non si spenga con l'im-
u
Impostazioni termostato
Livello 0 Grill spento
Livello 0 - 1 Grill acceso; temperatura bassa
Livello 1 - 3 Grill acceso; temperatura
media (ad es. verdure)
Livello 3 - M (Max) Grill acceso; temperatura
elevata (ad es. carne)
Alcuni consigli
• Per l'arrosto è più idonea la carne tenera.
• I pezzi di carne, spalla o capocollo, divengono
più teneri se lasciati a marinare per una notte.
• Evitare di tagliare gli alimenti da cuocere sulla
superficie grigliante.
• Per girare gli alimenti in cottura utilizzare sempre
le pinze e mai le forchette. In tal modo, la carne
resterà succosa all'interno e non si seccherà.
• Evitare di cuocere cibi troppo spessi, a causa
dei tempi di cottura prolungati.
• Se si vogliono grigliare delle polpette sul grill,
esse non devono superare lo spessore di 2.
Consigliamo di grigliare le polpette per circa 24
minuti al livello 3:
girare le polpette ogni 6 minuti, grigliando ogni
lato due volte.
Avvertenza:
I tempi di cottura indicati possono essere variati in
base alle qualità dell'alimento da grigliare e in
base ai gusti personali!
Pericolo di lesioni!
Afferrare la griglia bollente solo dalle maniglie di
supporto termoisolante
t
.
- 21 -
Page 25

Pulizia e cura
Smaltimento
Attenzione!
Prima della pulizia estrarre la spina dalla presa di
corrente e il termostato
di scossa elettrica!
Fare raffreddare l'apparecchio prima della pulizia!
Pericolo di ustioni!
dall'apparecchio. Pericolo
i
Attenzione!
Per la pulizia si può immergere il termostato iin
acqua, ma i contatti a innesto devono essere asciutti
prima che l’apparecchio dopo la pulizia venga ricollegato alla rete elettrica.
Fare attenzione a impedire il contatto del cavo e
della spina con l'acqua o altri liquidi.Ripulire il termostato
Asciugare tutto accuratamente, in particolare i contatti elettrici, prima del successivo impiego. In caso
contrario sussiste il rischio di scossa elettrica!
• Rimuovere lo sporco più evidente con un panno
• Proteggere lo strato antiaderente, evitando di
• Solo la griglia
• I contatti elettrici sulla griglia
• L'interno dell'apparecchio dev'essere completa-
con un panno leggermente inumidito.
i
inumidito.
utilizzare utensili metallici come coltelli, forchette, ecc. Se lo strato antiaderente è danneggiato,
non utilizzare più l'apparecchio.
e la vaschetta di raccolta
q
sono idonee al lavaggio in lavastoviglie. Pulire
la protezione dagli spruzzi
ta bollente e asciugarla accuratamente dopo la
pulizia. Pulire il supporto con un panno umido.
accuratamente asciugati dopo la pulizia.
mente asciutto prima di un nuovo impiego.
in acqua sapona-
w
devono essere
q
r
Non gettare per alcun motivo l’apparecchio insieme ai normali rifiuti
domestici. Questo prodotto sottostà
alla direttiva europea 2002/96/EC.
Smaltire l'apparecchio presso un'azienda autorizzata
o presso l'ente comunale di smaltimento.
Rispettate le prescrizioni attualmente in vigore.
In caso di dubbio mettersi in contatto con l'ente di
smaltimento competente.
Smaltire tutti i materiali dell'imballaggio in
modo ecologicamente conforme.
Garanzia e assistenza
Questo apparecchio è garantito per 3 anni a partire
dalla data di acquisto. L'apparecchio è stato prodotto con cura e debitamente collaudato prima
della consegna.
Conservare lo scontrino come prova d'acquisto. In
caso di interventi in garanzia, contattare telefonicamente il proprio centro di assistenza. Solo in questo
modo è possibile garantire una spedizione gratuita
della merce.
La garanzia vale solo per i difetti di materiale o
fabbricazione, non per i danni da trasporto, parti
soggette a usura o danni a parti fragili come ad es.
interruttori o accumulatori. Il prodotto è destinato
esclusivamente all'uso domestico e non a quello
commerciale.
La garanzia decade in caso di impiego improprio
o manomissione, uso della forza e interventi non
eseguiti dalla nostra filiale di assistenza autorizzata. Questa garanzia non costituisce alcun limite ai
diritti legali del consumatore. Il periodo di garanzia
non viene prolungato in caso di un intervento in garanzia. Ciò vale anche per le componenti sostituite
e riparate. I danni e difetti presenti già all'acquisto
devono essere comunicati immediatamente dopo il
disimballaggio, e non oltre due giorni dalla data di
acquisto. Le riparazioni effettuate dopo la scadenza del periodo di garanzia sono a pagamento.
- 22 -
Page 26

Assistenza Italia
Tel.: 02 36003201
E-Mail: kompernass@lidl.it
IAN 86020
Assistenza Svizzera
Tel.: 0842 665566 (0,08 CHF/Min.,
telefonia mobile max. 0,40 CHF/Min.)
E-Mail: kompernass@lidl.ch
IAN 86020
Importatore
KOMPERNASS GMBH
BURGSTRASSE 21
44867 BOCHUM, GERMANY
www.kompernass.com
- 23 -
Page 27

- 24 -
Page 28

Content Page
Introduction 26
Intended use 26
Items supplied 26
Operating Elements 26
Technical data 26
Safety information 26
Installing the Stand 28
Taking it into use 28
Handling the grill 28
Thermostat adjustments 29
Some tips 29
Cleaning and care 29
Disposal 30
Warranty and Service 30
Importer 30
Read the operating instructions carefully before using the device for the first time and preserve this booklet
for later reference. Pass this manual on to whoever might acquire the device at a future date.
- 25 -
Page 29

Tabletop Barbecue
Introduction
Congratulations on the purchase of your new appliance.
You have clearly decided in favour of a quality
product. These operating instructions are a part of
this product. They contain important information in
regard to safety, use and disposal. Before using the
product, familiarise yourself with all of these operating and safety instructions. Use the product only as
described and only for the specified areas of application. In addition, pass these documents on, together
with the product, to any future owner.
Intended use
This appliance is intended for grilling foodstuffs in
indoor areas or in covered outdoor areas. It may
not come into contact with moisture, such as rain.
Only the original attachments and accessories, as
described herein, may be used. All other usages or
modifications are regarded as being contrary to the
operating instructions and carry with them a real
risk of serious accidents.
The manufacturer declines to accept responsibility
for damage(s) arising out of usage contrary to the
instructions specified below. The appliance is not
intended for commercial use.
Items supplied
Tabletop Barbecue
Splatter protection shield
Thermostat
Stand: Storage plate, top plate, 4 legs,
4 leg pads, 8 screws, 8 nuts
Operating Elements
Figure A:
Grill bars
q
Splatter protection shield
w
Connection for power cable with thermostat
e
Catchment pan
r
Heat-insulated handles
t
Figure B:
Heating element
y
Figure C:
Indicator lamp
u
Thermostat
i
Technical data
Mains voltage: 220 - 240 V ~/ 50 Hz
Nominal power: 1600 W
Safety information
To avoid potentially fatal electric
shocks:
• Arrange for defective power plugs and/or cables
to be replaced at once by qualified technicians
or our Customer Service Department.
• Before taking the appliance into use and after
cleaning it, check to ensure that the plug contacts
on the grill plate are dry.
• Protect the power cable against contact with
heated appliance parts. NEVER use the appliance
adjacent to open flames, a hot plate or a heated
oven.
- 26 -
Page 30

• Do not expose the appliance to rain and never
use it in a humid or wet environment. Ensure that
the power cable never becomes wet or moist during operation.
• The power cable must be regularly checked for
signs of damage. Should the power cable be damaged, the appliance may no longer be used.
• The appliance must be supplied through a residual current device (RCD) with a rated tripping
current not exceeding 30 mA.
• The appliance must be plugged into a mains
power socket fitted with a protective conductor.
To avoid the risks of fire or injuries:
• Never leave the appliance unsupervised during
use.
• Do not place the appliance under cupboards or
close to curtains and other easily inflammable
materials and also keep such combustible materials away from the appliance.
• This appliance is not intended for use by individuals (including children) with restricted physical, physiological or intellectual abilities or deficiences in experience and/or knowledge unless
they are supervised by a person responsible for
their safety or receive from this person instruction
in how the appliance is to be used.
• Children should be supervised to ensure that
they do not play with the appliance..
• Risk of burns! After use, allow the appliance to
cool down completely before cleaning it.
• Risk of burns! Use only the heat-insulated handles. The upper surfaces of the appliance become
very hot during use.
• Ensure that the appliance stands with a safe and
secure positioning.
• If possible, place the appliance in the immediate
vicinity of an electrical power socket. Ensure that
the power plug is quickly reachable in case of
danger, and also that there is no danger of tripping over the cable.
• To protect the non-stick coating, do not use metallic tools such as knives, forks etc. Should the nonstick coating become damaged, discontinue use
of the appliance.
• Do not use an external timing switch or a separate remote control system to operate the appliance.
• Do not use charcoal or similar fuels to operate
the appliance!
• NEVER operate the appliance without water in
the catchment pan.
Tips for safety:
• In cases of danger, immediately remove the electrical plug from the socket.
• Never use the appliance for purposes other than
those for which it was designed.
• Avoid heat accumulation. Do not lay aluminium
foil or other grilling utensils on the grill bars. An
accumulation of heat could destroy plastic parts
as well as the non-stick coating.
• Only the appropriate connector must be used.
• Take the grill plate into use ONLY when it is lying
on the catchment pan.
• Detach the power plug and cable from the
appliance when it is not in use, when you
detach parts or before cleaning the appliance.
- 27 -
Page 31

Installing the Stand
3. Place the top plate on the legs so that the
legs lie against the pre-bored holes of the top
plate from inside. The pre-bored holes in the
top plate as well as those in the legs must
lie opposite each other.
4. Insert screws through the holes and secure them
with the nuts.
Taking it into use
Before taking the table grill into use for the first time
clean it as described in the chapter “Cleaning and
care”.
Usage / grilling may only take place with the catchment pan
The voltage of the power source must tally with the
details given on the rating plate of the appliance.
intended for the purpose.
r
Handling the grill
Top plate
Storage plate
Supporting legs
Leg pads
1. Insert the leg pads on the ends of the legs
where there is not a pre-drilled hole.
2. Assemble the legs onto the storage plate .
Insert screws through the pre-bored holes and
secure them with nuts from the inner side of the
storage plate .
A good and even heat distribution is assured by the
integrated heating element
Cleaning is made easier by the non-stick coating,
which prevents the adhesion of grillables.
• Place the assembled stand on a level surface.
Bear in mind that there needs to be a mains power
socket in the close vicinity.
• Fill the catchment pan
with water (ca. 1.3 ltrs). You can thus prevent the
burning-on of fats falling from the grillables and
make the subsequent cleaning of the appliance
easier.
• Install the splatter protection shield
side (the later rear side) of the grill bars
you be grilling greasy grillables. Additionally, it
serves well as a windbreak. Insert the three tenons of the splatter protection shield
holes provided on one side of the grill bars
To do this, the splatter protection shield
be lightly flexed.
- 28 -
under the grill q.
y
up to the max. marking
r
w
w
on one
should
q
into the
must
w
q
.
Page 32

• Place the grill bars qon the catchment pan r,
such that they are firmly seated.
• Place the grill on the stand. The 4 mounting pegs
on the top plate of the stand must encroach into
the depressions on the underside of the grill.
The grill must sit firmly on the stand.
Notice:
You can also use the grill without the stand:
Place the grill on an absolutely level and even surface. The surface must be insensitive to heat.
Otherwise, it could cause damage to the surface.
• Check to ensure that the grill bars
placed onto the catchment pan
• Insert the power cable with thermostat
the appliance such that the control lamp
facing upwards. Then insert the plug into a
mains power socket.
• Adjust the thermostat
setting. The grill starts to warm up and the indicator lamp
• As soon as the indicator lamp
grill has reached the adjusted temperature and
is ready for use.
u
glows.
to the desired temperature
i
are correctly
q
(see Fig. A).
r
goes out the
u
i
u
into
is
Some tips
• Tender meat is best suited for grilling.
• Pieces of meat marinated overnight, from for
example the shoulder or neck, will be more tender.
• Avoid cutting grillables on the grilling area.
• Always use grilling tongs and not forks for turning
the grillables. This will ensure it stays succulent
on the inside and does not dry out.
• Due to its longer grilling time, avoid selecting
thick-cut grillables.
• When cooking beefburgers/meatballs on the
grill, ensure that they are not thicker than 2 cm.
We recommend that you grill the beefburgers/
meatballs for about 24 minutes at level 3:
Turn the beefburgers/meatballs every 6 minutes
so that each side is cooked twice.
Notice:
The times given may vary, depending on the composition of the grillables and personal taste!
Cleaning and care
Notice:
Subject to the ambient temperature, it can happen
that the control lamp
thermostat setting “M”.
• After a warm-up phase of approx. 15 minutes
the grill is ready for use.
Risk of injuries!
When the grill has warmed up, take hold of it ONLY
with the heat-insulated handles
does not go out with the
u
.
t
Thermostat adjustments
Level 0 Grill switched off
Level 0 - 1 Grill switched on;
low temperature
Level 1 - 3 Grill switched on; medium
temperature (e.g. vegetables)
Level 3 - M (Max) switched on; high temperature
(e.g. meats)
Attention!
Before starting to clean it, remove the plug from the
power source and the thermostat
Risk of electrical shock!
Allow the appliance to cool down completely before cleaning it! Risk of Burns!
from the appliance.
i
Attention!
The thermostat imay not be immersed in water for
cleaning, the plug contacts must be dry before the
appliance, after cleaning, is reconnected to the power grid.
Take steps to ensure that neither the power cable
nor the plug come into contact with water or other
fluids. Wipe the themostat
ned cloth. Dry everything well, especially the plug
contacts, before the next usage. If you do not, there
is the risk of receiving an electric shock!
- 29 -
with a lightly moiste-
i
Page 33

• Remove coarse soiling with a moistened cloth.
• To protect the non-stick coating, do not use
metallic tools such as knives, forks etc. Should
the non -stick coating become damaged, discontinue use of the appliance.
• Only the grill bars
are suitable for cleaning in a dishwasher. Clean
the spatter protection shield
ter, then dry it off well afterwards. Clean the
stand with a moist cloth.
• The plug contacts on the grill bars
scrupulously dried after cleaning.
• The inside of the appliance must be completely
dry before it is taken back into use.
and the catchment pan
q
in hot soapy wa-
w
q
must be
Disposal
The warranty covers only claims for material and
maufacturing defects, but not for transport damage,
for wearing parts or for damage to fragile components, e.g. buttons or batteries. This product is for
private use only and is not intended for commercial
use. The warranty is void in the case of abusive and
r
improper handling, use of force and internal tampering not carried out by our authorized service branch.
Your statutory rights are not restricted in any way by
this warranty.
The warranty period will not be extended by repairs
made under warranty. This applies also to replaced
and repaired parts. Any damage and defects extant
on purchase must be reported immediately after unpacking the appliance, at the latest, two days after
the purchase date. Repairs made after the expiration of the warranty period are subject to payment.
Do not dispose of the appliance in your
normal domestic waste. This appliance
is subject to the European Guidelines
2002/96/EC.
Dispose of the appliance through an approved
disposal centre or at your community waste facility.
Observe the currently applicable regulations. In
case of doubt, please contact your waste disposal
centre.
Dispose of all packaging materials in an
environmentally friendly manner.
Warranty and Service
The warranty for this appliance is for 3 years from
the date of purchase. The appliance has been
manufactured with care and meticulously examined
before delivery.
Please retain your receipt as proof of purchase. In the
event of a warranty claim, please make contact by
telephone with our Service Department. Only in this
way can a post-free despatch for your goods be assured.
Service Great Britain
Tel.: 0871 5000 720 (£ 0.10/Min.)
E-Mail: kompernass@lidl.co.uk
IAN 86020
Importer
KOMPERNASS GMBH
BURGSTRASSE 21
44867 BOCHUM, GERMANY
www.kompernass.com
- 30 -
Page 34

KOMPERNASS GMBH
Burgstraße 21
D-44867 Bochum
www.kompernass.com
Stand der Informationen · Version des informations
Versione delle informazioni · Last Information Update:
11 / 2012 · Ident.-No.: STGR1600A2092012-1
IAN 86020
 Loading...