

Page 1
KITCHEN TOOLS
Electric Barbecue STGR 1600 A2
KOMPERNASS GMBH
BURGSTRASSE 21 · D-44867 BOCHUM
www.kompernass.com
ID-Nr.: STGR 1600 A2-09/11-V2
IAN: 70351
Electric Barbecue
Operating instructions
R
Grătar electric
Instrucţiunile
ΗΗλλεεκκττρριικκήή ψψηησσττιιέέρραα
Οδηγίες χρήσης
Električni roštilj
Upute za upotrebu
Електрически грил
Ръководство за експлоатация
Elektro-Grill
Bedienungsanleitung
Page 2
STGR 1600 A2
q
w
t
q
w
e
r
i
e
y
r
u
Page 3

Content Page
Intended use 2
Technical data 2
Safety information 2
Items supplied 3
Operating Elements 3
Taking it into use 4
Handling the grill 4
Thermostat adjustments 5
Some tips 5
Cleaning and care 5
Disposal 6
Warranty and Service 6
Importer 6
Read the operating instructions carefully before using the device for the first time and preserve this booklet
for later reference. Pass this manual on to whoever might acquire the device at a future date.
- 1 -
Page 4
Electric Barbecue
Intended use
This appliance is intended for grilling foodstuffs in
indoor areas or in covered outdoor areas. It may
not come into contact with moisture, such as rain.
Only the original attachments and accessories, as
described herein, may be used. All other usages or
modifications are regarded as being contrary to the
operating instructions and carry with them a real
risk of serious accidents.
The manufacturer declines to accept responsibility
for damage(s) arising out of usage contrary to the
instructions specified below. The appliance is not
intended for commercial use.
Technical data
Mains voltage: 220 - 240 V ~/ 50Hz
Nominal power: 1600 W
Safety information
To avoid potentially fatal electric
shocks:
• Arrange for defective power plugs and/or cables
to be replaced at once by qualified technicians
or our Customer Service Department.
• Before taking the appliance into use and after
cleaning it, check to ensure that the plug contacts
on the grill plate are dry.
• Protect the power cable against contact with
heated appliance parts. NEVER use the appliance
adjacent to open flames, a hot plate or a heated
oven.
• Do not expose the appliance to rain and never
use it in a humid or wet environment. Ensure that
the power cable never becomes wet or moist during
operation.
• The power cable must be regularly checked for
signs of damage. Should the power cable be damaged, the appliance may no longer be used.
• The appliance must be supplied through a residual current device (RCD) with a rated tripping
current not exceeding 30mA.
• The appliance must be plugged into a mains power socket fitted with a protective conductor.
To avoid the risks of fire or injuries:
• Never leave the appliance unsupervised during use.
• Do not place the appliance under cupboards or
close to curtains and other easily inflammable
materials and also keep such combustible materials away from the appliance.
• This appliance is not intended for use by individuals (including children) with restricted physical,
physiological or intellectual abilities or deficiences
in experience and/or knowledge unless they
are supervised by a person responsible for their
safety or receive from this person instruction in
how the appliance is to be used.
• Children should be supervised to ensure that
they do not play with the appliance..
• Risk of burns! After use, allow the appliance to
cool down completely before cleaning it.
• Risk of burns! Use only the heat-insulated handles.
The upper surfaces of the appliance become
very hot during use.
• Ensure that the appliance stands with a safe and
secure positioning.
- 2 -
Page 5
• If possible, place the appliance in the immediate
vicinity of an electrical power socket. Ensure that
the power plug is quickly reachable in case of
danger, and also that there is no danger of tripping over the cable.
• To protect the non-stick coating, do not use
metallic tools such as knives, forks etc. Should
the non-stick coating become damaged, discontinue
use of the appliance.
• Do not use an external timing switch or a separate
remote control system to operate the appliance.
• Do not use charcoal or similar fuels to operate
the appliance!
• NEVER operate the appliance without water in
the catchment pan.
Tips for safety:
• In cases of danger, immediately remove the electrical plug from the socket.
• Never use the appliance for purposes other than
those for which it was designed.
• Avoid heat accumulation. Do not lay aluminium
foil or other grilling utensils on the grill bars. An
accumulation of heat could destroy plastic parts
as well as the non-stick coating.
• Use the Table grill exclusively with the supplied
thermostat.
• Take the grill plate into use ONLY when it is lying
on the catchment pan.
• Detach the power plug and cable from the
appliance when it is not in use, when you detach
parts or before cleaning the appliance.
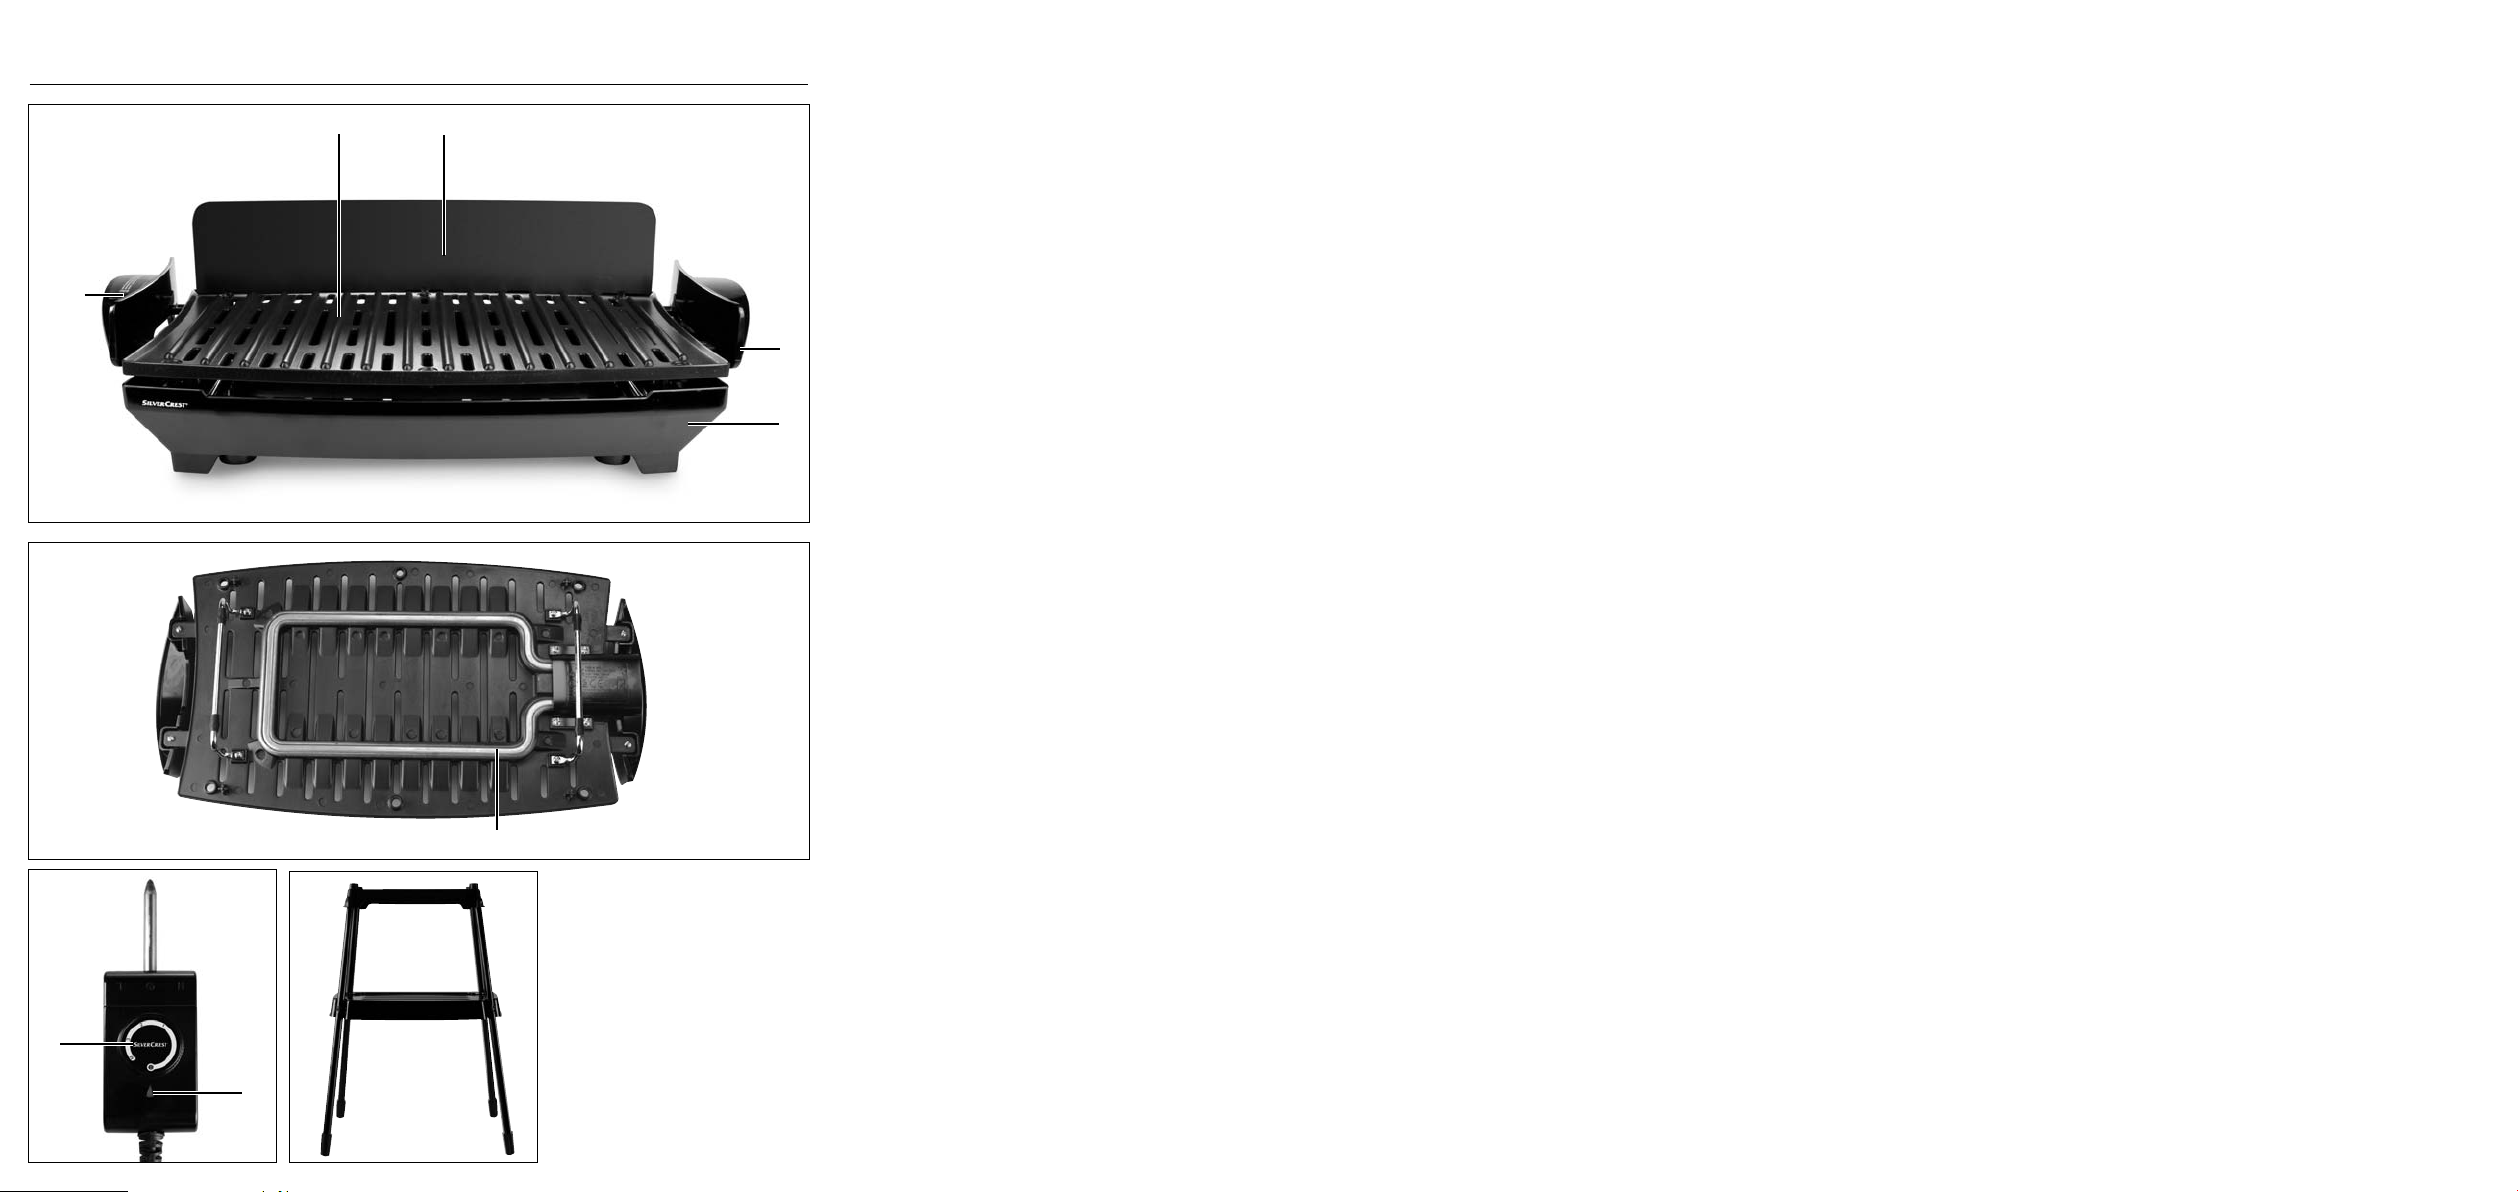
Operating Elements
Grill bars
q
Splatter protection shield
w
Connection for power cable with thermostat
e
Catchment pan
r
Heat-insulated handles
t
Heating element
y
Indicator lamp
u
Thermostat
i
Items supplied
Electric Grill
Splatter protection shield
Thermostat
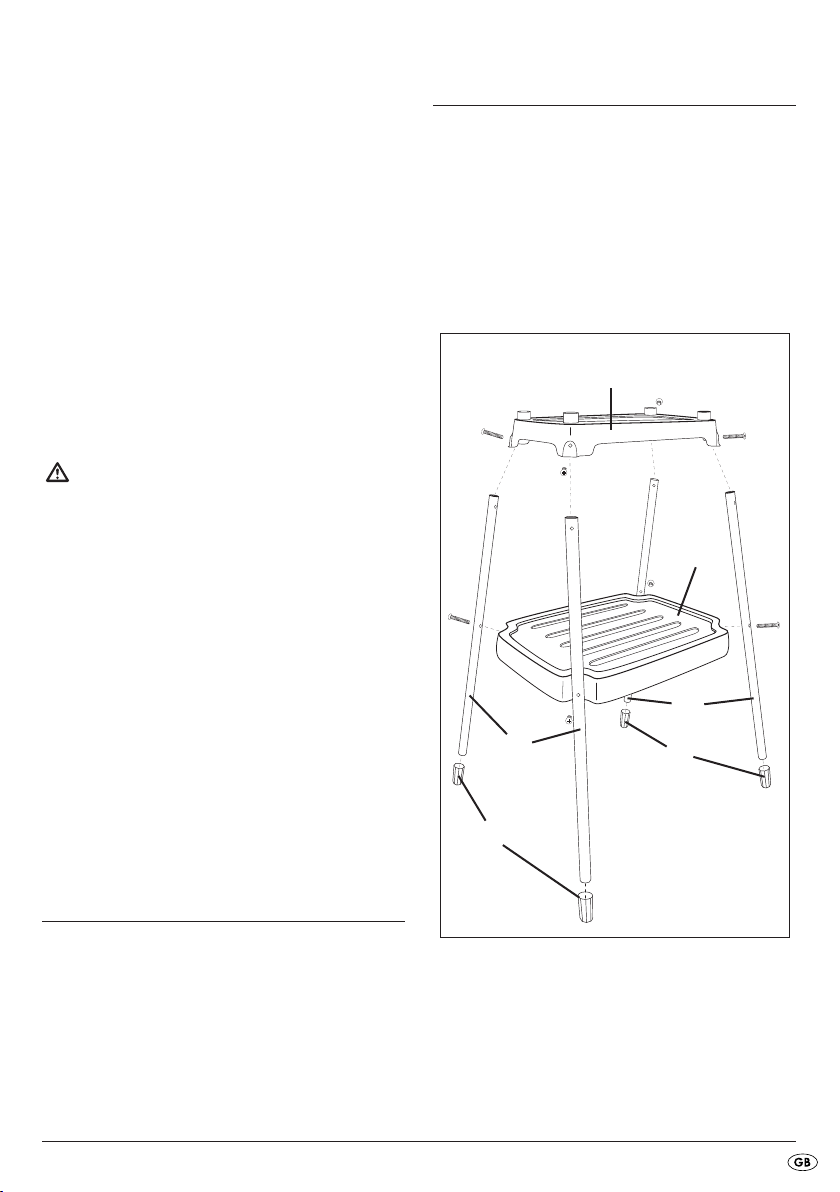
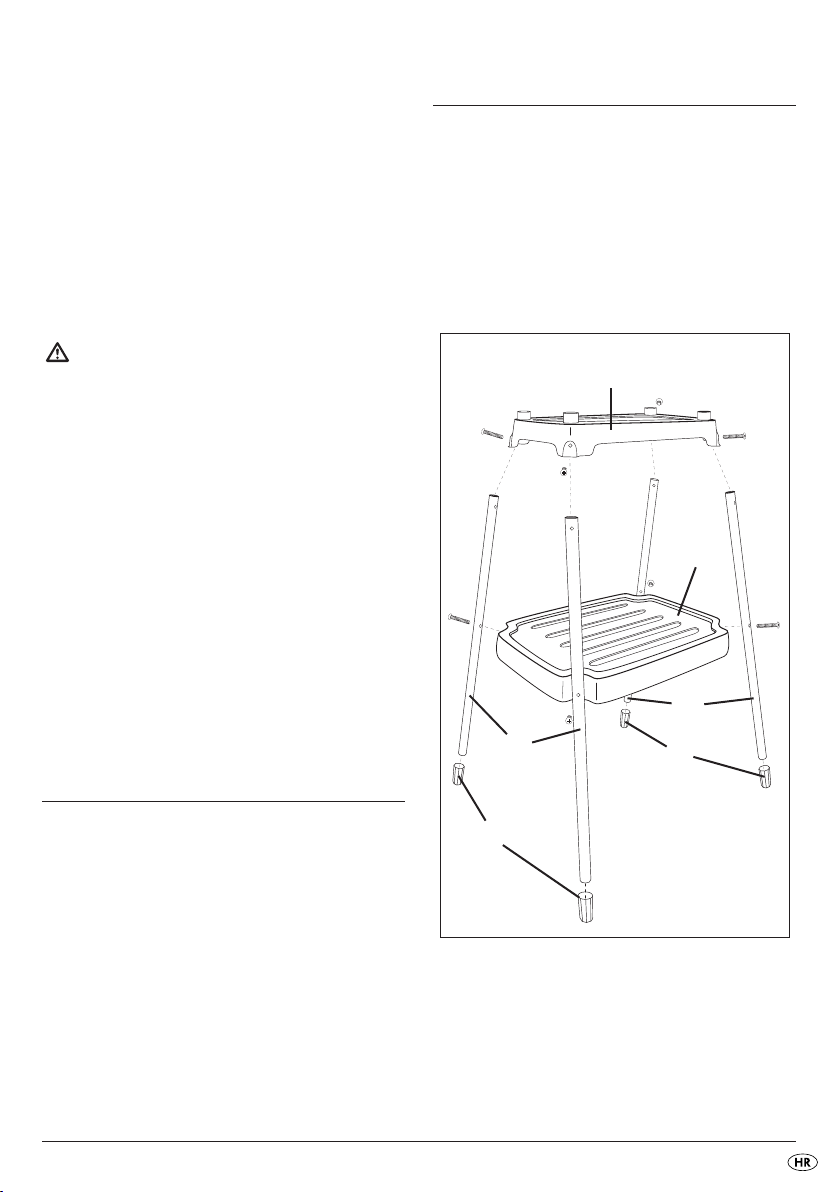
Stand: Storage plate, top plate, 4 legs,
4 leg pads, 8 screws, 8 nuts
Top plate
Shelf plate
Supporting leg
Foot of supporting leg
- 3 -
Page 6

1. Insert the leg pads on the ends of the legs
where there is not a pre-drilled hole.
2. Assemble the legs onto the storage plate .
Insert screws through the pre-bored holes and
secure them with nuts from the inner side of the
storage plate .
3. Place the top plate on the legs so that the
legs lie against the pre-bored holes of the top
plate from inside. The pre-bored holes in the
top plate as well as those in the legs must
lie opposite each other.
4. Insert screws through the holes and secure them
with the nuts.
Taking it into use
Before taking the table grill into use for the first time
clean it as described in the chapter “Cleaning and
care”.
Usage / grilling may only take place with the catchment pan
The voltage of the power source must tally with the
details given on the rating plate of the appliance.
intended for the purpose.
r
• Fill the catchment pan
with water (ca. 1.3 ltrs). You can thus prevent the
burning-on of fats falling from the grillables and
make the subsequent cleaning of the appliance
easier.
• Install the splatter protection shield
side (the later rear side) of the grill bars
should you be grilling greasy grillables. Additionally, it serves well as a windbreak. Insert the
three tenons of the splatter protection shield
into the holes provided on one side of the grill
bars
. To do this, the splatter protection shield
q
must be lightly flexed.
w
• Place the grill bars
such that they are firmly seated.
• Place the grill on the stand. The 4 mounting pegs
on the top plate of the stand must encroach into
the depressions on the underside of the grill.
The grill must sit firmly on the stand.
up to the max. marking
r
on one
w
on the catchment pan r,
q
q
w
Notice
You can also use the grill without the stand:
Place the grill on an absolutely level and even surface. The surface must be insensitive to heat.
Otherwise, it could cause damage to the surface.
Handling the grill
A good and even heat distribution is assured by the
integrated heating element
Cleaning is made easier by the non-stick coating,
which prevents the adhesion of grillables.
• Place the assembled stand on a level surface.
Bear in mind that there needs to be a mains power
socket in the close vicinity.
under the grill q.
y
• Check to ensure that the grill bars
placed onto the catchment pan
• Insert the power cable with thermostat
the appliance such that the control lamp
facing upwards. Then insert the plug into a
mains power socket.
• Adjust the thermostat
setting. The grill starts to warm up and the indicator lamp
• As soon as the indicator lamp
grill has reached the adjusted temperature and
is ready for use.
- 4 -
u
to the desired temperature
i
glows.
u
are correctly
q
(see Fig. q).
r
i
goes out the
u
into
is
Page 7
Notice
Subject to the ambient temperature, it can happen
that the control lamp
thermostat setting “M”.
does not go out with the
u
Notice
The times given may vary, depending on the composition of the grillables and personal taste!
• After a warm-up phase of approx. 15 minutes
the grill is ready for use.
Risk of injuries
When the grill has warmed up, take hold of it ONLY
with the heat-insulated handles
t
.
Thermostat adjustments
Level 0 Grill switched off
Level 0 - 1 Grill switched on; low temperature
Level 1 - 3 Grill switched on; medium tem-
perature (e.g. vegetables)
Level 3 - M (Max) switched on; high temperature
(e.g. meats)
Some tips
• Tender meat is best suited for grilling.
• Pieces of meat marinated overnight, from for
example the shoulder or neck, will be more tender.
• Avoid cutting grillables on the grilling area.
• Always use grilling tongs and not forks for turning
the grillables. This will ensure it stays succulent
on the inside and does not dry out.
• Due to its longer grilling time, avoid selecting
thick-cut grillables.
• When cooking beefburgers/meatballs on the
grill, ensure that they are not thicker than 2 cm.
We recommend that you grill the
beefburgers/meatballs for about 24 minutes at
level 3:
Turn the beefburgers/meatballs every 6 minutes
so that each side is cooked twice.
Cleaning and care
Attention!
Before starting to clean it, remove the plug from the
power source and the thermostat
Risk of electrical shock!
Allow the appliance to cool down completely before cleaning it! Risk of Burns!
Attention!
Take steps to ensure that neither the power cable
nor the plug come into contact with water or other
fluids. Wipe the themostat
cloth. Dry everything well, especially the plug contacts,
before the next usage. If you do not, there is the risk
of receiving an electric shock!
• Remove coarse soiling with a moistened cloth.
• To protect the non-stick coating, do not use
metallic tools such as knives, forks etc. Should
the non -stick coating become damaged, discontinue use of the appliance.
• Only the grill bars
are suitable for cleaning in a dishwasher. Clean
the spatter protection shield
ter, then dry it off well afterwards. Clean the
stand with a moist cloth.
• The plug contacts on the grill bars
scrupulously dried after cleaning.
• The inside of the appliance must be completely
dry before it is taken back into use.
q
from the appliance.
i
with a lightly moistened
i
and the catchment pan
in hot soapy wa-
w
must be
q
r
- 5 -
Page 8
Disposal
Do not dispose of the appliance in your
normal domestic waste. This appliance
is subject to the European Guidelines
2002/96/EC.
Dispose of the appliance through an approved
disposal centre or at your community waste facility.
Observe the currently applicable regulations. In
case of doubt, please contact your waste disposal
centre.
Dispose of all packaging materials in an
environmentally friendly manner.
Warranty and Service
The warranty for this appliance is for 3 years from
the date of purchase. The appliance has been manufactured with care and meticulously examined before delivery. Please retain your receipt as proof of
purchase. In the event of a warranty claim, please
make contact by telephone with our Service Department. Only in this way can a post-free despatch for
your goods be assured.
The warranty covers only claims for material and
maufacturing defects, but not for transport damage,
for wearing parts or for damage to fragile components, e.g. buttons or batteries. This product is for
private use only and is not intended for commercial
use. The warranty is void in the case of abusive and
improper handling, use of force and internal tampering not carried out by our authorized service
branch. Your statutory rights are not restricted in any
way by this warranty.
The warranty period will not be extended by repairs
made under warranty. This applies also to replaced
and repaired parts. Any damage and defects extant
on purchase must be reported immediately after unpacking the appliance, at the latest, two days after
the purchase date. Repairs made after the expiration of the warranty period are subject to payment.
Service Great Britain
Tel.: 0871 5000 720 (£ 0.10/Min.)
E-Mail: kompernass@lidl.co.uk
IAN 70351
Importer
KOMPERNASS GMBH
BURGSTRASSE 21
44867 BOCHUM, GERMANY
www.kompernass.com
- 6 -
Page 9

Sadrˇzaj Strana
Uporaba u skladu sa namjenom 8
Tehnički podaci 8
Sigurnosne upute 8
Obim isporuke 9
Elementi za rukovanje 9
Puštanje u rad 10
Rukovanje sa roštiljem 10
Podešenja termostata 11
Nekoliko savjeta 11
Čišćenje i održavanje 11
Zbrinjavanje 12
Jamstvo i servis 12
Uvoznik 12
Upute za rukovanje prije prve upotrebe pažljivo pročitajte i sačuvajte ih za kasnije korištenje. Ukoliko uređaj
dajete trećim osobama, priložite i ove upute.
- 7 -
Page 10
Električni roštilj
Uporaba u skladu sa namjenom
Uređaj je predviđen za roštiljanje namirnica u unutrašnjim prostorijama ili u natkrovljenim područjima.
Uređaj ne smije doći u dodir sa vlagom, na primjer
sa kišom. Smijete upotrebljavati isključivo originalnu
opremu na opisani način. Svaki drugi oblik uporabe
i svaka promjena uređaja smatra se nenamjenskom
i krije znatnu opasnost od nezgode.
Za štete nastale nenamjenskom uporabom proizvođač
ne preuzima nikakvu odgovornost. Uređaj nije namjenjen za komercijalnu uporabu.
Tehnički podaci
Mrežni napon: 220 - 240 V~50Hz
Nominalna snaga:1600 W
Izjava o sukladnosti za ovaj proizvod dostupna je
na internet stranici www.lidl.hr.
Sigurnosne upute
Da biste izbjegli opasnost po život
uslijed strujnog udara:
• Oštećene mrežne utikače ili oštećen mrežni kabel
neizostavno dajte zamijeniti od strane autoriziranog stručnog osoblja ili servisa za kupce,
kako biste izbjegli nastanak opasnosti.
• Prije puštanja uređaja u rad, i nakon svakoga čišćenja uređaja prekontrolirajte, da li su kontakti na
roštiljnoj ploči suhi.
• Mrežne vodove zaštitite od kontakta sa vrućim
dijelovima uređaja. Uređaj nikada ne koristite u
blizini otvorenog plamena, vruće ploče štednjaka ili pećnice.
• Uređaj ne izložite kiši i ne koristite ga u vlažnom
ili mokrom okruženju. Obratite pažnju na to, da
mrežni kabel za vrijeme rada uređaja nikada ne
bude mokar ili vlažan.
• Mrežni dovod mora biti redovno pregledavan i
treba ustanoviti, da li postoje znakovi oštećenja.
Ukoliko je mrežni dovod oštećen, uređaj više ne
smije biti pušten u rad.
• Uređaj mora biti napajan preko Fid-zaštitne
sklopke (RCD) sa mjernom aktivirajućom strujom,
koja ne prelazi vrijednost od 30mA.
• Uređaj mora biti priključen na utičnicu sa zaštitnim vodom.
Da biste izbjegli opasnost od požara
i ozljeda:
• Uređaj za vrijeme rada nikada ne ostavite bez
nadzora.
• Uređaj ne postavljajte ispod ormara ili u blizini
zavjesa ili sličnih zapaljivih stvari. Osim toga
od njega držite podalje zapaljive tvari.
• Ovaj uređaj nije namijenjen da bude korišten
od strane osoba (uključujući djecu) sa ograničenim
fizičkim, senzoričnim i mentalnim osobinama i
nedostatkom iskustva ili znanja, osim ako ove
osobe stoje pod nadzorom druge osobe zadužene za njihovu sigurnost, ili ako su od nje primili
upute za ispravno korištenje uređaja.
• Djeca bi trebala biti pod nadzorom, čime treba
biti osigurano da se ne mogu igrati ovim
uređajem.
• Opasnost od opeklina! Uređaj nakon rada
ostavite da se dobro ohladi, prije nego što ga
čistite.
• Opasnost od opeklina! Koristite isključivo
rukohvate, koji su termički izolirani. Površine
uređaja za vrijeme njegovog rada postaju vrlo
vruće.
• Osigurajte, da uređaj bude sigurno postavljen.
• Uređaj po mogućnosti postavite u blizini utičnice.
Pobrinite se za to, da mrežni utikač u slučaju
opasnosti bude brzo dostupan, te da se nitko
ne može protepsti preko kabela.
- 8 -
Page 11
• Zaštitite sloj protiv lijepljenja na taj način , da
ne koristite metalne alate poput noža, vilice itd.
Kada dođe do oštećenja ovoga sloja, uređaj
prestanite upotrebljavati.
• Za pogon uređaja ne koristite eksterni rasklopni
sat ili odvojeni sustav za daljinsko upravljanje.
• Za pogon uređaja ne koristite ugljen ili slična
sredstva za sagorijevanje!
• Nikada ne radite sa uređajem, ako se ne nalazi
voda u prihvatnoj posudi.
Ovako ćete sigurno postupati:
• U slučaju opasnosti odmah izvucite utikač iz
utičnice.
• Uređaj nikada ne koristite u druge namjene.
• Izbjegavajte toplinski zastoj. Ne postavljajte aluminijsku foliju ili druge vrste pribora za roštiljanje
na rešetke. Uslijed toplinskog zastoja može doći
do oštećenja plastičnih dijelova kao i zaštitnog
sloja.
• Upotrebljavajte stolni roštilj isključivo sa priloženim termostatom.
• Molimo Vas da roštiljnu ploču u rad pustite tek
onda, kada leži na prihvatnoj posudi.
• Izvucite utikač i odvojite kabel za struju kada
uređaj ne koristite, kada odstranjujete dijelove
i prije čišćenja.
Obim isporuke
Elementi za rukovanje
Roštiljna rešetka
q
Štit za zaštitu od prskanja
w
Priključak za mrežni vod sa termostatom
e
Prihvatno korito
r
toplinsko izolirani rukohvati
t
Grijači element
y
Kontrolna lampica
u
Termostat
i
Električan roštilj
Zaštita od rasprskavanja
Termostat
Stalak: Ploča za odlaganje, gornja ploča,
4 nogara, 4 stalka nogara, 8 vijaka, 8 matica
gornja ploča
ploča za odlaganje
stalci
oslonci stalaka
- 9 -
Page 12

1. Stalke nogara postavite na onu stranu stalaka , na kojoj se ne nalazi izbušeni otvor.
2. Pričvrstite stalke na ploči za odlaganje .
U tu svrhu umetnite vijke kroz unaprijed izbušene
otvore i izvršite međusobno kontriranje vijaka i matica sa unutrašnje strane ploče za odlaganje .
3. Postavite gornju ploču na nogare , tako da
nogari sa unutrašnje strane na otvorima gornje
ploče naliježu. Unaprijed izbušeni otvori u
gornjoj ploči i u nogarima moraju se nalaziti
jedni iznad drugih.
4. Umetnite vijke kroz otvore i kontrirajte vijke sa
maticama.
• Ploču za zaštitu od rasprskavanja
na jednoj strani roštiljne rešetke
nije biti stražnja strana), ukoliko roštiljate masne
namirnice. Ona dodatno služi kao zaklon od
vjetra. Utaknite tri klina štitnika
ni roštiljne rešetke
U tu svrhu morate štitnik protiv rasprska-vanja
blago saviti.
• Postavite roštiljnu rešetku
posudu
• Postavite roštilj na stalak. Četiri klina držača na
gornjoj ploči stalka moraju zahvatati u udubine
na donjoj strani roštilja. Roštilj mora stajati čvrsto
na stalku.
, da čvrsto naliježe.
r
u za to predviđene otvore.
q
tako na prihvatnu
q
pričvrstite
w
(koja će kas-
q
na jednoj stra-
w
w
Puštanje u rad
Očistite stolni roštilj prije prvog puštanja u pogon
na način opisan u poglavlju "Čišćenje i održavanje".
Pogon/postupak roštiljanja smije biti izvršen isključivo
uz uporabu za to predviđenog prihvatnog korita
Mrežni napon izvora struje mora odgovarati navodima na tipskoj ploči uređaja.
r
Rukovanje sa roštiljem
Dobra i ravnomjerna raspodjela toplote osigurava
integrirani element za zagrijavanje
gril
. Čišćenje je olakšano uslijed sloja protiv lijep-
q
ljenja, koji olakšava postavljanje namirnica za roštiljanje.
• Gotovo montirani stalak postavite na ravnu površinu. Ne zaboravite, da se mrežna utičnica treba nalaziti u blizini.
• Napunite prihvatnu posudu
sa vodom (ca. 1,3 l). Na taj način ćete spriječiti
zagaranje masnoće koja kaplje iz namirnica,
a osim toga će biti lakše naknadno čišćenje
uređaja.
u rešetci za
y
do oznake Max
r
Napomena
Roštilj možete koristiti i bez stalka:
Postavite roštilj na potpuno ravnu površinu. Ova
površina mora biti otporna na visoke temperature.
U protivnom može doći do oštećenja površine.
.
• Prekontrolirajte, da li je roštiljna rešetka
ispravno postavljena na prihvatnom koritu
(vidi sliku q).
• Utaknite mrežni vod sa termostatom
uređaj, da kontrolna lampica
prema gore. Nakon toga mrežni utikač utaknite
u mrežnu utičnicu.
• Postavite na termostatu
Roštilj se počinje zagrijavati i kontrolna lampica
se uključuje.
• Čim se kontrolna lampica
dostigao podešenu temperaturu, te je pripreman
za korištenje.
u
željenu temperaturu.
i
isključi, roštilj je
u
Napomena
Ovisno o temperaturi okruženja može se dogoditi,
da se kontrolna lampica
“M” ne zagasi.
• Roštilj je nakon faze zagrijavanja u trajanju od
ca. 15 minuta spreman za rad.
pri postavci termostata
u
q
r
tako u
i
bude usmjerena
u
- 10 -
Page 13

Opasnost od ozljeđivanja!
Kada je roštilj zagrijan, smijete ga dotaknuti isključivo
hvatanjem za toplinsko izolirane rukohvate
t
.
Podešenja termostata
Stupanj 0 Roštilj isključen
Stupanj 0 - 1 Roštilj uključen; niska tempera-
tura
Stupanj 1 - 3 Roštilj uključen; srednja tempe-
ratura (npr. povrće)
Stupanj 3 - M
(Maks) Roštilj uključen; visoka tempera-
tura (npr. meso)
Nekoliko savjeta
• Mekano meso je prikladnije za roštiljanje.
• Preko noći marinirani komadi mesa, primjerice
vratina, postaju mekši.
• Izbjegavajte rezanje namirnica na površini za
roštiljanje.
• Za okretanje namirnica uvijek koristite kliješta za
roštiljanje, a nikada vilice. Na taj način namirnice
ostaju iznutra sočne i ne isušuju se.
• Zbog dužeg vremena pripremanja izbjegavajte
odabir debljih namirnica.
• Ukoliko na roštilju priređujete kosane
odreske/ćevape, obratite pažnju na to da oni ne
budu deblji od 2 cm.
Preporučamo da kosane odreske/ćevape roštiljate ca. 24 minute na stupnju 3:
Kosane odreske/ćevape okrenite nakon 6 minuta, tako da svaka strana bude roštiljana 2 puta.
Čišćenje i održavanje
Pažnja!
Prije svakog čišćenja izvucite mrežni utikač iz utičnice
i termostat
udara!
Uređaj prije čišćenja ostavite da se ohladi! Opasnost
od opeklina!
Pažnja!
Obratite pažnju na to, da ni mrežni vod niti utikač
ne dovedete u dodir sa vodom ili drugim tekućinama.
Prebrišite termostat
krpe. Osušite sve elemente, posebno utične kontakte,
vrlo temeljito prije slijedeće uporabe uređaja.
U protivnom postoji opasnost od strujnog udara!
• Grubu nečistoću odstranite pomoću navlažene
krpe.
• Zaštitite sloj protiv lijepljenja na taj način , da
ne koristite metalne alate poput noža, vilice itd.
Kada je sloj protiv lijepljenja oštećen, prestanite
koristiti uređaj.
• Samo rešetka roštilja
prikladni za strojno pranje. Štitnik od rasprskavajućih kapljica
nakon čišćenja ga temeljito osušite. Očistite stalak
pomoću vlažne krpe.
• Utični kontakti na roštiljnoj rešetci
čišćenja trebaju biti temeljito osušeni.
• Unutrašnjost uređaja prije nove upotrebe mora
biti potpuno suha.
iz uređaja. Opasnost od strujnog
i
pomoću blago navlažene
i
i prihvatno korito rsu
q
očistite u vrućoj sapunskoj vodi i
w
nakon
q
Napomena
Navedeno vrijeme trajanja može varirati ovisno o
svojstvima namirnica i osobnog ukusa!
- 11 -
Page 14

Zbrinjavanje
Uređaj nikako ne bacajte u obično kućno
smeće. Ovaj proizvod podliježe europskoj
smjernici 2002/96/EC.
Uređaj otklonite preko ovlaštenog poduzeća za
otklanjanje otpada ili preko vašeg komunalnog
poduzeća za otklanjanje otpada.
Obratite pažnju na aktualno važeće propise. U slučaju
dvojbe se povežite sa svojim poduzećem za uklanjanje otpada.
Sve materijale ambalaže zbrinite na način
neškodljiv za okoliš.
Jamstveni rok se ne produžava uslijed ostvarivanja
prava na jamstvo. To vrijedi i za zamijenjene i popravljene dijelove. Eventualno već prilikom kupovine prisutna oštećenja i nedostaci moraju biti javljena neposredno nakon raspakiranja, ali najkasnije
dva dana nakon datuma kupovine. Popravke vršene
nakon isteka jamstvenog roka podliježu obavezi
plaćanja.
Servis Hrvatska
Tel.: 0800 777 999
E-Mail: kompernass@lidl.hr
IAN 70351
Uvoznik
Jamstvo i servis
Na ovaj uređaj vrijedi jamstvo u trajanju od 3 godine od datuma kupovine. Uređaj je pažljivo proizveden i prije isporuke brižljivo kontroliran. Molimo sačuvajte blagajnički račun kao dokaz o kupnji.
Molimo da se u slučaju ostvarivanja prava na jamstvo telefonski povežete sa Vašom servisnom ispostavom. Samo na taj način vaša roba može biti besplatno uručena.
Jamstvo vrijedi samo za greške materijala i izrade,
a ne za transportne štete, potrošne dijelove ili oštećenja lomljivih dijelova, na primjer prekidača ili baterija.
Proizvod je namijenjen isključivo za privatnu, a ne
za gospodarstvenu uporabu.
U slučaju nestručnog rukovanja, rukovanja protivnog namjeni uređaja, primjene sile i zahvata, koji
nisu izvršeni od strane našeg ovlaštenog servisnog
predstavništva, važenje jamstva prestaje. Vaša zakonska prava ovim jamstvom ostaju netaknuta.
Lidl Hrvatska d.o.o. k.d.,
p.p. 61
10020 Novi Zagreb
Proizvođač:
KOMPERNASS GMBH
BURGSTRASSE 21
D-44867 BOCHUM, Njemačka
www.kompernass.com
- 12 -
Page 15

CUPRINS PAGINA
Utilizarea conform destinaţiei 14
Date tehnice 14
Indicaţii de siguranţă 14
Furnitura 15
Elemente de comandă 15
Montarea cadrului 15
Punerea în funcţiune 16
Manipularea grătarului 16
Reglarea termostatului 17
Sfaturi utile 17
Curăţarea şi întreţinerea 17
Eliminarea aparatelor uzate 18
Garanţia şi service-ul 18
Importator 18
Citiţi cu atenţie instrucţiunile de utilizare înainte de prima utilizare şi păstraţi-le pentru o consultare ulterioară.
Dacă înmănaţ iaparatul unor terţi, ataşaţi şi instrucţiunile de utilizare.
- 13 -
R
Page 16

Grătar electric
Utilizarea conform destinaţiei
Aparatul este destinat pentru prepararea produselor
la grătar, în interior sau în spaţii deschise acoperite.
Nu este permis să ajungă în contact cu umiditatea,
ca de ex. ploaia sau umezeala. Este permisă numai
utilizarea de accesorii originale, în modul descris de
către noi. Orice altă utilizare sau modificare este
considerată a fi contrară destinaţiei şi aduce cu sine
pericole serioase de accidentare.
Producătorul nu-şi asumă răspunderea pentru prejudiciile rezultate în urma unei utilizări care contravine
destinaţiei . A nu se utiliza în scopuri comerciale.
Date tehnice
Tensiune: 220 - 240 V~/50 Hz
Putere nominală: 1600 W
Indicaţii de siguranţă
Pentru a evita pericolul de moarte
prin electrocutare:
• Dacă ştecărul sau cablul de alimentare se defectează, solicitaţi imediat repararea de către personal
specializat sau de către serviciul clienţi, pentru a
evita periclitările.
• Protejaţi cablul electric de contactul cu părţile
fierbinţi. Nu utilizaţi niciodată aparatul în apropierea focului deschis, a unei plite de gătit sau
a unui cuptor încălzit.
• Nu expuneţi aparatul ploii şi nu-l utilizaţi în mediu
umed. Asiguraţi-vă că în timpul funcţionării cablul
de alimentare nu se udă şi nu se umezeşte.
• Înainte de punerea în funcţiune şi după orice
curăţare a aparatului, verificaţi contactele electrice
de la placa de frigere dacă sunt uscate.
• Cablul electric trebuie verificat periodic cu privire
la eventuale deteriorări. În cazul în care cablul
electric este deteriorat, nu este permisă utilizarea
aparatului.
• Aparatul trebuie alimentat printr-un dispozitiv de
protecţie contra curenţilor vagabonzi (RCD) cu
curent de declanşare măsurat de până la 30mA.
• Aparatul trebuie conectat la o priză cu conductor
de protecţie.
Pentru a evita pericolul de incendiu
şi vătămările fizice:
• Nu lăsaţi niciodată aparatul nesupravegheat în
timpul funcţionării.
• Nu amplasaţi aparatul sub dulapuri sau în apropierea perdelelor sau a altor materiale asemănătoare, ţănând la distanţă orice astfel de material
uşor inflamabil.
• Acest aparat nu este destinat utilizării de către
persoane (inclusiv copii) cu capacităţi fizice, senzoriale sau mentale limitate sau cu o experienţă
limitată şi/sau cunoştinţe limitate, cu excepţia cazului în care sunt supravegheate de către o persoană responsabilă cu siguranţa lor sau au primit
instrucţiuni de la aceasta privind modul de utilizare
a aparatului.
• Copiii trebuie supravegheaţi, pentru a împiedica
utilizarea aparatului ca jucărie.
• Pericol de arsuri! Înainte de a-l curăţa, aşteptaţi
până când aparatul s-a răcit.
• Pericol de arsuri! Utilizaţi numai mânerele termoizolante. Suprafeţele aparatului devin foarte
fierbinţi în timpul utilizării.
• Asiguraţi stabilitatea aparatului.
R
- 14 -
Page 17

• Pe cât posibil, aşezaţi aparatul în apropierea unei
prize. În caz de pericol, asiguraţi-vă că ştecărul
este imediat accesibil, iar cablul de alimentare
nu este un obstacol de care să vă împiedicaţi.
• Protejaţi stratul antiaderent nefolosind unelte
metalice precum cuţit, furculiţă etc. Dacă stratul
antiaderent este deteriorat, nu mai utilizaţi aparatul.
• Nu utilizaţi temporizatoare externe sau sisteme
separate de comandă de la distanţă pentru operarea aparatului.
• Nu utilizaţi cărbuni sau materiale asemănătoare
pentru exploatarea aparatului!
• Nu utilizaţi niciodată aparatul fără apă în tava
colectoare.
Elemente de comandă
Grătar pentru frigere
q
Placă antistropire
w
Racord cu termostat
e
Tavă colectoare
r
Mânere termoizolante
t
Element de încălzire
y
Lumină de control
u
Termostat
i
Montarea cadrului
Mod de lucru pentru o utilizare fără
pericole
• În caz de pericol scoateţi imediat ştecărul din priză.
• Nu utilizaţi aparatul în alte scopuri decât în cel
pentru care a fost conceput.
• Evitaţi acumularea căldurii. Nu aşezaţi folie de
aluminiu sau alte ustensile pe grătarul pentru frigere.
Prin acumularea căldurii pot fi distruse componentele din material plastic precum şi straturile antiaderente.
• Utilizaţi grătarul numai cu termostatul furnizat.
• Folosiţi grătarul pentru frigere numai dacă se
află deasupra tăvii colectoare.
• Scoateţi ştecărul din priză şi cablul de alimentare
de la aparat, atunci când aparatul nu este utilizat,
când se îndepărtează componente şi înainte de
curăţare.
:
Furnitura
Grătar electric
Placă antistropire
Termostat
Cadru: poliţă, placa superioară, 4 picioare de sprijin,
4 vârfuri pentru picioare, 8 şuruburi, 8 piuliţe
Placa superioară
Poliţă
Picioare de sprijin
Vârfuri pentru picioarele de sprijin
- 15 -
R
Page 18

1. Introduceţi vârfurile pe partea picioarelor de
sprijin, pe care nu se află nicio gaură.
2. Montaţi picioarele de sprijin la poliţa .
Pentru aceasta introduceţi şuruburile în găurile
existente şi contraţi cu piuliţele dinspre partea
interioară a poliţei .
3. Aşezaţi placa superioară pe picioarele de
sprijin , astfel încât picioarele de sprijin să
se rezeme din interior pe găurile plăcii superioare
. Găurile existente deja în placa superioară
şi picioarele de sprijin trebuie să se suprapună.
4. Introduceţi şuruburile în găuri şi contraţi cu piuliţele.
Punerea în funcţiune
Înainte de prima folosire curăţaţi grătarul conform
instrucţiunilor din capitolul “Curăţare şi întreţinere”.
Punerea aparatului în funcţiune/prepararea este
permisă numai cu tava colectoare
de curent trebuie să coincidă cu specificaţiile de pe
plăcuţa de caracteristici a aparatului.
. Tensiunea sursei
r
Manipularea grătarului
Datorită elementului de încălzire yintegrat în grătarul
pentru frigere
a căldurii. Curăţarea este facilă datorită stratului
antiaderent care împiedică prinderea produselor
preparate.
• Aşezaţi cadrul montat deja pe o suprafaţă plană.
Ţineţi cont de faptul că în apropiere trebuie să
se afle o priză.
este asigurată repartizarea uniformă
q
• Umpleţi tava colectoare
până la marcajul max. Astfel împiedicaţi arderea
grăsimii picurate din produse şi uşuraţi curăţarea
ulterioară a aparatului.
• Ataşaţi placa antistropire
apoi partea din spate) a grătarului de frigere
atunci când preparaţi produse grase. Aceasta
serveşte de asemenea ca protecţie contra vântului.
Introduceţi cele 3 cepuri ale plăcii antistropire
pe o parte a grătarului de frigere qîn găurile
prevăzute. În acest scop trebuie să îndoiţi uşor
placa antistropire
• Aşezaţi grătarul pentru frigere
toare
, astfel încât să stea fix.
r
• Aşezaţi grătarul pe cadru. Cele 4 ştifturi de prindere de pe placa superioară a cadrului trebuie
să intre în adânciturile de pe partea inferioară
a grătarului. Grătarul trebuie să fie bine fixat pe
cadru.
w
cu apă (cca. 1,3 l)
r
w
.
pe o parte (devine
pe tava colec-
q
q
Indicaţie
Grătarul poate fi folosit şi fără cadru:
Aşezaţi grătarul pe o suprafaţă perfect plană.
Suprafaţa trebuie să fie rezistentă la încălzire.
Altfel, zona pe care este aşezat se poate deteriora.
• Verificaţi dacă grătarul de frigere
corect pe tava colectoare
• Conectaţi cablul de reţa cu termostat
astfel încât lumina de control
în sus. Introduceţi apoi ştecărul într-o priză.
• La termostat
Grătarul începe să se încinte şi lumina de control
se aprinde
• Imediat ce lumina de control
a atins temperatura reglată şi este gata de
funcţionare.
reglaţi temperatura dorită.
i
.
u
(vezi fig. q).
r
este aşezat
q
la aparat,
i
să fie orientată
u
s-a stins, grătarul
u
,
w
R
- 16 -
Page 19

Indicaţie
În funcţie de temepratura ambientală se poate ca lumina de control
statului în poziţia “M”.
, să nu se stingă la reglajul termo-
u
Indicaţie
Duratele specificate pot varia în funcţie de proprietăţile produselor şi de gusturile personale!
• Grătarul este pregătit pentru preparare după o
fază de încălzire de cca. 15 minute.
Pericol de rănire!
Când grătarul s-a încălzit, apucaţi-l numai de mânerele termoizolante
t
.
Reglarea termostatului
Treapta 0 grătarul este oprit
Treapta 0 - 1 grătarul este pornit; temperatură
joasă
Treapta 1 - 3 grătarul este pornit; temperatură
medie (de ex. legume)
Treapta 3 - M (Max) grătarul este pornit; temperatură
ridicată (de ex. carne)
Sfaturi utile
• Carnea fragedă este mai potrivită pentru prepararea la grătar.
• Bucăţile de carne marinate peste noapte, de ex.
spată sau carne de la gât, devin mai fragede.
• Evitaţi să tăiaţi produsele pe suprafaţa grătarului.
• Pentru întoarcerea produselor pe grătar utilizaţi
întotdeauna cleşti pentru grătar, nu furculiţe. Prin
aceasta preparatele rămân zemoase în mijloc şi
nu se usucă.
• Din cauza timpului de preparare prelungit evitaţi
produsele groase.
• Dacă preaparaţi chiftele / bulete de carne pe
grătar, acestea să nu fie mai groase de 2 cm.
Recomandăm să preparaţi chiftelele / buletele
de carne aprox. 24 minute, la treapta a 3-a.:
Întoarceţi chiftelele / buletele de carne la fiecare
6 minute, astfel încât fiecare parte să se frigă de
două ori.
Curăţarea şi întreţinerea
Atenţie!
Înainte de curăţare scoateţi ştecărul din priză şi termostatul
Înainte de curăţare lăsaţi aparatul să se răcească!
Pericol de arsuri!
Feriţi cablul electric şi ştecărul de apă şi alte lichide.
Ştergeţi termostatul
Înainte de următoarea utilizare uscaţi totul foarte
bine, în special contactele de conectare. Altfel există
pericol de electrocutare!
• Îndepărtaţi depunerile cu o lavetă uşor umezită.
• Protejaţi stratul antiaderent nefolosind unelte
metalice precum cuţit, furculiţă etc. Dacă stratul
antiaderent este deteriorat, nu mai utilizaţi aparatul.
• Numai grătarul de frigere
pot fi spălate în maşina de spălat vase. Curăţaţi
placa antistropire
uscaţi-o foarte bine. Curăţaţi suportul cu un prosop
umed.
• Contactele de conectare de la grătarul de frigere
trebuie uscate foarte bine după curăţare.
• Interiorul aparatului trebuie să fie bine uscat
înainte de o nouă utilizare.
din aparat. Pericol de electrocutare!
i
Atenţie!
cu o lavetă uşor umezită.
i
şi tava colectoare
q
în apă fierbinte cu săpun şi
w
r
q
- 17 -
R
Page 20

Eliminarea aparatelor uzate
Nu aruncaţi aparatul sub nicio formă
în gunoiul menajer obişnuit. Acest
produs intră sub incidenţa directivei
europene 2002/96/EC.
Eliminaţi aparatul prin intermediul unei firme specializate şi autorizate sau prin intermediul serviciului local
de eliminare a deşeurilor.
Respectaţi reglementările actuale în vigoare.
Dacă aveţi nelămuriri, contactaţi serviciul dumneavoastră local de eliminare a deşeurilor.
Eliminaţi toate materialele de ambalare
într-un mod ecologic.
Garanţia şi service-ul
Pentru acest aparat se acordă o garanţie de 3 ani
începând cu data cumpărării. Aparatul a fost produs
cu grijă şi verificat cu scrupulozitate înaintea livrării.
Păstraţi bonul de casă pentru a dovedi cumpărarea.
În cazul reparaţiilor din perioada de garanţie, contactaţi telefonic centrul dumneavoastră de service.
Numai astfel poate fi asigurată o expediere gratuită
a produsului dumneavoastră.
Garanţia acoperă numai defectele de material sau
de fabricaţie, nu şi deteriorările rezultate în urma
transportului, piesele de uzură sau deteriorările apărute la componentele fragile, de ex. comutatoare sau
acumulatoare. Aparatul este destinat numai pentru
uz privat şi nu pentru o utilizare profesională.
În cazul manevrării abuzive sau necorespunzătoare,
al uzului de forţă şi al intervenţiilor care nu au fost
realizate de către filiala noastră autorizată de service,
garanţia îşi pierde valabilitatea. Drepturile dumneavoastră legale nu sunt restrânse prin această garanţie.
Perioada de garanţie nu este prelungită după realizarea reparaţiilor în perioada de garanţie. Acest lucru
este valabil şi pentru piesele înlocuite şi reparate.
Deteriorările şi deficienţele prezente deja la cumpărare trebuie semnalate imediat după dezambalare
sau cel târziu în două zile de la data cumpărării.
Reparaţiile necesare după expirarea perioadei de
garanţie se efectuează contra cost.
R
Service România
Tel.: 0800896637
E-Mail: kompernass@lidl.ro
IAN 70351
Importator
KOMPERNASS GMBH
BURGSTRASSE 21
44867 BOCHUM, GERMANIA
www.kompernass.com
R
- 18 -
Page 21

Cъдържание Cтраница
Употреба по предназначение 20
Технически характеристики 20
Указания за безопасност 20
Окомплектовка на доставката 21
Елементи на обслужване 21
Пускане в експлоатация 22
Работа с грила 22
Настройки на термостата 23
Някои съвети 23
Почистване и поддържане 23
Изхвърляне 24
Гаранция и сервиз 24
Вносител 24
Прочетете внимателно ръководството за експлоатация преди да използвате уреда за първи път и го
запазете за по-нататъшна употреба. Когато предавате уреда на трети лица, предайте и това ръководство.
- 19 -
Page 22

Електрически грил
Употреба по предназначение
Уредът е предназначен за печене на грил на
продукти в затворено помещение или на открито
под навес. Той не трябва да влиза в съприкосновение с влага, например дъжд. Трябва да се използват, както е описано, единствено оригиналните принадлежности. Всяка друга употреба или
промяна се счита за употреба не по предназначение и крие значителни опасности от злополука.
За щети, вследствие на употреба, която не отговаря
на предназначението, производителят не поема
отговорност. Уредът не е предвиден за професионална употреба.
Технически характеристики
Мрежово напрежение: 220 - 240 V ~/50 Hz
Номинална мощност: 1600 W
Указания за безопасност
За избягване на опасност за
живота от токов удар:
• Дайте веднага повредения щепсел или кабел
за смяна от оторизиран специалист или сервиз,
за да избегнете опасности.
• Пазете мрежовия кабел от съприкосновение с
горещи части на уреда. Никога не използвайте
уреда в близост до открит огън, котлон или
загрята фурна.
• Не излагайте уреда на дъжд и никога не го използвайте във влажна или мокра обстановка.
Внимавайте мрежовият кабел никога да не се
мокри или навлажнява по време на работа.
• Преди всяко пускане и след всяко почистване
на уреда проверявайте дали контактите на
скарата са сухи.
• Кабелът за свързване към мрежата трябва да
се проверява редовно за признаци на
повреди. В случай че кабелът за свързване
към мрежата е повреден, уредът не трябва да
се използва повече.
• Уредът трябва да се захранва с устройство за
дефектнотокова защита (RCD) с номинален
ток на изключване, не по-голям от 30 mA.
• Уредът трябва да е включен към контакт със
защитен проводник.
За предотвратяване на опасност
от пожар и наранявания:
• Никога не оставяйте уреда без наблюдение
по време на работа.
• Не инсталирайте уреда под шкафове или в
близост до пердета или други подобни лесно
запалими материали и дръжте горимите
материали на разстояние.
• Този уред не е предвиден за използване от лица
(включително и деца) с ограничени физически,
органолептични или умствени способности или
от лица, които не притежават необходимия опит
и/или знания, освен ако не са под надзора на
лица, отговорни за тяхната безопасност или не
са получили от тях указания как трябва да се
използва уредът.
• Децата трябва да се наблюдават, за да е
сигурно, че не играят с уреда.
ООппаасснноосстт оотт ииззггаарряяннее!!
•
уреда след употреба трябва да го оставите
да се охлади добре.
ООппаасснноосстт оотт ииззггаарряяннее!!
•
лоизолираните дръжки. По време на работа
повърхностите на уреда се нагорещяват силно.
• Осигурете стабилно положение на уреда.
• По възможност инсталирайте уреда в близост
до контакт. Погрижете се в случай на
опасност да има бърз достъп до щепсела и
никой да не може да се спъва в мрежовия
кабел.
Преди да почистите
Използвайте само топ-
- 20 -
Page 23

• Пазете незалепващото покритие, като не използвате метални инструменти като ножове,
вилици и др.п. Ако незалепващото покритие е
повредено, не продължавайте да използвате
уреда.
• За работа с уреда не използвайте външен
таймер или отделна система за дистанционно
управление.
• За работа с уреда не използвайте въглища
или други подобни горива!
• Никога не използвайте уреда без вода в
събирателната вана.
За безопасно поведение:
• При опасност изключвайте веднага щепсела
от контакта.
• Никога не използвайте уреда не по предна-значение.
• Избягвайте акумулиране на топлина. Върху
скарата на грила не поставяйте алуминиево
фолио или други принадлежности за печене
на грил. Поради акумулирането на топлина
могат да се повредят пластмасовите части и
покритията.
• Използвайте грила само с термостата от комплекта на доставката.
• Пускайте грила да работи, само ако се намира
в събирателната вана.
• Изключвайте щепсела и захранващия кабел
от уреда, когато уредът не се използва, когато
сваляте части и преди почистване.
Елементи на обслужване
Скара на грила
q
Щит за предпазване от пръски
w
Контакт за мрежовия кабел с термостата
e
Събирателна вана
r
Топлоизолирани ръкохватки
t
Нагревателен елемент
y
Контролен индикатор
u
Термостат
i
Окомплектовка на доставката
Електрически грил
Щит за предпазване от пръски
Термостат
Стойка: Масичка, горен плот, 4 опорни крака,
4 пети за опорните крака, 8 винта, 8 гайки
горна плоча
полица
опорни крака
пети за опорните крака
- 21 -
Page 24

1. Поставете петите от страната на опорните
крака , където няма отвор.
2. Монтирайте опорните крака към маси-
чката . За тази цел пъхнете винтовете през
пробитите предварително отвори и законтрете
винтовете с гайките от вътрешната страна на
масичката .
3. Поставете горния плот върху опорните
крака , така че опорните крака да легнат
отвътре в отворите на горния плот .
Предварително пробитите отвори в горния
плот и в опорните крака трябва да се
намират един над друг.
4. Пъхнете винтовете през отворите и законтрете
винтовете с гайките.
Пускане в експлоатация
Преди първото пускане в експлоатация почистете
грила, както е описано в глава “Почистване и
поддържане”. Работата/печенето на грил трябва
да се извършва само с предвидената за тази цел
събирателна вана
източник трябва да отговаря на данните от
фабричната табелка на уреда.
. Напрежението на токовия
r
Работа с грила
Добро и равномерно разпределяне на топлината се осигурява с нагревателния елемент
вграден в скарата на грила
се улеснява от незалепващото покритие, което
предотвратява загарянето на продуктите за печене
на грил.
• Поставете готово монтираната стойка на равна
повърхност. Съобразете се с това, че контактът
трябва да се намира в непосредствена близост.
. Почистването
q
y
,
• Напълнете събирателната вана
ровката Max с вода (около 1,3 л). Така ще
избегнете загарянето на капещата мазнина от
продуктите за печене на грил и ще улесните
почистването на уреда след това.
• Поставете щита за предпазване от пръски
едната страна (която по-късно ще остане отзад)
на скарата на грила
продукти на грила. Той служи допълнително за
предпазване от вятъра. Пъхнете щифтовете на
щита за предпазване от пръски
страна на скарата на грила
за тях отвори. За тази цел трябва малко да
огънете щита за предпазване от пръски
• Поставете скарата на грила
ната вана
• Поставете грила върху стойката. Четирите
задържащи щифта на горния плот на стойката
трябва да влязат във вдлъбнатините от долната
страна на грила. Грилът трябва да стои
стабилно върху стойката.
Указани
Можете да използвате грила и без стойката:
Поставете грила върху абсолютно равна повърхност. Повърхността не трябва да е чувствителна
към топлина. В противен случай е възможно да
се получат повреди по опорната повърхност.
• Проверете дали скарата на грила
ложена правилно в събирателната вана
(виж фиг. q).
• Поставете проводника с термостата
така че контролната лампичка
нагоре. След това включете щепсела в контакта.
• С термостата
ра. Грилът започва да се нагрява и контролният
индикатор
• Щом контролният индикатор
е достигнал настроената температура и е
готов за работа.
, така че да застане стабилно.
r
е
i
светва.
u
, ако печете мазни
q
настройте желаната температу-
до марки-
r
от едната
w
в предвидените
q
в събирател-
q
q
i
да сочи
u
угасне, грилът
u
w
.
w
е разпо-
r
в уреда,
от
- 22 -
Page 25

Указани
В зависимост от околната температура е възможно, при настройка на термостата “M”, контролният
индикатор
• След фаза на нагряване от около 15 минути
грилът е готов за работа.
Опасност от нараняване!
Когато уредът е нагрят, хващайте само топлоизолираните ръкохватки
е
да не угасва.
u
t
.
Настройки на термостата
Степен 0 Грилът е изключен
Степен 0 - 1 Грилът е включен;
ниска температура
Степен 1 - 3 Грилът е включен; средна
температура (напр. за зеленчуци)
Степен 3 - M (Max) Грилът е включен; висока
температура (напр. за месо)
Някои съвети
• Крехкото месо е по-подходящо за печене на
грил.
• Маринованите в продължение на една нощ
парчета месо, като напр. от плешка или от
врат, стават по-крехки.
• Избягвайте да режете продуктите за печене
върху повърхността на грила.
• Винаги използвайте щипки за грил, а не вилици
за обръщане на продуктите за печене. Тогава
те остават сочни отвътре и не изсъхват.
• Поради по-дългото време за приготвяне
избягвайте да избирате дебели продукти за
печене на грил.
• Когато печете фрикадели/кюфтета на скарата,
обърнете внимание на това, че дебелината им
не трябва да е повече от 2 см. Препоръчваме да
печете фрикаделите/ кюфтетата около 24
минути на степен 3: Обръщайте фрикаделите/
кюфтетата на всеки 6 минути, така че да се
пекат от всяка страна по 2 пъти.
Указани
Посочените времена могат да се различават в
зависимост от състава на продукта за печене и
личния вкус!
е
Почистване и поддържане
Внимание!
Преди почистване изключвайте щепсела от
контакта и термостата
токов удар!
Преди почистване оставяйте уреда да се охлади!
Опасност от изгаряне!
Внимание!
Внимавайте мрежовият кабел и щепселът да не
влизат в контакт с вода или други течности.
Избърсвайте термостата
кърпа.
Подсушавайте всичко добре, особено контактите,
преди следващата употреба. В противен случай
съществува опасност от токов удар!
• Отстранявайте грубото замърсяване с навлажнена кърпа.
• Пазете незалепващото покритие, като не използвате метални инструменти като ножове,
вилици и др.п. Ако незалепващото покритие е
повредено, не продължавайте да използвате
уреда.
• Само скарата на грила
вана
са годни за миене в съдомиялна маши-
r
на. Мийте щита за предпазване от пръски
в гореща сапунена вода и го подсушавайте
старателно след измиването. Почиствайте
стойката с влажна кърпа.
• След измиването контактите на скарата на
грила
• Преди да използвате уреда отново, вътрешността му трябва да е напълно суха.
трябва да се подсушават старателно.
q
от уреда. Опасност от
i
с леко навлажнена
i
и събирателната
q
w
- 23 -
Page 26

Изхвърляне
В никакъв случай не изхвърляйте
уреда с битовите отпадъци. Този уред
подлежи на европейската Директива
2002/96/EC.
Изхвърляйте уреда чрез лицензирана фирма за
изхвърляне на отпадъци или общинската служба
за изхвърляне на отпадъци.
Спазвайте актуално валидните разпоредби.
В случай на съмнение се свържете със службата
за изхвърляне на отпадъци.
Предавайте опаковъчните материали за
екологично изхвърляне.
Гаранция и сервиз
За този уред Вие получавате гаранция от 3 години
от датата на закупуване. Уредът е произведен
старателно и е проверен добросъвестно преди
доставката.
Запазете касовата бележка като доказателство
за покупката. В гаранционен случай се свържете
по телефона с вашия сервиз. Само по този начин
може да се осигури безплатното изпращане на
вашата стока.
Даването на гаранция важи само за материални
или фабрични дефекти, но не и за транспортни
щети, износващи се части или при повреда на
лесно чупливи части, напр. превключватели или
акумулаторни батерии. Продуктът е предназначен
единствено за домашна, а не за професионална
употреба.
При непозволена и неправилна употреба, при
прилагане на сила или интервенции, които не
са извършени от нашия оторизиран сервизен
филиал, гаранцията отпада. Законните ви права
не се ограничават от тази гаранция.
Гаранционният срок не се удължава от гаранцията.
Това важи и за сменени и ремонтирани части.
За евентуалните, налични още при закупуването
повреди и недостатъци трябва да се съобщи
веднага след разопаковането, но най-късно
два дена след датата на закупуване. След като
изтече гаранционният срок, ремонтите трябва да
се заплащат.
Сервизно обслужване България
Тел.:00800 111 4920
Е-мейл: kompernass@lidl.bg
IAN 70351
Вносител
KOMPERNASS GMBH
BURGSTRASSE 21
44867 BOCHUM, GERMANY
www.kompernass.com
- 24 -
Page 27

Περιεχόμενα Σελίδα
Σκοπός χρήσης 26
Τεχνικές πληροφορίες 26
Υποδείξεις ασφαλείας 26
Σύνολο παράδοσης 27
Στοιχεία χειρισμού 27
Θέση σε λειτουργία 28
Χειρισμός του γκριλ 28
Ρυθμίσεις θερμοστάτη 29
Μερικές υποδείξεις 29
Καθαρισμός και φροντίδα 29
Απομάκρυνση 30
Εγγύηση και σέρβις πελατών 30
Εισαγωγέας 30
Διαβάστε το εγχειρίδιο χειρισμού πριν από την πρώτη χρήση προσεκτικά και φυλάξτε το για μια μελλοντική
χρήση. Παραδώστε το εγχειρίδιο σε όποιον παραδοθεί στη συνέχεια η συσκευή.
- 25 -
Page 28

ΗΗλλεεκκττρριικκήή ψψηησσττιιέέρραα
Σκοπός χρήσης
Η συσκευή προβλέπεται για το ψήσιμο αντίστοιχων
τροφίμων σε εσωτερικό χώρο ή σε στεγασμένο εξωτερικό
χώρο. Δεν επιτρέπεται να έρθει σε επαφή με υγρασία,
όπως βροχή. Επιτρέπεται να χρησιμοποιούνται μόνο
γνήσια εξαρτήματα όπως περιγράφεται. Κάθε άλλη
χρήση ή μετατροπή δεν ισχύει ως σύμφωνη με τους
κανονισμούς και κρύβει σημαντικούς κινδύνους
ατυχημάτων.
Για βλάβες από χρήση μη σύμφωνη με τους
κανονισμούς ο κατασκευαστής δεν αναλαμβάνει
καμία ευθύνη. Η συσκευή δεν προορίζεται για την
επαγγελματική χρήση.
Τεχνικές πληροφορίες
Τάση δικτύου: 220 - 240 V~50Hz
Ονομαστική ισχύς:1600 W
Υποδείξεις ασφαλείας
Προς αποφυγή κινδύνου ζωής από
ηλεκτροπληξία:
• Τα βύσματα ή καλώδια δικτύου με βλάβη πρέπει να
αντικαθίστανται αμέσως από εξουσιοδοτημένο ειδικό
προσωπικό ή από το τμήμα εξυπηρέτησης πελατών,
ώστε να αποφεύγονται κίνδυνοι.
• Ελέγχετε πριν από τη θέση σε λειτουργία και μετά
από κάθε καθαρισμό της συσκευής εάν οι επαφές
σύνδεσης στην πλάκα γκριλ είναι στεγνές.
• Προστατεύετε τη γραμμή δικτύου από επαφές με
καυτά τμήματα της συσκευής. Ποτέ μη χρησιμοποιείτε
τη συσκευή κοντά σε ανοιχτές πηγές φλόγας, σε
θερμαντική πλάκα ή σε ζεστό φούρνο.
• Μην εκθέτετε τη συσκευή στη βροχή και ποτέ μην την
χρησιμοποιείτε σε υγρό ή βρεγμένο περιβάλλον.
Προσέχετε ώστε η γραμμή δικτύου να μη βρέχεται ή
υγραίνεται κατά τη λειτουργία.
• Η γραμμή σύνδεσης δικτύου πρέπει να ελέγχεται
τακτικά για σημάδια ζημιών. Εάν η γραμμή
σύνδεσης δικτύου έχει ζημιά, η συσκευή δεν
επιτρέπεται πλέον να χρησιμοποιείται.
• Η συσκευή πρέπει να τροφοδοτείται μέσω μιας
διάταξης προστασίας εσφαλμένου ρεύματος
(RCD) με ένα ρεύμα ενεργοποίησης μέτρησης όχι
μεγαλύτερο από 30mA.
• Η συσκευή πρέπει να συνδέεται σε μια πρίζα με
αγωγό προστασίας.
Για αποφυγή κινδύνου πυρκαγιάς
και τραυματισμών:
• Μην αφήνετε τη συσκευή ποτέ χωρίς επιτήρηση
κατά τη λειτουργία.
• Μην τοποθετείτε τη συσκευή κάτω από ντουλάπες
ή κοντά σε κουρτίνες ή σε παρόμοια εύφλεκτα
υλικά και κρατάτε παρόμοια εύφλεκτα υλικά
μακριά.
• Αυτή η συσκευή δεν προορίζεται για χρήση από
άτομα (συμπεριλαμβανομένων παιδιών) με
περιορισμένες, φυσικές, αισθητηριακές ή
πνευματικές δυνατότητες ή με έλλειψη εμπειρίας
και/ ή με έλλειψη γνώσεων, εκτός εάν
επιτηρούνται μέσω ενός υπεύθυνου ατόμου για
την ασφάλειά τους ή εάν αυτά τα άτομα έχουν
λάβει υποδείξεις για το πως χρησιμοποιείται η
συσκευή.
• Τα παιδιά πρέπει να επιτηρούνται ώστε να
εξασφαλίζεται ότι δεν παίζουν με τη συσκευή.
• Κίνδυνος εγκαύματος! Αφήνετε τη συσκευή
να κρυώνει καλά μετά τη χρήση, πριν την
καθαρίσετε.
• Κίνδυνος εγκαύματος! Χρησιμοποιείτε μόνο τις
λαβές με μόνωση από θερμότητα. Οι επιφάνειες
της συσκευής γίνονται πολύ καυτές κατά τη
λειτουργία.
• Φροντίστε για μια ασφαλή θέση της συσκευής.
- 26 -
Page 29

• Τοποθετείτε τη συσκευή όσο γίνεται πιο κοντά στην
πρίζα. Φροντίζετε ώστε το βύσμα σε περίπτωση
κινδύνου να είναι γρήγορα προσβάσιμο και η
γραμμή δικτύου να μην γίνεται παγίδα για να
σκοντάψετε.
• Η αντικολλητική επίστρωση προστατεύεται όταν
δε χρησιμοποιείτε μεταλλικά εργαλεία όπως
μαχαίρια, πιρούνια κλπ.
• Μη χρησιμοποιείτε εξωτερικό χρονοδιακόπτη ή
ξεχωριστό τηλεχειριστήριο για να λειτουργήσετε
τη συσκευή.
• Μη χρησιμοποιείτε κάρβουνα ή παρόμοια υλικά
ανάφλεξης, για να λειτουργήσετε τη συσκευή!
• Ποτέ μη λειτουργείτε τη συσκευή χωρίς νερό στο
κοίλο τμήμα συλλογής.
Έτσι θα συμπεριφέρεστε με ασφάλεια:
• Σε περίπτωση κινδύνου τραβήξτε αμέσως το
βύσμα από την πρίζα.
• Ποτέ μη χρησιμοποιείτε τη συσκευή για άλλο σκοπό.
• Αποφεύγετε μια συσσώρευση θερμότητας. Μη
τοποθετείτε αλουμινόχαρτα ή άλλα σκεύη
ψησίματος επάνω στη σχάρα ψησίματος. Μέσω
μιας συσσώρευσης θερμότητας μπορεί να
καταστραφούν πλαστικά τμήματα καθώς και οι
επιστρώσεις.
• Λειτουργείτε το επιτραπέζιο γκριλ αποκλειστικά με
τον απεσταλμένο θερμοστάτη.
• Θέτετε σε λειτουργία την πλάκα ψησίματος μόνο
όταν βρίσκεται επάνω στο κοίλο τμήμα συλλογής.
• Τραβήξτε το βύσμα καθώς και τη γραμμή από τη
συσκευή όταν αυτή δεν χρησιμοποιείται, όταν
απομακρύνετε εξαρτήματα και πριν από τον
καθαρισμό.
Στοιχεία χειρισμού
Σχάρα ψησίματος
q
Προστασία από πιτσιλίσματα
w
Σύνδεση για τη γραμμή δικτύου με θερμοστάτη
e
Κοίλο τμήμα συλλογής
r
Χειρολαβές με μόνωση από τη θερμότητα
t
Θερμαντικό στοιχείο
y
Λυχνία ελέγχου
u
Θερμοστάτης
i
Σύνολο παράδοσης
Ηλεκτρική ψησταριά
Προστασία από πιτσιλίσματα
Θερμοστάτης
Βάση: Πλάκα απόθεσης, άνω πλάκα, 4 πόδια
βάσεις, 4 Πόδια βάσεις, 8 βίδες, 8 παξιμάδια
επάνω πλάκα
πλάκα απόθεσης
πόδια βάσεις
πέλματα ποδιών βάσεων
- 27 -
Page 30

1. Εισάγετε τα πόδια βάσεις στα πλάγια των
ποδιών βάσεων , όπου δεν υπάρχει οπή
διάτρησης.
2. Συναρμολογήστε τα πόδια βάσεις στην πλάκα
απόθεσης . Εισάγετε για αυτό τις βίδες μέσα
από τις προδιατρημένες οπές και σφίξτε τις βίδες
με τα παξιμάδια από την εσωτερική πλευρά της
πλάκας απόθεσης .
3. Τοποθετήστε την άνω πλάκα επάνω στα πόδια
βάσεις , έτσι ώστε τα πόδια βάσεις να
εδράζονται από μέσα στις οπές διάτρησης της
άνω πλάκας . Οι προδιατρημένες οπές στην
άνω πλάκα , καθώς και στα πόδια βάσεις
πρέπει να είναι η μια επάνω στην άλλη.
4. Εισάγετε τις βίδες μέσω των οπών και σφίξτε τις
βίδες με τα παξιμάδια.
Θέση σε λειτουργία
Καθαρίζετε το επιτραπέζιο γκριλ πριν από την πρώτη
θέση σε λειτουργία όπως περιγράφεται στο Κεφάλαιο
“Καθαρισμός και φροντίδα”. Η λειτουργία /
διαδικασία ψησίματος επιτρέπεται να γίνεται μόνο με
το προβλεπόμενο κοίλο τμήμα συλλογής
Η τάση της πηγής ρεύματος πρέπει να συμφωνεί με
τις πληροφορίες επάνω στην πινακίδα τύπου της
συσκευής.
r
.
Χειρισμός του γκριλ
Η καλή και ομοιόμορφη κατανομή θερμότητας
εξασφαλίζεται μέσω του ενσωματωμένου θερμαντικού
στοιχείου
Ο καθαρισμός διευκολύνεται μέσω της αντικολλητικής
επίστρωσης η οποία εμποδίζει το κάψιμο του
προϊόντος ψησίματος.
• Τοποθετήστε την έτοιμη συναρμολογημένη βάση
επάνω σε μια ίσια επιφάνεια. Σκεφθείτε ότι μια πρίζα
δικτύου πρέπει να βρίσκεται σε προσβάσιμο σημείο.
στη σχάρα της ψησταριάς q.
y
• Γεμίστε το κοίλο τμήμα συλλογής
Max με νερό (περ. 1,3 λ.). Έτσι εμποδίζετε το κάψιμο
λίπους του προϊόντος ψησίματος που στάζει προς
τα κάτω και διευκολύνετε τον εν συνεχεία καθαρισμό
της συσκευής.
• Τοποθετήστε την προστασία από πιτσιλίσματα
στην μια πλευρά (την μετέπειτα πίσω πλευρά) της
σχάρας ψησίματος
είδη που περιέχουν λίπος. Αυτό εξυπηρετεί επιπλέον
ως προστασία από τον αέρα. Εισάγετε τους τρεις
αξονίσκους του προστατευτικού από πιτσιλίσματα
στη μια πλευρά της σχάρας ψησίματος
w
στις για αυτούς προβλεπόμενες οπές. Για αυτό
πρέπει να κάμψετε ελαφρώς το προστατευτικό
από πιτσιλίσματα
• Τοποθετήστε τη σχάρα ψησίματος
κοίλο τμήμα συλλογής
σταθερά.
• Τοποθετήστε την ψησταριά επάνω στη βάση. Οι
4 αξονίσκοι συγκράτησης στην άνω πλάκα της
βάσης πρέπει να πιάνουν στις εγκοπές στην κάτω
πλευρά της ψησταριάς. Η ψησταριά πρέπει να
στέκεται σταθερά επάνω στη βάση.
, εάν πρόκειται να ψήσετε
q
.
w
r
έως το σύμβολο
r
w
q
επάνω στο
q
, έτσι ώστε να εδράζεται
Υπόδειξη
Μπορείτε να χρησιμοποιήσετε την ψησταριά και
χωρίς βάση:
Τοποθετήστε την ψησταριά επάνω σε μια εντελώς
ίσια επιφάνεια. Αυτή η επιφάνεια πρέπει να είναι
θερμανθεκτική. Αλλιώς μπορεί να εμφανιστούν
ζημιές στην επιφάνεια απόθεσης.
• Ελέγξτε εάν η σχάρα ψησίματος
τοποθετηθεί σωστά επάνω στο κοίλο τμήμα
συλλογής
• Εισάγετε τη γραμμή δικτύου με το θερμοστάτη
έτσι στη συσκευή, ώστε η λυχνία ελέγχου uνα
δείχνει προς τα επάνω. Στη συνέχεια βάλτε το φις
σε μια πρίζα.
• Ρυθμίστε στο θερμοστάτη
θερμοκρασία. Το γκριλ αρχίζει να θερμαίνεται
και η λυχνία ελέγχου
• Μόλις η λυχνία ελέγχου
φτάσει στη ρυθμισμένη θερμοκρασία και είναι
έτοιμο για λειτουργία.
(βλέπε Εικ. q).
r
u
i
ανάβει.
u
έχει
q
την επιθυμητή
σβήσει, το γκριλ έχει
i
- 28 -
Page 31

Υπόδειξη
Ανάλογα με τη θερμοκρασία περιβάλλοντος μπορεί
η λυχνία ελέγχου
να μην σβήσει.
• Η ψησταριά είναι έτοιμη για λειτουργία μετά από
μια φάση θέρμανσης περ. 15 λεπτών.
Κίνδυνος τραυματισμού!
Εάν το γκριλ έχει ζεσταθεί, πιάνετέ το μόνο από τις
χειρολαβές με μόνωση από τη θερμότητα
, στη ρύθμιση θερμοστάτη “M”,
u
.
t
Ρυθμίσεις θερμοστάτη
Βαθμίδα 0 Γκριλ απενεργοποιημένο
Βαθμίδα 0 - 1 Γκριλ ενεργοποιημένο;
χαμηλή θερμοκρασία
Βαθμίδα 1 - 3 Γκριλ ενεργοποιημένο;
μεσαία θερμοκρασία
(π.χ. λαχανικά)
Βαθμίδα 3 - M (Μέγ.) Γκριλ ενεργοποιημένο;
υψηλή θερμοκρασία
(π.χ. κρέας)
Μερικές υποδείξεις
• Όταν ψήνετε μπιφτέκια/κεφτέδες στο γκριλ,
προσέχετε ότι αυτά δεν θα είναι πιο χοντρά από 2 εκ.
Προτείνουμε να ψήνετε τα μπιφτέκια/τους
κεφτέδες για περ. 24 λεπτά στη βαθμίδα 3:
Γυρίστε τα μπιφτέκια/τους κεφτέδες μετά από 6
λεπτά, έτσι ώστε κάθε πλευρά να ψηθεί 2 φορές.
Υπόδειξη
Οι δοθέντες χρόνοι μπορεί να ποικίλουν ανάλογα με
την πυκνότητα του προϊόντος ψησίματος και με την
προσωπική γεύση!
Καθαρισμός και φροντίδα
Προσοχή!
Πριν από τον καθαρισμό τραβάτε το βύσμα από
την πρίζα δικτύου και το θερμοστάτη
συσκευή. Κίνδυνος ηλεκτροπληξίας !
Αφήνετε τη συσκευή να κρυώνει πριν από τον
καθαρισμό! Κίνδυνος εγκαύματος!
Προσοχή!
Προσέχετε ώστε ούτε η γραμμή δικτύου ούτε το
βύσμα να έρχονται σε επαφή με νερό ή άλλα υγρά.
Σκουπίζετε το θερμοστάτη
πανί. Στεγνώνετε όλα τα μέρη καλά πριν από την
επόμενη χρήση, κυρίως τις επαφές. Αλλιώς υπάρχει
κίνδυνος ηλεκτροπληξίας!
με ένα ελαφρώς νωπό
i
i
από τη
• Το μαλακό κρέας ενδείκνυται καλύτερα για το
ψήσιμο.
• Κατά τη διάρκεια της νύχτας τα μαριναρισμένα
κομμάτια κρέατος, όπως π.χ. από τον ώμο ή από
το λαιμό, γίνονται πιο μαλακά.
• Αποφεύγετε να κόβετε προϊόντα ψησίματος
επάνω στην επιφάνεια ψησίματος.
• Χρησιμοποιείτε πάντα ειδικές δαγκάνες και όχι
πιρούνια για το γύρισμα των ψητών. Έτσι τα ψητά
παραμένουν εσωτερικά χυμώδη και δε
στεγνώνουν εξωτερικά.
• Αποφεύγετε τα χοντρά κομμάτια για ψήσιμο λόγω
του ότι το ψήσιμό τους διαρκεί περισσότερο.
• Απομακρύνετε τη χοντρή βρομιά με ένα νωπό πανί.
• Η αντικολλητική επίστρωση προστατεύεται όταν
δε χρησιμοποιείτε μεταλλικά εργαλεία όπως
μαχαίρια, πιρούνια κλπ. Όταν η αντικολλητική
επίστρωση έχει χαλάσει, μη συνεχίζετε με τη
χρήση της συσκευής.
• Μόνο η σχάρα ψησίματος
συλλογής
πλυντήριο πιάτων. Καθαρίζετε το προστατευτικό
από πιτσιλίσματα
και στεγνώνετέ το καλά μετά τον καθαρισμό.
Καθαρίζετε τη βάση με ένα νωπό πανί.
• Οι επαφές στη σχάρα ψησίματος
στεγνώνουν καλά μετά τον καθαρισμό.
• Το εσωτερικό της συσκευής πρέπει να είναι
πλήρως στεγνό πριν από μια νέα χρήση.
- 29 -
ενδείκνυνται για καθαρισμό στο
r
σε καυτό νερό με σαπούνι
w
και το δοχείο
q
q
πρέπει να
Page 32

Απομάκρυνση
Σε καμία περίπτωση μην πετάξετε τη
συσκευή στα οικιακά απορρίμματα. Αυτό
το προϊόν υπόκειται στην Ευρωπαϊκή
Οδηγία 2002/96/EC.
Απομακρύνετε τη συσκευή μέσω μιας εγκεκριμένης
επιχείρησης απομάκρυνσης ή μέσω της κοινοτικής
επιχείρησης απομάκρυνσης.
Να τηρείτε τους ισχύοντες κανονισμούς. Σε
περίπτωση αμφιβολιών ελάτε σε επαφή με την
επιχείρηση απόρριψης.
Απομακρύνετε όλα τα υλικά συσκευασιών
φιλικά προς το περιβάλλον.
Ο χρόνος εγγύησης δεν επεκτείνεται μέσω της
απόδοσης εγγύησης. Αυτό ισχύει και για
εξαρτήματα τα οποία έχουν αντικατασταθεί ή
επισκευαστεί. Ενδεχόμενες ήδη υπάρχουσες κατά
την αγορά, ζημιές και ελλείψεις πρέπει να
αναφέρονται αμέσως μετά την αποσυσκευασία, το
αργότερο όμως δύο ημέρες μετά την ημερομηνία
αγοράς. Επισκευές που εμφανίζονται μετά τη λήξη
του χρόνου εγγύησης χρεώνονται.
Σέρβις Ελλάδα
Tel.: 801 5000 019 (0,03 EUR/Min.)
E-Mail: kompernass@lidl.gr
IAN 70351
Εισαγωγέας
Εγγύηση και σέρβις πελατών
Έχετε για αυτή τη συσκευή 3 χρόνια εγγύηση από
την ημερομηνία αγοράς. Η συσκευή κατασκευάστηκε
και ελέγχθηκε προσεκτικά πριν από την αποστολή.
Παρακαλούμε φυλάξτε την απόδειξη ταμείου ως
απόδειξη για την αγορά. Παρακαλούμε
επικοινωνήστε τηλεφωνικά με την υπηρεσία σέρβις σε
περίπτωση εγγύησης. Μόνο έτσι μπορεί να
εξασφαλιστεί μια δωρεάν αποστολή του
εμπορεύματός σας.
Η απόδοση εγγύησης ισχύει μόνο για σφάλματα
υλικού ή κατασκευής, όχι όμως για ζημιές από τη
μεταφορά, για εξαρτήματα φθοράς ή για βλάβες σε
εύθραυστα εξαρτήματα, π.χ. διακόπτες ή
συσσωρευτές. Το προϊόν προορίζεται μόνο για την
ιδιωτική και όχι για την επαγγελματική χρήση.
Σε περίπτωση κακής μεταχείρισης και ακατάλληλης
χρήσης, σε χρήση βίας και σε παρεμβάσεις οι
οποίες δεν διεξήχθησαν από το εξουσιοδοτημένο
μας τμήμα σέρβις, η εγγύηση παύει να ισχύει. Τα νομικά σας δικαιώματα δεν περιορίζονται μέσω αυτής
της εγγύησης.
KOMPERNASS GMBH
BURGSTRASSE 21
44867 BOCHUM, GERMANY
www.kompernass.com
- 30 -
Page 33

Inhaltsverzeichnis Seite
Bestimmungsgemäßer Gebrauch 32
Technische Daten 32
Sicherheitshinweise 32
Lieferumfang 33
Bedienelemente 33
Ständer montieren 33
In Betrieb nehmen 34
Handhabung des Grills 34
Thermostat-Einstellungen 35
Einige Tipps 35
Reinigen und Pflegen 35
Entsorgen 36
Garantie und Service 36
Importeur 36
Lesen Sie die Bedienungsanleitung vor der ersten Verwendung aufmerksam durch und heben Sie diese für
den späteren Gebrauch auf. Händigen Sie bei Weitergabe des Gerätes an Dritte auch die Anleitung aus.
- 31 -
Page 34

Elektro-Grill
Bestimmungsgemäßer
Gebrauch
Das Gerät ist zum Grillen von Grillgut im Innenbereich oder im überdachten Außenbereich vorgesehen. Es darf nicht mit Feuchtigkeit, wie Regen oder
Nässe, in Berührung kommen. Es darf ausschließlich
Originalzubehör wie beschrieben verwendet werden. Jede andere Verwendung oder Veränderung
gilt als nicht bestimmungsgemäß und birgt erhebliche Unfallgefahren.
Für aus bestimmungswidriger Verwendung entstandene Schäden übernimmt der Hersteller keine Haftung. Nicht für den gewerblichen Einsatz bestimmt.
Technische Daten
Netzspannung: 220 - 240 V ~/ 50Hz
Nennleistung: 1600 W
Sicherheitshinweise
Um Lebensgefahr durch elektrischen
Schlag zu vermeiden:
• Lassen Sie beschädigte Netzstecker oder Netzkabel sofort von autorisiertem Fachpersonal
oder dem Kundenservice austauschen, um
Gefährdungen zu vermeiden.
• Schützen Sie die Netzleitung vor Berührungen
mit heißen Geräteteilen. Benutzen Sie das Gerät
niemals in der Nähe einer offenen Flamme, einer Heizplatte oder eines beheizten Ofens.
• Setzen Sie das Gerät nicht dem Regen aus und
benutzen Sie es auch niemals in feuchter oder
nasser Umgebung. Achten Sie darauf, dass die
Netzleitung während des Betriebs niemals nass
oder feucht wird.
• Überprüfen Sie vor Inbetriebnahme und nach jeder Reinigung des Gerätes, ob die Steckkontakte
am Grillrost trocken sind.
• Die Netzanschlussleitung muss regelmäßig auf
Zeichen von Beschädigungen untersucht werden. Falls die Netzanschlussleitung beschädigt
ist, darf das Gerät nicht mehr benutzt werden.
• Das Gerät muss über eine Fehlerstrom-Schutzeinrichtung (RCD) mit einem Bemessungsauslösestrom von nicht mehr als 30mA gespeist werden.
• Das Gerät muss an eine Steckdose mit Schutzleiter angeschlossen werden.
Um Brandgefahr und Verletzungen
zu vermeiden:
• Das Gerät während des Betriebs niemals unbeaufsichtigt lassen.
• Stellen Sie das Gerät nicht unter Schränken oder
in der Nähe von Vorhängen oder ähnlich leicht
entzündlichem Material auf und halten Sie entsprechend brennbare Materialien fern.
• Dieses Gerät ist nicht dafür bestimmt, durch
Personen (einschließlich Kinder) mit eingeschränkten physischen, sensorischen oder
geistigen Fähigkeiten oder mangels Erfahrung
und/oder mangels Wissen benutzt zu werden,
es sei denn, sie werden durch eine für ihre
Sicherheit zuständige Person beaufsichtigt oder
erhielten von ihr Anweisungen, wie das Gerät
zu benutzen ist.
• Kinder sollten beaufsichtigt werden, um sicherzustellen, dass sie nicht mit dem Gerät spielen.
• Verbrennungsgefahr! Lassen Sie das Gerät
nach Gebrauch gut abkühlen, bevor Sie es
reinigen.
• Verbrennungsgefahr! Benutzen Sie nur die
wärmeisolierten Griffe. Die Oberflächen des
Gerätes werden während des Betriebs sehr heiß.
• Sorgen Sie für einen sicheren Stand des
Gerätes.
- 32 -
Page 35

• Stellen Sie das Gerät möglichst in der Nähe
einer Steckdose auf. Sorgen Sie dafür, dass der
Netzstecker bei Gefahr schnell erreichbar ist
und die Netzleitung nicht zur Stolperfalle werden kann.
• Schützen Sie die Antihaftbeschichtung, indem
Sie keine metallischen Werkzeuge wie Messer,
Gabel u.s.w. benutzen. Wenn die Antihaftbeschichtung beschädigt ist, benutzen Sie das
Gerät nicht weiter.
• Benutzen Sie keine externe Zeitschaltuhr oder
ein separates Fernwirksystem um das Gerät zu
betreiben.
• Benutzen Sie keine Kohle oder ähnliche Brennstoffe, um das Gerät zu betreiben!
• Betreiben Sie das Gerät niemals ohne Wasser in
der Auffangwanne.
So verhalten Sie sich sicher:
• Ziehen Sie bei Gefahr sofort den Netzstecker
aus der Steckdose.
• Verwenden Sie das Gerät niemals zweckentfremdet.
• Vermeiden Sie einen Wärmestau. Legen Sie
keine Alufolie oder andere Grillutensilien auf
den Grillrost. Durch einen Wärmestau können
Kunststoffanteile sowie die Beschichtungen zerstört werden.
• Betreiben Sie den Grill ausschließlich mit dem
mitgelieferten Thermostat.
• Bitte nehmen Sie den Grillrost nur in Betrieb,
wenn es auf der Auffangwanne liegt.
• Ziehen Sie den Netzstecker sowie die Zuleitung
vom Gerät, wenn das Gerät nicht benutzt wird,
wenn Sie Teile entfernen und vor dem Reinigen.
Bedienelemente
Grillrost
q
Spritzschutzschild
w
Anschluss für Netzleitung mit Thermostat
e
Auffangwanne
r
wärmeisolierte Haltegriffe
t
Heizelement
y
Kontrollleuchte
u
Thermostat
i
Ständer montieren
Lieferumfang
Elektro-Grill
Spritzschutzschild
Thermostat
Ständer: Ablageplatte, obere Platte, 4 Standbeine,
4 Standbeinfüße, 8 Schrauben, 8 Muttern
obere Platte
Ablageplatte
Standbeine
Standbeinfüße
- 33 -
Page 36

1. Stecken Sie die Standbeinfüße auf die Seite
der Standbeine , wo sich kein Bohrloch befindet.
2. Montieren Sie die Standbeine an der Abla-
geplatte . Stecken Sie dafür die Schrauben
durch die vorgebohrten Löcher und kontern Sie
die Schrauben mit den Muttern von der Innenseite der Ablageplatte .
3. Setzen Sie die obere Platte auf die Standbeine , so dass die Standbeine von Innen an
den Bohrlöchern der oberen Platte anliegen.
Die vorgebohrten Löcher in der oberen Platte
, sowie in den Standbeinen müssen übereinander liegen.
4. Stecken Sie die Schrauben durch die Löcher und
kontern Sie die Schrauben mit den Muttern.
In Betrieb nehmen
Reinigen Sie den Grill vor der ersten Inbetriebnahme
wie im Kapitel “Reinigen und Pflegen” beschrieben.
Der Betrieb / Grillvorgang darf nur mit der dafür
vorgesehenen Auffangwanne
Die Spannung der Stromquelle muss mit den
Angaben auf dem Typenschild des Gerätes
übereinstimmen.
erfolgen.
r
• Befüllen Sie die Auffangwanne
Markierung mit Wasser (ca. 1,3 l). Sie verhindern so das Anbrennen von herunter tropfendem
Fett des Grillguts und erleichtern die anschließende Reinigung des Gerätes.
• Bringen Sie das Spritzschutzschild
Seite (die spätere Rückseite) des Grillrostes
an, sollten Sie fetthaltiges Grillgut grillen. Zusätzlich dient es als Windschutz. Stecken Sie die drei
Zapfen des Spritzschutzschildes
des Grillrosts
cher. Dafür müssen Sie das Spritzschutzschild
leicht biegen.
• Legen Sie den Grillrost
ne
, so dass es fest aufliegt.
r
• Stellen Sie den Grill auf den Ständer. Die 4 Halterungsstifte auf der oberen Platte des Ständers
müssen in die Vertiefungen auf der Unterseite
des Grills greifen. Der Grill muss fest auf dem
Ständer stehen.
in die dafür vorgesehenen Lö-
q
q
bis zur Max-
r
an einer
w
q
an eine Seite
w
auf die Auffangwan-
Hinweis
Sie können den Grill auch ohne Ständer benutzen:
Stellen Sie den Grill auf eine absolut ebene Fläche.
Diese Fläche muss gegen Hitze unempfindlich sein.
Ansonsten kann es zu Beschädigungen an der Stellfläche kommen.
w
Handhabung des Grills
Gute und gleichmäßige Hitzeverteilung ist durch
das integrierte Heizelement
chert. Die Reinigung wird durch die Antihaftbeschichtung erleichtert die das Ansetzen von Grillgut verhindert.
• Stellen Sie den fertig montierten Ständer auf
eine ebene Fläche. Denken Sie daran, dass sich
eine Netzsteckdose in erreichbarer Nähe befinden muss.
im Grillrost qgesi-
y
• Überprüfen Sie, ob der Grillrost
der Auffangwanne
).
q
• Stecken Sie die Netzleitung mit Thermostat
am Gerät ein, dass die Kontrollleuchte
oben weist. Stecken Sie den Netzstecker danach
in eine Netzsteckdose.
• Stellen Sie am Thermostat
Temperatur ein. Der Grill fängt an sich aufzuheizen und die Kontrollleuchte
• Sobald die Kontrollleuchte
Grill die eingestellte Temperatur erreicht und ist
betriebsbereit.
- 34 -
platziert ist (siehe Abb.
r
die gewünschte
i
leuchtet auf.
u
erlischt, hat der
u
korrekt auf
q
u
i
nach
so
Page 37

Hinweis
Je nach Umgebungstemperatur, kann es sein, dass
die Kontrollleuchte
“M”, nicht erlischt.
• Der Grill ist nach einer Aufheizphase von ca. 15
Minuten betriebsbereit.
Verletzungsgefahr!
Ist der Grill aufgeheizt, fassen Sie ihn nur noch an
den wärmeisolierenden Haltegriffen
, bei Thermostateinstellung
u
an.
t
Thermostat-Einstellungen
Hinweis
Die angegebenen Zeiten können je nach Beschaffenheit des Grillgutes und durch persönlichen Geschmack variieren!
Reinigen und Pflegen
Achtung!
Ziehen Sie vor der Reinigung den Netzstecker aus
der Netzsteckdose und den Thermostat
Gerät. Gefahr eines elektrischen Schlages!
Lassen Sie das Gerät vor dem Reinigen abkühlen!
Verbrennungsgefahr!
i
aus dem
Stufe 0 Grill ausgeschaltet
Stufe 0 - 1 Grill eingeschaltet;
niedrige Temperatur
Stufe 1 - 3 Grill eingeschaltet; mittlere
Temperatur (z.B. Gemüse)
Stufe 3 - M (Max) Grill eingeschaltet; hohe
Temperatur (z.B. Fleisch)
Einige Tipps
• Zartes Fleisch eignet sich besser zum Grillen.
• Über Nacht marinierte Fleischstücke, wie z.B.
von der Schulter oder vom Hals, werden zarter.
• Vermeiden Sie es, Grillgut auf der Grillfläche zu
schneiden.
• Verwenden Sie immer Grillzangen und keine
Gabeln zum Wenden des Grillgutes. Dadurch
bleibt es innen saftig und trocknet nicht aus.
• Vermeiden Sie auf Grund der längeren Garzeit
die Auswahl von dickem Grillgut.
• Wenn Sie Frikadellen/Hackbällchen auf dem
Grill grillen, achten Sie darauf, dass diese nicht
dicker als 2 cm sind.
Wir empfehlen die Frikadellen/Hackbällchen
ca. 24 Minuten auf Stufe 3 zu grillen:
Wenden Sie die Frikadellen/Hackbällchen nach
jeweils 6 Minuten, so dass jede Seite 2 mal gegrillt wird.
Achtung!
Achten Sie darauf, weder Netzleitung noch den
Stecker mit Wasser oder anderen Flüssigkeiten in
Berührung zu bringen. Wischen Sie den Themostat
mit einem leicht angefeuchteten Tuch ab.
i
Trocknen Sie alles, insbesonders die Steckkontakte,
vor der nächsten Benutzung gut ab. Ansonsten besteht die Gefahr eines elektrischen Schlages!
• Entfernen Sie groben Schmutz mit einem angefeuchteten Tuch.
• Schützen Sie die Antihaftbeschichtung, indem
Sie keine metallischen Werkzeuge wie Messer,
Gabel u.s.w. benutzen. Wenn die Antihaftbeschichtung beschädigt ist, benutzen Sie das
Gerät nicht weiter.
• Nur der Grillrost
sind dazu geeignet, in der Spülmaschine gereinigt zu werden. Reinigen Sie das Spritzschutzschild
Sie es nach der Reinigung gründlich ab. Reinigen Sie den Ständer mit einem feuchten Tuch.
• Die Steckkontakte am Grillrost
Reinigung gründlich abzutrocknen.
• Das Geräteinnere muss vor einer erneuten Verwendung vollständig trocken sein.
in heißem Seifenwasser und trocknen
w
und die Auffangwanne
q
sind nach der
q
r
- 35 -
Page 38

Entsorgen
Werfen Sie das Gerät keinesfalls in den
normalen Hausmüll. Dieses Produkt
unterliegt der europäischen Richtlinie
2002/96/EC.
Entsorgen Sie das Gerät über einen zugelassenen
Entsorgungsbetrieb oder über Ihre kommunale
Entsorgungseinrichtung.
Beachten Sie die aktuell geltenden Vorschriften.
Setzen Sie sich im Zweifelsfall mit Ihrer Entsorgungseinrichtung in Verbindung.
Die Garantiezeit wird durch die Gewährleistung
nicht verlängert. Dies gilt auch für ersetzte und reparierte Teile. Eventuell schon beim Kauf vorhandene
Schäden und Mängel müssen sofort nach dem
Auspacken gemeldet werden, spätestens aber zwei
Tage nach Kaufdatum. Nach Ablauf der Garantiezeit anfallende Reparaturen sind kostenpflichtig.
Service Deutschland
Tel.: 01805 772 033 (0,14 EUR/Min. aus dem dt.
Festnetz, Mobilfunk max. 0,42 EUR/Min.)
E-Mail: kompernass@lidl.de
IAN 70351
Führen Sie alle Verpackungsmaterialien
einer umweltgerechten Entsorgung zu.
Garantie und Service
Sie erhalten auf dieses Gerät 3 Jahre Garantie ab
Kaufdatum. Das Gerät wurde sorgfältig produziert
und vor Anlieferung gewissenhaft geprüft.
Bitte bewahren Sie den Kassenbon als Nachweis
für den Kauf auf. Bitte setzen Sie sich im Garantiefall mit Ihrer Servicestelle telefonisch in Verbindung.
Nur so kann eine kostenlose Einsendung Ihrer Ware
gewährleistet werden.
Die Garantieleistung gilt nur für Material- oder
Fabrikationsfehler, nicht aber für Transportschäden,
Verschleißteile oder für Beschädigungen an zerbrechlichen Teilen, z. B. Schalter oder Akkus. Das
Produkt ist lediglich für den privaten und nicht für
den gewerblichen Gebrauch bestimmt.
Bei missbräuchlicher und unsachgemäßer Behandlung, Gewaltanwendung und bei Eingriffen, die
nicht von unserer autorisierten Service-Niederlassung vorgenommen wurden, erlischt die Garantie.
Ihre gesetzlichen Rechte werden durch diese
Garantie nicht eingeschränkt.
Service Österreich
Tel.: 0820 201 222 (0,15 EUR/Min.)
E-Mail: kompernass@lidl.at
IAN 70351
Service Schweiz
Tel.: 0842 665566 (0,08 CHF/Min.,
Mobilfunk max. 0,40 CHF/Min.)
E-Mail: kompernass@lidl.ch
IAN 70351
Importeur
KOMPERNASS GMBH
BURGSTRASSE 21
44867 BOCHUM, GERMANY
www.kompernass.com
- 36 -
 Loading...