

Page 1
KITCHEN TOOLS
4
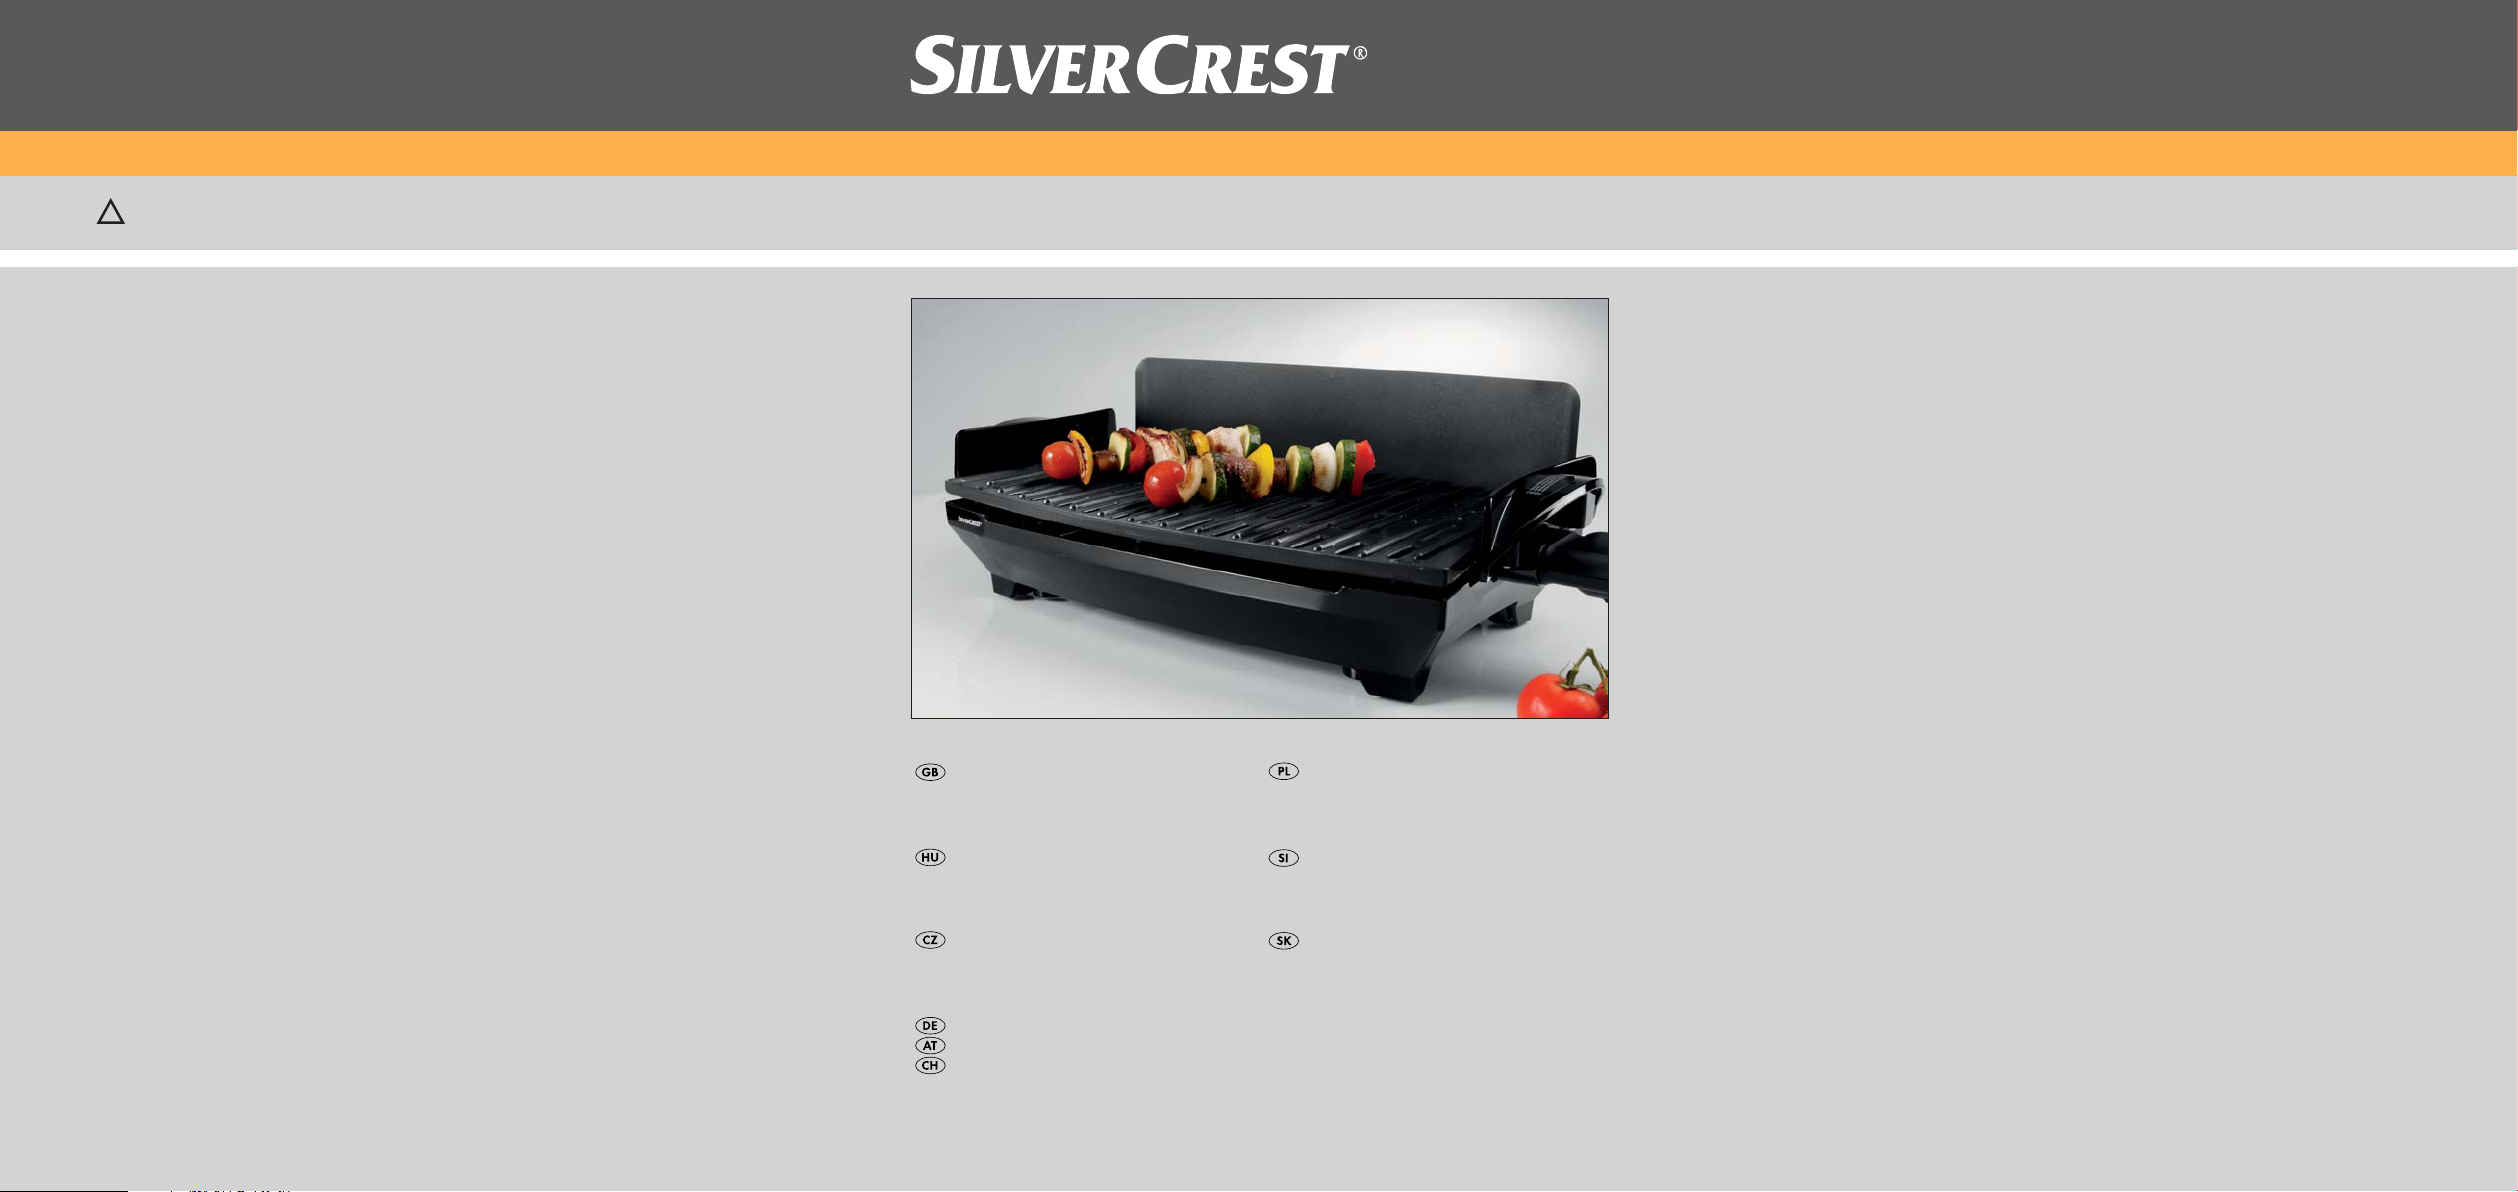
Electric Grill STGR 1600 A1
Electric Grill
Operating instructions
Grill elektryczny
Instrukcja obsługi
KOMPERNASS GMBH
BURGSTRASSE 21 · D-44867 BOCHUM
www.kompernass.com
ID-Nr.: STGR1600A1-09/10-V1
IAN: 61121
Elektromos grill
Használati utasítás
Elektrický gril
Návod k obsluze
Elektro-Grill
Bedienungsanleitung
Električni žar
Navodila za uporabo
Elektrický gril
Návod na obsluhu
Page 2
STGR 1600 A1
q
w
t
q
w
e
r
e
y
r
u
i
Page 3

Content Page
Intended use 2
Technical data 2
Safety information 2
Items supplied 3
Operating Elements 3
Assembly of the stand 3
Taking it into use 4
Handling the grill 4
Thermostat adjustments 4
Some tips 5
Cleaning and care 5
Disposal 5
Warranty and Service 6
Importer 6
Read the operating instructions carefully before using the appliance for the first time and preserve this
booklet for later reference. Pass the manual on to whomsoever might acquire the appliance at a later date.
- 1 -
Page 4
ELECTRIC GRILL
Intended use
• Do not expose the appliance to rain and never
use it in a humid or wet environment. Ensure that
the power cable never becomes wet or moist during
operation.
This appliance is intended for grilling foodstuffs in
indoor areas or in covered outdoor areas. It may
not come into contact with moisture, such as rain.
Only the original attachments and accessories, as
described herein, may be used. All other usages or
modifications are regarded as being contrary to the
operating instructions and carry with them a real
risk of serious accidents.
The manufacturer declines to accept responsibility
for damage(s) arising out of usage contrary to the
instructions specified below. The appliance is not
intended for commercial use.
Technical data
Mains voltage: 220 - 240 V ~50Hz
Nominal power: 1600 W
Safety information
To avoid potentially fatal electric
shocks:
• Arrange for defective power plugs and/or cables
to be replaced at once by qualified technicians
or our Customer Service Department.
• Before taking the appliance into use and after
cleaning it, check to ensure that the plug contacts
on the grill plate are dry.
• Protect the power cable against contact with
heated appliance parts. NEVER use the appliance
adjacent to open flames, a hot plate or a heated
oven.
To avoid the risks of fire or injuries:
• Never leave the appliance unsupervised during use.
• Do not place the appliance under cupboards or
close to curtains and other easily inflammable
materials and also keep such combustible materials away from the appliance.
• This appliance is not intended for use by individuals (including children) with restricted physical,
physiological or intellectual abilities or deficiences
in experience and/or knowledge unless they
are supervised by a person responsible for their
safety or receive from this person instruction in
how the appliance is to be used.
• Children should be supervised to ensure that
they do not play with the appliance..
• Risk of burns! After use, allow the appliance to
cool down completely before cleaning it.
• Risk of burns! Use only the heat-insulated handles.
The upper surfaces of the appliance become
very hot during use.
• Ensure that the appliance stands with a safe and
secure positioning.
• If possible, place the appliance in the immediate
vicinity of an electrical power socket. Ensure
that the power plug is quickly reachable in case
of danger, and also that there is no danger of
tripping over the cable.
• To protect the non-stick coating, do not use
metallic tools such as knives, forks etc. Should
the non-stick coating become damaged, discontinue
use of the appliance.
• Do not use an external timing switch or a separate
remote control system to operate the appliance.
• Do not use charcoal or similar fuels to operate
the appliance!
• NEVER operate the appliance without water in
the catchment pan.
- 2 -
Page 5
Tips for safety:
• In cases of danger, immediately remove the electrical plug from the socket.
• Never use the appliance for purposes other than
those for which it was designed.
• Avoid heat accumulation. Do not lay aluminium
foil or other grilling utensils on the grill bars. An
accumulation of heat could destroy plastic parts
as well as the non-stick coating.
• Use the Table grill exclusively with the supplied
thermostat.
• Take the grill plate into use ONLY when it is lying
on the catchment pan.
• Detach the power plug and cable from the
appliance when it is not in use, when you detach
parts or before cleaning the appliance.
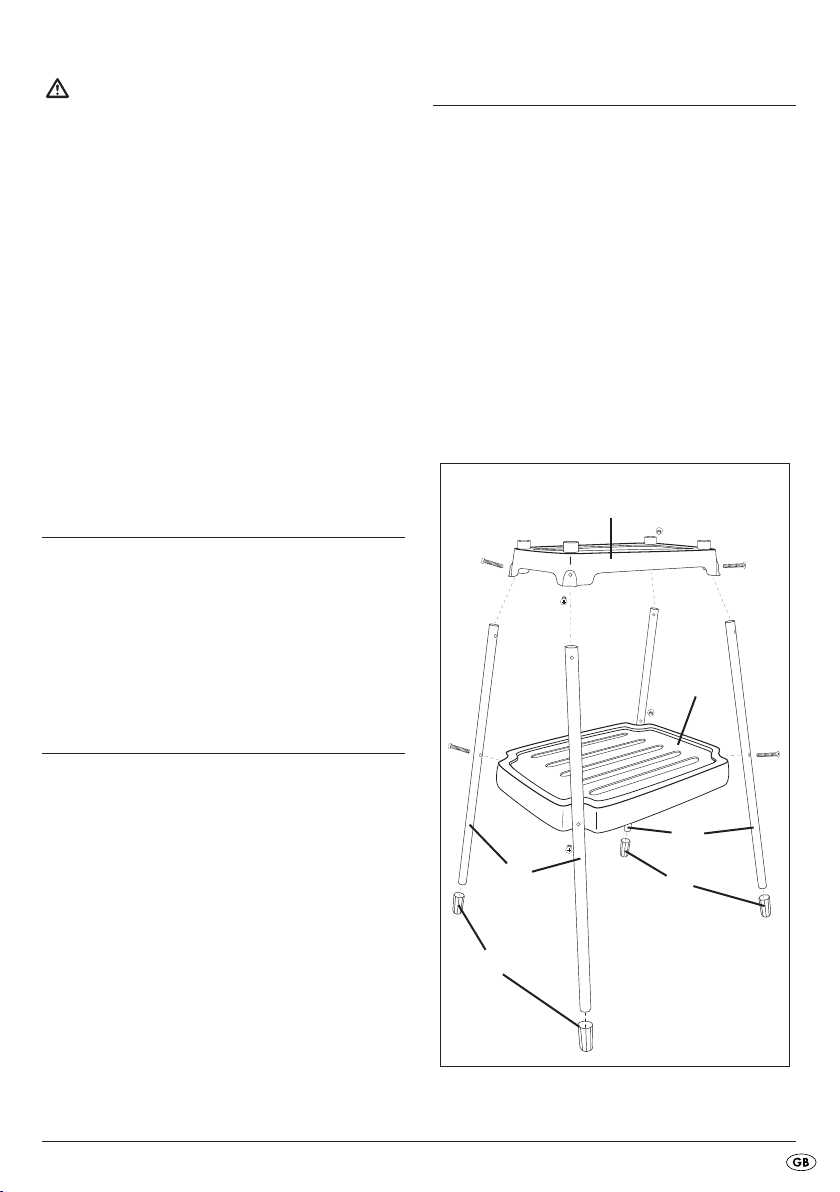
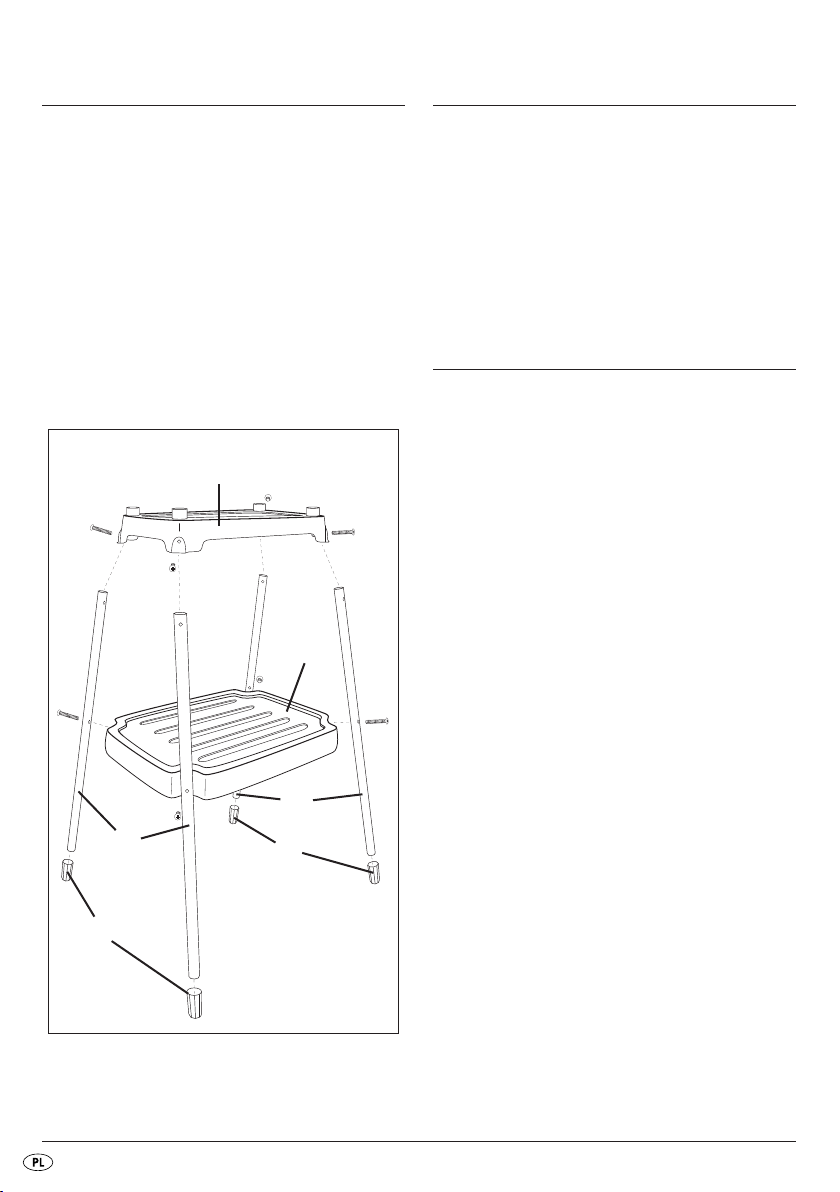
Assembly of the stand
1. Insert the leg pads on the ends of the legs
where there is not a pre-drilled hole.
2. Assemble the legs onto the storage plate .
Insert screws through the pre-bored holes and
secure them with nuts from the inner side of the
storage plate .
3. Place the top plate on the legs so that the
legs lie against the pre-bored holes of the top
plate from inside. The pre-bored holes in the
top plate as well as those in the legs must
lie opposite each other.
4. Insert screws through the holes and secure them
with the nuts.
Items supplied
Electric Grill
Splatter protection shield
Thermostat
Stand: Storage plate, top plate, 4 legs,
4 leg pads, 8 screws, 8 nuts
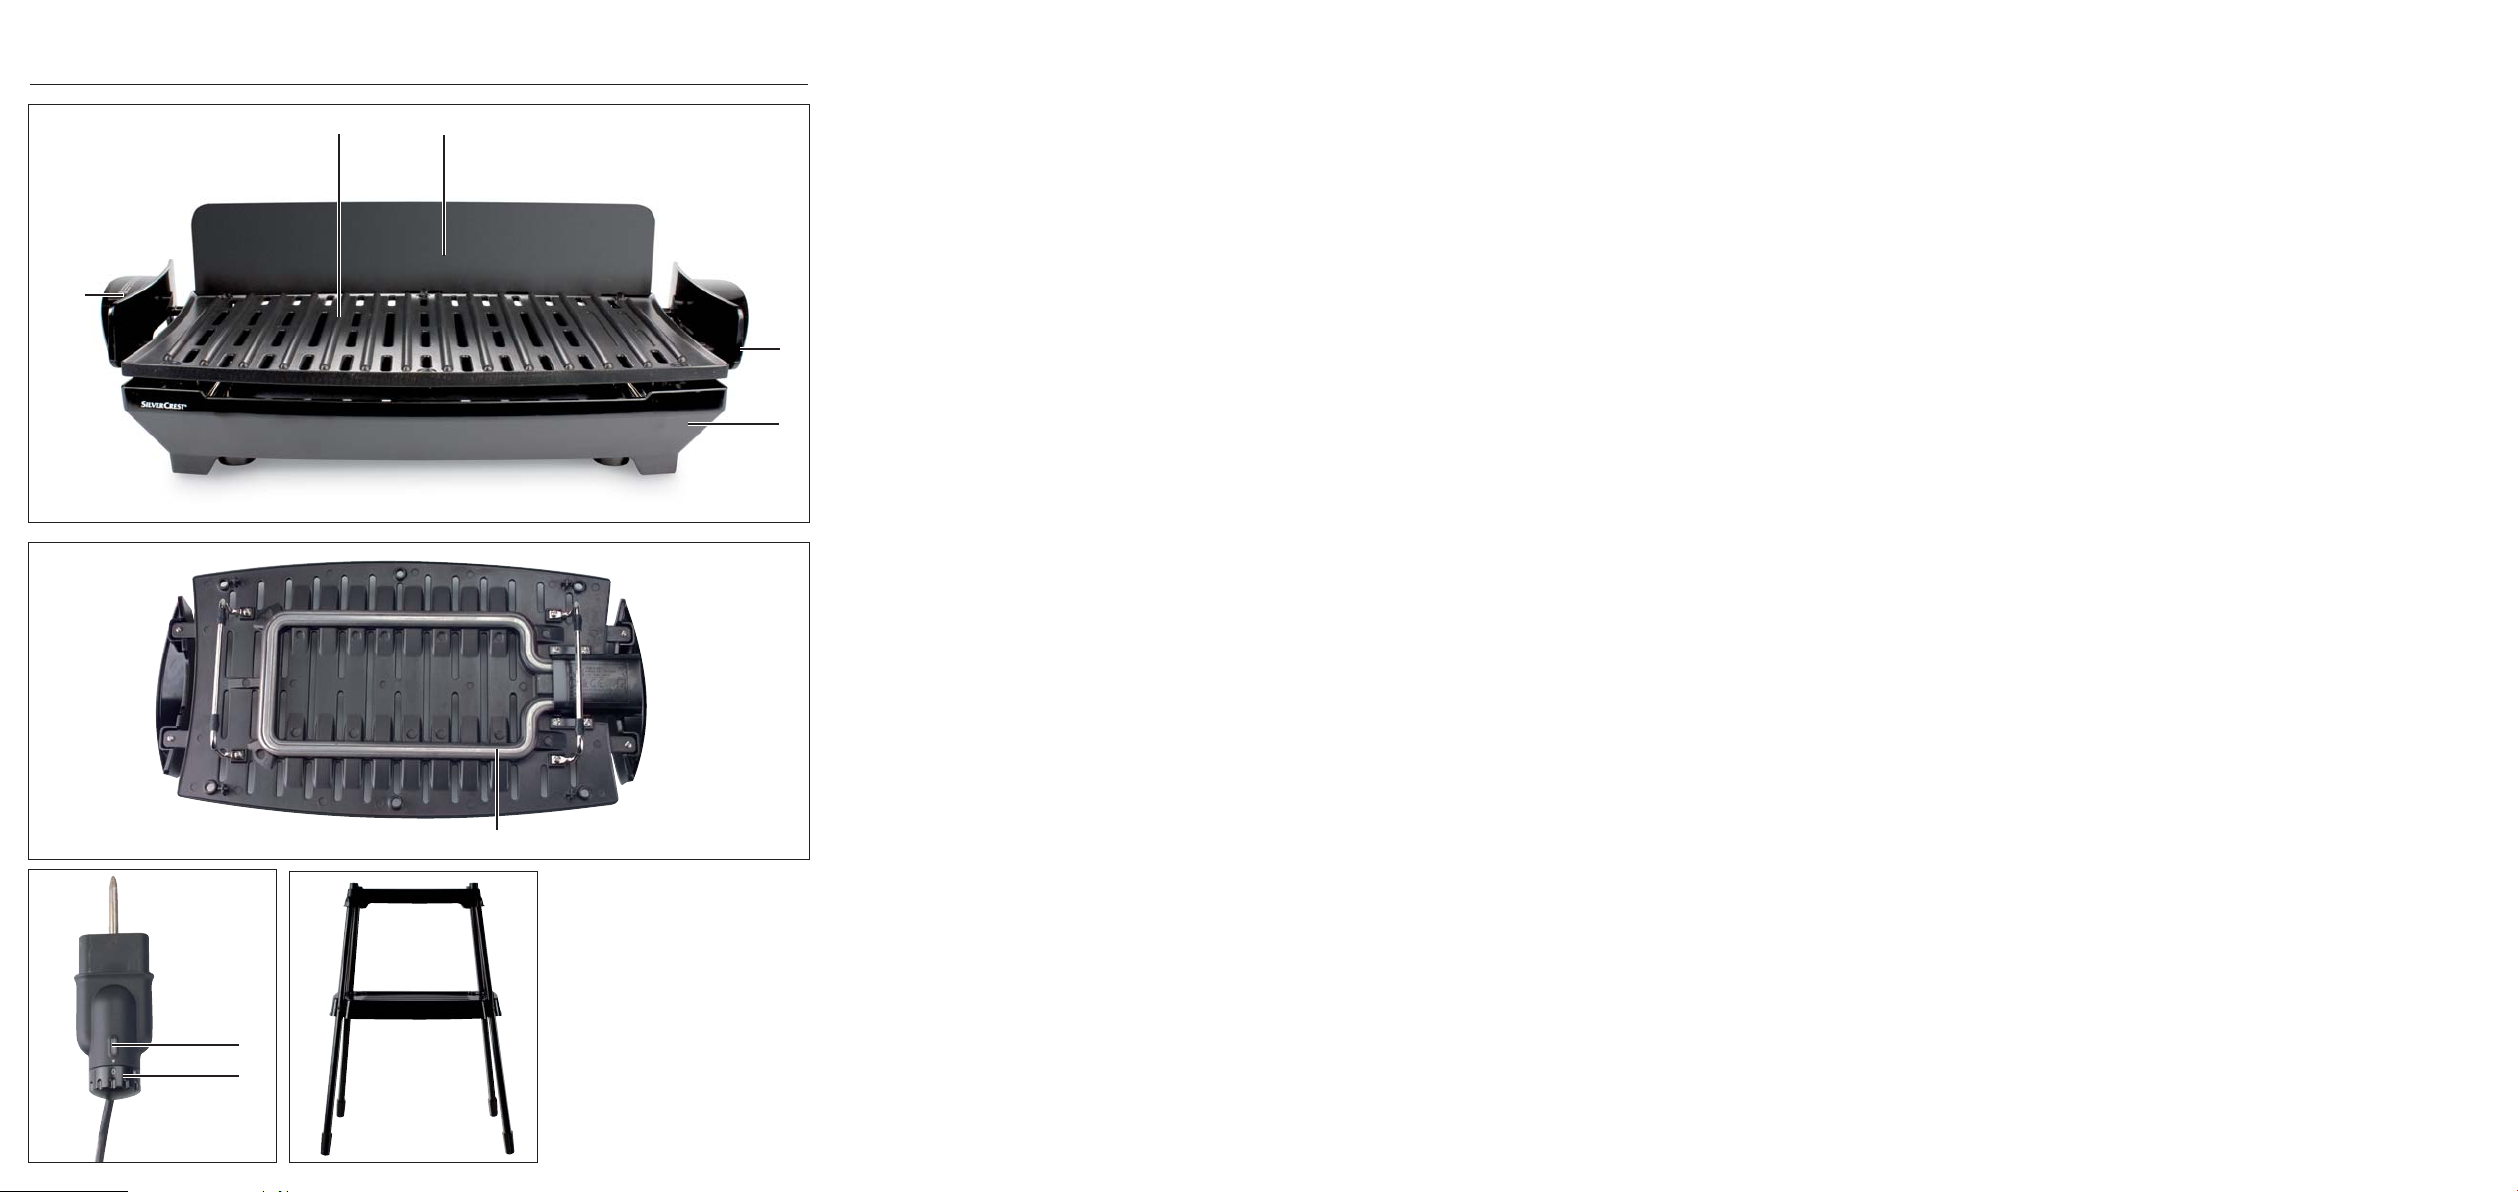
Operating Elements
Grill bars
q
Splatter protection shield
w
Connection for power cable with thermostat
e
Catchment pan
r
Heat-insulated handles
t
Heating element
y
Indicator lamp
u
Thermostat
i
- 3 -
Page 6
Taking it into use
Before taking the table grill into use for the first time
clean it as described in the chapter “Cleaning and
care”.
Usage / grilling may only take place with the catchment pan
The voltage of the power source must tally with the
details given on the rating plate of the appliance.
intended for the purpose.
r
Handling the grill
A good and even heat distribution is assured by the
integrated heating element
Cleaning is made easier by the non-stick coating,
which prevents the adhesion of grillables.
• Place the assembled stand on a level surface.
Bear in mind that there needs to be a mains power
socket in the close vicinity.
• Fill the catchment pan
with water (ca. 1.3 ltrs). You can thus prevent the
burning-on of fats falling from the grillables and
make the subsequent cleaning of the appliance
easier.
• Install the splatter protection shield
side (the later rear side) of the grill bars
should you be grilling greasy grillables. Additionally, it serves well as a windbreak. Insert the
three tenons of the splatter protection shield
into the holes provided on one side of the grill
bars
. To do this, the splatter protection shield
q
must be lightly flexed.
w
• Place the grill on the stand. The 4 mounting pegs
on the top plate of the stand must encroach into
the depressions on the underside of the grill.
The grill must sit firmly on the stand.
• Place the grill bars
such that they are firmly seated.
under the grill q.
y
up to the max. marking
r
on one
w
on the catchment pan r,
q
q
w
Notice
You can also use the grill without the stand:
Place the grill on an absolutely level and even surface. The surface must be insensitive to heat.
Otherwise, it could cause damage to the surface.
• Check to ensure that the grill bars
placed onto the catchment pan
• Insert the power cable with thermostat
the appliance such that the control lamp
facing upwards. Then insert the plug into a
mains power socket.
• Adjust the thermostat
setting. The grill starts to warm up and the indicator lamp
• As soon as the indicator lamp
grill has reached the adjusted temperature and
is ready for use.
u
to the desired temperature
i
glows.
are correctly
q
(see Fig. q).
r
goes out the
u
i
u
into
is
Notice
Subject to the ambient temperature, it can happen
that the control lamp
thermostat setting “M”.
• After a warm-up phase of approx. 15 minutes
the grill is ready for use.
Risk of injuries
When the grill has warmed up, take hold of it ONLY
with the heat-insulated handles
does not go out with the
u
.
t
Thermostat adjustments
Level 0 Grill switched off
Level 0 - 1 Grill switched on; low temperature
Level 1 - 3 Grill switched on; medium tem-
perature (e.g. vegetables)
Level 3 - M (Max) switched on; high temperature
(e.g. meats)
- 4 -
Page 7
Some tips
• Tender meat is best suited for grilling.
• Pieces of meat marinated overnight, from for
example the shoulder or neck, will be more tender.
• Avoid cutting grillables on the grilling area.
• Always use grilling tongs and not forks for turning
the grillables. This will ensure it stays succulent
on the inside and does not dry out.
• Due to its longer grilling time, avoid selecting
thick-cut grillables.
• When cooking beefburgers/meatballs on the
grill, ensure that they are not thicker than 2 cm.
We recommend that you grill the
beefburgers/meatballs for about 24 minutes at
level 3:
Turn the beefburgers/meatballs every 6 minutes
so that each side is cooked twice.
Notice
The times given may vary, depending on the composition of the grillables and personal taste!
Cleaning and care
Attention!
Before starting to clean it, remove the plug from the
power source and the thermostat
Risk of electrical shock!
Allow the appliance to cool down completely before cleaning it! Risk of Burns!
from the appliance.
i
• Remove coarse soiling with a moistened cloth.
• To protect the non-stick coating, do not use
metallic tools such as knives, forks etc. Should
the non -stick coating become damaged, discontinue use of the appliance.
• Only the grill bars
are suitable for cleaning in a dishwasher. Clean
the spatter protection shield
ter, then dry it off well afterwards. Clean the
stand with a moist cloth.
• The plug contacts on the grill bars
scrupulously dried after cleaning.
• The inside of the appliance must be completely
dry before it is taken back into use.
and the catchment pan
q
in hot soapy wa-
w
q
must be
Disposal
Do not dispose of the appliance in your
normal domestic waste. This appliance
is subject to the European Guidelines
2002/96/EC.
Dispose of the appliance through an approved
disposal centre or at your community waste facility.
Observe the currently applicable regulations. In
case of doubt, please contact your waste disposal
centre.
Dispose of all packaging materials in an
environmentally friendly manner.
r
Attention!
Take steps to ensure that neither the power cable
nor the plug come into contact with water or other
fluids. Wipe the themostat
cloth. Dry everything well, especially the plug contacts,
before the next usage. If you do not, there is the risk
of receiving an electric shock!
with a lightly moistened
i
- 5 -
Page 8
Warranty and Service
Importer
The warranty for this appliance is for 3 years from
the date of purchase. The appliance has been manufactured with care and meticulously examined before delivery. Please retain your receipt as proof of
purchase. In the event of a warranty claim, please
make contact by telephone with our Service Department. Only in this way can a post-free despatch for
your goods be assured.
The warranty covers only claims for material and
maufacturing defects, but not for transport damage,
for wearing parts or for damage to fragile components, e.g. buttons or batteries. This product is for
private use only and is not intended for commercial
use. The warranty is void in the case of abusive and
improper handling, use of force and internal tampering not carried out by our authorized service
branch. Your statutory rights are not restricted in
any way by this warranty.
The warranty period will not be extended by repairs
made under warranty. This applies also to replaced
and repaired parts. Any damage and defects extant
on purchase must be reported immediately after unpacking the appliance, at the latest, two days after
the purchase date. Repairs made after the expiration of the warranty period are subject to payment.
KOMPERNASS GMBH
BURGSTRASSE 21
44867 BOCHUM, GERMANY
www.kompernass.com
DES UK LTD
Tel.: 0871 5000 700
e-mail: support.uk@kompernass.com
Kompernass Service Ireland
Tel: 1850 930 412 (0,082 EUR/Min.)
Standard call rates apply. Mobile operators may vary.
e-mail: support.ie@kompernass.com
(£ 0.10 / minute)
- 6 -
Page 9

Spis treści Strona
Zastosowanie zgodnie z przeznaczeniem 8
Dane techniczne 8
Wskazówki bezpieczeństwa 8
Zakres dostawy 9
Elementy obsługowe 9
Montaż stojaka 10
Uruchomienie 10
Korzystanie z grilla 10
Ustawienia termostatu 11
Kilka porad 11
Czyszczenie i konserwacja 11
Usuwanie/wyrzucanie 12
Gwarancja i serwis 12
Importer 12
Niniejszą instrukcję należy zachować, aby móc także później z niej skorzystać, w przypadku
przekazywania urządzenia osobom trzecim należy przekazać także instrukcję!
- 7 -
Page 10
GRILL ELEKTRYCZNY
Zastosowanie zgodnie
z przeznaczeniem
Urządzenie jest przeznaczone do grillowania potraw
we wnętrzu pomieszczeń lub pod zadaszeniem na
zewnątrz. Urządzenie nie jest odporne na działanie
wilgoci ani deszczu. Należy używać wyłącznie
oryginalnych przystawek, takich jak opisane w instrukcji. Jakiekolwiek inne użycie lub zmiany urządzenia uważane są za niezgodne z przeznaczeniem i kryją w sobie poważne niebezpieczeństwo
wypadku.
Producent nie bierze na siebie żadnej odpowiedzialności w przypadku powstania szkody, wynikającej z użytkowania urządzenia w sposób całkowicie
niezgodny z przeznaczeniem. Urządzenie nie jest
przeznaczone do celów komercyjnych.
Dane techniczne
Napięcie sieciowe: 220 - 240 V~50 Hz
Moc znamionowa: 1600 W
Wskazówki bezpieczeństwa
Aby uniknąć zagrożenia życia przez
porażenie prądem elektrycznym:
• Naprawę uszkodzonej wtyczki lub kabla siecio-
wego zleć niezwłocznie wykwalifikowanemu
personelowi lub serwisowi klienta.
• Przed użyciem oraz po każdym czyszczeniu
sprawdź, czy styki w płycie grilla są suche.
• Chroń przewód zasilania przed dotykaniem o
gorące elementy urządzenia. Nigdy nie używaj
urządzenia w pobliżu otwartych płomieni, płyty
grzewczej lub piekarnika.
• Nie wystawiać urządzenia na działanie deszczu
oraz nie używać go w wilgotnym lub mokrym otoczeniu. Dopilnuj, aby przewód zasilania w trakcie
użytkowania urządzenia nie był mokry ani wilgotny.
W celu uniknięcia pożaru lub
obrażeń:
• Pracującego urządzenia nigdy nie należy
pozostawiać bez nadzoru.
• Nie stawiaj urządzenia pod szafkami lub
w pobliżu zasłon lub innych łatwopalnych
materiałów.
• To urządzenie nie jest przystosowane do użytkowania go przez osoby (w tym dzieci) o ograniczonej sprawności umysłowej, czuciowej lub umysłowej, bądź w przypadku niedostatecznego doświadczenia i / lub wiedzy, chyba że będą one
znajdowały się pod opieką odpowiedzialnej osoby
lub też uzyskają od opiekuna instrukcje, jak należy użytkować urządzenie.
• Nie można pozwolić dzieciom na zabawę
urządzeniem.
• Zagrożenie poparzeniem! Przed przystąpieniem do czyszczenia odczekaj do całkowitego
ostygnięcia.
• Zagrożenie poparzeniem! Urządzenie chwytaj
wyłącznie za przeznaczone do tego uchwyty,
które są zabezpieczone przed nagrzewaniem.
Powierzchnia urządzenia w czasie pracy
nagrzewa się do wysokiej temperatury.
• Należy dbać o prawidłowy stan techniczny
urządzenia.
• Postaw urządzenie jak najbliżej gniazdka sieciowego. Pamiętaj, by wtyczka była łatwo dostępna
w celu wyjęcia jej z gniazdka w przypadku
zagrożenia, a także by przewód zasilania nie
był przyczyną potknięcia.
• Chroń powłokę przeciwdziałającą przywieraniu
, unikając stosowania metalowych przedmiotów,
np. noży, widelców itp. W przypadku uszkodzenia powłoki przeciwdziałającej przywieraniu,
urządzenie nie powinno być więcej używane.
- 8 -
Page 11

• Do sterowania pracą urządzenia nie próbuj używać żadnych zewnętrznych zegarów sterujących
ani żadnego innego systemu zdalnego sterowania.
• Do nagrzania urządzenia nie próbuj używać
węgla ani żadnych innych podobnych paliw!
• Nigdy nie używaj urządzenie bez wcześniejszego nalania wody do wanienki spływowej.
Bezpieczeństwo zapewnią Państwo
sobie w następujący sposób:
• W wypadku zagrożenia natychmiast wyciągać
wtyczkę z gniazdka sieciowego.
• Używając urządzenia tylko zgodnie z jego
przeznaczeniem.
• Unikaj nadmiernego gromadzenia się ciepła.
Na ruszt do grillowania nie kładź folii aluminiowej
ani żadnych innych naczyń do grillowania.
Nadmierne gromadzenie się ciepła może
zniszczyć elementy plastikowe oraz powłoki
ochronne urządzenia.
• Grill stołowy można używać wyłącznie z dołączonym do niego termostatem.
• Włączaj płytę do grillowania tylko wtedy gdy
znajduje się ona na wanience spływowej.
• Gdy urządzenie nie jest używane, podczas
demontażu części i przed czyszczeniem należy
wyciągnąć wtyczkę sieciową oraz przewód zasilający urządzenia.
Zakres dostawy
Grill elektryczny
Osłona przeciwbryzgowa
Termostat
Stojak: półka, płyta górna, 4 nogi, 4 stopki, 8 śrub,
8 nakrętek
Elementy obsługowe
ruszt do grillowania
q
osłona przeciwbryzgowa
w
przyłącze przewodu zasilania z termostatem
e
wanienka spływowa
r
uchwyty zabezpieczone przed nagrzewaniem
t
grzałka
y
lampka kontrolna
u
termostat
i
- 9 -
Page 12
Montaż stojaka
Uruchomienie
1. Stopki wciśnij w nogi po stronie, gdzie nie
ma otworu.
2. Przymocuj nogi do półki . W tym celu
przełóż śruby przez nawiercone otwory i od
wewnątrz półki nakręć na śruby nakrętki.
3. Górną płytę załóż na nogi w taki sposób,
by nogi przylegały od wewnątrz do otworów
w płycie górnej . Otwory nawiercone w płycie
górnej , jak również w nogach muszą się
ze sobą zejść.
4. Przełóż śruby przez otwory i nakręć na śruby
nakrętki.
Przed pierwszym uruchomieniem grilla należy go
dokładnie wyczyścić, patrz rozdział „Czyszczenie
i konserwacja”.
Użytkowanie / grillowanie dozwolone wyłącznie
na przeznaczonej do tego wanience spływowej
Napięcie źródła prądu musi być zgodne z danymi
na tabliczce znamionowej urządzenia.
Korzystanie z grilla
Wbudowany w ruszcie qelement grzewczy
zapewnia równomierne rozprowadzanie ciepła.
Czyszczenie urządzenia jest łatwe dzięki powłoce
zabezpieczającej przed przywieraniem przyrządzanych potraw.
• Gotowy stojak po zmontowaniu ustaw na płaskiej
powierzchni. Pamiętaj o ustawieniu grilla w pobliżu gniazdka sieciowego.
• Wanienkę spływową
Max wodą (około 1,3 l). Dzięki temu spływający
tłuszcz z potraw nie będzie przypalał się do
powierzchni wanienki i możliwe będzie łatwe
wymycie urządzenia.
• Osłonę przeciwbryzgową
nej strony (będzie później tyłem grilla) do rusztu
grilla
, jeżeli będziesz chciał grillować tłuste
q
produkty. Dodatkowo służy ona jako ochrona
przed wiatrem. Wciśnij trzy kołki osłony przeciwbryzgowej
naczone do tego otwory. W tym celu trzeba lekko zgiąć osłonę przeciwbryzgową
• Ruszt
• Postaw grill na stojaku. 4 trzpienie ustalające
q
.
r
w płycie górnej stojaka muszą wejść pod spód
grilla. Grill musi stabilnie i mocno trzymać się
na stojaku.
z jednej strony rusztu qw przez-
w
połóż stabilnie na wanience spływowej
napełnij do zaznaczenia
r
przymocuj z jed-
w
w
y
.
r
.
- 10 -
Page 13

Wskazówka
Grill możesz używać również bez stojaka:
Postaw grill na idealnie płaskiej powierzchni.
Powierzchnia ta musi być odporna na wysokie temperatury. W przeciwnym razie może dojść do uszkodzenia powierzchni pod grillem.
• Sprawdź, czy ruszt
wo na wanience spływowej
• Przewód sieciowy z termostatem
urządzenia w taki sposób, by lampka kontrolna
była skierowana do góry. Następnie po-
u
dłącz wtyczkę do gniazdka sieciowego.
• Ustaw termostat
Grill zaczyna się nagrzewać i włącza się lampka
kontrolna
• Jeśli tylko lampka kontrolna
jest rozgrzany do odpowiedniej temperatury i
można przystąpić do przyrządzania potrawy.
u
.
jest umieszczony prawidło-
q
(patrz ilustracja q).
r
podłącz do
i
na wybraną temperaturę.
i
wyłączy się, grill
u
Wskazówka
W zależności od temperatury otoczenia może się
zdarzyć, że lampka kontrolna
ustawieniu termostatu “M”.
• Grill jest gotowy do pracy po około 15 minutach
nagrzewania.
nie zapali się przy
u
Kilka porad
• Miękkie mięso nadaje się lepiej do grillowania.
• Porcje mięsa, np. łopatka lub karkówka, pozostawione na noc w marynacie będą bardziej miękkie.
• Nigdy nie krój mięsa na powierzchni do grillowania.
• Do odwracania porcji mięsa używaj zawsze
szczypiec do grilla, nigdy widelca. Dzięki temu
mięso pozostanie soczyste w środku i będzie
wysychało.
• Staraj się wybierać zawsze cieńsze porcje mięsa aby grillowanie nie trwało zbyt długo.
• Frykadele/klopsiki z mięsa mielonego grillowane na grillu powinny mieć grubość co najmniej 2
cm.
Frykadele/klopsiki z mięsa mielonego należy
grillować przez około 24 minuty na 3 zakresie:
Co 6 minut frykadele/klopsiki z mięsa mielonego obracać tak, by każda strony była grillowana 2 razy.
Wskazówka
Podane czasy grillowania mogą się różnić w zależności od właściwości użytych produktów i indywidualnego gustu smakowego!
Zagrożenie odniesieniem obrażeń!
Rozgrzany grill chwytaj wyłącznie za przeznaczone
do tego uchwyty
waniem.
zabezpieczone przed nagrze-
t
Ustawienia termostatu
Zakres 0 grill wyłączony
Zakres 0 - 1 grill włączony; niska temperatura
Zakres 1 - 3 grill włączony; średnia temp.
(np. warzywa)
Zakres 3 - M (maks.) grill włączony; wysoka tempe-
ratura (np. mięso)
Czyszczenie i konserwacja
Uwaga!
Przed przystąpieniem do czyszczenia grilla wyjmij
wtyczkę z gniazdka oraz termostat
Zagrożenie porażeniem prądem elektrycznym!
Zanim przystąpisz do czyszczenia urządzenia
odczekaj aż ostygną gorące elementy! Niebezpieczeństwo poparzenia!
- 11 -
z urządzenia.
i
Page 14
Uwaga!
Uważaj, by nie zamoczyć przewodu zasilania ani
wtyczki. Termostat
wilgotnej szmatki. Przed następnym uruchomieniem
wysuszyć dokładnie wszystkie elementy, szczególnie
wtyki. W przeciwnym razie powstanie zagrożenie
porażenia prądem elektrycznym!
• Większe zanieczyszczenia usuń wilgotną szmatką.
• Chroń powłokę przeciwdziałającą przywieraniu,
unikając stosowania metalowych przedmiotów,
np. noży, widelców itp. W przypadku uszkodzenia
powłoki przeciwdziałającej przywieraniu, urządzenie nie powinno być więcej używane.
• Do mycia w zmywarce nadaje się tylko ruszt
i naczynie r. Osłonę przeciwbryzgową wwymyj gorącą wodą z płynem do mycia naczyń, a
następnie dokładnie wytrzyj do sucha. Stojak
czyść wilgotną szmatką.
• Styki rusztu
• Wnętrz urządzenia przed ponownym użyciem
musi najpierw dokładnie wyschnąć.
czyść wyłącznie za pomocą
i
po wymyciu dokładnie wysusz.
q
q
Usuwanie/wyrzucanie
W żadnym przypadku nie należy wyrzucać urządzenia do normalnych śmieci
domowych. W odniesieniu do produktu
ma zastosowanie dyrektywa europejska
2002/96/EC.
Urządzenie należy poddać utylizacji w akredytowanym zakładzie utylizacij lub komunalnym zakłladzie utylizacji odpadów.
Przestrzegaj aktualnie obowiązujących przepisów.
W razie pytań należy skontaktować się z komunalnym
zakładem utylizacji odpadów.
Wszystkie materiały wchodzące w skład
opakowania należy przekazać do odpowiednich punktów zbiórki odpadów.
Gwarancja i serwis
Urządzenie objęte jest dwuletnią gwarancją, licząc
od daty zakupu. Urządzenie zostało starannie wyprodukowane i poddane skrupulatnej kontroli przed
wysyłką. Paragon należy zachować jako dowód
dokonania zakupu. W przypadku roszczeń gwarancyjnych należy skontaktować się telefonicznie z
serwisem. Tylko w ten sposób można zagwarantować bezpłatną wysyłkę zakupionego produktu.
Gwarancja obejmuje wyłącznie wady materiałowe
i fabryczne, natomiast nie obejmuje szkód powstałych podczas transportu, części ulegających zużyciu ani uszkodzeń części łatwo łamliwych, np. wyłączników, akumulatorów. Produkt przeznaczony
jest wyłącznie do użytku domowego, a nie do zastosowań profesjonalnych.
Gwarancja traci ważność w przypadku niewłaściwego używania urządzenia, używania niezgodnego z przeznaczeniem, użycia siły lub ingerencji w
urządzenie dokonywanej poza naszymi autoryzowanymi punktami serwisowymi. Niniejsza gwarancja nie ogranicza ustawowych praw nabywcy urządzenia.
Okres gwarancji nie ulega wydłużeniu o czas trwania usługi gwarancyjnej. Dotyczy to również wymienionych i naprawionych części. Szkody i wady zauważone już w chwili zakupu należy zgłosić od razu
po rozpakowaniu, nie później niż po upływie
dwóch dni od daty zakupu. Po upływie okresu
gwarancyjnego wszystkie naprawy będą wykonywane płatnie.
Kompernass Service Polska
Tel.: 022 / 3972212
e-mail: support.pl@kompernass.com
Importer
KOMPERNASS GMBH
BURGSTRASSE 21
44867 BOCHUM, GERMANY
www.kompernass.com
- 12 -
Page 15

Tartalomjegyzék Oldalszám
Rendeltetésszerű használat 14
Technikai adatok 14
Biztonsági utasítás 14
Tartozékok 15
Kezelőelemek 15
Az állvány összeszerelése 15
Használatbavétel 16
A grill használata 16
A termosztát beállítása 16
Néhány tipp 16
Tiszítás és ápolás 17
Ártalmatlanítás 17
Garancia és szerviz 18
Gyártja 18
Őrizze meg ezt a leírást arra az esetre, ha később kérdése merülne fel. A készülék harmadik személynek
történő továbbadásakor adja tovább a leírást is!
- 13 -
Page 16

ELEKTROMOS GRILL
Rendeltetésszerű használat
A készülék ételek lakásban vagy kint tetővel fedett
helyen történő grillezésére való. Nem szabad, hogy
nedvességgel, mint például esővel érintkezzen.
Kizárólag eredeti tartozékokat, és azokat is csak
a leírtak szerint szabad használni. Minden másfajta
használat vagy változtatás nem rendeltetésszerűnek
minősül és balesetveszélyes.
A nem rendeltetésszerű használatból eredő károkért
a gyártó nem vállal felelősséget. Nem alkalmas
kereskedelmi használatra.
Technikai adatok
Hálózati feszültség: 220 - 240 V~50 Hz
Névleges teljesítmény: 1600W
Biztonsági utasítás
Életveszélyes áramütés elkerülése
érdekében:
• A veszélyek elkerülése érdekében a sérült hálózati
csatlakozót vagy vezetéket azonnal cseréltesse
ki engedélyeztetett szakemberrel vagy az ügyfélszolgálattal.
• A készülék üzembevétele és tisztítása előtt mindig
ellenőrizze, hogy a grillező lapon lévő csatlakozások szárazak-e.
• Vigyázzon, hogy a hálózati vezeték ne érjen
hozzá a készülék forró részeihez. Soha ne használja a készüléket nyílt tűz, tűzhely vagy fűtött
kályha közelében.
• Soha ne tegye ki esőnek a készüléket, és ne
használja nedves vagy vizes környezetben.
Ügyeljen arra, hogy a hálózati vezeték üzemelés
közben soha ne legyen vizes vagy nedves.
A tűzveszély és a sérülések elkerülése
érdekében:
• Soha ne hagyja felügyelet nélkül a készüléket
üzem közben.
• Ne helyezze a készüléket szekrények alá vagy
függönyök és hasonló könnyen gyúlékony vagy
éghető anyagok közelébe.
• A készülék nem alkalmas arra, hogy olyan személyek (ideértve a gyermekeket is) használják,
akik testi, érzékszervi vagy elmebeli képességeik
vagy tapasztalatuk és ismeretük hiánya megakadályoznának abban, hogy biztonságosan használják a készüléket, kivéve ha a biztonságukról
gondoskodó felügyelettel vannak, vagy ha előtte
felvilágosították őket a készülék használatáról.
• Vigyázni kell a gyermekekre, hogy ne játsszanak
a készülékkel.
• Égésveszély! Használat után hagyja jól lehűlni
a készüléket, mielőtt megtisztítaná.
• Égésveszély! Csak a hőszigetelt fogantyúkat
használja. A készülék felülete üzemelés közben
nagyon felforrósodhat.
• Biztosítsa a készülék stabil állóhelyzetét.
• Lehetőleg konnektor közelében állítsa fel a
készüléket. Gondoskodjon arról, hogy a hálózati
csatlakozó vészhelyzetben gyorsan elérhető
legyen és hogy a vezetékben le lehessen megbotlani.
• A tapadásmentes bevonat védelme érdekében
ne használjon olyan fémtárgyakat, mint pl. kést,
villát, stb. Ha megsérül a tapadásmentes bevonat,
ne használja tovább a készüléket.
• Ne használjon külső időkapcsoló órát vagy külön távirányító rendszert a készülék üzemeltetéséhez.
• Ne használjon szenet vagy más tüzelőanyagot
a készülék üzemeltetéséhez!
• Ne üzemeltesse a készüléket úgy, hogy nincsen
víz a felfogó tartályban.
Így cselekszik helyesen:
• Vészhelyzetben azonnal húzza ki a csatlakozót
a konnektorból.
• Soha ne használja a készüléket egyéb célokra.
- 14 -
Page 17

• Ne engedje felgyülemleni a hőt. Ne tegyen a
grill tetejére alufóliát vagy más grillező eszközt.
Ha nagy hő halmozódik fel, a műanyagrészek
valamint a bevonat tönkremehetnek.
• A asztali grillt kizárólag a csomagban található
termosztáttal együtt használja.
• Kérjük, csak akkor használja a grillsütőt, ha az
a felfogó tálcán van.
• Húzza ki a hálózati dugót, valamint a készülék
vezetékét, ha már nem használja a készüléket,
ha tartozékokat akar leszerelni róla, és tisztítás
előtt.
Tartozékok
elektromos grill
kispriccelő zsír ellen védő lemez
termosztát
Állvány: tároló lap, felső lap, 4 láb, 4 talpak,
8 csavar, 8 anyacsavar
Kezelőelemek
grillező rács
q
kispriccelő zsírt felfogó lemez
w
e hálózati vezeték csatlakozása termosztáttal
felfogó tálca
r
szigetelt fogantyú
t
fűtőrész
y
ellenőrző lámpa
u
termosztát
i
Az állvány összeszerelése
1. Dugja a talpakat a lábak azon oldalára,
ahol nincsen furat.
2. Szerelje fel a tároló lapra a lábakat .
Ehhez dugja át a csavarokat az előrefúrt lyukakon
és a csavarokat a tárolólap belsejéről fixálja
az anyákkal.
3. Helyezze a felső lapot a lábakra , hogy a
lábak belülről a felső lemezen lévő furatok
belsejébe nyúljanak. A felső lapon , valamint
a lábakan lévő előrefúrt lyukaknak egymás
felett kell elhelyezkednie.
4. Dugja át a csavarokat a lyukakon és rögzítse
őket az anyákkal.
- 15 -
Page 18

Használatbavétel
Az első használat előtt tisztítsa meg az asztali grillt
a “Tisztítás és ápolás” részben leírtak szerint.
A készüléket üzemeltetni/grillezni csak az erre
alkalmas felfogó tálcával
Az áramforrás feszültségének meg kell egyeznie
a készülék típuscímkéjén lévő adatokkal.
r lehet.
A grill használata
A jó és egyenletes hőeloszlást a grillrácsba
beépített fűtőelem ybiztosítja. A tapadásmentes
bevonat, mely megakadályozza az élelmiszer
leégését, a tisztítást is megkönnyíti.
• Helyezze a készre szerelt állványt sík felületre.
Gondoljon arra is, hogy elérhető közelben legyen
egy konnektor.
• Töltse fel a felfogó edényt
vízzel (kb. 1,3 l). Ezzel megakadályozhatja az
élelmiszerről lecsöpögő zsír ráégését és megkönnyíti a tisztítást is.
• A kispriccelő zsír ellen védő lemezt
egyik oldalára (ami később hátul lesz) tegye
q
fel, ha zsíros ételt grillez. Dugja be a kispriccelő
zsírt felfogó lemez
lap
q oldalán található erre kialakított lyukak-
ba. Ehhez enyhén el kell hajlítani a kispriccelő
zsírt felfogó lemezt
• Helyezze a grillrácsot
hogy megfelelően illeszkedjen
• Helyezze a grillt az állványra. Az állvány felső
lapján lévő 4 tartócsapnak a grill alján lévő
mélyedésbe kell nyúlnia. A grillnek fixen az állványon kell állnia.
w három pöckét a grillező-
w
a maximum jelölésig
r
.
q a felfogó tartályra,
r
q
w a grillrács
.
• Ellenőrizze, hogy a grillezőlemez qrendesen
rá van-e helyezve a felfogótálcára
Aábrát).
q
• Úgy dugja a vezetéket a termosztáttal
készülékbe, hogy az ellenőrző lámpa
mutasson. Ezután dugja a hálózati csatlakozót a
konnektorba.
• Állítsa be a termosztáton
A grill kezd felmelegedni és az ellenőrző lámpa
a kívánt hőmérsékletet.
i
(lásd az
r
u felfele
i a
u világítani kezd.
• Amint kialszik az ellenőrző lámpa
elérte a beállított hőmérsékletet és üzemkész
állapotban van.
u, a grill
Tudnivaló
A környezeti hőmérséklettől függően előfordulhat,
hogy az ellenőrzőlámpa
zatán nem alszik ki.
• A grill csak kb. 15 perces felmelegedési idő után
üzemkész.
Balesetveszély!
Ha a grill felmelegedett, csak a hőszigetelt fogantyúknál
t fogva szabad megfogni.
a termosztát “M” foko-
u
A termosztát beállítása
0 fokozat A grill ki van kapcsolva
0 - 1 fokozat A grill be van kapcsolva;
alacsony hőmérséklet
1 - 3 fokozat A grill be van kapcsolva; közepes
hőmérséklet (pl. zöldség)
3 - M fokozat (Max) A grill be van kapcsolva; magas
hőmérséklet (pl. hús)
Tudnivaló
A grillt álvány nélkül is lehet használni:
Helyezze a grillt egy teljesen egyenes felületre.
A felület ne legyen hőérzékeny, mert különben megsérülhet azon a helyen, ahol rátettük az állványt.
Néhány tipp
• Leginkább zsenge hús alkalmas grillezésre.
• Bepácolt és éjszakára a pácban állni hagyott
húsok, mint pl. lapocka vagy tarja puhábbak
lesznek.
- 16 -
Page 19

• Ne vágja a grillezett élelmiszert a grillezőlapon.
• A grillezett élelmiszer megfordításához mindig
grillezőfogót használjon és ne pedig villát. Így
belül zamatos marad és nem szárad ki.
• Grillezéshez ne válasszon ki vastag élelmiszereket,
mert hosszabb ideig tartana az elkészítésük.
• Ha a grillen grillezi a fasírtot/húsgolyót, ügyeljen arra, hogy legfeljebb 2 cm vastagok legyenek.
Azt ajánljuk, hogy a fasírtot/húsgolyót kb. 24
percig 3-as fokozaton grillezze:
6 perc elteltével fordítsa meg a fasírtot/húsgolyót, hogy mindkét oldalát kétszer grillezze.
Tudnivaló
A megadott időtartam függ a grillezendő élelmiszer
tulajdonságától és személyes ízlésünktől!
Tiszítás és ápolás
Figyelem!
Tisztítás előtt húzza ki a csatlakozót a dugaszoló
aljzatból, a termosztátot
Áramütés veszélye!
Tisztítás előtt hagyja lehűlni a készüléket! Megégetheti magát!
pedig a készülékből.
i
• Csak a grillrácsot q és a felfogóedényt r lehet
tisztítani mosogatógépben. A ráfröccsenéstől
védő lemezt
és a tisztítás után alaposan szárítsa meg. Az
állványt nedves ruhával tisztítsuk.
• A grillezőlapon
tisztítás után alaposan meg kell szárítani.
• A készülék belsejének a legközelebbi használat
előtt teljesen meg kell száradnia.
w forró szappanos vízben tisztítsa
q található csatlakozásokat
Ártalmatlanítás
Semmi esetre se dobja a készüléket a
háztartási hulladékba. A termékre az
2002/96/EC irányelv vonatkozik.
A készüléket engedélyeztetett hulladékgyűjtő helyen
vagy a helyi hulladékeltávolító üzemnél tudja kidobni.
Vegye figyelembe az aktuális előírásokat. Kétség
esetén vegye fel a kapcsolatot a hulladékfeldolgozó
vállalattal.
Valamennyi csomagolóanyagot juttasson el
a környezetbarát hulladékhasznosítóhoz.
Figyelem!
Ügyeljen arra, hogy a hálózati vezeték és a csatlakozó ne érintkezzen vízzel vagy más folyadékkal.
A termosztátot
le. Mindent szárítson meg, különösen az összedugható kapcsolatokat, mielőtt legközelebb használná
a készüléket. Máskülönben áramütés veszélye állhat
fenn!
• A szennyeződés nagyját nedves kendővel törölje le.
• A tapadásmentes bevonat védelme érdekében
ne használjon olyan fémtárgyakat, mint pl. kést,
villát, stb. Ha megsérül a tapadásmentes bevonat,
ne használja tovább a készüléket.
enyhén nedves kendővel törölje
i
- 17 -
Page 20

Garancia és szerviz
Gyártja
A készülékre 3 év garanciát adunk a vásárlás dátumától számítva. A készüléket gondosan gyártottuk,
és szállítás előtt lelkiismeretesen ellenőriztük. Kérjük,
a vásárlás igazolására őrizze meg a pénztári blokkot.
Kérjük, garanciaigény esetén vegye fel a kapcsolatot telefonon az Ön közelében lévő szervizzel.
Csak ebben az esetben garantálhatjuk, hogy ingyen tudja beküldeni az árut.
A garancia csak anyag- és gyártási hibára vonatkozik, nem pedig szállítási kárra, kopásra vagy törékeny részek (pl. kapcsoló vagy elem) sérülésére. A termék kizárólag magánhasználatra, nem üzleti
használatra készült.
A garancia érvényét veszti visszaélésszerű vagy
szakavatatlan kezelés, erőszak alkalmazása vagy
olyan beavatkozások esetén, amelyeket nem engedélyeztetett szervizelő üzleteink hajtottak végre. Az
ön törvényes jogait ez a garancia nem korlátozza.
A garanciaidő nem hosszabbodik a jótállással. Ez
a kicserélt vagy javított alkatrészekre is érvényes.
Az esetlegesen már a megvételkor meglévő károkat
és hiányosságokat azonnal kicsomagolás után, legkésőbb két nappal a vétel dátumától számítva jelezni kell. A garanciális idő lejárta után esedékes javítások térítéskötelesek.
KOMPERNASS GMBH
BURGSTRASSE 21
44867 BOCHUM, GERMANY
www.kompernass.com
Kompernass Service Hungary
Tel.: 06 40 104680
e-mail: support.hu@kompernass.com
- 18 -
Page 21

Kazalo vsebine Stran
Predvidena uporaba 20
Tehnični podatki 20
Varnostni napotki 20
Vsebina kompleta 21
Upravljalni elementi 21
Montaža stojala 21
Zagon 22
Rokovanje z žarom 22
Nastavitve termostata 22
Nekaj nasvetov 23
Čiščenje in nega 23
Odstranitev 23
Garancijski list 24
Proizvajalec 24
Ta navodila shranite za poznejša vprašanja – ob predaji naprave tretji osebi jih priložite zraven!
- 19 -
Page 22

ELEKTRIČNI ŽAR
Predvidena uporaba
Naprava je namenjena za peko živil na žaru v notranjih prostorih ali zunaj pod streho. Pri tem ne sme
priti v stik z vlago, kot na primer z dežjem. Uporabljati se sme izključno originalni pribor, kot je navedeno
spodaj. Vsakršna druga uporaba ali sprememba
naprave velja za nepredvideno in pomeni bistveno
nevarnost nezgod.
Proizvajalec ne prevzema nobene garancije za škodo,
nastalo zaradi nepredvidene oz. nenamenske uporabe. Naprava ni primerna za uporabo v obrti.
Tehnični podatki
Električna napetost: 220 - 240 V~50Hz
Nazivna moč: 1600 W
Varnostni napotki
Da se izognete smrtni nevarnosti
zaradi električnega udara:
• Poškodovane omrežne vtiče ali omrežne kable
naj vam takoj zamenja pooblaščeno strokovno
osebje ali servisna služba, da se izognete nevarnosti.
• Pred zagonom in po vsakem čiščenju naprave
preverite, ali so vtični kontakti na žarni plošči
suhi.
• Omrežno napeljavo zaščitite pred stiki z vročimi
deli naprave. Naprave nikoli ne uporabljajte
v bližini odprtega ognja, grelne plošče ali segrete
pečice.
• Naprave ne izpostavljajte dežju in je nikoli ne
uporabljajte v vlažni ali mokri okolici. Pazite na
to, da se omrežna napeljava med obratovanjem
nikoli ne omoči ali navlaži.
Da se izognete požaru in poškodbam:
• Naprave med obratovanjem nikoli ne pustite
nenadzorovane.
• Naprave ne postavite pod omare ali v bližino
zastorov ali drugih podobnih hitro vnetljivih
materialov in gorljive materiale hranite v ustrezni
oddaljenosti.
• Ta naprava ni namenjena temu, da jo uporabljajo
osebe (vključno z otroci) z omejenimi fizičnimi,
zaznavnimi ali duševnimi sposobnostmi ali s pomanjkljivimi izkušnjami in/ali znanjem, razen
pod nadzorom osebe, ki je zanje odgovorna ali
jim je dala navodila v zvezi z uporabo naprave.
• Otroke je treba nadzorovati, da se z napravo ne
bi igrali.
• Nevarnost opeklin! Po uporabi napravo pustite,
da se ohladi, preden jo začnete čistiti.
• Nevarnost opeklin! Prijemajte samo za toplotno
izolirane ročaje. Površine naprave se med obratovanjem zelo segrejejo.
• Poskrbite za varen položaj naprave.
• Napravo po možnosti postavite v bližini vtičnice.
Poskrbite za to, da je omrežni vtič v primeru nevarnosti hitro dosegljiv in omrežna napeljava ne
more povzročati spotikanja.
• Zaščitite oblogo proti sprijemanju in ne uporabljajte kovinskih orodij kot so noži, vilice itd. Če je
obloga proti sprijemanju poškodovana, naprave
ne uporabljajte več.
• Ne uporabljajte zunanje časovne stikalne ure ali
posebnega daljinskega sistema za upravljanje
naprave.
• Za peko v napravi ne uporabljajte oglja ali podobnih goriv!
• Naprave nikoli ne uporabljajte brez vode v
prestrezni kadi.
Tako ravnate varno:
• V primeru nevarnosti omrežni vtič takoj potegnite
iz vtičnice.
• Naprave nikoli ne uporabljajte v tuje namene.
- 20 -
Page 23

• Izogibajte se kopičenju toplote. Na rešetko žara
ne polagajte aluminijeve folije ali drugih delov
pribora za peko. Zaradi kopičenja toplote se
lahko poškodujejo deli iz umetne snovi ter obloge.
• Namizni žar uporabljajte izključno s priloženim
termostatom.
• Žarna plošča sme obratovati samo, če se nahaja
na prestrezni kadi.
• Omrežni vtič ter napeljavo odstranite z naprave,
ko naprave ne uporabljate, ko odstranjujete njene
dele in pred čiščenjem.
Vsebina kompleta
Električni žar
Zaščitni zaslon
Termostat
Stojalo: odlagalna plošča, zgornja plošča,
4 noge, 4 podstavki stojal, 8 vijakov, 8 matic
Upravljalni elementi
Rešetka žara
q
Zaščitni zaslon
w
Priključek za omrežno napeljavo s termostatom
e
Prestrezna kad
r
Toplotno izolirani ročaji
t
Grelni element
y
Kontrolna lučka
u
Termostat
i
Montaža stojala
1. Nataknite podstavke stojal na strani stojal ,
kjer ni nobene vrtine.
2. Montirajte noge na odlagalni plošči . V
ta namen vijake vtaknite skozi izvrtane luknje in
vijake pritrdite z maticami na notranji strani odlagalne plošče .
3. Namestite zgornjo ploščo na noge , tako
da se noge od znotraj prilegajo izvrtinam
v zgornji plošči . Izvrtane luknje v zgornji plošči
ter v nogah se morajo nahajati ena nad
drugo.
4. Vtaknite vijake skozi luknje in jih pritrdite z maticami.
- 21 -
Page 24

Zagon
Pred prvim zagonom namizni žar očistite, kot je
opisano v poglavju “Čiščenje in nega”.
Obratovanje / peka na žaru sme potekati samo
z uporabo zato predvidene prestrezne kadi
Napetost vira toka se mora ujemati z navedbami
na tipski tablici naprave.
r
.
Rokovanje z žarom
Dobro in enakomerno porazdelitev vročine zagotavlja grelni element
Čiščenje je lažje zaradi obloge proti sprijemanju,
ki preprečuje sprijemanje živil med peko.
• Montirano stojalo postavite na ravno površino.
Ne pozabite, da se mora v dosegu naprave
nahajati omrežna vtičnica.
• Napolnite prestrezno kad
1,3 l) do oznake Max. Tako preprečite, da bi se
maščoba, ki se cedi iz živila na rešetki, prismodila
na podlago, in olajšate čiščenje naprave po koncu
peke.
• Pri peki mastnih živil zaščitni zaslon
na eni strani (ki naj bo potem hrbtna stran) rešetke
žara
. Dodatno vam bo služil tudi kot zaščita
q
pred vetrom. Vse tri nastavke zaščitnega zaslona
vtaknite na eni strani rešetke žara qv zato
w
predvidene odprtine. Za to morate zaščitni zaslon
rahlo upogniti
w
• Položite rešetko žara
tako da se ji trdno prilega.
• Žar postavite na stojalo. 4 držalni nastavki na
zgornji plošči stojala se morajo zatakniti v vdolbine na spodnji strani žara. Žar se mora stojalu
trdno prilegati.
, integriran v rešetki žara q.
y
z vodo (okrog
r
namestite
w
na prestrezno kad r,
q
• Preverite, ali je rešetka žara qpravilno nameščena na prestrezno kad
• Vtaknite omrežno napeljavo s termostatom
napravo tako, da kontrolna lučka
gor. Potem omrežni vtič vtaknite v omrežno vtičnico.
• Na termostatu
Žar se začne segrevati in kontrolna lučka
zasveti.
• Kakor hitro kontrolna lučka
dosegel želeno temperaturo in je pripravljen za
obratovanje.
nastavite želeno temperaturo.
i
(glejte sl. q).
r
ugasne, je žar
u
kaže navz-
u
i
u
Opomba
Odvisno od temperature okolice se lahko zgodi, da
kontrolna lučka
ugasne.
• Žar je pripravljen za delovanje po poteku časa
segrevanja okrog 15 minut.
Nevarnost poškodb!
Če je žar segret, ga prijemajte samo za toplotno
izolirane ročaje
pri nastavitvi termostata “M” ne
u
.
t
Nastavitve termostata
Stopnja 0 žar je izklopljen
Stopnja 0 - 1 žar je vklopljen; nizka
temperatura
Stopnja 1 - 3 žar je vklopljen; srednja
temperatura (npr. zelenjava)
Stopnja 3 - M (Max) žar je vklopljen; visoka
temperatura (npr. meso)
v
Opomba
Žar lahko uporabljate tudi brez stojala:
Postavite ga na popolnoma ravno površino. Ta površina mora biti neodporna na vročino. Drugače lahko pride do poškodb mesta postavitve.
- 22 -
Page 25

Nekaj nasvetov
• Nežno meso je bolj primerno za peko na žaru.
• Kosi mesa, marinirani čez noč, kot npr. s stegna
ali vratu, postanejo tako mehkejši.
• Izogibajte se temu, da bi živilo za peko rezali
na površini za peko.
• Za obračanje živila med peko zmeraj uporabljajte prijemalo za žar in ne vilic. S tem bo živilo
v notranjosti ostalo sočno in se ne bo izsušilo.
• Izogibajte se debelim kosom živila za peko na
žaru, ker to potrebuje veliko časa, da se speče.
• Če na žaru želite speči polpete/mesne kroglice,
te naj ne bodo debelejše od 2 cm.
Priporočamo vam, da polpete/mesne kroglice
pečete okrog 24 minut na stopnji 3:
Polpete/mesne kroglice vsake 6 minut obrnite,
tako da vsako stran popečete dvakrat.
Opomba
Navedeni čas peke se lahko spremeni zaradi lastnosti živil za peko in pa osebnega okusa!
Čiščenje in nega
Pozor!
Pred čiščenjem omrežni vtič potegnite iz omrežne
vtičnice in termostat
Nevarnost električnega udara!
Pred čiščenjem napravo pustite, da se ohladi!
Nevarnost opeklin!
odstranite iz naprave.
i
• Grobo umazanijo odstranite z navlaženo krpo.
• Zaščitite oblogo proti sprijemanju in ne uporabljajte kovinskih orodij kot so noži, vilice itd. Če je
obloga proti sprijemanju poškodovana, naprave
ne uporabljajte več.
• Samo rešetka žara
primerni za čiščenje v pomivalnem stroju. Zaščitni zaslon
čiščenju temeljito obrišite. Stojalo čistite z vlažno
krpo.
• Vtične kontakte na rešetki žara
čiščenju temeljito obrisati.
• Notranjost naprave mora biti pred ponovno
uporabo v celoti posušena.
očistite v vroči milnici in ga po
w
in prestrezna kad rsta
q
je treba po
q
Odstranitev
Naprave nikakor ne odvrzite v običajne
hišne smeti. Ta proizvod je podvržen
evropski Direktivi 2002/96/EC.
Napravo oddajte pri podjetju, registriranem za predelavo odpadkov, ali pri svojem komunalnem podjetju za predelavo odpadkov.
Upoštevajte trenutno veljavne predpise. V primeru
dvoma se obrnite na svoje podjetje za predelavo
odpadkov.
Vse embalažne materiale oddajte v reciklažo.
Pozor!
Pazite na to, da omrežne napeljave ali vtiča ne
približate vodi ali drugim tekočinam. Termostat
obrišite le z rahlo vlažno krpo. Pred naslednjo uporabo vse dele, še posebej vtične kontakte, dobro
obrišite oz. posušite. Drugače obstaja nevarnost
električnega udara!
i
- 23 -
Page 26

Garancijski list
1. S tem garancijskim listom jamčimo Kompernass
GmbH, da bo izdelek v garancijskem roku ob
normalni in pravilni uporabi brezhibno deloval in
se zavezujemo, da bomo ob izpolnjenih spodaj
navedenih pogojih odpravili morebitne pomanjkljivosti in okvare zaradi napak v materialu ali izdelavi oz. po svoji presoji izdelek zamenjali ali
vrnili kupnino.
2. Garancijski rok za proizvod je 3 leta od dneva
nabave.
3. Kupec je dolžan okvaro javiti pooblaščenemu servisu oz. se informirati o nadaljnih postopkih na
zgoraj navedeni telefonski številki. Svetujemo vam,
da pred tem natančno preberete navodila o sestavi in uporabi izdelka.
4. Kupec je dolžan pooblaščenemu servisu predložiti garancijski list in račun, kot potrdilo in dokazilo
o nakupu.
5. V primeru, da proizvod popravlja nepooblaščeni
servis ali oseba, kupec ne more uveljavljati zahtevkov iz te garancije.
6. Vzroki za okvaro oz. nedelovanje izdelka morajo
biti lastnosti stvari same, in ne vzroki, ki so zunaj
proizvajalčeve oz. prodajalčeve sfere. Kupec ne
more uveljavljati zahtevkov iz te garancije, če se
ni držal priloženih navodil za sestavo in uporabo
izdelka ali, če je izdelek kakorkoli spremenjen ali
nepravilno vzdrževan.
Proizvajalec
KOMPERNASS GMBH
BURGSTRASSE 21
44867 BOCHUM, GERMANY
www.kompernass.com
7. Jamčimo servisiranje in rezervne dele za dobo, ki
je minimalno zahtevana s strani zakonodaje.
8. Obrabni deli oz. potrošni material so izvzeti iz
garancije.
9. Vsi potrebni podatki za uveljaljanje garancije
se nahajajo na dveh ločenih dokumentih
(garancijski list, račun).
Prodajalec:
Lidl d.o.o.k.d., Žeje pri Komendi 100,
SI-1218 Komenda
Birotehnika
Phone:+386 (0) 2 522 16 66
Fax: +386 (0) 2 531 17 40
e-mail: support.si@kompernass.com
- 24 -
Page 27

Obsah Strana
Účel použití 26
Technické údaje 26
Bezpečnostní pokyny 26
Rozsah dodávky 27
Ovládací prvky 27
Smontování stojanu 27
Zapnutí 28
Manipulace s grilem 28
Nastavení termostatu 28
Několik tipů 29
Čištění a údržba 29
Likvidace 29
Záruka a servis 30
Dovozce 30
Uschovejte tento návod pro případné pozdější dotazy a předejte jej v případě přenechání přístroje třetím
osobám zároveň s ním!
- 25 -
Page 28

ELEKTRICKÝ GRIL
Účel použití
Přístroj je určen pro grilování grilovací masy ve vnitřním
prostředí nebo v zastřešeném vnějším prostředí.
Nesmí se do něj dostat žádná vlhkost, jako je např.
déšť. Smí se používat pouze originální příslušenství
tak, jak je popsáno níže. Jakékoli jiné použití nebo
úprava přístroje jsou zakázány a představují závažné
nebezpečí poranění.
Za škody, které vzniknou při použití mimo vymezený
účel, neposkytuje výrobce záruku. Přístroj není určen
pro průmyslové použití.
Technické údaje
Jmenovité napětí: 220 - 240 V~50 Hz
Jmenovitý výkon: 1600 W
Bezpečnostní pokyny
Abyste zabránili nebezpečí ohrožení
života elektrickým proudem:
• Poškozené zástrčky nebo síťový kabel nechte ihned
vyměnit autorizovanými odborníky nebo zákaznickým servisem - vyhnete se tím nebezpečí.
• Před uvedením přístroje do chodu a po každém
čištění zkontrolujte, zda jsou konektory na grilovací
desce suché.
• Chraňte síťový kabel před kontaktem s horkými
díly přístroje. Nikdy přístroj nepoužívejte v blízkosti
otevřeného plamene, topné desky nebo horkých
kamen.
• Nevystavujte zařízení působení deště a rovněž
jej nikdy nepoužívejte ve vlhkém nebo mokrém
prostředí. Dbejte na to, aby síťový kabel během
provozu nebyl nikdy vlhký nebo mokrý.
Pro eliminaci nebezpečí požáru
a zranění:
• Zařízení během provozu nikdy nenechávejte
bez dozoru.
• Nestavte přístroj pod skříně nebo do blízkosti
závěsů nebo podobného snadno vznětlivého
materiálu a udržujte jej v bezpečné vzdálenosti
od hořlavých materiálů.
• Tento přístroj není určen k tomu, aby jej používaly
osoby (včetně dětí), které mají omezené fyzické,
senzorické nebo duševní schopnosti či nedostatek
zkušeností a/nebo znalostí, ledaže by jej používaly pod bezpečnostním dohledem zodpovědné
osoby nebo by od ní obdržely pokyny, jak přístroj používat.
• Děti by neměly být ponechány bez dozoru, aby
se zajistilo, že si nebudou s přístrojem hrát.
• Nebezpečí popálenin! Nechte přístroj po použití
dostatečně zchladnout, než se pustíte do čištění.
• Nebezpečí popálenin! Používejte jen tepelně
izolovaná držadla. Povrchy přístroje se během
provozu silně zahřívají.
• Dbejte na bezpečné umístění přístroje.
• Přístroj umísťujte pokud možno do blízkosti zásuvky.
Zajistěte, aby síťová zástrčka byla v případě nebezpečí rychle dosažitelná a aby nebylo možno
klopýtnout o síťový kabel.
• Chraňte protiadhezivní vrstvu tak, že nebudete
používat kovové nástroje jako nůž, vidličku
apod. Je-li protiadhezivní vrstva poškozená, přístroj dále nepoužívejte.
• Neoužívejte po provoz přístroje externí časovač
nebo separátní systém k dálkovému ovládání.
• Nepoužívejte pro provoz přístroje uhlí nebo podobné hořlaviny!
• Nikdy nepoužívejte přístroj bez vody v odkapávací nádobě.
Bezpečnostní pokyny:
• V případě nebezpečí okamžitě vytáhněte síťovou
zástrčku ze zásuvky.
• Zařízení nikdy nepoužívejte způsobem, který by
odporoval účelu použití.
- 26 -
Page 29

• Vyhněte se tepelnému vzdutí. Na grilovací rošt
nepokládejte alobal nebo jiné grilovací potřeby.
V důsledku tepelného vzdutí se mohou plastové
díly a vrstvy poškodit.
• Používejte stolní gril výhradně s termostatem,
který je součástí dodávky.
• Uvádějte grilovací desku do chodu jen tehdy,
spočívá-li na záchytné vaničce.
• Pokud zařízení nebudete používat, pokud budete
odnímat díly a před každým čištěním vytáhněte
zástrčku a přívodní kabel zařízení ze zástrčky.
Rozsah dodávky
Smontování stojanu
1. Zastrčte nohy podstavce na stranu podstavců
, kde není žádný otvor.
2. Nohy namontujte na odkládací desku .
Zastrčte šroubydo předvyvrtaných otvorů a zatáhněte je maticemi z vnitřní strany odkládací desky .
3. Položte horní desku na nohy tak, aby nohy
doléhaly zevnitř na vyvrtané otvory na horní
desce . Předem vyvrtané otvory na horní desce a na nohách , se musí překrývat.
4. Zastrčte šrouby do vyvrtaných otvorů a utáhněte
šrouby maticemi.
Elektrický gril
Ochranný štít proti stříkání
Termostat
Stojan: Odkládací deska, horní deska, 4 nohy,
4 nohy podstavce, 8 šroubů, 8 matic
Ovládací prvky
Grilovací rošt
q
Ochrana proti odstřikujícímu tuku
w
Přípojka pro síťový kabel s termostatem
e
Záchytná vanička
r
Tepelně izolovaná držadla
t
Topný prvek
y
Kontrolka
u
Termostat
i
- 27 -
Page 30

Zapnutí
Stolní gril před prvním použitím očistěte, jak je popsáno v kapitole “Čištění a údržba”.
Provoz / grilování je možné pouze s příslušnou
záchytnou vaničkou
Napětí zdroje musí souhlasit s údaji na typovém
štítku přístroje.
r
.
Manipulace s grilem
Dobré a rovnoměrné rozložení tepla je zajištěno
pomocí integrovaného topného tělesa
cím roštu
vrstvou, která zabraňuje přichycování grilovaných
potravin.
. Čištění je usnadněno protiadhezivní
q
v grilova-
y
Upozornění
Gril můžete používat i bez stojanu:
Postavte gril na absolutně rovnou plochu. Tato plocha
musí být odolná proti teplu. V opačném případě
může dojít k poškození plochy, na kter ou je gril
postaven.
• Zkontrolujte, zda je grilovací rošt
umístěn na záchytné vaničce
• Zastrčte napájecí kabel s termostatem
přístroje tak, aby kontrolní žárovka
nahoru. Poté zastrčte síťovou zástrčku do síťové
zásuvky.
• Na termostatu
Gril se začne zahřívat a kontrolka
• Jakmile kontrolka
teploty a je připraven k provozu.
nastavte požadovanou teplotu.
i
zhasne, dosáhl gril nastavené
u
q správně
r (viz obr.
i do
směřovala
u
se rozsvítí.
u
q
).
• Kompletně smontovaný gril postavte na rovnou
plochu. Myslete na to, že se v dosažitelné blízkosti musí nacházet síťová zásuvka.
• Do odkapávací nádoby
Max vodu (cca. 1,3 l). Zabráníte tak připékání
skapávajícího tuku z grilovaných potravin a usnadníte následné čištění přístroje.
• Namontujte ochranný štít proti odstřikování tuku
nalijte až po značku
r
w na jednu stranu (pozdějí zadní strana) grilo-
vacího roštu
obsahující tuk. Dodatečně slouží jako ochrana
proti větru. Strčte tři trny ochranného štítu
jedné straně grilovacího roštu
otvorů. Pro tento účel musíte ochranu proti odstřikujícímu tuku
• Položte grilovací rošt
q, pokud chcete grilovat potraviny,
w na
q do příslušných
lehce prohnout.
w
q na odkapávací nádobu
r tak, aby přiléhal napevno.
• Postavte gril na stojan. 4 přidržovací kolíky na
horní desce stojanu musí zapadat do prohloubenin
na spodní desce grilu. Gril musí na stojan pevně
doléhat.
Upozornění
V závislosti na teplotě okolí se může stát, že nezhasne
kontrolka
• Po vyhřívací fázi cca. 15 minutách je gril připraven
k provozu.
Nebezpečí zranění
Jakmile je gril zahřátý, dotýkejte se jej jen za tepelně
izolovaná držadla
při nastavení termostatu do polohy “M”.
u
!
t.
Nastavení termostatu
Stupeň 0 Gril vypnut
Stupeň 0 - 1 Gril zapnut; nízká teplota
Stupeň 1 - 3 Gril zapnut; střední teplota
(např. zelenina)
Stupeň 3 - M (max.)Gril zapnut; vysoká teplota
(např. maso)
- 28 -
Page 31

Několik tipů
• Jemné maso se hodí ke grilování lépe.
• Kousky masa naložené přes noc, jako např.
z plecka nebo krkovičky se zjemní.
• Potraviny ke grilování neřežte na grilovací ploše.
• K obracení potravin používejte vždy grilovací
kleště a ne vidličky. Tím zůstanou šťavnaté a
nevyschnou.
• Nevybírejte kvůli delší době grilování tlustší kousky.
• Chcete-li na grilu grilovat hamburgery/malé karbanátky, dbejte na to, aby tyto nebyly tlustší než 2
cm.
Doporučujeme hamburgery/malé karbanátky grilovat na grilu cca. 24 minut na stupni 3:
Každých 6 minut hamburgery/malé karbanátky
vždy obraťte, aby každá strana byla grilovaná 2
krát.
• Hrubou nečistotu odstraňte navlhčeným
hadříkem.
• Chraňte protiadhezivní vrstvu tak, že nebudete
používat kovové nástroje jako nůž, vidličku
apod. Je-li protiadhezivní vrstva poškozená, přístroj dále nepoužívejte.
• Pouze rošt grilu
vhodné pro mytí v myčce na nádobí. Vyčistěte ochranný plech proti postříkání
vodou a osušte jej po omytí řádně do sucha. Otřete
stojan vlhkým hadříkem.
• Konektory na grilovacím roštu
musí nechat řádně oschnout.
• Vnitřek přístroje musí být před opětovným použitím
zcela suchý.
q a zachytávací vana r jsou
w horkou mýdlovou
q se po vyčištění
Likvidace
Upozornění
Uvedené grilovací doby se mpohou lišit v závislosti od
vlastnostech grilovaných potravin a osobní chuti!
Čištění a údržba
Pozor!
Před čištěním vytáhněte síťovou zástrčku ze zásuvky
a termostat
kým proudem!
Před čištěním nechte přístroj vychladnout! Nebezpečí popálení!
Pozor!
Vyhněte se kontaktu kabelu nebo zástrčky s vodou
nebo jinými kapalinami. Termostat
navlhčeným hadříkem. Před dalším používáním
vše dobře osušte, zejména konektory. V opačném
případě hrozí nebezpečí zasažení elektrickým proudem!
z přístroje. Nebezpečí úrazu elektrik-
i
otřete lehce
i
V žádném případě nevyhazujte přístroj
do běžného domovního odpadu. Tento
výrobek podléhá evropské směrnici
2002/96/EC.
Přístroj předejte k likvidaci odborné firmě či jej odevzdejte ve Vašem místním recyklačním zařízení.
Dodržujte aktuálně platné předpisy. V případě
pochyb se poraďte s recyklační firmou.
Také všechny obalové materiály zlikvidujte
v souladu s ekologickými předpisy.
- 29 -
Page 32

Záruka a servis
Dovozce
Na tento přístroj platí tříletá záruka od data zakoupení. Přístroj byl vyroben s nejvyšší pečlivostí a před
odesláním prošel výstupní kontrolou. Uschovejte si,
prosím, pokladní
lístek jako doklad o nákupu. V případě uplatňování
záruky kontaktujte telefonicky
Vaší servisní službu. Pouze tak může být zajištěno
bezplatné zaslání Vašeho zboží.
Záruka se vztahuje pouze na chyby materiálu nebo
výrobní závady, ale ne na škody,vzniklé při přepravě, ne na součásti, podléhající rychlému opotřebení
nebo na poškození křehkých dílů, jako jsou např.
spínače nebo akumulátory. Výrobek je určen pouze
pro privátní použití, ne průmyslové.
Při nesprávném a neodborném využívání, při použití
násilí a při zásazích, které nebyly provedeny našimi
autorizovanými servisními provozovnami, záruční
nároky zanikají.
Vaše práva vyplývající ze zákona touto zárukou
nejsou omezena.
Záruční doba se zárukou neprodlouží. Toto platí
také pro náhradní díly a opravené součásti. Případné škody a vady, existující už při koupi, se musí hlásit ihned po vybalení, nejpozději však
do dvou dnů od data nákupu. Po uplynutí záruční
doby se provedené opravy musí zaplatit.
KOMPERNASS GMBH
BURGSTRASSE 21
44867 BOCHUM, GERMANY
www.kompernass.com
Ing. Martin Šimák, zprostředkovatel
servisu výrobků Kompernass
Hotline: 800 400 235
Fax: 271 722 939
e-mail: support.cz@kompernass.com
- 30 -
Page 33

Obsah Strana
Používanie v súlade s určením 32
Technické údaje 32
Bezpečnostné pokyny 32
Obsah dodávky 33
Súčasti 33
Montáž stojana 33
Uvedenie do prevádzky 34
Používanie grilu 34
Nastavenie termostatu 34
Zopár tipov 34
Čistenie a údržba 35
Likvidácia 35
Záruka a servis 36
Dovozca 36
Uschovajte si tento návod na použitie v budúcnosti – a pri odovzdávaní prístroja tretej osobe odovzdajte aj
návod!
- 31 -
Page 34

ELEKTRICKÝ GRIL
Používanie v súlade s určením
• Nevystavujte prístroj dažďu a nikdy ho nepoužívajte vo vlhkom alebo mokrom prostredí. Dbajte
na to, aby sieťová šnúra počas prevádzky nikdy
nenamokla ani nezvlhla.
Tento prístroj je určený na grilovanie jedál v interiéroch a zakrytých vonkajších priestoroch. Nesmie
sa dostať do styku s vlhkosťou, akou je napríklad
dážď. Používajte výlučne originálne príslušenstvo
a spôsobom, aký je tu opísaný. Akýkoľvek iný spôsob
používania alebo prebudovanie sa považuje za
nezodpovedajúce určeniu a je skrytým zdrojom
nebezpečenstva úrazu.
Za škody vzniknuté používaním, ktoré je v rozpore
s deklarovaným účelom, nepreberá výrobca žiadnu
záruku. Tento gril nie je určený na komerčné používanie.
Technické údaje
Sieťové napätie: 220 - 240 V~50 Hz
Menovitý výkon: 1600 W
Bezpečnostné pokyny
Aby ste zabránili poraneniu v dôsledku
úrazu elektrickým prúdom:
• Poškodenú sieťovú šnúru alebo zástrčku nechajte
ihneď vymeniť oprávnenému odborníkovi alebo
v zákazníckom servise, aby ste sa vyhli ohrozeniu
zdravia.
• Pred uvedením do prevádzky a po každom čistení
prístroja skontrolujte, či sú kontakty na grilovacej
doske suché.
• Chráňte sieťovú šnúru pred stykom s horúcimi
časťami grilu. Nikdy nepoužívajte prístroj
v blízkosti otvoreného ohňa, varnej dosky alebo
rozpálenej rúry.
Aby ste zabránili vzniku požiaru alebo
poraneniam:
• Nikdy nenechávajte prístroj počas prevádzky
bez dozoru.
• Nikdy neklaďte prístroj pod skrine alebo do
blízkosti závesov alebo iných ľahko zápalných
materiálov a udržiavajte horľavé materiály zodpovedajúco vzdialené.
• Tento prístroj nie je určený na to, aby ho používali
osoby (vrátane detí) s obmedzenými fyzickými,
zmyslovými alebo duševnými schopnosťami, alebo
s nedostatkom skúseností alebo nedostatkom
znalostí, len za predpokladu, že budú pod
dohľadom osoby zodpovednej za ich bezpečnosť
alebo od nej dostanú pokyny, ako sa má prístroj
používať.
• Na deti treba dohliadať, aby sa zabezpečilo, že
sa nebudú hrať s prístrojom.
• Nebezpečenstvo popálenia! Nechajte prístroj
po použití dobre vychladnúť než ho budete čis-tiť.
• Nebezpečenstvo popálenia! Používajte len
tepelne izolované rukoväte. Povrch prístroja je
počas prevádzky veľmi horúci.
• Postarajte sa o bezpečné umiestnenie prístroja.
• Umiestnite prístroj podľa možnosti v blízkosti zásuvky. Zabezpečte, aby bola zástrčka v prípade
nebezpečenstva ľahko a rýchlo dostupná a aby
sa nedalo potknúť o napnutú sieťovú šnúru.
• Chráňte nepriľnavú vrstvu, preto nepoužívajte
žiadne kovové nástroje, ako sú nože alebo vidličky.
Keď sa nepriľnavá vrstva poškodí, nepoužívajte
prístroj ďalej.
• Na ovládanie zariadenia nepoužívajte žiadne
externé spínacie hodiny ani samostatný systém
diaľkového ovládania.
• Na prevádzku zariadenia nepoužívajte žiadne
uhlie ank podobné palivá!
• Nikdy nepoužívajte prístroj bez vody v záchytnej
vani.
- 32 -
Page 35

Zaistenie bezpečného používanie:
• Vytiahnite pri nebezpečenstve ihneď zástrčku zo
sieťovej zásuvky.
• Nikdy nepoužívajte prístroj v rozpore s deklarovaným účelom.
• Zabráňte prehriatiu. Neklaďte hliníkovú fóliu ani
iné grilovacie pomôcky na grilovací rošt. Prehriatím
sa môžu umelohmotné súčasti a povlaky zničiť.
• Používajte stolný gril výlučne s dodaným termostatom.
• Grilovaciu dosku používajte na grilovanie len
vtedy, keď je položená na záchytnej vani.
• Zástrčku a prívodnú šnúru vytiahnite z prístroja
vždy, keď sa prístroj nepoužíva, keď demontujete
jednotlivé časti alebo keď ho idete čistiť.
Obsah dodávky
Elektrický gril
Štít na ochranu pred vystrekovaním
Termostat
Stojan: odkladacia doska, horná doska, 4 nohy
stojana, 4 oporné nástavce nôh stojana,8 skrutiek,
8 matíc
Montáž stojana
1. Nasuňte oporné nástavce nôh stojana na
boky nôh stojana , kde nie sú vyvŕtané otvory.
2. Namontujte nohy stojana na odkladaciu
dosku . Prevlečte skrutky cez vyvŕtané otvory
a zaistite ich maticami z vnútornej strany odkladacej dosky .
3. Nasaďte hornú dosku na nohy stojana
tak, aby nohy stojana dosadali na vnútornú
stranu predvŕtaných otvorov v hornej doske .
Predvŕtané otvory v hornej doske a v nohách
stojana musia k sebe pasovať.
4. Prevlečte skrutky cez otvory a zaistite ich maticami.
Súčasti
Grilovací rošt
q
Štít na ochranu pred vystrekovaním
w
Prípoj pre sieťovú šnúru s termostatom
e
Záchytná vaňa
r
Tepelne izolované rukoväte
t
Vyhrievacia špirála
y
Kontrolka
u
Termostat
i
- 33 -
Page 36

Uvedenie do prevádzky
Pred prvým uvedením do prevádzky vyčistite stolný
gril podľa opisu v kapitole „Čistenie a údržba”.
Spustenie a grilovanie sa smie urobiť len s na to
určenou záchytnou vaňou
Sieťové napätie musí zodpovedať údajom na typovom
štítku prístroja.
r
.
Používanie grilu
• Skontrolujte, či je grilovací rošt qsprávne nasadený na záchytnej vani
• Zasuňte sieťovú šnúru s termostatom
prístroja tak, aby bolo kontrolné svetlo
né nahor. Potom zasuňte sieťovú zástrčku do
zásuvky.
• Na termostate
Gril sa začne zohrievať a kontrolné svetlo
rozsvieti.
• Len čo kontrolné svetlo
nastavenú teplotu a je pripravený na grilovanie.
nastavte požadovanú teplotu.
i
(pozri obr. q).
r
i
zhasne, gril dosiahol
u
u
do
otoče-
sa
u
Dobré a rovnomerné rozdelenie tepla je zabezpečené vyhrievacím prvkom
vacom rošte
vrstvou, ktorá zabraňuje pripečeniu grilovaných
potravín.
• Postavte zmontovaný stojan na rovný podklad.
Myslite na to, že v blízkosti grilu musí byť k dispozícii elektrická zásuvka.
• Naplňte záchytnú vaňu
Max (asi 1,3 l). Tým zabránite zapáleniu tuku odkvapkávajúceho z grilovaného pokrmu a uľahčíte
si následné čistenie prístroja.
• Ak budete grilovať jedlá obsahujúce veľa tuku,
dajte štít na ochranu pred vystrekovaním
jednu stranu (neskoršiu zadnú stranu) grilovacieho roštu
pred vetrom. Zasuňte tri výčnelky ochranného štítu
w
ne roštu
ne ohnúť.
• Postavte gril na stojan. Štyri prídržné kolíky
na hornej doske stojana musia zasahovať do
priehlbní na spodnej strane grilu. Gril musí
pevne sedieť na stojane.
. Čistenie je uľahčené nepriľnavou
q
. Štít slúži okrem toho aj na ochranu
q
do otvorov pre ne určených na jednej stra-
. Na to musíte ochranný štít wmier-
q
integrovaným v grilo-
y
vodou až po značku
r
w
na
Upozornenie
Gril môžete používať aj bez stojana:
Postavte gril na úplne rovnú plochu. Táto plocha
musí byť odolná voči horúčave. Inak by mohlo
dôjsť k poškodeniu tejto plochy.
Upozornenie
V závislosti od teploty okolia sa môže stať, že kontrolné
svetlo
„M“.
• Gril je pripravený na prevádzku po nahrievaní,
Keď je gril zohriaty, chytajte ho len za tepelne izolované rukoväte
nezhasne, ak je termostat nastavený na
u
ktoré trvá asi 15 minút.
Nebezpečenstvo poranenia!
.
t
Nastavenie termostatu
Stupeň 0 Gril je vypnutý
Stupeň 0 - 1 Gril je zapnutý, nízka teplota
Stupeň 1 - 3 Gril je zapnutý, stredná teplota
(napr. zelenina)
Stupeň 3 - M (max) Gril je zapnutý; vysoká teplota
(napr. mäso)
Zopár tipov
• Na grilovanie sa lepšie hodí jemné mäso.
• Cez noc marinované kúsky mäsa, napr. z pliecka
alebo z krku, zjemnejú.
• Vyhnite sa krájaniu grilovaného pokrmu na grilovacej ploche.
- 34 -
Page 37

• Na otáčanie grilovaného mäsa používajte vždy
grilovacie kliešte a nikdy vidličky. Tým zostane
zvnútra šťavnaté a nevyschne.
• Vyhnite sa grilovaniu hrubého mäsa kvôli dlhej
dobe grilovania.
• Keď na tomto grile grilujete frikadely alebo
guľôčky z mletého mäsa, dávajte pozor, aby neboli hrubšie než 2 cm.
Frikadely alebo guľôčky z mletého mäsa odporúčame grilovať asi 24 minút na stupni 3:
Po každých 6 minútach ich otočte, aby sa každá strana grilovala 2 razy.
• Len grilovací rošt qa záchytná vaňa rsú
vhodné na čistenie v umývačke riadu. Štít na
ochranu pred prskaním tuku
cej mydlovej vode a po umytí ho poriadne
vysušte. Stojan čistite navlhčenou utierkou.
• Zásuvné kontakty na grilovacom rošte
po čistení dôkladne vysušiť.
• Vnútrajšok prístroja musí byť pred ďalším použitím
úplne suchý.
vyčistite v horú-
w
q
treba
Likvidácia
Upozornenie
Uvedené doby sa môžu podľa vlastností grilovaných potravín a osobnej chuti meniť!
Čistenie a údržba
Pozor!
Pred čistením vytiahnite sieťovú zástrčku zo zásuvky
a termostat
elektrickým prúdom!
Pred čistením nechajte prístroj vychladnúť! Nebezpečenstvo popálenia!
Pozor!
Dajte pozor na to, aby sa sieťová šnúra ani zástrčka
nedostali do styku s vodou alebo inými tekutinami.
Termostat
Pred ďalším používaním poriadne vysušte všetko,
hlavne zásuvné kontakty. Inak hrozí nebezpečenstvo
úrazu elektrickým prúdom!
• Odstráňte hrubú nečistotu navlhčenou utierkou.
• Chráňte nepriľnavú vrstvu, preto nepoužívajte
žiadne kovové nástroje, ako sú nože alebo vidličky.
Keď sa nepriľnavá vrstva poškodí, prestaňte
prístroj používať.
z prístroja. Nebezpečenstvo úrazu
i
utierajte len mierne navlhčenou utierkou.
i
Prístroj v žiadnom prípade nevyhadzujte
do normálneho domového odpadu.
Tento výrobok podlieha európskej
smernici 2002/96/EC.
Zlikvidujte prístroj v príslušnom zariadení (firme) na
likvidáciu odpadu.
Dodržte pritom aktuálne platné predpisy. V prípade
pochybností sa spojte so zariadením na likvidáciu
odpadu.
Všetok baliaci materiál zlikvidujte ekologikkým spôsobom.
- 35 -
Page 38

Záruka a servis
Dovozca
Na tento prístroj máte trojročnú záruku od dátumu
nákupu. Prístroj bol starostlivo vyrobený a pred expedíciou dôkladne vyskúšaný. Uschovajte si, prosím, účtenku ako dôkaz o nákupe. V prípade uplatňovania záruky sa spojte s opravovňou telefonicky.
Len tak sa dá zabezpečiť bezplatné zaslanie tovaru.
Záruka platí len na chyby materiálu a výroby, nie
na poškodenia spôsobené prepravou, opotrebením
ani na poškodenia krehkých častí, ako sú spínače
alebo akumulátory.
Výrobok je určený výlučne na súkromné používanie
a nie na komerčné účely.
Záruka prestáva platiť pri zaobchádzaní nezodpovedajúcom účelu, pri neprimeranom zaobchádzaní,
pri používaní násilia a pri zásahoch, ktoré neurobil
nami autorizovaný servis. Práva vyplývajúce zo zákona nie sú touto zárukou obmedzené.
Záručná doba sa nepredlžuje o dobu trvania záručných opráv. To platí aj na vymenené alebo opravené diely. Prípadné poškodenia a nedostatky zistené
už pri nákupe musíte ohlásiť ihneď po vybalení, najneskoršie však do dvoch dní od dátumu zakúpenia.
V prípade opráv spadajúcich do obdobia po uplynutí záručnej doby ste povinní uhradiť vzniknuté
náklady.
KOMPERNASS GMBH
BURGSTRASSE 21
44867 BOCHUM, GERMANY
www.kompernass.com
Kompernass Service Slowakia
Tel. 0850 00 10 16 (
e-mail: support.sk@kompernass.com
0,075 EUR/Min.)
- 36 -
Page 39

Inhaltsverzeichnis Seite
Bestimmungsgemäßer Gebrauch 38
Technische Daten 38
Sicherheitshinweise 38
Lieferumfang 39
Bedienelemente 39
Ständer montieren 39
In Betrieb nehmen 40
Handhabung des Grills 40
Thermostat-Einstellungen 41
Einige Tipps 41
Reinigen und Pflegen 41
Entsorgen 42
Garantie und Service 42
Importeur 42
Lesen Sie die Bedienungsanleitung vor der ersten Verwendung aufmerksam durch und heben Sie diese für
den späteren Gebrauch auf. Händigen Sie bei Weitergabe des Gerätes an Dritte auch die Anleitung aus.
- 37 -
Page 40

ELEKTRO-GRILL
Bestimmungsgemäßer
Gebrauch
Das Gerät ist zum Grillen von Grillgut im Innenbereich oder im überdachten Außenbereich vorgesehen. Es darf nicht mit Feuchtigkeit, wie Regen oder
Nässe, in Berührung kommen. Es darf ausschließlich
Originalzubehör wie beschrieben verwendet werden. Jede andere Verwendung oder Veränderung
gilt als nicht bestimmungsgemäß und birgt erhebliche Unfallgefahren.
Für aus bestimmungswidriger Verwendung entstandene Schäden übernimmt der Hersteller keine Haftung. Nicht für den gewerblichen Einsatz bestimmt.
Technische Daten
Netzspannung: 220 - 240 V ~50Hz
Nennleistung: 1600 W
Sicherheitshinweise
Um Lebensgefahr durch elektrischen
Schlag zu vermeiden:
• Lassen Sie beschädigte Netzstecker oder Netzkabel sofort von autorisiertem Fachpersonal
oder dem Kundenservice austauschen, um
Gefährdungen zu vermeiden.
• Schützen Sie die Netzleitung vor Berührungen
mit heißen Geräteteilen. Benutzen Sie das Gerät
niemals in der Nähe einer offenen Flamme, einer Heizplatte oder eines beheizten Ofens.
• Setzen Sie das Gerät nicht dem Regen aus und
benutzen Sie es auch niemals in feuchter oder
nasser Umgebung. Achten Sie darauf, dass die
Netzleitung während des Betriebs niemals nass
oder feucht wird.
• Überprüfen Sie vor Inbetriebnahme und nach jeder Reinigung des Gerätes, ob die Steckkontakte
am Grillrost trocken sind.
Um Brandgefahr und Verletzungen
zu vermeiden:
• Das Gerät während des Betriebs niemals unbeaufsichtigt lassen.
• Stellen Sie das Gerät nicht unter Schränken oder
in der Nähe von Vorhängen oder ähnlich leicht
entzündlichem Material auf und halten Sie entsprechend brennbare Materialien fern.
• Dieses Gerät ist nicht dafür bestimmt, durch
Personen (einschließlich Kinder) mit eingeschränkten physischen, sensorischen oder
geistigen Fähigkeiten oder mangels Erfahrung
und/oder mangels Wissen benutzt zu werden,
es sei denn, sie werden durch eine für ihre
Sicherheit zuständige Person beaufsichtigt oder
erhielten von ihr Anweisungen, wie das Gerät
zu benutzen ist.
• Kinder sollten beaufsichtigt werden, um sicherzustellen, dass sie nicht mit dem Gerät spielen.
• Verbrennungsgefahr! Lassen Sie das Gerät
nach Gebrauch gut abkühlen, bevor Sie es
reinigen.
• Verbrennungsgefahr! Benutzen Sie nur die
Wärme isolierten Griffe. Die Oberflächen des
Gerätes werden während des Betriebs sehr heiß.
• Sorgen Sie für einen sicheren Stand des
Gerätes.
• Stellen Sie das Gerät möglichst in der Nähe
einer Steckdose auf. Sorgen Sie dafür, dass der
Netzstecker bei Gefahr schnell erreichbar ist
und die Netzleitung nicht zur Stolperfalle werden kann.
• Schützen Sie die Antihaftbeschichtung, indem
Sie keine metallischen Werkzeuge wie Messer,
Gabel u.s.w. benutzen. Wenn die Antihaftbeschichtung beschädigt ist, benutzen Sie das
Gerät nicht weiter.
• Benutzen Sie keine externe Zeitschaltuhr oder
ein separates Fernwirksystem um das Gerät zu
betreiben.
- 38 -
Page 41

• Benutzen Sie keine Kohle oder ähnliche Brennstoffe, um das Gerät zu betreiben!
• Betreiben Sie das Gerät niemals ohne Wasser in
der Auffangwanne.
So verhalten Sie sich sicher:
• Ziehen Sie bei Gefahr sofort den Netzstecker
aus der Steckdose.
• Verwenden Sie das Gerät niemals zweckentfremdet.
• Vermeiden Sie einen Wärmestau. Legen Sie
keine Alufolie oder andere Grillutensilien auf
den Grillrost. Durch einen Wärmestau können
Kunststoffanteile sowie die Beschichtungen zerstört werden.
• Betreiben Sie den Grill ausschließlich mit dem
mitgelieferten Thermostat.
• Bitte nehmen Sie das Grillrost nur in Betrieb,
wenn es auf der Auffangwanne liegt.
• Ziehen Sie den Netzstecker sowie die Zuleitung
vom Gerät, wenn das Gerät nicht benutzt wird,
wenn Sie Teile entfernen und vor dem Reinigen.
Lieferumfang
Ständer montieren
1. Stecken Sie die Standbeinfüße auf die Seite
der Standbeine , wo sich kein Bohrloch befindet.
2. Montieren Sie die Standbeine an der Ablageplatte . Stecken Sie dafür die Schrauben
durch die vorgebohrten Löcher und kontern Sie
die Schrauben mit den Muttern von der Innenseite der Ablageplatte .
3. Setzen Sie die obere Platte auf die Standbei-
ne , so dass die Standbeine von Innen an
den Bohrlöchern der oberen Platte anliegen.
Die vorgebohrten Löcher in der oberen Platte
, sowie in den Standbeinen müssen übereinander liegen.
4. Stecken Sie die Schrauben durch die Löcher und
kontern Sie die Schrauben mit den Muttern.
Elektro-Grill
Spritzschutzschild
Thermostat
Ständer: Ablageplatte, obere Platte, 4 Standbeine,
4 Standbeinfüße, 8 Schrauben, 8 Muttern
Bedienelemente
Grillrost
q
Spritzschutzschild
w
Anschluss für Netzleitung mit Thermostat
e
Auffangwanne
r
wärmeisolierte Haltegriffe
t
Heizelement
y
Kontrollleuchte
u
Thermostat
i
- 39 -
Page 42

In Betrieb nehmen
Reinigen Sie den Grill vor der ersten Inbetriebnahme
wie im Kapitel “Reinigen und Pflegen” beschrieben.
Der Betrieb / Grillvorgang darf nur mit der dafür
vorgesehenen Auffangwanne
Die Spannung der Stromquelle muss mit den
Angaben auf dem Typenschild des Gerätes
übereinstimmen.
erfolgen.
r
Handhabung des Grills
Gute und gleichmäßige Hitzeverteilung ist durch
das integrierte Heizelement
chert. Die Reinigung wird durch die Antihaftbeschichtung erleichtert die das Ansetzen von Grillgut verhindert.
• Stellen Sie den fertig montierten Ständer auf
eine ebene Fläche. Denken Sie daran, dass sich
eine Netzsteckdose in erreichbarer Nähe befinden muss.
• Befüllen Sie die Auffangwanne
Markierung mit Wasser (ca. 1,3 l). Sie verhindern so das Anbrennen von herunter tropfendem
Fett des Grillguts und erleichtern die anschließende Reinigung des Gerätes.
• Bringen Sie das Spritzschutzschild
Seite (die spätere Rückseite) des Grillrostes
an, sollten Sie fetthaltiges Grillgut grillen. Zusätzlich dient es als Windschutz. Stecken Sie die drei
Zapfen des Spritzschutzschildes
des Grillrosts
cher. Dafür müssen Sie das Spritzschutzschild
leicht biegen.
• Legen Sie das Grillrost
, so dass es fest aufliegt.
r
• Stellen Sie den Grill auf den Ständer. Die 4 Halterungsstifte auf der oberen Platte des Ständers
müssen in die Vertiefungen auf der Unterseite
des Grills greifen. Der Grill muss fest auf dem
Ständer stehen.
in die dafür vorgesehenen Lö-
q
im Grillrost qgesi-
y
bis zur Max-
r
an einer
w
an eine Seite
w
auf die Auffangwanne
q
q
Hinweis
Sie können den Grill auch ohne Ständer benutzen:
Stellen Sie den Grill auf eine absolut ebene Fläche.
Diese Fläche muss gegen Hitze unempfindlich sein.
Ansonsten kann es zu Beschädigungen an der Stellfläche kommen.
• Überprüfen Sie, ob das Grillrost
der Auffangwanne
).
q
• Stecken Sie die Netzleitung mit Thermostat
am Gerät ein, dass die Kontrollleuchte
oben weist. Stecken Sie den Netzstecker danach
in eine Netzsteckdose.
• Stellen Sie am Thermostat
Temperatur ein. Der Grill fängt an sich aufzuheizen und die Kontrollleuchte
• Sobald die Kontrollleuchte
Grill die eingestellte Temperatur erreicht und ist
betriebsbereit.
platziert ist (siehe Abb.
r
die gewünschte
i
leuchtet auf.
u
erlischt, hat der
u
Hinweis
Je nach Umgebungstemperatur, kann es sein, dass
die Kontrollleuchte
“M”, nicht erlischt.
• Der Grill ist nach einer Aufheizphase von ca. 15
Minuten betriebsbereit.
Verletzungsgefahr!
Ist der Grill aufgeheizt, fassen Sie ihn nur noch an
den wärmeisolierenden Haltegriffen
, bei Thermostateinstellung
u
w
korrekt auf
q
an.
t
u
i
nach
so
- 40 -
Page 43

Thermostat-Einstellungen
Stufe 0 Grill ausgeschaltet
Stufe 0 - 1 Grill eingeschaltet;
niedrige Temperatur
Stufe 1 - 3 Grill eingeschaltet; mittlere
Temperatur (z.B. Gemüse)
Stufe 3 - M (Max) Grill eingeschaltet; hohe
Temperatur (z.B. Fleisch)
Einige Tipps
• Zartes Fleisch eignet sich besser zum Grillen.
• Über Nacht marinierte Fleischstücke, wie z.B.
von der Schulter oder vom Hals, werden zarter.
• Vermeiden Sie es, Grillgut auf der Grillfläche zu
schneiden.
• Verwenden Sie immer Grillzangen und keine
Gabeln zum Wenden des Grillgutes. Dadurch
bleibt es innen saftig und trocknet nicht aus.
• Vermeiden Sie auf Grund der längeren Garzeit
die Auswahl von dickem Grillgut.
• Wenn Sie Frikadellen/Hackbällchen auf dem
Grill grillen, achten Sie darauf, dass diese nicht
dicker als 2 cm sind.
Wir empfehlen die Frikadellen/Hackbällchen
ca. 24 Minuten auf Stufe 3 zu grillen:
Wenden Sie die Frikadellen/Hackbällchen nach
jeweils 6 Minuten, so dass jede Seite 2 mal gegrillt wird.
Hinweis
Die angegebenen Zeiten können je nach Beschaffenheit des Grillgutes und durch persönlichen Geschmack variieren!
Reinigen und Pflegen
Achtung!
Ziehen Sie vor dem Reinigung den Netzstecker aus
der Netzsteckdose und den Thermostat
Gerät. Gefahr eines elektrischen Schlages!
Lassen Sie das Gerät vor dem Reinigen abkühlen!
Verbrennungsgefahr!
Achtung!
Achten Sie darauf, weder Netzleitung noch den
Stecker mit Wasser oder anderen Flüssigkeiten in
Berührung zu bringen. Wischen Sie den Themostat
mit einem leicht angefeuchteten Tuch ab.
i
Trocknen Sie alles, insbesonders die Steckkontakte,
vor der nächsten Benutzung gut ab. Ansonsten besteht die Gefahr eines elektrischen Schlages!
• Entfernen Sie groben Schmutz mit einem angefeuchteten Tuch.
• Schützen Sie die Antihaftbeschichtung, indem
Sie keine metallischen Werkzeuge wie Messer,
Gabel u.s.w. benutzen. Wenn die Antihaftbeschichtung beschädigt ist, benutzen Sie das
Gerät nicht weiter.
• Nur der Grillrost
sind dazu geeignet, in der Spülmaschine gereinigt zu werden. Reinigen Sie das Spritzschutzschild
Sie es nach der Reinigung gründlich ab. Reinigen Sie den Ständer mit einem feuchten Tuch.
• Die Steckkontakte am Grillrost
Reinigung gründlich abzutrocknen.
• Das Geräteinnere muss vor einer erneuten Verwendung vollständig trocken sein.
in heißem Seifenwasser und trocknen
w
und die Auffangwanne
q
q
aus dem
i
r
sind nach der
- 41 -
Page 44

Entsorgen
Werfen Sie das Gerät keinesfalls in den
normalen Hausmüll. Dieses Produkt
unterliegt der europäischen Richtlinie
2002/96/EC.
Entsorgen Sie das Gerät über einen zugelassenen
Entsorgungsbetrieb oder über Ihre kommunale
Entsorgungseinrichtung.
Beachten Sie die aktuell geltenden Vorschriften.
Setzen Sie sich im Zweifelsfall mit Ihrer Entsorgungseinrichtung in Verbindung.
Führen Sie alle Verpackungsmaterialien
einer umweltgerechten Entsorgung zu.
Garantie und Service
Die Garantiezeit wird durch die Gewährleistung
nicht verlängert. Dies gilt auch für ersetzte und reparierte Teile. Eventuell schon beim Kauf vorhandene
Schäden und Mängel müssen sofort nach dem
Auspacken gemeldet werden, spätestens aber zwei
Tage nach Kaufdatum. Nach Ablauf der Garantiezeit anfallende Reparaturen sind kostenpflichtig.
Schraven
Service- und Dienstleistungs GmbH
Tel.: +49 (0) 180 5 008107
(14 Ct/Min. aus dem dt. Festnetz ggf. abweichende Preise
aus den Mobilfunknetzen)
Fax: +49 (0) 2832 3532
e-mail: support.de@kompernass.com
Kompernaß Service Österreich
Tel.: 0820 899 913 (
e-mail: support.at@kompernass.com
0,20 EUR/Min.)
Sie erhalten auf dieses Gerät 3 Jahre Garantie ab
Kaufdatum. Das Gerät wurde sorgfältig produziert
und vor Anlieferung gewissenhaft geprüft.
Bitte bewahren Sie den Kassenbon als Nachweis
für den Kauf auf. Bitte setzen Sie sich im Garantiefall mit Ihrer Servicestelle telefonisch in Verbindung.
Nur so kann eine kostenlose Einsendung Ihrer Ware
gewährleistet werden.
Die Garantieleistung gilt nur für Material- oder
Fabrikationsfehler, nicht aber für Transportschäden,
Verschleißteile oder für Beschädigungen an zerbrechlichen Teilen, z. B. Schalter oder Akkus. Das
Produkt ist lediglich für den privaten und nicht für
den gewerblichen Gebrauch bestimmt.
Bei missbräuchlicher und unsachgemäßer Behandlung, Gewaltanwendung und bei Eingriffen, die
nicht von unserer autorisierten Service-Niederlassung vorgenommen wurden, erlischt die Garantie.
Ihre gesetzlichen Rechte werden durch diese
Garantie nicht eingeschränkt.
Kompernaß Service Switzerland
Tel.: 0848 000 525 (
e-mail: support.ch@kompernass.com
max. 0,0807 CHF/Min.)
Importeur
KOMPERNASS GMBH
BURGSTRASSE 21
44867 BOCHUM, GERMANY
www.kompernass.com
- 42 -
 Loading...