

Page 1
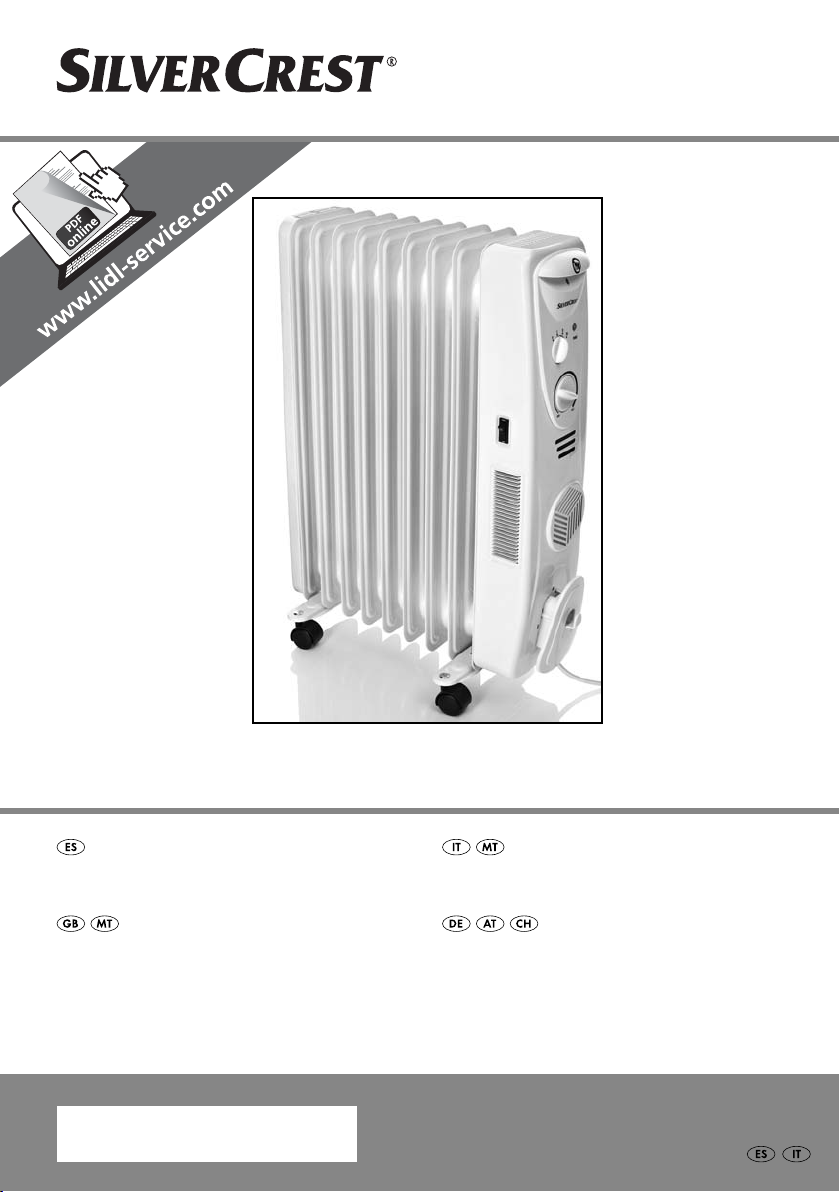
RADIADOR DE ACEITE
RADIATORE AD OLIO SOR 2600 A1
RADIADOR DE ACEITE
Instrucciones de uso
RADIATORE AD OLIO
Istruzioni per l‘uso
OIL-FILLED RADIATOR
Operating instructions
IAN 90852
ÖLRADIATOR
Bedienungsanleitung
Page 2
Antes de empezar a leer abra la página que contiene las imágenes y, en seguida, familiarícese con todas
las funciones del dispositivo.
Prima di leggere aprire la pagina con le immagini e prendere confi denza con le diverse funzioni
dell’apparecchio.
Before reading, unfold the page containing the illustrations and familiarise yourself with all functions of
the device.
Klappen Sie vor dem Lesen die Seite mit den Abbildungen aus und machen Sie sich anschließend mit allen
Funktionen des Gerätes vertraut.
ES Instrucciones de uso Página 1
IT / MT Istruzioni per l‘uso Pagina 7
GB / MT Operating instructions Page 13
DE / AT / CH Bedienungsanleitung Seite 19
Page 3
A
B
Page 4

Índice Página
Uso conforme al previsto 2
Volumen de suministro 2
Descripción de aparatos 2
Datos técnicos 2
Indicaciones de seguridad 2
Montaje 4
Puesta en funcionamiento 4
Función de protección contra heladas 5
Termoventilador 5
Cuidado y limpieza 5
Conservación 5
Evacuación 5
Garantía y asistencia técnica 6
Importador 6
- 1 -
Page 5
RADIADOR DE ACEITE
Descripción de aparatos
Felicidades por la compra de su aparato nuevo.
Ha optado por adquirir un producto de alta calidad.
Las instrucciones de uso forman parte del producto.
Contiene indicaciones importantes acerca de la
seguridad, uso y evacuación. Antes de usar el
producto familiaricese con todas las indicaciones
de manejo y de seguridad. Utilice el producto
como se describe y para los ámbitos de aplicación
indicados. Entregue todos los documentos cuando
transfiera el producto a terceros.
Uso conforme al previsto
Este aparato está destinado exclusivamente para
uso doméstico. Su finalidad es calentar el ambiente.
No es apto para fines comerciales o industriales.
Volumen de suministro
Radiador de aceite
2 barras para ruedas
2 estribos de sujeción
4 tuercas de mariposa
Instrucciones de uso
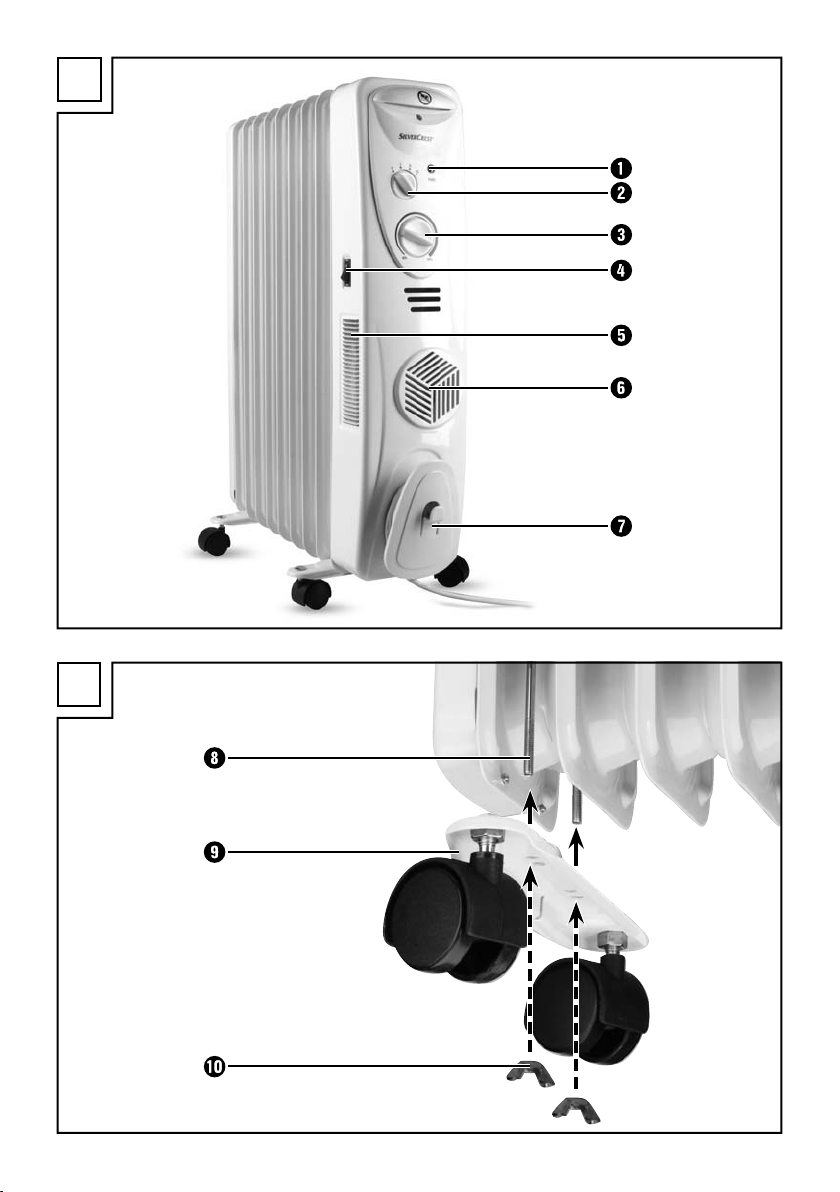
Fig. A:
1 piloto "Power"
2 interruptor de nivel de calor
3 regulador termostático
4 interruptor del termoventilador con piloto
del termoventilador integrado
5 salida del termoventilador
6 ranura de ventilación
7 soporte del cable de red
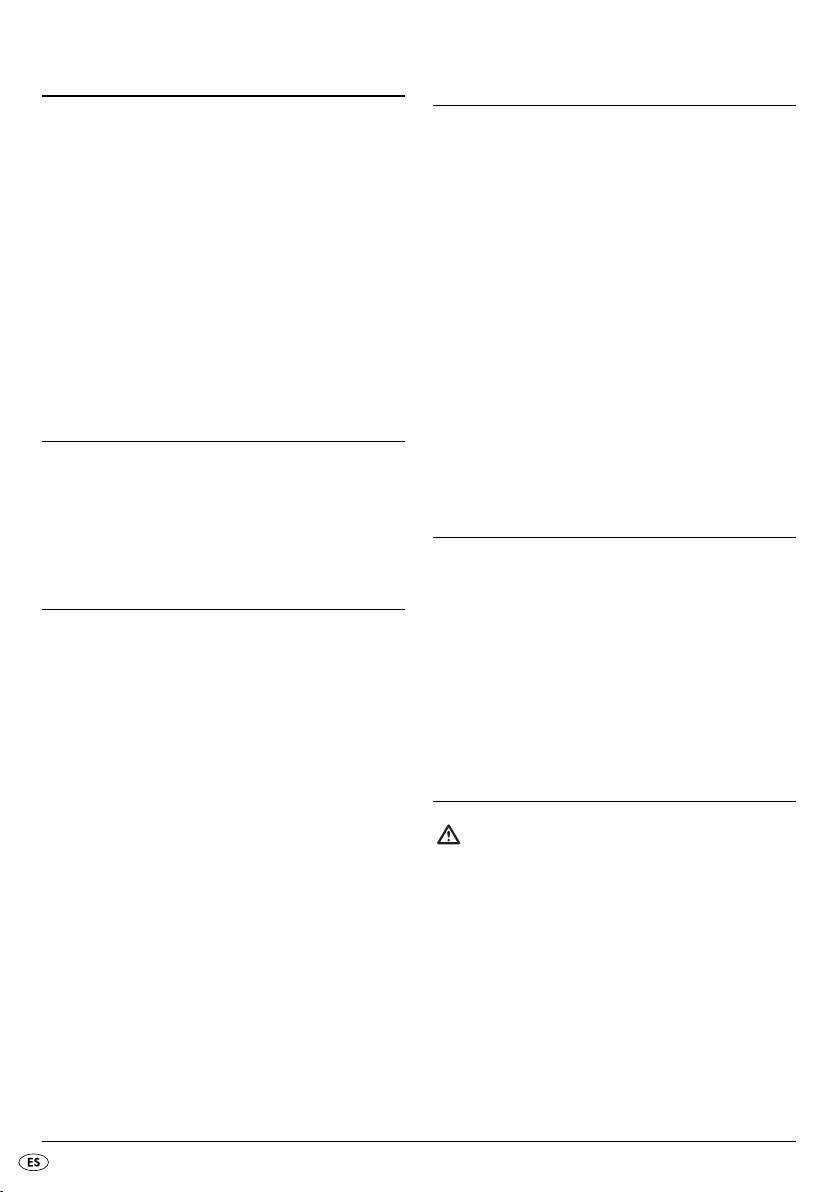
Fig. B:
8 estribo de sujeción
9 barra para ruedas
0 tuerca de mariposa
Datos técnicos
Tensión nominal: 220–240 V ~, 50 Hz
Potencia calorífica: 2300 - 2600 W
Niveles de calefacción: I = 800 W
II = 1200 W
III = 2000 W
Regulador termostático: con ajuste continuo
Placas de calor: 9
Indicaciones de seguridad
¡Peligro por descarga eléctrica!
• Conecte el radiador de aceite únicamente a una
base de enchufe instalada y conectada a tierra
de acuerdo con la normativa. Compruebe que
la tensión de la base de enchufe se corresponde
con la tensión indicada en la placa de características.
• No doble ni aplaste el cable de red.
• Extraiga siempre el cable de red del enchufe
tirando de la clavija y nunca directamente del
propio cable.
- 2 -
Page 6
• Nunca toque el radiador de aceite, el cable de
red ni la clavija de red con las manos mojadas.
• No debe usar ningún prolongador de cable.
• No introduzca de ningún modo el aparato en un
líquido ni deje que ningún líquido penetre en la
carcasa del aparato. El aparato no debe estar
expuesto a la humedad ni ser utilizado a la intemperie. Existe peligro de descarga eléctrica.
Si por cualquier motivo penetrase líquido en la
carcasa del aparato, extraiga la clavija de red
de la base de enchufe y entrégueselo a personal
especialista cualificado para su reparación.
• Nunca utilice el aparato en las proximidades de
agua, por ejemplo, de bañeras, duchas, lavabos
o en sótanos húmedos. Las proximidades del
agua suponen un riesgo aunque este desconectado el aparato.
• En caso de fallos de funcionamiento y antes de
limpiar el aparato, extraiga la clavija de la base
de enchufe.
• En caso de una clavija de red dañada o cable
de red dañado, encomiende su sustitución a
personal técnico autorizado o al servicio de
posventa con el fin de evitar riesgos.
• Este aparato calentador lleva en su interior una
cantidad precisa de aceite especial. Si el aparato
sufre daños o pierde aceite, no deberá ponerlo
de nuevo en funcionamiento. Deje que compruebe
el aparato personal especialista cualificado y en
su caso que lo repare.
• Queda prohibido abrir la carcasa del aparato
o intentar repararlo. En este caso no estará protegido y perderá el derecho a la garantía. Si el
aparato está defectuoso, hágalo reparar solamente por personal especializado autorizado.
• Nunca coloque el aparato en las proximidades
de fuentes de calor y proteja el cable de red de
cualquier daño .
• No coloque sobre el aparato ningún objeto que
contenga agua, como p.ej. jarrones.
¡Riesgo de incendio!
• No coloque nunca el aparato en las proximidades de material inflamable, líquidos o gases.
Deje al menos un metro de distancia hacia todos
los lados y hacia arriba.
• Nunca deje el radiador de aceite encendido sin
vigilancia.
• No permita utilizar el aparato a personas (incluidos
los niños) cuyas facultades físicas, sensoriales o
mentales, así como su falta de conocimientos o
de experiencia, les impida hacer un uso seguro
del mismo si no están bajo vigilancia o han sido
instruidos correctamente acerca del uso del aparato.
• Vigile a los niños para asegurarse de que no
juegan con el aparato.
• Coloque siempre el aparato sobre una base
firme, plana y resistente al calor.
• No coloque sobre el aparato fuentes de fuego
abierto, como p.ej. velas.
Advertencia: Para evitar un sobrecalentamiento del radiador de aceite, no se deberá cubrir el radiador.
• Límpielo con regularidad.
• No utilice ningún tipo de temporizador externo
o un sistema de control remoto para accionar
el aparato.
• No coloque el aparato por debajo de una base
de enchufe.
¡Peligro de lesiones
• Coloque el cable de red de modo que no pueda
tropezar o pisarlo.
• No debe usar ningún prolongador de cable.
La clavija de red debe estar bien accesible en
caso de emergencia.
- 3 -
Page 7
Montaje
Sírvase de la página desplegable de este manual
como ayuda para el montaje.
1. Extraiga el radiador de aceite junto con todas
las piezas del embalaje y retire todo el material
de embalaje.
2. Coloque el radiador de aceite con el lado inferior
hacia arriba sobre una base blanda como, p.ej.,
una alfombra.
3. Inserte un estribo de sujeción 8 por debajo del
elemento del cuerpo del radiador de modo que
las piezas roscas sobresalgan hacia fuera.
4. Coloque las barras para las ruedas 9 encima
de modo que las piezas roscadas sobresalgan a
través de los orificios. Procure que los huecos en
las barras para ruedas 9 queden hacia afuera.
Los extremos de los tornillos que sobresalen del
aparato deben encajar en los huecos.
5. Atornille respectivamente de forma manual una
tuerca de mariposa 0 en las piezas roscadas
del estribo de sujeción 8.
6. Lleve a cabo el mismo procedimiento en los
otros lados.
7. Gire el aparato y colóquelo sobre las ruedas.
Puesta en funcionamiento
Advertencia:
El interruptor de nivel de calor 2 le permite regular
el grado de rapidez de calentamiento del aparato.
Si desea que el aparato caliente el ambiente de
manera rápida, seleccione el nivel de calor "III". Si,
por el contrario, prefiere que el aparato caliente lentamente el ambiente, seleccione el nivel de calor "I".
El regulador termostático 3 le permite seleccionar
la temperatura deseada.
4. Una vez alcanzada la temperatura deseada de
la sala, aplique un ligero giro inverso en el regulador termostático 3 hasta que oiga un ligero
"clic" y el piloto "Power" 1 se apague. Se man-
tendrá ahora la temperatura momentánea de la
sala. Es probable que el piloto "Power" 1 se
vuelva a encender y apagar. Esto significa que
la temperatura de la sala ha descendido durante
un intervalo breve de tiempo por debajo de la
temperatura ajustada y el aparato ha calentado
de nuevo el ambiente.
Indicación:
Si desea calentar más rápidamente una sala, active
también el interruptor del termoventilador 4.
Cuando el interruptor del termoventilador 4 se
encuentra en la posición ON, el piloto del termoventilador 4 se ilumina y sale aire caliente a través
de la salida del termoventilador 5.
1. Desenrolle completamente el cable de alimentación del soporte del cable de red 7.
Advertencia:
Asegúrese de que el regulador termostático 3 y el
interruptor de nivel de calor 2 están en la posición
MIN o 0 .
2. Enchufe el aparato.
3. Sitúe el interruptor de nivel de calor 2 en "III"
y el regulador termostático 3 en MAX. El piloto
"Power" 1 se ilumina.
5. Si desea apagar el aparato, coloque primero el
interruptor del termoventilador 4 en la posición
OFF. Gire a continuación el interruptor del nivel
de calor 2 a la posición "o" y seguidamente el
regulador termostático 3 a la posición MIN.
6. Retire la clavija de red de la base de enchufe.
- 4 -
Page 8
Función de protección contra
heladas
Puede ajustar el radiador de aceite de modo que se
encienda automáticamente y caliente cuando la temperatura de la sala sea de 5°C apróx.:
1. Enchufe el aparato.
2. Coloque el interruptor de nivel de calefacción 2
en “I”, “II” o “III”, y el regulador termostático 3
en MIN.
El radiador de aceite se enciende sólo si la temperatura de la sala es de 5°C apróx. Al momento que la
temperatura de la sala supera los 5°C apróx, se vuelve apagar el radiador de aceite automáticamente.
Termoventilador
Ahora puede usar el radiador de aceite como termoventilador:
1. Enchufe el aparato.
2. Coloque el interruptor del termoventilador 4 en
ON.
La lámpara de control roja del termoventilador 4
se ilumina y el aire caliente es soplado dentro de
la sala a través de la salida del termoventilador 5.
3. Para desconectar el termoventilador, coloque el
interruptor del termoventilador 4 en OFF.
La lámpara de control roja del termoventilador 4
se apaga.
Atención!
¡
No utilice ningún producto de limpieza agresivo,
abrasivo ni químico. Estos productos pueden dañar
la superficie del aparato.
Conservación
Si no va a utilizar el aparato durante un período
prolongado, límpielo tal y como se describe en el
capítulo "Cuidado y limpieza".
Enrolle el cable de alimentación en el soporte del
cable de alimentación 7.
Guarde el aparato en un lugar limpio y seco.
Evacuación
En ningún caso deberá tirar el aparato
a la basura doméstica. Este producto
está sometido a la directiva europea
2002/96/EC.
Evacue el aparato en un centro de evacuación
autorizado a través de las instalaciones de evacuación comunitarias.
Observe las normativas actuales en vigor acerca
de la evacuación de aceite usado.
En caso de dudas póngase en contacto con su
centro de evacuación.
Cuidado y limpieza
Peligro de lesiones
¡Antes de la limpieza deberá dejar que se enfríe el
aparato! ¡Peligro de quemaduras!
Retire la clavija de red de la base del enchufe.
¡Existe riesgo de descarga eléctrica!
Limpie el aparato con un paño ligeramente húmedo.
En caso de suciedad persistente añada al paño un
detergente suave.
Advertencia:
¡Las directivas respecto a la evacuación y reciclaje
del aparato se ha de cumplir necesariamente! Informese en su centro municipal de evacuación.
El material de embalaje debe desecharse de
forma respetuosa con el medio ambiente.
- 5 -
Page 9
Garantía y asistencia técnica
Importador
Con este aparato recibe usted 3 años de garantía
desde la fecha de compra. El aparato ha sido fabricado cuidadosamente y ha sido probado antes de
su entrega.
Guarde el comprobante de caja como justificante
de compra. Si necesitara hacer uso de la garantía,
póngase en contacto por teléfono con su centro de
servicio habitual. Éste es el único modo de garantizar
un envío gratuito.
La garantía cubre sólo defectos de fabricación o
del material, pero no los daños de transporte, piezas sujetas a desgaste y los daños sufridos por las
piezas frágiles p. ej. el interruptor o baterías. Este
producto ha sido diseñado exclusivamente para el
uso particular y no para el uso industrial.
En caso de manipulación indebida e incorrecta, uso
de la fuerza y en caso de abrir el aparato personas
extrañas a nuestros centros de asistencia técnica
autorizados, la garantía pierde su validez. Esta garantía no reduce en forma alguna sus derechos legales.
Por el mero hecho de hacer uso de la garantía no
implica la prolongación del período de válidez de
la garantía. Ello rige también para piezas sustituidas y reparadas. Los posibles daños y defectos detectados al comprar el producto, se han de notificar
de inmediato o como muy tarde dos días desde la
fecha de compra. . Finalizado el periodo de garantía, las reparaciones se han de abonar.
KOMPERNASS GMBH
BURGSTRASSE 21
44867 BOCHUM, GERMANY
www.kompernass.com
Servicio España
Tel.: 902 59 99 22
(0,08 EUR/Min. + 0,11 EUR/llamada
(tarifa normal))
(0,05 EUR/Min. + 0,11 EUR/llamada
(tarifa reducida))
E-Mail: kompernass@lidl.es
IAN 90852
Disponibilidad de la línea de atención al cliente:
de lunes a viernes de 8.00 a 20.00 h (CET)
- 6 -
Page 10

Indice Pagina
Uso conforme 8
Volume della fornitura 8
Descrizione dell'apparecchio 8
Dati tecnici 8
Avvertenze di sicurezza 8
Montaggio 9
Messa in funzione 10
Funzione di protezione dalla brina 10
Termoventilatore 11
Pulizia e cura 11
Conservazione 11
Smaltimento 11
Garanzia e assistenza 12
Importatore 12
- 7 -
Page 11

RADIATORE AD OLIO
Descrizione dell'apparecchio
Congratulazioni per l'acquisto del nuovo apparecchio.
Lei ha scelto un prodotto di alta qualità. Il manuale
di istruzioni è parte integrante del presente prodotto. Esso contiene importanti indicazioni per la sicurezza, l'uso e lo smaltimento. Prima di utilizzare il
prodotto, si familiarizzi con tutte le indicazioni relative
ai comandi e alla sicurezza.Utilizzi il prodotto solo
come descritto e per i campi di impiego indicati. In
caso di cessione del prodotto a terzi, consegni anche
tutta la documentazione relativa.
Uso conforme
Questo apparecchio è destinato esclusivamente al
riscaldamento in ambiente domestico privato. Non
è idoneo all'uso commerciale o industriale.
Volume della fornitura
Radiatore ad olio
2 rotaie a rulli
2 staffe di fissaggio
4 dadi ad alette
Istruzioni per l'uso
Ill. A:
1 Spia di controllo “Power”
2 Commutatore del livello di riscaldamento
3 Manopola del termostato
4 Interruttore del ventilatore con spia di controllo
integrata
5 Sbocco termoventilatore
6 Aperture di aerazione
7 Supporto per il cavo di rete
Ill. B:
8 Staffe di fissaggio
9 Rotaie a rulli
0 Dado ad alette
Dati tecnici
Tensione nominale: 220–240 V ~, 50 Hz
Potenza riscaldante: 2300 - 2600 W
Livelli di riscaldamento: I = 800 W
II = 1200 W
III = 2000 W
Regolatore termostato: regolabile in continuo
Corpi riscaldanti: 9
Avvertenze di sicurezza
Pericolo di scossa elettrica!
• Connettere l'apparecchio solo a una presa
installata a norma e provvista di messa a terra.
Controllare che la tensione della presa di corrente
corrisponda alla tensione indicata sulla targhetta
dell'apparecchio.
• Non piegare o schiacciare il cavo di rete.
• Per disinserire la spina dalla presa tirare sempre
dalla spina, mai dal cavo.
• Non afferrare mai il radiatore a olio, il cavo e la
spina di rete con le mani umide.
• Non usare prolunghe.
- 8 -
Page 12

• Non immergere mai l'apparecchio in liquidi e impedire la penetrazioni di liquidi nell'alloggiamento
dell'apparecchio. Non esporre l'apparecchio
a fonti di umidità e non utilizzarlo all'aperto. Esiste il
rischio di scossa elettrica. In caso di infiltrazioni
di liquidi nell'alloggiamento dell'apparecchio,
disinserire subito la spina dalla presa di rete e farlo
riparare da personale specializzato qualificato.
• Non utilizzare mai l'apparecchio nelle vicinanze
di acqua, ad esempio vasche da bagno, docce,
lavandini o cantine umide. La vicinanza all'acqua
rappresenta un pericolo anche ad apparecchio
spento.
• In caso di guasti e prima della pulizia, staccare
sempre la spina dalla presa di corrente
• Fare sostituire immediatamente la spina o il cavo
di rete danneggiato da personale specializzato
autorizzato o dal centro assistenza clienti, per
evitare possibili danni.
• Questo apparecchio è stato riempito con una
certa quantità di olio speciale. Se l'apparecchio
è danneggiato o perde olio, non dev'essere più
messo in funzione. L'apparecchio dev'essere
sottoposto a controllo da parte di personale
specializzato e all'occorrenza riparato.
• Non è consentito aprire o riparare l'alloggiamento
dell'apparecchio. Aprendolo ci si espone a pericoli
e la garanzia decade. Fare riparare l'apparecchio
guasto solo da personale specializzato autorizzato.
• Non collocare mai l'apparecchio nelle vicinanze
di sorgenti di calore, e proteggere il cavo di rete
dai danni.
• Non collocare oggetti pieni d'acqua, come ad
es. vasi, sull'apparecchio.
• Questo apparecchio non è indicato per l'uso da
parte di persone (inclusi bambini) con limitate
capacità fisiche, sensoriali o mentali o prive dell'esperienza e/o della conoscenza necessaria,
a meno che tali persone non vengano sorvegliate
da un responsabile per la sicurezza o abbiano
ricevuto indicazioni sull'impiego dell'apparecchio.
• Sorvegliare i bambini per assicurarsi che non
giochino con l'apparecchio.
• Collocare l'apparecchio sempre su una superficie
stabile, piana e termoresistente.
• Non collocare sorgenti di fiamme libere, come
ad es. candele, sull'apparecchio.
Avvertenza: per evitare un surriscaldamento
del radiatore a olio, non coprirlo!
• Pulire l'apparecchio a scadenze regolari.
• Non utilizzare timer esterni o un sistema di telecomando separato per azionare l'apparecchio.
• Non collocare l'apparecchio al di sotto di una
presa elettrica.
Pericolo di lesioni
• Collocare il cavo di rete in modo che non venga
calpestato o costituisca intralcio.
• Non usare prolunghe. In caso di emergenza, la
spina di rete dev'essere raggiungibile rapidamente.
Montaggio
Per il montaggio, consultare la pagina pieghevole
del presente manuale.
Pericolo d'incendio!
• Non mettere mai l'apparecchio vicino a sostanze,
liquidi o gas infiammabili. Lasciare almeno un
metro di spazio libero intorno a tutti i lati
dell'apparecchio.
• Non lasciare mai il radiatore incustodito mentre
è acceso.
1. Prelevare il radiatore a olio e tutte le componenti
dalla confezione, rimuovendo tutto il materiale
di imballaggio.
2. Collocare il radiatore a olio con la parte inferiore
rivolta verso l'alto su una superficie morbida, ad
esempio un tappeto.
3. Spingere una staffa di fissaggio 8 sotto l'elemento
riscaldante, in modo che si possano vedere i pezzi
filettati.
- 9 -
Page 13

4. Collocare la rotaia a rulli 9 al di sopra, in modo
che i pezzi filettati sporgano attraverso i fori. Fare
in modo che gli intagli della rotaia a rulli 9
poggino all'esterno. Le estremità delle viti che
sporgono dall'apparecchio devono inserirsi negli intagli.
5. Avvitare saldamente a mano ogni dado ad alette 0 sulle filettature sulla staffa di fissaggio 8.
6. Procedere allo stesso modo dall'altro lato.
7. Capovolgere l'apparecchio e poggiarlo sui rulli.
4. Se si è raggiunta la temperatura ambientale desiderata, ruotare lentamente all'indietro la manopola del termostato 3 fino a udire un leggero
“clic” e la spia di controllo “Power” 1 si speg-
ne. La temperatura ambientale momentanea
verrà mantenuta. Potrebbe succedere che la spia
di controllo “Power” 1 si spenga e riaccenda
temporaneamente. Ciò significa che la temperatura ambientale era scesa brevemente al di sotto
di quella impostata e che l'apparecchio si è riacceso per raggiungerla.
Messa in funzione
1. Svolgere l'intero cavo di rete dal supporto cavo 7.
Avvertenza:
Assicurarsi che la manopola del termostato 3 e il
commutatore del livello di riscaldamento 2 si trovino
su MIN o 0.
2. Inserire la spina di rete in una presa di corrente.
3. Impostare il commutatore di livello di riscaldamento 2 su “III”, e la manopola del termostato 3
su MAX. La spia di controllo "Power" 1 si ac-
cende.
Avvertenza:
Con il commutatore di livello di riscaldamento 2 si
regola la velocità di riscaldamento dell'apparecchio.
Se si desidera un riscaldamento particolarmente
rapido, il livello di riscaldamento “III”, se si desidera un riscaldamento lento, selezionare il livello di
riscaldamento “I”.
Con la manopola del termostato 3 impostare la
temperatura desiderata.
Avvertenza:
Se si desidera riscaldare un ambiente in modo particolarmente rapido, azionare inoltre l'interruttore
del termoventilatore 4. Se l'interruttore del termoventilatore 4 è spostato su ON, la relativa spia 4
si accenderà e il calore verrà soffiato nell'ambiente
tramite l'apertura 5.
5. Se si desidera spegnere l'apparecchio, impostare
prima di tutto l'interruttore del termoventilatore 4 su
OFF. Ruotare quindi il commutatore del livello di
riscaldamento 2 su “0”, e quindi la manopola
del termostato 3 su MIN.
6. Staccare la spina dalla presa di corrente.
Funzione di protezione
dalla brina
Il radiatore a olio può essere impostato in modo
tale che si attivi e si riscaldi quando la temperatura
ambiente è pari a circa 5° C:
1. Inserire la spina di rete in una presa di corrente.
2. Impostare l'interruttore del livello di riscaldamento 2 su "I", "II" o "III", e la manopola del termostato 3 a MIN.
Il radiatore a olio si accende quando la temperatura ambiente è pari a circa 5° C. Non appena la
temperatura ambiente sale oltre i 5° C circa, il radiatore a olio si spegne automaticamente.
- 10 -
Page 14

Termoventilatore
Smaltimento
Il radiatore a olio può essere utilizzato come termoventilatore:
1. Inserire la spina di rete in una presa di corrente.
1. Impostare l'interruttore del termoventilatore 4 su
ON.
La spia di controllo rossa del termoventilatore 4
si accende e l'aria calda viene soffiata nell'ambiente tramite l'uscita del termoventilatore 5.
3. Per spegnere il termoventilatore, impostare l'interruttore del termoventilatore 4 su OFF.
La spia di controllo rossa del termoventilatore 4
si spegne.
Pulizia e cura
Pericolo di lesioni
Fare raffreddare l'apparecchio prima della pulizia!
Pericolo di ustioni!
Staccare la spina dalla presa di corrente. Sussiste il
pericolo di scossa elettrica!
Pulire l'apparecchio con un panno leggermente
inumidito. In caso di sporco resistente, versare un
po' di detergente delicato sul panno.
Non gettare per alcun motivo l’apparecchio insieme ai normali rifiuti
domestici. Questo prodotto sottostà
alla direttiva europea 2002/96/EC.
Smaltire l'apparecchio attraverso un'azienda di
smaltimento autorizzata o attraverso l'ente di smaltimento comunale.
Attenersi alle prescrizioni attualmente in vigore in
materia di smaltimento di apparecchi usati.
In caso di dubbi mettersi in contatto con l'ente di
smaltimento competente.
Avvertenza:
È necessario attenersi assolutamente alle direttive in
vigore in materia di smaltimento di apparecchi! Informarsi pre il centro di smaltimento autorizzato locale.
Smaltire tutti i materiali dell'imballaggio in
modo ecologicamente conforme.
Attenzione!
Non utilizzare detergenti aggressivi, abrasivi o
chimici. Essi possono danneggiare la superficie
dell'apparecchio.
Conservazione
Se si prevede di non utilizzare l'apparecchio per un
periodo di tempo prolungato, pulirlo come descritto
al capitolo “Pulizia e cura”.
Avvolgere il cavo di rete sull'apposito supporto 7.
Riporre l'apparecchio in un luogo asciutto e pulito.
- 11 -
Page 15

Garanzia e assistenza
Questo apparecchio è garantito per tre anni a
partire dalla data di acquisto. L'apparecchio è stato
prodotto con cura e debitamente collaudato prima
della consegna.
Conservare lo scontrino come prova d'acquisto. In
caso di interventi in garanzia, contattare telefonicamente il proprio centro di assistenza. Solo in questo
modo è possibile
garantire una spedizione gratuita della merce.
La garanzia vale solo per i difetti di materiale o
fabbricazione, non per i danni da trasporto, parti
soggette a usura o danni a parti fragili come ad es.
interruttori o accumulatori. Il prodotto è destinato
esclusivamente all'uso domestico e non a quello
commerciale.
La garanzia decade in caso di impiego improprio o
manomissione, uso della forza e interventi non eseguiti dalla nostra filiale di assistenza autorizzata.
Questa garanzia non costituisce alcun limite ai diritti legali del consumatore. Il periodo di garanzia
non viene prolungato in caso di un intervento in garanzia. Ciò vale anche per le componenti sostituite
e riparate. I danni e difetti presenti già all'acquisto
devono essere comunicati immediatamente dopo il
disimballaggio, e non oltre due giorni dalla data di
acquisto. Le riparazioni effettuate dopo la scadenza del periodo di garanzia sono a pagamento.
Assistenza Italia
Tel.: 02 36003201
E-Mail: kompernass@lidl.it
IAN 90852
Assistenza Malta
Tel.: 80062230
E-Mail: kompernass@lidl.com.mt
IAN 90852
Raggiungibilità della hotline:
dal lunedì al venerdì, dalle 8.00 alle 20.00 (CET)
Importatore
KOMPERNASS GMBH
BURGSTRASSE 21
44867 BOCHUM, GERMANY
www.kompernass.com
- 12 -
Page 16

Content Page
Intended Use 14
Items supplied 14
Description of the appliance 14
Technical data 14
Safety instructions 14
Assembly 15
Commissioning 16
Frost protection function 16
Fan Heater 16
Cleaning and care 17
Storage 17
Disposal 17
Warranty and Service 17
Importer 18
- 13 -
Page 17

OIL-FILLED RADIATOR
Description of the appliance
Congratulations on the purchase of your new
appliance.
You have clearly decided in favour of a quality
product. These operating instructions are a part of
this product. They contain important information
in regard to safety, use and disposal. Before using
the product, familiarise yourself with all of these
operating and safety instructions. Use the product
only as described and only for the specified areas
of application. In addition, pass these documents
on, together with the product, to any future owner.
Intended Use
This appliance in intended exclusively for heating in
domestic households. It is not suitable for commercial
or industrial applications.
Items supplied
Oil-filled radiator
2 Roller rails
2 Mounting bracket
4 Wing nuts
Operating instructions
Fig. A:
1 Control lamp “Power”
2 Heat level switch
3 Thermostat
4 Warm air switch with integrated
warm air control lamp
5 Warm air outlet
6 Cold air intake
7 Power cable retainer
Fig. B:
8 Mounting bracket
9 Roller rails
0 Wing nuts
Technical data
Rated voltage: 220–240 V ~, 50 Hz
Heat output: 2300 - 2600 W
Heat level: I = 800 W
II = 1200 W
III = 2000 W
Thermostat: Infinitely variable
Heating gills: 9
Safety instructions
Risk of electrocution!
• Connect the oil radiator only to correctly installed
and earthed mains sockets. Ensure that the voltage
supplied through the mains socket tallies completely
with the details given on the appliance rating
plate.
• Do not fold or crush the power cable.
• To disconnect, always pull the plug itself out of
the power socket, do not pull on the power cable.
• Never touch the oil radiator, the power cable or
the plug with wet hands.
• Do not use extension cables.
- 14 -
Page 18

• Under no circumstances may the appliance be
submersed in fluids or fluids be allowed to permeate the housing. Do not expose the appliance
to humidity and do not use it outdoors. There is
the danger of electrocution. Should liquids enter
the housing, unplug the appliance from the power
socket immediately and arrange for it to be
repaired by a qualified technician.
• Under no circumstances should the oil radiator
be used in the vicinity of water, for example in
a bath, shower, washbasin or in humid cellar
rooms. The proximity of moisture presents a danger,
even when the appliance is switched off.
• In event of operating malfunctions and before
cleaning the appliance, remove the power plug
from the wall socket.
• Arrange for defective power plugs and/or cables
to be replaced at once by qualified technicians
or our Customer Service Department.
• This heating appliance has been filled with a
specific volume of a special oil. Should the
appliance become damaged or leak oil then
it may no longer be taken into use. Arrange for
the appliance to be checked and/or repaired by
qualified technicians.
• Do not open the housing or attempt to repair the
appliance yourself. Should you do so, the safety
concept of the device may be compromised and
the warranty becomes void. Permit only authorised
technicians to repair a defective appliance.
• Never place the appliance in the close vicinity
of sources of heat and protect the power cable
from potential damage.
• Do not place water-filled receptacles, e.g. flower
vases, on the appliance.
Risk of fire!
• Never place the appliance close to inflammable
materials, liquids or gases. Ensure there is at
least one meter of space to all sides and above
the appliance.
• Never leave a switched-on oil radiator unsupervised.
• This appliance is not intended for use by individuals (including children) with restricted physical,
physiological or intellectual abilities or deficiences
in experience and/or knowledge unless they
are supervised by a person responsible for their
safety or receive from this person instruction in
how the appliance is to be used.
• Children should be supervised to ensure that
they do not play with the appliance.
• ALWAYS position the appliance on a level and
heat resistant surface.
• Do not place open fire sources, e.g. candles,
on the appliance.
Warning: To avoid an overheating of the
oil radiator it may not be covered!
• Clean the appliance at regular intervals.
• Do not use an external timing switch or a separate
remote control system to operate the appliance.
• Do not position the appliance underneath a
mains power socket.
Injury hazard
• Lay the power cable in such a way that no one
can tread on or trip over it.
• Do not use extension cables. In an emergency
the power plug must be quickly accessible.
Assembly
Use the fold-out page of these instructions to assist
you with the assembly.
1. Take the oil radiator and all components from
the package and remove all packaging materials.
2. Place the oil radiator, with the base uppermost,
on a soft surface, for example a carpet.
3. Place a mounting bracket 8 under the heater
element so that the parts with a screw thread
project upwards.
- 15 -
Page 19

4. Lay a roller railer 9 over it, such that the screw
threads protrude through the holes. Check to
ensure that the recesses on the roller railers 9
face outwards. The screw ends projecting from
the appliance must reach into the recesses.
5. Screw one wing nut 0 onto each of the threaded
ends of the mounting bracket 8 until it is hand
tight.
6. Proceed in the same manner with the other side.
7. Turn the appliance over and place it on the rollers.
Commissioning
Note:
If you want to heat a room up particularly quickly,
activate additionally the warm air switch 4.
When the warm air switch 4 is positioned at ON,
the warm air control lamp 4 glows and warm air is
blown through the warm air outlet 5 into the room.
5. If you wish to switch the appliance off, first place
the warm air switch 4 at the position OFF. Next,
turn the heat level switch 2 to “0” and then the
thermostat 3 to MIN.
6. Remove the plug from the wall power socket.
1. Unwind all of the power cable from the power
cable retainer 7.
Note:
Ensure that the thermostat 3 and the heat level
switch 2 are standing at MIN resp. 0.
2. Insert the power plug into a wall power socket.
3. Place the heat level switch 2 at “III” and the
thermostat 3 at MAX. The control lamp “Power”
1 glows.
Note:
With the heat level switch 2 you can regulate how
quickly the appliance warms up. If you wish to heat
it up particularly quickly, select heat level “III”, if a
slow warming up is preferred, select heat level “I”.
Using the thermostat 3 you can set it to the desired
temperature.
4. When the desired room temperature has been
reached, slowly turn the thermostat 3 back until
a quiet “click” is heard and the control lamp
“Power” 1 extinguishes. The momentary room
temperature will now be retained. It could be
that every now and then the control lamp
“Power” 1 switches itself on and then back off.
This means that the programmed room temperature had fallen below this level for a short period
and the appliance had warmed itself back up.
Frost protection function
You can adjust the oil-filled radiator so that it automatically switches on and heats up when the room
temperature reaches about 5°C:
1. Insert the plug into a mains power socket.
2. Position the heat level switch 2 at “I”, “II” or
“III”, and the thermostat 3 at MIN.
The oil radiator will now switch itself on if the temperature falls to about 5°C. As soon as the room temperature rises to above about 5°C, t he oil radiator
switches itself off automatically.
Fan Heater
You can use the oil radiator as a heating fan:
1. Insert the plug into a mains power socket.
2. Place the heating fan switch 4 at ON.
The red heating fan indicator lamp 4 lights up
and warm air will now be blown through the heating fan exit 5 into the room.
3. To switch the heating fan off, place the heating
fan switch 4 at OFF.
The red heating fan indicator lamp 4 extinguishes.
- 16 -
Page 20

Cleaning and care
Injury hazard
Allow the appliance to cool down before cleaning
it! Risk of Burns!
Remove the power plug from the wall socket.
There is a risk of electric shock!
Note:
The guidelines regarding the scrapping of the appliance must be strictly followed! Enquire at your local
waste disposal facility.
Dispose of all packaging materials in an
environmentally friendly manner.
Clean the appliance with a lightly moist cloth. For
stubborn soiling use a mild detergent on the cloth.
Attention!
Do not use any aggressive, abrasive or chemical
cleaning agents. These could damage the surfaces.
Storage
If you do not intend to use the appliance for a long
period, clean it as described in the section “Cleaning
and care”.
Wrap the power cable around the power cable
retainer 7.
Store the appliance at a clean and dry location.
Disposal
Do not dispose of the appliance in your
normal domestic waste. This product is
subject to the European guideline
2002/96/EC.
Dispose of the appliance through an approved
disposal centre or at your community waste facility.
Observe the currently applicable regulations for
waste oil disposal.
In case of doubt, please contact your waste disposal
centre.
Warranty and Service
The warranty for this appliance is for 3 years from
the date of purchase. The appliance has been manufactured with care and meticulously examined
before delivery.
Please retain your receipt as proof of purchase. In the
event of a warranty claim, please make contact by
telephone with our Service Department. Only in this
way can a post-free despatch for your goods be
assured.
The warranty covers only claims for material and
maufacturing defects, but not for transport damage,
for wearing parts or for damage to fragile components, e.g. buttons or batteries. This product is for
private use only and is not intended for commercial
use. The warranty is void in the case of abusive and
improper handling, use of force and internal tampering not carried out by our authorized service branch.
Your statutory rights are not restricted in any way by
this warranty.
The warranty period will not be extended by repairs
made under warranty. This applies also to replaced
and repaired parts. Any damage and defects extant
on purchase must be reported immediately after unpacking the appliance, at the latest, two days after
the purchase date. Repairs made after the expiration of the warranty period are subject to payment.
- 17 -
Page 21

Service Great Britain
Tel.: 0871 5000 720 (£ 0.10/Min.)
E-Mail: kompernass@lidl.co.uk
IAN 90852
Service Malta
Tel.: 80062230
E-Mail: kompernass@lidl.com.mt
IAN 90852
Hotline availability:
Monday to Friday 08:00 - 20:00 (CET)
Importer
KOMPERNASS GMBH
BURGSTRASSE 21
44867 BOCHUM, GERMANY
www.kompernass.com
- 18 -
Page 22

Inhaltsverzeichnis Seite
Bestimmungsgemäßer Gebrauch 20
Lieferumfang 20
Gerätebeschreibung 20
Technische Daten 20
Sicherheitshinweise 20
Montage 22
Inbetriebnahme 22
Frostschutzfunktion 22
Heizlüfter 23
Reinigen und Pflegen 23
Aufbewahren 23
Entsorgen 23
Garantie und Service 24
Importeur 24
- 19 -
Page 23

ÖLRADIATOR
Gerätebeschreibung
Herzlichen Glückwunsch zum Kauf Ihres neuen
Gerätes.
Sie haben sich damit für ein hochwertiges Produkt
entschieden. Die Bedienungsanleitung ist Bestandteil dieses Produkts. Sie enthält wichtige Hinweise
für Sicherheit, Gebrauch und Entsorgung. Machen
Sie sich vor der Benutzung des Produkts mit allen
Bedien- und Sicherheitshinweisen vertraut. Benutzen
Sie das Produkt nur wie beschrieben und für die angegebenen Einsatzbereiche. Händigen Sie alle
Unterlagen bei Weitergabe des Produkts an Dritte
mit aus.
Bestimmungsgemäßer
Gebrauch
Dieses Gerät ist ausschließlich für das Heizen in privaten Haushalten bestimmt. Es ist nicht für gewerbliche oder industrielle Zwecke geeignet.
Lieferumfang
Ölradiator
2 Rollenschienen
2 Befestigungsbügel
4 Flügelmuttern
Bedienungsanleitung
Abbildung A:
1 Kontrollleuchte “Power”
2 Heizstufenschalter
3 Thermostatregler
4 Heizlüfter-Schalter mit integrierter
Heizlüfter-Kontrollleuchte
5 Heizlüfteraustritt
6 Lüftungsschlitze
7 Netzkabelhalterung
Abbildung B:
8 Befestigungsbügel
9 Rollenschiene
0 Flügelmutter
Technische Daten
Nennspannung: 220–240 V ~, 50 Hz
Heizleistung: 2300 - 2600 W
Heizstufen: I = 800 W
II = 1200 W
III = 2000 W
Thermostatregler: stufenlos einstellbar
Heizrippen: 9
Sicherheitshinweise
Gefahr eines Stromschlags!
• Schließen Sie den Ölradiator nur an eine vor-
schriftsmäßig installierte und geerdete Netzsteckdose an. Achten Sie darauf, dass die auf
dem Typenschild angegebene Spannung der
Spannung der Netzsteckdose entspricht.
• Knicken oder quetschen Sie das Netzkabel
nicht.
• Ziehen Sie das Netzkabel stets am Stecker aus
der Steckdose, ziehen Sie nicht am Kabel selbst.
- 20 -
Page 24

• Fassen Sie Ölradiator, Netzkabel und -stecker
nie mit nassen Händen an.
• Sie dürfen keine Verlängerungskabel verwenden.
• Sie dürfen das Gerät keinesfalls in eine Flüssigkeit tauchen und keine Flüssigkeiten in das Gerätegehäuse gelangen lassen. Sie dürfen das Gerät keiner Feuchtigkeit aussetzen und nicht im
Freien benutzen. Es besteht die Gefahr eines
Stromschlags. Falls doch einmal Flüssigkeit in
das Gerätegehäuse gelangt, ziehen Sie sofort
den Netzstecker des Geräts aus der Netzsteckdose und lassen Sie es von qualifiziertem
Fachpersonal reparieren.
• Benutzen Sie das Gerät keinesfalls in der Nähe
von Wasser, zum Beispiel in Badewannen, Duschen, Waschbecken oder in feuchten Kellerräumen. Die Nähe von Wasser stellt eine Gefahr
dar, auch wenn das Gerät ausgeschaltet ist.
• Ziehen Sie bei Betriebsstörungen und bevor Sie
das Gerät reinigen den Netzstecker aus der
Netzsteckdose.
• Lassen Sie beschädigte Netzstecker oder Netzkabel sofort von autorisiertem Fachpersonal
oder dem Kundenservice austauschen, um
Gefährdungen zu vermeiden.
• Dieses Heizgerät ist mit einer bestimmten Menge
speziellen Öls gefüllt. Falls das Gerät beschädigt ist oder Öl austritt, dürfen Sie es nicht mehr
in Betrieb nehmen. Lassen Sie das Gerät von
qualifiziertem Fachpersonal überprüfen und gegebenenfalls reparieren.
• Sie dürfen das Gerätegehäuse nicht öffnen oder
reparieren. In diesem Falle ist die Sicherheit nicht
gegeben und die Gewährleistung erlischt. Lassen Sie ein defektes Gerät nur von autorisiertem
Fachpersonal reparieren.
• Stellen Sie das Gerät nie in der Nähe von Wärmequellen auf, und schützen Sie das Netzkabel
vor Beschädigungen.
• Stellen Sie keine mit Wasser gefüllten Gegenstände, wie z.B. Vasen, auf das Gerät.
Brandgefahr!
• Stellen Sie das Gerät niemals in der Nähe von
brennbaren Materialien, Flüssigkeiten oder Gasen auf. Lassen Sie zu allen Seiten und nach
oben mindestens ein Meter Platz.
• Lassen Sie den eingeschalteten Ölradiator niemals unbeaufsichtigt.
• Dieses Gerät ist nicht dafür bestimmt, durch
Personen (einschließlich Kinder) mit eingeschränkten physischen, sensorischen oder
geistigen Fähigkeiten oder mangels Erfahrung
und/oder mangels Wissen benutzt zu werden,
es sei denn, sie werden durch eine für ihre
Sicherheit zuständige Person beaufsichtigt oder
erhielten von ihr Anweisungen, wie das Gerät
zu benutzen ist.
• Kinder sollten beaufsichtigt werden, um sicherzustellen, dass sie nicht mit dem Gerät spielen.
• Stellen Sie das Gerät immer auf einem ebenen
und hitzeunempfindlichen Untergrund auf.
• Stellen Sie keine offenen Brandquellen, wie z.B.
Kerzen, auf das Gerät.
Warnung: Um eine Überhitzung des Ölradiators zu vermeiden, darf dieser nicht
abgedeckt werden!
• Reinigen Sie es in regelmäßigen Abständen.
• Benutzen Sie keine externe Zeitschaltuhr oder
ein separates Fernwirksystem um das Gerät zu
betreiben.
• Stellen Sie das Gerät nicht unterhalb einer Netzsteckdose auf.
Verletzungsgefahr
• Verlegen Sie das Netzkabel so, dass niemand
darauf treten oder darüber stolpern kann.
• Sie dürfen keine Verlängerungskabel verwenden. Im Notfall muss der Netzstecker schnell zu
erreichen sein.
- 21 -
Page 25

Montage
Nehmen Sie zur Montage die Ausklappseite in dieser Anleitung zur Hilfe.
1. Entnehmen Sie den Ölradiator und alle Teile aus
der Verpackung und entfernen Sie sämtliches
Verpackungsmaterial.
2. Stellen Sie den Ölradiator mit der Unterseite
nach oben auf eine weiche Unterlage, zum Beispiel einen Teppich.
3. Schieben Sie einen Befestigungsbügel 8 unter
das Heizkörperelement, so dass die Gewindestücke herausschauen.
4. Legen Sie die Rollenschiene 9 darüber, so dass
die Gewindestücke durch die Löcher ragen. Achten Sie darauf, dass die Aussparungen an der
Rollenschiene 9 außen liegen. Die Schraubenenden, die aus dem Gerät herausragen,
müssen in die Aussparungen hineingreifen.
5. Schrauben Sie je eine Flügelmutter 0 auf die
Gewindestücke am Befestigungsbügel 8 hand-
fest auf.
6. Verfahren Sie genauso mit der anderen Seite.
7. Drehen Sie das Gerät um und stellen Sie es auf
die Rollen.
Hinweis:
Mit dem Heizstufenschalter 2 regeln Sie, wie
schnell das Gerät aufheizt. Wenn es besonders
schnell aufheizen soll, wählen Sie die Heizstufe
“III”, wenn ein langsames Aufheizen gewünscht ist,
wählen Sie die Heizstufe “I”.
Mit dem Thermostatregler 3 stellen Sie die gewünschte Temperatur ein.
4. Wenn die gewünschte Raumtemperatur erreicht
ist, drehen Sie den Thermostatregler 3 langsam
zurück, bis Sie ein leises “klick” hören und die
Kontrollleuchte “Power” 1 erlischt. Die momentane Raumtemperatur wird nun gehalten. Es kann
sein, dass die Kontrollleuchte “Power” 1
zwischendurch wieder aufleuchtet und erlischt.
Dies bedeutet, dass die eingestellte Raumtemperatur für kurze Zeit unterschritten war und das
Gerät wieder aufgeheizt hat.
Hinweis:
Wenn Sie besonders schnell einen Raum aufheizen
wollen, betätigen Sie zusätzlich den HeizlüfterSchalter 4. Wenn der Heizlüfter-Schalter 4 auf
ON steht, leuchtet die Heizlüfter-Kontrollleuchte 4
und warme Luft wird durch den Heizlüfteraustritt 5
in den Raum geblasen.
Inbetriebnahme
1. Wickeln Sie das gesamte Netzkabel von der
Netzkabelhalterung 7 ab.
Hinweis:
Vergewissern Sie sich, dass der Thermostatregler 3
und der Heizstufenschalter 2 auf MIN bzw. 0 stehen.
2. Stecken Sie den Netzstecker in eine Netzsteckdose.
3. Stellen Sie den Heizstufenschalter 2 auf “III”,
und den Thermostatregler 3 auf MAX. Die Kon-
trollleuchte “Power” 1 leuchtet.
5. Wenn Sie das Gerät ausschalten wollen, stellen
Sie zuerst den Heizlüfter-Schalter 4 auf OFF.
Drehen Sie dann den Heizstufenschalter 2 auf
“0” und danach den Thermostatregler 3 auf
MIN.
6. Ziehen Sie den Netzstecker aus der Netzsteckdose.
Frostschutzfunktion
Sie können den Ölradiator so einstellen, dass dieser
automatisch anspringt und heizt, wenn die Raumtemperatur ca. 5°C beträgt:
1. Stecken Sie den Netzstecker in eine Netzsteckdose.
- 22 -
Page 26

2. Stellen Sie den Heizstufenschalter 2 auf “I”, “II”
oder“III”, und den Thermostatregler 3 auf MIN.
Der Ölradiator schaltet sich nun ein, wenn die
Raumtemperatur ca. 5°C beträgt. Sobald die Raumtemperatur oberhalb von ca. 5°C liegt, schaltet sich
der Ölradiator automatisch wieder ab.
Heizlüfter
Sie können den Ölradiator als Heizlüfter verwenden:
1. Stecken Sie den Netzstecker in eine Netzsteckdose.
2. Stellen Sie den Heizlüfter-Schalter 4 auf ON.
Die rote Heizlüfter-Kontrollleuchte 4 leuchtet
und warme Luft wird durch den Heizlüfteraustritt
5 in den Raum geblasen.
3. Um den Heizlüfter auszuschalten, stellen Sie den
Heizlüfter-Schalter 4 auf OFF.
Die rote Heizlüfter-Kontrollleuchte 4 erlischt.
Reinigen und Pflegen
Verletzungsgefahr
Lassen Sie das Gerät vor dem Reinigen abkühlen!
Verbrennungsgefahr!
Ziehen Sie den Netzstecker aus der Netzsteckdose.
Es besteht die Gefahr eines elektrischen Schlages.
Reinigen Sie das Gerät mit einem leicht angefeuchteten Tuch. Bei hartnäckigen Verschmutzungen geben Sie ein mildes Spülmittel auf das Tuch.
Aufbewahren
Wenn Sie das Gerät längere Zeit nicht benutzen,
reinigen Sie es wie im Kapitel “Reinigen und Pflegen” beschrieben.
Wickeln Sie das Netzkabel um die Netzkabelhalterung 7.
Verstauen Sie das Gerät an einem sauberen und
trockenem Ort.
Entsorgen
Werfen Sie das Gerät keinesfalls in den
normalen Hausmüll. Dieses Produkt
unterliegt der europäischen Richtlinie
2002/96/EC.
Entsorgen Sie das Gerät über einen zugelassenen
Entsorgungsbetrieb oder über Ihre kommunale
Entsorgungseinrichtung.
Beachten Sie die aktuell geltenden Vorschriften für
die Altölentsorgung.
Setzen Sie sich im Zweifelsfall mit Ihrer Entsorgungseinrichtung in Verbindung.
Hinweis:
Die Richtlinien hinsichtlich der Verschrottung des Gerätes sind unbedingt zu befolgen! Erkundigen Sie
such bei Ihrer kommunalen Entsorgungseinrichtung.
Führen Sie alle Verpackungsmaterialien
einer umweltgerechten Entsorgung zu.
Achtung!
Benutzen Sie keine aggressiven, scheuernden oder
chemischen Reinigungsmittel. Diese können die
Oberfläche des Gerätes angreifen.
- 23 -
Page 27

Garantie und Service
Sie erhalten auf dieses Gerät 3 Jahre Garantie ab
Kaufdatum. Das Gerät wurde sorgfältig produziert
und vor Anlieferung gewissenhaft geprüft.
Bitte bewahren Sie den Kassenbon als Nachweis
für den Kauf auf. Bitte setzen Sie sich im Garantiefall mit Ihrer Servicestelle telefonisch in Verbindung.
Nur so kann eine kostenlose Einsendung Ihrer Ware
gewährleistet werden.
Die Garantieleistung gilt nur für Material- oder
Fabrikationsfehler, nicht aber für Transportschäden,
Verschleißteile oder für Beschädigungen an zerbrechlichen Teilen, z. B. Schalter oder Akkus. Das
Produkt ist lediglich für den privaten und nicht für
den gewerblichen Gebrauch bestimmt.
Bei missbräuchlicher und unsachgemäßer Behandlung, Gewaltanwendung und bei Eingriffen, die
nicht von unserer autorisierten Service-Niederlassung vorgenommen wurden, erlischt die Garantie.
Ihre gesetzlichen Rechte werden durch diese
Garantie nicht eingeschränkt.
Die Garantiezeit wird durch die Gewährleistung
nicht verlängert. Dies gilt auch für ersetzte und reparierte Teile. Eventuell schon beim Kauf vorhandene
Schäden und Mängel müssen sofort nach dem
Auspacken gemeldet werden, spätestens aber zwei
Tage nach Kaufdatum. Nach Ablauf der Garantiezeit anfallende Reparaturen sind kostenpflichtig.
Service Deutschland
Tel.: 0800 5435 111
E-Mail: kompernass@lidl.de
IAN 90852
Service Österreich
Tel.: 0820 201 222 (0,15 EUR/Min.)
E-Mail: kompernass@lidl.at
IAN 90852
Service Schweiz
Tel.: 0842 665566 (0,08 CHF/Min.,
Mobilfunk max. 0,40 CHF/Min.)
E-Mail: kompernass@lidl.ch
IAN 90852
Erreichbarkeit Hotline:
Montag bis Freitag von 8:00 Uhr - 20:00 Uhr (MEZ)
Importeur
KOMPERNASS GMBH
BURGSTRASSE 21
44867 BOCHUM
DEUTSCHLAND
www.kompernass.com
- 24 -
Page 28

KOMPERNASS GMBH
BURGSTRASSE 21
44867 BOCHUM
DEUTSCHLAND / GERMANY
www.kompernass.com
Estado de las informaciones · Versione delle informazioni
Last Information Update · Stand der Informationen:
04 / 2013 · Ident.-No.: SOR2600A1-042013-1
IAN 90852
5
 Loading...