

Page 1

6
Overlock Sewing Machine SON 90 A1
KOMPERNASS GMBH
BURGSTRASSE 21 · D-44867 BOCHUM
www.kompernass.com
ID-Nr.: SON 90 A1-01/11-V1
IAN: 64780
Overlock Sewing Machine
Operating instructions
Page 2
SON 90 A1
i
1
uztr
2
3
o
p
a
s
d
e
w
q
4
f
5
6
7
8
9
0
Page 3

INDEX PAGE
Intended Usage 3
Safety instructions 3
Items supplied 4
Technical Data 4
Description of the appliance 5
Bringing the upper blade into a rest position 5
Needle Information 5
Upper looper element 5
Opening the front flap 6
Preparation 6
Connecting the foot pedal . . . . . . . . . . . . . . . . . . . . . . . . . . . . . . . . . . . . . . . . . . . . . . . . . . . . . . . . . . . . . . . . . . . . . . . . . . . . . . . . . . . . . . .6
Controlling the sewing speed . . . . . . . . . . . . . . . . . . . . . . . . . . . . . . . . . . . . . . . . . . . . . . . . . . . . . . . . . . . . . . . . . . . . . . . . . . . . . . . . . . . .6
Safety switch . . . . . . . . . . . . . . . . . . . . . . . . . . . . . . . . . . . . . . . . . . . . . . . . . . . . . . . . . . . . . . . . . . . . . . . . . . . . . . . . . . . . . . . . . . . . . . . . . .6
Fitting the waste container . . . . . . . . . . . . . . . . . . . . . . . . . . . . . . . . . . . . . . . . . . . . . . . . . . . . . . . . . . . . . . . . . . . . . . . . . . . . . . . . . . . . . . .6
Removing needle(s) . . . . . . . . . . . . . . . . . . . . . . . . . . . . . . . . . . . . . . . . . . . . . . . . . . . . . . . . . . . . . . . . . . . . . . . . . . . . . . . . . . . . . . . . . . . .7
Inserting needle(s) . . . . . . . . . . . . . . . . . . . . . . . . . . . . . . . . . . . . . . . . . . . . . . . . . . . . . . . . . . . . . . . . . . . . . . . . . . . . . . . . . . . . . . . . . . . . .7
Operating the handwheel . . . . . . . . . . . . . . . . . . . . . . . . . . . . . . . . . . . . . . . . . . . . . . . . . . . . . . . . . . . . . . . . . . . . . . . . . . . . . . . . . . . . . . .7
Adjusting the thread tree . . . . . . . . . . . . . . . . . . . . . . . . . . . . . . . . . . . . . . . . . . . . . . . . . . . . . . . . . . . . . . . . . . . . . . . . . . . . . . . . . . . . . . . .7
Threading 8
General instructions for threading . . . . . . . . . . . . . . . . . . . . . . . . . . . . . . . . . . . . . . . . . . . . . . . . . . . . . . . . . . . . . . . . . . . . . . . . . . . . . . . . .8
Threading the upper looper thread (red) . . . . . . . . . . . . . . . . . . . . . . . . . . . . . . . . . . . . . . . . . . . . . . . . . . . . . . . . . . . . . . . . . . . . . . . . . . .8
Threading the lower looper thread (yellow) . . . . . . . . . . . . . . . . . . . . . . . . . . . . . . . . . . . . . . . . . . . . . . . . . . . . . . . . . . . . . . . . . . . . . . . .10
Threading yarn for the right needle (green) . . . . . . . . . . . . . . . . . . . . . . . . . . . . . . . . . . . . . . . . . . . . . . . . . . . . . . . . . . . . . . . . . . . . . . . .11
Threading yarn for the left needle (blue) . . . . . . . . . . . . . . . . . . . . . . . . . . . . . . . . . . . . . . . . . . . . . . . . . . . . . . . . . . . . . . . . . . . . . . . . . .13
Trial run . . . . . . . . . . . . . . . . . . . . . . . . . . . . . . . . . . . . . . . . . . . . . . . . . . . . . . . . . . . . . . . . . . . . . . . . . . . . . . . . . . . . . . . . . . . . . . . . . . . .14
Changing threads (binding together) 15
Set the stitch length 15
Setting the seam width 15
... by using the right or left needle . . . . . . . . . . . . . . . . . . . . . . . . . . . . . . . . . . . . . . . . . . . . . . . . . . . . . . . . . . . . . . . . . . . . . . . . . . . . . . . .15
... by turning the seam width adjustment knob . . . . . . . . . . . . . . . . . . . . . . . . . . . . . . . . . . . . . . . . . . . . . . . . . . . . . . . . . . . . . . . . . . . . . .16
Setting the seam width adjustment knob . . . . . . . . . . . . . . . . . . . . . . . . . . . . . . . . . . . . . . . . . . . . . . . . . . . . . . . . . . . . . . . . . . . . . . . . . . .16
Adjust sewing foot pressure 16
Differential transport 17
Manner of operation . . . . . . . . . . . . . . . . . . . . . . . . . . . . . . . . . . . . . . . . . . . . . . . . . . . . . . . . . . . . . . . . . . . . . . . . . . . . . . . . . . . . . . . . . .17
Gathered overlock seam - Settings . . . . . . . . . . . . . . . . . . . . . . . . . . . . . . . . . . . . . . . . . . . . . . . . . . . . . . . . . . . . . . . . . . . . . . . . . . . . . . .17
Stretched overlock seam - Settings . . . . . . . . . . . . . . . . . . . . . . . . . . . . . . . . . . . . . . . . . . . . . . . . . . . . . . . . . . . . . . . . . . . . . . . . . . . . . . .17
Free arm sewing 18
Read these operating instructions carefully before using the appliance for the first time and preserve this booklet for later reference. Pass this booklet on to
whoever might acquire the appliance at a future date.
- 1 -
Page 4

Overlock seams 19
Roll hemmings . . . . . . . . . . . . . . . . . . . . . . . . . . . . . . . . . . . . . . . . . . . . . . . . . . . . . . . . . . . . . . . . . . . . . . . . . . . . . . . . . . . . . . . . . . . . . . .19
Binding-off and sample sewing . . . . . . . . . . . . . . . . . . . . . . . . . . . . . . . . . . . . . . . . . . . . . . . . . . . . . . . . . . . . . . . . . . . . . . . . . . . . . . . . . .20
Recommended tension settings . . . . . . . . . . . . . . . . . . . . . . . . . . . . . . . . . . . . . . . . . . . . . . . . . . . . . . . . . . . . . . . . . . . . . . . . . . . . . . . . . .20
2-thread overcast chain stitch (overlock) . . . . . . . . . . . . . . . . . . . . . . . . . . . . . . . . . . . . . . . . . . . . . . . . . . . . . . . . . . . . . . . . . . . . . . . . . . .21
2-thread-overcast-stitch . . . . . . . . . . . . . . . . . . . . . . . . . . . . . . . . . . . . . . . . . . . . . . . . . . . . . . . . . . . . . . . . . . . . . . . . . . . . . . . . . . . . . . . . .22
3-thread chain stitch (overlock) . . . . . . . . . . . . . . . . . . . . . . . . . . . . . . . . . . . . . . . . . . . . . . . . . . . . . . . . . . . . . . . . . . . . . . . . . . . . . . . . . .23
3-thread - flatlock seam . . . . . . . . . . . . . . . . . . . . . . . . . . . . . . . . . . . . . . . . . . . . . . . . . . . . . . . . . . . . . . . . . . . . . . . . . . . . . . . . . . . . . . . .24
3-thread overcast chain stitch (overlock) . . . . . . . . . . . . . . . . . . . . . . . . . . . . . . . . . . . . . . . . . . . . . . . . . . . . . . . . . . . . . . . . . . . . . . . . . . .25
3-thread safety stitch, highly elastic, imitated . . . . . . . . . . . . . . . . . . . . . . . . . . . . . . . . . . . . . . . . . . . . . . . . . . . . . . . . . . . . . . . . . . . . . . .26
4-thread safety stitch, highly elastic, imitated . . . . . . . . . . . . . . . . . . . . . . . . . . . . . . . . . . . . . . . . . . . . . . . . . . . . . . . . . . . . . . . . . . . . . . .27
Roll hemmings 28
3-thread rolled hem . . . . . . . . . . . . . . . . . . . . . . . . . . . . . . . . . . . . . . . . . . . . . . . . . . . . . . . . . . . . . . . . . . . . . . . . . . . . . . . . . . . . . . . . . . .28
3-thread upper looper overcast rolled hem . . . . . . . . . . . . . . . . . . . . . . . . . . . . . . . . . . . . . . . . . . . . . . . . . . . . . . . . . . . . . . . . . . . . . . . .28
2-thread rolled hem . . . . . . . . . . . . . . . . . . . . . . . . . . . . . . . . . . . . . . . . . . . . . . . . . . . . . . . . . . . . . . . . . . . . . . . . . . . . . . . . . . . . . . . . . . .29
2-thread lower looper overcast rolled hem . . . . . . . . . . . . . . . . . . . . . . . . . . . . . . . . . . . . . . . . . . . . . . . . . . . . . . . . . . . . . . . . . . . . . . . . .29
Flatlock decorative seams 30
Flatlock seam as assembly seam . . . . . . . . . . . . . . . . . . . . . . . . . . . . . . . . . . . . . . . . . . . . . . . . . . . . . . . . . . . . . . . . . . . . . . . . . . . . . . . . .30
Flatlock seam as decorative seam . . . . . . . . . . . . . . . . . . . . . . . . . . . . . . . . . . . . . . . . . . . . . . . . . . . . . . . . . . . . . . . . . . . . . . . . . . . . . . . .31
Overlock blind hems 31
Pin tucks 31
Sewing corners 32
Outer corners . . . . . . . . . . . . . . . . . . . . . . . . . . . . . . . . . . . . . . . . . . . . . . . . . . . . . . . . . . . . . . . . . . . . . . . . . . . . . . . . . . . . . . . . . . . . . . . .32
Inner corners . . . . . . . . . . . . . . . . . . . . . . . . . . . . . . . . . . . . . . . . . . . . . . . . . . . . . . . . . . . . . . . . . . . . . . . . . . . . . . . . . . . . . . . . . . . . . . . .32
Tips and Tricks 33
Using pins . . . . . . . . . . . . . . . . . . . . . . . . . . . . . . . . . . . . . . . . . . . . . . . . . . . . . . . . . . . . . . . . . . . . . . . . . . . . . . . . . . . . . . . . . . . . . . . . . . .33
Secure empty threads . . . . . . . . . . . . . . . . . . . . . . . . . . . . . . . . . . . . . . . . . . . . . . . . . . . . . . . . . . . . . . . . . . . . . . . . . . . . . . . . . . . . . . . . .33
Seam reinforcement . . . . . . . . . . . . . . . . . . . . . . . . . . . . . . . . . . . . . . . . . . . . . . . . . . . . . . . . . . . . . . . . . . . . . . . . . . . . . . . . . . . . . . . . . . .33
Edging . . . . . . . . . . . . . . . . . . . . . . . . . . . . . . . . . . . . . . . . . . . . . . . . . . . . . . . . . . . . . . . . . . . . . . . . . . . . . . . . . . . . . . . . . . . . . . . . . . . . .33
Maintenance and Cleaning 34
Cleaning and lubrication . . . . . . . . . . . . . . . . . . . . . . . . . . . . . . . . . . . . . . . . . . . . . . . . . . . . . . . . . . . . . . . . . . . . . . . . . . . . . . . . . . . . . . .34
Exchanging the lower blade . . . . . . . . . . . . . . . . . . . . . . . . . . . . . . . . . . . . . . . . . . . . . . . . . . . . . . . . . . . . . . . . . . . . . . . . . . . . . . . . . . . .34
Storage 35
Disposal 35
Warranty and Service 35
Importer 35
Troubleshooting 36
- 2 -
Page 5

Intended Usage
OVERLOCK SEWING MACHINE
This overlock sewing machine is intended ...
- for use as a portable machine,
– for the trimming of material edges (sewing) of typical household
textiles, and ...
– only for domestic household use.
Safety instructions
Like any other electrical device, a sewing machine can cause serious, even
life-threatening injuries. To avoid these, and to work safely:
• Always disconnect the power supply when leaving the machine unattended.
This will prevent the risk of accidents if the machine is switched on
accidentally.
• Always first disconnect the power plug before carrying out maintenance
work on the machine. This will prevent possibly life-threatening electric
shocks. The LED light is not exchangeable.
• Do not pull the plug out of the wall socket by the lead. When pulling
out the plug, always hold the plug, not the lead.
• Only use the sewing machine in dry rooms.
• Arrange for defective power plugs and/or cables to be replaced at
once by qualified technicians or our Customer Service Department.
• This appliance is not intended for use by individuals (including children) with
restricted physical, physiological or intellectual abilities or deficiences in
experience and/or knowledge unless they are supervised by a person
responsible for their safety or receive from this person instruction in how
the appliance is to be used.
• Children should be supervised to ensure that they do not play with
the appliance.
• Never use the machine when the ventilation apertures are blocked.
Keep the ventilation apertures of the machine and the foot switch free
from fluff, dust and waste material.
• Should the cable connected to the foot pedal become damaged,
to avoid potential risks it must be replaced by the manufacturer, his
customers services or a similarly qualified person.
This overlock sewing machine is not intended ...
- to be installed at a permanent location,
– for the processing of other materials (e.g. leather, canvas, sailcloth
and other heavy materials),
- for commercial or industrial use.
Warning about injuries and material damages:
• Keep your work space tidy. An untidy workplace can lead to accidents.
• Provide adequate lighting when working!
• Do not wear loose clothing or jewellery, as these can be caught in
moving parts. You should also wear a hair net if you have long hair.
• Avoid adopting an unusual posture. Remain steady and in a well-balanced
position at all times.
• If accidents occur as a result of handling the machine with insufficient
care, or failure to follow the safety instructions in this manual, then the
manufacturer cannot accept liability.
• Never cover the ventilation slots! Risk of overheating!
• Keep the sewing machine oil well away from children.
• If swallowed, or should eye contact be made with the sewing machine
oil, consult a doctor immediately.
- 3 -
Page 6
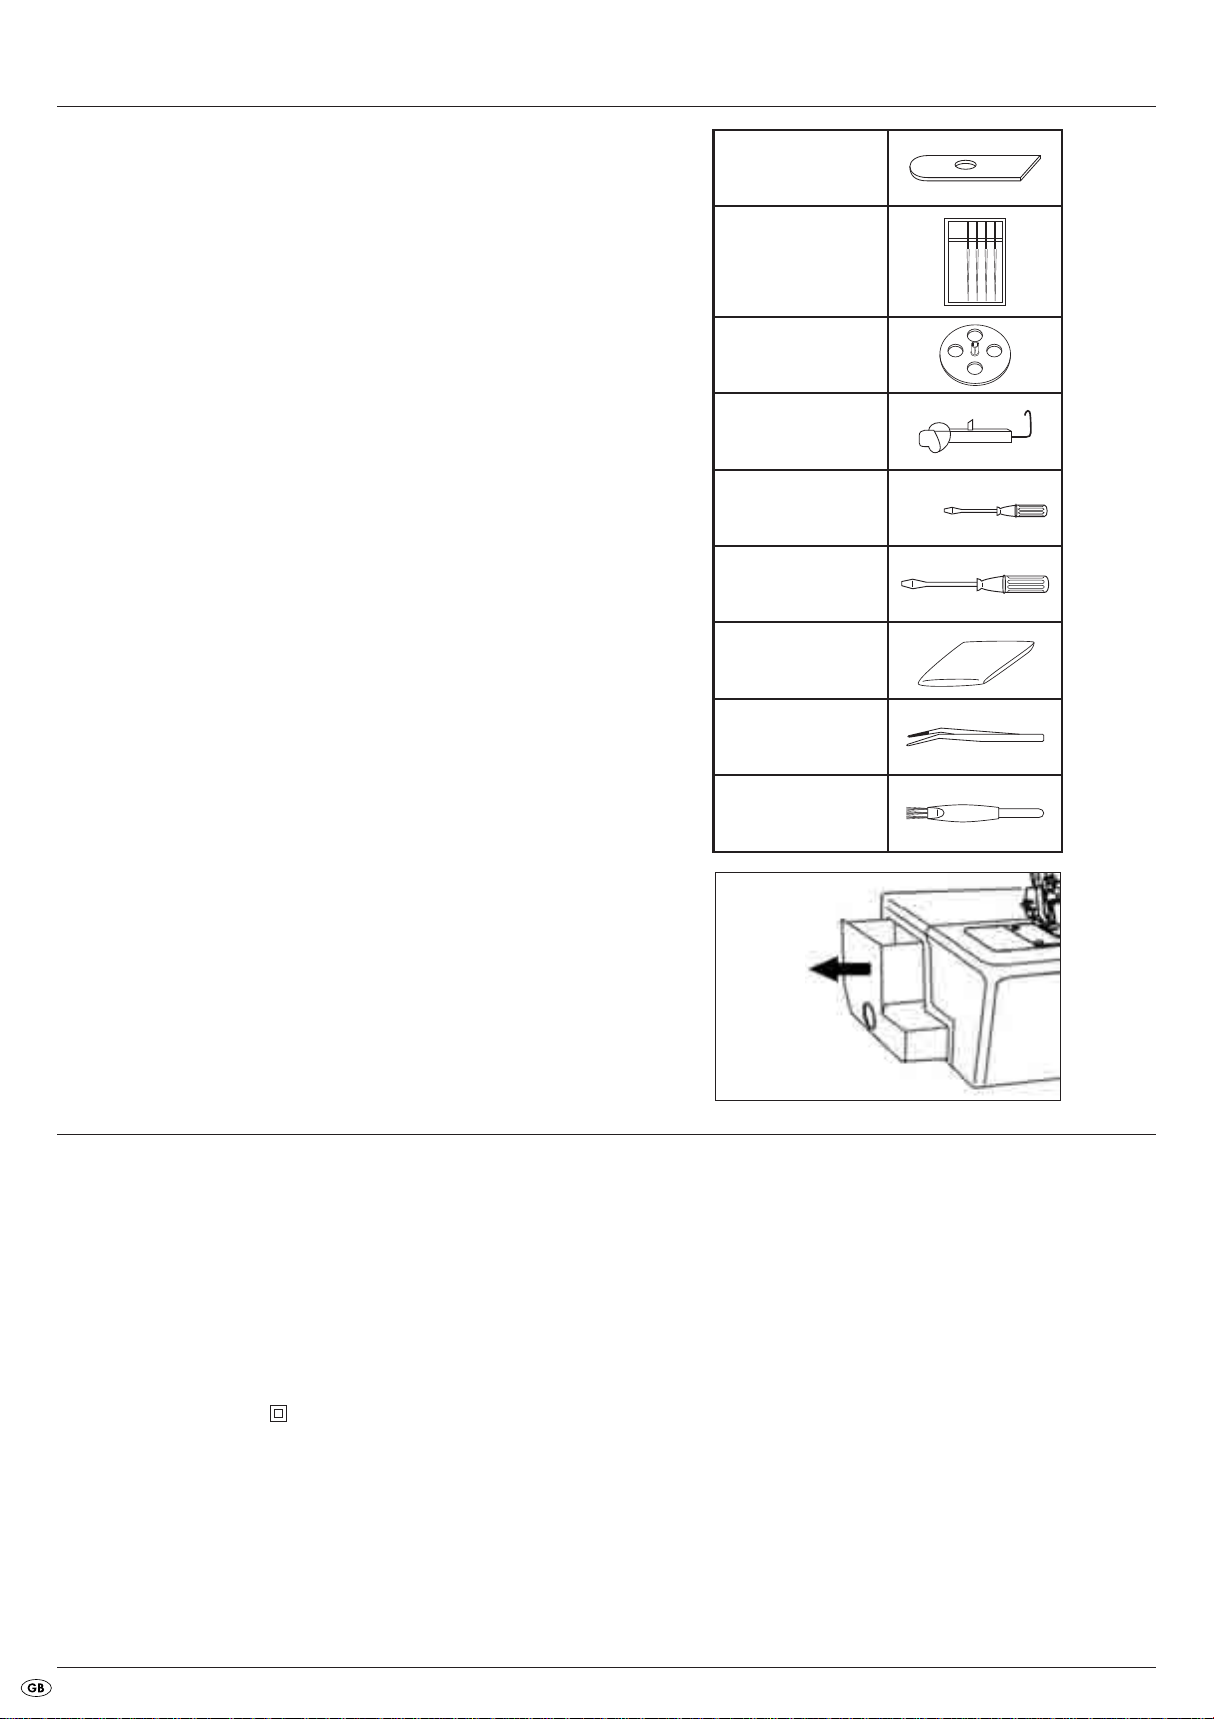
Items supplied
Overlock Sewing Machine
Oil
Waste container
Accessory box
Operating instructions
Replacement blade
(bottom)
2 Needles Nr. 11
4 Needles Nr. 14
(2 in the machine,
pre-installed)
4 Bobbin caps
Upper looper element
Screwdriver small
Screwdriver large
Covering hood
The accessories are to be found in the accessory box on the side
of the machine (Fig.1.).
Technical Data
Number of threads 2, 3 or 4
Number of needles 2 or 1
Sewing speed approx. 1200 rpm
Stitch width
right: 3.0 mm - 4.5 mm
left: 5.2 mm - 6.7 mm
Stitch length 1 – 4 mm
Needles HA x 1 Nr. 11-14 or 130/705 Nr. 75-90
Power consumption : 90 W
Rated voltage: 220 - 240 V ~, 50Hz
Protection class: II
Tweezers
Brush with integrated
unstitcher
Fig. 1
The sound intensity level under normal operating conditions amounts to
78dB(A).
Foot pedal
Use only the foot pedal originally supplied with this sewing machine:
- ELECTRONIC FDM Speed Controller
- Type KD - 2902
- 4 -
Page 7
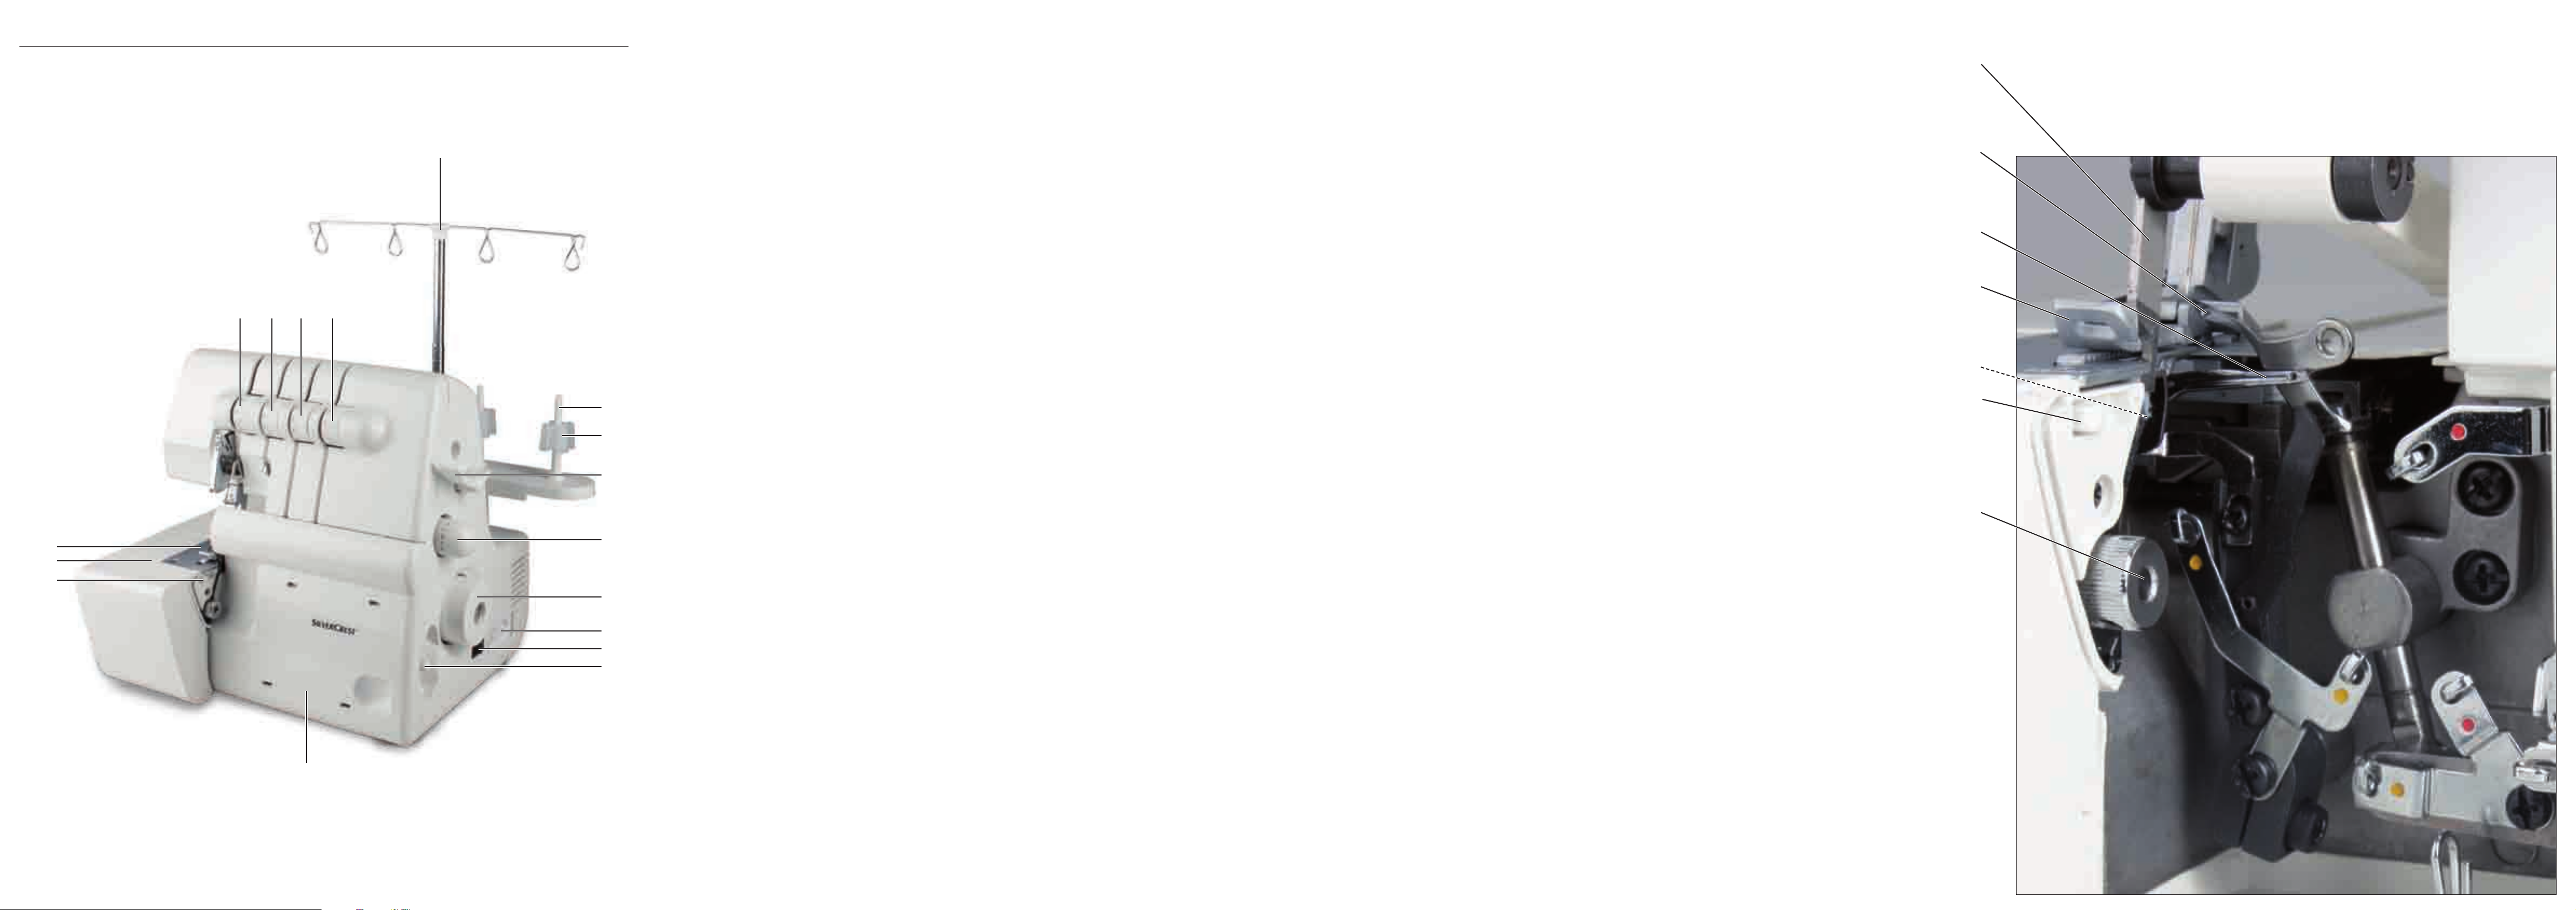
Description of the appliance
On the front fold-out page:
1 Thread tree
2 Spool support
3 Thread roll centerer
4 Sewing foot lever
5 Adjustment wheel for stitch length
6 Handwheel
7 Connection Footpedal/Power supply
8 Power switch (On/Off switch)
9 Differential transport lever
0 Front flap
q Support plate of the seam width finger
w Free arm
e Stitch plate
r Thread tension selector (left needle)
t Thread tension selector (right needle)
z Thread tension selector (upper looper)
u Thread tension selector (lower looper)
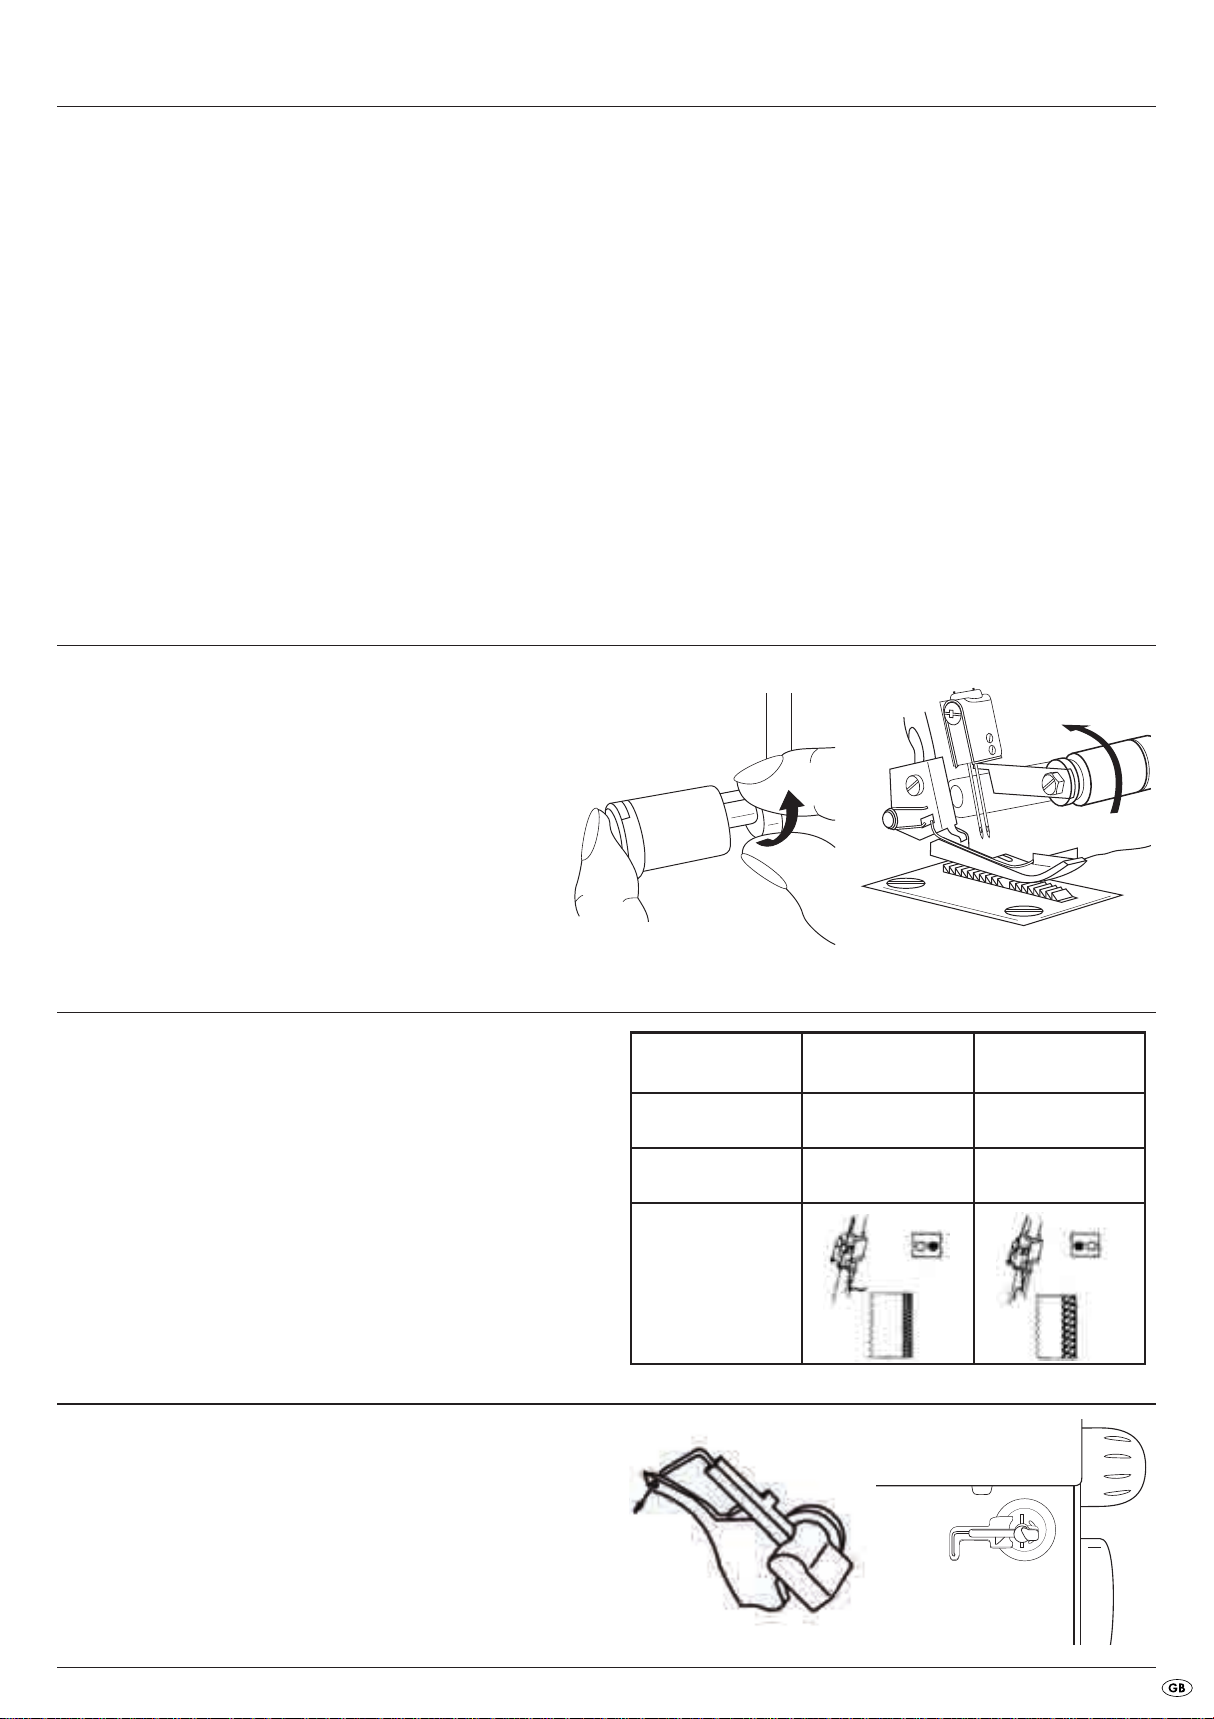
Bringing the upper blade into a rest position
To make certain types of seam, or to more easily operate the adjustment
wheel for cutting width f, you must bring the upper blade i into a
rest position.
For this, press the upper blade i to the right and rotate it a little, so
that it is firmly seated (Fig. 2 and 3).
On the rear fold-out page:
i movable upper blade (Upper blade)
o Upper looper
p Lower looper
a Sewing foot
s Fixed lower blade
d Seam width switch
f Seam width adjustment knob
Fig. 2
Needle Information
This machine uses standard commercial flat-shaft needles for sewing machines.
These prevent the incorrect insertion of the needle. You can purchase these
needles in any specialist shop.
You can use needles of the sizes 11 and 14 in this machine.
The adjoining table gives you a brief overview of the differences when using a
needle (for detailed information, see "Setting the seam width).
Upper looper element
For some kinds of stitches you will need to use the upper looper element.
When you need to insert it is described in the individual stitches.
Insert the small wire from behind in the eyelet of the upper looper o and
the plastic bolt, on the other end and from the front, in the hole in the upper
looper o (Fig. 4a).
You can store the upper looper ready for use in the slot behind the front
flap 0 (Fig. 4b).
Fig. 3
Seam width 3.5 mm 5.7 mm
Employed needle right needle left needle
Thread tension selector green blue
- 5 -
Fig.4a
Fig.4b
Page 8
Opening the front flap
Attention!
Always switch the machine off with the power switch 8 when you open
the front flap 0. Risk of Injury!
• Slide the front flap 0 to the right (A) and then pull it towards you (B)
(Fig. 5).You will see the upper looper behind the front flap 0.
Note:
While sewing, the front flap 0 must be kept closed!
Preparation
Place the overlock sewing machine on a stable and level surface.
Ensure there is sufficient illumination at your workplace.
Connecting the foot pedal
• Insert the plug of the foot pedal into the socket for the foot pedal 7.
• Insert the plug into a power socket.
To switch the machine on, press the power switch 8.
Fig. 5
Attention!
During absences from the machine or when doing maintenance work,
always remove the plug from the mains power socket. Risk of Injury!
Controlling the sewing speed
The sewing speed is controlled by means of the footpedal. The sewing
speed is changed by applying more or less pressure to the footpedal.
Safety switch
This machine is fitted with a micro safety switch. You cannot start the machine
if the front flap 0 is open. Close the front flap 0 before you start to sew.
Fitting the waste container
The waste container collects remnants during sewing, so that your workplace
stays tidy.
• First push the two restraints (A) into the receiving holes (B) (Fig. 6).
• Then guide the two restraints (C) into the receiving holes (D) (Fig. 7).
Fig. 6
• To remove the waste container, pull it forward and then tilt it slightly
(Fig. 8).
Fig. 7
Fig. 8
- 6 -
Page 9

Removing needle(s)
Attention!
Before exchanging the needles, remove the power plug. This prevents an
unintended starting of the machine. If you do not, you run a risk of serious
injury!
TTiipp!!
An exchange of the needles is easier if you first remove the free arm cover
(Fig. 9a)!
1. Turn the handwheel 6 towards yourself until the needles are in the
highest position (Fig. 9b)
2. Loosen the needle retaining screws with the small screwdriver until the
needles are free (Fig. 10).
3. Remove the needles.
Inserting needle(s)
Attention!
Before exchanging the needles, remove the power plug. This prevents an
unintended starting of the machine. If you do not, you run a risk of serious
injury!
1. Hold the needle with the flattened side to the rear.
2. Push the needle as far as it will go into the needle holder.
3. Firmly tighten the needle screws with the small screwdriver (Fig. 10).
Fig.9a
Fig.9b
Operating the handwheel
Note:
Always turn the handwheel 6 only towards yourself (Fig. 9b).
Adjusting the thread tree
• Completely remove the thread tree 1 before threading (Fig. 11).
• Turn the thread tree 1 so that the thread guides stand exactly above
the spool supports 2.
• In the correct position, the two jointed parts of the thread tree 1 snap
audibly into position.
• Place the thread rolls on the thread roll centrings.
If you do not use industrial coils, remove the thread roll centrings. Slide
a spool cap onto each of the thread rolls (Fig. 12). This will hold them in
place when sewing.
Fig.10
Fig. 11
- 7 -
Fig. 12
Page 10
Threading
143 2
Note:
On delivery, all 4 threads are already threaded. You can begin sewing immediately. Should you wish to change the thread, and all 4 threads are still
threaded, then proceed as described in the chapter "Changing threads
(binding together)“.
Should you need to rethread all threads from scratch, then proceed as
described in this chapter, "Threading“.
General instructions for threading
Attention!
Before threading, ALWAYS place the power switch 8 at "O" (Off) and
remove the plug from the mains power socket. This prevents an unintended
starting of the machine. If you do not, you run a risk of serious injury!
Correct threading is important, so that the stitches are not irregular and that
the yarn does not break.
Behind the front flap 0 there is a diagram with instructions for threading.
Additionally, the thread guides are marked in various colours.
In the accessory box you will find tweezers, the use of which helps make
threading easier.
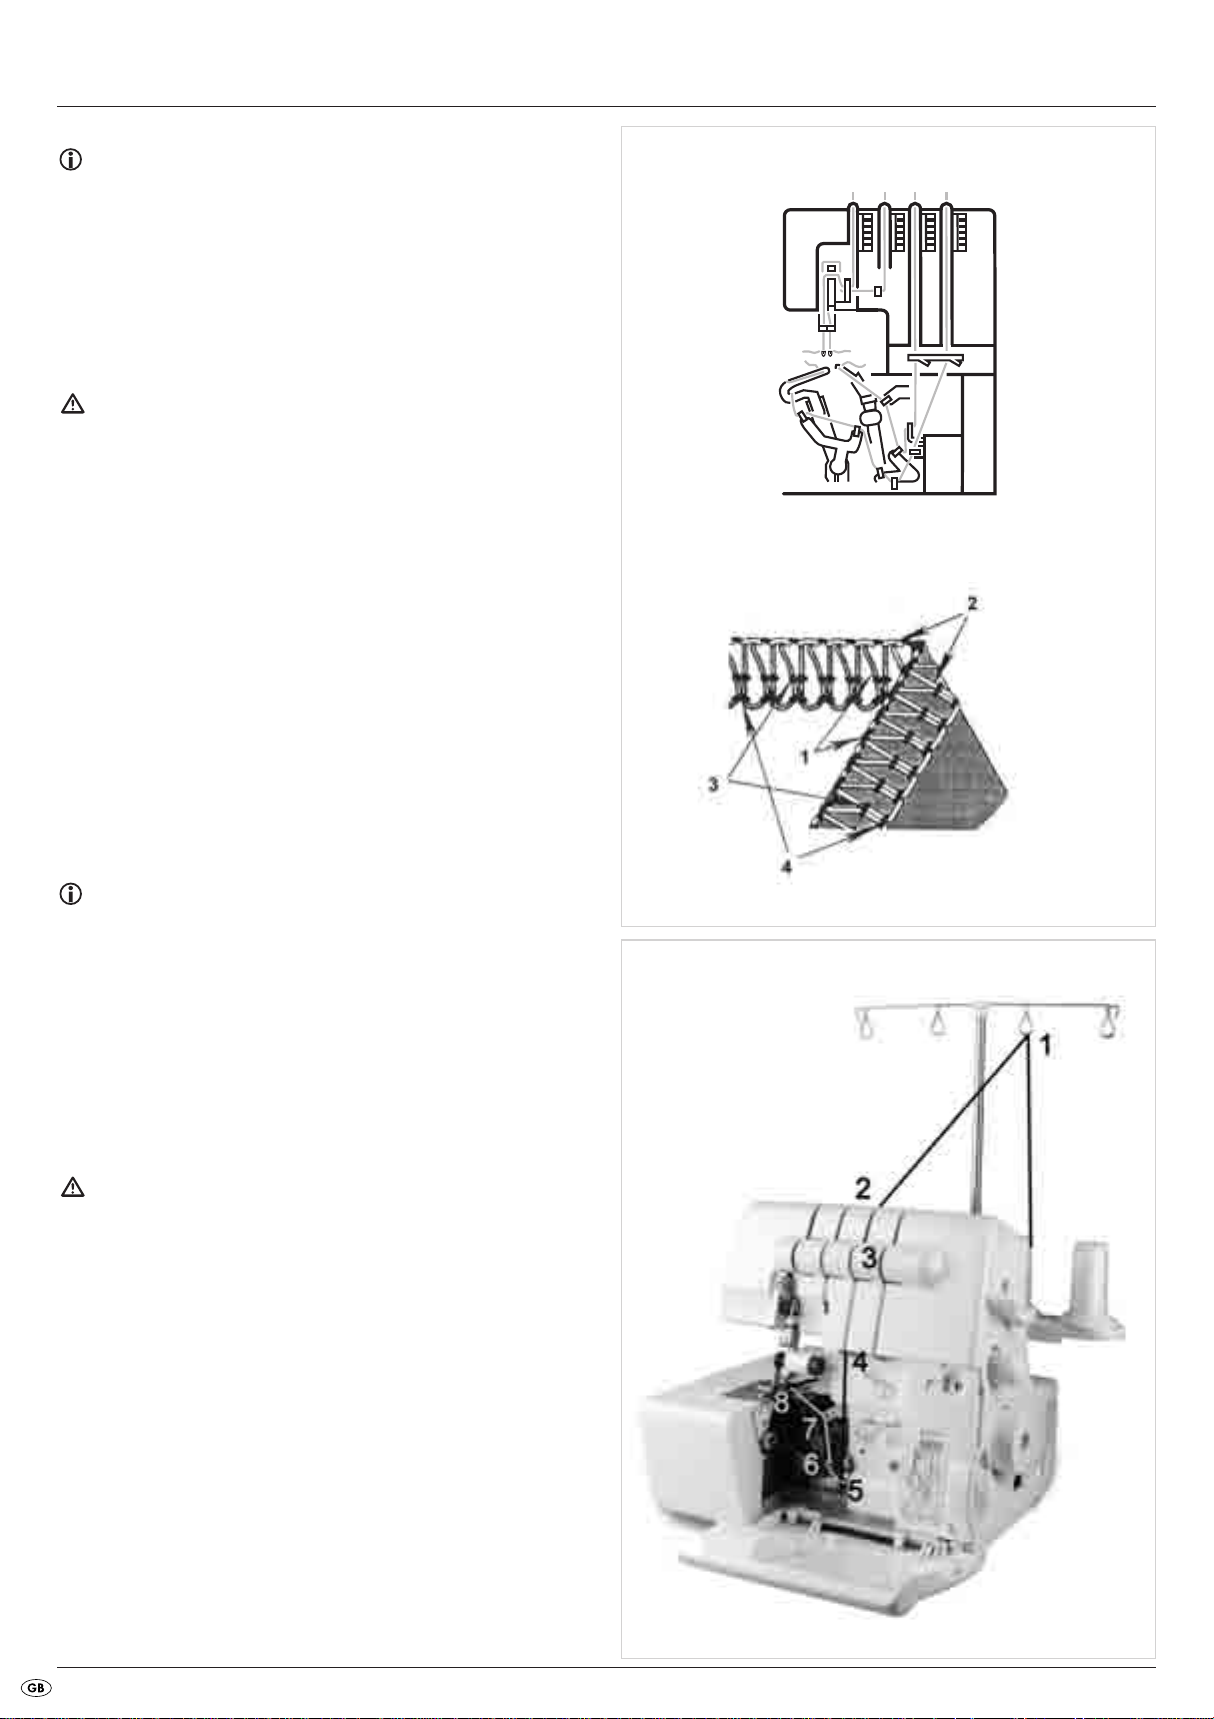
Threading is done in this order (Fig. 13/14):
1. First step: Upper looper (red)
2. Second step: Lower looper (yellow)
3. Third step: Thread for the right needle (green)
4. Fourth step: Thread for the left needle (blue)
Note:
When all threads are threaded, and the lower looper thread loosens itself,
proceed as follows:
• Unthread the two threads of the needles.
• Then thread the lower looper thread.
• First then rethread the threads of the two needles again.
The needles must always be the last to be threaded!
For simplification, the individual steps are numbered on the drawings.
Fig. 13
Fig. 14
Threading the upper looper thread (red)
Attention!
Before threading, ALWAYS place the power switch 8 at "O" (Off) and
remove the plug from the mains power socket. This prevents an unintended
starting of the machine. If you do not, you run a risk of serious injury!
Always use the accompanying drawings for assistance.
Figure 15 shows the thread path of the upper looper thread. The individual
threading positions are numbered and described in detail in the following.
1. Open the front flap 0.
2. Guide the yarn from back to front through the thread tree 1 (1).
Fig. 15
- 8 -
Page 11

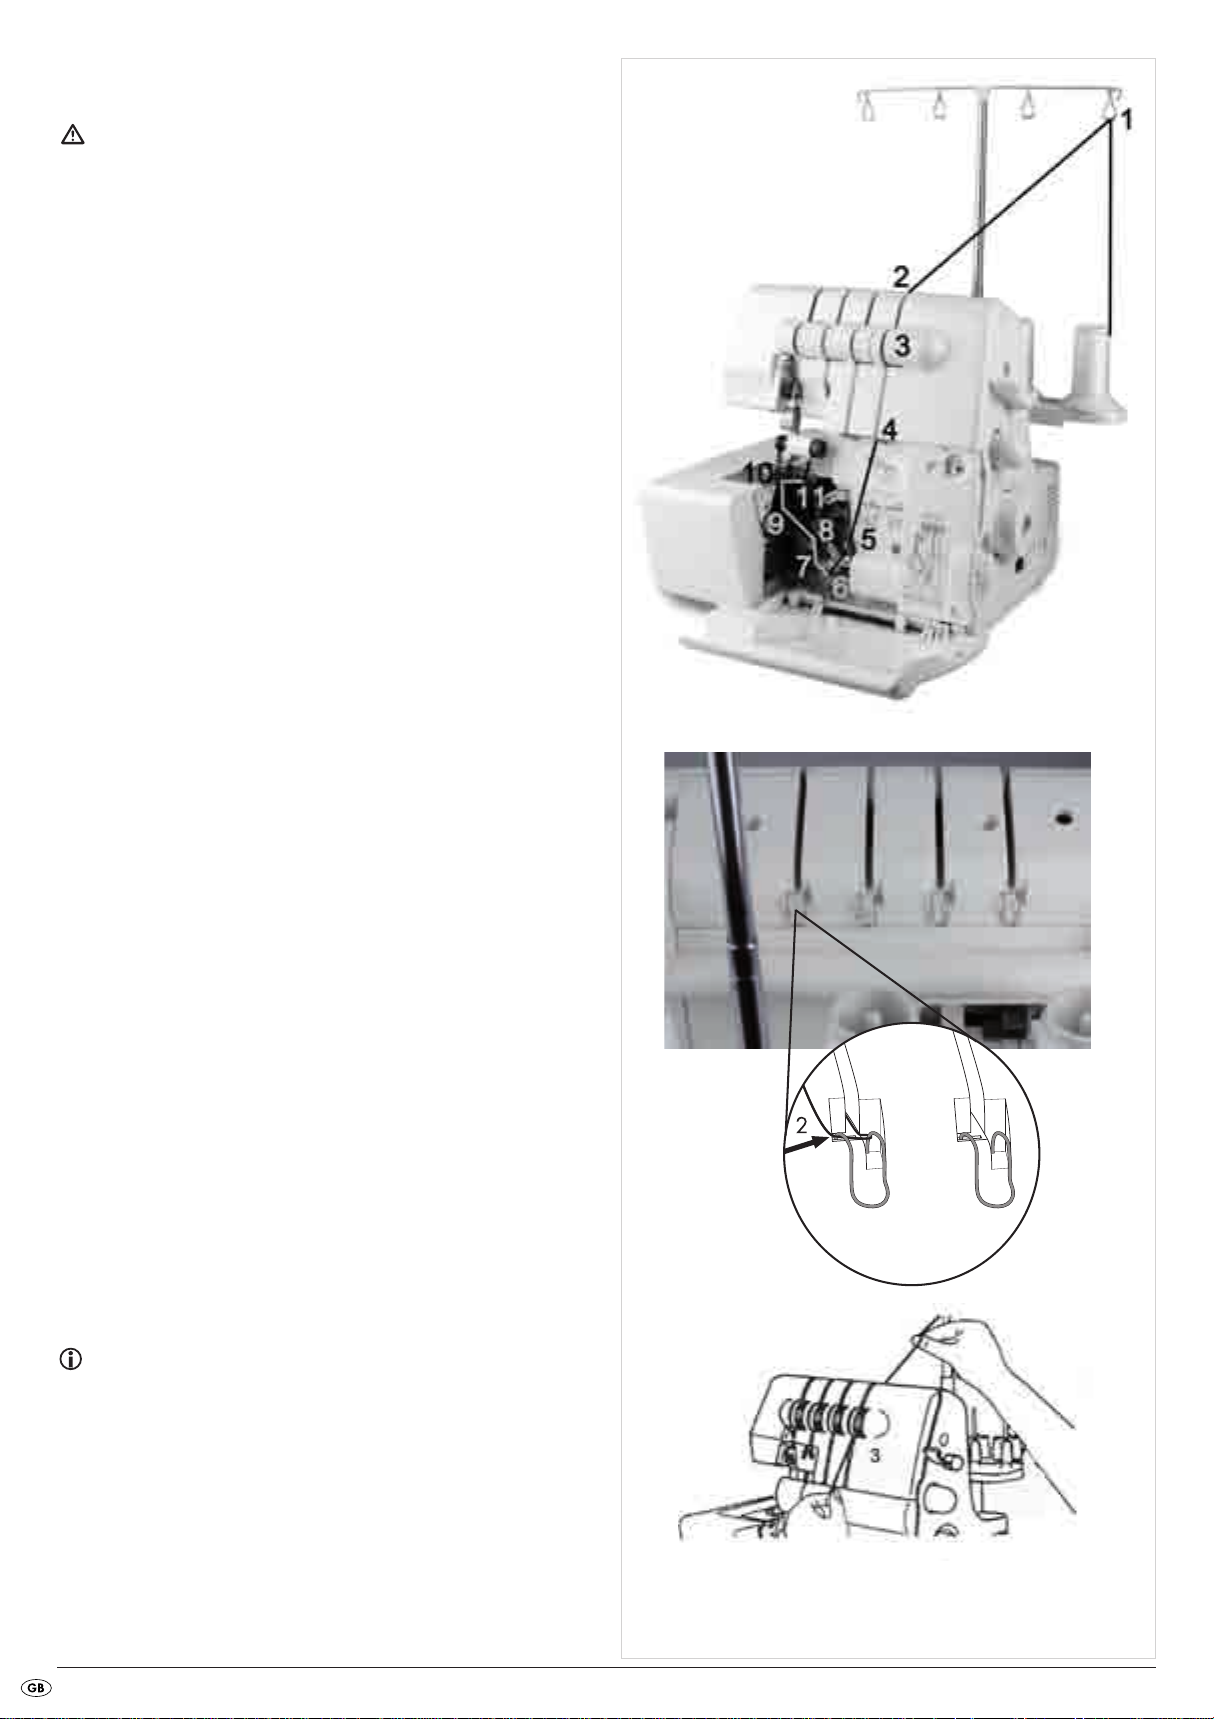
3. Thread the yarn into the thread guide in that you pull the thread down
until it slips under the thread guide (2) (Fig. 16).
Fig. 16
4. Firmly hold the yarn with your fingers, guide it between and through
the discs of the thread tension selector z and then pull it down (3)
(Fig. 17).
Note:
The yarn must lie correctly between the two discs of the thread tension
selector z.
5. Thread the yarn in the looper area as per the red markings (Fig. 18).
6. Pull the thread from back to front through the upper looper o.
7. Pull around 10 cm of thread through the looper and place it behind
the stitch plate e.
Fig. 17
- 9 -
Fig. 18
Page 12
Threading the lower looper thread (yellow)
Attention!
Before threading, ALWAYS place the power switch 8 at "O" (Off) and
remove the plug from the mains power socket. This prevents an unintended
starting of the machine. If you do not, you run a risk of serious injury!
Figure 19 shows the thread path of the lower looper thread. The individual
threading positions are numbered and described in detail in the following.
1. Guide the yarn from back to front through the thread tree 1 (1).
2. Thread the yarn into the thread guide in that you pull the thread down
until it slips under the thread guide (2) (Fig. 20).
3. Firmly hold the yarn with your fingers, guide it between and through
the discs of the thread tension selector u and then pull it down (3)
(Fig. 21).
Fig. 19
Fig. 20
Note:
The yarn must lie correctly between the two discs of the thread tension
selector u.
4. Turn the handwheel 6 to yourself until the lower looper p is at the
far right.
Fig. 21
- 10 -
Page 13

5. Thread the yarn in the looper area as per the yellow markings (4 - 8)
(Fig. 22).
6. Firmly hold the yarn with the tweezers about 4 cm from the thread
guide (Fig. 23).
7. Now guide it lightly, from the left and with the tweezers, under the
thread guide.
8. Pull the yarn upwards into the thread guide (9).
Fig. 22
9
9. Lead the yarn to the rear and over the upper end of the lower looper p
(10A) (Fig. 23).
10. Then, carefully pull the yarn down so that it slides into the recess of
the looper (10B) (Fig. 23). For this step also use the drawing which
is attached to the machine!
11. Guide the thread through the looper eyelet (11). The yarn should run
in the groove of the lower looper p (Fig. 23).
12. Draw around 10 cm of yarn through the looper and place it to the
oovveerr
rear
the upper looper o and the stitch plate e.
Threading yarn for the right needle (green)
Attention!
Before threading, ALWAYS place the power switch 8 at "O" (Off) and
remove the plug from the mains power socket. This prevents an unintended
starting of the machine. If you do not, you run a risk of serious injury!
Fig. 23
11
8
10
10
Figure 24 shows the thread path of the right needle thread. The individual
threading positions are numbered and described in detail in the following.
1. Guide the yarn from back to front through the thread tree 1 (1).
Fig. 24
- 11 -
Page 14

2. Thread the yarn into the thread guide in that you pull the thread down
5
6
until it slips under the thread guide (2) (Fig. 25).
Fig. 25
3. Firmly hold the yarn with your fingers, guide it between and through
the discs of the thread tension selector t and then pull it down (3)
(Fig. 26).
Note:
The yarn must lie correctly between the two discs of the thread tension
selector t.
4. Thread the yarn as per the green markings (4- 7) (Fig. 27/28).
Fig. 26
5. Thread the yarn through the right needle (8) (Fig. 28).
6. Lay the yarn to the rear under the sewing foot a.
Fig. 27
Fig. 28
- 12 -
Page 15

Threading yarn for the left needle (blue)
Attention!
Before threading, ALWAYS place the power switch 8 at "O" (Off) and
remove the plug from the mains power socket. This prevents an unintended
starting of the machine. If you do not, you run a risk of serious injury!
Figure 29 shows the thread path of the left needle thread. The individual
threading positions are numbered and described in detail in the following.
1. Guide the yarn from back to front through the thread tree 1 (1).
2. Thread the yarn into the thread guide in that you pull the thread down
until it slips under the thread guide (2) (Fig. 30).
Fig. 29
Fig. 30
3. Firmly hold the yarn with your fingers, guide it between and through
the discs of the thread tension selector r and then pull it down (3)
(Fig. 31).
Note:
The yarn must lie correctly between the two discs of the thread tension
selector r.
Fig. 31
- 13 -
Page 16

4. Thread the yarn as per the blue markings (4 - 6) (Fig. 32/33).
4
5
5. Thread the yarn through the left needle (7) (Fig. 33).
6. Lay the yarn to the rear under the sewing foot a.
Fig. 32
Trial run
When yarn has been threaded for the first time, or after a yarn breakage
it must be rethreaded, proceed as follows:
Lift the sewing foot a.
Hold the ends of the threads between the fingertips of your left hand, slowly turn the handwheel 6 two or three times towards yourself and
then check the threads once again.
Lay the material for a trial run under the sewing foot a and slowly start
to sew.
The material will be automatically fed through.
When the task is complete, continue sewing until an approximately
5cm (2") long length of threads has formed at the end of the material.
Cut through the threads with scissors.
Fig. 33
- 14 -
Page 17

Changing threads (binding together)
Changing threads is quite simple with the following procedure:
1. Cut the yarn above the spool support 2 (Fig. 34) and place the new
roll of thread on the spool support 2.
2. Tie the ends of the new and the old thread together (Fig. 35).
3. Place the thread tension selector r/t/z/u at "0" (Fig. 36) and lift
the sewing foot a.
4. Pull on the other end of the yarn until the knot passes under the sewing
foot a.
5. For threading it in the needle, pull on the other end until the knot is in
the eye of the needle and then cut the yarn to the left and right of the
knot. Then carry out the rethreading.
Fig. 34
Fig. 35
Fig. 36
Set the stitch length
The stitch length can be adjusted from 1.0 to 4.0 mm. Almost all overlock
work is carried out with a stitch length of 2.5 – 3.5 mm.
Turn on the adjustment wheel for stitch length 5 (Fig. 37) to adjust the
stitch length:
• A stitch length of 3 mm is recommended for most sewing.
• For the working of heavy fabrics, a stitch length of 4 mm is to be recommended.
• For the working of light fabrics, a stitch length of 2 mm is to be recommended..
With these settings you will produce respectable seams and the fabric
will not be crimped.
Setting the seam width
The width of seams can be determined both by changing the needle position
and via the seam width adjustment knob f.
... by using the right or left needle
The width of the seam can be determined by using the left or the right
needle.
Fig. 37
• Only the left needle is used: 5.7 mm
• Only the right needle is used: 3.5 mm
- 15 -
Page 18

... by turning the seam width adjustment knob
By using the seam width adjustment knob f, seam width can be adjusted
within the ranges indicated below.
• Only the left needle is used: 5.2 - 6.7 mm
• Only the right needle is used: 3.0 - 4.5 mm
Setting the seam width adjustment knob
Attention!
Before making adjustments with the seam width adjustment knob f
always place the mains switch 8 at the position "O" (Off). This prevents
an accidental start of the appliance and thus the risk of injury!
• Open the front flap 0, this can make the adjustment easier to carry out.
• Turn the seam width adjustment knob f to the desired seam width
(Fig. 38). Orientate yourself on the scale on the stitch plate e
(Fig. 39).
Adjust sewing foot pressure
Upon delivery, the sewing foot pressure is set for medium-weight materials.
If you wish to use heavier or lighter materials, adjust the sewing foot pressure
as follows:
• For lighter fabrics, you need to reduce the pressure.
• For heavier fabrics, you need to increase the pressure.
Insert the small screwdriver into the hole on the upper side of the machine
(Fig. 40). The pressure adjustment screw is located here (A). Ensure that the
screwdriver slips into the slot of the pressure adjustment screw (B) (Fig. 41).
• Turn the screwdriver in the direction "+" if you want to increase the pressure.
• Turn the screwdriver in the direction "-" if you want to reduce the pressure.
Note:
To return to the factory-set default sewing foot pressure, turn the pressure
adjustment screw as far as it will go anti-clockwise (-). Then turn it 6 rotations in
a clockwise (+) direction.
The standard sewing foot pressure is reset.
Fig. 39
Fig. 38
Fig. 40
- 16 -
Fig. 41
Page 19

Differential transport
Manner of operation
The machine has two sets of toothed rack feeders, one to the front and one
to the rear. Both sets move independant of each other. Through the differential
feed motion both toothed rack sets can move themselves at various speeds.
With this, the fabric is stretched or gathered, depending on which transport
differential has been set between the front and rear rack feeders.
With the aid of the differential transport, interesting effects can be achieved when sewing overlock seams on stretch materials and diagonally cut
fabrics (Fig. 43).
Note:
When the differential transport lever 9 stands at "1.0", that corresponds
to a differential transport ratio of 1:1. Both toothed feed racks move at the
same rate (Fig. 42).
The differential transport lever 9 can be adjusted in a range from 1:0.7
to 1:2.0.
Gathered overlock seam - Settings
The gathered overlock seam is suitable for the ruffling of sleeves, back
upper parts, skirt seams etc.made of elastic materials such as knitwear
and jersey. The individual parts should be brought together before sewing.
• Adjust the differential transport lever 9 to a value higher than 1.0
(Fig. 44). The exact setting depends on the material to be processed
and the desired level of ruffling or gathering.
Therefore always do a sample stitching to test the settings.
Fig. 42
Fig. 43
Stretched overlock seam - Settings
The stretched overlock seam is suitable for the manufacture of ruffles at the
collar, cuffs and skirt edges etc. in soft, stretchy fabric and knitwear.
• Adjust the differential transport lever 9 to a value lower than 1.0 (Fig.
45). The exact setting depends on the material to be processed, and
on the strength of the desired "ruffle effect".
Therefore always do a sample stitching to test the settings.
• Hold the seam down with slight firmness before and behind the sewing
foot a so as to keep the textile under tension.
Note:
If you have set a value of "3" or higher on the adjustment wheel for the
stitch length 5, this setting will automatically return to "3" when you set the
differential transport lever 9 to 2.0.
Fig. 44
Fig. 45
- 17 -
Page 20

Free arm sewing
To work tubular-shaped fabrics, such as sleeves or trouser legs, you can
remove the free arm cover.
• If appropriate, remove the waste container from the machine.
• Slide the free arm cover to the left and pull it off (Fig. 46)..
• You can now pull the textiles over the free arm w and work them
(Fig. 47).
• To replace the free arm cover, push it onto the free arm w until it clicks
into place and is firmly seated (Fig. 48).
Fig. 46
Fig. 47
Fig. 48
- 18 -
Page 21

Overlock seams
• Open the front flap 0.
• Slide the seam width switch d to "S", so that the seam width finger is
pushed forward (1) (Fig. 49).
Note:
The seam width switch d must be pushed until it can go no further.
Otherwise, the seams will be untidy.
Standard position
Roll hemmings
• Open the front flap 0.
• Slide the seam width switch d to "R", so that the seam width finger is
pushed backward (1) (Fig. 50).
Note:
The seam width switch d must be pushed until it can go no further,
otherwise the seams will be untidy.
Fig. 49
- 19 -
Roll hem
Fig. 50
Page 22

Binding-off and sample sewing
• Lay all yarns under the sewing foot a, to the rear, slightly to the left
and over the stitch plate e.
• Firmly hold the yarns under a slight tension.
• Turn the handwheel 6 2 to 3 revolutions onto itself to begin empty
chainstitch formation.
• Lower the sewing foot a with the sewing foot lever 4.
• Hold the empty chainstitch again firmly and carefully activate the foot
pedal until the empty chainstatch is approximately 5 - 7.5 cm long.
• Place the fabric from the front under the sewing foot a and sew a test
seam (Fig. 51). Under no circumstances should you pull on the textile,
otherwise the needle will be bent or could even break off.
• Continue sewing even after the textile is finished for about 15 to 20 cm.
• Cut the empty chainstitch by using the blade at the rear of the machine
(Fig. 52).
Fig. 51
Recommended tension settings
Note:
All information about tension settings for the different kinds of stitches are
purely guiding values. The thread tension itself is always dependant
on the type and thickness of the fabric, as well as needle strength and
the strength, type and material composition of the yarn.
It is therefore absolutely necessary to sew a test seam. It is the only way
you can find out if the tension settings are correct, or if they need to be
changed.
Fig. 52
- 20 -
Page 23

2-thread overcast chain stitch (overlock)
Figure 53 shows you the stitch pattern for this stitch.
This stitch with a needle and 2 threads is used for tidying the edges of
light or stretchy fabrics. By changing the needle position you can obtain a
narrow or a wide overcast seam.
Adjust the thread tension selectors r t z u to the appropriate values
(see table) then sew a test seam on the material being used.
For this type of stitch insert the upper looper element in the upper looper o.
Tensioning the thread
Textiles
blue green red yellow
Needle position
Seam width switch
Stitch length
Upper looper element
S
2 - 4
insert
light
material
medium-
weight
material
heavy
material
Textiles
light material
medium-
weight
material
heavy
material
Inserting the
2.0 -
2.5 -
3.5 -
Tensioning the thread
blue green red yellow
- 1.5
- 1.5
- 3.0
upper looper
element
Inserting the
upper looper
element
Inserting the
upper looper
element
Inserting the
upper looper
element
Inserting the
upper looper
element
Inserting the
upper looper
element
0
0
0.5
0.5
0.5
1.5
needle thread
Top
Correct thread tension
lower looper thread
Underside
Fig. 53
Incorrect thread tension
Should the lower looper yarn appear to be too tight or the needle thread
too loose (Fig. 54) :
• turn the thread tension selector for the lower looper thread u (yellow)
to a lower number, or ...
• turn the thread tension selector for the needle (blue r or green t) to
a higher number.
Should the lower looper yarn appear to be too loose (Fig. 55), turn the
thread tension selector for the lower looper thread u (yellow) to a higher
number.
needle thread
Top
needle thread
Top
lower looper thread
Underside
Fig. 54
Incorrect thread tension
lower looper thread
Underside
Fig. 55
- 21 -
Page 24

2-thread-overcast-stitch
Figure 56 shows you the stitch pattern for this stitch.
This stitch with a needle and 2 threads is used for tidying normal fabrics
with an overcast stitch. It is also ideal for flat stitch seams (fell or butt seams)
and blind hemming.
By changing the needle position you can obtain a narrow or a wide overcast
seam.
Adjust the thread tension selectors r t z u to the appropriate values
(see table) then sew a test seam on the material being used.
For this type of stitch insert the upper looper element in the upper looper o.
Tensioning the thread
Textiles
blue green red yellow
Needle position
Seam width switch
Stitch length
Upper looper element
Correct thread tension
S
2 - 4
insert
light
material
medium-
weight
material
heavy
material
Textiles
light
material
medium-
weight
material
heavy
material
Inserting the
0.5 -
0.5 -
1.0 -
Tensioning the thread
blue green red yellow
- 1.0
- 1.5
- 1.5
upper looper
element
Inserting the
upper looper
element
Inserting the
upper looper
element
Inserting the
upper looper
element
Inserting the
upper looper
element
Inserting the
upper looper
element
1.0
1.5
1.5
3.0
3.5
3.5
lower looper thread
Top
needle thread
Underside
Fig. 56
Incorrect thread tension
Should the lower looper yarn lie on the underside of the textile (Fig. 57):
• turn the thread tension selector for the lower looper thread u (yellow)
to a higher number, or ...
• turn the thread tension selector for the needle (blue r or green t) to a
lower number.
Should the needle yarn be too loose (Fig. 58):
• turn the thread tension selector for the needle (blue r or green t) to a
higher number.
• turn the thread tension selector for the lower looper thread u (yellow)
to a lower number.
lower looper thread
lower looper thread
- 22 -
Top
Top
Underside
Incorrect thread tension
Underside
needle thread
Fig. 57
needle thread
Fig. 58
Page 25

3-thread chain stitch (overlock)
Figure 59 shows you the stitch pattern for this stitch.
This stitch with a needle and 3 threads is used for tidying of normal fabrics
with an overcast stitch.
By changing the needle position you can obtain a narrow or a wide overcast
seam.
Adjust the thread tension selectors r t z u to the appropriate values
(see table) then sew a test seam on the material being used.
Tensioning the thread
Textiles
blue green red yellow
Needle position
Seam width switch
Stitch length
Upper looper element
S
2 - 4
not necessary
light
material
medium-
weight
material
heavy
material
Textiles
light
material
medium-
weight
material
heavy
material
Should the upper looper yarn lie on the underside of the textile (Fig. 60):
• turn the thread tension selector z for the upper looper thread (red) to a
higher number, or ...
• turn the thread tension selector for the lower looper thread u (yellow)
to a lower number.
2.0 - 2.0 1.0
3.0 - 2.0 1.5
3.0 - 3.0 1.5
Tensioning the thread
blue green red yellow
- 2.0 7.0 2.0
- 2.5 6.5 2.5
- 3.5 6.5 2.5
upper looper thread
needle thread
Top
upper looper thread
needle thread
Top
Correct thread tension
lower looper thread
Underside
Fig. 59
Incorrect thread tensions
lower looper thread
Underside
Fig. 60
Should the lower looper yarn lie on the upperside of the textile (Fig. 61):
• turn the thread tension selector for the lower looper thread u (yellow)
to a higher number, or ...
• turn the thread tension selector z for the upper looper thread (red) to a
lower number.
Should the needle thread appear to be too loose (Fig. 62), turn the thread
tension selector for the needle thread (blue r or green t) to a higher
number.
upper looper thread
upper looper thread
- 23 -
needle thread
Top
needle thread
Top
lower looper thread
Underside
Fig. 61
lower looper thread
Underside
Fig. 62
Page 26

3-thread - flatlock seam
Figure 63 shows you the stitch pattern for this stitch.
This stitch with a needle and 3 threads is used for fell or butt seams and for
ornamental stitches with decorative thread. By changing the needle position
you can obtain a narrow or a wide flatlock seam (flatlock).
Adjust the thread tension selectors r t z u to the appropriate values
(see table) then sew a test seam on the material being used.
Needle position
Seam width switch
Stitch length
S
2 - 4
Textiles
light
material
medium-
weight
material
heavy
material
Textiles
light
material
medium-
weight
material
heavy
material
Tensioning the thread
blue green red yellow
0.5 - 2.5 2.5
0.5 - 2.0 2.0
1.0 - 3.0 3.0
Tensioning the thread
blue green red yellow
- 0 7.0 4.0
- 0.5 7.0 4.0
- 1.0 7.0 4.0
Upper looper element
needle thread
upper looper thread
Top
Incorrect thread tensions
not necessary
Correct thread tension
needle thread
lower looper thread
Underside
Fig. 63
Should the lower looper yarn be too loose (Fig. 64):
• turn the thread tension selector for the lower looper thread u (yellow)
to a higher number, or ...
• turn the thread tension selector for the needle (blue r or green t) to a
lower number.
Should the upper looper yarn be too loose (Fig. 65):
• turn the thread tension selector for the upper looper thread z (red) to a
higher number, or ...
• turn the thread tension selector for the needle (blue r or green t) to a
lower number.
Should the needle yarn be too loose (Fig. 66):
• turn the thread tension selector for the needle (blue r or green t) to a
higher number.
• turn the thread tension selector for the upper looper thread z (red) to a
lower number.
needle thread
upper looper thread
Top
needle thread
upper looper thread
Top
needle thread
upper looper thread
Top
needle thread
lower looper thread
Underside
needle thread
lower looper thread
Underside
needle thread
lower looper thread
Underside
Fig. 64
Fig. 65
Fig. 66
- 24 -
Page 27

3-thread overcast chain stitch (overlock)
Figure 67 shows you the stitch pattern for this stitch.
This stitch with a needle and 3 threads is used for sewing, for example,
decorative edges.
By changing the needle position you can obtain a narrow or a wide overcast
chain seam.
Adjust the thread tension selectors r t z u to the appropriate values
(see table) then sew a test seam on the material being used.
Needle position
Seam width switch
Stitch length
S
2 - 4
Textiles
light
material
medium-
weight
material
heavy
material
Textiles
light
material
medium-
weight
material
heavy
material
Tensioning the thread
blue green red yellow
2.0 - 0 4.0
3.0 - 0.5 6.5
4.0 - 0.5 7.5
Tensioning the thread
blue green red yellow
- 1.5 0 5.0
- 2.5 1.0 7.0
- 3.0 1.5 8.0
Upper looper element
needle thread
upper looper thread
Top
not necessary
Correct thread tension
needle thread
lower looper thread
Underside
Fig. 67
Incorrect thread tension
Should the upper looper yarn be too loose (Fig. 68):
• turn the thread tension selector for the upper looper thread z (red) to a
higher number.
Should the lower looper yarn be too loose (Fig. 69):
• turn the thread tension selector for the lower looper thread u (yellow)
to a higher number, or ...
• turn the thread tension selector for the upper looper thread z (red) to a
lower number.
Should the needle yarn be too loose (Fig. 70):
• turn the thread tension selector for the needle (blue r or green t) to a
higher number.
• turn the thread tension selector for the upper looper thread z (red) to a
lower number.
needle thread
upper looper thread
Top
needle thread
upper looper thread
Top
needle thread
upper looper thread
Top
Underside
Underside
Underside
needle thread
lower looper thread
Fig. 68
needle thread
lower looper thread
Fig. 69
needle thread
lower looper thread
Fig. 70
- 25 -
Page 28

3-thread safety stitch, highly elastic, imitated
Figure 71 shows you the stitch pattern for this stitch.
This stitch with 2 needles and 3 threads is ideal for lightweight, extremely
stretchy fabrics such as jersey and spandex.
Adjust the thread tension selectors r t z u to the appropriate values
(see table) then sew a test seam on the material being used.
For this type of stitch insert the upper looper element in the upper looper o.
Needle position
Seam width switch
Stitch length
Upper looper element
S
2 - 4
insert
Tensioning the thread
Textiles
blue green red yellow
light
material
medium-
weight
material
heavy
material
If the lower looper thread is too loose (Fig. 72):
• turn the thread tension selector for the lower looper thread u (yellow)
to a higher number.
2.0 1.5
3.0 2.0
4.0 3.0
Inserting the
upper looper
element
Inserting the
upper looper
element
Inserting the
upper looper
element
0
0.5
1.0
Correct thread tension
Left needle thread
Right needle thread
lower looper thread
Top
Underside
Fig. 71
Incorrect thread tension
Left needle thread
Should the left needle yarn be too loose (Fig. 73):
• turn the thread tension selector for the left needle r (blue) to a higher
number.
Should the right needle yarn be too loose (Fig. 74):
• turn the thread tension selector for the right needle t (green) to a higher
number.
Right needle thread
Top
Left needle thread
Right needle thread
Top
Left needle thread
Right needle thread
Top
lower looper thread
Underside
Fig. 72
lower looper thread
Underside
Fig. 73
lower looper thread
Underside
Fig. 74
- 26 -
Page 29

4-thread safety stitch, highly elastic, imitated
Figure 75 shows you the stitch pattern for this stitch.
This stitch with 2 needles and 4 threads is ideal for medium to heavy,
stretchy fabrics such as double-knitted materials and swimwear.
It is suitable for combining two materials and neatening the edges at the
same time.
Adjust the thread tension selectors r t z u to the appropriate values
(see table) then sew a test seam on the material being used.
Tensioning the thread
Textiles
blue green red yellow
Needle position
Seam width switch
Stitch length
Upper looper element
upper looper thread
S
2 - 4
not necessary
Correct thread tension
light material
medium-
weight
material
heavy
material
Should the upper looper yarn lie on the underside of the textile (Fig. 76):
• turn the thread tension selector for the upper looper thread z (red) to a
higher number, or ...
• turn the thread tension selector for the lower looper thread u (yellow)
to a lower number.
Should the lower looper yarn lie on the upperside of the textile (Fig. 77):
• turn the thread tension selector for the lower looper thread u (yellow) to a
higher number, or ...
• turn the thread tension selector for the upper looper thread z (red) to
a lower number.
2.5 2.0 2.5 2.0
3.0 2.0 3.0 2.0
4.0 2.5 4.0 2.5
Right needle thread
Left needle thread
Top
upper looper thread
Right needle thread
Left needle thread
upper looper thread
Right needle thread
Left needle thread
upper looper thread
lower looper thread
Underside
Incorrect thread tension
lower looper thread
Top
Top Underside
Underside
lower looper thread
Fig. 75
Fig. 76
Fig. 77
Should the left needle yarn be too loose (Fig. 78):
• turn the thread tension selector for the left needle r (blue) to a higher
number.
Should the right needle yarn be too loose (Fig. 79):
• turn the thread tension selector for the right needle t (green) to a higher
number.
- 27 -
Right needle thread
Left needle thread
Top
upper looper thread
Right needle thread
Left needle thread
Top
lower looper thread
Underside
Fig. 78
lower looper thread
Underside
Fig. 79
Page 30

Roll hemmings
With this machine you can sew four different roll hemming types. When
sewing roll hemmings, the fabric edge is folded over and provided with an
overlock seam. Lightweight fabrics such as batiste, chiffon, organza and
so on are best for these kinds of seams. Heavy fabrics or stiff materials are
not suitable for roll hemmings.
• Remove the left needle.
• Set the seam width switch d at "R" (Fig. 80).
• Align the support plate of the seam width finger on the marking "R"
on the stitch plate by turning out the seam width adjustment knob f
(Fig. 81).
• Place the dial for the stitch length 5 at "F - 2" (Fig. 82). With this a fine
seam is sewn.
• For roll hemmings use a needle with specification Nr. 14.
Tips:
• For a rolled hem many different combinations of yarn can be used. To
create a particularly beautiful rolled hem (3-thread rolled hem), use a
bushy yarn (bushy polyamid thread/woolly nylon) as the upper looper
yarn and normal yarn for the needle and lower looper. For a 2-thread
rolled hem use bushy yarn for the lower looper thread and normal yarn
for the needle thread.
• At the start of sewing hold the empty thread chain firmly so that they
cannot roll into the seam.
• Subject the material to slight tension in the sewing direction. This will
make the seam more delicate.
• Before cutting the thread chain close to the textile, apply a small drop
of fabric glue to the seam and allow it to dry. Check for colourfastness
on the textile prior to this.
Roll hem
Fig. 81
Fig. 80
Fig. 82
3-thread rolled hem
Figure 83 shows you the stitch pattern for this stitch.
Upper looper
thread
Polyester
Bushy yarn
Adjust the thread tension selectors t z u to the appropriate values
(see table) then sew a test seam on the material being used.
blue green red yellow
- 2.0 7.5 3.0
- 2.0 2.0 2.0
Tensioning the thread
3-thread upper looper overcast rolled hem
Figure 84 shows you the stitch pattern for this stitch. Adjust the thread tension
selectors t z u to the appropriate values (see table) then sew a test
seam on the material being used.
Upper looper
thread
blue green red yellow
Tensioning the thread
Needle position
Seam width switch
Stitch length
Upper looper element
upper looper thread
needle thread
Top
needle thread
R
F - 2
not necessary
lower looper thread
Underside
Fig. 83
Polyester
Bushy yarn
- 2.0 5.5 7.0
- 2.0 0 2.5
upper looper thread
lower looper thread
Top
Underside
Fig. 84
- 28 -
Page 31

2-thread rolled hem
Figure 85 shows you the stitch pattern for this stitch.
Adjust the thread tension selectors t u to the appropriate values (see
table) then sew a test seam on the material being used.
For this type of stitch insert the upper looper element in the upper looper o.
Needle position
Seam width switch
R
Lower looper
thread
Bushy yarn
blue green red yellow
- 1.5
Tensioning the thread
Inserting the
upper looper
element
1.5
2-thread lower looper overcast rolled hem
Figure 86 shows you the stitch pattern for this stitch..
Adjust the thread tension selectors t u to the appropriate values (see
table) then sew a test seam on the material being used.
For this type of stitch insert the upper looper element in the upper looper o.
Stitch length
Upper looper element
lower looper thread
Top
Needle position
Seam width switch
Stitch length
F - 2
insert
needle thread
Underside
Fig. 85
R
F - 2
Lower looper
thread
Polyester
Bushy yarn
Tensioning the thread
blue green red yellow
Inserting the
- 2.0
- 1.5
upper looper
element
Inserting the
upper looper
element
2.0
1.5
Upper looper element
needle thread
Top
insert
lower looper thread
Underside
Fig. 86
- 29 -
Page 32

Flatlock decorative seams
To produce flatlock seams, set up the thread tensions for a 3-thread overlock
stitch. Sew a seam and then pull the fabric apart to smooth the seam.
The flatlock seam can be used as a decorative assembly seam or as pure
ornamental stitching (Fig. 87, dark thread).
Tips:
• Pay attention to proper tension, so that the workpiece can be pulled
well apart after sewing.
• Use a decorative thread as the upper looper thread, since this is the
most important thread and will be clearly visible.
1. Remove the right or the left needle (Fig. 88).
Fig. 87
Fig. 88
2. Set up the recommended tension settings for a 3-thread overlock seam
(Fig. 89).
3. Then readjust the upper thread tensions (green or blue) so that they are
much looser.
4. Now also release the thread tension of the upper looper (red) somewhat.
5. Then adjust the thread tension of the lower looper (yellow) considerably
tighter.
Flatlock seam as assembly seam
• Place the two fabrics to be sewn inside out to each other, so as to create
a decorative seam on the front side.
• Sew the seam and while doing this cut away the excess fabric (Fig. 90).
Fig. 89
Fig. 90
Figure 91 shows you the stitch pattern for this stitch.
• The upper thread (needle thread) (green or blue) then has a V-shaped
pattern on the inside of the fabric.
• The lower looper thread runs as a straight line along the fabric edge.
• Pull the fabric apart on both sides of the seam, so that the stitches lie
flat.
- 30 -
needle thread
upper looper thread
Top
lower looper
thread
Underside
Fig. 91
Page 33

Flatlock seam as decorative seam
• Adjust the movable upper blade i into a rest position (Fig. 92).
The textile is not trimmed in this type of seam.
• Fold the textile so that the two inside sides lie on each other.
• Place the textile so that a portion of the stitch is sewn outside of the
textile (Fig. 93).
• Sew the seam.
• Then fold the textiles apart. The stitches will then lie flat.
Overlock blind hems
The overlock blind hem is best suited for knitwear. It creates a durable
edgetidying and is hardly noticeable (Fig. 94).
In one operation the protruding material is cut away, the hem is sewn and
the edges are provided with an overlock seam.
Fig. 92
Fig. 93
1. Remove the left needle and set the machine up for a narrow 3-thread
overlock seam.
2. Set the stitch length to 4 mm.
3. Fold the hem, first to the inside and then to the outside of the fabric, so
that the fabric edge stands 6 mm above the first fold (Fig. 95).
4. Sew carefully on the fold. Thereby, the needle must pierce straight into
the edge of the fold.
Pin tucks
To render your decorative garment as more creative, it can be provided
with pin tucks before trimming (Fig. 96). Pin tucks are ornamental seams, as
shown in the figure 96.
1. Remove the left needle and set the machine up for a narrow 3-thread overlock seam.
2. Adjust the upper blade i into the rest position.
3. To achieve a uniform result, mark the desired number of pin-tucks on the
fabric with water-soluble fabric pen or fabric chalk.
4. Fold the fabric inside out and sew it.
5. When all of the tucks are sewn, iron them all in one direction so that
they lie evenly flat.
Fig. 94
Fig. 95
- 31 -
Fig. 96
Page 34

Sewing corners
Outer corners
1. Cut away, before and after the corner, about 2 cm to the seam line
(Fig. 97).
2. Sew a stitch further than to the marking "A" on the drawing and then
stop (Fig. 97).
3. Lift the needle and sewing foot a.
4. Pull the fabric to the rear, such that the yarn being held by the finger of
the stitch plate e is released. (For better recognition, on the drawing
opposite the sewing foot a is not shown - Figure 98).
5. Rotate the workpiece and lower the sewing foot a so that the upper
blade i lies in a line with the cutting edge (Fig. 99).
6. Pull the loose threads up and continue to sew.
Fig. 98
Cutting line
Fig. 97
Fig. 99
Inner corners
1. Cut the fabric away from the seam edge.
2. Adjust the upper blade i into the rest position (Fig. 100).
3. Sew on the cutting edge (Fig. 101).
4. Stop sewing just before reaching the corner.
5. Place a fold on the corner, so that the two edges form a line (Fig. 102).
6. Sew slowly over the corner and along the second edge. Ensure that you do
not include the fold!
Fig. 100
Fig. 101
- 32 -
Fig. 102
Page 35

Tips and Tricks
Using pins
Always insert pins to the left of the sewing foot a (Fig. 103).
The pins are thus not in the cutting area of the blade i s and they can
be easily removed afterwards.
Attention! Appliance Damage!
NEVER sew over pins or other hard materials. The blade i s could be
irreparably damaged!
Secure empty threads
To prevent the loosening of an empty thread chain, you should thread the
empty thread chain into a hand-sewing needle. For security, insert the
needle into the end of the seam.
Seam reinforcement
The seam can be strengthened if it is sewn with a reinforcing strip.
To do this, guide the strip through the slot in the front area of the sewing
foot a (Fig. 104).
Fig. 103
Place the strip under the foot and to the rear and then sew the seam.
Thus the strip is sewn into the seam (Fig. 105).
Edging
1. Adjust the upper blade i into the rest position.
2. Remove the right needle and its thread.
3. Pull the cord inlay (yarn or reinforcing strip) through the slot in the front
of the sewing foot a (Fig. 106).
Fig. 104
Fig. 105
4. Lay the cord inlay under the sewing foot a and chainstitch the desired
length (Fig. 107).
You can use the chainstitched edgings individually or weave several together.
Fig. 106
Fig. 107
- 33 -
Page 36

Maintenance and Cleaning
Attention!
Before cleaning or carrying out maintenance, ALWAYS remove the plug
from the mains power socket. This prevents an unintended starting of the
machine. If you do not, you run a risk of serious injury!
Cleaning and lubrication
• Regularly remove dust and lint from the looper and blade areas.
For this you can use the supplied brush (Fig. 108).
• Wipe the machine with a lightly moistened cloth.
• Lubricate the machine regularly at the lubrication points shown on
Figure 109. For this use exclusively sewing machine oil.
Fig. 108
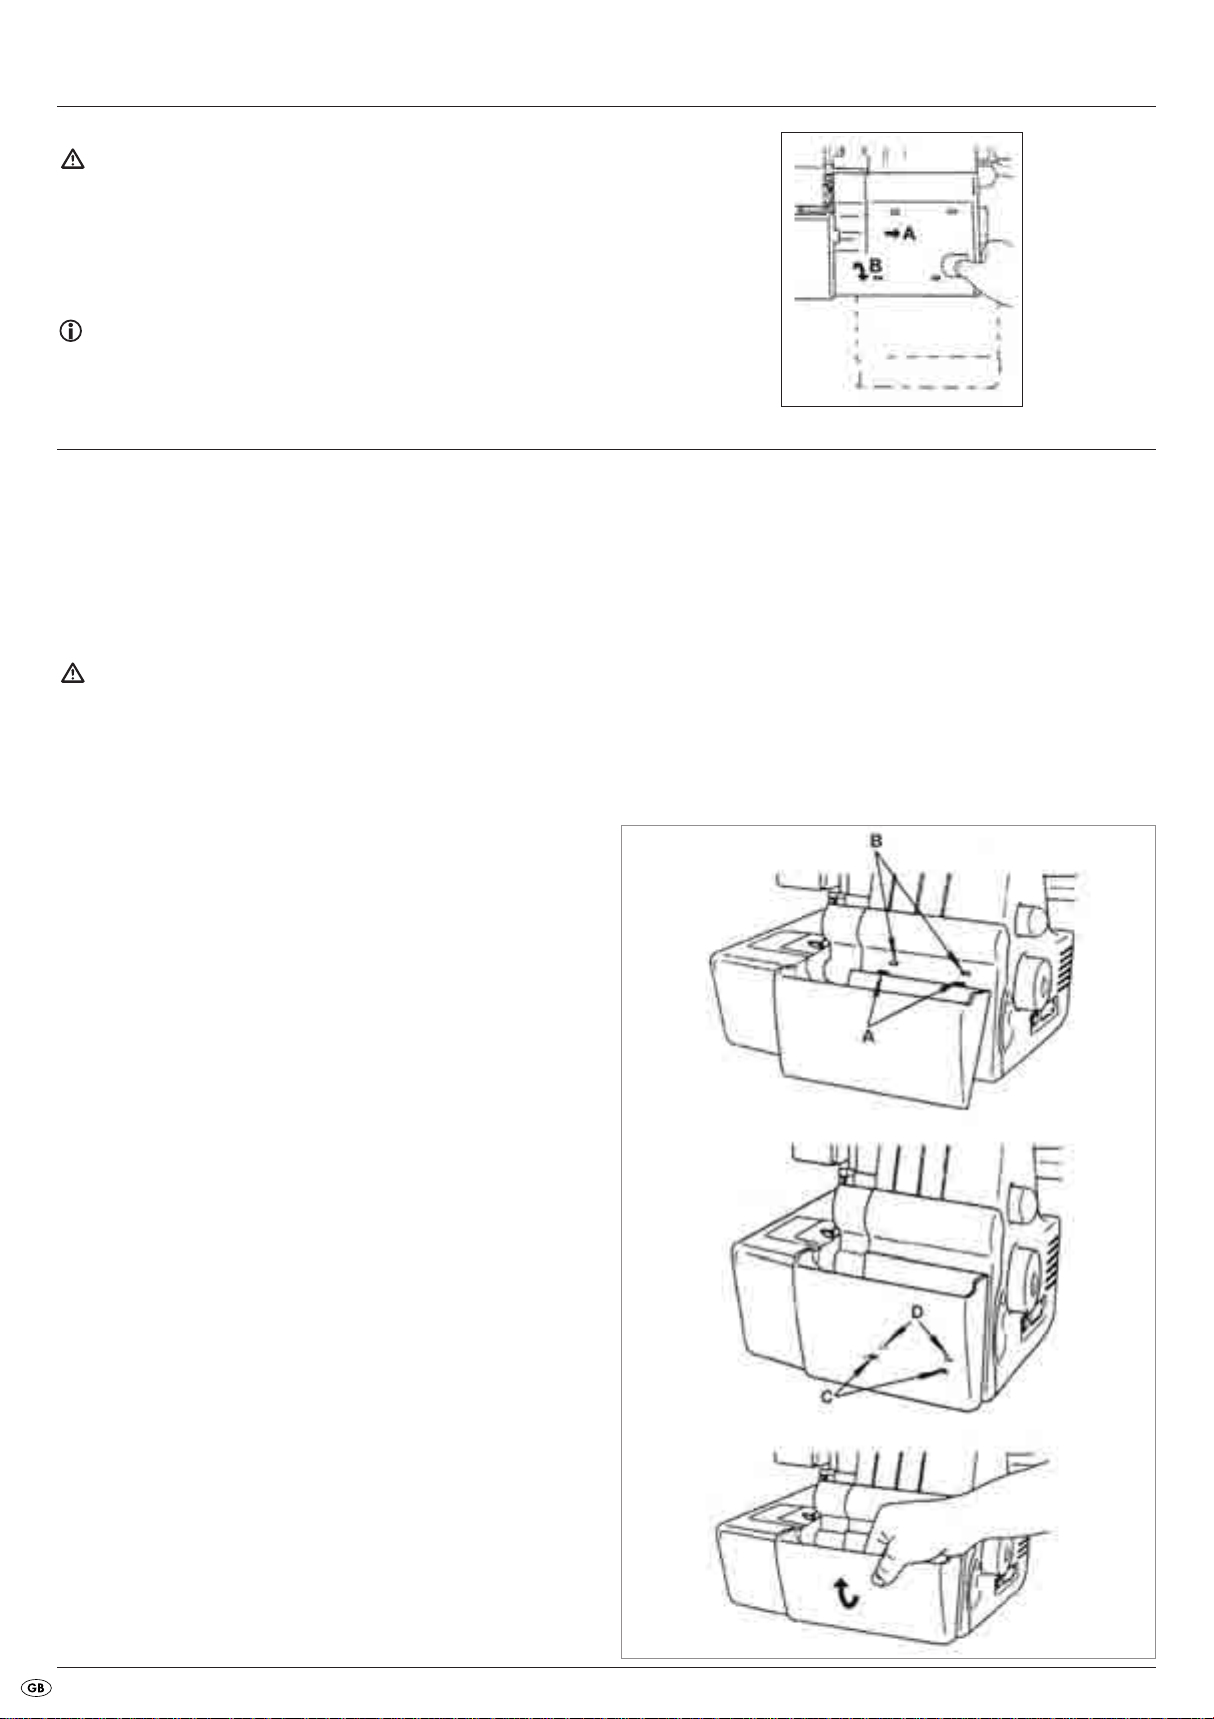
Exchanging the lower blade
Attention!
Before changing the blade s ALWAYS remove the plug from the mains
power socket. This prevents an unintended starting of the machine. If you
do not, you run a risk of serious injury!
Change the lower blade s as soon as you notice that the lower blade s
no longer provides accurate and clean cuts. Use Figure 110 for assistance.
1. Open the front flap 0.
2. Adjust the upper blade i into the rest position (A).
3. Remove the screw on the lower blade s (B) and remove the blade s
(C) (Fig. 111).
4. Slide the new blade s into the retainer and then tighten it with the
screws.
5. Place the upper blade i in the work position and close the front flap 0.
Fig. 109
Fig. 110
- 34 -
Fig. 111
Page 37

Storage
IMPORTANT:
ALWAYS remove the plug from the mains power socket before putting the
machine into storage. This prevents an unintentional starting of the appliance,
and thus the risk of injury, as well as an overheating of it!
When the machine is not in use, always cover it with the hood. This will
protect the machine from dust. Store the machine at a clean and dry
location.
Always transport the machine with the fold-out handle.
Disposal
Do not dispose of the appliance in your normal domestic
waste. This product is subject to the provisions of European
Directive 2002/96/EC.
Dispose of the appliance through an approved disposal centre or at your
community waste facility.
Observe the currently applicable regulations. In case of doubt, please
contact your waste disposal centre.
Warranty and Service
You receive a 3-year warranty for this appliance as of the purchase date.
This appliance has been manufactured with care and meticulously examined
before delivery.
Please retain your receipt as proof of purchase. In the case of a warranty
claim, please make contact by telephone with our service department.
Only in this way can a post-free despatch for your goods be assured.
The warranty covers only claims for material and maufacturing defects, not
for transport damage, wearing parts or for damage to fragile components,
e.g. buttons or batteries. This product is for private use only and is not intended
for commercial applications.
In the event of misuse and improper handling, use of force and interference
not carried out by our authorized service branch, the warranty will become
void.. Your statutory rights are not restricted in any way by this warranty.
The warranty is not extended by repairs made under warranty. This also applies to replaced and repaired parts. Damages and defects extant on purchase must be reported immediately after unpacking, at latest by two days
after the purchase date. Repairs carried out after expiry of the
warranty period are subject to charge.
Dispose of the packaging materials in an environmentally
responsible manner.
Under no circumstances should you dispose of the sewing machine oil with
household waste. Do not pour it down the drain. Dispose of the machine oil
through an approved disposal centre or at your community waste facility.
Service Great Britain
Tel.: 0871 5000 720
E-Mail: kompernass@lidl.gb
Service Ireland
Tel.: 1890 930 034
(0,08 EUR/Min., (peak))
(0,06 EUR/Min., (off peak))
E-Mail: kompernass@lidl.ie
(£ 0.10/Min.)
Importer
KOMPERNASS GMBH
BURGSTRASSE 21
44867 BOCHUM, GERMANY
www.kompernass.com
- 35 -
Page 38

Troubleshooting
Problem Cause Solution
Needles break
Thread breaks
Stitches are omitted
Stitches are irregular
• Needles are bent, blunt or damaged at the
points.
• Needles are not correctly inserted. • Insert the needles into the retainers correctly.
• You have pulled the material too heftily. • Carefully guide the material with both hands.
• Yarn has not been correctly threaded. • Thread the yarn correctly.
• Thread tension is too high. • Reduce the thread tension.
• Needles are not correctly inserted. • Insert the needles into the retainers correctly.
• Needles are bent, blunt or damaged at the
points.
• Needles are not correctly inserted. • Insert the needles into the retainers correctly.
• Yarn has not been correctly threaded. • Check the course of the individual threads.
• Thread tension is not correct. • Correct the thread tension.
• Thread is trapped. • Check the course of the individual threads.
• Fit new needles.
• Fit new needles.
• Thread tension is too high. • Adjust the thread tension.
Seams cause wrinkles
Material is not cut off cleanly • Blades are blunt or improperly fitted. • Exchange the blade or reinsert it correctly.
Material edges ruffle themselves • Too much material in a stitch. • Altering the seam width.
• Yarn has not been correctly threaded. • Thread the yarn correctly.
• Thread is blocked. • Check the course of the individual threads.
• Differential feed motion not adjusted. • Correctly adjust the differential transport.
- 36 -
 Loading...