

Page 1
NAIL STUDIO SET SNS 45 A3
NAIL STUDIO SET
Operating instructions
ZSELÉS KÖRÖMÉPÍTŐ KÉSZLET
Használati utasítás
SADA NA ÚPRAVU NEHTŮ
Návod k obsluze
NAGELSTUDIO-SET
Bedienungsanleitung
IAN 90252
ZESTAW DO STYLIZACJI PAZNOKCI
Instrukcja obsługi
KOMPLET ZA UREJANJE NOHTOV
Navodila za uporabo
NECHTOVÉ ŠTÚDIO
Návod na obsluhu
4
Page 2
Before reading, unfold the page containing the illustrations and familiarise yourself with all functions of
the device.
Przed przeczytaniem proszę rozłożyć stronę z ilustracjami, a następnie proszę zapoznać się z wszystkimi
funkcjami urządzenia.
Olvasás előtt kattintson az ábrát tartalmazó oldalra és végezetül ismerje meg a készülék mindegyik
funkcióját.
Pred branjem odprite stran s slikami in se nato seznanite z vsemi funkcijami naprave.
Před čtením si otevřete stranu s obrázky a potom se seznamte se všemi funkcemi přístroje.
Pred čítaním si odklopte stranu s obrázkami a potom sa oboznámte so všetkými funkciami prístroja.
Klappen Sie vor dem Lesen die Seite mit den Abbildungen aus und machen Sie sich anschließend mit allen
Funktionen des Gerätes vertraut.
GB Operating instructions Page 1
PL Instrukcja obsługi Strona 31
HU Használati utasítás Oldal 61
SI Navodila za uporabo Stran 91
CZ Návod k obsluze Strana 121
SK Návod na obsluhu Strana 151
DE / AT / CH Bedienungsanleitung Seite 181
Page 3
A
1
5
7
90
4
6
8
B
ur
i
op a s
23
ewq
tz
Page 4
Table of Contents
Introduction . . . . . . . . . . . . . .2
Copyright . . . . . . . . . . . . . . . . . . . . . 2
Limitation of Liability . . . . . . . . . . . . .2
Intended Use . . . . . . . . . . . . . . . . . . 2
Warning Notices . . . . . . . . . . . . . . . 3
Safety instructions . . . . . . . . .4
Appliance and
Accessories . . . . . . . . . . . . . .10
Setting up and connecting
to the power supply . . . . . . .11
Safety instructions . . . . . . . . . . . . . .11
Items supplied and
initial inspection . . . . . . . . . . . . . . .11
Unpacking . . . . . . . . . . . . . . . . . . .12
Disposal of packaging . . . . . . . . . .12
Requirements for the
installation location . . . . . . . . . . . . .12
Electrical connection . . . . . . . . . . . .13
Handling and operation . . .14
Switching On and Off . . . . . . . . . . 14
Functions . . . . . . . . . . . . . . . . . . . . .14
Utilisation . . . . . . . . . . . . . . .15
Selecting artifi cial nails . . . . . . . . . . 15
Attaching artifi cial nails . . . . . . . . . 16
Matching a nail set . . . . . . . . . . . . .19
GB
Application of the UV-Gel . . . . . . .19
Hardening of the UV-Gel . . . . . . . .20
Topping up . . . . . . . . . . . . . . . . . . .22
French nails . . . . . . . . . . . . . . . . . . .23
Removal of artifi cial nails . . . . . . . .23
Care . . . . . . . . . . . . . . . . . . . . . . . .24
Cleaning . . . . . . . . . . . . . . . .24
Safety instructions . . . . . . . . . . . . . . 24
Cleaning the appliance . . . . . . . . .24
Cleaning accessories . . . . . . . . . . .25
Exchanging the UV Lamps . . . 25
Troubleshooting . . . . . . . . . .26
Safety instructions . . . . . . . . . . . . . . 26
Malfunction causes and remedies . . . 27
Storage/Disposal . . . . . . . . .28
Storage . . . . . . . . . . . . . . . . . . . . . .28
Disposing of the appliance . . . . . . .28
Appendix . . . . . . . . . . . . . . .28
Notes on the EC Declaration
of Conformity . . . . . . . . . . . . . . . . .28
Technical data . . . . . . . . . . . . . . . .29
Warranty . . . . . . . . . . . . . . . . . . . .29
Service . . . . . . . . . . . . . . . . . . . . . . 30
Importer . . . . . . . . . . . . . . . . . . . . .30
SNS 45 A3
1
Page 5
GB
Introduction
Congratulations on the purchase of your new appliance.
You have clearly decided in favour of a quality product. These operating instruc-
tions are a part of this product. They contain important information in regard to
safety, use and disposal. Before using the product, familiarise yourself with all of
these operating and safety instructions. Use the product only as described and
only for the specifi ed areas of application. In addition, pass these documents on,
together with the product, to any future owner.
Copyright
This documentation is copyright protected.
Any copying or reproduction, including as extracts, as well as the reproduction of
images, also in an altered state, is only permitted with the written authorisation of
the manufacturer.
Limitation of Liability
All technical information, data and information for connection and operation, contained in these operating instructions correspond to the latest at the time of printing and, to the best of our knowledge, take into account our previous experience
and know-how. No claims can be derived from the details, illustrations and descriptions in these instructions. The manufacturer assumes no responsibility for damage
caused by failure to observe the instructions, improper use, inappropriate repairs,
making unauthorized changes or for using unapproved replacement parts.
Intended Use
This appliance is intended only for the application and fi xating of artifi cial fi nger
nails for manicure purposes in indoor areas and is only for domestic use. This appliance is not intended for any other use or for uses beyond those mentioned here.
WARNING
Risks from unintended use!
Risks can be engendered by the appliance if it is used for unintended
purposes and/or other types of use.
► Use the appliance exclusively for intended purposes.
► Observe the procedures described in these operating instructions.
2
SNS 45 A3
Page 6
Claims of any kind resulting from damage caused by improper use, incompetent
repairs, unauthorized modifi cations or the use of non-approved spare parts will
not be acknowledged.
The operator alone bears liability.
Warning Notices
In the existing operation instructions the following warnings are used:
DANGER
A warning at this risk level indicates a threateningly dangerous
situation.
If the danger
injuries.
► Observe the directives in this warning notice to avoid the risk of deaths or
serious ph
WARNING
A warning at this risk level indicates a possibly dangerous
situation.
If the dangerous situation is not avoided, this could lead to personal injury.
► Follow the instructions in this warning to avoid personal injuries.
IMPORTANT
A warning at this risk level signifi
If the situation is not avoided it can lead to property damage.
► The directives in this warning are there to avoid property damage.
GB
ous situation is not avoided it could lead to death or serious physical
ysical injuries.
es possible property damage.
SNS 45 A3
NOTICE
► A notice signifi es additional information that assists in the handling of the
appliance.
3
Page 7
GB
Safety instructions
This appliance complies with the statutory safety regulations. Incorrect usage can,
however, lead to personal and property damage.
■ A repair to the appliance during the warranty period may only be carried out
y a customer service fi rm authorised by the manufacturer, otherwise no
b
additional warranty claims can be considered for subsequent damages.
DANGER
Potentially fatal risk of electrical shocks!
U
pon contact with live wires or live components there is a
potentially fatal risk!
Pay heed to the following safety information to avoid a potentially fatal risk
from electrical power:
► To avoid potential risks, if the appliance power cable is damaged, it must
eplaced by the manufacturer, its Customer Service or by a qualifi ed
be r
technician.
► Do not instal the appliance in the bathroom.
► Connect the appliance exclusively to a correctly fused mains power socket.
► Do not touch the appliance and the plug with wet hands.
► NEVER place the appliance in water.
► Do NOT open the housing of the appliance (except when changing the UV
amps). If live connections are touched and/or the electrical or mechanical
l
construction is altered, there will be an increased risk of electric shock.
WARNING
Risk of injury from ultraviolet light (UV-Light)!
Looking directly into the UV light from the UV lamps in this appliance can
cause eye injuries and diminish the power of your vision!
► NEVER look directly into the ultraviolet light from the UV lamps.
► If the UV lamps are not in use, switch them off .
► Non-users, and especially children, may not be present during the opera-
tion of the appliance.
4
SNS 45 A3
Page 8
WARNING - RISK OF INJURY
► Before use check the appliance for visible external damage. Do not put
into oper
► This appliance is not intended for use by individuals with restricted physical,
ph
knowledge unless they are supervised by a person responsible for their
safety or receive from this person instruction in how the appliance is to be
used.
► Children should be supervised to ensure that they do not play with the
appliance.
► Never look directly into the UV lamps. It could cause injury to the eyes!
► Always keep the appliance and all accessories out of the reach of children.
► Pay heed to the instructions given on the containers of all substances used.
► Repairs should only be carried out by authorised specialist companies or by
the Customer Ser
risks for the user. In addition, warranty claims become void.
► Defective components may only be replaced with original replacement parts.
Only b
comply with the safety requirements.
WARNING
Risks of damage to health from solvent-containing
substances and vapours!
The inhalation of solvent-containing substances and vapours can damage your
health!
► Do not breathe in the vapours from solvent-containing substances (e.g.
acetone).
► Ensure there is adequate ventilation when interacting with solvent-containing
s
► Pay heed to the instructions on the containers of the solvent-containing
substances.
ation an appliance that is damaged or has been dropped.
ysiological or intellectual abilities or defi ciences in experience and/or
vice Department. Incorrect repairs can result in signifi cant
y using these replacement parts can it be guaranteed that they
ubstances.
GB
SNS 45 A3
5
Page 9
GB
WARNING
Risks of health damage from chemical substances!
The improper handling of chemical substances can lead to serious health
damage!
► If swallowed, IMMEDIATELY seek medical attention!
► In cases of allergic reactions, consult a doctor immediately!
► In the event of contact with the eyes or mucous membranes, contact a doctor
immediately!
INFORMATION ON HANDLING CHEMICAL SUBSTANCES
The chemical substances supplied with this product include the nail glue, the
fi nishing solution, the UV gel and the French gel.
► Open the pots and jars containing the chemical substances carefully.
► Handle the chemical substances cautiously and with care.
► The chemical substances are irritating to the eyes and skin.
► The chemical substances can cause skin irritations (sensitisation of the skin).
► Wear protective gloves and protective clothing when handling chemical
substances.
► Ensure that there is suffi
chemical substances. If there is insuffi cient ventilation, wear breathing
apparatus.
► Never use the UV gel or the French gel on damaged or unhealthy nails,
epairing damaged nails.
or for r
cient ventilation when you are working with the
ATTENTION - PROPERTY DAMAGE
► Protect the appliance from moisture and the penetration of liquids.
NEVER immer
vicinity of water and DO NOT place objects fi lled with liquids (e..g. vases)
onto the appliance.
► Do not place any objects on the appliance.
► Do not operate the appliance close to open fl ames (e.g. candles).
► Avoid direct solar radiation.
► Always pull the plug itself out of the mains power socket, do not pull it with
the po
► In the case of a malfunction occurring or a thunderstorm, disconnect the
plug fr
6
se the appliance in water or place the appliance in the close
wer cable.
om the mains power socket.
SNS 45 A3
Page 10

WARNING - RISK OF INJURY!
UV appliances may not be used by:
► People who suff er from skin cancer or are predisposed to it,
► People, who are taking light-sensitivity enhancing drugs,
► People under 18 years of age,
► People with a tendency towards freckles,
► People with a naturally red hair colour,
► People with unusual skin discolourations,
► People with more than 16 moles (with a minimum diameter of 2 mm) on
their body
► People with atypical moles (atypical moles are asymmetrical moles with
a diameter of mor
border areas; if in doubt, consult your doctor),
► People who are suff ering from sunburn,
► People who do not tan in the sun without skin burns,
► People who quickly suff er from skin burns in direct sunlight,
► People who have frequently suff ered from a severe sunburn during their
childhood,
► People who suff er from skin cancer or are suff ering from this disease or are
susceptible to skin cancer
► People with a fi rst-degree relative who is suff ering or has already suff ered
om a melanoma (skin cancer),
fr
► People who, due to a light sensitivity ailment, are in physicianly or medical
eatment,
tr
► People who absolutely cannot tan at all, or who cannot tan without getting
sunburned, when the
► People who are easily sunburned when they are exposed to the sun,
► during pregnancy.
,
e than 5 mm and diff erent pigmentation plus irregular
,
y are exposed to the sun,
GB
SNS 45 A3
7
Page 11

GB
■ The irradiation should not exceed the minimal erythema dose (MED). If ery-
thema (skin redness) occurs several hours after irradiation there should be no
further applications made. In this case, the next irradiation should not take
place before one week after the date of the skin redness.
■ If unexpected side eff ects such as itching occur within 48 hours after the fi rst
application of the UV appliance, y
further UV irradiation.
■ Recommended exposure timetable:
– Do not carry out more than 5 treatments per day. This could lead to skin
irritation.
– Do not exceed the recommended number of 400 treatments per year.
■ The appliance may not be used if the timer is not working properly.
■ Use only lamps of the specifi ed type. The use of a UV lamp from another manu-
f
acturer or of a diff erent type will lead to the revocation of the warranty.
■ UV radiation from the sun or from UV appliances can cause both skin and eye
damage, which may be irr
quality and quantity of the radiation and on the skin and eye sensitivity of the
individual person.
■ The skin can suff er from sunburn after excessive exposure to radiation. Too
fr
equent UV radiation from the sun or UV appliances can lead to premature
skin aging and cause an increased risk of skin cancer. This risk increases with
increasingly cumulative UV exposures. UV radiation at a young age increases
the subsequent risk of skin cancer.
■ UV radiation can lead to injuries to the eyes and skin, such as premature skin
aging and e
medications or cosmetics increase the sensitivity to UV radiation.
■ The unprotected eye can suff er superfi cial infl ammation and, in some cases,
e
xcessive exposure may cause damage to the retina. Frequently repeated
exposures can lead to cataracts.
ven skin cancer. Read these operating instructions carefully. Some
ou should consult a doctor before receiving
eversible. These biological eff ects depend on the
8
SNS 45 A3
Page 12
■ In the event of individually identifi ed sensitivity or allergic reactions to UV radia-
tion, you should fi rst seek medical advice before beginning the irradiation.
■ Certain ailments or the side eff ects of certain drugs may be exacerbated by
UV irr
adiation. If in doubt, consult your doctor.
■ There should be a period of at least 48 hours between the fi rst two exposures.
■ Avoid sunbathing and use of the appliance on the same day. This could lead
to skin irritation.
■ Pay heed to the instructions on the irradiation time, time inter
and the distance to be from the lamp. If you do not, it could lead to skin irritation.
■ Consult your doctor if persistent tumours or ulcers form, or changes in moles
come about or sor
■ Protect sensitive skin areas, such as scars, tattoos and the genitals, from irradiation.
■ Do not carry out more than 5 treatments per day. This could lead to skin
irritation.
■ Do not exceed the recommended number of 400 treatments per year.
■ Remove cosmetics and sun care products before using the appliance. If you
do not, it could lead to skin irritation.
NOTICE
► If in any doubt, consult your doctor about the possible applications before
using the appliance.
es develop.
vals for the irradiation
GB
SNS 45 A3
9
Page 13

GB
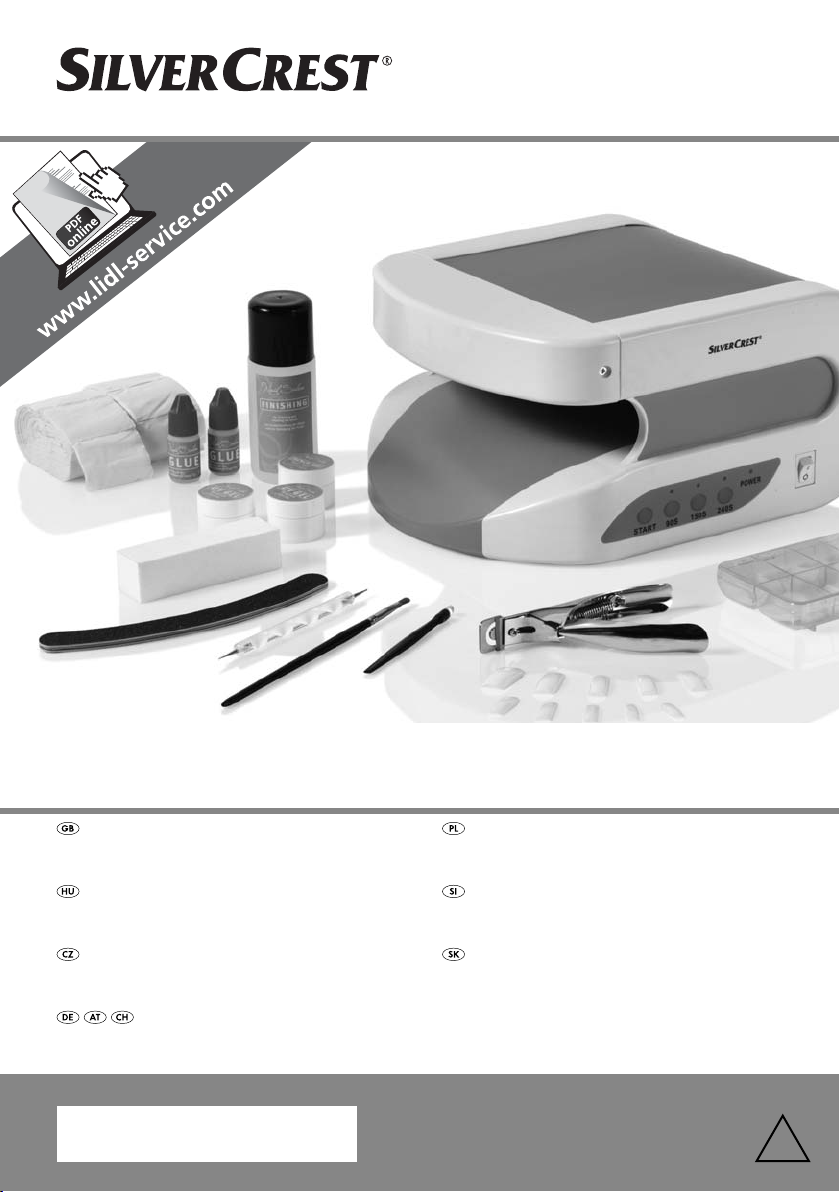
Appliance and Accessories
NOTICE
► See in addition the illustrations on the fold-out side.
igure A:
F
1 UV appliance with 4 built-in UV lamps
2 ON/OFF switch
3 Operating indicator “POWER”/Standby
4 Operating indicator “240 seconds”
5 Time preselect button “240 seconds”
6 Operating indicator “150 seconds”
7 Time preselect button “150 seconds”
8 Operating indicator “90 seconds”
9 Time preselect button “90 seconds”
0 Start button
Figure B:
q Nail clippers (for clipping the nail-tips)
w Cuticle pusher (to push back the cuticle)
e Brush (for applying the UV Gel)
r Sanding block (for smoothing of unevenness)
t Spot swirl (for applying French gel or decorative elements)
z Cellulose pads (for applying the fi nishing solution or for correction)
u Sandpaper fi le (for fi ling nails)
i Nail tips (artifi cial fi ngernails)
o Finishing solution (for fi nal treatment and for cleaning brushes)
p Nail glue (to glue the “GLUE” nail tips on)
a UV gel (for topping up nails)
s French gel (for modelling “French nails”)
10
SNS 45 A3
Page 14
Setting up and connecting to the power supply
Safety instructions
WARNING
During the commissioning of the appliance personal injury and
property damage could occur!
Observe the following safety information to avoid these risks:
► Packaging material should not be used as a play thing. There is a risk of
suff
ocation.
► To avoid damage to people and property, pay heed to the requirements
for the installation site and the electrical connection of the appliance.
Items supplied and initial inspection
The appliance is supplied with the following components as standard:
● UV appliance with 4 UV lamps and mains power cable
● Sand sheet fi le
● Sanding block
● Nail Tips
● Cuticle pusher
● Brush
● Spot swirl
● Nail clippers
● 1 pot French gel (“French gel”)
● 2 pots of UV gel (“UV Gel”)
● Finishing solution (“Finishing”)
● 2 bottles of nail glue (“Glue”)
● 100 cellulose pads (cellulose tissues)
● Storage case
● Operating instructions
GB
SNS 45 A3
NOTICE
► Check the contents to ensure everything has been provided, and for signs
of visible damage.
► If the contents are incomplete, or have been damaged due to defective
aging or transportation, contact the Service Hotline (see chapter
pack
Service).
11
Page 15
GB
Unpacking
♦ Remove all parts of the appliance and these operating instructions from the
box.
♦ Remove all packing material.
Disposal of packaging
The packaging protects the appliance against transport damage. The packaging
materials are selected from the point of view of their environmental friendliness
and disposal technology and are therefore recyclable.
The recirculation of packaging into the material circuit saves on raw material and
reduces generated waste. Dispose of packaging material that is no longer needed
according to the regionally established regulations.
NOTICE
► If possible preserve the appliance's original packaging during the warranty
period so that, in the e
appliance properly for its return.
vent of a warranty claim, you can package the
Requirements for the installation location
For the safe and trouble-free operation of the appliance the following requirements
must be met at the installation location:
■ Place the appliance on a dry, fl at and fi rm surface.
■ Do not place the appliance in a damp environment and not in an area at risk
fr
om spraywater.
■ Do not place the appliance adjacent to a radiator or a raiation heater.
■ The mains power socket must be easily accessible, so that the plug can be
easily r
emoved in an emergency.
12
SNS 45 A3
Page 16
Electrical connection
DANGER
Potentially fatal risk of electrical shocks!
U
pon contact with live wires or live components there is a
potentially fatal risk!
Pay heed to the following safety information to avoid risks from electrical
power:
► Do not operate the appliance if the plug or the power cable are damaged.
► Connect the appliance exclusively to a correctly fused mains power socket.
► Do not touch the appliance and the plug with wet hands.
► Avoid water contact with the appliance.
► DO NOT open the housing of this appliance. If live connections are
touched and/or the electrical or mechanical construction is alter
will be an increased risk of electric shock.
♦ Before you connect the appliance, compare the connection data (voltage and
fr
equency) on the typeplate of the appliance with that for the intended power
source. his data must match, in order to avoid any damage to the appliance.
♦ Ensure that the power cable of the appliance is not damaged and that it is not
laid o
ver hot surfaces and/or sharp edges.
♦ Ensure that the power cable is not over-taut or kinked.
♦ Do not let the power cable hang over edges (trip wire eff ect).
♦ Insert the plug into the mains power socket.
GB
ed, there
SNS 45 A3
13
Page 17
GB
Handling and operation
In this chapter you receive important information for the handling and operation
of the appliance.
NOTICE
► See also the chapter Appliance and Accessories.
Switching On and Off
♦ Switch the UV appliance 1 on by pressing the ON/OFF switch 2 to the
position “I”. The operating indicator 3 lights up and the appliance is ready
for use.
♦ Switch the UV appliance 1 off
position “0”. The operating indicator 3 extinguishes.
Functions
Three diff erent treatment times can be set on the appliance:
■ 90 seconds (Button 9)
■ 150 seconds (Button 7)
■ 240 seconds (Button 5)
♦ Switch the UV lamps on by pressing the Start button 0.
♦ Select the desired treatment time and then press the appropriate time preselect
button 9, 7 or 5.
by pressing the ON/OFF switch 2 to the
14
NOTICE
► The UV lamps switch off automatically after the lapse of the preset time.
♦ Press the time preselect button 9, 7 or 5 and the Star
again as described above for any further treatments.
t button 0 once
SNS 45 A3
Page 18
Utilisation
CAUTION
Risk of property damage from glue and UV gel.
Nail glue p, UV gel a and F
furniture surfaces, clothes and carpets.
► Cover your work area with paper or with a hand towel prior to use.
NOTE
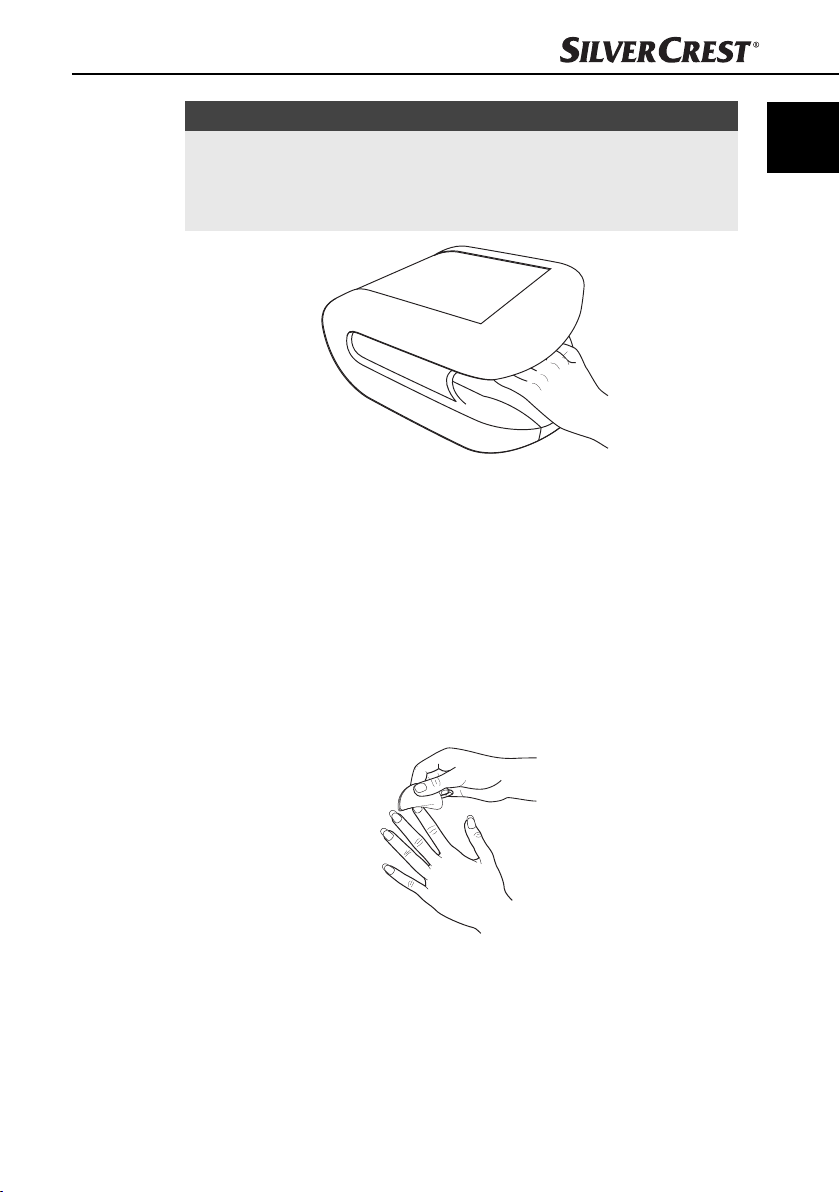
► Place the UV appliance 1 on a co
► Never place the nail glue p, the F
vicinity of the UV appliance 1.
► Never expose the nail glue p, the F
sunshine.
Selecting artifi cial nails
NOTICE
► For the fi rst applications it may be helpful to be assisted by an experienced
son.
per
► Before the application, remove all jewelry on the hands.
► Clean and dry your hands before the application. We recommend that the
hands ar
there will be no residual moisture on the nails.
♦ Select a nail tip i whose cur
e washed about 15 - 20 minutes before the application, so that
natural curve of your nail.
GB
rench gel s are very diffi cult to remove from
vered, stable surface.
rench gel s or the UV gel a in the
rench gel s or the UV gel a to direct
vature corresponds as closely as possible to the
i
SNS 45 A3
♦ Select a nail tip i which closes exactly at the edge of your natural nail and
whereby the sides are parallel to your natural nail.
15
Page 19
GB
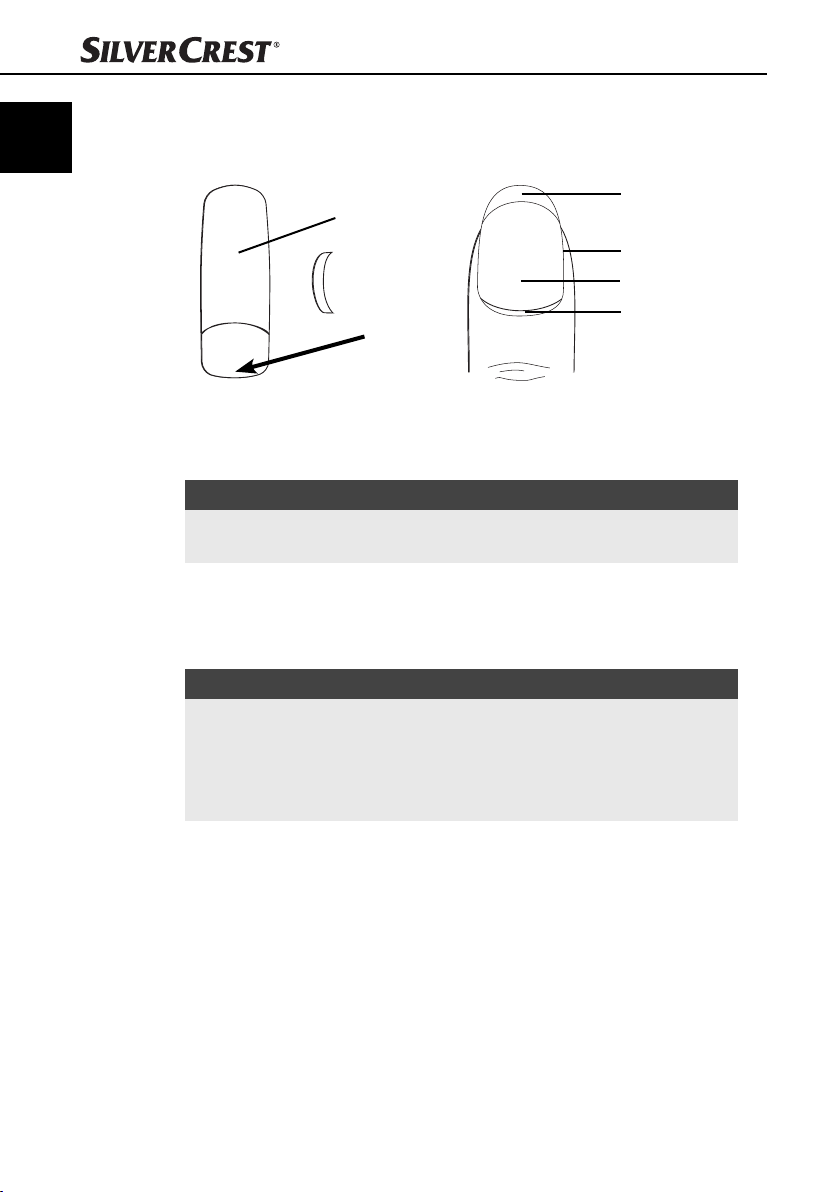
♦ If necessary, fi le the ends of the nail tips i with the sandpaper fi le u, so that
the end point (arrow) covers about one third of your natural nail.
i
Free edge Nail bed
Nail plate Cuticle
NOTICE
► If you use a too small nail tip i, it can br
select a larger nail tip i and then fi le the sides into the desired form.
♦ Repeat the described process until all of your nails have the desired length
and shape.
Attaching artifi cial nails
NOTICE
► Take note that nails absorb moisture from contact with water. The nails,
wever, must be completely dry before the application.
ho
► Before the application, refrain from using any hand creams or the like,
because, to mak
surfaces must be completely free from greases.
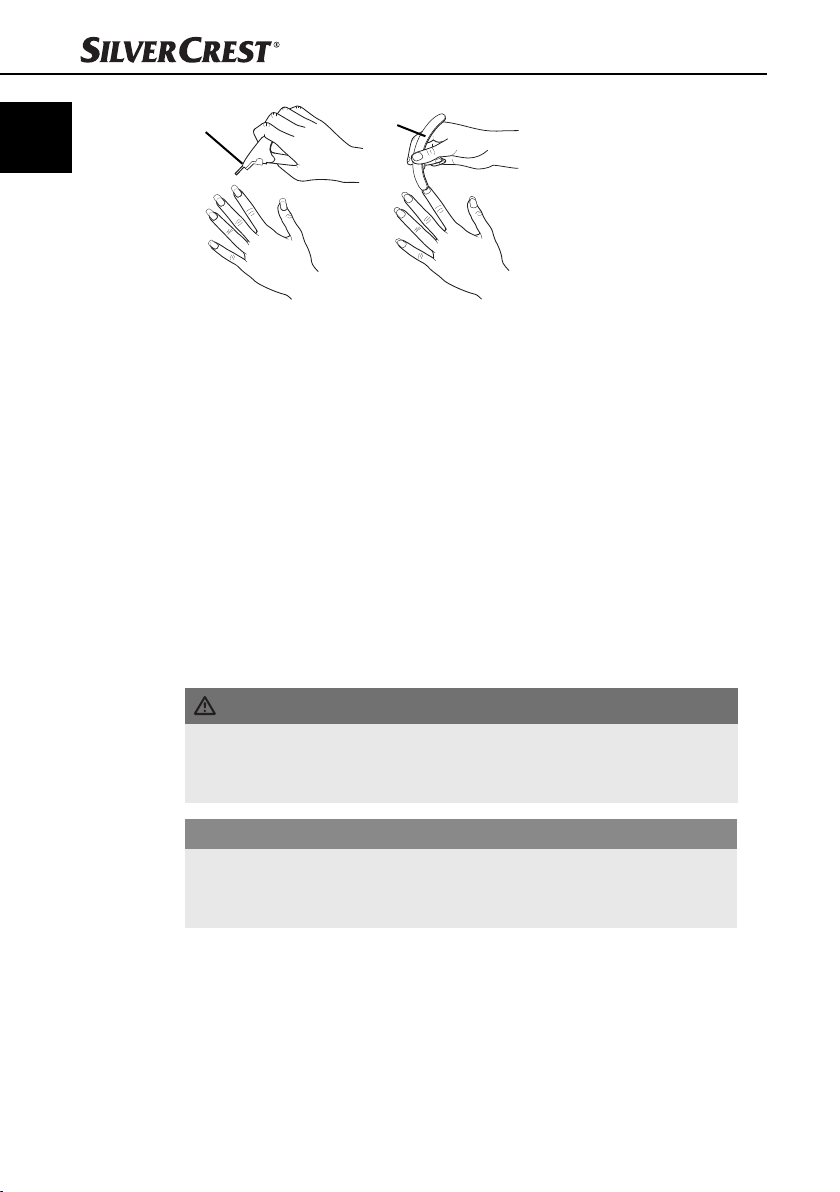
♦ Push the cuticle back with the cuticle pusher w and then r
parent skin from the nail plate of your fi nger.
♦ Now treat the nail surface with the sanding block r until the fi
longer shiny.
♦ Remove the dust from fi ling with a paper cloth or cellulose pad z.
♦ Rub the nails with the fi nishing solution o so that the last r
and grease are removed.
e possible the optimal adhesion of the nail tips i the nail
eak off more easily. Therefore,
emove the trans-
ngernail is no
emnants of dust
16
SNS 45 A3
Page 20
NOTICE
► Under no circumstance should you now touch the nail surfaces with your
ngers, if you do, they will become greasy again and this will prevent a
fi
good bonding!
♦ Apply a small drop of nail glue p to the lo
distribute it with the aid of the nail glue bottle p on the lower surface. Hold
the nail tip i down so that the nail glue p cannot run onto the upper part
of the nail tip i.
NOTICE
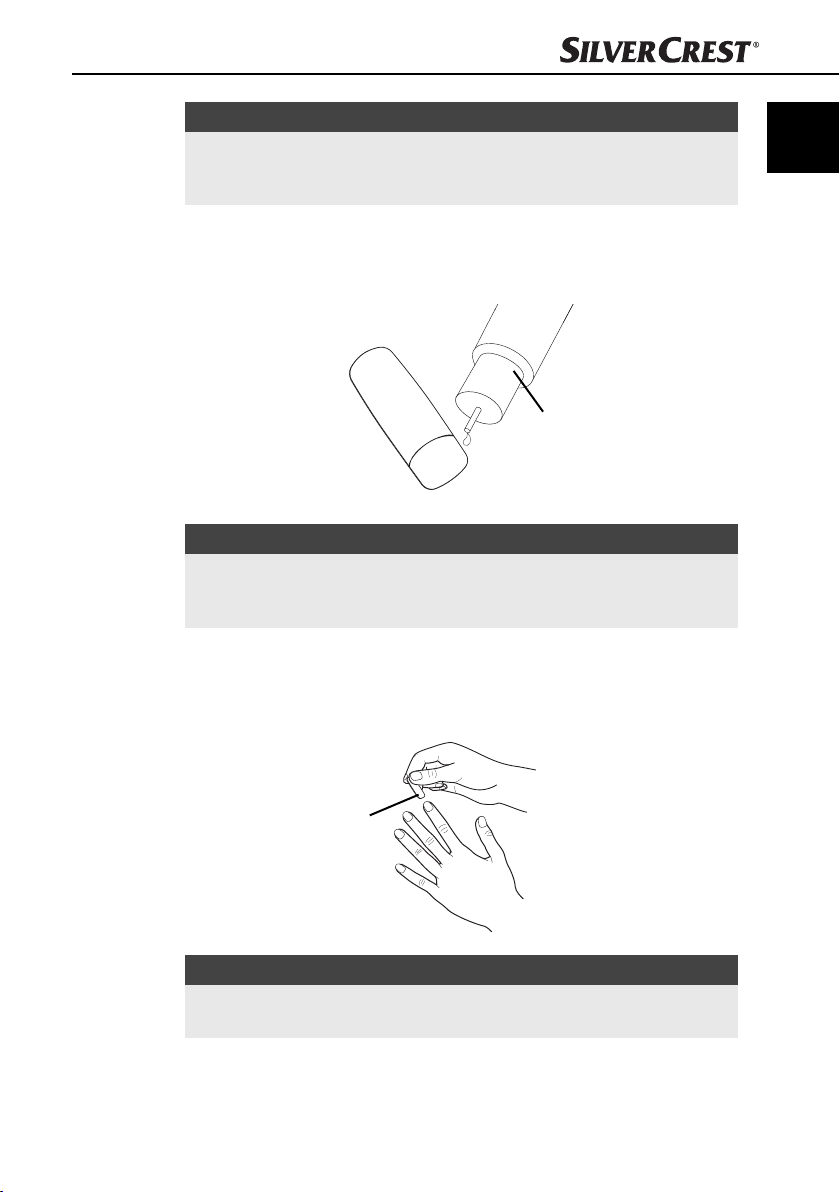
► Before the fi rst use you must puncture the bottle of nail glue p w
ted object, such as a needle. If, at a later date, the bottle of nail glue p has
become blocked, it can again be opened for use with a needle.
♦ Now place the nail tip i at an angle on the natur
mined edge of the nail tip i lies on the edge of the natural nail.
♦ Now tilt the nail tip i with gentle pr
tential air bubbles are squeezed out .
wer part of the nail tip i and
p
ith a poin-
al nail, so that the predeter-
essure onto the natural nail, so that po-
GB
SNS 45 A3
i
NOTICE
► Wipe away excess nail glue p with a cellulose pad z, a cotton bud or
a paper to
wel.
17
Page 21
GB
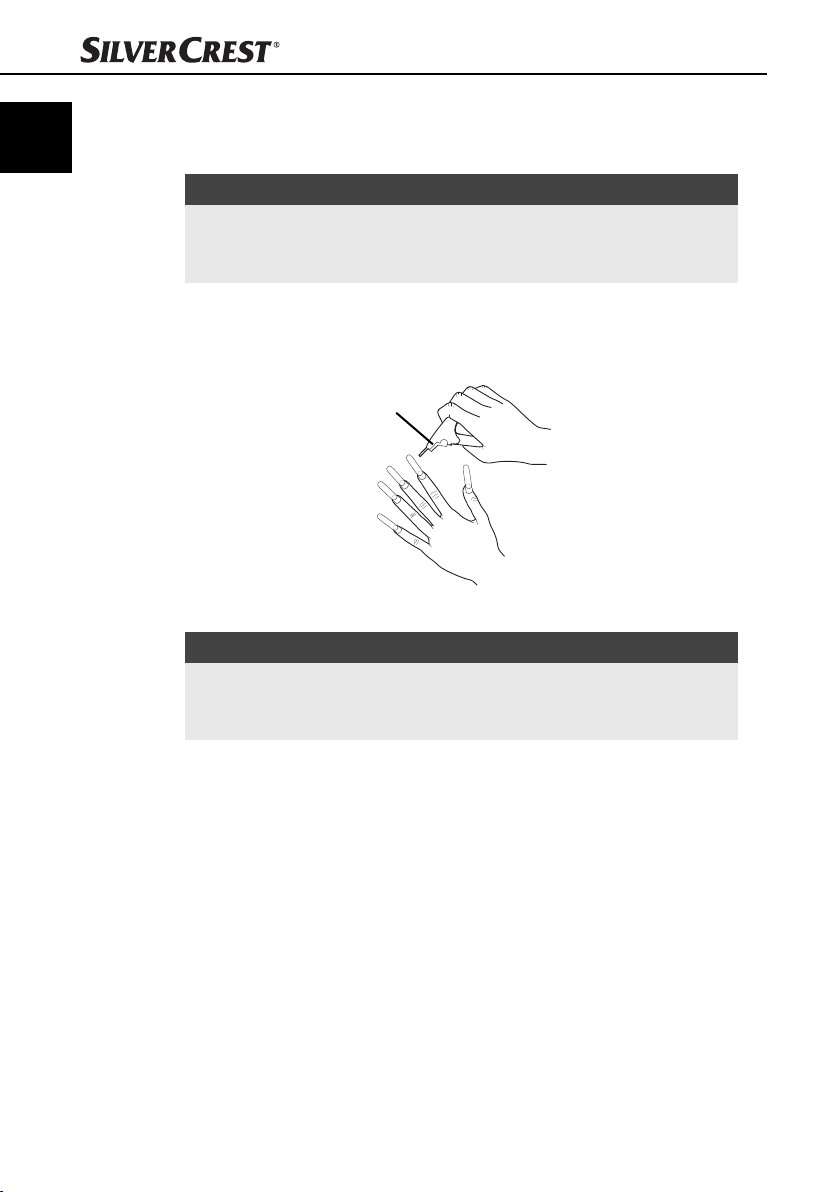
♦ Hold the nail tip i fi rmly for 10-12 seconds and, at the same time, press it
down with suffi cient pressure onto the natural nail. Ensure that no air bubbles
are formed and that the tip is glued on perfectly straight.
NOTICE
► There may no longer be a gap under the nail, so that dirt cannot penetrate.
► Ensure that no air bubbles or white spots form under the nail tip i. In this
case, tak
♦ When you have glued all of the nail tips i on, trim them to the desir
♦ File them into shape with the sand sheet fi le u.
NOTICE
► File very carefully, because the nail tips i ar
► If you are not used to long nails, cut them back a little in order to avoid
knock
e the nail tip i off immediately and lay it back on again.
ed length
with the nail clippers q. Press the nail clippers q together in one squeeze. If
you press too slowly, it may happen that the nail tips i splitter.
q
e held only with a nail glue p.
s and the falling off of the nail tips i.
18
SNS 45 A3
Page 22
Matching a nail set
♦ Carefully fi le the transitions from the nail tips i to the natural nails with the
Sandpaper fi le u until they conform to the contour of the natural nail. File
only the nail tips i! Do not damage your natural nail.
♦ Carefullly fi le the sides of the nail with the Sandpaper fi le u until it is str
and does not exhibit a “wing”.
♦ Repeat this step for each individual nail.
♦ Remove the dust from fi ling with a paper cloth or cellulose pad z.
Application of the UV-Gel
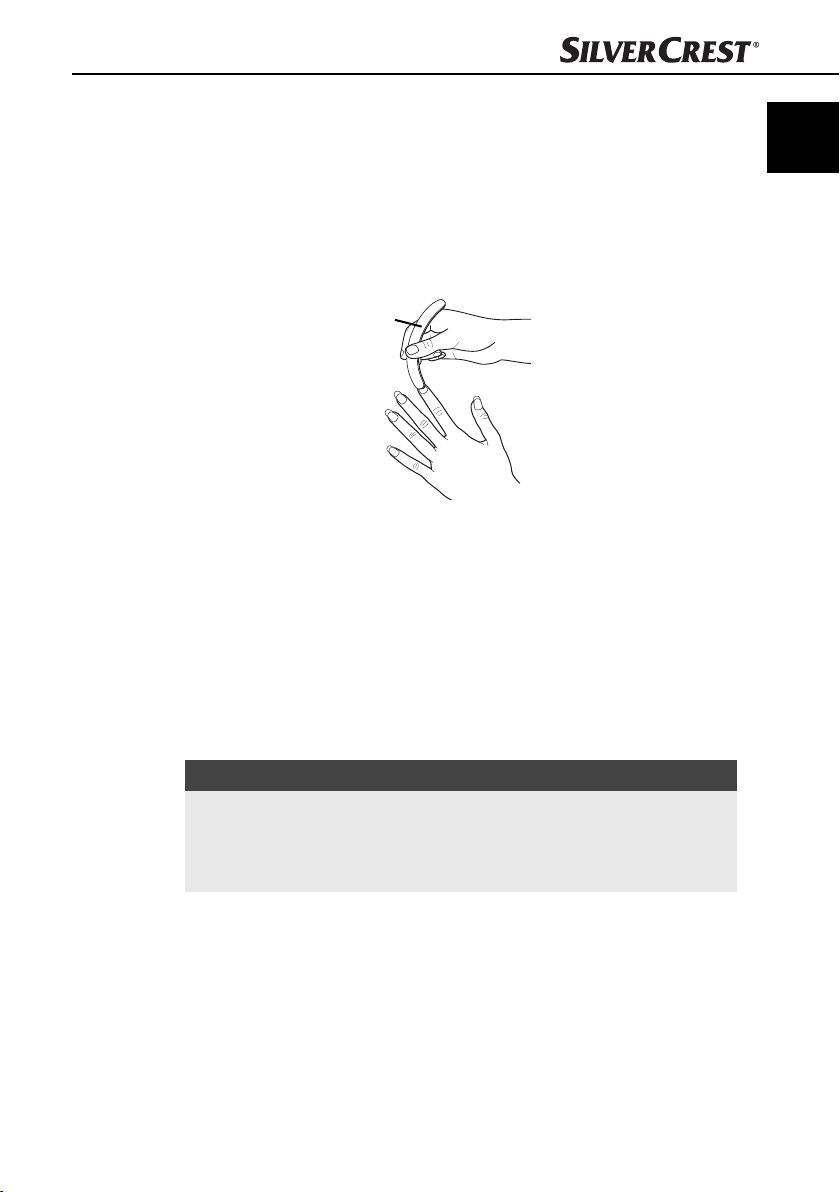
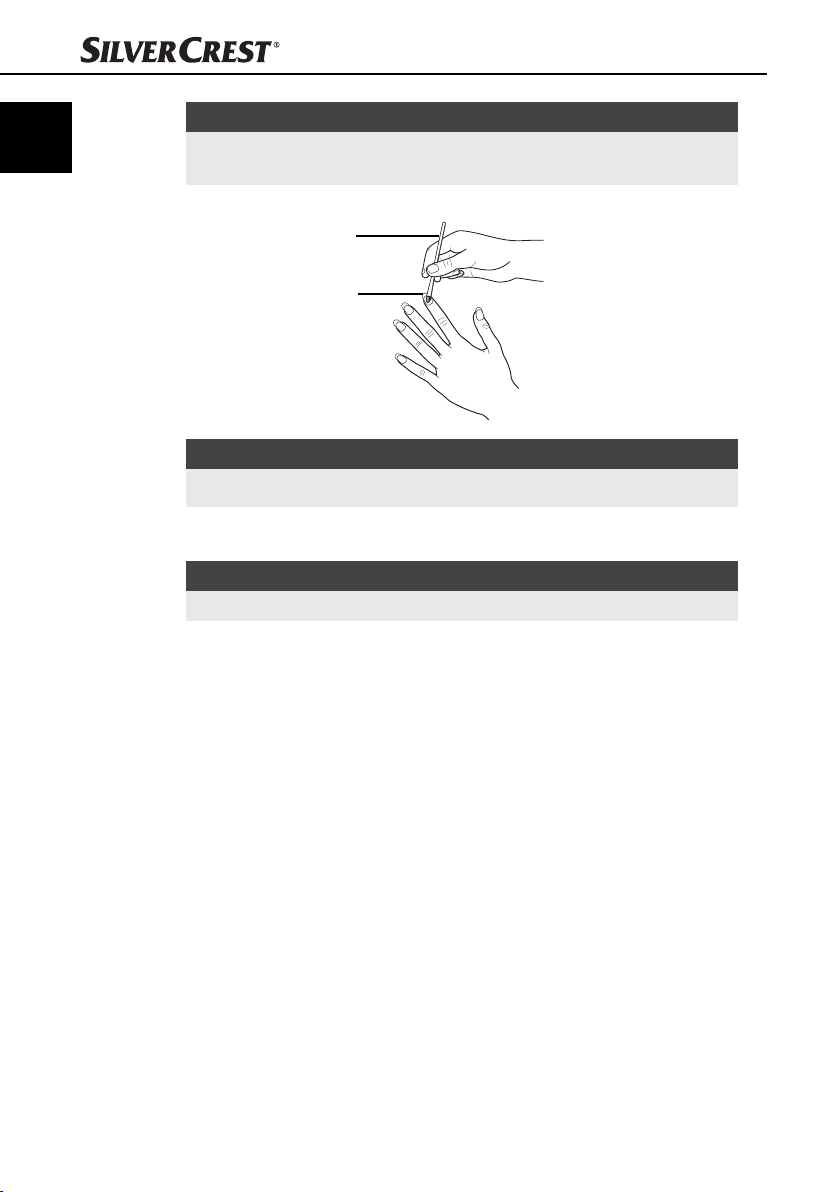
♦ Using the brush e, take a small amount of UV Gel a and then wipe the
excess on one side of the brush e off on the edge the UV Gel pot.
♦ Apply a thin coating of UV-Gel a onto the complete nail. Apply a little mor
UV Gel a to the lower part of the nail, as hereby is how the off set between
the natural and the artifi cial nail is created. Furthermore, the transition from
natural to artifi cial nails is especially sensitive to pressure and knocks, thus
more UV Gel a must be applied here.
GB
aight
u
e
SNS 45 A3
INFORMATION
► When you are doing the application do not press too heavily on the brush e,
since the brush e could other
► Model the fi rst layer of the UV Gel a v
future shape of the nail. Model the best possible natural nail shape.
♦ Maintain a distance of about 1 mm from the cuticle during the application.
wise cause streaking.
ery carefully, as this determines the
19
Page 23
GB
NOTICE
► Should any UV Gel a inadv
remove it before the hardening, for example, with a cotton wool swab.
♦ Repeat the above process for all nails.
e
i
NOTICE
► Ensure that the nail is covered evenly with UV Gel a.
Hardening of the UV-Gel
NOTICE
► See also the chapter Handling and oper
♦ Switch the UV appliance 1 on with the ON/OFF switch 2.
♦ Press the Start button 0; the UV Lamps will be switched on.
♦ Now select the desired treatment time and then press the appropriate time
pr
eselect button 9, 7 or 5. For the fi rst hardening we recommend the time
setting of 240 seconds.
♦ Hold your hand with the nails upward for the duration of the set treatment
time in the opening of the UV appliance 1.
♦ Treat the thumbnail separately because, when you hold your hand in the UV
unit, the UV light only shines on the side of it.
♦ Repeat the application of the UV gel a and the har
ance 1 as described above once more.
ertantly come onto the cuticle or the nail bed,
ation.
dening in the UV appli-
20
SNS 45 A3
Page 24
NOTICE
► After the expiry of the preselected treatment time the UV lamps are switched
automatically.
off
► The Start button 0 and a time pr
vated again for each new treatment.
♦ Examine each nail, after the application and hardening of all coatings, for
unevenness, small scratches or ridges.
♦ If you discover unevenness, apply a further thin layer of UV gel a and har
en the nail with the setting of 150 seconds or 90 seconds (depending on the
amount of applied UV gel a).
Even after the last hardening of the Gel layer, the nails may feel a feel sticky
(“sweat-layer” or polymerization layer).
♦ Moisten a cellulose pad z with fi
the nail.
eselect button (9, 7 or 5) must be acti-
d-
nishing solution o and then wipe this over
GB
SNS 45 A3
21
Page 25
GB
TIP
► If you want to apply ornaments or small rhinestones to the nail, use the
Topping up
NOTICE
► Because the natural nail grows, over time the attachment of the nail tip i
► A topping up is required about every 2 - 3 weeks.
♦ Using the sandpaper fi le u, fi
♦ Use the sanding block r until the nail is no longer shin
♦ When done, reapply UV gel a and har
NOTICE
► In this regard, see the previous chapters Application of t
sharp side of the Spot swirl t to place them in the non-har
recent layer of the UV gel a. Then harden the UV gel a.
Apply an additional, very thin layer of UV gel a over the nail and then
harden it to ensure that the ornaments are held fi rmly in place. This gives
the ornaments better protection.
aise itself. For this reason the gap between the cuticle and the nail
can r
attachment must be topped up from time to time.
le around the attachments of the hardened gel.
den it again.
and Hardening of the UV-Gel
dened most
y.
he UV-Gel
22
SNS 45 A3
Page 26
French nails
“French nails” means decorating the fi ngernails with a white tip.
♦ Model the nail as described in the chapter entitled “Application” until you
e applied the fi rst layer of UV gel a and hardened it.
hav
♦ Use the round application side of the Spot swirl t to apply F
the nail tip. Always take up new French gel s with the point and model the
white nail tip with light circular movements.
♦ Proceed with the other nails in the same way.
♦ Now harden the nail using a setting of 150 seconds.
♦ Then apply an additional layer of UV gel a. Apply a little less UV gel a
to the white par
white tip disappear.
♦ Now harden the nail using a setting of 150 seconds. After the last hardening
of the gel lay
tion layer).
♦ Moisten a cellulose pad z with fi
the nail.
t of the nails than to the rest. This makes the transition to the
er, the nails may feel a little sticky (“sweat layer” or polymeriza-
Removal of artifi cial nails
IMPORTANT
Risk of damaging the natural nail surface!
A for
cible breaking-off of the nail tips i can cause damage to the natural nail
surfaces!
► Do not break the nail tips i off
► Remove the nail tips i only in accor
♦ First trim the nails all the way back with the nail clippers q.
♦ Then fi le the nail tips i off
GB
rench gel s to
nishing solution o and then wipe this over
of the natural nails.
dance with the following description.
with the sandpaper fi le u.
SNS 45 A3
TIP
► After this, apply a little nail oil or use a rich hand cream for hands and
nails in or
der to care for your natural nails.
23
Page 27
GB
q
Care
■ Regularly fi le the attachments and nail edges.
■ Polish the nails once a week.
■ When applying nail varnish, use both a lower layer and an upper layer.
■ Do not use an acetone-based nail polish remover for removing nail polish,
because this w
■ Wear rubber gloves when using detergents or bleaching agents.
■ Wear a pair of rubber gloves for all work/activities that may damage the
nails.
Cleaning
Safety instructions
u
ould loosen and damage the artifi cial nails.
DANGER
Potentially fatal risk of electrical shocks!
► Disconnect the plug from the mains power socket before you start cleaning
the appliance.
IMPORTANT
Damage to the appliance!
► To avoid irreparable damage, ensure that no moisture can penetrate inside
the UV appliance 1 when y
Cleaning the appliance
♦ Clean the surfaces of the UV appliance 1 only with a soft and dry cloth.
24
ou are cleaning it.
SNS 45 A3
Page 28
Cleaning accessories
NOTE
► Clean the brush e and the Spot swirl t immediately af
► Always close all bottles and tubs after use.
♦ Keep the brush e and the Spot swirl t in the fi
wipe them both off with a paper towel.
Exchanging the UV Lamps
DANGER
Potentially fatal risk of electrical shocks!
► Disconnect the plug from the mains power socket before you start with the
e
xchange of the UV lamps!
NOTICE
► The UV lamps may ONLY be replaced with lamps of the same type. The speci-
cations for the precise lamp type are given in the chapter "Technical Data".
fi
♦ Unscrew the two screws on the sides of the appliance with a cross-head
ewdriver.
scr
GB
ter every use.
nishing solution o and then
SNS 45 A3
25
Page 29
GB
♦ Pull the front appliance cover with the ultraviolet lamps carefully from the
appliance, thereby paying heed to the cable connection on the side.
♦ Carefully pull the defective UV lamp out of its socket.
♦ Insert the new UV lamp into the socket.
♦ Slide the appliance cover with the UV lamps back onto the appliance, thereby
ensuring that the cable connection on the side does not get snagged or tr
♦ Re-attach the appliance cover with the two side screws.
Troubleshooting
In this chapter you will receive important information for malfunction localization
and remedies. Observe the instructions in order to avoid risks and damage.
Safety instructions
apped.
26
WARNING
Observe the following safety information to avoid risks and property damage:
► Repairs to electronic appliances may only be carried out by specialists who
e been trained by the manufacturer. Considerable risk to the consumer
hav
and damage to the appliance can occur as a result of incompetent repairs.
SNS 45 A3
Page 30
Malfunction causes and remedies
The following table will help with localizing and remedying minor malfunctions:
Defect Possible cause Solution
Insert the plug into the mains
power socket.
Check the fuses.
Select a longer treatment time.
Replace any defective UV lamps (see
chapter entitled “Exchanging UV
lamps”)
Apply less UV gel a.
Hold the hand correctly in the
UV appliance 1.
Remove the "sweat layer" with
the fi nishing solution o.
Apply no products with a high
acetone concentration.
Do not press too hard on the brush e
when you are applying the UV gel a.
Apply a further and thinner layer
of UV gel a and then harden it.
Appliance does
not switch on.
UV gel a does not
harden suffi ciently.
After hardening,
a "sweat layer" remains on the nails.
The artifi cial nails
are soft/loosened.
The artifi cial
fi ngernails show
unevenness.
A UV lamp does
not glow.
The plug is not connected.
Mains power socket does
not supply any voltage.
The selected treatment
time too short.
One or more UV lamps
are defective.
Too much UV gel a
applied.
The nails were not directly
under the UV lamps.
Occurence of a "sweatlayer" caused by polymerization.
Loosening of the artifi cial
nails by products with a
high acetone concentration.
Pressure on the brush e
too high when applying
the UV gel a.
UV gel a unevenly applied.
UV lamp defect. Replace the defective UV lamp.
GB
SNS 45 A3
NOTICE
► If you cannot solve the problem with the aforementioned solutions, please
contact Customer Ser
vices.
27
Page 31

GB
Storage/Disposal
Storage
IMPORTANT
Health risks from solvent-containing substances!
Solv
ent-containing substances and their vapours can damage your health!
► Carefully close all containers holding the accompanying substances.
► Store the accompanying substances out of the reach of children.
♦ Should you decide not use the appliance for an extended period, disconnect
om the mains power supply and store it in a clean and dry location away
it fr
from direct sunlight and out of the reach of children.
♦ Store all substances in a clean, dry and cool location away from direct sun-
light and out of the r
Disposing of the appliance
UNDER NO CIRCUMSTANCES should you throw the appliance or
the substances into normal household waste. This product is subject
to the provisions of the European Directive 2012/19/EU.
Dispose of the appliance and the substances via an approved waste disposal
company or your communal waste disposal centre. The chemical substances are
subject to special waste treatment. Observe the currently applicable regulations.
In case of doubt, please contact your waste disposal centre.
each of children.
Appendix
Notes on the EC Declaration of Conformity
This appliance complies with all the essential requirements and
other relevant provisions of ...
– the European directive on electromagnetic compat-
y 2004/108/EC,
ibilit
– the Low Voltage Directive 2006/95/EC,
– and the RoHS Directive 2011/65/EU.
The full original Declar
the importer.
28
ation of Conformity is available from
SNS 45 A3
Page 32

Technical data
Model SNS 45 A3
Operating voltage 220 - 240 V ~ / 50 Hz
Power consumption 45 W
Operating temperature +5 - +45 °C
Humidity (no condensation) 5 - 90 %
Dimensions (W x H x D): 23,1 x 29,6 x 14,3 cm
Weight approx. 1300 g
Number of UV Lamps 4
UV Lamp Type UV-9W 365 nm, 9 W
UV-type of the appliance UV-A Lamp type 3
Automatic switch-off times after 90, 150 and 240 seconds
Warranty
The warranty for this appliance is for 3 years from the date of purchase. The
appliance has been manufactured with care and meticulously examined before
delivery.
Please retain your receipt as proof of purchase. In the case of a warranty claim,
please make contact by telephone with our Customer Service Department. Only
in this way can a post-free despatch for your goods be assured.
GB
SNS 45 A3
NOTICE
► The warranty covers only claims for material and manufacturing defects,
but not for tr
components, e.g. buttons or batteries.
This product is for domestic use only and is not intended for commercial use. The
warranty is void in the case of abusive and improper handling, use of force and
internal tampering not carried out by our authorised service branch.
Your statutory rights are not restricted in any way by this warranty. The warranty
period is not extended by repairs made under the warranty. This applies also to
replaced and repaired parts.
Damages and defects extant at the time of purchase must be reported immediately
after unpacking, resp. no later than two days after the date of purchase.
Repairs made after the lapse of the warranty period are subject to charge.
ansport damage, wearing parts or for damage to fragile
29
Page 33

GB
Service
Importer
Service Great Britain
Tel.: 0871 5000 720 (£ 0.10/Min.)
E-Mail: kompernass@lidl.co.uk
IAN 90252
Hotline availability: Monday to Friday 08:00 - 20:00 (CET)
KOMPERNASS HANDELS GMBH
BURGSTRASSE 21
44867 BOCHUM
GERMANY
www.kompernass.com
30
SNS 45 A3
Page 34

Spis treści
Wprowadzenie . . . . . . . . . . .32
Prawo autorskie . . . . . . . . . . . . . . . 32
Ograniczenie od
odpowiedzialności . . . . . . . . . . . . .32
Użycie zgodne
z przeznaczeniem . . . . . . . . . . . . . 32
Wskazówki ostrzegawcze . . . . . . .33
Wskazówki dotyczące
bezpieczeństwa . . . . . . . . . .34
Urządzenie i akcesoria . . . .40
Ustawianie i podłączanie . .41
Wskazówki dotyczące
bezpieczeństwa . . . . . . . . . . . . . . .41
Zakres dostawy i przegląd
po rozpakowaniu . . . . . . . . . . . . . .41
Rozpakowanie . . . . . . . . . . . . . . . . 42
Utylizacja opakowania . . . . . . . . . 42
Warunki wymagane w
miejscu użytkowania . . . . . . . . . . . . 42
Przyłącze elektryczne . . . . . . . . . . . 43
Obsługa i użytkowanie . . . .44
Włączanie i wyłączanie . . . . . . . . .44
Funkcje . . . . . . . . . . . . . . . . . . . . . .44
Zastosowanie . . . . . . . . . . . .45
Wybór tipsów . . . . . . . . . . . . . . . . .45
Nakładanie tipsów . . . . . . . . . . . . . 46
Przygotowanie
nasady paznokcia . . . . . . . . . . . . . 49
Nakładanie żelu UV . . . . . . . . . . . .49
Utwardzanie żelu UV . . . . . . . . . . .50
Wypełnianie . . . . . . . . . . . . . . . . . . 52
Francuski manicure (French-Nails) . . . 53
Odklejanie tipsów . . . . . . . . . . . . .53
Pielęgnacja . . . . . . . . . . . . . . . . . . . 54
Czyszczenie . . . . . . . . . . . . .54
Wskazówki dotyczące
bezpieczeństwa . . . . . . . . . . . . . . .54
Czyszczenie urządzenia . . . . . . . . 54
Czyszczenie akcesoriów . . . . . . . .55
Wymiana żarówek UV . . . .55
Usuwanie usterek . . . . . . . .56
Wskazówki dotyczące
bezpieczeństwa . . . . . . . . . . . . . . .56
Przyczyny błędów i
ich usuwanie . . . . . . . . . . . . . . . . . .57
Przechowywanie/
Utylizacja . . . . . . . . . . . . . . .58
Przechowywanie . . . . . . . . . . . . . . 58
Utylizacja urządzenia . . . . . . . . . .58
Załącznik . . . . . . . . . . . . . . .58
Wskazówki dotyczące
deklaracji zgodności WE . . . . . . . .58
Dane techniczne . . . . . . . . . . . . . . .59
Gwarancja . . . . . . . . . . . . . . . . . . .59
Serwis . . . . . . . . . . . . . . . . . . . . . . . 60
Importer . . . . . . . . . . . . . . . . . . . . .60
PL
SNS 45 A3
31
Page 35

PL
Wprowadzenie
Gratulujemy Ci zakupu naszego urządzenia.
Jest to produkt wysokiej jakości. Instrukcja obsługi stanowi część tego produktu.
Zawiera ona ważne wskazówki dotyczące bezpieczeństwa, użytkowania i utylizacji urządzenia. Przed przystąpieniem do użytkowania produktu zapoznaj się
z wszystkimi wskazówkami obsługi i bezpieczeństwa. Używaj produkt zgodnie
z opisem i w podanych obszarach użytkowania. W razie przekazania produktu
następnej osobie, nie zapomnij dołączyć również instrukcji obsługi.
Prawo autorskie
Niniejsza dokumentacja jest prawnie chroniona.
Wszelkie powielanie lub przedruk, także we fragmentach, oraz przekazywanie
ilustracji, również po ich modyfi kacji, jest dozwolone wyłącznie po uzyskaniu
pisemnej zgody producenta.
Ograniczenie od odpowiedzialności
Wszystkie zawarte w niniejszej instrukcji obsługi informacje techniczne, dane i wskazówki montażu i podłączania oraz obsługi, są zgodne z ostatnim stanem przekazania do druku i uwzględniają nasze dotychczasowe doświadczenie i orientację
zgodnie z najnowszą wiedzą. Na podstawie zawartych tu informacji, ilustracji
i opisów nie można wysuwać żadnych roszczeń. Producent nie ponosi żadnej
odpowiedzialności za szkody, spowodowane nieprzestrzeganiem instrukcji, użytkowaniem urządzenia niezgodnie z przeznaczeniem, niefachowymi naprawami,
niedozwolonymi przeróbkami ani używaniem niedozwolonych części zamiennych.
Użycie zgodne z przeznaczeniem
Niniejsze urządzenie służy do nakładania i mocowania tipsów do manicure.
Urządzenie jest przystosowane do pracy w zamkniętych pomieszczeniach w warunkach domowych i może być wykorzystywane wyłącznie do celów prywatnych.
Inne lub wykraczające poza powyższe użytkowanie, uznaje się za niezgodne z
przeznaczeniem.
OSTRZEŻENIE
Niebezpieczeństwo spowodowane użytkowaniem niezgodnie
z przeznaczeniem!
Użytkowanie urządzenia niezgodnie z jego przeznaczeniem i/lub inne wykorzystanie urządzenia może wiązać się z różnymi zagrożeniami.
► Urządzenie należy użytkować wyłącznie zgodnie z jego przeznaczeniem.
► Należy przestrzegać opisanych w niniejszej instrukcji obsługi metod
postępo
wania.
32
SNS 45 A3
Page 36

Wyklucza się możliwość wnoszenia jakichkolwiek roszczeń ztytułu uszkodzeń
spowodowanych zastosowaniem niezgodnie zprzeznaczeniem, nieprawidłowymi
naprawami, niedozwolonymi zmianami lub użyciem niedopuszczalnych części
zamiennych.
Wszelkie ryzyko ponosi wyłącznie użytkownik.
Wskazówki ostrzegawcze
W niniejszej instrukcji obsługi zastosowano następujące wskazówki ostrzegawcze:
NIEBEZPIECZEŃSTWO
Wskazówka ostrzegawcza o tym stopniu zagrożenia oznacza
wy
stępowanie groźnej sytuacji.
W razie braku możliwości uniknięcia niebezpiecznej sytuacji, może to doprowadzić do odniesienia obrażeń.
► Przestrzeganie instrukcji podawanych w tej wskazówce ostrzegawczej
oli uniknąć niebezpieczeństwa utraty życia lub odniesienia poważ-
pozw
nych obrażeń.
OSTRZEŻENIE
Wskazówka ostrzegawcza tego stopnia zagrożenia oznacza
możliwą do wystąpienia sytuację niebezpieczną.
W razie braku możliwości uniknięcia niebezpiecznej sytuacji, może to doprowadzić do odniesienia obrażeń.
► Instrukcje w niniejszej wskazówce ostrzegawczej stosuje się, by uniknąć
odniesienia obr
ażeń osób.
PL
SNS 45 A3
UWAGA
Wskazówka ostrzegawcza tego stopnia zagrożenia oznacza
możliwą szk
W razie braku możliwości uniknięcia niebezpiecznej sytuacji, może to doprowadzić do szkód materialnych.
► Instrukcje w niniejszej wskazówce ostrzegawczej stosuje się, by uniknąć
ód materialnych.
szk
WSKAZÓWKA
► Wskazówka oznacza dodatkowe informacje, ułatwiające korzystanie z
ządzenia.
ur
odę materialna.
33
Page 37

PL
Wskazówki dotyczące bezpieczeństwa
Niniejsze urządzenie jest zgodne z odpowiednimi przepisami bezpieczeństwa.
Mimo to nieprawidłowe użycie może prowadzić do szkód osobowych i materialnych.
■ Naprawy urządzenia w okresie trwania gwarancji zlecaj wyłącznie auto-
r
yzowanym serwisom, ponieważ w przeciwnym razie może dojść do utraty
gwarancji.
NIEBEZPIECZEŃSTWO
Niebezpieczeństwo śmiertelnego porażenia prądem elektryczn
ym!
Dotknięcie przewodów znajdujących się pod napięciem grozi
odniesieniem śmiertelnych obrażeń!
Przestrzegaj następujących wskazówek bezpieczeństwa, by uniknąć zagrożenia
porażenia prądem elektrycznym:
► W przypadku uszkodzenia kabla zasilającego powinien być on wymie-
y przez producenta, jego serwis lub przez osobę o odpowiednich
nion
kwalifi kacjach, aby zapobiec powstaniu zagrożeń.
► Nie stawiaj urządzenia w łazience.
► Urządzenie podłączaj zawsze do uziemionego gniazdka sieciowego.
► Nie dotykaj urządzenia ani wtyczki sieciowej mokrymi rękoma.
► Nigdy nie wkładaj urządzenia do wody.
► Nigdy nie próbuj otwierać obudowy urządzenia (z wyjątkiem konieczności
y świetlówki UV). Dotykanie przyłączy elektrycznych lub próba
wymian
zmiany konstrukcji elektrycznej i mechanicznej grozi porażeniem prądem
elektrycznym.
34
OSTRZEŻENIE
Niebezpieczeństwo odniesienia obrażeń w wyniku działania
światła ultrafi oletowego (światło UV)
Patrzenie prosto w źródło światła UV świetlówek UV w urządzeniu może
prowadzić do obrażeń oczu i pogorszenia się wzroku!
► Nigdy nie patrz bezpośrednio w źródło światła ultrafi oletowego świetlówek
UV
.
► Nieużywane świetlówki UV należy wyłączać.
► Wszystkie inne osoby, w szczególności dzieci, które nie używają urzą-
enia, nie powinny przebywać w otoczeniu urządzenia.
dz
SNS 45 A3
Page 38

OSTRZEŻENIE –
NIEBEZPIECZEŃSTWO ODNIESIENIA OBRAŻEŃ
► Przed przystąpieniem do użytkowania sprawdź, czy urządzenie nie jest
nigdzie uszk
urządzenia.
► Urządzenie nie jest przeznaczone do użytkowania przez osoby (w tym
dzieci) o ogr
lub nieposiadające doświadczenia i / lub wiedzy, chyba że będą one
przebywały pod opieką osoby odpowiedzialnej za ich bezpieczeństwo lub
uzyskają od niej wskazówki dotyczące właściwego używania urządzenia.
► Nie można pozwolić dzieciom na zabawę urządzeniem.
► Nigdy nie patrz prosto na świetlówki UV. Mogłoby to doprowadzić do
ażeń oczu.
obr
► Urządzenie wraz z całym wyposażeniem przechowuj zawsze z dala od
dzieci.
► Przestrzegaj wskazówek podanych na opakowaniach wszystkich używa-
ych substancji.
n
► Naprawy urządzenia zlecaj wyłącznie autoryzowanym serwisom lub
obsłudz
poważne zagrożenie dla użytkownika. Do tego można stracić gwarancję.
► Uszkodzone elementy wymieniaj zawsze na oryginalne części zamienne.
ylko te części gwarantują odpowiednie bezpieczeństwo użytkowania
T
urządzenia.
OSTRZEŻENIE
Niebezpieczeństwo utraty zdrowie spowodowane substancjami
i oparami zawierającymi rozpuszczalniki!
Wdychanie substancji i oparów zawierających rozpuszczalniki może prowadzić
do utraty zdrowia!
► Nie wdychać oparów substancji (np. aceton) zawierających rozpuszczalniki.
► Należy zadbać o dostateczne przewietrzanie pomieszczenia w trakcie
używ
► Należy zwracać uwagę na wskazówki podane na opakowaniach substancji
zawier
odzone. Nie uruchamiaj uszkodzonego ani upuszczonego
aniczonej sprawnością fi zycznej, ruchowej bądź umysłowej
e klienta. Nieprawidłowo wykonane naprawy mogą powodować
ania substancji zawierających rozpuszczalniki.
ających rozpuszczalniki.
PL
SNS 45 A3
35
Page 39

PL
OSTRZEŻENIE
Niebezpieczeństwo utraty zdrowia spowodowane działaniem
substancji chemicznych!
Nieprawidłowe korzystanie z substancji chemicznych może prowadzić do
poważnych obrażeń zdrowia!
► W przypadku połknięcia niezwłocznie udaj się do lekarza!
► W razie wystąpienia reakcji alergicznych niezwłocznie zgłoś się do
lek
arza!
► W razie kontaktu z oczami lub śluzówkami niezwłocznie zgłoś się do
arza!
lek
UWAGI DOTYCZĄCE OBCHODZENIA SIĘ Z SUBSTANCJAMI
CHEMICZNYMI
Do substancji chemicznych w tym produkcie zaliczają się klej do paznokci,
utrwalacz, żel UV oraz żel francuski.
► Otwórz ostrożnie tygielki i butelki z substancjami chemicznymi.
► Obchodź się z substancjami chemicznymi w sposób ostrożny i rozważny.
► Substancje chemiczne są drażniące dla oczu i skóry.
► Substancje chemiczne mogą wywoływać podrażnienia skóry (uczulenie
sk
óry).
► W czasie posługiwania się substancjami chemicznymi należy nosić rękawice
chronne oraz odzież ochronną.
o
► Podczas pracy z substancjami chemicznymi zadbaj o dostateczną wentylację.
przypadku braku możliwości zapewnienia odpowiedniej wentylacji
W
należy korzystać z aparatu oddechowego.
► Nigdy nie używać żelu UV oraz żelu francuskiego na uszkodzonych lub
ch zmiany chorobowe paznokciach ani do naprawy uszkodzonych
mający
paznokci.
UWAGA – SZKODY MATERIALNE
► Chroń urządzenie przed wilgocią i przedostaniem się do środka płynów.
Nigdy nie wkładaj ur
pobliżu wody ani nie stawiaj na urządzeniu żadnych przedmiotów z wodą
(np. wazonów).
► Nie stawiaj żadnych przedmiotów na urządzenie.
► Nie używaj urządzenia w pobliżu otwartych źródeł ognia (np. świec).
► Chroń urządzenie przed bezpośrednim nasłonecznieniem.
► Wyciągając kabel sieciowy z gniazdka, ciągnij zawsze za wtyczkę, a nie
abel.
za k
► W razie wystąpienia usterek i podczas burzy wyciągnij wtyczkę z gniazdka.
ządzenia pod wodę, nie stawiaj urządzenia w
36
SNS 45 A3
Page 40

OSTRZEŻENIE –
NIEBEZPIECZEŃSTWO ODNIESIENIA OBRAŻEŃ!
Urządzeń ultrafi oletowych nie mogą używać:
► osoby cierpiące na nowotwory lub znajdujące się w grupie ryzyka zacho-
r
owania;
► osoby przyjmujące światłoczułe leki;
► osoby poniżej 18 roku życia;
► osoby podatne na tworzenie się piegów;
► osoby o naturalnym rudym kolorze włosów;
► osoby z nietypowymi przebarwieniami skóry;
► osoby posiadające więcej niż 16 znamion (o średnicy co najmniej 2 mm)
na ciele;
► osoby posiadające nietypowe znamiona (asymetryczne o średnicy powyżej
óżnej pigmentacji oraz nieregularnych obszarach na krawędzi;
5 mm i r
w razie wątpliwości zgłoś się do lekarza);
► osoby cierpiące na poparzenia słoneczne;
► osoby, które na promieniowaniu słonecznym nie opalają się bez poparzeń
óry;
sk
► osoby, u których szybko dochodzi do poparzeń skóry w wyniku działania
omieniowania słonecznego;
pr
► osoby, które w dzieciństwie często cierpiały na oparzenia słoneczne;
► osoby cierpiące na nowotwór skóry lub które chorowały na tę chorobę,
e które znajdują się w grupie ryzyka zachorowania;
a takż
► osoby posiadające krewnych w prostej linii, którzy chorowali już na
erniaka (nowotwór skóry);
cz
► osoby w trakcie lekarskich i medycznych zabiegów przeprowadzanych
wodu chorób prowokowanych przez światło;
z po
► osoby, które się opalają w ogóle bądź nie opalają bez towarzyszących
temu opar
► osoby, u których szybko pojawiają się oparzenia słoneczne w wyniku
pr
► kobiety w ciąży.
zeń słonecznych w wyniku przebywania na słońcu;
zebywania na słońcu;
PL
SNS 45 A3
37
Page 41

PL
■ Promieniowanie nie może przekraczać minimalnej dawki rumieniowej (MED).
Gdy rumień (zaczerwienienie skóry) pojawi się po upływie paru godzin od
promieniowania, należy zrezygnować dalszych zabiegów. W takim wypadku
następne promieniowanie można powtórzyć dopiero po upływie jednego
tygodnia od czasu pojawienia się zaczerwienienia skóry.
■ Po wystąpieniu niespodziewanych działań ubocznych, takich jak świąd w
ciągu 48 godzin od pier
następnymi zabiegami promieniowania UV skontaktuj się z lekarzem.
■ Zalecany harmonogram naświetlania:
– Nigdy nie przeprowadzać więcej niż 5 zabiegów dziennie. Może to
po
wodować podrażnienia skóry.
– Nie powinno się również przekraczać zalecanej liczby maksymalnie
400 zabiegó
■ Urządzenia nie można używać, gdy dojdzie do uszkodzenia zegara steru-
jącego.
■ Używaj wyłącznie świetlówek zalecanego typu. Używanie świetlówek UV
innego pr
■ Promieniowanie UV emitowane przez słońce może powodować trwałe obra-
ż
niowania, jak również od wrażliwości skóry lub oczu konkretnej osoby.
■ Skóra wskutek nadmiernego promieniowania może ulec poparzeniu sło-
necznemu. Zb
emitowanego przez słońce lub urządzenia UV może prowadzić do przedwczesnego starzenia się skóry i zwiększa ryzyko rozwoju nowotworu skóry.
Ryzyko to zwiększa się wraz z kumulacją promieniowania UV. Narażanie
się na promieniowanie UV z młodym wieku zwiększa ryzyko późniejszego
rozwoju nowotworu skóry.
■ Promieniowanie UV może prowadzić do obrażeń oczu i skóry, np. do przed-
w
czytaj dokładnie instrukcję obsługi. Niektóre leki lub kosmetyki zwiększają
wrażliwość na promieniowanie UV.
oducenta lub innego typu powoduje wygaśnięcie gwarancji.
enia skóry lub oczu. Te efekty biologiczne zależą od jakości i dawki promie-
yt częste wystawianie skóry na działanie promieniowania UV
czesnego zestarzenia się skóry, a nawet do rozwoju nowotworu skóry. Prze-
wszego użycia urządzenia ultrafi oletowego, przed
w rocznie.
38
SNS 45 A3
Page 42

■ Bez zastosowania odpowiedniej ochrony, można doprowadzić do powierzch-
niowego zapalenia, a w niektórych wypadkach przy nadmiernym promieniowaniu, do uszkodzenia siatkówki. Często narażanie na promieniowanie może
wywołać zaćmę.
■ W wypadku stwierdzonej indywidualnej wrażliwości na promieniowanie UV,
bądź aler
wania skontaktuj się z lekarzem.
■ Określone schorzenia lub działania uboczne powodowane przez konkretne
leki mogą ulec nasileniu w wynik
wątpliwości zgłoś się do lekarza.
■ Między pierwszym dwoma zabiegami promieniowania należy zachować
pr
■ Unikaj opalania i używania urządzenia tego samego dnia. Może to dopro-
w
■ Przestrzegaj instrukcji dotyczących czasu wystawiania na promieniowa-
nie, pr
W przeciwnym wypadku może dojść do podrażnień skóry.
■ W razie pojawienia się twardych zgrubień lub owrzodzeń, bądź też zmian
na po
■ Chroń wrażliwe partie skóry, np. blizny, tatuaże i genitalia przed promienio-
w
■ Nigdy nie wykonuj więcej niż 5 zabiegów dziennie. Może to doprowadzić
do podr
■ Nie przekraczaj zalecanej ilości 400 zabiegów w roku.
■ Przed uruchomieniem urządzenia usuń ze skóry wszystkie kosmetyki i
pr
dojść do podrażnień skóry.
gii na to promieniowanie, przed rozpoczęciem działania promienio-
u działania promieniowania UV. W razie
zedział czasu co najmniej 48 godzin.
adzić do podrażnienia skóry.
zedziałów czasu między kolejnymi promieniowania i odstępu lampy.
wierzchni znamion lub ran, zwróć się do lekarza.
aniem.
ażnienia skóry.
odukty służące do ochrony przed słońcem. W przeciwnym wypadku może
PL
SNS 45 A3
WSKAZÓWKA
► Przed przystąpieniem do użytkowania urządzenia upewnij się u swojego
arza, czy nie ma żadnych przeciwwskazań zdrowotnych.
lek
39
Page 43

PL
Urządzenie i akcesoria
WSKAZÓWKA
► Zobacz ilustracja na rozkładanej stronie.
sunek A:
Ry
1 Urządzenie UV z 4 świetlówkami UV
2 Przełącznik wł. / wył.
3 Wskaźnik pracy „POWER”/gotowość do pracy
4 Wskaźnik pracy „240 sekund”
5 Przycisk nastawy czasu „240 sekund”
6 Wskaźnik pracy „150 sekund”
7 Przycisk nastawy czasu „150 sekund”
8 Wskaźnik pracy „90 sekund”
9 Przycisk nastawy czasu „90 sekund”
0 Przycisk Start
Rysunek B:
q Obcinacz (do obcinania tipsów)
w Kopytko (do wyginania skórek)
e Pędzelek (do nakładania żelu UV)
r Bloczek szlifujący (do wygładzania nierówności)
t Spot Swirl (do nanoszenia żelu francuskiego lub elementów
dekoracyjnych)
z Waciki Zelletten (do nanoszenia utrwalacza lub do korekty)
u Pilniczek piaskowy (do piłowania paznokci)
i Tipsy (sztuczne paznokcie)
o Utrwalacz (do wykańczania oraz do czyszczenia pędzlem)
p Klej do paznokci (do naklejania tipsów „GLUE“)
a Żel UV (do wypełniania paznokci)
s Żel francuski (do modelowania „French Nails“)
40
SNS 45 A3
Page 44

Ustawianie i podłączanie
Wskazówki dotyczące bezpieczeństwa
OSTRZEŻENIE
W trakcie uruchamiania urządzenia może dojść do szkód
osobowych i materialnych!
By uniknąć zagrożeń, przestrzegaj następujących wskazówek bezpieczeństwa:
► Elementów opakowania nie dawaj dzieciom do zabawy. Istnieje niebez-
piecz
eństwo uduszenia.
► By uniknąć szkód osobowych i materialnych, przestrzegaj wskazówek
yczących warunków wymaganych w miejscu użytkowania, jak również
dot
związanych z podłączaniem urządzenia do zasilania elektrycznego.
Zakres dostawy i przegląd po rozpakowaniu
Urządzenie jest wyposażone standardowo w następujące elementy:
● urządzenie UV z 4 świetlówkami UV i kablem sieciowym
● pilnik piaskowy
● bloczek szlifujący
● tipsy
● kopytko
● pędzelek
● Spot Swirl
● Obcinak do paznokci
● 1 tygielek żelu francuskiego („French-Gel“)
● 2 tygielki żelu UV („UV-Gel“)
● Utrwalacz („Finishing“)
● 2 butelki kleju do paznokci („Glue“)
● 100 Zelletten (wacików celulozowych)
● pokrowiec
● instrukcja obsługi
PL
SNS 45 A3
WSKAZÓWKA
► Po rozpakowaniu nowego urządzenia sprawdź, czy w środku są wszystkie
części.
► Braki elementów wyposażenia oraz szkody spowodowane niedostatecznym
zabezpiecz
infolinię (zobacz rozdział Serwis).
eniem lub powstałe podczas transportu prosimy zgłaszać na
41
Page 45

PL
Rozpakowanie
♦ Wyjmij z kartonu wszystkie elementy urządzenia oraz instrukcję obsługi.
♦ Usuń wszystkie materiały opakowaniowe.
Utylizacja opakowania
Opakowanie chroni urządzenie przed uszkodzeniami podczas transportu. W trosce o ochronę środowiska, wszystkie zastosowane elementy opakowania nadają
się do ponownego przetworzenia.
Zwracanie opakowania do obiegu materiałów oszczędza surowce naturalne i
zmniejsza zanieczyszczenie odpadami. Zbędne materiały opakowania utylizuj
zgodnie z obowiązującymi przepisami.
WSKAZÓWKA
► W miarę możliwości zachowaj oryginalne opakowanie na czas trwania
arancji, by w razie odsyłania urządzenia móc je prawidłowo zapakować.
gw
Warunki wymagane w miejscu użytkowania
W celu zapewnienia bezpiecznej i bezusterkowej pracy urządzenia, miejsce ustawienia powinno spełniać następujące wymagania:
■ Urządzenie ustaw na stabilnym, równym i wypoziomowanym podłożu.
■ Nie stawiaj urządzenia w wilgotnym otoczeniu ani w zasięgu wody rozpry-
sk
owej.
■ Nie stawiaj urządzenia bezpośrednio obok grzejnika ani nagrzewnicy.
■ Gniazdko sieciowe musi być zlokalizowane w łatwo dostępnym miejscu, by
w r
azie niebezpieczeństwa móc natychmiast odłączyć wtyczkę z gniazdka.
42
SNS 45 A3
Page 46

Przyłącze elektryczne
NIEBEZPIECZEŃSTWO
Niebezpieczeństwo śmiertelnego porażenia prądem elektryczn
ym!
Dotknięcie przewodów znajdujących się pod napięciem grozi
odniesieniem śmiertelnych obrażeń!
Przestrzegaj poniższych wskazówek bezpieczeństwa, by uniknąć zagrożeń
spowodowanych prądem elektrycznym:
► Nigdy nie używaj urządzenia z uszkodzoną wtyczką sieciową lub kablem
wym.
siecio
► Urządzenie podłączaj zawsze do uziemionego gniazdka sieciowego.
► Nie dotykaj urządzenia ani wtyczki sieciowej mokrymi rękoma.
► Unikaj kontaktu urządzenia z wodą.
► Nigdy nie próbuj otwierać obudowy urządzenia. Dotykanie przyłączy
ycznych lub próba zmiany konstrukcji elektrycznej i mechanicznej
elektr
grozi porażeniem prądem elektrycznym.
♦ Przed podłączeniem urządzenia sprawdź, czy dane znajdujące się na
tabliczce znamiono
nicznymi sieci elektrycznej. Urządzenie będzie pracowało bez usterek tylko
wtedy, gdy dane te będzie się zgadzały.
♦ Upewnij się, czy kabel przyłączeniowy urządzenia nie jest uszkodzony,
ani nie pr
♦ Kabel sieciowy nie może być naciągnięty ani pozaginany.
♦ Kabel sieciowy nie powinien zwisać na narożach (niebezpieczeństwo
potknięcia).
♦ Podłącz wtyczkę do gniazdka.
zebiega przez gorące i/lub ostre krawędzie.
PL
wej (napięcie i częstotliwość) są zgodne ze danymi tech-
SNS 45 A3
43
Page 47

Obsługa i użytkowanie
W tym rozdziale opisano ważne wskazówki dotyczące obsługi oraz użytkowania
urządzenia.
PL
WSKAZÓWKA
► Zobacz rozdział Urządzenie i ak
Włączanie i wyłączanie
♦ Włącz urządzenie 1 poprzez naciśnięcie przycisku WŁ./WYŁ. 2 w położe-
nie „I”. Zapala się lampka wskaźnika pracy 3 i urządzenie jest gotowe do
pracy.
♦ Włącz urządzenie 1 popr
żenie „0”. Gaśnie lampka wskaźnika pracy 3.
Funkcje
W urządzeniu można ustawić trzy różne czasy działania:
■ 90 sekund (przycisk 9)
■ 150 sekund (przycisk 7)
■ 240 sekund (przycisk 5)
♦ Włącz świetlówki UV naciskając przycisk Start 0.
♦ Wybierz żądany czas działania i naciśnij odpowiedni przycisk nastawy cza-
su 9, 7 lub 5.
WSKAZÓWKA
► Po upływie nastawionego czasu świetlówki UV automatycznie się
wyłączają.
♦ Naciśnij przycisk nastawy czasu 9, 7 lub 5, a następnie pr
by wybrać następny zabieg.
cesoria.
zez naciśnięcie przycisku WŁ./WYŁ. 2 w poło-
zycisk Start 0,
44
SNS 45 A3
Page 48

Zastosowanie
UWAGA
Niebezpieczeństwo wystąpienia szkód materialnych spowodow
anych klejem i żelem UV.
Klej do paznokci p, żel UV a oraz żel francuski s pozwalają się tylko
z trudem usunąć z powierzchni meblowych, odzieży i dywanów.
► Przed rozpoczęciem korzystania należy stanowisko pracy zakryć papierem
ęcznikiem.
lub r
WSKAZÓWKA
► Ustaw urządzenie UV 1 na zakr
► Nigdy nie ustawiaj kleju do paznokci p, ż
UV a w pobliżu urządzenia UV 1.
► Nigdy nie wystawiaj kleju do paznokci p, ż
żelu UV a na bezpośrednie działanie promieni słonecznych.
Wybór tipsów
WSKAZÓWKA
► Przy pierwszym użyciu może zajść konieczność skorzystania z pomocy
doświadcz
► Przed przystąpieniem do pracy ściągnij biżuterię z rąk.
► Na początku pielęgnacji wymyj i wysusz ręce. Zalecamy umyć ręce
15- 20 minut
dokładnie wyschną.
♦ Wybierz tips i, któr
naturalnego paznokcia.
PL
ytym i stabilnym podłożu.
elu francuskiego s ani żelu
elu francuskiego s ani
onej osoby.
przed przystąpieniem do pielęgnacji. W tym czasie paznokcie
ego krzywizna jak najdokładniej pasuje do krzywizny
i
SNS 45 A3
♦ Wybierz tips i, który dokładnie dochodzi do krawędzi naturalnego pa-
znokcia, przy czym boki muszą przebiegać równolegle do naturalnego paznokcia.
45
Page 49

♦ W razie potrzeby spiłuj pilnikiem u końcówkę tipsa i tak, by punkt koń-
cowy (strzałka) zakrywał mniej więcej jedną trzecią część naturalnego paznokcia.
PL
wolna krawędź łożysko paznokcia
płytka paznokcia skórka
WSKAZÓWKA
► W wypadku użycia mniejszego tipsa i, moż
Z tego powodu użyj większego tipsa i i odpowiednio spiłuj jego boki.
♦ Powtórz opisaną czynność, aż wszystkie paznokcie będą miały żądaną dłu-
ształt.
gość i k
Nakładanie tipsów
WSKAZÓWKA
► Pamiętaj o tym, że paznokcie przy kontakcie z wodą chłoną wilgoć. Pa-
cie przed przystąpieniem do pielęgnacji muszą być całkowicie suche.
znok
► Przed przystąpieniem do pielęgnacji nie smaruj rąk kremem ani innymi
osmetykami, ponieważ powierzchnia paznokcia musi być całkowicie
k
odtłuszczona, by zapewnić optymalne przymocowanie tipsa i.
♦ Odwiń skórkę za pomocą k
z płytki paznokcia .
♦ Powierzchnię paznokcia przeszlifuj bloczkiem szlifującym r, aż do zmato-
wienia paznok
♦ Pył z piłowania usuń za pomocą papierowego ręcznika lub wacika celulo-
z
owego Zelette z.
♦ Paznokcie natrzyj roztworem do końcowych zabiegów pielęgnacyjnych o,
b
y ostatecznie usunąć pozostałości pyłu i tłuszczu.
i
e ona łatwiej się złamać.
opytka w i usuń przezroczystą część skórki
cia.
46
SNS 45 A3
Page 50

WSKAZÓWKA
► Nie dotykaj powierzchni paznokcia palcami, ponieważ opuszki palców
mogą być tłuste i tłuste plam
wić prawidłowe przyklejenie tipsów!
♦ Nanieś kropelkę kleju p na spodnią część tipsa i i za pomocą buteleczki
z klejem p rozpr
tak, by klej p nie spływał do górną część tipsa i.
WSKAZÓWKA
► Przed pierwszym użyciem, za pomocą ostrego przedmiotu np. igły, wykonaj
wór w buteleczce z klejem p. Gdy z czasem otwór w buteleczce z
ot
klejem p zatka się, możesz go przetkać igłą.
♦ Przyłóż tips i ukośnie do sw
wiednia krawędź tipsa i przylegała do krawędzi naturalnego paznokcia.
♦ Teraz tips i dociśnij lekko do po
spodu ewentualne pęcherzyki powietrza.
owadź klej po spodniej powierzchni. Trzymaj tips i w dół
y pozostawione paznokciach mogą uniemożli-
p
ojego naturalnego paznokcia tak, by odpo-
wierzchni paznokcia tak, by usunąć spod
PL
SNS 45 A3
i
WSKAZÓWKA
► Nadmiar kleju do paznokci zmyj p wacikiem celuloz
patyczkiem higienicznym lub ręcznikiem papierowym.
owym Zellette z,
47
Page 51

PL
♦ Przytrzymaj tips i przez 10 - 12 sekund, dopasowując go przy tym z od-
powiednią siłą docisku do naturalnego paznokcia. Uważaj, by pod tipsem
nie tworzyły się pęcherzyki powietrza, a także zwróć uwagę, czy tips równo
się przykleił.
WSKAZÓWKA
► Pod paznokciem nie może być najmniejsze przerwy.
► Zwróć uwagę na to, by pod tipsem i nie po
ani białe plamy. W takim wypadku natychmiast odklej tips i i przyłóż go
ponownie.
♦ Po naklejeniu wszystkich tipsów i pr
długość. Końcówkę tipsa odetnij jednym energicznym cięciem obcinacza
q. Zbyt powolny ruch obcinacza może doprowadzić do odłamywania się
tipsów i.
q
wstały pęcherzyki powietrza
zytnij je obcinaczem q na żądaną
48
♦ Za pomocą pilnika piaskowego u spiłuj tipsy do wymaganego k
WSKAZÓWKA
► Zachowaj ostrożność przy używaniu pilnika, ponieważ tipsy i tr
się paznokcie jedynie na klej p.
► By uniknąć uderzania tipsami i lub ich oder
czajenia do noszenia długich paznokci, paznokcie należy najpierw nieco
przyciąć.
wania w sytuacji nieprzyzwy-
ształtu.
zymają
SNS 45 A3
Page 52

Przygotowanie nasady paznokcia
♦ Ostrożnie spiłuj przejście od tipsa i do naturalnego paznokcia pilnikiem
piaskowym u, aż powstanie równa powierzchnia. Następnie spiłuj tips i!
Uważaj, by nie uszkodzić naturalnego paznokcia.
♦ Boki paznokcie ostrożnie spiłuj pilnikiem piaskowym u, aż będą pr
„skrzydełek”.
♦ Powtórz tę operację na każdym paznokciu.
u
♦ Pył z piłowania usuń za pomocą papierowego ręcznika lub wacika celulo-
owego Zelette z.
z
Nakładanie żelu UV
♦ Pędzelkiem e pobierz niewielką ilość żelu UV a i jednym bokiem pędzelka e
przeciągnij o krawędź pojemnika z żelem UV.
♦ Cienką warstwę żelu UV a nanieś na całą po
tylnej stronie paznokcia zostaw nieco więcej żelu UV a, by w ten sposób
utworzyło się równe przejście między paznokciem naturalnym i sztucznym.
Ponadto miejsce przejścia z paznokcia naturalnego do sztucznego jest
szczególnie wrażliwe na obciążenia mechaniczne i uderzenia, dlatego też
przyda się tu więcej żelu UV a.
oste, bez
wierzchnię paznokcia. Na
PL
SNS 45 A3
PRZYGOTOWANIA
► Przy nakładaniu żelu nie naciskaj zbyt mocno na pędzelek e, gdyż w
zeciwnym wypadku pędzelek e powodowałby powstawanie pasków
pr
żelu.
► Pierwszą warstwę żelu UV a wyk
ona decydowała o późniejszym kształcie paznokcia. Wykonaj możliwie
naturalny kształt paznokcia.
♦ Nakładając żel zachowaj odstęp około 1 mm od skórki.
onaj szczególnie starannie, gdyż będzie
49
Page 53

PL
WSKAZÓWKA
► Gdy żel UV a pr
wytrzyj go zanim stwardnieje, np. wacikiem.
♦ Opisaną operację powtórz we wszystkich paznokciach.
WSKAZÓWKA
► Zwróć uwagę na to, by paznokieć był równo pokryty żelem UV a.
Utwardzanie żelu UV
WSKAZÓWKA
► Zobacz rozdział Obsługa i użytk
♦ Włącz urządzenie UV 1 pr
♦ Naciśnij przycisk Start 0; włączają się świetló
♦ Wybierz żądany czas działania i naciśnij odpowiedni przycisk nastawy cza-
su 9, 7 lub 5. Pr
240 sekund.
♦ Na czas trwania operacji trzymaj rękę paznokciami skierowanymi do góry
w otw
orze urządzenia UV 1.
♦ Pielęgnację paznokcia kciuka wykonaj osobno, gdyż po włożeniu ręki do
ur
ządzenia UV, światło UV pada na ten paznokieć tylko z boku.
♦ Powtórz operację nakładania żelu a i tw
opisano powyżej.
zypadkowo dostanie na skórkę lub łożysko paznokcia,
e
i
owanie.
zyciskiem WŁ./WYŁ. 2.
wki UV.
zy pierwszym twardnieniu zaleca się wybranie czasu
ardnienia w urządzeniu UV 1, jak
50
SNS 45 A3
Page 54

WSKAZÓWKA
► Po upływie nastawionego czasu działania wszystkie świetlówki UV wyłą-
czają się.
► Przed każdym następnym działaniem trzeba ponownie nacisnąć przycisk
t 0 oraz przycisk nastawy czasu (9, 7 lub 5).
Star
♦ Po naniesieniu żelu i utwardzeniu wszystkich warstw sprawdź, czy na po-
wierzchni nie widać nierówności, zadrapań ani pęknięć.
♦ W razie stwierdzenia nierówności, nałóż kolejną cienką warstwę żelu UV a
i utw
ardź paznokieć na ustawieniu 150 sekund lub 90 sekund (w zależności
od ilości naniesionego żelu UV a).
Paznokcie mogą się nieco kleić także po utwardzaniu ostatniej warstwy żelu
(„warstwa potna” wzgl. warstwa polimeryzacyjna).
♦ Nasącz wacik celulozowy Zellette z r
pomocą zmyj paznokieć.
oztworem utrwalacza o i za jego
PL
SNS 45 A3
51
Page 55

PL
PORADA
► Jeśli chcesz na paznokieć nanieść małe ozdoby lub stras, umieść go ostrą
troną przyrządu Spot-Swirl t w jeszcze nie utwardzonej ostatniej warstwie
s
żelu UV a. Następnie utwardź żel UV a.
Aby ozdoby lepiej się trzymały, nanieś na paznokieć kolejną, bardzo
cienką warstwę żelu UV a i utwardź go. W ten sposób ozdoby są lepiej
chronione.
Wypełnianie
WSKAZÓWKA
► Ze względu na fakt, że naturalny paznokieć stale rośnie, z czasem nasada
tipsa i moż
wypełnić szczelinę między skórką a nasadą paznokcia.
► Wypełnianie trzeba wykonać co 2–3 tygodnie.
♦ Pilnikiem piaskowym u spiłuj obszar
♦ Bloczkiem szlifującym przeszlifuj paznokieć r, aż do zmato
wierzchni.
♦ Następnie nanieś warstwę żelu UV a i pono
WSKAZÓWKA
► Zobacz poprzedni rozdział N
żelu UV
e się oddzielić. Z tego powodu od czasu do czasu trzeba
y wokół nasad utwardzonego żelu.
wienia po-
wnie wykonaj utwardzenie.
akładanie żelu UV, Utwardzanie
52
SNS 45 A3
Page 56

Francuski manicure (French-Nails)
Pod pojęciem „francuskiego manicure“ rozumie się wykonywanie paznokci z białą
końcówką.
♦ Modeluj paznokcie w sposób opisany w rozdziale „Zastosowanie“, aż
wszą warstwę żelu UV a naniesiesz i utwardzisz.
pier
♦ Użyj teraz okrągłej strony aplikacyjnej przyrządu Spot Swirl t, ab
od góry paznokcia żel francuski s. Za każdym razem pobieraj nowy żel
francuski s na sam czubek i modeluj lekko krążącymi ruchami białą koń-
cówkę paznokcia.
♦ Przy pozostałych paznokciach postępuj w ten sam sposób.
♦ Utwardź następnie paznokcie stosując ustawienie na 150 sekund.
♦ Nanieś następnie kolejną warstwę żelu UV a. Nanieś nieco mniej ż
na białej części paznokcia, niż na części pozostałej. W ten sposób znika
stopień powstały między białą częścią a resztą paznokcia.
♦ Utwardź następnie paznokcie stosując ustawienie na 150 sekund. Po utwar-
dz
eniu ostatniej warstwy żelu paznokcie mogą się wydawać nieco klejące
(„warstwa potliwa“ lub warstwa polimeryzacyjna).
♦ Nasącz wacik celulozowy Zellette z r
pomocą zmyj paznokieć.
Odklejanie tipsów
UWAGA
Niebezpieczeństwo uszkodzenia powierzchni naturalnego
paznok
Użycie dużej siły przy odklejaniu tipsów i może prowadzić do uszkodzenia
powierzchni naturalnego paznokcia!
cia!
► Nie odłamuj tipsów i od natur
► Tipsy i odklejaj wyłącznie zgodnie z poniższym opisem.
♦ Najpierw paznokcie obetnij obcinaczem q.
♦ Następnie tipsy i odpiłuj pilnikiem piask
alnych paznokci.
PL
y nanieść
elu UVa
oztworem utrwalacza o i za jego
owym u.
SNS 45 A3
PORADA
► Na końcu w celu pielęgnacji swoich naturalnych paznokci nanieś niewielką
ilość olejk
i paznokci.
u do paznokci lub użyj odżywczego kremu do pielęgnacji dłoni
53
Page 57

PL
q
Pielęgnacja
■ Regularnie piłuj nasady i krawędzie paznokci.
■ Paznokcie poleruj raz w tygodniu.
■ Do nakładania lakieru do paznokci używaj warstwę podkładową i warstwę
wier
zchnią.
■ Du usuwania lakieru nie używaj zmywaczy do paznokci zawierających aceton,
gdyż wyk
■ Do prac z wykorzystaniem środków myjących lub wybielającym używaj gu-
mo
wych rękawic ochronnych.
■ Do wszystkich prac, w trakcie których zachodzi niebezpieczeństwo uszkodzenia
pazno
Czyszczenie
u
onane z tworzywa sztucznego paznokcie mogłyby ulec uszkodzeniu.
kci, zakładaj gumowe rękawice ochronne.
Wskazówki dotyczące bezpieczeństwa
NIEBEZPIECZEŃSTWO
Niebezpieczeństwo śmiertelnego porażenia prądem
elektr
ycznym!
► Przed przystąpieniem do czyszczenia wyciągnij wtyczkę z gniazdka.
UWAGA
Uszkodzenie urządzenia!
► Podczas czyszczenia należy pamiętać o tym, aby do wnętrza obudowy
nie pr
zedostała się wilgoć. Mogłoby to trwale uszkodzić urządzenie 1.
Czyszczenie urządzenia
♦ Powierzchnię obudowy urządzenia UV czyść miękką, suchą szmatką 1.
54
SNS 45 A3
Page 58

Czyszczenie akcesoriów
WSKAZÓWKA
► Pędzelek oraz e Spot Swirl t należy czy
użyciu.
► Wszystkie buteleczki i pojemniki zamykaj bezpośrednie po użyciu.
♦ Włóż pędzelek e or
oba narzędzia wytrzyj papierowym ręcznikiem.
az Spot Swirl t w roztwór utwardzacza o i następnie
Wymiana żarówek UV
NIEBEZPIECZEŃSTWO
Niebezpieczeństwo śmiertelnego porażenia prądem elektryczn
ym!
► Przed przystąpieniem do wymiany świetlówek UV wyciągnij wtyczkę z
a!
gniazdk
WSKAZÓWKA
► Świetlówki UV można wymieniać wyłącznie na nowe tego samego typu.
ozdziale „Dane techniczne” podano informacje o typie świetlówek.
W r
♦ Śrubokrętem do wkrętów z łbem krzyżowym odkręć obie śruby z boku urzą-
enia.
dz
ścić bezpośrednio po każdym
PL
SNS 45 A3
55
Page 59

PL
♦ Ostrożnie wyciągnij z urządzenie przednią pokrywę ze świetlówkami UV,
zwracając przy tym uwagę na połączenie przewodów z boku.
♦ Niesprawną świetlówkę UV ostrożnie wyciągnij z oprawy.
♦ Umieść nową świetlówkę UV w oprawie.
♦ Pokrywę ze świetlówkami UV załóż ponownie na urządzenie zwracając
pr
zy tym uwagę na to, by nie zakleszczyć połączenia przewodów z boku.
♦ Pokrywę urządzenia przykręć dwiema bocznymi śrubami.
Usuwanie usterek
W tym rozdziale podano ważne wskazówki dotyczące wykrywania usterek i ich
usuwania. Przestrzegaj tych wskazówek, by uniknąć uszkodzenia urządzenia.
Wskazówki dotyczące bezpieczeństwa
56
OSTRZEŻENIE
W celu uniknięcia zagrożeń i szkód materialnych przestrzegaj następujących
wskazówek bezpieczeństwa:
► Naprawę sprzętu elektrycznego zlecaj wyłącznie specjalistom. Nieprofe-
sjonalna napr
nika i uszkodzenie urządzenia.
awa może spowodować poważne zagrożenie dla użytkow-
SNS 45 A3
Page 60

Przyczyny błędów i ich usuwanie
Poniższa tabela stanowi pomoc w lokalizacji i usuwaniu mniejszych usterek:
Błąd Możliwa przyczyna Usunięcie
Nie można włączyć
urządzenia
Żel UV a nie
twardnieje
dostatecznie.
Po utwardzeniu
na paznokciach
zostaje „warstwa
potna”.
Sztuczne paznokcie
miękną/odklejają
się.
Na powierzchni
sztucznych paznokci
pojawiają się
nierówności.
Świetlówka UV nie
świeci się.
Wtyczka nie jest podłączona do gniazdka.
W gniazdku nie ma
napięcia.
Nastawiony zbyt krótki
czas działania.
Niesprawna jedna lub
kilka świetlówek UV.
Nałożono zbyt dużo
żelu UV a.
Paznokcie były umieszczone niedokładnie pod
świetlówkami UV.
Powstawanie „warstwy
potnej” uwarunkowane
przez polimeryzację.
Odklejanie się sztucznych
paznokci spowodowane
kontaktem z produktami
zawierającymi aceton.
Za duży nacisk na pędzelek e przy nakładaniu
żelu UV a.
Nierównomierne nałożenie
żelu UV a.
Niesprawna świetlówka
UV.
Podłącz wtyczkę do gniazdka.
Sprawdź bezpieczniki główne.
Ustaw dłuższy czas działania.
Wymień uszkodzone świetlówki UV
(patrz rozdział „Wymiana świetlówek
UV“)
Użyj mniej żelu UV a.
Trzymaj rękę prawidłowo
w urządzeniu UV 1.
Usuń „warstwę potną” roztworem
do końcowych zabiegów
pielęgnacyjnych o.
Nie nakładaj produktów
o wysokim stężeniu acetonu.
Przy nakładaniu żelu UV a nie
naciskaj zbyt mocno na pędzelek e.
Nanieś kolejną, cienką warstwę
żelu UV a i utwardź ją.
Wymień niesprawną świetlówkę UV.
PL
SNS 45 A3
WSKAZÓWKA
► Gdy powyższe czynności nie rozwiążą problemu, zgłoś usterkę do
wisu.
ser
57
Page 61

Przechowywanie/Utylizacja
Przechowywanie
PL
UWAGA
Niebezpieczeństwo utraty zdrowie spowodowane substancjami
z
awierającymi rozpuszczalniki
Kontakt z substancjami i ich oparami zawierającymi rozpuszczalniki może
prowadzić do utraty zdrowia!
► Dobrze zamykaj wszystkie opakowania z dostarczonymi substancjami.
► Dołączone substancje trzymaj z dala od dzieci.
♦ Przed dłuższą przerwą w użytkowaniu urządzenia, odłącz je od zasilania
ycznego i odłóż w czyste, suche miejsce, osłonięte przed bezpośrednim
elektr
działaniem promieni słonecznych.
♦ Wszystkie substancje przechowuj w czystym, suchym i chłodnym miejscu,
chr
oniącym przed bezpośrednim działaniem promieni słonecznych i z dala
od dzieci.
Utylizacja urządzenia
W żadnym przypadku nie należy wyrzucać urządzenia i baterii
do normalnych śmieci domowych. Ten produkt podlega dyrektywie
europejskiej 2012/19/EU.
Urządzenie i dołączone do niego substancje należy poddać utylizacji w akredy-
towanym zakładzie utylizacji lub w komunalnym zakładzie utylizacji odpadów.
Substancje chemiczne utylizuje się zgodnie z zasadami utylizacji odpadów specjalnych. Należy przestrzegać aktualnie obowiązujących przepisów. W razie pytań i wątpliwości odnośnie zasad utylizacji należy skontaktować z komunalnym
zakładem utylizacji odpadów.
Załącznik
Wskazówki dotyczące deklaracji zgodności WE
Urządzenie zostało przetestowane i posiada dopuszczenie w
zakresie podstawowych wymagań i innych obowiązujących
przepisów...
– europejskiej dyrektywy w sprawie kompatybilności
omagnetycznej 2004/108/EC,
elektr
– dyrektywy niskonapięciowej 2006/95/EC,
– dyrektywy RoHS 2011/65/EU.
ełny oryginalny tekst deklaracji zgodności jest dostępny u
P
importera.
58
SNS 45 A3
Page 62

Dane techniczne
Model SNS 45 A3
Napięcie robocze 220 - 240 V ~ / 50 Hz
Pobór mocy 45 W
Temperatura robocza +5 - +45 °C
Wilgotność (bez skraplania) 5 - 90 %
Wymiary (wys. x szer. x gł.) 23,1 x 29,6 x 14,3 cm
Ciężar ok. 1300 g
Liczba świetlówek UV 4
Typ świetlówek UV UV-9W 365 nm, 9 W
Typ UV urządzenia Świetlówka UV-A typ 3
Automatyczne czasy wyłączenia po 90, 150 i 240 sekundach
Gwarancja
Urządzenie objęte jest 3-letnią gwarancją, licząc od daty zakupu. Urządzenie
zostało starannie wyprodukowane i poddane skrupulatnej kontroli przed wysyłką.
Paragon należy zachować jako dowód dokonania zakupu. W przypadku roszczeń
gwarancyjnych należy skontaktować się telefonicznie z serwisem. Tylko w ten sposób można zagwarantować bezpłatną wysyłkę zakupionego produktu.
WSKAZÓWKA
► Gwarancja obejmuje wyłącznie wady materiałowe i fabryczne, natomiast
nie obejmuje uszk
uszkodzeń części łatwo łamliwych, np. wyłącznika lub akumulatorów.
odzeń transportowych, części ulegających zużyciu ani
PL
SNS 45 A3
Urządzenie jest przeznaczone wyłącznie do użytkowania w gospodarstwie domowym, a nie do celów przemysłowych. Gwarancja traci ważność w przypadku
niewłaściwego używania urządzenia, używania niezgodnego z przeznaczeniem,
użycia siły lub ingerencji w urządzenie dokonywanej poza autoryzowanymi punktami serwisowymi.
Niniejsza gwarancja nie ogranicza ustawowych praw nabywcy urządzenia.
Okres gwarancji nie ulega przedłużeniu o czas trwania usługi gwarancyjnej. Dotyczy to również wymienionych i naprawionych części.
Ewentualne szkody i wady stwierdzone w chwili zakupu należy zgłosić niezwłocznie
po rozpakowaniu urządzenia, nie później niż po upływie dwóch dni od daty zakupu.
Wszystkie naprawy wykonywane po upływie okresu gwarancji będą płatne.
59
Page 63

PL
Serwis
Importer
Serwis Polska
Tel.: 22 397 4996
E-Mail: kompernass@lidl.pl
IAN 90252
Czas pracy infolinii: od poniedziałku do piątku, w godzinach 08:00 - 20:00
czasu środkowoeuropejskiego
KOMPERNASS HANDELS GMBH
BURGSTRASSE 21
44867 BOCHUM
GERMANY
www.kompernass.com
60
SNS 45 A3
Page 64

Tartalomjegyzék
Bevezetés . . . . . . . . . . . . . . .62
Szerzői jogvédelem . . . . . . . . . . . . 62
A jótállás korlátozása . . . . . . . . . . .62
Rendeltetésszerű használat . . . . . .62
Figyelmeztető utasítás . . . . . . . . . . . 63
Biztonsági utasítások . . . . . .64
A készülék és tartozékai . . .70
Felszerelés és
csatlakoztatás . . . . . . . . . . .71
Biztonsági utasítások . . . . . . . . . . . 71
A csomag tartalma és annak
hiánytalanságának ellenőrzése . . . . . 71
Kicsomagolás . . . . . . . . . . . . . . . . .72
A csomagolás ártalmatlanítása . . . 72
A felállítás helyével szemben
támasztott elvárások . . . . . . . . . . .72
Elektromos csatlakoztatás . . . . . . .73
Kezelés és üzemeltetés . . . .74
Be- és kikapcsolás . . . . . . . . . . . . . . 74
Funkciók . . . . . . . . . . . . . . . . . . . . .74
Felhasználás . . . . . . . . . . . . .75
A műköröm tip kiválasztása . . . . . . 75
A műköröm tip felhelyezése . . . . . .76
A körömágy vonalához
való hozzáigazítás . . . . . . . . . . . .79
Az UV-zselé felvitele . . . . . . . . . . .79
Az UV-zselé kikeményítése . . . . . .80
Feltöltés . . . . . . . . . . . . . . . . . . . . . .82
Francia manikűr (French-Nails) . . . .83
A műköröm tip eltávolítása . . . . . .83
Ápolás . . . . . . . . . . . . . . . . . . . . . . 84
Tisztítás . . . . . . . . . . . . . . . . .84
Biztonsági utasítások . . . . . . . . . . . 84
A készülék tisztítása . . . . . . . . . . . .84
A tartozékok tisztítása . . . . . . . . . .85
Az UV-égő cseréje . . . . . . . .85
Hibaelhárítás . . . . . . . . . . . .86
Biztonsági utasítások . . . . . . . . . . . 86
Hiba oka és elhárítása . . . . . . . . . .87
Tárolás/Ártalmatlanítás . . . .88
Tárolás . . . . . . . . . . . . . . . . . . . . . .88
A készülék ártalmatlanítása . . . . . .88
Függelék . . . . . . . . . . . . . . . .88
EK megfelelőségi nyilatkozatra
vonatkozó tudnivalók . . . . . . . . . . .88
Műszaki adatok . . . . . . . . . . . . . . .89
Garancia . . . . . . . . . . . . . . . . . . . .89
Szerviz . . . . . . . . . . . . . . . . . . . . . . 90
Gyártja . . . . . . . . . . . . . . . . . . . . . .90
HU
SNS 45 A3
61
Page 65

HU
Bevezetés
Gratulálunk új készüléke megvásárlásához.
Vásárlásával kiváló minőségű termék mellett döntött. A használati útmutató a termék
része. Fontos tudnivalókat tartalmaz a biztonságra, használatra és ártalmatlanításra
vonatkozólag. A termék használata előtt ismerkedjen meg a használati és biztonsági utasításokkal. Csak a leírtak szerint és a megadott célokra használja a terméket.
A készülék harmadik személynek történő továbbadásakor adja a termékhez valamennyi leírást is.
Szerzői jogvédelem
Ez a dokumentáció szerzői jogvédelem alatt áll.
A sokszorosítás bármilyen formában, még utánnyomásként is, kivonatos formában
is, valamint az ábrák megjelentetése még módosított formában is csak a gyártó
írásos engedélyével lehetséges.
A jótállás korlátozása
A jelen használati útmutatóban lévő valamennyi műszaki információ, a csatlakoztatásra és kezelésre vonatkozó tudnivalók és adatok megfelelnek a nyomtatás
időpontjában aktuális változatnak, melybe legjobb tudomásunk szerint vontuk be
eddigi tapasztalatainkat és felismeréseinket. A leírás adataiból, ábráiból és leírásaiból semmiféle igényt nem szabad levezetni. A gyártó nem vállal felelősséget
a leírás be nem tartásából, rendeltetésével ellentétes használatból, szakszerűtlen
javítási munkából, engedély nélkül elvégzett módosításból vagy a nem engedélyezett pótalkatrészekből eredő károkért.
Rendeltetésszerű használat
A készülék manikűr célból zárt helyiségben és csak magánjellegű használatra
műköröm tipek felvitelére és rögzítésére való. Más vagy ezen túlmenő használat
rendeltetésellenesnek minősül.
FIGYELMEZTETÉS
Nem a rendeltetésnek megfelelő használatból eredő veszély!
A készülék a nem rendeltetésnek megfelelő használatából és/vagy másfajta
használatából veszélyek adódhatnak.
► A készüléket csak rendeltetésének megfelelően szabad használni.
► Be kell tartani a jelen használati útmutatóban leírt eljárási módot.
62
SNS 45 A3
Page 66

A nem rendeltetésszerű használatból, szakszerűtlen szerelésből, engedély nélküli
módosításból, vagy nem engedélyezett pótalkatrészek használatából eredő károk
miatti bármilyen igény ki van zárva.
A kockázatot egyedül az üzemeltető viseli.
Figyelmeztető utasítás
Az alábbi használati útmutatóban a következő fi gyelmeztető utasításokat használjuk:
VESZÉLY
Ennek a veszélyességi fokozatnak a fi gy
fenyegető veszélyes helyzetet jelöl.
Halált vagy súlyos sérülést okozhat, ha nem kerüli el a veszélyes helyzetet.
► Tartsa be ennek a fi gyelmeztetésnek az utasításait, hogy elkerülje a halált
agy súlyos személyi sérüléseket.
v
FIGYELMEZTETÉS
Ennek a veszélyességi fokozatnak a fi gyelmeztető jele
lehetséges veszélyes helyzetet jelöl.
Sérülést okozhat, ha nem tudjuk elkerülni ezeket a veszélyes helyzeteket.
► Tartsa be a használati útmutatóban lévő fi gyelmeztető utasításokat, hogy
elk
erülje a személyi kárt.
FIGYELEM
Ezen veszélyességi fokozat fi
anyagi kárt jelöl.
Anyagi kárt okozhat, ha nem tudjuk elkerülni ezeket a veszélyes helyzeteket.
► Az anyagi kár elkerülése érdekében tartsa be a fi gyelmeztető utasításban
ereplő felszólítást.
sz
HU
elmeztető jele
gyelmeztető utasítása lehetséges
SNS 45 A3
TUDNIVALÓ
► Tudnivaló jelöli a kiegészítő információkat, melyek megkönnyítik a készülék
ezelését.
k
63
Page 67

Biztonsági utasítások
A készülék megfelel az előírt biztonsági utasításoknak. A szakszerűtlen használat
azonban személyi és anyagi kárt is okozhat.
■ A készüléket a garanciaidő alatt csak a gyártó által engedélyezett ügyfélszol-
gálat javíthatja, k
a garancia.
ülönben az utána előforduló kár esetén már nem érvényes
HU
VESZÉLY
Áramütés veszélye!
A f
eszültség alatt álló vezetékekhez vagy részekhez érni
életveszélyes!
Vegye fi gyelembe az alábbi biztonsági utasításokat, hogy elkerülje az áramütést:
► Ha a készülék csatlakozóvezetéke megsérül, veszélyek elkerülése céljából
ártónak, a gyártó vevőszolgálatának vagy hasonló erre képesített
a gy
személynek ki kell cserélnie.
► A készüléket ne a fürdőszobában állítsa fel.
► A készüléket kizárólag biztosított dugaszoló aljzatra csatlakoztassa.
► Ne érjen vizes kézzel a készülékhez és a csatlakozóhoz.
► Ne tegye a készüléket vízbe.
► Ne nyissa fel a készülék burkolatát (kivéve
Ha hozzáér a feszültségvezető csatlakozásokhoz, vagy megváltoztatja
a mechanikai felépítést, áramütés veszélye áll fenn.
FIGYELMEZTETÉS
Ultraibolya fény (UV-fény) okozta sérülésveszély!
Szemsérülést és a látóképesség csökkenését okozhatja, ha közvetlenül az
UV-lámpa UV-fényébe néz!
► Ne nézzen közvetlenül az UV-lámpa ultraibolya fényébe.
► Kapcsolja ki az UV-lámpát, ha nem használja.
► A készülék üzemeltetése közben ne legyenek olyanok is jelen, akik nem
használják, k
ülönösképpen pedig a gyerekek maradjanak távol.
UV-lámpa cserélésekor).
64
SNS 45 A3
Page 68

FIGYELMEZTETÉS - SÉRÜLÉSVESZÉLY!
► Használat előtt ellenőrizze a készüléket, hogy nincsen-e rajta szemmel
ár. Ne működtessen hibás vagy leesett készüléket.
látható k
► A készülék nem alkalmas arra, hogy olyan személyek ideértve a gyer-
eket ishasználják, akiket testi, érzékszervi vagy elmebeli képességeik
mek
vagy tapasztalatuk és ismeretük hiánya megakadályoznának abban,
hogy biztonságosan használják a készüléket, kivéve ha a biztonságukról
gondoskodó felügyelettel vannak, vagy ha előtte felvilágítosották őket a
készülék használatáról.
► Vigyázni kell a gyermekekre, hogy ne játsszanak a készülékkel.
► Ne tekintsen soha közvetlenül az UV-lámpába. Ez szemsérülést okozhat!
► A készüléket és tartozékait gyermekek számára nem hozzáférhető helyen
olja.
tár
► Vegye fi gyelembe a felhasznált anyagok csomagolásán lévő utasításokat.
► Csak engedélyezett szakemberrel vagy az ügyfélszolgáltassa javíttassa a
észüléket. A szakszerűtlen javítás jelentős veszélyt jelenthet a használó
k
számára. Ezenkívül a garancia is megszűnik.
► A hibás részeket csak eredeti alkatrészekre szabad cserélni. Csak ezeknél
észeknél tudjuk biztosítani, hogy megfelelnek a biztonsági elvárásoknak.
a r
FIGYELMEZTETÉS
Oldószertartalmú anyagok és gőzök okozta egészségügyi
veszély!
Egészségügyi károkat okozhat, ha belélegezzük az oldószertartalmú anyagokat
és gőzöket!
► Ne lélegezzük be az oldószertartalmú anyagok gőzeit (pl. aceton)!
► Gondoskodjuk megfelelő szellőztetésről, ha oldószertartalmú anyagokkal
dolgozunk!
► Tartsuk be az oldószertartalmú anyagok csomagolásán lévő utasításokat.
HU
SNS 45 A3
65
Page 69

HU
FIGYELMEZTETÉS
Vegyi anyagok okozta egészségügyi veszély!
Súlyos egészségügyi károkat okozhat, ha szakszerűtlenül kezeljük a vegyi
anyagokat.
► Ha valaki lenyelte volna az anyagot, azonnal forduljunk orvoshoz.
► Allergiás reakció esetén azonnal forduljunk orvoshoz!
► A szembe vagy a nyálkahártyára kerülve azonnal forduljunk orvoshoz!
TUDNIVALÓK A VEGYI ANYAGOK KEZELÉSÉRŐL
A termék esetén a körömragasztó, a fi xáló oldat, az UV zselé és a francia
zselé számít vegyi anyagnak.
► Óvatosan nyissa ki a vegyi anyagokat tartalmazó tégelyeket és fl akonokat!
► Óvatosan és gondosan kezelje a vegyi anyagokat.
► A vegyi anyagok irritálják a szemet és a bőrt.
► A vegyi anyagok bőrirritációt (szenzibilizációt) válthatnak ki.
► Viseljen védőkesztyűt és védőruházatot, ha vegyi anyaggal dolgozik.
► Gondoskodjon elegendő szellőzésről, miközben vegyi anyaggal dolgozik.
Ha nincsen megfelelő sz
► Az UV zselét, valamint a francia zselét ne használja sérült vagy beteg
örmön, ill. sérült köröm javítására.
k
FIGYELEM - ANYAGI KÁR
► Védje a készüléket a nedvességtől és ne engedje, hogy folyadék hatoljon
bele. Ne merítse a k
zen rá vízzel töltött tárgyat (pl. vázát).
► Ne tegyen semmit a készülékre.
► A készüléket nem szabad nyílt láng (pl. gyertya) közelében üzemeltetni.
► Ne érje a készüléket közvetlen napsugárzás.
► Soha ne húzza ki a csatlakozót a kábelnél fogva, a csatlakozóvéget fogja
meg.
► Fellépő zavar és vihar esetén húzza ki a csatlakozót a dugaszoló aljzatból.
ellőzés, akkor használjon légzésvédőt.
észüléket vízbe, ne tegye víz közelébe és ne helyez-
66
SNS 45 A3
Page 70

FIGYELMEZTETÉS - SÉRÜLÉSVESZÉLY!
UV készüléket nem szabad használni azoknak,
► akik bőrrákban szenvednek, vagy hajlamosak rá,
► akik fényérzékenységet növelő gyógyszereket szednek,
► akik nem töltötték be a 18 évet,
► akiknek könnyen előjönnek a szeplőik,
► akiknek természetes vörös haja van,
► akiknek szokatlan bőrelszíneződésük van,
► akiknek 16-nál több (legalább 2 mm átmérőjű) májfoltja van a testén,
► akiknek atipikus májfoltja van (atipikus májfoltnak nevezzük az
asszimetrik
valamint rendszertelen szegélyű májfoltokat; ha bizonytalan, kérje ki
orvosa véleményét),
► akiknek napszúrása van,
► akik napozás közben csak akkor barnulnak, ha leégnek,
► akik napsütésben gyorsan leégnek,
► akik gyerekkorukban gyakran nagyon leégtek a napon,
► akik bőrrákban szenvednek, vagy bőrrákjuk volt, vagy hajlamosak
a bőrr
► akik első fokon rokonok valakivel, aki már megbetegedett egyszer
melanomában (fek
► akik fényérzékenység miatt orvosi vagy gyógyászati kezelés alatt áll,
► akik egyáltalán nem tudnak napozni, vagy nem tudnak napozni anélkül,
hogy leégnének, ha a napon v
► akik könnyen leégnek a napon,
► akik terhesek.
us, 5 mm átmérőjűnél nagyobb és különböző pigmentációjú,
ákra,
ete bőrrákban),
annak,
HU
SNS 45 A3
67
Page 71

HU
■ A sugárzás ne haladja meg a minimális eritéma adagot (MED). Ha az eritéma
(bőrpír) a sugárzás után pár órával nem múlik el, el kell tekinteni a további
alkalmazástól. A következő sugárzást ez esetben csak egy héttel a bőrpír
fellépése után szabad ütemezni.
■ Ha az UV-készülék első használata után 48 órával olyan váratlan mellékhatás
ezne, mint bőrviszketés, kérje ki orvosa véleményét, mielőtt újra hasz-
jelentk
nálná az UV sugárzást.
■ Javasolt sugárzási idő:
– Naponta ne végezzen ötnél több kezelést. Ez bőrirritációt okozhat.
– Ne lépje túl a 400 javasolt kezelést évente.
■ A készüléket nem szabad használni, ha az időkapcsoló óra nem működik
megfelelően.
■ Csak az előírt típusú égőt használjon. Más gyártótól származó vagy más
típusú UV-égő használata miatt a gar
■ A nap UV-sugárzása vagy UV-készülékek visszafordíthatatlan bőr- és szemkáro-
sodást ok
nyiségétől, valamint az egyes személyek bőr- és szemérzékenységétől függnek.
■ A bőr a túlzott sugárzástól leéghet. A nap vagy UV-készülékek általi túl gyakori
s
a kockázat a növekvő halmozott UV-sugárzással nő. A fi atalkori UV-sugárzás
növeli a későbbi bőrrák kialakulásának kockázatát.
■ Az UV-sugárzás szem- és bőrsérülést, mint például idő előtti bőröregedést,
v
útmutatót. Néhány gyógyszer és kozmetikum növelheti az UV-sugárzással
szembeni érzékenységet.
■ Ha nem védjük szemünket, felülete begyulladhat, vagy néhány esetben túlzott su-
gár
okozhat.
ozhatnak. Ezek a biológiai hatások a sugárzás minőségétől és meny-
ugárzás idő előtti bőröregedést okozhat és növelheti a bőrrák veszélyét. Ez
agy akár bőrrákot okozhat. Figyelemesen olvassa el az alábbi használati
zás esetén megsérülhet a retina. A gyakran ismételt sugárzás szürkehályogot
anciaigény megszűnik.
68
SNS 45 A3
Page 72

■ Ha bizonyítottan érzékenyek vagyunk vagy allergiával reagálunk az UV-su-
gárzásra, forduljunk orvoshoz a sugárzás előtt.
■ Bizonyos megbetegedések, vagy bizonyos gyógyszerek mellékhatásai romol-
hatnak az UV-sugár
■ Az első két sugárzás között legalább 48 órás időköz legyen.
■ Ne feküdjön ki aznap a napra, amikor a készüléket használja. Ez bőrirritációt
ok
ozhat.
■ Tartsa be a sugárzás időtartamára, a sugárzási időközökre és a lámpától
aló távolságra vonatkozó utasításokat. Különben bőrirritáció léphet fel.
v
■ Forduljon orvoshoz, ha makacs csomók, duzzanatok jelennének meg, ha
áltoznának a májfoltjai, vagy sebes részek keletkeznének.
megv
■ Védje a sugárzástól az olyan érzékeny bőrterületeket, mint hegeket, tetoválá-
at, nemi szerveket.
sok
■ Naponta ne végezzen ötnél több kezelést. Ez bőrirritációt okozhat.
■ Ne lépje túl az ajánlott 400 kezelést évente!
■ A készülék üzembe helyezése előtt mossa le a kozmetikumokat és a napvédő
t
ermékeket. Különben bőrirritáció léphet fel.
TUDNIVALÓ
► Ha bizonytalan, kérje ki orvosa véleményét a készülék alkalmazási
lehetőségér
zással. Ha bizonytalan, kérje ki orvosa véleményét.
ől.
HU
SNS 45 A3
69
Page 73

HU
A készülék és tartozékai
TUDNIVALÓ
► Ehhez lásd a kihajtható oldalon lévő ábrát.
A“ ábra:
„
1 UV-készülék 4 beszerelt UV-lámpával
2 ki/be kapcsoló
3 „POWER“ működésjelző/üzemkészség
4 „240 mp“ működésjelző
5 „240 mp“ kiválasztása
6 „150 mp“ működésjelző
7 „150 mp“ kiválasztása
8 „90 mp“ működésjelző
9 „90 mp“ kiválasztása
0 indítógomb
„B“ ábra:
q tipvágó (a műköröm tipek vágásához)
w bőrfeltoló (a körömágy bőrének visszatolásához)
e ecset (az UV-zselé felviteléhez)
r buff er (az egyenetlenségek kisimítására)
t Spot Swirl (a francia zselé vagy a díszítő elemek felviteléhez)
z perforált papírvatta törlő (a fi xáló oldat felviteléhez vagy javításhoz)
u fa reszelő (a köröm reszelésére)
i műköröm tipek (műkörmök)
o fi xáló oldat (a kezelés lezárásához és az ecset tisztításához)
p körömragasztó (a „GLUE“ tipek felragasztásához)
a UV zselé (a köröm feltöltéséhez)
s francia zselé (francia manikűr kialakításához)
70
SNS 45 A3
Page 74

Felszerelés és csatlakoztatás
Biztonsági utasítások
FIGYELMEZTETÉS
A készülék beüzemelésekor személyi és anyagi kár is felléphet!
A veszélyek és anyagi károk elkerülése végett vegye fi gyelembe az alábbi
biztonsági utasításokat:
► A csomagolóanyag nem játékszer. Fulladás veszélye áll fenn.
► Tartsa be a felállítás helyére, valamint a készülék elektromos csatlakoztatá-
sár
a vonatkozó utasításokat, hogy elkerülje a személyi és anyagi kárt.
A csomag tartalma és annak hiánytalanságának
ellenőrzése
A készüléket szabványszerűen az alábbi elemekkel szállítjuk:
● UV-készülék 4 beszerelt UV-lámpával és vezetékkel
● Reszelő
● Buff er
● Műköröm tipek
● Bőrfeltoló
● Ecset
● Spot Swirl
● Tipvágó
● 1 francia zselé („French-Gel“)
● 2 tégely UV zselé („UV-Gel“)
● Fixáló oldat („Finishing“)
● 2 fl akon tipragasztó („Glue“)
● 100 perforált papírvatta törlő
● Tárolótasak
● Használati útmutató
HU
SNS 45 A3
TUDNIVALÓ
► Ellenőrizze a csomag tartalmát, hogy hiánytalan-e és nincs-e rajta látható
sérülés.
► Forduljon az ügyfélszolgálati forródrótunkhoz (lásd a Szer
ha a csomag hiányos csomagolás vagy szállítás miatt hiányos vagy sérült
lenne.
viz részben),
71
Page 75

HU
Kicsomagolás
♦ Vegye ki a készülék valamennyi részét és ezt a leírást a kartondobozból.
♦ Távolítsa el az összes csomagolóanyagot!
A csomagolás ártalmatlanítása
A csomagolás védi a készüléket a szállítás közben előfordulható károktól. A csomagolóanyagok környezetbarát módon és a hulladékszétválasztás szempontja
szerint kerültek kiválasztásra, ezért újrahasznosíthatóak.
Nyersanyagot takarít meg és csökkenti a hulladékmennyiséget, ha a csomagolást
visszajuttatjuk az anyagkörforgásba. A kiselejtezett csomagolóanyagokat a helyi
érvényes előírásoknak megfelelően helyezze el a hulladékban.
TUDNIVALÓ
► Amennyiben lehetséges, őrizze meg az eredeti csomagolást a garancia
ideje alatt, hogy gar
ancia esetén rendesen vissza lehessen csomagolni bele.
A felállítás helyével szemben támasztott elvárások
A készülék biztonságos és hibamentes üzemeltetéséhez a felállítás helyének az
alábbi feltételeket kell teljesítenie:
■ Helyezze a készüléket stabil, vízszintes és száraz felületre.
■ Ne állítsa fel a készüléket vizes helyen és ott, ahol ráspriccelhet a víz.
■ Ne tegye a készüléket fűtőtest vagy hősugárzó közvetlen közelébe.
■ A dugaszoló aljzat jól elérhető helyen legyen, hogy a csatlakozót könnyen ki
lehessen húzni.
72
SNS 45 A3
Page 76

Elektromos csatlakoztatás
VESZÉLY
Áramütés veszélye!
A f
eszültség alatt álló vezetékekhez vagy részekhez érni élet-
veszélyes!
Vegye fi gyelembe az alábbi biztonsági utasításokat, hogy elkerülje az áramütést:
► Ne üzemeltesse a készüléket, ha a csatlakozóvezeték vagy a csatlakozó
an sérülve.
meg v
► A készüléket kizárólag biztosított dugaszoló aljzatra csatlakoztassa.
► Ne érjen vizes kézzel a készülékhez és a csatlakozóhoz.
► A készülék ne érjen vízhez!
► Ne nyissa fel a készülék burkolatát!Ha hozzáér a feszültségvezető
ozásokhoz, vagy megváltoztatja a mechanikai felépítést, áramütés
csatlak
veszélye áll fenn.
♦ A készülék csatlakoztatása előtt hasonlítsa össze (feszültség és frekvencia) a
k
észüléken lévő típusjelölésen lévő csatlakoztatási adatokat elektromos hálózatának adataival. Ezeknek az adatoknak meg kell egyezniük, hogy ne
sérüljön meg a készülék.
♦ Győződjön meg arról, hogy a készülék vezetéke nincsen megsérülve, és nem
tette forr
ó felületre és/vagy éles szegélyre.
♦ Ügyeljen arra, hogy a vezeték ne feszüljön és ne legyen megtörve.
♦ A vezetéket ne lógassa le sarkokon (felbotolhat benne valaki).
♦ Dugja be a hálózati dugót a csatlakozó aljzatba.
HU
SNS 45 A3
73
Page 77

Kezelés és üzemeltetés
Ebben a fejezetben a készülék kezelésére és üzemeltetésére vonatkozó fontos
utasításokat ismerhet meg.
TUDNIVALÓ
► Lásd a Készülék és t
artozékai részt.
HU
Be- és kikapcsolás
♦ Kapcsolja be az UV-készüléket 1 a BE/KI kapcsoló 2 ”I” állásba való
helyezésével. A működésjelző 3 világít, a készülék üzemkész.
♦ Kapcsolja ki az UV-készüléket 1 a BE-/KI-k
sével. A működésjelző 3 kialszik.
Funkciók
A készüléken három különböző kezelési idő van beállítva:
■ 90 mp (9 gomb)
■ 150 mp (7 gomb)
■ 240 mp (5 gomb)
♦ Az UV-lámpát az indítógomb 0 megn
♦ Válassza ki a kívánt kezelési időt és nyomja meg hozzá a megfelelő 9, 7
v
agy 5 gombot.
TUDNIVALÓ
► Az UV-lámpa a beállított idő lejárta után magától kikapcsol.
♦ Nyomja meg a 9, 7 v
módon, ha el szeretné indítani a lámpát.
apcsoló 2 „0“ állásba helyezé-
yomásával kapcsolhatja be.
agy 5 gombot és az indítógombot 0 a fent leírt
74
SNS 45 A3
Page 78

Felhasználás
FIGYELEM
A ragasztó és az UV-zselé anyagi kárt okozhat.
A tipr
agasztót a p az UV zselét a és a francia zselét s csak nehezen lehet
eltávolítani a bútorok felületéről, ruházatról és szőnyegről.
► Használat előtt papírral vagy törülközővel takarja le a munkaterületet.
TUDNIVALÓ
► Helyezze az UV lámpát 1 letak
► A tipragasztót p, a fr
UV lámpa 1 közelébe.
► A tipragasztót p, a fr
közvetlen napsugárzásnak.
A műköröm tip kiválasztása
TUDNIVALÓ
► Első alkalommal hasznos lehet, ha tapasztalt személy tud segíteni a
ában.
munk
► Használat előtt húzza le a kezéről az ékszereket.
► Használat előtt tisztítsa és szárítsa meg a kezét. Azt ajánljuk, hogy a
használat előtt kb. 15-20 per
szárazak legyenek.
♦ Olyan műköröm tipet válasszon i, melynek domborulata megegy
körme domborulatával.
ancia zselét s és az UV zselét a ne tegye az
ancia zselét s és az UV zselét a ne tegye ki
HU
art és stabil felületre.
ccel mosson kezet, hogy körmei teljesen
ezik saját
i
SNS 45 A3
♦ Olyan műköröm tipet válasszon i, mely pontosan illeszkedik saját körme
szegélyéhez, az oldala pedig párhuzamos legyen saját körmével.
75
Page 79

♦ Szükség esetén a dohánylevél reszelővel u reszelje le a műköröm i végét,
hogy a végpontja (nyíl) kb. a természetes körme egy harmadát fedje le.
HU
i
szabad szél körömágy
körömlemez körömredő
TUDNIVALÓ
► Ha túl kicsi műköröm tipet választ i, akk
válasszon nagyobb körömtipet i és reszelje az oldalát megfelelő alakúra.
♦ Ismételje meg a leírt folyamatot, míg valamennyi körme kívánt hosszúságú
és alakú..
A műköröm tip felhelyezése
TUDNIVALÓ
► Vegye fi gyelembe, hogy a köröm vízzel érintkezve nedvességet vehet fel.
almazás előtt körmei teljesen szárazok legyenek.
Alk
► Ne használjon alkalmazás előtt kézkrémet, vagy hasonló ápolószert,
el a köröm felületének teljesen zsírmentesnek kell lennie ahhoz, hogy a
miv
műköröm tipek i jól tapadjanak.
♦ A bőrfeltolóval w tolja vissza a k
átlátszó bőrét.
♦ A köröm felületét a buff errel r mattír
♦ A lereszelt port papírtörlővel vagy perforált papírvatta törlővel z sz
♦ Dörzsölje le a körmöt Finishing oldattal o, hogy a visszamar
teljesen eltűnjön.
or az könnyen letörhet. Ezért
örömredőt és távolítsa el a körömlemez
ozza, amíg a köröm már nem csillog.
edje fel.
adt por és zsír
76
SNS 45 A3
Page 80

TUDNIVALÓ
► Ne érjen hozzá a köröm felületéhez az ujjával, mert megint bezsírosodhat
és a tip nem fog jól megtapadni r
♦ Tegyen egy kis csepp tipragasztót p a tip i alsó r
kupakjának segítségével oszlassa el az alsó részen. Lefele tartsa a tipet i,
hogy a tipragasztó p ne folyjon a tip i felső részére.
TUDNIVALÓ
► A tipragasztó p fl
fel, pl. egy tűvel. Ha később beragadna a tipragasztó p fl akonja, tűvel
megint ki lehet tisztítani.
♦ Helyezze a tipet i fer
saját körme szegélyéhez illeszkedjen.
♦ Enyhe nyomással hajlítsa a tipet i a k
levegő kiszoruljon.
akonját az első használat előtt hegyes tárggyal szúrja
dén a saját körmére, hogy a tip i kialakított szegélye
ajta!
észére és a ragasztó p
p
örmére, hogy az esetleg bent maradt
HU
SNS 45 A3
i
TUDNIVALÓ
► A felesleges tipragasztót p per
pálcikával vagy papírtörlővel törölje le.
forált papírvatta törlővel z, fültisztító
77
Page 81

HU
♦ Tartsa a tipet i 10-12 másodpercig, és közben gyakoroljon nyomást a kö-
römre. Ügyeljen arra, hogy ne legyen közte légbuborék és hogy a tip tökélete-
sen egyenesen legyen felragasztva.
TUDNIVALÓ
► Nem szabad, hogy rés legyen a köröm alatt, nehogy bemenjen a piszok.
► Ügyeljen arra, hogy ne képződjön légbuborék vagy fehér folt a tip i
alatt. Ebben az esetben az
♦ Ha valamennyi tipet i felr
hosszúságúra. Egy mozdulattal nyomja le a tipvágót q. Ha lassan nyomja,
előfordulhat, hogy elpattan a tip i.
onnal vegye le a tipet i és tegye fel újra.
agasztotta, vágja őket a tipvágóval q a kívánt
q
78
♦ A reszelővel u r
TUDNIVALÓ
► Nagyon óvatosan reszeljen, mivel a tipeket i csak a tipr
► Ha nincsen hozzászokva a hosszú körmökhöz, előtte vágja le, nehogy
beütődjön és leessen a tip i.
eszelje a kívánt formára.
agasztó p fogja.
SNS 45 A3
Page 82

A körömágy vonalához való hozzáigazítás
♦ A tip i és a saját körme közötti átmenetet a reszelővel u reszelje meg,
míg a tip kontúrja nem hasonlít saját körméhez. Csak a tipet i reszelje! Ne
sértse meg a saját körmét.
♦ Óvatosan reszelje a köröm oldalát a reszelővel u, míg egy
és nem áll ki.
♦ Ezeket a lépéseket minden egyes körömnél ismételje meg.
u
enes nem lesz
HU
♦ A lereszelt port papírtörlővel vagy perforált papírvatta törlővel z sz
Az UV-zselé felvitele
♦ Tegyen az ecsetre e kis mennyiségű UV-zselét a és húzza le az ecset e
egyik oldalán az UV-zselé tégelyén.
♦ Vigyen fel egy vékony réteg UV-zselét a a teljes k
részére kicsit több UV-zselét a vigyen fel, hogy kiegyenlítse a saját körme
és a műköröm közötti részt. Ezenkívül a saját körme és a műköröm közötti
átmenet nagyon érzékeny a terhelésre és az ütődésre, ezért ezen a részen
több UV-zselét a kell felvinni.
TUDNIVALÓ
► Felvitelnél ne nyomja nagyon erősen az ecsetet e, mer
csíkokat húzna.
► Az UV-zselé elős rétegét a k
ez határozza meg a köröm alakját. Lehetőleg természetes körömformát
alakítson ki.
♦ Felhordáskor hagyjon kb. 1 mm távolságot a körömredőtől.
edje fel.
örömre. A köröm alsó
t akkor az ecset e
ülönösen gondosan formázza, mert később
SNS 45 A3
79
Page 83

TUDNIVALÓ
► Ha véletlenül UV-zselé a k
fültisztító pálcikával törölje le.
♦ Minden egyes körömnél ismételje meg a fenti lépéseket.
e
erülne a körömredőre, kikeményítés előtt pl.
HU
i
TUDNIVALÓ
► Ügyeljen arra, hogy a körmöt egyenletesen befedje az UV-zselé a.
Az UV-zselé kikeményítése
TUDNIVALÓ
► Lásd a K
♦ Kapcsolja be az UV-készüléket 1 a BE/KI k
♦ Nyomja meg az indítógombot 0; az UV-csö
♦ Válassza ki a kívánt kezelési időt és nyomja meg hozzá a megfelelő 9, 7
♦ Tartsa a kezét a körmökkel felfele a beállított kezelési ideig az UV-készülék 1
♦ A hüvelykujját külön tegye be, mert csak ferdén éri a fény, ha egész kezünket
♦ Ismét vigyen fel egy réteg UV-zselét a és k
ezelés és üzemeltetés részt.
v
agy 5 gombot. Ha először keményíti ki a zselét, 240 másodperces szárítási
időt javaslunk.
n
yílásába.
tesszük be az UV-k
a leírt módon.
észülékbe.
apcsolóval 2.
vek bekapcsolnak.
eményítse ki az UV-készülékben 1
80
SNS 45 A3
Page 84

TUDNIVALÓ
► A beállított kezelési idő lejártával az UV-csövek maguktól kikapcsolnak.
► Minden újabb kezeléshez meg kell nyomni az indítógombot 0 és az idő
beállításának gombját (9, 7 v
♦ Felhordás és kikeményítés után nézzen meg minden réteget, hogy nem-e
egyenetlen, nincsenek-e rajta karcolások vagy barázdák.
♦ Ha egyenetlenséget fedez fel, vigyen fel még egy vékony UV-zselé réteget a
és a felvitt UV-zselé a menn
vagy 90 másodperces beállításon.
Az utolsó zseléréteg kikeményedése után előfordulhat, hogy a köröm kicsit ragacsos
hatású („izzadó réteg“, ill. polimerizációs réteg).
♦ Nedvesítsen meg egy perforált papírvatta törlőt z a fi
törölje le vele a körmöt.
agy 5).
yiségétől függően keményítse ki a körmöt 150
xáló oldattal o és
HU
SNS 45 A3
81
Page 85

TIPP
► Ha díszítő elemeket, vagy strasszkövet szeretne felragasztani a körmökre,
a Spot-Swirl t hegy
nem kikeményedett utolsó rétegébe. Ezután keményítse ki az UV zselét a.
Vigyen fel még egy vékony réteg UV zselét a a körömre és keményítse ki,
hogy a díszítés jobban tartson. Így jobban van védve a díszítés.
es oldalával helyezze be őket az UV zselé a még
HU
Feltöltés
TUDNIVALÓ
► Mivel saját körme tovább nő, a tip alja i időv
időről-időre fel kell tölteni a körömredő és a köröm alja közötti rést.
► A feltöltés 2-3 hetente esedékes.
♦ Reszelje körbe a kikeményedett zselé alját a reszelővel u.
♦ Használja a buff ert r, míg k
♦ Ezután vigyen fel UV-zselét a és k
TUDNIVALÓ
► Lásd az előző Az UV
fejezeteket
örme elveszíti fényét.
eményítse ki.
-zselé felvitele és Az UV-zselé kikeményítése
el kiemelkedhet. Ezért
82
SNS 45 A3
Page 86

Francia manikűr (French-Nails)
Francia manikűr alatt azt értjük, ha a köröm végét fehérre alakítjuk ki.
♦ Az „Alkalmazás“ részben leírtak szerint alakítsa ki a körmöket, míg felviszi az
éteg UV zselét a és kikeményítette.
első r
♦ Használja a Spot Swirl t gömbölyített oldalát, hogy felvigy
a francia zselét s. Mindig vigyen fel új francia zselét s a hegyével és enyhe
köröző mozdulatokkal alakítsa ki a fehér ívet a köröm végén.
♦ A következő körömmel ugyanígy folytassa.
♦ Ezt követően a 150 másodperces beállítással keményítse ki a körmöt.
♦ Ezután vigyen fel egy újabb réteget az UV zselével a. A k
kicsivel kevesebb UV zselét a vigyen fel, mint a többi részére. Ezzel eltüntetheti
a fehér körömvég és a köröm többi része közötti átmenetet.
♦ Ezután a 150 másodperces beállítással keményítse ki a körmöt. Az utolsó
zselér
éteg kikeményedése után előfordulhat, hogy a köröm kicsit ragacsos
hatású („izzadó réteg“, ill. polimerizációs réteg).
♦ Nedvesítsen meg egy perforált papírvatta törlőt z a fi
törölje le vele a körmöt.
A műköröm tip eltávolítása
FIGYELEM
A természetes köröm felülete megsérülhet!
Ha er
őszakkal töri le a tipet i, megsérülhet a természetes köröm felülete!
► Ne törje le a tipeket i a termész
► A tipeket i kizár
ólag az alábbi leírás alapján szedje le!
e a körömhegyre
HU
öröm fehér részére
xáló oldattal o és
etes körömről!
SNS 45 A3
♦ Először teljesen vágja vissza a körmöt a tipvágóval q.
♦ Reszelje le a tipeket i a r
TIPP
► Ezután vigyen fel a körömágyra egy kis körömápoló olajat vagy használjon
gazdag k
ézvédő krémet, mely ápolja a kezét és körmét.
eszelővel u.
83
Page 87

HU
q
Ápolás
■ Rendszeresen reszelje le a köröm végét és szegélyét.
■ Hetente egyszer polírozza körmeit.
■ A körömlakk felvitelekor vigyen fel egy alsó és egy fedőréteget.
■ Ne használjon a körömlakk eltávolításához acetontartalmú körömlakklemosót,
m
ert ez feloldja és megsérheti a műkörmöt.
■ Mosó- és fehérítőszer használata közben használjon gumikesztyűt.
■ Munkavégzés, vagy olyan tevékenység közben, mely felsértheti a körmöt,
viseljen gumik
esztyűt.
Tisztítás
Biztonsági utasítások
u
VESZÉLY
Áramütés veszélye!
► A készülék tisztítása előtt húzza ki a csatlakozót a konnektorból!
FIGYELEM
A készülék megsérülhet!
► Győződjön meg arról, hogy tisztításkor ne kerüljön nedvesség az UV-ké-
szülékbe 1, nehogy helyr
A készülék tisztítása
♦ Az UV-készülék 1 felületét csak puha és száraz kendővel tisztítsa.
84
ehozhatatlan kár keletkezzen benne.
SNS 45 A3
Page 88

A tartozékok tisztítása
TUDNIVALÓ
► Az ecsetet e és a Spot Swirlt t mindig k
tisztítsa meg.
► Használat után zárja vissza a fl akonokat és tégelyeket.
♦ Tartsa az ecsetet e és a Spot Swirlt t a fi
törölje le egy papírtörlővel.
Az UV-égő cseréje
VESZÉLY
Áramütés veszélye!
► Az UV-cső tisztítása előtt húzza ki a csatlakozót a konnektorból!
TUDNIVALÓ
► Az UV-lámpát csak azonos típusú lámpára szabad kicserélni. A lámpa
pontos típusát a „Műszaki adatok“ alatt találja meg.
♦ Csillagfejű csavarhúzóval csavarozza ki a készülék oldalán lévő csavarokat.
özvetlenül használat után
xáló oldatba o és mindkettőt
HU
SNS 45 A3
85
Page 89

HU
♦ Óvatosan húzza le a készülékről az elülső burkolatot és közben ügyeljen az
oldalt lévő kábelkapcsolatra.
♦ Óvatosan húzza ki a foglalatból az üres égőt.
♦ Dugja bele az új UV-égőt a foglalatba.
♦ Tolja a készülék burkolatát az UV-égővel a készülékre és közben vigyázzon
arr
a, hogy ne szorítsa be az oldalt lévő kábelkapcsolatot.
♦ A készülék burkolatát a két oldalsó csavarral rögzítse.
Hibaelhárítás
Ebben a fejezetben fontos tudnivalókat kaphat a hibafelismerésre és hibaeljárításra
vonatkozólag. A sérülés és veszélyek elkerülése végett tartsa be az utasításokat.
Biztonsági utasítások
86
FIGYELMEZTETÉS
A veszély és anyagi kár elhárítása érdekében tartsa be az alábbi biztonsági
utasításokat:
► Az elektromos készülékeken csak olyan szakemberek végezhetnek javítást,
et a gyártó képzett ki erre. A szakszerűtlen szerelés által jelentős veszé-
akik
lyek állhatnak fel a felhasználóra nézve és a készülékben kár keletkezhet.
SNS 45 A3
Page 90

Hiba oka és elhárítása
Az alábbi táblázat kisebb üzemzavarok okának felderítésére és elhárítására szolgál:
Hiba Lehetséges okok Elhárítás
A készüléket nem
lehet bekapcsolni.
Az UV-zselé a
nem keményedik
ki eléggé.
Kikeményítés után
„izzadt réteg“
marad a körmön.
A műköröm felpuhul/feloldódik.
A műköröm
egyenetlen.
Nem világít az
UV-lámpa.
A hálózati csatlakozó
nincsen bedugva.
A dugaszoló aljzaton
nincsen feszültség.
A kiválaszott szárítási idő
túl kevés.
Egy vagy több UV-lámpa
hibás.
Túl sok UV-zselét a vitt fel. Kevesebb UV-zselét a használjon.
A körmét nem tartotta elég
ideig az UV-lámpa alá.
Az „izzadt réteg“ keletkezése a polimerizáció jele.
A magas acetontartalmú
termékek feloldják a
műkörmöt.
Nagyon megnyomta az
ecsetet e, amikor felvitte
az UV-zselét a.
Egyenetlenül lett felhordva
az UV-zselé a.
Ki van égve az UV-lámpa. Cserélje ki a kiégett UV-lámpát.
Dugja be a hálózati dugót a
csatlakozó aljzatba.
Ellenőrizze a biztosítékokat.
Cserélje ki a kiégett UV lámpákat
(lásd „Az UV-égő cseréje“ részt)
Forduljon ügyfélszolgálatunkhoz!
Dugja be rendesen a kezét az
UV-készülékbe 1.
Távolítsa el az „izzadt réteget“
a Finishing oldattal o.
Ne használjon magas acetontartalmú
terméket.
Ne nyomja annyira az ecsetet e,
ha felviszi az UV-zselét a.
Vigyen fel még egy vékony réteg
UV-zselét a és keményítse ki.
HU
SNS 45 A3
TUDNIVALÓ
► Ha nem tudja megoldani a problémát a fent nevezett lépésekkel, forduljon
olgálatunkhoz.
ügyfélsz
87
Page 91

HU
Tárolás/Ártalmatlanítás
Tárolás
FIGYELEM
Oldószertartalmú anyagok okozta egészségre leselkedő
v
eszély!
Az oldószertartalmú anyagok és gőzeik károsíthatják az egészséget!
► Gondosan csukja vissza a csomagban található anyagok fl akonjait és
eit.
tégely
► A csomagban található anyagokat gyermekektől elzárva tárolja!
♦ Ha hosszabb ideig nem használja a készüléket, húzza ki a csatlakozót és
tiszta, szár
hozzá.
♦ Az anyagokat tiszta, száraz és hűvös helyen tárolja, ahol nem éri nap és
gy
A készülék ártalmatlanítása
Ne dobja a készüléket és az anyagokat a háztartási hulladékba.
A termék az európai 2012/19/EU irányelv alá tartozik.
A készüléket engedélyeztetett hulladékgyűjtő helyen vagy a helyi hulladékeltá-
volító üzemnél tudja kidobni. A vegyi anyagokat veszélyes hulladékként kell kezelni. Tartsa be az érvényes előírásokat. Kétség esetén vegye fel a kapcsolatot a
hulladékfeldolgozó vállalattal.
az helyen tárolja, ahol nem éri nap és gyermekek sem férhetnek
ermekek sem férhetnek hozzá.
Függelék
EK megfelelőségi nyilatkozatra vonatkozó tudnivalók
A készülék megfelel
– az elektromágneses összeférhetőségre vonatkozó
ányelv,
88
2004/108/EC ir
– a kisfeszültségű gépekre vonatkozó 2006/95/EC,
– és a veszélyes anyagok elektromos és elektronikus
endezésekben való alkalmazásának korlátozásáról
ber
szóló 2011/65/EU irányelv alapvető elvárásainak
és más idevonatkozó előírásoknak.
A teljes eredeti megfelelőségi nyilatkozat a gyártónál szerezhető be.
SNS 45 A3
Page 92

Műszaki adatok
Modell SNS 45 A3
Üzemelési feszültség 220 - 240 V ~ / 50 Hz
Teljesítményfelvétel 45 W
Garancia
A készülékre 3 év garanciát adunk a vásárlás dátumától számítva. A készüléket
gondosan gyártottuk, és szállítás előtt lelkiismeretesen ellenőriztük.
Kérjük, a vásárlás igazolására őrizze meg a pénztári blokkot. Kérjük, garanciaigény esetén vegye fel a kapcsolatot telefonon az Ön közelében lévő szervizzel.
Csak ebben az esetben garantálhatjuk, hogy ingyen tudja beküldeni az árut.
A termék kizárólag magánhasználatra, nem kereskedelmi használatra készült. A
garancia érvényét veszti visszaélésszerű vagy szakavatatlan kezelés, erőszak alkalmazása vagy olyan beavatkozások esetén, amelyeket nem engedélyeztetett
szervizelő üzleteink hajtottak végre.
Az ön törvényes jogait ez a garancia nem korlátozza. A garancia ideje nem hoszszabbodik a jótállással. Ez érvényes a cserélt és javított alkatrészekre is.
Az esetlegesen már vételkor meglévő károkat és hiányosságokat kicsomagolás
után azonnal, de legkésőbb 2 nappal a vásárlás után jelezni kell.
A garancia idejének lejárta után esedékes javítások költségtérítésesek.
Üzemelési hőmérséklet +5 - +45 °C
Nedvesség (kondenzáció nélkül) 5 - 90 %
Méretei (szélesség x hosszúság x
mélység):
Súly kb. 1300 g
UV-lámpák száma 4
UV-lámpa típusa UV-9W 365 nm, 9 W
A készülék UV-típusa UV-A lámpa típusú 3
Automatikus kikapcsolási idők 90, 150 és 240 másodperc után
TUDNIVALÓ
► A garancia csak anyag- és gyártási hibára vonatkozik, nem pedig szállítási
árra, kopásra vagy törékeny részek (pl. kapcsoló vagy elem) sérülésére.
k
23,1 x 29,6 x 14,3 cm
HU
SNS 45 A3
89
Page 93

HU
Szerviz
Gyártja
Szerviz Magyarország
Tel.: 0640 102785
E-Mail: kompernass@lidl.hu
IAN 90252
Az ügyfélszolgálati forródrót elérhetősége:
hétfőtől péntekig 8.00 és 20.00 óra között (közép-európai idő szerint)
KOMPERNASS HANDELS GMBH
BURGSTRASSE 21
44867 BOCHUM
GERMANY
www.kompernass.com
90
SNS 45 A3
Page 94

Kazalo vsebine
Uvod . . . . . . . . . . . . . . . . . . . . 92
Avtorske pravice . . . . . . . . . . . . . . . . .92
Omejitev odgovornosti . . . . . . . . . . . .92
Predvidena uporaba . . . . . . . . . . . . . . 92
Opozorila . . . . . . . . . . . . . . . . . . . . . .93
Varnostni napotki . . . . . . . . . . 94
Naprava in pribor . . . . . . . . 100
Postavitev in priključitev . . . . .101
Varnostni napotki . . . . . . . . . . . . . . .101
Vsebina kompleta in
pregled po dobavi . . . . . . . . . . . . . .101
Razpakiranje . . . . . . . . . . . . . . . . . .102
Odstranitev embalaže . . . . . . . . . . .102
Zahteve za mesto postavitve . . . . . .102
Električni priključek . . . . . . . . . . . . . .103
Uporaba in delovanje . . . . . 104
Vklop in izklop . . . . . . . . . . . . . . . . .104
Funkcije . . . . . . . . . . . . . . . . . . . . . . .104
Uporaba . . . . . . . . . . . . . . . . 105
Izbira konic nohtov . . . . . . . . . . . . . .105
Namestitev konic nohtov . . . . . . . . .106
Prilagoditev nastavka nohtov . . . . . .109
Nanos UV-gela . . . . . . . . . . . . . . . . .109
Strjevanje UV-gela . . . . . . . . . . . . . .110
Polnjenje . . . . . . . . . . . . . . . . . . . . . .112
Francoski nohti (French-Nails). . . . . .113
Odstranjevanje konic nohtov . . . . . .113
Nega . . . . . . . . . . . . . . . . . . . . . . . .114
Čiščenje . . . . . . . . . . . . . . . . . 114
Varnostni napotki . . . . . . . . . . . . . . .114
Čiščenje naprave . . . . . . . . . . . . . . .114
Čiščenje pribora . . . . . . . . . . . . . . . .115
Menjava UV-luči . . . . . . . . . . 115
Odprava napak . . . . . . . . . . 116
Varnostni napotki . . . . . . . . . . . . . . .116
Vzroki in odpravljanje napak . . . . . .117
Shranjevanje/odstranitev . . . .118
Shranjevanje . . . . . . . . . . . . . . . . . . .118
Odstranitev naprave . . . . . . . . . . . . .118
Priloga . . . . . . . . . . . . . . . . . . 118
Napotki k ES-izjavi o skladnosti . . . .118
Tehnični podatki . . . . . . . . . . . . . . . .119
Proizvajalec . . . . . . . . . . . . . . . . . . .119
Servis . . . . . . . . . . . . . . . . . . . . . . . .119
Garancijski list . . . . . . . . . . . . . . . . .120
SI
SNS 45 A3
91
Page 95

Uvod
Iskrene čestitke ob nakupu vaše nove naprave.
Odločili ste se za kakovosten izdelek. Ta navodila za uporabo so sestavni del
vašega izdelka. Vsebujejo pomembne napotke za njegovo varnost, uporabo in
odstranitev. Preden izdelek začnete uporabljati, si preberite vse napotke za njegovo varno uporabo. Izdelek uporabljajte samo na opisani način in le za navedena področja uporabe. Ob predaji naprave tretji osebi zraven priložite tudi vso
dokumentacijo.
SI
Avtorske pravice
Ta dokumentacija je zaščitena z avtorskimi pravicami.
Vsakršno razmnoževanje oz. vsak ponatis, tudi po delih, ter prikazovanje slik, tudi
v spremenjenem stanju, je dovoljeno le s pisnim soglasjem proizvajalca.
Omejitev odgovornosti
Vse tehnične informacije, podatki in napotki za priključitev ter uporabo, navedeni
v teh navodilih za uporabo, ustrezajo zadnjemu stanju pri izdaji navodil in so
podani ob upoštevanju naših dosedanjih izkušenj in znanja po najboljši vesti. Iz
podatkov, slik in opisov v teh navodilih ni mogoče izpeljevati nikakršnih zahtevkov.
Proizvajalec ne prevzema nikakršne odgovornosti za škodo zaradi neupoštevanja navodil, nepredvidene uporabe, nestrokovnih popravil, nedovoljenih izvedenih
sprememb ali uporabe nedovoljenih nadomestnih delov.
Predvidena uporaba
Ta naprava je predvidena le za namestitev in pritrditev konic nohtov za namene
manikure v zaprtih prostorih in samo za zasebno uporabo. Kakršna koli druga ali
drugačna vrsta uporabe velja za nepredvideno.
OPOZORILO
Nevarnost zaradi nepredvidene uporabe!
Naprava lahko v primeru nepredvidene uporabe in/ali drugačne vrste uporabe
predstavlja vir nevarnosti.
► Napravo uporabljajte izključno v predvidene namene.
► Upoštevajte načine ravnanja, opisane v teh navodilih za uporabo.
92
SNS 45 A3
Page 96

Izključeno je uveljavljanje kakršnih koli zahtevkov zaradi škode, nastale zaradi nepredvidene uporabe, nestrokovnih popravil, nedovoljenih sprememb ali uporabe
nedovoljenih nadomestnih delov.
Tveganje prevzame izključno uporabnik.
Opozorila
V teh navodilih za uporabo se uporabljajo naslednja opozorila:
Opozorilo te stopnje nevarnosti označuje grozečo nevarno
situaci
Če se nevarni situaciji ne izognete, to lahko privede do smrti ali do težkih
poškodb.
OPOZORILO
Opozorilo te stopnje nevarnosti označuje morebitno nevarno
situacijo.
Če se nevarni situaciji ne izognete, to lahko privede do poškodb.
POZOR
Opozorilo te stopnje nevarnosti označuje možno stvarno škodo.
Če se ne
NEVARNOST
jo.
► Upoštevajte navodila v tem opozorilu, da preprečite nevarnost smrti ali
žkih poškodb oseb.
te
► Upoštevajte navodila pri tem opozorilu, da preprečite poškodbe oseb.
varni situaciji ne izognete, to lahko privede do stvarne škode.
► Upoštevajte navodila pri tem opozorilu, da preprečite stvarno škodo.
SI
SNS 45 A3
NAPOTEK
► Napotek označuje dodatne informacije, ki vam olajšajo ravnanje z napravo.
93
Page 97

SI
Varnostni napotki
Ta naprava ustreza predpisanim varnostnim določilom. Nepravilna uporaba lahko privede od osebne in stvarne škode.
■ Popravila naprave med garancijsko dobo sme izvajati samo servisna služba
s pooblastilom pr
garancije ni več mogoče uveljavljati.
NEVARNOST
Smrtna nevarnost zaradi električnega toka!
Pri s
tiku z napeljavami pod napetostjo ali sestavnimi deli
obstaja smrtna nevarnost!
Upoštevajte naslednje varnostne napotke, da preprečite nevarnost zaradi
električnega toka:
► Če se poškoduje električni kabel naprave, ga mora zamenjati proizvajalec,
v servis ali podobno usposobljena oseba, da ne pride do nesreč.
njego
► Naprave ne postavljajte v kopalnici.
► Napravo priključite izključno na zavarovano omrežno vtičnico.
► Naprave in omrežnega vtiča se ne dotikajte z mokrimi rokami.
► Naprave nikoli ne postavljajte v vodo.
► Ohišja naprave v nobenem primeru ne odpirajte (razen pri menjavanju
UV-luči). Če se dotaknete priključk
električno ter mehansko sestavo, obstaja nevarnost električnega udara.
OPOZORILO
Nevarnost poškodbe zaradi ultravijolične svetlobe
(UV-svetloba)!
Pogled, neposredno usmerjen v UV-svetlobo UV-luči v napravi lahko privede
do poškodbe oči in zmanjšane zmožnosti vida!
► Nikoli ne glejte neposredno v ultravijolično svetlobo UV-luči.
► UV-luči izključite, ko jih ne uporabljate.
► Pri delovanju naprave pa ne smejo biti prisotne osebe, ki je ne uporabljajo,
še posebej pa ne smejo biti prisotni otr
oizvajalca, drugače pri posledični škodi pravic iz naslova
ov pod napetostjo ali spremenite
oci.
94
SNS 45 A3
Page 98

OPOZORILO – NEVARNOST POŠKODB
► Pred uporabo preverite, ali ima naprava vidne poškodbe. Če je naprava
odovana ali vam je padla dol, je ne uporabljajte.
pošk
► Ta naprava ni namenjena temu, da jo uporabljajo osebe z omejenimi fi zič-
nimi, zaznavnimi ali duše
in/ali znanjem, razen pod nadzorom osebe, ki je zanje odgovorna ali jim
je dala navodila v zvezi z uporabo naprave.
► Otroke je treba nadzorovati, da se z napravo ne bi igrali.
► Nikoli ne glejte neposredno v UV-luči. To lahko privede do poškodbe oči!
► Napravo in celoten pribor vedno hranite izven dosega otrok.
► Upoštevajte napotke na embalaži vseh snovi, ki jih uporabljate.
► Popravila naprave naj izvaja le pooblaščeno strokovno podjetje ali servisna
lužba. Zaradi nestrokovnih popravil lahko pride od nevarnosti za uporab-
s
nika. Poleg tega pa garancijska pravica neha veljati.
► Okvarjene sestavne dele lahko zamenjate le za originalne nadomestne dele.
Samo pri teh delih je zagoto
OPOZORILO
Nevarnost ogrožanja zdravja zaradi snovi in hlapov z vseb-nostjo
topil!
Vdihovanje snovi in hlapov z vsebnostjo topil lahko privede do ogrožanja
zdravja!
► Hlapov snovi z vsebnostjo topil (npr. acetona) ne vdihavajte.
► Poskrbite za zadostno prezračevanje pri rokovanju s snovmi z vsebnostjo
topil.
► Upoštevajte napotke na embalaži snovi z vsebnostjo topil.
vnimi sposobnostmi ali s pomanjkljivimi izkušnjami
vljeno, da izpolnjujejo varnostne zahteve.
SI
SNS 45 A3
95
Page 99

OPOZORILO
Nevarnost ogrožanja zdravja zaradi kemičnih snovi!
Nepravilno ravnanje s kemičnimi snovmi lahko privede do hudega ogrožanja
zdravja!
► Pri zaužitju takoj pojdite k zdravniku!
► V primeru alergičnih reakcij takoj pojdite k zdravniku!
► Pri stiku z očmi ali sluznico takoj pojdite k zdravniku!
SI
NAVODILA ZA RAVNANJE S KEMIČNIMI SNOVMI
Med kemične snovi tega izdelka štejejo lepilo za nohte, končna raztopina,
UV-gel in francoski gel.
► Previdno odprite posodice s kemičnimi snovmi.
► Kemične snovi uporabljajte previdno in s premislekom.
► Kemične snovi dražijo oči in kožo.
► Kemične snovi lahko povzročijo vzdraženost kože (povečanje občutljivosti
k
ože).
► Pri delu s kemičnimi snovmi nosite zaščitne rokavice in zaščitna oblačila.
► Ko delate s kemičnimi snovmi, skrbite za zadostno prezračevanje.
Pri nezadostnem pr
► UV-gela in francoskega gela nikoli ne uporabljajte na poškodovanih ali
bolnih nohtih ali za popr
POZOR – STVARNA ŠKODA
► Zaščitite napravo pred vlago in pred vdorom tekočin. Naprave nikoli ne
potopite v v
predmetov, napolnjenih z vodo (npr. vaze).
► Na napravo ne odlagajte nobenih predmetov.
► Naprave ne uporabljajte v bližini odprtih plamenov (npr. sveče).
► Izogibajte se neposrednemu sončnemu obsevanju.
► Omrežni kabel zmeraj povlecite iz vtičnice za priključni vtič, ne vlecite
abla samega.
k
► V primeru pojavljanja motenj in pri nevihti omrežni vtič potegnite iz vtičnice.
ezračevanju nosite napravo za zaščito dihal.
avilo poškodovanih nohtov.
odo, ne postavljajte je v bližini vode in nanjo ne odlagajte
96
SNS 45 A3
Page 100

OPOZORILO – NEVARNOST POŠKODB!
UV-naprav ne smejo uporabljati:
► osebe, ki imajo kožnega raka ali so posebej nagnjene h kožnemu raku,
► osebe, ki jemljejo zdravila, ki povečajo občutljivost na svetlobo,
► osebe pod 18 leti starosti,
► osebe z nagnjenostjo k poletnim pegam,
► osebe z naravno rdečo barvo las,
► osebe z nenavadnimi madeži na koži,
► osebe z več kot 16 pigmentnimi znamenji (s premerom najmanj 2 mm) na
telesu,
► osebe z netipičnimi pigmentnimi znamenji (netipična pigmentna znamenja
so asimetrična pigmentna znamenja s pr
pigmentacijo ter neenakomernimi robovi; v primeru dvoma se obrnite na
svojega zdravnika),
► osebe, ki imajo opekline od sončenja,
► osebe, ki na soncu ne porjavijo brez opeklin na koži,
► osebe, ki na soncu hitro dobijo opekline na koži,
► osebe, ki so v otroštvu pogosto dobile težke opekline zaradi sončenja,
► osebe, ki imajo kožnega raka ali so imele kožnega raka ali so bolj dovzetne
a kožnega raka,
z
► osebe, ki imajo sorodnika v prvem kolenu, ki je že zbolel za melanomom
ak na koži),
(črni r
► osebe, ki so v zdravniški in medicinski oskrbi zaradi obolenja na podlagi
etlobne občutljivosti,
sv
► osebe, ki sploh ne morejo porjaveti ali ne morejo porjaveti, ne da bi dobile
opeklin zar
► osebe, ki hitro dobijo opekline, če so izpostavljene soncu,
► med nosečnostjo.
adi sončenja, kadar so izpostavljene soncu,
emerom več kot 5 mm in z raznoliko
SI
SNS 45 A3
97
 Loading...