

Page 1
PERSONAL CARE
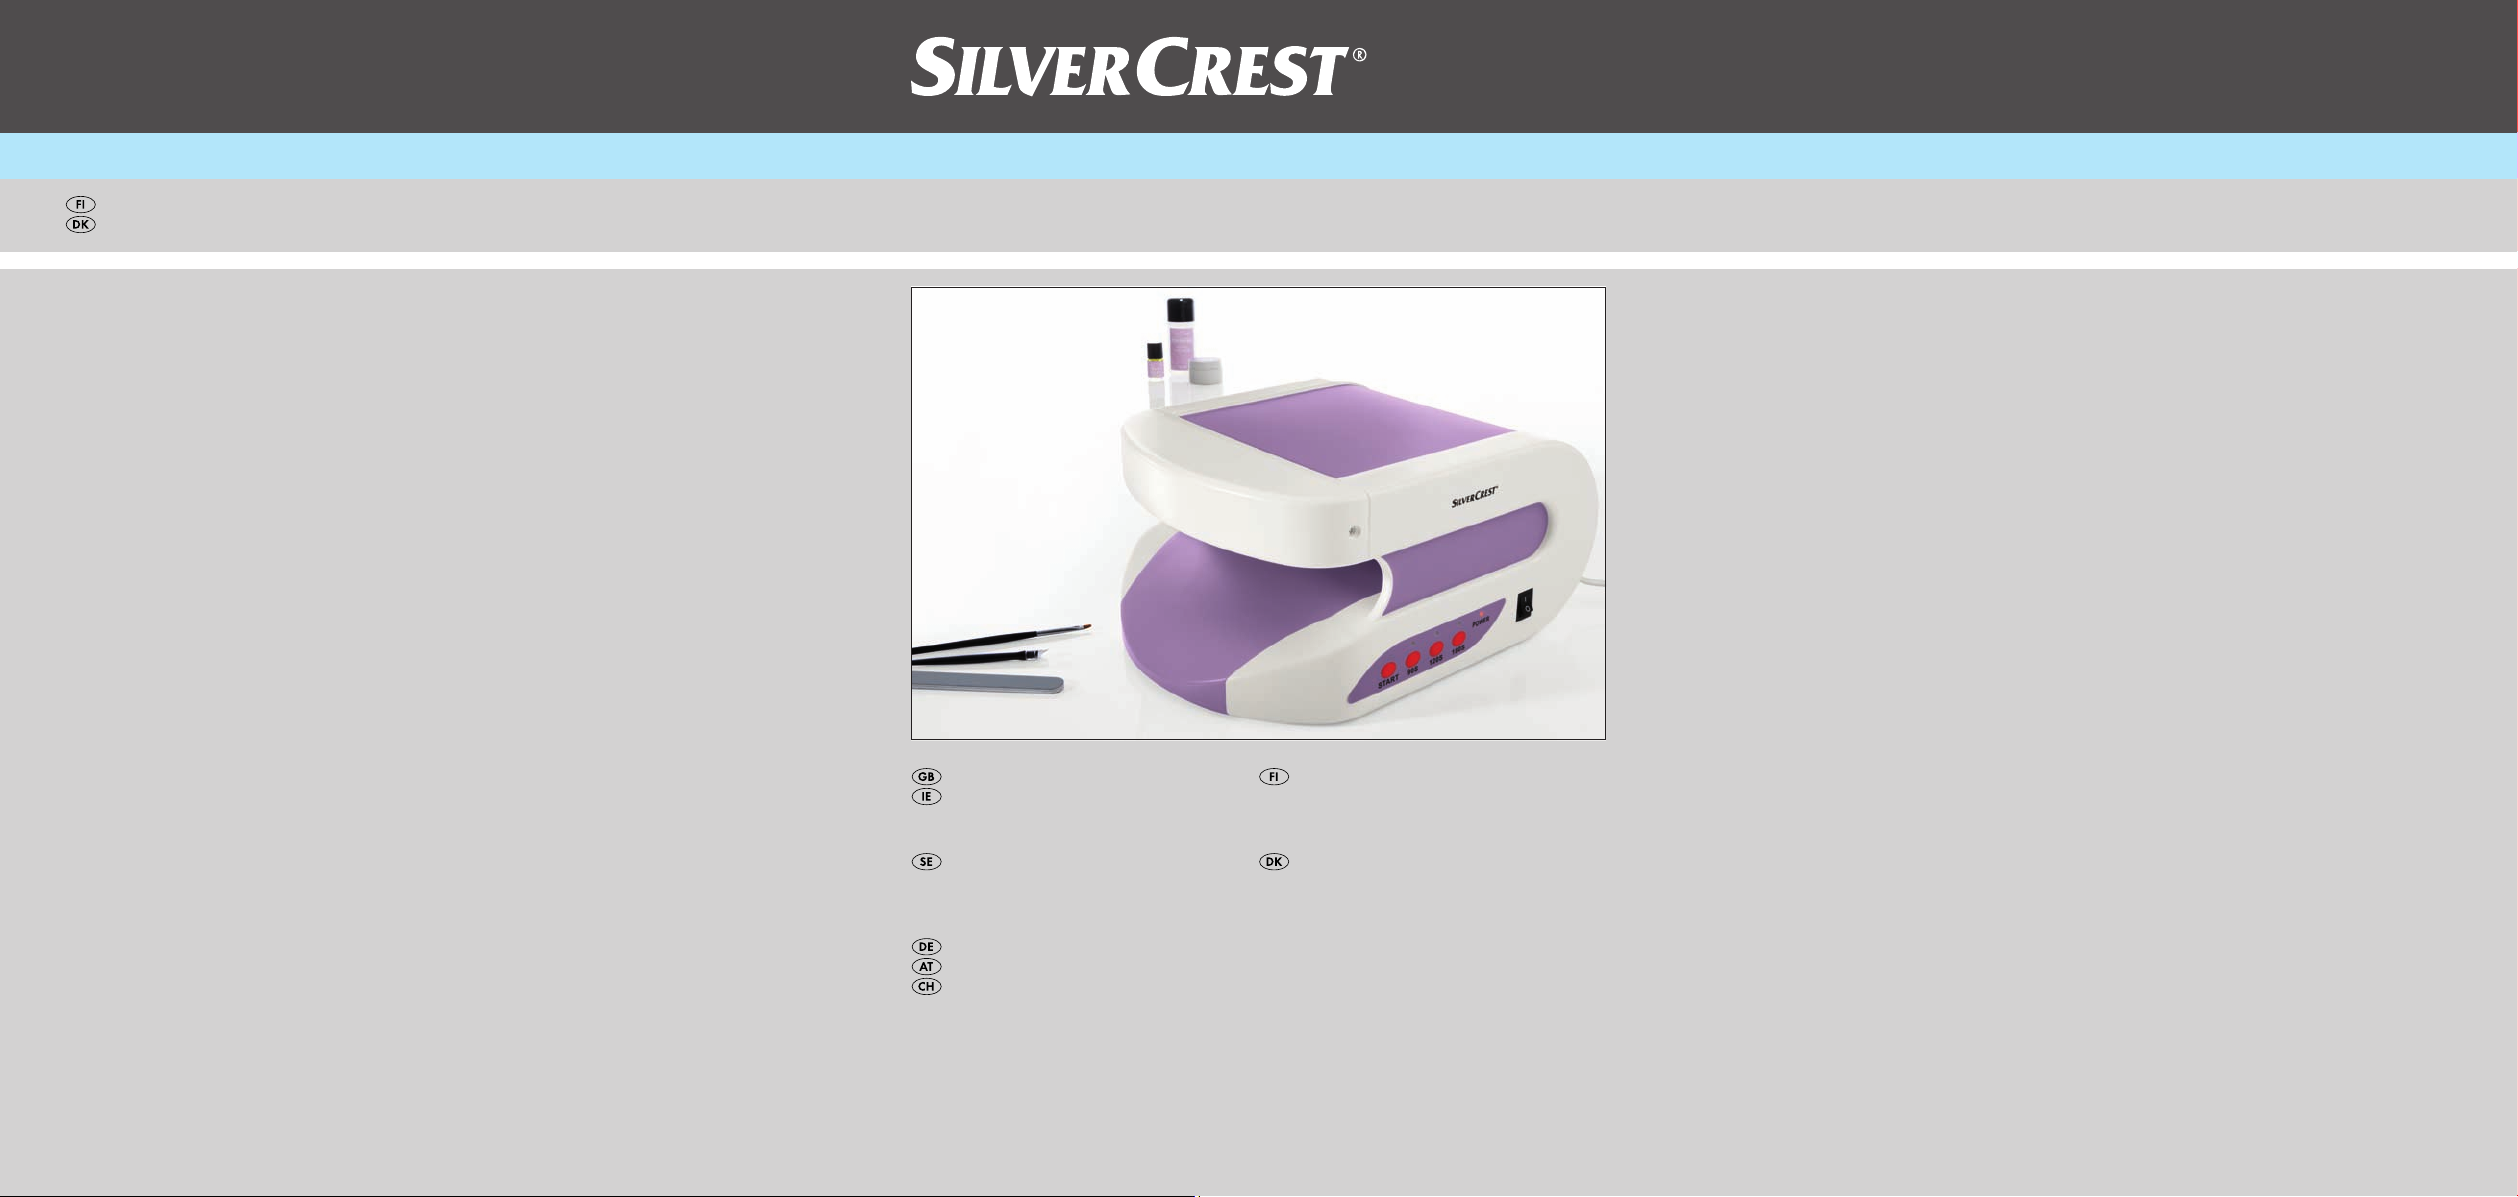
Nail Studio Set SNS 45 A1
KOMPERNASS GMBH
BURGSTRASSE 21 · D-44867 BOCHUM
www.kompernass.com
ID-Nr.: SNS 45 A1-08/10-V4
IAN: 54334
Nail Studio Set
Operating instructions
Nagelstudioset
Bruksanvisning
Nagelstudio-Set
Bedienungsanleitung
Kynsistudio
Käyttöohje
Sæt neglestudie
Betjeningsvejledning
Page 2
SNS 45 A1
1
iu rtz
opas
5
7
90
4
6
8
23
ewq
d
Page 3
Table of Contents
Introduction . . . . . . . . . . . . . .4
Information about these
operating instructions . . . . . . . . . . . . 4
Copyright . . . . . . . . . . . . . . . . . . . . . 4
Limitation of Liability . . . . . . . . . . . . .4
Intended Use . . . . . . . . . . . . . . . . . . 4
Warning Notices . . . . . . . . . . . . . . . 5
Safety . . . . . . . . . . . . . . . . . . .6
Safety instructions . . . . . . . . . . . . . . . 6
Basic safety instructions . . . . . . . . . . 8
Risk of electrical shocks . . . . . . . . . 10
Risks from ultraviolet light
(UV-Light) . . . . . . . . . . . . . . . . . . . .10
Risks from solvent-containing
substances . . . . . . . . . . . . . . . . . . .11
Appliance and
Accessories . . . . . . . . . . . . . .12
Setting up and connecting
to the power supply . . . . . . .13
Safety instructions . . . . . . . . . . . . . .13
Items supplied and initial
inspection . . . . . . . . . . . . . . . . . . . .13
Unpacking . . . . . . . . . . . . . . . . . . .14
Disposal of packaging . . . . . . . . . .14
Requirements for the installation
location . . . . . . . . . . . . . . . . . . . . . .14
Electrical connection . . . . . . . . . . . .15
Handling and operation . . .16
Switching On and Off . . . . . . . . . .16
Functions . . . . . . . . . . . . . . . . . . . . .16
GB
IE
Utilisation . . . . . . . . . . . . . . .17
Selecting artifi cial nails . . . . . . . . . .17
Attaching artifi cial nails . . . . . . . . . 18
Matching a nail set . . . . . . . . . . . . .21
Application of the UV-Gel . . . . . . .22
Hardening of the UV-Gel . . . . . . . .23
Topping up . . . . . . . . . . . . . . . . . . . 25
Removal of artifi cial nails . . . . . . . .25
Care . . . . . . . . . . . . . . . . . . . . . . . .26
Cleaning . . . . . . . . . . . . . . . .27
Safety instructions . . . . . . . . . . . . . .27
Cleaning the appliance . . . . . . . . .27
Cleaning accessories . . . . . . . . . . .27
Exchanging the UV Lamps . . . 28
Troubleshooting . . . . . . . . . .29
Safety instructions . . . . . . . . . . . . . .29
Malfunction causes and remedies . . . . 30
Storage/Disposal . . . . . . . . .31
Storage . . . . . . . . . . . . . . . . . . . . . . 31
Disposing of the appliance . . . . . . .31
Appendix . . . . . . . . . . . . . . .32
Notes on the EC Declaration
of Conformity . . . . . . . . . . . . . . . . .32
Technical data . . . . . . . . . . . . . . . .32
Warranty . . . . . . . . . . . . . . . . . . . .33
Service . . . . . . . . . . . . . . . . . . . . . . 33
Importer . . . . . . . . . . . . . . . . . . . . .34
SNS 45 A1
3
Page 4
GB
IE
Introduction
Information about these operating instructions
These operating instructions are a component of the Nail Studio SNS 45 A1 (hereafter designated as the appliance) and they provide you with important information about the intended use, safety, connection and operation of the appliance.
These operating instructions must be constantly kept available close to the appliance. They are to be read and applied by everyone assigned to operate the
appliance and to eliminate faults in it.
Retain these operating instructions and pass them on, together with the appliance,
to a possible future owner.
Copyright
This documentation is copyright protected.
Any copying or reproduction, including as extracts, as well as the reproduction of
images, also in an altered state, is only permitted with the written authorisation of
the manufacturer.
Limitation of Liability
The manufacturer assumes no responsibility for damage caused by failure to observe these instructions, improper use, incompetent repairs, making unauthorised
changes or for using unapproved replacement parts.
Intended Use
This appliance is intended only for the application and fi xating of artifi cial fi nger
nails for manicure purposes in indoor areas and is only for domestic use. This
appliance is not intended for any other use or for uses beyond those mentioned
here.
WARNING
Risks from unintended use!
Risks can be engendered by the appliance if it is used for unintended
purposes and/or other types of use.
Use the appliance exclusively for intended purposes. ►
Observe the procedures described in these operating instructions. ►
4
SNS 45 A1
Page 5
Claims of any kind resulting from damage caused by improper use, incompetent
repairs, unauthorized modifi cations or the use of non-approved spare parts will
not be acknowledged.
The operator alone bears liability.
Warning Notices
In the existing operation instructions the following warnings are used:
DANGER
A warning at this risk level indicates a threateningly dangerous
situation.
If the dangerous situation is not av
injuries.
Observe the directives in this warning notice to avoid the risk of deaths or ►
serious physical injuries.
WARNING
A warning at this risk level indicates a possibly dangerous
situation.
If the dangerous situation is not avoided, this could lead to personal injury.
Follow the instructions in this warning to avoid personal injuries. ►
GB
IE
oided it could lead to death or serious physical
SNS 45 A1
IMPORTANT
A warning at this risk level signifi es possible pr
If the situation is not avoided it can lead to property damage.
The directives in this warning are there to avoid property damage. ►
NOTICE
A notice signifi es additional information that assists in the handling of the ►
appliance.
operty damage.
5
Page 6
GB
IE
Safety
This appliance complies with the statutory safety regulations.
Incorrect usage can, however, lead to personal and property damage.
Safety instructions
WARNING - RISK OF INJURY!
UV appliances may not be used by:
People who suff er from skin cancer or are predisposed to it, ►
People, who are taking light-sensitivity enhancing drugs, ►
People under 18 years of age, ►
People with a tendency towards freckles, ►
People with a naturally red hair colour, ►
People with unusual skin discolourations, ►
People with more than 16 moles (with a minimum diameter of 2 mm) on ►
their body,
People with atypical moles (atypical moles are asymmetrical moles with ►
a diameter of more than 5 mm and diff erent pigmentation plus irregular
border ar
People who are suff ering from sunburn, ►
People who do not tan in the sun without skin burns, ►
People who quickly suff er from skin burns in direct sunlight, ►
People who have frequently suff ered from a severe sunburn during their ►
childhood,
People who suff
susceptible to skin cancer,
People with a fi rst-degree relative who is suff ering or has already suff ered ►
from a melanoma (skin cancer),
People who, due to a light sensitivit
treatment,
People who absolutely cannot tan at all, or who cannot tan without getting ►
sunburned, when they are exposed to the sun,
People who are easily sunburned when they are exposed to the sun, ►
during pregnancy. ►
eas; if in doubt, consult your doctor),
er from skin cancer or are suff ering from this disease or are ►
y ailment, are in physicianly or medical ►
6
SNS 45 A1
Page 7
The irradiation should not exceed the minimal erythema dose (MED). If ery- ■
thema (skin redness) occurs several hours after irradiation there should be no
further applications made. In this case, the next irradiation should not take
place before one week after the date of the skin redness.
If unexpected side eff ects such as itching occur within 48 hours after the fi rst ■
application of the UV appliance, you should consult a doctor before receiving
ther UV irr
fur
Recommended irradiation timetable, stating the time-period and intervals. ■
The appliance may not be used if the timer is not working properly. ■
Use only lamps of the specifi ed type. The use of a UV lamp from another manu- ■
facturer or of a diff erent type will lead to the revocation of the warranty.
UV r
damage, which may be irreversible. These biological eff ects depend on the
quality and quantit
individual person.
The skin can suff er from sunburn after excessive exposure to radiation. Too ■
frequent UV radiation from the sun or UV appliances can lead to premature
skin aging and cause an increased risk of skin cancer
increasingly cumulative UV exposures. UV radiation at a young age increases
the subsequent risk of skin cancer.
UV radiation can lead to injuries to the eyes and skin, such as premature skin ■
aging and even skin cancer. Read these operating instructions carefully. Some
medications or cosmetics increase the sensitivit
The unprotected eye can suff er superfi cial infl ammation and, in some cases, ■
excessive exposure may cause damage to the retina. Frequently repeated
exposur
In the event of individually identifi ed sensitivity or allergic reactions to UV radia- ■
tion, you should fi
Certain ailments or the side eff ects of certain drugs may be exacerbated by ■
UV irradiation. If in doubt, consult your doctor.
There should be a period of at least 48 hour
adiation.
adiation fr
om the sun or from UV appliances can cause both skin and eye ■
y of the radiation and on the skin and eye sensitivity of the
es can lead to cataracts.
rst seek medical advice before beginning the irradiation.
. This risk increases with
y to UV radiation.
s between the fi rst two exposures. ■
GB
IE
SNS 45 A1
7
Page 8
GB
IE
Avoid sunbathing and use of the appliance on the same day. This could lead ■
to skin irritation.
Pay heed to the instructions on the irradiation time, time intervals for the ir- ■
radiation and the distance to be from the lamp. If you do not, it could lead to
skin irritation.
Consult your doctor if per
come about or sores develop.
Protect sensitiv
irradiation.
Do not carry out mor
irritation.
Remo
ve cosmetics and sun care products before using the appliance. If you ■
do not, it could lead to skin irritation.
NOTICE
If in any doubt, consult your doctor about the possible applications before ►
using the appliance.
e skin areas, such as scars, tattoos and the genitals, from ■
Basic safety instructions
The power cable on this appliance cannot be replaced. In the event of it being ■
damaged the whole appliance must be disposed of.
A repair to the appliance during the warranty period may only be carried out ■
by a customer service fi rm authorised by the manufacturer, otherwise no
additional warr
anty claims can be considered for subsequent damages.
sistent tumours or ulcers form, or changes in moles ■
e than 5 treatments per day. This could lead to skin ■
ATTENTION - PROPERTY DAMAGE
Protect the appliance from moisture and the penetration of liquids. ►
NEVER immerse the appliance in water or place the appliance in the close
vicinity of w
onto the appliance.
Do not place any objects on the appliance. ►
Do not operate the appliance close to open fl ames (e.g. candles). ►
Avoid direct solar radiation. ►
Always pull the plug itself out of the mains power socket, do not pull it with ►
the power cable.
In the case of a malfunction occurring or a thunderstorm, disconnect the ►
plug fr
8
ater and DO NOT place objects fi lled with liquids (e..g. vases)
om the mains power socket.
SNS 45 A1
Page 9
WARNING - RISK OF INJURY
Before use check the appliance for visible external damage. Do not put ►
into operation an appliance that is damaged or has been dropped.
This appliance is not intended for use by individuals with r
physiological or intellectual abilities or defi ciences in experience and/or
knowledge unless the
safety or receive from this person instruction in how the appliance is to be
used.
Children should be supervised to ensure that they do not play with the ►
appliance.
er look directly into the UV lamps. It could cause injury to the eyes! ►
Nev
Always keep the appliance and all accessories out of the reach of children. ►
Pay heed to the instructions given on the containers of all substances used. ►
Repairs should only be carried out by authorised specialist companies or by ►
the Customer Service Department. Incorrect repairs can result in signifi cant
ks for the user. In addition, warranty claims become void.
ris
Defective components may only be replaced with original replacement parts. ►
Only by using these replacement parts can it be guaranteed that they
comply with the safety requirements.
y are supervised by a person responsible for their
estricted physical, ►
GB
IE
SNS 45 A1
9
Page 10
GB
IE
Risk of electrical shocks
DANGER
Potentially fatal risk of electrical shocks!
Upon cont
potentially fatal risk!
Pay heed to the following safety information to avoid a potentially fatal risk
from electrical power:
The power cable on this appliance cannot be replaced. In the event of it ►
being damaged the appliance must be disposed of.
Do not instal the appliance in the bathroom. ►
Connect the appliance e
Do not touch the appliance and the plug with wet hands. ►
NEVER place the appliance in water. ►
Do NOT open the housing of the appliance (except when changing the UV ►
lamps). If live connections are touched and/or the electrical or mechanical
construction is altered, ther
act with live wires or live components there is a
xclusively to a correctly fused mains power socket. ►
e will be an increased risk of electric shock.
Risks from ultraviolet light (UV-Light)
WARNING
Risk of injury from ultraviolet light (UV-Light)!
Looking directly into the UV light from the UV lamps in this appliance can
cause eye injuries and diminish the power of your vision!
NEVER look directly into the ultraviolet light from the UV lamps. ►
If the UV lamps are not in use, switch them off . ►
Non-users, and especially children, may not be present during the opera- ►
tion of the appliance.
10
SNS 45 A1
Page 11
Risks from solvent-containing substances
WARNING
Risks of damage to health from solvent-containing
substances and vapours!
The inhalation of solvent-containing substances and vapours can damage your
health!
Do not breathe in the vapours from solvent-containing substances (e.g. ►
acetone).
Ensure ther
substances.
Pay heed to the instructions on the containers of the solvent-containing ►
substances.
WARNING
Risks of health damage from chemical substances!
The improper handling of chemical substances can lead to serious health
damage!
If swallowed, IMMEDIATELY seek medical attention! ►
In cases of allergic reactions, consult a doctor immediately! ►
In the event of contact with the eyes or mucous membranes, contact a doctor ►
immediately!
e is adequate ventilation when interacting with solvent-containing ►
GB
IE
SNS 45 A1
11
Page 12
GB
IE
Appliance and Accessories
NOTICE
See in addition the illustrations on the fold-out side. ►
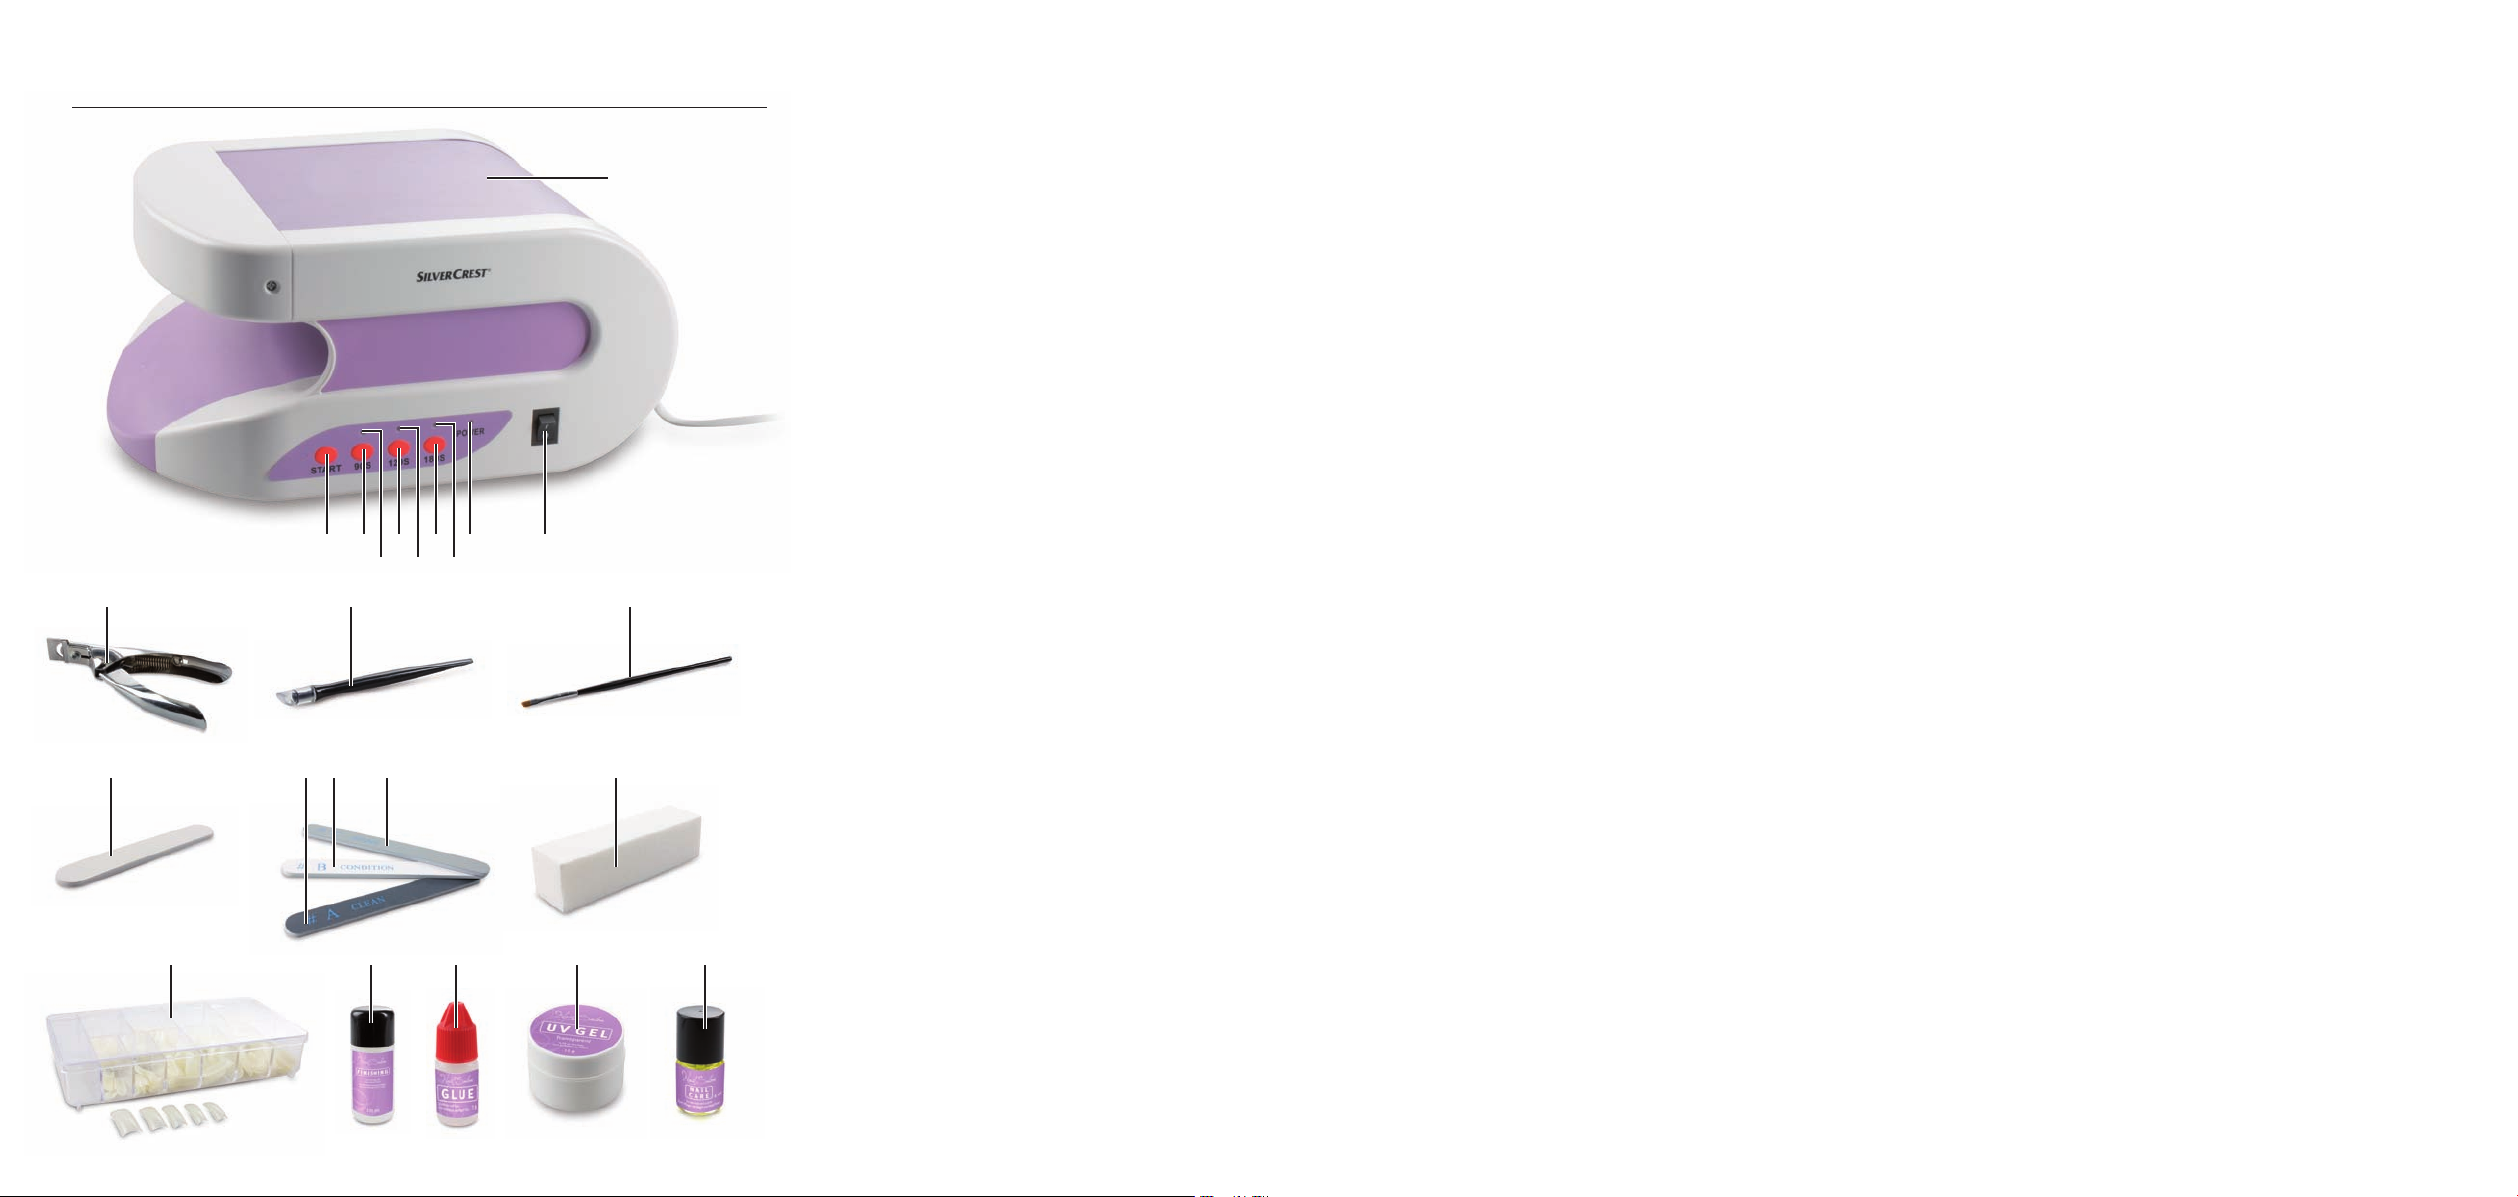
1 UV appliance with 4 built-in UV lamps
On/Off switch
2
3 Operating indicator "POWER"/Standby
4 Operating indicator "180 seconds"
5 Time preselect button "180 seconds"
6 Operating indicator "120 seconds"
7 Time preselect button "120 seconds"
8 Operating indicator "90 seconds"
9 Time preselect button "90 seconds"
0 Start button
q Nail clippers (for clipping the nail-tips)
w Cuticle pusher (to push back the cuticle)
e Brush (for applying the UV Gel)
r Sanding block (for smoothing of unevenness)
t Polishing fi le fi ne (for polishing the nails "shine")
z Polishing fi le medium (for polishing the nails "condition")
u Polishing fi le coarse (for polishing the nails "clean")
i Sand sheet fi le (for fi ling nails)
o Nail Tips (artifi cial fi nger nails)
p Finishing solution (for fi nal treatment and for cleaning brushes)
a Nail Glue (to glue the nail tips on "GLUE")
s UV Gel (for topping up nails)
d Nail Oil (for care of the nails and cuticles "NAIL CARE")
12
SNS 45 A1
Page 13
Setting up and connecting to the power supply
Safety instructions
WARNING
During the commissioning of the appliance personal injury and
property damage could occur!
Observe the following safety information to avoid these risks:
Packaging material should not be used as a play thing. There is a risk of ►
suff ocation.
To av
oid damage to people and property, pay heed to the requirements ►
for the installation site and the electrical connection of the appliance.
Items supplied and initial inspection
The appliance is supplied with the following components as standard:
UV appliance with 4 UV lamps and mains power cable ●
Polishing fi les, one each of coarse, medium and fi ne ●
Sand sheet fi le ●
Sanding block ●
Nail Tips ●
Cuticle pusher ●
Brush ●
Nail clippers ●
2 Pots of UV Gel ("UV Gel") ●
Finishing solution ("Finishing") ●
2 Bottles of Nail Glue ("Glue") ●
Nail Oil ("Nail Care") ●
Storage bag ●
Operating Instructions ●
GB
IE
SNS 45 A1
NOTICE
Check the contents to ensure everything has been provided, and for signs ►
of visible damage.
If the contents are incomplete, or hav
packaging or transportation, contact the Service Hotline (see chapter
Service
).
e been damaged due to defective ►
13
Page 14
GB
IE
Unpacking
Remove all parts of the appliance and these operating instructions from the
box.
Remove all packing material.
Disposal of packaging
The packaging protects the appliance against transport damage. The packaging
materials are selected from the point of view of their environmental friendliness
and disposal technology and are therefore recyclable.
The recirculation of packaging into the material circuit saves on raw material and
reduces generated waste. Dispose of packaging material that is no longer needed
according to the regionally established regulations.
NOTICE
If possible preserve the appliance's original packaging during the warranty ►
period so that, in the event of a warranty claim, you can package the
appliance properly for its r
eturn.
Requirements for the installation location
For the safe and trouble-free operation of the appliance the following requirements
must be met at the installation location:
Place the appliance on a dry, fl at and fi rm surface. ■
Do not place the appliance in a damp environment and not in an area at risk ■
from spraywater.
Do not place the appliance adjacent to a radiator or a r
The mains power socket must be easily accessible, so that the plug can be ■
easily removed in an emergency.
aiation heater. ■
14
SNS 45 A1
Page 15
Electrical connection
DANGER
Potentially fatal risk of electrical shocks!
Upon cont
potentially fatal risk!
Pay heed to the following safety information to avoid risks from electrical
power:
Do not operate the appliance if the plug or the power cable are damaged. ►
Connect the appliance exclusively to a correctly fused mains power socket. ►
Do not touch the appliance and the plug with wet hands. ►
Avoid water contact with the appliance. ►
DO NOT open the housing of this appliance. If live connections are ►
touched and/or the electrical or mechanical construction is altered, ther
will be an increased risk of electric shock.
Before you connect the appliance, compare the connection data (voltage and
frequency) on the typeplate of the appliance with that for the intended power
source. his data must match, in or
Ensure that the power cable of the appliance is not damaged and that it is not
laid over hot surfaces and/or sharp edges.
Ensure that the po
Do not let the power cable hang over edges (trip wire eff ect).
Insert the plug into the mains power socket.
act with live wires or live components there is a
GB
IE
e
der to avoid any damage to the appliance.
wer cable is not over-taut or kinked.
SNS 45 A1
15
Page 16
GB
IE
Handling and operation
In this chapter you receive important information for the handling and operation
of the appliance.
NOTICE
See also the chapter ► Appliance and Accessories.
Switching On and Off
Switch the UV appliance 1 on by pressing the On/Off switch 2 to the
position "I". The operating indicator 3 lights up and the appliance is ready
for use.
Switch the UV appliance 1 off by pressing the On/Off switch 2 to the posi-
tion "0". The oper
Functions
Three diff erent treatment times can be set on the appliance:
90 seconds (Button ■ 9)
120 seconds (Button ■ 7)
180 seconds (Button ■ 5)
ating indicator 3 extinguishes.
16
Switch the UV lamps on b
Select the desired tr
button 9, 7 or 5.
NOTICE
The UV lamps switch off automatically after the lapse of the preset time. ►
Press the time preselect button 9, 7 or 5 and the Start button
again as described above for any further treatments.
eatment time and then press the appropriate time preselect
essing the Start button 0.
y pr
0 once
SNS 45 A1
Page 17
Utilisation
IMPORTANT
Risk of property damage from glue and UV gel.
Nail glue a and UV Gel s can only be remo
surfaces, clothing and carpets.
Cover these work areas with paper or with a hand towel prior to use. ►
NOTICE
Place the UV appliance ► 1 on a covered and stable surface.
NEVER place the nail glue ► a
UV appliance 1.
NEVER subject the nail glue ► a and the UV Gel s to direct sunlight.
Selecting artifi cial nails
NOTICE
For the fi rst applications it may be helpful to be assisted by an experienced ►
person.
Before the application, r
Clean and dry your hands before the application. We recommend that the ►
hands are washed about 15 - 20 minutes before the application, so that
there will be no residual moisture on the nails.
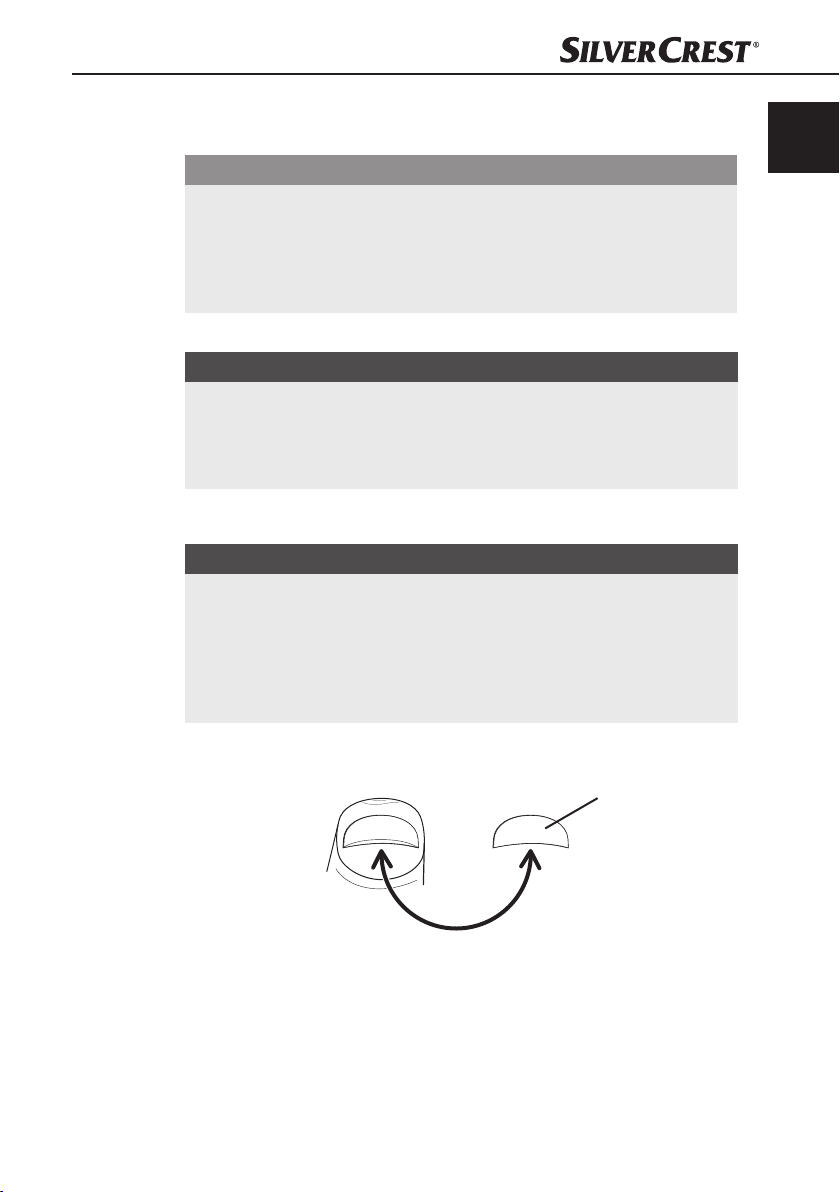
Select a nail tip o whose curv
natural curve of your nail.
GB
IE
ved with diffi culty from furniture
and the UV Gel s in the close vicinity of the
emove all jewelry on the hands. ►
ature corresponds as closely as possible to the
o
SNS 45 A1
Select a nail tip o which closes exactly at the edge of your natural nail and
whereby the sides are parallel to your natural nail.
17
Page 18
GB
IE
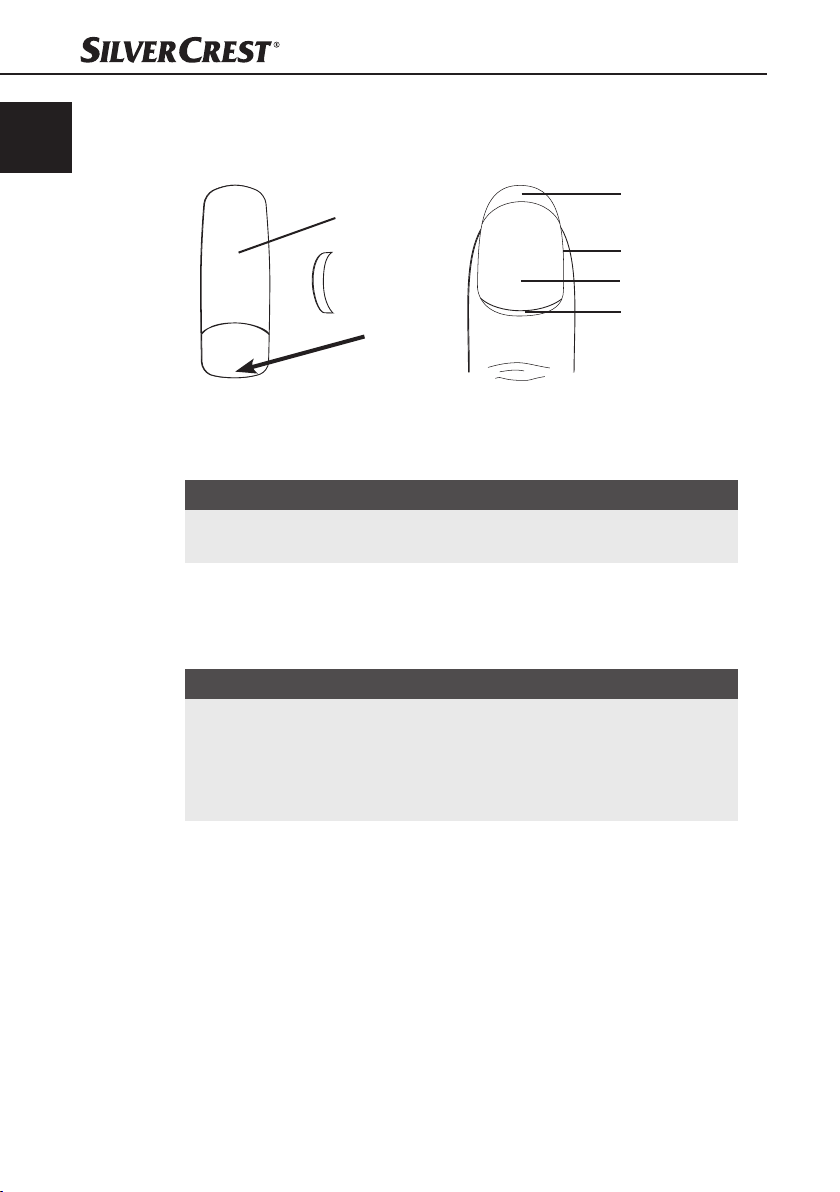
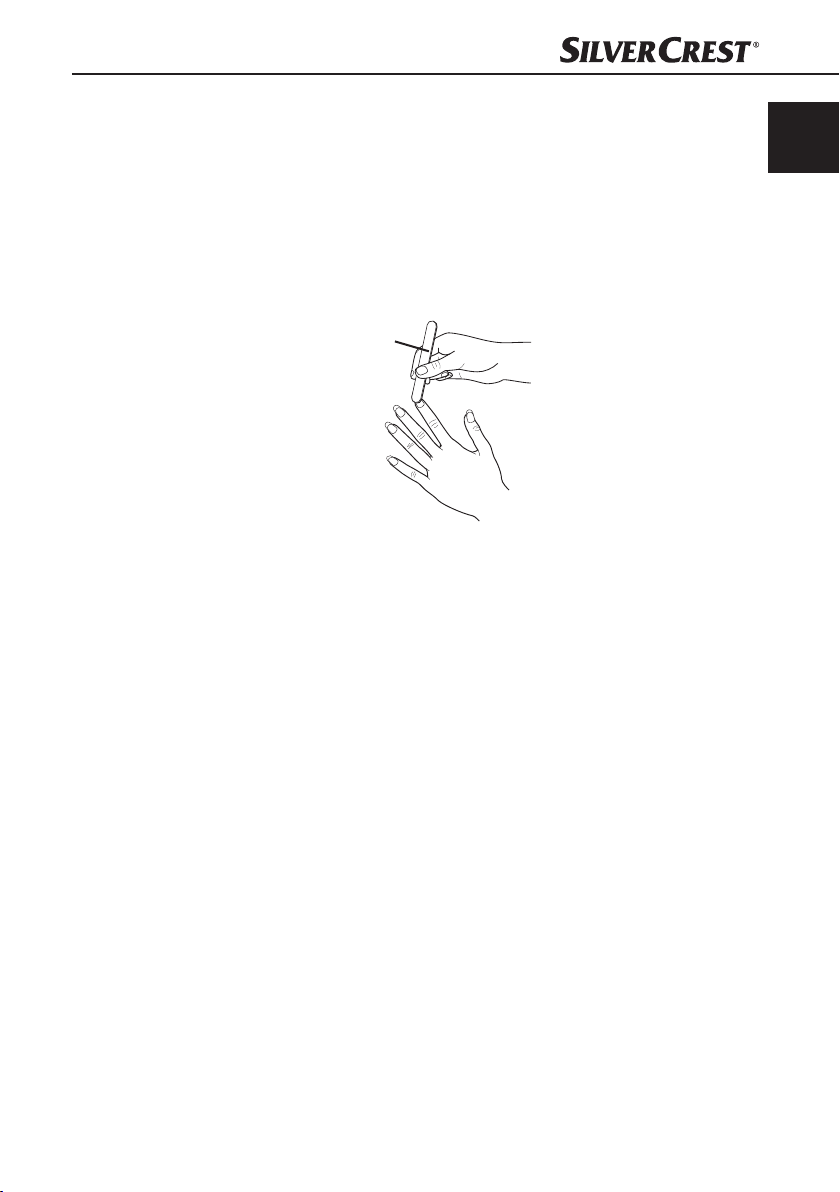
If necessary, using the nail clippers q trim off the end of the nail tip o so that
the end point (arrow) is covering about a third of your natural nail.
o
Free edge Nail bed
Nail plate Cuticle
NOTICE
If you use a too small nail tip ► o, it can break off more easily. Therefore,
select a lar
Repeat the above described process until you have trimmed all the nails to
the desired length and fi led them into shape.
ger nail tip o and then fi le the sides into the desired form.
Attaching artifi cial nails
NOTICE
Take note that nails absorb moisture from contact with water. The nails, ►
however, must be completely dry before the application.
Before the application, r
because, to make possible the optimal adhesion of the nail tips o the nail
surfaces must be completely fr
Push the cuticle back with the cuticle pusher w and then remo
parent skin from the nail plate of your fi nger.
Now treat the nail surface with the sanding block r until the fi ngernail is no
longer shin
Remove the sanding dust with a paper towel.
Rub the nails with the fi nishing solution p so that the last r
and gr
y.
ease are removed.
efrain from using any hand creams or the like, ►
ee from greases.
ve the trans-
emnants of dust
18
SNS 45 A1
Page 19
NOTICE
Under no circumstance should you now touch the nail surfaces with your ►
fi ngers, if you do, they will become greasy again and this will prevent a
good bonding!
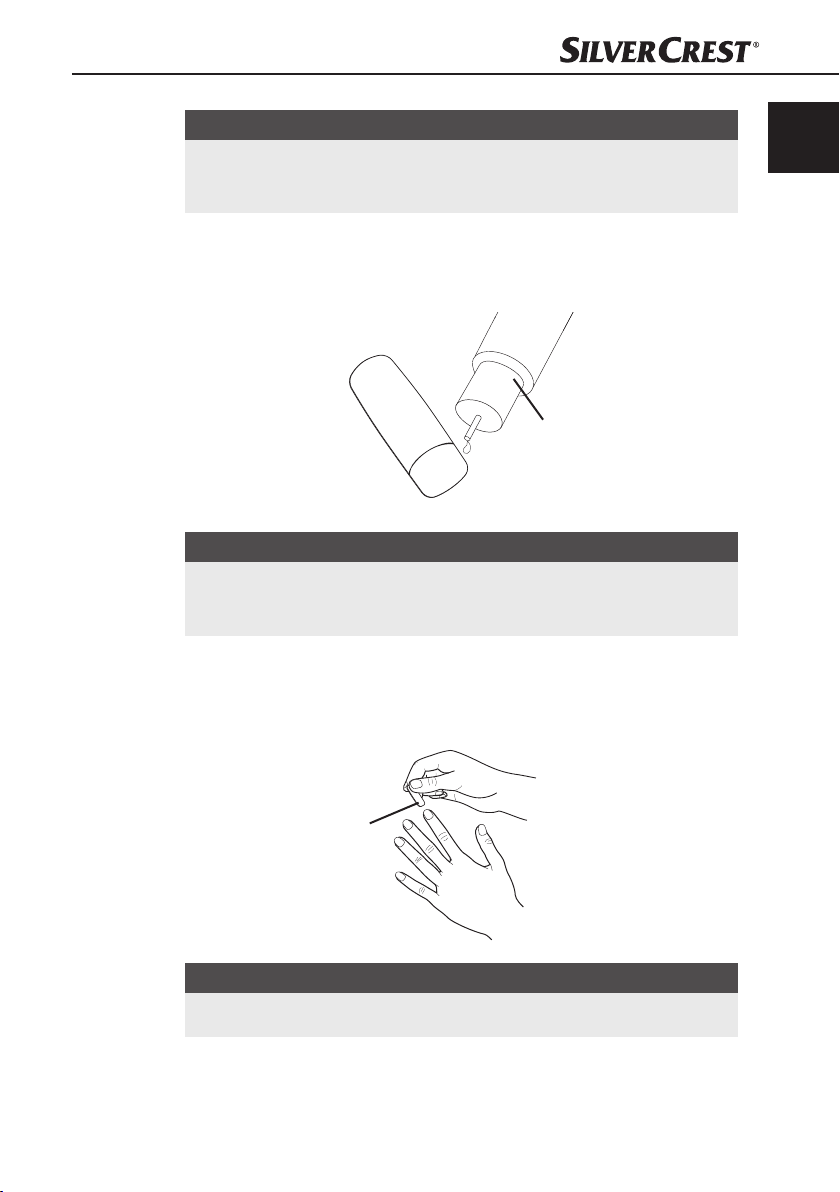
Apply a small drop of nail glue a
distribute it with the aid of the nail glue bottle a
the nail tip o down so that the nail glue a cannot run onto the upper part
of the nail tip o.
NOTICE
Before the fi rst use you must puncture the bottle of nail glue ► a with a
pointed object, such as a needle. If, at a later date, the bottle of nail glue
a has become blocked, it can again be opened for use with a needle.
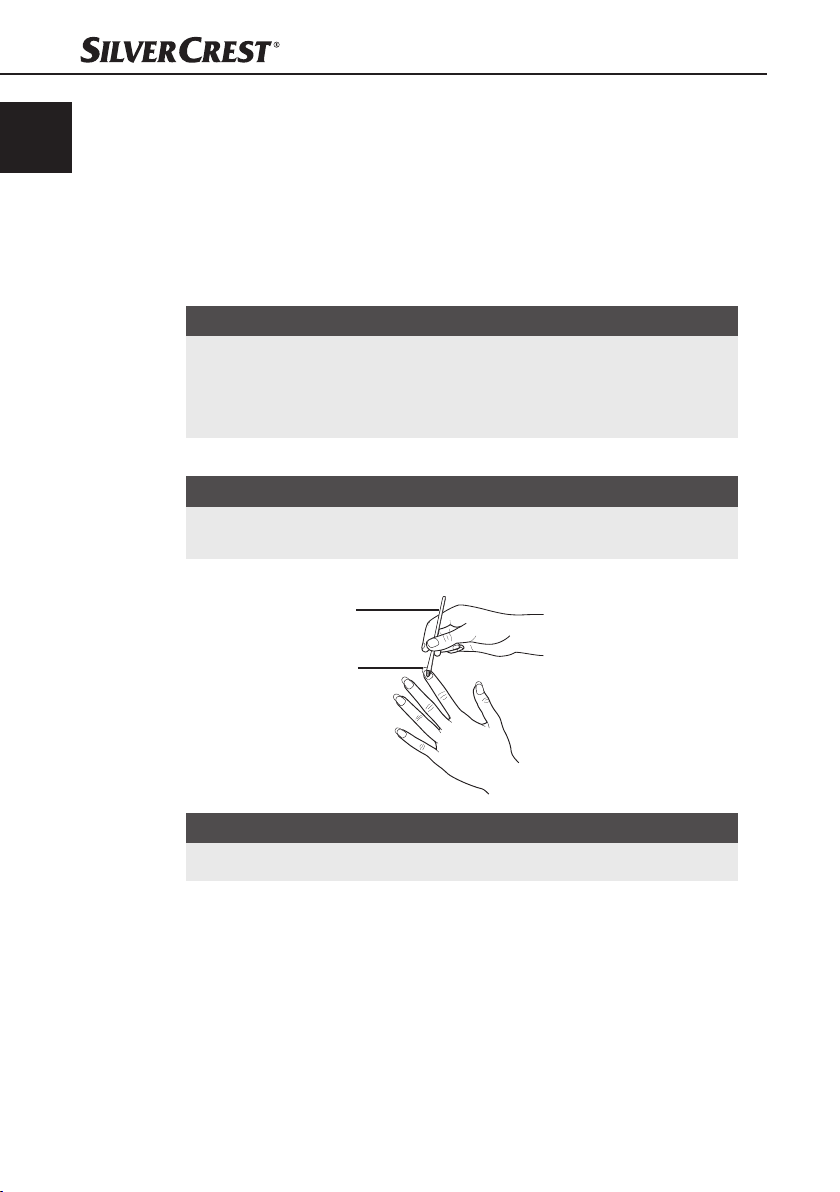
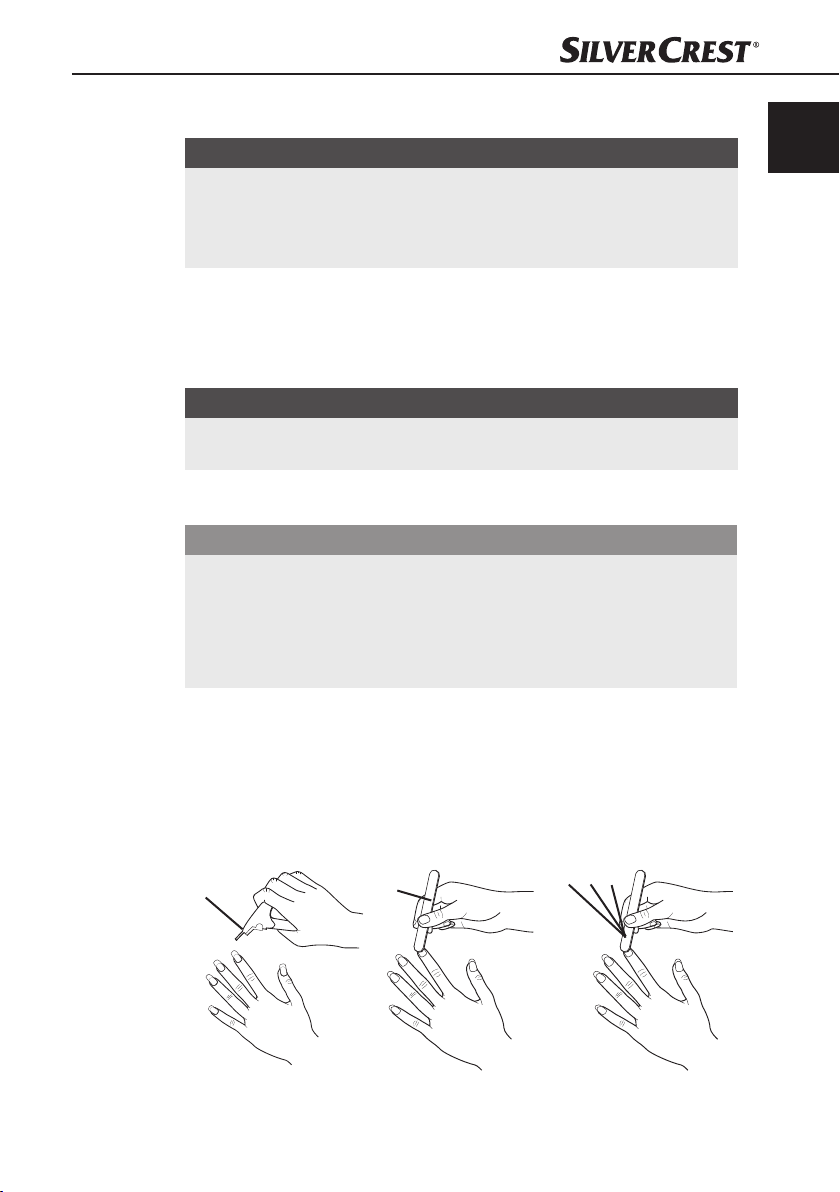
w place the nail tip o at an angle on the natural nail, so that the predeter-
No
mined edge of the nail tip o lies on the edge of the natural nail.
Now tilt the nail tip o with gentle pressur
tential air bubbles are squeezed out .
to the lower part of the nail tip o and
on the lower surface. Hold
a
e onto the natural nail, so that po-
GB
IE
SNS 45 A1
o
NOTICE
Wipe excess nail glue ► a off with a cotton swab or a paper towel.
19
Page 20
GB
IE
Hold the nail tip o fi rmly for 10-12 seconds and, at the same time, press it
down with suffi cient pressure onto the natural nail. Ensure that no air bubbles
are formed and that the tip is glued on perfectly straight.
NOTICE
There may no longer be a gap under the nail, so that dirt cannot penetrate. ►
Ensure that no air bubbles or white spots form under the nail tip ► o. In this
case, take the nail tip
When you have glued all of the artifi cial nails o on, trim them to the desired
length with the nail clipper
squeeze. If you press too slowly, it may happen that the nail tips o splitter.
File them into shape with the sand sheet fi le i.
NOTICE
File very carefully, because the nail tips ► o are held only with a nail glue a.
ou are not used to long nails, cut them back a little in order to avoid ►
If y
knocks and the falling off of the nail tips o.
o off immediately and lay it back on again.
s q. Press the nail clippers q together in one
q
20
SNS 45 A1
Page 21
Matching a nail set
Carefully fi le the transitions from the artifi cial nails o to the natural nails with
the Sand sheet fi le i until they conform to the contour of the natural nail. File
only the nail tips o! Do not damage your natural nail.
Carefullly fi le the sides of the nail with the Sand sheet fi le i until it is str
and does not e
Repeat this step for each individual nail.
Remove the sanding dust with a paper towel.
GB
IE
aight
xhibit a "wing".
i
SNS 45 A1
21
Page 22
GB
IE
Application of the UV-Gel
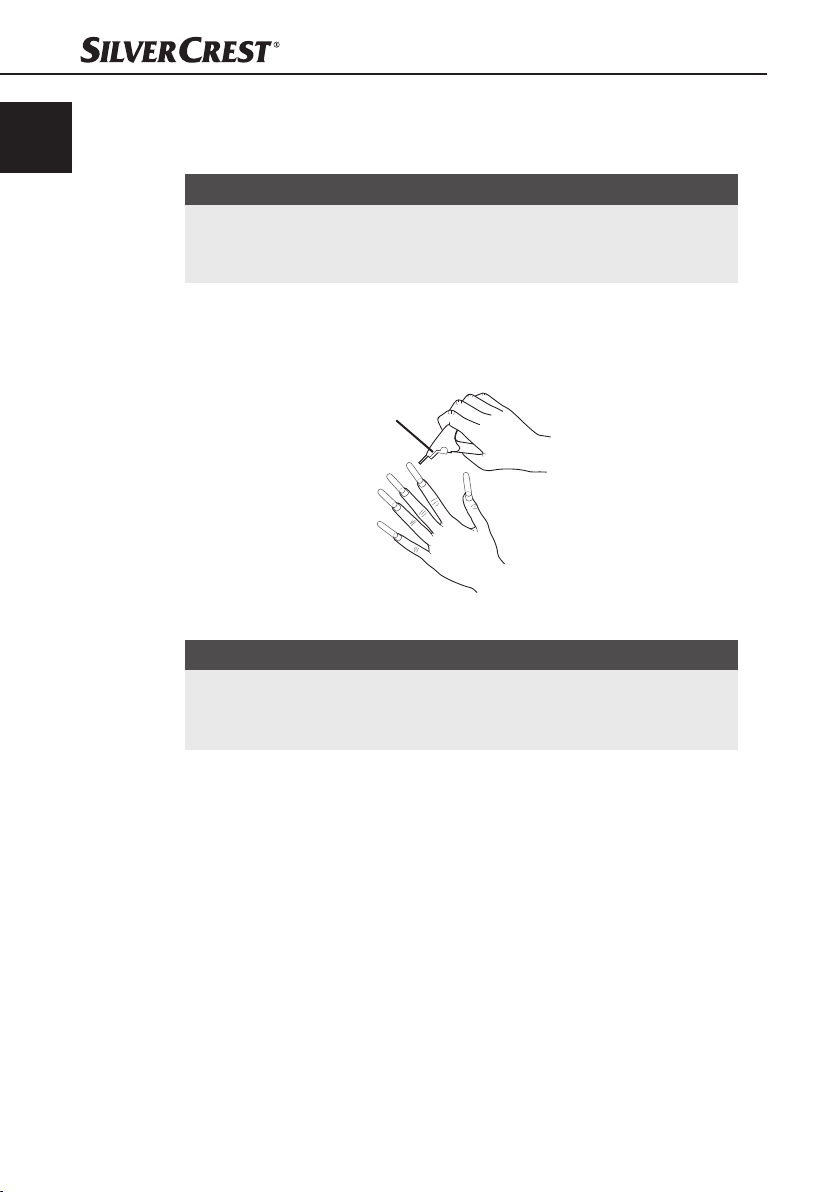
Using the brush e, take a small amount of UV Gel s and then wipe the
excess on one side of the brush e off on the edge the UV Gel pot.
Apply a thin coating of UV-Gel s onto the complete nail. Apply a little more
UV Gel
s to the lower part of the nail, as hereby is how the off set between
the natural and the artifi cial nail is created. Furthermore, the transition from
natural to artifi cial nails is especially sensitive to pressure and knocks, thus
more UV Gel s must be applied here.
INFORMATION
When you are doing the application do not press too heavily on the brush ► e,
since the brush e could otherwise cause str
Model the fi rst layer of the UV Gel ► s very carefully, as this determines the
e shape of the nail. Model the best possible natural nail shape.
futur
Maintain a distance of about 1 mm from the cuticle during the application.
NOTICE
Should any UV Gel ► s inadvertantly come onto the cuticle or the nail bed,
emove it before the hardening, for example, with a cotton wool swab.
r
Repeat the above process for all nails.
e
o
eaking.
22
NOTICE
Ensure that the nail is covered evenly with UV Gel ► s.
SNS 45 A1
Page 23
Hardening of the UV-Gel
NOTICE
See also the chapter ► Handling and operation.
GB
IE
Switch the UV appliance 1 on with the On/Off
Press the Start button 0; the UV Lamps will be switched on.
Now select the desir
preselect button 9, 7 or 5. For the fi
setting of 180 seconds.
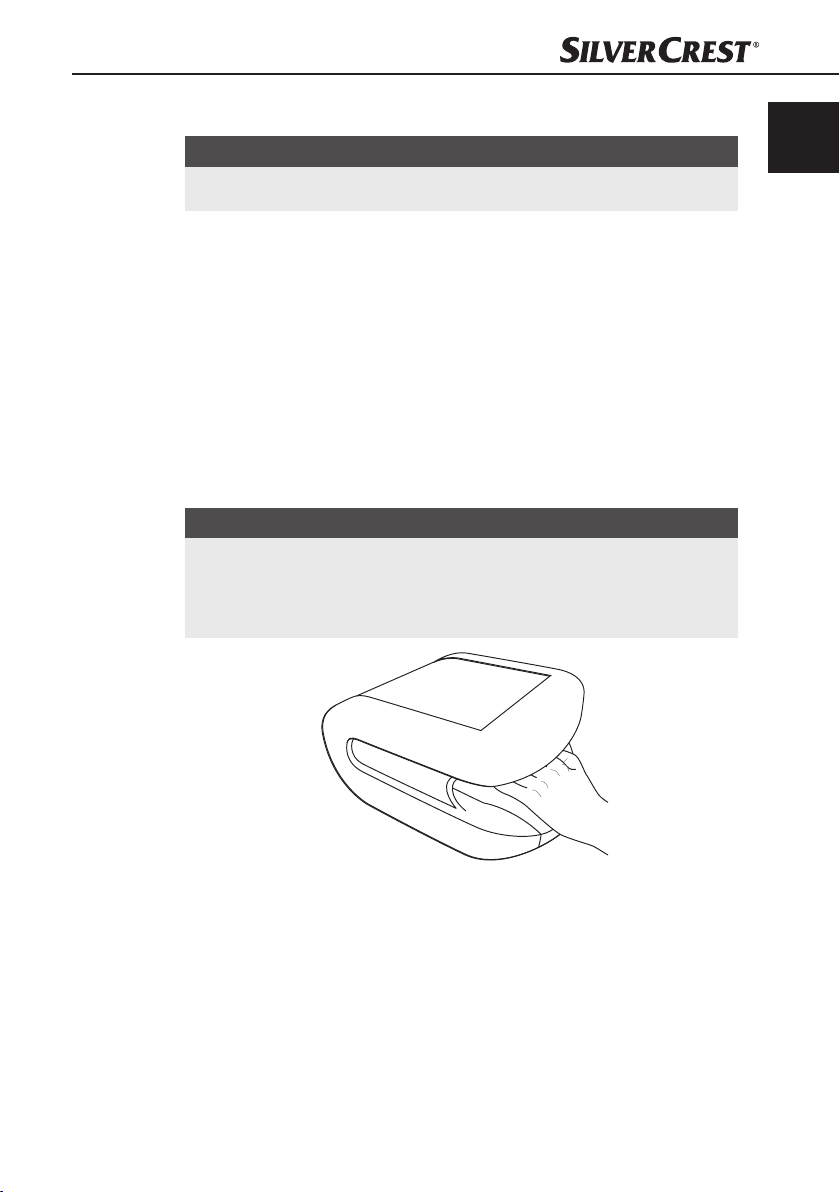
Hold your hand with the nails upward for the duration of the set treatment
time in the opening of the UV appliance 1.
Tr
eat the thumbnail separately because, when you hold your hand in the UV
unit, the UV light only shines on the side of it.
Repeat the application of the UV Gel s
ance
1 as described above once more.
NOTICE
After the expiry of the preselected treatment time the UV lamps are switched ►
off automatically.
The Start button ► 0 and a time preselect button (9,
vated again for each new treatment.
ed treatment time and then press the appropriate time
rst hardening we recommend the time
switch 2.
and the hardening in the UV appli-
7 or 5) must be acti-
SNS 45 A1
Examine each nail, after the application and hardening of all coatings, for
unevenness, small scratches or ridges.
If you discover unevenness, apply a further thin layer of UV Gel s and
harden the nail with the setting of 120 seconds or 90 seconds (depending
on the amount of applied UV Gel
s).
23
Page 24
GB
IE
Even after the last hardening of the Gel layer, the nails may feel a feel sticky
("sweat-layer" or polymerization layer).
Moisten a cottonwool ball or paper towel with fi nishing solution p and wipe
er the nail.
it ov
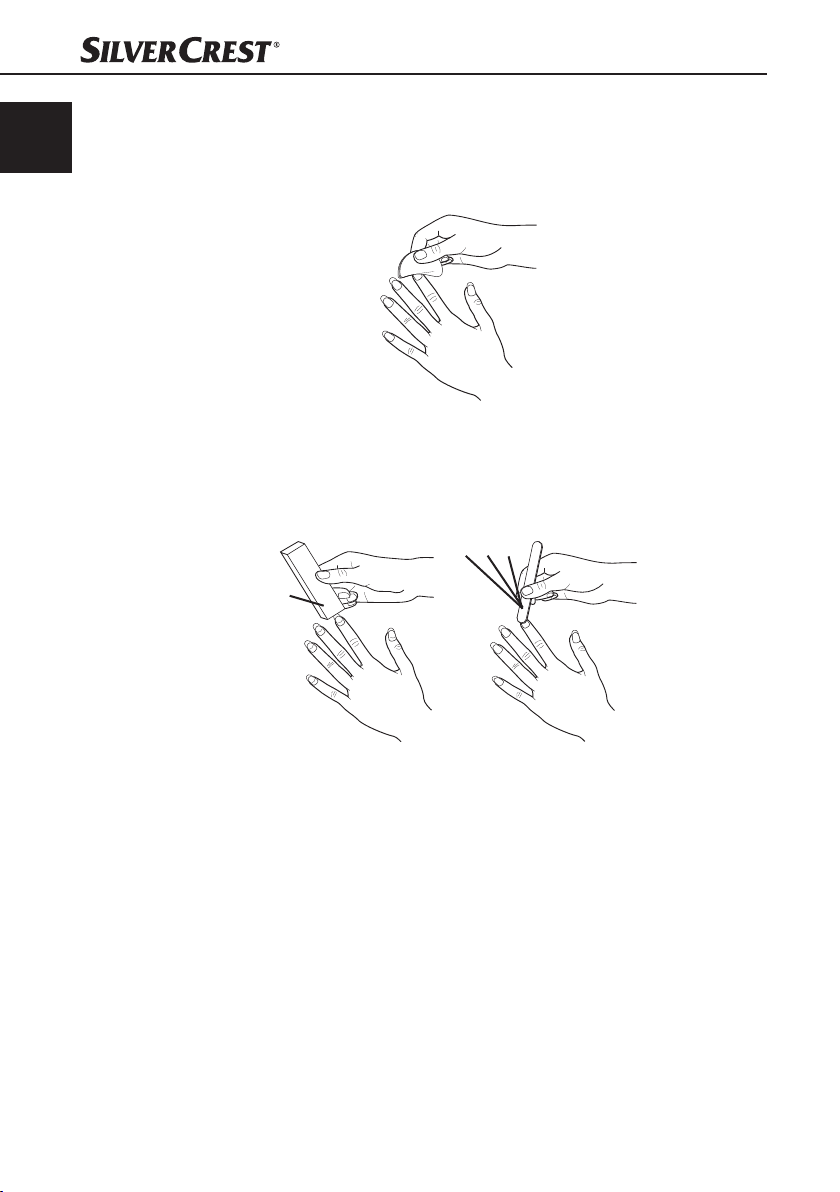
Afterwards, delustre each nail with the sanding block r.
Finally, using the polishing fi les u, z and t, polish each individual nail until
the nail surface is shin
r
y.
t
z
u
24
SNS 45 A1
Page 25
Topping up
NOTICE
Because the natural nail grows, over time the attachment of the artifi cial ►
nail o can raise itself. For this reason the gap between the cuticle and the
nail attachment must be topped up fr
A topping up is required about every 2 - 3 weeks. ►
Using the sand sheet fi le i, fi le around the attachments of the hardened
gel.
Use the sanding block r
When done, reapply UV Gel s and harden it again.
NOTICE
In this regard, see the previous chapters ► Application of the UV-Gel
and Hardening of t
Removal of artifi cial nails
IMPORTANT
Risk of damaging the natural nail surface!
A forcible br
surfaces!
Do not break the nail tips ► o off of the natural nails.
R
eaking-off of the nail tips o can cause damage to the natural nail
emove the nail tips ► o only in accordance with the following description.
First trim the nails all the way back with the nail clippers q.
le the nail tips o off with the sand sheet fi le i
Then fi
Afterwards, polish your natural nails with the various polishing fi les u, z
and t.
Finally
, apply a little nail oil d to care for your natural nails.
om time to time.
until the nail is no longer shiny
he UV-Gel
GB
IE
.
.
SNS 45 A1
q
i
t
z
u
25
Page 26
GB
IE
Care
Regularly fi le the attachments and nail edges. ■
Polish the nails once a week. ■
Every night apply nail oil ■ d to the nails and also rub it in and ar
cuticles.
Use a hand cr
When applying nail varnish, use both a lower layer and an upper layer. ■
Do not use an acetone-based nail polish remover for removing nail polish, ■
because this would loosen and damage the artifi cial nails.
W
ear rubber glo
Wear a pair of rubber gloves for all work/activities that may damage the ■
nails.
eam regularly. ■
ves when using detergents or bleaching agents. ■
ound the
26
SNS 45 A1
Page 27
Cleaning
Safety instructions
DANGER
Potentially fatal risk of electrical shocks!
Disconnect the plug from the mains po
the appliance.
IMPORTANT
Damage to the appliance!
To av
oid irreparable damage, ensure that no moisture can penetrate inside ►
the UV appliance 1 when you are cleaning it.
Cleaning the appliance
Clean the surfaces of the UV appliance 1 only with a soft and dry cloth.
Cleaning accessories
NOTICE
Clean the brush ► e immediately after each use.
ays close all bottles and tubs after use. ►
Alw
Hold the brush e in the fi nishing solution p and then wipe it off on a paper
wel.
to
Afterwards, swirl the brush e in the nail oil d, so as to keep its bristles
supple.
GB
IE
wer socket before you start cleaning ►
SNS 45 A1
NOTICE
Remove the nail oil ► d before each new utilisation of the brush e
To remove the nail oil d dip the brush e in the fi
wipe it on a paper towel.
nishing solution p and then
.
27
Page 28
GB
IE
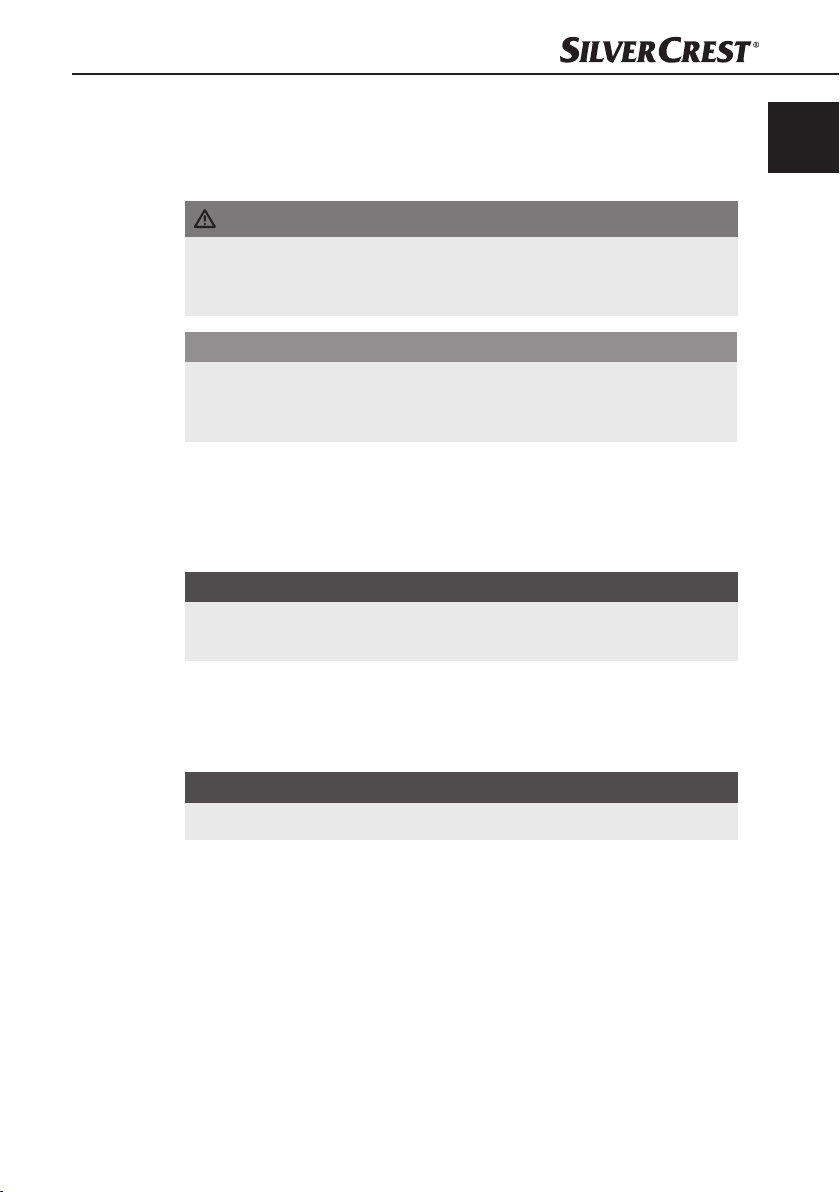
Exchanging the UV Lamps
DANGER
Potentially fatal risk of electrical shocks!
Disconnect the plug from the mains po
exchange of the UV lamps!
NOTICE
The UV lamps may ONLY be replaced with lamps of the same type. The ►
specifi cations for the precise lamp type are given in the chapter "Technical
Data".
w the two screws on the sides of the appliance with a cross-head
Unscre
screwdriver.
wer socket before you start with the ►
28
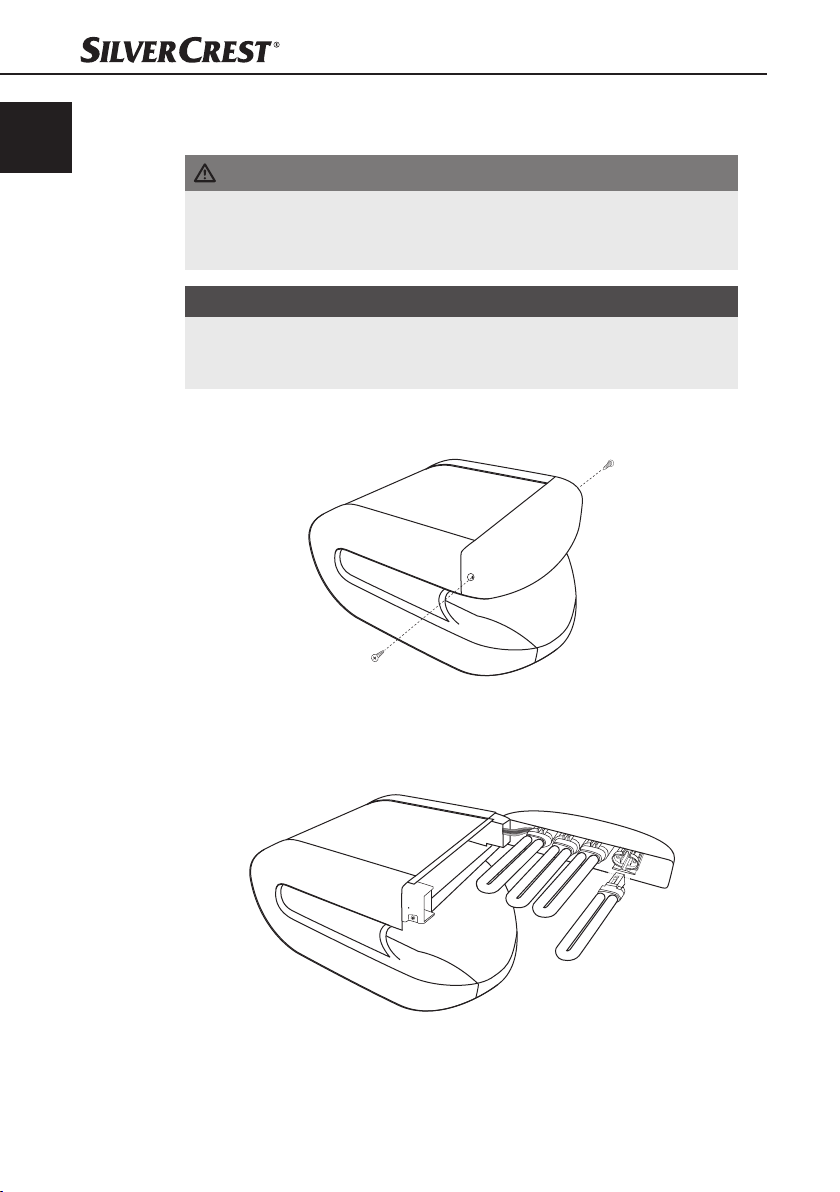
Pull the front appliance cover with the ultraviolet lamps carefully from the
appliance, thereby paying heed to the cable connection on the side.
Carefully pull the defective UV lamp out of its socket.
SNS 45 A1
Page 29
Insert the new UV lamp into the socket.
Slide the appliance cover with the UV lamps back onto the appliance, thereby
ensuring that the cable connection on the side does not get snagged or
trapped.
R
e-attach the appliance cover with the two side screws.
Troubleshooting
In this chapter you will receive important information for malfunction localization
and remedies. Observe the instructions in order to avoid risks and damage.
Safety instructions
WARNING
Observe the following safety information to avoid risks and property damage:
Repairs to electronic appliances may only be carried out by specialists who ►
have been trained by the manufacturer. Considerable risk to the consumer
and damage to the appliance can occur as a result of incompetent r
GB
IE
epairs.
SNS 45 A1
29
Page 30
GB
IE
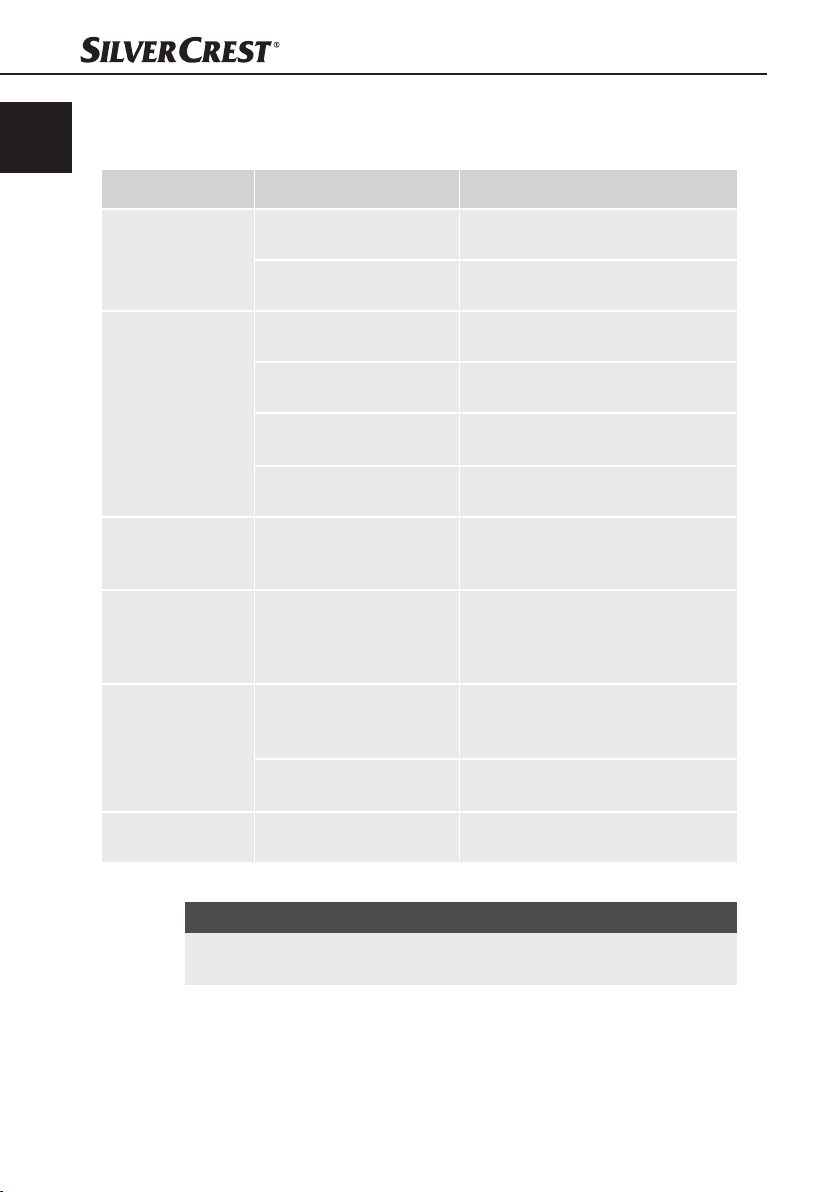
Malfunction causes and remedies
The following table will help with localizing and remedying minor malfunctions:
Defect Possible cause Solution
Appliance does
not switch on.
UV Gel s does not
harden suffi ciently.
After hardening,
a "sweat layer" remains on the nails.
The artifi cial nails
are soft/loosened.
The artifi cial
fi ngernails show
unevenness.
A UV lamp does
not glow.
The plug is not connected.
Mains power socket does
not supply any voltage.
The selected treatment
time too short.
One or more UV lamps
are defective.
Too much UV-Gel s
applied.
The nails were not directly
under the UV lamps.
Occurence of a "sweatlayer" caused by polymerization.
Loosening of the artifi cial
nails by products with a
high acetone concentration.
Pressure on the brush e
too high when applying
the UV Gel s.
UV Gel s unevenly
applied.
UV lamp defect. Replace the defective UV lamp.
Insert the plug into the mains
power socket.
Check the fuses.
Select a longer treatment time.
In this case, contact Customer
Services.
Apply less UV Gel s.
Hold the hand correctly in the
UV appliance 1.
Remove the "sweat layer" with
the fi nishing solution p.
Apply no products with a high
acetone concentration.
Do not press too hard on the brush
e when you are applying the UV
Gel s.
Apply a further and thinner layer
of UV Gel s and then harden it.
30
NOTICE
If you cannot solve the problem with the aforementioned solutions, please ►
contact Customer Services.
SNS 45 A1
Page 31

Storage/Disposal
Storage
IMPORTANT
Health risks from solvent-containing substances!
Solvent-containing substances and their v
Carefully close all containers holding the accompanying substances. ►
Store the accompanying substances out of the reach of children. ►
Should you decide not use the appliance for an extended period, disconnect
it from the mains power supply and store it in a clean and dry location away
ect sunlight and out of the reach of children.
from dir
Store all substances in a clean, dry and cool location away from direct sun-
light and out of the reach of children.
Disposing of the appliance
UNDER NO CIRCUMSTANCES should you throw the appliance or
the substances into normal household waste. This product is subject to the provisions of the European Directive 2002/96/EC-WEEE
(Waste Electrical and Electronic Equipment).
Dispose of the appliance and the substances via an approved waste disposal
company or your communal waste disposal centre. The chemical substances are
subject to special waste treatment. Observe the currently applicable regulations.
In case of doubt, please contact your waste disposal centre.
GB
IE
apours can damage your health!
SNS 45 A1
31
Page 32

GB
IE
Appendix
Notes on the EC Declaration of Conformity
With regard to conformity with essential requirements and other
relevant provisions, this appliance complies with the guidelines
of the Electromagnetic Compatibility Directive 2004/108/EC
and the Low Voltage Directive 2006/95/EC.
The complete original declaration of conformity can be
obtained from the importer.
Technical data
Model Nail Studio SNS 45 A1
Operating voltage 220 - 240 V / ~ 50 Hz
Power consumption 45 W
Operating temperature +5 - +45 °C
Humidity (no condensation) 5 - 90 %
Dimensions (W x H x D): 23 x 27.5 x 14 cm
Weight 1777 g
32
Number of UV Lamps 4
UV Lamp Type UV-9W-L 365 nm, 9 W
UV-type of the appliance UV-A Lamp
Automatic switch-off times after 90, 120 and 180 seconds
SNS 45 A1
Page 33

Warranty
The warranty for this appliance is for 3 years from the date of purchase. The
appliance has been manufactured with care and meticulously examined before
delivery.
Please retain your receipt as proof of purchase. In the case of a warranty claim,
please make contact by telephone with our service department. Only in this way
can a post-free despatch for your goods be assured.
NOTICE
GB
IE
The warranty covers only claims for material and maufacturing defects, not ►
for transport damages, wearing parts or for damage to fragile components,
e.g. switches or UV Lamps.
Service
This product is for domestic use only and is not intended for commer
tions. The warranty is void in the case of abusive and improper handling, use of
force and internal tampering not carried out by our authorised service branch.
Your statutory rights are not restricted in any way by this warranty. The warranty
period is not extended by repairs made under the warranty. This applies also to
replaced and repaired parts.
Damages and defects extant at the time of purchase must be reported immediately
after unpacking, resp. no later than two days after the date of purchase.
Repairs made after the lapse of the warranty period are subject to charge.
Service Great Britain
Tel.: 0871 5000 720 (£ 0.10/Min.)
E-Mail: kompernass@lidl.gb
IAN 54344
Service Ireland
Tel.: 1890 930 034
(0,08 EUR/Min., (peak))
(0,06 EUR/Min., (off peak))
E-Mail: kompernass@lidl.ie
IAN 54344
cial applica-
SNS 45 A1
33
Page 34

GB
IE
Importer
KOMPERNASS GMBH
BURGSTRASSE 21
44867 BOCHUM, GERMANY
www.kompernass.com
34
SNS 45 A1
Page 35

Sisällysluettelo
Johdanto . . . . . . . . . . . . . . . .36
Tietoja tästä käyttöohjeesta . . . . . .36
Tekijänoikeus . . . . . . . . . . . . . . . . .36
Vastuun rajoittaminen . . . . . . . . . . . 36
Määräystenmukainen käyttö . . . . .36
Varoitukset . . . . . . . . . . . . . . . . . . . 37
Turvallisuus . . . . . . . . . . . . . .38
Turvaohjeet . . . . . . . . . . . . . . . . . . .38
Tärkeitä turvallisuusohjeita . . . . . . .40
Sähkövirran aiheuttama vaara . . . .42
Ultraviolettivalon (UV-valon)
aiheuttama vaara . . . . . . . . . . . . . . 42
Liuotinainepitoisten aineiden
aiheuttama vaara . . . . . . . . . . . . . . 43
Laite ja tarvikkeet . . . . . . . .44
Sijoitus ja kytkennät . . . . . .45
Turvaohjeet . . . . . . . . . . . . . . . . . . .45
Toimituslaajuus ja kuljetustarkastus . . . . 45
Purkaminen pakkauksesta . . . . . . . . 46
Pakkauksen hävittäminen . . . . . . . .46
Pystytyspaikalle asetetut
vaatimukset . . . . . . . . . . . . . . . . . . . 46
Sähköliitäntä . . . . . . . . . . . . . . . . . . 47
Käyttö ja toiminta . . . . . . . .48
Kytkeminen päälle ja
pois päältä . . . . . . . . . . . . . . . . . . .48
Toiminnot . . . . . . . . . . . . . . . . . . . .48
Käyttö . . . . . . . . . . . . . . . . . .49
Kynsitippien valitseminen . . . . . . . .49
Kynsitippien asettaminen . . . . . . . .50
Kynnen liitoskohdan muotoilu . . . . .53
UV-geelin levittäminen . . . . . . . . . .54
UV-geelin kovettaminen . . . . . . . . .55
Täyttäminen . . . . . . . . . . . . . . . . . .57
Kynsitippien irrottaminen. . . . . . . . .57
Hoito . . . . . . . . . . . . . . . . . . . . . . . .58
Puhdistus . . . . . . . . . . . . . . .59
Turvaohjeet . . . . . . . . . . . . . . . . . . .59
Laitteen puhdistaminen . . . . . . . . . . 59
Tarvikkeiden puhdistaminen . . . . . .59
UV-lamppujen
vaihtaminen . . . . . . . . . . . . .60
Vikojen pistaminen . . . . . . .61
Turvaohjeet . . . . . . . . . . . . . . . . . . .61
Vikojen syyt ja poistaminen . . . . . . 62
Varastointi/Hävittäminen . . . 63
Varastointi . . . . . . . . . . . . . . . . . . . .63
Laitteen hävittäminen . . . . . . . . . . .63
Liite . . . . . . . . . . . . . . . . . . . .64
EY-vaatimustenmukaisuusvakuutusta
koskevia ohjeita . . . . . . . . . . . . . . . 64
Tekniset tiedot . . . . . . . . . . . . . . . . . 64
Takuu . . . . . . . . . . . . . . . . . . . . . . .65
Huolto . . . . . . . . . . . . . . . . . . . . . . .65
Maahantuoja . . . . . . . . . . . . . . . . .66
FI
SNS 45 A1
35
Page 36

Johdanto
Tietoja tästä käyttöohjeesta
FI
Tekijänoikeus
Vastuun rajoittaminen
Määräystenmukainen käyttö
Tämä käyttöohje on kynsistudion SNS 45 A1 (jatkossa "laite") osa ja antaa tärkeitä
ohjeita laitteen määräystenmukaisesta käytöstä, turvallisuudesta, liitännästä sekä
hallinnasta.
Käyttöohjeen on oltava jatkuvasti saatavilla laitteen läheisyydessä. Jokaisen laitteen
käytön ja häiriönpoiston kanssa tekemisissä olevan henkilön on luettava se ja noudatettava sitä.
Säilytä tämä käyttöohje ja luovuta se laitteen mukana seuraavalle omistajalle.
Tämä asiakirja on suojattu tekijänoikeuden nojalla.
Kaikenlainen monistaminen, esim. kaikenlainen jälkipainanta, myös osittain, sekä
kuvien toistaminen, myös muutetussa muodossa, on sallittua ainoastaan valmistajan
kirjallisella suostumuksella.
Valmistaja ei vastaa vahingoista, joiden syynä on käyttöohjeen noudattamatta
jättäminen, määräystenvastainen käyttö, asiattomasti suoritetut korjaukset, luvattomasti suoritetut muutokset tai muiden kuin sallittujen varaosien käyttö.
Tämä laite on tarkoitettu kynsitippien asetukseen ja kiinnitykseen manikyyritarkoituksissa suljetuissa tiloissa ja ainoastaan yksityiseen käyttöön. Toinen tai tämän
ylittävä käyttö katsotaan määräystenvastaiseksi.
36
VAROITUS
Muun kuin määräystenmukaisen käytön aiheuttama vaara!
Laite saattaa aiheuttaa vaaraa, jos sitä käytetään määräystenvastaisesti ja/tai
muulla tavalla.
Käytä laitetta ainoastaan määräystenmukaisesti. ►
Noudata tässä käyttöohjeessa kuvattuja toimintatapoja. ►
SNS 45 A1
Page 37

Valmistaja ei vastaa minkäänlaisista määräystenvastaisesta käytöstä, virheellisesti
suoritetuista korjauksista, luvattomista muutostöistä tai muiden kuin hyväksyttyjen
varaosien käytöstä aiheutuvista vahingoista.
Vastuu on yksinomaan käyttäjällä.
Varoitukset
Tässä käyttöohjeessa käytetään seuraavia varoituksia:
Tämän vaaratason varoitus on merkkinä uhkaavasta vaarallisest
Mikäli vaarallista tilannetta ei vältetä, se voi johtaa kuolemaan tai vakaviin
loukkaantumisiin.
VAROITUS
Tämän vaaratason varoitus on merkkinä mahdollisesti vaarallisesta tilanteesta.
Mikäli vaarallista tilannetta ei vältetä, se voi johtaa loukkaantumisiin.
FI
VAARA
a tilanteesta.
Noudata tämän varoituksen ohjeita välttääksesi kuolemanvaaran tai vaka- ►
vat henkilövammat.
Noudata tämän varoituksen ohjeita välttääksesi henkilövammat. ►
SNS 45 A1
HUOMIO
Tämän vaara-asteen varoitus on merkkinä mahdollisesta
aineellisest
Mikäli tilannetta ei vältetä, se voi johtaa aineellisiin vahinkoihin.
Noudata tämän varoituksen ohjeita välttääksesi aineelliset vahingot. ►
OHJE
Ohje on merkkinä lisätiedoista, jotka helpottavat laitteen käsittelyä. ►
a vahingosta.
37
Page 38

Turvallisuus
Tämä laite on turvallisuusmääräysten mukainen.
FI
Turvaohjeet
Asiaton käyttö voi johtaa henkilövahinkoihin ja aineellisiin vahinkoihin.
VAROITUS - LOUKKAANTUMISVAARA!
UV-laitteita eivät saa käyttää:
henkilöt, joilla on ihosyöpä tai jotka ovat sille alttiita ►
henkilöt, jotka käyttävät valoherkkyyttä lisäävää lääkitystä ►
alle 18-vuotiaat henkilöt ►
henkilöt, joilla on taipumusta kesakoihin ►
henkilöt, joiden luonnollinen hiustenväri on punainen ►
henkilöt, joilla on epätavallisesti värjäytynyttä ihoa ►
henkilöt, joilla on kehossaan yli 16 maksaläiskää (halkaisija vähintään ►
2 mm)
henkilöt, joilla on atyyppisiä maksaläiskiä (atyyppiset maksaläiskät ovat ►
epäsymmetrisiä maksaläiskiä, joiden halkaisija on yli 5 mm ja joiden pigmentointi on erilaista ja reuna-alueet epäsäännöllisiä; k
tapauksissa lääkärisi puoleen)
henkilöt, jotka ovat polttaneet ihonsa auringossa ►
henkilöt, jotka eivät rusketu auringossa ilman palovammoja ►
henkilöt, jotka polttavat ihonsa nopeasti auringossa ►
henkilöt, jotka ovat lapsena polttaneet useasti ihonsa vakavasti auringossa ►
henkilöt, joilla on tai on ollut ihosyöpä tai jotka ovat alttiita ihosyövälle, ►
henkilöt, joilla on kerran melanoomaa (tummasolusyöpää) sairastanut ►
lähisukulainen
henkilöt, jotka o
sairauden vuoksi
henkilöt, jotka eivät voi ruskettua lainkaan tai eivät voi ruskettua polttamatta ►
ihoaan auringossa
henkilöt, jotka polttavat ihonsa helposti auringossa ollessaan ►
raskaana olevat henkilöt. ►
vat lääkärin hoidossa tai lääkehoidossa valoherkkyys- ►
äänny epäselvissä
38
SNS 45 A1
Page 39

Sätelily ei saa ylittää eryteema-annosta (MED). Jos muutamia tunteja sätei- ■
lyn jälkeen esiintyy eryteemaa (ihon punotusta), laitetta ei tulisi enää käyttää.
Seuraavan säteilyn saa tässä tapauksessa suorittaa vasta viikko ihon punotusajankohdan jälkeen.
Jos 48 tunnin sisällä ensimmäisen UV-laitteen käyttökerran jälkeen esiintyy ■
odottamattomia sivuvaikutuksia, kuten esim. kutinaa, neuvottele lääkärin
anssa ennen UV-säteilyjen jatk
k
Suositeltu säteilyaikataulu (kesto ja väli). ■
Laitetta ei saa käyttää, jos ajastin ei toimi oikein. ■
Käytä ainoastaan ilmoitetun tyyppisiä lamppuja.Toisen valmistajan tai tyypin ■
UV-lamppujen käyttö johtaa takuun raukeamiseen.
Auringon tai UV-laitteiden UV-säteily v
tomia iho- tai silmäv
laadusta ja määrästä sek
Iho voi kärsiä auringonpolttamasta liiallisen säteilyn jälkeen. Liian usein ta- ■
pahtuva auringon tai UV-laitteiden UV-säteily voi johtaa ihon ennenaikaiseen
vanhenemiseen ja lisätä ihosy
kumulatiivisen UV-säteilyn myötä. Nuorella iällä koettu UV-säteily lisää myöhempää ihosyövän vaaraa.
UV-säteily voi johtaa silmien ja ihon vammoihin, kuten esim. ihon ennenaikai- ■
seen vanhenemiseen tai jopa ihosyöpään. Lue käyttöohje huolellisesti. Jotkut
lääkkeet tai k
Suojaamaton silmä voi kärsiä pinnallisista tulehduksista ja joissakin tapauksis- ■
sa liiallinen säteily voi aiheuttaa verkkokalvon vaurioita. Usein toistuvat säteilyt
voiv
at johtaa harmaakaihiin.
Jos sinulla on havaittu yksilöllistä herkkyytä tai allergisia reaktioita UV-säteilylle, ■
neuvottele lääkär
Tietyt sairaudet tai tiettyjen lääkkeiden sivuvaikutukset voivat pahentua UV- ■
säteilyn vaikutuksesta. Käänny epäselvissä tapauksissa lääkärin puoleen.
Ensimmäisten säteilyjen välissä tulisi olla v
aurioita. Nämä biologiset vaikutukset riippuvat säteilyn
osmeettiset aineet lisäävät herkkyyttä UV-säteilylle.
isi kanssa ennen säteilyn aloittamista.
amista.
oi aiheuttaa mahdollisesti peruuttamat- ■
ä yksittäisen henkilön ihon tai silmien herkkyydestä.
övän vaaraa. Tämä vaara lisääntyy lisääntyvän
ähintään 48 tunnin ajanjakso. ■
FI
SNS 45 A1
39
Page 40

Vältä auringonottoa ja laitteen käyttöä samana päivänä. Se voi johtaa iho- ■
ärsytyksiin.
Noudata säteilyn kestosta, säteilyväleistä ja etäisyydestä lamppuun annettuja ■
ohjeita. Muuten se voi johtaa ihoärsytyksiin.
FI
Käänn
y lääkärin puoleen, jos esiintyy itsepintaisia pöhöttymiä tai paiseita tai ■
muutoksia maksaläiskissä tai muodostuu avohaavoja.
Suojaa herkät ihoalueet, k
Älä suorita enempää kuin 5 käsittelyä päivässä. Se voi johtaa ihoärsytyksiin. ■
Poista kosmeettiset ja auringonsuojatuotteet ennen laitteen käyttöönottoa. ■
Muuten se voi johtaa ihoärsytyksiin.
OHJE
Kysy epäselvässä tapauksessa lääkäriltäsi ohjeita käyttömahdollisuudesta ►
ennen laitteen käyttöä.
uten arvet, tatuoinnit ja sukuelimet säteilyltä. ■
Tärkeitä turvallisuusohjeita
Tämän laitteen virtajohtoa ei voida vaihtaa. Jos johto vahingoittuu, laite on ■
romutettava.
Laitteen korjauksen saa takuuaikana suorittaa ainoastaan valmistajan valtuut- ■
tama huoltoliike, muuten takuu ei ole enää voimassa seuraavien vahinkojen
sattuessa.
HUOMIO - AINEELLISET VAHINGOT
Suojaa laitetta kosteudelta ja nesteiden tunkeutumiselta sen sisään.Älä ►
koskaan upota laitetta veteen, älä aseta laitetta veden läheisyyteen, äläkä
aseta laitteelle mitään vedellä täytett
Älä aseta laitteen päälle esineitä. ►
Älä käytä laitetta avotulen (esim. kynttilöiden) läheisyydessä. ►
Vältä suoraa auringonpaistetta. ►
Vedä virtajohto pistorasiasta aina liitospistokkeesta vetämällä, älä vedä itse ►
johdosta.
Vedä häiriöiden tai ukk
osen esiintyessä verkkopistoke pistorasiasta. ►
yjä esineitä (esim. maljakoita).
40
SNS 45 A1
Page 41

VAROITUS - LOUKKAANTUMISVAARA
Tarkasta laite ennen käyttöä ulkoisten näkyvien vaurioiden varalta. Älä ota ►
viallista tai pudonnutta laitetta käyttöön.
Tätä laitetta ei ole tarkoitettu sellaisten henkilöiden k
fyysiset, aistilliset tai henkiset kyvyt tai kokemuksen ja/tai tiedon puute estävät
ytön, lukuun ottamatta tilanteita, joissa heitä valvoo turvallisuudesta
kä
vastaava henkilö tai joissa he ovat saaneet tältä ohjeita laitteen käytöstä.
Lapsia on valvottava, jotta varmistettaisiin, etteivät he leiki laitteella. ►
Älä koskaan katso suoraan UV-lamppuihin. Tämä voi johtaa silmävammoihin! ►
Säilytä laite ja kaikki tarvikkeet aina lapsien ulottumattomissa. ►
Noudata kaikkien käytettyjen aineiden astioissa annettuja ohjeita. ►
Anna korjaukset ainoastaan valtuutettujen ammattiliikkeiden tai asiakaspal- ►
velun suoritettavaksi. Asiattomat korjaukset voivat aiheuttaa huomattavan
an käyttäjälle.Lisäksi takuu raukeaa.
vaar
Vialliset rakenneosat saa vaihtaa ainoastaan alkuperäisiin varaosiin. Vain ►
näillä osilla on taattua, että turvavaatimukset täyttyvät.
äyttöön, joiden rajoitetut, ►
FI
SNS 45 A1
41
Page 42

Sähkövirran aiheuttama vaara
VAARA
FI
Sähkövirran aiheuttama hengenvaara!
Jännitteen alaisia joht
olemassa hengenvaara!
Noudata seuraavia turvaohjeita välttääksesi sähkövirran aiheuttamat vaarat:
Tämän laitteen virtajohtoa ei voida vaihtaa. Jos verkkojohto vahingoittuu, ►
laite on romutettava.
Älä aseta laitetta kylpyhuoneeseen. ►
Liitä laite ainoastaan suojatuun v
Älä koske laitteeseen tai verkkopistokkeeseen märillä käsillä. ►
Älä koskaan aseta laitetta veteen. ►
Älä missään tapauksessa avaa laitteen koteloa (UV-lampun vaihtoa lukuun ►
ottamatta). Jos kosketaan jännitettä johtaviin liitäntöihin tai sähköistä tai
mekaanista r
akennetta muutetaan, on olemassa sähköiskun vaara.
oja tai rakenneosia kosketettaessa on
erkkopistorasiaan. ►
Ultraviolettivalon (UV-valon) aiheuttama vaara
VAROITUS
Ultraviolettivalon (UV-valon) aiheuttama loukkaantumisvaara!
Suoraan laitteessa olevien UV-lamppujen UV-valoon katsominen voi johtaa
silmävammoihin ja näkökyvyn heikkenemiseen!
Älä koskaan katso suoraan UV-lamppujen ultraviolettivaloon. ►
Sammuta UV-lamput, kun niitä ei käytetä. ►
Muut kuin laitteen käyttäjät, ja erityisesti lapset, eivät saa olla läsnä laitetta ►
käytettäessä.
42
SNS 45 A1
Page 43

Liuotinainepitoisten aineiden aiheuttama vaara
VAROITUS
Liuotinpitoisten aineiden ja höyryjen aiheuttama terveyshaitto-
jen vaara!
Liuotinpitoisten aineiden ja höyryjen hengittäminen voi johtaa terveyshaittoihin!
Älä hengitä liuotinpitoisten aineiden (esim. asetoni) höyryjä. ►
Huolehdi riittävästä tuuletuksesta liuotinpitoisia aineita käsiteltäessä. ►
Noudata liuotinpitoisten aineiden astioissa olevia ohjeita. ►
VAROITUS
Kemiallisten aineiden aiheuttama terveyshaittojen vaara!
Kemiallisten aineiden asiaton käsittely voi johtaa vakaviin terveydellisiin
haittoihin!
Jos ainetta joutuu nieluun, hakeudu heti lääkäriin!. ►
Jos havaitset allergisia reaktioita, hakeudu heti lääkäriin! ►
Jos ainetta joutuu kosketuksiin silmien tai limakalvojen kanssa, hakeudu heti ►
lääkäriin!
FI
SNS 45 A1
43
Page 44

Laite ja tarvikkeet
OHJE
FI
Katso tästä kääntösivulla oleva kuva. ►
1 UV-laite ja 4 sisäänrakennettua UV-lamppua
Virtakytkin
2
3 Merkkivalo "POWER"/käyttövalmius
4 Merkkivalo "180 sekuntia"
5 Aikavalintapainike "180 sekuntia"
6 Merkkivalo "120 sekuntia"
7 Aikavalintapainike "120 sekuntia"
8 Merkkivalo "90 sekuntia"
9 Aikavalintapainike "90 sekuntia"
0 Start-painike
q Kynsileikkuri (kynsitippien leikkuuseen)
w Kynsinauhatikku (kynsinauhojen siistimiseen)
e Sivellin (UV-geelin levittämiseen)
r Hiontapalkki (epätasaisuuksien tasoittamiseen)
t Kiillotusviila, hieno (kynnen kiillotukseen "shine")
z Kiillotusviila, keski (kynnen kiillotukseen "condition")
u Kiillotusviila, karkea (kynnen kiillotukseen "clean")
i Hiekkapaperiviila (kynsien viilaukseen)
o Kynsitipit (tekokynnet)
p Finishing-liuos (loppukäsittelyyn ja siveltimen puhdistukseen)
a Kynsiliima (kynsitippien liimaukseen "GLUE")
s UV-geeli (kynsien täyttöön)
d Kynsiöljy (kynsien ja kynsinauhojen hoitoon "NAIL CARE")
44
SNS 45 A1
Page 45

Sijoitus ja kytkennät
Turvaohjeet
VAROITUS
Laitteen käyttöönotossa voi esiintyä henkilövahinkoja ja
aineellisia vahinkoja!
Noudata seuraavia turvaohjeita välttääksesi vaaroja:
Pakkausmateriaalia ei saa käyttää leikkeihin. Ne voivat aiheuttaa tukehtu- ►
misvaaran.
Huomioi py
nästä annettuja ohjeita välttääksesi henkilövahingot ja aineelliset vahingot.
Toimituslaajuus ja kuljetustarkastus
Laite toimitetaan vakiona seuraavin osin:
UV-laite ja 4 UV-lamppua sekä verkkojohto ●
Yksi kiillotusviila kutakin: karkea, keski ja hieno ●
Hiekkapaperiviila: ●
Hiontapalkki ●
Kynsitipit: ●
Kynsinauhatikku ●
Sivellin ●
Kynsileikkuri ●
2 pulloa UV-geeliä ("UV-Gel") ●
Finishing-liuos ("Finishing") ●
2 pulloa kynsiliimaa ("Glue") ●
Kynsiöljy ("Nail Care") ●
Säilytyspussi ●
Käyttöohje ●
stytyspaikalle asetetuista vaatimuksista sekä laitteen sähköliitän- ►
FI
SNS 45 A1
OHJE
Tarkista toimituksen täydellisyys ja osat näkyvien vaurioiden varalta. ►
Jos havaitset toimituksessa puutteita tai puutteellisen pakkauksen tai kulje- ►
tuksen aiheuttamia vaurioita, käänny huoltomme palvelunumeron puoleen
(katso luk
u Huolto).
45
Page 46

Purkaminen pakkauksesta
Ota kaikki laitteen osat ja käyttöohje pakkauksesta.
Poista koko pakkausmateriaali
FI
Pakkauksen hävittäminen
Pakkaus suojaa laitetta kuljetusvaurioilta. Pakkaus-materiaalit on valittu ympäristöystävällisyys ja jätehuoltotekniset näkökohdat huomioiden ja siksi ne voidaan
kierrättää.
Pakkauksen palauttaminen materiaalikiertoon säästää raaka-aineita ja vähentää
syntyvien jätteiden määrää. Hävitä tarpeettomat pakkausmateriaalit paikallisten
voimassa olevien määräysten mukaisesti.
OHJE
Säilytä alkuperäispakkaus mahdollisuuksien mukaan laitteen takuuajan, ►
jotta voit pakata laitteen asianmukaisesti mahdollisen takuutapahtuman
sattuessa.
Pystytyspaikalle asetetut vaatimukset
Laitteen turvallisen ja häiriöttömän toiminnan takaamiseksi pystytyspaikan on
täytettävä seuraavat vaatimukset:
Aseta laite kiinteälle, vaakasuoralle ja kuivalle alustalle. ■
Älä aseta laitetta märkään ympäristöön tai roiskevesialueelle. ■
Älä aseta laitetta lämpöpatterin tai lämmityslaitteen lähelle. ■
Pistorasian on oltava helppopääsyisessä paikassa, jotta verkkopistoke voitaisiin ■
hätätapauksessa irrottaa helposti.
46
SNS 45 A1
Page 47

Sähköliitäntä
VAARA
Sähkövirran aiheuttama hengenvaara!
Jännitteen alaisia joht
olemassa hengenvaara!
Noudata seuraavia turvaohjeita välttääksesi sähkövirran aiheuttamat vaarat:
Älä käytä laitetta, jos verkkopistoke tai virtajohto on vaurioitunut. ►
Liitä laite ainoastaan suojatuun verkkopistorasiaan. ►
Älä koske laitteeseen tai verkkopistokkeeseen märillä käsillä. ►
Vältä vesikosketusta laitteen kanssa. ►
Älä missään tapauksessa avaa laitteen koteloa. Jos kosketaan jännitettä ►
johtaviin liitäntöihin tai sähköistä tai mekaanista rakennetta muutetaan, on
olemassa sähköisk
Vertaa ennen laitteen liittämistä laitteen tyyppikilvessä olevia liitäntätietoja
(jännite ja taajuus) sähköverkkosi tietoihin. Näiden tietojen on vastattava toisiaan, jotta laite ei vahingoittuisi.
V
armista, että laitteen virtajohto on vahingoittumaton, äläkä vedä sitä kuumien
pintojen ja/tai terävien reunojen yli.
Varmista, ettei vir
Älä anna virtajohdon roikkua reunojen yli (ansalankavaikutus).
Työnnä verkkopistoke pistorasiaan.
oja tai rakenneosia kosketettaessa on
un vaara.
tajohtoa vedetä kireälle tai taiteta.
FI
SNS 45 A1
47
Page 48

Käyttö ja toiminta
Tässä luvussa annetaan tärkeitä ohjeita laitteen käytöstä ja toiminnasta.
FI
OHJE
Katso tästä luku ► Laite ja tarvikkeet.
Kytkeminen päälle ja pois päältä
Kytke UV-laite 1 päälle painamalla virtakytkin 2 asentoon "I".
Merkkivalo 3 palaa ja laite on käyttövalmis.
Sammuta UV-laite 1 jälleen painamalla virtakytkin 2
Merkkivalo 3 sammuu.
asentoon "0".
Toiminnot
Laitteessa voidaan asettaa kolme eri käsittelyaikaa:
90 sekuntia (painike ■ 9)
120 sekuntia (painik
180 sekuntia (painik
Kytk
e UV-lamput päälle painamalla Start-painiketta 0.
Valitse haluttu k
ketta 9, 7 tai 5.
OHJE
UV-lamput sammuvat jälleen automaattisesti esiasetetun ajan kuluttua. ►
e ■ 7)
e ■ 5)
äsittelyaika ja paina sitä varten vastaavaa aikavalintapaini-
48
Paina seuraavia käsittelyjä varten jälleen aikavalintapainiketta 9, 7 tai 5
ja Start-painik
etta 0 yllä kuvatulla tavalla.
SNS 45 A1
Page 49

Käyttö
HUOMIO
Liiman ja UV-geelin aiheuttamien aineellisten vahinkojen vaara.
Kynsiliima
matoista vain erittäin vaikeasti.
OHJE
Kynsitippien valitseminen
OHJE
a ja UV-geeli s lähtevät huonekalujen pinnoilta, vaatetuksesta ja
Peitä työskentelyalue ennen käyttöä paperilla tai pyyhkeellä. ►
Aseta UV-laite ► 1 peitetylle ja tukevalle alustalle.
oskaan aseta kynsiliimaa ► a ja UV-geeliä s UV-laitteen 1 lähelle.
Älä k
Älä koskaan altista kynsiliimaa ► a ja UV-geeliä s suoralle auringosäteilylle.
Ensimmäisellä käyttökerralla voi olla hyvä pyytää apua kokeneelta henkilöltä. ►
Poista ennen käyttöä käsistä kaikki korut. ►
Puhdista ja kuivaa kätesi ennen käyttöä. Suosittelemme käsien pesua n. ►
15 - 20 minuuttia ennen käsittelyä, jotta kynsissä ei olisi jäämiä kosteudesta.
Valitse kynsitippi o
aarretta.
kyntesi k
, jonka kaarre vastaa mahdollisimman tarkkaan luonnon-
FI
o
SNS 45 A1
Valitse kynsitippi o, joka vastaa muodoltaan tarkasti luonnonkyntesi reunaa,
kun sivut ovat samansuuntaiset luonnonkyntesi kanssa.
49
Page 50

Leikkaa tarvittaessa kynsileikkurilla q kynsitipin o kärki niin, että loppukohta
(nuoli) peittää noin kolmanneksen luonnonkynnestäsi.
FI
vapaa reuna kynnenalusta
kynsilevy kynsinauha
OHJE
Jos käytät liian pientä kynsitippiä ► o, se voi murtua helpommin. Valitse siksi
empi kynsitippi o, ja viilaa sivut muotoonsa.
suur
Toista kuvattu toimenpide, kunnes olet leikannut kaikki kynnet halutun pituisiksi
ja viilannut ne muotoonsa.
o
Kynsitippien asettaminen
OHJE
Huomaa, että kynnet keräävät kosteutta joutuessaan kosketuksiin veden ►
kanssa. Kynsien on kuitenkin oltava täysin kuivia ennen käyttöä.
Älä käytä ennen k
oltava täysin rasvaton, jotta kynsitippien o ihanteellinen kiinnittyminen olisi
mahdollista.
yönnä kynsinauha taakse kynsinauhatikun w avulla ja poista läpinäkyvä
T
iho sormesi kynsilevyltä .
Käsittele nyt kynnen pintaa hiontapalkilla r, kunnes kynnen pinta ei enää
kiillä.
P
oista hiontapöly paperipyyhkeellä.
Hankaa kynttä Finishing-liuoksella p, jota loputkin pöly
tetaan.
äyttöä käsirasvoja tai vastaavia, koska kynnen pinnan on ►
asvajäämät pois-
- ja r
50
SNS 45 A1
Page 51

OHJE
Älä nyt missään tapauksessa koske kynnen pintaan sormillasi, koska kynnen ►
pintaan tarttuu muuten jälleen rasvaa ja hyvä kiinnitys ei ole mahdollista!
Tipauta pieni tippa kynsiliimaa a
pullon avulla alapinnalle. Pidä kynsitippiä o alaspäin, jotta kynsilii-
man a
ma a ei pääse valumaan kynsitipin o yläosaan.
OHJE
Läpäise kynsiliiman ► a pullo ennen ensimmäistä käyttöä ter
esim. liimalla. Jos kynsiliiman a pullo on tukossa myöhemmillä käyttökerroilla, se voidaan avata myös neulan avulla.
Aseta nyt kynsitippi o vinoon luonnokynnelle niin, että kynsitipin o annettu
reuna on luonnonkynnen reunalla.
Kallista nyt kynsitippi o kevyesti painaen luonnonkynnelle niin, että mahdol-
liset ilmak
uplat painuvat ulos.
kynsitipin o alaosaan ja levitä se kynsilii-
a
ävällä esineellä,
FI
SNS 45 A1
o
OHJE
Pyyhi liika kynsiliima ► a pois vanupuikolla tai paperipyyhkeellä.
51
Page 52

Pidä kynsitippiä o paikoillaan 10-12 sekuntia ja paina sitä samalla riittä-
vällä paineella luonnonkynttä vasten. Varmista, ettei synny ilmakuplia ja että
tippi liimataan täysin suoraan.
FI
OHJE
Kynnen alla ei saa olla enää minkäänlaisia aukkoja, jotta niihin ei pääse ►
likaa.
Varmista, ettei kynsitipin ► o
Irrota tällaisessa tapauksessa kynsitippi o välittömästi ja aseta se uudelleen
paikoilleen.
Kun kaikki kynsitipit o on liimattu, leikkaa ne kynsileikk
pituuteen. Paina kynsileikkuri q kerralla yhteen. Jos painat liian hitaasti, kynsitipit o saattavat halkeilla.
Viilaa ne hiekkapaperiviilalla i muotoonsa.
OHJE
Viilaa erittäin varovasti, koska kynsitipit ► o ovat kiinni pelkällä kynsiliimalla a.
Jos et ole tottunut pitkiin kynsiin, leikk
kynsitippien o iskeytyminen ja irtoaminen vältettäisiin.
alle muodostu ilmakuplia tai valkoisia läiskiä.
urilla q haluttuun
q
aa tipeistä ensin hieman pituutta, jotta ►
52
SNS 45 A1
Page 53

Kynnen liitoskohdan muotoilu
Viilaa kynsitipin o ja luonnonkynnen välinen siirtymä varovasti hiekkapaperi-
viilalla i, kunnes se muotoutuu luonnonkynnen muotoon. Viilaa ainoastaan
kynsitippiä o! Älä vahingoita luonnonkynttäsi.
Viilaa kynnen sivut varovasti hiekkapaperiviilalla i, k
eik
ä niissä ole "siipiä".
Toista nämä vaiheet jokaiselle yksittäiselle kynnelle.
i
Poista hiontapöly paperipyyhkeellä.
unnes ne ovat suoria,
FI
SNS 45 A1
53
Page 54

UV-geelin levittäminen
Ota siveltimellä e pieni määrä UV-geeliä s ja sivele siveltimen e toinen
puoli jälleen kuivaksi UV-geelipurkin reunaan.
FI
Levitä ohut kerros UV-geeliä s koko kynnelle. Levitä kynnen alaosaan hie-
man lisää UV-geeliä s
Lisäksi luonnon- ja tekokynnen välinen liitos on erityisen herkkä kuormituksien
ja iskujen suhteen, siksi siihen on levitettävä enemmän UV-geeliä s.
OHJEITA
Älä paina levittäessäsi sivellintä ► e liikaa, koska muutoin sivellin e
aikaan raitoja.
Muotoile UV-geelin ► s ensimmäinen kerr
määrittää kynnen myöhemmän muodon. Muotoile mahdollisimman luonnollinen kynnen muoto.
Säilytä levittäessäsi n. 1 mm:n etäisyys kynsinauhaan.
OHJE
Jos UV-geeliä ► s joutuu vahingossa kynsinauhalle tai kynnenaluselle, poista
se ennen k
Toista kuvattu toimenpide kaikille kynsille.
ovettamista esim. vanupuikolla.
luonnon- ja tekokynnen välisen eron tasoittamiseksi.
saa
os erityisen huolella, koska se
e
o
54
OHJE
Varmista, että kynsi on tasaisesti UV-geelin ► s peitossa.
SNS 45 A1
Page 55

UV-geelin kovettaminen
OHJE
Katso tästä luku ► Käyttö ja toiminta.
Kytk
e UV-laite 1 päälle virtakytkimellä 2
Paina Start-painiketta 0; UV-lamput kytketään päälle.
V
alitse nyt haluttu käsittelyaika ja paina sitä varten vastaavaa aikavalintapai-
niketta 9, 7 tai 5. Ensimmäiseen ko
aikavalintaa.
Pidä kättäsi kynnet ulospäin asetetut käsittelyajan UV-laitteen 1 aukossa.
K
äsittele peukalonkynsi erikseen, koska UV-valo osuu siihen vain sivusta, kun
kättä pidetään UV-laitteessa.
Toista UV-geelin s
k
uvatulla tavalla.
OHJE
Valitun käsittelyajan kuluttua UV-lamput sammutetaan automaattisesti. ►
Jokaista uutta käsittelyä varten on painettava uudelleen Start-painiketta ► 0
ja yhtä aikav
levittäminen ja kovettaminen UV-laitteessa 1 vielä kerran
alintapainikkeista (9, 7 tai 5).
FI
.
vetukseen suosittelemme 180 sekunnin
SNS 45 A1
Tutki jokainen kynsi kaikkien kerrosten levittämisen ja kovettamisen jälkeen
epätasaisuuksien, pienten naarmujen tai urien varalta.
Jos havaitset epätasaisuuk
kynttä 120 sek
rästä riippuen).
unnin tai 90 sekunnin asetuksella (levitetyn UV-geelin s mää-
sia, levitä uusi, ohut kerros UV-geeliä s ja koveta
55
Page 56

Myös viimeisen geelikerroksen jälkeen kynnet voivat tuntua hieman tahmeilta
("hikoilukerros" tai polymerointikerros).
Kostuta vanutuppo tai paperipyyhe Finishing-liuoksella p ja pyyhi kynsi sillä.
FI
Mattaa sen jälkeen jokainen kynsi hiontapalkilla r.
Käytä sen jälkeen kiillotusviiloja u, z ja t ja kiillota jokaista yk
kynttä, kunnes kynnen pinta kiiltää.
t
z
u
r
sittäistä
56
SNS 45 A1
Page 57

Täyttäminen
OHJE
Koska luonnonkynsi kasvaa, voi kynsitipin ► o liitos nousta ylös ajan mittaan.
Siksi kynsinauhan ja kynnen r
Täyttäminen on tarpeen noin 2 - 3 viikon välein. ►
Viilaa hiekkapaperiviilalla i kovetetun geelin reunoja.
äytä hiontapalkkiak r, kunnes kynsi ei enää kiillä.
K
Le
vitä sen jälkeen jälleen UV-geeliä s ja koveta se uudelleen.
OHJE
Katso tästä edellinen luku ► UV-geelin levittäminen, UV-geelin
k
ovettaminen
Kynsitippien irrottaminen
HUOMIO
Luonnonkynnen pinnan vaurioitumisen vaara!
Kynsitippien
vaurioitumiseen!
Älä murra kynsitippejä ► o irti luonnonkynsistä.
P
Leikkaa kynsi ensiksi aivan lyhyeksi kynsileikkurilla q.
Viilaa sitten kynsitipit o pois hiekkapaperiviilalla
Kiillota sen jälkeen luonnonkyntesi eri kiillotusviiloilla u, z ja t.
Levitä sen jälk
o irrottaminen väkivalloin voi johtaa luonnonkynnen pinnan
oista kynsitipit ► o ainoastaan seuraav
een luonnonkynsillesi hoitoa varten hieman kynsiöljyä d.
eunan välinen rako on aika ajoin täytettävä.
an kuvauksen mukaisesti.
i.
FI
SNS 45 A1
q
i
t
z
u
57
Page 58

Hoito
Viilaa kärjet ja kynnen reunat säännöllisesti. ■
Kiillota kynnet kerran viikossa. ■
FI
Levitä joka ilta kynsiöljyä ■ d kynsille ja hier
hojen ympärille.
äytä käsirasvaa säännöllisesti. ■
K
Käytä kynsilakkaa levittäessäsi pohjakerrosta ja peitekerrosta. ■
Älä käytä kynsilakan poistoon asetonia sisältävää kynsilakanpoistoainetta, ■
koska se sulattaa ja vahingoittaa tekokynsiä.
K
äytä pesu- tai v
Käytä kaikissa mahdollisesti kynsiä vahingoittavissa töissä/toimissa kumihans- ■
koja.
alkaisuaineita käyttäessäsi kumihanskoja. ■
o sitä kynsinauhoihin ja kynsinau-
58
SNS 45 A1
Page 59

Puhdistus
Turvaohjeet
VAARA
Sähkövirran aiheuttama hengenvaara!
Irro
ta verkkopistoke pistorasiasta ennen laitteen puhdistamisen aloittamista. ►
HUOMIO
Laitevauriot!
Varmista, ettei UV-laitteeseen ► 1
vältetään laitteen vahingoittuminen korjauskelvottomaksi.
Laitteen puhdistaminen
Puhdista UV-laitteen 1 pinnat ainoastaan pehmeällä, kuivalla liinalla.
Tarvikkeiden puhdistaminen
OHJE
Puhdista sivellin ► e välittömästi jokaisen käyttökerran jälkeen.
Sulje aina k
Pidä sivellintä e Finishing-liuoksessa p ja pyyhi se paperipyyhkeeseen.
Pidä siv
meinä.
aikki pullot ja astiat käytön jälkeen. ►
ellintä e sen jälkeen kynsiöljyssä d, jotta sen harjakset pysyvät peh-
FI
tunkeudu puhdistettaessa kosteutta. Näin
SNS 45 A1
OHJE
Poista kynsiöljy ► d jälleen siveltimestä e
Upota sivellin e kynsiöljyn d poistamista var
pyyhi se paperipyyhkeellä
ennen jokaista uutta käyttöä.
ten Finishing-liuokseen p ja
59
Page 60

UV-lamppujen vaihtaminen
VAARA
FI
Sähkövirran aiheuttama hengenvaara!
Irro
ta verkkopistoke pistorasiasta ennen UV-lamppujen vaihdon aloittamista. ►
OHJE
UV-lamput saa vaihtaa ainoastaan samaa tyyppiä oleviin lamppuihin. ►
Katso tarkka lampputyyppi luvusta "Tekniset tiedot".
aa molemmat laitteen sivuissa olevat ruuvit irti ristipääruuvimeisselillä.
Ruuv
Vedä laitteen etusuojus ja UV-lamput varovasti laitteesta ja varo tällöin sivussa
olevaa johtoliitäntää.
Vedä viallinen UV-lamppu varovasti ulos istukasta.
60
SNS 45 A1
Page 61

Työnnä uusi UV-lamppu istukkaan.
Työnnä laitesuojus UV-lamppuineen laitteelle ja varmista, ettei sivussa oleva
johtoliitäntä jää puristuksiin.
Kiinnitä laitteen suojus molemmilla sivussa olevilla ruuv
Vikojen pistaminen
Tässä luvussa annetaan tärkeitä ohjeita laitteen häiriöiden paikallistamiseen ja
poistoon. Noudata ohjeita vaarojen ja vaurioiden välttämiseksi.
Turvaohjeet
VAROITUS
Noudata seuraavia turvaohjeita vaarojen ja aineellisten vahinkojen välttämi-
seksi:
Sähkölaitteiden korjaukset saa suorittaa ammattihenkilöstö, jonka valmis- ►
taja on kouluttanut. Asiattomat korjaukset voivat aiheuttaa huomattavan
an käyttäjälle ja vahinkoja laitteelle.
vaar
eilla.
FI
SNS 45 A1
61
Page 62

Vikojen syyt ja poistaminen
Seuraava taulukko on avuksi pienempien häiriöiden paikallistamisessa ja poistamisessa:
FI
Vika Mahdollinen syy Korjaus
Laitetta ei voida
kytkeä päälle.
UV-geeli s ei
kovetu riittävästi.
Kovettumisen
jälkeen kynsille jää
"hikoilukerros".
Tekokynnet pehmenevät/irtoavat.
Tekokynsissä näkyy
epätasaisuuksia.
Yksi UV-lampuista
ei pala.
Verkkopistoke o ei ole
pistorasiassa.
Pistorasiassa ei ole
jännitettä.
Käsittelyaika on valittu
liian lyhyeksi.
Yksi tai useampi
UV-lamppu on rikki.
UV-geeliä s on
levitetty liikaa.
Kynnet eivät ole olleet
tarkasti UV-lamppujen alla.
"Hikoilukerroksen"
syntyminen johtuu
polymerisaatiosta.
Korkean asetonipitoisuuden
omaavat tuotteet saavat
tekokynnet irtoamaan.
Sivellintä e on painettu
liian kovaa UV-geeliä s
levitettäessä.
UV-geeli s on levitetty
epätasaisesti.
UV-lamppu rikki. Vaihda viallinen UV-lamppu uuteen.
Työnnä verkkopistoke pistorasiaan.
Tarkista talon sulakkeet.
Valitse pidempi käsittelyaika.
Käänny huollon puoleen.
Käytä vähemmän UV-geeliä s.
Pidä kättä oikein UV-laitteessa 1.
Poista "hikoilukerros"
Finishing-liuoksella p.
Älä käytä tuotteita, joiden
asetonipitoisuus on korkea.
Älä paina UV-geeliä s levittäessäsi
sivellintä e liikaa.
Levitä ohut lisäkerros UV-geeliä s ja
koveta se.
62
OHJE
Jos et saa korjattua ongelmaa edellä mainituilla toimenpiteillä, käänny ►
huollon puoleen.
SNS 45 A1
Page 63

Varastointi/Hävittäminen
Varastointi
HUOMIO
Liuotinainepitoisten aineiden aiheuttama terveysvaara!
Liuotinainepitoiset aineet ja niiden höyr
Sulje kaikki mukana tulevien aineiden astiat huolellisesti. ►
Säilytä mukana tulevia aineita lapsilta ulottumattomissa. ►
Jos laitetta ei käytetä pidempään, irrota se virtalähteestä ja varastoi se puh-
taaseen, kuivaan paikkaan ilman suoraa auringonsäteilyä ja lapsilta ulottumattomissa.
astoi kaikki aineet puhtaassa, kuivassa ja viileässä paikassa ilman suoraa
Var
auringonsäteilyä ja lapsilta ulottumattomissa.
Laitteen hävittäminen
Älä missään tapauksessa heitä laitetta tai aineita normaalin talousjätteen sekaan. Tämä tuote on eurooppalaisen direktiivin
2002/96/EC-WEEE (sähkö- ja elektroniikkalaiteromudirektiivi)
alainen.
Anna laite ja aineet hyväksytyn jätehuoltoyrityksen tai kunnallisen jätelaitoksen
hävitettäväksi. Kemialliset aineet ovat ongelmajätettä. Noudata ajankohtaisia voimassa olevia määräyksiä. Ota epävarmoissa tilanteissa yhteyttä jätelaitokseen.
FI
yt voivat johtaa terveyshaittoihin!
SNS 45 A1
63
Page 64

Liite
EY-vaatimustenmukaisuusvakuutusta koskevia ohjeita
FI
Tekniset tiedot
Tämä laite vastaa eurooppalaisen sähkömagneettista yhteensopivuutta koskevan direktiivin 2004/108/EY sekä pienjännitedirektiivin 2006/95/EY perustavia vaatimuksia ja muita
tärkeitä määräyksiä.
Täydellinen alkuperäinen vaatimustenmukaisuusvakuutus on
saatavana maahantuojalta.
Malli Kynsistudio SNS 45 A1
Käyttöjännite 220 - 240 V / ~ 50 Hz
Tehonotto 45 W
Käyttölämpötila +5 ... +45 °C
Kosteus (ei kondensaatiota) 5 - 90 %
Mitat (K x L x S) 23 x 27,5 x 14 cm
Paino 1777 g
UV-lamppujen määrä 4
64
UV-lamppujen tyyppi UV-9W-L 365 nm, 9 W
Laitteen UV-tyyppi UV-A -lamppu
Automaattiset sammutusajat 90, 120 ja 180 sekunnin kuluttua
SNS 45 A1
Page 65

Takuu
Huolto
Laitteen takuu on 3 vuotta ostopäivästä lukien. Laite on valmistettu huolella ja tarkastettu perusteellisesti ennen toimitusta.
Säilytä ostokuitti tositteeksi ostosta. Ota takuutapauksessa puhelimitse yhteyttä
lähimpään huoltopisteeseen. Vain näin voidaan taata tuotteesi maksuton lähettäminen huoltoon.
OHJE
Takuu koskee ainoastaan materiaali- tai valmistusvirheitä, mutta ei kuljetus- ►
vaurioita, kuluvia osia tai särkyvien osien, esim. kytkinten tai UV-lamppujen
vaurioita.
uote on tarkoitettu ainoastaan yksityiseen, ei kaupalliseen käyttöön. Väärä tai
T
asiaton käyttö, väkivallan käyttö ja muut kuin valtuutetun huoltopisteen suorittamat
korjaukset aiheuttavat takuun raukeamisen.
Tämä takuu ei rajoita kuluttajan lakisääteisiä oikeuksia. Takuukorjaus ei pidennä
takuuaikaa. Tämä koskee myös vaihdettuja ja korjattuja osia.
Mahdollisesti jo ostettaessa olemassa olevista vaurioista ja puutteista on ilmoitettava välittömästi pakkauksen avaamisen jälkeen, viimeistään kuitenkin kahden
päivän sisällä ostopäiväyksestä.
Takuuajan päättymisen jälkeen suoritetut korjaukset ovat maksullisia.
Huolto Suomi
Tel.: 010309 3582
E-Mail: kompernass@lidl.fi
IAN 54344
FI
SNS 45 A1
65
Page 66

Maahantuoja
KOMPERNASS GMBH
BURGSTRASSE 21
FI
44867 BOCHUM, SAKSA
www.kompernass.com
66
SNS 45 A1
Page 67

Innehållsförteckning
Introduktion . . . . . . . . . . . . .68
Information om den här
bruksanvisningen . . . . . . . . . . . . . .68
Upphovsrätt . . . . . . . . . . . . . . . . . .68
Ansvarsbegränsning . . . . . . . . . . . .68
Föreskriven användning . . . . . . . . . 68
Varningar . . . . . . . . . . . . . . . . . . . .69
Säkerhet . . . . . . . . . . . . . . . .70
Säkerhetsanvisningar . . . . . . . . . . .70
Grundläggande
säkerhetsanvisningar . . . . . . . . . . . 72
Fara på grund av elektricitet . . . . . . 74
Fara på grund av ultraviolett ljus
(UV-ljus) . . . . . . . . . . . . . . . . . . . . .74
Fara på grund av
lösningsmedelshaltiga substanser . . . . 75
Produkt och tillbehör . . . . . .76
Uppställning och
anslutning . . . . . . . . . . . . . . .77
Säkerhetsanvisningar . . . . . . . . . . .77
Leveransens innehåll och
transportinspektion . . . . . . . . . . . . .77
Uppackning . . . . . . . . . . . . . . . . . . 78
Kassera förpackningen . . . . . . . . . .78
Krav på uppställningsplatsen . . . . .78
Elektrisk anslutning . . . . . . . . . . . . .79
Användning och drift . . . . . .80
Sätta på/Stänga av produkten . . . 80
Funktioner . . . . . . . . . . . . . . . . . . . .80
Användning . . . . . . . . . . . . .81
Välja lösnaglar . . . . . . . . . . . . . . . . 81
Sätta på lösnaglar . . . . . . . . . . . . . 82
Anpassa nagelfog . . . . . . . . . . . . .85
Applicera UV-gel . . . . . . . . . . . . . .86
Härda UV-gel . . . . . . . . . . . . . . . . .87
Fylla i nagelfog . . . . . . . . . . . . . . . .89
Ta bort lösnaglarna . . . . . . . . . . . .89
Nagelvård . . . . . . . . . . . . . . . . . . . 90
Rengöring . . . . . . . . . . . . . . .91
Säkerhetsanvisningar . . . . . . . . . . .91
Rengöra produkten . . . . . . . . . . . . .91
Rengöra tillbehören . . . . . . . . . . . .91
Byta UV-lampor . . . . . . . . . .92
Åtgärda fel . . . . . . . . . . . . . .93
Säkerhetsanvisningar . . . . . . . . . . .93
Orsaker till fel och åtgärder . . . . . . 94
Förvaring/Kassering . . . . . .95
Förvaring . . . . . . . . . . . . . . . . . . . . 95
Kassera produkten . . . . . . . . . . . . .95
Bilaga . . . . . . . . . . . . . . . . . .96
Information om
EG-överensstämmelse . . . . . . . . . . . 96
Tekniska data . . . . . . . . . . . . . . . . .96
Garanti . . . . . . . . . . . . . . . . . . . . . .97
Service . . . . . . . . . . . . . . . . . . . . . . 97
Importör . . . . . . . . . . . . . . . . . . . . . 98
SE
SNS 45 A1
67
Page 68

SE
Introduktion
Information om den här bruksanvisningen
Den här bruksanvisningen ingår som en del i leveransen av Nagelstudio SNS 45
A1 (hädanefter kallad produkten) och den innehåller viktig information om föreskriven användning, säkerhet, anslutning och hantering av produkten.
Bruksanvisningen måste alltid förvaras i närheten av produkten. Den ska läsas och
följas av alla som använder eller åtgärdar fel på produkten.
Ta väl vara på bruksanvisningen och lämna över den tillsammans med produkten
om du överlåter den till någon annan person.
Upphovsrätt
Det här dokumentet skyddas av upphovsrätt.
All form av mångfaldigande eller eftertryck, även delvis, samt återgivning av bil-
derna, även i förändrat tillstånd, är endast tillåten med tillverkarens skriftliga godkännande.
Ansvarsbegränsning
Tillverkaren ansvarar inte för skador som är ett resultat av att anvisningarna i bruksanvisningen inte följs, produkten används på ett sätt som strider mot föreskrifterna,
felaktigt utförda reparationer, otillåtna ändringar på produkten eller för att reservdelar som inte är godkända använts.
Föreskriven användning
Den här produkten ska användas för manikyr inomhus för att sätta på och fi xera
lösnaglar och den är endast avsedd för privat bruk. All övrig eller utökad form av
användning räknas som felaktig.
68
VARNING
Fara på grund av felaktig användning!
Produkten kan vara farlig om den används annat sätt och/eller på ett sätt som
strider mot föreskrifterna.
Använd endast produkten enligt föreskrifterna. ►
Följ de instruktioner som ingår i den här bruksanvisningen när du använder ►
produkten.
SNS 45 A1
Page 69

Det fi nns inga som helst möjligheter att ställa krav på ersättning för skador som är
ett resultat av att apparaten använts på ett sätt som strider mot föreskrifterna, felaktigt utförda reparationer, otillåtna ändringar på apparaten eller för att reservdelar
som inte är godkända använts.
Det är användaren själv som bär hela ansvaret.
Varningar
I den här bruksanvisningen används följande varningar:
En varning på den här nivån innebär att en mycket farlig situation hotar
Om ingenting görs för att åtgärda situationen kan resultatet bli dödsolyckor
eller svåra personskador.
VARNING
En varning på den här nivån innebär att en farlig situation kan
uppstå.
Om ingenting görs för att undvika situationen kan resultatet bli personskador.
SE
FARA!
.
Följ anvisningarna i varningstexten för att undvika dödsolyckor och svåra ►
personskador.
Följ anvisningarna i varningstexten för att undvika personskador. ►
SNS 45 A1
AKTA
En varning på den här nivån innebär risk för materialskador.
Om ingenting görs för att undvik
Följ anvisningarna i varningstexten för att undvika materialskador. ►
OBSERVERA
Under Observera fi nns extra information som ska hjälpa dig att hantera ►
produkten.
a situationen kan resultatet bli materialskador.
69
Page 70

Säkerhet
Den här produkten motsvarar gällande säkerhetsbestämmelser.
Om den används på fel sätt kan den ändå orsaka skador på person och material.
Säkerhetsanvisningar
SE
VARNING - RISK FÖR PERSONSKADOR!
UV-produkter får inte användas av:
personer med hudcancer eller personer med anlag för hudcancer, ►
personer som är extra ljuskänsliga på grund av sin medicinering, ►
personer under 18 år, ►
personer som lätt får fräknar av solen, ►
personer med naturligt rött hår, ►
personer med ovanliga missfärgningar på huden, ►
personer med mer än 16 leverfl äckar (med en diameter på minst 2 mm) ►
på kroppen,
personer med atypiska leverfl äckar (atypiska leverfl äckar är asymmetriska ►
fl äckar med en diameter över 5 mm med varierande pigmentering och
oregelbundna k
personer som bränt sig i solen, ►
personer som alltid bränner sig i solen innan de blir bruna, ►
personer som snabbt blir brända av solen, ►
personer som ofta bränt sig i solen när de var barn, ►
personer som lider eller har lidit av hudcancer eller är extra mottagliga för ►
sjukdomen,
personer med en när
personer som behandlas av läkare och med medicin på grund av ökad ►
ljuskänslighet,
personer som inte alls k
bränna huden,
personer som lätt br
gravida personer. ►
anter; fråga din läkare om du är tveksam),
a anhörig som drabbats av melanom, ►
an bli solbrända eller inte kan bli bruna utan att ►
änner sig om de utsätts för solljus, ►
70
SNS 45 A1
Page 71

Strålningen får inte överskrida den minsta erytemdosen (MED). Om erytem ■
(hudrodnad) uppstår några timmar efter bestrålningen får man avstå från
ytterligare behandlingar. I så fall får man inte använda funktionen igen förrän
en vecka efter att hudrodnaden uppstod.
Om man upplever oväntade biverkningar som t ex klåda inom 48 timmar ■
efter att UV-funktionen använts första gången bör man rådfråga en läkare
sök
innan man för
Följ det rekommenderade tidsschemat för bestrålning med angivelser för ■
varaktighet och intervaller.
Produkten får inte an
Använd bara den typ av lampor som anges. Om du använder UV-lampor från ■
en annan tillverkare eller av en annan typ upphör garantin att gälla.
UV-str
ålning fr
hud och ögon. Dessa biologiska eff ekter beror på kvaliteten och mängden av
strålning samt på den enskilde individens k
Efter alltför mycket strålning kan huden bli bränd. Om man utsätter sig för allt- ■
för mycket UV-strålning av solen eller en UV-lampa kan huden åldras i förtid
och risken för hudcancer ök
UV-strålning. UV-strålning i unga år ökar risken för hudcancer senare i livet.
UV-strålning kan orsaka skador på hud och ögon, t ex förtidigt åldrande och ■
i värsta fall hudcancer. Läs igenom bruksanvisningen noga. Vissa läkemedel
och kosmetik
Oskyddade ögon kan infl ammeras på ytan och i vissa fall kan det uppstå ■
skador på näthinnan om man utsatt den för alltför mycket UV-strålning. Om
ögonen ofta utsätts för UV-ljus k
Om du vet att du är extra känslig eller får allergiska reaktioner av UV-strålning ■
bör du konsultera en läkare innan du börjar.
Vissa sjukdomar och biverkningar av vissa mediciner k
strålnining. Kontakta en läkare om du är tveksam.
Det bör gå minst 48 timmar mellan de två för
er igen.
vändas om timern inte fungerar som den ska. ■
ån solen eller från UV-lampor kan leda till kroniska skador på ■
änslighet.
ar. Den här risken ökar succesivt med tilltagande
a ökar känsligheten för UV-strålning.
an man drabbas av grå starr.
an förvärras av UV- ■
sta behandlingarna. ■
SE
SNS 45 A1
71
Page 72

SE
Undvik att solbada och använda produkten på samma dag. Det kan leda till ■
hudirritaioner.
Följ anvisningarna för strålningstid, intervaller och avstånd till lampan. Annars ■
kan huden bli irriterad.
Kontakta en läk
eller sår och ont på vissa ställen.
Skydda känsliga ställen på huden som t e
från UV-strålning.
Anv
änd inte produkten mer än 5 gånger per dag. Annars kan huden bli ■
irriterad.
Tv
ätta bort kosmetika och solskyddsprodukter innan du använder produkten. ■
Annars kan huden bli irriterad.
OBSERVERA
Om du är tveksam ska du först rådgöra med din läkare om du kan an- ►
vända produkten.
are om du får envisa svulster, bölder, förändrade leverfl äckar ■
x ärr, tatueringar och könsorgan ■
Grundläggande säkerhetsanvisningar
Det går inte att byta anslutningsledning på den här produkten. Om kabeln ■
skadas måste produkten kasseras.
Endast en kundtjänst som auktoriser
under garantitiden, annars gäller inte garantin för ev. senare skador.
ats av tillverkaren får reparera produkten ■
72
AKTA - RISK FÖR MATERIALSKADOR
Skydda produkten från fukt och låt det inte komma in vätska i den. Doppa ►
aldrig ner produkten i vatten, ställ den inte i närheten av vatten och ställ
inga vätsk
Ställ inga föremål på produkten. ►
Använd inte produkten i närheten av öppna lågor (t ex stearinljus). ►
Utsätt inte produkten för direkt solljus. ►
Fatta alltid tag om kontakten när du ska dra ut den ur uttaget, dra aldrig ►
i kabeln.
Dra ut k
efyllda kärl på produkten (t ex vaser).
ontakten ur uttaget vid upprepade störningar och åska. ►
SNS 45 A1
Page 73

VARNING - RISK FÖR PERSONSKADOR
Kontrollera om produkten har några synliga skador innan du använder ►
den. Om produken är skadad eller har fallit i golvet får den inte användas.
Den här produkten sk
sensorisk eller mental förmåga eller bristande erfarenhet och/eller kunskap
om inte någon ansvarig per
användas.
Håll uppsikt över barnen och se till så att de inte leker med produkten. ►
Titta aldrig rakt in i UV-lamporna. Det kan orsaka ögonskador! ►
Förvara alltid produkten och samtliga tillbehör oåtkomligt för barn. ►
Observera anvisningarna på förpackningarna till alla medel du använder. ►
Låt endast en auktoriserad fackverkstad eller vår kundtjänst göra repara- ►
tioner på produkten. Felaktigt utförda reparationer kan utgöra en avsevärd
risk för anv
Defekta delar får bara bytas ut mot reservdelar i original. Det är endast ►
originaldelarna som uppfyller säkerhetskraven.
ändaren. Dessutom upphör garantin att gälla.
a inte användas av personer med begränsad fysisk, ►
son håller uppsikt eller visar hur produkten ska
SE
SNS 45 A1
73
Page 74

SE
Fara på grund av elektricitet
FARA!
Livsfarlig elektrisk ström!
Det är livsf
ledningar och delar!
Följ nedanstående anvisningar för att undvika olyckor på grund av elektrisk
ström:
Det går inte att byta anslutningsledning på den här produkten. ►
Om anslutningsledningen är skadad måste produkten kasseras.
Ställ inte produkten i badrummet. ►
Anslut endast pr
Rör inte vid produkten eller kontakten med våta händer. ►
Sätt aldrig produkten i vatten. ►
Öppna aldrig produktens hölje (utom för att byta UV-lampa). Det fi nns risk ►
för elchocker om man rör vid spänningsförande anslutningar och förändrar
den elektriska eller mek
arligt att komma i kontakt med spänningsförande
odukten till ett säkrat eluttag. ►
aniska konstruktionen.
Fara på grund av ultraviolett ljus (UV-ljus)
VARNING
Risk för personskador på grund av ultraviolett ljus (UV-ljus)
Man kan skada ögonen och få försämrad syn genom att titta rakt in i produktens
tända UV-lampor!
Titta aldrig rakt in i det ultravioletta ljuset från UV-lamporna. ►
Släck UV-lamporna när du inte använder produkten. ►
Den som inte själv använder produkten och i synnerhet barn får inte vara i ►
närheten när produkten är påkopplad.
74
SNS 45 A1
Page 75

Fara på grund av lösningsmedelshaltiga substanser
VARNING
Risk för skador på hälsan av substanser och ångor som inne-
håller lösningsmedel!
Man kan skada sin hälsa genom att andas in substanser och ångor som
innehåller lösningsmedel!
Andas inte in ångor från lösningsmedelshaltiga substanser (t ex aceton). ►
Sörj för tillräckligt god ventialtion när du handskas med produkter som ►
innehåller lösningsmedel.
Observ
era anvisningarna på förpackningen till den lösningsmedelshaltiga ►
produkten.
VARNING
Risk för skador på hälsan på grund av kemiska substanser!
Man kan få allvarliga skador av att handskas med kemikalier på fel sätt!
Uppsök omedelbart en läkare om någon råkar svälja en kemisk substans! ►
Uppsök omedelbart en läkare om det uppstår allergiska reaktioner! ►
Uppsök omedelbart en läkare om en kemisk substans kommer i kontakt ►
med ögon eller slemhinnor!
SE
SNS 45 A1
75
Page 76

Produkt och tillbehör
OBSERVERA
Se bilden på den uppfällbara sidan. ►
SE
1 UV-strålare med 4 inbyggda UV-lampor
På/Av-knapp
2
3 Driftindikator POWER/Klar för drift
4 Driftindikator 180 sekunder
5 Knapp för tidsinställning 180 sekunder
6 Driftindikator 120 sekunder
7 Knapp för tidsinställning 120 sekunder
8 Driftindikator 90 sekunder
9 Knapp för tidsinställning 90 sekunder
0 Startknapp
q Nageltång (för att skära till lösnaglarna)
w Nagelbandspetare (för att peta ner nagelbanden)
e Pensel (för att stryka på UV-gel)
r Slipblock (för att slipa ner ojämnheter)
t Polerfi l fi n (för att polera naglarna "shine")
z Polerfi l medel (för att polera naglarna "condition")
u Polerfi l grov (för att polera naglarna "clean")
i Sandbladsfi l (för att fi la naglarna)
o Lösnaglar (konstgjorda fi ngernaglar)
p Finishingvätska (för slutbehandling och rengöring penseln)
a Nagellim (för att klistra på lösnaglarna GLUE)
s UV-gel (för att bygga upp nageln)
d Nagelolja (för att vårda naglar och nagelband NAIL CARE)
76
SNS 45 A1
Page 77

Uppställning och anslutning
Säkerhetsanvisningar
VARNING
Risk för person- och materialskador när produkten tas i bruk!
Följ nedanstående säkerhetsanvisningar för att minska risken för olyckor:
Förpackningsmaterialet är ingen leksak. Risk för kvävningsolyckor. ►
Observera anvisningarna för krav på uppställningsplatsen och den ele- ►
ktriska anslutningen för att undvika skador på person och material.
Leveransens innehåll och transportinspektion
Produkten levereras med följande delar som standard:
UV-strålare med 4 UV-lampor och strömkabel ●
En grov, en medelgrov och en fi n polerfi l ●
Sandbladsfi l ●
Slipblock ●
Lösnaglar ●
Nagelbandspetare ●
Pensel ●
Nageltång ●
2 burkar UV-gel (UV-Gel) ●
Finishingvätska (Finishing) ●
2 fl askor nagellim (Glue) ●
Nagelolja (Nail Care) ●
Förvaringsväska ●
Bruksanvisning ●
SE
SNS 45 A1
OBSERVERA
Kontrollera att leveransen är komplett och inte har några synliga skador. ►
Om någonting fattas eller om leveransen skadats på grund av bristfällig ►
förpackning eller i transporten ska du vända dig till vår Service Hotline
(se kapitel
Service).
77
Page 78

SE
Uppackning
Ta upp alla delar av produkten och bruksanvisningen ur förpackningen.
Ta bort allt förpackningsmaterial.
Kassera förpackningen
Förpackningen ska skydda produkten från transportskador. Förpackningsmaterialet
har valts med tanke på miljön och de tekniska förutsättningarna för avfallshantering
och kan därför återvinnas .
Genom att återföra förpackningen till kretsloppet kan vi spara på råvaror och
minska sopberget. Kassera förpackningar som inte behövs längre enligt gällande
lokala bestämmelser.
OBSERVERA
Spara helst originalförpackningen under garantitiden så att du kan använda ►
den för att förpacka produkten ordentligt om du skulle behöva skicka in
den för att utnyttja gar
antiförmånerna.
Krav på uppställningsplatsen
För att produkten ska fungera säkert och utan problem måste uppställningsplatsen
uppfylla följande krav:
Ställ produkten på ett stabilt, horisontellt och torrt underlag. ■
Ställ inte produkten i våta utrymmen eller där det stänker vatten. ■
Ställ inte produkten direkt bredvid ett värmeelement eller värmestrålare. ■
Eluttaget måste vara låttåtkomligt så att det går snabbt att dra ut kontakten ■
vid nödsituationer.
78
SNS 45 A1
Page 79

Elektrisk anslutning
FARA!
Livsfarlig elektrisk ström!
Det är livsf
ledningar och delar!
Följ nedanstående säkerhetsanvisningar för att undvika olyckor på grund av
elektrisk ström:
Använd inte produkten om kontakten eller kabeln skadats. ►
Anslut endast produkten till ett säkrat eluttag. ►
Rör inte vid produkten eller kontakten med våta händer. ►
Låt inte produkten komma i kontakt med vatten. ►
Öppna aldrig produktens hölje. Det fi nns risk för elchocker om man rör vid ►
spänningsförande anslutningar och förändrar den elektriska eller mekaniska
ko
Jämför uppgifterna för anslutning (spänning och frekvens) på produktens typ-
skylt med ditt elnäts innan du ansluter produkten. De måste stämma överens,
annars k
Försäkra dig om att produktens kabel är oskadd och inte ligger över heta ytor
och/eller vassa kanter.
Se till så att kabeln inte spänns för hår
Låt inte kabeln hänga ner över ett hörn (snubbelrisk).
Sätt kontakten i ett eluttag.
arligt att komma i kontakt med spänningsförande
nstruktionen.
an produkten skadas.
SE
t eller bockas.
SNS 45 A1
79
Page 80

SE
Användning och drift
Det här kapitlet innehåller viktig information om hur produkten ska hanteras och
användas.
OBSERVERA
Se kapitel ► Produkt och tillbehör.
Sätta på/Stänga av produkten
Sätt på UV-strålaren 1 genom att fl ytta På/Av-knappen 2 till läge I.
Driftindikatorn 3 tänds och produkten är klar för drift.
Stäng av UV-strålaren 1 igen genom att sätta Pa/A
Driftindikatorn 3 slocknar.
Funktioner
Det går att ställa in tre olika behandlingstider på produkten:
90 sekunder (knapp ■ 9)
120 sekunder (knapp ■ 7
180 sekunder (knapp ■ 5
)
)
v-knappen 2 på läge 0.
80
Tänd UV-lamporna genom att try
Välj en behandlingstid genom att tr
9, 7 eller 5.
OBSERVERA
UV-lamporna släcks automatiskt när den inställda tiden är slut. ►
Tryck på tidsinställningsknapp 9, 7 eller 5 och på startknappen 0
för varje ny behandling så som beskrivs ovan.
cka på startknappen 0.
ycka på motsvarande inställningsknapp
igen
SNS 45 A1
Page 81

Användning
AKTA
Risk för materialskador på grund av lim och UV-gel.
Nagellimmet a och UV-gelen s är my
kläder och mattor.
Täck arbetsytan med papper eller en handduk innan du börjar. ►
OBSERVERA
Ställ UV-strålaren ► 1 på ett övertäckt och stabilt underlag.
Ställ aldrig nagellimmet ► a
Utsätt aldrig nagellimmet ► a och UV-gelen s för direkt solljus.
Välja lösnaglar
OBSERVERA
Första gången man använder produkten kan det vara bra att ha någon ►
mer erfaren person till hjälp.
Ta av alla sm
Tvätta och torka händerna innan du börjar. Vi rekommenderar att händerna ►
tvättas ca 15 - 20 minuter före behandlingen för att all fukt under fi ngernaglarna ska hinna försvinna.
Välj en lösnagel o som är böjd på samma sätt som din naturliga nagel, så
långt det är möjligt.
cket svåra att få bort från möbler,
SE
och UV-gelen s i närheten av UV-strålaren 1.
ycken från händerna innan du börjar. ►
o
SNS 45 A1
Välj en lösnagel o som sluter exakt mot kanten och ligger parallellt mot
sidorna av din egen nagel.
81
Page 82

Om det behövs kan du klippa av änden på lösnageln o med nageltången
q så att avslutet (pil) täcker ca en tredjedel av din naturliga nagel.
SE
Fri kant ovanför fi ngerspetsen Nagelbädd
Nagelplatta Nagelband
OBSERVERA
Om lösnageln ► o är för liten kan den lätt br
lösnagel o och fi la till sidorna.
Upprepa samma procedur tills alla naglar har klippts av till rätt längd och
fi lats till rätt form.
Sätta på lösnaglar
OBSERVERA
Kom ihåg att naglarna absorberar fukt när de kommer i kontakt med vatten. ►
Därför måste de vara helt torra innan man börjar.
Smörj inte in häderna med handcreme eller liknande, det får inte fi
något fett på naglarna om lösnaglarna o ska fästa or
Peta ner nagelbandet med nagelbandspetaren w och ta bort den trans-
parenta huden från nagelplattan .
Behandla naglarna med slipblocket r tills de slutar glänsa.
Ta bor
t slipdammet med en pappersservett.
Gnid in naglarna med fi nishingvätska p så att de sista r
och fett för
o
ytas av. Välj därför en större
nnas ►
dentligt.
esterna av damm
svinner.
82
SNS 45 A1
Page 83

OBSERVERA
Rör absolut inte vid nagelytorna med fi ngrarna, då kommer det fett på dem ►
igen och lösnaglarna fastnar inte ordentligt!
Sätt en liten droppe nagellim a
stryk ut den med hjälp av nagellimmets a fl aska. Håll lösnageln o nedåt-
vänd så att limmet a inte rinner ner mot den övre delen av lösnageln o.
OBSERVERA
Du måste sticka hål i öppningen på fl askan med nagellim ► a med ett
spetsigt föremål, t e
i fl askan med nagellim a vid ett senare tillfälle sticker du bara upp hålet
igen.
Sätt nu lösnageln o i vinkel mot din nagel så att lösnagelns o kant ligger
mot k
anten av din egen nagel.
Fäll sedan upp lösnageln o och tryck den lätt mot din naturliga nagel så att
e
ventuella luftbubblor trycks ut.
x en nål, innan den kan användas. Om det blir stopp
på den undre delen av lösnageln
a
o och
SE
SNS 45 A1
o
OBSERVERA
Torka bort överfl ödigt nagellim ► a med en bomullspinne eller pappersser
vett.
83
Page 84

SE
Håll fast lösnageln o i det här läget i 10 - 12 sekunder och pressa fast den
mot din naturliga nagel. Se till så att det inte uppstår några luftbubblor och
att lösnageln sitter alldeles rakt.
OBSERVERA
Det får inte uppstå några tomrum där det kan samlas smuts mellan lösnageln ►
och din riktiga nagel.
ollera att det inte bildas några luftbubblor eller vita fl äckar under ►
Kontr
lösnageln o. Ta i så fall genast bort lösnageln o och försök igen.
När du limmat fast alla lösnaglarna o klipper du av dem till önskad längd
med nageltången
trycker för långsamt kan det hända att lösnageln o splittras.
Fila till naglarnas form med sandbladsfi len i.
OBSERVERA
Var försiktig när du fi lar, lösnaglarna ► o är bara fästa med nagellim a
Om du inte är van vid långa naglar klipper du av dem lite först för att ►
undvika att stöta emot så att lösnageln o lossnar.
q. Tryck ihop nageltången q i ett enda moment. Om du
q
.
84
SNS 45 A1
Page 85

Anpassa nagelfog
Fila försiktigt vid övergången mellan lösnagel o och naturlig nagel med
sandbladsfi len i för att anpassa den till den riktiga nagelns kontur. Fila bara
på lösnageln o! Akta så att du inte skadar din egen nagel.
Fila försiktigt till naglarnas sidor tills de är raka och inte sticker upp med
sandbladsfi len i.
epa pr
Uppr
Ta bort slipdammet med en pappersservett.
oceduren på alla naglarna.
i
SE
SNS 45 A1
85
Page 86

SE
Applicera UV-gel
Ta penseln e med en liten mängd UV-gel s och stryk av ena sidan av
penslen e igen mot kanten av burken.
Stryk ett tunt lager UV-gel s över hela nageln. Ta lite mer UV-gel s
den undre delen för att jämna ut skillnaden mellan lösnagel och naturnagel.
Dessutom är övergången mellan den konstgjorda och den naturliga nageln
känsligare för belastning och stötar och kräver därför mera UV-gel s.
OBSERVERA
Tryck inte för hårt med penseln ► e, då bildas det ränder ef
Var extra noga när du modellerar upp det första lagret UV-gel ► s, eftersom
gör nagelns senare form. Bygg upp en så naturlig nagel som möjligt.
det av
Håll ett avstånd på ca 1 mm till nagelbandet när du strycker på gel.
OBSERVERA
Om du ändå råkar få UV-gel ► s på nagelbandet tar du bort den med t e
en bomullspinne innan den härdas.
Upprepa samma procedur på alla naglar.
på
ter penseln e.
x
e
o
86
OBSERVERA
Kontrollera att du strukit på ett jämnt skikt UV-gel ► s över nageln.
SNS 45 A1
Page 87

Härda UV-gel
OBSERVERA
Se kapitel ► Användning och drift.
Sätt på UV-strålar
T
ryck på startknappen 0; UV-lamporna tänds.
Välj sedan en behandlingstid genom att tr
knapp 9, 7 eller 5. Vi rek
första härdningen.
Håll handen med naglarna uppåt i öppningen på UV-strålaren 1 under den
inställda tiden.
Behandla tumnaglarna separat, ef
dan när man håller handen uppåtvänd i öppningen.
Stryk på mer UV-gel s
beskrivits tidigare.
OBSERVERA
När den inställda behandlingstiden är slut släcks UV-lamporna automatiskt. ►
Man måste trycka på startknappen ► 0 och tidsinställningsknapp (9, 7
eller 5) igen för varje n
en 1 med PÅ/AV-knappen 2.
ycka på motsvarande inställnings-
ommenderar en tid på 180 sekunder för den
tersom UV-ljuset bara träff ar dem från si-
och låt också det här
y behandling.
das i UV-strålaren 1 så som
SE
SNS 45 A1
Untersök varje nagel när du applicerat och härdat alla skikt för att se om det
fi nns ojämnheter, små repor eller spår på ytan.
Om ytan är ojämn stryk
härdas i 120 eller 90 sek
strukits på).
er du på ännu ett tunt lager UV-gel s och låter det
under (beroende på hur mycket UV-gel s som
87
Page 88

SE
Naglarna kan kännas lite klibbiga även efter att det sista lagret gel har härdats
(polymerisationsskikt, ytan "svettas").
Fukta en bomullstuss eller en pappersservett med fi nishingvätska p och torka
av naglarna med den.
Slipa alla naglarna matta med slipblocket r.
Använd slutligen polerfi larna u, z och t för att polera alla naglar tills
ytan glänser
r
.
t
z
u
88
SNS 45 A1
Page 89

Fylla i nagelfog
OBSERVERA
Eftersom de naturliga naglarna fortsätter växa kan fogen till lösnageln ► o
resa sig ef
bandet och kanten emellanåt.
Det måste göras ungefär varannan till var tredje vecka. ►
Använd sandbladsfi len i för att slipa ner den härdade gelens k
Slipa sedan med slipblocket r tills naglarna slutar glänsa.
Stryk sedan på UV-gel s
OBSERVERA
Se föregående kapitel ► Applicera UV-gel, Härda UV
ter en tid. Därför måste man fylla på gel i sprickan mellan nagel-
Ta bort lösnaglarna
AKTA
Risk för skador på den naturliga nagelytan!
Om lösnaglarna o bryts av för hår
Bryt inte loss lösnageln ► o från din naturliga nagel.
Ta bara bort lösnaglarna ► o enligt följande beskrivning.
och härda.
t kan den naturliga nagelytan skadas!
-gel
anter.
SE
SNS 45 A1
Klipp förs
Fila sedan loss lösnaglarna o med sandbladsfi
Polera sedan dina egna naglar med de olika polerfi larna u, z och t.
Stryk till sist på lite nagelolja d
q
t av naglarna så mycket som möjligt med nageltången q.
len i.
på naglarna.
t
z
i
u
89
Page 90

SE
Nagelvård
Fila fogar och nagelkanter regelbundet. ■
Polera naglarna en gång i veckan. ■
Smörj in naglarna med nagelolja ■ d v
vänd handcreme regelbundet. ■
An
Stryk på ett undre och ett övre skikt om du använder nagellack. ■
Använd inga medel som innehåller aceton för att ta bort nagellack, då lossnar ■
lösnaglarna och skadas.
An
v
änd gummihandskar om du arbetar med tvätt- eller blekmedel. ■
Använd gummihandskar vid alla aktiviteter som kan skada lösnaglarna. ■
arje kväll och gnid in den i nagelbanden.
90
SNS 45 A1
Page 91

Rengöring
Säkerhetsanvisningar
FARA!
Livsfarlig elektrisk ström!
Dra alltid ut k
AKTA
Risk för skador på produkten!
För
säkra dig om att det inte kan komma in fukt i UV-strålaren ► 1 när den
rengörs, då kan den bli totalt förstörd.
Rengöra produkten
Rengör endast UV-strålarens 1 utsida med en mjuk och torr trasa.
Rengöra tillbehören
OBSERVERA
Rengör penseln ► e direkt efter varje användning.
Stäng alltid alla fl
Doppa ner penseln e i fi nishingvätska p och tork
servett.
Doppa sedan ner penseln e i nagelolja d så att borsten hålls mjuk
ontakten ur uttaget innan du rengör produkten. ►
SE
askor och burkar direkt efter användningen. ►
a av den med en pappers-
a.
SNS 45 A1
OBSERVERA
Ta alltid bort nageloljan ► d från penseln e innan du använder den igen.
Doppa ner penseln e
torka sedan av den med en pappersservett.
i fi nishingvätska p för att få bort nageloljan d
och
91
Page 92

Byta UV-lampor
FARA!
Livsfarlig elektrisk ström!
Dra alltid ut k
ontakten ur uttaget innan du byter UV-lampor! ►
SE
OBSERVERA
UV-lamporna får bara ersättas med lampor av samma typ. Vilken lamptyp ►
som ska användas anges i kapitel Tekniska data.
Skruva loss de båda skruv
mejsel.
Dra försiktigt av den främre skyddskåpan med UV-lamporna och akta kabel-
förbindelsen på sidan.
Dra försiktigt ut den defekta UV-lampan ur fattningen.
arna på sidan av produkten med en stjärnskruv-
92
SNS 45 A1
Page 93

Stick in en ny UV-lampa i fattningen.
Skjut tillbaka skyddskåpan med UV-lampor och akta så att kabelförbindelsen
på sidan inte kläms fast.
Skruva fast skyddsk
åpan igen med de båda skruvarna på sidan.
Åtgärda fel
Det här kapitlet innehåller viktig information om hur man lokaliserar och åtgärdar
störningar. Följ anvisningarna för att undvika olyckor och skador.
Säkerhetsanvisningar
VARNING
Följ nedanstående säkerhetsanvisningar för att undvika olyckor och material-
skador:
Endast behöriga elektriker som utbildats av tillverkaren får utföra repara- ►
tioner på elektriska apparater. Felaktigt utförda reparationer kan innebära
värda risker för användaren och orsaka skador på produkten.
avse
SE
SNS 45 A1
93
Page 94

Orsaker till fel och åtgärder
Följande tabell ska hjälpa dig att lokalisera och åtgärda mindre störningar
:
Fel Möjliga orsaker Åtgärd
SE
Det går inte att
sätta på apparaten.
UV-gelen s härdas
inte tillräckligt bra.
Efter härdningen
har det bildats ett
klibbigt skikt på
naglarna.
Lösnaglarna blir
mjuka/upplösta.
Lösnaglarnas yta
är ojämn.
En UV-lampa lyser
inte.
Kontakten sitter inte i
uttaget.
Det fi nns ingen spänning
i eluttaget.
Du har valt en för kort
behandlingstid.
En eller fl era UV-lampor
är defekta.
Du har lagt på för mycket
UV-gel s.
Naglarna befann sig inte
exakt under UV-lamporna.
Ytan "svettas" på grund
av polymerisation.
Lösnaglar löses upp om
man använder produkter
som innehåller mycket
aceton.
Du tryckte för hårt med
penseln e när du strök
på UV-gel s.
UV-gelen s har strukits
på ojämnt.
UV-lampan är defekt. Byt ut den defekta UV-lampan.
Sätt kontakten i ett eluttag.
Kontrollera säkringarna i huset.
Ställ in en längre behandlingstid.
Kontakta kundservice.
Använd mindre UV-gel s.
Håll handen rätt i UV-strålaren 1.
Ta bort det klibbiga skiktet med
fi nishingvätska p.
Använd inte produkter som
innehåller mycket aceton.
Tryck inte så hårt med penseln e
när du stryker på UV-gel s.
Lägg på ytterligare ett tunt lager
UV-gel s och härda.
94
OBSERVERA
Om problemet inte går att lösa med hjälp av dessa tips ska du vända dig ►
till vår kundtjänst.
SNS 45 A1
Page 95

Förvaring/Kassering
Förvaring
AKTA
Risk för skador på hälsan på grund av lösningsmedelshaltiga
subst
anser!
Lösningsmedelshaltiga substanser och ångor från dessa kan skada hälsan!
Stäng alla behållare till de produkter som medföljer noga. ►
Förvara alla medföljande produkter oåtkomligt för barn. ►
Om du inte ska använda produkten under en längre tid bryter du strömtillför-
seln och förvarar den på ett rent och torrt ställe skyddat från direkt solljus och
utom räckhåll för barn.
örvara alla produkter som medföljer på ett rent, torrt och svalt ställe utan
F
direkt solljus och utom räckhåll för barn.
Kassera produkten
Den här produkten och de medel som medföljer får absolut inte
kastas bland de vanliga hushållssoporna. Den här produkten faller
under EU-direktiv 2002/96/EC-WEEE (Waste Electrical and Electronic
Equipment).
Lämna in produkten och alla medel till ett godkänt återvinningsföretag eller din
kommunala avfallsanläggning för kassering. De kemiska preparaten ska sorteras
som farligt avfall. Följ gällande föreskrifter. Kontakta din avfallsanläggning om du
har några frågor.
SE
SNS 45 A1
95
Page 96

SE
Bilaga
Information om EG-överensstämmelse
Den här produkten uppfyller de grundläggande kraven och
övriga relevanta föreskrifter i det europeiska direktivet för elektromagnetisk tolerans 2004/108/EC samt lågspänningsdirektivet 2006/95/EC.
En fullständig försäkran om överensstämmelse i original kan
beställas av importören.
Tekniska data
Modell Nagelstudio SNS 45 A1
Driftspänning 220 - 240 V / ~ 50 Hz
Eff ektförbrukning 45 W
Drifttemperatur +5 - +45 °C
Fuktighet (utan kondensation) 5 - 90 %
Mått (H x B x D) 23 x 27,5 x 14 cm
Vikt 1777 g
Antal UV-lampor 4
96
Typ av UV-lampor UV-9W-L 365 nm, 9 W
UV-typ UV-A lampa
Automatiska frånkopplingstider efter 90, 120 och 180 sekunder
SNS 45 A1
Page 97

Garanti
För den här apparaten lämnar vi tre års garanti från och med inköpsdatum. Den
här apparaten har tillverkats med omsorg och genomgått en noggrann kontroll
innan leveransen.
Var god bevara kassakvittot som köpbevis. Vi ber dig kontakta vår kundtjänst per
telefon vid garantifall. Endast då kan produkten skickas in fraktfritt.
Service
OBSERVERA
Garantin gäller endast för material- eller fabrikationsfel, den täcker inte ►
transportskador, förslitningsdelar eller skador på ömtåliga delar som t ex
e och UV-lampor.
brytar
Produkten är endast avsedd för privat bruk och får inte användas yrkesmässigt.
Vid missbruk och felaktig behandling, användande av våld och vid ingrepp som
inte gjorts av vår auktoriserade servicefi lial upphör garantin att gälla.
Den lagstadgade garantin begränsas inte av denna garanti. Garantitiden förlängs
inte för att man utnyttjar garantin. Det gäller även utbytta och reparerade delar.
Eventuella skador och brister som existerar redan vid köpet måste rapporteras så
snart apparaten packats upp, dock senast två dagar efter köpet.
När garantitiden är slut kostar det pengar att reparera apparaten.
Service Sverige
Tel.: 0770 930739
E-Mail: kompernass@lidl.se
IAN 54344
Service Suomi
Tel.: 010309 3582
E-Mail: kompernass@lidl.fi
IAN 54344
SE
SNS 45 A1
97
Page 98

SE
Importör
KOMPERNASS GMBH
BURGSTRASSE 21
44867 BOCHUM, GERMANY
www.kompernass.com
98
SNS 45 A1
Page 99

Indholdsfortegnelse
Indledning . . . . . . . . . . . . . 100
Informationer til denne
betjeningsvejledning . . . . . . . . . . .100
Ophavsret . . . . . . . . . . . . . . . . . . .100
Ansvarsbegrænsning . . . . . . . . . .100
Anvendelsesområde . . . . . . . . . . .100
Advarselsinfo . . . . . . . . . . . . . . . .101
Sikkerhed . . . . . . . . . . . . . 102
Sikkerhedsanvisninger . . . . . . . . .102
Grundlæggende
sikkerhedsanvisninger . . . . . . . . . .104
Fare på grund af elektrisk strøm . . .106
Fare på grund af ultraviolet lys
(UV-lys) . . . . . . . . . . . . . . . . . . . .106
Fare på grund af substanser,
der indeholder opløsningsmidler .107
Apparat og tilbehør . . . . 108
Opstilling og tilslutning . . . .109
Sikkerhedsanvisninger . . . . . . . . .109
Leverede dele og
transporteftersyn . . . . . . . . . . . . . .109
Udpakning . . . . . . . . . . . . . . . . . .110
Bortskaff else af emballagen . . . . .110
Krav til opstillingsstedet . . . . . . . .110
Eltilslutning . . . . . . . . . . . . . . . . . .111
Betjening og funktion . . . . 112
Tænd/sluk . . . . . . . . . . . . . . . . . . .112
Funktioner . . . . . . . . . . . . . . . . . . .112
Anvendelse . . . . . . . . . . . . 113
Valg af negletipper . . . . . . . . . . .113
Påsætning af negletipper . . . . . . .114
Tilpasning af negleenden . . . . . .117
Behandling med UV-gel . . . . . . . .118
Hærdning for UV-gel . . . . . . . . . .119
Opfyldning . . . . . . . . . . . . . . . . . .121
Fjernelse af negletipper . . . . . . . .121
Pleje . . . . . . . . . . . . . . . . . . . . . . .122
Rengøring . . . . . . . . . . . . . 123
Sikkerhedsanvisninger . . . . . . . . .123
Rengøring af apparatet . . . . . . . .123
Rengøring af tilbehør . . . . . . . . . .123
Skift af UV-lamper . . . . . . 124
Afhjælpning af fejl . . . . . . 125
Sikkerhedsanvisninger . . . . . . . . .125
Fejlårsager og -afhjælpning . . . . .126
Opbevaring/
bortskaff else . . . . . . . . . . . 127
Opbevaring . . . . . . . . . . . . . . . . .127
Bortskaff else af apparatet . . . . . .127
Tillæg . . . . . . . . . . . . . . . . . 128
Info til EFoverensstemmelseserklæringen. . .128
Tekniske data . . . . . . . . . . . . . . . .128
Garanti . . . . . . . . . . . . . . . . . . . . .129
Service . . . . . . . . . . . . . . . . . . . . .129
Importør . . . . . . . . . . . . . . . . . . . .130
DK
SNS 45 A1
99
Page 100

DK
Indledning
Informationer til denne betjeningsvejledning
Denne betjeningsvejledning er del af neglestudiet SNS 45 A1 (efterfølgende kaldet
apparatet) og giver vigtige informationer om anvendelsesområdet, sikkerheden,
tilslutningen samt betjeningen af apparatet.
Betjeningsvejledningen skal altid opbevares i nærheden af apparatet. Den skal
læses og anvendes af alle personer, som skal betjene og reparere apparatet.
Opbevar denne betjeningsvejledning, og lad den følge med apparatet, hvis du
giver det videre til andre.
Ophavsret
Denne dokumentation er ophavsretligt beskyttet.
Enhver kopiering eller eftertryk - også i uddrag - samt videregivelse af billederne -
også i ændret tilstand - er kun tilladt med producentens skriftlige tilladelse.
Ansvarsbegrænsning
Producenten påtager sig intet ansvar for skader på grund af manglende overholdelse af vejledningen, anvendelse, som ikke hører ind under anvendelsesområdet,
forkerte reparationer, ændringer, som er foretaget uden tilladelse samt anvendelse
af ikke-tilladte reservedele.
Anvendelsesområde
Dette neglestudie er kun beregnet til påsætning og fastgøring af negletipper til
manicure i lukkede rum og kun til privat brug. Al anden anvendelse betragtes som
værende uden for anvendelsesområdet.
100
ADVARSEL
Fare ved anvendelse uden for anvendelsesområdet!
Der kan være farer forbundet med apparatet, hvis det anvendes til områder,
det ikke er beregnet til.
Brug udelukkende apparatet til det anvendelsesområde, det er beregnet til. ►
Følg fremgangsmåden, som er beskrevet i denne betjeningsvejledning. ►
SNS 45 A1
 Loading...