

Page 1
KITCHEN TOOLS
3C
Microwave SMW 900 EDS A1
Microwave
Operating instructions
Mikrobølgeovn
Betjeningsvejledning
KOMPERNASS GMBH
BURGSTRASSE 21 · D-44867 BOCHUM
www.kompernass.com
ID-Nr.: SMW900EDSA1-04/10-V3
Page 2
SMW 900 EDS A1
4
5
1
2
3
r
e
w
t
6
7
8
9
0
q
Page 3

INDEX PAGE
Intended Use 3
Important safety instructions 3
Items supplied 6
Technical Data 6
Before you begin 7
Basic principles of microwave cookery..........................................................................................7
Use suitable cookware.....................................................................................................................7
Description of the appliance 8
Commissioning 8
Installation of the appliance............................................................................................................8
Preparing the appliance ..................................................................................................................8
Inserting the turntable 3...................................................................................................................9
Operation 9
Setting the Clock...............................................................................................................................9
Dormant mode..................................................................................................................................9
Setting the kitchen timer.................................................................................................................10
Child protection system .................................................................................................................10
Query functions..............................................................................................................................10
Heating and cooking 10
Microwave operation....................................................................................................................10
Grill function "Top heat"................................................................................................................12
Grill function "Top and bottom heat"...........................................................................................12
Grill function "Bottom heat"...........................................................................................................12
Combination cooking process "Grill"...........................................................................................12
Convection operation....................................................................................................................14
Convection operation with preheating ........................................................................................14
Combination cooking process "Convection"...............................................................................14
Defrosting 15
Defrosting by weight......................................................................................................................15
Defrosting by time..........................................................................................................................16
Auto menu 16
Starting the Auto Menu .................................................................................................................16
Memory function............................................................................................................................19
Select a start time...........................................................................................................................20
- 1 -
Page 4

Recipes 21
Meat patty ......................................................................................................................................21
Baking frozen ready-made breadrolls ........................................................................................21
Potato gratin ...................................................................................................................................21
Muffins ............................................................................................................................................22
Cleaning and Care 22
Troubleshooting 23
Disposal 24
Warranty and Service 24
Importer 24
Read these operating instructions carefully before using the appliance for the first time and preserve this
booklet for later reference. Pass this booklet on to whoever might acquire the appliance at a future date.
- 2 -
Page 5
MICROWAVE
Intended Use
This appliance is intended for the heating up and
preparation of foodstuffs according to the described
procedures.
Any modifications to the appliance shall be deemed
to be improper use and implies substantial danger
of accidents. The manufacturer declines to accept
responsibility for damage(s) arising out of usage
contrary to the instructions specified below.
This appliance is not intended for commercial use.
Important safety instructions
Carefully read these safety and operating instructions
before the first use and preserve them for future reference.
Attention!
Warnings regarding damages to the appliance.
Danger! / Risk of injury!
Warning about physical injuries and electric shock!
Risk of fire!
Warning about risks of fire.
Notice!
Note – Hints and tips for using the microwave.
Safety precautions for the avoidance of excessive contact with microwave energy
• Do not try to operate the appliance while the
door is open, as this can lead to you coming
into contact with a potentially harmful dose of
microwave radiation. It is also important not to
break open or manipulate the safety locks .
• Do not jam anything between the front of the
appliance and the door, and make sure that
there is no residual food or cleaning agent
on the seals.
Risk of injury!
• If the door or the door seal is damaged, UNDER
NO CIRCUMSTANCES may you continue to
use the appliance. Arrange for it to be repaired
as soon as possible by qualified specialists.
• Never attempt to repair the appliance yourself.
Removal of the appliance housing could cause
the release of microwave energy. Arrange for
the repair to be carried out only by qualified
specialists.
• This appliance is not intended for use by individuals
(including children) with restricted physical, physiological or intellectual abilities or deficiences in
experience and/or knowledge unless they are
supervised by a person responsible for their
safety or receive from this person instruction in
how the appliance is to be used. Children
should be supervised to ensure that they do
not play with the appliance.
• Children may only be allowed to use the ap-
pliance without supervision if appropriate instructions have been given that have provided
the child with the knowledge to use the cooker
in a safe manner and to understand the risks
of improper use.
- 3 -
Page 6

• Only use this appliance for its intended purpose as
described in this manual. Do not use any caustic
chemicals or vapours in this appliance. This microwave oven is especially designed for the heating,
cooking, grilling or drying of foodstuffs.
It is not designed for use in industrial or laboratory areas.
• Do not operate the microwave oven if the power
cable or plug are damaged. To avoid the risk of
injury, arrange for damaged power cables or
plugs to be exchanged by qualified specialists.
• Keep children well away from the microwave
oven when it is in use. Risk of Burns!
• UNDER NO CIRCUMSTANCES should you
remove the microwave oven housing.
• Should the lamp in the interior of the microwave
oven need replacing, arrange for this to be
done by a qualified specialist.
• NEVER touch the microwave oven door, housing,
ventilation openings, accessories or the dinnerware directly after the grill, combi or automatic
menu process. The parts will be very hot. Allow
them to cool down before cleaning them.
• Ensure that the plug is at all times easily accessible,
so that it can be quickly removed in the event of
an emergency.
• People fitted with a heart pacemaker should
consult their doctor about the possible risks of
using a microwave oven before taking one into
use.
• Do not allow the power cable to hang from a
table or work surface. Children could pull on it.
• After they have been warmed up, always open
containers, popcorn-bags etc. with the opening
pointing away from your body. Escaping steam
could lead to scalds.
• NEVER stand directly against the microwave
oven when opening the door. Escaping steam
could lead to scalds.
• Do not fry in the microwave. Hot oil can damage
parts of the appliance and utensils and even
cause skin burns.
• ALWAYS shake-up or stir warmed up baby glasses
or bottles! The contents could have heated up
unevenly and the baby could be burned/scalded
by them. AT ALL EVENTS, check their temperature
BEFORE feeding them to the baby!
• Do not modify the microwave oven.
• Microwave radiation is dangerous! Maintenance
and repairs requiring the removal of access covers, which are intended for protection against
contact with microwave radiation, are to be
carried out by trained specialists only.
• Before feeding babies, check the temperature
of the foodstuff/drink so as to avoid potentially
lethal burns or scalds.
Cooking utensils may become hot from the heat
emitted by the food, therefore you may require
oven gloves to touch them. In this case, a check
should also be made to ensure that the cooking
utensils are suitable for use with the microwave
oven.
Attention! Hot surfaces!
Risk of fire
• NEVER leave the microwave oven unattended
if you are heating foodstuffs packed in plastics
or paper.
• NEVER place flammable materials close to the
microwave oven or the ventilation openings.
• Remove ALL metallic closures from the packaging
of the foodstuff that you intend to warm up.
Risk of fire!
• When making popcorn, use only popcorn-bags
suitable for microwave ovens.
- 4 -
Page 7

• Do not use the microwave oven to warm up
cushions filled with kernels, cherry stones or
gels. Risk of fire!
• Do not use the microwave oven for storing foodstuffs or other objects.
• Do not exceed the cooking times detailed by
the manufacturer.
• Do not place any objects on the microwave
oven when it is in use. The ventilation openings
would be blocked!
• Do not place the microwave oven adjacent to
other appliances discharging heat, for example,
an oven.
• Clean the microwave oven thoroughly after
warming up greasy foods, especially if they
were not covered. Allow the appliance to cool
down completely before cleaning it. Residues
such as fat or grease cannot be allowed to
collect on the heating elements of the grill.
They could possibly ignite.
• Do not thaw frozen fat or oil in the microwave
oven. The fat or oil could ignite.
• Do not use an external timing switch or a separate
remote control system to operate the appliance.
Attention! Appliance Damage!
• Do not use the microwave oven when it is empty.
The only exception is for the initial commissioning
(see chapter "Commissioning").
• NEVER insert foreign objects into the ventilation
openings or the door safety locks.
• Do not use metallic utensils which reflect microwaves and lead to sparking. Do not place tins
in the microwave oven.
• Do not place plastic containers in the microwave
oven immediately after a grill, combi or automatic menu process. The plastic could melt.
• This microwave oven may not be located in areas
with high humidity or where moisture could
collect.
Liquids and other foods must not be heated in airtight
containers, as these may explode and damage the
appliance.
• Do not lean on the microwave oven door.
• Insufficient cleanliness of the appliance could
lead to the destruction of the upper surfaces,
which themselves influence its useful lifespan
and could possibly also lead to dangerous
situations.
Danger
• NEVER submerse the appliance, the power
cable or the plug in water or other fluids.
• Keep the power cable away from hot surfaces.
Do not lead it in front of the microwave oven
door. The heat could damage the cable.
• NEVER pour fluids into the ventilation openings
or the safety locks. Should fluids ever enter them,
IMMEDIATELY switch the microwave oven off
and remove the plug from the mains power
socket. Arrange for the microwave oven to be
checked by qualified specialists.
Safety tips
• To minimize the risk of fire in the microwave:
When heating food in plastic or paper containers,
always keep an eye on the microwave oven
when it is in operation, as these materials can
easily catch fire.
When heating drinks in the microwave, bubbling
may be delayed when the drink boils. Therefore,
be careful when handling the container. To avoid
sudden simmering:
- 5 -
Page 8
- If possible, place a glass rod in the fluid for as
long as it is being heated.
- To avoid an unexpected reboiling, leave the
fluid to stand in the microwave oven for ca.
20 seconds after being warmed up.
• Puncture the skins of potatoes, sausages or
similar. Otherwise, they could explode.
• Proceed with caution when warming up fluids.
Use only open containers, so that any air bubbles
produced can escape.
• Should you notice smoke, switch the appliance
off or remove the plug from the socket and keep
the door closed to suffocate any possible flames.
• Eggs in their shells and hard-boiled eggs should
not be heated in the microwave oven as they could
explode, even on completion of the heating process.
Food with thick skins, such as potatoes, whole
pumpkins, apples and chestnuts must be pricked
before cooking.
• Do not transport the microwave oven when it is
in use.
Earthing information/correct installation
This appliance must be earthed. This appliance is
to be connected only to a correctly earthed power
socket. An individual circuit, solely for the connection of the microwave oven, is recommended.
Neither the manufacturer nor the dealer can accept
liability for damage to the microwave oven or injury
to persons resulting from failure to comply with the
instructions for electrical connection.
Interference with other appliances
The operation of the microwave may cause interference on your radio, television or similar appliances.
If such interferences should occur, they may be reduced
or corrected by the following remedial measures:
• Clean the door and the seal of the microwave.
• Re-align the receiver antenna of your radio or
television.
• Position the microwave in a different place to
the receiver.
• Move the microwave away from the receiver.
• Plug the microwave into another wall socket.
The microwave and the receiver should be
connected to different circuits.
Items supplied
Microwave oven
Turntable
Grill stand
Operating instructions
Concise Information
Danger: Improper use of the earthing connector
could increase the risk of an electric shock.
Take note: Should have any questions about
earthing or the instructions on the use of this
electrical appliance, please consult an electrician or a maintenance technician.
Technical Data
Power rating: 230 - 240 V
50 Hz
Maximum power consumption: 2000 W
Microwave: 1400 W
Double Grill: 1700 W
Top Grill: 1200 W
Convection: 2000 W
Maximum power
output Microwave: 900 W
Microwave frequency: 2450 MHz
- 6 -
~
Page 9
Before you begin
Basic principles of microwave cookery
• Arrange the food with consideration.
• The thickest parts near the edges.
• Pay attention to the cooking time. Select the
shortest possible stated cooking time and increase as required. Food that is cooked too
long can begin to smoke or catch fire.
• Cover the food during cooking with a lid suitable
for microwave cookery. The lid prevents splashing
and helps in the even cooking of the food.
• While cooking, turn the food in the microwave
once so that items such as chicken or hamburgers
are cooked more quickly.
• Large pieces of food, such as joints of meat,
must be turned at least once.
• Completely re-arrange foods such as meatballs
after half the cooking time. Turn them and
move the meatballs from the middle of the
cookware to the edge.
Use suitable cookware
• The ideal material for a microwave oven is
microwave-permeable, allowing the energy
to penetrate the container to heat the food.
Microwaves cannot permeate metal. For this
reason metal containers and cookware may
not be used.
• When using the microwave for heating do not
use products made of recycled paper. These
can contain minute fragments of metal, which
can generate sparks and/or fires.
• We recommend the use of round/oval cookware instead of square or oblong containers,
as food in corner areas tends to overcook.
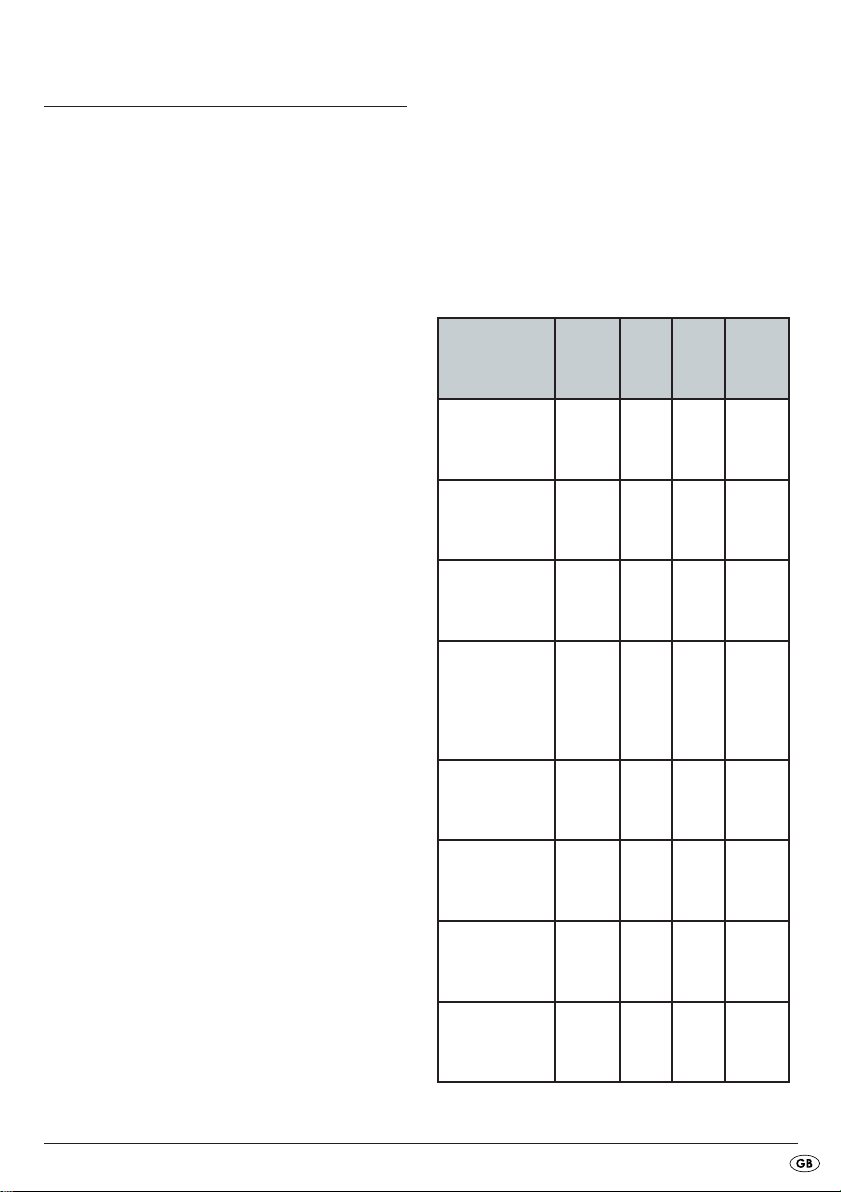
The following list provides general hints to
assist you in selecting the correct cookware.
Micro-
Cookware
Heat-resistant
glass
Non-heatresistant glass
Heat-resistant
ceramics
Plastic crockery
suitable for
microwave
Kitchen roll Yes No No No
wave
oven
Yes Yes Yes Yes
No No No No
Yes Yes Yes Yes
Yes No No No
Grill
Con-
vection
Combination
Metal
tray/plate
Grill stand No Yes Yes No
Alufoil & Foil
containers
- 7 -
No Yes Yes No
No Yes Yes No
Page 10
Risk of fire!
NEVER use the grill stand or other metallic objects
when you are using the appliance in the microwave
mode or in the combination cooking process.
Metals reflect the microwave radiation and it leads
to the generation of sparks. This could cause a fire
and irreparably damage the appliance!
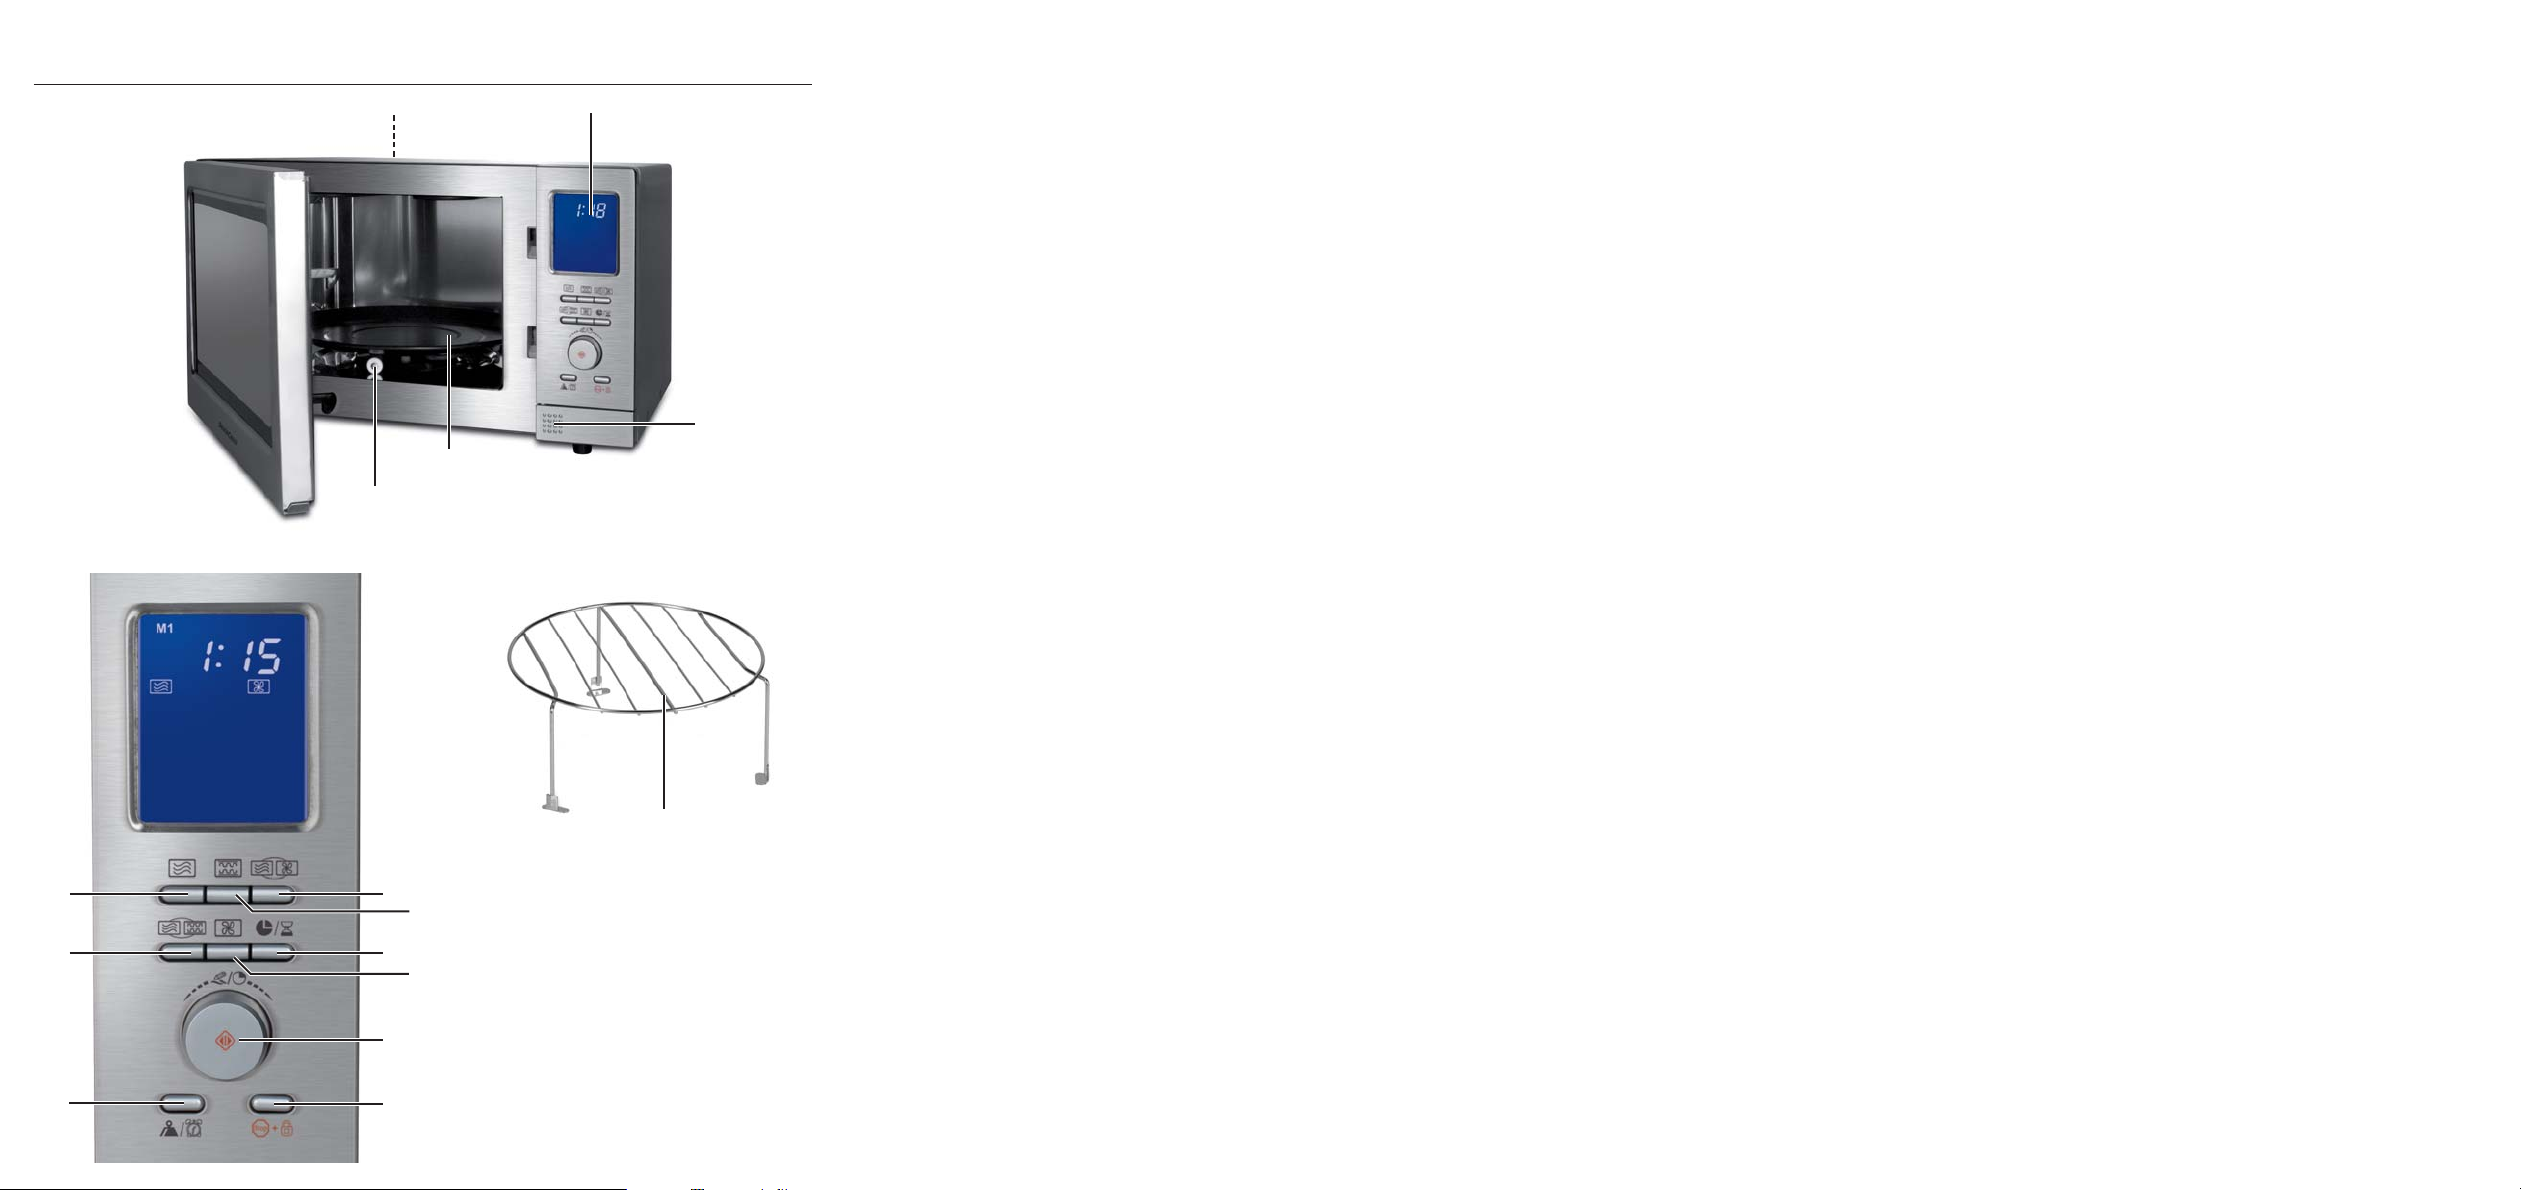
Description of the appliance
1 Display
2 Door opener button
3 Turntable
4 Rollers
5 Cold air intake
6 Combination button Microwave - Convection
7 Grill Button
8 Clock/Timer button
9 Convection button
0 Control dial/Button Start/Quickstart
q Stop/Child safety
w Weight/Kitchen timer button
e Combination button Microwave - Grill
r Operation (Microwave) button
t Grill stand
Commissioning
Installation of the appliance
Risk of fire!
This microwave oven is not suitable for installation
in a kitchen cabinet. In closed cabinets sufficient
ventilation for the appliance cannot be assured.
The appliance could be damaged and there would
be the additional risk of a fire!
• Select an even surface offering sufficient space
for the adequate ventilation of the appliance:
Ensure that you maintain a minimum distance
of 10 cm from neighbouring walls/surfaces.
Make sure that the door of the microwave
oven can be opened easily.
Maintain a gap of at least 20 cm above the
microwave oven.
• Ensure that the electrical plug is accessible
without problem, so that in case of danger it
can be easily reached and removed.
• Do not remove the pads underneath the microwave oven.
• Do not block the ventilation openings 5. If you
do, it could cause damage to the appliance.
• Install the appliance as far away as possible
from radios and televisions. The operation of
the microwave oven can cause malfunctions of
radio and televsision reception.
Warning:
Do not install the microwave above a cooker or any
other appliance generating heat. Installation at such
a location could cause damage to the appliance
and thereby a subsequent lapse of the warranty
provisions.
Preparing the appliance
• Remove all packaging materials and any
protective film on the surface of the housing.
• Insert the plug into a mains power socket.
Use a 230 - 240 V, 50 Hz mains power socket
with a 16 A fuse. It is recommended that the
microwave oven is powered from its own ring
main. If you are unsure about how to connect
the microwave oven, consult a specialist.
- 8 -
Page 11
Before the first regular usage of the microwave oven
the appliance must be heated up to remove any
remaining production residues.
After inserting the mains plug into the socket, open
the microwave door.
Without foodstuffs or accessories (turntable 3 and
grill stand t), switch the appliance on in the mode
Grill:
• Press the button Grill 7 twice. With this,
you have chosen to use the grill with top and
bottom heat. In the display 1 the symbol
and the symbol appear.
• Adjust the control dial 0 to a cooking time
of 10 minutes.
• Press button Start/Quickstart 0 to start
the grilling process.
Take note:
On the first usage, the generation of light smoke
and a slight smell can occur, this is due to the production residues. This is unharmful. Provide for sufficient ventilation. For example, open a window.
Operation
Setting the Clock
After inserting the mains plug into the socket, open
the microwave door once. The display 1 indicates
"1:00".
1. Press the button Clock 8 . In the display
appears 1 "Hr 24". Press the button Clock 8
once again should you wish to switch to
the 12-hour mode.
2. By turning the control dial 0 programme in the
current hour.
3. Press the button Clock 8 . The minutes
value blinks.
4. By turning the control dial 0 programme in the
current minute.
5. When the correct time is programmed in, press
the button Clock 8 . The colon blinks
to indicate that the clock is running.
To read off the current time when the microwave
oven is in operation, press the button Clock 8 ;
the time will then be indicated in the display 1 for
approx. 4 seconds.
• After 10 minutes, the appliance switches itself
off automatically. Wait until it has cooled down
completely.
• Remove the plug from the mains power socket
then, after cleaning the appliance with a moist
cloth, dry it carefully.
Inserting the turntable 3
• Place the turntable 3 centrally on the axle in the
cooking area. Ensure that it slides completely
onto the axle and is firmly seated.
Dormant mode
The microwave automatically switches itself into a
dormant mode if no keys are pressed for a long
time. The display lighting is first dimmed slightly.
After about 4 minutes the display lighting switches off.
Press any key to exit the dormant mode and press the
appropriate button to call up the required function.
- 9 -
Page 12
Setting the kitchen timer
The microwave oven is provided with a kitchen timer
which you can use independent of the microwave
operation.
1. Press the button Weight/Kitchen timer w
when the appliance is in standby
mode. In the display 1 appears "0:00" and
the symbol .
2. Now set the desired time using the control dial 0.
You can select any time range from 10 seconds
to 95 minutes.
3. Press the button Start/Quickstart 0 . the
appliance emits an acoustic signal. The count
down begins. After approx. 3 seconds the
current time is shown once again. The cooking
timer progresses further in the background.
If you wish to check the progress of the kitchen
timer, press the Weight/Kitchentimer button w
. It appears for a brief period in the
kitchen timer.
Once the set time has expired, signal tones sound
until the door is opened.
Query functions
Query the time during operation
During the cooking process press the button Clock
8 . The time appears in the display 1 for
approx. 3 seconds.
Query the power level operation
During the cooking process press the button Operation r . In the display 1 the activated operational level appears for approx. 3 seconds.
Heating and cooking
Note
This microwave is equipped with a cooling function.
This means that after a cooking or grill process that
takes at least two minutes, the fan of the machine
continues running for about 3 minutes. This is not
a malfunction of the appliance! The rapid cooling
helps to prolong the life of the appliance.
Child protection system
Engage this setting to prevent accidental activation
by children and other persons not familiar with the
operation of the appliance.
The symbol for Child safety appears in the display 1 and, for as long as this function is activated,
the appliance cannot be put into operation.
• Press and hold the button Stop/Child safety q
until a signal tone sounds and the symbol
for Child safety appears in the display 1.
The buttons and the control dial now no longer
have a function.
• To deactivate Child safety, press and hold the
Stop/Child safety button q until a sig-
nal tone sounds and the symbol for Child safety
extinguishes.
Note
For hygienic reasons, never place the food you want
to cook in the microwave directly onto the turntable 3.
Always place it in dishes suitable for microwave
ovens. Excepted from this is the preparation of fresh
pizza (see chapter "Automatic Menu").
Microwave operation
Note
During the cooking process, drops of water can
form on the oven door or on the housing. This is
normal and is not an indication of a malfunction.
When the appliance has cooled down, wipe the
moisture off with a dry cloth.
- 10 -
Page 13
Risk of fire!
NEVER use the grill stand t or other metallic objects
when you are using the appliance in the microwave
mode. Metals reflect the microwave radiation and it
leads to the generation of sparks. This could cause
a fire and irreparably damage the appliance!
Selecting the operation level
• Press the button Operation r the ap-
propriate number of times to set the required
power.
• 1x for 900 Watt power (P900).
• 2x for 800 Watt power (P800).
• 3x for 700 Watt power (P700).
• 4x for 600 Watt power (P600).
• 5x for 500 Watt power (P500).
• 6x for 400 Watt power (P400).
• 7x for 300 Watt power (P300).
• 8x for 200 Watt power (P200).
• 9x for 100 Watt power (P100).
The operational level is indicated in the display 1
(e. g. P800 at 800 Watt power).
Programming the cooking time
After you have selected the power level, programme
in the desired cooking time:
• Turn the control dial 0 until the desired
cooking time has been programmed in.
The increments for setting the time with the
control dial 0 are as follows:
• from 0 sec. to 5 min: in 10 second increments
• from 5 to 10 min: in 30 second increments
• from 10 to 30 min: in 1 minute increments
• from 30 to 95 min: in 5 minute increments
Starting the cooking process
When you have set the power and cooking time,
you can start the cooking process:
To start the cooking process, press button Start/
Quick start 0 . In the display 1 the symbols
for microwave operation and "M1" appear.
The programmed time counts backwards.
Interrupting the cooking process
Press the button Stop q once to interrupt a
cooking process. The appliance interrupts the cooking
process and stops countdown of the remaining time.
Press the button Start/Quickstart 0 to continue
the cooking process.
Abort the cooking process
Press the button Stop q twice to stop the
cooking process. The appliance reverts to standby
mode.
Quick start
With this function you can immediately begin cooking at 900 W power for 30 seconds (or longer, up
to 95 minutes).
• Press the button Start/Quickstart 0
once. In the display 1 appear the symbols for
microwave operation and "M1", as well
as " :30". The microwave starts the cooking
process for 30 seconds. The countdown begins.
Should you wish to cook for longer than 30 seconds,
repeatedly press the button Start/Quickstart 0
until the desired time is reached.
The time levels are apportioned as follows:
• from 30 sec. to 5 min: in 30 second increments
• from 5 Min. to 95 Min: in 1 minute increments
Aborting/stopping an input process
Press the button Stop q once to cancel or
end the input of data. The appliance reverts to
standby mode.
- 11 -
Page 14
Grill function "Top heat"
This grill function is eminently suitable for baked-over
sandwiches and gratins.
When grilling with "top heat", always use the metal
stand t. To achieve an optimal grilling result.
Always place the grillstand t on the turntable 3.
1. Press the button Grill 7 once to activate
the grill function "top heat".
In the display 1 appear the symbols for the
grill function "top heat" and "Gr 1".
2. Set the required cooking time with the rotary
switch 0. The maximum possible cooking time
setting is 95 minutes.
3. Press button Start/Quickstart 0 to start
the grill function.
Grill function "Top and bottom heat"
This grilling function can be used for thin slices of
meat, steaks, meatballs, sausage or pieces of chicken.
When grilling with "top and bottom heat", always
use the metal stand t. To achieve an optimal grilling
result.
Always place the grillstand t on the turntable 3.
1. Press the button Grill 7 twice to activate
the grill function "top and bottom heat".
In the display 1 appear the symbols for the grill
function "top heat" , for the grill function
"bottom heat" and "Gr 2".
2. Set the required cooking time with the rotary
switch 0. The maximum possible cooking time
setting is 95 minutes.
3. Press button Start/Quickstart 0 to start
the grill function.
Grill function "Bottom heat"
When grilling with "bottom heat", always use the metal stand t. To achieve an optimal grilling result.
Always place the grillstand t on the turntable 3.
1. Press the button Grill 7 three times to activate the grill function "bottom heat".
In the display 1 appear the symbols for the
grill function "bottom heat"
2. Set the required cooking time with the rotary
switch 0. The maximum possible cooking time
setting is 95 minutes.
3. Press button Start/Quickstart 0 to start
the grill function.
nd "Gr 3".
a
Combination cooking process "Grill"
This function combines the grill function and the normal
microwave operation. During the combination mode, a
certain amount of time for cooking and the remaining
time for grilling is carried out automatically and in
one process. You may notice a quiet clicking noise
when the oven is switching between modes.
Risk of fire!
NEVER use the grill stand t or other metallic objects,
when you are using the appliance in the combination cooking process. Metals reflect the microwave
radiation and it leads to the generation of sparks.
This could cause a fire and irreparably damage the
appliance!
- 12 -
Page 15
Combination 1
In Combination 1 the microwave element amounts
to 30% and the grill element amounts to 70% of the
cooking time. This is suitable for, for example fish or
gratins.
The microwave function and the grill function "top
heat" are used.
1. Press the combination button Microwave – Grill
e once to activate combination 1. In
the display 1 appears , ,and "C 1".
2. Set the required cooking time with the rotary
switch 0. The maximum possible cooking time
setting is 95 minutes.
3. To start, press the button Start/Quickstart 0
.
Combination 2
In Combination 2 the microwave element amounts
to 55% and the grill element amounts to 45% of the
cooking time. This is suitable for, for example omlettes,
puddings or lasagne. The microwave function and
the grill function "top heat" are used.
1. Press the combination button Microwave – Grill
e twice to activate combination 2. In
the display 1 appears , , and "C 2".
2. Set the required cooking time with the rotary
switch 0. The maximum possible cooking time
setting is 95 minutes.
3. To start, press the button Start/Quickstart 0
.
1. Press the combination button Microwave – Grill
e three times to activate combination
3. In the display 1 appears ,
,
,
and "C 3".
2. Set the required cooking time with the rotary
switch 0. The maximum possible cooking time
setting is 95 minutes.
3. To start, press the button Start/Quickstart 0
.
Combination 4
In Combination 4 the microwave element amounts
to 55% and the grill element amounts to 45% of the
cooking time. This is suitable for, for example, poultry
dishes. The microwave function and the grill functions "top and bottom heat" are used.
1. Press the combination button Microwave – Grill
e four times to activate combination 4.
In the display 1 appears ,
and
,
"C 4".
2. Set the required cooking time with the rotary
switch 0. The maximum possible cooking time
setting is 95 minutes.
3. To start, press the button Start/Quickstart 0
.
Combination 3
In Combination 3 the microwave element amounts
to 30% and the grill element amounts to 70% of the
cooking time. This is suitable for, for example potatoes.
The microwave function and the grill functions "top
and bottom heat" are used.
- 13 -
Page 16

Convection operation
When cooking with convection, hot air circulates in
the oven. Hot air is especially recommended for
cooking souffles or crunchy foods.
Selecting the temperature
• Press the button Convection 9 the ap-
propriate number of times to set the required
temperature.
• 1x for 230 °C
• 2x for 215 °C
• 3x for 200 °C
• 4x for 185 °C
• 5x for 170 °C
• 6x for 155 °C
• 7x for 140 °C
• 8x for 125 °C
• 9x for 110 °C
• 10x for 95 °C
The temperature level is indicated in the display 1
(e. g. 230C for a temperature of 230°C ).
Programming the cooking time
After you have selected the temperature level, programme in the desired cooking time:
• Turn the control dial 0 until the desired cooking
time has been programmed in.
Starting the cooking process
When you have set the temperature and cooking
time, you can start the cooking process:
To start the cooking process, press button Start/
Quick start 0 . In the display 1 the symbols
for hot air operation and "M1" appear.
The programmed time counts backwards.
When the set time has elapsed, "End" and "Hot
will appear alternately in the display 1. A signal
tone is heard repeatedly.
Convection operation with preheating
You can also preheat your microwave before you
start a cooking process:
1. Select the desired temperature by pressing the
Convection 9 button the required number
of times.
2. To preheat, press the button Start/Quickstart
0 . In the display 1 appears "30:00"
and the time counts down. As soon as the set
temperature is reached, a signal tone is heard.
3. Open the door and insert the food to be cooked
into the microwave.
4. Set the required cooking time with the rotary
switch 0. The maximum possible cooking time
setting is 95 minutes.
5. To start, press the button Start/Quickstart 0
.
Combination cooking process
"Convection"
This function combines the convection function with
the normal microwave operation. With this, for
example, meat is juicy and tender but still crisp.
Risk of fire!
NEVER use the grill stand t or other metallic objects,
when you are using the appliance in the combination cooking process. Metals reflect the microwave
radiation and it leads to the generation of sparks.
This could cause a fire and irreparably damage the
appliance!
1. Press the combination button Microwave –
Convention 6 :
- 1 x, to activate the combination with 200°C,
- 2 x, to activate the combination with 170°C,
- 3 x, to activate the combination with 140°C,
- 4 x, to activate the combination with 110°C.
In the display 1 appear the selected temperature,
"M1" and the symbols and .
- 14 -
Page 17

2. Set the required cooking time with the rotary
switch 0. The maximum possible cooking time
setting is 95 minutes.
3. To start, press the button Start/Quickstart 0
.
4. When the food you have selected appears in
the display 1, press the button Weight/Kitchen
Timer w repeatedly until the desired
weight is shown in the display 1.
The following weights can be set:
Defrosting
Defrosting by weight
Take note:
Always place the food to be defrosted on dishes
suitable for use in a microwave oven. Never directly
onto the turntable 3!
This function enables you to defrost meat, poultry and
fish with ease. The defrosting time and the power level
are calculated and set automatically once you have
entered the weight.
1. In standby mode turn the control dial 0 anti-
clockwise until "A -12" and appear in the
display 1.
2. Press the button Start/Quickstart 0 .
3. Now select the food to be defrosted by turning
the control dial 0. In the display 1 appears:
"d-01" and for "Beef"
„d-02“ and for "Pork“
"d-03" and for "Pizza"
"d-04" and for "Poultry"
"d-05" and for "Fruit/Vegetables"
"d-06" and for "Fish"
"d-07" and for "Potates"
"d-01"/ / "Beef" 100 - 1800g
„d-02“/ / "Pork" 100 - 1800g
"d-03"/ / "Pizza" 100 - 900g
"d-04"/ / "Poultry" 100 - 1800g
"d-05"/ /"Fruit/Vegetables" 100 - 900g
"d-06"/ / "Fish" 100 - 1800g
"d-07"/ / "Potatoes" 100 - 900g
5. When the required weight appears in the display 1, press the button Start/Quickstart 0
. The appliance automatically calculates
the required defrosting period.
Take note:
To ensure optimum defrosting, it is necessary to turn
the food during the thawing process. The appliance
reminds you of the need to turn by sounding signal
tones and "turn" appears on the display 1. Open
the appliance door, turn the foodstuff and then reclose the door. Press the button Start/Quickstart 0
to continue the thawing process.
If you do not want to turn the foodstuff, just wait for
the signal tones to stop. The appliance will automatically continue the thawing process. We recommend
that you do turn the food. This will ensure an even
thawing.
- 15 -
Page 18

Defrosting by time
Auto menu
Take note:
Always place the food to be defrosted on dishes
suitable for use in a microwave oven. Never directly
onto the turntable 3!
1. In standby mode turn the control dial 0 anti-
clockwise until "A -13" and appear in the
display 1.
2. Press the button Weight/Kitchen Timer w
.
3. Set the desired time using the control dial 0.
4. Press button Start/Quickstart 0 to start
the defrosting operation. The count down begins.
Take note:
To ensure optimum defrosting, it is necessary to turn
the food during the thawing process. The appliance
reminds you of the need to turn by sounding signal
tones and "turn" appears on the display 1. Open
the appliance door, turn the foodstuff and then reclose the door. Press the button Start/Quickstart 0
to continue the thawing process.
If you do not want to turn the foodstuff, just wait for
the signal tones to stop. The appliance will automatically continue the thawing process. We recommend
that you do turn the food. This will ensure an even
thawing.
For foods that are intended to be prepared in the
Auto Menu modus it is not necessary to programme
in the period of the cooking process and the power
level. It is quite sufficient to enter which type of food
is to be cooked/boiled, and its weight.
Note
The microwave calculates the time/operational level
for fresh foods. Frozen foods are not cooked with
the timings set by the microwave (except for automatic
programme "Pizza").
If needs be, defrost frozen foods with the defrost
programme beforehand (see section "Defrosting").
Starting the Auto Menu
1. Turn the control dial 0 (in standby operation)
slowly to the left to call-up the automatic menu
mode. In the display 1 a numer appears (e.g.
"A - 02" for automatic programme 2 (sausage))
and the symbol "sausage". By turning the control dial 0 select the automatic menu appropriate for your food.
- 16 -
Page 19

Dis-
Symbol Foodstuff Weight
play
A-01 Beef 200 - 1400g
2. Press, if necessary repeatedly, the button
Weight/Kitchen Timer w until the
desired weight appears in the display 1.
3. Press the button Start/Quickstart 0 to
commence the cooking process.
A-02 Sausage 100 - 500g
P1 150-450g
A-03 Pizza
A-04 Beverages 200 - 500ml
A-05 Pork 200 - 1400g
A-06 Fish 200 - 1200g
A-07 Entrees 300 / 500g
A-08 Warming 300 - 700g
A-09 Poultry 400 - 1400g
P2 150-450g
P3 150-450g
Note
To obtain uniform warming or cooking, some foodstuffs should be turned after 1/2 - 2/3 of the period
of the cooking process The microwave oven will stop
automatically after this time, four signal tones sound
and "Turn" appears on the display 1.
Dis-
Symbol Foodstuff
play
A-01 Beef
A-02 Sausage
A-05 Pork
A-06 Fish
A-09 Poultry
turn over
after.
1/2 of
the time
2/3 of
the time
1/2 of
the time
2/3 of
the time
2/3 of
the time
A-10
A-11 Potatoes 100 - 800g
A-12
A-13
Fruit/
Vegetables
Defrosting by
weight
Defrosting by
time
100 - 1000g
-
-
• Turn the foodstuff. Proceed cautiously with the
possibly already hot food.
• Press the button Start/Quickstart 0 to continue
the cooking process.
Note
If you do not want to turn the foodstuff, just wait for
the signal tones to stop. The appliance will automatically continue the cooking process. We recommend
that you do turn the food. This will ensure even cooking.
- 17 -
Page 20

Note
Should the meal not be properly cooked on completion of the auto-menu, continue cooking for a couple
of minutes with the Quick start programme.
Risk of fire!
For the programmes with enabled Grill function
(A-01, A-02, A-03, A-05, A-06, A-09), under NO
circumstances may you use covers or non-heat-resistant
dishes, as they can melt or catch fire!
Risk of injury!
After a cooking process, the turntable 3 is very hot!
You should therefore always use an oven cloth or
heat resistant oven gloves when removing it from the
cooking area.
Take note:
Take note that size, shape and the type of foodstuff
help determine the result of the cooking process.
Example 1:
Proceed as follows to cook 400 g of vegetables or
fruit:
1. In standby mode turn the control dial 0 slowly
to the left until "A-10" appears in the display 1.
2. Press the button Weight/Kitchen Timer w
four times. 400 g appears in the
display 1.
3. Press the button Start/Quickstart 0 to
commence the cooking process.
Example 2:
To heat 300 ml water, proceed as follows:
1. In standby mode turn the control dial 0 slowly
to the left until "A-04" appears in the display 1.
2. Press the button Weight/Kitchen Timer w
three times. 300 g appears in the
display 1.
3. Press the button Start/Quickstart 0 to
commence the cooking process.
Example 3:
To heat 300 g of appetizers, proceed as follows:
1. In standby mode turn the control dial 0 slowly
to the left until "A-07" appears in the display 1.
2. Press the button Weight/Kitchen Timer w
once. 300 g appears in the display 1.
3. Press the button Start/Quickstart 0 to
commence the cooking process.
Baking Pizza
With the automatic programme "Pizza" you can
prepare delicious pizza in the microwave.
1. In standby mode turn the control dial 0 slowly
to the left until "A-03" appears in the display 1.
2. Press the button Start/Quickstart 0 .
3. Using the control dial 0 select the matching
pizza programme:
• "P-01" for deep-frozen pizza,
temperature approx. -18°C
Weight 150 g–450 g
("P-01" appears in the display 1).
• "P-02: for chilled pizza,
temperature approx. 5°C,
Weight 150 g–450 g
("P-02" appears in the display 1).
• "P-03" for fresh pizza,
temperature approx. 20°C,
Weight 150 g–450 g
("P-03" appears in the display 1).
4. Repeatedly press the button Weight/Kitchen
Timer w until the desired weight
appears in the display 1.
- 18 -
Page 21

5. Press the button Start/Quickstart 0 to
commence the cooking process.
Note
If you cook fresh pizza, you can place it directly on
the turntable 3. It will be very crispy. Ensure that
the edge of the pizza does not extend up to the
walls of the cooking area during cooking.
Memory function
Use the memory function if you wish to carry out
up to 3 processes, one after the other. .
After finishing a process, the acoustic signal sounds
once and the next process starts immediately.
Note
The automatic menu programmes defrosting by
time and defrosting by weight cannot be saved.
Example:
Proceed as follows to cook a deep-frozen, 450 g
heavy pizza:
1. In standby mode turn the control dial 0 slowly
to the left until "A-03" appears in the display 1.
2. Press the button Start/Quickstart 0 .
3. Using the control dial 0 select the programme
"P -01".
4. Press the button Weight/Kitchen Timer w
repeatedly until 450g appears in the
display 1.
6. Press the button Start/Quickstart 0 to
commence the cooking process. The appliance
calculates the time required automatically.
To save three events in succession, proceed as
follows:
1. Programme in the first operation. For instance,
a microwave process, at 900 W power, for 2
minutes. "2:00", "M1" and appear in the
display 1. Do NOT then press the button
Start/Quickstart 0 !
2. Programme in the second operation. For example,
a grilling, with bottom heat, for 3 minutes. "3:00",
"M2" and appear in the display 1. Do
NOT then press the button Start/Quickstart 0
!
3. Programme in the third operation. For example,
a convection process, at 200°C, for 2 minutes.
"2:00", "M3" and appear in the display
1.
4. To start, press the button Start/Quickstart 0
.
The microwave starts the first operation. When an
operation is completed, you will hear a signal tone
and the oven automatically starts the next operation.
- 19 -
Page 22

Select a start time
With this programme you can preset a specific start
time for the cooking or grilling of the foodstuff. If the
programming is carried out correctly, the appliance
starts automatically at the programmed time.
Take note: The clock must be correctly set to be
able to select the function "Selecting the start
time"..
1. Enter the desired cooking program:
• For microwave operation: Press the button
Operation r the appropriate number of
times to set the required power level. Programme
the cooking time with the control dial 0.
• For grilling: Press the button Grill 7 until
the desired grill function is activated. Set the required cooking time with the control dial 0.
• For convection operation: Press the button Convection 9 the appropriate number of times
to set the required temperature. Programme the
cooking time with the control dial 0.
• For the combination process "Convection":
Press the combination button Microwave –
Convention 6 the appropriate number of times to set the required temperature.
Programme the cooking time with the control
dial 0.
• For the combination process "Grill":
Press the combination button Microwave –
Grill e the appropriate number of times to set the grilling process. Programme the
cooking time with the control dial 0.
• For an automatic menu: Select the desired automatic menu using the control dial 0. Repeatedly
press the button Weight/Kitchen Timer w
until the desired weight appears in the
display 1.
2. Press the button Clock/Timer 8 . The
display 1 shows the currently set time and the
hour digit flashes.
3. Turn the control dial 0 to programme in the
hours.
4. Press the button Clock/Timer 8 , now
the minute figure flashes.
5. Turn the control dial 0 to programme in the
minutes.
6. Press the button Start/Quickstart 0 0 .
The hourglass appears in the display 1.
The microwave oven automatically starts the
cooking process at the programmed time.
Take note:
To query the saved start time, press the button
Clock/Timer 8 .
The saved start time will be shown in the display 1.
To delete the saved start time and thus cancel the
programmed procedure, press the button Clock/
Timer 8 so that the set start time appears
in the display 1. Then, while the start time is to be
seen in the display 1, press the button Stop/Child
safety q. The hourglass in the display 1
extinguishes. The saved procedure is deleted.
- 20 -
Page 23

Recipes
Meat patty
• Shape approx.125g of minced beef into a patty
(about 75mm in diameter, height 35mm).
• Locate the meat patties evenly on a plate suitable
for microwave ovens and then place it on the
turntable 3.
Potato gratin
Ingredients
• 750 g waxy potatoes, peeled
• 300 g cream
• 100 g grated cheese with a fat content of 25%
to 30% fat in dry matter.
• Spices to taste (e.g., salt/pepper)
Use a microwave-proof, round dish with a lid, height
5-6 cm and a diameter of about 22 cm.
Preparation
The best results are achieved with the following selfprogrammed combination (See also the chapter
memory function):
• Process 1:
Convection 230°C, 4:00 Mins.
• Process 2:
Microwave 900 W power , 5:30 Mins.
• Process 3:
Convection 230°C, 2:00 Mins (depending on
personal taste, a time of up to 4:00 min can
also be be possible).
Baking frozen ready-made breadrolls
• For the baking of breadrolls, select the convec-
tion function.
• Locate 3-4 rolls on an appropriate dish for mi-
crowave ovens then place it on the turntable 3.
Pre-heating of the microwave is not required.
Select the following settings for the baking process:
• Convection 170°C, Duration: 12 Minutes
If you wish to bake additional rolls directly afterwards, shorten the baking time for these by about
1-2 minutes, as the appliance is now already preheated.
Preparation
• Cut the potatoes into slices approximately
3-4 mm thick.
• Lay about half of the potatoes in the casserole
dish in the style of roof tiles.
• Sprinkle the potatoes with about half of the
cheese.
• Then add half of the spices, and about 150 g
of cream.
• Lay the rest of the sliced potatoes on it, also in
the style of roof tiles.
• Sprinkle the remaining cheese over the potatoes
and pour the remaining cream over them.
• Sprinkle the remaining spices over the gratin.
• Cover the dish with the lid and place it in the
centre of the turntable 3.
The best results are achieved with the following selfprogrammed combination:
• Process 1:
Microwave 900 W power, 10:00 Mins.
• Process 2:
Convection 230 °C, 10:00 Mins.
• Process 3:
Microwave 900 W power, 10:00 Mins.
A pre-heating is not required.
- 21 -
Page 24

Muffins
Ingredients
This recipe yields 10 to 20 muffins.
• Baking margarine (80% fat content) or salted
butter
• 170 g granulated sugar (up to 0.3 mm grain
size)
• 3 eggs (55-60 g with shell/Size M)
• 225 g wheat flour
• 7 g baking powder
• 0,25 g salt
Preparation
• Mix all ingredients well.
• Fill the muffin pastry into commercial paper baking
cases (diameter 45 mm, height 28 mm)
• Preheat the oven with the convection function to
170°C.
Take note:
Should, due to the number of muffins, multiple
baking operations be necessary, preheating is
required only once.
• Distribute the muffins evenly on the turntable 3.
• Select the following settings for the baking
process:
Convection 170°C, Duration: 12 Minutes
Cleaning and Care
Risk of injury!
Before cleaning, switch the microwave oven off and
remove the plug from the mains power socket.
Otherwise, there is the great risk of receiving an
electric shock!
UNDER NO CIRCUMSTANCES should you
immerse the appliance in water or other liquids.
This could result in you receiving a fatal electric
shock and the appliance could be damaged.
• Always keep the interior of the microwave
oven clean.
• If splashes of food or spilt liquids stick to the
walls of the microwave, wipe them off with a
damp cloth.
• Use a mild detergent if the microwave is more
heavily soiled.
• Avoid using cleaning sprays and other aggressive cleaning agents, as they can cause stains,
stripes or a blurring of the door surface.
Clean the external walls with a damp cloth.
• To avoid damage to the functional components
in the interior of the microwave, do not let liquids
to seep in through the ventilation slits 5.
• Regularly remove splashes or contaminants. Clean the door, both sides of the viewing window,
door seals and adjacent components with a
damp cloth. Do not use abrasive cleaning
agents.
- 22 -
Page 25

• Should steam collect on or around the outside
of the appliance door, wipe it off with a soft
towel. This can happen if the microwave is
operated in extremely humid conditions.
• Clean the turntable 3 regularly. Clean the
plate in warm soapy water or in the dishwasher.
• Clean the grill stand t in warm dishwater
and dry it well.
• Regularly eliminate odours. Place a deep microwave bowl with a cup of water and the juice
and peel of a lemon into the microwave oven.
Heat it up for 5 minutes. Wipe off thoroughly
and rub dry with a cloth.
• Should replacement of the bulb in the microwave be necessary, arrange for it to be exchanged by a dealer or consult our Service
Department.
Troubleshooting
The display 1 indicates nothing.
• The plug is not inserted into a power socket.
Check the plug.
• The mains power socket is defective.
Try another mains power socket.
• The display 1 is defective. Contact our
Customer Services Department.
The turntable 3 generates loud noise when
revolving.
• The turntable 3 is not correctly positioned on
the axle. Insert the turntable 3 correctly into
the cooking area.
• The small rollers 4 and/or the floor of the
cooking area are unclean. Clean the rollers 4
and the floor of the cooking area.
The display 1 indicates "E01" and signal tones
sound.
• The microwave is overheated. Terminate the
current programme immediately. Remove the
plug from the mains power socket, open the
microwave door and allow the appliance to
cool down.
The display 1 indicates "E02" and signal tones
sound.
• There is an error on the sensor. Interrupt the
programme and let the appliance cool down.
Then restart the microwave. If the error occurs
again, contact Customer Support.
• There is an error during the heating up of the
appliance. Interrupt the programme and let the
appliance cool down. Then restart the microwave. If the error occurs again, contact Customer
Support.
The appliance does not respond to pressing
the buttons.
• The Child safety facility is activated. Deactivate
the Child safety facility (see chapter "Operation“).
The appliance does not start the cooking/
warming process.
• The door is not properly closed. Close the
door correctly.
The display 1 indicates "E03" and signal tones
sound.
• Due to a short circuit or open circuit voltage,
the microwave has switched into fault protection.
Stop the programme and remove the power
plug. If possible, eliminate the problem, e.g.
metals in the cooking area, which can lead to
the above problem when using the microwave
function. Otherwise, please contact our Customer
Support.
- 23 -
Page 26

Disposal
Do not dispose of this appliance in your
normal domestic waste. This product is
subject to the provisions of European
Directive 2002/96/EC.
Dispose of the appliance through an approved disposal centre or at your community waste facility.
Observe the currently applicable regulations.
In case of doubt, please
contact your waste disposal centre.
Dispose of all packaging materials in an environmentally friendly manner.
The warranty period is not extended by repairs effected under warranty. This applies also to replaced
and repaired parts. Damages or defects discovered
after purchase are to be reported directly after unpacking, at the latest two days after the purchase
date. Repairs carried out after lapse of the warranty
period are subject to charge.
DES UK LTD
Tel.: 0871 5000 700
e-mail: support.uk@kompernass.com
Kompernass Service Ireland
Tel.: 1850 930 412 (0,082 EUR/Min.)
Standard call rates apply. Mobile operators may vary.
e-mail: support.ie@kompernass.com
(£ 0.10 / minute)
Warranty and Service
You receive a 3-year warranty for this appliance
as of the purchase date. This appliance has been
manufactured with care and meticulously examined
before delivery.
Please retain your receipt as proof of purchase. In
the case of a warranty claim, please make contact
by telephone with our service department. Only in
this way can a post-free despatch for your goods
be assured.
The warranty covers only claims for material and
manufacturing defects, not for transport damages,
worn parts or for damage to fragile components,
e.g. buttons or batteries. This product is for private
use only and is not intended for commercial applications.
In the event of misuse and improper handling, use
of force and interference not carried out by our
authorized service branch, the warranty will become void.. Your statutory rights are not restricted
in any way by this warranty.
CY
Kompernass Service Cyprus
Tel.: 800 9 44 01
e-mail: support.cy@kompernass.com
Importer
KOMPERNASS GMBH
BURGSTRASSE 21
44867 BOCHUM, GERMANY
www.kompernass.com
- 24 -
Page 27

INDHOLDSFORTEGNELSE SIDE
Anvendelsesområde 27
Vigtige sikkerhedsanvisninger 27
Medfølger ved levering 30
Tekniske data 30
Før du starter 31
Grundprincipper ved tilberedning i mikrobølgeovn...................................................................31
Anvend velegnede køkkenredskaber...........................................................................................31
Beskrivelse af mikrobølgeovnen 32
Første brug 32
Opstilling af mikrobølgeovnen .....................................................................................................32
Forberedelse af mikrobølgeovnen ...............................................................................................32
Indsætning af drejetallerkenen ....................................................................................................33
Betjening 33
Indstilling af ur................................................................................................................................33
Hvile-modus ....................................................................................................................................33
Indstilling af minuturet....................................................................................................................34
Børnesikring....................................................................................................................................34
Informationsfunktioner....................................................................................................................34
Tilberedning 34
Mikrobølgefunktion........................................................................................................................34
Grillfunktion "overvarme" ..............................................................................................................36
Grillfunktion "over- og undervarme".............................................................................................36
Grillfunktion "undervarme"............................................................................................................36
Kombinationstilberedning "grill" ...................................................................................................36
Varmluftdrift ....................................................................................................................................38
Varmluftfunktion med forvarmning ...............................................................................................38
Kombinationstilberedning "varmluft"............................................................................................38
Optøning 39
Optøning efter vægt ......................................................................................................................39
Optøning efter tid ..........................................................................................................................40
Automatisk menu 40
Start for den automatiske menu....................................................................................................40
Hukommelsesfunktion.....................................................................................................................43
Valg af starttid................................................................................................................................44
- 25 -
Page 28

Opskrifter 45
Frikadeller.......................................................................................................................................45
Bagning af færdige frostboller ....................................................................................................45
Kartoffelgratin.................................................................................................................................45
Muffins ............................................................................................................................................46
Rengøring og vedligeholdelse 46
Afhjælpning af fejl 47
Bortskaffelse 48
Garanti og service 48
Importør 48
Læs betjeningsvejledningen omhyggeligt igennem, før du bruger mikrobølgeovnen første gang, og gem vejledningen til senere brug. Hvis du giver mikrobølgeovnen videre til andre, skal vejledningen også følge med.
- 26 -
Page 29

MIKROBØLGEOVN
Anvendelsesområde
Denne mikrobølgeovn er beregnet til opvarmning
og tilberedning af fødevarer som angivet under de
beskrevne fremgangsmåder.
Enhver ændring af mikrobølgeovnen anses for anvendelse uden for anvendelsesområdet og indebærer
betydelige farer for ulykker. Producenten påtager
sig intet ansvar for skader, der opstår som følge af
anvendelse uden for anvendelsesområdet.
Denne mikrobølgeovn er ikke beregnet til erhvervsmæssigt brug.
Vigtige sikkerhedsanvisninger
Læs sikkerhedsanvisningerne og betjeningsvejledningen omhyggeligt igennem, før du bruger mikrobølgeovnen første gang, og gem disse til senere
brug.
Obs!
Advarsel mod skader på mikrobølgeovnen.
Pas på! /Fare for uheld!
Advarsel mod personskader og elektriske stød!
Brandfare!
Advarsel mod brandfare.
Forholdsregler der forhindrer mulig, langvarig
kontakt med mikrobølgeenergi
• Prøv ikke på at bruge mikrobølgeovnen med
åben dør, da du så kan udsættes for en skadelig
dosis mikrobølgestråling. Det er også vigtigt, at
du ikke bryder sikkerhedslåsene op eller manipulerer dem.
• Sæt aldrig noget i klemme mellem ovnens forside
og døren, og sørg for, at der ikke samler sig snavs
eller rester fra rengøringsmidler på tætningsfladerne.
Fare for uheld!
• Hvis døren eller dørpakningerne er beskadigede,
må mikrobølgeovnen ikke anvendes længere.
Lad den omgående reparere af en kvalificeret
reparatør.
• Prøv ikke på at reparere mikrobølgeovnen selv.
Når kabinettet tages af, kan der frigøres mikrobølgeenergi. Lad kun reparationer udføre af en
kvalificeret reparatør.
• Denne mikrobølgeovn må ikke benyttes af per-
soner (inklusive børn) med begrænsede fysiske,
sensoriske eller psykiske evner eller med manglende erfaringer og/eller manglende viden,
medmindre en ansvarlig person holder opsyn
med dem og giver dem anvisninger til, hvordan
mikrobølgeovnen anvendes. Børn skal være
under opsyn, så det sikres, at de ikke leger med
mikrobølgeovnen.
• Børn må kun bruge mikrobølgeovnen uden opsyn,
hvis de er blevet oplært tilstrækkeligt i at bruge
den sikkert og kan forstå de farer, der kan opstå
ved forkert betjening.
Bemærk!
Anvisninger og tips vedrørende behandling af
mikrobølgeovnen.
- 27 -
Page 30

• Mikrobølgeovnen må kun anvendes til anvendelsesområdet efter beskrivelsen i denne vejledning.
Der må ikke anvendes ætsende kemikalier eller
dampe i denne ovn. Denne mikrobølgeovn er
specielt konstrueret til opvarmning, kogning,
grillning eller tørring af fødevarer.
Den er ikke beregnet til brug inden for industrien
eller på laboratorier.
• Brug ikke mikrobølgeovnen, hvis strømledningen/
strømstikket er beskadiget. Lad en professionel
reparatør udskifte ledningen/strømstikket, så risiko
for ulykker undgås.
• Hold børn på afstand af mikrobølgeovnens dør,
mens ovnen er i funktion. Forbrændingsfare!
• Fjern aldrig mikrobølgeovnens kabinet.
• Lampen inden i mikrobølgeovnen må udelukkende
udskiftes af en kvalificeret reparatør.
• Rør aldrig ved mikrobølgeovnens dør, kabinet,
ventilationsåbninger, tilbehørsdele eller bestikket
lige efter grill-, kombi- eller automatik-menuprogrammet. Delene bliver meget varme. Lad delene
afkøle før rengøring.
• Sørg for, at det altid er nemt at komme til stikket,
så det hurtigt kan trækkes ud, hvis der opstår
nødsituationer.
• Personer, som bærer pacemaker, skal kontakte
deres læge om mulige risici, før mikrobølgeovnen
tages i brug.
• Lad aldrig ledningen hænge over bordet eller
arbejdsområdet. Børn kan trække i den.
• Åbn altid dåser, popcornposer etc. efter opvarmningen, så åbningen peger væk fra din
krop. Du kan blive skoldet af dampene, som
lukkes ud.
• Stil dig ikke lige foran mikrobølgeovnen, når du
åbner døren. Du kan blive skoldet af dampene,
som lukkes ud.
• Lad være med at friturestege i mikrobølgeovnen.
Varm olie kan beskadige ovnens dele og køkkenredskaber og også forårsage forbrændinger
på huden.
• Ryst altid opvarmede babyglas eller babyflasker,
eller rør rundt i dem! Indholdet kan opvarmes
uensartet, og barnet kan brænde sig på det.
Kontrollér altid temperaturen, før du mader
barnet!
• Lad være med at ændre noget ved mikrobølgeovnen.
• Mikrobølgestråler er farlige! Lad kun en autoriseret reparatør vedligeholde eller reparere
mikrobølgeovnen, hvis det er nødvendigt at fjerne
afdækningerne, som beskytter mod kontakt med
mikrobølgestråler.
• Kontrollér temperaturen, før maden spises, så
barnet ikke udsættes for livsfarlige forbrændinger. Køkkenredskaber kan blive varme af den opvarmede mads afgivne varme, så det kan være
nødvendigt at bruge grydelapper for at holde
på dem. Køkkenredskaberne skal være godkendt til brug i mikrobølgeovn.
Obs! Varm overflade!
Brandfare!
• Lad aldrig mikrobølgeovnen være uden opsyn,
hvis du varmer madvarer op i plast- eller papiremballage.
• Stil ikke brændbare materialer i nærheden af
mikrobølgeovnen eller ventilationsåbningen.
• Fjern alle lukninger af metal på emballagerne til
de madvarer, du vil opvarme. Brandfare!
• Brug kun popcorn-poser, som er egnede til
mikrobølgeovn, hvis du vil lave popcorn.
- 28 -
Page 31

• Brug ikke mikrobølgeovnen til at opvarme puder,
der er fyldt med granulat, kirsebærsten eller
gel. Brandfare!
• Brug ikke mikrobølgeovnen til opbevaring af
madvarer eller andre ting.
• Overskrid aldrig tilberedningstiderne, som er
angivet af producenten.
• Stil ikke genstande på mikrobølgeovnen, så
længe den er i gang. Ventilationsåbningerne
dækkes til!
• Stil ikke mikrobølgeovnen i nærheden af apparater, som afgiver varme, som f.eks. en bageovn.
• Rengør mikrobølgeovnen grundigt efter opvarmning af fedtholdige madvarer, og især hvis de
ikke har været tildækket. Lad ovnen køle helt af,
før den rengøres. Der må ikke sidde rester som
for eksempel fedt på grillens varmeelementer.
Det kan føre til overopvarmning og antændelse.
• Lad være med at optø frosset fedt eller olie i
mikrobølgeovnen. Fedtet eller olien kan antændes.
• Brug aldrig et eksternt tænd-sluk-ur eller et separat
fjernkontrolsystem til at styre mikrobølgeovnen
med.
• Mikrobølgeovnen må ikke opstilles på steder
med høj luftfugtighed, eller hvor der samler sig
fugtighed.
• Væsker og andre næringsmidler må ikke opvarmes i lufttætte beholdere, da de kan eksplodere
og beskadige mikrobølgeovnen.
• Læn dig ikke op ad mikrobølgeovnens dør.
• Hvis køkkenredskaberne ikke er ordentligt rene,
kan det betyde, at overfladen ødelægges, hvilket
påvirker brugstiden og muligvis kan føre til farlige situationer.
Fare!
• Læg aldrig ledningen eller stikkene ned i vand
eller andre væsker.
• Hold ledningen på afstand af varmekilder. Lad
den ikke ligge foran mikrobølgeovnens dør.
Varmen kan ødelægge ledningen.
• Hæld aldrig væsker i ventilationsåbningerne
eller sikkerhedsdørlåsene. Hvis der kommer
væske ind, skal du straks slukke for mikroovnen
og tage stikket ud af stikkontakten. Lad mikrobølgeovnen efterse af en kvalificeret reparatør.
Obs! Skader på mikrobølgeovnen
• Mikrobølgeovnen må ikke startes, hvis den er
tom. Det gælder dog ikke den første opstart
(se kaptitlet "Første opstart“).
• Sæt aldrig genstande ind i ventilationsåbningerne
eller sikkerhedsdørlåsene.
• Brug ikke redskaber af metal, som reflekterer
mikrobølger og fører til gnistdannelse. Stil ikke
metaldåser ind i mikrobølgeovnen.
• Stil ikke plastbeholdere ind i mikrobølgeovnen
lige efter et grill-, kombi- eller automatik-menuprogram. Plasten kan smelte.
!
Sikkerhedstips
• For at minimere brandrisikoen i mikrobølgeovnen:
Hold altid øje med mikrobølgeovnen, når du
opvarmer mad i plast- eller papirbeholdere,
da materialet eventuelt kan antændes.
• Ved opvarmning af drikkevarer i mikrobølgeovnen
kan det begynde at boble med forsinkelse, når
drikken koger. Vær derfor forsigtig, når du tager
fat i beholderen. Hvis du vil undgå pludselig
kogning:
- 29 -
Page 32

- Hvis du har en glaspind, kan du stille den i
væsken, så længe den opvarmes.
- For at undgå, at væsken bruser pludseligt op,
skal den blive stående 20 sekunder i
mikrobølgeovnen efter opvarmning.
• Prik kartofler, pølser og lign. med en gaffel.
Ellers kan de eksplodere.
• Vær forsigtig ved opvarmning af væsker. Brug
kun åbne skåle, så luftbobler, som opstår under
opvarmningen, kan slippe væk.
• Hvis der opstår røg, skal du slukke for ovnen,
tage stikket ud og holde døren lukket, så eventuelle flammer kvæles.
• Æg i skal og hårdkogte æg må ikke opvarmes
i mikrobølgeovnen, da de kan eksplodere i ovnen, selv efter at opvarmningen er slut.
Fødevarer med tyk skræl som f.eks. kartofler,
hele knolde, æbler og kanstanjer, skal prikkes
før kogningen.
• Flyt ikke mikrobølgeovnen, mens den er i funktion.
Jordingsanvisninger/korrekt installation
Denne mikrobølgeovnen skal jordes. Denne mikrobølgeovnen må kun sluttes til en stikkontakt, som er
sluttet til jord efter forskrifterne. Det anbefales at
bruge en separat strømkreds, der kun forsyner mikrobølgeovnen.
Fare: Hvis jordstikket behandles forkert, kan
det medføre risiko for elektrisk stød.
Producenten eller forhandleren kan ikke påtage sig
ansvaret for beskadigelse af mikrobølgeovnen eller
for personskader, der skyldes, at fremgangsmåden i
forbindelse med eltilslutningen ikke er blevet fulgt.
Radiointerferens med andre apparater
Når du bruger mikrobølgeovnen, kan det fremkalde
forstyrrelser i din radio, dit fjernsyn eller lignende
apparater.
Hvis der skulle opstå sådanne interferenser, kan de
reduceres eller fjernes ved hjælp af følgende foranstaltninger:
• Rengør mikrobølgeovnens dør og tætningsflade.
• Foretag en ny justering af radioens eller fjernsynets antenne.
• Anbring mikrobølgeovnen et andet sted end
der, hvor modtageren står.
• Fjern mikrobølgeovnen fra modtageren.
• Tilslut mikrobølgeovnen til en anden stikkontakt.
Mikrobølgeovnen og modtageren skal belaste
hver sin gren af strømkredsløbet.
Medfølger ved levering
Mikrobølgeovn
Drejetallerken
Grillstativ
Betjeningsvejledning
Kort information
Bemærk: Hvis du har spørgsmål angående
jording eller anvisningerne på elområdet, skal
du henvende dig til en elektriker eller servicetekniker.
Tekniske data
Mærkespænding: 230 - 240V
50 Hz
Maks. optaget effekt: 2000 W
Mikrobølgeovn: 1400 W
Doppelt-grill: 1700 W
Øverste grill: 1200 W
Varmluft: 2000 W
Maksimal effekt, mikrobølge: 900 W
Mikrobølgefrekvens: 2450 MHz
- 30 -
~
Page 33

Før du starter
Grundprincipper ved tilberedning i
mikrobølgeovn
• Anbring madvarerne med omtanke.
• De tykkeste steder skal være i nærheden af
kanten.
• Vær opmærksom på tilberedningstiden. Vælg
den korteste af de angivne tilberedningstider,
og forlæng den ved behov. Madvarer, der tilberedes alt for længe, kan begynde at ryge
eller antændes.
• Dæk madvarerne til med et låg, der er egnet
til mikrobølgeovn under tilberedningen. Låget
forhindrer sprøjt og bidrager også til, at madvarerne tilberedes ensartet.
• Vend madvarerne en gang under tilberedningen
i mikrobølgeovnen, så madretter som kylling
eller hamburger bliver hurtigere færdige.
• Store stykker som for eksempel en steg skal
vendes mindst én gang.
• Flyt dele som f.eks. kødboller rundt efter halvdelen af tilberedningstiden. Vend dem, og anbring bollerne fra midten og ud mod kanten.
Anvend velegnede køkkenredskaber.
• Det ideelle materiale til en mikrobølgeovn er
mikrobølgegennemtrængeligt, hvilket vil sige,
at det slipper energien gennem beholderen,
så maden opvarmes.
Mikrobølger er ikke i stand til at trænge gennem
metal. Derfor må der ikke anvendes metalbeholdere eller metalkøkkenredskaber.
• Brug ikke produkter af genbrugspapir ved opvarmning i mikrobølgeovn. Papiret kan indeholde
bittesmå metalfragmenter, der kan fremkalde
gnister og/eller brand.
• Det anbefales at bruge rundt/ovalt køkkenservice i stedet for firkantet/aflangt, da madvarerne, som ligger i hjørnerne, let koger ud.
Den efterfølgende liste skal opfattes som en
generel hjælp til valg af køkkenredskaber.
Køkkenservice
Varmebestandigt glas
Ikke-varmebestandigt
glas
Varmebestandigt keramik
Plastservice,
egnet til mikrobølgeovn
Køkkenrulle Ja Nej Nej Nej
Metalbakke/ plade
Mikrobølgeovn
Ja Ja Ja Ja
Nej Nej Nej Nej
Ja Ja Ja Ja
Ja Nej Nej Nej
Nej Ja Ja Nej
Grill
Varm
luft
Kombination
Grillstativ Nej Ja Ja Nej
Alufolie &
foliebeholder
- 31 -
Nej Ja Ja Nej
Page 34

Brandfare!
Brug aldrig grillstativet eller andre metalgenstande,
hvis du anvender mikrobølgeovnen til mikrobølgefunktion eller til kombinationstilberedning. Metal
reflekterer mikrobølgestrålingen og fører dermed
til gnistdannelse. Det kan føre til brand, og ovnen
kan gå i stykker, så den ikke kan repareres igen!
Beskrivelse af mikrobølgeovnen
1 Display
2 Knap til døråbner
3 Drejetallerken
4 Ruller
5 Ventilationsåbning
6 knap kombination mikroovn – varmluft
7 Knap grill
8 Knap ur/timer
9 Knap varmluft
0 Drejeknap / knap start/lynstart
q Stop/børnesikring
w Knap vægt/minutur
e Knap kombination mikrobølge – grill
r Knap effekt (mikrobølge)
t Grillstativ
Første brug
Opstilling af mikrobølgeovnen
Brandfare!
Denne mikrobølgeovn er ikke beregnet til indbygning
i et køkkenskab. I lukkede skabe ventileres mikrobølgeovnen ikke tilstrækkeligt. Derved kan ovnen beskadiges, og der er risiko for brand!
• Vælg en jævn flade, hvor der er tilstrækkelig
plads til siderne for ventilation af ovnen.
Mellem ovnen og de tilstødende vægge er det
vigtigt, at der er en minimumafstand på 10 cm.
Kontrollér, at mikrobølgeovnens dør kan åbnes
uden problemer.
Der skal være en afstand på mindst 20 cm
over mikrobølgeovnen.
• Det skal være nemt at komme til strømstikket,
så det hurtigt kan trækkes ud, hvis der opstår
farlige situationer.
• Afmontér ikke fødderne under mikrobølgeovnen.
• Blokér ikke ventilationsåbningen 5. Ellers kan
ovnen ødelægges.
• Anbring mikrobølgeovnen så langt væk fra
radio og fjernsyn som muligt. Når mikrobølgeovnen arbejder, kan det forstyrre radio- eller
fjernsynsmodtagelsen.
Obs:
Placér ikke mikrobølgeovnen over et komfur eller et
andet apparat, der frembringer varme. Hvis ovnen
opstilles sådan et sted, kan den skades, hvilket samtidig betyder bortfald af garantien.
Forberedelse af mikrobølgeovnen
• Fjern emballagematerialet og en eventuel
beskyttelsesfolie på kabinettets overflade.
• Sæt stikket i stikkontakten. Brug en 230 - 240 V,
50 Hz stikkontakt med en 16 A sikring. Det
anbefales, at mikrobølgeovnen forsynes med
en separat strømkreds. Hvis du ikke er sikker
på, hvordan mikrobølgeovnen skal sluttes til,
skal du søge råd hos en fagmand.
- 32 -
Page 35
Før mikrobølgeovnen anvendes, skal den varmes op,
mens den er tom, så rester efter produktionen kan
fordampe.
Når du har sat stikket i stikkontakten, skal du åbne
døren til mikrobølgeovnen én gang.
Tænd for ovnen uden fødevarer og tilbehør (drejetallerken 3 og grillstativ t) på grillfunktionen:
• Tryk to gange på knappen grill 7 .
Derved vælger du grillfunktionen med over- og
undervarme. I displayet 1 vises symbolet
og symbolet .
• Indstil en tilberedningstid på 10 minutter med
drejeknappen 0.
• Tryk på knappen start/lynstart 0 for at
starte grillningen.
Bemærk:
Når mikrobølgeovnen bruges første gang, kan der
udvikles lidt røg og lugt på grund af rester i forbindelse med produktionsteknikken. Dette er uskadeligt.
Sørg for tilstrækkelig udluftning. Åbn for eksempel
vinduet.
• Efter 10 minutter slukkes ovnen automatisk.
Vent, til den er helt afkølet.
• Tag stikket ud af stikkontakten, og rengør derefter
ovnen indeni og tør den omhyggeligt af.
Indsætning af drejetallerkenen 3
• Sæt drejetallerkenen 3 midt på aksen i ovn-
rummet. Sørg for, at den glider helt ned på
aksen og sidder fast.
Betjening
Indstilling af ur
Når du har sat stikket i stikkontakten, skal du åbne
døren til mikrobølgeovnen én gang. Displayet 1
viser "1:00".
1. Tryk på ur-knappen 8 . I displayet 1
vises "Hr 24". Tryk på ur-knappen 8
igen, hvis du vil skifte til 12-timers-modus.
2. Indstil den ønskede time ved at dreje på drejeknappen 0.
3. Tryk på tasten ur 8 . Minutangivelsen
blinker.
4. Indstil de ønskede minutter ved at dreje på dreje
-knappen 0.
5. Når du har indstillet klokkeslættet, skal du trykke
på tasten ur 8 . Dobbeltpunktet viser, at
uret er i gang ved at blinke.
For at aflæse det aktuelle klokkeslæt mens mikrobølgeovnen er i gang, skal du trykke på tasten ur 8 ;
Klokkeslættet vises i ca. 4 sekunder i displayet 1.
Hvile-modus
Mikrobølgeovnen skifter automatisk til hvile-modus,
hvis der ikke trykkes på nogen knap i længere tid.
Displaybelysningen dæmpes først lidt. Efter ca. 4
minutter slukkes displaybelysningen. Tryk på en vilkårlig knap for at forlade hvile-modus og åbne funktionen til knappen, der er trykket på.
- 33 -
Page 36

Indstilling af minuturet
Mikrobølgeovnen er udstyret med et minutur, som
du kan anvende uafhængigt af mikrobølgefunktionen.
1. Tryk på knappen vægt/minutur w ,
når ovnen står på standby-funktion. I displayet
1 vises "0:00" og symbolet .
2. Indstil nu den ønskede tid med drejeknappen 0.
Du kan foretage tidsindstillinger fra 10 sekunder
til 95 minutter.
3. Tryk på knappen start/lynstart 0 . Der
lyder en signaltone. Tiden tæller ned. Efter
cirka 3 sekunder vises det normale klokkeslæt
igen. Minuturet kører videre i baggrunden.
Hvis du ind imellem vil kontrollere minuturets
tid, kan du trykke på knappen vægt/minutur w
. Minuturet vises i kort tid.
Så snart den indstillede tid er gået, lyder signaltonerne,
indtil døren åbnes.
Børnesikring
Aktivér børnesikringen for at forhindre, at mikrobølgeovnen kan sættes i gang af små børn, som ikke er
under opsyn, eller af andre personer, som ikke er
fortrolige med betjening af ovnen.
Symbolet for børnesikringen vises i displayet
1, og ovnen kan ikke tændes, så længe denne
funktion er aktiveret.
• Tryk på knappen stop/børnesikring q ,
og hold den nede, indtil der lyder en signaltone,
og symbolet for børnesikring vises i displayet 1. Mikrobølgeovnens knapper og dre-
jeknappen fungerer nu ikke længere.
• For at deaktivere børnesikringen skal du trykke
på knappen stop/børnesikring q og
holde den nede, indtil der lyder en signaltone,
og symbolet for børnesikring forsvinder.
Informationsfunktioner
Aflæsning af klokkeslæt mens ovnen er i gang
Tryk under tilberedningen på tasten ur 8 . I
displayet 1 vises klokkeslættet i ca. 3 sekunder.
Aflæsning af effekttrin mens ovnen er i gang
Tryk under tilberedningen på knappen effekt r
. I displayet 1 vises det aktiverede effekttrin
i ca. 3 sekunder.
Tilberedning
Bemærk
Denne mikrobølgeovn er udstyret med en afkølingsfunktion. Efter tilberedning eller grillning, der varer
mindst 2 minutter, fortsætter ovnens ventilator derfor
med at køre i cirka 3 minutter. Det er ikke en fejlfunktion ved mikrobølgeovnen! Den hurtige afkøling
hjælper med til, at ovnen holder længere.
Bemærk
Af hygiejniske grunde må du aldrig lægge fødevarer,
som skal tilberedes i mikrobølgeovnen, direkte på
drejetallerkenen 3.
Læg dem altid på køkkenredskaber, der er egnet til
mikrobølgeovne. Undtagen herfra er tilberedning af
frisk pizza (se kapitlet "Automatisk menu").
Mikrobølgefunktion
Bemærk
På mikrobølgeovnens dør eller på kabinettet kan
der dannes vanddråber under tilberedningen. Det
er normalt og ikke tegn på, at mikrobølgeovnen
har fejlfunktioner. Tør fugten af med en tør klud,
når ovnen er kølet af.
- 34 -
Page 37

Brandfare!
Brug aldrig grillstativet t eller andre metalgenstande,
hvis mikrobølgeovnen anvendes i mikrobølgefunktion. Metal reflekterer mikrobølgestrålingen og fører
dermed til gnistdannelse. Det kan føre til brand, og
ovnen kan gå i stykker, så den ikke kan repareres
igen!
Start for tilberedningen
Når du har indstillet effekten og tilberedningstiden,
kan tilberedningen startes:
Tryk på knappen start/lynstart 0 for at starte
tilberedningen. I displayet 1 vises symbolerne for
mikrobølgefunktion og "M1". Den indstillede
tid tæller ned.
Valg af effekt
Tryk på knappen effekt r for at vælge det
ønskede effekttrin.
• 1x for 900 Watt effekt (P900).
• 2x for 800 Watt effekt (P800).
• 3x for 700 Watt effekt (P700).
• 4x for 600 Watt effekt (P600).
• 5x for 500 Watt effekt (P500).
• 6x for 400 Watt effekt (P400).
• 7x for300 Watt effekt (P300).
• 8x for200 Watt effekt (P200).
• 9x for100 Watt effekt (P100).
Effekten vises i displayet 1 (f. eks. P800 ved effekt
på 800 Watt).
Indstilling af tilberedningstiden
Når effekten er valgt, skal du indstille den ønskede
tilberedningstid:
• Drej drejeknappen 0, til den ønskede tilbered-
ningstid er indstillet.
Trinene for drejeknappens indstillingstid 0 er
følgende:
• fra 0 sek. til 5 min.: i trin på 10 sek.
• Fra 5 til 10 min.: i trin på 30 sek.
• Fra 10 til 30 min.: i trin på 1 min.
• Fra 30 til 95 min.: i trin på 5 min.
Afbrydelse af tilberedningen
Tryk én gang på knappen stop q for at
afbryde tilberedningen. Mikrobølgeovnen afbryder
tilberedningen og stopper den resterende tid. Tryk
på knappen start/lynstart 0 for at fortsætte
tilberedningen igen.
Stop for tilberedningen
Tryk to gange på tasten stop q for at af-
bryde tilberedningen. Ovnen skifter tilbage til standby-tilstand igen.
Lynstart
Med denne funktion kan du straks starte tilberedningen i 30 sekunder (eller længere, op til 95 minutter)
med 900 W effekt.
. Tryk én gang på knappen start/lynstart 0
. I displayet 1 vises symbolerne for mikrobølgefunktion og "M1". samt ":30“.
Mikrobølgeovnen starter tilberedningen i 30
sekunder. Tiden tæller ned.
Hvis du vil varme længere end 30 sekunder, skal
du trykke på knappen start/lynstart 0 , til den
ønskede tid er nået.
Tids-trinene opdeles på følgende måde:
• fra 30 sek. til 5 min.: i trin på 30 sek.
• fra 5 min. til 95 min.: i trin på 1 min.
Afbrydelse/afslutning for indtastningen
Tryk én gang på knappen Stop q “11” for
at afbryde en indtastning og afslutte. Ovnen skifter
tilbage til standby-tilstand igen.
- 35 -
Page 38

Grillfunktion "overvarme"
Denne grillfunktion er særdeles velegnet til gratinerede
sandwiches og gratiner.
Brug altid grillstativet t, når der grilles med "over-
varme". Så opnår du det bedste grillresultat.
Stil altid grillstativet t på drejetallerkenen 3.
1. Tryk én gang på knappen grill 7 for
at aktivere grillfunktionen "overvarme".
I displayet 1 vises symbolet for grillfunktionen
"overvarme" og "Gr 1".
2. Indstil den ønskede tilberedningstid med dreje-
knappen 0. Den længste tilberedningstid, der
kan indstilles, er på 95 minutter.
3. Tryk på knappen start/lynstart 0 for at
starte grillfunktionen.
Grillfunktion "over- og undervarme"
Denne grillfunktion kan anvendes til tynde skiver
kød, steaks, frikadeller, pølser eller kyllingestykker.
Brug altid grillstativet t, når der grilles med "over- og
undervarme". Så opnår du det bedste grillresultat.
Stil altid grillstativet t på drejetallerkenen 3.
Grillfunktion "undervarme"
Brug altid grillstativet t, når der grilles med "under-
varme". Så opnår du det bedste grillresultat.
Stil altid grillstativet t på drejetallerkenen 3.
1. Tryk tre gange på knappen grill 7 for
at aktivere grillfunktionen "undervarme".
I displayet 1 vises symbolet for grillfunktionen
"undervarme" og "Gr 3".
2. Indstil den ønskede tilberedningstid med drejeknappen 0. Den længste tilberedningstid,
der kan indstilles, er på 95 minutter.
3. Tryk på knappen start/lynstart 0 for
at starte grillfunktionen.
Kombinationstilberedning "grill"
Denne funktion kombinerer grillfunktionen og den
normale mikrobølgefunktion. Under kombinationstilberedningen anvendes der automatisk en bestemt
tid til tilberedningen og den resterende tid til grillning,
og det udføres i én arbejdsgang. Du kan høre et svagt
klik, når ovnen skifter fra den ene til den anden
funktion.
1. Tryk to gange på knappen grill 7 for at
aktivere grillfunktionen "over- og undervarme".
I displayet 1 vises symbolet for grillfunktionen
"overvarme" , for grillfunktionen "undervarme" og "Gr 2".
2. Indstil den ønskede tilberedningstid med drejeknappen 0. Den længste tilberedningstid, der
kan indstilles, er på 95 minutter.
3. Tryk på knappen start/lynstart 0 for at
starte grillfunktionen.
Brandfare!
Brug aldrig grillstativet t eller andre metalgenstande,
hvis mikrobølgeovnen anvendes til kombinationstilberedning.
Metal reflekterer mikrobølgestrålingen og fører
dermed til gnistdannelse. Det kan føre til brand, og
ovnen kan gå i stykker, så den ikke kan repareres
igen!
- 36 -
Page 39

Kombination 1
Ved kombination 1 er mikrobølgeeffekten 30 %
og grilleffekten 70 % af tilberedningstiden. Dette er
f. eks. velegnet til fisk eller gratiner.
Der anvendes mikrobølgefunktionen og grillfunktionen
"overvarme".
1. Tryk på knappen kombination mikrobølgeovn grill e for at aktivere kombination 1.
I displayet 1 vises , , samt "C 1".
2. Indstil den ønskede tilberedningstid med drejeknappen 0. Den længste tilberedningstid, der
kan indstilles, er på 95 minutter.
3. Tryk på knappen start/lynstart 0 for at
starte.
1. Tryk på knappen kombination mikrobølgeovn grill e for at aktivere kombination 3.
I displayet 1 vises
,
samt "C 3".
2. Indstil den ønskede tilberedningstid med drejeknappen 0. Den længste tilberedningstid, der
kan indstilles, er på 95 minutter.
3. Tryk på knappen start/lynstart 0 for at
starte.
Kombination 4
Ved kombination 4 er mikrobølgeeffekten 55 % og
grilleffekten 45 % af tilberedningstiden. Det egner
sig for eksempel til fjerkræretter. Der bruges mikrobølgefunktionen og grillfunktionen "over- og undervarme".
Kombination 2
Ved kombination 2 er mikrobølgeeffekten 55 %
og grilleffekten 45 % af tilberedningstiden. Dette er
f. eks. velegnet til omeletter, buddinger eller lasagne.
Der anvendes mikrobølgefunktionen og grillfunktionen "overvarme".
1. Tryk på knappen kombination mikrobølgeovn grill e for at aktivere kombination 2.
I displayet 1 vises , samt "C 2".
2. Indstil den ønskede tilberedningstid med drejeknappen 0. Den længste tilberedningstid, der
kan indstilles, er på 95 minutter.
3. Tryk på knappen start/lynstart 0 for at
starte.
Kombination 3
Ved kombination 3 er mikrobølgeeffekten 30 % og
grilleffekten 70 % af tilberedningstiden. Dette egner
sig for eksempel til kartofler. Der bruges mikrobølgefunktionen og grillfunktionen "over- og undervarme".
1. Tryk på knappen kombination mikrobølgeovn grill e for at aktivere kombination 4.
I displayet 1 vises
,
samt "C 4".
2. Indstil den ønskede tilberedningstid med drejeknappen 0. Den længste tilberedningstid, der
kan indstilles, er på 95 minutter.
3. Tryk på knappen start/lynstart 0 for at
starte.
- 37 -
Page 40
Varmluftdrift
Ved tilberedning med varmluft cirkulerer der varm
luft i ovnrummet. Varmluft anbefales især til tilberedning af gratiner eller sprøde fødevarer.
Valg af temperatur
• Tryk på knappen varmluft 9 for at vælge
temperaturen.
• 1x til 230 °C
• 2x til 215 °C
• 3x til 200 °C
• 4x til 185 °C
• 5x til 170 °C
• 6x til 155 °C
• 7x til 140 °C
• 8x til 125 °C
• 9x til 110 °C
• 10x til 95 °C
Temperaturen vises i displayet 1 (f. eks. 230C ved
230 °C temperatur).
Indstilling af tilberedningstiden
Når temperaturen er valgt, skal du indstille den
ønskede tilberedningstid:
• Drej drejeknappen 0, til den ønskede tilberedningstid er indstillet.
Start for tilberedningen
Når du har indstillet temperaturen og tilberedningstiden,
kan tilberedningen startes:
Tryk på knappen start/lynstart 0 for at starte
tilberedningen. I displayet 1 vises symbolerne for
varmluftfunktion og "M1". Den indstillede tid
tæller ned.
Når den indstillede tid er gået, vises skiftevist "End"
og "Hot" i displayet 1. En signaltone lyder flere
gange efter hinanden.
Varmluftfunktion med forvarmning
Du kan også forvarme mikrobølgeovnen, før du
starter tilberedningen:
1. Vælg den ønskede temperatur ved at trykke på
knappen varmluft 9 tilstrækkeligt mange
gange.
2. Tryk på knappen start/lynstart 0 for at
forvarme. I displayet 1 vises "30:00", og tiden
tæller ned. Så snart den indstillede temperatur
er nået, lyder der en signaltone.
3. Åbn døren, og stil fødevarerne, der skal tilberedes
ind.
4. Indstil den ønskede tilberedningstid med drejeknappen 0. Den længste tilberedningstid, der
kan indstilles, er på 95 minutter.
5. Tryk på knappen start/lynstart 0 for at
starte.
Kombinationstilberedning "varmluft"
Denne funktion kombinerer varmluft-funktionen og
den normale mikrobølgefunktion. Derved bliver
kødet saftigt, mørt og alligevel sprødt.
Brandfare!
Brug aldrig grillstativet t eller andre metalgenstande,
hvis mikrobølgeovnen anvendes til kombinationstilberedning.
Metal reflekterer mikrobølgestrålingen og fører
dermed til gnistdannelse. Det kan føre til brand, og
ovnen kan gå i stykker, så den ikke kan repareres
igen!
1. Tryk på knappen kombination mikrobølgeovn varmluft 6 .
- 1 x for at aktivere kombinationen med 200°C,
- 2 x for at aktivere kombinationen med 170°C,
- 3 x for at aktivere kombinationen med 140°C,
- 4 x for at aktivere kombinationen med 110°C,
I displayet 1 vises den valgte temperatur, "M1"
og symbolerne og .
- 38 -
Page 41

2. Indstil den ønskede tilberedningstid med drejeknappen 0. Den længste tilberedningstid, der
kan indstilles, er på 95 minutter.
3. Tryk på knappen start/lynstart 0 for at
starte.
4. Når den ønskede fødevare vises i displayet 1,
skal du trykke på knappen vægt/minutur w
, indtil den ønskede vægt vises i dis-
playet 1.
Følgende vægtindstillinger er mulige:
Optøning
Optøning efter vægt
Bemærk:
Læg fødevarerne, der skal tøs op, på køkkenservice,
der er egnet til mikrobølgeovn. Læg dem aldrig
direkte på drejetallerkenen 3!
Med denne funktion kan du uden problemer optø
kød, fjerkræ og fisk. Optøningstiden og effekttrinet
udregnes og indstilles automatisk, når vægten indtastes.
1. Drej drejeknappen 0 i standby-mode mod urets
retning, indtil der vises "A-12" og 1 displayet.
2. Tryk på knappen start/lynstart 0 .
3. Vælg nu fødevarerne, der skal tøs op, ved at
dreje på drejeknappen 0. I displayet 1 vises:
"d-01" og for "okse"
"d-02" og for "svin"
"d-03" og for "pizza"
"d-04" og for "fjerkræ"
"d-05" og for "frugt/grønt"
"d-06" og for "fisk"
"d-07" og for "kartofler"
"d-01"/ / "okse" 100 - 1800g
"d-02"/ / "svin" 100 - 1800g
"d-03"/ / "pizza" 100 - 900g
"d-04"/ / "fjerkræ" 100 - 1800g
"d-05"/ /"frugt/grønt" 100 - 900g
"d-06"/ / "fisk" 100 - 1800g
"d-07"/ / "kartofler" 100 - 900g
5. Når den ønskede vægt vises i displayet 1, skal
du trykke på knappen start/lynstart 0 .
Ovnen beregner automatisk den nødvendige
optøningstid.
Bemærk:
For at garantere optimal optøning er det nødvendigt
at vende fødevarerne under optøningen. Ovnen
minder dig med signaltoner om, at du skal vende, og
på displayet 1 vises "turn". Åbn mikrobølgeovnens
dør, vend fødevarerne, og luk døren igen. Tryk på
knappen start/lynstart 0 for at fortsætte optøningen.
Hvis du ikke vil vende fødevarerne, skal du bare vente,
til signaltonerne holder op. Mikrobølgeovnen fortsætter
automatisk optøningen. Vi anbefaler, at maden
vendes. Dermed opnår du en ensartet optøning.
- 39 -
Page 42

Optøning efter tid
Automatisk menu
Bemærk:
Læg fødevarerne, der skal tøs op, på køkkenservice,
der er egnet til mikrobølgeovn. Læg dem aldrig
direkte på drejetallerkenen 3!
1. Drej drejeknappen 0 i standby-mode mod
urets retning, indtil der vises "A-13" og i
displayet 1.
2. Tryk på knappen vægt/minutur w .
3. Indstil den ønskede tid med drejeknappen 0.
4. Tryk på knappen start/lynstart 0 for at
starte optøningen. Tiden tæller ned.
Bemærk:
For at garantere optimal optøning er det nødvendigt
at vende fødevarerne under optøningen. Ovnen
minder dig med signaltoner om, at du skal vende,
og på displayet 0 vises "turn". Åbn mikrobølgeovnens dør, vend fødevarerne, og luk døren igen.
Tryk på knappen start/lynstart 0 for at fortsætte optøningen.
Hvis du ikke vil vende fødevarerne, skal du bare
vente, til signaltonerne holder op. Mikrobølgeovnen
fortsætter automatisk optøningen. Vi anbefaler,
at maden vendes. Dermed opnår du en ensartet
optøning.
Til madretter, som skal tilberedes i automatisk menumodus, er det ikke nødvendigt at indtaste kogeforløbets
tid og effekttrinet. Det er tilstrækkeligt, at du indtaster,
hvilken type fødevare, der skal tilberede/koges,
samt vægten for denne fødevare.
Bemærk
Mikrobølgeovnen beregner tiden/effekttrinet for
friske fødevarer. Dybfrosne fødevarer bliver ikke
færdigtilberedt med tiderne, der er fastsat af mikrobølgeovnen (undtagen det automatiske program
"pizza").
Optø evt. dybfrosne fødevarer med optøningsprogrammet først (se kapitlet "Optøning").
Start for den automatiske menu
1. Drej drejeknappen 0 (i standby-funktion) langsomt til venstre for at åbne den automatiske
menufunktion. I displayet 0 vises et tal (f. eks.
"A - 02" for autoprogram 2 (pølse)) og symbolet "pølse". Vælg den automatiske menu, der
passer til dine fødevarer, ved at dreje drejeknappen 0.
- 40 -
Page 43

Dis-
Symbol Fødevare Vægt
play
A-01 Oksekød 200 - 1400 g
2. Tryk flere gange på knappen vægt/minutur w
, indtil den ønskede vægt vises i dis-
playet 1.
3. Tryk på knappen start/lynstart 0 for at
starte tilberedningen.
A-02 Pølse 100 - 500 g
P1 150-450g
A-03 Pizza
A-04 Drikkevarer 200 - 500ml
A-05 Svinekød 200 - 1400 g
A-06 Fisk 200 - 1200 g
A-07 Forretter 300 /500 g
A-08 Opvarmning 300 - 700 g
A-09 Fjerkræ 400 - 1400 g
P2 150-450g
P3 150-450g
Bemærk
For at opnå ensartet tilberedning skal nogle fødevarer
vendes om, når 1/2 - 2/3 af tiden er gået. Mikrobølgeovnen stopper automatisk efter denne tid, der
lyder 4 signaltoner, og "Turn" vises i displayet 1.
Dis-
Symbol Fødevare Vend efter..
play
A-01 Oksekød 1/2 af tiden
A-02 Pølse 2/3 af tiden
A-05 Svinekød 1/2 af tiden
A-06 Fisk 2/3 af tiden
A-09 Fjerkræ 2/3 af tiden
A-10
A-11 Kartofler 100 - 800 g
A-12
A-13
Grøntsager/
frugt
Optøning
efter vægt
Optøning
efter tid
100 - 1000 g
-
-
• Vend fødevarerne om. Vær forsigtig, da føde-
varerne er varme.
Tryk på knappen start/lynstart 0 for at fortsætte
tilberedningen igen.
Bemærk
Hvis du ikke vil vende fødevarerne, skal du bare
vente, til signaltonerne holder op. Mikrobølgeovnen
fortsætter automatisk tilberedningen. Vi anbefaler,
at maden vendes. Derved opnår du en ensartet tilberedning.
- 41 -
Page 44

Bemærk
Hvis retten ikke er rigtigt tilberedt, når den automatiske
menu er afsluttet, kan du tilberede den nogle minutter
med lynstartprogrammet.
2. Tryk 3 gange på knappen vægt/minutur w
. Der vises 300 g i displayet 1.
3. Tryk på knappen start/lynstart 0 for at
starte tilberedningen.
Brandfare!
Brug aldrig afdækninger eller køkkenservice, der
ikke er varmebestandigt, hvis grillfunktionen er aktiveret (A-01, A-02, A-03, A-05, A-06, A-09), da
disse kan smelte eller antændes!
Fare for uheld!
Drejetallerkenen 3 er meget varm efter tilberedning
med grill! Brug altid grydelapper eller varmebestandige handsker, når du tager maden ud af ovnen.
Bemærk:
Bemærk, at fødevarernes størrelse, form og sort
også har betydning for resultatet.
Anvendelseseksempel 1:
Du skal gøre følgende, når du vil tilberede 400 g
grøntsager eller frugt:
1. Drej drejeknappen 0 ( i standby-mode) langsomt til venstre, indtil der vises "A-10" i displayet 1.
2. Tryk 4 gange på knappen vægt/minutur w
. Der vises 400 g i displayet 1.
3• Tryk på knappen start/lynstart 0 for
at starte tilberedningen.
Anvendelseseksempel 2:
Gå frem på følgende måde, hvis du vil opvarme
300 ml vand:
1. Drej drejeknappen 0 ( i standby-mode) langsomt til venstre, indtil der vises "A-04" i displayet 1.
Anvendelseseksempel 3:
Gå frem på følgende måde, hvis du vil opvarme
300 g forret:
1. Drej drejeknappen 0 ( i standby-mode) langsomt til venstre, indtil der vises "A-07" i displayet 1.
2. Tryk én gang på knappen vægt/minutur w
. Der vises 300 g i displayet 1.
3. Tryk på knappen start/lynstart 0 for
at starte tilberedningen.
Bagning af pizza
Med det automatiske program "pizza" kan du tilberede
sprøde pizzaer i mikrobølgeovnen.
1. Drej drejeknappen 0 ( i standby-mode) langsomt til venstre, indtil der vises "A-03" i displayet 1.
2. Tryk på knappen start/lynstart 0 .
3. Vælg det ønskede pizza-program med drejeknappen 0:
• "P-01" for dybfrossen pizza,
Temperatur ca. -18 grader
Vægt 150 g–450 g
(Der vises "P-01" i displayet 1).
• "P-02" for kølet pizza,
Temperatur ca. 5 grader
Vægt 150 g–450 g
(Der vises "P-02" i displayet 1).
• "P-03" for frisk pizza,
Temperatur ca. 20 grader
Vægt 150 g–450 g
(Der vises "P-03" i displayet 1).
4. Tryk på knappen vægt/minutur w ,
indtil den ønskede vægt vises i displayet 1.
- 42 -
Page 45

5 Tryk på knappen start/lynstart 0 for at
starte tilberedningen.
Bemærk
Hvis du vil tilberede frisk pizza, kan du lægge den
direkte på drejetallerkenen 3. Så bliver den særligt
sprød. Sørg for, at pizzaens kant ikke rager ud til
ovnrummets vægge under tilberedningen.
Anvendelseseksempel:
Gør følgende for at tilberede en dybfrossen pizza
på 450 g:
1. Drej drejeknappen 0 ( i standby-mode) langsomt til venstre, indtil der vises "A-03" i displayet 1.
2. Tryk på knappen start/lynstart 0 .
3. Vælg programmet "P-01" med drejeknappen 0:
4. Tryk på knappen vægt/minutur w ,
indtil der vises "450 g" i displayet 1.
6 Tryk på knappen start/lynstart 0 for
at starte tilberedningen. Mikrobølgeovnen
beregner automatisk den nødvendige tid.
Hukommelsesfunktion
Udnyt hukommelsesfunktionen, hvis du vil udføre op
til 3 forskellige tilberedningsforløb efter hinanden.
Når det ene forløb er afsluttet, lyder der et enkelt
signal, og derefter startes det næste forløb med det
samme.
Bemærk
De automatiske menuprogrammer, optøning efter
tid og optøning efter vægt kan ikke gemmes.
For at gemme 3 forløb efter hinanden skal du gøre
følgende:
1. Indtast det første forløb. For eksempel et mikrobølgeforløb, 900 W effekt, 2 minutter. "2:00",
"M1" og vises i displayet 1. Tryk så
på knappen start/lynstart 0 !
2. Indtast det andet forløb. For eksempel et grillforløb,
overvarme, 3 minutter. "3:00", "M2" og
vises i displayet 1. Tryk så
start/lynstart 0 !
3. Indtast det tredje forløb. For eksempel et varmluftforløb, 200°C, 2 minutter. "2:00", "M3" og
vises i displayet 1.
4. Tryk først derefter på knappen start/lynstart 0
. Mikrobølgeovnen starter det første forløb.
Når et forløb er afsluttet, lyder der en signaltone,
og mikrobølgeovnen starter automatisk det næste forløb.
iikkkkee
på knappen
iikkkkee
- 43 -
Page 46

Valg af starttid
Med dette program kan du forprogrammere en
bestemt starttid for tilberedning eller grillning af
maden. Når du har startet indstillingerne, starter
ovnen automatisk på det indstillede tidspunkt.
Bemærk: Uret skal indstilles, for at funktionen
"Forindstil starttid" kan benyttes.
4. Tryk på knappen ur/timer 8 , nu
blinker minutcifrene.
5. Drej nu på drejeknappen 0 for at indstille
minutterne.
6. Tryk på knappen start/lynstart 0 .
Timeglasset vises i displayet 1.
Mikrobølgeovnen starter automatisk forløbet
på det indstillede tidspunkt.
1. Indtast det ønskede tilberedningsprogram:
• Til mikrobølgefunktionen: Tryk på knappen
effekt r for at vælge det ønskede effekttrin.
Indstil kogetiden med drejeknappen 0.
• Til grillfunktionen: Tryk på knappen grill 7,
indtil den ønskede grillfunktion er aktiveret.
Indstil den ønskede tilberedningstid med drejeknappen 0.
• Til varmluftfunktion: Tryk på knappen varmluft 9
for at vælge temperaturen. Indstil kogetiden
med drejeknappen 0.
• Til kombinationsforløbet "varmluft":
Tryk på knappen kombination mikrobølgeovn varmluft 6 for at vælge temperaturen.
Indstil
kogetiden med drejeknappen 0.
• Til kombinationsforløbet "grill":
Tryk på knappen kombination mikrobølgeovn grill e for at vælge det ønskede grill-
forløb. Indstil
kogetiden med drejeknappen 0.
• For en automatisk menu: Vælg den ønskede
automatiske menu med drejeknappen 0.
Tryk på knappen vægt/minutur w ,
indtil den ønskede vægt vises i displayet 1.
2. Tryk på ur/timer-knappen 8 .
Displayet 1 viser det aktuelt indstillede
klokkeslæt, og timetallet blinker.
3. Drej drejeknappen 0 for at indstille timerne.
Bemærk:
Hvis du vil se på den gemte starttid, skal du
trykke på knappen ur/timer 8 .
I displayet 1 vises den indstillede starttid.
For at slette den gemte starttid og dermed afbryde
det gemte forløb skal du trykke på knappen ur/
timer 8 , så den indstillede starttid vises i
displayet 1. Tryk så, mens starttiden vises i dis-
playet 1 på knappen stop/børnesikring q.
Timeglasset i displayet 1 slukkes. Det gemte forløb
er slettet.
- 44 -
Page 47

Opskrifter
Frikadeller
• Form frikadellerne af ca. 125g hakket oksekød
for hver (diameter ca. 75mm, højde ca.
35mm).
• Fordel frikadellerne på en tallerken, der er
egnet til mikrobølgeovn, og stil den på drejetallerkenen 3.
Kartoffelgratin
Ingredienser
• 750 g faste, skrællede kartofler
• 300 g fløde
• 100 g revet ost med et fedtindhold på 25% til
30 % fedt i tørmasse.
• Krydderier efter smag (f.eks. salt/peber)
Brug rundt køkkenservice med låg, som kan tåle
mikrobølger, med en højde på 5 til 6 cm og en
diameter på ca. 22 cm.
Tilberedning
Det bedste resultat opnår du ved selv at indstille
følgende programkombination (se også kapitlet
Gemmefunktion):
• Fremgangsmåde 1:
Varmluft 230°C, 4:00 min.
• Fremgangsmåde 2:
Mikrobølgeovn 900 W effekt , 5:30 min.
• Fremgangsmåde 3:
Varmluft 230°C, 2:00 min (afhængigt af smag
kan en tid på op til 4:00 min. også være mulig).
Bagning af færdige frostboller
• Vælg varmluftfuntionen til bagning af boller.
• Læg 3-4 boller på en tallerken, der er egnet til
mikrobølger, og stil den på drejetallerkenen 3.
Forvarmning af mikrobølgeovnen er ikke nødvendig.
Vælg følgende indstilling til bagningen:
• Varmluft 170°C, tid: 12 minutter
Hvis du vil bage flere boller lige efter, skal du afkorte
tiden med ca. 1-2 minutter, da ovnen allerede er forvarmet.
Tilberedning
• Skær kartoflerne i ca. 3 – 4 mm tykke skiver.
• Læg cirka halvdelen af kartoflerne som tagsten
i gratinformen.
• Strø halvdelen af osten over kartoflerne.
• Tilsæt halvdelen af krydderierne samt ca. 150 g
fløde.
• Læg resten af de skårne kartofler over - også
som tagsten.
• Fordel resten af osten over kartoflerne, og hæld
resten af fløden over.
• Strø resten af krydderierne over gratinen.
• Dæk formen til med låget, og stil den i midten
på drejetallerkenen 3.
Det bedste resultat opnår du ved selv at indstille
følgende programkombination:
• Fremgangsmåde 1:
Mikrobølgeovn 900 W effekt , 10:00 min.
• Fremgangsmåde 2:
Varmluft 230°C, 10:00 min.
• Fremgangsmåde 3:
Mikrobølgeovn 900 W effekt , 10:00 min.
Forvarmning er ikke nødvendig.
- 45 -
Page 48

Muffins
Ingredienser
Opskriften er nok til ca. 10 til 20 muffins.
• Bagemargarine (80% fedtindhold) eller saltet
smør
• 170 g krystalsukker (maks. kornstørrelse
0,3 mm)
• 3 æg (55 - 60 g med skal/størrelse M)
• 225 g hvedemel
• 7 g bagepulver
• 0,25 g salt
Rengøring og vedligeholdelse
Fare for uheld!
Før du begynder rengøringen, skal du slukke for mikrobølgeovnen og trække stikket ud af stikkontakten.
Ellers er der fare for elektrisk stød!
Mikrobølgeovnen må under ingen omstændig-
heder lægges ned i vand eller andre væsker.
Det kan være livsfarligt på grund af elektrisk
stød, og mikrobølgeovnen kan ødelægges.
Tilberedning
• Bland alle ingredienserne godt.
• Fyld muffindejen i almindelige papir-bageforme
(diameter ca. 45 mm, højde ca. 28 mm)
• Varm mikrobølgeovnen op med varmluftfunktionen til 170°C.
Bemærk:
Hvis du skal bage flere gange efter hinanden,
fordi du har dej til mange muffins, skal du kun
forvarme en gang.
• Fordel nu muffinerne på drejetallerkenen 3.
• Vælg følgende indstilling til bagningen:
Varmluft 170°C, tid: 12 minutter
• Hold altid mikrobølgeovnen ren indeni.
• Hvis sprøjt fra mad eller spildt væske sidder
fast på væggene i mikrobølgeovnen, skal du
tørre væggene af med en fugtig klud.
• Anvend et mildt opvaskemiddel, hvis mikrobølgeovnen er mere snavset.
• Undgå at anvende rengøringsspray og andre
skrappe rengøringsmidler, da de kan frembringe
pletter, striber eller gøre dørens overflade mat.
• Rengør ovnens ydervægge med en fugtig klud.
• Sørg for, at der ikke kan trænge vand ind i
ventilationsåbningen 5, så det undgås, at
funktionsdelene inden i mikrobølgeovnen beskadiges.
• Fjern regelmæssigt sprøjt og snavs. Rengør døren
og vinduet på begge sider, dørtætningerne og
de tilstødende dele med en fugtig klud. Der må
ikke anvendes skuremiddel.
- 46 -
Page 49

• Hvis ovndøren dampes til udenpå eller indeni,
skal den tørres af med en blød klud. Det kan
ske, hvis mikrobølgeovnen står i et miljø med
høj luftfugtighed.
• Rengør drejetallerkenen 3 regelmæssigt.
Vask glastallerkenen i varmt sæbevand eller i
opvaskemaskinen.
• Rengør grillstativet t i varmt opvaskevand,
og tør det godt af.
• Fjern jævnligt lugt. Stil en dyb mikrobølgeskål,
der er fyldt med en kop vand, saft og skal fra
en citron, ind i mikrobølgeovnen. Varm op i
5 minutter. Tør grundigt efter, og gnid den helt
tør med en blød klud.
• Hvis det er nødvendigt at skifte pæren i mikrobølgeovnen, skal du overlade det til forhandleren
eller spørge vores serviceafdeling.
Displayet 1 viser "E01", og signaltonerne
lyder.
• Mikrobølgeovnen er overophedet. Afbryd
omgående det igangværende program. Tag
strømstikket ud, åbn mikrobølgedøren, og lad
ovnen køle af.
Displayet 1 viser "E02", og signaltonerne
lyder.
• Der foreligger en fejl på sensoren. Afbryd programmet, og lad ovnen køle af. Start så mikrobølgeovnen igen. Hvis fejlen forekommer flere
gange, bedes du henvende dig til kundeservice.
• Der er en fejl ved opvarmning af mikrobølgeovnen. Afbryd programmet, og lad ovnen køle
af. Start så mikrobølgeovnen igen. Hvis fejlen
forekommer flere gange, bedes du henvende
dig til kundeservice.
Afhjælpning af fejl
Displayet 1 viser ingenting.
• Stikket sidder ikke i stikkontakten. Kontrollér
stikket.
• Stikkontakten er defekt. Prøv en anden stikkontakt.
• Displayet 1 er defekt. Kontakt service.
Mikrobølgeovnen reagerer ikke, når der
trykkes på knapperne.
• Børnesikringen er aktiveret. Deaktivér børnesikringen (se kapitlet "Betjening").
Mikrobølgeovnen starter ikke tilberedningen.
• Døren er ikke lukket rigtigt. Luk døren rigtigt.
Drejetallerkenen 3 laver høje lyde, når den
drejer.
• Drejetallerkenen 3 sidder ikke rigtigt på aksen.
Stil drejetallerkenen 3 rigtigt ind i ovnen.
• De små hjul 4 og/eller bunden af ovnrummet
er snavsede. Rengør hjulene 4 og bunden.
Displayet 1 viser "E03", og signaltonerne
lyder.
• Mikrobølgeovnen er skiftet til fejlfunktions-beskyttelse på grund af en kortslutning eller tomgangsspænding. Afbryd programmet, og tag
strømstikket ud. Afhjælp problemet hvis det er
muligt, f.eks. metal i ovnrummet, som kan føre
til ovennævnte problem ved brug af mikrobølgefunktionen. Ellers bedes du henvende dig til
kundeservice.
- 47 -
Page 50

Bortskaffelse
Smid aldrig mikrobølgeovnen ud sammen med det normale husholdningsaffald. Dette produkt er underkastet det
europæiske direktiv 2002/96/EF.
Bortskaf mikrobølgeovnen via en godkendt bortskaffelsesvirksomhed eller den kommunale genbrugsstation.
Følg de aktuelt gældende regler.
Henvend dig i tvivlstilfælde til det lokale bortskaffelsessted.
Garantiperioden forlænges ikke, hvis der gøres brug
af garantien. Det gælder også for udskiftede og
reparerede dele. Skader og mangler, der eventuelt
allerede fandtes ved købet, skal straks anmeldes
efter udpakningen og senest to dage efter købsdatoen. Når garantiperioden er udløbet, er reparationer
betalingspligtige.
Kompernass Service Danmark
Tel.: 80-889 980
(
Der kan kun ringes til servicenummeret fra fastnet)
e-mail: support.dk@kompernass.com
Aflever alle emballagematerialer på et
affaldsdepot, så miljøet skånes.
Garanti og service
På denne mikrobølgeovn får du 3 års garanti fra
købsdatoen. Mikrobølgeovnen er produceret omhyggeligt og inden levering afprøvet samvittighedsfuldt.
Opbevar kassebonen som bevis for købet. Kontakt
venligst din serviceafdeling telefonisk, hvis du ønsker at
gøre brug af garantien. På denne måde garanteres
det, at tilsendelsen af varen er gratis.
Garantien gælder kun for materiale- eller fabrikationsfejl, men ikke for transportskader, sliddele eller
skrøbelige dele som f.eks. kontakten eller akkumulatorer. Produktet er kun beregnet til privat og ikke til
erhvervsmæssigt brug.
Ved misbrug og uhensigtsmæssig behandling, anvendelse af vold og ved indgreb, som ikke er foretaget af vores autoriserede service-afdeling, ophører
garantien. Dine juridiske rettigheder indskrænkes
ikke ved denne garanti.
Importør
KOMPERNASS GMBH
BURGSTRASSE 21
44867 BOCHUM, GERMANY
www.kompernass.com
- 48 -
 Loading...