

Page 1
KITCHEN TOOLS
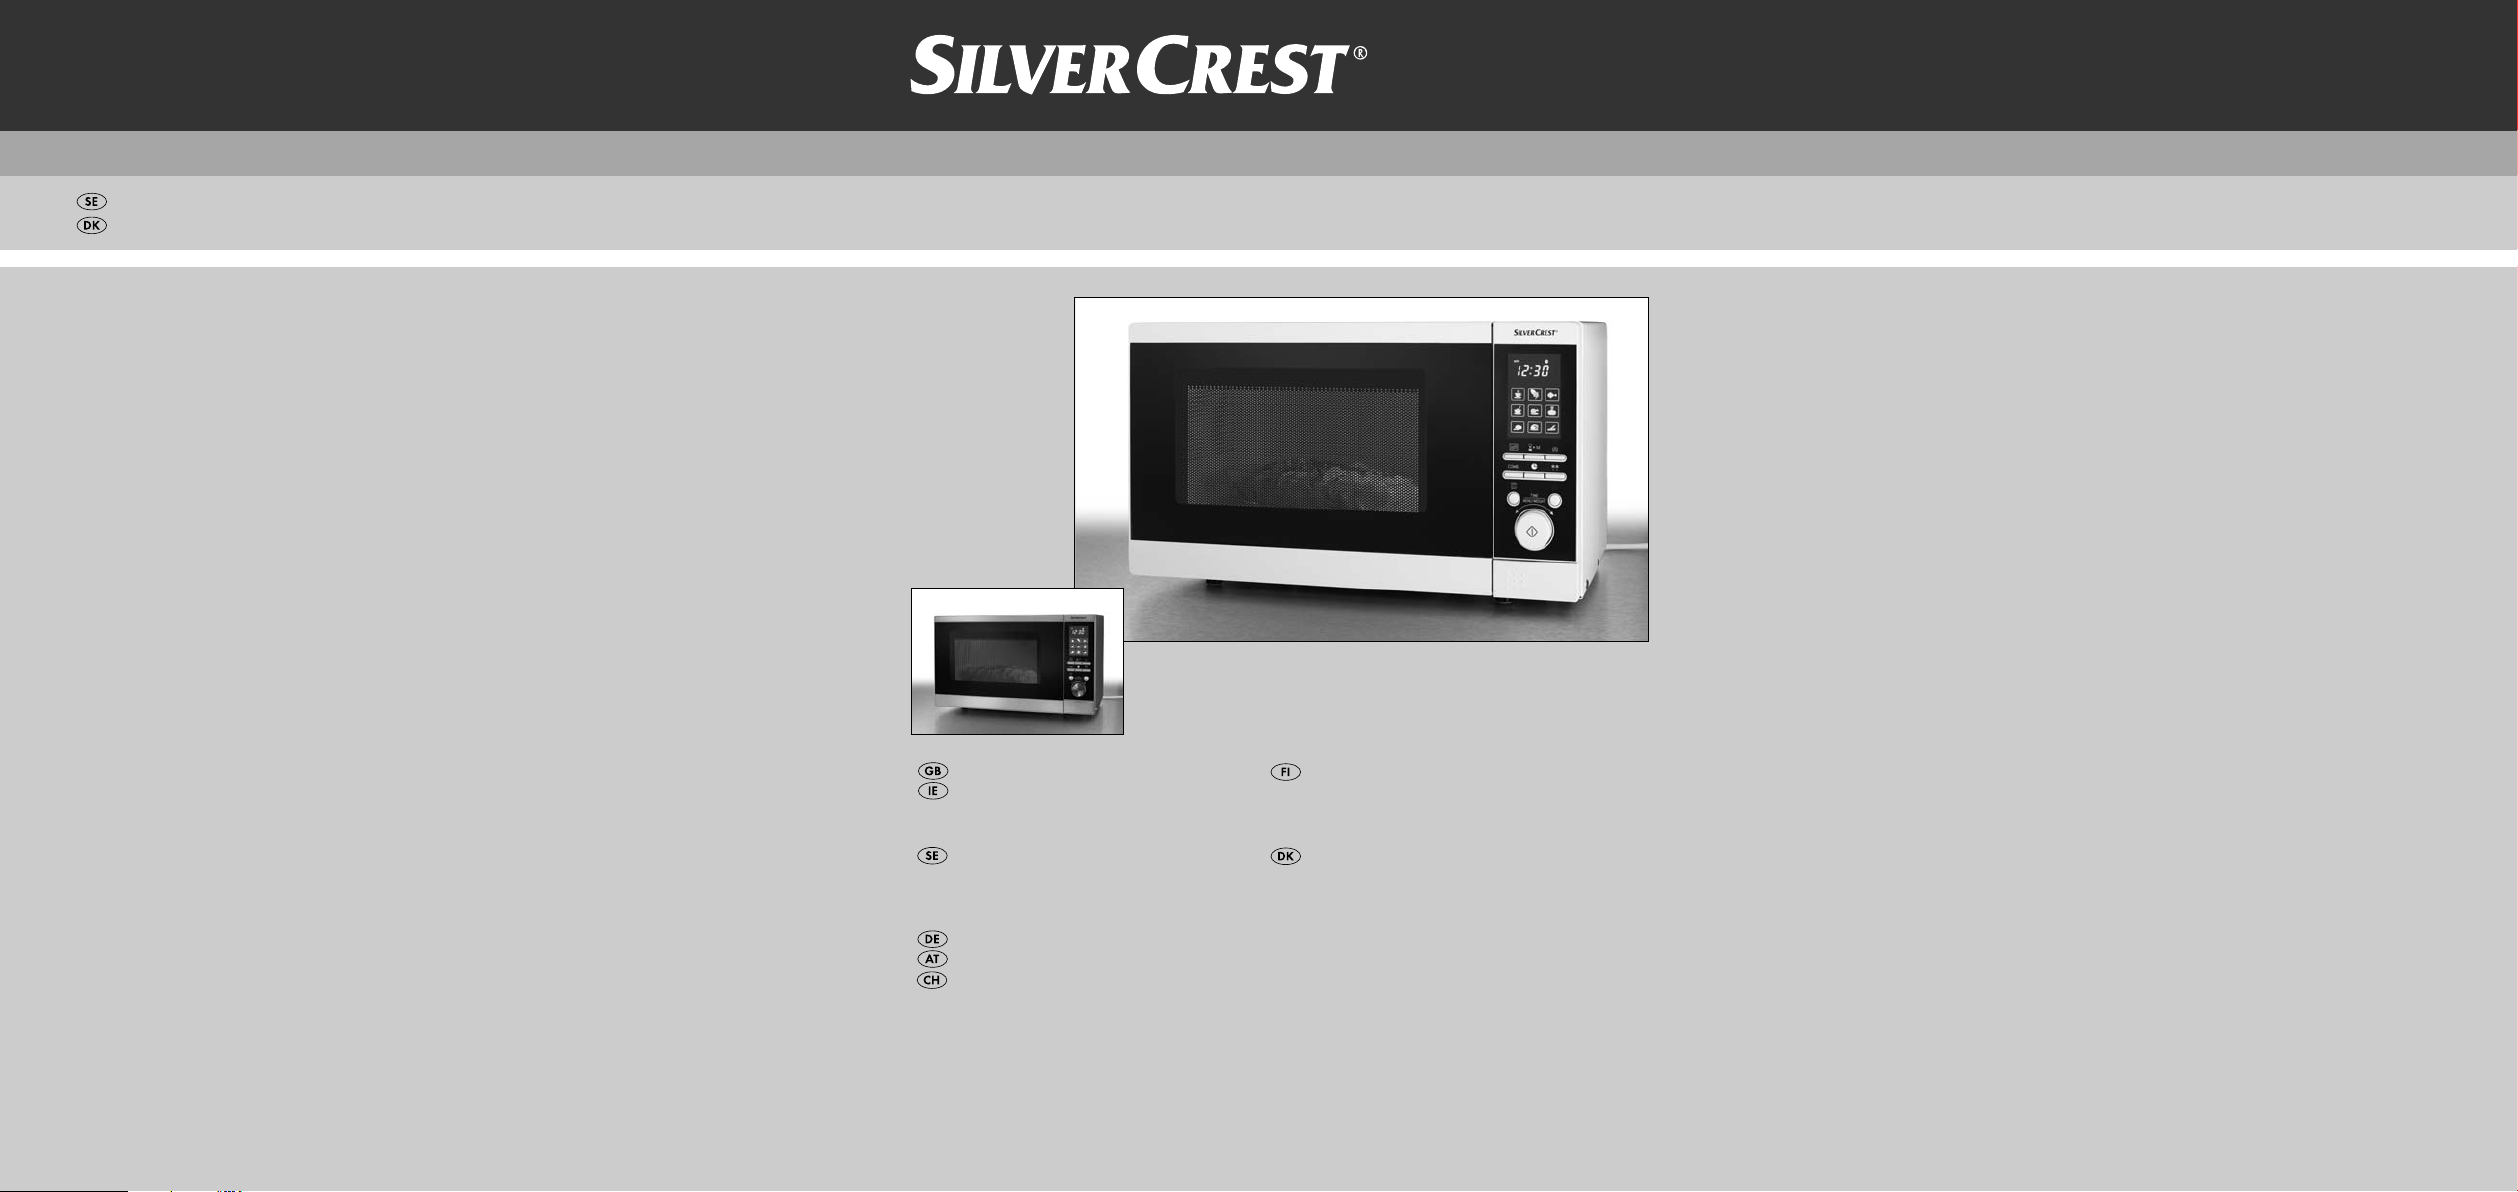
Microwave SMW 800 A2
KOMPERNASS GMBH
BURGSTRASSE 21 · D-44867 BOCHUM
www.kompernass.com
ID-Nr.: SMW 800 A2-09/11-V3
IAN: 71492/71493
Microwave
Operating instructions
Mikrovågsugn
Bruksanvisning
Mikrowelle
Bedienungsanleitung
Mikroaaltouuni
Käyttöohje
Mikrobølgeovn
Betjeningsvejledning
Page 2
SMW 800 A2
5
4
1
2
3
r
e
w
0
q
7
9
t
6
8
Page 3
INDEX PAGE
Safety instructions 2
Intended Usage 5
Items supplied 5
Technical Data 5
Before you begin 6
Basic principles of microwave cookery..........................................................................................6
Use suitable cookware.....................................................................................................................6
Description of the appliance 7
Commissioning 7
Installation of the appliance............................................................................................................7
Preparing the appliance ..................................................................................................................7
Inserting accessories ........................................................................................................................8
Operation 8
Setting the Clock...............................................................................................................................8
Setting the kitchen timer...................................................................................................................8
Child protection system....................................................................................................................9
Query functions ................................................................................................................................9
Heating and cooking 9
Microwave operation.......................................................................................................................9
Grill operation.................................................................................................................................11
Combination cooking processes...................................................................................................11
Auto menu 11
Starting the Auto-menu...................................................................................................................12
Programmes in detail .....................................................................................................................13
Defrosting 15
Preset the start time (Preset) 15
Cleaning and Care 16
Troubleshooting 17
Disposal 17
Warranty and Service 17
Importer 18
Read the operating instructions carefully before using the device for the first time and preserve this booklet
for later reference. Pass this manual on to whoever might acquire the device at a future date.
- 1 -
Page 4
Microwave
Safety instructions
Important!
Warnings regarding damage to the appliance.
Danger! / Risk of injury!
Warning about physical injuries and electric shock!
Risk of fire!
Warning about risks of fire.
Notice!
Note – Hints and tips for using the microwave.
Safety precautions for the avoidance of excessive
contact with microwave energy
• Do not try to operate the appliance while the
door is open, as this can lead to you coming
into contact with a potentially harmful dose of
microwave radiation. It is also important not
to break open or manipulate the safety locks .
• Do not jam anything between the front of the
appliance and the door, and make sure that
there is no residual food or cleaning agent
on the seals.
Risk of injury!
• If the door or the door seal is damaged, under
no circumstances may you continue to use the
appliance. Arrange for it to be repaired as soon
as possible by qualified specialists.
• Never attempt to repair the appliance yourself.
Removal of the appliance housing could cause
the release of microwave energy. Arrange for
the repair to be carried out only by qualified
specialists.
• This appliance is not intended for use by individuals
(including children) with restricted physical, physiological or intellectual abilities or deficiences in
experience and/or knowledge unless they are
supervised by a person responsible for their safety
or receive from this person instruction in how the
appliance is to be used. Children should be
supervised to ensure that they do not play with
the appliance.
• Children may only be allowed to use the appliance without supervision if appropriate instructions have been given that have provided
the child with the knowledge to use the cooker
in a safe manner and to understand the risks
of improper use.
• Only use this appliance for its intended purpose
as described in this manual. Do not use any caustic
chemicals or vapours in this appliance. This microwave oven is especially designed for heating,
cooking, grilling, or drying foodstuffs.
It is not intended for use in industrial applications
or laboratories.
• Do not operate the microwave oven if the power
cable or plug are damaged. To avoid injury,
arrange for damaged power cables or plugs to
be exchanged by qualified specialists before
re-using the appliance.
• Keep children well away from the microwave
oven when it is in use. Risk of Burns!
• Under no circumstances should you remove the
microwave oven housing.
• Should the lamp in the interior of the microwave
oven need replacing, arrange for this to be done
by a qualified specialist.
• Never touch the microwave oven door, housing,
ventilation openings, accessories or the dinnerware
directly after the grill, combi or automatic menu
process. The parts will be very hot. Allow them
to cool down before cleaning them.
• Ensure that the plug is at all times easily accessible,
so that it can be quickly removed in the event of
an emergency.
- 2 -
Page 5

• People fitted with a heart pacemaker should consult
their doctor about the possible risks of using a microwave oven before taking one into use.
• Do not allow the power cable to hang from a table
or work surface. Children could pull on it.
• After they have been warmed up, always open
containers, popcorn-bags etc. with the opening
pointing away from your body. Escaping steam
could lead to scalds.
• Never stand directly against the microwave oven
when opening the door. Escaping steam could
lead to scalds.
• Do not fry in the microwave. Hot oil can damage
parts of the appliance and utensils and even
cause skin burns.
• Always shake-up or stir warmed up baby glasses
or bottles! The contents could have heated up
unevenly and the baby could be burned/scalded
by them. At all events, check their temperature
before feeding them to the baby!
• Do not modify the microwave oven.
• Microwave radiation is dangerous! Maintenance and repairs requiring the removal of access
covers, which are intended for protection
against contact with microwave radiation, are to
be carried out by trained specialists only.
• Before consumption, check the temperature, so
as to avoid a potentially life-threatening scalding
for babies.
Cooking utensils may become hot from the heat
emitted by the food, so that you may require oven
gloves to touch them. In this case, a check should
also be made to ensure that the cooking utensils
are suitable for use with the microwave oven.
Attention! Hot surfaces!
Risk of fire
• Never leave the microwave oven unattended if
you are heating foodstuffs packed in plastics or
paper.
• Never place flammable materials close to the
microwave oven or the ventilation openings.
• Remove ALL metallic closures from the packaging
of the foodstuff that you intend to warm up.
Risk of fire!
• When making popcorn, use only popcorn-bags
suitable for microwave ovens.
• Do not use the microwave oven to warm up cushions
filled with kernels, cherry stones or gels.
Risk of fire!
• Do not use the microwave oven for storing foodstuffs
or other objects.
• Do not exceed the cooking times detailed by the
manufacturer.
• Do not place any objects on the microwave oven
when it is in use. The ventilation openings would
be blocked!
• Do not place the microwave oven adjacent to
other appliances discharging heat, for example,
an oven.
• Clean the microwave oven thoroughly after warming
up greasy foods, especially if they were not covered.
Allow the appliance to cool down completely
before cleaning it. Residues such as fat or grease
cannot be allowed to collect on the heating
elements of the grill. They could possibly ignite.
• Do not thaw frozen fat or oil in the microwave oven.
The fat or oil could ignite.
• Do not use an external timing switch or a separate
remote control system to operate the appliance.
- 3 -
Page 6

Important! Appliance Damage!
• Do not use the microwave oven when it is empty.
The only exception is for the initial commissioning
(see chapter "Commissioning").
• Never insert foreign objects into the ventilation
openings or the door safety locks.
• Do not use metallic utensils which reflect micro-
waves and lead to sparking. Do not place tins
in the microwave oven.
• Do not place plastic containers in the microwave
oven immediately after a grill, combi or automatic
menu process. The plastic could melt.
• This microwave oven may not be located in areas
with high humidity or where moisture could collect.
• Liquids and other foods must not be heated in airtight containers, as these may explode and
damage the appliance.
• Do not lean on the microwave oven door.
• Insufficient cleanliness of the appliance could lead
to the destruction of the upper surfaces, which
themselves influence its useful lifespan and could
possibly also lead to dangerous situations.
Danger
• Never submerse the appliance, the power cable
or the plug in water or other fluids.
• Keep the power cable away from hot surfaces.
Do not lead it in front of the microwave oven door.
The heat could damage the cable.
• Never pour fluids into the ventilation openings
or the safety locks. Should fluids ever enter them,
immediately switch the microwave oven off and
remove the plug from the mains power socket.
Arrange for the appliance to be checked by
qualified specialists.
Safety tips
• To minimize the risk of fire in the microwave:
When heating food in plastic or paper containers,
always keep an eye on the microwave when it
is in operation, as these materials can catch fire.
• When heating drinks in the microwave, bubbling
may be delayed when the drink boils. Therefore,
be careful when handling the container.
To avoid sudden simmering:
- If possible, place a glass rod in the fluid for as
long as it is being heated.
- To avoid an unexpected reboiling, leave the
fluid to stand in the microwave oven for
ca. 20 seconds after being warmed up.
• Puncture the skins of potatoes, sausages or similar.
Otherwise, they could explode.
• Proceed with caution when warming up fluids.
Use only open containers, so that any air bubbles
produced can escape.
• Should you notice smoke, switch the appliance
off or remove the plug from the socket and
keep the door closed to suffocate any possible
flames.
• Eggs in their shells and hard-boiled eggs should
not be heated in the microwave oven as they
could explode, even on completion of the heating
process. Food with thick skins, such as potatoes,
whole pumpkins, apples and chestnuts must be
pricked before cooking.
• Do not transport the microwave oven when it is
in use.
- 4 -
Page 7
Earthing information/correct installation
This appliance must be earthed. This appliance is
to be connected only to a correctly earthed power
socket. An individual circuit, solely for the connection
of the microwave oven, is recommended.
Danger: Improper use of the earthing connector
could increase the risk of an electric shock.
Note: Should you have any questions about earthing or about the instructions on the use of
this electrical appliance given here, please
consult an electrician or
a maintenance technician.
Neither the manufacturer nor the dealer can accept
liability for damage to the microwave oven or injury
to persons resulting from failure to comply with the
instructions for electrical connection.
Interference with other appliances
The operation of the microwave may cause interference
on your radio, television or similar appliances.
If such interference should occur, they may be reduced
or corrected by the following remedial measures:
• Clean the door and the seal of the microwave.
• Re-align the receiver antenna of your radio or
television.
• Position the microwave in a different place to
the receiver.
• Move the microwave away from the receiver.
• Plug the microwave into another wall socket.
The microwave and the receiver should be
connected to different circuits.
Intended Usage
This appliance is intended for the heating up and
preparation of foodstuffs according to the described
procedures.
Any modifications to the appliance shall be deemed
to be improper use and implies substantial risk of
accidents. The manufacturer declines to accept
responsibility for damage(s) arising out of usage
contrary to the instructions specified below.
This appliance is intended exclusively for use in
domestic households!
Do not use it in/for commercial, industrial or laboratory areas/applications!
Items supplied
Microwave
Glass plate
Grill stand
Star rotator
Operating instructions
Concise instruction sheet
Technical Data
Power rating: 230 - 240 V
50 Hz
Maximum power consumption: 1200 W
Maximum power output
Microwave: 800 W
Maximum power consumption
Grill: 1000 W
Microwave frequency: 2450 MHz
~
- 5 -
Page 8
Before you begin
Basic principles of microwave cookery
• Arrange the food with consideration.
• The thickest parts near the edges.
• Pay attention to the cooking time. Select the
shortest possible stated cooking time and increase
as required. Food that is cooked too long can
begin to smoke or catch fire.
• Cover the food during cooking with a lid suitable
for microwave cookery. The lid prevents splashing
and helps in the even cooking of the food.
• While cooking, turn the food in the microwave
once so that items such as chicken or hamburgers
are cooked more quickly.
• Large pieces of food, such as joints of meat,
must be turned at least once.
• Completely re-arrange foods such as meatballs
after half the cooking time. Turn them and move
the meatballs from the middle of the cookware
to the edge.
• We recommend the use of round/oval cookware
instead of square or oblong containers, as food
in corner areas tends to overcook.
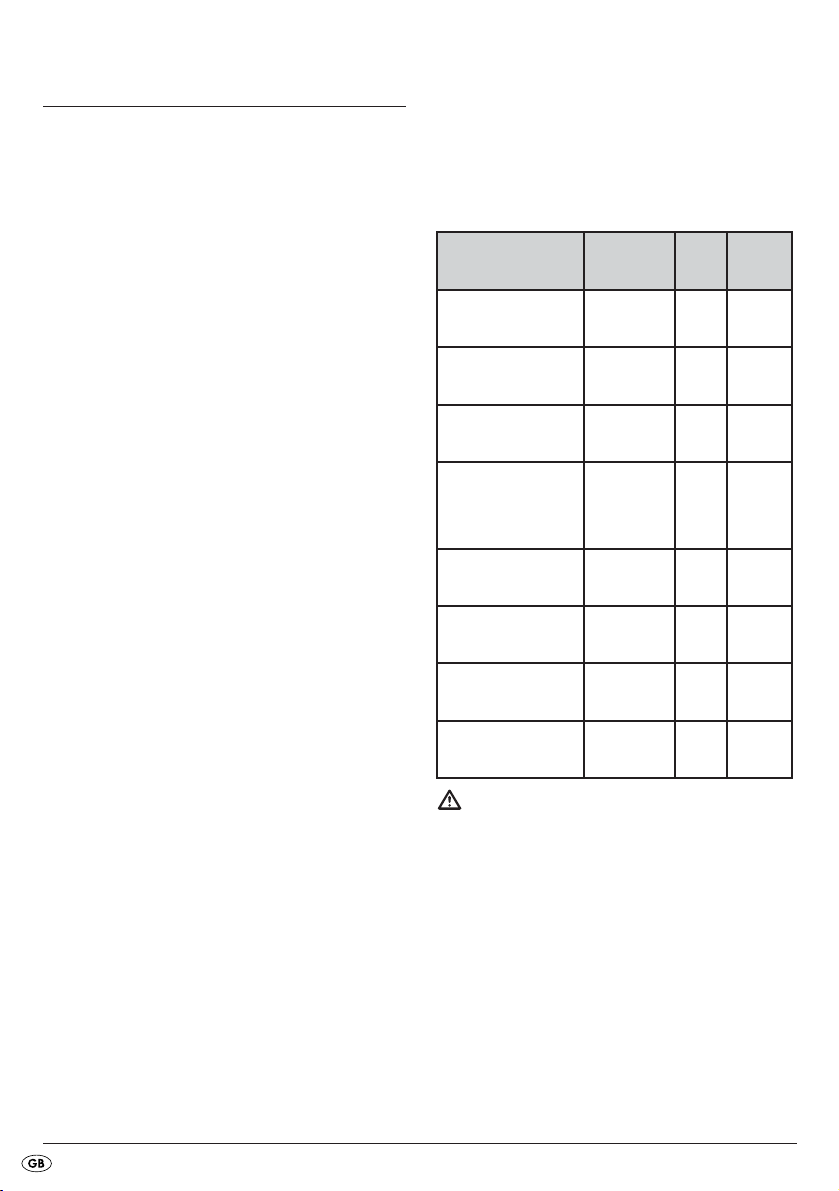
The following list provides general hints to assist
you in selecting the correct cookware.
Cookware
Heat-resistant glass Yes Yes Yes
Non-heat-resistant
glass
Heat-resistant
ceramics
Plastic crockery
suitable for microwave
Kitchen roll Yes No No
Microwave oven
No No No
Yes Yes Yes
Yes No No
Grill
Combination
Use suitable cookware
• The ideal material for a microwave oven is
microwave-permeable, allowing the energy to
penetrate the container to heat the food.
Microwaves cannot permeate metal. Therefore,
metal containers and cookware should not be
used.
Microwaves cannot permeate metal. For this
reason metal containers and cookware should
not be used.
• When using the microwave for heating do not
use products made of recycled paper. These
can contain minute fragments of metal, which
can generate sparks and/or fires.
Metal tray/plate No Ye s No
Grill stand No Yes No
Alufoil & Foil
containers
No Yes No
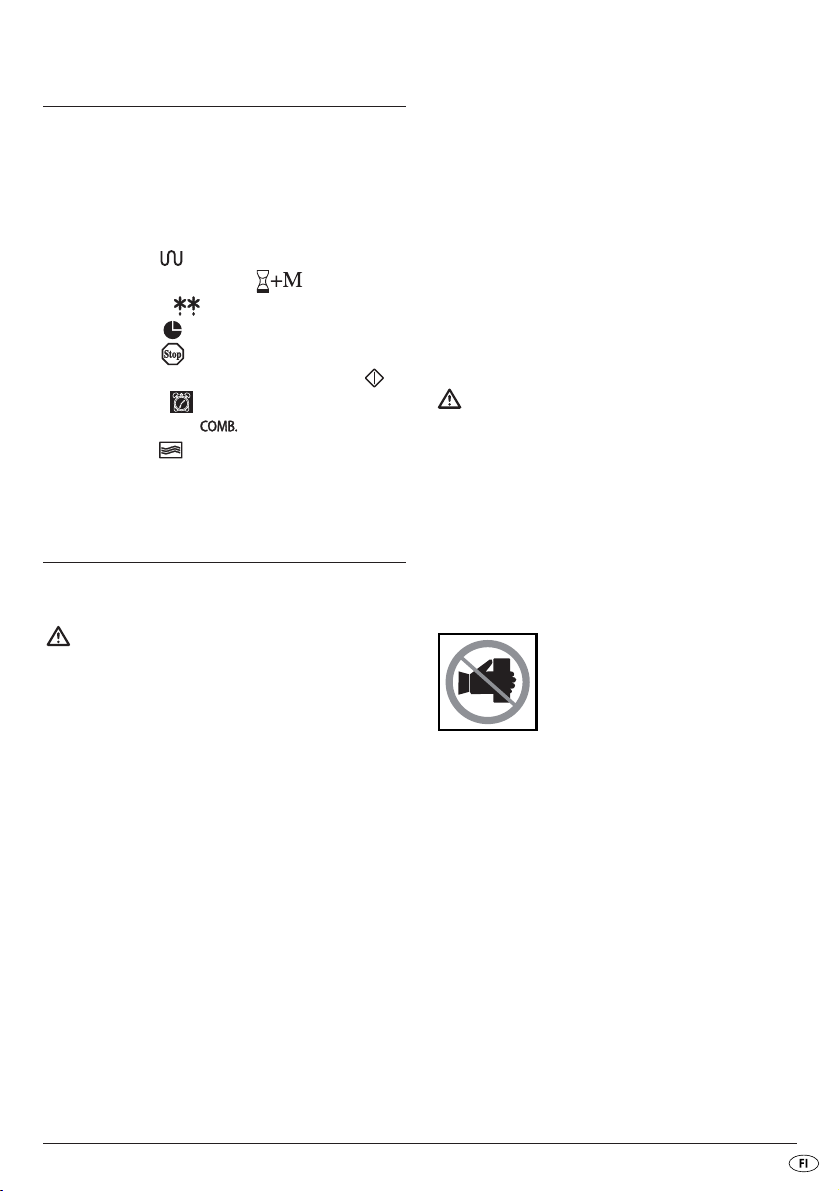
Risk of fire!
Never use the grill stand or other metallic objects
when you are using the appliance in the microwave
mode or in the combination cooking process.
Metals reflect the microwave radiation and it leads
to the generation of sparks. This could cause a fire
and irreparably damage the appliance!
- 6 -
Page 9
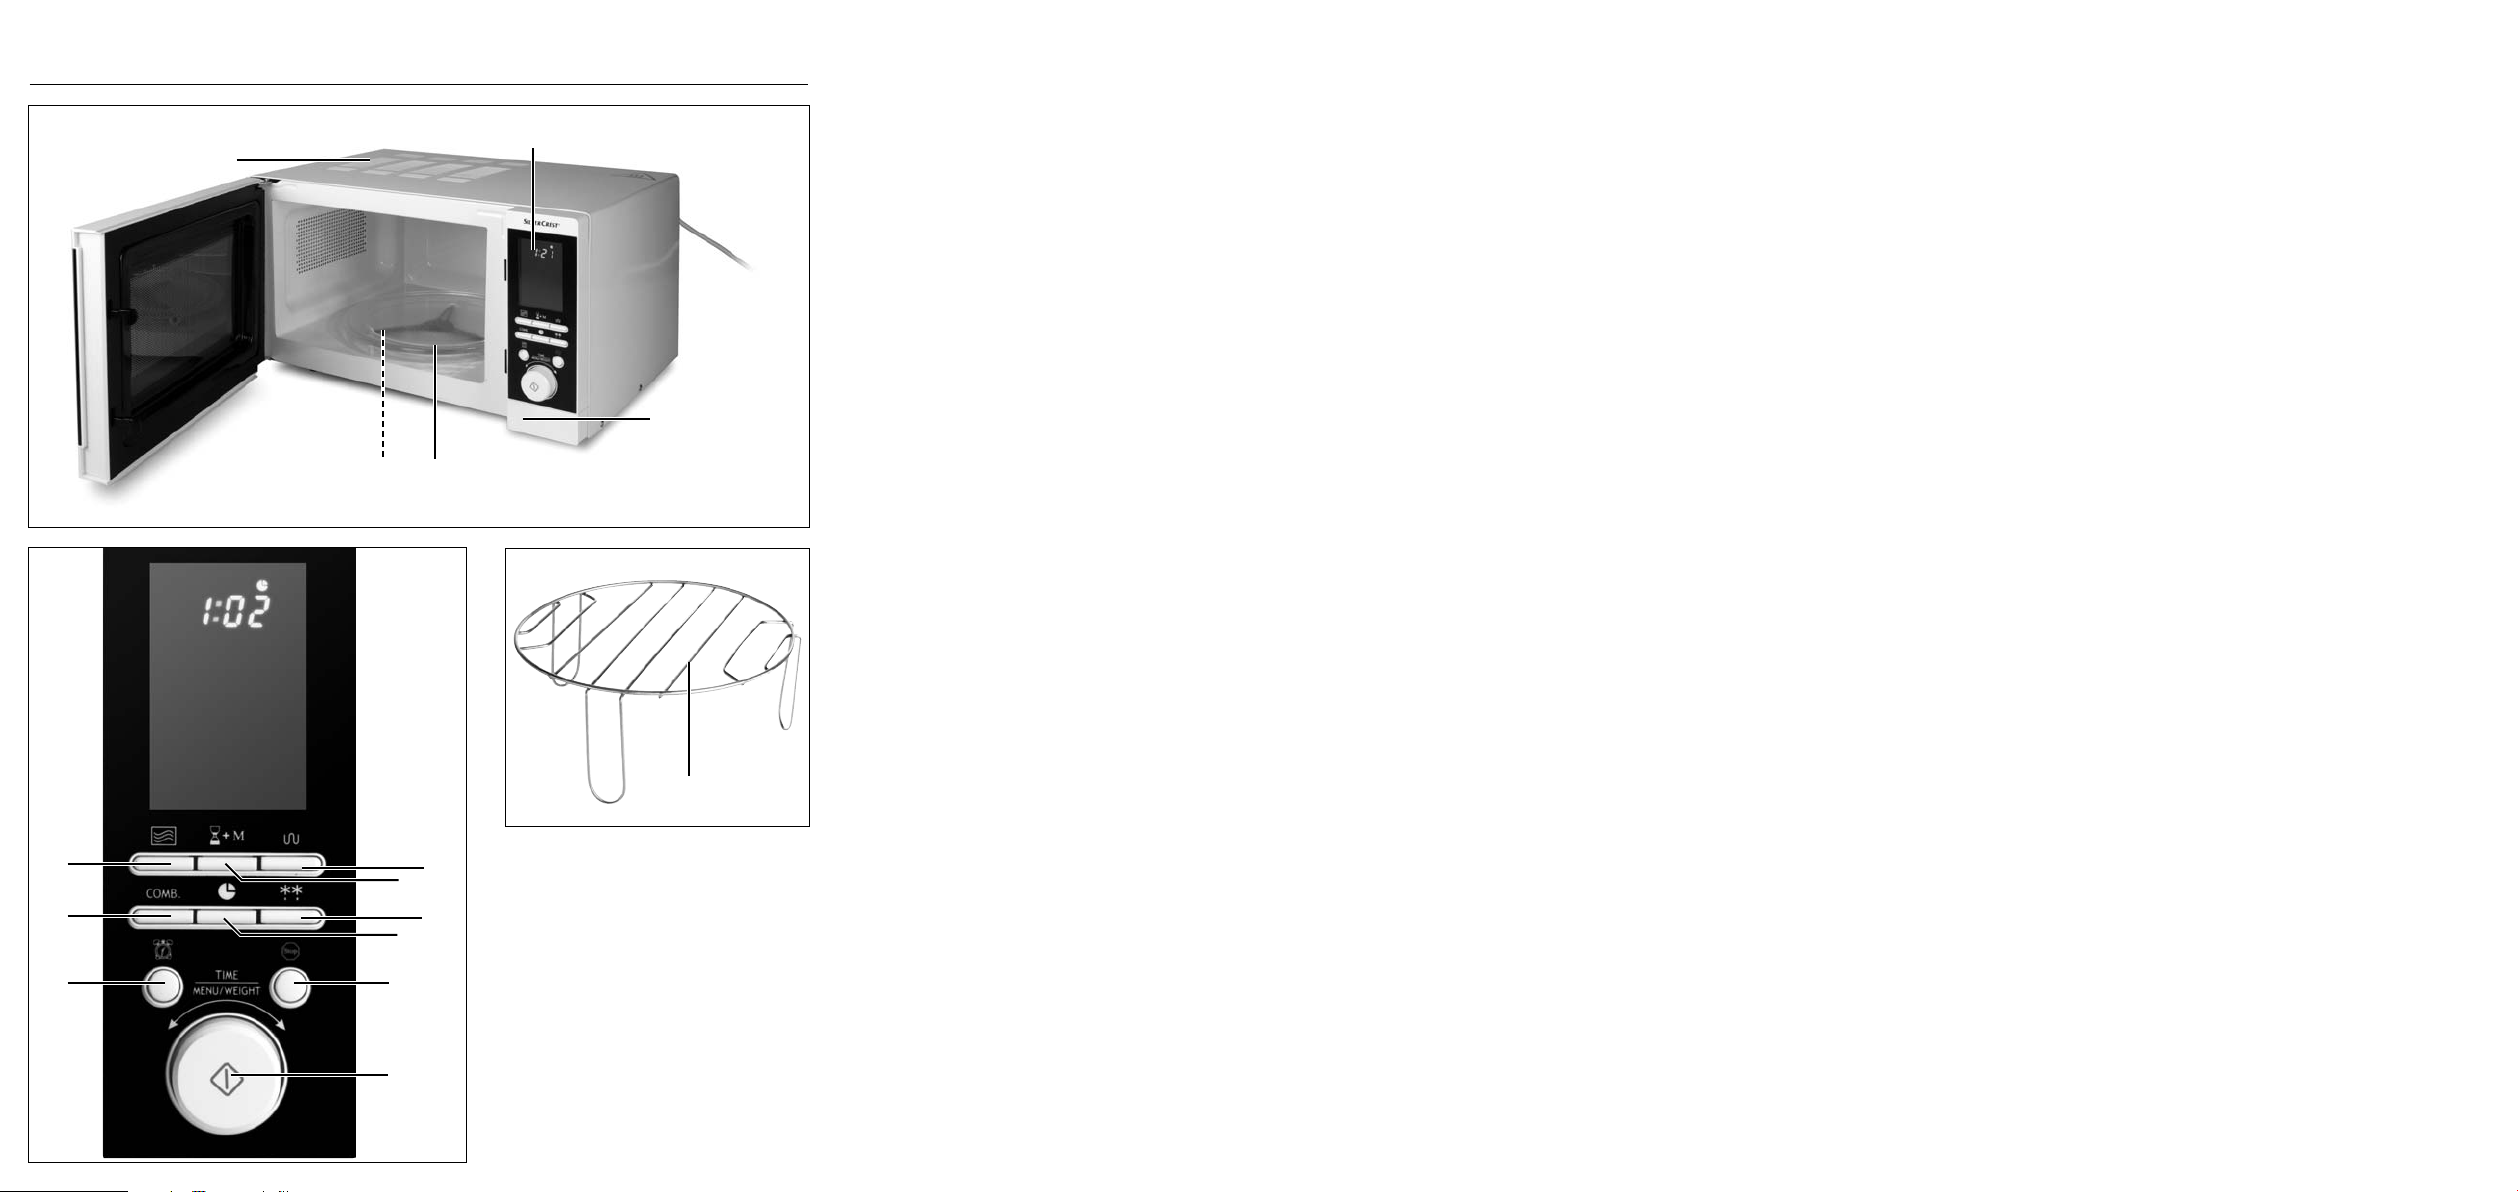
Description of the appliance
DO NOT
1 Display
2 Door opener button
3 Glass plate
4 Star rotator
5 Cold air intake
6 Grill Button
7 Preset Button
8 Defrosting button
9 Time Button
0 Stop button
q Control dial/Start/Quickstart
w Kitchen timer button
e Combination Button
r Operation button
t Grill stand
• Ensure that the electrical plug is accessible
without problem, so that in case of danger it
can be easily reached and removed.
• Do not remove the pads underneath the microwave oven.
• Do not block the ventilation slots 5. If you do,
it could damage the appliance.
• Install the appliance as far away as possible
from radios and televisions. The operation of
the microwave oven can cause malfunctions to
radio and televsision reception.
Warning:
Do not install the microwave above a cooker or any
other appliance generating heat. Installation in such
a location could cause damage to the appliance and
lead to a subsequent cancellation of the warranty
provisions.
Commissioning
Installation of the appliance
Risk of fire!
This microwave oven is not suitable for installation in
a kitchen cabinet. In closed cabinets sufficient ventilation
for the appliance cannot be assured. The appliance
could be damaged and there would be the additional
risk of a fire!
• Select an even surface offering sufficient space
for the adequate ventilation of the appliance:
Ensure that you maintain a minimum distance
of 10 cm from neighbouring walls/surfaces.
Ensure that the door of the microwave oven
can be opened easily.
Maintain a gap of at least 20 cm above the
microwave oven.
Preparing the appliance
• Remove all packaging materials and any
protective film on the surface of the housing.
D
mer cover plate, which is mounted
in the cooking area to protect the
magnetron.
• Insert the plug into a power socket.
Use a 230 - 240 V ~, 50 Hz, mains power
socket with a 16A fuse. It is recommended that
the microwave oven is powered from its own
ring main. If you are unsure about how to connect the microwave oven, consult a specialist.
remove the light grey flim-
- 7 -
Page 10
Before the first regular usage of the microwave oven
the appliance must be heated up to remove any
remaining production residues.
Without foodstuffs or accessories (glass plate 3, star
roller 4 and grill stand t), switch the appliance on
in the mode Grill:
• Press the button Grill once 6 .
With this you select the Grill operation.
In the display 1 appears the symbol and
the symbol blinks. This indicates readiness
to start.
• Adjust the control dial q to a cooking time of
10 minutes.
• Press the button Start/Quick start q to
start the grilling process.
Note:
On the first usage, the generation of light smoke and
a slight smell can occur, this is due to the production
residues. This is unharmful. Provide for sufficient
ventilation. For example, open a window.
Operation
Setting the Clock
When you take the microwave oven into use for the
first time, or there has been a power cut, the display 1
indicates "1 : 0 1 ".
1. Press the button Clock 9 . "Hr 12" appears
in the display 1.Press the button Clock 9
once again should you wish to switch to the 24hour mode.
2. By turning the control dial q programme in the
current hour. The clock symbol in the display 1 blinks.
3. Press button Start/Quick Start q . The
minute indicator appears.
4. By turning the control dial q, programme in the
current minute.
5. When the clock is correctly set, press the Start/
Quick Start button q . The clock symbol
in the display 1 glows continuously and
the colon indicates, by blinking, that the clock is
running.
• After 10 minutes, the appliance switches itself
off automatically. Signal tones sound. Open the
door. Wait until it has cooled down completely.
• Remove the plug from the mains power socket
then, after cleaning the appliance with a moist
cloth, dry it carefully.
Inserting accessories
• Place the star rotator 4 centrally on the drive
shaft in the cooking area. Ensure that it slides
completely onto the axle and is firmly seated.
• Place the glass plate 3 centrally on the star
rotator. The three rollers must be seated on the
leading edge on the glass plate 3.
To read off the current time when the microwave oven
is in operation, press the button Clock 9 ; the
time will then be indicated in the display 1 for
approx. 4 seconds.
Setting the kitchen timer
The microwave oven is provided with a kitchen timer
which you can use independently of the microwave
operation.
1. Press the button Kitchen timer w when the
appliance is in standby mode. In the display
appears 1 "00:10".
2. Now set the desired time using the control dial q.
You can select any time range from 10 seconds
to 95 minutes.
- 8 -
Page 11
3. Press button Start/Quick Start q . The
appliance emits an acoustic signal. The count
down begins. After approx. 3 seconds the current time is shown once again. The cooking timer progresses further in the background.
If you wish to check the progress of the kitchen timer, press the kitchentimer button w . It
appears for a brief period in the kitchen timer.
As soon as the set time has expired you will hear
3 signal tones.
Take note:
To stop the countdown of the kitchen timer, press
the button Kitchen timer w so that the remaining
time of the kitchen appears in the display. Press, during the period that the remaining time of the kitchen
timer is being shown in the display 1, the
Stop 0 button. The kitchen timer will then be cancelled and the current time appears in the display 1.
Child protection system
Engage this setting to prevent accidental activation
by children and other persons not familiar with the
operation of the appliance.
The symbol for Child safety appears in the display 1 and, for as long as this function is activated,
the appliance cannot be put into operation.
• Press and hold the button Stop0 until a
signal tone sounds and the symbol for Child
Safety appears in the display 1. The
buttons and the control dial now no longer have
a function.
• To deactivate Child Safety, press and hold the
Stop button 0 until an signal tone sounds
and the symbol for Child Safety extinguishes.
Query functions
Query the time during operation
During the cooking process press the button
Clock 9 .
The time appears in the display 1 for approx.
4 seconds.
Query the power level operation
During the cooking process press the button
Operation r .
In the display 1 the activated operational level
appears for approx. 3 seconds.
Heating and cooking
Microwave operation
Notice
During the cooking process, drops of water can form
on the oven door or on the housing. This is normal and
is not an indication of a malfunction.When the appliance has cooled down, wipe the moisture off with a
dry cloth.
Risk of fire!
Never use the grill stand t or other metallic objects
when you are using the appliance in the microwave
mode. Metals reflect the microwave radiation and it
leads to the generation of sparks. This could cause
a fire and irreparably damage the appliance!
- 9 -
Page 12
Selecting the operation level
• Press the button Operation r the appropriate number of times to set the required power
level.
• 1x for 800 Watts of power (P800).
• 2x for 700 Watts of power (P700).
• 3x for 600 Watts of power (P600).
• 4x for 500 Watts of power (P500).
• 5x for 400 Watts of power (P400).
• 6x for 300 Watts of power (P300).
• 7x for 200 Watts of power (P200).
• 8x for 100 Watts of power (P100).
The power setting level is indicated in the display 1
(e.g. P800 at 800 Watts of power).
Programming the cooking time
After you have selected the power level, programme
in the desired cooking time:
• Turn the control dial q, until the desired cooking
time has been programmed in.
The increments for setting the time with the control
dial q are as follows:
• from 10 sec. to 5 min: in 10 second increments
• from 5 to 10 min: in 30 second increments
• from 10 to 30 min: in 1 minute increments
• from 30 to 95 min: in 5 minute increments
Aborting/stopping an input process
Press the button Stop 0 once to cancel or end
input of data. The appliance reverts to standby mode.
Interrupting the cooking process
Press the button Stop 0 once to interrupt a cooking
process . The appliance interrupts the cooking process
and stops the remaining time. Press the button
Start/Quick start q to continue the cooking pro-
cess.
Abort the cooking process
Press the button Stop 0 twice to stop the cooking
process. The appliance reverts to standby mode.
Cooking process is finished
When a cooking process is complete, "End" appears
in the display 1 and 4 signal tones sound. If the
door of the microwave is not opened, the signal
tones sound again after about 2 minutes.
Quick start
With this function you can immediately begin cooking
at 800W power for 30 seconds (or longer, up to
12 minutes).
• Press the button Start/Quick Start q once.
In the display 1 appear the symbols for micro-
wave operation and cooking , as well
as ":30". The microwave starts the cooking process for 30 seconds. The count down begins.
Should you wish to cook for a longer period, repeatedly press the button Start/Quickstart q
until the desired time is reached.
Starting the cooking process
When you have programmed in the power level
and the cooking time, and the symbol blinks in
the display 1, you can start the cooking process:
To start the cooking process, press button Start/
Quickstart q .In the display 1 appear the
symbols for microwave operation and cooking
(Power P100 - P400) or (Power P500 P800).
The programmed time starts to count down.
- 10 -
Page 13
Grill operation
You can use the grill function for thin slices of meat,
steaks, hamburgers, sausage or chicken pieces. It is
also excellent for use in making topped sandwiches
and gratins. Always use the grill stand t for grilling.
To achieve an optimal grilling result.
Always place the Grill stand t on the Glass plate 3.
1. Press the button Grill 6 to activate the
grill function.
In the display 1 appears the symbol for the
grill function and „:10“.
2. Using the control knob q, set the required
cooking time. The maximum possible cooking
time setting is 95 minutes.
3. To start the grilling function press the button
Start/Quick start q .
4. Turn the meat after about half of the cooking
time.
Combination cooking processes
This function combines the grill function and the normal
microwave operation. In combined mode, the microwave automatically cooks for a certain amount of
time and grills for the remaining time. You may notice
a quiet clicking noise when the oven is switching
between modes.
Warning:
Never use the grill stand t, or other metallic objects,
when you are using the appliance in the combination
cooking process. Metals reflect the microwave radiation
and it leads to the generation of sparks. This could
cause a fire and irreparably damage the appliance!
Combination 1
In Combination 1 the microwave element amounts
to 30% and the grill element amounts to 70% of the
cooking time. This is suitable for, for example, fish,
potatoes or gratins.
1. Press the button Combination e once
to activate combination 1. In the display 1
appears as well as „:10“.
2. Using the control dial q set the required cooking
time. The maximum possible cooking time setting
is 95 minutes.
3. To start, press the button Start/Quick start q .
Combination 2
In Combination 2 the microwave element amounts
to 55% and the grill element amounts to 45% of the
cooking time. This is suitable for, for example,
puddings, omelettes, poultry dishes or lasagne.
1. Press the button Combination e twice
to activate combination 2. In the display 1
appears as well as „:10“.
2. Using the control dial q set the required cooking
time. The maximum possible cooking time setting
is 95 minutes.
3. To start, press the button Start/Quick start q .
Auto menu
For foods that are intended to be prepared in the
Auto Menu modus it is not necessary to programme
in the period of the cooking process and the power
level. It is quite sufficient to enter which type of food
is to be cooked/boiled, and its weight.
- 11 -
Page 14
Notice
The microwave calculates the time/operational level
for fresh foods. Frozen foods will not be cooked
with the times programmed into the microwave.
If needs be, defrost frozen foods with the defrost
programme beforehand (see section "Defrosting").
Starting the Auto-menu
Note
Always place the food item in a suitable container
or on a plate. Bear in mind that, during the cooking
or heating process, liquids such as grease, etc. can
drain from the food. The container/plate should
therefore be large enough to avoid the overflowing
of liquids.
1. Turn the Control dial q slowly to the left. In the
display 1 appears a number (e.g. "3" for
Auto Programme 3 (fish)), the Symbol "Fish"
and
for your foodstuff (1 to 9). You can, after you
are in automatic mode menu, also access the
desired automatic menu with a clockwise rotation. Confirm your selection by pressing the
Start/Quick Start button q .
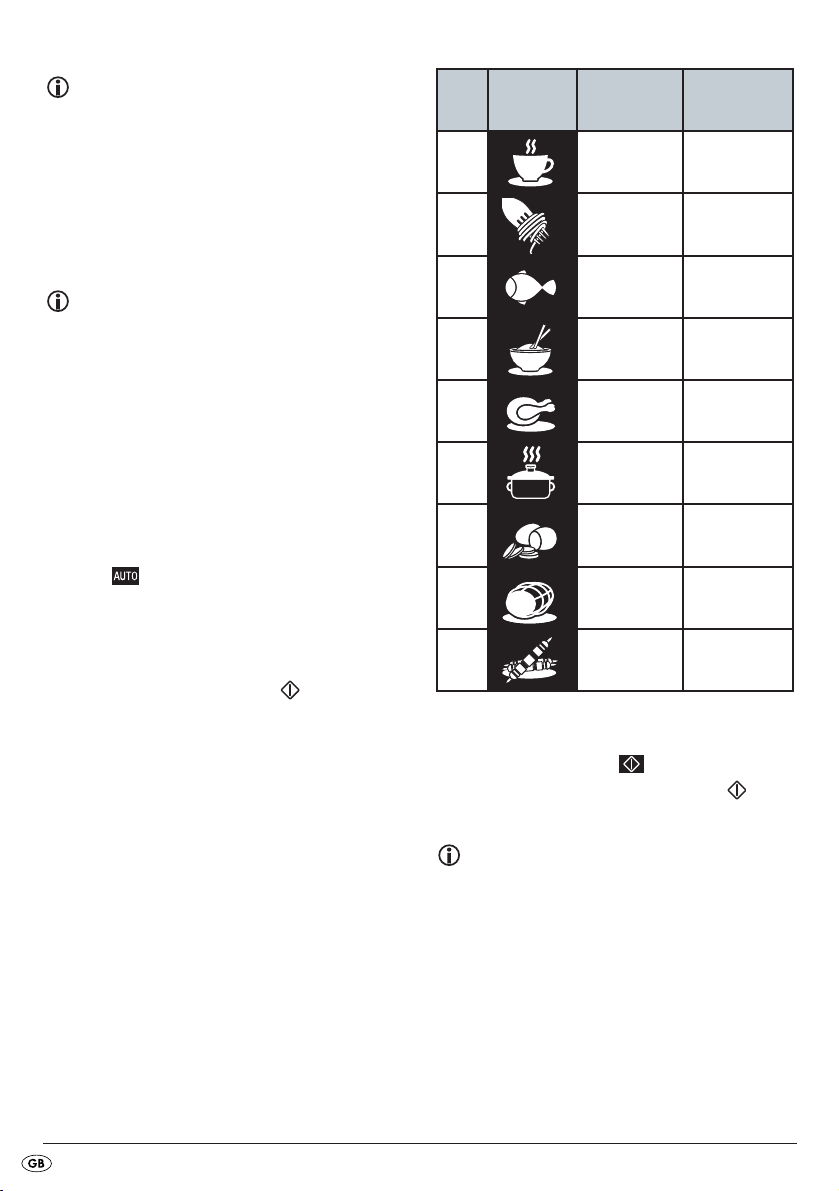
Select the appropriate Auto-menu
.
Nr. Symbol Foodstuff
1 Beverages 1 - 3
2 Noodles 100 - 300g
3 Fish 100 - 1000g
4 Rice 100 - 1000g
5 Chicken 800 - 1400g
6 Warming 100 - 1000g
7 Potatoes 150 - 600g
8 Roasting 300 - 1300g
9 Kebabs 100 - 700g
2. Now set by, by rotating the control knob q
the desired weight resp. the desired number of
servings. The symbol blinks.
3. Press the button Start/Quick start q to
start the cooking process.
Weight
(Portions)
Note:
To achieve an even cooking or simmering, you
should turn the food after about 2/3 of the cooking
process (only programme 5, 8 and 9). The microwave reminds you of the need to turn: "turn" appears in
the display 1 and a signal tone sounds.
• Open the door and turn the food over. Proceed
cautiously with the possibly already hot food.
- 12 -
Page 15
• Press the button Start/Quickstart q to continue
the cooking process.
Take note:
If you wish to dispense with turning, simply wait for
the signal tones to finish. The microwave continues
your programme automatically after approx. 30
seconds.
Note
Should the meal not be properly cooked on completion
of the auto-menu, continue cooking for a couple of
minutes with the Quick start programme. For programmes that continue with utilisation of the grill
function (Programme numbers 5, 8 and 9), the food
can be cooked further with the grill function. Extended
cooking with the grill function also increases the
browning level of the food.
Programmes in detail
Programme 1: Beverages
This programme runs only with utilisation of microwave power. Subject to the number of portions, the
programme runs for between 1:30 and 3:50 minutes.
• Place the beverage that you wish to heat up on
the Glass plate 3 in the cooking area. If you
wish to place several glasses or cups in the
microwave oven, ensure that the receptacles do
not touch each other.
Notice
To avoid sudden simmering:
• If possible, place a glass rod in the fluid for as
long as it is being heated.
• To avoid an unexpected reboiling, leave the
fluid to stand in the microwave oven for ca.
20 seconds after being warmed up.
Risk of fire!
When using the programes with incorporated grill
function, under no circumstances should you use any
form of covering or cookware that is not heat resistant,
as these could melt or ignite themselves!
Risk of injury!
After a cooking process, the Glass plate 3 is very
hot! You should therefore always use an oven cloth
or heat resistant oven gloves when removing it from
the cooking area.
Note:
Take note that size, shape and the type of foodstuff
determines the result of the cooking process.
Programme 2: Noodles
This programme runs only with utilisation of microwave power.
Subject to the weight programmed in, this programme
runs for between 25 and 35 minutes.
• When cooking noodles use a tall container, as
there is a great risk of it boiling over.
• Use as much water as you would in conventional
cooking. The noodles should "swim" in the water.
• First bring the the water to the boil: Set the microwave to its highest performance level (P800)
and then start it. For a liter of water you need
about 10 minutes to bring the water to the boil.
• Then add the noodles. After this, you can start
the auto-menu for noodles.
• Finally, allow the noodles to stand for approx.
3 minutes.
- 13 -
Page 16
Programmme 3: Fish
This programme runs only with utilisation of microwave power.
Subject to the weight programmed in, this programme
runs for between approx 3:30 and 16 minutes.
• Lay the pieces of fish on a plate suitable for
microwave ovens, add a little butter or an other
fat, add flavouring to taste and then start the
auto-menu for fish.
Programmme 4: Rice
This programme runs only with utilisation of microwave power.
Subject to the weight programmed in, this programme
runs for between 16 and 36 minutes.
• When cooking rice use a tall container, as there
is a great risk of it boiling over. Use 400 ml water
for, for example, 200 gr of rice. Use the weight
adjustment "200g" despite the water. It is always
the weight of the rice that is to be set.
• Place the rice in the container, fill it with the required volume of liquids and then allow the rice
to swell for approx 3 minutes.
• Cover the container. Ensure that it is not sealed
airtight. After this, you can start the auto-menu
for rice.
Programmme 5: Chicken
This programme runs over several cooking stages,
using microwave power and the grill function.
Subject to the weight programmed in, this programme
runs for between 39 and 50 minutes.
• Place the chicken on a plate suitable for microwave ovens.
• Season to taste and then start the auto-menu for
chicken.
• A whole chicken must be turned, otherwise the
side facing upwards could dry out. For this reason
the microwave oven automatically interrupts the
programme after about 2/3 of the time has
elapsed and a signal tone sounds.
Turn the chicken and then press the button Start/
Quick start q once again to continue the
programme.
Programmme 6: Warming
This programme runs only with utilisation of microwave power.
Subject to the weight programmed in, this programme
runs for between approx 1:00 and 6:20 minutes.
• Place the receptacle with the foodstuff that you
wish to warm up on the glass plate 3 in the
cooking area and then start the auto-menu for
warming.
Programme 7: Potatoes
This programme runs only with utilisation of microwave power.
Subject to the weight programmed in, this programme
runs for between 3:50 and 11 minutes.
Tip!
Use unpeeled potatoes for the cooking process.
Prick the skins a couple of times.
• Place the unpeeled potatoes onto a plate suitable
for microwave ovens or into a receptacle. As far
as possible, use potatoes of the same size.
If possible, the potatoes should not touch each other.
- 14 -
Page 17
Programmme 8: Roasting
This programme runs over several cooking stages,
using microwave power and the grill function.
Subject to the weight programmed in, this programme
runs for between 16 and 60 minutes.
• Place the roast on a plate suitable for microwave
ovens. Season to taste and then start the auto-menu
for roasting.
• A whole roast must be used, otherwise the side
facing upwards could dry out. For this reason
the microwave oven automatically interrupts the
programme after about 2/3 of the time has
elapsed and a signal tone sounds.
Turn the roast and then press the button Start/
Quick start q once again to continue the
programme.
Defrosting
This function enables you to defrost meat, poultry and
fish with ease. The defrosting time and the power level
are calculated and set automatically once you have
entered the weight.
1. Press button Defrosting 8 .
In the display 1 appears and .
The symbol blinks.
2. Using the control dial q enter in the weight of
the foodstuff to be defrosted. You can enter in
a weight of between 100 g and 1800 g.
3. Press button Start/Quick Start q .
The appliance calculates the defrosting time automatically. It appears in the display 1 and starts to
countdown.
Programme 9: Kebabs
This programme runs over several cooking stages,
using microwave power and the grill function.
Subject to the weight programmed in, this programme
runs for between 9 and 27 minutes.
• Place the kebabs on a plate suitable for microwave ovens. Season to taste and then start the
auto-menu for kebabs.
• The kebabs must be turned to ensure even cooking.
For this reason the microwave oven automatically
interrupts the programme after about 2/3 of the
time has elapsed and a signal tone sounds.
Turn the kebabs and then press the button Start/
Quick start q once again to continue the
programme.
After about 1/2 the time you hear a signal tone
and "turn" appears in the display 1. Open the
door and turn the food over. Close the door and
press the Start/Quick Start q button to continue
the defrosting process.
Note:
If you wish to dispense with turning, simply wait for
the signal tones to finish. The defrosting programme
will continue despite the signal tone!
Preset
With this programme you can preset a specific start
time for the cooking or grilling of the foodstuff. If the
programming is carried out correctly, the appliance
starts automatically at the programmed time.
Take note:
The clock must be correctly set to be able to select
the function "Preset".
- 15 -
Page 18
1. Programme in the required microwave function
(cooking, grilling or automatic-menu (except
auto-programme 6):
For microwave operation: Press the button Operation r the appropriate number of times to
set the required power level. Programme the
cooking time with the rotary switch q.
For grill operation: Press the button Grill 6
to activate the grill function.
Set the desired grilling time using the rotary
switch q.
For automatic-menu: Using the control dial q
select the appropriate programme for your foodstuff (excluding auto-programme 6).Confirm your
selection by pressing the Start/Quick Start button q . Now set by, by rotating the control
knob q, the desired weight resp. the desired number of servings.
2. Press the Preset Button 7 . In the
display 1 "01: “ blinks and the hour-glass symbol appears.
3. Turn the control knob q to programme the
hours.
4. Press the button Start/Quick Start q , now
the minute figures appear.
5. Turn the control knob q to programme the minutes.
6. Press the button Start/Quick start q . The
hour-glass symbol blinks. The
start time is shown. The microwave oven automatically starts the cooking process at the programmed time.
A signal tone sounds when it starts.
Take note:
To erase the saved start time and thus cancel the
saved procedure, press the Stop 0 button.
The hourglass symbol disappears and the time
is displayed.
Cleaning and Care
Risk of personal injury!
Before cleaning, switch the microwave oven off and
remove the plug from the mains power socket.
Under no circumstances should you immerse
the appliance in water or other liquids.
This could result in you receiving a fatal electric
shock and the appliance could be damaged.
• Always keep the interior of the microwave oven
clean.
• If splashes of food or spilt liquids stick to the
walls of the microwave, wipe them off with
a damp cloth.
• Use a mild detergent if the microwave is more
heavily soiled. Rinse detergent residues off with
clear water.
• Avoid using cleaning sprays and other aggressive
cleaning agents, as they can cause stains, stripes
or a blurring of the door surface.
• Clean the external walls with a damp cloth.
• To avoid damage to the functional components
in the interior of the microwave, do not let liquids
seep in through the ventilation slits 5.
• Regularly remove splashes or contaminants.
Clean the door, both sides of the viewing window, the door seals and adjacent components
with a damp cloth. Do not use abrasive cleaning
agents.
• If steam should collect on or around the outside
of the appliance door, wipe it off with a soft towel. This can happen if the microwave is
operated in extremely humid conditions.
- 16 -
Page 19
• Clean the Glass plate 3 regularly. Clean the
plate in warm soapy water or in the dishwasher.
• Clean the grill stand t in warm dishwater and
dry it well.
• Regularly eliminate odours. Put a deep microwave bowl with a cup of water, juice and peel
of a lemon into the microwave. Heat for 5 minutes.
Wipe off thoroughly and rub dry with a cloth.
• Should replacement of the bulb in the microwave
be necessary, arrange for it to be exchanged
by a dealer or consult our Service Department.
Disposal
Do not dispose of this appliance in your
normal domestic waste. This product is
subject to the provisions of European
Directive 2002/96/EC.
Dispose of the appliance through an approved disposal
centre or at your community waste facility.
Observe the currently applicable regulations.
In case of doubt, please contact your waste disposal
centre.
Troubleshooting
The display 1 indicates nothing.
• The plug is not inserted into a power socket.
Check the plug.
• The mains power socket is defective.
Try another mains power socket.
• The display 1 is defective.
Contact our Customer Services Department.
The appliance does not respond to pressing the
buttons.
• The Child safety facility is activated. Deactivate
the Child safety facility (see chapter "Operation“).
The appliance does not start the cooking/
warming process.
• The door is not properly closed.
Close the door correctly.
The Glass plate 3 generates loud noise when
revolving.
• The Glass plate 3 is not correctly positioned
on the star rotator 4. Insert the Glass plate 3
correctly into the cooking area.
• The star rotator 4 and/or the floor of the
cooking area are unclean. Clean the star
rotator 4 and the floor of the cooking area.
Dispose of all packaging materials in an
environmentally friendly manner.
Warranty and Service
The warranty for this appliance is for 3 years from
the date of purchase. The appliance has been manufactured with care and meticulously examined before delivery. Please retain your receipt as proof of
purchase. In the event of a warranty claim, please
make contact by telephone with our Service Department. Only in this way can a post-free despatch for
your goods be assured.
The warranty covers only claims for material and
maufacturing defects, but not for transport damage,
for wearing parts or for damage to fragile components, e.g. buttons or batteries. This product is for
private use only and is not intended for commercial
use. The warranty is void in the case of abusive and
improper handling, use of force and internal tampering not carried out by our authorized service
branch. Your statutory rights are not restricted in
any way by this warranty.
- 17 -
Page 20
The warranty period will not be extended by repairs
made under warranty. This applies also to replaced
and repaired parts. Any damage and defects extant
on purchase must be reported immediately after unpacking the appliance, at the latest, two days after
the purchase date. Repairs made after the expiration of the warranty period are subject to payment.
Service Great Britain
Tel.: 0871 5000 720 (£ 0.10/Min.)
E-Mail: kompernass@lidl.co.uk
IAN 71492/71493
Service Ireland
Tel.: 1890 930 034
(0,08 EUR/Min., (peak))
(0,06 EUR/Min., (off peak))
E-Mail: kompernass@lidl.ie
IAN 71492/71493
Importer
KOMPERNASS GMBH
BURGSTRASSE 21
44867 BOCHUM, GERMANY
www.kompernass.com
- 18 -
Page 21
SISÄLLYSLUETTELO SIVU
Turvaohjeet 20
Määräystenmukainen käyttö 23
Toimitettavat osat 23
Tekniset tiedot 23
Ennen aloitusta 24
Mikroaaltouunin käyttämisen perusperiaatteet...........................................................................24
Sopivien keittoastioiden käyttäminen...........................................................................................24
Laitteen kuvaus 25
Ensi käyttöönotto 25
Laitteen asentaminen .....................................................................................................................25
Laitteen valmistelu ..........................................................................................................................25
Varusteiden asentaminen ..............................................................................................................26
Käyttö 26
Kellon asettaminen.........................................................................................................................26
Keittiöajastimen asettaminen.........................................................................................................26
Lapsilukko........................................................................................................................................27
Kyselytoiminnot...............................................................................................................................27
Keittäminen ja kypsentäminen 27
Mikroaaltouunitoiminto..................................................................................................................27
Grillitoiminto ...................................................................................................................................29
Yhdistelmäkypsennys.....................................................................................................................29
Automaattivalikko 30
Automaattivalikon käynnistäminen...............................................................................................30
Ohjelmat yksityiskohtaisesti ...........................................................................................................31
Sulattaminen 33
Käynnistysajan asettaminen (Preset) 33
Puhdistus ja hoito 34
Vianetsintä 34
Hävittäminen 35
Takuu ja huolto 35
Maahantuoja 35
Lue käyttöohje ennen ensimmäistä käyttökertaa huolellisesti läpi ja pidä sitä lähettyvillä myös myöhemmissä
käytöissä. Jos myyt laitteen, anna ohje myös seuraavalle omistajalle.
- 19 -
Page 22
Mikroaaltouuni
Turvaohjeet
Huomio!
Varoittaa laitteen vaurioitumisesta.
Vaara! / Loukkaantumisvaara!
Varoitus loukkaantumisesta ja sähköiskusta!
Tulipalon vaara!
Varoitus tulipalovaarasta.
Ohje!
Ohjeita ja vihjeitä mikroaaltouunin käyttöön.
Varotoimet, joilla estetään altistuminen
mikroaaltosäteilylle
• Älä yritä käyttää laitetta, kun sen oviluukku on
auki, koska käyttö oviluukun ollessa auki voi
johtaa haitalliseen määrään mikroaaltosäteilyä.
Tärkeätä tässä on myös, että turvalaitteita ei
rikota tai manipuloida.
• Älä tunge mitään laitteen etuosan ja oven väliin
ja huolehdi siitä, ettei tiivistepintoihin keräänny
epäpuhtauksia tai puhdistusainejäämiä.
Loukkaantumisvaara!
• Älä käytä mikroaaltouunia missään tapauksessa,
jos sen oviluukku tai oviluukun tiivisteet ovat vaurioituneet. Anna laite heti pätevän huoltoliikkeen
korjattavaksi.
• Älä yritä korjata laitetta itse. Kun kotelo irrote-
taan, voi vapautua mikroaaltoenergiaa. Anna
kaikki korjaustyöt vain pätevän huoltoliikkeen
tehtäväksi.
• Tätä laitetta ei ole tarkoitettu sellaisten henkilöiden
(mukaan lukien lapset) käyttöön, joiden rajoitetut,
fyysiset, aistilliset tai henkiset kyvyt tai kokemuksen
ja/tai tiedon puute estävät käytön, lukuun ottamatta tilanteita, joissa heitä valvoo turvallisuudesta vastaava henkilö tai joissa he ovat saaneet
tältä ohjeita laitteen käytöstä. Lapsia on valvottava, jotta varmistettaisiin, etteivät he leiki laitteella.
• Lapset saavat käyttää keittolaitetta ilman valvontaa
vain silloin, jos lapselle on annettu riittävät ohjeet,
joiden avulla hän kykenee käyttämään keittolaitetta turvallisesti ja ymmärtämään väärän käytön
aiheuttamat vaarat.
• Käytä laitetta ainoastaan tässä ohjekirjassa
kuvattujen laitteen käyttöä koskevien määräysten mukaisesti. Älä kuumenna laitteessa syövyttäviä kemiallisia aineita tai höyryjä. Tämä
mikroaaltouuni on tarkoitettu erityisesti elintarvikkeiden kuumentamiseen, kypsentämiseen,
grillaamiseen tai kuivattamiseen.
Laitetta ei ole tarkoitettu käytettäväksi teollisuus- tai
laboratorioalalla.
• Älä käytä mikroaaltouunia, jos sen verkkokaapeli/
pistoke on vaurioitunut. Anna verkkokaapelin/
pistokkeen vaihto pätevän huoltoliikkeen tehtäväksi vaarojen välttämiseksi.
• Älä päästä lapsia mikroaaltouunin oviluukun
lähelle, kun uuni on toiminnassa. Palovaara!
• Älä missään tapauksessa poista mikroaaltouunin
koteloa.
• Anna mikroaaltouunin sisällä olevan lampun
vaihtaminen ammattihenkilöstön tehtäväksi.
• Älä koskaan koske mikroaaltouunin oveen, koteloon, tuuletusaukkoihin, lisätarvikkeisiin tai ruokaastioihin välittömästi grillaus-, yhdistelmä- tai
automaattivalikkotoiminnon jälkeen. Osat kuumentuvat erittäin paljon. Anna osien jäähtyä ennen
niiden puhdistamista.
• Pidä huoli siitä, että pääset verkkopistokkeesen
aina hyvin käsiksi, jotta voit sen hätätapauksessa
irrottaa nopeasti virtaverkosta.
- 20 -
Page 23

• Sydämentahdistajaa käyttävien henkilöiden tulee
keskustella lääkärinsä kanssa mahdollisista
riskeistä ennen mikroaaltouunin käyttöönottoa.
• Älä koskaan anna verkkojohdon roikkua pöydän
tai työtason reunan yli. Lapset saattavat vetää
siitä.
• Avaa purkit, popcorn-pussit jne. kuumennuksen
jälkeen aina niin, että aukko osoittaa sinusta poispäin. Ulos purkautuva höyry saattaa aiheuttaa
palovammoja.
• Älä koskaan seiso suoraan mikroaaltouunin
edessä ovea avatessasi. Ulos purkautuva höyry
saattaa aiheuttaa palovammoja.
• Älä friteeraa mikroaaltouunissa. Kuuma öljy
saattaa vaurioittaa laitteen osia tai kypsennysvälineitä, ja se voi aiheuttaa jopa palovammoja
iholle.
• Ravistele tai hämmennä aina kuumennetut vauvan lasipurkit tai pullot! Sisältö voi kuumeta epätasaisesti ja vauva voi polttaa suunsa. Tarkista
aina lämpötila, ennen kuin syötät vauvaa!
• Älä tee mikroaaltouuniin mitään muutoksia.
• Mikroaaltosäteily on vaarallista! Anna kaikki
huolto- ja korjaustyöt, jotka vaativat mikroaaltosäiteilyltä suojaavien päällysteiden poistamista,
vain koulutetun ammattihenkilöstön tehtäväksi.
• Tarkista aina lämpötila ennen syöttämistä, jotta
vauva ei saa hengenvaarallisia palovammoja.
Keittoastiat saattavat kuumeta kuumennettavien
ruokien vuoksi, joten käytä patakintaita tai -lappuja, kun käsittelet keittoastioita. Tarkasta, että
keittoastiat soveltuvat mikroaaltouunissa käytettäväksi.
Huomio! Kuuma pinta!
Palovaara
• Älä jätä mikroaaltouunia koskaan ilman valvontaa
lämmittäessäsi elintarvikkeita muovi- tai paperipakkauksissa.
• Älä aseta mitään palavia materiaaleja mikroaaltouunin tai tuuletusaukkojen lähelle.
• Poista elintarvikepakkauksista kaikki metalliset
sulkimet, jotka saattavat kuumentua. Palovaara!
• Käytä popcornin valmistukseen ainoastaan
mikroaaltouuniin sopivia popcorn-pusseja.
• Älä käytä mikroaaltouunia jyvillä, kirsikansieme-
nillä tai geelillä täytettyjen tyynyjen kuumentamiseen. Palovaara!
• Älä käytä mikroaaltouunia elintarvikkeiden tai
muiden asioiden varastoimiseen.
• Älä koskaan ylitä valmistajan antamia kypsenny-
saikoja.
• Älä laita mitään esineitä mikroaaltouunin päälle,
kun se on toiminnassa. Tuuletusaukot voivat
peittyä!
• Älä aseta mikroaaltouunia muiden kuumuutta
säteilevien laitteiden, kuten leivinuunin lähelle.
• Puhdista mikroaaltouuni rasvaisten ruokien läm-
mittämisen jälkeen perusteellisesti, erityisesti,
jos ruokia ei oltu peitetty. Anna laitteen jäähtyä
täysin ennen sen puhdistamista. Grillin kuumennuselementeillä ei saa olla minkäänlaisia jäämiä, kuten esimerkiksi rasvaa. Se saattaa kuumentua liikaa ja syttyä palamaan.
• Älä sulata pakastettua rasvaa tai öljyä mikro-
aaltouunissa. Rasva tai öljy voi syttyä palamaan.
• Älä käytä laitetta ulkoisen ajastimen tai erillisen
kaukovaikutusjärjestelmän avulla.
- 21 -
Page 24

Huomio! Laitevauriot!
• Älä käytä mikroaaltouunia tyhjillään. Poikkeuksena
on ensi käyttöönotto (ks. luku „Ensi käyttöönotto“).
• Älä laita mitään esineitä tuuletusaukkoihin tai
oviluukun turvalukituksiin.
• Älä käytä metallisia työvälineitä, jotka heijasta-
vat mikroaaltoja ja aiheuttavat kipinöintiä. Älä
laita mikroaaltouunin sisään peltipurkkeja.
• Älä aseta mikroaaltouunin päälle muoviastioita
välittömästi grillaus-, yhdistelmä- tai automaattivalikkotoiminnon jälkeen. Muovi voi sulaa.
• Mikroaaltouunia ei saa asentaa tiloihin, joiden
ilma on erittäin kosteaa, tai tiloihin, joihin kerääntyy kosteutta.
• Nesteitä tai muita elintarvikkeita ei saa kuumentaa
ilmatiiviissä astioissa, koska ne voivat räjähtää
ja vaurioittaa laitteen.
• Älä nojaa mikroaaltouunin oveen.
• Huonosti puhdistettu keittolaitevoi vahingoittaa
laitteen pintaa, mikä vaikuttaa toisaalta laitteen
käyttöikään ja voi johtaa mahdollisesti vaarallisiin
tilanteisiin.
Vaara
• Älä koskaan upota verkkojohtoa tai verkkopistoketta veteen tai muihin nesteisiin.
• Pidä verkkojohto poissa lämpölähteiden läheltä.
Älä vedä sitä mikroaaltouunin oven edestä.
Kuumuus saattaa vaurioittaa johtoa.
• Älä koskaan kaada nesteitä tuuletusaukkoihin tai
oven turvalukitukseen. Jos nestettä sattuu pääsemään mikroaaltouunin sisään, kytke se heti pois
päältä ja irrota verkkopistoke pistorasiasta.
Anna pätevän ammattihenkilön tarkastaa mikroaaltouuni.
Turvallisuusvihjeitä
• Mikroaaltouunin tulipalovaaran vähentäminen
Jos kuumennat ruokaa muovi- tai paperiastioissa,
älä jätä uunia ilman valvontaa, koska nämä
materiaalit voivat syttyä palamaan.
• Kun kuumennat juomia mikroaaltouunissa, juoma
saattaa kuohua sen jälkeen, kun se on keitetty.
Ole siksi varovainen, kun käsittelet juomia.
Äkillisen kuohumisen estämiseksi:
- Aseta mahdollisuuksien mukaan nesteeseen
lasisauva nesteen lämmittämisen ajaksi.
- Anna nesteen seistä mikroaaltouunissa lämmit-
tämisen jälkeen 20 sekuntia odottamattoman
kuohumisen välttämiseksi.
• Puhko perunoiden, makkaroiden ja vastaavien
kuori. Ne saattavat muutoin räjähtää.
• Varo nesteitä lämmittäessäsi. Käytä ainoastaan
avoimia astioita, jotta syntyvät ilmakuplat pääsevät poistumaan.
• Jos havaitset savua, sammuta laite tai irrota
pistoke seinästä ja pidä ovi suljettuna, jotta
mahdolliset liekit tukahtuvat.
• Kuoressaan olevia kananmunia tai kovaksi keitetty-
jä kananmunia ei saa kuumentaa mikroaaltouunissa, koska ne saattavat räjähtää vielä mikroaaltouunissa kuumentamisen jälkeenkin. Pistele
reikiä ennen kuumentamista sellaisten ruokien
pinnalle, joissa on paksu kuori, kuten peruna,
kokonainen kurpitsa, omena ja kastanjat.
• Älä liikuta mikroaaltouunia sen ollessa käytössä.
- 22 -
Page 25
Maadoitusohjeet ja määräystenmukainen
asennus
Tämä laite täytyy olla suojamaadoitettu. Tämä laite
tulee liittää ainoastaan määräysten mukaisesti maadoitettuun pistorasiaan. Suosittelemme, että käytät
mikroaaltouunille vain sille soveltuvaa omaa virtapiiriä.
VAARA: Maadoituspistokkeen määräystenvastainen käyttö saattaa aiheuttaa sähköiskuja.
Ohje: Jos sinulla on kysymyksiä maadoituksesta
tai sähkön käyttöön liittyvistä ohjeista, kysy lisätietoja sähkö- tai huoltotöiden ammattihenkilöltä.
Valmistaja ja myyjä eivät ota vastuuta mikroaaltouunin
vaurioitumisesta tai henkilövahingoista, jos ne johtuvat
sähkökytkentää koskevien menettelyohjeiden laiminlyömisestä.
Muihin laitteisiin kohdistuvat häiriöt
Mikroaaltouunin käyttö voi aiheuttaa häiriötä radioon,
televisioon tai muihin vastaaviin laiteisiin.
Jos laitteen käytön yhteydessä esiintyy tämänkaltaisia
häiriöitä, niitä voi yrittää vähentää tai poistaa seuraavien toimenpiteiden avulla:
• Puhdista mikroaaltouunin tiivisteet.
• Suuntaa radion tai television vastaanottoantenni
uudelleen.
• Älä sijoita mikroaaltouunia samaan paikkaan
vastaanottimen kanssa.
• Sijoita mikroaaltouuni kauemmas vastaanottimesta.
• Kytke mikroaaltouuni toiseen pistorasiaan.
Mikroaaltouunin ja vastaanottimen virta ei
saisi tulla samasta virtapiirin haarasta.
Määräystenmukainen käyttö
Tämä laite soveltuu elintarvikkeiden kuumentamiseen
ja valmistukseen tässä ohjeessa kuvattujen menettelytapojen mukaisesti.
Laitteen muuttaminen on määräysten vastaista, ja se
aiheuttaa vakavan tapaturmavaaran. Valmistaja ei
ota mitään vastuuta määräystenvastaisesta käytöstä
aiheutuneista vahingoista.
Tätä laitetta ei ole tarkoitettu kaupalliseen käyttöön.
Tämä laite on tarkoitettu ainoastaan kotitalouksissa
käytettäväksi!
Älä käytä sitä kaupallisesti, teollisuus- tai laboratorioaloilla!
Toimitettavat osat
Mikroaaltouuni
Lasilautanen
Grillialusta
Rullatähti
Käyttöohje
Pikaohje
Tekniset tiedot
Nimellisjännite: 230 - 240 V
50 Hz
Suurin mahdollinen teho: 1200 W
Suurin mahdollinen teho
Mikroaaltouuni: 800 W
Suurin mahdollinen teho
Grilli: 1000 W
Mikroaaltouunin taajuus: 2450 MHz
~
- 23 -
Page 26

Ennen aloitusta
Mikroaaltouunin käyttämisen
perusperiaatteet
• Järjestele ruuat harkiten.
• Sijoita paksuimmat osat reunoille.
• Valitse sopiva kypsennysaika. Valitse lyhin annettu
kypsennysaika ja lisää aikaa tarvittaessa.
Kypsennettävät ruuat saattavat alkaa savuta
tai syttyä, jos niitä kypsennetään liian pitkään.
• Sulje ruoat kypsyttämisen ajaksi mikroaaltouunille
soveltuvalla kannella. Kupu suojaa uunin sisätilaa
roiskeilta. Lisäksi se vaikuttaa siihen, että ruoka
kypsyy tasaisesti.
• Käännä ruokia valmistuksen aikana mikroaaltouunissa kerran, jotta ruokalajit, kuten broileri
tai hampurilainen, kypsyvät tasaisemmin ja
nopeammin.
• Isoja ruokapaloja, kuten paisteja, täytyy kääntää
vähintään kerran.
• Vaihda ruokapalojen, kuten lihapullien, paikkoja,
kun kypsennysajasta on kulunut noin puolet.
Käännä niitä ja vaihda keskellä olevat lihapullat
reunoille.
Sopivien keittoastioiden käyttäminen
• Mikroaaltouuniin sopii kaikkein parhaiten
materiaali, joka läpäisee mikroaaltosäteilyä.
Se päästää säteilyn lävitseen keittoastiaan ja
lämmittää ruokaa.
Mikroaaltosäteily ei läpäise metallia. Tämän
vuoksi uunissa ei saa käyttää metallikulhoja
tai -astioita.
• Älä käytä mikroaaltouunissa ruokien kuumentamisessa mitään kierrätyspaperista tehtyjä
tuotteita. Ne saattavat sisältää pikkuruisia
metallisiruja, jotka saattavat kipinöidä ja/tai
aiheuttaa tulipaloja.
• Suosittelemme, että käytetään pyöreää tai
ovaalinmuotoista astiaa reunallisen tai suorakulmaisen astian sijaan, koska ruoka kuumenee
nopeasti liikaa kulmissa.
Seuraava luettelo on tarkoitettu yleiseksi ohjeeksi
oikeiden astioiden valinnassa.
Keittoastia
Kuumuudenkestävät
lasiastiat
Kuumuutta kestämättömät lasiastiat
Kuumuudenkestävät
keraamiset astiat
Mikroaalloille
soveltuvat
muoviastiat
Talouspaperi Kyllä Ei Ei
Metallinen tarjoilualusta/levy
Grillijalusta Ei Kyllä Ei
Alumiinikalvo &
kalvoastia
Mikroaalto
Kyllä Kyllä Kyllä
Ei Ei Ei
Kyllä Kyllä Kyllä
Kyllä Ei Ei
Ei Kyllä Ei
Ei Kyllä Ei
Grilli
Yhdistelmä
Huomio:
Älä käytä koskaan grillialustaa tai muita metallisia
esineitä, kun käytät mikroaaltouunia mikroaaltotoiminnolla tai yhdistelmäkypsytystoiminnolla. Metalli
heijastaa mikroaaltosäteilyä ja muodostaa kipinöitä.
Tämä voi aiheuttaa tulipalon ja vaurioittaa laitteen
lopullisesti!
- 24 -
Page 27
Laitteen kuvaus
Älä
1 Näyttö
2 Oven avauspainike
3 Lasilautanen
4 Rullatähti
5 Tuuletusraot
6 Grillipainike
7 Painike aloitusaika (Preset)
8 Sulatuspainike
9 Kellopainike
0 Stop-painike
q Kiertosäädin / Käynnistys/pikakäynnistys
w Ajastinpainike
e Yhdistelmäpainike
r Tehopainike
t Grillausteline
• Varmista, että verkkopistoke on helppopääsyisessä
paikassa, jotta siihen päästään vaaratilanteessa
ongelmitta käsiksi ja se voidaan vetää irti seinästä.
• Älä poista mikroaaltouunin alapuolella sijaitsevia
jalkoja.
• Älä tukkea tuuletusaukkoja 5. Muussa tapauksessa laite voi vaurioitua.
• Sijoita laite mahdollisimman kauas radio- ja
televisiovastaanottimista. Mikroaaltouunin käyttö
saattaa aiheuttaa häiriöitä radio- tai televisiolähetykselle.
Huomio:
Älä sijoita mikroaaltouunia lieden tai muun vastaavan
lämmönlähteen yläpuolelle. Jos sijoitat mikroaaltouunin tällaiseen paikkaan, laite saattaa vaurioitua ja
takuu saattaa raueta.
Ensi käyttöönotto
Laitteen asentaminen
Huomio:
Tämä mikroaaltouuni ei sovellu asennettavaksi keittiön
kaappiin. Suljetuissa kaapeissa tuuletus ei ole riittävää.
Laite voi vaurioitua ja vaarana on tulipalo!
• Valitse laitteelle tasainen alusta, jossa laitteen
tuuletukselle ja ilmanpoistolle jää tarpeeksi
tilaa:
Pidä laitteen ja viereisten seinämien välissä ehdottomasti 10 cm vähimmäisetäisyys. Varmista,
että voit avata mikroaaltouunin oviluukun vaivatta.
Pidä mikroaaltouunin yläpuolella vähintään
20 cm etäisyys.
Laitteen valmistelu
• Poista pakkausmateriaali ja laitteen ympärillä
mahdollisesti oleva suojamuovi.
Ä
poista vaaleanharmaata kiiltävää
suojalevyä, joka on kiinnitetty kypsennystilaan magneettikenttäputkien
suojaksi.
• Työnnä verkkopistoke pistorasiaan. Käytä vain
verkkopistorasiaa, jonka arvot ovat 230 240 V ~, 50 Hz, ja verkkopistorasiassa 16 A
sulake. Suosittelemme, että mikroaaltouunille
käytetään omaa virtapiiriä. Jos et ole varma, kuinka mikro-aaltouuni liitetään, ota avuksi alan tunteva henkilö.
- 25 -
Page 28

Ennen mikroaaltouunin varsinaista käyttöä laite on
kuumennettava ensiksi tyhjänä, jotta valmistuksesta
jäljelle jääneet jäänteet voivat haihtua.
Kytke laite päälle ilman elintarvikkeita ja ilman varusteita (lasilautasta 3, rullatähteä 4 ja grillialustaa t)
grillaustoimintoon:
• Paina kerran grillauspainiketta 6 . Olet
valinnut näin grillaustoiminnon. Näytössä 1
näkyy symboli ja symboli vilkkuu.
Tämä on ilmoitus laitteen käyttövalmiudesta.
• Aseta sitten vääntösäädinnupilla q 10 minuutin
kypsymisaika.
• Paina sen jälkeen käynnistys/pikakäynnistyspainiketta q grillaustoiminnon käynnistämiseksi.
Ohje:
Ensi käyttöönottokerralla voi muodostua valmistuksesta johtuiven jäänteiden vuoksi hieman savua ja hajua.
Tämä ei ole vaarallista. Pidä huoli riittävästä tuuletuksesta. Avaa esimerkiksi ikkuna.
• Laite kytkeytyy 10 minuutin kuluttua automaattisesti pois päältä. Merkkiäänet kuuluvat. Avaa
ovi. Odota, kunnes se on jäähtynyt täydellisesti.
• Irrota verkkopistoke pistorasiasta ja puhdista
laite sen jälkeen sisältä kostealla liinalla ja
kuivaa se huolellisesti.
Varusteiden asentaminen
• Aseta rullatähti 4 kypsennystilaan käyttöakselin
keskelle. Varmista, että se liukuu kokonaan akselille ja on tiiviisti paikoillaan.
• Aseta lasilautanen 3 rullatähden keskelle.
Alustan kolmen rullan täytyy istua lasilautasen 3
ohjausreunoilla.
Käyttö
Kellon asettaminen
Kun otat mikroaaltouunin ensi kertaa käyttöön tai
jos on tapahtunut virtakatko, näytössä 1 näkyy
"1 : 0 1 ".
1. Paina kellopainiketta 9 . Näyttöön 1 ilme-
styy "Hr 12". Paina kellopainiketta 9 vielä
kerran, jos haluat vaihtaa 24 tunnin tilaan.
2. Aseta haluttu tunti kiertosäädintä q kiertämällä.
Näytön 1 kellosymboli vilkkuu.
3. Paina painiketta Käyntiin/Pikakäynnistys q .
Näyttöön ilmestyy minuuttinäyttö.
4. Aseta vääntösäädintä q kiertämällä haluamasi
minuutit.
5. Kun kellonaika on asetettu oikein, paina painiketta
Käyntiin/Pikakäynnistys q . Kellosymboli
näytössä 1 palaa jatkuvasti ja kaksoispisteen
vilkkuminen ilmoittaa, että kello on käynnissä.
Ajankohtaisen päivänajan lukemiseksi mikroaaltouunin
ollessa käynnissä, paina kellopainiketta 9 ;
Kellonaika näkyy tällöin näytössä 1 noin 4 sekunnin
ajan.
Keittiöajastimen asettaminen
Mikroaaltouunissa on keittiöajastin, jota voidaan
käyttää myös ilman mikroaaltouunia.
1. Paina ajastinpainiketta w , kun laite on
odotustilassa. Näyttöön 1 ilmestyy "00:10".
2. Aseta sitten vääntösäätimellä q haluamasi aika.
Voit valita ajan 10 sekunnin ja 95 minuutin
väliltä.
- 26 -
Page 29

3. Paina käynnistys/pikakäynnistyspainiketta q
. Sen jälkeen kuuluu äänimerkki. Näytössä
oleva aika vähenee. Noin 3 sekunnin kuluttua
näytössä näkyy taas normaali kellonaika.
Keittiöajastin käy taka-alalla eteenpäin.
Jos haluat katsoa välillä keittiöajastinta, paina
vain keittiöajastinpainiketta w . Näytössä
näkyy sitten lyhyen aikaa keittiöajastin.
Heti kun asetettu aika on kulunut, kuuluu 3 äänimerkkiä.
Ohje:
Keittiöajastimen kuluva aika voidaan keskeyttää
painamalla keittiöajastin-painiketta w niin, että
keittiöajastimen ajankohtainen aika tulee näyttöön.
Paina keittiöajastimen ollessa näytössä 1 painiketta
Stop 0 . Keittiöajastin keskeytetään ja näytössä 1
näkyy kellonaika.
Lapsilukko
Aktivoi tämä säätömahdollisuus, jotta pienet lapset
tai muut henkilöt, jotka eivät tunne laitteen käyttöä,
eivät käynnistä mikroaaltouunia ilman valvontaa.
Lapsilukkosymboli näkyy näytössä 1, ja laitetta
ei voi ottaa käyttöön niin kauan kuin tämä toiminto
aktivoituna.
• Paina Stop-painiketta 0 ja pidä sitä painettu-
na niin kauan kunnes kuuluu pitkä äänimerkki ja
lapsilukkosymboli näkyy näytössä 1.
Mikroaaltouunin painikkeet ja säädin eivät toimi
tällöin enää.
• Lapsilukko otetaan pois käytöstä painamalla
Stop-painiketta 0 ja pitämällä sitä painettuna niin kauan, kunnes kuuluu pitkä äänimerkki ja
lapsilukkosymboli sammuu.
Kyselytoiminnot
Kellonajan tarkistaminen käytön aikana
Paina kypsentämisvaiheen aikana kellopainiketta
9 . Näytössä 1 näkyy sitten noin 4 sekunnin
ajan kellonaika.
Tehotason tarkistaminen käytön aikana
Paina kypsentämisvaiheen aikana tehopainiketta
r . Näytössä 1 näkyy sitten noin 3 sekunnin
ajan aktivoitu tehotaso.
Keittäminen ja kypsentäminen
Mikroaaltouunitoiminto
Ohje
Mikroaaltouunin oviluukkuun tai koteloon voi muodostua kypsentämisen aikana vesipisaroita. Se on
normaalia, eikä ole merkki mistään mikroaaltouunin
viasta. Pyyhi kosteus pois kuivalla liinalla, kun laite
on jäähtynyt.
Tulipalon vaara!
Älä käytä koskaan grillialustaa t tai muita metallie-
sineitä, kun käytät mikroaaltouunia mikroaaltotoiminnossa. Metalli heijastaa mikroaaltosäteilyä ja
muodostaa kipinöitä. Tästä voi olla seurauksena tulipalo ja laite voi vaurioitua peruuttamattomasti!
- 27 -
Page 30

Tehon valitseminen
• Paina tehopainiketta r tehotason
valitsemiseksi vastaavan monta kertaa.
• 1x 800 W:n teholle (P800).
• 2x 700 W:n teholle (P700).
• 3x 600 W:n teholle (P600).
• 4x 500 W:n teholle (P500).
• 5x 400 W:n teholle (P400).
• 6x 300 W:n teholle (P300).
• 7x 200 W:n teholle (P200).
• 8x 100 W:n teholle (P100).
Kypsennyksen keskeyttäminen
Paina kerran Stop-painiketta 0 , kun haluat kes-
keyttää kypsennyksen. Laite keskeyttää kypsennystapahtuman ja pysäyttää jäljellä olevan ajan. Paina
käynnistys/pikakäynnistyspainiketta q , kun
haluat taas jatkaa kypsennystä.
Kypsennyksen lopettaminen
Paina kaksi kertaa Stop-painiketta 0 , kun
haluat lopettaa kypsennyksen. Laite palaa valmiustilaan.
Teho esitetään näytössä 1 (esim. P800 800 W:n
teholla).
Kypsymisajan asettaminen
Kun olet valinnut tehotason, aseta haluamasi
kypsymisaika:
• Kierrä vääntösäädintä q, kunnes se on
haluamasi kypsymisajan kohdalla.
Vääntösäätimen q asetusaikajaksot ovat
seuraavat:
• 10 sek - 5 min: 10 sek askelin
• 5 - 10 min: 30 sek askelin
• 10 - 30 min: 1 min askelin
• 30 - 95 min: 5 min askelin
Syötön keskeyttäminen tai lopettaminen
Paina kerran Stop-painiketta 0 syötön keskeyttämiseksi ja päättämiseksi. Laite palaa valmiustilaan.
Kypsytyksen käynnistäminen
Kun olet asettanut tehotason ja kypsytysajan ja kun
näytössä 1 vilkkuu symboli , voit käynnistää
kypsytyksen:
Paina kypsennyksen käynnistämiseksi käynnistys/
pikakäynnistyspainiketta q . Näytössä 1 näkyvät symbolit mikroaaltokäytölle ja kypsennykselle (teho P100 - P400) tai (teho P500 P800).
Asetettu aika laskee takaperin kohti nollaa.
Kypsennystapahtuma on päättynyt
Kun kypsennystapahtuma on päättynyt, näytössä 1
näkyy "End" ja kuuluu 4 merkkiääntä. Jos mikroaaltouunin ovea ei avata, merkkiäänet kuuluvat n. 2
minuutin kuluttua uudelleen.
Pikakäynnistys
Tällä toiminnolla voit aloittaa kypsennyksen välittömästi 30 sekunniksi (tai pitemmäksi aikaa, korkeintaan
12 minuuttia) 800 W:n teholla.
• Paina kerran käynnistys/pikakäynnistyspainiketta q . Näytössä 1 näkyvät mikroaalto-
toiminnon ja kypsennyksen symbolit
sekä ":30". Mikroaaltouuni käynnistää kypsennystapahtuman 30 sekunniksi. Näytössä oleva
aika vähenee.
Jos haluat pidentää kypsennystapahtumaa, paina
käynnistys/pikakäynnistyspainiketta q niin
monta kertaa, kunnes haluamasi aika on saavutettu.
- 28 -
Page 31

Grillitoiminto
Grillitoiminnolla voidaan paistaa ohuita siivuja lihaa,
pihvejä, pyöryköitä, makkaroita tai broilerinpaloja.
Tämä toiminto soveltuu myös erinomaisesti kuorrutetuille leiville ja gratiineille. Käytä grillauksessa aina
grillitelinettä t.
Näin saavutat ihanteellisen grillaustuloksen.
Aseta grilliteline t aina lasilautaselle 3.
1. Aktivoi grillitoiminto painamalla grillipainiketta
6 .
Näytössä 1näkyy sitten grillitoiminnon symboli
ja „:10“.
2. Aseta haluttu kypsennysaika kiertosäätimellä q.
Pisin mahdollinen kypsennysaika on 95 min
3. Käynnistä grillitoiminto painamalla painiketta
Käynnistys/Pikakäynnistys q .
4. Käännä liha suunnilleen puolessa välissä aikaa.
Yhdistelmäkypsennys
Tämä toiminto yhdistää grillitoiminnon ja mikroaaltouunin tavallisen toiminnon. Yhdistelmätoiminnosta
tietty aika on varattu kypsentämiselle ja muu aika
grillaamiselle. Toiminto vaihtuu automaattisesti ohjelman aikana. Vaihtumisen ajankohta ilmaistaan hiljaisella napsautuksella.
Tulipalon vaara!
Älä käytä koskaan grillialustaa t tai muita metallie-
sineitä, kun käytät mikroaaltouunia yhdistelmätoiminnolla. Metalli heijastaa mikroaaltosäteilyä ja muodostaa kipinöitä. Tämä voi aiheuttaa tuipalon ja
vaurioittaa laitteen peruuttamattomasti!
Yhdistelmä 1
Yhdistelmässä 1 mikroaaltouunin teho on 30 % ja
grillausteho 70 % kypsennysajasta. Tämä soveltuu
esim. kalalle, perunoille tai gratiineille.
1. Paina yhdistelmäpainiketta e kerran
yhdistelmän 1 aktivoimiseksi. Näytössä 1
näkyy sekä „:10“.
2. Aseta vääntösäätimellä q haluamasi kypsen-
nysaika. Pisin mahdollinen kypsennysaika on
95 min
3. Paina toiminnon käynnistämiseksi käynnistys/
pikakäynnistyspainiketta q .
Yhdistelmä 2
Yhdistelmässä 2 on mikroaaltouunin teho 55 % ja
grilliteho 45 % kypsennysajasta. Soveltuu esimerkiksi vanukkaille, munakkaille, kanaruoille tai
lasagnelle.
1. Paina yhdistelmäpainiketta e kaksi ker-
taa yhdistelmän 2 aktivoimiseksi. Näytössä 1
näkyy sekä „:10“.
2. Aseta vääntösäätimellä q haluamasi kypsen-
nysaika. Pisin mahdollinen kypsennysaika on
95 min
3. Paina toiminnon käynnistämiseksi käynnistys/
pikakäynnistyspainiketta q .
- 29 -
Page 32

Automaattivalikko
Nro Symboli Elintarvike
Paino
(annokset)
Ruoille, joita aiotaan valmistaa automaattivalikon
avulla, ei tarvitse syöttää kypsymisaikaa eikä tehotasoa. Riittää, että valitset kypsennettävän ruoan lajin
ja painon.
Ohje
Mikroaaltouuni laskee ajan ja tehotason tuoreille
elintarvikkeille. Pakastetut elintarvikkeet eivät kypsy
mikroaaltouunin määrittelemissä ajoissa.
Sulata siksi pakastetut elintarvikkeet ennen kypsennystä sulatusohjelmalla (ks. luku „Sulatus“).
Automaattivalikon käynnistäminen
Ohje
Aseta ruoka aina sopivaan astiaan tai lautaselle.
Ota tällöin huomioon, että kypsennys- tai lämmitystapahtuman aikana ruoista voi valua nesteitä, kuten
rasvaa tms. Astian/lautasen tulisi siksi olla riittävän
suuri, jotta nesteiden ylivaluminen estettäisiin.
1. Kierrä kiertosäädintä q hitaasti vasemmalle.
Näytössä 1 näkyy numero (esim. "3" auto-
maattiohjelmalle 3 (kala)), "Kala"-symboli ja
. Valitse ruoallesi sopiva automaattivalikko
(1 - 9). Kun olet automaattivalikkotilassa, voit siirtyä haluttuun automaattivalikkoon myös kiertämällä kytkintä oikealle. Vahvista valintasi painamalla painiketta Käyntiin/
Pikakäynnistys q .
1 Juomat 1 - 3
2 Makaronit 100 - 300g
3 Kala 100 - 1000g
4 Riisi 100 - 1000g
5 Kana 800 - 1400g
6 Kuumennus 100 - 1000g
7 Perunat 150 - 600g
8 Paisti 300 - 1300g
9 Lihavartaat 100 - 700g
2. Aseta nyt kiertosäädintä q kiertämällä haluttu
paino tai annosten haluttu määrä. Symboli
vilkkuu.
3. Paina käynnistys/pikakäynnistyspainiketta
q kypsennyksen käynnistämiseksi.
Ohje:
Jotta saavutettaisiin tasainen kypsyminen, ruokaa tulisi
kääntää ohjelmissa 5, 8 ja 9 noin 2/3 kypsennysajan
jälkeen. Mikroaaltouuni muistuttaa kääntämisestä:
Näytössä 1 näkyy "turn" ja kuuluu merkkiääni.
• Avaa ovi ja käännä ruokia. Käsittele mahdollisesti
jo kuumaa ruokaa varovasti.
- 30 -
Page 33

• Jatka kypsennystä jälleen painamalla käynnistys/
pikakäynnistyspainiketta q .
Ohje:
Jos et halua kääntää ruokia, odota, että merkkiääni
hiljenee. Mikroaaltouuni jatkaa ohjelmaa automaattisesti n. 30 sekunnin kuluttua.
Ohje:
Jos ruoka ei ole tarpeeksi kypsää automaattivalikon
päätyttyä, kypsytä sitä vielä kerran pari minuuttia pikakäynnistysohjelmalla. Ohjelmissa, joissa on grillitoiminto (ohjelmanumero 5, 8 ja 9), ruokaa voidaan
vielä jälkikypsyttää grillitoiminnolla. Grillitoiminnolla
kypsytettäessä ruoka ruskettuu myös lisää.
Tulipalon vaara!
Kun käytät ohjelmia, joissa grillitoiminto on päällä,
älä käytä missään tapauksessa kansia tai kuumuutta
kestämättömiä astioita, koska ne voivat sulaa tai
syttyä palamaan!
Loukkaantumisvaara!
Lasilautanen 3 on grillillä kypsyttämisen jälkeen erittäin kuuma! Käytä tästä syystä ehdottomasti patalappuja tai kuumankestäviä käsineitä, kun otat lautasen pois kypsytystilasta.
Ohje:
Ota huomioon, että elintarvikkeiden koko, muoto
ja laji määrää osaltaan keittotuloksen.
Ohjelmat yksityiskohtaisesti
Ohjelma 1: Juomat
Tämä ohjelma toimii vain mikroaaltotoiminnolla.
Annosmäärän mukaan ohjelma käy 1:30 - 3:50
minuuttia.
• Laita kuumennettava juoma lasilautaselle 3 kyp-
sennystilaan. Jos laitat useampia laseja tai kuppeja mikroaaltouuniin, varmista. että astiat eivät
kosketa toisiaan.
Ohje
Äkilisen kuohumisen estämiseksi:
• Laita mahdollisuuksien mukaan lasisauva ne-
steeseen sen kuumennusajaksi.
• Jätä neste seisomaan kuumennuksen jälkeen
20 sekunniksi mikroaaltouuniin, jotta se ei kuohu yhtäkkiä.
Ohjelma 2: Makaronit
Tämä ohjelma toimii vain mikroaaltouuniteholla.
Ohjelma kestää asetetun painon mukaan 25 - 35
minuuttia.
• Käytä makaronien keittämiseen niin korkeaa
astiaa, etteivät ne voi kiehua yli.
• Käytä yhtä paljon vettä kuin perinteisessä keittämisessä. Pastan tulisi ”uida” vedessä.
• Keitä ensiksi vesi: Aseta mikroaaltouunin korkein
tehotaso (P800) ja kytke mikroaaltouuni päälle.
Yhden vesilitran kiehumiseen tarvitaan n. 10 minuuttia.
• Lisää sitten veteen makaronit. Tämän jälkeen voit
käynnistää makaroneille tarkoitetun automaattiohjelman.
• Anna makaronien levätä sen jälkeen noin 3
minuuttia.
- 31 -
Page 34

Ohjelma 3: Kala
Tämä ohjelma toimii vain mikroaaltouuniteholla.
Asetetun painon mukaan ohjelma toimii noin 3:30 16 minuuttia.
• Laita kalakappaleet mikroaaltouuniin soveltuvalle lautaselle, lisää siihen vähän voita tai muuta
rasvaa, mausta oman mielesi mukaan ja käynnistä automaattiohjelma kalalle.
Ohjelma 4: Riisi
Tämä ohjelma toimii vain mikroaaltouuniteholla.
Asetetun painon mukaan ohjelma toimii 16 - 36
minuuttia.
• Käytä riisin keittämiseen korkeata astiaa, jotta
riisi ei kiehu yli. Käytä esim. 200 g:lle riisiä n. 400
ml vettä. Käytä vedestä huolimatta painoasetusta
”200 g”. Asetuksena annetaan aina riisin paino.
• Täytä riisi astiaan ja tarpeellinen määrä nestettä
ja anna riisin turvota noin 3 minuuttia.
• Peitä astia kannella. Varmista, ettei astia ole
kiinni ilmatiiviisti. Tämän jälkeen voit käynnistää
automaattiohjelman riisille.
Ohjelma 5: Broileri
Tämä ohjelma toimii useammalla kypsennysvaiheella mikroaaltouuniteholla ja grillitoiminnolla. Asetetusta painosta riippuen ohjelma kestää 39 - 50 minuuttia.
• Laita broileri mikroaaltouunille soveltuvalle lautaselle.
• Mausta oman mielesi mukaan ja käynnistä automaattiohjelma broilerille.
• Kokonaista broileria on käännettävä, koska yläpuoli voisi kuivua muutoin liikaa. Mikroaaltouuni
keskeyttää tätä varten ohjelman automaattisesti,
kun ajasta on kulunut noin 2/3, ja kuuluu äänimerkkejä. Käännä broileri ja jatka ohjelmaa
painamalla käynnistys/pikakäynnistys-painiketta
q .
Ohjelma 6: Lämmittäminen
Tämä ohjelma toimii vain mikroaaltouuniteholla.
Asetetun painon mukaan ohjelma kestää 1:00 6:20 minuuttia.
• Laita lautasella lämmitettävä ruoka lasilautaselle 3
kypsytystilaan ja käynnistä lämmitysautomatiikka.
Ohjelma 7: Perunat
Tämä ohjelma toimii vain mikroaaltouuniteholla.
Asetetun painon mukaan ohjelma kestää 3:50 11 minuuttia.
Vinkki
Laita kypsytykseen kuorimattomia perunoita.
Pistä kuoriin haarukalla muutama reikä.
• Laita kuorimattomat perunat mikroaaltouunille
soveltuvalle lautaselle tai astiaan. Käytä mahdollisuuksien mukaan samankokoisia perunoita.
Perunat eivät saisi koskettaa toisiinsa.
Ohjelma 8: Paisti
Tässä ohjelmassa on useampia kypsytysvaiheita,
jotka toimivat mikroaaltoteholla ja grillitoiminnolla.
Asetetun painon mukaan ohjelma kestää 16 - 60 minuuttia.
• Laita paisti mikroaaltouunille soveltuvalle lautaselle.
Mausta liha tarpeiden mukaan ja käynnistä paistin automaattiohjelma.
• Kokonaista paistia on käännettävä, koska yläpuoli
voisi kuivua liikaa. Mikroaaltouuni keskeyttää
tätä varten ohjelman automaattisesti, kun ajasta
on kulunut noin 2/3, ja kuuluu äänimerkkejä.
Käännä paisti ja jatka ohjelmaa painamalla
käynnistys/pikakäynnistys-painiketta q
.
- 32 -
Page 35

Ohjelma 9: Lihavartaat
Tässä ohjelmassa on useampia kypsytysvaiheita,
jotka toimivat mikroaaltoteholla ja grillitoiminnolla.
Asetetun painon mukaan ohjelma kestää 9 - 27
minuuttia.
• Laita lihavartaat mikroaaltouunille soveltuvalle
lautaselle. Mausta liha maun mukaan ja käynnistä lihavartaiden automaattiohjelma.
• Vartaita on käännettävä, jotta ne kypsyvät tasaisesti. Mikroaaltouuni keskeyttää tätä varten ohjelman automaattisesti, kun ajasta on kulunut
noin 2/3, ja kuuluu äänimerkkejä. Käännä vartaat ja jatka ohjelmaa painamalla käynnistys/
pikakäynnistys-painiketta q .
Sulattaminen
Tällä toiminnolla voidaan helposti sulattaa lihaa,
linnunlihaa ja kalaa. Uuni laskee ja asettaa sulatusajan ja tehotason automaattisesti sulatettavan ruoan painon mukaan.
1. Paina sulatuspainiketta 8 . Näytössä 1
näkyy sitten ja . Symboli vilkkuu.
2. Valitse vääntösäätimellä q sulatettavan ruoan
paino. Voit asettaa painoksi 100 g - 1800 g.
3. Paina sitten käynnistys/pikakäynnistyspaini-
ketta q .
Laite määrää automaattisesti sulatusajan. Sulatusaika näkyy näytössä 1 ja juoksee taaksepäin.
Kun n. 1/2 ajasta on kulunut, kuuluu merkkiääni ja
näytössä 1 näkyy "turn". Avaa ovi ja käännä ruokia.
Sulje ovi uudelleen ja paina painiketta Käyntiin/
Pikakäynnistys q jatkaaksesi sulatustapahtumaa.
Ohje:
Jos et halua kääntää ruokia, odota, että merkkiääni
hiljenee. Sulatusohjelma jatkuu edelleen merkkiäänestä huolimatta!
Käynnistysajan asettaminen
(Preset)
Voit esiohjelmoida kypsentämiselle tai grillille tietyn
käynnistysajan tämän ohjelman avulla. Kun olet
suorittanut asetukset oikein, laite käynnistyy automaattisesti asetettuun aikaan.
Ohje:
Kellon on oltava asetettuna, jotta toiminto "Käynnistysajan asettaminen" voitaisiin valita.
1. Aseta haluttu mikroaaltouunin toiminto (kypsennys,
grillaus tai automaattivalikko (automaattiohjelmaa
6 lukuun ottamatta)):
Mikroaaltouunikäyttö: Valitse tehotaso painamalla
tehopainiketta r vastaavan monta kertaa.
Aseta kypsennysaika kiertosäätimellä q.
Grillikäyttö: Aktivoi grillitoiminto painamalla grillipainiketta 6 . Aseta haluttu grillausaika kiertosäätimellä q.
Automaattivalikko: Valitse kiertosäätimellä q
ruokaasi sopiva ohjelma (automaattiohjelmaa 6
lukuun ottamatta). Vahvista valintasi painamalla
painiketta Käyntiin/Pikakäynnistys q . Aseta
nyt kiertosäädintä q kiertämällä haluttu paino tai
annosten haluttu määrä.
2. Paina painiketta Käynnistysaika 7 .
Näytössä 1 vilkkuu "01: " ja näyttöön tulee
tiimalasisymboli .
3. Aseta tunnit kiertämällä kiertosäädintä q.
4. Paina painiketta Käyntiin/Pikakäynnistys q ,
nyt näyttöön tulevat minuuttiluvut.
5. Aseta minuutit kiertämällä kiertosäädintä q.
6. Paina käynnistys/pikakäynnistys-painiketta q .
Tiimalasisymboli vilkkuu. Käynnistysaika näytetään. Mikroaaltouuni aloittaa tapahtuman
automaattisesti asetettuun aikaan. Käynnistyessä
kuuluu merkkiääni.
- 33 -
Page 36

Ohje:
Tallennetun käynnistysajan voit poistaa ja siten keskeyttää tallennetun tapahtuman painamalla painiketta
Stop 0 . Tiimalasisymboli sammuu ja
näytössä näkyy kellonaika.
Puhdistus ja hoito
Loukkaantumisvaara!
Kytke mikroaaltouuni pois päältä ennen puhdistusta
ja irrota verkkopistoke pistorasiasta.
Laitetta ei saa missään tapauksessa upottaa
veteen tai muihin nesteisiin. Tästä voisi olla
seurauksena hengenvaara sähköiskun vuoksi
ja laite voisi vaurioitua.
• Pidä mikroaaltouunin sisäosa aina puhtaana.
• Jos mikroaaltouunin seiniin tarttuu ruoka- tai
nestetahroja, pyyhi ne kostealla liinalla.
• Jos mikroaaltouunissa on likaa, joka ei irtoa
pyyhkimällä, käytä laimeaa pesuaineliuosta. Pyyhi astianpesuainejäämät pois puhtaalla vedellä.
• Älä käytä puhdistussuihkeita tai muita voimakkaita puhdistusaineita, koska ne saattavat jättää
tahroja ja raitoja tai samentaa luukun pintaa.
• Puhdista ulkoseinät kostealla liinalla.
• Jotta mikroaaltouunin sisäosan toimintaosat eivät
vaurioidu, älä päästä vettä tuuletusaukkoihin 5.
• Poista roiskeet ja muut tahrat säännöllisesti.
Puhdista oviluukku, tarkastusikkuna kummaltakin puolelta, oviluukun tiivisteet ja viereiset osat
kostealla liinalla. Älä käytä hankaavia puhdistusaineita.
• Jos ovilluukun ulkopuolelle tai sen ympärille kerääntyy höyryä, pyyhi se pois pehmeällä
liinalla. Höyryä saattaa esiintyä, jos mikroaaltouunia käytetään tilassa, jossa on suuri ilmankosteus.
• Puhdista myös lasilautanen 3 säännöllisesti.
Huuhtele se lämpimässä pesuaineliuoksessa
tai astianpesukoneessa.
• Puhdista grilliteline t lämpimässä saippuavedessä ja kuivaa se kunnolla.
• Poista hajut säännöllisesti. Kaada mikroastiaan
kupillinen vettä ja lisää yhden sitruunan mehu
ja kuoret. Aseta astia mikroaaltouuniin. Kuumenna 5 minuuttia. Pyyhi uunin sisätila huolellises-ti.
Pyyhi lopuksi kuivalla liinalla kuivaksi.
• Jos mikroaaltouunin lamppu on vaihdettava,
anna vaihto myyntiliikkeen tehtäväksi tai kysy
neuvoa huoltopalvelultamme.
Vianetsintä
Näytössä 1 ei näy mitään.
• Verkkopistoke ei ole liitetty kunnolla pistorasiaan.
Tarkista verkkopistoke.
• Pistorasia on rikki. Kokeile toista pistorasiaa.
• Näyttö 1 on viallinen. Ota yhteys huoltopalveluun.
Laite ei reagoi, kun painikkeita painetaan.
• Lapsilukko on aktivoitu. Deaktivoi lapsilukko
(ks. luku „Käyttö“).
Laite ei käynnistä kypsytys/keittotapahtumaa.
• Oviluukku ei ole kunnolla kiinni. Sulje oviluukku
oikein.
Lasilautanen 3 tuottaa pyöriessään kovaa ääntä.
• Lasilautanen 3 ei ole rullatähdessä 4 oikein.
Aseta lasilautanen 3 kypsennystilaan oikein.
• Rullatähti 4 ja/tai kypsennystilan pohja on
likainen. Puhdista rullatähti 4 ja pohja.
- 34 -
Page 37

Hävittäminen
Älä missään tapauksessa heitä laitetta
tavallisen talousjätteen sekaan. Tämä
tuote on eurooppalaisen direktiivin
2002/96/EC mukainen.
Hävitä laite hyväksytyn jätteenhuoltoyrityksen tai
kunnallisen jätehuollon kautta.
Noudata voimassa olevia määräyksiä.
Ota epävarmoissa tapauksissa yhteyttä jätelaitokseesi.
Hävitä kaikki pakkausmateriaalit ympäristöystävällisellä tavalla.
Takuu ja huolto
Laitteen takuu on 3 vuotta ostopäivästä. Laite on
valmistettu huolellisesti ja tarkistettu tarkasti ennen
toimitusta. Säilytä ostokuitti todisteeksi takuun voimassaolosta.
Ota takuutapauksessa puhelimitse yhteyttä huoltopisteeseesi. Vain näin voidaan taata tuotteesi maksuton lähettäminen huoltoon.
Takuu koskee ainoastaan materiaali- ja valmistusvirheitä, ei kuitenkaan kuljetusvaurioita, kuluvia osia tai
herkästi vaurioituvien osien, esim. kytkinten tai akkujen vaurioita.
Tuote on tarkoitettu ainoastaan yksityiseen, ei kaupalliseen käyttöön.
Väärä tai asiaton käyttö, väkivallan käyttö ja muiden kuin valtuutetun huoltopisteen suorittamat korjaukset aiheuttavat takuun raukeamisen. Tämä takuu
ei rajoita kuluttajan lakisääteisiä oikeuksia.
Takuukorjaus ei pidennä takuuaikaa. Tämä koskee
myös vaihdettuja ja korjattuja osia. Mahdollisista jo
ostettaessa olemassa olevista vahingoista ja puutteista on ilmoitettava välittömästi pakkauksesta purkamisen jälkeen, kuitenkin viimeistään kaksi päivää
ostopäiväyksen jälkeen. Takuuajan jälkeen suoritetut
korjaukset ovat maksullisia.
Huolto Suomi
Tel.: 010309 3582
E-Mail: kompernass@lidl.fi
IAN 71492/71493
Maahantuoja
KOMPERNASS GMBH
BURGSTRASSE 21
44867 BOCHUM, SAKSA
www.kompernass.com
- 35 -
Page 38

- 36 -
Page 39

INNEHÅLLSFÖRTECKNING SIDAN
Säkerhetsanvisningar 38
Föreskriven användning 41
Leveransens innehåll 41
Tekniska data 41
Innan du sätter igång 42
Grundprinciper för att laga mat i mikrovågsugn........................................................................42
Använda lämpliga kokkärl............................................................................................................42
Beskrivning 43
Första användningstillfället 43
Ställa upp mikrovågsugnen ..........................................................................................................43
Förbereda apparaten....................................................................................................................43
Sätta in tillbehör.............................................................................................................................44
Användning 44
Ställa klockan.................................................................................................................................44
Ställa in kökstimer..........................................................................................................................44
Barnspärr ........................................................................................................................................45
Avläsningsfunktioner ......................................................................................................................45
Koka och steka 45
Mikrovågsdrift ................................................................................................................................45
Grilldrift ...........................................................................................................................................47
Kombinationsdrift............................................................................................................................47
Automeny 48
Starta automeny.............................................................................................................................48
Programmen i detalj.......................................................................................................................49
Upptining 51
Ställa in starttid (Preset) 51
Rengöring och skötsel 52
Åtgärda fel 52
Kassering 53
Garanti och service 53
Importör 53
Läs igenom bruksanvisningen noga innan du börjar använda apparaten och spara den för senare bruk.
Lämna över bruksanvisningen tillsammans med apparaten om du överlåter den till någon annan person.
- 37 -
Page 40

Mikrovågsugn
Säkerhetsanvisningar
Akta!
Varnar för skador på mikrovågsugnen .
Fara! / Risk för personskador!
Varning för personskador och elchocker!
Brandrisk!
Varning för brandrisk.
Observera!
Anvisningar och tips om hur mikrovågsugnen ska
användas.
Försiktighetsåtgärder för att undvika att utsättas
för alltför stor mängd mikrovågsenergi
• Försök aldrig använda apparaten med luckan
öppen, då kan du exponeras för skadliga doser
av farlig mikrovågsstrålning. Du får absolut inte
heller bryta eller manipulera säkerhetsspärrarna.
• Se till att inget kommer i kläm mellan kanten
och luckan och att det inte samlas smuts eller
rester av rengöringsmedel på tätningsytorna.
Risk för personskador!
• Om luckan eller tätningarna runt den är skadade
får du absolut inte använda mikrovågsugnen
längre. Lämna då genast in den till kvalificerad
fackpersonal för reparation.
• Försök aldrig själv att reparera apparaten. Om
höljet tas av kan mikrovågsenergin komma ut.
Låt endast kvalificerad fackpersonal reparera
apparaten.
• Den här apparaten ska inte användas av personer
(inklusive barn) med begränsad fysisk, sensorisk
eller mental förmåga eller bristande erfarenhet
och kunskap om de inte först övervakats eller
instruerats av någon ansvarig person. Se noga
till så att barnen inte leker med apparaten.
• Barn får bara använda apparaten själva om
de först fått lämpliga anvisningar om hur man
lagar mat på ett säkert sätt i apparaten och
förstår hur farligt det är att använda den på
fel sätt.
• Använd endast mikrovågsugnen till det den är
avsedd för enligt beskrivningen i denna bruksanvisning. Använd inga frätande kemikalier
eller ångor i den här mikrovågsugnen. Den
här mikrovågsugnen är byggd speciellt för att
värma, koka/steka grilla eller torka livsmedel.
Den är inte avsedd att användas inom industrin
eller i laboratorier.
• Använd inte mikrovågsugnen om kabeln eller
kontakten är skadade. Låt kvalificerad fackpersonal byta ut skadade kablar och kontakter för
att inte utsätta dig för onödiga risker.
• Håll barnen på avstånd från luckan när mikrovågsugnen används. Risk för brännskada!
• Du får absolut inte under några som helst omständigheter öppna mikrovågsugnens hölje.
• Låt bara kvalificerade yrkesmän byta lampa
inne i mikrovågsugnen.
• Rör inte vid luckan, höljet, ventilationsöppningarna,
tillbehören eller kärlen omedelbart efter att du
använt Grill-, Kombi- eller Automenyn. Dessa
delar blir mycket heta. Låt alla delar kallna innan
du rengör dem.
• Se till så att kontakten alltid är lättåtkomlig så
att det går snabbt att bryta strömförbindelsen
vid nödsituationer.
- 38 -
Page 41

• Personer som använder pacemaker bör tala
med sin läkare om ev. risker innan de använder
mikrovågsugnen.
• Låt aldrig kabeln hänga och dingla från bord
eller köksbänkar. Småbarn kan dra i den.
• Öppna alltid burkar, popcornpåsar, etc. som
värmts i mikron med öppningen riktad från
kroppen. Annars kan du bränna dig av ångan.
• Stå inte mitt framför luckan när du öppnar den.
Då kan du bränna dig av ångan.
• Fritera inte i mikrovågsugnen. Het olja kan skada
delar av mikrovågsugnen och redskap och i
värsta fall orsaka brännskador.
• Skaka alltid eller rör om innehållet i uppvärmda
nappflaskor och liknande behållare! Det kan
hända att innehållet är ojämnt uppvärmt så att
barnet bränner sig. Kontrollera alltid temperaturen
innan du matar barnet!
• Bygg inte om mikrovågsugnen.
• Mikrovågsstrålning är farligt! Låt endast utbildad
fackpersonal genomföra service- eller reparationsarbeten om några skydd mot mikrovågsstrålningen måste tas bort.
• Kontrollera alltid temperaturen innan du serverar
den mat som värmts i mikrovågsugnen för att
undvika att spädbarn får ev. livsfarliga brännskador.
Köksredskap kan bli mycket varma av den varma
maten och man kan behöva använda grytlappar
eller liknande när man tar i dem. Alla köksredskap
måste vara testade för att tåla mikrovågsugn.
Brandrisk!
• Lämna aldrig mikrovågsugnen utan uppsikt
när du värmer mat i plast- eller pappersförpackningar i den.
• Sätt inga brännbara material nära mikrovågsugnen eller dess ventilationsöppningar.
• Ta bort alla förslutningar av metall från för-
packningar som du ska värma. Brandrisk!
• Använd bara speciella mikropopcorn i påsar
som tål mikrovågsugn när du ska poppa.
• Använd inte mikrovågsugnen för att värma upp
kuddar fyllda med korn, körsbärskärnor eller
gel. Brandrisk!
• Använd inte mikrovågsugnen som förvarings-
plats för mat eller annat.
• Överskrid inte de tillagningstider som anges av
tillverkaren.
• Ställ inga föremål på mikrovågsugnen när den
används. Då blockeras ventilationsöppningarna!
• Ställ inte mikrovågsugnen nära andra värmekällor,
t ex vanliga spisar och ugnar.
• Rengör mikrovågsugnen noga när du lagat fet
mat i den, särskilt om du använt öppna kärl. Låt
mikrovågsugnen bli helt kall innan den rengörs.
Det får inte finnas några rester av t ex fett på
grillens värmeelement. Då kan det börja brinna
av värmen.
• Tina inte upp fruset fett eller olja i mikrovågsugnen.
Det kan börja brinna.
• Använd ingen extern timer eller separat fjärr-
kontroll för att styra apparaten.
Akta! Ytan är mycket het!
- 39 -
Page 42

Akta! Risk för skador på produkten!
• Sätt inte på mikrovågsugnen när den är tom.
Undantaget är den första gången mikrovågsugnen
sätts på (se kapitel Första användningstillfället).
• Stick inte in några föremål i ventilationsöppnin-
garna eller luckans säkerhetslås.
• Använd inga metallföremål som kan reflektera
mikrovågorna och ge upphov till gnistor. Sätt
inte plåtburkar i mikrovågsugnen.
• Ställ inga plastkärl i mikrovågsugnen om du just
använt Grill-, Kombi- eller Automenyn. Då kan
plasten smälta.
• Mikrovågsugnen får inte placeras på ställen
med hög luftfuktighet eller där det samlas fukt.
• Vätskor och liknande livsmedel får inte värmas
upp i hermetiskt förslutna behållare, eftersom
de kan explodera och skada apparaten.
• Luta dig inte mot luckan.
• Dåligt rengjorda kokkärl kan förstöra ytan,
vilket i sin tur påverkar apparatens livslängd
och eventuellt leder till farliga situationer.
Fara!
• Doppa aldrig ner kabel eller kontakt i vatten
eller andra vätskor.
• Håll kabeln borta från värmekällor. Lägg den inte
framför luckan. Då kan den skadas av värmen.
• Se till så att det aldrig stänker in vätska i ventilationsöppningarna eller luckspärren. Skulle det
komma in vätska där måste du genast stänga
av mikrovågsugnen och dra ut kontakten ur
uttaget. Låt sedan en yrkesman kontrollera
mikrovågsugnen.
Säkerhetstips
• För att minska risken för brand inuti mikrovågsugnen: Håll alltid ett öga på den när du lagar
mat i plast- eller pappersförpackningar, eftersom
dessa material kan börja brinna.
• När man värmer upp drycker i mikrovågsugnen
kan det bubbla över kanten efter en stund när det
kokar. Var därför försiktig när du tar ut kärlet.
För att undvika att det plötsligt kokar över:
- Ställ en glaspinne i kärlet med vätska när den
värms.
- Låt vätskan stå kvar i mikrovågsugnen i ca
20 sekunder innan du tar ut den så undviker
du att det kokar över kanten.
• Stick hål i potatis, korv och liknande livsmedel.
Annars kan de explodera.
• Var försiktig när du värmer upp vätskor i mikron.
Använd bara öppna kärl så att ångan kan komma
ut.
• Skulle det börja ryka ska du stänga av mikrovågsugnen eller dra ut kontakten och låta
luckan vara stängd så att elden kvävs om det
brinner.
• Oskalade eller hårdkokta ägg får inte värmas
i mikrovågsugnen, de kan explodera till och
med efter att de tagits ut ur mikrovågsugnen.
Livsmedel med hårda skal, som t ex potatis,
pumpa, äpplen och kastanjer ska stickas innan
de tillagas.
• Flytta inte på mikrovågsugnen när den används.
- 40 -
Page 43

Jordning/Rätt utförd installation
Den här mikrovågsugnen måste jordas. Den får endast
anslutas till ett eluttag som jordats enligt gällande
föreskrifter. Vi rekommenderar att mikrovågsugnen
får en egen strömkrets som bara ger ström till
mikrovågsugnen.
Fara: Om man handskas på fel sätt med den
jordade kontakten kan det finnas risk för elektriska
stötar.
Observera: Om du har några frågor om jordning eller behöver råd vad gäller det elektriska
ska du fråga en elektriker eller en servicetekniker.
Varken tillverkaren eller återförsäljaren tar något
ansvar för skador på person eller mikrovågsugn
som är ett resultat av en felaktigt utförd elektrisk
installation.
Störningar på andra apparater
Mikrovågsugnen kan ge upphov till störningar på
radio- och TV-apparater och liknande när den
används.
Om så skulle ske kan du minska eller ta bort störningarna helt genom följande åtgärder:
• Rengör mikrovågsugnens lucka och tätning.
• Rikta radions eller tevens antenn åt ett annat
håll.
• Flytta mikrovågsugnen till ett annat ställe än
där mottagaren står.
• Flytta mikrovågsugnen längre bort från mottagaren.
• Koppla mikrovågsugnen till ett annat uttag.
Mikrovågsugn och mottagare bör använda
olika strömkretsar.
Föreskriven användning
Den här mikrovågsugnen med grill är avsedd att
användas för att värma och tillaga livsmedel efter
beskrivningarna i den här bruksanvisningen.
All form av förändring på apparaten är förbjuden
och innebär avsevärda risker. Tillverkaren ansvarar
inte för skador som uppstår på grund av felaktig
användning.
Den här mikrovågsugnen är inte avsedd för yrkesmässigt bruk.
Den här produkten är endast avsedd för privat
bruk!
Använd den inte yrkesmässigt, industriellt eller i laboratorier!
Leveransens innehåll
Mikrovågsugn
Glastallrik
Grillstativ
Sjärnformat fäste
Bruksanvisning
Snabbinstruktion
Tekniska data
Nominell spänning: 230 - 240 V
50 Hz
Maximal effektförbrukning: 1200 W
Maximal uteffet
Mikrovågor: 800 W
Maximal effektförbrukning
Grill: 1000 W
Mikrovågsfrekvens: 2450 MHz
~
- 41 -
Page 44

Innan du sätter igång
Grundprinciper för att laga mat i
mikrovågsugn
• Lägg in livsmedel i mikron på ett smart sätt.
• De tjockaste bitarna ska ligga nära kanten.
• Observera tillagningstiden. Välj kortast angivna
tid och förläng den vid behov. Mat som tillagas
alltför länge kan börja ryka och brinna.
• Lägg ett lock som tål mikrovågsugnar över maten
när den tillagas. Då sprutar det inte utanför och
dessutom blir den jämnare stekt.
• Vänd på maten en gång under tillagningen
så blir t ex kyckling och hamburgare snabbare
genomstekta.
• Stora bitar, t ex stekar, måste vändas minst en
gång.
• T ex köttbullar måste flyttas om helt efter halva
stektiden. Vänd på dem och flytta de köttbullar
som ligger i mitten av tallriken till kanten och
vice versa.
• Det bästa är att använda ett runt eller ovalt kärl
istället för ett fyrkantigt eller avlångt, eftersom
livsmedel som hamnar i kanten lätt blir överkokta.
Listan nedan ska användas som ett allmänt hjälpmedel för att välja lämpliga kokkärl.
Kokkärl
Värmebeständigt
glas
Icke värmebeständigt glas
Värmebeständig
keramik
Plastkärl
lämpade för
mikrovågsugn
Hushållspapper Ja Nej Nej
Mikrovågor
Ja Ja Ja
Nej Nej Nej
Ja Ja Ja
Ja Nej Nej
Grill
Kombination
Använda lämpliga kokkärl
• Det bästa materialet för mikrovågsugnar släpper
igenom mikrovågorna, dvs. släpper energin
genom kärlet så att maten värms.
Mikrovågor kan inte tränga igenom metall.
Av det skälet får man inte använda några
metallkärl eller metallbestick i mikrovågsugnen.
• Använd aldrig produkter som tillverkats av
återvunnet papper i mikrovågsugnen. De kan
innehålla små, små metallfragment som kan
ge upphov till gnistor och/eller eld.
Metalltablett/platta
Grillstativ Nej Ja Nej
Aluminiumfolie &
folieformar
Nej Ja Nej
Nej Ja Nej
Brandrisk!
Använd aldrig grillstativet eller andra metallföremål
när mikrovågsugen går på mikrovågs- eller kombinationsdrift. Metall reflekterar mikrovågsstrålningen,
vilket ger upphov till gnistor. Då kan det börja brinna
och apparaten totalförstöras!
- 42 -
Page 45

Beskrivning
inte
1 Display
2 Knapp Dörröppnare
3 Glastallrik
4 Stjärnformat fäste
5 Ventilationsöppningar
6 Knapp Grill
7 Knapp Starttid (Preset)
8 Knapp Upptining
9 Knapp Klocka
0 Knapp Stopp
q Skruvreglage/Start/Snabbstart
w Knapp Kökstimer
e Knapp Kombination
r Knapp Effekt
t Grillstativ
• Se till att kontakten är lättåtkomlig så att den
lätt kan dras ut vid nödsituationer.
• Ta inte bort fötterna under mikrovågsugnen.
• Blockera inte ventilationsöppningarna 5.
Då kan apparaten skadas.
• Ställ mikrovågsugnen så långt från radio- och
TV-apparater som möjligt. När mikrovågsugnen
används kan det uppstå störningar i mottagningen.
Akta:
Ställ inte mikrovågsugnen på en elektrisk spis eller
liknande värmealstrande yta. Då kan den skadas
och garantin upphör att gälla.
Förbereda apparaten
• Ta bort förpackningsmaterial och ev. skyddsfolie
runt mikrovågsugnen.
Första användningstillfället
Ställa upp mikrovågsugnen
Brandrisk!
Den här mikrovågsugnen ska inte byggas in i ett skåp.
I slutna utrymmen får apparaten inte tillräckligt med
ventilation. Då kan apparaten skadas och det kan
börja brinna!
• Välj en plan yta där apparaten ventileras tillräckligt:
Det är mycket viktigt att det finns ett avstånd på
minst 10 cm mellan apparaten och väggarna.
Försäkra dig om att mikrovågsugnens lucka
kan öppnas och stängas utan problem.
Avståndet uppåt från mikrovågsugnen måste
vara minst 20 cm .
i
Ta
bort den ljusgrå glimmerplattan som skyddar magnetfältets
rör inuti ugnen.
• Sätt kontakten i ett eluttag. Använd ett eluttag
med 230 - 240 V ~, 50 Hz och en säkring på
16 A. Vi rekommenderar att mikrovågsugnen
får en egen strömkrets. Om du är osäker på hur
mikrovågsugnen ska anslutas bör du fråga en
yrkesman om råd.
- 43 -
Page 46

Innan mikrovågsugnen börjar användas måste den
först hettas upp utan innehåll för att få bort rester
från tillverkningsprocessen.
Sätt på mikrovågsugnen på grillfunktionen utan livsmedel och tillbehör (glastallrik 3, roterande fäste 4
och grillställ t):
• Tryck en gång på knappen Grill 6 . Nu
har du valt grilldrift. På displayen 1 visas
symbolen och symbolen blinkar.
Det visar att apparaten är startklar.
• Ställ in en tid på 10 minuter med skruvreglaget q.
• Tryck på knappen Start/Snabbstart q
för att starta grillfunktionen.
Observera:
Första gången apparaten sätts på kan det hända att
det ryker och luktar lite av resterna från tillverkningsprocessen. Det är helt ofarligt. Sörj för tillräcklig
ventilation. Öppna till exempel fönstret.
• Efter 10 minuter stängs apparaten av automatiskt.
Nu hörs flera signaler. Öppna luckan. Vänta
tills den blivit helt kall.
• Dra ut kontakten ur uttaget, rengör apparaten
invändigt med en fuktig trasa och torka den
sedan noga.
Sätta in tillbehör
• Sätt det stjärnformade fästet 4 mitt på drivaxeln
i ugnsutrymmet. Se till så att hela fästet glider
över axeln och fastnar ordentligt.
• Sätt glastallriken 3 mitt på fästet. De tre hjulen
måste ligga mot glastallrikens 3 styrkant.
Användning
Ställa klockan
När mikrovågsugnen används för första gången eller
om det är strömavbrott visar displayen 1 "1 : 0 1".
1. Tryck på knappen Klocka 9 . "Hr 12"
kommer upp på displayen 1. Tryck en gång till
på knappen Klocka 9 om du vill växla till
24-timmarsläget.
2. Ställ in rätt timme genom att skruva på reglaget q.
Klocksymbolen blinkar på displayen 1.
3. Tryck på knappen Start/Snabbstart q .
Minutangivelsen kommer upp.
4. Ställ in minuterna med skruvreglaget q.
5. När klockan är rätt inställd trycker du på knappen
Start/Snabbstart q . Klocksymbolen
på displayen 1 lyser konstant och kolontecknet
blinkar för att visa att klockan går.
För att avläsa det aktuella klockslaget när mikrovågsugnen är påkopplad trycker du på knappen
Klocka 9 ; då visas klockan i ca 4 sekunder
på displayen 1.
Ställa in kökstimer
Mikrovågsugnen är utrustad med en kökstimer som
kan användas separat.
1. Tryck på knappen Kökstimer w när appa-
raten står på vänteläge (Standby). På displayen 1 visas "00:10".
2. Ställ sedan in önskad tid med skruvreglaget q.
Du kan ställa in en tid mellan 10 sekunder och
95 minuter.
- 44 -
Page 47

3. Tryck på knappen Start/Snabbstart q .
Det hörs en signal. Tiden börjar räknas ner.
Efter ca 3 sekunder visas den vanliga klockan
igen. Kökstimern fortsätter att ticka i bakgrunden.
Om du vill kontrollera tiden på kökstimern
emellanåt trycker du på knappen Kökstimer w
. Då visas tiden för kökstimern en kort
stund.
Så snart den inställda tiden är slut hörs 3 signaler.
Observera:
För att avbryta kökstimern innan tiden är ute trycker
du på knappen w tills den tid som ställts in för
kökstimern visas. Medan kökstimern visas på displayen 1 trycker du på knappen Stop 0 .
Kökstimern avbryts och klockslaget visas på displayen 1.
Barnspärr
Aktivera den här inställningen för att hindra hindra
småbarn och andra oberäkneliga personer från att
sätta på mikrovågsugnen.
Symbolen för barnspärren kommer upp på displayen 1 och apparaten kan inte startas så länge
den här funktionen är aktiv.
• Tryck på Stopp-knappen 0 och håll den
inne tills det hörs en signal och symbolen för
barnspärren kommer upp på displayen 1.
Nu går det inte att använda mikrovågsugnens
knappar och reglage.
• För att avaktivera barnspärren igen håller du
Stopp-knappen 0 inne tills det hörs en
signal och symbolen för barnspärr försvinner.
Avläsningsfunktioner
Avläsa klockan under drift
Tryck på knappen Klocka 9 när du lagar mat i
mikrovågsugnen. På displayen 1 visas klockan i ca
4 sekunder.
Avläsa effekt under drift
Tryck på knappen Effekt r när du lagar mat i
mikrovågsugnen. På displayen 1 visas den aktuella
effekten i ca 3 sekunder.
Koka och steka
Mikrovågsdrift
Observera
Det kan bildas droppar på luckan och höljet när
mikrovågsugnen används. Det här helt normalt och
betyder inte att det är något fel på mikrovågsugnen.
Torka bort fukten med en torr trasa när mikrovågsugnen kallnat.
Brandrisk!
Använd aldrig grillstativet t eller andra metallföremål
när mikrovågsugnen går på mikrovågsdrift. Metall
reflekterar mikrovågsstrålningen, vilket ger upphov
till gnistor. Då kan det börja brinna och
apparaten totalförstöras!
- 45 -
Page 48

Välja effekt
• Tryck på knappen Effekt r motsvarande
antal gånger för att välja en effektnivå.
• 1 gång för 800 W effekt (P800).
• 2 gånger för 700 W effekt (P700).
• 3 gånger för 600 W effekt (P600).
• 4 gånger för 500 W effekt (P500).
• 5 gånger för 400 W effekt (P400).
• 6 gånger för 300 W effekt (P300).
• 7 gånger för 200 W effekt (P200).
• 8 gånger för 100 W effekt (P100).
Effekten visas på displayen 1 (t ex P800 vid 800
W effekt).
Ställa in tillagningstid
När du ställt in en effekt ställer du in önskad tillagningstid:
• Vrid på skruvreglaget q tills du ställt in rätt tid.
Skruvreglaget q kan ställas in på följande
sätt:
• från 10 sekunder till 5 minuter med 10 sekunder i taget
• från 5 till 10 min: med 30 sekunder i taget
• från 10 till 30 min: med 1 minut i taget
• från 30 till 95 min: med 5 minuter i taget
Avsluta/Avbryta inställning
Tryck en gång på knappen Stop 0 för att
avbryta eller avsluta en inmatning. Mikrovågsugnen
går tillbaka till vänteläget.
Avbryta tillagningsprocess
Tryck en gång på knappen Stop 0 för att avbryta processen. Mikrovågsugnen avbryter tillagningen
och stoppar den tid som är kvar. Tryck på knappen
Start/Snabbstart q igen för att fortsätta.
Avsluta tillagningsprocess
Tryck två gånger på knappen Stop 0 för att
avbryta processen. Mikrovågsugnen går tillbaka till
vänteläget.
Tillagningsprocessen är avslutad
När maten är klar visas "End" på displayen 1 och
det hörs fyra signaler. Om man inte öppnar luckan
hörs signalerna igen efter ca 2 minuter.
Snabbstart
Med den här funktionen kan du genast börja tilllaga
maten i 30 sekunder (eller längre, ända upp till
12 minuter) på 800 W effekt.
• Tryck en gång på knappen Start/Snabbstart q
. På displayen 1 visas symbolerna för
mikrovågsdrift och stekning/kokning
samt :30. Mikrovågsugnen startar tillagnings-
processen i 30 sekunder. Tiden börjar räknas ner.
Om du vill att maten ska tillagas längre trycker du
upprepade gånger på knappen Start/Snabbstart q
tills den tid du vill ha kommer upp.
Starta tillagningen
När du ställt in effekt och tillagningstid och när symbolen blinkar på displayen 1 kan du starta processen:
Tryck på Start/Snabbstart q för att börja steka
eller koka maten. Symbolerna för mikrovågsdrift
och tillagning (effekt P100 - P400) eller
(effekt P500 - P800) kommer upp på
displayen 1.
Den inställda tiden räknas baklänges.
- 46 -
Page 49

Grilldrift
Grillfunktionen kan används för tunna skivor kött, frikadeller, små korvar eller kycklingdelar. Den passar
också utmärkt till gratinerade smörgåsar och gratänger.
Använd alltid grillstativet t när du grillar.
Då blir resultatet bäst.
Ställ alltid grillstativet t på glastallriken 3.
1. Tryck på knappen Grill 6 för att aktivera
grillfunktionen.
På displayen 1 visas symbolen för grillfunktion
och ":10“.
2. Ställ in önskad grilltid med skruvreglaget q.
Maximal tid är 95 minuter.
3. Tryck på knappen Start/Snabbstart q för
att börja grilla.
4. Köttbitar bör vändas efter ungefär halva tiden.
Kombination 1
Vid kombination 1 är mikrovågseffekten 30 % och
grilleffekten 70 % av tillagningstiden. Det passar
bra till t ex fisk, potatis eller gratänger.
1. Tryck en gång på knappen Kombination e
för att aktivera Kombination 1. På dis-
playen 1 visas och ":10“.
2. Ställ in önskad tid med skruvreglaget q.
Maximal tid är 95 minuter.
3. Tryck på knappen Start/Snabbstart q
för att starta processen.
Kombination 2
Vid Kombination 2 är mikrovågseffekten 55 % och
grilleffekten 45 % av tillagningstiden. Det passar
bra till t ex puddingar, omeletter, fågelrätter och
lasagne.
Kombinationsdrift
Den här funktionen kombinerar grillfunktionen med
vanlig mikrovågsdrift. Förloppet innehåller en tid för
kokning/stekning och återstående tid för grillning,
som sker automatiskt i samma moment. Det hörs ett
svagt klickande ljud när mikrovågsugnen kopplar
över till grillning.
Akta:
Använd aldrig grillstativet t eller andra metallföremål
när du använder mikrovågsugnen på kombinationsdrift. Metall reflekterar mikrovågsstrålningen, vilket
ger upphov till gnistor. Då kan det börja brinna och
apparaten totalförstöras!
1. Tryck två gånger på knappen Kombination e
för att aktivera Kombination 2. På dis-
playen 1 visas och ":10“.
2. Ställ in önskad tid med skruvreglaget q.
Maximal tid är 95 minuter.
3. Tryck på knappen Start/Snabbstart q för
att starta processen.
- 47 -
Page 50

Automeny
Nr. Symbol Livsmedel
Vikt
(portioner)
För maträtter som ska tillagas med automenyn måste
man knappa in tillagningstid och effekt. Det räcker
att ange vilken typ av livsmedel det handlar om och
hur mycket det väger.
Observera
Mikrovågsugnen beräkna tid/effekt för färska livsmedel. Djupfryst mat blir inte färdiglagad med de
tider som ställts in på mikrovågsugnen i förväg.
Tina först upp ev. frysta livsmedel med upptiningsprogrammet (se kapitel Upptining).
Starta automeny
Observera
Lägg alltid maten i ett lämpligt kärl eller på en tallrik.
Tänk på att livsmedel kan avge vätskor som t ex
fett när de värms eller tillagas. Därför måste kärlet/
tallriken vara tillräckligt stor så att det inte rinner
över kanten.
1. Vrid skruvreglaget q långsamt åt vänster. På
displayen 1 visas ett nummer (t ex 3 för autoprogram 3, fisk), symbolen för fisk och .
Välj den automeny sopm passar till den mat
som ska tillagas (1 till 9). I automenyläget kan
du också hämta den automeny du vill ha genom
att vrida åt höger. Bekräfta ditt val genom att
trycka på knappen Start/Snabbstart q .
1 Drycker 1 - 3
2 Pasta/Nudlar 100 - 300 g
3 Fisk 100 - 1000 g
4 Ris 100 - 1000 g
5 Kyckling 800 - 1400 g
6 Uppvärmning 100 - 1000 g
7 Potatis 150 - 600 g
8 Stekar 300 - 1300 g
9
2. Vrid på reglaget q för att ställa in önskad vikt
eller önskat antal portioner. Symbolen blinkar.
3. Tryck på knappen Start/Snabbstart q för
att starta processen.
Grillspett med
kött
100 - 700 g
Observera
För att maten ska bli jämnt genomstekt eller kokt
bör man vända på den efter ungefär 2/3 av tiden
i program 5, 8 och 9. Mikrovågsugnen påminner
dig när det är dags att vända: "urn" kommer upp
på displayen 1 och det hörs en signal.
• Öppna luckan och vänd på bitarna. Var försiktig,
de kan redan vara ganska heta.
- 48 -
Page 51

• Tryck på knappen Start/Snabbstart q för att
fortsätta.
Observera:
Om du inte vill vända på maten väntar du bara
tills signalerna tystnat. Mikrovågsugnen fortsätter
programmet automatiskt efter ca 30 sekunder.
Observera
Om maten inte är riktigt klar när automenyn avslutats
kan du eftersteka den ett par minuter på Snabbstartprogrammet. Om du använder program som innehåller en grillfunktion (programnummer 5, 8 och 9)
kan du använda grillfunktionen för efterstekning.
När grillfunktionen används för att eftersteka får
maten en brunare stekyta.
Brandrisk!
Vid program med grillfunktion får du absolut inte
använda lock eller kärl som inte tål värme, eftersom
de kan smälta och börja brinna!
Risk för personskador!
Glastallriken 3 blir mycket varm när grillfunktionen
används! Använd därför alltid grytlappar eller grillhandskar när du tar ut den ur mikron.
Observera:
Kom ihåg att storlek, form och typ av livsmedel påverkar resultatet.
Programmen i detalj
Program 1: Drycker
I det här programmet används bara mikrovågor.
Beroende på hur många portioner som ställts in
varar programmet i mellan 1:30 och 3:50 minuter.
• Ställ den dryck som ska värmas på glastallriken 3
i mikrovågsugnen. Om du sätter in flera koppar
eller glas samtidigt i mikron ska du se till att de
inte rör vid varandra.
Observera
För att undvika att det plötsligt kokar över:
• Sätt om möjligt en glaspinne i vätskan medan
den värms upp.
• Låt vätskan stå kvar i mikrovågsugnen i 20 se-
kunder när den värmts upp så undviker du att
den plötsligt kokar över.
Program 2: Pasta/Nudlar
I det här programmet används bara mikrovågor.
Programmet pågår i mellan 25 och 30 minuter,
beroende på vilken vikt som ställts in.
• Använd ett kärl med höga kanter när du kokar
nudlar och pasta, eftersom det annars kan koka
över.
• Använd lika mycket vatten som när du kokar på
vanligt sätt. Pastan ska ”simma”.
• Koka först upp vattnet:
Sätt mikrovågsugnen på högsta effekt (P800)
och starta den. Det tar ca tio minuter att koka
upp en liter vatten.
• Tillsätt sedan pastan eller nudlarna. Starta automenyn för pasta och nudlar.
• Låt sedan pastan/nudlarna vila i 3 minuter.
- 49 -
Page 52

Program 3: Fisk
I det här programmet används bara mikrovågor.
Beroende på vilken vikt som ställts in pågår programmet i mellan 3:30 och 16 minuter.
• Lägg fiskbitarna på ett fat som tål mikrovågsugn,
tillsätt lite smör eller annat matfett, krydda efter
smak och sätt på autoprogrammet för fisk.
Program 6: Uppvärmning
I det här programmet används bara mikrovågor.
Beroende på vilken vikt som ställts in pågår programmet i mellan 1:00 och 6:20 minuter.
• Ställ fatet med den mat som ska värmas på
glastallriken 3 i mikrovågsugnen och sätt på
autoprogrammet för upptining.
Program 4: Ris
I det här programmet används bara mikrovågor.
Beroende på vilken vikt som ställts in pågår programmet i mellan 16 och 36 minuter.
• Använd ett kärl med höga kanter när du kokar
ris, annars kan det koka över. Till t ex 200 g
ris tar du ca 400 ml vatten. Ställ in vikten på
200 g, fast du tillsatt vatten. Det är alltid risets
vikt som ska ställas in.
• Lägg riset i kokkärlet, fyll på så mycket vätska
som krävs och låt det svälla i ca 3 minuter.
• Täck över kokkärlet. Akta så att det inte blir hermetiskt tillslutet. Starta sedan automenyn för ris.
Program 5: Kyckling
Det här programmet arbetar i flera steg med både
mikrovågs- och grillfunktionen. Beroende på vilken
vikt som ställts in pågår programmet i mellan 39
och 50 minuter.
• Lägg kycklingen på ett fat som tål mikrovågsugn.
• Krydda efter smak och starta automenyn för
kyckling.
• En hel kyckling måste vändas, annars kan den sida
som är vänd uppåt bli torr. Av den anledningen
avbryts programmet automatiskt när ca 2/3 av
tiden har gått och det hörs flera signaler. Vänd
på kycklingen och tryck på knappen Start/
Snabbstart q för att fortsätta programmet.
Program 7: Potatis
I det här programmet används bara mikrovågor.
Beroende på vilken vikt som ställts in pågår programmet i mellan 3:50 och 11 minuter.
Tips
Använd oskalad potatis. Stick några hål i skalet.
• Lägg de oskalade potatisarna på ett fat eller i
ett kärl som tål mikrovågsugn. Använd helst lika
stora potatisar. Rör helst inte vid potatisarna.
Program 8: Stekar
Det här programmet arbetar i flera steg med både
mikrovågs- och grillfunktionen. Beroende på vilken
vikt som ställts in pågår programmet i mellan 16
och 60 minuter.
• Lägg steken på ett fat som tål mikrovågsugn.
Krydda köttet efter smak och starta automenyn
för stekar.
• En hel stek måste vändas, annars kan den bli torr
på ovansidan. Av den anledningen avbryts programmet automatiskt när ca 2/3 av tiden har
gått och det hörs flera signaler. Vänd på steken
och tryck på Start/Snabbstart q för att
fortsätta programmet.
- 50 -
Page 53

Program 9: Grillspett med kött
Det här programmet arbetar i flera steg med både
mikrovågs- och grillfunktionen. Beroende på vilken
vikt som ställts in pågår programmet i mellan 9 och
27 minuter.
• Lägg grillspetten på ett fat som tål mikrovågsugn.
Krydda efter smak och starta automenyn för
grillspett.
• Spetten måste vändas för att bli jämnstekta. Av
den anledningen avbryts programmet automatiskt
när ca 2/3 av tiden har gått och det hörs flera
signaler. Vänd på spetten och tryck på Start/
Snabbstart q för att fortsätta programmet.
Upptining
Med den här funktionen kan du lätt tina upp kött, fågel
och fisk. Upptiningstiden och effekten beräknas och
ställs in automatiskt när du angivit vikten.
1. Tryck på knappen Upptining 8 . På dis-
playen 1 visas och . Symbolen
blinkar.
2. Ställ in vikten på det som ska tinas med
skruvreglaget q.Du kan ställa in en vikt på
mellan 100 g och 1800 g.
3. Tryck på knappen Start/Snabbstart q .
Apparaten anger upptiningstiden automatiskt.
Tidsförloppet visas på displayen 1.
Efter ungefär halva tiden hörs en signal och "turn"
kommer upp på displayen 1. Öppna luckan och
vänd på bitarna. Stäng luckan igen och tryck på
knappen Start/Snabbstart q för att fortsätta
tina.
Obs:
Om du inte vill vända på maten väntar du bara tills
signalerna tystnat. Upptiningsprogrammet fortsätter
fast signalen hörs!
Ställa in starttid (Preset)
Med det här programmet kan du programmera in
en tid när du vill börja steka eller grilla maten. Om
inställningarna görs på rätt sätt startar apparaten
automatiskt vid den inställda tiden.
Observera:
Klockan måste vara inställd för att funktionen
"Ställa in starttid i förväg" ska kunna väljas.
1. Ställ in önskad mikrovågsfunktion (stekning, grillning eller automeny (förutom Autoprogram 6)):
För mikrovågsdrift: Tryck på knappen Effekt r
motsvarande antal gånger för att välja en
effektnivå. Ställ in stektiden med skruvreglaget q.
För grilldrift: Tryck på knappen Grill 6 för
att aktivera grillfunktionen. Ställ in önskad grilltid
med skruvreglaget q.
För automenyn: Välj ett program som passar för
den mat du ska laga med skruvreglaget q (föru-
tom Autoprogram 6). Bekräfta ditt val genom att
trycka på knappen Start/Snabbstart q .
Vrid på reglaget q för att ställa in önskad vikt
eller önsklat antal portioner.
2. Tryck på knappen Starttid 7 . "01: "
blinkar på displayen 1 och det kommer upp
en timglassymbol .
3. Ställ in timmarna med skruvreglaget q.
4. Tryck på knappen Start/Snabbstart q
så att minutangivelsen kommer upp.
5. Ställ in minuterna med skruvreglaget q.
6. Tryck på knappen Start/Snabbstart q .
Timglassymbolen blinkar. Starttiden visas.
Mikrovågsugnen kommer nu att starta automatiskt vid den inställda tiden. Det hörs en signal
när den startar.
- 51 -
Page 54

Observera:
För att ta bort den sparade starttiden och därmed
även den sparade processen trycker du på knappen
Stop 0 . Timglassymbolen försvinner och
klockan kommer upp.
Rengöring och skötsel
Risk för personskador!
Stäng av mikrovågsugnen och dra ut kontakten ur
uttaget innan du börjar rengöra den.
Apparaten får absolut inte doppas ner i vatten
eller andra vätskor. Då finns risk för livsfarliga
elchocker och skador på apparaten.
• Håll alltid rent inuti mikrovågsugnen.
• Om det stänkt ut vätska eller matrester som
fastnat på väggarna inuti ugnen torkar du
bort det med en fuktig trasa.
• Använd ett milt diskmedel om mikrovågsugnen
är mycket smutsig. Skölj bort alla rester av diskmedel i rent vatten.
• Använd inte rengöringsspray eller starka rengöringsmedel, då kan det bli fläckar och ränder
eller beläggningar på luckan.
• Torka av mikrovågsugnen utvändigt med en
fuktig trasa.
• För att inte skada mikrovågsugnens funktionsdelar måste du akta att det inte tränger in vatten
genom ventilationsöppningarnar 5.
• Ta bort stänk och matrester regelbundet. Rengör
luckan, båda sidorna av fönstret, tätningarna och
området runt luckan med en fuktig trasa. Använd inte slipande medel.
• Om det bildas fukt på utsidan runt luckan
torkar du bort den med en mjuk trasa. Det kan
inträffa om mikrovågsugnen används där det
är mycket fuktigt.
• Rengör glastallriken 3 regelbundet. Diska den
i varmt diskvatten eller i diskmaskinen.
• Rengör grillstativet t i varmt vatten och diskmedel och torka det noga.
• Förhindra obehaglig lukt regelbundet. Ställ en
djup skål med en kopp vatten och skal och saft
från en citron i ugnen. Värm det i 5 minuter.
Rengör sedan ugnen noga och gnugga den
torr med en mjuk trasa.
• Om du behöver byta lampa i mikrovågsugnen
ska du lämna in den till återförsäljaren eller
fråga vår kundtjänst om råd.
Åtgärda fel
Det syns ingenting på displayen 1.
• Kontakten sitter inte i uttaget. Kontrollera kontakten.
• Eluttaget är defekt. Prova i ett annat uttag.
• Displayen 1 är defekt. Kontakta kundservice.
Det händer ingenting när jag trycker på
knapparna.
• Barnspärren är aktiverad. Avaktivera barnspärren
(se kapitel Användning).
Apparaten börjar inte koka eller steka.
• Luckan är inte riktigt stängd. Stäng luckan
ordentligt.
Det låter mycket när glastallriken 3 roterar.
• Glastallriken 3 ligger inte som den ska mot
fästet 4.
Sätt in glastallriken 3 på rätt sätt i mikrovågs-
ugnen.
• Det stjärnformade fästet 4 och/eller ugnens
botten är smutsiga. Rengör fästet 4 och ugnens
botten.
- 52 -
Page 55

Kassering
Apparaten får absolut inte kastas bland
hushållssoporna. Produkten faller under
EU-direktiv 2002/96/EC.
Lämna in den till ett företag som har tillstånd att ta
hand om den här typen av uttjänta apparater eller
till din kommunala avfallsanläggning.
Följ gällande föreskrifter.
Kontakta din avfallsanläggning om du har några
frågor.
Service Sverige
Tel.: 0770 930739
E-Mail: kompernass@lidl.se
IAN 71492/71493
Service Suomi
Tel.: 010309 3582
E-Mail: kompernass@lidl.fi
IAN 71492/71493
Importör
Lämna in allt förpackningsmaterial till
miljövänlig återvinning.
Garanti och service
För den här apparaten lämnar vi tre års garanti från
och med inköpsdatum. Den här apparaten har tillverkats med omsorg och genomgått en noggrann
kontroll innan leveransen. Var god bevara kassakvittot som köpbevis. Vi ber dig att kontakta ditt serviceställe per telefon vid garantifall. Endast då kan produkten skickas in fraktfritt.
Garantin gäller bara för bara för material- eller fabrikationsfel, den täcker inte transportskador, förslitningsdelar eller skador på ömtåliga delar som t ex
brytare och batterier. Produkten är endast avsedd
för privat bruk och får inte användas yrkesmässigt.
Vid missbruk och felaktig behandling, användande
av våld och vid ingrepp som inte gjorts av vår auktoriserade servicefilial upphör garantin att gälla.
Den lagstadgade garantin begränsas inte av denna
garanti.
Garantitiden förlängs inte för att man utnyttjar garantiförmånerna. Det gäller även för utbytta eller reparerade delar. Eventuella skador och brister som
upptäcks redan vid köpet måste anmälas omedelbart efter uppackningen, dock senast två dagar efter inköpsdatum. När garantitiden är slut måste man
betala för eventuella reparationer.
KOMPERNASS GMBH
BURGSTRASSE 21
44867 BOCHUM, GERMANY
www.kompernass.com
- 53 -
Page 56

- 54 -
Page 57

INDHOLDSFORTEGNELSE SIDE
Sikkerhedsanvisninger 56
Bestemmelsesmæssig anvendelse 59
Medfølger ved køb 59
Tekniske data 59
Før du starter 60
Grundprincipper ved tilberedning i mikrobølgeovn...................................................................60
Anvend velegnet køkkengrej.........................................................................................................60
Beskrivelse af mikrobølgeovnen 61
Første opstart 61
Opstilling af mikrobølgeovnen......................................................................................................61
Forberedelse af mikrobølgeovnen................................................................................................61
Anvendelse af tilbehør...................................................................................................................62
Betjening 62
Indstilling af ur................................................................................................................................62
Indstilling af minutur.......................................................................................................................62
Børnesikring....................................................................................................................................63
Informationsfunktioner....................................................................................................................63
Tilberedning 63
Mikrobølgefunktion........................................................................................................................63
Grillfunktion ....................................................................................................................................65
Kombinations-tilberedning.............................................................................................................65
Automatisk menu 66
Start for automatisk menu .............................................................................................................66
Detaljerede programmer...............................................................................................................67
Optøning 69
Indstilling af starttid (Preset) 69
Rengøring og vedligeholdelse 70
Afhjælpning af fejl 70
Bortskaffelse 71
Garanti og service 71
Importør 71
Læs betjeningsvejledningen omhyggeligt igennem, før du bruger apparatet første gang, og gem den til senere
brug. Hvis du giver apparatet videre til andre, skal vejledningen også følge med.
- 55 -
Page 58

Mikrobølgeovn
Sikkerhedsanvisninger
Obs!
Advarsel mod skader på mikrobølgeovnen.
Pas på!
Advarsel mod personskader og elektriske stød!
Brandfare!
Advarsel mod brandfare.
Bemærk!
Anvisninger og tips vedrørende behandling af mikrobølgeovnen.
Forholdsregler der forhindrer mulig, langvarig
kontakt med mikrobølgeenergi
• Prøv ikke på at bruge mikrobølgeovnen med
åben dør, da det kan medføre, at du udsættes
for en skadelig dosis mikrobølgestråling. I den
forbindelse er det også vigtigt, at du ikke bryder
sikkerhedslåsene op eller manipulerer dem.
• Sæt aldrig noget i klemme mellem ovnens forside
og døren, og sørg for, at der ikke samler sig snavs
eller rester fra rengøringsmidler på tætningsfladerne.
Fare for uheld!
• Hvis døren eller dørpakningerne er beskadigede,
må mikrobølgeovnen ikke anvendes længere.
Lad den omgående reparere af en kvalificeret
reparatør.
• Prøv ikke på at reparere mikrobølgeovnen selv.
Når kabinettet tages af, kan der frigøres mikrobølgeenergi. Lad kun reparationer udføre af en
kvalificeret reparatør.
/
Fare for uheld!
• Denne mikrobølgeovn må ikke benyttes af personer
(inklusive børn) med begrænsede fysiske, sensoriske eller psykiske evner eller med manglende
erfaringer og/eller manglende viden, medmindre
en ansvarlig person holder opsyn med dem og
giver dem anvisninger til, hvordan mikrobølgeovnen skal benyttes. Børn skal være under opsyn,
så det sikres, at de ikke leger med mikrobølgeovnen.
• Det er kun tilladt for børn at bruge mikroovnen,
hvis de har fået tilstrækkelig oplæring, som gør
dem i stand til at bruge mikroovnen sikkert og
forstå de farer, der kan opstå ved forkert betjening.
• Mikrobølgeovnen må kun anvendes til den
bestemmelsesmæssige anvendelse efter beskrivelsen i denne vejledning. Der må ikke anvendes
ætsende kemikalier eller dampe i denne ovn.
Denne mikrobølgeovn er specielt konstrueret til
opvarmning, kogning, grillning eller tørring af
fødevarer. Den er ikke beregnet til anvendelse i
industrien eller på laboratorier.
• Brug ikke mikrobølgeovnen, hvis strømledningen/
strømstikket er beskadiget. Lad en professionel
reparatør udskifte ledningen/strømstikket, så
risiko for ulykker undgås.
• Hold børn på afstand af mikrobølgeovnens dør,
mens ovnen er i funktion. Forbrændingsfare!
• Fjern aldrig mikrobølgeovnens kabinet.
• Lampen inden i mikrobølgeovnen må udelukkende
udskiftes af en kvalificeret reparatør.
• Rør aldrig ved mikrobølgeovnens dør, kabinet,
ventilationsåbninger, tilbehørsdele eller bestikket
lige efter grill-, kombi- eller automatik-menuprogrammet. Delene bliver meget varme.
Lad delene afkøle før rengøring.
• Sørg for, at det altid er nemt at komme til stikket,
så det hurtigt kan trækkes ud, hvis der opstår
nødsituationer.
- 56 -
Page 59

• Personer, som bærer pacemaker, skal kontakte
deres læge om mulige risici, før mikrobølgeovnen
tages i brug.
• Lad aldrig ledningen hænge over bordet eller
arbejdsområdet. Børn kan trække i den.
• Åbn altid dåser, popcornposer etc. efter opvarmningen, så åbningen peger væk fra din krop.
Du kan blive skoldet af dampene, som lukkes ud.
• Stil dig ikke lige foran mikrobølgeovnen, når du
åbner døren. Du kan blive skoldet af dampene,
som lukkes ud.
• Lad være med at friturestege i mikrobølgeovnen.
Varm olie kan beskadige ovnens dele og køkkenredskaber og også forårsage forbrændinger
på huden.
• Ryst altid opvarmede babyglas eller babyflasker,
eller rør rundt i dem! Indholdet kan opvarmes
uensartet, og barnet kan brænde sig på det.
Kontrollér altid temperaturen, før du mader barnet!
• Lad være med at ændre noget ved mikrobølgeovnen.
• Mikrobølgestråler er farlige! Lad kun en autoriseret
reparatør vedligeholde eller reparere mikrobølgeovnen, hvis det er nødvendigt at fjerne afdækningerne, som beskytter mod kontakt med
mikrobølgestråler.
• Kontrollér temperaturen, før maden skal spises,
så barnet ikke brænder sig på den, hvilket kan
være livsfarligt.
Køkkenredskaber kan blive varme af den
opvarmede mads afgivne varme, så det kan
være nødvendigt at bruge grydelapper for
at holde på dem. Køkkenredskaberne skal
være godkendt til brug i mikrobølgeovn.
Brandfare!
• Lad aldrig mikrobølgeovnen være uden opsyn,
hvis du varmer madvarer op i plast- eller papiremballage.
• Stil ikke brændbare materialer i nærheden af
mikrobølgeovnen eller ventilationsåbningerne.
• Fjern alle lukninger af metal på emballagerne
til de madvarer, du vil opvarme. Brandfare!
• Brug kun popcorn-poser, som er egnede til
mikrobølgeovn, hvis du vil lave popcorn.
• Brug ikke mikrobølgeovnen til at opvarme puder,
der er fyldt med granulat, kirsebærsten eller gel.
Brandfare!
• Brug ikke mikrobølgeovnen til opbevaring af
madvarer eller andre ting.
• Overskrid aldrig tilberedningstiderne, som er
angivet af producenten.
• Stil ikke genstande på mikrobølgeovnen, så
længe den er i gang. Ventilationsåbningerne
dækkes til!
• Stil ikke mikrobølgeovnen i nærheden af apparater,
som afgiver varme, som f.eks. en bageovn.
• Rengør mikrobølgeovnen grundigt efter opvarmning
af fedtholdige madvarer, og især hvis de ikke har
været tildækket. Lad ovnen køle helt af, før den
rengøres. Der må ikke sidde rester som for eksempel fedt på grillens varmeelementer. Det kan
føre til overopvarmning og antændelse
• Lad være med at optø frosset fedt eller olie i mikro-
bølgeovnen. Fedtet eller olien kan antændes
• Brug aldrig et eksternt tænd-sluk-ur eller et separat
fjernkontrolsystem til at styre mikrobølgeovnen
med.
Obs! Varm overflade!
- 57 -
Page 60

Obs! Skader på mikrobølgeovnen!
• Mikrobølgeovnen må ikke startes, hvis den er
tom. Undtaget er den første opstart (se kaptitlet
"Første opstart“).
• Sæt aldrig genstande ind i ventilationsåbningerne
eller sikkerhedsdørlåsene.
• Brug ikke redskaber af metal, som reflekterer
mikrobølger og fører til gnistdannelse.
Stil ikke metaldåser ind i mikrobølgeovnen.
• Stil ikke plastbeholdere ind i mikrobølgeovnen
lige efter et grill-, kombi- eller automatik-menuprogram. Plasten kan smelte.
• Mikrobølgeovnen må ikke opstilles på steder
med høj luftfugtighed, eller hvor der samler
sig fugtighed.
• Væsker og andre næringsmidler må ikke opvarmes
i lufttæt sluttende beholdere, da de kan eksplodere
og beskadige mikrobølgeovnen.
• Læn dig ikke op ad mikrobølgeovnens dør.
• Hvis køkkengrejet ikke er ordentligt rent, kan det
betyde, at overfladen ødelægges, hvilket påvirker
brugstiden og muligvis kan føre til farlige situationer.
Fare!
• Læg aldrig ledningen eller stikkene ned i vand
eller andre væsker.
• Hold ledningen på afstand af varmekilder.
Lad den ikke ligge foran mikroovnens dør.
Varmen kan ødelægge ledningen.
• Hæld aldrig væsker i ventilationsåbningerne eller
sikkerhedsdørlåsene. Hvis der kommer væske ind,
skal du straks slukke for mikroovnen og tage stikket
ud af stikkontakten. Lad mikroovnen efterse af en
kvalificeret reparatør.
Sikkerhedstips
• For at minimere brandrisikoen i mikroovnen.
Hold altid øje med mikroovnen, når du opvarmer
mad i plast- eller papirbeholdere, da materialet
eventuelt kan antændes.
• Ved opvarmning af drikkevarer i mikroovnen kan
det begynde at boble med forsinkelse, når drikken
koger. Vær derfor forsigtig, når du tager fat
i beholderen. Hvis du vil undgå pludselig kogning:
- Hvis du har en glaspind, kan du stille den i væ-
sken, så længe den opvarmes.
- For at undgå, at væsken bruser pludseligt op,
skal den blive stående 20 sekunder i mikroovnen
efter opvarmning.
• Prik kartofler, pølser og lign. med en gaffel.
Ellers kan de eksplodere.
• Vær forsigtig ved opvarmning af væsker.
Brug kun åbne skåle, så luftbobler, som opstår
under opvarmningen, kan slippe væk.
• Hvis der opstår røg, skal du slukke for ovnen,
tage stikket ud og holde døren lukket, så
eventuelle flammer kvæles.
• Æg i skål og hårdkogte æg må ikke opvarmes
i mikroovnen, da de kan eksplodere i ovnen,
selv efter at opvarmningen er slut. Fødevarer
med tyk skræl som f.eks. kartofler, hele knolde,
æbler og kanstanjer, skal prikkes før kogningen.
• Flyt ikke mikroovnen, mens den er i funktion.
- 58 -
Page 61

Jordingsanvisninger/korrekt installation
Denne mikroovn skal jordes. Denne mikroovn må kun
sluttes til en stikkontakt, som er sluttet til jord efter
forskrifterne. Det anbefales at bruge en separat
strømkreds, der kun forsyner mikroovnen.
Fare: Hvis jordstikket behandles forkert, kan
det medføre risiko for et elektrisk stød.
Bemærk: Hvis du har spørgsmål angående
jording eller anvisningerne på elområdet, skal
du henvende dig til en elektriker eller servicetekniker.
Hverken producenten eller forhandleren kan påtage
sig ansvaret for beskadigelse af mikroovnen eller for
personskader, der skyldes, at fremgangsmåden
i forbindelse med eltilslutningen ikke er blevet fulgt.
Radiointerferens med andre apparater
Når du bruger mikrobølgeovnen, kan det fremkalde
forstyrrelser i din radio, dit fjernsyn eller lignende
apparater.
Hvis der skulle opstå sådanne interferenser, kan de
reduceres eller fjernes ved hjælp af følgende foranstaltninger:
• Rengør mikrobølgeovnens dør og tætningsflade.
• Foretag en ny justering af radioens eller
fjernsynets antenne.
• Anbring mikrobølgeovnen et andet sted end
der, hvor modtageren står.
• Fjern mikrobølgeovnen fra modtageren.
• Tilslut mikrobølgeovnen til en anden stikkontakt.
Mikrobølgeovnen og modtageren skal belaste
hver sin gren af strømkredsløbet.
Bestemmelsesmæssig
anvendelse
Denne mikrobølgeovn er beregnet til opvarmning
og tilberedning af fødevarer som angivet under de
beskrevne fremgangsmåder.
Enhver ændring af mikrobølgeovnen anses for
ikke-bestemmelsesmæssig og indebærer betydelige
farer for ulykker. Producenten påtager sig intet ansvar
for skader, der opstår som følge af ikke-bestemmelsesmæssig anvendelse.
Denne mikrobølgeovn er ikke beregnet til erhvervsmæssigt brug.
Dette apparat er udelukkende beregnet til anvendelse
i private husholdninger.!
Det må ikke bruges erhversmæssigt, i indrustri- eller
laboratoriumsområder!
Medfølger ved køb
Mikrobølgeovn
Glastallerken
Grillstativ
Drejetallerken
Betjeningsvejledning
Kort vejledning
Tekniske data
Mærkespænding: 230 - 240 V
50 Hz
Maks. optaget effekt: 1200 W
Maksimal effekt
Mikrobølgeovn: 800 W
Maks. optaget effekt
Grill: 1000 W
Mikrobølgefrekvens: 2450 MHz
~
- 59 -
Page 62

Før du starter
Grundprincipper ved tilberedning
i mikrobølgeovn
• Placer madvarerne med omtanke.
• De tykkeste steder skal være i nærheden af
kanten.
• Vær opmærksom på tilberedningstiden. Vælg
den korteste af de angivne tilberedningstider,
og forlæng den ved behov. Madvarer, der
tilberedes alt for længe, kan begynde at ryge
eller antændes.
• Dæk madvarerne til med et låg, der er egnet til
mikrobølgeovn under tilberedningen.
Låget forhindrer sprøjt og bidrager også til, at
madvarerne tilberedes ensartet.
• Vend madvarerne en gang under tilberedningen
i mikrobølgeovnen, så madretter som kylling eller
hamburger bliver hurtigere færdig.
• Store stykker som for eksempel en steg skal
vendes mindst én gang.
• Flyt dele som f.eks. kødboller rundt efter halvdelen
af tilberedningstiden. Vend dem, og anbring
bollerne fra midten og ud mod kanten.
Anvend velegnet køkkengrej.
• Det ideelle materiale til en mikrobølgeovn er
mikrobølgegennemtrængeligt, hvilket vil sige,
at det slipper energien gennem beholderen,
så maden opvarmes.
Mikrobølger er ikke i stand til at trænge gennem
metal. Der må derfor ikke anvendes metalbeholdere eller metalredskaber.
• Brug ikke produkter af genbrugspapir ved
opvarmning i mikrobølgeovn.Papiret kan
indeholde bittesmå metalfragmenter, der
kan fremkalde gnister og/eller brand.
• Det anbefales at bruge rundt/ovalt køkkengrej
i stedet for firkantet/aflangt, da madvarerne,
som ligger i hjørnerne, let koger ud.
Den efterfølgende liste skal opfattes som en
generel hjælp til valg af køkkengej.
Køkkengrej
Varmebestandigt
glas
Ikke varmebestandigt glas
Varmebestandigt
keramik
Plastservice, egnet
til mikrobølgeovne
Køkkenrulle Ja Nej Nej
Metalbakke/
-plade
Grillstativ Nej Ja Nej
Alufolie &
foliebeholder
Mikrobølgeovn
Ja Ja Ja
Nej Nej Nej
Ja Ja Ja
Ja Nej Nej
Nej Ja Nej
Nej Ja Nej
Grill
Kombination
Brandfare!
Brug aldrig grillstativet eller andre metalgenstande,
hvis du anvender mikrobølgeovnen til mikrobølgefunktion eller til kombinationstilberedning. Metal
reflekterer mikrobølgestrålingen og fører dermed til
gnistdannelse. Det kan føre til brand, og ovnen kan
gå i stykker, så den ikke kan repareres igen!
- 60 -
Page 63

Beskrivelse af mikrobølgeovnen
ikke
1 Display
2 Knap til døråbner
3 Glastallerken
4 Drejetallerken
5 Ventilationsåbning
6 Knap grill
7 Tast Starttid (Preset)
8 Knap optøning
9 Knap ur
0 Knap stop
q Drejeknap / start/lynstart
w Knap køkkenur
e Knap kombination
r Knap effekt
t Grillstativ
Første opstart
Opstilling af mikrobølgeovnen
Brandfare!
Denne mikrobølgeovn er ikke beregnet til indbygning
i et køkkenskab. I lukkede skabe ventileres mikrobølgeovnen ikke tilstrækkeligt. Derved kan ovnen
beskadiges, og der er risiko for brand!
• Vælg en jævn flade, hvor der er tilstrækkelig
plads til siderne for ventilation af ovnen.
Mellem ovnen og de tilstødende vægge er det
vigtigt, at der er en minimumafstand på 10 cm.
Sørg for, at mikrobølgeovnens dør kan åbnes
uden problemer.
Der skal være en afstand på mindst 20 cm
over mikrobølgeovnen.
• Det skal være nemt at komme til strømstikket, så
det hurtigt kan trækkes ud, hvis der opstår farlige
situationer.
• Afmontér ikke fødderne under mikrobølgeovnen.
• Blokér ikke ventilationsåbningen 5.
Ellers kan mikrobølgeovnen gå i stykker.
• Anbring mikrobølgeovnen så langt væk fra radio
og fjernsyn som muligt. Når mikrobølgeovnen
arbejder, kan det forstyrre radio- eller fjernsynsmodtagelsen.
Obs:
Placér ikke mikrobølgeovnen over et komfur eller et
andet apparat, der frembringer varme. Hvis ovnen
opstilles sådan et sted, kan den beskadiges, hvilket
samtidig betyder bortfald af garantien.
Forberedelse af mikrobølgeovnen
• Fjern emballagematerialet og en eventuel
beskyttelsesfolie på kabinettets overflade.
i
Fjern
afdækningsplade, som er anbragt
inde i ovnen til beskyttelse af magnetfeltrøret.
• Sæt stikket i stikkontakten. Brug en 230 - 240 V ~,
50 Hz stikkontakt med en 16 A sikring. Det anbefales, at mikrobølgeovnen forsynes med en
separat strømkreds. Hvis du ikke er sikker på,
hvordan mikrobølgeovnen skal sluttes til, skal
du søge råd hos en fagmand.
den lysegrå glimmer-
- 61 -
Page 64

Før mikrobølgeovnen anvendes skal den først varmes
op, mens den er tom, så rester efter produktionen kan
fordampe.
Tænd for mikroovnen uden fødevarer og uden tilbehør (glastallerken 3, stjerne 4 og grillstativ t)
i driftsformen grillning:
• Tryk én gang på tasten grill 6 . Dermed
vælger du grillfunktionen. I displayet 1 vises
symbolet , og symbolet blinker.
Dermed vises det, at ovnen er klar til brug.
• Indstil en tilberedningstid på 10 minutter med
drejeknappen q.
• Tryk på tasten start/lynstart q for at
starte grillen.
Bemærk:
Når mikrobølgeovnen bruges første gang, kan der
udvikles lidt røg og lugt på grund af rester i forbindelse med produktionsteknikken. Dette er uskadeligt.
Sørg for tilstrækkelig udluftning. Åbn for eksempel
vinduet.
• Efter 10 minutter slukkes ovnen automatisk.
Signaltonerne lyder. Åbn døren. Vent, til den er
helt afkølet.
• Tag stikket ud af stikkontakten, og rengør derefter
ovnen indeni og tør den omhyggeligt af.
Anvendelse af tilbehør
• Sæt drejetallerkenen 4 midt på drivakslen i
ovnrummet. Sørg for, at den glider helt ned på
aksen og sidder fast.
• Stil glastallerkenen 3 i midten på drejetallerkenen. De tre ruller skal være på glastallerkenens føringskant 3.
Betjening
Indstilling af ur
Når du starter mikrobølgeovnen første gang,
eller hvis der har været strømafbrydelse, viser
displayet 1 "1 : 0 1 ".
1. Tryk på knappen kl. 9 . I displayet 1 vises
"Hr 12". Tryk på knappen kl. 9 igen, hvis
du vil skifte til 24-timers modus.
2. Indstil den ønskede time ved at dreje på drejeindstillingen q. Ursymbolet i displayet 1
blinker.
3. Tryk på tasten Start/hurtig start q .
Minutangivelsen vises.
4. Indstil de ønskede minutter ved at dreje på
drejeknappen q.
5. Tryk på tasten Start/hurtig start q , når
tiden er indstillet korrekt. Ursymbolet i displayet 1 lyser permanent, og dobbeltprikkerne
viser ved at blinke, at uret er i gang.
For at aflæse det aktuelle klokkeslæt mens mikrobølgeovnen er i gang, skal du trykke på tasten ur 9 ;
Klokkeslættet vises i ca. 4 sekunder i displayet 1.
Indstilling af minutur
Mikrobølgeovnen er udstyret med et minutur, som du
kan anvende uafhængigt af mikrobølgefunktionen.
1. Tryk på tasten minutur w , når ovnen står
på standby-funktion. I displayet 1 vises "00:10“.
2. Indstil nu den ønskede tid med drejeknappen q.
Du kan foretage tidsindstillinger fra 10 sekunder
til 95 minutter.
- 62 -
Page 65

3. Tryk på tasten "start/lynstart" q Der lyder
en signaltone. Tiden tæller ned.
Efter cirka 3 sekunder vises det normale klokkeslæt igen. Minuturet kører videre i baggrunden.
Hvis du ind imellem vil kontrollere minuturets tid, kan
du trykke på knappen minutur w .
Minuturet vises i kort tid. Såsnart den indstillede
tid er udløbet, lyder 3 signaltoner.
Informationsfunktioner
Aflæsning af klokkeslæt mens ovnen er i gang
Tryk under tilberedningen på tasten ur 9 .
I displayet 1 vises klokkeslættet i ca. 4 sekunder.
Aflæsning af effekttrin mens ovnen er i gang
Tryk under tilberedningen på tasten effekt r .
I displayet 1 vises det aktiverede effekttrin
i ca. 3 sekunder.
Bemærk:
Hvis du vil afbryde køkkentimerens tid, skal du trykke
på knappen køkkentimer w , så køkkentimerens
aktuelle tid vises. Tryk på knappen 0 , mens
køkkentimeren vises i displayet 1. Køkkentimeren
afbrydes, og klokkeslættet forsvinder i displayet 1.
Børnesikring
Aktivér børnesikringen for at forhindre, at mikrobølgeovnen kan sættes i gang af små børn, som ikke er
under opsyn, eller af andre personer, som ikke er
fortrolige med betjening af ovnen.
Symbolet for børnesikringen vises i displayet 1,
og ovnen kan ikke tændes, så længe denne funktion
er aktiveret.
• Tryk på tasten stop 0 , og hold den nede,
indtil der lyder en lang signaltone, og symbolet
for børnesikring vises i displayet 1.Mikro-
bølgeovnens knapper og drejeknappen fungerer
nu ikke længere.
• For at deaktivere børnesikringen skal du trykke
på tasten stop 0 og holde den nede, indtil
der lyder en signaltone, og symbolet for børnesikring forsvinder .
Tilberedning
Mikrobølgefunktion
Bemærk
På mikrobølgeovnens dør eller på kabinettet kan
der dannes vanddråber under tilberedningen.
Det er normalt og ikke tegn på, at mikrobølgeovnen
har fejlfunktioner. Tør fugten af med en tør klud, når
ovnen er kølet af.
Brandfare!
Brug aldrig grillstativet t eller andre metalgenstande, hvis mikrobølgeovnen anvendes i mikrobølgefunktion. Metal reflekterer mikrobølgestrålingen og fører
dermed til gnistdannelse. Det kan føre til brand, og
ovnen kan gå i stykker, så den ikke kan repareres
igen!
- 63 -
Page 66

Valg af effekt
• Tryk på knappen effekt r for at vælge
det ønskede effekttrin.
• 1x for 800 Watt effekt (P800).
• 2x for 700 Watt effekt (P700).
• 3x for 600 Watt effekt (P600).
• 4x for 500 Watt effekt (P500).
• 5x for 400 Watt effekt (P400).
• 6x for 300 Watt effekt (P300).
• 7x for 200 Watt effekt (P200).
• 8x for 100 Watt effekt (P100).
Effekten vises i displayet 1 (f. eks. P800 ved
800 Watt effekt).
Indstilling af tilberedningstiden
Når effekten er valgt, skal du indstille den ønskede
tilberedningstid:
• Drej drejeknappen q, til den ønskede tilberedningstid er indstillet.
Afbrydelse af tilberedningen
Tryk én gang på knappen stop 0 for at afbryde
tilberedningen. Mikrobølgeovnen afbryder tilberedningen og stopper den resterende tid. Tryk på knappen
start/lynstart q for at fortsætte tilberedningen igen.
Stop for tilberedningen
Tryk to gange på tasten stop 0 for at afbryde
tilberedningen. Ovnen går tilbage til standby igen.
Tilberedningen er afsluttet
Når tilberedningen er afsluttet, vises der "End" (slut)
i displayet 1, og der lyder 4 signaltoner. Hvis
mikroovnens dør ikke åbnes, lyder signaltonerne
igen efter ca. 2 minutter .
Lynstart
Med denne funktion kan du straks starte tilberedningen
i 30 sekunder (eller længere, op til 12 minutter) med
800 W effekt.
Drejeknappens q indstillingstid er inddelt i trin
på følgende måde:
• fra 10 sek. til 5 min.: i trin på 10 sek.
• Fra 5 til 10 min.: i trin på 30 sek.
• Fra 10 til 30 min.: i trin på 1 min.
• Fra 30 til 95 min.: i trin på 5 min.
Afbrydelse/afslutning af indtastningen
Tryk én gang på knappen Stop 0 for at afbryde
en indtastning og afslutte. Ovnen skifter tilbage til
standby-tilstand igen.
Start for tilberedningen
Når du har indstillet effekten og tilberedningstiden, og
symbolet blinker i displayet 1, kan tilberedningen
startes:
Tryk på knappen start/lynstart q for at starte
tilberedningen. I display 1 vises symbolerne til
mikrobølgefunktion og tilberedning
(indstilling P100 - P400) eller (indstilling
P500 - P800).
Den indstillede tid tæller baglæns ned.
• Tryk én gang på knappen start/lynstart q .
I displayet 1 vises symbolerne for mikrobølge-
funktion og tilberedning samt ":30“.
Mikroovnen starter tilberedningen i 30 sekunder.
Tiden tæller ned.
Hvis du vil varme længere, skal du trykke på knappen
start/lynstart q , til den ønskede tid er nået.
- 64 -
Page 67

Grillfunktion
Grillfunktionen kan anvendes til tynde skiver kød,
steaks, frikadeller, pølser eller kyllingestykker. Den
egner sig fremragende til gratinerede sandwiches
og gratiner. Brug altid grillstativet t til grillning.
Så opnår du det bedste grillresultat.
Stil altid grillstativet t på glastallerkenen 3.
1. Tryk på knappen grill 6 for at aktivere
grillfunktionen.
I displayet 1 vises symbolet for grillfunktionen
og ":10".
2. Indstil den ønskede tilberedningstid med drejeknappen q. Den længste tilberedningstid, der
kan indstilles, er på 95 minutter.
3. For at starte grillfunktionen skal du trykke på
knappen Start/lynstart q .
4. Vend kødet efter ca. halvdelen af tiden.
Kombinations-tilberedning
Denne funktion kombinerer grillfunktionen og den
normale mikrobølgefunktion. Under kombinationstilberedningen anvendes der automatisk en bestemt tid
til tilberedningen og den resterende tid til grillning,
og det udføres i én arbejdsgang. Du kan høre et
svagt klik, når ovnen skifter fra den ene til den anden
funktion.
Brandfare!
Brug aldrig grillstativet t eller andre metalgenstande, hvis mikroovnen anvendes til kombinationstilberedning. Metal reflekterer mikrobølgestrålingen og fører
dermed til gnistdannelse. Det kan føre til brand, og
ovnen kan gå i stykker, så den ikke kan repareres
igen!
Kombination 1
Ved kombination 1 er mikrobølgeeffekten 30 % og
grilleffekten 70 % af tilberedningstiden. Det er f.eks.
velegnet til fisk, kartofler eller gratin.
1. Tryk én gang på tasten kombination e
for at aktivere kombination 1. I displayet 1
vises samt ":10“.
2. Indstil den ønskede tilberedningstid med
drejeknappen q. Den længste tilberedningstid,
der kan indstilles, er på 95 minutter.
3. Tryk på knappen Start/lynstart q for at
starte.
Kombination 2
Ved kombination 2 er mikrobølgeeffekten 55 %
og grilleffekten 45 % af tilberedningstiden.
Det egner sig til f.eks. buddinger, omeletter, retter
med fjerkræ eller lasagne.
1. Tryk to gange på tasten kombination e
for at aktivere kombination 2. I displayet 1
vises samt ":10“.
2. Indstil den ønskede tilberedningstid med
drejeknappen q. Den længste tilberedningstid,
der kan indstilles, er på 95 minutter.
3. Tryk på knappen Start/lynstart q for at
starte.
- 65 -
Page 68

Automatisk menu
Nr. Symbol Fødevare
Vægt
(portioner)
Til madretter, som skal tilberedes i automatisk
menumodus, er det ikke nødvendigt at indtaste
kogeforløbets tid og effekttrinet. Det er tilstrækkeligt,
at du indtaster, hvilken type fødevare, der skal
tilberede/koges, samt vægten for denne fødevare.
Bemærk
Mikrobølgeovnen beregner tiden/effekttrinet for friske
fødevarer. Dybfrosne fødevarer tilberedes ikke tilstrækkeligt med den tid, som fastsættes af mikrobølgeovnen.
Optø evt. dybfrosne fødevarer med optøningsprogrammet først (se kapitlet "Optøning").
Start for automatisk menu
Bemærk
Læg altid maden i en egnet beholder eller på en
tallerken. Husk altid, at der kan udtræde væsker
som fedt o.l. af maden, når den laves eller opvarmes.
Beholderen/tallerkenen skal derfor være stor nok til
at undgå, at væsker løber over.
1. Drej drejeknappen q langsomt til venstre.
I displayet 1 vises der et nummer (f. eks. "3"
for autoprogram 3 (fisk)) og symbolet "fisk" og
. Vælg den ønskede automatiske menu til
dine fødevarer (1 til 9). Du kan, når du er i
automatik-menu-modus, med en drejning til højre også komme til den ønskede automatikmenu. Kvitter valget ved at trykke på tasten
Start/hurtig start q .
1 Drikkevarer 1 - 3
2 Spaghetti 100 - 300 g
3 Fisk 100 - 1000 g
4 Ris 100 - 1000 g
5 Kylling 800 - 1400 g
6 Opvarmning 100 - 1000 g
7 Kartofler 150 - 600 g
8 Stegning 300 - 1300 g
9 Kød på spyd 100 - 700 g
2. Indstil så ved drejning af drejeknappen q den
ønskede vægt hhv. det ønskede antal portioner. Symbolet blinker.
3. Tryk på tasten start/lynstart q for at
starte tilberedningen.
Bemærk
For at tilberede eller koge ensartet skal fødevarerne
drejes ved programmerne 5, 8 og 9, når cirka 2/3
af tilberedningstiden er gået. Mikrobølgeovnen minder dig om at vende: „turn“ fremstår i displayet 1
og der høres en signallyd.
• Åbn døren, og vend fødevarerne. Vær forsigtig,
for fødevarerne er muligvis allerede varme.
- 66 -
Page 69

• Tryk på knappen start/lynstart q for at
fortsætte tilberedningen.
Bemærk:
Hvis du ikke ønsker at vende maden, skal du bare
vente, til signaltonerne er færdige. Mikroovnen
fortsætter automatisk programmet efter ca. 30
sekunder.
Bemærk
Hvis retten ikke er rigtigt tilberedt, når den automatiske
menu er afsluttet, kan du tilberede den nogle minutter
med lynstartprogrammet. Ved programmer, som
anvender grillfunktionen (programnummer 5, 8 og 9),
kan du efterfølgende tilberede fødevarerne med
grillfunktionen. Ved efterfølgende tilberedning med
grillfunktionen øges fødevarernes bruningsgrad.
Obs
Ved programmer med aktiveret grillfunktion må der
aldrig bruges afdækninger eller service, som ikke er
varmebestandigt, da det smelter, eller der kan opstå
brand!
Fare for uheld!
Glastallerkenen 3 er meget varm efter tilberedning
med grill! Brug altid grydelapper eller varmebestandige
handsker, når du tager maden ud af ovnen.
Bemærk:
Bemærk, at fødevarernes størrelse, form og type har
betydning for resultatet.
Detaljerede programmer
Program 1: Drikkevarer
Dette program forløber kun med mikrobølgeeffekt.
Afhængigt af det indstillede antal portioner kører
programmet mellem 1:30 og 3:50 minutter.
• Stil drikkevarerne, du vil opvarme, på glastallerkenen 3 i ovnen. Hvis du vil stille flere glas eller
krus i mikrobølgeovnen, skal du sørge for, at de
ikke rører ved hinanden.
Bemærk
Hvis du vil undgå pludselig kogning:
• Stil en glaspind i væsken, så længe den opvar-
mes.
• For at undgå, at væsken bruser pludseligt op,
skal den blive stående 20 sekunder i mikrobølgeovnen efter opvarmning.
Program 2: Pasta
Dette program forløber kun med mikrobølgeeffekt.
Afhængigt af den indstillede vægt kører programmet
mellem 25 og 35 minutter.
• Brug en høj gryde til kogning af pasta, da de
kan koge over.
• Brug den samme mængde vand, som når du koger nudler på konventionel måde. Nudlerne skal
„svømme“ i vand.
• Få først vandet i kog: Stil mikrobølgeovnen på
højeste ydelsestrin (P800) og start den. For en liter vand tager det ca. 10 minutter at få vandet til
at koge.
• Tilsæt så pastaen. Derefter kan du starte den
automatiske menu for pasta.
• Lad derefter pastaen hvile ca. 3 minutter.
- 67 -
Page 70

Program 3: Fisk
Dette program forløber kun med mikrobølgeeffekt.
Afhængigt af den indstillede vægt kører programmet
mellem ca. 3:30 og 16 minutter.
• Læg fiskestykkerne på en tallerken, der er egnet
til mikroovn, tilsæt en smule smør eller andet fedt,
tilsæt krydderier efter smag, og start den automatiske menu for fisk.
Program 4: Ris
Dette program forløber kun med mikrobølgeeffekt.
Afhængigt af den indstillede vægt kører programmet
mellem 16 og 36 minutter.
• Brug en høj gryde til kogning af ris, da det kan
koge over. Tag f.eks. ca. 200 g ris til 400 ml
vand. Anvend trods vandet vægtindstillingen
„200 g“. Det er altid risens vægt, der skal indstilles.
• Hæld risen i beholderen, fyld væsken på, og lad
risen trække i ca. 3 minutter.
• Dæk beholderen til. Sørg for, at den er lukket
lufttæt. Derefter kan du starte den automatiske
menu til ris.
Program 5: Kylling
Dette program kører på flere trin og anvender mikrobølgeeffekten og grillfunktionen. Afhængigt af den
indstillede vægt kører programmet mellem 39 og
50 minutter.
• Læg kyllingen på en tallerken, der er egnet til
mikrobølgeovn.
• Tilsæt krydderier efter ønske, og start den automatiske menu for kyllinger.
• En hel kylling skal vendes, da siden, der vender
opad, ellers bliver tør. Mikrobølgeovnen afbryder
automatisk programmet efter cirka 2/3 af tiden,
og der lyder signaltoner.Vend kyllingen, og tryk
på knappen start/lynstart q for at fortsætte
programmet.
Program 6: Opvarmning
Dette program forløber kun med mikrobølgeeffekt.
Afhængigt af den indstillede vægt kører programmet
mellem ca.1:00 og 6:20 minutter.
• Stil tallerkenen med retten, du vil opvarme, på
glastallerkenen 3 i ovnen, og start den automatiske
menu til opvarmning.
Program 7: Kartofler
Dette program forløber kun med mikrobølgeeffekt.
Afhængigt af den indstillede vægt kører programmet
mellem ca. 3:50 og 11 minutter.
Tip
Brug kartofler med skræl til kogningen. Prik hul på
skrællen et par steder.
• Læg kartoflerne med skræl i en tallerken eller et
fad, der er egnet til mikrobølgeovn. Brug kartofler,
der er nogenlunde lige store. Hvis det er muligt,
må kartoflerne helst ikke røre ved hinanden.
Program 8: Stegning
Dette program kører på flere trin og anvender mikrobølgeeffekten og grillfunktionen. Afhængigt af den
indstillede vægt kører programmet mellem 16 og
60 minutter.
• Læg stegen på en tallerken, der er egnet til mikrobølgeovn. Tilsæt krydderier efter behov, og start
den automatiske menu for steg.
• En hel steg skal vendes, da siden, der vender
opad, ellers bliver tør. Mikrobølgeovnen afbryder
automatisk programmet efter cirka 2/3 af tiden,
og der lyder signaltoner. Vend stegen, og tryk
på tasten start/lynstart q for at fortsætte
programmet.
- 68 -
Page 71

Program 9: Kødspyd
Dette program kører på flere trin og anvender mikrobølgeeffekten og grillfunktionen. Afhængigt af den
indstillede vægt kører programmet mellem 9 og 27
minutter.
• Læg kødspyddet på en tallerken, der er egnet til
mikrobølgeovn. Tilsæt krydderier efter smag, og
start den automatiske menu for kødspyd.
• Spyddene skal vendes, for at de tilberedes ensartet.
Mikrobølgeovnen afbryder automatisk programmet
efter cirka 2/3 af tiden, og der lyder signaltoner.
Drej spyddene, og tryk på knappen Start/lynstart q for at fortsætte programmet.
Optøning
Med denne funktion kan du uden problemer optø kød,
fjerkræ og fisk. Optøningstiden og effekttrinet udregnes
og indstilles automatisk, når vægten indtastes.
1. Tryk på knappen optøning 8 . I displayet 1
vises og . Symbolet blinker.
2. Vælg vægten med drejeknappen q for fødevaren,
der skal optøs. Du kan indstille en vægt mellem
100 g og 1800 g.
3. Tryk på tasten start/lynstart q
Mikrobølgeovnen fastsætter automatisk optøningstiden.
Den vises i displayet 1 og forløber.
Efter halvdelen af tiden lyder signallyden og “turn”
fremstår i displayet 1. Åbn døren, og vend madvaren.
Luk døren igen og tryk på tasten Start/hurtig start q
, så optøningen fortsætter.
Bemærk:
Hvis du ikke ønsker at vende maden, skal du bare
vente, til signallydene er færdige. Optøningsprogrammet kører videre trods signallyden!
Indstilling af starttid (Preset)
Med dette program kan du forprogrammere en
bestemt starttid for tilberedning eller grillning af
maden. Når du har startet indstillingerne, starter
ovnen automatisk på det indstillede tidspunkt.
Bemærk:
Uret skal indstilles, for at funktionen “Preset" kan
vælges.
1. Indstil den ønskede mikrobølgefunktion (tilberedning, grillning eller automatisk menu (undtagen
autoprogrammet 6)):
Til mikrobølgefunktion: Tryk på knappen effekt r
for at vælge det ønskede effekttrin. Indstil
tilberedningstiden med drejeknappen q. Til
grillfunktionen: Tryk på knappen grill 6 for
at aktivere grillfunktionen. Indstil den ønskede
grilltid med drejeknappen q.
Til den automatiske menu: Vælg programmet, der
passer til ingredienserne, med drejeknappen q
(undtagen autoprogram 6). Kvitter valget ved at
trykke på tasten Start/hurtig start q . Indstil
så ved drejning af drejeknappen q den ønskede vægt hhv. det ønskede antal portioner.
2. Tryk på tasten Starttid 7 . I displayet 1
blinker "01: " og timeglassymbolet vises.
3. Drej på drejeknappen q for at indstille timerne.
4. Tryk på tasten Start/hurtig start q , nu fremstår
minutcifrene.
5. Drej på drejeknappen q for at indstille minutterne.
6. Tryk på knappen Start/lynstart q . Timeglassymbolet blinker. Starttiden vises. Mikroovnen
starter automatisk forløbet på det indstillede tidspunkt. Der lyder en signaltone ved start.
Bemærk:
For at slette den gemte starttid og dermed afbryde
det gemte forløb skal du trykke på knappen
stop 0 . Timeglassymbolet slukkes, og klokkeslættet vises.
- 69 -
Page 72

Rengøring og vedligeholdelse
Fare for personskade!
Før du begynder rengøringen, skal du slukke for
mikrobølgeovnen og trække stikket ud af stikkontakten.
Mikrobølgeovnen må under ingen omstændigheder dyppes i vand eller andre væsker.
Det kan være livsfarligt på grund af elektrisk
stød, og mikrobølgeovnen kan ødelægges.
• Rengør grillstativet t i varmt opvaskevand, og
tør det godt af.
• Fjern jævnligt lugt. Stil en dyb mikrobølgeskål,
der er fyldt med en kop vand, saft og skal fra
en citron, ind i mikrobølgeovnen. Varm op
i 5 minutter. Tør grundigt efter, og gnid den
helt tør med en blød klud.
• Hvis det er nødvendigt at skifte pæren i mikro-
bølgeovnen, skal du overlade det til forhandleren
eller spørge vores serviceafdeling.
• Hold altid mikrobølgeovnen ren indeni.
• Hvis sprøjt fra mad eller spildt væske sidder fast
på væggene i mikrobølgeovnen, skal du tørre
væggene af med en fugtig klud.
• Anvend et mildt opvaskemiddel, hvis mikrobølgeovnen er mere snavset. Tør resterne af opvaskemiddel af med rent vand.
• Undgå at anvende rengøringsspray og andre
skrappe rengøringsmidler, da de kan frembringe
pletter, striber eller gøre dørens overflade mat.
• Rengør ovnens ydervægge med en fugtig klud.
• Sørg for, at der ikke kan trænge vand ind i ventilationsåbningen 5 , så det undgås, at funktionsdelene inden i mikrobølgeovnen beskadiges.
• Fjern regelmæssigt sprøjt og snavs. Rengør døren
og vinduet på begge sider, dørtætningerne og
de tilstødende dele med en fugtig klud.
Der må ikke anvendes skuremiddel.
• Hvis ovndøren dampes til udenpå eller indeni,
skal den tørres af med en blød klud. Det kan ske,
hvis mikrobølgeovnen står i et miljø med høj luftfugtighed.
• Rengør glastallerkenen 3 regelmæssigt.
Vask glastallerkenen i varmt sæbevand eller
i opvaskemaskinen.
Afhjælpning af fejl
Displayet 1 viser ingenting.
• Stikket sidder ikke i stikkontakten.
Kontrollér stikket.
• Stikkontakten er defekt. Prøv en anden stikkontakt.
• Displayet 1 er defekt. Kontakt service.
Mikrobølgeovnen reagerer ikke, når der trykkes
på knapperne.
• Børnesikringen er aktiveret.
Deaktivér børnesikringen (se kapitlet "Betjening").
Mikrobølgeovnen starter ikke tilberedningen.
• Døren er ikke lukket rigtigt. Luk døren rigtigt.
Glastallerkenen 3 laver høje lyde, når den
drejer.
• Glastallerkenen 3 står ikke rigtigt på dreje-
tallerkenen 4.
Stil glastallerkenen 3 rigtigt ind i ovnen.
• Drejetallerkenen 4 og/eller bunden af ovn-
rummet er snavset. Rengør drejetallerkenen 4
og bunden.
- 70 -
Page 73

Bortskaffelse
Smid aldrig mikrobølgeovnen ud sammen
med det normale husholdningsaffald.
Dette produkt er underkastet det
europæiske direktiv 2002/96/EC.
Bortskaf mikrobølgeovnen via en godkendt bortskaffelsesvirksomhed eller den kommunale genbrugsplads.
Følg de aktuelt gældende regler.
Henvend dig i tvivlstilfælde til den lokale genbrugsplads.
Aflever alle emballagematerialer på et
affaldsdepot, så miljøet skånes.
Garantiperioden forlænges ikke på grund af produktansvaret. Det gælder også for udskiftede og reparerede dele. Eventuelle skader og mangler, som
allerede findes ved køb, skal straks anmeldes efter
udpakning og senest to dage efter købsdatoen.
Når garantiperioden er udløbet, skal udgifterne til
reparationer betales normalt.
Service Danmark
Tel.: 32 710005
E-Mail: kompernass@lidl.dk
IAN 71492/71493
Importør
Garanti og service
På denne donkraft får du 3 års garanti fra købsdatoen. Apparatet er produceret omhyggeligt og inden levering afprøvet samvittighedsfuldt. Opbevar
kassebonen som bevis for købet.
I garantitilfælde bedes du kontakte service-afdelingen telefonisk. På denne måde kan gratis indsendelse af varen garanteres.
Garantiydelsen gælder kun for materiale- eller fabrikationsfejl, men ikke for transportskader, sliddele eller skader på skrøbelige dele som f.eks. kontakter
eller batterier. Produktet er kun beregnet til privat og
ikke til erhvervsmæssigt brug.
Ved misbrug og uhensigtsmæssig behandling, anvendelse af vold og ved indgreb, som ikke er foretaget af vores autoriserede service-afdeling, ophører
garantien. Dine juridiske rettigheder indskrænkes
ikke ved denne garanti.
KOMPERNASS GMBH
BURGSTRASSE 21
44867 BOCHUM, GERMANY
www.kompernass.com
- 71 -
Page 74

- 72 -
Page 75

INHALTSVERZEICHNIS SEITE
Sicherheitshinweise 74
Bestimmungsgemäßer Gebrauch 77
Lieferumfang 77
Technische Daten 77
Bevor Sie beginnen 78
Grundprinzipien beim Kochen in der Mikrowelle ......................................................................78
Geeignetes Kochgeschirr verwenden..........................................................................................78
Gerätebeschreibung 79
Erste Inbetriebnahme 79
Gerät aufstellen..............................................................................................................................79
Gerät vorbereiten...........................................................................................................................79
Zubehör einsetzen .........................................................................................................................80
Bedienen 80
Uhr einstellen..................................................................................................................................80
Küchentimer einstellen...................................................................................................................80
Kindersicherung..............................................................................................................................81
Abfragefunktionen..........................................................................................................................81
Kochen und Garen 81
Mikrowellenbetrieb........................................................................................................................81
Grillbetrieb......................................................................................................................................83
Kombinations-Garvorgang............................................................................................................83
Automatik-Menü 83
Automatik-Menü starten.................................................................................................................84
Programme im Detail.....................................................................................................................85
Auftauen 87
Startzeit voreinstellen (Preset) 87
Reinigung und Pflege 88
Fehlerbehebung 89
Entsorgen 89
Garantie und Service 89
Importeur 90
Lesen Sie die Bedienungsanleitung vor der ersten Verwendung aufmerksam durch und heben Sie diese für
den späteren Gebrauch auf. Händigen Sie bei Weitergabe des Gerätes an Dritte auch die Anleitung aus.
- 73 -
Page 76

Mikrowelle
Sicherheitshinweise
Achtung!
Warnungen vor Beschädigungen am Gerät.
Gefahr! / Verletzungsgefahr!
Warnung vor Verletzungen und elektrischem Schlag!
Brandgefahr!
Warnung vor Brandgefahr.
Hinweis!
Hinweise und Tipps zur Handhabung der Mikrowelle.
Vorsichtsmaßnahmen zur Vermeidung eines
möglichen übermäßigen Kontaktes mit Mikrowellenenergie
• Versuchen Sie nicht, das Gerät bei geöffneter
Tür zu betreiben, da der Betrieb bei geöffneter
Tür zum Kontakt mit einer schädlichen Dosis
Mikrowellenstrahlung führen kann. Wichtig ist
hierbei auch, nicht die Sicherheitsverriegelungen
aufzubrechen oder zu manipulieren.
• Klemmen Sie nichts zwischen Gerätefront und
Tür und sorgen Sie dafür, dass sich keine Verschmutzungen oder Reinigungsmittelrückstände
auf den Dichtflächen ansammeln.
Verletzungsgefahr!
• Wenn die Tür oder die Türdichtungen beschä-
digt sind, betreiben Sie die Mikrowelle auf keinen Fall weiter. Lassen Sie sie sofort von qualifiziertem Fachpersonal reparieren.
• Versuchen Sie nie das Gerät selber zu reparie-
ren. Durch das Abnehmen des Gehäuses kann
Mikrowellenenergie freigesetzt werden. Lassen
Sie Reparaturen nur von qualifiziertem Fachpersonal durchführen.
• Dieses Gerät ist nicht dafür bestimmt, durch Personen (einschließlich Kinder) mit eingeschränkten physischen, sensorischen oder geistigen Fähigkeiten oder mangels Erfahrung und/oder
mangels Wissen benutzt zu werden, es sei denn,
sie werden durch eine für ihre Sicherheit zuständige Person beaufsichtigt oder erhielten von ihr
Anweisungen, wie das Gerät zu benutzen ist.
Kinder sollten beaufsichtigt werden, um sicherzustellen, dass sie nicht mit dem Gerät spielen.
• Kindern darf die Benutzung des Kochgerätes
ohne Aufsicht nur erlaubt werden, wenn eine angemessene Anweisung gegeben wurde, die das
Kind in die Lage versetzt, das Kochgerät in sicherer Weise zu benutzen und die Gefahren einer falschen Bedienung zu verstehen.
• Verwenden Sie dieses Gerät nur zum bestimmungsgemäßen Gebrauch gemäß Beschreibung
in diesem Handbuch. Verwenden Sie in diesem
Gerät keine ätzenden Chemikalien oder Dämpfe. Diese Mikrowelle ist speziell für Erhitzen, Kochen, Grillen, oder Trocknen von Nahrungsmitteln konstruiert.
Sie ist nicht für eine Nutzung im Industrieoder Laborbereich konzipiert.
• Betreiben Sie die Mikrowelle nicht, wenn
Netzkabel/Netzstecker beschädigt sind. Lassen
Sie Netzkabel/Netzstecker von qualifiziertem
Fachpersonal austauschen, um Gefährdungen
zu vermeiden.
• Halten Sie Kinder von der Mikrowellentür fern,
während diese in Betrieb ist. Verbrennungsgefahr!
• Entfernen Sie unter keinen Umständen das
Mikrowellengehäuse.
• Lassen Sie die Lampe im Inneren der Mikrowelle nur von qualifiziertem Fachpersonal austauschen.
• Berühren Sie nie die Mikrowellentür, das Mikrowellengehäuse, die Lüftungsöffnungen, Zubehörteile oder das Essgeschirr direkt nach dem
Grill-, Kombi- oder Automatikmenü-Vorgang.
Die Teile werden sehr heiß. Lassen Sie vor dem
Reinigen die Teile abkühlen.
- 74 -
Page 77

• Achten Sie darauf, dass der Netzstecker immer
gut zu erreichen ist, damit Sie diesen im Notfall
schnell vom Stromnetz trennen können.
• Personen, die einen Herzschrittmacher tragen,
sollten sich vor Inbetriebnahme der Mikrowelle
bei ihrem Hausarzt über mögliche Risiken informieren.
• Lassen Sie das Netzkabel nie über den Tisch
oder die Arbeitsplatte hängen. Kinder könnten
daran ziehen.
• Öffnen Sie Dosen, Popcorntüten etc. nach dem
Erhitzen immer so, dass die Öffnung von Ihrem
Körper weg zeigt. Austretender Dampf kann zu
Verbrühungen führen.
• Stellen Sie sich nie direkt vor die Mikrowelle,
wenn Sie die Tür öffnen. Austretender Dampf
kann zu Verbrühungen führen.
• Frittieren Sie nicht in der Mikrowelle. Heißes Öl
kann Geräteteile und Utensilien beschädigen
und sogar Hautverbrennungen hervorrufen.
• Schütteln oder rühren Sie aufgewärmte Babygläschen oder Babyfläschchen auf jeden Fall
um! Der Inhalt kann sich ungleichmäßig erhitzt
haben und das Baby kann sich am Inhalt verbrennen. Kontrollieren Sie auf jeden Fall die
Temperatur, bevor Sie Ihr Baby füttern!
• Bauen Sie die Mikrowelle nicht um.
• Mikrowellenstrahlen sind gefährlich! Lassen Sie
Wartungs- oder Reparaturarbeiten, bei denen
Abdeckungen zu entfernen sind, die vor einem
Kontakt mit Mikrowellenstrahlen schützen, nur
von geschultem Fachpersonal durchführen.
• Überprüfen Sie vor dem Verzehr die Temperatur, um für Babys u. U. lebensgefährliche Verbrennungen zu vermeiden.
Kochutensilien können durch die von den
erhitzten Speisen abgegebene Hitze heiß
werden, so dass sie sich eventuell nur mit Topflappen anfassen lassen. Die Kochutensilien müssen daraufhin geprüft werden, ob sie mikrowellengeeignet sind.
Brandgefahr
• Lassen Sie die Mikrowelle nie unbeaufsichtigt,
wenn Sie Lebensmittel in Plastik- oder Papierverpackungen erhitzen.
• Stellen Sie keine brennbaren Materialien in der
Nähe der Mikrowelle oder der Lüftungsöffnungen auf.
• Entfernen Sie alle metallischen Verschlüsse
der Verpackungen der Lebensmittel, die Sie
erhitzen wollen. Brandgefahr!
• Benutzen Sie zur Herstellung von Popcorn nur
mikrowellengeeignete Popcorn-Tüten.
• Benutzen Sie die Mikrowelle nicht, um mit
Körnern, Kirschkernen oder Gel gefüllte Kissen
zu erhitzen. Brandgefahr!
• Benutzen Sie die Mikrowelle nicht zur Lagerung
von Lebensmitteln oder anderen Dingen.
• Überschreiten Sie nie die vom Hersteller ange-
gebenen Garzeiten.
• Stellen Sie keine Gegenstände auf die Mikro-
welle, während diese in Betrieb ist. Die Lüftungsöffnungen werden verdeckt!
• Stellen Sie die Mikrowelle nicht in der Nähe von
anderen Hitze absondernden Geräten, wie zum
Beispiel einem Backofen, auf.
• Reinigen Sie die Mikrowelle nach dem Erhitzen
von fetthaltigen Speisen, insbesondere wenn diese nicht abgedeckt waren, gründlich. Lassen Sie
das Gerät vollständig abkühlen, bevor Sie es
reinigen. Auf den Heizelementen des Grills dürfen sich keine Rückstände, wie zum Beispiel Fett
befinden. Dieses könnte überhitzen und sich entzünden.
• Tauen Sie kein gefrorenes Fett oder Öl in der
Mikrowelle auf. Das Fett oder Öl kann sich
entzünden.
• Benutzen Sie keine externe Zeitschaltuhr oder
ein separates Fernwirksystem um das Gerät zu
betreiben.
Achtung! Heiße Oberfläche!
- 75 -
Page 78

Achtung! Geräteschäden!
• Betreiben Sie die Mikrowelle nicht im Leerzustand. Ausgenommen ist die erste Inbetriebnahme (siehe Kapitel „Erste Inbetriebnahme“).
• Stecken Sie keine Gegenstände in die Lüftungsöff-
nungen oder die Sicherheits-Türverriegelungen.
• Benutzen Sie keine metallischen Utensilien, die
Mikrowellen reflektieren und zu Funkenbildung
führen. Stellen Sie keine Blechdosen in die
Mikrowelle.
• Stellen Sie keine Plastikbehälter sofort nach
einem Grill-, Kombi- oder AutomatikmenüVorgang in die Mikrowelle. Das Plastik kann
schmelzen.
• Die Mikrowelle darf nicht an Orten mit hoher
Luftfeuchtigkeit, oder wo sich Feuchtigkeit
sammelt, aufgestellt werden.
• Flüssigkeiten und sonstige Nahrungsmittel dürfen nicht in luftdicht verschlossenen Behältern erhitzt werden, da diese explodieren und das Gerät beschädigen können.
• Lehnen Sie sich nicht auf die Mikrowellentür.
• Mangelhafte Sauberkeit des Kochgerätes kann
zu einer Zerstörung der Oberfläche führen, die
ihrerseits die Gebrauchsdauer beeinflusst und
möglicherweise zu gefährlichen Situationen führt.
Gefahr
• Tauchen Sie nie das Netzkabel oder den Netzstecker in Wasser oder andere Flüssigkeiten.
• Halten Sie das Netzkabel von Hitzequellen fern.
Führen Sie es nicht vor der Mikrowellentür her.
Die Hitze kann das Kabel beschädigen.
• Schütten Sie niemals Flüssigkeiten in die Lüftungsöffnungen oder die Sicherheits-Türverriegelungen. Sollte doch Flüssigkeit hineingelangen, stellen Sie die Mikrowelle sofort
aus und ziehen Sie den Netzstecker aus der
Netzsteckdose. Lassen Sie die Mikrowelle
von qualifiziertem Fachpersonal überprüfen.
Sicherheitstipps
• Um das Brandrisiko in der Mikrowelle zu
minimieren: Behalten Sie, wenn Sie Speisen
in Kunststoff- oder Papierbehältern erhitzen,
die Mikrowelle immer im Auge, da sich die Materialien eventuell entzünden können.
• Beim Erhitzen von Getränken in der Mikrowelle
kann es zu einem zeitlich verzögerten Sprudeln
kommen, wenn das Getränk kocht. Seien Sie
deshalb vorsichtig beim Hantieren mit dem
Gefäß. Um plötzliches Sieden zu vermeiden:
– Stellen Sie, wenn möglich, einen Glasstab in
die Flüssigkeit, solange es erhitzt wird.
– Lassen Sie die Flüssigkeit nach dem Erhitzen
20 Sekunden in der Mikrowelle stehen, um
unerwartetes Aufbrodeln zu vermeiden.
• Durchstechen Sie die Haut von Kartoffeln,
Würstchen, oder ähnlichem. Sie können sonst
explodieren.
• Seien Sie vorsichtig beim Erhitzen von Flüssigkeiten. Benutzen Sie nur offene Gefäße, damit entstehende Luftblasen entweichen können.
• Sollte Ihnen Rauch auffallen, schalten Sie das
Gerät aus oder ziehen Sie den Stecker und halten Sie die Tür geschlossen, um eventuelle Flammen zu ersticken.
• Eier in der Schale und hart gekochte Eier dür-
fen nicht in der Mikrowelle erhitzt werden, da
sie selbst noch nach der Beendigung des Erhitzens in der Mikrowelle explodieren können.
Nahrungsmittel mit dicker Schale, wie etwa
Kartoffeln, ganze Kürbisse, Äpfel und Kastanien vor dem Kochen einstechen.
• Bewegen Sie die Mikrowelle nicht, während sie
in Betrieb ist.
- 76 -
Page 79

Erdungshinweise/ordnungsgemäße
Installation
Das vorliegende Gerät muss geerdet sein. Dieses
Gerät ist nur an eine vorschriftsmäßig geerdete
Steckdose anzuschließen. Es wird empfohlen,
einen eigenen Stromkreis zu verwenden, der nur
die Mikrowelle versorgt.
Gefahr: Unsachgemäßer Umgang mit dem Erdungsstecker kann das Risiko eines elektrischen
Schlages nach sich ziehen.
Hinweis: Sollten Sie Fragen zum Erden oder
den Anweisungen in Sachen Elektrik haben, fragen Sie eine Elektro- oder Wartungsfachkraft.
Weder der Hersteller noch der Händler können die
Haftung für eine Beschädigung der Mikrowelle
oder für Personenschäden übernehmen, die auf
eine Nichtbeachtung der Verfahrenshinweise für
den Elektroanschluss zurückgehen.
Funkstörungen bei anderen Geräten
Der Betrieb der Mikrowelle kann Störungen bei Ihrem
Radio, Fernseher oder ähnlichen Geräten hervorrufen.
Falls solche Interferenzen auftreten sollten, lassen
sie sich mit Hilfe der folgenden Maßnahmen
vermindern oder ausschalten:
• Tür und Dichtfläche der Mikrowelle säubern.
• Empfangsantenne des Radios oder Fernsehers
neu ausrichten.
• Mikrowelle an einen anderen Ort stellen als
den, an dem der Empfänger steht.
• Entfernen Sie die Mikrowelle vom Empfänger.
• Stecken Sie die Mikrowelle in eine andere
Steckdose ein. Mikrowelle und Empfänger
sollten einen unterschiedlichen Zweig des
Stromkreises in Anspruch nehmen.
Bestimmungsgemäßer
Gebrauch
Dieses Gerät ist zum Erhitzen und Zubereiten von
Lebensmitteln gemäß den beschriebenen Vorgehensweisen vorgesehen.
Jede Veränderung des Gerätes gilt als nicht bestimmungsgemäß und birgt erhebliche Unfallgefahren.
Für aus bestimmungswidriger Verwendung entstandene Schäden übernimmt der Hersteller keine
Haftung.
Dieses Gerät ist ausschließlich für die Benutzung in
privaten Haushalten bestimmt!
Benutzen Sie es nicht gewerblich, in Industrie- oder
Laborbereichen!
Lieferumfang
Mikrowelle
Glasteller
Grillständer
Rollenstern
Bedienungsanleitung
Kurzinformation
Technische Daten
Nennspannung: 230 - 240 V
50 Hz
Maximale Leistungsaufnahme: 1200 W
Maximale Leistungsabgabe
Mikrowelle: 800 W
Maximale Leistungsaufnahme
Grill: 1000 W
Mikrowellen-Frequenz: 2450 MHz
~
- 77 -
Page 80

Bevor Sie beginnen
Grundprinzipien beim Kochen in der
Mikrowelle
• Ordnen Sie die Speisen wohlbedacht an.
• Die dicksten Stellen kommen in Randnähe.
• Achten Sie auf die Garzeit. Wählen Sie die
kürzeste angegebene Garzeit und verlängern
Sie diese bei Bedarf. Massiv zu lange gekochte Speisen können zu rauchen beginnen oder
sich entzünden.
• Versehen Sie die Speisen während des Garens
mit einem für die Mikrowelle geeigneten Deckel.
Der Deckel verhindert ein Spritzen und trägt
außerdem dazu bei, dass Speisen gleichmäßig
gar werden.
• Wenden Sie die Speisen während der Zubereitung in der Mikrowelle einmal, damit Gerichte
wie Hähnchen oder Hamburger schneller
„durch“ sind.
• Große Lebensmittelstücke wie etwa Braten
müssen mindestens einmal gewendet werden.
• Sortieren Sie Lebensmittelteile wie etwa Hackbällchen nach der halben Garzeit komplett um.
Wenden Sie sie, und platzieren Sie die Bällchen von der Mitte des Geschirrs an den Rand.
Geeignetes Kochgeschirr verwenden
• Das ideale Material für einen Mikrowellenherd
ist mikrowellendurchlässig, lässt also die Energie durch den Behälter hindurch, um die
Speise zu erwärmen.
Mikrowellen sind nicht in der Lage, Metall zu
durchdringen. Aus diesem Grund dürfen keine
Metallgefäße und kein Metallgeschirr verwendet werden.
• Verwenden Sie beim Erhitzen in der Mikrowelle keine Erzeugnisse aus Recyclingpapier.
Diese können winzige Metallfragmente enthalten, die Funken und/oder Brände erzeugen
können.
• Es empfiehlt sich eher rundes/ovales Geschirr
statt eckiges/längliches, da Speisen im Eckbereich leicht verkochen.
Die nachstehende Liste versteht sich als allgemeine Hilfe für die Wahl des korrekten Geschirrs.
Kochgeschirr
Hitzebeständiges
Glas
Nicht hitzebeständiges Glas
Hitzebeständige
Keramik
Mikrowellengeeignetes
Plastikgeschirr
Küchenpapier Ja Nein Nein
Metalltablett/
-platte
Grillständer Nein Ja Nein
Alufolie &
Folienbehälter
Mikrowelle
Ja Ja Ja
Nein Nein Nein
Ja Ja Ja
Ja Nein Nein
Nein Ja Nein
Nein Ja Nein
Grill
Kombination
Brandgefahr!
Benutzen Sie niemals den Grillständer oder andere
metallische Gegenstände, wenn Sie die Mikrowelle
im Mikrowellenbetrieb oder im KombinationsGarvorgang verwenden. Metall reflektiert die
Mikrowellenstrahlung und führt so zu Funkenbildung. Das kann zu einem Brand führen und das
Gerät irreparabel beschädigen!
- 78 -
Page 81

Gerätebeschreibung
nicht
1 Display
2 Taste Türöffner
3 Glasteller
4 Rollenstern
5 Lüftungsschlitze
6 Taste Grill
7 Taste Startzeit (Preset)
8 Taste Auftauen
9 Taste Uhr
0 Taste Stop
q Drehregler / Start/Schnellstart
w Taste Küchentimer
e Taste Kombination
r Taste Leistung
t Grillständer
Erste Inbetriebnahme
• Sorgen Sie dafür, dass der Netzstecker
problemlos zugänglich ist, damit er im Fall von
Gefahren mühelos erreicht und gezogen
werden kann.
• Entfernen Sie nicht die Füße unter dem Mikrowellengerät.
• Blockieren Sie nicht die Lüftungsschlitze 5. An-
dernfalls kann es zu Beschädigungen des Geräts kommen.
• Stellen Sie das Gerät möglichst weit entfernt
von Radio- und Fernsehgeräten auf. Der
Betrieb der Mikrowelle kann Störungen des
Radio- oder Fernsehempfangs hervorrufen.
Achtung:
Stellen Sie die Mikrowelle nicht über einem Küchenherd oder einem sonstigen Hitze erzeugenden Gerät auf. Eine Aufstellung an einem solchen Ort könnte zur Beschädigung des Gerätes und damit auch
zum Erlöschen der Garantie führen.
Gerät aufstellen
Brandgefahr!
Diese Mikrowelle ist nicht für den Einbau in einen
Küchenschrank geeignet. In geschlossenen
Schränken ist die Belüftung des Gerätes nicht ausreichend gewährleistet. Das Gerät kann beschädigt
werden und es besteht die Gefahr eines Brandes!
• Wählen Sie eine ebene Fläche, die genug
Abstand für die Be- und Entlüftung des Gerätes
lässt:
Halten Sie zwischen Gerät und den angrenzenden Wänden einen Mindestabstand von
10 cm unbedingt ein. Stellen Sie sicher,
dass sich die Tür der Mikrowelle einwandfrei
öffnen lässt.
Halten Sie über der Mikrowelle einen Abstand
von mindestens 20 cm.
Gerät vorbereiten
• Entfernen Sie das Verpackungsmaterial und
eine eventuell auf der Gehäuseoberfläche
angebrachte Schutzfolie.
n
Entfernen Sie
Glimmer-Abdeckplatte, die zum
Schutz der Magnetfeldröhre im Garraum angebracht ist.
• Stecken Sie den Netzstecker in eine Netzsteckdose. Benutzen Sie eine 230 - 240 V ~,
50 Hz Netzsteckdose mit einer 16 A Sicherung. Es wird empfohlen, dass ein eigener
Stromkreis die Mikrowelle versorgt. Wenn Sie
sich nicht sicher sind, wie Sie die Mikrowelle
anschließen sollen, ziehen Sie einen Fachmann
zu Rate.
- 79 -
die hellgraue
Page 82

Vor dem Verwenden der Mikrowelle muss das Gerät zunächst leer aufgeheizt werden, damit fertigungsbedingte Rückstände verdampfen können.
Schalten Sie das Gerät ohne Lebensmittel und ohne
Zubehör (Glasteller 3, Rollenstern 4 und Grillständer t) in der Betriebsart Grillen ein:
• Drücken Sie einmal die Taste Grill 6 . Sie
wählen damit den Grillbetrieb. Im Display 1
erscheint das Symbol und das Symbol
blinkt. Es zeigt damit die Startbereitschaft an.
• Stellen Sie mit dem Drehregler q eine Garzeit
von 10 Minuten ein.
• Drücken Sie die Taste Start/Schnellstart q ,
um den Grillvorgang zu starten.
Hinweis:
Bei der ersten Inbetriebnahme kann es durch fertigungsbedingte Rückstande zu leichter Rauch- und
Geruchsentwicklung kommen. Dieses ist unschädlich.
Sorgen Sie für eine ausreichende Belüftung. Öffnen
Sie zum Beispiel ein Fenster.
Bedienen
Uhr einstellen
Wenn Sie die Mikrowelle zum ersten Mal in Betrieb
nehmen oder ein Stromausfall vorlag, zeigt das
Display 1 "1 : 0 1 " an.
1. Drücken Sie die Taste Uhr 9 . Im Display 1
erscheint „Hr 12“. Drücken Sie die Taste Uhr 9
noch einmal, wenn Sie in den 24-Stunden-
Modus wechseln wollen.
2. Stellen Sie durch Drehen am Drehregler q die
gewünschte Stunde ein. Das Uhrsymbol im
Display 1 blinkt.
3. Drücken Sie die Taste Start/Schnellstart q .
Die Minutenangabe erscheint.
4. Stellen Sie durch Drehen am Drehregler q die
gewünschten Minuten ein.
5. Wenn die Uhrzeit korrekt eingestellt ist, drücken
Sie die Taste Start/Schnellstart q . Das
Uhrsymbol im Display 1 leuchtet dauerhaft
und der Doppelpunkt zeigt durch Blinken an,
dass die Uhr läuft.
• Nach 10 Minuten schaltet sich das Gerät automatisch aus. Signaltöne erklingen. Öffnen Sie
die Tür. Warten Sie, bis es vollständig abgekühlt ist.
• Ziehen Sie den Netzstecker aus der Steckdose
und reinigen Sie das Gerät anschließend mit
einem feuchten Tuch von innen und trocknen
Sie es sorgfältig ab.
Zubehör einsetzen
• Setzen Sie den Rollenstern 4 mittig auf die An-
triebswelle im Garraum. Achten Sie darauf,
dass er komplett auf die Antriebswelle rutscht
und fest sitzt.
• Setzen Sie den Glasteller 3 mittig auf den Rol-
lenstern. Die drei Rollen müssen an der Führungskante am Glasteller 3 sitzen.
Um die aktuelle Tageszeit abzulesen, während die
Mikrowelle in Betrieb ist, drücken Sie die Taste Uhr
9 ; die Uhrzeit wird dann für ca. 4 Sekunden
im Display 1 angezeigt.
Küchentimer einstellen
Die Mikrowelle verfügt über einen Küchentimer, den
Sie unabhängig vom Mikrowellenbetrieb einsetzen
können.
1. Drücken Sie die Taste Küchentimer w
wenn das Gerät im Standby-Betrieb ist. Im
Display 1 erscheint „00:10“.
2. Stellen Sie nun mit dem Drehregler q die gewünschte Zeit ein.
Sie können Zeiteinstellungen von 10 Sekunden
bis 95 Minuten vornehmen.
- 80 -
Page 83

3. Drücken Sie die Taste Start/Schnellstart q
. Ein Signalton ertönt. Die Zeit zählt
rückwärts herunter. Nach ca. 3 Sekunden wird
die normale Uhrzeit wieder angezeigt. Der
Küchentimer läuft im Hintergrund weiter.
Wenn Sie zwischendurch die Zeit des Küchentimers kontrollieren wollen, drücken Sie die Taste
Küchentimer w . Es erscheint für kurze Zeit
der Küchentimer.
Sobald die eingestellte Zeit abgelaufen ist, ertönen 3
Signaltöne.
Abfragefunktionen
Uhrzeit während des Betriebs abfragen
Drücken Sie während des Garvorgangs die Taste
Uhr 9 . Im Display 1 erscheint für
ca. 4 Sekunden die Uhrzeit.
Leistungsstufe während des Betriebs abfragen
Drücken Sie während des Garvorgangs die Taste
Leistung r . Im Display 1 erscheint für ca. 3
Sekunden die aktivierte Leistungsstufe.
Hinweis:
Um die ablaufende Zeit des Küchentimers abzubrechen, drücken Sie die Taste Küchentimer w , so
dass die aktuelle Zeit des Küchentimers erscheint.
Drücken Sie, noch während der Küchentimer im
Display 1 angezeigt wird, die Taste Stop 0 .
Der Küchentimer wird abgebrochen und die Uhrzeit
erscheint im Display 1.
Kindersicherung
Aktivieren Sie diese Einstellung, um eine unbeaufsichtigte Inbetriebnahme der Mikrowelle durch
Kleinkinder und andere, nicht mit der Bedienung
vertraute Personen zu verhindern.
Das Symbol für die Kindersicherung erscheint
im Display 1 , und das Gerät kann solange, wie
diese Funktion aktiviert ist, nicht in Betrieb genommen werden.
• Drücken Sie die Taste Stop 0 und halten
Sie sie solange gedrückt, bis ein Signalton ertönt
und das Symbol für die Kindersicherung im
Display 1 erscheint. Die Tasten und der Regler
der Mikrowelle haben nun keine Funktion mehr.
• Um die Kindersicherung zu deaktivieren,
drücken Sie die Taste Stop 0 und halten
Sie sie solange gedrückt bis ein Signalton ertönt
und das Symbol für die Kindersicherung erlischt.
Kochen und Garen
Mikrowellenbetrieb
Hinweis
Auf der Mikrowellentür oder dem Gehäuse
können sich während eines Garvorgangs Wassertropfen bilden. Das ist normal und kein Zeichen für
eine Fehlfunktion der Mikrowelle. Wischen Sie die
Feuchtigkeit, nachdem sie abgekühlt ist, mit einem
trockenen Tuch ab.
Brandgefahr!
Benutzen Sie niemals den Grillständer t oder an-
dere metallische Gegenstände, wenn Sie die Mikrowelle im Mikrowellenbetrieb verwenden. Metall
reflektiert die Mikrowellenstrahlung und führt so zu
Funkenbildung. Das kann zu einem Brand führen
und das Gerät irreparabel beschädigen!
- 81 -
Page 84

Leistung auswählen
• Drücken Sie die Taste Leistung r zur
Wahl der Leistungsstufe entsprechend häufig.
• 1x für 800 Watt Leistung (P800).
• 2x für 700 Watt Leistung (P700).
• 3x für 600 Watt Leistung (P600).
• 4x für 500 Watt Leistung (P500).
• 5x für 400 Watt Leistung (P400).
• 6x für 300 Watt Leistung (P300).
• 7x für 200 Watt Leistung (P200).
• 8x für 100 Watt Leistung (P100).
Garvorgang unterbrechen
Drücken Sie einmal die Taste Stop 0 , um einen
Garvorgang zu unterbrechen. Das Gerät unterbricht
den Garvorgang und stoppt die noch verbleibende
Zeit. Drücken Sie die Taste Start/Schnellstart q
um den Garvorgang wieder fortzusetzen.
Garvorgang abbrechen
Drücken Sie zweimal die Taste Stop 0 , um ei-
nen Garvorgang abzubrechen. Das Gerät schaltet
wieder in den Standby-Betrieb zurück.
,
Die Leistung wird im Display 1 dargestellt
(z. B. P800 bei 800 Watt Leistung).
Garzeit einstellen
Nachdem Sie die Leistung ausgewählt haben, stellen Sie die gewünschte Garzeit ein:
• Drehen Sie den Drehregler q, bis die ge-
wünschte Garzeit eingestellt ist.
Die Stufen für die Einstellungszeit des
Drehreglers q sind wie folgt:
• von 10 Sek. bis 5 Min: in 10-Sek.-Schritten
• von 5 bis 10 Min: in 30-Sek.-Schritten
• von 10 bis 30 Min: in 1-Min.-Schritten
• von 30 bis 95 Min: in 5-Min.-Schritten
Eingabevorgang abbrechen/beenden
Drücken Sie einmal die Taste Stop0 , um einen
Eingabevorgang abzubrechen und zu beenden. Das
Gerät schaltet wieder in den Standby-Betrieb zurück.
Garvorgang starten
Wenn Sie die Leistung und die Garzeit eingestellt
haben, und im Display 1 das Symbol blinkt,
können Sie den Garvorgang starten:
Drücken Sie zum Starten des Garvorgangs die
Taste Start/Schnellstart q . Im Display 1 er-
scheinen die Symbole für Mikrowellenbetrieb
und Garen (Leistung P100 - P400) oder
(Leistung P500 - P800). Die eingestellte Zeit zählt
rückwärts herunter.
Garvorgang ist beendet
Wenn ein Garvorgang beendet ist, erscheint im
Display 1 „End“ und 4 Signaltöne erklingen.
Wenn die Tür der Mikrowelle nicht geöffnet wird,
erklingen die Signaltöne nach ca. 2 Minuten erneut.
Schnellstart
Mit dieser Funktion können Sie unverzüglich für
30 Sekunden (oder länger, bis zu 12 Minuten) bei
800 W Leistung mit dem Garen beginnen.
• Drücken Sie einmal die Taste Start/Schnellstart
q . Im Display 1 erscheinen die Symbole
für Mikrowellenbetrieb und Garen ,
sowie „:30“. Die Mikrowelle startet den Garvorgang für 30 Sekunden. Die Zeit zählt
rückwärts herunter.
Wenn Sie den Garvorgang verlängern wollen,
drücken Sie so oft auf die Taste Start/Schnellstart
q , bis die gewünschte Zeit erreicht ist.
- 82 -
Page 85

Grillbetrieb
Die Grill-Funktion können Sie für dünne Scheiben
Fleisch, Steaks, Frikadellen, Würstchen oder Hähnchenteile verwenden. Sie eignet sich auch hervorragend für überbackene Sandwiches und Gratins.
Benutzen Sie zum Grillen immer den Grillständer
t. So erzielen Sie ein optimales Grillergebnis.
Stellen Sie den Grillständer t immer auf den
Glasteller 3.
1. Drücken Sie die Taste Grill 6 , um die
Grill-Funktion zu aktivieren.
Im Display 1 erscheint das Symbol für die
Grill-Funktion und „:10“.
2. Stellen Sie mit dem Drehregler q die
gewünschte Garzeit ein. Die maximal
einstellbare Garzeit beträgt 95 Minuten.
3. Drücken Sie zum Starten der Grill-Funktion die
Taste Start/Schnellstart q .
4. Wenden Sie das Fleisch nach etwa der Hälfte
der Zeit.
Kombinations-Garvorgang
Diese Funktion vereint die Grill-Funktion mit dem
normalen Mikrowellenbetrieb. Während des Kombinationsvorgangs wird eine bestimmte Zeit für
Garen und die übrige Zeit für Grillen automatisch
und in einem Vorgang ausgeführt. Den Umschaltzeitpunkt des Gerätes können Sie durch ein leises
Klicken wahrnehmen.
Kombination 1
Bei der Kombination 1 beträgt die Mikrowellenleistung 30 % und die Grill-Leistung 70 % der Garzeit. Dies ist z. B. geeignet für Fisch, Kartoffeln oder
Gratins.
1. Drücken Sie die Taste Kombination e
einmal, um die Kombination 1 zu aktivieren. Im
Display 1 erscheinen sowie „:10“.
2. Stellen Sie mit dem Drehregler q die
gewünschte Garzeit ein. Die maximal einstellbare Garzeit beträgt 95 Minuten.
3. Drücken Sie zum Starten die Taste
Start/Schnellstart q .
Kombination 2
Bei der Kombination 2 beträgt die Mikrowellenleistung 55 % und die Grill-Leistung 45 % der Garzeit. Dies eignet sich beispielsweise für Puddings,
Omelettes, Geflügelgerichte oder Lasagne.
1. Drücken Sie die Taste Kombination e
zweimal, um die Kombination 2 zu aktivieren.
Im Display 1 erscheinen sowie „:10“.
2. Stellen Sie mit dem Drehregler q die
gewünschte Garzeit ein. Die maximal einstellbare Garzeit beträgt 95 Minuten.
3. Drücken Sie zum Starten die Taste
Start/Schnellstart q .
Brandgefahr!
Benutzen Sie niemals den Grillständer t oder an-
dere metallische Gegenstände, wenn Sie die Mikrowelle im Kombinations-Garvorgang verwenden.
Metall reflektiert die Mikrowellenstrahlung und führt
so zu Funkenbildung. Das kann zu einem Brand führen und das Gerät irreparabel beschädigen!
Automatik-Menü
Für Speisen, die im Automatik-Menümodus zubereitet werden sollen, ist es nicht notwendig, die Dauer
des Garvorgangs und die Leistungsstufe einzugeben. Es reicht vielmehr aus, wenn Sie eingeben,
welche Art Lebensmittel gegart/gekocht werden
soll, sowie das Gewicht dieses Lebensmittels.
- 83 -
Page 86

Hinweis
Die Mikrowelle berechnet die Zeit/Leistungsstufe für
frische Lebensmittel. Tiefgekühlte Lebensmittel werden mit den von der Mikrowelle vorgegebenen Zeiten nicht gar.
Tauen Sie ggf. tiefgekühlte Lebensmittel mit dem Auftau-Programm vorher auf (siehe Kapitel „Auftauen“).
Nr. Symbol Lebensmittel
1 Getränke 1 - 3
2 Nudeln 100 - 300g
Gewicht
(Portionen)
Automatik-Menü starten
Hinweis
Legen Sie die Speisen immer in ein geeignetes Gefäß oder auf einen Teller. Bedenken Sie dabei, dass
während des Gar- oder Aufwärmvorganges Flüssigkeiten wie Fett o.ä. aus den Speisen austreten kann.
Das Gefäß/der Teller sollte daher ausreichend groß
sein, um überlaufende Flüssigkeiten zu vermeiden.
1. Drehen Sie den Drehregler q langsam nach
links. Im Display 1 erscheint eine Nummer
(z. B. „3“ für Autoprogramm 3 (Fisch)), das
Symbol „Fisch“ und . Wählen Sie das passende Automatik-Menü zu Ihrer Speise aus
(1 bis 9). Sie können, nachdem Sie im Automatik-Menü-Modus sind, auch mit einer Rechtsdrehung zu dem gewünschten Automatik-Menü
gelangen. Bestätigen Sie Ihre Wahl durch
Drücken der Taste Start/Schnellstart q .
3 Fisch 100 - 1000g
4 Reis 100 - 1000g
5 Hähnchen 800 - 1400g
6 Aufwärmen 100 - 1000g
7 Kartoffeln 150 - 600g
8 Braten 300 - 1300g
9 Fleischspieße 100 - 700g
2. Stellen Sie nun durch Drehen des Drehreglers
q das gewünschte Gewicht bzw. die gewünscht Anzahl von Portionen ein. Das Symbol
blinkt.
3. Drücken Sie die Taste Start/Schnellstart q ,
um den Garvorgang zu starten.
Hinweis
Um ein gleichmäßiges Kochen oder Garen zu erreichen, sollten die Speisen bei den Programmen 5, 8
und 9 nach etwa 2/3 der Garzeit umgedreht
werden. Die Mikrowelle erinnert Sie an das Wenden: „turn“ erscheint im Display 1 und ein Signal-
ton erklingt.
• Öffnen Sie die Tür und wenden Sie die Speisen.
Gehen Sie vorsichtig mit den eventuell schon heißen Speisen um.
- 84 -
Page 87

• Drücken Sie die Taste Start/Schnellstart q ,
um den Garvorgang wieder fortzusetzen.
Hinweis:
Wenn Sie auf das Wenden der Speisen verzichten
wollen, warten Sie nach den Signaltönen einfach
ab. Die Mikrowelle setzt ihr Programm automatisch
fort.
Hinweis
Wenn das Gericht nach dem Beenden des Automatik-Menüs nicht richtig durchgegart ist, garen Sie es
noch einmal ein paar Minuten mit dem Schnellstartprogramm nach. Bei Programmen, die unter Verwendung der Grillfunktion ablaufen (ProgrammNummer 5, 8 und 9), können Sie die Speisen mit
der Grillfunktion nachgaren. Beim Nachgaren mit
der Grillfunktion erhöht sich auch der Bräunungsgrad der Speisen.
Brandgefahr!
Benutzen Sie bei Programmen mit zugeschalteter
Grillfunktion auf keinen Fall Abdeckungen oder
nicht hitzebeständiges Geschirr, da diese schmelzen
oder in Brand geraten können!
Verletzungsgefahr!
Der Glasteller 3 ist nach einem Garvorgang mit
Grill sehr heiß! Benutzen Sie daher unbedingt Topflappen oder hitzebeständige Handschuhe, wenn Sie
ihn aus dem Garraum entnehmen.
Hinweis:
Bitte beachten Sie, dass Größe, Form und die
Sorten der Lebensmittel das Kochergebnis mitbestimmen.
Programme im Detail
Programm 1: Getränke
Dieses Programm läuft nur unter Verwendung von
Mikrowellenleistung ab. Je nach eingestellter Portionenzahl läuft das Programm zwischen 1:30 und
3:50 Minuten.
• Stellen Sie das Getränk, das Sie erhitzen wollen,
auf den Glasteller 3 im Garraum. Wenn Sie
mehrere Gläser bzw. Tassen in die Mikrowelle
stellen, achten Sie darauf, dass sich die Gefäße
nicht berühren.
Hinweis
Um plötzliches Sieden zu vermeiden:
• Stellen Sie, wenn möglich, einen Glasstab in
die Flüssigkeit, solange sie erhitzt wird.
• Lassen Sie die Flüssigkeit nach dem Erhitzen
20 Sekunden in der Mikrowelle stehen, um unerwartetes Aufbrodeln zu vermeiden.
Programm 2: Nudeln
Dieses Programm läuft nur unter Verwendung von
Mikrowellenleistung ab.
Je nach eingestelltem Gewicht läuft das Programm
zwischen 25 und 35 Minuten.
• Verwenden Sie für das Kochen von Nudeln ein
hohes Gefäß, da die Gefahr des Überkochens
besteht.
• Verwenden Sie so viel Wasser wie beim konventionellen Kochen. Die Nudeln sollten im Wasser
„schwimmen“.
• Kochen Sie zunächst das Wasser auf:
Stellen Sie die höchste Leistungsstufe der Mikrowelle (P800) ein und starten Sie sie. Für einen Liter Wasser benötigen Sie ca. 10 Minuten, um
das Wasser zum Kochen zu bringen.
• Geben Sie dann vorsichtig die Nudeln hinzu.
Danach können Sie das Automatik-Menü für Nudeln starten.
• Lassen Sie die Nudeln anschließend ca. 3 Minuten ruhen.
- 85 -
Page 88

Programm 3: Fisch
Dieses Programm läuft nur unter Verwendung von
Mikrowellenleistung ab.
Je nach eingestelltem Gewicht läuft das Programm
zwischen ca. 3:30 und 16 Minuten.
• Legen Sie die Fischstücke auf einen mikrowellengeeigneten Teller, geben Sie ein wenig Butter
oder anderes Fett dazu, würzen Sie nach Geschmack und starten Sie das AutomatikMenü für Fisch.
Programm 4: Reis
Dieses Programm läuft nur unter Verwendung von
Mikrowellenleistung ab.
Je nach eingestelltem Gewicht läuft das Programm
zwischen 16 und 36 Minuten.
• Verwenden Sie für das Kochen von Reis ein hohes Gefäß, da die Gefahr des Überkochens besteht. Nehmen Sie z. B. für 200 g Reis
ca. 400 ml Wasser. Benutzen Sie trotz des Wassers die Gewichtseinstellung „200 g“. Es wird
immer das Gewicht des Reises eingestellt.
• Geben Sie den Reis in das Behältnis, füllen Sie
die benötigte Flüssigkeit auf und lassen Sie den
Reis ca. 3 Minuten quellen.
• Decken Sie das Behältnis ab. Achten Sie darauf,
dass es nicht luftdicht verschlossen ist. Danach
können Sie das Automatik-Menü für Reis starten.
Programm 5: Hähnchen
Dieses Programm läuft in mehreren Garstufen unter
Verwendung von Mikrowellenleistung und
Grillfunktion ab. Je nach eingestelltem Gewicht läuft
das Programm zwischen 39 und 50 Minuten.
• Legen Sie das Hähnchen auf einen mikrowellengeeigneten Teller.
• Würzen Sie nach Geschmack und starten Sie
das Automatik-Menü für Hähnchen.
• Ein ganzes Hähnchen muss gewendet werden,
da die nach oben gerichtete Seite sonst austrocknen könnte. Die Mikrowelle unterbricht zu
diesem Zweck das Programm nach etwa 2/3
der Zeit automatisch und Signaltöne erklingen.
Drehen Sie das Hähnchen und drücken Sie die
Taste Start/Schnellstart q , um das Pro-
gramm fortzusetzen.
Programm 6: Aufwärmen
Dieses Programm läuft nur unter Verwendung von
Mikrowellenleistung ab.
Je nach eingestelltem Gewicht läuft das Programm
zwischen 1:00 und 6:20 Minuten.
• Stellen Sie den Teller mit dem Gericht, das Sie
aufwärmen wollen, auf den Glasteller 3 in den
Garraum und starten Sie das Automatik-Menü
zum Aufwärmen.
Programm 7: Kartoffeln
Dieses Programm läuft nur unter Verwendung von
Mikrowellenleistung ab.
Je nach eingestelltem Gewicht läuft das Programm
zwischen 3:50 und 11 Minuten.
Tipp
Verwenden Sie ungeschälte Kartoffeln für den Garvorgang. Stechen Sie die Schalen ein paar Mal ein.
• Geben Sie die ungeschälten Kartoffeln in einen
mikrowellengeeigneten Teller oder ein Gefäß.
Verwenden Sie möglichst gleich große Kartoffeln. Wenn möglich, sollten sich die Kartoffeln
nicht berühren.
- 86 -
Page 89

Programm 8: Braten
Dieses Programm läuft in mehreren Garstufen unter
Verwendung von Mikrowellenleistung und
Grillfunktion ab. Je nach eingestelltem Gewicht läuft
das Programm zwischen 16 und 60 Minuten.
• Legen Sie den Braten auf einen mikrowellengeeigneten Teller. Würzen Sie das Fleisch nach
Bedarf und starten Sie das Automatik-Menü für
Braten.
• Ein ganzer Braten muss gewendet werden, da
die nach oben gerichtete Seite sonst austrocknen
könnte. Die Mikrowelle unterbricht zu diesem
Zweck das Programm nach etwa 2/3 der Zeit
automatisch und Signaltöne erklingen. Drehen
Sie den Braten und drücken Sie die Taste
Start/Schnellstart q , um das Programm
fortzusetzen.
Programm 9: Fleischspieße
Dieses Programm läuft in mehreren Garstufen unter
Verwendung von Mikrowellenleistung und Grillfunktion ab. Je nach eingestelltem Gewicht läuft das Programm zwischen 9 und 27 Minuten.
• Legen Sie die Fleischspieße auf einen mikrowellengeeigneten Teller. Würzen Sie das Fleisch
nach Geschmack und starten Sie das AutomatikMenü für Fleischspieße.
• Die Spieße müssen gewendet werden, um
gleichmäßig zu garen. Die Mikrowelle unterbricht zu diesem Zweck das Programm nach
etwa 2/3 der Zeit automatisch und Signaltöne
erklingen. Drehen Sie die Spieße und drücken
Sie die Taste Start/Schnellstart q , um das
Programm fortzusetzen.
Auftauen
Mit dieser Funktion können Sie problemlos Fleisch,
Geflügel, Gemüse und Fisch auftauen. Die Auftauzeit und die Leistungsstufe werden nach Eingabe
des Gewichts automatisch errechnet und eingestellt.
1. Drücken Sie die Taste Auftauen 8 . Im
Display 1 erscheinen und . Das Sym-
bol blinkt.
2. Wählen Sie mit Hilfe des Drehreglers q das
Gewicht der aufzutauenden Speise. Sie können ein Gewicht zwischen 100 g und 1800 g
einstellen.
3. Drücken Sie die Taste Start/Schnellstart q
Das Gerät gibt die Auftauzeit automatisch vor. Sie
erscheint im Display 1 und läuft ab.
Nach ca. 1/2 der Zeit erklingt ein Signalton und
“turn” erscheint im Display 1. Öffnen Sie die Tür
und wenden Sie die Speisen. Schließen Sie die Tür
wieder und drücken Sie die Taste Start/Schnellstart
q , um den Auftauvorgang wieder fortzusetzen.
Hinweis:
Wenn Sie auf das Wenden der Speisen verzichten
wollen, warten Sie nach den Signaltönen einfach
ab. Das Auftauprogramm läuft trotz des Signaltones
weiter!
Startzeit voreinstellen (Preset)
Sie können mit diesem Programm eine bestimmte
Startzeit für das Garen oder Grillen der Speisen
vorprogrammieren. Wenn Sie die Einstellungen korrekt vorgenommen haben, startet das Gerät automatisch zur eingestellten Zeit.
.
Hinweis:
Die Uhr muss eingestellt sein, um die Funktion „Startzeit voreinstellen“ wählen zu können.
- 87 -
Page 90

1. Stellen Sie die gewünschte Mikrowellenfunktion
(Garen, Grillen oder Automatik-Menü (ausgenommen Autoprogramm 6)) ein:
Für den Mikrowellenbetrieb: Drücken Sie die Taste Leistung r zur Wahl der Leistungsstufe
entsprechend häufig. Stellen Sie die Garzeit mit
dem Drehregler q ein.
Für den Grillbetrieb: Drücken Sie die Taste
Grill 6 , um die Grill-Funktion zu aktivieren.
Stellen Sie mit dem Drehregler q die gewünschte Grillzeit ein.
Für das Automatik-Menü: Wählen Sie mit dem
Drehregler q das passende Programm zu Ihrer
Speise aus (ausgenommen Autoprogramm 6).
Bestätigen Sie Ihre Wahl durch Drücken der
Taste Start/Schnellstart q . Stellen Sie nun
durch Drehen des Drehreglers q das gewünschte Gewicht bzw. die gewünschte Anzahl von
Portionen ein.
2. Drücken Sie die Taste Startzeit 7 . Im
Display 1 blinkt „01: “ und das SanduhrSymbol erscheint.
3. Drehen Sie den Drehregler q, um die Stunden
einzustellen.
4. Drücken Sie die Taste Start/Schnellstart q ,
nun erscheinen die Minutenziffern.
5. Drehen Sie den Drehregler q, um die Minuten
einzustellen.
6. Drücken Sie die Taste Start/Schnellstart q .
Das Sanduhr-Symbol blinkt. Die Startzeit
wird angezeigt. Die Mikrowelle startet den Vorgang zur eingestellten Zeit automatisch. Ein Signalton ertönt beim Start.
Hinweis:
Um die gespeicherte Startzeit zu löschen und somit
den gespeicherten Vorgang abzubrechen, drücken
Sie die Taste Stop 0 . Das Sanduhr-Symbol
erlischt und die Uhrzeit wird angezeigt.
Reinigung und Pflege
Verletzungsgefahr!
Schalten Sie vor dem Säubern die Mikrowelle ab
und ziehen Sie den Netzstecker aus der Netzsteckdose.
Auf keinen Fall darf das Gerät in Wasser oder
andere Flüssigkeiten getaucht werden. Hierdurch kann Lebensgefahr durch elektrischen
Schlag entstehen und das Gerät kann beschädigt werden.
• Halten Sie das Innere der Mikrowelle stets
sauber.
• Sollten Speisespritzer oder verschüttete Flüssigkeiten an den Wänden der Mikrowelle haften,
wischen Sie diese mit einem feuchten Tuch ab.
• Verwenden Sie ein mildes Spülmittel, sollte die
Mikrowelle stärkere Verschmutzungen aufweisen.
Wischen Sie Spülmittelreste mit klarem Wasser
ab.
• Vermeiden Sie die Benutzung von Reinigungssprays und anderen scharfen Putzmitteln, da
diese Flecken, Streifen oder eine Trübung der
Türoberfläche hervorrufen können.
• Säubern Sie die Außenwände mit einem feuchten Tuch.
• Um eine Beschädigung der Funktionsteile im
Innern der Mikrowelle zu vermeiden, lassen
Sie kein Wasser in die Lüftungsschlitze 5 einsickern.
• Entfernen Sie regelmäßig Spritzer oder Verunreinigungen. Reinigen Sie Tür, Sichtfenster
beidseitig, Türdichtungen und benachbarte
Teile mit einem feuchten Tuch. Verwenden
Sie keine Scheuermittel.
• Sollte sich in oder um die Außenseite der Tür
Dunst ablagern, wischen Sie ihn mit einem weichen Tuch ab. Hierzu kommt es, wenn die
Mikrowelle unter hohen Feuchtigkeitsbedingungen betrieben wird.
- 88 -
Page 91

• Reinigen Sie auch den Glasteller 3 regelmäßig. Spülen Sie ihn in warmer Seifenlauge
oder in der Spülmaschine.
• Reinigen Sie den Grillständer t im warmen
Spülwasser und trocknen Sie ihn gut ab.
• Beseitigen Sie regelmäßig Gerüche. Stellen
Sie eine tiefe Mikrowellenschüssel mit einer
Tasse Wasser, Saft und Haut einer Zitrone
gefüllt in die Mikrowelle. Erhitzen Sie diese
für 5 Minuten. Gründlich abwischen und mit
einem weichen Lappen trockenreiben.
• Sollte ein Auswechseln der Lampe in der
Mikrowelle erforderlich werden, lassen Sie
diese bitte von einem Händler ersetzen oder
fragen Sie unseren Service.
Fehlerbehebung
Das Display 1 zeigt nichts an.
• Der Netzstecker steckt nicht in der Netzsteckdose. Kontrollieren Sie den Netzstecker.
• Die Netzsteckdose ist defekt. Probieren Sie
eine andere Netzsteckdose.
• Das Display 1 ist defekt. Kontaktieren Sie den
Service.
Das Gerät reagiert nicht auf das Drücken der
Tasten.
• Die Kindersicherung ist aktiviert. Deaktivieren Sie
die Kindersicherung (siehe Kapitel „Bedienen“).
Das Gerät startet den Gar-/Kochvorgang nicht.
• Die Tür ist nicht richtig verschlossen. Schließen
Sie die Tür richtig.
Der Glasteller 3 erzeugt beim Drehen laute
Geräusche.
• Der Glasteller 3 liegt nicht richtig auf dem
Rollenstern 4. Legen Sie den Glasteller 3
korrekt in den Garraum ein.
• Der Rollenstern 4 und/oder der Boden des
Garraumes sind verschmutzt. Reinigen Sie den
Rollenstern 4 und den Boden.
Entsorgen
Werfen Sie das Gerät keinesfalls in den
normalen Hausmüll. Dieses Produkt
unterliegt der europäischen Richtlinie
2002/96/EC.
Entsorgen Sie das Gerät über einen zugelassenen
Entsorgungsbetrieb oder über Ihre kommunale
Entsorgungseinrichtung.
Beachten Sie die aktuell geltenden Vorschriften.
Setzen Sie sich im Zweifelsfall mit Ihrer Entsorgungseinrichtung in Verbindung.
Führen Sie alle Verpackungsmaterialien
einer umweltgerechten Entsorgung zu.
Garantie und Service
Sie erhalten auf dieses Gerät 3 Jahre Garantie ab
Kaufdatum. Das Gerät wurde sorgfältig produziert
und vor Anlieferung gewissenhaft geprüft.
Bitte bewahren Sie den Kassenbon als Nachweis
für den Kauf auf. Bitte setzen Sie sich im Garantiefall mit Ihrer Servicestelle telefonisch in Verbindung.
Nur so kann eine kostenlose Einsendung Ihrer Ware
gewährleistet werden.
Die Garantieleistung gilt nur für Material- oder
Fabrikationsfehler, nicht aber für Transportschäden,
Verschleißteile oder für Beschädigungen an zerbrechlichen Teilen, z. B. Schalter oder Akkus. Das
Produkt ist lediglich für den privaten und nicht für
den gewerblichen Gebrauch bestimmt.
Bei missbräuchlicher und unsachgemäßer Behandlung, Gewaltanwendung und bei Eingriffen, die
nicht von unserer autorisierten Service-Niederlassung vorgenommen wurden, erlischt die Garantie.
Ihre gesetzlichen Rechte werden durch diese
Garantie nicht eingeschränkt.
- 89 -
Page 92

Die Garantiezeit wird durch die Gewährleistung
nicht verlängert. Dies gilt auch für ersetzte und reparierte Teile. Eventuell schon beim Kauf vorhandene
Schäden und Mängel müssen sofort nach dem
Auspacken gemeldet werden, spätestens aber zwei
Tage nach Kaufdatum. Nach Ablauf der Garantiezeit anfallende Reparaturen sind kostenpflichtig.
Service Deutschland
Tel.: 01805 772 033 (0,14 EUR/Min. aus dem dt.
Festnetz, Mobilfunk max. 0,42 EUR/Min.)
E-Mail: kompernass@lidl.de
IAN 71492/71493
Service Österreich
Tel.: 0820 201 222 (0,15 EUR/Min.)
E-Mail: kompernass@lidl.at
IAN 71492/71493
Service Schweiz
Tel.: 0842 665566 (0,08 CHF/Min.,
Mobilfunk max. 0,40 CHF/Min.)
E-Mail: kompernass@lidl.ch
IAN 71492/71493
Importeur
KOMPERNASS GMBH
BURGSTRASSE 21
44867 BOCHUM, GERMANY
www.kompernass.com
- 90 -
 Loading...