

Page 1
PROCESADOR DE ALIMENTOS SKMP 1200 A2
ROBOT DA CUCINA SKMP 1200 A2
PROCESADOR DE ALIMENTOS
Instrucciones de servicio
ROBOT DE COZINHA
Instruções de manejo
ROBOT DA CUCINA
Istruzioni per l’uso
PROFESSIONAL FOOD
PROCESSOR
Operating instructions
PROFI-KÜCHENMASCHINE
Bedienungsanleitung
IAN 100104/IAN 105590
RP100104_RP105590_Kuechenmaschine_Cover_LB5.indd 2 06.06.14 14:07
Page 2

RP100104-105590-Küchenmaschine LB5 Seite 1 Dienstag, 10. Juni 2014 12:00 12
Español . . . . . . . . . . . . . . . . . . . . . . . . . . . . . . . . . . . . . . . . . 3
Por favor, tenga en cuenta la página desplegable.
Italiano . . . . . . . . . . . . . . . . . . . . . . . . . . . . . . . . . . . . . . . . 21
Osservare la pagina pieghevole
Português . . . . . . . . . . . . . . . . . . . . . . . . . . . . . . . . . . . . . . 39
Preste atenção à página desdobrável
English . . . . . . . . . . . . . . . . . . . . . . . . . . . . . . . . . . . . . . . . . 57
Be sure to note the fold-out page
Deutsch . . . . . . . . . . . . . . . . . . . . . . . . . . . . . . . . . . . . . . . . 73
Bitte beachten Sie die Ausklappseite
SKMP 1200 A2_14_V1.4_ES_IT_PT_GB_DE
Page 3
RP100104-105590-Küchenmaschine LB5 Seite 1 Dienstag, 10. Juni 2014 12:00 12
16
1
2
3
4
5
6
7
15 14
13
8
9
1110
12
Page 4

RP100104-105590-Küchenmaschine LB5 Seite 2 Dienstag, 10. Juni 2014 12:00 12
Page 5
RP100104-105590-Küchenmaschine LB5 Seite 3 Dienstag, 10. Juni 2014 12:00 12
Índice
1. Descripción del aparato . . . . . . . . . . . . . . . . . . . . . . . . . . . . . . . . . . . . . . . . . . . . . . . . . . 3
2. Denominación de las piezas (consulte la página desplegable). . . . . . . . . . . . . . . . . . . . . . . 4
3. Datos técnicos. . . . . . . . . . . . . . . . . . . . . . . . . . . . . . . . . . . . . . . . . . . . . . . . . . . . . . . . . 4
4. Indicaciones de seguridad . . . . . . . . . . . . . . . . . . . . . . . . . . . . . . . . . . . . . . . . . . . . . . . . 5
5. Desembalaje e instalación . . . . . . . . . . . . . . . . . . . . . . . . . . . . . . . . . . . . . . . . . . . . . . . . 8
6. Manejo del aparato . . . . . . . . . . . . . . . . . . . . . . . . . . . . . . . . . . . . . . . . . . . . . . . . . . . . . 8
7. Recetas. . . . . . . . . . . . . . . . . . . . . . . . . . . . . . . . . . . . . . . . . . . . . . . . . . . . . . . . . . . . . 12
8. Limpieza del aparato . . . . . . . . . . . . . . . . . . . . . . . . . . . . . . . . . . . . . . . . . . . . . . . . . . . 17
9. Eliminación . . . . . . . . . . . . . . . . . . . . . . . . . . . . . . . . . . . . . . . . . . . . . . . . . . . . . . . . . . 18
10. Garantía de HOYER Handel GmbH . . . . . . . . . . . . . . . . . . . . . . . . . . . . . . . . . . . . . . . . . 18
Antes de utilizar el producto, debe
Le felicitamos cordialmente por la
compra de su nuevo aparato.
Se ha decidido por un producto de alta
calidad. Las instrucciones de uso son una
parte integral de este producto. Contienen
importantes indicaciones para la seguridad,
el uso y la eliminación.
familiarizarse con todas las indicaciones de
manejo y de seguridad. Utilice el producto
solo como está descrito y para los campos
de aplicación indicados.
En caso de transferir el producto a terceros,
entregue también toda la documentación.
1. Descripción del aparato
1.1 Uso previsto
El robot de cocina SilverCrest SKMP 1200
A2 sirve para mezclar, batir, amasar y
agitar alimentos.
El aparato debe utilizarse únicamente en
espacios secos. No está permitido su uso en
el exterior o en espacios húmedos.
Este aparato está diseñado para uso
doméstico, no para uso industrial.
El aparato también es apropiado para:
• el uso en cocinas para trabajadores en
tiendas, oficinas y otros sectores
profesionales,
• el uso en explotaciones agrícolas,
SKMP 1200 A2 3
• clientes en hoteles, moteles y otras
residencias,
•hostales.
1.2 Volumen de suministro
• 1 robot de cocina, equipo básico
• 1 protección contra salpicaduras
•1 vaso
• 1 gancho amasador
• 1 batidor de varillas
• 1 accesorio mezclador
• 1 manual de instrucciones de uso
Page 6
RP100104-105590-Küchenmaschine LB5 Seite 4 Dienstag, 10. Juni 2014 12:00 12
1.3 Variantes
El aparato se suministra en dos versiones:
• RP100104: rojo
• RP105590: crema
El manejo es idéntico en ambas variantes de
color.
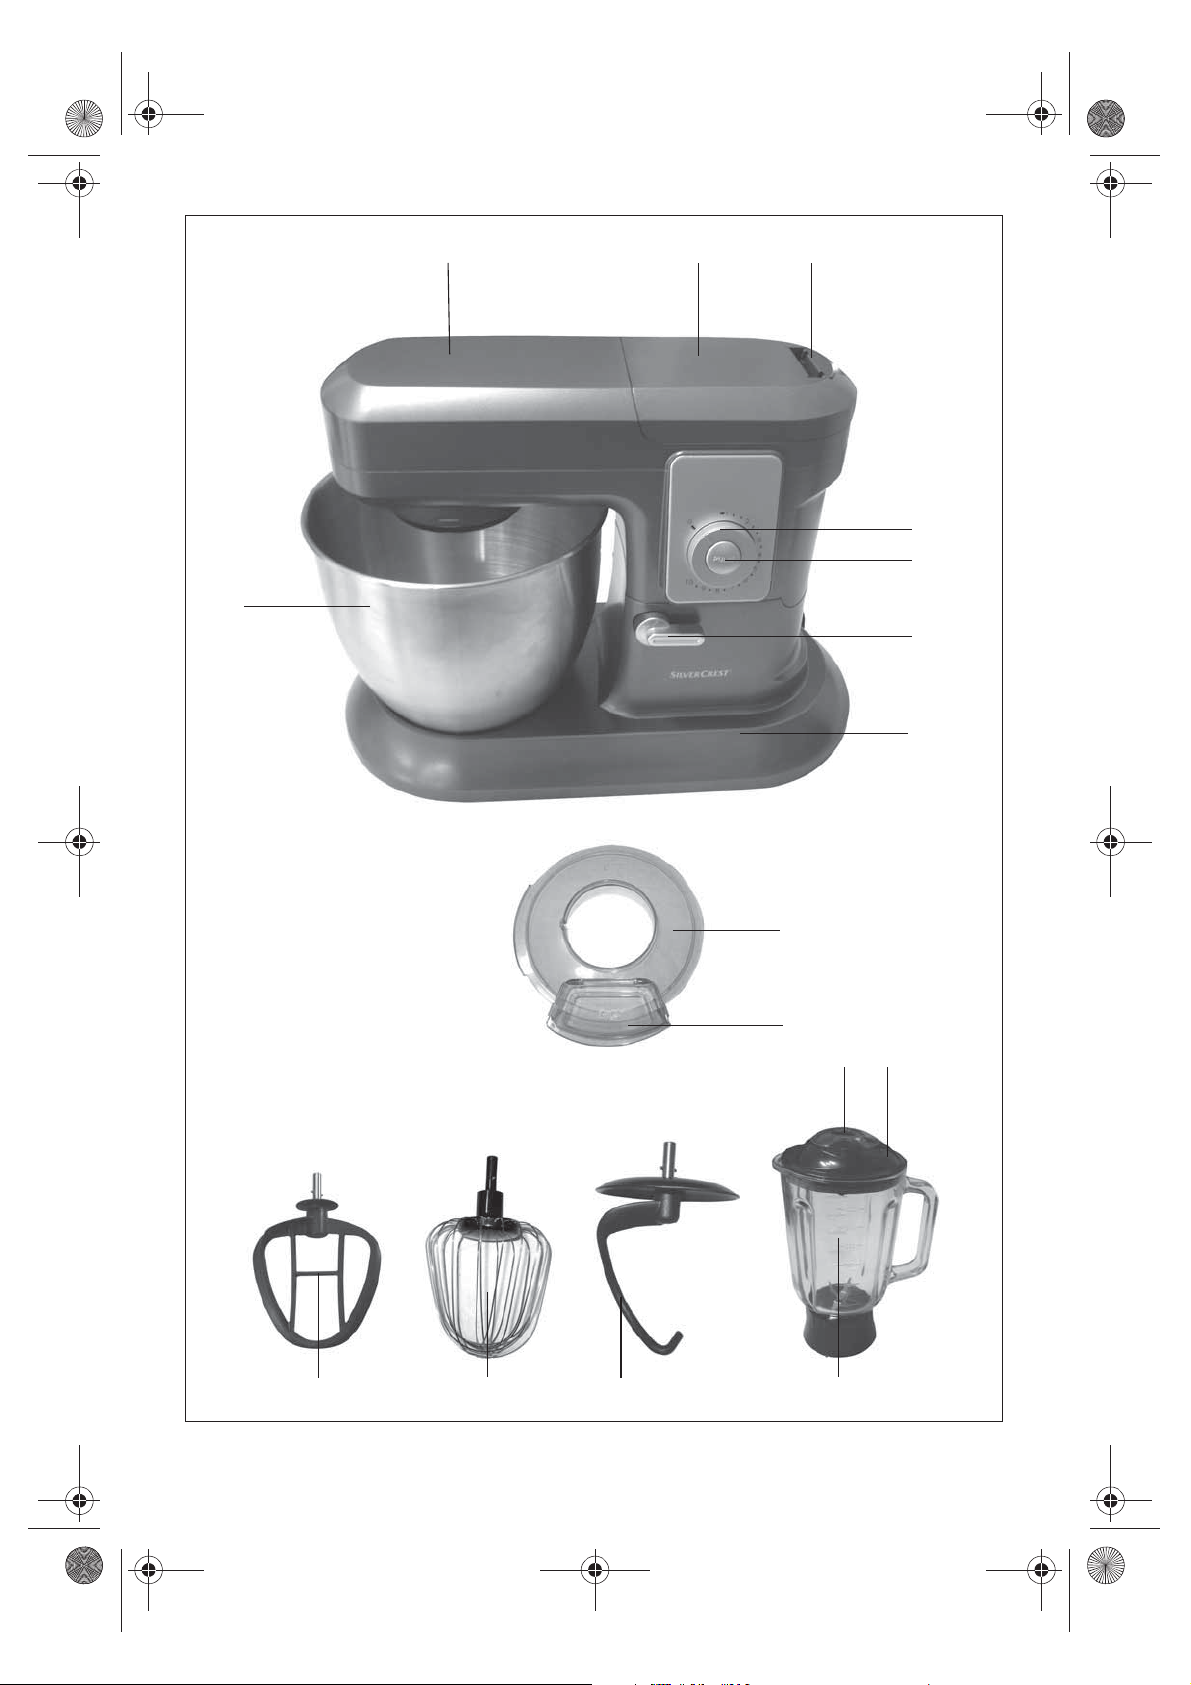
2. Denominación de las piezas (consulte la página desplegable)
1 Brazo de accionamiento
2 Cubierta
3 Desbloqueo para la cubierta
4 Regulador de velocidad con función de
conexión/desconexión
5 Botón de impulso
6 Palanca de desbloqueo
7 Aparato base
8 Protección contra salpicaduras
9 Orificio de llenado con tapa
10 Cierre de la tapa
11 Tapa del vaso
12 Vaso con tapa y cierre de la tapa
13 Gancho amasador
14 Batidor de varillas
15 Accesorio mezclador
16 Bol
3. Datos técnicos
Alimentación eléctrica: 220 - 240 V~ / 50 Hz
Potencia: 1.200 vatios
Clase de protección: II
Tiempo de FB robot de cocina: 10 minutos
Tiempo de FB vaso: 3 minutos
Tiempo de FB (tiempo de funcionamiento breve): indica durante cuánto tiempo puede
funcionar el aparato de forma ininterrumpida.
4
Page 7
RP100104-105590-Küchenmaschine LB5 Seite 5 Dienstag, 10. Juni 2014 12:00 12
4. Indicaciones de seguridad
4.1 Terminología
En estas instrucciones se utilizan los
siguientes símbolos:
¡Advertencia!
Alto riesgo: no atender la
advertencia puede causar daños
corporales o mortales.
¡Precaución!
Riesgo medio: no atender la advertencia
puede causar daños materiales.
Nota:
Riesgo menor: circunstancias que deben
atenderse al usar el aparato.
4.2 Indicaciones específicas
para este dispositivo
¡Advertencia!
riales o personales, respete en todo
momento las siguientes indicaciones.
• El aparato puede ser utilizado por personas con
capacidades físicas o psíquicas reducidas o con
falta de experiencia y/o de conocimiento siempre
y cuando estén vigiladas o hayan recibido
instrucciones sobre el uso seguro del equipo y
hayan comprendido los riesgos existentes.
• El equipo debe mantenerse fuera del alcance de
los niños.
• El equipo y su cable de conexión deben
mantenerse fuera del alcance de los niños.
• No permita que los niños jueguen con el aparato.
• El aparato debe desenchufarse siempre que no
esté vigilado, así como antes del montaje, del
desmontaje y de la limpieza.
• No sumerja el aparato base
• No utilice en ningún caso productos de limpieza
abrasivos, corrosivos o que puedan rayar la
Para evitar daños mate-
7
nunca en agua.
superficie. De lo contrario podría dañar el
aparato.
4.3 Información general
• Antes de usar el aparato, lea
atentamente estas instrucciones de uso.
Éstas son una parte integral del aparato
y deben estar siempre a mano.
• Utilice el aparato únicamente para el
uso previsto descrito (ver "1.1 Uso
previsto" en la página 3).
• Compruebe que la tensión de red
necesaria (véase la placa de
características del aparato) coincide
con la de su red eléctrica.
• Tenga en cuenta que todo tipo de
derechos de garantía o
responsabilidades expiran si se han
empleado piezas accesorias no
recomendadas en estas instrucciones de
uso o si, a la hora de efectuar
reparaciones, no se han utilizado
exclusivamente piezas de recambio
originales. Esto se aplica también en el
caso de reparaciones llevadas a cabo
por personas no cualificadas. Puede
encontrar los datos de contacto en
"Centro de servicio técnico" en la
página19.
• Ante cualquier posible anomalía de
funcionamiento dentro del plazo de
vigencia de la garantía, la reparación
del aparato siempre será a cargo de
nuestro Service-Center. En caso
contrario se extinguirá todo derecho de
garantía. Puede encontrar los datos de
contacto en "Centro de servicio técnico"
en la página19.
SKMP 1200 A2 5
Page 8
RP100104-105590-Küchenmaschine LB5 Seite 6 Dienstag, 10. Juni 2014 12:00 12
4.4 Protección contra descargas
eléctricas
¡Advertencia! Las siguientes
indicaciones de seguridad
deberían protegerle de una
descarga eléctrica.
• Si el aparato está dañado, éste no debe
utilizarse bajo ningún concepto. En estos
casos, llévelo a reparar por personal
técnico cualificado. Puede encontrar los
datos de contacto en "Centro de servicio
técnico" en la página19.
• Si la conexión a la red de este aparato
se daña, tiene que ser sustituida por el
fabricante u otra persona cualificada
para evitar peligros.
• Bajo ningún concepto debe penetrar
agua u otro líquido al interior del
aparato base 7. Por lo tanto:
– no utilice el aparato nunca en el
exterior
– no sumerja el aparato base 7 nunca
en agua
– no coloque nunca recipientes llenos
de líquido (p. ej., vasos de agua,
jarrones, etc.) sobre el aparato
– nunca lo instale en ambientes con
mucha humedad
– nunca lo utilice junto a un fregadero,
una bañera, una ducha ni una
piscina, ya que en esos casos podría
entrar agua en el aparato.
Si, a pesar de todo, entrara líquido en el
aparato, desenchúfelo inmediatamente
y encargue su reparación a personal
especializado cualificado. Puede
encontrar los datos de contacto en
"Centro de servicio técnico" en la
página19.
• Conecte siempre el aparato a una base
de enchufe con contacto de puesta a
tierra (Schuko).
• No toque nunca el cable de red, el
aparato o el enchufe con las manos
húmedas.
• Para desenchufar el cable de red, tire
siempre de la clavija. No lo haga nunca
tirando del propio cable.
• Evite doblar o aplastar el cable de red.
• Mantenga el cable de red alejado de
las superficies calientes (p. ej., placas de
cocina).
• Cuando no utilice el aparato,
desconecte la clavija de la toma de
corriente. Sólo entonces el aparato se
encuentra totalmente sin corriente.
• Debe evitarse la utilización de cables
prolongadores. Esto sólo está permitido
bajo unas condiciones muy
determinadas:
– el cable prolongador debe ser
adecuado para la intensidad de
corriente del aparato
– el cable prolongador no debe estar
tendido "en el aire": no debe poder
tropezar nadie con él, ni quedar al
alcance de los niños
– el cable prolongador no debe estar
nunca dañado
– en la toma de corriente no debe
haber ningún otro aparato enchufado
además de éste, ya que de lo
contrario se puede producir una
sobrecarga de la red eléctrica
(¡prohibido utilizar enchufes
múltiples!).
4.5 Protección contra lesiones
¡Advertencia! Observe las
siguientes indicaciones para evitar
posibles lesiones.
• Preste atención a que el cable de
conexión a la red no esté colocado de
forma que alguien pueda tropezar con
él ni quedarse enganchado o pisarlo.
6
Page 9
RP100104-105590-Küchenmaschine LB5 Seite 7 Dienstag, 10. Juni 2014 12:00 12
• Durante el funcionamiento, evite el
contacto con los elementos móviles del
aparato, tales como las cuchillas del
vaso 12, el gancho de amasar 13, el
batidor de varillas 14 o el accesorio
mezclador 15. Las manos o el cabello
podrían ser arrastrados al interior del
aparato y se podrían producir lesiones.
Conecte el aparato únicamente si la
protección contra salpicaduras 8 (al
utilizar el bol) 16 o la tapa 11 (al
utilizar el vaso) 12 están colocados
correctamente.
• Antes de limpiar o de cambiar los
accesorios, desenchufe el equipo de la
red eléctrica.
• Recuerde que las cuchillas del vaso 12
están muy afiladas. No las toque nunca
con las manos desnudas; de lo
contrario, podría cortarse.
• Desconecte el aparato siempre con el
regulador de velocidad 4 antes de
sacar el enchufe de la toma de
corriente. De lo contrario podría ocurrir
que el aparato arranque
inmediatamente al volver a conectar el
enchufe a una toma de corriente.
• Si no se ha montado el vaso 12, debe
estar colocada la tapa 2. De lo
contrario, no se garantiza la seguridad
del aparato y se pueden producir
lesiones.
4.6 Por la seguridad de sus hijos
¡Advertencia! Con frecuencia,
los niños no saben ver el peligro,
por lo que pueden exponerse a
lesiones con facilidad. Por esta
razón, observe lo siguiente:
• Tenga cuidado de que los niños no
jueguen con el plástico del envase, ya
que podría suponer peligro de muerte
para ellos. Las láminas de plástico del
embalaje no son un juguete.
4.7 Daños materiales
¡Atención! Para evitar posibles daños
materiales tenga en cuenta las siguientes
disposiciones.
• Coloque el aparato siempre sobre una
superficie plana, seca y antideslizante
para que no pueda volcar ni resbalar.
• No coloque el aparato sobre una placa
de cocina caliente.
• No utilice al mismo tiempo el vaso 12 y
el bol 16. Podría sobrecargar el
aparato.
• No utilice el agitador y el vaso 12
nunca sin contenido. Ello podría
provocar un recalentamiento del motor.
• El agitador se debe utilizar como
máximo 10 minutos y la batidora como
máximo 3 minutos a la vez.
Posteriormente, debe dejar que el
aparato se enfríe a la temperatura
ambiente antes de volver a utilizarlo.
•Utilice el vaso 12 únicamente con la
tapa 11 colocada; de lo contrario, el
líquido podría salir despedido.
• No cambie el equipo de sitio si todavía
hay alimentos o masa dentro.
•Utilice el vaso 12 únicamente para
preparar bebidas mezcladas o aliños.
• No llene el bol 16 o el vaso 12 en
exceso, puesto que, en este caso, el
contenido podría salir despedido.
• No introduzca nunca productos
calientes o hirviendo en el vaso 12.
SKMP 1200 A2 7
Page 10
RP100104-105590-Küchenmaschine LB5 Seite 8 Dienstag, 10. Juni 2014 12:00 12
5. Desembalaje e instalación
1. Saque las piezas sueltas del embalaje.
2. Compruebe que todas las piezas estén
íntegras (ver "1.2 Volumen de
suministro" en la página 3) y no
muestren ningún tipo de daños.
3. Limpie a fondo el aparato antes de
usarlo por primera vez (ver "8. Limpieza
del aparato" en la página 17).
6. Manejo del aparato
6.1 Ensamblar el aparato
1. Accione la palanca de desbloqueo 6 y
bascule el brazo de accionamiento 1
hacia arriba.
Nota: Conmute completamente la
palanca de desbloqueo 6 y manténgala
así hasta que el brazo de
accionamiento 1 haya subido por
completo. A continuación, devuelva la
palanca de desbloqueo 6 a su posición
original.
2. Para utilizar el bol 16, insértelo en el
aparato base 7.
3. Bloquee el bol, girándolo ligeramente
en sentido contrario a las agujas del
reloj hasta que encaje.
¡Atención!
No utilice el bol 16 nunca sin la protección
contra salpicaduras 8 colocada. El
producto podría salir despedido.
4. Coloque la protección contra
salpicaduras 8 desde abajo sobre el
brazo de accionamiento 1. El orificio de
llenado con la tapa 9 debería apuntar
en dirección al regulador de
velocidad 4.
4. Coloque el aparato sobre una superficie
plana, seca y antideslizante para que
no pueda volcar ni resbalar.
5. Compruebe que el regulador de
velocidad 4 se encuentra en posición
"0".
6. Introduzca el enchufe en una toma de
corriente adecuada (ver "3. Datos
técnicos" en la página 4).
El aparato ya puede utilizarse.
5. Apriete ligeramente la protección contra
salpicaduras 8 hasta que encaje.
6. Seleccione el accesorio apropiado:
Gancho amasador 13: para masas
pesadas, p. ej. masa de pan.
Batidor de varillas 14: para montar
nata, clara de huevo, etc.
Accesorio mezclador 15: para masas
medianas o ligeras, p. ej. masa para
bizcocho o para crepes.
7. Inserte el accesorio desde abajo en el
alojamiento correspondiente en el brazo
de accionamiento 1.
Preste atención a introducir los
pequeños elementos de arrastre en el
vástago del accesorio en la ranura
transversal del alojamiento.
8. Presione el accesorio ligeramente hacia
dentro y gírelo en el sentido de las
agujas del reloj hasta que encaje.
9. Accione la palanca de desbloqueo 6 y
bascule el brazo de accionamiento 1
hacia abajo a la posición de trabajo.
Nota: Conmute completamente la
palanca de desbloqueo 6 y manténgala
así hasta que el brazo de
8
Page 11
RP100104-105590-Küchenmaschine LB5 Seite 9 Dienstag, 10. Juni 2014 12:00 12
accionamiento 1 haya bajado por
completo. A continuación, devuelva la
palanca de desbloqueo 6 a su posición
original.
El aparato ya puede utilizarse.
Colocar el vaso 12:
¡Atención!
• No utilice al mismo tiempo el vaso 12 y
el bol 16. Podría sobrecargar el
aparato.
1. Presione el desbloqueo 3 para la
cubierta 2 hacia la izquierda.
2. Quite la cubierta 2 .
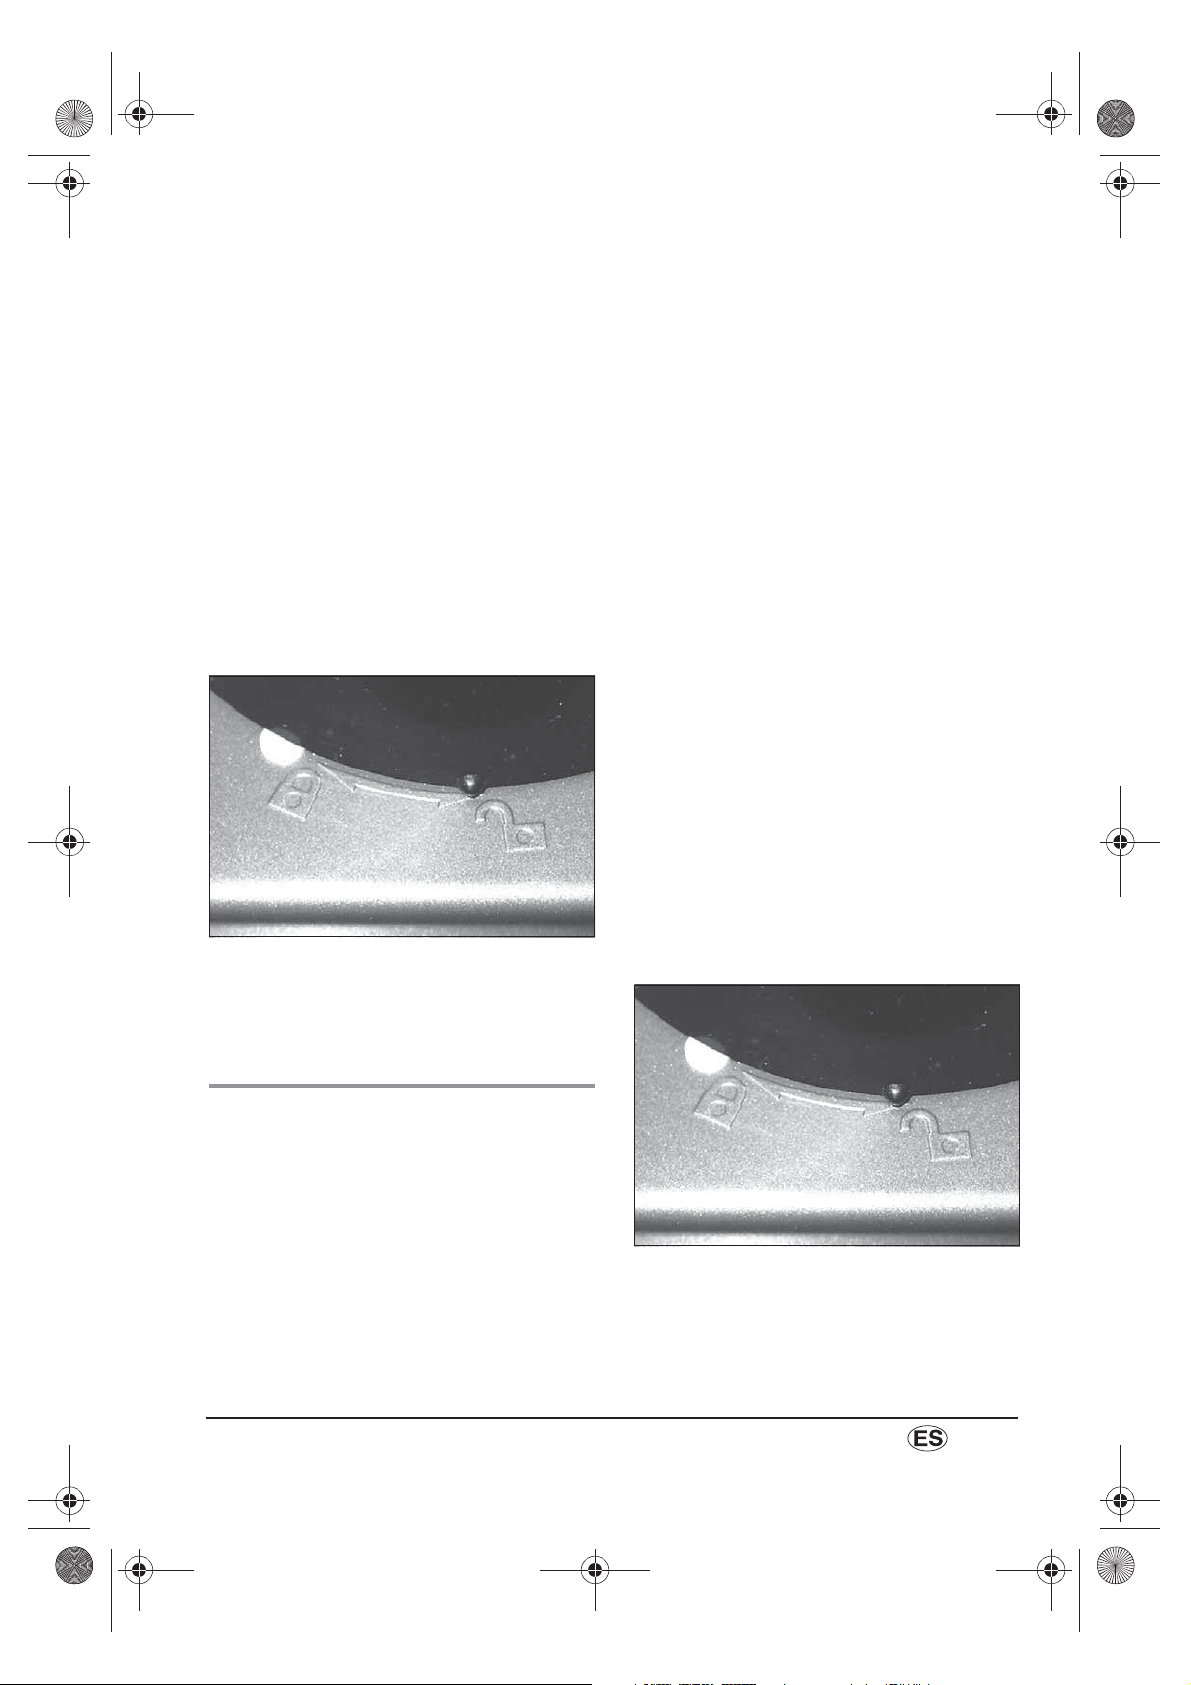
3. Coloque el vaso 12 de tal manera que
el pequeño saliente apunte hacia el
símbolo del candado abierto.
4. Gire el vaso 12 en el sentido de las
agujas del reloj hasta que encaje. El
pequeño saliente apunta entonces hacia
el símbolo del candado cerrado.
2. Para retirar un accesorio, presiónelo un
poco hacia dentro y desbloquéelo con
un ligero giro en sentido contrario a las
agujas del reloj.
3. Saque el accesorio.
4. Para quitar la protección contra
salpicaduras 8, retírela hacia abajo.
Para este fin, tire primero ligeramente
hacia abajo la parte posterior de la
protección contra salpicaduras 8.
5. Desbloquee el bol 16, girándolo un
poco en el sentido de las agujas del
reloj.
6. Retire el bol 16.
7. Accione la palanca de desbloqueo 6 y
bascule el brazo de accionamiento 1
hacia abajo a la posición de trabajo.
Nota: Conmute completamente la
palanca de desbloqueo 6 y manténgala
así hasta que el brazo de
accionamiento 1 haya bajado por
completo. A continuación, devuelva la
palanca de desbloqueo 6 a su posición
original.
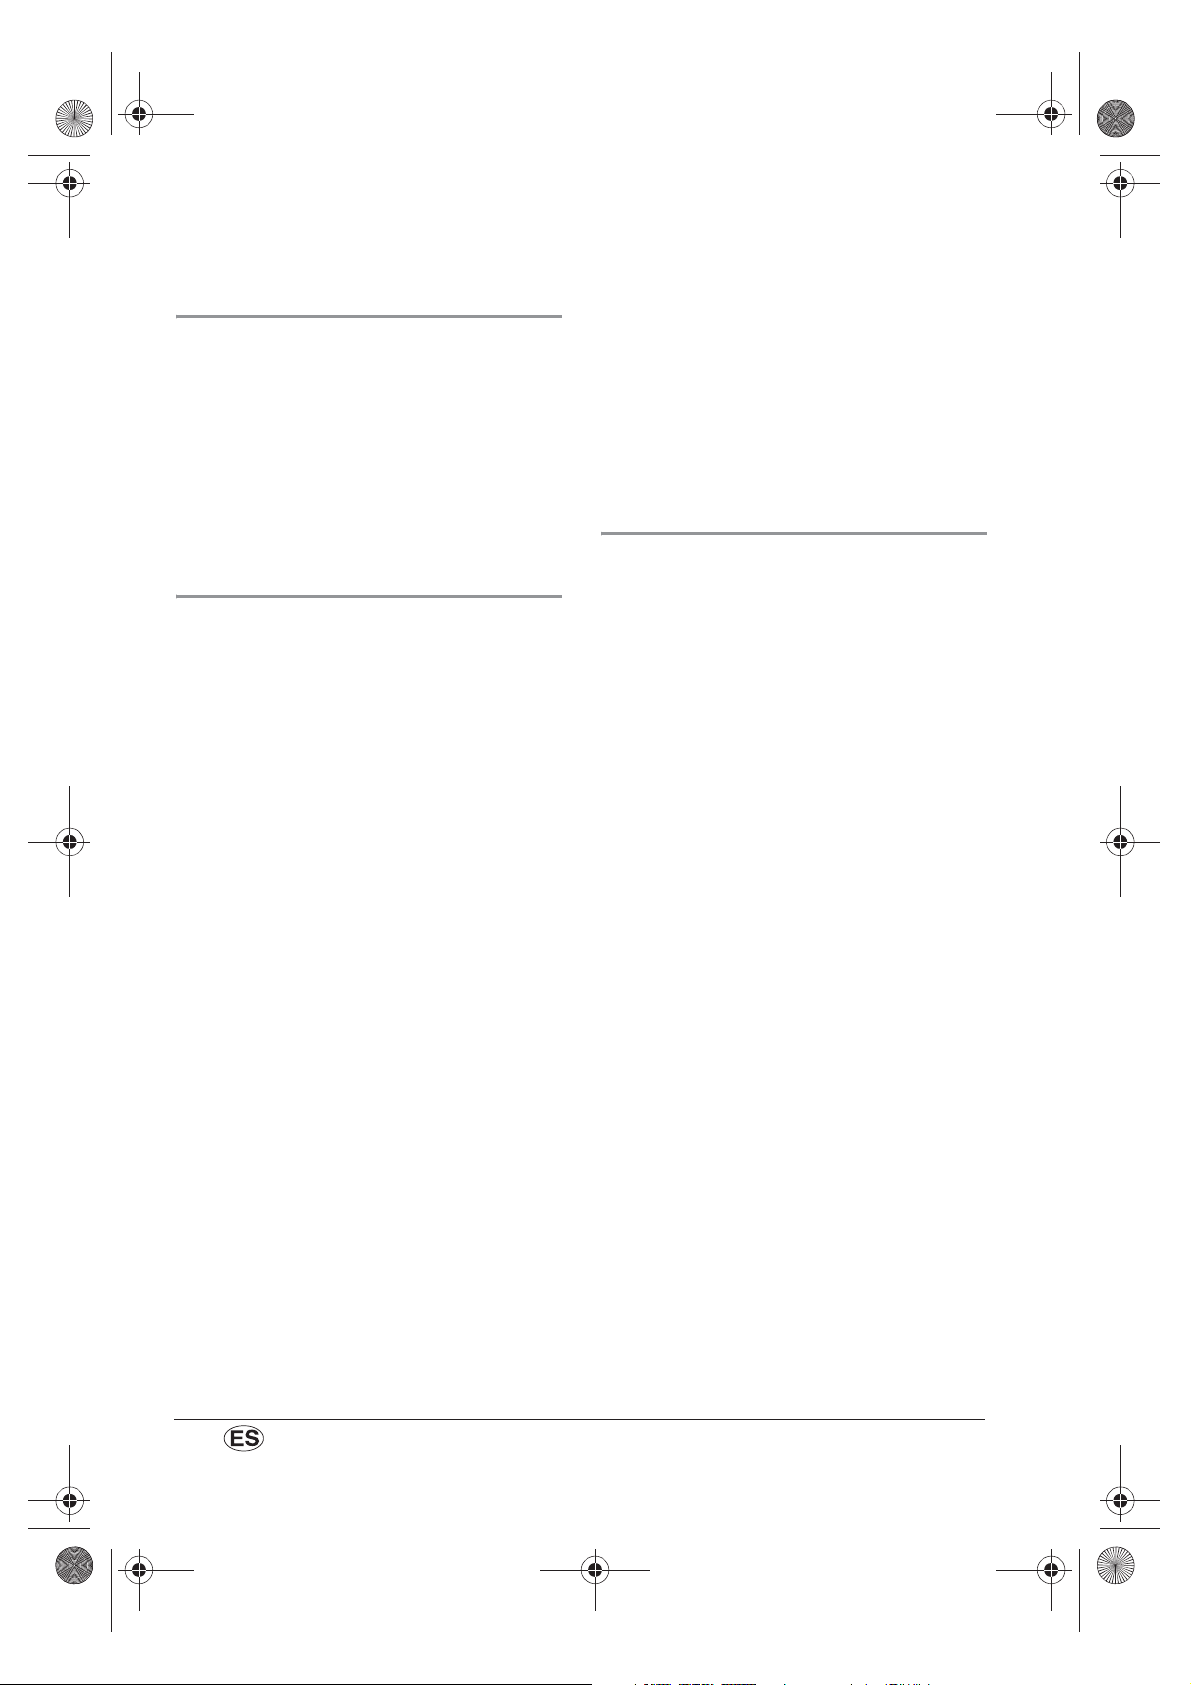
Quitar el vaso 12 :
1. Gire el vaso 12 en sentido contrario a
las agujas del reloj hasta que el
pequeño saliente apunte hacia el
símbolo del candado abierto.
6.2 Desensamblar el aparato
1. Accione la palanca de desbloqueo 6 y
bascule el brazo de accionamiento 1
hacia arriba.
Nota: Conmute completamente la
palanca de desbloqueo 6 y manténgala
así hasta que el brazo de
accionamiento 1 haya subido por
completo. A continuación, devuelva la
palanca de desbloqueo 6 a su posición
original.
SKMP 1200 A2 9
2. Quite el vaso 12.
3. Vuelva a colocar la cubierta 2 .
Page 12
RP100104-105590-Küchenmaschine LB5 Seite 10 Dienstag, 10. Juni 2014 12:00 12
6.3 Utilizar la protección contra
salpicaduras
Puede añadir ingredientes mientras vaya
mezclando:
1. Reduzca la velocidad a 1 - 2.
2. Bascule la tapa por encima del orificio
de llenado 9 hacia arriba.
3. Introduzca los ingredientes.
4. Vuelva a cerrar la tapa por encima del
orificio de llenado 9.
6.4 Utilizar el vaso 12
¡Atención!
• No deje el robot en marcha durante
más de 3 minutos a la vez. A
continuación, debe dejar que se enfríe
para evitar el sobrecalentamiento del
aparato.
1. Introduzca siempre primero los
ingredientes líquidos y después los
sólidos en el vaso 12.
2. Corte los ingredientes sólidos
previamente en en trozos pequeños
para evitar que queden bloqueados en
las cuchillas.
3. Es absolutamente necesario colocar la
tapa 11 encima del vaso 12 antes de
empezar a mezclar; de lo contrario, el
contenido podría salir despedido.
4. Si desea añadir algo mientras vaya
mezclando, abra el cierre 10 en la
tapa 11 del vaso 12, girándolo en el
sentido de las agujas del reloj.
5. Seleccione en el regulador de
velocidad 4 la velocidad deseada.
Nota:La velocidad ideal depende
principalmente de la consistencia del
producto. Cuanto más líquido sea el
contenido, mayor puede ser la
velocidad de trabajo.
6. Puede accionar alternativamente el
botón de impulso 5. Mientras mantenga
pulsado el botón de impulso 5, se
trabaja con la velocidad máxima.
Nota: El botón de impulso 5 sólo
funciona si con el regulador de
velocidad 4 se ha seleccionado, como
mínimo, la velocidad 1.
6.5 Regulación de la velocidad:
encendido y apagado
1. El aparato se enciende girando el
regulador de velocidad 4 hacia la
derecha.
2. Empiece con una velocidad
relativamente baja al mezclar y remover
y vaya aumentándola después.
Nota: El botón de impulso 5 sólo funciona
si con el regulador de velocidad 4 se ha
seleccionado, como mínimo, la velocidad 1.
10
Page 13
RP100104-105590-Küchenmaschine LB5 Seite 11 Dienstag, 10. Juni 2014 12:00 12
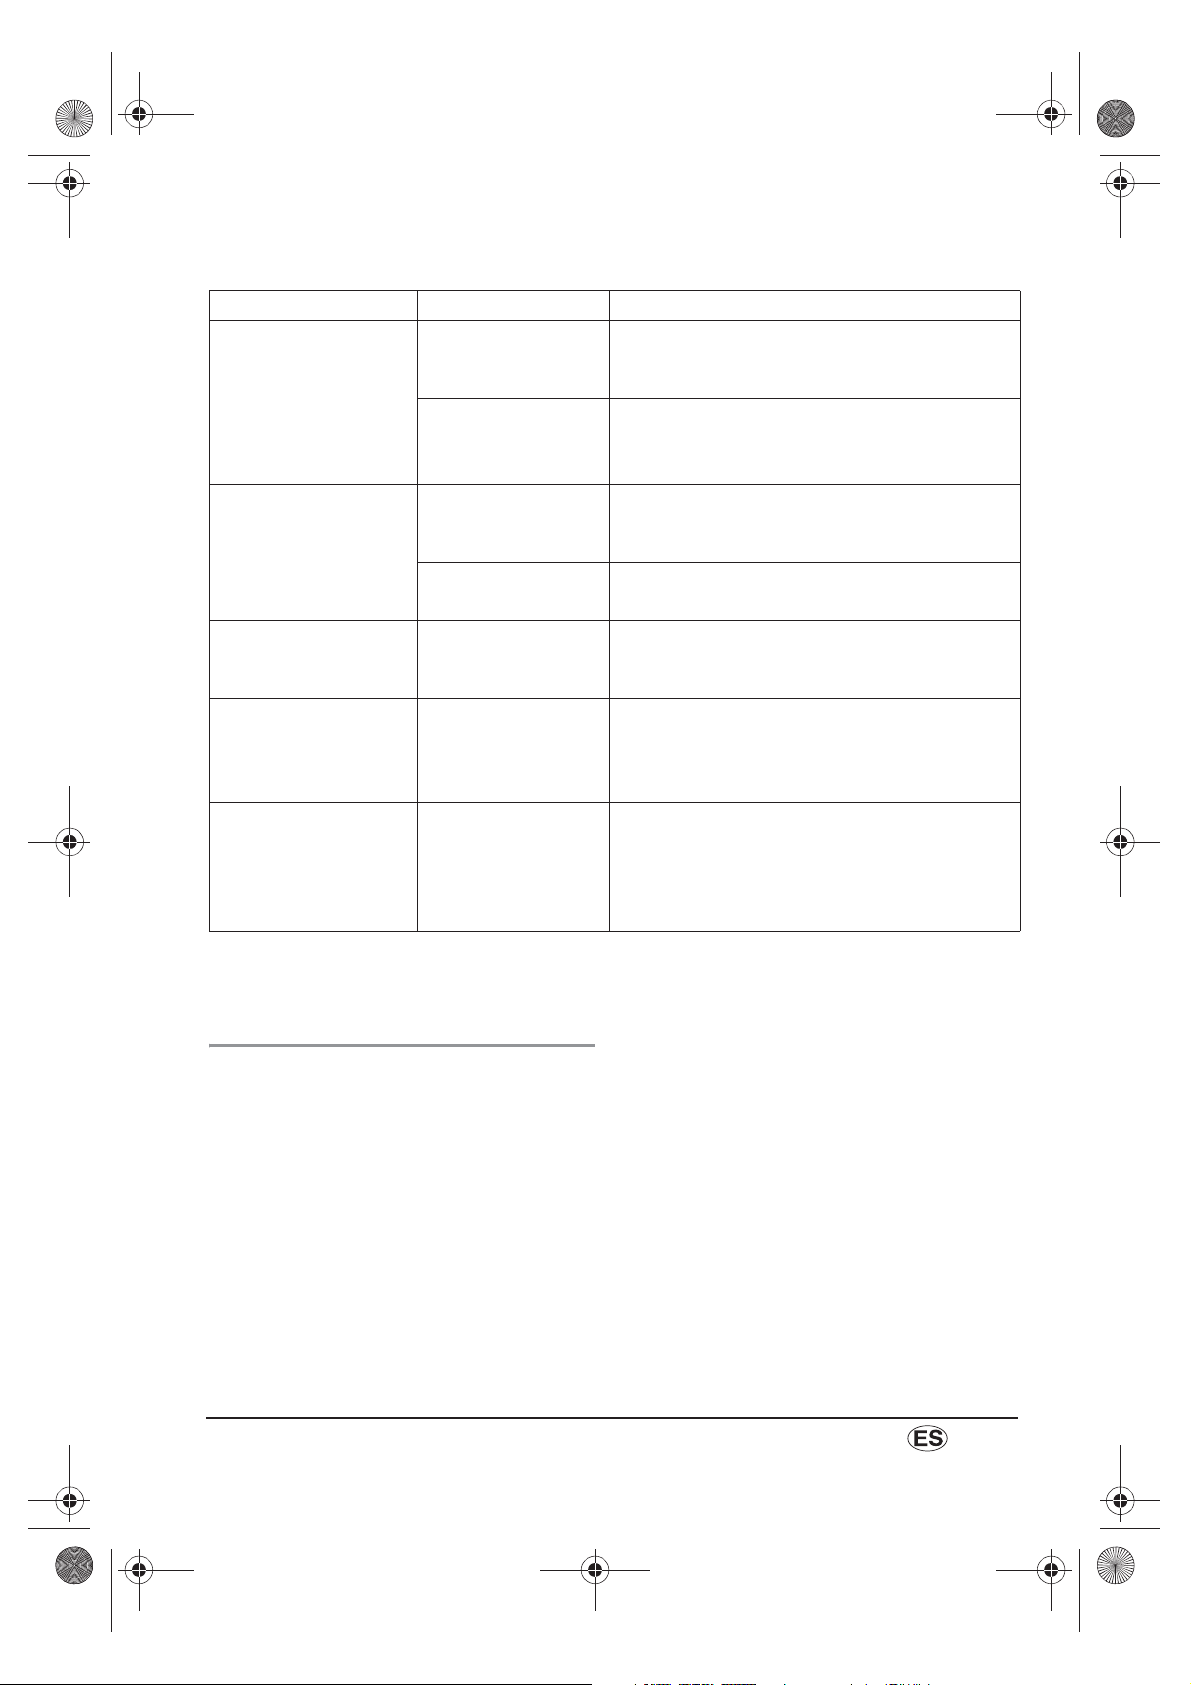
Recomendaciones para la velocidad
Velocidad Accesorio Descripción
1 - 2 todos
Gancho de amasar
13 o accesorio
mezclador 15
2 - 3 Accesorio
mezclador 15
Gancho amasador
13
4 - 6 Accesorio
mezclador 15
7 - 10 Batidor de varillas
14
Botón de impulso 5 Vaso 12
- Posición inicial para todos los procesos de
mezcla y agitación.
- Al añadir ingredientes
- Amasar y mezclar masas firmes o ingredientes
más sólidos
- Mezclar masas batidas espesas
- Mezclar mantequilla y harina
- Mezclar masa de levadura
- Amasar masa de levadura
- Amasar masas batidas espesas
- Masa para bizcocho
- Batir mantequilla con azúcar
- Masa para galletas
- Nata montada
-Clara de huevo
- Mayonesa
- Batir mantequilla hasta que esté espumosa
- Mezclar y triturar ingredientes blandos o
líquidos.
- El botón de impulso 5 sólo funciona si con el
regulador de velocidad 4 se ha seleccionado,
como mínimo, la velocidad 1.
Para apagar el aparato, gire el regulador
de velocidad 4 a la posición "0".
6.6 Protección de sobrecalentamiento
El aparato dispone de una protección
contra sobrecalentamiento. Si el motor se
calienta en exceso, el aparato se
desconecta automáticamente.
1. Apague el aparato.
2. Desconecte el enchufe.
3. Deje que el aparato se enfríe a
temperatura ambiente.
SKMP 1200 A2 11
Page 14
RP100104-105590-Küchenmaschine LB5 Seite 12 Dienstag, 10. Juni 2014 12:00 12
7. Recetas
7.1 Pan blanco
Ingredientes:
• 1 kg de harina de trigo tipo 405 (harina
para pastelería)
• 4 cucharaditas de sal
• 4 sobres de levadura seca
(aprox. 25 - 30 g)
• 650 ml de agua tibia
Elaboración:
1. Ponga los ingredientes en el bol 16.
2. Inserte la protección contra salpicaduras 8
y el gancho amasador 13.
3. Amase 10 minutos en el nivel 3.
4. Saque el bol y cúbralo con un paño.
5. Deje subir la masa 1 - 2 horas en un
lugar cálido.
6. Forme una hogaza o coloque la masa
en un molde.
7. Precaliente el horno a 220 °C.
8. Hornee el pan 35 - 40 minutos en el
centro del horno.
7.2 Masa de pizza
Nota: la masa de pizza sale
especialmente bien cuando se prepara, al
menos, 24 horas antes de hornearla y se
deja reposar dentro del frigorífico. La
siguiente receta le proporcionará un
resultado "como un auténtico italiano".
Ingredientes para 4 personas:
• 500 g de harina del tipo 405
• 300 ml de agua del grifo
• como máx. 1/5 del paquete de
levadura
• 20 g de sal
Elaboración:
1. Ponga 300 g de la harina en el bol 16.
2. Inserte la protección contra salpicaduras 8
y el accesorio mezclador 15.
3. Ajuste el nivel 2.
4. Añada lentamente 300 ml de agua del
grifo a través del orificio de llenado 9.
5. Incorpore la levadura.
6. Ponga la sal.
7. Mezcle la masa en el nivel 4 - 5 hasta
que esté lisa.
8. Cubra el bol y deje subir la masa unos
20 minutos a temperatura ambiente.
9. Vuelva a mezclar la masa unos 3
minutos en el nivel 4.
10.Retire el accesorio mezclador 15 e
inserte el gancho amasador 13.
11. Amase la masa en el nivel 3.
12.Vaya incorporando poco a poco el
resto de la harina a través del orificio de
llenado 9.
Nota: en cuanto la masa de pizza se
separe del fondo al amasar y forme una
bola, ya no añada más harina.
13.Para finalizar vuelva a amasar la masa
otros 3 minutos aproximadamente en el
nivel 2.
Nota: la masa de pizza tiene la
consistencia correcta cuando mantiene
un momento la forma de bola pero, con
el tiempo (aprox. 30 minutos), pierde la
forma y se expande.
14.Vuelva a dejar reposar la masa de pizza
20 minutos en el bol cubierto.
15.Vuelque el bol y deje que la masa caiga
sobre una tabla bien espolvoreada con
harina.
16.Enharine bien la superficie de la masa.
17. Amase brevemente la masa y forme una
bola.
12
Page 15
RP100104-105590-Küchenmaschine LB5 Seite 13 Dienstag, 10. Juni 2014 12:00 12
18.Coloque la bola de masa en un
recipiente que se pueda cerrar y déjelo
24 horas en el frigorífico.
19. Saque la masa del frigorífico y póngala
de nuevo sobre una bandeja de horno
bien espolvoreada con harina.
20.Enharine bien la masa y amásela
brevemente para que se forme una
bonita bola de masa.
21. La masa está terminada. Ahora puede
formar y guarnecer las bases de pizza.
Notas:
• no es necesario disolver previamente la
levadura en agua.
• Se añade bastante menos levadura de
lo que se indica en el paquete. Utilice la
cantidad necesaria que indica el
paquete para 200-250 g de harina.
• Si en su masa de pizza destaca el sabor
de la levadura, entonces deberá seguir
reduciendo la cantidad de levadura. La
cantidad de levadura reducida se
compensa con un tiempo más
prolongado para que suba.
• La sal marina hace que la masa sea más
aromática.
• Cuando se prueba directamente
después de añadir la sal, en principio la
masa debe saber algo a sal. Si destaca
más el sabor de la harina o de la
levadura, entonces falta algo de sal.
Añadiendo después el resto de la
harina, vuelve a desaparecer el sabor a
sal.
• Para que suba, no exponga la masa a
una fuente de calor adicional. Aunque
puede ahorrar tiempo, influye
negativamente en el sabor.
• El tiempo de reposo de 24 horas es muy
importante para que una masa de pizza
sepa bien.
• La masa de pizza preparada de este
modo puede conservarse varios días en
el frigorífico.
7.3 Bizcocho con fruta
Ingredientes:
• 1 copa de yogur (150 ml)
• 1 copa de aceite o mantequilla blanda
(150 g)
• 2 copas de azúcar (300 ml)
• 3 copas de harina (320 ml)
• 1 sobre de levadura química
•4 yemas de huevo
• 4 claras de huevo
• 1 lata de fruta según los gustos o fruta
fresca (aprox. 500 g)
Elaboración:
1. Ponga las claras de huevo en el bol 16.
2. Inserte la protección contra salpicaduras 8
y el batidor de varillas 14 .
3. Monte la clara de huevo a punto de
nieve 1 - 2 minutos en el nivel 9.
4. Saque la clara de huevo del bol y
resérvela.
5. Ponga el yogur en el bol.
6. Aclare la copa de yogur vacía y utilícela
para medir los demás ingredientes, o
mida las cantidades con una copa
graduada.
7. 1 copa de aceite (150 ml) o
mantequilla blanda (150 g).
8. Añadir 2 copas de azúcar (300 ml).
9. Añadir 4 yemas de huevo.
10.Bata los ingredientes aprox. 2 minutos
en el nivel 6 o 7 hasta que la masa esté
espumosa.
11. Añada 3 copas de harina (450 ml o
320 g) y la levadura química.
12.Retire el batidor de varillas 14 e inserte
el accesorio mezclador 15.
13.Mezcle los ingredientes aprox. 5
minutos en el nivel 4.
14.Pare el robot de cocina.
15.Añada la clara de huevo montada.
SKMP 1200 A2 13
Page 16
RP100104-105590-Küchenmaschine LB5 Seite 14 Dienstag, 10. Juni 2014 12:00 12
16.Añada la fruta escurrida y,
eventualmente, cortada en trocitos
pequeños.
17. Incorpore la fruta y la clara de huevo
montada 10 - 30 segundos en el nivel 2.
18.Coloque la masa en un molde.
19. Hornee aprox. 50 minutos a 200 °C.
7. 4 Bi zco cho
Ingredientes:
• 250 g de mantequilla
• 250 g de azúcar
•6 huevos
• 250 g de almidón
• 75 g de harina
• 1 sobre de levadura química (20 g)
• 1 limón sin tratar
• 1 sobre de azúcar de vainilla (2
cucharaditas)
Elaboración:
1. Tamice la harina y el almidón en un bol,
añada la levadura química y mezcle
bien.
2. Inserte la protección contra salpicaduras 8
y el accesorio mezclador 15.
3. Ponga la mantequilla, el azúcar y el
azúcar de vainilla en el bol 16.
4. Ajuste el nivel 3 y mezcle hasta obtener
una masa suelta.
5. Incorpore sucesivamente los huevos.
6. Ralle la cáscara del limón y añádala.
7. Añada la mezcla de harina por
cucharadas e incorpórela.
8. Una vez que todos los ingredientes
estén mezclados, remueva 3 minutos en
el nivel 6.
9. Ponga la masa en un molde engrasado.
10.Hornee unos 60 minutos a 180 °C
(calor superior e inferior) o 160 °C
(convección).
11. Decore el pastel enfriado con azúcar
glas o un glaseado de azúcar. El zumo
del limón se puede añadir al glaseado
de azúcar.
7. 5 Go fre s
Ingredientes:
•6 huevos
• 1 sobre de azúcar de vainilla
• 1/2 sobre de levadura química
• 250 g de azúcar
• 200 g de mantequilla o margarina
• 500 g de harina
• 300 ml de leche
• 125 ml de agua mineral con gas
Elaboración:
1. Separar las yemas de las claras.
2. Ponga las claras de huevo en el bol 16.
3. Inserte la protección contra salpicaduras 8
y el batidor de varillas 14 .
4. Monte la clara de huevo a punto de
nieve 1 - 2 minutos en el nivel 9.
5. Pare el robot de cocina.
6. Saque la clara de huevo del bol y
resérvela.
7. Quite el batidor de varillas 14 e inserte
el accesorio mezclador 15.
8. Bata la mantequilla y el azúcar en el
nivel 5-6 hasta obtener una masa
cremosa.
9. Ajuste el nivel 4.
10.Añada poco a poco las yemas de
huevo, el agua mineral y el azúcar de
vainilla.
11. Mezcle la harina y la levadura química
y añádalas por cucharadas.
12.Pare brevemente el robot de cocina y
ponga la clara montada en el bol.
13.En el nivel 2, incorpore la clara montada
unos 10 a 30 segundos.
14.Deje reposar la masa aprox.
30 minutos.
15.A continuación, fría los gofres.
14
Page 17
RP100104-105590-Küchenmaschine LB5 Seite 15 Dienstag, 10. Juni 2014 12:00 12
7.6 Cupcakes de chocolate
Ingredientes:
• 100 g de mantequilla
• 150 g de azúcar
•2 huevos
• 100 g de harina
• ½ cucharada pequeña de levadura
química
• ¼ de cucharada pequeña de
bicarbonato sódico
• ¼ de cucharada pequeña de sal
• 75 g de cacao en polvo
• 130 ml de leche, o más si fuera
necesario
• 1 cucharada pequeña de extracto o
pasta de vainilla
Elaboración:
1. Colar la harina y el cacao en una
fuente, añadir colados la levadura
química, el bicarbonato sódico y
mezclarlo todo a fondo.
2. Inserte la protección contra salpicaduras 8
y el accesorio mezclador 15.
3. Ponga la mantequilla, el azúcar y la
vainilla en el bol 16.
4. Ajuste el nivel 3 y mezcle hasta obtener
una masa suelta.
5. Incorporar y mezclar los huevos de uno
en uno.
6. Incorporar de forma alterna la mezcla
harinosa y unos 130 ml de leche y
mezclarlo todo removiendo hasta
obtener una masa uniforme.
7. Si la masa está demasiado seca, añadir
leche en pequeñas porciones hasta que
se vuelva semilíquida.
8. Ponga la masa en un Cupcake Maker o
engrase tazas refractarias y utilícelas
como moldes. También puede utilizar
moldes especiales.
9. Hornee unos 20 minutos a 190 °C.
7.7 Galletas de mantequilla
Ingredientes:
• 230 g de harina
• 150 g de mantequilla fría, cortada en
lonchas delgadas
• 100 g de azúcar
•1 huevo
• 1 sobre de azúcar de vainilla
• 1 pizca de sal
Elaboración:
1. Ponga los ingredientes en el bol 16.
2. Inserte la protección contra salpicaduras 8
y el gancho amasador 13 .
3. Amase unos 5 minutos en el nivel 2 - 3.
4. Ponga la masa en una manga pastelera
y expúlsela.
5. Coloque los cordones en forma de S,
rectas o en círculo encima de una
bandeja de horno.
6. Hornee 10 minutos a 180 °C.
Notas:
• Antes de hornear las galletas, puede
decorarlas con trocitos de avellana o
almendra.
• Las galletas horneadas y enfriadas se
pueden decorar con cobertura de
chocolate.
7.8 Batido de fresa con suero de leche
Ingredientes:
•1/2 l de leche fría
• 1/2 l de suero de leche frío
• 250 g de fresas frescas
• 4 cucharadas de mermelada de fresa
• 4 cucharadas de miel
• 1 cucharada de zumo de limón
• 1 pizca de sal
• según los gustos, adicionalmente azúcar
o edulcorante
SKMP 1200 A2 15
Page 18
RP100104-105590-Küchenmaschine LB5 Seite 16 Dienstag, 10. Juni 2014 12:00 12
Elaboración:
1. Quite la tapa 11 del vaso 12.
2. Ponga la leche, el suero de leche, la
miel, la mermelada de fresa, el zumo de
limón y una pizca de sal en el vaso.
3. Coloque la tapa 11 en el vaso 12.
4. Coloque el vaso 12 encima del
aparato.
5. Bata los ingredientes 30 segundos con
la tecla de impulso 5 o en el nivel de
velocidad 10.
Nota: El botón de impulso 5 sólo
funciona si con el regulador de
velocidad 4 se ha seleccionado, como
mínimo, la velocidad 1.
6. Suelte la tecla de impulso o reduzca la
velocidad al nivel 1.
7. Abra el cierre de la tapa 10 en la
tapa 11 del vaso 12 en el sentido de
las agujas del reloj.
8. Introduzca las fresas.
9. Si desea un batido más dulce, añada
azúcar adicional al gusto.
10.Bata dos minutos en el nivel máximo
(tecla de impulso o nivel de
velocidad 10).
11. Vierta el batido en vasos y decore con
fresas frescas.
7.9 Batido de plátano
Ingredientes:
• 2 plátanos muy maduros
•1/2 l de leche fría
• 4 cucharadas de helado de vainilla
• Chips de chocolate
Elaboración:
1. Pele los plátanos y córtelos en trozos.
2. Quite la tapa 11 del vaso 12.
3. Ponga todos los ingredientes en el
vaso 12.
4. Coloque la tapa 11 en el vaso 12.
5. Coloque el vaso 12 encima del
aparato.
6. Bata los ingredientes 60 segundos con
la tecla de impulso 5 o en el nivel de
velocidad 10.
Nota: El botón de impulso 5 sólo
funciona si con el regulador de
velocidad 4 se ha seleccionado, como
mínimo, la velocidad 1.
7. Vierta el batido en vasos y decore con
chips de chocolate.
7.10Batido de guindas
Ingredientes:
• 250 g de guindas de bote,
deshuesadas
• 150 g de yogur
•Azúcar al gusto
Elaboración:
1. Quite la tapa 11 del vaso 12.
2. Ponga las guindas con el jugo en el
vaso 12.
3. Coloque la tapa 11 en el vaso 12.
4. Coloque el vaso 12 encima del
aparato.
5. Triture las guindas 15 segundos con la
tecla de impulso 5.
Nota: El botón de impulso 5 sólo
funciona si con el regulador de
velocidad 4 se ha seleccionado, como
mínimo, la velocidad 1.
6. Añada el yogur y el azúcar.
7. Con la tecla de impulso 5 o en el nivel
de velocidad 10, bata los ingredientes
(máx. 2 minutos) hasta obtener un
batido liso y ligado.
16
Page 19
RP100104-105590-Küchenmaschine LB5 Seite 17 Dienstag, 10. Juni 2014 12:00 12
8. Limpieza del aparato
¡Advertencia! Para evitar el
riesgo de descarga eléctrica,
lesión o deterioro:
– Desenchufe el aparato de la
corriente antes de cada
limpieza.
– Nunca sumerja el aparato
base 7 en agua.
¡Precaución! En ningún caso utilice
productos de limpieza abrasivos, corrosivos
o que puedan rayar o dejar rozaduras. De
lo contrario, podría dañar el aparato.
8.1 Limpieza del aparato base (7)
1. Limpie el aparato base 7 con un paño
húmedo. También puede aplicar un
poco de detergente lavavajillas.
2. Aclare el aparato con agua limpia.
3. No vuelva a usar el aparato base 7
mientras no esté completamente seco.
8.2 Limpieza de la protección contra
salpicaduras (
amasador (
varillas (
8), del gancho
13), del batidor de
14) y del accesorio
mezclador (15)
¡Precaución! La protección contra
salpicaduras 8 no es apta para el
lavavajillas.
El gancho amasador 13, el batidor de
varillas 14 y el accesorio mezclador 15 se
pueden limpiar también en el lavavajillas.
1. Sumerja los elementos en agua fría o
tibia para reblandecer los restos de
masa.
Nota: puede añadir un poco de
detergente lavavajillas al agua.
2. Elimine los restos de masa
reblandecidos con el cepillo de fregar.
3. Enjuague con agua limpia.
4. Deje secar por completo los elementos
antes de volver a utilizarlos.
8.3 Limpieza del bol (16)
El bol 16 está hecho de acero inoxidable y
se puede lavar en el fregadero o en el
lavavajillas.
8.4 Limpieza del vaso (12)
Nota: Tanto el vaso 12 como la tapa 11
se pueden lavar en el lavavajillas.
1. Coloque el vaso 12 encima del
aparato.
2. Llénelo de agua caliente con detergente
hasta la mitad, más o menos.
3. Coloque la tapa 11.
4. Compruebe que el regulador de
velocidad 4 se encuentra en posición
"0".
5. Introduzca el enchufe en una toma de
corriente adecuada (ver "3. Datos
técnicos" en la página 4).
6. Pulse varias veces brevemente la tecla
de impulso 5.
Nota: El botón de impulso 5 sólo
funciona si con el regulador de
velocidad 4 se ha seleccionado, como
mínimo, la velocidad 1.
7. Quite el vaso 12 del aparato.
8. Tire el agua de lavado.
9. Enjuague el vaso 12 bajo agua limpia.
10.Deje secar completamente el vaso 12
antes de volver a utilizarlo.
SKMP 1200 A2 17
Page 20
RP100104-105590-Küchenmaschine LB5 Seite 18 Dienstag, 10. Juni 2014 12:00 12
9. Eliminación
9.1 Aparato
El símbolo del cubo de basura
tachado sobre ruedas significa que el producto, en la
Unión Europea, tiene que ser
entregado en un puesto colector de basura separada. Esta regla se aplica
a este producto y a todos los accesorios
marcados con este símbolo. Los productos
marcados no pueden ser desabastecidos
por la basura casera normal, sino tienen
que ser entregados en un puesto de recepción para el reciclaje de aparatos eléctricos
10. Garantía de HOYER Handel GmbH
Estimada clienta, estimado cliente:
usted recibe una garantía de 3 años para
este aparato a partir de la fecha de
compra. En caso de haber defectos en el
producto le corresponden a usted derechos
legales respecto al vendedor del producto.
Nuestra garantía, que se presenta a
continuación, no limita estos derechos
legales.
Condiciones de garantía
El periodo de garantía comienza con la
fecha de compra. Guarde bien el ticket de
caja. Este comprobante se necesita como
prueba de la compra.
Si en el transcurso de tres años a partir de la
fecha de compra de este producto aparece
algún defecto de material o de fabricación,
nosotros le repararemos o repondremos el
producto, a nuestra elección, sin coste para
usted. Esta prestación de garantía
presupone que dentro del plazo de tres
y electrónicos. El reciclaje ayuda a reducir
el consumo de materias primas y a aliviar el
medio ambiente. Puede obtener información
sobre la evacuación y la localización del
punto de reciclaje más cercano, por
ejemplo, en el servicio de limpieza municipal o en las páginas amarillas.
9.2 Embalaje
Si desea eliminar el embalaje, respete las
correspondientes normas medioambientales
de su país.
años se presentará el aparato defectuoso y
el comprobante de compra (ticket de caja)
y se describirá brevemente por escrito en
qué consiste el defecto y cuándo se
produjo.
Cuando el defecto esté cubierto por nuestra
garantía, recibirá de vuelta el producto
reparado o uno nuevo. Con la reparación o
el cambio del producto no comienza un
nuevo periodo de garantía.
Periodo de garantía y reclamaciones legales
por defectos
El periodo de garantía no se prolonga por
la prestación de la garantía. Esto también es
válido para las piezas cambiadas o
reparadas. Los daños y defectos que
puedan existir ya al realizar la compra se
deberán notificar inmediatamente después
18
Page 21
RP100104-105590-Küchenmaschine LB5 Seite 19 Dienstag, 10. Juni 2014 12:00 12
de desembalar el producto. Las
reparaciones que se produzcan una vez
transcurrido el periodo de garantía, se
deberán pagar.
Alcance de la garantía
El aparato ha sido producido
cuidadosamente siguiendo unas exigentes
directivas de calidad y se ha comprobado
meticulosamente antes de su suministro.
La prestación de garantía es válida para
defectos de material o de fabricación. Esta
garantía no abarca aquellas piezas del
producto sometidas a un desgaste normal y
que por lo tanto se pueden considerar como
piezas de desgaste, o los daños en piezas
frágiles como p. ej. interruptores,
acumuladores o piezas fabricadas de
vidrio.
Esta garantía se extingue si el producto
dañado no se ha utilizado o mantenido
correctamente. Para que el uso del producto
sea correcto, se deben seguir exactamente
todas las indicaciones contenidas en las
instrucciones de uso.
Es imprescindible evitar todos aquellos usos
y manejos que se desaconsejan o de los
que se advierte en las instrucciones de uso.
El producto está destinado solo para uso
privado, no profesional.
La garantía se extingue en caso de manejo
indebido o incorrecto, empleo de violencia
y en caso de intervenciones que no hayan
sido realizadas por nuestro centro de
servicio técnico autorizado.
Desarrollo de un caso de garantía
105590: crema) y el ticket de caja
como prueba de la compra.
• El número de artículo lo encontrará en la
placa de características, un grabado, en
la portada de sus instrucciones (abajo a
la izquierda) o como adhesivo sobre la
parte posterior o la inferior.
• Si se producen fallos de funcionamiento
u otros defectos, póngase primero en
contacto telefónico o por correo
electrónico con el centro de servicio que
a continuación se nombra.
• Una vez registrado como defectuoso ya
puede enviar el producto, exento de
franqueo, a la dirección del servicio
técnico que se le habrá comunicado,
acompañándolo con el comprobante de
compra (ticket de caja) y con la
descripción del defecto y de cuándo se
ha producido.
En www.lidl-service.com puede
usted descargar este y muchos
otros manuales, vídeos de
productos y software
Centro de servicio técnico
Servicio España
Tel.: 902 59 99 22
(0,08 EUR/Min. + 0,11 EUR/llamada
(tarifa normal))
(0,05 EUR/Min. + 0,11 EUR/llamada
(tarifa reducida))
E-Mail: hoyer@lidl.es
Para garantizar una rápida gestión de su
asunto, siga las siguientes indicaciones:
• Para todas las consultas tenga
preparado el número de artículo (para
este aparato: IAN 100104: rojo/
SKMP 1200 A2 19
IAN:
100104: rojo
105590: crema
Page 22
RP100104-105590-Küchenmaschine LB5 Seite 20 Dienstag, 10. Juni 2014 12:00 12
Proveedor
Tenga en cuenta que la siguiente dirección
no es ninguna dirección de servicio
técnico. Contacte primero con el centro de
servicio técnico arriba citado.
HOYER Handel GmbH
Kühnehöfe 5
22761 Hamburg
Alemania
20
Page 23
RP100104-105590-Küchenmaschine LB5 Seite 21 Dienstag, 10. Juni 2014 12:00 12
Indice
1. Descrizione dell'apparecchio . . . . . . . . . . . . . . . . . . . . . . . . . . . . . . . . . . . . . . . . . . . . . . 21
2. Denominazione dei componenti (vedere pagina ripiegata) . . . . . . . . . . . . . . . . . . . . . . . . . 22
3. Dati tecnici . . . . . . . . . . . . . . . . . . . . . . . . . . . . . . . . . . . . . . . . . . . . . . . . . . . . . . . . . . . 22
4. Indicazioni di sicurezza . . . . . . . . . . . . . . . . . . . . . . . . . . . . . . . . . . . . . . . . . . . . . . . . . . 23
5. Disimballaggio e montaggio. . . . . . . . . . . . . . . . . . . . . . . . . . . . . . . . . . . . . . . . . . . . . . . 26
6. Utilizzo dell’apparecchio . . . . . . . . . . . . . . . . . . . . . . . . . . . . . . . . . . . . . . . . . . . . . . . . . 26
7. Ricette . . . . . . . . . . . . . . . . . . . . . . . . . . . . . . . . . . . . . . . . . . . . . . . . . . . . . . . . . . . . . . 30
8. Pulizia dell’apparecchio. . . . . . . . . . . . . . . . . . . . . . . . . . . . . . . . . . . . . . . . . . . . . . . . . . 35
9. Smaltimento . . . . . . . . . . . . . . . . . . . . . . . . . . . . . . . . . . . . . . . . . . . . . . . . . . . . . . . . . . 36
10. Garanzia di HOYER Handel GmbH . . . . . . . . . . . . . . . . . . . . . . . . . . . . . . . . . . . . . . . . . . 36
Congratulazioni per l'acquisto del
vostro nuovo apparecchio.
Avete acquistato un prodotto di qualità. Le
istruzioni per l'uso sono parte integrante del
prodotto. Esse contengono avvertenze
importanti sulla sicurezza, l'utilizzo e lo
smaltimento.
1. Descrizione dell'apparecchio
1.1 Impiego previsto
Il robot da cucina SilverCrest SKMP 1200
A2 permette di mixare, frullare, impastare,
sbattere e amalgamare alimenti solidi e
liquidi.
Questo apparecchio può essere utilizzato
esclusivamente in ambienti asciutti. Non è
consentito l’utilizzo in ambienti aperti o umidi.
Questo apparecchio è destinato all’uso in
abitazioni private e non può essere
utilizzato per applicazioni commerciali.
L'apparecchio è anche adatto per:
• l'utilizzo in cucine per dipendenti in
negozi, uffici e altri luoghi di lavoro,
• l'utilizzo in contesto agricolo,
Prima di utilizzare il prodotto leggere con
attenzione tutte le avvertenze relative all'uso
e alla sicurezza. Utilizzare il prodotto solo
come descritto e per i campi di impiego
indicati.
In caso di cessione del prodotto a terzi
consegnare tutta la documentazione.
• clienti di hotel, motel e altri tipi di
alloggi,
•Bed & Breakfast
1.2 Dotazione
• 1 robot da cucina, base
• 1 protezione paraspruzzi
•1 caraffa
• 1 gancio impastatore
• 1 frusta a filo
• 1 frusta piatta
• 1 manuale d’uso
SKMP 1200 A2 21
Page 24

RP100104-105590-Küchenmaschine LB5 Seite 22 Dienstag, 10. Juni 2014 12:00 12
1.3 Varianti
L'apparecchio viene fornito in due versioni:
• RP100104: rosso
• RP105590: crema
Il funzionamento è identico per entrambe le
varianti di colore.
2. Denominazione dei componenti (vedere pagina ripiegata)
1 Braccio motore
2 Copertura
3 Sblocco della copertura
4 Selettore della velocità con funzione di
accensione/spegnimento
5 Tasto per il funzionamento a impulsi
6 Leva di sgancio
7 Base
8 Protezione paraspruzzi
9 Apertura di riempimento con coperchio
10 Blocco del coperchio
11 Coperchio della caraffa
12 Caraffa con coperchio e blocco del
coperchio
13 Gancio impastatore
14 Frusta a filo
15 Frusta piatta
16 Ciotola
3. Dati tecnici
Tensione di alimentazione: 220 - 240 V~/50 Hz
Potenza: 1.200 watt
Classe di protezione: II
Tempo max. di funzionamento ininterrotto
robot da cucina: 10 minuti
Tempo max. di funzionamento ininterrotto caraffa: 3 minuti
Tempo max. di funzionamento ininterrotto: indica per quanto tempo l’apparecchio
può funzionare ininterrottamente.
22
Page 25

RP100104-105590-Küchenmaschine LB5 Seite 23 Dienstag, 10. Juni 2014 12:00 12
4. Indicazioni di sicurezza
4.1 Spiegazione dei termini
Nelle presenti istruzioni per l’uso vengono
utilizzati i seguenti termini di segnalazione:
Avvertenza!
Pericolo elevato: la mancata
osservanza dell’avvertenza può
determinare lesioni fisiche e
mortali.
Attenzione!
Pericolo medio: la mancata osservanza
dell’avvertenza può causare danni
materiali.
Nota:
Pericolo ridotto: circostanze che devono
essere osservate nell utilizzo dell’apparecchio.
4.2 Indicazioni particolari per
questo apparecchio
Avvertenza!
indicazioni, per evitare di provocare
lesioni o danni.
• Il presente apparecchio può essere utilizzato da
persone che presentino limitazioni delle proprie
capacità fisiche, sensoriali o mentali o scarsa
esperienza e/o scarsa conoscenza, purché siano
sorvegliati o abbiano ricevuto istruzioni
sull'utilizzo sicuro dell'apparecchio e abbiano
compreso i pericoli che ne derivano.
• L'apparecchio non può essere utilizzato dai
bambini.
• Tenere l'apparecchio e il suo cavo di
collegamento alla rete lontano dalla portata dei
bambini.
• I bambini non devono giocare con l’apparecchio.
Osservare le seguenti
• Se lasciato incustodito e prima del montaggio,
dello smontaggio o della pulizia scollegare
sempre l'apparecchio dalla rete.
7
• Non immergere la base
in acqua.
• Non utilizzare in nessun caso detergenti in crema
corrosivi o abrasivi. L’apparecchio potrebbe
risultarne danneggiato.
4.3 Indicazioni generali
• Prima dell’utilizzo leggere accurata-
mente le presenti istruzioni per l’uso.
Sono parte integrante dell’apparecchio
e devono essere disponibili in qualsiasi
momento.
• Utilizzare l’apparecchio solo per
l’impiego previsto (vedi "1.1 Impiego
previsto" a pagina 21).
• Verificare che la tensione di rete
necessaria (vedere la targhetta
dell’apparecchio) corrisponda alla
tensione di rete disponibile, poiché in
caso di tensione errata l'apparecchio
potrebbe essere danneggiato.
• Si ricorda che qualsiasi diritto di
garanzia decade automaticamente
qualora si utilizzino accessori non
consigliati nelle presenti istruzioni per
l’uso oppure qualora vengano effettuate
riparazioni con pezzi di ricambio non
originali. Ciò vale anche in caso di
riparazione ad opera di personale non
qualificato. Per i dati di contatto si
rimanda al "Centro d’assistenza" a
pagina 38.
• In caso di eventuali anomalie di
funzionamento entro il periodo della
garanzia la riparazione
dell’apparecchio può essere eseguita
soltanto dal nostro centro d’assistenza.
SKMP 1200 A2 23
Page 26
RP100104-105590-Küchenmaschine LB5 Seite 24 Dienstag, 10. Juni 2014 12:00 12
In caso contrario decade qualsiasi diritto
di garanzia.
4.4 Protezione dalle folgorazioni
Avvertenza! Le seguenti
istruzioni di sicurezza servono per
proteggere l’utente da folgorazioni
elettriche.
• Mai utilizzare l’apparecchio se
danneggiato. In tal caso la riparazione
dell’apparecchio deve essere eseguita
da personale specializzato. Per i dati di
contatto si rimanda al "Centro
d’assistenza" a pagina 38.
• Se il cavo di rete di questo apparecchio
è danneggiato, deve essere sostituito dal
produttore o da una persona
ugualmente qualificata, per evitare
pericoli.
• All’interno della base 7 non devono
penetrare acqua o altri liquidi. Quindi:
– non utilizzare l’apparecchio all’aperto
– non immergere la base 7 in acqua
– non posizionare contenitori con liquidi
quali vasi, bicchieri, ecc.
sull’apparecchio
– non utilizzare mai l’apparecchio in
ambiente molto umido
– non utilizzare mai l’apparecchio nelle
immediate vicinanze di un lavello, una
vasca da bagno, una doccia o una
piscina per evitare che spruzzi
d’acqua vi penetrino all’interno.
In caso di contatto dell’apparecchio con
liquidi, estrarre immediatamente la spina
di rete e far riparare il dispositivo da
personale qualificato. Per i dati di
contatto si rimanda al "Centro
d’assistenza" a pagina 38.
• Non toccare mai l’apparecchio, il cavo
di rete o la spina di rete con mani umide.
• Estrarre sempre il cavo di rete in
corrispondenza della spina. Non
estrarlo mai afferrando il cavo stesso.
• Fare attenzione a non piegare o
schiacciare mai il cavo di rete.
• Tenere lontano il cavo di rete da
superfici molto calde (ad es. da piastre).
• Se l’unità non viene utilizzata per lungo
tempo, estrarre la spina dalla presa.
Soltanto in questo modo l’apparecchio è
completamente privo di alimentazione.
• L’utilizzo di cavi di prolunga dovrebbe
essere evitato. È consentito solo in
presenza di presupposti ben
determinati:
– il cavo di prolunga deve essere adatto
all’intensità di corrente dell’apparecchio.
– il cavo di prolunga non deve essere
posato “in aria”: non deve sussistere il
pericolo di inciamparvi o non deve
essere raggiungibile per i bambini.
– il cavo di prolunga non deve
assolutamente essere danneggiato.
– non deve essere collegato alla presa
di rete nessun altro apparecchio oltre
a questo, altrimenti può verificarsi un
sovraccarico della rete elettrica (prese
multiple vietate!).
4.5 Protezione da lesioni
Avvertenza! Osservare le
seguenti indicazioni per evitare di
provocare o subire lesioni.
• Assicurarsi che non sussista il pericolo di
inciampare nel cavo di collegamento
alla rete oppure che nessuno vi si possa
impigliare o lo possa calpestare.
• Durante l’utilizzo, evitare il contatto con
le parti dell’apparecchio in movimento,
quali il gruppo lame della caraffa 12, il
gancio impastatore 13, la frusta a
filo 14 o la frusta piatta 15. Mani o
24
Page 27
RP100104-105590-Küchenmaschine LB5 Seite 25 Dienstag, 10. Juni 2014 12:00 12
capelli potrebbero rimanere impigliati
nell’apparecchio con il conseguente
pericolo di ferimento. Mettere in
funzione l’apparecchio solo dopo avere
montato correttamente la protezione
paraspruzzi 8 in caso di utilizzo della
ciotola 16 oppure il coperchio 11 in
caso di utilizzo della caraffa 12.
• Prima di pulire l’apparecchio o di
sostituire gli accessori, scollegare la
spina dalla presa di rete.
• Tenere conto che le lame della
caraffa 12 sono molto affilate. Non
toccare le lame a mani nude per evitare
di tagliarsi.
• Prima di scollegare la spina, spegnere
sempre l’apparecchio dal selettore di
velocità 4. In caso contrario potrebbe
accadere che l’apparecchio si
riaccenda autonomamente nel momento
in cui la spina viene ricollegata a una
presa di rete.
•Quando la caraffa 12 non viene
utilizzata, è necessario applicare la
copertura 2. In caso contrario, il
dispositivo di protezione da possibili
lesioni non funziona.
4.6 Per la sicurezza dei bambini
Avvertenza! Spesso i bambini
non sono in grado di valutare bene
i pericoli e possono così provocarsi
lesioni. Per questo motivo
osservare quanto segue:
• Fare attenzione che la pellicola da
imballaggio non costituisca un pericolo
di morte per i bambini. Le pellicole da
imballaggio non sono giocattoli.
4.7 Danni materiali
Attenzione! Per evitare danni materiali,
attenersi alle seguenti disposizioni.
• Collocare l’apparecchio esclusivamente
su una superficie piana, asciutta e
antiscivolo in modo da non farlo cadere
o scivolare.
• Non collocare l’apparecchio su un
fornello caldo.
• Non utilizzare contemporaneamente la
caraffa 12 e la ciotola 16.
L’apparecchio potrebbe surriscaldarsi.
•Non utilizzare in nessun caso lo
sbattitore e la caraffa 12 senza alimenti
all’interno, per non surriscaldare il
motore.
• Lo sbattitore può essere fatto funzionare
al massimo per 10 minuti alla volta, il
mixer al massimo per 3 minuti alla volta.
Successivamente, l’apparecchio deve
essere fatto nuovamente raffreddare a
temperatura ambiente.
• Utilizzare la caraffa 12 solo con il
coperchio 11 montato per evitare
schizzi di liquido.
• Non spostare l’apparecchio quando al
suo interno vi sono alimenti o impasti.
• Utilizzare la caraffa 12 esclusivamente
per preparare bevande o condimenti.
• Non riempire eccessivamente la ciotola
o la caraffa 12 per evitare schizzi.
• Non introdurre ingredienti caldi o
bollenti nella caraffa 12.
SKMP 1200 A2 25
Page 28

RP100104-105590-Küchenmaschine LB5 Seite 26 Dienstag, 10. Juni 2014 12:00 12
5. Disimballaggio e montaggio
1. Estrarre i componenti dall'imballaggio.
2. Verificare che i singoli componenti siano
intatti (vedi "1.2 Dotazione" a
pagina 21) e non risultino danneggiati.
3. Prima del primo utilizzo pulire
accuratamente l’apparecchio (vedi
"8. Pulizia dell’apparecchio" a
pagina 35).
6. Utilizzo dell’apparecchio
6.1 Montaggio dell’apparecchio
1. Azionare la leva di sgancio 6 e
sollevare il braccio motore 1.
Nota: Ruotare completamente la leva
di sgancio 6 e tenerla ferma fino ad
abbassare del tutto il braccio motore 1.
Quindi riportare la leva di sgancio 6 in
posizione.
2. Per inserire la ciotola 16, posizionarla
sulla base 7.
3. Bloccare la ciotola ruotandola
leggermente in senso antiorario fino a
sentire lo scatto in posizione.
Attenzione!
Non utilizzare la ciotola 16 senza la
protezione paraspruzzi 8 per evitare che il
preparato possa schizzare fuori.
4. Inserire la protezione paraspruzzi 8
sulla parte inferiore del braccio
motore 1. L’apertura di riempimentocon
coperchio 9 deve essere rivolta verso il
lato del selettore della velocità 4.
4. Collocare l’apparecchio su una
superficie piana, asciutta e antiscivolo in
modo da non farlo cadere o scivolare.
5. Verificare che il selettore della velocità 4
sia posizionato su “0”.
6. Inserire la spina di rete in una presa di
rete idonea (vedi "3. Dati tecnici" a
pagina 22).
L’apparecchio è ora pronto per l’uso.
5. Esercitare una leggera pressione sulla
protezione paraspruzzi 8 fino a sentire
lo scatto in posizione.
6. Scegliere l’accessorio sbattitore
adeguato:
Gancio impastatore 13: per impasti
compatti, ad es. impasti per pane
Frusta a filo 14: per montare a neve
panna, albumi, ecc.
Frusta piatta 15: per impasti da morbidi
a medi, ad es. impasti per torte o impasti
per crêpes.
7. Inserire l’accessorio sbattitore dal basso
nell’apposita sede all’interno del
braccio motore 1.
Fare attenzione a introdurre i denti
presenti sullo stelo dell’accessorio
sbattitore nell’apposita fessura della
sede.
8. Premendo leggermente l’accessorio
sbattitore verso l’interno, ruotarlo in
senso orario fino a sentire lo scatto in
posizione.
26
Page 29
RP100104-105590-Küchenmaschine LB5 Seite 27 Dienstag, 10. Juni 2014 12:00 12
9. Azionare la leva di sgancio 6 e
abbassare il braccio motore 1 nella
posizione di lavoro.
Nota: Ruotare completamente la leva
di sgancio 6 e tenerla ferma fino ad
abbassare del tutto il braccio motore 1.
Quindi riportare la leva di sgancio 6 in
posizione.
L’apparecchio è ora pronto per l’uso.
Montaggio della caraffa 12:
Attenzione!
• Non utilizzare la caraffa 12 e la
ciotola 16 contemporaneamente.
L’apparecchio potrebbe surriscaldarsi.
1. Far scorrere lo sblocco 3 della
copertura 2 verso sinistra.
2. Rimuovere la copertura 2.
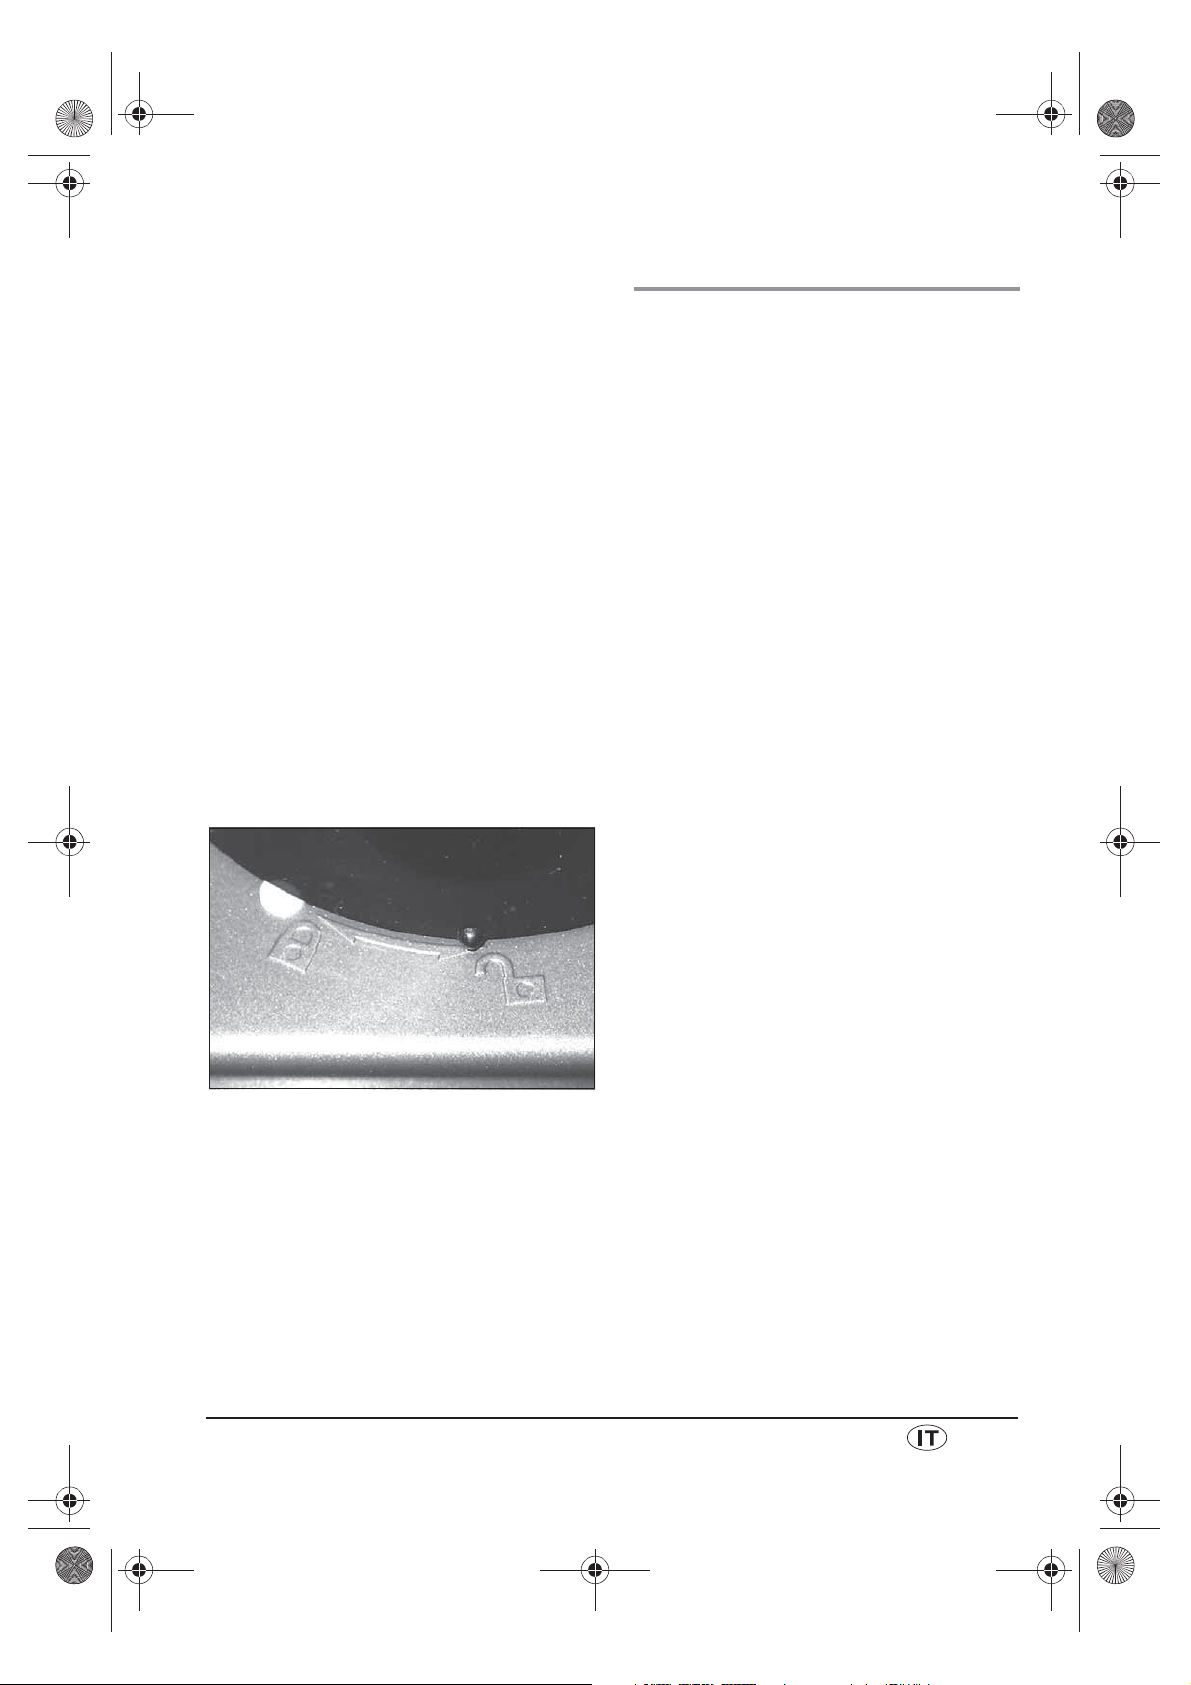
3. Montare la caraffa 12 in modo tale che
la piccola sporgenza alla sua base si
trovi in corrispondenza del simbolo del
lucchetto aperto.
4. Ruotare la caraffa 12 in senso orario
fino a sentire lo scatto in posizione. La
piccola sporgenza si trova ora in
corrispondenza del simbolo del
lucchetto chiuso.
6.2 Smontaggio dell’apparecchio
1. Azionare la leva di sgancio 6 e
sollevare il braccio motore 1.
Nota: Ruotare completamente la leva
di sgancio 6 e tenerla ferma fino ad
abbassare del tutto il braccio motore 1.
Quindi riportare la leva di sgancio 6 in
posizione.
2. Per rimuovere un accessorio sbattitore,
premerlo leggermente verso l’interno e
sbloccarlo ruotandolo leggermente in
senso antiorario.
3. Rimuovere l’accessorio sbattitore.
4. Per rimuovere la protezione
paraspruzzi 8, tirarla verso il basso.
Tirare verso il basso dapprima la parte
posteriore della protezione
paraspruzzi 8.
5. Sganciare la ciotola 16 ruotandola
leggermente in senso orario.
6. Prelevare la ciotola 16.
7. Azionare la leva di sgancio 6 e
abbassare il braccio motore 1 nella
posizione di lavoro.
Nota: Ruotare completamente la leva
di sgancio 6 e tenerla ferma fino ad
abbassare del tutto il braccio motore 1.
Quindi riportare la leva di sgancio 6 in
posizione.
Prelievo della caraffa 12:
1. Ruotare la caraffa 12 in senso
antiorario in modo tale che la piccola
sporgenza alla sua base venga a
SKMP 1200 A2 27
Page 30

RP100104-105590-Küchenmaschine LB5 Seite 28 Dienstag, 10. Juni 2014 12:00 12
trovarsi in corrispondenza del simbolo
del lucchetto aperto.
2. Prelevare la caraffa 12.
3. Riapplicare la copertura 2.
6.3 Utilizzo della protezione
paraspruzzi
Durante il funzionamento dello sbattitore, è
possibile aggiungere ingredienti:
1. Ridurre la velocità a 1 - 2.
2. Sollevare il coperchio dell’apertura di
riempimento 9.
3. Introdurre gli ingredienti.
4. Richiudere il coperchio dell’apertura di
riempimento 9.
6.4 Utilizzo della caraffa 12
Attenzione!
• Non far funzionare ininterrottamente il
mixer per più di 3 minuti alla volta.
Dopo l’utilizzo, farlo raffreddare per
evitare di surriscaldare l’apparecchio.
1. Introdurre nella caraffa 12 dapprima gli
ingredienti liquidi e, successivamente, gli
ingredienti solidi.
2. Prima di introdurre gli ingredienti solidi
nella caraffa, tagliarli in piccoli pezzi
per evitare che rimangano incastrati
nelle lame.
3. Posizionare il coperchio 11 sulla
caraffa 12 prima di mixare gli
ingredienti per evitare che il contenuto
possa schizzare.
4. Se, durante il mixaggio, si desidera
aggiungere altri ingredienti, aprire il
blocco 10 del coperchio 11 della
caraffa 12 ruotandolo in senso orario.
5. Selezionare la velocità desiderata sul
selettore 4.
Nota: la velocità ideale dipende
soprattutto dalla consistenza del
preparato. Tanto più liquido è il
preparato, quanto più elevata può
essere la velocità di mixaggio.
6. In alternativa, è possibile utilizzare il
tasto per il funzionamento a impulsi 5.
Tenendo premuto il tasto 5 il preparato
viene mixato alla velocità massima.
Nota: il tasto per il funzionamento a
impulsi 5 è attivo solo se, sul selettore
della velocità 4, è stato impostato
almeno il livello 1.
6.5 Regolazione della velocità, accensione e spegnimento
1. Per accendere l’apparecchio, ruotare
verso destra il selettore della velocità 4.
2. Inizialmente, mixare e sbattere a bassa
velocità, quindi aumentare
gradualmente la velocità.
28
Nota: il tasto per il funzionamento a
impulsi 5 è attivo solo se, sul selettore della
velocità 4, è stato impostato almeno il
livello 1.
Page 31

RP100104-105590-Küchenmaschine LB5 Seite 29 Dienstag, 10. Juni 2014 12:00 12
Raccomandazioni relative alla velocità
Velocità Accessorio Descrizione
1 - 2 Tutti - Velocità iniziale per tutti gli utilizzi
- Durante l’aggiunta di ingredienti
Gancio impastatore
13 o frusta piatta 15
2 - 3 Frusta piatta 15 - Per amalgamare impasti compatti
Gancio impastatore 13- Per impastare impasti lievitati
4 - 6 Frusta piatta 15 - Impasti per torte
7 - 10 Frusta a filo 14 - Panna montata
Tasto per il funzionamento a impulsi
Caraffa 12 - Per mixare e sminuzzare ingredienti morbidi o
- Per impastare e amalgamare impasti compatti o
ingredienti duri
- Per amalgamare burro e farina
- Per amalgamare impasti lievitati
- Per impastare impasti compatti
- Per montare il burro con lo zucchero
- Impasti per pasticcini
-Albume
- Maionese
- Per sbattere il burro a crema
liquidi
- Il tasto per il funzionamento a impulsi 5 è attivo
solo se, sul selettore della velocità 4, è stato
impostato almeno il livello 1.
Per spegnere l’apparecchio, ruotare il
selettore della velocità 4 su “0”.
6.6 Protezione da surriscaldamento
L’apparecchio è dotato di una protezione
da surriscaldamento. In caso di surriscaldamento del motore, l’apparecchio si spegne
automaticamente:
1. Spegnere l’apparecchio.
2. Scollegare la spina.
3. Lasciare raffreddare l’apparecchio a
temperatura ambiente.
SKMP 1200 A2 29
Page 32

RP100104-105590-Küchenmaschine LB5 Seite 30 Dienstag, 10. Juni 2014 12:00 12
7. Ricette
7.1 Pane bianco
Ingredienti:
• 1 kg di farina di frumento tipo 405
(farina per torte)
• 4 cucchiaini di sale
• 4 bustine di lievito secco
(ca. 25 - 30 g)
• 650 ml di acqua tiepida
Preparazione:
1. Mettere gli ingredienti nella ciotola 16.
2. Montare la protezione paraspruzzi 8 e il
gancio impastatore 13.
3. Impastare a velocità 3 per 10 minuti.
4. Prelevare la ciotola e coprirla.
5. Lasciare riposare l’impasto per circa 1 2 ore in un luogo caldo.
6. Dare all’impasto la forma di una
pagnotta o mettere l’impasto in uno
stampo.
7. Preriscaldare il forno a 220 °C.
8. Cuocere il pane ad un’altezza
intermedia del forno per 35 - 40 minuti.
7.2 Impasto per pizza
Indicazione: l’impasto della pizza riesce
particolarmente bene se viene preparato
almeno 24 ore prima della cottura e
lasciato riposare in frigorifero. Ecco una
ricetta per preparare la pizza “come quella
della pizzeria”.
Ingredienti per 4 persone:
• 500 g di farina tipo 405
• 300 ml di acqua del rubinetto
• massimo 1/5 di cubetto di lievito
• 20 g di sale
Preparazione:
1. Versare 300 g di farina nella ciotola 16.
2. Utilizzare la protezione paraspruzzi 8 e
la frusta piatta 15.
3. Impostare la velocità sul livello 2.
4. Aggiungere lentamente 300 ml di
acqua del rubinetto attraverso l’apertura
di riempimento 9.
5. Aggiungere il lievito.
6. Aggiungere il sale.
7. Amalgamare il tutto a una velocità di
4 - 5 fino ad ottenere un impasto liscio.
8. Coprire la ciotola e lasciare lievitare
l’impasto a temperatura ambiente per
circa 20 minuti.
9. Lavorare nuovamente l’impasto per circa
3 minuti a velocità 4.
10.Rimuovere la frusta piatta 15 e inserire il
gancio impastatore 13.
11. Impastare il composto a velocità 3.
12.A questo punto, aggiungere a poco a
poco il resto della farina attraverso
l’apertura di riempimento 9.
Indicazione: quando, durante la
lavorazione, l’impasto della pizza si
stacca dal fondo e forma una palla,
significa che la quantità di farina
aggiunta è corretta.
13.Infine, lavorare ancora l’impasto per
circa 3 minuti a velocità 2.
Indicazione: l’impasto della pizza ha
raggiunto la consistenza corretta
quando mantiene per breve tempo la
forma a palla, ma dopo un pò (ca.
30 minuti) perde di nuovo la forma.
30
Page 33

RP100104-105590-Küchenmaschine LB5 Seite 31 Dienstag, 10. Juni 2014 12:00 12
14.Lasciare riposare di nuovo l’impasto
della pizza per 20 minuti nella ciotola
coperta.
15.Prelevare la ciotola e lasciare cadere
l’impasto su un tagliere ben infarinato.
16.Cospargere sull’impasto un’abbondante
quantità di farina.
17. Lavorare brevemente l’impasto e
formare una palla.
18.Mettere la palla dell’impasto in un
contenitore richiudibile e collocarlo in
frigorifero per 24 ore.
19. Estrarre l’impasto dal frigorifero e porlo
su una teglia di cottura infarinata.
20.Cospargere altra farina sull’impasto e
lavorarlo brevemente fino a dargli la
forma di una palla.
21.A questo punto l’impasto è pronto ed è
possibile tirare le pizze e farcirle.
Indicazioni:
• Non è necessario sciogliere prima il
lievito in acqua.
• Aggiungere molto meno lievito della
quantità indicata sulla confezione del
lievito. Utilizzare la quantità che sulla
confezione è indicata per circa 200 250 g di farina.
• Se nell’impasto della pizza si sente
troppo il lievito, ridurre ulteriormente la
quantità di lievito. La minore quantità di
lievito viene compensata dal lungo
tempo di lievitazione.
• Il sale marino conferisce più aroma
all’impasto.
• Assaggiando l’impasto subito dopo
l’aggiunta di sale, l’impasto deve
sembrare un pò salato. Se prevale il
sapore di farina o lievito, manca ancora
sale. Con l’aggiunta successiva della
farina restante, l’impasto perde ancora
di sapidità.
• Per la lievitazione non collocare
l’impasto vicino a un’ulteriore fonte di
calore. Questo farà sì risparmiare
tempo, ma a discapito del gusto.
• Il riposo di 24 ore è importantissimo per
la buona riuscita dell’impasto della
pizza.
• L’impasto della pizza preparato in
questo modo può essere conservato in
frigorifero per molti giorni.
7.3 Ciambellone con frutta
Ingredienti:
• 1 bicchiere di yoghurt (150 ml)
• 1 bicchiere di olio da cucina o di burro
morbido (150 g)
• 2 bicchieri di zucchero (300 g)
• 3 bicchieri di farina (320 g)
• 1 bustina di lievito in polvere
•4 tuorli
•4 albumi
• 1 barattolo di frutta a piacere o frutta
fresca (ca. 500 g)
Preparazione:
1. Mettere gli albumi nella ciotola 16.
2. Montare la protezione paraspruzzi 8 e
la frusta a filo 14.
3. Montare a neve ben ferma gli albumi a
velocità 9 per 1 - 2 minuti.
4. Prelevare gli albumi montati dalla
ciotola e metterli da parte.
5. Mettere lo yoghurt nella ciotola.
6. Lavare il bicchiere dello yoghurt e
utilizzarlo per dosare gli altri ingredienti
oppure dosare le quantità con un
bicchiere dosatore.
7. Aggiungere 1 bicchiere di olio (150 ml)
o di burro morbido (150 g).
8. Aggiungere 2 bicchieri di zucchero
(300 ml).
SKMP 1200 A2 31
Page 34

RP100104-105590-Küchenmaschine LB5 Seite 32 Dienstag, 10. Juni 2014 12:00 12
9. Aggiungere 4 tuorli.
10.Sbattere gli ingredienti a velocità 6 o 7
per circa 2 minuti fino ad ottenere un
composto spumoso.
11. Aggiungere 3 bicchieri di farina (450 ml
o 320 g) e il lievito in polvere.
12.Smontare la frusta a filo 14 e montare la
frustapiatta 15.
13.Sbattere gli ingredienti a velocità 4 per
circa 5 minuti.
14.Fermare il robot da cucina.
15.Aggiungere gli albumi montati a neve.
16.Aggiungere la frutta sgocciolata ed
eventualmente tagliata in piccoli pezzi.
17. Amalgamare al composto la frutta e gli
albumi montati a neve a velocità 2 per
circa 10 - 30 secondi.
18.Mettere l’impasto in uno stampo.
19. Cuocere a 200 °C per circa 50 minuti.
7.4 Torta Margherita
Ingredienti:
• 250 g di burro
• 250 g di zucchero
•6 uova
• 250 g fecola di patate
• 75 g di farina
• 1 bustina di lievito in polvere (20 g)
• 1 limone non trattato
• 1 bustina di zucchero vanigliato (2
cucchiaini)
Preparazione:
1. In una ciotola, setacciare la farina e la
fecola, aggiungere il lievito in polvere e
mescolare bene il tutto.
2. Utilizzare la protezione paraspruzzi 8 e
la frusta piatta 15.
3. Mettere il burro, lo zucchero e lo
zucchero vanigliato nella ciotola 16.
4. Impostare la velocità 3 e sbattere fino
ad ottenere un composto morbido.
5. Aggiungere le uova ad una ad una.
6. Grattugiare la scorza del limone e
aggiungerla al composto.
7. Aggiungere un cucchiaio alla volta della
miscela di farina e fecola e mescolare.
8. Una volta mescolati tutti gli ingredienti,
sbattere per 3 minuti a velocità 6.
9. Mettere l’impasto in uno stampo unto.
10.Cuocere per circa 60 minuti a 180 °C
(riscaldamento superiore e inferiore) o a
160 °C (ventilato).
11.Una volta raffreddato, decorare il dolce
con zucchero a velo o glassa di
zucchero. Il succo del limone può essere
miscelato alla glassa di zucchero.
7. 5 Ci al d e
Ingredienti:
•6 uova
• 1 bustina di vaniglia
• 1/2 bustina di lievito in polvere
• 250 g di zucchero
• 200 g di burro o margarina
• 500 g di farina
• 300 ml di latte
• 125 ml di acqua minerale gassata
Preparazione:
1. Separare i tuorli dagli albumi.
2. Mettere gli albumi nella ciotola 16.
3. Montare la protezione paraspruzzi 8 e
la frusta a filo 14.
4. Montare a neve ben ferma gli albumi a
velocità 9 per 1 - 2 minuti.
5. Fermare il robot da cucina.
6. Prelevare gli albumi montati dalla
ciotola e metterli da parte.
32
Page 35

RP100104-105590-Küchenmaschine LB5 Seite 33 Dienstag, 10. Juni 2014 12:00 12
7. Rimuovere la frusta a filo 14 e montare
la frustapiatta 15.
8. Sbattere il burro e lo zucchero a velocità
5-6 fino ad ottenere una crema.
9. Impostare la velocità sul livello 4.
10.Aggiungere a poco a poco i tuorli, il
latte, l’acqua minerale e la vaniglia.
11. Mescolare la farina e il lievito in polvere
e aggiungerli al composto un cucchiaio
alla volta.
12.Fermare il robot da cucina e aggiungere
nella ciotola gli albumi montati a neve.
13.Amalgamare al composto gli albumi
montati a neve a velocità 2 per circa 10
- 30 secondi.
14.Lasciare riposare l’impasto per circa
30 minuti.
15.Successivamente, cuocere le cialde.
7.6 Cupcake al cioccolato
Ingredienti:
• 100 g di burro
• 150 g di zucchero
•2 uova
• 100 g di farina
• ½ cucchiaino di lievito in polvere
• ¼ di cucchiaino di bicarbonato di sodio
• ¼ di cucchiaino di sale
• 75 g di cacao in polvere
• 130 ml di latte, eventualmente di più
• 1 cucchiaino di estratto di vaniglia o
pasta di vaniglia
Preparazione:
1. In una ciotola, setacciare la farina e il
cacao. Sempre setacciando, aggiungere
il lievito in polvere, il bicarbonato di
sodio e il sale e mescolare bene il tutto.
2. Utilizzare la protezione paraspruzzi 8 e
la frusta piatta 15.
3. Mettere il burro, lo zucchero e la
vaniglia nella ciotola 16.
4. Impostare la velocità 3 e sbattere fino
ad ottenere un composto morbido.
5. Aggiungere le uova ad una ad una
mescolando.
6. Continuando a mescolare, aggiungere
gradatamente la miscela di farina e
circa 130 ml di latte e sbattere fino ad
ottenere un composto omogeneo.
7. Se l’impasto risulta troppo secco,
aggiungere a poco a poco altro latte
fino ad ottenere la consistenza di una
crema densa.
8. Mettere l’impasto in una macchina per
cupcake oppure ungere delle tazze
termoresistenti e utilizzarle come stampi.
È possibile utlizzare anche delle formine
apposite.
9. Cuocere per circa 20 minuti a 190 °C.
7. 7 B i s co t t i
Ingredienti:
• 230 g di farina
• 150 g di burro, freddo e tagliato a
fettine sottili
• 100 g di zucchero
•1 uovo
• 1 bustina di vaniglia
• 1 presa di sale
Preparazione:
1. Mettere gli ingredienti nella ciotola 16.
2. Montare la protezione paraspruzzi 8 e il
gancio impastatore 13 .
3. Impastare per circa 5 minuti a velocità
2 - 3.
4. Mettere l’impasto in una tasca da
pasticcere.
SKMP 1200 A2 33
Page 36

RP100104-105590-Küchenmaschine LB5 Seite 34 Dienstag, 10. Juni 2014 12:00 12
5. Spremere la tasca formando biscotti a
forma di S, a bastoncino o a cerchio su
una piastra da forno.
6. Cuocere a 180 °C per 10 minuti.
Indicazioni:
• Prima di infornare si possono guarnire i
biscotti con scaglie di noci o di
mandorle.
• Una volta cotti e raffreddati, i biscotti
possono essere decorati con glassa.
7.8 Milk-shake alla fragola con latticello
Ingredienti:
• 1/2 l di latte freddo
• 1/2 l di latticello freddo
• 250 g di fragole fresche
• 4 cucchiai di marmellata di fragole
• 4 cucchiai di miele
• 1 cucchiaio di succo di limone
• 1 presa di sale
• Zucchero o dolcificante in aggiunta a
seconda delle preferenze
Preparazione:
1. Togliere il coperchio 11 dalla
caraffa 12.
2. Mettere nella caraffa il latte, il latticello,
il miele, la marmellata di fragole, il
succo di limone e una presa di sale.
3. Riposizionare il coperchio 11 sulla
caraffa 12.
4. Posizionare la caraffa 12
sull’apparecchio.
5. Mixare gli ingredienti con il tasto per il
funzionamento a impulsi 5 oppure a
velocità 10 per circa 30 secondi.
Nota: il tasto per il funzionamento a
impulsi 5 è attivo solo se, sul selettore
della velocità 4, è stato impostato
almeno il livello 1.
6. Rilasciare il tasto per il funzionamento a
impulsi o ridurre la velocità a 1.
7. Aprire il blocco 10 del coperchio 11
della caraffa 12 ruotandolo in senso
orario.
8. Introdurre le fragole.
9. Se si desidera un milk-shake dolce,
aggiungere zucchero a piacere.
10.Mixare per 2 minuti alla velocità
massima (tasto per funzionamento a
impulsi o livello di velocità 10).
11. Versare il preparato nei bicchieri e
decorare confragole fresche.
7.9 Milk-shake alla banana
Ingredienti:
• 2 banane, molto mature
• 1/2 l di latte freddo
• 4 cucchiai di gelato alla vaniglia
• Granella di cioccolato
Preparazione:
1. Sbucciare le banane e tagliarle a
pezzetti.
2. Togliere il coperchio 11 dalla caraffa 12.
3. Mettere tutti gli ingredienti nella
caraffa 12.
4. Riposizionare il coperchio 11 sulla
caraffa 12.
5. Posizionare la caraffa 12
sull’apparecchio.
6. Mixare gli ingredienti con il tasto per il
funzionamento a impulsi 5 oppure a
velocità 10 per circa 60 secondi.
Nota: il tasto per il funzionamento a
impulsi 5 è attivo solo se, sul selettore
della velocità 4, è stato impostato
almeno il livello 1.
7. Versare il composto nei bicchieri e
decorare con granella di cioccolato.
34
Page 37

RP100104-105590-Küchenmaschine LB5 Seite 35 Dienstag, 10. Juni 2014 12:00 12
7.10Smoothie alle ciliegie amarene
Ingredienti:
• 250 g di ciliegie amarene in barattolo,
denocciolate
• 150 g di yoghurt
• Zucchero a piacere
Preparazione:
1. Togliere il coperchio 11 dalla caraffa 12.
2. Mettere nella caraffa 12 le ciliegie
amarene insieme al succo.
3. Riposizionare il coperchio 11 sulla
caraffa 12.
8. Pulizia dell’apparecchio
Avvertenza! Per evitare il pericolo di folgorazioni, di lesioni o di
danni:
– Estrarre la spina dalla presa di
rete prima di ogni operazione di
pulizia.
–Non immergere la base 7 in
acqua.
Attenzione! Non utilizzare detergenti corrosivi o abrasivi. L’apparecchio potrebbe
risultarne danneggiato.
8.1 Pulizia della base (7)
1. Pulire la base 7 con un panno umido.
Eventualmente con l’aggiunta di
detergente.
2. Risciacquare con acqua pulita.
3. Riutilizzare la base 7 solo quando si è
asciugata completamente.
4. Posizionare la caraffa 12
sull’apparecchio.
5. Con il tasto per il funzionamento a
impulsi 5 frullare le ciliegie amarene per
15 secondi.
Nota: il tasto per il funzionamento a
impulsi 5 è attivo solo se, sul selettore
della velocità 4, è stato impostato
almeno il livello 1.
6. Aggiungere lo yoghurt e lo zucchero.
7. Mixare gli ingredienti con il tasto per il
funzionamento a impulsi 5 o il livello di
velocità 10 (al massimo 2 minuti) fino
ad ottenere uno smoothie liscio e ben
amalgamato.
8.2 Pulizia della protezione
paraspruzzi (
impastatore (
8), del gancio
13), della frusta a
filo (14) e della frusta piatta (15)
Attenzione! La protezione paraspruzzi 8
non può essere lavata in lavastoviglie.
Il gancio impastatore 13, la frusta a filo 14
e la frusta piatta 15 possono essere lavati
anchein lavastoviglie.
1. Mettere i pezzi in acqua fredda o
tiepida per ammorbidire i residui di
pasta.
Nota: è possibile aggiungere
all’acqua un po’ di detergente.
2. Rimuovere i residui di pasta ammorbiditi
con una spazzola per stoviglie.
3. Sciacquare con acqua pulita.
4. Lasciare asciugare completamente i
pezzi prima di riutilizzarli.
SKMP 1200 A2 35
Page 38

RP100104-105590-Küchenmaschine LB5 Seite 36 Dienstag, 10. Juni 2014 12:00 12
8.3 Pulizia della ciotola (16)
La ciotola 16 è realizzata in acciaio inossidabile e può essere lavata a mano o in lavastoviglie.
8.4 Pulizia della caraffa (12)
Nota: la caraffa 12 e il coperchio 11
sono lavabili in lavastoviglie.
1. Posizionare la caraffa 12
sull’apparecchio.
2. Riempirla con acqua calda e detersivo
fino a circa metà.
3. Montare il coperchio 11.
4. Verificare che il selettore della velocità 4
sia posizionato su “0”.
9. Smaltimento
9.1 Apparecchio
Il simbolo con il bidone della
spazzatura su ruote depennato
significa che nell'Unione
Europea il prodotto deve
essere smaltito nella
spazzatura differenziata. Ciò vale sia per il
prodotto che per tutti gli accessori
contrassegnati con lo stesso simbolo. I
prodotti contrassegnati non possono essere
smaltiti nei rifiuti normali, ma devono essere
consegnati ad un ufficio accettazione di
5. Inserire la spina in una presa di rete
idonea (vedi "3. Dati tecnici" a
pagina 22).
6. Premere più volte brevemente il tasto per
il funzionamento a impulsi 5.
Nota: il tasto per il funzionamento a
impulsi 5 è attivo solo se, sul selettore
della velocità 4, è stato impostato
almeno il livello 1.
7. Prelevare la caraffa 12
dall’apparecchio.
8. Gettare l’acqua di lavaggio.
9. Risciacquare la caraffa 12 con acqua
pulita.
10.Lasciare asciugare la caraffa 12
completamente prima di riutilizzarla.
riciclaggio di apparecchiature elettriche ed
elettroniche. Il riciclaggio aiuta a ridurre
notevolmente il consumo di materie grezze e
soprattutto l'inquinamento ambientale.
Rispettare scrupolosamente le disposizioni
in materia di smaltimento in vigore nel
proprio paese.
9.2 Imballaggio
Per smaltire l’imballaggio osservare le
normative in materia ambientale specifiche
del paese.
10. Garanzia di HOYER Handel GmbH
Gentile cliente,
questo apparecchio è accompagnato da
una garanzia di 3 anni a partire dalla data
di acquisto. In caso di difetti del prodotto
36
può far valere i Suoi diritti nei confronti del
venditore come previsto dalla legge. Tali
diritti di legge non sono limitati dalla nostra
garanzia, descritta di seguito in dettaglio.
Page 39

RP100104-105590-Küchenmaschine LB5 Seite 37 Dienstag, 10. Juni 2014 12:00 12
Condizioni di garanzia
Il periodo di garanzia ha inizio dalla data
di acquisto. Conservare pertanto lo
scontrino di cassa originale, in quanto
documento comprovante l'acquisto.
Se entro tre anni dalla data di acquisto di
questo prodotto insorge un difetto di
materiale o di fabbricazione, ci impegniamo
a riparare o a sostituire a nostra scelta il
prodotto. La prestazioni di garanzia
presuppone, entro il termine di tre anni, la
presentazione dell'apparecchio difettoso e
della prova di acquisto (scontrino di cassa)
e una breve descrizione scritta del difetto e
del momento in cui è insorto.
Se il difetto è coperto dalla nostra garanzia,
ci impegniamo a rispedire il prodotto
riparato o un nuovo prodotto. Con la
riparazione o la sostituzione del prodotto
non decorre un nuovo periodo di garanzia.
Periodo di garanzia e rivendicazioni per
difetti
Il periodo di garanzia non viene prolungato
dalla prestazione di garanzia. Questo vale
anche per le parti sostituite e riparate.
Eventuali danni o difetti riscontrati già al
momento dell'acquisto devono essere
comunicati subito dopo l'apertura della
confezione. Dopo lo scadere del periodo di
garanzia le riparazioni vengono effettuate a
pagamento.
Ambito della garanzia
L’apparecchio è stato prodotto rispettando i
più severi standard di qualità ed è stato
scrupolosamente testato prima della
spedizione.
La garanzia copre i difetti di materiale o di
fabbricazione. Non si estende alle parti del
prodotto soggette a normale usura e
considerate pertanto parti usurabili, né ai
danni ai componenti più fragili, ad es.
interruttori, batterie o parti in vetro.
La garanzia decade se il prodotto viene
danneggiato, utilizzato o sottoposto a
manutenzione in modo non conforme. Per
un utilizzo conforme del prodotto è
necessario attenersi a tutte le avvertenze
contenute nelle istruzioni per l'uso.
Sono assolutamente da evitare gli utilizzi e
le azioni che le istruzioni per l'uso
sconsigliano.
Il prodotto è concepito esclusivamente per
l’uso privato, non per quello commerciale.
La garanzia decade in caso di utilizzo
indebito e non conforme, uso della forza e
interventi non effettuati dal nostro centro
d'assistenza autorizzato.
Svolgimento della garanzia
Per garantire una rapida evasione della
richiesta del cliente, si consiglia di attenersi
alla procedura seguente:
• Per tutte le richieste tenere a
disposizione il numero di articolo (per
questo apparecchio: IAN 100104:
rosso/105590: crema) e lo scontrino di
cassa comprovante l'acquisto.
• Il numero di articolo si trova sulla
targhetta dati, inciso, sul frontespizio
delle istruzioni (in basso a sinistra)
oppure sull'adesivo sul retro o sulla
parte inferiore dell'apparecchio.
• In caso di errori di funzionamento o altri
difetti, contattare dapprima
telefonicamente o per e-mail il centro
d'assistenza riportato di seguito.
• Il prodotto difettoso può essere spedito
gratuitamente all'indirizzo di assistenza
fornito, allegando la prova di acquisto
(scontrino di cassa) e indicando in cosa
consiste il difetto e quando è stato
riscontrato.
SKMP 1200 A2 37
Page 40

RP100104-105590-Küchenmaschine LB5 Seite 38 Dienstag, 10. Juni 2014 12:00 12
Su www.lidl-service.com è
possibile scaricare questo e
tanti altri manuali, video dei
prodotti e software.
Centro d’assistenza
Assistenza Italia
Tel.: 02 36003201
E-Mail: hoyer@lidl.it
Assistenza Malta
MT
Tel.: 80062230
E-Mail: hoyer@lidl.com.mt
Assistenza Svizzera
Tel.: 0842 665566 (0,08 CHF/Min.,
telefonia mobile max. 0,40 CHF/Min.)
E-Mail: hoyer@lidl.ch
Fornitore
Nota bene: l'indirizzo seguente non è
l'indirizzo d'assistenza. Contattare
dapprima il centro d'assistenza indicato
sopra.
HOYER Handel GmbH
Kühnehöfe 5
22761 Hamburg
Germania
IAN:
100104: rosso
105590: crema
38
Page 41

RP100104-105590-Küchenmaschine LB5 Seite 39 Dienstag, 10. Juni 2014 12:00 12
Índice
1. Descrição do aparelho . . . . . . . . . . . . . . . . . . . . . . . . . . . . . . . . . . . . . . . . . . . . . . . . . . 39
2. Designação das peças (ver página desdobrável) . . . . . . . . . . . . . . . . . . . . . . . . . . . . . . . 40
3. Dados técnicos . . . . . . . . . . . . . . . . . . . . . . . . . . . . . . . . . . . . . . . . . . . . . . . . . . . . . . . 40
4. Indicações de segurança. . . . . . . . . . . . . . . . . . . . . . . . . . . . . . . . . . . . . . . . . . . . . . . . . 41
5. Remoção da embalagem e instalação . . . . . . . . . . . . . . . . . . . . . . . . . . . . . . . . . . . . . . . 43
6. Operar o aparelho. . . . . . . . . . . . . . . . . . . . . . . . . . . . . . . . . . . . . . . . . . . . . . . . . . . . . 44
7. Receitas . . . . . . . . . . . . . . . . . . . . . . . . . . . . . . . . . . . . . . . . . . . . . . . . . . . . . . . . . . . . 47
8. Limpar o aparelho . . . . . . . . . . . . . . . . . . . . . . . . . . . . . . . . . . . . . . . . . . . . . . . . . . . . . 53
9. Eliminação . . . . . . . . . . . . . . . . . . . . . . . . . . . . . . . . . . . . . . . . . . . . . . . . . . . . . . . . . . 54
10. Garantia da HOYER Handel GmbH . . . . . . . . . . . . . . . . . . . . . . . . . . . . . . . . . . . . . . . . . 54
Parabéns pela compra do seu novo
aparelho.
Optou por um produto de grande
qualidade. O manual de instruções é parte
integrante deste produto. Este contém
indicações importantes a respeito da sua
segurança, utilização e eliminação.
1. Descrição do aparelho
1.1 Campo de aplicação
O robô de cozinha SilverCrest SKMP 1200
A2 serve para misturar, bater, amassar e
mexer alimentos.
Este aparelho só pode ser usado em espaços
secos. Não pode ser usado no exterior nem
em espaços húmidos.
Este aparelho foi concebido para utilização
doméstica e não para uso comercial.
O aparelho também foi concebido para:
• a utilização em cozinhas para
colaboradores de lojas, escritórios e
outras áreas comerciais,
• a utilização em propriedades rurais,
Antes de utilizar o produto, familiarize-se
com todas as indicações de utilização e de
segurança. Utilize o produto apenas como
descrito e nos campos de aplicação
indicados.
Caso entregue o aparelho a terceiros, façao acompanhar da respetiva documentação.
• clientes em hotéis, motéis e outros
espaços residenciais,
• estabelecimentos de alojamento e
pequeno-almoço.
1.2 Material fornecido
• 1 robô de cozinha, aparelho básico
• 1 proteção contra salpicos
•1 copo de mistura
• 1 gancho de amassar
• 1 batedor de claras
• 1 batedor
• 1 manual de instruções
SKMP 1200 A2 39
Page 42

RP100104-105590-Küchenmaschine LB5 Seite 40 Dienstag, 10. Juni 2014 12:00 12
1.3 Variantes
O aparelho é fornecido em duas versões:
• RP100104: vermelho
• RP105590: creme
A operação é idêntica para as duas varian-
tes de cor.
2. Designação das peças (ver página desdobrável)
1 Braço de acionamento
2 Cobertura
3 Desbloqueio da cobertura
4 Regulador de velocidade com função
de ligar/desligar
5 Botão de impulso
6 Alavanca de desbloqueio
7 Aparelho básico
8 Proteção contra salpicos
9 Abertura de enchimento com tampa
10 Fecho da tampa
11 Tampa do copo de mistura
12 Copo de mistura com tampa e fecho da
tampa
13 Gancho de amassar
14 Batedor de claras
15 Batedor
16 Taça
3. Dados técnicos
Alimentação de tensão: 220 - 240 V~ / 50 Hz
Potência: 1.200 Watt
Classe de proteção: II
Tempo FC do robô de cozinha: 10 minutos
Tempo FC do copo de mistura: 3 minutos
Tempo FC (tempo de funcionamento curto): indica o tempo que o aparelho pode funcionar
continuamente.
40
Page 43

RP100104-105590-Küchenmaschine LB5 Seite 41 Dienstag, 10. Juni 2014 12:00 12
4. Indicações de segurança
4.1 Explicação de termos
Encontrará os seguintes sinais de advertência neste manual de instruções:
Aviso!
Risco elevado: não considerar o
aviso pode constituir perigo para a
integridade física e para a vida.
Cuidado!
Risco mediano: não considerar o aviso
pode provocar danos materiais.
Nota:
Risco reduzido: ter em atenção determinados
factos durante o manuseamento do aparelho.
4.2 Indicações especiais para
este aparelho
Aviso!
a fim de evitar ferimentos ou danos.
• Este aparelho pode ser utilizado por pessoas com
capacidades físicas, sensoriais ou mentais
reduzidas ou falta de experiência e/ou
conhecimentos, sob supervisão e se tiverem sido
instruídos relativamente à forma segura de utilizar
o aparelho e tiverem compreendido os perigos
daí resultantes.
• Este aparelho não pode ser utilizado por
crianças.
• O aparelho e o respetivo cabo de ligação devem
ser mantidos fora do alcance das crianças.
• As crianças não podem brincar com o aparelho.
• O aparelho deve ser sempre desligado da rede,
quando não está sob vigilância e antes de ser
montado, desmontado ou limpo.
• Nunca mergulhe o aparelho básico
Respeite as seguintes indicações,
7
em água.
• Nunca utilize produtos de limpeza abrasivos,
corrosivos ou que risquem. Caso contrário, o
aparelho pode ficar danificado.
4.3 Notas genéricas
• Leia cuidadosamente este manual de
instruções antes de passar à utilização.
O manual é parte integrante do
aparelho e tem de estar sempre à
disposição.
• Utilize o aparelho apenas para a
finalidade descrita (ver "1.1 Campo de
aplicação" na página 39).
• Certifique-se de que a tensão de rede
necessária (ver placa de características
no aparelho) corresponde à sua.
• Tenha em conta que os direitos da
garantia e responsabilidade serão
anulados se utilizar acessórios não
recomendados neste manual de
instruções ou se em caso de reparações
não forem utilizadas exclusivamente
peças sobressalentes originais. Isto
também se aplica no caso de
reparações efectuadas por pessoal não
qualificado. Os dados de contacto
encontram-se no "Service-Center" na
página56.
• Em caso de eventuais falhas de
funcionamento dentro do período de
garantia, só o Service-Center poderá
efectuar a reparação do aparelho.
Caso contrário, a garantia do produto
perderá a sua validade. Os dados de
contacto encontram-se no "ServiceCenter" na página56.
SKMP 1200 A2 41
Page 44

RP100104-105590-Küchenmaschine LB5 Seite 42 Dienstag, 10. Juni 2014 12:00 12
4.4 Protecção contra choques eléctricos
Aviso! As seguintes indicações
de segurança servem para o
proteger contra choques eléctricos.
• Se o aparelho estiver danificado, o
aparelho não pode ser utilizado. Neste
caso, mande reparar o aparelho por
pessoal especializado qualificado. Os
dados de contacto encontram-se no
"Service-Center" na página56.
• Se o cabo de alimentação deste
aparelho for danificado, este tem de ser
reparado pelo fabricante ou por
pessoal qualificado para evitar perigos.
• Não permita em caso algum a infiltração de água ou outros líquidos no
aparelho básico 7. Por isso:
– Nunca o utilize no exterior
– Nunca mergulhe o aparelho básico 7
em água
– Nunca coloque recipientes com líqui-
dos, como copos com água, jarras,
etc. em cima do aparelho
– Nunca o utilize em ambientes muito
húmidos
– Nunca o utilize junto a um lava-loiças,
a uma banheira, a um duche ou a
uma piscina, pois podem entrar salpicos de água para dentro dele.
Se, mesmo assim, chegarem a entrar
líquidos no aparelho, desligue
imediatamente a ficha de rede da
tomada e mande reparar o aparelho
por pessoal especializado qualificado.
Os dados de contacto encontram-se em
"Service-Center" na página56.
• Nunca toque no aparelho, no cabo de
alimentação ou na ficha de rede com as
mãos húmidas.
• Desligue sempre o cabo de alimentação
pegando na ficha de rede. Nunca puxe
pelo próprio cabo de alimentação.
• Certifique-se de que o cabo não é
dobrado ou esmagado.
• Mantenha o cabo de alimentação
afastado de superfícies quentes (p. ex.
placa de fogão).
• Se não utilizar o aparelho, desligue a
ficha de rede da tomada de corrente.
Só depois é que o aparelho fica
totalmente sem corrente.
• Deve evitar a utilização de extensões.
Só são permitidas em condições muito
específicas:
– a extensão tem de ser adequada
para a intensidade de corrente do
aparelho
–a extensão não deve ficar
“suspensa”: não deve ficar disposta
de forma a que alguém possa
tropeçar nela, nem ficar ao alcance
das crianças
– a extensão nunca deve apresentar
danos
– além deste aparelho, não devem ser
ligados outros aparelhos à tomada de
corrente, uma vez que isto pode
provocar uma sobrecarga na rede
eléctrica (as tomadas múltiplas são
proibidas!).
4.5 Proteção contra ferimentos
Aviso! Respeite as seguintes indicações, a fim de evitar ferimentos.
• Certifique-se de que o cabo de ligação
à rede nunca se encontra disposto de
forma a que alguém tropece nele, fique
preso ou o pise.
• Durante o funcionamento, evite o contacto com as peças giratórias do aparelho, como as lâminas do copo de
mistura 12, o gancho de amassar 13, o
batedor de claras 14 ou o batedor 15.
As mãos e os cabelos podem ser puxa-
42
Page 45

RP100104-105590-Küchenmaschine LB5 Seite 43 Dienstag, 10. Juni 2014 12:00 12
dos pelo aparelho e provocar ferimentos. Só ligue o aparelho se a
proteção contra salpicos 8, caso utilize
a taça 16, ou a tampa 11, caso utilize
o copo de mistura 12, estiver colocada
corretamente.
• Desligue a ficha de rede da tomada
antes de cada limpeza e cada vez que
trocar de acessório.
• Tenha em atenção que as lâminas do
copo de mistura 12 estão muito afiadas.
Nunca toque nas lâminas com as mãos
desprotegidas, para evitar cortar-se.
• Desligue sempre o aparelho primeiro no
regulador de velocidade 4, antes de
desligar a ficha de rede. Caso contrário,
pode suceder que o aparelho arranque
no momento em que liga novamente a
ficha de rede à tomada.
• Se o copo de mistura 12 não estiver
montado, a cobertura 2 tem de estar
colocada. Caso contrário, o aparelho
não funciona como medida de proteção
contra ferimentos.
4.6 Para a segurança das crianças
Aviso! Na maior parte das vezes,
as crianças não conseguem avaliar corretamente os perigos,
podendo sofrer ferimentos. Por
isso, preste atenção ao seguinte:
• A película da embalagem também pode
representar um perigo fatal para as
crianças. As películas da embalagem
não são um brinquedo.
4.7 Danos materiais
Cuidado! Para evitar danos materiais, respeite as seguintes disposições.
• Coloque o aparelho sempre sobre uma
superfície plana, seca e antiderrapante,
para que não possa tombar nem cair.
• Não coloque o aparelho sobre uma
placa de fogão quente.
• Não utilize o copo de mistura 12 e a
taça 16 em simultâneo. Caso contrário,
o aparelho pode ficar sobrecarregado.
• Nunca utilize o agitador e o copo de
mistura 12 sem conteúdo. O motor
pode sobreaquecer.
• O agitador pode ser utilizado no máximo 10 minutos seguidos, a batedeira
no máximo 3 minutos. De seguida tem
de deixar o aparelho arrefecer para a
temperatura ambiente.
• Utilize o copo de mistura 12 apenas
com a tampa 11 colocada, caso contrário poderá ser projetado líquido para
fora.
• Não mova o aparelho enquanto ainda
houver alimentos ou massa no aparelho.
• Utilize o copo de mistura 12 exclusivamente para preparar cocktails ou
molhos.
• Não encha excessivamente a taça 16
ou o copo de mistura 12, caso contrário
o conteúdo pode ser projetado para
fora.
• Nunca encha o copo de mistura 12
com o alimento a misturar muito quente
ou a ferver.
5. Remoção da embalagem e instalação
1. Retire as peças individuais da
embalagem.
SKMP 1200 A2 43
2. Verifique se as peças individuais estão
completas (ver "1.2 Material fornecido"
na página 39) e não estão danificadas.
Page 46

RP100104-105590-Küchenmaschine LB5 Seite 44 Dienstag, 10. Juni 2014 12:00 12
3. Limpe bem o aparelho antes da primeira
utilização (ver "8. Limpar o aparelho" na
página 53).
4. Coloque o aparelho sobre uma
superfície plana, seca e antiderrapante,
para que não possa tombar nem cair.
6. Operar o aparelho
6.1 Montar o aparelho
1. Acione a alavanca de desbloqueio 6 e
levante o braço de acionamento 1.
Nota: Vire totalmente a alavanca de
desbloqueio 6 e mantenha-a fixa até
que o braço de acionamento 1 esteja
na sua posição superior máxima. A
seguir, vire a alavanca de
desbloqueio 6 para a sua posição
inicial.
2. Para utilizar a taça 16 coloque-a no
aparelho básico 7.
3. Bloqueie a taça, rodando-a um pouco
no sentido anti-horário até que engate.
Cuidado!
Nunca utilize a taça 16 sem que a proteção contra salpicos 8 esteja colocada.
Caso contrário, o alimento a misturar pode
ser projetado para fora.
4. Coloque a proteção contra salpicos 8 a
partir de baixo no braço de
acionamento 1. A abertura de
enchimento com tampa 9 deve indicar
no sentido do regulador de velocidade
4.
5. Pressione ligeiramente a proteção
contra salpicos 8 até que engate.
6. Selecione o acessório adequado:
Gancho de amassar 13: para massas
pesadas, p. ex. massa de pão
5. Certifique-se de que o regulador de
velocidade 4 se encontra em "0".
6. Ligue a ficha de rede a uma tomada
adequada (ver "3. Dados técnicos" na
página 40).
O aparelho está agora pronto a funcionar.
Batedor de claras 14: para bater natas,
claras, etc.
Batedor 15: para massas médias e
leves, p. ex. massa para bolos ou massa
para panquecas.
7. Coloque o acessório a partir de baixo
no respetivo encaixe do braço de
acionamento 1.
Certifique-se de que o pequeno pino no
cabo do acessório é inserido na ranhura
transversal do encaixe.
8. Pressione o acessório ligeiramente para
dentro e rode-o no sentido horário, até
que engate.
9. Acione a alavanca de desbloqueio 6 e
desça o braço de acionamento 1 para
a posição de trabalho.
Nota: Vire totalmente a alavanca de
desbloqueio 6 e mantenha-a fixa até
que o braço de acionamento 1 esteja
na sua posição inferior máxima. A
seguir, vire a alavanca de
desbloqueio 6 para a sua posição
inicial.
O aparelho está agora pronto a funcionar.
Colocar o copo de mistura 12:
Cuidado!
• Não utilize o copo de mistura 12 e a
taça 16 em simultâneo. Caso contrário,
o aparelho pode ficar sobrecarregado.
44
Page 47

RP100104-105590-Küchenmaschine LB5 Seite 45 Dienstag, 10. Juni 2014 12:00 12
1. Pressione o desbloqueio 3 da
cobertura 2 para a esquerda.
2. Retire a cobertura 2.
3. Coloque o copo de mistura 12 de
forma que a pequena saliência aponte
para o símbolo do cadeado aberto.
4. Rode o copo de mistura 12 no sentido
horário, até que engate. A pequena
saliência aponta para o símbolo do
cadeado fechado.
6.2 Desmontar o aparelho
5. Desbloqueie a taça 16, rodando-a
ligeiramente no sentido horário.
6. Retire a taça 16.
7. Acione a alavanca de desbloqueio 6 e
desça o braço de acionamento 1 para
a posição de trabalho.
Nota: Vire totalmente a alavanca de
desbloqueio 6 e mantenha-a fixa até
que o braço de acionamento 1 esteja
na sua posição inferior máxima. A
seguir, vire a alavanca de
desbloqueio 6 para a sua posição
inicial.
Retirar o copo de mistura 12:
1. Rode o copo de mistura 12 no sentido
anti-horário, até que a pequena
saliência aponte para o símbolo do
cadeado aberto.
1. Acione a alavanca de desbloqueio 6 e
levante o braço de acionamento 1.
Nota: Vire totalmente a alavanca de
desbloqueio 6 e mantenha-a fixa até
que o braço de acionamento 1 esteja
na sua posição superior máxima. A
seguir, vire a alavanca de
desbloqueio 6 para a sua posição
inicial.
2. Para retirar um acessório, pressione-o
ligeiramente para dentro e desbloqueieo rodando um pouco no sentido antihorário.
3. Retire o acessório.
4. Para retirar a proteção contra
salpicos 8, puxe-a para baixo. Para o
efeito, puxe primeiro a parte posterior
da proteção contra salpicos 8
ligeiramente para baixo.
SKMP 1200 A2 45
2. Retire o copo de mistura 12.
3. Coloque novamente a cobertura 2.
6.3 Utilizar a proteção contra salpicos
Pode adicionar ingredientes durante o processo de mistura:
1. Reduza a velocidade para 1 - 2.
2. Levante a tampa da abertura de
enchimento 9.
3. Adicione os ingredientes.
4. Feche novamente a tampa da abertura
de enchimento 9.
Page 48

RP100104-105590-Küchenmaschine LB5 Seite 46 Dienstag, 10. Juni 2014 12:00 12
6.4 Utilizar o copo de mistura 12
Cuidado!
• Nunca deixe a batedeira funcionar mais
do que 3 minutos seguidos. Após este
período, deixe-a arrefecer para que o
aparelho não sobreaqueça.
1. Adicione sempre primeiro os
ingredientes líquidos e só depois os
sólidos no copo de mistura 12.
2. Corte previamente os ingredientes
sólidos em pedaços pequenos para que
não fiquem presos nas lâminas.
3. Coloque impreterivelmente a tampa 11
no copo de mistura 12, antes de iniciar
a mistura, caso contrário o conteúdo
pode ser projetado para fora.
4. Se durante a mistura ainda desejar
acrescentar algum ingrediente, abra o
6.5 Regular, ligar e desligar a velocidade
fecho 10 na tampa 11 do copo de
mistura 12, rodando-o ligeiramente no
sentido-horário.
5. Selecione a velocidade desejada no
regulador de velocidade 4.
Nota: A velocidade ideal depende
principalmente da consistência do
alimento a misturar. Quanto mais líquido
for o conteúdo, mais rápida pode ser a
velocidade de mistura.
6. Em alternativa, pode pressionar o botão
de impulso 5. Enquanto mantiver o
botão de impulso 5 premido, a mistura é
feita com a velocidade máxima.
Nota: O botão de impulso 5 só
funciona se no regulador de
velocidade 4 for definido, pelo menos,
o nível 1.
1. Ligue o aparelho, rodando o regulador
de velocidade 4 para a direita.
2. Para misturar e mexer comece com uma
Nota: O botão de impulso 5 só funciona
se no regulador de velocidade 4 for
definido, pelo menos, o nível 1.
velocidade mais lenta e só depois
aumente a mesma.
Recomendações para as velocidades
Velocidade Acessório Descrição
1 - 2 Todos - Posição inicial para todos os processos de mistura e
de mexer.
- Na adição de ingredientes
Gancho de amassar 13
ou batedor 15
2 - 3 Batedor 15 - Misturar massa de bater consistente
Gancho de amassar 13 - Amassar massa de levedura
46
- Amassar e misturar massa compacta ou
ingredientes mais compactos
- Misturar manteiga e farinha
- Misturar massa de levedura
- Amassar massa de bater consistente
Page 49

RP100104-105590-Küchenmaschine LB5 Seite 47 Dienstag, 10. Juni 2014 12:00 12
Velocidade Acessório Descrição
4 - 6 Batedor 15 - Massa para bolos
- Bater manteiga com açúcar
- Massa para biscoitos
7 - 10 Batedor de claras 14 - Natas para bater
-Claras
- Maionese
- Creme espumoso de manteiga
Botão de impulso 5 Copo de mistura 12 - Misturar e triturar ingredientes macios ou líquidos.
- O botão de impulso 5 só funciona se no regulador
de velocidade 4 for definido, pelo menos, o nível 1.
Para desligar o aparelho, rode o regulador
de velocidade 4 para "0".
6.6 Proteção contra sobreaquecimento
O aparelho possui uma proteção contra
sobreaquecimento. Se o motor aquecer
excessivamente, o aparelho desliga-se automaticamente:
7. Receitas
7.1 Pão branco
Ingredientes:
• 1 kg de farinha de trigo tipo 405 (farinha para bolos)
• 4 colheres de chá de sal
• 4 embalagens de levedura seca
(aprox. 25 - 30 g)
• 650 ml de água morna
Preparação:
1. Coloque os ingredientes na taça 16.
2. Monte a proteção contra salpicos 8 e o
gancho de amassar 13.
3. Deixe amassar no nível 3 durante 10
minutos.
4. Retire a taça e cobra-a.
1. Desligue o aparelho.
2. Retire a ficha de rede.
3. Deixe o aparelho arrefecer para a
temperatura ambiente.
5. Deixe a massa levedar durante 1 - 2
horas num local quente.
6. Forme o pão ou encha a forma com a
massa.
7. Preaqueça o forno para uma
temperatura de 220 °C.
8. Deixe o pão cozer durante 35 - 40
minutos na calha intermédia.
7.2 Massa de piza
Nota: A massa de piza resulta especialmente bem se for preparada, pelo menos,
24 horas antes da cozedura e for deixada a
repousar no frigorífico. O resultado da
receita que se segue deve ser "tal como num
verdadeiro italiano".
SKMP 1200 A2 47
Page 50

RP100104-105590-Küchenmaschine LB5 Seite 48 Dienstag, 10. Juni 2014 12:00 12
Ingredientes para 4 pessoas:
• 500 g de farinha do tipo 405
• 300 ml de água da torneira
• 1/5, no máximo, de um bloco de fermento de padeiro
• 20 g de sal
Preparação:
1. Coloque os 300 g de farinha na taça
16.
2. Monte a proteção contra salpicos 8 e o
batedor 15.
3. Coloque no nível 2.
4. Adicione lentamente 300 ml de água
da torneira através da abertura de
enchimento 9.
5. Acrescente o fermento.
6. Acrescente o sal.
7. Mexa a massa no nível 4 - 5 até ficar
homogénea.
8. Cubra a taça e deixe repousar a massa
à temperatura ambiente durante cerca
de 20 minutos.
9. Mexa novamente a massa durante
cerca de 3 minutos no nível 4.
10.Retire o batedor 15 e monte o gancho
de amassar 13.
11. Amasse a massa no nível 3.
12.Vá acrescentando aos poucos o resto
da farinha através da abertura de
enchimento 9.
Nota: Assim que a massa de piza se
começar a despegar da taça ao ser
amassada e formar uma bola, a
quantidade de farinha acrescentada é a
indicada.
13.Por fim, amasse a massa mais uma vez
cerca de 3 minutos no nível 2.
Nota: a massa de piza tem a
consistência certa quando se consegue
manter algum tempo a forma de bola,
mas depois de passar um tempo maior
(aprox. 30 minutos) acaba por perder a
forma e espalhar-se.
14.Deixe novamente a massa de piza
repousar 20 minutos na taça coberta.
15.Retire a taça e deixe a massa cair numa
tábua bem polvilhada de farinha.
16.Enfarinhe bem a superfície da massa.
17. Amasse a massa por instantes e forme
uma bola com ela.
18.Coloque a bola de massa num
recipiente que possa ser fechado e
coloque no frigorífico durante 24 horas.
19. Retire a massa do frigorífico e volte a
colocá-la numa tábua com farinha.
20.Enfarinhe bem a massa e amasse-a por
instantes para formar uma bola bonita.
21. A massa está pronta e pode agora fazer
as bases das pizzas.
Indicações:
• O fermento não tem de ser previamente
dissolvido na água.
• Deve ser acrescentado muito menos fermento do que o existente na respetiva
embalagem. Use apenas o necessário
para cerca de 200 - 250 g de farinha
segundo as indicações da embalagem.
• Se o sabor do fermento for sentido na
massa da piza, a sua quantidade tem
de ser reduzida. A quantidade de fermento reduzida volta a ser compensada
pelo longo tempo de crescimento da
massa.
• O sal marinho torna a massa mais aromática.
• A massa tem de saber um pouco a sal
quando provada logo depois de este ter
sido acrescentando. Se o sabor predominante for a farinha ou a fermento,
ainda falta sal. Ao ser acrescentada,
48
Page 51

RP100104-105590-Küchenmaschine LB5 Seite 49 Dienstag, 10. Juni 2014 12:00 12
mais tarde, o resto da farinha, perde-se
novamente o sabor do sal.
• Não ponha a massa a crescer numa
fonte de calor adicional. O que poupar
em tempo vai perder em sabor.
• O repouso de 24 horas é extremamente
importante para uma massa de piza
saborosa.
• A massa de piza preparada desta
forma pode ser guardada no frigorífico
durante vários dias.
7.3 Bolo com fruta
Ingredientes:
• 1 copo de iogurte (150 ml)
• 1 copo de óleo alimentar ou manteiga à
temperatura ambiente (150 g)
• 2 copos de açúcar (300 g)
• 3 copos de farinha (320 g)
• 1 embalagem de fermento em pó
•4 gemas
• 4 claras de ovo
• 1 lata de fruta em calda a gosto ou fruta
fresca (aprox. 500 g)
Preparação:
1. Coloque as claras na taça 16.
2. Monte a proteção contra salpicos 8 e o
batedor de claras 14.
3. Bata as claras no nível 9 durante 1 - 2
minutos até ficarem em castelo.
4. Retire as claras em castelo da taça e
reserve.
5. Coloque o iogurte na taça.
6. Lave o copo de iogurte vazio e utilize
para as medições posteriores ou pese
as quantidades com um copo de
medição.
7. Adicione 1 copo de óleo (150 ml) ou
manteiga à temperatura ambiente
(150 g).
8. Adicione os 2 copos de açúcar (300 g)
9. Adicione as 4 gemas.
10.Mexa os ingredientes no nível 6 ou 7
durante aprox. 2 minutos até obter um
creme espumoso.
11. Adicione os 3 copos de farinha (450 ml
ou 320 g) e o fermento em pó.
12.Retire o batedor de claras 14 e monte o
batedor 15.
13.Misture os ingredientes no nível 4
durante aprox. 5 minutos.
14.Pare o robô de cozinha.
15.Adicione as claras em castelo.
16.Adicione a fruta escorrida e event.
cortada em pedaços pequenos.
17. Misture a fruta e as claras no nível 2
durante aprox. 10 - 30 segundos.
18.Coloque a massa numa forma para
bolos.
19. Deixe cozer a 200 °C durante aprox.
50 minutos.
7.4 Bolo seco
Ingredientes:
• 250 g de manteiga
• 250 g de açúcar
•6 ovos
• 250 g de fécula
• 75 g de farinha
• 1 saqueta de fermento em pó (20 g)
• 1 limão não tratado
• 1 saquete de açúcar baunilhado (2
colheres de chá)
Preparação:
1. Peneire a farinha e a fécula para uma
taça, adicione o fermento em pó e
misture tudo muito bem.
2. Monte a proteção contra salpicos 8 e o
batedor 15.
SKMP 1200 A2 49
Page 52

RP100104-105590-Küchenmaschine LB5 Seite 50 Dienstag, 10. Juni 2014 12:00 12
3. Coloque a manteiga, o açúcar e o
açúcar baunilhado na taça 16.
4. Coloque no nível 3 e deixe misturar até
obter uma massa fofa.
5. Vá juntando os ovos aos poucos.
6. Raspe a casca do limão e adicione.
7. Adicione a mistura de farinha às
colheres e mexa.
8. Quando todos os ingredientes estiverem
misturados, mexa durante 3 minutos no
nível 6.
9. Coloque a massa numa forma para
bolos untada.
10.Deixe cozer durante aprox. 60 minutos
a 180 °C (resistência superior/inferior)
ou a 160 °C (ar circulante).
11. Decore o bolo obtido com açúcar em
pó ou calda de açúcar. Pode misturar o
sumo de limão à calda de açúcar.
7. 5 Wa ff le s
Ingredientes:
•6 ovos
• 1 saqueta de açúcar baunilhado
• 1/2 saqueta de fermento em pó
• 250 g de açúcar
• 200 g de manteiga ou margarina
• 500 g de farinha
• 300 ml de leite
• 125 ml de água mineral com gás
Preparação:
1. Separe as gemas das claras.
2. Coloque as claras na taça 16.
3. Monte a proteção contra salpicos 8 e o
batedor de claras 14.
4. Bata as claras no nível 9 durante 1 - 2
minutos até ficarem em castelo.
5. Pare o robô de cozinha.
6. Retire as claras em castelo da taça e
reserve.
7. Retire o batedor de claras 14 e monte o
batedor 15.
8. Misture a manteiga e o açúcar no nível
5-6 até obter uma mistura cremosa.
9. Coloque no nível 4.
10.Vá adicionando lentamente as gemas, o
leite, a água mineral e o açúcar
baunilhado.
11. Misture a farinha com o fermento em pó
e vá adicionando às colheres.
12.Pare o robô de cozinha por breves
instantes e coloque as claras em castelo
na taça.
13.Envolva as claras em castelo no nível 2
durante aprox. 10 a 30 segundos.
14.Deixe a massa levedar durante aprox.
30 minutos.
15.A seguir, coza os waffles.
7.6 Cupcakes de chocolate
Ingredientes:
• 100 g de manteiga
• 150 g de açúcar
•2 ovos
• 100 g de farinha
• ½ colher de chá de fermento em pó
• ¼ de colher de chá de bicarbonato de
sódio
• ¼ de colher de chá de sal
• 75 g de cacau em pó
• 130 ml de leite, eventualmente mais
• 1 colher de chá de extrato de baunilha,
ou pasta de baunilha
Preparação:
1. Peneire a farinha e o cacau para uma
taça, adicione o fermento, o
bicarbonato de sódio e o sal também
peneirados e misture bem tudo.
50
Page 53

RP100104-105590-Küchenmaschine LB5 Seite 51 Dienstag, 10. Juni 2014 12:00 12
2. Monte a proteção contra salpicos 8 e o
batedor 15.
3. Coloque a manteiga, o açúcar e a
baunilha na taça 16.
4. Coloque no nível 3 e deixe misturar até
obter uma massa fofa.
5. Junte os ovos, um a um.
6. Vá juntando a mistura da farinha e
cerca de 130 ml leite alternadamente e
mexa tudo até obter uma massa
homogénea.
7. Se a massa estiver muito seca, vá
adicionando leite aos poucos, até esta
ficar viscosa.
8. Coloque a massa num tabuleiro para
Cupcakes ou unte chávenas resistentes
ao calor para utilizar como formas.
Também pode utilizar forminhas.
9. Coza durante aprox. 20 minutos a
190 °C.
7.7 Biscoitos feitos com saco de
pasteleiro
Ingredientes:
• 230 g de farinha
• 150 g de manteiga, fria e cortada em
fatias finas
• 100 g de açúcar
•1 ovo
• 1 saqueta de açúcar baunilhado
• 1 pitada de sal
Preparação:
1. Coloque os ingredientes na taça 16.
2. Monte a proteção contra salpicos 8 e o
gancho de amassar 13.
3. Deixe amassar durante aprox. 5 minutos
no nível 2 - 3.
4. Introduza a massa num saco de
pasteleiro e pressione.
5. Coloque os cordões em forma de S, de
retângulos ou círculos no tabuleiro de
cozedura.
6. Deixe cozer 10 minutos a 180 °C.
Indicações:
• Antes da cozedura, pode enfeitar os biscoitos com nozes ou amêndoas laminadas.
• Depois de cozidos e frios, pode decorálos com coberturas.
7.8 Batido de morango com leitelho
Ingredientes:
•1/2 l de leite frio
• 1/2 l de leitelho frio
• 250 g de morangos frescos
• 4 colheres de sopa de doce de
morango
• 4 colheres de sopa de mel
• 1 colher de sopa de sumo de limão
• 1 pitada de sal
• Adicionalmente açúcar ou adoçante
conforme o gosto
Preparação:
1. Retire a tampa 11 do copo de mistura
12.
2. Coloque o leite, o leitelho, o mel, o doce
de morango, o sumo de limão e a
pitada de sal no copo de mistura.
3. Coloque a tampa 11 no copo de
mistura 12.
4. Coloque o copo de mistura 12 no
aparelho.
5. Misture os ingredientes com o botão de
impulso 5 ou com a velocidade no nível
10 durante aprox. 30 segundos.
Nota: O botão de impulso 5 só
funciona se no regulador de
velocidade 4 for definido, pelo menos,
o nível 1.
SKMP 1200 A2 51
Page 54

RP100104-105590-Küchenmaschine LB5 Seite 52 Dienstag, 10. Juni 2014 12:00 12
6. Solte o botão de impulso ou reduza a
velocidade para o nível 1.
7. Ab r a o fech o 10 na tampa 11 do copo
de mistura 12 rodando no sentido
horário.
8. Adicione os morangos.
9. Se desejar uma bebida mais doce,
adicione açúcar a gosto.
10.Mexa durante dois minutos no nível
máximo (botão de impulso ou
velocidade no nível 10).
11. Distribua por copos e decore com os
morangos frescos.
7.9 Batido de banana
Ingredientes:
• 2 bananas, bem maduras
• 1/2 l de leite frio
• 4 colheres de sopa de gelado de baunilha
• Pedacinhos de chocolate
Preparação:
1. Descasque as bananas e corte-as em
pedaços.
2. Retire a tampa 11 do copo de mistura
12.
3. Coloque todos os ingredientes no copo
de mistura12.
4. Coloque a tampa 11 no copo de
mistura 12.
5. Coloque o copo de mistura 12 no
aparelho.
6. Misture os ingredientes com o botão de
impulso 5 ou com a velocidade no nível
10 durante aprox. 60 segundos.
Nota: O botão de impulso 5 só
funciona se no regulador de
velocidade 4 for definido, pelo menos,
o nível 1.
7. Distribua por copos e decore com os
pedacinhos de chocolate.
7.10Smoothie de ginjas
Ingredientes:
• 250 g de ginjas do frasco, sem caroço
• 150 g de iogurte
• Açúcar a gosto
Preparação:
1. Retire a tampa 11 do copo de mistura
12.
2. Coloque as gingas juntamente com o
sumo no copo de mistura 12.
3. Coloque a tampa 11 no copo de
mistura 12.
4. Coloque o copo de mistura 12 no
aparelho.
5. Com o botão de impulso 5 passe as
ginjas durante 15 segundos.
Nota: O botão de impulso 5 só
funciona se no regulador de
velocidade 4 for definido, pelo menos,
o nível 1.
6. Adicione o iogurte e o açúcar.
7. Misture os ingredientes com o botão de
impulso 5 ou com a velocidade no nível
10 (máximo 2 minutos), até que
obtenha um Smoothie homogéneo e
consistente.
52
Page 55

RP100104-105590-Küchenmaschine LB5 Seite 53 Dienstag, 10. Juni 2014 12:00 12
8. Limpar o aparelho
Aviso! Para evitar o perigo de
choque elétrico, ferimentos ou
danos:
– Desligue a ficha de rede da
tomada antes de cada limpeza.
– Nunca mergulhe o aparelho
básico 7 em água.
Cuidado! Nunca utilize produtos de
limpeza abrasivos, corrosivos ou que
risquem. Caso contrário, o aparelho pode
ficar danificado.
8.1 Limpar o aparelho básico (7)
1. Limpe o aparelho básico 7 com um
pano húmido. Também pode usar um
pouco de detergente.
2. Lave com água limpa, para remover os
restos dos produtos de limpeza.
3. Só deve utilizar o aparelho básico 7
novamente quando ele estiver
completamente seco.
8.2 Limpar a proteção contra salpicos
(
8), o gancho de amassar (13), o
batedor de claras (
14) e o
batedor (15)
Cuidado! A proteção contra salpicos 8
não é adequada para a máquina da loiça.
O gancho de amassar 13, o batedor de
claras 14 e o batedor 15 também podem
ser lavados na máquina da loiça.
1. Coloque as peças em água fria ou
morna para amolecer os restos de
massa.
Nota: Também pode adicionar algum
detergente à água.
2. Remova os restos de massa amolecidos
com a escova de loiça.
3. Enxague com água limpa.
4. Deixe as peças secar totalmente antes
de as voltar a utilizar.
8.3 Limpar a taça (16)
A taça 16 é feita em aço inoxidável e pode
ser lavada no lava-loiças ou na máquina da
loiça.
8.4 Limpar o copo de mistura (12)
Nota: O copo de mistura 12 e a
tampa 11 podem ser lavados na máquina.
1. Coloque o copo de mistura 12 no
aparelho.
2. Encha sensivelmente até meio com água
quente que contenha detergente.
3. Coloque a tampa 11.
4. Certifique-se de que o regulador de
velocidade 4 se encontra em "0".
5. Ligue a ficha de rede a uma tomada
adequada (ver "3. Dados técnicos" na
página 40).
6. Prima o botão de impulso 5 várias vezes
por breves instantes.
Nota: O botão de impulso 5 só
funciona se no regulador de
velocidade 4 for definido, pelo menos,
o nível 1.
7. Retire o copo de mistura 12 do
aparelho.
8. Deite fora a água de lavagem.
9. Enxague o copo de mistura 12 com
água limpa.
10.Deixe o copo de mistura 12 secar
totalmente antes de voltar a utilizá-lo.
SKMP 1200 A2 53
Page 56

RP100104-105590-Küchenmaschine LB5 Seite 54 Dienstag, 10. Juni 2014 12:00 12
9. Eliminação
9.1 Aparelho
O símbolo do contentor do lixo
com rodas com uma cruz por
cima significa que, na União
Europeia, o produto tem de ser
deixado numa recolha de lixo
separada. Isto é válido para o produto e
para todos os acessórios com este símbolo.
Os produtos assinalados não podem ser eliminados com o lixo doméstico normal,
tendo de ser entregues num ponto de
recolha para reciclagem de aparelhos eléct-
10. Garantia da HOYER Handel GmbH
Cara/o cliente,
o seu aparelho beneficia de uma garantia
de 3 anos a partir da data da compra. A lei
concede-lhe direitos legais contra o
vendedor do produto caso este apresente
defeitos. Estes direitos legais não estão
sujeitos a qualquer restrição perante as
nossas condições de garantia especificadas
em seguida.
Condições da garantia
O prazo da garantia começa a partir da
data de compra. Conserve o talão de
compra original, já que este é necessário
como comprovativo da compra.
Se, dentro do prazo de três anos a partir da
data da sua compra, este produto
apresentar algum defeito no material ou de
fabrico, assumimos, a nosso critério, a
reparação ou substituição do mesmo sem
quaisquer custos para si. A ativação da
garantia pressupõe que, dentro do referido
prazo de três anos, seja apresentado o
ricos e electrónicos. A reciclagem ajuda a
reduzir a utilização de matérias-primas e a
preservar o ambiente. Poderá encontrar
informações sobre a eliminação e a localização do centro de recolha mais próximo p.
ex. junto do departamento de limpeza
urbana da sua localidade ou nas Páginas
Amarelas.
9.2 Embalagem
Para eliminar a embalagem, observe os
regulamentos ambientais do seu país.
aparelho defeituoso acompanhado do
comprovativo da compra (talão de
compra), juntamente com uma breve
descrição por escrito do defeito e da data
da sua ocorrência.
Se o defeito estiver coberto pela nossa
garantia, ser-lhe-á entregue o produto
reparado ou um novo produto. A reparação
ou substituição do produto não implica o
reinício do período de garantia.
Período de garantia e reclamações de
defeitos no âmbito legal
A ativação da garantia não prolongará o
período de garantia original. O mesmo se
aplica às peças substituídas e reparadas.
Quaisquer eventuais danos ou defeitos já
existentes aquando da compra devem ser
reportados imediatamente depois de
desembalar o produto. As reparações
necessárias depois de decorrido o período
de garantia estão sujeitas a pagamento.
54
Page 57

RP100104-105590-Küchenmaschine LB5 Seite 55 Dienstag, 10. Juni 2014 12:00 12
Âmbito da garantia
O aparelho foi produzido em conformidade
com rigorosas diretivas de qualidade e
criteriosamente verificado antes do
fornecimento.
A ativação da garantia aplica-se a defeitos
no material ou de fabrico. Esta garantia não
se estende a partes do produto que estejam
sujeitas ao desgaste normal, sendo por isso
consideradas peças de desgaste, nem a
danos em peças frágeis, p. ex.,
interruptores, acumuladores ou peças de
vidro.
Esta garantia cessa se o produto tiver sido
danificado, utilizado de modo incorreto ou
sujeito a alguma reparação. A utilização
correta do produto pressupõe que sejam
criteriosamente respeitadas todas as
instruções constantes do manual de
instruções.
Quaisquer usos e aplicações que sejam
desaconselhados ou contra os quais haja
avisos no manual de instruções devem ser
impreterivelmente evitados.
Este produto foi concebido exclusivamente
para utilização privada e não para uso
comercial.
O tratamento impróprio e incorreto, a
aplicação de força excessiva e as
intervenções efetuadas sem o
consentimento do nosso Service-Center
autorizado fazem cessar o direito à
garantia.
compra como comprovativo da compra
para o caso de tal lhe ser solicitado.
• O número do artigo encontra-se na
placa de características, numa gravura,
na página de título destas instruções
(canto inferior esquerdo) ou num
autocolante no verso ou na parte de
baixo do aparelho.
• Se ocorrerem falhas de funcionamento
ou outros defeitos, contacte em primeiro
lugar o Service-Center seguidamente
referido, por telefone ou por e-mail.
• Os produtos adquiridos com defeitos
podem ser enviados para o endereço
do serviço de assistência que lhe foi
indicado, sem quaisquer portes de
envio, devendo enviar também o
respetivo comprovativo de compra
(talão de compra) e a indicação do tipo
de defeito e a data da sua ocorrência.
Este e muitos outros manuais,
vídeos de produtos e software
estão disponíveis para
download em
www.lidl-service.com.
Regularização em caso de ativação da
garantia
Para garantir uma resposta rápida ao seu
pedido, siga as indicações que se seguem:
• Tenha consigo o número do artigo (no
caso deste aparelho: IAN 100104:
vermelho/105590: creme) e o talão de
SKMP 1200 A2 55
Page 58

RP100104-105590-Küchenmaschine LB5 Seite 56 Dienstag, 10. Juni 2014 12:00 12
Service-Center
Assistência Portugal
Tel.: 70778 0005 (0,12 EUR/Min.)
E-Mail: hoyer@lidl.pt
IAN:
100104: vermelho
105590: creme
Fornecedor
Tenha em atenção que o endereço que se
segue não é o endereço do serviço
de assistência. Entre primeiro em
contacto com o Service-Center acima
mencionado.
HOYER Handel GmbH
Kühnehöfe 5
22761 Hamburg
Alemanha
56
Page 59

RP100104-105590-Küchenmaschine LB5 Seite 57 Dienstag, 10. Juni 2014 12:00 12
Contents
1. Device description . . . . . . . . . . . . . . . . . . . . . . . . . . . . . . . . . . . . . . . . . . . . . . . . . . . . . . 57
2. Names of parts (see fold-out page). . . . . . . . . . . . . . . . . . . . . . . . . . . . . . . . . . . . . . . . . . 58
3. Technical data . . . . . . . . . . . . . . . . . . . . . . . . . . . . . . . . . . . . . . . . . . . . . . . . . . . . . . . . . 58
4. Safety information . . . . . . . . . . . . . . . . . . . . . . . . . . . . . . . . . . . . . . . . . . . . . . . . . . . . . 58
5. Unpacking and setting up. . . . . . . . . . . . . . . . . . . . . . . . . . . . . . . . . . . . . . . . . . . . . . . . . 61
6. Operating the appliance. . . . . . . . . . . . . . . . . . . . . . . . . . . . . . . . . . . . . . . . . . . . . . . . . . 61
7. Recipes. . . . . . . . . . . . . . . . . . . . . . . . . . . . . . . . . . . . . . . . . . . . . . . . . . . . . . . . . . . . . . 65
8. Cleaning the appliance. . . . . . . . . . . . . . . . . . . . . . . . . . . . . . . . . . . . . . . . . . . . . . . . . . . 70
9. Disposal . . . . . . . . . . . . . . . . . . . . . . . . . . . . . . . . . . . . . . . . . . . . . . . . . . . . . . . . . . . . . 71
10. HOYER Handel GmbH Warranty. . . . . . . . . . . . . . . . . . . . . . . . . . . . . . . . . . . . . . . . . . . . 71
Congratulations on the purchase of
your new product.
You have selected a high-quality product.
The operating instructions are a constituent
part of this product. They contain important
information about safety, use and disposal.
1. Device description
1.1 Intended purpose
The SilverCrest SKMP 1200 A2 food
processor is used to mix, beat, knead,, whip
and blend food and produce.
This appliance should only be used in dry
rooms. It must not be used out in the open or
in humid rooms.
This appliance is intended for use in private
households and is not suitable for
commercial purposes.
The appliance is likewise suitable for:
• use in staff kitchens in shops, offices and
other commercial areas,
• use in agricultural settings,
Familiarize yourself with all the operating
and safety instructions before using the
product. Use the product only as described
and for the stated spheres of application.
If you pass the product on to a third party,
always pass on all the documentation as
well.
• customers in hotels, motels and other
accommodations,
• bed-and-breakfast establishments.
1.2 Scope of supply
• 1 food processor, base unit
• 1 splash guard
•1 blender jug
• 1 dough hook
• 1 balloon whisk
• 1 beater
• 1 copy of the user instructions
SKMP 1200 A2 57
Page 60

RP100104-105590-Küchenmaschine LB5 Seite 58 Dienstag, 10. Juni 2014 12:00 12
1.3 Variants
The appliance is available in two versions:
• RP100104: red
• RP105590: crème
Operation is identical for both colour
variants.
2. Names of parts (see fold-out page)
1 Drive arm
2 Cover
3 Unlock button for cover
4 Speed controller with on/off function
5 Pulse button
6 Unlock lever
7 Base unit
8 Splash guard
9 Filling opening with flap
10 Lid fastening
11 Lid of blender jug
12 Blender jug with lid and lid fastening
13 Dough hook
14 Balloon whisk
15 Beater
16 Mixing bowl
3. Technical data
Power supply: 220 - 240 V~ /50 Hz
Output: 1,200 W
Protection class: II
Short-time operation / food processor: 10 minutes
Short-time operation / blender jug: 3 minutes
Short-time operation: indicates how long the appliance may run without interruption.
4. Safety information
4.1 Explanation of terms
The following keywords are used in these
user instructions:
Warning!
High risk: ignoring this warning
could result in a risk to life and
limb.
58
Caution!
Medium risk: ignoring this warning may
result in damage.
Note:
Low risk: points to be noted when handling
the appliance.
Page 61

RP100104-105590-Küchenmaschine LB5 Seite 59 Dienstag, 10. Juni 2014 12:00 12
4.2 Special information about
this appliance
Warning!
age, please observe the following
information.
• This appliance can be used by persons who
have reduced physical, sensory or mental
ability or lack experience and/or knowledge, provided they are supervised or
instructed in the safe use of the appliance
and have understood its associated hazards.
• The appliance may not be used by children.
• Keep the appliance and its mains power
cable away from children.
• Do not allow children to play with the appli-
ance.
• While it is not under supervision and before
it is assembled, disassembled or cleaned,
the appliance should always be disconnected from the power supply.
• Never immerse the base unit
• Never use scouring, corrosive or abrasive
cleaning materials as these might damage
the appliance.
4.3 General information
• Please read these user instructions
carefully before use. They are a
constituent part of the appliance and
must be kept to hand at all times.
• Use the appliance only for the purpose
described (see “1.1 Intended purpose”
on page 57).
• To prevent damage, check that the
mains voltage required (see type plate
on the appliance) is compatible with
your mains voltage.
To avoid injury or dam-
7
in water.
• Please note that any claim under the
warranty or for liability will be invalid if
accessories are used that are not
recommended in these user instructions,
or if original spare parts are not used for
repairs. This also applies to repairs
undertaken by unqualified persons. You
will find the service address in “Service
Centre” on page 72.
• If the appliance should develop a fault
during the warranty period, it may only
be repaired by our Service Centre.
Otherwise all claims under warranty are
null and void. You will find the service
address in “Service Centre” on
page 72.
4.4 Protection against electric shock
Warning! The following safety
information is intended to protect
you against electric shock.
• The appliance must not under any
circumstances be used if it is damaged.
Have the device repaired in such cases
by a qualified specialist. The contact
data can be found in “Service Centre”
on page 72.
• If the mains cable for this appliance is
damaged, it must be replaced by the
manufacturer or a person with similar
qualifications in order to avoid a
hazard.
• Under no circumstances should water or
other liquids get into the base unit 7. For
this reason:
– never use it outdoors
– never immerse the base unit 7 in water
– never place containers filled with
liquid, such as drinking glasses, vases
etc. on the appliance
– never use in very humid environments
– never use in the immediate vicinity of a
kitchen sink, bath, shower or a
SKMP 1200 A2 59
Page 62

RP100104-105590-Küchenmaschine LB5 Seite 60 Dienstag, 10. Juni 2014 12:00 12
swimming pool, as water may splash
into the appliance.
If liquid should enter the appliance,
unplug the mains plug immediately and
have the appliance repaired by a
qualified technician. The contact data
can be found in “Service Centre” on
page 72.
• Never touch the appliance, the mains
cable or the mains plug with wet hands.
• Always unplug it by pulling out the plug,
never pull on the cable itself.
• Ensure that the mains cable is not kinked,
twisted or crushed.
• Keep the mains cable away from hot
surfaces, such as the top of a stove.
• If you are not going to use the appliance
for a while, remove the plug from the
wall socket. Only then is the appliance
completely free of current.
• Avoid using extension cables. These
may only be used under very specific
conditions:
– the extension cable must be able to
handle the amount of current drawn
by the appliance,
– the extension cable must not be
"suspended". Keep children away
from it and ensure that it does not
present a trip hazard,
– under no circumstances use a
damaged extension cable,
– do not connect any other appliances
to the mains socket, since it could
cause an overload (do not use
multiple sockets of any kind).
4.5 Preventing injury
Warning! To avoid injury, please
observe the following information.
• Make sure that the mains cable never
becomes a trip hazard, that no-one can
get tangled in it or tread on it.
• During operation, avoid contact with the
moving parts of the appliance such as
the blades of the blender jug 12, the
dough hook 13, balloon whisk 14 or
beater 15. Your hands or hair could be
drawn into the appliance, leading to
injuries. Only ever switch the appliance
on if you have correctly fitted the splash
guard 8 when using the mixing bowl 16
or the lid 11 when using the blender
jug 12.
• Always remove the power supply plug
from the mains socket before cleaning
the appliance or changing the attachments.
• Remember that the blades of the blender
jug 12 are extremely sharp. Never
touch the blades with bare fingers to
avoid cutting yourself.
• Always first switch off the appliance
using the speed controller 4 before
removing the power supply plug. Otherwise the appliance might start up when
you insert the power supply plug in a
mains socket again.
• If you are not using the blender jug 12,
the cover 2 must be fitted. Otherwise the
appliance will not work so as to protect
the user from injury.
60
Page 63

RP100104-105590-Küchenmaschine LB5 Seite 61 Dienstag, 10. Juni 2014 12:00 12
4.6 For the safety of your child
Warning! Children are often
unaware of danger and are injured
as a result. Please note therefore:
• Ensure that the packing foil does not
become a deadly trap for a child.
Packing foils are not toys.
4.7 Material damage
Warning! Follow the instructions given
below to prevent material damage.
• Only place the appliance on a level,
dry, non-slip surface to stop the appliance falling over or sliding off.
• Do not place the appliance on top of a
hot stove.
• Do not use the blender jug 12 and the
mixing bowl 16 at the same time. This
might overload the appliance.
• Never use the mixer and the blender
jug 12 when empty. This might cause
the motor to overheat.
• The mixer should only ever be operated
for max. 10 minutes at a time, and the
blender for 3 minutes. Afterwards the
appliance must be first allowed to cool
down to roomtemperature again.
• Only ever use the blender jug 12 with
the lid in place 11 as liquid might other-
wise be ejected.
• Do not move the appliance if food or
pastry is still inside.
• Only use the blender jug 12 to mix
drinks or make dressings.
• Do not overfill the mixing bowl 16 or
blender jug 12 as the contents might
otherwise be ejected.
• Never add hot or boiling food to the
blender jug 12.
5. Unpacking and setting up
1. Remove the individual parts from the
packaging.
2. Check that the individual parts are
complete (see “1.2 Scope of supply” on
page 57) and are undamaged.
3. Clean the appliance thoroughly before
using it for the first time (see
“8. Cleaning the appliance” on
page 70).
6. Operating the appliance
6.1 Assembling the appliance
1. Press the unlock lever 6 and swing up
the drive arm 1.
4. Place the appliance on a level, dry, nonslip surface so that the appliance can
neither fall over nor slide off.
5. Check that the speed controller 4 is set
to "0".
6. Put the plug in a suitable socket (see
“3. Technical data” on page 58).
The appliance is now ready to use.
Note: Press the unlock lever 6 round
fully and hold until the drive arm 1 is
right down. Then swing the unlock
lever 6 back again.
SKMP 1200 A2 61
Page 64

RP100104-105590-Küchenmaschine LB5 Seite 62 Dienstag, 10. Juni 2014 12:00 12
2. To fit the mixing bowl 16, insert it in the
base unit 7.
3. Lock the mixing bowl by rotating it
slightly anti-clockwise until it engages.
Caution!
Never use the mixing bowl 16 without the
splash guard 8 in position. Otherwise food
might be ejected.
4. Fit the splash guard 8 onto the drive
arm 1 from below. The filling opening
with flap 9 should point towards the
speed controller 4 .
5. Press on the splash guard 8 until it
engages.
6. Select the appropriate attachment:
Dough hook 13: For heavy dough, e.g.
bread dough
Balloon whisk 14: For whipping cream,
beating egg whites, etc.
Beater 15: For medium to light dough/
batter, e.g. batter for (pan)cakes.
7. Fit the attachment into the appropriate
opening in the drive arm 1 from below.
When doing so, make sure that the little
lugs on the shaft of the attachment are
inserted into the crosswise slot of the
opening.
8. Press the attachment lightly in and turn
clockwise until it engages.
9. Press the unlock lever 6 and swing the
drive arm 1 down into the working
position.
Note: Press the unlock lever 6 round
fully and hold until the drive arm 1 is
right down. Then swing the unlock
lever 6 back again.
The appliance is now ready to use.
Fitting the blender jug 12 :
Caution!
• Do not use the blender jug 12 and the
mixing bowl at the same time16. This
might overload the appliance.
1. Press the unlock button 3 for the lid 2 to
the left.
2. Take the lid 2 off.
3. Position the blender jug 12 so that the
little nib points to the open padlock
symbol.
4. Turn the blender jug 12 clockwise until it
engages. The little nib is now pointing to
the closed padlock symbol.
6.2 Dismantle appliance
1. Press the unlock lever 6 and swing up
the drive arm 1.
Note: Press the unlock lever 6 round
fully and hold until the drive arm 1 is
right down. Then swing the unlock
lever 6 back again.
2. To remove an attachment, press lightly in
again and unlock by turning
anticlockwise slightly.
3. Remove the attachment.
4. To remove the splash guard 8, pull it
downwards. When doing so, first pull
the splash guard 8 down at the back
slightly.
62
Page 65

RP100104-105590-Küchenmaschine LB5 Seite 63 Dienstag, 10. Juni 2014 12:00 12
5. Unlock the mixing bowl 16 by rotating
slightly in a clockwise direction.
6. Remove the mixing bowl 16.
7. Pr ess th e u n l o c k lev e r 6 and swing the
drive arm 1 down into the working
position.
Note: Press the unlock lever 6 round
fully and hold until the drive arm 1 is
right down. Then swing the unlock
lever 6 back again.
Removing the blender jug12 :
1. Turn the blender jug 12 anti-clockwise
until that the little nib points to the open
padlock symbol.
2. Remove the blender jug 12.
3. Put the lid 2 back on.
6.3 Using the splash guard
You can add ingredients during mixing:
1. Reduce the speed to 1 - 2.
2. Lift the flap over the filling opening 9.
3. Add ingredients.
4. Close the flap over the filling opening 9
again.
6.4 Using the blender jug 12
Caution!
• Never allow the blender to run for more
than 3 minutes at a time. It then has to
cool down again first to prevent the
appliance overheating.
1. Always put the liquid ingredients in the
blender jug first, followed by the solid
components 12.
2. Chop up the solid ingredients
beforehand to stop any lumps jamming
the blades.
3. Make sure you always replace the
lid 11 on the blender jug 12 before
starting the blender as the contents
might otherwise be ejected.
4. If you wish to add other ingredients
during blending, open the fastening 10
in the lid 11 of the blender jug 12 by
turning clockwise.
5. Select the desired speed on the speed
controller 4 .
Note: The ideal speed mainly depends
on the consistency of the food to be
blended. The more liquid it is, the faster
blending can be carried out.
6. Alternatively, you can press the pulse
button 5 here. Blending will take place
at maximum speed as long as the pulse
button 5 is held down.
Note: The pulse button 5 only functions
when at least level 1 is set on the speed
controller 4.
SKMP 1200 A2 63
Page 66

RP100104-105590-Küchenmaschine LB5 Seite 64 Dienstag, 10. Juni 2014 12:00 12
6.5 Regulating speed, switching on and off
1. Switch the appliance on by turning the
speed controller 4 to the right.
2. Start off at a slightly slower speed when
Note: The pulse button 5 only functions
when at least level 1 is set on the speed
controller 4.
blending or mixing and then increase.
Recommendations for speed levels
Speed Attachment Description
1 - 2 All - Starting position for all blending / mixing opera-
tions.
- When adding ingredients
Dough hook 13 or
beater 15
2 - 3 Beater 15 - Mixing thick dough/batter
Dough hook 13 - Kneading yeast dough
4 - 6 Beater 15 - Cake batter
7 - 10 Balloon whisk 14 - Whipping cream
Pulse button 5 Blender jug 12 - Blending and liquidising soft or liquid ingredients.
- Kneading and mixing firm dough or ingredients
- Mixing butter and flour
- Mixing yeast dough
- Kneading thick dough
- Beating butter with sugar
- Biscuit dough
- Egg whites
- Mayonnaise
- Beating butter until fluffy
- The pulse button 5 only functions when at least
level 1 is set on the speed controller 4.
Move the speed controller 4 to "0" to switch
the appliance off.
6.6 Thermal cut-out
The appliance has a thermal cut-out. If the
motor gets too hot, the appliance will switch
off automatically:
1. Switch the appliance off.
2. Remove the power supply plug.
3. Allow the appliance to cool down to
room temperature.
64
Page 67

RP100104-105590-Küchenmaschine LB5 Seite 65 Dienstag, 10. Juni 2014 12:00 12
7. Recipes
7.1 White bread
Ingredients
• 1 kg plain flour (type 405, cake flour)
•4 tsp salt
• 4 packs of dried yeast
(approx. 25 - 30 g)
• 650 ml lukewarm water
Preparation
1. Put the ingredients in the mixing
bowl 16.
2. Fit the splash guard 8 and dough
hook 13.
3. Knead for 10 minutes on level 3.
4. Remove and cover mixing bowl.
5. Allow dough to stand for around 1 - 2
hours in a warm place.
6. Shape into a loaf or place dough in a
loaf pan.
7. Preheat oven to 220 °C.
8. Bake bread on middle shelf for 35 -
40 minutes.
7.2 Pizza dough
Note: Pizza dough is particularly good
when prepared at least 24 hours in advance
and then allowed to rest in the fridge. The
following recipe should give you pizza
dough "just like Mamma used to make".
Ingredients for 4 people
• 500 g type 00 flour
• 300 ml water
• max. 1/5 of a block of yeast
• 20 g salt
Preparation
1. Place 300 g of the flour in the mixing
bowl 16.
2. Fit the splash guard 8 and beater 15.
3. Set to level 2.
4. Slowly pour 300 ml water through the
filling opening 9.
5. Add the yeast.
6. Add the salt.
7. Mix at level 4 - 5 until smooth.
8. Cover the bowl and allow the dough to
rise at room temperature for about
20 minutes.
9. Mix the dough again at level 4 for about
3 minutes.
10.Remove the beater 15 and insert the
dough hook 13.
11. Knead the dough at level 3.
12.Now gradually add the remaining flour
using the filling opening 9.
Note: The amount of flour is exactly
right when the dough can be lifted from
the surface and forms a ball when
kneading.
13.To finish, knead the dough one more
time at level 2 for about 3 minutes.
Note: The pizza dough has exactly the
right consistency when it briefly holds a
ball shape but loses its shape and
flattens out over a longer time (roughly
30 minutes).
14.Allow the pizza dough to rest in the
covered mixing bowl for a further
20 minutes.
15.Turn the bowl upside down and let the
dough fall onto a well-floured board.
16.Dust the surface of the dough well with
flour.
SKMP 1200 A2 65
Page 68

RP100104-105590-Küchenmaschine LB5 Seite 66 Dienstag, 10. Juni 2014 12:00 12
17. Briefly knead the dough and form into a
ball.
18.Put the dough ball into a lidded
container and place in the fridge for
24 hours.
19. Take the dough out of the fridge and
place it on a baking sheet dusted with
flour.
20.Dust the dough well with flour and
briefly knead to form a nice ball of
dough.
21. The dough is now ready and can be
made into pizza bases and the toppings
added.
Notes.
• The yeast does not need to be first dissolved in water.
• Much less yeast is required as is
recommended on the yeast packaging.
Only use as much yeast as required for
about 200 - 250 g flour according to
the packaging instructions.
• If your pizza dough tastes of yeast,
reduce the amount of yeast further. The
long rising time compensates for the
reduced amount of yeast.
• For more aromatic dough, add sea salt.
• When tasting just after adding the salt,
the dough should initially taste slightly
salty. If you can clearly taste the flour or
yeast, add another pinch of salt. The
salty taste becomes milder when the rest
of the flour is added.
•Do not place the dough near an addi-
tional heat source to rise. You may save
time, but the flavour will suffer as a
result.
• The resting time of 24 hours is extremely
important if your pizza dough is to be
nice and tasty.
• Pizza dough prepared in this way can
be stored in the fridge for several days.
7.3 Pound cake with fruit
Ingredients
• 1 tub of yoghurt (150 ml)
• 1 tub of cooking oil or soft butter
(150 g)
• 2 tubs of sugar (300 g)
• 3 tubs of flour (320 g)
• 1 sachet of baking powder
• 4 egg yolks
• 4 egg whites
• 1 tin of fruit of your choice or fresh fruit
(around 500 g)
Preparation:
1. Put the egg whites in the mixing
bowl 16.
2. Fit the splash guard 8 and the balloon
whisk 14.
3. Beat the egg whites at level 9 for 1 2 minutes until stiff.
4. Take the stiffly-beaten egg whites out of
the bowl and put to one side.
5. Add the yoghurt to the mixing bowl.
6. Rinse out the empty yoghurt tub and
measure out the other ingredients with it
or use a measuring beaker to determine
quantities.
7. Add 1 tub of oil (150 ml) or soft butter
(150 g).
8. Add 2 tubs of sugar (300 ml).
9. Add 4 egg yolks.
10.Beat the ingredients at level 6 or 7 for
around 2 minutes until smooth.
11. Add 3 tubs of flour (450 ml or 320 g)
and the baking powder.
12.Remove the balloon whisk 14 and fit the
beater 15.
13.Mix the ingredients at level 4 for around
5 minutes.
66
Page 69

RP100104-105590-Küchenmaschine LB5 Seite 67 Dienstag, 10. Juni 2014 12:00 12
14.Stop the food processor.
15.Add the stiffly-beaten egg whites.
16.Drain fruit, cut into pieces if required and
add to bowl.
17. Mix fruit and stiffly-beaten egg whites at
level 2 for around 10 - 30 seconds.
18.Place mixture in a cake tin.
19. Bake at 200 °C for around 50 minutes.
7.4 Sand cake
Ingredients
• 250 g butter
• 250 g sugar
•6 eggs
• 250 g cornflour
• 75 g plain flour
• 1 sachet of baking powder (20 g)
•1 untreated lemon
• 1 sachet of vanilla sugar (2 tsp)
Preparation
1. Sieve cornflour and flour into a bowl,
add baking powder and mix well.
2. Fit the splash guard 8 and beater 15.
3. Add the butter, sugar and vanilla sugar
to the mixing bowl 16.
4. Select level 3 to product a loose batter.
5. Gradually beat in the eggs one by one.
6. Grate the lemon rind and add.
7. Spoon in the flour mixture and stir.
8. Once all ingredients are stirred in, beat
at level 6 for 3 minutes.
9. Place mixture in a greased cake tin.
10.Bake for around 60 minutes at 180 °C
(top and bottom heat) or 160 °C (fan
oven).
11. Once the cake is cool, ice or decorate
with icing sugar. The lemon juice can be
added to the icing.
7. 5 W a f fl es
Ingredients
• 6 eggs
• 1 sachet of vanilla sugar
• 1/2 sachet of baking powder
• 250 g sugar
• 200 g butter or margarine
• 500 g plain flour
• 300 ml milk
• 125 ml carbonated mineral water
Preparation
1. Separate the eggs.
2. Put the egg whites in the mixing
bowl 16.
3. Fit the splash guard 8 and the balloon
whisk 14.
4. Beat the egg whites at level 9 for 1 - 2
minutes until stiff.
5. Stop the food processor.
6. Take the stiffly-beaten egg whites out of
the bowl and put to one side.
7. Re mov e t he ba l l o o n whi s k 14 and insert
the beater 15.
8. Cream butter and sugar at level 5 - 6.
9. Set to level 4.
10.Gradually add the egg yolks, milk,
mineral water and vanilla sugar.
11. Mix the flour and baking powder and
spoon in.
12.Stop the food processor briefly and add
the stiffly-beaten egg whites to the bowl.
13.Fold in the stiffly-beaten egg whites at
level 2 for around 10 - 30 seconds.
14.Leave the batter to stand for approx.
30 minutes.
15.Then cook the waffles.
SKMP 1200 A2 67
Page 70

RP100104-105590-Küchenmaschine LB5 Seite 68 Dienstag, 10. Juni 2014 12:00 12
7.6 Chocolate cupcakes
Ingredients
• 100 g butter
• 150 g sugar
•2 eggs
• 100 g plain flour
• ½ tsp baking powder
• ¼ tsp bicarbonate of soda
•¼ tsp salt
• 75 g cocoa powder
• 130 ml milk, possibly more
• 1 tsp vanilla extract or vanilla paste
Preparation
1. Sieve flour and cocoa powder into a
bowl, add baking powder, bicarbonate
of soda and salt through the sieve and
mix well.
2. Fit the splash guard 8 and beater 15.
3. Add the butter, sugar and vanilla to the
mixing bowl 16.
4. Select level 3 to product a loose batter.
5. Beat in the eggs one at a time.
6. Mix in the flour mixture and about 130
ml of milk alternately to form a smooth
mixture.
7. If the mixture is too dry, add a little milk
at a time until it becomes looser.
8. Add the mixture to a cupcake maker or
grease ovenproof cups to act as baking
tins. You can also use suitably shaped
pans or moulds.
9. Bake for around 20 minutes at 190 °C.
7.7 Piped biscuits
Ingredients
• 230 g plain flour
• 150 g butter, cold and cut into thin slices
• 100 g sugar
•1 egg
• 1 sachet of vanilla sugar
•1 pinch of salt
Preparation
1. Put the ingredients in the mixing
bowl 16.
2. Fit the splash guard 8 and the dough
hook 13.
3. Mix for around 5 minutes at level 2 - 3.
4. Add the mixture to a piping bag and
pipe out.
5. Place the strands on a baking sheet in
an S-shape, in straight lines or in circles.
6. Bake at 180 °C for 10 minutes.
Notes:
• You can garnish the biscuits with
chopped nuts or almonds before baking.
• Once the biscuits have cooled after baking, they can be iced.
7.8 Strawberry shake with buttermilk
Ingredients
• 1/2 l cold milk
• 1/2 l cold buttermilk
• 250 g fresh strawberries
• 4 tbsp strawberry jam
•4 tbsp honey
•1 tbsp lemon juice
•1 pinch of salt
• sugar or sweetener to taste
Preparation
1. Remove the lid 11 from the blender
jug 12.
2. Add the milk, buttermilk, honey,
strawberry jam, lemon juice and a pinch
of salt.
3. Replace the lid 11 on the blender
jug 12.
4. Place the jug 12 on the appliance.
68
Page 71

RP100104-105590-Küchenmaschine LB5 Seite 69 Dienstag, 10. Juni 2014 12:00 12
5. Mix the ingredients for around
30 seconds either using the pulse
button 5 or at speed level 10.
Note: The pulse button 5 only functions
when at least level 1 is set on the speed
controller 4.
6. Release the pulse button or reduce the
speed to level 1.
7. Open the fastening 10 in the lid 11 of
the blender jug 12 by turning clockwise.
8. Add the strawberries.
9. If you would like the shake to be
sweeter, add extra sugar to taste.
10.Mix for 2 minutes at the highest speed
setting (pulse button or speed level 10).
11. Pour into glasses and garnish with fresh
strawberries.
7.9 Banana shake
Ingredients
• 2 very ripe bananas
• 1/2 l cold milk
• 4 tbsp vanilla ice cream
• chocolate sprinkles
Preparation
1. Peel bananas and cut into pieces.
2. Remove the lid 11 from the blender
jug 12.
3. Put all ingredients in the jug 12.
4. Replace the lid 11 on the blender
jug 12.
5. Place the jug 12 on the appliance.
6. Mix the ingredients for around 60
seconds either using the pulse button 5
or at speed level 10.
Note: The pulse button 5 only functions
when at least level 1 is set on the speed
controller 4.
7. Pour into glasses and decorate with
chocolate sprinkles.
7.10 Sour cherr y smoothie
Ingredients
• 250 g jar of pitted sour cherries
• 150 g yoghurt
•sugar to taste
Preparation
1. Remove the lid 11 from the blender
jug 12.
2. Put the sour cherries plus juice in the
blender jug 12.
3. Replace the lid 11 on the blender
jug 12.
4. Place the jug 12 on the appliance.
5. Blend the sour cherries using the pulse
button 5 for 15 seconds.
Note: The pulse button 5 only functions
when at least level 1 is set on the speed
controller 4.
6. Add the yoghurt and sugar.
7. Mix the ingredients either using the pulse
button 5 or at speed level 10 (max.
2 minutes) until the mixture is smooth
and thick.
SKMP 1200 A2 69
Page 72

RP100104-105590-Küchenmaschine LB5 Seite 70 Dienstag, 10. Juni 2014 12:00 12
8. Cleaning the appliance
Warning! To prevent the risk of
electric shock, injury or damage:
– Disconnect the power supply
plug from the mains socket
before cleaning.
– Never immerse the base unit 7 in
water.
Caution! Never use scouring, corrosive or
abrasive cleaning materials as these could
damage the appliance.
8.1 Cleaning the base unit (7)
1. Clean the base unit 7 with a damp cloth.
A little detergent may also be used.
2. Wipe over with clean water.
3. Do not use the base unit 7 again until it
is completely dry.
8.2 Cleaning the splash guard (8),
dough hook (
13), balloon whisk
(14) and beater (15)
Caution!The splash guard 8 is not
dishwasher-safe.
The dough hook 13, balloon whisk 14 and
beater 15 can also be washed in the
dishwasher.
1. Put the parts in cold or lukewarm water
to soften dough residues.
Note You can also add a little
detergent to the water.
2. Remove softened dough residues with a
washing-up brush.
3. Rinse off with clean water.
4. Allow parts to dry completely before
using them again.
8.3 Cleaning the mixing bowl (16)
The mixing bowl 16 is made of stainless
steel and can be cleaned in the sink or
dishwasher.
8.4 Cleaning the blender jug (12)
Note: The blender jug 12 and the lid 11
are dishwasher-proof.
1. Place the blender jug 12 on the
appliance.
2. Fill up around halfway with warm water
containing detergent.
3. Put on lid 11.
4. Check that the speed controller 4 is set
to "0".
5. Put the power supply plug in a mains
socket (see “3. Technical data” on
page 58).
6. Press the pulse button 5 briefly several
times.
Note: The pulse button 5 only functions
when at least level 1 is set on the speed
controller 4.
7. Take th e jug 12 off the appliance .
8. Pour out the detergent solution.
9. Rinse out blender jug 12 with clean
water.
10.Allow the jug 12 to dry completely
before using again.
70
Page 73

RP100104-105590-Küchenmaschine LB5 Seite 71 Dienstag, 10. Juni 2014 12:00 12
9. Disposal
9.1 Appliance
The symbol with the crossedout rubbish bin on wheels
means that within the European
Union, the product must be
disposed of to a sorted rubbish
collection. This applies to the product and all
accessories which are marked with this
symbol. Marked products must not be
disposed of via the regular domestic waste
but must be handed in to a recycling centre
10. HOYER Handel GmbH Warranty
Dear Customer,
You have a warranty on this product which
is valid for 3 years from the date of
purchase. In the event of this product being
defective, you have statutory rights against
the seller of the product. These statutory
rights are not limited by our warranty as set
out below.
for electrical or electronic devices. Recycling
helps to reduce the use of raw materials and
to relieve the environment. It is therefore
imperative that you follow the disposal
regulations applicable in your country.
9.2 Packaging
If you wish to discard the packaging, please
observe the applicable environmental
regulations in your country.
If the defect is covered by our warranty, the
repaired product or a new one will be sent
back to you. There is no new warranty
period following repair or replacement of
the product.
Warranty period and statutory claims
relating to defects
Warranty conditions
The warranty period begins with the date of
purchase. Please keep the original till receipt
in a safe place. This is required as your
proof of purchase.
If a defect in materials or workmanship
occurs within three years of the date your
product was purchased, we will repair or
replace the product at our discretion at no
charge to you. This service under warranty
assumes that the defective product and the
proof of purchase (till receipt) are submitted
within the three-year period and that a brief
description in writing is provided of what the
defect is and when it occurred.
SKMP 1200 A2 71
The warranty period is not extended when a
service is provided under warranty. This also
applies to replaced and repaired parts. Any
damage or defects present at purchase must
be reported immediately the product is
unpacked. Repairs incurred once the
warranty period has expired are
chargeable.
Scope of warranty
The product has been carefully
manufactured in accordance with strict
quality guidelines and was thoroughly
checked before being delivered.
Page 74

RP100104-105590-Küchenmaschine LB5 Seite 72 Dienstag, 10. Juni 2014 12:00 12
The warranty applies to defective materials
or workmanship. This warranty does not
extend to product parts exposed to normal
wear and tear (and which can therefore be
considered wear parts) or to damage to
fragile parts such as switches, batteries or
parts made of glass.
This warranty is void if the product is
damaged or if it is not used or maintained
properly. All the information in the operating
instructions should be observed precisely to
ensure that the product is used properly.
It is essential to avoid intended uses and
actions which are discouraged or warned
against in the operating instructions.
The product is intended for only private use
and not for commercial purposes.
The warranty is void in the event of misuse,
incorrect treatment, use of force or
interference by anyone other than our
authorized service centre.
Warranty process
Please follow the instructions below to
ensure that your claim is processed quickly.
• In case of any enquiry, please keep the article number (for this product: IAN 100104:
red/105590: crème) and the till receipt as
proof of purchase.
• The article number can be found on the
rating plate, as an engraving, on the
cover sheet of your instructions (bottom
left) or as a label on the back or
underside of your appliance.
• If malfunctions or any other defects
should occur, in the first instance contact
the Service Centre mentioned below by
telephone or e-mail.
• Once a product has been recorded as
defective, you can then send it Freepost
to the service address you are given,
enclosing the proof of purchase (till
receipt) and quoting what the defect is
and when it occurred.
You can download these
instructions and many other
manuals, product videos and
software from
www.lidl-service.com.
Service Centre
Service Great Britain
Tel.: 0871 5000 720 (£ 0.10/Min.)
E-Mail: hoyer@lidl.co.uk
Service Ireland
IR
Tel.: 1890 930 034
(0,08 EUR/Min., (peak))
(0,06 EUR/Min., (off peak))
E-Mail: hoyer@lidl.ie
Service Cyprus
CY
Tel.: 8009 4409
E-Mail: hoyer@lidl.com.cy
Service Malta
MT
Tel.: 80062230
E-Mail: hoyer@lidl.com.mt
IAN: 100104: red/105590: crème
Supplier
Please note that the address below is not a
service address. In the first instance,
contact the service centre mentioned above.
HOYER Handel GmbH
Kühnehöfe 5
22761 Hamburg
Germany
72
Page 75

RP100104-105590-Küchenmaschine LB5 Seite 73 Dienstag, 10. Juni 2014 12:00 12
Inhalt
1. Gerätebeschreibung . . . . . . . . . . . . . . . . . . . . . . . . . . . . . . . . . . . . . . . . . . . . . . . . . . . . 73
2. Benennung der Teile (siehe Ausklappseite) . . . . . . . . . . . . . . . . . . . . . . . . . . . . . . . . . . . . 74
3. Technische Daten. . . . . . . . . . . . . . . . . . . . . . . . . . . . . . . . . . . . . . . . . . . . . . . . . . . . . . . 74
4. Sicherheitshinweise. . . . . . . . . . . . . . . . . . . . . . . . . . . . . . . . . . . . . . . . . . . . . . . . . . . . . 74
5. Auspacken und aufstellen. . . . . . . . . . . . . . . . . . . . . . . . . . . . . . . . . . . . . . . . . . . . . . . . . 77
6. Gerät bedienen . . . . . . . . . . . . . . . . . . . . . . . . . . . . . . . . . . . . . . . . . . . . . . . . . . . . . . . . 78
7. Rezepte . . . . . . . . . . . . . . . . . . . . . . . . . . . . . . . . . . . . . . . . . . . . . . . . . . . . . . . . . . . . . 81
8. Gerät reinigen . . . . . . . . . . . . . . . . . . . . . . . . . . . . . . . . . . . . . . . . . . . . . . . . . . . . . . . . 86
9. Entsorgung . . . . . . . . . . . . . . . . . . . . . . . . . . . . . . . . . . . . . . . . . . . . . . . . . . . . . . . . . . . 87
10. Garantie der HOYER Handel GmbH . . . . . . . . . . . . . . . . . . . . . . . . . . . . . . . . . . . . . . . . . 88
Herzlichen Glückwunsch zum Kauf
Ihres neuen Gerätes.
Sie haben sich damit für ein hochwertiges
Gerät entschieden. Die Bedienungsanleitung ist Bestandteil dieses Gerätes. Sie enthält wichtige Hinweise für Sicherheit,
Gebrauch und Entsorgung.
1. Gerätebeschreibung
1.1 Verwendungszweck
Die Küchenmaschine SilverCrest SKMP
1200 A2 dient zum Mixen, Quirlen, Kneten,
Aufschlagen und Mischen von Lebens- und
Nahrungsmitteln.
Dieses Gerät darf nur in trockenen Räumen
verwendet werden. Eine Verwendung im
Freien oder in Feuchträumen ist nicht gestattet.
Dieses Gerät ist für den Einsatz in Privathaushalten und nicht für den gewerblichen
Einsatz geeignet.
Das Gerät ist ebenfalls geeignet für:
• den Einsatz in Küchen für Mitarbeiter in
Läden, Büros und anderen gewerblichen
Bereichen,
Machen Sie sich vor der Benutzung des
Gerätes mit allen Bedien- und Sicherheitshinweisen vertraut. Benutzen Sie das Gerät nur
wie beschrieben und für die angegebenen
Einsatzbereiche.
Händigen Sie alle Unterlagen bei Weitergabe des Gerätes an Dritte mit aus.
• den Einsatz in landwirtschaftlichen
Anwesen,
• Kunden in Hotels, Motels und anderen
Wohneinrichtungen,
• Frühstückspensionen.
1.2 Lieferumfang
• 1 Küchenmaschine, Grundgerät
•1 Spritzschutz
•1 Mixbehälter
•1 Knethaken
•1 Schneebesen
•1 Rührbesen
• 1 Bedienungsanleitung
SKMP 1200 A2 73
Page 76

RP100104-105590-Küchenmaschine LB5 Seite 74 Dienstag, 10. Juni 2014 12:00 12
1.3 Varianten
Das Gerät wird in zwei Versionen geliefert:
• RP100104: rot
• RP105590: crème
Die Bedienung ist für beide Farbvarianten
identisch.
2. Benennung der Teile (siehe Ausklappseite)
1 Antriebsarm
2 Abdeckung
3 Entriegelung für Abdeckung
4 Geschwindigkeitsregler mit Ein/Aus-
Funktion
5 Impulsknopf
6 Entriegelungshebel
7 Grundgerät
8 Spritzschutz
9 Einfüllöffnung mit Klappe
10 Deckelverschluss
11 Deckel Mixbehälter
12 Mixbehälter mit Deckel und
Deckelverschluss
13 Knethaken
14 Schneebesen
15 Rührbesen
16 Rührschüssel
3. Technische Daten
Spannungsversorgung: 220 - 240 V~ / 50 Hz
Leistung: 1.200 Watt
Schutzklasse: II
KB-Zeit Küchenmaschine: 10 Minuten
KB-Zeit Mixbehälter: 3 Minuten
KB-Zeit (Kurzbetriebszeit): gibt an, wie lange das Gerät ununterbrochen laufen darf.
4. Sicherheitshinweise
4.1 Begriffserklärung
Folgende Signalbegriffe finden Sie in dieser
Bedienungsanleitung:
Warnung!
Hohes Risiko: Missachtung der
Warnung kann Schaden für Leib
und Leben verursachen.
74
Vorsicht!
Mittleres Risiko: Missachtung der Warnung
kann einen Sachschaden verursachen.
Hinweis:
Geringes Risiko: Sachverhalte, die im Umgang mit dem Gerät beachtet werden sollten.
Page 77

RP100104-105590-Küchenmaschine LB5 Seite 75 Dienstag, 10. Juni 2014 12:00 12
4.2 Besondere Hinweise für
dieses Gerät
Warnung!
Hinweise, um Verletzungen oder
Schäden zu vermeiden.
• Dieses Gerät darf von Personen mit redu-
zierten physischen, sensorischen oder mentalen Fähigkeiten oder Mangel an
Erfahrung und/oder Wissen benutzt werden, wenn sie beaufsichtigt oder bezüglich
des sicheren Gebrauchs des Gerätes unterwiesen wurden und die daraus resultierenden Gefahren verrstanden haben.
• Dieses Gerät darf nicht von Kindern benutzt
werden.
• Das Gerät und seine Anschlussleitung sind
von Kindern fernzuhalten.
• Kinder dürfen nicht mit dem Gerät spielen.
• Das Gerät ist bei nicht vorhandener Aufsicht
und vor dem Zusammenbau, dem Auseinandernehmen oder Reinigen stets vom Netz zu
trennen.
• Tauchen Sie das Grundgerät
Wasser.
• Verwenden Sie keinesfalls scheuernde,
ätzende oder kratzende Reinigungsmittel.
Dadurch könnte das Gerät beschädigt
werden.
4.3 Allgemeine Hinweise
• Lesen Sie vor dem Gebrauch bitte sorg-
fältig diese Bedienungsanleitung. Sie ist
Bestandteil des Gerätes und muss jederzeit verfügbar sein.
• Verwenden Sie das Gerät nur für den
beschriebenen Verwendungszweck
(siehe „1.1 Verwendungszweck“ auf
Seite 73).
Beachten Sie folgende
7
nie in
• Überprüfen Sie, ob die erforderliche
Netzspannung (siehe Typenschild am
Gerät) mit Ihrer Netzspannung übereinstimmt.
• Bitte beachten Sie, dass jeglicher
Anspruch auf Garantie und Haftung
erlischt, wenn Zubehörteile verwendet
werden, die nicht in dieser Bedienungsanleitung empfohlen werden oder wenn
bei Reparaturen nicht ausschließlich
Originalersatzteile verwendet werden.
Dies gilt auch für Reparaturen, die durch
nichtqualifizierte Personen durchgeführt
werden. Die Kontaktdaten finden Sie in
„Service-Center” auf Seite 89.
• Bei eventuellen Funktionsstörungen
innerhalb der Garantiezeit darf die
Instandsetzung des Gerätes nur durch
unser Service-Center erfolgen. Ansonsten erlischt jeglicher Garantieanspruch.
4.4 Schutz vor elektrischem Schlag
Warnung! Die folgenden Sicherheitshinweise sollen Sie vor einem
elektrischen Schlag schützen.
• Wenn das Gerät beschädigt ist, darf das
Gerät keinesfalls benutzt werden. Lassen
Sie das Gerät in diesem Falle von qualifiziertem Fachpersonal reparieren. Die
Kontaktdaten finden Sie in „Service-Center” auf Seite 89.
• Wenn die Netzanschlussleitung dieses
Gerätes beschädigt wird, muss sie durch
den Hersteller oder eine ähnlich qualifizierte Person ersetzt werden, um
Gefährdungen zu vermeiden.
• In das Innere des Grundgerätes 7 dürfen keinesfalls Wasser oder andere
Flüssigkeiten gelangen. Daher:
– niemals im Freien einsetzen
– niemals das Grundgerät 7 in Wasser
eintauchen
SKMP 1200 A2 75
Page 78

RP100104-105590-Küchenmaschine LB5 Seite 76 Dienstag, 10. Juni 2014 12:00 12
– niemals mit Flüssigkeit gefüllte
Gefäße, wie Trinkgläser, Vasen etc.
auf das Gerät stellen
– niemals in sehr feuchter Umgebung
einsetzen
– niemals in unmittelbarer Nähe eines
Spülbeckens, einer Badewanne, einer
Dusche oder eines Schwimmbeckens
benutzen, da Spritzwasser in das
Gerät gelangen könnte.
Falls doch einmal Flüssigkeit in das
Gerät gelangt, ziehen Sie sofort den
Netzstecker und lassen das Gerät von
qualifiziertem Fachpersonal reparieren.
Die Kontaktdaten finden Sie in „ServiceCenter” auf Seite 89.
• Fassen Sie das Gerät, die Netzanschlussleitung oder den Netzstecker
niemals mit feuchten Händen an.
• Ziehen Sie die Netzanschlussleitung
stets am Netzstecker heraus. Ziehen Sie
niemals an der Netzanschlussleitung
selber.
• Achten Sie darauf, dass die Netzanschlussleitung nie geknickt oder
gequetscht wird.
• Halten Sie die Netzanschlussleitung von
heißen Flächen (z.B. Herdplatte) fern.
• Wenn Sie das Gerät längere Zeit nicht
benutzen, ziehen Sie den Netzstecker
aus der Netzsteckdose. Nur dann ist das
Gerät völlig stromfrei.
• Die Benutzung von Verlängerungskabeln
sollten Sie vermeiden. Sie ist nur unter
ganz bestimmten Voraussetzungen
gestattet:
– Das Verlängerungskabel muss für die
Stromstärke des Gerätes geeignet
sein.
– Das Verlängerungskabel darf nicht
„fliegend“ verlegt sein: es darf nicht
zur Stolperfalle werden oder von
Kindern erreichbar sein.
– Das Verlängerungskabel darf keines-
falls beschädigt sein.
– Es dürfen keine weiteren Geräte als
dieses Gerät an der Netzsteckdose
angeschlossen werden, da es sonst zu
einer Überlastung des Stromnetzes
kommen kann (Verbot von Mehrfachsteckdosen!).
4.5 Schutz vor Verletzungen
Warnung! Beachten Sie folgende
Hinweise, um Verletzungen zu vermeiden.
• Achten Sie darauf, dass die Netzanschlussleitung nie zur Stolperfalle wird
oder sich jemand darin verfangen oder
darauftreten kann.
• Vermeiden Sie während des Betriebes
den Kontakt mit den beweglichen Teilen
des Gerätes wie Messerwerk des Mixbehälters 12, Knethaken 13, Schneebe-
sen 14 oder Rührbesen 15. Hände
oder Haare könnten in das Gerät gezogen werden und zu Verletzungen führen.
Schalten Sie das Gerät nur ein, wenn
der Spritzschutz 8 bei Verwendung der
Rührschüssel 16 bzw. der Deckel 11 bei
Verwendung des Mixbehälters 12 korrekt aufgesetzt ist.
• Ziehen Sie vor jeder Reinigung oder
jedem Wechseln der Einsätze den Netzstecker aus der Netzsteckdose.
• Beachten Sie, dass die Klingen des Mixbehälters 12 sehr scharf sind. Berühren
Sie die Klingen nie mit bloßen Händen,
um Schnittwunden zu vermeiden.
• Schalten Sie das Gerät immer zuerst am
Geschwindigkeitsregler 4 aus, bevor Sie
den Netzstecker ziehen. Sonst könnte es
passieren, dass das Gerät in dem
Moment anläuft, wenn Sie den Netzstecker erneut in eine Netzstreckdose
stecken.
76
Page 79

RP100104-105590-Küchenmaschine LB5 Seite 77 Dienstag, 10. Juni 2014 12:00 12
• Wenn der Mixbehälter 12 nicht aufgesetzt ist, muss die Abdeckung 2 aufgesetzt sein. Ansonsten arbeitet das Gerät
zum Schutz vor Verletzungen nicht.
4.6 Zur Sicherheit Ihres Kindes
Warnung! Kinder können Gefahren oft nicht richtig einschätzen und
sich dadurch Verletzungen
zuziehen. Beachten Sie daher:
• Achten Sie darauf, dass die Verpackungsfolie nicht zur tödlichen Falle
für Kinder wird. Verpackungsfolien sind
kein Spielzeug.
4.7 Sachschäden
Achtung! Um Sachschäden zu vermeiden,
beachten Sie folgende Bestimmungen.
• Stellen Sie das Gerät ausschließlich auf
einer ebenen, trockenen und rutschfesten
Fläche auf, damit das Gerät weder
umfallen noch herunterrutschen kann.
• Stellen Sie das Gerät nicht auf eine
heiße Herdplatte.
• Verwenden Sie nicht gleichzeitig den
Mixbehälter 12 und die
Rührschüssel 16. Dadurch könnte das
Gerät überlastet werden.
• Verwenden Sie das Rührwerk und den
Mixbehälter 12 nie ohne Inhalt.
Dadurch könnte der Motor überhitzen.
• Das Rührwerk darf höchstens 10 Minuten, der Mixer höchstens 3 Minuten am
Stück betrieben werden. Danach müssen
Sie das Gerät erst wieder auf Raumtemperatur abkühlen lassen.
• Verwenden Sie den Mixbehälter 12
ausschließlich mit aufgesetztem
Deckel 11, da sonst Flüssigkeit herausgeschleudert werden könnte.
• Stellen Sie das Gerät nicht um, solange
sich noch Speisen oder Teig im Gerät
befinden.
• Verwenden Sie den Mixbehälter 12
ausschließlich zur Herstellung von Mixgetränken oder Dressings.
• Überfüllen Sie die Rührschüssel 16 oder
den Mixbehälter 12 nicht, da sonst der
Inhalt herausgeschleudert werden kann.
• Füllen Sie nie heißes oder kochendes
Mixgut in den Mixbehälter 12.
5. Auspacken und aufstellen
1. Nehmen Sie die Einzelteile aus der
Verpackung.
2. Überprüfen Sie, dass die Einzelteile vollständig sind (siehe „1.2 Lieferumfang“
auf Seite 73) und keine Beschädigungen aufweisen.
3. Reinigen Sie vor der ersten Benutzung
das Gerät gründlich (siehe „8. Gerät reinigen“ auf Seite 86).
SKMP 1200 A2 77
4. Stellen Sie das Gerät auf einer ebenen,
trockenen und rutschfesten Fläche auf,
damit das Gerät weder umfallen noch
herunterrutschen kann.
5. Überprüfen Sie, dass der Geschwindigkeitsregler 4 auf „0” steht.
6. Stecken Sie den Netzstecker in eine
geeignete Netzsteckdose (siehe
„3. Technische Daten“ auf Seite 74).
Das Gerät ist nun betriebsbereit.
Page 80

RP100104-105590-Küchenmaschine LB5 Seite 78 Dienstag, 10. Juni 2014 12:00 12
6. Gerät bedienen
6.1 Gerät zusammenbauen
1. Betätigen Sie den Entriegelungshebel 6
und klappen Sie den Antriebsarm 1
nach oben.
Hinweis: Legen Sie den
Entriegelungshebel 6 ganz um und
halten Sie ihn fest, bis der Antriebsarm 1
ganz oben ist. Dananch klappen Sie
den Entriegelungshebel 6 wieder
zurück.
2. Um die Rührschüssel 16 einzusetzen,
setzen Sie sie in das Grundgerät 7.
3. Verriegeln Sie die Rührschüssel, indem
Sie sie etwas gegen den Uhrzeigersinn
drehen, bis sie einrastet.
Achtung!
Verwenden Sie die Rührschüssel 16 nie
ohne aufgesetzten Spritzschutz 8. Es könnte
sonst Mixgut herausgeschleudert werden.
4. Setzen Sie den Spritzschutz 8 von unten
auf den Antriebsarm 1. Die Einfüllöffnung mit Klappe 9 soll in Richtung
des Geschwindigkeitsreglers 4 zeigen.
5. Drücken Sie den Spritzschutz 8 etwas
fest, bis er einrastet.
6. Wählen Sie den geeigneten Rühreinsatz
aus:
Knethaken 13: Für schwere Teige, z.B.
Brotteig
Schneebesen 14: Zum Aufschlagen von
Sahne, Eiweiß etc.
Rührbesen 15: Für mittlere bis leichte
Teige, z.B. Kuchenteig oder
Pfannkuchenteig.
7. Setzen Sie den Rühreinsatz von unten in
die entsprechende Aufnahme im
Antriebsarm 1.
Achten Sie darauf, dass die kleinen
Mitnehmer am Schaft des Rühreinsatzes
in den Querschlitz der Aufnahme
eingeführt werden.
8. Drücken Sie den Rühreinsatz etwas
hinein und drehen ihn im Uhrzeigersinn,
bis er einrastet.
9. Betätigen Sie den Entriegelungshebel 6
und klappen Sie den Antriebsarm 1
nach unten in die Arbeitsstellung.
Hinweis: Legen Sie den
Entriegelungshebel 6 ganz um und
halten Sie ihn fest, bis der Antriebsarm 1
ganz unten ist. Dananch klappen Sie
den Entriegelungshebel 6 wieder
zurück.
Das Gerät ist nun betriebsbereit.
Mixbehälter 12 aufsetzen:
Achtung!
• Verwenden Sie nicht gleichzeitig den
Mixbehälter 12 und die
Rührschüssel 16. Dadurch könnte das
Gerät überlastet werden.
1. Drücken Sie die Entriegelung 3 für die
Abdeckung 2 nach links.
2. Nehmen Sie die Abdeckung 2 ab.
3. Setzen Sie den Mixbehälter 12 so auf,
dass die kleine Nase auf das Symbol
des offenen Schlosses zeigt.
78
Page 81

RP100104-105590-Küchenmaschine LB5 Seite 79 Dienstag, 10. Juni 2014 12:00 12
4. Drehen Sie den Mixbehälter 12 im Uhrzeigersinn, bis er einrastet. Die kleine
Nase zeigt nun auf das Symbol des
geschlossenen Schlosses.
6.2 Gerät auseinanderbauen
1. Betätigen Sie den Entriegelungshebel 6
und klappen Sie den Antriebsarm 1
nach oben.
Hinweis: Legen Sie den
Entriegelungshebel 6 ganz um und
halten Sie ihn fest, bis der Antriebsarm 1
ganz oben ist. Dananch klappen Sie
den Entriegelungshebel 6 wieder
zurück.
2. Um einen Rühreinsatz zu entnehmen,
drücken Sie ihn etwas hinein und entriegeln ihn mit einer leichten Drehung
gegen den Uhrzeigersinn.
3. Entnehmen Sie den Rühreinsatz.
4. Um den Spritzschutz 8 abzunehmen,
ziehen Sie ihn nach unten ab. Ziehen Sie
dabei zuerst den hinteren Teil des Spritzschutzes 8 etwas nach unten.
5. Entriegeln Sie die Rührschüssel 16,
indem Sie sie etwas im Uhrzeigersinn
drehen.
6. Entnehmen Sie die Rührschüssel 16.
7. Betätigen Sie den Entriegelungshebel 6
und klappen Sie den Antriebsarm 1
nach unten in die Arbeitsstellung.
Hinweis: Legen Sie den
Entriegelungshebel 6 ganz um und
halten Sie ihn fest, bis der Antriebsarm 1
ganz unten ist. Dananch klappen Sie
den Entriegelungshebel 6 wieder
zurück.
Mixbehälter 12 abnehmen:
1. Drehen Sie den Mixbehälter 12 gegen
den Uhrzeigersinn, bis die kleine Nase
auf das Symbol des offenen Schlosses
zeigt.
2. Nehmen Sie den Mixbehälter 12 ab.
3. Setzen Sie die Abdeckung 2 wieder auf.
6.3 Spritzschutz verwenden
Sie können während des Rührens Zutaten
zugeben:
1. Reduzieren Sie die Geschwindigkeit auf
1 - 2.
2. Klappen Sie die Klappe über der Einfüllöffnung 9 nach oben.
3. Füllen Sie die Zutaten ein.
4. Schließen Sie die Klappe über der Einfüllöffnung 9 wieder.
6.4 Mixbehälter 12 verwenden
Achtung!
• Lassen Sie den Mixer nie länger als
3 Minuten am Stück laufen, Danach
muss er erst wieder abkühlen, damit das
Gerät nicht überhitzt.
1. Geben Sie immer zuerst die flüssigen
und dann erst die festen Zutaten in den
Mixbehälter 12.
SKMP 1200 A2 79
Page 82

RP100104-105590-Küchenmaschine LB5 Seite 80 Dienstag, 10. Juni 2014 12:00 12
2. Schneiden Sie feste Zutaten vorher klein,
damit sich die Stücke nicht in den
Messern verklemmen.
3. Setzen Sie unbedingt den Deckel 11 auf
den Mixbehälter 12, bevor Sie mixen,
6. Sie können alternativ den Impulsknopf 5
da sonst der Inhalt herausgeschleudert
werden könnte.
4. Wenn Sie während des Mixens noch
etwas zugeben möchten, öffnen Sie den
Deckelverschluss 10 im Deckel 11 des
Mixbehälters 12, indem Sie ihn im Uhrzeigersinn drehen.
5. Wählen Sie am Geschwindigkeitsregler 4
die gewünschte Geschwindigkeit.
6.5 Geschwindigkeit regeln, ein- und ausschalten
1. Schalten Sie das Gerät ein, indem Sie
den Geschwindigkeitsregler 4 nach
rechts drehen.
2. Beginnen Sie mit einer etwas langsameren Geschwindigkeit beim Mixen und
Empfehlungen für Geschwindigkeiten
Hinweis: Der Impulsknopf 5 funktioniert
nur, wenn am Geschwindigkeitsregler 4 mindestens die Stufe 1 eingestellt wird.
Hinweis: Die ideale Geschwindigkeit
hängt vor allem von der Konsistenz des
Mixgutes ab. Je flüssiger der Inhalt ist,
um so schneller können Sie mixen.
drücken. Solange Sie den Impulsknopf 5
gedrückt halten, wird mit maximaler
Geschwindigkeit gemixt.
Hinweis: Der Impulsknopf 5
funktioniert nur, wenn am
Geschwindigkeitsregler 4 mindestens
die Stufe 1 eingestellt wird.
Rühren und erhöhen Sie erst danach die
Geschwindigkeit.
Geschwindigkeit Einsatz Beschreibung
1 - 2 alle - Startstellung bei allen Mix- und Rührvorgängen.
- Bei der Zugabe von Zutaten
Knethaken 13 oder
Rührbesen 15
2 - 3 Rührbesen 15 - Mischen von dickem Rührteig
Knethaken 13 - Kneten von Hefeteig
4 - 6 Rührbesen 15 -Kuchenteig
7 - 10 Schneebesen 14 -Schlagsahne
- Kneten und Mischen von festem Teig oder
festeren Zutaten
- Mischen von Butter und Mehl
- Mischen von Hefeteig
- Kneten von dickem Rührteig
- Aufschlagen von Butter mit Zucker
- Plätzchenteig
-Eiweiß
- Majonäse
- schaumig schlagen von Butter
80
Page 83

RP100104-105590-Küchenmaschine LB5 Seite 81 Dienstag, 10. Juni 2014 12:00 12
Geschwindigkeit Einsatz Beschreibung
Impulsknopf 5
Mixbehälter 12 - Mixen und zerkleinern weicher oder flüssiger
Zutaten.
- Es muss mindestens die Geschwindigkeitstufe 1
eingestellt sein, damit der Impulsknopf
niert
5 funktio-
Um das Gerät auszuschalten, drehen Sie
den Geschwindigkeitsregler 4 auf „0”.
6.6 Überhitzungsschutz
Das Gerät verfügt über einen Überhitzungsschutz. Sollte der Motor zu heiß geworden
sein, schaltet das Gerät automatisch ab:
7. Rezepte
7. 1 We iß br ot
Zutaten:
• 1 kg Weizenmehl Typ 405 (Kuchenmehl)
•4 TL Salz
• 4 Packungen Trockenhefe
(ca. 25 - 30 g)
• 650 ml lauwarmes Wasser
Zubereitung:
1. Zutaten in die Rührschüssel 16 geben.
2. Spritzschutz 8 und Knethaken 13 einsetzen.
3. Auf Stufe 3 10 Minuten durchkneten.
4. Rührschüssel entnehmen und zudecken.
5. Teig an einem warmen Ort 1 - 2 Stunden
gehen lassen.
6. Brotlaib formen oder Teig in Kastenform
füllen.
7. Backofen auf 220 °C vorheizen.
8. Brot auf mittlerer Schiene 35 - 40 Minuten lang ausbacken.
1. Schalten Sie das Gerät aus.
2. Ziehen Sie den Netztstecker.
3. Lassen Sie das Gerät auf Raumtemperatur abkühlen.
7.2 Pizzateig
Hinweis: Der Pizzateig gelingt besonders
gut, wenn Sie ihn mindestens 24 Stunden
vor dem Backen zubereiten und ihn dann im
Kühlschrank ruhen lassen. Das folgende
Rezept sollte zu einem Ergebnis führen „wie
beim guten Italiener”.
Zutaten für 4 Personen:
• 500 g Mehl Typ 405
• 300 ml Leitungswasser
• maximal 1/5 Block Backhefe
• 20 g Salz
Zubereitung:
1. Geben Sie 300 g des Mehls in die Rührschüssel 16.
2. Spritzschutz 8 und Rührbesen 15 einsetzen.
3. Auf Stufe 2 stellen.
4. 300 ml Leitungswasser durch die Einfüllöffnung 9 langsam zugeben.
5. Geben Sie die Backhefe hinzu.
6. Geben Sie das Salz hinzu.
SKMP 1200 A2 81
Page 84

RP100104-105590-Küchenmaschine LB5 Seite 82 Dienstag, 10. Juni 2014 12:00 12
7. Rühren Sie die Masse auf Stufe 4 - 5
glatt.
8. Decken Sie die Rührschüssel ab und
lassen Sie den Teig bei Zimmertemperatur etwa 20 Minuten lang gehen.
9. Rühren Sie den Teig erneut etwa 3 Minuten lang auf Stufe 4 durch.
10.Entnehmen Sie den Rührbesen 15 und
setzen Sie den Knethaken 13 ein.
11.Kneten Sie den Teig auf Stufe 3.
12.Geben Sie nun nach und nach das restliche Mehl durch die Einfüllöffnung 9
hinzu.
Hinweis: Sobald sich der Pizzateig
beim Kneten vom Boden ablöst und sich
zu einer Kugel formt, ist die zugegebene
Mehlmenge genau richtig.
13.Kneten Sie zum Schluss den Teig noch
einmal ca. 3 Minuten lang auf Stufe 2
durch.
Hinweis: Der Pizzateig hat genau die
richtige Konsistenz, wenn er kurzfristig
die Kugelform hält, aber über längere
Zeit (ca. 30 Minuten) die Form verliert
und zerfließt.
14.Lassen Sie den Pizzateig erneut
20 Minuten in der zugedeckten Rührschüssel ruhen.
15.Entnehmen Sie die Rührschüssel und
lassen Sie den Teig auf ein gut gemehltes Brett fallen.
16.Bestäuben Sie die Oberfläche des
Teiges gut mit Mehl.
17. Kneten Sie den Teig kurz durch und
formen Sie ihn dabei zu einer Kugel.
18.Geben Sie den Teigball in einen
verschließbaren Behälter und stellen ihn
für 24 Stunden in den Kühlschrank.
19. Nehmen Sie den Teig aus dem Kühlschrank und legen ihn zurück auf ein mit
Mehl bestäubtes Backbrett.
20.Stäuben Sie den Teig gut mit Mehl ein
und kneten ihn kurz durch, damit ein
schöner Teigball geformt wird.
21. Der Teig ist nun fertig und es können
Pizzaböden geformt und belegt werden.
Hinweise:
• Die Hefe muss nicht unbedingt vorher in
Wasser aufgelöst werden.
• Es wird deutlich weniger Hefe zugegeben, als auf der Verpackung der Hefe
steht. Nehmen Sie nur soviel, wie laut
Packungsangabe für etwa 200 - 250 g
Mehl erforderlich ist.
• Schmeckt man bei Ihrem Pizzateig die
Hefe durch, sollten Sie die Hefemenge
weiter reduzieren. Die reduzierte Hefemenge wird durch die lange Gehzeit
wieder ausgeglichen.
• Meersalz macht den Teig aromatischer.
• Beim Abschmecken direkt nach der Salzzugabe muss der Teig zunächst etwas
nach Salz schmecken. Wenn Sie das
Mehl oder die Hefe deutlich herausschmecken, fehlt noch etwas Salz. Mit
der späteren Zugabe des restlichen
Mehls verliert sich der Salzgeschmack
wieder.
• Stellen Sie den Teig zum Gehen nicht
an eine zusätzliche Wärmequelle. Sie
können dann zwar Zeit sparen, aber der
Geschmack leidet darunter.
• Die Ruhezeit von 24 Stunden ist enorm
wichtig für einen gut schmeckenden
Pizzateig.
• Der so zubereitete Pizzateig kann
mehrere Tage im Kühlschrank gelagert
werden.
82
Page 85

RP100104-105590-Küchenmaschine LB5 Seite 83 Dienstag, 10. Juni 2014 12:00 12
7.3 Rührkuchen mit Obst
Zutaten:
•1 Becher Joghurt (150ml)
• 1 Becher Speiseöl oder weiche Butter
(150 g)
• 2 Becher Zucker (300 g)
• 3 Becher Mehl (320 g)
•1 Packung Backpulver
•4 Eigelb
•4 Eiweiß
• 1 Dose Obst nach Geschmack oder
frisches Obst (ca. 500 g)
Zubereitung:
1. Eiweiß in die Rührschüssel 16 geben.
2. Spritzschutz 8 und Schneebesen 14
einsetzen.
3. Eiweiß auf Stufe 9 in 1 - 2 Minuten steif
schlagen.
4. Eischnee aus der Schüssel nehmen und
zur Seite stellen.
5. Den Joghurt in die Rührschüssel geben.
6. Den leeren Joghurtbecher ausspülen
und zum weiteren Abmessen benutzen
oder die Menge mit einem Messbecher
abwiegen.
7. 1 Becher Öl (150 ml) oder weiche
Butter (150 g) zugeben.
8. 2 Becher Zucker (300 ml) zugeben.
9. 4 Eigelb zugeben.
10.Zutaten auf Stufe 6 oder 7 ca. 2 Minuten lang schaumig rühren.
11. 3 Becher Mehl (450 ml bzw. 320 g)
und Backpulver zugeben.
12.Schneebesen 14 entnehmen und Rührbesen 15 einsetzen.
13.Zutaten auf Stufe 4 ca. 5 Minuten lang
verrühren.
14.Küchenmaschine anhalten.
15.Den Eischnee zugeben.
16.Abgetropftes und evtl. klein geschnittenes Obst zugeben.
17. Auf Stufe 2 Obst und Eischnee ca. 10 30 Sekunden lang unterrühren.
18.Teig in eine Kuchenform füllen.
19. Bei 200 °C ca. 50 Minuten lang
backen.
7. 4 S a n dk u c he n
Zutaten:
• 250 g Butter
• 250 g Zucker
•6 Eier
• 250 g Speisestärke
• 75 g Mehl
• 1 Päckchen Backpulver (20 g)
• 1 unbehandelte Zitrone
• 1 Päckchen Vanillezucker (2 TL)
Zubereitung:
1. Mehl und Speisestärke in eine Schüssel
sieben, das Backpulver zugeben und
alls gut vermischen.
2. Spritzschutz 8 und Rührbesen 15 einsetzen.
3. Butter, Zucker und Vanillezucker in die
Rührschüssel 16 geben.
4. Auf Stufe 3 stellen und zu einer lockeren
Masse verrühren.
5. Eier nach und nach einzeln unterrühren.
6. Schale von der Zitrone abreiben und
dazugeben.
7. Mehl-Mischung löffelweise zugeben und
unterrühren.
8. Wenn alle Zutaten gemischt sind,
3 Minuten lang auf Stufe 6 durchrühren.
9. Den Teig in eine eingefettete Kuchenform geben.
SKMP 1200 A2 83
Page 86

RP100104-105590-Küchenmaschine LB5 Seite 84 Dienstag, 10. Juni 2014 12:00 12
10.Etwa 60 Minuten lang bei 180 °C
(Ober- und Unterhitze) oder 160 °C
(Umluft) backen.
11. Den erkalteten Kuchen mit Puderzucker
oder Zuckerglasur dekorieren. Der Saft
der Zitrone kann der Zuckerglasur beigemischt werden.
7. 5 Wa ff el n
Zutaten:
•6 Eier
• 1 Päckchen Vanillezucker
• 1/2 Päckchen Backpulver
• 250 g Zucker
• 200 g Butter oder Margarine
• 500 g Mehl
• 300 ml Milch
• 125 ml Mineralwasser mit Kohlensäure
Zubereitung:
1. Eier trennen.
2. Eiweiß in die Rührschüssel 16 geben.
3. Spritzschutz 8 und Schneebesen 14
einsetzen.
4. Eiweiß auf Stufe 9 in 1 - 2 Minuten steif
schlagen.
5. Küchenmaschine anhalten.
6. Eischnee aus der Schüssel nehmen und
zur Seite stellen.
7. Entnehmen Sie den Schneebesen 14
und setzen Sie den Rührbesen 15 ein.
8. Butter und Zucker auf Stufe 5-6 cremig
rühren.
9. Auf Stufe 4 stellen.
10.Eigelb, Milch, Mineralwasser und
Vanillezucker nach und nach zugeben.
11. Mehl und Backpulver mischen und löffelweise zufügen.
12.Küchenmaschine kurz anhalten und den
Eischnee in die Rührschüssel geben.
13.Auf Stufe 2 den Eischnee etwa 10 bis
30 Sekunden lang unterheben.
14.Teig ca. 30 Minuten quellen lassen.
15.Danach die Waffeln ausbacken.
7.6 Schokoladen Cupcakes
Zutaten:
• 100 g Butter
• 150 g Zucker
•2 Eier
• 100 g Mehl
•½ TL Backpulver
•¼ TL Natron
•¼ TL Salz
• 75 g Kakaopulver
• 130 ml Milch, evtl. mehr
• 1 TL Vanilleextrakt, oder Vanillepaste
Zubereitung:
1. Mehl und Kakao in eine Schüssel sieben, Backpulver, Natron und Salz hinein
sieben und alles gut vermischen.
2. Spritzschutz 8 und Rührbesen 15 einsetzen.
3. Butter, Zucker und Vanille in die Rührschüssel 16 geben.
4. Auf Stufe 3 stellen und zu einer lockeren
Masse verrühren.
5. Eier einzeln unterrühren.
6. Mehl-Mischung und etwa 130 ml Milch
abwechselnd unterrühren und alles zu
einem gleichmäßigen Teig verrühren.
7. Wenn der Teig zu trocken ist, schluckweise Milch unterrühren, bis er zähflüssig wird.
8. Den Teig in einen Cupcake Maker füllen
oder hitzebeständige Tassen einfetten
und als Backform benutzen. Es können
auch entsprechende Förmchen verwendet werden.
84
Page 87

RP100104-105590-Küchenmaschine LB5 Seite 85 Dienstag, 10. Juni 2014 12:00 12
9. Etwa 20 Minuten lang bei 190 °C
backen.
7.7 Spritzgebäck
Zutaten:
• 230 g Mehl
• 150 g Butter, kalt und in dünne Scheiben geschnitten
• 100 g Zucker
•1 Ei
•1 Päckchen Vanillezucker
•1 Prise Salz
Zubereitung:
1. Zutaten in die Rührschüssel 16 geben.
2. Spritzschutz 8 und Knethaken 13
einsetzen.
3. Ca. 5 Minuten lang auf Stufe 2 - 3
durchkneten.
4. Teig in einen Spritzbeutel geben und
herausdrücken.
5. Die Stränge S-förmig, gerade oder kreisförmig auf ein Backblech legen.
6. Bei 180 °C 10 Minuten lang ausbacken.
Hinweise:
• Vor dem Backen können Sie das Spritzgebäck mit Nuss- oder Mandelsplittern
garnieren.
• Nach dem Backen können Sie das
abgekühlte Spritzgebäck mit Kuvertüre
verzieren.
7.8 Erdbeershake mit Buttermilch
Zutaten:
• 1/2 l kalte Milch
• 1/2 l kalte Buttermilch
• 250 g frische Erdbeeren
• 4 EL Erdbeermarmelade
•4 EL Honig
•1EL Zitronensaft
•1 Prise Salz
• nach Geschmack zusätzlich Zucker oder
Süßstoff
Zubereitung:
1. Dec kel 11 vom Mixbehälter 12
abnehmen.
2. Milch, Buttermilch, Honig, Erdbeermarmelade, Zitronensaft und eine Prise Salz
einfüllen.
3. Deckel 11 auf den Mixbehälter 12 aufsetzen.
4. Mixbehälter 12 auf das Gerät setzen.
5. Zutaten mit Impulsknopf 5 oder
Geschwindigkeit Stufe 10 ca. 30 Sekunden lang mixen.
Hinweis: Der Impulsknopf 5
funktioniert nur, wenn am
Geschwindigkeitsregler 4 mindestens
die Stufe 1 eingestellt wird.
6. Impulsknopf loslassen oder Geschwindigkeit auf Stufe 1 reduzieren.
7. Deckelverschluss 10 im Deckel 11 des
Mixbehälters 12 im Uhrzeigersinn öffnen.
8. Erdbeeren einfüllen.
9. Falls Süße gewünscht ist, zusätzlichen
Zucker nach Geschmack zugeben.
10.Zwei Minuten lang auf höchster Stufe
(Impulsknopf oder Geschwindigkeit
Stufe 10) mixen.
11. In Gläser füllen und mit frischen Erdbeeren garnieren.
7.9 Bananenshake
Zutaten:
• 2 Bananen, sehr reif
• 1/2 l kalte Milch
•4 EL Vanilleeis
• Schokostreusel
SKMP 1200 A2 85
Page 88

RP100104-105590-Küchenmaschine LB5 Seite 86 Dienstag, 10. Juni 2014 12:00 12
Zubereitung:
1. Bananen schälen und in Stücke
schneiden.
2. Deckel 11 vom Mixbehälter 12
abnehmen.
3. Alle Zutaten in den Mixbehälter 12
geben.
4. Deckel 11 auf den Mixbehälter 12 aufsetzen.
5. Mixbehälter 12 auf das Gerät setzen.
6. Zutaten mit Impulsknopf 5 oder
Geschwindigkeit Stufe 10 ca. 60 Sekunden lang mixen.
Hinweis: Der Impulsknopf 5
funktioniert nur, wenn am
Geschwindigkeitsregler 4 mindestens
die Stufe 1 eingestellt wird.
7. In Gläser füllen und mit Schokostreuseln
garnieren.
7.10Sauerkirsch-Smoothie
• 150 g Joghurt
• Zucker nach Geschmack
Zubereitung:
1. Deckel 11 vom Mixbehälter 12
abnehmen.
2. Sauerkirschen mitsamt dem Saft in den
Mixbehälter 12 geben.
3. Deckel 11 auf den Mixbehälter 12 aufsetzen.
4. Mixbehälter 12 auf das Gerät setzen.
5. Mit Impulsknopf 5 15 Sekunden lang
die Sauerkirschen pürieren.
Hinweis: Der Impulsknopf 5
funktioniert nur, wenn am
Geschwindigkeitsregler 4 mindestens
die Stufe 1 eingestellt wird.
6. Joghurt und Zucker zugeben.
7. Zutaten mit Impulsknopf 5 oder
Geschwindigkeit Stufe 10 so lange
mixen (maximal 2 Minuten), bis ein
glatter, gebundener Smoothie entsteht.
Zutaten:
• 250 g Sauerkirschen aus dem Glas, entsteint
8. Gerät reinigen
Warnung! Um die Gefahr eines
elektrischen Schlages, einer Verletzung oder einer Beschädigung
zu vermeiden:
– Ziehen Sie vor jeder Reinigung
den Netzstecker aus der Netzsteckdose.
– Tauchen Sie das Grundgerät 7
nie in Wasser.
Vorsicht! Verwenden Sie keinesfalls
scheuernde, ätzende oder kratzende Reinigungsmittel. Dadurch könnte das Gerät
beschädigt werden.
86
8.1 Grundgerät (7) reinigen
1. Reinigen Sie das Grundgerät 7 mit
einem feuchten Lappen. Sie können
auch etwas Spülmittel nehmen.
2. Wischen Sie mit klarem Wasser nach.
3. Benutzen Sie das Grundgerät 7 erst wieder, wenn es vollständig getrocknet ist.
Page 89

RP100104-105590-Küchenmaschine LB5 Seite 87 Dienstag, 10. Juni 2014 12:00 12
8.2 Spritzschutz (8), Knethaken (13),
Schneebesen (
14)und
Rührbesen (15) reinigen
Vorsicht! Der Spritzschutz 8 ist nicht spülmaschinengeeignet.
Knethaken 13, Schneebesen 14 und
Rührbesen 15 können auch in der Spülmaschine gereinigt werden.
1. Legen Sie die Teile in kaltes oder lauwar-
mes Wasser, um die Teigreste einzuweichen.
Hinweis: Sie können dem Wasser
auch etwas Spülmittel zugeben.
2. Entfernen Sie die eingeweichten Teig-
reste mit einer Spülbürste.
3. Spülen Sie mit klarem Wasser nach.
4. Lassen Sie die Teile vollständig trocknen,
bevor Sie sie erneut benutzen.
8.3 Rührschüssel (16) reinigen
Die Rührschüssel 16 ist aus Edelstahl und
kann im Spülbecken oder in der Spülmaschine gereinigt werden.
8.4 Mixbehälter (12) reinigen
Hinweis: Der Mixbehälter 12 sowie der
Deckel 11 sind spülmaschinengeeignet.
1. Setzen Sie den Mixbehälter 12 auf das
Gerät.
2. Füllen Sie etwa bis zur Hälfte warmes,
spülmittelhaltiges Wasser ein.
3. Setzen Sie den Deckel 11 auf.
4. Überprüfen Sie, dass der Geschwindigkeitsregler 4 auf „0” steht.
5. Stecken Sie den Netzstecker in eine
geeignete Netzsteckdose (siehe
„3. Technische Daten“ auf Seite 74).
6. Drücken Sie mehrmals kurz den Impulsknopf 5.
Hinweis: Der Impulsknopf 5
funktioniert nur, wenn am
Geschwindigkeitsregler 4 mindestens
die Stufe 1 eingestellt wird.
7. Nehmen Sie den Mixbehälter 12 vom
Gerät.
8. Kippen Sie das Spülwasser aus.
9. Spülen Sie den Mixbehälter 12 unter
klarem Wasser nach.
10.Lassen Sie den Mixbehälter 12 vollständig trocknen, bevor Sie ihn erneut
benutzen.
9. Entsorgung
9.1 Gerät
Das Symbol der durchgestrichenen Abfalltonne auf Rädern
bedeutet, dass das Gerät in
der Europäischen Union einer
getrennten Müllsammlung
zugeführt werden muss. Dies gilt für das
SKMP 1200 A2 87
Gerät und alle mit diesem Symbol gekennzeichneten Zubehörteile. Gekennzeichnete
Geräte dürfen nicht über den normalen
Hausmüll entsorgt werden, sondern müssen
an einer Annahmestelle für das Recycling
von elektrischen und elektronischen Geräten
abgegeben werden. Recycling hilft, den Verbrauch von Rohstoffen zu reduzieren und
Page 90

RP100104-105590-Küchenmaschine LB5 Seite 88 Dienstag, 10. Juni 2014 12:00 12
die Umwelt zu entlasten. Informationen zur
Entsorgung und zur Lage des nächsten Recyclinghofes erhalten Sie z.B. bei Ihrer Stadtreinigung oder in den Gelben Seiten.
10. Garantie der HOYER Handel GmbH
Sehr geehrte Kundin, sehr geehrter Kunde,
Sie erhalten auf dieses Gerät 3 Jahre
Garantie ab Kaufdatum. Im Falle von
Mängeln dieses Geräts stehen Ihnen gegen
den Verkäufer des Geräts gesetzliche
Rechte zu. Diese gesetzlichen Rechte werden durch unsere im Folgenden dargestellte
Garantie nicht eingeschränkt.
Garantiebedingungen
Die Garantiefrist beginnt mit dem Kaufdatum. Bitte bewahren Sie das Original des
Kassenbons gut auf. Diese Unterlage wird
als Nachweis für den Kauf benötigt.
Tritt innerhalb von drei Jahren ab dem Kaufdatum dieses Geräts ein Material- oder
Fabrikationsfehler auf, wird das Gerät von
uns – nach unserer Wahl – für Sie kostenlos
repariert oder ersetzt. Diese Garantieleistung setzt voraus, dass innerhalb der
Dreijahresfrist das defekte Gerät und der
Kaufbeleg (Kassenbon) vorgelegt und
schriftlich kurz beschrieben wird, worin der
Mangel besteht und wann er aufgetreten ist.
Wenn der Defekt von unserer Garantie
gedeckt ist, erhalten Sie das reparierte oder
ein neues Gerät zurück. Mit Reparatur oder
Austausch des Geräts beginnt kein neuer
Garantiezeitraum.
9.2 Verpackung
Wenn Sie die Verpackung entsorgen möchten, achten Sie auf die entsprechenden
Umweltvorschriften in Ihrem Land.
Garantiezeit und gesetzliche
Mängelansprüche
Die Garantiezeit wird durch die Gewähr-
leistung nicht verlängert. Dies gilt auch für
ersetzte und reparierte Teile. Eventuell schon
beim Kauf vorhandene Schäden und Mängel
müssen sofort nach dem Auspacken gemeldet
werden. Nach Ablauf der Garantiezeit
anfallende Reparaturen sind kostenpflichtig.
Garantieumfang
Das Gerät wurde nach strengen Qualitätsrichtlinien sorgfältig produziert und vor
Anlieferung gewissenhaft geprüft.
Die Garantieleistung gilt für Material- oder
Fabrikationsfehler. Diese Garantie erstreckt
sich nicht auf Geräteteile, die normaler
Abnutzung ausgesetzt sind und daher als
Verschleißteile angesehen werden können
oder für Beschädigungen an zerbrechlichen
Teilen, z. B. Schaltern, Akkus oder Teilen, die
aus Glas gefertigt sind.
Diese Garantie verfällt, wenn das Gerät
beschädigt, nicht sachgemäß benutzt oder
gewartet wurde. Für eine sachgemäße
Benutzung des Geräts sind alle in der Bedienungsanleitung aufgeführten Anweisungen
genau einzuhalten.
Verwendungszwecke und Handlungen, von
denen in der Bedienungsanleitung abgeraten oder vor denen gewarnt wird, sind unbedingt zu vermeiden.
88
Page 91

RP100104-105590-Küchenmaschine LB5 Seite 89 Dienstag, 10. Juni 2014 12:00 12
Das Gerät ist lediglich für den privaten und
nicht für den gewerblichen Gebrauch
bestimmt.
Bei missbräuchlicher und unsachgemäßer
Behandlung, Gewaltanwendung und bei
Eingriffen, die nicht von unserem autorisierten Service-Center vorgenommen wurden,
erlischt die Garantie.
Abwicklung im Garantiefall
Um eine schnelle Bearbeitung Ihres
Anliegens zu gewährleisten, folgen Sie bitte
den folgenden Hinweisen:
• Bitte halten Sie für alle Anfragen die
Artikelnummer (für dieses Gerät:
IAN 100104 (rot)/105590 (crème))
und den Kassenbon als Nachweis für
den Kauf bereit.
• Die Artikelnummer entnehmen Sie bitte
dem Typenschild, einer Gravur, auf dem
Titelblatt ihrer Bedienungsanleitung
(unten links) oder als Aufkleber auf der
Rück- oder Unterseite.
• Sollten Funktionsfehler oder sonstige
Mängel auftreten, kontaktieren Sie
zunächst das nachfolgend benannte
Service-Center telefonisch oder per
E-Mail.
• Ein als defekt erfasstes Gerät können Sie
dann unter Beifügung des Kaufbelegs
(Kassenbon) und der Angabe, worin der
Mangel besteht und wann er aufgetreten ist, für Sie portofrei an die Ihnen mitgeteilte Service-Anschrift übersenden.
Service-Center
Service Deutschland
Tel.: 0800-5435111
(kostenlos)
E-Mail: hoyer@lidl.de
Service Österreich
Tel.: 0820 201 222
(0,15 EUR/Min.)
E-Mail: hoyer@lidl.at
Service Schweiz
Tel.: 0842 665566
(0,08 CHF/Min.,
Mobilfunk max. 0,40 CHF/Min.)
E-Mail: hoyer@lidl.ch
IAN: 100104 (rot)/105590 (crème)
Lieferant
Bitte beachten Sie, dass die folgende
Anschrift keine Serviceanschrift ist.
Kontaktieren Sie zunächst das oben
benannte Service-Center.
HOYER Handel GmbH
Kühnehöfe 5
22761 Hamburg
Deutschland
Auf www.lidl-service.com
können Sie diese und viele
weitere Handbücher, Produktvideos und Software herunterladen.
SKMP 1200 A2 89
Page 92

RP100104-105590-Küchenmaschine LB5 Seite 90 Dienstag, 10. Juni 2014 12:00 12
Page 93

RP100104-105590-Küchenmaschine LB5 Seite 91 Dienstag, 10. Juni 2014 12:00 12
Page 94

HOYER HANDEL GMBH
Kühnehöfe 5
22761 Hamburg
Germany
Estado de las informaciones · Stato attuale delle conoscenze ·
Estado das informações · Status of information ·
Stand der Informationen:
06/2014 · Ident.-Nr.: SKMP 1200 A2
IAN 100104/IAN 105590
5
RP100104_RP105590_Kuechenmaschine_Cover_LB5.indd 1 06.06.14 14:07
 Loading...