

Page 1
Page 2
Page 3

SCAZ 5.00 A1 Table of Contents
Table of Contents
Important Notice 6
Safety Instructions...................................................................................... 6
Children and Persons with Disabilities ...................................................... 8
Charger and Rechargeable Battery ..........................................................8
Cables........................................................................................................9
Repair and Maintenance .......................................................................... 10
Intended Use............................................................................................10
Conformity Notice..................................................................................... 11
Disposal of Old Devices ...........................................................................11
Introduction 12
Package Contents.................................................................................... 12
Controls and buttons ................................................................................ 13
Front........................................................................................................13
Rear Panel .............................................................................................. 13
Left Panel................................................................................................ 14
Right Panel .............................................................................................14
Top.......................................................................................................... 15
Bottom.....................................................................................................15
Opening the Display................................................................................. 16
Getting Started......................................................................................... 17
Charging the Battery by Using the Charger ............................................ 17
English - 1
Page 4

Table of Contents SCAZ 5.00 A1
Charging the Battery while Inserted in the Camcorder ........................... 19
Inserting the Battery................................................................................ 20
Inserting the SD Card ............................................................................. 21
Write-Protecting the Memory Card ......................................................... 24
Switching the Camcorder On and Off ..................................................... 25
Switching the Operating Mode................................................................ 25
The Touch-Sensitive Display .................................................................. 25
Setting the Menu Language.................................................................... 26
Setting Date and Time............................................................................ 26
Recording 27
Recording Videos .................................................................................... 27
The Video Mode Display......................................................................... 28
Macro Mode............................................................................................. 30
Manual Focus .......................................................................................... 30
Locking the Auto Focus ........................................................................... 30
Capturing Pictures ................................................................................... 31
The Photo Mode Display ........................................................................ 32
Video Lamp.............................................................................................. 34
Playback 35
Playing Back Video Clips......................................................................... 35
Playing Back Photos................................................................................ 38
The Menus 40
The Main Menu........................................................................................ 40
2 -English
Page 5

SCAZ 5.00 A1 Table of Contents
Main Menu Icons..................................................................................... 41
Date/Time ...............................................................................................42
Beep........................................................................................................ 42
Auto PowerOff......................................................................................... 42
TV standard ............................................................................................43
Format..................................................................................................... 43
Default..................................................................................................... 44
Language................................................................................................ 45
Frequency............................................................................................... 45
Video Menu.............................................................................................. 46
White Balance......................................................................................... 47
Resolution............................................................................................... 47
Effect....................................................................................................... 48
Night Mode.............................................................................................. 49
Quality..................................................................................................... 50
Video Playback Menu ..............................................................................50
Video Playback Menu Icons....................................................................51
Deleting A Video Recording.................................................................... 51
Deleting all video recordings ................................................................... 52
Protect..................................................................................................... 53
Autoplay.................................................................................................. 53
Photo Menu.............................................................................................. 54
Photo Menu Icons ................................................................................... 54
White Balance......................................................................................... 55
Resolution............................................................................................... 55
Effect....................................................................................................... 56
English - 3
Page 6

Table of Contents SCAZ 5.00 A1
Night Mode ............................................................................................. 56
Selftimer ................................................................................................. 56
Quality .................................................................................................... 57
Photo Playback Menu.............................................................................. 57
Delete one picture .................................................................................. 58
Delete all pictures ................................................................................... 58
Protect .................................................................................................... 58
Autoplay.................................................................................................. 58
Connectors and Sockets 59
Viewing Recordings on a Television Screen............................................ 59
Connecting via the HDMI Cable ............................................................. 59
Connecting via the USB/AV Cable ......................................................... 60
Transferring Recordings to the Computer................................................ 60
Using the USB port................................................................................. 61
Using a Card Reader.............................................................................. 62
Software 63
System Requirements ............................................................................. 63
Installing the Software ............................................................................. 63
Uninstalling the Software ........................................................................ 64
The Main Dialog....................................................................................... 64
Select language...................................................................................... 65
Editing Recordings................................................................................... 65
Viewing Recordings................................................................................ 65
Importing Recordings.............................................................................. 66
4 -English
Page 7

SCAZ 5.00 A1 Table of Contents
Selecting the Navigation View................................................................. 67
Preview Window .....................................................................................68
Toolbar..................................................................................................... 69
Import...................................................................................................... 69
Merge videos ..........................................................................................69
Creating an AVCHD Disk ........................................................................ 70
Cutting Video Clips ................................................................................. 71
Upload to YouTube ................................................................................. 71
Upload to Facebook................................................................................ 71
Photo Album ...........................................................................................72
Album page............................................................................................. 72
Appendix 73
Technical Specifications........................................................................... 73
Warranty Information................................................................................ 75
Declaration of Conformity....................................................................... 152
English - 5
Page 8
Important Notice SCAZ 5.00 A1
Important Notice
This icon denotes important information for the safe
operation of the product and the user’s safety.
This icon denotes further information on the topic.
Safety Instructions
Before you use this device for the first time, please read the following
notes in this manual and heed all warnings, even if you are familiar
with handling electronic devices. Always check that the product works
correctly.
Keep this manual with the instructions in a safe place for future
reference.
If you sell the device or pass it on, it is essential that you also hand
over this manual.
Do not try to open the housing or reassemble the product. You are at
risk of receiving an electric shock. Maintenance and repairs should
only be carried out by qualified technicians.
Do not look at the sun or other sources of intense light. Doing so may
damage your eyesight.
Keep the device away from water and other liquids. Do not operate the
device with wet hands and do not use it in rain or snow. Dampness can
cause danger through fire or electric shock.
Keep the device out of the reach of children and animals to avoid
accidents or damage.
6 -English
Page 9

SCAZ 5.00 A1 Important Notice
Switch the device off immediately if you notice it emitting smoke or
strange noises. Contact customer service. Never try to repair the
device yourself.
Only use the supplied charger cradle Scope DJ04V20500A or the USB
interface cable to recharge the product battery.
Only use this device with the supplied rechargeable battery (NP120) in
order to avoid overheating, deformation of the cover, fire, electric
shocks, explosion and other dangers.
Unplug the power cord from the mains outlet before you remove the
rechargeable battery from the charger or separate the charger from the
power cord.
In the event of a defect in the product or its accessories, unplug the
power cord from the mains immediately.
Also, when there is the possibility of thunderstorms, unplug the power
cord from the wall outlet.
Never try to heat, disassemble or short-circuit the rechargeable
battery. Do not throw the rechargeable battery into fire.
Warning:
Notice concerning separation from the mains
The supplied charger consumes electrical energy even if there is no
battery inserted. You should therefore disconnect the charger from the
wall outlet when not using it. In order to completely disconnect the charger
from the mains, unplug the power cord from the wall outlet. The wall outlet
where the device is connected must be easy to access so that the power
cord can be pulled out quickly in case of emergency. Unplug the power
cord from the mains when you will not be using it for a long while (e.g.
when going on holiday) in order to avoid the danger of fire. Do not hold the
power cord with wet hands.
The device is not for use in rooms with a high temperature or humidity and
must be kept free of dust. Position the device on a stable, flat surface and
do not place any objects on the device.
English - 7
Page 10
Important Notice SCAZ 5.00 A1
Always make sure that:
no direct heat sources (e.g. heating) affect the device;
no direct sunlight or bright artificial light reaches the device;
contact with spray and dripping water and abrasive liquids must be
avoided and the device should never be operated near water, and it
must especially never be immersed (do not place any objects filled with
liquids such as vases or drinks near the device);
do not place any fire sources (e.g. burning candles) on or near the
device;
no foreign bodies enter the device;
the device must not be subject to any great temperature changes as
this may cause moisture through condensation;
the device should not be subject to excessive shock and vibrations.
Children and Persons with Disabilities
Do not allow children or persons with disabilities to use electrical devices
when not under supervision. They may not comprehend the presence of
potential risks. Rechargeable batteries and small parts represent potential
choking hazards. Keep batteries out of reach of children. If a rechargeable
battery is swallowed, seek medical help immediately. Keep all packaging
away from children as this may cause suffocation.
Charger and Rechargeable Battery
Insert the rechargeable battery with the correct polarity. Never throw a
rechargeable battery into fire. Remove the rechargeable battery when the
device is not to be used for a long time.
Danger of Explosion!
Improper use may cause explosions and danger to life. Only replace the
rechargeable battery with an equivalent or a type recommended by the
8 -English
Page 11

SCAZ 5.00 A1 Important Notice
manufacturer. Never replace any batteries in an explosion-sensitive
environment. While inserting or removing the batteries a spark may be
produced causing an explosion. Explosion-sensitive areas will normally
(but not always) be labelled. These include fuel storage areas such as
below deck on a boat, fuel line or tank areas, environments where the air
contains inflammable substances (e.g. cereals, dust or metal powder, etc.)
and any areas where you should normally switch off your car engine.
Respect the environment. Old rechargeable batteries do not belong in with
domestic waste. They must be handed in to a collection point for waste
batteries.
Cables
Always hold cables by the plug and never pull on the cable itself. Never
hold the power cord with wet hands as this may cause a short circuit or
electric shock. Never place the device, heavy objects or furniture on the
cable and take care that the cord does not become trapped, especially at
the plug and sockets. Never tie knots in the cable and do not tie it together
with other cables. All cables should be positioned so that nobody can trip
over them or be obstructed by them. A damaged power cord can cause a
fire or an electric shock. Inspect the power cord from time to time. Do not
use an adapter plug or extension cable that does not meet the required
safety standards.
English - 9
Page 12

Important Notice SCAZ 5.00 A1
Repair and Maintenance
Repairs are required when this device has been damaged in any way: for
example, when the charger or the housing of the SCAZ 5.00 A1 is
damaged, when liquid or objects have entered the device, when the
product has been exposed to rain or moisture, when the product does not
work normally or if the product has been dropped. If you notice any
smoke, unusual noise or strange smells, switch off the device immediately
and unplug the power cord from the power supply. If this occurs the device
should no longer be used and should be inspected by authorized service
personnel. Please contact qualified personnel when servicing is needed.
Intended Use
Your camcorder is a Consumer Electronics device and is designed for
recording and playing back videos and pictures only. Any use other than
that mentioned above does not correspond to the intended use. The
device may only be used for private use, not industrial or commercial use.
In its default configuration, this product has not been designed for medical,
lifesaving, rescue or life-maintaining purposes.
This device fulfils all that relates to CE Conformity, relevant standards and
Directives. Any changes to the equipment other than those recommended
by the manufacturer may lead to these directives no longer being met.
Only use the accessories recommended by the manufacturer. If you are
not using the device within the Republic of Germany, you must observe
the regulations and laws in the country of use.
10 -English
Page 13

SCAZ 5.00 A1 Important Notice
Conformity Notice
This device and its supplied accessories have been tested
and approved for compliance with the basic and other
relevant requirements of the EMC Directive 2004/108/EC,
as well as the Low-voltage Directive 2006/95/EC. The
corresponding Declaration of Conformity can be found at the
end of this User's Manual.
Disposal of Old Devices
Devices marked with this symbol are subject to the
European Directive 2002/96/EC. All electric and electronic
devices must be disposed of separately from household
waste at official disposal centres.
Avoid hazards to the environment and dangers to your personal health by
disposing of the device properly. For further information about proper
disposal, contact your local government, disposal bodies or the shop
where you bought the device.
Recycle the packaging material properly too. Cardboard packaging can be
taken to paper recycling containers or public collection points for recycling.
Any film or plastic contained in the packaging should be taken to your
public collection points for disposal.
Respect the environment. Old batteries do not belong in with domestic
waste. They must be handed in to a collection point for waste batteries.
English - 11
Page 14
Introduction SCAZ 5.00 A1
Introduction
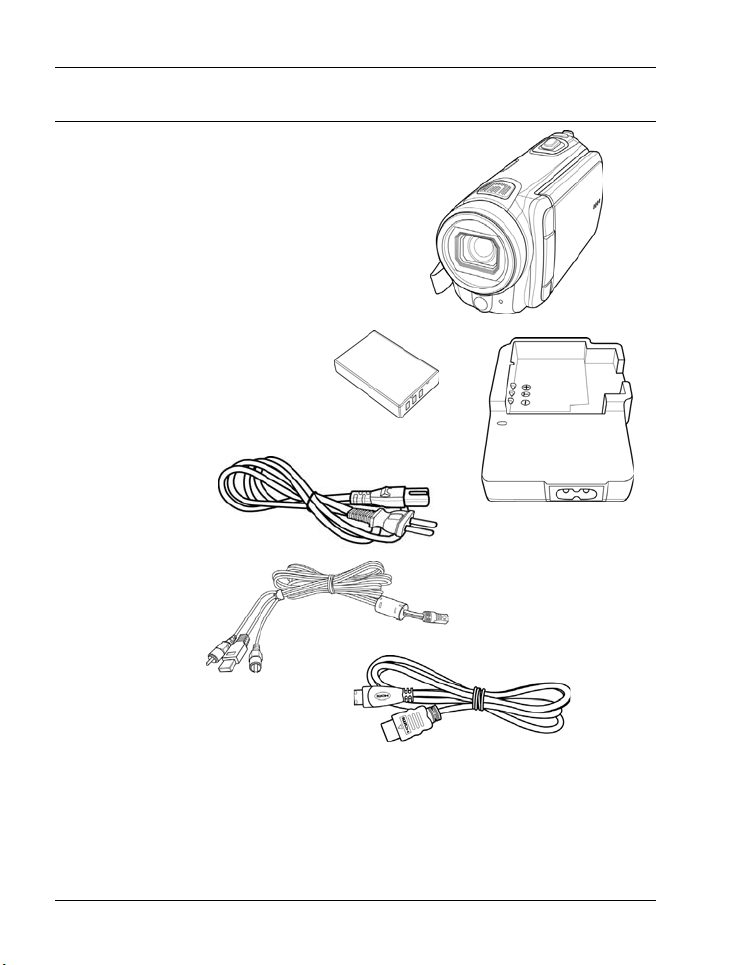
Package Contents
Camcorder SCAZ 5.00 A1
2 rechargeable batteries
Roofer Technology Co., Ltd. NP120
Charger Scope DJ04V20500A
Power Cable
USB/AV cable
HDMI cable
SD memory card, 4GB (not illustrated)
CD-ROM (not shown)
Bag (not illustrated)
User's manual (not shown)
12 -English
Page 15
SCAZ 5.00 A1 Introduction
Controls and buttons
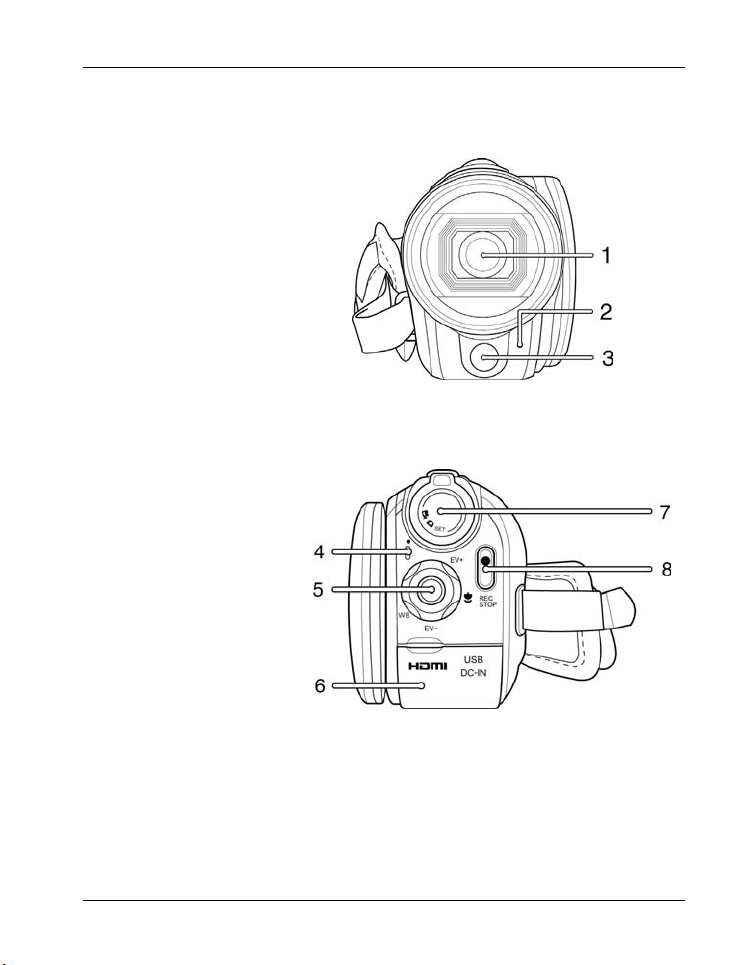
Front
1 Lens
2 Self-timer indicator
3 Video lamp
Rear Panel
4 Power indicator
5 Navigation button
6 HDMI input, USB
and AV port,
charger DC in
7 Mode selection
switch
8 RECORD button
English - 13
Page 16
Introduction SCAZ 5.00 A1
Left Panel
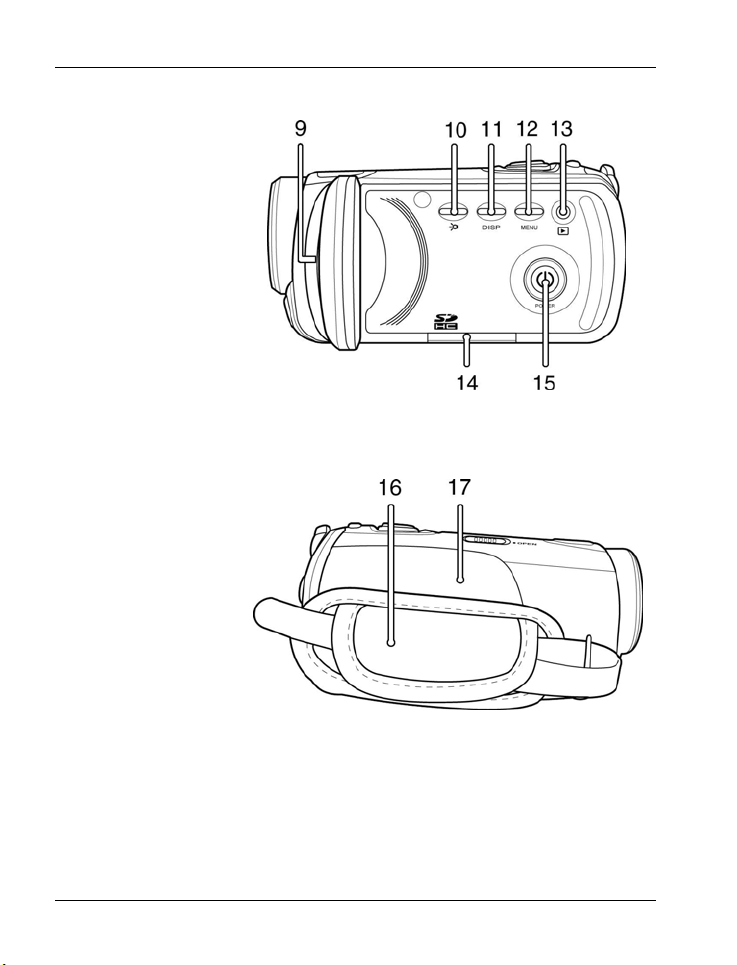
9 Microphone
10 Video lamp button
11 Display button
12 Menu button
13 PLAY button
14 Memory card
compartment
15 On/Off button
Right Panel
16 Hand strap
17 Battery
compartment
14 -English
Page 17
SCAZ 5.00 A1 Introduction
Top
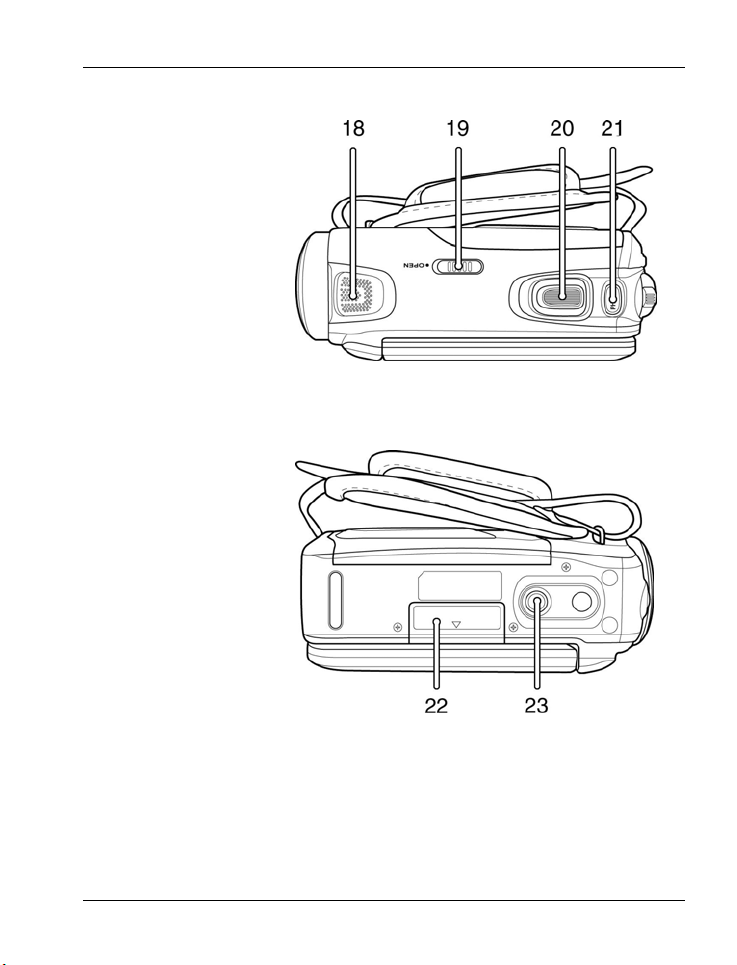
18 Speakers
19 Battery
compartment lock
20 Zoom swivel
button
21 Picture (photo)
shutter button
Bottom
22 Memory card
compartment
23 Tripod mount
English - 15
Page 18
Introduction SCAZ 5.00 A1
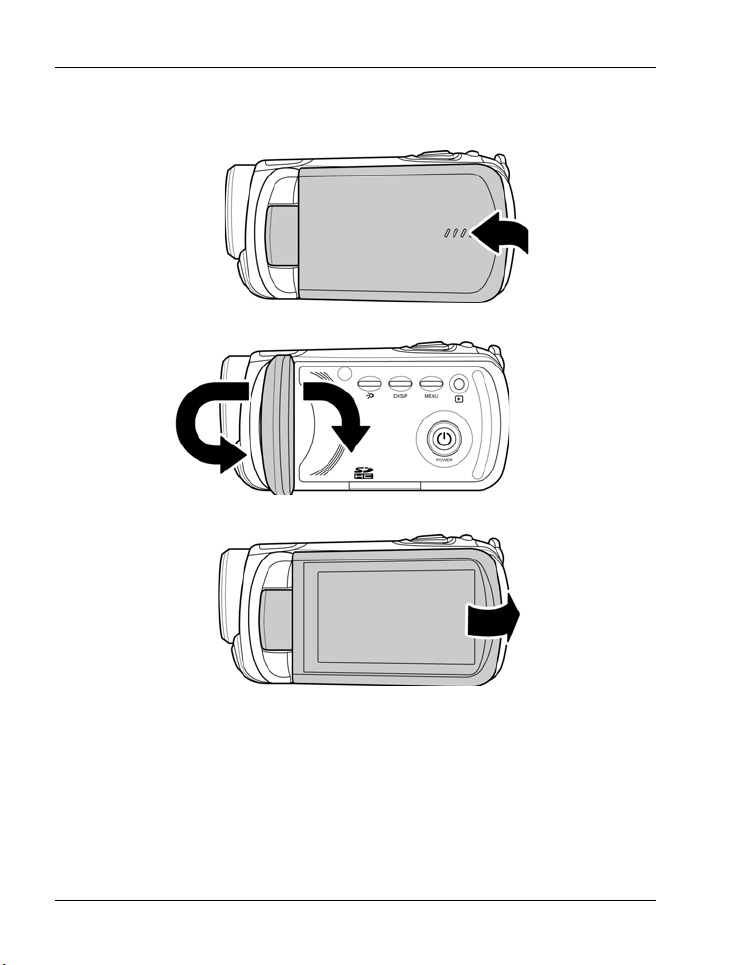
Opening the Display
Open the display and then rotate it according to your needs.
You can also rotate the display so it faces the front. In this case, the
picture orientation will be adjusted automatically.
The rotated display can be folded completely until it touches the camera
housing.
16 -English
Page 19
SCAZ 5.00 A1 Introduction
Getting Started
The camcorder is powered by a rechargeable Lithium-Ion (NP120) battery.
On delivery, the battery is not charged. Please charge the battery before
first use of the device.
To operate the camera, use only the rechargeable
Lithium-Ion battery NP120.
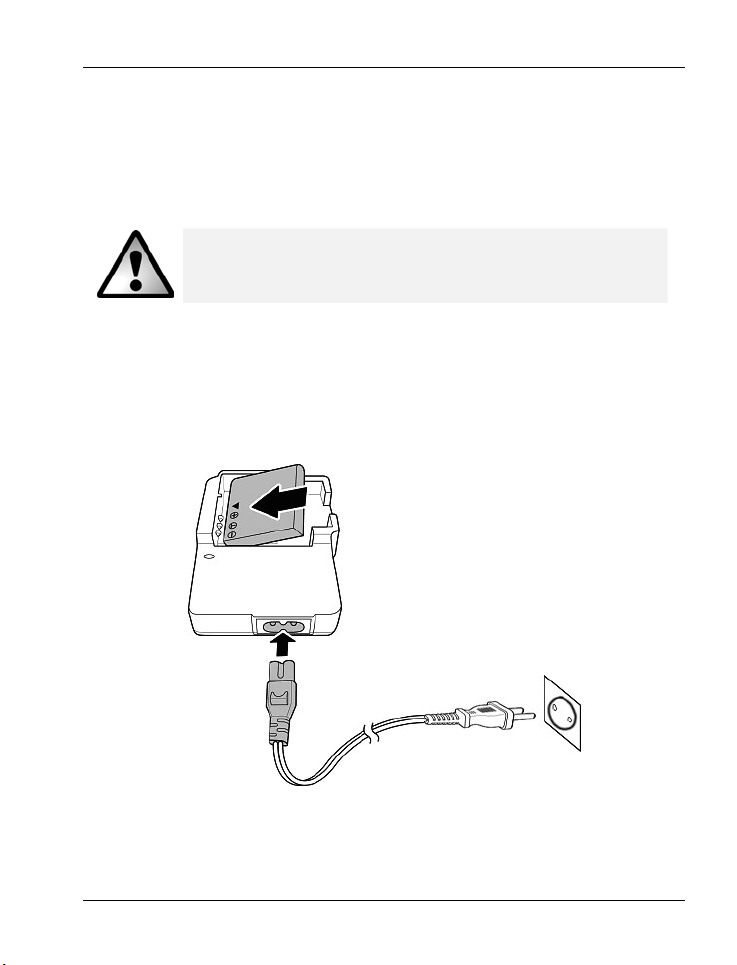
Charging the Battery by Using the Charger
Insert the rechargeable battery in the charger cradle Scope DJ04V20500A
so that the contacts [+] and [-] correspond to the rechargeable battery and
charging tray markings.
English - 17
Page 20

Introduction SCAZ 5.00 A1
Make sure that the battery clicks into place on the charger. Next connect
the power cord to the charger and plug the power cord to a wall outlet.
Remove the rechargeable battery from the camera when
the device is not to be used for a long time.
During charging, the rechargeable battery and charging
device will become warm. This is not a malfunction.
The status indicator of the charging cradle will light orange whilst the
battery is charging. When the charging process is completed, the status
indicator will light green. You can then insert the rechargeable battery into
the camcorder. Depending on the charge level, the charging cycle can
take up to 3 hours.
If, after inserting the rechargeable battery, the indicator
remains green, this means the rechargeable battery is
already charged or it is not correctly inserted. In this case,
check the polarity.
18 -English
Page 21
SCAZ 5.00 A1 Introduction
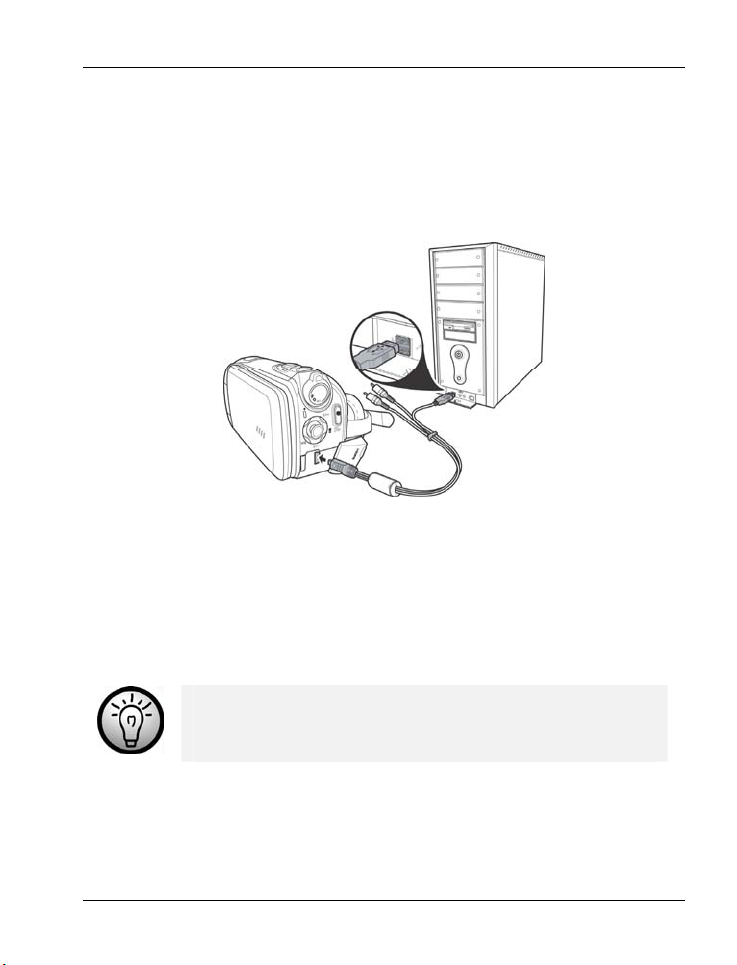
Charging the Battery while Inserted in the Camcorder
It is also possible to recharge the camcorder battery via the USB power of
a computer. To do this, you’ll need the supplied USB/AV cable.
Insert the rechargeable battery into the camcorder (see page 20).
Use the supplied USB/AV cable to connect the camcorder to an
available USB port on a computer.
Please make sure that your camcorder is powered off. If the device is
powered on, its battery will not recharge. If necessary, press the
On/Off button (15) to power the camcorder off.
The power indicator (4) will light red during charging. When the
charging process is completed, the power indicator will stop lighting.
Some computers do not supply USB power while they are
turned off. If the camcorder power indicator does not light,
make sure to power on your computer.
English - 19
Page 22
Introduction SCAZ 5.00 A1
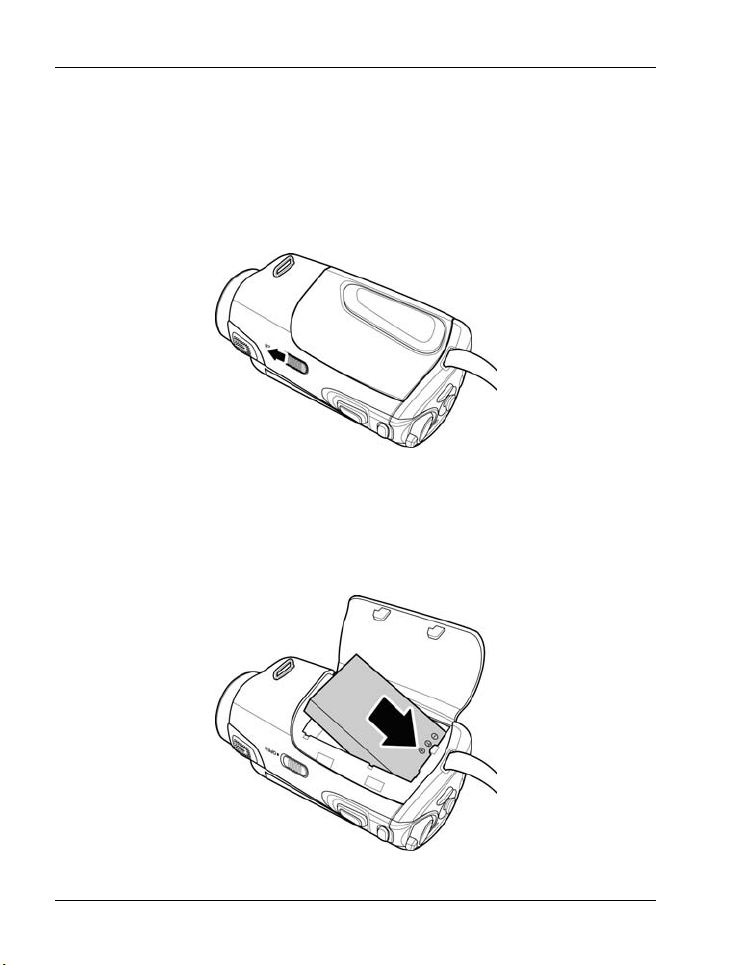
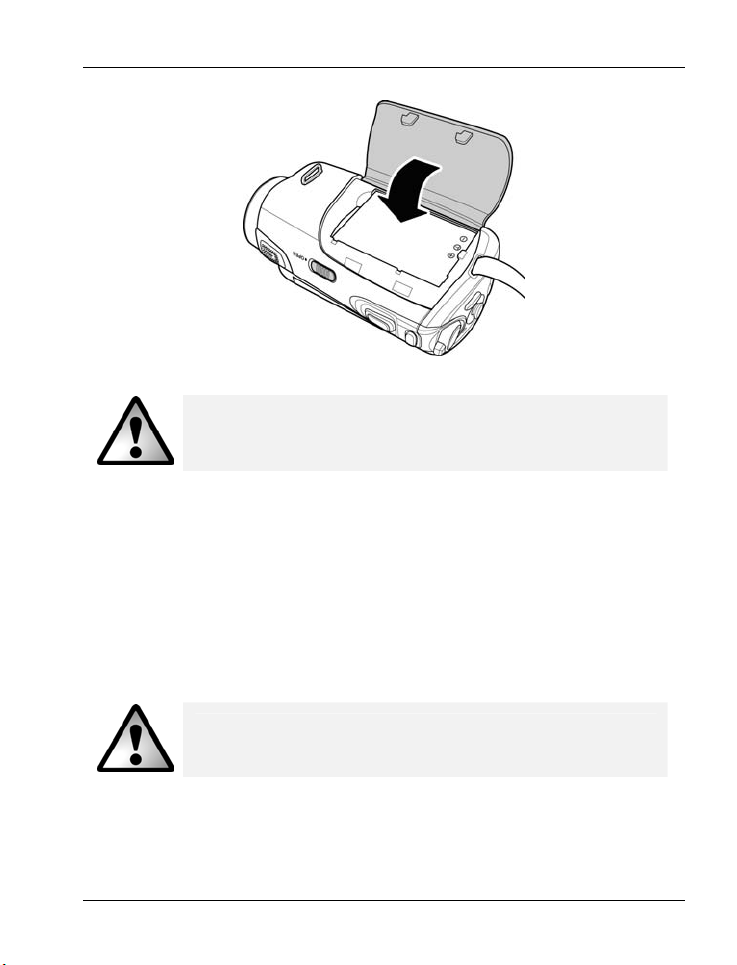
Inserting the Battery
When the battery is fully charged, insert it into the camcorder. Proceed as
follows:
Open the battery compartment (17) by gently sliding the battery cover lock
(19) to the front.
The battery compartment will open so you can insert the rechargeable
battery. Make sure that the contacts [+] and [-] correspond to the
rechargeable battery and charging tray markings.
20 -English
Page 23
SCAZ 5.00 A1 Introduction
Close the battery compartment.
Insert the rechargeable battery as indicated in the figures.
Positioning the battery the wrong way round may damage
the device.
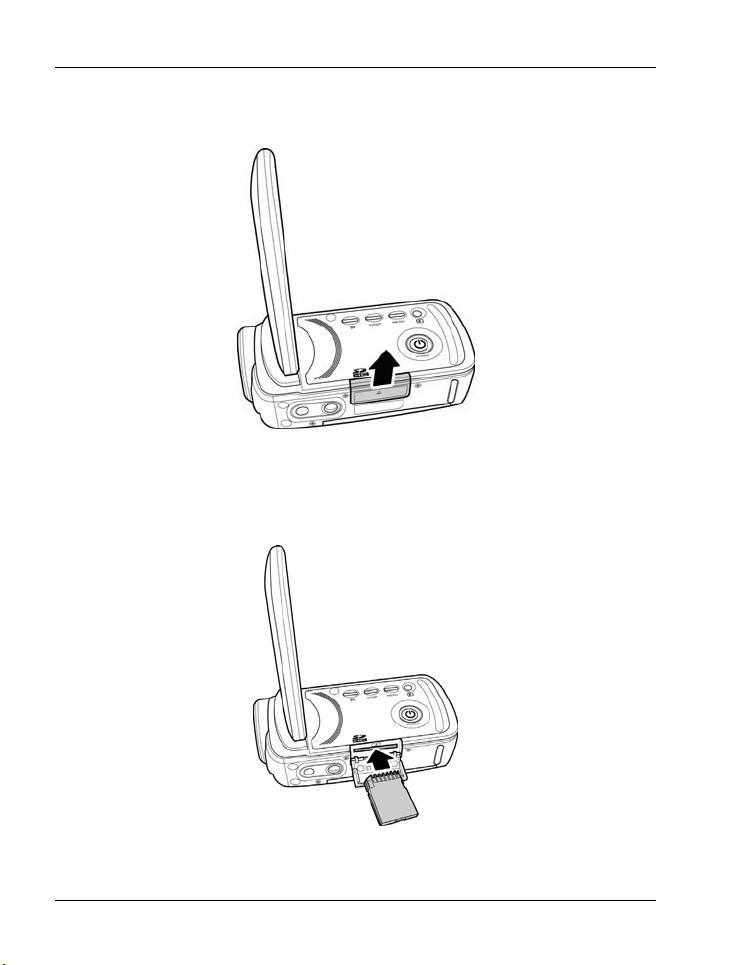
Inserting the SD Card
By using the supplied SD memory card you can increase the camcorder
storage capacity for saving your videos and photos. When a memory card
is inserted, all the recorded contents will be saved onto it. If there is no
memory card inserted, your photos and videos will be saved to the internal
memory of the camera.
Power the device off before you insert or remove the
memory card.
English - 21
Page 24
Introduction SCAZ 5.00 A1
Open the display and press the On/Off button (15) to power the camcorder
off. Open the memory card compartment (21) by sliding the cover in the
direction of the small arrow.
Then insert the memory card with the metal contacts facing forwards into
the card slot. The label must face downwards. Slide the card fully into the
slot opening until the card clicks into place.
22 -English
Page 25
SCAZ 5.00 A1 Introduction
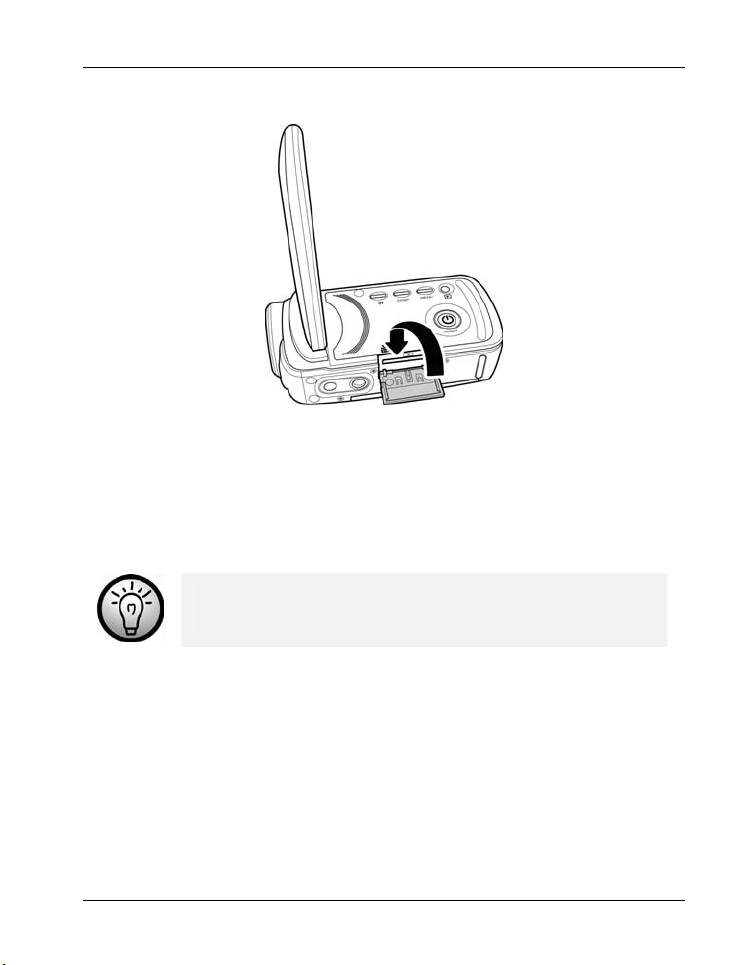
Close the memory card compartment by sliding the cover in the opposite
direction.
To remove the memory card, open the memory card compartment and
gently press on the inserted card. This will protrude a little so that you can
get a hold of it and remove it.
If the memory card or the internal memory is full, the
message Memory full will appear on the display.
English - 23
Page 26
Introduction SCAZ 5.00 A1
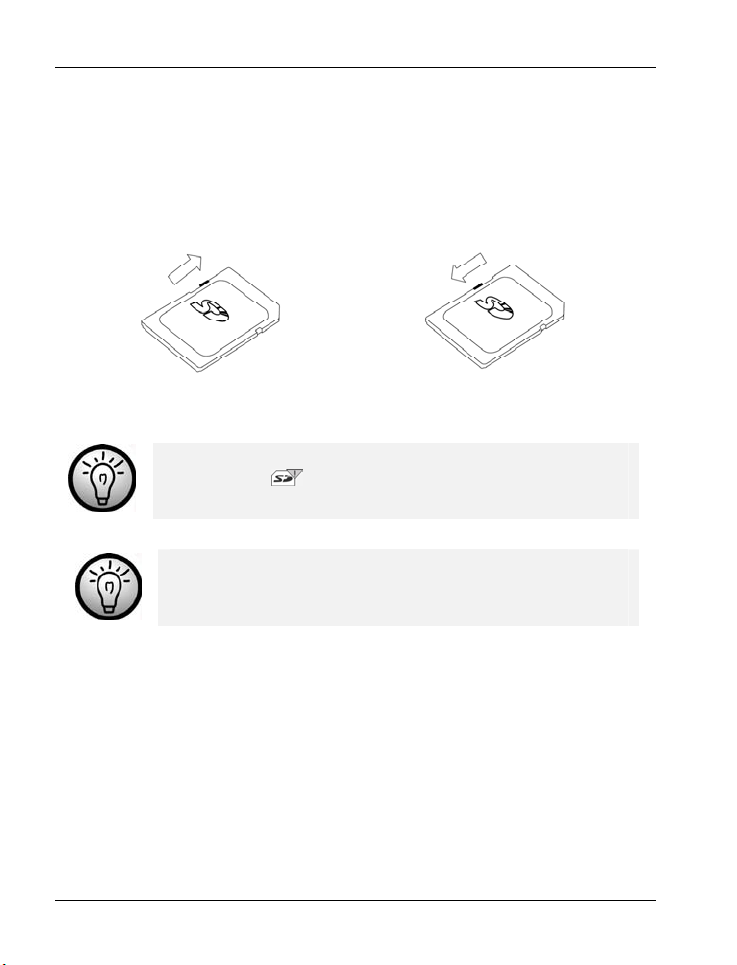
Write-Protecting the Memory Card
The memory card features a write-protection tab. When write-protection is
enabled (see the figure below right) you can only view existing videos and
pictures, not delete or edit them. Also, it will not be possible to record any
new videos or pictures onto the memory card.
Write-protection disabled Write-protection enabled
When inserting a write-protected memory card, the
warning icon will appear in the lower-right corner of
the display.
If you attempt to record a video or take a picture while
write-protection is enabled, an acoustic signal will be
heard when pressing the shutter button.
24 -English
Page 27
SCAZ 5.00 A1 Introduction
Switching the Camcorder On and Off
Press the On/Off button (15) to power the camcorder on. While
initialising, the power indicator (4) will light red for a few seconds then
change to green.
Press the On/Off button (15) to power the camcorder off. The power
indicator (4) then goes out.
When opening the display, the camcorder will power on
automatically. As soon as you close the cover, it will
power off.
Switching the Operating Mode
Rotate the mode selector switch (7) to toggle between the modes Movie,
Photo and Set. To do this, rotate the corresponding icon to the yellow dot
marking on the bottom left.
Video recordings
Photography
Settings
The Touch-Sensitive Display
The device display is touch-sensitive. The displayed icons can be selected
and activated either by tapping on them with the finger or by using the
navigation button (5). This User’s Manual describes operating the device
by using the navigation button.
English - 25
Page 28

Introduction SCAZ 5.00 A1
Setting the Menu Language
Open the camcorder display. The device powers on automatically.
Rotate the mode selector switch (7) to the SET position
Use the navigation button (5) to move the highlight to the “
Language” option.
Press the navigation button.
Use the navigation button to select the desired menu language.
Confirm the selection by pressing the navigation button
Setting Date and Time
Open the camcorder display. The device powers on automatically.
Rotate the mode selector switch (7) to the SET position
Use the navigation button (5) to move the highlight to the “
Date/Time” option.
Press the navigation button.
Move the navigation button to the left or right to toggle between the
year, month, day, hours and minutes fields.
Move the navigation button up or down to select a different value for
the current setting.
Repeat these steps until you have finished setting the date and time.
Confirm your selection by pressing the navigation button.
26 -English
Page 29

SCAZ 5.00 A1 Recording
Recording
Recording Videos
Open the display and then rotate it according to your needs. The
device powers on automatically.
If the current mode is not set to video recording, select it by using the
mode selector (7).
Move the navigation button (5) up or down to adjust exposure
compensation in four steps to a positive or negative value. The set
value is indicated on the display.
Move the navigation button (5) multiple times to the left to select a
White Balance preset. The corresponding icon will show on the
display. No icon will be shown for automatic White Balance.
Move the navigation button (5) to the right to toggle between Manual
focus and Macro mode.
Pressing the navigation button (5) will lock the currently set focus.
Press the record button (8) to start recording. During recording the
power indicator (4) will blink red.
If necessary, use the zoom swivel button (20) to select a larger to
smaller scene area. Move the swivel button to the right to zoom in or
move the swivel button to the left to zoom out.
Press the record button (8) to stop recording. The power indicator (4)
then goes out.
During recording, different icons may appear on the display informing you
about the current settings.
English - 27
Page 30
Recording SCAZ 5.00 A1
The Video Mode Display
You can press the display button (11) to turn the icons
display on or off.
28 -English
Page 31

SCAZ 5.00 A1 Recording
1
2
3
4
5
6
7
8
9
10
11
12
13
Manual focus
Macro mode
Auto focus lock
Movie mode
Use the zoom swivel button to focus
(only available for “Manual focus”
mode)
White Balance
Zoom indicator
Night mode
Effect mode
Battery level
Resolution
Recorded time
Exposure Compensation
Remaining memory card or internal
memory storage capacity
Indicates whether recording takes
place on the memory card (left icon) or
the internal memory (right icon)
English - 29
Page 32

Recording SCAZ 5.00 A1
Macro Mode
This device features a macro function allowing you to focus on very close
subjects. This allows you to position the lens as close as 10 cm (4 inches)
from the subject. Use the navigation button to enable Macro mode. To do
this, move the navigation button multiple times to the right until Macro
mode is enabled.
The Macro mode is indicated by the display icon.
Manual Focus
With this function you can focus the scene yourself. Use the navigation
button to enable Manual focus. To do this, move the navigation button
multiple times to the right until Manual focus is enabled.
Manual focus is indicated by the
is enabled, the
the zoom swivel button (20) to focus the scene. Tap on the icon to toggle
the zoom swivel button back to zoom adjustment mode. The
will appear on the display. Each tap on these icons will toggle the
operating mode allowing easy selection.
icon will appear on the display. You can then use
display icon. While Manual focus
icon
Locking the Auto Focus
While your camcorder is focussing automatically, you can lock the current
focus setting by pressing the navigation button (5). This focus setting will
be kept even if you aim the device at a different subject. The lock will be
disabled when you press the navigation button again.
30 -English
Page 33

SCAZ 5.00 A1 Recording
Capturing Pictures
Open the display and then rotate it according to your needs. The
device powers on automatically.
If the current mode is not set to photo capturing, select it by using the
mode selector (7).
Move the navigation button (5) up or down to adjust exposure
compensation in four steps to a positive or negative value. The set
value is indicated on the display.
Move the navigation button (5) multiple times to the left to select a
White Balance preset. The corresponding icon will show on the
display. No icon will be shown for automatic White Balance.
Move the navigation button (5) to the right to toggle between Manual
focus and Macro mode.
If necessary, use the zoom swivel button (20) to select a larger to
smaller scene area. Move the swivel button to the right to zoom in or
move the swivel button to the left to zoom out.
Press the shutter button (21) to capture a picture. During saving the
power indicator (4) will light red.
The photo taken will be shown on the display for a few seconds. After
this, the device will return to photo capture mode.
In photo mode, different icons may appear on the display informing you
about the current settings.
English - 31
Page 34

Recording SCAZ 5.00 A1
The Photo Mode Display
32 -English
Page 35

SCAZ 5.00 A1 Recording
1
2
3
4
5
6
7
8
9
10
11
12
13
Manual focus
Macro mode
Auto focus lock
Photo mode
Use the zoom swivel button to focus
(only available for “Manual focus”
mode)
White Balance
Zoom indicator
Night mode
Effect mode
Remaining number of shots
Self-timer
Battery level
Resolution
Exposure Compensation
Indicates whether recording takes
place on the memory card or the
internal memory
English - 33
Page 36

Recording SCAZ 5.00 A1
Video Lamp
In dark environments you can enable the built-in video lamp (3) for video
or photo recording. To do this, press the video lamp button (10). Pressing
this button again will turn the video lamp off.
34 -English
Page 37

SCAZ 5.00 A1 Playback
Playback
Depending on the selected mode you can use the Play button (13) to
switch to the corresponding playback mode. In the upper-left corner of the
screen a
Playing Back Video Clips
In Movie mode you can use the Play button (13) to switch to Playback
mode. Press this button once again to return to Movie mode. The icon in
the upper-left corner of the display shows the current mode.
In Playback mode the following features are available:
Move the navigation button (5) to the left or right to choose a recording.
To start or stop playback, press the navigation button.
Press the display button (11) to show or hide the display icons.
icon will indicate the playback mode.
Playback mode
Movie mode
English - 35
Page 38

Playback SCAZ 5.00 A1
1
2
3
4
5
File protection
Playback icon
Current and total playback time
Starts playback
Current video number/
total number of videos
6
7
8
9
Scrolls one video up
Playback menu
Multiple video thumbnail view *
Scrolls one video down
* This function can be selected via the touchscreen only.
36 -English
Page 39

SCAZ 5.00 A1 Playback
The following functions are available during video playback:
Move the navigation button (5) to the left to rewind. To cancel the
rewind function, press the navigation button.
Move the navigation button (5) to the right for fast forward. To cancel
the fast forward function, press the navigation button.
Move the navigation button (5) upwards to increase the sound volume.
Move the navigation button (5) downwards to decrease the volume.
To pause playback, press the recording button (8). Pressing the
recording button again will resume playback.
To stop playback, press the navigation button (5).
English - 37
Page 40

Playback SCAZ 5.00 A1
Playing Back Photos
In capture mode you can use the Play button (13) to switch to Playback
mode. Press the Play button once again to return to Photo mode. The icon
in the upper-left corner of the display shows the current mode.
Playback mode
Photo mode
In Playback mode the following features are available:
Move the navigation button (5) to the left or right to choose a recording.
Press the display button (11) to show or hide the display icons.
38 -English
Page 41

SCAZ 5.00 A1 Playback
1
2
3
4
5
6
7
File protection
Playback icon
Current picture number/
total number of pictures
Scrolls one picture up
Playback menu
Multiple picture thumbnail view *
Scrolls one picture down
* This function can be selected via the touchscreen only.
English - 39
Page 42

The Menus SCAZ 5.00 A1
The Menus
The camcorder uses different menus that offer multiple settings under
each operating mode. Furthermore, there is a main menu allowing you to
set the preferences for your camcorder.
In the following section you will find menu operation instructions using the
navigation button. However, you can also adjust the settings by tapping on
the icons.
The Main Menu
Rotate the mode selector switch (7) to the SET position (see also on page
25 - Switching the Operating Mode).
The menu contains eight items labelled with icons. Use either the
navigation button (5) to select a menu item or tap the desired menu items
with your finger.
40 -English
Page 43

SCAZ 5.00 A1 The Menus
Main Menu Icons
Date/Time
To set the date and time.
Beep
To turn the acoustic signals on or off.
Auto PowerOff
To select an automatic power off timeout.
TV standard
To select the TV standard.
Format
To format the memory card.
Default
Restores the factory-default settings.
Language
To select the menu language.
Frequency
Select the mains frequency
English - 41
Page 44

The Menus SCAZ 5.00 A1
Date/Time
Here you can set the date and time (see also page 26 – Setting Date and
Time).
Beep
Here you can determine if a sound is output when pressing a button. This
option enables or disables the power-on sound at the same time.
Use the navigation button (5) to select the desired icon and then press the
navigation button to confirm.
Disables the beep.
Enables the beep.
Confirms the selection
(when adjusting the settings via the touch-sensitive
display).
Auto PowerOff
You can have the device power off automatically after a certain time to
save battery power. If no operation is performed during the preset time,
the device will power off. To power the camcorder back on, press the
On/Off button (15).
42 -English
Page 45

SCAZ 5.00 A1 The Menus
Use the navigation button (5) to select the desired icon and then press the
navigation button to confirm.
Auto PowerOff disabled
Power off after 1 minute
Power off after 5 minutes
Confirms the selection
(when adjusting the settings via the touch-sensitive
display).
TV standard
Choose between the TV systems PAL or NTSC. NTSC is the colour
system used in America and Japan, PAL is used in Europe. This setting
only applies when playing back using the video cable. Use the navigation
button (5) to select the desired icon and then press the navigation button
to confirm.
Format
This function lets you delete all contents from your memory card and
internal memory and renew the file saving structure (formatting).
Warning! All saved videos and pictures will be erased and
cannot be restored. Make sure that all recordings you
want to keep have been backed up on a different
medium.
English - 43
Page 46

The Menus SCAZ 5.00 A1
To format the internal memory, you will first have to
remove the inserted memory card (if any). It is only
possible to format the internal memory if there is no
memory card inserted.
Use the navigation button (5) to select the desired icon and then press the
navigation button to confirm.
Does not format.
Format the memory.
Confirms the selection
(when adjusting the settings via the touch-sensitive
display).
Default
All device parameters (e.g. the menu language) will be reset to their
factory-default values. This will not erase any data from your memory
card.
Use the navigation button (5) to select the desired icon and then press the
navigation button to confirm.
44 -English
Does not apply any changes.
Resets the device,
Confirms the selection
(when adjusting the settings via the touch-sensitive
display).
Page 47

SCAZ 5.00 A1 The Menus
Language
Here you can set the menu language (see also page 26 – Setting the
Menu Language).
Frequency
Select the mains frequency to avoid any interference caused by
fluorescent lighting. A mains frequency of 50 Hz is used across Europe; in
America the mains uses a frequency of 60 Hz. Use the navigation button
(5) to select the desired icon and then press the navigation button to
confirm.
English - 45
Page 48

The Menus SCAZ 5.00 A1
Video Menu
To open the Video menu, press the Menu button (12) while in Movie
mode.
Video Menu Icons
White Balance
To match the environmental lighting conditions.
Resolution
The recording size in pixels.
Effect
To select colour presets.
Night Mode
For recordings in low lighting conditions.
Quality
To select the recording quality.
46 -English
Page 49

SCAZ 5.00 A1 The Menus
White Balance
White Balance is used to determine a colour temperature suitable for
current lighting conditions. Select one of the preset options or use the
Automatic setting.
Use the navigation button (5) to select the desired icon and then press the
navigation button to confirm.
Automatic
Daylight
Cloudy
Fluorescent
Tungsten
Confirms the selection
(when adjusting the settings via the touch-sensitive
display).
Resolution
The resolution determines the size of the recording in pixels. As a general
rule: The higher the resolution, the more storage space is required.
Choose between the following resolutions:
1080P
720P/60FPS
English - 47
HDTV (Full HD)
Highest resolution of 1920 x 1080 pixels
High resolution of 1280 x 720 pixels and a high
60fps frame rate
Page 50

The Menus SCAZ 5.00 A1
720P/30FPS
High resolution of 1280 x 720 pixels and a lower
30fps frame rate
WVGA
QVGA
Use the navigation button (5) to select the desired icon and then press the
navigation button to confirm.
Medium resolution of 800 x 480 pixels
Low resolution of 640 x 480 pixels
Effect
You can record using different presets.
Use the navigation button (5) to select the desired icon and then press the
navigation button to confirm.
Normal setting
Black and white
Sepia
Confirms the selection
(when adjusting the settings via the touch-sensitive
display).
The “Sepia” setting will create a black and white picture
with a brown colour tint. This will make the picture look
older.
48 -English
Page 51

SCAZ 5.00 A1 The Menus
Night Mode
In order to obtain properly exposed recordings in dark environments,
select Night mode. This will improve the quality of any night recordings.
Use the navigation button (5) to select the desired icon and then press the
navigation button to confirm.
Disables Night mode.
Enables Night mode.
Confirms the selection
(when adjusting the settings via the touch-sensitive
display).
English - 49
Page 52

The Menus SCAZ 5.00 A1
Quality
Here you can set the recording quality. Please note that a higher quality
requires more storage capacity.
Use the navigation button (5) to select the desired icon and then press the
navigation button to confirm.
High quality
Normal quality
Confirms the selection
(when adjusting the settings via the touch-sensitive
display).
Video Playback Menu
To open the Video playback menu, press the Menu button (12) while in
video record mode.
50 -English
Page 53

SCAZ 5.00 A1 The Menus
Video Playback Menu Icons
Delete a video recording
To delete the selected video recording.
Delete all video recordings
Erases all video recordings.
Protect
Protects your recordings against accidental deletion.
Autoplay
Plays all videos in sequence.
Deleting A Video Recording
Use this option to delete a single video recording.
Warning! After a recording has been erased, it cannot be
restored.
Move the navigation button (5) to the right to select the video you want to
erase. To delete the currently displayed video, press the navigation button.
English - 51
Page 54

The Menus SCAZ 5.00 A1
When using the touch-sensitive display you can use the following buttons:
To show the previous video.
To show the next video.
To delete the current video.
To return without applying any changes.
Deleting all video recordings
All saved video recordings can be deleted in one go. Any captured
pictures will not be erased.
Use the navigation button (5) to select the desired icon and then press the
navigation button to confirm.
Does not erase anything.
To erase all video recordings.
Confirms the selection
(when adjusting the settings via the touch-sensitive
display).
52 -English
Page 55

SCAZ 5.00 A1 The Menus
Protect
Here you can protect one or more recordings to avoid accidental deletion.
Move the navigation button (5) to the right to select the video you want to
protect. To protect the currently displayed video, press the navigation
button.
When using the touch-sensitive display you can use the following buttons:
To show the previous video.
To show the next video.
To protect the current video.
To return without applying any changes.
Protected videos will appear with a
To unprotect a video, repeat the above procedure.
icon on the display.
Autoplay
This function allows you to play all recorded videos in sequence.
English - 53
Page 56

The Menus SCAZ 5.00 A1
Photo Menu
To open the Photo menu, press the Menu button (12) while in Photo
mode.
Photo Menu Icons
White Balance
To match the environmental lighting conditions.
Resolution
The recording size in pixels.
Effect
To select colour presets.
Night Mode
For recordings in low lighting conditions.
54 -English
Page 57

SCAZ 5.00 A1 The Menus
Selftimer
To delay the recording.
Quality
To select the recording quality.
White Balance
This setting is equivalent to the White Balance setting for video recording
(see page 47).
Resolution
The resolution determines the size of the recording in pixels. As a general
rule: The higher the resolution, the more storage space is required.
Use the navigation button (5) to select the desired icon and then press the
navigation button to confirm.
Low resolution of 2048 x 1536 pixels
Medium resolution of 2592 x 1944 pixels
High resolution of 4608 x 3456 pixels (interpolated)
Confirms the selection
(when adjusting the settings via the touch-sensitive
display).
English - 55
Page 58

The Menus SCAZ 5.00 A1
Effect
This setting is equivalent to the Effect setting for video recording (see
page 48).
Night Mode
This setting is equivalent to the Night mode setting for video recording
(see page 49).
Selftimer
The self-timer delays the capture for a preset time after pressing the
shutter button (21). This allows you to participate in the scene (e.g. for a
group photo).
Use the navigation button (5) to select the desired icon and then press the
navigation button to confirm.
Self-timer disabled.
The photo will be captured 5 seconds after pressing
the shutter button.
The photo will be captured 10 seconds after pressing
the shutter button.
Confirms the selection
(when adjusting the settings via the touch-sensitive
display).
56 -English
During the delay time, the self-timer indicator (2) on the
front panel flashes.
Page 59

SCAZ 5.00 A1 The Menus
Quality
This setting is equivalent to the Quality setting for video recording (see
page 50).
Photo Playback Menu
To open the Photo playback menu, press the Menu button (12) while in
photo Playback mode.
Delete one picture
Deletes the selected picture.
Delete all pictures
Deletes all pictures.
Protect
Protects your recordings against accidental deletion.
Autoplay
Plays all pictures in sequence.
English - 57
Page 60

The Menus SCAZ 5.00 A1
Delete one picture
This allows you to erase a single picture. This function is operated the
same way as the Delete function for video playback (see page 51).
Delete all pictures
All saved pictures can be deleted at once. Any captured videos will not be
erased.
This function is operated in the same way as the Delete function for video
playback (see page 52).
Protect
This setting is equivalent to the Protect setting for video playback (see
page 53).
Autoplay
This setting is equivalent to the autoplay setting for video playback (see
page 53).
58 -English
Page 61

SCAZ 5.00 A1 Connectors and Sockets
Connectors and Sockets
Viewing Recordings on a Television Screen
Any recordings that you can view on the camcorder display can also be
played back on a regular TV set. For this, your television set must have an
appropriate Video In connector.
Depending on the connectors available on the TV set, you can use the
USB/AV cable or the HDMI cable. The HDMI cable will provide digital
picture and sound and therefore offers the best quality.
Simply operate the device as usual. For instance, enable the Autoplay
(slideshow) function to view all pictures in sequence.
Connecting via the HDMI Cable
English - 59
Page 62

Connectors and Sockets SCAZ 5.00 A1
Connecting via the USB/AV Cable
Transferring Recordings to the Computer
There are two possible ways to copy recordings from the camcorder to a
computer:
by connecting the device to a computer via the USB/AV cable
by inserting the memory card into a card reader
It is not possible to transfer data from the computer to the
camcorder. The copy function will only allow for the
transfer of data from the camcorder to the computer.
60 -English
Page 63

SCAZ 5.00 A1 Connectors and Sockets
Be careful when renaming any folders and files. Do NOT
try to change the folder or file names stored on the device
from the computer otherwise you may not be able to play
back any files contained here with your camcorder.
After you have copied your files or folders to the
computer, you can rename or edit them on the computer.
Using the USB port
Use the supplied USB cable to connect your camcorder to the
computer, as shown in the figure.
Power the camcorder on.
English - 61
Page 64

Connectors and Sockets SCAZ 5.00 A1
Using a Card Reader
If your computer features a card reader supporting SD memory cards, you
can read the memory card’s contents directly. Remove the memory card
from the powered-off camcorder.
Insert the memory card into the card reader of your computer (normally
labelled SD/MMC).
The PC will add the memory card contents under the drive letter in My
Computer representing the card reader.
Open My Computer on your PC and double-click on the disk drive
representing the card reader.
All recorded files can be found in the folder “DCIM” on this disk drive.
Now you can copy the recorded files from the camcorder into a folder
of your choice on the computer’s hard disk.
62 -English
Page 65

SCAZ 5.00 A1 Software
Software
The supplied software allows you to edit and play your recordings.
System Requirements
Operating system: Windows® XP or Windows Vista® or Windows® 7
CPU: Intel/AMD Dual-Core processor or higher
RAM: At least 1GB
Graphics Adapter: DirectX 9 or DirectX 10-compatible (recommended)
Interface: USB 1.1 or higher
Memory: At least 2GB free hard disk space
Installing the Software
The bundled software is contained on the supplied CD-ROM. To be able
to install the software, you first need to connect the camcorder to the
computer by using the USB cable.
Use the USB cable to connect the camcorder to your computer. Then
power the camcorder on.
Insert the supplied CD-ROM into the CD or DVD drive of your
computer.
The CD will launch automatically. Then follow the on-screen
instructions to install.
If the setup programme does not start automatically or
you have cancelled it accidentally, you can launch the file
“TotalMedia HDCam.exe” manually.
English - 63
Page 66

Software SCAZ 5.00 A1
Uninstalling the Software
To uninstall the software, please use the Uninstall Wizard found in the
Control Panel of your operating system.
The Main Dialog
Navigation bar with multiple display options
1
The preview window shows previews and further information.
2
Toolbar for accessing the most common functions
3
64 -English
Page 67

SCAZ 5.00 A1 Software
Select language
Here you can change the language of the software interface.
From the main dialog, click: >Options
>Preferences
Select the desired language from the list and click “OK” to confirm.
The software will prompt you that it will be necessary to restart it. Click
"OK" to confirm the message.
Then start the application again.
Editing Recordings
Viewing Recordings
Use the USB cable to connect the camcorder to your computer. Then
power the camcorder on.
Disk drives display and selection
4
Recordings stored on the selected disk
5
English - 65
Page 68

Software SCAZ 5.00 A1
The following options are available:
From the navigation (4), select the disk drive for which you want to
display the contents.
Click on the star icon
Click on the info icon
recording.
To display a recording in a new window, double-click on it. In the
display window, click the arrow icons
your keyboard to display the previous or next recording.
To view a video recording, double-click on it. The video window
contains the icons Stop
, or use the arrow keys on your keyboard to display the previous or
next video recording.
To delete a recording, click the Trash icon . The ensuing prompt
needs to be confirmed with “OK” in order to execute the deletion.
to rate the current recording.
to show further information on the current
, or use the arrow keys on
, Play and Pause . Click the arrow icons
Importing Recordings
To archive your recordings, you can use the Import function. The
recordings will be copied to your computer. After you have imported your
recordings, you will not need to connect the camcorder to view them.
Select all recordings that you want to import from the currently selected
disk drive and click "Import" on the bottom toolbar.
A window with a user prompt will appear. To import the selected
recordings, select the "Import Selected Scenes“ option. You can choose to
import all or only all new recordings.
If necessary, enter a folder name or use the default name.
Click "OK" to confirm.
66 -English
Depending on the number of recordings, the copying of
files can take a while.
Page 69

SCAZ 5.00 A1 Software
Selecting the Navigation View
There are different ways to open your imported recordings. In the libraries,
you can sort them by folder name or date.
Click on the folder icon
Click on the calendar icon
To open My Computer, click the
the disk drives installed on your computer. For example, this allows you to
access any recordings stored on a CD-ROM.
to sort by folder name.
to sort by folder date.
button. Here you can find all
English - 67
Page 70

Software SCAZ 5.00 A1
Preview Window
The preview window offers multiple options for sorting and editing your
recordings.
Shows all recordings according to their
rating.
Shows all recordings that haven’t been
imported yet.
Here you can filter to display only pictures,
only videos or all recordings.
Drag the slider to adjust the display size for
your recordings.
Shows the recordings only.
Shows the recordings together with other
information.
Here you can enter a keyword to search for.
68 -English
Page 71

SCAZ 5.00 A1 Software
Toolbar
Import Imports all recordings from any
Merge videos Creates movies from your video
Create AVCHD Burns your video files onto an
Upload to
YouTube
Upload to
Facebook
Photo Album Creates a photo album from your
Album page Creates a page (e.g. an invitation
The icon entitled „YouKu“ links to an Asian video portal
and is not suitable for European countries.
connected devices.
recordings.
AVCHD disk.
Uploads video recordings to your
YouTube account.
Uploads video recordings to your
Facebook account.
pictures.
card) from your pictures.
Import
See page 66 - Importing Recordings.
Merge videos
Merge videos lets you merge multiple video clips to a movie.
Click the merge videos icon
Drag the desired video clips onto the timeline at the bottom of the
window.
English - 69
to show the video editing timeline.
Page 72

Software SCAZ 5.00 A1
Click the "Next" button to start the process.
Specify the storage path on your computer and then click “Save”.
Creating an AVCHD Disk
AVCHD (Advanced Video Codec High Definition) is an
innovative digital standard with high resolution and
brilliant picture and sound quality. This format allows you
to record onto writeable DVD disks and playback on
suitable Blu-ray players. It is a good addition to an HDTV
television set.
Not all players support playback from self-recorded
AVCHD disks.
Insert a DVD±R, DVD±R DL, DVD±RW or DVD-RAM disk into your CD
drive.
Click the Create AVCHD Disk icon
workspace.
Drag the desired video clips onto the timeline at the bottom of the
window.
Click the "Next" button to start the process.
Select the drive and folder from your hard disk and click “OK”.
To be able to use this function your computer must
feature a DVD drive capable of writing one of the
following media types: DVD±R, DVD±R DL, DVD±RW or
DVD-RAM
to open the disk compilation
70 -English
Page 73

SCAZ 5.00 A1 Software
Cutting Video Clips
You can remove any undesired sections from your video clips. From the
video recordings overview, click on the scissor icon
window with the currently selected recording will appear.
Navigate to the beginning of the scene that you want to cut. Then click
.
Navigate to the end of the scene that you want to cut. Then click
Start cutting by clicking the confirmation icon .
The title will be cut and a new clip without the selection will be created.
. The playback
.
Upload to YouTube
Click on the YouTube upload icon .
Drag the desired video recording onto the timeline at the bottom of the
window.
Click on “Next”.
Enter the user name and password for your account and then click
“Login”.
Follow the YouTube on-screen instructions.
Upload to Facebook
Click on the Facebook upload icon .
Drag the desired video recording onto the timeline at the bottom of the
window.
Click on “Next”.
Enter your email address and password and click "Login".
Then follow the Facebook on-screen instructions.
English - 71
Page 74

Software SCAZ 5.00 A1
Photo Album
With this option you can create an album consisting of multiple pictures.
There are also several templates that you can use.
Click the Photo Album icon
Drag the desired pictures onto the bar at the bottom of the window.
Click on “Next”.
The programme "ArcSoft Print Creations” will launch automatically.
Choose a category and then a template from the application. To do
this, double-click on the desired template.
.
Album page
With this option you can create an album page consisting of one or
multiple pictures. There are also several templates that you can use.
Click the Album Page icon
Drag the desired pictures onto the bar at the bottom of the window.
Click on “Next”.
The programme "ArcSoft Print Creations” will launch automatically.
Choose a category and then a template from the application. To do
this, double-click on the desired template.
.
72 -English
Page 75

SCAZ 5.00 A1 Appendix
Appendix
Technical Specifications
Capture sensor 5 megapixels CMOS
Lens
Colour LCD Display 7.5cm TFT
Shutter speed
Photo mode
resolutions
Video mode
resolutions
Photo mode zoom
Video mode zoom
File format
White Balance
Effects Normal, Black and white, Sepia
Self-timer 5s, 10s
Video lamp LED light
Memory
Wide-angle: 45cm to infinite
Telephoto: 20cm to infinite
F/2.8-4.95
f=4.98-23.6 mm
Video: 1/15s ~ 1/2000s
Photo: 2s ~ 1/4000s
3M (2048x1536), 5M (2592x1944),
16M (4608x3456, interpolated)
QVGA 120fps (640x480), WVGA 60fps
(800x480), 720p 30fps (1280x720), 720p 60fps
(1280x720), 1080p 30fps (1920 x 1080)
optical: 5x
digital: 4x
optical: 5x
digital: 4x
(not for 1080p nor QVGA)
Video: AVI
Photo: JPEG
Automatic, Daylight, Cloudy, Fluorescent,
Tungsten
128 MB internal flash memory
(partially used by the operating system),
SD memory card reader
max. 32GB, SD(HC) Class 6
English - 73
Page 76

Appendix SCAZ 5.00 A1
SD memory card
(included in the
package) 4 GB
TV Out PAL, NTSC, HDMI
Power supply
Charger
Operating temperature 0°C - 35°C
Operating humidity max. 85 % rel. humidity
Microphone Integrated
Speakers Integrated
Dimensions
Weight approx. 227g (without battery)
Rechargeable Li-Ion battery, NP120
3.7 V, 1700 mAh
Manufacturer: Roofer Technology Co., Ltd.
Manufacturer:
Scope Technology Co., Ltd.
Model:
DJ04V20500A
Input voltage:
100-240V AC, 50/60Hz
Output voltage:
4.2 V 500 mA
60 x 62 x 120 mm
(W x H x D with hand strap)
74 -English
Page 77

SCAZ 5.00 A1 Appendix
Warranty Information
English - 75
Page 78

Appendix SCAZ 5.00 A1
76 -English
Page 79

SCAZ 5.00 A1 Indholdsfortegnelse
Indholdsfortegnelse
Vigtigt 82
Sikkerhedsanvisninger ............................................................................. 82
Børn og handicappede personer............................................................. 84
Oplader og genopladeligt batteri ............................................................. 85
Ledninger ................................................................................................. 85
Reparation og vedligeholdelse................................................................. 86
Beregnet brug ..........................................................................................86
Konformitetsbemærkning ......................................................................... 87
Bortskaffelse af gamle apparater .............................................................87
Indledning 88
Indhold i pakken....................................................................................... 88
Styring og knapper ...................................................................................89
Front........................................................................................................89
Bagpanel................................................................................................. 89
Venstre panel.......................................................................................... 90
Højre panel .............................................................................................90
Top.......................................................................................................... 91
Nederst ...................................................................................................91
Åbne skærmen......................................................................................... 92
Komme i gang.......................................................................................... 93
Opladning af batteriet med opladeren..................................................... 93
Opladning af batteriet, mens det sidder i videokameraet ........................ 95
Dansk - 77
Page 80

Indholdsfortegnelse SCAZ 5.00 A1
Isætning af batteriet................................................................................ 96
Isætning af SD-kortet.............................................................................. 97
Skrivebeskyttelse af hukommelseskortet.............................................. 100
Sådan tændes og slukkes videokameraet ............................................ 101
Ændre betjeningstilstand ...................................................................... 101
Den berøringsfølsomme skærm ........................................................... 101
Indstilling af menusproget..................................................................... 102
Indstilling af dato og klokkeslæt............................................................ 102
Optagelse 103
Optagelse af videoer.............................................................................. 103
Videotilstandsskærmen ........................................................................ 104
Makrotilstand ......................................................................................... 106
Manuelt fokus ........................................................................................ 106
Låse auto-fokus ..................................................................................... 106
Optagelse af billeder.............................................................................. 107
Fototilstandsskærmen .......................................................................... 108
Videolampe............................................................................................ 110
Afspilning 111
Afspilning af videoklip ............................................................................ 111
Afspilning af fotografier .......................................................................... 114
Menuerne 116
Hovedmenuen ....................................................................................... 116
Hovedmenuikoner ................................................................................ 117
78 - Dansk
Page 81

SCAZ 5.00 A1 Indholdsfortegnelse
Dato/klokkeslæt ....................................................................................118
Bip......................................................................................................... 118
Auto-sluk............................................................................................... 118
Tv-standard........................................................................................... 119
Format................................................................................................... 119
Standard ...............................................................................................120
Sprog ....................................................................................................121
Frekvens ............................................................................................... 121
Videomenu............................................................................................. 122
Hvidbalance .......................................................................................... 123
Opløsning.............................................................................................. 123
Effekt..................................................................................................... 124
Nattilstand............................................................................................. 125
Kvalitet .................................................................................................. 126
Menuen Videoafspilning......................................................................... 126
Ikoner i videoafspilningsmenuen........................................................... 127
Sletning af en videooptagelse ............................................................... 127
Sletning af alle videoer.......................................................................... 128
Beskyt ................................................................................................... 129
Auto-afsp............................................................................................... 129
Menuen Billede ......................................................................................130
Billedmenu-ikoner .................................................................................130
Hvidbalance .......................................................................................... 131
Opløsning.............................................................................................. 131
Effekt..................................................................................................... 132
Nattilstand............................................................................................. 132
Dansk - 79
Page 82

Indholdsfortegnelse SCAZ 5.00 A1
Selvudløser........................................................................................... 132
Kvalitet.................................................................................................. 133
Billedafspilningsmenu ............................................................................ 133
Slet ét billede ........................................................................................ 134
Slet alle billeder .................................................................................... 134
Beskyt................................................................................................... 134
Auto-afsp. ............................................................................................. 134
Stikforbindelser 135
Se optagelser på en fjernsynsskærm .................................................... 135
Tilslutning via HDMI-kablet ................................................................... 135
Tilslutning via USB/AV-kablet ............................................................... 136
Overføre optagelser til computeren ....................................................... 136
Bruge USB-porten ................................................................................ 137
Sådan bruges en kortlæser .................................................................. 138
Software 139
Systemkrav............................................................................................ 139
Installation af softwaren ......................................................................... 139
Afinstallere softwaren ........................................................................... 140
Hoveddialogen....................................................................................... 140
Vælg sprog ........................................................................................... 141
Redigere optagelser .............................................................................. 141
Se optagelser ....................................................................................... 141
Importere optagelser............................................................................. 142
Vælge navigationsvisning ..................................................................... 143
80 - Dansk
Page 83

SCAZ 5.00 A1 Indholdsfortegnelse
Forhåndsvisningsvindue .......................................................................144
Værktøjslinje ..........................................................................................145
Importer................................................................................................. 145
Sammenflet videoer .............................................................................. 145
Opret en AVCHD-disk........................................................................... 146
Klippe i videoklip ................................................................................... 147
Upload to YouTube (Upload til YouTube) .............................................147
Upload til Facebook (Upload til Facebook) ...........................................147
Photo Album (Fotoalbum) ..................................................................... 148
Album page (Albumside)....................................................................... 148
Tillæg 149
Tekniske specifikationer......................................................................... 149
Garantioplysninger ................................................................................. 151
Overensstemmelseserklæring................................................................ 152
Dansk - 81
Page 84

Vigtigt SCAZ 5.00 A1
Vigtigt
Dette ikon angiver vigtige oplysninger til sikker betjening
af produktet og for brugerens sikkerhed.
Dette ikon angiver, at der findes yderligere oplysninger
om emnet.
Sikkerhedsanvisninger
Før du tager dette apparat i brug første gang, bedes du læse følgende
bemærkninger og overholde alle advarsler, også selvom du i forvejen
er fortrolig med at håndtere elektroniske apparater. Du skal altid
kontrollere, at produktet fungerer korrekt.
Opbevar denne vejledning på et sikkert sted til fremtidig brug.
Hvis du sælger eller videregiver dette apparat til andre, er det meget
vigtigt, at denne vejledning vedlægges.
Forsøg ikke at åbne kabinettet eller samle produktet igen. Du risikerer
at få stød. Vedligeholdelse og reparationer bør kun udføres af
kvalificerede teknikere.
Se ikke på solen eller andre kilder til intenst lys. Det kan skade dit syn.
Hold apparatet væk fra vand og andre væsker. Betjen ikke enheden
med våde hænder, og brug den ikke i regn- eller snevejr. Fugt kan
være farlig pga. ild eller elektrisk stød.
Hold enheden væk fra børn og dyr for at undgå uheld eller skader.
Sluk straks for enheden, hvis du bemærker røg eller mærkelige lyde.
Kontakt kundeservice. Prøv aldrig selv at reparere apparatet.
Brug kun den medfølgende oplader Scope DJ04V20500A eller USB-
interfacekablet til at oplade batteriet i apparatet.
82 - Dansk
Page 85

SCAZ 5.00 A1 Vigtigt
Brug kun denne enhed med det medfølgende genopladelige batteri
(NP120) for at undgå overophedning, forvrængning af huset, brand,
elektriske stød, eksplosion og andre farer.
Tag stikket til strømforsyningen ud ad stikkontakten, før du fjerner det
genopladelige batteri fra opladeren, eller tag opladeren fra
strømforsyningen.
I tilfælde af en fejl i produktet eller tilbehøret, skal stikket straks tages
ud af stikkontakten.
Hvis der er risiko for tordenvejr, skal stikket tages ud af stikkontakten.
Forsøg aldrig at opvarme, adskille eller kortslutte de genopladelige
batterier. Kast ikke genopladelige batterier i ilden.
Advarsel:
Bemærkning om frakobling fra lysnettet.
Den medfølgende oplader forbruger elektrisk energi, selvom der ikke er et
batteri indsat. Derfor skal du afbryde opladeren fra stikkontakten, når den
ikke er i brug. For at frakoble opladeren helt fra lysnettet, skal stikket tages
ud af stikkontakten. Stikkontakten, hvor enheden er tilsluttet, skal være
lettilgængelig, så stikket kan tages hurtigt ud i nødstilfælde. Tag stikket ud
af stikkontakten, når du ikke har tænkt dig at bruge enheden i lang tid
(f.eks. når du skal på ferie), så der ikke er fare for brand. Hold ikke i stikket
med våde hænder.
Apparatet er ikke beregnet til brug i lokaler, hvor temperaturen eller
luftfugtigheden er høj, og det skal holdes frit for støv. Sæt enheden på et
stabilt, fladt underlag, og læg ikke genstande oven på den.
Sørg altid for, at:
der ikke er direkte varmekilder (f.eks. rumopvarmning), som kan
påvirke apparatet
apparatet ikke bliver udsat for direkte sollys eller skarp kunstig
belysning,
undgå kontakt med vandsprøjt og -dråber samt flydende slibemidler,
og brug aldrig apparatet i nærheden af vand, f.eks. må det aldrig
Dansk - 83
Page 86

Vigtigt SCAZ 5.00 A1
nedsænkes i vand (placer ikke genstande med væske, f.eks. vaser
eller drikkeglas, i nærheden af apparatet),
der ikke placeres brændende genstande (f.eks. tændte stearinlys) på
eller i nærheden af apparatet
der ikke kommer fremmedlegemer ind i apparatet
apparatet ikke udsættes for store temperaturændringer, da dette kan
give fugtdannelse på grund af kondens,
apparatet ikke udsættes for kraftige stødpåvirkninger eller vibrationer.
Børn og handicappede personer
Lad ikke børn eller handicappede personer bruge elektriske apparater
uden opsyn. De er måske ikke i stand til at forstå den mulige fare.
Genopladelige batterier og smådele er forbundet med kvælningsfare.
Opbevar batterier utilgængeligt for børn. Hvis et genopladeligt batteri
sluges, skal der straks søges lægehjælp. Hold al indpakning væk fra børn,
da det kan forårsage kvælning.
84 - Dansk
Page 87

SCAZ 5.00 A1 Vigtigt
Oplader og genopladeligt batteri
Isæt det genopladelige batteri med den korrekte polaritet. Smid aldrig et
genopladeligt batteri i åben ild. Tag batteriet ud, hvis apparatet ikke skal
bruges i længere tid.
Fare for eksplosion!
Forkert brug kan forårsage eksplosioner og livsfare. Erstat kun det
genopladelige batteri med et tilsvarende eller en type, som anbefales af
producenten. Udskift aldrig batterier i et eksplosions-følsomt miljø. Når
batterier tages ud eller sættes i, kan det frembringe gnister som kan
forårsage en eksplosion. Eksplosions-følsomme områder er som regel
(men ikke altid) afmærkede. Dette omfatter steder for opbevaring af
brændstof som f.eks. under dækket på en båd, områder med
brændstofledninger eller -tanke, miljøer hvor luften indeholder brandfarlige
stoffer (f.eks. korn, støv eller metalpulver osv.) og områder, hvor man
normalt skal slukke bilens motor.
Pas på miljøet. Brugte genopladelige batterier hører ikke til i
husholdningsaffald. De skal lægges i særlige batteriindsamlingskasser.
Ledninger
Hold altid ledningerne ved stikket, og træk aldrig i selve ledningen. Tag
aldrig fat i ledningen med våde hænder, da der kan ske en kortslutning,
eller du kan få elektrisk stød. Placer aldrig apparatet, tunge genstande
eller møbler på ledningen, og pas på, at ledningen ikke kommer i klemme,
især ved stikkene og stikkontakter. Der må aldrig slås knuder på
ledningen, og den må ikke bindes sammen med andre ledninger. Alle
ledninger skal placeres således, at man ikke kommer til at falde over dem,
og de må ikke være i vejen. Hvis ledningen beskadiges, er der risiko for
brand eller elektrisk stød. Undersøg ledningen med jævne mellemrum.
Dansk - 85
Page 88

Vigtigt SCAZ 5.00 A1
Brug ikke et adapterstik eller en forlængerledning, som ikke lever op til de
krævede sikkerhedsstandarder.
Reparation og vedligeholdelse
Det er nødvendigt med reparationer, når apparatet er blevet beskadiget:
F.eks. hvis opladeren eller kabinettet til SCAZ 5.00 A1 er beskadiget, hvis
der er trængt væske eller fremmedobjekter ind i apparatet, hvis apparatet
har været udsat for regn, hvis hvis det ikke fungerer korrekt, eller hvis det
er blevet tabt. Hvis du bemærker røg, unormale lyde eller en mærkelig
lugt, skal du straks slukke for apparatet, og stikket skal tages ud af
stikkontakten. Hvis dette sker, bør apparatet ikke bruges længere, og det
bør efterses af et autoriseret serviceværksted. Kontakt et serviceværksted,
hvis der er behov for service af enheden.
Beregnet brug
Dit videokamera er en forbrugerteknisk enhed, og den er kun designet til
optagelse og afspilning af videoer og billeder. Enhver anvendelse ud over
det, der er nævnt ovenfor, er ikke i overensstemmelse med den
beregnede brug. Enheden må kun anvendes til privat brug, ikke til
industrielle eller kommercielle formål. I standardkonfigurationen er dette
produkt ikke beregnet til brug ved livredning, redningsaktioner eller
livsbevarende formål.
Denne enhed overholder alle aspekter i forbindelse med CE-konformitet,
relevante standarder og direktiver. Ændringer af udstyret ud over som
anbefalet af producenten kan medføre, at apparatet ikke længere
overholder disse standarder. Anvend kun det tilbehør, som er anbefalet af
producenten. Hvis dette apparat ikke anvendes i Tyskland, skal det
anvendes i overensstemmelse med lovreglerne i det land, hvor det
bruges.
86 - Dansk
Page 89

SCAZ 5.00 A1 Vigtigt
Konformitetsbemærkning
Denne enhed og vedlagt tilbehør er afprøvet og godkendt
for overensstemmelse med de grundlæggende og øvrige
relevante krav i EMC-direktivet 2004/108/EC samt
Lavspændingsdirektivet 2006/95/EC. Den tilhørende
konformitetserklæring kan også findes i slutningen af denne
Brugervejledning.
Bortskaffelse af gamle apparater
Apparater mærket med dette symbol er underlagt det
europæiske Direktiv 2002/96/EC. Alle elektriske og
elektroniske apparater skal bortskaffes særskilt fra
husholdningsaffald på officielle genbrugspladser.
Skån miljøet, og undgå farer for dit eget helbred ved at bortskaffe
apparatet på korrekt vis. Kontakt de lokale myndigheder,
genbrugsstationer eller den forretning, hvor du købte apparatet, for
nærmere oplysninger om korrekt bortskaffelse.
Emballagen skal også genvindes på passende vis. Papemballage kan
afleveres i papircontaineren eller på offentlige afleveringssteder til
genvinding. Al folie og plastik i emballagen skal afleveres på et offentligt
afleveringssted til bortskaffelse.
Pas på miljøet. Gamle batterier hører ikke til sammen med
husholdningsaffaldet. De skal lægges i særlige batteriindsamlingskasser.
Dansk - 87
Page 90

Inledning SCAZ 5.00 A1
Indledning
Indhold i pakken
Videokamera SCAZ 5.00 A1
2 genopladelige batterier
Roofer Technology Co., Ltd. NP120
Oplader Scope DJ04V20500A
Strømledning
USB-/AV-kabel
HDMI-kabel
SD-hukommelseskort, 4 GB (ikke illustreret)
Cd-rom (ikke vist)
Pose (ikke vist)
Brugervejledning (ikke vist)
88 - Dansk
Page 91

SCAZ 5.00 A1 Inledning
Styring og knapper
Front
1 Objektiv
2 Selvudløserlampe
3 Videolampe
Bagpanel
4 Strømindikator
5 Navigationsknap
6 HDMI-indgang,
USB- og AV-port,
oplader DC in
7 Tilstandsvælger
8 RECORD-knap
Dansk - 89
Page 92

Inledning SCAZ 5.00 A1
Venstre panel
9 Mikrofon
10 Videoindikator-
knap
11 Display-knap
12 Menu-knap
13 AFSPIL-knap
14 Rum til
hukommelseskort
15 Afbryderkontakt
Højre panel
16 Håndstrop
17 Batterirum
90 - Dansk
Page 93

SCAZ 5.00 A1 Inledning
Top
18 Højttalere
19 Lås til batterirum
20 Zoom-skydeknap
21 Billedlukker-knap
Nederst
22 Rum til
hukommelseskort
23 Montering til
trefod
Dansk - 91
Page 94

Inledning SCAZ 5.00 A1
Åbne skærmen
Åbn skærmen og drej den efter behov.
Du kan også dreje skærmen, så den vender fremad. I dette tilfælde
justeres billedretningen automatisk.
Den drejede skærm kan foldes helt ned, til det rører selve kameraet.
92 - Dansk
Page 95

SCAZ 5.00 A1 Inledning
Komme i gang
Videokameraet strømforsynes af et genopladeligt lithium-ion-batteri
(NP120). Batteriet er ikke ladet op ved levering. Oplad batteriet, inden du
bruger kameraet første gang.
Du må kun bruge det genopladelige lithium-ion-batteri,
NP120, til at drive kameraet.
Opladning af batteriet med opladeren
Sæt det genopladelige batteri i opladeren Scope DJ04V20500A så
kontakterne [+] og [-] stemmer overens på både batteriet og opladeren.
Dansk - 93
Page 96

Inledning SCAZ 5.00 A1
Sørg for, at batteriet klikker på plads på opladeren. Tilslut derefter
ledningen til opladeren, og sæt stikket i stikkontakten.
Fjern det genopladelige batteri fra kameraet, hvis det ikke
skal bruges i lang tid.
Under opladning bliver batteriet og opladeren varm. Dette
er ikke en fejl.
Statusindikatoren på opladeren er orange, mens batteriet lader. Når
opladningen er færdig, vil statuslampen være grøn. Du kan derefter sætte
det genopladelige batteri i videokameraet. Afhængig af ladeniveauet kan
opladningen tage op til 3 timer.
Hvis indikatoren forbliver grøn, efter du har isat batteriet,
er batteriet allerede ladet op, eller ikke isat korrekt. I dette
tilfælde skal du kontrollere polariteten.
94 - Dansk
Page 97

SCAZ 5.00 A1 Inledning
Opladning af batteriet, mens det sidder i videokameraet
Det er også muligt at oplade videokameraets batteri ved hjælp af USBstrømmen fra en computer. For at gøre dette skal du bruge det
medfølgende USB-/AV-kabel.
Indsæt det genopladelige batteri i videokameraet (se side 96).
Brug det medfølgende USB-kabel til at slutte dit videokamera til
computeren, som vist på figuren.
Du skal sikre dig, at videokameraet er slukket. Batteriet vil ikke oplade,
hvis apparatet er tændt. Tryk på tænd/sluk-knappen [15] for at slukke
for videokameraet, hvis det er nødvendigt.
Strømindikatoren (4) lyser rødt under opladningen. Når opladningen er
færdig, slukkes strømindikatoren.
Visse computere har ingen USB-strømforsyning, når de
er slukkede. Sørg for at tænde for din computer, hvis
videokameraets strømindikator ikke lyser.
Dansk - 95
Page 98

Inledning SCAZ 5.00 A1
Isætning af batteriet
Når batteriet er fuldt opladet, skal det sættes i videokameraet som vist
nedenfor. Gør følgende:
For at gøre dette skal du åbne batterirummet (17) ved forsigtigt at trække
låsen til batterirummet (19) fremad.
Batterirummet åbnes, så du kan indsætte det genopladelige batteri. Sørg
for, at kontakterne [+] og [-] stemmer overens på både batteriet og
opladeren.
96 - Dansk
Page 99

SCAZ 5.00 A1 Inledning
Luk batterirummet.
Indsæt det genopladelige batteri, som vist på figurerne.
Forkert indsætning af batteriet kan skade apparatet.
Isætning af SD-kortet
Ved at bruge det vedlagte SD-hukommelseskort kan du øge
videokameraets lagerkapacitet, så du kan gemme dine videoer og
fotografier. Når der er isat et hukommelseskort, gemmes alle optagelser
på det. Hvis der ikke er isat et hukommelseskort, bliver alle dine fotografier
og videoer gemt i kameraets interne hukommelse.
Husk at slukke for apparatet, inden du isætter eller fjerner
hukommelseskortet.
Dansk - 97
Page 100

Inledning SCAZ 5.00 A1
Åbn skærmen, og tryk på tænd/sluk-knappen [15] for at slukke for
videokameraet. Åbn ind til hukommelseskortet (21) ved at trække låget i
samme retning som den lille pil.
Isæt derefter hukommelseskortet med metalkontakterne vendende fremad
ind i kortsprækken. Mærkaten skal vende nedad. Skub kortet helt ind i
åbningen, indtil kortet klikker på plads.
98 - Dansk
 Loading...