

Page 1
Avant de lire le mode d‘emploi, ouvrez la page contenant les illustrations et familiarisez-vous ensuite avec
toutes les fonctions de l‘appareil.
Klappen Sie vor dem Lesen die Seite mit den Abbildungen aus und machen Sie sich anschließend mit allen
Funktionen des Gerätes vertraut.
Before reading, unfold the page containing the illustrations and familiarise yourself with all functions of
the device.
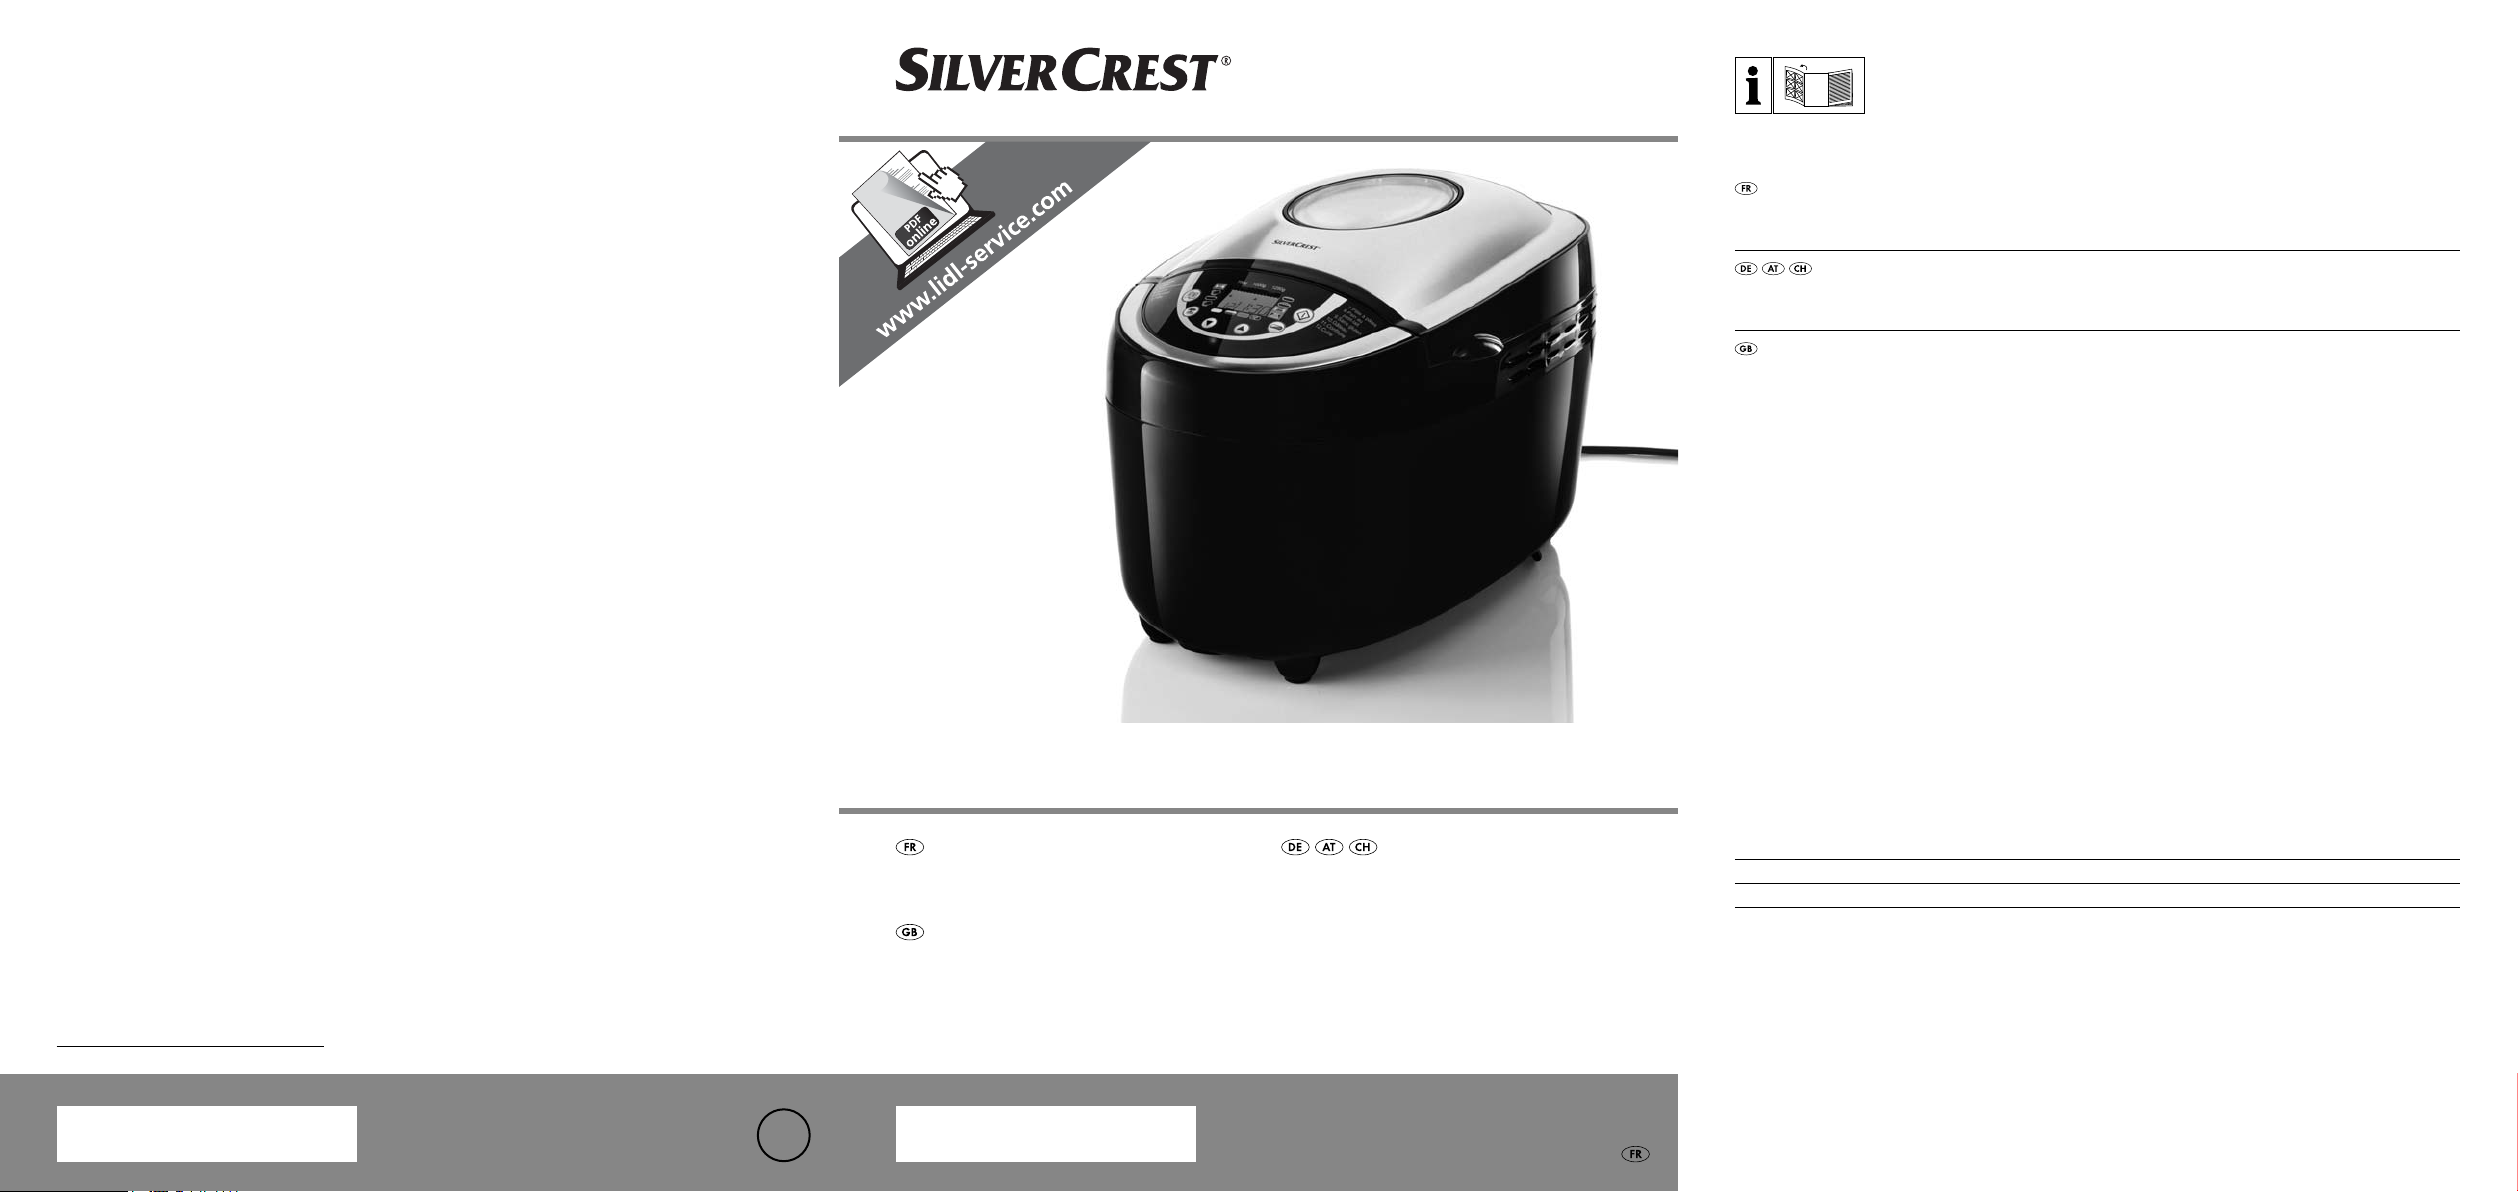
MACHINE À PAIN SBB 850 EDS A1
KOMPERNASS GMBH
Burgstraße 21
D-44867 Bochum
www.kompernass.com
Version des informations · Stand der Informationen
Last Information Update:
02 / 2012 · Ident.-No.: SBB850EDSA1022012-1
IAN 73485 IAN 73485
2
MACHINE À PAIN
Mode d’emploi
BREAD MAKER
Operating instructions
BROTBACKAUTOMAT
Bedienungsanleitung
FR Mode d’emploi Page 1
DE / AT / CH Bedienungsanleitung Seite 21
GB Operating instructions Page 45
Page 2
A
B
C
Page 3

Sommaire Page
Introduction 2
Usage conforme 2
Accessoires fournis 2
Description de l'appareil 2
Caractérestiques techniques 2
Consignes de sécurité 2
Avant la première utilisation 4
Propriétés 5
Champ de commande 5
Programmes 6
Fonction de minuterie 8
Avant la cuisson 8
Faire cuire du pain 9
Messages d'erreur 11
Nettoyage et entretien 11
Mise au rebut 12
Garantie et service après-vente 12
Importateur 12
Déroulement des programmes 13
Dépannage de la machine à pain 17
Lisez attentivement le mode d'emploi avant la première utilisation et conservez ce dernier pour une utilisation
ultérieure. Lors du transfert de l'appareil à une tierce personne, remettez-lui également le mode d'emploi.
- 1 -
Page 4

Machine à pain
Description de l'appareil
Introduction
Toutes nos félicitations pour l'achat de votre nouvel
appareil.
Vous avez choisi un produit de grande qualité. Le
mode d'emploi fait partie de ce produit. Il contient
des remarques importantes concernant la sécurité,
l'utilisation et la mise au rebut. Veuillez vous familiariser avec l'ensemble des consignes d'opération et
de sécurité avant l'usage du produit. N'utilisez le
produit que conformément aux consignes et pour
les domaines d'utilisation prévus. En cas de transfert
du produit à un tiers, remettez-lui également tous les
documents.
Usage conforme
N'utilisez votre machine à pain que pour la cuisson
du pain et la préparation de marmelades / confitures dans le cadre domestique.
N'utilisez en aucun cas l'appareil pour le séchage
d'aliments ou d'objets. N'utilisez pas la machine à
pain à l'extérieur.
Utilisez exclusivement les accessoires recommandés
par le fabricant. L'utilisation d'accessoires non
recommandés peut conduire à un endommagement
de l'appareil.
Cet appareil est exclusivement destiné à l’utilisation
dans le cadre de ménages privés.
Ne pas utiliser l’appareil dans un but commercial!
Accessoires fournis
Machine à pain
Moule de cuisson
2 crochets de pétrissage
Verre mesureur
Cuillère-mesure
Mode d'emploi
Brève notice
Livret de recettes
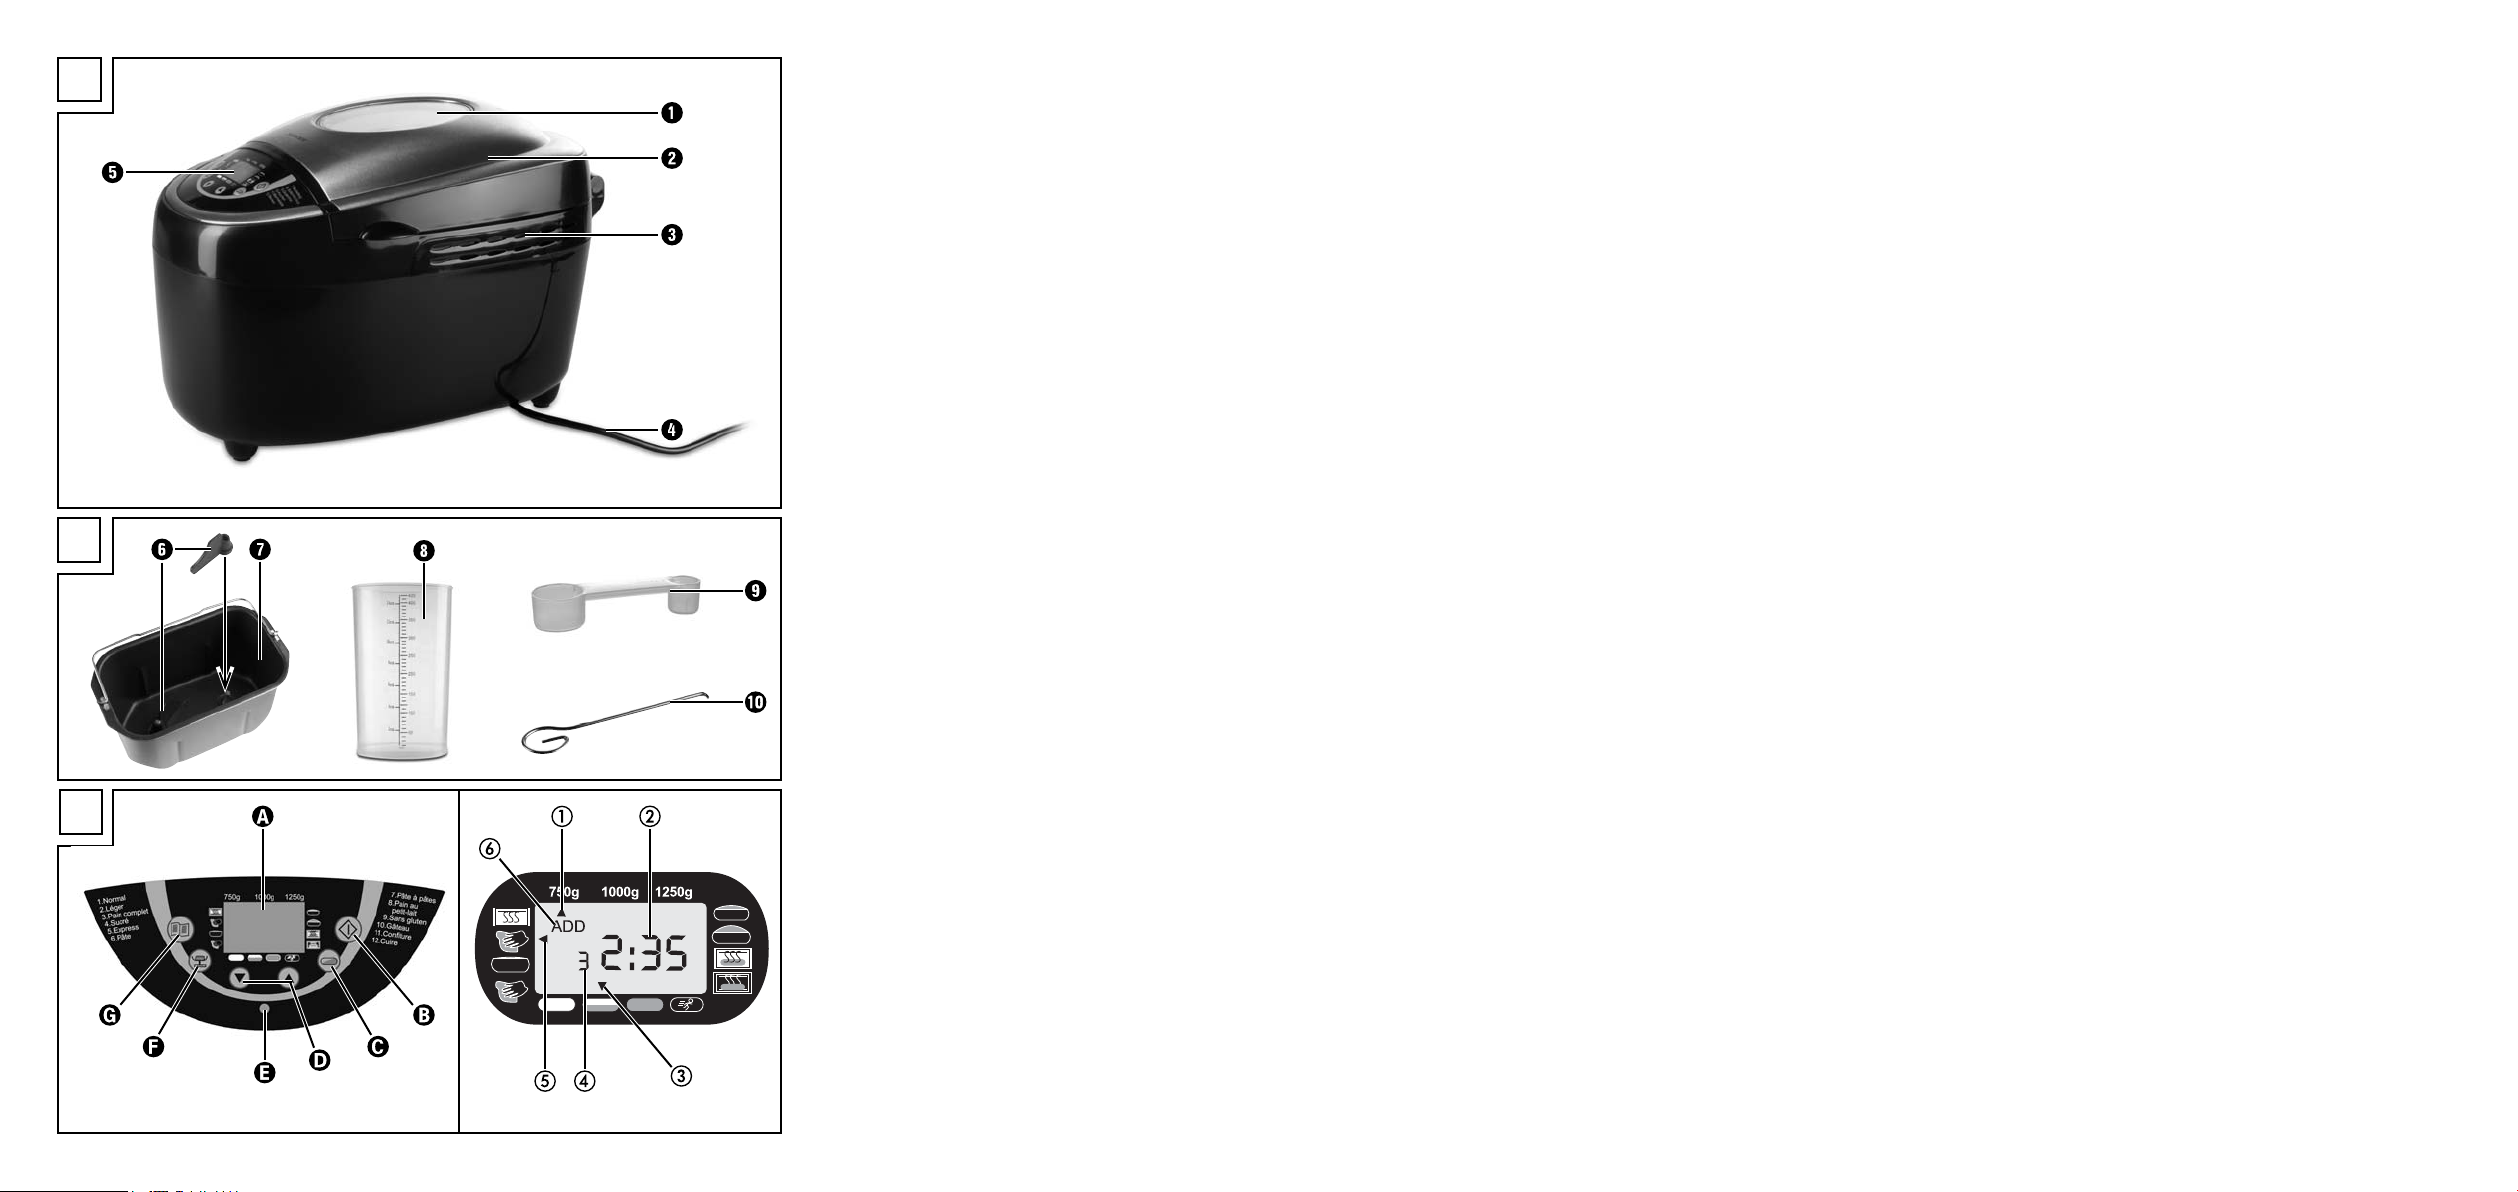
Figure A :
Fenêtre de contrôle
Couvercle d'appareil
Fentes d'aération
Cordon d'alimentation
Champ de commande
Figure B :
2 pétrins
Moule de cuisson pour un pain d'un poids
allant jusqu'à 1250 g
Verre mesureur
Cuillère graduée
Crochet de retrait des pétrins
Caractérestiques techniques
Modèle : Machine à pain
SBB 850 EDS A1
Tension nominale : 220-240 V ~ / 50 Hz
Puissance absorbée : 850 watts
Consignes de sécurité
• Lisez intégralement le mode d'emploi avant la
première utilisation.
• Danger d'asphyxie! Les enfants peuvent étouffer
en cas d'utilisation inappropriée de l'emballage.
Mettez-le au rebut immédiatement après le
déballage ou conservez-le hors de portée des
enfants.
• Suite au déballage, contrôlez la machine à
pain en vue d'éventuels dommages de transport.
Si nécessaire, veuillez vous adresser à votre
fournisseur.
• Posez l'appareil sur une surface sèche, plane
et non sensible à la chaleur.
- 2 -
Page 5

• N'installez pas l'appareil à proximité de matériaux combustibles, explosifs et/ou de gaz combustibles. La distance par rapport aux autres
appa-reils ne doit pas être inférieure de 10 cm.
• Assurez-vous que les fentes d'aération de
l'appareil ne sont pas recouvertes.
• Avant le raccordement, contrôlez si le type de
courant et la tension du réseau correspondent
aux indications figurant sur la plaque signalétique.
• N'acheminez pas le câble au niveau d'arêtes
vives ou à proximité de surfaces ou d'objets
chauds. L'isolement du câble peut être endommagé.
• Ne laissez jamais l'appareil fonctionner sans
surveillance !
• Afin d'éviter tout risque de trébuchement ou
d'accident, l'appareil est équipé d'un cordon
d'alimentation court.
• L'appareil ne doit être utilisé qu'en intérieur.
• Ne jamais placer l'appareil au-dessus ou à
côté d'une cuisinière à gaz ou électrique ou
un four brûlant ou d'autres sources de chaleur.
• Ne recouvrez jamais l'appareil avec une serviette ou tout autre matériau. La chaleur et la
vapeur doivent pouvoir s'échapper. Un incendie
peut se déclarer si l'appareil est recouvert d'un
matériau inflammable tel que des rideaux ou
qu'il entre en contact avec eux.
• Si vous utilisez une rallonge, la puissance maximum autorisée du câble doit correspondre à la
puissance de la machine à pain.
• Acheminez une rallonge de manière à éviter
tout trébuchement ou que quelqu'un ne tire
dessus par inadvertance.
• Contrôlez le cordon d'alimentation et la prise
avant toute utilisation. Si le cordon d'alimentation de cet appareil est endommagé, il doit
impérativement être remplacé par le fabricant,
son service après-vente ou une personne de
qualification similaire afin d'éviter d'autres
risques.
• L'utilisation d'accessoires non recommandés
peut être à l'origine de dommages. L'appareil
ne doit être utilisé que pour l'emploi auquel il
est destiné. Sinon, la garantie est annulée.
• Ne commencez un programme de cuisson
qu'après avoir introduit un moule de cuisson.
Sinon l'appareil risque d'être endommagé de
manière irréparable.
• Ne laissez pas l'appareil sans surveillance si
des enfants se trouvent à proximité. Retirer la
fiche secteur lorsque l'appareil est inutilisé et
avant de le nettoyer. Laisser refroidir l'appareil
avant d'enlever des pièces.
• Cet appareil n'est pas prévu pour des personnes
(y compris des enfants) dont les capacités
physiques, sensorielles ou mentales ou dont le
manque d'expérience ou de connaissances les
empêchent d'assurer un usage sûr des appareils, s'ils n'ont pas été surveillés ou initiés au
préalable. Les enfants doivent être surveillés
afin d'éviter qu'ils ne jouent avec l'appareil.
• Cet appareil satisfait aux dispositions de sécurité
correspondantes. Les vérifications, les réparations et l'entretien technique sont exclusivement
réservés au revendeur spécialisé qualifié.
Sinon, la garantie est annulée.
• Ne posez pas d'objets sur l'appareil et ne le
recouvrez pas. Risque d'incendie.
• ATTENTION! La machine à pain est un appareil qui chauffe. Avant de toucher l'appareil,
attendez qu'il ait refroidi ou utilisez une manique.
• Laissez l'appareil refroidir et débranchez la
fiche secteur avant de retirer ou de mettre en
place les pièces accessoires.
• Ne déplacez pas la machine à pain si le
moule de cuisson contient quelque chose de
brûlant ou un liquide tel que de la confiture.
Il y a risque de brûlure !
• Lors de l'utilisation, évitez à tout prix de toucher
les pétrins en rotation. Il y a en effet un risque
de blessures !
• Ne tirez pas sur le cordon d'alimentation pour
débrancher la fiche de la prise.
- 3 -
Page 6

• Lorsque vous n'utilisez pas l'appareil et avant
tout nettoyage, débranchez la fiche secteur
de la prise.
• N'utilisez pas la machine à pain pour conserver
des aliments ou des ustensiles.
• Ne mettez jamais de papier d'aluminium ou
d'autres objets métalliques dans la machine à
pain. Cela peut causer un court-circuit. Danger
d'incendie !
• Ne plongez pas la machine à pain dans l'eau
ou dans d'autres liquides. Risque d'électrocution !
• Ne nettoyez pas l'appareil avec des éponges
récurantes.
Si des particules de l'éponge se désagrègent
et entrent en contact avec des pièces électriques,
il y a risque d'électrocution.
• Ne pas utiliser de minuterie externe ou de
dispositif de commande à distance pour faire
fonctionner l'appareil.
• Ne jamais utiliser l'appareil sans moule de
cuisson ou avec un moule de cuisson vide.
Dans ce cas, vous risquez d'infliger des
dommages irréparables à l'appareil.
• Fermez toujours le couvercle lorsque
l´appareil est en marche.
• Ne retirez jamais le moule de cuisson lorsque
l´appareil est en marche.
• Lors de la cuisson, ne dépassez jamais la
quantité de 700 g de farine et n'ajoutez
jamais plus de 1 1/4 paquet de levure sèche.
La pâte peut en effet déborder et provoquer
un incendie !
• En cours d’opération, la température de la surface extérieure et de la porte peut être très
élevée. Risque de brûlure !
Attention ! Surface chaude !
Certaines pièces de l’appareil chauffent fortement en cours d’opération ! Risque de brûlure !
Avant la première
utilisation
Mise au rebut du matériau d'emballage
Déballez votre appareil et éliminez le matériau
d'emballage selon les dispositions en vigueur dans
votre lieu de résidence.
Premier nettoyage
Avant la mise en service, essuyez le moule de cuisson
, les pétrins et la surface extérieure de la machine
à pain à l'aide d'un chiffon propre et humide.
N'utilisez pas d'éponges récurantes ou de produits
à récurer. Retirez le film protecteur sur le champ de
commande .
Préchauffage
Point important avant la première mise en service:
Uniquement la première fois que vous faites chauffer la
machine à pain, enfournez le moule à cuisson
vide. Fermez le couvercle .
Sélectionnez le programme 12, comme indiqué au
chapitre „PROGRAMMES“, et appuyez sur le bouton de marche/arrêt pour chauffer l'appareil
pendant 5 minutes. Au bout de 5 minutes, appuyez
sur le bouton de marche/arrêt jusqu'à ce qu'un
signal sonore assez long retentisse pour mettre fin
au programme.
Les éléments chauffants étant légèrement graissés,
une légère odeur peut se dégager lors de la première
mise en service. Elle n'est pas dangereuse et se dissipe rapidement. Assurez une aération suffisante,
par exemple en ouvrant une fenêtre.
Attendez que l'appareil ait complètement refroidi et
essuyez à nouveau le moule de cuisson , les
pétrins et la face extérieure de la machine à
pain à l'aide d'un chiffon propre et humide.
Risque d'incendie ! Ne laissez jamais la
machine à pain chauffer pendant plus de
5 minutes avec le moule de cuisson vide.
Il y a risque de surchauffe.
- 4 -
Page 7
Propriétés
Avec la machine à pain, vous avez la possibilité
de faire cuire du pain selon votre goût.
• Vous pouvez choisir entre 12 programmes
différents.
• Vous pouvez utiliser des mélanges pour pâtes
tout prêts.
• Vous pouvez pétrir de la pâte à petits pains et
confectionner de la marmelade.
• Grâce au programme "Sans gluten", vous pouvez cuire des mélanges à pâte sans gluten et
confectionner des recettes à base de farines
sans gluten, comme par ex. la farine de maïs,
la farine de sarrasin et la fécule de pommes
de terre.
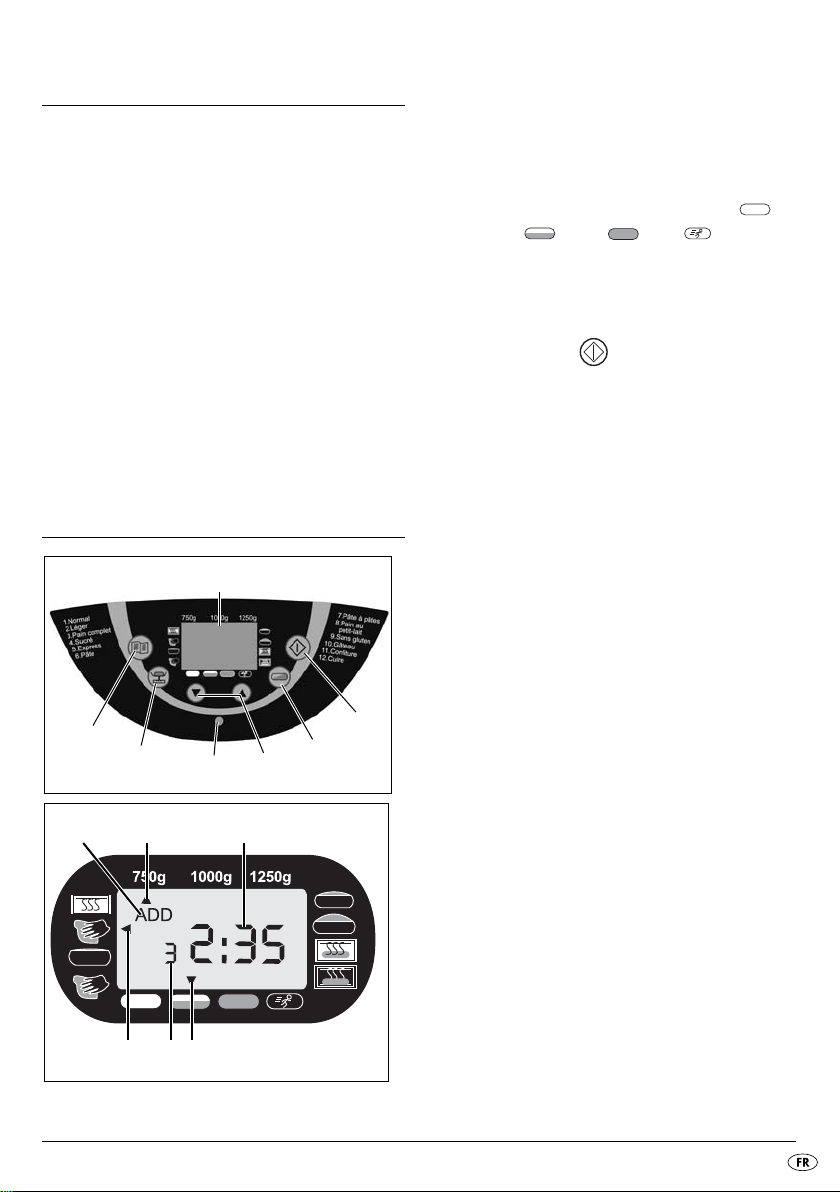
Champ de commande
Ecran
L'affichage indique
la sélection du poids (750 g, 1000 g, 1250 g)
le temps d'opération restant en heures et la
présélection du temps programmée
le degré de dorage sélectionné (Clair ,
Moyen , Doré , Vite )
le numéro de programme sélectionné
le déroulement du programme
l'ajout d'ingrédients ("ADD")
Marche / Arrêt
Pour démarrer ou arrêter le fonctionnement ou pour
effacer une programmation de minuterie.
Pour interrompre l'opération, appuyez brièvement sur
la touche Marche/Arrêt , jusqu'à ce qu'un signal
sonore retentisse et que l'indication des heures clignote
sur l'écran . En appuyant à nouveau sur la touche
Marche/Arrêt , l'opération peut être poursuivi
dans un délai de 10 minutes. Si vous oubliez d'enclencher le programme, celui-ci reprend automatiquement après 10 minutes.
Pour arrêter complètement le fonctionnement ou
effecer les réglages, appuyez pendant 3 secondes
sur la touche de marche/arrêt jusqu'à ce qu'un
long signal sonore retentisse.
Remarque :
N'appuyez pas sur la touche Marche/Arrêt , si
vous souhaitez uniquement contrôler l'état du pain.
Observez la procédure de cuisson par la fenêtre
de contrôle.
Attention !
A chaque fois que vous appuyez sur une touche,
un signal sonore doit retentir, à part quand l'appareil est en marche.
- 5 -
Page 8

Degré de dorage (ou mode Vite)
Sélection du degré de dorage ou passage en
mode Vite (Clair/Moyen/Doré/Vite). Appuyez plusieurs fois sur la touche Degré de dorage , jusqu'à ce que la flèche apparaisse au-dessus du degré
de dorage souhaité. Pour les programmes 1 - 4,
vous pouvez activer le mode Vite en appuyant plusieurs fois sur la touche Degré de dorage , pour raccourcir la procédure de cuisson. Appuyez sur la touche
Degré de dorage jusqu'à ce que la flèche apparaisse au-dessus de "Vite". Il n'est pas possible de
choisir un degré de dorage pour les programmes 6,
7 et 11.
Sélection des programmes (Menu)
Affichage du programme de cuisson souhaité (1-12).
L'écran affiche le numéro de programme et la
durée de cuisson correspondante.
Fonction de mémorisation
Lorsqu'il est de nouveau mis en marche après une
coupure de courant d'environ 10 minutes maximum,
le programme continue à se dérouler à l'endroit où il
a été arrêté. Cela ne s'applique cependant pas lorsque vous effacez ou mettez fin au processus de cuisson ou lorsque vous activez le bouton de marche/
arrêt jusqu'à ce qu'un long signal sonore retentisse.
Minuterie
Cuisson temporisée.
▼ ▲
Remarque :
Dans le cas du programme 11, vous ne pouvez
pas définir de cuisson temporisée.
Témoin de service
Lorsqu’il est allumé, le témoin de service indique
qu’un programme est en cours. Si vous souhaitez
procéder au démarrage temporisé d’un programme à l’aide de la fonction de temporisation, le
témoin de service s’allume uniquement lorsque
le programme a démarré et non pas lorsque le temporisateur est activé.
Qantité de pâte
Sélection du poids du pain ( 750 g / 1000 g /
1250 g). Appuyez plusieurs fois sur cette touche
jusqu'à ce que la flèche apparaisse sous le poids
souhaité. Les indications de poids (750 g / 1000 g /
1250 g) se rapportent à la quantité d'ingrédients
versés dans le moule de cuisson .
Remarque :
Le réglage standard à la mise en marche de l'appareil
est de 1250 g. Dans les programmes 6, 7, 11 et
12, il ne vous est pas possible de régler le poids
du pain.
Fenêtre de contrôle
La fenêtre de contrôle vous permet d'observer la
procédure de cuisson.
Programmes
La touche Sélection du programme vous permet
de sélectionner le programme souhaité. Le numéro
de programme correspondant s'affiche sur l'écran
. Les temps de cuisson dépendent des combinaisons de programme sélectionnées. Voir le chapitre
"Déroulement des programmes".
Programme 1 : Normal
Pour les pains mixtes et blancs essentiellement composés de farine de blé ou de seigle. La pain est
d'une consistance compacte. Le dorage du pain est
défini à l'aide de la touche Degré de dorage .
Programme 2 : Léger
Pour des pains légers composés de farine bien fine.
En règle générale, le pain est léger et présente une
croûte croustillante.
Programme 3 : Pain complet
Pour les pains à base de farine plus consistante,
par ex. de la farine de blé complète et de la farine
de seigle. Le pain est plus compact et plus lourd.
- 6 -
Page 9

Programme 4 : Sucré
Pour des pains avec des ingrédients composés de
jus de fruits, de flocons de noix de coco, de raisins,
de fruits secs, de chocolat ou de sucre supplémentaire.
Le pain sera plus léger et plus aéré à l'issue d'une
phase de levée plus longue.
Programme 5 : Express
Pour le pétrissage, laisser lever la pâte et la cuisson
sera moins longue. Ce programme n'est indiqué
que pour les recettes ne contenant pas d'ingrédients lourds ou des types de farine complète.
Notez bien qu'avec ce programme, le pain peut
devenir moins moelleux et pas aussi savoureux
qu'avec un autre programme.
Programme 6 : Pâte (pétrir)
Pour la fabrication de pâtes levées pour les petits
pains, les pâtes à pizza ou les brioches. La procédure de cuisson n'est pas applicable pour ce programme.
Programme 7 : Pâte à pâtes
Pour la confection de pâtes. La procédure de cuisson n'est pas applicable pour ce programme.
Programme 8 : Pain au petit-lait
Pour des pains composés de babeurre ou de yaourt.
Programme 9 : Sans gluten
Pour les pains composés de farines et de mélanges
de cuisson sans gluten. Les farines sans gluten ont
besoin d'un temps de cuisson plus long pour l'absorption des liquides et disposent de propriétés de
gonflement différentes.
Programme 10 : Gâteau
Les ingrédients sont pétris dans ce programme, ils
sont mélangés tranquillement et cuits. Utilisez de la
poudre à lever pour ce programme.
Programme 11 : Confiture
Pour la confection de marmelades, de confitures,
de gelées et de pâtes à tartiner à base de fruits.
Programme 12 : Cuire
Pour la recuisson de pains qui sont trop clairs ou
qui ne sont pas bien cuits ou pour des pâtes tout
prêtes. L'ensemble des procédures de pétrissage et
de repos ne sont pas applicables pour ce programme.
Après la fin de la procédure de cuisson, le pain est
maintenu au chaud pendant une heure maximum.
Ce programme empêche que le pain devienne trop
humide.
Le programme 12 cuit le pain pendant 60 minutes.
Pour mettre fin à ces fonctions de manière prématurée,
appuyez sur la touche de marche/arrêt jusqu'à
ce qu'un long signal sonore retentisse. Pour arrêter
l'appareil, coupez l'alimentation électrique.
Remarque :
Chez les programmes 1, 2, 3, 4, 5, 6, 8 et 9, un
signal sonore retentit pendant le déroulement du
programme et "ADD" apparaît sur l'écran.
Ajoutez immédiatement d'autres ingrédients tels que
des fruits ou des noix.
Les ingrédients ne sont pas malaxés par le crochet
de retrait des pétrins . Si vous avez réglé la minuterie, vous pouvez verser tous les ingrédients dans
le moule de cuisson également au début du programme. Dans ce cas, vous devriez légèrement
réduire les fruits et les noix avant de les ajouter.
- 7 -
Page 10

Fonction de minuterie
La fonction de minuterie vous permet de procéder
à une cuisson temporisée.
Les touches fléchées
de définir la fin de la procédure de cuisson. La temporisation de retard maximale s’élève à 15 heures.
Avertissement ! Avant de cuire un certain
pain avec la fonction de minuterie, vérifiez
d'abord que la recette marche, afin de vous
assurer que la proportion respective entre les
différents ingrédients est adéquate, que la
pâte n'est pas trop ferme ou trop fine, ou que
la quantité n'est pas trop grande et resque
éventuellement de déborder. Risque d'incendie!
Sélectionnez un programme. L'écran indique la
durée de cuisson requise.
La touche fléchée
la fin du programme. Une nouvelle pression fait
avancer l'heure de fin de dix minutes supplémentaires. A chaque fois que vous appuyez à nouveau sur
la touche fléchée
à nouveau de 10 minutes. En maintenant la touche
fléchée enfoncée, vous accélérez cette procédure.
L'affichage vous indique la durée totale du temps
de cuisson et le délai. En cas de dépassement du
décalage de temps possible, vous pouvez corriger
le temps à l'aide de la touche fléchée
Confirmez la configuration de la minuterie à l'aide
de la touche Marche/Arrêt . Le double point
clignote à l'écran et le temps programmé commence à s'écouler.
Dès que le programme démarre, la lampe d’indication de service est allumée.
Lorsque la procédure de cuisson est terminée, dix
signaux sonores retentissent et l'écran affiche
0:00.
▲ et ▼ vous permettent
▲ vous permet de décaler
▲ , la date de fin se déplace
▼ .
Exemple :
Il est 8 h et vous souhaitez avoir du pain frais dans
7 heures et 30 minutes, c'est-à-dire à 15:30.
Dans un premier temps, sélectionnez le programme 1
et maintenez la touche fléchée enfoncée jusqu'à ce
que l'écran affiche 7:30 dans la mesure où le
temps de la préparation s'élève à 7 heures et 30
minutes.
Remarque :
La fonction de minuterie n'est pas disponible pour
le programme "Confiture".
Remarque :
Ne pas utiliser la fonction de minuterie en cas de
transformation de denrées alimentaires rapidement
périssables tels que le lait, les œufs, la crème fraîche ou
le fromage, etc.
Avant la cuisson
Pour réussir une procédure de cuisson, veuillez tenir
compte des facteurs suivants:
Ingrédients
Remarque :
Retirez le moule de cuisson du corps de l'appareil
avant de verser les ingrédients. Si des ingrédients
pénètrent dans la zone de cuisson, un incendie
peut se déclencher suite au réchauffement des serpentins de chauffage.
• Mettez toujours les ingrédients de votre recette
dans l'ordre indiqué dans le moule de cuisson
.
• Il est recommandé de laisser tous les ingrédients
à température ambiante afin d'obtenir une procédure de fermentation optimale de la levure.
- 8 -
Page 11

• Veillez à la mesure exacte des ingrédients. De
légères divergences par rapport aux quantités
indiquées dans la recette peuvent déjà influencer le résultat de cuisson.
Remarque :
N'utilisez en aucun cas des quantités plus importantes
que celles indiquées. Une quantité excessive de pâte
peut déborder du moule de cuisson et un incendie
peut se déclencher suite au réchauffement des serpentins de chauffage.
Faire cuire du pain
Préparation
Respectez les consignes de sécurité figurant dans
ce mode d'emploi.
Installez la machine à pain sur une surface plane
et ferme.
1. Retirez le moule de cuisson de l'appareil
par le haut.
2. Mettez en place les pétrins sur l'arbre d'entraînement dans le moule de cuisson . Veillez
à ce qu'ils soient fermement positionnés.
3. Mettez les ingrédients de votre recette dans
l'ordre indiqué dans la forme de cuisson .
Ajoutez tout d'abord les liquides, le sucre, le
sel puis la farine, et, pour terminer, la levure.
Remarque :
Veillez à ce que la levure n'entre pas en contact
avec le sel ou des liquides.
4. Remettez le moule de cuisson en place.
Veillez à ce qu'elle s'enclenche correctement.
5. Fermez le couvercle .
6. Enfichez la fiche secteur dans la prise de courant.
Un signal sonore retentit et l'écran affiche
le numéro du programme et la durée du programme 1.
7. Sélectionnez votre programme avec la touche
de choix de programme . Chaque entrée
est confirmée par un signal acoustique.
8. Le cas échéant, sélectionnez la taille du pain à
l'aide de la touche .
9. Sélectionnez le degré de dorage de votre
pain. Dans l'écran , la flèche vous indique
si vous avez opté pour Clair, Moyen ou Doré.
Vous pouvez en l'occurrence également sélectionner le mode "Vite" pour raccourcir le temps
de levée de la pâte.
Remarque :
La fonction "Degré de dorage" n'est pas disponible
pour les programmes 6, 7 et 11. La fonction "Vite"
est uniquement possible pour les programmes 1-4.
Pour les programmes 6, 7, 11 et 12, le réglage du
poids du pain n'est pas possible.
10. Vous avez maintenant la possibilité de régler
l'heure de fin de votre programme à l'aide de
la fonction de minuterie. Vous pouvez saisir un
décalage maximal allant jusqu'à 15 heures.
Remarque :
Cette fonction n'est pas possible pour le
programme 11.
Démarrer le programme
Démarrez à présent le programme à l'aide de la
touche Marche/Arrêt .
Remarque :
Les programmes 1, 2, 3, 4, 6, 8 et 9 démarrent
avec une phase de préchauffage de 10 à 30 minutes (à l'exception du mode Vite, voir le tableau du
déroulement des programmes). Les pétrins ne
bougent pas. Il ne s'agit pas d'une erreur de l'appareil.
Le programme exécute automatiquement les différentes étapes de travail.
- 9 -
Page 12

La fenêtre de contrôle vous permet d'observer la
procédure de cuisson de votre machine à pain. De
l'humidité peut occasionnellement se former sur la
fenêtre de contrôle pendant la procédure de
cuisson. Pendant la phase de pétrissage, le couvercle peut être ouvert.
Remarque :
N'ouvrez pas le couvercle de la machine au
cours de la phase de levée et de cuisson. Le pain
peut s'affaisser.
Si le pain ne se détache pas des pétrins , retirez
doucement les pétrins à l'aide du crochet de
retrait des pétrins .
Remarque :
N'utilisez aucun objet métallique susceptible de
rayer le revêtement antiadhésif.
Dès que vous avez retiré le pain du moule de cuisson
, rincez cette dernière à l'eau chaude. Vous
empêchez ainsi un encroûtement des pétrins au
niveau de l'arbre d'entraînement.
Terminer le programme
Lorsque la procédure de cuisson est terminée, dix signaux sonores retentissent et l'écran affiche 0:00.
Lorsque le programme est terminé, l'appareil passe
automatiquement en mode "Garder au chaud" qui
dure 60 minutes maximum.
Remarque :
Ceci ne s'applique pas aux programmes 6, 7 et 11.
Pendant ce temps, de l'air chaud circule dans l'appareil. Vous pouvez mettre fin prématurément à la
fonction "Garder au chaud" en maintenant la touche
Marche/Arrêt enfoncée jusqu'à ce que les signaux
sonores retentissent.
Avertissement !
Débranchez la fiche secteur de la prise avant d'ouvrir
le couvercle .
Lorsque l'appareil n'est pas utilisé, débranchez
toujours ce dernier de l'alimentation électrique.
Sortir le pain
Pour sortir le pain du moule de cuisson , utilisez
toujours des maniques ou des gants de protection.
Maintenez le moule de cuisson penchée au-dessus
d'une grille et secouez-la légèrement jusqu'à ce
que le pain se décolle du moule de cuisson .
Conseil : Lorsque vous retirez les pétrins après
la dernière opération de pétrissage, le
pain ne sera pas déchiré lorsqu'il est
prélevé du moule de cuisson .
• Appuyez brièvement sur la touche Marche/
Arrêt pour interrompre le programme au
tout début de la phase de cuisson ou retirez la
fiche de la prise réseau. Vous devez rétablir la
connexion avec le réseau électrique dans un
délai de 10 minutes afin d'assurer la poursuite
de la procédure de cuisson.
• Ouvrez le couvercle de l'appareil et retirez
le moule de cuisson . Avec les mains enfarinées, vous pouvez prélever la pâte et retirer
les pétrins .
• Remettez la pâte dans le moule de cuisson .
Remettez en place le moule de cuisson et
fermez le couvercle de l'appareil .
• Le cas échéant, enfichez la fiche secteur dans
la prise de courant. Le programme de cuisson
est poursuivi.
Laissez le pain refroidir pendant 15 à 30 minutes
avant de le consommer.
Avant de couper le pain, assurez-vous toujours
qu'aucun pétrin ne se trouve dans la pâte.
- 10 -
Page 13

Messages d'erreur
• Lorsque l'écran affiche "HHH" après le
démarrage du programme, cela signifie que la
température de la machine à pain est encore
trop élevée. Arrête le programme et retirez la
fiche secteur. Ouvrez le couvercle de l'appareil et laissez refroidir l'appareil pendant 20
minutes avant de l'utiliser à nouveau.
• S'il s'avère impossible de démarrer un nouveau programme alors que la machine à pain
vient d'en achever un, cela signifie que l'appareil est encore trop chaud. Dans ce cas, l'écran affiche le réglage de base (Programme 1).
Ouvrez le couvercle de l'appareil et laissez
refroidir l'appareil pendant 20 minutes avant de
l'utiliser à nouveau.
Avertissement !
N'essayez pas de mettre en service l'appareil avant
qu'il ne se soit refroidi. Cela fonctionne uniquement
pour le programme 12.
Attention !
Les éléments de l'appareil et les accessoires ne sont
pas adaptés au lavage en lave-vaisselle !
Corps de l'appareil, couvercle, cuve
Retirez tous les résidus de la cuve avec un chiffon
humide ou une éponge légèrement humidifiée.
Essuyez également le corps de l'appareil et le
couvercle avec un chiffon ou une éponge humide.
• Séchez bien l'intérieur. Pour faciliter le nettoyage, retirez le couvercle du corps de l'appareil :
• Ouvrez le couvercle jusqu'à ce que les
ergots en forme de languette des charnières
soient introduits dans les ouvertures des guides
de la charnière.
• Retirez le couvercle des guides de la
charnière.
• Pour installer le couvercle , passez les
ergots à travers l'ouverture des guides de la
charnière.
• Lorsque l'écran affiche „EE0“, „EE1“ ou “LLL” une
fois que le programme a été lancé, commencez
par éteindre la machine à pain, puis sortez la fiche
secteur de la prise de courant, remettez-là à nouveau dans la prise de courant et allumez une nouvelle fois la machine à pain. Si le messsage d'erreur
persiste, adressez-vous au service après-vente.
Nettoyage et entretien
Avertissement !
Avant tout nettoyage, débranchez la fiche secteur
de la prise et laissez tout d'abord l'appareil refroidir entièrement.
Protégez l'appareil à l'encontre de l'humidité, car
ceci peut entraîner un choc électrique.
Respectez à cet effet les consignes de sécurité.
Formes de cuisson et couteaux de pétrissage
La surface des formes de cuisson et des couteaux de pétrissage est pourvue d'un revêtement
antiadhésif. Lors du nettoyage, n'utilisez pas de produits nettoyants agressifs, de récurants ou d'objets
qui pourraient provoquer des rayures sur les surfaces.
De par l'humidité et la vapeur, l'apparence des surfaces peut se modifier au cours du temps. Cet état
ne correspond pas à un entravement du fonctionnement ou à une réduction de la qualité.
Avant de nettoyer, retirez les formes de cuisson
et les couteaux de pétrissage de l'espace de
cuisson. Essuyez la surface extérieure des formes
de cuisson avec un chiffon humide.
- 11 -
Page 14
Attention !
Ne plongez jamais le moule de cuisson dans de
l'eau ou tout autre liquide.
Nettoyez l'intérieur du moule de cuisson à l'eau
chaude savonneuse.
Si de la pâte séchée colle sur les pétrins , rem-
plissez d'eau chaude le moule de cuisson et
laissez baigner pendant une trentaine de minutes.
Si le support de l'insert est bouché au niveau du
pétrin , vous pouvez le nettoyer doucement à
l'aide d'une baguette de bois.
N'utilisez pas de produits nettoyants chimiques ou
de diluants pour nettoyer la machine à pain.
Mise au rebut
L’appareil ne doit jamais être jeté dans
la poubelle domestique normale. Ce
produit est soumis à la directive
européenne 2002/96/EC.
La prestation de garantie concerne uniquement les
erreurs de matériaux ou de fabrication, mais pas les
dommages liés au transport, les pièces d'usure,
comme par ex. les pétrins et les formes de cuisson,
ou les dommages sur les pièces fragiles. Le produit
est exclusivement destiné à un usage privé et non
commercial.
La garantie est annulée en cas de manipulation incorrecte et inappropriée, d'utilisation brutale et en
cas d'intervention qui n'aurait pas été réalisée par
notre centre de service après-vente agréé. Cette garantie ne constitue pas une restriction de vos droits
légaux.
La période de garantie n'est pas prolongée par la
garantie du fabricant. Ceci vaut également pour les
pièces remplacées et réparées. Les dommages et
défauts présents à l'achat doivent être signalés immédiatement après le déballage, et au plus tard
deux jours après la date d'achat.
Les réparations qui doivent être effectuées après expiration de la période sous garantie sont payantes.
Eliminez l’appareil par l’intermédiaire d’une entreprise de traitement des déchets autorisée ou via le
service de recyclage de votre commune.
Veuillez respecter les règlements actuellement en
vigueur. En cas de doutes, contactez votre
organisation de recyclage.
Eliminez l'ensemble des matériaux d'emballage d'une manière respectueuse de
l'environnement.
Garantie et service après-vente
Cet appareil est garanti 3 ans à partir de la date
d'achat. L'appareil a été fabriqué avec soin et consciencieusement contrôlé avant sa distribution.
Veuillez conserver le ticket de caisse en guise de
preuve d'achat. Dans le cas où la garantie s'applique, veuillez appeler le service après-vente compétent. Cette condition doit être respectée pour assurer l'expédition gratuite de votre marchandise.
Service France
Tel.: 0800 919270
E-Mail: kompernass@lidl.fr
IAN 73485
Importateur
KOMPERNASS GMBH
BURGSTRASSE 21
44867 BOCHUM, GERMANY
www.kompernass.com
- 12 -
Page 15

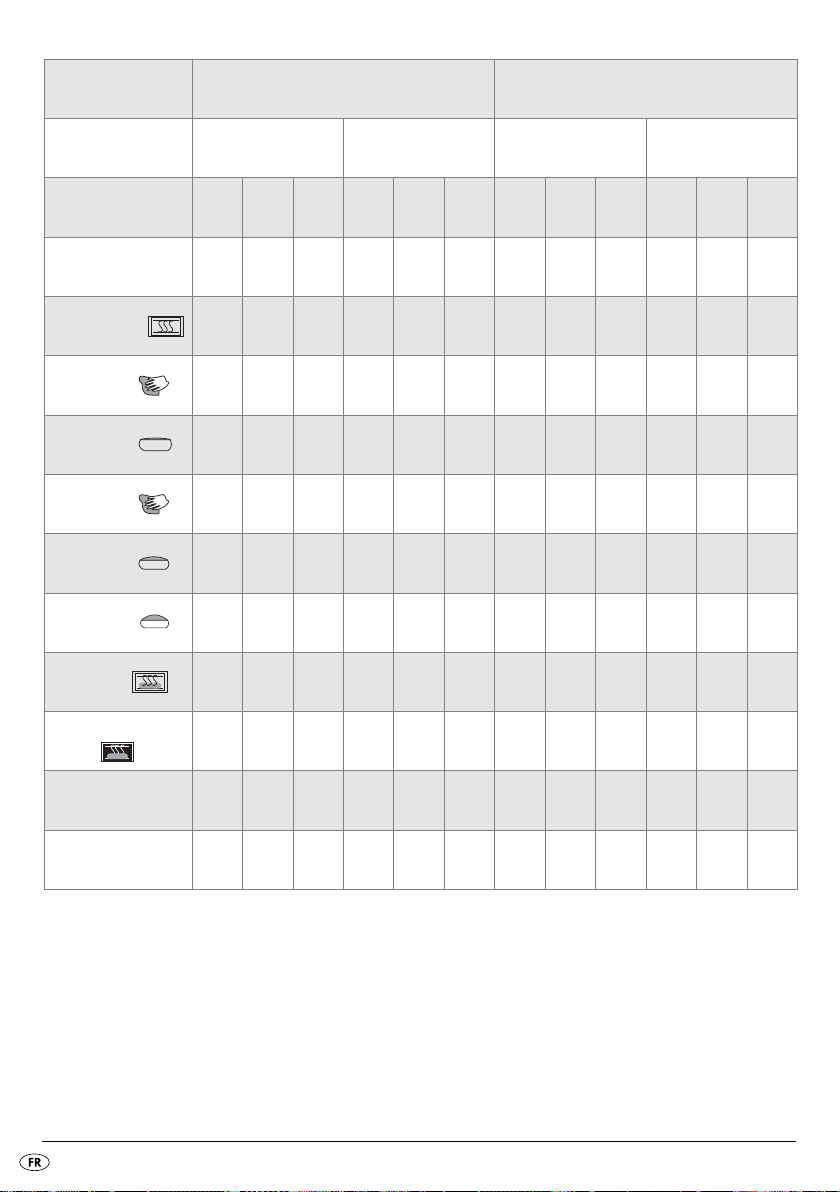
Déroulement des programmes
Programme 1. Normal 2. Léger
Clair
3A*
Moyen
Doré
2
2
2
5A
5
5A
5
5
1A
Vite
2
2
2
2A
5
2A
5
5
Degré de dorage
Taille 750 g 1000 g 1250 g 750 g 1000 g 1250 g 750 g 1000 g 1250 g 750 g 1000 g 1250 g
Durée (heures) 2:58 3:05 3:15 2:14 2:20 2:25 3:13 3:18 3:25 2:18 2:25 2:30
Préchauffer (min) 15 15 20 N/A N/A N/A 10 10 15 N/A N/A N/A
Pétrir 1 (min) 12 13 13 12 13 13 12 12 15 12 13 13
Lever 1 (min) 25 25 25 10 10 10 20 20 20 10 10 10
Pétrir 2 (min)
Lever 2 (min) 30 30 30 18 18 18 43 41 35 18 18 18
Lever 3 (min) 30 30 30 30 30 30 35 35 35 30 30 30
Cuire (min) 56 60 65 56 60 65 60 65 70 60 65 70
3A*
Clair
Moyen
Doré
2
2
2
5A
8
5A
8
8
1A
Vite
2
2
2
2A
5
2A
5
5
Garder au chaud (min)
Ajout d'ingrédients
(durée restante en heures)
Affichage horaire 15h 15h 15h 15h 15h 15h 15h 15h 15h 15h 15h 15h
60 60 60 60 60 60 60 60 60 60 60 60
2:01 2:05 2:10 1:49 1:53 1:58 2:26 2:29 2:28 1:53 1:58 2:03
* 3A signifie que la machine à pain pétrit pendant 3 minutes et que le signal sonore pour l'ajout des ingrédients retentit en même temps que l'affichage de „ADD“ apparaît sur l'écran.
- 13 -
Page 16
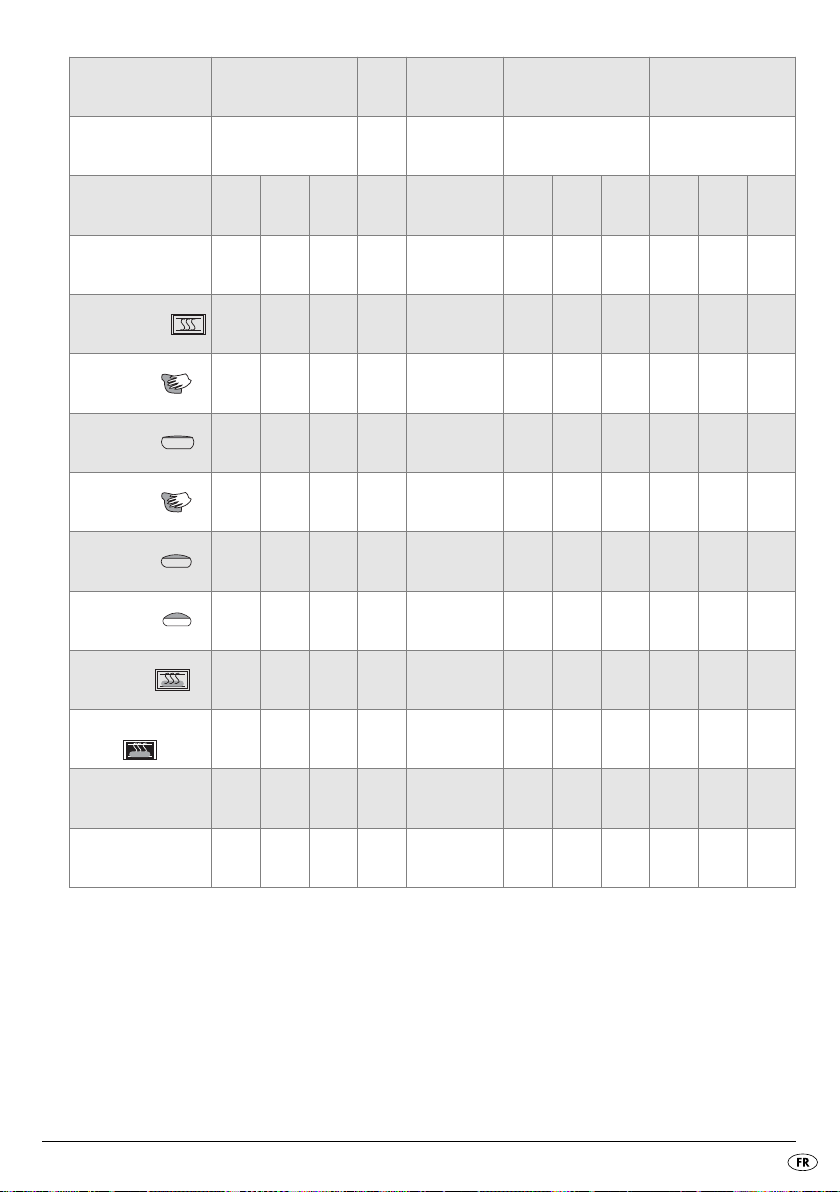
Programme 3. Pain complet 4. Sucré
Clair
3A
Moyen
Doré
2
2
2
5A
8
5A
8
8
2A
Vite
2
2
2
2A
5
2A
5
5
Degré de dorage
Taille 750 g 1000 g 1250 g 750 g 1000 g 1250 g 750 g 1000 g 1250 g 750 g 1000 g 1250 g
Durée (heures) 3:18 3:25 3:35 2:24 2:30 2:35 2:56 3:01 3:10 2:10 2:16 2:20
Préchauffer (min) 15 15 20 N/A N/A N/A 10 10 15 N/A N/A N/A
Pétrir 1 (min) 11 12 12 11 13 13 12 12 12 11 12 12
Lever 1 (min) 30 30 30 10 10 10 25 25 25 10 10 10
Pétrir 2 (min)
Lever 2 (min) 38 38 38 23 23 23 35 35 35 18 18 18
Lever 3 (min) 35 35 35 35 35 35 30 30 30 30 30 30
Cuire (min) 56 60 65 56 60 65 52 56 60 52 56 60
4A*
Clair
Moyen
Doré
2
2
2
5A
6
5A
6
6
1A
Vite
2
2
2
2A
6
2A
6
6
Garder au chaud (min)
Ajout d'ingrédients
(durée restante en heures)
Affichage horaire 15h 15h 15h 15h 15h 15h 15h 15h 15h 15h 15h 15h
60 60 60 60 60 60 60 60 60 60 60 60
2:17 2:21 2:26 1:59 2:03 2:08 2:03 2:07 2:11 1:46 1:50 1:54
* 4A signifie que la machine à pain pétrit pendant 4 minutes et que le signal sonore pour l'ajout des ingrédients retentit en même temps que l'affichage de „ADD“ apparaît sur l'écran
- 14 -
Page 17
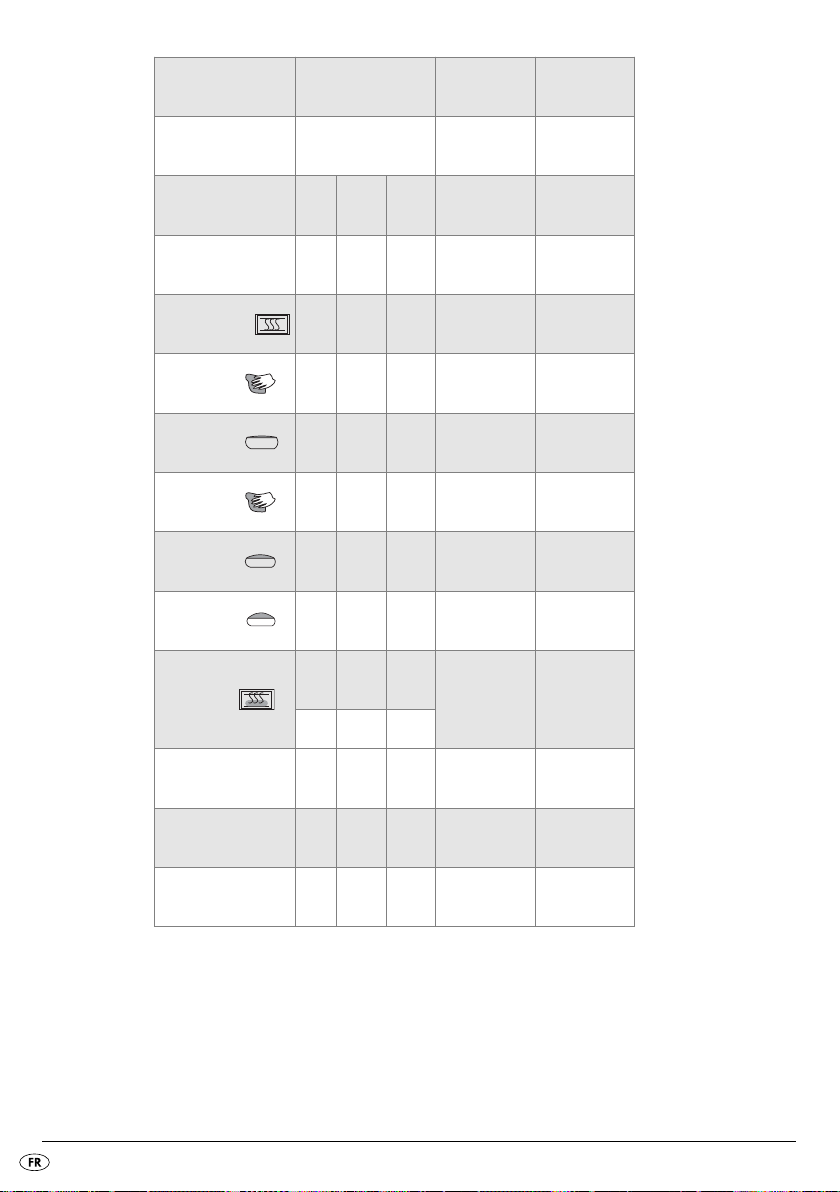
Programme 5. Express 6. Pâte 7. Pâte à pâtes 8. Pain au petit-lait 9. Sans gluten
Clair
N/A
2A
5
Moyen
Doré
N/A
2A
5
N/A
2A
5
N/A N/A
N/A
3A
5
N/A
N/A
N/A
Degré de dorage
Taille 750 g 1000 g 1250 g N/A N/A 750 g 1000 g 1250 g 750 g 1000 g 1250 g
Durée (heures) 1:15 1:18 1:20 1:50 0:15 3:17 3:21 3:30 3:40 3:45 3:55
Préchauffer (min) N/A N/A N/A 10 N/A 25 25 30 15 15 20
Pétrir 1 (min) 8 8 8 12 15 10 10 10 12 12 12
Lever 1 (min) N/A N/A N/A 10 N/A 20 20 20 20 20 20
Pétrir 2 (min)
Lever 2 (min) N/A N/A N/A 25 N/A 45 45 45 50 50 50
Lever 3 (min) 20 20 20 45 N/A 30 30 30 50 50 50
Cuire (min) 40 43 45 N/A N/A 52 56 60 60 65 70
5A*
Clair
Moyen
Doré
2
2
2
5A
8
5A
8
8
3A
Clair
Moyen
Doré
2
2
3A
8
3A
8
2
8
Garder au chaud (min)
Ajout d'ingrédients
(durée restante en heures)
Affichage horaire 15h 15h 15h 15h 15h 15h 15h 15h 15h 15h 15h
60 60 60 N/A N/A 60 60 60 60 60 60
1:05 1:08 1:10 1:15 N/A 2:15 2:19 2:23 2:48 2:53 2:58
* 5A signifie que la machine à pain pétrit pendant 5 minutes et que le signal sonore pour l'adjonction des
ingrédients retentit en même temps que l'affichage de „ADD“ apparaît sur l'écran.
- 15 -
Page 18
Programme 10. Gâteau 11. Confiture 12. Cuire
Clair
Degré de dorage
Taille 750 g 1000 g 1250 g N/A N/A
Durée (heures) 1:30 1:35 1:40 1:20 1:00
Préchauffer (min) N/A N/A N/A N/A N/A
Pétrir 1 (min) 15 15 15 N/A N/A
Lever 1 (min) N/A N/A N/A
Pétrir 2 (min)
Lever 2 (min) N/A N/A N/A N/A N/A
Lever 3 (min) N/A N/A N/A
Cuire (min)
Ajout d'ingrédients
(durée restante en heures)
Moyen
Doré
N/A
N/A
N/A
N/A
N/A
N/A
N/A
N/A
N/A
60 65 70
15
Lever15Lever15Lever
60 60 60 N/A 60
N/A
15
Chaleur + pétrir
N/A
N/A
N/A
45
Chaleur + pétrir
20
Lever
Clair
Moyen
Doré
N/A
N/A
N/A
N/A
N/A
60
Affichage horaire N/A N/A N/A N/A N/A
Affichage horaire 15h 15h 15h N/A 15h
- 16 -
Page 19

Dépannage de la machine à pain
Que faire si le couteau de pétrissage reste coincé
dans le moule de cuisson après la cuisson ?
Que se passe-t-il si le pain cuit reste dans la machine à
pain ?
Le moule de cuisson et les pétrins peuvent-ils être
lavés dans le lave-vaisselle ?
Pourquoi la pâte n'est-elle pas pétrie bien que le moteur
tourne ?
Que faire si le couteau de pétrissage reste coincé
dans le pain ?
Que se passe-t-il lors d'une coupure de courant pendant
un programme ?
Combien de temps dure la cuisson du pain ? Veuillez consulter les durées exactes dans le tableau
Versez de l'eau dans le moule de cuisson et faites tourner le couteau de pétrissage pour décoller les croûtes
formées en dessous.
Grâce à la fonction "Garder au chaud", le pain est maintenu au chaud pendant env. 1 heure, tout en étant protégé
de l'humidité. Si le pain devait rester plus d'une heure dans
la machine à pain, il risque de s'humidifier.
Non. Veuillez laver le moule de cuisson et les pétrins
à la main.
Assurez-vous que les pétrins et le moule de cuisson
sont bien insérés.
Retirez le couteau de pétrissage avec l' outil .
Dans le cas d'une panne de courant de 10 minutes maximum, la machine à pain va poursuivre le programme exécuté en dernier.
"Déroulement des programmes".
Quels poids de pain puis-je cuire ? Vous pouvez cuire des pains de 750 g - 1000 g - 1250 g .
Pourquoi la fonction de minuterie ne peut-elle pas être utilisée lors de la cuisson avec du lait frais ?
Que s'est-il passé lorsque la machine ne fonctionne pas,
alors que l'on a appuyé sur la touche Marche/Arrêt ?
L'appareil réduit en morceaux les raisins secs ajoutés. Pour éviter la réduction en morceaux des ingrédients
Des produits frais comme le lait ou les œufs s'avarient s'ils
restent trop longtemps dans l'appareil.
Certaines étapes sont difficiles à reconnaître, comme par
ex. "Préchauffer" ou "Reposer". A l'aide du tableau
"Déroulement des programmes", vérifiez quel étape du programme est en cours.
Veuillez vérifier si l'appareil travaille en contrôlant si la
lame témoin fonctionne.
Vérifiez que vous avez bien appuyé sur la touche
Marche/Arrêt .
Vérifiez que la fiche secteur est bien branché sur l'alimentation électrique.
comme des fruits ou des noix, ajoutez ces derniers uniquement après le retentissement du signal sonore.
- 17 -
Page 20

- 18 -
Page 21

Car
te de commande SBB 850 EDS A1
Quantité
(max. 3 sets par commande)
Description des articles Prix unitaire Prix net
1 forme de cuisson
avec 2 fouets à
pétrir
10 €
€
4 fouets à pétrir
10 €
€
www.kompernass.com
(Lieu, date)
(Signature)
Mode de règlement
Virement
7,50 €
€
Frais de port, magasinage,
emballage et expédition non inclus.
+
=
Page 22

Car
te de commande - Pour commander :
1.
Saisissez v
o
tr
e nom, v
o
tr
e titr
e et v
o
tr
e numér
o de téléphone (pour d'é
v
entuelles
questions) sous la r
u
br
ique "Expéditeur/Commandé par" en lettr
es majuscules.
2.
V
i
r
ement :
Mer
ci de vir
er le montant total au
pr
éalable sur le compte suiv
ant
K
o
m
pernaß Handelsg
esellsc
haf
t mbH
IB
AN : DE03440100460799566462
SWIFT (BIC) : PBNKDEFF 440
Banq
ue : P
o
s
tbank Dor
tmund A
G
Dans le champ "Motif de l'opér
ation", v
euillez indi-
quer l'ar
ticle de même que v
o
tr
e nom et lieu de
r
ésidence. V
euillez nous r
e
n
v
o
y
er la car
te de com-
mande dûment r
enseignée dans une en
v
eloppe à
notr
e adr
esse postale f
igur
ant ci-apr
ès.
Notr
e adr
esse postale :
K
o
m
pernaß Handelsg
esellsc
haf
t mbH
Bur
gs
trasse 21
44867 Boc
hum
Allemagne
Im
por
t
ant :
• Veuillez affranchir au tarif en vigueur
•
Ecr
iv
ez v
o
tr
e nom comme e
xpéditeur sur
l'en
v
eloppe
www.kompernass.com
Expéditeur/Acheteur
(à compléter en majuscules)
Nom, Prénom
Rue
Code Postal, Ville
Téléphone
Simplif
iez-vous la vie
en commandant sur Internet
www.kompernass.com
Information importante :
Si vous payez par virement bancaire, cochez le champ “shared” (frais
partagés) sur le formulaire de virement sous le point Frais. Sinon, nous
ne pourrons pas traiter votre commande.
Pays
Page 23

Inhaltsverzeichnis Seite
Einführung 22
Bestimmungsgemäßer Gebrauch 22
Lieferumfang 22
Gerätebeschreibung 22
Technische Daten 22
Sicherheitshinweise 22
Vor dem ersten Gebrauch 24
Eigenschaften 25
Bedienfeld 25
Programme 26
Timer-Funktion 28
Vor dem Backen 28
Brot backen 29
Fehlermeldungen 31
Reinigung und Pflege 31
Entsorgung 32
Garantie und Service 32
Importeur 32
Programmablauf 33
Fehlerbehebung Brotbackautomat 37
Lesen Sie die Bedienungsanleitung vor der ersten Verwendung aufmerksam durch und heben Sie diese für
den späteren Gebrauch auf. Händigen Sie bei Weitergabe des Gerätes an Dritte auch die Anleitung aus.
- 21 -
Page 24

Brotbackautomat
Gerätebeschreibung
Einführung
Herzlichen Glückwunsch zum Kauf Ihres neuen
Gerätes.
Sie haben sich damit für ein hochwertiges Produkt
entschieden. Die Bedienungsanleitung ist Bestandteil dieses Produkts. Sie enthält wichtige Hinweise
für Sicherheit, Gebrauch und Entsorgung. Machen
Sie sich vor der Benutzung des Produkts mit allen
Bedien- und Sicherheitshinweisen vertraut. Benutzen
Sie das Produkt nur wie beschrieben und für die angegebenen Einsatzbereiche. Händigen Sie alle
Unterlagen bei Weitergabe des Produkts an Dritte
mit aus.
Bestimmungsgemäßer
Gebrauch
Benutzen Sie Ihren Brotbackautomaten nur zum
Brotbacken und zur Herstellung von
Marmeladen/Konfitüren im häuslichen Bereich.
Verwenden Sie das Gerät nicht zum Trocknen von
Lebensmitteln oder Gegenständen. Verwenden Sie
den Brotbackautomat nicht im Freien.
Verwenden Sie nur vom Hersteller empfohlenes
Zubehör. Nicht empfohlenes Zubehör kann das
Gerät beschädigen.
Dieses Gerät ist ausschließlich für die Benutzung in
privaten Haushalten bestimmt.
Benutzen Sie das Gerät nicht gewerblich!
Lieferumfang
Brotbackautomat
Backform
2 Knethaken
Messbecher
Messlöffel
Bedienungsanleitung
Kurzinformation
Rezeptheft
Abbildung A:
Sichtfenster
Gerätedeckel
Belüftungsschlitze
Netzkabel
Bedienfeld
Abbildung B:
2 Knethaken
Backform bis zu 1250 g Brotgewicht
Messbecher
Messlöffel
Knethakenentferner
Technische Daten
Modell: Brotbackautomat
SBB 850 EDS A1
Nennspannung: 220-240 V ~ / 50 Hz
Leistungsaufnahme: 850 Watt
Sicherheitshinweise
• Lesen Sie bitte die Bedienungsanleitung erst
vollständig durch, bevor Sie das Gerät
benutzen!
• Erstickungsgefahr! Kinder ersticken bei unsach-
gemäßem Gebrauch des
Verpackungsmaterials. Entsorgen Sie dieses
sofort nach dem Auspacken oder bewahren
Sie es für Kinder unzugänglich auf.
• Kontrollieren Sie den Brotbackautomaten nach
dem Auspacken auf Transportschäden.
Wenden Sie sich gegebenenfalls an Ihren
Lieferanten.
• Stellen Sie das Gerät auf eine trockene, ebene
und hitzeunempfindliche Oberfläche.
- 22 -
Page 25

• Stellen Sie das Gerät nicht in der Nähe von
brennbaren Materialien, explosiven und/oder
brennbaren Gasen auf. Zu anderen
Gegenständen muss ein Mindestabstand von
10 cm eingehalten werden.
• Achten Sie darauf, dass die Lüftungsschlitze
des Gerätes nicht verdeckt werden. Überhitzungsgefahr!
• Überprüfen Sie vor dem Anschluss, ob
Stromart und Netzspannung mit den Angaben
auf dem Typenschild übereinstimmen.
• Verlegen Sie das Netzkabel nicht über scharfe
Kanten oder in der Nähe von heißen Flächen
oder Gegenständen. Die Isolierung des Kabels
kann beschädigt werden.
• Lassen Sie das Gerät während des Betriebes
nie unbeaufsichtigt!
• Um Stolper- oder Unfallgefahren zu vermeiden, ist das Gerät mit einem kurzen Netzkabel
ausgestattet.
• Das Gerät nur innerhalb von Gebäuden
benutzen.
• Das Gerät nie auf oder neben einen Gasoder Elektroherd, einen heißen Backofen oder
sonstigen Hitzequellen stellen. Überhitzungsgefahr!
• Decken Sie das Gerät niemals mit einem
Handtuch oder anderen Materialien ab. Hitze
und Dampf müssen entweichen können. Ein
Brand kann entstehen, wenn das Gerät mit
brennbarem Material abgedeckt wird oder in
Kontakt kommt, wie z. B. mit Vorhängen.
• Wenn Sie ein Verlängerungskabel verwenden,
muss die maximal zulässige Leistung des Kabels
der Leistung des Brotbackautomaten entsprechen.
• Verlegen Sie ein Verlängerungskabel so, dass
niemand darüber stolpern und unbeabsichtigt
daran ziehen kann.
• Überprüfen Sie vor jedem Gebrauch
Netzkabel und -stecker. Wenn das Netzkabel
dieses Gerätes beschädigt wird, muss es durch
den Hersteller, seinen Kundendienst oder eine
ähnlich qualifizierte Person ersetzt werden, um
Gefährdungen zu vermeiden.
• Die Verwendung von nicht vom Hersteller empfohlenem Zubehör kann zu Beschädigungen
führen. Das Gerät nur für den vorgesehenen
Zweck verwenden. Ansonsten erlischt der
Garantieanspruch.
• Starten Sie ein Backprogramm nur mit eingesetzter Backform. Ansonsten kann es zu irreparablen Schäden am Gerät führen.
• Wenn Kinder in der Nähe sind, bitte das
Gerät gut beaufsichtigen! Wenn das Gerät
nicht benutzt wird, wie auch vor dem Reinigen,
bitte den Netzstecker ziehen. Vor dem
Abnehmen einzelner Teile das Gerät auskühlen lassen.
• Dieses Gerät ist nicht dafür bestimmt, durch
Personen (einschließlich Kinder) mit eingeschränkten physischen, sensorischen oder geistigen Fähigkeiten oder mangels Erfahrung
und/oder mangels Wissen benutzt zu werden,
es sei denn, sie werden durch eine für ihre
Sicherheit zuständige Person beaufsichtigt
oder erhielten von ihr Anweisungen, wie das
Gerät zu benutzen ist. Kinder sollten beaufsichtigt werden, um sicherzustellen, dass sie
nicht mit dem Gerät spielen.
• Dieses Gerät entspricht den einschlägigen
Sicherheitsbestimmungen. Überprüfung,
Reparatur und technische Wartung dürfen nur
von einem qualifizierten Fachhändler durchgeführt werden. Ansonsten erlischt der
Garantieanspruch.
• Stellen Sie keine Gegenstände auf das Gerät
und bedecken Sie es nicht. Brandgefahr!
• Vorsicht! Der Brotbackautomat wird heiß.
Fassen Sie das Gerät erst an, wenn es sich
abgekühlt hat, oder benutzen Sie zum
Anfassen einen Topflappen.
• Lassen Sie das Gerät abkühlen und ziehen Sie
den Netzstecker, bevor Sie Teile des Zubehörs
herausnehmen oder einsetzen.
• Versetzen Sie den Brotbackautomaten nicht,
wenn sich heißer oder flüssiger Inhalt, z.B.
Konfitüre, in der Backform befindet. Es besteht
Verbrennungsgefahr!
- 23 -
Page 26

• Kommen Sie nie während der Benutzung mit
den rotierenden Knethaken in Berührung. Es
besteht Verletzungsgefahr!
• Ziehen Sie den Stecker nicht am Netzkabel
aus der Steckdose.
• Ziehen Sie den Netzstecker bei
Nichtgebrauch und vor jeder Reinigung des
Gerätes aus der Steckdose.
• Benutzen Sie den Brotbackautomaten nicht, um
darin Speisen oder Utensilien aufzubewahren.
• Legen Sie nie Alufolie oder andere metallische
Gegenstände in den Brotbackautomaten. Dies
kann zu einem Kurzschluss führen. Es besteht
Brandgefahr!
• Tauchen Sie den Brotbackautomaten nicht in
Wasser oder andere Flüssigkeiten. Es besteht
Stromschlaggefahr!
• Reinigen Sie das Gerät nicht mit kratzenden
Putzschwämmen.
Wenn sich Partikel des Schwammes lösen und
mit elektrischen Teilen in Berührung kommen,
besteht Stromschlaggefahr.
• Benutzen Sie keine externe Zeitschaltuhr oder
ein separates Fernwirksystem um das Gerät zu
betreiben.
• Benutzen Sie das Gerät nie mit leerer oder
ohne Backform. Das führt zu irreparablen
Schäden am Gerät.
• Schließen Sie immer den Deckel während des
Betriebs.
• Entfernen Sie nie die Backform während des
Betriebs.
• Überschreiten Sie beim Backen niemals die
Menge von 700 g Mehl und geben Sie
niemals mehr als 1
dazu. Der Teig kann überlaufen und einen
Brand verursachen!
• Während des Betriebs kann die Temperatur
der berührbaren Oberfläche sehr hoch sein.
Verbrennungsgefahr!
Achtung! Heiße Oberfläche!
Teile des Gerätes werden während des
Betriebes sehr heiß! Verbrennungsgefahr!
1
/4Päckchen Trockenhefe
Vor dem ersten Gebrauch
Entsorgung des Verpackungsmaterials
Packen Sie Ihr Gerät aus und entsorgen Sie das
Verpackungsmaterial gemäß den Vorschriften an
Ihrem Wohnort.
Erste Reinigung
Wischen Sie Backform , Knethaken und
Außenfläche des Brotbackautomaten vor der
Inbetriebnahme mit einem sauberen, feuchten Tuch
ab. Verwenden Sie keine kratzenden
Putzschwämme oder Scheuermittel. Entfernen Sie
die Schutzfolie auf dem Bedienfeld .
Aufheizen:
Bitte beachten Sie folgenden Hinweis zur
ersten Inbetriebnahme:
Setzen Sie ausschließlich beim erstmaligen
Aufheizen die leere Backform in das Gerät ein.
Schließen Sie den Gerätedeckel . Wählen Sie
das Programm 12, wie im Kapitel „PROGRAMME“
beschrieben und drücken Sie Start/Stop , um
das Gerät für 5 Minuten aufzuheizen. Drücken Sie
nach 5 Minuten die Taste Start/Stop , bis ein
langer Signalton ertönt, um das Programm zu beenden.
Da die Heizelemente leicht eingefettet sind, kann es
bei der ersten Inbetriebnahme zu leichter
Geruchsbildung kommen. Diese ist unschädlich und
hört nach kurzer Zeit auf. Sorgen Sie für ausreichende Belüftung, öffnen Sie zum Beispiel ein
Fenster.
Lassen Sie das Gerät vollständig abkühlen und
wischen Sie noch einmal Backform , Knethaken
und Außenfläche des Brotbackautomaten mit
einem sauberen, feuchten Tuch ab.
Brandgefahr! Lassen Sie den
Brotbackautomaten nicht länger als 5 Minuten
mit leerer Backform aufheizen. Es besteht
die Gefahr der Überhitzung.
- 24 -
Page 27

Eigenschaften
Display
Mit dem Brotbackautomat haben Sie die
Möglichkeit Brot nach Ihrem Geschmack zu backen.
• Sie können zwischen 12 verschiedenen
Programmen wählen.
• Sie können fertige Backmischungen verarbeiten.
• Sie können Nudel- oder Brötchenteig kneten
lassen und Marmelade herstellen.
• Durch das Programm “Glutenfrei” können Sie
glutenfreie Backmischungen und Rezepte mit
glutenfreien Mehlen, wie z.B. Maismehl,
Buchweizenmehl und Kartoffelmehl, backen.
Bedienfeld
Anzeige für
die Auswahl des Gewichts
(750 g, 1000 g, 1250 g)
die noch verbleibende Betriebszeit in Stunden
und die programmierte Zeitvorwahl
den gewählten Bräunungsgrad (Hell ,
Mittel , Dunkel , Schnell )
die gewählte Programm-Nummer
den Programmablauf
das Zugeben von Zutaten („ADD“)
Start / Stop
Zum Starten und Beenden des Betriebes oder um
eine Timer-Programmierung zu löschen.
Um den Betrieb anzuhalten, drücken Sie kurz die
Start/Stop-Taste , bis ein Signalton ertönt und die
Zeit im Display blinkt. Durch erneutes Drücken
der Start/Stop-Taste kann der Betrieb innerhalb
von 10 Minuten wieder fortgesetzt werden. Wenn
Sie vergessen, das Programm fortzusetzen, wird
das Programm nach 10 Minuten automatisch fortgesetzt.
Um den Betrieb vollständig zu beenden oder die
Einstellungen zu löschen, drücken Sie für
3 Sekunden die Start/Stop-Taste , bis ein langer
Signalton ertönt.
Hinweis:
Drücken Sie nicht die Start/Stop-Taste , wenn Sie
lediglich den Zustand des Brotes kontrollieren
wollen. Beobachten Sie den Backvorgang durch
das Sichtfenster.
Achtung!
Beim Drücken aller Tasten muss ein Signalton ertönen, ausgenommen, während das Gerät in Betrieb
ist.
- 25 -
Page 28

Bräunungsgrad (oder Schnellmodus)
Wahl des Bräunungsgrades oder wechseln in den
Schnellmodus (Hell/Mittel/Dunkel/Schnell).
Drücken Sie wiederholt die Taste Bräunungsgrad
, bis der Pfeil über dem gewünschten
Bräunungsgrad erscheint. Für die Programme 1 - 4
können Sie durch mehrmaliges Drücken der Taste
Bräunungsgrad den Schnellmodus aktivieren,
um den Backvorgang zu verkürzen. Drücken Sie
die Taste Bräunungsgrad so oft, bis der Pfeil
über „Schnell“ erscheint. Bei den Programmen 6, 7
und 11 kann kein Bräunungsgrad gewählt werden.
Programmwahl (Menü)
Aufrufen des gewünschten Backprogramms (1-12).
Im Display erscheint die Programm-Nummer und
die entsprechende Backzeit.
Memory Funktion
Das Programm wird beim Wiedereinschalten nach
einem Stromausfall von bis zu ca. 10 Minuten an
gleicher Stelle fortgesetzt. Dies gilt jedoch nicht bei
Löschen/Beenden des Backvorgangs oder bei
Betätigung der Start/Stop-Taste bis ein langer
Signalton ertönt.
Timer
Zeitverzögertes Backen.
▼▲
Hinweis:
Bei Programm 11 können Sie kein zeitverzögertes
Backen einstellen.
Betriebsindikationslampe
Die Betriebsindikationslampe zeigt mit ihrem
Leuchten an, dass grade ein Programm läuft. Wenn Sie
ein Programm mit der Timer-Funktion zeitverzögert starten wollen, leuchtet die Betriebsindikationslampe
erst, wenn das Programm gestartet ist, und nicht, wenn
der Timer aktiviert ist.
Brotgewicht
Wahl des Brotgewichtes (750 g / 1000 g / 1250 g).
Drücken Sie diese Taste wiederholt, bis der Pfeil
unter dem gewünschtem Gewicht erscheint. Die
Gewichtsangaben (750 g / 1000 g / 1250 g)
beziehen sich auf die Menge der eingefüllten
Zutaten in die Backform .
Hinweis:
Die Voreinstellung beim Einschalten des Gerätes ist
1250 g. Bei den Programmen 6, 7, 11 und 12
können Sie das Brotgewicht nicht einstellen.
Sichtfenster
Durch das Sichtfenster können Sie den
Backvorgang beobachten.
Programme
Mit der Taste Programmwahl wählen Sie das
gewünschte Programm aus. Die entsprechende
Programm-Nummer wird im Display angezeigt.
Die Backzeiten sind abhängig von den gewählten
Programmkombinationen. Siehe Kapitel
„Programmablauf“.
Programm 1: Normal
Für Weiß- und Mischbrote die hauptsächlich aus
Weizen- oder Roggenmehl bestehen. Das Brot hat
eine kompakte Konsistenz. Die Bräunung des Brotes
stellen Sie mit der Taste Bräunungsgrad ein.
Programm 2: Locker
Für leichte Brote aus gut gemahlenem Mehl. Das
Brot ist in der Regel locker und hat eine knusprige
Kruste.
Programm 3: Vollkorn
Für Brote mit kräftigeren Mehlsorten, z. B.
Weizenvollkornmehl und Roggenmehl. Das Brot
wird kompakter und schwerer.
- 26 -
Page 29

Programm 4: Süß
Für Brote mit Zutaten aus Fruchtsäften,
Kokosnussflocken, Rosinen, Trockenfrüchten,
Schokolade oder zusätzlichem Zucker. Durch eine
längere Aufgehphase wird das Brot leichter und
luftiger.
Programm 5: Express
Für das Kneten, Teig gehen lassen und das Backen
wird weniger Zeit benötigt. Für dieses Programm
sind jedoch nur Rezepte geeignet, die keine schweren Zutaten oder kräftige Mehlsorten enthalten.
Beachten Sie, dass das Brot bei diesem Programm
weniger luftig und nicht ganz so schmackhaft werden kann.
Programm 6: Teig (kneten)
Zur Herstellung von Hefeteig für Brötchen, Pizza
oder Zöpfe. Der Backvorgang entfällt bei diesem
Programm.
Programm 7: Nudelteig
Für die Zubereitung von Nudelteig. Der
Backvorgang entfällt bei diesem Programm.
Programm 8: Buttermilchbrot
Für Brote die aus Buttermilch oder Joghurt hergestellt werden.
Programm 9: Glutenfrei
Für Brote aus glutenfreien Mehlen und
Backmischungen. Glutenfreie Mehle benötigen
länger für die Aufnahme von Flüssigkeiten und
haben andere Triebeigenschaften.
Programm 10: Kuchen
Die Zutaten werden bei diesem Programm geknetet, gehen gelassen und gebacken. Benutzen Sie
Backpulver für dieses Programm.
Programm 11: Marmelade
Zum Herstellen von Marmeladen, Konfitüren,
Gelees und Fruchtaufstrichen.
Programm 12: Backen
Zum Nachbacken von Broten, die zu hell oder
nicht ganz durch gebacken sind oder Fertigteige.
Alle Knet- oder Ruhevorgänge entfallen bei diesem
Programm. Das Brot wird bis zu einer Stunde nach
Ende des Backvorgangs warm gehalten. Dadurch
wird verhindert, dass das Brot zu feucht wird.
Das Programm 12 backt das Brot für 60 Minuten.
Um diese Funktionen vorzeitig zu beenden,
drücken Sie die Start/Stop-Taste , bis ein langer
Signalton ertönt. Um das Gerät auszuschalten, trennen Sie das Gerät vom Stromnetz.
Hinweis:
Bei den Programmen 1, 2, 3, 4, 5, 6, 8 und 9
ertönt während des Programmablaufs ein Signalton
und „ADD“ erscheint im Display.
Fügen Sie unmittelbar danach weitere Zutaten, wie
Früchte oder Nüsse hinzu.
Die Zutaten werden durch den Knethaken nicht
zerkleinert.
Wenn Sie den Timer eingestellt haben, können Sie
sämtliche Zutaten auch zu Programmbeginn in die
Backform geben. Früchte und Nüsse sollten Sie
in diesem Fall vor der Zugabe etwas zerkleinern.
- 27 -
Page 30

Timer-Funktion
Die Timer-Funktion ermöglicht Ihnen ein zeitverzögertes Backen.
Mit den Pfeiltasten
gewünschten Endzeitpunkt des Backvorgangs ein.
Die maximale Zeitverzögerung beträgt 15 Stunden.
▲ und ▼ stellen Sie den
Beispiel:
Es ist 8.00 Uhr und Sie möchten in 7 Stunden und 30
Minuten, also um 15:30 Uhr, frisches Brot haben.
Wählen Sie zunächst das Programm 1 und
drücken Sie dann die Pfeiltasten so lange, bis im
Display 7:30 erscheint, da die Zeit bis zur
Fertigstellung 7 Stunden und 30 Minuten beträgt.
Warnung! Bevor Sie ein bestimmtes Brot mit
der Timerfunktion backen wollen, probieren
Sie das Rezept erst aus, um sicherzustellen,
dass das Verhältnis der Zutaten zueinander
stimmt, der Teig nicht zu fest oder zu dünn ist
oder die Menge zu groß ist und dann evtl.
überläuft. Brandgefahr!
Wählen Sie ein Programm. Das Display zeigt
Ihnen die benötigte Backdauer.
Mit der Pfeiltaste
des Programmes. Beim erstmaligen Betätigen verschiebt sich die Endzeit bis zum nächsten Zehner.
Jedes weitere Drücken der Pfeiltaste
schiebt die Endzeit um 10 Minuten. Bei gedrückter
Pfeiltaste beschleunigen Sie diesen Vorgang. Das
Display zeigt Ihnen die Gesamtdauer von Backzeit
und Verzögerungszeit.
Bei einer Überschreitung der möglichen
Zeitverschiebung können Sie mit der Pfeiltaste
die Zeit korrigieren.
Bestätigen Sie die Einstellung des Timers mit der
Start/Stop-Taste .
Der Doppelpunkt im Display blinkt und die
programmierte Zeit beginnt abzulaufen.
Sobald das Programm startet, leuchtet die
Betriebsindikationslampe .
Bei Beendigung des Backvorgangs ertönen zehn
Signaltöne und das Display zeigt 0:00 an.
▲ verschieben Sie das Ende
▲ ver-
▼
Hinweis:
Bei dem Programm „Marmelade“ steht die TimerFunktion nicht zur Verfügung.
Hinweis:
Verwenden Sie die Timer-Funktion nicht, wenn Sie
schnell verderbliche Lebensmittel wie Eier, Milch,
Sahne oder Käse verarbeiten.
Vor dem Backen
Für einen erfolgreichen Backvorgang berücksichtigen Sie bitte folgende Faktoren:
Zutaten
Hinweis:
Nehmen Sie die Backform aus dem Gehäuse,
bevor Sie die Zutaten einfüllen. Wenn Zutaten in
den Backraum gelangen, kann durch die Erhitzung
der Heizschlangen ein Brand entstehen.
• Geben Sie die Zutaten immer in der angegebenen Reihenfolge in die Backform .
• Alle Zutaten sollten auf Zimmertemperatur
erwärmt sein, um einen optimalen Gärvorgang
der Hefe zu erhalten.
• Achten Sie auf ein genaues Abmessen der der
Zutatenmengen. Bereits geringe
Abweichungen von der im Rezept angegebenen Menge können das Backergebnis
beeinflussen.
- 28 -
Page 31

Hinweis:
Verwenden Sie auf keinen Fall größere Mengen als
angegeben. Zu viel Teig kann über die Backform
laufen und an den heißen Heizschlangen einen
Brand verursachen.
9. Wählen Sie den Bräunungsgrad Ihres
Brotes. Im Display zeigt Ihnen der Pfeil, ob
Sie Hell, Mittel oder Dunkel eingestellt haben.
Sie können hier auch die Einstellung „Schnell“
wählen, um die Zeit, in der der Teig geht,
abzukürzen.
Brot backen
Vorbereitung
Beachten Sie die Sicherheitshinweise in dieser
Anleitung.
Stellen Sie den Brotbackautomaten auf einen
geraden und festen Untergrund.
1. Ziehen Sie die Backform aus dem Gerät
nach oben heraus.
2. Stecken Sie die Knethaken auf die
Antriebswellen in der Backform . Achten Sie
darauf, dass sie fest sitzen.
3. Geben Sie die Zutaten Ihres Rezeptes in der
angegebenen Reihenfolge in die Backform .
Geben Sie zuerst die Flüssigkeiten, Zucker,
Salz und dann Mehl hinzu, die Hefe als letzte
Zutat.
Hinweis:
Achten Sie darauf, dass Hefe nicht mit Salz oder
Flüssigkeiten in Berührung kommt.
4. Setzen Sie die Backform wieder ein.
Achten Sie darauf, dass sie richtig einrastet.
5. Schließen Sie den Gerätedeckel .
6. Stecken Sie den Netzstecker in die Steckdose.
Es ertönt ein Signalton und im Display
erscheint die Programm-Nummer und
Zeitdauer für das Programm 1.
7. Wählen Sie Ihr Programm mit der
Programmwahl Taste . Jede Eingabe wird mit
einem Signalton bestätigt.
8. Wählen Sie gegebenenfalls die Größe des
Brotes mit der Taste .
Hinweis:
Für die Programme 6, 7 und 11 ist die Funktion
„Bräunungsgrad” nicht möglich.
Die Funktion „Schnell“ ist nur für die Programme
1-4 möglich.
Für die Programme 6, 7, 11 und 12 ist die
Einstellung des Brotgewichts nicht möglich.
10. Sie haben jetzt die Möglichkeit über die TimerFunktion den Endzeitpunkt Ihres Programms
einzustellen. Sie können eine maximale
Zeitverschiebung von bis zu 15 Stunden eingeben.
Hinweis:
Für das Programm 11 ist diese Funktion nicht möglich.
Programm starten
Starten Sie nun das Programm mit der Start/Stop
Taste .
Hinweis:
Die Programme 1, 2, 3, 4, 6, 8 und 9 starten mit
einer 10- bis 30-minütigen Vorheizphase (außer
Schnell-Modus, siehe Tabelle Programmablauf).
Die Knethaken bewegen sich hierbei nicht. Das
ist kein Fehler des Gerätes.
Das Programm führt automatisch die verschiedenen
Arbeitsgänge durch.
- 29 -
Page 32

Sie können den Programmablauf über das
Sichtfenster Ihres Brotbackautomaten beobachten. Gelegentlich kann es während des
Backvorgangs zur Feuchtigkeitsbildung im
Sichtfenster kommen. Der Gerätedeckel kann
während der Knetphase geöffnet werden.
Hinweis:
Öffnen Sie den Gerätedeckel nicht während der
Geh- oder Backphase. Das Brot kann in sich
zusammenfallen.
Programm beenden
Bei Beendigung des Backvorgangs ertönen zehn
Signaltöne und das Display zeigt 0:00 an.
Bei Beendigung des Programms schaltet das Gerät
automatisch auf einen bis zu 60 Minuten andauernden Warmhaltebetrieb.
Hinweis:
Das gilt nicht für die Programme 6, 7 und 11.
Dabei zirkuliert warme Luft im Gerät. Die
Warmhaltefunktion können Sie vorzeitig beenden,
indem Sie die Start/Stop-Taste bis zum Ertönen
der Signaltöne gedrückt halten.
Warnung!
Ziehen Sie den Netzstecker aus der Steckdose, bevor
Sie den Gerätedeckel öffnen.
Bei Nichtbenutzung sollte das Gerät immer vom
Stromnetz getrennt werden!
Brot entnehmen
Verwenden Sie beim Herausnehmen der Backform
immer Topflappen oder Schutzhandschuhe.
Halten Sie die Backform schräg über einen Rost
und schütteln leicht, bis sich das Brot aus der
Backform löst.
Löst sich das Brot nicht von den Knethaken ,
entfernen Sie vorsichtig die Knethaken mit dem
beiliegenden Knethakenentferner .
Hinweis:
Benutzen Sie keine Metallgegenstände, die zu
Kratzern auf der Antihaftbeschichtung führen
können.
Spülen Sie gleich nach der Brotentnahme die
Backform mit warmem Wasser aus. Sie verhin-
dern ein Festsetzen der Knethaken an der
Antriebswelle.
Tipp: Wenn Sie die Knethaken nach dem letz-
ten Knetvorgang entnehmen, wird das Brot
beim Herausnehmen aus der Backform
nicht aufgerissen.
• Drücken Sie kurz die Start/Stop- Taste , um das
Programm ganz zu Anfang der Backphase zu
unterbrechen oder ziehen Sie den Stecker aus der
Netzsteckdose. Sie müssen den Netzstecker innerhalb von 10 Minuten wieder mit dem Stromnetz
verbinden, damit der Backvorgang anschließend
fortgesetzt werden kann.
• Öffnen Sie den Gerätedeckel und nehmen
Sie die Backform heraus. Mit bemehlten
Händen können Sie den Teig entnehmen und
die Knethaken entfernen.
• Legen Sie den Teig wieder in die Backform .
Setzen Sie die Backform wieder ein und
schließen Sie den Gerätedeckel .
• Stecken Sie ggf. den Netzstecker in die
Steckdose. Das Backprogramm wird fortgesetzt.
Lassen Sie das Brot 15-30 Minuten abkühlen,
bevor Sie es verzehren.
Vergewissern Sie sich vor dem Anschneiden des
Brotes immer, dass sich kein Knethaken im Teig
befindet.
- 30 -
Page 33

Fehlermeldungen
• Wenn das Display „HHH“ anzeigt, nachdem
das Programm gestartet wurde, ist die Temperatur des Brotbackautomaten noch zu hoch. Stoppen Sie das Programm und ziehen Sie den Netzstecker. Öffnen Sie den Gerätedeckel und
lassen Sie das Gerät 20 Minuten abkühlen, bevor Sie es weiter benutzen.
• Wenn sich kein neues Programm starten lässt,
nachdem der Brotbackautomat ein Programm
bereits abgeschlossen hat, ist er noch zu heiß. In
diesem Fall springt die Displayanzeige auf die
Grundeinstellung (Programm 1). Öffnen Sie den
Gerätedeckel und lassen Sie das Gerät 20
Minuten abkühlen, bevor Sie es weiter
benutzen.
Warnung!
Versuchen Sie nicht, das Gerät in Betrieb zu
nehmen, bevor es sich abgekühlt hat. Das funktioniert nur bei dem Programm 12.
Achtung!
Die Geräte- bzw. Zubehörteile sind nicht spülmaschinengeeignet!
Gehäuse, Deckel, Backraum
Entfernen Sie alle Rückstände im Backraum mit
einem feuchten Tuch oder einem leicht angefeuchteten weichen Schwamm. Wischen Sie das Gehäuse
und den Deckel ebenfalls nur mit einem feuchten
Tuch oder Schwamm ab.
• Trocknen Sie den Innenbereich gut ab. Zur
leichten Reinigung kann der Gerätedeckel
vom Gehäuse entfernt werden:
• Öffnen Sie den Gerätedeckel , bis die keil-
förmigen Kunststoffnasen durch die Öffnungen
der Scharnierführungen passen.
• Ziehen Sie den Gerätedeckel aus den
Scharnierführungen heraus.
• Um den Gerätedeckel zu montieren,
führen Sie die Kunststoffnasen durch die
Öffnung der Scharnierführungen.
• Wenn das Display „EE0“, „EE1“ oder “LLL” anzeigt, nachdem das Programm gestartet wurde,
schalten Sie den Brotbackautomaten zunächst
aus und danach wieder ein, indem Sie den Netzstecker aus der Steckdose ziehen und ihn dann
wieder einstecken. Sollte die Fehleranzeige bestehen, wenden Sie sich an den Kundendienst.
Reinigung und Pflege
Warnung!
Ziehen Sie vor jeder Reinigung den Netzstecker
aus der Steckdose und lassen Sie das Gerät ganz
abkühlen.
Schützen Sie das Gerät vor Feuchtigkeit, da dies
einen Stromschlag zur Folge haben kann.
Beachten Sie dazu bitte auch die
Sicherheitshinweise.
Backformen und Knethaken
Die Oberflächen der Backformen und
Knethaken sind mit einer Antihaftbeschichtung
versehen. Benutzen Sie bei der Reinigung keine
aggressiven Reinigungsmittel, Scheuermittel oder
Gegenstände, die zu Kratzern auf den
Oberflächen führen können.
Durch Feuchtigkeit und Dampf kann sich das
Aussehen der Oberflächen im Laufe der Zeit verändern. Dies ist keine Beeinträchtigung der
Funktionsfähigkeit oder Qualitätsminderung.
Nehmen Sie vor der Reinigung die Backformen
und Knethaken aus dem Backraum. Wischen
Sie die Außenseite der Backformen mit einem
feuchten Tuch ab.
- 31 -
Page 34

Achtung!
Tauchen Sie die Backform niemals in Wasser
oder andere Flüssigkeiten.
Reinigen Sie den Innenraum der Backform mit
warmer Spülmittellauge.
Sind die Knethaken verkrustet und schwer
lösbar, füllen Sie die Backform für etwa 30
Minuten mit heißem Wasser.
Ist die Einsatzhalterung im Knethaken verstopft,
können Sie diese vorsichtig mit einem Holzstäbchen
reinigen.
Benutzen Sie zum Reinigen des Brotbackautomaten
keine chemischen Reinigungsmittel oder Verdünner.
Entsorgung
Werfen Sie das Gerät keinesfalls in den
normalen Hausmüll. Dieses Produkt
unterliegt der europäischen Richtlinie
2002/96/EC.
Entsorgen Sie das Gerät über einen zugelassenen
Entsorgungsbetrieb oder über Ihre kommunale
Entsorgungseinrichtung.
Beachten Sie die aktuell geltenden Vorschriften.
Setzen Sie sich im Zweifelsfall mit Ihrer Entsorgungseinrichtung in Verbindung.
Führen Sie alle Verpackungsmaterialien
einer umweltgerechten Entsorgung zu.
Garantie und Service
Sie erhalten auf dieses Gerät 3 Jahre Garantie ab
Kaufdatum. Das Gerät wurde sorgfältig produziert
und vor Anlieferung gewissenhaft geprüft.
Bitte bewahren Sie den Kassenbon als Nachweis
für den Kauf auf. Bitte setzen Sie sich im Garantiefall mit Ihrer Servicestelle telefonisch in Verbindung.
Nur so kann eine kostenlose Einsendung Ihrer Ware
gewährleistet werden.
Die Garantieleistung gilt nur für Material- oder
Fabrikationsfehler, nicht aber für Transportschäden,
Verschleißteile oder für Beschädigungen an zerbrechlichen Teilen, z. B. Schalter oder Akkus. Das
Produkt ist lediglich für den privaten und nicht für
den gewerblichen Gebrauch bestimmt.
Bei missbräuchlicher und unsachgemäßer Behandlung, Gewaltanwendung und bei Eingriffen, die
nicht von unserer autorisierten Service-Niederlassung vorgenommen wurden, erlischt die Garantie.
Ihre gesetzlichen Rechte werden durch diese
Garantie nicht eingeschränkt.
Die Garantiezeit wird durch die Gewährleistung
nicht verlängert. Dies gilt auch für ersetzte und reparierte Teile. Eventuell schon beim Kauf vorhandene
Schäden und Mängel müssen sofort nach dem
Auspacken gemeldet werden, spätestens aber zwei
Tage nach Kaufdatum. Nach Ablauf der Garantiezeit anfallende Reparaturen sind kostenpflichtig.
Service Deutschland
Tel.: 01805 772 033 (0,14 EUR/Min. aus dem dt.
Festnetz, Mobilfunk max. 0,42 EUR/Min.)
E-Mail: kompernass@lidl.de
IAN 73485
Service Österreich
Tel.: 0820 201 222 (0,15 EUR/Min.)
E-Mail: kompernass@lidl.at
IAN 73485
Service Schweiz
Tel.: 0842 665566 (0,08 CHF/Min.,
Mobilfunk max. 0,40 CHF/Min.)
E-Mail: kompernass@lidl.ch
IAN 73485
Importeur
KOMPERNASS GMBH
BURGSTRASSE 21
44867 BOCHUM, GERMANY
www.kompernass.com
- 32 -
Page 35

Programmablauf
Programm 1. Normal 2. Locker
Hell
3A*
Mittel
Dunkel
2
2
2
5A
5
5A
5
5
1A
Schnell
2
2
2
2A
5
2A
5
5
Bräunungsgrad
Größe 750 g 1000 g 1250 g 750 g 1000 g 1250 g 750 g 1000 g 1250 g 750 g 1000 g 1250 g
Zeit (Stunden) 2:58 3:05 3:15 2:14 2:20 2:25 3:13 3:18 3:25 2:18 2:25 2:30
Vorheizen (Min) 15 15 20 N/A N/A N/A 10 10 15 N/A N/A N/A
Kneten 1 (Min) 12 13 13 12 13 13 12 12 15 12 13 13
Gehen 1 (Min) 25 25 25 10 10 10 20 20 20 10 10 10
Kneten 2 (Min)
Gehen 2 (Min) 30 30 30 18 18 18 43 41 35 18 18 18
Gehen 3 (Min) 30 30 30 30 30 30 35 35 35 30 30 30
Backen (Min) 56 60 65 56 60 65 60 65 70 60 65 70
3A*
Hell
Mittel
Dunkel
2
2
2
5A
8
5A
8
8
1A
Schnell
2
2
2
2A
5
2A
5
5
Warmhalten (Min) 60 60 60 60 60 60 60 60 60 60 60 60
Zutaten hinzugeben
(Stunden verbleibend)
Voreinstellung der Zeit 15h 15h 15h 15h 15h 15h 15h 15h 15h 15h 15h 15h
2:01 2:05 2:10 1:49 1:53 1:58 2:26 2:29 2:28 1:53 1:58 2:03
* 3A heißt, dass der Brotbackautomat 3 Minuten knetet und gleichzeitig der Signalton zum Zutaten hinzugeben ertönt und die Displayanzeige „ADD“ erscheint.
- 33 -
Page 36

Programm 3. Vollkorn 4. Süß
Hell
3A
Mittel
Dunkel
2
2
2
5A
8
5A
8
8
2A
Schnell
2
2
2
2A
5
2A
5
5
Bräunungsgrad
Größe 750 g 1000 g 1250 g 750 g 1000 g 1250 g 750 g 1000 g 1250 g 750 g 1000 g 1250 g
Zeit (Stunden) 3:18 3:25 3:35 2:24 2:30 2:35 2:56 3:01 3:10 2:10 2:16 2:20
Vorheizen (Min) 15 15 20 N/A N/A N/A 10 10 15 N/A N/A N/A
Kneten 1 (Min) 11 12 12 11 13 13 12 12 12 11 12 12
Gehen 1 (Min) 30 30 30 10 10 10 25 25 25 10 10 10
Kneten 2 (Min)
Gehen 2 (Min) 38 38 38 23 23 23 35 35 35 18 18 18
Gehen 3 (Min) 35 35 35 35 35 35 30 30 30 30 30 30
Backen (Min) 56 60 65 56 60 65 52 56 60 52 56 60
4A*
Hell
Mittel
Dunkel
2
2
2
5A
6
5A
6
6
1A
Schnell
2
2
2
2A
6
2A
6
6
Warmhalten (Min) 60 60 60 60 60 60 60 60 60 60 60 60
Zutaten hinzugeben
(Stunden verbleibend)
Voreinstellung der Zeit 15h 15h 15h 15h 15h 15h 15h 15h 15h 15h 15h 15h
2:17 2:21 2:26 1:59 2:03 2:08 2:03 2:07 2:11 1:46 1:50 1:54
* 4A heißt, dass der Brotbackautomat 4 Minuten knetet und gleichzeitig der Signalton zum Zutaten hinzugeben ertönt und die Displayanzeige „ADD“ erscheint.
- 34 -
Page 37

Programm 5. Express 6. Teig 7. Nudelteig 8. Buttermilchbrot 9. Glutenfrei
Hell
N/A
2A
5
Mittel
Dunkel
N/A
2A
5
N/A
2A
5
N/A N/A
N/A
3A
5
N/A
N/A
N/A
Bräunungsgrad
Größe 750 g 1000 g 1250 g N/A N/A 750 g 1000 g 1250 g 750 g 1000 g 1250 g
Zeit (Stunden) 1:15 1:18 1:20 1:50 0:15 3:17 3:21 3:30 3:40 3:45 3:55
Vorheizen (Min) N/A N/A N/A 10 N/A 25 25 30 15 15 20
Kneten 1 (Min) 8 8 8 12 15 10 10 10 12 12 12
Gehen 1 (Min) N/A N/A N/A 10 N/A 20 20 20 20 20 20
Kneten 2 (Min)
Gehen 2 (Min) N/A N/A N/A 25 N/A 45 45 45 50 50 50
Gehen 3 (Min) 20 20 20 45 N/A 30 30 30 50 50 50
Backen (Min) 40 43 45 N/A N/A 52 56 60 60 65 70
5A*
Hell
Mittel
Dunkel
2
2
2
5A
8
5A
8
8
3A
Hell
Mittel
Dunkel
2
2
3A
8
8
2
3A
8
Warmhalten (Min) 60 60 60 N/A N/A 60 60 60 60 60 60
Zutaten hinzugeben
(Stunden verbleibend)
Voreinstellung der Zeit 15h 15h 15h 15h 15h 15h 15h 15h 15h 15h 15h
1:05 1:08 1:10 1:15 N/A 2:15 2:19 2:23 2:48 2:53 2:58
* 5A heißt, dass der Brotbackautomat 5 Minuten knetet und gleichzeitig der Signalton zum Zutaten hinzugeben ertönt und die Displayanzeige „ADD“ erscheint.
- 35 -
Page 38

Programm 10. Kuchen 11. Marmelade 12. Backen
Hell
Bräunungsgrad
Größe 750 g 1000 g 1250 g N/A N/A
Zeit (Stunden) 1:30 1:35 1:40 1:20 1:00
Vorheizen (Min) N/A N/A N/A N/A N/A
Kneten 1 (Min) 15 15 15 N/A N/A
Gehen 1 (Min) N/A N/A N/A
Kneten 2 (Min)
Gehen 2 (Min) N/A N/A N/A N/A N/A
Gehen 3 (Min) N/A N/A N/A
Backen (Min)
Mittel
Dunkel
N/A
N/A
N/A
N/A
N/A
N/A
N/A
N/A
N/A
60 65 70
15
Gehen15Gehen15Gehen
N/A
15
Hitze + kneten
N/A
N/A
N/A
45
Hitze + kneten
20
Gehen
Hell
Mittel
Dunkel
N/A
N/A
N/A
N/A
N/A
60
Warmhalten (Min) 60 60 60 N/A 60
Zutaten hinzugeben
(Stunden verbleibend)
Voreinstellung der Zeit 15h 15h 15h N/A 15h
N/A N/A N/A N/A N/A
- 36 -
Page 39

Fehlerbehebung Brotbackautomat
Was tun, wenn der Knethaken nach dem Backen in
der Backform stecken bleibt?
Was passiert, wenn das fertige Brot im Backautomaten
bleibt?
Sind Backform und Knethaken spülmaschinen-
geeignet?
Warum wird der Teig nicht gerührt, obwohl der Motor
läuft?
Was tun, wenn der Knethaken im Brot stecken bleibt? Entfernen Sie den Knethaken mit dem
Was passiert bei einem Stromausfall während eines
Programms?
Wie lange dauert das Brotbacken? Bitte entnehmen Sie die genauen Zeiten der Tabelle
Füllen Sie heißes Wasser in die Backform und drehen
Sie den Knethaken , um die Verkrustungen darunter zu
lösen.
Durch die „Warmhalte-Funktion“ wird sichergestellt, dass
das Brot ca. 1 Std. warm gehalten und vor Feuchtigkeit
geschützt wird. Sollte das Brot länger als 1 Stunde im
Backautomaten bleiben, könnte es feucht werden.
Nein. Bitte spülen Sie die Backform und Knethaken
mit der Hand.
Überprüfen Sie, ob die Knethaken und die Backform
richtig eingerastet sind.
Knethakenentferner .
Bei einem Stromausfall bis 10 Minuten wird der
Brotbackautomat das zuletzt ausgeführte Programm zu
Ende führen.
„Programmablauf“.
Welche Brotgewichte kann ich backen? Sie können Brote von 750 g - 1000 g - 1250 g backen.
Warum kann die Timer-Funktion beim Backen mit
frischer Milch nicht benutzt werden?
Was ist passiert, wenn der Brotbackautomat nicht arbeitet,
nachdem man die Start/Stop-Taste gedrückt hat?
Das Gerät zerhackt die beigegebenen Rosinen. Um das Zerkleinern von Zutaten wie Obst oder Nüssen
Frische Produkte wie Milch oder Eier verderben, wenn sie
zu lange in dem Gerät bleiben.
Einige Arbeitsgänge wie zum Beispiel „Aufwärmen“ oder
„Ruhen“ sind schwer zu erkennen. Kontrollieren Sie
anhand der Tabelle „Programmablauf“, welcher
Programmabschnitt gerade läuft.
Kontrollieren Sie, ob das Gerät arbeitet, indem Sie prüfen,
ob die Betriebsindikationslampe leuchtet.
Kontrollieren Sie, ob Sie die Start/Stop-Taste richtig
gedrückt haben.
Kontrollieren Sie, ob der Netzstecker an das Stromnetz
angeschlossen ist.
zu vermeiden, geben Sie diese erst nach Ertönen des
Signals zum Teig.
- 37 -
Page 40

- 38 -
Page 41

Bes
tellkarte SBB 850 EDS A1
Bestellmenge
(max. 3 Sets pro Bestellung)
Artikelbeschreibung Einzelpreis Gesamtbetrag
1 Backform
inkl. 2 Knethaken
10 €
€
4 Knethaken
10 €
€
www.kompernass.de
(Ort, Datum)
(Unterschrift)
Zahlungsweise
7,50
€
€
zzgl. Abwicklungskosten für Porto,
Handling, Verpackung und Versand.
+
=
Überweisung
Page 42

Bes
tellkarte -
So bes
t
ellen Sie:
1.
T
r
agen Sie unter „
A
bsender/Besteller“ Ihr
e
n N
amen, Ihr
e
Anschr
i
f
t
und Ihr
e
T
e
lefonnummer
(für eventuelle Rückfragen) in Blockschrift ein.
2.
Ü
ber
w
eisung:
Über
w
eisen Sie den
Gesamtbetrag vorab auf das Konto
K
o
m
pernaß Handelsg
esellsc
haf
t mbH
K
ont
onummer 0799 566 462
Bankleitzahl 440 100 46
P
o
s
tbank Dor
tmund
Geben Sie bei Ihr
er Über
w
eisung als
V
e
r
w
endungszw
eck den Ar
tik
el so
wie
Ihr
en N
amen und W
ohnor
t an.
Senden Sie dann die v
ollständig aus-
gefüllte Bestellkarte in einem
Br
iefumschlag an unser
e nachstehende
P
o
stadr
esse.
A
bsender
/
Bes
t
eller
(bitte v
ollständig und in BL
OC
K
S
C
HRIF
T
ausfüllen)
Unser
e P
o
stadr
esse:
K
o
m
pernaß Handelsg
esellsc
haf
t mbH
Bur
gs
traße 21
44867 Boc
hum
W
i
c
htig:
•
Bitte fr
ankier
en Sie die Sendung
ausr
eichend.
• Schreiben Sie Ihren Namen
als A
bsender auf den Umschlag.
Name, Vorname
Straße
PLZ/Ort
Telefon
www.kompernass.de
Bestellen Sie bequem im Inter
net
www.kompernass.de
Page 43

Bes
tellkarte SBB 850 EDS A1
www.kompernass.com
Überweisung
(Ort, Datum)
(Unterschrift)
Zahlungsweise
7,50 €
€
zzgl. Abwicklungskosten für Porto,
Handling, Verpackung und Versand.
+
=
Bestellmenge
(max. 3 Sets pro Bestellung)
Artikelbeschreibung Einzelpreis Gesamtbetrag
1 Backform
inkl. 2 Knethaken
10,- € €
4 Knethaken
10,- € €
Page 44

A
bsender / Besteller
(bitte v
ollständig und in BL
OC
K
S
C
HRIF
T ausfüllen)
Name, Vorname
Straße
PLZ/Ort
Telefon
www.kompernass.com
Bes
tellkarte -
So bes
t
ellen Sie:
1.
T
r
agen Sie unter „
A
bsender/Besteller“ Ihr
e
n N
amen, Ihr
e
Anschr
i
f
t
und Ihr
e
Telefonnummer (für eventuelle Rückfragen) in Blockschrift ein.
2.
Ü
ber
w
eisung:
Über
w
eisen Sie den
Gesamtbetrag vorab auf das Konto
K
o
m
pernaß Handelsg
esellsc
haf
t mbH
IB
AN: DE03440100460799566462
SWIFT (BIC): PBNKDEFF 440
Bank: P
o
s
tbank Dor
tmund A
G
Geben Sie bei Ihr
er Über
w
eisung als
Verwendungszweck den Artikel sowie Ihren
N
amen und W
ohnor
t an.
Senden Sie dann die v
ollständig ausgefüllte
Bestellkarte in einem Briefumschlag an unsere
nachstehende P
o
stadr
esse.
Unser
e P
o
stadr
esse:
K
o
m
pernaß Handelsg
esellsc
haf
t mbH
Burgstraße 21
44867 Boc
hum
Deutsc
hland
W
i
c
htig:
• Bitte frankieren Sie die Sendung
ausr
eichend
•
S
chr
eiben Sie Ihr
en N
amen als
A
bsender auf den Umschlag.
Bestellen Sie bequem im Inter
net
www.kompernass.com
Land
Page 45

Bes
tellkarte/Carte de commande/Scheda d'ordinazione SBB 850 EDS A1
Bestellmenge/Quantité/
Quantità da ordinare
(max. 3 Sets/max. 3 sets/max. 3 set)
Artikelbeschreibung/Description
des articles/Descrizione articolo
Einzelpreis/Prix
unitaire/prezzo singolo
Gesamtbetrag/Prix net/
prezzo complessivo
1 Backform
inkl. 2 Knethaken
1 forme de cuisson
avec 2 fouets à pétrir
1 stampo
incl. 2 ganci da impasto
10 €
€
4 Knethaken
4 fouets à pétrir
4 ganci da impasto
10 €
€
www.kompernass.com
(Or
t, Datum)/(Lieu, date)/(Luogo, data)
(Unterschrift)/(Signature)/(Firma)
Zahlungsweise/Mode de règlement/Tipo di pagamento
7,50 €
€
zzgl. Abwicklungskosten für Porto, Handling, Verpackung und Versand,
Frais de port, magasinage, emballage et expédition non inclus.
+
=
Überweisung/Virement/Bonifico
Page 46

So bes
tellen Sie/Pour commander/Ecco come ordinare:
1.
T
r
agen Sie unter „
A
bsender/Besteller“ Ihr
e
n N
amen, Ihr
e
Anschr
i
f
t
und Ihr
e
T
e
lefonnummer
(für e
v
entuelle R
ü
ckfr
agen) in Block
s
chr
i
f
t
ein.
Saisissez v
o
tr
e nom, v
o
tr
e titr
e et v
o
tr
e numér
o de téléphone (pour d'é
v
entuelles questions) sous la
r
ubr
ique "Expéditeur/Acheteur" en lettr
es majuscules.
Alla voce "Mittente/ordinante", inserire nome, titolo, indirizzo e numero telefonico (per eventuali
domande), scr
iv
endo in stampatello.
2.
Über
w
eisung:
Über
w
eisen Sie den Gesamtbetr
ag
v
o
r
ab auf das K
onto:
V
i
r
ement :
Mer
ci de vir
er le montant total au pr
éala-
ble sur le compte suivant:
Bonif
ico:
v
e
rsar
e l'impor
to totale in anticipo sul
seguente conto:
K
o
m
pernaß Handelsg
esellsc
haf
t mbH
IB
AN: DE03440100460799566462
SWIFT (BIC): PBNKDEFF 440
Bank/Banq
ue/Banca:
P
o
s
tbank Dor
tmund A
G
Geben Sie bei Ihr
er Über
w
eisung als V
e
r
w
endungs-
zw
eck den Ar
tik
el so
wie Ihr
en N
amen und W
ohnor
t
an. Senden Sie dann die v
ollständig ausgefüllte
Bestellk
ar
te in einem Br
iefumschlag an unser
e nach-
stehende P
o
stadr
esse.
Dans le champ "Motif de l'opér
ation", v
euillez indi-
quer l'ar
ticle de même que v
o
tr
e nom et lieu de r
ési-
dence. V
euillez nous r
e
n
v
o
y
er la car
te de comman-
de dûment r
enseignée dans une en
v
eloppe à notr
e
adresse postale figurant ci-après.
Indicar
e l'ar
ticolo nella causale del bonif
ico, non-
ché nome, cognome e indir
izzo. I
n
viar
e quindi la
car
tolina di or
dinazione inter
amente c
o
m
pilata, inse-
r
endola in una busta, all'indir
izzo indicato qui accanto.
A
bsender
/
Bes
t
eller
(bitte v
ollständig und in BL
OC
K
S
C
HRIF
T ausfüllen)
Expédit
eur/A
c
h
et
eur
(à compléter en majuscules)
Mitt
ent
e
(si pr
ega di compilar
e il modulo in stampatello)
W
i
c
htig:
Über
w
eisung bitte spesenfr
ei ausführ
en, K
o
sten Ihr
er
eigenen Bank bitte zu Ihr
en eigenen Lasten.
Remarque:
ef
fectuer un tr
ansfer
t bancair
e, les fr
ais demandés par
v
o
tr
e banque sont à v
o
tr
e char
ge.
Im
por
t
ant
e:
Ef
fettuar
e a pr
opr
ie spese il bonif
ico bancar
io, assu-
mendosi le spese bancar
ie della pr
opr
ia banca.
Unser
e P
o
stadr
esse/Notr
e
adr
esse postale/Il nostr
o
indir
izzo postale:
K
o
m
pernaß Handelsg
esellsc
haf
t mbH
Bur
gs
traße 21
44867 Boc
hum
Deutsc
hland/Allemagne/Germania
W
i
c
htig:
•
Bitte fr
ankier
en Sie die Sendung ausr
eichend.
•
S
chr
eiben Sie Ihr
en N
amen als A
bsender auf den
Umschlag.
R
emar
q
ue :
•
V
euillez af
fr
anchir au tar
if en vigueur
•
Ecr
iv
ez v
o
tr
e nom comme e
xpéditeur sur l'en
v
e
-
loppe.
Im
por
t
ant
e:
•
A
f
f
r
ancar
e adeguatamente la busta.
•
Scr
iv
er
e il nome come mittente sulla busta.
Name, Vorname/Nom, Prénom/Cognome, Nome
Straße/Rue/Via
PLZ, Ort/Code Postal, Ville/Cap, Città
Telefon/Téléphone/Telefono
www.kompernass.com
Land/P
ays/Paese
Page 47

Content Page
Introduction 46
Intended Use 46
Items supplied 46
Description of the appliance 46
Technical data 46
Safety Notices 46
Before the first usage 48
Properties 49
Control panel 49
Programme 50
Timer-Function 52
Before baking 52
Baking bread 53
Error Messages 55
Cleaning and Care 55
Disposal 56
Warranty and Service 56
Importer 56
Programme sequence 57
Troubleshooting the Bread Baking Machine 61
Read the operating instructions carefully before using the device for the first time and preserve this booklet
for later reference. Pass this manual on to whoever might acquire the device at a future date.
- 45 -
Page 48

Bread Maker
Introduction
Congratulations on the purchase of your new appliance.
You have clearly decided in favour of a quality product. These operating instructions are a part of this
product. They contain important information in regard to safety, use and disposal. Before using the
product, familiarise yourself with all of these operating and safety instructions. Use the product only as
described and only for the specified areas of application. In addition, pass these documents on, together with the product, to any future owner.
Intended Use
Use your Bread Baking Machine for baking bread
and making jams or marmaldes in domestic areas
only.
Do not use the appliance for drying foodstuffs or
other objects. Do not use the Bread Baking Machine
outdoors.
Use only the ancillaries recommended by the
manufacturer. Non-recommended accessories may
cause damage to the appliance.
This appliance is intended exclusively for use in
domestic households.
Do not use the appliance for commercial purposes!
Items supplied
Bread Baking Machine
Baking mould
2 Kneading hooks
Measuring beaker
Measuring spoon
Operating instructions
Concise Information
Recipe Book
Description of the appliance
Illustration A:
Viewing window
Appliance lid
Ventilation slits
Power cable
Control panel
Illustration B:
2 kneading paddles
Baking mould for bread weights up to 1250 g
Measuring cup
Measuring spoon
Kneading paddle remover
Technical data
Model: Bread Maker
SBB 850 EDS A1
Nominal voltage: 220-240 V ~ / 50 Hz
Power consumption: 850 Watt
Safety Notices
• Please read the operating instructions through
completely before using the appliance for the
first time!
• Danger of suffocation! Children can suffocate
through the improper use of packaging materials.
Dispose of them immediately after unpacking
or store them in a place that is out of reach of
children.
• After unpacking, check the appliance for da-
mage that may have occurred during transportation. If necessary, contact your supplier.
• Place the appliance on a dry, flat and heat-
resistant surface.
- 46 -
Page 49

• Do not place the appliance near inflammable
materials or explosive/ignitable gases. A minimum distance of 10 cm must be maintained to
all other materials.
• Ensure that the ventilation slots of the appliance
are kept free at all times. Risk of overheating!
• Before plugging the appliance in, check that
the electricity type and mains voltage matches
the information given on the type plate.
• Do not place the power cable over sharp edges
or close to hot surfaces or objects. These may
damage the insulation of the power cable.
• Never leave the appliance unsupervised whilst
in use.
• To avoid the risk of tripping accidents the appliance is provided with a short power cable.
• Only use the appliance inside buildings.
• Never place the appliance on or close to a
gas or electric cooker, a hot oven or any other
source of heat. Risk of overheating!
• Never cover the appliance with a tea-towel or
other material. Heat and steam must be able
to escape. A fire could occur if the appliance
is covered with an inflammable material or
comes into contact with inflammable materials,
e.g. curtains.
• If you use an extension cable, ensure that the
maximum permitted power rating for the cable
corresponds to that of the bread baking
machine.
• Place the extension cable in such a way as to
prevent anyone from tripping over it or unintentially pulling on it .
• Always check the power cable and plug before
use. Should the power cable of the appliance
become damaged, to avoid the risk of injury
or a fatality it must be replaced by the manufacturer, the manufacturer's customer service or
a similarly qualified specialist.
• The use of ancillaries not recommended by
the manufacturer could cause damage to the
appliance. Only use the appliance for its intended purposes. Non-compliance invalidates all
claims under the warranty.
• Start a baking programme only when a
baking mould is fitted in. If a mould is not fitted,
it could cause irreparable damage to the
appliance.
• If children are in the vicinity, supervise the appliance particularly well! If the appliance is not in
use, and also before cleaning it, remove the plug
from the power socket. Allow the appliance to
cool down before removing individual parts.
• This appliance is not intended for use by
individuals (including children) with restricted
physical, physiological or intellectual abilities or
deficiences in experience and/or knowledge
unless they are supervised by a person responsible for their safety or receive from this person
instruction in how the appliance is to be used.
Children should be supervised to ensure that
they do not play with the appliance.
• This appliance complies with standard safety regulations. Inspection, repair and technical maintenance may only be performed by a qualified
specialist. Non-compliance invalidates all claims
under the warranty.
• Do not place any objects on the appliance and
do not cover it during operation. Risk of fire!
• Caution! The bread maker becomes very hot
during operation. Do not touch the appliance
until its has cooled down, or use oven gloves.
• Before taking out or inserting accessories,
unplug the power cable and allow the
appliance to cool down.
• Do not transport the Bread Baking Machine if
the baking mould contains hot or fluid contents,
e.g. jams. There is a danger of being burnt!
- 47 -
Page 50

• During use, NEVER come into contact with the
rotating kneading paddles. There is also a risk
of personal injury!
• Do not pull on the cable to remove the plug,
rather, pull the plug itself from the socket.
• When not in use, and before cleaning the
app-liance, remove the power cable from the
wall socket.
• Do not use the Bread Baking Machine for the
storage of foods or utensils.
• Never lay aluminium foil or other metallic
objects in the Bread Baking Machine. This
could lead to a short circuit. There would be a
risk of fire!
• Never place the bread machine in water or
other liquids. Risk of fatal electrical shocks!
• Do not clean the appliance with abrasive sponge
cleaning pads.
Should particles break away from the sponge
and come into contact with electrical components, you could receive an electric shock.
• Do not use an external timing switch or a separate
remote control system to operate the appliance.
• Never use the appliance without a baking mould
or with an empty one. This would
irreparably damage the appliance.
• Always close the lid during operation.
• NEVER remove the baking mould during
operation.
• When baking, NEVER exceed the amount of
700 g of flour and NEVER add more than
1 1/4 packets of dry yeast. The dough could
overflow and cause a fire!
• When in use, the temperature of the outer
surfaces and the door can be very high. Risk
of Burns!
Before the first usage
Disposal of the packaging material
Unpack your appliance and dispose of the packaging
material in accordance with your local regulations.
Initial cleaning
Wipe the baking mould , kneading paddles
and outer surfaces of the bread baking machine
with a clean, damp cloth before putting it into operation. Do not use abrasive scrubbers or cleaning
powders. Remove the protective foil on the control
panel .
Pre-heating
Please take note of the following notice
regarding the first usage:
For the first heating up ONLY, place the empty baking
mould into the appliance. Close the appliance
lid . Select the programme 12, as described in
the section "PROGRAMMES“ then press the button
Start/Stop , to warm up the appliance for 5 minutes. To terminate the programme, after 5 minutes
press the button Start/Stop until a long signal
tone is heard.
As the heating elements are lightly greased, a slight
smell may occur when first putting the appliance
into operation. This is harmless and stops after a
short time. Provide for sufficient ventilation, for
example, open a window.
Allow the appliance to cool down completely and
once again wipe the baking mould , kneading
paddles and the outer surfaces of the Bread
Baking Machine with a clean moist cloth.
Caution! Hot surfaces!
Parts of the appliance become very hot
during operation! Risk of burns!
Risk of fire! Do not allow the Bread Baking
Machine to warm up for more than 5 minutes
with an empty baking mould . There is a
real danger of overheating.
- 48 -
Page 51

Properties
With this Bread Baking Machine you have the possibility to bake bread according to your taste.
• You can choose from 12 different baking
programmes.
• You can employ ready-to-use baking mixtures.
• You can knead dough for buns and noodles
and also prepare marmalades and jams.
• With the programme “Gluten Free” you can
bake gluten-free baking mixtures and recipes
with gluten-free flours, such as cornflour,
buckwheat flour and potato starch.
Control panel
Display
Display for
selection of the weight
(750 g, 1000 g, 1250 g)
the remaining baking time in minutes and
the programmed time
the selected level of browning (light ,
medium , dark , rapid )
the selected program number
the programme sequence
the addition of ingredients („ADD“)
Start / Stop
To start and stop an operation or to delete a
time-programming.
To interrupt the operation, briefly press the Start/Stop
button until a signal tone sounds and the time in
the display flashes. By once again pressing the
Start/Stop button within 10 minutes, the opera-
tion can be continued. Should you forget to re-start
the programme, after 10 minutes it will be automatically continued.
To completely terminate the operation or to delete
a programming, press the Start/Stop button for
3 seconds, until long signal tone sounds.
Note:
Do not press the Start/Stop button if you want
to simply check the condition of the bread. You can
watch the baking operation through the viewing
window.
Warning!
When pressing all buttons an acoustic signal must
be audible, unless the appliance is in operation.
- 49 -
Page 52

Level of browning (or Rapid modus)
Select the browning level or switch into the Rapid
modus (light/medium/dark/Rapid). Press the
Browning Level button repeatedly, until the
arrow is located above the desired browning level.
For the Programmes 1 - 4 you can, through repeated pressing of the Browning Level button ,
activate the Rapid modus to shorten the baking process. Press the Browning Level button
repeatedly until the arrow appears over "Rapid". A
browning level cannot be selected with the
programmes 6, 7 and 11.
Programme selection (Menu)
Call-up of the desired baking programme (1-12).
In the display appears the Programme number
and the corresponding baking time.
Memory Function
When being switched on again after a power failure
of up to approx. 10 minutes, the program will continue from the same point. This is however not valid
when erasing/terminating the baking process or
pressing the button Start/Stop until an extended
signal tone sounds.
Timer
Time-delayed baking.
▼▲
Note:
Time-delayed baking cannot be arranged with
Programme 11.
Operation indicator lamp
The operation indicator lamp indicates with its
glowing that a programme is currently running. If
you want to start a programme time-delayed by
using the timer function, the operation indicator
lamp first glows when the programme itself
starts, not when the timer is activated.
Bread weight
Select the bread weight (750 g / 1000 g / 1250 g).
Press the button repeatedly until the arrow appears
under the desired weight. The weight details (750 g /
1000 g / 1250 g) relate themselves to the amount
of ingredients placed in the baking mould .
Note:
The default setting when switching the appliance on
is 1250 g. You cannot adjust the bread weight with
the Programmes 6, 7, 11 and 12.
Viewing window
You can observe the baking process through the
window .
Programme
Select the desired programme with the button Programme selection . The corresponding programme
number is shown in the display . The baking times
are dependant on the selected Programme combinations. See the chapter "Programme sequence“.
Programme 1: Regular
For white and mixed breads mainly consisting of
wheat flour or rye flour. The bread has a compact
consistency. Set the browning of the bread with the
button browning level .
Programme 2: French
For light breads from well-milled flour. As a rule,
the bread is light and has a crispy crust.
Programme 3: Whole Wheat
For breads made from robust flours, e.g. whole
wheat flour and whole rye flour. The bread will
be more compact and heavy.
- 50 -
Page 53

Programme 4: Sweet
For breads with ingredients like fruit juices, coconut
flakes, raisins, dried fruit, chocolate or additional
sugar. Due to an extended rising phase the bread
will be lighter and airier.
Programme 5: Super Rapid
Less time is required for kneading, rising and baking.
For this Programme, however, use only such recipes
that do not contain any heavy ingredients or heavy
varieties of flour. Note that in this programme the
bread is less aerated and may not be quite so
tasty.
Programme 6: Dough (kneading)
For the preparation of yeast dough for buns, pizza
or plaits. In this Programme no baking is done.
Programme 7: Pasta
For the preparation of pasta dough. In this
Programme no baking is done.
Programme 10: Cake
In this programe the ingredients are kneaded,
allowed to rise and then baked. Use baking
powder for this programme.
Programme 11: Jam
For making jams, preserves, jellies and fruit
spreads.
Programme 12: Bake
For the after-baking of breads that are not brown
enough, not baked through or ready-made dough.
All kneading and rising processes are dispensed
with in this programme. The bread is kept warm for
up to one hour after the baking process. This prevents
the bread from becoming too moist.
Programme 12 bakes the bread for 60 minutes.
To terminate these functions prematurely, press the
Start/Stop button until a long signal tone is
heard. To switch the appliance off, remove the
power plug from the wall socket.
Programme 8: Buttermilk bread
For breads made with buttermilk or yoghurt.
Programme 9: Gluten Free
For breads made of gluten-free flours and baking
mixtures. Gluten-free flours require longer for the
absorption of liquids and have differing rising
properties.
Note:
With the programmes 1, 2, 3, 4, 5, 6, 8 and 9 a
signal tone sounds during the programme process
and „ADD“ appears in the display.
As soon as possible after it sounds add the other
ingredients, such as fruit or nuts.
The ingredients will not be crushed by the
kneading paddle .
If you have set the timer, you can put all the ingredients into the baking mould at the beginning. In
this case, however, fruits and nuts should be cut into
smaller pieces before inserting them.
- 51 -
Page 54

Timer-Function
The timer function allows you to do time-delayed
baking.
With the arrow buttons
desired completion time for the baking process. The
maximum time delay amounts to 15 hours.
▲ and ▼ enter in the
Example:
It is 8:00 a.m. and you would like to have fresh
bread in 7 hours and 30 minutes, in other words
at 3:30 p.m. First of all select Programme 1 and
then press the arrow button until 7:30 appears
in the display , as the time period to be allowed
for completion is one of 7 hours and 30 minutes.
Warning! Before you bake a particular type
of bread with time delay first try out the recipe
under observation, to ensure that the
relationships of the ingredients to each other
are correct, the dough is not too firm or too
thin, and that the amounts are not too large
and could possibly overflow. Risk of fire!
Select a Programme. The display indicates the
required baking time.
With the arrow key
end of the Programme. The first activation pushes
the completion time back to the next full interval of
10 minutes. Each subsequent activation of the
arrow key
10 minutes. You can accelerate this procedure by
holding the button pressed down. The display
shows you the whole period of the baking time and
delay time. On a possible exceeding of the possible time delay you can correct the time with the
arrow button
the timer with the Start/Stop button . The colon
on the display flashes and the programmed time
starts to run.
As soon as the programme starts, the operation
indicator lamp glows.
When the baking process has been completed, ten
acoustic signals are sounded and the display
indicates 0:00.
▲ pushes the completion time back by
▲ you can postpone the
▼ . Confirm the programming of
Note:
The timer function cannot be activated with the
Programme "Jam".
Note:
With time delayed baking please do not use perishable ingredients such as milk, eggs, fruit, yoghurt,
onions etc.
Before baking
For a successful baking process, please consider
the following factors:
Ingredients
Note:
Take the baking mould out of the housing before putting in the ingredients. Should ingredients
drop into the baking area, a fire may be caused by
them burning on the heating elements.
• Always place ingredients into the baking
mould in the sequence specified .
• All ingedients should be at room temperature,
to ensure an optimal rising result from the yeast.
• Ensure that you measure the ingredients precisely.
Even negligible deviations from the quantities specified in the recipe may affect the baking results.
- 52 -
Page 55

Note:
NEVER use quantities larger than those specified. Too
much dough could rise out of the baking mould
drop onto the hot heating elements and cause a fire.
Baking bread
Preparation
Pay heed to the safety instructions in this manual.
Place the Bread Baking Machine on a level and
firm surface.
1. Pull the baking mould upwards and out of
the appliance.
2. Push the kneading paddles onto the drive
shafts in the baking mould . Make sure they
are firmly in place.
3. Place the ingredients for your recipe into the
baking mould in the specified order. First
add the liquids, sugar and salt, then the flour,
adding the yeast as the last ingredient.
Note:
Ensure that the yeast does not come into contact
with salt or fluids.
4. Place the baking mould back in the appliance.
Ensure that it engages correctly.
5. Close the appliance lid .
6. Insert the power plug into the wall socket.
A signal tone sounds and in the display
appears the Programme number and the timeduration for Programme 1.
7. Select your programme with the Programme
select button . Each input is confirmed with
a signal tone.
8. If necessary, select the size of bread you want
to bake with the button .
9. Select the browning level for your bread.
In the display the arrow sEDShows you
what you have selected, light, medium or dark.
Here you can also select the setting "Rapid"
to shorten the time period in which the dough
rises.
Note:
A browning level cannot be selected with the
programmes 6, 7 and 11.
The function "Rapid" is only available with
Programmes 1-4.
A bread weight level cannot be selected with the
Programmes 6, 7, 11 and 12.
10. You now have the option of setting the end time
of your programme using the timer function.
You can enter in a maximum time delay of up
to 15 hours.
Note:
This function is not available for Programme 11.
Starting the Programme
Now start the programme with the Start/Stop button
.
Note:
The Programmes 1, 2, 3, 4, 6, 8 and 9 start with
a 10 to 30 minute pre-heat phase (except Rapid,
see Table for Programme Sequences). The kneading paddles do not move themselves. That is
not an error of the machine.
- 53 -
Page 56

The Programme automatically carries out the
various operations.
You can watch the programme sequence via the
window of your Bread Baking Machine.
Occasionally, condensation may collect in the window during baking . The appliance lid can
be opened during the kneading phase.
Note:
Do not open the appliance lid during the rising
or baking phases. The bread could collapse.
If the bread does not slip off the kneading paddles
, carefully remove the kneading paddles
using the supplied kneading paddle remover .
Note:
Do not use any metal objects which may cause
scratches on the non-stick coating.
After removing the bread, immediately rinse the
baking mould with warm water. This prevents
the kneading paddles from sticking to the
driving shaft.
Ending the Programme
When the baking process has been completed, ten
acoustic signals are sounded and the display
indicates 0:00.
At the end of the programme the appliance automatically changes to a keep-warm mode for up to
60 minutes.
Note:
This is not applicable to Programmes 6, 7 and 11.
In this mode, warm air circulates inside the
appliance. The keep warm period can be
prematurely terminated by pressing down the
Start/Stop button until the signal tone sounds.
Warning!
Before opening the appliance lid remove the
power plug from the wall socket.
When not in use, the appliance should never be
plugged in!
Taking out the bread
When handling the hot baking mould, always
use pot holders or oven gloves.
Hold the baking mould tilted over a grid and
shake it lightly until the bread slides out of the
baking mould .
Tip: If you remove the kneading paddles after
the last kneading of the dough, the bread will
remain intact when you remove it from the
baking mould .
• Briefly press the Start/Stop button to interrupt
the programme at the very start of the baking
phase or, remove the power plug from the wall
socket. Ensure that you re-insert the power plug
within 10 minutes so that the baking process can
be continued.
• Open the appliance lid and remove the
baking mould . You can take the dough out
with floured hands and remove the kneading
paddles .
• Lay the dough back into the baking mould .
Replace the baking mould and close the
appliance lid .
• Insert the power plug into the wall socket. The
baking programme continues from where it
was stopped.
Allow the bread to cool for 15-30 minutes before
eating it.
Before cutting the bread, ensure that the kneading
paddles have been removed .
- 54 -
Page 57

Error Messages
• If the display shows "HHH" after the programme
has been started, it indicates that the temperature in the Bread Baking Machine is still too high.
Stop the programme and remove the power plug.
Open the appliance lid and allow the machine
to cool down for 20 minutes before re-using it.
• If a new Programme cannot be started directly
after the Bread Baking Machine has completed
a baking process, it means the appliance is still
too hot. In this case the display panel reverts to
the default setting (Programme 1). Open the appliance lid and allow the machine to cool
down for 20 minutes before re-using it.
Warning!
Do not attempt to take the appliance into use before
it has cooled itself down. This functions only with
Programmme 12.
Important!
The appliance and its ancillaries are not suitable
for being cleaned in a dish washing machine!
Housing, lid, baking space
Remove all particles left behind inside the baking
area using a wet cloth or a slightly wet soft sponge.
Wipe the housing and the lid too, only with a moist
cloth or sponge.
• Ensure that the interior is completely dry. For
easier cleaning, the appliance lid can be
removed from the housing:
• Open the appliance lid until the wedgeshaped hinge cams pass through the openings
of the hinge guides.
• Pull the appliance lid out of the hinge guides.
• To reassemble the appliance lid , guide the
hinge cams through the opening of the hinge
guides.
• If the display shows "EE0", "EE1" or "LLL" after
the programme has been started, first of all
switch the Bread Baking Machine off and then
back on by removing and then re-inserting the
power plug from/into the wall socket. Should the
error display continue, make contact with
Customer Services.
Cleaning and Care
Warning!
Before cleaning it, always remove the power plug
from the wall socket and allow the appliance to
cool down completely.
Protect the appliance against moisture, this could
cause you to receive an electric shock.
Please also observe the safety instructions.
Baking moulds and kneading paddles
The surfaces of the baking moulds and kneading paddles have a non-stick coating. When
cleaning the appliance do not use aggressive
detergents, cleaning powders or objects that may
cause scratches to the surfaces.
Due to moisture and vapours the surfaces of
various parts may undergo changes in their appearance over a period of time. This has no influence
on the function nor does it reduce the quality of the
baking results.
Before cleaning, take the baking moulds and
kneading paddles out of the baking area. Wipe
the outside of the baking moulds with a damp
cloth.
- 55 -
Page 58

Important!
Never submerse the baking mould in water or
other liquids.
Clean the interior areas of the baking mould with
warm soapy water.
If the kneading paddles are encrusted and it is
difficult to dissolve, fill the baking mould with hot
water for approx. 30 minutes.
If the mountings of the kneading paddles are
clogged, you can clean them carefully with a wooden
toothpick.
Do not use any chemical cleaning agents or solvents to
clean the Bread Baking Machine.
Disposal
Do not dispose of the appliance in your
normal domestic waste. This product is
subject to the European guideline
2002/96/EC.
Dispose of the appliance through an approved disposal centre or at your community waste facility.
Observe the currently applicable regulations.
In case of doubt, please contact your waste disposal
centre.
The warranty covers only claims for material and
manufacturing defects, but not transport damage,
worn parts, e.g the baking mould or the kneading
paddles, or damage to fragile components. This
product is intended for domestic use only, it is not intended for commercial applications.
In the event of misuse and improper handling, use
of force and modifications not carried out by our
authorized service branch, the warranty will become void. Your statutory rights are not restricted in
any way by this warranty.
The warranty period is not extended by repairs
made under the warranty. This applies also to replaced and repaired parts. Damages or defects discovered after purchase are to be reported directly after unpacking, at the latest two days after the
purchase date.
Repairs carried out after lapse of the warranty period are subject to charge.
Service Great Britain
Tel.: 0871 5000 720 (£ 0.10/Min.)
E-Mail: kompernass@lidl.co.uk
IAN 73485
Importer
Dispose of all packaging materials in an
environmentally friendly manner.
Warranty and Service
You receive a 3-year warranty for this device as of
the purchase date. The device has been manufactured with care and meticulously examined before delivery.
Please retain your receipt as proof of purchase. In
the case of a warranty claim, please make contact
by telephone with our service department. Only in
this way can a post-free despatch for your goods be
assured.
KOMPERNASS GMBH
BURGSTRASSE 21
44867 BOCHUM, GERMANY
www.kompernass.com
- 56 -
Page 59

Programme sequence
Programme 1. Regular 2. French
Light
3A*
Medium
Dark
2
2
2
5A
5
5A
5
5
1A
Rapid
2
2
2
2A
5
2A
5
5
Level of browning
Size 750 g 1000 g 1250 g 750 g 1000 g 1250 g 750 g 1000 g 1250 g 750 g 1000 g 1250 g
Time (Hours) 2:58 3:05 3:15 2:14 2:20 2:25 3:13 3:18 3:25 2:18 2:25 2:30
Preheat (Min) 15 15 20 N/A N/A N/A 10 10 15 N/A N/A N/A
Kneading 1 (min) 12 13 13 12 13 13 12 12 15 12 13 13
Rise 1 (Min) 25 25 25 10 10 10 20 20 20 10 10 10
Kneading 2 (min)
Rise 2 (Min) 30 30 30 18 18 18 43 41 35 18 18 18
Rise 3 (Min) 30 30 30 30 30 30 35 35 35 30 30 30
Bake (min) 56 60 65 56 60 65 60 65 70 60 65 70
3A*
Light
Medium
Dark
2
2
2
5A
8
5A
8
8
1A
Rapid
2
2
2A
5
5
2
2A
5
Keep-Warm time
(Min)
Insert ingredients
(Time remaining)
Pre-adjustment of the time 15h 15h 15h 15h 15h 15h 15h 15h 15h 15h 15h 15h
60 60 60 60 60 60 60 60 60 60 60 60
2:01 2:05 2:10 1:49 1:53 1:58 2:26 2:29 2:28 1:53 1:58 2:03
- 57 -
Page 60

Programme 3. Whole Wheat 4. Sweet
Light
3A
Medium
Dark
2
2
2
5A
8
5A
8
8
2A
Rapid
2
2
2
2A
5
2A
5
5
Level of browning
Size 750 g 1000 g 1250 g 750 g 1000 g 1250 g 750 g 1000 g 1250 g 750 g 1000 g 1250 g
Time (Hours) 3:18 3:25 3:35 2:24 2:30 2:35 2:56 3:01 3:10 2:10 2:16 2:20
Preheat (Min) 15 15 20 N/A N/A N/A 10 10 15 N/A N/A N/A
Kneading 1 (min) 11 12 12 11 13 13 12 12 12 11 12 12
Rise 1 (Min) 30 30 30 10 10 10 25 25 25 10 10 10
Kneading 2 (min)
Rise 2 (Min) 38 38 38 23 23 23 35 35 35 18 18 18
Rise 3 (Min) 35 35 35 35 35 35 30 30 30 30 30 30
Bake (min) 56 60 65 56 60 65 52 56 60 52 56 60
4A*
Light
Medium
Dark
2
2
2
5A
6
5A
6
6
1A
Rapid
2
2
2A
6
2A
6
2
6
Keep-Warm time
(Min)
Insert ingredients
(Time remaining)
Pre-adjustment of the time 15h 15h 15h 15h 15h 15h 15h 15h 15h 15h 15h 15h
60 60 60 60 60 60 60 60 60 60 60 60
2:17 2:21 2:26 1:59 2:03 2:08 2:03 2:07 2:11 1:46 1:50 1:54
* 4A means that the Bread Baking Machine kneads for 4 minutes and simultaneusly the signal tone sounds
to add ingredients and the display notice "ADD" appears.
- 58 -
Page 61

N/A
2A
5
6.
Dough
N/A N/A
N/A
7. Pasta 8. Buttermilk bread 9. Gluten Free
3A
5
N/A
N/A
N/A
5A*
Light
Medium
Dark
2
2
2
5A
8
5A
8
8
3A
Light
Medium
Dark
2
2
3A
8
8
Programme 5. Super Rapid
Light
N/A
2A
5
Medium
Dark
N/A
2A
5
Level of browning
Size 750 g 1000 g 1250 g N/A N/A 750 g 1000 g 1250 g 750 g 1000 g 1250 g
Time (Hours) 1:15 1:18 1:20 1:50 0:15 3:17 3:21 3:30 3:40 3:45 3:55
Preheat (Min) N/A N/A N/A 10 N/A 25 25 30 15 15 20
Kneading 1 (min) 8 8 8 12 15 10 10 10 12 12 12
Rise 1 (Min) N/A N/A N/A 10 N/A 20 20 20 20 20 20
Kneading 2 (min)
Rise 2 (Min) N/A N/A N/A 25 N/A 45 45 45 50 50 50
Rise 3 (Min) 20 20 20 45 N/A 30 30 30 50 50 50
2
3A
8
Bake (min) 40 43 45 N/A N/A 52 56 60 60 65 70
Keep-Warm time
(Min)
Insert ingredients
(Time remaining)
Pre-adjustment of the time 15h 15h 15h 15h 15h 15h 15h 15h 15h 15h 15h
60 60 60 N/A N/A 60 60 60 60 60 60
1:05 1:08 1:10 1:15 N/A 2:15 2:19 2:23 2:48 2:53 2:58
* 5A means that the Bread Baking Machine kneads for 5 minutes and simultaneusly the signal tone sounds
to add ingredients and the display notice "ADD" appears.
- 59 -
Page 62

Programme 10. Cake 11. Jam 12. Bake
Light
Level of browning
Size 750 g 1000 g 1250 g N/A N/A
Time (Hours) 1:30 1:35 1:40 1:20 1:00
Preheat (Min) N/A N/A N/A N/A N/A
Kneading 1 (min) 15 15 15 N/A N/A
Rise 1 (Min) N/A N/A N/A
Kneading 2 (min)
Rise 2 (Min) N/A N/A N/A N/A N/A
Rise 3 (Min) N/A N/A N/A
Bake (min)
Medium
Dark
N/A
N/A
N/A
N/A
N/A
N/A
N/A
N/A
N/A
60 65 70
15 Rise 15 Rise 15 Rise
N/A
15
Heat + kneading
N/A
N/A
N/A
45
Heat + kneading
20
Rise
Light
Medium
Dark
N/A
N/A
N/A
N/A
N/A
60
Keep-Warm time
(Min)
Insert ingredients
(Time remaining)
Pre-adjustment of the time 15h 15h 15h N/A 15h
60 60 60 N/A 60
N/A N/A N/A N/A N/A
- 60 -
Page 63

Troubleshooting the Bread Baking Machine
What do I do if the kneading paddle gets stuck in the
baking mould after baking?
What happens if the finished bread is left inside the
bread maker?
Are the baking mould and the kneading paddle
suitable for cleaning in a dishwasher?
Why doesn't the dough get stirred, even if the motor is
running?
What do I do if the kneading paddle gets stuck in the
loaf?
What happens if there is a power failure when a
Programme is running?
How long does it take to bake bread? Please take note of the exact times given in the table
Fill the baking mould with hot water and twist the kneading
paddle to loosen the encrustation underneath.
Through the "Keep-warm function" it is ensured that the bread
is kept warm for ca. 1 hour and that it is also protected
against moisture. If the bread remains in the baking machine
for longer than 1 hour, it may become moist.
No. Please clean the baking mould and the kneading
paddle by hand.
Check to see if the kneading paddle and the baking
mould have properly engaged.
Remove the kneading paddle with the kneading paddle
remover .
In the case of power failure for up to 10 minutes, the
bread maker will complete the last implemented programme through to the end.
"Programme sequence".
What size breads can I bake? You can bake breads with weights of 750 g - 1000 g -
1250 g.
Why can't I use the Timer function while baking with fresh
milk?
What has happened if the Bread Baking Machine does
not work after the Start/Stop button has been pressed?
The appliance crushes the added raisins. To avoid the breaking up of ingredients such as fruit or
Fresh products such as milk or eggs spoil if they remain
in the appliance for too long.
Some baking processes, such as "Warming up“ or "Rise" are
difficult to recognise. Using the table „ Programme sequence“,
check which programme section is currently in operation.
Verify that the appliance is functioning by checking
whether the operation indication lamp is glowing.
Check to seeif you have correctly pressed the Start/Stop
button .
Check to see if the power plug is connected to the wall
socket.
nuts, add them to the dough after the signal has sounded.
- 61 -
Page 64

- 62 -
Page 65

Order card SBB 850 EDS A1
www.kompernass.com
£
(Location, Dat
e)
(Signature)
Payment method
Add. £ 7 p&p.
Quantity ordered
(max. 3 sets per order)
Name of article Cost p. Unit Total sum
1 baking mould
incl. 2
Kneading paddles
£ 7,- £
4 Kneading paddles
£ 7,- £
Bank T
ransfer
Page 66

Bank T
ransfer (BACS): Please transfer
the complete amount to our account
below:
Natwest Bank Plc
Hammersmith Branch
Sort Code: 60-50-06
Account No: 37758829
Account Name: Domestic Electrical
Solutions UK Limited
On your transfer, please provide the
article(s) you ordered as well as your complete name
and address. Then post your completed order card to
our postal address below.
Our postal address:
DES UK LTD
Unit B7
Oxford Street Industrial Park
Vulcan Road
Bilston/ West Midlands
WV14 7LF
Important:
• Please affix sufficient postage to the letter.
• Write your name as the sender on the
envelope.
www.kompernass.com
Order Card -
How to order:
Enter under “Sender/or
der
er”y
our name, addr
ess and telephone number (for possible quer
ies) in
block capitals.
Sender
/
O
rderer
(please complete in block captals)
(Surname, first name)
(Street)
(Post code, town)
(Telephone)
 Loading...