

Page 1

Page 2

Page 3

Deutsch ............................................................................................................ 2
Français .......................................................................................................... 26
Italiano .......................................................................................................... 50
English ............................................................................................................ 74
V1.21
Page 4

SilverCrest EDS SBB 850 B1
Inhaltsverzeichnis
Einleitung ........................................................................................................... 3
Bestimmungsgemäße Verwendung .................................................................... 3
Lieferumfang ...................................................................................................... 3
Technische Daten ................................................................................................ 4
Sicherheitshinweise ............................................................................................ 4
Urheberrecht ...................................................................................................... 7
Vor der Inbetriebnahme ..................................................................................... 7
Erstinbetriebnahme ............................................................................................ 7
Inbetriebnahme ................................................................................................. 8
Leistungsumfang .................................................................................................................................... 8
Das Bedienfeld ...................................................................................................................................... 9
Das Display ........................................................................................................................................ 10
Displayanzeigen ................................................................................................................................ 10
Die Programme ................................................................................................ 10
Der Timer.......................................................................................................... 12
Backen vorbereiten .......................................................................................... 13
Zutaten abmessen .............................................................................................................................. 13
Brot backen ...................................................................................................... 14
Vorbereitung / Einstellungen ............................................................................................................. 14
Programm starten ............................................................................................................................... 14
Remove-Funktion ................................................................................................................................. 15
Programmende ................................................................................................................................... 15
Brot entnehmen .................................................................................................................................. 16
Wartung / Reinigung ........................................................................................ 16
Fehlerbehebung / Häufige Fragen ................................................................... 18
Umwelthinweise und Entsorgungsangaben ..................................................... 19
Konformitätsvermerke ..................................................................................... 19
Programmablauf .............................................................................................. 20
Hinweise zu Garantie und Serviceabwicklung ................................................. 24
2 - Deutsch
Page 5

SilverCrest EDS SBB 850 B1
Einleitung
Vielen Dank, dass Sie sich für den SilverCrest Brotbackautomaten EDS SBB 850 B1, nachfolgend
als Brotbackautomat bezeichnet, entschieden haben. Sie haben damit ein hochwertiges und
langlebiges Produkt erstanden.
Diese Bedienungsanleitung enthält wichtige Hinweise zum sicheren Gebrauch des Gerätes, sowie
Hinweise und Informationen zur täglichen Verwendung und zur Entsorgung. Machen Sie sich vor
der Benutzung des Brotbackautomaten intensiv mit dieser Bedienunganleitung vertraut und
benutzen Sie den Brotbackautomaten nur in den beschriebenen Einsatzbereichen und für die
beschriebenen Zwecke. Bei Verkauf oder Weitergabe des Brotbackautomaten händigen Sie
unbedingt auch diese Bedienungsanleitung mit aus. Sie ist Bestandteil des Gerätes.
Bestimmungsgemäße Verwendung
Der Brotbackautomat ist einfach in der Handhabung und bietet Ihnen die Möglichkeit, Brot, Kuchen
und Marmeladen für den häuslichen Gebrauch in einem Arbeitsgang herzustellen. Anschließend
können Sie die hergestellten Produkte nach Ihren Bedürfnissen weiterverarbeiten.
Dieser Brotbackautomat ist nicht für den Betrieb in einem Unternehmen bzw. den gewerblichen
Einsatz vorgesehen. Verwenden Sie den Brotbackautomaten ausschließlich für den privaten
Gebrauch, jede andere Verwendung ist nicht bestimmungsgemäß. Außerdem darf der
Brotbackautomat nicht außerhalb von geschlossenen Räumen und in tropischen Klimaregionen
genutzt werden. Verwenden Sie den Brotbackautomaten ausschließlich für die in dieser
Bedienungsanleitung dargestellten Zwecke und keinesfalls zum Trocknen von Lebensmitteln oder
anderen Gegenständen. Verwenden Sie nur vom Hersteller empfohlenes Zubehör, nicht
empohlenes Zubehör kann das Gerät nachhaltig beschädigen. Dieses kann zum Verlust Ihres
Garantieanspruches führen.
Dieser Brotbackautomat erfüllt alle, im Zusammenhang mit der CE-Konformität, relevanten Normen
und Standards. Bei einer nicht mit dem Hersteller abgestimmten Änderung des Brotbackautomaten
ist die Einhaltung dieser Normen nicht mehr gewährleistet. Aus hieraus resultierenden Schäden
oder Störungen ist jegliche Haftung seitens des Herstellers ausgeschlossen.
Bitte beachten Sie die Landesvorschriften bzw. Gesetze des Einsatzlandes.
Lieferumfang
Brotbackautomat
Backform
2 Knethaken
Knethakenentferner
Messbecher
Messlöffel
Diese Bedienungsanleitung
Rezeptheft
Kurzanleitung
Deutsch - 3
Page 6

SilverCrest EDS SBB 850 B1
Diese Bedienungsanleitung ist mit einem ausklappbaren Umschlag versehen. Auf der Innenseite des
Umschlags ist der Brotbackautomat mit einer Bezifferung abgebildet. Die Ziffern haben folgende
Bedeutung:
Abbildung A Abbildung B
1 Sichtfenster 6 Knethaken
2 Abdeckung 7 Backform
3 Belüftungsschlitze 8 Messbecher
4 Netzkabel 9 Messlöffel
5 Bedienfeld 10 Knethakenentferner
Technische Daten
Modell SilverCrest EDS SBB 850 B1
Spannungsversorgung
Leistungsaufnahme 850W
Abmessungen (B x H x T) incl. Griffe ca. 28 x 27 x 42cm
Gewicht ca. 5,9 kg
Sicherheit geprüft:
TÜV SÜD
Änderungen der technischen Daten sowie des Designs können ohne Ankündigung erfolgen.
220-240V~, 50Hz
Sicherheitshinweise
Vor der ersten Verwendung des Brotbackautomaten lesen Sie die folgenden Anweisungen genau
durch und beachten Sie alle Warnhinweise, selbst wenn Ihnen der Umgang mit elektronischen
Geräten vertraut ist. Bewahren Sie diese Anleitung sorgfältig als zukünftige Referenz auf.
GEFAHR! Dieses Symbol kennzeichnet eine drohende gefährliche Situation, die,
wenn Sie nicht verhindert wird, zu schweren Verletzungen oder sogar zum Tod
führen kann.
WARNUNG! Dieses Symbol kennzeichnet wichtige Hinweise für den sicheren
Betrieb des Brotbackautomaten und zum Schutz des Anwenders.
GEFAHR! Dieses Symbol warnt vor Verletzungen / Verbrennungen im
Zusammenhang mit heißen Oberflächen am Brotbackautomaten.
Dieses Symbol kennzeichnet weitere informative Hinweise zum Thema.
4 - Deutsch
Page 7
SilverCrest EDS SBB 850 B1
GEFAHR! Der Brotbackautomat ist nicht dazu bestimmt, mit einer externen Zeitschaltuhr
oder einem separaten Fernwirksystem betrieben zu werden.
GEFAHR! Dieser Brotbackautomat kann von Kindern ab 8 Jahren sowie von Personen
mit verringerten physischen, sensorischen oder mentalen Fähigkeiten oder Mangel an
Erfahrung und Wissen benutzt werden, wenn sie beaufsichtigt oder bezüglich des
sicheren Gebrauchs des Brotbackautomaten unterwiesen wurden und die daraus
resultierenden Gefahren verstehen. Kinder dürfen nicht mit dem Brotbackautomaten
spielen. Reinigung und Benutzer-Wartung dürfen nicht durch Kinder durchgeführt
werden, es sei denn, sie sind älter als 8 Jahre und beaufsichtigt. Halten Sie auch die
Verpackungsfolien von Kindern fern. Es besteht Erstickungsgefahr.
Kinder jünger als 8 Jahre sind vom Gerät und der Anschlussleitung fernzuhalten.
GEFAHR! Falls Sie Rauchentwicklung, ungewöhnliche Geräusche oder Gerüche
feststellen, ziehen Sie sofort den Netzstecker des Brotbackautomaten aus der Steckdose.
In diesen Fällen darf der Brotbackautomat nicht weiter verwendet werden, bevor eine
Überprüfung durch einen Fachmann durchgeführt wurde. Atmen Sie keinesfalls Rauch
aus einem möglichen Gerätebrand ein. Sollten Sie dennoch Rauch eingeatmet haben,
suchen Sie einen Arzt auf. Das Einatmen von Rauch kann gesundheitsschädlich sein.
GEFAHR! Achten Sie darauf, dass keine offenen Brandquellen (z. B. brennende
Kerzen) auf oder neben dem Brotbackautomaten stehen. Es besteht Brandgefahr!
GEFAHR! Betreiben Sie den Brotbackautomaten nicht unbeaufsichtigt. Ziehen Sie
immer den Netzstecker aus der Steckdose, wenn Sie ihn nicht benutzen. Stellen Sie den
Brotbackautomaten erst weg, wenn er vollständig abgekühlt ist. Es besteht Brandgefahr!
GEFAHR! Betreiben Sie den Brotbackautomaten nur auf einer trockenen, ebenen und
hitzeunempfindlichen Oberfläche. Verwenden Sie den Brotbackautomaten niemals in
der Nähe von leicht entzündbaren Materialien, wie zum Beispiel Gardinen, Vorhängen
oder explosiven und/oder brennbaren Gasen oder Flüssigkeiten. Halten Sie zu anderen
Gegenständen einen Mindestabstand von 10cm ein. Lassen Sie den Brotbackautomaten
während des Betriebes niemals unbeaufsichtigt! Es besteht Brandgefahr.
GEFAHR! Die Lüftungsschlitze des Brotbackautomaten dürfen niemals verdeckt
werden. Das Gerät darf nicht auf oder neben einem Gas- oder Elektroherd, einem
heißen Backofen oder sonstigen Hitzequellen betrieben werden. Decken Sie den
Brotbackautomaten niemals mit einem Tuch oder ähnlichen Materialien ab, da sonst
Hitze und Dampf nicht entweichen können. Es besteht Überhitzungs- und Brandgefahr.
GEFAHR! Nutzen Sie den Brotbackautomaten niemals, um darin Lebensmittel oder
andere, insbesondere metallische Gegenstände aufzubewahren. Diese könnten einen
Kurzschluss verursachen. Es besteht Brandgefahr.
Deutsch - 5
Page 8
SilverCrest EDS SBB 850 B1
GEFAHR! Die Menge von 700 Gramm Mehl und 1 1/4 Päckchen Hefe (maximal
10g) darf beim Backen niemals überschritten werden, da ansonsten der Teig überlaufen
und einen Brand verursachen kann. Es besteht Brandgefahr.
GEFAHR! Während des Betriebes kann die Temperatur der berührbaren Flächen des
Brotbackautomaten sehr hoch sein. Es besteht Verbrennungsgefahr.
GEFAHR! Der Brotbackautomat wird heiß. Bewegen und transportieren Sie das Gerät
nicht, wenn sich heißer Inhalt, z.B. Marmelade in der Backform (7) befindet. Lassen Sie
den Brotbackautomaten abkühlen und ziehen Sie den Netzstecker, bevor Sie
Zubehörteile entnehmen oder einsetzen. Benutzen Sie gegebenenfalls einen Topflappen
oder Backhandschuh. Es besteht Verbrennungsgefahr.
WARNUNG! Transportieren Sie den Brotbackautomaten nicht, wenn sich darin heißer
oder flüssiger Inhalt, z.B. Marmelade befindet. Es besteht Verbrennungsgefahr.
WARNUNG! Der Brotbackautomat darf nicht beschädigt werden, um Gefährdungen
zu vermeiden.
WARNUNG! Der Brotbackautomat darf keinen direkten Wärmequellen (z.B.
Heizungen) und keinem direkten Sonnenlicht oder starkem Kunstlicht ausgesetzt werden.
Vermeiden Sie auch den Kontakt mit Spritz- und Tropfwasser und aggressiven
Flüssigkeiten. Betreiben Sie den Brotbackautomaten nicht in der Nähe von Wasser. Der
Brotbackautomat darf niemals untergetaucht werden. Stellen Sie keine mit Flüssigkeiten
gefüllten Gegenstände, z.B. Vasen oder Getränke auf den Brotbackautomat. Achten Sie
weiterhin darauf, dass der Brotbackautomat keinen übermäßigen Erschütterungen und
Vibrationen ausgesetzt wird. Außerdem dürfen keine Fremdkörper eindringen.
Andernfalls könnte der Brotbackautomat beschädigt werden.
WARNUNG! Ein Backprogramm darf nur mit eingesetzter Backform (7) gestartet
werden, um Beschädigungen des Gerätes zu vermeiden. Halten Sie die Abdeckung (2)
während des Betriebes geschlossen. Entfernen Sie nie die Backform (7) während des
Betriebes, um Verletzungen zu vermeiden.
WARNUNG! Betreiben Sie den Brotbackautomaten niemals ohne Backform (7). Das
Gerät könnte beschädigt werden.
WARNUNG! Betreiben Sie den Brotbackautomaten niemals mit geöffneter
Abdeckung (2), um Verletzungen zu vermeiden.
Netzkabel
GEFAHR! Achten Sie darauf, dass das Netzkabel (4) nicht über scharfe Kanten geführt
wird. Verlegen Sie das Netzkabel (4) nicht in der Nähe von heißen Flächen oder
Gegenständen und achten Sie darauf, dass es keine heißen Flächen des
Brotbackautomaten berührt. Die Isolierung des Netzkabels (4) könnte beschädigt
werden. Es besteht Stromschlaggefahr.
6 - Deutsch
Page 9
SilverCrest EDS SBB 850 B1
WARNUNG! Fassen Sie das Netzkabel (4) immer am Stecker an und ziehen Sie nicht
am Netzkabel (4) selbst.
WARNUNG! Stellen Sie weder den Brotbackautomaten, Möbelstücke oder andere
schwere Gegenstände auf das Netzkabel (4) und achten Sie darauf, dass dieses nicht
geknickt wird.
WARNUNG! Machen Sie niemals einen Knoten in das Netzkabel (4) und binden Sie
es nicht mit anderen Kabeln zusammen. Verlegen Sie das Netzkabel (4) so, dass
niemand darauf tritt oder behindert wird.
WARNUNG! Verwenden Sie keine Adapterstecker oder Verlängerungskabel, die
nicht den geltenden Sicherheitsnormen entsprechen und nehmen Sie auch keine Eingriffe
an dem Netzkabel (4) vor! Wenn das Netzkabel (4) beschädigt ist, muss es durch den
Hersteller oder seinen Kundendienst oder eine ähnlich qualifizierte Person ersetzt
werden, um Gefährdungen zu vermeiden.
Urheberrecht
Alle Inhalte dieser Anleitung unterliegen dem Urheberrecht und werden dem Leser ausschließlich
als Informationsquelle bereitgestellt. Jegliches Kopieren oder Vervielfältigen von Daten und
Informationen ist ohne ausdrückliche und schriftliche Genehmigung durch den Autor verboten.
Dieses betrifft auch die gewerbliche Nutzung der Inhalte und Daten. Text und Abbildungen
entsprechen dem technischen Stand bei Drucklegung. Änderungen vorbehalten.
Vor der Inbetriebnahme
Entnehmen Sie den Brotbackautomaten aus der Verpackung und entfernen Sie das
Verpackungsmaterial vollständig. Prüfen Sie den Brotbackautomaten auf Beschädigungen. Bei
Beschädigungen darf der Brotbackautomat nicht in Betrieb genommen werden.
Reinigen Sie das Gehäuse des Brotbackautomaten, die Backform (7) und die Knethaken (6) vor
dem ersten Gebrauch mit einem sauberen, feuchten Tuch. Verwenden Sie keinesfalls Scheuermittel
oder kratzende Putzschwämme.
Erstinbetriebnahme
GEFAHR! Im Betrieb kann die Temperatur der berührbaren Flächen sehr hoch sein.
Verbrennungsgefahr!
Bei der ersten Inbetriebnahme kann durch fertigungsbedingte Rückstände ein leichter
Geruch entstehen, auch geringe Rauchentwicklung ist möglich. Dieses ist normal und
verliert sich nach kurzer Zeit. Bitte sorgen Sie für ausreichende Belüftung. Öffnen Sie
gegebenenfalls ein Fenster.
Deutsch - 7
Page 10
SilverCrest EDS SBB 850 B1
GEFAHR! Lassen Sie den Brotbackautomaten keinesfalls länger als 5 Minuten mit
leerer Backform (7) aufheizen. Es besteht Überhitzungs- und Brandgefahr!
Gehen Sie bei der Erstinbetriebnahme folgendermaßen vor:
Nur bei dieser ersten Inbetriebnahme setzen Sie die leere Backform (7) ein, schließen die
Abdeckung (2) und wählen Programm 12, wie im Kapitel „Programme“ beschrieben. Drücken Sie
die Taste , um den Brotbackautomaten für 5 Minuten aufzuheizen. Nach 5 Minuten drücken
Sie erneut die Taste so lange, bis ein langer Signalton ertönt. Das Programm wird beendet.
Ziehen Sie das Netzkabel (4) aus der Steckdose, lassen Sie den Brotbackautomaten vollständig
abkühlen und reinigen Sie dann mit einem sauberen, feuchten Tuch erneut Backform (7),
Knethaken (6) und Gehäuse des Brotbackautomaten.
Der Brotbackautomat ist nun betriebsbereit.
Inbetriebnahme
GEFAHR! Die Teile des Brotbackautomaten können sich stark erhitzen. Benutzen Sie
Topflappen oder Ofenhandschuhe, um Verbrennungen vorzubeugen.
GEFAHR! Betreiben Sie den Brotbackautomaten nicht an einer Zeitschaltuhr oder einer
Funksteckdose.
WARNUNG! Stellen Sie den Brotbackautomaten auf eine ebene, wärmebeständige
Oberfläche. Legen Sie bei einer empfindlichen Oberfläche eine hitzebeständige Platte
unter den Brotbackautomaten.
Leistungsumfang
Sie können unter12 verschiedenen Programmen wählen.
Sie können eigene Brote nach eigenen Rezepturen herstellen.
Sie können Fertigbackmischungen verarbeiten.
Sie können Kuchen-, Brötchen- oder Nudelteig kneten.
Sie können Marmelade oder Konfitüre herstellen.
Sie können glutenfreie Backmischungen und Rezepte mit glutenfreien Mehlen verarbeiten.
Viele leckere Backmischungen und Zutaten für Ihre eigenen Rezepte können Sie in Ihrem
LIDL vor Ort kaufen.
8 - Deutsch
Page 11
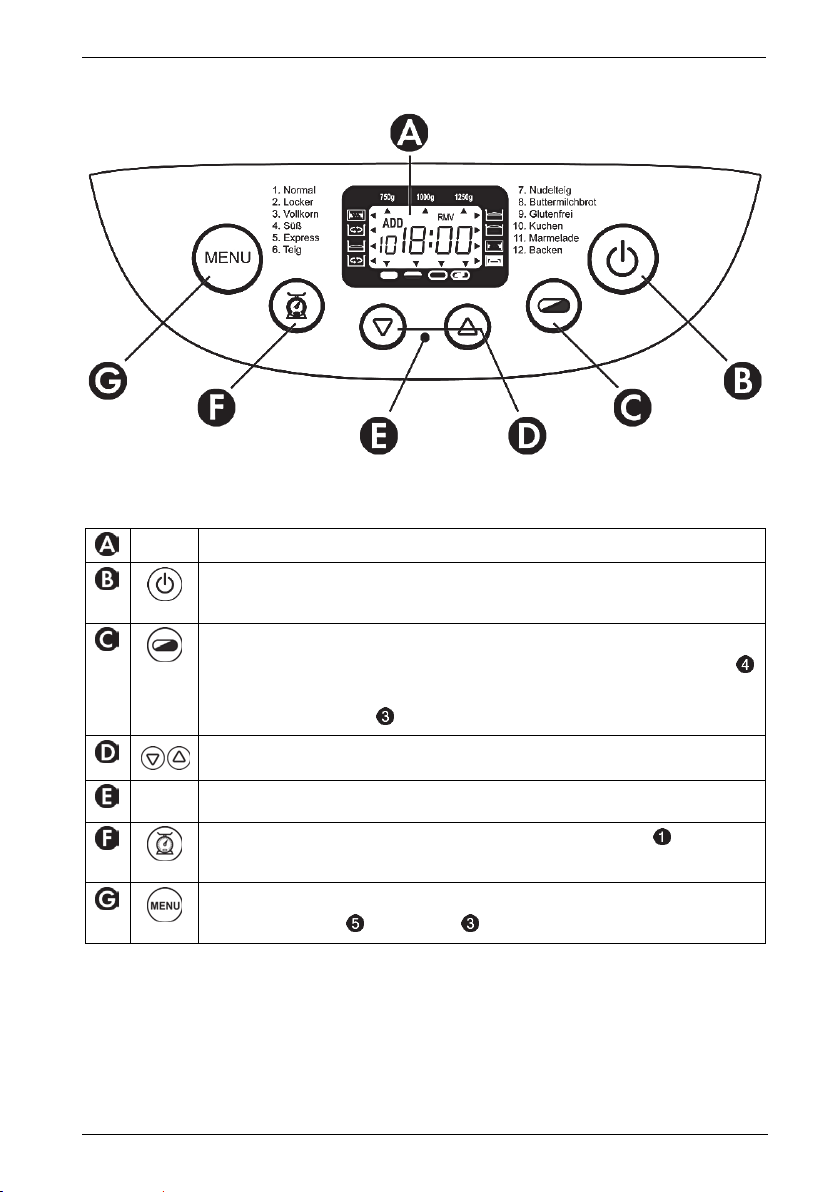
Das Bedienfeld
SilverCrest EDS SBB 850 B1
Display
Start / Stop: Drücken Sie diese Taste bis ein Signalton ertönt zum
Starten/Stoppen des Gerätes oder zum Löschen einer Timer-Einstellung,
Bräunungsgrad / Schnellmodus: Einstellung von Bräunungsgrad (hell,
mittel, dunkel) oder Schnellmodus. Drücken Sie die Taste so oft, bis der Pfeil
über dem gewünschten Symbol steht. Abhängig von der gewählten Einstellung
ändert sich die Backzeit .
Timer: zeitverzögertes Backen
Betriebs-LED: zeigt an, dass ein Programm läuft
Brotgewicht: Drücken Sie die Taste so oft, bis der Pfeil unter dem
gewünschten Gewicht steht.
Menü / Programm: Wählen Sie hier das gewünschte Backprogramm.
Programm-Nummer und Backzeit werden im Display angezeigt.
Deutsch - 9
Page 12
SilverCrest EDS SBB 850 B1
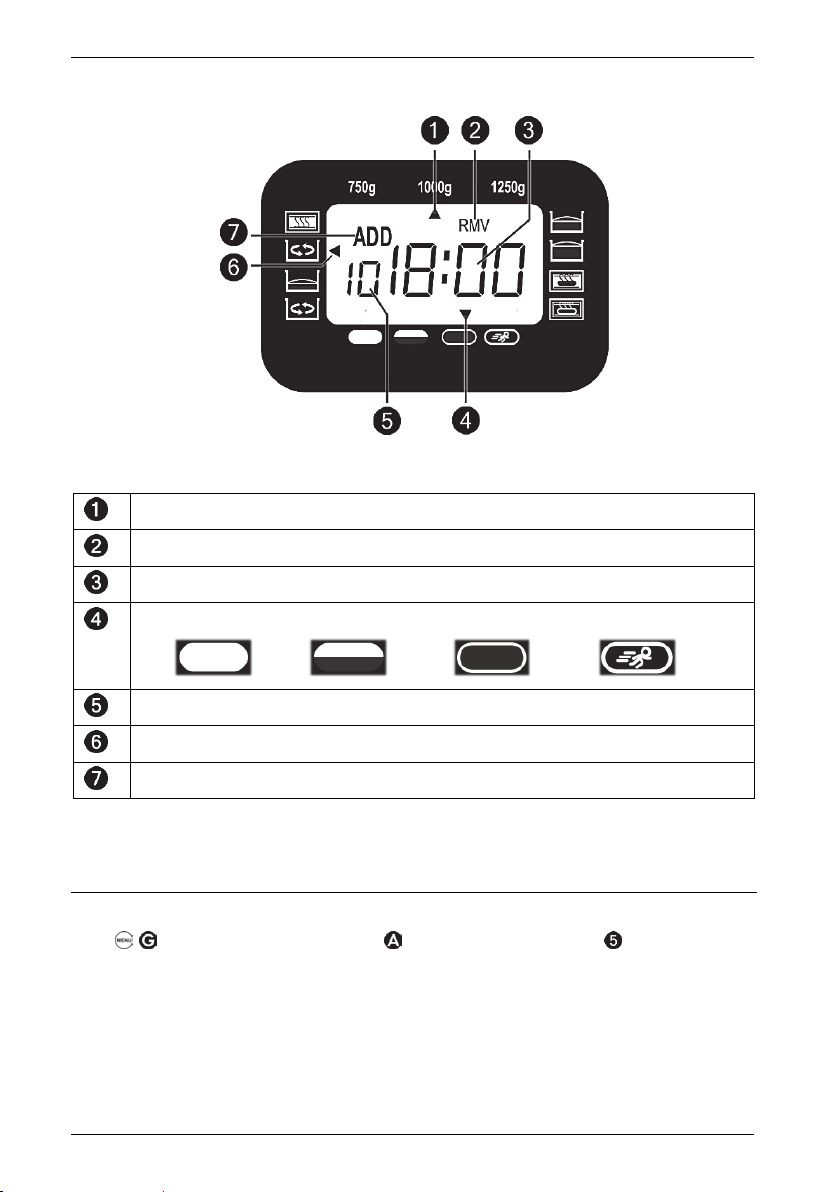
Das Display
Displayanzeigen
Gewichtsanzeige (750g / 1000g / 1250g)
REMOVE-Funktion (RMV)
Restbetriebszeit (STD) / Zeitvorwahl
Gewählter Bräunungsgrad / Schnellmodus
Hell , Mittel , Dunkel , Schnell
Gewähltes Programm (1 – 12)
Programmablauf
Zugabe von Zutaten (ADD)
Die Programme
Der Brotbackautomat bietet Ihnen 12 vorprogrammierte Programme, die Sie mit der
Taste auswählen können. Im Display wird die Programmnummer des ausgewählten
Programmes angezeigt.
Die Backzeiten sind abhängig von den gewählten Programmkombinationen, insbesondere vom
Gewicht. Beachten Sie hierzu auch das Kapitel „Programmablauf“.
Die folgende Beschreibung der Programme gibt Ihnen einen Überblick über die Programme und die
Eignung für Ihre Backvorhaben.
10 - Deutsch
Page 13

SilverCrest EDS SBB 850 B1
Programm 1: Normal
Dieses Programm eignet sich für das Backen von Weiß- oder Mischbroten, die zum größten Teil aus
Weizen- oder Roggenmehl bestehen. Sie erhalten Brote von kompakter Konsistenz.
Programm 2: Locker
Zum Backen leichter Brote aus gut gemahlenen Mehlen eignet sich dieses Program. In der Regel
erhalten Sie lockere Brote mit einer knusprigen Kruste.
Programm 3: Vollkorn
Dieses Programm ist für die Verarbeitung kräftiger Mehlsorten, wie z.B. Weizenvollkornmehl oder
Rogenvollkornmehl geeignet. Das Backergebnis wird ein schweres und kompaktes Brot sein.
Programm 4: Süß
Wenn Sie Ihrem Brot zusätzlichen Zucker oder Zutaten wie Fruchtsäfte, Trockenfrüchte,
Kokosnussflocken, Rosinen oder Schokolade beimengen möchten, ist dieses Programm gut
geeignet. Der Programmablauf sorgt für ein leichteres, luftigeres Brot.
Programm 5: Express
Beim Programm Express sind die Zeiten für Kneten und Backen, sowie die Gehzeit stark reduziert.
Aus diesem Grund sind für dieses Programm nur Rezepte geeignet, die keine kräftigen Mehlsorten
oder sonstige schwere Zutaten benötigen. Das Brot wird bei diesem Programm weniger luftig und
möglicherweise auch nicht so geschmackvoll wie gewohnt.
Programm 6: Teig
Hefeteig für Brötchen, Pizza oder anderes Gebäck kann mit diesem Programm geknetet werden.
Der Backvorgang entfällt.
Programm 7: Nudelteig
Mit diesem Programm können sie Nudelteig vorbereiten. Gehzeiten und Backvorgang entfallen.
Programm 8: Buttermilchbrot
Für Brote mit Buttermilch oder Joghurt ist dieses Programm gut geeignet.
Programm 9: Glutenfrei
Glutenfreie Mehle oder Backmischungen haben andere Triebeigenschaften und benötigen mehr
Zeit für die Aufnahme von Flüssigkeiten. Für Brote aus glutenfreien Mehlen oder glutenfreien
Backmischungen ist dieses Programm geeignet.
Programm 10: Kuchen
Backen Sie Ihre Kuchen nach eigenen Rezepten oder auch Kuchenbackmischungen mit diesem
Programm.
Programm 11: Marmelade
Dieses Programm dient zur Herstellung von Marmelade, Konfitüre, Gelee und anderen
Brotaufstrichen aus Früchten.
Deutsch - 11
Page 14

SilverCrest EDS SBB 850 B1
W
Programm 12: Backen
Dieses Programm gibt Ihnen die Möglickeit, zu helle oder nicht ganz durchgebackene Brote
nachzubacken und so das Backergebnis zu optimieren. Auch können Sie mit diesem Programm
Fertigteige backen. Beachten Sie, dass bei diesem Programm alle Knet- und Ruhevorgänge
vollständig entfallen. Dem 60-minütigen Backvorgang folgt eine Warmhaltezeit von maximal einer
Stunde.
Um das Programm vorzeitig zu beenden, drücken Sie die Taste , bis ein langer Signalton
ertönt. Trennen Sie den Brotbackautomaten vom Stromnetz, um ihn auszuschalten.
Hinweis zum Hinzufügen von Zutaten:
Bei den Programmen 1, 2, 3, 4, 5, 6, 8, 9 können Sie während des Programmablaufs
weitere Zutaten, wie z.B. Nüsse, Kerne oder Früchte hinzufügen.
ertönt und im Display „ADD“ angezeigt wird, geben Sie die gewünschten
Zutaten dazu.
Bei Nutzung des Timers ist es aber auch möglich, sämtliche Zutaten zu Programmbeginn
in die Backform (7) zu geben. In diesem Fall kann es sinnvoll sein, Früchte und Nüsse
vorher zu zerkleinern.
enn ein Signalton
Der Timer
Diese Funktion ermöglicht Ihnen ein zeitverzögertes Backen mit einer maximalen Verzögerung von
15 Stunden. Stellen Sie den Endzeitpunkt mit den Tasten ein.
GEFAHR! Verwenden Sie die Timer-Funktion ausschließlich bei Rezepten, die Sie
vorher schon einmal ausprobiert haben. Damit ist sichergestellt, dass die Zutaten und
Mengen zueinander passen und das gewünschte Backergebnis erreicht wird.
Insbesondere ist sicherzustellen, dass die Teigmenge nicht zu groß ist und dieser nicht
überläuft. Es besteht Brandgefahr!
Für das Programm „11. Marmelade“ steht die Timer-Funktion nicht zur Verfügung.
Achten sie bei Nutzung der Timer-Funktion besonders auf die Auswahl der Zutaten.
Verwenden Sie diese Funktion nicht, falls Sie leicht verderbliche Zutaten wie zum
Beispiel Milch, Eier oder Sahne verarbeiten wollen.
Gehen Sie folgendermaßen vor:
Wählen Sie ein Programm aus. Im Display wird die Backdauer angezeigt.
Durch Drücken der Taste können Sie das Ende des Backprogrammes verschieben. Beim
ersten Drücken der Taste verschiebt sich das Programmende auf die nächsten vollen 10
Minuten, jeder weitere Druck bewirkt weitere 10 Minuten Verschiebung nach hinten. Um den
Fortlauf der Ziffern zu beschleunigen, können Sie die Taste auch gedrückt halten.
Im Display wird die Gesamtzeit aus Backdauer und Verzögerungszeit angezeigt.
12 - Deutsch
Page 15
SilverCrest EDS SBB 850 B1
Mit der Taste können Sie die vorgenommene Verschiebung um jeweils 10 Minuten
verkürzen.
Bestätigen Sie die Timereinstellung durch Drücken der Taste . Im Display blinkt der
Doppelpunkt, die Betriebs-LED blinkt blau und die eingestellte Zeit beginnt abzulaufen.
Wenn der Zeitpunkt des Programmbeginns erreicht ist, wird Ihnen dieses durch das Leuchten
der Betriebs-LED angezeigt. Zusätzlich informiert Sie das Display über den gerade
aktiven Programmschritt .
Das Ende des Backvorganges wird durch 10 Signaltöne signalisiert.
Das Display zeigt 0:00 an.
Beispiel zur Timer-Programmierung:
Es ist 12.00 Uhr mittags und Sie möchten um 19.00 Uhr, also 7 Stunden später gerne
frisches Brot haben. Wählen Sie also zuerst das passende Programm und erhöhen Sie
danach die Zeit, die im Display angezeigt wird, durch Drücken der Taste auf
7:00. Planen Sie bei der Timer-Einstellung eine Abkühlzeit ein, damit Sie das frisch
gebackene Brot auch zur gewünschten Zeit genießen können.
Backen vorbereiten
Eine gute Vorbereitung sichert Ihnen ein gutes Backergebnis. Beachten Sie daher die folgenden
Hinweise zum Umgang mit den Zutaten.
GEFAHR! Nehmen Sie die Backform (7) zum Einfüllen der Zutaten aus dem
Brotbackautomaten, damit nicht versehentlich Zutaten in den Backraum und auf die
Heizschlangen gelangen.
Verwenden Sie auch niemals größere Mengen als angegeben. Überlaufender Teig
kann sich an den Heizschlangen entzünden. Es besteht Brandgefahr.
Die Zutaten sollten immer in der angegebenen Reihenfolge in die Backform (7) gefüllt werden.
Alle verwendeten Zutaten sollten Zimmertemperatur haben. Nur so kann ein optimaler
Gärprozess der Hefe sichergestellt werden.
Schon geringe Mengenabweichungen können sich auf das Backergebnis auswirken. Halten
Sie daher die angegebenen Zutatenmengen möglichst genau ein.
Natürlich ist es möglich, Rezepte durch leichte Veränderungen der Zutatenmengen auf die
persönlichen Bedürfnisse zu optimieren. Dabei sollten Sie sich jedoch langsam an die für Sie
optimalen Mengen herantasten und immer darauf achten, dass es nicht zu einem Überlaufen
des Teiges kommt.
Zutaten abmessen
Im Lieferumfang des Brotbackautomaten befinden sich Messbehälter für trockene und flüssige
Zutaten, die Ihnen das genaue Dosieren der verwendeten Zutaten erleichtern sollen:
Deutsch - 13
Page 16

SilverCrest EDS SBB 850 B1
1 Messbecher mit Messskala für Flüssigkeiten
1 großer Messlöffel, der Inhalt entspricht einem Esslöffel (EL)
1 kleiner Messlöffel, der Inhalt entspricht einem Teelöffel (TL)
Achten Sie beim Abmessen der Zutaten darauf, dass Sie sich möglichst exakt an die
Mengenangaben in den Rezepten halten. Nur so erhalten Sie das gewünschte Ergebnis.
Brot backen
Vorbereitung / Einstellungen
Entnehmen Sie die Backform (7) nach oben aus dem Brotbackautomaten.
Stecken Sie die 2 Knethaken (6) bis zum Anschlag auf die Antriebsachsen innerhalb der
Backform (7).
Geben Sie die Zutaten in der Reihenfolge Ihres Rezeptes in die Backform (7). In der Regel
werden zunächst die Flüssigkeiten, gefolgt von Zucker und Salz eingefüllt. Danach geben Sie
das Mehl und als letzte Zutat die Hefe hinzu. Diese sollte nicht mit den Flüssigkeiten oder dem
Salz in Verbindung kommen.
Setzen Sie nun die Backform (7) wieder in den Brotbackautomaten ein.
Schließen Sie die Abdeckung (2).
Verbinden Sie den Netzstecker mit einem Stromanschluss. Sie hören einen Signalton und im
Display wird die Programmnummer 1 mit der zugehörigen Backzeit angezeigt.
Wählen sie das gewünschte Programm durch ein- oder mehrmaliges Drücken der Taste .
Jeder Tastendruck wird mit einem Signalton quittiert.
Wählen Sie das Brotgewicht mit der Taste .
Wählen Sie den Bräunungsgrad mit der Taste , indem Sie den Pfeil am unteren Rand des
Displays auf die gewünschte Bräunungsstufe bringen. Ebenfalls ist hier die Einstellung
„Schnell“ möglich. Damit wird die Gehzeit des Teiges verkürzt.
Die Einstellung des Bräunungsgrades ist bei den Programmen 6, 7 und 11 nicht
möglich.
Die Funktion „Schnell“ ist nur bei den Programmen 1, 2, 3 und 4 verfügbar.
Die Gewichtseinstellung ist bei den Programmen 6, 7, 11 und 12 nicht möglich.
Mit der Timer-Funktion können Sie nun bei Bedarf den Endzeitpunkt der Backzeit festlegen
(nicht möglich für Programm 11).
Programm starten
Drücken Sie die Taste , um das gewünschte Programm zu starten. Die einzelnen
Programmschritte werden nun nacheinander ausgeführt.
Einige Programme starten mit einer Vorheizphase (siehe Programmablauftabelle). In
dieser Phase bewegen sich die Knethaken (6) nicht. Dabei handelt es sich nicht um
einen Defekt.
14 - Deutsch
Page 17
SilverCrest EDS SBB 850 B1
Sie können den Ablauf der Programme und die einzelnen Arbeitsschritte durch das Sichtfenster (1)
in der Abdeckung (2) beobachten.
Öffnen Sie die Abdeckung (2) niemals während der Geh- oder Backphase, um ein
Zusammenfallen des Brotes zu vermeiden.
Remove-Funktion
Diese Funktion gibt Ihnen die Möglichkeit, die Knethaken (6) vor der Backphase zu entfernen.
Dieses ist nicht zwingend notwendig, hat aber den Vorteil, dass die störenden Löcher im fertigen
Brot etwas kleiner ausfallen, da diese nur noch von den dünnen Achsen verursacht werden. Das
Brot wird beim Herausnehmen aus der Backform (7) nicht mehr durch die Knethaken (6)
aufgerissen und lässt sich auch leichter entfernen.
Gehen Sie folgendermaßen vor:
Nach der letzten Knetphase ertönen 10 Signaltöne und im Display blinkt die Anzeige
„RMV“ .
Drücken sie die Taste , um den Programmablauf für 10 Minuten zu unterbrechen.
Während dieser 10 Minuten Unterbrechung blinkt im Display die verbleibende
Programmdauer.
Öffnen Sie die Abdeckung (2) und entnehmen Sie die Backform (7).
Entnehmen Sie den Teig mit bemehlten Händen und entfernen Sie die Knethaken (6).
Geben Sie den Teig zurück in die Backform (7).
Setzen sie die Backform (7) wieder in den Brotbackautomaten ein und schließen sie die
Abdeckung (2).
Drücken sie die Taste , um den Programmablauf fortzusetzen. Wenn Sie die Taste
nicht drücken, wird das Programm nach 10 Minuten Unterbrechung automatisch fortgesetzt.
Die Remove-Funktion entfällt bei den Programmen 6, 7, 11 und 12.
Programmende
Zum Ende des Backvorganges ertönen 10 Signaltöne und im Display wird 0:00 angezeigt. Der
Brotbackautomat schaltet nun in eine 60 Minuten dauernde Warmhaltephase. Um diese
Warmhaltephase vor Ablauf von 60 Minuten zu beenden, drücken Sie die Taste und halten
sie diese bis zum Ertönen eines langen Signaltones gedrückt.
Die Warmhaltephase entfällt bei den Programmen 6, 7 und 11.
Warnung! Entfernen Sie den Netzstecker vom Stromanschluss, bevor Sie die
Abdeckung (2) des Brotbackautomaten öffnen.
Deutsch - 15
Page 18
SilverCrest EDS SBB 850 B1
Brot entnehmen
GEFAHR! Verwenden Sie zum Entnehmen der Backform (7) Topflappen oder ziehen
Sie Ofenhandschuhe an. Es besteht Verbrennungsgefahr.
Das Brot lässt sich leichter aus der Backform (7) entfernen, wenn Sie es nach dem
Backen noch mindestens 30 Minuten in der Backform (7) belassen (Warmhaltephase).
Halten Sie die Backform (7) schräg mit der Öffnung nach unten über einen Küchenrost und
schütteln Sie diese leicht. Durch die Antihaftbeschichtung der Backform (7) sollte sich das Brot leicht
lösen. Benutzen sie keine Metallgegenstände, um das Brot aus der Backform (7) zu lösen. Die
Antihaftbeschichtung könnte beschädigt werden.
Falls sich die Knethaken (6) nicht vom Brot lösen, entfernen Sie diese mit Hilfe des
Knethakenentferners (10).
Wartung / Reinigung
Wartung
WARNUNG! Wartungsarbeiten sind erforderlich, wenn der Brotbackautomat
beschädigt wurde, Flüssigkeit oder Gegenstände ins Innere des Gehäuses gelangt sind,
der Brotbackautomat Regen oder Feuchtigkeit ausgesetzt wurde oder wenn der
Brotbackautomat nicht einwandfrei funktioniert oder heruntergefallen ist. Falls Sie
Rauchentwicklung, ungewöhnliche Geräusche oder Gerüche feststellen, schalten Sie
den Brotbackautomaten sofort aus und ziehen Sie den Netzstecker aus der Steckdose.
In diesen Fällen darf der Brotbackautomat nicht weiter verwendet werden, bevor eine
Überprüfung durch einen Fachmann durchgeführt wurde. Lassen Sie alle
Wartungsarbeiten nur von qualifiziertem Fachpersonal durchführen. Öffnen Sie niemals
das Gehäuse des Brotbackautomaten.
Informationen zu Ersatzteilen erhalten Sie über unsere Service-Hotline. (siehe Seite 25)
Reinigung
GEFAHR! Ziehen Sie den Netzstecker vor der Reinigung aus der Steckdose, es besteht
Stromschlaggefahr!
GEFAHR! Der Brotbackautomat darf nicht in Wasser getaucht werden! Es besteht
Gefahr von Stromschlag und Kurzschluss.
16 - Deutsch
Page 19

SilverCrest EDS SBB 850 B1
GEFAHR! Warten Sie, bis der Brotbackautomat ganz abgekühlt ist. Andernfalls besteht
Gefahr durch Verbrennungen!
Geräte- und Zubehörteile des Brotbackautomaten sind nicht spülmaschinengeeignet. Verwenden
Sie zur Reinigung des Brotbackautomaten keine chemischen Reinigungs- oder Lösungsmittel. Sie
vermeiden dadurch Schäden am Brotbackautomaten und Reinigungsrückstände in den nächsten
Broten.
Gehen Sie zur Reinigung folgendermaßen vor:
Gerätegehäuse, Abdeckung und Backraum
Entfernen Sie zunächst Knethaken (6) und Backform (7). Zur einfacheren Reinigung des
Backraums kann die Abdeckung (2) abgenommen werden, indem Sie diese in eine Stellung
von ca. 45° bringen, bis das Scharnier durch die Aussparungen in der Scharnierführung passt
und die Abdeckung (2) nach oben abgenommen werden kann.
Entfernen Sie nun mit einem angefeuchteten Tuch oder weichen Schwamm alle Rückstände aus
dem Backraum.
Reinigen Sie anschließend die Abdeckung (2) und das Gerätegehäuse ebenfalls mit einem
angefeuchteten Tuch oder weichen Schwamm.
Trocknen Sie jetzt den Backraum, die Abdeckung (2) und das Gerätegehäuse mit einem
weichen, trockenen Tuch gut ab.
Wenn Sie zuvor die Abdeckung (2) entfernt haben, setzen Sie diese wieder ein.
Backform, Knethaken und weiteres Zubehör
Die Oberflächen von Backform (7) und Knethaken (6) sind mit einer Antihaftbeschichtung versehen.
Um die Funktion dieser Antihaftbeschichtung zu erhalten, benutzen Sie für die Reinigung keine
aggressiven oder scheuernden Reinigungsmittel und keine Gegenstände, die die Oberfläche
verkratzen und beschädigen können.
Entnehmen Sie Backform (7) und Knethaken (6) aus dem Backraum
Entnehmen Sie die Knethaken (6) aus der Backform (7), indem Sie diese von den Achsen nach
oben abziehen. Es kann vorkommen, dass sich die Knethaken (6) nicht abziehen lassen, da
diese durch den vorherigen Backvorgang an der Achse „kleben“. In diesem Fall füllen Sie die
Backform (7) mit heißem Wasser. Nach einer halben Stunde Einwirkzeit sollten sich
Verkrustungen gelöst und die Knethaken (6) entnehmen lassen.
Reinigen Sie die Knethaken (6) mit warmem Wasser, etwas mildem Spülmittel und einer
Spülbürste, bei hartnäckigen Verkrustungen weichen Sie die Knethaken (6) zuvor in dem
Spülwasser ein. Eventuelle Rückstände im Achsendurchlass der Knethaken (6) können Sie
vorsichtig mit einem Holzstäbchen entfernen.
Trocknen Sie die Knethaken (6) nach erfolgter Reinigung gründlich ab.
Reinigen Sie die Außenseite der Backform (7) mit einem feuchten Tuch.
Deutsch - 17
Page 20

SilverCrest EDS SBB 850 B1
Reinigen Sie den Inneraum der Backform (7) mit warmem Wasser, etwas mildem Spülmittel und
einer Spülbürste. Bei hartnäckigen Verkrustungen füllen Sie die Backform (7) mit warmem
Wasser und geben Sie mildes Spülmittel dazu. Warten Sie bis die Verkrustungen gelöst sind
und Sie diese mit einer Spülbürste entfernen können.
Spülen Sie die Backform (7) nach der Reinigung mit reichlich klarem Wasser aus, um
Spülmittelreste zu entfernen und trocknen Sie die Backform (7) anschließend gründlich ab.
Messbecher (8), Messlöffel (9) und Knethakenentferner (10) reinigen Sie bitte mit warmem
Wasser und etwas mildem Spülmittel. Trocknen Sie diese Teile nach Abspülen mit klarem
Wasser gründlich ab.
Durch Hitze, Feuchtigkeit und Dampf kann es im Laufe der Zeit zu leichten farblichen
Veränderungen der Oberflächen kommen. Dies ist normal und stellt keine
Beeinträchtigung der Funktionsfähigkeit oder Qualitätsminderung im Sinne der
Garantiebedingungen dar.
Fehlerbehebung / Häufige Fragen
Displayanzeige „HHH“
Problem: Ein Programm wurde gestartet, obwohl der Brotbackautomat nach dem letzten
Backvorgang noch nicht ausreichend abgekühlt ist.
Lösung: Stoppen Sie das Programm und ziehen Sie den Netzstecker. Lassen Sie den
Brotbackautomaten mit geöffneter Abdeckung (2) 20-30 Minuten abkühlen.
Programm startet nicht und Display springt auf Programm 1
Problem: Der Brotbackautomat ist nach dem letzten Backvorgang noch nicht ausreichend
abgekühlt.
Lösung: Lassen Sie den Brotbackautomaten mit geöffneter Abdeckung (2) 20-30 Minuten
abkühlen.
Displayanzeige „EE0“, „EE1“ oder „ELL“ nach Programmstart
Lösung: Schalten Sie den Brotbackautomaten aus und ziehen Sie den Netzstecker. Stecken Sie
anschließend den Netzstecker wieder ein. Sollte die Fehlermeldung weiter erscheinen, wenden Sie
sich bitte an den Kundendienst.
Nach dem Backen bleibt der Knethaken (6) in der Backform (7) stecken
Lösung: Füllen Sie heißes Wasser in die Backform (7) und drehen Sie den Knethaken (6), damit
sich die Verkrustungen lösen können.
Nach dem Backen bleibt der Knethaken (6) im Brot stecken
Lösung: Entfernen Sie den Knethaken (6) mit dem Knethakenentferner (10).
18 - Deutsch
Page 21
SilverCrest EDS SBB 850 B1
Der Motor dreht, aber der Teig wird nicht gerührt
Lösung: Prüfen Sie, ob Backform (7) und Knethaken (6) richtig eingerastet sind.
Brotbackautomat zerkleinert Obst und Nüsse
Lösung: Geben Sie Zutaten wie Obst und Nüsse möglichst erst zum Teig, wenn das Signal ertönt
und „ADD“ im Display angezeigt wird.
Brotbackautomat arbeitet nicht
Lösung: Vergewissern Sie sich, dass der Netzstecker eingesteckt an das Stromnetz angeschlossen
ist und die Betriebs-LED leuchtet. Versuchen Sie anhand des Programmablaufs festzustellen, in
welcher Phase sich der Brotbackautomat gerade befindet. Einige Programmschritte sind von außen
schwer zu erkennen. Kontrollieren Sie, ob die Taste richtig gedrückt wurde.
Umwelthinweise und Entsorgungsangaben
Die mit diesem Symbol gekennzeichneten Geräte unterliegen der europäischen
Richtlinie 2012/19/EU. Alle Elektro- und Elektronik-Altgeräte müssen getrennt vom
Hausmüll über dafür staatlich vorgesehene Stellen entsorgt werden. Mit der
ordnungsgemäßen Entsorgung des alten Gerätes vermeiden Sie Umweltschäden
und eine Gefährdung Ihrer persönlichen Gesundheit. Weitere Informationen zur
vorschriftsgemäßen Entsorgung des alten Geräts erhalten Sie bei der
Stadtverwaltung, beim Entsorgungsamt oder in dem Geschäft, wo Sie das Gerät
erworben haben.
Führen Sie auch die Verpackung einer umweltgerechten Entsorgung zu. Kartonagen können bei
Altpapiersammlungen oder an öffentlichen Sammelplätzen zur Wiederverwertung abgegeben
werden. Folien und Kunststoffe des Lieferumfangs werden über Ihr örtliches
Entsorgungsunternehmen eingesammelt und umweltgerecht entsorgt.
Konformitätsvermerke
Dieses Gerät entspricht den grundlegenden Anforderungen und den anderen
relevanten Vorschriften der Richtlinie für Niederspannungsgeräte 2006/95/EC,
der EMV-Richtlinie 2004/108/EC, die ERP-Richtlinie 2009/125/EC sowie der
RoHS Richtlinie 2011/65/EU. Die dazugehörige Konformitätserklärung finden Sie
am Ende dieser Anleitung.
Deutsch - 19
Page 22
SilverCrest EDS SBB 850 B1
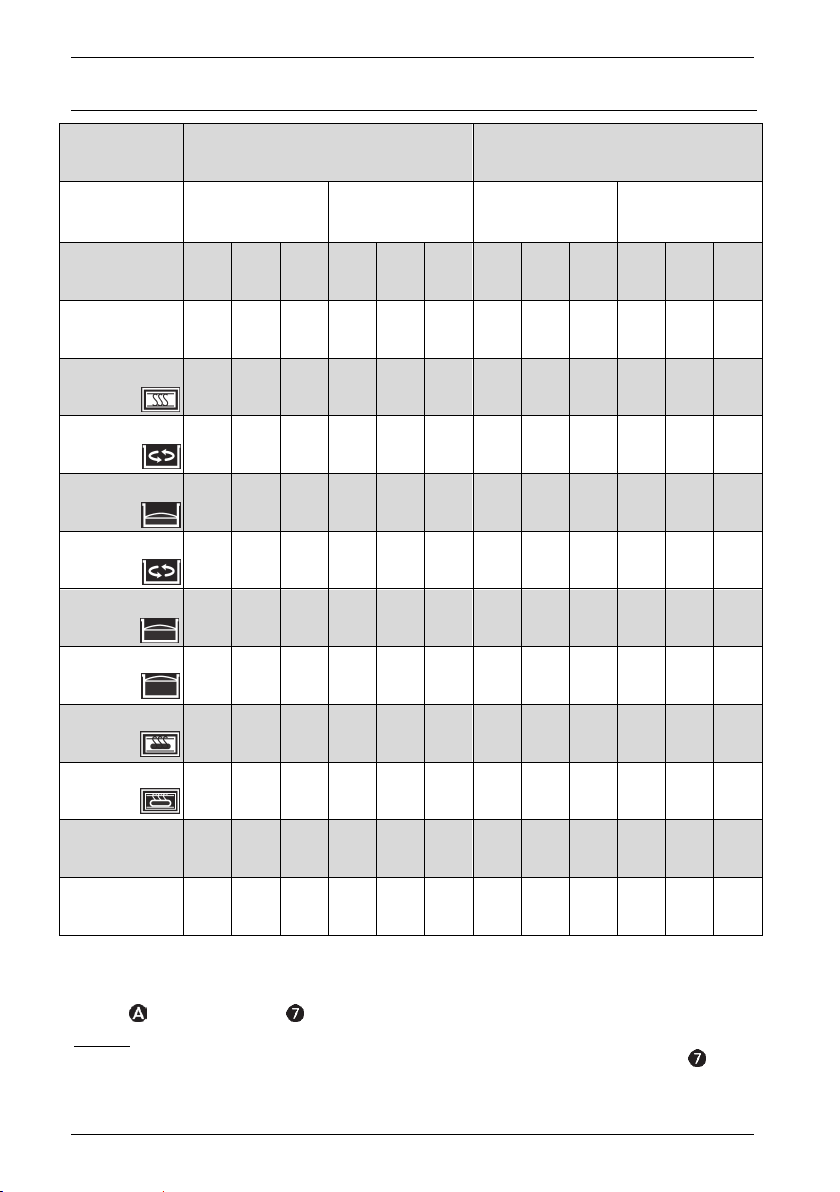
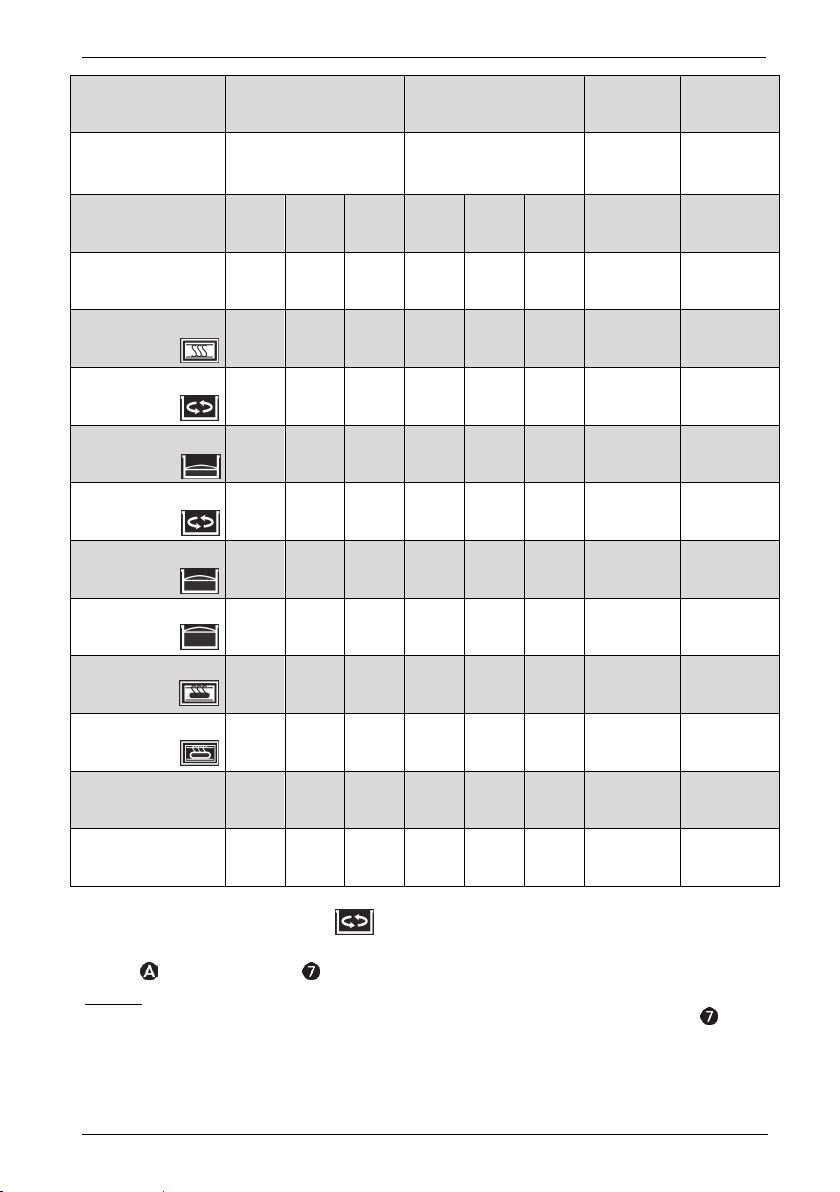
Programmablauf
Programm 1. Normal 2. Locker
Hell
Bräunungsgrad
Mittel
Schnell
Dunkel
Gewicht (Gramm) 750 1000 1250 750 1000 1250 750 1000 1250 750 1000 1250
Zeit (Stunden) 2:58 3:05 3:15 2:14 2:20 2:25 3:13 3:18 3:25 2:18 2:25 2:30
Vorheizen (Min.)
Kneten 1 (Min.)
Gehen 1 (Min.)
Kneten 2 (Min.)
Gehen 2 (Min.)
Gehen 3 (Min.)
Backen (Min.)
15 15 20
12 13 13 12 13 13 12 12 15 12 13 13
25 25 25 10 10 10 20 20 20 10 10 10
2
2
3A*
5A*
5
5
30 30 30 18 18 18 43 41 35 18 18 18
30 30 30 30 30 30 35 35 35 30 30 30
56 60 65 56 60 65 60 65 70 60 65 70
2
5A*
5
-/- -/- -/-
2
2
1A*
2A*
5
5
2
2A*
5
Hell
Mittel
Dunkel
10 10 15
2
2
3A*
5A*
8
8
2
5A*
8
Schnell
-/- -/- -/-
2
2
1A*
2A*
5
5
2
2A*
5
Warmhalten (Min.)
Zutaten ergänzen
(STD verbleibend)
Zeitvorwahl 15h 15h 15h 15h 15h 15h 15h 15h 15h 15h 15h 15h
60 60 60 60 60 60 60 60 60 60 60 60
2:01 2:05 2:10 1:49 1:53 1:58 2:26 2:29 2:28 1:53 1:58 2:03
*: Beim Programmschritt „Kneten 2“ können Sie weitere Zutaten hinzugeben.
Das hinter der Ziffer stehende A bedeutet, dass in dieser Phase ein Signalton ertönt und im
Display gleichzeitig „ADD“ erscheint. Während dieser Zeit können Sie Zutaten hinzufügen.
Beispiel:
3A > Während dieser 3-minütigen Knetphase wird ein Signalton ausgegeben und „ADD“ wird
angezeigt. Geben Sie Zutaten hinzu.
20 - Deutsch
Page 23
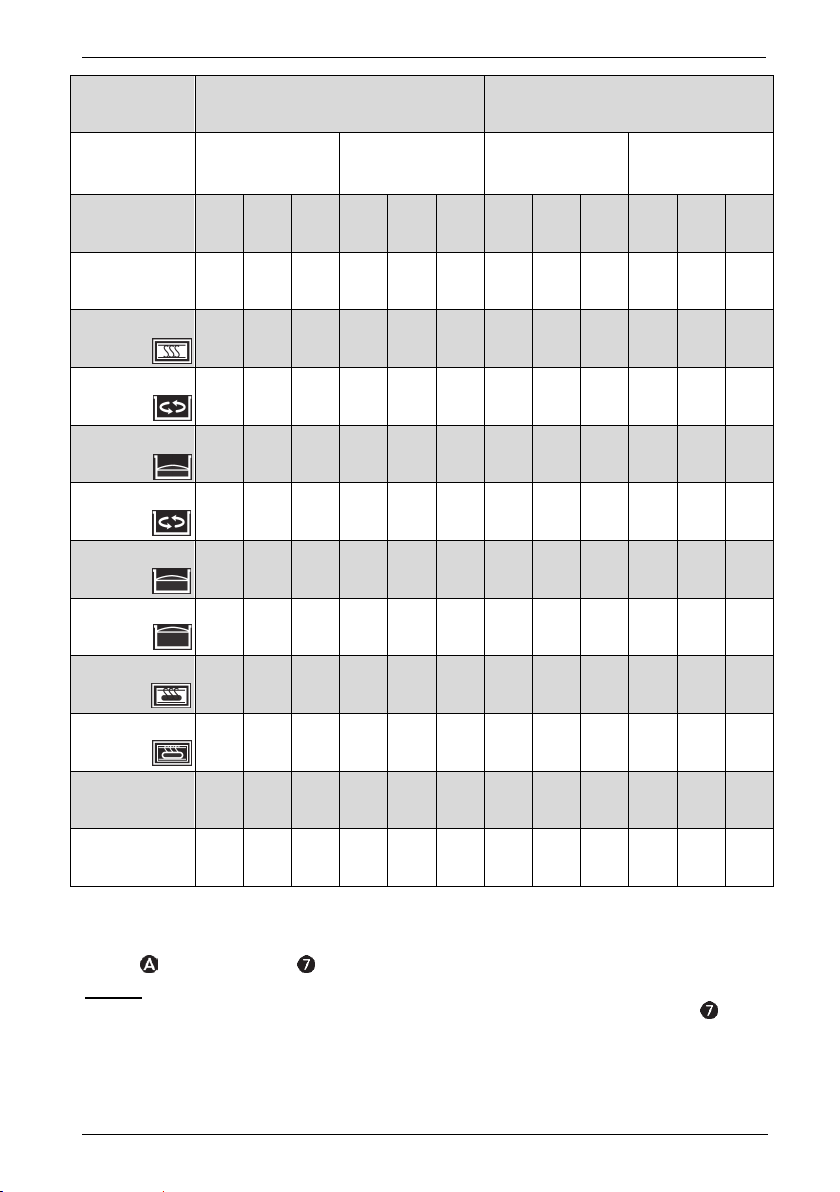
SilverCrest EDS SBB 850 B1
Programm 3. Vollkorn 4. Süß
Hell
Bräunungsgrad
Mittel
Schnell
Dunkel
Gewicht (Gramm) 750 1000 1250 750 1000 1250 750 1000 1250 750 1000 1250
Zeit (Stunden) 3:18 3:25 3:35 2:24 2:30 2:35 2:56 3:01 3:10 2:10 2:16 2:20
Vorheizen (Min.)
Kneten 1 (Min.)
Gehen 1 (Min.)
Kneten 2 (Min.)
Gehen 2 (Min.)
Gehen 3 (Min.)
Backen (Min.)
15 15 20
11 12 12 11 13 13 12 12 12 11 12 12
25 25 25 10 10 10 20 20 20 10 10 10
2
2
3A*
5A*
8
8
38 38 38 23 23 23 35 35 35 18 18 18
35 35 35 35 35 35 30 30 30 30 30 30
56 60 65 56 60 65 52 56 60 52 56 60
2
5A*
8
-/- -/- -/-
2
2
2A*
2A*
5
5
2
2A*
5
Hell
Mittel
Dunkel
10 10 15
2
2
4A*
5A*
6
6
2
5A*
6
Schnell
-/- -/- -/-
2
2
1A*
2A*
6
6
2
2A*
6
Warmhalten (Min.)
Zutaten ergänzen
(STD verbleibend)
Zeitvorwahl 15h 15h 15h 15h 15h 15h 15h 15h 15h 15h 15h 15h
60 60 60 60 60 60 60 60 60 60 60 60
2:17 2:21 2:26 1:59 2:03 2:08 2:03 2:07 2:11 1:46 1:50 1:54
*: Beim Programmschritt „Kneten 2“ können Sie weitere Zutaten hinzugeben.
Das hinter der Ziffer stehende A bedeutet, dass in dieser Phase ein Signalton ertönt und im
Display gleichzeitig „ADD“ erscheint. Während dieser Zeit können Sie Zutaten hinzufügen.
Beispiel:
3A > Während dieser 3-minütigen Knetphase wird ein Signalton ausgegeben und „ADD“ wird
angezeigt. Geben Sie Zutaten hinzu.
Deutsch - 21
Page 24

SilverCrest EDS SBB 850 B1
Programm
5.
Express
Hell
Bräunungsgrad
Mittel
Dunkel
Gewicht (Gramm) 750 1000 1250
Dauer (Stunden) 1:15 1:18 1:20 1:50 0:15 3:17 3:21 3:30
Vorheizen (Min.)
-/- -/- -/-
Kneten 1 (Min.)
Gehen 1 (Min.)
8 8 8 12 15
-/- -/- -/-
-/-
-/-
Kneten 2 (Min.)
Gehen 2 (Min.)
Gehen 3 (Min.)
Backen (Min.)
2A*
2A*
5
-/- -/- -/-
20 20 20 45
40 43 45
-/-
2A*
5
5
6.
Teig
7.
Nudelteig
-/- -/-
-/- -/-
10
-/-
10 10 10
10
-/-
3A*
5
25
-/-
-/-
-/-
-/-
-/-
-/-
8.
Buttermilchbrot
Hell
Mittel
Dunkel
750 1000 1250
25 25 30
20 20 20
2
2
5A*
5A*
8
45 45 45
30 30 30
52 56 60
2
5A*
8
8
Warmhalten (Min.)
Zutaten ergänzen (STD
verbleibend)
Zeitvorwahl 15h 15h 15h 15h 15h 15h 15h 15h
60 60 60
1:05 1:08 1:10 1:15
-/-
-/-
-/-
60 60 60
2:15 2:19 2:23
*: Beim Programmschritt „Kneten 2“ können Sie weitere Zutaten hinzugeben.
Das hinter der Ziffer stehende A bedeutet, dass in dieser Phase ein Signalton ertönt und im
Display gleichzeitig „ADD“ erscheint. Während dieser Zeit können Sie Zutaten hinzufügen.
Beispiel:
3A > Während dieser 3-minütigen Knetphase wird ein Signalton ausgegeben und „ADD“ wird
angezeigt. Geben Sie Zutaten hinzu.
22 - Deutsch
Page 25
SilverCrest EDS SBB 850 B1
Programm
9.
Glutenfrei
Hell
Bräunungsgrad
Mittel
Dunkel
Gewicht (Gramm) 750 1000 1250 750 1000 1250
Dauer (Stunden) 1:37 1:41 1:45
Vorheizen (Min.)
1:30
10.
Kuchen
Hell
Mittel
Dunkel
1:35 1:40 1:20 1:00
-/- -/- -/- -/- -/- -/- -/- -/-
Kneten 1 (Min.)
Gehen 1 (Min.)
15 15 15
15
15 15
-/- -/- -/- -/- -/- -/-
Kneten 2 (Min.)
Gehen 2 (Min.)
Gehen 3 (Min.)
Backen (Min.)
Warmhalten (Min.)
-/- -/- -/- -/- -/- -/- -/- -/-
30 30 30
-/- -/- -/- -/- -/-
-/- -/- -/- -/- -/- -/-
52 56 60
60 +
Gehen
60 60 60
15
60
65 +
70 +
15
Gehen
15
Gehen
60 60
11.
Marmelade
-/-
-/- -/-
-/- -/-
15
(Hitze und
Rühren)
45
(Hitze und
Rühren)
20
Gehen
-/-
12.
Backen
Hell
Mittel
Dunkel
-/-
-/-
60
60
Zutaten ergänzen (STD
verbleibend)
Zeitvorwahl 15h 15h 15h 15h 15h 15h
-/- -/- -/- -/- -/- -/- -/- -/-
-/-
15h
*: Beim Programmschritt „Kneten 2“ können Sie weitere Zutaten hinzugeben.
Das hinter der Ziffer stehende A bedeutet, dass in dieser Phase ein Signalton ertönt und im
Display gleichzeitig „ADD“ erscheint. Während dieser Zeit können Sie Zutaten hinzufügen.
Beispiel:
3A > Während dieser 3-minütigen Knetphase wird ein Signalton ausgegeben und „ADD“ wird
angezeigt. Geben Sie Zutaten hinzu.
Deutsch - 23
Page 26

SilverCrest EDS SBB 850 B1
Hinweise zu Garantie und Serviceabwicklung
Garantie der TARGA GmbH
Sehr geehrte Kundin, sehr geehrter Kunde,
Sie erhalten auf dieses Gerät 3 Jahre Garantie ab Kaufdatum. Im Falle von Mängeln dieses
Produkts stehen Ihnen gegen den Verkäufer des Produkts gesetzliche Rechte zu. Diese gesetzlichen
Rechte werden durch unsere im Folgenden dargestellte Garantie nicht eingeschränkt.
Garantiebedingungen
Die Garantiefrist beginnt mit dem Kaufdatum. Bitte bewahren Sie den originalen Kassenbon gut
auf. Diese Unterlage wird als Nachweis für den Kauf benötigt. Tritt innerhalb von drei Jahren ab
dem Kaufdatum dieses Produkts ein Material- oder Fabrikationsfehler auf, wird das Produkt von uns
– nach unserer Wahl – für Sie kostenlos repariert oder ersetzt.
Garantiezeit und gesetzliche Mängelansprüche
Die Garantiezeit wird durch die Gewährleistung nicht verlängert. Dies gilt auch für ersetzte und
reparierte Teile. Eventuell schon beim Kauf vorhandene Schäden und Mängel müssen sofort nach
dem Auspacken gemeldet werden. Nach Ablauf der Garantiezeit anfallende Reparaturen sind
kostenpflichtig.
Garantieumfang
Das Gerät wurde nach strengen Qualitätsrichtlinien sorgfältig produziert und vor Auslieferung
gewissenhaft geprüft. Die Garantieleistung gilt für Material- oder Fabrikationsfehler. Diese Garantie
erstreckt sich nicht auf Produktteile, die normaler Abnutzung ausgesetzt sind und daher als
Verschleißteile angesehen werden können oder für Beschädigungen an zerbrechlichen Teilen, z. B.
Schalter, Akkus oder die aus Glas gefertigt sind. Diese Garantie verfällt, wenn das Produkt
beschädigt, nicht sachgemäß benutzt oder gewartet wurde. Für eine sachgemäße Benutzung des
Produkts sind alle in der Bedienungsanleitung aufgeführten Anweisungen genau einzuhalten.
Verwendungszwecke und Handlungen, von denen in der Bedienungsanleitung abgeraten oder vor
denen gewarnt wird, sind unbedingt zu vermeiden. Das Produkt ist nur für den privaten und nicht für
den gewerblichen Gebrauch bestimmt. Bei missbräuchlicher und unsachgemäßer Behandlung,
Gewaltanwendung und bei Eingriffen, die nicht von unserer autorisierten Service-Niederlassung
vorgenommen wurden, erlischt die Garantie. Mit Reparatur oder Austausch des Produkts beginnt
kein neuer Garantiezeitraum.
Abwicklung im Garantiefall
Um eine schnelle Bearbeitung Ihres Anliegens zu gewährleisten, folgen Sie bitte den folgenden
Hinweisen:
24 - Deutsch
Page 27
SilverCrest EDS SBB 850 B1
- Bitte lesen Sie vor Inbetriebnahme Ihres Produktes sorgfältig die beigefügte
Dokumentation. Sollte es mal zu einem Problem kommen, welches auf diese Weise nicht
gelöst werden kann, wenden Sie sich bitte an unsere Hotline.
- Bitte halten Sie für alle Anfragen den Kassenbon und die Artikelnummer bzw. wenn
vorhanden die Seriennummer als Nachweis für den Kauf bereit.
- Für den Fall, dass eine telefonische Lösung nicht möglich ist, wird durch unsere Hotline in
Abhängigkeit der Fehlerursache ein weiterführender Service veranlasst.
Service
E-Mail: service.DE@targa-online.com
Telefon: 0049 (0) 211 - 547 69 93
Telefon: 0043 (0) 1 - 79 57 60 09
E-Mail: service.AT@targa-online.com
Telefon: 0041 (0) 44 - 511 82 91
E-Mail: service.CH@targa-online.com
IAN: 102869
Hersteller
Bitte beachten Sie, dass die folgende Anschrift keine Serviceanschrift ist. Kontaktieren Sie zunächst
die oben benannte Servicestelle.
TARGA GmbH
Coesterweg 45
59494 SOEST
DEUTSCHLAND / GERMANY
Deutsch - 25
Page 28

SilverCrest EDS SBB 850 B1
Table des matières
Introduction ...................................................................................................... 27
Utilisation conforme à sa destination ............................................................... 27
Contenu du coffret ............................................................................................ 27
Caractéristiques techniques .............................................................................. 28
Consignes de sécurité ....................................................................................... 28
Droits d'auteur ................................................................................................. 31
Avant la mise en service ................................................................................... 31
Première mise en service .................................................................................. 31
Mise en service ................................................................................................. 32
Applications possibles ....................................................................................................................... 32
La zone de commande ...................................................................................................................... 33
L'écran ................................................................................................................................................. 34
Indications à l'écran ........................................................................................................................... 34
Les programmes ............................................................................................... 34
La programmation ........................................................................................... 36
Préparation ...................................................................................................... 37
Mesure des ingrédients...................................................................................................................... 37
Pour faire votre pain ........................................................................................ 38
Préparation/réglages ........................................................................................................................ 38
Démarrage du programme ............................................................................................................... 38
Fonction RMV (Enlever) ..................................................................................................................... 39
Fin du programme .............................................................................................................................. 39
Retrait du pain .................................................................................................................................... 40
Maintenance/nettoyage .................................................................................. 40
Dépannage / Questions fréquentes .................................................................. 42
Consignes sur l'environnement et sur l'élimination ........................................... 43
Marquages de conformité ................................................................................ 43
Déroulement du programme ............................................................................ 44
Remarques sur la garantie et en cas d'intervention technique .......................... 48
26 - Français
Page 29

SilverCrest EDS SBB 850 B1
Introduction
Merci d'avoir porté votre choix sur la machine à pain SilverCrest EDS SBB 850 B1, désignée ciaprès machine à pain. Vous avez acheté un produit de qualité et durable.
Le présent mode d'emploi contient des consignes importantes pour l'utilisation en toute sécurité de
l'appareil, ainsi que des remarques et des informations relatives à son utilisation quotidienne et à sa
mise au rebut. Avant d'utiliser la machine à pain, lisez attentivement ce mode d'emploi dans son
intégralité et utilisez la machine à pain uniquement dans les limites d'utilisation indiquées et aux fins
décrites. Si vous vendez ou cédez la machine à pain, remettez impérativement ce mode d'emploi
au nouveau propriétaire. Il fait partie intégrante de l'appareil.
Utilisation conforme à sa destination
La machine à pain est facile à utiliser et vous offre la possibilité de fabriquer en une seule opération
du pain, des gâteaux et des confitures pour votre consommation domestique. Ensuite, vous pouvez
utiliser les produits fabriqués selon vos besoins.
Cette machine à pain n'est pas prévue pour un usage dans une entreprise ou tout autre
environnement professionnel. Cette machine à pain est exclusivement réservée à un usage privé,
toute autre utilisation est considérée non conforme. En outre, la machine à pain ne doit pas être
utilisée en dehors de locaux fermés ni dans des zones de climat tropical. Utilisez la machine à pain
uniquement aux fins décrites dans ce mode d'emploi, et jamais pour déshydrater les aliments ou
d'autres objets. Utilisez uniquement les accessoires recommandés par le fabricant. Les accessoires
non recommandés peuvent endommager irrémédiablement l'appareil. Ceci peut entraîner la perte
de vos droits à la garantie.
Cette machine à pain est conforme à toutes les normes européennes applicables. La conformité à
ces normes n'est plus assurée si une modification est apportée à la machine à pain sans l'accord du
fabricant. Le fabricant décline toute responsabilité en cas de dommages ou pannes en résultant.
Veuillez tenir compte des réglementations et lois nationales du pays d'utilisation.
Contenu du coffret
Machine à pain
Moule
2 pales de pétrissage
Outil de retrait des pales de pétrissage
Verre mesureur
Cuillères doseuses
Ce mode d'emploi
Cahier de recettes
Mode d'emploi succinct
Français - 27
Page 30

SilverCrest EDS SBB 850 B1
Ce mode d'emploi est muni d'une couverture dépliable. Sur la page intérieure de la couverture est
représentée la machine à pain avec des références. Les numéros ont la signification suivante :
Figure A Figure B
1 Hublot 6 Pale de pétrissage
2 Couvercle 7 Moule
3 Fentes d'aération 8 Verre mesureur
4 Câble d'alimentation 9 Cuillères doseuses
5 Zone de commande 10 Outil de retrait des pales de pétrissage
Caractéristiques techniques
Modèle SilverCrest EDS SBB 850 B1
Alimentation électrique
Puissance absorbée 850 W
Dimensions (l x h x p) avec les poignées env. 28 x 27 x 42 cm
Poids env. 5,9 kg
Certification de sécurité :
TÜV SÜD
Les données techniques et la conception de l'appareil peuvent être modifiées sans préavis.
220-240 V~, 50 Hz
Consignes de sécurité
Avant d'utiliser cette machine à pain pour la première fois, veuillez lire attentivement les instructions
du présent mode d'emploi et prendre en compte tous les avertissements qui y sont mentionnés,
même si vous êtes habitué à manipuler des appareils électroniques. Conservez soigneusement ce
mode d'emploi pour pouvoir le consulter à l'avenir.
DANGER ! Ce symbole désigne une situation potentiellement dangereuse qui, si
elle n'est pas évitée, peut entraîner de graves blessures, voire même la mort.
AVERTISSEMENT ! Ce symbole indique des remarques importantes portant sur
l'utilisation en toute sécurité de la machine à pain et sur la protection de l'utilisateur.
DANGER ! Ce symbole avertit des blessures/brûlures potentielles sur les surfaces
brûlantes de la machine à pain.
Ce symbole indique des informations supplémentaires sur le sujet abordé.
28 - Français
Page 31

SilverCrest EDS SBB 850 B1
DANGER ! La machine à pain n'est pas destinée à être utilisée avec un programmateur
externe ou un système séparé de commande à distance.
DANGER ! Cette machine à pain ne peut être utilisé par des enfants à partir de 8 ans
et par des personnes aux facultés physiques, sensorielles ou mentales restreintes ou
manquant d'expérience et de connaissances que si elles sont surveillées ou si elles ont
été instruites sur l'utilisation en toute sécurité de la machine à pain ainsi que sur les
dangers pouvant en résulter. Les enfants ne doivent pas jouer avec la machine à pain.
Le nettoyage et la maintenance par l'utilisateur ne doivent pas être effectués par des
enfants sauf s’ils ont au moins 8 ans et qu'ils sont surveillés. Conservez également
l'emballage hors de portée des enfants. Il représente un risque de suffocation.
Les enfants de moins de 8 ans ne doivent pas s'approcher de l'appareil ni du câble
d'alimentation.
DANGER ! Si vous décelez de la fumée, une odeur ou des bruits inhabituels,
débranchez immédiatement la machine à pain de la prise électrique. Si cela se produit,
cessez immédiatement d'utiliser la machine à pain et faites-la réviser par un service
technique agréé. N'inhalez en aucun cas la fumée provenant d'un incendie possible sur
l'appareil. Cependant, si vous avez inhalé cette fumée, consultez un médecin.
L'inhalation de fumée peut être dangereuse pour votre santé.
DANGER ! Ne placez pas de sources incandescentes nues (bougies, etc.) sur la
machine à pain ou à proximité. Il y a risque d'incendie.
DANGER ! N'utilisez pas la machine à pain sans surveillance. Débranchez toujours la
fiche secteur de la prise électrique lorsque vous ne l'utilisez pas. Rangez la machine à
pain seulement une fois qu'elle a entièrement refroidi. Il y a risque d'incendie.
DANGER ! Utilisez la machine à pain uniquement sur une surface sèche, plane et
résistant à la chaleur. N'utilisez jamais la machine à pain à proximité de matériaux
facilement inflammables comme des voilages, des rideaux ou des gaz ou liquides
explosifs et/ou inflammables. Respectez une distance minimum de 10 cm avec les
autres objets. Ne laissez jamais la machine à pain sans surveillance lorsque vous
l'utilisez. Il y a risque d'incendie.
DANGER ! Les fentes d'aération de la machine à pain ne doivent jamais être
recouvertes. L'appareil ne doit pas être utilisée sur ou à proximité d'une gazinière ou de
plaques électriques, un four chaud ou d'autres sources de chaleur. Ne recouvrez jamais
la machine à pain d'un torchon ou de matériaux similaires car cela empêche la vapeur
et la chaleur de s'échapper. Il y a risque de surchauffe et d'incendie.
DANGER ! N'utilisez jamais la machine à pain pour y conserver des aliments ou
d'autres objets, en particulier métalliques. Ils pourraient provoquer un court-circuit. Il y a
risque d'incendie.
Français - 29
Page 32

SilverCrest EDS SBB 850 B1
DANGER ! Ne jamais dépasser la quantité de 700 g de farine et 1 1/4 paquet de
levure (max. 10 g) pour les préparations à cuire, sinon la pâte risque de déborder et de
provoquer un incendie. Il y a risque d'incendie.
DANGER ! En fonctionnement, la température des surfaces accessibles sur la machine
à pain peut être très élevée. Il y a risque de brûlure.
DANGER ! La machine à pain chauffe. Ne bougez pas et ne transportez pas
l'appareil si son contenu est très chaud, p.ex. si de la confiture se trouve dans le moule
(7). Laissez la machine à pain refroidir et débranchez la fiche secteur avant de retirer
ou de mettre en place des accessoires. Le cas échéant, utilisez une manique ou un gant
de cuisine. Il y a risque de brûlure.
AVERTISSEMENT ! Ne transportez pas la machine à pain si son contenu est chaud
ou liquide, p.ex. de la confiture. Il y a risque de brûlure.
AVERTISSEMENT ! Pour écarter tout risque, la machine à pain ne doit pas être
endommagée.
AVERTISSEMENT ! La machine à pain ne doit pas être exposée à des sources de
chaleur directes (p.ex. radiateurs) ni aux rayons directs du soleil ou à une lumière
artificielle intense. Évitez également le contact avec les projections et gouttes d'eau et
avec les fluides agressifs. N'utilisez pas la machine à pain à proximité de l'eau. La
machine à pain ne doit jamais être plongée dans un liquide. Ne placez aucun objet
contenant du liquide (p.ex. vase, boissons,…) sur la machine à pain. Veillez également
à ne pas exposer la machine à pain à des vibrations et des chocs violents. De plus,
aucun corps étranger ne doit pénétrer à l'intérieur. Cela risquerait d'endommager la
machine à pain.
AVERTISSEMENT ! Afin d'éviter d'endommager l'appareil, un programme de cuisson
ne doit être démarré que lorsque le moule (7) est inséré. Pendant que l'appareil
fonctionne, gardez le couvercle (2) fermé. Ne retirez jamais le moule (7) en cours de
fonctionnement afin d'éviter toute blessure.
AVERTISSEMENT ! N'utilisez jamais la machine à pain sans le moule (7). Cela
risquerait d'endommager l'appareil.
AVERTISSEMENT ! N'utilisez jamais la machine à pain avec le couvercle (2) ouvert
afin d'éviter toute blessure.
Câble d'alimentation
DANGER ! Veillez à ne pas faire passer le câble d'alimentation (4) sur des bords
tranchants. Ne posez pas le câble d'alimentation (4) à proximité de surfaces ou objets
chauds, et veillez à ce qu'il ne touche aucune surface chaude de la machine à pain.
Cela pourrait endommager l'isolation du câble d'alimentation (4). Il y a risque
d'électrocution.
30 - Français
Page 33

SilverCrest EDS SBB 850 B1
AVERTISSEMENT ! Saisissez toujours le câble d'alimentation (4) par la fiche et ne
tirez pas sur le câble d'alimentation (4) lui-même.
AVERTISSEMENT ! Ne posez pas la machine à pain, de meubles ni autres objets
lourds sur le câble d'alimentation (4) et veillez à ne pas le plier.
AVERTISSEMENT ! Ne faites jamais de nœud sur le câble d'alimentation (4) et ne
l'attachez pas à d'autres câbles. Disposez le câble d'alimentation (4) de façon à ce qu’il
ne gêne pas le passage et que personne ne puisse marcher dessus.
AVERTISSEMENT ! N’utilisez pas d’adaptateur ou de rallonge non-conformes aux
normes de sécurité et n’effectuez aucune intervention sur le câble d’alimentation (4) et
la prise électrique. Si le câble d'alimentation (4) est endommagé, il doit être remplacé
par le fabricant ou son service après-vente ou par une personne qualifiée afin d'éviter
tout risque.
Droits d'auteur
Le contenu de ce mode d'emploi est soumis aux droits d'auteur et n'est communiqué au lecteur qu'à
titre d'information. La copie et la reproduction des données et des informations sont interdites sans
l'accord exprès et par écrit de l'auteur. Ceci s'applique également à l'utilisation commerciale des
contenus et des données. Le texte et les figures sont conformes à l'état de la technique au moment
de l'impression. Sous réserve de modifications.
Avant la mise en service
Sortez la machine à pain de son emballage et retirez tous les matériaux d'emballage. Vérifiez si la
machine à pain a été endommagée. En cas de dommages, la machine à pain ne doit pas être mise
en service.
Avant la première utilisation, nettoyez le corps de la machine à pain, le moule (7) et les pales de
pétrissage (6) avec un chiffon propre et humide. N'utilisez en aucun cas de produit à récurer ou
d'éponges à grattoir.
Première mise en service
DANGER ! En cours de fonctionnement, la température des surfaces accessibles peut
être très élevée. Risque de brûlure !
Lors de la première mise en service, d'éventuels résidus du processus de fabrication
peuvent provoquer une légère odeur et une faible formation de fumée. Ceci est normal
et disparaît au bout de quelque temps. Veillez à aérer suffisamment. Le cas échéant,
ouvrez une fenêtre.
Français - 31
Page 34

SilverCrest EDS SBB 850 B1
DANGER ! Ne préchauffez jamais la machine à pain plus de 5 minutes avec le moule
vide (7). Il y a risque de surchauffe et d'incendie.
Lors de la première mise en service, procédez comme suit :
Uniquement lors de cette première mise en service, mettez en place le moule vide (7), fermez le
couvercle (2) et sélectionnez le programme 12, comme décrit au chapitre « Les programmes ».
Appuyez sur la touche pour préchauffer la machine à pain pendant 5 minutes. Au bout de 5
minutes, appuyez de nouveau sur la touche jusqu'à ce que signal sonore retentisse. Le
programme est terminé.
Débranchez le câble d'alimentation (4) de la prise électrique, laissez la machine à pain refroidir
entièrement et nettoyez une nouvelle fois le moule (7), les pales de pétrissage (6) et le corps de la
machine à pain à l'aide d'un chiffon propre et humide.
La machine à pain est désormais prête à l'emploi.
Mise en service
DANGER ! Les pièces de la machine à pain peuvent chauffer fortement. Utilisez des
maniques ou des gants de cuisine pour éviter les brûlures.
DANGER ! N'utilisez pas la machine à pain avec un programmateur ou une prise
commandée à distance.
AVERTISSEMENT ! Placez la machine à pain sur une surface plane résistant à la
chaleur. Sur une surface fragile, placez une plaque résistant à la chaleur sous la
machine à pain.
Applications possibles
Vous pouvez sélectionner un programme parmi les 12 différents proposés.
Vous pouvez fabriquer vos propres pains selon vos propres recettes.
Vous pouvez utiliser des préparations prêtes à l'emploi.
Vous pouvez pétrir des pâtes à gâteau, à petits pains et à pâtes (nouilles).
Vous pouvez fabriquer des confitures.
Vous pouvez utiliser des préparations sans gluten et des recettes avec des farines sans gluten.
Vous trouverez dans votre magasin LIDL local de nombreuses préparations délicieuses
et des ingrédients pour faire vos propres recettes.
32 - Français
Page 35

SilverCrest EDS SBB 850 B1
La zone de commande
>>> Les noms des programmes figurent en français sur cette figure, ils sont en anglais sur l’appareil <<<
Écran
Marche/Arrêt : Appuyez sur cette touche jusqu'à ce qu'un signal sonore
retentisse pour démarrer/arrêter l'appareil ou pour effacer un réglage de
programmation.
Degré de dorage/mode rapide : Réglage du degré de dorage (clair,
moyen, foncé) ou mode rapide. Appuyez sur la touche autant de fois que
nécessaire jusqu'à ce que la flèche se situe au-dessus du symbole souhaité.
La durée de cuisson change en fonction du réglage sélectionné.
Programmation : cuisson différée
LED d'état : indique qu'un programme est en cours.
Poids du pain : Appuyez sur la touche autant de fois que nécessaire jusqu'à
ce que la flèche se situe sous le poids souhaité.
Menu/programme : sélectionnez ici le programme de cuisson souhaité. Le
numéro du programme et la durée de cuisson s'affichent.
Français - 33
Page 36

SilverCrest EDS SBB 850 B1
L'écran
Indications à l'écran
Indication du poids (750 g/1 000 g/1 250 g)
Fonction RMV (Enlever)
Durée de cuisson restante (heures)/présélection de la durée
Degré de dorage sélectionné/mode rapide :
clair , moyen , foncé , rapide
Programme sélectionné (1 – 12)
Déroulement du programme
Ajout d'ingrédients (ADD)
Les programmes
La machine à pain vous propose 12 programmes préprogrammés que vous pouvez sélectionner
avec la touche . Le numéro du programme sélectionné s'affiche à l'écran .
Les durées de cuisson dépendent des combinaisons de programmes sélectionnées, en particulier du
poids. Voir à ce sujet le chapitre « Déroulement du programme ».
La description des programmes, ci-après, vous donne un aperçu des programmes et de leur
adéquation en fonction de votre projet culinaire.
34 - Français
Page 37

SilverCrest EDS SBB 850 B1
Programme 1 : Normal (Regular)
Ce programme est adapté à la cuisson de pains blancs ou mixtes composés essentiellement de
farine de blé ou de seigle. Vous obtenez des pains à la consistance compacte.
Programme 2 : Léger (French)
Ce programme convient pour la cuisson de pains légers composés de farines finement moulues. En
général, le pain obtenu est léger et sa croûte croustillante.
Programme 3 : Pain complet (Whole Wheat)
Ce programme convient pour la préparation de farines denses, p.ex. de la farine de blé complet
ou de seigle complet. Le résultat est un pain lourd et compact.
Programme 4 : Sucré (Sweet)
Si vous voulez ajouter du sucre ou des ingrédients comme des jus de fruits, des fruits secs, de la
noix de coco râpé, des raisins secs ou du chocolat, ce programme convient particulièrement bien.
Les étapes du programme produisent un pain léger et aéré.
Programme 5 : Express (Super Rapid)
Avec le programme Express, les temps de pétrissage et de cuisson ainsi que de levée sont
fortement réduits. Pour cette raison, les recettes qui conviennent pour ce programme ne contiennent
pas de farines denses ni d'autres ingrédients lourds. Avec ce programme, le pain est moins aéré, et
il peut être moins bon que d'habitude.
Programme 6 : Pétrissage (Dough)
Ce programme permet de pétrir les pâtes levées pour petits pains, pâtes à pizza et autres
préparations boulangères. Ce programme ne comprend pas d'étape de cuisson.
Programme 7 : Pâte pour pâtes (Pasta)
Ce programme vous permet de préparer la pâte pour la confection de pâtes (nouilles). Il ne
comprend pas d'étapes de levée ni de cuisson.
Programme 8 : Pain au babeurre (Buttermilk Bread)
Ce programme convient bien pour les pains au babeurre ou au yaourt.
Programme 9 : Sans gluten (Gluten Free)
Les farines ou préparations sans gluten lèvent différemment et nécessitent plus de temps pour
absorber les liquides. Ce programme convient pour les pains à base de farines sans gluten
ou pour les préparations sans gluten.
Programme 10 : Gâteau (Cake)
Avec ce programme, vous pouvez cuire vos gâteaux selon vos propres recettes ou avec des
préparations pour gâteau.
Programme 11 : Confiture (Jam)
Ce programme sert à préparer les confitures, les gelées et autres préparations à tartiner à base de
fruits.
Français - 35
Page 38

SilverCrest EDS SBB 850 B1
Programme 12 : Cuisson (Bake)
Ce programme vous permet de prolonger la cuisson de pains trop clairs ou pas complètement
cuits, afin d'optimiser le résultat. Ce programme permet également de cuire les pâtes déjà prêtes. À
noter que ce programme ne comprend aucune étape de pétrissage ni de repos. Au terme du temps
de cuisson de 60 minutes, le pain est maintenu au chaud pendant une durée maximale d'une
heure.
Pour terminer le programme avant la fin, appuyez sur la touche jusqu'à ce qu'un signal
sonore long retentisse. Débranchez la machine à pain du secteur pour la désactiver.
Remarque sur l'ajout d'ingrédients :
avec les programmes 1, 2, 3, 4, 5, 6, 8, 9, vous pouvez ajouter des ingrédients, p.ex.
des noix, des graines ou des fruits, au cours du programme. Lorsqu'un signal sonore
retentit et que « ADD » s'affiche à l'écran , ajoutez les ingrédients souhaités.
Si vous utilisez la programmation, il est également possible de placer tous les
ingrédients dans le moule (7) au début du programme. Dans ce cas, il peut être
judicieux de broyer les fruits et les noix au préalable.
La programmation
Cette fonction vous permet de programmer la cuisson jusqu'à 15 heures à l'avance. Réglez l'heure
de fin à l'aide des touches .
DANGER ! Utilisez la programmation uniquement avec les recettes que vous avez déjà
essayées au préalable. Vous serez alors sûr que les ingrédients et les quantités sont
adaptés et d'obtenir le résultat de cuisson souhaité. Il convient en particulier de s'assurer
que la quantité de pâte n'est pas trop importante et que celle-ci ne déborde pas. Il y a
risque d'incendie.
La programmation n'est pas disponible pour le programme « 11. Confiture ».
Quand vous utilisez la programmation, veillez en particulier au choix des ingrédients.
N'utilisez pas cette fonction si vous voulez utiliser des ingrédients périssables comme le
lait, les œufs ou la crème.
Procédez comme suit :
Sélectionnez un programme. La durée de cuisson s'affiche à l'écran .
Vous pouvez modifier la fin du programme de cuisson à l'aide de la touche . Une
première pression sur la touche repousse la fin du programme de 10 minutes complètes,
chaque nouvelle pression rajoute 10 minutes supplémentaires. Pour accélérer le défilement des
chiffres, vous pouvez également maintenir la pression sur la touche .
La durée totale cuisson + temporisation s'affiche à l'écran .
La touche vous permet de raccourcir la durée paramétrée de l'ordre de 10 minutes.
36 - Français
Page 39

SilverCrest EDS SBB 850 B1
Activez le réglage de la programmation en appuyant sur la touche . Le signe des deux-
points à l'écran clignote, la LED d'état clignote en bleu et la durée paramétrée
commence à s'écouler.
Lorsque l'heure du début du programme est atteinte, ceci est indiqué par la LED d'état qui
s'allume. De plus, l'écran affiche l'étape de programme actuelle .
La fin de la cuisson est signalée par 10 signaux sonores.
L'écran affiche 00:00.
Exemple de programmation :
Il est midi, et vous souhaitez avoir du pain frais pour 19:00, c'est-à-dire 7 heures plus
tard. Commencez par sélectionner le programme adapté et augmentez la durée qui
s'affiche à l'écran de 7:00 en appuyant sur la touche . Lors du réglage de la
programmation, prévoyez un temps de refroidissement pour pouvoir consommer le pain
cuit à l'heure souhaitée.
Préparation
Une bonne préparation vous donnera de bons résultats. Pour cette raison, merci de tenir compte
des consignes suivantes pour la manipulation des ingrédients.
DANGER ! Pour remplir le moule (7) avec les ingrédients, sortez-le de la machine à
pain afin d'éviter que des ingrédients ne tombent par mégarde sur les résistances du
compartiment de cuisson.
N'utilisez jamais de quantités supérieures à celles indiquées. La pâte qui déborde risque
de s'enflammer au contact des résistances. Il y a risque d'incendie.
Toujours verser les ingrédients dans le moule (7) dans l'ordre indiqué.
Tous les ingrédients nécessaires doivent être à température ambiante. C'est seulement ainsi que
vous pouvez être assuré que la levure pourra lever de manière optimale.
Les moindres différences de quantités peuvent avoir une influence sur le résultat à la cuisson.
Pour cette raison, respectez le plus précisément possible les quantités d'ingrédients indiquées.
Il est bien sûr possible d'optimiser des recettes en modifiant légèrement certaines quantités
d'ingrédients pour les adapter à vos besoins personnels. Dans ce cas, faites plusieurs tentatives
en ne modifiant que légèrement les quantités à chaque fois, tout en veillant à ce que la pâte ne
déborde pas.
Mesure des ingrédients
La machine à pain est fournie avec des accessoires permettant de mesurer les ingrédients secs et
liquides et destinés à faciliter le dosage précis des ingrédients nécessaires :
1 verre mesureur gradué pour les liquides
1 grosse cuillère doseuse, dont la contenance correspond à une cuillère à soupe (CS)
Français - 37
Page 40

SilverCrest EDS SBB 850 B1
1 petite cuillère doseuse, dont la contenance correspond à une cuillère à café (CC)
Lorsque vous mesurez les ingrédients, veillez à respecter le plus précisément possible les quantités
indiquées dans les recettes. C'est uniquement ainsi que vous obtiendrez le résultat escompté.
Pour faire votre pain
Préparation/réglages
Sortez le moule (7) de la machine à pain par le haut.
Placez les 2 pales de pétrissage (6) jusqu'à la butée sur les tiges d'entraînement dans le moule
(7).
Ajoutez les ingrédients dans le moule (7) dans l'ordre indiqué dans la recette. En général, il
faut commencer par les liquides, puis le sucre et le sel. Ensuite, ajoutez la farine, et la levure en
dernier. Celle-ci ne doit pas entrer en contact avec les liquides ou le sel.
Remettez le moule (7) en place dans la machine à pain.
Fermez le couvercle (2).
Branchez la fiche secteur sur une prise électrique. Un signal sonore se fait entendre, et le
numéro de programme 1 avec le temps de cuisson correspondant s'affiche à l'écran .
Sélectionnez le programme souhaité en appuyant une ou plusieurs fois sur la touche .
Chaque pression sur la touche est validée par un signal sonore.
Sélectionnez le poids du pain à l'aide de la touche .
Sélectionnez le degré de dorage à l'aide de la touche en amenant la flèche située dans
le bord inférieur de l'écran sur le degré de dorage souhaité. Il est également possible ici de
définir le réglage « Rapide ». Il réduit la durée de levée de la pâte.
Pour les programmes 6, 7 et 11, il n'est pas possible de régler le degré de
dorage.
La fonction « Rapide » n'est disponible que pour les programmes 1, 2, 3 et 4.
Il est impossible de régler le poids pour les programmes 6, 7, 11 et 12.
Si besoin, vous pouvez ici définir l'heure de fin de la durée de cuisson à l'aide de la fonction
Programmation (impossible pour le programme 11).
Démarrage du programme
Appuyez sur la touche pour démarrer le programme souhaité. Les différentes étapes du
programme sont alors exécutées successivement.
Certains programmes commencent par une phase de préchauffage (voir le tableau de
décomposition des programmes). Pendant cette phase, les pales de pétrissage (6) ne
tournent pas. Il ne s'agit pas d'un défaut de l'appareil.
38 - Français
Page 41

SilverCrest EDS SBB 850 B1
Vous pouvez observer le déroulement du programme et les différentes étapes de travail à travers le
hublot (1) du couvercle (2).
N'ouvrez jamais le couvercle (2) pendant la phase de levée ou de cuisson, sinon le
pain risque de s'affaisser.
Fonction RMV (Enlever)
Cette fonction vous donne la possibilité d'enlever les pales de pétrissage (6) avant la phase de
cuisson. Ce n'est pas obligatoire mais permet d'éliminer les trous disgracieux et d'obtenir des trous
plus petits dans le pain cuit qui sont produits simplement par les fines tiges. Il est aussi plus facile de
retirer le pain du moule (7) qui n'est plus arraché par les pales de pétrissage (6).
Procédez comme suit :
Après la phase de pétrissage, 10 signaux sonores retentissent et l'indication « RMV »
s'affiche à l'écran .
Appuyez sur la touche pour interrompre le programme pendant 10 minutes.
Pendant ces 10 minutes d'interruption, la durée restante du programme clignote à l'écran .
Ouvrez le couvercle (2) et sortez le moule (7).
Soulevez la pâte après avoir fariné vos mains, et retirez les pales de pétrissage (6).
Remettez la pâte dans le moule (7).
Replacez le moule (7) dans la machine à pain et fermez le couvercle (2).
Appuyez sur la touche pour reprendre le programme. Si vous n'appuyez pas sur la
touche , le programme reprend automatiquement après l'interruption de 10 minutes.
La fonction RMV n'est pas disponible pour les programmes 6, 7, 11 et 12.
Fin du programme
À la fin de la cuisson, 10 signaux sonores retentissent et 0:00 s'affiche à l'écran . La machine à
pain passe alors en phase de maintien au chaud pendant 60 minutes. Pour mettre fin à cette phase
de maintien au chaud avant la fin des 60 minutes, appuyez sur la touche et maintenez-la
appuyée jusqu'à ce qu'un long signal sonore retentisse.
La phase de maintien au chaud n'est pas disponible pour les programmes 6, 7 et 11.
Avertissement ! Débranchez la fiche secteur de la prise électrique avant d'ouvrir le
couvercle (2) de la machine à pain.
Français - 39
Page 42

SilverCrest EDS SBB 850 B1
Retrait du pain
DANGER ! Pour retirer le moule (7), utilisez des maniques ou mettez des gants de
cuisine. Il y a risque de brûlure.
Il est plus facile de retirer le pain du moule (7) si vous le laissez dans le moule (7)
pendant encore au moins 30 minutes après la cuisson (phase de maintien au chaud).
Tenez le moule (7) incliné au-dessus d'une grille, ouverture vers le bas, et secouez-le légèrement.
Normalement, le pain se détache facilement grâce au revêtement antiadhésif du moule (7).
N'utilisez pas d'objets métalliques pour détacher le pain du moule (7) afin de ne pas endommager
le revêtement antiadhésif.
Si les pales de pétrissage (6) ne se détachent pas du pain, retirez-les à l'aide de l'outil de retrait
spécial (10).
Maintenance/nettoyage
Maintenance
AVERTISSEMENT ! La machine à pain doit être soumise à une maintenance
lorsqu'elle a été endommagée, si un liquide ou des objets ont pénétré à dans le corps
de l'appareil, si la machine à pain a été exposée à la pluie ou à l'humidité, ou si la
machine à pain ne fonctionne pas normalement ou si elle est tombée. En cas de
formation de fumée, bruit ou odeur inhabituel(le), éteignez immédiatement la machine à
pain et débranchez la fiche secteur de la prise électrique. Si cela se produit, cessez
immédiatement d'utiliser la machine à pain et faites-la réviser par un service technique
agréé. En cas de réparation de maintenance, faites appel uniquement à un personnel
qualifié. N'ouvrez jamais le corps de la machine à pain.
Contactez notre assistance téléphonique pour obtenir des informations sur les pièces de
rechange (voir page 49).
Nettoyage
DANGER ! Avant le nettoyage, débranchez la fiche secteur de la prise électrique.
Sinon, il y a risque d'électrocution.
DANGER ! La machine à pain ne doit pas être plongée dans l'eau. Sinon, il y a risque
d'électrocution et de courts-circuits.
40 - Français
Page 43

SilverCrest EDS SBB 850 B1
DANGER ! Patientez jusqu'à ce que la machine à pain ait refroidi. Sinon, il y a risque
de brûlure.
Les accessoires et les pièces de la machine à pain ne passent pas au lave-vaisselle. Pour nettoyer la
machine à pain, n'utilisez pas de détergents chimiques ou de solvants. Vous éviterez ainsi
d'endommager la machine à pain et les résidus de détergent à la prochaine fournée.
Pour le nettoyage, procédez comme suit :
Corps de l'appareil, couvercle et compartiment de cuisson
Commencez par retirer les pales de pétrissage (6) et le moule (7). Pour faciliter le nettoyage
du compartiment de cuisson, il est possible de retirer le couvercle (2). Pour ce faire,
positionnez-le à env. 45° jusqu'à ce que la charnière puisse passer à travers les ouvertures du
guide-charnière et que le couvercle (2) puisse être retiré par le haut.
À l'aide d'un chiffon humide ou d'une éponge douce, éliminez tous les dépôts du compartiment
de cuisson.
Nettoyez ensuite le couvercle (2) et le corps de la machine, également à l'aide d'un chiffon
humide ou d'une éponge douce.
Ensuite, séchez soigneusement le compartiment de cuisson, le couvercle (2) et le corps de la
machine à l'aide d'un chiffon doux et sec.
Si vous aviez retiré le couvercle (2), remettez-le en place.
Moule, pales de pétrissage et autres accessoires
Les surfaces du moule (7) et les pales de pétrissage (6) possèdent un revêtement antiadhésif. Pour
maintenir les propriétés de ce revêtement antiadhésif, n'utilisez pas de détergent agressif ou à
récurer pour les nettoyer, et n'utilisez pas d'objets qui peuvent rayer la surface et l'endommager.
Sortez le moule (7) et les pales de pétrissage (6) du compartiment de cuisson.
Sortez les pales de pétrissage (6) du moule (7) en les retirant des tiges par un mouvement
ascendant. Il peut arriver que les pales de pétrissage (6) soient difficiles à retirer car elles
« collent » aux tiges après la cuisson. Dans ce cas, remplissez le moule (7) d'eau très chaude.
Après une demi-heure de trempage, les croûtes sèches devraient s'être détachées et les pales
de pétrissage (6) être faciles à retirer.
Nettoyez les pales de pétrissage (6) à l'eau tiède additionnée d'un détergent doux et à l'aide
d'une brosse à vaisselle. En cas de croûtes sèches tenaces, faites d'abord tremper les pales de
pétrissage (6) dans l'eau de nettoyage. Pour retirer les éventuels dépôts dans l'orifices prévu
pour la tige dans chaque pale de pétrissage (6), vous pouvez utiliser un cure-dent en bois, en
procédant avec précaution.
Une fois nettoyées, séchez soigneusement les pales de pétrissage (6).
Nettoyez l'extérieur du moule (7) à l'aide d'un chiffon humide.
Nettoyez l'intérieur du moule (7) à l'eau tiède additionnée de détergent doux et à l'aide d'une
brosse à vaisselle. En cas de croûtes sèches tenaces, remplissez le moule (7) d'eau tiède et
Français - 41
Page 44

SilverCrest EDS SBB 850 B1
ajoutez un détergent doux. Attendez que les croûtes se détachent et qu'elles puissent être
retirées à l'aide de la brosse à vaisselle.
Une fois nettoyé, rincez abondamment le moule (7) à l'eau claire pour éliminer les résidus de
détergent, puis séchez soigneusement le moule (7).
Nettoyez le verre mesureur (8), les cuillères doseuses (9) et l'outil de retrait des pales de
pétrissage (10) à l'eau tiède additionnée d'un détergent doux. Après les avoir rincées à l'eau
clair, séchez soigneusement ces pièces.
Les surfaces peuvent changer de couleur au fil du temps sous l'effet de la chaleur, de
l'humidité et de la vapeur. Ceci est normal et n'affecte aucunement le bon
fonctionnement. En outre, ce n'est pas une diminution de la qualité au sens des
conditions de garantie.
Dépannage / Questions fréquentes
Indication « HHH » à l'écran
Problème : Un programme a été démarré alors que la machine à pain n'avait pas encore
suffisamment refroidi après la cuisson précédente.
Solution : Arrêtez le programme et débranchez la fiche secteur. Laissez la machine à pain refroidir
pendant 20 à 30 minutes avec le couvercle (2) ouvert.
Le programme ne démarre pas et l'écran passe au programme 1.
Problème : La machine à pain n'a pas suffisamment refroidi après la cuisson précédente.
Solution : Laissez la machine à pain refroidir pendant 20 à 30 minutes avec le couvercle (2)
ouvert.
Indications « EE0 », « EE1 » ou « ELL » à l'écran après le démarrage d'un
programme
Solution : Arrêtez la machine à pain et débranchez la fiche secteur. Ensuite, rebranchez la fiche
secteur. Si ce message d'erreur se produit une nouvelle fois, contactez le service après-vente.
La pale de pétrissage (6) reste coincée dans le moule (7) après la cuisson
Solution : Remplissez le moule (7) d'eau très chaude et faites tourner la pale de pétrissage (6) pour
que les croûtes sèches se détachent.
La pale de pétrissage (6) reste coincée dans le pain après la cuisson
Solution : Retirez la pale de pétrissage (6) à l'aide de l'outil de retrait des pales de pétrissage (10).
Le moteur tourne, mais la pâte n'est pas mélangée
Solution : Vérifiez que le moule (7) et les pales de pétrissage (6) sont bien en place.
42 - Français
Page 45

SilverCrest EDS SBB 850 B1
La machine à pain réduit les fruits et les noix en petits morceaux
Solution : Ajoutez à la pâte les ingrédients comme les fruits et les noix si possible lorsque le signal
retentit et que « ADD » s'affiche à l'écran .
La machine à pain ne fonctionne pas
Solution : Assurez-vous d'avoir branché la fiche secteur sur le secteur et que la LED d'état est
allumée. En vous reportant au déroulement du programme, essayez de déterminer la phase dans
laquelle la machine à pain se trouve actuellement. Certaines étapes du programme sont difficiles à
déterminer d'un point de vue extérieur. Vérifiez si la touche a bien été actionnée.
Consignes sur l'environnement et sur l'élimination
Les appareils portant ce symbole sont soumis à la directive européenne
2012/19/EU. Les appareils électriques ou électroniques usagés ne doivent en
aucun cas être jetés aux ordures ménagères, mais déposés dans des centres de
récupération prévus à cet effet. En procédant à la mise au rebut conforme de votre
appareil usagé, vous contribuez à la protection de l'environnement et de votre
santé Pour plus d'informations sur la mise au rebut réglementaire des vieux
appareils, contactez votre mairie, les autorités d'élimination des déchets ou le
magasin où vous avez acheté cet appareil.
Éliminez aussi l'emballage dans le respect de l'environnement. Les cartons peuvent être déposés
dans des conteneurs de collecte de papier ou dans les déchetteries collectives pour être recyclés.
Les films et les éléments en plastique livrés doivent être déposés auprès votre centre de recyclage
local afin d'être éliminés dans le respect de l'environnement.
Marquages de conformité
Cet appareil répond aux exigences essentielles et autres réglementations
applicables de la directive 2006/95/EC relative aux appareils à basse tension,
de la directive 2004/108/EC relative à la compatibilité électromagnétique, de la
directive 2009/125/EC relative aux exigences en matière d'écoconception et de
la directive RoHS 2011/65/EU relative à la limitation d'utilisation de substances
dangereuses dans les équipements électriques et électroniques. Vous trouverez la
déclaration de conformité correspondante à la fin de ce mode d'emploi.
Français - 43
Page 46

SilverCrest EDS SBB 850 B1
Déroulement du programme
Programme 1. Normal 2. Léger
Clair
Degré de dorage
Moyen
Rapide
Foncé
Poids (grammes) 750 1000 1250 750 1000 1250 750 1000 1250 750 1000 1250
Durée (heures) 2:58 3:05 3:15 2:14 2:20 2:25 3:13 3:18 3:25 2:18 2:25 2:30
Préchauffage
(minutes)
Pétrissage 1 (minutes)
Levée 1 (minutes)
Pétrissage 2 (minutes)
Levée 2 (minutes)
Levée 3 (minutes)
Cuisson (minutes)
15 15 20
12 13 13 12 13 13 12 12 15 12 13 13
25 25 25 10 10 10 20 20 20 10 10 10
2
2
3A*
5A*
5
5
30 30 30 18 18 18 43 41 35 18 18 18
30 30 30 30 30 30 35 35 35 30 30 30
56 60 65 56 60 65 60 65 70 60 65 70
2
5A*
5
-/- -/- -/-
2
2
1A*
2A*
5
5
2
2A*
5
Clair
Moyen
Foncé
10 10 15
2
2
3A*
5A*
8
8
2
5A*
8
Rapide
-/- -/- -/-
2
2
1A*
2A*
5
5
2
2A*
5
Maintien au chaud
(minutes)
Ajout d'ingrédients
(durée de cuisson
restante en heures)
Programme différé 15 h 15 h 15 h 15 h 15 h 15 h 15 h 15 h 15 h 15 h 15 h 15 h
60 60 60 60 60 60 60 60 60 60 60 60
2:01 2:05 2:10 1:49 1:53 1:58 2:26 2:29 2:28 1:53 1:58 2:03
* : à l'étape de programme « Pétrissage 2 », vous pouvez ajouter des ingrédients supplémentaires.
Le A qui suit le chiffre signifie que dans cette phase, un signal sonore retentit avec affichage
simultané de « ADD » à l'écran . Pendant cette durée, vous pouvez ajouter des ingrédients.
Exemple :
3A > pendant cette phase de pétrissage de 3 minutes, un signal sonore retentit et « ADD »
s'affiche. Ajoutez des ingrédients.
44 - Français
Page 47

SilverCrest EDS SBB 850 B1
Programme 3. Pain complet 4. Sucré
Clair
Degré de dorage
Moyen
Rapide
Foncé
Poids (grammes) 750 1000 1250 750 1000 1250 750 1000 1250 750 1000 1250
Durée (heures) 3:18 3:25 3:35 2:24 2:30 2:35 2:56 3:01 3:10 2:10 2:16 2:20
Préchauffage
(minutes)
Pétrissage 1 (minutes)
Levée 1 (minutes)
Pétrissage 2 (minutes)
Levée 2 (minutes)
Levée 3 (minutes)
Cuisson (minutes)
15 15 20
11 12 12 11 13 13 12 12 12 11 12 12
25 25 25 10 10 10 20 20 20 10 10 10
2
2
3A*
5A*
8
8
38 38 38 23 23 23 35 35 35 18 18 18
35 35 35 35 35 35 30 30 30 30 30 30
56 60 65 56 60 65 52 56 60 52 56 60
2
5A*
8
-/- -/- -/-
2
2
2A*
2A*
5
5
2
2A*
5
Clair
Moyen
Foncé
10 10 15
2
2
4A*
5A*
6
6
2
5A*
6
Rapide
-/- -/- -/-
2
2
1A*
2A*
6
6
2
2A*
6
Maintien au chaud
(minutes)
Ajout d'ingrédients
(durée de cuisson
restante en heures)
Programme différé 15 h 15 h 15 h 15 h 15 h 15 h 15 h 15 h 15 h 15 h 15 h 15 h
60 60 60 60 60 60 60 60 60 60 60 60
2:17 2:21 2:26 1:59 2:03 2:08 2:03 2:07 2:11 1:46 1:50 1:54
* : à l'étape de programme « Pétrissage 2 », vous pouvez ajouter des ingrédients supplémentaires.
Le A qui suit le chiffre signifie que dans cette phase, un signal sonore retentit avec affichage
simultané de « ADD » à l'écran . Pendant cette durée, vous pouvez ajouter des ingrédients.
Exemple :
3A > pendant cette phase de pétrissage de 3 minutes, un signal sonore retentit et « ADD »
s'affiche. Ajoutez des ingrédients.
Français - 45
Page 48

SilverCrest EDS SBB 850 B1
Programme
5.
Express
6.
Pétrissage
7.
Pâte pour pâtes
Clair
Degré de dorage
Moyen
-/- -/-
Foncé
Poids (grammes) 750 1000 1250
Durée (heures) 1:15 1:18 1:20 1:50 0:15 3:17 3:21 3:30
Préchauffage (minutes)
-/- -/- -/-
Pétrissage 1 (minutes)
Levée 1 (minutes)
8 8 8 12 15
-/- -/- -/-
-/-
-/-
Pétrissage 2 (minutes)
Levée 2 (minutes)
Levée 3 (minutes)
Cuisson (minutes)
2A*
2A*
5
-/- -/- -/-
20 20 20 45
40 43 45
-/-
2A*
5
5
-/- -/-
10
10
-/-
3A*
5
25
-/-
-/-
10 10 10
-/-
-/-
-/-
-/-
-/-
750 1000 1250
25 25 30
20 20 20
5A*
45 45 45
30 30 30
52 56 60
8.
Pain au babeurre
Clair
Moyen
Foncé
2
2
5A*
8
5A*
8
2
8
Maintien au chaud
(minutes)
Ajout d'ingrédients (durée
de cuisson restante en
heures)
Programme différé 15 h 15 h 15 h 15 h 15 h 15 h 15 h 15 h
60 60 60
1:05 1:08 1:10 1:15
-/-
-/-
-/-
60 60 60
02:15 02:19 02:23
* : à l'étape de programme « Pétrissage 2 », vous pouvez ajouter des ingrédients supplémentaires.
Le A qui suit le chiffre signifie que dans cette phase, un signal sonore retentit avec affichage
simultané de « ADD » à l'écran . Pendant cette durée, vous pouvez ajouter des ingrédients.
Exemple :
3A > pendant cette phase de pétrissage de 3 minutes, un signal sonore retentit et « ADD »
s'affiche. Ajoutez des ingrédients.
46 - Français
Page 49

SilverCrest EDS SBB 850 B1
Programme
9.
Sans gluten
Clair
Degré de dorage
Moyen
Foncé
Poids (grammes) 750 1000 1250 750 1000 1250
Durée (heures) 1:37 1:41 1:45
Préchauffage (minutes)
01:30
10.
Gâteau
Clair
Moyen
Foncé
01:35 01:40 01:20 01:00
-/- -/- -/- -/- -/- -/- -/- -/-
Pétrissage 1 (minutes)
Levée 1 (minutes)
15 15 15
15
15 15
-/- -/- -/- -/- -/- -/-
Pétrissage 2 (minutes)
Levée 2 (minutes)
Levée 3 (minutes)
Cuisson (minutes)
Maintien au chaud
(minutes)
-/- -/- -/- -/- -/- -/- -/- -/-
30 30 30
-/- -/- -/- -/- -/-
-/- -/- -/- -/- -/- -/-
60 +
52 56 60
60 60 60
15
Levée
60
65 +
Levée
70 +
15
15
Levée
60 60
11.
Confiture
-/-
-/- -/-
-/- -/-
15
(cuisson et
mélange)
45
(cuisson et
mélange)
20
Levée
-/-
12.
Cuisson
Clair
Moyen
Foncé
-/-
-/-
60
60
Ajout d'ingrédients (durée
de cuisson restante en
heures)
Programme différé 15 h 15 h 15 h 15 h 15 h 15 h
-/- -/- -/- -/- -/- -/- -/- -/-
-/-
* : à l'étape de programme « Pétrissage 2 » , vous pouvez ajouter des ingrédients
supplémentaires.
Le A qui suit le chiffre signifie que dans cette phase, un signal sonore retentit avec affichage
simultané de « ADD » à l'écran . Pendant cette durée, vous pouvez ajouter des ingrédients.
Exemple :
3A > pendant cette phase de pétrissage de 3 minutes, un signal sonore retentit et « ADD »
s'affiche. Ajoutez des ingrédients.
Français - 47
15 h
Page 50

SilverCrest EDS SBB 850 B1
Remarques sur la garantie et en cas d'intervention technique
Garantie de TARGA GmbH
Cher client, chère cliente,
La garantie accordée sur ce produit est de trois ans à partir de la date d'achat. En cas de vice sur
ce produit, vous disposez de droits que vous pouvez faire valoir vis-à-vis du vendeur du produit.
L’exercice de ces droits n’est pas limité par notre garantie exposée ci-après.
Conditions de garantie
La période de garantie commence à la date d’achat. Merci de conserver soigneusement le ticket
de caisse d’origine. Il vous sera demandé comme preuve d’achat. Si un vice matériel ou de
fabrication survient dans les trois ans qui suivent la date d’achat de ce produit, le produit sera
réparé ou remplacé gratuitement, le choix restant à notre discrétion.
Période de garantie et droits résultant de vices
La période de garantie n’est pas prolongée en cas de son exercice. La même chose s’applique
pour les pièces remplacées et réparées. Les dégâts et vices éventuellement présents dès l’achat
doivent être signalés immédiatement dès le déballage. Une fois la période de garantie écoulée,
toute réparation est payante.
Prestations incluses dans la garantie
L’appareil a été fabriqué selon des directives qualité strictes et a été soigneusement contrôlé avant
d’être livré. La garantie s’applique aux défauts matériels ou de fabrication. Cette garantie ne
s'étend pas aux pièces soumises à une usure normale et qui peuvent donc être considérées comme
des pièces d’usure, ni aux dégâts sur les pièces fragiles comme p. ex. les interrupteurs, les piles
rechargeables ou les pièces en verre. Cette garantie est invalidée si le produit est endommagé, est
utilisé ou entretenu de manière inappropriée. Pour assurer une utilisation conforme du produit,
toutes les instructions indiquées dans le mode d’emploi doivent être soigneusement respectées. Les
utilisations et manipulations non conseillées dans le mode d’emploi ou qui font l’objet d’un
avertissement doivent impérativement être évitées. Ce produit est destiné exclusivement à une
utilisation privée et non commerciale. La garantie prend fin en cas de manipulation abusive et
inappropriée, de recours à la force et d'interventions qui ne sont pas effectuées par notre service
technique autorisé. La réparation ou le remplacement du produit ne prolonge pas d'autant la
période de garantie.
Processus d’application de la garantie
Afin de permettre un traitement rapide de votre demande, nous vous prions de suivre les indications
suivantes :
- Avant de mettre votre produit en service, merci de lire avec attention la documentation
jointe. Si un problème survient qui ne peut être résolu de cette manière, merci de vous
adresser à notre assistance téléphonique.
- Pour toute demande, ayez la référence de l'article et si disponible, le numéro de série, à
portée de main pour apporter la preuve de votre achat.
48 - Français
Page 51

SilverCrest EDS SBB 850 B1
- S’il est impossible d’apporter une solution par téléphone, notre assistance téléphonique
organisera une intervention technique en fonction de l’origine de la panne.
Indépendamment de la garantie commerciale souscrite, le vendeur reste tenu des défauts de
conformité du bien et des vices rédhibitoires dans les conditions prévues aux articles L211-4 et
suivants du Code de la consommation et aux articles 1641 et suivants du Code Civil.
Service technique
Téléphone : 01 – 712 302 83
E-Mail : service.FR@targa-online.com
Téléphone : 02 – 700 16 43
E-Mail : service.BE@targa-online.com
Téléphone : 800 – 24 14 3
E-Mail : service.LU@targa-online.com
Téléphone : 044 – 511 82 91
E-Mail : service.CH@targa-online.com
IAN: 102869
Fabricant
Important : l’adresse suivante n'est pas l’adresse de notre service technique. Contactez d’abord
notre service technique aux coordonnées ci-dessus.
TARGA GmbH
Coesterweg 45
59494 SOEST
GERMANY
Français - 49
Page 52

SilverCrest EDS SBB 850 B1
Indice
Introduzione .................................................................................................... 51
Utilizzo conforme alla destinazione d'uso ........................................................ 51
Dotazione ........................................................................................................ 51
Dati tecnici ........................................................................................................ 52
Disposizioni di sicurezza ................................................................................... 52
Diritto d'autore ................................................................................................. 55
Prima della messa in funzione .......................................................................... 55
Prima messa in funzione .................................................................................. 55
Messa in funzione ............................................................................................ 56
Prestazioni .......................................................................................................................................... 56
Pannello di comando ......................................................................................................................... 57
Display ................................................................................................................................................ 58
Visualizzazioni del display ................................................................................................................ 58
Programmi ....................................................................................................... 58
Timer ................................................................................................................ 60
Preparare la cottura ......................................................................................... 61
Misurazione degli ingredienti ........................................................................................................... 61
Cottura del pane .............................................................................................. 62
Preparazione / Impostazioni ............................................................................................................ 62
Avvio del programma ........................................................................................................................ 62
Funzione Remove ............................................................................................................................... 63
Fine del programma ........................................................................................................................... 63
Estrazione del pane ........................................................................................................................... 64
Manutenzione/pulizia ...................................................................................... 64
Risoluzione dei problemi / Domande frequenti ................................................ 66
Avvertenze per l'ambiente e indicazioni di smaltimento ................................... 67
Marchio di conformità ...................................................................................... 67
Esecuzione del programma .............................................................................. 68
Informazioni sulla garanzia e sull'assistenza ................................................... 72
50 - Italiano
Page 53

SilverCrest EDS SBB 850 B1
Introduzione
Grazie per avere acquistato la macchina impastatrice per il pane SilverCrest EDS SBB 850 B1, di
seguito denominata macchina per il pane. Si tratta di un prodotto di elevata qualità e destinato a
durare nel tempo.
Queste istruzioni d'uso contengono indicazioni importanti per un utilizzo sicuro dell'apparecchio,
nonché informazioni e indicazioni circa il suo uso quotidiano e il suo smaltimento. Prima di
utilizzare la macchina per il pane leggere attentamente le istruzioni d'uso e utilizzare l'apparecchio
solo nelle aree di impiego descritte e per gli scopi indicati. In caso di vendita o cessione della
macchina per il pane, consegnare assolutamente anche queste istruzioni. Sono parte integrante del
prodotto.
Utilizzo conforme alla destinazione d'uso
La macchina per il pane è facile da utilizzare e offre la possibilità di preparare pane, dolci e
marmellate per il consumo domestico in un ciclo di lavoro. Successivamente è possibile rielaborare
ulteriormente i prodotti realizzati in base alle proprie esigenze.
Questa macchina per il pane non è destinata all'utilizzo aziendale o commerciale. Utilizzare la
macchina per il pane solo in ambito privato, ogni altro utilizzo non è conforme. Inoltre
l'apparecchio non deve essere utilizzato all'aperto e in zone geografiche con clima tropicale.
Utilizzare la macchina per il pane solo per gli scopi descritti in queste istruzioni d'uso e mai per
l'asciugatura di alimenti o altri oggetti. Utilizzare solo gli accessori raccomandati dal produttore;
accessori non raccomandati possono danneggiare in modo persistente l'apparecchio. Ciò può
comportare la perdita del diritto di garanzia.
Questo apparecchio rispetta tutte le norme e le direttive previste dalla dichiarazione di conformità
CE. In caso di eventuali modifiche apportate alla macchina per il pane, non è garantita
l'osservanza di tali norme se le modifiche stesse non sono state concordate con il produttore. Il
produttore declina ogni responsabilità per i danni o i guasti risultanti da tali modifiche.
Vi preghiamo di rispettare le direttive locali ovvero le leggi in vigore nel paese in cui viene
utilizzato l'apparecchio.
Dotazione
Macchina per il pane
Recipiente di cottura
2 ganci per impastare
Utensile per rimuovere i ganci per impastare
Bicchiere graduato
Misurino
Istruzioni d'uso allegate
Ricettario
Guida rapida
Italiano - 51
Page 54

SilverCrest EDS SBB 850 B1
Queste istruzioni d'uso sono dotate di una copertina con risvolto. Sul lato interno della copertina è
raffigurata la macchina per il pane. Alcune parti sono numerate. La numerazione ha il significato
seguente:
Immagine A Immagine B
1 Oblò di ispezione 6 Ganci per impastare
2 Coperchio 7 Recipiente di cottura
3 Fessure di ventilazione 8 Bicchiere graduato
4 Cavo elettrico 9 Misurino
5 Pannello di comando 10 Utensile per rimuovere i ganci per impastare
Dati tecnici
Modello SilverCrest EDS SBB 850 B1
Tensione
Potenza assorbita 850W
Dimensioni (L x A x P) incl. impugnature circa 28 x 27 x 42cm
Peso circa 5,9 kg
Sicurezza testata
TÜV SÜD
Modifiche dei dati tecnici e del design possono avvenire senza preavviso.
220-240V~, 50Hz
Disposizioni di sicurezza
Prima di utilizzare per la prima volta la macchina per il pane leggere attentamente tutte le seguenti
istruzioni e attenersi a tutte le avvertenze di sicurezza, anche se si possiede una certa familiarità
con le apparecchiature elettroniche. Conservare accuratamente queste istruzioni d'uso come
riferimento futuro.
PERICOLO! Questo simbolo segnala una situazione di pericolo che se non viene
evitata può comportare ferimenti di grave entità o persino la morte.
AVVERTENZA! Questo simbolo contrassegna indicazioni importanti per il
funzionamento sicuro della macchina per il pane e per la protezione dell'utente.
PERICOLO! Questo simbolo mette in guardia da lesioni / ustioni che potrebbero
essere causate dalle superfici calde della macchina per il pane.
Questo simbolo contrassegna ulteriori note informative relative all'argomento.
52 - Italiano
Page 55

SilverCrest EDS SBB 850 B1
PERICOLO! La macchina per il pane non è prevista per l'utilizzo con un timer esterno
o con un sistema di telecomando esterno.
PERICOLO! La macchina per il pane può essere utilizzata da bambini a partire dagli
8 anni di età e da persone con ridotte capacità fisiche, sensoriali o mentali o con
esperienza e conoscenze insufficienti, solo dietro supervisione o istruzioni sull'utilizzo in
condizioni di sicurezza e sui pericoli che da tale utilizzo potrebbero risultare. Ai
bambini non deve essere consentito di giocare con l'apparecchio. La pulizia e la
manutenzione a carico dell'utente non deve essere svolta da bambini, se non maggiori
di 8 anni e dietro supervisione. Tenere i fogli utilizzati per l'imballaggio lontani dalla
portata dei bambini. Pericolo di soffocamento.
Tenere lontano dalla portata dei bambini di età inferiore agli 8 anni l'apparecchio e il
cavo.
PERICOLO! Se si dovessero sviluppare del fumo oppure rumori od odori insoliti,
estrarre subito la spina della macchina per il pane dalla presa elettrica. In questi casi
utilizzare nuovamente la macchina per il pane solo dopo un controllo effettuato da un
tecnico specializzato. Non inalare in nessun caso il fumo originato da un eventuale
incendio dell'apparecchio. In caso sia stato inalato del fumo, rivolgersi subito a un
medico. L'inalazione di fumo può nuocere alla salute.
PERICOLO! Non collocare la macchina per il pane sopra o vicino a fuochi aperti (ad
es. candele accese). Pericolo di incendio!
PERICOLO! Non azionare la macchina per il pane lasciandola incustodita. Quando
non si utilizza l'apparecchio, scollegarlo sempre dalla presa elettrica. Conservare la
macchina per il pane solo quando si è completamente raffreddata. Pericolo di incendio!
PERICOLO! Azionare la macchina per il pane solo su una superficie asciutta, piana e
insensibile al calore. Non utilizzare mai l'apparecchio nelle vicinanze di materiali
facilmente infiammabili, come tende, tendine oppure gas o liquidi esplosivi e/o
combustibili. Rispettare una distanza minima di 10cm da altri oggetti. Non lasciare mai
incustodita la macchina per il pane durante il suo utilizzo. Pericolo di incendio.
PERICOLO! Le fessure di ventilazione della macchina per il pane non devono mai
essere coperte. Non utilizzare l'apparecchio nei pressi di una cucina a gas o elettrica,
di un forno caldo o vicino ad altre fonti di calore. Non coprire mai la macchina per il
pane con un panno o con materiali simili, poiché si impedirebbe la fuoriuscita di calore
e vapore. Pericolo di surriscaldamento e incendio.
PERICOLO! Non utilizzare mai la macchina per il pane per conservare al suo interno
alimenti o altri oggetti, in particolare quelli metallici. Ciò potrebbe causare un corto
circuito. Pericolo di incendio.
Italiano - 53
Page 56

SilverCrest EDS SBB 850 B1
PERICOLO! Per la cottura, non superare mai le quantità di 700 grammi di farina e 1
1/4 bustine di lievito (massimo 10g), poiché altrimenti l'impasto potrebbe fuoriuscire
dal recipiente e causare un incendio. Pericolo di incendio.
PERICOLO! Durante la cottura la superficie di contatto della macchina per il pane può
raggiungere temperature molto elevate. Pericolo di ustione.
PERICOLO! La macchina per il pane diventa bollente. Non spostare e trasportare
l'apparecchio quando contiene sostanze molto calde all'interno del recipiente di cottura
(7), ad es. marmellata. Lasciar raffreddare la macchina per il pane e scollegare la spina
prima di rimuovere o inserire gli accessori. Utilizzare eventualmente una presina o un
guanto da forno. Pericolo di ustione.
AVVERTENZA! Non trasportare la macchina per il pane se contiene al suo interno
sostanze molto calde o liquide, ad es. marmellata. Pericolo di ustione.
AVVERTENZA! Al fine di evitare pericoli, la macchina per il pane non deve essere
danneggiata.
AVVERTENZA! Non esporre la macchina per il pane a fonti di calore dirette (ad es.
caloriferi) oppure alla luce diretta del sole o a una forte luce artificiale. Evitare il
contatto con spruzzi e gocce d'acqua e con liquidi aggressivi. Non utilizzare la
macchina per il pane vicino all'acqua. L'apparecchio non deve mai essere immerso in
sostanze liquide. Non collocare oggetti in cui sono presenti liquidi, ad esempio vasi o
bevande, sulla macchina per il pane. Inoltre, non sottoporre la macchina per il pane a
scosse e vibrazioni eccessive. Non inserire corpi esterni nell'apparecchio perché
potrebbe riportare dei danni.
AVVERTENZA! Per evitare di danneggiare l'apparecchio, avviare un programma di
cottura solo quando il recipiente di cottura (7) è inserito. Durante l'utilizzo non sollevare
il coperchio (2). Non rimuovere mai il recipiente di cottura (7) mentre la macchina è in
funzione, per evitare lesioni.
AVVERTENZA! Non azionare mai la macchina per il pane senza il recipiente di
cottura (7) poiché potrebbe danneggiarsi.
AVVERTENZA! Non azionare mai la macchina per il pane con il coperchio aperto
(2), per evitare lesioni.
Cavo elettrico
PERICOLO! Fare attenzione a non far passare il cavo elettrico (4) su bordi taglienti.
Non posizionare il cavo elettrico (4) nelle vicinanze di superfici od oggetti molto caldi e
fare attenzione a non mettere a contatto la macchina per il pane con superfici calde.
L'isolamento del cavo (4) potrebbe danneggiarsi. Pericolo di scossa elettrica.
54 - Italiano
Page 57

SilverCrest EDS SBB 850 B1
AVVERTENZA! Afferrare il cavo elettrico (4) sempre attraverso il connettore e non
tirare il cavo stesso (4).
AVVERTENZA! Non posizionare la macchina per il pane, mobili o altri oggetti
pesanti sul cavo elettrico (4) e assicurarsi che questo non venga piegato.
AVVERTENZA! Non fare mai nodi nel cavo elettrico (4) e non legarlo ad altri cavi.
Posizionare il cavo elettrico (4) in modo tale da non essere calpestato o da non
ostacolare nessuno.
AVVERTENZA! Utilizzare esclusivamente adattatori o prolunghe che siano conformi
alle norme di sicurezza vigenti e non intervenire sul cavo elettrico (4)! Se il cavo (4) è
danneggiato, deve essere sostituito dal produttore o dal suo servizio di assistenza clienti
o da una persona parimenti qualificata al fine di evitare pericoli.
Diritto d'autore
Il contenuto di queste istruzioni d'uso è soggetto al diritto d'autore e viene fornito al lettore
esclusivamente a titolo informativo. Qualsiasi copia o riproduzione dei dati e delle informazioni
senza autorizzazione scritta ed esplicita da parte dell'autore è vietata. Ciò riguarda anche l'uso
commerciale del contenuto e dei dati. Testo e immagini corrispondono allo stato tecnico al
momento della stampa. Con riserva di modifiche.
Prima della messa in funzione
Estrarre la macchina per il pane dalla confezione e rimuovere completamente il materiale di
imballaggio. Accertarsi che l'apparecchio non sia danneggiato. In caso di danni, la macchina per
il pane non deve essere utilizzata.
Prima di utilizzare per la prima volta la macchina per il pane, pulire il corpo esterno, il recipiente di
cottura (7) e i ganci per impastare (6) con un panno pulito e umido. Non utilizzare in nessun caso
sostanze o spugne abrasive.
Prima messa in funzione
PERICOLO! Durante la cottura la superficie di contatto può raggiungere temperature
molto elevate. Pericolo di scottature!
Nel corso della prima messa in funzione è possibile che si generi un leggero odore o
che si sviluppi un lieve fumo, a causa di residui legati alla produzione. Questo è
normale e scompare dopo poco tempo. Fare in modo che vi sia una ventilazione
sufficiente ed aprire eventualmente una finestra.
Italiano - 55
Page 58

SilverCrest EDS SBB 850 B1
PERICOLO! Non lasciare mai riscaldare la macchina per il pane con il recipiente di
cottura (7) vuoto per più di 5 minuti. Pericolo di surriscaldamento e incendio!
Durante la prima messa in funzione, procedere come segue:
Solo per la prima messa in funzione, inserire il recipiente di cottura (7) vuoto, chiudere il coperchio
(2) e selezionare il programma 12, come descritto nel capitolo "Programmi". Premere il tasto
, per riscaldare la macchina per il pane per 5 minuti. Trascorsi i 5 minuti, premere nuovamente il
tasto finché si avverte un lungo segnale acustico. Il programma viene terminato.
Scollegare il cavo elettrico (4) dalla presa, lasciare raffreddare completamente la macchina per il
pane e dopodiché pulire nuovamente con un panno pulito e umido il recipiente di cottura (7), i
ganci per impastare (6) e il corpo esterno dell'apparecchio.
La macchina per il pane è ora pronta per l’utilizzo.
Messa in funzione
PERICOLO! I pezzi della macchina per il pane possono raggiungere temperature
molto elevate. Utilizzare delle presine o dei guanti da forno per evitare di ustionarsi.
PERICOLO! Non utilizzare la macchina per il pane con un timer o una presa
telecomandata.
AVVERTENZA! Posizionare la macchina per il pane su una superficie piana e
resistente al calore. In caso di superfici delicate, inserire sotto la macchina per il pane
un ripiano che sopporti le alte temperature.
Prestazioni
È possibile selezionare 12 diversi programmi.
È possibile produrre il pane in base alle proprie ricette.
È possibile utilizzare miscele da forno già pronte per l'uso.
È possibile preparare impasti dolci, panini o pasta.
È possibile produrre marmellate o confetture.
È possibile utilizzare miscele da forno prive di glutine e ricette con farine prive di glutine.
Potete trovare molti buoni ingredienti e miscele da forno per le vostre ricette nel punto
vendita LIDL a voi più vicino.
56 - Italiano
Page 59
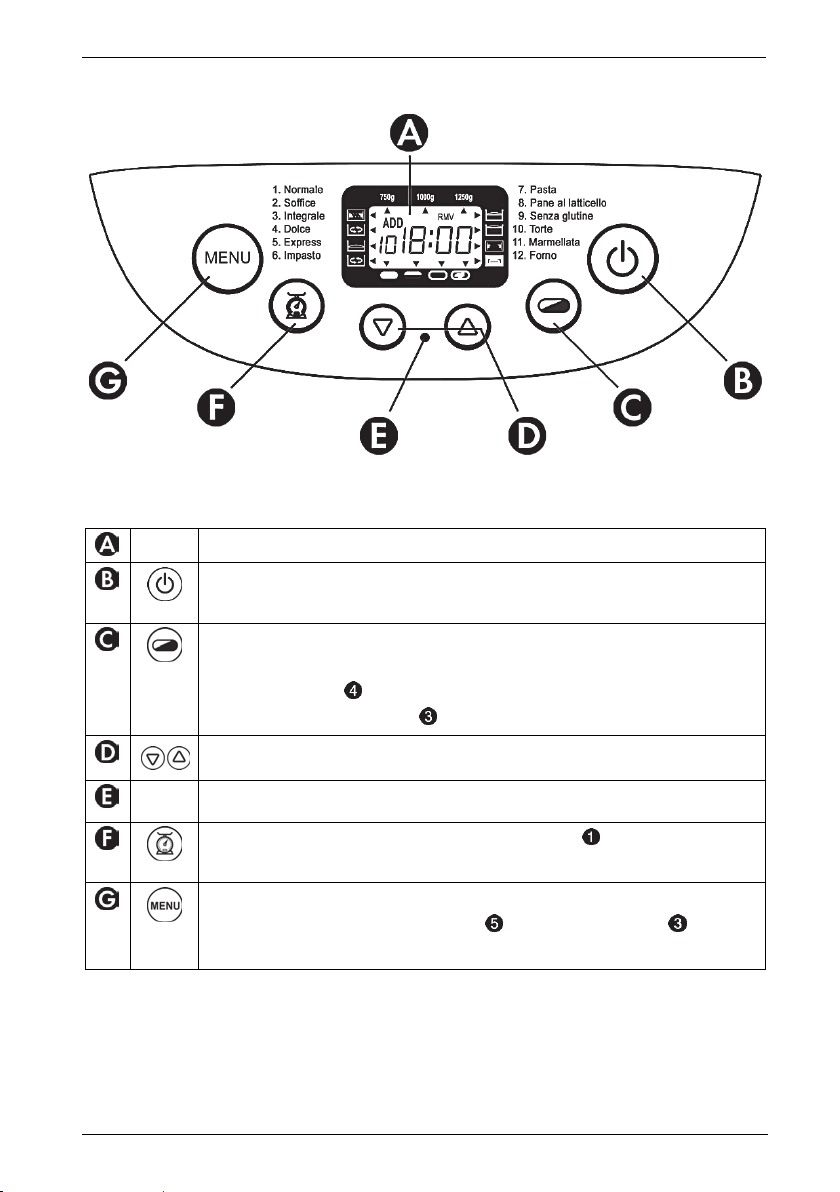
SilverCrest EDS SBB 850 B1
Pannello di comando
>>> Nomi dei programmi tradotti nella lingua del paese nell'immagine, in inglese sull'apparecchio <<<
Display
Start / Stop: Premere questo tasto finché non si avverte un segnale acustico
per avviare/fermare l'apparecchio o per cancellare un'impostazione del timer.
Grado di doratura / Modalità rapida: Impostazione del grado di
doratura (chiara, media, scura) oppure della modalità rapida. Premere il tasto
finché la freccia non è posizionata in corrispondenza del simbolo
desiderato. Il tempo di cottura cambia in base all'impostazione selezionata.
Timer: cottura posticipata
LED di funzionamento: mostra che è in corso un programma
Peso del pane: Premere il tasto finché la freccia non è posizionata in
corrispondenza del peso desiderato.
Menu / Programma: Selezionare in questo punto il programma di cottura
desiderato. Il numero del programma e il tempo di cottura vengono
visualizzati sul display.
Italiano - 57
Page 60

SilverCrest EDS SBB 850 B1
Display
Visualizzazioni del display
Visualizzazione del peso (750g / 1000g / 1250g)
Funzione REMOVE (RMV)
Tempo di funzionamento rimanente (ORE) / Preselezione ora
Grado di doratura selezionato / Modalità rapida
Chiara , Media , Scura , Rapida
Programma selezionato (1 – 12)
Esecuzione del programma
Aggiunta di ingredienti (ADD)
Programmi
La macchina per il pane offre 12 programmi predefiniti che è possibile selezionare con il tasto
. Sul display viene visualizzato il numero del programma selezionato.
I tempi di cottura dipendono dalle combinazioni dei programmi selezionate, in particolare dal
peso. Consultare a tal fine anche il capitolo "Esecuzione del programma".
La seguente descrizione dei programmi offre una panoramica dei diversi programmi e di quanto
questi siano adatti alle vostre esigenze di cottura.
58 - Italiano
Page 61

SilverCrest EDS SBB 850 B1
Programma 1: Normale (Regular)
Questo programma è adatto alla cottura di pane bianco o misto, composto per la maggior parte
da farina di frumento o di segale. Si ottiene del pane con una consistenza compatta.
Programma 2: Soffice (French)
Questo programma è adatto alla cottura di pane soffice composto da farine ben macinate. Di
norma si ottiene del pane soffice con la crosta croccante.
Programma 3: Integrale (Whole Wheat)
Questo programma è adatto alla preparazione di tipi di farina corposi, come ad es. farina di
frumento integrale o farina di segale integrale. Il risultato è del pane compatto e con una
consistenza più pesante.
Programma 4: Dolce (Sweet)
Questo programma è adatto per aggiungere al pane ulteriore zucchero o ingredienti come succhi
di frutta, frutta secca, scaglie di cocco, uvetta o cioccolato. Si ottiene del pane leggero e soffice.
Programma 5: Express (Super Rapid)
Con il programma Express i tempi di impasto, cottura e lievitazione si riducono notevolmente. Per
questo motivo sono adatte a questo programma solo ricette che non contengono tipi di farina
corposi o altri ingredienti pesanti. Con questo programma il pane è più denso e potrebbe anche
non essere così saporito come al solito.
Programma 6: Impasto (Dough)
Con questo programma è possibile preparare impasti con lievito per panini, pizza o altri prodotti
da forno. Non viene eseguita la cottura.
Programma 7: Pasta (Pasta)
Con questo programma è possibile preparare la pasta. Non viene eseguita la lievitazione e la
cottura.
Programma 8: Pane al latticello (Buttermilk Bread)
Questo programma è adatto per pane preparato con latticello o yogurt.
Programma 9: Senza glutine (Gluten Free)
Le farine o le miscele da forno senza glutine hanno altre proprietà di innescamento e hanno
bisogno di più tempo per l'assorbimento dei liquidi. Questo programma è adatto alla cottura di
pane preparato con farine o miscele da forno senza glutine.
Programma 10: Torte (Cake)
Con questo programma è possibile preparare torte sulla base di proprie ricette oppure anche
utilizzando miscele per torte già pronte.
Programma 11: Marmellata (Jam)
Questo programma consente di preparare marmellate, confetture, gelatine e altri prodotti
spalmabili a base di frutta.
Italiano - 59
Page 62

SilverCrest EDS SBB 850 B1
Programma 12: Forno (Bake)
Questo programma permette di proseguire la cottura in forno di pane troppo chiaro o non ben
cotto, ottimizzando cosi l'esito della cottura. È anche possibile cuocere al forno impasti già pronti.
Considerare che con questo programma non vengono eseguite tutte le operazioni di impasto e di
riposo. Alla cottura di 60 minuti segue un tempo di mantenimento del calore di massimo un'ora.
Per terminare in anticipo il programma, premere il tasto finché si avverte un lungo segnale
acustico. Scollegare la macchina per il pane dalla rete elettrica per spegnerla.
Nota per l'aggiunta degli ingredienti:
Durante l'esecuzione dei programmi 1, 2, 3, 4, 5, 6, 8, 9 è possibile aggiungere altri
ingredienti, come noci, semi o frutta. Quando si avverte un segnale acustico e sul
display compare "ADD" è possibile aggiungere gli ingredienti desiderati.
Mediante l'uso del timer è tuttavia anche possibile aggiungere tutti gli ingredienti nel
recipiente di cottura (7) all'inizio del programma. In questo caso può essere d'aiuto
spezzettare precedentemente la frutta e le noci.
Timer
Questa funzione permette di posticipare la cottura, con un ritardo massimo di 15 ore. Impostare
l'ora di fine con i tasti .
PERICOLO! Utilizzare la funzione Timer solo con ricette già provate almeno una volta.
In questo modo si è sicuri che gli ingredienti e le quantità sono corretti e che il risultato
di cottura sarà quello desiderato. Occorre accertarsi in particolare che la quantità
dell'impasto non sia troppa e che non rischi quindi di fuoriuscire dal recipiente di
cottura. Pericolo di incendio!
Per il programma "11. Marmellata" la funzione Timer non è disponibile.
Se si seleziona questa funzione, prestare particolare attenzione alla scelta degli
ingredienti. Non utilizzare questa funzione se si intende preparare ricette con
ingredienti facilmente deperibili, come ad es. latte, uova o panna.
Procedere nel seguente modo:
Selezionare un programma. Sul display viene indicata la durata di cottura.
Premendo il tasto è possibile ritardare la fine del programma di cottura. Quando si
preme il tasto la fine del programma viene spostata ai 10 minuti successivi, e poi per
ogni pressione del tasto si avanza di 10 minuti. Per accelerare l'avanzamento dei numeri è
possibile anche tenere premuto il tasto .
Sul display si visualizza il tempo complessivo tra la durata della cottura e il tempo di
posticipo.
60 - Italiano
Page 63

SilverCrest EDS SBB 850 B1
Con il tasto è possibile abbreviare il posticipo impostato di 10 minuti per ogni pressione.
Confermare l'impostazione del timer premendo il tasto . Sul display lampeggiano i
due punti, il LED di funzionamento lampeggia con una luce blu e il tempo impostato inizia a
scorrere.
Il raggiungimento dell'ora di inizio del programma viene indicato dal LED di funzionamento .
Inoltre il display indica la fase del programma attiva in quel momento.
La fine della cottura viene segnalata da 10 segnali acustici.
Sul display si visualizza 0:00.
Esempio di programmazione del timer:
Sono le 12:00 e si vuole avere il pane fresco alle 19:00, quindi 7 ore più tardi.
Selezionare innanzitutto il programma adatto e dopodiché aumentare il tempo indicato
sul display premendo il tasto fino a 7:00. Al momento dell'impostazione del
timer, considerare anche il tempo di raffreddamento, in modo da poter gustare il pane
appena sfornato nell'ora desiderata.
Preparare la cottura
Una buona preparazione vi assicura un buon risultato di cottura. Pertanto osservare le seguenti
note sulla preparazione degli ingredienti.
PERICOLO! Estrarre il recipiente di cottura (7) per introdurre gli ingredienti nella
macchina per il pane, in modo che questi non cadano accidentalmente nella camera di
cottura e sulle serpentine di riscaldamento.
Non superare mai le dosi indicate. L'impasto che potrebbe fuoriuscire dal recipiente può
incendiarsi sulle serpentine di riscaldamento. Pericolo di incendio.
Aggiungere gli ingredienti nel recipiente di cottura (7) rispettando sempre l'ordine indicato.
Tutti gli ingredienti utilizzati dovrebbero essere a temperatura ambiente. Solo in questo modo si
assicura un ottimale processo di fermentazione del lievito.
Anche minime variazioni di quantità possono avere un effetto sul risultato di cottura. Attenersi
pertanto il più possibile alle dosi indicate.
Naturalmente è possibile modificare leggermente le dosi delle ricette, per soddisfare al meglio
le esigenze personali. Tuttavia è opportuno testare con cautela le dosi ottimali e fare sempre
attenzione a non provocare una fuoriuscita dell'impasto.
Misurazione degli ingredienti
In dotazione con la macchina per il pane sono presenti dei misurini per ingredienti solidi e liquidi,
al fine di facilitare il dosaggio preciso degli ingredienti utilizzati.
Italiano - 61
Page 64

SilverCrest EDS SBB 850 B1
1 Bicchiere graduato per i liquidi
1 misurino grande, il cui contenuto corrisponde a un cucchiaio
1 misurino piccolo, il cui contenuto corrisponde a un cucchiaino
In fase di misurazione degli ingredienti, attenersi il più precisamente possibile alle dosi indicate
nelle ricette. Solo in questo modo sarà possibile ottenere il risultato desiderato.
Cottura del pane
Preparazione / Impostazioni
Estrarre il recipiente di cottura (7) dalla macchina per il pane, sfilandolo verso l'alto.
Inserire i 2 ganci per impastare (6) fino all'arresto sugli assi di trasmissione all'interno del
recipiente di cottura (7).
Introdurre gli ingredienti nel recipiente di cottura (7) seguendo l'ordine indicato nella ricetta. Di
solito si introducono prima gli ingredienti liquidi, seguiti da zucchero e sale. Successivamente si
aggiunge la farina, dopodiché il lievito come ultimo ingrediente. Quest'ultimo non deve entrare
in contatto diretto con gli ingredienti liquidi o il sale.
Reinserire ora il recipiente di cottura (7) nella macchina per il pane.
Chiudere il coperchio (2).
Collegare il cavo alla presa elettrica. Si avvertirà un segnale acustico e sul display apparirà
il numero del programma 1 con il tempo di cottura corrispondente.
Selezionare il programma desiderato premendo una o più volte il tasto .
Ogni pressione del tasto viene confermata da un segnale acustico.
Selezionare il peso del pane con il tasto .
Selezionare il grado di doratura con il tasto , spostando la freccia del bordo inferiore del
display in corrispondenza del grado di doratura desiderato. In questo punto è possibile
selezionare anche "Rapida“. In questo modo il tempo di lievitazione dell'impasto viene ridotto.
Con i programmi 6, 7 e 11 non è possibile impostare il grado di doratura.
La funzione di modalità "Rapida" è possibile solo per i programmi 1, 2, 3 e 4.
Con i programmi 6, 7, 11 e 12 non è possibile impostare il peso.
Dopodiché con la funzione Timer è possibile, se necessario, stabilire l'ora di fine della cottura
(impossibile per il programma 11).
Avvio del programma
Premere il tasto per avviare il programma desiderato. Le singole fasi del programma
vengono eseguite in successione.
Alcuni programmi iniziano con una fase di preriscaldamento (si veda la tabella di
esecuzione dei programmi). In questa fase i ganci per impastare (6) non si muovono.
Non si tratta di un difetto.
62 - Italiano
Page 65

SilverCrest EDS SBB 850 B1
È possibile osservare l'esecuzione dei programmi e le singole fasi di lavoro attraverso l'oblò di
ispezione (1) sul coperchio (2).
Non aprire mai il coperchio (2) durante la fase di lievitazione o di cottura, per evitare
che il pane si afflosci.
Funzione Remove
Questa funzione permette di rimuovere i ganci per impastare (6) prima della fase di cottura. Ciò
non è strettamente necessario, ma ha il vantaggio di rimpicciolire i buchi presenti nel pane una
volta pronto, poiché sono determinati solo dagli assi sottili. Al momento dell'estrazione dal
recipiente di cottura (7) il pane non viene più lacerato dai ganci per impastare (6) e può essere
prelevato più facilmente.
Procedere nel seguente modo:
Dopo l'ultima fase di impasto si avvertono 10 segnali acustici e sul display lampeggia la
scritta "RMV" .
Premere il tasto , per interrompere l'esecuzione del programma per 10 minuti.
Durante questa interruzione di 10 minuti, sul display lampeggia la durata residua del
programma.
Aprire il coperchio (2) ed estrarre il recipiente di cottura (7).
Prelevare l'impasto con le mani infarinate e rimuovere i ganci per impastare (6).
Rimettere l'impasto nel recipiente di cottura (7).
Reinserire il recipiente di cottura (7) nella macchina per il pane e chiudere il coperchio (2).
Premere il tasto per continuare l'esecuzione del programma. Se non si preme il tasto
il programma riprende automaticamente la sua esecuzione dopo 10 minuti di interruzione.
Con i programmi 6, 7, 11 e 12 non è possibile utilizzare la funzione Remove.
Fine del programma
Alla fine della cottura si avvertono 10 segnali acustici e sul display si visualizza 0:00. La
macchina per il pane passa quindi in una fase di mantenimento del calore di 60 minuti. Per
terminare questa fase prima che siano trascorsi 60 minuti, premere il tasto e lasciarlo
premuto finché si avverte un lungo segnale acustico.
Con i programmi 6, 7 e 11 non viene attivata nessuna fase di mantenimento del calore.
Avvertenza! Scollegare il cavo dalla presa elettrica prima di aprire il coperchio (2)
della macchina per il pane.
Italiano - 63
Page 66

SilverCrest EDS SBB 850 B1
Estrazione del pane
PERICOLO! Per prelevare il recipiente di cottura (7) utilizzare delle presine o dei
guanti da forno. Pericolo di ustione.
È possibile estrarre il pane con maggiore facilità dal recipiente di cottura (7) se questo è
rimasto per almeno 30 minuti dopo il termine della cottura nel recipiente (7) (fase di
mantenimento del calore).
Inclinare il recipiente di cottura (7) con l'apertura verso il basso su una griglia di cottura e scuoterlo
leggermente. Grazie al rivestimento antiaderente del recipiente di cottura (7), il pane dovrebbe
staccarsi facilmente. Non utilizzare oggetti metallici per staccare il pane dal recipiente di cottura
(7). Il rivestimento antiaderente potrebbe danneggiarsi.
Se i ganci per impastare (6) non si staccano dal pane, rimuoverli con l'ausilio di un utensile
apposito (10).
Manutenzione/pulizia
Manutenzione
AVVERTENZA! Lavori di manutenzione sono necessari se la macchina per il pane è
stata danneggiata, se al suo interno sono penetrati liquidi od oggetti, se è stata esposta
alla pioggia o se non funziona perfettamente oppure ancora se è caduta. Se si dovesse
sviluppare del fumo oppure rumori od odori insoliti, spegnere subito la macchina per il
pane ed estrarre la spina dalla presa. In questi casi utilizzare nuovamente la macchina
per il pane solo dopo un controllo effettuato da un tecnico specializzato. Tutti i lavori di
manutenzione devono essere eseguiti da personale specializzato. Non aprire mai il
corpo esterno della macchina per il pane.
Il nostro servizio telefonico di assistenza clienti fornisce informazioni sui pezzi di
ricambio. (si veda pagina 73)
Pulizia
PERICOLO! Prima di pulire l'apparecchio scollegarlo dalla presa elettrica, in quanto
sussiste il pericolo di scossa elettrica.
PERICOLO! La macchina per il pane non deve essere immersa in acqua. Si corre il
rischio di scossa elettrica e si potrebbe causare un corto circuito.
64 - Italiano
Page 67

SilverCrest EDS SBB 850 B1
PERICOLO! Attendere che la macchina per il pane si sia raffreddata completamente,
altrimenti si corre il rischio di ustionarsi.
I pezzi e gli accessori della macchina per il pane non sono adatti alla lavastoviglie. Per la pulizia
della macchina per il pane non utilizzare detergenti o solventi chimici. In questo modo si evitano
danni all'apparecchio e residui nel pane dei cicli di cottura successivi.
Per la pulizia procedere come segue:
Corpo esterno, coperchio e camera di cottura
Rimuovere innanzitutto i ganci per impastare (6) e il recipiente di cottura (7). Per una pulizia
più facile della camera di cottura, è possibile rimuovere il coperchio (2), ruotandolo di ca.
45°, finché la cerniera passa attraverso le fessure della sua guida e il coperchio (2) può
essere estratto verso l'alto.
Dopodiché, con un panno o una spugna morbida, entrambi umidi, eliminare tutti i residui dalla
camera di cottura.
Pulire quindi il coperchio (2) e il corpo esterno, sempre utilizzando un panno umido o una
spugna morbida.
Asciugare poi la camera di cottura, il coperchio (2) e il corpo esterno con un panno morbido e
asciutto.
Se il coperchio (2) è stato rimosso, reinserirlo.
Recipiente di cottura, ganci per impastare e altri accessori
Le superfici del recipiente di cottura (7) e dei ganci per impastare (6) sono ricoperti da un
rivestimento antiaderente. Per mantenere le proprietà del rivestimento antiaderente, non utilizzare
per la pulizia detergenti aggressivi o abrasivi oppure oggetti che potrebbero graffiare e
danneggiare la superficie.
Estrarre il recipiente di cottura (7) e i ganci per impastare (6) dalla camera di cottura.
Rimuovere i ganci per impastare (6) dal recipiente di cottura (7), sfilandoli verso l'alto dai
propri assi. È possibile che non si riesca ad estrarre i ganci per impastare (6), poiché questi
sono rimasti "attaccati" all'asse a causa del processo di cottura precedente. In questo caso
riempire il recipiente di cottura (7) con acqua bollente. Dopo circa mezz'ora le incrostazioni
dovrebbero essersi disciolte e sarà possibile rimuovere i ganci per impastare (6).
Pulire i ganci per impastare (6) con acqua calda, un detergente delicato e una spazzola per
piatti. In caso di incrostazioni resistenti mettere prima a mollo i ganci per impastare (6)
nell'acqua di lavaggio. Eventuali residui nell'apertura degli assi dei ganci per impastare (6)
possono essere rimossi con cautela con uno stuzzicadenti.
Asciugare accuratamente i ganci per impastare (6) dopo la pulizia.
Pulire la superficie esterna del recipiente di cottura (7) con un panno umido.
Pulire la superficie interna del recipiente di cottura (7) con acqua calda, un detergente delicato
e una spazzola per piatti. In caso di incrostazioni resistenti riempire il recipiente di cottura (7)
Italiano - 65
Page 68

SilverCrest EDS SBB 850 B1
con acqua calda e aggiungere del detergente delicato. Attendere finché le incrostazioni si
siano ammorbidite e possano essere rimosse con una spazzola per piatti.
Dopo la pulizia, sciacquare il recipiente di cottura (7) con abbondante acqua corrente per
eliminare i residui di detergente e dopodiché asciugarlo completamente.
Pulire il bicchiere graduato (8), il misurino (9) e l'utensile per rimuovere i ganci per impastare
(10) con acqua calda e un detergente delicato. Dopo il risciacquo con acqua corrente,
asciugare completamente questi accessori.
Nel corso del tempo, il calore, l'umidità e il vapore, possono alterare leggermente il
colore delle superfici. Questo è normale e non compromette in alcun modo il
funzionamento né riduce la qualità ai sensi delle condizioni di garanzia.
Risoluzione dei problemi / Domande frequenti
Visualizzazione del display "HHH"
Problema: è stato avviato un programma, anche se la macchina per il pane non si è
sufficientemente raffreddata dopo l'ultima cottura.
Soluzione: fermare il programma e scollegare il cavo elettrico. Lasciar raffreddare la macchina per
il pane con il coperchio (2) aperto per 20-30 minuti.
Il programma non si avvia e sul display compare il programma 1
Problema: la macchina per il pane non si è sufficientemente raffreddata dopo l'ultima cottura.
Soluzione: lasciar raffreddare la macchina per il pane con il coperchio (2) aperto per 20-30
minuti.
Visualizzazione del display "EE0", "EE1" o "ELL" dopo l'avvio del programma
Soluzione: spegnere la macchina per il pane e scollegare il cavo elettrico. Reinserire il cavo nella
presa elettrica. Se il messaggio di errore dovesse ricomparire, contattare il servizio di assistenza
clienti.
Dopo la cottura il gancio per impastare (6) rimane attaccato al recipiente di
cottura (7)
Soluzione: riempire il recipiente di cottura (7) con acqua bollente e girare il gancio per impastare
(6) in modo da poter sciogliere le incrostazioni.
Dopo la cottura il gancio per impastare (6) rimane attaccato al pane
Soluzione: rimuovere il gancio per impastare (6) con l'utensile apposito (10).
Il motore gira, ma l'impasto non viene mescolato
Soluzione: controllare che il recipiente di cottura (7) e i ganci per impastare (6) siano inseriti
correttamente.
66 - Italiano
Page 69

SilverCrest EDS SBB 850 B1
La macchina per il pane sminuzza frutta e noci
Soluzione: aggiungere all'impasto ingredienti come frutta e noci se possibile solo dopo aver udito il
segnale acustico e aver visto comparire "ADD“ sul display .
La macchina per il pane non lavora
Soluzione: assicurarsi che il cavo sia collegato alla rete elettrica e che il LED di funzionamento
sia acceso. In base all'esecuzione del programma, cercare di individuare in quale fase di lavoro si
trovi attualmente la macchina per il pane. Alcune fasi del programma sono difficilmente
riconoscibili dall'esterno. Controllare di aver premuto correttamente il tasto .
Avvertenze per l'ambiente e indicazioni di smaltimento
Gli apparecchi contrassegnati da questo simbolo sono soggetti alla direttiva
europea 2012/19/EU. Tutti gli apparecchi elettrici ed elettronici non più utilizzati
devono essere smaltiti, separatamente dai rifiuti domestici, presso appositi punti di
raccolta previsti dalla propria amministrazione comunale. Lo smaltimento corretto
dell’apparecchio non più utilizzato evita danni all’ambiente e tutela la salute
personale. L’amministrazione comunale, l’ufficio responsabile dello smaltimento
rifiuti oppure il negozio nel quale è stato acquistato il prodotto forniscono ulteriori
informazioni sulle direttive riguardanti lo smaltimento dell’apparecchio non più
utilizzato.
Smaltire anche l'imballaggio nel rispetto dell'ambiente. Gli imballaggi possono essere smaltiti nella
raccolta della carta o consegnati nei punti di raccolta pubblici per il riciclaggio. Pellicole e
plastiche in dotazione vengono raccolte tramite l'impresa di smaltimento locale e smaltite nel
rispetto dell'ambiente.
Marchio di conformità
Questo apparecchio è conforme, nel rispetto dei requisiti essenziali e delle altre
relative disposizioni, alla direttiva Bassa Tensione 2006/95/EC, alla direttiva
EMC 2004/108/EC, alla direttiva ErP 2009/125/EC e alla direttiva RoHS
2011/65/EU. La relativa dichiarazione di conformità si trova al termine di queste
istruzioni.
Italiano - 67
Page 70

SilverCrest EDS SBB 850 B1
Esecuzione del programma
Programma 1. Normale 2. Soffice
Chiara
Grado di doratura
Media
Rapida
Scura
Peso (grammi) 750 1000 1250 750 1000 1250 750 1000 1250 750 1000 1250
Tempo (ore) 2:58 3:05 3:15 2:14 2:20 2:25 3:13 3:18 3:25 2:18 2:25 2:30
Preriscaldamento
(min.)
Impasto 1 (min.)
Lievitazione 1 (min.)
Impasto 2 (min.)
Lievitazione 2 (min.)
Lievitazione 3 (min.)
Cottura (min.)
15 15 20
12 13 13 12 13 13 12 12 15 12 13 13
25 25 25 10 10 10 20 20 20 10 10 10
2
2
3A*
5A*
5
5
30 30 30 18 18 18 43 41 35 18 18 18
30 30 30 30 30 30 35 35 35 30 30 30
56 60 65 56 60 65 60 65 70 60 65 70
2
5A*
5
-/- -/- -/-
2
2
1A*
2A*
5
5
2
2A*
5
Chiara
Media
Scura
10 10 15
2
2
3A*
5A*
8
8
2
5A*
8
Rapida
-/- -/- -/-
2
2
1A*
2A*
5
5
2
2A*
5
Mantenimento del
calore (min.)
Aggiunta degli
ingredienti (ORE
rimanenti)
Preselezione ora 15h 15h 15h 15h 15h 15h 15h 15h 15h 15h 15h 15h
60 60 60 60 60 60 60 60 60 60 60 60
2:01 2:05 2:10 1:49 1:53 1:58 2:26 2:29 2:28 1:53 1:58 2:03
*: Nella fase di programma "Impasto 2" è possibile aggiungere altri ingredienti.
La A dopo il numero indica che in questa fase si avverte un segnale acustico e sul display
compare contemporaneamente "ADD“ . Durante questo intervallo è possibile aggiungere gli
ingredienti.
Esempio:
3A > Durante questa fase di impasto di 3 minuti si avverte un segnale acustico e si visualizza
"ADD“ . Aggiungere gli ingredienti.
68 - Italiano
Page 71

SilverCrest EDS SBB 850 B1
Programma 3. Integrale 4. Dolce
Chiara
Grado di doratura
Media
Rapida
Scura
Peso (grammi) 750 1000 1250 750 1000 1250 750 1000 1250 750 1000 1250
Tempo (ore) 3:18 3:25 3:35 2:24 2:30 2:35 2:56 3:01 3:10 2:10 2:16 2:20
Preriscaldamento
(min.)
Impasto 1 (min.)
Lievitazione 1 (min.)
Impasto 2 (min.)
Lievitazione 2 (min.)
Lievitazione 3 (min.)
Cottura (min.)
15 15 20
11 12 12 11 13 13 12 12 12 11 12 12
25 25 25 10 10 10 20 20 20 10 10 10
2
2
3A*
5A*
8
8
38 38 38 23 23 23 35 35 35 18 18 18
35 35 35 35 35 35 30 30 30 30 30 30
56 60 65 56 60 65 52 56 60 52 56 60
2
5A*
8
-/- -/- -/-
2
2
2A*
2A*
5
5
2
2A*
5
Chiara
Media
Scura
10 10 15
2
2
4A*
5A*
6
6
2
5A*
6
Rapida
-/- -/- -/-
2
2
1A*
2A*
6
6
2
2A*
6
Mantenimento del
calore (min.)
Aggiunta degli
ingredienti (ORE
rimanenti)
Preselezione ora 15h 15h 15h 15h 15h 15h 15h 15h 15h 15h 15h 15h
60 60 60 60 60 60 60 60 60 60 60 60
2:17 2:21 2:26 1:59 2:03 2:08 2:03 2:07 2:11 1:46 1:50 1:54
*: Nella fase di programma "Impasto 2" è possibile aggiungere altri ingredienti.
La A dopo il numero indica che in questa fase si avverte un segnale acustico e sul display
compare contemporaneamente "ADD“ . Durante questo intervallo è possibile aggiungere gli
ingredienti.
Esempio:
3A > Durante questa fase di impasto di 3 minuti si avverte un segnale acustico e si visualizza
"ADD" . Aggiungere gli ingredienti.
Italiano - 69
Page 72

SilverCrest EDS SBB 850 B1
Programma
5.
Express
Chiara
Grado di doratura
Media
Scura
Peso (grammi) 750 1000 1250
Durata (ore) 1:15 1:18 1:20 1:50 0:15 3:17 3:21 3:30
Preriscaldamento (min.)
-/- -/- -/-
Impasto 1 (min.)
Lievitazione 1 (min.)
8 8 8 12 15
-/- -/- -/-
-/-
-/-
Impasto 2 (min.)
Lievitazione 2 (min.)
Lievitazione 3 (min.)
Cottura (min.)
2A*
2A*
5
-/- -/- -/-
20 20 20 45
40 43 45
-/-
2A*
5
5
6.
Impasto
7.
Pasta
-/- -/-
-/- -/-
10
-/-
10 10 10
10
-/-
3A*
5
25
-/-
-/-
-/-
-/-
-/-
-/-
8.
Pane al latticello
Chiara
Media
Scura
750 1000 1250
25 25 30
20 20 20
2
2
5A*
5A*
8
45 45 45
30 30 30
52 56 60
2
5A*
8
8
Mantenimento del calore
(min.)
Aggiunta degli ingredienti
(ORE rimanenti)
Preselezione ora 15h 15h 15h 15h 15h 15h 15h 15h
60 60 60
1:05 1:08 1:10 1:15
-/-
-/-
-/-
60 60 60
2:15 2:19 2:23
*: Nella fase di programma "Impasto 2" è possibile aggiungere altri ingredienti.
La A dopo il numero indica che in questa fase si avverte un segnale acustico e sul display
compare contemporaneamente "ADD" . Durante questo intervallo è possibile aggiungere gli
ingredienti.
Esempio:
3A > Durante questa fase di impasto di 3 minuti si avverte un segnale acustico e si visualizza
"ADD“ . Aggiungere gli ingredienti.
70 - Italiano
Page 73

SilverCrest EDS SBB 850 B1
Programma
9.
Senza glutine
Chiara
Grado di doratura
Media
Scura
Peso (grammi) 750 1000 1250 750 1000 1250
Durata (ore) 1:37 1:41 1:45
Preriscaldamento (min.)
1:30
10.
Torte
Chiara
Media
Scura
1:35 1:40 1:20 1:00
-/- -/- -/- -/- -/- -/- -/- -/-
Impasto 1 (min.)
Lievitazione 1 (min.)
15 15 15
15
15 15
-/- -/- -/- -/- -/- -/-
Impasto 2 (min.)
Lievitazione 2 (min.)
Lievitazione 3 (min.)
Cottura (min.)
Mantenimento del calore
(min.)
-/- -/- -/- -/- -/- -/- -/- -/-
30 30 30
-/- -/- -/- -/- -/-
-/- -/- -/- -/- -/- -/-
60 +
52 56 60
Lievitazione
60 60 60
15
60
65 +
Lievitazione
70 +
15
15
Lievitazione
60 60
11.
Marmellata
-/-
-/- -/-
-/- -/-
15
(Calore e
mescolamento)
45
(Calore e
mescolamento)
20
Lievitazione
-/-
12.
Forno
Chiara
Media
Scura
-/-
-/-
60
60
Aggiunta degli ingredienti
(ORE rimanenti)
Preselezione ora 15h 15h 15h 15h 15h 15h
-/- -/- -/- -/- -/- -/- -/- -/-
-/-
*: Nella fase di programma "Impasto 2" è possibile aggiungere altri ingredienti.
La A dopo il numero indica che in questa fase si avverte un segnale acustico e sul display
compare contemporaneamente "ADD" . Durante questo intervallo è possibile aggiungere gli
ingredienti.
Esempio:
3A > Durante questa fase di impasto di 3 minuti si avverte un segnale acustico e si visualizza
"ADD" . Aggiungere gli ingredienti.
Italiano - 71
15h
Page 74

SilverCrest EDS SBB 850 B1
Informazioni sulla garanzia e sull'assistenza
Garanzia di TARGA GmbH
Gentile cliente,
con questo apparecchio riceve 3 anni di garanzia a partire dalla data di acquisto. Nel caso in cui
dovesse riscontrare difetti del presente prodotto, Lei gode di diritti legali nei confronti del venditore
del prodotto. Tali diritti non sono in alcun modo limitati dalla garanzia qui di seguito riportata.
Condizioni di garanzia
Il periodo di validità della garanzia ha inizio con la data di acquisto. Conservare lo scontrino
fiscale originale come prova d'acquisto. Se entro tre anni dalla data di acquisto dovessero essere
riscontrati difetti di materiale o di fabbricazione, il prodotto sarà, a nostra discrezione, riparato o
sostituito gratuitamente.
Durata della garanzia e diritti per difetti
La durata della presente garanzia non viene prolungata dalla garanzia legale. Ciò vale anche per
i pezzi sostituiti e riparati. Eventuali danni e difetti già presenti al momento dell'acquisto devono
essere notificati immediatamente dopo l'apertura della confezione. Allo scadere della garanzia le
riparazioni saranno a carico del cliente.
Copertura della garanzia
L'apparecchio è stato accuratamente prodotto nel rispetto di elevati standard qualitativi e
controllato scrupolosamente prima della consegna. La garanzia è valida per difetti di materiale o
fabbricazione. Tale garanzia non si estende alle parti del prodotto esposte a normale usura (i
cosiddetti pezzi d'usura) o al danneggiamento di pezzi fragili, ad es. interruttori, accumulatori o
pezzi in vetro. La presente garanzia decade se il prodotto viene danneggiato, non utilizzato
correttamente o sottoposto a manutenzione. Per un corretto utilizzo del prodotto, attenersi
scrupolosamente alle istruzioni descritte nel manuale d'uso. Evitare nel modo più assoluto utilizzi e
azioni sconsigliate o segnalate come pericolose nelle istruzioni d'uso. Il prodotto è destinato
esclusivamente all'uso privato e non commerciale. In caso di utilizzo improprio, scorretto o violento
e in caso di interventi non eseguiti dal nostro centro di assistenza autorizzato, la garanzia è da
considerarsi nulla. La riparazione o sostituzione del prodotto non comporta l’inizio di un nuovo
periodo di garanzia.
Gestione in caso di garanzia
Per una rapida soddisfazione della Sua richiesta, si attenga alle seguenti istruzioni:
- Prima della messa in funzione del prodotto, leggere attentamente la documentazione
allegata. Se dovesse presentarsi un problema che non si riesce a risolvere con i mezzi
indicati, contattare la nostra assistenza clienti.
72 - Italiano
Page 75

SilverCrest EDS SBB 850 B1
- Per ogni richiesta, si prega di custodire come prova d'acquisto lo scontrino fiscale e il
codice articolo oppure il numero di serie, se esistente.
- Nel caso in cui non sia possibile trovare una soluzione per via telefonica, tramite la
nostra assistenza clienti viene contattata una seconda assistenza, in base alla causa del
difetto.
Assistenza
Telefono: 02 – 69 68 28 59
E-Mail: service.IT@targa-online.com
Telefono: 044 – 511 82 91
E-Mail: service.CH@targa-online.com
Telefono: 800 – 62 175
E-Mail: service.MT@targa-online.com
IAN: 102869
Produttore
Considerare che il seguente indirizzo non coincide con l'indirizzo dell'assistenza. Contattare in
primo luogo il centro di assistenza sopra indicato.
TARGA GmbH
Coesterweg 45
59494 SOEST
GERMANY
Italiano - 73
Page 76

SilverCrest EDS SBB 850 B1
Table of contents
Introduction ...................................................................................................... 75
Intended use .................................................................................................... 75
Supplied items .................................................................................................. 75
Technical data .................................................................................................. 76
Safety instructions ............................................................................................ 76
Copyright ......................................................................................................... 79
Prior to use ....................................................................................................... 79
Initial start-up ................................................................................................... 79
First use ............................................................................................................ 80
Range of options available ............................................................................................................... 80
Control panel ...................................................................................................................................... 81
Display ................................................................................................................................................ 82
Visual display ..................................................................................................................................... 82
Programmes .................................................................................................... 82
Timer ................................................................................................................ 84
Preparing to bake ............................................................................................ 85
Measuring ingredients ....................................................................................................................... 85
Baking bread ................................................................................................... 86
Preparation / Settings ........................................................................................................................ 86
Starting programme ........................................................................................................................... 86
Remove function ................................................................................................................................. 87
End of programme ............................................................................................................................. 87
Removing bread ................................................................................................................................. 87
Maintenance / Cleaning ................................................................................... 88
Troubleshooting / Frequently asked questions ................................................. 90
Environmental and disposal information .......................................................... 91
Conformity information .................................................................................... 91
Programme sequence ...................................................................................... 92
Warranty and servicing advice ........................................................................ 96
74 - English
Page 77

SilverCrest EDS SBB 850 B1
Introduction
Thank you for purchasing a SilverCrest automatic bread maker EDS SBB 850 B1, hereinafter
referred to as automatic bread maker. You have thus purchased a high-quality and durable
product.
These operating instructions contain important information on the safe use of the device, as well as
instructions and information on its daily use and disposal. Read these operating instructions
thoroughly before using the automatic bread maker and use it only for the purposes specified in the
range of application that is described. If you sell or pass on the automatic bread maker to someone
else, be sure to always include these operating instructions. They are an integral part of the device.
Intended use
The automatic bread maker is easy to use and enables you to produce bread, cakes and jams in a
single step for domestic use. You can then process what you have made according to your needs.
This automatic bread maker is not designed for commercial use or installation and operation in a
company. Use the automatic bread maker only for private use as any other use is not as intended.
Furthermore, the automatic bread maker may not be used outdoors or in tropical climates. Use the
automatic bread maker solely for the purposes shown in this manual, and never for drying food or
other objects. Only use accessories recommended by the manufacturer as non-recommended
accessories may damage the device permanently. This could void your warranty.
This automatic bread maker meets all relevant norms and standards in conjunction with CE
conformity. In the event of any modification to the automatic bread maker that was not approved
by the manufacturer, compliance with these standards is no longer guaranteed. The manufacturer
does not accept any liability for any resulting damage or faults in such cases.
Please observe the regulations and laws in the country of use.
Supplied items
Automatic bread maker
Baking tin
2 dough hooks
Dough hook remover
Measuring cup
Measuring spoon
These operating instructions
Recipe booklet
Quick start guide
English - 75
Page 78

SilverCrest EDS SBB 850 B1
These operating instructions have a fold-out cover. The automatic bread maker is illustrated with
numbers on the inside cover. The numbers indicate the following:
Figure A Figure B
1 Viewing window 6 Dough hook
2 Cover 7 Baking tin
3 Ventilation slots 8 Measuring cup
4 Mains cable 9 Measuring spoon
5 Control panel 10 Dough hook remover
Technical data
Model SilverCrest EDS SBB 850 B1
Power supply
Power consumption 850W
Dimensions (W x H x D) including handles approx. 28 x 27 x 42cm
Weight approx. 5.9kg
Safety tested:
TÜV SÜD
The technical data and design may be changed without notification.
220-240V~, 50Hz
Safety instructions
Before using the automatic bread maker for the first time, please read the following instructions and
pay attention to all warnings, even if you are familiar with handling electronic devices. Store these
instructions in a safe place for future reference.
DANGER! This symbol indicates an imminent dangerous situation which, if not
prevented, could result in serious injury or even death.
WARNING! This symbol indicates important information for safe operation of the
automatic bread maker and the safety of the user.
DANGER! This symbol indicates a warning about injuries or burns associated with
hot surfaces of the automatic bread maker.
This symbol indicates other important information on the topic.
76 - English
Page 79

SilverCrest EDS SBB 850 B1
DANGER! The automatic bread maker is not intended to be operated with an external
time switch or a separate remote control system.
DANGER! This automatic bread maker can be used by children aged 8 and older and
by persons with reduced physical, sensory or mental abilities or lack of experience and
knowledge if they are supervised or have been instructed on the safe use of the
automatic bread maker and understand the resulting risks. Children must not play with
the automatic bread maker. Cleaning and user maintenance should not be carried out
by children, unless they are older than 8 years of age and are supervised. Always keep
plastic packaging away from children. It poses a suffocation risk.
Children who are younger than 8 years of age must be kept away from the device and
its power cable.
DANGER! If smoke is produced, or there are any unusual sounds or odours,
disconnect the mains plug of the automatic bread maker from the mains socket
immediately. In such cases, the automatic bread maker should not be used until it has
been inspected by authorised service personnel. Never inhale smoke from a potential
device fire. If you have inhaled smoke, however, consult a doctor. The inhalation of
smoke can be harmful.
DANGER! Ensure that no fire sources (e.g. burning candles) are placed on or near the
automatic bread maker. It poses a fire hazard!
DANGER! Do not leave the automatic bread maker unattended when it is operating.
Always disconnect the mains plug from the socket when you are not using the device.
Put away the automatic bread maker only when it has completely cooled down. It poses
a fire hazard!
DANGER! Operate the automatic bread maker only on a dry, flat and heat-resistant
surface. Never use the automatic bread maker in the vicinity of flammable materials
such as curtains, drapes or explosive and/or inflammable gases or liquids. Always keep
the device at a minimum distance of 10cm from other objects. Never leave the
automatic bread maker unattended when it is operating! It poses a fire hazard.
DANGER! The ventilation slots of the automatic bread maker must never be covered.
The device must not be operated on or near a gas or electric hob, a hot oven or other
heat sources. Never cover the automatic bread maker with a cloth or similar material as
otherwise the heat and steam cannot escape. There is a risk of overheating and fire.
DANGER! Never use the automatic bread maker to store food or other things,
especially metal objects. This could cause a short circuit. It poses a fire hazard.
English - 77
Page 80

SilverCrest EDS SBB 850 B1
DANGER! You must never use more than 700 grams of flour and 1.25 sachets of
yeast (maximum 10g) when baking as otherwise the dough can spill over and cause a
fire. It poses a fire hazard.
DANGER! When operating, the temperature of the accessible surfaces of the
automatic bread maker can be very high. There is a risk of burns.
DANGER! The automatic bread maker becomes hot. Do not move or transport the
device when the baking tin (7) contains something hot, for example, jam. Let the
automatic bread maker cool down and disconnect the mains plug from the socket
before you remove or insert accessories. Use a pot holder or oven glove if necessary.
There is a risk of burns.
WARNING! Do not transport the automatic bread maker when it contains hot or liquid
contents, for example, jam. There is a risk of burns.
WARNING! The automatic bread maker must not become damaged in order to
prevent hazards.
WARNING! The automatic bread maker must never be exposed to any direct heat
sources (for example, heaters) or direct sunlight or bright artificial light. Also avoid
contact with dripping water and splashes and corrosive liquids. Do not use the
automatic bread maker near water. The automatic bread maker must never be
submerged. Never place any objects filled with liquids, for example, vases or drinks, on
the automatic bread maker. Also ensure that the automatic bread maker is not exposed
to any excessive shocks or vibrations. Furthermore, no foreign objects may penetrate the
device. Otherwise, the automatic bread maker could be damaged.
WARNING! A baking programme may be started only if the baking tin (7) is inserted
to avoid damage to the machine. Keep the cover (2) closed during operation. Never
remove the baking tin (7) during operation to prevent injury.
WARNING! Never operate the automatic bread maker without the baking tin (7). The
device could be damaged.
WARNING! Never operate the automatic bread maker with its cover (2) open in
order to prevent injury.
Mains cable
DANGER! Make sure that the mains cable (4) is not connected over sharp edges.
Never place the mains cable (4) in the vicinity of hot surfaces or objects and ensure that
it does not touch any hot surfaces of the automatic bread maker. The insulation of the
mains cable (4) could be damaged. It poses an electric shock risk.
78 - English
Page 81

SilverCrest EDS SBB 850 B1
WARNING! Always handle the mains cable (4) by the plug and do not pull on the
mains cable (4) itself.
WARNING! Do not place the automatic bread maker, furniture or other heavy objects
on the mains cable (4) and ensure that it is not kinked.
WARNING! Never tie a knot in the mains cable (4) and do not tie cables together.
Place the mains cable (4) so that no one can trip over it and it does not cause an
obstruction.
WARNING! Do not use adapter plugs or extension cables that do not comply with
applicable safety standards, and do not make any alterations to the mains cable (4)! If
the mains cable (4) is damaged, it must be replaced by the manufacturer or its customer
service representative or a similarly qualified person to prevent any safety hazards.
Copyright
All information contained in these instructions is subject to copyright and is provided for information
purposes only. It is only permitted to copy or duplicate data and information with the express and
written consent of the author. This also includes commercial use of the content and data. The text
and illustrations are based on the state of the art at the time of printing. Subject to change.
Prior to use
Remove the automatic bread maker from the packaging and remove the packaging material
completely. Check the automatic bread maker for signs of damage. If it is damaged, the automatic
bread maker must not be used.
Clean the housing of the automatic bread maker, the baking tin (7) and the dough hooks (6) with a
clean, damp cloth before using the device for the first time. Never use scouring agents or abrasive
sponges.
Initial start-up
DANGER! The temperature of the accessible surfaces may be very high when the
device is operating. There is a risk of burns!
When using the device for the first time, production-related residue may give rise to a
slight odour and minor smoke emission is also possible. This is normal and will fade after
a short time. Please ensure that there is sufficient ventilation. Open a window if
necessary.
English - 79
Page 82

SilverCrest EDS SBB 850 B1
DANGER! Never preheat the automatic bread maker for longer than 5 minutes with an
empty baking tin (7). There is a risk of overheating and fire!
When using the device for the first time, proceed as follows:
Only for the initial start-up, insert the empty baking tin (7), close the cover (2) and select
programme 12 as described in the section "Programmes". Press the button to preheat the
automatic bread maker for 5 minutes. After 5 minutes, press the button again until a long
beep sounds. The programme has then ended.
Unplug the mains cable (4) from the socket, let the automatic bread maker cool down completely,
and then once again clean the baking tin (7), dough hooks (6) and housing of the automatic bread
maker with a clean, damp cloth.
The automatic bread maker is now ready to use.
First use
DANGER! The parts of the automatic bread maker can become very hot. Use pot
holders or oven gloves to prevent burns.
DANGER! Do not operate the automatic bread maker with a time switch or a remote
control socket.
WARNING! Place the automatic bread maker on a flat, heat-resistant surface. If the
surface is sensitive, place a heat-resistant board under the automatic bread maker.
Range of options available
You can choose between 12 different programmes.
You can make your own breads according to your own recipes.
You can process pre-made baking mixes.
You can knead cake mixtures, bread roll or pasta dough.
You can make marmalade or jam.
You can process gluten-free baking mixes and recipes with gluten-free flours.
You can buy many delicious baking mixes and ingredients for your own recipes in your
local LIDL store.
80 - English
Page 83

Control panel
SilverCrest EDS SBB 850 B1
Display
Start / Stop: Press this button until a beep sounds to start/stop the device or
to delete a timer setting.
Browning level / Quick mode: setting browning level (light, medium,
dark) or quick mode. Press the button repeatedly until the arrow is on the
desired symbol. Depending on the selected setting, the baking time changes.
Timer: time-delayed baking
Power LED: indicates that a programme is running
Bread weight: Press the button repeatedly until the arrow is below the
desired weight.
Menu / Programme: Select the desired baking programme here. The
programme number and baking time are indicated on the display.
English - 81
Page 84

SilverCrest EDS SBB 850 B1
Display
Visual display
Weight display (750g / 1000g / 1250g)
REMOVE function (RMV)
Remaining operating time (hours) / preset time
Selected browning level / quick mode:
light , medium , dark , quick
Selected programme (1 – 12)
Programme sequence
Adding ingredients (ADD)
Programmes
The automatic bread maker provides you with 12 preset programmes which you can select via the
button . The display indicates the programme number of the selected programme.
The baking times depend on the selected programme combinations, and particularly on the weight.
Please pay particular attention also to the section "Programme sequence".
The following description of the programmes gives you an overview of the programmes and their
suitability for your baking plans.
82 - English
Page 85

SilverCrest EDS SBB 850 B1
Programme 1: Regular
This programme is suitable for baking white or brown breads, which largely consist of wheat or rye
flour. You obtain bread which has a compact consistency.
Programme 2: French
This programme is suitable for baking fluffy breads made from finely ground flours. You usually
obtain fluffy breads with a crispy crust.
Programme 3: Whole Wheat
This programme is suitable for processing strong flours such as wholemeal wheat flour or
wholemeal rye flour. This results in a heavy and compact bread.
Programme 4: Sweet
This programme is very suitable if you would like to add additional sugar or ingredients such as fruit
juice, dried fruit, coconut flakes, raisins or chocolate to your bread. The programme provides a
fluffy, airier bread.
Programme 5: Super Rapid
The times for kneading and baking as well as the rise time are greatly reduced in the express
programme. This programme is thus suitable only for recipes that do not require any strong types of
flour or other heavy ingredients. The bread is less airy and also may not be as tasty as usual with
this programme.
Programme 6: Dough
Yeast dough for bread rolls, pizza or other pastries can be kneaded with this programme. The
baking process does not apply here.
Programme 7: Pasta
You can prepare pasta dough with this programme. Rise times and the baking process do not
apply here.
Programme 8: Buttermilk Bread
This programme is very suitable for breads with buttermilk or yoghurt.
Programme 9: Gluten Free
Gluten-free flours and baking mixes have different rise properties and need more time to absorb
fluids. This programme is suitable for baking breads made from gluten-free flour or gluten-free baking
mixes.
Programme 10: Cake
Use this programme to bake your cake according to your own recipes or even cake mixes.
Programme 11: Jam
This program is used to produce jam, marmalade, jelly and other fruit-based spreads.
English - 83
Page 86

SilverCrest EDS SBB 850 B1
Programme 12: Bake
This programme allows you to bake breads that are too light or not fully baked and thus optimise
the baking result. You can also bake ready-made dough with this programme. Note that all
kneading and resting processes are completely eliminated in this programme. The 60-minute baking
process is followed by a maximum “keep warm” period of one hour.
To end the programme ahead of time, press the button until a long beep sounds. Disconnect
the automatic bread maker from the mains to switch it off.
Note about adding ingredients:
For programmes 1, 2, 3, 4, 5, 6, 8 and 9, you can add other ingredients such as nuts,
seeds or fruit while the programme is running. When a beep sounds and "ADD" is
indicated on the display , add the desired ingredients.
When using the timer, you can also place all ingredients in the baking tin (7) at the start
of the programme. In this case, it may be advisable to chop fruit and nuts in advance.
Timer
This function enables time-delayed baking with a maximum delay of 15 hours. Set the end time
using the buttons .
DANGER! Use the timer function solely for recipes that you have already tried out. This
ensures that the ingredients and quantities are in the right proportion and the desired
baking result is achieved. In particular, you must ensure that there is not too much dough
and that it does not spill over. It poses a fire hazard!
The timer function is not available for programme 11 "Jam".
When using the timer function, pay particular attention to the selection of ingredients. Do
not use this function if you want to process easily perishable ingredients such as milk,
eggs or cream.
Proceed as follows:
Select a programme. The display indicates the baking time.
By pressing the button , you can defer the end of the baking programme. When you first
press the button , the end of the programme is deferred for the next full 10 minutes, and
each additional pressing results in a further 10-minute deferral. You can also keep the button
pressed to speed up the progress of the numbers.
The display indicates the total time consisting of baking time and deferral time.
By pressing the key , you can shorten the set deferral time by 10-minute intervals.
84 - English
Page 87

SilverCrest EDS SBB 850 B1
Confirm the timer setting by pressing the button . On the display , the colon flashes,
the power LED flashes blue and the set time starts to run.
When the start time of the programme is reached, this is indicated by the power LED lighting
up. The display also indicates the programme step that is currently active.
The end of the baking process is indicated by 10 beeps.
The display indicates 0:00.
Example of programming the timer:
It is 12.00 noon and you would really like to have fresh bread at 7.00 p.m., thus 7
hours later. First, select the appropriate programme and then increase the time that is
indicated on the display by pressing the button to 7:00. Schedule a cooling
down period with the timer setting so that you can enjoy the freshly baked bread at the
desired time.
Preparing to bake
Good preparation ensures good baking results. Thus please pay attention to the following
information on the handling of ingredients.
DANGER! Remove the baking tin (7) from the automatic bread maker to add the
ingredients to it so that ingredients do not accidentally spill in the baking compartment
or on the heating coils.
Never use larger quantities than those specified. Dough which spills over may ignite on
the heating coils. It poses a fire hazard.
The ingredients should always be added to the baking tin (7) in the specified sequence.
All ingredients used should be at room temperature. This is the only way in which an optimal
fermentation process of the yeast can be ensured.
Even small deviations in quantity may affect the baking results. Thus adhere as precisely as
possible to the specified quantities of ingredients.
Of course, you can optimise recipes to your personal needs by making minor changes to the
quantities of ingredients. However, you should gradually determine the optimal quantities and
always pay attention that the dough does not spill over.
Measuring ingredients
Measuring containers for dry and liquid ingredients are included with the automatic bread maker
and are intended to facilitate the precise measuring of the ingredients used:
1 measuring cup with measuring scale for liquids
1 large measuring spoon, the content of which is equivalent to one tablespoon (tbsp.)
English - 85
Page 88

SilverCrest EDS SBB 850 B1
1 small measuring spoon, the content of which is equivalent to one teaspoon (tsp.)
When measuring the ingredients, ensure that you adhere as precisely as possible to the specified
quantities in the recipes. This is the only way in which to achieve the desired result.
Baking bread
Preparation / Settings
Remove the baking tin (7) upwards out of the automatic bread maker.
Insert the 2 dough hooks (6) as far as possible into the drive shafts inside the baking tin (7).
Add the ingredients to the baking tin (7) in the sequence specified in your recipe. You usually
add the liquids first, followed by sugar and salt. You then add the flour and, finally, the yeast.
This should not come into contact with the liquids or salt.
Now re-insert the baking tin (7) into the automatic bread maker.
Close the cover (2).
Insert the mains plug into a power socket. You hear a beep and the display indicates
programme number 1 with the corresponding baking time.
Select the desired programme by pressing the button once or repeatedly.
Each press of the button is confirmed with a beep.
Select the bread weight using the button .
Select the browning level using the button by moving the arrow on the lower edge of the
display to the desired browning level. The "Quick" setting is also possible here. This reduces
the rise time of the dough.
It is not possible to set the browning level for programmes 6, 7 or 11.
The "Quick" function is possible only for programmes 1, 2, 3 and 4.
The weight setting is not possible for programmes 6, 7, 11 or 12.
With the timer function, you can now set the time when baking is to end, if necessary (not
possible for programme 11).
Starting programme
Press the button to start the desired programme. The individual programme steps are now
executed in sequence.
Some programs start with a preheating phase (see programme sequence table). The
dough hooks (6) do not move during this phase. This is not a fault.
You can observe the programme sequence and the individual work steps through the viewing
window (1) in the cover (2).
Never open the cover (2) during the rising or baking phase to prevent the bread from
collapsing.
86 - English
Page 89

SilverCrest EDS SBB 850 B1
Remove function
This function allows you to remove the dough hooks (6) before the baking phase. This is not
mandatory, but has the advantage that the unaesthetic holes in the finished bread are slightly
smaller because they are caused only by the thin shafts. The bread is no longer torn by the dough
hooks (6) when removing it from the baking tin (7) and is also easier to remove.
Proceed as follows:
After the last kneading phase, 10 beeps sound and the "RMV" indicator flashes on the
display .
Press the button to pause the programme sequence for 10 minutes.
During this 10-minute pause, the remaining programme time flashes on the display .
Open the cover (2) and remove the baking tin (7).
Remove the dough with floured hands and remove the dough hooks (6).
Return the dough to the baking tin (7).
Re-insert the baking tin (7) into the automatic bread maker and close the cover (2).
Press the button to continue the programme sequence. If you do not press the button
, the programme continues automatically after a 10-minute pause.
The remove function does not apply to programmes 6, 7, 11 or 12.
End of programme
At the end of the baking process, 10 beeps sound and 0:00 is indicated on the display . The
automatic bread maker now switches to a 60-minute “keep warm” phase. To stop this “keep warm”
phase before the end of the 60 minutes, press the button and keep it pressed until a long
beep sounds.
The “keep warm” phase does not apply to programmes 6, 7 or 11.
Warning! Remove the mains plug from the power socket before opening the cover (2)
of the automatic bread maker.
Removing bread
DANGER! Use pot holders to remove the baking tin (7) or put on oven gloves. There is
a risk of burns.
Bread can be removed more easily from the baking tin (7) if you leave it there for at
least 30 minutes after baking (“keep warm” phase).
English - 87
Page 90

SilverCrest EDS SBB 850 B1
Hold the baking tin (7) at an angle with the opening facing down over a wire cooling rack and
shake it gently. It should be easy to remove the bread due to the non-stick coating of the baking tin
(7). Do not use metal objects to remove the bread from the baking tin (7). The non-stick coating
could be damaged.
If the dough hooks (6) remain stuck in the bread, take them out using the dough hook remover
(10).
Maintenance / Cleaning
Maintenance
WARNING! Servicing is necessary if the automatic bread maker has been damaged
or if liquids or objects have penetrated the housing, if the automatic bread maker has
been exposed to rain or moisture or if it does not work properly or has been dropped. If
smoke is produced, or there are any unusual sounds or smells, switch off the automatic
bread maker immediately and remove the mains plug from the socket. In such cases, the
automatic bread maker should not be used until it has been inspected by authorised
service personnel. Only have qualified personnel carry out the maintenance work on the
device. Never open the housing of the automatic bread maker.
You can obtain information on spare parts via our service hotline. (see page 97)
Cleaning
DANGER! Remove the mains plug from the socket before cleaning as there is a risk of
an electric shock!
DANGER! The automatic bread maker must not be immersed in water! This poses a
risk of an electric shock and short circuit.
DANGER! Wait until the automatic bread maker has cooled down completely.
Otherwise, there is a risk of burns!
Device parts and accessories of the automatic bread maker are not dishwasher-proof. Do not use
any chemical, cleaning solvents or strong detergents to clean the automatic bread maker. You thus
avoid damage to the automatic bread maker and cleaning residues in the next breads.
To clean the device, proceed as follows:
88 - English
Page 91

SilverCrest EDS SBB 850 B1
Device housing, cover and baking compartment
First, remove the dough hooks (6) and the baking tin (7). To facilitate cleaning the baking
compartment, the cover (2) can be removed by tilting it at a position of approx. 45° until the
hinge fits through the slots in the hinge guide and the cover (2) can be removed upwards.
Now remove all residue from the baking compartment with a damp cloth or soft sponge.
Then clean the cover (2) and the device housing also with a damp cloth or soft sponge.
Now dry the baking compartment, the cover (2) and the device housing thoroughly with a soft,
dry cloth.
If you previously removed the cover (2), re-insert it.
Baking tin, dough hooks and other accessories
The surfaces of the baking tin (7) and dough hooks (6) have a non-stick coating. To ensure this nonstick coating continues to work, do not clean the device with any aggressive or abrasive cleaning
agents or any objects that could scratch and damage the surface.
Remove the baking tin (7) and dough hooks (6) from the baking compartment.
Remove the dough hooks (6) from the baking tin (7) by lifting them off from the shafts. It may
not be possible to lift off the dough hooks (6) because they may be "stuck" to the shaft due to
the previous baking process. In this case, fill the baking tin (7) with hot water. After leaving it to
soak for half an hour, deposits should have dissolved and it should be possible to remove the
dough hooks (6).
Clean the dough hooks (6) with warm water, a little mild detergent and a washing-up brush.
For stubborn deposits, soak the dough hooks (6) in advance in the rinse water. You can
carefully remove possible residues in the shaft passage of the dough hooks (6) using a small
wooden stick.
After cleaning, dry the dough hooks (6) thoroughly.
Clean the outside of the baking tin (7) with a damp cloth.
Clean the inside of the baking tin (7) with warm water, a little mild detergent and a washing-up
brush. For stubborn deposits, fill the baking tin (7) with warm water and add mild detergent.
Wait until the deposits have dissolved and you can remove them with a washing-up brush.
After cleaning, rinse the baking tin (7) with plenty of clear water to remove detergent residue
and then dry it thoroughly.
Please clean the measuring cup (8), measuring spoon (9) and dough hook remover (10) with
warm water and a little mild detergent. Dry these parts thoroughly after rinsing them with clear
water.
There may be slight discolourations of the surface over time due to heat, moisture or
steam. This is normal and does not constitute an impairment of its functions or a
reduction in quality in the sense of the warranty terms and conditions.
English - 89
Page 92

SilverCrest EDS SBB 850 B1
Troubleshooting / Frequently asked questions
Display indicates "HHH"
Problem: A program was started although the automatic bread maker had not cooled down
enough since the last baking process.
Solution: Stop the programme and disconnect the mains plug. Let the automatic bread maker cool
down with its cover (2) open for 20-30 minutes.
Programme does not start and display jumps to programme 1
Problem: The automatic bread maker has not cooled down enough since the last baking process.
Solution: Let the automatic bread maker cool down with its cover (2) open for 20-30 minutes.
Display indicates "EE0", "EE1" or "ELL" after programme starts
Solution: Switch off the automatic bread maker and disconnect the mains plug. Then insert the
mains plug again. If the error message is still displayed, please contact customer service.
The dough hook (6) is stuck in the baking tin (7) after baking
Solution: Fill the baking tin (7) with hot water and turn the dough hook (6) so that the deposits can
dissolve.
The dough hook (6) is stuck in the bread after baking
Solution: Remove the dough hook (6) with the dough hook remover (10).
The motor turns, but the dough is not mixed
Solution: Check whether the baking tin (7) and dough hooks (6) are locked into place correctly.
Automatic bread maker crushes fruit and nuts
Solution: Only add ingredients such as fruit and nuts to the dough when the beep sounds and
"ADD" is indicated on the display .
Automatic bread maker does not work
Solution: Make sure that the mains plug is connected to the power supply and the power LED
lights up. Use the programme sequence to try to determine the current phase of the automatic
bread maker. Some programme steps are hard to recognise from the outside. Check whether the
button was pressed correctly.
90 - English
Page 93

SilverCrest EDS SBB 850 B1
Environmental and disposal information
When this symbol appears on a product, this indicates that the product is subject to
the European Directive 2012/19/EU. All electrical and electronic devices must be
disposed of separately from household waste at designated disposal points.
Disposal of old devices in this manner will prevent harm to the environment and
human health hazards. For further information regarding disposal of old devices in
accordance with the directive, contact your local government office or the retailer
where you purchased the device.
Dispose of the packaging in an environmentally compatible manner. Cardboard can be put out for
municipal paper collections or brought to public collection points for recycling. Films and plastic
used for packaging the device are collected by your local disposal services and disposed of in an
environmentally compatible manner.
Conformity information
This device meets the basic requirements and other relevant regulations of the Low
Voltage Directive 2006/95/EC, the EMC Directive 2004/108/EC, the ErP
Directive 2009/125/EC and the RoHS Directive 2011/65/EU. The Declaration
of Conformity can be found at the end of this manual.
English - 91
Page 94

SilverCrest EDS SBB 850 B1
Programme sequence
Programme 1. Regular 2. French
Light
Browning level
Medium
Quick
Dark
Weight (grams) 750 1000 1250 750 1000 1250 750 1000 1250 750 1000 1250
Time (hours) 2:58 3:05 3:15 2:14 2:20 2:25 3:13 3:18 3:25 2:18 2:25 2:30
Preheat (minutes)
Knead 1 (minutes)
Rise 1 (minutes)
Knead 2 (minutes)
Rise 2 (minutes)
Rise 3 (minutes)
Bake (minutes)
15 15 20
12 13 13 12 13 13 12 12 15 12 13 13
25 25 25 10 10 10 20 20 20 10 10 10
2
2
3A*
5A*
5
5
30 30 30 18 18 18 43 41 35 18 18 18
30 30 30 30 30 30 35 35 35 30 30 30
56 60 65 56 60 65 60 65 70 60 65 70
2
5A*
5
-/- -/- -/-
2
2
1A*
2A*
5
5
2
2A*
5
Light
Medium
Dark
10 10 15
2
2
3A*
5A*
8
8
2
5A*
8
Quick
-/- -/- -/-
2
2
1A*
2A*
5
5
2
2A*
5
Keep warm (minutes)
Add ingredients
(remaining hours)
Preset time 15h 15h 15h 15h 15h 15h 15h 15h 15h 15h 15h 15h
60 60 60 60 60 60 60 60 60 60 60 60
2:01 2:05 2:10 1:49 1:53 1:58 2:26 2:29 2:28 1:53 1:58 2:03
*: You can add more ingredients during programme step "Knead 2".
The A after the number means that a beep sounds and the display also indicates "ADD" in
this phase. You can add ingredients during this time.
Example:
3A > During this 3-minute kneading phase, a beep sounds and "ADD" is indicated. Add
ingredients.
92 - English
Page 95

SilverCrest EDS SBB 850 B1
Programme 3. Whole Wheat 4. Sweet
Light
Browning level
Medium
Quick
Dark
Weight (grams) 750 1000 1250 750 1000 1250 750 1000 1250 750 1000 1250
Time (hours) 3:18 3:25 3:35 2:24 2:30 2:35 2:56 3:01 3:10 2:10 2:16 2:20
Preheat (minutes)
Knead 1 (minutes)
Rise 1 (minutes)
Knead 2 (minutes)
Rise 2 (minutes)
Rise 3 (minutes)
Bake (minutes)
15 15 20
11 12 12 11 13 13 12 12 12 11 12 12
25 25 25 10 10 10 20 20 20 10 10 10
2
2
3A*
5A*
8
8
38 38 38 23 23 23 35 35 35 18 18 18
35 35 35 35 35 35 30 30 30 30 30 30
56 60 65 56 60 65 52 56 60 52 56 60
2
5A*
8
-/- -/- -/-
2
2
2A*
2A*
5
5
2
2A*
5
Light
Medium
Dark
10 10 15
2
2
4A*
5A*
6
6
2
5A*
6
Quick
-/- -/- -/-
2
2
1A*
2A*
6
6
2
2A*
6
Keep warm (minutes)
Add ingredients
(remaining hours)
Preset time 15h 15h 15h 15h 15h 15h 15h 15h 15h 15h 15h 15h
60 60 60 60 60 60 60 60 60 60 60 60
2:17 2:21 2:26 1:59 2:03 2:08 2:03 2:07 2:11 1:46 1:50 1:54
*: You can add more ingredients during programme step "Knead 2".
The A after the number means that a beep sounds and the display also indicates "ADD" in
this phase. You can add ingredients during this time.
Example:
3A > During this 3-minute kneading phase, a beep sounds and "ADD" is indicated. Add
ingredients.
English - 93
Page 96

SilverCrest EDS SBB 850 B1
Programme
5.
Super Rapid
Light
Browning level
Medium
Dark
Weight (grams) 750 1000 1250
Time (hours) 1:15 1:18 1:20 1:50 0:15 3:17 3:21 3:30
Preheat (minutes)
-/- -/- -/-
Knead 1 (minutes)
Rise 1 (minutes)
8 8 8 12 15
-/- -/- -/-
-/-
-/-
Knead 2 (minutes)
Rise 2 (minutes)
Rise 3 (minutes)
Bake (minutes)
2A*
2A*
5
-/- -/- -/-
20 20 20 45
40 43 45
-/-
2A*
5
5
6.
Dough
7.
Pasta
-/- -/-
-/- -/-
10
-/-
10 10 10
10
-/-
3A*
5
25
-/-
-/-
-/-
-/-
-/-
-/-
8.
Buttermilk Bread
Light
Medium
Dark
750 1000 1250
25 25 30
20 20 20
2
2
5A*
5A*
8
45 45 45
30 30 30
52 56 60
2
5A*
8
8
Keep warm (minutes)
Add ingredients (remaining
hours)
Preset time 15h 15h 15h 15h 15h 15h 15h 15h
60 60 60
1:05 1:08 1:10 1:15
-/-
-/-
-/-
60 60 60
2:15 2:19 2:23
*: You can add more ingredients during programme step "Knead 2".
The A after the number means that a beep sounds and the display also indicates "ADD" in
this phase. You can add ingredients during this time.
Example:
3A > During this 3-minute kneading phase, a beep sounds and "ADD" is indicated. Add
ingredients.
94 - English
Page 97

SilverCrest EDS SBB 850 B1
Programme
9.
Gluten Free
Light
Browning level
Medium
Dark
Weight (grams) 750 1000 1250 750 1000 1250
Time (hours) 1:37 1:41 1:45
Preheat (minutes)
1:30
10.
Cake
Light
Medium
Dark
1:35 1:40 1:20 1:00
-/- -/- -/- -/- -/- -/- -/- -/-
Knead 1 (minutes)
Rise 1 (minutes)
15 15 15
15
15 15
-/- -/- -/- -/- -/- -/-
Knead 2 (minutes)
Rise 2 (minutes)
Rise 3 (minutes)
Bake (minutes)
Keep warm (minutes)
-/- -/- -/- -/- -/- -/- -/- -/-
30 30 30
-/- -/- -/- -/- -/-
-/- -/- -/- -/- -/- -/-
60 +
52 56 60
60 60 60
65 +
15
Rise
60
70 +
15
Rise
15
Rise
60 60
11.
Jam
-/-
-/- -/-
-/- -/-
15
(Heat and stir)
45
(Heat and stir)
20
Rise
-/-
12.
Bake
Light
Medium
Dark
-/-
-/-
60
60
Add ingredients (remaining
hours)
Preset time 15h 15h 15h 15h 15h 15h
-/- -/- -/- -/- -/- -/- -/- -/-
-/-
*: You can add more ingredients during programme step "Knead 2" .
The A after the number means that a beep sounds and the display also indicates "ADD" in
this phase. You can add ingredients during this time.
Example:
3A > During this 3-minute kneading phase, a beep sounds and "ADD" is indicated. Add
ingredients.
English - 95
15h
Page 98

SilverCrest EDS SBB 850 B1
Warranty and servicing advice
Warranty of TARGA GmbH
Dear Customer,
This device is sold with three years warranty from the date of purchase. In the event of product
defects, you have legal rights towards the seller. These statutory rights are not restricted by our
warranty as described below.
Warranty conditions
The warranty period commences upon the date of purchase. Please keep the original receipt in a
safe place as it is required as proof of purchase. If any material or manufacturing faults occur within
three years of purchase of this product, we will repair or replace the product free of charge as we
deem appropriate.
Warranty period and legal warranty rights
The warranty period is not extended in the event of a warranty claim. This also applies to replaced
and repaired parts. Any damage or defects discovered upon purchase must be reported
immediately when the product has been unpacked. Any repairs required after the warranty period
will be subject to charge.
Scope of warranty
The device was carefully manufactured in compliance with stringent quality guidelines and
subjected to thorough testing before it left the works. The warranty applies to material and
manufacturing faults. This warranty does not cover product components which are subject to normal
wear and which can therefore be regarded as wearing parts, or damage to fragile components
such as switches, rechargeable batteries or components made of glass. This warranty is void if the
product is damaged, incorrectly used or serviced. To ensure correct use of the product, always
comply fully with all instructions contained in the user manual. The warnings and recommendations
in the user manual regarding correct and incorrect use and handling of the product must always be
observed and complied with. The product is solely designed for private use and is not suitable for
commercial applications. The warranty is rendered void in the event of incorrect handling and
misuse, if it is subjected to force, and also if any person other than our authorised service
technicians interfere with the device. No new warranty period commences if the product is repaired
or replaced.
Submitting warranty claims
To ensure speedy handling of your complaint, please note the following:
- Before using your product for the first time, please read the enclosed documentation
carefully. Should any problems arise which cannot be solved in this way, please call our
hotline.
96 - English
Page 99

SilverCrest EDS SBB 850 B1
- Always have your receipt, the product article number as well as the serial number (if
available) to hand as proof of purchase.
- If it is not possible to solve the problem on the phone, our hotline support staff will initiate
further servicing procedures depending on the fault.
Service
Phone: 0207 – 36 50 744
E-Mail: service.GB@targa-online.com
Phone: 01 – 242 15 83
E-Mail: service.IE@targa-online.com
Phone: 800 – 62 175
E-Mail: service.MT@targa-online.com
Phone: 800 – 92 496
E-Mail: service.CY@targa-online.com
IAN: 102869
Manufacturer
Please note that the following address is not a service address. First contact the service point stated
above.
TARGA GmbH
Coesterweg 45
59494 SOEST
GERMANY
English - 97
Page 100

 Loading...