

Page 1

CAR RADIO SAR 28 A1
CAR RADIO
Operating instructions
AUTORADIO
Bedienungsanleitung
IAN 85465
BILRADIO
Betjeningsvejledning
Page 2

Before reading, unfold both pages containing illustrations and familiarise yourself with all functions of the
device.
Før du læser, vend begge sidene med billeder frem og bliv bekendt med alle apparatets funktioner.
Klappen Sie vor dem Lesen die beiden Seiten mit den Abbildungen aus und machen Sie sich anschließend
mit allen Funktionen des Gerätes vertraut.
GB / IE Operating instructions Page 1
DK Betjeningsvejledning Side 31
DE / AT / CH Bedienungsanleitung Seite 61
Page 3

A
B
C
Page 4

D
Page 5

Table of contents
Introduction . . . . . . . . . . . . . . . . . . . . . . . . . . . . . . . . . . . . . . . . . . . . . . . . .2
Preface . . . . . . . . . . . . . . . . . . . . . . . . . . . . . . . . . . . . . . . . . . . . . . . . . . . . . . . . . . . . . . . 2
Copyright . . . . . . . . . . . . . . . . . . . . . . . . . . . . . . . . . . . . . . . . . . . . . . . . . . . . . . . . . . . . . 2
Limitation of liability . . . . . . . . . . . . . . . . . . . . . . . . . . . . . . . . . . . . . . . . . . . . . . . . . . . . . 2
Warnings . . . . . . . . . . . . . . . . . . . . . . . . . . . . . . . . . . . . . . . . . . . . . . . . . . . . . . . . . . . . . 3
Intended use . . . . . . . . . . . . . . . . . . . . . . . . . . . . . . . . . . . . . . . . . . . . . . . . . . . . . . . . . . . 3
Safety . . . . . . . . . . . . . . . . . . . . . . . . . . . . . . . . . . . . . . . . . . . . . . . . . . . . . . . . . . . . . . . . 4
Basic safety instructions . . . . . . . . . . . . . . . . . . . . . . . . . . . . . . . . . . . . . . . . . . . . . . . . . . 4
Items supplied and transport inspection . . . . . . . . . . . . . . . . . . . . . . . . . . . . . . . . . . . . . . 5
Disposal of packaging . . . . . . . . . . . . . . . . . . . . . . . . . . . . . . . . . . . . . . . . . . . . . . . . . . . 5
Controls . . . . . . . . . . . . . . . . . . . . . . . . . . . . . . . . . . . . . . . . . . . . . . . . . . . . .6
Installation . . . . . . . . . . . . . . . . . . . . . . . . . . . . . . . . . . . . . . . . . . . . . . . . . .7
Connection . . . . . . . . . . . . . . . . . . . . . . . . . . . . . . . . . . . . . . . . . . . . . . . . . . . . . . . . . . . . 7
Installation . . . . . . . . . . . . . . . . . . . . . . . . . . . . . . . . . . . . . . . . . . . . . . . . . . . . . . . . . . . . 9
Removing the device . . . . . . . . . . . . . . . . . . . . . . . . . . . . . . . . . . . . . . . . . . . . . . . . . . . . 11
Using the device . . . . . . . . . . . . . . . . . . . . . . . . . . . . . . . . . . . . . . . . . . . . 12
Face plate . . . . . . . . . . . . . . . . . . . . . . . . . . . . . . . . . . . . . . . . . . . . . . . . . . . . . . . . . . . . 12
Handling and use . . . . . . . . . . . . . . . . . . . . . . . . . . . . . . . . . . . . . . . . . . . 13
Switching on and off . . . . . . . . . . . . . . . . . . . . . . . . . . . . . . . . . . . . . . . . . . . . . . . . . . . 13
Settings . . . . . . . . . . . . . . . . . . . . . . . . . . . . . . . . . . . . . . . . . . . . . . . . . . . . . . . . . . . . . . 13
Radio reset (RESET) . . . . . . . . . . . . . . . . . . . . . . . . . . . . . . . . . . . . . . . . . . . . . . . . . . . . 14
Radio functions . . . . . . . . . . . . . . . . . . . . . . . . . . . . . . . . . . . . . . . . . . . . . . . . . . . . . . . . 17
USB port . . . . . . . . . . . . . . . . . . . . . . . . . . . . . . . . . . . . . . . . . . . . . . . . . . . . . . . . . . . . . 19
Card reader . . . . . . . . . . . . . . . . . . . . . . . . . . . . . . . . . . . . . . . . . . . . . . . . . . . . . . . . . . 19
MP3 / WMA playback functions . . . . . . . . . . . . . . . . . . . . . . . . . . . . . . . . . . . . . . . . . . 20
Connecting an external audio device to the device . . . . . . . . . . . . . . . . . . . . . . . . . . . . 22
Cleaning . . . . . . . . . . . . . . . . . . . . . . . . . . . . . . . . . . . . . . . . . . . . . . . . . . 23
Safety instructions . . . . . . . . . . . . . . . . . . . . . . . . . . . . . . . . . . . . . . . . . . . . . . . . . . . . . . 23
Cleaning the display. . . . . . . . . . . . . . . . . . . . . . . . . . . . . . . . . . . . . . . . . . . . . . . . . . . . 23
Disposal . . . . . . . . . . . . . . . . . . . . . . . . . . . . . . . . . . . . . . . . . . . . . . . . . . . 23
Disposal of the device . . . . . . . . . . . . . . . . . . . . . . . . . . . . . . . . . . . . . . . . . . . . . . . . . . 23
Fault rectifi cation . . . . . . . . . . . . . . . . . . . . . . . . . . . . . . . . . . . . . . . . . . . 24
Safety instructions . . . . . . . . . . . . . . . . . . . . . . . . . . . . . . . . . . . . . . . . . . . . . . . . . . . . . . 24
Fault causes and rectifi cation . . . . . . . . . . . . . . . . . . . . . . . . . . . . . . . . . . . . . . . . . . . . . 24
Appendix . . . . . . . . . . . . . . . . . . . . . . . . . . . . . . . . . . . . . . . . . . . . . . . . . 26
Technical details . . . . . . . . . . . . . . . . . . . . . . . . . . . . . . . . . . . . . . . . . . . . . . . . . . . . . . . 26
EC Declaration of Conformity information . . . . . . . . . . . . . . . . . . . . . . . . . . . . . . . . . . . 27
Warranty . . . . . . . . . . . . . . . . . . . . . . . . . . . . . . . . . . . . . . . . . . . . . . . . . . . . . . . . . . . .27
Importer . . . . . . . . . . . . . . . . . . . . . . . . . . . . . . . . . . . . . . . . . . . . . . . . . . . . . . . . . . . . . 27
GB
IE
SAR 28 A1
1
Page 6

Introduction
GB
IE
Introduction
Preface
Congratulations on the purchase of your new device.
You have decided to purchase a high-quality product. These operating instructions
are part of the SAR 28 A1 car radio (hereafter referred to as the device) and
provide you with important instructions pertaining to the intended use, safety,
installation, connection and operation of the device.
The operating instructions must be kept near to the device at all times. They are
to be read and applied by all those working on installation, servicing and fault
rectifi cation of the device.
Keep these operating instructions in a safe place and pass them on to any future
owner together with the device.
Copyright
This documentation is subject to copyright protection.
All rights, including those of photographic reproduction, duplication and distribu-
tion by means of particular methods (such as data processing, data carriers and
data networks), in whole or in part, as well as substantive and technical changes,
are reserved.
Limitation of liability
All technical information, data and information in these operating instructions
pertaining to installation, connection and operation correspond to the latest
versions at the time of printing and to the best of our knowledge take into due
consideration our previous experience and expertise.
No claims can be derived from the details, illustrations and descriptions in these
instructions.
The manufacturer assumes no liability for damage caused by failure to observe
these instructions, non-intended use, improper repairs, making unauthorised modifi cations or using non-approved replacement parts.
2
SAR 28 A1
Page 7

Introduction
Warnings
The following warnings are used in these operating instructions:
WARNING
A warning of this risk level indicates a potentially hazardous
situation.
Not averting this hazardous situation could result in physical injury.
► Follow the instructions in this warning to prevent physical injury.
CAUTION
A warning of this risk level indicates potential material damage.
Not averting this situation could result in material damage
► Follow the instructions in this warning to prevent material damage.
NOTE
A notice indicates additional information that will assist you in handling the
►
device.
Intended use
This device is intended solely for the reception of FM radio stations, for the playback of MP3/WMA fi les from USB data carriers and SD/MMC memory cards,
as well as audio signals from external audio devices. The device is intended for
installation into a vehicle. The device is not intended for any other use or for uses
extending beyond those stated.
GB
IE
SAR 28 A1
WARNING
Risks from non-intended use!
Risks can arise if the device is used for non-intended purposes and/or other
types of usage.
► Only use the device for its intended purpose.
► Observe the procedures described in these operating instructions.
Claims of any kind for damage arising as a result of non-intended use are
excluded. The user is the sole bearer of the risk.
3
Page 8

Introduction
GB
IE
Safety
This section provides you with important safety information regarding the handling of the device.
The device complies with statutory safety regulations. However, incorrect use can
result in injury and material damage.
Basic safety instructions
For safe handling of the device, follow the safety information below:
■ Before use, check the device for visible external damage. Do not use a
damaged device or one that has been dropped.
■ If the cables or connections are damaged, arrange for them to be exchanged
by an authorised specialist or customer service.
■ Those who, due to their physical, intellectual or motor abilities, are incapable
of using the device safely, may only use it whilst under the supervision or
direction of a person responsible.
■ Only permit children to use the device when under supervision.
■ Only have repairs carried out by authorised specialist companies or customer
service. Improper repairs can pose signifi cant risks to the user. Warranty
claims also become void.
■ Repairs to the device during the warranty period may only be carried out by
a customer service department authorised by the manufacturer. Otherwise
no additional warranty claims can be considered for subsequent damage.
■ Defective components may only be replaced with original replacement parts.
Only by using original replacement parts can it be guaranteed that safety
requirements are being complied with.
■ Protect the device from moisture and liquid penetration.
Traffi c safety
WARNING
Road traffi c safety has the highest priority!
Observe the following safety instructions so as not to endanger yourself or
others:
► Before starting your journey, familiarise yourself with how to use the device.
► Only use the device when the traffi c situation allows it! Stop at a suitable
place if you wish to perform major confi gurations.
► Only remove or insert the face plate when the vehicle is parked.
► Set the volume to a moderate level so that the acoustic sirens of police
vehicles, fi re trucks and other emergency service vehicles can be heard in
good time.
4
SAR 28 A1
Page 9

Introduction
Items supplied and transport inspection
WARNING
Risk of suff ocation!
► Packaging material must not be used as a play thing since it poses a risk of
suff ocation.
This device is supplied with the following components as standard:
▯ Car Radio (including face plate)
▯ Installation bracket (attached)
▯ Fixture plate (including securing material)
▯ Keys for installation frame (2x)
▯ Case for face plate
▯ This operating manual
NOTE
Check the contents for completeness and for signs of visible damage.
►
► If the contents are not complete or are damaged due to defective packaging
or transportation, contact the service hotline (see warranty card).
Disposal of packaging
The packaging protects the device from damage caused during transit. The
packaging materials are selected according to their environmental friendliness
and disposal attributes - and are therefore recyclable.
Recirculation of packaging into the material fl ow saves on raw material and reduces the amount of waste generated. Dispose of packaging material no longer
needed in line with applicable local regulations.
GB
IE
SAR 28 A1
NOTE
If possible, keep the device's original packaging during the warranty period
►
so that, in the event of a warranty claim, you can package the device
properly for its return.
5
Page 10

Controls
GB
IE
Controls
Car radio (see front fold out fl ap)
Figure A:
Button : Unlocking the face plate
2
Button /MU: Switching the device on and off / turning the sound off
3
MD/PTY button: Setting the operating mode / setting the PTY function
4
Button ▸▸I: Title / Station search forwards
5
Display
6
USB port
7
BD/DISP: Selecting memory location band / showing display information
8
AUX: 3.5 mm stereo input socket for the connection of an external audio device
9
6/FL+ button: Station memory location 6 / directory forwards during MP3/WMA playback
10
5/FL- button: Station memory location 5 / directory backwards during MP3/WMA playback
11
4/RDM button: Station memory location 4 / random play during MP3/WMA playback
12
3/INT button: Station memory location 3 / intro function during MP3/WMA playback
2/RPT button: Station memory location 2 / repeat function during MP3/WMA playback
13
14
1/PAU button: Station memory location 1 / pause playback (Pause)
15
I◂◂: Title / Station search backwards
16
A/PS : Automatic station memory / search function during MP3/WMA playback
17
Multi-controller: Turn to set values/volume
18
SEL (EQ/LD TA/AF) button: Call up Settings menu
Figure B:
19
Locking the face plate
20
Holder for face plate
21
Card reader for SD/MMC cards
22
RESET: Resetting the device
Figure C:
ISO block connection B
23
24
Automotive blade type fuse 7.5 A
25
ISO block connection A
26
SUBW: Audio cinch output for subwoofer
27
LINE OUT: Audio cinch output L/R for amplifi er
28
Antenna socket for DIN antenna plug
6
SAR 28 A1
Page 11

Installation
Accessories (see rear fold out fl ap)
Figure D:
29
Case for face plate
30
Installation bracket
31
Key for installation bracket
32
Anchoring plate (including securing material)
Installation
WARNING
Damage can be caused when installing the device!
► If possible, have the device installed by a qualifi ed technician.
► If you wish to install the device yourself, follow the instructions for connec-
tion and installation for safe, fault-free use of the device.
Connection
CAUTION
Using incorrect connections can cause damage to the device.
► For installation, use the device's ISO connections. The vehicle-specifi c ISO
adapters you may require can be sourced from a specialist workshop, from
a local dealer or from a general store's technical department. Using other
connector types voids the warranty.
GB
IE
SAR 28 A1
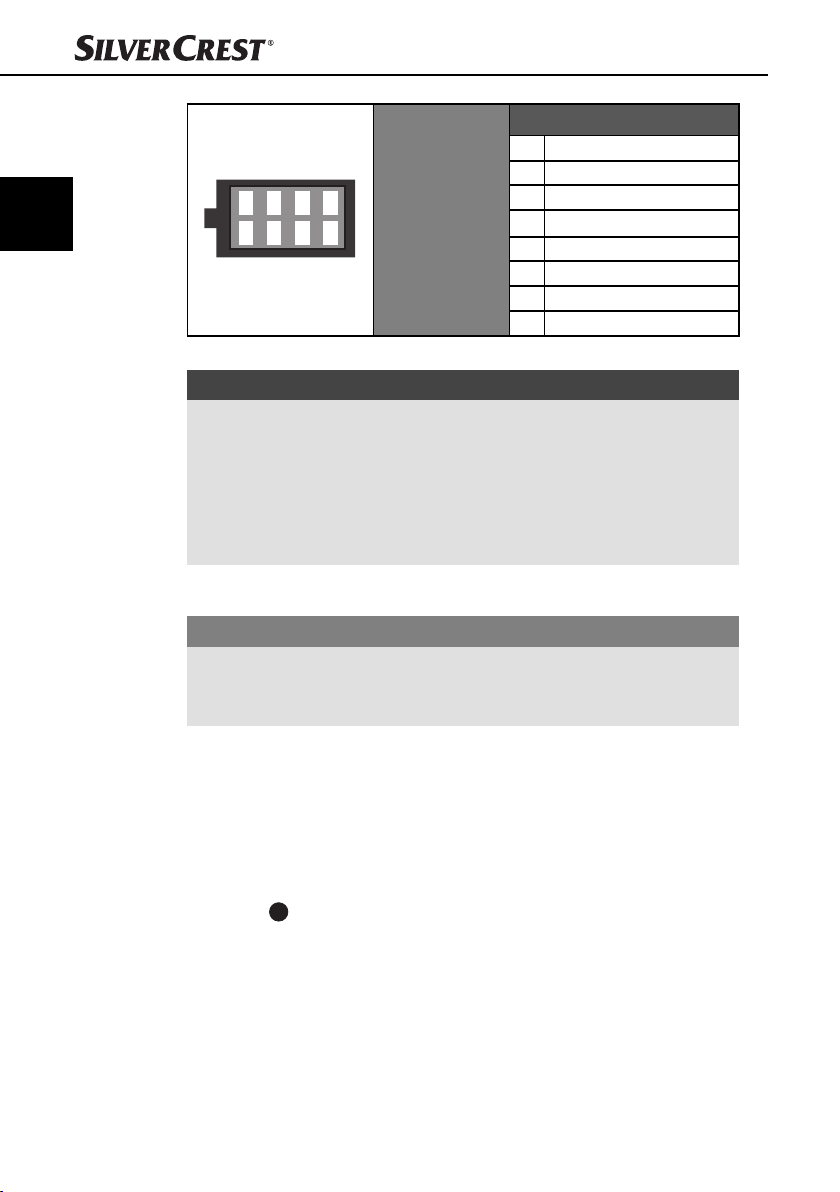
Assignment of the ISO connections
The view of the plug connector is from behind.
1357
2468
ISO A
(power supply
assignment)
Assignment
1 Not used
2 Not used
3 Not used
Steady plus 12 V
4
(terminal 30)
5 Antenna power
6 Not used
Ignition circuit positive 12 V
7
(terminal 15)
Negative (-)
8
ground (terminal 31)
7
Page 12

Installation
GB
IE
Assignment
1 Rear right +
2 Rear right -
1357
2468
To connect the device to two speakers, only use the cables for the front speakers.
NOTE
Ensure that a steady plus connection is applied to the station memory of
►
connector 4 in ISO Block A.
► In some vehicle models, the default assignment of connectors [4] and [7]
in ISO Block A are interchanged at the factory. If this is the case, the station
memory can be lost. To remedy this, connectors 7 (Ignition positive) and
4 (Steady plus) in ISO Block A must be swapped.
ISO B
(speaker connection assignment)
3 Front right +
4 Front right 5 Front left +
6 Front left 7 Rear left +
8 Rear left -
Antenna power connector
CAUTION
Possible damage to the device
► Never load the antenna power connection with the antenna motor power
cable or other consumers.
The connector for the antenna power is available for a relay-controlled antenna.
The relay then automatically extends the antenna out when the device is switched
on. When switched off , the antenna retracts back in. This connector can also be
used to control an external amplifi er. For exact connector information, please
consult the operating instructions for the amplifi er.
Connection of an external amplifi er
Use the LINE OUT 27 audio cinch output to connect an external amplifi er.
To do this, following the operating instructions for the external amplifi er.
8
SAR 28 A1
Page 13

Installation
A
Connection of an external subwoofer
Use the orange SUBW 26 cinch output to connect an external subwoofer.
To do this, follow the operating instructions for the external subwoofer.
Connection diagram
SubwooferAntenna
External amplifi er
Installation
The device can be installed into any standard ISO mounting bay. In the event that
your vehicle does not have an ISO mounting bay, contact your local specialist
workshop, local dealer or the technical department of a general store.
1234
5678
1234
5678
GB
IE
ISO B
ISO
Installation instructions
SAR 28 A1
NOTE
Connect up the cables before fi nally installing the device.
►
Ensure that it is plugged in properly and that the system works correctly.
■ Install the device in the bay provided or select the installation location so
that all buttons can be reached easily without the driver being impeded.
■ Only connect the device to a 12 V car battery that is installed properly.
■ Only connect up the device within the vehicle via the ISO plugs.
■ Install the device in such a way as to prevent heat build-up and so that the
device is adequately ventilated.
9
Page 14

Installation
GB
IE
■ Do not install the device where it is subjected to high temperatures (i.e. direct
sunlight or heating vents), heavy contamination or strong vibrations.
■ Should modifi cations to the vehicle be necessary, contact your vehicle dealer
or specialist workshop.
Installing the device into the ISO bay
♦ Remove the installation bracket 30 from the device housing.
♦ Place the installation bracket into the ISO mounting bay.
♦ Bend the tabs on the installation bracket with a screwdriver so that the
bracket is fi xed fi rmly into the mounting bay (see diagram).
♦ Check to ensure the bracket is securely fi xed.
♦ Connect the ISO socket block of the device to the two ISO plugs on your
vehicle.
♦ Connect the cable from the vehicle antenna to the antenna socket 28 on the
device. The vehicle-specifi c ISO adapters you may require can be sourced
from a specialist workshop, from a local dealer or from a general store’s
technical department.
♦ If required, connect the audio cinch cable of an external amplifi er to the
LINE OUT 27 socket on the device.
♦ If required, connect the audio cinch cable of an external subwoofer to the
orange SUBW
♦ Protect your device against theft with additional measures as required.
Attach the securing screw with the anchoring plate
material to the engine fi rewall of the vehicle.
26
cinch socket on the device.
32
and the securing
10
SAR 28 A1
Page 15

Installation
CAUTION
Possible damage to the cable!
► To avoid damage, observe the position of the cables when sliding the
device into the bay.
♦ Carefully push the device into the installation bracket 30 until it locks into
place.
♦ After all the connections have been established, press the RESET 22 button
for about 6 seconds with a ballpoint pen or other sharp object.
♦ Attach the face plate as described under “Installing the face plate”.
Removing the device
To remove the installed device, proceed as follows:
♦ Insert the right and left keys
device. (The tabs are now bent back).
♦ Pull the device out.
31
into their respective slots on the sides of the
GB
IE
SAR 28 A1
11
Page 16

Using the device
GB
IE
Using the device
Face plate
You are able to remove the face plate from your device as an anti-theft measure.
Do not keep the face plate in your vehicle after removal.
NOTE
Always keep the face plate in its case 29 to protect it.
►
Inserting the face plate
♦ First, place the face plate with its right-hand
side against the holder 20.
♦ Then press the left-hand side into the frame until
the locking mechanism 19 engages.
Check to ensure that the face plate is installed correctly and securely in the frame. Not installing the
face plate correctly can result in malfunctions when
using the device.
Removing the face plate
♦ Press the button to unlock the face
plate. The left-hand side of the face plate jumps
forwards slightly.
♦ Remove the face plate by its left-hand side fi rst,
then by its right-hand side.
2.
1.
12
SAR 28 A1
Page 17

Handling and use
Handling and use
This section provides you with important information on handling and using the
device.
NOTE
If no setting is confi gured and/or no button pushed within about 5 seconds,
►
the device returns to its previous operating mode. Settings changed are saved.
Switching on and off
♦ Press the /MU 2 button to switch the device on. The WELCOME display
is shown.
♦ To switch off , keep the /MU button pressed. The GOODBYE display is
shown.
Settings
WARNING
Hearing damage as a result of too high a volume!
Setting the volume too high can result in permanent hearing damage.
► Set the volume to moderate levels only.
Volume
♦ Turn the multi-controller 17 to set the volume.
GB
IE
Switching mute on / off
Operating mode
SAR 28 A1
♦ Press the /MU button briefl y to turn the sound off . The MUTE ON message
appears in the display.
♦ Press the /MU button again to turn the sound on again. Muting is
cancelled when receiving a PTY or TA station.
♦ Press the MD/PTY 3 button to switch between radio reception (TUNER),
card reader (CARD), USB port (USB) and audio input (AUX).
NOTE
►
The CARD and USB operating modes can only be enabled once the appropriate medium has been inserted.
13
Page 18

Handling and use
GB
IE
Display
♦ Keep pressing the BD/DISP 7 button to have the following information
displayed in turn:
Radio station, time (automatically set with RDS reception), frequency and PTY settings (these RDS functions are sent by broadcasting services in various volumes;
also refer to Section “Radio functions”).
NOTE
►
If you are not receiving any RDS or PTY information, PTY NONE is shown on
the display.
Radio reset (RESET)
To reset the device to its default factory settings, keep the RESET 22 button
pressed for about 6 seconds with a sharp object, such as a pen.
NOTE
To access the RESET button, the face plate must be completely removed,
►
see also Section "Removing the face plate".
Reset the device:
▯ when using for the fi rst time,
▯ after connecting the cables,
▯ when not all function buttons are working,
▯ when an error message is shown on the display.
14
Settings using the SEL button (EQ/LD/TA/AF)
♦ Press the SEL 18 button on the device. The current volume level is shown.
Each further press of the SEL button accesses the next setting.
The following settings are possible:
VOL - Volume (from 0 to 47)
BAS - Bass (from -7 to +7)
TRE - Treble (from -7 to +7)
BAL - Balance (sound distribution between the right and left speakers),
from 0L to 9L and 0R to 9R
FAD - Fader (sound distribution between the front and rear speakers),
from 0F to 9F and 0R to 9R
♦ Turn the multi-controller 17 to change the settings of the menu item
displayed.
SAR 28 A1
Page 19

Handling and use
Further settings using the SEL button (EQ/LD/TA/AF)
♦ Hold down the SEL 18 button for about 2 seconds and then keep pressing
the SEL button until the required function is shown on the display.
♦ Turn the multi-controller 17 to change the settings of the menu item dis-
played.
TA - Enabling / disabling Traffi c Announcement (traffi c information)
TA ON: If TA mode is enabled, the device immediately switches from other stations or operating modes to the radio station that is currently transmitting traffi c
information.
NOTE
When the TA function is enabled, you can only search for or save stations
►
that are transmitting traffi c information. Stations that are transmitting traffi c
information signals are denoted in the display by TP.
TA OFF: The TA function is disabled.
AF - Enabling / disabling Alternative Frequencies
AF ON: When the AF function is enabled, the device searches for the current
station’s optimum frequency.
AF OFF: The AF function is disabled.
EQ - Equaliser
♦ Turn the multi-controller to select one of the FLAT, CLASSIC, ROCK, POP or
EQ OFF settings. No equaliser is enabled if EQ OFF is set. The equaliser
setting is shown at the bottom of the display.
SUBW - Subwoofer
You can connect an active external subwoofer to produce a more powerful bass
eff ect.
♦ Turn the multi-controller to enable the bass eff ect (SUBW ON) or disable it
(SUBW OFF).
AVOL - Set the volume when radio is switched on
♦ Turn the multi-controller to set the volume level used when the radio is turned on.
GB
IE
SAR 28 A1
15
Page 20

Handling and use
GB
IE
STEREO / MONO - Set the audio output
♦ Turn the multi-controller 17 to set the audio output in radio mode to stereo
(STEREO) or mono (MONO). If you are receiving a stereo station, the stereo
symbol appears on the display.
LOUD - Enable / disable the loudness function
♦ Turn the multi-controller to increase base or treble levels (LOUD ON) or to
disable the function (LOUD OFF). When the loudness function is enabled,
LOUD is shown on the right of the display.
Dx / LOCAL - Set reception sensitivity
♦ Turn the multi-controller to align the reception sensitivity to national stations
(DX) or regional stations (LOCAL).
ADJ - Set the time
NOTE
The device has an RDS-controlled clock. The clock sets itself automatically
►
when the RDS function is enabled and continues to run when the radio is
switched off . If you do not receive any RDS signal, you can set the time of
day manually.
♦ Turn the multi-controller to the right to set the minutes and to the left to set
the hours.
16
SAR 28 A1
Page 21

Handling and use
Radio functions
Selecting the station memory band
♦ Press the BD/DISP 7 button to switch between station memory bands
(FM1, FM2, FM3). Each station memory band covers the same frequency
range (87.5 - 108 MHz) and has 6 memory locations.
Automatic station search
♦ Keep the ▸▸I 4 or I◂◂ 15 button pressed to start automatic station search.
The search stops when a station is found.
Manual station selection
♦ Press the ▸▸I or I◂◂ button briefly to change the frequency in
0.05 MHz (FM) increments until the required frequency is set.
Storing radio stations
♦ Keep one of the 1 to 6 buttons pressed for about 3 seconds to store the
station currently selected. The showing of numbers 1 to 6 on the display
indicates a successful store.
Selecting stations stored
♦ Use BD/DISP to select the station memory band (FM1, FM2, FM3).
♦ Press one of the 1 to 6 buttons to select the station stored.
GB
IE
Automatic storing
Run through the stations stored
SAR 28 A1
♦ Keep the A/PS 16 button pressed for 3 seconds. A search starts imme-
diately and stays for about 5 seconds at each station found. The station indicator and/or the station frequency fl ashes and the memory slot is displayed.
The search continues automatically when weak stations are found.
♦ Press the A/PS button briefl y. All stations are selected briefl y.
♦ When you hear the required station, press the A/PS button.
The station chosen remains selected.
17
Page 22

Handling and use
GB
IE
Programme type (PTY)
You can use this function to search for a particular type of station. The following
settings are available:
POP M
ROCK M
NEWS
AFFAIRS
INFO
EASY M
LIGHT M
NOTE
Please note that this information is dependent on region, broadcasting
►
corporation and station.
Setting the PTY ID
♦ Keep pressing the MD/PTY 3 button until the PTY message is shown at
the bottom of the display.
♦ Then press one of the 1 to 6 buttons to select the required PTY entry.
♦ To change between the “Musical style” and “Vocal style” PTY entries, press
the MD/PTY button again when the fi rst PTY entry is displayed.
Buttons 1 to 6 are assigned as follows:
SPORT
EDUCATE
DRAMA
CLASSICS
OTHER M
CULTURE
SCIENCE
VARIED
JAZZ
COUNTRY
WEATHER
FINANCE
CHILDREN
NATION M
OLDIES
SOCIAL
RELIGION
PHONE IN
FOLK M
TRAVEL
LEISURE
DOCUMENT
18
Button Musical genre Vocal style
1 POP M, ROCK M NEWS, AFFAIRS, INFO
2 EASY M, LIGHT M SPORT, EDUCATE, DRAMA
3 CLASSICS, OTHER M CULTURE, SCIENCE, VARIED
4 JAZZ, COUNTRY WEATHER, FINANCE, CHILDREN
5 NATION M, OLDIES SOCIAL, RELIGION, PHONE IN
6 FOLK M TRAVEL, LEISURE, DOCUMENT
If there is no further input for 2 seconds, an automatic search for stations matching
the PTY entry starts. The search stops when the fi rst station is found.
SAR 28 A1
Page 23

Handling and use
Disabling / enabling the PTY function
♦ Press the MD/PTY 3 button to activate the PTY search.
The PTY symbol is shown on the display with the last PTY entry selected
(e.g. POP M).
Only stations with the PTY ID currently selected are included in the station search.
♦ Press the MD/PTY button again to disable the PTY search. PTY is no longer
shown on the display.
Station search by PTY ID
♦ If you do not input anything for 2 seconds whilst a PTY ID is being dis-
played, an automatic search for stations matching this PTY ID is started.
If no stations matching this PTY ID are found, PTY NONE is shown briefl y and the
search then ends at the station last set.
USB port
The device can process USB data carriers up to 16 GB.
Connecting data carriers
♦ Push the USB port protective cap to the right.
♦ Connect your USB device to the port.
♦ To protect against dirt, replace the protective cap on the USB port when no
USB device is connected.
Card reader
The device can process SD/MMC memory cards up to 2 GB, and SDHC
memory cards up to 32 GB.
GB
IE
Connecting data carriers
SAR 28 A1
♦ Press the button to unlock the face plate and remove it from the
device (see also Section “Removing the face plate”).
♦ Push a memory card into the memory card slot with the lettering pointing
upwards.
19
Page 24

Handling and use
GB
IE
MP3 / WMA playback functions
Playback
■ The device can play back fi les in the MP3 and WMA formats.
■ A mixture of titles and directories on the same level can cause problems
when playing back.
■ During playback, the information from the MP3 fi le ID3 tag is read and
shown in turn on the display.
♦ Playback of the MP3 or WMA title on the USB device or memory card
begins automatically.
Stop playback
♦ Press the 1/PAU 14 button to stop playback.
♦ Press the 1/PAU button again to continue playback.
NOTE
Keep the 1/PAU button pressed to play the first title on the storage
►
medium.
Skip title
♦ Press the ▸▸I 4 or I◂◂ 15 button to select the next or previous title.
The title number is shown on the display.
20
Fast forward/backward
♦ Hold down the ▸▸I or I◂◂ button for longer to start fast forward or backward.
Repeat function (RPT - Repeat)
♦ Press the RPT/2 13 button several times to switch between the repeat
functions. The following settings are available:
– RPT ONE: The current title is repeated.
– RPT DIR: All titles in the current directory are repeated.
– RPT ALL: All titles on the storage medium are repeated.
If the RPT ONE or RPT DIR function is enabled, RPT is shown on the display.
SAR 28 A1
Page 25

Handling and use
Title sampling
♦ Press the 3/INT 12 button. INT ON appears briefl y on the display. All titles
are played back one after the other for approximately 10 seconds.
♦ Press the 3/INT button again to commence playback of the title currently
selected. INT OFF appears briefl y on the display.
Random playback of all titles (RDM - Random)
♦ Press the 4/RDM 11 button. RDM ON appears briefl y on the display. A ran-
domly controlled playback is started.
♦ Press the 4/RDM button to commence normal playback again. RDM OFF
appears briefl y on the display.
Skip directory
♦ Press the 6/FL+ 9 button to skip to the next directory or the 5/FL- 10
button to skip to the previous directory. Playback starts automatically.
Search functions
Title number search
♦ Press the A/PS
♦ Turn the multi-controller 17 to set the fi rst digit of the title number required.
♦ Press the SEL 18 button to confi rm the entry and to skip to entry of the
second, third or fourth digit.
♦ Press the 1/PAU 14 button to commence playback of the selected title.
Title name search
16
button.
GB
IE
SAR 28 A1
♦ Press the A/PS button twice. A-SEARCH is shown on the display. The
search for title names starts immediately. If no title starting with the digit set
is found, NONE is displayed.
♦ Turn the multi-controller until the desired character or digit appears.
♦ Press the ▸▸I 4 or I◂◂ 15 button to confi rm the character set and to display
all titles beginning with the required character.
♦ Press the 1/PAU button to commence playback of the title displayed.
21
Page 26

Handling and use
GB
IE
Search for directories
♦ Press the A/PS 16 button three times. The directory currently being
played back is shown.
♦ Turn the multi-controller 17 to switch between the available directories.
♦ Press the 1/PAU 14 button to select the directory currently being displayed.
Playback of the fi rst title from the selected directory starts immediately.
Connecting an external audio device to the device
♦ Connect the audio output of an external audio device (e.g. an MP3 player)
via a 3.5 mm stereo jack plug to the AUX 8 socket on the front panel of
the device.
♦ Select audio input playback by repeatedly pressing the MD/PTY 3
button until AUX is shown on the display.
22
SAR 28 A1
Page 27

Cleaning/Disposal
Cleaning
Safety instructions
CAUTION
Possible damage to the device
► To avoid irreparable damage, ensure that no moisture penetrates into the
device whilst it is being cleaned.
Cleaning the display
■ Only clean the front panel of the device / the display with a soft, moist,
lint-free cloth and mild dish washing liquid.
Disposal
Disposal of the device
Never dispose of the device in your normal domestic waste.
This product is subject to the provisions of European Directive
2002/96/EC-WEEE (Waste Electrical and Electronic Equipment).
Dispose of the device through an approved disposal centre or at your community
waste facility. Please observe currently applicable regulations. Please contact
your waste disposal centre should you be in any doubt.
GB
IE
SAR 28 A1
23
Page 28

Fault rectifi cation
GB
IE
Fault rectifi cation
This section contains important information on fault localisation and rectifi cation.
Follow the instructions to avert hazards and damage.
Safety instructions
WARNING
Observe the following safety instructions to avert hazards and material
damage:
► Repairs to electrical devices may only be carried out by specialists trained
by the manufacturer. Improper repairs can represent considerable risk to
users and can cause damage to the device.
Fault causes and rectifi cation
The following table can help with localising and rectifying minor faults:
Defect Possible cause Rectifi cation
The device will
not switch on
No sound
The Function
buttons are not
working
The radio and/
or automatic
station store
function are/is
not working
The station
memory is not
working
The ignition is not switched on. Switch the ignition on by turning the key.
The fuse is defective. Replace the fuse.
The volume is set to minimum. Increase the volume.
The cables are not connected
correctly.
The sound is turned off .
There is a fault with the
device.
The face plate is not installed
correctly.
The antenna cable is not connected correctly.
The station signals are too
weak.
Connector 4 in ISO Block A
(steady plus) is not connected correctly.
Check the cable connections.
Press the
sound back on.
Press the RESET button.
Check that the face plate is installed
correctly.
Check the antenna cable for correct
connection.
Set the station manually.
Check the cable connections. Please
refer to the "Connections" section.
/MU button to turn the
24
SAR 28 A1
Page 29

Fault rectifi cation
Defect Possible cause Rectifi cation
The USB port is intended for
devices working in accord-
The device on
the USB port is
not working
The card reader
cannot read the
card
NOTE
►
ance with the USB standard.
Not all devices available on
the marketplace conform to
this standard. It is a possibility that a device not working
in accordance with the USB
standard is connected.
The card may be defective,
dirty or not properly inserted.
Please contact Customer Service (see warranty card) if you are unable to
resolve the problem with any of the above actions.
Connect a device that works in accordance with the USB standard. Check that
the data carrier is formatted with the
FAT32 fi le system.
Check the card. Slide it in with the lettered side pointing to the right. Check
that the data carrier is formatted with
the FAT32 fi le system.
GB
IE
SAR 28 A1
25
Page 30

Appendix
GB
IE
Appendix
Technical details
General
Input voltage 12 V DC
Input current max. 7.5 A
Rated power 4 x 7 W
Operating temperature +5 - +40 °C
Humidity (no condensation) ≤ 75 %
Dimensions (L x W x H): 18.6 x 12.7 x 5.7 cm
Weight including accessories approx. 650 g
Device fuse
Automotive blade type fuse
Radio frequency range
Frequency FM (VHF) 87.5 - 108 MHz
Station memory locations FM (VHF) 18 locations
Audio input (AUX)
7.5 A
26
Stereo jack plug 3.5 mm
Audio output
2 x cinch socket for external amplifi er (L/R)
1 x cinch socket for external subwoofer
USB port
USB 1.1 and 2.0 compatible data carrier (to 16 GB)
Card slot
SD/MMC memory card connector (SD/MMC to 2 GB, SDHC to 32 GB)
SAR 28 A1
Page 31

Appendix
EC Declaration of Conformity information
This device satisfi es the fundamental requirements and other
relevant regulations of Vehicle Directive 2004/104/EC.
The full original Declaration of Conformity is available from
the importer.
Warranty
The warranty provided for this device is 3 years from date of purchase. This
device has been manufactured with care and inspected meticulously prior
to delivery. Please retain your receipt as proof of purchase. In the event of
a warranty claim, please contact Customer Service by telephone. This is the
only way to guarantee free dispatch of your goods.
NOTE
The warranty only covers claims for material and manufacturing defects, not
►
for transport damage, wearing parts or for damage to fragile components
such as switches and batteries.
This device is intended solely for private use and not for commercial purposes.
The warranty is deemed void if this product has been subjected to improper or
inappropriate handling, abuse or modifi cations not carried out by one of our
authorised service centres. Your statutory rights are not restricted in any way by
this warranty.
The warranty period is not prolonged by repairs made under the warranty. This
also applies to replaced and repaired parts. Damage and defects present at the
time of purchase must be reported immediately after unpacking, or no later than
two days after the date of purchase. Repairs made after expiry of the warranty
period are chargeable.
GB
IE
Importer
SAR 28 A1
KOMPERNASS GMBH
BURGSTRASSE 21
44867 BOCHUM, GERMANY
www.kompernass.com
27
Page 32

GB
IE
28
SAR 28 A1
Page 33

Car Radio
SAR 28 A1
Please contact the Service hotline
to guarantee free repair. Ensure you
have your sales receipt handy.
Sender, please write clearly:
Last name
First name
Street
Post code/Town
Country
Warranty
Service Great Britain
Tel.: 0871 5000 720 (£ 0.10/Min.)
E-Mail: kompernass@lidl.co.uk
IAN 85465
Service Ireland
Tel.: 1890 930 034
(0,08 EUR/Min., (peak))
(0,06 EUR/Min., (off peak))
E-Mail: kompernass@lidl.ie
IAN 85465
Telephone
Complete this section and include it with the device!
Date/Signature
Fault description:
Page 34

Page 35

Indholdsfortegnelse
Introduktion . . . . . . . . . . . . . . . . . . . . . . . . . . . . . . . . . . . . . . . . . . . . . . . 32
Forord . . . . . . . . . . . . . . . . . . . . . . . . . . . . . . . . . . . . . . . . . . . . . . . . . . . . . . . . . . . . . . . 32
Ophavsret . . . . . . . . . . . . . . . . . . . . . . . . . . . . . . . . . . . . . . . . . . . . . . . . . . . . . . . . . . . .32
Ansvarsbegrænsning . . . . . . . . . . . . . . . . . . . . . . . . . . . . . . . . . . . . . . . . . . . . . . . . . . . 32
Advarselsinfo . . . . . . . . . . . . . . . . . . . . . . . . . . . . . . . . . . . . . . . . . . . . . . . . . . . . . . . . . 33
Anvendelsesområde . . . . . . . . . . . . . . . . . . . . . . . . . . . . . . . . . . . . . . . . . . . . . . . . . . . . 33
Sikkerhed . . . . . . . . . . . . . . . . . . . . . . . . . . . . . . . . . . . . . . . . . . . . . . . . . . . . . . . . . . . .34
Grundlæggende sikkerhedsanvisninger . . . . . . . . . . . . . . . . . . . . . . . . . . . . . . . . . . . . . 34
Leverance og transporteftersyn . . . . . . . . . . . . . . . . . . . . . . . . . . . . . . . . . . . . . . . . . . . . 35
Bortskaff else af emballagen . . . . . . . . . . . . . . . . . . . . . . . . . . . . . . . . . . . . . . . . . . . . . . 35
Betjeningselementer . . . . . . . . . . . . . . . . . . . . . . . . . . . . . . . . . . . . . . . . 36
Installation . . . . . . . . . . . . . . . . . . . . . . . . . . . . . . . . . . . . . . . . . . . . . . . . 37
Tilslutning . . . . . . . . . . . . . . . . . . . . . . . . . . . . . . . . . . . . . . . . . . . . . . . . . . . . . . . . . . . . 37
Montering . . . . . . . . . . . . . . . . . . . . . . . . . . . . . . . . . . . . . . . . . . . . . . . . . . . . . . . . . . . .39
Afmontering af bilradioen . . . . . . . . . . . . . . . . . . . . . . . . . . . . . . . . . . . . . . . . . . . . . . . 41
Første brug . . . . . . . . . . . . . . . . . . . . . . . . . . . . . . . . . . . . . . . . . . . . . . . . 42
Betjeningsdel . . . . . . . . . . . . . . . . . . . . . . . . . . . . . . . . . . . . . . . . . . . . . . . . . . . . . . . . . 42
Betjening og funktion . . . . . . . . . . . . . . . . . . . . . . . . . . . . . . . . . . . . . . . . 43
Tænd/sluk . . . . . . . . . . . . . . . . . . . . . . . . . . . . . . . . . . . . . . . . . . . . . . . . . . . . . . . . . . . .43
Indstillinger . . . . . . . . . . . . . . . . . . . . . . . . . . . . . . . . . . . . . . . . . . . . . . . . . . . . . . . . . . . 43
Nulstilling af bilradioen (RESET) . . . . . . . . . . . . . . . . . . . . . . . . . . . . . . . . . . . . . . . . . . . 44
Radiofunktioner. . . . . . . . . . . . . . . . . . . . . . . . . . . . . . . . . . . . . . . . . . . . . . . . . . . . . . . . 47
USB-tilslutning . . . . . . . . . . . . . . . . . . . . . . . . . . . . . . . . . . . . . . . . . . . . . . . . . . . . . . . . .49
Kortlæser . . . . . . . . . . . . . . . . . . . . . . . . . . . . . . . . . . . . . . . . . . . . . . . . . . . . . . . . . . . .49
Funktioner MP3/WMA-afspilning . . . . . . . . . . . . . . . . . . . . . . . . . . . . . . . . . . . . . . . . . 50
Tilslutning af en ekstern audioenhed til bilradioen . . . . . . . . . . . . . . . . . . . . . . . . . . . . . 52
Rengøring . . . . . . . . . . . . . . . . . . . . . . . . . . . . . . . . . . . . . . . . . . . . . . . . . 53
Sikkerhedsanvisninger . . . . . . . . . . . . . . . . . . . . . . . . . . . . . . . . . . . . . . . . . . . . . . . . . . 53
Rengøring af display . . . . . . . . . . . . . . . . . . . . . . . . . . . . . . . . . . . . . . . . . . . . . . . . . . . 53
Bortskaff else . . . . . . . . . . . . . . . . . . . . . . . . . . . . . . . . . . . . . . . . . . . . . . . 53
Bortskaff else af bilradioen . . . . . . . . . . . . . . . . . . . . . . . . . . . . . . . . . . . . . . . . . . . . . . . 53
Afhjælpning af fejl . . . . . . . . . . . . . . . . . . . . . . . . . . . . . . . . . . . . . . . . . . 54
Sikkerhedsanvisninger . . . . . . . . . . . . . . . . . . . . . . . . . . . . . . . . . . . . . . . . . . . . . . . . . . 54
Fejlårsager og -afhjælpning . . . . . . . . . . . . . . . . . . . . . . . . . . . . . . . . . . . . . . . . . . . . . . 54
Tillæg . . . . . . . . . . . . . . . . . . . . . . . . . . . . . . . . . . . . . . . . . . . . . . . . . . . . . 56
Tekniske data . . . . . . . . . . . . . . . . . . . . . . . . . . . . . . . . . . . . . . . . . . . . . . . . . . . . . . . . . 56
Info om EF-overensstemmelseserklæringen . . . . . . . . . . . . . . . . . . . . . . . . . . . . . . . . . . 57
Garanti . . . . . . . . . . . . . . . . . . . . . . . . . . . . . . . . . . . . . . . . . . . . . . . . . . . . . . . . . . . . . . 57
Importør . . . . . . . . . . . . . . . . . . . . . . . . . . . . . . . . . . . . . . . . . . . . . . . . . . . . . . . . . . . . . 57
DK
SAR 28 A1
31
Page 36

DK
Introduktion
Introduktion
Forord
Tillykke med købet af din nye bilradio.
Du har dermed valgt et produkt af høj kvalitet. Denne betjeningsvejledning er
del af bilradioen SAR 28 A1 (efterfølgende kaldet bilradioen) og giver vigtige
informationer om bilradioens anvendelsesområde, sikkerhed, installation,
tilslutning og betjening.
Betjeningsvejledningen skal altid opbevares i nærheden af bilradioen. Den skal
læses og anvendes af de personer, som har til opgave at installere, betjene og
reparere fejl på bilradioen.
Opbevar denne betjeningsvejledning, og lad den følge med bilradioen, hvis du
giver den videre til andre.
Ophavsret
Denne dokumentation er ophavsretligt beskyttet.
Vi forbeholder os alle rettigheder - også i uddrag - til denne dokumentation.
Det gælder også fotomekanisk reproduktion, mangfoldiggørelse og udbredelse
ved hjælp af særlige metoder (for eksempel databehandling, datamedier og
datanet) samt ret til indholdsmæssige og tekniske ændringer.
Ansvarsbegrænsning
Alle tekniske informationer, data og anvisninger til montering, tilslutning og betjening i denne betjeningsvejledning svarer til den sidste nye viden på trykningstidspunktet og gives efter bedste viden baseret på vores hidtidige erfaringer og
viden.
Der kan ikke stilles nogen form for krav baseret på informationerne, billederne
og beskrivelserne i denne vejledning.
Producenten påtager sig intet ansvar for skader på grund af manglende overholdelse af vejledningen, anvendelse, som ikke hører ind under anvendelsesområdet,
forkerte reparationer, ændringer, som er foretaget uden tilladelse samt anvendelse af ikke-tilladte reservedele.
32
SAR 28 A1
Page 37

Introduktion
Advarselsinfo
I denne betjeningsvejledning anvendes følgende advarselsinfoer:
ADVARSEL
Advarselsinfo på dette faretrin markerer en mulig farlig situation.
Hvis den farlige situation ikke undgås, kan det føre til personskader.
► Følg anvisningerne i denne advarselsinfo for at undgå, at personer kommer
til skade.
OBS
Advarselsinfo på dette faretrin markerer en mulig materiel skade.
Hvis den farlige situation ikke undgås, kan det føre til materielle skader.
► Følg anvisningerne i denne advarselsinfo for at undgå materielle skader.
BEMÆRK
En bemærk-info markerer ekstra informationer, som gør brugen af bilra-
►
dioen lettere.
Anvendelsesområde
Denne bilradio er kun beregnet til modtagelse af FM/AM-radiokanaler samt til
afspilning af MP3-/WMA-fi ler fra USB-datamedier og SD/MMC-lagerkort samt
audiosignaler fra eksterne audioenheder. Bilradioen er beregnet til montering i
køretøjer. Al anden anvendelse betragtes som værende uden for anvendelsesområdet.
DK
SAR 28 A1
ADVARSEL
Fare på grund af anvendelse uden for anvendelsesområdet!
Der kan være farer forbundet med bilradioen, hvis den anvendes til områder,
den ikke er beregnet til.
► Brug kun bilradioen til det anvendelsesområde, den er beregnet til.
► Følg fremgangsmåden, som er beskrevet i denne betjeningsvejledning.
Der kan ikke stilles nogen form for krav i forbindelse med skader forårsaget af
anvendelse af bilradioen til formål, den ikke er beregnet til. Brugeren bærer
alene risikoen.
33
Page 38
DK
Introduktion
Sikkerhed
I dette kapitel får du vigtige sikkerhedsanvisninger til brug af bilradioen.
Denne bilradio overholder de foreskrevne sikkerhedsbestemmelser. Forkert
anvendelse kan dog føre til personskader og materielle skader.
Grundlæggende sikkerhedsanvisninger
Overhold følgende sikkerhedsanvisninger for sikker brug af bilradioen:
■ Kontrollér bilradioen for udvendige, synlige skader før brug. Tænd ikke for
bilradioen, hvis den er beskadiget eller faldet ned.
■ Hvis kabler eller tilslutninger er beskadigede, skal de udskiftes af en autoriseret
reparatør eller af kundeservice.
■ Personer, som ikke er i stand til at betjene bilradioen sikkert på grund af
deres fysiske, psykiske eller motoriske evner, må kun bruge bilradioen under
opsyn og vejledning af en ansvarlig person.
■ Lad kun børn bruge bilradioen under opsyn.
■ Lad kun bilradioen reparere af autoriserede specialforretninger eller kunde-
service. Uforsvarlige reparationer kan medføre betydelige farer for brugeren.
Endvidere ophæves alle garantikrav.
■ Reparation af bilradioen i løbet af garantiperioden må kun foretages af en
kundeservice, som er autoriseret af producenten, da der ellers ikke kan stilles
garantikrav ved efterfølgende skader.
■ Defekte komponenter må kun udskiftes med originale reservedele. Sikker-
hedskravene kan kun garanteres, hvis der anvendes disse dele.
■ Beskyt bilradioen mod fugt og indtrængende væsker.
34
Færdselssikkerhed
ADVARSEL
Sikkerhed i trafi kken har højeste prioritet!
Overhold følgende sikkerhedsanvisninger, så du selv eller andre ikke udsættes
for fare:
► Sæt dig ind i bilradioens funktion, før du begynder kørslen.
► Betjen kun bilradioen, når trafi kforholdene tillader det! Hold ind til siden,
hvis du skal foretage indstillinger.
► Fjern og anbring kun betjeningsdelen, når bilen er standset.
► Indstil en lydstyrke, så du rettidigt kan høre de akustiske signaler fra politi,
brandvæsen og andre redningstjenester.
SAR 28 A1
Page 39

Introduktion
Leverance og transporteftersyn
ADVARSEL
Fare for kvælning!
► Emballeringsmaterialer må ikke bruges til leg. Der er fare for kvælning.
Bilradioen leveres standardmæssigt med følgende komponenter:
▯ Bilradio (inklusiv betjeningsdel)
▯ Monteringsramme (sat på)
▯ Forankringsplade (inkl. fastgørelsesmateriale)
▯ Nøgle til monteringsrammen (2x)
▯ Etui til betjeningsdel
▯ Denne betjeningsvejledning
BEMÆRK
► Kontrollér, at alle dele er medleveret, og at de ikke har synlige skader.
► Hvis der mangler dele, eller hvis der fi ndes skader på grund af mangelfuld
emballage eller på grund af transporten, bedes du henvende dig til vores
service-hotline (se garantibeviset).
Bortskaff else af emballagen
Emballagen beskytter bilradioen mod transportskader. Emballeringsmaterialerne
er valgt ud fra kriterier som miljøforligelighed og bortskaff elsesteknik og kan
derfor genbruges.
Afl evering af emballagen til genbrug sparer råstoff er og reducerer aff aldsmængden. Bortskaf emballeringsmaterialer, du ikke skal bruge mere, efter de lokalt
gældende forskrifter.
DK
SAR 28 A1
BEMÆRK
Opbevar den originale emballage i løbet af bilradioens garantiperiode,
►
hvis det er muligt, så du kan pakke bilradioen ordentligt ind, hvis du skal
gøre brug af garantien.
35
Page 40

DK
Betjeningselementer
Betjeningselementer
Bilradio (se den første folde-ud-side)
Figur A:
Knap : Oplåsning betjeningsdel
2
Knap /MU: Tænd og sluk for bilradioen/sluk for lyden
3
Knap MD/PTY: Indstilling af driftsmodus/PTY-funktion
4
Knap ▸▸I: Titel-/kanalsøgning fremad
5
Display
6
USB-tilslutning
7
BD/DISP: Valg af frekvens for lagerplads/visning af displayinformationer
8
AUX: 3,5 mm stereo-indgangsstik til tilslutning af ekstern audioenhed
9
Knap 6/FL+: Kanallagerplads 6/mappe frem ved MP3-/WMA-afspilning
10
Knap 5/FL-: Kanallagerplads 5/mappe tilbage ved MP3-/WMA-afspilning
11
Knap 4/RDM: Kanallagerplads 4/tilfældighedsafspilning ved MP3-/WMA-afspilning
12
Knap 3/INT: Kanallagerplads 3/introfunktion ved MP3-/WMA-afspilning
Knap 2/RPT: Kanallagerplads 2/gentagefunktion ved MP3-/WMA-afspilning
13
14
Knap 1/PAU: Kanallagerplads 1/standser afspilning (pause)
15
I◂◂: Titel-/kanalsøgning tilbage
16
A/PS : Automatisk kanallagring/søgefunktion ved MP3-/WMA-afspilning
17
Multiknap: Drej for at indstille værdierne/lydstyrken
18
Knap SEL (EQ/LD TA/AF): Åbner indstillingsmenuen
36
Figur B:
19
Lås betjeningsdel
20
Holdepunkt til betjeningsdel
21
Kortlæser til SD/MMC-kort
22
RESET: Nulstilling af bilradioen
Figur C:
ISO-blok tilslutning B
23
24
Bil-fl adsikring 7,5 A
25
ISO-blok tilslutning A
26
SUBW: Audio-cinch-udgang til subwoofer
27
LINE OUT: Audio-cinch-udgang L/R til forstærker
28
Antennetilslutning til DIN-antennestik
SAR 28 A1
Page 41

Installation
Tilbehør (se bageste folde-ud-side)
Figur D:
29
Etui til betjeningsdel
30
Monteringsramme
31
Nøgle til monteringsramme
32
Forankringsplade (inkl. fastgørelsesmateriale)
Installation
ADVARSEL
Ved installation af bilradioen kan der opstå materielle skader!
► Lad så vidt muligt en fagmand montere bilradioen.
► Hvis du selv vil montere bilradioen, skal du følge anvisningerne for tilslutning
og installation for at få en sikker og fejlfri funktion.
Tilslutning
OBS
Hvis du anvender forkerte tilslutninger, kan bilradioen
beskadiges.
► Brug bilradioens ISO-tilslutninger ved monteringen. ISO-adapteren, som
passer til din bil, kan fås på værksteder, hos specialforhandleren eller i
stormagasiner. Hvis der anvendes andre tilslutningstyper, bortfalder garan-
tikravet!
DK
SAR 28 A1
ISO-tilslutningernes tildeling
Stikkene vises bagfra.
1357
2468
ISO A (tildeling
strømforsyning)
Tildeling
1fri
2fri
3fri
Vedvarende plus 12 V
4
(Kl. 30)
5 Antennespænding
6fri
Tændingsplus 12 V
7
(Kl. 15)
8 Minus (-) masse (Kl. 31)
37
Page 42
DK
Installation
Tildeling
1 Bagest til højre +
2 Bagest til højre -
1357
2468
Brug kun kablerne til de forreste højttalere, hvis bilradioen skal sluttes til to højttalere.
BEMÆRK
Vær opmærksom på, at tilslutning 4 i ISO-blok A skal være tilsluttet den
►
permanente plusforbindelse ved lagring af kanaler.
► I nogle bilmodeller er der byttet om på den standardmæssige tildeling for
tilslutningerne [4] og [7] i ISO-blok A fra fabrikken. Hvis det er tilfældet,
kan lagringen af kanalerne gå tabt. For at afhjælpe dette problem, skal
der byttes om på tilslutningerne 7 (tændingsplus) og 4 (permanent plus) i
ISO-blok A.
ISO B
(tildeling højttalertilslutninger)
Antennetilslutning
OBS
Mulige skader på bilradioen!
► Belast aldrig antennetilslutningen med antennens motorstrømkabel eller
andre forbrugere.
Tilslutningen til antennestrømmen anvendes til en relæstyret antenne. Relæet
kører automatisk antennen ud, når du tænder for bilradioen. Når du slukker for
bilradioen igen, kører antennen ind igen. Denne tilslutning kan også anvendes
til styring af en ekstern forstærker. Se betjeningsvejledningen til forstærkeren, så
tilslutningen er korrekt.
3 Forrest til højre +
4 Forrest til højre 5 Forrest til venstre +
6 Forrest til venstre 7 Bagest til venstre +
8 Bagest til venstre -
38
Tilslutning af ekstern forstærker
For at slutte en ekstern forstærker til skal du bruge audio-cinch-udgangen
LINE OUT
27
. Se betjeningsvejledningen til den eksterne forstærker.
SAR 28 A1
Page 43

Installation
A
Tilslutning af en ekstern subwoofer
For at tilslutte en ekstern subwoofer skal du bruge den orange cinch-udgang
SUBW
26
. Se betjeningsvejledningen til den eksterne subwoofer.
Tilslutningsdiagram
Montering
Bilradioen kan indsættes i alle standard ISO-monteringsskakte. Hvis din bil ikke
har nogen ISO-monteringsskakt, skal du kontakte dit værksted, din forhandler
eller specialafdelingen i stormagasinet.
BEMÆRK
Tilslut kablerne, før du foretager den endelige montering af bilradioen.
►
Kontrollér, at kablerne er tilsluttet korrekt, og at systemet fungerer rigtigt.
SubwooferAntenne
Ekstern forstærker
1234
5678
1234
5678
DK
ISO B
ISO
Monteringsanvisninger
SAR 28 A1
■ Sæt bilradioen ind i skakten, eller vælg monteringsstedet, så det er nemt at
få adgang til alle knapper, og chauff øren ikke hindres.
■ Slut kun bilradioen til et forskriftsmæssigt installeret 12 V bilbatteri.
■ Slut kun bilradioen til via ISO-stikket i bilen.
■ Montér bilradioen, så der ikke kan opstå varmeophobning, og så bilradioen
ventileres godt.
39
Page 44

DK
■ Montér ikke bilradioen på et sted, hvor den er udsat for høje temperaturer
(f.eks. direkte sol eller varm luft), meget snavs og voldsomme vibrationer.
■ Hvis der skal foretages ændringer på bilen, skal du kontakte din bilforhand-
ler /et værksted.
Montering af bilradio i ISO-skakten
♦ Tag monteringsrammen 30 af bilradioens kabinet.
♦ Sæt monteringsrammen ind i ISO-monteringsskakten.
♦ Bøj fl igene på monteringsrammen med en skruetrækker, så den sidder fast i
monteringsskakten (se billedet).
♦ Kontrollér, at monteringsrammen sidder fast.
♦ Forbind bilradioens ISO-stikblok med bilens to ISO-stik.
♦ Forbind bilantennens antennekabel med bilradioens antennestik 28.
DIN-ISO-adapteren, som passer til din bil, kan fås på værksteder, hos
specialforhandlere eller i stormagasiners specialafdelinger.
♦ Slut eventuelt den eksterne forstærkers audio-cinchkabel til bilradioens
LINE OUT-stik 27.
♦ Slut eventuelt den eksterne subwoofers audio-cinchkabel til bilradioens
orange cinch-stik SUBW
♦ Sørg for at sikre din bilradio mod tyveri. Fastgør skruen med forankrings-
32
pladen
og fastgørelsesmaterialet til bilmotorens forpanel.
26
.
Installation
40
SAR 28 A1
Page 45

Installation
OBS
Kablerne kan ødelægges!
► Vær opmærksom på kablernes placering ved indsætning, så skader undgås.
♦ Sæt forsigtigt bilradioen ind i monteringsrammen 30, til den går i hak.
♦ Når alle forbindelser er sluttet til, skal du trykke på knappen RESET 22 i
ca. 6 sekunder med en kuglepen eller en anden spids genstand.
♦ Sæt betjeningsdelen ind som beskrevet under "Indsætning af betjeningsdelen“.
Afmontering af bilradioen
Gå frem på følgende måde for at afmontere bilradioen igen:
♦ Sæt højre og venstre nøgle
(Nu er fl igene bøjet tilbage).
♦ Tag bilradioen ud.
31
ind i åbningen på bilradioens sider.
DK
SAR 28 A1
41
Page 46

DK
Første brug
Betjeningsdel
Du kan beskytte bilradioen mod tyveri ved at tage betjeningsdelen til bilradioen
af. Lad være med at opbevare den løse betjeningsdel i bilen.
BEMÆRK
Opbevar altid betjeningsdelen i etuiet 29, så den beskyttes.
►
Indsætning af betjeningsdelen
♦ Sæt først betjeningsdelen ind i rammen med
højre side på holdepunktet 20.
♦ Tryk så den venstre side ind i rammen, indtil
den går i hak ved låsen 19.
Kontrollér, om betjeningsdelen sidder korrekt og
fast i rammen. Hvis betjeningsdelen ikke er monteret
korrekt, kan der opstå fejlfunktioner ved betjening af
bilradioen.
Første brug
2.
1.
42
Aftagning af betjeningsdelen
♦ Tryk på knappen for at låse betjenings-
delen op. Betjeningsdelen hopper lidt frem i
venstre side.
♦ Tag først betjeningsdelen ud i venstre side og
derefter i højre.
SAR 28 A1
Page 47

Betjening og funktion
Betjening og funktion
I dette kapitel får du vigtige informationer om bilradioens betjening og funktion.
BEMÆRK
Hvis der ikke foretages indstillinger eller trykkes på knapperne i løbet af
►
cirka 5 sekunder, vender bilradioen tilbage til den foregående funktion.
Ændrede indstillinger gemmes.
Tænd/sluk
♦ Tryk på knappen /MU 2 for at tænde for bilradioen. I displayet vises
WELCOME.
♦ For at slukke for bilradioen skal du holde knappen /MU trykket nede
i længere tid. I displayet vises GOODBYE.
Indstillinger
ADVARSEL
Høreskader på grund af for høj lydstyrke!
Hvis lydstyrken er for høj, kan det skade hørelsen.
► Indstil lydstyrken på en mellemindstilling.
Lydstyrke
♦ Drej multiknappen 17 for at indstille lydstyrken.
Aktivering / deaktivering af stum-indstilling
♦ Tryk kort på knappen /MU for at deaktivere lyden. I displayet vises
MUTE ON.
♦ Tryk på knappen /MU igen for at aktivere lyden. Ved modtagelse af
en PTY- eller TA-kanal ophæves stum-indstillingen.
DK
Funktionsindstilling
SAR 28 A1
♦ Tryk på knappen MD/PTY 3 for at skifte mellem radiomodtagelse
(TUNER), kortlæser (CARD), USB-tilslutning (USB) og audioindgang (AUX).
BEMÆRK
Funktionerne CARD og USB kan kun åbnes, hvis det pågældende medie er
►
sat i.
43
Page 48

DK
Betjening og funktion
Display
♦ Tryk fl ere gange på knappen BD/DISP 7 for at få vist følgende informa-
tioner efter hinanden:
Radiostation, klokkeslæt (indstilles automatisk ved RDS-modtagelse), frekvens
PTY-indstillinger (kanalerne sender disse RDS-funktioner i forskelligt omfang, se
endvidere kapitlet "Radiofunktioner").
BEMÆRK
►
Hvis du ikke modtager RDS- eller PTY-informationer, vises PTY NONE i
displayet.
Nulstilling af bilradioen (RESET)
For at nulstille bilradioen til leveringstilstanden skal du trykke på knappen
RESET 22 med en spids genstand, f.eks. en kuglepen, og holde den nede
i ca. 6 sekunder.
BEMÆRK
For at få adgang til knappen RESET skal betjeningsdelen tages helt af,
►
se endvidere kapitlet "Aftagning af betjeningsdel".
Nulstil bilradioen:
▯ ved første brug,
▯ efter tilslutning af kablerne,
▯ hvis ikke alle funktionsknapperne fungerer,
▯ hvis der vises en fejlmeddelelse i displayet.
44
Indstillinger med knappen SEL (EQ/LD/TA/AF)
♦ Tryk på knappen SEL 18 på bilradioen. Den aktuelle lydstyrke vises. Hver
gang, du trykker på knappen SEL, åbnes det næste indstillingspunkt.
Følgende indstillinger er mulige:
VOL - lydstyrke (fra 0 til 47),
BAS - bastoner (fra -7 til +7),
TRE - diskanttoner (fra -7 til +7)
BAL - balance (klangfordeling mellem højre og venstre højttalere)
(fra 0L til 9L og 0R til 9R)
FAD - fader (klangfordeling mellem de bageste og forreste højttalere)
(fra 0F til 9F og 0R til 9R)
♦ Drej multiknappen 17 for at ændre indstillingerne for det viste menupunkt.
SAR 28 A1
Page 49

Betjening og funktion
Flere indstillinger med knappen SEL (EQ/LD/TA/AF)
♦ Hold knappen SEL 18 nede i ca. 2 sekunder, og tryk derefter på knappen
SEL, indtil den ønskede funktion vises på displayet.
♦ Drej multiknappen 17 for at ændre indstillingerne for det viste menupunkt.
Tænd/sluk for TA - Traffi c Announcement (trafi kradio)
TA ON: Når TA-funktionen er tændt, skiftes der straks fra andre stationer eller
andre funktionstyper til radiostationen, som sender trafi kradio.
BEMÆRK
Når TA-funktionen er tændt, kan der kun søges efter eller gemmes stationer,
►
som udsender trafi kradiosignalet. Stationer, som udsender trafi kradiosignalet, er markeret med TP i displayet.
TA OFF: TA-funktionen er slukket.
AF - Aktivering/deaktivering af alternative frekvenser
AF ON: Når AF-funktionen er aktiveret, søger bilradioen efter den optimale
frekvens for den indstillede kanal.
AF OFF: AF-funktionen er deaktiveret.
EQ - equalizer
♦ Drej på multiknappen for at vælge en af indstillingerne FLAT, CLASSIC,
ROCK, POP eller EQ OFF. Ved indstillingen EQ OFF er equalizer ikke aktiveret.
Equalizer-indstillingen vises nederst i displayet.
SUBW - subwoofer
Du kan tilslutte en ekstern aktiv subwoofer for at få en kraftigere basvirkning.
♦ Drej multiknappen for at aktivere (SUBW ON) eller deaktivere basvirkningen
(SUBW OFF).
AVOL - indstilling af lydstyrken, når radioen tændes
♦ Drej multiknappen for at indstille lydstyrkeniveauet, som radioen skal tæn-
des med.
DK
SAR 28 A1
45
Page 50

DK
Betjening og funktion
STEREO/MONO - indstilling af audiogengivelsen
♦ Drej multiknappen 17 for at indstille audiogengivelsen i stereo- (STEREO)
eller monolyd (MONO). Hvis der modtages en stereokanal, vises stereosymbolet i displayet.
LOUD - tænd/sluk for loudnessfunktionen
♦ Drej multiknappen for at skrue op/ned for bassen og diskanten (LOUD ON)
(SUBW OFF). Når loudnessfunktionen er aktiveret, vises LOUD til højre i
displayet.
Dx/LOCAL - Indstilling af modtagefølsomhed
♦ Drej multiknappen for at justere modtagefølsomheden efter transregionale
kanaler (DX) eller regionale kanaler (LOCAL).
ADJ - indstilling af klokkeslæt
BEMÆRK
Bilradioen er udstyret med et RDS-styret ur. Uret indstilles automatisk, når
►
RDS-funktionen er slået til, og fortsætter også, når bilradioen er slukket.
Hvis du ikke modtager RDS-signalet, kan du indstille klokkeslættet manuelt her.
♦ Drej multiknappen til højre for at indstille minutterne, og til venstre for at
indstille timerne.
46
SAR 28 A1
Page 51

Betjening og funktion
Radiofunktioner
Valg af båndfrekvens
♦ Tryk på knappen BD/DISP 7 for at skifte mellem båndfrekvenserne
(FM1, FM2, FM3). Hver båndfrekvens dækker det samme frekvensområde
(87,5 - 108 MHz) og har 6 lagerpladser.
Automatisk søgning efter kanaler
♦ Tryk på knapperne ▸▸I 4 eller I◂◂ 15 for at starte en søgning.
Stands søgningen, når du har fundet kanalen.
Manuel indstilling af kanaler
♦ Tryk kort på knapperne ▸▸I eller I◂◂ for at ændre frekvensen i trin på
0,05 MHz (VHF), indtil den ønskede frekvens er indstillet.
Lagring af kanaler
♦ Hold en af knapperne 1 til 6 nede i ca. 3 sekunder for at gemme den
aktuelle kanal. Når kanalerne er gemt, vises tallene 1 til 6 i displayet.
Åbning af den gemte kanal
♦ Vælg båndfrekvensen med BD/DISP (FM1, FM2, FM3).
♦ Tryk på én af knapperne 1 til 6 for at åbne den gemte kanal.
DK
Automatisk lagring
Søgning mellem lagrede kanaler
SAR 28 A1
♦ Hold knappen A/PS 16 nede i 3 sekunder. Der startes straks en
søgning, som stopper i ca. 5 sekunder ved alle de kanaler, systemet fi nder.
Kanalen vises, eller sendefrekvensen blinker, og lagerpladsen vises. Ved
svage kanaler fortsætter søgningen automatisk.
♦ Tryk kort på knappen A/PS . Alle kanaler vælges kort.
♦ Når du hører den ønskede kanal, skal du trykke på knappen A/PS .
Den valgte kanal bliver ved med at være valgt.
47
Page 52

Betjening og funktion
Programtype (PTY)
Med denne funktion kan du søge efter kanaler med en bestemt genre. Følgende
indstillinger er mulige:
DK
POP M
ROCK M
NEWS
AFFAIRS
INFO
EASY M
LIGHT M
BEMÆRK
Vær opmærksom på, at disse informationer er afhængige af regionen,
►
tv-selskabet og senderen.
Indstilling af PTY-kode
♦ Tryk på knappen MD/PTY 3, og hold den nede, til PTY vises nederst i
displayet.
♦ Tryk derefter fl ere gange på én af knapperne 1 til 6 for at vælge den
ønskede PTY-indstilling.
♦ For at skifte mellem PTY-indstillingerne "Musikretning" og "Taleprogrammer"
skal du trykke på knappen MD/PTY igen, når den første PTY-indstilling
vises.
Tasterne 1 til 6 er defi neret på følgende måde:
Knap Musikretning Taleprogrammer
1 POP M, ROCK M NEWS, AFFAIRS, INFO
2 EASY M, LIGHT M SPORT, EDUCATE, DRAMA
3 CLASSICS, OTHER M CULTURE, SCIENCE, VARIED
4 JAZZ, COUNTRY WEATHER, FINANCE, CHILDREN
5 NATION M, OLDIES SOCIAL, RELIGION, PHONE IN
6 FOLK M TRAVEL, LEISURE, DOCUMENT
Hvis der ikke foretages valg i 2 sekunder, starter der en automatisk søgning efter
stationer, som svarer til PTY-indstillingen. Søgefunktionen stopper ved den første
fundne kanal.
SPORT
EDUCATE
DRAMA
CLASSICS
OTHER M
CULTURE
SCIENCE
VARIED
JAZZ
COUNTRY
WEATHER
FINANCE
CHILDREN
NATION M
OLDIES
SOCIAL
RELIGION
PHONE IN
FOLK M
TRAVEL
LEISURE
DOCUMENT
48
SAR 28 A1
Page 53

Betjening og funktion
Aktivering/deaktivering af PTY-funktionen
♦ For at aktivere PTY-søgningen skal du trykke på knappen MD/PTY 3.
I displayet vises PTY og den sidste PTY-indstilling (f.eks. POP M).
Ved kanalsøgningen ledes der kun efter kanaler med den aktuelt valgte
PTY-mærkning.
♦ For at deaktivere PTY-søgningen skal du trykke på knappen MD/PTY igen.
PTY forsvinder i displayet.
Søgning efter kanal efter PTY-kode
♦ Hvis du ikke foretager indtastninger i 2 sekunder, mens en PTY-kode vises,
startes der straks en søgning efter kanaler, som svarer til denne PTY-kode.
Hvis der ikke fi ndes nogen kanal, der svarer til denne PTY-kode, vises beskeden
PTY NONE kort, og herefter slutter søgningen ved den sidst indstillede kanal.
USB-tilslutning
Bilradioen kan bearbejde USB-datamedier på op til 16 GB.
Tilslutning af datamedie
♦ Skub beskyttelseskappen til USB-tilslutningen til højre.
♦ Slut USB-enheden til USB-tilslutningen.
♦ Skub beskyttelseskappen hen over USB-tilslutningen igen, hvis der ikke er
tilsluttet nogen USB-enhed, så tilslutningen ikke bliver snavset.
DK
Kortlæser
Tilslutning af datamedie
SAR 28 A1
Bilradioen kan forarbejde SD/MMC-lagerkort op til 2 GB og SDHC-lagerkort
op til 32 GB.
♦ Tryk på knappen for at låse betjeningsdelen op, og tag den af
bilradioen (se endvidere kapitlet "Aftagning af betjeningsdel").
♦ Sæt et lagerkort ind i kortslottet med teksten opad.
49
Page 54

DK
Betjening og funktion
Funktioner MP3/WMA-afspilning
Afspilning
■ Bilradioen kan afspille fi ler i formatet MP3 og WMA.
■ Hvis numre og mapper blandes på samme niveau, kan det give problemer
ved afspilningen.
■ Under afspilningen udlæses informationerne fra MP3-fi lens ID3-tag og vises i
displayet efter hinanden.
♦ Afspilningen af MP3- eller WMA-numrene på USB-enheden eller lagerkortet
begynder automatisk.
Afbrydelse af afspilningen
♦ Tryk på knappen 1/PAU 14 for at afbryde afspilningen.
♦ For at fortsætte afspilningen igen skal du trykke på knappen 1/PAU én
gang til.
BEMÆRK
Tryk på knappen 1/PAU, og hold den nede for at afspille det første num-
►
mer på lagermediet.
Spring over titler
♦ Tryk på knapperne ▸▸I 4 eller I◂◂ 15 for at vælge det næste eller foregå-
ende nummer. Titelnummeret vises i displayet.
50
Hurtigt frem/tilbage
♦ Tryk på knapperne ▸▸I eller I◂◂, og hold dem nede for at køre hurtigt frem
og tilbage.
Gentagefunktion (RPT - Repeat)
♦ Tryk fl ere gange på knappen 2/RPT 13 for at skifte mellem gentagefunktio-
nerne. Følgende indstillinger er mulige:
– RPT ONE: Det aktuelle nummer gentages.
– RPT DIR: Alle numre i den aktuelle mappe gentages.
– RPT ALL: Alle numre på lagermediet gentages.
Hvis funktionerne RPT ONE eller RPT DIR er aktiveret, vises RPT på displayet.
SAR 28 A1
Page 55

Betjening og funktion
Kort afspilning af numre
♦ Tryk på knappen 3/INT 12. I displayet vises kort INT ON. Alle numre afspilles
efter hinanden i ca. 10 sekunder.
♦ Tryk på knappen 3/INT igen for at starte afspilningen af nummeret, der
spilles for øjeblikket. I displayet vises kort INT OFF.
Tilfældighedsafspilning af alle numre (RDM - Random)
♦ Tryk på knappen 4/RDM 11. I displayet vises kort RDM ON. Numrene afspil-
les nu i tilfældig rækkefølge.
♦ Tryk på knappen 4/RDM igen for at starte den normale afspilning.
I displayet vises kort RDM OFF.
Overspringning af mappe
♦ Tryk på knappen 6/FL+ 9 for at komme til den næste mappe eller på
10
knappen 5/FL-
begynder automatisk
Søgefunktioner
Søgning efter nummer
for at afspille den foregående mappe. Afspilningen
DK
SAR 28 A1
♦ Tryk på knappen A/PS
♦ Drej multiknappen 17 for at indstille første bogstav/tal for det ønskede
nummer.
♦ Tryk på knappen SEL 18 for at bekræfter indtastningen og for at komme til
det andet, tredje eller fjerde bogstav/tal.
♦ Tryk på knappen 1/PAU 14 for at starte afspilningen af det indstillede
nummer.
Søgning efter navn
♦ Tryk to gange på knappen A/PS . I displayet vises A-SEARCH. Søgningen
efter nummerets navn starter straks. Hvis der ikke fi ndes noget nummer, som
begynder med det indstillede bogstav/tal, vises NONE.
♦ Drej multiknappen, til det ønskede bogstav eller tal vises.
♦ Tryk på knapperne ▸▸I 4 eller I◂◂ 15 for at bekræfte det indstillede bogstav/
tal og få vist alle numre, som begynder med de søgte bogstaver/tal.
♦ Tryk på knappen 1/PAU for at starte afspilningen af det viste nummer.
16
.
51
Page 56

DK
Betjening og funktion
Søgning efter mapper
♦ Tryk tre gange på knappen A/PS 16. Den aktuelt afspillede mappe
vises.
♦ Drej multiknappen 17 for at skifte mellem de eksisterende mapper.
♦ Tryk på knappen 1/PAU 14 for at vælge den aktuelt viste mappe.
Afspilningen af det første nummer i den udvalgte mappe starter straks.
Tilslutning af en ekstern audioenhed til bilradioen
♦ Forbind audioudgangen på den eksterne audioenhed (f.eks. en MP3-player)
til stikket AUX8 på forsiden af bilradioen med et 3,5 mm stereo-jackstik.
♦ Vælg afspilning af audioindgangen ved at trykke fl ere gange på knappen
MD/PTY 3, indtil AUX vises i displayet.
52
SAR 28 A1
Page 57

Rengøring/Bortskaff else
Rengøring
Sikkerhedsanvisninger
OBS
Mulige skader på bilradioen
► Sørg for, at der ikke trænger fugt ind i bilradioen ved rengøring, så irrepa-
rable skader undgås.
Rengøring af display
■ Forsiden af bilradioen / displayet må udelukkende rengøres med en let
fugtig, fnugfri klud og et mildt opvaskemiddel.
Bortskaff else
Bortskaff else af bilradioen
Smid under ingen omstændigheder produktet ud med det
normale husholdningsaff ald.
Dette produkt er underlagt det europæiske direktiv 2002/96/ECWEEE (Waste Electrical and Electronic Equipment).
Bortskaf bilradioen via en godkendt bortskaff elsesvirksomhed eller den kommunale genbrugsstation. Følg de aktuelt gældende regler. Henvend dig i tvivlstilfælde til det lokale bortskaff elsessted.
DK
SAR 28 A1
53
Page 58
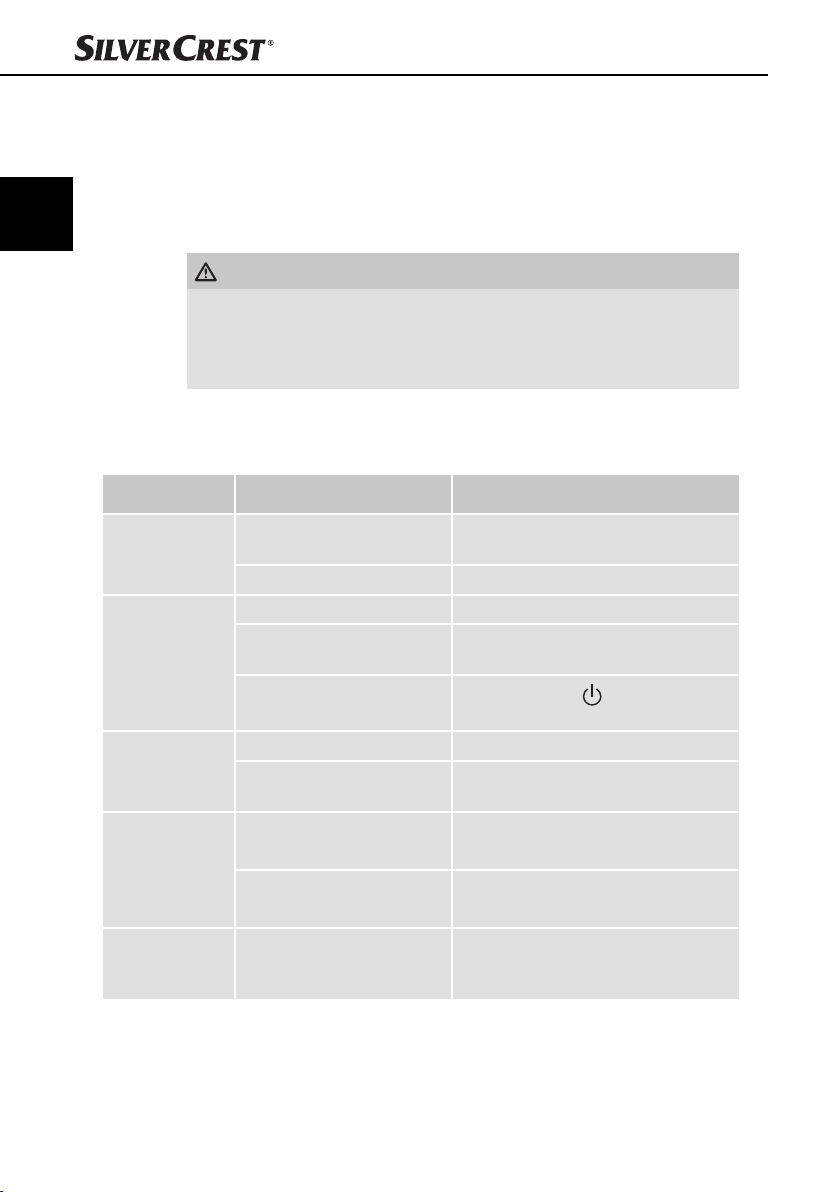
DK
Afhjælpning af fejl
Afhjælpning af fejl
I dette kapitel får du vigtige anvisninger til fejlfi nding og fejlafhjælpning.
Overhold anvisningerne, så farer og skader undgås.
Sikkerhedsanvisninger
ADVARSEL
Overhold følgende sikkerhedsanvisninger, så farer og materielle skader undgås:
► Reparationer på el-apparater må kun udføres af reparatører, som er oplært
af producenten. Der kan opstå alvorlige farer for brugeren og skader på
bilradioen, hvis reparationerne udføres forkert.
Fejlårsager og -afhjælpning
Efterfølgende tabel hjælper til lokalisering og afhjælpning af mindre fejl:
Fejl Mulig årsag Afhjælpning
Bilradioen kan
ikke tændes
Ingen lyd
Funktionsknapperne fungerer
ikke
Radioen og/
eller den automatiske lagring
af kanaler
fungerer ikke
Kanallagringen
fungerer ikke
Tændingen er ikke slået til.
Sikringen er defekt. Skift sikringen.
Lydstyrken står på laveste trin. Skru op for lyden.
Kablerne er ikke sluttet
rigtigt til.
Lyden er slukket.
Der er en fejl ved bilradioen. Tryk på knappen RESET.
Betjeningsdelen sidder ikke
korrekt.
Antennekablet er ikke sluttet
rigtigt til.
Kanalernes signaler
er for svage.
Tilslutning 4 i ISO-blok A
(permanent plus) er ikke korrekt tilsluttet.
Slå tændingen til ved
at dreje på nøglen.
Kontrollér kabelforbindelserne.
Tryk på knappen
for at tænde for lyden igen.
Kontrollér, at betjeningsdelen
sidder korrekt.
Kontrollér, at antennekablet
sidder korrekt.
Indstil kanalerne manuelt.
Kontrollér kabelforbindelserne.
Se kapitlet “Tilslutning”.
/MU
54
SAR 28 A1
Page 59

Afhjælpning af fejl
Fejl Mulig årsag Afhjælpning
USB-tilslutningen er beregnet
til apparater, som fungerer
efter USB-standarden. Det
Apparatet på
USB-tilslutningen
fungerer ikke
Kortlæserenheden læser ikke
kortet
er ikke alle apparater på
markedet, der opfylder
denne standard. Under visse
omstændigheder kan der
være tilsluttet et apparat,
som ikke fungerer efter
USB-standarden.
Kortet kan være defekt,
snavset eller ikke sat rigtigt i.
BEMÆRK
Hvis du ikke kan løse problemet med de angivne trin, bedes du henvende
►
dig til kundeservice (se garantibeviset).
Tilslut et apparat, der fungerer efter
USB-standarden. Sørg for, at datamediet
er formateret med fi lsystemet FAT32.
Kontrollér kortet. Sæt det ind, så siden
med teksten vender til højre. Sørg for,
at datamediet er formateret med
fi lsystemet FAT32.
DK
SAR 28 A1
55
Page 60

Tillæg
Tekniske data
Tillæg
DK
Generelt
Indgangsspænding 12 V DC
Indgangsstrøm maks. 7,5 A
Nominel eff ekt 4 x 7 W
Funktionstemperatur +5 - +40 °C
Fugt (ingen kondensering) ≤ 75 %
Mål (L x B x H) 18,6 x 12,7 x 5,7 cm
Vægt inkl. tilbehør ca. 650 g
Bilradioens sikring
Fladstiksikring til biler
Frekvensområde radio
Frekvens FM (VHF) 87,5 - 108 MHz
Lagerpladser til stationer FM (VHF) 18 Pladser
Audioindgang (AUX)
Stereo-jackstik 3,5 mm
Audioudgang
2 x cinchstik til ekstern forstærker (L/R)
1 x cinchstik til ekstern subwoofer
7,5 A
56
USB-tilslutning
USB 1.1 og 2.0 kompatible datamedier (indtil 16 GB)
Kortslot
SD/MMC korttilslutning (SD/MMC til 2 GB, SDHC til 32 GB)
SAR 28 A1
Page 61

Tillæg
Info om EF-overensstemmelseserklæringen
Denne bilradio er i overensstemmelse med de grundlæggende krav og andre relevante forskrifter i køretøjsdirektivet 2004/104/EC.
Den komplette, originale overensstemmelseserklæring kan
rekvireres hos importøren.
Garanti
På denne bilradio får du 3 års garanti fra købsdatoen. Bilradioen er produceret
omhyggeligt og inden levering afprøvet samvittighedsfuldt. Opbevar kassebonen
som bevis for købet. Kontakt venligst serviceafdelingen telefonisk, hvis du ønsker
at gøre brug af garantien. På denne måde garanteres det, at tilsendelsen af
varen er gratis.
BEMÆRK
Garantien gælder kun for materiale- eller fabrikationsfejl, men ikke for
►
transportskader, sliddele eller skrøbelige dele som f.eks. kontakter eller
batterier.
Produktet er kun beregnet til privat og ikke til erhvervsmæssigt brug.
Ved misbrug og uhensigtsmæssig behandling, anvendelse af vold og ved
indgreb, som ikke er foretaget af vores autoriserede serviceafdeling, bortfalder
garantien. Dine juridiske rettigheder indskrænkes ikke ved denne garanti.
Garantiperioden forlænges ikke, hvis der gøres brug af garantien. Det gælder
også for udskiftede og reparerede dele. Skader og mangler, som eventuelt
forefi ndes allerede ved køb, skal straks anmeldes efter udpakning og senest to
dage efter købsdatoen. Når garantiperioden er udløbet, er reparation af skader
betalingspligtig.
DK
Importør
SAR 28 A1
KOMPERNASS GMBH
BURGSTRASSE 21
44867 BOCHUM, GERMANY
www.kompernass.com
57
Page 62

DK
58
SAR 28 A1
Page 63

Bilradio
SAR 28 A1
For at garantere reparation uden
udgifter for dig bedes du kontakte
vores service-hotline. Hertil bedes
du have dit kassebilag inden for
rækkevidde.
Afsender, skriv venligst tydeligt:
Efternavn
Fornavn
Gade/vej
Postnummer/by
Land
Garanti
Service Danmark
Tel.: 32 710005
E-Mail: kompernass@lidl.dk
IAN 85465
Telefon
Udfyld dette afsnit fuldstændigt, og læg det sammen med bilradioen!
Dato/underskrift
Fejlbeskrivelse:
Page 64

Page 65

Inhaltsverzeichnis
Einführung . . . . . . . . . . . . . . . . . . . . . . . . . . . . . . . . . . . . . . . . . . . . . . . . . 62
Vorwort . . . . . . . . . . . . . . . . . . . . . . . . . . . . . . . . . . . . . . . . . . . . . . . . . . . . . . . . . . . . . . 62
Urheberrecht. . . . . . . . . . . . . . . . . . . . . . . . . . . . . . . . . . . . . . . . . . . . . . . . . . . . . . . . . . 62
Haftungsbeschränkung . . . . . . . . . . . . . . . . . . . . . . . . . . . . . . . . . . . . . . . . . . . . . . . . . . 62
Warnhinweise . . . . . . . . . . . . . . . . . . . . . . . . . . . . . . . . . . . . . . . . . . . . . . . . . . . . . . . . . 63
Bestimmungsgemäße Verwendung . . . . . . . . . . . . . . . . . . . . . . . . . . . . . . . . . . . . . . . . 63
Sicherheit . . . . . . . . . . . . . . . . . . . . . . . . . . . . . . . . . . . . . . . . . . . . . . . . . . . . . . . . . . . . 64
Grundlegende Sicherheitshinweise . . . . . . . . . . . . . . . . . . . . . . . . . . . . . . . . . . . . . . . . 64
Lieferumfang und Transportinspektion . . . . . . . . . . . . . . . . . . . . . . . . . . . . . . . . . . . . . . 65
Entsorgung der Verpackung . . . . . . . . . . . . . . . . . . . . . . . . . . . . . . . . . . . . . . . . . . . . . . 65
Bedienelemente . . . . . . . . . . . . . . . . . . . . . . . . . . . . . . . . . . . . . . . . . . . . 66
Installation . . . . . . . . . . . . . . . . . . . . . . . . . . . . . . . . . . . . . . . . . . . . . . . . 67
Anschluss . . . . . . . . . . . . . . . . . . . . . . . . . . . . . . . . . . . . . . . . . . . . . . . . . . . . . . . . . . . .67
Einbau . . . . . . . . . . . . . . . . . . . . . . . . . . . . . . . . . . . . . . . . . . . . . . . . . . . . . . . . . . . . . . 69
Das Gerät ausbauen . . . . . . . . . . . . . . . . . . . . . . . . . . . . . . . . . . . . . . . . . . . . . . . . . . . 71
Inbetriebnahme . . . . . . . . . . . . . . . . . . . . . . . . . . . . . . . . . . . . . . . . . . . . 72
Bedienteil . . . . . . . . . . . . . . . . . . . . . . . . . . . . . . . . . . . . . . . . . . . . . . . . . . . . . . . . . . . . 72
Bedienung und Betrieb . . . . . . . . . . . . . . . . . . . . . . . . . . . . . . . . . . . . . . 73
Ein-/Ausschalten . . . . . . . . . . . . . . . . . . . . . . . . . . . . . . . . . . . . . . . . . . . . . . . . . . . . . . . 73
Einstellungen . . . . . . . . . . . . . . . . . . . . . . . . . . . . . . . . . . . . . . . . . . . . . . . . . . . . . . . . . .73
Radio zurücksetzen (RESET) . . . . . . . . . . . . . . . . . . . . . . . . . . . . . . . . . . . . . . . . . . . . . . 74
Radiofunktionen . . . . . . . . . . . . . . . . . . . . . . . . . . . . . . . . . . . . . . . . . . . . . . . . . . . . . . . 77
USB-Anschluss . . . . . . . . . . . . . . . . . . . . . . . . . . . . . . . . . . . . . . . . . . . . . . . . . . . . . . . . 79
Kartenleser . . . . . . . . . . . . . . . . . . . . . . . . . . . . . . . . . . . . . . . . . . . . . . . . . . . . . . . . . . .79
Funktionen MP3/WMA-Wiedergabe . . . . . . . . . . . . . . . . . . . . . . . . . . . . . . . . . . . . . . 80
Ein externes Audiogerät an das Gerät anschließen . . . . . . . . . . . . . . . . . . . . . . . . . . . . 82
Reinigung . . . . . . . . . . . . . . . . . . . . . . . . . . . . . . . . . . . . . . . . . . . . . . . . . 83
Sicherheitshinweise . . . . . . . . . . . . . . . . . . . . . . . . . . . . . . . . . . . . . . . . . . . . . . . . . . . . . 83
Display reinigen . . . . . . . . . . . . . . . . . . . . . . . . . . . . . . . . . . . . . . . . . . . . . . . . . . . . . . . 83
Entsorgung . . . . . . . . . . . . . . . . . . . . . . . . . . . . . . . . . . . . . . . . . . . . . . . . 83
Gerät entsorgen . . . . . . . . . . . . . . . . . . . . . . . . . . . . . . . . . . . . . . . . . . . . . . . . . . . . . . . 83
Fehlerbehebung . . . . . . . . . . . . . . . . . . . . . . . . . . . . . . . . . . . . . . . . . . . . 84
Sicherheitshinweise . . . . . . . . . . . . . . . . . . . . . . . . . . . . . . . . . . . . . . . . . . . . . . . . . . . . . 84
Fehlerursachen und -behebung . . . . . . . . . . . . . . . . . . . . . . . . . . . . . . . . . . . . . . . . . . . 84
Anhang . . . . . . . . . . . . . . . . . . . . . . . . . . . . . . . . . . . . . . . . . . . . . . . . . . . 86
Technische Daten . . . . . . . . . . . . . . . . . . . . . . . . . . . . . . . . . . . . . . . . . . . . . . . . . . . . . . 86
Hinweise zur EG-Konformitätserklärung . . . . . . . . . . . . . . . . . . . . . . . . . . . . . . . . . . . . . 87
Garantie . . . . . . . . . . . . . . . . . . . . . . . . . . . . . . . . . . . . . . . . . . . . . . . . . . . . . . . . . . . . . 87
Importeur . . . . . . . . . . . . . . . . . . . . . . . . . . . . . . . . . . . . . . . . . . . . . . . . . . . . . . . . . . . .87
DE
AT
CH
SAR 28 A1
61
Page 66

DE
AT
CH
Einführung
Einführung
Vorwort
Herzlichen Glückwunsch zum Kauf Ihres neuen Gerätes.
Sie haben sich damit für ein hochwertiges Produkt entschieden. Diese Bedie-
nungsanleitung ist Bestandteil des Autoradios SAR 28 A1 (nachfolgend als
Gerät bezeichnet) und gibt Ihnen wichtige Hinweise für den bestimmungsgemäßen Gebrauch, die Sicherheit, den Einbau und Anschluss, sowie die Bedienung
des Gerätes.
Die Bedienungsanleitung muss ständig in der Nähe des Gerätes verfügbar sein.
Sie ist von jeder Person zu lesen und anzuwenden, die mit dem Einbau, der
Bedienung und Störungsbehebung des Gerätes beschäftigt ist.
Bewahren Sie diese Bedienungsanleitung auf und geben Sie diese mit dem
Gerät an Nachbesitzer weiter.
Urheberrecht
Diese Dokumentation ist urheberrechtlich geschützt.
Alle Rechte, auch die der fotomechanischen Wiedergabe, der Vervielfältigung
und der Verbreitung mittels besonderer Verfahren (zum Beispiel Datenverarbeitung, Datenträger und Datennetze), auch teilweise, sowie inhaltliche und
technische Änderungen vorbehalten.
Haftungsbeschränkung
Alle in dieser Bedienungsanleitung enthaltenen technischen Informationen, Daten
und Hinweise für den Einbau und Anschluss und die Bedienung, entsprechen
dem letzten Stand bei Drucklegung und erfolgen unter Berücksichtigung unserer
bisherigen Erfahrungen und Erkenntnisse nach bestem Wissen.
Aus den Angaben, Abbildungen und Beschreibungen in dieser Anleitung können
keine Ansprüche hergeleitet werden.
Der Hersteller übernimmt keine Haftung für Schäden aufgrund von Nichtbeachtung der Anleitung, nicht bestimmungsgemäßer Verwendung, unsachgemäßen
Reparaturen, unerlaubt vorgenommener Veränderungen oder Verwendung nicht
zugelassener Ersatzteile.
62
SAR 28 A1
Page 67
Einführung
Warnhinweise
In der vorliegenden Bedienungsanleitung werden folgende Warnhinweise verwendet:
WARNUNG
Ein Warnhinweis dieser Gefahrenstufe kennzeichnet eine
mögliche gefährliche Situation.
Falls die gefährliche Situation nicht vermieden wird, kann dies zu Verletzungen
führen.
► Die Anweisungen in diesem Warnhinweis befolgen, um Verletzungen von
Personen zu vermeiden.
ACHTUNG
Ein Warnhinweis dieser Gefahrenstufe kennzeichnet einen
möglichen Sachschaden.
Falls die Situation nicht vermieden wird, kann dies zu Sachschäden führen.
► Die Anweisungen in diesem Warnhinweis befolgen, um Sachschäden zu
vermeiden.
HINWEIS
Ein Hinweis kennzeichnet zusätzliche Informationen, die den Umgang mit
►
dem Gerät erleichtern.
DE
AT
CH
Bestimmungsgemäße Verwendung
Dieses Gerät ist nur zum Empfang von FM-Radiosendern, sowie zur Wiedergabe
von MP3-/WMA-Dateien von USB-Datenträgern und SD/MMC-Speicherkarten,
sowie Audiosignalen externer Audiogeräte bestimmt. Das Gerät ist zum Einbau
in ein Fahrzeug vorgesehen. Eine andere oder darüber hinausgehende Benutzung
gilt als nicht bestimmungsgemäß.
WARNUNG
Gefahr durch nicht bestimmungsgemäße Verwendung!
Von dem Gerät können bei nicht bestimmungsgemäßer Verwendung und/oder
andersartiger Nutzung Gefahren ausgehen.
► Das Gerät ausschließlich bestimmungsgemäß verwenden.
► Die in dieser Bedienungsanleitung beschriebenen Vorgehensweisen einhalten.
Ansprüche jeglicher Art wegen Schäden aus nicht bestimmungsgemäßer
Verwendung sind ausgeschlossen. Das Risiko trägt allein der Benutzer.
SAR 28 A1
63
Page 68

DE
AT
CH
Einführung
Sicherheit
In diesem Kapitel erhalten Sie wichtige Sicherheitshinweise im Umgang mit dem Gerät.
Dieses Gerät entspricht den vorgeschriebenen Sicherheitsbestimmungen. Ein
unsachgemäßer Gebrauch kann jedoch zu Personen- und Sachschäden führen.
Grundlegende Sicherheitshinweise
Beachten Sie für einen sicheren Umgang mit dem Gerät die folgenden Sicherheitshinweise:
■ Kontrollieren Sie das Gerät vor der Verwendung auf äußere sichtbare Schäden.
Nehmen Sie ein beschädigtes oder heruntergefallenes Gerät nicht in Betrieb.
■ Bei Beschädigung der Kabel oder Anschlüsse lassen Sie diese von autorisiertem
Fachpersonal oder dem Kundenservice austauschen.
■ Personen, die aufgrund ihrer körperlichen, geistigen oder motorischen Fähigkeiten
nicht in der Lage sind, das Gerät sicher zu bedienen, dürfen das Gerät nur
unter Aufsicht oder Anweisung durch eine verantwortliche Person benutzen.
■ Gestatten Sie Kindern die Benutzung des Gerätes nur unter Aufsicht.
■ Lassen Sie Reparaturen am Gerät nur von autorisierten Fachbetrieben oder
dem Kundenservice durchführen. Durch unsachgemäße Reparaturen können
erhebliche Gefahren für den Benutzer entstehen. Zudem erlischt der Garantieanspruch.
■ Eine Reparatur des Gerätes während der Garantiezeit darf nur von einem
vom Hersteller autorisierten Kundendienst vorgenommen werden, sonst
besteht bei nachfolgenden Schäden kein Garantieanspruch mehr.
■ Defekte Bauteile dürfen nur gegen Original-Ersatzteile ausgetauscht werden.
Nur bei diesen Teilen ist gewährleistet, dass sie die Sicherheitsanforderungen
erfüllen werden.
■ Schützen Sie das Gerät vor Feuchtigkeit und dem Eindringen von Flüssigkeiten.
64
Verkehrssicherheit
WARNUNG
Sicherheit im Straßenverkehr hat höchste Priorität!
Beachten Sie die folgenden Sicherheitshinweise, um sich oder andere nicht zu
gefährden:
► Machen Sie sich vor Fahrtantritt mit der Bedienung des Gerätes vertraut.
► Bedienen Sie das Gerät nur, wenn es die Verkehrslage zulässt! Halten Sie
an geeigneter Stelle an, um umfangreiche Bedienungen durchzuführen.
► Entfernen oder bringen Sie das Bedienteil nur bei stehendem Fahrzeug an.
► Stellen Sie eine angemessene Lautstärke ein, damit Sie akustische Signale der
Polizei, Feuerwehr und anderen Rettungsdiensten rechtzeitig wahrnehmen.
SAR 28 A1
Page 69
Einführung
Lieferumfang und Transportinspektion
WARNUNG
Erstickungsgefahr!
► Verpackungsmaterialien dürfen nicht zum Spielen verwendet werden.
Es besteht Erstickungsgefahr.
Das Gerät wird standardmäßig mit folgenden Komponenten geliefert:
▯ Autoradio (inklusive Bedienteil)
▯ Einbaurahmen (aufgesteckt)
▯ Verankerungsblech (inkl. Befestigungsmaterial)
▯ Schlüssel für Einbaurahmen (2x)
▯ Etui für Bedienteil
▯ Diese Bedienungsanleitung
HINWEIS
Prüfen Sie die Lieferung auf Vollständigkeit und auf sichtbare Schäden.
►
► Bei einer unvollständigen Lieferung oder Schäden infolge mangelhafter
Verpackung oder durch Transport wenden Sie sich an die Service-Hotline
(siehe Garantiekarte).
DE
AT
CH
Entsorgung der Verpackung
Die Verpackung schützt das Gerät vor Transportschäden. Die Verpackungsmaterialien sind nach umweltverträglichen und entsorgungstechnischen Gesichtspunkten ausgewählt und deshalb recyclebar.
Die Rückführung der Verpackung in den Materialkreislauf spart Rohstoff e und
verringert das Abfallaufkommen. Entsorgen Sie nicht mehr benötigte Verpackungsmaterialien gemäß den örtlich geltenden Vorschriften.
HINWEIS
Heben Sie wenn möglich die Originalverpackung während der Garantiezeit
►
des Gerätes auf, um das Gerät im Garantiefall ordnungsgemäß verpacken
zu können.
SAR 28 A1
65
Page 70

DE
AT
CH
Bedienelemente
Bedienelemente
Autoradio (siehe vordere Ausklappseite)
Abbildung A:
Taste : Entriegelung Bedienteil
2
Taste /MU: Gerät ein- und ausschalten/Ton ausschalten
3
Taste MD/PTY: Betriebsmodus einstellen/PTY-Funktion einstellen
4
Taste ▸▸I: Titel-/Sendersuchlauf vorwärts
5
Display
6
USB-Anschluss
7
BD/DISP: Speicherplatzband wählen/Displayinformationen anzeigen
8
AUX: 3,5 mm Stereo-Eingangsbuchse für den Anschluss eines externen Audiogerätes
9
Taste 6/FL+: Senderspeicherplatz 6/Ordner vorwärts bei MP3-/WMA-Wiedergabe
10
Taste 5/FL-: Senderspeicherplatz 5/Ordner rückwärts bei MP3-/WMA-Wiedergabe
11
Taste 4/RDM: Senderspeicherplatz 4/ Zufallswiedergabe bei MP3-/WMA-Wiedergabe
12
Taste 3/INT: Senderspeicherplatz 3/Introfunktion bei MP3-/WMA-Wiedergabe
Taste 2/RPT: Senderspeicherplatz 2/Wiederholfunktion bei MP3-/WMA-Wiedergabe
13
14
Taste 1/PAU: Senderspeicherplatz 1/Wiedergabe anhalten (Pause)
15
I◂◂: Titel-/Sendersuchlauf rückwärts
16
A/PS : Automatische Senderspeicherung/Suchfunktion bei MP3-/WMA-
Wiedergabe
17
Multiregler: Drehen, um Werte/Lautstärke einzustellen
18
Taste SEL (EQ/LD TA/AF): Einstellmenü aufrufen
66
Abbildung B:
19
Verriegelung Bedienteil
20
Haltepunkt für Bedienteil
21
Kartenleser für SD/MMC-Karten
22
RESET: Gerät zurücksetzen
Abbildung C:
ISO-Block Anschluss B
23
24
Kfz-Flachstecksicherung 7,5 A
25
ISO-Block Anschluss A
26
SUBW: Audio-Cinch-Ausgang für Subwoofer
27
LINE OUT: Audio-Cinch-Ausgang L/R für Verstärker
28
Antennenanschluss für DIN-Antennenstecker
SAR 28 A1
Page 71
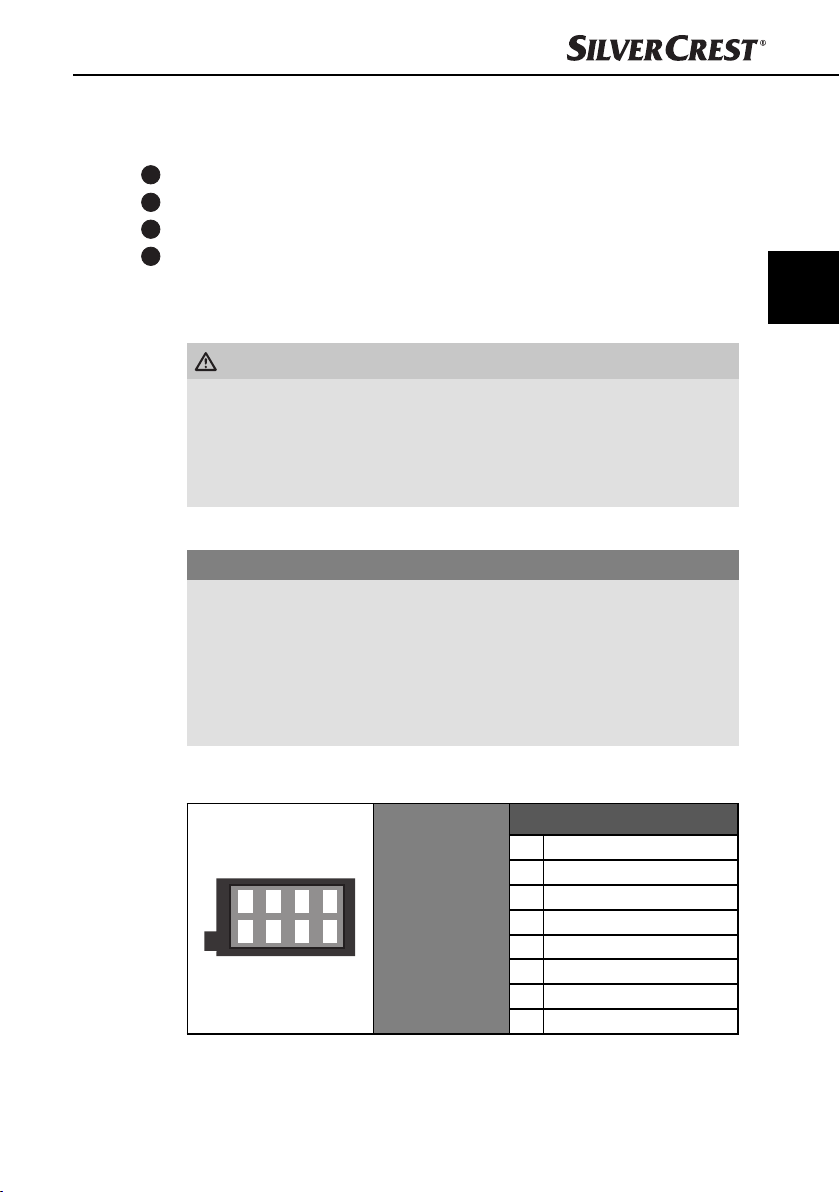
Installation
Zubehör (siehe hintere Ausklappseite)
Abbildung D:
29
Etui für Bedienteil
30
Einbaurahmen
31
Schlüssel für Einbaurahmen
32
Verankerungsblech (inkl. Befestigungsmaterial)
Installation
WARNUNG
Bei der Installation des Gerätes können Sachschäden auftreten!
► Lassen Sie das Gerät nach Möglichkeit von einem Fachbetrieb einbauen.
► Wenn Sie das Gerät selbst einbauen möchten, beachten Sie für einen
sicheren und fehlerfreien Betrieb des Gerätes die Anweisungen für den
Anschluss und Einbau.
Anschluss
ACHTUNG
Die Verwendung von falschen Anschlüssen kann zu Beschädigungen am Gerät führen.
► Benutzen Sie beim Einbau die ISO-Anschlüsse des Gerätes. Die fahr-
zeugspezifi schen ISO-Adapter, die Sie gegebenenfalls benötigen, erhalten
Sie in Fachwerkstätten, im Fachhandel oder in den Fachabteilungen der
Warenhäuser. Bei Verwendung anderer Anschlussarten erlischt der Garan-
tieanspruch!
DE
AT
CH
SAR 28 A1
Belegung der ISO-Anschlüsse
Die Ansicht erfolgt von hinten auf die Stecker.
1357
2468
ISO A (Belegung
Stromversorgung)
Belegung
1 unbelegt
2 unbelegt
3 unbelegt
4 Dauerplus 12 V (Kl. 30)
5 Antennenspannung
6 unbelegt
7 Zündungsplus 12 V (Kl. 15)
8 Minus (-) Masse (Kl. 31)
67
Page 72

DE
AT
CH
1 Hinten rechts +
2 Hinten rechts -
1357
2468
Um das Gerät an zwei Lautsprecher anzuschließen, verwenden Sie nur die
Kabel für die vorderen Lautsprecher.
HINWEIS
Beachten Sie, dass zur Senderspeicherung der Anschluss 4 im ISO-Block A
►
an Dauerplus angeschlossen sein muss.
► In einigen Fahrzeugmodellen ist die standardmäßige Belegung der An-
schlüsse [4] und [7] im ISO-Block A werkseitig vertauscht. Wenn dies der
Fall ist, kann die Senderspeicherung verloren gehen. Zur Abhilfe müssen
die Anschlüsse 7 (Zündungsplus) und 4 (Dauerplus) im ISO-Block A
getauscht werden.
ISO B (Belegung
Lautsprecheranschlüsse)
3 Vorne rechts +
4 Vorne rechts 5 Vorne links +
6 Vorne links 7 Hinten links +
8 Hinten links -
Antennenstrom-Anschluss
Installation
Belegung
68
ACHTUNG
Mögliche Schäden am Gerät!
► Belasten Sie den Anschluss für den Antennenstrom niemals mit dem Motor-
stromkabel der Antenne oder mit anderen Verbrauchern.
Der Anschluss für den Antennenstrom steht für eine relaisgesteuerte Antenne
zur Verfügung. Das Relais fährt die Antenne dann automatisch aus, wenn das
Gerät angeschaltet wird. Beim Ausschalten fährt die Antenne wieder ein. Dieser
Anschluss kann auch zum Steuern eines externen Verstärkers benutzt werden.
Zum genauen Anschluss ziehen Sie bitte die Bedienungsanleitung des Verstärkers
hinzu.
Anschluss eines externen Verstärkers
Für den Anschluss eines externen Verstärkers benutzen Sie den Audio-CinchAusgang LINE OUT 27. Beachten Sie hierzu die Bedienungsanleitung des
externen Verstärkers.
SAR 28 A1
Page 73
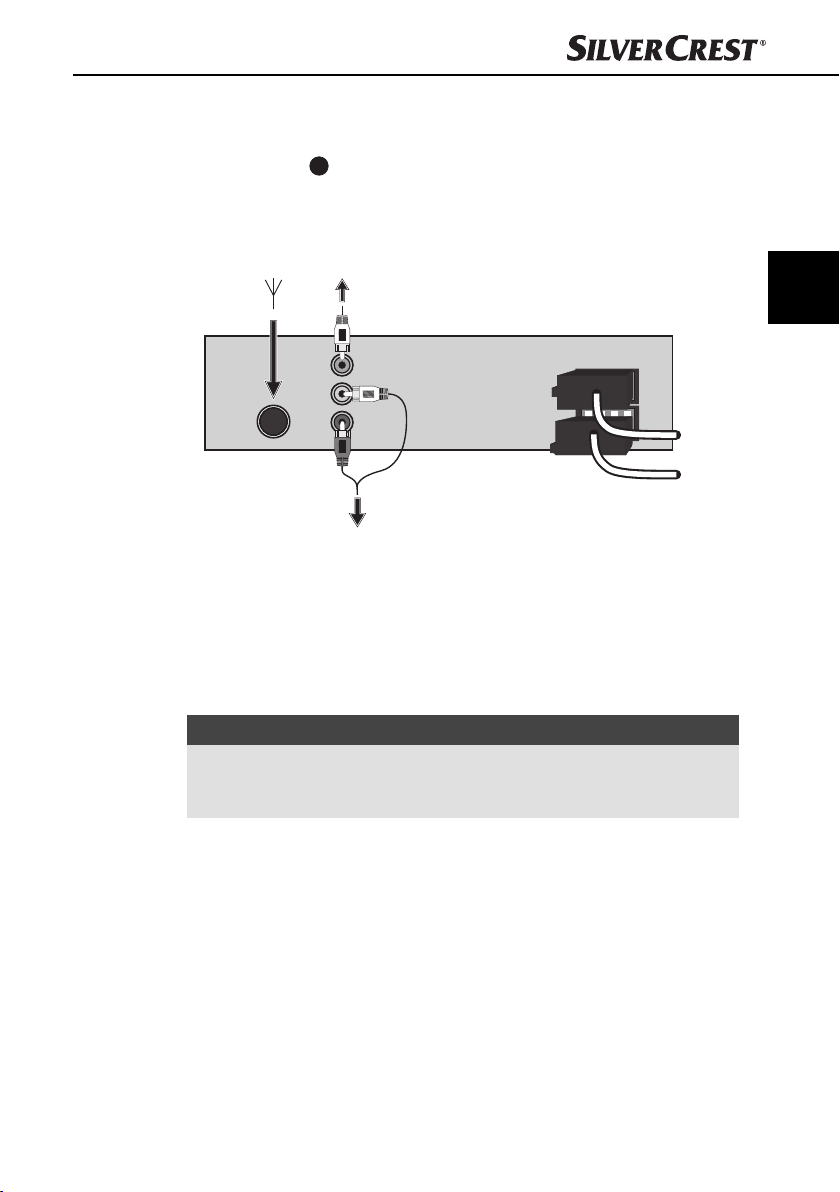
Installation
A
Anschluss eines externen Subwoofers
Für den Anschluss eines externen Subwoofers benutzen Sie den orangen CinchAusgang SUBW
Subwoofers.
Anschlussschema
Einbau
Das Gerät kann in jeden Standard-ISO-Einbauschacht eingesetzt werden. Sollte
Ihr Kraftfahrzeug keinen ISO-Einbauschacht besitzen, wenden Sie sich an Ihre
Fachwerkstatt, den Fachhandel oder die Fachabteilungen der Warenhäuser.
26
. Beachten Sie hierzu die Bedienungsanleitung des externen
SubwooferAntenne
1234
5678
1234
5678
Externer Verstärker
DE
AT
CH
ISO B
ISO
Einbauhinweise
SAR 28 A1
HINWEIS
Schließen Sie die Kabel an, bevor Sie das Gerät endgültig einbauen.
►
Stellen Sie sicher, dass diese richtig eingesteckt sind und das System richtig
funktioniert.
■ Setzen Sie das Gerät in den dafür vorgesehenen Schacht ein oder wählen
Sie den Einbauplatz so, dass Sie alle Tasten bequem erreichen können und
der Fahrer nicht behindert wird.
■ Schließen Sie das Gerät nur an eine vorschriftsmäßig installierte 12V
Autobatterie an.
■ Schließen Sie das Gerät nur über die ISO-Stecker im Auto an.
■ Bauen Sie das Gerät so ein, dass kein Hitzestau entstehen kann und das
Gerät gut belüftet ist.
69
Page 74

Installation
■ Bauen Sie das Gerät nicht an einem Platz ein, wo es hohen Temperaturen
(z.B. direkte Sonneneinstrahlung oder Heizungsluft), starker Verschmutzung
und starken Erschütterungen ausgesetzt ist.
■ Falls Änderungen am Fahrzeug erforderlich sind, wenden Sie sich an Ihren
Fahrzeughändler/eine Fachwerkstatt.
DE
AT
CH
Einbau des Gerätes in den ISO-Schacht
♦ Ziehen Sie den Einbaurahmen 30 vom Gehäuse des Gerätes ab.
♦ Stecken Sie den Einbaurahmen in den ISO-Einbauschacht.
♦ Biegen Sie die Laschen des Einbaurahmens mit einem Schraubendreher um,
so dass dieser fest im Einbauschacht fi xiert ist (s. Abbildung).
♦ Überprüfen Sie den Einbaurahmen auf festen Halt.
♦ Verbinden Sie den ISO-Buchsen-Block des Gerätes mit den beiden ISO-
Steckern Ihres Fahrzeugs.
♦ Verbinden Sie das Antennenkabel der Fahrzeugantenne mit der Antennen-
buchse 28 des Gerätes. Den fahrzeugspezifi schen DIN-ISO-Adapter, den
Sie gegebenenfalls benötigen, erhalten Sie in Fachwerkstätten, im Fachhandel oder in den Fachabteilungen der Warenhäuser.
♦ Schließen Sie eventuell das Audio-Cinchkabel eines externen Verstärkers an
die LINE OUT Buchsen 27 des Gerätes an.
♦ Schließen Sie eventuell das Audio-Cinchkabel eines externen Subwoofers
an die orange Cinch-Buchse SUBW
♦ Sichern Sie Ihr Gerät ggf. zusätzlich gegen Diebstahl. Befestigen Sie die
Befestigungsschraube mit dem Verankerungsblech
material an der Motor-Feuerwand des KFZ.
26
des Gerätes an.
32
und dem Befestigungs-
70
SAR 28 A1
Page 75

Installation
ACHTUNG
Mögliche Beschädigung der Kabel!
► Beachten Sie beim Einschieben die Verlegung der Kabel, um eine Beschädigung
zu vermeiden.
♦ Schieben Sie das Gerät vorsichtig in den Einbaurahmen 30, bis es einrastet.
♦ Nachdem alle Verbindungen hergestellt sind, betätigen Sie die Taste RESET
22
für ca. 6 Sekunden mit einem Kugelschreiber oder anderem spitzen
Gegenstand.
♦ Setzen Sie das Bedienteil ein, wie unter „Bedienteil einsetzen“ beschrieben.
Das Gerät ausbauen
Um das Gerät wieder auszubauen, gehen Sie wie folgt vor:
♦ Führen Sie den rechten und den linken Schlüssel
an den Seiten des Gerätes ein. (Die Laschen sind nun zurückgebogen.)
31
in den jeweiligen Schlitz
DE
AT
CH
SAR 28 A1
♦ Ziehen Sie das Gerät heraus.
71
Page 76

Inbetriebnahme
Bedienteil
Zum Schutz vor Diebstahl, können Sie das Bedienteil Ihres Gerätes abnehmen.
Bewahren Sie das abgenommene Bedienteil nicht in Ihrem Fahrzeug auf.
Inbetriebnahme
DE
AT
CH
HINWEIS
Bewahren Sie das Bedienteil zum Schutz immer im Etui 29 auf.
►
Bedienteil einsetzen
♦ Setzen Sie das Bedienteil zuerst mit der rechten
Seite auf den Haltepunkt 20.
♦ Drücken Sie dann die linke Seite in den
Rahmen, bis sie an der Verriegelung 19
einrastet.
Überprüfen Sie, ob das Bedienteil richtig und fest im
Rahmen sitzt. Ist das Bedienteil nicht richtig eingebaut, kann es zu Fehlfunktionen bei der Bedienung
des Gerätes kommen.
Bedienteil abnehmen
♦ Drücken Sie die Taste zum Entriegeln
des Bedienteils. Das Bedienteil springt an der
linken Seite leicht nach vorne.
♦ Ziehen Sie das Bedienteil erst an der linken, dann
an der rechten Seite ab.
2.
1.
72
SAR 28 A1
Page 77
Bedienung und Betrieb
Bedienung und Betrieb
In diesem Kapitel erhalten Sie wichtige Hinweise zur Bedienung und Betrieb des
Gerätes.
HINWEIS
Erfolgt innerhalb von etwa 5 Sekunden keine Einstellung bzw. kein Tasten-
►
druck, kehrt das Gerät in die vorherige Betriebsart zurück. Geänderte
Einstellungen werden gespeichert.
Ein-/Ausschalten
♦ Drücken Sie die Taste /MU 2 zum Einschalten des Gerätes.
Im Display erscheint die Anzeige WELCOME.
♦ Zum Ausschalten halten Sie die Taste /MU länger gedrückt. Im Display
erscheint die Anzeige GOODBYE.
Einstellungen
WARNUNG
Gehörschäden durch zu hohe Lautstärke!
Eine zu hohe Lautstärke kann Ihr Gehör dauerhaft schädigen.
► Stellen Sie nur eine mäßige Lautstärke ein.
DE
AT
CH
Lautstärke
Stummschaltung ein- / ausschalten
Betriebsart
SAR 28 A1
♦ Drehen Sie den Multiregler 17, um die Lautstärke einzustellen.
♦ Drücken Sie kurz die Taste /MU, um den Ton auszuschalten. Im Display
erscheint die Anzeige MUTE ON.
♦ Drücken Sie die Taste /MU erneut, um den Ton wieder einzuschalten.
Beim Empfang eines PTY- oder TA-Senders wird die Stummschaltung aufgehoben.
♦ Drücken Sie die Taste MD/PTY 3, um zwischen Radioempfang (TUNER),
Kartenleser (CARD), USB-Anschluss (USB) und Audioeingang (AUX) zu
wechseln.
HINWEIS
►
Die Betriebsarten CARD und USB lassen sich nur aufrufen, wenn das
entsprechende Medium eingelegt ist.
73
Page 78

DE
AT
CH
Display
♦ Drücken Sie mehrmals die Taste BD/DISP 7, um sich nacheinander
folgende Informationen anzeigen zu lassen:
Radiosender, Uhrzeit (wird bei RDS-Empfang automatisch eingestellt), Frequenz
und PTY-Einstellungen (diese RDS-Funktionen werden von den Sendeanstalten in
unterschiedlichem Umfang gesendet; siehe auch Kapitel „Radiofunktionen”).
HINWEIS
Wenn Sie keine RDS oder PTY-Informationen empfangen, erscheint
►
PTY NONE im Display.
Radio zurücksetzen (RESET)
Um das Gerät in den Auslieferungszustand zurückzusetzen, drücken und halten
Sie die Taste RESET 22 für ca. 6 Sekunden mit einem spitzen Gegenstand, z.B.
einem Kugelschreiber.
HINWEIS
Um an die Taste RESET zu gelangen, muss das Bedienteil vollständig
►
abgenommen werden, siehe auch Kapitel „Bedienteil abnehmen“.
Setzen Sie das Gerät zurück:
▯ bei der Erstinbetriebnahme,
▯ nach Anschluss der Kabel,
▯ wenn nicht alle Funktionstasten funktionieren,
▯ bei Erscheinen einer Fehlermeldung im Display.
Bedienung und Betrieb
74
Einstellungen über die Taste SEL (EQ/LD/TA/AF)
♦ Drücken Sie die Taste SEL 18 am Gerät. Die aktuelle Lautstärke wird ange-
zeigt. Jeder weitere Druck der Taste SEL ruft den nächsten Einstellungspunkt
auf.
Folgende Einstellungen sind möglich:
VOL - Lautstärke (von 0 bis 47),
BAS - Bässe (von -7 bis +7),
TRE - Höhen (von -7 bis +7),
BAL - Balance (Klangverteilung zwischen den rechten und linken Lautsprechern)
(von 0L bis 9L und 0R bis 9R),
FAD - Fader (Klangverteilung zwischen den hinteren und vorderen Lautsprechern)
(von 0F bis 9F und 0R bis 9R),
♦ Drehen Sie den Multiregler 17, um die Einstellungen des angezeigten
Menüpunktes zu ändern.
SAR 28 A1
Page 79

Bedienung und Betrieb
Weitere Einstellungen über die Taste SEL (EQ/LD/TA/AF)
♦ Halten Sie die Taste SEL 18 ca. 2 Sekunden lang gedrückt und drücken
Sie danach so oft die Taste SEL, bis die gewünschte Funktion im Display
angezeigt wird.
♦ Drehen Sie den Multiregeler 17, um die Einstellungen des angezeigten
Menüpunktes zu ändern.
TA - Traffi c Announcement (Verkehrsfunk) ein-/ausschalten
TA ON: Bei eingeschalteter TA-Funktion wird von anderen Sendern oder
Betriebsarten sofort auf den Radiosender umgeschaltet, der gerade Verkehrsfunk
überträgt.
HINWEIS
Bei eingeschalteter TA-Funktion können während der Sendersuche nur
►
Sender gefunden bzw. gespeichert werden, die ein Verkehrsfunksignal
ausstrahlen. Sender, die ein Verkehrsfunksignal übertragen, sind im Display
durch TP gekennzeichnet.
TA OFF: TA-Funktion ist deaktiviert.
AF - Alternative Frequenzen ein-/ausschalten
AF ON: Bei eingeschalteter AF-Funktion sucht das Gerät nach der optimalen
Frequenz des eingestellten Senders.
AF OFF: AF-Funktion ist deaktiviert.
EQ - Equalizer
♦ Drehen Sie den Multiregler, um eine der Einstellungen FLAT, CLASSIC, ROCK,
POP oder EQ OFF zu wählen. Bei der Einstellung EQ OFF ist kein Equalizer
zugeschaltet. Die Equalizer Einstellung wird unten im Display angezeigt.
SUBW - Subwoofer
Sie können einen externen aktiven Subwoofer anschließen, um einen kräftigeren
Basseff ekt zu erzeugen.
♦ Drehen Sie den Multiregler, um den Basseff ekt ein- (SUBW ON) oder auszu-
schalten (SUBW OFF).
AVOL - Lautstärke beim Einschalten des Radios einstellen
♦ Drehen Sie den Multiregler, um den Lautstärkepegel einzustellen, mit dem
sich das Radio einschalten soll.
DE
AT
CH
SAR 28 A1
75
Page 80

DE
AT
CH
Bedienung und Betrieb
STEREO/MONO - Audioausgabe einstellen
♦ Drehen Sie den Multiregler 17, um die Audioausgabe bei Radiobetrieb in
Stereo- (STEREO) oder Monoton (MONO) einzustellen. Beim Empfang eines
Stereo-Senders erscheint im Display das Stereosymbol .
LOUD - Loudness-Funktion ein-/ausschalten
♦ Drehen Sie den Multiregler, um Bässe und Höhen anzuheben (LOUD ON)
oder ausschalten (LOUD OFF). Bei eingeschalteter Loudness-Funktion wird
rechts im Display LOUD eingezeigt.
Dx/LOCAL - Empfangsempfi ndlichkeit einstellen
♦ Drehen Sie den Multiregler, um die Empfangsempfi ndlichkeit auf überregio-
nale Sender (DX) oder auf regionale Sender (LOCAL) auszurichten.
ADJ - Uhrzeit einstellen
HINWEIS
Das Gerät ist mit einer RDS-gesteuerten Uhr ausgestattet. Die Uhr stellt sich
►
bei eingeschalteter RDS-Funktion automatisch und läuft auch bei ausgeschaltetem Radio weiter. Wenn Sie kein RDS-Signal empfangen, können Sie hier
die Uhrzeit auch manuell einstellen.
♦ Drehen Sie den Multiregler nach rechts, um die Minuten einzustellen und
nach links, um die Stunden einzustellen.
76
SAR 28 A1
Page 81

Bedienung und Betrieb
Radiofunktionen
Senderspeicherband wählen
♦ Drücken Sie die Taste BD/DISP 7, um zwischen den Senderspeicherbän-
dern (FM1, FM2, FM3) zu wechseln. Jedes Senderspeicherband deckt
den selben Frequenzbereich (87,5 - 108 MHz) ab und verfügt über 6
Speicherplätze.
Sender automatisch suchen
♦ Drücken und halten Sie die Tasten ▸▸I 4 oder I◂◂ 15, um einen Sender-
suchlauf zu starten. Bei einem gefundenen Sender wird die Suche angehalten.
Sender manuell einstellen
♦ Drücken Sie kurz die Tasten ▸▸I oder I◂◂, um die Frequenz in Schritten von
0,05 MHz (UKW) zu ändern, bis die gewünschte Frequenz eingestellt ist.
Sender speichern
♦ Halten Sie für ca. 3 Sekunden eine der Tasten 1 bis 6 gedrückt, um den
aktuell eingestellten Sender zu speichern. Die erfolgreiche Speicherung wird
durch das Anzeigen der Nummer 1 bis 6 im Display signalisiert.
DE
AT
CH
Gespeicherten Sender aufrufen
Automatisches Speichern
Gespeicherte Sender durchlaufen
SAR 28 A1
♦ Wählen Sie mit BD/DISP das Senderspeicherband (FM1, FM2, FM3).
♦ Drücken Sie eine der Tasten 1 bis 6, um den gespeicherten Sender aufzu-
rufen.
♦ Halten Sie die Taste A/PS 16 für 3 Sekunden gedrückt. Es startet sofort
ein Suchlauf, der bei jedem gefundenen Sender ca. fünf Sekunden anhält.
Die Anzeige des Senders bzw. der Sendefrequenz blinkt und der Speicherplatz wird angezeigt. Bei schwachen Sendern läuft der Suchlauf automatisch
weiter.
♦ Drücken Sie kurz die Taste A/PS . Alle Sender werden kurz angewählt.
♦ Wenn Sie den gewünschten Sender hören, drücken Sie die Taste A/PS .
Der gewählte Sender bleibt ausgewählt.
77
Page 82
Bedienung und Betrieb
Programmtyp (PTY)
Mit Hilfe dieser Funktion können Sie nach Sendern eines bestimmten Genres
suchen. Folgende Einstellungen sind möglich:
DE
AT
CH
POP M
ROCK M
NEWS
AFFAIRS
INFO
EASY M
LIGHT M
HINWEIS
Bitte beachten Sie, dass diese Informationen von der Region, der Rundfunk-
►
anstalt und dem Sender abhängig sind.
PTY-Kennung einstellen
♦ Drücken und halten Sie die Taste MD/PTY 3, bis unten im Display die
Anzeige PTY erscheint.
♦ Drücken Sie anschließend wiederholt eine der Tasten 1 bis 6, um den
gewünschten PTY-Eintrag zu wählen.
♦ Um zwischen den PTY-Einträgen „Musikrichtung“ und „Sprachbeiträge“ zu
wechseln, drücken Sie, bei der Anzeige des ersten PTY-Eintrags, die Taste
MD/PTY erneut.
Die Tasten 1 bis 6 sind wie folgt belegt:
Taste Musikrichtung Sprachbeiträge
1 POP M, ROCK M NEWS, AFFAIRS, INFO
2 EASY M, LIGHT M SPORT, EDUCATE, DRAMA
3 CLASSICS, OTHER M CULTURE, SCIENCE, VARIED
4 JAZZ, COUNTRY WEATHER, FINANCE, CHILDREN
5 NATION M, OLDIES SOCIAL, RELIGION, PHONE IN
6 FOLK M TRAVEL, LEISURE, DOCUMENT
Wenn für 2 Sekunden keine weitere Eingabe erfolgt, startet ein automatischer
Suchlauf nach Sendern, die dem PTY-Eintrag entsprechen. Beim ersten gefundenen
Sender hält der Suchlauf an.
SPORT
EDUCATE
DRAMA
CLASSICS
OTHER M
CULTURE
SCIENCE
VARIED
JAZZ
COUNTRY
WEATHER
FINANCE
CHILDREN
NATION M
OLDIES
SOCIAL
RELIGION
PHONE IN
FOLK M
TRAVEL
LEISURE
DOCUMENT
78
SAR 28 A1
Page 83

Bedienung und Betrieb
PTY-Funktion ein-/ausschalten
♦ Um die PTY-Suche zu aktivieren, drücken Sie die Taste MD/PTY 3.
Im Display erscheint die Anzeige PTY und der zuletzt gewählte PTY-Eintrag
(z.B. POP M).
Bei der Sendersuche werden nur Sender der aktuell gewählten PTY-Kennung
berücksichtigt.
♦ Um die PTY-Suche zu deaktivieren, drücken Sie die Taste MD/PTY erneut.
Im Display erlischt die Anzeige PTY.
Sender nach PTY-Kennung suchen
♦ Wenn Sie während der Anzeige einer PTY-Kennung für 2 Sekunden keine
weitere Eingabe vornehmen, startet sofort ein Suchlauf nach Sendern, die
dieser PTY-Kennung entsprechen.
Wird kein Sender gefunden, der dieser PTY-Kennung entspricht, erscheint kurz
die Anzeige PTY NONE und danach endet der Suchlauf beim zuletzt eingestellten
Sender.
USB-Anschluss
Das Gerät kann USB-Datenträger bis zu 16 GB verarbeiten.
Datenträger anschließen
♦ Schieben Sie die Schutzkappe vom USB-Anschluss nach rechts.
♦ Verbinden Sie Ihr USB-Gerät mit dem USB-Anschluss.
♦ Schieben Sie die Schutzkappe wieder über den USB-Anschluss, wenn kein
USB-Gerät angeschlossen ist, um Verunreinigungen zu vermeiden.
DE
AT
CH
Kartenleser
Datenträger anschließen
SAR 28 A1
Das Gerät kann SD/MMC Speicherkarten bis zu 2 GB und SDHC Speicherkarten
bis zu 32 GB verarbeiten.
♦ Drücken Sie die Taste zum Entriegeln des Bedienteils und nehmen
Sie es vom Gerät ab (siehe auch Kapitel „Bedienteil abnehmen“).
♦ Schieben Sie eine Speicherkarte mit der Beschriftung nach oben zeigend in
das Kartenfach ein.
79
Page 84

DE
AT
CH
Bedienung und Betrieb
Funktionen MP3/WMA-Wiedergabe
Wiedergabe
■ Das Gerät kann Dateien im Format MP3 und WMA abspielen.
■ Ein Vermischen von Titeln und Verzeichnissen auf derselben Ebene könnte zu
Problemen beim Abspielen führen.
■ Während der Wiedergabe werden die Informationen aus dem ID3-Tag der
MP3-Datei ausgelesen und nacheinander im Display angezeigt.
♦ Die Wiedergabe der MP3- oder WMA-Titel auf dem USB-Gerät bzw. der
Speicherkarte beginnt automatisch.
Wiedergabe unterbrechen
♦ Drücken Sie die Taste 1/PAU 14, um die Wiedergabe zu unterbrechen.
♦ Um die Wiedergabe fortzusetzen, drücken Sie die Taste 1/PAU noch einmal.
HINWEIS
Drücken und halten Sie die Taste 1/PAU, um den ersten Titel auf dem
►
Speichermedium wiederzugeben.
Titel überspringen
♦ Drücken Sie die Tasten ▸▸I 4 oder I◂◂ 15, um den nächsten bzw. den
vorherigen Titel zu wählen. Die Titelnummer wird im Display angezeigt.
80
Schneller Vor-/Rücklauf
♦ Halten Sie die Tasten ▸▸I oder I◂◂ länger gedrückt, um einen schnellen Vor-
oder Rücklauf zu starten.
Wiederholungsfunktion (RPT - Repeat)
♦ Drücken Sie mehrmals die Taste 2/RPT 13, um zwischen den Wiederholungs-
funktionen umzuschalten. Folgende Einstellungen sind möglich:
– RPT ONE: Der aktuelle Titel wird wiederholt.
– RPT DIR: Alle Titel im aktuellen Verzeichnis werden wiederholt.
– RPT ALL: Alle Titel auf dem Speichermedium werden wiederholt.
Sind die Funktionen RPT ONE oder RPT DIR aktiviert, wird RPT im Display angezeigt.
SAR 28 A1
Page 85
Bedienung und Betrieb
Titel kurz anspielen
♦ Drücken Sie die Taste 3/INT 12. Im Display erscheint kurz INT ON. Es wer-
den nacheinander alle Titel für ca. 10 Sekunden angespielt.
♦ Drücken Sie die Taste 3/INT erneut, um die Wiedergabe des aktuell ange-
spielten Titels zu starten. Im Display erscheint kurz INT OFF.
Zufallswiedergabe aller Titel (RDM - Random)
♦ Drücken Sie die Taste 4/RDM 11. Im Display erscheint kurz RDM ON. Es
wird eine zufallsgesteuerte Wiedergabe gestartet.
♦ Drücken Sie die Taste 4/RDM erneut, um die normale Wiedergabe zu
starten. Im Display erscheint kurz RDM OFF.
Verzeichnis überspringen
♦ Drücken Sie die Taste 6/FL+ 9, um das nächste Verzeichnis bzw. die
10
Taste 5/FL-
gabe beginnt automatisch.
, um das vorherige Verzeichnis wiederzugeben. Die Wieder-
Suchfunktionen
Titelnummer suchen
♦ Drücken Sie die Taste A/PS
♦ Drehen Sie den Multiregler 17, um die erste Stelle der gewünschten
Titelnummer einzustellen.
♦ Drücken Sie die Taste SEL 18, um die Eingabe zu bestätigen und zur
Eingabe der zweiten, dritten oder vierten Stelle zu gelangen.
♦ Drücken Sie die Taste 1/PAU 14, um die Wiedergabe des eingestellten
Titels zu starten.
Titelnamen suchen
♦ Drücken Sie die Taste A/PS
A-SEARCH. Die Suche nach Titelnamen startet sofort. Wurden keine Titel gefunden, die mit dem eingestellten Zeichen beginnen, wird NONE angezeigt.
♦ Drehen Sie den Multiregler, bis der gewünschte Buchstabe bzw. die Zahl
erscheint.
♦ Drücken Sie die Tasten ▸▸I 4 oder I◂◂ 15, um das eingestellte Zeichen
zu bestätigen und um alle Titel anzuzeigen, die mit den gesuchten Zeichen
beginnen.
♦ Drücken Sie die Taste 1/PAU, um die Wiedergabe des angezeigten Titels
zu starten.
16
.
zweimal. Im Display erscheint die Anzeige
DE
AT
CH
SAR 28 A1
81
Page 86

DE
AT
CH
Bedienung und Betrieb
Suche nach Verzeichnissen
♦ Drücken Sie die Taste A/PS 16 dreimal. Das aktuell wiedergegebene
Verzeichnis erscheint.
♦ Drehen Sie den Multiregler 17, um zwischen den vorhandenen Verzeichnis-
sen umzuschalten.
♦ Drücken Sie die Taste 1/PAU 14, um das aktuell angezeigte Verzeichnis
auszuwählen. Die Wiedergabe des ersten Titels des ausgewählten Verzeichnisses startet sofort.
Ein externes Audiogerät an das Gerät anschließen
♦ Verbinden Sie den Audio-Ausgang eines externen Audio-Gerätes (z. B. ein
MP3-Player) über einen 3,5 mm Stereo-Klinkenstecker mit der Buchse AUX
8
an der Vorderseite des Gerätes.
♦ Wählen Sie die Wiedergabe des Audioeingangs aus, indem Sie mehrmals
die Taste MD/PTY 3 drücken, bis im Display AUX angezeigt wird.
82
SAR 28 A1
Page 87
Reinigung/Entsorgung
Reinigung
Sicherheitshinweise
ACHTUNG
Mögliche Beschädigung des Gerätes
► Stellen Sie sicher, dass bei der Reinigung keine Feuchtigkeit in das Gerät
eindringt, um eine irreparable Beschädigung des Gerätes zu vermeiden.
Display reinigen
■ Reinigen Sie die Vorderseite des Gerätes / das Display ausschließlich mit
einem leicht feuchten, fusselfreien Tuch und einem milden Spülmittel.
Entsorgung
Gerät entsorgen
Werfen Sie das Gerät keinesfalls in den normalen Hausmüll.
Dieses Produkt unterliegt der europäischen Richtlinie
2002/96/EC-WEEE (Waste Electrical and Electronic Equipment).
Entsorgen Sie das Gerät über einen zugelassenen Entsorgungsbetrieb oder über
Ihre kommunale Entsorgungseinrichtung. Beachten Sie die aktuell geltenden
Vorschriften. Setzen Sie sich im Zweifelsfall mit Ihrer Entsorgungseinrichtung in
Verbindung.
DE
AT
CH
SAR 28 A1
83
Page 88

Fehlerbehebung
In diesem Kapitel erhalten Sie wichtige Hinweise zur Störungslokalisierung und
Störungsbehebung. Beachten Sie die Hinweise um Gefahren und Beschädigungen
zu vermeiden.
Fehlerbehebung
DE
AT
CH
Sicherheitshinweise
WARNUNG
Beachten Sie die folgenden Sicherheitshinweise um die Gefahren und Sachschäden zu vermeiden:
► Reparaturen an Elektrogeräten dürfen nur von Fachleuten durchgeführt werden,
die vom Hersteller geschult sind. Durch unsachgemäße Reparaturen können
erhebliche Gefahren für den Benutzer und Schäden am Gerät entstehen.
Fehlerursachen und -behebung
Die nachfolgende Tabelle hilft bei der Lokalisierung und Behebung kleinerer
Störungen:
Fehler Mögliche Ursache Behebung
Das Gerät
lässt sich nicht
einschalten
Kein Ton
Funktionstasten
funktionieren
nicht
Radio und/oder
die Automatische
Senderspeicherung funktionieren nicht
Senderspeicher
funktioniert nicht
Die Zündung ist nicht eingeschaltet.
Sicherung ist defekt. Ersetzen Sie die Sicherung.
Die Lautstärke steht auf
Minimum.
Die Kabel sind nicht richtig
angeschlossen.
Der Ton ist ausgeschaltet.
Am Gerät liegt eine Störung
vor.
Das Bedienteil sitzt nicht
korrekt.
Das Antennenkabel ist nicht
korrekt angeschlossen.
Die Sendersignale sind zu
schwach.
Der Anschluss 4 im ISOBlock A (Dauerplus) ist nicht
richtig angeschlossen.
Schalten Sie die Zündung durch Drehen
des Schlüssels ein.
Heben Sie die Lautstärke an.
Überprüfen Sie die Kabelverbindungen.
Drücken Sie die Taste
Ton wieder einzuschalten.
Drücken Sie die Taste RESET.
Überprüfen Sie den korrekten Sitz des
Bedienteils.
Überprüfen Sie das Antennenkabel auf
korrekten Sitz.
Stellen Sie die Sender manuell ein.
Überprüfen Sie die Kabelverbindungen.
Beachten Sie hierzu das Kapitel
„Anschluss“.
/MU, um den
84
SAR 28 A1
Page 89

Fehlerbehebung
Fehler Mögliche Ursache Behebung
Der USB-Anschluss ist für Geräte, die nach der USB-Norm
Gerät am
USB-Anschluss
funktioniert nicht
Kartenlesegerät
liest die Karte
nicht
funktionieren, bestimmt. Nicht
alle am Markt erhältliche Geräte erfüllen diese Norm. Unter Umständen ist ein Gerät,
das nicht nach USB-Norm
funktioniert, angeschlossen.
Eventuell ist die Karte defekt,
verschmutzt oder nicht richtig
eingelegt.
HINWEIS
Wenn Sie mit den vorstehend genannten Schritten das Problem nicht lösen
►
können, wenden Sie sich bitte an den Kundendienst (siehe Garantiekarte).
Schließen Sie ein Gerät an, das nach
USB-Norm funktioniert. Stellen Sie
sicher, das der Datenträger mit dem
Dateisystem FAT32 formatiert ist.
Überprüfen Sie die Karte. Schieben
Sie sie mit der beschrifteten Seite nach
rechts zeigend ein. Stellen Sie sicher,
dass der Datenträger mit dem Dateisystem FAT32 formatiert ist.
DE
AT
CH
SAR 28 A1
85
Page 90
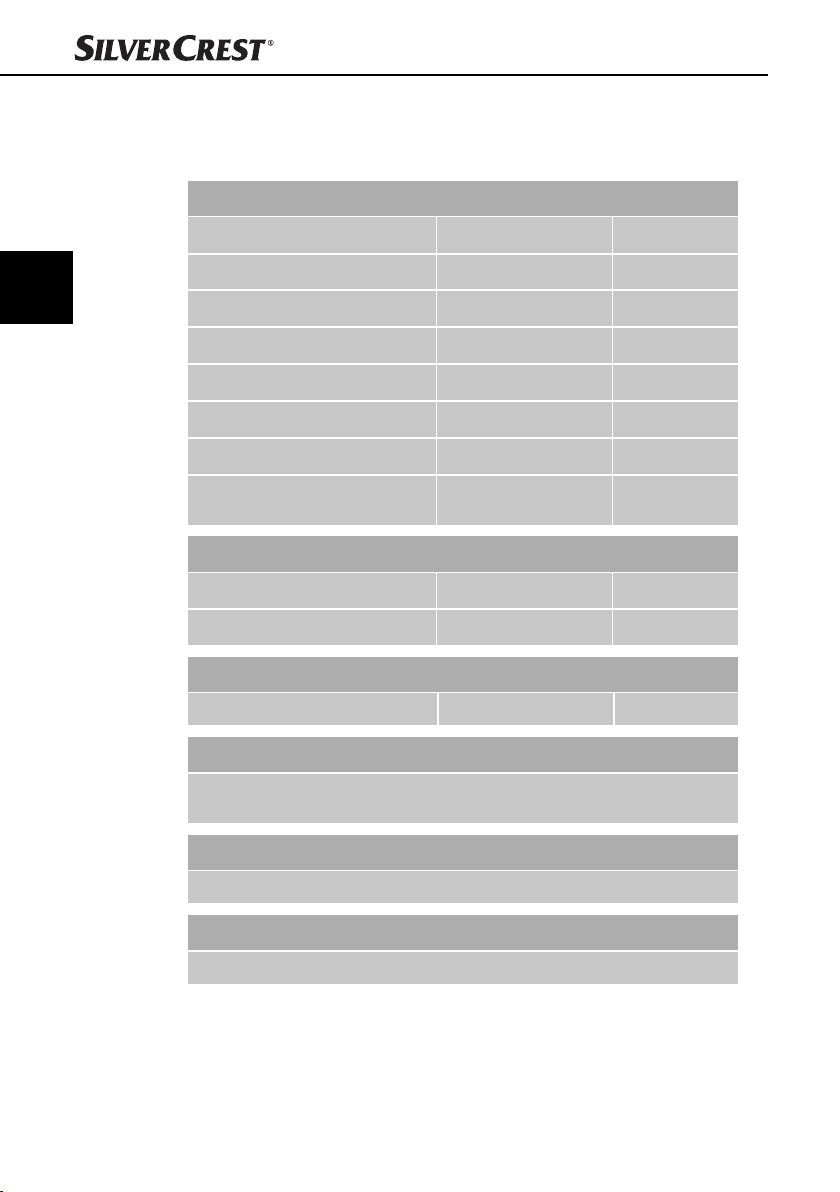
DE
AT
CH
Anhang
Technische Daten
Allgemeines
Eingangsspannung 12 V DC
Eingangsstrom max. 7,5 A
Nennleistung 4 x 7 W
Betriebstemperatur +5 - +40 °C
Feuchtigkeit (keine Kondensation) ≤ 75 %
Abmessungen (L x B x H) 18,6 x 12,7 x 5,7 cm
Gewicht inkl. Zubehör ca. 650 g
Gerätesicherung
KFZ-Flachsteckersicherung
Frequenzbereich Radio
Frequenz FM (UKW) 87,5 - 108 MHz
Senderspeicherplätze FM (UKW) 18 Plätze
Anhang
7,5 A
86
Audioeingang (AUX)
Stereo-Klinkenbuchse 3,5 mm
Audioausgang
2 x Cinch-Buchse für externen Verstärker (L/R)
1 x Cinch-Buchse für externen Subwoofer
USB-Anschluss
USB 1.1 und 2.0 kompatible Datenträger (bis 16 GB)
Kartenfach
SD/MMC Speicherkartenanschluss (SD/MMC bis 2 GB, SDHC bis 32 GB)
SAR 28 A1
Page 91

Anhang
Hinweise zur EG-Konformitätserklärung
Dieses Gerät entspricht hinsichtlich Übereinstimmung mit
den grundlegenden Anforderungen und den anderen relevanten Vorschriften der Kfz-Richtlinie 2004/104/EC.
Die vollständige Original-Konformitätserklärung ist beim
Importeur erhältlich.
Garantie
Sie erhalten auf dieses Gerät 3 Jahre Garantie ab Kaufdatum. Das Gerät wurde
sorgfältig produziert und vor Anlieferung gewissenhaft geprüft. Bitte bewahren
Sie den Kassenbon als Nachweis für den Kauf auf. Bitte setzen Sie sich im
Garantiefall mit Ihrer Servicestelle telefonisch in Verbindung. Nur so kann eine
kostenlose Einsendung Ihrer Ware gewährleistet werden.
HINWEIS
Die Garantieleistung gilt nur für Material- oder Fabrikationsfehler, nicht
►
aber für Transportschäden, Verschleißteile oder für Beschädigungen an
zerbrechlichen Teilen, z.B. Schalter oder Akkus.
Das Produkt ist lediglich für den privaten und nicht für den gewerblichen
Gebrauch bestimmt.
Bei missbräuchlicher und unsachgemäßer Behandlung, Gewaltanwendung und
bei Eingriff en, die nicht von unserer autorisierten Service-Niederlassung vorgenommen wurden, erlischt die Garantie. Ihre gesetzlichen Rechte werden durch
diese Garantie nicht eingeschränkt.
Die Garantiezeit wird durch die Gewährleistung nicht verlängert. Dies gilt auch
für ersetzte und reparierte Teile. Eventuell schon beim Kauf vorhandene Schäden
und Mängel müssen sofort nach dem Auspacken gemeldet werden, spätestens
aber zwei Tage nach Kaufdatum. Nach Ablauf der Garantiezeit anfallende
Reparaturen sind kostenpfl ichtig.
DE
AT
CH
Importeur
SAR 28 A1
KOMPERNASS GMBH
BURGSTRASSE 21
D-44867 BOCHUM
www.kompernass.com
87
Page 92

DE
AT
CH
88
SAR 28 A1
Page 93

Autoradio
SAR 28 A1
Um einen kostenlosen Reparaturablauf zu gewährleisten, setzen Sie
sich bitte mit der Service-Hotline in
Verbindung. Halten Sie hierfür Ihren
Kassenbeleg bereit.
Garantie
Service Deutschland
Tel.: 01805 772 033 (0,14 EUR/Min. aus dem
dt. Festnetz, Mobilfunk max. 0,42 EUR/Min.)
E-Mail: kompernass@lidl.de
IAN 85465
Absender bitte deutlich schreiben:
Name
Vorname
Straße
PLZ/Ort
Land
Telefon
Diesen Abschnitt vollständig ausfüllen und dem Gerät beilegen!
Datum/Unterschrift
Fehlerbeschreibung:
Service Österreich
Tel.: 0820 201 222 (0,15 EUR/Min.)
E-Mail: kompernass@lidl.at
IAN 85465
Service Schweiz
Tel.: 0842 665 566 (0,08 CHF/Min.,
Mobilfunk max. 0,40 CHF/Min.)
E-Mail: kompernass@lidl.ch
IAN 85465
Page 94

Page 95

KOMPERNASS GMBH
Burgstraße 21
D-44867 Bochum
www.kompernass.com
Last Information Update · Tilstand af information
Stand der Informationen:
11 / 2012 · Ident.-No.: SAR28A1072012-2
IAN 85465
3
 Loading...