

Page 1
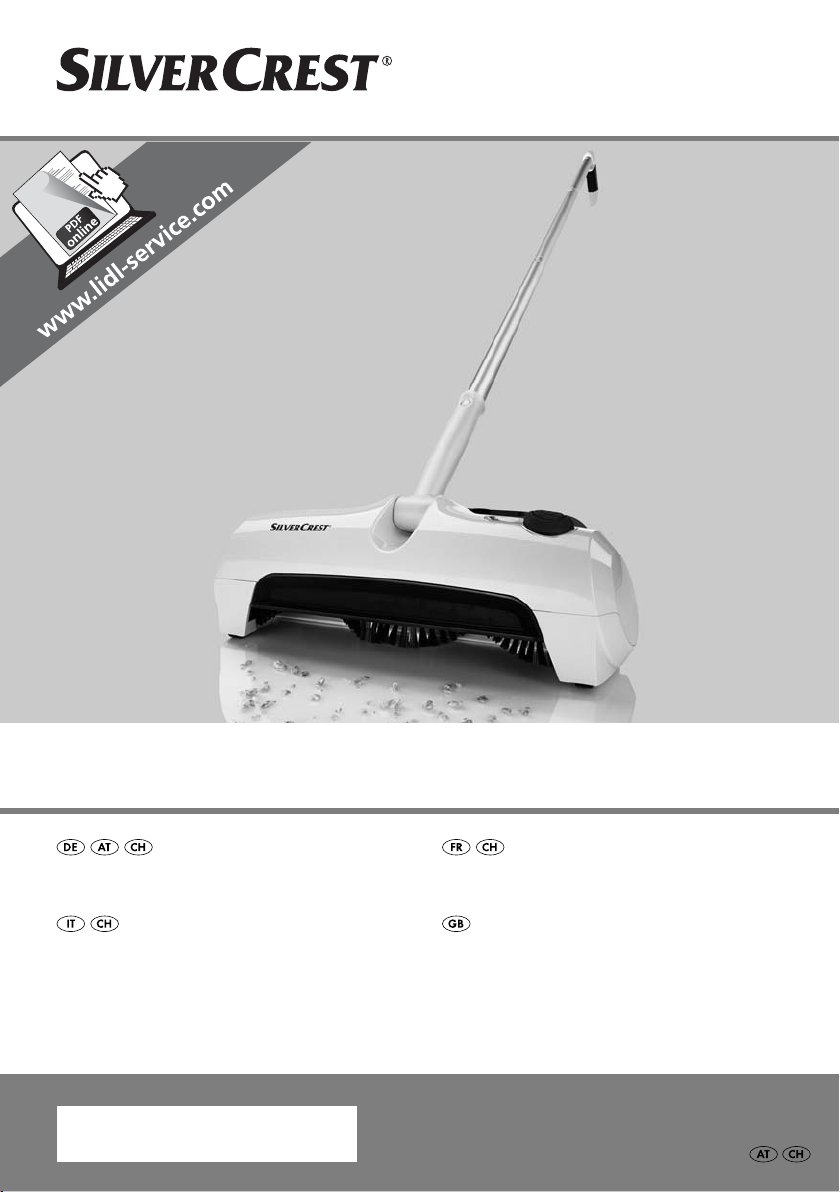
AKKU-BESEN SABD 3.6 Li A1
AKKU-BESEN
Bedienungsanleitung
SCOPA A BATTERIA RICARICABILE
Istruzioni per l‘uso
IAN 100114
BALAI ÉLECTRIQUE SANS FIL
Mode d’emploi
RECHARGEABLE FLOOR SWEEPER
Operating instructions
Page 2
Klappen Sie vor dem Lesen die Seite mit den Abbildungen aus und machen Sie sich anschließend mit allen
Funktionen des Gerätes vertraut.
Avant de lire le mode d‘emploi, ouvrez la page contenant les illustrations et familiarisez-vous ensuite avec
toutes les fonctions de l‘appareil.
Prima di leggere aprire la pagina con le immagini e prendere confi denza con le diverse funzioni
dell’apparecchio.
Before reading, unfold the page containing the illustrations and familiarise yourself with all functions of
the device.
DE / AT / CH Bedienungsanleitung Seite 1
FR / CH Mode d’emploi Page 9
IT / CH Istruzioni per l’uso Pagina 17
GB Operating instructions Page 25
Page 3
A
B
C
D
Page 4
Inhaltsverzeichnis
Einleitung . . . . . . . . . . . . . . . . . . . . . . . . . . . . . . . . . . . . . . . . . . . . . . . . . . . . . . . . . . . . .2
Bestimmungsgemäßer Gebrauch . . . . . . . . . . . . . . . . . . . . . . . . . . . . . . . . . . . . . . . . . .2
Lieferumfang . . . . . . . . . . . . . . . . . . . . . . . . . . . . . . . . . . . . . . . . . . . . . . . . . . . . . . . . . .2
Gerätebeschreibung . . . . . . . . . . . . . . . . . . . . . . . . . . . . . . . . . . . . . . . . . . . . . . . . . . . .2
Technische Daten . . . . . . . . . . . . . . . . . . . . . . . . . . . . . . . . . . . . . . . . . . . . . . . . . . . . . . .2
Sicherheitshinweise . . . . . . . . . . . . . . . . . . . . . . . . . . . . . . . . . . . . . . . . . . . . . . . . . . . . .3
Vor dem ersten Gebrauch . . . . . . . . . . . . . . . . . . . . . . . . . . . . . . . . . . . . . . . . . . . . . . . .4
Zusammenbau des Akku-Besens . . . . . . . . . . . . . . . . . . . . . . . . . . . . . . . . . . . . . . . . . . . . . . . . . . . . . . . 4
Akku laden . . . . . . . . . . . . . . . . . . . . . . . . . . . . . . . . . . . . . . . . . . . . . . . . . . . . . . . . . . . . . . . . . . . . . . . 4
Mit dem Akku-Besen arbeiten . . . . . . . . . . . . . . . . . . . . . . . . . . . . . . . . . . . . . . . . . . . .5
Reinigung und Pfl ege . . . . . . . . . . . . . . . . . . . . . . . . . . . . . . . . . . . . . . . . . . . . . . . . . . .5
Gehäuse . . . . . . . . . . . . . . . . . . . . . . . . . . . . . . . . . . . . . . . . . . . . . . . . . . . . . . . . . . . . . . . . . . . . . . . . . 5
Schmutzbehälter . . . . . . . . . . . . . . . . . . . . . . . . . . . . . . . . . . . . . . . . . . . . . . . . . . . . . . . . . . . . . . . . . . . 5
Bürstenrolle . . . . . . . . . . . . . . . . . . . . . . . . . . . . . . . . . . . . . . . . . . . . . . . . . . . . . . . . . . . . . . . . . . . . . . . 5
Aufbewahrung . . . . . . . . . . . . . . . . . . . . . . . . . . . . . . . . . . . . . . . . . . . . . . . . . . . . . . . .6
Fehler beheben . . . . . . . . . . . . . . . . . . . . . . . . . . . . . . . . . . . . . . . . . . . . . . . . . . . . . . . .6
DE
AT
CH
Garantie und Service . . . . . . . . . . . . . . . . . . . . . . . . . . . . . . . . . . . . . . . . . . . . . . . . . . .6
Entsorgung . . . . . . . . . . . . . . . . . . . . . . . . . . . . . . . . . . . . . . . . . . . . . . . . . . . . . . . . . . . .7
Gerät entsorgen . . . . . . . . . . . . . . . . . . . . . . . . . . . . . . . . . . . . . . . . . . . . . . . . . . . . . . . . . . . . . . . . . . . 7
Akkus entsorgen . . . . . . . . . . . . . . . . . . . . . . . . . . . . . . . . . . . . . . . . . . . . . . . . . . . . . . . . . . . . . . . . . . . 7
Verpackung entsorgen . . . . . . . . . . . . . . . . . . . . . . . . . . . . . . . . . . . . . . . . . . . . . . . . . . . . . . . . . . . . . . 7
Importeur . . . . . . . . . . . . . . . . . . . . . . . . . . . . . . . . . . . . . . . . . . . . . . . . . . . . . . . . . . . . .7
SABD 3.6 Li A1
1
Page 5

Einleitung
DE
AT
Herzlichen Glückwunsch zum Kauf Ihres neuen
Gerätes.
CH
Sie haben sich damit für ein hochwertiges Produkt
entschieden. Die Bedienungsanleitung ist Bestandteil dieses Produkts. Sie enthält wichtige Hinweise
für Sicherheit, Gebrauch und Entsorgung. Machen
Sie sich vor der Benutzung des Produkts mit allen
Bedien- und Sicherheitshinweisen vertraut. Benutzen Sie das Produkt nur wie beschrieben und für
die angegebenen Einsatzbereiche. Händigen Sie
alle Unterlagen bei Weitergabe des Produkts an
Dritte mit aus.
Bestimmungsgemäßer
Gebrauch
Dieses Gerät ist ausschließlich vorgesehen zum Kehren von trockenem Schmutz in trockenen geschlossenen Räumen.
Dieses Gerät ist ausschließlich für den privaten
Gebrauch bestimmt.
Benutzen Sie das Gerät nicht gewerblich. Nutzen Sie
das Gerät nur wie in dieser Anleitung beschrieben.
Lieferumfang
■ Akku-Besen
■ Ladegerät
■ Stiel (3 Elemente und Griff )
■ Bedienungsanleitung
Gerätebeschreibung
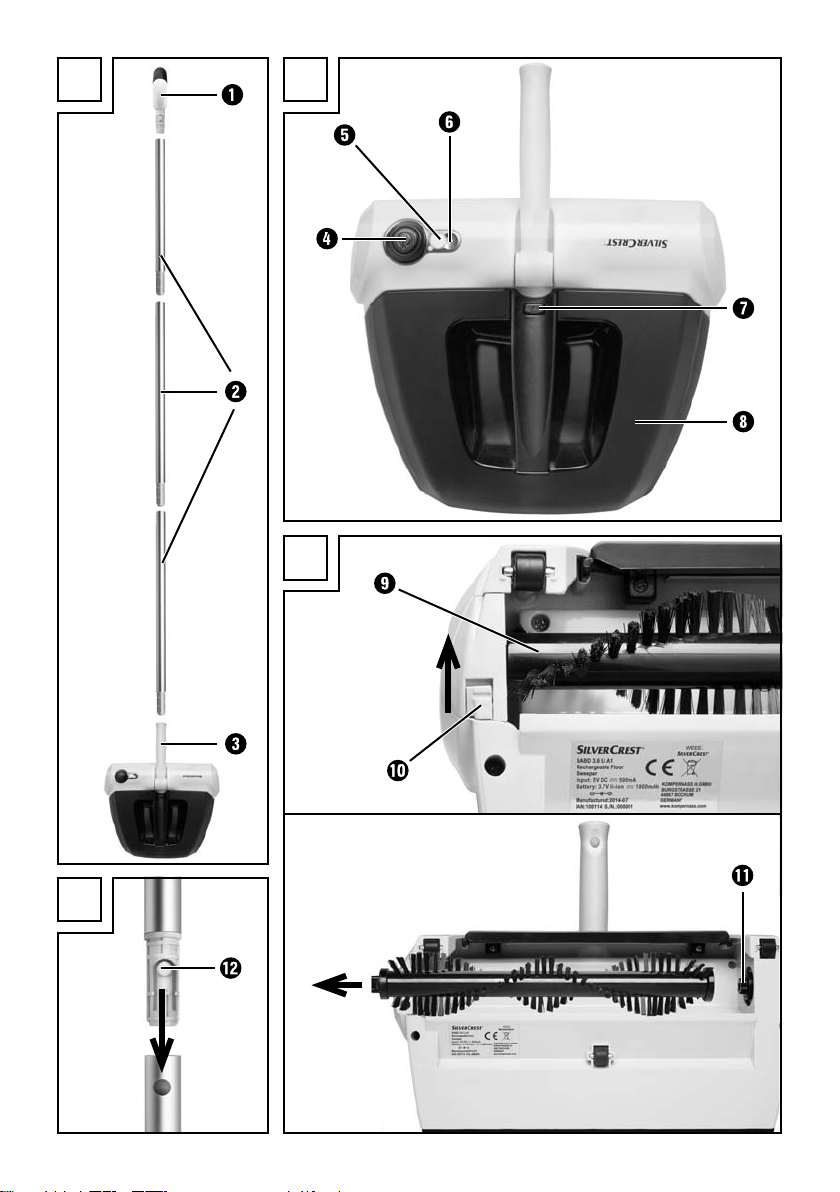
Abbildung A:
1 Griff
2 Stiel (3 Elemente)
3 Halterung
Abbildung B:
4 Schalter
5 Ladebuchse (mit Staubschutz)
6 Ladeanzeige
7 Entriegelungsknopf
8 Schmutzbehälter
Abbildung C:
9 Bürstenrolle
0 Verriegelung
q Antriebswelle
Abbildung D:
w Arretierung
Technische Daten
Ladegerät
Eingang: 100 - 240 V ~,
50 / 60 Hz,
0,3 A max.
Ausgang: 5 V
Typenbezeichnung: SABD 3.6 Li A1-1
Schutzklasse: II /
Hersteller: Kompernass Handels
500 mA
GmbH
Akku-Besen
Eingangsspannung/-strom: 5 V
Akku - Arbeitsspannung: 3,7 V
Akku: Lithium-Ionen Akku
1 x 3,7 V, 1800 mAh
Ladezeit bei leerem Akku: 5 Std.
Betriebszeit bei voller Akkuladung
(abhängig vom Bodenbelag): ca. 50 Min
Schutzklasse: III /
2
500 mA
SABD 3.6 Li A1
Page 6
Sicherheitshinweise
GEFAHR - ELEKTRISCHER SCHLAG!
► Laden Sie das Gerät niemals mit einem beschädigten Netzteil! Tauschen
Sie ein beschädigtes Netzteil sofort aus, um Gefährdungen zu vermeiden.
Wenden Sie sich hierzu an den Kundenservice.
► Lassen Sie beschädigte Netzstecker oder Netzkabel am Netzteil sofort von
autorisiertem Fachpersonal austauschen, um Gefährdungen zu vermeiden.
► Achten Sie darauf, dass im Betrieb das Netzkabel nicht nass oder feucht
wird. Führen Sie es so, dass es nicht eingeklemmt oder beschädigt werden
kann.
WARNUNG! VERLETZUNGSGEFAHR!
► Betreiben Sie das Gerät nur mit dem mitgeliefertem Zubehör.
► Benutzen Sie das Gerät nicht, um Waschbeton, Schotter und ähnliche
Oberfl ächen zu kehren.
► Benutzen Sie das Gerät nicht, um hochfl orige Teppiche und nasse Boden-
beläge zu säubern.
► Dieses Gerät kann von Kindern ab 8 Jahren und darüber sowie von Perso-
nen mit verringerten physischen, sensorischen oder mentalen Fähigkeiten
oder Mangel an Erfahrung und Wissen benutzt werden, wenn sie beaufsichtigt oder bezüglich des sicheren Gebrauchs des Gerätes unterwiesen
wurden und die daraus resultierenden Gefahren verstehen.
► Kinder dürfen nicht mit dem Gerät spielen.
► Reinigung und Benutzer-Wartung dürfen nicht von Kindern ohne Beaufsich-
tigung durchgeführt werden.
► Verwenden Sie dieses Gerät nur zum bestimmungsgemäßen Gebrauch
gemäß Beschreibung in dieser Bedienungsanleitung.
► Dieses Produkt enthält wiederaufl adbare Akkus. Werfen Sie die Akkus
nicht ins Feuer und setzen Sie sie nicht hohen Temperaturen aus. Es besteht
Explosionsgefahr!
► Verwenden Sie das Gerät nicht als Spielzeug.
► Lassen Sie Kinder nicht unbeaufsichtigt mit dem Gerät umgehen.
DE
AT
CH
SABD 3.6 Li A1
3
Page 7

DE
ACHTUNG! SACHSCHÄDEN!
AT
CH
► Laden Sie das Gerät nur mit dem mitgelieferten Netzadapter/Ladegerät
(Typ SABD 3.6 Li A1-1) auf!
► Mit dem beigefügten Ladegerät darf ausschließlich der Akku-Besen gela-
den werden, das Ladegerät ist für andere Akkus nicht geeignet.
► Versuchen Sie niemals, nicht wiederaufl adbare Batterien aufzuladen.
Vor dem ersten Gebrauch
■ Entfernen Sie alles Verpackungsmaterial vom
Gerät. Auch die Plastiksicherung, die den Schalter 4 vor unbeabsichtigtem Drücken während
des Transportes sichert.
Zusammenbau des Akku-Besens
■ Montieren Sie den Stiel 2:
– Stecken Sie die 3 Stielelemente 2 so zu-
sammen, dass die ovalen Arretierungen w
in den Löchern einrasten.
– Schieben Sie den Griff 1 in den Stiel, so
dass die Arretierung des Griff s 1 in das
Loch des Stiels 2 ragt.
– Stecken Sie den montierten Stiel 2 mit
der Arretierung w in die Halterung 3 des
Gerätes.
■ Schieben Sie den Schmutzbehälter 8 auf das
Gerät, so dass dieser an dem Entriegelungsknopf 7 einrastet.
Akku laden
Damit der Akku seine volle Leistungsfähigkeit erhält,
ist es vor dem ersten Gebrauch notwendig, den
Akku ca. 5 Stunden zu laden. Weitere Ladevorgänge benötigen, je nach Entladung des Akkus, bis zu
5 Stunden.
Das Gerät bietet bei voll geladenem Akku eine
Betriebszeit von ca. 50 Min, bevor ein erneutes
Aufl aden notwendig ist.
ACHTUNG! SACHSCHADEN!
Verwenden Sie nur das beigefügte Ladegerät.
►
► Betreiben Sie das Gerät nur mit dem einge-
bauten Akku.
► Versuchen Sie nicht den Akku zum Aufl aden
auszubauen.
► Versuchen Sie nicht, die Akku-Hülle zu öff nen
oder den Akku zu zerlegen, dies würde den
Akku zerstören.
1) Um den Akku zu laden, stellen Sie sicher, dass
der Akku-Besen ausgeschaltet ist.
Schalten Sie ihn gegebenenfalls am Schalter 4
aus.
HINWEIS
Benutzen Sie den Akkubesen nicht, wenn das
Gerät mit dem Ladegerät verbunden ist!
2) Öff nen Sie den Staubschutz, der die Ladebuchse 5 verschließt.
3) Stecken Sie den Stecker des Ladegerätes in
die Ladebuchse 5 des Gerätes und dann den
Netzstecker in eine Netzsteckdose.
4) Während des Ladevorgangs leuchtet die rote
Ladeanzeige 6. Sollte dies nicht der Fall sein,
überprüfen Sie die Steckerverbindungen und
ob der Akku-Besen ausgeschaltet ist.
5) Ist der Akku aufgeladen, leuchtet die Ladeanzeige 6 grün. Sie können dann das Gerät
wieder mit voller Leistung benutzen.
6) Ziehen Sie das Ladegerät aus der Netzsteckdose und den Stecker des Ladegerätes aus der
Ladebuchse 5 am Gerät.
7) Verschließen Sie die Ladebuchse 5 mit dem
Staubschutz.
4
SABD 3.6 Li A1
Page 8

Mit dem Akku-Besen arbeiten
WARNUNG! VERLETZUNGSGEFAHR!
Halten Sie das Ende der rotierenden Bürstenrolle
9, Stäbe und Geräteöff nungen fern von Gesicht
und Körper.
HINWEIS
Benutzen Sie das Gerät niemals mit abgenommenem Schmutzbehälter 8. Der Schmutz würde
nur aufgewirbelt!
■ Drücken Sie den Schalter 4, um den Akku-
Besen einzuschalten.
■ Führen Sie den Akku-Besen nun über den
Boden.
■ Durch erneutes Drücken des Schalters 4 schal-
tet sich das Gerät aus.
Sie können den Stiel 2 bei Arbeitsunterbrechungen in senkrechter Position eingerastet lassen.
HINWEIS
Bei einigen Teppicharten könnte der Akku-Besen
rattern oder hüpfen. Arbeiten Sie in diesem Fall
langsam und in entgegengesetzter Richtung.
Reinigung und Pfl ege
ACHTUNG! SACHSCHADEN!
Verwenden Sie keine scheuernden oder
►
aggressiven Reinigungsmittel. Diese können
die Oberfl ächen beschädigen!
Gehäuse
■ Wischen Sie das Gehäuse des Gerätes mit
einem feuchten Tuch ab. Bei Bedarf geben Sie
ein mildes Spülmittel auf das Tuch.
■ Achten Sie darauf, dass das Gerät vollständig
trocken ist, bevor Sie es wieder mit dem Ladegerät verbinden.
Schmutzbehälter
Um die Leistungsfähigkeit des Akku-Besens zu
erhalten, leeren Sie den Schmutzbehälter 8 nach
jedem Gebrauch.
■ Drücken Sie den Entriegelungsknopf 7 des
Schmutzbehälters 8, um diesen vom Gerät zu
lösen.
■ Ziehen Sie den Schmutzbehälter 8, während
Sie den Entriegelungsknopf 7 drücken, vom
Gerät ab.
■ Leeren Sie den Schmutzbehälter 8 und
schieben Sie ihn wieder so auf das Gerät, dass
dieser fest sitzt und am Entriegelungsknopf 7
einrastet.
DE
AT
CH
GEFAHR - ELEKTRISCHER SCHLAG!
Reinigen Sie das Gerät nicht während des
►
Ladevorgangs. Ziehen Sie das Ladegerät vor
der Reinigung des Gerätes immer aus der
Netzsteckdose!
Tauchen Sie das Gerät niemals in Wasser
oder andere Flüssigkeiten!
WARNUNG! VERLETZUNGSGEFAHR!
Achten Sie darauf, dass das Gerät bei abgenommenem Schmutzbehälter 8 oder bei der
Reinigung der Bürstenrolle 9 nicht unbeabsichtigt eingeschaltet wird. Verletzungsgefahr!
SABD 3.6 Li A1
Bürstenrolle
Sollte sich die Bürstenrolle 9 nicht mehr drehen
lassen, weil sich grobe Verschmutzungen oder Fäden angesammelt haben, gehen Sie wie folgt vor:
Bauen Sie die Bürstenrolle 9 aus:
1) Drehen Sie den Akku-Besen um und halten Sie
ihn so, dass die fl ache Seite mit der Bürstenrolle 9 zu Ihnen zeigt.
2) Schieben Sie die kleine Verriegelung 0 zu-
rück, so dass sich die Abdeckung an der Seite
abnehmen lässt.
3) Nehmen Sie die Abdeckung ab.
4) Ziehen Sie die Bürstenrolle 9 aus dem
Gehäuse.
5
Page 9
5) Entfernen Sie Verschmutzungen (auf beiden
DE
AT
CH
Seiten der Borsten) und säubern Sie die Bürstenrolle 9.
Setzen Sie die Bürstenrolle 9 wieder ein:
1) Schieben Sie die eine Seite der Bürstenrolle 9
auf die Antriebswelle q.
2) Schieben Sie das eckige Ende der Bürstenrolle 9
in das Gehäuse, so dass die Bürstenrolle 9
wieder grade im Gehäuse sitzt.
3) Setzen Sie die Abdeckung wieder auf das
Gehäuse und schieben Sie die Verriegelung 0
wieder zurück, so dass die Abdeckung fest sitzt.
Aufbewahrung
ACHTUNG! SACHSCHADEN!
Stellen Sie sicher, dass das Gerät ausgeschaltet
►
ist, wenn Sie es verstauen. Der Akku könnte
ansonsten durch Tiefentladung beschädigt
werden.
■ Bewahren Sie das gereinigte Gerät an einem
sauberen, staubfreien und trockenen Ort auf.
Fehler beheben
Das Gerät startet nicht.
■ Das Gerät ist entladen. Laden Sie das Gerät erst
wieder auf.
■ Das Gerät ist defekt. Wenden Sie sich an den
Service.
Die Bürstenrolle 9 erzeugt beim Drehen
laute Geräusche.
■ Die Bürstenrolle 9 ist verschmutzt. Reinigen Sie
die Bürstenrolle 9.
■ Die Bürstenrolle 9 ist nicht richtig eingesetzt.
Überprüfen Sie, ob die Bürstenrolle 9 korrekt
eingesetzt ist und korrigieren Sie gegebenenfalls
den Einbau.
Garantie und Service
Sie erhalten auf dieses Gerät 3 Jahre Garantie
ab Kaufdatum. Das Gerät wurde sorgfältig
produziert und vor Anlieferung gewissenhaft
geprüft. Bitte bewahren Sie den Kassenbon als
Nachweis für den Kauf auf. Bitte setzen Sie sich
im Garantiefall mit Ihrer Servicestelle telefonisch
in Verbindung. Nur so kann eine kostenlose
Einsendung Ihrer Ware gewährleistet werden.
Die Garantieleistung gilt nur für Material- oder
Fabrikationsfehler, nicht aber für Transportschäden,
Verschleißteile oder für Beschädigungen an zerbrechlichen Teilen, z. B. Schalter oder Akkus. Das Produkt
ist lediglich für den privaten und nicht für den
gewerblichen Gebrauch bestimmt.
Bei missbräuchlicher und unsachgemäßer Behandlung, Gewaltanwendung und bei Eingriff en, die
nicht von unserer autorisierten Service-Niederlassung vorgenommen wurden, erlischt die Garantie.
Ihre gesetzlichen Rechte werden durch diese Garantie nicht eingeschränkt.
Die Garantiezeit wird durch die Gewährleistung
nicht verlängert. Dies gilt auch für ersetzte und reparierte Teile. Eventuell schon beim Kauf vorhandene
Schäden und Mängel müssen sofort nach dem
Auspacken gemeldet werden, spätestens aber zwei
Tage nach Kaufdatum. Nach Ablauf der Garantiezeit anfallende Reparaturen sind kostenpfl ichtig.
Service Deutschland
Tel.: 0800 5435 111 (Kostenfrei aus dem
dt. Festnetz/Mobilfunknetz)
E-Mail: kompernass@lidl.de
IAN 100114
Service Österreich
Tel.: 0820 201 222 (0,15 EUR/Min.)
E-Mail: kompernass@lidl.at
IAN 100114
Service Schweiz
Tel.: 0842 665566 (0,08 CHF/Min.,
Mobilfunk max. 0,40 CHF/Min.)
E-Mail: kompernass@lidl.ch
IAN 100114
Erreichbarkeit Hotline:
Montag bis Freitag von 8:00 Uhr – 20:00 Uhr (MEZ)
6
SABD 3.6 Li A1
Page 10
Entsorgung
Das Gerät und der Akku müssen getrennt voneinander entsorgt werden.
Gerät entsorgen
Werfen Sie das Gerät keinesfalls
in den normalen Hausmüll.
Dieses Produkt unterliegt
der europäischen Richtlinie
2012/19/EU.
Entsorgen Sie das Gerät über einen zugelassenen
Entsorgungsbetrieb oder über Ihre kommunale
Entsorgungseinrichtung. Beachten Sie die aktuell
geltenden Vorschriften. Setzen Sie sich im Zweifelsfall mit Ihrer Entsorgungseinrichtung in Verbindung.
Akkus entsorgen
Batterien/Akkus dürfen nicht im
Hausmüll entsorgt werden. Jeder
Verbraucher ist gesetzlich verpfl ichtet,
Batterien/Akkus bei einer Sammelstelle seiner Gemeinde/seines Stadtteils
oder im Handel abzugeben.
Diese Verpfl ichtung dient dazu, dass Batterien/Akkus einer umweltschonenden Entsorgung zugeführt
werden können. Geben Sie Batterien/Akkus nur im
entladenen Zustand zurück.
Um das Gerät umweltgerecht zu entsorgen, müssen
Sie den Akku aus dem Gerät entfernen:
GEFAHR - ELEKTRISCHER SCHLAG!
Entfernen Sie das Gerät vom Stromnetz,
►
wenn Sie den Akku entfernen!
1) Nehmen Sie den Schmutzbehälter 8 ab.
2) Drehen Sie den Akku-Besen um und halten Sie ihn
so, dass die fl ache Seite mit der Bürstenrolle 9 zu
Ihnen zeigt.
3) Entnehmen Sie die Bürstenrolle 9, wie im
Kapitel „Reinigung und Pfl ege“ beschrieben.
4) Hebeln Sie mit einem fl achen Gegenstand,
zum Beispiel einem Schraubendreher, die
beiden kleinen äußeren Rollen heraus. Lösen
Sie die darunter liegenden Schrauben.
5) Lösen Sie die 2 Kreuzschlitzschrauben an der
schwarzen Plastikabdeckung und nehmen Sie
diese ab.
6) Lösen Sie die noch verbliebenen 3 Kreuzschlitzschrauben an dem unteren Platikteil und
nehmen Sie dieses ab. Sie können nun den
Antriebsriemen sehen.
7) Entfernen Sie den Antriebsriemen an der Seite
und ziehen Sie das Antriebsrad nach oben aus
der Schiene heraus.
8) Lösen Sie die 4 Kreuzschlitzschrauben am
Motorblock und entfernen Sie die Abdeckung
des Motorblocks.
9) Knipsen Sie die Kabel, die zu den Akkus führen
ab und entfernen Sie den Akku, um diesen
umweltgerecht zu entfernen.
Verpackung entsorgen
Die Verpackung besteht aus umwelt-
freundlichen Materialien, die Sie über
die örtlichen Recyclingstellen entsorgen
können.
DE
AT
CH
ACHTUNG! SACHSCHADEN!
Entnehmen Sie den Akku nur aus dem Gerät,
►
wenn Sie das Gerät entsorgen/verschrotten
wollen! Das Gerät ist defekt, wenn Sie den
Akku ausgebaut haben!
SABD 3.6 Li A1
Importeur
KOMPERNASS HANDELS GMBH
BURGSTRASSE 21
44867 BOCHUM
GERMANY
www.kompernass.com
7
Page 11

8
SABD 3.6 Li A1
Page 12

Table des matières
Introduction . . . . . . . . . . . . . . . . . . . . . . . . . . . . . . . . . . . . . . . . . . . . . . . . . . . . . . . . . .10
Usage conforme . . . . . . . . . . . . . . . . . . . . . . . . . . . . . . . . . . . . . . . . . . . . . . . . . . . . . .10
Matériel livré . . . . . . . . . . . . . . . . . . . . . . . . . . . . . . . . . . . . . . . . . . . . . . . . . . . . . . . . .10
Description de l'appareil . . . . . . . . . . . . . . . . . . . . . . . . . . . . . . . . . . . . . . . . . . . . . . . .10
Caractéristiques techniques . . . . . . . . . . . . . . . . . . . . . . . . . . . . . . . . . . . . . . . . . . . . .10
Consignes de sécurité . . . . . . . . . . . . . . . . . . . . . . . . . . . . . . . . . . . . . . . . . . . . . . . . . .11
Avant la première utilisation . . . . . . . . . . . . . . . . . . . . . . . . . . . . . . . . . . . . . . . . . . . .12
Assemblage du balai électrique . . . . . . . . . . . . . . . . . . . . . . . . . . . . . . . . . . . . . . . . . . . . . . . . . . . . . . 12
Chargement de la batterie . . . . . . . . . . . . . . . . . . . . . . . . . . . . . . . . . . . . . . . . . . . . . . . . . . . . . . . . . .12
Travailler avec le balai électrique . . . . . . . . . . . . . . . . . . . . . . . . . . . . . . . . . . . . . . . .13
Nettoyage et entretien . . . . . . . . . . . . . . . . . . . . . . . . . . . . . . . . . . . . . . . . . . . . . . . . .13
Boîtier . . . . . . . . . . . . . . . . . . . . . . . . . . . . . . . . . . . . . . . . . . . . . . . . . . . . . . . . . . . . . . . . . . . . . . . . . . 13
Bac à poussière. . . . . . . . . . . . . . . . . . . . . . . . . . . . . . . . . . . . . . . . . . . . . . . . . . . . . . . . . . . . . . . . . . . 13
Brosse rouleau . . . . . . . . . . . . . . . . . . . . . . . . . . . . . . . . . . . . . . . . . . . . . . . . . . . . . . . . . . . . . . . . . . .13
Rangement . . . . . . . . . . . . . . . . . . . . . . . . . . . . . . . . . . . . . . . . . . . . . . . . . . . . . . . . . . .14
Dépannage . . . . . . . . . . . . . . . . . . . . . . . . . . . . . . . . . . . . . . . . . . . . . . . . . . . . . . . . . .14
FR
CH
Garantie et service . . . . . . . . . . . . . . . . . . . . . . . . . . . . . . . . . . . . . . . . . . . . . . . . . . . .14
Mise au rebut . . . . . . . . . . . . . . . . . . . . . . . . . . . . . . . . . . . . . . . . . . . . . . . . . . . . . . . . .15
Mise au rebut de l'appareil . . . . . . . . . . . . . . . . . . . . . . . . . . . . . . . . . . . . . . . . . . . . . . . . . . . . . . . . . . 15
Mise au rebut des batteries . . . . . . . . . . . . . . . . . . . . . . . . . . . . . . . . . . . . . . . . . . . . . . . . . . . . . . . . . . 15
Recycler l'emballage . . . . . . . . . . . . . . . . . . . . . . . . . . . . . . . . . . . . . . . . . . . . . . . . . . . . . . . . . . . . . . . 15
Importateur . . . . . . . . . . . . . . . . . . . . . . . . . . . . . . . . . . . . . . . . . . . . . . . . . . . . . . . . . .15
SABD 3.6 Li A1
9
Page 13

Introduction
Toutes nos félicitations pour l'achat de votre nouvel
appareil.
Ainsi, vous venez d'opter pour un produit de grande
FR
qualité. Le mode d'emploi fait partie de ce produit.
CH
Il contient des remarques importantes concernant la
sécurité, l'usage et la mise au rebut. Avant l'usage
du produit, veuillez vous familiariser avec toutes les
consignes d'utilisation et de sécurité. N'utilisez le
produit que conformément aux consignes et pour
les domaines d'utilisation prévus. Si vous cédez le
produit à un tiers, remettez-lui également tous les
documents.
Usage conforme
Cet appareil est exclusivement destiné à balayer
de la poussière sèche dans des pièces sèches et
fermées.
Cet appareil est uniquement conçu pour une utilisation domestique.
N'utilisez pas l'appareil pour des applications
commerciales. Utilisez l'appareil conformément
à cette notice.
Matériel livré
■ Balai électrique sans fi l
■ Chargeur
■ Manche (3 éléments et poignée)
■ Mode d'emploi
Description de l'appareil
Figure A :
1 Poignée
2 Manche (3 éléments)
3 Support
Figure B:
4 Interrupteur
5 Prise de charge (avec protection
anti-poussière)
6 Indicateur de charge
7 Bouton de déverrouillage
8 Bac à poussière
Figure C:
9 Brosse rouleau
0 Verrouillage
q Axe moteur
Figure D:
w Arrêt
Caractéristiques techniques
Chargeur
Entrée : 100 - 240 V ~,
50 / 60 Hz,
0,3 A max.
Sortie : 5 V
Désignation du type: SABD 3.6 Li A1-1
Classe de protection: II /
Fabricant: Kompernass Handels
Balai électrique
Tension/courant d'entrée : 5 V
Batterie -
Tension de service : 3,7 V
Batterie: batterie lithium-ion
1 x 3,7 V, 1800 mAh
Durée de chargement
avec une batterie vide : 5 heures
Durée de service avec une batterie
entièrement chargée (selon le type
de revêtement de sol): env. 50 min.
Classe de protection: III /
500 mA
GmbH
500 mA
10
SABD 3.6 Li A1
Page 14

Consignes de sécurité
DANGER - RISQUE D'ÉLECTROCUTION !
► Ne chargez jamais l'appareil avec un bloc d'alimentation endommagé !
Remplacez immédiatement un bloc d'alimentation endommagé, pour éviter
tous dangers. Veuillez vous adresser pour cela au service après-vente.
► Faites immédiatement remplacer une fi che secteur ou un câble d'alimenta-
tion endommagé(e) sur le bloc d'alimentation par des spécialisés agréés,
pour éviter tous risques.
► Veillez à ce que le cordon d'alimentation ne soit pas mouillé ou humide
en cours d'opération. Guidez-le de telle manière qu'il ne soit ni coincé ni
endommagé.
AVERTISSEMENT ! RISQUE DE BLESSURES!
► N'opérez l'appareil qu'avec les accessoires fournis.
► N'utilisez pas l'appareil pour balayer du béton lavé, des graviers et des
surfaces semblables.
► N'utilisez pas l'appareil pour nettoyer des tapis à poils longs et des revête-
ments de sol mouillés.
► Cet appareil ne doit pas être utilisé par des enfants de moins de 8 ans ni
par des personnes ayant des capacités physiques, mentales ou sensorielles
réduites ou qui n'ont pas l'expérience et les connaissances nécessaires, à
moins qu'elles ne soient sous la surveillance d'une personne responsable
de leur sécurité ou qu'elles n'aient reçu de cette personne des directives
concernant l'utilisation de l'appareil et qu'elles comprennent les dangers
pouvant en résulter.
► Ne pas laisser les enfants jouer avec l'appareil.
► Il est interdit aux enfants de nettoyer ou d'entretenir l'appareil sans surveillance.
► Utilisez cet appareil uniquement dans le cadre de la fi nalité prévue selon la
description mentionnée dans ce mode d'emploi.
► Ce produit contient une batterie rechargeable. Ne jetez pas les batteries
dans le feu et ne les exposez pas à des températures élevées.
Risque d'explosion!
► N'utilisez pas l'appareil comme un jouet.
► Ne laissez pas les enfants sans surveillance toucher à l'appareil !
FR
CH
SABD 3.6 Li A1
11
Page 15

ATTENTION! DOMMAGES MATÉRIELS !
► Chargez uniquement l'appareil avec l'adaptateur réseau/chargeur
(type SABD 3.6 Li A1-1) livré !
FR
CH
► Le chargeur joint sert exclusivement à charger le balai électrique, il n'est
pas adapté pour d'autres batteries.
► N'essayez jamais de recharger des batteries non rechargeables.
Avant la première utilisation
■ Retirez tous les matériaux d'emballage de l'appa-
reil. Même la sécurité plastique qui sécurise
l'interrupteur 4 de toute pression involontaire
durant le transport.
Assemblage du balai électrique
■ Montez le manche 2:
– Assemblez les 3 éléments du manche 2
de manière à ce que les arrêts ovales w
s'enclenchent dans les trous.
– Glissez la poignée 1 sur le manche de
manière à ce que l'arrêt de la poignée 1
s'enclenche dans le trou du manche 2.
– Placez le manche monté 2 avec l'arrêt w
dans le support 3 de l'appareil.
■ Glissez le bac à poussière 8 sur l'appareil de
manière à ce qu'il s'enclenche sur le bouton
d'arrêt 7.
Chargement de la batterie
Pour que la batterie développe sa pleine puissance,
il est nécessaire de la charger env. 5 heures avant
la première utilisation. En fonction du déchargement de la batterie, d'autres opérations de chargement nécessitent jusqu'à 5 heures.
Une fois la batterie entièrement chargée, l'appareil
off re une autonomie de travail de 50 minutes environ avant qu'un rechargement soit nécessaire.
ATTENTION!
RISQUE DE DÉGÂTS MATÉRIELS!
Utilisez exclusivement le chargeur joint.
►
► N'opérez l'appareil qu'avec la batterie
fournie.
► N'essayez pas de démonter la batterie pour
la charger.
► N'essayez pas d'ouvrir l'enveloppe de la
batterie ou de la démonter, ceci la détruirait.
1) Pour charger la batterie, assurez-vous que le
balai électrique est éteint.
Éteignez-le si nécessaire avec l'interrupteur 4.
REMARQUE
N'utilisez pas le balai électrique lorsque l'appareil est relié au chargeur !
2) Ouvrez la protection anti-poussière qui obture
la prise de charge 5.
3) Branchez la fi che du chargeur dans la prise de
charge 5 de l'appareil puis la fi che secteur
dans une prise secteur.
4) L'indicateur de charge 6 rouge s'allume durant
le processus de chargement. Si ce n'est pas le
cas, vérifi ez les fi ches de raccordement et si le
balai électrique est éteint.
5) Lorsque la batterie est chargée, l'indicateur de
charge 6 est vert. Vous pouvez alors utiliser
à nouveau l'appareil à pleine puissance.
6) Débranchez le chargeur de la prise secteur et
la fi che du chargeur de la prise de charge 5
sur l'appareil.
7) Fermez la prise de charge 5 avec la protection
anti-poussière.
12
SABD 3.6 Li A1
Page 16

Travailler avec
le balai électrique
AVERTISSEMENT !
RISQUE DE BLESSURES!
Tenez l'extrémité de la brosse rouleau 9 rotative,
les tiges et ouvertures de l'appareil éloignées du
visage et du corps.
REMARQUE
N'utilisez jamais l'appareil avec un bac à poussière 8 retiré. Le nettoyage consisterait alors
uniquement à soulever la poussière!
■ Appuyez sur l'interrupteur 4 pour mettre en
marche le balai électrique.
■ Passez maintenant le balai électrique sur le sol.
■ En appuyant à nouveau sur l'interrupteur 4,
l'appareil s'éteint.
Vous pouvez laisser le manche 2 en position
verticale lorsque vous interrompez le travail.
REMARQUE
Il est possible que le balai électrique bourdonne
ou vibre sur certains tapis. Travaillez dans ce cas
plus lentement ou dans le sens opposé.
ATTENTION!
RISQUE DE DÉGÂTS MATÉRIELS!
► N'utilisez pas de produits nettoyants abrasifs
ou agressifs. Ceux-ci peuvent en eff et endommager les surfaces!
Boîtier
■ Essuyez le boîtier de l'appareil à l'aide d'un
chiff on humide. Si nécessaire, versez un peu
de liquide vaisselle sur le chiff on.
■ Assurez-vous que l'appareil est entièrement sec,
avant de le raccorder à nouveau au chargeur.
Bac à poussière
Pour préserver la performance du balai électrique,
videz le bac à poussière 8 après chaque utilisation.
■ Appuyez sur le bouton de déverrouillage 7
du bac à poussière 8 pour le détacher de
l'appareil.
■ Retirez le bac à poussière 8 de l'appareil
pendant que vous appuyez sur le bouton de
déverrouillage 7.
■ Videz le bac à poussière 8 et remettez-le en
place sur l'appareil de manière à ce qu'il soit
correctement fi xé et qu'il s'enclenche sur le
bouton de déverrouillage 7.
FR
CH
Nettoyage et entretien
DANGER -
RISQUE D'ÉLECTROCUTION!
Ne nettoyez pas l'appareil au cours du
►
processus de chargement. Avant de procéder
au nettoyage de l'appareil, retirez toujours le
chargeur de la prise !
Ne plongez jamais l'appareil dans de l'eau
ou d'autres liquides!
AVERTISSEMENT !
RISQUE DE BLESSURES!
Veillez à ce que l'appareil ne soit pas allumé par
inadvertance lorsque le bac à poussière 8 est retiré ou lors du nettoyage de la brosse rouleau 9.
Risque de blessures!
SABD 3.6 Li A1
Brosse rouleau
Si la brosse rouleau 9 ne tourne plus parce que
des saletés ou des fi ls de taille importante se sont
accumulés, procédez comme suit :
démontez la brosse rouleau 9 :
1) tournez le balai électrique et tenez-le de
manière à ce que la face plate avec la brosse
rouleau 9 pointe vers vous.
2) Repoussez le petit verrouillage 0 de manière
à pouvoir retirer le cache latéral.
3) Retirez le cache latéral.
4) Retirez la brosse rouleau 9 du boîtier.
13
Page 17

5) Éliminez les saletés (des deux côtés des poils)
et nettoyez la brosse rouleau 9.
Remettez la brosse rouleau 9 en place :
FR
1) Glissez un côté de la brosse rouleau 9 sur
CH
l'axe moteur q.
2) Glissez l'extrémité rectangulaire de la brosse
rouleau 9 dans le boîtier de manière à ce
que la brosse rouleau 9 soit à nouveau droite
dans le boîtier.
3) Replacez le cache sur le boîtier et repoussez
à nouveau le verrouillage 0 de manière à ce
que le cache soit bien serré.
Rangement
ATTENTION!
RISQUE DE DÉGÂTS MATÉRIELS!
Assurez-vous que l'appareil est éteint avant
►
de le ranger. La batterie risquerait sinon
d'être détériorée par la décharge totale.
■ Conservez l'appareil nettoyé dans un endroit
sec, propre et exempt de poussières.
Dépannage
L'appareil ne démarre pas.
■ L'appareil est déchargé. Rechargez d'abord
l'appareil.
■ L'appareil est défectueux. Adressez-vous au
service après-vente.
La brosse rouleau 9 est très bruyante
lorsqu'elle tourne.
■ La brosse rouleau 9 est encrassée. Nettoyez
la brosse rouleau 9.
■ La brosse rouleau 9 n'est pas mise en place
correctement. Vérifi ez si la brosse rouleau 9
est correctement mise en place et corrigez si
nécessaire le montage.
Garantie et service
Cet appareil est garanti 3 ans à partir de la
date d'achat. L'appareil a été fabriqué avec
soin et consciencieusement contrôlé avant sa
livraison. Veuillez conserver le ticket de caisse
en guise de preuve d'achat. Dans le cas où la
garantie s'applique, veuillez appeler le service
après-vente compétent. Cette condition doit être
respectée pour assurer l'expédition gratuite de
votre marchandise.
La prestation de garantie s'applique uniquement
aux vices de matériau ou de fabrication, et non
aux dégâts de transport, aux pièces d'usure ou
aux dégâts subis par des pièces fragiles telles que
les commutateurs ou les batteries. Le produit est
destiné uniquement à un usage privé et ne répond
pas à un usage professionnel.
La garantie est annulée en cas de manipulation
incorrecte et inappropriée, d'usage de la force et
en cas d'intervention non réalisée par notre centre
de service après-vente agréé.
Vos droits légaux ne sont pas restreints par la
présente garantie.
L'exercice de la garantie ne prolonge pas la
période de garantie. Cette disposition s'applique
également aux pièces remplacées ou réparées.
Signalez sans attendre toute anomalie éventuelle
sur le matériel au moment de l'achat, au plus tard
deux jours après la date d'achat. Toute réparation
fera l'objet d'une facturation après expiration de la
période de garantie.
Service France
Tel.: 0800 919270
E-Mail: kompernass@lidl.fr
IAN 100114
Service Suisse
Tel.: 0842 665566 (0,08 CHF/Min.,
mobile max. 0,40 CHF/Min.)
E-Mail: kompernass@lidl.ch
IAN 100114
Heures de service de notre hotline :
du lundi au vendredi de 8 h à 20 h (HEC)
14
SABD 3.6 Li A1
Page 18

Mise au rebut
L'appareil et la batterie doivent être mis au rebut
séparément.
Mise au rebut de l'appareil
Ne jamais jeter l'appareil avec
les ordures ménagères. Ce
produit est assujetti à la directive européenne 2012/19/EU.
Éliminez l'appareil par l'intermédiaire d'une entreprise de traitement des déchets autorisée ou via le
service de recyclage de votre commune. Respectez
la réglementation en vigueur. En cas de doute,
veuillez contacter votre centre de recyclage.
Mise au rebut des batteries
Ne pas jeter les piles/batteries avec
les ordures ménagères. Chaque
consommateur est légalement tenu
de rapporter les piles/batteries à un
point de collecte de sa commune/son
quartier ou dans le commerce.
Cette obligation a pour objectif d'assurer la mise
au rebut écologique des piles et batteries. Ne jetez
que des piles/batteries à l'état déchargé.
Dans le cadre d'une mise au rebut respectueuse de
l'environnement, les batteries doivent être retirées
de l'appareil:
DANGER - RISQUE D'ÉLECTROCUTION!
Retirez l'appareil du réseau électrique lorsque
►
vous retirez la batterie!
ATTENTION!
RISQUE DE DÉGÂTS MATÉRIELS!
Ne retirez la batterie de l'appareil qu'à partir
►
du moment où vous avez l'intention de mettre
l'appareil au rebut/de le recycler! L'appareil
est défectueux si vous avez retiré la batterie!
1) Retirez le bac à poussière 8.
2) Tournez le balai électrique et tenez-le de
manière à ce que la face plate avec la brosse
rouleau 9 soit tournée vers vous.
3) Retirez la brosse rouleau 9 comme décrit
dans le chapitre «Nettoyage et entretien».
4) À l’aide d’un objet plat, par exemple un
tournevis, levez les deux petits rouleaux à
l’extérieur de la brosse rouleau. Desserrez les
vis situées en dessous.
5) Desserrez les 2 vis à tête cruciforme du cache
plastique noir et retirez-les.
6) Desserrez les 3 vis à tête cruciforme restantes
de la partie plastique inférieure et retirez-les.
Vous pouvez maintenant retirer la courroie
d'entraînement.
7) Retirez la courroie d'entraînement sur le côté
et sortez la roue d'entraînement du rail par le
haut.
8) Desserrez les 4 vis à tête cruciforme du bloc
moteur et retirez le cache du bloc moteur.
9) Retirez les câbles qui mènent à la batterie et
retirez cette dernière pour l'éliminer de manière
respectueuse de l'environnement.
Recycler l'emballage
L'emballage est réalisé à l'aide de
matériaux écologiques qu'il est possible
d'éliminer auprès de centres de recyclage proches de chez vous.
Importateur
KOMPERNASS HANDELS GMBH
BURGSTRASSE 21
44867 BOCHUM
GERMANY
www.kompernass.com
FR
CH
SABD 3.6 Li A1
15
Page 19

16
SABD 3.6 Li A1
Page 20

Indice
Introduzione . . . . . . . . . . . . . . . . . . . . . . . . . . . . . . . . . . . . . . . . . . . . . . . . . . . . . . . . .18
Uso conforme . . . . . . . . . . . . . . . . . . . . . . . . . . . . . . . . . . . . . . . . . . . . . . . . . . . . . . . . .18
Volume della fornitura . . . . . . . . . . . . . . . . . . . . . . . . . . . . . . . . . . . . . . . . . . . . . . . . .18
Descrizione dell'apparecchio . . . . . . . . . . . . . . . . . . . . . . . . . . . . . . . . . . . . . . . . . . . .18
Dati tecnici . . . . . . . . . . . . . . . . . . . . . . . . . . . . . . . . . . . . . . . . . . . . . . . . . . . . . . . . . . .18
Indicazioni relative alla sicurezza . . . . . . . . . . . . . . . . . . . . . . . . . . . . . . . . . . . . . . . .19
Prima del primo impiego . . . . . . . . . . . . . . . . . . . . . . . . . . . . . . . . . . . . . . . . . . . . . . .20
Assemblaggio della scopa elettrica . . . . . . . . . . . . . . . . . . . . . . . . . . . . . . . . . . . . . . . . . . . . . . . . . . .20
Caricamento della batteria . . . . . . . . . . . . . . . . . . . . . . . . . . . . . . . . . . . . . . . . . . . . . . . . . . . . . . . . . .20
Utilizzo della scopa elettrica . . . . . . . . . . . . . . . . . . . . . . . . . . . . . . . . . . . . . . . . . . . . .21
Pulizia e manutenzione . . . . . . . . . . . . . . . . . . . . . . . . . . . . . . . . . . . . . . . . . . . . . . . . .21
Alloggiamento. . . . . . . . . . . . . . . . . . . . . . . . . . . . . . . . . . . . . . . . . . . . . . . . . . . . . . . . . . . . . . . . . . . . 21
Contenitore dello sporco . . . . . . . . . . . . . . . . . . . . . . . . . . . . . . . . . . . . . . . . . . . . . . . . . . . . . . . . . . . . 21
Rullo a spazzola . . . . . . . . . . . . . . . . . . . . . . . . . . . . . . . . . . . . . . . . . . . . . . . . . . . . . . . . . . . . . . . . . . 21
Conservazione . . . . . . . . . . . . . . . . . . . . . . . . . . . . . . . . . . . . . . . . . . . . . . . . . . . . . . . .22
Eliminazione dei guasti . . . . . . . . . . . . . . . . . . . . . . . . . . . . . . . . . . . . . . . . . . . . . . . . .22
IT
CH
Garanzia e assistenza . . . . . . . . . . . . . . . . . . . . . . . . . . . . . . . . . . . . . . . . . . . . . . . . . .22
Smaltimento . . . . . . . . . . . . . . . . . . . . . . . . . . . . . . . . . . . . . . . . . . . . . . . . . . . . . . . . . .23
Smaltimento dell'apparecchio . . . . . . . . . . . . . . . . . . . . . . . . . . . . . . . . . . . . . . . . . . . . . . . . . . . . . . . . 23
Smaltimento batterie . . . . . . . . . . . . . . . . . . . . . . . . . . . . . . . . . . . . . . . . . . . . . . . . . . . . . . . . . . . . . . .23
Smaltimento dell'imballaggio . . . . . . . . . . . . . . . . . . . . . . . . . . . . . . . . . . . . . . . . . . . . . . . . . . . . . . . .23
Importatore . . . . . . . . . . . . . . . . . . . . . . . . . . . . . . . . . . . . . . . . . . . . . . . . . . . . . . . . . .23
SABD 3.6 Li A1
17
Page 21

Introduzione
Congratulazioni per l'acquisto del Suo nuovo
apparecchio.
È stato acquistato un prodotto di alta qualità. Il
manuale di istruzioni è parte integrante del presente
prodotto. Esso contiene importanti indicazioni per
la sicurezza, l'uso e lo smaltimento. Prima di utiliz-
IT
zare il prodotto, familiarizzarsi con tutte le indicazioni
relative ai comandi e alla sicurezza.
CH
Utilizzare l'apparecchio solo come descritto e per
i campi d'impiego indicati. In caso di cessione del
prodotto a terze persone, consegnare anche tutta
la relativa documentazione.
Uso conforme
Questo apparecchio è previsto esclusivamente per
eliminare sporco asciutto in locali chiusi e asciutti.
Questo apparecchio è destinato esclusivamente
ad un uso privato.
Non utilizzare l'apparecchio a fi ni commerciali.
Usare l'apparecchio solo nel modo descritto in
queste istruzioni.
Volume della fornitura
■ Scopa a batteria ricaricabile
■ Caricatore
■ Bastone (3 elementi e impugnatura)
■ Istruzioni per l'uso
Descrizione dell'apparecchio
Figura A:
1 Impugnatura
2 Bastone (3 elementi)
3 Attacco
Figura B:
4 Interruttore
5 Presa di carica (con protezione dalla polvere)
6 Spia di carica
7 Pulsante di sbloccaggio
8 Contenitore di raccolta dello sporco
Figura C:
9 Rullo a spazzola
0 Blocco
q Albero motore
Figura D:
w Leva di arresto
Dati tecnici
Caricatore
Ingresso: 100 - 240 V ~,
50 / 60 Hz,
0,3 A max.
Uscita: 5 V
Nome del modello: SABD 3.6 Li A1-1
Classe di protezione: II /
Fabricante: Kompernass Handels
Scopa elettrica
Tensione/corrente di
ingresso: 5 V
Tensione di lavoro della
batteria: 3,7 V
Batteria: batteria agli ioni di litio
1 x 3,7 V, 1800 mAh
Tempo necessario per il
caricamento della batteria
scarica: 5 ore
Durata di funzionamento
a batteria completamente
carica (a seconda
del tipo di pavimento): ca. 50 min
Classe di protezione: III /
500 mA
GmbH
500 mA
18
SABD 3.6 Li A1
Page 22

Indicazioni relative alla sicurezza
PERICOLO DI FOLGORAZIONE!
► Non caricare mai l'apparecchio in presenza di alimentatore di rete dan-
neggiato! Sostituire immediatamente l'alimentatore danneggiato, per evitare
pericoli. In tal caso rivolgersi al servizio clienti.
► Fare sostituire immediatamente il cavo dell'alimentatore o la spina danneg-
giati da personale specializzato autorizzato, per evitare rischi.
► Assicurarsi che durante il funzionamento il cavo di rete non sia esposto
all'acqua o all'umidità. Collocarlo in modo tale da impedirne il bloccaggio
o il danneggiamento.
ATTENZIONE! PERICOLO DI LESIONI!
► Utilizzare l'apparecchio solo con gli accessori forniti in dotazione.
► Non impiegare l'apparecchio per scopare su superfi ci in calcestruzzo lavato,
pietrisco o simili.
► Non impiegare l'apparecchio per pulire tappeti a pelo alto o pavimenti
bagnati.
► Questo apparecchio può essere utilizzato dai bambini di almeno 8 anni di
età e da persone con capacità fi siche, sensoriali o mentali ridotte o insuffi ciente esperienza o conoscenza, solo se sorvegliati o istruiti sull'uso sicuro
dell'apparecchio e qualora ne abbiano compreso i pericoli associati.
► I bambini non devono giocare con l'apparecchio.
► La pulizia e la manutenzione a cura dell'utente non devono essere eseguite
da bambini, a meno che non siano sorvegliati.
► Utilizzare questo apparecchio solo per l'uso conforme a quanto descritto
nelle presenti istruzioni per l'uso.
► Questo prodotto contiene batterie ricaricabili. Non gettare mai le batterie nel
fuoco e non esporle a temperature elevate. Sussiste il pericolo di esplosione!
► Non utilizzare l'apparecchio come giocattolo.
► Non lasciare che i bambini utilizzino l'apparecchio senza essere sorvegliati.
IT
CH
SABD 3.6 Li A1
19
Page 23

ATTENZIONE! PERICOLO DI DANNI MATERIALI!
► Caricare l'apparecchio solo con l'adattatore di rete / il caricatore fornito in
dotazione (tipo SABD 3.6 Li A1-1)!
► Con l'accluso caricabatteria si deve caricare esclusivamente la scopa
elettrica, poiché esso non è idoneo per altri tipi di batteria.
IT
CH
► Non tentare mai di ricaricare pile non ricaricabili.
Prima del primo impiego
■ Rimuovere tutti i materiali di imballaggio dal-
l'apparecchio. Anche la sicura in plastica che
protegge l'interruttore 4 dall'azionamento
accidentale durante il trasporto.
Assemblaggio della scopa elettrica
■ Montare il bastone 2:
– Congiungere i 3 elementi del bastone 2 in
modo tale che i dispositivi di arresto ovali w
presenti nei fori scattino in posizione.
– Infi lare l'impugnatura 1 nel bastone in
modo tale che il dispositivo di arresto
dell'impugnatura 1 spunti nel foro del
bastone 2.
– Infi lare il bastone 2 così montato con il
dispositivo di arresto w nell'attacco 3
dell'apparecchio.
■ Infi lare il contenitore di raccolta dello sporco 8
sull'apparecchio in modo tale che il contenitore
scatti in posizione sul pulsante di sbloccaggio 7.
ATTENZIONE!
PERICOLO DI DANNI MATERIALI!
►
► Azionare l'apparecchio solo con la batteria
► Non cercare di smontare la batteria per caricare.
► Non cercare di aprire l'involucro della batte-
1) Per caricare la batteria, la scopa elettrica deve
AVVERTENZA
Non utilizzare la scopa elettrica quando l'apparecchio è collegato al caricatore!
2) Aprire la protezione contro la polvere che
3) Infi lare la spina del caricatore nella presa di
4) Durante il processo di caricamento la spia
Caricamento della batteria
Affi nché la batteria mantenga la sua piena effi cienza, è necessario che prima del primo utilizzo
la batteria venga caricata per ca. 5 ore. Ulteriori
caricamenti necessitano, a seconda di quanto la
batteria si è scaricata, di un massimo di 5 ore.
A batteria completamente carica l'apparecchio
off re una durata di funzionamento autonomo di
ca. 50 minuti prima che sia necessario un nuovo
caricamento.
5) Quando la batteria è carica, la spia di carica 6
6) Staccare il caricatore dalla presa di corrente e
7) Chiudere la presa di carica 5 con la protezione
Utilizzare solo il caricatore fornito in dotazione.
in esso incorporata.
ria o di smontare la batteria, ciò comporterebbe la sua distruzione.
essere spenta. Spegnerla all'occorrenza premendo l'interruttore 4.
chiude la presa di carica 5.
carica 5 dell'apparecchio e poi la spina in
una presa.
di carica 6 è accesa ed è di colore rosso.
Qualora non fosse così, controllare i collegamenti a spina e verifi care se la scopa elettrica
è eff ettivamente spenta.
è accesa ed è di colore verde. A questo punto si
può utilizzare nuovamente l'apparecchio con la
piena potenza.
la spina del caricatore dalla presa di carica 5
dell'apparecchio.
dalla polvere.
20
SABD 3.6 Li A1
Page 24

Utilizzo della scopa elettrica
ATTENZIONE! PERICOLO DI LESIONI!
Tenere l'estremità del rullo a spazzola rotante 9,
le barre e i fori dell'apparecchio lontani da viso
e corpo.
AVVERTENZA
Non utilizzare mai l'apparecchio senza contenitore dello sporco 8. Altrimenti lo sporco viene
solo agitato e non eliminato!
■ Per accendere la scopa elettrica, premere
l'interruttore 4.
■ Passare ora la scopa elettrica lungo il pavimento.
■ Se si preme nuovamente l'interruttore 4, l'appa-
recchio si spegne.
In caso di interruzione del lavoro, si può lasciare
il bastone 2 bloccato in posizione verticale.
AVVERTENZA
Nel caso di alcuni tipi di tappeto, la scopa elettrica potrebbe vibrare o saltellare. In questa
circostanza lavorare lentamente e procedere
nella direzione opposta.
ATTENZIONE!
PERICOLO DI DANNI MATERIALI!
Non utilizzare detergenti abrasivi o aggressivi.
►
Essi potrebbero danneggiare le superfi ci!
Alloggiamento
■ Strofi nare l'alloggiamento dell'apparecchio con
un panno umido. Se necessario, versare sul
panno un detergente delicato.
■ Assicurarsi che l'apparecchio sia completamente
asciutto prima di connetterlo al caricabatteria.
Contenitore dello sporco
Per mantenere l'effi cienza della scopa elettrica,
scaricare il contenitore dello sporco 8 dopo ogni
utilizzo.
■ Per staccarlo dall'apparecchio, premere il
pulsante di sbloccaggio 7 del contenitore dello
sporco 8.
■ Sfi lare il contenitore dello sporco 8 dall'apparec-
chio mentre si preme il pulsante di sbloccaggio 7.
■ Scaricare il contenitore dello sporco 8 e
infi larlo nuovamente sull'apparecchio in modo
tale che sia ben fi sso e scatti in posizione sul
pulsante di sbloccaggio 7.
IT
CH
Pulizia e manutenzione
PERICOLO DI FOLGORAZIONE!
Non pulire l'apparecchio mentre è in carica.
►
Prima della pulizia disconnettere sempre
l'apparecchio dalla presa elettrica!
Non immergere mai l'apparecchio in acqua
o altri liquidi!
ATTENZIONE! PERICOLO DI LESIONI!
Impedire che l'apparecchio venga acceso accidentalmente, se il contenitore dello sporco 8 è
stato rimosso o se si intende pulire il rullo a
spazzola 9. Pericolo di lesioni!
SABD 3.6 Li A1
Rullo a spazzola
Qualora il rullo a spazzola 9 cessasse di ruotare
perché si sono accumulati fi li o grandi quantità di
sporco, procedere come segue:
smontare il rullo a spazzola 9:
1) Girare la scopa elettrica e tenerla in una posizione tale che il lato piatto con il rullo a spazzola 9 sia rivolto verso l'utente.
2) Riportare indietro il piccolo interblocco 0
in modo tale che sia possibile rimuovere la
copertura che si trova sul lato.
3) Rimuovere la copertura.
4) Sfi lare il rullo a spazzola 9 dall'involucro.
21
Page 25

5) Rimuovere lo sporco (su entrambi i lati delle
setole) e pulire il rullo a spazzola 9.
Reintrodurre il rullo a spazzola 9:
1) Infi lare un lato del rullo a spazzola 9 sull'albero
motore q.
2) Infi lare l'estremità angolare del rullo a spaz-
IT
CH
zola 9 nell'involucro in modo tale che il rullo
a spazzola 9 sia nuovamente sistemato in
posizione diritta nell'involucro.
3) Rimettere la copertura sull'involucro e riportare
indietro l'interblocco 0 in modo che la copertura
sia ben fi ssa.
Conservazione
ATTENZIONE!
PERICOLO DI DANNI MATERIALI!
Assicurarsi che l'apparecchio sia spento prima
►
di ritirarlo. Altrimenti la batteria potrebbe
danneggiarsi per via della conseguente
scarica profonda.
■ Riporre l'apparecchio pulito in un luogo asciutto,
privo di polvere e pulito.
Eliminazione dei guasti
L'apparecchio non si avvia.
■ L'apparecchio è scarico. Ricaricare l'apparecchio.
■ L'apparecchio è guasto. Rivolgersi al servizio
clienti.
Il rullo a spazzola 9 fa rumore mentre ruota.
■ Il rullo a spazzola 9 è sporco. Pulire il rullo a
spazzola 9.
■ Il rullo a spazzola 9 non è stato inserito corretta-
mente. Verifi care se il rullo a spazzola 9 è cor-
rettamente inserito e all'occorrenza correggerne
il montaggio.
Garanzia e assistenza
Questo apparecchio è garantito per tre anni a
partire dalla data di acquisto. L'apparecchio è
stato prodotto con cura e debitamente collaudato
prima della consegna. Conservare lo scontrino
come prova di acquisto. Nei casi contemplati
dalla garanzia, mettersi in comunicazione telefonicamente con il centro di assistenza più vicino.
Solo in tal modo è possibile garantire una spedizione gratuita della merce.
La garanzia vale solo per difetti del materiale o di
fabbricazione, ma non per i danni da trasporto,
danni alle parti soggette a usura o alle parti fragili,
come per es. interruttori o batterie. Il prodotto è
destinato esclusivamente all'uso domestico e non a
quello commerciale.
La garanzia decade in caso di impiego improprio
o manomissione, uso della forza e interventi non
eseguiti dalla nostra fi liale di assistenza autorizzata.
Questa garanzia non costituisce alcun limite ai
diritti legali del consumatore.
Il periodo di garanzia non viene prolungato da
interventi in garanzia. Ciò vale anche per le parti
sostituite e riparate. I danni e difetti eventualmente
presenti già all'atto dell'acquisto devono venire
comunicati immediatamente dopo il disimballo, e
comunque entro e non oltre due giorni dalla data
di acquisto. Le riparazioni eseguite dopo la scadenza del periodo di garanzia sono a pagamento.
Assistenza Italia
Tel.: 02 36003201
E-Mail: kompernass@lidl.it
IAN 100114
Assistenza Svizzera
Tel.: 0842 665566 (0,08 CHF/Min.,
telefonia mobile max. 0,40 CHF/Min.)
E-Mail: kompernass@lidl.ch
IAN 100114
Raggiungibilità della hotline:
dal lunedì al venerdì, dalle 8.00 alle 20.00 (CET)
22
SABD 3.6 Li A1
Page 26

Smaltimento
Smaltire l'apparecchio e la batteria separatamente.
Smaltimento dell'apparecchio
Non smaltire per alcun motivo
l'apparecchio assieme ai normali rifi uti domestici. Questo
prodotto è soggetto alla Direttiva Europea 2012/ 19/EU-RAEE.
Smaltire l'apparecchio attraverso un'azienda di
smaltimento autorizzata o attraverso l'ente di smaltimento comunale. Rispettare le norme attualmente
in vigore. In caso di dubbi mettersi in contatto con
l'ente di smaltimento competente.
Smaltimento batterie
Le batterie / pile non devono essere
smaltite insieme ai rifi uti domestici.
Ogni utente è obbligato per legge a
consegnare pile/batterie usate presso gli appositi centri di raccolta della
propria città o del proprio quartiere,
o presso i punti vendita.
Questo obbligo è fi nalizzato allo smaltimento
ecologico delle pile e/o delle batterie. Restituire le
pile/le batterie solo se scariche.
Per smaltire ecologicamente l'apparecchio, rimuovere
la batteria:
PERICOLO DI FOLGORAZIONE!
► Disconnettere l'apparecchio dalla rete elet-
trica prima di rimuovere la batteria!
ATTENZIONE!
PERICOLO DI DANNI MATERIALI!
Rimuovere la batteria dall'apparecchio solo
►
se si desidera smaltire l'apparecchio! L'apparecchio si guasta non appena si rimuove la
batteria!
1) Rimuovere il contenitore dello sporco 8.
2) Girare la scopa elettrica e tenerla in una
posizione tale che il lato piatto con il rullo a
spazzola 9 sia rivolto verso l'utente.
3) Rimuovere il rullo a spazzola 9 come descritto
al capitolo "Pulizia e manutenzione".
4) Facendo leva con un oggetto piatto, per esempio un cacciavite, sollevare le due rotelle che
si trovano a destra e a sinistra del rullo a
spazzola. Svitare le viti che si trovano sotto.
5) Svitare le due viti con intaglio a croce che
si trovano sulla copertura di plastica nera e
rimuovere quest'ultima.
6) Svitare le tre viti con intaglio a croce rimaste
sul componente in plastica inferiore e rimuovere
quest'ultimo. A questo punto è possibile vedere
la cinghia di trasmissione.
7) Rimuovere la cinghia di trasmissione che si
trova sul lato ed estrarre la ruota motrice dalla
guida tirandola verso l'alto.
8) Svitare le quattro viti con intaglio a croce che
si trovano sul blocco motore e rimuovere la
copertura di quest'ultimo.
9) Staccare i cavi che portano alla batteria e
rimuovere quest'ultima per smaltirla in modo
ecocompatibile.
Smaltimento dell'imballaggio
L'imballaggio è composto di materiali
ecocompatibili, che possono essere
smaltiti tramite gli appositi centri di
raccolta e riciclaggio.
Importatore
KOMPERNASS HANDELS GMBH
BURGSTRASSE 21
44867 BOCHUM
GERMANY
www.kompernass.com
IT
CH
SABD 3.6 Li A1
23
Page 27

24
SABD 3.6 Li A1
Page 28

Contents
Introduction . . . . . . . . . . . . . . . . . . . . . . . . . . . . . . . . . . . . . . . . . . . . . . . . . . . . . . . . . .26
Intended use . . . . . . . . . . . . . . . . . . . . . . . . . . . . . . . . . . . . . . . . . . . . . . . . . . . . . . . . .26
Package contents. . . . . . . . . . . . . . . . . . . . . . . . . . . . . . . . . . . . . . . . . . . . . . . . . . . . . .26
Appliance description . . . . . . . . . . . . . . . . . . . . . . . . . . . . . . . . . . . . . . . . . . . . . . . . . .26
Technical data . . . . . . . . . . . . . . . . . . . . . . . . . . . . . . . . . . . . . . . . . . . . . . . . . . . . . . . .26
Safety guidelines . . . . . . . . . . . . . . . . . . . . . . . . . . . . . . . . . . . . . . . . . . . . . . . . . . . . . .27
Before initial use . . . . . . . . . . . . . . . . . . . . . . . . . . . . . . . . . . . . . . . . . . . . . . . . . . . . . .28
Assembly of the cordless sweeper . . . . . . . . . . . . . . . . . . . . . . . . . . . . . . . . . . . . . . . . . . . . . . . . . . . . 28
Charging the battery . . . . . . . . . . . . . . . . . . . . . . . . . . . . . . . . . . . . . . . . . . . . . . . . . . . . . . . . . . . . . . . 28
Working with the cordless sweeper . . . . . . . . . . . . . . . . . . . . . . . . . . . . . . . . . . . . . .29
Cleaning and care . . . . . . . . . . . . . . . . . . . . . . . . . . . . . . . . . . . . . . . . . . . . . . . . . . . . .29
Housing . . . . . . . . . . . . . . . . . . . . . . . . . . . . . . . . . . . . . . . . . . . . . . . . . . . . . . . . . . . . . . . . . . . . . . . . . 29
Dirt container . . . . . . . . . . . . . . . . . . . . . . . . . . . . . . . . . . . . . . . . . . . . . . . . . . . . . . . . . . . . . . . . . . . .29
Rotary brush . . . . . . . . . . . . . . . . . . . . . . . . . . . . . . . . . . . . . . . . . . . . . . . . . . . . . . . . . . . . . . . . . . . . . 29
Storage . . . . . . . . . . . . . . . . . . . . . . . . . . . . . . . . . . . . . . . . . . . . . . . . . . . . . . . . . . . . . .30
Troubleshooting . . . . . . . . . . . . . . . . . . . . . . . . . . . . . . . . . . . . . . . . . . . . . . . . . . . . . . .30
Warranty and service . . . . . . . . . . . . . . . . . . . . . . . . . . . . . . . . . . . . . . . . . . . . . . . . . .30
Disposal . . . . . . . . . . . . . . . . . . . . . . . . . . . . . . . . . . . . . . . . . . . . . . . . . . . . . . . . . . . . .31
Disposal of the appliance . . . . . . . . . . . . . . . . . . . . . . . . . . . . . . . . . . . . . . . . . . . . . . . . . . . . . . . . . . . 31
Disposal of batteries . . . . . . . . . . . . . . . . . . . . . . . . . . . . . . . . . . . . . . . . . . . . . . . . . . . . . . . . . . . . . . . 31
Disposal of packaging . . . . . . . . . . . . . . . . . . . . . . . . . . . . . . . . . . . . . . . . . . . . . . . . . . . . . . . . . . . . .31
Importer . . . . . . . . . . . . . . . . . . . . . . . . . . . . . . . . . . . . . . . . . . . . . . . . . . . . . . . . . . . . .31
GB
SABD 3.6 Li A1
25
Page 29

Introduction
Congratulations on the purchase of your new
appliance.
You have selected a high-quality product.
The operating instructions are part of this product.
They contain important information on safety, usage
and disposal. Before using the product, familiarise
yourself with all handling and safety guidelines.
Use the product only as described and for the range
of applications specifi ed. Please also pass these
operating instructions on to any future owner(s).
GB
Intended use
This appliance is intended only for sweeping dry
dirt in dry closed rooms.
The appliance is intended exclusively for domestic
use.
Not for commercial use! Use the appliance only
as described in this manual.
Appliance description
Figure A:
1 Grip
2 Handle (3 elements)
3 Holder
Figure B:
4 Switch
5 Charging socket (with dust cover)
6 Charge indicator
7 Release knob
8 Dirt container
Figure C:
9 Rotary brush
0 Catch
q Drive shaft
Figure D:
w Locking studs
Package contents
■ Rechargeable Floor Sweeper
■ Charger
■ Handle (3 elements and grip)
■ Operating instructions
Technical data
Charger
Input: 100 - 240V ~,
50/60Hz,
0.3A max.
Output: 5 V
Type designation: SABD 3.6 Li A1-1
Protection class: II /
Manufacturer: Kompernass Handels GmbH
Cordless sweeper
Input voltage/current: 5 V
Battery working voltage: 3.7 V
Battery: High-capacity
Charging time with
empty battery: 5 hrs.
Operating time with full
battery charge (depending
on fl oor covering): approx. 50 min.
Protection class: III /
500 mA
500 mA
Li-ion battery
1 x 3.7V, 1800mAh
26
SABD 3.6 Li A1
Page 30

Safety guidelines
DANGER – ELECTRIC SHOCK!
► Never charge the appliance with a damaged power adapter! To avoid
risks, replace a damaged power adapter immediately. To do this, contact
Customer Services.
► To avoid risks, arrange to have damaged power cables and/or plugs
replaced as soon as possible by a qualifi ed specialist.
► Ensure that the power cable does not become wet or moist during use.
Route the cable in such a way that it cannot be crushed or damaged.
WARNING! RISK OF INJURY!
► Operate the appliance only with the supplied accessories.
► Do not use the appliance to sweep exposed concrete, gravel or similar
surfaces.
► Do not use the appliance to clean deep-pile carpets or wet fl oor coverings.
► This appliance may be used by children aged 8 years and above and by
persons with limited physical, sensory or mental capabilities or lack of experience and knowledge, provided that they are under supervision or have been
told how to use the appliance safely and are aware of the potential risks.
► Children must not use the appliance as a plaything.
► Cleaning and user maintenance tasks may not be carried out by children
unless they are supervised.
► Only use this appliance for its intended purpose as described in this operating
instructions.
► This product contains rechargeable batteries. Do not throw the batteries
into a fi re and do not subject them to high temperatures. There is a risk of
explosion!
► Do not use the appliance as a toy.
► Never leave children unsupervised in the vicinity of the appliance!
GB
SABD 3.6 Li A1
27
Page 31

ATTENTION! PROPERTY DAMAGE!
► Charge the appliance only with the supplied mains adapter/charger
(type SABD 3.6 Li A1-1)!
► Only this cordless sweeper may be charged with the supplied battery
charger; the charger is not suitable for other batteries.
► Never try to recharge non-rechargeable batteries.
Before initial use
GB
■ Remove all packaging materials from the ap-
pliance. Including the plastic safety catch that
secures the switch 4 from accidental activation
during transportation.
Assembly of the cordless sweeper
■ Attach the handle 2:
– put the 3 handle elements 2 together so
that the oval locking studs w click into the
holes.
– Press the grip 1 into the handle so that the
locking stud on the grip 1 protrudes into
the hole in the handle 2.
– Push the assembled handle 2 with the
locking stud w into the holder 3 on the
appliance.
■ Push the dirt container 8 onto the appliance
so that the release knob 7 clicks into place.
Charging the battery
To ensure that the battery reaches its full performance potential, it is necessary to charge the battery for around 5 hours before the fi rst use. Further
charges will take up to 5 hours depending on the
discharge level of the battery.
With a fully charged battery, the appliance provides
an operating time of 50 minutes before recharging
will be again required.
ATTENTION! MATERIAL DAMAGE!
Use only the supplied charger.
►
► Operate the appliance only with the built-in
battery.
► Never attempt to remove the battery to
recharge it.
► Do not attempt to open the battery housing
or dismantle the battery. This will destroy it.
1) To charge the battery, ensure that the cordless
sweeper is switched off .
Switch it off using the switch 4 if required.
NOTE
Do not use the cordless sweeper when it is connected to the charger.
2) Open the dust cover that closes the charging
socket 5.
3) Insert the plug of the battery charger into the
charging socket 5 of the appliance and then
attach the mains plug to a mains power outlet.
4) While the battery is charging, the charge indicator 6 lights up red. If this is not the case,
check the connectors and whether the cordless
sweeper is switched off .
5) Once the battery is fully charged, the charge
indicator 6 lights up green. You can now use
the appliance with full power again.
6) First unplug the charger from the mains power
socket and then the charger plug from the
charging socket 5 on the appliance.
7) Close the charging socket 5 with the dust cover.
28
SABD 3.6 Li A1
Page 32

Working with the
cordless sweeper
WARNING! RISK OF INJURY!
Hold the end of the rotary brush 9, the rod and
the appliance openings away from your face
and body.
NOTE
Never use the appliance without the dirt container 8 attached. The dirt will simply be swirled up!
■ Press the switch 4 to switch the cordless
sweeper on.
■ Move the cordless sweeper across the fl oor.
■ By pressing the switch 4 again, you will turn
the appliance off .
You can leave the handle 2 engaged in the vertical
position during breaks.
NOTE
On some kinds of carpets, the cordless sweeper
may clatter or jump. If this is the case, work
slowly and in the opposite direction.
ATTENTION! MATERIAL DAMAGE!
Do not use abrasive or aggressive cleaning
►
materials. These may damage the surfaces of
your appliance.
Housing
■ Wipe off the housing of the appliance with a
damp cloth. If required, use a mild detergent on
the cloth.
■ Ensure that the appliance is completely dry
before reconnecting it with the battery charger.
Dirt container
To ensure that the performance of the cordless
sweeper does not deteriorate, empty the dirt
container 8 after every use.
■ Press the release knob 7 of the dirt container 8
to detach it from the appliance.
■ Pull the dirt container 8 off the appliance while
keeping the release knob 7 pressed.
■ Empty the dirt container 8 and push it back
onto the appliance so that it sits fi rmly on the
appliance and clicks into place on the release
knob 7.
GB
Cleaning and care
DANGER – ELECTRIC SHOCK!
Do not clean the appliance while charging it.
►
Always disconnect the battery charger from
the mains power socket before cleaning the
appliance!
NEVER immerse the appliance in water or
any other liquid!
WARNING! RISK OF INJURY!
Ensure that the appliance is not accidentally
switched on without the dirt container 8 at-
tached or while cleaning the rotary brush 9.
Risk of injury!
SABD 3.6 Li A1
Rotary brush
If the rotary brush 9 stops turning because of a
severe dirt accumulation or because threads have
caught around it, proceed as follows:
Remove the rotary brush 9:
1) Turn the cordless sweeper around and hold it
so that the fl at side with the rotary brush 9 is
facing you.
2) Push the small catch 0 back so that the cover
can be removed at the side.
3) Remove the cover.
4) Pull the rotary brush 9 out of the appliance.
29
Page 33

5) Remove any dirt (on both sides of the brush
bristles) and clean the rotary brush 9.
Replace the rotary brush 9.
1) Push one side of the rotary brush 9 onto the
drive shaft q.
2) Push the square end of the rotary brush 9 into
the housing so that the rotary brush 9 sits
straight in the housing again.
3) Replace the cover on the housing and push
GB
the catch 0 back so that the cover sits fi rmly
in place.
Storage
ATTENTION! MATERIAL DAMAGE!
Ensure that the appliance is switched off
►
before putting it away. Otherwise the battery
could be damaged by excessive discharging.
■ Store the cleaned appliance in a clean, dust-free
and dry place.
Troubleshooting
The appliance will not start.
■ The battery is discharged. Recharge the appliance.
■ The appliance is defective. Contact Customer
Service.
The rotary brush 9 generates loud noises
when revolving.
■ The rotary brush 9 is soiled. Clean the rotary
brush 9.
■ The rotary brush 9 is not inserted properly.
Check whether the rotary brush 9 is correctly
fi tted and correct the fi tting if required.
Warranty and service
You are provided a 3-year warranty on this
appliance, valid from the date of purchase.
This appliance has been manufactured with care
and inspected meticulously prior to delivery.
Please retain your receipt as proof of purchase.
In the event of a warranty claim, please contact
your Customer Service unit by telephone. This is the
only way to guarantee free return of your goods.
The warranty only covers claims for material and
manufacturing defects, not for damage sustained
during carriage, components subject to wear and
tear or damage to fragile components such as
switches or batteries. This appliance is intended
solely for private use and not for commercial
purposes.
The warranty shall be deemed void in the case
of misuse or improper handling, use of force and
interventions which have not been carried out by
one of our authorised Service centres.
Your statutory rights are not restricted by this
warranty.
The warranty period is not prolonged by repairs
eff ected under the warranty. This also applies to
replaced and repaired components. Any damage
and defects present at the time of purchase must be
reported immediately after unpacking, but no later
than two days after the date of purchase. Repairs
eff ected after expiry of the warranty period shall
be subject to charge.
Service Great Britain
Tel.: 0871 5000 720 (£ 0.10/Min.)
E-Mail: kompernass@lidl.co.uk
IAN 100114
Hotline availability:
Monday to Friday 08:00 - 20:00 (CET)
30
SABD 3.6 Li A1
Page 34

Disposal
The appliance and the batteries must be disposed
of separately.
Disposal of the appliance
Under no circumstances should
the appliance be disposed of
in standard household waste.
This product is subject to
the provisions of European
Directive 2012/19/EU.
Dispose of the appliance via an approved waste
disposal company or your municipal waste disposal facility. Please observe applicable regulations.
Please contact your waste disposal centre if you are
in any doubt.
Disposal of batteries
Used batteries may not be disposed
of in the household waste. Consumers
are required by law to dispose of batteries at a collection point provided
by their local community or at a retail
store.
The purpose of this obligation is to ensure that batteries are disposed of in an environmentally sound
manner. Only dispose of batteries when they are
fully discharged.
To dispose of the appliance in an environmentally
friendly way, you must remove the battery from the
appliance:
DANGER – ELECTRIC SHOCK!
► Disconnect the appliance from the mains
power supply when you remove the battery!!
1) Remove the dirt collector 8.
2) Turn the cordless sweeper around and hold it
so that the fl at side with the rotary brush 9 is
facing you.
3) Remove the rotary brush 9 as described in
Chapter "Cleaning and Care".
4) Use a fl at object such as a screwdriver to lever
out the two small external rollers. Unscrew the
screws beneath.
5) Unscrew the 2 Phillips screws from the black
plastic cover and then remove it.
6) Unscrew the remaining 3 Phillips screws from
the plastic part beneath and then remove it.
You can now see the drive belt.
7) Remove the drive belt at the side and pull the
drive gear upwards out of the rail.
8) Unscrew the 4 Phillips screws on the motor
block and remove the cover of the motor block.
9) Snip the cables to the battery and remove the
battery for environmentally friendly disposal.
Disposal of packaging
The packaging for this product is made
from environmentally friendly material
and can be disposed of at your local
recycling plant.
Importer
KOMPERNASS HANDELS GMBH
BURGSTRASSE 21
44867 BOCHUM
GERMANY
www.kompernass.com
GB
ATTENTION! MATERIAL DAMAGE!
► Remove the battery from the appliance only if
you want to scrap/dispose of the appliance!
The appliance is permanently defective after
you have removed the battery!
SABD 3.6 Li A1
31
Page 35

32
SABD 3.6 Li A1
Page 36

KOMPERNASS HANDELS GMBH
BURGSTRASSE 21
44867 BOCHUM
DEUTSCHLAND / GERMANY
www.kompernass.com
Stand der Informationen · Version des informations
Versione delle informazioni · Last Information Update:
07 / 2014 · Ident.-No.: SABD3.6LiA1-042014-2
IAN 100114
1
 Loading...