

Siemens Gigaset Gigaset S1, Gigaset SL1 professional, iPath 500, HiPath 3000, Gigaset S1 professional Operating Manual
HiPath 3000 V3.0 or later
Gigaset SL1 professional
Gigaset S1 professional
in HiPath Cordless Office
Operating Manual
Safety notes
Safety notes
Handset
Danger:
• Do not use the handset in potentially explosive atmospheres.
• Do not install the handset in the vicinity of electronic equipment
to avoid mutual interference.
• Do not use the handset in wet rooms! Devices are not splashproof.
• A transmitter signal is emitted by your handset. Please observe
safety procedures for your area.
Note:
• Information for hearing aid users: Radio signals can interfere in
hearing aids.
• Please provide the operating instructions with the handset if
giving it to another user.
Note:
The ringing tone, signal tones and handsfree talking (speakerphone
mode) are played over the loudspeaker. Do not hold the telephone
to your ear when it is ringing or if speakerphone mode is switched
on. Otherwise you may seriously impair your hearing.
Batteries
Danger:
• Only use permitted batteries.
• Do not use conventional batteries. Failure to observe this advice
can lead to danger.
• Avoid contact with fire and water.
• Only use the approved C39280-Z4-C373 power supply unit to
operate the charging shell.
Note:
Please dispose of the battery, the handset, the charging
shell and the plug-in power supply unit in accordance
with the environmental specifications.
Overview of handsets
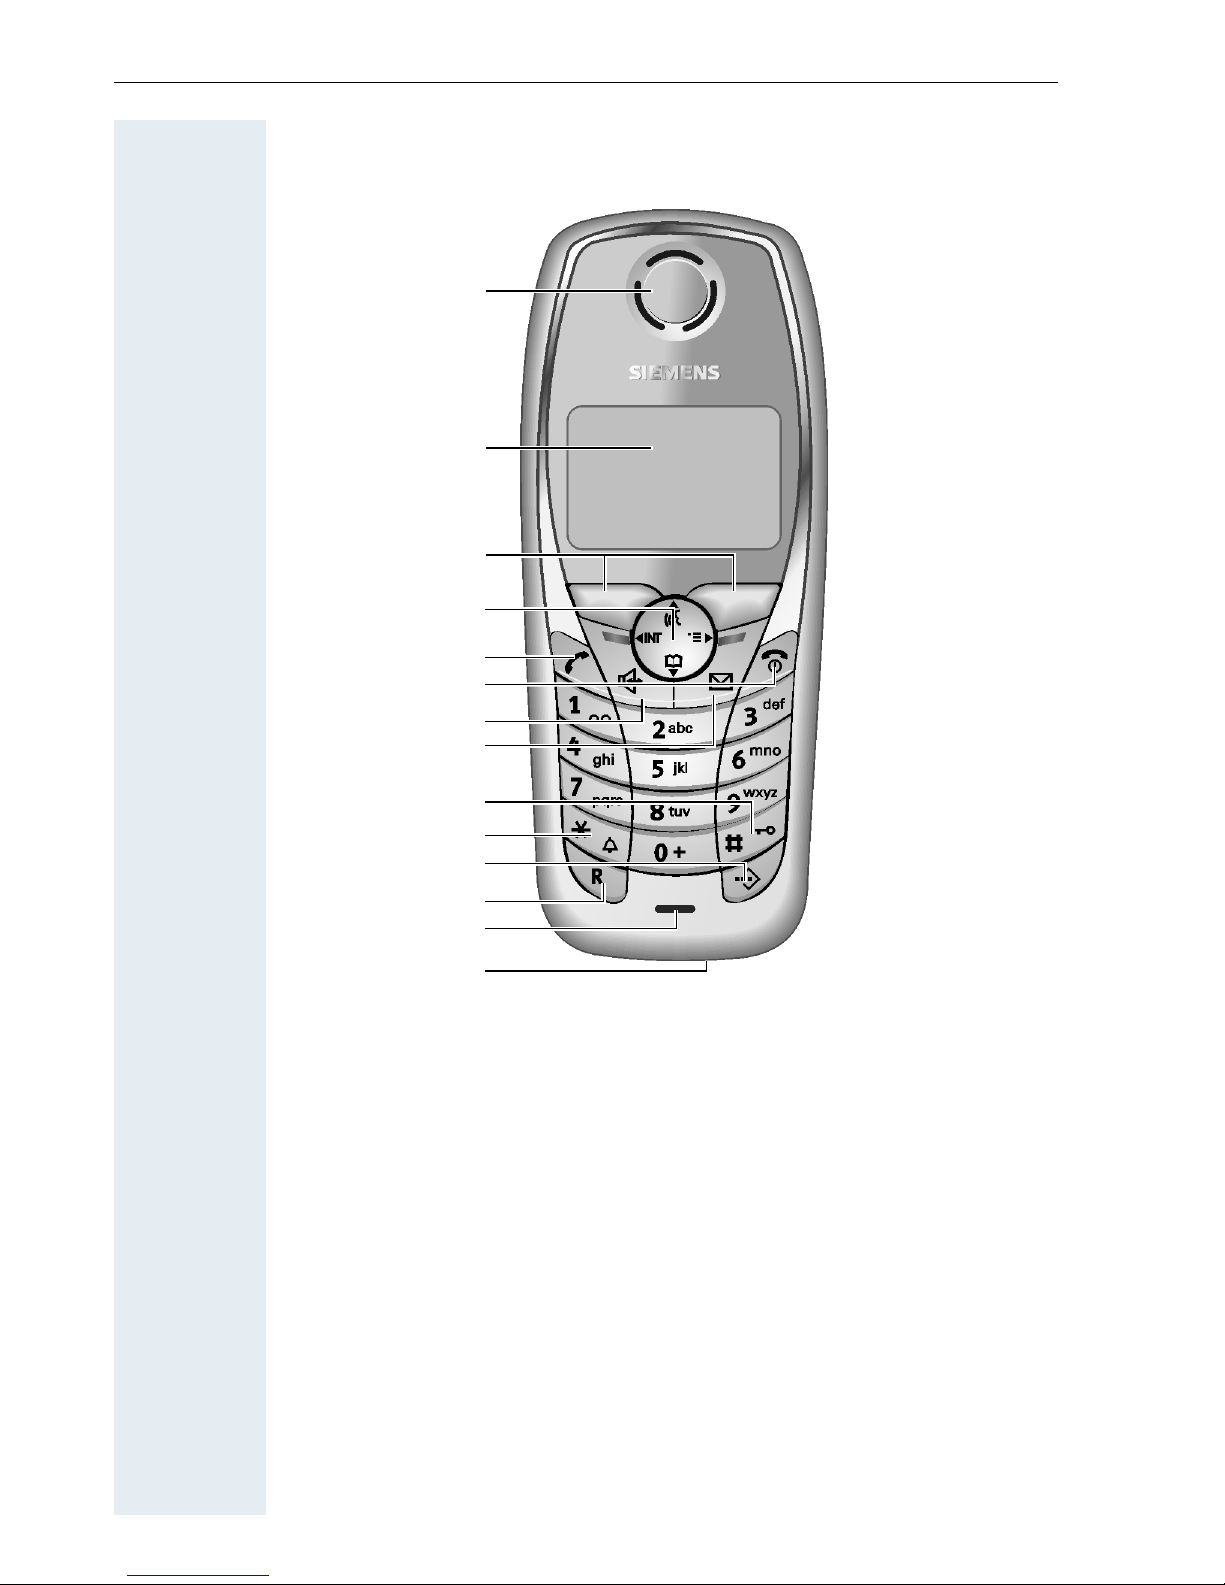
Gigaset S 1 professional
Overview of handsets
10
11
12
13
1
2
3
4
5
6
7
8
9
14
15
16
1 Receiver inset 9 Hash key
2 Display 10 Star key
3 Display keys 11 Speed dialling key
4 Control key 12 R key
5Talk key 13Microphone
6 On-hook and on/off key 14 Attachment clip
7 Speakerphone key 15 Ringer loudspeaker
8 Message list 16 Battery compartment
How to use the keys: Æ page 10
cover
I
Overview of handsets
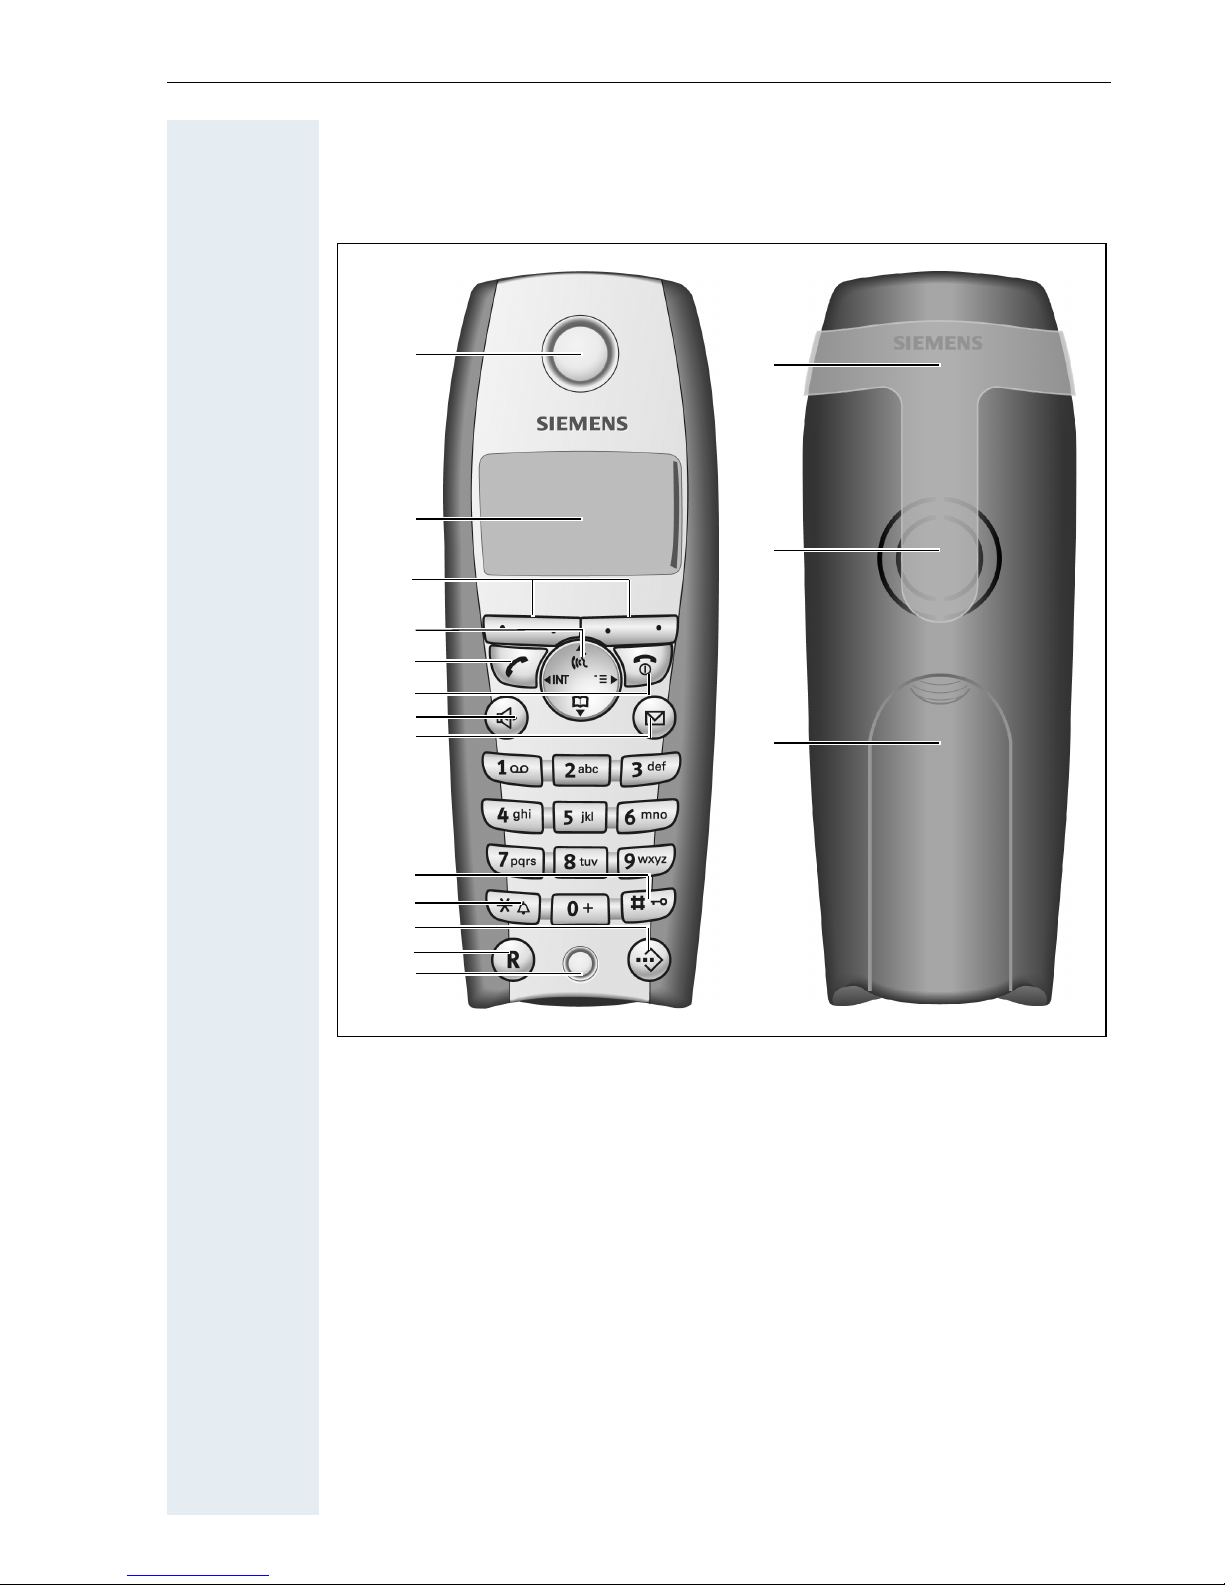
Gigaset SL 1 professional
1
10
11
12
13
14
Ð
2
20.04.03
INT 1
U
09.45
3
4
5
6
7
8
9
1 Receiver inset 8 Message key
2Display 9Hash key
3 Display keys 10 Star key
4 Control key 11 Speed dial key
5 Talk key 12 R key
6 On-hook and on/off key 13 Microphone
7 Speakerphone key 14 Connection jack for head-
How to use the keys: Æ page 10
II
set and PC interface
(Æ page 30)

Contents
Contents
Overview of handsets . . . . . . . . . . . . . . . . . . . . . . . . . . I
Gigaset S 1 professional . . . . . . . . . . . . . . . . . . . . . . . . . . . . . . . . . . . . . I
Gigaset SL 1 professional . . . . . . . . . . . . . . . . . . . . . . . . . . . . . . . . . . . . II
Operating instructions . . . . . . . . . . . . . . . . . . . . . . . . .1
Conducting calls – the basic functions . . . . . . . . . . .1
Activating/deactivating the handset. . . . . . . . . . . . . . . . . . . . . . . . . . . . . 2
First seize the line, then dial . . . . . . . . . . . . . . . . . . . . . . . . . . . . . . . . . . 3
Dial first, then seize the line . . . . . . . . . . . . . . . . . . . . . . . . . . . . . . . . . . 3
Manual number redial . . . . . . . . . . . . . . . . . . . . . . . . . . . . . . . . . . . . . . . 3
Callback . . . . . . . . . . . . . . . . . . . . . . . . . . . . . . . . . . . . . . . . . . . . . . . . . . 4
Enquiry. . . . . . . . . . . . . . . . . . . . . . . . . . . . . . . . . . . . . . . . . . . . . . . . . . . 5
Answering a call . . . . . . . . . . . . . . . . . . . . . . . . . . . . . . . . . . . . . . . . . . . 6
Placing a call in a call pickup group . . . . . . . . . . . . . . . . . . . . . . . . . . . . . 7
Ending a call. . . . . . . . . . . . . . . . . . . . . . . . . . . . . . . . . . . . . . . . . . . . . . . 7
Call forwarding. . . . . . . . . . . . . . . . . . . . . . . . . . . . . . . . . . . . . . . . . . . . . 7
Activating or deactivating the keypad lock . . . . . . . . . . . . . . . . . . . . . . . 9
Leaving the radio network . . . . . . . . . . . . . . . . . . . . . . . . . . . . . . . . . . . . 9
Description of the keys. . . . . . . . . . . . . . . . . . . . . . . .10
Function keys . . . . . . . . . . . . . . . . . . . . . . . . . . . . . . . . . . . . . . . . . . . . 10
R-key . . . . . . . . . . . . . . . . . . . . . . . . . . . . . . . . . . . . . . . . . . . . . . . . . . . 11
Control key . . . . . . . . . . . . . . . . . . . . . . . . . . . . . . . . . . . . . . . . . . . . . . 11
Display keys. . . . . . . . . . . . . . . . . . . . . . . . . . . . . . . . . . . . . . . . . . . . . . 12
Putting the handset into service. . . . . . . . . . . . . . . . 13
Removing the protective cover . . . . . . . . . . . . . . . . . . . . . . . . . . . . . . . 13
Inserting the batteries . . . . . . . . . . . . . . . . . . . . . . . . . . . . . . . . . . . . . . 13
Charging and using the batteries. . . . . . . . . . . . . . . . . . . . . . . . . . . . . . 14
Operating and charging times of the batteries . . . . . . . . . . . . . . . . . . . 15
Permitted batteries . . . . . . . . . . . . . . . . . . . . . . . . . . . . . . . . . . . . . . . . 15
Fitting the attachment clip. . . . . . . . . . . . . . . . . . . . . . . . . . . . . . . . . . . 16
Setting the handset display language . . . . . . . . . . . . . . . . . . . . . . . . . . 16
Setting the system display language. . . . . . . . . . . . . . . . . . . . . . . . . . . 17
III

Contents
Setting the handset . . . . . . . . . . . . . . . . . . . . . . . . . . .18
Setting the handset volume . . . . . . . . . . . . . . . . . . . . . . . . . . . . . . . . . 18
Setting the ringer. . . . . . . . . . . . . . . . . . . . . . . . . . . . . . . . . . . . . . . . . . 19
Advisory tones. . . . . . . . . . . . . . . . . . . . . . . . . . . . . . . . . . . . . . . . . . . . 21
Setting the ringer echo . . . . . . . . . . . . . . . . . . . . . . . . . . . . . . . . . . . . . 22
Activating and deactivating silent alert . . . . . . . . . . . . . . . . . . . . . . . . . 22
Sound Manager. . . . . . . . . . . . . . . . . . . . . . . . . . . . . . . . . . . . . . . . . . . 23
Recording a melody . . . . . . . . . . . . . . . . . . . . . . . . . . . . . . . . . . . . . 23
Playing a melody . . . . . . . . . . . . . . . . . . . . . . . . . . . . . . . . . . . . . . . 23
Editing an entry . . . . . . . . . . . . . . . . . . . . . . . . . . . . . . . . . . . . . . . . 24
Activating or deactivating the ringer . . . . . . . . . . . . . . . . . . . . . . . . . . . 25
Activating or deactivating the warning tone . . . . . . . . . . . . . . . . . . . . . 25
Activating/deactivating automatic call answering . . . . . . . . . . . . . . . . . 26
Setting the date and time . . . . . . . . . . . . . . . . . . . . . . . . . . . . . . . . . . . 26
Editing the idle display. . . . . . . . . . . . . . . . . . . . . . . . . . . . . . . . . . . . . . 27
Resetting the defaults. . . . . . . . . . . . . . . . . . . . . . . . . . . . . . . . . . . . . . 28
PC interface (Gigaset SL 1 professional only) . . . . . . . . . . . . . . . . . . . . 30
Conducting calls – enhanced functions . . . . . . . . .31
Speakerphone mode . . . . . . . . . . . . . . . . . . . . . . . . . . . . . . . . . . . . . . . 31
Voice dialling . . . . . . . . . . . . . . . . . . . . . . . . . . . . . . . . . . . . . . . . . . . . . 32
Number redial . . . . . . . . . . . . . . . . . . . . . . . . . . . . . . . . . . . . . . . . . . . . 34
System speed dialling . . . . . . . . . . . . . . . . . . . . . . . . . . . . . . . . . . . . . . 36
Individual system speed dialling . . . . . . . . . . . . . . . . . . . . . . . . . . . . . . 36
System telephone directory . . . . . . . . . . . . . . . . . . . . . . . . . . . . . . . . . 37
Handset telephone directory/speed dialling list. . . . . . . . . . . . . . . . . . . 38
E-mail directory . . . . . . . . . . . . . . . . . . . . . . . . . . . . . . . . . . . . . . . . . . . 40
Directed assignment of an MSN (multiple subscriber number) . . . . . . 41
Making calls using identification codes . . . . . . . . . . . . . . . . . . . . . . . . . 42
Using the handset as a second line. . . . . . . . . . . . . . . . . . . . . . . . . . . . 43
Deactivating the phone number display . . . . . . . . . . . . . . . . . . . . . . . . 43
Directed call transfer . . . . . . . . . . . . . . . . . . . . . . . . . . . . . . . . . . . . . . . 44
Activating/deactivating do not disturb . . . . . . . . . . . . . . . . . . . . . . . . . . 45
Call charge display. . . . . . . . . . . . . . . . . . . . . . . . . . . . . . . . . . . . . . . . . 45
Call trace . . . . . . . . . . . . . . . . . . . . . . . . . . . . . . . . . . . . . . . . . . . . . . . . 46
Entrance telephone . . . . . . . . . . . . . . . . . . . . . . . . . . . . . . . . . . . . . . . . 47
TDS telephone data service. . . . . . . . . . . . . . . . . . . . . . . . . . . . . . . . . . 49
Activating control relays . . . . . . . . . . . . . . . . . . . . . . . . . . . . . . . . . . . . 49
Sending a signal to the network . . . . . . . . . . . . . . . . . . . . . . . . . . . . . . 50
External call forwarding with a multiple subscriber number . . . . . . . . . 51
Using night service . . . . . . . . . . . . . . . . . . . . . . . . . . . . . . . . . . . . . . . . 52
Using dual-tone multifrequency signalling. . . . . . . . . . . . . . . . . . . . . . . 53
Parking/activating calls. . . . . . . . . . . . . . . . . . . . . . . . . . . . . . . . . . . . . . 54
IV

Contents
Conducting calls – with multiple users. . . . . . . . . . 55
Call waiting . . . . . . . . . . . . . . . . . . . . . . . . . . . . . . . . . . . . . . . . . . . . . . 55
Call waiting tone off/on . . . . . . . . . . . . . . . . . . . . . . . . . . . . . . . . . . . . . 56
Disabling/enabling automatic call waiting . . . . . . . . . . . . . . . . . . . . . . . 57
Override. . . . . . . . . . . . . . . . . . . . . . . . . . . . . . . . . . . . . . . . . . . . . . . . . 57
Transferring calls . . . . . . . . . . . . . . . . . . . . . . . . . . . . . . . . . . . . . . . . . . 58
Placing a call on hold . . . . . . . . . . . . . . . . . . . . . . . . . . . . . . . . . . . . . . . 60
Toggling. . . . . . . . . . . . . . . . . . . . . . . . . . . . . . . . . . . . . . . . . . . . . . . . . 60
Conducting a conference. . . . . . . . . . . . . . . . . . . . . . . . . . . . . . . . . . . . 61
Using the second call function . . . . . . . . . . . . . . . . . . . . . . . . . . . . . . . 64
Group functions . . . . . . . . . . . . . . . . . . . . . . . . . . . . . . 65
Activating/deactivating group calls . . . . . . . . . . . . . . . . . . . . . . . . . . . . 65
Ringing group on . . . . . . . . . . . . . . . . . . . . . . . . . . . . . . . . . . . . . . . . . . 67
UCD (Universal Call Distribution) . . . . . . . . . . . . . . . . . . . . . . . . . . . . . . 68
Mulap group (Multiple Line Application) . . . . . . . . . . . . . . . . . . . . . . . . 71
Message functions . . . . . . . . . . . . . . . . . . . . . . . . . . .74
Leaving a message/advisory message . . . . . . . . . . . . . . . . . . . . . . . . . 74
Sending/calling text messages . . . . . . . . . . . . . . . . . . . . . . . . . . . . . . . 75
Answering a message or voice-mail message . . . . . . . . . . . . . . . . . . . 77
Caller list . . . . . . . . . . . . . . . . . . . . . . . . . . . . . . . . . . . . . . . . . . . . . . . . 79
Additional functions . . . . . . . . . . . . . . . . . . . . . . . . . . 81
Handset alarm clock function . . . . . . . . . . . . . . . . . . . . . . . . . . . . . . . . 81
Handset appointment reminder function. . . . . . . . . . . . . . . . . . . . . . . . 82
System appointment function . . . . . . . . . . . . . . . . . . . . . . . . . . . . . . . . 85
Using predictive text . . . . . . . . . . . . . . . . . . . . . . . . . . . . . . . . . . . . . . . 86
Selecting a base . . . . . . . . . . . . . . . . . . . . . . . . . . . . . . . . . . . . . . . . . . 87
Telephone blocking. . . . . . . . . . . . . . . . . . . . . . . . . . . 88
Handset telephone lock. . . . . . . . . . . . . . . . . . . . . . . . . . . . . . . . . . . . . 88
Telephone lock code programming . . . . . . . . . . . . . . . . . . . . . . . . . . . . 89
Locking/unlocking the handset . . . . . . . . . . . . . . . . . . . . . . . . . . . . . . . 90
Central telephone lock/locking/unlocking other handsets . . . . . . . . . . . 91
System functions . . . . . . . . . . . . . . . . . . . . . . . . . . . . .92
Calling functions via the menu . . . . . . . . . . . . . . . . . . . . . . . . . . . . . . . 92
Calling functions via codes . . . . . . . . . . . . . . . . . . . . . . . . . . . . . . . . . . 92
Functions and codes . . . . . . . . . . . . . . . . . . . . . . . . . . . . . . . . . . . . . . . 93
V

Contents
Appendix . . . . . . . . . . . . . . . . . . . . . . . . . . . . . . . . . . . .96
Troubleshooting. . . . . . . . . . . . . . . . . . . . . . . . . . . . . . . . . . . . . . . . . . . 96
Cleaning the handset. . . . . . . . . . . . . . . . . . . . . . . . . . . . . . . . . . . . . . . 97
Technical data and accessories . . . . . . . . . . . . . . . . . . . . . . . . . . . . . . . 97
EU-guidelines. . . . . . . . . . . . . . . . . . . . . . . . . . . . . . . . . . . . . . . . . . . . . 98
Declaration of conformity . . . . . . . . . . . . . . . . . . . . . . . . . . . . . . . . . . . 98
Index. . . . . . . . . . . . . . . . . . . . . . . . . . . . . . . . . . . . . . . .99
VI

Step by Step
Operating instructions
Operating instructions
These operating instructions describe your handset and
its functions on your communications system.
All functions that can be performed via your handset are
described here. If some of the required functions are
not available on your handset, it may be due to one of
the following:
• The function is not configured for you or your handset - please contact your system administrator.
• Your communications platform does not feature this
function - please contact your Siemens contract
partner to upgrade.
Conducting calls – the basic
functions
You can use your handset to make both internal and external calls.
Internal calls are calls that
• you make within the range of a communication system, e. g. within your company,
• you make between networked communication systems, e. g. to different company locations.
External calls are calls that you conduct with users of
the public telephone network.
1

Conducting calls – the basic functions
Step by Step
a Press the On-hook key until the activation or deactiva-
Activating/deactivating the handset
tion is confirmed by a crescendo tone sequence.
Note:
• The handset can only be fully switched off
when removed from the charging shell.
• After switching off a mobile phone, place it in
the charging shell; with PIN "0000" it will
switch on immediately and is ready for operation. If the PIN is not "0000", you must first
enter the PIN. Only then is the mobile phone
ready for operation.
• When a handset that is ready for operation is
placed in the charging shell it goes to idle status and shows the idle display.
If your preferred language for the display texts is not
set, you can set this yourself (Æ page 16).
If a mobile phone that is switched off is placed in the
charging shell, it will switch on.
If the PIN is still the same as the factory default (0000),
the phone is ready for operation.
If the PIN is not the same as the factory default, the PIN
must be entered to make the mobile phone ready for
operation.
Displaying the connection quality
The strength of the incoming signal is displayed by the
"receive field strength" icon in on or message status:
|
Ò
Ñ
No receive field strength
Low receive field strength
50% receive field strength
2
Ð
The radio range is different indoors and outdoors
(Æ page 97). Please consult your system administrator
in the event of range problems.
100% receive field strength

Step by Step
o if necessary X Enter the required phone no. and correct individual char-
Conducting calls – the basic functions
First seize the line, then dial
c or u Press the Talk or Speakerphone key.
o Enter the required phone number. The user will be
called.
Typing errors cannot be corrected. If you make a typing
error: press the On-hook key.
p The user answers. Conduct the call.
Dial first, then seize the line
acters as necessary using the "Delete" Display key.
if necessary
© The following functions are available while you are en-
tering the phone number:
• "Insert Pause" (Insert a dial pause, e.g. between the
prefix and phone number or when checking a mailbox.)
• "Insert TBR" (irrelevant)
• "Copy to Directory" (save the phone number in the
handset’s redial list)
Note:
This dialling preparation function is also available
with number redial and dialling using the handset redial list.
c or u Press the Talk key or Speakerphone key within 30 sec-
onds. The user will be called.
p The user answers. Conduct the call.
Manual number redial
D or E Press the top or bottom of the control key to select the
With Gigaset S1 professional the last five numbers dialled, or with Gigaset SL 1 professional the last ten
numbers, are automatically saved in the redial list.
z Call the redial list.
required phone number.
c Press the Talk key.
3

Conducting calls – the basic functions
Step by Step
p The number is dialled. You hear the busy tone or the
Callback
This function enables you to call a user who does not
answer or whose line is busy. The Callback function enables you to contact him as soon as he hangs up or reuses his telephone. Please note that a line is signalled
as busy when it is being called by another user. You can
continue to use your handset without restriction when
a callback has been booked.
You can also send a callback request as a message
(Æ page 75). This function can also be called by entering the code (Æ page 92).
Booking a callback
user does not answer.
Callbck
Save the callback request.
a Press the On-hook key to end the process.
You receive a Callback call
You will receive the callback, as soon as the user you
want has hung up or the first time he uses his telephone. The following appears on your handset display
"Callback:...".
c Press the Talk key.
The connection is set up.
Note:
Callbacks are repeated until a connection is established or until the callback is deleted. A handset can initiate up to five callbacks and can be
the destination for up to five callback requests.
If these conditions are met, any further callbacks are rejected.
c Press the Talk key.
Menu
> < [Select and confirm the menu item.
4
Service?
Deleting a callback request
Call the system menu.

Step by Step
Conducting calls – the basic functions
> < [
> < [Select and confirm the menu item.
> < [Select and confirm the menu item.
More features?
#58=View
callbacks?
Delete?
Mnu
Select and confirm the menu item.
Call the additional menu.
a Press the On-hook key to end the process.
Enquiry
You interrupt your call to conduct an enquiry with a user (including external users) and then resume the original call.
p You are on a call.
R
or Activate enquiry. The current call is placed "on-hold", so
Enquiry
o Enter the phone number for the enquiry call.
that the first user waits.
p The number is dialled. The user answers. The enquiry
starts.
The enquiry is ended and you return to the call "onhold"
either: The second user hangs up. You are reconnected to the
first user.
or: Option 1
Menu
> < [Select and confirm the menu item.
Quit and return?
Call the system menu.
Option 2
R Press the R key.
You are reconnected to the first partner. The second
partner hears the busy tone and hangs up; a Gigaset
handset hangs up automatically.
However, you can also
• toggle between the partners (Æ page 60),
• set up a conference (Æ page 61) or
• transfer the waiting partner to the second partner
(Æ page 58).
5

Conducting calls – the basic functions
Step by Step
Î Cancel the callback. You are reconnected to the first
The second user is busy or does not answer
partner.
During the enquiry you can
• book a callback (Æ page 4),
• activate call waiting (Æ page 55) or
•override(Æ page 57).
Answering a call
Your handset rings and/or vibrates (Æ page 26). The
caller information appears on the display. The name
and/or telephone number of the caller can be displayed.
The following options are available for answering a call:
k The handset is in the charging shell: remove the hand-
set from the charging shell (functions only if "Auto Answer" is active Æ page 26).
cor u The handset is not in the charging shell. Press the Talk
key or Speakerphone key.
When you have answered the call you can
• transfer the call (Æ page 58),
• place the call on hold and consult with someone
else in the room (Æ page 60),
• place the call on hold and call a second partner
(Æ page 5) in order to forward (Æ page 58) or toggle
the call (Æ page 60) or to set up a conference
(Æ page 61).
Rejecting a call
If you do not wish to be disturbed, you can reject the
call.
Reject call
Confirm the message displayed with one of the two
Display keys. The call is rejected and the caller hears the
busy tone.
6

Step by Step
Conducting calls – the basic functions
Placing a call in a call pickup group
You can use your handset to pick up calls to telephones
within your call pickup group (set by the service engineer). This is also possible when you are conducting a
call.
Prerequisite:
You hear that a telephone in your call pickup group is
ringing.
c Press the Talk key. The message "Call for:" appears on
the display.
Menu
> < [Select and confirm the menu item.
Group Pickup?
Call the system menu.
p Conduct the call.
Ending a call
a or k Press the On-hook key or place the handset in the
charging shell.
The call charges are displayed, depending on the communication system.
Call forwarding
This function is for when you leave your desk for a while
and want certain calls to be forwarded to your new location. The forwarding destination for internal calls can
be any internal or external phone number. The destination number is usually an external phone number because you can be reached internally anytime by means
of your handset.
> < [Select and confirm the menu item.
Forwarding on?
Activating call forwarding
c Press the Talk key.
Menu
Call the system menu.
7

Conducting calls – the basic functions
Step by Step
either:
> < [Select and confirm the menu item.
1=all calls?
or:
> < [Select and confirm the menu item.
2=external
calls only?
or:
> < [Select and confirm the menu item.
3=internal
calls only?
continue:
o Enter the destination phone number.
Save
Save the settings.
a Press the On-hook key to end the process.
Note:
The external code must be entered before external phone numbers.
If the service engineer has activated DTMF DID,
you can also forward calls to these external
phone numbers.
Deactivating call forwarding
Prerequisite:
The room monitor function is activated.
c Press the Talk key.
Menu
> < [Select and confirm the menu item.
Divert cancelled?
Call the system menu.
a Press the On-hook key to end the process.
8

Step by Step
Conducting calls – the basic functions
Activating or deactivating the keypad
lock
This feature protects against accidentally pressing buttons when the handset is in a pocket, for example. The
keypad lock turns off automatically when a call comes
in and turns back on when the call has ended.
# Press the hash key until the activation or deactivation is
confirmed by a crescendo tone sequence.
A key icon on the display indicates that keypad lock is
active.
Leaving the radio network
After leaving the radio network
The base name flashes on the display. The handset repeatedly attempts to synchronise with a base. The intervals between synchronisation attempts increase on
account of the integrated power saving function.
You can switch off your handset to save the battery. The
date and time settings will be lost (Æ page 26).
9

Description of the keys
Description of the keys
Function keys
The following function keys are available:
Key Name Use
a
c
u
?
*
#
On-hook and
on/off key
Ta l k k e y • Answer a call
Speakerphone
key
Message list Access message lists
Star key Activate/deactivate the ringer
Hash key Activate/deactivate keypad lock
• End a call
• Cancel functions
• Jump back to the previous menu (only
following © )
• Activate or deactivate the handset
• Dial a phone number
• Switch from speakerphone mode to
handset mode
• Access telephone system functions
• Answer a call
• Dial a phone number
• Switch from handset to speakerphone
mode
• Access telephone system functions
C
R
10
Speed dialling
list
R key R key function (Æ page 11)
Access speed dialling list

Description of the keys
R-key
The R-key provides access to the following functions depending on how it
is operated:
Operation Function
Press Enquiry function:
Make an enquiry (alternative to "Enquiry" Display key)
Press and hold (min. 1 second) R key function:
• Insert a pause (e. g. between
the prefix and the phone
number, or when checking a
mailbox)
• End connection to a mailbox
(e. g. when performing a callback, setting up a conference
or transferring a call)
Control key
The control key is assigned different functions depending on the operating
situation:
Control
key
E
D
G
F
In idle status In lists and
menus
Use voice dialling
Open the mobile’s telephone
directory
Open the menu Select an entry
Next menu level upMove the cursor
Next menu level
down
(OK)
Next menu level
up, cancel
In an input
field
up one line
Move the cursor
down one line
Move the cursor
right
Move the cursor
left
11

Description of the keys
Display keys
The handset has two Display keys, each with one or two functions. When
the key is allocated two functions, press the right or left side of the key to
select the corresponding function. Display key assignment depends on the
operating status. A function can be represented by text or an icon.
Icon Name Use
©
X
z
J
Î
n
[
< >
Record
Phonebk
Menu Call the handset menu
Delete Delete the entry character by char-
acter from right to left
Number redial Open a list of the last five phone
numbers called
Message list Open message list
Go Back Go back to the next highest menu
level, cancel
Internal Stop entering the phone number
after the first digit
OK Confirm the selected menu item
Up/down Scroll up or down to select menu
items
Record Record voice pattern
Telephone direc-
Call the system telephone directory
tory
Enquiry
Toggle
2ndCall
Callbck
Change
Save
Dial
Send
Menu
Mnu
12
Consultation Make a consultation
To gg le Toggle between two partners
2nd call Accept call waiting
Callback Conduct a callback with a second
partner
Change Change the configuration
Save Save entries
Dial Dial the digits entered
Send Send information message
System menu Call the system menu
Additional menu Call the additional menu
Putting the handset into service
Putting the handset into service
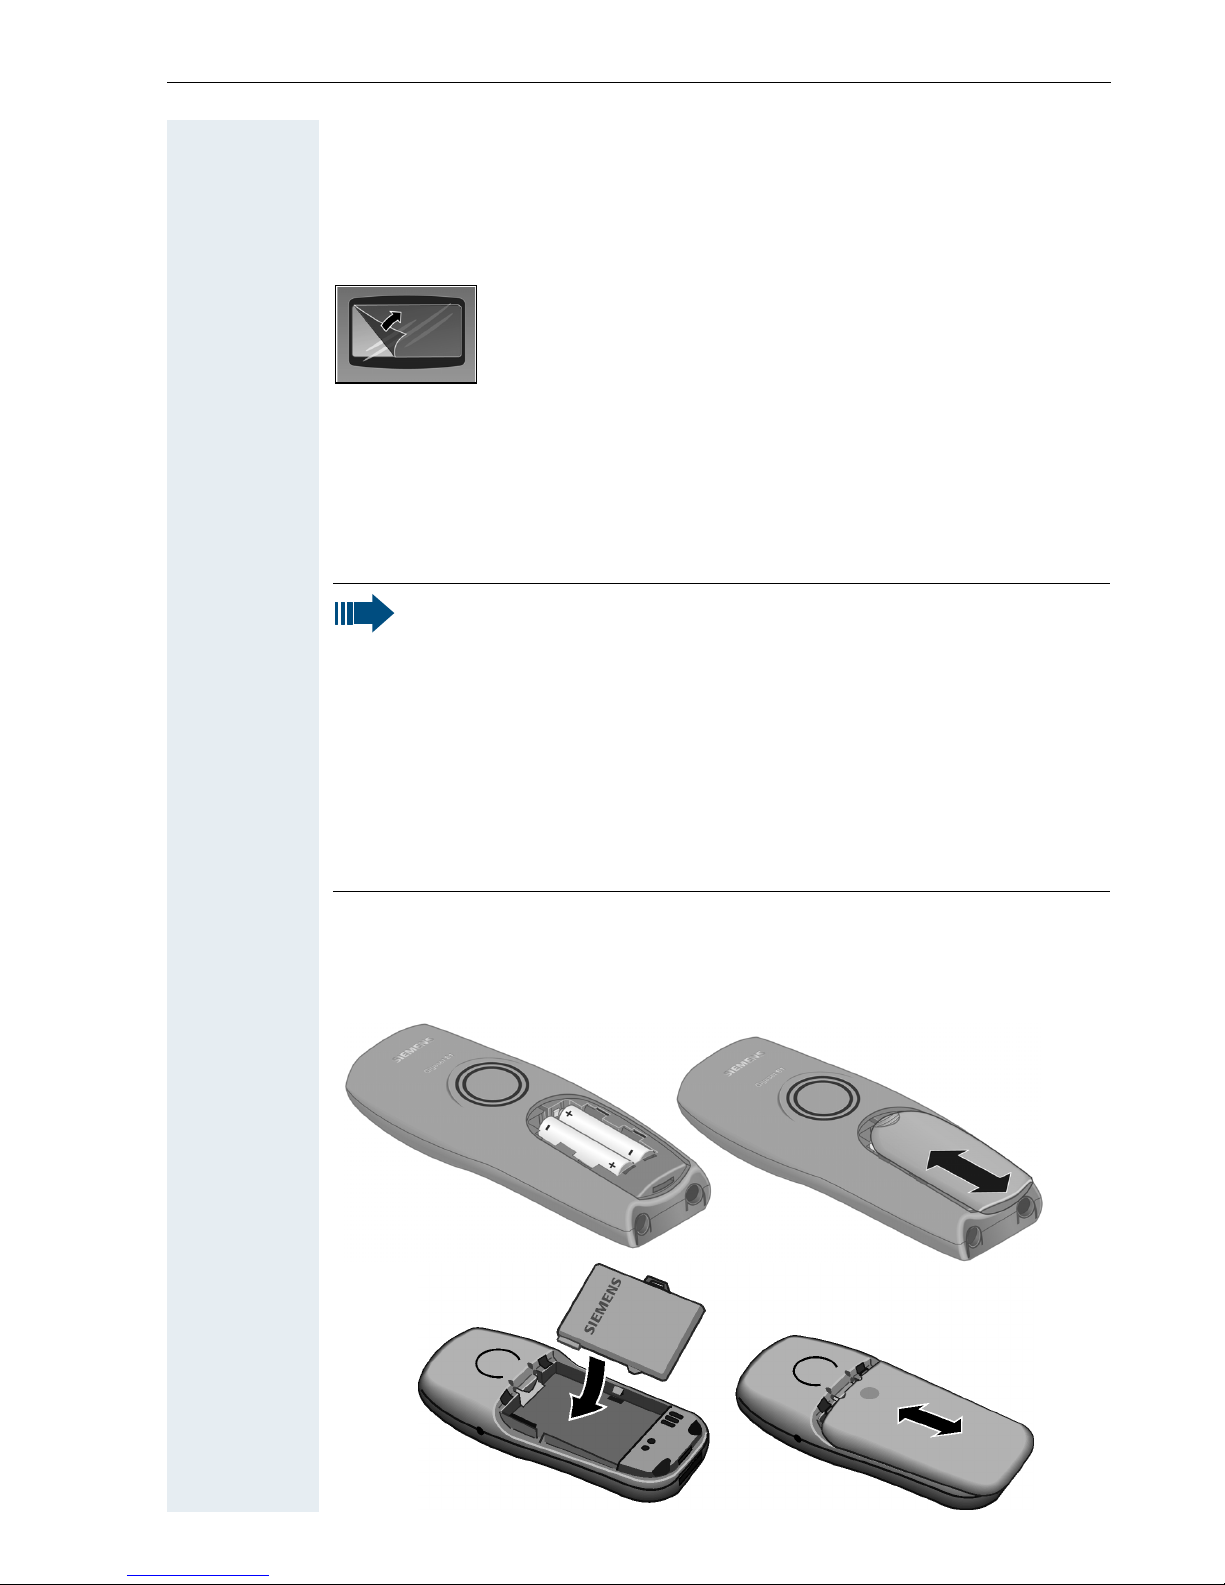
Removing the protective cover
Remove the protective cover from the display before
putting the handset into service.
Inserting the batteries
Two batteries are supplied with the Gigaset S1 professional while Gigaset
SL 1 professional comes with a single battery pack. The batteries are supplied uncharged. They are charged in the handset.
Note:
• Please observe the safety notes on the back cover.
• Only use approved batteries (Æ page 15).
• Always replace both batteries at the same time and only use
two batteries of the same type/ from the same manufacturer!
• Open the battery compartment in a dust-free environment only.
• Your telephone directory entries and all settings remain stored
even if you remove the batteries. The date and time settings
will be reset.
• Only remove the batteries if they are defective. Any unnecessary removal of the batteries reduces their lifespan.
Opening the battery compartment and inserting the batteries
Press down on the ridged surface and slide the cover from the battery
compartment. Insert the approved battery(ies).
Gigaset S1 professional
Gigaset SL 1 professional
13
Putting the handset into service
Closing the battery compartment
Put the cover back in place and slide it onto the battery compartment until
it engages.
Charging and using the batteries
To charge the batteries, insert the handset into the charging shell with the
keypad facing forwards.
Caution:
Only use the relevant approved power supply units for operating
the charging shell in Gigaset S1 professional.
(Order numbers see Æ page 97)
Use the Gigaset Charger SL charging shell with integrated power
supply for Gigaset SL 1 professional
(Order numbers see Æ page 97).
The charging status is indicated by the charge status display. This flashes
during charging:
=
e
V
U
Note:
• Initial charging: Charge the batteries for at least 5 hours without a break, regardless of the charging status icon. Without replacing it in the charging shell, use the handset until the "battery low" beep is heard. This action aligns the charge status
display with the operating times of the batteries.
• To attain full operating and charging times (Æ page 15): Without replacing it in the charging shell, use the handset until the
"battery low" beep is heard.
• For future charging: you can place your handset in the charging
shell each time it is used. Charging is electronically controlled
which ensures that the batteries are charged optimally.
Batteries empty
Batteries 33% charged
Batteries 66% charged
Batteries 100% charged
14
Putting the handset into service
Operating and charging times of the batteries
The operating times are only achieved after several charging and discharging cycles.
Gigaset S1 professional
Capacity (mAh) Stand-by mode
(hours)
700 (“Sanyo Twicell 650”: 650) 170 (7 days) over 13 approx. 5
Gigaset SL 1 professional
Capacity (mAh) Stand-by mode
(hours)
700 approx. 250 (10 days) approx. 15 approx. 2,5
Ta l k tim e
(hours)
Ta l k ti me
(hours)
Charging
time
(hours)
Charging
time
(hours)
Permitted batteries
The following batteries are approved for use with the Gigaset S1 professional:
Nickel Metal Hydrid (NiMH)
Sanyo Twicell 700
Sanyo Twicell 650
Panasonic 700 mAh
GP 700 mAh
YDT AAA SUPER 700
VARTA PhonePower AAA 700 mAh
The following battery pack is approved for Gigaset SL 1 professional:
Lithium-Ion (LiIon), 700 mAh
15
Putting the handset into service
Step by Step
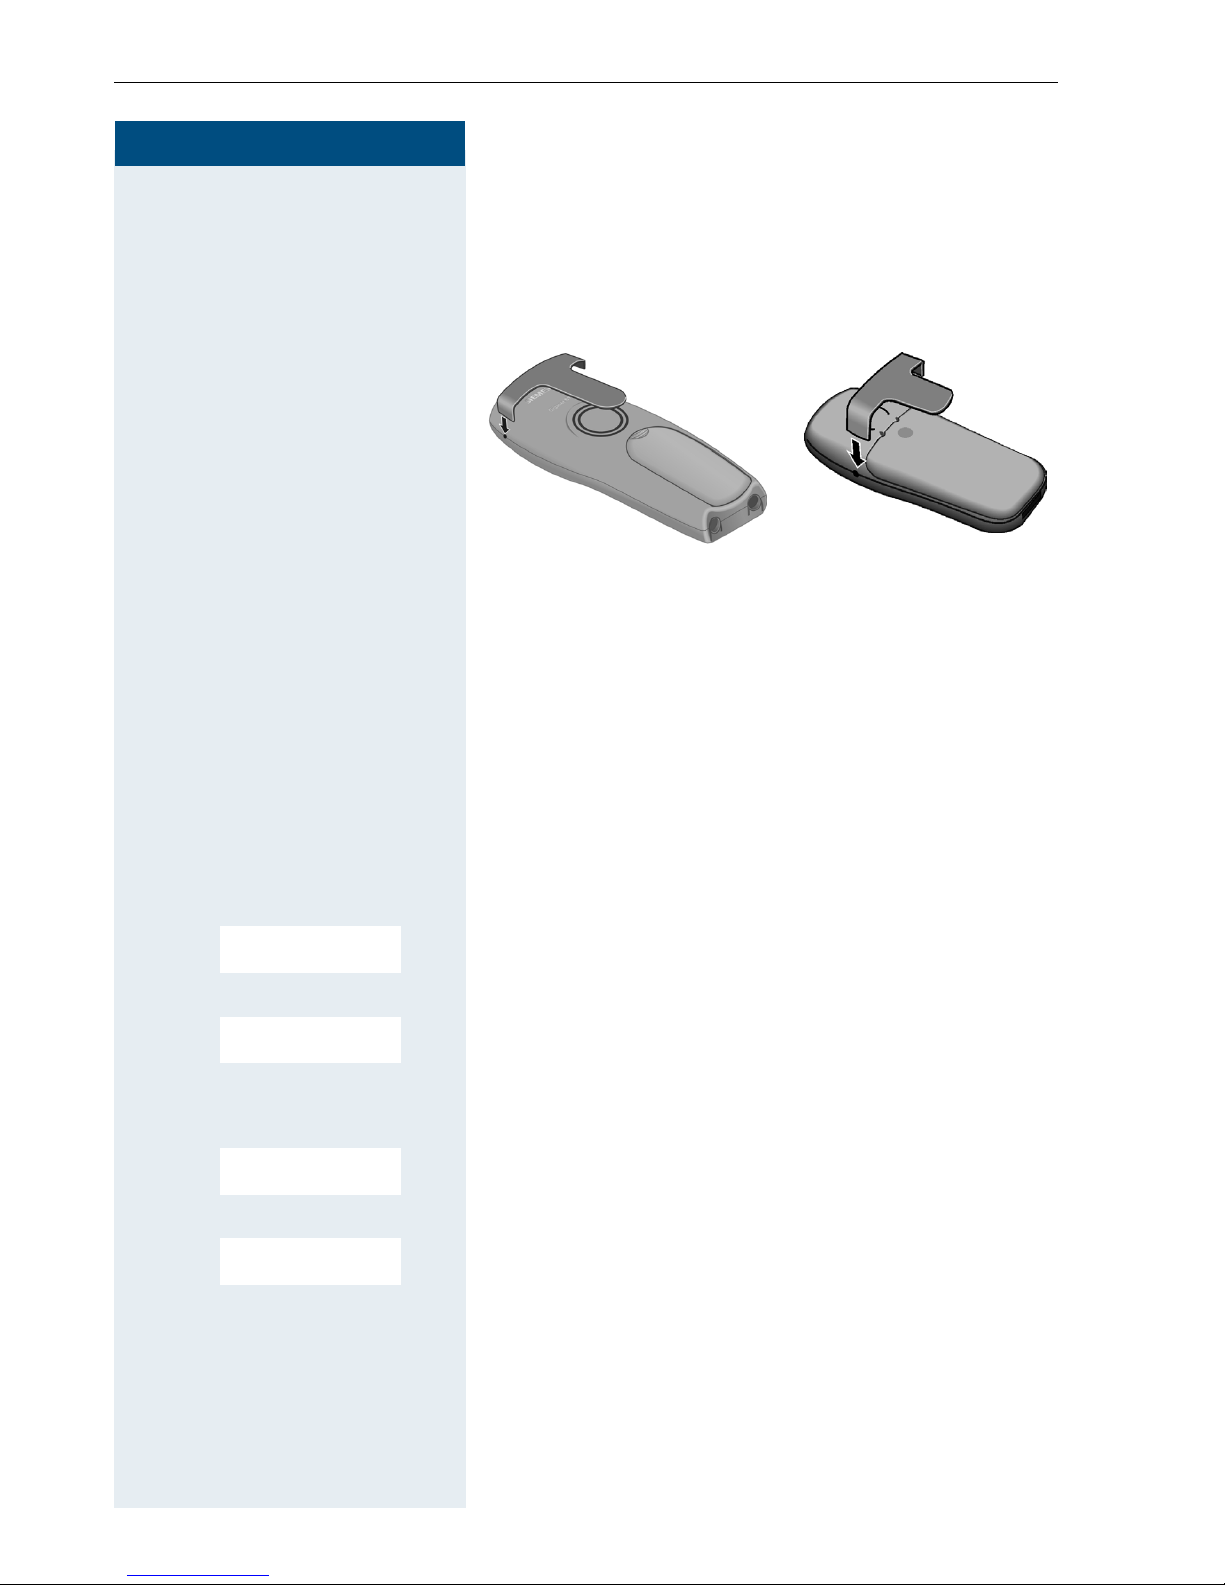
Fitting the attachment clip
Press the attachment clip onto the back of the handset
until the tabs on the sides engage in the recesses on
the phone.
Gigaset S1 professional Gigaset SL 1 professional
Setting the handset display language
If your preferred language for display texts is not set as
the default, then you can set this yourself.
Open the main menu
© or G Open the main menu of the mobile phone.
Open the submenu
either:
D E [Select and confirm the menu item.
D E [Select and confirm the menu item.
D E [Select and confirm the menu item.
H/Set Settings
or:
Einstellungen
Open the submenu
either:
Language
or:
D E [Select and confirm the menu item.
16
Sprache

Step by Step
Putting the handset into service
Select a language
D E [Select and confirm the language you require.
Deutsch
...
a Press the On-hook key to end the process.
Note:
For how to return the telephone to the default
settings (Æ page 28).
Setting the system display language
If you wish to change the language of the display texts,
then you must also change the system language on the
handset. A different language can be set for every handset on the system.
c Press the Talk key.
Menü
> < [Select and confirm the menu item.
Service?
Call the system menu.
> < [Select and confirm the menu item.
> < [Select and confirm the menu item.
> < [Select and confirm the language you require.
More features?
*48=
Select language?
11=Ge rman
...
a Press the On-hook key to end the process.
17
Setting the handset
Step by Step
Setting the handset
You can change the standard settings of the handset if
you are not happy with them.
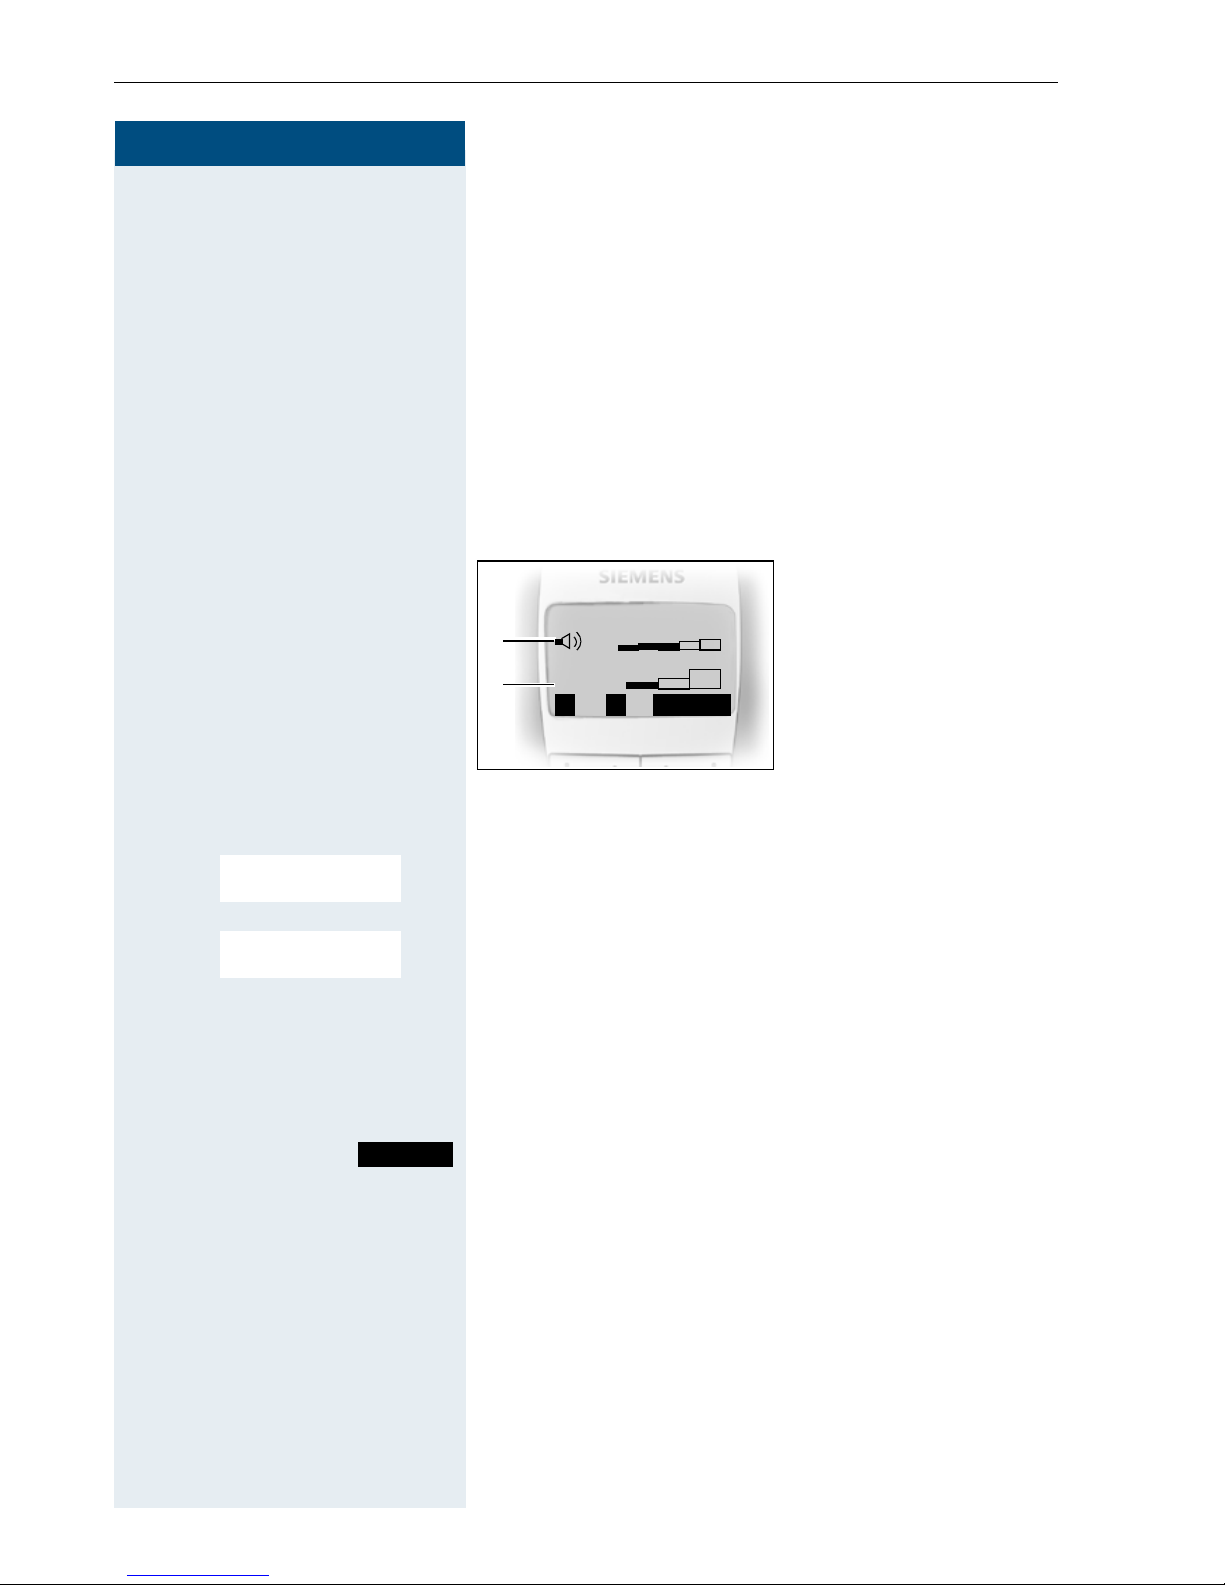
Setting the handset volume
When selecting the menu, the tone sounds at the current setting in speakerphone mode. You can choose between five volume levels in handset mode and three
volume levels in speakerphone mode.
1 Volume in speaker-
__Handset Volume__
B
Î
f
g
Save
1
2
phone mode
2 Volume in handset
mode
© or G Open the main menu of the mobile phone.
D E [Select and confirm the menu item.
D E [Select and confirm the menu item.
Audio Settings
Handset Volume
F G Fix the setting.
D Move the cursor down one line.
...
Save
Save the settings.
a Press the On-hook key to end the process.
18
Step by Step
Setting the handset
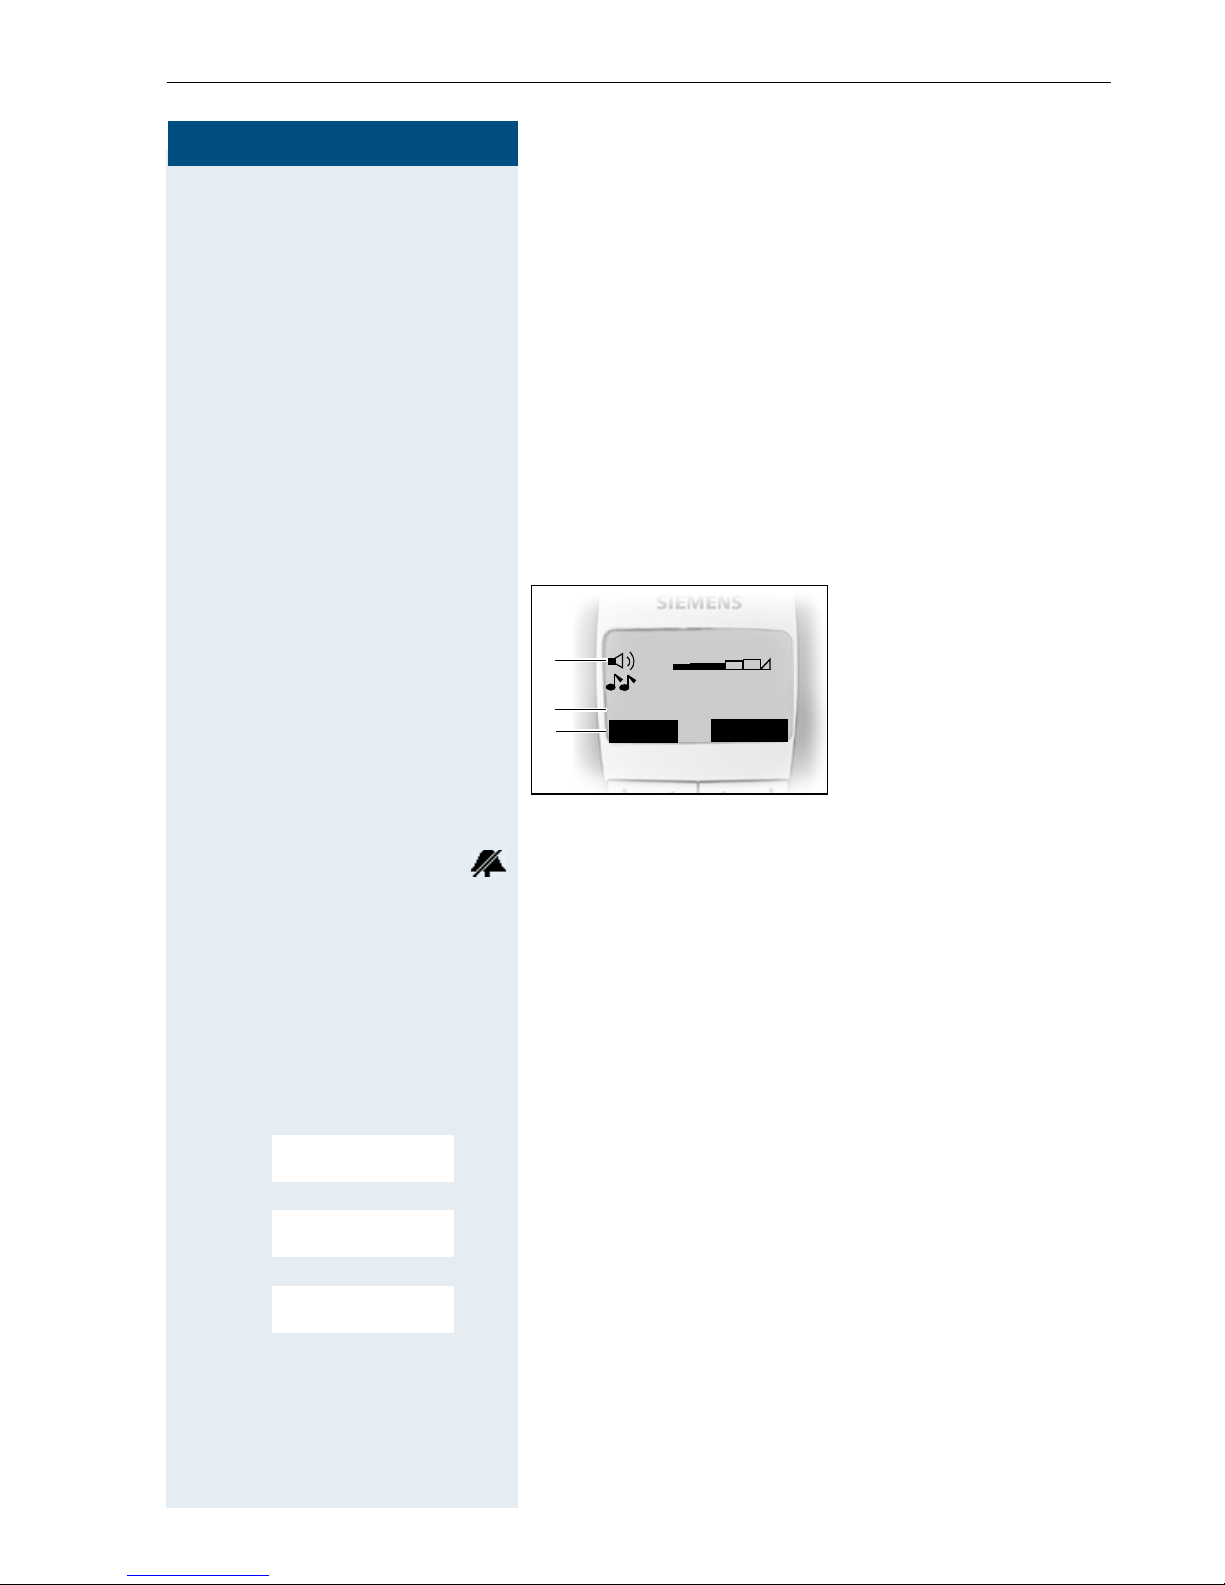
Setting the ringer
Setting the ringer volume and melody
When selecting the menu, the ringer sounds at the current setting. You can choose between three ringer volumes, as well as a crescendo ring (volume increases
gradually) and no ringer. The ten ringer melodies cannot
be stored in the communication system.
With Gigaset SL 1 professional up to 16 additional melodies can be used. Melodies 11 to 26 are polyphone
melodies, which must first be loaded via PC interface or
recorded via the Sound Manager.
1Ringer volume
___Ext. Calls___
1
f
E
2
3
Announce On
Time C.
g
1
Save
2 Ringer melody
3 Time control activa-
tion function for the
ringer volume
Display when ringer is deactivated.
In order to better differentiate between your handset’s
ringing tones, select the following settings:
•Ext. Calls
• Internal Calls
• Appointments
•Alarm
•All
G Open the main menu of the mobile phone.
D E [Select and confirm the required menu item.
Audio Settings
D E [Select and confirm the menu item.
D E [Select and confirm the menu item.
Ringer Settings
Ext. Calls
...
F G Set volume.
F G Set melody.
D Move the cursor down one line.
19
Setting the handset
Step by Step
• Tones: 1 to 3 (recommended for internal calls)
• Melodies: 4 to 10 (recommended for external calls
with Gigaset S1 professional)
• Melodies: 4 to 26 (recommended for external calls
with Gigaset SL 1 professional)
Please make sure that you have picked up the call
before holding the phone to your ear. This is to
ensure that the loud ringing tone does not cause
damage to your hearing.
either:
Save
Save the settings.
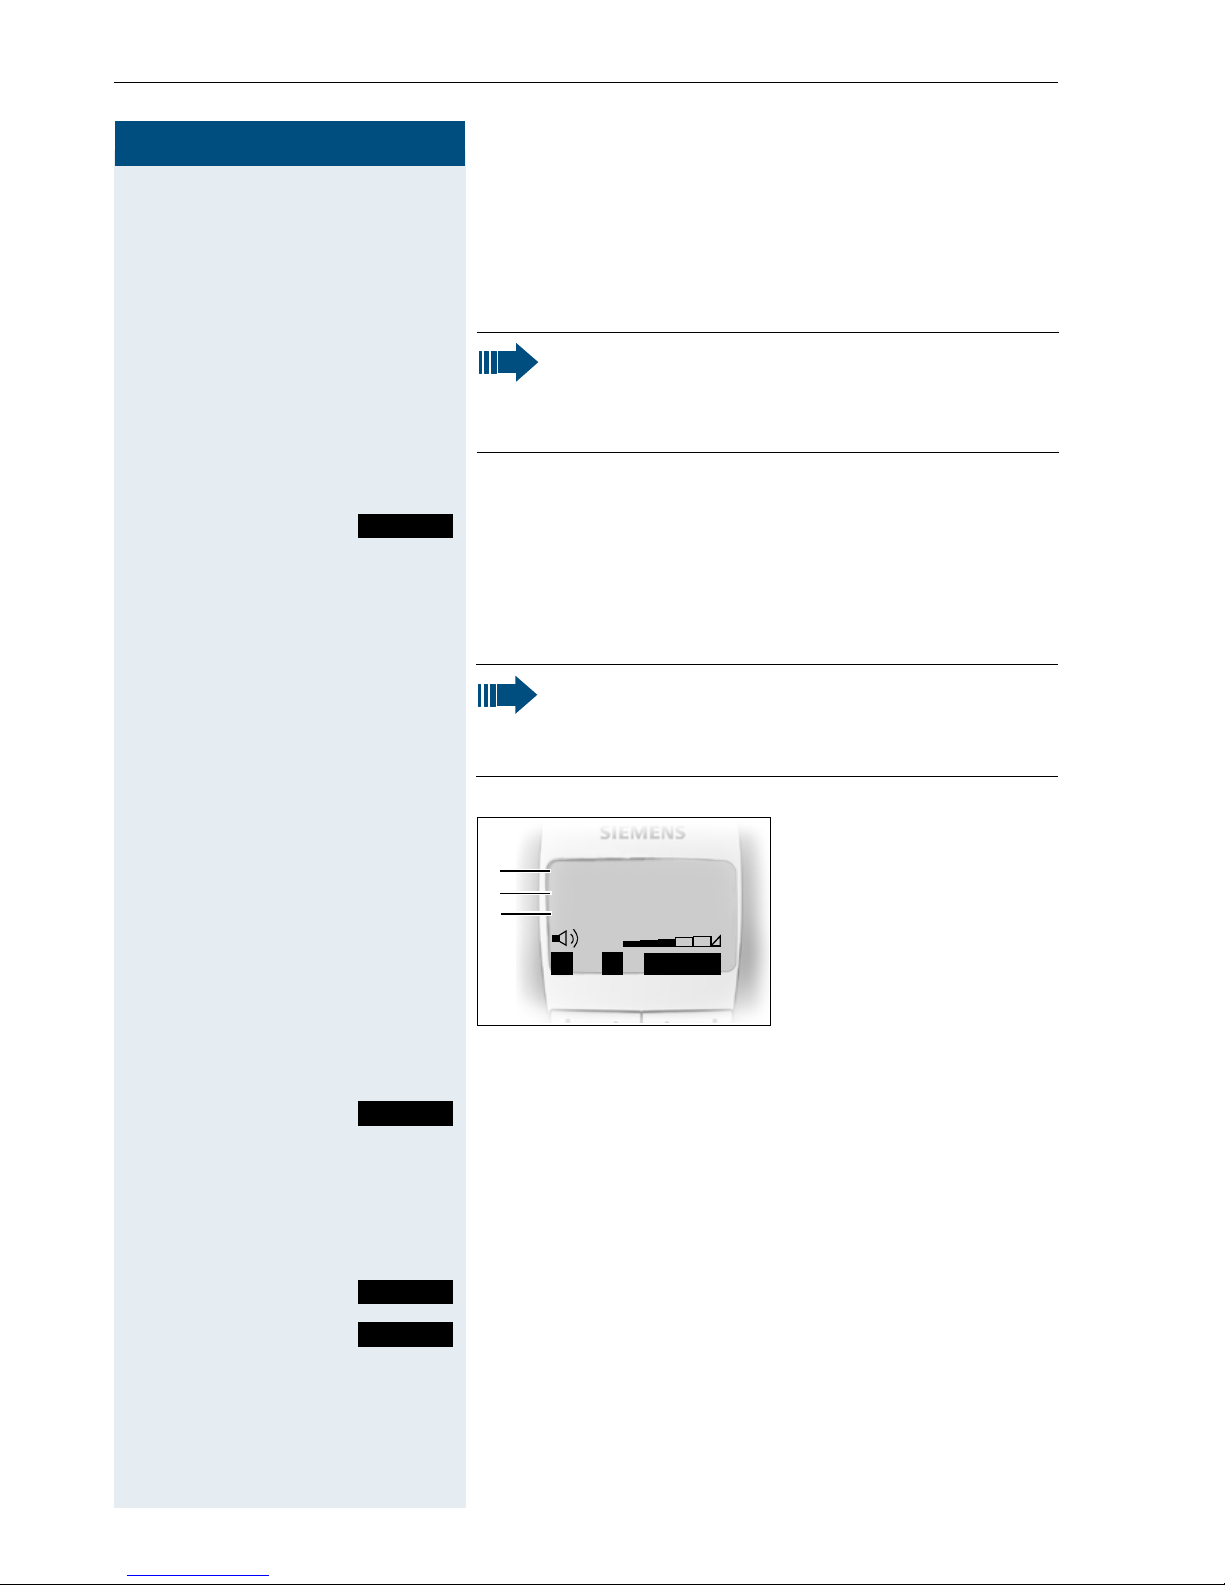
or: Setting the time control for the ringer
You can select a different ringer volume for a specific
length of time in this menu (e.g. during the night).
Note:
Please take account of the special features of
the handset‘s internal clock (Æ page 26).
1 Time control status
f
g
1
2
3
Time ctrl::
From:
Until:
On
00:00
00:00
2 Start of the time
3 End of the time
Î
Save
frame
frame
Time C.
F On G Fix the setting.
D Move the cursor down one line.
Save
Save
a Press and hold the On-hook key to end the process.
20
Call the ringer time control menu.
...
Save the time control settings.
Save the ringer settings.
Step by Step
Setting the handset
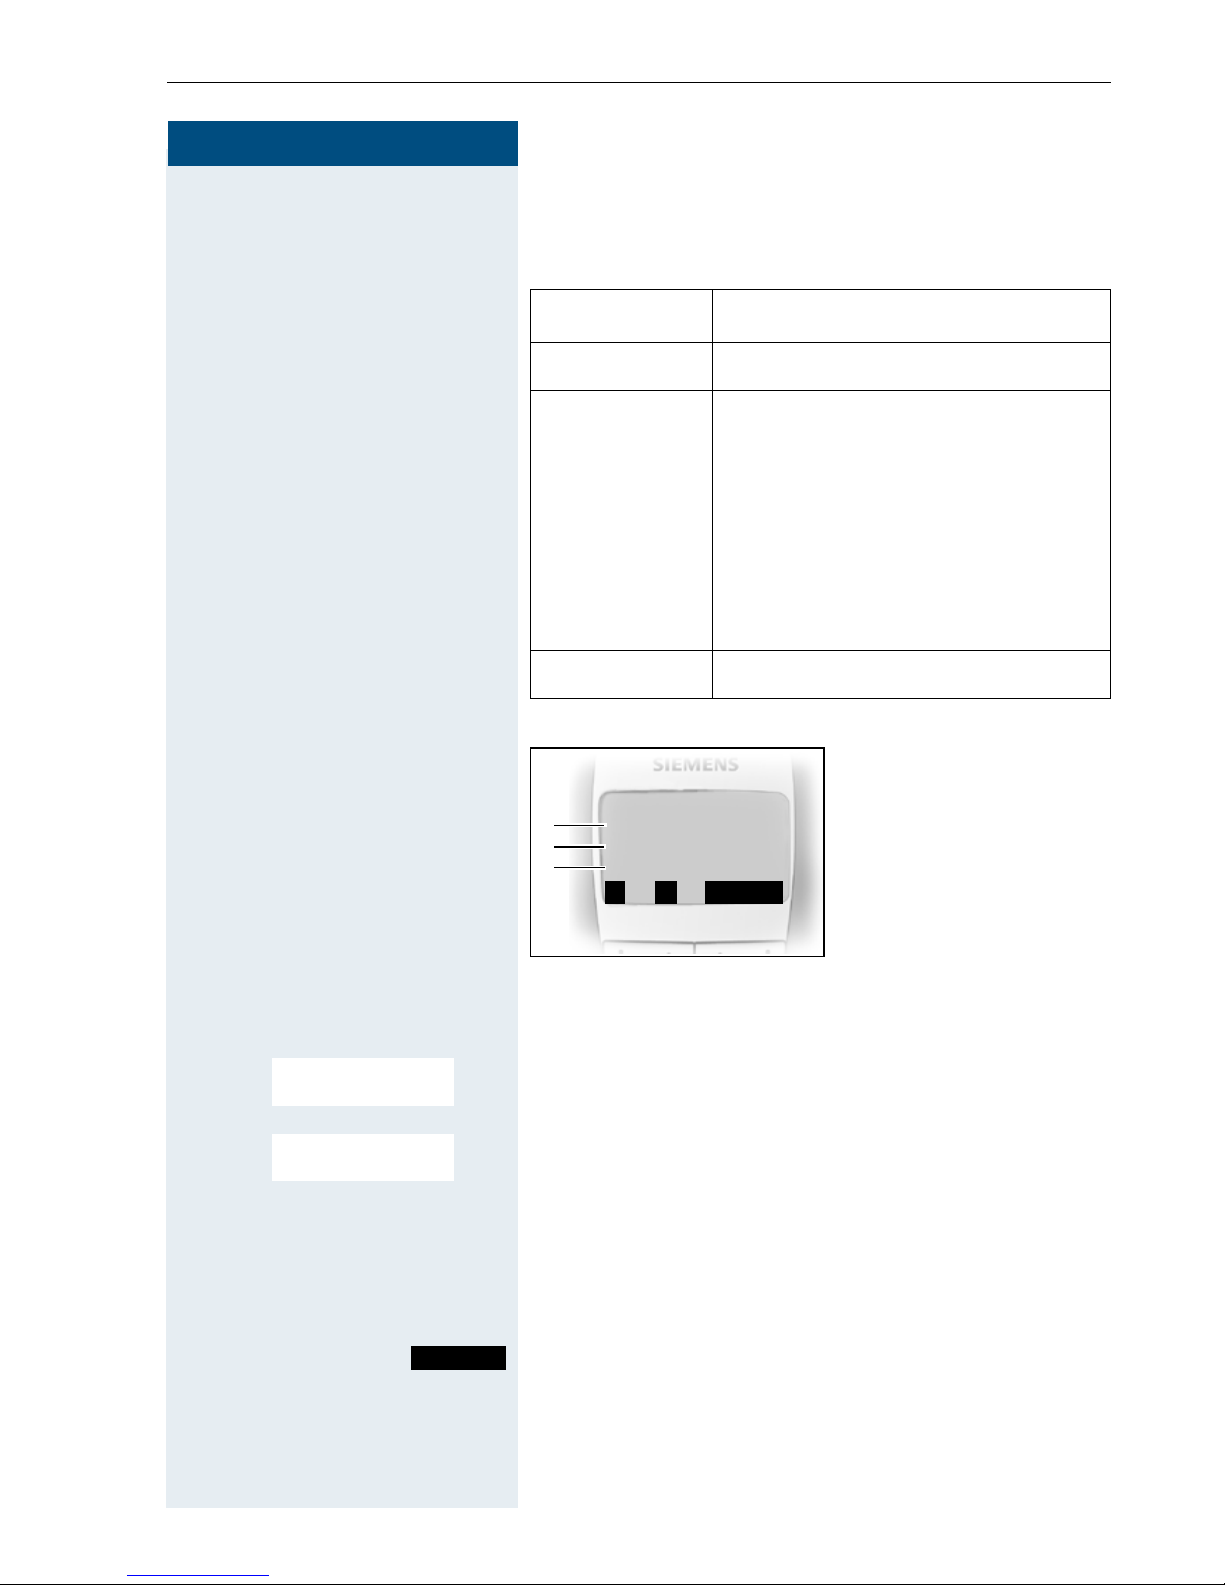
Advisory tones
The advisory tones have the following meaning:
Advisory Meaning
Key tone Every keystroke is confirmed
Confirmation
tones
• Confirmation tone (crescendo
tone sequence) when saving inputs/settings and when placing
the handset in the charging shell
• Error beep (decrescendo tone
sequence) to signal incorrect inputs
• End-of-menu beep at the menu
end
Battery tone The battery must be charged
1 Key tone status
___Advisory Tones___
f
g
1
2
3
Key tone:
Con. tone:
Battery
Î
On
On
On
Save
2 Confirmation tone
status
3 Battery tone status
© or G Open the main menu of the mobile phone.
D E [Select and confirm the menu item.
D E [Select and confirm the menu item.
Audio Settings
Advisory Tones
F G Fix the setting.
D Move the cursor down one line.
...
Save
Save the settings.
a Press and hold the On-hook key to end the process.
21

Setting the handset
Step by Step
Setting the ringer echo
This function enables you to set the tone quality for the
longer melodies (4 to 10). When ringer echo is activated, melodies will be played with an echo.
G Open the main menu of the handset.
D E [Select and confirm the menu item.
D E [Select and confirm the menu item.
Audio Settings
Ringer Echo
Ringer echo is activated.
The activated function is ticked. It can be deactivated by
selecting the option once more.
a Press and hold the On-hook key to end the process.
Activating and deactivating silent alert
In Gigaset SL 1 professional. you can activate the silent
alert feature in addition to ringer settings or else instead
of ringer settings.
You can deactivate the ringer settings once you have activated the silent alert (Æ page 25).
© or G Open the main menu of the handset.
D E [Select the menu item and confirm.
Audio Settings
D E [Select the menu item and confirm.
22
Silent alert
Silent alert is active.
The activated function is ticked and can be deactivated
by selecting it once more.
Note:
If you have called up the Service menu, then silent alert will not be activated for an incoming
call if "Turn ring off" and "Silent alert (on)" have
been set.
 Loading...