

Page 1

EN Dear Customer,
Gigaset Communications GmbH is the legal successor to
Siemens Home and Office Communication Devices GmbH &
Co. KG (SHC), which in turn continued the Gigaset business
of Siemens AG. Any statements made by Siemens AG or
SHC that are found in the user guides should therefore be
understood as statements of Gigaset Communications
.
GmbH
We hope you enjoy your Gigaset.
DE Sehr geehrte Kundin, sehr geehrter Kunde,
FR Chère Cliente, Cher Client,
IT Gentile cliente,
NL Geachte klant,
ES Estimado cliente,
PT SCaros clientes,
die Gigaset Communications GmbH ist Rechtsnachfolgerin
der Siemens Home and Office Communication Devices
GmbH & Co. KG (SHC), die ihrerseits das Gigaset-Geschäft
der Siemens AG fortführte. Etwaige Erklärungen der
Siemens AG oder der SHC in den Bedienungsanleitungen
sind daher als Erklärungen der Gigaset Communications
GmbH zu verstehen.
Wir wünschen Ihnen viel Freude mit Ihrem Gigaset.
la société Gigaset Communications GmbH succède en droit
à Siemens Home and Office Communication Devices GmbH
& Co. KG (SHC) qui poursuivait elle-même les activités Gigaset de Siemens AG. Donc les éventuelles explications de Siemens AG ou de SHC figurant dans les modes d’emploi
doivent être comprises comme des explications de Gigaset
Communications GmbH.
Nous vous souhaitons beaucoup d’agrément avec votre
Gigaset.
la Gigaset Communications GmbH è successore della Siemens Home and Office Communication Devices GmbH &
Co. KG (SHC) che a sua volta ha proseguito l’attività della
Siemens AG. Eventuali dichiarazioni della Siemens AG o
della SHC nei manuali d’istruzione, vanno pertanto intese
come dichiarazioni della Gigaset Communications GmbH.
Le auguriamo tanta soddisfazione con il vostro Gigaset.
Gigaset Communications GmbH is de rechtsopvolger van
Siemens Home and Office Communication Devices GmbH &
Co. KG (SHC), de onderneming die de Gigaset-activiteiten
van Siemens AG heeft overgenomen. Eventuele uitspraken
of mededelingen van Siemens AG of SHC in de gebruiksaanwijzingen dienen daarom als mededelingen van Gigaset
Communications GmbH te worden gezien.
Wij wensen u veel plezier met uw Gigaset
la Gigaset Communications GmbH es derechohabiente de la
Siemens Home and Office Communication Devices GmbH &
Co. KG (SHC) que por su parte continuó el negocio Gigaset
de la Siemens AG. Las posibles declaraciones de la
Siemens AG o de la SHC en las instrucciones de uso se
deben entender por lo tanto como declaraciones de la Gigaset Communications GmbH.
Le deseamos que disfrute con su Gigaset.
Gigaset Communications GmbH é a sucessora legal da Siemens Home and Office Communication Devices GmbH &
Co. KG (SHC), que, por sua vez, deu continuidade ao sector
de negócios Gigaset, da Siemens AG. Quaisquer declarações por parte da Siemens AG ou da SHC encontradas nos
manuais de utilização deverão, portanto, ser consideradas
como declarações da Gigaset Communications GmbH.
Desejamos que tenham bons momentos com o seu Gigaset.
DA Kære Kunde,
FI Arvoisa asiakkaamme,
SV Kära kund,
NO Kjære kunde,
EL Αγ α πητή πελάτισσα, αγαπητέ πελάτη,
HR Poštovani korisnici,
.
SL Spoštovani kupec!
Gigaset Communications GmbH er retlig efterfølger til Siemens Home and Office Communication Devices GmbH &
Co. KG (SHC), som fra deres side videreførte Siemens AGs
Gigaset-forretninger. Siemens AGs eller SHCs eventuelle
forklaringer i betjeningsvejledningerne skal derfor forstås
som Gigaset Communications GmbHs forklaringer.
Vi håber, du får meget glæde af din Gigaset.
Gigaset Communications GmbH on Siemens Home and
Office Communication Devices GmbH & Co. KG (SHC)-yri-
tyksen oikeudenomistaja, joka jatkoi puolestaan Siemens
AG:n Gigaset-liiketoimintaa. Käyttöoppaissa mahdollisesti
esiintyvät Siemens AG:n tai SHC:n selosteet on tämän
vuoksi ymmärrettävä Gigaset Communications GmbH:n
selosteina.
Toivotamme Teille paljon iloa Gigaset-laitteestanne.
Gigaset Communications GmbH övertar rättigheterna från
Siemens Home and Office Communication Devices GmbH &
Co. KG (SHC), som bedrev Gigaset-verksamheten efter Siemens AG. Alla förklaringar från Siemens AG eller SHC i
användarhandboken gäller därför som förklaringar från
Gigaset Communications GmbH.
Vi önskar dig mycket nöje med din Gigaset.
Gigaset Communications GmbH er rettslig etterfølger etter
Siemens Home and Office Communication Devices GmbH &
Co. KG (SHC), som i sin tur videreførte Gigaset-geskjeften i
Siemens AG. Eventuelle meddelelser fra Siemens AG eller
SHC i bruksanvisningene er derfor å forstå som meddelelser
fra Gigaset Communications GmbH.
Vi håper du får stor glede av din Gigaset-enhet.
η Gigaset Communications GmbH είναι η νομική διάδοχος της
Siemens Home and Office Communication Devices GmbH &
Co. KG (SHC), η οποία έχει αναλάβει την εμπορική
δραστηριότητα Gigaset της Siemens AG. Οι δηλώσεις της
Siemens AG ή της SHC στις
επομένως δηλώσεις της Gigaset Communications GmbH.
Σας ευχόμαστε καλή διασκέδαση με τη συσκευή σας Gigaset.
Gigaset Communications GmbH pravni je sljednik tvrtke
Siemens Home and Office Communication Devices GmbH &
Co. KG (SHC), koji je nastavio Gigaset poslovanje tvrtke
Siemens AG. Zato sve izjave tvrtke Siemens AG ili SHC koje
se nalaze u uputama za upotrebu treba tumačiti kao izjave
tvrtke Gigaset Communications GmbH.
Nadamo se da sa zadovoljstvom koristite svoj Gigaset
uređaj.
Podjetje Gigaset Communications GmbH je pravni naslednik
podjetja Siemens Home and Office Communication Devices
GmbH & Co. KG (SHC), ki nadaljuje dejavnost znamke
Gigaset podjetja Siemens AG. Vse izjave podjetja Siemens
AG ali SHC v priročnikih za uporabnike torej veljajo kot izjave
podjetja Gigaset Communications GmbH.
Želimo vam veliko užitkov ob uporabi naprave Gigaset.
οδηγίες χρήσ
ης αποτ
ελούν
Issued by
Gigaset Communications GmbH
Schlavenhorst 66, D-46395 Bocholt
Gigaset Communications GmbH is a trademark
licensee of Siemens AG
© Gigaset Communications GmbH 2008
All rights reserved.
Subject to availability. Rights of modifications
reserved.
www.gigaset.com
Page 2

CS Vážení zákazníci,
společnost Gigaset Communications GmbH je právním
nástupcem společnosti Siemens Home and Office
Communication Devices GmbH & Co. KG (SHC), která dále
přejala segment produktů Gigaset společnosti Siemens AG.
Jakékoli prohlášení společnosti Siemens AG nebo SHC, které
naleznete v uživatelských příručkách, je třeba považovat za
prohlášení společnosti Gigaset Communications GmbH.
Doufáme, že jste s produkty Gigaset spokojeni.
SK Vážený zákazník,
Spoločnosť Gigaset Communications GmbH je právnym
nástupcom spoločnosti Siemens Home and Office
Communication Devices GmbH & Co. KG (SHC), ktorá zasa
pokračovala v činnosti divízie Gigaset spoločnosti Siemens
AG. Z tohto dôvodu je potrebné všetky vyhlásenia
spoločnosti Siemens AG alebo SHC, ktoré sa nachádzajú v
používateľských príručkách, chápať ako vyhlásenia
spoločnosti Gigaset Communications GmbH.
Veríme, že budete so zariadením Gigaset spokojní.
PL Szanowny Kliencie,
Firma Gigaset Communications GmbH jest spadkobiercą
prawnym firmy Siemens Home and Office Communication
Devices GmbH & Co. KG (SHC), która z kolei przejęła
segment produktów Gigaset od firmy Siemens AG. Wszelkie
oświadczenia firm Siemens AG i SHC, które można znaleźć
w instrukcjach obsługi, należy traktować jako oświadczenia
firmy Gigaset Communications GmbH.
Życzymy wiele przyjemności z korzystania z produktów
Gigaset.
TR Sayın Müşterimiz,
Gigaset Communications GmbH, Siemens AG'nin Gigaset
işletmesini yürüten Siemens Home and Office
Communication Devices GmbH & Co. KG (SHC)'nin yasal
halefidir. Kullanma kılavuzlarında bulunan ve Siemens AG
veya SHC tarafından yapılan bildiriler Gigaset
Communications GmbH tarafından yapılmış bildiriler olarak
algılanmalıdır.
Gigaset'ten memnun kalmanızı ümit ediyoruz.
RO Stimate client,
Gigaset Communications GmbH este succesorul legal al
companiei Siemens Home and Office Communication
Devices GmbH & Co. KG (SHC), care, la rândul său, a
continuat activitatea companiei Gigaset a Siemens AG.
Orice afirmaţii efectuate de Siemens AG sau SHC şi incluse
în ghidurile de utilizare vor fi, prin urmare, considerate a
aparţine Gigaset Communications GmbH.
Sperăm ca produsele Gigaset să fie la înălţimea dorinţelor
dvs.
SR Poštovani potrošaču,
Gigaset Communications GmbH je pravni naslednik
kompanije Siemens Home and Office Communication
Devices GmbH & Co. KG (SHC), kroz koju je nastavljeno
poslovanje kompanije Gigaset kao dela Siemens AG. Stoga
sve izjave od strane Siemens AG ili SHC koje se mogu naći u
korisničkim uputstvima treba tuma
Gigaset Communications GmbH.
Nadamo se da ćete uživati u korišćenju svog Gigaset
uređaja.
BG Уважаеми потребители,
Gigaset Communications GmbH е правоприемникът на
Siemens Home and Office Communication Devices GmbH
& Co. KG (SHC), която на свой ред продължи бизнеса на
подразделението Siemens AG. По тази причина
всякакви изложения, направени от Siemens AG или
SHC, които се намират в ръководствата за
потребителя, следва да се разбират като изложения на
Gigaset Communications GmbH.
Надяваме се да ползвате с удоволствие вашия Gigaset.
izjave kompanije
čiti kao
RU Уважаемыи покупатель!
Компания Gigaset Communications GmbH является
правопреемником компании Siemens Home and Office
Communication Devices GmbH & Co. KG (SHC), которая,
ою очередь, приняла подразделение Gigaset в свое
в св
управление от компании Siemens AG. Поэтому любые
заявления, сделанные от имени компании Siemens AG
или SHC и встречающиеся в руководствах
пользователя, должны восприниматься как заявления
компании Gigaset Communications GmbH.
Мы надеемся, что продукты Gigaset удовлетворяют
вашим требованиям.
HU T
isztelt Vásárló!
A Siemens Home and Communication Devices GmbH & Co.
KG (SHC) törvényes jogutódja a Gigaset Communications
GmbH, amely a Siemens AG Gigaset üzletágának utódja.
Ebből következően a Siemens AG vagy az SHC felhasználói
kézikönyveiben található bármely kijelentést a Gigaset
Communications GmbH kijelentésének kell tekinteni.
Reméljük, megelégedéssel használja Gigaset készülékét.
Issued by
Gigaset Communications GmbH
Schlavenhorst 66, D-46395 Bocholt
Gigaset Communications GmbH is a trademark
licensee of Siemens AG
© Gigaset Communications GmbH 2008
All rights reserved.
Subject to availability. Rights of modifications
reserved.
www.gigaset.com
Page 3

s
Be inspired
DEUTSCH
Page 4
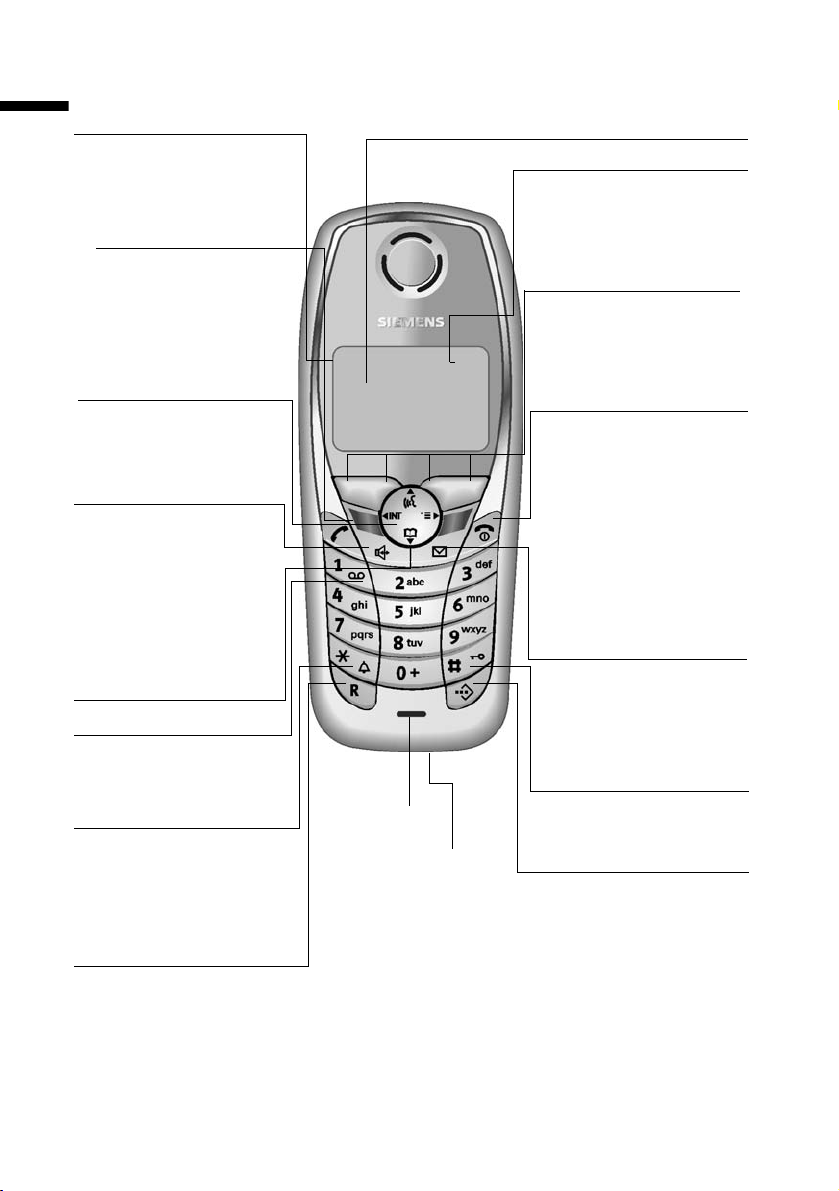
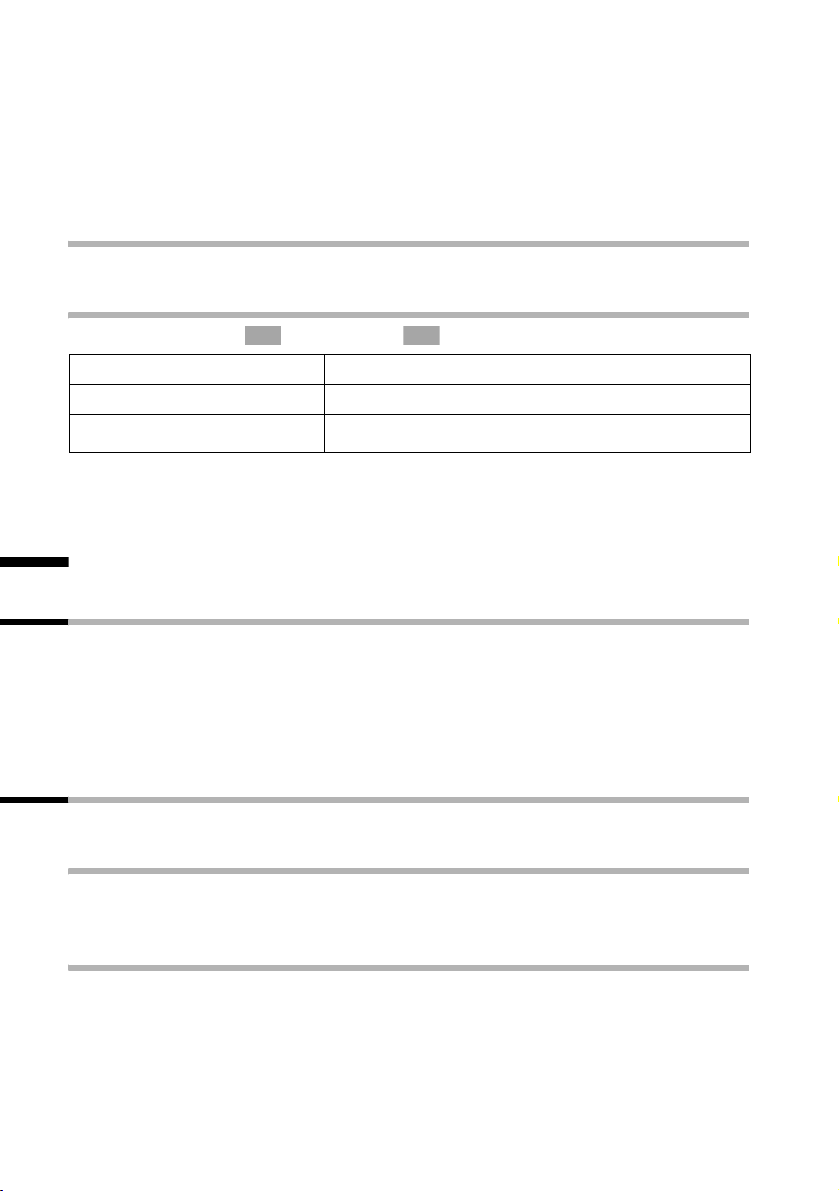
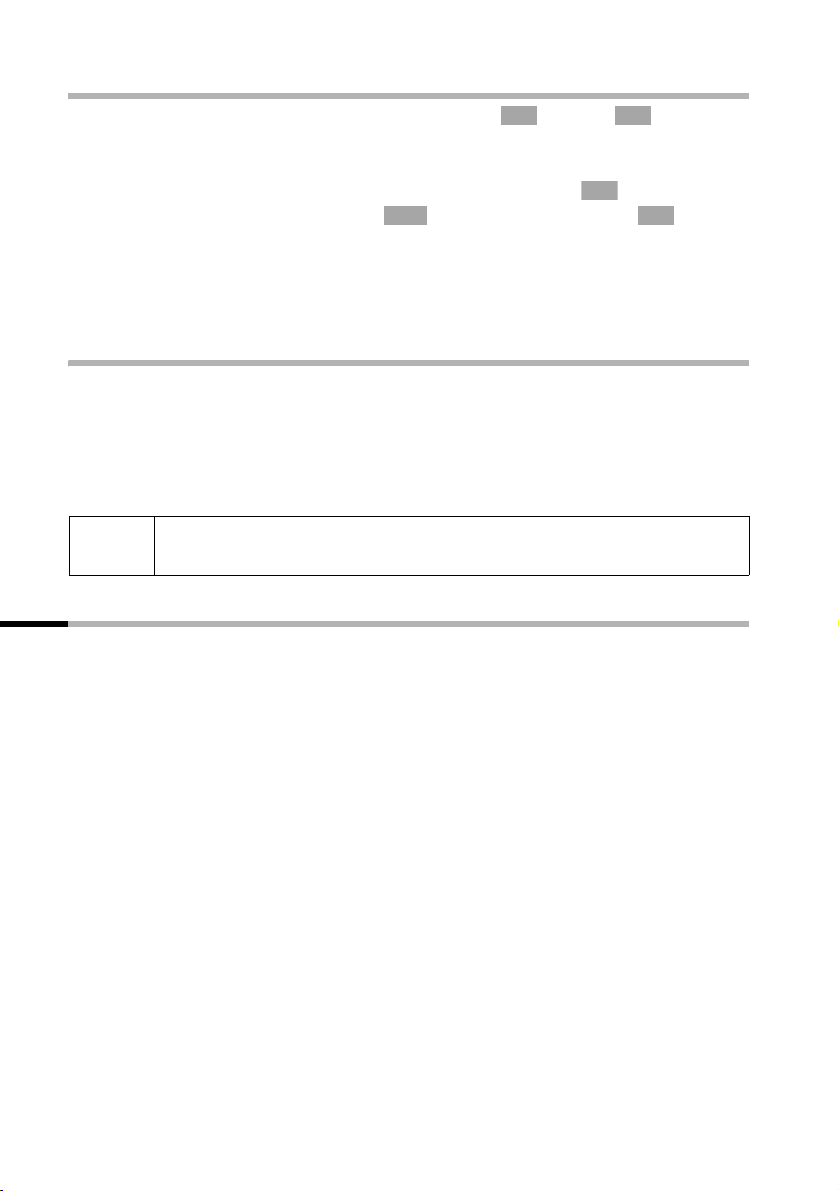
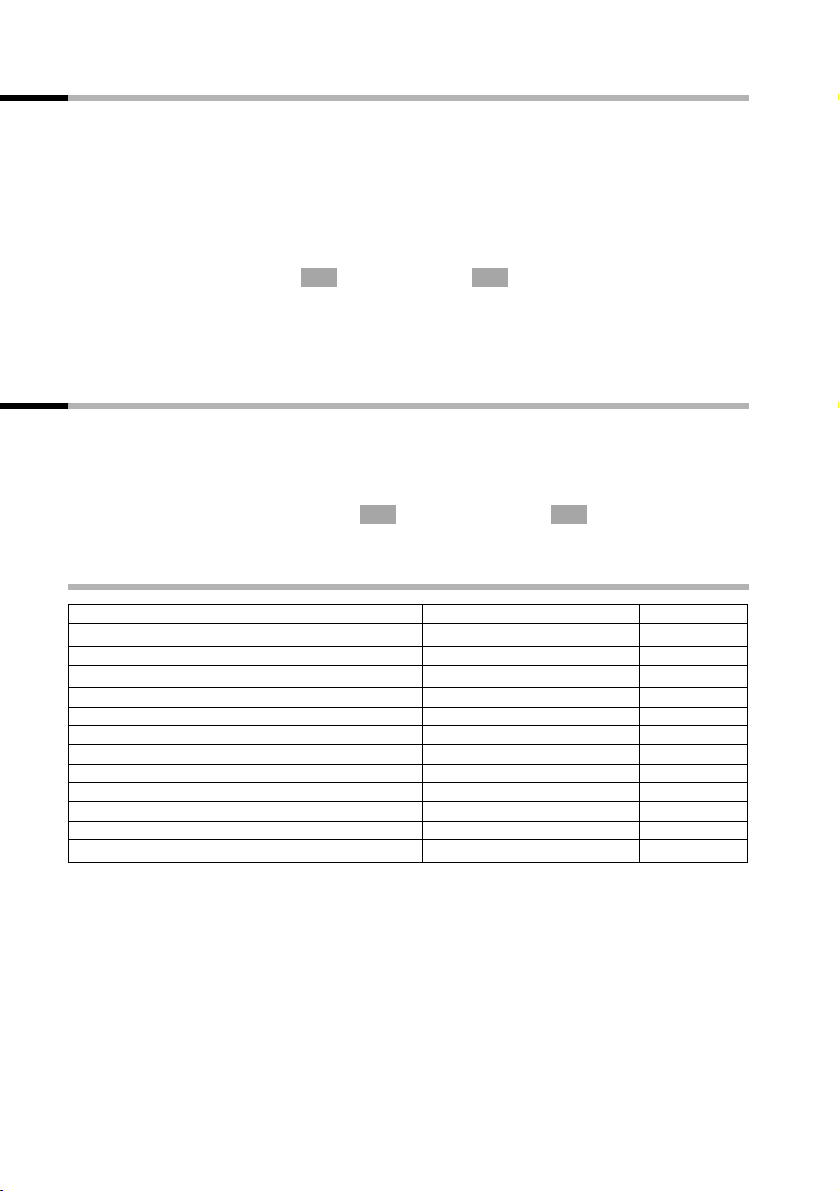
Kurzübersicht
Kurzübersicht
Empfangsfeldstärke
Ð 100 % i 75 %
Ñ 50 % Ò geringer E.
| kein Empfang (blinkt)
Abheben-Taste
◆ Gespräch annehmen
◆ Wahlvorgang einleiten
◆ Umschalten von Frei-
sprech- auf „Hörerbetrieb“
Steuer-Taste
Öffnet das Menü, Telefonbuch, Sprachwahl. Navigation im Eingabefeld
Freisprech-Taste
◆ Umschalten von „Hörer“-
auf Freisprechbetrieb
◆ Leuchtet: Freisprechen
ist eingeschaltet
◆ Blinkt: ankommender
Ruf, automatische
Wahlwiederholung
Telefonbuch öffnen
Taste 1
T-NetBox/Anrufbeantworter auswählen (ca. 2 Sek.
lang drücken)
Stern-Taste
◆ Klingeltöne ein/aus (ca. 2
Sek. lang drücken)
◆ Bei der Texteingabe Wech-
sel zwischen Groß-, Kleinund Ziffernschreibung
R-Taste
Wahlpause eingeben
(lang drücken)
Display (Anzeigefeld)
Ladezustand
= leer U voll
= blinkt: Akku fast leer
bzw. Akku wird geladen
Aktuelle Funktionen und
Display-Tasten
Mit den Display-Tasten
haben Sie Zugriff auf die
ÐV
INT 1
20.05.03 09:45
• §§§§§§§SMS§§§§§§
im Display dargestellten
Funktionen.
Auflegen-, Ein-/Aus-Taste
◆ Gespräch beenden
◆ Funktion abbrechen
◆ Eine Menüebene
zurück (kurz drücken)
◆ Zurück in Ruhezustand
(ca. 1 Sek. lang
drücken)
◆ Mobilteil ein/aus (ca.
2 Sek. lang drücken)
Nachrichten-Taste
◆ Zugriff auf Anrufer-
und Nachrichtenliste
◆ Blinkt: neue Nachrich-
ten und Anrufe
Raute-Taste
Mikrofon
Anschlussbuchse
für Headset und
PC-Interface
Tastensperre ein/aus
(ca. 1 Sek. lang drücken)
Kurzwahllisten-Taste
Kurzwahlliste öffnen
(kurz drücken)
Darstellung eines Mobilteils, das an einer SMS-fähigen Basis angemeldet ist.
2
Page 5

Inhaltsverzeichnis
Inhaltsverzeichnis
Kurzübersicht . . . . . . . . . . . . . . . . . . . . . . . . . . . . . . . 2
Sicherheitshinweise . . . . . . . . . . . . . . . . . . . . . . . . . 5
Telefon in Betrieb nehmen . . . . . . . . . . . . . . . . . . . . 6
Mobilteil in Betrieb nehmen . . . . . . . . . . . . . . . . . . . . . . . . . . . . . . . . . . . . . . . . . . . . . 6
Anmeldung . . . . . . . . . . . . . . . . . . . . . . . . . . . . . . . . . . . . . . . . . . . . . . . . . . . . . . . . . . . 7
Display-Sprache ändern . . . . . . . . . . . . . . . . . . . . . . . . . . . . . . . . . . . . . . . . . . . . . . . . . 7
Basis wechseln . . . . . . . . . . . . . . . . . . . . . . . . . . . . . . . . . . . . . . . . . . . . . . . . . . . . . . . . 8
Gürtelclip befestigen . . . . . . . . . . . . . . . . . . . . . . . . . . . . . . . . . . . . . . . . . . . . . . . . . . . 8
Mobilteil ein-/ausschalten . . . . . . . . . . . . . . . . . . . . . . . . . . . . . . . . . . . . . . . . . . . . . . . 8
Tastensperre ein-/ausschalten . . . . . . . . . . . . . . . . . . . . . . . . . . . . . . . . . . . . . . . . . . . . 8
Bedienen des Telefons und Menü-Führung . . . . . . 9
Tasten . . . . . . . . . . . . . . . . . . . . . . . . . . . . . . . . . . . . . . . . . . . . . . . . . . . . . . . . . . . . . . . 9
Hauptmenü . . . . . . . . . . . . . . . . . . . . . . . . . . . . . . . . . . . . . . . . . . . . . . . . . . . . . . . . . 10
Zeitfunktionen . . . . . . . . . . . . . . . . . . . . . . . . . . . . . 11
Datum und Uhrzeit einstellen . . . . . . . . . . . . . . . . . . . . . . . . . . . . . . . . . . . . . . . . . . . 11
Wecker einstellen . . . . . . . . . . . . . . . . . . . . . . . . . . . . . . . . . . . . . . . . . . . . . . . . . . . . . 11
Termin einstellen . . . . . . . . . . . . . . . . . . . . . . . . . . . . . . . . . . . . . . . . . . . . . . . . . . . . . 11
Telefonieren . . . . . . . . . . . . . . . . . . . . . . . . . . . . . . . 12
Extern anrufen und Gespräch beenden . . . . . . . . . . . . . . . . . . . . . . . . . . . . . . . . . . . . 12
Intern anrufen und Gespräch beenden . . . . . . . . . . . . . . . . . . . . . . . . . . . . . . . . . . . . 12
Anruf annehmen . . . . . . . . . . . . . . . . . . . . . . . . . . . . . . . . . . . . . . . . . . . . . . . . . . . . . 13
Freisprechen . . . . . . . . . . . . . . . . . . . . . . . . . . . . . . . . . . . . . . . . . . . . . . . . . . . . . . . . . 13
Mobilteil stummschalten . . . . . . . . . . . . . . . . . . . . . . . . . . . . . . . . . . . . . . . . . . . . . . . 13
Telefonbuch und weitere Listen nutzen . . . . . . . . 14
Telefonbuch und Kurzwahlliste . . . . . . . . . . . . . . . . . . . . . . . . . . . . . . . . . . . . . . . . . . 14
Telefonbuch- bzw. Kurzwahllisten-Einträge verwalten . . . . . . . . . . . . . . . . . . . . . . . . 15
Sprachwahl . . . . . . . . . . . . . . . . . . . . . . . . . . . . . . . . . . . . . . . . . . . . . . . . . . . . . . . . . . 16
Verketten einer Call-by-Call-Nummer mit einer Rufnummer . . . . . . . . . . . . . . . . . . . 17
Wahlwiederholungsliste . . . . . . . . . . . . . . . . . . . . . . . . . . . . . . . . . . . . . . . . . . . . . . . . 17
E-Mail-Verzeichnis . . . . . . . . . . . . . . . . . . . . . . . . . . . . . . . . . . . . . . . . . . . . . . . . . . . . 18
Freien Speicherplatz anzeigen . . . . . . . . . . . . . . . . . . . . . . . . . . . . . . . . . . . . . . . . . . . 18
Mehrere Mobilteile nutzen . . . . . . . . . . . . . . . . . . . 19
Intern rückfragen . . . . . . . . . . . . . . . . . . . . . . . . . . . . . . . . . . . . . . . . . . . . . . . . . . . . . 19
Anklopfen beim internen Gespräch annehmen/abweisen . . . . . . . . . . . . . . . . . . . . . 19
Mobilteil als Babyfon nutzen . . . . . . . . . . . . . . . . . . . . . . . . . . . . . . . . . . . . . . . . . . . . 19
Walkie-Talkie-Modus einstellen . . . . . . . . . . . . . . . . . . . . . . . . . . . . . . . . . . . . . . . . . . 20
3
Page 6

Inhaltsverzeichnis
Mobilteil einstellen . . . . . . . . . . . . . . . . . . . . . . . . . 22
Automatische Rufannahme aus-/einschalten . . . . . . . . . . . . . . . . . . . . . . . . . . . . . . . 22
Sprachlautstärke ändern . . . . . . . . . . . . . . . . . . . . . . . . . . . . . . . . . . . . . . . . . . . . . . . 22
Klingeltöne ändern . . . . . . . . . . . . . . . . . . . . . . . . . . . . . . . . . . . . . . . . . . . . . . . . . . . . 22
Sound Manager . . . . . . . . . . . . . . . . . . . . . . . . . . . . . . . . . . . . . . . . . . . . . . . . . . . . . . 23
Hinweistöne ein-/ausschalten . . . . . . . . . . . . . . . . . . . . . . . . . . . . . . . . . . . . . . . . . . . 24
Mobilteil in den Lieferzustand zurücksetzen . . . . . . . . . . . . . . . . . . . . . . . . . . . . . . . . 24
Anhang . . . . . . . . . . . . . . . . . . . . . . . . . . . . . . . . . . . 25
Pflege und Kontakt mit Flüssigkeit . . . . . . . . . . . . . . . . . . . . . . . . . . . . . . . . . . . . . . . 25
Kundenservice (Customer Care) . . . . . . . . . . . . . . . . . . . . . . . . . . . . . . . . . . . . . . . . . 25
Technische Daten . . . . . . . . . . . . . . . . . . . . . . . . . . . . . . . . . . . . . . . . . . . . . . . . . . . . . 26
Zeichensatztabelle . . . . . . . . . . . . . . . . . . . . . . . . . . . . . . . . . . . . . . . . . . . . . . . . . . . . 26
Texteingabehilfe . . . . . . . . . . . . . . . . . . . . . . . . . . . . . . . . . . . . . . . . . . . . . . . . . . . . . . 27
PC Interface . . . . . . . . . . . . . . . . . . . . . . . . . . . . . . . . . . . . . . . . . . . . . . . . . . . . . . . . . 28
Spiel „Balloon Shooter“ . . . . . . . . . . . . . . . . . . . . . . . . . . . . . . . . . . . . . . . . . . . . . . . . . 29
Garantie-Schein Belgien . . . . . . . . . . . . . . . . . . . . . . . . . . . . . . . . . . . . . . . . . . . . . . . . 30
Garantie Schweiz . . . . . . . . . . . . . . . . . . . . . . . . . . . . . . . . . . . . . . . . . . . . . . . . . . . . . 30
Stichwortverzeichnis . . . . . . . . . . . . . . . . . . . . . . . . 31
4
Page 7
Sicherheitshinweise
Sicherheitshinweise
Verwenden Sie nur das mitgelieferte Steckernetzgerät, wie auf der Unter-
$
seite des Gerätes gekennzeichnet.
Legen Sie nur den empfohlenen, aufladbaren Akku (S. 26) ein! D. h. keinen
anderen Akkutyp oder eine nicht wieder aufladbare Batterie, da das zu
Gesundheits- und Personenschäden führen kann.
‹
Legen Sie den wieder aufladbaren Akku richtig gepolt ein und verwenden Sie
ihn gemäß dieser Bedienungsanleitung.
Œ
Medizinische Geräte können in ihrer Funktion beeinflusst werden. Beachten
Sie die technischen Bedingungen des jeweiligen Umfeldes (z. B. Arztpraxis).
Das Mobilteil kann in Hörgeräten einen unangenehmen Brummton verursachen.
Das Mobilteil ist nicht spritzwassergeschützt (S. 25).
Während der Autofahrt darf der Fahrer nicht telefonieren (Walkie-Talkie-Funktion).
!
Telefon ausschalten, während Sie sich im Flugzeug aufhalten (Walkie-TalkieFunktion). Gegen versehentliches Einschalten sichern.
Nutzen Sie das Telefon nicht in explosionsgefährdeten Umgebungen
(z. B. Lackierereien).
ƒ
Geben Sie Ihr Gigaset nur mit der Bedienungsanleitung an Dritte weiter.
Entsorgen Sie Akku und Telefon umweltgerecht.
i
Nicht alle in dieser Bedienungsanleitung beschriebenen Funktionen sind
in allen Ländern verfügbar.
5
Page 8
Telefon in Betrieb nehmen
Telefon in Betrieb nehmen
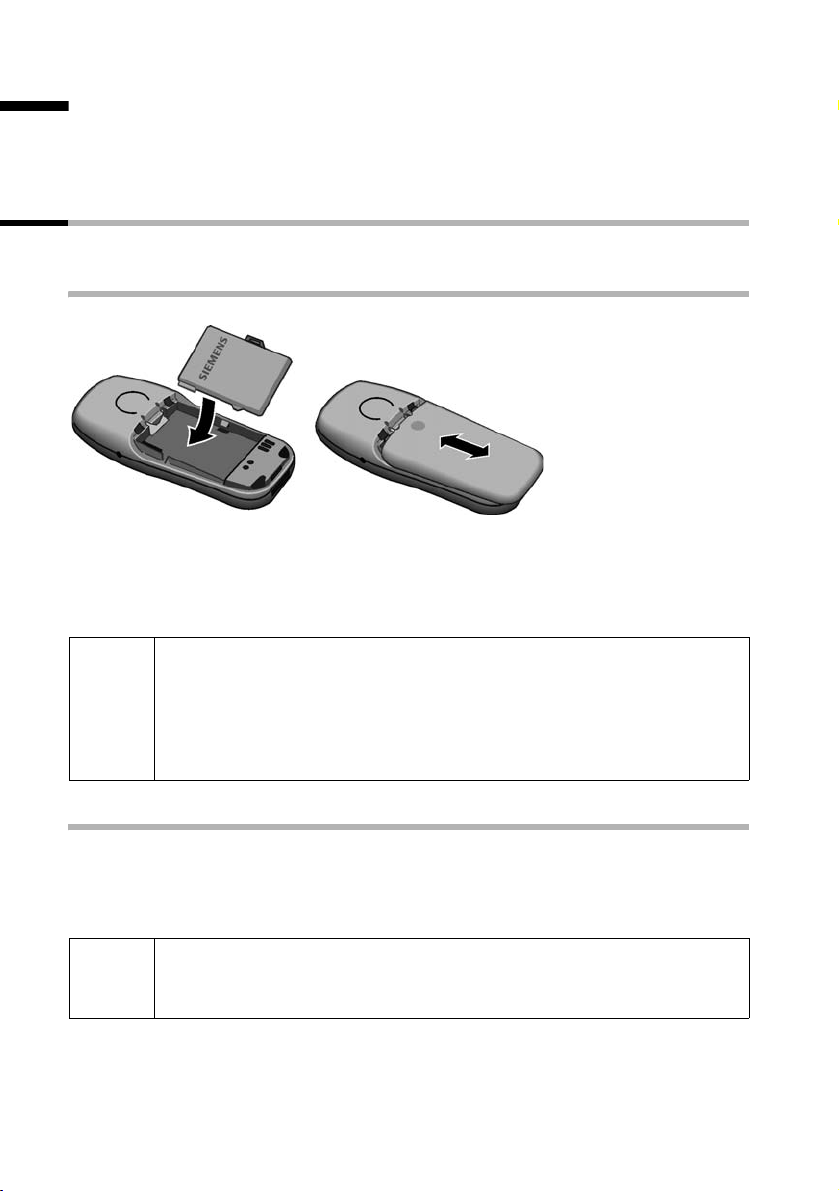
Die Verpackung enthält:
ein Mobilteil SL 1, eine Ladeschale mit Steckernetzgerät, einen Gürtelclip für das
Mobilteil, einen Akku, eine Bedienungsanleitung.
Mobilteil in Betrieb nehmen
Das Display ist durch eine Folie geschützt. Bitte die Schutzfolie abziehen!
Akku einlegen
◆ Akku richtig einlegen (siehe linke Abbildung),
◆ Deckel etwa 3 mm nach unten versetzt auflegen und nach oben schieben, bis er
einrastet,
◆ zum Öffnen des Deckels auf die Vertiefung drücken und nach unten schieben.
Verwenden Sie nur den von Siemens auf S. 26 empfohlenen aufladbaren
Akku! D. h. auf keinen Fall eine herkömmliche (nicht wieder aufladbare)
W
Batterie oder einen anderen Akkutyp, da erhebliche Gesundheits- und
Sachschäden nicht auszuschließen sind. Es könnte z. B. der Mantel der
Batterie bzw. des Akkus zerstört werden (gefährlich). Ebenfalls könnten
Funktionsstörungen bzw. Beschädigungen des Gerätes auftreten.
Akku laden
Stellen Sie das Mobilteil mit dem Display nach vorn in die Ladeschale. Lassen Sie das
Mobilteil zum Laden des Akkus in der Ladeschale stehen, denn der Akku ist im Lieferzustand nicht geladen. Das Aufladen des Akkus wird im Display oben rechts durch Blinken
des Akkusymbols = angezeigt.
Beim ersten Laden empfehlen wir eine ununterbrochene Ladezeit von
W
fünf Stunden – unabhängig von der Ladezustandsanzeige! Die Ladekapazität des Akkus reduziert sich technisch bedingt nach einiger Zeit.
6
Page 9
Telefon in Betrieb nehmen
Der Ladezustand des Akkus wird nur nach einem ununterbrochenen Lade-/Entladevor-
gang richtig angezeigt. Sie sollten daher den Akku nicht unnötig entfernen und den
Ladevorgang nicht vorzeitig beenden.
◆ Nach dem ersten Ladevorgang können Sie Ihr Mobilteil nach jedem
Gespräch in die Ladeschale zurückstellen. Das Laden wird
i
elektronisch gesteuert. Dadurch wird der Akku schonend geladen.
◆ Der Akku erwärmt sich während des Aufladens; das ist normal und
ungefährlich.
Anmeldung
Bevor Sie Ihr Gigaset SL 1 nutzen können, müssen Sie es manuell anmelden. Die
Anmeldung müssen Sie am Mobilteil und an der Basis einleiten.
1. Am Mobilteil
v
[______________________________________________]
s Einstellungen
[______________________________________________]
s MT anmelden
[______________________________________________]
s Basis 1
OK
Nach Eingabe der System-PIN blinkt im Display z. B. Basis 1.
Menü öffnen.
Auswählen und bestätigen.
OK
Auswählen und bestätigen.
OK
Basis (1–4) auswählen und bestätigen, z. B. Basis 1.
OK
System-PIN der Basis (Lieferzustand: 0000) eingeben
und bestätigen.
2. An der Basis
Wie Sie die Anmeldung des Mobilteils an der Basis einleiten, lesen Sie bitte in der Bedienungsanleitung der Basis nach.
Display-Sprache ändern
Sie können sich die Display-Texte in verschiedenen Sprachen anzeigen lassen.
v
[______________________________________________]
s Einstellungen
[______________________________________________]
s Sprache
OK
s Sprache auswählen und bestätigen.
a
Menü öffnen.
Auswählen und bestätigen.
OK
Auswählen und bestätigen. Die aktuelle Sprache ist
OK
mit ‰ markiert (Lieferzustand: Englisch).
Lang drücken (zurück in den Ruhezustand).
Sie haben aus Versehen eine für Sie unverständliche Sprache eingestellt:
v M 2 drücken, mit s die richtige Sprache auswählen und mit bestätigen.
OK
7
Page 10
Telefon in Betrieb nehmen
Basis wechseln
Ist Ihr Mobilteil an mehreren Basen angemeldet, können Sie es auf eine bestimmte Basis
oder auf die Basis mit dem besten Empfang (Beste Basis) einstellen.
v; s Einstellungen ; s Basisauswahl ;
s (Angemeldete Basis oder Beste Basis auswählen) .
OK OK
OK
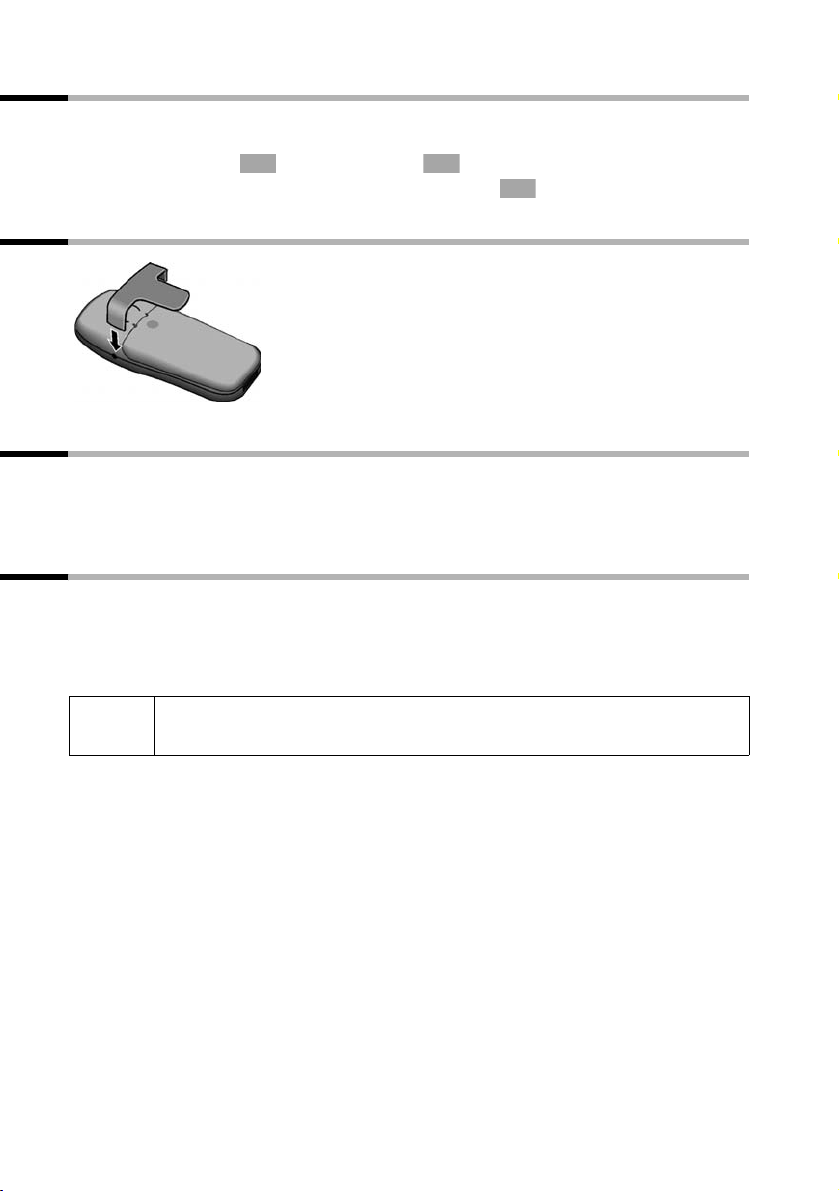
Gürtelclip befestigen
Den Gürtelclip auf der Rückseite des
Mobilteils andrücken, bis die seitlichen „Nasen“ in die Aussparungen
einrasten.
Mobilteil ein-/ausschalten
Zum Einschalten: Auflegen-Taste a lang drücken.
Zum Ausschalten: Auflegen-Taste a im Ruhezustand erneut lang drücken.
Wenn Sie das Mobilteil in die Ladeschale legen, schaltet es sich automatisch ein.
Tastensperre ein-/ausschalten
Raute-Taste R lang drücken (im Display erscheint das Symbol Ø).
Zum Ausschalten/Entsperren: Raute-Taste
Die Tastensperre schaltet sich automatisch aus, wenn Sie angerufen werden. Nach
Gesprächsende schaltet sie sich wieder ein.
R erneut lang drücken.
i
Bei eingeschalteter Tastensperre können auch Notrufnummern nicht
gewählt werden.
8
Page 11
Bedienen des Telefons und Menü-Führung
Bedienen des Telefons und Menü-Führung
Tasten
Steuer-Taste
Die Steuer-Taste ist mit vier schwarzen Richtungspfeilen und den dazugehörigen Symbolen versehen. Je nachdem, auf welche Markierung Sie drücken wird eine bestimmte
Funktion aufgerufen. In der Bedienungsanleitung ist die jeweilige Seite, auf die Sie drücken müssen, schwarz markiert, z. B.: Taste v für rechts = Menü öffnen.
Mit der Steuer-Taste können Sie häufig auch die Funktionen der rechten Display-Taste
ausführen.
Beispiel:
Steuer-Taste
Unterschiedliche Funktionen der Steuer-Taste:
Im Ruhezustand In Listen und Menüs In einem Eingabefeld
Sprachwahl einleiten
t
(lang drücken)
Telefonbuch öffnen Nach unten blättern Die Schreibmarke eine Zeile
s
Menü öffnen Ausgewählten Eintrag bestä-
v
Liste der Mobilteile öffnen Eine Menü-Ebene zurück
u
Nach oben blättern Die Schreibmarke eine Zeile
tigen (wie )
springen bzw. abbrechen
OK
nach oben setzen
nach unten setzen
Die Schreibmarke nach rechts
setzen
Die Schreibmarke nach links
setzen
Display-Tasten
Display-Tasten sind die waagrechten Wipp-Tasten direkt unter dem Display. Entspre-
chend der jeweiligen Bediensituation wechselt ihre Funktion. Die aktuelle Funktion wird
direkt darüber im Display angezeigt.
Beispiel:
• §§§§§§§SMS§§§§§§
Display-Tasten
Die verschiedenen Symbole haben bei Tastendruck folgende Bedeutung:
Þ
OK
Wahlwiederholungs-Taste: Die Liste der letzten 10 Rufnummern öffnen.
OK-Taste: Menüfunktion bestätigen bzw. Eingabe durch Bestätigung speichern.
9
Page 12
Bedienen des Telefons und Menü-Führung
à
f
C
Ý
ä
Menü-Taste: Im Ruhezustand das Hauptmenü öffnen.
Beim Telefonieren ein zustandsabhängiges Menü öffnen.
Lösch-Taste: Eingabe zeichenweise von rechts nach links löschen.
Escape-Taste: Eine Menüebene zurück bzw. Vorgang abbrechen.
E-Mail-Verzeichnis öffnen.
Von einer beliebigen Stelle im Menü in den Ruhezustand zurückkehren
Auflegen-Taste a ca. 1 Sek. lang drücken oder keine Taste drücken.
Nach 2 Min. wechselt das Display automatisch in den Ruhezustand. Änderungen, die
OK OK
Sie nicht durch Drücken von ,
Ja, Sichern, Senden oder mit Speichern bestätigt
bzw. gespeichert haben, werden verworfen.
Hauptmenü
Zum Öffnen drücken Sie im Ruhezustand des Telefons die rechte Seite der Steuer-Taste
v und blättern mit s zum gewünschten Eintrag.
SMS
1
T-Net-LM
2
Familie/Freizeit
3
Zeitfunktionen
4
Audio
5
Kosten
6
Einstellungen
7
Basis einstellen
8
Anrufbeantw.
9
Das Angebot der Menüeinträge hängt
von Ihrer Basis ab.
10
Page 13
Zeitfunktionen
Zeitfunktionen
Datum und Uhrzeit einstellen
Die Datums- und Uhrzeiteinstellung ist notwendig, damit korrekt angezeigt werden
kann, wann Anrufe eingegangen sind.
v; s Zeitfunktionen ; s Datum/Uhrzeit ; ~ (Tag/Monat/Jahr eingeben);
s (in die nächste Zeile) ~ (Std./Min. eingeben);
s (ggf. in die nächste Zeile) r (12- oder 24-Stunden-Anzeige wählen);
a (zurück in den Ruhezustand).
Bei eingestellter 12-Stunden-Anzeige können Sie in der Zeile Zeit: mit der Display-Taste
am/pm zwischen am und pm wechseln.
Wecker einstellen
Voraussetzung: Datum und Uhrzeit sind eingestellt (S. 11).
Wecker einschalten und einstellen
OK OK
Sichern ,
v; s Zeitfunktionen ; s Wecker ; r (Ein auswählen);
s ~ (Weckzeit eingeben
Bei eingestellter 12-Stunden-Anzeige können Sie in der Zeile Zeit: mit der Display-Taste
am/pm zwischen am und pm wechseln.
Ein Weckruf erfolgt nur im Ruhezustand des Mobilteils, nicht bei eingeschaltetem Babyfon, Walkie-Talkie, im Gespräch oder während einer automatischen Wahlwiederholung.
Wie Sie Lautstärke und Melodie einstellen, lesen Sie auf S. 22.
OK OK
); Sichern; a (zurück in den Ruhezustand).
Wecker ausschalten
Der Wecker ist auf eine bestimmte Uhrzeit eingestellt, er soll aber nicht klingeln.
v; s
r (Aus auswählen); Sichern; a (zurück in den Ruhezustand).
Zeitfunktionen ; s Wecker .
OK OK
Weckruf ausschalten
Display-Taste Ruf aus oder eine beliebige Taste drücken.
Termin einstellen
Sie können sich von Ihrem Mobilteil an bis zu fünf Termine erinnern lassen.
Termin einschalten und einstellen
v; s Zeitfunktionen ; Term ine ; s Termin 2 (Beispiel) .
r (Ein auswählen); s ~ (Tag/Monat eingeben
s Ändern; ~ (Namen eingeben) ; Sichern; a (zurück in den Ruhezustand).
Ein eingestellter Termin wird mit dem Symbol ¼ angezeigt.
OK OK OK
); s ~ (Std./Min. eingeben);
OK
11
Page 14
Telefonieren
Der Terminruf erfolgt nur im Ruhezustand des Mobilteils, nicht bei eingeschaltetem
Babyfon, Walkie-Talkie, im Gespräch oder während einer automatischen Wahlwiederholung.
Bei eingestellter 12-Stunden-Anzeige können Sie in der Zeile Zeit: mit der Display-Taste
am/pm zwischen am und pm wechseln.
Wie Sie Lautstärke und Melodie einstellen, lesen Sie auf S. 22.
Terminruf ausschalten
Wenn Ihnen ein Termin signalisiert wird, können Sie ihn mit Ruf aus ausschalten.
Nicht angenommene Termine, Jahrestage anzeigen und löschen
v; s Zeitfunktionen ; s Ereignisse ; s Termin/Jahrestag auswählen).
[RRRRRRRRRRRRRRRRRRRRRR]
Löschen
... weiter mit
a
Ein abgelaufener Termin ist mit ¼, ein abgelaufener Jahrestag mit ‚ markiert.
OK OK
Display-Taste drücken.
Lang drücken (zurück in den Ruhezustand).
Telefonieren
Extern anrufen und Gespräch beenden
~ (Rufnummer eingeben), c (Abheben-Taste) drücken (Reihenfolge unerheblich).
Gespräch beenden/Wählvorgang abbrechen:
Wahlpause
Sie können zwischen der Vorwahl und der Rufnummer eine Wahlpause einfügen.
Drücken Sie dazu ca. 2 Sek. die Taste S. Anschließend geben Sie die Rufnummer ein.
Intern anrufen und Gespräch beenden
Gespräche mit anderen, an derselben Basis angemeldeten Mobilteilen sind kostenlos.
Ein bestimmtes Mobilteil anrufen
u; s (Mobilteil auswählen); c drücken. Oder: u2 (Beispiel) drücken.
Zum Beenden:
a (Auflegen-Taste) drücken.
a (Auflegen-Taste) drücken.
Alle Mobilteile gleichzeitig anrufen („Sammelruf“)
u; P (Stern-Taste) drücken.
Zum Beenden:
a (Auflegen-Taste) drücken.
12
Page 15

Telefonieren
Anruf annehmen
Ihr Mobilteil klingelt, der Anruf wird im Display angezeigt und die Freisprech-Taste d
blinkt. c (Abheben-Taste) drücken (oder Display-Taste
d).
Ist die Funktion Aut.Rufannahme eingeschaltet (S. 22), müssen Sie das Mobilteil nur
aus der Ladeschale nehmen, um den Anruf anzunehmen.
Wenn der Klingelton stört, drücken Sie die Display-Taste
noch so lange annehmen, wie er im Display angezeigt wird.
Abheben oder Freisprech-Taste
Ruf aus. Den Anruf können Sie
Freisprechen
Freisprechen ein-/ausschalten
Vor dem Wählen: ~ (Rufnummer eingeben); d (Freisprech-Taste) drücken.
Während eines Gesprächs:
Zum Ausschalten:
Möchten Sie das Mobilteil während eines Gesprächs in die Ladeschale stellen, müssen
Sie die Freisprech-Taste
c (Abheben-Taste) drücken.
d (Freisprech-Taste) drücken.
beim Hineinstellen gedrückt halten.
d
i
Bevor Sie die Funktion Freisprechen nutzen, sollten Sie dies Ihrem
Gesprächspartner sagen.
Lautstärke während des Freisprechens im Gespräch ändern
Sie führen ein Gespräch, das Freisprechen d ist eingeschaltet.
(Freisprech-Taste) erneut drücken; r Lautstärke leiser oder lauter; Sichern.
d
Mobilteil stummschalten
. Das Gespräch wird „gehalten“ (Wartemelodie).
u
Zum Beenden: Display-Taste drücken.
Ý
13
Page 16
Telefonbuch und weitere Listen nutzen
Telefonbuch und weitere Listen nutzen
Telefonbuch und Kurzwahlliste
Im Telefonbuch und in der Kurzwahlliste können Sie bis zu 200 Rufnummern speichern.
Das Tel efonbuch rufen Sie mit der Taste s auf. Zu jedem Telefonbucheintrag können
Sie einen Jahrestag hinterlegen und den Eintrag als „VIP“ markieren.
Die Kurzwahlliste ist ein spezielles Telefonbuch, in dem Sie besonders wichtige Ruf-
nummern ablegen können, z. B. private Telefonnummern, Vorwahlen von Netzanbietern („Call-by-Call-Nummern“) o. Ä. Sie rufen die Kurzwahlliste mit der Taste C auf.
Die Bedienung der Kurzwahlliste ist, abgesehen vom Speichern von Einträgen, mit
der Bedienung des Telefonbuchs identisch.
◆ Bei der Eingabe von Namen unterstützt Sie die Texteingabehilfe EATONI (S. 27, im
Lieferzustand ausgeschaltet).
◆ Wie Sie Text korrekt eingeben, entnehmen Sie bitte der Zeichensatztabelle (S. 26).
◆ Sie können für eine Nummer bis zu 32 Ziffern und für einen Namen bis zu 16 Buch-
staben eingeben.
◆ Bei Eingabe einer Nummer können Sie über , s Pause einfügen bzw.
über etwa 2 Sek. langes Drücken der Taste S die entsprechende Pause einfügen.
Rufnummer im Telefonbuch speichern
à OK
s (Telefonbuch öffnen); Neuer Eintrag ; ~ (Rufnummer eingeben);
s (in die nächste Zeile); ~ (Namen eingeben);
(Um zusätzlich einen Jahrestag einzugeben, nach Eingabe des Namens: mit s in die
Zeile Jahrestag: springen, Display-Taste
drücken.); a lang drücken (zurück in den Ruhezustand).
Einen Jahrestag löschen Sie, indem Sie im Telefonbuch-Eintrag im Feld für den Jahres-
tag die Display-Tasten
teren Display-Wechsel
Erinnerungsruf an einen Jahrestag
Ein Erinnerungsruf wird mit der ausgewählten Klingeltomelodie am Mobilteil signalisiert. Im Display wird der Telefonbucheintrag mit ‚ ‚ ‚ angezeigt.
Ist Ihr Telefon an eine Telefonanlage angeschlossen, müssen Sie ggf. die
i
Vorwahlziffer (Amtskennziffer AKZ) als erste Ziffer Ihres Telefonbucheintrags eingeben.
Ändern , nach dem Display-Wechsel Löschen und nach einem wei-
Sichern drücken.
OK
à OK
(Menü öffnen), Speichern .
Ändern drücken und Datum eingeben. Sichern
14
Page 17
Telefonbuch und weitere Listen nutzen
Rufnummer in der Kurzwahlliste speichern
Sie können bis zu neun Einträgen der Kurzwahlliste jeweils eine der Ziffern 0, 2–9
zuordnen. Wenn Sie im Ruhezustand eine dieser Ziffern lang drücken und die AbhebenTas te c drücken, sind Sie sofort mit der Rufnummer verbunden, die der Ziffer zugeordnet ist.
C (Kurzwahlliste öffnen);
Neuer Eintrag ; ~ (Rufnummer eingeben);
s (in die nächste Zeile), ~ (Namen eingeben);
OK
à OK
(Menü öffnen); Speichern .
(Um zusätzlich eine Kurzwahlziffer zu speichern, nach Eingabe des Namens: mit s in
die Zeile Auf Taste: springen, mit r eine Ziffer [0, 2–9] für diese Rufnummer auswäh-
len, Display-Taste
Sichern drücken.) a lang drücken (zurück in den Ruhezustand).
Bereits verwendete Ziffern können nicht doppelt vergeben werden.
Mit Telefonbuch/Kurzwahlliste wählen
s bzw. C (Telefonbuch/Kurzwahlliste öffnen); s (Eintrag auswählen); c.
Telefonbuch- bzw. Kurzwahllisten-Einträge verwalten
Um eine der folgenden Menüfunktionen zu nutzen, drücken Sie die Telefonbuch-Taste
s bzw. die Kurzwahllisten-Taste C. Blättern Sie mit s
Sie anschließend v, um das Menü zu öffnen. Blättern Sie mit s
Funktion.
Oder: s bzw. C; ~ (Anfangsbuchstaben eingeben); ggf. mit s blättern oder
~ weitere Buchstaben des Namens eingeben; c.
Nr. verwenden
Eintrag ändern
Eintrag löschen
Eintrag als VIP Gilt nur für das Telefonbuch (
Kopier. u. ändern Gilt nur für das Telefonbuch (
Eintrag senden
Liste löschen
Liste senden
Speicherplatz
zu dem Eintrag und drücken
zu der gewünschten
s
)
s
)
Haben Sie einen Eintrag ausgewählt, drücken Sie zum Ansehen bzw. Ändern des Eintrags die Display-Taste
Ansehen und dann Ändern.
Die Funktionen „Als VIP markieren“ und „kopieren und ändern“
Telefonbucheinträge von besonders wichtigen Anrufern können Sie als VIP (Very Important Person) markieren, d. h. eine bestimmte Melodie zuweisen. Sie hören dann an der
Klingelmelodie, wer Sie anruft. Voraussetzung: Rufnummernübermittlung.
Um einen ähnlichen Eintrag nicht doppelt eingeben zu müssen, können Sie eine Kopie
anlegen und diesen Eintrag dann ändern.
15
Page 18

Telefonbuch und weitere Listen nutzen
Einzelnen Eintrag bzw. komplette Liste an ein Mobilteil senden
Sie können einzelne Einträge oder die komplette Liste an ein anderes, an derselben
Basis angemeldetes SL 1-, S1-, C2-Mobilteil oder Comfort-Mobilteile der Serie Gigaset
4000, 3000 und 2000 übertragen. Hinterlegte Sprachmuster und Kurzwahlziffern werden nicht übertragen. Die Einstellungen VIP wird mobilteilabhängig übertragen
s bzw. C (Telefonbuch/Kurzwahlliste öffnen); s (Eintrag auswählen);
v (Menü öffnen); s
Eintrag senden oder s Liste senden );
~ (Interne Nummer des Empfänger-Mobilteil eingeben); .
OK OK
OK
Solange Sie nach Senden eines Eintrags mit der Display-Taste Ja bestätigen, können Sie
weitere Einträge auswählen. Mit der Display-Taste
Nein beenden Sie den Sendevorgang.
Sprachwahl
Mit der Sprachwahl wählen Sie, indem Sie den Namen des Gesprächspartners sprechen.
Dazu müssen Sie ein Sprachmuster hinterlegen, d. h. der von Ihnen gesprochene Name
wird im Mobilteil gespeichert.
Bis zu vier Benutzer können pro Eintrag ein Sprachmuster hinterlegen/aufnehmen. Vor
der Aufnahme muss sich der Benutzer „identifizieren“, z. B. als Benutzer 2.
Es können insgesamt 23 Sprachmuster für Telefonbuch-Einträge gespeichert werden.
Ein mit einem Sprachmuster hinterlegter Eintrag ist im Sprach-Telefonbuch mit ´ markiert.
Sprachmuster für einen vorhandenen Telefonbuch-Eintrag aufnehmen
Sprechen Sie Ihr Sprachmuster in einer leisen Umgebung (Abstand ca. 25 cm) auf.
Schritt 1: Telefonbuch für die Sprachwahl öffnen:
s (Telefonbuch öffnen); s(Eintrag auswählen); Sprache; s Benutzer 2 (Bsp.) .
Schritt 2: Aufnahme starten:
OK
Aufn. ; (Display-Aufforderung bestätigen). Sprechen Sie nach der entsprechenden
Aufforderung im Display den Namen. Wiederholen Sie den Namen nach der erneuten
Aufforderung im Display. Die Aufnahme wird automatisch gespeichert
a lang drücken (zurück in den Ruhezustand).
Ist Ihr Sprachmuster dem eines anderen Benutzers zu ähnlich, werden Sie mit einer
Meldung darauf aufmerksam gemacht. Beenden Sie diese Meldung mit , kehren
Sie zum Anfang der Sprachaufnahme zurück und wiederholen Sie die Aufnahme.
Mit Sprachwahl wählen: Taste t lang drücken und den Namen sprechen.
Ý
OK
Ansage des Namens bei einem Anruf
Bei einem ankommenden externen Anruf können Sie sich zusätzlich zum Klingelton einmal den Namen des Anrufers ansagen lassen.
Voraussetzungen: Rufnummernübermittlung. Ein Sprachmuster ist hinterlegt (S. 16).
Ansage des Namens ein-/ausschalten
v (Menü öffnen); s Audio ; s Klingeltöne ; Für ext. Anrufe ;
OK
2x s (in die übernächste Zeile), r (Name ansag.:) ein-/ausschalten;
OK OK
Sichern;
a lang drücken (zurück in den Ruhezustand).
16
Page 19

Telefonbuch und weitere Listen nutzen
Sprachmuster anhören
Telefonbuch für die Sprachwahl öffnen (s. Schritt 1, S. 16). Danach:
s (Eintrag auswählen);
Anhören; a lang drücken (zurück in den Ruhezustand).
Sprachmuster ändern oder löschen
Telefonbuch für die Sprachwahl öffnen (s. Schritt 1, S. 16). Danach:
s (Eintrag auswählen); v (Menü öffnen);
; a lang drücken (zurück in den Ruhezustand).
OK
Nach dem Löschen eines Eintrags, bleiben Rufnummer und Name erhalten. Auch die
Sprachmuster von anderen Benutzern sind noch vorhanden.
Muster aufn. oder s Muster löschen
OK
Benutzername ändern
s (Telefonbuch öffnen); s (Eintrag auswählen); Sprache;
s
Benutzer 2 (Bsp.) ; Ändern; ~ (Namen eingeben) Sichern;
a lang drücken (zurück in den Ruhezustand).
Verketten einer Call-by-Call-Nummer mit einer Rufnummer
Mit dieser Funktion kann eine Vorwahl eines Netzanbieters, die in der Kurzwahlliste
gespeichert ist, der Rufnummer vorangestellt werden („Verketten“).
C (Kurzwahlliste öffnen); s (Eintrag auswählen); (Menü öffnen);
Nr. verwenden ; s (Telefonbuch öffnen); s (Eintrag auswählen) ; oder ~
die Nummer eingeben; c
OK OK
.
à
Wahlwiederholungsliste
In der Wahlwiederholungsliste stehen die zehn zuletzt gewählten Rufnummern.
Manuelle Wahlwiederholung
Þ (Wahlwiederholungsliste öffnen); s (Eintrag auswählen); c.
Automatische Wahlwiederholung
Bei dieser Funktion wird die Rufnummer automatisch alle 20 Sek. gewählt. Der Teilnehmer meldet sich: c (Abheben-Taste), drücken. Bei Nichtmelden bricht der Ruf nach ca.
30 Sek. ab. Die Funktion schaltet sich nach zehn erfolglosen Versuchen aus.
a (Auflegen-Taste) drücken; • (Wahlwiederholungsliste öffnen);
v (Menü öffnen); Aut. Wahlwiederh. .
Wahlwiederholung abbrechen: Display-Taste
OK
Aus oder beliebige Taste drücken.
17
Page 20
Telefonbuch und weitere Listen nutzen
Einträge der Wahlwiederholungsliste verwalten
Folgende Menüfunktionen können Sie nutzen:
• (Wahlwiederholungsliste öffnen);
s (Eintrag auswählen); v (Menü öffnen);
s (Funktion auswählen).
Aut. Wahlwiederh.
Nr. verwenden
Nr. ins Tel.buch
Eintrag löschen
Liste löschen
E-Mail-Verzeichnis
Im E-Mail-Verzeichnis speichern Sie E-Mail-Adressen. Sie können insgesamt max. 200
Einträge in Telefonbuch und E-Mail-Verzeichnis und Kurzwahlliste speichern.
Einträge des E-Mail-Verzeichnisses verwalten Sie wie einen Telefonbuch-Eintrag S. 15.
Neue E-Mail-Adresse speichern
Schritt 1: E-Mail-Verzeichnis öffnen:
s (Telefonbuch öffnen) s E-Mail-Verzeichnis .
Schritt 2: E-Mail-Eintrag anlegen:
Neuer Eintrag ; ~ (Adresse eingeben); (Menü öffnen);
OK à
( ggf. s, „.“, „@“ oder Texteingabehilfe-Funktion auswählen ). Bei eingeschalteter Textein-
gabehilfe
R 1x lang und 1x kurz drücken.
Schritt 3: E-Mail-Eintrag speichern:
à
(Menü öffnen); Speichern ; a lang drücken (zurück in den Ruhezustand).
OK
Haben Sie einen Eintrag ausgewählt, drücken Sie die Display-Taste
und geben die Adresse ein. Speichern Sie, wie unter „Schritt 3“ beschrieben.
OK
OK
Ansehen , dann Ändern
Freien Speicherplatz anzeigen
Der Speicherplatz wird zwischen dem Telefonbuch, der Kurzwahlliste (S. 14) und dem
E-Mail-Verzeichnis (S. 18) aufgeteilt. Es wird der Speicherplatz aller Listen angezeigt.
s (Telefonbuch öffnen); s (Eintrag auswählen); v (Menü öffnen);
Speicherplatz ; a lang drücken (zurück in den Ruhezustand).
s
18
OK
Page 21

Mehrere Mobilteile nutzen
Mehrere Mobilteile nutzen
Externes Gespräch an ein anderes Mobilteil weitergeben
u (Intern-Liste öffnen); s (bestimmtes Mobilteil oder An alle) auswählen; .
Der interne Teilnehmer meldet sich: a (Auflegen-Taste) drücken.
Meldet er sich nicht oder ist besetzt, kommt der Anruf automatisch an Sie zurück (im
Display steht Wiederanruf).
OK
Intern rückfragen
Während eines externen Gesprächs können Sie intern anrufen.
u (Intern-Liste öffnen); s (Mobilteil auswählen), .
Zum Beenden: Display-Taste Beenden drücken (zurück zu externem Teilnehmer).
OK
Anklopfen beim internen Gespräch annehmen/abweisen
Wenn Sie während eines internen Gesprächs einen externen Anruf erhalten, hören Sie
den Anklopfton (kurzer Ton). Display-Taste
Der abgewiesene Anklopfton ist an weiteren angemeldeten Mobilteilen noch zu hören.
Abheben oder Abweis. drücken.
Mobilteil als Babyfon nutzen
Mit dieser Funktion wird eine vorher gespeicherte interne oder externe Rufnummer
angerufen, sobald im Raum der eingestellte Geräuschpegel erreicht ist. Auch nach dem
Auflegen bleibt das Babyfon am Mobilteil eingeschaltet.
Der Abstand zwischen Mobilteil und Baby sollte zwischen 1 und 2 Meter betragen.
Das Mikrofon muss zum Baby zeigen.
Wenn die Babyfonfunktion eingeschaltet ist, werden ankommende Anrufe an dem
Mobilteil, das sich in der Nähe des Babys befindet, ohne Klingelton signalisiert und
lediglich am Display angezeigt. Display und Tastatur sind dabei nicht beleuchtet.
Achten Sie bei Eingabe einer externen Rufnummer darauf, dass der Anschluss, an den
der Babyfonruf weitergeleitet wird, nicht durch einen eingeschalteten Anrufbeantworter blockiert ist.
◆ Wenn Sie Ihr Babyfon auf eine externe Rufnummer umleiten, sollten Sie den Besitzer
dieser Nummer darüber informieren.
◆ Der Babyfon-Ruf zu einer externen Rufnummer bricht nach ca. 90 Sek., zu einer
internen Rufnummer (Mobilteil) nach ca. 180 Sek. ab (basisabhängig).
W
i
Bevor Sie weggehen, sollten Sie unbedingt die Einstellung des
Babyfons, z. B. Empfindlichkeit und Verbindungsaufbau, prüfen.
Die eingeschaltete Babyfonfunktion verringert die Betriebszeit des
Mobilteils erheblich. Stellen Sie das Mobilteil, das sich in der Nähe des
Babys befindet, ggf. in die Ladeschale, um sicherzustellen, dass sich der
Akku nicht leert.
Die Babyfonfunktion ist auch im Walkie-Talkie-Modus möglich.
19
Page 22
Mehrere Mobilteile nutzen
Babyfonfunktion aktivieren und Zielrufnummer erstmalig eingeben
Schritt 1: Eingabefeld öffnen: v; s Familie/Freizeit ; Babyfon .
Schritt 2: Babyfon aktivieren: r (in der Zeile Aktivierung: Ein wählen);
Schritt 3: Zielrufnummer eingeben: s (in die nächste Zeile);
Interne Rufnummer eingeben: INT s (Mobilteil auswählen) ; oder:
Externe Rufnummer eingeben: ~; (Menü öffnen); Speichern ;
Schritt 4: Empfindlichkeit einstellen: Ggf. s (in die nächste Zeile); r;
Die Babyfonfunktion ist jetzt eingeschaltet.
Ist das Babyfon eingeschaltet, wechseln Sie mit v (Menü öffnen) direkt in die Babyfon-
einstellung.
à OK
OK OK
Ändern;
OK
Sichern;
Babyfon deaktivieren
Sie können das Babyfon von Extern (basisabhängig) ausschalten. Nehmen Sie den
durch die Babyfonfunktion ausgelösten Anruf an und geben Sie die Tasten O R ein.
Etwa 90 Sek. nach Beenden der Verbindung ist die Funktion deaktiviert. Es erfolgt kein
erneuter Babyfonruf mehr. Die übrigen Babyfonfunktionen am Mobilteil (z. B. kein Klingelton) bleiben noch so lange eingeschaltet, bis Sie am Mobilteil, das sich beim Baby
befindet, die Display-Taste
i
Zum erneuten Aktivieren der Babyfonfunktion mit derselben Rufnummer
müssen Sie die Aktivierung wieder einschalten und mit
Aus drücken.
Sichern speichern.
Walkie-Talkie-Modus einstellen
Die Walkie-Talkie-Funktion ermöglicht ein Gespräch zwischen zwei Mobilteilen (max.
300 m Reichweite), unabhängig davon, wie weit diese von der Basis entfernt sind.
Voraussetzung:
◆ Beide Mobilteile sind an derselben Basis angemeldet worden (für Babyfonfunktion
empfohlen) oder
◆ beide Mobilteile sind an verschiedenen Basen angemeldet und beide sind auf Beste
Basis eingestellt (S. 8) oder
◆ eines der Mobilteile ist an keiner Basis angemeldet und das angemeldete Mobilteil
ist auf Beste Basis eingestellt oder
◆ beide Mobilteile sind an keiner Basis angemeldet.
Im Walkie-Talkie-Modus sind die Mobilteile für kommende Anrufe nicht mehr erreichbar.
Die Betriebszeiten der Mobilteile verringern sich erheblich.
20
Page 23
Walkie-Talkie-Modus ein-/ausschalten
Mehrere Mobilteile nutzen
v (Menü öffnen); s Familie/Freizeit ; s Walkie-Talkie .
Zum Ausschalten: Display-Taste
c (Abheben-Taste) oder d (Freisprech-Taste) drücken. Der Ruf geht an alle Mobilteile
im Walkie-Talkie-Modus. Das Einstellen der Sprachlautstärke und der Hinweistöne
erfolgt genau so, als wenn Ihre Mobilteile Kontakt mit der Basis hätten (S. 22). Das Einstellen der Klingeltöne ist im Walkie-Talkie-Modus nicht möglich.
Das Ein-/Ausschalten des Klingeltons (S. 23) bzw. der Tastensperre (S. 8) ist im WalkieTalkie-Modus möglich.
Um das Menü zu öffnen, drücken Sie die Display-Taste ©.
i
Auch wenn Sie Ihr Mobilteil aus- und wieder einschalten, bleibt der Walkie-Talkie-Modus erhalten.
OK OK
Aus drücken.
Mobilteil im Walkie-Talkie-Modus als Babyfon nutzen
à OK
(Menü öffnen); s Babyfon ; r (Ein wählen);
s (in die nächste Zeile); r (Niedrig oder Hoch wählen);
Der Babyfonruf geht nur an Mobilteilen, die sich im Walkie-Talkie-Modus befinden.
Bevor Sie weggehen, sollten Sie unbedingt die Einstellung des
W
Drücken Sie die Display-Taste Aus am Babyfon-Mobilteil, um das Babyfon auszuschalten.
Das Mobilteil kehrt in den normalen Walkie-Talkie-Modus zurück.
Babyfons, z. B. Empfindlichkeit und Verbindungsaufbau, prüfen.
Danach sollte die Distanz zwischen den Mobilteilen nicht mehr
verändert werden (Reichweite).
Sichern.
21
Page 24
Mobilteil einstellen
Mobilteil einstellen
Automatische Rufannahme aus-/einschalten
Wenn Sie diese Funktion eingeschaltet haben, nehmen Sie das Mobilteil bei einem
Anruf einfach aus der Ladeschale, ohne dafür die Abheben-Taste drücken zu müssen
(Lieferzustand: Ein).
v (Menü öffnen); s
a lang drücken (zurück in den Ruhezustand).
Einstellungen ; Aut.Rufannahme (‰ = Ein);
Sprachlautstärke ändern
Sie können die Lautstärke für das Freisprechen in fünf Stufen, die Hörerlautstärke in drei
Stufen einstellen – auch während eines externen Gesprächs.
OK OK
v (Menü öffnen); s
len); s (in die nächste Zeile) r (Hörerlautstärke auswählen);
a lang drücken (zurück in Ruhezustand).
Audio ; Sprachlautst. ; r (Freisprechlautstärke auswäh-
Klangbetonung
Sie können die Klangqualität der langen Klingelmelodien (4-10) erhöhen.
v (Menü öffnen); s
(zurück in den Ruhezustand).
OK OK
Audio ; s Klangbetonung (‰ = Ein); a lang drücken
Klingeltöne ändern
OK OK
Sichern;
Sie können zwischen sechs Lautstärken und 26 Melodien (davon 16 polyphonen Melodien) wählen. Polyphone Melodien sind nur verfügbar, wenn Sie vorher mit dem Sound
Manager aufgezeichnet oder über das PC-Interface geladen worden sind.
Einstellungen für externe Anrufe, Zeitsteuerung und Namensansage
v (Menü öffnen); s Audio ; s Klingeltöne ; Für ext. Anrufe ;
r (Lautstärke auswählen); s (in die nächste Zeile) r (Melodie auswählen);
s (ggf. in die nächste Zeile) r (Namensansage einschalten, S. 16);
Zeitsteuerung aktivieren
Zeitstrg auswählen; r (Aktivierung: Ein auswählen.); s in die Zeile Von: springen (4-
stellige Eingabe des Zeitraumes); s in die Zeile Bis: springen (4-stellige Eingabe des
Zeitraumes); s r (Eingabe der Klingeltonlautstärke);
chern); nochmals
zustand).
Sichern (Einstellung speichern); a lang drücken (zurück in den Ruhe-
OK OK OK
Sichern (Zeitsteuerung spei-
Individuelle Einstellung für interne Anrufe, Weckruf und Termine
v (Menü öffnen); s Audio ; s Klingeltöne ; s (Funktion auswählen) ;
r (Lautstärke auswählen); s (in die nächste Zeile) r (Melodie auswählen);
Sichern. (Zusätzlich bei der Einstellung Für alle gleich mit Ja Abfrage bestätigen.)
a lang drücken (zurück in den Ruhezustand).
OK OK OK
22
Page 25
Mobilteil einstellen
Klingelton aus-/einschalten
Bei ankommenden externen Anrufen klingeln alle Mobilteile. Klingelton ausschalten:
Stern-Taste P lang drücken. Im Display erscheint das Symbol
Klingelton einschalten: Stern-Taste P lang drücken.
Ú.
i
Um den Klingelton für den aktuellen Anruf auszuschalten, drücken
Sie die Display-Taste
Ruf aus.
Aufmerksamkeitston ein-/ausschalten
Beim Ausschalten des Klingeltons können Sie einen Aufmerksamkeitston einschalten.
Bei einem Anruf ertönt dann ein kurzer Ton („Beep“) anstelle des Klingeltons.
Stern-Taste P lang drücken und innerhalb von 3 Sek. die Display-Taste Beep drücken.
Im Display steht
Zum Ausschalten: Stern-Taste P lang drücken
º
.
Vibrationsalarm
Eingehende Anrufe und andere Meldungen werden durch Vibration angezeigt. Diese
Einstellung ist unabhängig von den Klingeltoneinstellungen.
OK OK
v (Menü öffnen); s
(zurück in den Ruhezustand).
Audio ; s Vibration (‰ = Ein); a lang drücken
Sound Manager
Sie können polyphone Melodien aufnehmen (max. Länge 4 Sek.) oder mittels eines
Datenkabels überspielen (S. 28). Maximal 16 Melodien können gespeichert werden.
Melodie aufnehmen
v (Menü öffnen); s Audio ; s Sound Manager ; <Neuer Sound> ;
Sound aufnehmen? ;
(Name der Melodie eingeben) Sichern; a lang drücken (zurück in den Ruhezustand).
OK
OK OK OK
Beenden drücken oder 4 Sec. warten; Sichern; Eintrag ändern
Melodie abspielen
v (Menü öffnen); s Audio ; s Sound Manager ; s (Melodie auswählen);
Anhören; a lang drücken (zurück in den Ruhezustand).
OK OK
Eintrag bearbeiten
v (Menü öffnen); s Audio ; s Sound Manager ; s (Melodie auswählen);
à OK OK
;
Lautstärke (Lautstärke ändern) oder s Eintrag ändern (Namen
ändern) oder s
Eintrag löschen ;a lang drücken (zurück in den Ruhezustand).
s
Eintrag ansehen (Dateinamen anzeigen) oder
OK
OK OK
OK
23
Page 26
Mobilteil einstellen
Hinweistöne ein-/ausschalten
Ihr Mobilteil weist Sie akustisch auf verschiedene Tätigkeiten und Zustände hin. Folgende Hinweistöne können Sie unabhängig voneinander ein- oder ausschalten (Lieferzustand: Ein).
◆ Ta stenklick (jeder Tastendruck wird bestätigt),
◆ Quittungstöne (Bestätigungston, Fehlerton, Menüendeton),
◆ Akkuton.
v (Menü öffnen); s
OK OK
Audio ; s Hinweistöne ;
r (Tastenklick: einschalten); s (in die nächste Zeile) r (Quittung: einschalten);
s (in die nächste Zeile) r (für Akkuton: Ein, Aus bzw. in Verb. wählen);
Sichern; a lang drücken (zurück in den Ruhezustand).
Mobilteil in den Lieferzustand zurücksetzen
Sie können individuelle Einstellungen und Änderungen zurücksetzen. Einträge des Telefonbuchs, der Anruferliste, des E-Mail-Verzeichnisses und der Kurzwahlliste, die Anmeldung des Mobilteils an der Basis sowie Screensaver und Melodien, die Sie geladen
haben, bleiben erhalten. Mit a brechen Sie das Zurücksetzen ab.
v (Menü öffnen); s
Einstellungen ; s Mobilteil-Reset ;Ja (Abfrage bestä-
tigen); a lang drücken (zurück in den Ruhezustand)
Lieferzustand des Mobilteils
Hörerlautstärke 1 S. 22
Lautstärke für Freisprechen 3 S. 22
Klingeltonlautstärke 5 S. 22
Zeitsteuerung für Klingelton ausgeschaltet S. 22
Klingeltonmelodie Melodie 1 S. 22
Namensansage ausgeschaltet S. 16
Automatische Rufannahme eingeschaltet S. 22
Akkuton/Tastenklick/Quittungston eingeschaltet S. 24
Display-Sprache länderspezifisch S. 7
Wecker/Termin ausgeschaltet S. 11/S. 11
Terminname gelöscht S. 11
Wahlwiederholungsliste leer S. 17
Babyfon/Babyfon-Empfindlichkeit ausgeschaltet/hoch S. 20
OK OK
24
Page 27

Anhang
Anhang
Pflege und Kontakt mit Flüssigkeit
Wischen Sie das Mobilteil mit einem feuchten Tuch (keine Lösungsmittel) oder einem
Antistatiktuch ab. Benutzen Sie nie ein trockenes Tuch. Es besteht die Gefahr der stati-
schen Aufladung.
Sollte das Mobilteil mit Flüssigkeit in Kontakt gekommen sein, auf keinen Fall das
Gerät einschalten. Sofort den Akku entnehmen.
Lassen Sie die Flüssigkeit aus dem Gerät abtropfen und tupfen Sie anschließend alle
Teile trocken.
Lagern Sie das Mobilteil ohne Akku mindestens 72 Stunden an einem trockenen, warmen Ort. Danach ist in vielen Fällen die Inbetriebnahme wieder möglich.
!
Kundenservice (Customer Care)
Wir bieten Ihnen schnelle und individuelle Beratung!
Unser Online-Support im Internet:
www.my-siemens.de/kundenservice Schweiz
www.my-siemens.de/kundenservice
Im Falle einer notwendigen Reparatur, evtl. Garantie- oder Gewährleistungsansprüche
erhalten Sie schnelle und zuverlässige Hilfe bei unserem
Service-Center Schweiz 0848 212 000
www.my-siemens.com/contact
Service-Center Belgien 078 15 22 21
Die Service-Adresse für die Schweiz ist:
Omnicom AG
Industrie Neuhof 9
3422 Kirchberg b. Bern
Weitere Servicenummern finden Sie am Ende der Bedienungsanleitung unter
„Service“.
Belgien
In Ländern, in denen unser Produkt nicht durch autorisierte Händler verkauft wird, werden keine Austausch- bzw. Reparaturleistungen angeboten.
Länderspezifische Besonderheiten sind berücksichtigt. Das Mobilteil SL 1 ist EU-weit
und in der Schweiz zugelassen.
Die Übereinstimmung des Gerätes mit den grundlegenden Anforderungen der R&TTEDirektive ist durch das CE-Kennzeichen bestätigt.
25
Page 28

Anhang
Auszug aus der Originalerklärung:
„We, Siemens AG, declare, that the above mentioned product is manufactured according to our Full
Quality Assurance System certified by CETECOM ICT Services GmbH in compliance with ANNEX V
of the R&TTE-Directive 99/5/EC. The presumption of conformity with the essential requirements
regarding Council Directive 99/5/EC is ensured.“
Senior Approvals Manager“
The Declaration of Conformity (DoC) has been signed. In case of need a copy of the original DoC
can be made available via the company hotline.
Technische Daten
Empfohlene Akku
Lithium-Ionen (LiIon), 700 mAh
(Stand bei Drucklegung der Bedienungsanleitung)
Das Gerät wird nur mit zugelassenem Akku ausgeliefert.
Betriebszeiten/Ladezeit des Mobilteils
Kapazität
(mAh)
700 etwa 250 (10 Tage) etwa 15 etwa 2,5
Die genannten Betriebs- und Ladezeiten gelten nur bei Verwendung des empfohlenen
Akkus.
Bereitschaftszeit
(Stunden)
Gesprächszeit
(Stunden)
Ladezeit
(Stunden)
Zeichensatztabelle
Standardschrift
Entsprechende Taste mehrmals bzw. lang drücken:
1 x 2 x 3 x 4 x 5 x 6 x 7 x 8 x 9 x 10 x 11 x 12 x 13 x 14 x
1
2
I
4
5
L
M
N
O
Q
P
R
Leerzeichen
abc2äáàâãç
def3ëéèê
g h i4ïíìî
jkl5
m n o6цсутфх
pqrs7ß
tuv8üúùû
wx yz9ÿýæøå
.,?!0+-:¿¡“‘;_
Abc--> 123 123 --> abc
#@\&§
1
â
£$¥¤
/()<=>%
*
26
Page 29

Anhang
Text bearbeiten (ohne Texteingabehilfe)
◆ Die Schreibmarke steuern Sie mit u v t s.
f
◆ Zeichen (links von der Schreibmarke) löschen Sie mit .
◆ Zeichen werden links von der Schreibmarke (Cursor) angefügt.
◆ Um von Großschreibung (1. Buchstabe groß geschrieben, alle weiteren klein
geschrieben) zur Kleinschreibung zu wechseln, drücken Sie vor der Eingabe des
Buchstabens P. Bei erneutem Drücken von P wechseln Sie von der Kleinschreibung zur Ziffernschreibung. Bei weiterem Drücken wechseln Sie von der Ziffernschreibung wieder zur Großschreibung.
◆ Bei Einträgen ins Telefonbuch wird der erste Buchstabe des Namens automatisch
groß geschrieben, es folgen kleine Buchstaben.
◆ Wenn Sie eine Taste lang drücken, werden die Zeichen der entsprechenden Taste in
der untersten Display-Zeile angezeigt und nacheinander markiert. Wenn Sie die
Taste loslassen, wird das markierte Zeichen im Eingabefeld eingefügt.
– Ob die Groß-, Klein- oder Ziffernschreibung eingestellt ist, wird Ihnen im Display
angezeigt:
– bei der Eingabe ins Telefonbuch steht in der untersten Display-Zeile „A“ bzw. „a“.
Reihenfolge der Telefonbucheinträge
1. Leerzeichen (hier mit s dargestellt)
2. Ziffern (0–9)
3. Buchstaben (alphabetisch)
4. Restliche Zeichen
Um die alphabetische Reihenfolge der Einträge zu umgehen, fügen Sie vor dem Namen
ein Leerzeichen ein. Dieser Eintrag rückt dann an die erste Stelle (Beispiel: „sKarla“).
Sie können die Einträge auch mit Ziffern nummerieren (z. B. „1Ute“, „2Karla“, „3Albert“).
C
Texteingabehilfe
Die Texteingabehilfe EATONI unterstützt Sie beim Schreiben von Namen (Telefonbuch,
Kurzwahlliste oder E-Mail-Verzeichnis).
Jeder Taste zwischen Q und O sind mehrere Buchstaben und Zeichen zugeordnet,
die alle in einer Auswahlzeile direkt über den Displaytaste (unter dem Textfeld) angeordnet werden, sobald Sie eine Taste drücken. Bei der Eingabe von Buchstaben wird
jeweils der nach der Wahrscheinlichkeit am ehesten gesuchte Buchstabe invers dar-
gestellt. Er s teht a m Anfang di eser Auswa hlzeil e und wird in das Text feld übernomm en.
Die Texteingabehilfe EATONI ist
53 ________Ç_____abc
Peter K
KLJ5
W¨
eingeschaltet.
E-Mail Adresse
Auswahlzeile
27
Page 30

Anhang
Entspricht dieser Buchstabe dem gewünschten, bestätigen Sie ihn, indem Sie die
nächste Taste drücken. Entspricht der von EATONI gewählte Buchstabe nicht Ihrem
Wunsch, drücken Sie so oft die Raute-Taste R, bis der gesuchte Buchstabe invers dar-
gestellt in der Darstellungszeile erscheint und damit in das Textfeld übernommen wird.
P Stern-Taste kurz drücken: Wechselt vom Modus abc zu Abc, von Abc zu 123
und von 123 zu abc .
R Springt in der Auswahlzeile zum nächsten Buchstaben.
Texteingabehilfe aus-/einschalten
Die Texteingabehilfe wird funktionsspezifisch ein- bzw. ausgeschaltet.
Voraussetzung: Sie befinden sich in einem Texteingabefeld (Name im Telefonbuch,
Kurzwahlliste oder E-Mail-Verzeichnis).
v (Menü öffnen); s
Txt.eingabehilfe (‰ = Ein);
OK
a Auflegen-Taste kurz drücken (zurück in das Textfeld). Geben Sie jetzt den Text ein.
PC Interface
Das Mobilteil SL 1 kann über ein Siemens Datenkabel mit Ihrem Rechner verbunden
werden. Ihr Rechner kann dann mit Hilfe des Programmes „Siemens Data Suite“ (kostenloser download unter http:\\www.my-siemens.com\gigaset-sds) mit Ihrem SL 1 kommunizieren und auf folgende Parameter und Listen des Mobilteils zugreifen:
Auslesen von Parametern
◆ SW-Version
◆ Ty p
◆ Herstellercode
Lese-/Schreibzugriff auf
◆ das Telefonbuch
◆ das E-Mail-Verzeichnis
◆ die Netzanbieterliste
◆ die Liste der Termine
◆ die Wahlwiederholungsliste
Lese-/Schreibzugriff auf andere Parameter
◆ Klingeltoneinstellungen
◆ Lautstärkeeinstellungen
◆ Laden von Bildschirmschonern
◆ Laden von Melodien
◆ Telefonate führen und Anrufe annehmen
28
Page 31

Anhang
Datenübertragung
Bei einigen Funktionen werden große Datenmengen zwischen Mobilteil und externem
Gerät übertragen. In diesem Fall schaltet das Mobilteil in den DatenübertragungsModus um, im Display wird Datenübertragung angezeigt. In diesem Modus sind keine
Eingaben über die Tastatur möglich und ankommende Anrufe werden ignoriert.
In folgenden Fällen geht das Mobilteil in den Datenübertragungs-Modus über:
◆ Lese-/Schreibzugriff auf das Telefonbuch
◆ Lese-/Schreibzugriff auf das E-Mail-Verzeichnis
◆ Lese-/Schreibzugriff auf die Netzanbieterliste
◆ Lese-/Schreibzugriff auf die Liste der Termine
◆ Lese-/Schreibzugriff auf die Wahlwiederholungsliste
◆ Laden von Bildschirmschonern
◆ Laden von Melodien
Tritt während der Übertragung ein Fehler auf, geht das Mobilteil automatisch in den
Ruhezustand über.
Telefonate führen und Anrufe annehmen
Wählen Sie eine Nummer vom externen Gerät aus oder nehmen Sie von dort ein
Gespräch an, verhält sich das Mobilteil genau so, als hätten Sie diese Funktionen am
Mobilteil ausgeführt.
Spiel „Balloon Shooter“
Versuchen Sie, möglichst viele Ballons zu treffen.
v ¢ Familie/Freizeit ¢ Balloon Shooter
entweder ...
[RRRRRRRRRRRRRRRRRRRR]
Starten
oder ...
à
Um das Fadenkreuz zu bewegen drücken Sie:
¢
1
¢
4
M
¢
Um den Ballon abzuschießen drücken Sie die Taste
¢
2
N
¢
I
L
O
¢
¢
¢
Spiel starten:
Display-Taste drücken.
Weitere Optionen:
Display-Taste drücken, um das Optionen-Menü zu
öffnen.
oder
¢
¢
p
¢
5.
¢
29
Page 32

Anhang
Garantie-Schein Belgien
Dem Verbraucher (Kunden) wird unbeschadet seiner Mängelansprüche gegenüber dem
Vertragshändler eine Garantie zu den nachstehenden Bedingungen eingeräumt:
◆ Wenn das neue Gerät oder Zubehör innerhalb von 24 Monaten nach Ankauf Defekte
aufweist infolge von Produktions- bzw. Materialfehlern, hat Siemens die Wahl, das
Gerät kostenlos zu reparieren oder durch ein anderes, dem Stand der Technik
entsprechendes Gerät zu ersetzen. Im Falle von Teilen, die dem Verschleiß
ausgesetzt sind (wie Batterien, Tastatur, Gehäuse), gilt diese Garantie für eine Dauer
von sechs Monaten nach Kaufdatum.
◆ Diese Garantie gilt nicht, soweit der Defekt der Geräte auf unsachgemäßer
Behandlung und/oder Nichtbeachtung der Handbücher beruht.
◆ Diese Garantie erstreckt sich nicht auf vom Vertragshändler oder vom Kunden selbst
erbrachte Leistungen (z.B. Installation, Konfiguration, Softwaredownloads).
Handbücher und ggf. auf einem separaten Datenträger mitgelieferte Software sind
ebenfalls von der Garantie ausgeschlossen.
◆ Als Garantienachweis gilt der Kaufbeleg, mit Kaufdatum. Garantieansprüche sind
innerhalb von zwei Monaten nach Feststellung des Defekts geltend zu machen.
◆ Ersetzte Geräte bzw. deren Komponenten, die im Rahmen des Austauschs an
Siemens zurückgeliefert werden, gehen in das Eigentum von Siemens über.
◆ Diese Garantie gilt für in der Europäischen Union erworbene Neugeräte.
Garantiegeberin für in Belgien erworbene Geräte ist Siemens S.A. Chaussée de
Charleroi 116,B1060 Bruxelles
◆ Weitergehende oder andere Ansprüche aus dieser Garantie sind ausgeschlossen,
ausgenommen soweit die Haftung auf zwingendem Recht beruht wie etwa die
gesetzliche Regelung zur Produkthaftung.
◆ Durch eine erbrachte Garantieleistung verlängert sich der Garantiezeitraum nicht.
◆ Soweit kein Garantiefall vorliegt, behält sich Siemens vor, dem Kunden den
Austausch oder die Reparatur in Rechnung zu stellen.
◆ Eine Änderung der Beweislastregeln zum Nachteil des Kunden ist mit den
vorstehenden Regelungen nicht verbunden.
Zur Einlösung dieser Garantie wenden Sie sich bitte an den Siemens Telefonservice. Die
Rufnummer entnehmen Sie bitte der Bedienungsanleitung.
Garantie Schweiz
Die Garantiedauer beträgt 12 Monate.
30
Page 33

Stichwortverzeichnis
Stichwortverzeichnis
A
Abbrechen (Vorgang) . . . . . . . . . . . . 10
Abheben
Abschalten s. Ausschalten
Akku
Akkuton
Anhören (Sprachmuster)
Anklopfen (internes Gespräch)
Anrufen
Anzeige
Aufmerksamkeitston
Ausschalten
Auswählen (Menüeintrag)
Automatische Rufannahme
. . . . . . . . . . . . . . . . . . . . . . 2
. . . . . . . . . 11
Anzeige
einlegen
empfohlener Akku
laden
. . . . . . . . . . . . . . . . . . . . . . 6
. . . . . . . . . . . . . . . . . . . . . 6
. . . . . . . . . . . . . 26
. . . . . . . . . . . . . . . . . . . . . . . 6
. . . . . . . . . . . . . . . . . . . . . . 24
. . . . . . . . . . 17
. . . . . . . . . . . . . . . . . . . . . . 12
extern
. . . . . . . . . . . . . . . . . . . . . . 12
intern
12-/24-Stunden-Anzeige
Speicherplatz
. . . . . . . . . . . . . . . . . 18
. . . . . 11, 12
. . . . . . . . . . . . . 23
Klingelton (am Mobilteil)
Mobilteil
Tastensperre
Ter minruf
Weckruf
. . . . . . . . . . . . . . . . . . . . . 8
. . . . . . . . . . . . . . . . . . 8
. . . . . . . . . . . . . . . . . . . 12
. . . . . . . . . . . . . . . . . . . . . 11
. . . . . . . . 23
. . . . . . . . . . 9
. . . . . 19
. . . . . . . . 22
B
Babyfon . . . . . . . . . . . . . . . . . . . . . . 19
Balloon Shooter
Basis wechseln
Bestätigungston
Beste Basis
Betrieb (Telefon in Betrieb nehmen)
Betriebszeit
des Babyfons
des Mobilteils
im Walkie-Talkie-Modus
. . . . . . . . . . . . . . . . 29
. . . . . . . . . . . . . . . . . . 8
. . . . . . . . . . . . . . . . 24
. . . . . . . . . . . . . . . . . . . . . 8
. . . 6
. . . . . . . . . . . . . . . . . 19
. . . . . . . . . . . . . . . . 26
. . . . . . . . . 20
C
Call-by-Call-Nummern . . . . . . . . . . . . 14
Cursor (Schreibmarke)
Customer Care (Service)
. . . . . . . . . . . . . 9
. . . . . . . . . . 25
D
Datum einstellen . . . . . . . . . . . . . . . . 11
Display
Sprache ändern
. . . . . . . . . . . . . . . . . . . . . . . 9
Taste n
. . . . . . . . . . . . . . . . 7
E
EATONI s. Texteingabehilfe
Eingeben
Geburtstag/Jahrestag
. . . . . . . . . . . . . . . . . . . . . . 11
Ter min
Weckzeit
Einschalten
Mobilteil
Tastensperre
Ter min
Walkie-Talkie
Wecker
Einstellen
Datum
Display-Sprache
Hörerlautstärke
Klingeltonlautstärke
Lautsprecherlautstärke
Ter min
Uhrzeit
Wecker
Eintrag (Menü) auswählen
E-Mail-Verzeichnis
Empfangsfeldstärke
Erinnerungsruf
Escape-Taste
. . . . . . . . . . . . . . . . . . . . 11
. . . . . . . . . . . . . . . . . . . . . . 8
. . . . . . . . . . . . . . . . . . . 8
. . . . . . . . . . . . . . . . . . . . . . 11
. . . . . . . . . . . . . . . . . 21
. . . . . . . . . . . . . . . . . . . . . . 11
. . . . . . . . . . . . . . . . . . . . . . 11
. . . . . . . . . . . . . . . . . . . . . . 11
. . . . . . . . . . . . . . . . . . . . . . 11
. . . . . . . . . . . . . . . . . . . . . . 11
. . . . . . . . . . . . . . . . . 14
. . . . . . . . . . . . . . . . . . . 10
. . . . . . . . . . . 11
. . . . . . . . . . . . . . . . 7
. . . . . . . . . . . . . . . . 22
. . . . . . . . . . . . 22
. . . . . . . . . . 22
. . . . . . . . . . 9
. . . . . . . . . . . . . . . 18
. . . . . . . . . . . . . . . 2
F
Fehler/Fehlerton . . . . . . . . . . . . . . . .24
Freisprechen
. . . . . . . . . . . . . . . . . . . 13
G
Garantie . . . . . . . . . . . . . . . . . . . . . . 30
Geburtstag (als Termin) eingeben
Gespräch beenden
Gespräch weitergeben
Gürtelclip
. . . . . . . . . . . . . . . . . . . . . . 8
. . . . . . . . . . . . . . . 12
. . . . . . . . . . . . 19
. . . . 11
31
Page 34

Stichwortverzeichnis
H
Hinweistöne . . . . . . . . . . . . . . . . . . . 24
Hörerbetrieb
Hörerlautstärke
Hörgeräte
. . . . . . . . . . . . . . . . . . . . 2
. . . . . . . . . . . . . . . . . 22
. . . . . . . . . . . . . . . . . . . . . . 5
I
In Betrieb nehmen (Telefon) . . . . . . . . 6
Intern
anrufen
rückfragen
. . . . . . . . . . . . . . . . . . . . . 12
. . . . . . . . . . . . . . . . . . . 19
J
Jahrestag . . . . . . . . . . . . . . . . . . 11, 12
K
Klangbetonung . . . . . . . . . . . . . . . . . 22
Klingelton
Kundenservice
Kurzwahlliste
Nummer speichern
Kurzwahl-Taste
. . . . . . . . . . . . . . . . . . . . . 22
. . . . . . . . . . . . . . . . . 25
. . . . . . . . . . . . . . . . . . 14
. . . . . . . . . . . . 15
. . . . . . . . . . . . . . . . . 14
L
Ladezeit des Mobilteils. . . . . . . . . . . . 26
Ladezustandsanzeige
Lautstärke
Lieferzustand des Mobilteils
Liste
E-Mail-Verzeichnis
Mobilteile
Löschen (Sprachmuster)
Lösch-Taste
. . . . . . . . . . . . . . . . . . . . . 22
. . . . . . . . . . . . . . . . . . . . 9
. . . . . . . . . . . . . . . . . . . . 10
. . . . . . . . . . . . . 6
. . . . . . . . 24
. . . . . . . . . . . . . 18
. . . . . . . . . . 17
M
Medizinische Geräte . . . . . . . . . . . . . . 5
Melodie
Polyphone
Menü
eine Menüebene zurück
Endeton
Führung durch das Menü
öffnen
Taste
Mikrofon
Mobilteil
als Babyfon benutzen
anmelden an weiterer Basis
. . . . . . . . . . . . . . . . . . . 23
. . . . . . . . . 10
. . . . . . . . . . . . . . . . . . . . . 24
. . . . . . . . . 9
. . . . . . . . . . . . . . . . . . . . . . . 9
. . . . . . . . . . . . . . . . . . . . . . . 10
. . . . . . . . . . . . . . . . . . . . . . . 2
. . . . . . . . . . . 19
. . . . . . . 8
Betriebs- und Ladezeiten . . . . . . . . .26
ein-/ausschalten
Gürtelclip
in Betrieb nehmen
in Lieferzustand zurücksetzen
. . . . . . . . . . . . . . . . . . . . . . . . .9
Liste
stummschalten
Wechsel zu bestem Empfang
Wechsel zu einer anderen Basis
. . . . . . . . . . . . . . . .8
. . . . . . . . . . . . . . . . . . . . .8
. . . . . . . . . . . . . .6
. . . . .24
. . . . . . . . . . . . . . . .13
. . . . . . .8
. . . . .8
N
Netzanbieter (Nummernliste) . . . . . . .14
Nicht angenommen
Jahrestag
Ter min
Nummer s. a. Rufnummer o. Eintrag
. . . . . . . . . . . . . . . . . . . .12
. . . . . . . . . . . . . . . . . . . . . .12
. .14
O
Öffnen
. . . . . . . . . . . . . . . . . . . . . . . .9
Menü
Tel efo nbuch
Online-Support
. . . . . . . . . . . . . . . . . . .9
. . . . . . . . . . . . . . . . .25
P
PC Interface . . . . . . . . . . . . . . . . . . . .28
Pflege des Telefons
Polyphone Melodien
. . . . . . . . . . . . . . .25
. . . . . . . . . . . . . .23
Q
Quittungstöne . . . . . . . . . . . . . . . . . .24
R
Raute-Taste . . . . . . . . . . . . . . . . . . . . .8
Reihenfolge im Telefonbuch
Rückfrage (intern)
Rufnummer
aus dem Telefonbuch übernehmen
speichern (Telefonbuch)
. . . . . . . . . . . . . . .19
. . . . . . . .27
.15
. . . . . . . . .14
S
Sammelruf. . . . . . . . . . . . . . . . . . . . .12
Schreibmarke
Schutzfolie
Senden eines Telefonbucheintrags
Service
Sicherheitshinweise
Signalton s. Hinweistöne
Sound Manager
. . . . . . . . . . . . . . . . . . . .9
. . . . . . . . . . . . . . . . . . . . . .6
. . .16
. . . . . . . . . . . . . . . . . . . . . . .25
. . . . . . . . . . . . . . .5
. . . . . . . . . .24
. . . . . . . . . . . . . . . . .23
32
Page 35

Stichwortverzeichnis
Speichern
Kurzwahllisteneintrag
Telefonbucheintrag
Speicherplatz
Sperre
Tastensperre
Sprache s. Display
Sprachlautstärke
Sprachmuster
Sprachwahl
Steckernetzgerät
Steuer-Taste
Stummschalten (Mobilteil)
. . . . . . . . . . . . . . . . . . 18
. . . . . . . . . . . . . . . . . . 8
. . . . . . . . . . . . . . . . . . 17
. . . . . . . . . . . . . . . . . . 9, 16
. . . . . . . . . . . . . . . . . . . . 9
. . . . . . . . . . 15
. . . . . . . . . . . . 14
. . . . . . . . . . . . . . . . 22
. . . . . . . . . . . . . . . . . 5
. . . . . . . . 13
T
Taste 1 (Schnellwahl) . . . . . . . . . . . . . 2
Tas ten
Abbrechen. . . . . . . . . . . . . . . . . . . 10
Display-Tasten
Escape/Menü/Löschen/OK
Steuer-Taste
Tastendruck (Bestätigungston)
Tastenklick
Tastensperre
Wahlwiederholungs-Taste
Technische Daten
Tel efo nbuch
Eintrag senden an Mobilteil
öffnen
Reihenfolge der Einträge
Rufnummer speichern
Tel efo niere n
Anruf annehmen
extern
. . . . . . . . . . . . . . . . . . . . . . . 12
Ter min
Texteingabehilfe
Ton
Fehlerton
Ton (Bestätigung/Fehler/Akku/
. . . . . . . . . . . . . . . . . 9
. . . . . . . 10
. . . . . . . . . . . . . . . . . . . 9
. . . . 24
. . . . . . . . . . . . . . . . . . . 24
. . . . . . . . . . . . . . . . . . 8
. . . . . . . . 9
. . . . . . . . . . . . . . . 26
. . . . . . . . . . . . . . . . . . . 14
. . . . . . 16
. . . . . . . . . . . . . . . . . . . . . . . 9
. . . . . . . . 27
. . . . . . . . . . 14
. . . . . . . . . . . . . . . . . . . 13
. . . . . . . . . . . . . . 13
. . . . . . . . . . . . . . . . . . . . . . 12
. . . . . . . . . . . . . . . . 27
. . . . . . . . . . . . . . . . . . . 24
Menüende)
. . . . . . . . . . 24
W
Wahlpause. . . . . . . . . . . . . . . . . . . . . 12
Wahlwiederholung
Wahlwiederholungsliste
Walkie-Talkie
Warnton s. Hinweistöne
Wartemelodie
. . . . . . . . . . . . . . . . . . . . . . . 11
Wecker
Weckruf
. . . . . . . . . . . . . . . . . . . . . . . 11
. . . . . . . . . . . . . . . 17
. . . . . . . . . . . 17
. . . . . . . . . . . . . . . . 20, 21
. . . . . . . . . . . 24
. . . . . . . . . . . . . . . . . . 13
Z
Zeichensatztabelle . . . . . . . . . . . . . . .26
Zeitfunktionen
. . . . . . . . . . . . . . . . . . 11
U
Uhrzeit einstellen . . . . . . . . . . . . . . . 11
V
Verpackungsinhalt . . . . . . . . . . . . . . . 6
Vibrationsalarm
VIP (Telefonbuch-Eintrag)
. . . . . . . . . . . . . . . . 23
. . . . . . . . . 15
33
Page 36

s
Be inspired
ENGLISH
Page 37

Brief overview
Brief overview
Signal strength
Ð 100 % i 75 %
Ñ 50 % Ò poor signal
| no signal (flashes)
Tal k key
◆ Answer a call
◆ Initiate dialling
◆ Switch from handsfree
to "earpiece" mode
Control key
Opens the menu,
directory, voice dialling.
Navigation in the input
field
Handsfree key
◆ Switch from "earpiece"
to handsfree mode
◆ Lights up: Handsfree
is activated
◆ Flashes: incoming call,
automatic last number
redial
Open directory
Key 1
Select network mailbox/
answering machine (press
for approx. 2 sec.)
Star key
◆ Ringer on/off (press for
approx. 2 seconds)
◆ Toggles between upper/
lower case and digits for
text input
Recall key
Insert a dial pause (hold
key down)
Display (display screen)
Charge status
= flat U fully charged
= flashes: battery is
almost flat or is charging
Current functions and
display keys
The display keys give you
access to the functions
ÐV
INT 1
20.05.03 09:45
• §§§§§§§SMS§§§§§§
shown in the display.
End call key, On/Off key
◆ End call
◆ Cancel function
◆ One menu level back
(short press)
◆ Back to idle status
(press for approx. 1
second)
◆ Handset on/off (press
for approx. 2 seconds)
Message key
◆ Access to calls and
messages list
◆ Flashes: new
messages and calls
Hash key
Microphone
Socket for headset
and PC interface
Keypad lock on/off (press
for approx. 1 second)
Speed dial list key
Open the speed dial list
(short press)
Illustration of a handset that is registered to a base with SMS functionality.
2
Page 38

Contents
Contents
Brief overview . . . . . . . . . . . . . . . . . . . . . . . . . . . . . . 2
Safety precautions . . . . . . . . . . . . . . . . . . . . . . . . . . 5
Preparing to use your phone . . . . . . . . . . . . . . . . . . 6
Preparing to use the handset . . . . . . . . . . . . . . . . . . . . . . . . . . . . . . . . . . . . . . . . . . . . . 6
Registering . . . . . . . . . . . . . . . . . . . . . . . . . . . . . . . . . . . . . . . . . . . . . . . . . . . . . . . . . . . 7
Changing the display language . . . . . . . . . . . . . . . . . . . . . . . . . . . . . . . . . . . . . . . . . . . 7
Changing the base . . . . . . . . . . . . . . . . . . . . . . . . . . . . . . . . . . . . . . . . . . . . . . . . . . . . . 8
Attaching the belt clip . . . . . . . . . . . . . . . . . . . . . . . . . . . . . . . . . . . . . . . . . . . . . . . . . . 8
Activating/deactivating the handset . . . . . . . . . . . . . . . . . . . . . . . . . . . . . . . . . . . . . . . 8
Activating/deactivating the keypad lock . . . . . . . . . . . . . . . . . . . . . . . . . . . . . . . . . . . . 8
Operating the telephone, menu guidance . . . . . . . 9
Keys . . . . . . . . . . . . . . . . . . . . . . . . . . . . . . . . . . . . . . . . . . . . . . . . . . . . . . . . . . . . . . . . 9
Main menu . . . . . . . . . . . . . . . . . . . . . . . . . . . . . . . . . . . . . . . . . . . . . . . . . . . . . . . . . . 10
Date and Time . . . . . . . . . . . . . . . . . . . . . . . . . . . . . 11
Setting the date and the time . . . . . . . . . . . . . . . . . . . . . . . . . . . . . . . . . . . . . . . . . . . 11
Setting the alarm clock . . . . . . . . . . . . . . . . . . . . . . . . . . . . . . . . . . . . . . . . . . . . . . . . 11
Setting an appointment . . . . . . . . . . . . . . . . . . . . . . . . . . . . . . . . . . . . . . . . . . . . . . . . 12
Making calls . . . . . . . . . . . . . . . . . . . . . . . . . . . . . . . 13
Making external calls and ending a call . . . . . . . . . . . . . . . . . . . . . . . . . . . . . . . . . . . . 13
Internal calls, ending a call . . . . . . . . . . . . . . . . . . . . . . . . . . . . . . . . . . . . . . . . . . . . . 13
Answering a call . . . . . . . . . . . . . . . . . . . . . . . . . . . . . . . . . . . . . . . . . . . . . . . . . . . . . . 13
Handsfree . . . . . . . . . . . . . . . . . . . . . . . . . . . . . . . . . . . . . . . . . . . . . . . . . . . . . . . . . . . 13
Muting the handset . . . . . . . . . . . . . . . . . . . . . . . . . . . . . . . . . . . . . . . . . . . . . . . . . . . 14
Using the directory and other lists . . . . . . . . . . . . 14
Directory and speed dial list . . . . . . . . . . . . . . . . . . . . . . . . . . . . . . . . . . . . . . . . . . . . . 14
Managing entries in the directory and speed dial list . . . . . . . . . . . . . . . . . . . . . . . . . 15
Voice-activated dialling . . . . . . . . . . . . . . . . . . . . . . . . . . . . . . . . . . . . . . . . . . . . . . . . 16
Linking a call-by-call number with a phone number . . . . . . . . . . . . . . . . . . . . . . . . . . 17
Last number redial list . . . . . . . . . . . . . . . . . . . . . . . . . . . . . . . . . . . . . . . . . . . . . . . . . 17
Email directory . . . . . . . . . . . . . . . . . . . . . . . . . . . . . . . . . . . . . . . . . . . . . . . . . . . . . . . 18
Display available memory . . . . . . . . . . . . . . . . . . . . . . . . . . . . . . . . . . . . . . . . . . . . . . 18
Using several handsets . . . . . . . . . . . . . . . . . . . . . . 19
Internal consultation calls . . . . . . . . . . . . . . . . . . . . . . . . . . . . . . . . . . . . . . . . . . . . . . 19
Accepting/rejecting call waiting during an internal call . . . . . . . . . . . . . . . . . . . . . . . 19
Using a handset as a room monitor . . . . . . . . . . . . . . . . . . . . . . . . . . . . . . . . . . . . . . . 19
Setting the Walk and Talk mode . . . . . . . . . . . . . . . . . . . . . . . . . . . . . . . . . . . . . . . . . 20
3
Page 39

Contents
Handset settings . . . . . . . . . . . . . . . . . . . . . . . . . . . 22
Activating/deactivating Auto Answer . . . . . . . . . . . . . . . . . . . . . . . . . . . . . . . . . . . . . 22
Adjusting the loudspeaker volume . . . . . . . . . . . . . . . . . . . . . . . . . . . . . . . . . . . . . . . 22
Changing the ringer tone . . . . . . . . . . . . . . . . . . . . . . . . . . . . . . . . . . . . . . . . . . . . . . . 22
Sound Manager . . . . . . . . . . . . . . . . . . . . . . . . . . . . . . . . . . . . . . . . . . . . . . . . . . . . . . 23
Activating/deactivating advisory tones . . . . . . . . . . . . . . . . . . . . . . . . . . . . . . . . . . . . 24
Restoring the handset factory settings . . . . . . . . . . . . . . . . . . . . . . . . . . . . . . . . . . . . 24
Appendix . . . . . . . . . . . . . . . . . . . . . . . . . . . . . . . . . 25
Care and contact with liquid . . . . . . . . . . . . . . . . . . . . . . . . . . . . . . . . . . . . . . . . . . . . 25
Customer Care . . . . . . . . . . . . . . . . . . . . . . . . . . . . . . . . . . . . . . . . . . . . . . . . . . . . . . . 25
Specifications . . . . . . . . . . . . . . . . . . . . . . . . . . . . . . . . . . . . . . . . . . . . . . . . . . . . . . . . 26
Character set chart . . . . . . . . . . . . . . . . . . . . . . . . . . . . . . . . . . . . . . . . . . . . . . . . . . . . 26
Predictive text . . . . . . . . . . . . . . . . . . . . . . . . . . . . . . . . . . . . . . . . . . . . . . . . . . . . . . . . 27
PC Interface . . . . . . . . . . . . . . . . . . . . . . . . . . . . . . . . . . . . . . . . . . . . . . . . . . . . . . . . . 28
Play "Balloon Shooter" . . . . . . . . . . . . . . . . . . . . . . . . . . . . . . . . . . . . . . . . . . . . . . . . . 29
Warranty Certificate Ireland . . . . . . . . . . . . . . . . . . . . . . . . . . . . . . . . . . . . . . . . . . . . . 30
Index . . . . . . . . . . . . . . . . . . . . . . . . . . . . . . . . . . . . . 31
4
Page 40

Safety precautions
Safety precautions
Only use the power supply unit supplied, as indicated on the underside of
$
the device.
Fit only the recommended rechargeable battery (page 26)! Do not use any
other type of battery or a non-rechargeable battery, as this could damage
health and cause personal injury.
‹
Insert the rechargeable battery ensuring correct polarity, and use it as directed
in these instructions.
Œ
The operation of medical appliances may be affected. Be aware of the
technical conditions within the particular environment (e.g. doctor's practice).
The handset may cause an intrusive 'hum' in hearing aids.
The handset is not watertight (page 25).
Drivers must not use their phones while driving (Walk and Talk function).
!
Switch off your phone while on board an aircraft (Walk and Talk function).
Ensure that it cannot be switched on again accidentally.
Do not use the phone in environments subject to explosion hazard (e.g. auto
paint shops).
Ensure that your Gigaset is accompanied by these instructions when you give
ƒ
it to others to use.
Dispose of the battery and phone in accordance with environmental
regulations.
i
Not all of the functions described in these instructions are available in all
countries.
5
Page 41

Preparing to use your phone
Preparing to use your phone
The pack contains:
one SL 1 handset, one charger with power supply unit, one belt clip for the handset, one
battery, one set of operating instructions.
Preparing to use the handset
The display is protected by a plastic film. Remove the protective plastic film!
Inserting the battery
◆ Insert the battery ensuring correct polarity – see figure on left.
◆ Position the battery cover so that it is open by around 3 mm, then slide up until it
closes with a click,
◆ To open the battery cover, press on the recessed area and slide down.
Use only the rechargeable battery recommended by Siemens on page 26!
Never use a conventional battery (non-rechargeable) or other battery
W
type as this may cause significant damage to health and property. For
example, the jacket of the battery could be destroyed (hazardous). The
phone could also malfunction or be damaged.
Charging the battery
Place the handset in the charger with the display facing the front. Now leave the
handset in the charger for the battery to charge – the battery is supplied uncharged.
Battery charging is indicated in the top right of the display by the flashing battery
icon =.
For the initial charge we recommend a continuous, uninterrupted
W
charging period of five hours, whatever charge status is indicated. After
a while the charge capacity of the battery will decrease for technical
reasons.
6
Page 42

Preparing to use your phone
The battery charging status is correctly displayed only after uninterrupted charging/
discharging. You should therefore avoid removing the battery unnecessarily and
ending the charging process prematurely.
◆ Once initial charging is complete, you can replace your handset in the
charging shell after each call. Charging is controlled electronically.
i
This ensures that the battery is charged in a way that maximises its
life.
◆ The battery heats up during charging. This is normal and not
dangerous.
Registering
Before you can use your Gigaset SL 1 you must register it manually. You must initiate
handset registration on the handset and on the base.
1. On the handset
v
[______________________________________________]
s H/Set Settings
[______________________________________________]
s Register H/Set
[______________________________________________]
s Base 1
OK
Base 1 flashes in the display when the system PIN has been entered.
Open the menu.
Select the menu item and confirm.
OK
Select the menu item and confirm.
OK
Select base (1–4) and confirm, e.g. Base 1.
OK
Enter the system PIN of the base (the default is 0000)
and confirm.
2. On the base
Please refer to the operating instructions for the base to find out how to initiate handset
registration on the base.
Changing the display language
You can view the display texts in different languages.
v
[______________________________________________]
s H/Set Settings
[______________________________________________]
s Language
OK
s Select a language and confirm.
a
Open the menu.
Select the menu item and confirm.
OK
Select the menu item and confirm. The current
OK
language is checked ‰ (the default setting is
English).
Long press (back to idle status).
You have selected a language in error:
Press v M 2, select the correct language with s and then press to confirm.
OK
7
Page 43

Preparing to use your phone
Changing the base
If your handset is registered to more than one base, you can set it to a particular base or
to the base that has the best reception (Best Base).
v; s H/Set Settings ; s Select Base ;
s (select registered base or Best Base) .
OK OK
OK
Attaching the belt clip
Push the belt clip onto the back of
the handset until the lugs click into
the recesses on either side of the
handset.
Activating/deactivating the handset
To activate: press the 'end call' key a and hold.
To deactivate: press the 'end call' key a again in the idle status and hold.
The handset activates automatically when placed in the charger.
Activating/deactivating the keypad lock
Press the hash key R and hold (the Ø icon appears in the display).
To deactivate/unlock: press the hash key
The keypad lock deactivates automatically when you receive a call. It re-activates when
the call is finished.
R again and hold.
i
When the keypad lock is active, you cannot even call emergency
numbers.
8
Page 44

Operating the telephone, menu guidance
Operating the telephone, menu guidance
Keys
Control key
The control key has four black arrows and associated icons. A certain function is
activated depending on which side of the key you press. In the operating instructions,
the side you must press is highlighted in black, e.g. key v for right = Open Menu.
You can also use the control key to execute many of the functions of the right-hand
display key.
Example:
Control key
Different functions of the control key:
In the idle status In lists and menus In an input field
Initiate voice-activated
t
dialling (long press)
Open directory Scroll down Move the cursor down a line
s
Open the menu Confirm the selected option
v
Open list of handsets Go back one menu level, or
u
Scroll up Move the cursor up a line
(same as )
cancel
OK
Move the cursor to the right
Move the cursor to the left
Display keys
The display keys are the horizontal rocker keys just below the display. Their function
changes depending on the particular operating situation. The current function is shown
in the display directly above the key to which it relates.
Example:
• §§§§§§§SMS§§§§§§
Display keys
9
Page 45

Operating the telephone, menu guidance
The various icons have the following meanings when the keys are pressed:
Þ
OK
à
f
C
Ý
ä
Last number redial key: Open the list of the last 10 numbers you dialled.
OK key: Confirm menu function or confirm an input and store.
Menu key: Open the main menu when in idle status
Open a status-dependent menu while making a call.
Delete key: Delete input from right to left one character at a time.
Escape key: Go back one menu level, or cancel the operation.
Open email directory.
Reverting to idle status from anywhere in the menu
Press the 'end call' key a for around 1 second, or do not press any key.
The display automatically reverts to the idle status after 2 minutes. Changes which you
have not confirmed or saved by pressing , Yes, Save, Send or with Save Entry
OK OK
will be lost.
Main menu
To open the main menu, press the right side of the control key v with the phone in the
idle status and scroll to the required option with
SMS
1
Select Services
2
Add. Features
3
Calendar/Clock
4
Audio Settings
5
Call Charges
6
H/Set Settings
7
Base Settings
8
Answer Machine
9
The menu options that are available will
depend on your base.
s.
10
Page 46

Date and Time
Date and Time
Setting the date and the time
Correct date and time settings are essential if you want to know exactly when calls were
received.
v; s Calendar/Clock ; s Date/Time ; ~ (enter day/month/year);
s (to the next line); ~ (enter hours/minutes); s (to the next line if necessary);
r (select the 12 or 24 hour clock display);
If you have selected the 12 hour display, on the Time: line you can use the display key
am/pm to toggle between am and pm.
Setting the alarm clock
Precondition: The date and time have already been set (page 11).
Activating and setting the alarm clock
OK OK
Save, a (back to idle status).
v; s Calendar/Clock ; s Alarm Clock ; r (select On);
s ~ (enter the wake-up time
If you have selected the 12 hour display, on the Time: line you can use the display key
am/pm to toggle between am and pm.
A wake-up call will only work when the handset is in the idle status, it will not work
when the Room Monitor or Walk and Talk functions are activated, or during a call or an
automatic redial.
To find out how to set the volume and melody, turn to page 22.
OK OK
); Save; a (return to idle status).
Deactivating the alarm clock
The alarm clock is set to a particular time but you do not want it to ring.
v; s
r (select Off);
Calendar/Clock ; s Alarm Clock .
Save; a (return to idle status).
OK OK
Deactivating the wake-up call
Press the display key Silence or any key.
11
Page 47

Date and Time
Setting an appointment
You can use your handset to remind yourself of up to five appointments.
Activating and setting an appointment
v; s Calendar/Clock ; Set Appoints. ; s Appoint. 2 (example) .
r (select On); s ~ (enter day/month);
s Edit; ~ (enter name) ; Save; a (back to idle status).
Once set, an appointment is displayed with the ¼ icon.
An appointment call will only work when the handset is in the idle status, it will not work
when the Room Monitor or Walk and Talk functions are activated, or during a call or an
automatic redial.
If you have selected the 12 hour display, on the Time: line you can use the display key
am/pm to toggle between am and pm.
To find out how to set the volume and melody, turn to page 22.
OK OK OK
s ~ (enter hours/minutes);
OK
Deactivating an appointment call
When the appointment calls sounds, you can deactivate it with Silence.
Viewing and deleting missed appointments, anniversaries etc.
v; s Calendar/Clock ; s Missed Dates ; s select appointment/
anniversary).
[RRRRRRRRRRRRRRRRRRRRRR]
Delete
... then
a
A missed appointment is indicated by ¼, a missed anniversary by ‚.
OK OK
Press the display key.
Long press (back to idle status).
12
Page 48

Making calls
Making calls
Making external calls and ending a call
~ (enter the number) and press c (the 'talk' key) – the sequence does not matter.
To end a call/cancel dialling: press
Dialling pause
You can insert a dialling pause between the prefix and the actual telephone number.
To do this, press S for around 2 seconds. Now enter the telephone number.
Internal calls, ending a call
Calls to other handsets that are registered to the same base are free of charge.
Calling a specific handset
u; s (select handset); press c. Or: Press u 2 (example).
To end the call: press
a ('end call' key).
Calling all handsets ("group call")
u; press P (star key).
To end the call: press
a ('end call' key).
Answering a call
a ('end call' key).
Your handset rings, the call is displayed and the handsfree key d flashes. Press c
(Talk key) (or display key
If the Auto Answer function is activated (page 22) you just need to lift the handset out
of the charger to take the call.
If the ringer is intrusive, press the display key
is displayed on the screen.
Accept or handsfree key d).
Silence. You can take the call so long as it
Handsfree
Activating/deactivating handsfree
Before you dial: ~ (enter the number); press d (the handsfree key).
During a call: press
To deactivate: press
If you wish to place the handset in the charger during a call you must press the
handsfree key d and hold it down as you do so.
i
d (the handsfree key).
c (the Talk key).
You should inform your caller that you intend to use the handsfree
function before you activate it.
13
Page 49

Using the directory and other lists
Adjusting the volume while in handsfree mode during a call
A call is in progress and handsfree d is activated.
d (the handsfree key) again; r volume softer or louder; Save.
Press
Muting the handset
. The call is "held" (wait melody).
u
To end the call: press the display key .
Ý
Using the directory and other lists
Directory and speed dial list
You can store up to 200 numbers in the directory and the speed dial list.
You open the directory with the s key. You can store an anniversary/birthday for every
directory entry and mark the entry as "VIP".
The speed dial list is a special directory in which you can store particularly important
numbers such as private telephone numbers and prefixes of network providers (socalled "call-by-call numbers"). You open the speed dial list with the C key.
The speed dial list is operated in just the same way as the directory, except for the
way in which entries are stored.
◆ The EATONI predictive text helps you input names (page 27), this feature is
deactivated when you purchase your phone).
◆ Please refer to the Character Set Chart (page 26) to see how to enter text correctly.
◆ You can enter up to 32 digits for a number and up to 16 letters for a name.
◆ When entering a number you can insert the required pause with , s Insert
Pause or by pressing S for about 2 seconds.
OK
à
Storing a telephone number in the directory
s (open directory); New Entry ; ~ (enter the number); s (to the next line);
~ (enter name); (open menu);
after you have entered the name: press s to go to the Annivers.: line, press the
display key Edit and enter the date. Press Save.); press a and hold (return to idle status).
To delete an anniversary, in the directory entry in the field for the anniversary, press
the display key
finally after another display change press
Anniversary reminder call
The handset sounds a reminder call with the selected ringer melody. The display shows
the directory entry with ‚ ‚ ‚.
i
à OK
Edit, then when the display changes press the display key Delete and
If your phone is connected to a PABX you may have to enter the access
code (outside line code) as the first digit of your directory entry.
OK
Save Entry ; (To enter an anniversary as well,
Save.
14
Page 50

Using the directory and other lists
Storing a telephone number in the speed dial list
You can assign one of the digits 0, 2–9 to up to nine entries on your speed dial list.
When you press and hold one of these digits with the handset in the idle status, then
press the Talk key c, you are immediately connected to the telephone number that is
assigned to that digit.
C (open speed dial list);
~ (enter name); (open menu);
New Entry ; ~ (enter the number); s (to the next line);
à OK
OK
Save Entry
(To enter a speed dial digit as well, after you have entered the name: press s to go to
the Enter key: line, press r to select a digit [0, 2–9] for this number, then press the
display key
Save); press a and hold (back to idle status).
Speed dial digits cannot be assigned more than once at a time.
Dialling with the directory/speed dial list
s or C (open directory/speed dial list); s (select entry); c.
Managing entries in the directory and speed dial list
To use one of the following menu functions, press the directory key s or the speed dial
list key C. Scroll to the entry with s
key to scroll to the function you require.
Or: s or C; ~ (enter first letter); if necessary scroll with s or
~ enter more letters of the name; c.
Display Number
Edit Entry
Delete Entry
VIP Entry For the directory only (
Copy and Edit For the directory only (
Copy Entry
Delete List
Copy List
Available Memory
and then press v to open the menu. Use the s
s
)
s
)
Once you have selected an entry, press the display key
View and then Edit to view / edit it.
The "Mark as VIP" and "copy and edit" functions
You can mark the directory entries of particularly important callers as VIP (Very
Important Person); this links a particular melody to them. You can then tell who is
calling you from the ringer melody. Precondition: Calling Line Identification.
So that you do not have to enter a similar entry twice, you can create a copy and then
edit that entry.
15
Page 51

Using the directory and other lists
Sending a single entry or complete list to a handset
You can send individual entries or the entire list to another SL 1, S1 or C2 handset or a
Comfort handset in the Gigaset 4000, 3000 or 2000 series that is registered to the same
base. Stored voice patterns and speed dial numbers are not sent. The VIP settings are
sent depending on the handset.
s or C (open directory/speed dial list); s (select entry);
v (open menu); s
Copy Entry or s Copy List );
~ (enter the internal number of the receiving handset); .
OK OK
OK
You can select further entries provided you confirm with the display key
have sent an entry. Select
No to stop sending.
Yes after you
Voice-activated dialling
With voice-activated dialling, you dial simply by speaking the name of the person you
wish to call. To do this, you must first store a voice pattern, i.e. the name which you
speak will be stored in the handset.
Up to four users can store/record a voice pattern per entry. Before he records a voice
pattern, the user must "identify" himself, e.g. as User 2.
A maximum of 23 voice patterns can be stored for directory entries. An entry stored
with a voice pattern is indicated by ´ in the voice directory.
Recording a voice pattern for an existing directory entry
Record your voice pattern in quiet surroundings (holding the handset about 25 cm
away).
Step 1: Open the directory for voice-activated dialling:
s (open directory); s(select entry);
View; s User 2 (example) .
Step 2: Begin recording:
OK
record; (Confirm the display prompt). Speak the name when prompted to do so by
the display. Repeat the name when prompted again to do so. Your recording is stored
automatically.
Press a and hold (return to idle status).
A message tells you if your speech pattern is too much like another user's. Close this
message with , go back to the start of the voice pattern recording sequence and
Ý
repeat the recording.
Using voice-activated dialling: Press t and hold and speak the name.
OK
Phone announces the caller's name
When you receive an external call, you hear the ringer and the telephone announces the
caller's name.
Preconditions: Calling Line Identification. A voice pattern is stored (page 16).
Activating/deactivating the name announcement
v (open menu); s
Audio Settings ; s Ringer Settings ; Ext. Calls ;
OK
2x s (to the next-but-one line); activate/deactivate r (Announce);
OK OK
Save;
press a and hold (return to idle status).
16
Page 52

Using the directory and other lists
Play the voice pattern
Open the directory for voice-activated dialling (see Step 1, page 16). Now:
s (select an entry);
Play; press a and hold (back to idle status).
Changing or deleting voice patterns
Open the directory for voice-activated dialling (see Step 1, page 16). Now:
s (select an entry); v (open menu);
press a and hold (return to idle status).
Deleting a voice pattern does not affect the telephone number or name. The voice
patterns of other users are also unaffected.
Record Name or s Delete Name ;
OK OK
Changing a user name
s (open directory); s (select an entry); View;
User 2 (example) ; Edit; ~ (enter name) Save;
s
press a and hold (return to idle status).
Linking a call-by-call number with a phone number
This function can be used to put a network provider's prefix (which is stored in the speed
dial list) in front of the telephone number ("linking").
C (open the speed dial list); s (select an entry); (open menu);
Display Number ; s (open directory); s (select an entry) ;
~ enter the number; c.
or
OK OK
à
Last number redial list
The last number redial list contains the ten last dialled numbers.
Manual last number redial
Þ (open last number redial list); s (select an entry); c.
Automatic redial
With this function the number is automatically dialled every 20 seconds. When the
other party answers the call, press c (the Talk key). If the call is not answered, ringing
stops after about 30 seconds. The function is cancelled after ten failed attempts.
a (the 'end call' key); • (open last number redial list); v (open menu);
Press
Automatic Redial .
To cancel the redial: press the display key Off or any key.
OK
17
Page 53

Using the directory and other lists
Managing entries in the last number redial list
You can use the following menu functions:
• (open the redial list);
s (select an entry); v (open menu);
s (select function).
Automatic Redial
Display Number
Copy to Directory
Delete Entry
Delete List
Email directory
You store email addresses in the email directory. You can store a maximum of
200 entries in the directory, email directory and speed dial list together.
Email directory entries are managed in the same way as normal phone directory entries
(page 15).
Storing a new email address
Step 1: Open the email directory:
s (open directory) s E-mail Directory .
Step 2: Create an email entry:
New Entry ; ~ (enter address); (open menu);
OK à
(select s, ".", "@" or the predictive text function as required ). With the predictive
text activated, press
R once long and once short.
Step 3: Save an email entry:
à OK
(open menu); Save Entry ; press a and hold (return to idle status).
When you have selected an entry, press the display key
address. Save as described.
OK
OK
View, then Edit and enter the
Display available memory
The memory space is divided up between the directory, the speed dial list (page 14) and
the email directory (page 18). The available memory of all these lists is displayed.
s (open directory); s
(select entry); v (open menu); s Available Memory ;
press a and hold (return to idle status).
18
OK
Page 54

Using several handsets
Transferring a call to another handset
Using several handsets
u (open internal list); select s (a particular handset or Call All); .
The internal user answers: press a ('end call' key).
If he does not answer or is busy, the call will come back to you automatically (Recall
appears in the display).
OK
Internal consultation calls
You can make an internal call while an external call is in progress.
u (open internal list); s (select handset), .
To end the call: press the display key End (back to outside caller).
OK
Accepting/rejecting call waiting during an internal call
If you get an external call while conducting an internal call, you will hear the call
waiting tone (short tone). Press the display key
The rejected call waiting tone can still be heard at other registered handsets.
Accept or Reject.
Using a handset as a room monitor
With this function, a previously stored internal or external number is called when a set
noise level in the room is reached. The room monitor remains activated on the handset
even after you hang up.
The handset should be between 1 and 2 metres away from the baby.
The microphone must be directed towards the baby.
When the room monitor is activated, incoming calls to the handset which is near the
baby are indicated without a ring tone, they are just shown on the display. The display
and the key pad are not illuminated.
When entering an external phone number, make sure that the line to which you want
the room monitor to be transferred is not blocked by an activated answering machine.
◆ If you redirect your room monitor to an external number, then you should tell that
number's owner.
◆ The room monitor's call to an external phone number stops after about 90 seconds,
to an internal number (handset) it stops after about 180 seconds (depending on the
base).
W
i
Always check the settings of the room monitor before you leave
home, e.g. sensitivity and phone line.
The room monitor function severely curtails the handset's operating time.
If necessary you should place the handset which is near the baby in the
charger to ensure that the battery does not run down.
The room monitor function can also be used in Walk and Talk mode.
19
Page 55

Using several handsets
Activating the room monitor function and entering the 'call to' number for the first time
Step 1: Open the input field: v; s Add. Features ; Room Monitor .
Step 2: Activate room monitor: r (in the Room M.: line, select On)
Step 3: Enter the destination number: s (to the next line);
Enter internal number: INT s (select handset) or:
Enter external number: ~; (open menu);
Step 4: Set the sensitivity: if necessary press s (to the next line); r; Save
The room monitor function is now activated.
Once the room monitor is activated, switch directly to the room monitor setting with v
(open menu).
à OK
OK OK
Edit
OK
Save Entry
Deactivating the room monitor
You can deactivate the room monitor remotely (depending on the base). Take the call
from the room monitor and press O R. The room monitor function will deactivate
around 90 seconds after the call ends. The room monitor will make no further calls. The
other room monitor functions on the handset (e.g. no ringer) will remain activated until
you press the display key
i
To reactivate the room monitor function with the same telephone
number, you must turn on the activation again and save with
Off on the handset that is in the baby's room.
Save.
Setting the Walk and Talk mode
The Walk and Talk function allows two handsets (maximum range 300 metres) to call
each other no matter how far they are from the base.
Precondition:
◆ Both handsets have been registered to the same base (recommended for the room
monitor function) or
◆ Both handsets are registered to different bases and both are set to Best Base
(page 8) or
◆ One of the handsets is not registered to any base and the registered handset is set
to Best Base or
◆ Neither handset is registered to a base.
In Walk and Talk mode the handsets cannot be reached by incoming calls. The handset
operating times are greatly curtailed.
20
Page 56

Activating/deactivating the Walk and Talk mode
Using several handsets
v (open menu); s Add. Features ; s Walk and Talk .
To deactivate: press the display key Off.
Press c (Talk key) or d (handsfree key) The call will go to all handsets that are in Walk
and Talk mode. The loudspeaker volume and the advisory tones are set in exactly the
same way as if your handsets were in range of the base (page 22). The ringers cannot
be set in Walk and Talk mode.
The ringer (page 23) and keypad lock (page 8) can be activated/deactivated in the Walk
and Talk mode.
To open the menu, press the display key ©.
i
The Walk and Talk mode is retained even when you switch your handset
off and back on.
OK OK
Using a handset in Walk and Talk mode as a room monitor
à OK
(open menu); s Room Monitor ; r (select On);
s (to the next line); select r (Low or High);
The room monitor will only call handsets that are in the Walk and Talk mode.
Always check the settings of the room monitor before you leave
W
Press the display key Off on the room monitor handset to deactivate the room monitor.
The handset returns to the normal Walk and Talk mode.
home, e.g. sensitivity and phone line. The distance between the
handsets should not now be changed (range).
Save.
21
Page 57

Handset settings
Handset settings
Activating/deactivating Auto Answer
If you have activated this function, when you get a call you can simply lift the handset
out of its base or the charger without having to press the Talk key (the default setting is
On).
v (open menu); s
press a and hold (return to idle status).
H/Set Settings ; Auto Answer (‰ = On);
Adjusting the loudspeaker volume
You can adjust the handsfree volume on five levels and the earpiece volume on three
levels – you can even do this while an external call is in progress.
v (open menu); s
volume); s (to the next line) r (select earpiece volume);
press a and hold (return to idle status).
Audio Settings ; Handset Volume ; r (select handsfree
Ringer echo
You can enhance the sound quality of the long ringer melodies (4-10).
v (open menu); s
hold (back to idle status).
Audio Settings ; s Ringer Echo (‰ = On); press a and
Changing the ringer tone
OK OK
OK OK
Save;
OK OK
You can choose from six volumes and 26 melodies (including 16 polyphonic melodies).
Polyphonic melodies are only available if they have previously been recorded with the
Sound Manager or downloaded on the PC interface.
Settings for external calls, time control and name announcement
v (open menu); s Audio Settings ; s Ringer Settings ; Ext. Calls ;
r (select volume); s (to the next line); r (select melody);
s (to the next line if necessary); r (activate name announcement, page 16).
Activating time control
Select Time C.; r (select Time ctrl: On); s go to the line From: (4-digit input of the
time period); s go to the line Until: (4-digit input of the time period);
s r (enter ringer volume); Save (save time control); Save again (save setting);
press a and hold (back to idle status).
OK OK OK
Individual settings for internal calls, wake-up and appointments
v (open menu); s Audio Settings ; s Ringer Settings ;
OK
s (select function)
Save (With the All setting you must also confirm the prompt with Yes.);
press a and hold (return to idle status).
; r (select volume); s (to the next line); r (select melody);
OK OK
22
Page 58

Handset settings
Activating/deactivating the ringer
All handsets ring when there is an incoming call. To deactivate the ringer: press the star
key P and hold. The
To activate the ringer: press the star key P and hold.
Ú icon appears in the display.
i
To cancel the ringer for the current call, press the display key Silence.
Activating/deactivating the alert tone
When you deactivate the ringer you can activate an alert tone. When you get a call, you
will hear a short tone (beep) instead of the ring tone.
Press the star key P and hold and within 3 seconds press the display key Beep on.
º
You will now see
To deactivate: press the star key P and hold.
in the display.
Vibration alarm
Incoming calls and other messages are indicated by vibration. This setting is separate
from the ringer settings.
v (open menu); s
press
a and hold (back to idle status).
Audio Settings ; s Silent Alert (‰ = On);
OK OK
Sound Manager
You can record polyphonic melodies (max. length 4 seconds) or dub them using a data
cable (page 28). You can store up to 16 melodies.
Record a melody
v (open menu); s Audio Settings ; s Sound Manager ;
<New Sound> ;
Edit Entry (enter melody name) Save; press a and hold (return to idle status).
OK OK
Record Sound? ; Press End or wait 4 seconds; Save;
Play a melody
OK OK
v (open menu); s Audio Settings ; s Sound Manager ;
(select melody); Play; press a and hold (return to idle status).
s
OK OK
Edit entry
v (open menu); s Audio Settings ; s Sound Manager ;
(select melody); ; Volume (adjust volume) or s Edit Entry (edit
s
name) or s
press a and hold (return to idle status).
View Entry (view filename) or s Delete Entry ;
à OK OK
OK OK
OK OK
23
Page 59

Handset settings
Activating/deactivating advisory tones
Your handset uses 'advisory tones' to tell you about different activities and statuses. The
following advisory tones can be activated and deactivated individually (the default
setting is On).
◆ Key click (every key press is confirmed),
◆ Acknowledge tones (Confirmation tone, Error tone, End of menu tone),
◆ Battery tone.
v (open menu); s
Audio Settings ; s Advisory Tones ;
OK OK
r (activate Key Tones:); s (to the next line) r (activate Confirm.:);
s (to the next line); r (for Battery: select On, Off or During Call);
Save;
press a and hold (return to idle status).
Restoring the handset factory settings
You can reset individual settings and changes you have made. This will not affect entries
in the directory, the calls list, the email directory or the speed dial list, the handset's
registration to the base or screensavers and melodies that you have loaded. Press a to
cancel the reset.
v (open menu); s
H/Set Settings ; s Reset Handset ; Yes (confirm the
prompt);
press a and hold (back to idle status)
Factory settings of the handset
Earpiece volume 1 page 22
Handsfree volume 3 page 22
Ringer volume 5 page 22
Time control for ringer deactivated page 22
Ringer melody Melody 1 page 22
Name announcement deactivated page 16
Auto answer activated page 22
Battery tone/Key click/Confirmation tone activated page 24
Display language country specific page 7
Alarm clock/appointment deactivated page 11/
Appointment name deleted page 12
Last number redial list empty page 17
Room monitor/room monitor sensitivity deactivated/high page 20
OK OK
page 12
24
Page 60

Appendix
Appendix
Care and contact with liquid
Wipe the handset with a damp cloth (use no solvent) or an antistatic cloth. Never use
a dry cloth. This can cause static.
If the handset should come into contact with liquid, on no account switch the device
on. Remove the battery immediately.
Allow the liquid to drain out of the device, and then pat all parts of the device dry.
Keep the handset with the battery removed in a warm, dry place for at least 72 hours.
In many cases, you will then be able to use it again.
!
Customer Care
Our online support on the Internet:
www.my-siemens.com/customercare
If you need any repair work, or have a guarantee claim to submit, our
Service-Center Ireland 18 50 77 72 77
will give you quick and reliable assistance. Keep your till receipt handy.
You will find more service numbers in the section entitled "Service" at the end of
this booklet.
Replacement or repair services are not offered in countries where our product is not sold
by authorised dealers.
Country-specific features have been taken into account. The SL1 handset is licensed
throughout the EU and in Switzerland.
The CE mark certifies conformity of the device with the essential requirements of the
R&TTE directive.
Excerpt from the original declaration
"We, Siemens AG, declare, that the above mentioned product is manufactured according to our Full
Quality Assurance System certified by CETECOM ICT Services GmbH in compliance with ANNEX V
of the R&TTE-Directive 99/5/EC. The presumption of conformity with the essential requirements
regarding Council Directive 99/5/EC is ensured."
Senior Approvals Manager
The Declaration of Conformity (DoC) has been signed. In case of need, a copy of the original DoC
can be made available via the company hotline.
25
Page 61

Appendix
Specifications
Recommended battery
Lithium-Ion (LiIon), 700 mAh
(correct at time of going to press)
The product is supplied with an approved battery only.
Handset operating times/ charging time
Capacity
(mAh)
700 approx. 250
These operating and charging times apply only when using the recommended battery.
Standby time
(hours)
(10 days)
Calling time
(hours)
approx. 15 approx. 2.5
Charging time
(hours)
Character set chart
Standard characters
Press the relevant key repeatedly or hold it down:
1 x 2 x 3 x 4 x 5 x 6 x 7 x 8 x 9 x 10 x 11 x 12 x 13 x 14 x
1
2
I
4
5
L
M
N
O
Q
P
R
Space
abc2äáàâãç
def3ëéèê
g h i4ïíìî
jkl5
m n o6цсутфх
pqrs7ß
tuv8üúùû
wx yz9ÿýæøå
.,?!0+-:¿¡"‘;_
Abc--> 123 123 --> abc
#@\&§
1
â
£$¥¤
/()<=>%
*
Creating and editing text (without predictive text)
◆ The cursor is controlled with u v t s.
f
◆ Characters (to the left of the cursor) are deleted with .
◆ Characters are added to the left of the cursor.
◆ To switch from upper case (first letter upper case, all other letters lower case) to
lower case, press P before you key in the letter. Pressing P again switches from
lower case letters to digits. Press again to return from digits to upper case letters.
◆ The first letter of the name of directory entries is automatically capitalised, followed
by lower case letters.
C
26
Page 62

Appendix
◆ When you press a key and hold it, the characters of that key appear in the bottom
display line and are highlighted one after the other. When you release the key the
highlighted character is inserted into the input field.
– You can see in the display whether upper case, lower case or digits are selected:
– 'A' or 'a' appears on the bottom display line when you make an entry in the
directory.
Order of directory entries
1. Space (shown here as s)
2. Digits (0–9)
3. Letters (alphabetical)
4. Other characters
To work around the alphabetical order of the entries in the directory, insert a space
before the name. This entry then goes to the first position (example: "sCarla"). You can
also number the entries with digits (e.g. "1Jane", "2Mary", "3John").
Predictive text
The EATONI predictive text helps you to write names (in the directory, speed dial list or
email directory).
Each key between Q and O is assigned several letters and characters which all
appear on a selection line immediately above the display keys (beneath the text area)
as soon as you press a key. When you are entering letters, the letter you are most
probably looking for is reverse highlighted. This letter is at the beginning of the
selection line and is transferred to the text area.
The EATONI predictive text
53 ________Ç_____abc
Peter K
KLJ5
W¨
function is activated.
email address
Selection line
If this letter is the one you want, confirm it by pressing the next key. If the letter selected
by the EATONI is not the one you want, then press the hash key R repeatedly until the
required letter appears reverse highlighted in the display line and is transferred to the
text area.
P Press the star key briefly: Switches from abc to Abc, from Abc to 123 and
from 123 back to abc mode.
R Goes to the next letter in the selection list.
Activating/deactivating predictive text
Predictive text is activated and deactivated according to specific functions.
Precondition: You are in a text input field (name in the directory, speed dial list or email
directory).
v (open menu); s
Predictive Text (‰ = On);
OK
give the a 'end call' key a short press to return to the text field. Now enter your text.
27
Page 63

Appendix
PC Interface
You can connect the SL 1 handset to your PC with a Siemens data cable. Your PC can now
communicate with your SL 1 by means of the "Siemens Data Suite" software
(downloaded free from http:\\www.my-siemens.com\gigaset-sds) and access the
following handset parameters and lists:
Read parameters
◆ Software version
◆ Ty pe
◆ Manufacturer's code
Read/write access to
◆ The telephone directory
◆ The email directory
◆ The network provider list
◆ The appointments list
◆ The last number redial list
Read/write access to other parameters
◆ Ringer settings
◆ Volume settings
◆ Load screensavers
◆ Load melodies
◆ Make and answer telephone calls
Data transfer
With some functions, large amounts of data are transferred between the handset and
the external device (PC). In this case the handset switches to data transfer mode, and
Data Transfer appears in the handset display. When the handset is in this mode you
cannot make any inputs on the keypad, and incoming calls are ignored.
The handset goes into data transfer mode in the following cases:
◆ Read/write access to the telephone directory
◆ Read/write access to the email directory
◆ Read/write access to the network provider list
◆ Read/write access to the appointments list
◆ Read/write access to the last number redial list
◆ Load screensavers
◆ Load melodies
The handset returns to idle status automatically if any errors occur during data transfer.
Make and answer telephone calls
If you dial a number from the external device or answer a call from it, the handset will
behave exactly as if you carried out these functions on the handset.
28
Page 64

Play "Balloon Shooter"
Try to hit as many balloons as possible.
v ¢ Add. Features ¢ Balloon Shooter
either ...
[RRRRRRRRRRRRRRRRRRRR]
Start
or ...
à
To aim the cross-hairs, press:
Start the game:
Press the display key.
Other options:
Press the display key to open the options menu.
Appendix
¢
1
¢
4
M
¢
To shoot the balloon down, press
¢
2
N
¢
I
L
O
¢
¢
¢
or
5.
¢
¢
p
¢
¢
29
Page 65

Appendix
Warranty Certificate Ireland
◆ Without prejudice to any claim the user (customer) may have in relation to the
dealer or retailer, the customer shall be granted a manufacturer's Guarantee under
the conditions set out below:
◆ In the case of new devices and their components exhibiting defects resulting from
manufacturing and/or material faults within 24 months of purchase, Siemens shall,
at its own option and free of charge, either replace the device with another device
reflecting the current state of the art, or repair the said device. In respect of parts
subject to wear and tear (including but not limited to, batteries, keypads, casing),
this warranty shall be valid for six months from the date of purchase.
◆ This Guarantee shall be invalid if the device defect is attributable to improper care or
use and/or failure to comply with information contained in the user manuals. In
particular claims under the Guarantee cannot be made if:
– The device is opened (this is classed as third party intervention)
– Repairs or other work is done by persons not authorised by Siemens.
– Components on the printed circuit board are manipulated
– The software is manipulated
– Defects or damage caused by dropping, breaking, lightning or ingress of
moisture. This also applies if defects or damage was caused by mechanical,
chemical, radio interference or thermal factors (e.g.: microwave, sauna etc.)
– Devices fitted with accessories not authorised by Siemens
◆ This Guarantee shall not apply to or extend to services performed by the authorised
dealer or the customer themselves (e.g. installation, configuration, software
downloads). User manuals and any software supplied on a separate data medium
shall be excluded from the Guarantee.
◆ The purchase receipt, together with the date of purchase, shall be required as
evidence for invoking the Guarantee. Claims under the Guarantee must be
submitted within two months of the Guarantee default becoming evident.
◆ Ownership of devices or components replaced by and returned to Siemens shall vest
in Siemens.
◆ This Guarantee shall apply to new devices purchased in the European Union. For
Products sold in the Republic of Ireland the Guarantee is issued by Siemens Ireland
Limited, Ballymoss Road, Sandyford Industrial Estate, Dublin 18 – The Republic of
Ireland.
◆ Any other claims resulting out of or in connection with the device shall be excluded
from this Guarantee. Nothing in this Guarantee shall attempt to limit or exclude a
Customers Statutory Rights, nor the manufacturer's liability for death or personal
injury resulting from its negligence.
◆ The duration of the Guarantee shall not be extended by services rendered under the
terms of the Guarantee.
◆ Insofar as no Guarantee default exists, Siemens reserves the right to charge the
customer for replacement or repair.
◆ The above provisions do not imply a change in the burden of proof to the detriment
of the customer.
To make a claim under this Guarantee, please contact the Siemens helpdesk on
1850 777 277. This number is also to be found in the accompanying user guide.
30
Page 66

Index
Index
A
Acknowledge tones . . . . . . . . . . . . . . 24
Activate
alarm clock
appointment
keypad lock
Walk and Talk
Activation
handset
Advisory tones
Alarm clock
Alert tone
Anniversary
Appointment
Auto answer
. . . . . . . . . . . . . . . . . . 11
. . . . . . . . . . . . . . . . . 12
. . . . . . . . . . . . . . . . . . . 8
. . . . . . . . . . . . . . . . . 21
. . . . . . . . . . . . . . . . . . . . . . 8
. . . . . . . . . . . . . . . . . 24
. . . . . . . . . . . . . . . . . . . . 11
. . . . . . . . . . . . . . . . . . . . . 23
. . . . . . . . . . . . . . . . . . . 12
. . . . . . . . . . . . . . . . . . 12
. . . . . . . . . . . . . . . . . . . 22
B
Balloon Shooter . . . . . . . . . . . . . . . . 29
Battery
charging
display
inserting
recommended battery
Battery tone
Belt clip
Best base
Block
keypad lock
. . . . . . . . . . . . . . . . . . . . . 6
. . . . . . . . . . . . . . . . . . . . . . 6
. . . . . . . . . . . . . . . . . . . . . 6
. . . . . . . . . . 26
. . . . . . . . . . . . . . . . . . . 24
. . . . . . . . . . . . . . . . . . . . . . . 8
. . . . . . . . . . . . . . . . . . . . . . 8
. . . . . . . . . . . . . . . . . . . 8
C
Call transfer . . . . . . . . . . . . . . . . . . . 19
Call waiting (internal call)
Call-by-Call numbers
Cancel (operation)
Care of the telephone
Changing the base
Character set chart
Charging status display
Confirmation tone
Consultation call (internal)
Control key
Cursor
Customer Care
Customer Care (Service)
. . . . . . . . . . . . . . . . . . . . . 9
. . . . . . . . . . . . . . . . . . . . . . . . 9
. . . . . . . . . . . . . . . . . 25
. . . . . . . . . 19
. . . . . . . . . . . . . 14
. . . . . . . . . . . . . . 10
. . . . . . . . . . . . 25
. . . . . . . . . . . . . . . 8
. . . . . . . . . . . . . . 26
. . . . . . . . . . . . 6
. . . . . . . . . . . . . . . 24
. . . . . . . . 19
. . . . . . . . . . 25
D
Date and time . . . . . . . . . . . . . . . . . . 11
Date setting
Deactivate
appointment call
handset
keypad lock
ringer (handset)
wake-up call
Delete (voice pattern)
Delete key
Dialling pause
Directory
opening the
order of entries
send an entry to a handset
storing a number
Display
12/24 hour display
changing language
keys
memory
. . . . . . . . . . . . . . . . . . . . 11
. . . . . . . . . . . . . . 12
. . . . . . . . . . . . . . . . . . . . . . 8
. . . . . . . . . . . . . . . . . . . 8
. . . . . . . . . . . . . . . 23
. . . . . . . . . . . . . . . . . . 11
. . . . . . . . . . . . 17
. . . . . . . . . . . . . . . . . . . . . 10
. . . . . . . . . . . . . . . . . . 13
. . . . . . . . . . . . . . . . . . . . . . 14
. . . . . . . . . . . . . . . . . . . 9
. . . . . . . . . . . . . . . . 27
. . . . . . . 16
. . . . . . . . . . . . . . 14
. . . . . . . . . . 11, 12
. . . . . . . . . . . . . . 7
. . . . . . . . . . . . . . . . . . . . . . . . . 9
. . . . . . . . . . . . . . . . . . . . . 18
E
Earpiece mode. . . . . . . . . . . . . . . . . . . 2
Earpiece volume
EATONI, see Predictive text
Email directory
End call
Enter
Enter birthday (as appointment)
Error/Error tone
Escape key
. . . . . . . . . . . . . . . . . . . . . . . 13
appointment
birthday/anniversary
wake-up time
. . . . . . . . . . . . . . . . 22
. . . . . . . . . . . . . . . . . 18
. . . . . . . . . . . . . . . . . 12
. . . . . . . . . . . . 12
. . . . . . . . . . . . . . . . . 11
. . . . . 12
. . . . . . . . . . . . . . . . . 24
. . . . . . . . . . . . . . . . . . . . . 10
F
Factory settings of the
handset
. . . . . . . . . . . . . 24
G
Group call . . . . . . . . . . . . . . . . . . . . . 13
31
Page 67

Index
H
Handset
activate/deactivate
belt clip
change for best reception
change to another base
list
muting
operating and charging times
preparing to use
register on another base
restore factory settings
use as room monitor
Handset charging time
Handsfree
Hash key
Hearing aids
. . . . . . . . . . . . . . . . . . . . . . 8
. . . . . . . . . . . . . . . . . . . . . . . . . . 9
. . . . . . . . . . . . . . . . . . . . . 14
. . . . . . . . . . . . . . . . . . . . . 13
. . . . . . . . . . . . . . . . . . . . . . . 8
. . . . . . . . . . . . . . . . . . . . 5
. . . . . . . . . . . . . . 8
. . . . . . . . . 8
. . . . . . . . . . 8
. . . . . 26
. . . . . . . . . . . . . . . . 6
. . . . . . . . . . 8
. . . . . . . . . . 24
. . . . . . . . . . . 19
. . . . . . . . . . . 26
I
Internal
. . . . . . . . . . . . . . . . . . . . . . . . 13
calls
consultation
. . . . . . . . . . . . . . . . . 19
K
Key 1 (fast access). . . . . . . . . . . . . . . . 2
Keys
. . . . . . . . . . . . . . . . . . . . . . 10
cancel
control key
display keys
Escape/Menu/Delete/OK
key click
key press (confirmation tone)
keypad lock
last number redial key
. . . . . . . . . . . . . . . . . . . . 9
. . . . . . . . . . . . . . . . . . . 9
. . . . . . . . . 10
. . . . . . . . . . . . . . . . . . . . . 24
. . . . . 24
. . . . . . . . . . . . . . . . . . . 8
. . . . . . . . . . 10
L
Language, see Display
Last number redial
Last number redial list
List
email directory
handsets
Loudspeaker volume
. . . . . . . . . . . . . . . . . . . . . 9
. . . . . . . . . . . . . . 17
. . . . . . . . . . . . 17
. . . . . . . . . . . . . . . . 18
. . . . . . . . . . . . . 22
M
Making calls. . . . . . . . . . . . . . . . . . . .13
answering a call
external
internal
Medical appliances
Melody
polyphonic
Memory
Menu
back one menu level
end tone
guidance through the menu
key
opening the
Microphone
Missed
anniversary
appointment
Muting (handset)
. . . . . . . . . . . . . . . . . . . . .13
. . . . . . . . . . . . . . . . . . . . .13
. . . . . . . . . . . . . . . . . . . . . . .18
. . . . . . . . . . . . . . . . . . . . . . . . .10
. . . . . . . . . . . . . . .13
. . . . . . . . . . . . . . . .5
. . . . . . . . . . . . . . . . . . .23
. . . . . . . . . . . .10
. . . . . . . . . . . . . . . . . . . . .24
. . . . . . .9
. . . . . . . . . . . . . . . . . . .9
. . . . . . . . . . . . . . . . . . . . .2
. . . . . . . . . . . . . . . . . . .12
. . . . . . . . . . . . . . . . .12
. . . . . . . . . . . . . . . .14
N
Network provider (number list). . . . . .14
Number, see also Tel. Number or Entry 14
O
Open
directory
menu
Operating time
in Walk and Talk mode
of the handset
of the room monitor
Operation (preparing to use your
Order in directory
. . . . . . . . . . . . . . . . . . . . . .9
. . . . . . . . . . . . . . . . . . . . . . . .9
. . . . . . . . . . .20
. . . . . . . . . . . . . . . .26
. . . . . . . . . . . .19
phone)
. . . . . . . . . . . . . . .6
. . . . . . . . . . . . . . . .27
P
Pack contents. . . . . . . . . . . . . . . . . . . .6
PC Interface
Play (voice pattern)
Polyphonic melodies
Power supply unit
Predictive text
Preparing to use (the phone)
Protective plastic film
. . . . . . . . . . . . . . . . . . . .28
. . . . . . . . . . . . . .17
. . . . . . . . . . . . .23
. . . . . . . . . . . . . . . .5
. . . . . . . . . . . . . . . . . .27
. . . . . . . .6
. . . . . . . . . . . . . .6
32
Page 68

Index
R
Reminder call . . . . . . . . . . . . . . . . . . 14
. . . . . . . . . . . . . . . . . . . . . . . 22
Ringer
Ringer echo
Room monitor
. . . . . . . . . . . . . . . . . . . 22
. . . . . . . . . . . . . . . . . 19
S
Safety precautions . . . . . . . . . . . . . . . 5
Saving
speed dial list entry
Select (menu option)
Select option (menu)
Send a directory entry
Service
Setting
Signal strength
Signal tone, see Advisory tones
Sound Manager
Specifications
Speed dial key
Speed dial list
Storing
Switch off, see Deactivate
. . . . . . . . . . . . . . . . . . . . . . . 25
alarm clock
appointment
date
display language
earpiece volume
loudspeaker volume
ringer volume
time
store a number
directory entry
. . . . . . . . . . . . . . . . . . 11
. . . . . . . . . . . . . . . . . . . . . . . 11
. . . . . . . . . . . . . . . . . . . . . . . 11
. . . . . . . . . . . . 15
. . . . . . . . . . . . . 9
. . . . . . . . . . . . . 9
. . . . . . . . . . . . 16
. . . . . . . . . . . . . . . . . 12
. . . . . . . . . . . . . . . 7
. . . . . . . . . . . . . . 22
. . . . . . . . . . . . 22
. . . . . . . . . . . . . . . . 22
. . . . . . . . . . . . . . . . . . 2
. . . . . 24
. . . . . . . . . . . . . . . . 23
. . . . . . . . . . . . . . . . . . 26
. . . . . . . . . . . . . . . . . . 14
. . . . . . . . . . . . . . . . . . 14
. . . . . . . . . . . . . . . 15
. . . . . . . . . . . . . . . . 14
. . . . . . . . . 11
V
Vibration alarm . . . . . . . . . . . . . . . . . 23
VIP (directory entry)
Voice patterns
Voice-activated dialling
Volume
. . . . . . . . . . . . . . . . . . . . . . . 22
. . . . . . . . . . . . . . 15
. . . . . . . . . . . . . . . . . . 17
. . . . . . . . . 9, 16
W
Wait melody . . . . . . . . . . . . . . . . . . . 14
Wake-up call
Walk and Talk
Warning tone, see Advisory tones
Warranty
. . . . . . . . . . . . . . . . . . . 11
. . . . . . . . . . . . . . . . 20, 21
. . . . 24
. . . . . . . . . . . . . . . . . . . . . . 30
T
Tal k . . . . . . . . . . . . . . . . . . . . . . . . . . 2
Telephone number
pick from directory
store (directory)
Time setting
Ton e
error tone
Tone (confirmation/error/batt./
. . . . . . . . . . . . . . . . . . . 11
. . . . . . . . . . . . . . . . . . . 24
end of menu)
. . . . . . . . . . . . . 15
. . . . . . . . . . . . . . . 14
. . . . . . . . . 24
33
Page 69

s
Be inspired
FRANÇAIS
Page 70

Présentation
Présentation
Intensité de la réception
Ð 100 % i 75 %
Ñ 50 %
Ò réception faible
| aucune réception
(clignotante)
Touche « Décrocher »
◆ Accepter la
communication
◆ Activer la numérotation
◆ Passer du mode Mains-
libres au mode
Ecouteur
Touche de navigation
Accès aux menu,
répertoire, reconnaissance
vocale, appels internes.
Touche Mains-libres
◆ Ecoute en
mode Mains-libres
◆ Témoin lumineux:
– Fixe: Mains libre
activé
–Clignotant:
Appel entrant
◆ rappel automatique
Répertoire principal
Touche 1
Accès à la messagerie
externe / au répondeur
(Appui long env. 2sec.)
Tour che étoile
◆ Activer/désactiver les
sonneries (appui long
env. 2 sec.)
◆ Passage du mode
majuscules au mode
minuscules et au mode
chiffres lors de la saisie
ÐV
INT 1
20.05.03 09:45
• §§§§§§§SMS§§§§§§
Microphone
Connecteur pour
kit piéton et
interface PC
Touche R
Insérer une pause
entre les chiffres
(appui prolongé)
Ecran (affichage)
Niveau de charge
= vide U pleine
= clignotante : batterie
presque vide ou batterie
en charge
Touches écran
Accès aux fonctions
affichées en regard au bas
de l'écran.
Touche Raccrocher et
Marche/Arrêt
◆ Mettre fin à la
communication
◆ Annuler la fonction
◆ Niveau menu
précédent (bref appui)
◆ Retour à l'état de repos
(appui long)
◆ Marche/Arrêt du
combiné (appui long
env. 2 sec.)
Journal des
événements:
(Témoin lumineux)
◆ Appels reçus/perdus
◆ Messages répondeur
◆ Messagerie externe
◆ SMS reçus
Touche Dièse
Activer/désactiver le
verrouillage du clavier
Répertoire secondaire
Liste de numéros spéciaux
(N° abrégés, préfixes, VIP,
etc...)
Représentation d'un combiné déclaré sur une base gérant les SMS.
2
Page 71

Sommaire
Sommaire
Présentation . . . . . . . . . . . . . . . . . . . . . . . . . . . . . . . . 2
Consignes de sécurité . . . . . . . . . . . . . . . . . . . . . . . . 5
Préparer le téléphone . . . . . . . . . . . . . . . . . . . . . . . . 6
Mettre en service le combiné . . . . . . . . . . . . . . . . . . . . . . . . . . . . . . . . . . . . . . . . . . . . . 6
Déclaration . . . . . . . . . . . . . . . . . . . . . . . . . . . . . . . . . . . . . . . . . . . . . . . . . . . . . . . . . . . 7
Modifier la langue d’affichage . . . . . . . . . . . . . . . . . . . . . . . . . . . . . . . . . . . . . . . . . . . . 7
Sélectionner la base . . . . . . . . . . . . . . . . . . . . . . . . . . . . . . . . . . . . . . . . . . . . . . . . . . . . 8
Fixer le clip ceinture . . . . . . . . . . . . . . . . . . . . . . . . . . . . . . . . . . . . . . . . . . . . . . . . . . . 8
Combiné : allumer/éteindre . . . . . . . . . . . . . . . . . . . . . . . . . . . . . . . . . . . . . . . . . . . . . . 8
Verrouillage du clavier . . . . . . . . . . . . . . . . . . . . . . . . . . . . . . . . . . . . . . . . . . . . . . . . . . 8
Manipulation du téléphone et de ses menus . . . . . 9
Touches . . . . . . . . . . . . . . . . . . . . . . . . . . . . . . . . . . . . . . . . . . . . . . . . . . . . . . . . . . . . . 9
Menu principal . . . . . . . . . . . . . . . . . . . . . . . . . . . . . . . . . . . . . . . . . . . . . . . . . . . . . . . 10
Date / Heure / Réveil / RdV . . . . . . . . . . . . . . . . . . . . 11
Régler la date et l'heure . . . . . . . . . . . . . . . . . . . . . . . . . . . . . . . . . . . . . . . . . . . . . . . . 11
Réveil / Alarme . . . . . . . . . . . . . . . . . . . . . . . . . . . . . . . . . . . . . . . . . . . . . . . . . . . . . . . 11
Rendez-vous (RdV) . . . . . . . . . . . . . . . . . . . . . . . . . . . . . . . . . . . . . . . . . . . . . . . . . . . . 11
Téléphoner . . . . . . . . . . . . . . . . . . . . . . . . . . . . . . . . 12
Effectuer un appel externe et terminer la communication . . . . . . . . . . . . . . . . . . . . . 12
Effectuer un appel interne et terminer la communication . . . . . . . . . . . . . . . . . . . . . 12
Accepter un appel entrant . . . . . . . . . . . . . . . . . . . . . . . . . . . . . . . . . . . . . . . . . . . . . . 13
Mains-libres . . . . . . . . . . . . . . . . . . . . . . . . . . . . . . . . . . . . . . . . . . . . . . . . . . . . . . . . . 13
Secret microphone . . . . . . . . . . . . . . . . . . . . . . . . . . . . . . . . . . . . . . . . . . . . . . . . . . . . 13
Utilisation des répertoires et autres listes . . . . . . 14
Répertoires principal et secondaire . . . . . . . . . . . . . . . . . . . . . . . . . . . . . . . . . . . . . . . 14
Gérer les entrées des répertoires . . . . . . . . . . . . . . . . . . . . . . . . . . . . . . . . . . . . . . . . . 15
Reconnaissance vocale . . . . . . . . . . . . . . . . . . . . . . . . . . . . . . . . . . . . . . . . . . . . . . . . . 16
Association de deux numéros « Appel par Appel » . . . . . . . . . . . . . . . . . . . . . . . . . . . 17
Liste des numéros Bis . . . . . . . . . . . . . . . . . . . . . . . . . . . . . . . . . . . . . . . . . . . . . . . . . . 17
Répertoire E-mail . . . . . . . . . . . . . . . . . . . . . . . . . . . . . . . . . . . . . . . . . . . . . . . . . . . . . 18
Affichage de l'espace libre . . . . . . . . . . . . . . . . . . . . . . . . . . . . . . . . . . . . . . . . . . . . . . 18
Utiliser plusieurs combinés . . . . . . . . . . . . . . . . . . 19
Double appel interne . . . . . . . . . . . . . . . . . . . . . . . . . . . . . . . . . . . . . . . . . . . . . . . . . . 19
Accepter/refuser un signal d'appel lors d'une communication interne . . . . . . . . . . . . 19
Utiliser le combiné pour la surveillance de pièce . . . . . . . . . . . . . . . . . . . . . . . . . . . . 19
Activer le mode Talkie-Walkie . . . . . . . . . . . . . . . . . . . . . . . . . . . . . . . . . . . . . . . . . . . 21
3
Page 72

Sommaire
Réglage combiné . . . . . . . . . . . . . . . . . . . . . . . . . . . 22
Désactiver/activer le décroché automatique . . . . . . . . . . . . . . . . . . . . . . . . . . . . . . . . 22
Régler le volume d'écoute . . . . . . . . . . . . . . . . . . . . . . . . . . . . . . . . . . . . . . . . . . . . . . 22
Réglage des sonneries . . . . . . . . . . . . . . . . . . . . . . . . . . . . . . . . . . . . . . . . . . . . . . . . . 22
Sound manager (gestion mélodie) . . . . . . . . . . . . . . . . . . . . . . . . . . . . . . . . . . . . . . . 23
Activer/désactiver les tonalités ou bips d'avertissement . . . . . . . . . . . . . . . . . . . . . . . 24
Remettre le combiné en configuration usine . . . . . . . . . . . . . . . . . . . . . . . . . . . . . . . 24
Annexe . . . . . . . . . . . . . . . . . . . . . . . . . . . . . . . . . . . 25
Entretien et contact avec les liquides . . . . . . . . . . . . . . . . . . . . . . . . . . . . . . . . . . . . . 25
Service clients (Customer Care) . . . . . . . . . . . . . . . . . . . . . . . . . . . . . . . . . . . . . . . . . . 25
Caractéristiques techniques . . . . . . . . . . . . . . . . . . . . . . . . . . . . . . . . . . . . . . . . . . . . . 26
Table de caractères . . . . . . . . . . . . . . . . . . . . . . . . . . . . . . . . . . . . . . . . . . . . . . . . . . . . 27
Saisie assistée de texte . . . . . . . . . . . . . . . . . . . . . . . . . . . . . . . . . . . . . . . . . . . . . . . . . 28
Interface PC . . . . . . . . . . . . . . . . . . . . . . . . . . . . . . . . . . . . . . . . . . . . . . . . . . . . . . . . . 29
Jeu « Balloon Shooter » . . . . . . . . . . . . . . . . . . . . . . . . . . . . . . . . . . . . . . . . . . . . . . . . 30
Certificat de garantie France . . . . . . . . . . . . . . . . . . . . . . . . . . . . . . . . . . . . . . . . . . . . 31
Certificat de garantie Belgique . . . . . . . . . . . . . . . . . . . . . . . . . . . . . . . . . . . . . . . . . . 33
Garantie Suisse . . . . . . . . . . . . . . . . . . . . . . . . . . . . . . . . . . . . . . . . . . . . . . . . . . . . . . . 33
Index . . . . . . . . . . . . . . . . . . . . . . . . . . . . . . . . . . . . . 34
4
Page 73

Consignes de sécurité
Consignes de sécurité
Utilisez exclusivement le bloc-secteur fourni (comme indiqué sous le support
$
chargeur).
Utiliser uniquement le modèle de batterie homologué (rechargeable)
(p. 26). Ne jamais utiliser des piles normales (non rechargeables), qui peuvent
endommager l'appareil et représenter un risque pour la santé ou occasionner
des blessures.
‹
Positionner correctement la batterie rechargeable (comme décrit p. 6).
N'utiliser que le et utiliser le type de batterie recommandé dans ce manuel
Œ
d'utilisation.
Le combiné peut perturber le fonctionnement de certains équipements
médicaux. Tenir compte des recommandations émises à ce sujet par le corps
médical.
Le combiné peut provoquer un bourdonnement désagréable dans les aides
auditives.
Le combiné n'est pas étanche aux projections d'eau (p. 25).
!
Ne pas téléphoner en conduisant (fonction Talkie-Walkie).
Éteignez le téléphone pendant que vous êtes en avion (fonction TalkieWalkie). S'assurer que le téléphone ne peut pas être mis en marche
involontairement.
Ne pas utiliser le téléphone dans un environnement présentant un risque
d'explosion (par exemple ateliers industriels de peinture).
Lorsque vous confiez votre Gigaset à un tiers, toujours joindre le mode
ƒ
d'emploi.
Bien respecter les règles concernant la protection de l'environnement lorsque
vous mettez au rebut le téléphone et la batterie. Ne pas jeter cette dernière au
feu, ni l' ouvrir ou la mettre en court-circuit.
i
Toutes les fonctions décrites dans ce mode d'emploi ne sont pas
nécessairement disponibles dans tous les pays.
5
Page 74

Préparer le téléphone
Préparer le téléphone
L'emballage contient les éléments suivants :
Un combiné SL 1, un support chargeur et son bloc secteur, un clip ceinture pour le
combiné, une batterie, un manuel d'utilisation.
Mettre en service le combiné
L’écran est protégé par un film. Retirer le film de protection
Insérer la batterie
◆ Placer la batterie en respectant le sens(voir schéma de gauche)
◆ Positionner le couvercle en le décalant de 3 mm environ vers le bas puis pousser
vers le haut jusqu'à ce qu'il s'enclipse,
◆ Pour ouvrir le couvercle, appuyer sur le cercle en creux et pousser vers le bas.
Utiliser uniquement la batterie homologuée par Siemens à la p. 26.
Autrement dit, ne jamais utiliser de piles traditionnelles (non
W
rechargeables) ou d'autres types de batteries, susceptibles de nuire à la
santé et de causer des dégâts corporels. Par exemple, l'enveloppe des
piles ou de la batterie peut se désagréger (dangereux). De la même
manière, l'appareil peut subir des dysfonctionnements et des dommages.
Charger la batterie
Placez votre combiné sur le chargeur avec l'écran orienté vers le haut. Pour charger la
batterie, laisser le combiné sur le chargeur. La batterie n'est pas chargée à la livraison.
Le chargement de la batterie est signalé en haut à droite de l'écran par le clignotement
du témoin de charge =.
Il est recommandé la première fois de charger la batterie pendant cinq
W
Le niveau de charge de la batterie n’est indiqué avec précision qu’à la suite d’un cycle
charge/décharge ininterrompu. En conséquence, vous ne devez pas retirer inutilement
la batterie et interrompre la charge avant son terme.
heures sans interruption, sans tenir compte des indications s'affichant sur
l'écran. La capacité de charge de la batterie diminue pour des raisons
techniques après quelque temps.
6
Page 75

Préparer le téléphone
◆ Une fois la première charge effectuée, vous pouvez reposer votre
combiné sur le chargeur après une communication. La charge est
i
contrôlée électroniquement. La batterie est ainsi ménagée durant la
charge.
◆ La batterie s’échauffe durant la charge ; il s’agit d’un phénomène
normal et sans danger.
Déclaration
Avant de pouvoir utiliser votre Gigaset SL 1, vous devez procéder à sa déclaration
manuelle. Vous devez activer la déclaration du combiné au niveau du combiné et de la
base.
1. Sur le combiné
v
[______________________________________________]
s Réglages comb.
[______________________________________________]
s Inscrire comb.
[______________________________________________]
s Base 1
OK
Une fois le code PIN système entré, le message Base 1, par exemple, clignote à l'écran.
Ouvrir le menu.
Sélectionner et valider.
OK
Sélectionner et valider.
OK
Sélectionner la base (1 à 4) et valider, par exemple
OK
Base 1.
Entrer le code PIN système de la base (configuration
usine : 0000) et valider.
2. Au niveau de la base
Reportez-vous au manuel d'utilisation de la base pour savoir comment déclarer le
combiné sur la base.
Modifier la langue d’affichage
Le texte peut s'afficher à l'écran dans différentes langues.
v
[______________________________________________]
s Réglages comb.
[______________________________________________]
s Langue
OK
s Sélectionner une langue et valider.
a
Ouvrir le menu.
Sélectionner et valider.
OK
Sélectionner et valider. La langue en cours est
OK
signalée par ‰ (configuration usine : Anglais.
Appuyer de manière prolongée (retour au mode
repos).
Vous avez malencontreusement défini la mauvaise langue (et ce qui s'affiche reste
incompréhensible) :
Appuyer sur v M 2, sélectionner la langue avec s puis appuyer sur pour
valider.
OK
7
Page 76

Préparer le téléphone
Sélectionner la base
Si votre combiné est déclaré sur plusieurs bases, vous pouvez l'associer à une base
donnée ou à celle offrant la meilleure qualité de réception (Meilleure base).
v s Réglages comb. s Sélect. Base ;
s (sélectionner la base déclarée ou Meilleure base) .
Fixer le clip ceinture
Combiné : allumer/éteindre
Pour allumer : appuyer sur la touche Raccrocher a de manière prolongée.
Pour éteindre : appuyer de nouveau sur la touche Raccrocher a de manière
prolongée lorsque le téléphone est en repos.
Lorsque vous placez le combiné sur le chargeur, il s'allume automatiquement..
Verrouillage du clavier
OK OK
OK
Placer le clip ceinture à l’arrière du
combiné et appuyer jusqu’à ce que
les « ergots » disposés latéralement
s’enclipsent dans les trous.
Appuyer de manière prolongée sur la touche R (l' écran affiche le symbole Ø).
Pour déverrouiller : Appuyer de nouveau de manière prolongée sur la touche R.
Le verrouillage clavier se désactive automatiquement lorsque vous recevez un appel.
Il se réactive à nouveau à la fin de la communication.
i
Lorsque le verrouillage clavier est activé, les numéros d'appel d'urgence
ne sont pas non plus accessibles.
8
Page 77

Manipulation du téléphone et de ses menus
Manipulation du téléphone et de ses menus
Touches
Touche de navigation
La touche de navigation comporte quatre flèches de direction de couleur noire ainsi que
les symboles correspondants. En fonction de l'indication sur laquelle vous pressez, la
fonction particulière est appelée. Dans le mode d'emploi, le côté sur lequel vous devez
presser est marqué par un triangle noir, par exemple : touche v pour le côté
droit = Ouvrir le menu.
La touche de navigation vous permet également d'exécuter les fonctions de la touche
écran de droite.
Exemple :
Touche de navigation
Différentes fonctions de la touche de navigation :
À l'état de repos Dans les listes et les menus Dans un champ de saisie
Activer la reconnaissance
t
vocale
(appui prolongé)
Ouvrir le répertoire principal Feuilleter vers le bas Faire descendre le curseur
s
Ouvrir le menu Ouvrir l'entrée sélectionnée
v
Liste des combinés
u
accessibles
Feuilleter vers le haut Faire remonter le curseur
(comme )
Remonter d'un niveau de
menu ou annuler
OK
d'une ligne
d'une ligne
Déplacer le curseur vers la
droite
Déplacer le curseur vers la
gauche
Touches écran
Les touches écran sont les touches à bascule horizontales situées directement sous
l'écran. Leur fonction varie selon le contexte d'utilisation. La fonction en cours est
affichée à l'écran, juste au-dessus.
Exemple :
• §§§§§§§SMS§§§§§§
Tou ches écr an
9
Page 78

Manipulation du téléphone et de ses menus
La signification des icônes est la suivante :
Þ
OK
à
f
C
Ý
ä
Touche de répétition de la numérotation (Bis) : la liste des 10 derniers numéros
appelés s'affiche.
Touche OK : activer la fonction du menu ou enregistrer l'entrée en la validant.
Touche Menu : à l'état de repos, afficher le menu principal.
En cours de communication, ouvrir un menu contextuel.
Touche Effacer : effacer les entrées de la droite vers la gauche, caractère par
caractère.
Touche Échapper : revenir au niveau de menu précédent ou annuler l'opération.
Ouverture de l'annuaire E-Mail.
Retour à l'état de repos depuis n'importe quel niveau du menu
Appuyer sur la touche Raccrocher a pendant 1 seconde environ ou n'appuyer sur
aucune touche.
L'écran revient automatiquement à l'état de repos après 2 minutes. Les modifications
OK OK
qui n'ont pas été validés à l'aide des touches ,
Oui, Sauver, Envoi ou Sauvegarder
sont perdues.
Menu principal
Pour ouvrir, lorsque le téléphone est à l'état de repos, presser sur le côté droit de la
touche de navigation
SMS / MiniMsg.
1
SVC réseau
2
Famille/Loisirs
3
RDV/Heure
4
Sons / Audio
5
Coûts
6
Réglages comb.
7
Réglages base
8
Répondeur
9
v et utiliser s pour naviguer jusqu'à l'entrée souhaitée.
Les options proposées dans les menus
dépendent de votre base.
10
Page 79

Date / Heure / Réveil / RdV
Date / Heure / Réveil / RdV
Régler la date et l'heure
Le réglage de la date et de l’heure est nécessaire pour indiquer précisément l’heure
d’arrivée des appels.
v ; s RDV/Heure ; s Date/Heure ; ~ (entrer le jour, le mois et l'année) ;
s (à la ligne suivante) ~ (entrer l'heure et les minutes) ; s (éventuellement à la
ligne suivante) r (sélectionner le mode 12 ou 24 heures) ;
repos).
Si vous avez choisi le mode d'affichage 12 heures, vous pouvez utiliser la touche écran
am/pm, pour sélectionner les heures du matin (am) ou de l'après-midi (pm).
Réveil / Alarme
Préalable : Il est nécessaire d’avoir réglé au préalable la date et l’heure (p. 11).
Activer et régler le réveil
OK OK
Sauver, a (retour à l'état de
vs RDV/Heure ; s Réveil/Alarme ; r (sélectionner Act.);
s ~ (entrer l'heure de réveil
Si vous avez choisi le mode d'affichage 12 heures, vous pouvez utiliser la touche écran
am/pm à la ligne Heure:, pour passer du mode d'affichage am à pm.
Le réveil ne sonne que si le combiné est à l'état de r epos. Il ne sonne pas si la surveillance
de pièce ou si le mode Talkie-Walkie est activé, pendant une conversation ou pendant
une opération de rappel automatique.
Reportez-vous à la p. 22 pour le réglage de la sonnerie (volume et mélodie).
OK OK
); Sauver ; a (retour à l'état de repos).
Désactiver la fonction de réveil
Le réveil est réglé sur une heure particulière mais il ne doit pas sonner.
RDV/Heure ; s Réveil/Alarme .; r (sélectionner Dés.); Sauver ;
vs
a (retour à l'état de repos).
OK OK
Arrêt du réveil
Appuyer sur la touche écran Silence ou sur une touche quelconque.
Rendez-vous (RdV)
Vous pouvez créer jusqu'à cinq rendez-vous, qui vous seront rappelés depuis votre
combiné.
Activer et régler le rendez-vous
v; s RDV/Heure ; Entrer RDV ; s Rendez-vous 2 (exemple) ;
r (sélectionner Act.); s ~ (entrer le jour et le mois
minutes
Un rendez-vous paramétré est marqué par le symbole ¼.
); s Modifier ; ~ (entrer le nom) ; Sauver ; a (retour à l'état de repos).
OK OK OK
); s ~ (entrer l'heure et les
OK
11
Page 80

Téléphoner
La sonnerie rendez-vous ne sonne que si le combiné est à l'état de repos. Elle ne sonne
pas si la surveillance de pièce ou si le mode Talkie-Walkie est activé, pendant une
conversation ou pendant une opération de rappel automatique.
Si vous avez choisi le mode d'affichage 12 heures, vous pouvez utiliser la touche écran
am/pm à la ligne Heure:, pour passer du mode d'affichage am à pm.
Reportez-vous à la p. 22 pour le réglage de la sonnerie (volume et mélodie).
Arrêt de la sonnerie rendez-vous
Lorsque vous recevez un signal de rendez-vous, vous pouvez le désactiver à l'aide de la
touche écran
Silence.
Dates échues
Afficher et effacer les rendez-vous et les dates anniversaires non acquittés à échéance.
RDV/Heure ; s Dates échues ; s sélectionner le rendez-vous ou la
vs
date anniversaire.
[RRRRRRRRRRRRRRRRRRRRRR]
Effacer
... ensuite
a
Un rendez-vous dépassé est identifié par ¼, une date anniversaire arrivée à échéance
est identifiée par ‚.
OK OK
Presser sur la touche écran.
Appuyer de manière prolongée (retour à l'état de
repos).
Téléphoner
Effectuer un appel externe et terminer la communication
~ (entrer le numéro d'appel), c (ou vice versa).
Mettre fin à la communication/interruption de la numérotation : a (touche
Raccrocher).
Pause interchiffre
Vous pouvez insérer une pause interchiffre entre le préfixe et le numéro d'appel.
Pour ce faire, pressez pendant 2 secondes environ sur la touche S. Composer ensuite
le numéro.
Effectuer un appel interne et terminer la communication
Les communications entre combinés déclarés sur la même base sont gratuites.
Appeler un combiné en particulier
us (sélectionner le combiné) ; Presser sur la touche c.
Ou : presser sur u2 (exemple).
Pour mettre fin à la communication : presser sur la touche
12
a (touche Raccrocher).
Page 81

Téléphoner
Appeler tous les combinés en même temps (« appel général »)
u appuyer sur la touche c ou sur sur la touche Etoile P.
Pour mettre fin à la communication : presser sur la touche
a (touche Raccrocher).
Accepter un appel entrant
Votre combiné sonne, l'appel entrant s'affiche à l'écran et la touche d clignote.
Appuyer sur la touche Décrocher (ou sur la touche écran
c
Mains-libres d).
Lorsque la fonction Décroché auto. est activée (p. 22), il vous suffit de prendre le
prendre le combiné de son chargeur afin de prendre l'appel.
Si vous êtes gêné par la sonnerie, pressez sur la touche écran Silence. Vous pouvez
prendre l'appel tant qu'il est visible à l'écran.
Accept. ou ou la touche
Mains-libres
Activer/désactiver le mode Mains-libres
Avant de composer : ~ (entrer le numéro) ; appuyer sur la touche d (Mains-libres).
Lorsque vous êtes en communication : appuyer sur la touche
Pour reprendre la communication à l'écouteur : appuyer sur la touche « Décrocher »
c.
Si vous souhaitez reposer le combiné sur sa base sans interrompre la communication,
maintenez la touche Mains-libres
enfoncée tout en reposant le combiné.
d
d (Mains-libres).
i
Avant d’activer la fonction Mains-libres, vous devez en avertir votre
correspondant.
Régler le volume pendant une conversation en mode Mains-libres
Vous êtes en communication, le mode Mains-libres d est activé ; appuyer à nouveau
sur la touche Mains-libres d ; r augmenter ou diminuer le volume ;
Sauver.
Secret microphone
. La communication est « suspendue » (musique d'attente).
u
Pour reprendre la communication : presser sur la touche écran .
Ý
13
Page 82

Utilisation des répertoires et autres listes
Utilisation des répertoires et autres listes
Répertoires principal et secondaire
Les répertoires principal et secondaire se partagent une capacité de 200 fiches.
Le répertoire principal est appelé à l'aide de la touche s. Il est possible d'associer à
chaque fiche un jour anniversaire et le statut « VIP ».
Le répertoire secondaire est une liste spéciale dans laquelle vous pouvez enregistrer
des numéros particulièrement importants, tels que des numéros de téléphone
personnels, des préfixes ou numéros de services par exemple. Le répertoire secondaire
est appelé à l'aide de la touche C.
Les deux répertoires s'utilisent de la même manière, hormis l'enregistrement des
entrées.
◆ L'aide à la saisie de texte EATONI (p. 28, désactivée en configuration usine) facilite
l'entrée de noms.
◆ Pour savoir comment effectuer la saisie de texte, reportez-vous au tableau des
caractères (p. 27).
◆ Vous pouvez entrer jusqu'à 32 chiffres pour un numéro et 16 lettres pour un nom.
◆ Lors de la saisie des numéros, vous pouvez utiliser , s Insérer pause ou
maintenir pendant 2 secondes la touche S appuyée pour ajouter la pause
correspondante.
Enregistrer un fiche dans le répertoire principal
à OK
s (ouvrir le répertoire) ; Nouvelle entrée ~ (entrer le numéro) ;
s (à la ligne suivante) ; ~ (entrer le nom) ; (ouvrir le menu),
(pour associer une date anniversaire, après avoir entré le nom : presser sur s pour
passer à la ligne Annivers.:, presser sur la touche écran
anniversaire puis l'heure, choisir la mélodie ou le visuel pour le rappel. Sauvegarder les
données en appuyant sur
de repos).
Pour supprimer une date anniversaire dans le champ correspondant d'une fiche
répertoire, appuyer sur la touche
l'écran suivant, puis sur
Rappel de date anniversaire
Un rappel de date anniversaire utilise la mélodie que vous avez choisie. L'écran affiche
les fiches répertoire concernées avec le symbole ‚ ‚ ‚.
Si votre téléphone est connecté à un autocommutateur privé, vous devez
i
éventuellement spécifier le préfixe afin de le faire apparaître au début de
l'entrée de l'annuaire.
Sauver) ; appuyer sur a de manière prolongée (retour à l'état
Modifier de l'écran ; appuyer ensuite sur Effacer sur
Sauver sur le dernier écran.
OK
à OK
Modifier, entrer la date
Sauvegarder ;
14
Page 83

Utilisation des répertoires et autres listes
Enregistrer une fiche du répertoire secondaire
Pour un accès rapide, un raccourci clavier (touches 0, 2 à 9) peut être affecté à neuf des
entrées du répertoire secondaire.
Maintenir un appui long sur la touche de raccourci puis décrocher avec la touche c,
pour appeler. Vous êtes immédiatement en communication avec le numéro affecté à la
touche en question.
C (ouvrir le répertoire secondaire) ;
Nouvelle entrée ~ (entrer le numéro) ;
s (à la ligne suivante) ; ~ (entrer le nom) ; (ouvrir le menu) ;
Sauvegarder ;
OK
OK
à
(Pour en plus affecter un raccourci clavier, après avoir entré le nom : presser sur s pour
passer à la ligne Touche:, presser sur r pour entrer un chiffre [0, 2–9] correspondant
à la touche de raccourci choisie, puis sauvegarder avec
Sauver) ; appuyer sur a de
manière prolongée (retour à l'état de repos).
Vous ne pouvez pas affecter deux fois le même touche.
Composer un numéro à partir de l'un des répertoires
presser sur s ou sur C (ouvrir le répertoire principal ou secondaire) ;
s (sélectionner l'entrée) ; c.
Gérer les entrées des répertoires
Pour utiliser l'une de ces fonctions, sélectionner une fiche de l'un des répertoires puis
presser sur s
Presser sur s
pour ouvrir le menu contextuel.
pour naviguer jusqu'à la fonction choisie.
Utiliser le No
Modifier entrée
Effacer entrée
Entrer comme VIP Valable uniquement pour le
Copier et modif. Valable uniquement pour le
Copier entrée
Effacer liste
Copier liste
Mémoire dispo.
répertoire principal (
répertoire principal (
s
s
)
)
Après avoir sélectionné une entrée, presser sur la touche Afficher pour visualiser l'entrée,
puis sur
Modifier pour la modifier.
Les fonctions « Comme VIP » et « Copier et modifier »
Vous pouvez marquer comme VIP (Very Important Person) les fiches importantes du
répertoire principal en leur attribuant une mélodie particulière. La mélodie de sonnerie
vous permet alors de savoir qui vous appelle.
Condition : le service "Présentation du numéro" a été souscrit..
Pour éviter de devoir saisir deux fois une même entrée, vous pouvez en réaliser une
copie, puis modifier cette entrée.
15
Page 84

Utilisation des répertoires et autres listes
Copier une ou toutes les fiches entre combinés
Vous pouvez transférer des fiches ou le répertoire complet à un autre combiné SL 1, S1,
C2 ou Comfort déclaré sur la même base Gigaset. Les commandes vocales enregistrées
et les raccourcis clavier ne sont pas transmis. La transmission des paramètres VIP est
dépendante du combiné.
Presser sur s ou sur C (ouvrir le répertoire principal ou secondaire) ; s (sélectionner
l'entrée) ; v (ouvrir le menu) ; s
Copier entrée ou s Copier liste );
~ (saisir le numéro interne du combiné destinataire) ; .
OK OK
OK
Vous pouvez sélectionner d'autres entrées aussi longtemps que vous validez avec la
touche écran
Oui. La touche écran Non permet de mettre fin à l'envoi.
Reconnaissance vocale
La reconnaissance vocale permet de composer un numéro en prononçant le nom de
l'interlocuteur. Vous devez à cet effet enregistrer un modèle vocal pour chaque fiche
concernée, c'est-à-dire enregistrer dans le combiné le nom énoncé.
Quatre utilisateurs au maximum peuvent enregistrer un modèle vocal pour une même
fiche. L'utilisateur doit s'identifier avant l'enregistrement, par exemple comme
Utilisateur 2.
Il est possible d'enregistrer au total 23 modèles vocaux. Une fiche assortie d'un modèle
vocal est marquée dans le répertoire vocal par un ´.
Enregistrement de modèles vocaux associés à une fiche du répertoire
principal
Enregistrez votre modèle vocal dans un environnement silencieux (à une distance de 25
cm environ).
Etape 1 : le répertoire vocal :
s (ouvrir le répertoire principal) ; s(sélectionner l'entrée) ;
(par exemple) .
OK
R.Vocale ; s Utilisateur 2
Etape 2 : commencer l'enregistrement :
OK
Enreg. ; (Valider le message à l'écran). Énoncer le nom après y avoir été invité sur
l'écran et par un Bip. Répétez le nom après y avoir été invité une nouvelle fois sur écran
et par un nouveau Bip. Il est automatiquement enregistré.
appuyer sur a de manière prolongée (retour à l'état de repos).
Si votre modèle vocal est trop semblable à celui d'un autre utilisateur, un message vous
en informe. Fermez ce message en pressant sur , revenez au début de
Ý
l'enregistrement vocal et recommencez l'enregistrement.
Numéroter en utilisant la reconnaissance vocale : presser sur la touche t de manière
prolongée et énoncer le nom après y avoir été invité par un Bip.
16
Page 85

Utilisation des répertoires et autres listes
Annonce du nom de l'appelant
Chaque fois qu'un appel externe entre, vous pouvez également faire annoncer une fois
le nom de l'appelant parallèlement à la sonnerie.
Préalables : présentation du numéro. Enregistrement d'un modèle vocal pour ce nom
(p. 16).
Activer/désactiver l'annonce du nom
v (ouvrir le menu) ; s
OK
; presser 2 x sur s (deux lignes plus loin) ; r (Annonc.nom) activer/désactiver ;
Sauver ; appuyer sur a de manière prolongée (retour à l'état de repos).
Sons / Audio ; s Régl.sonnerie ; Appels externes
OK
OK
Écouter les modèles vocaux
Ouvrir le répertoire pour la reconnaissance vocale (voir Étape 1, p. 16). Ensuite :
s (sélectionner l'entrée) ;
l'état de repos).
Ecouter ; appuyer sur a de manière prolongée (retour à
Ré-enregistrer ou effacer un modèle vocal
Ouvrir le répertoire pour la reconnaissance vocale (voir étape 1, p. 16). Ensuite :
s (sélectionner l'entrée) ; v(ouvrir le menu) ;
Effac. modèle ; appuyer sur a de manière prolongée (retour à l'état de repos).
s
Lorsqu'une entrée a été supprimée, le numéro et le nom sont conservés. De même, les
modèles vocaux d'autres utilisateurs restent présents.
OK
Enreg. modèle ou
OK
Modification du nom de l'utilisateur
s (ouvrir le répertoire principal) ; s (sélectionner l'entrée) ; R.Vocale ; s Utilisateur 2
(par exemple) ; Modifier ; ~ (entrer le nom) Sauver ; appuyer sur a de manière
prolongée
(retour à l'état de repos).
Association de deux numéros « Appel par Appel »
Cette fonction permet, par exemple, d'insérer un préfixe, enregistré dans le répertoire
secondaire, devant le numéro à appeler (association de préfixe et numéro).
C (ouvrir le répertoire secondaire) ; s (sélectionner l'entrée) ; (ouvrir le
menu) ;
l'entrée) ; ;
ou
Utiliser le No ; s (ouvrir le répertoire principal) ; s (sélectionner
OK
~ entrer le numéro ; c.
OK
à
Liste des numéros Bis
La liste des numéros Bis contient les dix derniers numéros appelés.
Répétition manuelle de la numérotation
Þ (ouvrir la liste des numéros Bis) ; s (sélectionner l'entrée) ; c.
17
Page 86

Utilisation des répertoires et autres listes
Rappel automatique du dernier numéro
Cette fonction permet de rappeler automatiquement le numéro à un intervalle de
20 secondes. Le correspondant répond : Appuyer sur la touche Décrocher c. Au bout
de 30 secondes sans réponse, l'appel est interrompu. La fonction se désactive après
10 tentatives infructueuses.
a presser sur la touche Raccrocher ; • (ouvrir la liste des numéros Bis) ;
v (ouvrir le menu) ; Renumérot.Auto. .
Interrompre le rappel automatique : Appuyer sur la touche écran Arrêt ou sur une
touche quelconque.
OK
Gérer les entrées de la liste des numéros Bis
Vous pouvez utiliser les fonctions du menu indiquées ci-après : • (afficher la liste
des numéros/noms Bis) ;
s (sélectionner l'entrée) ; v (ouvrir le menu) ;
s (sélectionner une fonction).
Renumérot.Auto.
Utiliser le No
No.vers répert.
Effacer entrée
Effacer liste
Répertoire E-mail
La partition E-Mail du répertoire principal vous permet d'enregistrer des adresses E-Mail.
Vous pouvez enregistrer jusqu'à 200 fiches pour l'ensemble des répertoires principal, EMail et secondaire.
La gestion des entrées du répertoire E-Mail est analogue à celle des entrées des autres
répertoires p. 15.
Enregistrement d'une nouvelle adresse E-Mail
Etape 1 : Ouverture du répertoire E-Mail : s (ouvrir le répertoire principal) s
<Répert. e-mail> .
Etape 2 : Création d'une adresse E-Mail :
~ (entrer une adresse) ; (ouvrir le menu pour sélectionner éventuellement s,
« . », « @ » ou la fonction de saisie assistée de texte ). Lorsque l'aide à la saisie du
texte est activée, pour saisir le caractère @ appuyer sur
OK
à
Nouvelle entrée ;
OK
OK
R 1 x longuement et 1 x
brièvement.
Etape 3 : Enregistrement d'une adresse E-Mail :
à OK
(ouvrir le menu) ; Sauvegarder ; Appuyer sur a de manière prolongée
(retour à l'état de repos).
Après avoir sélectionné une entrée, presser sur la touche écran
Afficher, puis sur Modifier
pour corriger une adresse existante. Enregistrez l'entrée, comme indiqué à l'étape 3.
Affichage de l'espace libre
L'espace de stockage se répartit entre les différents répertoires. Vous pouvez voir à
l'écran l'espace de stockage restant pour toutes les listes.
s (ouvrir le répertoire principal) ; s
Mémoire dispo. ; Appuyer sur a de manière prolongée (retour à l'état de repos).
OK
18
(sélectionner l'entrée) ; v (ouvrir le menu) ; s
Page 87

Utiliser plusieurs combinés
Utiliser plusieurs combinés
Transfert de l’appel vers un autre combiné
Vous êtes en communication avec un correspondant externe:
u (ouvrir la liste des combinés) ; s (sélectionner un combiné ou Appel général);
OK
.
Avant ou après que le correspondant interne ne réponde: presser sur la touche a
(touche Raccrocher).
Si le correspondant interne ne répond pas ou est occupé, l'appel vous est
automatiquement renvoyé (Retour d'appel s'affiche à l'écran).
Double appel interne
Lors d'une communication externe, vous pouvez passer un appel interne.
u (ouvrir la liste des combinés) ; s (sélectionner le combiné), .
Pour mettre fin à la communication : presser sur la touche écran
correspondant externe).
Accepter/refuser un signal d'appel lors d'une communication
interne
Si vous recevez un appel externe alors que vous êtes en communication interne, un
signal d’appel (bip court) retentit. Appuyer sur la touche écran
Le signal d'appel refusé reste audible sur les autres combinés déclarés.
OK
Fin (retour au
Accept. ou sur Refuser.
Utiliser le combiné pour la surveillance de pièce
Cette fonction appelle un numéro interne ou externe préalablement programmé dès
que le niveau sonore réglé est atteint dans la pièce. La fonction Surveillance de pièce
reste active sur le combiné même après avoir raccroché.
La surveillance de pièce est limitée à l'environnement immédiat du combiné placé en
surveillance.
Lorsque la fonction Surveillance de pièce est activée, les appels entrants destinés au
combiné qui se trouve en surveillance sont uniquement signalés à l’écran,sans
sonnerie. L'écran et le clavier ne sont pas éclairés.
Dans le cas d'un numéro externe, veillez à ce que le poste vers lequel est transféré
l’appel de surveillance de pièce ne soit pas bloqué par un répondeur activé.
◆ Si la fonction Surveillance de pièce appelle un numéro externe, le propriétaire de ce
numéro doit en être averti.
◆ L'appel Surveillance de pièce vers un numéro externe s'interrompt au bout de 90
secondes environ. Le délai est de 180 secondes environ pour un appel vers un
numéro interne (combiné) (en fonction de la base).
Il faut impérativement vérifier le paramétrage du combiné de
W
surveillance de pièce avant de partir, notamment la sensibilité et
l’établissement de la communication.
19
Page 88

Utiliser plusieurs combinés
L’autonomie du combiné est considérablement réduite lorsque la
fonction Surveillance de pièce est activée. Placez le combiné, laissé en
i
surveillance, dans son chargeur, de manière à éviter que la batterie ne se
vide.
La fonction surveillance de pièce peut également être réalisée en mode
Tal kie-Wa lki e.
Activer la fonction de surveillance de pièce et première saisie du numéro
à appeler
Etape 1 : accéder à la fonction : v; s Famille/Loisirs ; Surveill. Pièce
Etape 2 : activer la surveillance de pièce : r (ligne Activation: sélectionner Act.)
Etape 3 : saisir le numéro cible : s (à la ligne suivante) ;
Entrer le numéro Interne du combiné destinataire : INT s (sélectionner le
combiné) ou :
Entrer le numéro externe : ~; (ouvrir le menu) ;
Etape 4 : Paramétrer la sensibilité : s (à la ligne suivante) ; r (faible ou
élevée) ; Sauver
La fonction surveillance de pièce est à présent activée.
Lorsque la surveillance de pièce est activée, pressez sur v (Menu Ouvrir) pour accéder
directement au réglage de la surveillance de pièce.
OK
à OK
OK OK
Modifier
Sauvegarder .
Désactivation de la surveillance de pièce
La surveillance de pièce peut être désactivée à distance (en fonction de la base).
Prendre l'appel déclenché par la fonction surveillance de pièce et presser sur les touches
O R. La fonction est désactivée environ 90 secondes après la fin de la
communication. La surveillance de pièce ne produira plus d'appel. Les autres fonctions
de surveillance de pièce accessibles sur le combiné (par exemple, l'absence de sonnerie)
restent activées jusqu'à ce vous ayez pressé sur la touche écran
Pour réactiver la fonction surveillance de pièce avec le même numéro,
i
vous devez réinitialiser l'activation et l'enregistrer à l'aide de la fonction
Sauver.
Dés. du combiné.
20
Page 89

Utiliser plusieurs combinés
Activer le mode Talkie-Walkie
La fonction Talkie-Walkie permet à deux combinés de communiquer entre eux (avec une
portée de 300 m maximale), indépendamment de leur éloignement par rapport à la
base.
Préalable :
◆ les deux combinés ont été déclarés sur la même base (recommandé pour la fonction
surveillance de pièce) ou
◆ les deux combinés ont été déclarés sur des bases différentes et sont paramétrés sur
Meilleure base (p. 8) ou
◆ l’un des combinés n’est déclaré sur aucune base et le combiné déclaré est paramétré
sur Meilleure base ou
◆ les deux combinés n’ont été déclarés sur aucune base.
En mode Talkie-Walkie, les combinés ne peuvent plus recevoir d’appels entrants.
L’autonomie des combinés est considérablement réduite.
Activer/désactiver le mode Talkie-Walkie
v (ouvrir le menu) ; s Famille/Loisirs ; s Talkie-Walkie .
Désactiver : presser sur la touche écran Arrêt.
Presser sur la touche Décrocher c (ou la touche écran ou la touche Mains-libres d).
L'appel du combiné est émis vers l'ensemble des combinés ayant activé le mode TalkieWalkie. Le réglage du volume du haut-parleur et des bips d'avertissement s’effectue en
suivant exactement la même procédure que si vos combinés étaient en contact avec la
base (p. 22). Il n'est pas possible de régler les bips d'avertissement en mode TalkieWalkie.
Il est possible d'activer/désactiver la sonnerie (p. 23) ou le verrouillage clavier (p. 8) en
mode Talkie-Walkie.
Pour ouvrir le menu, pressez sur la touche écran ©.
i
Le mode Talkie-Walkie reste activé même après avoir éteint, puis rallumé
le combiné.
OK OK
Utiliser le combiné en mode Talkie-Walkie pour la surveillance de pièce
à OK
(ouvrir le menu) ; s Surveill. Pièce ; r (sélectionner Ma.);
s (à la ligne suivante) ; r (sélectionner Faible ou Elevée);
L'appel du combiné surveillance de pièce est émis uniquement vers les combinés ayant
activé le mode Talkie-Walkie.
Il faut impérativement vérifier le paramétrage du combiné de
W
surveillance de pièce avant de partir, notamment la sensibilité et
l’établissement de la communication. La distance entre les combinés
ne devrait plus, par la suite, être changée (portée).
Sauver.
Pressez sur la touche écran Dés. sur le combiné pour la surveillance de pièce afin de le
désactiver. Le combiné revient en mode Talkie-Walkie normal.
21
Page 90

Réglage combiné
Réglage combiné
Désactiver/activer le décroché automatique
Si vous avez activé cette fonction, prenez simplement le combiné sur le chargeur
lorsque vous recevez un appel, sans presser sur la touche Décrocher (réglage usine :
activé).
v (ouvrir le menu) ; s
appuyer sur a de manière prolongée (retour à l'état de repos).
Réglages comb. ; Décroché auto. (‰ = activé) ;
Régler le volume d'écoute
Vous disposez de cinq niveaux de réglage pour le mode Mains-libres, de trois niveaux de
réglage pour le volume de l'écouteur– même pendant une communication externe.
v (ouvrir le menu) ; s Sons / Audio ; Volume écoute ; r (sélectionner
le volume du mode Mains libres) ; s (à la ligne suivante) r (sélectionner le volume
de l'écouteur) ;
Sauver ; appuyer sur a de manière prolongée (retour à l'état de repos).
Réglage des sonneries
Vous avez le choix entre six volumes et 26 mélodies (dont 16 polyphoniques). Les
sonneries polyphoniques ne sont disponibles que si elles ont été auparavant
enregistrées avec le Sound Manager (voir p. 23) ou par le biais de l'interface ordinateur
PC (voir p. 29).
Réglage de la tonalité
OK OK
OK OK
Vous avez la possibilité d'augmenter la qualité audio des mélodies longues (4-10).
v (ouvrir le menu) ; s
appuyer sur a de manière prolongée (retour à l'état de repos).
Sons / Audio ; s Sonn. avec echo (‰ = activé) ;
OK OK
Réglage pour les appels externes et selon plage horaire
v (ouvrir le menu) ; s Sons / Audio ; s Régl.sonnerie ;
OK
Appels externes
r (sélectionner la mélodie) ; s (éventuellement à la ligne suivante) ;
r (activer l'annonce du nom, p. 17).
Volume différent pour une plage horaire
Sélectionner SV Nuit ; r (sélectionner SVC nuit: Act.); s passer à la ligne De: (début
de la plage horaire); s passer à la ligne A: (fin de la plage horaire) ; s r (définition
du volume de la sonnerie) ;
(enregistrer le réglage) ; appuyer sur a de manière prolongée (retour à l'état de
repos).
; r (sélectionner le volume) ; s (à la ligne suivante) ;
Sauver (enregistrement du réglage horaire) ; répéter Sauver
OK OK
22
Page 91

Réglage combiné
Réglages spécifiques pour les appels internes, le réveil et les rendez-vous
v (ouvrir le menu) ; s Sons / Audio ; s Régl.sonnerie ;
s (sélectionner une fonction)
suivante) ; r (sélectionner la mélodie) ;
Tous appels presser sur
prolongée (retour à l'état de repos).
; r (sélectionner le volume) ; s (à la ligne
Oui pour valider le réglage.) ; appuyer sur a de manière
OK OK
OK
Sauver (à effectuer également lors du réglage
Activer/désactiver la sonnerie
En cas d’appel entrant externe, tous les combinés sonnent. Désactiver la sonnerie :
appuyer sur la touche Etoile P de manière prolongée. Le symbole
l'écran.
Activer la sonnerie : appuyer sur la touche Etoile P de manière prolongée.
i
Pour désactiver la sonnerie pour l'appel en court, pressez sur la
touche écran
Silence.
Ú s'affiche à
Sonnerie discrète (Bip)
Un bip retentit lorsque vous désactivez la sonnerie. Un bip court retentit alors à la place
de la sonnerie lors d'un appel.
Maintenir la touche Étoile P longuement appuyée et presser la touche écran
º
dans un délai de 3 secondes. L'écran affiche
Désactiver : appuyer sur la touche P de manière prolongée.
º.
Bip
Vibreur
Les appels entrants et les autres messages sont signalés par le vibreur. Ce réglage est
indépendant du réglage de la sonnerie.
v (ouvrir le menu) ; s
presser sur a de manière prolongée (retour à l'état de repos).
Sons / Audio ; s Vibreur (‰ = activé);
OK OK
Sound manager (gestion mélodie)
Vous pouvez enregistrer des sonneries polyphoniques (d'une durée maximale de
4 secondes) ou les transférer à l'aide d'un câble de transfert depuis votre PC (p. 29).
Vous pouvez enregistrer jusqu'à 16 sonneries.
Enregistrer une sonnerie (via le microphone)
v(ouvrir le menu) ; sSons / Audio ; s Gestion mélodie ;
OK OK
<Nouv.mélodie> ;
microphone et se termine après 4 sec. ou an appuyant sur
(attribuer un nom à la sonnerie) Sauver ;
appuyer sur a de manière prolongée (retour à l'état de repos).
Enregistr.Mélodie? ; l'enregistrement commence via le
OK OK
Fin; Sauver ; Modifier entrée
23
Page 92

Réglage combiné
Ecouter la sonnerie
v (ouvrir le menu) ; s Sons / Audio ; s Gestion mélodie ;
(sélectionner la sonnerie) ; Ecouter ; appuyer sur a de manière prolongée (retour à
s
OK OK
l'état de repos).
Editer l'entrée
v(ouvrir le menu) ; s Sons / Audio ; s Gestion mélodie ;
s
(sélectionner la sonnerie) ; ; Vol ume (Modifier le volume) ou
Modifier entrée (Modifier le nom) ou s Afficher entrée (afficher le nom du
s
fichier) ou s
OK OK
Effacer entrée ; appuyer sur a de manière prolongée (retour à
OK
l'état de repos).
OK OK
à
OK
Activer/désactiver les tonalités ou bips d'avertissement
Votre combiné vous informe, par des signaux sonores (bip), de l'activation des
fonctionnalités et des différents états. Vous pouvez activer/désactiver les tonalités
d'avertissement suivantes, indépendamment les unes des autres (configuration usine :
activé).
◆ Clic clavier (chaque pression sur une touche est confirmée),
◆ Tonalités de validation (tonalité de validation, tonalité d'erreur, tonalité de fin de
menu),
◆ Tonalité d'alarme batteries.
v (ouvrir le menu) ; s
Sons / Audio ; s Tonal. avertis. ;
r (activer Clic clavier:); s (à la ligne suivante) ; r (activer Bip confir.:);
s (à la ligne suivante) ; r (pour Batter.: sélectionner Act., Dés. ou en
communication);
Sauver ; appuyer sur a de manière prolongée (retour à l'état de
repos).
OK OK
Remettre le combiné en configuration usine
Vous pouvez restaurer des paramètres et annuler des modifications. Les entrées des
répertoires, du journal des appels, des adresses E-Mail, la déclaration du combiné sur la
base ainsi que les images fond d'écran et les sonneries que vous avez chargées sont
conservées. Pour interrompre la réinitialisation, appuyez sur a.
v(ouvrir le menu) ; s
OK
; Oui (confirmer la question) ; appuyer sur a de manière prolongée (retour à
Réglages comb. ; s Réinit. Combiné
l'état de repos).
24
OK
Page 93

Configuration d'usine du combiné
Volume de l'écouteur 1 p. 22
Volume pour la fonction Mains-libres 3 p. 22
Volume de la sonnerie 5 p. 22
Réglage horaire pour la sonnerie désactivée p. 22
Mélodie de la sonnerie Mélodie 1 p. 22
Présentation vocale du nom désactivée p. 17
Décroché automatique activé p. 22
Alarme batteries/clic clavier/tonalité de
confirmation
Langue d’affichage spécifique au pays p. 7
Réveil/rendez-vous désactivée p. 11/p. 11
Rendez-vous effacé p. 11
Liste des numéros bis vide p. 17
Surveillance de pièce/sensibilité de la sur veillance
de pièce
activé p. 24
désactivée / élevée p. 20
Annexe
Annexe
Entretien et contact avec les liquides
!
Essuyer la base et le combiné avec un chiffon légèrement humecté (pas de solvant)
ou un chiffon antistatique. Ne jamais utiliser de chiffon sec. Il existe un risque de charge
statique.
Si le combiné a été mis en contact avec un liquide, il ne faut en aucun cas le mettre
en marche. Retirer immédiatement la batterie.
Laisser le liquide s'écouler, sécher toutes les parties avec un linge absorbant.
Placer le mobile sans batterie pendant au moins 72 heures dans un endroit chaud et sec.
Ensuite, il est possible que le combiné puisse fonctionner à nouveau. Si ce n'est pas le
cas contacter le service client pour connaître la marche à suivre. Le bénéfice de la
garantie ne pourra cependant pas être accordé.
Service clients (Customer Care)
Notre assistance en ligne sur Internet :
www.my-siemens.com/customercare
En cas de réparation nécessaire ou pour faire valoir la garantie, vous trouverez une
aide simple et efficace auprès de notre
centre de services France 01 56 38 42 00
centre de services Belgique 078 15 22 21
centre de services Suisse 080 8212 000
www.my-siemens.com/contact
25
Page 94
Annexe
Service pour la Suisse :
Omnicom AG
Industrie Neuhof 9
3422 Kirchberg b. Berne
Vous trouverez d'autres numéros de service à la fin du manuel d'utilisation, à la
rubrique « Service ».
Nous ne proposons pas d'échange ou de services de réparation dans les pays où notre
produit n'est pas distribué pas des revendeurs autorisés.
Les spécificités nationales sont prises en compte. Le combiné SL 1 est autorisé en
Europe et en Suisse.
La conformité de l’appareil aux exigences fondamentales de la directive européenne
R&TTE (99/05/CEE) est confirmée par le label CE.
Extrait de la déclaration originale :
"We, Siemens AG, declare, that the above mentioned product is manufactured according to our Full
Quality Assurance System certified by CETECOM ICT Services GmbH in compliance with ANNEX V
of the R&TTE-Directive 99/5/EC. The presumption of conformity with the essential requirements
regarding Council Directive 99/5/EC is ensured."
Senior Approvals Manager
The Declaration of Conformity (DoC) has been signed. In case of need a copy of the original DoC
can be made available via the company hotline.
Caractéristiques techniques
Batteries homologuée
Siemens Lithium Ion (LiIon), 700 mAh
Ref: V30145-K1310-X250
(Situation lors de la mise sous presse du présent manuel d'utilisation)
L'appareil est exclusivement fourni avec une batterie homologuée.
Autonomie/temps de charge du combiné
Capacité
(mAh)
700 environ 250 (10 jours) environ 15 environ 2,5
Les temps d'utilisation et de charge indiqués ne sont vala bles que lors de l'utilisation des
batteries recommandées.
26
Autonomie (heures) Autonomie en
communication
(heures)
Temps de charge
(heures)
Page 95

Table de caractères
Police par défaut
Appuyer sur la touche correspondante plusieurs fois ou de manière prolongée :
1 x 2 x 3 x 4 x 5 x 6 x 7 x 8 x 9 x 10 x 11 x 12 x 13 x 14 x
1
2
I
4
5
L
M
N
O
Q
P
R
Traitement de texte (sans aide à la saisie du texte)
◆ Commander le curseur avec u v t s.
◆ Effacer les caractères (à gauche du curseur) avec .
◆ L'insertion des caractères s'effectue à gauche du curseur.
◆ Pour passer du mode majuscule (majuscule initiale et lettres suivantes en
◆ Pour les entrées dans les répertoires, la première lettre du nom s'écrit
◆ Une pression longue sur une touche permet d'afficher successivement puis de
Classement des entrées d'annuaire
1. Espace (représenté ici par s)
2. Chiffres (0 - 9)
3. Lettres (alphabétique)
4. Autres symboles
Espace
abc2äáàâãç
def3ëéèê
g h i4ïíìî
jkl5
m n o6цсутфх
pqrs7ß
tuv8üúùû
wx yz9ÿýæøå
.,?!0+-:¿¡“‘;_
Abc--> 123 123 --> abc
#@\&§
minuscule) au mode minuscule, presser P avant d'entrer la lettre. Si vous appuyez
de nouveau sur P, vous passez des minuscules aux chiffres. Une nouvelle pression
permet de passer de l'écriture des chiffres au mode majuscule.
automatiquement en majuscule et les lettres suivantes en minuscule.
sélectionner les caractères de la touche correspondante sur la ligne inférieure de
l'écran. Lorsque vous relâchez la touche, le caractère sélectionné est ajouté à la
zoned'édition.
– Vous pouvez voir sur l'écran quel est le mode d'édition qui est activé (majuscules,
minuscules, chiffres) :
– lors de la saisie dans l'annuaire, la ligne inférieure de l'écran affiche un « A » ou
un « a ».
1
â
£$¥¤
/()<=>%
*
f
C
Annexe
27
Page 96

Annexe
Pour enregistrer une entrée qui ne sera pas classée de manière alphabétique, faire
précéder le nom d’un espacement. Cette entrée figure alors en tête de la liste (exemple:
« sCarla »). Les entrées peuvent également être numérotées (par exemple : 1Laura,
2Carla, 3Albert).
Saisie assistée de texte
L'aide à la saisie de texte EATONI vous assiste dans la saisie des noms (répertoires
principal et secondaire) mais aussi pour la rédaction des textes SMS.
Plusieurs lettres et caractères sont affectés à chaque touche entre Q et O. Ils sont
tous disposés sur une ligne de sélection juste au-dessus des touches de fonction (sous
le champ de texte) dès que vous appuyez sur une touche. Lors d'un appui touche pour
la saisie de lettres, celle la plus probable par rapport à la lettre précédente est proposée
sur fond gris. Elle figure au début de cette ligne de sélection et est insérée dans le
champ de texte.
La saisie assistée de texte
53 ________Ç_____abc
Peter K
KLJ5
W¨
Dans le cas où la lettre proposée correspond à celle que vous avez choisie, validez-la en
pressant sur la touche suivante. Si au contraire, la lettre choisie par EATONI ne
correspond pas à votre choix, pressez sur la touche dièse R jusqu'à ce que la lettre
recherchée apparaisse sur fond gris dans la ligne d'affichage et qu'elle puisse ainsi être
copiée dans la zone texte.
P Presser brièvement sur la touche Étoile : passer du mode abc au mode Abc,
du mode Abc au mode 123 et du mode 123 au mode abc.
R Permet de passer à la lettre suivante dans la ligne de sélection.
EATONI est activée.
Adresse e-mail
Ligne de sélection
Activer/désactiver la saisie assistée de texte
La saisie assistée de texte est activée ou désactivée selon la fonction choisie.
Préalable : Vous vous trouvez dans une zone de saisie de texte (nom dans les
répertoires principal et secondaire, adresses E-Mail, SMS).
v (ouvrir le menu) ; s
Saisie intuitive (‰ = activé) ; appuyer brièvement sur la
touche Raccrocher a pour revenir au champ de texte. Entrer alors le texte.
OK
28
Page 97

Annexe
Interface PC
Il est possible de relier le combiné SL 1 à votre ordinateur (PC) à l'aide d'un câble de
transfert de données Siemens. Votre ordinateur PC peut alors communiquer avec votre
SL 1 à l'aide du programme « Siemens Data Suite » (à télécharger gratuitement sous
http://www.my-siemens.com\gigaset-sds) et accéder aux paramètres et listes ci-après
du combiné :
Lecture des paramètres
◆ Version SW
◆ Ty pe
◆ Code constructeur
Accès en lecture/écriture à
◆ Répertoire principal
◆ Adresses E-Mail
◆ Répertoire secondaire
◆ la liste des rendez-vous
◆ la liste des numéros bis
Accès en lecture/écriture à d'autres paramètres
◆ réglage de la sonnerie
◆ réglage du volume
◆ chargement de fond d'écran
◆ chargement de sonneries
◆ appeler et recevoir des appels
Transmission des données
Certaines fonctions transmettent d'importants volumes de données entre le combiné et
le périphérique externe. Le combiné passe alors en mode transmission de données et
l'écran affiche Echange données. Lorsque ce mode est activé, le clavier est verrouillé
et les appels entrants sont ignorés.
Le combiné passe au mode transmission de données dans les cas suivants :
◆ accès en lecture/écriture au répertoire principal
◆ accès en lecture/écriture à aux adresses E-Mail
◆ accès en lecture/écriture à la liste des au répertoire secondaire
◆ accès en lecture-écriture à la liste des rendez-vous
◆ accès en lecture-écriture à la liste des numéros bis
◆ chargement de fond
◆ chargement de sonneries
En cas d'erreur de transmission, le combiné passe automatiquement au mode repos.
29
Page 98

Annexe
Appeler et recevoir des appels
Lorsque vous prenez un appel externe ou que vous avez une communication externe, le
combiné fonctionne comme si vous aviez exécuté ces fonctions sur le combiné.
Jeu « Balloon Shooter »
Essayez d'atteindre le maximum de ballons.
v ¢ Famille/Loisirs ¢ Balloon Shooter
soit ...
[RRRRRRRRRRRRRRRRRRRRR]
Départ
soit ...
à
Pour déplacer le réticule, presser sur :
Lancer un jeu :
Presser sur la touche écran.
Autres options :
Po ur a ffic her le m enu Opt ion s, a ppu yer sur l a to uche
écran.
¢
1
¢
4
M
¢
Pour tirer sur le ballon, presser sur la touche
¢
2
N
¢
I
L
O
¢
¢
¢
ou
¢
p
5.
¢
¢
¢
30
Page 99

Annexe
Certificat de garantie France
La présente garantie bénéficie, dans les conditions ci-après, à l'utilisateur final ayant
procédé à l'acquisition de ce Produit Siemens (ci-après le Client). Pour la France, la
présente garantie ne limite en rien, ni ne supprime, les droits du Client issus des articles
1641 et suivants du Code Civil Français relatifs à la garantie légale des vices cachés.
◆ Si ce Produit Siemens et ses composants présentent des vices de fabrication et/ou de
matière dans les 24 mois suivant son achat neuf, Siemens procédera à sa réparation
ou le remplacera gratuitement et de sa propre initiative par un modèle identique ou
par un modèle équivalent correspondant à l'état actuel de la technique. La présente
garantie n'est valable que pendant une période de 6 mois à compter de sa date
d'achat neuf pour les pièces et éléments de ce Produit Siemens qui sont soumis à
l'usure (par ex. batteries, claviers et boîtiers).
◆ La présente garantie n'est pas valable en cas de non-respect des informations
contenues dans le mode d'emploi, ou en cas de dommage manifestement provoqué
par une manipulation ou une utilisation inadéquate.
◆ La présente garantie ne s'applique pas aux éléments et données fournis par le
vendeur du Produit Siemens, ou installés par le Client lui-même (par ex.
l'installation, la configuration, le téléchargement de logiciels, l'enregistrement de
données). Sont également exclus de la présente garantie le manuel d'utilisation
ainsi que tout logiciel fourni séparément sur un autre support de données, ainsi que
les Produits Siemens dotés d'éléments ou d'accessoires non homologués par
Siemens, les Produits dont les dommages sont causés volontairement ou par
négligence (bris, casses, humidité, température inadéquate, oxydation, infiltration
de liquide, surtension électrique, incendie, ou tout autre cas de force majeure), les
Produits Siemens présentant des traces d'ouverture (ou de réparation et/ou
modifications effectuées par un tiers non agréé par Siemens), et les Produits
envoyés en port dû à Siemens ou à son centre agréé.
◆ La facture ou le ticket de caisse comportant la date d'achat par le Client sert de
preuve de garantie. Une copie de ce document justifiant de la date de départ de la
garantie est à fournir pour toute mise en œuvre de la présente garantie. Un
justificatif d'achat doit au moins comporter le nom et le logo de l'enseigne, la date
d'achat, le modèle concerné et le prix. Le Client doit faire valoir ses droits à garantie
dans les deux mois de la découverte du vice du téléphone, sauf disposition
impérative contraire.
◆ Le présent Produit Siemens ou ses composants échangés et renvoyés à Siemens ou
son prestataire deviennent propriété de Siemens.
◆ La présente garantie s'applique uniquement aux Produits Siemens neufs achetés au
sein de l'Union Européenne. Elle est délivrée par Siemens SAS, 9, rue du Docteur
Finot, F- 93200 SAINT-DENIS pour les téléphones achetés en France.
◆ La présente garantie représente l'unique recours du Client à l'encontre de Siemens
pour la réparation des vices affectant le Produit Siemens. Siemens exclut donc toute
autre responsabilité au titre des dommages matériels et immatériels directs ou
indirects, et notamment la réparation de tout préjudice financier découlant d'une
perte de bénéfice ou d'exploitation, ainsi que des pertes de données. En aucun cas
Siemens n'est responsable des dommages survenus aux biens du Client sur lesquels
est connecté, relié ou intégré le Produit Siemens, sauf disposition impérative
contraire.
31
Page 100

Annexe
◆ De même, la responsabilité de Siemens ne peut être mise en cause pour les
dommages survenus aux logiciels intégrés dans le Produit Siemens par le Client ou
tout tiers à l'exception de Siemens.
◆ La mise en jeu de la présente garantie, et l'échange ou la réparation concernant le
Produit Siemens ne font pas naître une nouvelle période de garantie, qui demeure
en tout état de cause la durée initiale, sauf disposition impérative contraire.
◆ Siemens se réserve le droit de facturer au client les frais découlant du remplacement
ou de la réparation du Produit Siemens lorsque le défaut du Produit Siemens n'est
pas couvert par la garantie. De même Siemens pourra facturer au Client les frais
découlant de ses interventions sur un Produit Siemens remis par le Client et en bon
état de fonctionnement.
Pour faire usage de la présente garantie, veuillez contacter en priorité votre revendeur,
ou bien le service téléphonique de Siemens dont vous trouverez le numéro dans le
manuel d'utilisation ci-joint.
32
 Loading...