

s
Gigaset S675IP
Gigaset
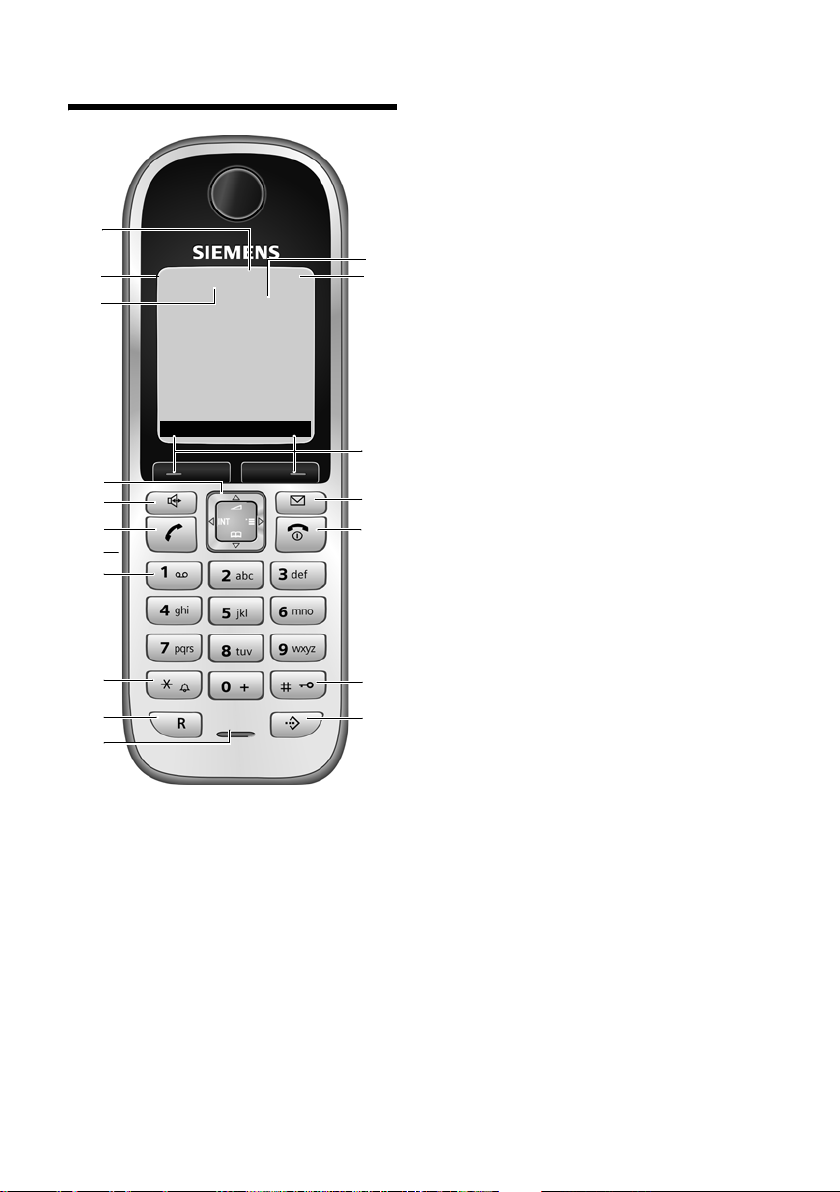
The handset at a glance
The handset at a glance
18
17
16
15
14
13
12
11
10
9
8
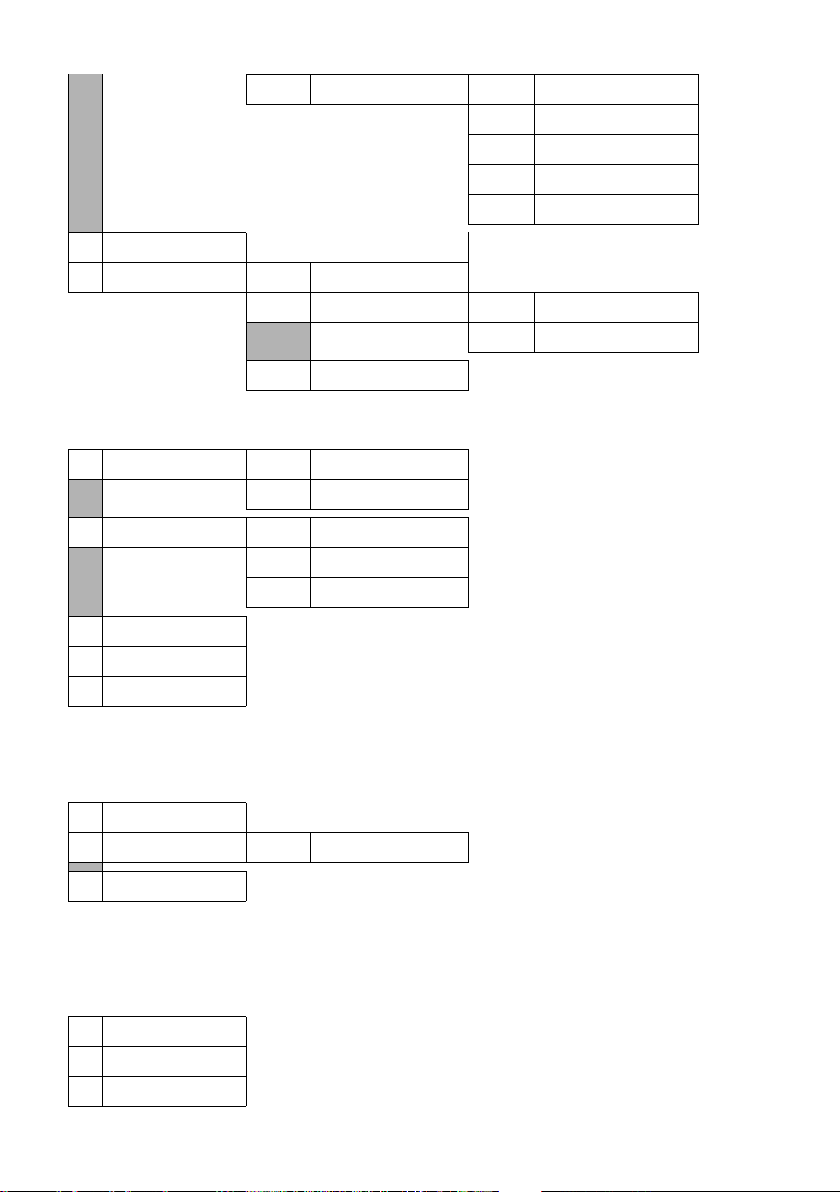
Handset keys
1 Display in idle status (example)
2 Charge status of the batteries
e V U (1/3 charged to fully charged)
= flashes: battery almost flat
e V U flashes: battery charging
3 Display keys (page 29)
4 Message key
Opens calls and message lists
Flashes: new message or new call
5 End call key, On/Off key
End call, cancel function, go back one menu
level (press briefly), back to idle status
(press and hold), activate/deactivate
handset (press and hold in idle status)
нV
INT 1
15.01.08 09:45
?SMS
6 Hash key
Keypad lock on/off (press and hold,
page 28)
Switch between upper/lower case letters
and digits for text input (page 131)
7 Call-by-call list key (not for VoIP)
Open call-by-call list
8 Microphone
9 Recall key
1
2
3
4
5
6
7
Fixed line network:
enter flash (press briefly)
insert a pause (press and hold)
VoIP: enter Flash (adjustable, page 108)
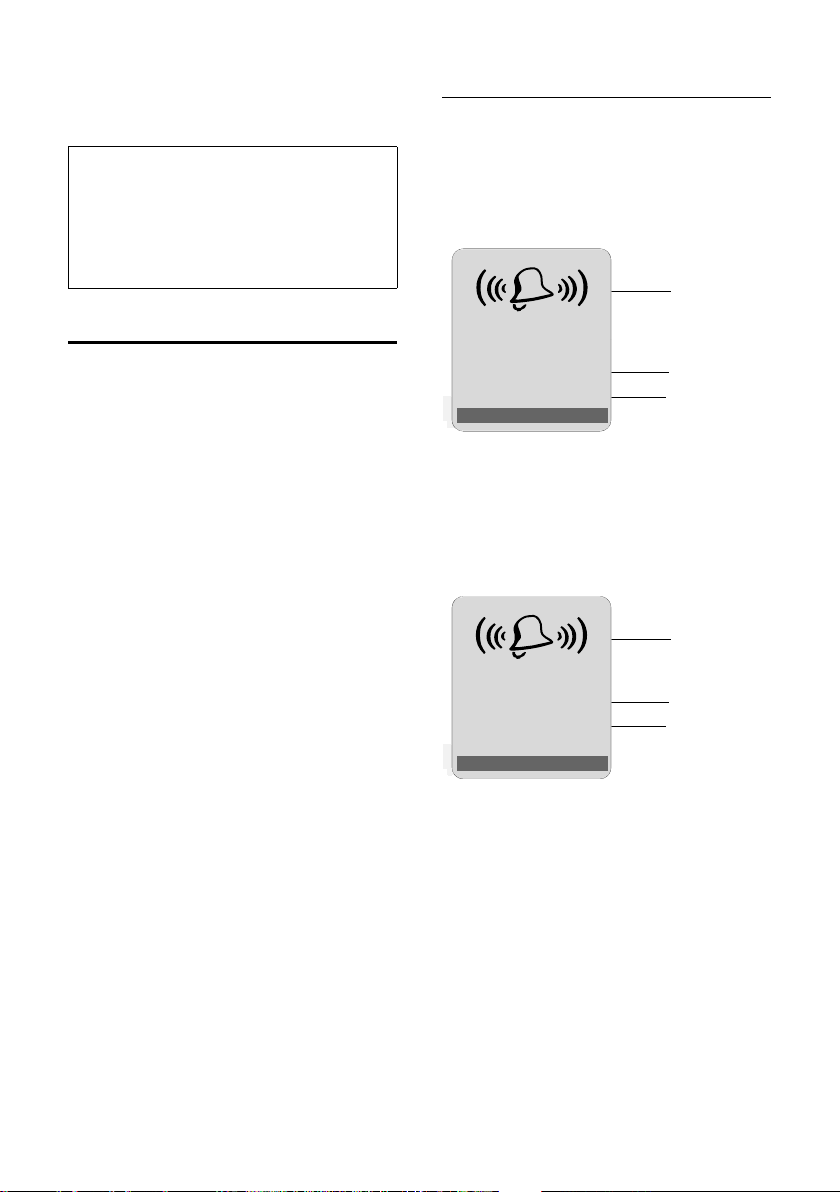
10 Star key
Idle status: ringer tones on/off
(press and hold)
Fixed line network: switch between
dial pulsing/touch tone dialling
Editor: open special characters table
11 Key 1 (press and hold)
Call the network mailbox or answer machine
12 Connection socket for headset (page 18)
13 Tal k key
Accept call, open last number redial list
(press briefly in idle status), select connec-
tion type and start dialling (press briefly/
press and hold after entering the number,
page 24)
SMS editor: send SMS
14 Handsfree key
Change between speaker/handsfree mode
Lights up: handsfree talking activated
Flashes: incoming call
15 Control key (page 29)
16 Eco mode activated (page 18)
17 Signal strength
Ò Ñ i (low to high)
| flashes: no reception
18 Answer machine icon
Answer machine switched on;
Flashes: answer machine is recording a
message or is being operated by another
internal party
1

The base station at a glance
The base station at a glance
1
Base station key
1 Paging key
Lights up:
LAN connection active (phone is connected
to router)
Flashes:
data transfer to LAN connection
Press briefly:
start paging (page 74), display IP address on
handset
Press and hold:
set base station to registration mode
(page 73)
2

Contents
Contents
The handset at a glance . . . . . . . 1
The base station at a glance . . . . 2
Safety precautions . . . . . . . . . . . . 6
Gigaset S675 IP –
more than just a telephone . . . . . 8
VoIP – making calls via
the Internet . . . . . . . . . . . . . . . . . . 9
Gigaset HDSP – telephony with
brilliant sound quality . . . . . . . . . 9
First steps . . . . . . . . . . . . . . . . . . . 10
Pack contents . . . . . . . . . . . . . . . . . . . 10
Setting up the handset for use . . . . . . 10
Installing the base station . . . . . . . . . 12
Connecting the base station . . . . . . . 13
Making settings for VoIP telephony . . 15
Belt clip and headset . . . . . . . . . . . . . 18
ECO DECT:
reducing the transmission power
and power consumption . . . . . . 18
Menu trees . . . . . . . . . . . . . . . . . . 19
Phone menu . . . . . . . . . . . . . . . . . . . . 19
Web configurator menu . . . . . . . . . . . 23
Making calls with VoIP and
the fixed line network . . . . . . . . 24
Making an external call . . . . . . . . . . . 24
Ending a call . . . . . . . . . . . . . . . . . . . . 25
Accepting a call . . . . . . . . . . . . . . . . . 25
Calling Line Identification . . . . . . . . . 26
Handsfree talking . . . . . . . . . . . . . . . . 28
Muting the handset . . . . . . . . . . . . . . 28
Operating the handset . . . . . . . . 28
Activating/deactivating the handset . 28
Activating/deactivating the
keypad lock . . . . . . . . . . . . . . . . . . . . . 28
Control key . . . . . . . . . . . . . . . . . . . . . 29
Display keys . . . . . . . . . . . . . . . . . . . . 29
Reverting to idle status . . . . . . . . . . . . 30
Menu guidance . . . . . . . . . . . . . . . . . 30
Correcting incorrect entries . . . . . . . . 30
Network services . . . . . . . . . . . . 31
Anonymous calling –
withholding caller ID . . . . . . . . . . . . . . 31
Further network services in the
fixed line network . . . . . . . . . . . . . . . . 31
Further network services for VoIP . . . . 33
Using the directory and lists . . 35
Directory/call-by-call list . . . . . . . . . . . 35
Last number redial list . . . . . . . . . . . . 39
Opening lists with the
message key . . . . . . . . . . . . . . . . . . . . 39
Making cost-effective calls . . . . 42
SMS (text messages) . . . . . . . . . 43
Writing/sending an SMS . . . . . . . . . . . 44
Receiving an SMS . . . . . . . . . . . . . . . . 46
Notification by SMS . . . . . . . . . . . . . . . 48
SMS mailboxes . . . . . . . . . . . . . . . . . . 49
Setting SMS centres . . . . . . . . . . . . . . 50
SMS on a PABX . . . . . . . . . . . . . . . . . . 50
Activating/deactivating SMS function . 50
SMS troubleshooting . . . . . . . . . . . . . 51
Operating the base station
answer machine . . . . . . . . . . . . 52
Operation via the handset . . . . . . . . . 52
Activating/deactivating call screening 56
Setting up the answer machine . . . . . 57
Configuring the network mailbox
for fast access . . . . . . . . . . . . . . . . . . . 58
Operating when on the move
(remote operation) . . . . . . . . . . . . . . . 58
E-mail notifications . . . . . . . . . . 60
Opening the incoming e-mail list . . . . 60
Viewing the message header of
an e-mail . . . . . . . . . . . . . . . . . . . . . . . 61
Viewing an e-mail sender's
address . . . . . . . . . . . . . . . . . . . . . . . . 62
Messenger . . . . . . . . . . . . . . . . . 63
Establishing a connection,
going online . . . . . . . . . . . . . . . . . . . . 64
Changing/checking your personal status,
going offline . . . . . . . . . . . . . . . . . . . . 65
Opening the buddy list . . . . . . . . . . . . 66
Receiving messages . . . . . . . . . . . . . . 67
Writing and sending messages . . . . . . 68
3

Contents
Calling a buddy . . . . . . . . . . . . . . . . . . 69
Self-help with errors . . . . . . . . . . . . . . 69
Using the network mailbox . . . . 70
Activating/deactivating the network mail-
box, entering numbers . . . . . . . . . . . . 70
Configuring the (network) mailbox for fast
access . . . . . . . . . . . . . . . . . . . . . . . . . 71
Listening to messages on the network
mailbox . . . . . . . . . . . . . . . . . . . . . . . . 72
Using several handsets . . . . . . . . 73
Registering handsets . . . . . . . . . . . . . 73
De-registering handsets . . . . . . . . . . . 74
Locating a handset ("paging") . . . . . . 74
Changing the base station . . . . . . . . . 74
Changing a handset's
internal number . . . . . . . . . . . . . . . . . 74
Changing the name of a handset . . . . 75
Making internal calls . . . . . . . . . . . . . 75
Using a handset as a
room monitor . . . . . . . . . . . . . . . . . . . 76
Handset settings . . . . . . . . . . . . . 78
Changing the display language . . . . . 78
Setting the display . . . . . . . . . . . . . . . 78
Setting the screensaver . . . . . . . . . . . 78
Setting the display backlight . . . . . . . 79
Shortcuts for functions and
numbers . . . . . . . . . . . . . . . . . . . . . . . 79
Activating/deactivating
auto answer . . . . . . . . . . . . . . . . . . . . 80
Changing the handsfree/
earpiece volume . . . . . . . . . . . . . . . . . 80
Changing ringer tones . . . . . . . . . . . . 81
Activating/deactivating muting
for the first ringer tone . . . . . . . . . . . . 82
Activating/deactivating
advisory tones . . . . . . . . . . . . . . . . . . 82
My stuff . . . . . . . . . . . . . . . . . . . . . . . 82
Setting the alarm clock . . . . . . . . . . . . 83
Setting an appointment (calendar) . . 84
Displaying missed appointments
and anniversaries . . . . . . . . . . . . . . . . 85
Setting your own area code . . . . . . . . 85
Restoring the handset to the factory
settings . . . . . . . . . . . . . . . . . . . . . . . . 86
Base station settings . . . . . . . . . 86
Protecting against unauthorised
access . . . . . . . . . . . . . . . . . . . . . . . . . 86
Restoring the base station to the
factory settings . . . . . . . . . . . . . . . . . . 87
Activating/deactivating
music on hold . . . . . . . . . . . . . . . . . . . 87
Activating/deactivating
repeater mode . . . . . . . . . . . . . . . . . . 87
Set default connection . . . . . . . . . . . . 88
Updating the base station firmware . . 88
Making VoIP settings . . . . . . . . . 89
Using the connection assistant . . . . . . 89
Changing settings without the
connection assistant . . . . . . . . . . . . . . 89
Setting the phone's IP address in
the LAN . . . . . . . . . . . . . . . . . . . . . . . . 89
Activating/deactivating display
of VoIP status messages . . . . . . . . . . . 90
Checking the base station
MAC address . . . . . . . . . . . . . . . . . . . . 91
Operating the base station
on the PABX . . . . . . . . . . . . . . . . 91
Setting recall . . . . . . . . . . . . . . . . . . . . 91
Setting pauses . . . . . . . . . . . . . . . . . . . 91
Switching temporarily to
tone dialling (DTMF) . . . . . . . . . . . . . . 91
Web configurator –configuring
phone via PC . . . . . . . . . . . . . . . 92
Connecting PC with
Web configurator . . . . . . . . . . . . . . . . 92
Logging in, setting the Web configurator
language . . . . . . . . . . . . . . . . . . . . . . . 93
Logging off . . . . . . . . . . . . . . . . . . . . . 93
Structure of the Web pages . . . . . . . . 94
Opening Web pages . . . . . . . . . . . . . . 95
Setting the phone with
Web configurator . . . . . . . . . . . . . . . . 96
IP Configuration . . . . . . . . . . . . . . . . . 96
Configuring telephone
connections . . . . . . . . . . . . . . . . . . . . . 98
Optimising voice quality for
VoIP connections . . . . . . . . . . . . . . . . 103
4

Contents
Setting the telephone default
connection . . . . . . . . . . . . . . . . . . . . 105
Assigning send and receive numbers
to handsets . . . . . . . . . . . . . . . . . . . . 106
Assigning receive numbers to
the answer machine . . . . . . . . . . . . . 107
Activating Call Forwarding for
VoIP connections . . . . . . . . . . . . . . . 107
Setting the DTMF-reminder for VoIP 107
Defining recall key functions for
VoIP (hook flash) . . . . . . . . . . . . . . . 108
Defining local communication ports for
VoIP . . . . . . . . . . . . . . . . . . . . . . . . . . 108
Configuring call forwarding
via VoIP . . . . . . . . . . . . . . . . . . . . . . . 109
Setting area code predialling . . . . . . 109
Defining dialling plans –
cost control . . . . . . . . . . . . . . . . . . . . 110
Activating/deactivating network mailbox,
entering numbers . . . . . . . . . . . . . . . 112
Saving messenger access data . . . . . 112
Making e-mail settings . . . . . . . . . . . 113
Activating/deactivating info
services . . . . . . . . . . . . . . . . . . . . . . . 113
Changing internal handset numbers
and names . . . . . . . . . . . . . . . . . . . . 114
Loading and deleting handset directories
to/from the PC . . . . . . . . . . . . . . . . . 114
Activating VoIP status message
display . . . . . . . . . . . . . . . . . . . . . . . . 116
Starting a firmware update . . . . . . . 116
Activating/deactivating the
automatic version check . . . . . . . . . 117
Copying the date/time from
time server . . . . . . . . . . . . . . . . . . . . 118
Querying the phone status . . . . . . . 119
Appendix . . . . . . . . . . . . . . . . . 120
Care . . . . . . . . . . . . . . . . . . . . . . . . . . 120
Contact with liquid . . . . . . . . . . . . . . 120
Questions and answers . . . . . . . . . . . 120
Checking service information . . . . . . 126
Authorisation . . . . . . . . . . . . . . . . . . 126
Service (Customer Care) . . . . . . . . . . 127
Specifications . . . . . . . . . . . . . . . . . . 128
Icons . . . . . . . . . . . . . . . . . . . . . . . . . 129
Example of a menu input . . . . . . . . . 129
Example of multiple line input . . . . . 130
Writing and editing text . . . . . . . . . . 130
Gigaset S675 IP –
free software . . . . . . . . . . . . . . . . . . . 132
Accessories . . . . . . . . . . . . . . . . 139
Glossary . . . . . . . . . . . . . . . . . . 142
Index . . . . . . . . . . . . . . . . . . . . . 152
Mounting the charging cradle
to the wall, connecting the
charging cradle . . . . . . . . . . . . 165
Mounting the base station
to the wall . . . . . . . . . . . . . . . . 166
5
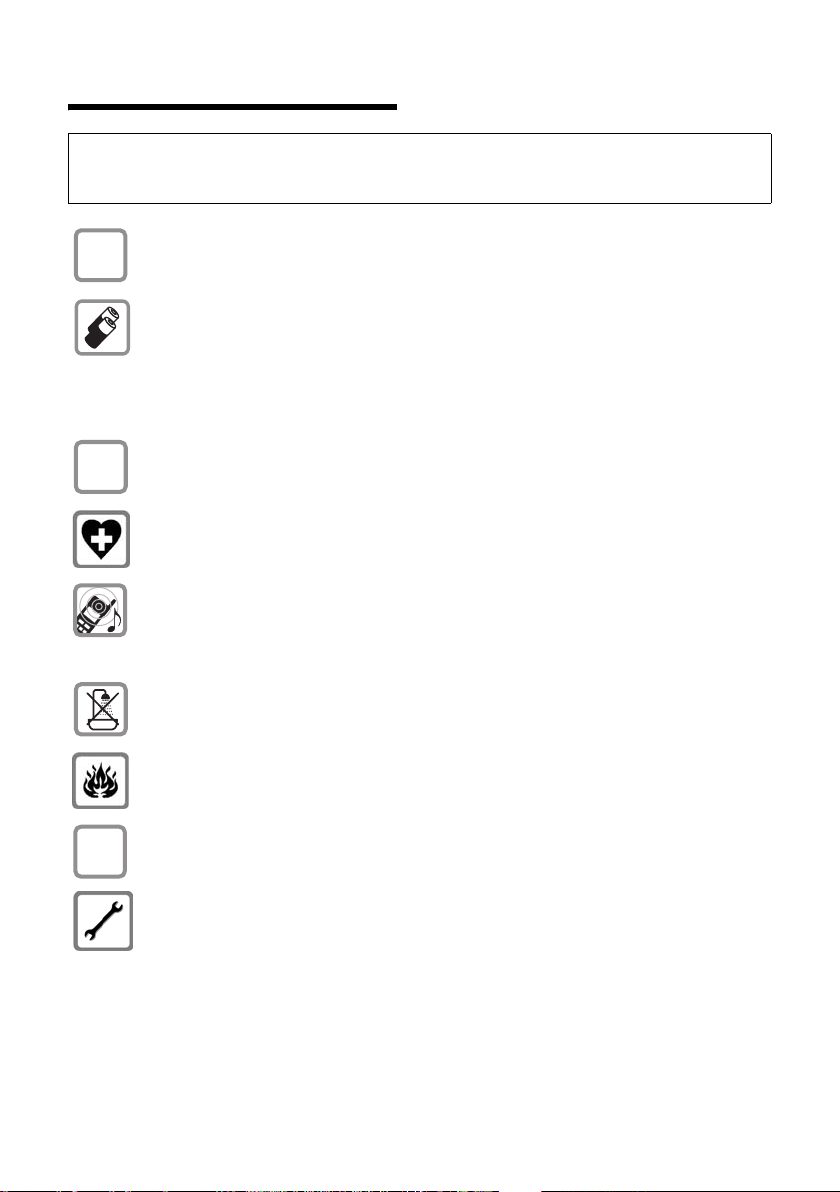
Safety precautions
Safety precautions
Warning:
Read the safety precautions and the user guide before use.
Explain their contents and the potential hazards associated with using the telephone to your children.
Only use the mains adapter supplied, as indicated on the underside of the base
$
station or charging cradle.
Only use the recommended, rechargeable batteries (page 128), i.e. never
use a conventional (non-rechargeable) battery or other battery types as this
could result in significant health risks and personal injury.
Batteries should not be disposed of in general household waste. Observe the
local waste disposal regulations, details of which can be obtained from your
local authority or the dealer you purchased the product from.
Insert rechargeable batteries with the correct polarity, and use them in accordance with this user guide (polarity symbols can be seen in or on the handset's
battery compartment, page 10).
The operation of medical appliances may be affected. Be aware of the technical
conditions in your particular environment, e.g. doctor's surgery.
Do not hold the rear of the handset to your ear when it is ringing or when
the handsfree function is activated. Otherwise you risk serious and permanent
damage to your hearing.
The handset may cause an unpleasant humming noise in hearing aids.
Do not install the base station or charging cradle in bathrooms or shower rooms.
The handset, base station and charging cradle are not splashproof (page 120).
6
Do not use the phone in environments with a potential explosion hazard,
e.g. paint shops.
If you give your Gigaset to someone else, make sure you also give them the
user guide.
Please remove faulty base stations from use or have them repaired by our
service, as they could interfere with other wireless services.
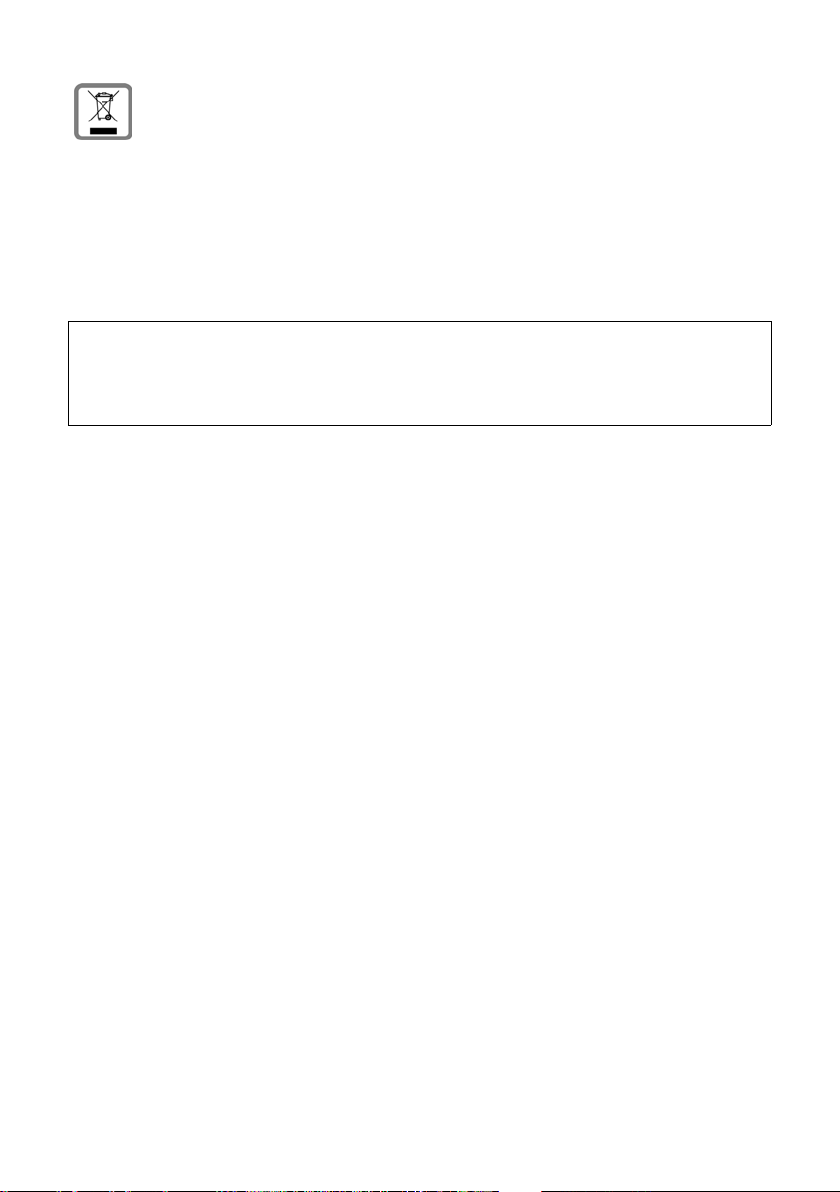
All electrical and electronic equipment must be disposed of separately from general household waste using the sites designated by local authorities.
If a product displays this symbol of a crossed-out rubbish bin, the product is subject to European Directive 2002/96/EC.
The appropriate disposal and separate collection of used equipment serve to
prevent potential harm to the environment and to health. They are a requirement for the re-use and recycling of used electrical and electronic equipment.
For further information on disposing of your used equipment, please contact
your local authority, your refuse collection service or the dealer you purchased
the product from.
Warning:
When the keypad lock is active, you cannot call emergency numbers.
Please note:
Not all of the functions described in this user guide are available in all countries.
Safety precautions
7

Gigaset S675 IP – more than just a telephone
Gigaset S675 IP –
more than just a telephone
Your phone lets you make calls both via
the fixed line network and (cost effectively) via the Internet (VoIP) without
using a PC.
Your phone can do much more besides:
u Make calls with brilliant sound quality
(High Definition Sound Performance
HDSP, page 9) – for internal calls or
calls via VoIP.
u Press a button each time you make a
call to indicate whether you want to call
via the fixed line network or the Internet (page 24).
u Register up to six handsets on your
base station. With your base station,
you can simultaneously conduct two
calls via VoIP and one call via the fixed
line network.
u Multiline: Set up a maximum of six
VoIP accounts with your VoIP provider.
Together with your fixed line number,
your phone can then be reached via up
to seven different phone numbers.
u Assign each handset its own VoIP
number as a send and receive number.
If a member of your family is called on
their VoIP number, only their handset
will ring (page 106).
u Setting dialling plans for phone num-
bers or area codes enables you to automate the selection of the VoIP connection (page 110).
u Determine which of your phone
numbers should be answered by the
answer machine (page 107).
u Configure the phone connection for
VoIP without a PC. Your phone's con-
nection assistant guides you through
entering your personal data (VoIP/SIP
account). This makes it easy for you to
start using VoIP (page 15).
u If necessary, make any further VoIP set-
tings on a PC. The phone features a
Web interface (Web configurator) that
can be accessed via your PC's Web
browser (page 92).
u Use instant messaging on your hand-
set. Go online and see which of your
messenger contacts (buddies) are also
online. Exchange SMS messages with
your buddies or simply give them a call
(page 63). .
u Let your phone tell you, without
requiring a PC, about new e-mail mes-
sages in your mailbox (page 60). Use
your handset to delete old e-mail mes-
sages from your mailbox.
u Make sure your phone is always up-to-
date. Keep yourself informed about
firmware updates on the Internet and
download them onto your phone
(page 88).
u Reduce the transmission power of
the base station and handset. Activate
eco mode on your phone (page 18).
Your Gigaset S675 IP has a protected operating
system that offers increased security against
viruses from the Internet.
Enjoy using your new phone!
8

VoIP – making calls via the Internet
VoIP – making calls via
the Internet
With VoIP (Voice over Internet Protocol),
your calls are not made via a fixed connection as in the telephone network, but
rather they are transmitted via the Internet in the form of data packets.
You can take advantage of all the benefits
of VoIP with your phone:
u You can make cost-effective calls in
high voice quality with callers on the
Internet, the fixed line network or the
mobile phone network.
u Your VoIP provider will give you per-
sonal numbers, with which you can be
reached from the Internet, the fixed
line network and any mobile phone
network.
To be able to use VoIP, you need the
following:
u A broadband Internet connection
(e.g. DSL) with flat rate (recommended) or volume-based price.
u Internet access, i.e. you need a router
that will connect your phone to the
Internet.
You can find a list of recommended
routers on the Internet at:
www.gigaset.com/customercare
Here, go to the FAQ page and select
your Gigaset IP phone. Search for
"Router", for example.
u Access to the services of a VoIP pro-
vider. Open up to six accounts with
your VoIP provider.
Gigaset HDSP – telephony with brilliant sound quality
Your Gigaset IP
phone supports the
Broadband codec
G.722. With your
base station and the
corresponding handset, you can thus make calls via VoIP with
brilliant sound quality (High Definition
Sound Performance).
If you register further broadband-capable
handsets (e.g. Gigaset S67H, S68H or
SL37H) with your base station, internal
calls between these handsets will also be
conducted via broadband.
Preconditions for broadband connections
to your base station are:
u For internal calls:
Both handsets are broadband-capable,
i.e. both support codec G.722.
u For external calls via VoIP:
– You make the call from a broadband-
capable handset.
– You have selected codec G.722 for
outgoing calls (page 103).
– Your VoIP provider supports broad-
band connections.
– The recipient's phone supports
codec G.722 and accepts the establishment of a broadband connection.
9
First steps
First steps
Pack contents
The pack contains:
u one Gigaset S675 IP base station
u one Gigaset S67H handset
u one mains adapter for the base station
u one charging cradle incl. mains adapter
u one phone cable
u one Ethernet cable (LAN cable)
u two batteries
u one battery cover
u one belt clip
u one quick guide
Firmware updates:
Your telephone is supplied with the firmware
version 097 or higher.
Whenever there are new or improved functions for your Gigaset IP phone, base station
firmware updates will be made available for
you to download to your telephone (page 88).
If this results in operational changes to your
phone, a new version of this user guide will be
published on the Internet at
www.gigaset.com
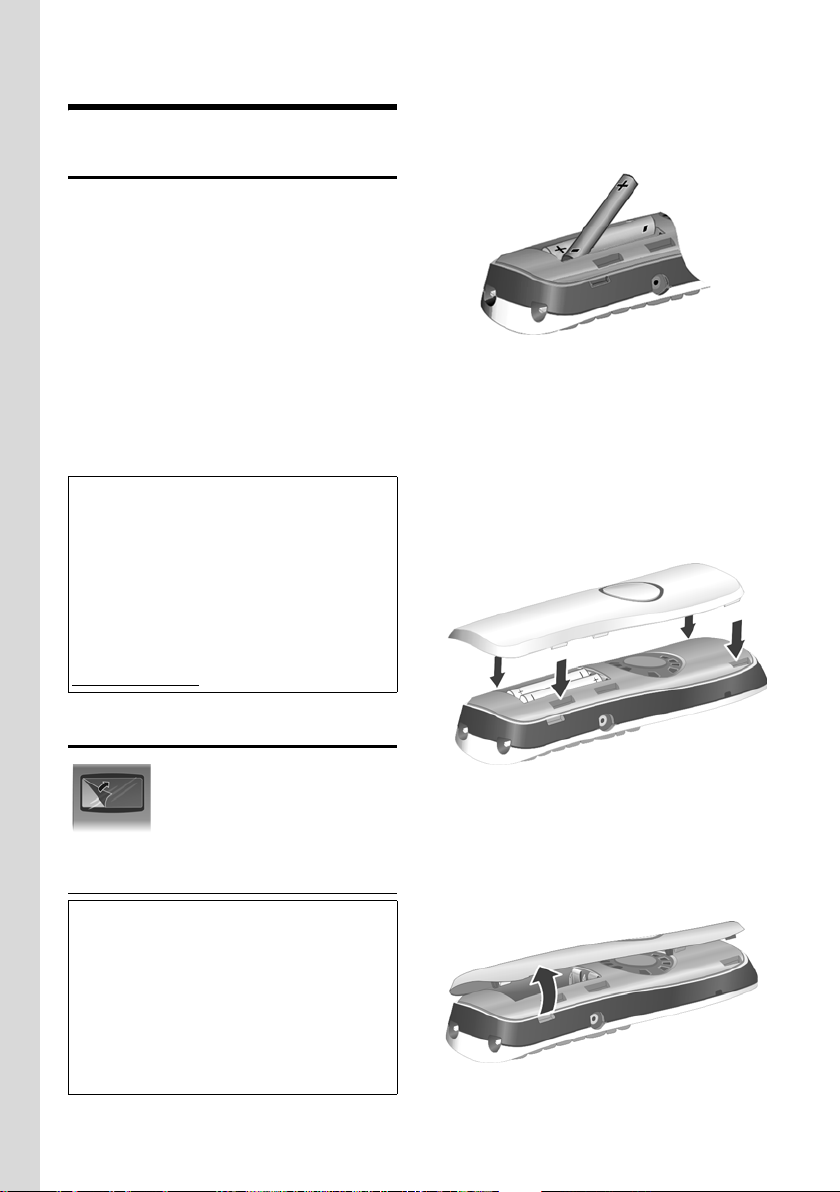
¤ Insert the batteries the right way round
(see figure).
The polarity is indicated in/on the battery
compartment.
The handset switches on automatically.
You will hear a confirmation tone.
Closing the battery cover
¤ First, align the notches on the side of
the battery cover with the protrusions
on the inside of the housing.
¤ Then press the cover until it clicks into
place.
Setting up the handset for use
The display is protected by a
plastic film. Please remove
the protective film!
Opening the battery cover
¤ If fitted, remove the belt clip.
¤ Place your fingertip in the cavity on the
Inserting the batteries
Warning:
Only use rechargeable batteries (page 128)
recommended by Gigaset Communications
GmbH*. Never use a conventional (nonrechargeable) battery or other battery types as
this could result in significant health risks and
personal injury. For example, the batteries
could explode. The phone could also malfunction or be damaged as a result of using batteries that are not of the recommended type.
* Gigaset Communications GmbH is a trademark licensee of Siemens AG.
10
casing and pull the battery cover
upwards.
First steps
Connecting the charging cradle
The charging cradle is designed to be
operated in enclosed, dry areas at temperatures ranging from +5 °C to +45 °C.
Instructions on how to connect the
charging cradle and mount it on the wall
(if required) can be found on page 165.
¤ To charge the batteries, leave the hand-
set in the charging cradle.
Please note:
– Only place the handset in the charging cra-
dle that is intended for it.
– If the handset has turned itself off because
the batteries are flat and is then placed in
the charging cradle, it will turn itself on
automatically.
For questions and problems see page 120.
Initial charging and discharging of batteries
If the handset is activated, the flashing
battery icon e in the top right of the display indicates that the batteries are being
charged.
During handset operation, the battery
icon indicates the charge status of the batteries (page 1).
The correct charge status can only be displayed if the batteries are first fully
charged and discharged through use.
¤ To do this, leave the handset in the
charging cradle without interruption
until the battery icon stops flashing in
the display (around 10 hours).
¤ Once the batteries are fully charged,
remove the handset from the charging
cradle and do not put it back again until
the batteries are fully discharged.
Please note:
After the first battery charge and discharge,
you may place your handset in the charging
cradle after every call.
Please note:
u Always repeat the charging and dis-
charging procedure if you remove the
batteries from the handset and reinsert
them.
u The batteries may warm up during
charging. This is not dangerous.
u After a while the charge capacity of the
batteries will decrease for technical reasons.
Please note:
You will find explanations for the symbols and
typographical conventions used in this user
guide in the appendix, page 129.
Setting the date and time
The date and time must be set in order to
have the correct time for incoming calls
and to be able to use the alarm clock and
calendar.
Please note:
The address of a time server on the Internet is
stored on your telephone. The date and time
are taken from this time server provided that
the base station is connected to the Internet
and synchronisation with the time server is
activated (page 118). Manual settings are
overwritten in this case.
If the date and time on the phone have not
yet been set, the
appear.
§Time§ display key will
11

First steps
Manual setting:
You can use the menu at a later point to
enter the date and time.
¤ Press §Time§ or open the v ¢
¢ Date/Time menu.
¤ Change multiple line input:
Date:
Enter the day, month and year in 8-digit
format, e.g. Q M Q
QQN for 07/01/2008.
Time:
Enter hours and minutes as 4 digits,
e.g. Q M for 07:15 a.m.
§Save§ Press the display key
The date and time are shown in the handset's idle display (page 1).
Registering the handset to the base station
Your handset is registered to the base station by default.
Instructions on how to register additional
handsets with the base station and make
free internal calls can be found from
page 73.
Installing the base station
The base station is designed for use in
closed, dry rooms with a temperature
range of +5 °C to +45 °C.
¤ Place or hang the base station in a cen-
tral position in your flat or house.
Instructions for mounting the base station
on the wall can be found on page 166.
Please note:
u Never expose the telephone to heat
sources, direct sunlight or other electrical appliances.
u Protect your Gigaset from moisture,
dust, corrosive liquids and vapours.
12
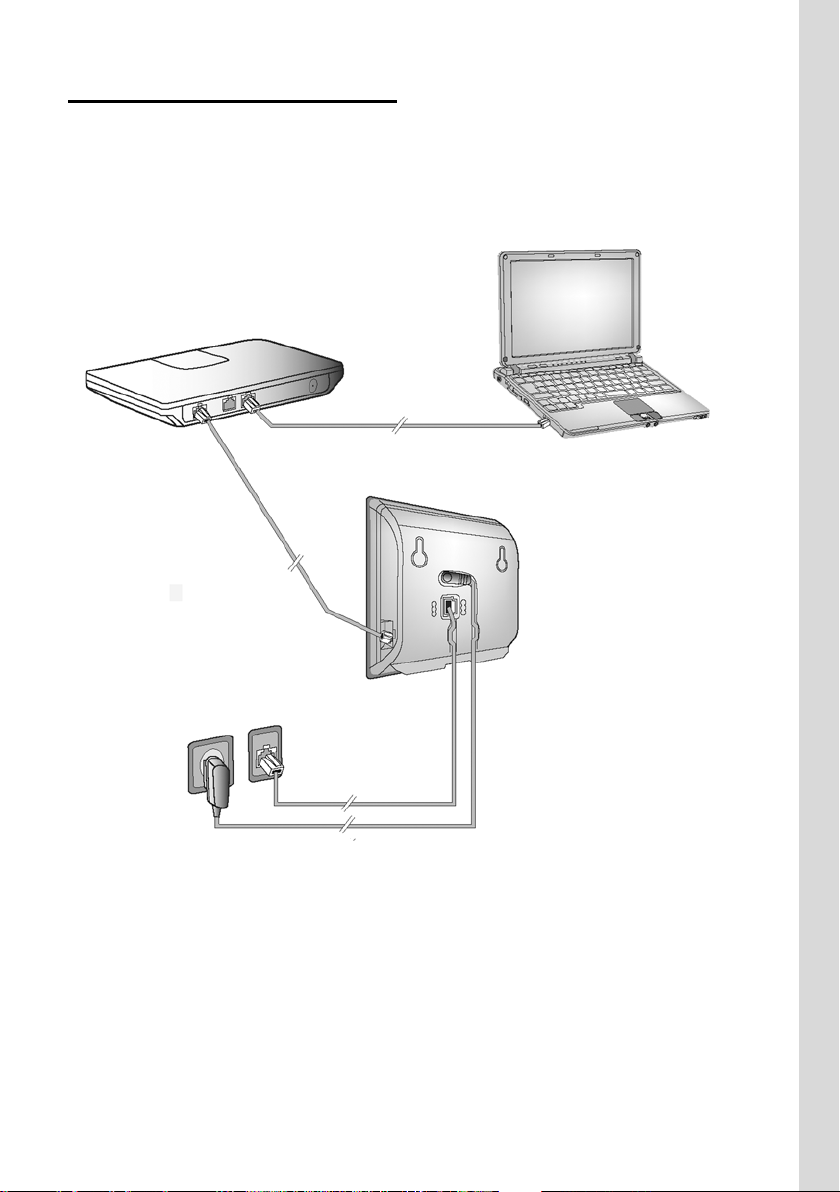
Connecting the base station
In order to be able to make calls with your
phone via the fixed line network and via
VoIP, you must connect the base station
to the fixed line and the Internet, see
Figure 1.
3
First steps
4
1
2
Figure 1 Connecting the phone to the fixed line and the Internet
Follow the steps in the order given below:
1. Connect the phone cord and power
lead to the base station.
2. Connect the base station to the fixed
line network and the mains power supply.
3. To connect the base station to the Internet, first connect the base station to
the router (connection via router and
modem or via router with integrated
modem).
4. Connect the PC and router (optional) for advanced configuration of the base
station (see page 92).
13
First steps
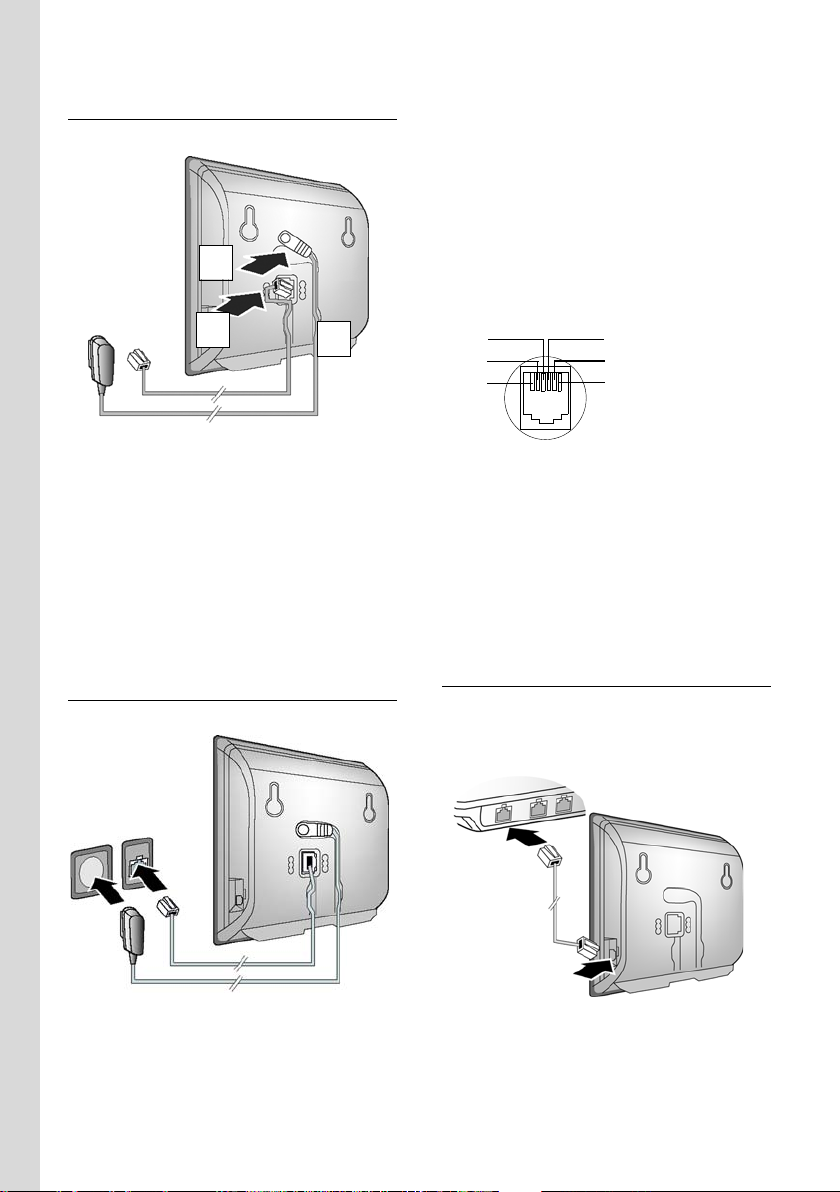
1. Connect the phone cord and power lead to the base station
2
1
1. Insert the phone cord into the lower
connection socket at the rear of the
base station.
2. Insert the power lead of the mains
adapter into the upper connection
socket at the rear of the base station.
3. Push both cables into the appropriate
cable channels.
3
2. Connect the base station to the fixed
line network and the mains power
supply
Please note:
u Keep the mains adapter plugged in at
all times for operation, as the phone
does not work without mains connection.
u Only use the mains adapter and phone
cord supplied.
u If you buy a replacement phone cord
from a retailer, pay attention to the wiring of the phone jack.
Correct phone jack assignment
1unused
3
2
1
4
5
6
2unused
3a
4b
5unused
6unused
You can now use your phone to make calls
via the fixed line network and can be
reached on your fixed line number.
Your answer machine is set with a default
announcement in answer and record mode
(page 52).
3. Connect the base station to the router (Internet)
For Internet access you need a router connected to the Internet via a modem (this
may be integrated in the router).
2
1. Insert the phone cord into the fixed line
2. Then insert the mains adapter into the
14
1
network connection socket.
mains socket.
2
1
1. Connect an Ethernet cable plug into
the LAN socket at the side of the base
station.
2. Then insert the second Ethernet cable
plug into a LAN socket on the router.
First steps
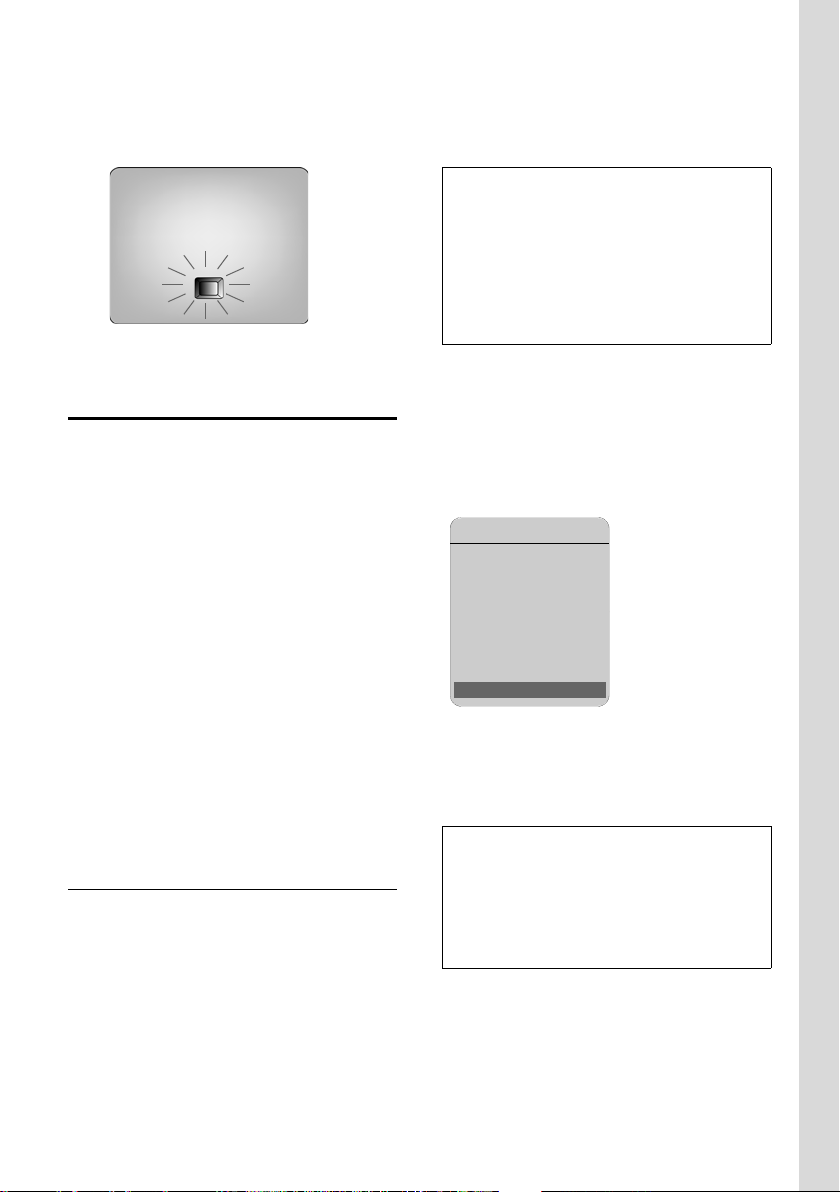
As soon as the cable connecting the
phone and router is plugged in and the
router is turned on, the key lights up on the
front of the base station (paging key).
Making settings for VoIP telephony
Before you can use the Internet (VoIP) to
phone any other numbers on the Internet,
the fixed line network or the mobile
phone network, you need the services of a
VoIP provider who supports the VoIP SIP
standard.
Precondition: You have set up at least one
VoIP account with your VoIP provider.
The following phone settings are necessary in order for you to use VoIP. You can
obtain the following information from
your VoIP provider:
u Your user name with the VoIP provider,
if this is required by the VoIP provider
u Your registration name
u Your password with the VoIP provider
The connection assistant will help you
with the settings.
Starting the connection assistant
Precondition: The base station is connected to the mains power supply and a
router. Your router is connected to the
Internet (page 14).
Tip: Leave VoIP activated as the default
connection for your telephone (default
setting, page 88). The telephone then
attempts to establish a connection
directly to your VoIP provider's server
after the connection assistant is closed.
If incorrect/incomplete information
means that the connection cannot be
established, messages will be displayed
(page 17).
Please note:
Your phone is preconfigured for dynamic
assignment of the IP address. In order for your
router to "recognise" the phone, dynamic IP
address assignment must also be activated on
the router, i.e. the router's DHCP server is activated. Turn to page 89 to find out how to
assign your phone a static IP address if necessary.
As soon as the handset battery is sufficiently charged, the message key on
the handset will flash (approx. 20 minutes
after you have put the handset in the
charging cradle). Press the message key
to start the connection assistant.
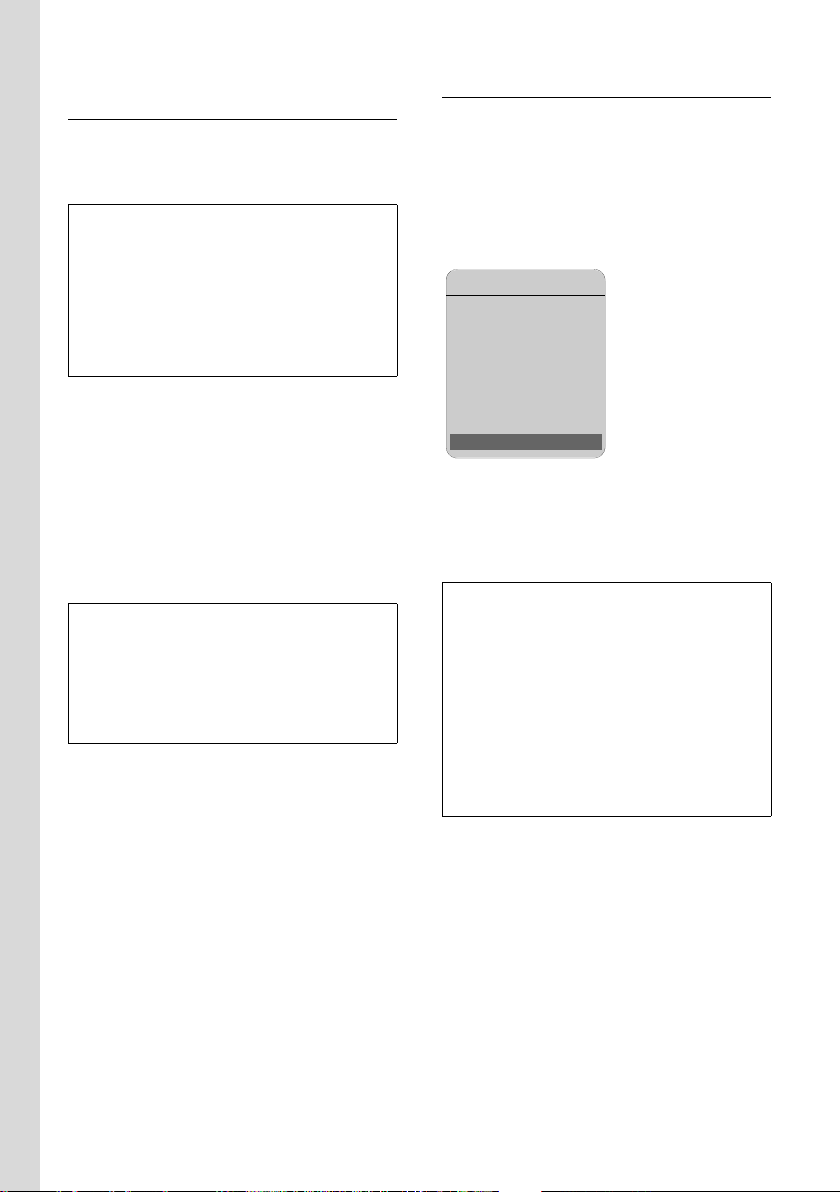
You will see the following display:
Connection Assist.
Start assistant
for entry of VoIP
connection data?
No Yes
§Yes§ Press the display key to start
the connection assistant.
Enter the system PIN (default
is 0000) and press
§OK§.
Please note:
The connection assistant will also start automatically if you try to establish a connection
via the Internet before you have made the necessary settings.
You can also call up the connection assistant at
any time via the menu (page 89).
15
First steps
Entering user data for your first VoIP account
Enter the VoIP user data for the first VoIP
account. Your VoIP provider will supply
you with this data.
You can enter five additional VoIP accounts
(VoIP phone numbers) via the Web configurator at a later stage (page 98). Your phone
(together with your fixed line number) can
then be reached on up to seven different
phone numbers. You can assign the phone
numbers to the individual handsets that are
registered with the base station as send and
receive numbers (page 106).
Username:
Enter the user name and press
§OK§ if this is required by your
provider.
Authent. Name:
Enter the registration name
and press
Authent. Password:
Enter password and press
Please note:
When making these entries, please remember
the VoIP user data is case sensitive. When you
enter text, the first letter is capitalised by
default. If necessary, press and hold the
key to switch between upper and lower case
and numbers.
If you have made all the required entries,
the message "Connection data complete" will
appear on the display.
§OK§.
§OK§.
Completing the VoIP settings
After the entries have been completed,
the handset reverts to idle status.
If all the settings are correct and if the
phone can establish a connection to the
VoIP server, then the internal name of the
handset will be displayed (example):
ÐV
INT 1
15.01.08 09:45
? SMS
You can now use your phone to make calls
via the fixed line network and the Internet.
Callers can reach you on your fixed line
number and your VoIP number.
Please note:
– To ensure that you can always be reached
via the Internet, the router must be permanently connected to the Internet.
– If you try to make a call via a VoIP connec-
tion that is not configured correctly, the following VoIP status message will appear on
the display: IP configuration error: xxx or VoI P
config. error: xxx (xxx = VoIP status code).
The various status codes and their respective meanings can be found in the appendix on page 123.
16

First steps
No connection to the Internet/VoIP server
If one of the following messages is displayed instead of the internal name after
the connection assistant is closed, errors
have occurred:
u Server not accessible!
u Provider registration failed!
Below you will find possible causes and
measures you can take.
Server not accessible!
The phone has no connection to the Internet.
¤ Check the cable connection between
the base station and the router (the
LED on the base station must light up)
and the connection between the router
and the Internet connection.
¤ Check whether the phone is connected
to the LAN.
– It may not have been possible to
dynamically assign an IP address to
the phone
or
– You have assigned a static IP address
to the phone that has either already
been assigned to another LAN sub-
scriber or does not belong to the
router's address block.
¤ Press the paging key on the base sta-
tion. The IP address appears on the
handset display.
¤ Press the talk key on the handset to
end paging call.
¤ Start the Web configurator with the
IP address.
¤ If no connection can be established,
change the settings on the router
(activate DHCP server) or the
phone's IP address.
Provider registration failed!
Your personal data for registering with the
VoIP provider may have been entered
incompletely or incorrectly.
¤ Check your entries for Username,
Authent. Name and Authent. Password.
In particular, check your use of upper
and lower case.
To do this, open the following menu
on your handset:
¢ ¢ Telephony ¢ VoIP
v
(enter system PIN)
(see page 89)
¢ Provider Registr.
Please note:
If port forwarding is activated on your router
for the ports that have been registered as the
SIP port (Standard 5060) and the RTP port
(Standard 5004), it is advisable to deactivate
DHCP and assign the phone a static IP address
(otherwise you may not be able to hear the
other party during VoIP calls):
– Assign IP address via the handset menu:
v
£ £ Base £ Local Network
Or
– Assign IP address via the Web configurator:
¥ Open the following Web page:
Settings
£ IP Configuration.
¥ Select IP address type.
Please note that the IP address and subnet
mask depend on the router's address block.
You must also enter the standard gateway and
DNS server. The IP address for the router is
generally entered here.
17
ECO DECT: reducing the transmission power and power consumption
Belt clip and headset
By using a belt clip and headset (optional)
you can easily make your handset a constant companion both inside the building
and in its immediate vicinity.
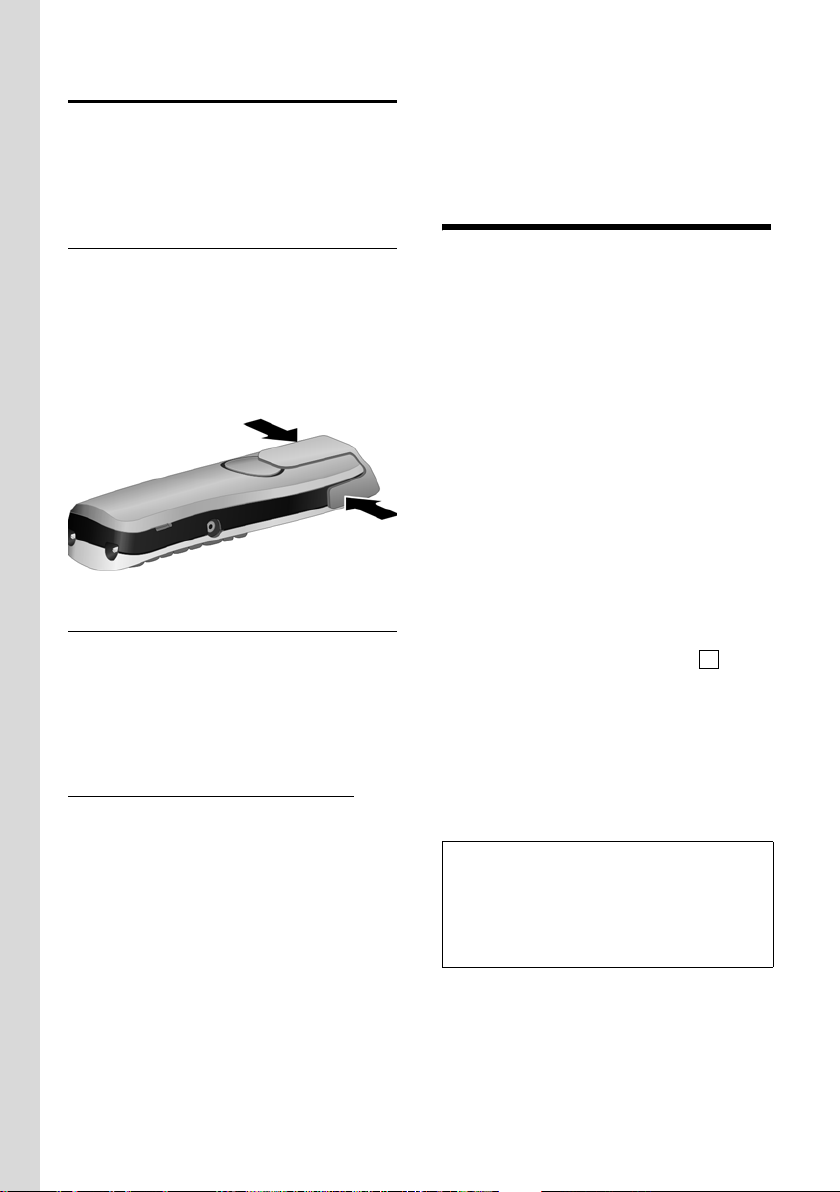
Attaching the belt clip
There are notches for attaching the belt
clip on both sides of the handset at the top
and at the same height as the display.
¤ Press the belt clip onto the back of the
handset so that the protrusions on the
belt clip engage with the notches.
Connection socket for headset
You can connect various headset types
(with 2.5 mm jack connector), including
HAMA Plantronics M40, MX100 and
MX150.
A compatibility list of tested headsets is
available on the Internet at:
www.plantronics.com/productfinder
ECO DECT:
reducing the transmission
power and power
consumption
The base station of your phone is an ECO
DECT base station, this means that:
u The base station uses less power
because it is equipped with a powersaving mains adaptor.
u The reduction of the handset's trans-
mission power is dependent on the
handset's proximity to the base station.
u The base station can also be switched
to eco mode. Eco mode reduces the
transmission power and power consumption of the base station. This can
be set on your handset.
Activating/deactivating eco mode
Precondition: Repeater support must be
deactivated.
¢ ¢ Base ¢ Add. Features
v
Eco Mode Select and press §OK§ (=on).
Eco mode enables an additional reduction
in the transmission power of the
Gigaset S67H/S68H handset. If, with
Eco mode activated, the transmission
power of both the base station and the
handset is reduced, the ½ icon is shown
in the top line of the display.
‰
18
Please note:
– Activating eco mode reduces the range of
the base station.
– Eco mode and repeater support cancel each
other out, i.e. both functions cannot be
used at the same time.
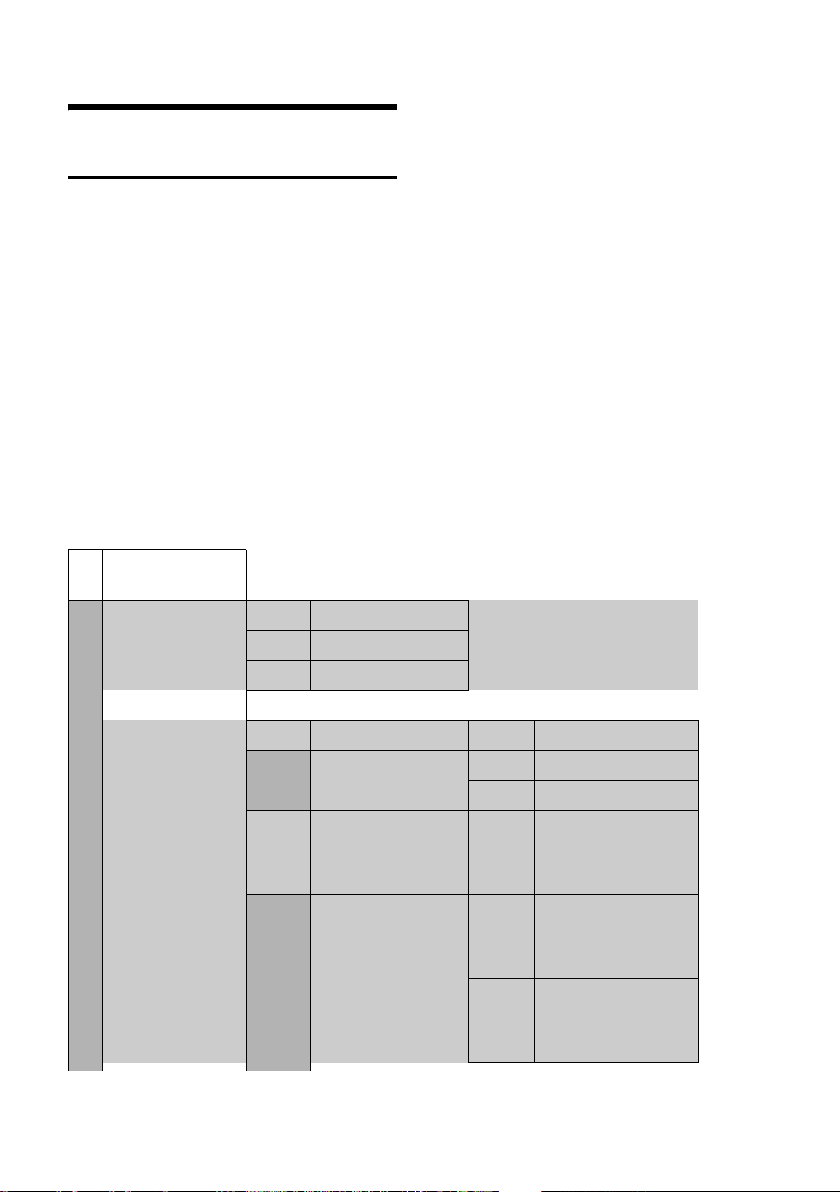
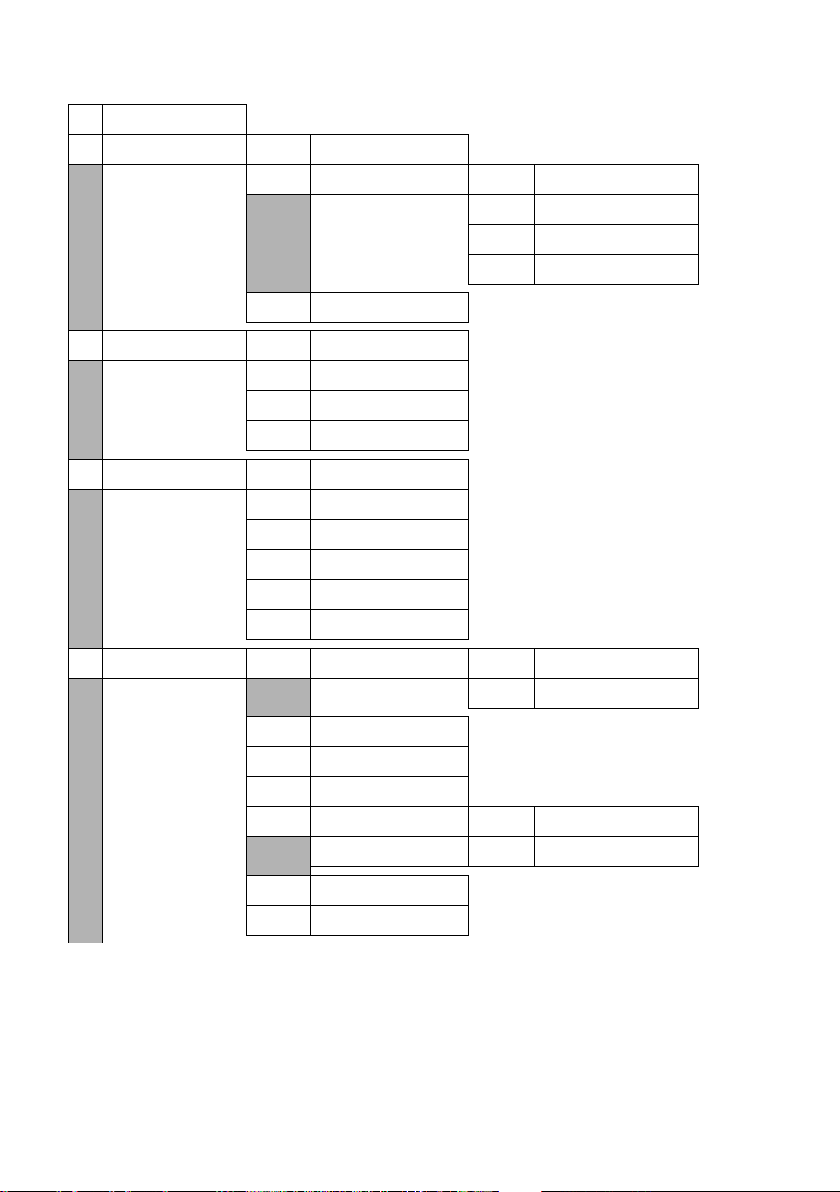
Menu trees
Menu trees
Phone menu
Open the main menu on your phone by right-clicking the control key when the handset is
in idle status: v.
There are two ways to select a function:
Using number combinations (shortcut)
¤ Enter the number combination that is in front of the function in the menu tree.
Example: v N for "Set handset language".
Scrolling through the menus
¤ In the main menu: navigate to the function using the control key (press up/
down or left/right) and press
¤ In the submenus: scroll to the function with the control key (press up or down) and
§OK§.
press
1 Messaging
1-1 SMS An SMS mailbox (general or private) activated
without a PIN
1-1-1 New SMS
1-1-2 Incoming (0)
1-1-3 Outgoing (0)
An SMS mailbox activated with a PIN or 2-3 mailboxes
1-1-1 Mailbox 1-1-1-1 New SMS
1-1-2
to
1-1-4
§OK§.
Mailbox 1
Mailbox 2
Mailbox 3
1-1-1-2 Incoming (0)
1-1-1-3 Outgoing (0)
1-1-2-1
to
1-1-4-1
1-1-2-2
to
1-1-4-2
1-1-2-3
to
1-1-4-3
New SMS
Incoming (0)
Outgoing (0)
page 43
page 44
page 46
page 45
page 44
page 46
page 45
page 44
page 46
page 45
19
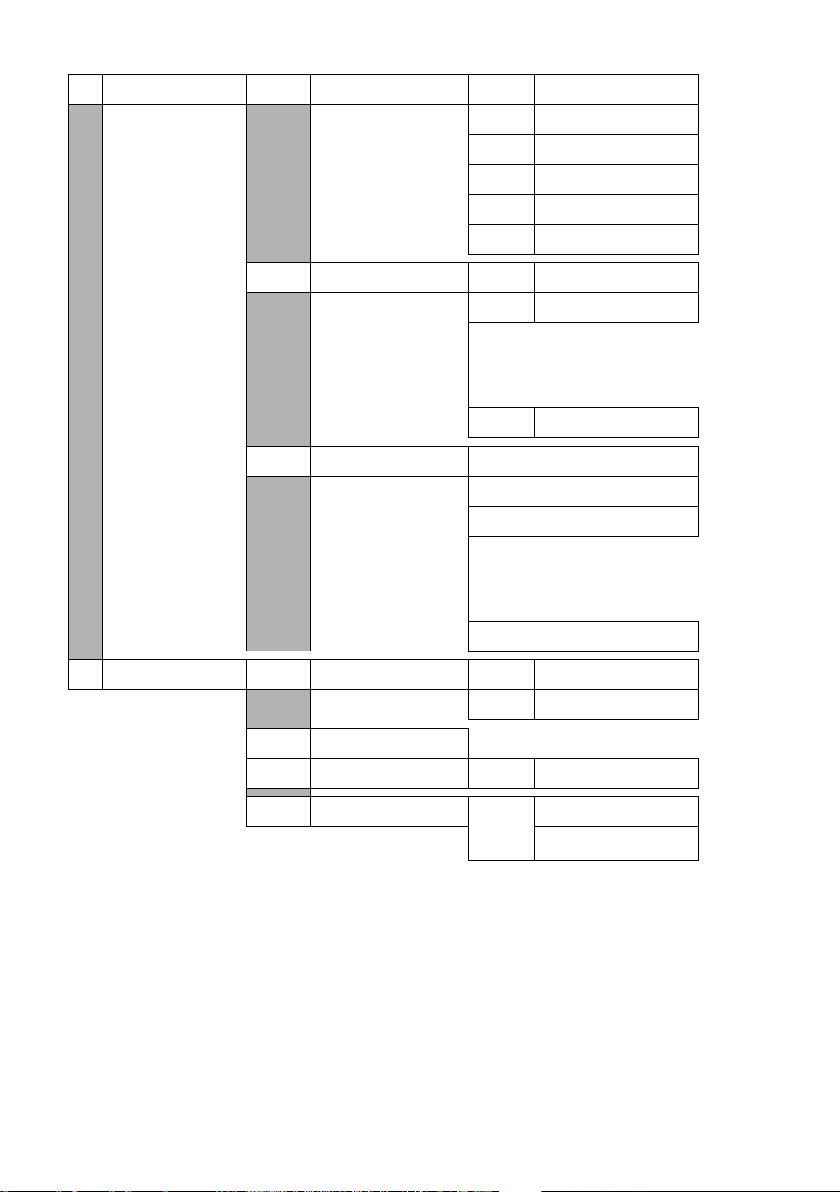
Menu trees
1-1-6 Settings 1-1-6-1 Service Centres
1-2 E-mail
1-3 Messenger 1-3-1 Buddies
1-3-2 User Status 1-3-2-1 Change Status
1-3-3 Messages
2 Sel. Services
2-1 VoIP 2-1-6 Call Divert
2-1-7 Call Waiting
2-2 Fixed Line 2-2-4 Automatic Recall
2-2-6 Call Divert
2-2-7 Call Waiting
2-3 Ringback Off
2-4 Always anon.
2-5 Next Call
1-1-6-2 SMS Mailboxes
1-1-6-3 Notify Number
1-1-6-4 Notify Type
1-1-6-5 Status Report
1-3-2-2 Info
page 50
page 49
page 48
page 48
page 45
page 60
page 66
page 65
page 65
page 67
page 33
page 34
page 33
page 31
page 32
page 33
page 31
page 31
3 Calls List
4 Add. Features
4-3 Room Monitor
4-4 Data Transfer 4-4-3 Directory
4-6 Missed Alarms
5 Alarm Clock
6 Calendar
7 Resource Dir.
7-1 Screensavers
7-2 Caller Pictures
7-3 Sounds
20
page 76
page 37
page 85
page 83
page 84
page 83
page 83
page 83
8 Settings
8-1 Date/Time
8-2 Audio Settings 8-2-1 Handset Volume
8-2-2 Ringer Settings 8-2-2-1 Ext. Calls
Menu trees
page 11
page 81
8-2-2-2 Internal Calls
8-2-2-3 Appointments
8-2-2-4 All
8-2-3 Advisory Tones
8-3 Display 8-3-1 Screen Saver
8-3-2 Colour Scheme
8-3-3 Contrast
8-3-4 Backlight
8-4 Handset 8-4-1 Language
8-4-2 Auto Answer
8-4-3 Register H/Set
8-4-4 Select Base
8-4-5 Area Codes
8-4-6 Reset Handset
8-5 Base 8-5-1 Calls List Type 8-5-1-1 Missed Calls
8-5-1-2 All Calls
8-5-2 Music on hold
8-5-3 System PIN
8-5-4 Base Reset
8-5-5 Add. Features 8-5-5-1 Repeater Mode
8-5-5-3 Eco Mode
page 82
page 78
page 78
page 78
page 79
page 78
page 80
page 73
page 74
page 85
page 86
page 40
page 87
page 86
page 87
page 87
page 18
8-5-6 Local Network
8-5-8 Software Update
page 89
page 88
21
Menu trees
8-6 Voice Mail 8-6-1
8-6-2 Network AM(s) 8-6-2-1 Net AM: Fxd. line page 70
8-6-3 Set Key 1
Local AM
8-6-1-1 Ans Machine
8-6-1-2 Call Screening
8-6-1-3 Announcements
8-6-1-4 Message Length
8-6-1-5 Record Quality
8-6-1-6 Ring Delay
page 52
page 56
page 53
page 57
page 57
page 57
8-6-2-2 Net AM: IP1
:
(dependent on the number of configured
VoIP phone numbers and receive numbers
on the handset)
8-6-2-7 Net AM: IP6
Local AM
page 58
Net AM: Fxd. line page 71
Net AM: IP1
:
(dependent on the number of configured
VoIP phone numbers and receive numbers
on the handset)
Net AM: IP6
8-7 Telephony 8-7-1 Default Line 8-7-1-1 VoIP
8-7-1-2 Fixed Line
8-7-2 Connection Assist.
8-7-6 Fixed Line 8-7-6-2 Recall
8-7-7 VoIP
Enter
system
PIN.
Show Stat. on HS
Provider Registr.
22
page 88
page 89
page 91
page 90
page 89

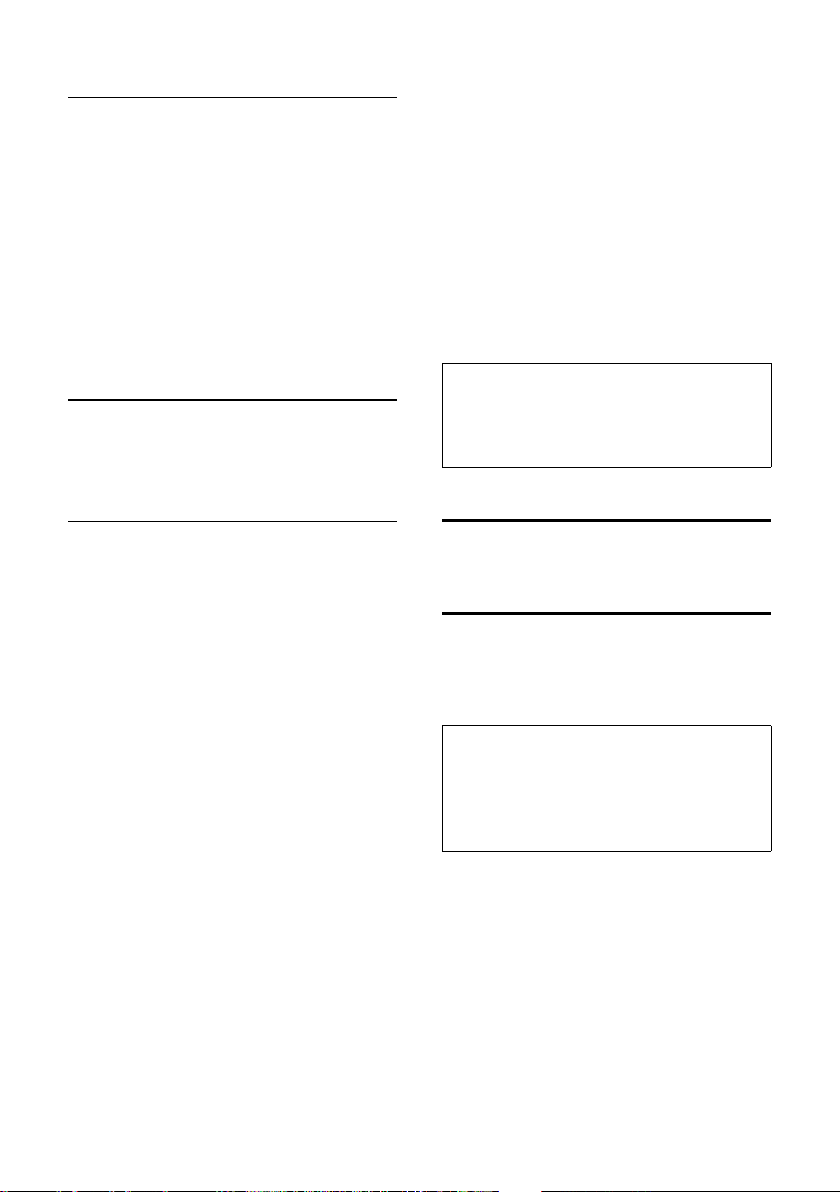
Web configurator menu
Menu trees
Home
Settings
Status
IP Configuration
Telephony
Messaging
Services
Handsets
Miscellaneous
Device
Connections
Audio
Number Assignment
Call Forwarding
Dialling Plans
Network Mailbox
Advanced Settings
Messenger
E-Mail
page 92
page 96
page 98
page 103
page 106
page 107
page 110
page 112
page 107
page 112
page 113
page 113
page 114/page 114
page 116 to page 116
page 119
23

Making calls with VoIP and the fixed line network
Making calls with VoIP and
the fixed line network
Making an external call
External calls are calls made via the public
telephone network (fixed line network) or
via the Internet (VoIP). You generally
decide which connection type you want to
use for a specific call when you dial the
number.
Please note:
– You can conduct up to three separate exter-
nal calls via your base station (using different handsets): two calls via VoIP and one
via the fixed line network.
– You can define dialling plans for certain
numbers or area codes by determining the
connection and therefore the billing
method to be used when these numbers
are dialled.
– Dialling with the directory (page 35), quick
dial keys (page 79) or last number redial list
(page 39) saves repeated keying of phone
numbers. You can modify or add to these
numbers on a call-to-call basis.
– If you use VoIP to make a call to the fixed
line network, you may also have to dial the
area code for local calls (depending on the
VoIP provider). You can avoid having to dial
your own area code by entering it into the
configuration (page 109). Your area code is
then added automatically when you make
local calls.
Use the talk key to select the type of
connection and make the call
By briefly pressing or pressing and holding
the call key , you can determine the
type of connection for the call you want to
make (fixed line network or VoIP).
Precondition: You have not defined any
dialling plans for this number.
Enter number (without suffix)
and briefly press/press and
hold the talk key.
A default connection is established on
your phone (fixed line network or VoIP,
page 88/page 105).
¤ Briefly press the talk key if you
want to make a call via this default connection.
¤ Press and hold the talk key if you
want to make the call via the other connection type.
If you have assigned a number of VoIP
numbers to your phone, you can define
which VoIP number (VoIP account) is used
for external calls from each specific handset (handset send number, page 106).
Please note:
If you are using a GAP compatible handset
other than the Gigaset handsets C47H, S67H,
S68H, SL37H, S45 and C45, every call will be
made via the standard connection, even if you
press and hold the talk key. If you want to use
the non-default connection to make a call,
enter a star (*) at the end of the number.
Selecting the connection type using
display keys and making a call
Precondition: The display keys on your
handset have been assigned
§IP§ (page 79).
or
§FixedLine§ / §IP§
Press the display key to select
the connection type.
Enter the number or select
from the directory.
/ Press the talk or handsfree key.
The number will always be called via the
selected connection type.
§FixedLine§ and/
24
Making calls with VoIP and the fixed line network
Entering an IP address
You can also dial an IP address instead of a
phone number using VoIP.
¤ Press the star key to separate the
sections of the IP address
(e.g. 149*246*122*28).
¤ If necessary press the hash key to
attach the SIP port number of the person you are calling to the IP address
(e.g. 149*246*122*28#5060).
You cannot dial IP addresses using a line
suffix.
Cancelling the dialling operation
You can cancel the dialling operation with
the end call key .
Dialling emergency numbers – defining dialling plans
You can use the Web configurator to block
certain numbers or to define which of
your numbers (fixed line network, VoIP)
should be used to call specific numbers
(Dialling Plans, see page 110).
If you enter a number that has a defined
dialling plan, the call will be made via the
line defined in the dialling plan – regardless of whether the talk key is pressed
briefly or pressed and held. Any automatic
area code will not be prefixed to the
number.
Emergency numbers
Dialling plans for emergency numbers
(e.g. the local emergency service
number) are factory-set for certain countries. Emergency calls are then always
made via the fixed line network.
You cannot delete or deactivate these dialling plans. However, you can change the
connection through which each emergency number should be called (e.g. if the
phone is not connected to the fixed line
network). You must make sure that the
VoIP provider for the selected connection
supports emergency calls.
If your phone does not have default dialling plans for emergency calls, you should
define the rules yourself (page 110).
Assign them to a connection that you
know supports emergency calls. Emergency calls are always supported by fixed
line networks.
Please note: If no rules are defined for
emergency numbers and you have programmed an automatic local area code
(page 109), the code will be prefixed to
emergency numbers as soon as they are
dialled via a VoIP connection.
Please note:
Emergency numbers cannot be dialled if the
keypad lock is activated. Before dialling, press
and hold the hash key
keypad lock.
, to release the
Ending a call
Press the end call key.
Accepting a call
The handset indicates an incoming call in
three ways: by ringing, by a display on the
screen and by the flashing handsfree key
.
Please note:
Only calls to receive numbers assigned to your
handset will be signalled (page 106).
Calls made to a number that is not assigned to
a handset as a receive number will not be signalled on any handset.
You can accept the call by:
¤ Pressing the talk key .
¤ Pressing the handsfree key .
¤ Pressing the display key Ÿ to for-
ward the call to the answer machine
(page 56).
If the handset is in the charging cradle and
the Auto Answer function is activated
(page 80), the handset will take a call
automatically when you lift it out of the
cradle.
25
Making calls with VoIP and the fixed line network
If the ringer tone is intrusive, press the
§Silence§ display key. You can accept the call
so long as it is displayed on the screen.
Please note:
You can reject VoIP calls by pressing the end
call key . The caller receives an appropriate
message.
Pressing the end call key on an incoming call
from the fixed line network will cancel the
ringer tone (same as §Silence§).
Calling Line Identification
When you receive a call from the Internet,
the caller's number and/or the name they
have specified is displayed on the screen.
When you receive a call from the fixed line
network, the caller's number is displayed
on the screen if the following conditions
are met:
u Your fixed line network provider sup-
ports CLIP, CLI:
– CLI (Calling Line Identification):
number of the caller is transmitted
– CLIP (Calling Line Identification Pres-
entation): the caller's number is dis-
played
u You have arranged CLIP with your net-
work provider.
u The caller has arranged CLI with the
network provider.
If the phone number is identified and the
caller's number is saved in your handset's
local directory, the name will be displayed
from the directory. A CLIP image allocated
to the name will also appear in the display.
Call display
You can use the display to determine
whether the call is for your fixed line network number or one of your VoIP numbers.
Calls to your fixed line number
1234567890
for Fixed Line
× Silence
1 Ringer icon or the CLIP picture assigned to
the caller (page 36)
2 Number or name of caller
3 Display of the receive number: The name is
displayed that you have assigned to your
fixed line network number (page 102).
Calls to your VoIP number
IP: 1234567890
for Anna
× Silence
1 Ringer icon or the CLIP picture assigned to
the caller (page 36)
2 Number or name of caller
3 Receive number: Indicates which of your
VoIP phone numbers the caller has dialled.
You assign the names when you enter the
VoIP phone numbers into the phone
(page 99).
1
2
3
1
2
3
26

Making calls with VoIP and the fixed line network
Display when Calling Line Identification is
withheld
The caller's name and/or number will not
be displayed if the caller has suppressed
Calling Line Identification:
u VoIP: The caller has activated the
"anonymous calling" function.
u Fixed line network: The caller has acti-
vated the "anonymous calling" function
or has suppressed Calling Line Identification from the fixed line network provider.
The following is displayed in place of the
number:
u For calls to one of your VoIP numbers
(example):
IP:Unavailable
Anonymous
for IP1
× Silence
u For calls to your fixed line network
numbers:
– External, if no number is transmitted.
– Withheld, if the caller has withheld
Calling Line Identification.
– Unavailable, if the caller has not
arranged Calling Line Identification.
VoIP: Displaying the called party's phone number (COLP)
Preconditions:
u Your VoIP provider supports COLP (Con-
nected Line Identification Presenta-
tion). You may have to ask your pro-
vider to activate COLP (contact your
VoIP provider for more information).
u The called party has not activated COLR
(Connected Line Identification Restric-
tion).
For outgoing VoIP calls, the phone
number of the connection on which the
call is received is displayed on the handset.
The displayed number may differ from the
number you have dialled. Examples:
u The called party has activated call for-
warding.
u The call is answered by another con-
nection within a PABX system.
If there is an entry in the directory for this
phone number, the corresponding name
will be displayed.
Please note:
– The number of the connection you have
reached (or the assigned name) will also be
displayed instead of the called number during toggling, conference calls and consultation calls.
– When the phone number is copied to the
directory (§Options§
the last number redial list, the dialled
number (not the displayed number) is copied.
£ Copy to Directory) and
27

Operating the handset
Handsfree talking
In handsfree mode, instead of holding the
handset to your ear you can put it down,
for example on the table in front of you.
This allows others to participate in the call.
Activating/deactivating handsfree mode
Activating while dialling
Enter number and press
briefly/press and hold the
handsfree key to select the
connection type (page 24).
¤ You should inform your caller before
you use the handsfree function so that
they know someone else is listening.
Switching between earpiece and
handsfree mode
¤ Press the handsfree key to activate/
deactivate handsfree talking during a
call and when listening to the answer
machine.
If you wish to place the handset in the
charging cradle during a call:
¤ Press and hold the handsfree key
while placing the handset in the charging cradle.
¤ If the handsfree key does not light
up, press the key again.
For how to adjust the loudspeaker volume, see page 80.
Cancelling muting
/ Press the display key or the
end call key to cancel the muting.
Operating the handset
Activating/deactivating the handset
In idle status, press and hold
the end call key.
You will hear the confirmation tone.
Activating/deactivating the keypad lock
Press and hold the hash key.
You will hear the confirmation tone. The
Ø icon appears in the display when the
keypad lock is activated.
The keypad lock deactivates automatically
when you receive a call and activates
again after the call.
Please note:
The handset displays an advisory message if
you press a key by accident while the keypad
lock is on. To deactivate the keypad lock, press
and hold the hash key
.
Muting the handset
You can deactivate the microphone in
your handset during an external call. Your
caller will hear hold music, if activated
(page 87).
Muting the handset
Press the control key on the
left to mute the handset.
28

Operating the handset
Control key
In this user guide, the side/position of the
control key that you must press in the
given operating situation is shown in
black (top, bottom, right, left). Example:
for "press up on the control key".
The control key has a number of different
functions:
When the handset is in idle status
Press briefly to open the hand-
set directory.
v Open the main menu.
Open the list of handsets.
Call up the menu for setting
the handset's call volume
(page 80), ringer tones
(page 81) and advisory tones
(page 82).
In the main menu and in input fields
You can use the control key to move the
cursor up , down , right v or
left .
In lists and submenus
/ Scroll up/down line by line.
v Open the submenu.
Go back one menu level or
cancel.
Display keys
The current display functions are shown in
the bottom display line and are reversedhighlighted. The function of the display
keys changes depending on the particular
operating situation.
Example:
? SMS
1 Current display key functions are shown in
the bottom display line.
2 Display keys
The most important display icons are:
Left display key, as long as it
has not been assigned a function (page 79).
§Options§ Open a situation-dependent
menu (context menu).
W Delete key: deletes one char-
acter at a time from right to
left.
Î Go back one menu level or
cancel operation.
Fetch e-mail address from the
directory.
Copy number into directory.
Ÿ Forward external call to
answer machine.
1
2
During an external call
Briefly press to open the hand-
set directory.
Initiate an internal consulta-
tion call.
Adjust the loudspeaker vol-
ume for earpiece and handsfree mode.
29

Operating the handset
Reverting to idle status
You can revert to idle status from anywhere in the menu as follows:
¤ Press and hold the end call key .
Or:
¤ Do not press any key: after 2 minutes
the display will automatically revert to
idle status.
Changes that you have not confirmed or
saved by pressing
Save Entry
You can find an example of the display in
idle status on page 1.
§OK§ will be lost.
§OK§, §Yes§, §Save§, §Send§ or
Menu guidance
Your telephone's functions are accessed
using a menu that has a number of levels.
Main menu (first menu level)
¤ To open the main menu, press v with
the handset in idle status.
The main menu functions are shown in
the display as a list with colour icons.
Accessing a function
¤ Navigate to the function using the con-
trol key /. The name of the func-
tion is displayed in the display header.
Press the display key
Or:
§OK§.
¤ Enter the number that is in front of the
function in the menu tree (page 19)
(shortcut).
The corresponding submenu (the next
menu level) is opened.
Submenus
The functions in the submenus are displayed as lists.
To access a function:
¤ Scroll to the function with the control
key and press
Or:
§OK§.
¤ Enter the number combination that is
in front of the function in the menu
tree (page 19) (shortcut).
Briefly press the end call key once to
return to the previous menu level/cancel
the operation.
Correcting incorrect entries
You can correct incorrect characters in the
text by navigating to the incorrect entry
using the control key. You can then:
u Press X to delete the character to the
left of the cursor.
u Insert a new character to the left of the
cursor.
u Overwrite the flashing character when
entering time and date, IP addresses
etc.
You will find examples of icons used,
menu entries and multiple line input in the
appendix to this user guide, page 129.
30

Network services
Network services
Network services are functions made
available by your fixed line network or
VoIP provider.
Anonymous calling – withholding caller ID
Phone number identification can be withheld (CLIR = Calling Line Identification
Restriction). Your number will not be displayed when making outgoing calls. You
are calling anonymously.
Preconditions:
u For anonymous calls via your fixed line
network connection you need to have
requested the relevant service (feature)
from your fixed line network provider.
u Anonymous calls are only possible via
VoIP connections through providers
that support the "anonymous calling"
function. You may need to activate the
function with your VoIP provider.
Activating/deactivating anonymous calling for all calls
Withholding caller ID can be activated/
deactivated permanently for all your
phone's connections (fixed line network
and VoIP).
When this function is activated, the phone
number will be withheld both for fixed
line network calls and for calls via a VoIP
connection. Withholding caller ID is activated for all registered handsets.
¢ Sel. Services
v
Always anon.
Select and press
If the Always anon. function is activated,
Withhold number active is shown in the
handset's idle display.
‰
§OK§ (=on).
Activating/deactivating "anonymous calling" for the next call
You can change the setting for withholding caller ID for the next call.
¢ Sel. Services ¢ Next Call
v
Anonymous:
Select Yes / No to activate/
deactivate withholding caller
ID and press
If necessary, enter the phone
number with line suffix.
§Send§ Press the display key. The
phone number is dialled. If
you have not specified a line
suffix, the number will be
dialled via the default connection.
§Dial§.
Further network services in the fixed line network
The following network services can only
be used for making calls via the fixed line
network. You will need to request them
from your fixed line network provider.
¤ If you require assistance, please con-
tact your network provider.
Settings for all calls
If you have completed one of the following procedures, a code is sent.
¤ After confirmation from the telephone
network, press the end call key .
You can set the following features:
General call forwarding
v ¢ ¢ Fixed Line ¢ Call Divert
¤ Change multiple line input:
When:
Select All Calls.
All Calls: Calls are forwarded immedi-
ately, i.e. no more calls to your fixed
line number are signalled on your
phone.
31

Network services
Call No.:
Press the display key
to which call is to be forwarded and
§Save§. You can enter a fixed line,
press
VoIP or mobile number.
Status:
Activate/deactivate call forwarding.
§Edit§. Enter number
¤ Press the display key §Send§.
¤ Press the end call key after the
announcement from the telephone
network.
Activating/deactivating call waiting
If call waiting is activated, a caller on the
fixed line network will hear the ringing
tone if you are already conducting a
phone conversation using your fixed line
connection. This call is announced acoustically and visually on your handset
screen.
Calls on the VoIP connection are not
shown as call waiting. They are signalled
on other registered handsets. If no other
handset is available, the caller will hear
the busy tone.
Accepting/rejecting a waiting call, see
page 32.
¢ ¢ Fixed Line ¢ Call Waiting
v
Status: Activate/deactivate.
¤ Press the display key §Send§.
¤ Press the end call key after the
announcement from the telephone
network.
Please note:
The setting does not affect the procedure for
call waiting on the VoIP connection. For how to
activate/deactivate call waiting for the VoIP
connection, see page 34.
Functions during a call
Initiating ringback
You hear the busy tone.
§Options§ ¢ Ringback
Press the end call key.
Consultation call
During a call:
§Ext.Call§ Press the display key.
Enter a number or copy it from
the directory and press
The number will be dialled via the fixed
line connection.
§OK§.
Please note:
After a few seconds, the number selected for a
consultation call is saved in the last number
redial list.
You have the following options:
u Toggling:
¤ Use to toggle between the par-
ticipants.
– End call with active participant:
§Options§ End Active Call.
u Conference call:
– Call both participants: press the dis-
play key
– End call with both participants:
press the end call key .
Accepting a waiting call
Precondition: Call waiting is activated
(page 32).
§Accept§ Press the display key.
Or: if the caller's number is not transferred:
§Options§ ¢ Accept waiting call
You have the option of toggling or holding
a conference call.
§Conf.§.
32

Network services
Please note:
– Without CLIP, a waiting call is only
announced with a signal tone.
– If the first call was an internal call, the inter-
nal connection is ended.
– An internal call waiting is shown on the dis-
play. You can neither accept the internal
call nor reject it.
Rejecting a waiting call
§Options§ ¢ Reject waiting call
Favouring a waiting call
The current call is ended and the waiting
call is answered.
§Options§ ¢ Favour waiting call
Functions after a call
Cancelling ringback
v ¢ ¢ Ringback Off
If you have cancelled the ringback, a code
is sent.
¤ After confirmation from the telephone
network, press the end call key .
Call back last caller or last dialled number
v ¢ ¢ Fixed Line
¢ Automatic Recall
Further network services for VoIP
You can use the following network services to make calls via the VoIP connection.
Settings for all calls
General call forwarding
Precondition: The VoIP provider supports
call forwarding.
¢ ¢ VoIP ¢ Call Divert
v
The display shows a list of configured and
activated VoIP phone numbers of your telephone. Numbers for which call forwarding is activated are marked with .
‰
¤ Select the phone number for which you
want to activate or deactivate call for-
warding, and press
§OK§.
¤ Change multiple line input:
When:
Select All Calls / No Answer / When Busy.
All Calls: Calls are forwarded immedi-
ately, i.e. no more calls are signalled on
your phone for this VoIP phone
number.
No Answer: Calls are forwarded if no-
one replies within several rings.
When Busy: Calls are forwarded if your
line is busy.
Call No.:
Press the display key
to which call is to be forwarded and
§Save§.
press
You can state a fixed line network, VoIP
or mobile number for forwarding calls
from a VoIP number.
Status:
Activate/deactivate call forwarding.
§Edit§. Enter number
¤ Press the display key §Save§.
Please note that call forwarding from your
VoIP number may incur additional costs. Please
consult your VoIP provider.
33

Network services
Activating/deactivating call waiting
Precondition: Your phone will permit two
parallel VoIP connections (s. Allow 1 VoIP
call only on page 103).
If call waiting is activated, a caller on one
of your VoIP connections will hear the
ringing tone if you are already on a call
using this VoIP connection. This call is
announced acoustically and visually on
your handset screen.
Calls on the fixed line connection are not
signalled as call waiting. They are signalled on other registered handsets to
which the fixed line number has been allocated as a receive number. If no other
handset is available, the caller will hear
the busy tone.
Accepting/rejecting a waiting call, see
page 34.
¢ ¢ VoIP ¢ Call Waiting
v
Status: Activate/deactivate.
¤ Press the display key §Save§.
Please note:
The setting applies to all VoIP phone numbers.
It does not affect the procedure for call waiting
on the fixed line connection. For how to activate/deactivate call waiting for the fixed line
connection, see page 32.
Functions during a call
Precondition: Your phone will permit two
parallel VoIP connections (see Allow 1 VoIP
call only on page 103).
Consultation call
During a call:
§Ext.Call§ Press the display key.
Enter the number or copy
from the directory and briefly
press/press and hold the
talk key .
The number must be dialled via VoIP.
.
Please note:
After a few seconds, the number selected for a
consultation call is saved in the last number
redial list.
If the participant answers, you have the
following options:
u Toggling:
¤ Use to toggle between the par-
ticipants.
¤ End call with active participant:
§Options§ End Active Call.
u Conference call:
¤ Call both participants: press the dis-
play key
§Conf.§.
¤ End the conference call (toggling):
press display key
§EndConf§.
¤ End call with both participants:
press the end call key .
u Forwarding (provider dependent):
Precondition: You are toggling calls
and you phoned the currently active
participant yourself.
¤ To connect the two external partici-
pants:
§Options§ Call Transfer
If call forwarding was successful, a
message will appear to this effect. The
handset will then switch to idle.
Accepting a waiting call
Precondition: Call waiting is activated
(page 34).
§Accept§ Press the display key.
You have the option of toggling or holding
a conference call.
Please note:
– If the first call was an internal call, the inter-
nal connection is ended.
– An internal call waiting is shown on the dis-
play. You can neither accept the internal
call nor reject it.
34

Using the directory and lists
Using the directory and lists
The options are:
u Directory
u Call-by-call list
u If applicable, online directories
u Last number redial list
u E-mail, SMS and messenger list
u Calls list
u Answer machine list
You can store a maximum of 250 entries in
the directory and call-by-call list (the
actual number depends on the size of the
individual entries).
You create the directory and call-by-call
list for your own individual handset. However, you can send the lists or individual
entries to other handsets (page 37).
Directory/call-by-call list
Please note:
For quick access to a number from the directory or the call-by-call list (quick dial), you can
assign the number to a key (page 37).
Directory
In the directory, you can save
u Up to three numbers and associated
first names and surnames
u VIP designation and VIP ringer tone
(optional)
u E-mail address (optional)
u CLIP pictures (optional)
u Anniversaries with reminder
¤ With the handset in idle status, open
the directory by pressing the key.
Length of the entries (directory)
3 numbers:
each max. 32 digits
First name and surname:
each max. 16 characters
E-mail address
max. 60 characters
Please note:
Some VoIP providers do not support local calls
for calls to the fixed line network. In this case,
always enter the fixed line number with the
area code in your directory. Alternatively, you
can also use the Web configurator to define an
area code, which is automatically prefixed to
all numbers that are dialled via VoIP without an
area code (page 109).
Call-by-call list
The call-by-call list is used to store access
codes for network providers (called "callby-call numbers"), that can be put ahead
of the numbers when dialling via the fixed
line network.
¤ Open the call-by-call list in idle status
by pressing the C key.
Length of entries
Number: max. 32 digits
Name: max. 16 characters
Storing a number in the directory
¢ New Entry
¤ Change multiple line input:
First Name / Surname:
Enter a name in at least one of the
fields.
Phone (Home) / Phone (Office) / Phone (Mobile)
Enter a number in at least one of the
fields.
E-mail
Enter e-mail address.
Annivers.:
Select On or Off.
With setting On:
Enter Anniversary (Date) and Annivers.
(Time) (page 38) and select reminder
type: Annivers. (Signal).
35

Using the directory and lists
Caller Picture
Precondition: Calling Line Identification
(CLIP).
If required, select a picture to be displayed when the caller calls.
The options are:
– CLIP pictures that are supplied with
the handset.
The pictures are saved in the My Stuff
section of the handset (page 82).
¤ Save changes (page 130).
Please note:
– To find out how to enter IP addresses, turn
to page 25.
– If you add a star (*) at the end of the
number, the number will be dialled via the
non-standard connection (page 88), even
if you briefly press the talk key . On condition that no dialling plan has been
defined for the number (page 110).
– You can use the Web configurator to save
the directory to a file on your PC, where it
can be edited and then sent back to the
handset (page 114). Or you can transfer
Outlook contacts from the PC to the handset's directory.
Storing a number in the call-by-call list
C ¢ New Entry
¤ Change multiple line input:
Number:
Enter the number.
Name:
Enter name.
Selecting entries in the directory and call-by-call list
/ C Open the directory or call-by-
call list.
You have the following options:
u Use to scroll to the entry until the
required name is selected.
u Enter the first character of the name (in
the directory: first character of the surname or of the first name if only the
first name has been entered), or scroll
to the entry using .
Dialling with the directory/call-by-call list
/ C ¢ (Select entry; page 36)
Briefly press/press and hold
the talk key. The number is
dialled using the selected connection type (page 24).
Please note:
You can only dial IP addresses via VoIP.
Managing directory/call-by-call list entries
/ C ¢ (Select entry; page 36)
Viewing entries
§View§ Press the display key. The
entry is displayed.
Back with
§OK§.
Editing entries
§View§ §Edit§ Press the display keys one after
the other.
¤ Carry out changes and save.
Using other functions
/ C ¢ (Select entry; page 36)
§Options§ Open menu.
The following functions can be selected
with :
Display Number
Change or add to a saved number and
then dial it (press talk key ).
Edit Entry
Edit selected entry.
Delete Entry
Delete selected entry.
VIP Entry (directory only)
Mark a directory entry as VIP (Very
Important Person) and assign it a par-
ticular ringer tone. You can then iden-
tify VIP calls by their ringer tone mel-
ody.
Precondition: Calling Line Identifica-
tion (page 26).
36

Using the directory and lists
Copy Entry
Send a single entry to a handset
(page 37).
Delete List
Delete all entries in the directory or in
the call-by-call list.
Copy List
Send complete list to a handset
(page 37).
Available Memory
Display the available entries in the
directory and call-by-call list.
Using quick dial keys
How to assign numbers to the digit keys
on your handset is described on page 79.
¤ Press and hold the required quick dial
key.
If there is a valid line suffix at the end of
the number in the directory (e.g.: #1), the
number will be dialled via the line belonging to the suffix (page 98).
A number with a hash key (#) only at the
end will be dialled via the default connection.
A number with a star (*) at the end will be
dialled via the non-default connection.
If no suffix is entered, the number will be
dialled via the default connection. Exception: A dialling plan has been defined for
the number (page 110).
Sending the directory/call-by-call list to another handset
Preconditions:
u The sending and receiving handsets
must both be registered to the same
base station.
u The other handset can send and receive
directory entries.
/ C
¢ (Select entry; page 36)
¢ §Options§ ¢ Copy Entry / Copy List
¢ to Internal
Select the internal number of
the receiving handset and
§OK§.
press
A successful transfer is confirmed by a
message and confirmation tone on the
receiving handset.
You can transfer several individual entries
one after the other by responding
the Copy next entry? prompt.
§Yes§ to
Please note:
You can also send the complete directory via
data transfer, without opening the directory:
v
£ £ Data Transfer £ Directory
Please note:
u Entries with identical numbers are not
overwritten in the receiver handset.
u The transfer is cancelled if the phone
rings or if the memory of the receiving
handset is full.
Copying a displayed number to the directory
You can copy numbers to the directory
that are displayed in a list, e.g. the calls list
or the last number redial list, in an SMS or
during a call.
A number is displayed:
§Options§ ¢ Copy to Directory
Or:
Press the display key.
The directory is opened.
New Entry / Directory entry
Select and press
/ /
Select and press
The number is copied to the relevant
number field (Phone (Home) / Phone (Office)
/ Phone (Mobile)).
§OK§.
§OK§.
¤ Complete the entry if necessary, see
page 35.
During the number transfer from the
answer machine list, the message playback is interrupted.
37

Using the directory and lists
Copying a number or e-mail address from the directory
In many operating situations, you can
open the directory to copy a number or email address, for example. Your handset
need not be in idle status.
¤ Depending on the operating situation,
open the directory with or .
Select an entry (page 36).
Saving an anniversary in the directory
You can save an anniversary for every
number in the directory and specify a time
when you will receive a reminder call on
the anniversary.
Anniversaries are automatically recorded
in the calendar (page 84).
¢ (Select entry; page 36)
§View§ §Edit§ Press the display keys one after
the other.
Scroll to the Annivers.: line.
v Select On.
¤ Change multiple line input:
Anniversary (Date)
Enter day/month/year in 8-digit format.
Annivers. (Time)
Enter the hour/minute for the reminder
call in 4-digit format.
Annivers. (Signal)
Select the type of signal for the
reminder.
¤ Save changes (page 130).
Deactivating anniversaries
¢ (Select entry; page 36)
§View§ §Edit§ Press the display keys one after
the other.
Scroll to the Annivers.: line.
v Select Off.
§Save§ Press the display key.
Reminder call on an anniversary
A reminder call is signalled on the handset
using the selected ringer tone.
You have the following options:
§SMS§ Write an SMS.
§Off§ Press the display key to
acknowledge and end the
reminder call.
Viewing missed anniversaries
In idle status, you are reminded of an
elapsed and unacknowledged anniversary
by the one-off display of
§Appoint.§.
¤ View appointment:
§Appoint.§ Press the display key.
You now have the following options:
§SMS§ Write an SMS.
§Delete§ Delete reminder.
After deleting, press the display key or
Back in idle status,
no longer displayed.
You can also view missed anniversaries
afterwards (see page 85).
§Go Back§:
§Appoint.§ is
Please note:
A time must be specified for reminder calls. If
you select a visual signal, a time is not required
and is automatically set to 00.00.
38

Using the directory and lists
Last number redial list
The last number redial list contains the
20 numbers last dialled with the handset
(max. 32 digits). If one of the numbers is
in the directory, the corresponding name
will be displayed.
Dialling from the last number redial list
Press the key briefly.
Select an entry.
Briefly press/press and hold
the talk key. The number is
dialled using the selected connection type (page 24).
When a name is displayed, you can display
the corresponding phone number by
pressing the
Managing entries in the last number redial list
Press the key briefly.
Select an entry.
§Options§ Open menu.
The following functions can be selected
with :
Copy to Directory
Copying a displayed number to the
directory (page 37).
Automatic Redial
The selected number is automatically
dialled at fixed intervals (at least every
20 seconds). The handsfree key flashes
and "open listening" is activated.
– Party answers: press the talk key
– Party does not answer: the call is ter-
Display Number
(As in the directory, page 36)
Delete Entry
Delete selected entry.
§View§ display key.
. The function is ended.
minated after approx. 30 seconds.
The function is ended after pressing
any key or after ten unsuccessful
attempts.
Delete List
Delete complete list.
Opening lists with the message key
You can use the message key to open
the following lists:
u Answer machine list
u Network mailbox, see page 70
A separate list is displayed for each net-
work mailbox.
Precondition: Its number is saved in
the base station, it is switched on
(page 70, page 112) and the corre-
sponding VoIP/fixed line network
number is assigned to the handset as a
receive number.
u SMS list, see page 46
If several mailboxes are set up
(page 49), several lists will be dis-
played, if required.
u Incoming e-mail list, see page 60
The list is only shown if new messages
have arrived in the mailbox from the
incoming e-mail server.
u Calls list
u Messenger message list, see page 67
The list is only shown on the handset
that is online.
An advisory tone sounds as soon as a new
message arrives in a list. The key
flashes (it stops when the key is pressed).
In idle status, the display shows an icon for
the new message:
Icon New message...
The number of new entries is shown
beneath the corresponding icon.
... in one of your network mailboxes or
... in the answer machine list
... in calls list
... in the SMS, messenger or email list
39

Using the directory and lists
List selection
Pressing the button will only display
lists that contain messages and also the
network mailbox lists Net AM: ....
Lists with new messages are shown first
and identified in bold. The number of
messages received are shown in brackets.
If a list contains no new messages, the
number of old messages will be shown.
Exception: (0) is displayed for Net AM: ...
network mailboxes.
Example:
Messages & Calls
Net AM: IP1 (1)
Ans M.: (2)
Calls List: (4)
Net AM: Fxd. line (0)
Net AM: IP2 (0)
OK
¤ Select a list with and press §OK§.
Calls list
Precondition: Calling Line Identification
(CLIP, page 26).
Depending on the type of list set, the calls
list contains
u Received calls (marked with )
u Missed calls
The numbers of the last 30 calls are saved.
Multiple calls from the same number will
be stored once in the list of missed calls
(the latest call). The number of calls from
this number is shown in brackets after the
entry.
Multiple calls from the same number are
stored several times in the list of answered
calls.
The list of missed calls does not contain
calls that were answered and calls that
were recorded by the answer machine.
‰
Please note:
– Only calls to the receive numbers assigned
to your handset are stored in the calls list
(page 106).
If no receive numbers are assigned, all calls
will be stored in the calls list for all handsets.
– You can also call up the call history via the
menu: v
£
Setting the calls list type
v ¢ ¢ Base ¢ Calls List Type
Missed Calls / All Calls
‰
Select and press
§OK§ (=on).
Press and hold (idle status).
The calls list entries are retained when you
change the list type.
List entry in calls list
New messages are displayed at the top.
Example of list entries:
All Calls
Susi Sorglos
15.01.08 12:20 ‰
Louise Miller
14.01.08 11: 15
Delete Options
u List type in header: Missed Calls,
All Calls
u Status of entry
Bold: New entry
u Number or name of caller
You can add the caller's number to the
directory (page 37).
u Date and time of call (if set, page 11)
40

Using the directory and lists
Managing entries in the calls list
Pressing the display key §Delete§ deletes the
marked entry.
After pressing the display key
§Options§ you
can select more functions with :
Copy to Directory
Copying a displayed number to the
directory.
Information
If a URI was received and stored for a
VoIP call, this will be shown. The URI is
dialled if you press the talk key .
The URI is not entered on the last
number redial list.
Delete List
Delete complete list.
After exiting the calls list, all entries are set
to "old" status and are no longer shown in
bold.
Selecting from the calls list
¢ Calls List: (2)
Select entry.
Briefly press/press and hold
the talk key. The number is
dialled using the selected connection type (page 24).
Answer machine list
The answer machine list Ans M.: is only displayed on handsets that have at least one
receive number in common with the
answer machine.
You can use the answer machine list to listen to the messages stored on the base
station answer machine.
The first new message received is displayed at the top of the answer machine
list. Playback starts when the list is
opened.
New messages are placed after old messages when they have been played back.
All messages are played back irrespective
of the associated receive number.
Old messages are played back if the list
does not contain any new messages.
List entry in the answer machine list
Example of list entries:
Message Playback
Susi Sorglos
15.01.08 12:20
Louise Miller
14.01.08 11:15
Delete Options
u Status of entry
Bold: New entry
u Number or name of caller
You can add the caller's number to the
directory (page 37).
u Call date and time (if set, page 11).
How to manage messages in the answer
machine list is described on page 54.
Dialling numbers from the answer machine list
¢ Ans M.: (2)
Select entry.
Briefly press/press and hold
the talk key. The number is
dialled using the selected connection type (page 24).
41

Making cost-effective calls
Making cost-effective calls
Using the Internet (VoIP) is the preferred
cost-effective way of making calls.
If you are using your fixed line network
phone, choose a network provider who
offers particularly favourable rates (callby-call). You can manage call-by-call numbers in the call-by-call list.
Linking call-by-call numbers with
one number
You can prefix a network provider's
number ("chaining") to numbers dialled
via a fixed line network.
C Open call-by-call list.
Select entry (call-by-call
number).
§Options§ Press the display key.
Display Number
Select and press
/ Enter number or dial number
from the directory (page 38).
Briefly press/press and hold
the talk key so that the
number is dialled via the fixed
line network. Both numbers
are dialled.
§OK§.
Displaying the call duration
The duration of each call appears in the
display for calls made via a fixed line network and VoIP
u during the conversation,
u until about three seconds after the call
has ended if you do not replace the
handset in the charging cradle.
Please note:
The actual duration of the call can vary from
that shown by a few seconds.
Please note:
You can also dial "chained" numbers via a fixed
line network by adding the line suffix #0 (for
the fixed line network) to the end of the
number. Alternatively, you can define appropriate rules for call-by-call numbers
(page 110).
42

SMS (text messages)
SMS (text messages)
You can only send and receive SMS messages via the fixed line network.
When an SMS is sent, the base station
automatically establishes a connection via
the fixed line network.
Your phone is supplied ready for sending
SMS messages immediately.
Preconditions:
u Calling Line Identification is enabled for
your fixed line network connection.
u Your network provider supports SMS in
the fixed line network (information on
this can be obtained from your network
provider).
u You are registered with your service
provider to send and receive SMS.
SMS messages are exchanged between
SMS centres operated by service providers. You must enter the SMS centre
through which you wish to send and
receive SMS messages into your phone.
You can receive SMS messages from every
SMS centre that is entered, provided you
have registered with your service provider.
Your SMS messages are sent via the Serv-
ice Centr. that is entered as the active
send service centre. However, you can
activate any other SMS centre as the active
send service centre to send a current message (page 50).
If no SMS service centre is entered,
the SMS menu only contains the entry
Settings . Enter an SMS service centre
(page 50).
Information on writing an SMS can be
found in the appendix:
u For how to enter text, see page 130.
u Writing using the predictive text tool
EATONI, see page 131.
Rules
u For more than 160 characters, the SMS
will be sent as a linked SMS (up to
four SMS messages each containing
152 or 153 characters, depending on
the length of the linking information).
The following will be shown on the top
right in the header when an SMS is
being written (example):
1
SMS 596(1)
1 Maximum number of characters you can
still write or attach.
2 Number of SMS messages that need to
be linked for the text written so far.
Please note that linking SMS messages usually
incurs higher charges.
2
Please note:
u Each incoming SMS is signalled by a
single ring (ringer tone as for external
calls). If you accept an SMS "call", the
SMS will be lost. To prevent this ring,
suppress the first ringer tone for all
external calls (page 82).
u If your phone is connected to a PABX,
see page 50.
u To receive SMS messages you must be
registered with your service provider.
43

SMS (text messages)
Writing/sending an SMS
Writing an SMS
v ¢ ¢ SMS
Mailbox 2 Select mailbox if necessary
and press
Enter mailbox PIN if necessary
and press
New SMS Select and press §OK§.
Write an SMS.
Please note:
– Entering text with and without EATONI pre-
dictive text is described from page 131.
– EATONI is activated as a default setting.
How to activate/deactivate EATONI,
see page 132.
Sending an SMS
Press the talk key
or:
§Options§ Press the display key.
Send Select and press §OK§.
Then:
SMS Select and press §OK§.
/ C /
Select number with area code
(even if you are in that area)
from the directory or call-bycall list, or enter number
directly. For sending SMS to an
SMS mailbox: add the mailbox
ID to the end of the number.
§Send§ Press the display key.
The SMS will be sent as soon as your
phone's fixed line network connection is
free.
§OK§ (page 49).
§OK§.
Please note:
– If you are interrupted by an external call
while writing an SMS, the text is automatically saved in the draft message list.
– If the memory is full, or if the SMS function
on the base station is being used by
another handset, the operation is cancelled. An appropriate message appears in
the display. Delete SMS messages you no
longer require or send the SMS later.
Using other functions
Precondition: You are writing an SMS.
§Options§ Open menu.
The following functions can be selected
with :
Send
Send an SMS.
Save
Save an SMS in the draft message list
(page 45).
Insert E-mail Adr.
Add an e-mail address to the message
text.
Predictive Text
Activate/deactivate predictive text
EATONI, page 131.
Select Language
For EATONI: select the language in
which you wish to write the text and
§OK§.
press
44

SMS (text messages)
SMS status report
Precondition: Your network provider supports this feature.
If you have activated the status report, you
will receive an SMS with a confirmation
message after sending.
Activating/deactivating a status report
v ¢ ¢ SMS ¢ Settings
Status Report
Select and press
‰
§OK§ (=on).
Reading/deleting a status report
¤ Open the incoming message list
(page 47) and then:
Select SMS with State OK or
State not OK status.
§Read§ Press the display key.
Or:
§Options§ Press the display key.
Delete Entry Select and press §OK§.
Draft message list
You can save an SMS in the draft message
list and edit and send it later.
Saving an SMS in the draft message list
¤ Write an SMS (page 44).
§Options§ Press the display key.
Save Select and press §OK§.
Please note:
After saving, the SMS editor will be displayed
again with your SMS. You can continue writing
the text and save it again. The SMS that was
saved previously will be overwritten.
Opening the draft message list
v ¢ ¢ SMS ¢ (Mailbox, mailbox
PIN)
Outgoing (3)
Select and press
number of SMS messages in
the list will be shown in brackets (e.g. (3)).
The first list entry is displayed, e.g.
1234567890
15.01.08 09:45
§OK§. The
Reading or deleting SMS messages
¤ Open the draft message list and then:
Select SMS.
§Read§ Press the display key. The
entry will be displayed. Scroll
line by line using .
Or:
§Options§ Open menu.
Delete Entry Press §OK§. The selected SMS
message is deleted.
You can use §Options§ ¢ Delete all to delete
every SMS in the draft message list.
Writing/changing an SMS
¤ You are reading an SMS in the draft
message list.
§Options§ Open menu.
You have the following options:
New SMS
Write a new SMS and then send
(page 44) or save it.
Edit
Edit the text of the saved SMS and then
send it (page 44).
Character Set
Text is shown in the selected character
set.
45

SMS (text messages)
Sending SMS messages to an e-mail address
If your service provider supports the SMS
to e-mail feature, you can also send your
SMS messages to e-mail addresses.
The e-mail address must be at the beginning of the text. You must send the SMS to
the e-mail service of your SMS send centre.
¢ ¢ SMS ¢ (Mailbox, mailbox
v
¢ New SMS
PIN)
/
Load the e-mail address from
the directory or enter it
directly. End the entry with a
space or colon (depending on
the service provider).
Enter the SMS text.
§Options§ Press the display key.
Send Select and press §OK§.
E-mail Select and press §OK§. If the
number of the e-mail service is
not entered (page 50), enter
the number of the e-mail service.
§Send§ Press the display key. The SMS
will be sent as soon as your
phone's fixed line network
connection is free.
Sending SMS messages as a fax
You can also send an SMS to a fax
machine.
Precondition: Your network provider supports this feature.
¤ Write an SMS (page 44).
§Options§ Press the display key.
Send Select and press §OK§.
Fax Select and press §OK§.
/ Select the number from the
directory or enter it manually.
Enter the number with area
code (even if you are in the
same area).
§Send§ Press the display key. The SMS
will be sent as soon as your
phone's fixed line network
connection is free.
Receiving an SMS
All received SMS messages are saved in
the incoming message list. Linked SMS
messages are displayed as one message. If
this is too long (it consists of too many
linked individual SMS messages) or if it
was not fully transmitted, it will be split
into several individual SMS messages.
Since an SMS remains in the list even after
it has been read, you should regularly
delete SMS messages from the list.
The display tells you if the SMS memory is
full.
¤ Delete SMS messages you no longer
require (page 47).
Incoming message list
The incoming message list contains:
u All received SMS messages, starting
with the most recent.
u SMS messages that could not be sent
due to an error.
u SMS status messages, if the status
report is activated (page 45).
New SMS messages are signalled on all
Gigaset S67H handsets by the icon in
the display, the flashing message key
and an advisory tone.
46

SMS (text messages)
Opening the incoming message list with
the
key
Press.
Select a mailbox if necessary and enter the
mailbox PIN.
The incoming message list is displayed as
follows (example):
SMS: (2)
1 Bold: number of new entries
Regular: number of read entries
2 Name of mailbox, here: general mailbox
Open list with §OK§.
An entry in the list is displayed as in the
following example:
1234567890
15.01.08 09:45
1 Number of the sender or name of the
directory entry
2 SMS status:
Bold: new unread SMS messages
Regular: old read SMS messages
1
2
1
2
Opening the incoming message list via the
SMS menu
v ¢ ¢ SMS ¢ (Mailbox, mailbox
¢ Incoming (2)
PIN)
Reading or deleting individual SMS
messages
¤ Open the incoming message list.
¤ Continue as described in "Reading or
deleting SMS messages", page 45.
After you have read a new SMS, it is given
the status "Old" (it is no longer shown in
bold).
Changing the character set
¤ Read the SMS (page 47):
If you cannot see any text or symbols, the
SMS may have been written with a different character set.
§Options§ Press the display key.
Character Set
Select and press
Select character set and press
§OK§.
Text is shown in the selected character set.
§OK§.
Deleting the incoming message list
All new and old SMS messages in the list
are deleted.
¤ Open the incoming message list.
§Options§ Open menu.
Delete all Select, press §OK§ and confirm
§Yes§. The list is cleared.
with
Replying to or forwarding SMS messages
¤ Read the SMS (page 47):
§Options§ Press the display key.
You have the following options:
Reply
Write and send a reply SMS directly
(page 44).
Edit
Edit the text in the SMS and then send
it (page 44).
Forwarding an SMS
¤ You are reading an SMS (page 47):
§Options§ Press the display key.
Forward Select and press §OK§. For fur-
ther information, see page 44.
47

SMS (text messages)
Adding a number to the directory
Copying the sender's number
¤ Open the incoming message list and
select SMS (page 46).
§Options§ Press the display key. For fur-
ther information, see page 37.
Please note:
– You can create a special directory for SMS
messages within your main directory by
putting a star (*) before the names.
– An attached mailbox identifier is added to
the directory. It must be deleted for 'normal
calls'.
Dialling numbers from SMS texts/
transferring to the directory
¤ Read the SMS (page 47) and scroll to
the telephone number.
The digits are reverse-highlighted.
Briefly press/press and hold
the talk key to dial the number.
Or:
Press the display key to trans-
fer the number to the directory. For further information,
see page 37.
Please note:
– The + symbol is not transferred for interna-
tional area codes.
¥ You should then enter '00' at the start of
the number.
– If an SMS contains several numbers, the
next number will be highlighted if you
scroll down until the first number disappears from the display.
If you wish to use the number to send an
SMS:
¤ Save the number with the local area
code (dialling code) in the directory.
Notification by SMS
You can be notified via SMS about missed
calls and also about new answer machine
messages.
Precondition: For missed calls, the caller's
number (CLI) must have been transmitted.
Notification is sent to your mobile phone
or another phone with SMS functionality.
You only need to save the phone number
to which notification should be sent (notification number) and set the notification
type.
Please note that your network provider will
usually charge for SMS notifications.
Saving the notification number
v ¢ ¢ SMS ¢ Settings
¢ Notify Number
Enter the number (including
area code) to which the SMS is
to be sent.
§Save§ Press the display key.
Press and hold (idle status).
Warning:
Do not enter your own fixed line number for
the notification of missed calls. This can lead to
chargeable endless looping.
Setting the notification type
v ¢ ¢ SMS ¢ Settings
¢ Notify Type
¤ Change multiple line input if necessary:
Missed Calls:
Select On if you require SMS notifica-
tion.
Ans Machine:
Select On if you require SMS notifica-
tion.
¤ Save changes (page 130).
48

SMS (text messages)
SMS mailboxes
The general mailbox is the default setting. Anyone can access this mailbox and
it cannot be protected by a PIN. You can
additionally set up three personal mail-
boxes and protect these with a PIN. Each
mailbox is identified by a name and a
"mailbox ID" (a kind of extension number).
Please note:
u If you operate a number of devices
(base stations) with SMS functionality
on a single phone line, then each SMS
mailbox ID may only occur once. In this
case you must also change the preset
ID of the general mailbox ("0").
u You can only use personal mailboxes if
your service provider supports this
function. You can tell whether this is
the case by the addition of a star (*) to
the number of a (preset) SMS centre.
u If you have forgotten your mailbox PIN,
you can reset it by restoring the base
station's default settings. This will
delete all SMS messages from all
mailboxes.
Setting up and changing a personal mailbox
Active mailboxes are marked with in
the mailbox list. They are shown in the
SMS list and can, if necessary, be displayed
by pressing the message key .
‰
Deactivating a mailbox
¤ Set On/Off: to Off. Confirm
message with
All SMS messages saved in this mailbox
will be deleted.
Deactivating PIN protection
§Yes§ if necessary.
¤ Set Protection: to Off.
The mailbox PIN is reset to "0000".
Changing the name of a mailbox
v ¢ ¢ SMS ¢ Settings ¢ SMS
Mailboxes
§Edit§ Press the display key.
Enter new name.
§Save§ Press the display key.
Press and hold (idle status).
¢ (Select mailbox)
Changing a mailbox's PIN and ID
v ¢ ¢ SMS ¢ Settings ¢ SMS
Mailboxes
Enter mailbox PIN if required
¢ (Select mailbox)
and press
§OK§.
¤ Set ID:, Protection: and PIN (page 49).
Setting up a personal mailbox
v ¢ ¢ SMS ¢ Settings
¢ SMS Mailboxes
Select mailbox, e.g. Mailbox 2,
and press
§OK§.
¤ Change multiple line input:
On/Off:
Activate or deactivate mailbox.
ID:
Select mailbox ID (0–9). You can only
select the available numbers.
Protection:
Activate/deactivate PIN protection.
PIN
If necessary, enter 4-digit PIN.
¤ Save changes (page 130).
Sending an SMS to a personal mailbox
To send an SMS to a personal mailbox, the
sender must know your ID and enter it
after your number.
¤ You can send your SMS contact an SMS
via your personal mailbox.
Your SMS contact will then receive your
SMS number with current ID and can save
it in their directory. If the ID is invalid, the
SMS will not be delivered.
49

SMS (text messages)
Setting SMS centres
Entering/changing SMS centres
¤ You should find out about the services
and special functions offered by your
service provider before you make a
new application and/or before you
delete pre-configured call numbers.
¢ ¢ SMS ¢ Settings
v
¢ Service Centres
Select SMS centre (e.g. Service
Centr. 1) and press
§OK§.
¤ Change multiple line input:
Active Send:
Select Yes if SMS messages are to be
sent via the SMS centre. For the SMS
centres 2 to 4, the setting only applies
to the next SMS.
SMS:
Press the display key
number of the SMS service and insert a
star if your service provider supports
personal mailboxes.
E-mail:
Press the display key
number of the e-mail service.
§Edit§. Enter the
§Edit§. Enter the
¤ Save changes (page 130).
Please note:
Ask your service provider for details on how to
enter service numbers if you wish to use personal mailboxes (precondition: your service
provider supports this function).
Sending an SMS through another SMS centre
¤ Activate the SMS centre (2 to 4) as the
active send service centre.
¤ Send the SMS.
This setting only applies to the next SMS
to be sent. Thereafter, the setting returns
to Service Centr. 1.
SMS on a PABX
u You can only receive an SMS when the
Calling Line Identification is for-
warded to the extension of the PABX
(CLIP). The CLIP evaluation of the
phone number for the SMS centre takes
place in your Gigaset.
u If required, you must prefix the number
for the SMS centre with the access code
(depending on your PABX).
If in doubt, test your PABX, e.g. by
sending an SMS to your own number:
once with and once without the access
code.
u When you send SMS messages, your
sender number may be sent without
your extension number. In this case the
recipient cannot reply to you directly.
Sending and receiving SMS messages on
ISDN PABXs is only possible via the MSN
number assigned to your base station.
Activating/deactivating SMS function
If you deactivate the SMS function, you
cannot send or receive any SMS messages
with your phone.
The settings you have made for sending
and receiving SMS messages (e.g. the call
numbers of the SMS centres) and the
entries in the incoming and draft message
lists are saved even after you turn off your
phone.
v Open menu.
NOL
Enter the digits.
§OK§ Deactivate SMS function.
Q
Or:
§OK§ Activate SMS function (default
setting).
50

SMS (text messages)
SMS troubleshooting
Error codes when sending
E0 Calling Line Identification permanently
withheld (CLIR) or Calling Line Identification not activated.
FE Error occurred during SMS transfer.
FD Connection to SMS centre failed; see self-
help.
Self-help with errors
The following table lists error situations
and possible causes and provides notes on
troubleshooting.
You cannot send messages.
1. You have not requested the CLIP service
(Calling Line Identification Presentation).
¥ Ask your service provider to enable this
service.
2. SMS transmission has been interrupted
(e.g. by a call).
¥ Re-send the SMS.
3. Network provider does not support this feature.
4. No number or an invalid number is entered
for the SMS centre set as the active send
service centre.
¥ Enter the number (page 50).
You receive an incomplete SMS.
1. Your phone's memory is full.
¥ Delete old SMS messages (page 47).
2. The service provider has not yet sent the
rest of the SMS.
You have stopped receiving SMS messages.
1. You have changed the ID of your mailbox.
¥ Give your SMS contacts your new ID or
undo the change (page 49).
2. You have not activated your mailbox.
¥ Activate your mailbox (page 49).
3. Call forwarding is activated with When: All
Calls for a fixed line connection, and with All
Calls for the network mailbox.
¥ Change the call forwarding.
The message is played back.
1. The "display call number" service is not activated.
¥ Ask your service provider to activate this
function (chargeable).
2. Your mobile phone operator and your fixed
line network SMS service provider have not
agreed on a co-operation.
¥ Obtain information from your fixed line
network SMS service provider.
3. Your end device has been recorded by your
SMS provider as having no fixed line network SMS functionality, i.e. you are no
longer registered with the provider.
¥ Have the device (re-)registered to
receive SMS messages.
Messages are only received during the day.
1. The terminal is recorded in your SMS provider's database as having no fixed line network SMS functionality, i.e. you are no
longer registered with the provider.
¥ Register the terminal (again) for SMS
reception (see above).
51

Operating the base station answer machine
Operating the base station
answer machine
You can operate the answer machine that
is integrated in the base station via the
handset or via remote operation (other
phone/mobile phone). You can record
your own announcement message or
advisory message via the handset.
Please note:
Connections to the answer machine (internal
and external) are not established using broadband.
Receive numbers
You can use your phone's Web configurator to set which of your phone numbers
your answer machine is to accept as soon
as it is switched on (page 107). You can
assign your phone any amount of phone
numbers as receive numbers (VoIP, fixed
line network).
All calls accepted by the answer machine
are stored in sequence in the answer
machine independently of the receive
number and displayed in the same answer
machine list.
Any registered handset to which at least
one receive number from the answer
machine has been assigned as a send or
receive number can access the answer
machine list (page 106).
After a new phone number is configured
(a new VoIP account), it is first assigned to
the answer machine as a receive number.
Parallel calls
If a caller is connected to the answer
machine and a second call for the answer
machine comes in on a different line
(fixed line network or VoIP), the second
caller hears the ringing tone. The answer
machine will answer the second call if:
u the connection with the first caller has
ended and
u the set time period for the answer
machine to answer a call (page 57) has
expired.
Announce only/answer and record mode
You can use the answer machine in two
different modes.
u In Ans. & Record mode, the caller hears
the announcement and can then leave
a message.
u In Announce Only mode, the caller hears
your announcement but cannot leave a
message.
Operation via the handset
The handset loudspeaker activates automatically if you receive an acoustic
prompt or message while operating. You
can switch it off with the handsfree key
.
Activating/deactivating the answer machine
v ¢ ¢ Voice Mail ¢ Local AM
¢ Ans Machine (=on)
When the answer machine is activated,
the remaining memory time is
announced. If the time has not yet been
set (page 11), an appropriate announcement is made. The × icon appears in the
display.
The answer machine accepts calls for all
the receive numbers assigned to it
(page 107).
In answer and record mode
If the memory is full the answer machine
automatically switches to announce only
mode.
‰
¤ Delete old messages.
The answer machine reverts automatically
to answer and record mode.
52

Operating the base station answer machine
Selecting announcement mode
You can choose between Ans. & Record and
Announce Only.
¢ ¢ Voice Mail ¢ Local AM
v
¢ Announcements ¢ Set Ans. Mode
¢ Ans. & Record / Announce Only (=on)
Press and hold (idle status).
The selected mode is saved even after the
answer machine is deactivated.
The selection process will be cancelled if
the message memory is already full when
you change to Ans. & Record mode. You
will be requested to delete old messages.
The answer machine stays in announce
only mode Announce Only.
‰
¤ Delete old messages.
Only after messages have been deleted
can you switch the answer machine to
answer and record mode.
Setting "Answer & Record" or "Announce
Only" by toggling
You can use the Ans Mode Time setting to
change over the announcement mode for
a specific period.
Example: Ans. & Record mode is set. If you
activate Ans Mode Time and set the time
period From: 18:00, Until: 08:00 the
answer machine will switch to Announce
Only mode every day at 18:00 (if it is
switched on). It will switch back to Ans. &
Record mode at 08:00 the next day.
¢ ¢ Voice Mail ¢ Local AM
v
¢ Announcements ¢ Set Ans. Mode
¢ Ans Mode Time (=on)
‰
¤ Change multiple line input:
From:
Enter hours/minutes for the start of the
period in 4-digit format.
Until:
Enter hours/minutes for the end of the
period in 4-digit format.
Activation:
Select On or Off.
¤ Save changes with §Save§.
If the messages memory is full and Activa-
tion: On has been selected, saving is inter-
rupted and you will receive an instruction
to delete old messages.
¤ Delete old messages and repeat the set-
ting.
As soon as you change the announcement
mode (page 53), the Ans Mode Time function is automatically deactivated. You may
have to re-activate it if required.
If you do not enter a time for From: / Until:,
Ans Mode Time will still be activated but the
machine will not switch to announcement
mode.
Recording a personal announcement/ notification
Pre-recorded announcements are stored
in your telephone for both announcement
modes. The pre-recorded announcements
are used if there is no personal announcement for the mode concerned.
¢ ¢ Voice Mail ¢ Local AM
v
¢ Announcements ¢ Record Announce /
Record Anc Only
§OK§ Press the display key to start
the recording.
When the recording starts, the handset
changes to handsfree mode. You hear the
ready tone (short tone).
¤ Now speak your announcement (at
least 3 secs.).
Use or to cancel recording and
§OK§ to restart the recording process.
The recording is cancelled if the answer
machine memory is full.
¤ Delete old messages and repeat record-
ing if required.
Stop recording:
§End§ Press the display key.
After recording, the announcement is
played back for you to check.
You can re-record the announcement with
§New§.
53

Operating the base station answer machine
You can cancel playback by pressing
or .
Please note:
u Recording ends automatically if the
maximum recording time of 170 seconds is exceeded or there is a break in
speech for more than 2 seconds.
u If you cancel the recording, the previ-
ously recorded announcement will be
deleted. The pre-recorded announcement will be used again.
u The recording is cancelled if the answer
machine memory is full.
¤ Delete old messages and repeat
recording if required.
u If an external call is received during a
recording for one of the handset's
receive numbers, the recording is interrupted and the call is signalled on the
handset.
Playing back announcements
v ¢ ¢ Voice Mail ¢ Local AM
¢ Announcements ¢ Play Announce /
Play Anc Only
If you have not recorded a personal
announcement, the relevant pre-recorded
announcement is played.
Record a new announcement while playing back the announcement:
§New§ Press the display key. For fur-
ther information, page 53.
Deleting announcements/announce only
v ¢ ¢ Voice Mail ¢ Local AM
¢ Announcements ¢ Del Announce /
Del Anc Only
§Yes§ Press the display key to con-
firm the prompt.
Press and hold (idle status).
Once you have deleted your announcement, the relevant pre-recorded
announcement will be used again. You
cannot delete the pre-recorded announcements.
Playing back messages
New messages that have not yet been
heard are indicated by the icon in the
display and by the key flashing on the
handset.
You can start to play back the messages in
two ways:
u Open the answer machine list with the
message key.
u If the answer machine is set for fast
access (page 58): press and hold key
.
Please note:
All messages are played back irrespective of
their receive number.
Listening to messages via the answer
machine list
Precondition: At least one of your handset's send/receive numbers matches the
receive number of a stored message.
The date and time of each message is
logged in the answer machine list (provided it has been set, page 11) and displayed during the playback. If Calling Line
Identification is activated, the caller's
number is displayed. If the caller's number
is saved in the directory, their name is displayed.
Press the message key.
Ans M.: Select and press
An announcement informs you if there are
new or old messages.
If there are new messages, playback
begins with the first new message. If the
message has been saved with the date
and time, you will hear an appropriate
announcement before playback begins.
All messages are played back irrespective
of the receive number.
§OK§.
54

Operating the base station answer machine
After the last new message you will hear
the end tone and an announcement about
how much recording time remains.
You can listen to old messages if there are
no more new messages. Begin playback as
described above.
Listening to messages via key
Preconditions: The answer machine has
been set to fast access (page 58). At least
one of your handset's send/receive numbers matches the receive number of a
stored message (page 107).
¤ Press and hold key .
The stored messages are now played back.
Pausing and controlling playback
During message playback:
Pause playback. Press
again to resume.
or
Skip to the previous message.
or 3
Skip to the next message.
2 x Skip to next-but-one message.
If playback is interrupted for over a
minute, the answer machine returns to
idle status.
Copying the phone number of a message
to the directory
See "Copying a displayed number to the
directory", page 37.
Deleting messages
You can either delete all old messages
together or individually.
Deleting all old messages
During playback or pause:
§Options§ Press the display key.
Del All Old Msgs
Select and press
§Yes§ Press the display key to con-
firm the prompt.
All old messages are deleted irrespective
of the receive number.
Deleting individual old messages
During playback or pause:
§Delete§ / Q
Press the display key or Q
key.
Please note:
You can delete a new message as soon as playback has started.
§OK§.
Marking a message as "new"
A previously played back "old" message is
displayed as a "new" message again.
During message playback or pause:
Press the star key.
Or:
§Options§ Open menu.
Mark as New
Select and press
Playback of the current message is cancelled. Playback of next message starts, if
applicable.
The key on the handset flashes.
§OK§.
Picking up a call from the answer machine
You can pick up a call while the answer
machine is recording or is being operated
via remote operation:
§Accept§
/
Press the talk or display key.
Recording stops and you can speak to the
caller.
If 3 seconds of the call have already been
recorded when you pick it up, the call will
be displayed as a new message. The
key on the handset flashes.
55

Operating the base station answer machine
Forwarding an external call to the answer machine
You can forward an incoming external call
to the answer machine.
Preconditions: There is sufficient free
memory space. One of your handset's
send/receive numbers matches a receive
number of the answer machine.
An external call is signalled on the
handset:
Ÿ Press the display key.
The answer machine starts immediately in
recording mode and records the call. The
set time for the call acceptance (page 57)
is ignored.
The display key Ÿ will not be displayed if the memory is full.
Activating/deactivating two-way recording
You can record an external call with the
answer machine.
Precondition: You are conducting an
external call. At least one of the handset's
send/receive numbers is assigned to the
answer machine as a receive number
(page 107).
¤ Inform the caller that the call is being
recorded.
§Options§ Press the display key.
Two Way Record
Select and press
The two-way recording is indicated on the
display by an advisory text and is added to
the answer machine list as a new message.
§End§ Press the display key to stop
the two-way recording.
§OK§.
The maximum recording time depends on
the memory available on the answer
machine. If the memory is full, you will
hear an end tone and the recording is
aborted. The conversation recorded up to
the end tone is then allocated to the
answer machine list as a new message.
Please note:
You can activate two-way recording for conference calls and toggling when making calls via
a fixed line network.
Activating/deactivating call screening
During recording of a message you can
screen a call via the handset loudspeaker.
Precondition: The number called is
assigned to the handset as a receive
number (page 106).
Permanently activating/deactivating call screening
v ¢ ¢ Voice Mail ¢ Local AM
Call Screening
Select and press
Press and hold (idle status).
Deactivating call screening for the current recording
You can d eact ivate the Call Screening function for the current call during recording
via the handset.
Briefly press the end call key.
‰
§OK§ (=on)
56

Operating the base station answer machine
Setting up the answer machine
The answer machine has already been
preset at the factory. Make individual settings using the handset.
Call acceptance/charge saving function for remote operation
You can set when you want the answer
machine to accept a call.
The options are: 0 sec., after 10 sec., 18 sec.
or 30 sec. and the cost-saving setting
Automatic.
In Automatic mode, the following applies
for call acceptance:
u If there are no new messages, the
answer machine accepts a call after
18 seconds.
u If new messages are present, the
answer machine accepts a call after
10 seconds.
When operating remotely you can tell
after approx. 15 seconds that there are no
new messages (otherwise the answer
machine would already have accepted
your call). There will be no call charges if
you hang up now.
¢ ¢ Voice Mail ¢ Local AM
v
¢ Ring Delay
Select 0 sec. / 10 sec. / 18 sec. /
30 sec. / Automatic.
§Save§ Press the display key.
Press and hold (idle status).
Setting the recording time
You can set the maximum recording time
of a message. You can choose between:
60 Sec, 120 Sec, 180 Sec or Maximum.
¢ ¢ Voice Mail ¢ Local AM
v
¢ Message Length
Select the recording time.
§Save§ Press the display key.
Setting the recording quality
Set the quality you require for your recordings. The options are: Standard, High, Excel-
lent. If the quality is higher, the maximum
recording time is reduced.
¢ ¢ Voice Mail ¢ Local AM
v
¢ Record Quality
Select the recording quality.
§Save§ Press the display key.
Please note:
Your announcements are always recorded in
best quality.
Please note:
You can configure your telephone so that
the first ringing tone is suppressed on all
calls (page 82). The time set for call
acceptance therefore does not indicate
how long the phone rings before the
answer machine accepts the call.
57

Operating the base station answer machine
Configuring the network mailbox for fast access
You can assign the local answer machine
or one of your network mailboxes to key
for fast access (page 71). This setting
is handset-specific.
Configuring the local answer machine for
fast access
Precondition: At least one of your handset's send/receive numbers matches a
receive number of the answer machine.
¢ ¢ Voice Mail ¢ Set Key 1
v
Local AM Select and press §OK§.
Press and hold (idle status).
Listening to messages on the answer
machine
Precondition: The answer machine is set
for fast access on the handset.
Press and hold.
The messages are now played back.
Hands-free operation is activated. You will
hear the answer machine announcement.
If necessary, press the hands-
free button to switch it off.
Operating when on the move (remote operation)
You can check and activate your answer
machine from any other telephone (hotel,
pay phone etc.), or initiate ringback from
the answer machine with an SMS.
Preconditions:
u You have set a system PIN other than
0000 (page 86).
u The phone you are using for remote
operation has touch tone dialling
(DTMF), i.e. you hear different tones
when you press the keys. Alternatively,
you can use a code transmitter (available from your mobile phone retailer).
Please note:
Remote operation via VoIP connections is possible as long as DTMF signals are transmitted
(depending on the provider) as SIP info messages, audible signals in the voice channel
(inband or audio) or as special RTP data packets (pursuant to RFC2833).
Calling the answer machine and playing back messages
Precondition: Your answer machine is
activated.
Dial your own number that is
assigned to the answer
machine as a receive number.
9 When you hear your
announcement, press 9 and
enter the system PIN.
You will be informed whether any new
messages have been recorded. The messages are now played back. All messages
are played back irrespective of their
receive number. After the new messages,
the old messages are played back. Finally,
the remaining memory time is given.
You can control message playback by
means of the keypad.
58

Operating the base station answer machine
Please note:
The answer machine will terminate the connection under the following circumstances:
– An incorrect system PIN has been entered.
– There are no messages in the answer
machine
– After the remaining memory announce-
ment
Operating the answer machine via the
keypad
The following keys are used for operation:
Previous:
Go to the start of the current
message. Press repeatedly to
go to the previous messages.
Stop/resume:
Stop playback. Press again to
resume.
If there is a pause lasting
longer than one minute, the
connection to the answer
machine is terminated.
Next:
Skip to next message. Press
several times to go to the following messages.
: New:
Mark current message as
"new". Start playback of the
following message.
0 Delete:
Delete current message.
Activating the answer machine
¤ Phone home and allow the phone to
ring for around a minute. Use a phone
number that has been assigned to the
answer machine as a receive number.
You hear: "Please enter PIN".
Your answer machine will be activated in
the set mode (page 53). It tells you how
much memory time is left.
The messages are now played back.
The answer machine cannot be deacti-
vated remotely.
Enter system PIN.
Cancelling remote operation
¤ Press the end call key or replace the
receiver.
59
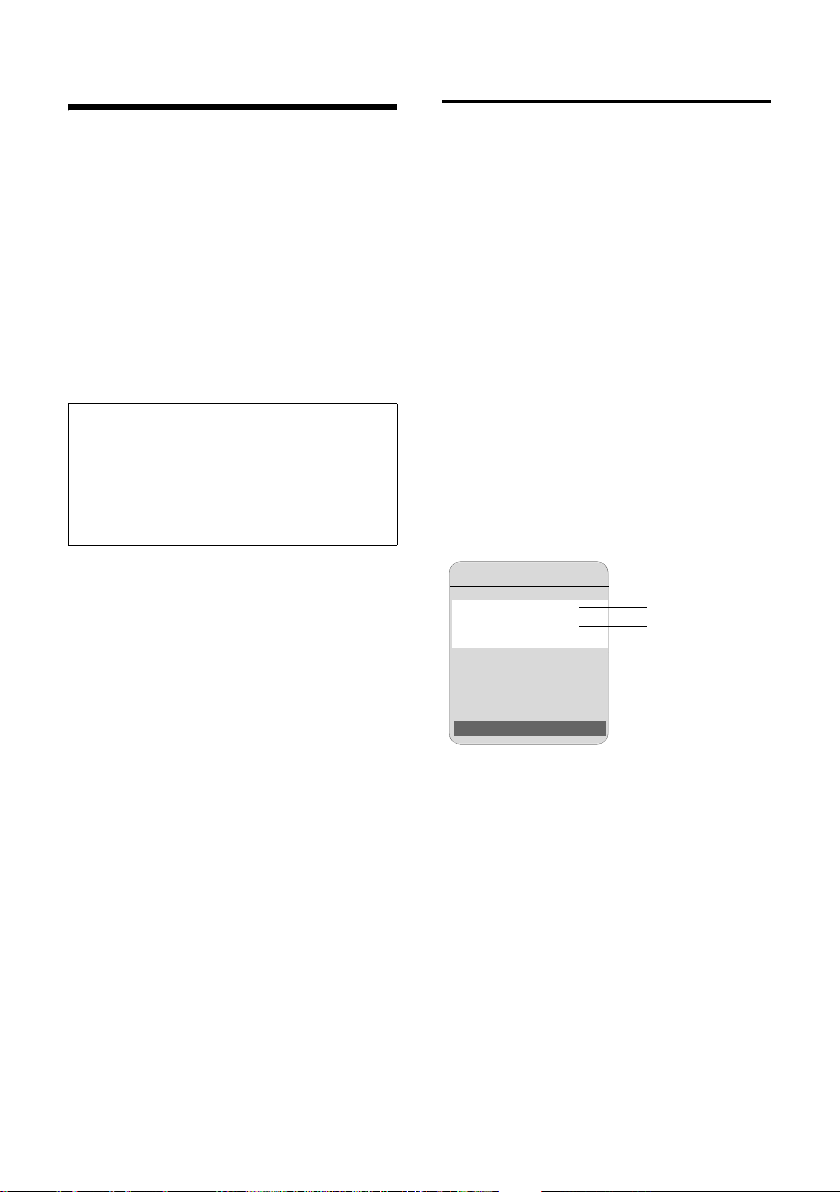
E-mail notifications
E-mail notifications
Your phone will notify you when new email messages have been received on
your incoming e-mail server.
You can set your phone to periodically
connect to your incoming e-mail server
and check whether you have new e-mail.
Any new messages that have been
received are displayed on all Gigaset S67H
handsets that have been registered: you
will hear an advisory tone, the message
key will flash and the icon will be
displayed in the idle display.
Please note:
The icon is also displayed if new SMS messages or messenger messages have been
received.
If new e-mail messages have been received,
pressing the message key will display
them in the E-mail: list.
You can use your phone to connect to the
incoming e-mail server and display the
sender, date and time of receipt and subject for every e-mail message in the list of
incoming mail (page 60).
Preconditions:
u You have set up an e-mail account with
an Internet provider.
u The incoming e-mail server uses the
POP3 protocol.
u You have stored the name of the
incoming e-mail server and your personal access data (account name, password) in the phone (page 113).
Opening the incoming e-mail list
v ¢ ¢ E-mail
Or if new e-mail messages have been
received (the message key is flashing):
¢ E-mail:
The telephone establishes a connection to
the incoming e-mail server. A list of e-mail
messages that are stored there will be displayed.
New unread messages appear above old
read messages. The most recent entry is at
the head of the list.
The following details are displayed for
each e-mail: name or e-mail address of the
sender (one line, abbreviated if necessary)
and date and time (date and time will only
display correct values if sender and recipient are located in the same time zone).
Example display:
Inbox
Susi Sorglos
15.01.08 12:20
Louise Miller
15.01.08 11:15
Options
1 E-mail address or name transmitted by the
sender
Bold: New message.
2 Date and time of receipt of e-mail message
If the incoming message list on the incoming e-mail server is empty, No entries will
appear in the display.
1
2
60

E-mail notifications
Please note:
Many e-mail providers operate standard spam
protection measures. E-mail messages classified as spam are stored in a separate folder and
are therefore not shown on the list of incoming mail.
Some e-mail providers allow you to deactivate
spam protection or show spam e-mails on the
list of incoming mail.
Other e-mail providers may send a message to
the Inbox when a new spam e-mail is received.
This is to inform you that a suspected spam email has been received.
Date and sender of this mail are repeatedly
updated, so that it is always displayed as a new
message.
Messages when establishing a connection
The following problems may occur when
connecting to the incoming e-mail server.
The messages are displayed in the handset's display for a few seconds.
Server not accessible!
The connection to the incoming e-mail
server could not be established. This
may have the following causes:
– Incorrect entry for name of incom-
ing e-mail server.
– Temporary problems with the
incoming e-mail server (server is
down or is not connected to the
Internet).
¤ Check settings (page 113).
¤ Try again later.
Currently not possible!
The resources your phone requires to
make the connection are busy, e.g.:
– Two VoIP connections have already
been made.
– Another handset is currently con-
nected to the incoming e-mail
server.
¤ Try again later.
Log-in failed!
Error when logging in to the incoming
e-mail server. This may have the following cause:
– Incorrect entries for name of incom-
ing e-mail server, user name and/or
password.
¤ Check settings (page 113).
Mailbox settings incomplete!
Incomplete entries for name of incoming e-mail server, user name and/or
password.
¤ Check settings and complete if nec-
essary (page 113).
Viewing the message header of an e-mail
Precondition: You have opened the
incoming mail list (page 60).
Select e-mail entry.
§Subject§ Press the display key.
The subject of the e-mail message will be
displayed (max. 120 characters).
Press the display key to return
to the incoming message list.
Please note:
If the header is formatted in HTML it may be
displayed differently to headers on the PC email client.
61

E-mail notifications
Viewing an e-mail sender's address
Precondition: You have opened the
incoming mail list (page 60).
Select e-mail entry.
§From§ Press the display key.
The sender's e-mail address is shown in
full.
Press the display key to return
to the incoming message list.
Example:
From
Susi.Sorglos@mailp
rov.com
Options
Deleting an e-mail
Precondition: You have viewed the message header or the sender's address of an
e-mail (page 61).
¤ Select §Options§ ¢ Delete E-mail and press
§OK§.
The e-mail is deleted from the incoming
e-mail server.
62

Messenger
Messenger
The messenger on your phone makes
instant messaging possible (immediate
message transfer, chatting). The phone
supports the XMPP messenger (Jabber).
Instant messaging refers to communication between "friends" on the Internet.
Subscribers exchange short messages,
which are forwarded immediately. This
gives rise to a flowing "conversation" similar to chatting.
The precondition for this form of communication is that both subscribers have a
connection to the messenger server of
the same instant messaging provider.
Therefore, both subscribers must be
"online". The messenger server forwards
the messages to the recipient.
The subscribers to instant messaging are
called buddies.
Most messenger servers allow you to create what are known as buddy lists. You
can store the buddies you want to chat to
in the buddy list.
The messenger server informs you as soon
as one of your buddies comes online or
goes offline. Offline means that the
buddy has disconnected from the messenger server.
In addition to this, each buddy can determine their own (communication) status
(state of presence, see page 65), from
which buddies can tell whether they are in
the mood to chat or wish to remain undisturbed.
The Web configurator on your phone gives
you the following options:
u Go online (page 64).
u Display the list of your contacts (bud-
dies) on the handset that you previously created on the PC. This will indicate for each buddy whether they are
available (online) and ready to chat
(state of presence, see page 65).
u Exchange messages with your buddies.
Your handset notifies you about new
messages with a flashing message key
and a beep.
u Call your buddies directly from your
buddy list (page 69).
Preconditions for instant messaging:
u You have registered with an instant
messaging provider via the Web
browser on your PC and (optionally)
agreed a Web name (nickname).
u You have created a buddy list via the
messenger client on the PC.
u You have saved the messenger server
address and your access data for the
messenger server (user ID, password)
in the phone using the Web configurator (page 112). The phone needs the
data to establish a connection with the
messenger server.
Please note:
If your instant messaging provider doesn't support the phone's messenger client, then you
can open an account with an open Jabber
server and use the Web configurator to enter
its address in your phone. Many of these Jabber servers offer gateways to other messenger
servers (e.g. AOL, ICQ, MSN, Yahoo!).
You can find a list of Jabber servers and an
overview of the gateways to other messenger
servers on the Internet at
http://www.jabber.org
You can find information on setting up a Jabber account with connections from ICQ, MSN
or Yahoo on the Internet, e.g. at:
http://web.swissjabber.ch
.
63

Messenger
Establishing a connection, going online
When you go online, your buddy list will
be displayed on the handset and you will
receive messages from your buddies.
Only one of the handsets connected to the
base station can connect to the messenger server. You can then only "chat" on this
handset.
An external call will interrupt the "chat",
but you will still be online. You can continue your chat after you end or reject the
call.
Precondition: You have saved the messenger server address and your access
data for the messenger server (user ID and
password) in the phone using the Web
configurator (page 112).
¢ ¢ Messenger
v
§Yes§ Press the display key to con-
firm the prompt.
The phone attempts to establish a connection. You are informed about the status of
the connection by messages on the display.
If the connection can be established, you
are Online . The display will show the submenu for your messenger. You can open
your buddy list, send and receive messages and call your buddies.
The following is displayed when the handset is in idle status.
ÐV
You remain online until you set your status
to Offline (page 65) or the connection to
the messenger server is terminated
(page 69).
You also remain online if you press the end
call key .
If the connection cannot be established,
you will receive an appropriate message.
Please try again later (page 69).
Please note:
You can also assign the messenger to one of
the display keys on your handset (page 79).
The connection is established when you press
the display key.
Lost connection
If your phone loses its connection to the
messenger server, the display key will
flash on the handset that had been connected to the messenger. In idle status it
will display "Messenger connection failed!".
All messages that you had previously
received, as well as any message you were
currently writing, will be saved.
Reconnecting:
Press the message key.
§Yes§ Press the display key to con-
firm the prompt.
The phone will attempt to reconnect. You
are informed about the status of the connection by messages on the display.
If you reply to the request with
phone will behave as during regular disconnection. All messenger messages will
be deleted. The phone is offline.
§No§ the
INT 1
%
15.01.08 09:45
?SMS
64

Messenger
Changing/checking your personal status, going offline
You want to log off (go offline) or let your
buddies know whether you wish to chat or
would prefer to remain undisturbed.
You have the following options:
Offline
You log off from the messenger server.
The messenger server informs your
buddies that you are no longer available.
The handset switches to idle status.
You can neither send nor receive messages.
Online
(Setting after successful connection)
You are logged on to the messenger
server and can send and receive messages.
Ready for chat
You are Online and can send and
receive messages.
You invite your buddies to "chat" with
you.
Away / Extended Away / Do not disturb
You are Online and can send and
receive messages. You inform your
buddies that you currently cannot/do
not wish to "chat", i.e. will not reply to
their messages immediately.
Invisible
You are Online and can send and
receive messages.
However, the messenger server indicates to your buddies that you are
Offline .
Please note:
All status settings apart from Offline only
inform other buddies about your communication status. Whether this information is passed
on to your buddies depends on the provider.
Changing status
v ¢ ¢ Messenger ¢ User Status
¢ Change Status
Select status and press §OK§
Press and hold if necessary
Disconnecting, going offline
‰
(=on).
(idle status).
¤ Select Offline status, and respond
§Yes§.to the security prompt.
The connection to the messenger server
will be terminated. The handset returns to
idle status. New messenger messages are
no longer sent to you. The messenger
message list is deleted. The buddy list is no
longer available.
Please note:
Whether messages directed to you are deleted
or stored in the messenger server depends on
the provider. Stored messages are sent to you
when you go online again.
Checking your status and user ID
v ¢ ¢ Messenger ¢ User Status
¢ Info
If you are online, the following information may be displayed (depending on your
provider):
u Your Web name (nickname, abbrevi-
ated if necessary)
u Your current status
u Your user ID (format: userid@provider-
domain; abbreviated if necessary)
Only Offline will be displayed if you are
offline.
65

Messenger
Opening the buddy list
Precondition: You are Online and have
already created a buddy list (using the PC)
on your provider's messenger server.
¢ ¢ Messenger ¢ Buddies
v
Only the first 20 (maximum) buddies on
the buddy list will be read by the messenger server and displayed on the handset.
The number depends on the available
memory space.
The buddies that are displayed depend on
which buddies were transferred from the
messenger server first.
Please note:
You can also receive and respond to messages
from buddies who are not on the list displayed
on the handset.
Example:
Buddies
Buddies
Mark %
Mark %
Julian %
Julian %
Lisa
Lisa
Herbert
Herbert
Chat Info
Chat Info
The Web names (nicknames) of your buddies are displayed on the list. If they do not
have a Web name, the user ID is displayed.
If the name of a buddy is longer than one
line, it will be abbreviated. You can navigate in the list with the control key .
The buddies appear on the list in the following order. Their status (page 65) is
identifiable by the colour of the % icon
next to the buddies:
1. Buddies with Online status or Ready for
chat in alphabetical order. The % icon is
green.
2. Buddies with Away , Extended Away or
Do not disturb status in alphabetical or-
der. The % icon is orange.
3. Buddies with Offline or Invisible status in
alphabetical order. The % icon is red.
Please note:
The buddy list will remain open until you exit it
(briefly press or press and hold ).
The handset will not automatically return to
idle status.
Changes in the status of buddies
You have opened the buddy list and one of
the buddies changes their status. The following distinctions are made:
u A buddy changes to status Online /
Ready for chat :
You are informed via a message on the
display. The buddy list is updated.
u In the event of another status change,
the buddy list is updated. No message
is displayed.
Please note:
If the buddy changes to Offline status, your
messages are no longer sent to them. Whether
the messenger server stores the messages
until the buddy is Online again or deletes them
depends on the provider.
Requesting information about buddies
You have opened the buddy list (page 66).
Select buddy.
§Info§ Press the display key.
The display depends on the provider.
Example:
Info
Julian
Online
Julian.Reeves@jabbe
r.c om
Chat
1 Web name (nickname, abbreviated if neces-
sary)
2Status
3 User ID (format: userid@provider-domain;
abbreviated if necessary). (Resource names
are not displayed)
1
2
3
66

Messenger
If the buddy changes their status the entry
is updated.
Press to return to your buddy list. Press
§Chat§ if you want to "chat" with the buddy.
Chatting to buddies
You want to "chat" to a buddy, i.e. send a
message.
Precondition: You have opened the
buddy list (page 66) and selected a buddy
with .
¤ Press the display key §Chat§. The text edi-
tor is opened.
¤ Write and send your message
(page 68).
The buddy list is shown again.
Receiving messages
Precondition: You are online.
Newly arrived buddy or info messages
(page 67) are indicated by a flashing message key and a beep, even if you are
in a messenger menu or text editor.
The messages are stored in the Messenger:
message list.
Please note:
The Messenger list is only displayed if you are
online.
Opening the message list using the
key
The message key flashes.
¤ Press the message key .
¤ Select Messenger: (2) list if required and
§OK§. The number in brackets indi-
press
cates the number of new messages.
Please note:
If you are in the messenger menu or one of
its submenus/text editors and you press the
flashing message key , this will open the
Messenger list directly.
To open the message list from the menu:
In the handset idle status:
v ¢ ¢ Messenger ¢ Messages
Select and press
§OK§.
Message list
The messages on the list are sorted chronologically, with the oldest message at the
head of the list.
Example of a list display:
Messenger
Julian
15.01.08 15:25
INFO message
15.01.08 15:30
Delete Read
1 Sender's Web name/user ID
Bold: new/unread message
2 Date and time of message
3 Message from the messenger server
(page 67)
1
2
3
If the memory is full and new messages
arrive, the oldest message(s) will be overwritten. If there are no old (read) messages, the oldest new (unread) messages
will be overwritten.
Message types
In instant messaging, a distinction is made
between the following types of message:
u Buddy messages are the "instant mes-
sages" you receive from other buddies.
You can answer the messages.
u Info messages are special information
from the provider. They are forwarded
to you, but you cannot reply to them.
Example: With some messaging pro-
viders you receive an info message
when another subscriber tries to add
you to their buddy list. You are
prompted to check the messages on
the messenger client on your PC.
67

Messenger
Via the messenger client on your PC
you can agree to the action or refuse
permission. Without your agreement,
the other subscriber cannot add you to
their buddy list.
Reading messages
Precondition: You have opened the message list and selected a message with .
¤ Press the display key §Read§.
The message is opened for you to read.
You have the following options:
§Delete§ Delete a message from the list.
You will return to the message
list.
Or:
§Answer§ (for buddy messages only)
Reply to message. The text
editor is opened. You can write
a reply (see "Writing and sending messages" on page 68).
Or:
Back to the message list.
Delete message
Precondition: You have opened the message list and selected a message with .
¤ Press the display key §Delete§.
Writing and sending messages
Precondition:
u You are reading a buddy's message and
press the display key
u You have pressed the display key §Chat§
in the buddy list or the buddy profiles.
A text editor is opened.
§Answer§ or
¤ Use the handset keys to enter a mes-
sage (max. 612 characters).
¤ Select ©§ ¢ Send and press §OK§.
The message is sent to the buddy.
Please note:
– Entering text with and without EATONI pre-
dictive text is described from page 131.
– EATONI is activated as a default setting.
How to activate/deactivate EATONI, see
page 132.
If the messenger server is unable to send
the message to the buddy, a message will
be displayed.
¤ Confirm the message by clicking §OK§.
The text-editor will re-open with your
message. You can then retry sending the
message.
Interruption while writing
If you receive a call/SMS while you are
writing a message or the connection to
the messenger server is interrupted, the
text editor is terminated and the text written so far is lost.
Menu options for the text editor
By pressing © within the text editor you
have the following options:
Send
Send message to buddy.
Delete Text
Delete the whole text.
Predictive Text
Activate/deactivate predictive text see
page 131.
Select Language
For predictive text: select the language
in which you wish to write the text and
§OK§.
press
68

Messenger
Calling a buddy
You can call a buddy directly.
Precondition: The messenger server sup-
ports calls using vCard and your buddy's
vCard contains a phone number.
Preconditions:
u You have opened the buddy list and
selected a buddy
or
u You have opened the buddy's profile
or
u You have opened the Messenger: list
and selected a buddy
or
u You are reading a message from a
buddy
/ Briefly press or press and
hold the talk or handsfree key.
The phone will try to establish a VoIP/fixed
line connection.
The first number that is found on the
vCard will be dialled.
Ending a call
Press the end call key.
Errors when sending
If it is not possible to send a message, a
distinction is made between the following
situations:
u The connection to the messenger
server is interrupted:
A message is shown in the display to
indicate that the connection to the
messenger server has been inter-
rupted.
The message is stored temporarily
(page 68).
¤ Try to re-establish the connection
(page 64) and send the message
again.
u The server is unable to send the mes-
sage:
A message is shown in the display to
indicate that the message could not be
sent. If, for example, the buddy is not
available, the message you have sent
will also be displayed.
The message is stored temporarily
(page 68).
¤ If necessary, check the buddy's user
ID and send the message again later.
Self-help with errors
While establishing a connection to the
messenger server, during connection and
when sending messages the following
errors may occur.
Behaviour when the connection is lost
If the connection to the messenger server
is interrupted, an appropriate message is
shown in the display. You are Offline .
If you are in a submenu of the messenger,
the handset switches to the messenger
menu.
¤ Try to re-establish the connection
(page 64).
69

Using the network mailbox
Using the network mailbox
Some fixed line network providers and
VoIP providers offer answer machines on
the network – these are known as network
mailboxes.
Each network mailbox accepts incoming
calls made via the corresponding line
(fixed line network or corresponding VoIP
phone number). To record all calls, you
should therefore set up network mailboxes for both the fixed line network and
for each of your VoIP connections.
You need to have requested the network
mailbox for your fixed line network connection from your fixed line network provider. You can store the phone number for
the fixed line network mailbox in the base
station.
You can activate/deactivate the network
mailboxes for your VoIP connections using
your handset or the Web configurator. To
do this, you only require the network mailbox phone number.
Activating/deactivating the network mailbox, entering numbers
You have selected a VoIP connection:
¤ Change multiple line input:
Status
Select On to activate the network mail-
box. Select Off to deactivate.
Number
The number that is currently stored for
the network mailbox is displayed.
Enter or change the phone number for
the network mailbox if necessary.
You have selected the fixed line network
connection:
Number
Enter or change the phone number for
the network mailbox.
You cannot activate/deactivate the network mailbox for the fixed line network
connection via the handset. For how to
activate/deactivate the network mailbox
for the fixed line network connection
please refer to the fixed line network provider's information.
Please note:
For information on how to activate and deactivate network mailboxes via the Web configurator and to change their assigned numbers, see,
see page 112.
You can manage the network mailboxes
on your handset that are assigned to a
receive number on the handset.
¢ Settings ¢ Voice Mail
v
¢ Network AM(s)
The list of connections (VoIP and fixed line
network) that are assigned to the handset
as receive numbers is displayed. The display shows Net AM: xxx, where xxx is
replaced by the relevant default name for
the connection (IP1 to IP6, Fxd. line).
Select connection and press
§OK§.
70

Using the network mailbox
Configuring the (network) mailbox for fast access
You can use fast access to make direct calls
to a network mailbox or also the integrated answer machine on the base station.
Assigning key 1 of the handset, changing assignments
The setting for fast access is handset-specific. You can assign a different answer
machine to key on each registered
handset.
No answer machine is preconfigured for
fast access in the default settings.
Fast access is not yet set on the
handset: Press and hold key
.
Or:
¢ Settings ¢ Voice Mail
v
¢ Set Key 1
The list of connections (VoIP and fixed line
network) that are assigned to the handset
as receive numbers is displayed. The display shows Net AM: xxx, where xxx is
replaced by the relevant default name for
the connection (IP1 to IP6, Fxd. line).
For the integrated answer machine of the
base station, the entry Local AM is offered
in the list (see page 58).
Select entry and press
When selecting a network mailbox:
If a number is already saved to the base
station for the network mailbox, fast
access is activated.
Press and hold (idle status).
If no number has been saved for the net-
work mailbox, a message is displayed to
this effect.
‰
(=on).
§OK§
You will be prompted to enter the number
for the network mailbox.
Jump to the Number line.
Enter the number for the net-
work mailbox.
§Save§ Press the display key.
Press and hold (idle status).
Fast access is automatically activated.
Please note:
You can only assign fast access to one answer
machine.
However, you can also call the network mailbox assigned to a handset's receive numbers
directly via the message key (page 72).
Calling the network mailbox
Press and hold.
If you have set a network mailbox for fast
access you will be connected straight to
this network mailbox.
If necessary, press the hands-
free key.
You hear the network mailbox announcement.
If you have set the integrated answer
machine on the base station for fast
access, message playback begins (see
page 58).
71

Using the network mailbox
Listening to messages on the network mailbox
Under the message key you will find a
list for each network mailbox that fulfils
the following requirements:
u The corresponding connections are
allocated to the handset as receive
numbers.
u The network mailbox phone number is
saved on the base station.
You can call and check the network mailbox directly from the list.
When you press the message key , the
following is displayed (example):
Messages & Calls
Calls List: (4)
Net AM: IP1 (1)
Net AM: Fxd. line (2)
Net AM: IP2 (0)
OK
1 "Fxd. line", "IP1" etc. are the default names
for the associated connections. The default
names are always shown irrespective of
which connection name you have specified
when configuring via the Web configurator.
2 If there are new messages in the network
mailbox, the list entry is shown in bold. The
number of new messages is shown in brackets following the list entry.
3 If there are no new messages (0) is shown
after the list entry for the network mailbox.
The number of messages stored in the network mailbox is not displayed.
Displaying new messages in the handset's
idle status
If a new message is present on one of the
network mailboxes to which the handset
is allocated via its receive number, or there
is a new message on the integrated
answer machine, the icon and the
number of new messages are shown on
the handset's idle display. The message key flashes.
1
2
3
Calling the network mailbox and checking
messages
Press the message key.
Net AM: Fxd. line / Net AM: IP1 / etc.
Select the network mailbox
and press
§OK§.
You are connected directly to the network
mailbox and hear its announcement. Messages can generally be played back using
your handset keypad (digit codes). Listen
to the announcement.
Please note:
– The network mailbox is automatically
called via the corresponding connection.
An area code predefined for your phone is
not prefixed.
– Network mailbox messages can generally
be played back using your handset keypad
(digit codes). You need to define how the
digit codes for VoIP should be converted to
DTMF signals and transmitted (page 107).
Ask your VoIP provider which type of DTMF
transmission it supports.
72

Using several handsets
Using several handsets
Registering handsets
You can register up to six handsets to your
base station.
You can register your Gigaset S67H handset on up to four base stations.
Please note:
– If a number of handsets are registered on
your base station, you can simultaneously
make two calls via the Internet and one via
the fixed line network. Up to two additional
internal connections are also possible.
– Selecting the connection via the talk key
(page 24) is not supported on GAP handsets. Therefore, if you enter a number without a line suffix and without defining a dialling plan for the phone number, it will be
dialled via Default Line (page 88). If you
enter a "*" (star) at the end of the phone
number, it will be dialled via the nondefault connection.
– After registration, all the phone numbers
for the phone will be assigned to the handset as receive numbers. It will use the fixed
line network number and the first VoIP
number as send numbers. For how to
change the assignments, see page 106.
Registering another Gigaset S67H handset on the Gigaset S675 IP
Before you can use your handset, you
must register it to a base station.
You must initiate handset registration on
the handset and on the base station.
If the handset has been registered successfully, the handset returns to idle status. The handset's internal number is
shown in the display e.g. Int 1. If not,
repeat the procedure. Registration can
take up to one minute.
¤ Select v ¢ ¢ Handset
¢ Register H/Set on the handset.
¤ Enter the system PIN of the base station
(the default is 0000) and press
display shows e.g. Base 1 and flashes.
§OK§. The
¤ Within the next 60 seconds, press and
hold (for approx. 3 seconds) the regis-
tration/paging key (page 2) on the
base station.
The handset is given the lowest available
internal number (1–6). If a number of
handsets are registered on the base station, the internal number appears in the
display after registration, e.g. INT 2. This
means that the internal number 2 was
assigned to the handset.
Please note:
If six handsets are already registered to the
base station, there are two options:
– The handset with the internal number 6 is
in idle status: the handset you wish to register is assigned the number 6. The handset
that was previously number 6 is de-registered.
– The handset with the internal number 6 is
being used: the handset you wish to register cannot be registered.
Registering other handsets on the Gigaset S675 IP
You can register other Gigaset handsets
and handsets for other devices with GAP
functionality as follows.
¤ Begin the registration procedure on
the handset in accordance with the
handset's operating instructions.
¤ Press and hold (for approx. 3 seconds)
the registration/paging key (page 2) on
the base station.
Please note:
You can also make changes on your base station with a Gigaset S45 and C47H handset.
73

Using several handsets
De-registering handsets
You can de-register any registered handset
from any registered Gigaset S67H handset.
Open list of internal parties.
The handset you are currently
using is highlighted with <.
Select the handset to be de-
registered.
§Options§ Press the display key.
De-reg. H/Set No.
Select and press
Enter the base station system
PIN (default setting: 0000).
§Yes§ Press the display key to con-
firm the prompt.
Press and hold (idle status).
The handset is de-registered immediately,
even if it is not in idle status.
§OK§.
Locating a handset ("paging")
You can locate your handset using the
base station.
¤ Briefly press the registration/paging
key on the base station (page 2).
¤ All handsets will ring at the same time
("paging"), even if ringer tones are
switched off.
The current (local) IP address for the base
station appears in the handset displays.
Ending paging
¤ Briefly press the registration/paging
key on the base station (page 2).
Or
¤ Press the talk key or the end call
key on a handset.
Changing the base station
If your handset is registered to more than
one base station, you can set it to a particular base station or to the base station
that has the best reception (Best Base).
¢ ¢ Handset ¢ Select Base
v
Select one of the registered
base stations or Best Base and
§OK§.
press
Changing a handset's internal number
A handset is automatically assigned the
lowest free number on registration. In the
list of internal parties, the handsets are
sorted according to their internal number.
You can change the internal number of all
registered handsets (1-6). Numbers 1–6
can only be assigned once each.
Open list of handsets. Your
own handset is indicated by <.
§Options§ Press the display key.
Edit H/Set No.
Select and press
handsets and their internal
numbers will be displayed.
The internal number for the
first handset flashes.
Select handset.
Enter the new internal number
(1-6). The handset's old
number is overwritten.
If necessary, select further
handsets and change numbers.
After all the changes are completed:
§Save§ Press the display key to save
the input.
Press and hold (idle status).
You will hear the error tone if an internal
number has been allocated twice.
§OK§. The list of
¤ Repeat the procedure with a free
number.
74

Using several handsets
Changing the name of a handset
The names "INT 1", "INT 2" etc. are assigned
automatically at registration. You can
change these names. The changed name
is displayed in every handset's list.
Open list of handsets. Your
own handset is indicated by <.
Select handset.
§Edit§ Press the display key.
X Delete previous name if neces-
sary.
Enter the new name
(max. 10 characters).
§Save§ Press the display key.
Press and hold (idle status).
Please note:
If you delete the current handset name and
then press §Save§ without entering a new name,
the handset will automatically be allocated the
standard name "INT x" (x= internal number).
Making internal calls
Internal calls to other handsets registered
on the same base station are free.
They will always be made via broadband if
both handsets are broadband-capable.
Calling a specific handset
Initiate internal call.
Enter the number of the hand-
set.
Or:
Initiate internal call.
Select handset.
Press the talk key.
Calling all handsets ("group call")
Initiate internal call.
Press the star key. All handsets
are called.
Ending a call
Press the end call key.
Please note:
You can reject an internal call by pressing the
end call key .
Other handsets will continue to signal an internal "group call".
Transferring a call to another handset
You can forward (connect) an external
call, made via fixed line network or VoIP, to
another handset.
Open the list of handsets.
The external participant hears
hold music if activated
(page 87).
Select handset or Call All and
§OK§.
press
When the internal participant answers:
¤ If necessary announce the external call.
Press the end call key.
The external call is transferred to the other
handset.
If the internal participant does not answer
or the line is busy, press the display key
§End§ to return to the external call.
When transferring a call you can also press
the end call key before the internal
participant answers.
Then, if the internal participant does not
answer or the line is busy, the call will
automatically return to you (the display
will show Recall).
Initiating internal consultation call, conference call
You are talking to an external participant
(via fixed line network or VoIP) and can
call an internal participant at the same
time to hold a consultation call.
Open the list of handsets.
The external participant hears
hold music if activated
(page 87).
Select handset and press
When an internal participant answers you
can speak to them.
§OK§.
75

Using several handsets
You have the following options:
Ending a consultation call
§End§ Press the display key.
You are reconnected with the external
participant.
Initiating a conference call
§Conf.§ Press the display key.
You are in a three-way conference call
with the external participant and the internal participant.
If the internal participant who has been
called ends the call (press end call key
), you will be connected with the
external participant. If you press end call
key , the external call will be transferred to the internal participant.
Accepting/rejecting call waiting during an internal call
If you receive an external call during an
internal call, you will hear the call waiting
tone (short tone). With Calling Line Identification, the caller's number will appear in
the display.
Ending an internal call, accepting an
external call
§Accept§ Press the display key.
The internal call is ended. You are connected to the external caller.
Rejecting the external call
§Reject§ Press the display key.
The call waiting tone is turned off.
You remain connected with the internal
participant. The ringer tone can still be
heard on other registered handsets.
Using a handset as a room monitor
If the room monitor is activated, a previously stored destination number is called
as soon as a set noise level is reached in
the room.
You can save an internal or external
number in your handset as the destination
number.
The room monitor call to an external
number stops after around 90 seconds.
The room monitor call to an internal
number (handset) stops after approx. 3
minutes (depending on the base station).
During use as a room monitor, all keys are
barred except for the end call key . The
speaker of the handset is muted.
When the room monitor is activated,
incoming calls to the handset are indicated without a ringer tone and are only
shown on the screen. The display and keypad are not illuminated and advisory
tones are also turned off.
If you accept an incoming call, the room
monitor is suspended for the duration of
the call, but the function remains activated.
If you deactivate then re-activate the
handset, the room monitor remains activated.
Warning!
– You should always check the operation
of the room monitor before use. For
example, test its sensitivity. Check the
connection if you are diverting the room
monitor to an outside number.
– When the function is switched on, the
handset's operating time is considerably
reduced. If necessary, place the handset in
the charging cradle. This ensures that the
batteries do not run down.
– Ideally the handset should be positioned 1
to 2 metres away from the baby. The microphone must be directed towards the baby.
– The connection to which the room monitor
is forwarded must not be blocked by an
activated answer machine.
76

Using several handsets
Activating the room monitor and entering the number to be called
v ¢ ¢ Room Monitor
¤ Change multiple line input:
Room M.:
Select On to activate.
Call to:
External number:
¤ Select the number from the direc-
tory (press display key
enter it directly. Only the last 4
characters are displayed.
Internal number:
) or
¤ Press the display key §Options§.
Select INT and press
§OK§.
¤ Use to select the handset or Call
All (if all registered handsets are to
be called) and press
Level:
Set noise level sensitivity (Low or High).
§OK§.
¤ Save changes (page 130).
The function is now activated.
You can use the §Options§ display key to
switch directly to the baby alarm settings.
Please note:
If you do not define any dialling plans for the
number (page 110), an external number will
be dialled via the set standard connection
(VoIP or fixed line network).
Deactivating the room monitor remotely
Precondition: The room monitor call is
sent to an external destination number.
The telephone called supports touch tone
dialling.
¤ Accept the call from the room monitor
and press keys 9 ;.
Your base station sends a confirmation
tone and ends the connection.
Please note:
External deactivating via VoIP connections is
possible as long as the DTMF signals are transmitted (depending on the provider) either as
SIP info messages, audible signals in the voice
channel (inband or audio) or as special RTP
data packets (pursuant to RFC2833).
The room monitor function is deactivated
on the handset. There will be no further
room monitor calls. The other room monitor settings (e.g. no ringer tone) on the
handset will remain activated until you
press the display key
To re-activate the room function with the
same phone number:
§OFF§ on the handset.
¤ Turn on the activation again and save
§Save§ (page 77).
with
Changing the set destination number
v ¢ ¢ Room Monitor
Scroll to the Call to: line.
X or §Delete§
Delete existing number.
¤ Enter number as described in "Activat-
ing the room monitor and entering the
number to be called" (page 77).
77

Handset settings
Handset settings
Your handset is preconfigured, but you
can change the settings to suit your individual requirements.
Changing the display language
You can view the display texts in different
languages.
¢ ¢ Handset ¢ Language
v
The current language is indicated by .
Select a language and press
§OK§.
Press and hold (idle status).
If you accidentally choose a language you
do not understand:
v N
Press keys in sequence.
Select the correct language
and press
§OK§.
Setting the display
You have a choice of four colour schemes
and several different contrasts.
¢ ¢ Display
v
Colour Scheme
Select and press
Select a colour scheme and
§OK§ ( = current col-
press
our).
Press briefly.
Scroll to the Contrast line.
Contrast Select and press
Select contrast.
§Save§ Press the display key.
Press and hold (idle status).
§OK§.
‰
§OK§.
‰
Setting the screensaver
You can set a picture from the Resource
Dir. (page 82) to be displayed as a screensaver when the handset is in idle status.
This will replace the idle status display. It
may conceal the date, time and name.
The screensaver is not displayed in certain
situations, e.g. during a call or if the handset is de-registered.
If a screensaver is activated, the Screen
Saver menu option is marked with .
¢ ¢ Display ¢ Screen Saver
v
The current setting is displayed.
‰
¤ Change multiple line input:
Activation:
Select On (screensaver is displayed) or
Off (no screensaver).
Selection:
If required, change the screensaver
(see below).
¤ Save changes: (page 130).
If the screensaver conceals the display,
briefly press to show the idle display
with time and date.
Changing the screensaver
v ¢ ¢ Display ¢ Screen Saver
Scroll to the Selection line.
§View§ Press the display key. The
active screensaver is displayed.
Select screensaver and press
§Change§.
¤ Save changes: (page 130).
78

Handset settings
Setting the display backlight
Depending on whether or not the handset
is in the charging cradle you can set different levels of display illumination. If it is
activated, the display is permanently
dimmed.
¢ ¢ Display ¢ Backlight
v
The current setting is displayed.
¤ Change multiple line input:
In Charger
Select On or Off.
Without Charger
Select On or Off.
§Save§ Press the display key.
Press and hold (idle status).
Please note:
The handset's standby time can be significantly reduced if the display backlight (On) is
activated.
Shortcuts for functions and numbers
You can assign the left display key and
each of the digit keys Q and to
O a number or a function. The right display key has a function pre-selected by
default. You can change the function
assigned.
The number is then dialled or the function
started by simply pressing a key.
Assigning a digit key/left display key
Precondition: The digit key or the left display key has not yet been assigned a
number or a function.
¤ Press the display key or press
and hold the digit key.
The list of possible key assignments is
opened (see below).
¤ Select the function with the control key
and press
to idle status.
§OK§. The handset returns
The following features are available:
Quick Dial / Call-by-Call
Assign key to a number from the direc-
tory or call-by-call list.
The directory or call-by-call list is
opened.
¤ Select an entry and press §OK§.
If you delete or edit an entry in the
directory or call-by-call list, this has no
effect on the assignment to the digit/
display key.
Please note:
A number from the directory with a hash
(#) at the end will be dialled via the standard connection, otherwise it is always
dialled via the non-standard connection
(page 88).
u INT (§INT§)
Opens the list of internal participants.
u SMS (§SMS§)
Opens the SMS submenu for writing,
sending and reading SMS messages
(page 44):
¢ SMS
u Room Monitor (§Room M.§)
Assign menu for setting and activating
the room monitor to a key (page 77).
u Alarm Clock (§Alarm§)
Assign menu for setting and activating
the alarm clock to a key (page 83).
u Calendar (§Calendar§)
Opens the calendar to enter new or
view saved appointments:
u Withhold No. (§Withhold§)
If you press the display key §Withhold§,
your phone number will not be trans-
mitted for the next call and will there-
fore not appear in the recipient's dis-
play.
If you press the display key
a number editor will be opened.
Enter the phone number and press the
display key
§Send§.
§Withhold§,
79

Handset settings
The number is always dialled via the
fixed line network. This function does
not support dialling with a line suffix.
u E-mail (§EMail§)
Opens the e-mail submenu for receiving and reading e-mail notifications
(page 60):
¢ E-mail
u Messenger (§Messgr.§)
Opens the Messenger submenu for
chatting with friends on the Internet
(page 63):
¢ Messenger
u Fixed Line Call (§FixedLine§)
Opens the pre-dialling option for making a call via the fixed line network.
u IP Call (§IP§)
Opens the pre-dialling option for making a call via VoIP.
If the display keys have been assigned a
shortcut, the selected function or name of
the phone number in the directory or callby-call list is displayed (abbreviated if necessary) in the bottom display line via the
relevant display key.
Starting the function, dialling the number
If the handset is in idle status, press and
hold the digit key or press the display key
briefly.
Depending on the key assignment:
u Numbers are dialled directly.
u The function menu is opened.
Changing key assignments
Display key
¤ Press and hold the left or right display
key.
The list of possible key assignments is
opened.
¤ Proceed as is described when first
assigning the key with a shortcut
(page 79).
Digit key
¤ Press the digit key briefly.
§Change§ Press the display key. The list
of possible key assignments is
displayed.
¤ Proceed as is described when first
assigning the key with a shortcut
(page 79).
Activating/deactivating auto answer
If you activate this function, when you
receive a call you can simply lift the handset out of the charging cradle without having to press the talk key .
¢ ¢ Handset
v
Auto Answer
Select and press
Press and hold (idle status).
Changing the handsfree/ earpiece volume
You can set the loudspeaker volume for
handsfree talking to five different levels
and the earpiece volume to three different
levels.
In the handset idle status:
Press the control key at the
top.
Handset Volume
Select and press
Set the earpiece volume.
Scroll to the Handsfree Volume
line.
Set the handsfree volume.
§Save§ Press display key if necessary
to save the setting permanently.
Setting the volume during a call:
Press the control key.
Select volume.
‰
§OK§ (=on).
§OK§.
80

Handset settings
§Save§ Press display key if necessary
to save the setting permanently.
The setting is automatically saved after
approx. 3 seconds.
If is assigned with another function,
e.g. toggling (page 32):
§Options§ Open menu.
Vol um e Select and press §OK§.
Configure setting (see above).
Please note:
You can also adjust the call volume via the
menu
£ Audio Settings £ Handset Volume .
Changing ringer tones
u Volume:
You can choose between five volumes
(1–5; e.g. volume 2 = ) and
the "crescendo" ring (6; volume
increases with each ring =
).
u Ringer tones:
You can select various ringer tones,
melodies or any sound from My stuff
(page 82).
You can set different ringer tones for the
following functions:
u Ext. Calls: for external calls
u Internal Calls: for internal calls
u Appointments: for set appointments
(page 84)
u All: the same ringer tone for all func-
tions
Settings for individual functions
Set the volume and melody depending on
the type of signalling required.
In the handset idle status:
Press the control key at the
top.
Ringer Settings
Select and press
§OK§.
Ext. Calls / Internal Calls / Appointments
Select and press §OK§.
¤ Change multiple line input:
Set volume (1–6).
Scroll to the next line.
Select melody.
§Save§ Press the display key to save
the setting.
Same ringer tone for all functions
In the handset idle status:
¢ Ringer Settings ¢ All
¤ Set volume and ringer tone (see
"Settings for individual functions").
§Save§ Press the display key to con-
firm the prompt.
Press and hold (idle status).
Please note:
You can also adjust the ringer tones via the
menu
Activating/deactivating the ringer tone
You can deactivate the ringer tone on your
handset before you answer a call or when
the handset is in idle status; the ringer
tone can be deactivated permanently or
just for the current call. The ringer tone
cannot be re-activated while an external
call is in progress.
Deactivating the ringer tone permanently
Press and hold the star key.
The Ú icon appears in the display.
Re-activating the ringer tone
Press and hold the star key.
Deactivating the ringer tone for the current
call
§Silence§ Press the display key.
£ Audio Settings £ Ringer Settings.
81

Handset settings
Activating/deactivating the alert tone
In place of the ringer tone you can activate
an alert tone. When you receive a call, you
will hear a short tone ("Beep") instead of
the ringer tone.
Press and hold the star key
and within 3 seconds:
§Beep§ Press the display key. A call will
now be signalled by one short
alert tone. appears in the
display.
Activating/deactivating muting for the first ringer tone
v Open menu.
NOO
Press keys.
§OK§ Make the first ringer tone
Q
audible.
Or:
§OK§ Suppress the first ringer tone.
Press and hold (idle status).
Activating/deactivating advisory tones
Your handset uses "advisory tones" to tell
you about different activities and statuses.
The following advisory tones can be activated/deactivated independently of each
other:
u Key click: every key press is confirmed.
u Advisory Tones:
– Confirmation tone (ascending tone
sequence): at the end of an entry/
setting and when an SMS or a new
entry arrives in the calls list or in the
answer machine list
– Error tone (descending tone
sequence): when you make an
incorrect entry
– Menu end tone: when scrolling at
the end of a menu
u Battery tone: the batteries need to be
charged.
In the handset idle status:
Press the control key at the
top.
Advisory Tones
Select and press
§OK§.
¤ Change multiple line input:
Key Tones:
Select On or Off.
Confirm.:
Select On or Off.
Battery:
Select On, Off or In Call. The battery
warning tone is only activated/deacti-
vated and only sounds during a call.
¤ Save changes (page 130).
You cannot deactivate the confirmation
tone for placing the handset in the charging cradle.
Please note:
You can also adjust the ringer tones via the
menu
My stuff
My stuff on the handset manages sounds,
which you can use as ringer tones, and
pictures (CLIP pictures and screensavers),
which you can use as caller pictures or as
screensavers. Precondition: Calling Line
Identification (CLIP).
My stuff can manage the following media
types:
Icon Sound Format
Ringer tones Standard
Monophonic Standard
Polyphonic .mid
£ Audio Settings £ Advisory Tones .
Picture:
CLIP picture
Screensaver
BMP
128 x 100 px
Or
128 x 160 px
(px = Pixel)
82

Handset settings
The icon is displayed in front of the name
in My stuff. Various mono- and polyphonic
sounds and pictures are preconfigured on
your handset.
You can listen to the available sounds and
view the pictures.
The pre-configured pictures are labelled
with . You cannot rename or delete
them.
Playing back sounds/viewing CLIP pictures
v ¢ ¢ Screensavers / Caller Pictures
/ Sounds (select entry)
§Play§ / View Press the display key. Sounds
are played back or pictures are
displayed. Press the key to
switch between entries.
§End§ / Press the display key. Playback
of the sound or display of the
picture ends.
While you are playing back
sounds, you can also interrupt
playback with the key.
Press and hold (idle status).
If you have saved a picture in an invalid
data format, you will see an error message
after selecting the entry. Cancel the operation with Î. Delete the picture
§Delete§.
with
Sounds: Setting the volume
During playback:
§Volume§ Press the display key.
Set volume.
§Save§ Press the display key.
Renaming/deleting a picture
You have selected an entry.
§Options Open menu.
If a picture cannot be deleted (), these
options are not available. Depending on
the situation, you can select the following
functions:
Delete Entry
The selected entry is deleted.
Delete List
All entries in the list that can be deleted
are deleted.
Rename
Change the name (max. 16 characters)
and press
the new name.
§Save§. The entry is stored with
Setting the alarm clock
Precondition: The date and time have
already been set (page 11).
Activating/deactivating the alarm clock and setting the wake-up time
v ¢
¤ Change multiple line input:
Activation:
Select On or Off.
Time:
Enter the wake-up time in 4-digit for-
mat.
Occurance:
Select Daily or Monday-Friday.
Volume:
Set loudspeaker (1–6).
Melody:
Select melody.
¤ Save changes (page 130).
You will see the icon.
83

Handset settings
A wake-up call with the selected ringer
tone is signalled on the handset. The
wake-up call sounds for 60 seconds. is
shown in the display. If no key is pressed,
the wake-up call is repeated twice at five
minute intervals and then turned off.
During a call, the wake-up call is signalled
by a short tone.
Deactivating the wake-up call/ repeating after a pause (snooze mode)
Precondition: A wake-up call is sounding.
§OFF§ Press the display key. The
wake-up call is deactivated.
Or
§Snooze§ Press the display key or any
key. The wake-up call is deactivated and then repeated after
5 minutes. After the second
repetition the wake-up call is
deactivated completely.
Setting an appointment (calendar)
You can have your handset remind you of
up to 30 appointments (volume and melody, see page 81).
Saving an appointment
If you have already saved 30 appointments, you must first delete an existing
appointment.
Precondition: The date and time have
already been set (page 11).
¢ Open the graphical calendar.
v
Days on which appointments
have already been saved are
highlighted in black.
/ Select day and press
If appointments have already been saved
for the day, the list of appointments will
be displayed: select <New Entry> and press
§OK§.
§OK§.
¤ Change multiple line input:
Appoint.:
Select On or Off.
Date:
Enter day/month/year in 8-digit format.
Time:
Enter hours/minutes in 4-digit format.
Notes:
Enter text (max. of 16 characters). The
text appears as the appointment name
in the list and will be displayed on the
screen during the appointment
reminder. If you do not enter any text,
only the date and time of the appoint-
ment are displayed.
§Save§ Press the display key.
Press and hold (idle status).
The appointment is marked with in the
appointments list. The list of appointments is sorted by date.
An appointment reminder is signalled
with the selected ringer tone (page 81).
The appointment reminder sounds for
60 seconds. The entered text, date and
time are displayed.
During a call, the appointment reminder is
signalled by a short tone.
Managing appointments
v ¢
/ Select the day in the graphical
calendar and press
Days on which appointments
have already been saved are
highlighted in black in the calendar.
Select appointment for the
day.
§Options§ Open menu
Back with
§.
‰
§OK§ or v.
84

Handset settings
You have the following options:
View Entry
View selected appointment.
Open the
deleting and activating/deactivating.
Edit Entry
Edit selected appointment.
Delete Entry
Delete selected appointment.
Activate / Deactivate
Activate/deactivate the selected
appointment.
Delete List
Delete all appointments.
§Options§ menu for editing,
Deactivating or accepting an appointment reminder
Precondition: An appointment reminder
is sounding.
¤ Press the display key §OFF§ to switch off
the appointment reminder.
Or:
¤ Press the display key §SMS§ to write an
SMS.
If there is a new appointment/anniversary
in the list, the display shows
Pressing the display key will also open the
Missed Alarms list.
To open the list from the menu:
¢ ¢ Missed Alarms
v
Select appointment/anniversary.
Information about the
appointment/anniversary is
displayed. A missed appointment is displayed with the
appointment name and
a missed anniversary is
displayed with the last name
and first name. The date and
time will also be given.
§Delete§ Delete appointment.
§SMS§ Write an SMS
Press and hold (idle status).
If 10 entries are already stored in the list,
the next appointment reminder will delete
the oldest entry.
§Appoint.§.
Setting your own area code
Displaying missed appointments and anniversaries
Missed appointments/anniversaries
(page 38) are displayed in the Missed
Alarms list if:
u You do not accept an appointment/
anniversary.
u The appointment/anniversary was sig-
nalled during a phone call.
u The handset is deactivated at the time
of the appointment/anniversary.
u Automatic redial was activated at the
time of an appointment/anniversary
(page 39).
The most recent entry is at the head of the
list.
If necessary these numbers are already
preset.
¢ ¢ Handset ¢ Area Codes
v
Check that the (pre)set area code is correct.
¤ Change multiple line input:
Select/change input field.
Navigate in the input field.
X Delete number if necessary:
Press the display key.
Enter number.
§Save§ Press the display key.
85

Base station settings
Example:
Area Codes
International code:
00 - 213
Local area code:
0 - [ XX ]
X
Save
Please note:
For how to enter your own area code using the
Web configurator, see page 109.
Restoring the handset to the factory settings
Each individual handset setting is reset, in
particular the language, display, volume,
ringer and alarm clock settings (see from
page 78 onwards). The last number redial
list is cleared.
Entries in the directory, the call-by-call list,
the call history, the SMS lists and the
handset's registration to the base station
as well as the content of My stuff are
retained.
¢ ¢ Handset ¢ Reset Handset
v
§Yes§ Press the display key.
You can cancel the factory
reset by pressing or the
display key
Press and hold (idle status).
§No§.
Base station settings
The base station settings are carried out
using a registered Gigaset S67H handset.
Protecting against unauthorised access
Protect the system settings of the base station with a PIN known only to yourself.
You have to enter the system PIN if,
among other things, you register and deregister a handset, change VoIP settings or
reset the phone to factory settings.
Changing the system PIN
You have to enter the system pin when,
for example, you register a handset with
the base station, change VoIP settings or
start the Web configurator.
You can change the base station's 4-digit
default system PIN ("0000") to a 4-digit
system PIN known only to yourself.
¢ ¢ Base ¢ System PIN
v
Enter the current system PIN
and press
Enter new system PIN.
Scroll to the Re-enter PIN: line.
Now re-enter the new system
PIN and press
For security reasons, "
instead of the system PIN.
Press and hold (idle status).
§OK§.
§OK§.
" is displayed
****
86

Base station settings
Restoring the base station to the factory settings
Resetting the base station via the menu
Each individual setting is reset, in particular:
u VoIP settings such as account data and
DTMF settings (page 89, page 98,
page 107)
u Settings for the local network (page 89,
page 96)
u Default connection (page 88)
u The names of the handsets (page 75)
u SMS settings (e.g. SMS centres,
page 43)
u Settings for the connection to the PABX
(page 91)
u The answer machine settings (page 57)
and own announcements are deleted
The following lists are deleted:
u SMS lists
u Calls list
u Answer machine lists
The following are not reset:
u Date and time
u System PIN
The handsets are still registered.
v ¢ ¢ Base ¢ Base Reset
Enter the system PIN and press
§OK§.
§Yes§ Press the display key to
confirm.
Resetting the base station using a key on the base station
As with resetting the base station via the
menu, all individual settings are reset. The
system PIN will also be reset to "0000"
and all handsets registered above and
beyond the scope of delivery will be de-
registered.
Please note:
For how to re-register the handsets after resetting, if necessary, see page 73.
¤ Remove the cable connections from
the base station to the router (page 14)
and fixed line network (page 14).
¤ Remove the base station mains adapter
from the socket (page 14).
¤ Press and hold the registration/paging
key (page 2).
¤ Plug the mains adapter back into the
power socket.
¤ Continue to press and hold the registra-
tion/paging key (at least 2 sec.).
¤ Release the registration/paging key.
The base station has now been reset.
Activating/deactivating music on hold
v ¢ ¢ Base
Music on hold
Select and press
or deactivate music on hold
‰
(=on).
§OK§ to activate
Activating/deactivating repeater mode
With a repeater you can increase the range
and reception strength of your base station. You will need to activate repeater
mode. This will terminate any calls being
made via the base station at that time.
Preconditions:
u A repeater is registered with the base
station.
¤ Eco mode is deactivated (page 18).
v ¢ ¢ Base ¢ Add. Features
Repeater Mode
Select and press
§Yes§ Press the display key to con-
firm the security prompt.
‰
§OK§ (=on).
87

Base station settings
Set default connection
You can make settings according to
whether you want to make calls via VoIP or
the fixed line network by default.
Please note:
– The standard connection is only relevant
when dialling numbers that are not subject
to dialling plans (page 110).
– For how to set the default connection using
the Web configurator, see page 105.
¢ ¢ Telephony ¢ Default Line
v
VoI P / Fixed Line
Select and press
‰
§OK§ (=on).
When making calls:
¤ Press the talk key briefly if you
want to make the call via the default
connection.
¤ Press and hold the talk key if you
want to make the call via the other connection type.
Updating the base station firmware
If necessary, you can update your base station firmware.
The firmware update is downloaded
directly from the Internet by default. The
relevant Web page is preconfigured in
your phone.
Precondition:
The base station is in idle status, i.e.:
u No calls are being made via the fixed
line network or VoIP.
u There is no internal connection
between the registered handsets.
u No other handset has opened the base
station menu.
Starting the firmware update manually
v ¢ ¢ Base
Software Update
Select and press
Enter the system PIN and press
§OK§.
The base station establishes a connection
to the Internet or to the local PC.
§Yes§ Press the display key to start
the firmware update.
§OK§.
Please note:
– The firmware update can last up to 3 min-
utes.
– When updating from the Internet, checks
are made to ensure that no newer version
of the firmware exists. If this is not the case,
the operation is terminated and a message
is issued to that effect.
Automatic firmware update
Your phone will check daily whether a
newer firmware update is available via the
Internet on the Gigaset configuration
server. If this is the case, the message New
firmware available is displayed when the
handset is in idle status and the message
key flashes.
Press the message key.
§Yes§ Press the display key to con-
firm the prompt.
The firmware will be loaded onto your
phone.
Please note:
– If you reply to the prompt with §No§, the dis-
play will not be repeated.The message New
firmware available will only be shown again if
a newer version of the firmware than the
one rejected is available.
– You can deactivate the automatic version
check via the Web configurator (page 117).
88

Making VoIP settings
Making VoIP settings
In order to be able to use VoIP, you must
set a few parameters for your phone.
You can make the following settings using
your handset.
u Enter your personal access data for
your first VoIP account (first VoIP phone
number). You can configure the access
data for five further VoIP accounts via
the phone's Web configurator.
u Set the phone's IP address in the LAN.
Please note:
You can set these and other parameters conveniently via the Web configurator on a PC
connected to your local network (see
page 98).
The connection assistant on your phone
can help you make the settings.
Using the connection assistant
The connection assistant starts automatically when you set the handset and base
station up for the first time, or when you
try to connect to the Internet before making the necessary settings.
You can also start the connection assistant
via the menu:
¢ ¢ Telephony
v
Connection Assist.
Select and press
Enter the system PIN and press
§OK§.
For how to enter VoIP settings using the
connection assistant, see page 15.
§OK§.
Changing settings without the connection assistant
You can change the VoIP user data via the
menu without starting the connection
assistant.
The VoIP settings must also be extended
for your personal data. You will receive all
necessary data from your VoIP provider.
Please note:
When making these entries, please remember
the VoIP user data is case sensitive. To enter
text see page 130.
¢ ¢ Telephony ¢ Vo IP (Enter
v
system PIN)
¢ Provider Registr.
¤ Change multiple line input:
Username:
Enter the user name (caller ID) for your
VoIP provider account. Username is
often identical to your Internet tele-
phone number (the first part of your
SIP address, see page 100).
Authent. Name: / Authent. Password:
Enter the provider-dependent access
data that has to be transferred by the
phone to the SIP service at registration.
¤ Click §Save§ to save the settings.
Setting the phone's IP address in the LAN
The base station requires an IP address in
order to be "recognised" by the LAN.
The IP address can be assigned to the base
station automatically (by the router) or
manually.
u If performed dynamically, the router's
DHCP server automatically assigns the
base station an IP address. The base
station's IP address can be changed
according to router settings.
89

Making VoIP settings
u If performed manually/statically, you
assign the base station a static IP
address. This may be necessary
depending on your network configuration.
Please note:
– For how to make the local network settings
on the Web configurator, turn to page 96.
– To assign the IP address dynamically, the
DHCP server on the router must be activated. Please also read the user guide for
your router.
¢ ¢ Base ¢ Local Network
v
Enter the system PIN and press
§OK§.
¤ Change multiple line input:
IP Address Type:
Select Static or Dynamic.
If you select Static, you must manually
define the IP address and the subnet
mask for the base station in the next
lines, as well as the standard gateway
and DNS server.
IP Address:
For IP Address Type = Dynamic:
The IP address that is currently assigned
to the base station will be displayed. It
cannot be amended.
For IP Address Type = Static:
Enter the IP address that is to be
assigned to the base station (overwriting the current settings).
192.168.2.2 has been preset.
For the IP address see also page 147.
Subnet Mask:
For IP Address Type = Dynamic:
The subnet mask that is currently
assigned to the base station will be displayed. It cannot be amended.
For IP Address Type = Static:
Enter the subnet mask to be assigned
to the base station (overwriting the
current settings).
The default setting is 255.255.255.0
For the subnet mask see also page 150.
DNS Server:
For IP Address Type = Static:
Enter the IP address for the preferred
DNS server. The DNS server (Domain
Name System) converts the symbolic
name of a server (DNS name) into the
public IP address for the server when
the connection is made.
You can specify your router's IP address
here. The router forwards phone
address requests to its DNS server.
192.168.2.1 has been preset.
Default Gateway:
For IP Address Type = Static:
Enter the IP address for the standard
gateway, by means of which the local
network is connected with the Internet.
This is generally the local (private) IP
address for your router (e.g.
192.168.2.1). Your phone requires this
information to be able to access the
Internet.
192.168.2.1 has been preset.
¤ Click §Save§ to save the settings.
Please note:
You can find notes on the IP address and the
subnet mask on page 97 and in the glossary on
page 147/page 150.
Activating/deactivating display of VoIP status messages
If the function is activated, a VoIP status
code for your service provider is displayed.
Activate the function if, for example, you
have problems with VoIP connections. You
will receive a provider-specific status
code, which supports the service when
the problem is analysed. You will find a
table with the possible status screens in
the appendix (page 123).
¢ ¢ Telephony ¢ Vo IP
v
Enter the system PIN and press
§OK§.
90

Operating the base station on the PABX
Show Stat. on HS
Select and press
‰
§OK§ (=on).
Please note:
For how to make the setting on the Web configurator, see page 119.
Checking the base station MAC address
Depending on your network configuration, you may have to enter your base station MAC address, for example, into your
router's access control list. You can check
your base station MAC address:
v NOQ
The base station MAC address is displayed.
Press and hold (idle status).
Operating the base station
on the PABX
The following settings are only necessary
when your PABX requires them; see the
PABX user guide. The settings only concern fixed line network connections.
You cannot send or receive SMS messages
on PABXs that do not support Calling Line
Identification.
Setting recall
You can set the recall option.
v ¢ ¢ Telephony ¢ Fixed Line
¢ Recall
Select recall and press §OK§.
The current setting is indicated by .
Press and hold (idle status).
‰
Setting pauses
Changing pause after line seizure
You can set the length of the pause
inserted between pressing the talk key
and sending the phone number.
vNOL
Enter a number for the length
of the pause (1 = 1 sec.;
2 =3sec.; 3 = 7 sec.) and
§OK§.
press
Changing the pause after the recall key
You can change the length of the pause if
your PABX requires this (refer to the user
guide for your PABX).
vNO
Enter a number for the length
of the pause (1 = 1 sec.;
2 =2sec.; 3 = 3 sec.;
4 = 6 sec.) and press
§OK§.
Switching temporarily to tone dialling (DTMF)
If your PABX still operates with dial pulsing
(DP), but you need touch tone dialling for
a connection (e.g. to listen to the network
mailbox for your fixed line network connection) you must switch to touch tone
dialling for the call.
Precondition: You are currently conducting an external call via the fixed line network or you have dialled an external fixed
line network number or an external call is
signalled.
§Options§ Open menu.
Tone Dialing Select and press §OK§.
Touch tone dialling is now activated for
this call only.
91

Web configurator –configuring phone via PC
Web configurator –
configuring phone via PC
The Web configurator is the Web interface
for your phone. It allows you to make the
settings for your phone's base station via
your PC's Web browser.
Please note:
Depending on your VoIP provider, it is possible
that you will be unable to change individual
settings in the Web configurator.
Preconditions:
u A standard Web browser is installed on
the PC, e.g. Internet Explorer version
6.0 or higher, or Firefox version 1.0.4 or
higher.
u The phone and PC are connected with
each other via a router.
Please note:
–The phone is not blocked while you make
your settings in the Web configurator. You
can also use your phone to make calls or
change base station or handset settings on
your handset at the same time.
– While you are connected to the Web config-
urator, it is blocked to other users. It cannot
be accessed by more than one user at any
time.
With the Web configurator on your phone
you have the following options:
u Configure your phone access to the
local network (IP address, gateway to
the Internet).
u Configure your phone for VoIP. Assign
up to six VoIP phone numbers to your
telephone.
u Load new firmware onto the phone if
necessary.
u Use internet services: Enable access to
an online directory, display text information on the handset (info services)
and synchronise the telephone's date/
time with a time server on the Internet.
u Manage the names and internal num-
bers of registered handsets and your
local directories
u Obtain information about your phone's
status (firmware version, MAC address,
etc.).
Connecting PC with Web configurator
Precondition: The settings of a firewall
installed on your PC allow the PC and
phone to communicate with each other.
There are two ways of connecting your PC
to the base station Web configurator:
u via the (local) IP address of the base sta-
tion
u via Gigaset config
Establishing a connection via the IP
address:
¤ Establish the telephone's current IP
address on the handset:
You can see the phone's current IP
address in the handset display by
briefly pressing the paging key on the
base station.
Your phone's IP address can change if
you have activated dynamic IP address
assignment (page 96).
¤ Launch the Web browser on your PC.
¤ Enter http:// and the phone's IP address
into the address field of the Web
browser, e.g. http://192.168.2.2.
¤ Press the return key.
A connection is established to the phone's
Web configurator.
92

Web configurator –configuring phone via PC
Establish a connection via Gigaset config:
Precondition: The router is connected to
the Internet and your PC can access the
Internet via the router.
¤ Launch the Web browser on your PC.
¤ Enter the following URL into the Web
browser's address field:
http://www.Gigaset-config.com
¤ Press the return key.
You will receive a message stating the
connection will be forwarded to your base
station.
If several Gigaset VoIP phones can be
reached via your Internet connection, you
will be asked to which one of these
phones you would like to be forwarded.
After successfully forwarding the connection, the Login Web page of the Web configurator will be displayed in the Web
browser.
Please note:
The connection between the PC and the Web
configurator is a local connection (LAN connection). The Internet is only accessed to
establish the connection.
Logging in, setting the Web configurator language
¤ Click OK.
Once you have successfully logged in, a
Home screen opens with general informa-
tion on the Web configurator.
Please note:
– If you have forgotten your system PIN, you
must restore your device's factory settings.
Please note that this will restore all other
settings too (page 87).
– If you do not make any entries for a lengthy
period (around 10 minutes), you will be
automatically logged off. The next time
you try to make an entry or open a Web
page, the Login Web page will be displayed.
Enter the system PIN again to log in again.
– Any entries that you did not save on the
phone before automatic log-off will be lost.
Logging off
In the menu bar (page 94) at the top right
of every Web page in the Web configurator, you will see the Log Off command.
Click Log Off to log off from the Web configurator.
Warning:
Always use the Log Off command to end the
connection to the Web configurator. If, for
example, you close the Web browser without
logging off beforehand, it is possible that
access to the Web configurator will be blocked
for a few minutes.
Once you have successfully established
the connection, the Login Web page will
be displayed in the Web browser.
You can select the language you want the
menus and Web configurator dialogues to
be displayed in. The language that is currently selected is displayed in the top field
of the Web page.
¤ If necessary, click to open the list of
available languages.
¤ Select the language.
¤ In the bottom field of the Web page,
enter your phone's system PIN (default
setting: 0000) to access the Web configurator functions.
93

Web configurator –configuring phone via PC
Structure of the Web pages
The Web pages contain the UI elements
displayed in Figure 2.
Working areaNavigation area Menu barButtons
Figure 2 Example of the structure of a Web page
Menu bar
In the menu bar, the Web configurator
menus are offered in the form of tab
pages.
The following menus are available:
u Home
The start screen is opened once you
have registered with the Web configurator. It contains information on the
Web configurator functions.
u Settings (page 96)
This menu allows you to make settings
on your phone.
94
u Status (page 119)
This menu gives you information about
your phone.
If you click the Settings menu, a list with
this menu's functions is displayed in the
navigation area (see below).
You will find the Log Off function to the
right of the menu bar on every Web page
(page 93).
Please note:
You will find an overview of the Web configurator menu on page 23.

Web configurator –configuring phone via PC
Navigation area
In the navigation area, the functions of the
menu selected in the menu bar (page 94)
are listed.
If you click a function, the associated page
opens in the working area with information and/or fields for your inputs.
If a function is assigned subfunctions,
these are displayed with the function as
soon as you click the function. The relevant page for the first subfunction is displayed in the working area.
Working area
Depending on the function selected, information or dialogue boxes are displayed in
the working area, which allow you to
make or change your phone settings.
Making changes
Make settings for entry fields, lists or
options.
u There may be restrictions regarding the
possible values for a field, e.g. entering
special characters or certain value
ranges.
u To open a list, click . You can choose
between default values.
u There are two kinds of options:
– Options in a list, from which you can
activate one or several options.
Active, i.e. selected options are highlighted with , non-active options
with . You can activate an option
by clicking . The status of the
other options in the list does not
change. You can deactivate an
option by clicking .
– Alternative options. The active
option in the list is highlighted with
, and the non-active with .
You can activate an option by clicking . The previously activated
option is deactivated. You can only
deactivate an option by activating
another option.
Applying changes
As soon as you have made your change on
a page, activate the new setting on the
phone by clicking Set.
If your input in a field does not comply
with the rules for this field, an appropriate
error message will be displayed. You can
then repeat the input.
Warning:
Changes that have not been saved on your
phone are lost if you move to another Web
page or if the Web configurator is terminated,
e.g. due to the time limit (page 93).
Buttons
Buttons are displayed in the bottom section of the working area.
Set
Save entries on the phone.
Cancel
Reject changes made on the Web page
and reload the settings that are currently saved in your phone to the Web
page.
Opening Web pages
A brief outline of the navigation to the
individual Web configurator functions is
given below.
Example:
Setting DTMF signalling
Settings ¢ Telephony ¢ Advanced Settings
To open the Web page, carry out the following steps after registration:
¤ Click the Settings menu in the menu
bar.
¤ Click the Telephony function in the navi-
gation area.
The subfunctions of Telephony are dis-
played in the navigation tree.
¤ Click the Advanced Settings subfunction.
The Web page from Figure 2 will be shown
in the Web browser.
95

Web configurator –configuring phone via PC
Setting the phone with Web configurator
You can make the following settings using
the Web configurator:
u Connecting your phone to the local
network (page 96)
u Configuring for telephony
– Configure VoIP accounts and acti-
vate/deactivate (page 99)
– Specify the name of the fixed line
network (page 102)
– Activate/deactivate call forwarding
for calls to your VoIP numbers
(page 107)
– Configure settings to improve voice
quality for the VoIP connections
(page 103)
– Define the standard connection for
your telephone (fixed line network
or VoIP) (page 105)
– Assign VoIP phone numbers to indi-
vidual handsets as send/receive
numbers (page 106)
– Determine fixed line network and
VoIP phone numbers for which the
answer machine of the base station
should record calls (page 107).
– Define user-specific dialling plans
for emergency numbers and for
cost-control purposes (page 110)
– Enter and activate/deactivate the
network mailbox for each number
assigned to the telephone
(page 112)
– Define the type of DTMF signalling
(e.g. for remote operation of a VoIP
network mailbox) and the recall key
function for VoIP (page 107)
– Enter settings for call forwarding via
VoIP (call placing, i.e. connecting
two external callers to each other,
page 109)
u Output of information from an
IP info service on the handset
(page 113)
u Synchronisation of date and time on
the base station with a time server on
the Internet (page 118)
u Starting firmware updates (page 116)
u Managing registered handsets
– Change names and internal num-
bers of the registered handsets
(page 114)
– Copy contacts from your PC's Out-
look address book to the handset
directories or save handset directories to your PC (page 114)
– Activate/deactivate the display of
VoIP status messages on your handset (page 116)
IP Configuration
Assigning the IP address
Make the necessary settings for operating
your phone in your local network and to
connect it to the Internet. For more
detailed explanations of the individual
components/terms, see the glossary
(page 142).
¤ Open the following Web page:
Settings
¢ IP Configuration.
¤ In the Address Assignment area, select
the IP address type.
Select Obtained automatically if you want
your phone to be assigned a dynamic IP
address by a DHCP server in your local network. No further settings are necessary for
the local network.
Select Static if you would like to set up a
static IP address for your phone. A static IP
address is useful, for example, if port forwarding or a DMZ is set up on the router
for the phone.
96

Web configurator –configuring phone via PC
The following fields are displayed when
you select IP address type = Static:
IP address
Enter an IP address for your phone. This
IP address allows your phone to be
reached by other subscribers in your
local network (e.g. PC).
192.168.2.2 has been preset.
Please note the following:
– The IP address must be from the
address block for private use that is
used in the router. This is generally
in the range 192.168.0.1 –
192.168.255.254 with Subnet mask
255.255.255.0. The subnet mask
determines that the first three parts
of the IP address must be identical
for all subscribers in your LAN.
– The static IP address must not
belong to the address block (IP pool
range) that is reserved for the DHCP
server of the router. It must also not
be used by another device on the
router.
If necessary, check the settings on the
router.
Subnet mask
Enter the subnet mask for your device's
IP address. For addresses from the
address block 192.168.0.1 –
192.168.255.254, the subnet mask
255.255.255.0 is generally used. This
is preconfigured when the phone is
supplied.
Default gateway
Enter the IP address for the standard
gateway, by means of which the local
network is connected with the Internet.
This is generally the local (private) IP
address for your router (e.g.
192.168.2.1). Your phone requires this
information to be able to access the
Internet.
192.168.2.1 has been preset.
Preferred DNS server
Enter the IP address for the preferred
DNS server. DNS (Domain Name System) allows you to assign public IP
addresses to symbolic names. The DNS
server is required to convert the DNS
name into the IP address when connection is being established to a server.
You can specify your router's IP address
here. The router forwards phone
address requests to its DNS server.
192.168.2.1 has been preset.
Alternate DNS server (optional)
Enter the IP address for the alternative
DNS server that should be used in situations where the preferred DNS server
cannot be reached.
Click Set to save the changes.
Click Cancel to reject the changes.
Allowing access from other networks
The default setting for your phone is set so
that you can only access your phone's Web
configurator via a PC that is in the same
local network as your phone. The subnet
mask of the PC must match that of the
phone.
You can also allow access from PCs in
other networks.
Warning:
Expansion of access entitlement to other networks increases the risk of unauthorised
access.
It is therefore recommended that you deactivate remote access again if you no longer
require it.
¤ Open the following Web page:
Settings
¢ IP Configuration.
¤ In the Remote Management area, activate
the Yes option to permit access from
other networks.
To deactivate remote access, click the
No option. Access is then limited to PCs
in your own local network.
97

Web configurator –configuring phone via PC
Access to the Web configurator services
from other networks is only possible if
your router is set accordingly. The router
must pass on the service requests from
"outside" to Port 80 (default port) of the
phone. Please also read the user guide for
your router.
To establish a connection, the public IP
address or the DNS name of the router
and, where applicable, the port number
on the router must be indicated in the
Web browser of the remote PC.
Configuring telephone connections
You can configure up to seven numbers on
your phone: your fixed line network
number and six VoIP numbers.
You need to set up a VoIP account with a
VoIP provider for each VoIP phone number. You must save the access data for
each account in the phone. You can assign
a name to each connection (VoIP and fixed
line network).
To configure the connections:
¤ Open the following Web page:
Settings
A list (see Figure 3) will be shown with all
possible connections that you can configure, or have already configured, for your
phone.
Figure 3 List of possible connections
¢ Telephony ¢ Connections.
The list will show the following:
Name / Provider
Name of the connection. This will show
the name that you have defined for the
connection (page 99, page 102) or the
default name (IP1 to IP6 for VoIP con-
nections, Fixed Line for the fixed line
network connection and Gigaset.net).
VoIP connections also display the name
of the VoIP provider.
Suffix
Line suffix that you have to add to the
phone number of an outgoing call to
allow the account assigned to the suffix
to be used as the sending account.
Example: If you dial 123456765#1, the
connection will be made and billed
through the first VoIP account, regard-
less of the number you have assigned
to your handset as the send number
and whether you press briefly/press
and hold the talk key.
If you dial 123456765#0, the connec-
tion will be made via the fixed line net-
work.
Status
The status of the connection will be
shown for VoIP connections:
Registered
The connection is activated. The phone
has been successfully registered. You
can use the connection to make calls.
Disabled
The connection is deactivated. The
phone is not registering with the corre-
sponding account with the VoIP serv-
ice. You cannot use the connection to
make or receive calls.
Registration failed / Server not accessible
Your phone was unable to register with
the VoIP service, e.g. because the VoIP
access data is incorrect or incomplete
or the phone is not connected to the
Internet. There is information about
this in the section "Questions and
answers" from page 120 onwards.
98

Web configurator –configuring phone via PC
Active
You can use the option in the Active column to activate ( ) and deactivate
( ) VoIP connections. If a connection
is deactivated, the phone will not register for this connection. The connection
can be activated/deactivated by clicking
directly on the option. The change does
not need to be saved.
To configure a connection or to change
the configuration of a connection:
¤ Click Edit next to the connection.
This will open a Web page where you can
make the settings needed. More in formation is available
u in the section "Configuring the VoIP
connection" on page 99 and
u in the section "Configuring the fixed
line connection" on page 102
Configuring the VoIP connection
Open the Web page:
¤ Open the following Web page:
Settings
¢ Telephony ¢ Connections.
¤ Click Edit next to the VoIP connection
that you want to configure or the configuration of which you want to
change.
This will open a Web page where you can
make the settings that your phone needs
to access your provider's VoIP server.
The Web page always displays the
following areas:
u IP Connection (page 99),
u Auto Configuration (page 99)
u Personal Provider Data (page 100).
The areas
u General Provider Data (page 100) and
u Network (page 101)
can be shown and hidden by clicking the
Show Advanced Settings and Hide Advanced
Settings buttons.
These areas display general access data of
your VoIP provider among other things.
¤ Make the settings on the Web page.
¤ Save them in the phone, see page 102.
¤ Activate the connection if necessary,
see page 102.
Area: IP Connection
Connection Name or Number
Enter a name for the VoIP connection or
the VoIP phone number (max. 16 char-
acters). This name is used to display the
connection on the handset and the
Web configurator interface, e.g. during
allocation of send and receive numbers
(page 106), for the call display
(page 26).
Area: Auto Configuration
General VoIP access data is stored in the
General Provider Data (page 100) and Network (page 101) areas of your phone.
You can update this data by downloading
it from the Internet onto your base station
again.
¤ In the Auto Configuration area, click on
Select VoIP Provider.
Please note:
If you click the Select VoIP Provider button, any
changes that have been made to the Web page
will be saved and checked. Values may need to
be corrected before the Select VoIP Provider
operation is started.
¤ On the next Web page, click on Next.
¤ On the next Web page, click on Finish.
Your current VoIP provider data is loaded
onto your phone and saved under
General Provider Data (page 100) and
Network (page 101).
After downloading, you must enter your
account data in the Personal Provider Data
area to complete the VoIP connection configuration.
99
 Loading...