

Page 1

R-607/R-507
AUDIO/VIDEO RECEIVER
RÉCEPTEUR AUDIO/VIDÉO
RECEPTOR DE AUDIO/VÍDEO
AUDIO/VIDEO RECEIVER
АУДИО-/ВИДЕОРЕСИВЕР
OPERATING INSTRUCTIONS
GUIDE D’UTILISATION
INSTRUCCIONES DE FUNCIONAMIENTO
BEDIENUNGSANLEITUNG
ИНСТРУКЦИЯ ПО ЭКСПЛУАТАЦИИ
Page 2
Safety Information
READ THIS BEFORE OPERATING YOUR UNIT
CAUTION
RISK OF ELECTRIC SHOCK
DO NOT OPEN
CAUTION
TO REDUCE THE RISK OF ELECTRIC SHOCK, DO NOT
REMOVE FRONT OR BACK COVER. NO USER-SERVICEABLE
PARTS INSIDE. REFER SERVICING TO QUALIFIED SERVICE
PERSONNEL.
This symbol indicates the presence of uninsulated “dangerous voltage” within the product’s enclosure
that may be of sufcient magnitude to constitute a risk of electric shock.
This symbol indicates important operating and maintenance (servicing) instructions in the literature
accompanying the appliance.
WARNING:
TO REDUCE THE RISK OF FIRE OR ELECTRIC SHOCK, DO NOT EXPOSE THIS APPLIANCE TO
RAIN OR MOISTURE.
CAUTION
•Leave space around the unit for sufcient ventilation.
•Avoid installation in extremely hot or cold locations, or in an
area that is exposed to direct sunlight or heating equipment.
•Keep the unit free from moisture, water, and dust.
•Do not let foreign objects in the unit.
•Keep the ventilation openings clear of items, such as
newspapers, linens, or curtains.
•Keep open ame from candles or other sources away from the
unit.
•Observe the local regulations regarding disposal of packaging
materials, exhausted batteries and old equipment.
•Do not expose the unit to dripping or splashing, or place objects
lled with liquids such as vases.
•Do not let insecticides, benzene, or thinner come in contact
with the unit.
•Never disassemble or modify the unit in any way.
Notes on the AC power cord and the wall outlet
•The unit remains connected to AC power as long as it is
plugged into the wall outlet, even if the unit has been turned off.
•To completely disconnect this product from AC power,
disconnect the plug from the wall socket outlet.
•When setting up this product, make sure that the AC outlet you
are using is easily accessible.
•Disconnect the plug from the wall outlet when not using the unit
for long periods of time.
Manufactured under license under U.S.
Patent Nos: 5,956,674; 5,974,380;
6,226,616; 6,487,535; 7,212,872;
7,333,929; 7,392,195; 7,272,567 &
other U.S. and worldwide patents issued & pending. DTS-HD,
the Symbol, & DTS-HD and the Symbol together are registered
trademarks & DTS-HD Master Audio is a trademark of DTS, Inc.
Product includes software. © DTS, Inc. All Rights Reserved.
Manufactured under license from
Dolby Laboratories. Dolby, Pro
Logic, and the double-D symbol are
trademarks of Dolby Laboratories.
HDMI, the HDMI Logo, and High-
Denition Multimedia Interface are
trademarks or registered trademarks
of HDMI Licensing LLC in the United States and other contries.
* DTS-HD Master Audio and Dolby TrueHD is applicable only for
R-607.
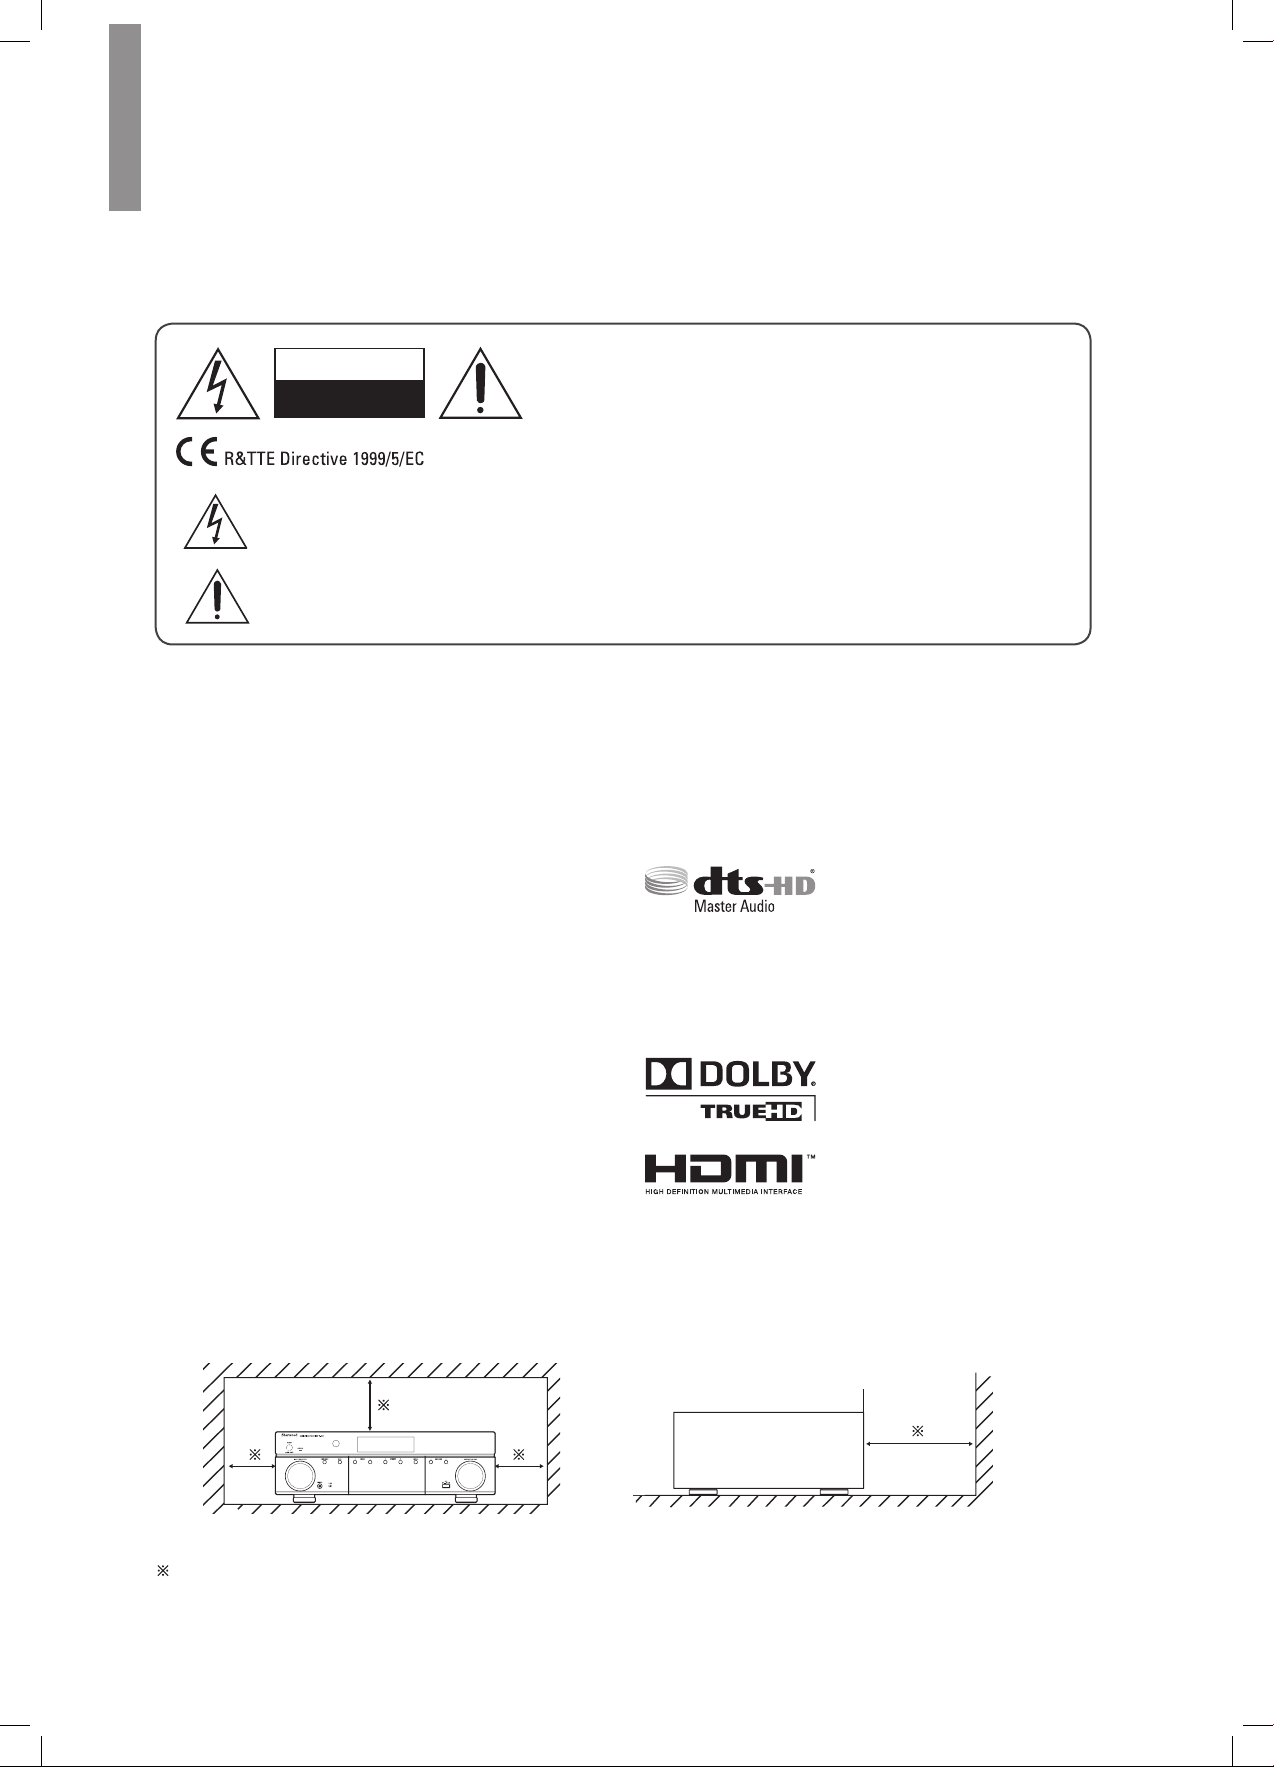
Caution regarding installation
Note
Do not block ventilation openings or stack other equipment on the top.
Note:
For heat dispersal, do not install this unit in a conned space such as a bookcase or similar enclosure.
2
Wall
Page 3

Table of Contents
2 SAFETY INFORMATION
4 GETTING STARTED
4 Front Panel
4 Rear Panel
5 Remote Control
6 Placement
7 CONNECTIONS
7 Connect Your Speakers
7 Connect Your Subwoofer
8 Connect Your TV or Video Display
9 Connect Your Audio and Video Source Devices
13 Connect the Tuner Antennas
13 Connect to AC Power
13 Install the Batteries in the Remote Control
14 SETUP
14 Turn On the AVR
English
14 Congure the AVR for Your Speakers
16 OPERATION
16 Operating Your AVR
16 Listening to FM and AM Radio
17 Listening to Media on a USB Device
17 Selecting a Surround Mode
18 Advanced Functions
20 TROUBLESHOOTING
21 SPECIFICATIONS
3
Page 4
Getting Started
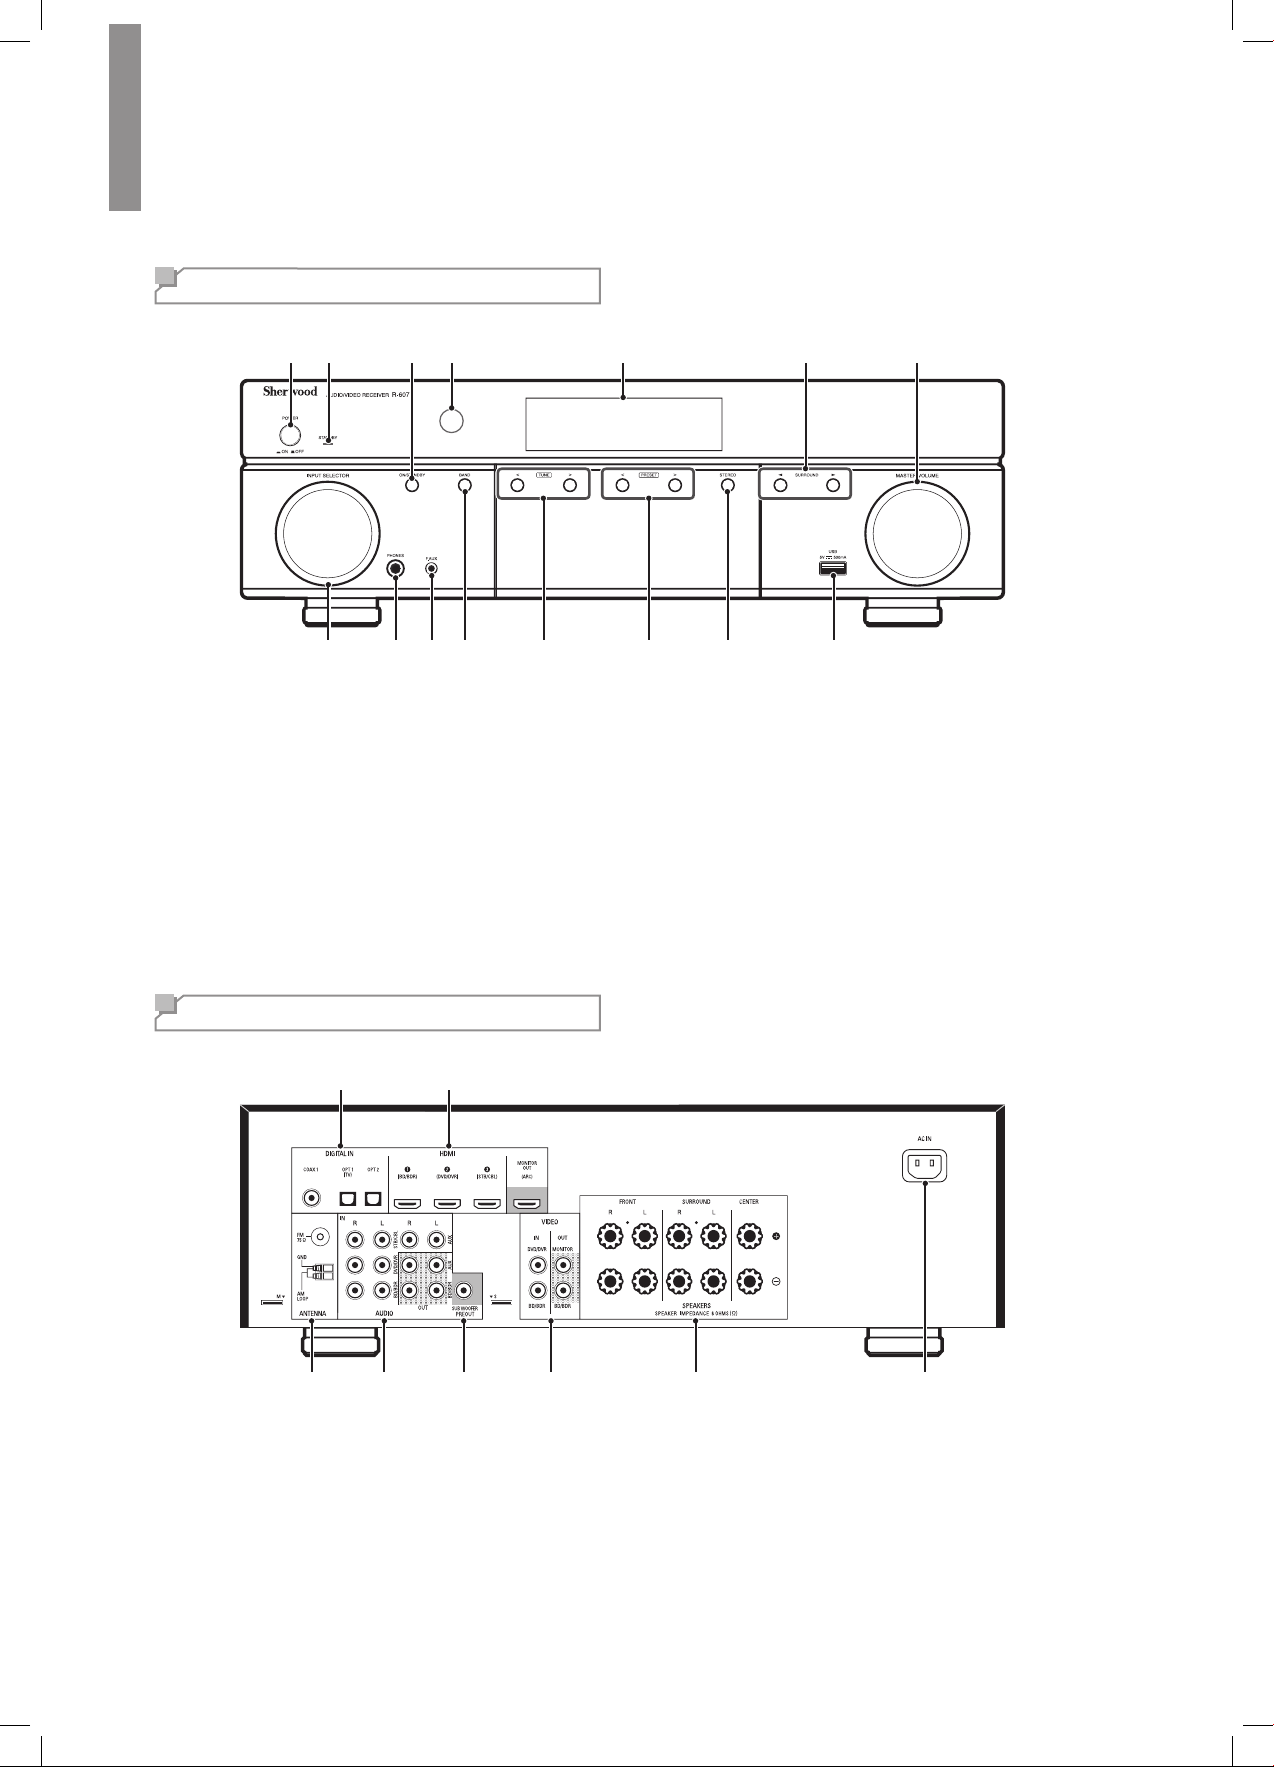
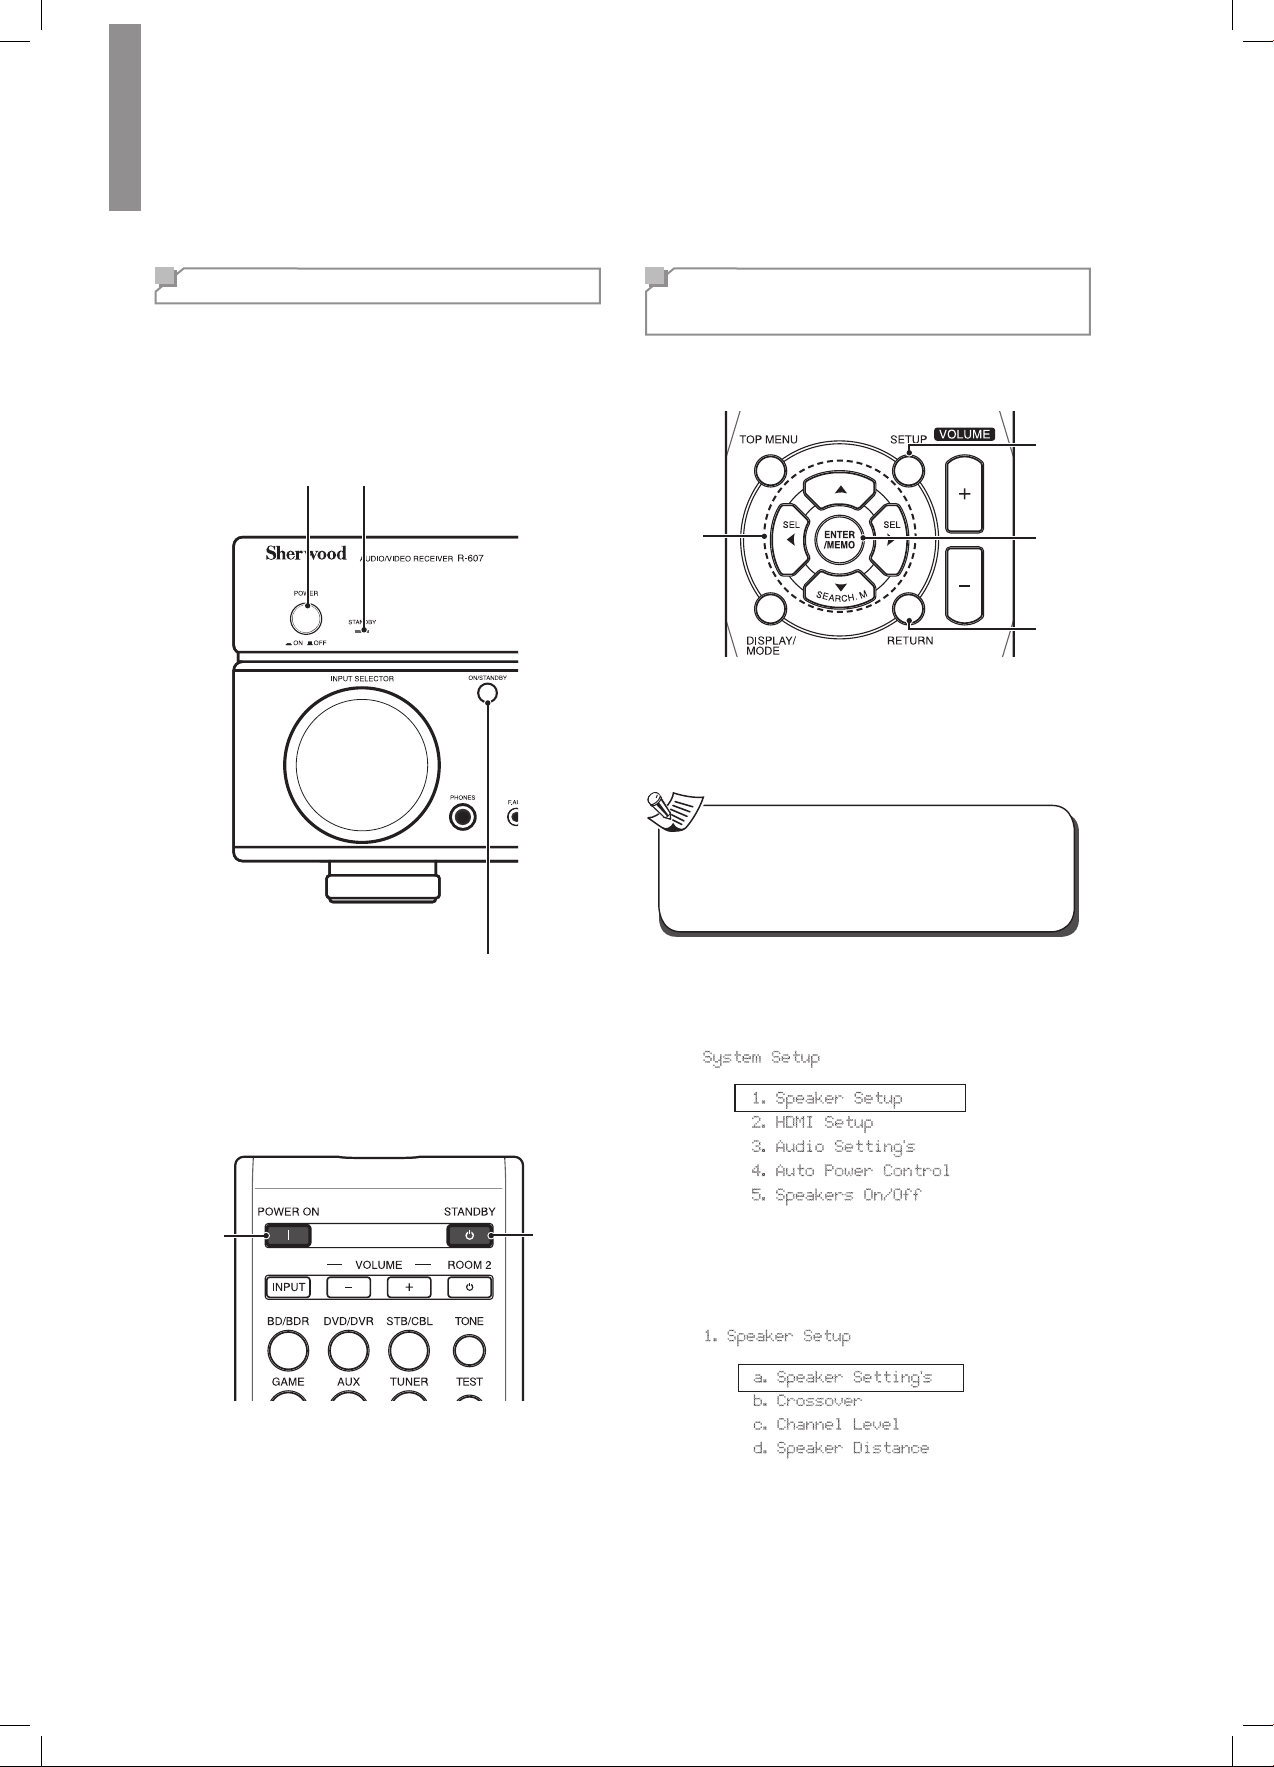
Front Panel
1 2 3 4 5 6 7
Main Power Switch
1
Standby Indicator
2
On/Standby Switch
3
IR Sensor
4
Display
5
Surround Select Buttons
6
Master Volume Control
7
Input Selector
8
Rear Panel
8 9 10 11 14 15
12 13
9
10
11
12
13
14
15
Headphone Connector
F.AUX Input Connector
Band Select Button
Tuning Up/Down Buttons
Preset Select Buttons
Stereo Mode Button
USB Port
1 2
4
3 4 5 6 7 8
Digital Audio Connectors
1
HDMI Connectors
2
Tuner Antenna Connectors
3
Analog Audio Connectors
4
Subwoofer Connector
5
Composite Video Connectors
6
Speaker Connectors
7
AC Input Connector
8
Page 5

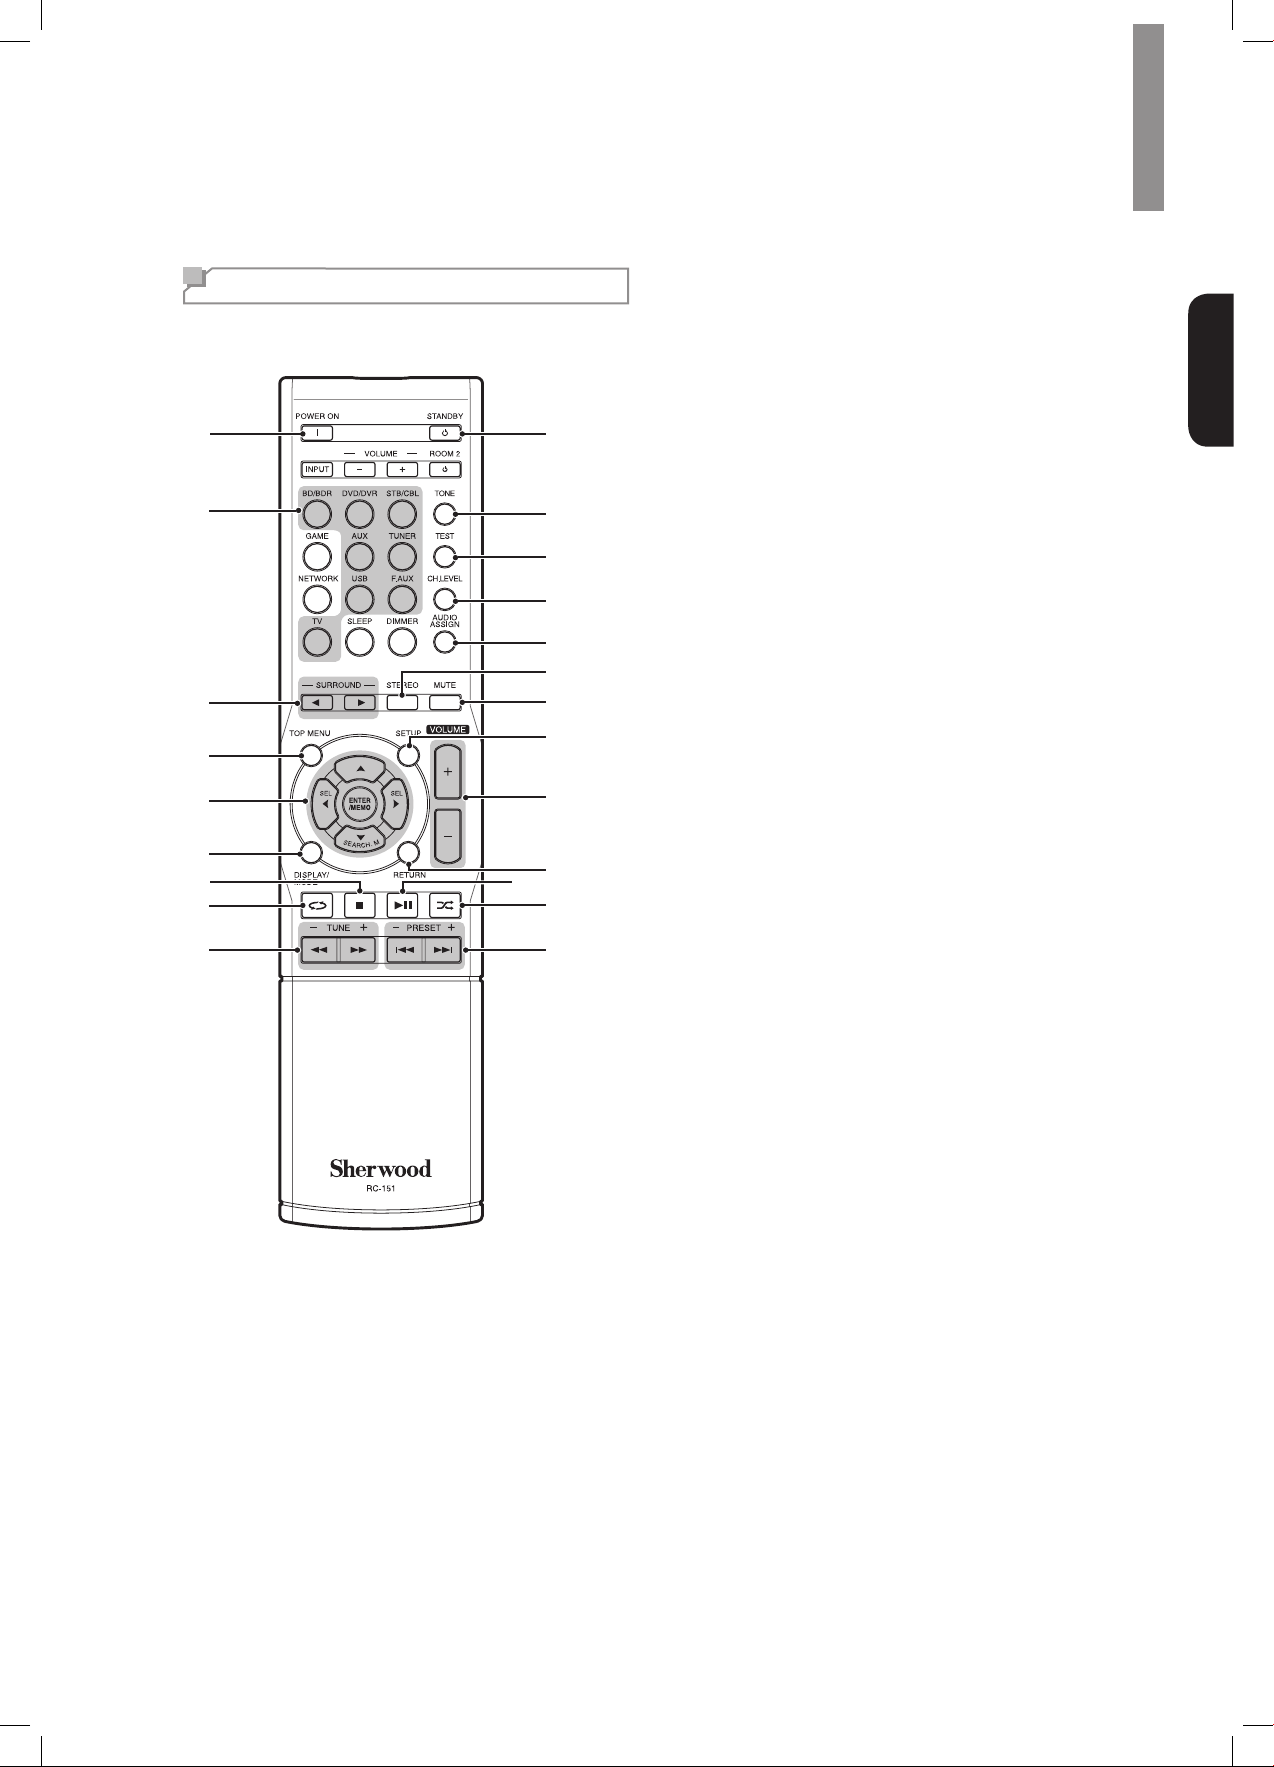
Remote Control
1
2
3
4
5
6
7
8
9
12
22
21
20
19
18
17
16
15
14
13
11
10
Getting Started
Power On Button
1
Source Select Buttons
2
Surround Select Buttons
3
(The GAME and NETWORK buttons are
not available.)
Top Menu Button
4
▲/▼/◄/► Select Buttons
5
ENTER/MEMO Enter/Memory Button
SEARCH.M RDS Search Button
(* The SEARCH.M button is available only
in models that are distributed in Europe.)
Display/Mode Button
6
Stop Button
7
Repeat Button
8
Tuning Up/Down Buttons
9
Rewind/Fast forward Buttons
Preset Station Up/Down Buttons
10
Previous/Next Buttons
Random Button
11
Play/Pause Button
12
Return Button
13
Volume Up/Down Buttons
14
Setup Menu Button
15
Mute Button
16
Stereo Mode Button
17
Audio Assign Button
18
Channel Level Button
19
Test Tone Sequence Button
20
Tone Control Button
21
Standby Button
22
English
5
Page 6
R-607/R-507AUDIO/VIDEORECEIVER
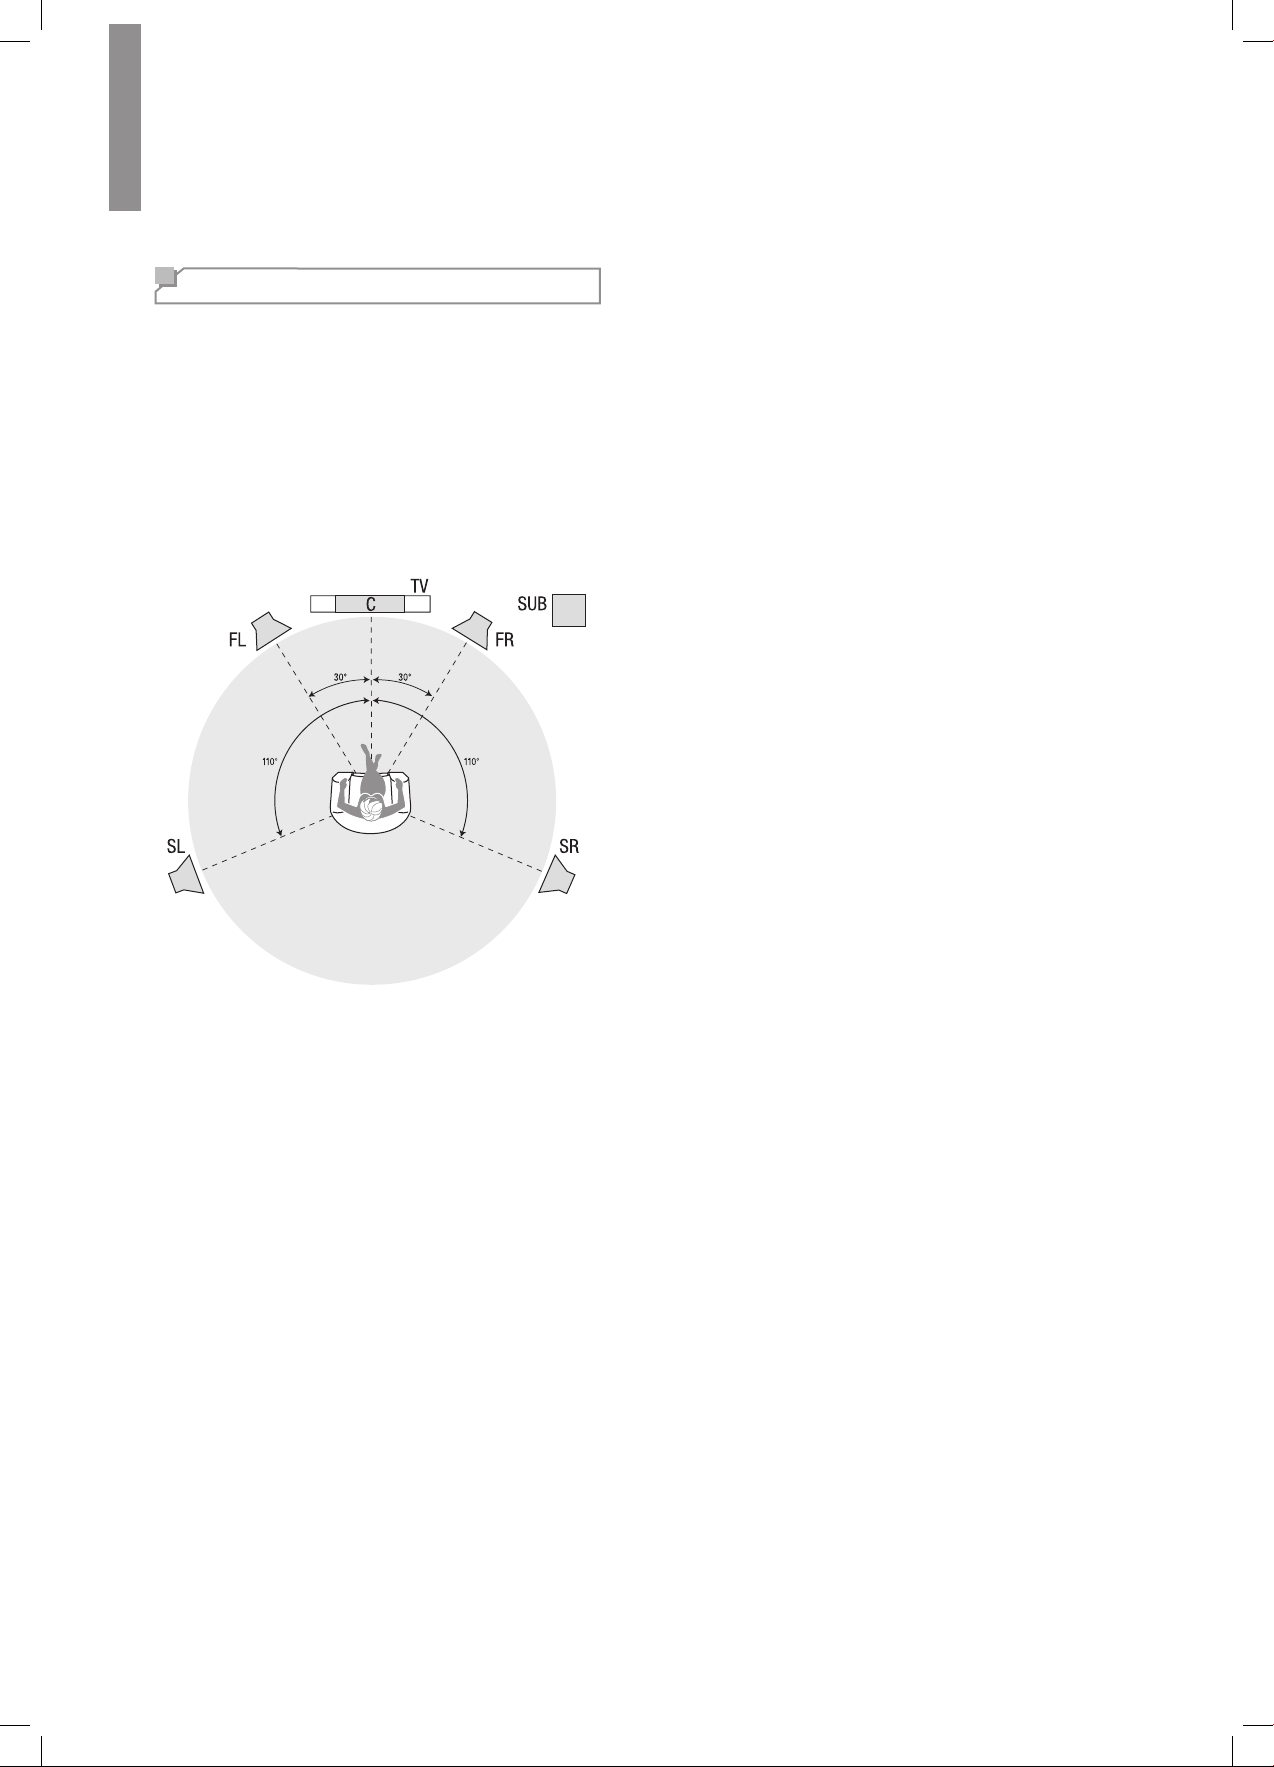
Placement
Place Your Speakers
Determine the locations for your system’s speakers
according to their manufacturer’s directions and the
layout of your listening room. Use the illustration below
as a guide for 5.1-channel systems.
To create the most realistic surround-sound environment
possible, you should place your speakers in a circle
with the listening position at its center. You should angle
each speaker so it directly faces the listening position.
Use the diagram below as a guide.
Placing the Left, Center and Right
Speakers
Place the center speaker either on top of, below or
mounted on the wall above or below the TV or video-
display screen. Place the front left and right speakers
along the circle, about 30 degrees from the center
speaker and angled toward the listener.
Place the front left, front right and center speakers at
the same height, preferably at about the same height
as the listener’s ears. The center speaker should be
no more than 2 feet (0.6m) above or below the left/
right speakers. If you’re using only two speakers with
your AVR, place them in the front left and front right
positions.
Placing the Surround Speakers
You should place the left and right surround speakers
approximately 110 degrees from the center speaker,
slightly behind and angled toward the listener.
Alternatively, you can place them behind the listener,
with each surround speaker facing the opposite-side
front speaker. You should place the surround speakers
2 feet – 6 feet (0.6m – 1.8m) higher than the listener’s
ears.
Placing the Subwoofer
Because a room’s shape and volume can have a
dramatic effect on a subwoofer’s performance, it is best
to experiment with placement so that you will nd the
location that produces the best results in your particular
listening room. With that in mind, these rules will help
you get started:
•Placing the subwoofer next to a wall generally will
increase the amount of bass in the room.
•Placing the subwoofer in a corner generally will
maximize the amount of bass in the room.
•In many rooms, placing the subwoofer along the
same plane as the left and right speakers can
produce the best integration between the sound of
the subwoofer and that of the left and right speakers.
•In some rooms, the best performance could even
result from placing the subwoofer behind the
listening position. A good way to determine the best
location for the subwoofer is by temporarily placing it
in the listening position and playing music with strong
bass content. Move around to various locations in
the room while the system is playing (putting your
ears where the subwoofer would be placed), and
listen until you nd the location where the bass
performance is best. Place the subwoofer in that
location.
6
Page 7
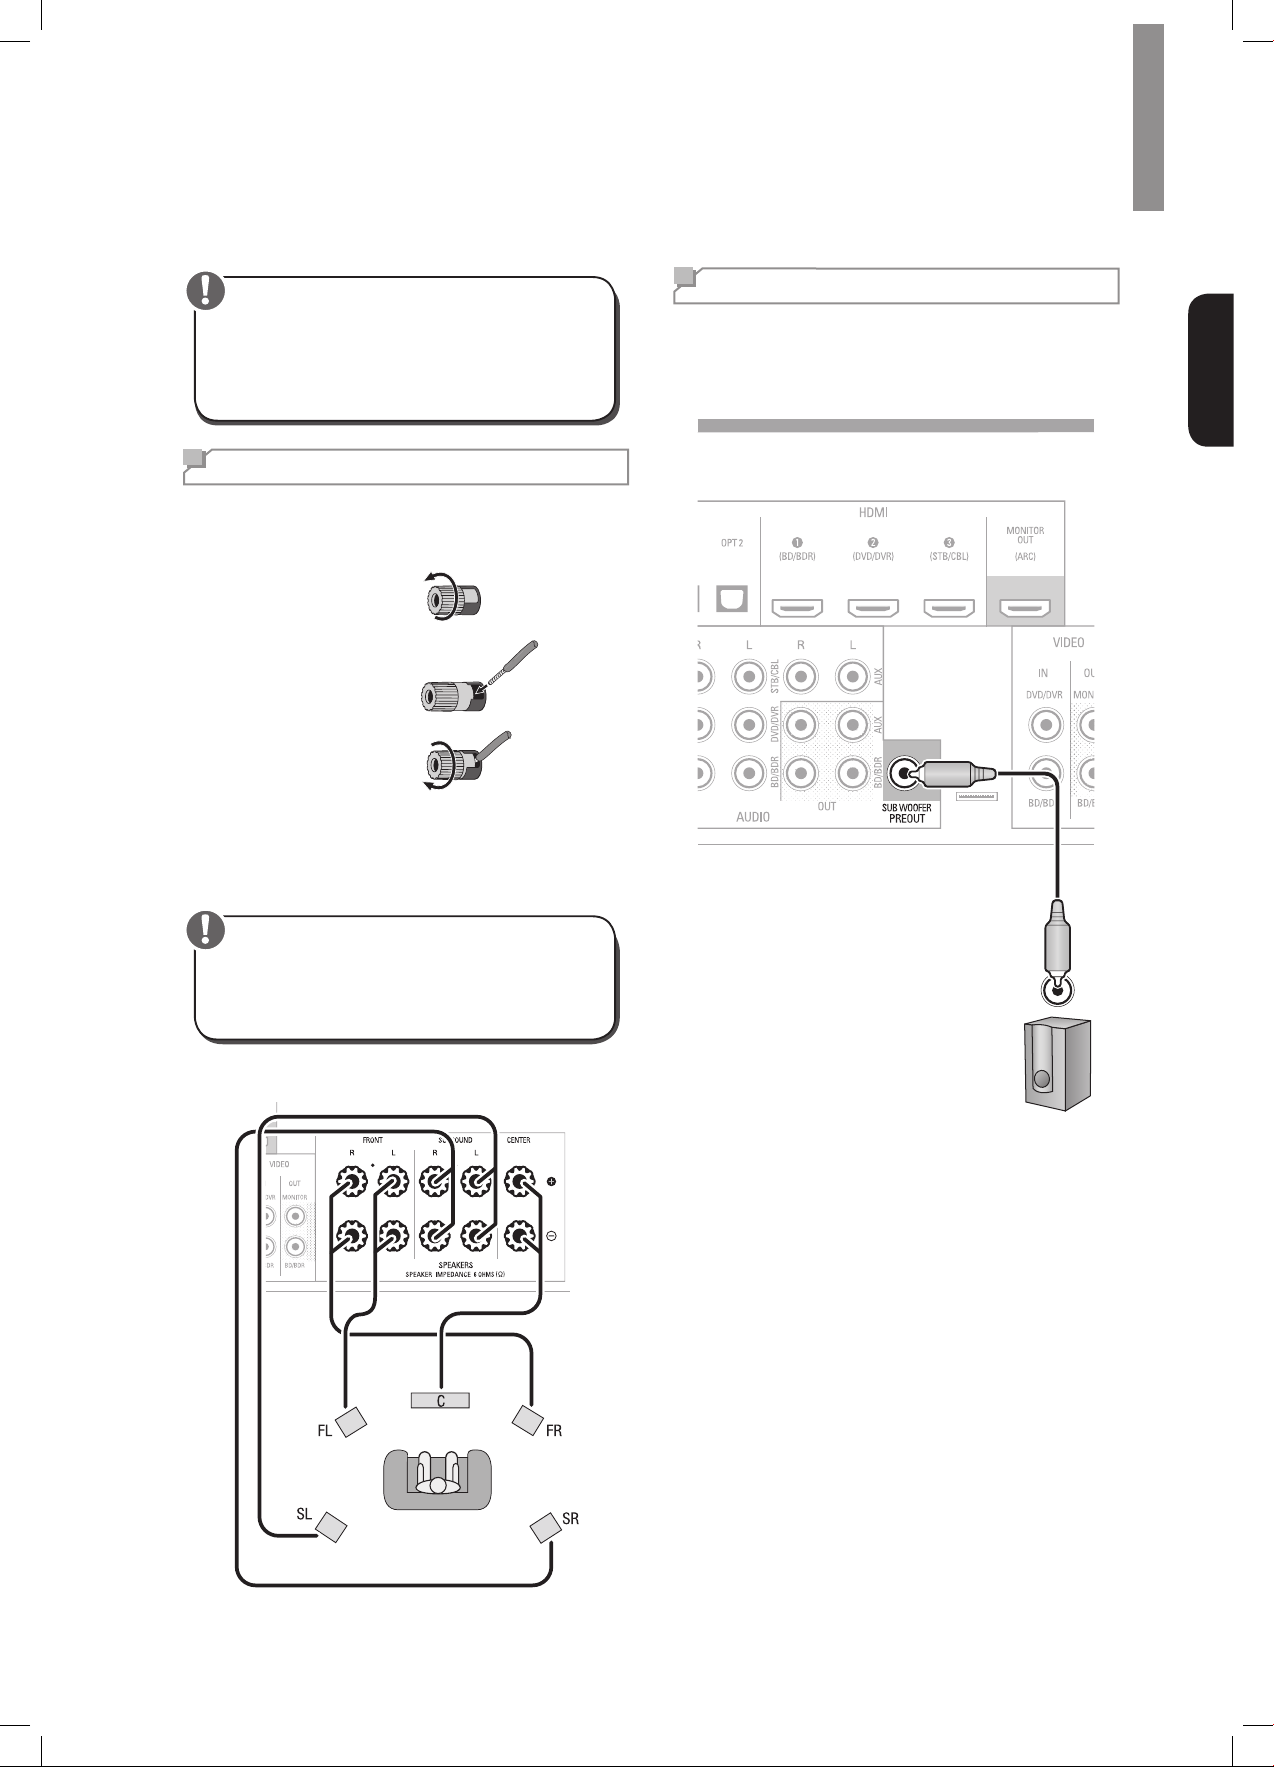
Connections
Caution
•Before making any connections to the audio/
video receiver, ensure that the AVR’s AC cord
is unplugged from the AVR and the AC outlet.
Making connections with the AVR plugged in and
turned on could damage the speakers.
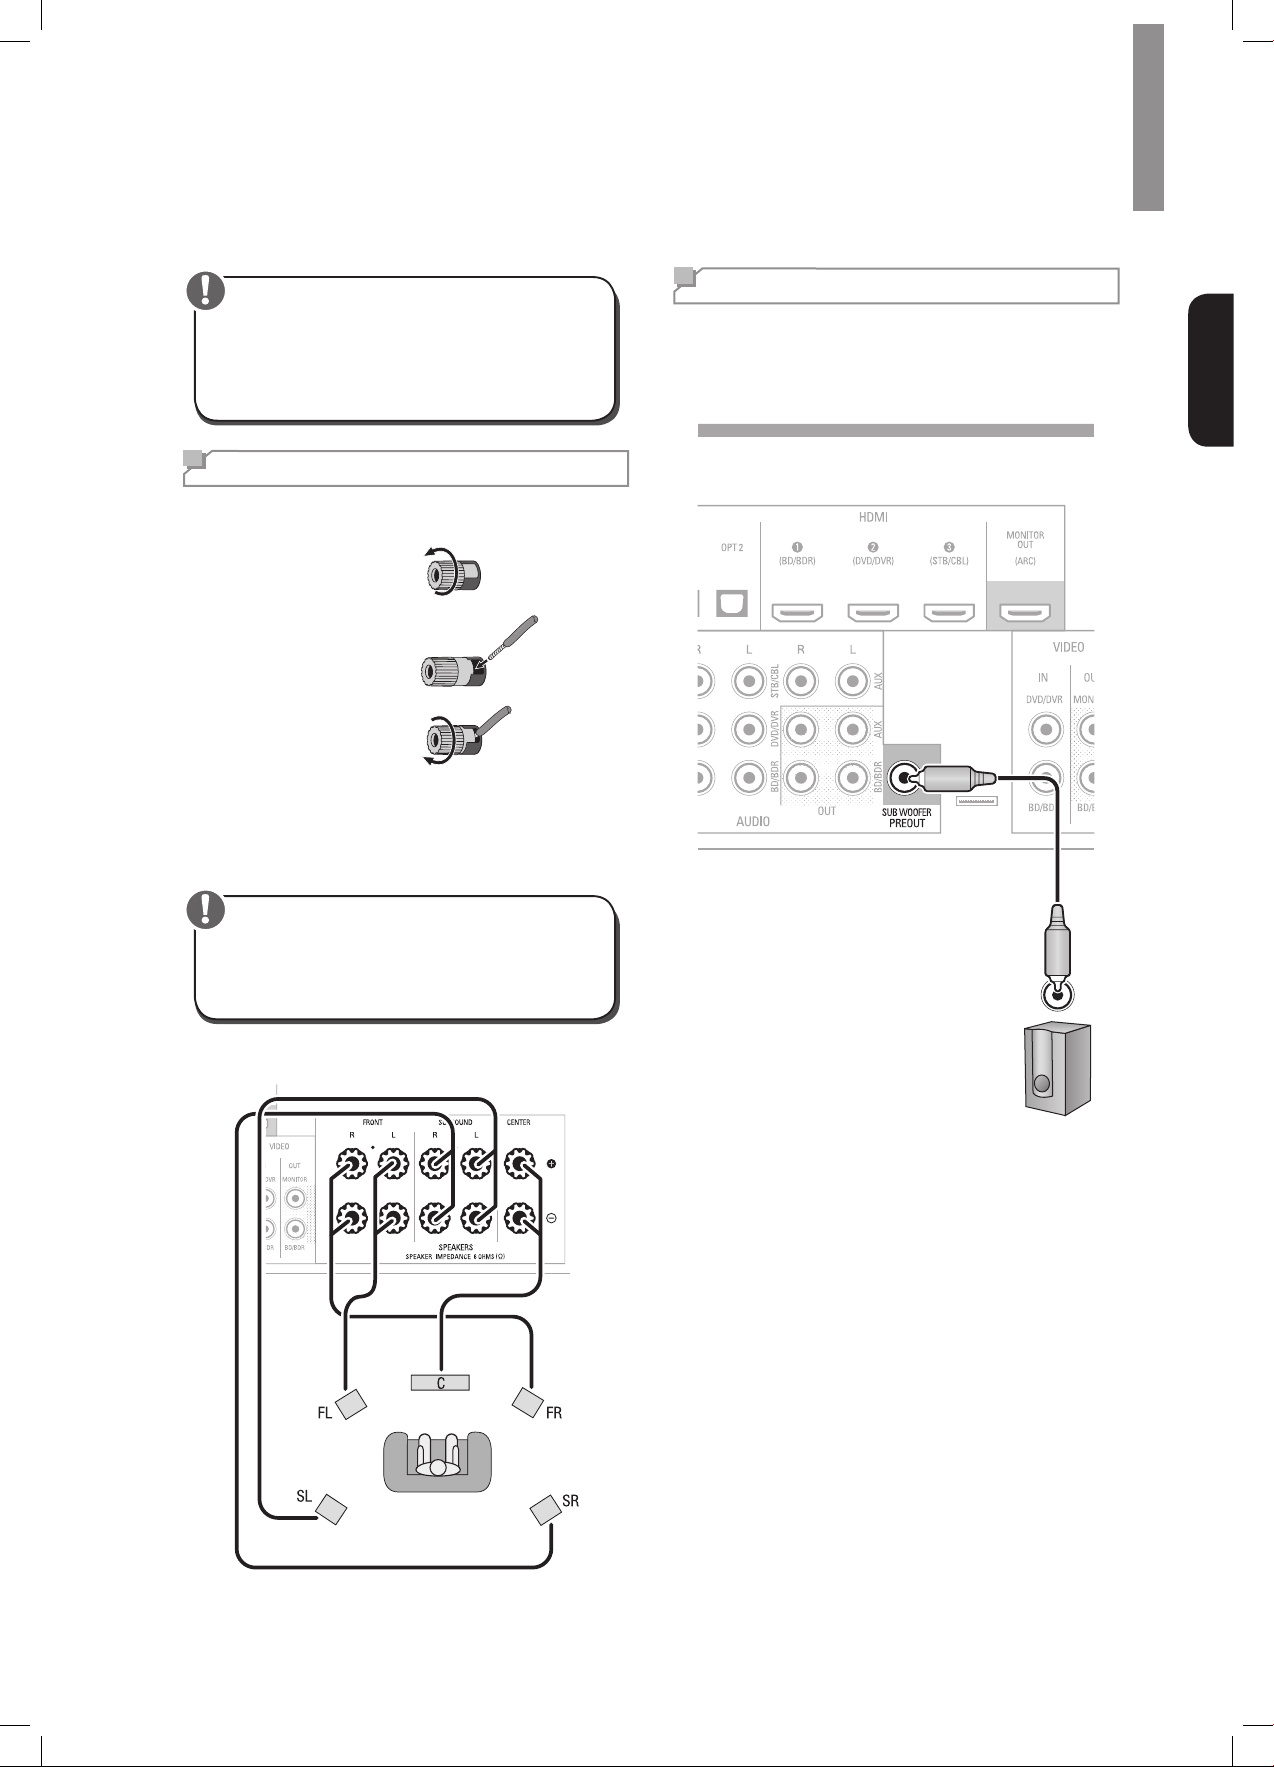
Connect Your Speakers
HowtousetheAVR’sspeakerterminals
Unscrew Cap
1
Insert Bare Wire
2
Tighten Cap
3
Always connect the colored (+) terminal on the AVR to
the (+) terminal on the speaker (usually red), and the
black (–) terminal on the AVR to the (–) terminal on the
speaker (usually black).
Connect Your Subwoofer
Use a single RCA audio cable to connect the AVR’s
Subwoofer Pre-Out connector to your subwoofer.
Consult your subwoofer’s user manual for specic
information about making connections to it.
Rear Panel
English
Caution
•Make sure the (+) and (–) bare wires do not touch
each other or the other terminal. Touching wires
can cause a short circuit that can damage your
AVR.
Connect the speakers as shown in the illustration.
Subwoofer
7
Page 8
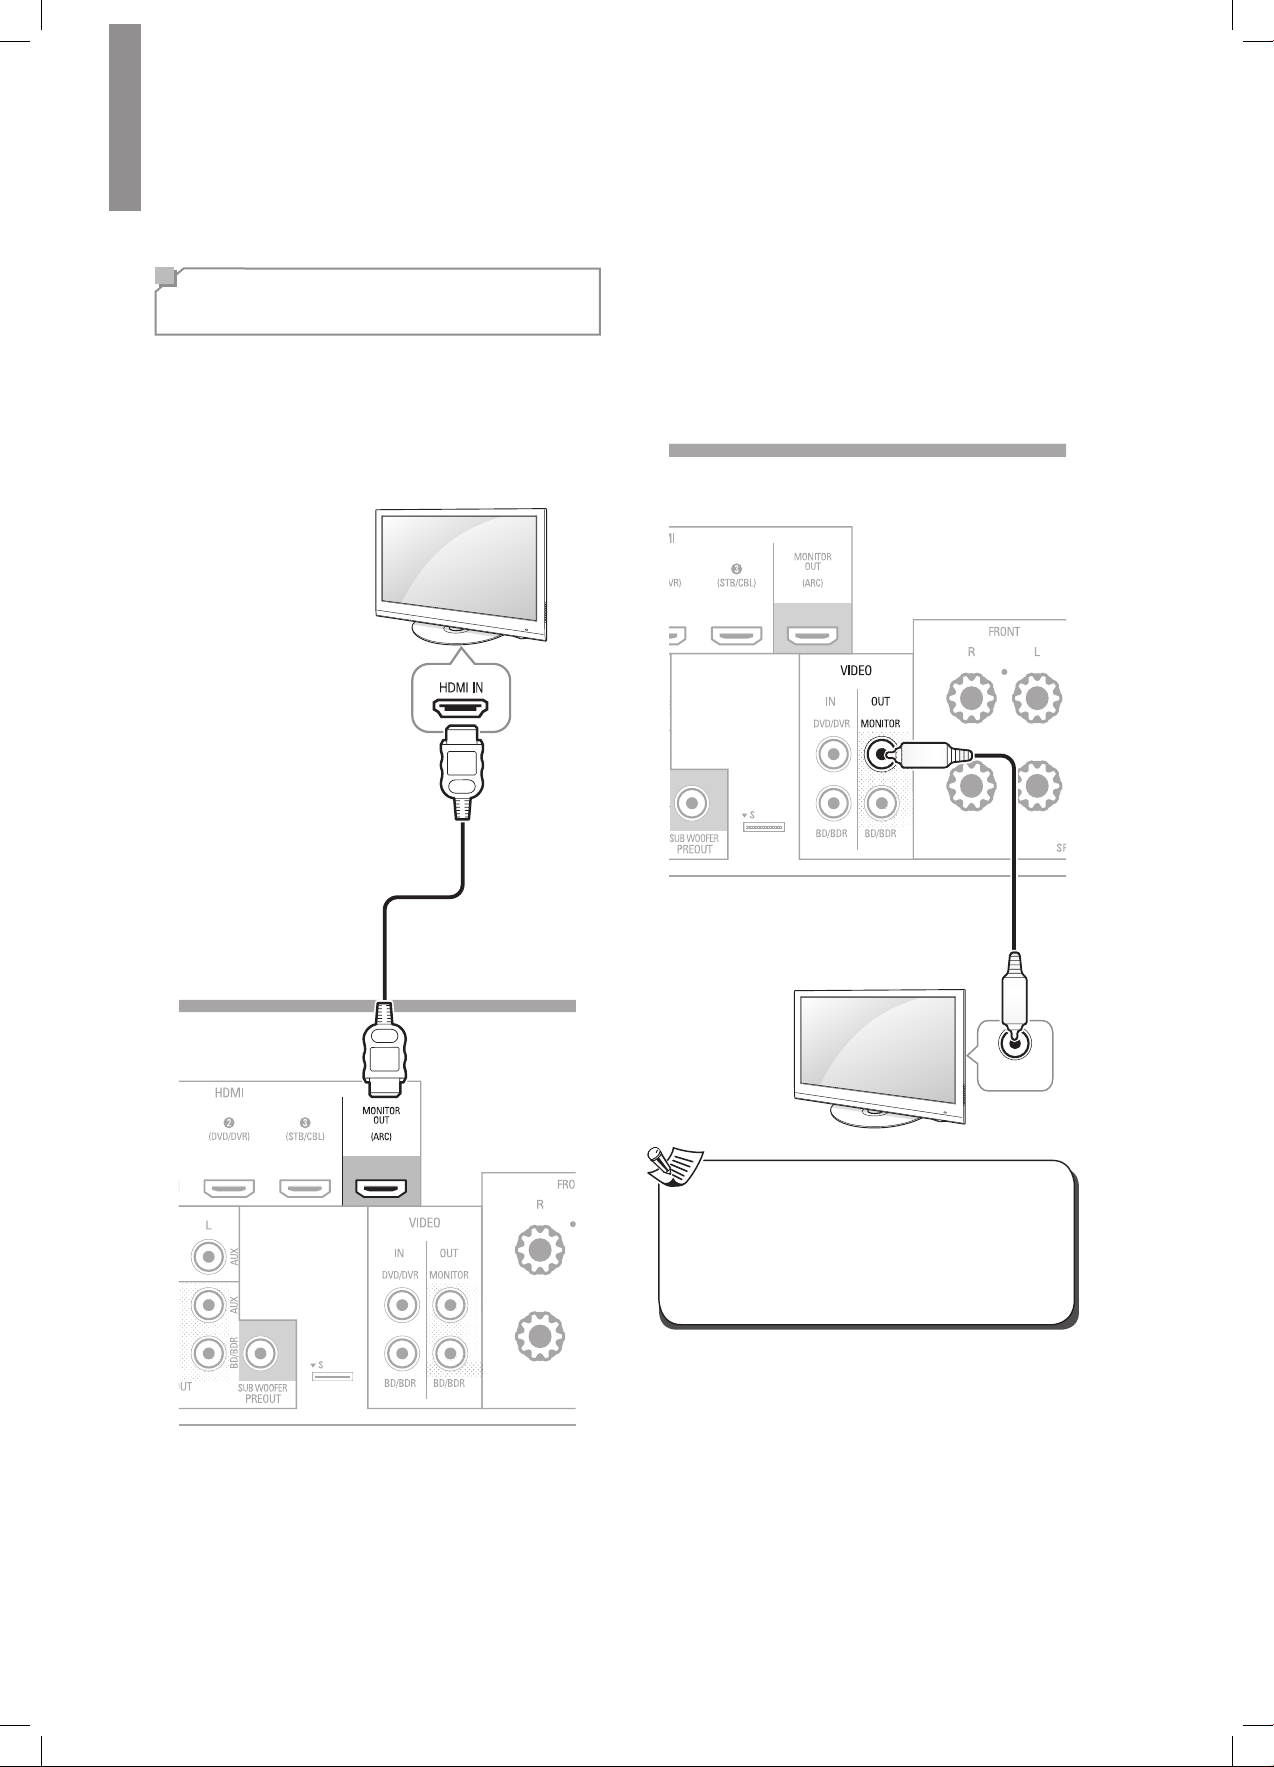
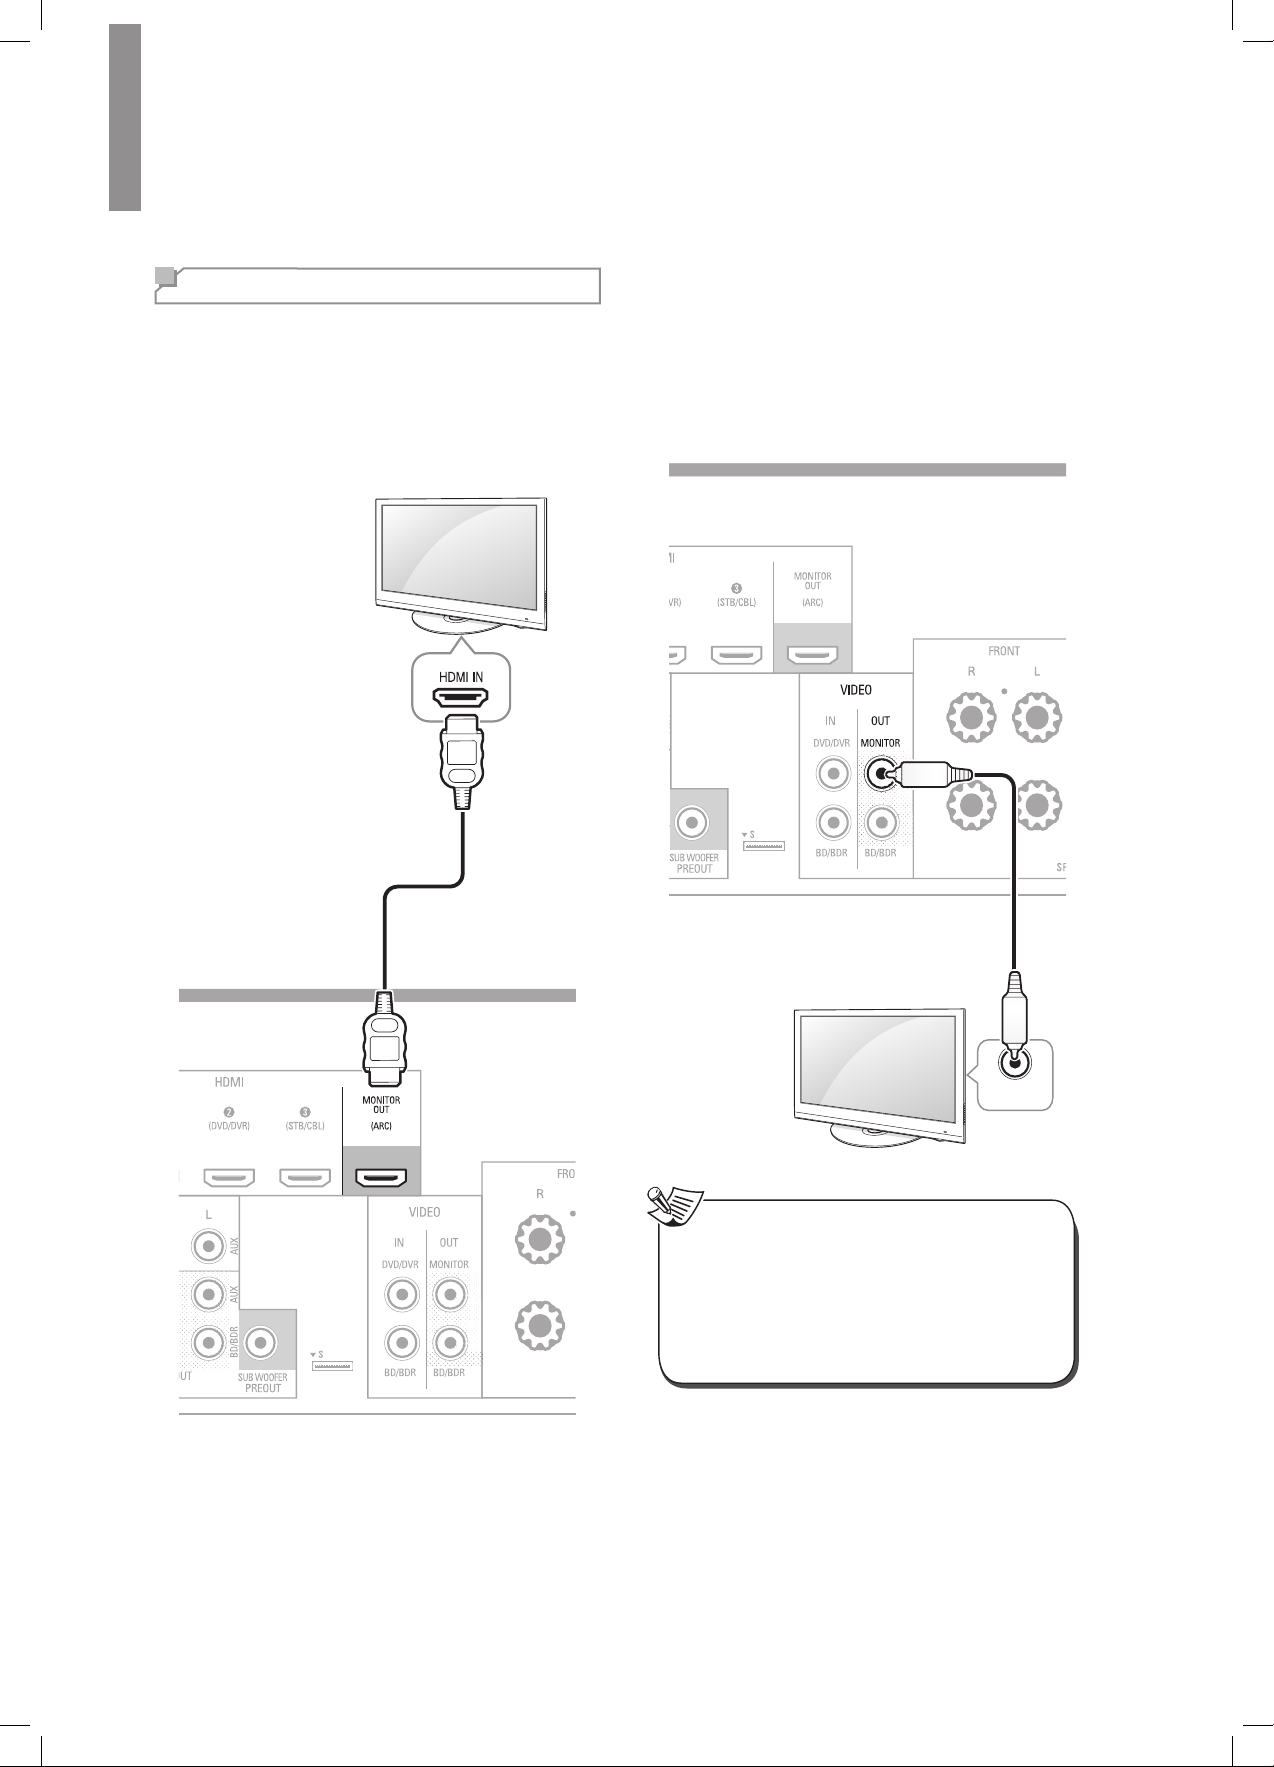
R-607/R-507AUDIO/VIDEORECEIVER
Composite
VIDEO IN
Connect Your TV or Video
Display
HDMI Monitor Out Connector
If your TV has an HDMI connector and you have HDMI
video source devices, use an HDMI cable (not supplied)
to connect your TV to the AVR’s HDMI Monitor Out
connector.
It will provide the best possible picture quality.
CompositeVideoMonitorOutConnector
If your TV does not have an HDMI connector, or if
your TV does have an HDMI connector
connecting some source devices with only composite
video connectors
included) to connect the AVR's Composite Monitor Out
connector to your TV’s composite video connector.
Rear Panel
, use a composite video cable (not
but you are
Rear Panel
Composite Video Cable
(not supplied)
TV
Note
•The AVR’s on-screen display (OSD) only appears
through the Composite Monitor Out connector. If
you want to use the AVR’s OSD menus you need
to connect its Composite Monitor Out connector
to your TV even if you are not connecting any
composite video source devices to the AVR.
8
Page 9
Connections
Connect Your Audio and
Video Source Devices
Source devices are components where a playback
signal originates, e.g., a Blu-ray Disc™ or DVD player;
a cable, satellite or HDTV tuner; etc. Your AVR has
several different types of input connectors for your
audio and video source devices: HDMI, composite
video, optical digital audio, coaxial digital audio and
analog audio.
Each of your AVR’s source buttons is assigned to an
analog audio input connector.
The digital inputs are not assigned to any specic sets
of analog inputs. Once you select a source device you
can use the remote control’s DIGITAL button to select
the specic audio input connection (HDMI, coaxial
digital, optical digital, analog) that you want to listen to.
(Note: You cannot select an audio input connection for
the FM/AM or USB source buttons.)
As you connect your various source components, ll out
the “Source Device Connected” and “Digital Audio Input
Connector Used” columns in the following table. it will
make it easy to keep track of which devices you have
connected to which connectors.
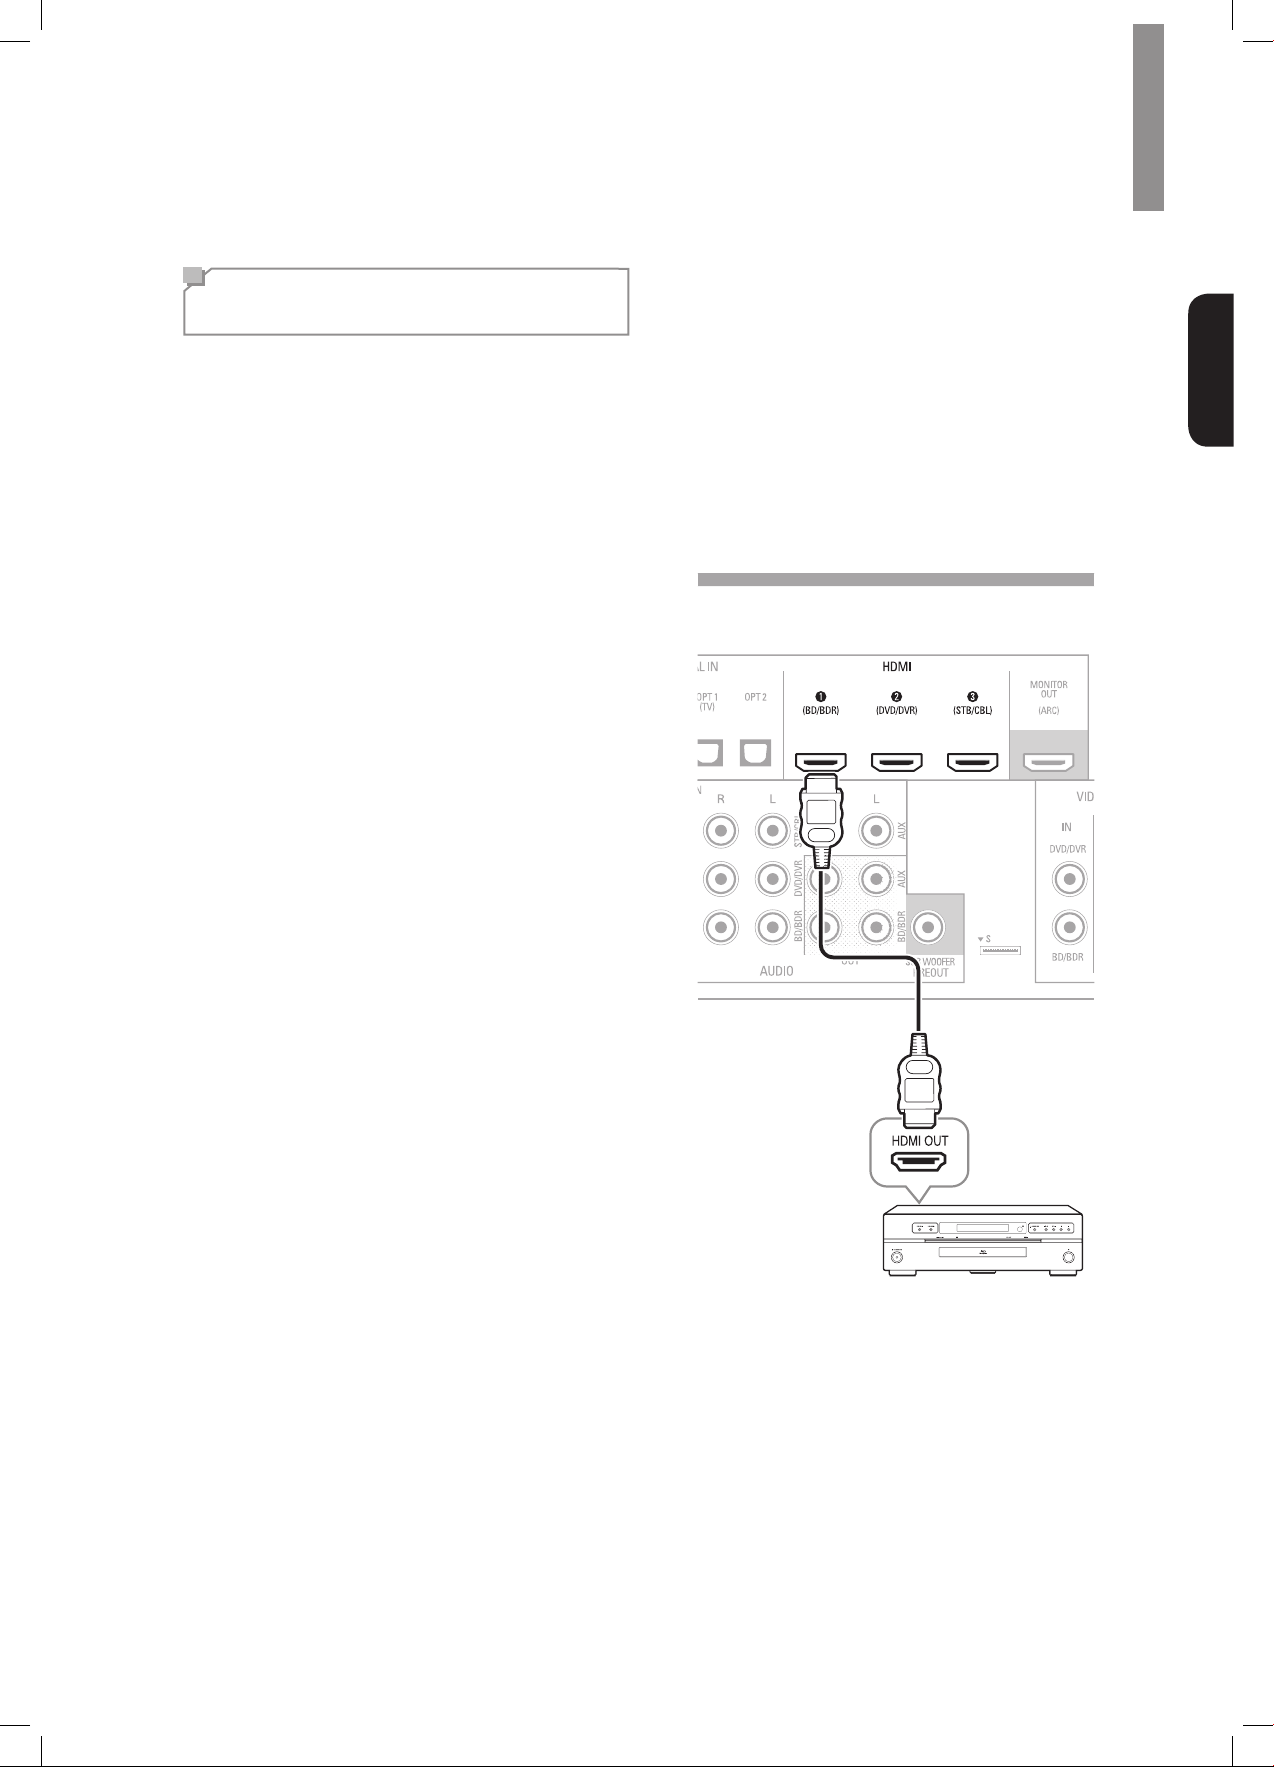
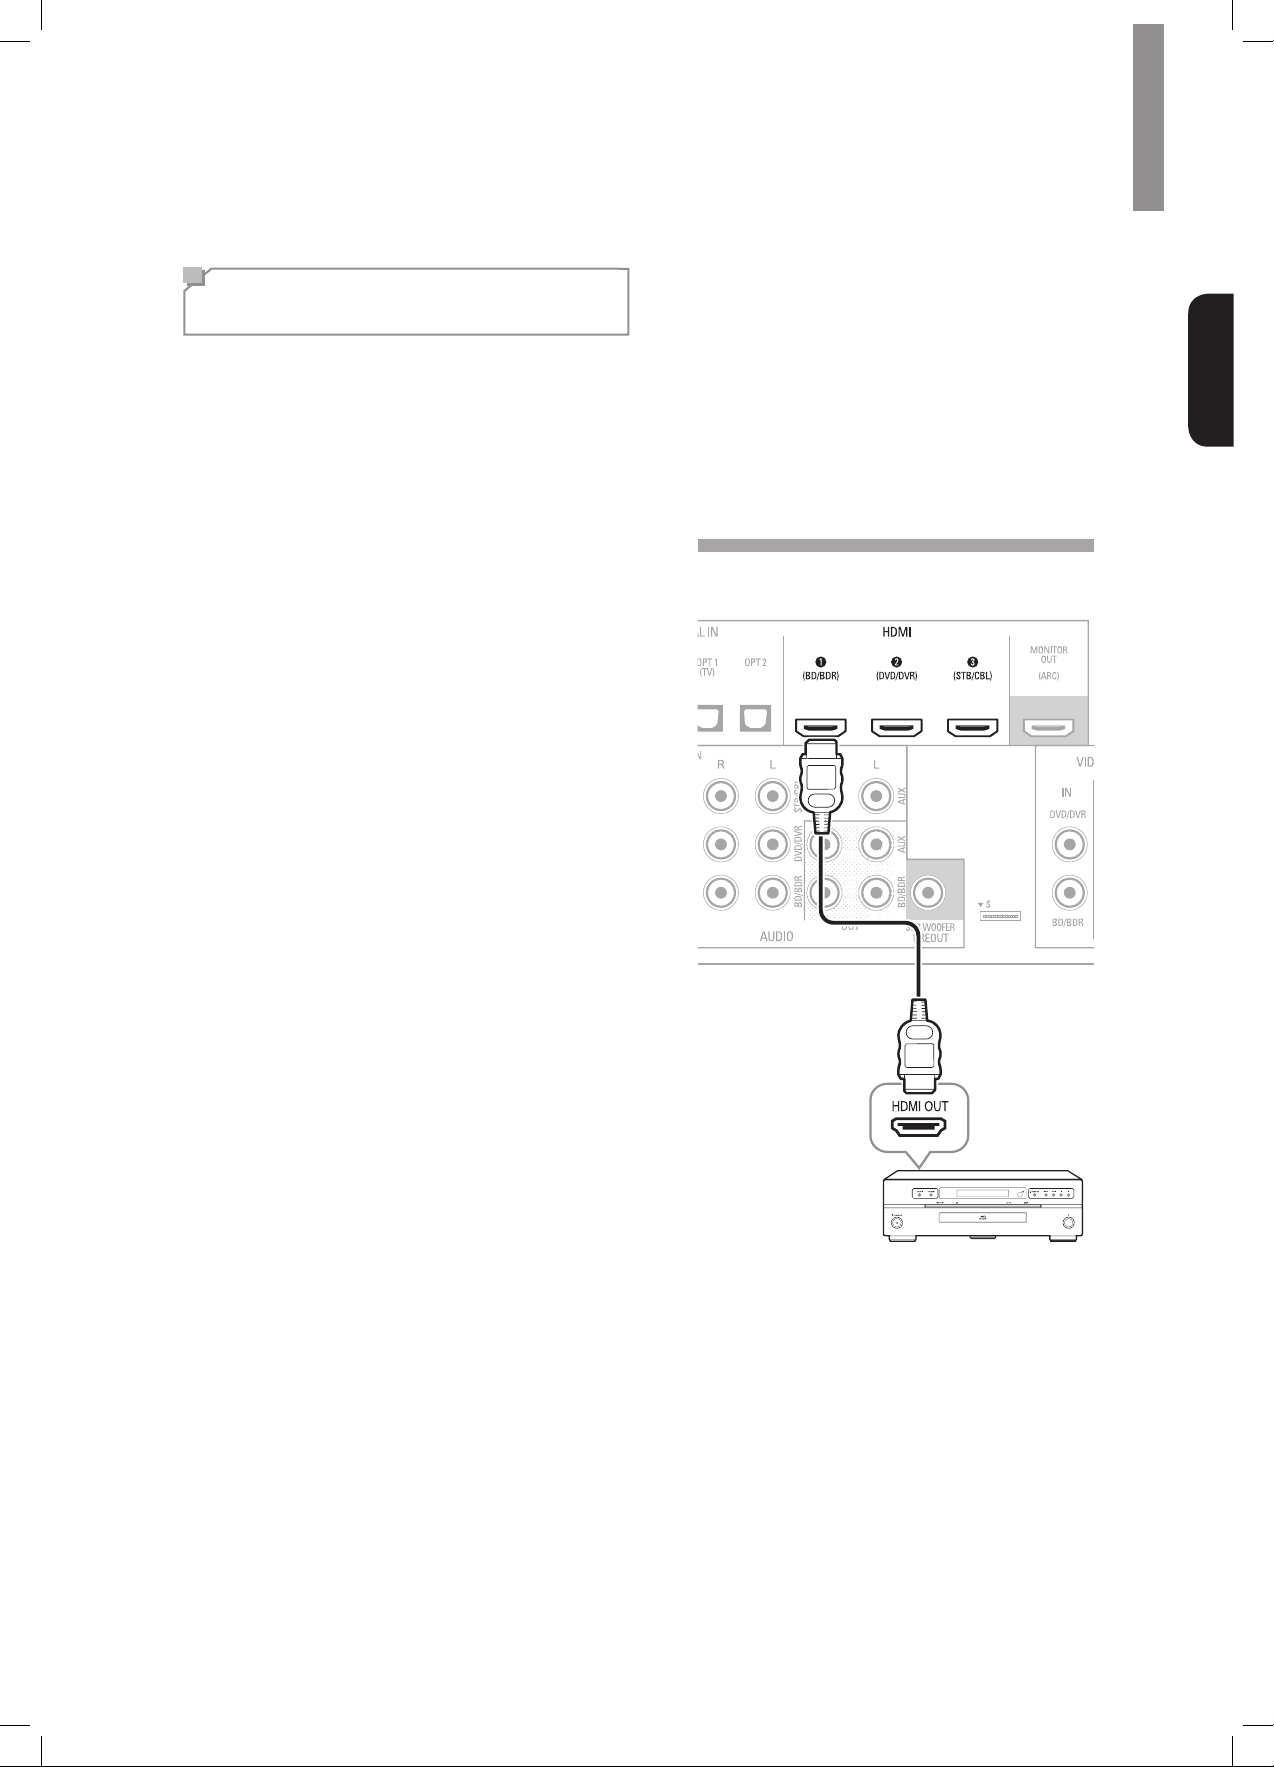
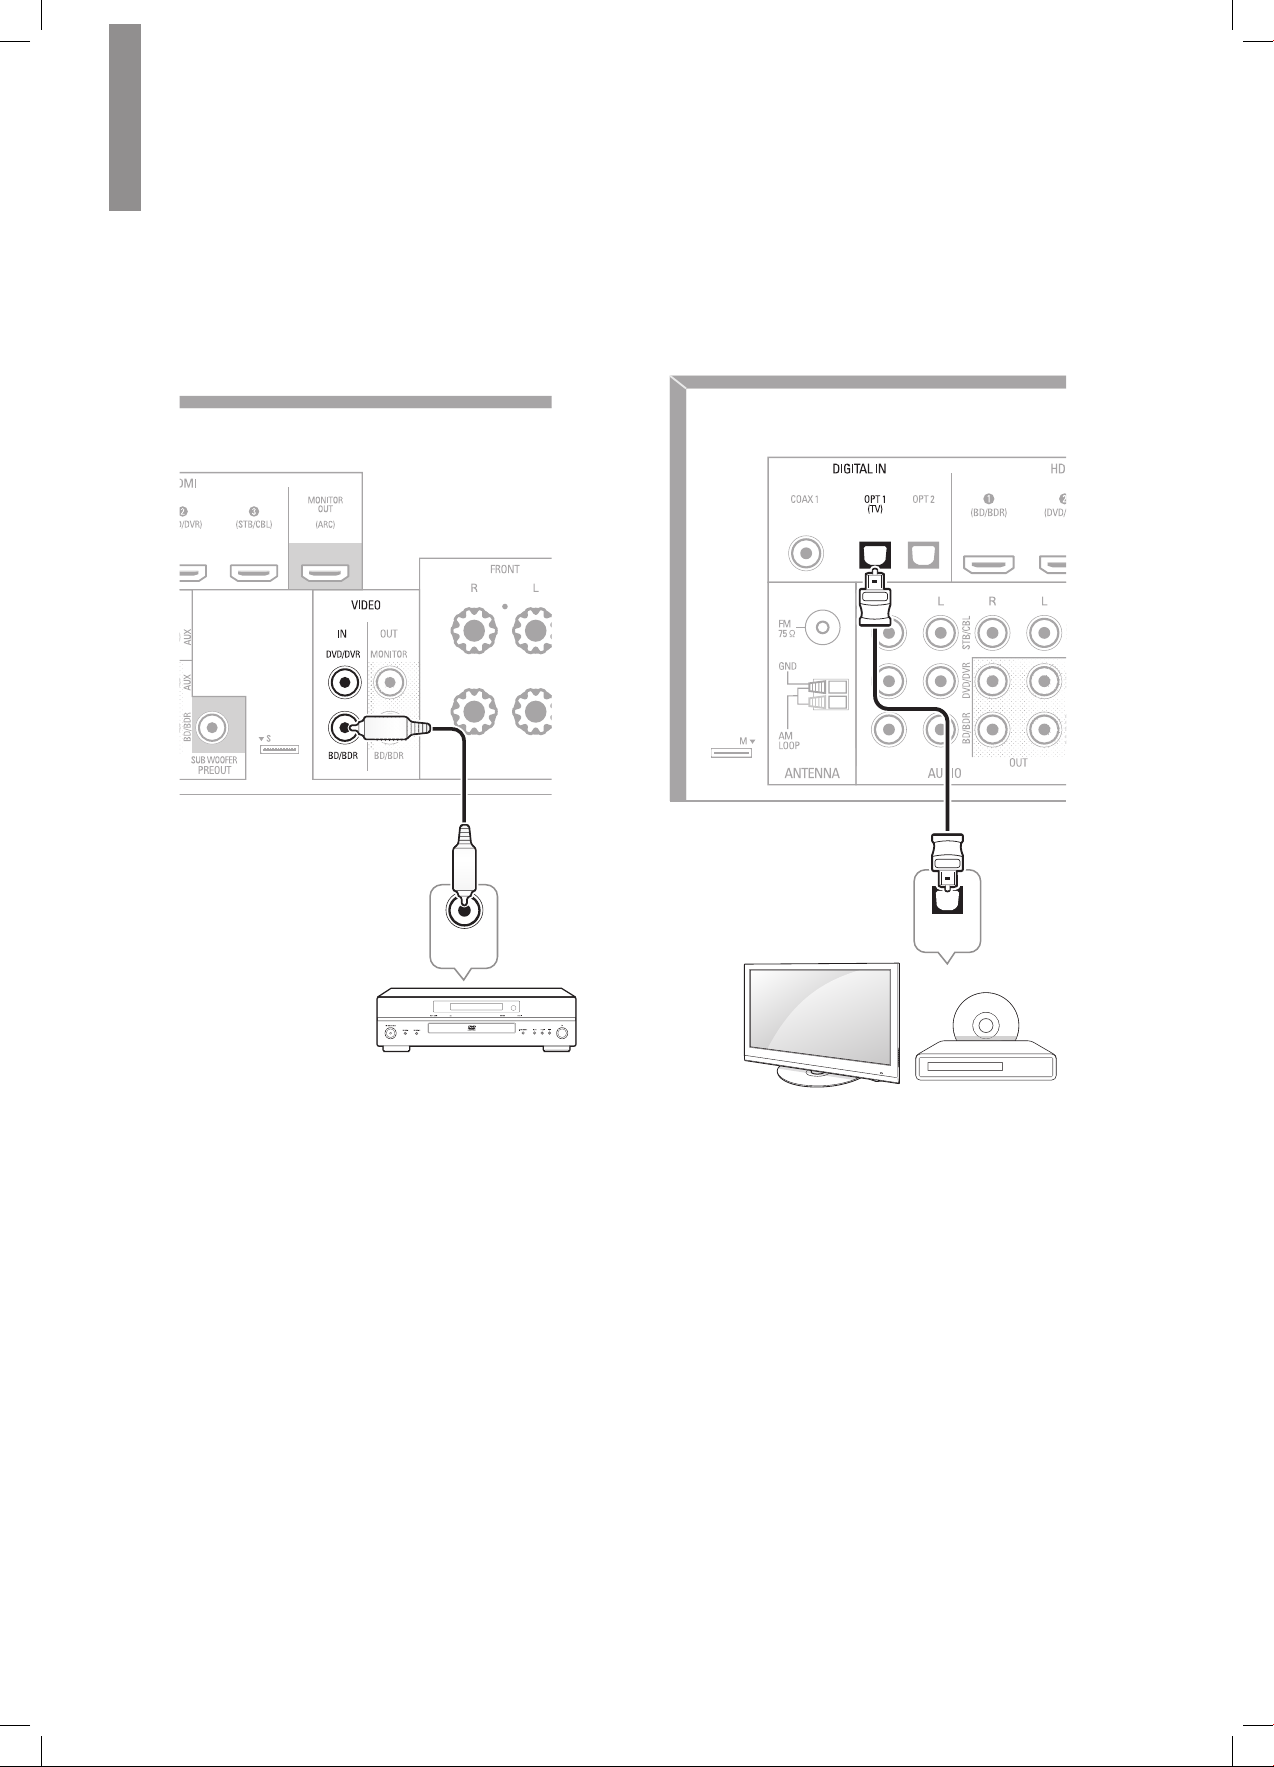
HDMI Devices
If any of your source devices have HDMI connectors,
using those connectors will provide the best possible
video and audio performance quality. Since the HDMI
cable carries both digital video and digital audio
signals, you do not have to make any additional audio
connections for devices you connect via HDMI cables.
If you have a TV equipped with the HDMI Audio Return
Channel function, its sound is fed to the AVR via the
HDMI Monitor Out connection’s Audio Return Channel,
and it will not require additional audio connections to
the AVR.
Rear Panel
English
HDMI Cable
(not supplied)
HDMI-Equipped Source Device
9
Page 10
R-607/R-507AUDIO/VIDEORECEIVER
CompositeVideoDevices
You will need to make composite video connections
from your source devices that do not have HDMI video
connections. You will also need to make an audio
connection from the device to the AVR.
Rear Panel
Composite Video Cable
(not supplied)
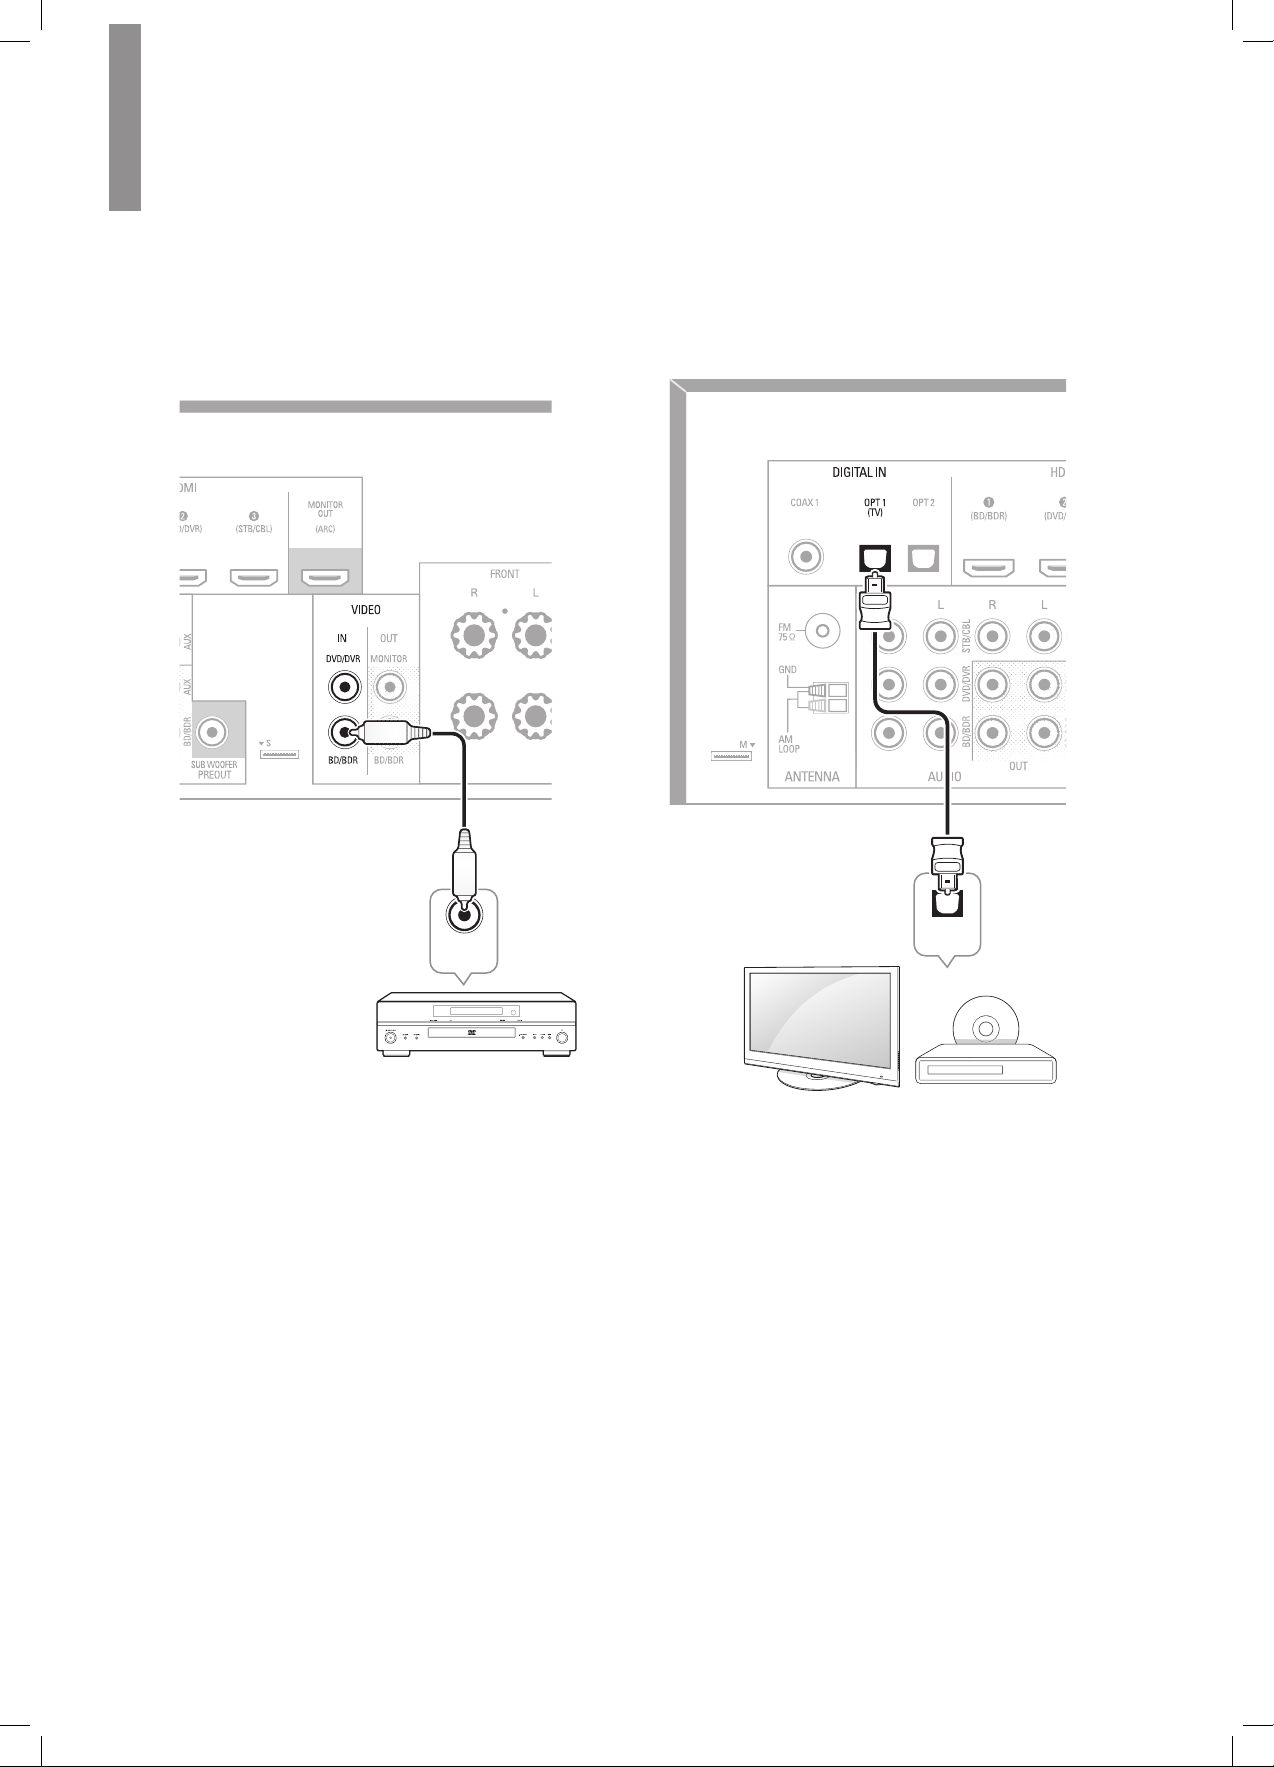
Optical Digital Audio Devices
If your source devices have optical digital outputs,
connect them to the AVR’s optical digital audio
connectors.
Rear Panel
Composite
VIDEO OUT
Composite Video-Equipped
Source Device
OPTICAL
OUT
TV, DVD Player, etc.
10
Page 11
Connections
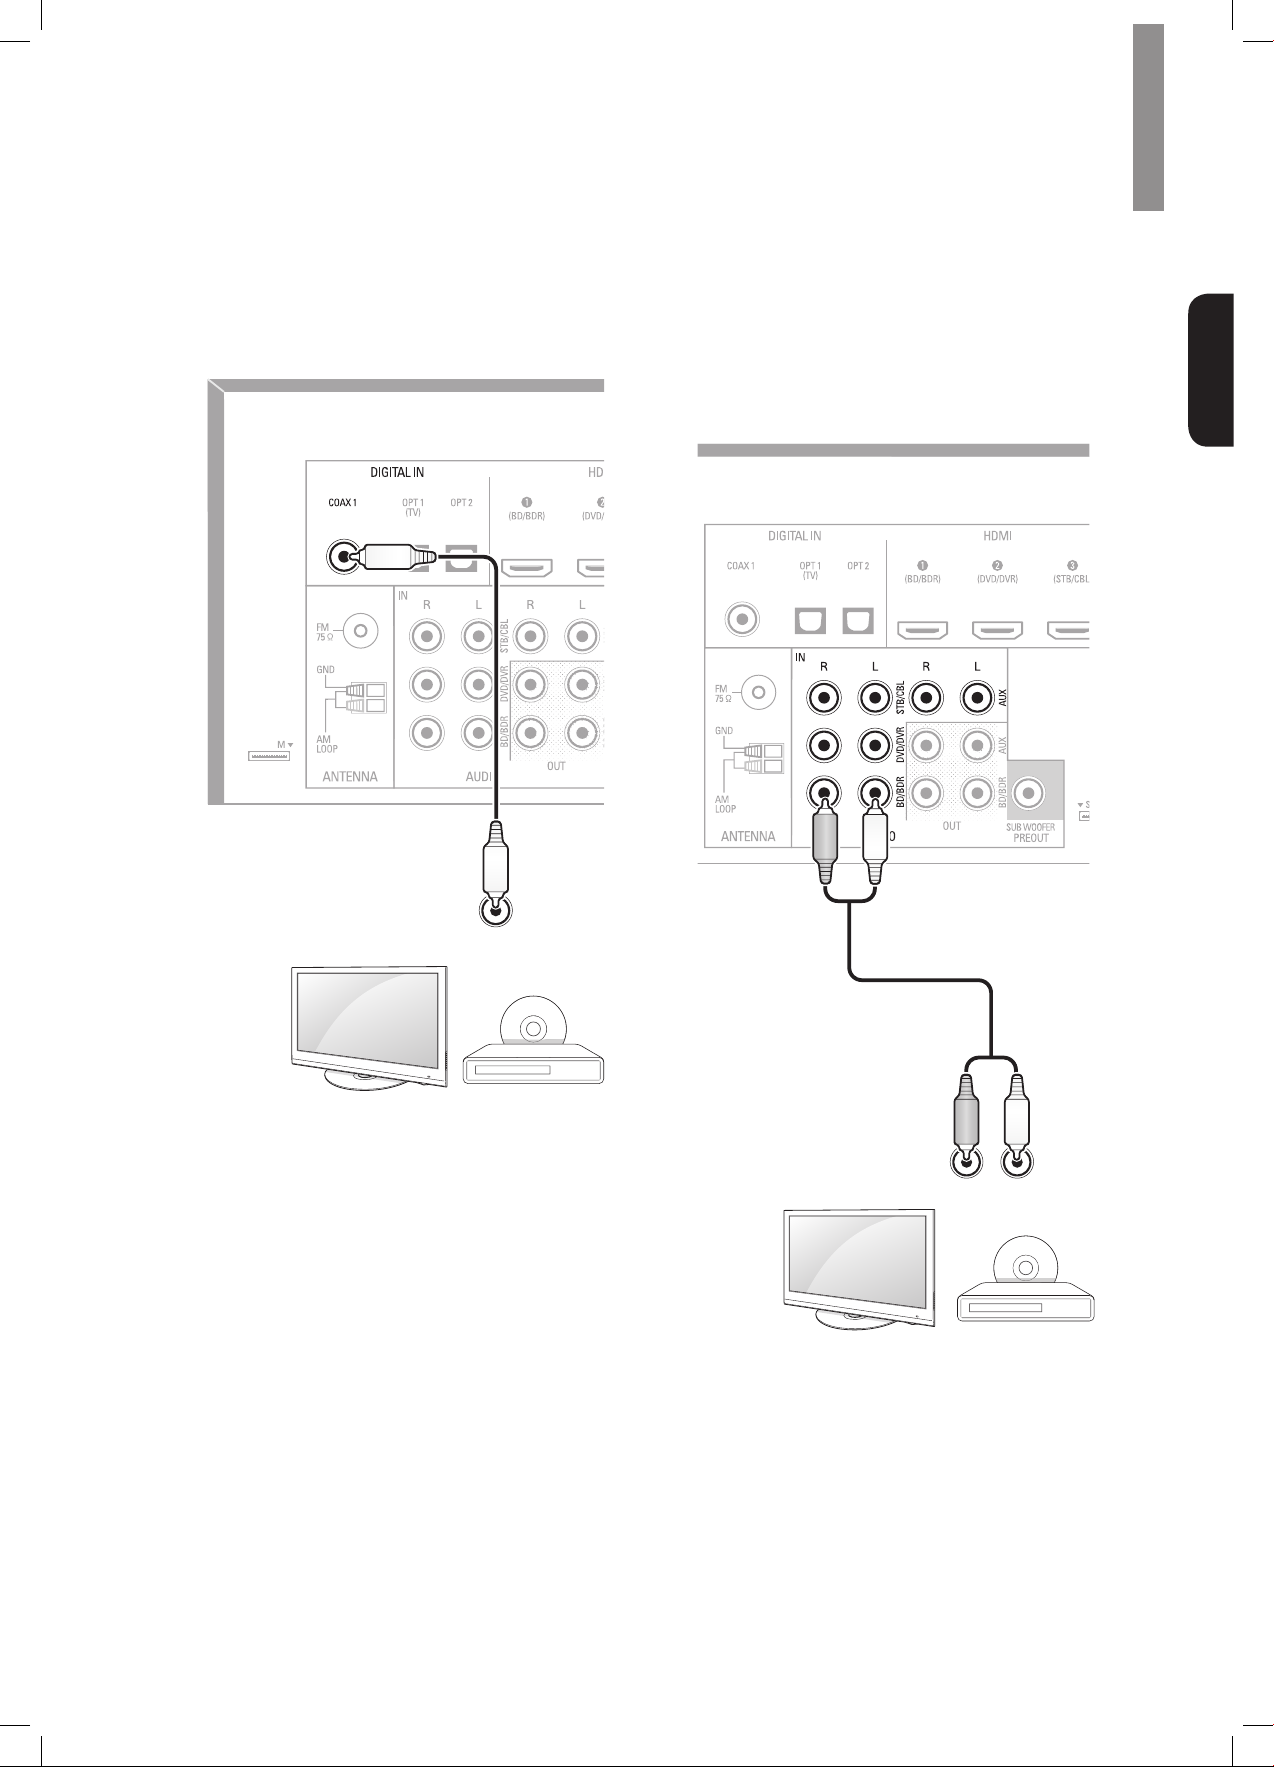
Coaxial Digital Audio Devices
If your source devices have coaxial digital outputs,
connect them to the AVR’s coaxial digital audio
connectors.
Rear Panel
Analog Audio Devices
Make analog audio connections from your source
devices that do not have HDMI or digital audio
connections. If you’re connecting video sources to the
AVR’s Video 1 or Video 2 audio inputs, you must also
connect the source device’s composite video output to
the corresponding composite video connector.
Rear Panel
English
OUT
OUT
TV, DVD Player, etc.
RL
TV, DVD Player, etc.
11
Page 12

R-607/R-507AUDIO/VIDEORECEIVER
RL
Audio Recorder
Connect an analog audio recorder’s inputs to the AVR’s
analog audio Tape Out connectors.
You can record any analog audio input signal (except
Tape In).
Rear Panel
VideoRecorders
Connect an analog video recorder’s video input
connector to the AVR’s Video 1 Out composite video
connector and its audio input connectors to the AVR’s
Video 1 Out analog audio connectors. You can record
the Video 2 composite video input signal.
Rear Panel
12
Analog Audio Recording Device
R L
AUDIO IN (COMPOSITE)
Analog Video Recording Device
IN
VIDEO
Page 13

Connections
Connect the Tuner Antennas
•Connect the supplied FM antenna to the AVR’s FM
75Ω antenna connector. For the best reception,
extend the FM antenna as far as possible.
•Bend and fold the base of the supplied AM antenna
as shown and connect the antenna wires to the
AVR’s AM and Gnd connectors. Rotate the antenna
as necessary to minimize background noise.
Rear Panel
Connect to AC Power
Connect the AC power cord to the AVR’s AC Input
connector and then to a working AC power outlet.
English
Rear Panel
AC power cord
To the wall outlet
Note
•Before connecting the AC power cord, make
sure that the AC voltage listed on the AVR’s
back panel matches the AC voltage used in your
country.
AM Loop Antenna
Install the Batteries in the
Remote Control
Remove the remote control’s battery cover, insert the
two supplied AAA batteries as shown in the illustration,
and replace the battery cover.
Note
•Remove the protective plastic from the AVR’s
front panel to keep it from reducing the remote
control’s effectiveness.
13
Page 14
Setup
Turn On the AVR
Set the AVR’s Main Power switch to “On”.
1
(The Standby indicator will glow red.)
Press the front-panel On/Standby button.
2
Main Power Switch Standby Indicator
Congure the AVR for Your
Speakers
You will be using the following remote control buttons to
congure your AVR:
Setup
Menu
Button
Left/
Right/
Up/
Down
Buttons
Turn on your TV and select the TV input where
1
you connected the AVR’s Composite Monitor
Out connector in
Source Devices
Connect Your Audio and Video
, on page 9.
Note
•Although you can congure the AVR using only
its front-panel message display, it is much easier
to use the On-Screen Display (OSD) menu
system.
Enter
Button
Return
Button
On/Standby Button
On the remote control, you can only turn on or off the
AVR to standby mode by following the steps below.
When the power button is pressed on the main unit,
you cannot turn on the main unit even by pressing the
power button on the remote control.
POWER
ON
Button
Press POWER ON on the standby mode.
1
Press STANDBY to turn on the standby mode.
2
Standby
Button
Press the remote control’s SETUP button. The
2
AVR’s OSD System Setup menu will appear on
the TV.
System Setup
1. Speaker Setup
2. HDMI Setup
3. Audio Setting’s
4. Auto Power Control
5. Speakers On/Off
Use the remote’s arrow and ENTER buttons
3
to select “Speaker Setup”. The Speaker Setup
menu will appear.
1. Speaker Setup
a. Speaker Setting’s
b. Crossover
c. Channel Level
d. Speaker Distance
14
Page 15
Setup
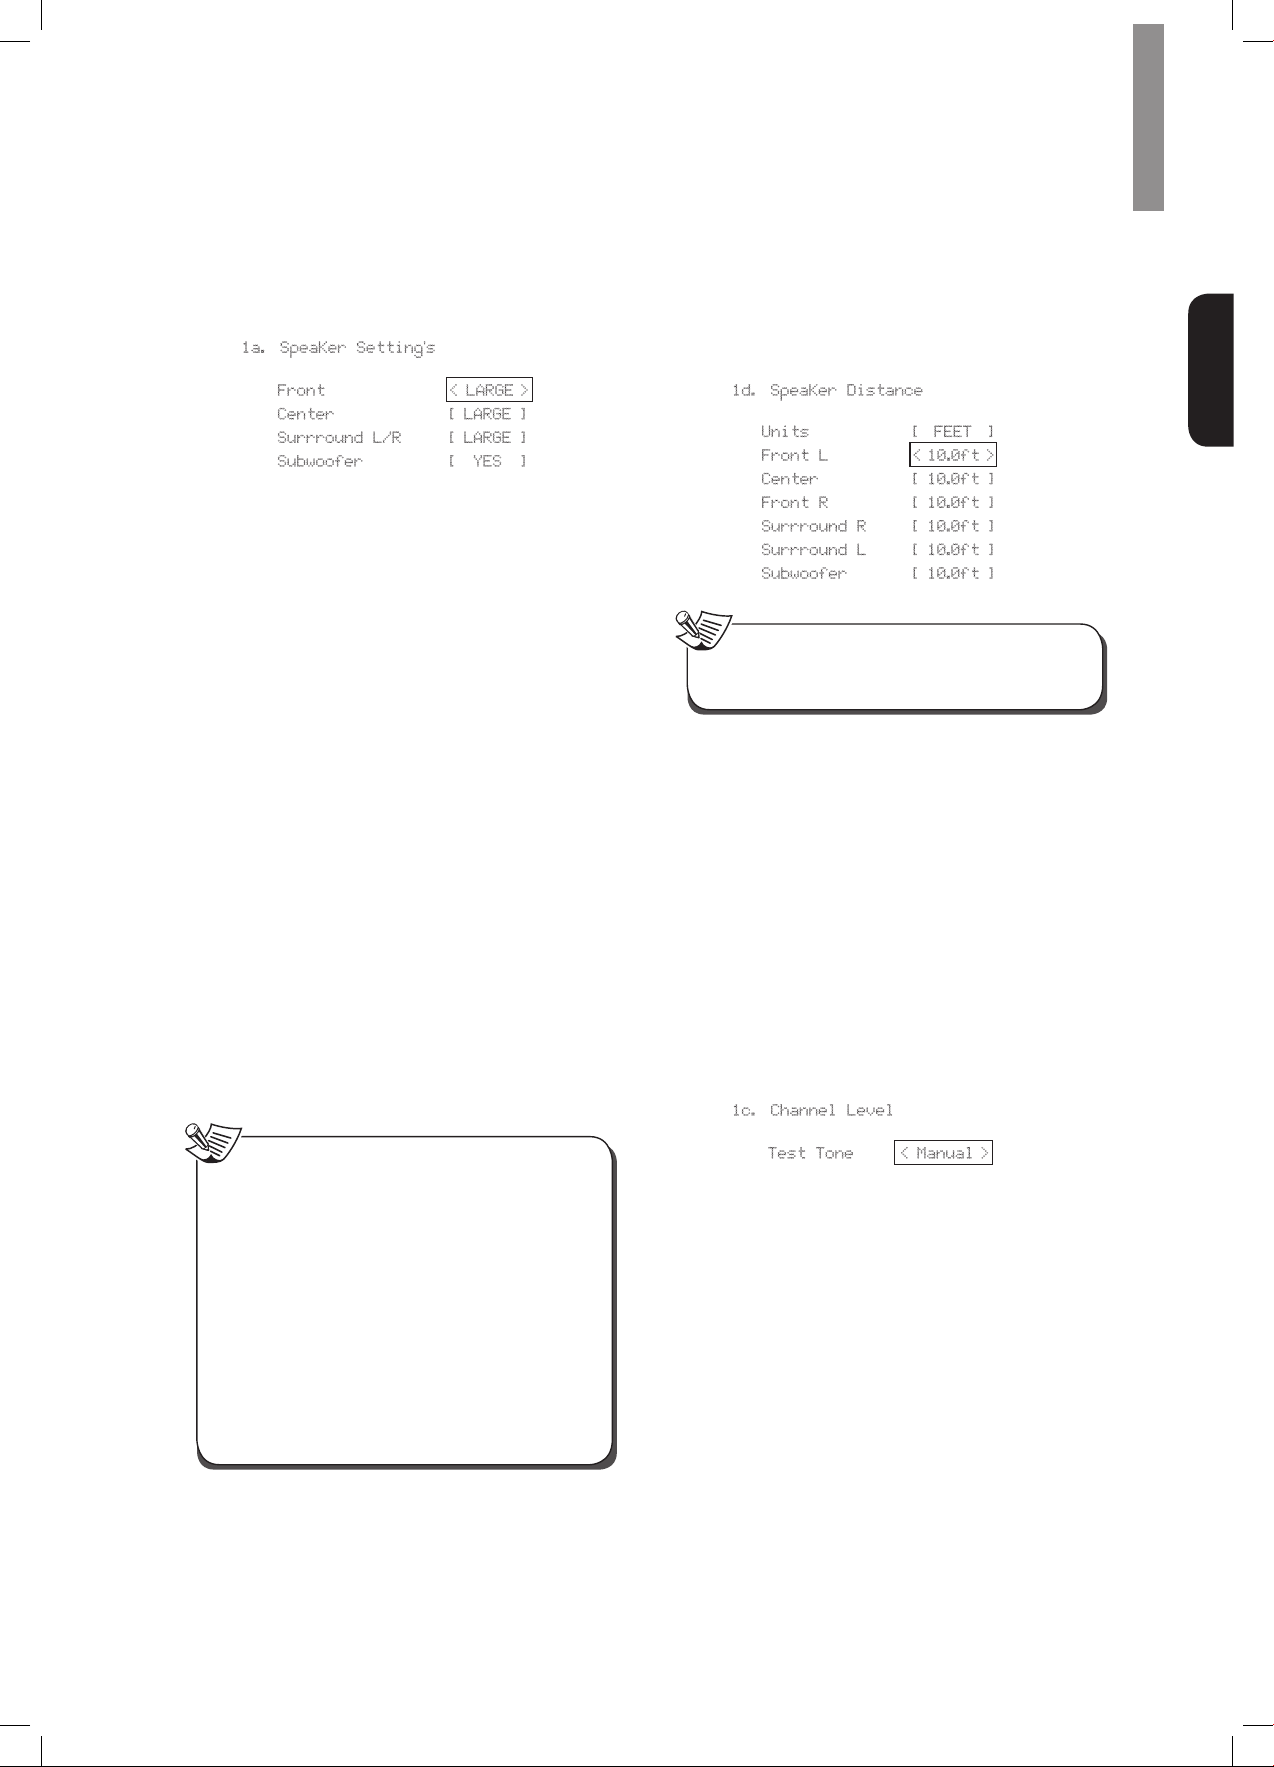
Select “Speaker Settings”. The Speaker Settings
4
menu will appear.
SpeaKer Setting’s1a.
Front
Center
Surrround L/R
Subwoofer
Use the remote’s left and right arrow buttons
5
to select NO, SMALL or LARGE for the Front,
Center and Surround speaker positions,
depending on the speakers you have connected
to the receiver.
NO:
Select this setting if you have not connected
a speaker in that position (not available for the
Front speakers).
SMALL:
capable of producing clean, deep bass energy
at output levels that match those produced by
a powered subwoofer. All bass in that channel
is removed from that speaker and is sent to the
subwoofer (or to the Front speakers if Subwoofer
is set to NO). Most speakers (unless they are
large and powerful) should be considered
SMALL.
LARGE:
capable of producing clean, deep bass energy
at output levels that match those produced by a
powered subwoofer. All bass in that channel is
sent to that speaker.
When you’re nished, press the remote control’s
RETURN button to return to the Speaker Setting
menu.
Select this setting if the speaker is not
Select this setting if the speaker is
< LARGE >
[ LARGE ]
[ LARGE ]
[ YES ]
For now you can skip the “Crossover” setting.
6
Select “Speaker Distance”. The Speaker
7
Distance menu will appear.
SpeaKer Distance1d.
Units [ FEET ]
Front L
Center
Front R
Surrround R
Surrround L
Subwoofer
Note
•The unit display may differ depending on the
distributed models.
Measure the distance from each speaker in your
8
system to the listening position. Write down the
distances.
Use the remote’s left and right arrow buttons to
9
change the distance setting for each speaker so
it matches the distance you wrote down in step 8.
When you’re nished, press the remote control’s
RETURN button to return to the Speaker Setting
menu.
Select “Channel Level”. The Channel Level
10
menu will appear. Use the remote’s left and
right arrow buttons to set Test Tone to “Manual”
and press the remote’s ENTER button. After the
on-screen countdown you will hear test noise
through the front left speaker.
< 10.0ft >
[ 10.0ft ]
[ 10.0ft ]
[ 10.0ft ]
[ 10.0ft ]
[ 10.0ft ]
Channel Level1c.
English
Note
•If your system has a subwoofer and you set the
Front speakers to LARGE, the subwoofer may
not output audio except for Dolby Digital and
DTS encoded program material that contains
LFE channel information. If you set your
Front speakers to LARGE and you want your
subwoofer to reproduce bass from all program
material, set the Subwoofer to PLUS (see below).
•For Subwoofer, select YES (if your system has
a subwoofer), NO (if your system does not
have a subwoofer), or PLUS (if your system
has a subwoofer, you set your Front speakers
to LARGE and you want your subwoofer to
reproduce bass from all program material).
Test Tone < Manual >
Sit in the main listening position and adjust
11
the AVR’s volume control so the test noise
is moderately loud. Note the volume of the
test noise through the rst speaker. Press the
remote’s down arrow button to advance the
test noise to each of your system’s speakers
and note the volume level of the noise in each
speaker.
As you advance the test noise through the
12
speakers, use the remote’s left and right arrow
buttons to adjust the volumes of the channels
until all of them play at the same volume.
When you’re nished, press the remote’s SETUP
button to turn of the on-screen menus.
15
Page 16

Operation
Operating Your AVR
Now that you have installed your components and
completed a basic conguration, you are ready to begin
enjoying your home theater system.
ControllingtheVolume
Adjust the volume either by turning the front-panel
Volume knob (clockwise to increase volume or
counterclockwise to decrease volume) or by pressing
the Volume Up/Down buttons on the remote.
Muting the Sound
To mute all speakers and the headphones, press the
Mute button on the remote. Any recording in progress
will not be affected. The MUTE message will appear
in the front-panel display as a reminder. To restore
the sound, press the Mute button again, or adjust the
volume.
Listening Through Headphones
Plug the 1/4-inch stereo plug on a pair of headphones
into the front-panel Phones jack for private listening.
Note
•For information about turning off the speakers
during headphone listening, see page 14.
•Check all connections for a loose or incorrect
connection.
•Check the video-input selection on the TV/display
device.
Additional Tips for Troubleshooting HDMI
Connections
•Turn off all devices (including the TV, the AVR and
any source components).
•Unplug the HDMI cables, starting with the cable
between the AVR and the TV, and continuing with the
cables between the AVR and each source device.
•Carefully reconnect the cables from the source
devices to the AVR. Connect the cable from the AVR
to the TV last.
•Turn on the devices in this order: TV, AVR, source
devices.
Note
•Depending upon the particular components
involved, the complexity of the required
communication between HDMI components may
cause delays of up to a minute in the completion
of some actions, such as input switching or
switching between SD and HD channels.
Selecting a Source
There are two different ways to select a source:
•Rotate the front-panel INPUT SELECTOR.
•Directly select any source by pressing its Source
Selector button on the remote.
The AVR selects the analog audio and video inputs
assigned to the source and any other settings you made
during setup.
The digital audio inputs are not assigned to any specic
sets of analog inputs. Once you select a source device
you can use the remote control’s Audio Input Select
(DIGITAL) button to select the specic audio input
connection (HDMI, coaxial digital, optical digital, analog)
that you want to listen to. (Note: You cannot select an
audio input connection for the FM/AM or USB source
buttons.)
The source name, the selected audio input and the
surround mode will appear on the front panel.
VideoTroubleshootingTips
If there is no picture:
•Check the source selection.
Listening to FM and AM Radio
Select the AM/FM source. Use the Tuning Up/Down
buttons to tune a station, which will be shown on the
front-panel display.
For automatic tuning, press and hold the Tuning Up/
Down buttons to scan stations until a station with
acceptable signal strength is found. For manual tuning,
press each Tuning button until the desired station is
found. Using the FM Mono mode may improve the
reception of weaker stations.
Preset Stations
A total of 30 stations (AM and FM combined) may be
stored as presets. When the desired station has been
tuned in, press the Memory button and the preset
number will ash on the front-panel Message display.
Use the remote’s Number buttons to enter the desired
preset number.
To tune a preset station, press the Preset Up/Down
buttons or enter the preset number using the remote’s
Number buttons.
RDS
RDS(Radio Data System) is a method for sending
information signals together with the transmitter signals.
These codes contain Program Service name (PS), A list
of Program Types (PTY), Radio Text (RT).
16
Page 17
Note
•RDS is available only in models that are
distributed in Europe.
•RDS is only possible in the FM band.
•RDS searches for the preset stations only. If no
stations have been stored in the memory, or if
the program type could not be found among the
preset stations, “NO PTY” is displayed.
Listening to Media on a USB
Device
Your AVR is compatible with USB 2.0 or USB 1.1 media
in the FAT 16 or FAT 32 le format and is compatible
with the following MP3 and WMA media:
MP3:
•
•
Bit rates between 96 – 320kbps. Fixed bit-
rates at 44.1kHz sampling is recommended. Variable
bit-rates (VBR) are playable, but playing time may be
displayed incorrectly. Files must have a “.mp3” le
extension.
WMA:
Bit rates of 64kbps or higher. NOTE: Bit rates
of 80kbps and 256kbps are not compatible. Files
must have a “.wma” le extension.
Operation
Use the remote’s Transport Control buttons to control
playback.
To browse the contents of the current folder, press the
remote’s RETURN button. The USB folder screen will
appear on the OSD for 20 seconds.
English
Use the remote’s UP/Down and ENTER buttons to
highlight and select tracks.
Caution
•To prevent damage or malfunction, press the
remote’s Stop (■) Transport Control button before
removing the USB device from the AVR’s USB
port.
A maximum number of 65,536 folders and les can be
supported.
PlayinglesonaUSBdevice
Insert the USB drive into the AVR’s front-panel
1
USB port.
Caution
•Do not connect a personal computer or peripheral
to the USB port. USB hubs are not supported.
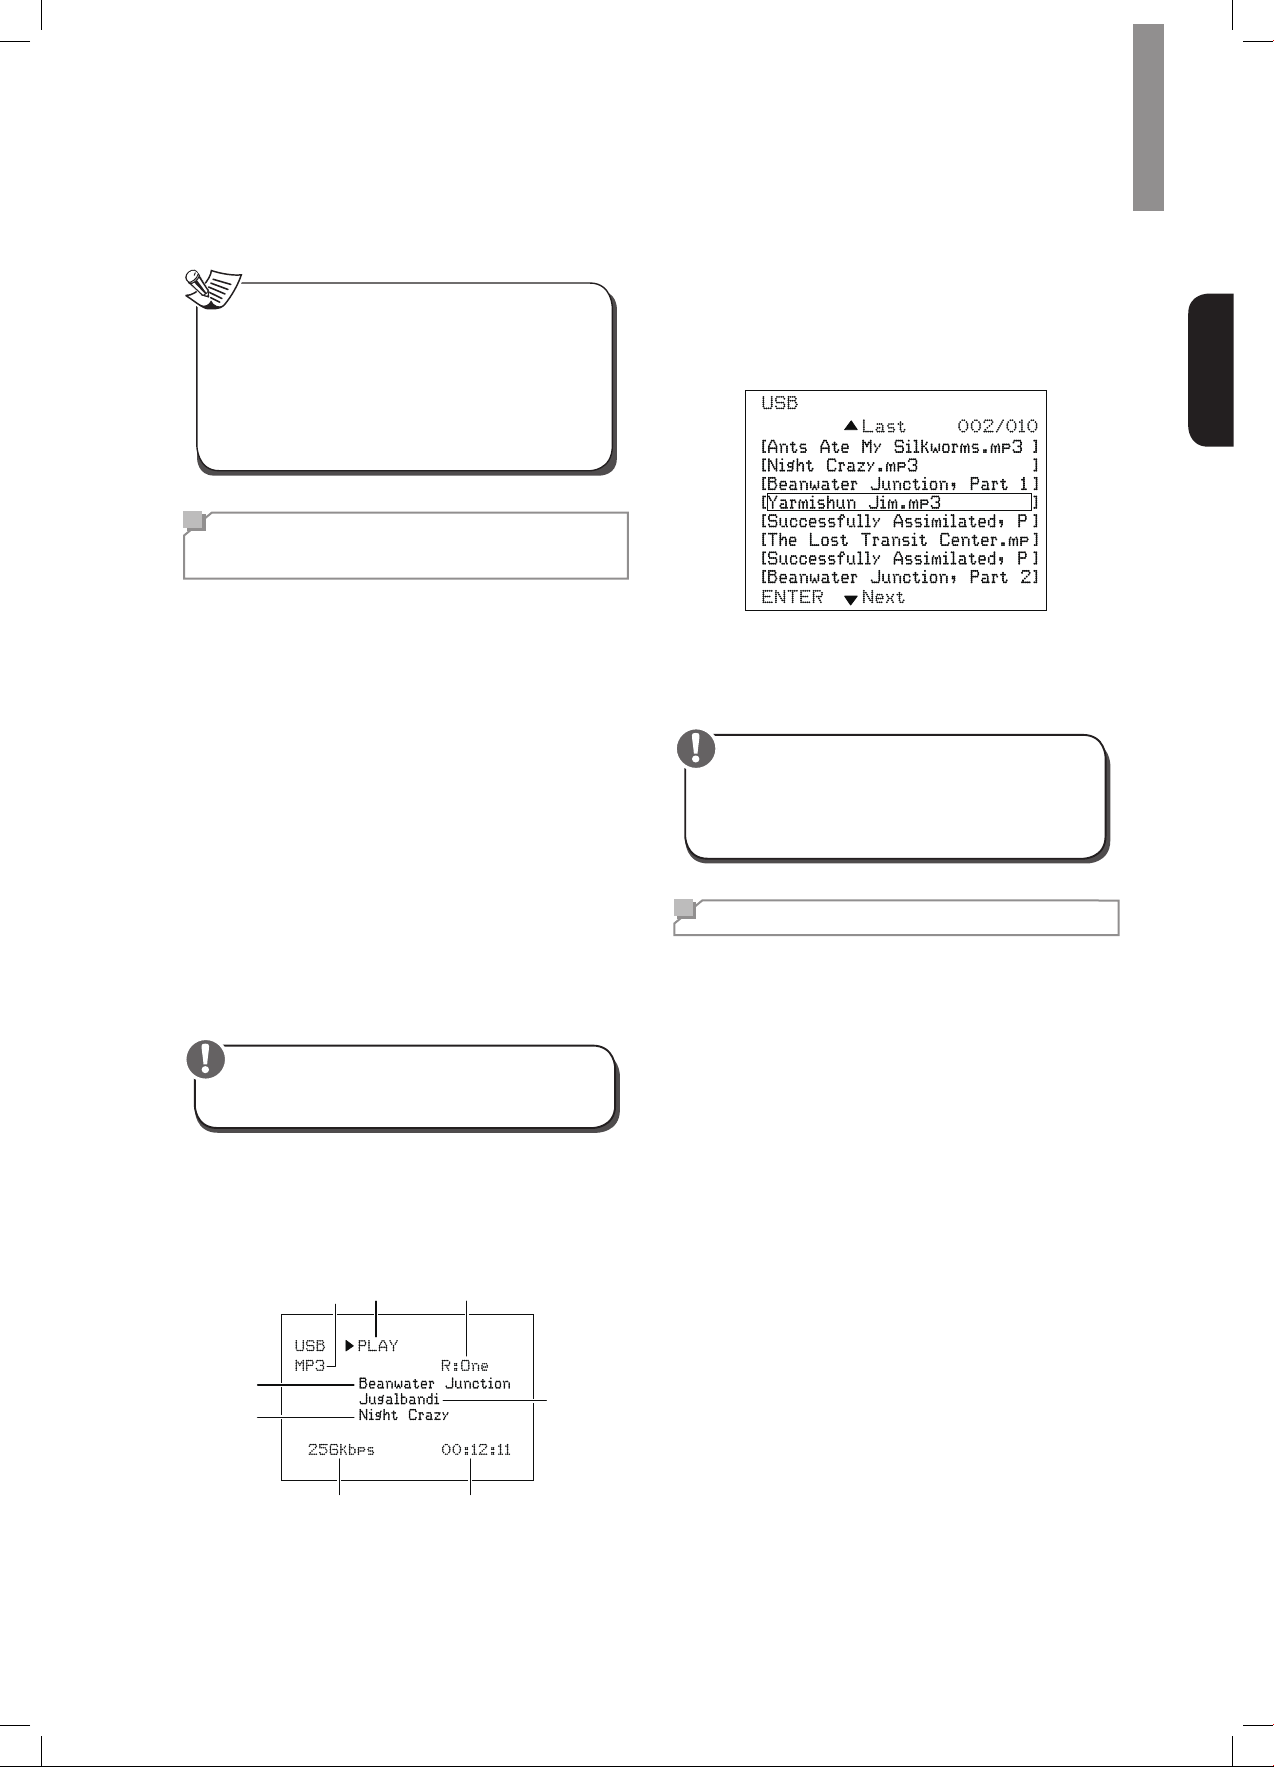
Select USB as the source device. “USB” will
2
appear on the front-panel display, and after the
AVR loads the contents of the current folder the
USB playback screen will appear on the OSD.
File
Song Title
Album Title
Type
Playback
Mode
Repeat
Mode
Artist Name
Selecting a Surround Mode
Selecting a surround mode can be as simple or
sophisticated as your individual system and tastes. Feel
free to experiment, and you may nd a few favorites
for certain sources or program types. You can nd
more detailed information on surround modes in Audio
Processing and Surround Sound, below.
To select a surround mode, press the Surround Mode
Select buttons. Each press advances to the next
available surround mode.
Digital surround-sound modes, such as Dolby Digital
and DTS systems, are available only with specially
encoded programs, such as those available via HDTV,
DVD and Blu-ray Disc media and digital cable or
satellite television. Other surround modes such as
Dolby Pro Logic II may be used with digital or analog
signals to create a different surround presentation or to
use a different number of speakers.
Surround mode selection depends upon the number
of speakers in your system, the programs you are
watching or listening to, and your personal tastes.
Data
Rate
Elapsed
Time
17
Page 18
R-607/R-507AUDIO/VIDEORECEIVER
Advanced Functions
Much of the adjusting and conguration your AVR
requires is handled automatically, with little intervention
required on your part. You can also customize your AVR
to suit your system and your tastes. In this section, we
will describe some of the more advanced adjustments
available to you.
Audio Processing and Surround Sound
Audio signals can be encoded in a variety of formats
that affect not only the quality of the sound but also the
number of speaker channels and the surround mode.
You may also manually select a different surround
mode, when available.
Analog Audio Signals
Analog audio signals usually consist of two channels –
left and right. Your AVR offers several options for analog
playback:
Stereo:
•
playback, press the STEREO button. Sound will be
output from the front left and right speakers.
5-ChStereo:
•
through all of the system’s speakers (such as during
a party), select 5CH STEREO via the Surround Mode
Select buttons. This plays the left-channel signal
through the front left and surround left speakers,
the right-channel signal through the front right and
surround right speakers, and a summed mono signal
through the center speaker.
Analog Surround Modes:
•
process 2-channel audio signals to produce multichannel surround sound, even when no surround
sound has been encoded in the recording. Among
the available modes are Dolby Pro Logic II, Dolby
Pro Logic, DTS Neo: 6, Theater, Hall, Stadium, Club
and Arena modes. Use the Surround Mode Select
buttons to select one of these modes.
When you want conventional 2-channel
When you want to hear stereo sound
Your AVR is able to
channel information in 6.1-channel and 7.1-channel
recordings into your system’s surround left and
surround right channels.)
Surround Mode Selection
Surround-mode selection depends upon the format
of the incoming audio signal as well as your personal
taste. Although there is never a time when all of the
AVR’s surround modes are available, the table below
indicates which surround modes are available for a
given input.
Input Signal
Format
Dolby TrueHD
(Only for
R- 607),
Dolby Digital
Plus (Only
for R- 607),
Dolby Digital
(7.1-channel/
5.1-channel)
Dolby Digital
(2.0-channel)
DTS-HD (Only
for R- 607),
DTS, DTS 96/24
PCM
(2-channel),
Analog
(2-channel)
Available Surround Modes
Corresponding Dolby TrueHD
(Only for R-607) or Dolby Digital
mode (Theater, Hall, Stadium,
Club, Arena and 5-Ch Stereo are
also available for 5.1-channel
programs)
Dolby Pro Logic II Movie, Dolby
Pro Logic II Music, Dolby Pro
Logic II Game, Dolby Pro Logic
Corresponding DTS Mode
(Theater, Hall, Stadium, Club,
Arena and 5-Ch Stereo are
also available for 5.1-channel
programs)
Dolby Pro Logic II Movie, Dolby
Pro Logic II Music, Dolby Pro
Logic II Game, Dolby Pro Logic,
DTS Neo:6 Cinema, DTS Neo:6
Music, Theater, Hall, Stadium,
Club, Arena, 5-Ch Stereo
Digital Audio Signals
Digital audio signals offer greater exibility and capacity
than analog signals and allow the encoding of up to 5.1
channels of discrete channel information directly into
the signal. The result is improved sound quality and
startling directionality, since each channel’s information
is transmitted independently of the other channels.
High-resolution recordings sound extraordinarily
distortion-free, especially in the high frequencies.
Digital surround-sound formats include Dolby Digital 2.0
(two channels only), Dolby Digital 5.1, Dolby Digital
EX, Dolby Digital Plus, Dolby TrueHD, DTS-HD HighResolution Audio, DTS-HD, DTS 5.1, DTS 96/24,
2-channel PCM modes in 44.1kHz, 48kHz, 88.1kHz,
96kHz or 176.4kHz, and 5.1 or 7.1 multichannel PCM.
(Your AVR will downmix the discrete surround back-
18
Dolby Pro Logic II Movie, Dolby
Pro Logic II Music, Dolby Pro
MP3/WMA
When in doubt, check the broadcast or the jacket
of your disc for more information on which surround
modes are available. Usually, nonessential sections of a
disc, such as trailers, extra materials or the disc menu,
are available only in Dolby Digital 2.0 (2-channel) or
PCM 2-channel mode. Look for an audio setup section
in the disc’s menu.
Also, make sure your disc player’s audio output is set to
the original bitstream rather than 2-channel PCM. Stop
play and check the player’s output setting.
Logic II Game, Dolby Pro Logic,
DTS Neo:6 Cinema, DTS Neo:6
Music, Theater, Hall, Stadium,
Club, Arena, 5-Ch Stereo
Page 19
Operation
AdjustingtheChannelVolumes
In addition to using the AVR’s built-in test noise to
congure the AVR for your speakers as explained
Congure the AVR for Your Speakers
in
also adjust the volume of any channel at any time to
compensate for individual program sources or your
personal taste.
Press the remote’s Channel Level button. The
1
Message Display will show the left channel
volume level.
Use the remote’s up and down arrow buttons to
2
display the channel you want to adjust.
Use the remote’s left and right arrow buttons to
3
adjust the channel’s volume.
Press the RETURN button when you’re nished.
, you can
Recording
Two-channel analog audio signals, as well as composite
video signals, are normally available at the appropriate
recording output connectors. To make a recording,
connect your audio or video recorder to the appropriate
AVR output connectors as described in the
Connections
and make sure the recorder is turned on and recording
while the source is playing. Refer to the recording
device’s instructions for complete information about
making recordings.
section, insert blank media in the recorder
Making
Processor Reset
If the AVR behaves erratically after a power surge, rst
turn off the front-panel Main Power switch and unplug
the AC power cord for at least 3 minutes. Plug the cord
back in and turn the AVR on. If this procedure doesn’t
help, reset the AVR’s processor as described below.
Note
•Resetting the processor will erase all user
congurations, including speaker and level
settings, and tuner presets. After a reset, reenter
all of these settings from your notes in the
Appendix worksheets.
ToresettheAVR’sprocessor:
Press the front-panel Standby/On switch to
1
place the unit in the Standby mode (the Standby
Indicator LED will turn red).
Press and hold the SURROUND down button on
2
the remote control as pressing and holding the
front-panel Standby/On switch simultaneously.
When the RESET message “RESET?” appears
3
on the front-panel Message display, press
BAND.
When the RESET message “OK?” appears on
4
the front-panel Message display, press BAND.
English
Note
•The AVR does not convert digital signals to
analog. Only devices connected to the analog
audio and composite video input connections can
be recorded.
•HDMI video sources are not available for
recording.
•Please make certain that you are aware of any
copyright restrictions on any material you record.
Unauthorized duplication of copyrighted materials
is prohibited by law.
SleepTimer
The sleep timer sets the AVR to play for up to
90 minutes and then turn off automatically.
Press the Sleep button on the remote, and the time until
turn-off will be displayed on the front-panel Message
display The available settings are 30 min., 60 min.,
90 min. and OFF.
When the sleep timer has been set, a small crescentmoon icon will appear on the front-panel display.
If you press the SLEEP button after the timer has been
set, the remaining play time will be displayed. Press the
SLEEP button again to change the play time.
Memory
If the AVR is unplugged or experiences a power outage,
it will retain your user settings for up to two weeks.
19
Page 20
Troubleshooting
If you experience any of the following difculties while using the system, use this troubleshooting guide to help
remedy the problem before requesting servicing. Should any problem persist, consult your nearest authorized dealer
or authorized independent company.
If the unit does not operate normally due to external inuence such as static electricity, disconnect the power plug
from the outlet and insert again to return to normal operating conditions.
Symptom Cause Solution
Unit does not function when
Main Power switch is turned
on.
Front-panel Message display
lights, but there's no sound
or picture.
No sound from any speaker.
No sound from any speaker;
PROTECT message appears
on Message display.
No sound from center or
surround speakers.
Unit does not respond to
remote control commands.
•No AC power. •Ensure that the power cord is plugged into
a live AC power outlet.
•Intermittent input connection.
•Mute is on.
•Volume control is turned down.
•Speakers set to “Off” in System
Setup menu.
•Amplier is in protection mode
due to possible short circuit.
•Amplier is in protection mode
due to internal problems.
•Incorrect surround mode.
•Program material is
monophonic.
•Incorrect speaker conguration.
•Program material is stereo.
•Weak batteries in remote.
•AVR not selected.
•Remote sensor is obscured.
•Secure all input and speaker connections
•Press Mute button.
•Turn up Volume control.
•Set speakers to “On” in System Setup
menu. See page 14, for more information.
•Check all speaker wires at speaker and
AVR connections for crossed wires.
•Contact your local service center.
•Select a surround mode other than stereo.
•Mono programs contain no surround
information.
•Check the speaker conguration in the
setup menu.
•The surround decoder may not create
center- or surround-channel information
from non-encoded stereo programs.
•Change batteries in remote.
•Press the Setup/AVR button.
•Ensure that the AVR’s front-panel remote
sensor is in the line of sight of the remote.
Intermittent buzzing in tuner.
20
•Local interference. •Move the AVR or antenna away from
computers, uorescent lights, motors or
other electrical appliances.
Page 21
Specications
Audio Section
100 W x 7ch (20 Hz~20 kHz, 6 Ohms, THD 1 %/Only Channel
Power Output
Input sensitivity/impedance 200 mV/47k ohms
Signal-to-noise ratio (IHF-A) 95 dB
Surround system adjacent-channel separation
Frequency response 10Hz – 100kHz: ±3 dB
High instantaneous-current capability (HCC) ±25 amps
FM Tuner Section
Frequency range 87.5 – 108.0 MHz
Usable sensitivity IHF 1.3 μV/13.2 dBf
Signal-to-noise ratio (mono/stereo) 65 dB/62 dB
Driven)
75 W x 2ch (20 Hz~20 kHz, 6 Ohms, THD 0.1 %/Stereo Mode)
Dolby Pro Logic/PLII: 40 dB
Dolby Digital: 55 dB
DTS: 55 dB
English
Distortion (mono/stereo) 0.2 %/0.3 %
Stereo separation 35 dB @ 1 kHz
Image rejection 80 dB
IF rejection 80 dB
AM Tuner Section
Frequency range 520 – 1720 kHz, 522 –1161 kHz
Signal-to-noise ratio 45 dB
Usable sensitivity (loop) 500 μV
Selectivity (±10kHz) 30 dB
IF rejection 80 dB
VideoSection
Television format NTSC/PAL
Input level/impedance 1 Vp-p/75 ohms
Output level/impedance 1 Vp-p/75 ohms
Video frequency response (composite video) 10 Hz – 8 MHz (–3 dB)
HDMI With 3 D and Deep Color
GeneralSpecications
Power requirement AC 120 V/60 Hz, AC 230 V/50 Hz
Power consumption <0.5 W (standby), 280 W maximum
Dimensions (W×H×D, including protruding parts) 17.1" x 5.4" x 14.9" (435mm x 138mm x 379mm)
Weight (Net) 17.6lb (8kg)
21
Page 22
Informations de sécurité
À LIRE AVANT D'UTILISER L'APPAREIL
ATTENTION
RISQUE DE CHOC ELECTRIQUE
NE PAS OUVRIR
ATTENTION
AFIN DE REDUIRE LES RISQUE DE CHOC ELECTRIQUE,
N'ENLEVEZ PAS LE PANNEAU ARRIERE. AUCUNE PIÈCE À
L'INTÉRIEUR NE PEUT ÊTRE RÉPARÉE PAR L'UTILISATEUR.
EN CAS DE PROBLÈME, S'ADRESSER À DU PERSONNEL
TECHNIQUE QUALIFIÉ.
Ce symbole sert à avertir l'utilisateur de la présence dans le boîtier de l'appareil de tensions dangereuses
non isolées d'une magnitude pouvant constituer un risque d'électrocution.
Ce symbole indique que la documentation fournie avec l'appareil contient des instructions d'utilisation et
d'entretien importantes.
AVERTISSEMENT :
POUR REDUIRE TOUT RISQUE D'INCENDIE OU DE CHOC ELECTRIQUE, NE PAS EXPOSER
CET APPAREIL A LA PLUIE OU A L'HUMIDITE.
ATTENTION
•Laissez de l'espace autour de l'appareil pour en assurer une
ventilation sufsante.
•Evitez d'installer l'appareil dans des endroits trop chauds ou
trop froids ou dans une zone exposée directement au soleil ou
à un dispositif de chauffage.
•Protégez l’appareil de l’humidité, de l’eau et de la poussière.
•Ne faites pas tomber de corps étrangers dans l’appareil.
•N'obstruez pas les ouvertures de ventilation par des journaux,
rideaux, linge etc.
•Eloignez toute amme nue, telle que bougie, ou autres
sources de chaleur de l'appareil.
•Respectez les réglementations locales concernant la mise
au rebut des emballages, piles/batteries usagées et anciens
équipements.
•N’exposez pas l’appareil au ruissellement ou à la projection
d'eau et évitez de poser dessus des objets remplis de liquides,
tels que des vases.
•Ne pas mettre l'appareil en contact avec des insecticides, du
benzène ou des diluants.
•Ne démontez pas et ne modiez pas l’appareil de quelle que
manière que ce soit.
Remarques concernant le câble et la prise d’alimentation
secteur
•L'appareil reste sous tension tant qu'il est branché à une prise
secteur, même s’il a été éteint.
Avertissements concernant l'installation
•Il faut le débrancher de la prise secteur pour le mettre
complètement hors tension.
•Lors de l’installation de l’appareil, veillez à ce que la prise
secteur soit facilement accessible.
•Débranchez l'appareil du secteur s'il ne va pas être utilisé
pendant une longue période.
Fabriqué sous licence sous les
brevets américains n° : 5,956,674 ;
5,974,380 ; 6,226,616 ; 6,487,535 ;
7,212,872 ; 7,333,929 ; 7,392,195 ;
7,272,567 et autres brevets américains et étrangers en cours
d’homologation.. DTS-HD et les logos DTS-HD sont des marques
déposées et DTS-HD Master Audio est une marque de commerce
de DTS, Inc. Le produit comprend le logiciel. © DTS, Inc. Tous
droits réservés.
Fabriqué sous licence des laboratoires
Dolby. Dolby, Pro Logic et le symbole
du double D sont des marques
déposées des laboratoires Dolby.
HDMI, le logo HDMI et High-
Denition Multimedia Interface sont
des marques commerciales ou des
marques déposées de HDMI Licensing LLC aux Etats-Unis et
dans d’autres pays.
* DTS-HD Master Audio et Dolby TrueHD est applicable
uniquement pour R-607.
Remarque
Ne pas couvrir les ouvertures de ventilation et ne pas placer d'autres équipements au-dessus de l'appareil.
Remarque :
Pour la dissipation de la chaleur, ne pas placer cet appareil dans un espace fermé, tel qu’une bibliothèque
ou meuble similaire.
22
Paroi
Page 23

Table des matières
22 INFORMATIONS DE SÉCURITÉ
24 MISE EN ROUTE
24 Panneau avant
24 Panneau arrière
25 Télécommande
26 Emplacement
27 CONNEXIONS
27 Connexion des enceintes
27 Connexion du Subwoofer
28 Connexion d'écran télé/vidéo
29 Connexion des sources audio/vidéo
33 Connexion des antennes du tuner
33 Branchement au courant
33 Mettre des piles dans la télécommande
34 CONFIGURATION
34 Allumer le RAV(Récepteur Audio/Vidéo)
Français
34 Congurer le RAV en fonction des enceintes
36 UTILISATION
36 Utilisation du RAV
36 Ecouter la radio FM/AM
37 Ecouter des contenus multimédias d’une une clé USB
37 Sélection d'un mode surround
38 Fonctions avancées
40 DÉPANNAGE
41 SPÉCIFICATIONS
23
Page 24

Mise en route
Panneau avant
1 2 3 4 5 6 7
8 9 10 11 14 15
Interrupteur d'alimentation principal
1
Témoin veille
2
Commutateur Marche/Veille
3
Capteur infrarouge
4
Ecran
5
Touches sélection Surround
6
Contrôle du volume principal
7
Sélecteur d'entrée
8
Panneau arrière
1 2
12 13
9
10
11
12
13
14
15
Prise casque
Prise d'entrée F.AUX
Touche sélecteur de bande
Touches Syntonisation vers le Haut/Bas
Touche sélecteur de préréglage
Touche mode stéréo
Port USB
24
3 4 5 6 7 8
Prises audio numérique
1
Prises HDMI
2
Prises des antennes du tuner
3
Prises audio analogique
4
Prise Subwoofer
5
Prises vidéo composite
6
Prises enceintes
7
Prise d'alimentation secteur
8
Page 25
Télécommande
1
2
3
4
5
6
7
8
9
12
22
21
20
19
18
17
16
15
14
13
11
10
Mise en route
Touche Allumer
1
Touches Sélecteur de source
2
Touches sélecteur de Surround
3
(Les touches GAME et NETWORK ne
sont pas disponibles.)
Touche Menu principal
4
▲/▼/◄/► Touches de sélection
5
ENTER/MEMO Touche Entrer/mémoire
SEARCH.M Touche recherche
RDS (Radio Data
System) (Système de
radiocommunication de
données)
(* La touche SEARCH.M n’est disponible
que sur les modèles distribués en Europe)
Touche Afchage/Mode
6
Touche Stop
7
Touche répéter
8
Touches Syntonisation vers le Haut/Bas
9
Touches Avance/Retour rapide
Français
Touches Station préréglée vers le
10
Haut/Bas
Touches Précédent/Suivant
Touche aléatoire
11
Touche Lecture/Pause
12
Touche Retour
13
Touches Augmenter/diminuer le volume
14
Touche menu réglages
15
Touche Couper le son
16
Touche mode stéréo
17
Touche Attribution Audio
18
Touche niveau de canal
19
Touche Séquence de tonalité de test
20
Touche Contrôle de tonalité
21
Touche Veille
22
25
Page 26
R-607/R-507RÉCEPTEURAUDIO/VIDÉO
Emplacement
Emplacement des enceintes
Déterminez l'emplacement des enceintes de votre système
selon les instructions du fabricant et en fonction de
l'aménagement de votre salle d'écoute. Utilisez l'illustration
ci-dessous comme guide pour les systèmes 5.1 canaux.
Pour créer l'environnement son surround le plus réaliste
possible, vous devez placer vos enceintes autour
d’un cercle avec la position d'écoute au centre. Vous
devez orienter chaque enceinte de manière qu'elle soit
directement en face de la position d'écoute. Utilisez
l'illustration ci-dessous comme guide.
Emplacement des enceintes gauche,
centrale et droite
Placez l'enceinte centrale en haut, en bas ou accrochée au
mur au dessus ou en dessous du téléviseur ou de l'écran
vidéo. Placez les enceintes avant gauche et droite sur le
cercle, orientées à environ 30 degrés de l'enceinte centrale
et dirigées vers l'auditeur.
Placez de préférence les enceintes avant gauche, avant
droite et centrale à environ la même hauteur que les
oreilles de l'auditeur. Il est préférable que l'enceinte
centrale soit à 0,6m (2 pieds) maximum au dessus ou en
dessous des enceintes gauche/droite. Si vous n'utilisez
que deux enceintes avec votre RAV, les placer dans les
positions avant gauche et droite.
Emplacement des enceintes surround
Il est préférable d’orienter les enceintes surround gauche
et droite à environ 110 degrés de l'enceinte centrale,
légèrement en arrière et orientées vers l'auditeur. Vous
pouvez également les placer derrière l'auditeur, en les
orientant de façon opposée à l'enceinte avant. Vous devez
placer les enceintes surround plus haut que les oreilles de
l'auditeur de 0,6 - 1,8m (2 - 6 pieds).
Emplacement du subwoofer
Les performances d'un subwoofer sont considérablement
affectées par la forme et le volume de la pièce d’écoute,
il est préférable d'essayer différentes positions jusqu'à ce
que vous trouviez l'emplacement qui produit les meilleurs
résultats dans votre propre pièce. Dans ce contexte, les
règles suivantes vous aideront dans vos débuts :
•Un subwoofer placé à côté d'un mur accentue
généralement les graves dans la pièce.
•Un subwoofer placé dans un coin donne généralement
les graves les plus fortes dans la pièce.
•Dans plusieurs pièces, placer le subwoofer au niveau
de la même hauteur que les enceintes gauche et droite
peut produire la meilleure intégration entre le son du
subwoofer et celui des enceintes.
•Dans certaines pièces, le placement du subwoofer
derrière la position d'écoute pourrait donner la meilleure
performance. Une bonne manière pour déterminer la
meilleure position du subwoofer consiste à le placer
temporairement dans la position d'écoute et d’écouter
de la musique avec un contenu très grave. Il faut ensuite
se déplacer dans divers endroits de la pièce tout en
écoutant (mettez vos oreilles là où le subwoofer serait
placé), jusqu'à ce que vous trouviez l'emplacement où
la performance des graves serait meilleure. Placez alors
le subwoofer à l’endroit que vous jugez meilleur.
26
Page 27
Connexions
Attention
•Avant toute connexion au récepteur audio/vidéo,
assurez-vous que le cordon d’alimentation secteur
est débranché du RAV et de la prise secteur.
Des connexions avec le RAV branché et allumé
pourraient endommager les enceintes.
Connexion des enceintes
Comment utiliser les bornes d'enceintes
duRAV(RécepteurAudio/Vidéo):
Dévissez le capot
1
Insérez un l dénudé
2
Serrez le capot
3
Connectez toujours la borne marquée (+) du RAV à la
borne (+) de l'enceinte (généralement rouge), et la borne
noire (-) du RAV à la borne (-) de l'enceinte (généralement
noire).
Connexion du Subwoofer
Utilisez un simple câble audio RCA pour connecter la borne
Subwoofer Pre-Out du RAV au Subwoofer. Reportez-vous
au guide d'utilisation de votre subwoofer pour avoir des
informations spéciques sur les connexions.
Panneau arrière
Français
Attention
•Veillez à ce que les ls dénudés (+) et (-) ne se
touchent pas et aucun ne touche l'autre borne. En
cas de contact des ls, un court-circuit peut avoir
lieu et peut endommager le RAV.
Connectez les enceintes comme indiqué dans l’illustration.
(Enceinte d'extrêmes graves)
Subwoofer
27
Page 28
R-607/R-507RÉCEPTEURAUDIO/VIDÉO
Composite
VIDEO IN
Connexion d'écran télé/vidéo
Prise HDMI Monitor Out
(sortieHDMImoniteur)
Si votre téléviseur est doté d’une prise HDMI et que vous
disposez de sources vidéo HDMI, utilisez un câble HDMI
(non fourni) pour connecter votre téléviseur à la prise HDMI
Monitor Out (sortie HDMI moniteur) du RAV.
Vous aurez la meilleure qualité d'image possible.
Prise Composite Video Monitor Out
(sortievidéocompositemoniteur)
Si votre téléviseur ne comprend pas une prise HDMI ou
s’il en comprend
seulement des prises vidéo composite
vidéo composite (non fourni) pour connecter la prise de
sortie vidéo composite moniteur du RAV à la prise vidéo
composite du téléviseur.
Panneau arrière
mais vous utilisez certaines sources avec
, utilisez un câble
Panneau arrière
Câble vidéo composite
(Non fourni)
TV
Remarque
•L'afchage à écran (OSD) du RAV n’apparaît
que via la prise de sortie Composite moniteur
(Composite Monitor Out). Pour utiliser les menus
OSD du RAV vous devez connecter sa prise de
sortie Composite moniteur à votre téléviseur,
même si vous ne connectez pas de sources
vidéo composite au RAV.
28
Page 29
Connexions
Connexion des sources
audio/vidéo
Les sources sont des composants qui reproduisent un
signal de lecture, ex. un lecteur Blu-ray Disc™, un lecteur
DVD, un tuner par câble, satellite ou HDTV etc. Ce RAV
est doté de plusieurs types de prises d'entrée pour vos
sources audio/vidéo : HDMI, vidéo composante, vidéo
composite, audio numérique optique, audio numérique
coaxiale et audio analogique.
Chacune des diverses touches sources du RAV est
affectée à une prise d'entrée audio analogique.
Les entrées audio numérique ne sont pas affectées à des
ensembles d'entrées audio analogique spéciques. Une
fois vous sélectionnez une source, vous pouvez utiliser
la touche DIGITAL de la télécommande pour sélectionner
la connexion d'entrée audio spécique (HDMI, coaxiale
numérique, optique numérique, analogique) souhaitée.
(Remarque : Les touches source radio FM/AM et USB ne
permettent pas de sélectionner une connexion d'entrée
audio).
Au fur et à mesure que vous connectez vos composants
sources, remplissez dans le tableau ci-dessous les
colonnes « Sources connectées » et « Prise d’entrée audio
utilisé » ; il vous sera facile de connaître quel appareil est
connecté à quelle prise.
Appareils HDMI
L'utilisation des prises HDMI des sources offre la meilleure
qualité de reproduction audio/vidéo possible. Un câble
HDMI transmet des signaux vidéo et audio numérique en
même temps, vous n'avez pas à utiliser d’autres câbles de
connexion audio si vous utilisez des connexions HDMI.
Français
Si votre téléviseur ou autre appareil source est équipé de
la fonction « Canal de Retour Audio HDMI » (HDMI ARC),
vous pouvez connecter le RAV via la prise HDMI Monitor
Out - ARC (sortie HDMI moniteur - Canal de Retour Audio)
sans aucune autre connexion audio.
Panneau arrière
Câble HDMI
(Non fourni)
Source avec HDMI
29
Page 30
R-607/R-507RÉCEPTEURAUDIO/VIDÉO
Appareils vidéo composite
Vous devez établir des connexions vidéo composite à partir
de vos sources qui ne disposent pas de prise HDMI vidéo.
Vous devez également établir une connexion audio de vos
sources vers le RAV.
Panneau arrière
Câble vidéo composite
(Non fourni)
Appareils audio numérique optique
Si vos sources sont dotées de sorties audio numérique
optique, il faut les connecter aux prises audio numérique
optique du RAV.
Panneau arrière
Composite
VIDEO OUT
Source avec vidéo composite
OPTICAL
OUT
TV, lecteur DVD, etc.
30
Page 31

Connexions
Appareils audio numérique coaxiale
Si vos sources sont dotées de sorties audio numérique
coaxiale, il faut les connecter aux prises audio numérique
coaxiale du RAV.
Panneau arrière
Appareils audio analogique
Utilisez des prises audio analogique pour les sources qui
ne disposent pas de prises HDMI ou audio numérique.
Pour connecter des sources vidéo aux entrées audio
Vidéo 1 ou Vidéo 2 du RAV, vous devez également
connecter la sortie vidéo composite de la source à la prise
vidéo composite correspondante.
Panneau arrière
Français
SORTIE
OUT
TV, lecteur DVD, etc.
RL
TV, lecteur DVD, etc.
31
Page 32

R-607/R-507RÉCEPTEURAUDIO/VIDÉO
RL
Enregistreur audio
Connectez les entrées d'un enregistreur audio analogique
d'un enregistreur audio aux prises de sortie audio
analogique Tape (cassette) du RAV.
Vous pouvez enregistrer tout signal d'entrée audio
analogique (sauf Tape In).
Panneau arrière
Enregistreur vidéo
Connectez la prise d'entrée vidéo analogique d'un
enregistreur vidéo à la prise de sortie vidéo composite
Vidéo 1 du RAV et ses prises d'entrée audio aux prises
de sortie audio analogique Vidéo 1 du RAV. Vous pouvez
enregistrer tout signal d'entrée vidéo composite à partir de
Video 2.
Panneau arrière
32
Enregistreur audio analogique
R L
ENTREE
AUDIO
Enregistreur vidéo analogique
IN (ENTREE)
VIDEO
(COMPOSITE)
Page 33

Connexions
Connexion des antennes du
tuner
•Connectez l'antenne FM fournie à la prise d'antenne FM
75Ω du RAV. Déployez au maximum l'antenne FM pour
obtenir une meilleure réception.
•Dépliez et rabattez le socle de l'antenne AM fournie
comme illustré et connectez les câbles de l'antenne
aux prises AM et Gnd du RAV. Réorientez l'antenne, si
nécessaire, pour réduire le bruit de fond.
Panneau arrière
Branchement au courant
Branchez le cordon d'alimentation dans la prise
d'alimentation secteur AC In du RAV et dans une prise
secteur sous tension.
Français
Panneau
arrière
Cordon
d'alimentation
secteur
Vers une prise
secteur
Remarque
•Avant de brancher le cordon d'alimentation secteur,
assurez-vous que la tension secteur indiquée sur
le panneau arrière du RAV correspond à la tension
secteur utilisée dans votre région.
Antenne boucle AM
Mettre des piles dans la
télécommande
Enlevez le couvercle du compartiment à piles de la
télécommande, insérez les deux piles AAA fournies comme
illustré puis remettez le couvercle.
Remarque
•Enlevez le lm protecteur du panneau avant du
RAV pour éviter une réduction de l'efcacité de la
télécommande.
33
Page 34

Conguration
Allumer le RAV
(Récepteur Audio/Vidéo)
Positionnez l'interrupteur d'alimentation principal
1
du panneau arrière du RAV sur « On ». (Le témoin
veille s’allume en rouge).
Appuyez sur la touche On/Standby du panneau
2
avant.
Interrupteur
d'alimentation
principal
Témoin veille
Congurer le RAV en fonction
des enceintes
Vous utilisez les touches de la télécommande suivantes
pour congurer le RAV :
Touche
menu
réglages
Touches
Gauche/
Droite/
Haut/
Bas
Allumez votre téléviseur et sélectionnez l'entrée
1
TV que vous avez utilisée pour connecter la sortie
composite moniteur du RAV dans
sources audio/vidéo
, à la page 29.
Connexion des
Remarque
•Bien qu'il soit possible de congurer le RAV en
utilisant uniquement la télécommande, il est plus
facile d'utiliser les menus écran.
Touche
Entrer
Touche
Retour
Touche Marche/Veille
En utilisant la télécommande, vous ne pouvez qu’allumer
le RAV ou le faire passer en mode veille selon les
étapes ci-dessous. Lorsque la touche alimentation de
l'unité principale est appuyée, il est impossible d’allumer
l'appareil, même en appuyant sur la touche alimentation de
la télécommande.
Touche
Marche
Appuyez sur POWER ON en mode veille.
1
Touche
Veille
Appuyez sur la touche SETUP de la télécommande.
2
Le menu de conguration du RAV s’afche à l'écran
du téléviseur.
System Setup
1. Speaker Setup
2. HDMI Setup
3. Audio Setting’s
4. Auto Power Control
5. Speakers On/Off
Utilisez les touches échées de déplacement
3
et la touche ENTER de la télécommande pour
sélectionner « Speaker Setup » (Conguration des
enceintes). Le menu Conguration des enceintes
s’afche à l'écran.
1. Speaker Setup
a. Speaker Setting’s
b. Crossover
c. Channel Level
d. Speaker Distance
34
Appuyez STANDBY pour allumer à partir du mode
2
veille.
Page 35

Conguration
Sélectionnez « Speaker Settings » (paramètres des
4
enceintes). Le menu Paramètres des enceintes
s’afche à l'écran.
SpeaKer Setting’s1a.
Front
Center
Surrround L/R
Subwoofer
Utilisez les touches échées gauche et droite de
5
la télécommande pour sélectionner NO, SMALL
ou LARGE pour les positions des enceintes Avant,
Centrale et Surround, selon les enceintes que vous
avez connectées au récepteur.
NO :
Sélectionnez ce paramètre si vous n'avez
pas connecté d’enceinte dans cette position (non
valable pour les enceintes avant).
SMALL :
n'est pas capable de produire des graves
claires et profondes à des niveaux de sortie qui
correspondent à celles produites par un subwoofer
actif. Toute tonalité grave dans ce canal est ltrée
dans cette enceinte et envoyée au subwoofer
(ou aux enceintes avant si le subwoofer est
réglé sur NO). La plupart des enceintes (à moins
qu’elles soient grandes et puissantes) doivent être
considérées comme SMALL.
LARGE :
l'enceinte est capable de produire des graves
claires et profondes à des niveaux de sortie qui
correspondent à celles produites par un subwoofer
actif. Toute tonalité grave dans ce canal est
envoyée à cette enceinte.
Une fois vous aurez terminé, appuyez sur la touche
RETURN de la télécommande pour retourner au
menu Conguration des enceintes.
Sélectionnez ce paramètre si l'enceinte
Sélectionnez ce paramètre si
< LARGE >
[ LARGE ]
[ LARGE ]
[ YES ]
Vous pouvez ignorer la conguration du
6
« Crossover » pour le moment.
Sélectionnez « Speaker Distance » (Distance
7
des enceintes). Le menu Distance des enceintes
s’afche à l’écran.
SpeaKer Distance1d.
Units [ FEET ]
Front L
Center
Front R
Surrround R
Surrround L
Subwoofer
Remarque
•L'afchage peut varier en fonction des modèles
distribués.
Mesurez la distance entre chaque enceinte et la
8
position d'écoute. Notez les distances.
Utilisez les touches échées gauche et droite de
9
la télécommande pour modier les distances de
chaque enceinte an qu'elles correspondent aux
distances que vous avez mesurées à l'étape 8.
Une fois terminé, appuyez sur la touche RETURN
de la télécommande pour retourner au menu
Conguration des enceintes.
Sélectionnez « Channel Level » (Niveau de canal).
10
Le menu Niveau de canal s’afche à l’écran.
Utilisez les touches échées gauche et droite de
la télécommande pour régler la tonalité de test
sur « Manual » et appuyez sur ENTER. Après le
compte à rebours à l'écran, vous entendrez la
tonalité de test via l'enceinte avant gauche.
< 10.0ft >
[ 10.0ft ]
[ 10.0ft ]
[ 10.0ft ]
[ 10.0ft ]
[ 10.0ft ]
Channel Level1c.
Français
Remarque
•Si votre système comprend un subwoofer et
les enceintes avant sont réglées sur LARGE,
le subwoofer ne peut pas reproduire de l’audio
à l'exception de contenus Dolby Digital et DTS
encoded program qui contiennent des effets de
basse fréquence spéciaux sur le canal (LFE). Si
vous réglez vos enceintes Avant sur LARGE et si
vous voulez que votre subwoofer reproduise les
graves de tout contenu du programme, réglez le
subwoofer sur PLUS (voir ci-dessous).
•Pour le subwoofer, sélectionnez YES (si
un subwoofer existe), NO (en l’absence de
subwoofer), ou PLUS (si un subwoofer est
présent, réglez vos enceintes Avant sur LARGE
si vous voulez que votre subwoofer reproduise
les graves de tout contenu de programme).
Test Tone < Manual >
Il faut se mettre dans la position d'écoute principale
11
et régler le volume du RAV an que la tonalité
de test soit moyennement forte. Notez le volume
de la tonalité de test via la première enceinte.
Appuyez sur la touche échée vers le bas de la
télécommande pour faire avancer la tonalité de test
à chacune des enceintes du système et notez le
niveau de volume de la tonalité de test via chaque
enceinte.
Au fur et à mesure que vous avancez d’enceinte,
12
utilisez les touches échées gauche et droite de
la télécommande pour régler les volumes jusqu'à
ce que la tonalité de test soit reproduite au même
niveau de volume.
Une fois terminé, appuyez sur la touche SETUP de
la télécommande pour quitter les menus.
35
Page 36

Utilisation
Utilisation du RAV
Une fois vos composants installés et une conguration de
base effectuée, vous pouvez jouir de votre cinédom.
Contrôle du volume
Le réglage du volume peut se faire en tournant le bouton
volume du panneau avant (dans le sens horaire pour
augmenter et antihoraire pour diminuer le volume) ou
en appuyant sur les touches Volume haut/bas de la
télécommande.
Coupure du son
Appuyez sur la touche Mute de la télécommande pour
couper le son de toutes les enceintes et du casque. Tout
enregistrement en cours ne sera pas affecté par cette
opération. Le symbole MUTE reste afché sur l’écran du
panneau avant pour rappel. Appuyez sur la touche Mute ou
réglez le volume pour rétablir le son.
Utiliser un casque
Branchez la che stéréo 1/4 pouce d'un écouteur dans la
prise Phones du panneau avant pour écouter en privé.
Remarque
•Pour plus d'informations sur comment éteindre
les enceintes lors d'écoute via un casque, voir
page 34.
•Vériez s'il y a des connecteurs desserrés ou des
connexions incorrectes.
•Vériez l'entrée vidéo choisie sur le téléviseur/moniteur.
Autres conseils pour le dépannage des
connexions HDMI
•Eteignez tous les appareils (téléviseur, RAV et toutes
les sources).
•Débranchez les câbles HDMI, en commençant par celui
entre le RAV et le téléviseur, et continuez avec ceux
entre le RAV et les autres sources.
•Reconnectez avec soin les câbles des sources vers
le RAV. Branchez enn le câble entre le RAV et le
téléviseur.
•Les appareils doivent être allumés dans cet ordre :
Téléviseur, RAV, sources.
Remarque
•Selon les composants connectés, la complexité de
la communication exigée entre les composantes
HDMI peut entraîner des retards allant jusqu'à une
minute dans l’exécution de certaines actions, telles
que la commutation d'entrée ou la commutation
entre les canaux SD et HD.
Ecouter la radio FM/AM
Sélectionner une source
On peut sélectionner une source de deux façons :
•Tourner le sélecteur d’entrée du panneau avant INPUT
SELECTOR.
•Utiliser la touche Sélecteur de source de la
télécommande pour sélectionner directement une
source.
Le RAV utilise les entrées audio et vidéo analogique et
tous les autres paramètres de la conguration attribués à
la source.
Les entrées audio numérique sont attribuées à un
ensemble spécique d'entrées audio analogique. Une
fois vous sélectionnez une source, vous pouvez utiliser
la touche DIGITAL de la télécommande pour choisir une
connexion d'entrée audio spécique (HDMI, coaxiale
numérique, optique numérique, analogique). (Remarque
: Les touches source radio FM/AM et USB ne permettent
pas de sélectionner une connexion d'entrée audio).
Le nom de la source, l’entrée audio sélectionnée et le
mode surround s'afchent sur l’écran du panneau avant.
Conseils de dépannage vidéo
Pas d'image :
•Vériez la source choisie.
Sélection de source AM/FM. Syntonisez une station à l’aide
des touches de syntonisation Haut/Bas, la station sera
afchée sur l'écran du panneau avant.
Pour une syntonisation automatique, maintenez appuyée
la touche Tuning Haut/Bas pour rechercher les stations
jusqu'à ce qu'une station de signal acceptable soit trouvée.
Pour une syntonisation manuelle, appuyez sur une touche
Tuning jusqu'à ce qu’on trouve la station souhaitée.
L’utilisation du mode FM Mono peut améliorer la réception
des stations faibles.
Stations préréglées
On peut mémoriser jusqu'à 30 stations (AM et FM)
dans des positions de préréglage. Une fois une station
est syntonisée, appuyez sur la touche Memory de la
télécommande, le numéro de préréglage se met à clignoter
à l’écran. Entrez le numéro de position du préréglage à
l’aide des touches numériques.
Pour syntoniser une station préréglée, utilisez les touches
Preset Haut/Bas ou entrez le numéro du préréglage à l’aide
des touches numériques.
RDS
Le RDS (Radio Data System) permet de transmettre des
signaux de données avec les signaux radio.
Ces codes contiennent le nom du programme de service
(PS), une liste des types de programmes (PTY) et du Texte
Radio (RT).
36
Page 37

Remarque
•RDS est disponible uniquement sur les modèles
distribués en Europe.
•RDS n'est reçu qu'en bande FM.
•RDS ne recherche que les stations préréglées. Le
message « NO PTY » sera afché si aucune station
n'a été préréglée ou si le type de programme
n'existe pas dans les stations préréglées.
Ecouter des contenus
multimédias d’une une clé USB
Ce RAV est compatible avec les chiers multimédias sur
des clés USB 2.0 et USB 1.1 aux formats FAT 16 et FAT
32, et aux chiers MP3 et WMA :
MP3 :
•
•
Débits binaires compris entre 96 et 320 kbps.
Il est recommandé d’utiliser des débits binaires xes
à une fréquence d'échantillonnage de 44,1 kHz.
Des chiers à débits binaires variables (VBR) sont
compatibles, mais le temps de lecture peut ne pas
être afché correctement. Les chiers doivent avoir
l'extension « .mp3 ».
WMA :
Débits binaires supérieurs ou égaux à 64 kbps.
REMARQUE : Les débits binaires de 80 kbps et
256kbps ne sont pas compatibles. Les chiers doivent
avoir l'extension « .wma ».
Utilisation
Utilisez les touches de Transport de la télécommande pour
contrôler la lecture.
Pour parcourir le contenu du dossier actif, appuyez sur
la touche RETURN de la télécommande. L’arborescence
des chiers de la clé USB s'afche sur l’écran pendant
20 secondes.
Français
Utilisez les touches de la télécommande Haut/Bas et
ENTER pour mettre en surbrillance et sélectionner des
pistes.
Attention
•Appuyez sur la touche Stop (■) de la
télécommande avant de retirer une clé USB du
port USB du RAV pour éviter de l'endommager ou
provoquer un dysfonctionnement.
L'appareil peut supporter jusqu'à 65 536 dossiers et chiers.
Lecturedechiersd'unecléUSB
Insérez la clé USB dans le port USB située sur le
1
panneau avant du RAV.
Attention
•Ne connectez pas un ordinateur ou un
périphérique au port USB. Les concentrateurs
USB ne sont pas supportés.
Sélectionnez USB comme source. « USB » s’afche
2
sur l'écran du panneau avant du RAV qui charge le
contenu du dossier en cours et l'écran de lecture
de l’USB s'afche sur l’écran.
Type de
Titre du
morceau
Titre de
l'album
chier
Mode de
lecture
Mode de
répétition
Nom de
l'artiste
Sélection d'un mode surround
Sélectionner un mode surround peut être simple ou
compliquée selon votre système et vos goûts. Il ne faut pas
hésiter à essayer ; quelques préférences pour certaines
sources ou types de programme sont données à titre
d’indication. Des informations plus détaillées sur les modes
surround sont données dans « Traitement audio et son
surround » ci-après.
Appuyez sur la touche Surround Mode pour sélectionner
un mode surround. Chaque pression sur la touche vous fait
passer à un autre mode surround disponible.
Les modes son surround numérique, tels que Dolby
Digital et DTS systems, ne sont disponibles qu'avec des
programmes spécialement codés, tels que ceux disponibles
dans des contenus de disques HDTV, DVD et Blu-ray Disc,
câbles numériques ou télévision par satellite. D'autres
modes surround tels que Dolby Pro Logic II peuvent être
utilisés avec des signaux numériques et analogiques pour
créer une différente présentation surround ou pour utiliser
un nombre différent d'enceintes.
La sélection du mode Surround dépend du nombre
d'enceintes, des programmes regardés ou écoutés et de
vos goûts personnels.
Débit de
données
Temps
écoulé
37
Page 38

R-607/R-507RÉCEPTEURAUDIO/VIDÉO
Fonctions avancées
Une grande partie des réglages et de la conguration de
votre RAV est prise en charge automatiquement ne vous
laissant que peu d'interventions. Vous pouvez également
congurer votre RAV selon votre système et vos goûts
personnels. Dans cette section, nous allons décrire
quelques réglages avancés que vous pouvez effectuer.
Traitement audio et son Surround
Les signaux audio peuvent être codés dans divers formats
qui peuvent affecter la qualité du son et le nombre de
canaux d'enceintes et le mode surround. Vous pouvez
éventuellement sélectionner un autre mode surround de
façon manuelle.
Signaux audio analogique
Généralement les signaux audio analogique se composent
de deux canaux : gauche et droite. Ce RAV peut lire le son
analogique de deux manières :
Stéréo :
•
lecture conventionnelle à 2 canaux. Le son sera
reproduit par les enceintes avant gauche et droite.
Stéréo5-Ch:
•
des touches de sélection du mode Surround pour que
toutes les enceintes du système reproduisent du son
stéréo (par exemple lors d'une soirée). Le signal du
canal gauche sera reproduit via les enceintes avant
gauche et surround gauche, le signal du canal droit
sera reproduit via les enceintes avant droite et surround
droite et un signal mono mixte via l'enceinte centrale.
Mode Surround analogique :
•
les signaux audio 2 canaux an de produire un son
surround multicanal, même si aucun son surround n'a
été codé dans le contenu. Parmi les modes disponibles
on trouve Dolby Pro Logic II, Dolby Pro Logic, DTS
Neo: 6, Theater, Hall, Stadium, Club and Arena modes.
Utilisez les touches de sélection du mode Surround
pour sélectionner l’un de ces modes.
Signaux audio numérique
Les signaux audio numérique offrent une plus grande
souplesse et plus de possibilités que les signaux
analogiques en permettent le codage de l'information 5.1
canaux directement dans le signal. Ainsi, la qualité sonore
sera améliorée et la directionnalité surprenante, car les
informations de chaque canal sont transmises de façon
indépendante des autres canaux. Les enregistrements à
haute résolution seront sans distorsion, surtout dans les
hautes fréquences.
Les formats son surround numériques comprennent Dolby
Digital 2.0 (uniquement deux canaux), Dolby Digital 5.1,
Dolby Digital EX, Dolby Digital Plus, Dolby TrueHD, DTSHD High-Resolution Audio, DTS-HD, DTS 5.1, DTS 96/24,
2-channel PCM en 44,1kHz, 48kHz, 88,1kHz, 96kHz ou
176,4kHz, et 5.1 ou 7.1 multicanal PCM. (Ce RAV réduit le
mixage des informations surround du canal d’appui dans
les enregistrements 6.1 et 7.1 canaux dans les canaux
surround gauche et surround droit de votre système).
Appuyez sur la touche STEREO pour une
Sélectionnez 5CH STEREO au moyen
Ce RAV peut traiter
Sélection d’un mode surround
La sélection d’un mode Surround dépend du format
du signal d'entrée audio ainsi que de vos préférences
personnelles. Bien que jamais à un moment donné tous les
modes surround du RAV ne soient disponibles, le tableau
ci-dessous indique les modes surround disponibles pour
une entrée donnée.
Format
du signal
d'entrée
Dolby TrueHD
(uniquement
pour R- 607),
Dolby
Digital Plus
(uniquement
pour R- 607),
Dolby Digital
(7.1-canaux/
5.1-canaux)
Dolby Digital
(2.0 canaux)
DTS-HD
(uniquement
pour R- 607),
DTS, DTS 96/24
PCM
(2 canaux),
analogique
(2 canaux)
MP3/WMA
En cas de doute, consultez les informations de diffusion
ou de la pochette du disque pour avoir plus de détails
sur les modes surround disponibles. Généralement, les
sections non essentielles du disque, telles que les amorces
de début, contenus supplémentaires ou le menu disque,
sont disponibles uniquement en mode Dolby Digital 2.0
(2 canaux) ou PCM 2 canaux. Recherchez une section de
conguration audio dans le menu disque.
Aussi, assurez-vous que la sortie audio de votre lecteur de
disque est réglée sur le ux binaire original plutôt que sur
PCM 2 canaux. Arrêtez la lecture et vériez la conguration
de sortie du lecteur.
Modes Surround
disponibles
Les modes correspondants à
Dolby TrueHD (uniquement pour
R-607) ou Dolby Digital (Theater,
Hall, Stadium, Club, Arena et
5-Ch Stereo sont également
disponibles pour les programmes
à 5.1 canaux)
Dolby Pro Logic II Movie, Dolby
Pro Logic II Music, Dolby Pro
Logic II Game, Dolby Pro Logic
Modes DTS correspondants
(Theater, Hall, Stadium, Club,
Arena et 5-Ch Stereo sont
également disponibles pour les
programmes à 5.1 canaux)
Dolby Pro Logic II Movie, Dolby
Pro Logic II Music, Dolby Pro
Logic II Game, Dolby Pro Logic,
DTS Neo:6 Cinema, DTS Neo:6
Music, Theater, Hall, Stadium,
Club, Arena, 5-Ch Stereo
Dolby Pro Logic II Movie, Dolby
Pro Logic II Music, Dolby Pro
Logic II Game, Dolby Pro Logic,
DTS Neo:6 Cinema, DTS Neo:6
Music, Theater, Hall, Stadium,
Club, Arena, 5-Ch Stereo
38
Page 39

Utilisation
Réglage des volumes des canaux
En plus d'utiliser le dispositif de test de bruit intégré au
RAV pour congurer ce dernier pour vos enceintes comme
expliqué dans
vous pouvez également régler le volume de tout canal à
tout moment pour compenser les sources de programmes
individuels ou vos goûts personnels.
1
2
3
Appuyez sur la touche RETURN lorsque vous aurez
terminé.
«CongurerleRAVpourvosenceintes»
Appuyez sur la touche Channel Level (contrôle
niveau de canal) de la télécommande. L'écran
afche le niveau de volume du canal gauche.
Utilisez touches échées haut et bas de la
télécommande pour afcher le canal que vous
souhaitez régler.
Utilisez touches échées gauche et droite de la
télécommande pour régler le volume du canal.
,
Enregistrement
Deux canaux de signaux audio analogique, ainsi que des
signaux vidéo composite, sont normalement disponibles
aux prises de sortie appropriés pour l'enregistrement. Pour
faire un enregistrement, connectez un enregistreur audio
ou vidéo aux prises de sortie appropriés du RAV comme
décrit dans la section
insérez un support vierge dans l’enregistreur et vériez
que ce dernier est en train d'enregistrer lorsque la source
est en cours de lecture. Reportez-vous aux instructions de
l'enregistreur pour obtenir des informations complètes sur
les enregistrements.
Etablissement de connexions
,
Remarque
•Ce RAV ne convertit pas les signaux numériques
en signaux analogiques. Seuls les appareils
connectés aux entrées audio analogique et vidéo
composite peuvent être enregistrés.
•Les sources vidéo HDMI ne peuvent pas être
enregistrées.
•Il est entendu que vous connaissez les
restrictions concernant l'enregistrement de
contenus protégés par le droit d'auteur. Il est
interdit par la loi de dupliquer de façon non
autorisée des contenus protégés.
Si vous appuyez sur la touche SLEEP après le réglage
du minuteur, la durée de fonctionnement restante sera
afchée. Appuyez à nouveau sur la touche SLEEP pour
changer la durée de fonctionnement.
Réinitialisation du processeur
Si le RAV se comporte de façon anormale après une
surtension, mettez d'abord interrupteur principal du
panneau arrière sur arrêt et débranchez le cordon
d'alimentation pendant au moins 3 minutes. Rebranchez
le cordon et rallumez le RAV. Si cette procédure ne donne
pas satisfaction, réinitialisez le processeur du RAV comme
décrit ci-dessous.
Remarque
•La réinitialisation du processeur efface tous
les paramètres personnels de conguration, y
compris les réglages de niveau des enceintes et
les stations préréglées. Après une réinitialisation,
il faut entrer de nouveau vos paramètres à partir
des notes que vous avez prises sur les feuilles
blanches fournies dans l'annexe.
Réinitialisation du processeur du RAV
Appuyez sur la touche Standby/On du panneau
1
avant pour passer en mode veille (le témoin veille
s’allume en rouge).
Maintenez appuyée la touche SURROUND de
2
la télécommande en même temps que la touche
Standby/On du panneau avant.
Appuyez sur BAND lorsque le message
3
« RESET? » s’afche sur l'écran du panneau avant.
Appuyez sur BAND lorsque le message « OK? »
4
s’afche sur l'écran du panneau avant.
Mémoire
Si le RAV est débranché ou subit une panne de courant,
il conservera vos paramètres personnels pendant deux
semaines maximum.
Français
Veille automatique
Le minuteur de veille automatique permet de régler le RAV
pour fonctionner jusqu'à un maximum de 90 minutes avant
de s'éteindre de façon automatique.
Appuyez sur la touche Sleep de la télécommande ; la
durée de fonctionnement jusqu'à l'arrêt sera afchée sur
l’écran du panneau avant. Les options disponibles sont
30 min., 60 min., 90 min. et OFF.
Une fois le minuteur de veille automatique réglé, un petit
icône de croissant sera afché sur l’écran du panneau
avant.
39
Page 40

Dépannage
Si vous rencontrez l'un des problèmes suivants lors de l'utilisation du système, consultez ce guide de dépannage pour tenter
d’y remédier avant d’envoyer l'appareil pour réparation. Si le problème persiste, consultez votre revendeur ou une société
indépendante agréée.
Si l'appareil ne fonctionne pas normalement pour cause extérieure telle qu’électricité statique, débranchez puis rebranchez
la che d'alimentation de la prise secteur pour retrouver un fonctionnement normal.
Symptôme Cause Solution
L'appareil ne marche
pas lorsque l'interrupteur
d'alimentation principal est
positionné sur marche.
Les témoins du panneau
avant sont allumés, mais pas
de son ni image.
Aucun son n’est reproduit au
niveau des enceintes.
Aucun son n’est reproduit
au niveau des enceintes ; le
message PROTECT s'afche
sur l’ecran.
Absence de son des
enceintes centrale ou
surround.
•Pas d'alimentation secteur. •Vériez que le cordon d'alimentation est
branché dans une prise secteur sous
tension.
•Connexion d'entrée
intermittente.
•Le son est coupé.
•Le volume est bas.
•Les enceintes sont réglées
sur « Off » dans le menu
conguration.
•L'amplicateur est en mode
protection suite à un éventuel
court-circuit.
•L'amplicateur est en mode
protection suite à un éventuel
problème interne.
•Mode surround incorrect.
•Le contenu du programme est
monophonique.
•Conguration incorrecte des
enceintes.
•Le contenu du programme est
stéréo.
•Bien insérer les ches dans toutes les
prises d’entrée et des enceintes.
•Rétablissez le son avec la touche Mute.
•Augmentez le volume.
•Réglez les enceintes sur « On » dans le
menu conguration. Voir page 34, pour
plus d'informations.
•Vériez tous les câbles des enceintes et les
connexions croisées du RAV.
•Contactez votre centre de services local.
•Sélectionner un mode Surround autre que
stéréo.
•Les programmes mono ne contiennent
aucune information surround.
•Vériez la conguration de l’enceinte dans
le menu conguration.
•Le décodeur surround peut ne pas créer de
canal d'information central ou surround à
partir de programmes stéréo non codés.
Le RAV ne répond pas
aux commandes de la
télécommande.
Bourdonnement intermittent
du tuner.
40
•Les piles de la télécommande
sont faibles.
•RAV non sélectionné.
•Le capteur de la télécommande
est obstrué.
•Interférences locales. •Eloignez le RAV ou l'antenne de tout
•Changez les piles de la télécommande.
•Appuyez sur la touche Setup/AVR.
•Vériez que le capteur de la télécommande
du RAV est en visibilité directe avec la
télécommande.
ordinateur, lampe uorescente, moteur ou
autres appareils électriques.
Page 41

Spécications
Section audio
100 W x 7ch (20 Hz~20 kHz, 6 Ohms, THD 1 %/alimenté par
Alimentation de sortie
Sensibilité/impédance des entrées 200 mV/47k ohms
Rapport signal/bruit (IHF-A) 95 dB
Séparation des canaux adjacents du système surround
Réponse en fréquence 10Hz – 100kHz : ±3 dB
Réponse en courant instantané élevée (HCC) ±25 amps
Section tuner FM
Gamme de fréquences 87,5 – 108,0 MHz
Sensibilité IHF utilisable 1,3 μV/13,2 dBf
Rapport signal/bruit (mono/stéréo) 65 dB/62 dB
canal uniquement)
75 W x 2ch (20 Hz~20 kHz, 6 Ohms, THD 0,1 %/Mode stéréo)
Dolby Pro Logic/PLII : 40 dB
Dolby Digital : 55 dB
DTS : 55 dB
Français
Distorsion (mono/stéréo) 0,2 %/0,3 %
Séparation stéréo 35 dB @ 1 kHz
Réjection d'image 80 dB
Réjection de fréquence intermédiaire 80 dB
Section tuner AM
Gamme de fréquences 520 – 1720 kHz, 522 –1161 kHz
Rapport signal/bruit 45 dB
Sensibilité utilisable (boucle) 500 μV
Sélectivité (±10kHz) 30 dB
Réjection de fréquence intermédiaire 80 dB
Section vidéo
Système TV NTSC/PAL
Niveau/impédance d'entrée 1 Vp-p/75 ohms
Niveau/impédance de sortie 1 Vp-p/75 ohms
Réponse en fréquence vidéo (vidéo composite) 10 Hz – 8 MHz (–3 dB)
HDMI Avec 3D et Deep Color
Caractéristiques générales
Alimentation requise 120 VAC/60 Hz, 230 VAC/50 Hz
Consommation électrique <0,5 W (veille), 280 W maximum
Dimensions (L×H×P, parties saillantes incluses) 17,1" x 5,4" x 14,9" (435mm x 138mm x 379mm)
Poids (Net) 8 kg (17,6 livres)
41
Page 42

Información de seguridad
LEA ESTO ANTES DE UTILIZAR SU EQUIPO
PRECAUCIÓN
RIESGO DE DESCARGA ELÉCTRICA
NO ABRIR
PRECAUCIÓN
PARA REDUCIR EL RIESGO DE DESCARGA ELÉCTRICA,
NO DESMONTE EL FRONTAL NI LA CUBIERTA TRASERA.
NO HAY PIEZAS REPARABLES POR EL USUARIO EN EL
INTERIOR. LLÉVELO A REPARAR A PERSONAL DE SERVICIO
CUALIFICADO.
Este símbolo indica la presencia de “tensiones peligrosas” sin aislamiento en el interior del equipo, que
pueden ser de magnitud suciente para constituir un riesgo de descarga eléctrica.
Este símbolo indica la existencia de instrucciones importantes de funcionamiento y mantenimiento
(reparaciones) en la literatura que acompaña al aparato.
ADVERTENCIA:
PARA REDUCIR EL RIESGO DE INCENDIO O DE DESCARGA ELÉCTRICA, NO EXPONGA EL
APARATO A LA LLUVIA O LA HUMEDAD.
PRECAUCIÓN
•Deje espacio alrededor de la unidad para una ventilación
adecuada.
•Evite su instalación en lugares extremadamente calientes o
fríos, o en áreas donde quede expuesto a la luz directa del sol
o a equipos de calefacción.
•Mantenga el equipo libre de humedad, agua y polvo.
•No permita que caigan objetos en el interior del equipo.
•Mantenga las aberturas de ventilación libres de objetos, como
papeles, manteles o cortinas.
•Mantenga la unidad alejada de las llamas abiertas de las velas
u otras fuentes.
•Cumpla con la normativa local sobre la eliminación de los
materiales de embalaje, pilas usadas y equipos electrónicos
viejos.
•No exponga la unidad a goteos ni salpicaduras, ni coloque
sobre ella objetos conteniendo líquidos, como jarrones.
•No permita que insecticidas, bencina y aguarrás entren en
contacto con la unidad.
•Nunca desmonte ni modique el equipo de ninguna manera.
Notas acerca del cable de alimentación de CA y de la toma de
corriente de pared
•La unidad permanece conectada a la red eléctrica mientras
continúe enchufada a la toma de corriente, incluso aunque
esté apagada.
Precauciones sobre la instalación
•Para desconectar completamente este producto de la corriente
eléctrica, desconecte el enchufe de la toma de corriente.
•Cuando congure este producto, asegúrese de que la toma de
corriente de AC que utilice sea de fácil acceso.
•Desconecte el enchufe de la toma de corriente cuando no use
el equipo durante largos periodos de tiempo.
Fabricado bajo licencia de las
Patentes de EE.UU. No.: 5,956,674;
5,974,380; 6,226,616; 6,487,535;
7,212,872; 7,333,929; 7,392,195;
7,272,567 y otras patentes de EE.UU y de otros países otorgadas
y pendientes. DTS-HD, el Símbolo, así como DTS-HD y el
Símbolo juntos son marcas registradas y DTS-HD Master
Audio es una marca comercial de DTS, Inc. El producto incluye
software. © DTS, Inc. Todos los derechos reservados.
Fabricado bajo licencia de Dolby
Laboratories. Dolby, Pro Logic y el
símbolo de Doble-D son marcas
comerciales registradas de Dolby
Laboratories.
HDMI, el logo HDMI y High-Denition
Multimedia Interface son marcas
comerciales o marcas comerciales
registradas de HDMI Licencing LLC en los EE.UU. y en otros
países.
* Las funciones DTS-HD Master Audio y Dolby TrueHD son
aplicables solamente al R-607.
Nota
No obstruya las ranuras de ventilación ni apile otro equipo encima.
Nota:
Para una buena dispersión del calor, no instale este equipo en espacios reducidos como en un mueble librería o
en recintos similares.
42
Muro
Page 43

Índice de Contenidos
42 INFORMACIÓN DE SEGURIDAD
44 PRIMEROS PASOS
44 Panel frontal
44 Panel Trasero
45 Mando a distancia
46 Colocación
47 CONEXIONES
47 Conectar sus altavoces
47 Conectar el Subwoofer
48 Conectar su TV o Pantalla de vídeo
49 Conectar sus dispositivos fuente de audio y vídeo
53 Conectar las antenas de recepción Radio
53 Conectar la alimentación eléctrica
53 Instalar las pilas en el mando a distancia
54 AJUSTES INICIALES
54 Encender el Receptor A/V
Español
54 Congurar el Receptor A/V para sus altavoces
56 FUNCIONAMIENTO
56 Utilizar su Receptor A/V
56 Oír la radio FM y AM
57 Oír archivos multimedia de un dispositivo USB
57 Seleccionar el modo de Sonido Envolvente
58 Funciones avanzadas
60 RESOLUCIÓN DE PROBLEMAS
61 ESPECIFICACIONES
43
Page 44

Primeros pasos
Panel frontal
1 2 3 4 5 6 7
8 9 10 11 14 15
Interruptor de alimentación eléctrica
1
Indicador modo en espera
2
Interruptor de encendido
3
Sensor IR
4
Visualizador
5
Botones de Sonido envolvente
6
Control maestro del volumen
7
Selector de entrada
8
Panel Trasero
1 2
12 13
9
10
11
12
13
14
15
Salida de auriculares
Entrada F.AUX
Botón Selector de Banda
Botones de sintonía Arriba/Abajo
Botones de selección de Emisoras memorizadas
Botón modo estéreo
Puerto USB
44
3 4 5 6 7 8
Conectores de audio digital
1
Conectores HDMI
2
Conectores de la antena de radio
3
Conectores de audio analógico
4
Conector del Subwoofer
5
Conectores de vídeo compuesto
6
Conectores de los altavoces
7
Conector de la alimentación
8
Page 45

Mando a distancia
1
2
3
4
5
6
7
8
9
12
22
21
20
19
18
17
16
15
14
13
11
10
Primeros pasos
Botón de encendido
1
Botones de selección de la fuente
2
Botones de Sonido envolvente
3
(Los botones GAME y NETWORK no
están disponibles.)
Botón de menú superior
4
▲/▼/◄/► Botones de selección
5
ENTER/MEMO Botón Introducir/Memoria
SEARCH.M Botón de búsqueda RDS
(* El botón SEARCH.M sólo está
disponible en modelos distribuidos en
Europa.)
Botón Presentación/Modo
6
Botón Parar
7
Botón Repetir
8
Botones de sintonía Arriba/Abajo
9
Botones de Avance/Retroceso rápido
Botones de Emisora memorizada
10
arriba/abajo
Español
Botones Anterior/Siguiente
Botón aleatorio
11
Botón Reproducción/Pausa
12
Botón Atrás
13
Botones Subir/Bajar Volumen
14
Botón Menú de Conguración
15
Botón Silencio
16
Botón modo estéreo
17
Botón de asignación de audio
18
Botón de Nivel de canal
19
Botón de Secuencia de tonos de prueba
20
Botón de control de Tono
21
Botón modo en espera
22
45
Page 46

R-607/R-507RECEPTORDEAUDIO/VÍDEO
Colocación
Colocar sus altavoces
Determine dónde va a colocar los altavoces de su sistema
de sonido de acuerdo con las indicaciones del fabricante
y la distribución de la habitación de audición. Use las
siguientes ilustraciones como guía para sistemas de audio
de 5.1 canales.
Para crear el ambiente de sonido envolvente lo más real
posible, debería colocar sus altavoces en un círculo con
la posición de audición en el centro. Debería orientar cada
altavoz para que apunte directamente a la posición de
audición. Use el siguiente diagrama como guía.
Colocación de los altavoces izquierdo,
central y derecho
Coloque el altavoz central sobre, debajo, o colgado en la
pared por encima o por debajo de la TV, o de la pantalla de
vídeo. Coloque los altavoces frontales izquierdo y derecho
a la misma distancia del oyente que el altavoz central,
abiertos 30 grados a izquierda y derecha, y orientados
hacia el oyente.
Coloque los altavoces frontal izquierdo, frontal derecho
y central a la misma altura, y preferiblemente a la altura
de los oídos del oyente. El altavoz central debería estar a
menos de 2 pies (0,6m) arriba o debajo de los altavoces
izquierdo/derecho. Si sólo está usando dos altavoces
con su Receptor A/V, colóquelos en las posiciones frontal
izquierda y derecha.
Colocar los altavoces de sonido
envolvente
Debería colocar los altavoces envolventes izquierdo y
derecho aproximadamente 110 grados a lado y lado del
altavoz central, ligeramente detrás y orientados hacia el
oyente. Como alternativa, puede colocarlos detrás del
oyente, con cada altavoz envolvente enfrentado con el
altavoz frontal opuesto. Debería colocar los altavoces
envolventes entre 2 y 6 pies (0,6 – 1,8m) más altos que los
oídos del oyente.
Colocación del subwoofer
Ya que la forma y el volumen de la habitación pueden tener
efectos dramáticos en el rendimiento del subwoofer, es
mejor experimentar con la posición que produce mejores
resultados en su habitación de audición particular. Con
esto en mente, estas reglas le ayudarán a empezar:
•Colocando el subwoofer junto a una pared aumentará
generalmente la cantidad de graves en la habitación.
•Colocando el subwoofer en una esquina aumentará al
máximo la cantidad de graves en la habitación.
•En muchas habitaciones, colocando el subwoofer sobre
el mismo plano que los altavoces izquierdo y derecho
puede obtener la mejor integración entre el sonido del
subwoofer y el de los altavoces izquierdo y derecho.
•En otras habitaciones, el mejor rendimiento se
podría obtener al colocar el subwoofer detrás de la
posición de escucha. Un buen modo de determinar
la mejor ubicación del subwoofer es colocándolo
momentáneamente en la posición de escucha y
reproduciendo música con alto contenido en bajas
frecuencias. Muévase a las diferentes posibles
ubicaciones del subwoofer mientras suena la canción
(escuchando donde debería colocar el subwoofer), y
determine dónde se oyen mejor las bajas frecuencias.
Coloque el subwoofer en esa posición.
46
Page 47

Conexiones
Precaución
•Antes de realizar ninguna conexión en el
Receptor A/V, cerciórese de que tiene el cable
de alimentación del Receptor desenchufado de
la toma de corriente. Hacer las conexiones con
el Receptor A/V enchufado y encendido podría
averiar los altavoces.
Conectar sus altavoces
Cómo usar losa terminales de altavoz del
ReceptorA/V.
Desenrosque el tapón
1
Introduzca el cable
2
pelado
Apriete el tapón
3
Conecte siempre el terminal de color (+) del Receptor A/V
al terminal (+) del altavoz (normalmente rojo), y el terminal
negro (-) del Receptor A/V al terminal (-) del altavoz
(normalmente negro).
Conectar el Subwoofer
Use un cable simple RCA para conectar el conector
Subwoofer Pre-Out del Receptor A/V al Subwoofer.
Consulte el manual del usuario de su subwoofer para
información especíca sobre cómo hacer las conexiones.
Panel Trasero
Español
Precaución
•Compruebe que la parte pelada de los cables (+)
y (-) no entran en contacto entre sí ni tocan el otro
terminal. Si entran en contacto pueden producir un
cortocircuito que puede averiar el Receptor A/V.
Conecte los altavoces como se muestra en la ilustración.
Subwoofer
47
Page 48

R-607/R-507RECEPTORDEAUDIO/VÍDEO
Composite
VIDEO IN
Conectar su TV o Pantalla de
vídeo
Conector de salida HDMI
Si su TV tiene un conector HDMI y tiene dispositivos
de fuentes de vídeo HDMI, use un cable HDMI (no
suministrado) para conectar su TV en el conector de salida
HDMI ‘Monitor Out’ de su Receptor A/V.
Esto le proporcionará la mejor calidad de imagen posible.
Conector de salida de Video Compuesto
Si su TV no tiene un conector HDMI, o si su TV tiene
un conector HDMI
fuente conectados únicamente en sus salidas de video
compuesto
suministrado) para conectar la salida de vídeo compuesto
‘Monitor Out’ de su Receptor A/V al conector de vídeo
compuesto de su TV.
Panel Trasero
pero tiene sus otros dispositivos
, use un cable de vídeo compuesto (no
Panel Trasero
Cable de vídeo compuesto
(no suministrado)
TV
Nota
•El menú OSD (datos en pantalla) del Receptor
A/V sólo aparece a través del conector ‘Monitor
Out’ de vídeo compuesto. Si desea usar los
menús OSD del Receptor A/V necesita conectar
el conector de salida ‘Monitor Out’ de vídeo
compuesto a su TV, incluso si no va a conectar
ningún dispositivo fuente de vídeo compuesto al
Receptor A/V.
48
Page 49

Conexiones
Conectar sus dispositivos
fuente de audio y vídeo
Los dispositivos fuente son equipos en los que se origina
la señal de reproducción, p.ej. un reproductor de DVDs o
Blu-ray Disc™, un receptor/descodicador de señal por
cable o satélite, un sintonizador HDTV, etc. Su Receptor
A/V tiene diferentes tipos de conectores de entrada para
sus dispositivos de entrada de audio y vídeo: HDMI, vídeo
compuesto, audio digital óptico, audio digital coaxial y
audio analógico.
Cada botón de fuente de su Receptor A/V está asignado a
un conector de entrada de audio analógico.
Las entradas digitales no están asignadas a ningún
conjunto especíco de entradas analógicas. Una vez que
usted seleccione el dispositivo fuente que va a usar, utilice
el botón DIGITAL del mando a distancia para seleccionar
la conexión de entrada de audio especíca (HDMI, coaxial
digital, coaxial óptica, analógica) que desea escuchar.
(Nota: No puede seleccionar una conexión de entrada de
audio para los botones de las fuentes FM/AM o USB.)
Cuando conecte varios equipos fuente, complete las
columnas “Dispositivos fuente conectados” y “Conector
de entrada de audio digital utilizado” de la tabla siguiente.
Le será más fácil seguir la pista de qué dispositivos tiene
conectados y en qué conectores.
Dispositivos HDMI
Si alguno de sus dispositivos fuente tiene conectores
HDMI, usando estos conectores obtendrá la mejor calidad
posible de audio y vídeo. Ya que el cable HDMI lleva tanto
la señal de audio como la de vídeo, no tendrá que realizar
conexiones de audio adicionales para los dispositivos que
conecte con cables HDMI.
Si tiene una TV equipada con la función de Canal de
Retorno de Audio HDMI, su sonido lo obtiene procedente
del Canal de Retorno de Audio de la conexión HDMI
'Monitor Out' del Receptor A/V, y no necesitará conexiones
de audio adicionales al Receptor A/V.
Panel Trasero
Español
Cable HDMI
(no suministrado)
Dispositivo fuente equipado
con HDMI
49
Page 50

R-607/R-507RECEPTORDEAUDIO/VÍDEO
Dispositivos de Vídeo compuesto
Necesitará hacer las conexiones de vídeo compuesto
desde sus dispositivos fuente que no tengan conexiones
de vídeo HDMI. También necesitará hacer una conexión
de audio desde el dispositivo al Receptor A/V.
Panel Trasero
Cable de vídeo compuesto
(no suministrado)
Dispositivos de Audio Digital óptico
Si sus dispositivos fuente tienen salidas digitales ópticas,
conéctelas a los conectores de audio digital ópticos del
Receptor A/V.
Panel Trasero
Composite
VIDEO OUT
Dispositivo fuente equipado
con Vídeo compuesto
OPTICAL
OUT
TV, Reproductor DVD, etc.
50
Page 51

Conexiones
Dispositivos de Audio Digital Coaxial
Si sus dispositivos fuente tienen salidas digitales coaxiales,
conéctelas a los conectores de audio digital coaxial del
Receptor A/V.
Panel Trasero
Dispositivos de audio analógico
Realice conexiones de audio analógico desde sus
dispositivos fuentes que no tengan conectores HDMI ni
de audio digital. Si está conectando fuentes de vídeo a
las entradas Video 1 o Video 2 del Receptor A/V, también
debe conectar la salida de vídeo compuesto del dispositivo
fuente al conector de vídeo compuesto correspondiente.
Panel Trasero
Español
SALIDA
OUT
TV, Reproductor DVD, etc.
RL
TV, Reproductor DVD, etc.
51
Page 52

R-607/R-507RECEPTORDEAUDIO/VÍDEO
RL
Grabador de audio
Conecte una entrada de un grabador de audio analógica
en los conectores de salida ‘Aux Out’ de audio analógico
del Receptor A/V.
Usted puede grabar cualquier señal de entrada analógica
(excepto la de la entrada Aux).
Panel Trasero
Grabadores de vídeo
Conecte el conector de entrada de vídeo del grabador
de vídeo analógico en el conector de salida de vídeo
compuesto ‘Video 1’ del Receptor A/V y sus conectores
de entrada de audio en los conectores de salida de audio
analógico ‘Video 1’ del Receptor A/V. Puede grabar la
señal de entrada de vídeo compuesto ‘Video 2’.
Panel Trasero
52
Dispositivo de grabación de
audio analógico
R L
ENTRADA
DE AUDIO
Dispositivo de grabación de vídeo
ENTRADA
VÍDEO
(COMPUESTO)
analógico
Page 53

Conexiones
Conectar las antenas de
recepción Radio
•Conecte la antena FM suministrada en el conector
de antena FM 75Ω del Receptor A/V. Para la mejor
recepción, extienda la antena FM todo lo que le sea
posible.
•Doble y pliegue la base de la antena AM suministrada
como se muestra en la imagen y conecte los cables en
los conectores AM y ‘Gnd’ del Receptor A/V. Oriente
la antena como sea necesario para reducir el ruido de
fondo.
Panel Trasero
Conectar la alimentación
eléctrica
Conecte el cable de alimentación en el conector de entrada
AC IN en el panel trasero del Receptor A/V y enchúfelo en
una toma de corriente.
Panel
Trasero
Cable de
alimentación
A la toma de
corriente
Nota
•Antes de conectar el cable de alimentación,
cerciórese de que el voltaje de CA indicado en el
panel trasero del Receptor A/V se corresponde
con la tensión de la red eléctrica de su país.
Español
Antena de lazo para AM
Instalar las pilas en el mando
a distancia
Quite la tapa de las pilas del mando a distancia, coloque
las dos pilas AAA suministradas como se muestra en la
ilustración, y vuelva a colocar la tapa.
Nota
•Quite el plástico protector del panel frontal
del Receptor A/V para evitar que reduzca la
efectividad del mando a distancia.
53
Page 54

Ajustes iniciales
Encender el Receptor A/V
Coloque el interruptor de alimentación de la unidad
1
principal del Receptor en la posición “On”. (El
indicador del modo en espera se iluminará en rojo.)
Pulse el botón On/Standby en el panel frontal.
2
Interruptor de
alimentación eléctrica
Indicador modo en
espera
Congurar el Receptor A/V
para sus altavoces
Usted necesitará usar los botones siguientes del mando a
distancia para congurar su Receptor A/V.
Botón
Menú de
Con-
guración
Botones
Izquierda/
Derecha/
Arriba/
Abajo
Encienda su TV y seleccione la entrada en la que
1
tiene conectada la salida de vídeo compuesto
'Monitor Out' del Receptor A/V según el párrafo
Conectar sus dispositivos fuente de audio y vídeo
en página 49.
Nota
•Aunque puede congurar el Receptor A/V para
que sólo use su visualizador de mensajes del
panel frontal, es más fácil usar el sistema de
menús OSD (en la TV).
Botón
Aceptar/
Entrar
Botón
Atrás
,
Botón Encendido/En espera
Desde el mando a distancia usted puede encender y apagar
el Receptor A/V desde el modo en espera siguiendo estos
pasos. Si no tiene pulsado el botón de alimentación en
la unidad principal, no podrá encender la unidad aunque
pulse el botón de encendido en el mando a distancia.
Botón de
ENCENDIDO
Pulse el botón POWER ON con el Receptor en
1
modo en espera.
Pulse el botón STANDBY para que el receptor
2
vuelva al modo en espera.
Botón
modo
en
espera
Pulse el botón SETUP del mando a distancia.
2
El menú OSD de conguración del sistema del
Receptor A/V le aparecerá en la TV.
System Setup
1. Speaker Setup
2. HDMI Setup
3. Audio Setting’s
4. Auto Power Control
5. Speakers On/Off
Use los botones de dirección y el botón ENTER
3
del mando a distancia para seleccionar “Speaker
Setup”. Le aparecerá el menú de conguración de
altavoces.
1. Speaker Setup
a. Speaker Setting’s
b. Crossover
c. Channel Level
d. Speaker Distance
54
Page 55

Ajustes iniciales
Seleccione “Speaker Settings”. Le aparecerá el
4
menú de opciones de los altavoces.
SpeaKer Setting’s1a.
Front
Center
Surrround L/R
Subwoofer
Use las teclas de dirección Izquierda y Derecha del
5
mando a distancia para seleccionar NO, SMALL
o LARGE para las posiciones de los altavoces
Frontal, Central y Envolvente, dependiendo de los
altavoces que tenga conectados al receptor.
NO:
Seleccione esta opción si no tiene conectado
ningún altavoz en esa posición (no disponible para
los altavoces frontales).
SMALL:
es capaz de producir graves limpios y profundos
a niveles de salida que se ajusten a aquellos
producidos por un subwoofer con amplicación.
Todos los graves de ese canal se eliminarán de
ese altavoz y se envían al subwoofer (o a los
altavoces frontales si seleccione la opción NO para
la posición subwoofer). La mayoría de altavoces (a
menos que sean grandes y potentes) se deberían
considerar SMALL.
LARGE:
capaz de producir graves limpios y profundos
a niveles de salida que se ajusten a aquellos
producidos por un subwoofer con amplicación.
Todos los graves de ese canal se enviarán al
altavoz.
Cuando haya terminado, pulse el botón RETURN
del mando a distancia para regresar al menú de
conguración de altavoces.
Seleccione esta opción si el altavoz no
Seleccione esta opción si el altavoz es
< LARGE >
[ LARGE ]
[ LARGE ]
[ YES ]
Por ahora puede saltarse la conguración del
6
“Crossover”.
Seleccione “Speaker Distance”. Le aparecerá el
7
menú de distancia de los altavoces.
SpeaKer Distance1d.
Units [ FEET ]
Front L
Center
Front R
Surrround R
Surrround L
Subwoofer
Nota
•La presentación de la unidad puede ser diferente
dependiendo de los modelos distribuidos.
Mida la distancia desde la posición de audición a
8
cada uno de los altavoces de su sistema. Anote
dichas distancias.
Use los botones de dirección Izquierda y Derecha
9
del mando a distancia para cambiar las distancias
de cada altavoz para que se ajusten a las
distancias que anotó en el paso 8. Cuando haya
terminado, pulse el botón RETURN del mando a
distancia para regresar al menú de conguración
de altavoces.
Seleccione “Channel Level”. Le aparecerá el menú
10
de nivel de canal. Use los botones de dirección
Izquierda y Derecha para establecer el tono de
prueba en “Manual” y pulse el botón ENTER del
mando a distancia. Tras una cuenta atrás en
pantalla oirá el tono de prueba a través el altavoz
frontal izquierdo.
< 10.0ft >
[ 10.0ft ]
[ 10.0ft ]
[ 10.0ft ]
[ 10.0ft ]
[ 10.0ft ]
Español
Nota
•Si su sistema de sonido tiene un subwoofer y
ha congurado los altavoces frontales como
LARGE, el subwoofer no tendrá salida de audio
excepto para material codicado Dolby Digital y
DTS que contenga información del canal LFE. Si
congura los altavoces frontales como LARGE y
desea que el subwoofer reproduzca los graves
de todos los materiales, congure el subwoofer
como PLUS (véalo a continuación).
•Para el subwoofer, seleccione YES (si su sistema
de sonido tiene subwoofer), NO (si su sistema
de sonido no lo tiene), o PLUS (si su sistema
tiene subwoofer, ha congurados sus altavoces
frontales como LARGE y desea que el subwoofer
reproduzca los graves de todos los materiales de
los programas)
Channel Level1c.
Test Tone < Manual >
Siéntese en la posición principal de audición y
11
ajuste el control de volumen el receptor A/V de
manera que oiga bien el tono de prueba. Anote
el volumen del tono de prueba a través el primer
altavoz. Pulse el botón de dirección Abajo del
mando a distancia para avanzar el tono de prueba
por el resto de altavoces de su sistema de audio y
anote el nivel de volumen necesario para oírlo bien
en la posición de audición.
A medida que suene el tono de prueba por los
12
altavoces, use los botones de dirección Izquierda
y Derecha del mando a distancia para ajustar los
volúmenes de los canales hasta que los oiga igual
de bien.
Cuando haya terminado, pulse el botón SETUP del
mando a distancia para desactivar los menús en
pantalla.
55
Page 56

Funcionamiento
Utilizar su Receptor A/V
Ahora que ha conectado sus equipos y completado una
conguración básica, está listo para empezar a disfrutar de su
sistema de entretenimiento doméstico.
Control de volumen
Ajuste el volumen ya sea girando el control de volumen del
panel frontal (en sentido de las agujas del reloj para subir el
volumen y en sentido contrario para bajarlo) o pulsando los
botones VOLUME arriba/abajo del mando a distancia.
Desactivar el sonido
Para desactivar el audio de los altavoces y auriculares, pulse
el botón MUTE en el mando a distancia. Cualquier grabación
en progreso no se verá afectada. El mensaje MUTE aparecerá
en el visualizador del panel frontal como recordatorio. Para
recuperar el sonido, pulse otra vez el botón MUTE, o ajuste el
volumen.
Escuchar por los auriculares
Conecte la clavija estéreo de 1/4" de los auriculares en el
conector de salida para auriculares del panel frontal para una
escucha privada.
Nota
•Para más información sobre la desactivación de
los altavoces cuando utilice los auriculares, vea
la página 54.
incorrectas.
•Compruebe la selección de entrada de vídeo en la TV/
dispositivo de presentación.
Consejos adicionales para problemas en las
conexiones HDMI
•Apague todos los dispositivos (incluyendo la TV, el
Receptor A/V y cualquier equipo fuente).
•Desconecte los cables HDMI, empezando con el cable
entre la TV y el receptor A/V, y continúe con los cables
desde el Receptor A/V y los dispositivos fuente.
•Vuelva a conectar cuidadosamente los cables desde los
dispositivos fuente hacia el Receptor A/V. Finalmente
conecte el cable desde el Receptor A/V a la TV.
•Encienda los dispositivos en el orden siguiente: TV,
Receptor A/V, dispositivos fuente.
Nota
•Dependiendo de los equipos conectados
involucrados, las complejidad de la comunicación
necesaria entre equipos HDMI puede causar
retardos de hasta un minuto en la terminación
de algunas acciones, como cambio de entrada o
cambio entre canales SD y HD.
Oír la radio FM y AM
Seleccionar una fuente
Hay dos modos diferentes para seleccionar una fuente:
•Usando el control giratorio INPUT SELECTOR del panel
frontal.
•Seleccionando directamente una fuente pulsando su botón
correspondiente en el mando a distancia.
El Receptor A/V selecciona las entradas de audio y vídeo
analógicos asignadas a la fuente y cualquier otro ajuste que
haya realizado durante la conguración.
Las entradas de audio digital no están asignadas a ningún
conjunto especíco de entradas analógicas. Una vez que
seleccione el dispositivo fuente puede usar el botón de
selección de entrada de audio (DIGITAL) del mando a
distancia para seleccionar la conexión de entrada de audio
especíca (HDMI, coaxial digital, coaxial óptica, analógica)
que desea escuchar. (Nota: No puede seleccionar una
conexión de entrada de audio para los botones de las fuentes
FM/AM o USB.)
El nombre de la fuente, la entrada de audio seleccionada y el
modo de sonido envolvente aparecerán en el visualizador del
panel frontal.
Consejos para solucionar problemas de la imagen
Si no hay imagen:
•Compruebe la selección de la fuente.
•Verique las conexiones por si estuviesen sueltas o
56
Seleccione la fuente AM/FM. Use los botones TUNE +/- para
sintonizar una emisora, la cual le aparecerá en el visualizador
del panel frontal.
Para una sintonización automática, mantenga pulsado el
botón TUNE+ o TUNE- para buscar emisoras, hasta que
encuentre una emisora con suciente fuerza de señal. Para
una sintonización manual, pulse cada botón repetidamente
hasta que encuentre la emisora deseada. El uso del modo
FM Mono puede mejorar la recepción de emisoras con poca
fuerza de señal.
Emisoras memorizadas
Se pueden almacenar un total de 30 emisoras (combinación
de AM y FM) como presintonizadas. Cuando haya sintonizado
la estación deseada, pulse el botón MEMORY y aparecerá
parpadeando en el visualizador el número de posición en la
memoria. Use los botones numéricos del mando a distancia
para introducir el número en el que desee guardarla.
Para sintonizar una emisora memorizada, use los botones
PRESET +/- o introduzca directamente el número con los
botones numéricos del mando a distancia.
RDS
RDS (Sistema de Datos de Radio) es un método para el
envío de señales de información junto con las señales del
transmisor.
Estos códigos contienen el Nombre del Servicio de programas
(PS), lista de los Tipos de programas (PTY), Texto Radio (RT).
Page 57

Nota
•La función RDS sólo está disponible en modelos
distribuidos en Europa.
•El sistema RDS sólo es posible en la banda FM.
•RDS sólo busca en las emisoras guardadas
en memoria (presintonizadas). Si no tiene
estaciones guardadas en la memoria, o si el tipo
de programa deseado no se encuentra entre las
estaciones presintonizadas, aparece “NO PTY”
en el visualizador.
Oír archivos multimedia de un
dispositivo USB
Funcionamiento
Use los controles de transporte del mando a distancia para
controlar la reproducción.
Para explorar el contenido de la unidad actual, pulse el
botón RETURN del mando a distancia. El contenido de la
unidad USB aparecerá en la pantalla durante 20 segundos.
Español
Su Receptor A/V es compatible con dispositivos multimedia
USB 2.0 o USB 1.1 con formato FAT 16 o FAT 32 y con
archivos multimedia MP3 y WMA:
MP3:
•
•
Soporta un número máximo de 65 536 carpetas y archivos.
Tasa de bits entre 96 – 320kbps. Se recomienda
tasa de bit na a 44,1kHz de muestreo. Archivos con
tasa de bits variable (VBR) se pueden reproducir, pero
la presentación del tiempo de reproducción puede ser
incorrecta. Los archivos deben tener una extensión
“.mp3”.
WMA:
Tasa de bits de 64kbps o superior. NOTA: Las
tasas de bits de 80kbps y 256kbps no son compatibles.
Los archivos deben tener una extensión “.wma”.
Reproducir archivos desde un dispositivo
USB
Conecte el dispositivo USB en el puerto USB del
1
panel frontal del Receptor USB.
Precaución
•No conecte un PC ni otro periférico en el puerto
USB. El equipo no soporta concentradores USB.
Seleccione USB como dispositivo fuente.
2
Aparecerá “USB” en el visualizador del panel
frontal, y a continuación el Receptor A/V cargará
el contenido de la unidad USB mostrándola en la
pantalla de presentación.
Tipo de
archivo
Modo
Reproducción
Modo
Repetición
Use los botones Arriba/Abajo y ENTER del mando a
distancia para resaltar y seleccionar las pistas.
Precaución
•Para evitar averías o fallos de funcionamiento,
pulse el botón de parada (■) en el mando a
distancia antes de desconectar el dispositivo USB
del puerto USB del Receptor A/V.
Seleccionar el modo de
Sonido Envolvente
La selección de un modo de sonido envolvente puede
ser tan simple o sosticada como lo sea su sistema de
sonido o sus gustos personales. Tómese su tiempo en
experimentar, y podrá encontrar diferentes modos para
determinadas fuentes o tipos de programas. Puede
encontrar información más detallada sobre los modos de
sonido envolvente en las secciones Procesamiento de
Audio y Sonido envolvente, a continuación.
Para seleccionar un modo de sonido envolvente, use los
botones de selección SURROUND. Con cada pulsación
cambia al siguiente modo de sonido envolvente disponible.
Los modos de sonido envolvente digital, como los sistemas
Dolby Digital y DTS, sólo están disponibles con programas
especialmente codicados, como los disponibles en
por HDTV, discos Blu-ray, y televisión digital por cable
o satélite. Otros modos de sonido envolvente como
Dolby Pro Logic II se puede usar con señales analógicas
o digitales para crear una presentación diferente del
sonido envolvente o para utilizar un número diferente de
altavoces.
Título
Canción
Título
Álbum
Velocidad
de datos
Tiempo
transcurrido
Nombre
Artista
La selección del modo de sonido envolvente depende
del número de altavoces de su sistema de sonido, de los
programas que va a ver y oír, y de sus gustos personales.
57
Page 58

R-607/R-507RECEPTORDEAUDIO/VÍDEO
Funciones avanzadas
Muchas de las necesidades de ajuste y conguración
de su Receptor A/V se gestionan automáticamente, con
una pequeña intervención de su parte. Usted también
puede personalizar su Receptor A/V para que se acomode
a su sistema de audio y a sus gustos personales. En
esta sección describiremos algunos ajustes avanzados
disponibles para usted.
Procesamiento del audio y Sonido
envolvente
Las señales de audio se pueden codicar en diferentes
formatos que afectan no solo a la calidad del sonido sino
también al número de canales de los altavoces y al modo
del sonido envolvente. Usted también puede seleccionar
manualmente el modo de sonido envolvente, cuando estén
disponibles.
Señales analógicas de audio
Las señales analógicas de audio normalmente constan de
dos canales – izquierdo y derecho. Su Receptor A/V ofrece
varias opciones para la reproducción analógica:
Estéreo:
•
de 2 canales, pulse el botón STEREO. El sonido saldrá
por los altavoces frontales izquierdo y derecho.
Estéreo 5 canales:
•
estéreo a través de todos los altavoces de su sistema
de sonido (como por ejemplo en una esta), seleccione
5CH STEREO usando los botones de selección
SURROUND. Este modo reproduce la señal del canal
izquierdo a través de los altavoces frontal izquierdo y
envolvente izquierdo, la señal del canal derecho por los
altavoces frontal derecho y envolvente derecho, y una
señal suma monoaural por el altavoz central.
Modos analógicos de sonido envolvente
•
Receptor A/V es capaz de procesar señales de audio
de dos canales para producir sonido envolvente
multicanal, incluso cuando no se haya codicado ningún
sonido envolvente en la grabación. Entre los modos
disponibles están Dolby Pro Logic II, Dolby Pro Logic,
DTS Neo: 6, Theater, Hall, Stadium, Club y Arena. Use
los botones de selección SURROUND para seleccionar
uno de estos modos.
Señales digitales de audio
Las señales digitales de audio ofrecen mayor exibilidad
y capacidad que las señales analógicas y permiten la
codicación hasta 5.1 canales de información discreta del
canal directamente en la señal. El resultado es una calidad
de sonido mejorada y una sorprendente direccionalidad,
ya que la información de cada canal se transmite
independientemente de los otros canales. Las grabaciones
en alta resolución suenan extraordinariamente libres de
distorsión, especialmente en las altas frecuencias.
Los formatos digitales de sonido envolvente incluyen Dolby
Digital 2.0 (sólo dos canales), Dolby Digital 5.1, Dolby
Digital EX, Dolby Digital Plus, Dolby TrueHD, Audio de alta
resolución DTS-HD, DTS-HD, DTS 5.1, DTS 96/24, modos
PCM de 2 canales en 44,1kHz, 48kHz, 88,1kHz, 96kHz o
Cuando desea una reproducción convencional
Cuando desee escuchar el sonido
Su
176,4kHz, y PCM multicanal en 5.1 o 7.1. (Su Receptor
A/V hará una mezcla de la información de los canales
traseros del sonido envolvente en las grabaciones de 6.1
y 7.1 canales para reducirlos a los canales izquierdo y
derecho del sonido envolvente de su sistema.)
Selección del modo de sonido envolvente
La selección del modo de sonido envolvente depende
tanto del formato de la señal de audio entrante como de su
gusto personal. Aunque nunca será posible tener todos los
modos envolventes del Receptor A/V disponibles a la vez,
la tabla siguiente indica que modos están disponibles para
una determinada entrada.
Formato de
la señal de
entrada
Dolby TrueHD
(sólo para R- 607),
Dolby Digital Plus
(sólo para R-
607), Dolby Digital
(7.1-canales/
5.1-canales)
Dolby Digital
(2.0-canales)
DTS-HD (sólo
para R- 607),
DTS, DTS 96/24
PCM (2-canales),
Analógico
(2-canales)
MP3, WMA
Cuando tenga dudas, compruebe la transmisión o la caja
del disco para más información sobre que modos de
sonido envolvente están disponibles. Normalmente, las
secciones no esenciales del disco, tales como avances
de películas, material extra o el menú del disco, están
disponibles solamente en modo Dolby Digital 2.0 (dos
canales) o PCM dos canales. Busque la sección de
conguración del audio en el menú del disco.
También, asegúrese de que la salida de audio del
reproductor del disco está seleccionada al ujo de
bits original en lugar de PCM dos canales. Detenga la
reproducción y compruebe la conguración de salida del
reproductor.
Modos envolventes
disponibles
Los modos TrueHD (sólo
para R-607) o Dolby Digital
correspondientes (Theater, Hall,
Stadium, Club, Arena y 5-Ch
Stereo están disponibles también
para programas en 5.1-canales)
Dolby Pro Logic II Movie, Dolby
Pro Logic II Music, Dolby Pro
Logic II Game, Dolby Pro Logic
Modo DTS correspondiente
(Theater, Hall, Stadium, Club,
Arena and 5-Ch Stereo están
disponibles también para
programas en 5.1-canales)
Dolby Pro Logic II Movie, Dolby
Pro Logic II Music, Dolby Pro
Logic II Game, Dolby Pro Logic,
DTS Neo:6 Cinema, DTS Neo:6
Music, Theater, Hall, Stadium,
Club, Arena, 5-Ch Stereo
Dolby Pro Logic II Movie, Dolby
Pro Logic II Music, Dolby Pro
Logic II Game, Dolby Pro Logic,
DTS Neo:6 Cinema, DTS Neo:6
Music, Theater, Hall, Stadium,
Club, Arena, 5-Ch Stereo
58
Page 59

Funcionamiento
Ajustar el volumen de los canales
Además de usar el tono de prueba integrado para
congurar el Receptor A/V como se explicó en la sección
Congurar el Receptor A/V para sus altavoces
puede ajustar el volumen de cualquier canal en cualquier
momento para compensar las fuentes de programas
individuales o cambiar su gusto personal.
Pulse el botón CH LEVEL en el mando a distancia.
1
En el Visualizador de mensajes aparecerá el nivel de
volumen del canal izquierdo.
Use los botones de dirección Arriba y Abajo del mando
2
a distancia para ver el canal que desea ajustar.
Use los botones de dirección Izquierda y Derecha del
3
mando a distancia para ajustar el volumen del canal.
Pulse el botón RETURN cuando haya terminado.
, también
Grabación
Las señales de audio analógico de dos canales, así como
las señales de vídeo compuesto, están normalmente
disponibles en los conectores de salida de grabación
apropiados. Para hacer una grabación, conecte su
grabador de audio o video en los conectores de salida
apropiados del Receptor A/V como se describe en la
sección
en el grabador y cerciórese de que está encendido y
grabando cuando la fuente esté reproduciendo. Consulte
las instrucciones del dispositivo de grabación para una
información completa sobre como grabar.
Hacer las conexiones
, introduzca un disco virgen
Nota
•El Receptor A/V no convierte señales digitales en
señales analógicas. Sólo puede hacer grabaciones
de dispositivos conectados a las entradas de audio
analógico y de vídeo compuesto.
•Las fuentes de vídeo HDMI no están disponibles
para su grabación.
•Por favor, cerciórese de conocer las restricciones
por derechos de autor de cualquier material que
grabe. La copia sin autorización de material con
derechos de autor está prohibida por ley.
Reiniciar el Procesador
Si observa un funcionamiento errático del Receptor A/
V después de un pico de tensión, primero apague el
interruptor principal de alimentación del panel frontal y
luego desenchufe el cable de alimentación al menos
durante 3 minutos. Vuelva a enchufar el cable y encienda
el Receptor A/V. Si este procedimiento no soluciona el
problema, reinicie el procesador del Receptor A/V como se
describe a continuación.
Nota
•Al reiniciar el procesador se perderán las
conguraciones hechas por el usuario, incluidos
los ajustes de los altavoces y del nivel de
volumen, y también las emisoras memorizadas.
Después de reiniciar, vuelva a efectuar los
ajustes desde las notas que tomó en las hojas de
trabajo del Apéndice.
ParareiniciarelprocesadorelReceptorA/V:
Pulse el interruptor Standby/On del panel frontal
1
para poner la unidad en modo en espera (el LED
‘STANDBY’ se iluminará en rojo).
Mantenga pulsado el botón SURROUND en el
2
mando a distancia mientras pulsa simultáneamente
el botón Standby/On en el panel frontal.
Cuando le aparezca en el visualizador del panel
3
frontal el mensaje de reinicio “RESET?”, pulse el
botón BAND.
Cuando le aparezca en el visualizador del panel
4
frontal el mensaje de reinicio “OK?”, vuelva a pulsar
BAND.
Memoria
Si desenchufa el Receptor A/V o experimenta un corte de
suministro eléctrico, conservará los ajustes realizados por
el usuario unas dos semanas.
Español
Temporizador Apagado Automático
El temporizador de apagado permite el funcionamiento
del Receptor A/V durante 90 minutos y luego lo apaga
automáticamente.
Pulse el botón SLEEP en el mando a distancia, y le
aparecerá en el visualizador el tiempo restante para el
apagado. Las opciones disponibles son 30 min., 60 min.,
90 min. y OFF.
Cuando haya ajustado el temporizador de apagado,
aparecerá en el visualizador una pequeña luna creciente.
Si pulsa el botón SLEEP después de ajustar el
temporizador, en el visualizador le aparecerá el tiempo
que resta para que se apague la unidad. Pulse otra vez el
botón SLEEP para cambiar el tiempo de funcionamiento.
59
Page 60

Resolución de problemas
Si experimenta cualquiera de las siguientes dicultades mientras usa el sistema, use esta guía de resolución de problemas
para ayudarle a remediar el problema antes de solicitar la reparación. Si el problema persiste, consulte a su distribuidor más
cercano o una empresa independiente autorizada.
Si la unidad no funciona bien debido a inuencias externas como la electricidad estática, desconecte el enchufe de la toma
de corriente y vuelva a conectarla transcurridos unos segundos para recuperar las condiciones normales de funcionamiento.
Síntoma Causa Solución
La unidad no funciona cuando
se activa el Interruptor
principal de alimentación.
El visualizador del panel
frontal se ilumina, pero no hay
sonido ni imagen.
No hay sonido en ninguno de
los altavoces.
No hay sonido en ningún
altavoz; aparece el mensaje
PROTECT (PROTEGIDO) en
el Visualizador.
No hay sonido por los
altavoces central y
envolventes.
•No hay alimentación. •Cerciórese de que tiene enchufado el cable
de alimentación en una toma de corriente.
•Conexión de entrada intermitente.
•El sonido está desactivado.
•El control de volumen está al
mínimo.
•Los altavoces están en “Off” en
el menú de conguración del
sistema.
•El amplicador está en modo
protección probablemente por un
cortocircuito.
•El amplicador está en modo
protección debido a problemas
internos.
•Modo incorrecto de sonido
envolvente.
•El material del programa es
monofónico.
•Conguración incorrecta de los
altavoces.
•El material del programa es
estéreo.
•Verique todas las conexiones de entrada y
las de los altavoces.
•Pulse el botón MUTE.
•Suba el volumen.
•Congure los altavoces en “On” en el menú
de conguración del sistema. Vea la
página 54, para más información.
•Compruebe todo el cableado de los altavoces
y las conexiones del receptor A/V por posible
cruce de cables.
•Contacte con un centro de reparaciones de
su ciudad.
•Seleccione un modo de sonido envolvente
diferente a estéreo.
•Los programas Mono no contienen
información de sonido envolvente.
•Compruebe la conguración de los altavoces
en el menú de conguración.
•El decodicador de sonido envolvente puede
ser que no cree la información de los canales
central y envolventes de programas estéreo
no codicados.
La unidad no responde al
mando a distancia.
Sonido zumbante intermitente
en la radio.
•Pilas gastadas en el mando a
distancia.
•Receptor A/V no seleccionado.
•El sensor remoto está
obstaculizado.
•Interferencia local. •Aleje el Receptor A/V o separe la antena de
•Cambie las pilas del mando a distancia.
•Pulse el botón Setup/AVR.
•Compruebe que el sensor remoto del panel
frontal del Receptor A/V tiene una línea clara
con el mando a distancia.
PCs, luces uorescentes, motores u otros
electrodomésticos.
60
Page 61

Especicaciones
Sección de audio
100 W x 7 Canales (20 Hz~20 kHz, 6 Ohmios, THD 1 %/solo en canal
Salida de potencia
Sensibilidad/Impedancia de la entrada 200 mV/47k ohmios
Relación Señal/Ruido (IHF-A) 95 dB
Separación entre canales adyacentes del sistema
de sonido envolvente
Respuesta de Frecuencia 10Hz – 100kHz: ±3 dB
Capacidad de alta corriente instantánea (HCC) ±25 amperios
Margen de Frecuencias 87,5 – 108,0 MHz
Sensibilidad útil IHF 1,3 μV/13,2 dBf
Relación Señal/Ruido (mono/estéreo) 65 dB/62 dB
activado)
75 W x 2 Canales (20 Hz~20 kHz, 6 Ohmios, THD 0,1 %/Modo estéreo)
Dolby Pro Logic/PLII: 40 dB
Dolby Digital: 55 dB
DTS 55 dB
Sección Radio FM
Español
Distorsión (mono/estéreo) 0,2 %/0,3 %
Separación estéreo 35 dB @ 1 kHz
Rechazo de imagen 80 dB
Rechazo IF 80 dB
Sección Radio AM
Margen de Frecuencias 520 – 1720 kHz, 522 – 1161 kHz
Relación Señal/Ruido 45 dB
Sensibilidad útil (lazo) 500 μV
Selectividad (±10kHz) 30 dB
Rechazo IF 80 dB
Sección de vídeo
Formato de televisión NTSC/PAL
Nivel de entrada/impedancia 1 Vp-p/75 ohmios
Nivel de salida/impedancia 1 Vp-p/75 ohmios
Respuesta de frecuencia de vídeo
(vídeo compuesto)
HDMI Con 3D y ‘Color Profundo’
10 Hz – 8 MHz (–3 dB)
Especicacionesgenerales
Requisitos eléctricos 120 V CA/60 Hz, 230 V CA/50 Hz
Consumo de potencia <0,5 W (en espera), 280 W máximo
Dimensiones
(A×A×P, incluyendo piezas sobresalientes)
Peso (neto) 17,6 libras (8 kg)
17,1” x 5,4” x 14,9” (435mm x 138mm x 379mm)
61
Page 62

Sicherheitshinweise
BITTE LESEN SIE DIESE HINWEISE VOR INBETRIEBNAHME DES GERÄTS
VORSICHT
ZUR VERMEIDUNG VON STROMSCHLAG ÖFFNEN SIE DAS
GERÄTEGEHÄUSE NICHT. ES BEFINDEN SICH KEINE VOM
VERBRAUCHER WARTBAREN TEILE IM INNERN DES GERÄTS.
REPARATUR UND WARTUNG NUR DURCH FACHPERSONAL.
WARNUNG:
VORSICHT
STROMSCHLAGGEFAHR
NICHT ÖFFNEN
Der Blitz im gleichseitigen Dreieck weist auf gefährliche Hochspannung im Gerät hin, die zu Stromschlag
führen kann.
Das Ausrufungszeichen im gleichseitigen Dreieck weist auf wichtige Bedienungs- und Wartungsanleitungen
hin.
ZUR VERMEIDUNG VON FEUER UND STROMSCHLAG SETZEN SIE DAS GERÄT NICHT REGEN ODER
FEUCHTIGKEIT AUS.
VORSICHT
•Lassen Sie um das Gerät herum ausreichend Platz zur
Belüftung.
•Installieren Sie das Gerät nicht in besonders heißen oder
kalten Umgebungen, in direkter Sonneneinstrahlung oder in
unmittelbarer Nähe von Heizgeräten.
•Schützen Sie das Gerät vor Feuchtigkeit, Wasser und Staub.
•Führen Sie keine Fremdkörper in das Gerät ein.
•Blockieren Sie die Lüftungsöffnungen nicht mit Zeitungen,
Gardinen oder ähnlichem.
•Schützen Sie das Gerät vor offenen Flammen wie brennenden
Kerzen.
•Beachten Sie die örtlichen Bestimmungen zur Entsorgung von
Verpackungsmaterialien, Batterien und Elektroaltgeräten.
•Setzen Sie das Gerät nicht Spritzwasser oder Tropfwasser aus
und stellen Sie keine mit Wasser gefüllten Gegenstände (wie
Vasen) auf dem Gerät ab.
•Schützen Sie das Gerät vor Insektenvernichtungsmitteln und
Lösungsmitteln.
•Demontieren oder modizieren Sie das Gerät nicht.
Hinweise zu Netzkabel und Steckdose
•Das Gerät ist bei Netzanschluss spannungsversorgt, auch
wenn es ausgeschaltet ist.
•Zum vollständigen Abtrennen des Geräts vom Stromnetz
ziehen Sie bitte den Netzstecker.
•Während des Betriebs muss die Steckdose jederzeit frei
zugänglich sein.
•Die Steckdose sollte sich in unmittelbarer Nähe des Geräts
benden und muss jederzeit frei zugänglich sein.
Hergestellt unter Lizenz der USPatente: 5,956,674; 5,974,380;
6,226,616; 6,487,535; 7,212,872;
7,333,929; 7,392,195; 7,272,567
und andere erteilte und angemeldete US- und weltweite Patente.
DTS-HD, das Symbol und DTS-HD und das Symbol DTS sind
eingetragene Markenzeichen und DTS-HD Master Audio ist ein
Markenzeichen von DTS, Inc. Das Produkt umfasst Software. ©
DTS, Inc. Alle Rechte vorbehalten.
Hergestellt unter Lizenz von Dolby
Laboratories. Dolby, Pro Logic und das
Doppel-D-Symbol sind Markenzeichen
der Dolby Laboratories.
HDMI, das HDMI-Logo und High-
Denition Multimedia Interface sind
Marken oder eingetragene Marken
von HDMI Licensing LLC in den Vereinigten Staaten und anderen
Ländern.
* DTS-HD Master Audio und Dolby TrueHD betrifft nur R-607.
Installationshinweise
Hinweis
Blockieren Sie nicht die Lüftungsschlitze und stellen Sie keine anderen Geräte oben auf dem Gerät ab.
Hinweis:
Bauen Sie dieses Gerät nicht umschlossen ein, beispielsweise in einem Bücherschrank oder in einem ähnlichen
Gehäuse.
62
Wand
Page 63

Inhalt
62 SICHERHEITSHINWEISE
64 ERSTE SCHRITTE
64 Frontblende
64 Geräterückseite
65 Fernbedienung
66 Aufstellung
67 ANSCHLÜSSE
67 Lautsprecher anschließen
67 Subwoofer anschließen
68 Fernseher oder Video-Display anschließen
69 Audio- und Videogeräte anschließen
73 Tunerantennen anschließen
73 Netzanschluss
73 Batterien in der Fernbedienung einsetzen
74 EINSTELLUNG
74 Audio/Video Receiver einschalten
Deutsch
74 Audio/Video Receiver für Lautsprecher kongurieren
76 BETRIEB
76 Bedienungshinweise für Ihren Audio/Video Receiver
76 UKW- und MW-Radio hören
77 Medien von einem USB-Gerät wiedergeben
77 Surround-Modus wählen
78 Erweiterte Funktionen
80 STÖRUNGSERKENNUNG
81 SPEZIFIKATIONEN
63
Page 64

Erste Schritte
Frontblende
1 2 3 4 5 6 7
8 9 10 11 14 15
Hauptschalter
1
Stand-by-Anzeige
2
Ein/Stand-by-Modus
3
IR-Sensor
4
Display
5
Surround-Wahltasten
6
Master-Lautstärke
7
Umschalter Eingänge
8
Geräterückseite
1 2
12 13
9
10
11
12
13
14
15
Kopfhörerbuchse
AUX-Eingang auf der Frontblende
Bandwahl
Sendersuche aufwärts/abwärts
Senderspeicher
Stereoumschalter
USB-Port
64
Digitaleingänge
1
HDMI-Eingänge
2
Tuner-Antenneneingänge
3
Analog-Audioanschlüsse
4
3 4 5 6 7 8
Subwooferanschluss
5
Composite Videoanschlüsse
6
Lautsprecheranschlüsse
7
Netzeingang
8
Page 65

Fernbedienung
1
2
3
4
5
6
7
8
9
12
22
21
20
19
18
17
16
15
14
13
11
10
Erste Schritte
Ein/Aus
1
Eingangsquelle
2
Surround-Wahltasten
3
(Die Tasten GAME und NETWORK stehen
nicht zur Verfügung.)
Menü aufwärts
4
▲/▼/◄/► Navigationstasten
5
ENTER/MEMO Enter/Speicher
SEARCH.M RDS-Suche
(* Die Taste SEARCH.M steht nur für
Modelle in Europa zur Verfügung.)
Anzeigen/Modus
6
Stopp
7
Wiederholung
8
Sendersuche aufwärts/abwärts
9
Schneller Vorlauf/Rücklauf
Senderspeicher aufwärts/abwärts
10
Vorheriger/Nächster
Zufall
11
Wiedergabe/Pause
12
Zurück
13
Lautstärke aufwärts/abwärts
14
Menüeinstellungen
15
Stummschaltung
16
Stereoumschalter
17
Audio zuordnen
18
Kanalpegel
19
Testton
20
Klangsteuerung
21
Stand-by-Modus
22
Deutsch
65
Page 66

R-607/R-507AUDIO/VIDEORECEIVER
Aufstellung
Lautsprecher aufstellen
Stellen Sie die Lautsprecher entsprechend den Anleitungen
des Herstellers und dem Layout Ihres Raums auf. Die
nachstehende Abbildung dient als Hilfestellung für ein
5.1-Kanalsystem.
Für eine realistische Surround-Sound-Umgebung stellen
Sie Ihre Lautsprecher im Kreis auf die Sitzposition
ausgerichtet auf. Richten Sie die Lautsprecher direkt auf
die Sitzposition aus. Die nachstehende Abbildung dient als
Hilfestellung.
Linken, mittleren und rechten
Lautsprecher aufstellen
Stellen Sie den mittleren Lautsprecher auf, unter oder
wandmontiert über oder unter dem Fernseher oder
Videobildschirm auf. Stellen Sie den vorderen linken und
rechten Lautsprecher am Kreisbogen ca. 30 Grad vom
mittleren Lautsprecher entfernt und auf die Sitzposition
ausgerichtet auf.
Stellen Sie den vorderen linken und rechten sowie den
mittleren Lautsprecher auf gleicher Höhe auf, möglichst in
Kopfhöhe der Sitzposition. Der mittlere Lautsprecher sollte
sich nicht mehr als 60 cm über oder unter dem linken/
rechten Lautsprecher benden. Benutzen Sie nur zwei
Lautsprecher mit dem Audio/Video Receiver, so stellen Sie
diese in der Position vorn links und rechts auf.
Surround-Lautsprecher aufstellen
Stellen Sie den linken und rechten Surround-Lautsprecher
ca. 110 Grad vom mittleren Lautsprecher entfernt und
etwas von hinten auf die Sitzposition ausgerichtet auf.
Alternativ stellen Sie sie hinter der Sitzposition auf,
gegenüber den vorderen Lautsprechern. Die SurroundLautsprecher sollten ca. 0,6 m – 1,8 m über Kopfhöhe der
Sitzposition aufgestellt werden.
Subwoofer aufstellen
Die Form eines Zimmers und das Volumen können einen
dramatischen Effekt auf die Leistung eines Subwoofers
haben, daher sollten Sie mit der Position experimentieren,
um den besten Standort zu nden. Die nachstehenden
Regeln sollen Ihnen dabei helfen:
•Wenn Sie den Subwoofer direkt an einer Wand
aufstellen, werden die Bässe im Allgemeinen verstärkt.
•Wenn Sie den Subwoofer in einer Ecke aufstellen,
werden die Bässe im Allgemeinen verstärkt.
•Die Aufstellung des Subwoofers auf der gleichen
Ebene wie der linke und rechte Lautsprecher führt in
vielen Zimmern zur besten Integration zwischen dem
Klang des Subwoofers und des linken und rechten
Lautsprechers.
•In einigen Zimmern erhalten Sie die beste Leistung,
wenn der Subwoofer hinter der Sitzposition steht.
Sie nden den besten Standort für den Subwoofer
auch, wenn Sie ihn vorübergehend in der Sitzposition
aufstellen und Musik mit starken Bässen abspielen.
Bewegen Sie sich im Raum zu den verschiedenen
Standorten, während die Musik spielt (gehen Sie mit
dem Kopf in die Positionen des Subwoofers) und
nden Sie auf diese Weise heraus, wo Sie die besten
Bässe haben. An diesem Standort stellen Sie dann den
Subwoofer auf.
66
Page 67

Anschlüsse
Vorsicht
•Bevor Sie Anschlüsse am Audio/Video Receiver
vornehmen vergewissern Sie sich bitte, dass das
Netzkabel vom Audio/Video Receiver und von
der Steckdose abgezogen ist. Anschlüsse am
eingeschalteten Audio/Video Receiver können zu
Schäden an den Lautsprechern führen.
Lautsprecher anschließen
LautsprecheranschlüssedesAudio/Video
Receivers
Verschlusskappe lösen
1
Abisoliertes Kabel
2
einführen
Verschlusskappe
3
anziehen
Schließen Sie stets den farbigen Anschluss (+) des Audio/
Video Receivers am Anschluss (+) des Lautsprechers
(gewöhnlich rot) an und den schwarzen Anschluss
(–) des Audio/Video Receivers am Anschluss (–) des
Lautsprechers (gewöhnlich schwarz).
Subwoofer anschließen
Benutzen Sie ein einfaches Cinch (RCA) Audiokabel zum
Anschluss Ihres Subwoofers an Subwoofer Pre-Out des
Audio/Video Receivers. Weitere Einzelheiten nden Sie in
der Bedienungsanleitung Ihres Subwoofers.
Geräterückseite
Deutsch
Vorsicht
•Achten Sie darauf, dass sich die abisolierten (+)
und (–) Pole nicht gegenseitig berühren und auch
nicht den jeweils anderen Anschluss. Das kann zu
einem Kurzschluss und Schäden am Audio/Video
Receiver führen.
Schließen Sie die Lautsprecher entsprechend der Zeichnung an.
Subwoofer
67
Page 68

R-607/R-507AUDIO/VIDEORECEIVER
Composite
VIDEO IN
Fernseher oder Video-Display
anschließen
HDMI-Monitorausgang
Hat Ihr Fernseher einen HDMI-Anschluss und Sie haben
HDMI-Videogeräte, so benutzen Sie ein HDMI-Kabel (nicht
mitgeliefert) zum Anschluss Ihres Fernsehers an HDMI
Monitor Out des Audio/Video Receivers.
Hiermit erhalten Sie die beste Bildqualität.
Composite Video-Monitorausgang
Hat Ihr Fernseher keinen HDMI-Anschluss oder Ihr
Fernseher hat einen HDMI-Anschluss,
jedoch Geräte nur mit Composite Videoanschlüssen an
benutzen Sie ein Composite-Videokabel (nicht mitgeliefert)
zum Anschluss Ihres Fernsehers an Composite Monitor
Out des Audio/Video Receivers.
Geräterückseite
Sie schließen
, so
Geräterückseite
Composite Videokabel
(nicht mitgeliefert)
TV
Hinweis
•Das Bildschirmmenü (OSD) des Audio/Video
Receivers wird nur über den Anschluss Composite
Monitor Out angezeigt. Zur Benutzung des OSDMenüs des Audio/Video Receivers müssen Sie
Composite Monitor Out an Ihrem Fernseher
anschließen, selbst wenn Sie keine Composite
Videogeräte am Audio/Video Receiver anschließen.
68
Page 69

Anschlüsse
Audio- und Videogeräte
anschließen
Dies sind Komponenten, von denen das Wiedergabesignal
stammt, beispielsweise ein Blu-ray Disc™ oder DVDPlayer, ein Kabel-, Satelliten- oder HDTV-Tuner usw. Ihr
Audio/Video Receiver ist mit unterschiedlichen Eingängen
für Ihre Audio- und Videogeräte ausgestattet: HDMI,
Composite Video, optisches Digital-Audio, Koaxial-DigitalAudio und Analog-Audio.
Jede der Signalquellentasten Ihres Audio/Video Receivers
ist einem Analog-Audioeingang zugeordnet.
Die Digitaleingänge sind keinen spezischen
Analogeingängen zugeordnet. Zur Auswahl einer
Signalquelle können Sie die Taste DIGITAL der
Fernbedienung für einen bestimmten Audioeingang
benutzen (HDMI, koaxial digital, optisch digital, analog).
(Hinweis: Sie können keinen Audioeingang für die
Signalquellen FM/AM oder USB wählen.)
Bei Anschluss Ihrer verschiedenen Geräte füllen Sie bitte
die Spalten „Angeschlossene Signalquelle“ und „Benutzter
Digital-Audioeingang“ in der nachstehenden Tabelle aus.
Hiermit behalten Sie einen Überblick, welche Geräte an
welchen Eingängen angeschlossen sind.
HDMI-Geräte
Haben Ihre Geräte einen HDMI-Anschluss, so haben Sie
hierüber die beste Bild- und Tonqualität. Da das HDMIKabel gleichzeitig digitale Video- und Audiosignale
überträgt, müssen Sie keine zusätzlichen Audioanschlüsse
vornehmen.
Haben Sie einen Fernseher, der mit HDMI AudioRückmeldekanal ausgestattet ist, so wird der Ton an den
Audio/Video Receiver über den Audio-Rückmeldekanal von
HDMI Monitor Out übertragen und es ist kein zusätzlicher
Audioanschluss notwendig.
Geräterückseite
Deutsch
HDMI-Kabel
(nicht mitgeliefert)
Signalquelle mit
HDMI-Anschluss
69
Page 70

R-607/R-507AUDIO/VIDEORECEIVER
Composite Video-Geräte
Schließen Sie Geräte, die nicht über einen HDMIAnschluss verfügen, über Composite Video an. Stellen Sie
ebenfalls einen Audioanschluss zwischen dem Gerät und
dem Audio/Video Receiver her.
Geräterückseite
Composite Videokabel
(nicht mitgeliefert)
Optische digitale Audiogeräte
Haben Ihre Geräte einen optischen Digitalausgang, so
schließen Sie sie am optischen digitalen Audioeingang des
Audio/Video Receivers an.
Geräterückseite
Composite
VIDEO OUT
Signalquelle mit Composite
Videoanschluss
OPTICAL
OUT
TV, DVD-Player usw.
70
Page 71

Anschlüsse
Koaxial-Digital-Audiogeräte
Haben Ihre Geräte einen digitalen Koaxialausgang, so
schließen Sie sie am digitalen Koaxialeingang des Audio/
Video Receivers an.
Geräterückseite
Analoge Audiogeräte
Stellen Sie einen Analog-Audioanschluss zu Ihren Geräten
her, die keinen HDMI- oder digitalen Audioanschluss
haben. Schließen Sie Videogeräte an den Audioeingängen
Video 1 oder Video 2 des Audio/Video Receivers an, so
müssen Sie ebenfalls den Composite Videoausgang des
Geräts am entsprechenden Composite Videoeingang
anschließen.
Geräterückseite
Deutsch
Ausgang
OUT
TV, DVD-Player usw.
RL
TV, DVD-Player usw.
71
Page 72

R-607/R-507AUDIO/VIDEORECEIVER
RL
Audiorekorder
Schließen Sie die Eingänge eines analogen Audiorekorders
an den analogen Audioanschlüssen Tape Out des Audio/
Video Receivers an.
Alle analogen Audioeingangssignale (außer Tape In)
können aufgezeichnet werden.
Geräterückseite
Videorekorder
Schließen Sie die Videoeingänge eines analogen
Videorekorders am Composite Videoausgang Video 1 Out
des Audio/Video Receivers und die Audioeingänge an den
analogen Audioanschlüssen von Video 1 Out des Audio/
Video Receivers an. Das Videoeingangssignal von Video 2
kann aufgezeichnet werden.
Geräterückseite
72
Analog-Audiorekorder
R L
AUDIO IN (COMPOSITE)
Analog-Videorekorder
Eingang
VIDEO
Page 73

Anschlüsse
Tunerantennen anschließen
•Schließen Sie die mitgelieferte UKW-Antenne am
Antennenanschluss FM 75Ω des Audio/Video Receivers
an. Für besten Empfang wickeln Sie die UKW-Antenne
vollständig ab.
•Klappen Sie den Standfuß der mitgelieferten MWAntenne aus, wie in der Abbildung dargestellt und
schließen Sie die Antennenkabel an den Anschlüssen
AM und Gnd des Audio/Video Receivers an. Richten Sie
die Antenne für die geringsten Störgeräusche aus.
Geräterückseite
Netzanschluss
Schließen Sie das Netzkabel an AC In des Audio/Video
Receivers und an einer Steckdose an.
Geräterückseite
Netzkabel
An Steckdose
Hinweis
•Vergewissern Sie sich vor dem Anschluss des
Netzkabels, dass Ihre Netzspannung mit den
Angaben auf dem Typenschild auf der Rückseite
des Audio/Video Receivers übereinstimmt.
Deutsch
MW-Zimmerantenne
Batterien in der
Fernbedienung einsetzen
Öffnen Sie das Batteriefach der Fernbedienung, setzen Sie
die beiden mitgelieferten AAA-Batterien entsprechend der
Abbildung ein und schließen Sie das Batteriefach wieder.
Hinweis
•Ziehen Sie den Schutzlm von der Frontblende des
Audio/Video Receivers ab, damit die Reichweite
der Fernbedienung nicht beeinträchtigt wird.
73
Page 74

Einstellung
Audio/Video Receiver
einschalten
Stellen Sie den Hauptschalter des Audio/Video
1
Receivers auf „On“ (die Stand-by-Anzeige leuchtet
rot).
Drücken Sie On/Standby auf der Frontblende.
2
Hauptschalter Stand-by-Anzeige
Audio/Video Receiver für
Lautsprecher kongurieren
Mit folgenden Tasten der Fernbedienung kongurieren Sie
den Audio/Video Receiver:
Menüeinstellungen
Navigation
links/
rechts/
aufwärts/
abwärts
Schalten Sie den Fernseher ein und wählen Sie
1
Composite Monitor Out des Audio/Video Receivers
Audio- und Videogeräte anschließen
gemäß
Eingangsquelle Seite 69.
Hinweis
•Obwohl Sie den Audio/Video Receiver nur mit
dem Display auf der Frontblende kongurieren
können, ist es mit dem OSD-Menü deutlich
einfacher.
Enter
Zurück
als
Ein/Stand-by
Mit der Fernbedienung können Sie mit den nachstehenden
Schritten den Audio/Video Receiver nur einschalten oder
in den Stand-by-Modus schalten. Wenn das Gerät mit dem
Hauptschalter ausgeschaltet ist, können Sie es mit der
Fernbedienung nicht einschalten.
Stand-
Ein/Aus
Drücken Sie POWER ON auf der Fernbedienung.
1
Drücken Sie STANDBY, um das Gerät in den
2
Stand-by-Modus auszuschalten.
byModus
Drücken Sie SETUP auf der Fernbedienung. Das
2
Einstellungsmenü des Audio/Video Receivers wird
auf dem Fernseher angezeigt.
System Setup
1. Speaker Setup
2. HDMI Setup
3. Audio Setting’s
4. Auto Power Control
5. Speakers On/Off
Mit den Navigationstasten und ENTER wählen
3
Sie „Speaker Setup“. Das LautsprecherEinstellungsmenü wird angezeigt.
1. Speaker Setup
a. Speaker Setting’s
b. Crossover
c. Channel Level
d. Speaker Distance
74
Page 75

Einstellung
Wählen Sie „Speaker Settings“. Das Lautsprecher-
4
Einstellungsmenü wird angezeigt.
SpeaKer Setting’s1a.
Front
Center
Surrround L/R
Subwoofer
Mit der linken und rechten Pfeiltaste wählen Sie
5
NO, SMALL oder LARGE für die vorderen, den
mittleren und die Surround-Lautsprecher, abhängig
von den angeschlossenen Lautsprechern.
NO:
Wählen Sie diese Einstellung, falls in dieser
Position kein Lautsprecher angeschlossen ist (gilt
nicht für die vorderen Lautsprecher).
SMALL:
Lautsprecher keine sauberen, tiefen Bässe bei
Ausgangspegeln wiedergeben kann, die einem
aktiven Subwoofer entsprechen. Alle Bässe des
Kanals werden dann nicht zu diesem Lautsprecher
übertragen, sondern zum Subwoofer (oder den
vorderen Lautsprechern, falls Subwoofer auf NO
eingestellt ist). Die meisten Lautsprecher sollten als
SMALL betrachtet werden (es sei denn, es handelt
sich um große und leistungsstarke Boxen).
LARGE:
der Lautsprecher saubere, tiefe Bässe bei
Ausgangspegeln wiedergeben kann, die einem
aktiven Subwoofer entsprechen. Alle Bässe des
Kanals werden dann zu diesem Lautsprecher
übertragen.
Wenn Sie die Einstellung beendet haben,
drücken Sie RETURN, um in das LautsprecherEinstellungsmenü zurückzukehren.
Wählen Sie diese Einstellung, falls der
Wählen Sie diese Einstellung, falls
< LARGE >
[ LARGE ]
[ LARGE ]
[ YES ]
Überspringen Sie zunächst die Einstellung
6
„Crossover“.
Wählen Sie „Speaker Distance“. Das Menü
7
Lautsprecherentfernung wird angezeigt.
SpeaKer Distance1d.
Units [ FEET ]
Front L
Center
Front R
Surrround R
Surrround L
Subwoofer
Hinweis
•Die Anzeige kann je nach Modell abweichen.
Messen Sie die Entfernung aller Lautsprecher
8
im System zur Sitzposition. Notieren Sie die
Entfernungen.
Mit der linken und rechten Navigationstaste stellen
9
Sie die Entfernung der einzelnen Lautsprecher
entsprechend Ihren Notizen aus Schritt 8 ein.
Wenn Sie die Einstellung beendet haben,
drücken Sie RETURN, um in das LautsprecherEinstellungsmenü zurückzukehren.
Wählen Sie „Channel Level“. Das Kanalpegelmenü
10
wird angezeigt. Mit der linken und rechten
Navigationstaste stellen Sie den Testton auf
„Manual“ ein, dann drücken Sie ENTER. Nach
dem Countdown auf dem Bildschirm hören Sie den
Testton über den vorderen linken Lautsprecher.
< 10.0ft >
[ 10.0ft ]
[ 10.0ft ]
[ 10.0ft ]
[ 10.0ft ]
[ 10.0ft ]
Channel Level1c.
Deutsch
Hinweis
•Hat Ihr System einen Subwoofer und Sie stellen
die vorderen Lautsprecher auf LARGE ein,
so hören Sie über den Subwoofer kein Audio,
außer für Dolby Digital- und DTS-Material
mit LFE-Kanalinformationen. Stellen Sie Ihre
vorderen Lautsprecher auf LARGE ein und Sie
möchten über Ihren Subwoofer Bässe von allen
Programmmaterialien hören, so stellen Sie den
Subwoofer auf PLUS ein (siehe nachstehend).
•Wählen Sie für Subwoofer YES (falls Ihr
System einen Subwoofer hat), NO (falls Ihr
System keinen Subwoofer hat) oder PLUS
(falls Ihr System einen Subwoofer hat, Sie die
vorderen Lautsprecher auf LARGE einstellen
und Sie über Ihren Subwoofer Bässe von allen
Programmmaterialien hören möchten).
Test Tone < Manual >
Sitzen Sie in der Sitzposition und stellen Sie
11
die Lautstärke des Audio/Video Receivers
auf eine moderate Lautstärke ein. Notieren
Sie die Lautstärke des Testtons über den
ersten Lautsprecher. Mit der Navigationstaste
abwärts schalten Sie den Testton zum nächsten
Lautsprecher des Systems weiter, notieren Sie den
Lautstärkepegel für die jeweiligen Lautsprecher.
Während Sie den Testton durch die Lautsprecher
12
schalten, stellen Sie die Lautstärke der Kanäle mit
der linken und rechten Navigationstaste ein, bis alle
Kanäle mit der gleichen Lautstärke gehört werden.
Wenn Sie die Einstellung beendet haben, drücken
Sie SETUP, um die OSD-Menüs auszublenden.
75
Page 76

Betrieb
Bedienungshinweise für
Ihren Audio/Video Receiver
Nach der Installation Ihrer Komponenten und der
allgemeinen Konguration können Sie Ihr Heimkinosystem
in Betrieb nehmen.
Lautstärke regeln
Stellen Sie die Lautstärke entweder mit dem
Lautstärkeregler auf der Frontblende ein (mit
Rechtsdrehung Lautstärke erhöhen, mit Linksdrehung
Lautstärke verringern) oder drücken Sie Volume aufwärts/
abwärts auf der Fernbedienung.
Stummschaltung
Zum Stummschalten aller Lautsprecher und der Kopfhörer
drücken Sie die Stummschalttaste auf der Fernbedienung.
Laufende Aufnahmen sind hiervon nicht betroffen.
MUTE wird im Display angezeigt. Zum Aufheben der
Stummschaltung drücken Sie erneut die Stummschalttaste
oder stellen Sie die Lautstärke ein.
Kopfhörer
Schließen Sie für privaten Hörgenuss Ihre Kopfhörer an
der ¼"-Stereobuchse auf der Frontblende an.
Hinweis
•Für Informationen zum Ausschalten der
Lautsprecher während der Benutzung der
Kopfhörer, siehe Seite 74.
•Überprüfen Sie alle Anschlüsse.
•Überprüfen Sie den Videoeingang des angeschlossenen
Fernsehers/Monitors.
Zusätzliche Tipps zur Problembehebung
bei HDMI-Anschluss
•Schalten Sie alle Geräte aus (einschließlich
Fernseher, Audio/Video Receiver und angeschlossene
Komponenten).
•Ziehen Sie die HDMI-Kabel ab, beginnend mit dem
Kabel zwischen dem Audio/Video Receiver und dem
Fernseher, danach die Kabel zwischen dem Audio/
Video Receiver und den einzelnen anderen Geräten.
•Schließen Sie die Kabel wieder vorsichtig am Audio/
Video Receiver an. Schließen Sie das Kabel vom Audio/
Video Receiver zum Fernseher als letztes wieder an.
•Schalten Sie die Geräte in folgender Reihenfolge ein:
TV, Audio/Video Receiver, Signalquellen.
Hinweis
•Abhängig von Ihren Komponenten kann die
Komplexität der erforderlichen Kommunikation
zwischen HDMI-Komponenten zu einer
Verzögerung bis zu einer Minute führen,
beispielsweise beim Umschalten von Eingängen
oder zwischen SD- und HD-Kanälen.
UKW- und MW-Radio hören
Signalquelle wählen
Wählen Sie die Signalquelle alternativ wie folgt:
•Drehen Sie INPUT SELECTOR auf der Frontblende.
•Wählen Sie eine Signalquelle direkt mit der
entsprechenden Taste auf der Fernbedienung.
Der Audio/Video Receiver wählt die Analog-Audio- und
Videoeingänge entsprechend Zuordnung zur Signalquelle
sowie anderer von Ihnen getätigter Einstellungen.
Die digitalen Audioeingänge sind keinen bestimmten
Analogeingängen zugeordnet. Nach der Auswahl eines
Geräts wählen Sie einen spezischen Audioeingang
(HDMI, koaxial digital, optisch digital, analog) mit der
Fernbedienung (Hinweis: Sie können keinen Audioeingang
für die Signalquellen FM/AM oder USB wählen.)
Der Name der Eingangsquelle, der gewählte Audioeingang
und der Surround-Modus werden auf der Frontblende
angezeigt.
Problembehandlung Video
Kein Bild:
•Überprüfen Sie die Wahl der Signalquelle.
Wählen Sie AM/FM als Signalquelle. Mit der Sendersuche
aufwärts/abwärts stellen Sie einen Sender ein, er wird auf
der Frontblende angezeigt.
Für die automatische Sendersuche halten Sie Sendersuche
aufwärts/abwärts gedrückt. Für die manuelle Sendersuche
drücken Sie die jeweilige Taste. UKW-Mono verbessert den
Empfang schwacher Sender.
Sender speichern
30 Sender (MW und UKW zusammen) können
gespeichert werden. Drücken Sie bei gewähltem
Sender die Speichertaste, damit blinkt die Nummer
des Senderspeichers auf der Frontblende auf. Mit den
Zifferntasten der Fernbedienung geben Sie nun den
gewünschten Senderspeicher ein.
Zum Aufrufen eines Senderspeichers drücken Sie
Senderspeicher aufwärts/abwärts oder geben Sie die
Nummer mit den Zifferntasten der Fernbedienung ein.
RDS
RDS (Radio Data System) ist eine Methode zum Senden
von Informationen zusammen mit den Sendersignalen.
Diese Informationen enthalten den Programmdienstnamen
(PS), eine Liste mit Programmtypen (PTY) und Radiotext
(RT).
76
Page 77

Hinweis
•RDS haben Sie nur für in Europa ausgelieferte
Modelle.
•RDS steht nur auf UKW zur Verfügung.
•RDS sucht nur nach gespeicherten Sendern. Sind
keine Sender gespeichert oder der Programmtyp
kann nicht unter den gespeicherten Sendern
gefunden werden, dann wird „NO PTY“ angezeigt.
Medien von einem USB-Gerät
wiedergeben
Ihr Audio/Video Receiver ist mit USB 2.0 oder USB 1.1
Medien im Dateiformat FAT 16 oder FAT 32 sowie mit
folgenden MP3- und WMA-Medien kompatibel:
MP3:
•
•
Bitraten zwischen 96 – 320 kbps. Eine
feststehende Bitrate von 44,1 kHz wird empfohlen.
Variable Bitraten (VBR) können wiedergegeben werden,
jedoch wird die Spielzeit möglicherweise nicht korrekt
angezeigt. Dateien müssen die Endung „.mp3“ haben.
WMA:
Bitraten von 64 kbps oder höher. HINWEIS:
Bitraten von 80 kbps und 256 kbps sind nicht
kompatibel. Dateien müssen die Endung „.wma“ haben.
Betrieb
Mit den entsprechenden Tasten der Fernbedienung steuern
Sie die Wiedergabe.
Zum Durchsuchen der Inhalte des aktuellen Ordners
drücken Sie RETURN auf der Fernbedienung. Der USBOrdner wird für 20 Sekunden angezeigt.
Deutsch
Mit den Navigationstasten aufwärts/abwärts und ENTER
markieren und wählen Sie die Titel.
Vorsicht
•Zur Vermeidung von Schäden oder Fehlfunktionen
drücken Sie Stopp (■) auf der Fernbedienung,
bevor Sie das USB-Gerät vom USB-Port des
Audio/Video Receivers abtrennen.
Die Höchstzahl von 65.536 Ordnern und Dateien wird
unterstützt.
Dateien von USB-Gerät wiedergeben
Schließen Sie das USB-Gerät am USB-Port auf der
1
Frontblende des Audio/Video Receivers an.
Vorsicht
•Schließen Sie keinen PC oder Peripheriegeräte am
USB-Port an. USB-Hubs werden nicht unterstützt.
Wählen Sie USB als Eingangsquelle. „USB“ wird
2
auf der Frontblende angezeigt und nach dem
Laden der Inhalte des aktuellen Ordners wird das
USB-Wiedergabemenü angezeigt.
Musiktitel
Album
Wiedergabe-
Dateityp
Datenübertragungsrate Vergangene
modus
Wiederholungsmodus
Interpret
Spielzeit
Surround-Modus wählen
Die Auswahl des Surround-Modus kann so einfach oder
so anspruchsvoll sein, wie Ihr individuelles System und
Ihr Geschmack. Experimentieren Sie und nden Sie Ihre
Favoriten für bestimmte Quellen oder Programmtypen. Sie
nden weitere detaillierte Informationen zum Surround-
Modus im nachstehenden Abschnitt Audioverarbeitung und
Surround-Sound.
Zur Auswahl des Surround-Modus drücken Sie die
entsprechenden Auswahltasten. Mit mehrfachem
Tastendruck durchlaufen Sie die verfügbaren SurroundModi.
Digitale Surround-Sound-Modi wie Dolby Digital und
DTS sind nur für speziell codierte Programme verfügbar,
beispielsweise auf HDTV, DVD und Blu-ray Disc sowie
digitale Kabel- oder Satellitenprogramme. Andere
Surround-Modi wie Dolby Pro Logic II können mit
digitalen oder analogen Signalen zur Schaffung einer
Surround-Umgebung oder Benutzung einer Mehrzahl von
Lautsprechern benutzt werden.
Die Auswahl des Surround-Modus hängt von der Anzahl
der Lautsprecher in Ihrem System, den gesehenen oder
gehörten Programmen und Ihrem persönlichen Geschmack
ab.
77
Page 78

R-607/R-507AUDIO/VIDEORECEIVER
Erweiterte Funktionen
Viele der Einstellungen und Kongurationen Ihres Audio/
Video Receivers erfolgen automatisch, Ihrerseits sind
nur geringfügige Eingriffe notwendig. Sie können Ihren
Audio/Video Receiver ebenfalls an Ihr System und Ihren
persönlichen Geschmack anpassen. Dieser Abschnitt
beschreibt einige der erweiterten Funktionen.
Audioverarbeitung und Surround-Sound
Audiosignale können in einer Vielzahl von Formaten codiert
werden, die nicht nur die Klangqualität, sondern auch die
Anzahl der Lautsprecherkanäle und den Surround-Modus
beeinussen. Sie können ebenfalls manuell einen anderen
Surround-Modus wählen.
Analoge Audiosignale
Analoge Audiosignale bestehen gewöhnlich aus zwei
Kanälen – links und rechts. Ihr Audio/Video Receiver bietet
verschiedene Optionen für die analoge Wiedergabe:
Stereo:
•
•
•
Digitale Audiosignale
Digitale Audiosignal bieten eine größere Flexibilität und
Kapazität als Analogsignale und ermöglichen die Codierung
von bis zu 5.1 Kanälen diskreter Kanalinformationen
direkt in das Signal. Das Ergebnis ist eine verbesserte
Klangqualität und eine verblüffende Bündelung, da
alle Kanalinformationen unabhängig voneinander
übertragen werden. Hochauösende Aufnahmen
klingen außergewöhnlich rein, insbesondere die hohen
Frequenzen.
Digitale Surround-Sound-Formate sind Dolby Digital
2.0 (nur zwei Kanäle), Dolby Digital 5.1, Dolby Digital
EX, Dolby Digital Plus, Dolby TrueHD, DTS-HD HighResolution Audio, DTS-HD, DTS 5.1, DTS 96/24, 2-Kanal
PCM-Modi in 44,1 kHz, 48 kHz, 88,1 kHz, 96 kHz oder
176,4 kHz sowie 5.1 oder 7.1 Mehrkanal-PCM (Ihr Audio/
Video Receiver mischt die diskreten hinteren SurroundKanalinformationen in 6.1-Kanal- und 7.1-KanalAufnahmen in den linken und rechten Surround-Kanal
Ihres Systems herunter).
Zur herkömmlichen 2-Kanal-Wiedergabe
drücken Sie STEREO. Der Ton wird über die vorderen
linken und rechten Lautsprecher ausgegeben.
5-Kanal-Stereo:
Lautsprecher des Systems (wie beispielsweise während
einer Party), wählen Sie mit den Auswahltasten für den
Surround-Modus 5CH STEREO. Hiermit wird das Signal
des linken Kanals über den vorderen linken und linken
Surround-Lautsprecher ausgegeben, das Signal des
rechten Kanals über den vorderen rechten und rechten
Surround-Lautsprecher und ein zusammengefasstes
Monosignal über den mittleren Lautsprecher.
Analoge Surround-Modi:
kann 2-Kanal-Audiosignale zu Mehrkanal-SurroundSound verarbeiten, selbst wenn die Aufnahme nicht im
Surround-Sound erfolgte. Verfügbare Modi sind Dolby
Pro Logic II, Dolby Pro Logic, DTS Neo: 6, Theater, Hall,
Stadium, Club und Arena. Wählen Sie den SurroundModus mit den entsprechenden Auswahltasten.
Zum Hören des Stereoklangs über alle
Ihr Audio/Video Receiver
Auswahl des Surround-Modus
Die Auswahl des Surround-Modus hängt vom Format
der eingehenden Audiosignale sowie Ihrem persönlichen
Geschmack ab. Obwohl zu keiner Zeit alle Surround-Modi
Ihres Audio/Video Receivers zur Verfügung stehen, zeigt
Ihnen die nachstehende Tabelle, welche Surround-Modi für
einen gegebenen Eingang verfügbar sind.
Eingangs-
signalformat
Dolby TrueHD
(nur R- 607),
Dolby Digital
Plus (nur
R- 607),
Dolby Digital
(7.1-Kanal/
5.1-Kanal)
Dolby Digital
(2.0-Kanal)
DTS-HD (nur
R- 607), DTS,
DTS 96/24
PCM (2-Kanal),
Analog
(2-Kanal)
MP3/WMA
Im Zweifel schauen Sie in die Senderinformationen
oder auf das Cover der Disc, um weitere Informationen
zum Surround-Modus zu erhalten. Gewöhnlich sind
unbedeutende Abschnitte einer Disc, wie beispielsweise
der Trailer, Zusatzmaterial oder das Discmenü nur in Dolby
Digital 2.0 (2-Kanal) oder PCM 2-Kanal verfügbar. Sehen
Sie sich die Audioeinstellungen im Discmenü an.
Vergewissern Sie sich ebenfalls, dass der Audioausgang
Ihres Players auf den Original-Bitstream eingestellt ist und
nicht auf 2-Kanal PCM. Beenden Sie die Wiedergabe und
überprüfen Sie die Ausgangseinstellungen des Players.
Verfügbare Surround-Modi
Entsprechend Dolby TrueHD
(nur R-607) oder Dolby Digital
(Theater, Hall, Stadium, Club,
Arena und 5-Kanal Stereo
sind ebenfalls für 5.1-Kanal
Programme verfügbar)
Dolby Pro Logic II Movie, Dolby
Pro Logic II Music, Dolby Pro
Logic II Game, Dolby Pro Logic
Entsprechend DTS (Theater,
Hall, Stadium, Club, Arena und
5-Kanal Stereo sind ebenfalls für
5.1-Kanal Programme verfügbar)
Dolby Pro Logic II Movie, Dolby
Pro Logic II Music, Dolby Pro
Logic II Game, Dolby Pro Logic,
DTS Neo:6 Cinema, DTS Neo:6
Music, Theater, Hall, Stadium,
Club, Arena, 5-Kanal Stereo
Dolby Pro Logic II Movie, Dolby
Pro Logic II Music, Dolby Pro
Logic II Game, Dolby Pro Logic,
DTS Neo:6 Cinema, DTS Neo:6
Music, Theater, Hall, Stadium,
Club, Arena, 5-Kanal Stereo
78
Page 79

Betrieb
Kanallautstärke einstellen
Zusätzlich zum integrierten Testton des Audio/Video
Receivers zur Konguration Ihrer Lautsprecher, wie
im Abschnitt
kongurieren
der einzelnen Kanäle auch jederzeit für individuelle
Programmquellen oder nach Ihrem persönlichen
Geschmack einstellen.
1
2
3
Drücken Sie RETURN, wenn die Einstellung beendet ist.
Audio/Video Receiver für Lautsprecher
beschrieben, können Sie die Lautstärke
Drücken Sie die Kanalpegeltaste auf
der Fernbedienung. Im Display wird der
Lautstärkepegel des linken Kanals angezeigt.
Mit den Navigationstasten aufwärts/abwärts zeigen
Sie die einzustellenden Kanäle an.
Mit der linken und rechten Navigationstaste stellen
Sie die Kanallautstärke ein.
Aufnahme
2-Kanal Analog-Audiosignale sowie Composite
Videosignale liegen gewöhnlich an den entsprechenden
Aufnahmeausgängen an. Zur Aufnahme schließen Sie
Ihren Audio- oder Videorekorder am entsprechenden
Ausgang des Audio/Video Receivers an, wie im Abschnitt
Anschlüsse
Aufnahmemedium in den Rekorder ein und schalten Sie
ihn ein. Vollständige Anleitungen zur Aufnahme nden Sie
in der Bedienungsanleitung Ihres Aufnahmegeräts.
beschrieben; legen Sie ein unbespieltes
Hinweis
•Der Audio/Video Receiver wandelt Digitalsignale
nicht in Analogsignale um. Nur von am Analog-Audiound Composite Videoeingang angeschlossenen
Geräten kann aufgezeichnet werden.
•HDMI-Videoquellen stehen zur Aufnahme nicht zur
Verfügung.
•Bitte beachten Sie das Copyright, wenn Sie
Aufnahmen erstellen. Die unbefugte Vervielfältigung
urheberrechtlich geschützter Materialien ist verboten.
Rückstellung
Zeigt der Audio/Video Receiver nach einer Stromspitze
Fehlfunktionen, so schalten Sie ihn mit dem Hauptschalter
auf der Frontblende aus und ziehen Sie das Netzkabel für
wenigstens 3 Minuten ab. Dann schließen Sie das Kabel
wieder an und schalten Sie den Audio/Video Receiver ein.
Führt dies nicht zum Erfolg, so stellen Sie den Audio/Video
Receivers zurück, wie nachstehend beschrieben.
Hinweis
•Bei der Rückstellung verlieren Sie alle
Kongurationen, einschließlich Lautsprecher- und
Pegeleinstellungen sowie Senderspeicher. Nach
der Rückstellung geben Sie diese Einstellungen
erneut entsprechend Ihren Notizen auf den
Arbeitsblättern im Anhang ein.
FolgenSiezurRückstellungdesAudio/
Video Receivers folgenden Schritten:
Drücken Sie Standby/On auf der Frontblende, um
1
das Gerät in den Stand-by-Modus zu versetzen (die
Stand-by-Anzeige leuchtet rot).
Halten Sie SURROUND auf der Fernbedienung
2
gedrückt, während Sie gleichzeitig Standby/On auf
der Frontblende gedrückt halten.
Wenn die Rückstellmeldung „RESET?“ auf der
3
Frontblende angezeigt wird, drücken Sie BAND.
Wenn die Rückstellmeldung „OK?“ auf der
4
Frontblende angezeigt wird, drücken Sie BAND.
Speicher
Wird der Audio/Video Receiver vom Netz getrennt oder Sie
haben einen Stromausfall, so bleiben Ihre Einstellungen
bis zu zwei Wochen gespeichert.
Deutsch
Sleeptimer
Der Sleeptimer schaltet den Audio/Video Receiver für bis
zu 90 Minuten ein und danach wieder automatisch aus.
Drücken Sie SLEEP auf der Fernbedienung, die Zeit bis
zum Ausschalten wird auf der Frontblende angezeigt.
Wählen Sie als Einstellung 30 min., 60 min., 90 min. oder
OFF.
Nach der Aktivierung des Sleeptimers wird ein kleiner
Halbmond auf der Frontblende angezeigt.
Drücken Sie SLEEP nach der Einstellung des Timers, so
wird die verbleibende Spielzeit angezeigt. Drücken Sie
erneut SLEEP, um die Spielzeit umzustellen.
79
Page 80

Störungserkennung
Bei Problemen mit dem System sehen Sie zunächst in dieser Anleitung nach, bevor Sie sich an den Kundendienst wenden.
Besteht ein Problem weiterhin, so wenden Sie sich an Ihren Fachhändler oder an einen autorisierten Kundendienst.
Bei abnormalem Verhalten des Geräts aufgrund äußerer Einüsse wie statischer Auadung ziehen Sie zur Rückstellung
vorübergehend den Netzstecker.
Problem Ursache Lösungsvorschlag
Das Gerät funktioniert
nicht, nachdem es mit dem
Hauptschalter eingeschaltet
wurde.
Das Display auf der
Frontblende leuchtet, aber
kein Bild und kein Ton.
Kein Ton von allen
Lautsprechern.
Kein Ton von allen
Lautsprechern; PROTECT
wird angezeigt.
Kein Ton vom mittleren
oder den SurroundLautsprechern.
•Keine Netzspannung. •Vergewissern Sie sich, dass das Netzkabel
an einer funktionierenden Steckdose
angeschlossen ist.
•Eingang unterbrochen.
•Stummschaltung ist aktiviert.
•Lautstärke ist heruntergeregelt.
•Lautsprecher sind im
Einstellungsmenü auf „Off“
eingestellt.
•Der Verstärker bendet sich im
Schutzmodus, möglicherweise
aufgrund eines Kurzschlusses.
•Der Verstärker bendet sich im
Schutzmodus, möglicherweise
aufgrund interner Probleme.
•Falscher Surround-Modus.
•Programmmaterial ist Mono.
•Falsche
Lautsprecherkonguration.
•Programmmaterial ist Stereo.
•Überprüfen Sie alle Eingänge und
Lautsprecheranschlüsse.
•Drücken Sie die Stummschalttaste.
•Regeln Sie die Lautstärke hoch.
•Stellen Sie die Lautsprecher im
Einstellungsmenü auf „On“ ein.
Siehe Seite 74 für weitere Informationen.
•Überprüfen Sie alle Lautsprecherkabel an
den Lautsprechern und am Audio/Video
Receiver auf Kurzschluss.
•Wenden Sie sich an den autorisierten
Kundendienst.
•Wählen Sie einen anderen Surround-
Modus als Stereo.
•Monoprogramme enthalten keine
Surround-Informationen.
•Überprüfen Sie die
Lautsprecherkonguration im
Einstellungsmenü.
•Der Surround-Decoder erstellt
möglicherweise keine Informationen aus
nicht codierten Stereoprogrammen für den
mittleren oder die Surround-Kanäle.
Das Gerät reagiert nicht auf
die Fernbedienung.
Brummgeräusch im Tuner.
80
•Batterien der Fernbedienung
sind erschöpft.
•Audio/Video Receiver ist nicht
ausgewählt.
•Der Fernbedienungssensor ist
blockiert.
•Örtliche Störung. •Stellen Sie den Audio/Video Receiver oder
•Tauschen Sie die Batterien der
Fernbedienung aus.
•Drücken Sie die Einstelltaste auf dem
Audio/Video Receiver.
•Achten Sie darauf, dass der Sensor auf der
Frontblende des Audio/Video Receivers
Sichtverbindung zur Fernbedienung hat.
die Antenne von Computern, Neonlampen,
Motoren und anderen Elektrogeräten
entfernt auf.
Page 81

Spezikationen
Ausgangsleistung
Eingangsempndlichkeit/Impedanz
Rauschabstand (IHF-A)
Surround-System Kanaltrennung
Frequenzgang
Audio
7 x 100 W (20 Hz~20 kHz, 6 Ohm, Klirrfaktor 1 %/nur
Kanal-getrieben)
2 x 75 W (20 Hz~20 kHz, 6 Ohm, Klirrfaktor 0,1 %/Stereo)
200 mV/47 kOhm
95 dB
Dolby Pro Logic/ PLII: 40 dB
Dolby Digital: 55 dB
DTS: 55 dB
10 Hz – 100 kHz: ±3 dB
Deutsch
Hohe sofortige Belastbarkeit (HCC)
Frequenzbereich
Empndlichkeit IHF
Rauschabstand (Mono/Stereo)
Verzerrung (Mono/Stereo)
Stereotrennung
Bildunterdrückung
Zf-Unterdrückung
Frequenzbereich
Rauschabstand
Empndlichkeit (Schleife)
Trennschärfe (±10 kHz)
Zf-Unterdrückung
±25 A
UKW-Tuner
87,5 – 108,0 MHz
1,3 μV/13,2 dBf
65 dB/62 dB
0,2 %/0,3 %
35 dB bei 1 kHz
80 dB
80 dB
MW-Tuner
520 – 1720 kHz, 522 –1161 kHz
45 dB
500 μV
30 dB
80 dB
Video
TV-Format
Eingangspegel/Impedanz
Ausgangspegel/Impedanz
Video Frequenzgang (Composite Video)
HDMI Mit 3D und Farbtiefe
NTSC/PAL
1 Vp-p/75 Ohm
1 Vp-p/75 Ohm
10 Hz – 8 MHz (–3 dB)
Allgemein
Netzanschluss
Leistungsaufnahme
Abmessungen (B×H×T, einschließlich überstehender Teile)
Gewicht (Netto)
AC 120 V/60 Hz, AC 230 V/50 Hz
<0,5 W (Stand-by-Modus), 280 W max.
435 mm x 138 mm x 379 mm (17.1" x 5.4" x 14.9")
8 kg (17.6 lb)
81
Page 82

Информация о безопасности эксплуатации
ПЕРЕД ЭКСПЛУАТАЦИЕЙ ВАШЕГО УСТРОЙСТВА ОЗНАКОМЬТЕСЬ СО
СЛЕДУЮЩИМИ ПОЛОЖЕНИЯМИ
ВНИМАНИЕ
ДЛЯ СНИЖЕНИЯ РИСКА ПОРАЖЕНИЯ ЭЛЕКТРИЧЕСКИМ ТОКОМ
НЕ СНИМАЙТЕ ПЕРЕДНЮЮ ИЛИ ЗАДНЮЮ ПАНЕЛИ. ВНУТРИ
УСТРОЙСТВА НЕТ ДЕТАЛЕЙ, ОБСЛУЖИВАНИЕ КОТОРЫХ ДОЛЖНО
ПРОВОДИТЬСЯ ПОЛЬЗОВАТЕЛЕМ. РЕМОНТ УСТРОЙСТВА ДОЛЖЕН
ОСУЩЕСТВЛЯТЬСЯ КВАЛИФИЦИРОВАННЫМ ПЕРСОНАЛОМ.
ВНИМАНИЕ:
ВНИМАНИЕ
РИСК ПОРАЖЕНИЯ ЭЛЕКТРИЧЕСКИМ ТОКОМ
НЕ ОТКРЫВАТЬ
Этот символ указывает на присутствие неизолированного «опасного напряжения» внутри корпуса, которое может
стать причиной поражения электрическим током.
Этот символ указывает на важные инструкции по эксплуатации и обслуживанию в сопровождающей
документации устройства.
ДЛЯ СНИЖЕНИЯ РИСКА ПОРАЖЕНИЯ ЭЛЕКТРИЧЕСКИМ ТОКОМ НЕ ПОДВЕРГАЙТЕ ЭТО УСТРОЙСТВО
ВОЗДЕЙСТВИЮ ДОЖДЯ ИЛИ ВЛАГИ.
ВНИМАНИЕ
•Оставьте пространство вокруг устройства для обеспечения
достаточной вентиляции.
•Избегайте установки устройства в чрезвычайно горячей или
холодной окружающей среде, под воздействием прямых
солнечных лучей или нагревательных приборов.
•Избегайте воздействия влаги, воды или пыли.
•Не допускайте попадания посторонних предметов внутрь
изделия.
•Не загораживайте вентиляционные отверстия какими-либо
предметами, например, газетами, cалфетками или шторами.
•Не допускайте воздействия открытого пламени, например,
свечей и других источников огня на устройство.
•Соблюдайте правила утилизации упаковки, разряженных
батареек и старого оборудования.
•Не подвергайте устройство воздействию капель или брызг,
а также не устанавливайте на них наполненные жидкостью
предметы, например, вазы.
•Не допускайте контакта устройства с инсектицидами, бензином
или растворителями.
•Ни в коем случае не разбирайте и не модернизируйте
устройство.
Примечания, связанные с кабелем электропитания и сетевой
розеткой
•Устройство остается подключенным к электрической сети
переменного тока пока оно подключено к розетке, даже если
переключатель электропитания устройства выключен.
•Для полного отключения устройства от электрической сети
выньте вилку из розетки.
•При установке изделия убедитесь, что имеется доступ к
электрической розетке.
•При отсутствии использования устройства в течение
длительного времени отключите штепсельную вилку от
электрической розетки.
Изготавливается по лицензии согласно
патентам США No: 5,956,674; 5,974,380;
6,226,616; 6,487,535; 7,212,872;
7,333,929; 7,392,195; 7,272,567 и
другим, которые действуют на территории США и всего мира,
которые уже получены или находятся в стадии получения. DTSHD, Symbol, и DTS-HD Symbol являются зарегистрированными
торговыми марками, DTS-HD Master Audio является торговой
маркой DTS, Inc. В комплект поставки устройства входит
программное обеспечение. © DTS, Inc. Все права защищены.
Изготовлено по лицензии Dolby
Laboratories. Dolby, Pro Logic, и двойной
D символ являются торговыми марками
Dolby Laboratories.
HDMI, логотип HDMI и High-
Denition Multimedia Interface
являются торговыми марками или
зарегистрированными торговыми марками компании HDMI Licensing
LLC в США и других странах.
* DTS-HD Master Audio и Dolby TrueHD применимы только для
устройства R-607.
Меры предосторожности при установке
Примечание
Не перекрывайте вентиляционные отверстия и не ставьте на устройство другое оборудование.
Примечание:
В целях рассеивания теплоты не размещайте устройство в закрытом пространстве, например, в книжном
шкафу или другом закрытом месте.
82
Стена
Page 83

Содержание
82 ИНФОРМАЦИЯ О БЕЗОПАСНОСТИ ЭКСПЛУАТАЦИИ
84 НАЧАЛО РАБОТЫ
84 Передняя панель
84 Задняя панель
85 Дистанционное управление
86 Установка
87 ПОДКЛЮЧЕНИЯ
87 Подключение динамиков
87 Подключение сабвуфера
88 Подключение телевизора или дисплея
89 Подключение устройств, которые являются источниками аудио- и
видеосигнала
93 Подключение тюнера антенны
93 Подключение к электрической сети переменного тока
93 Установка батарей в пульт дистанционного управления
94 НАСТРОЙКА
Русский
94 Включение проектора
94 Настройка аудио-/видеоресивера для работы с вашими динамиками
96 ЭКСПЛУАТАЦИЯ
96 Эксплуатация аудио-/видеоресивера
96 Прослушивание FM- и AM-радио
97 Прослушивание сигнала от мультимедийных устройств через
USB-разъем
97 Выбор режима объемного звука
98 Расширенные функции
100 ПОИСК И ИСПРАВЛЕНИЕ НЕИСПРАВНОСТЕЙ
101 ТЕХНИЧЕСКИЕ ХАРАКТЕРИСТИКИ
83
Page 84

Начало работы
Передняя панель
1 2 3 4 5 6 7
8 9 10 11 14 15
Основной выключатель электропитания
1
Индикатор режима ожидания
2
Переключатель вкл./режим ожидания
3
ИК-датчик
4
Дисплей
5
Кнопки выбора режимов объемного звука
6
Основной регулятор уровня громкости
7
Селектор входных разъемов
8
Задняя панель
1 2
12 13
9
10
11
12
13
14
15
Разъем для наушников
Входной разъем «F.AUX»
Кнопка выбора диапазона
Кнопки настройки вверх/вниз
Кнопки выбора предустановок
Кнопка режима стерео
USB-разъем
84
Цифровые аудиоразъемы
1
Разъемы HDMI
2
Разъемы тюнера антенны
3
Аналоговые аудиоразъемы
4
3 4 5 6 7 8
Разъемы для подключения сабвуфера
5
Разъемы для композитного видеосигнала
6
Разъемы для подключения динамиков
7
Входной разъем для подключения электропитания
8
переменного тока
Page 85

Дистанционное управление
1
22
Кнопка «ВКЛ.»
1
Кнопка выбора источника сигнала
2
Кнопки выбора режимов объемного звука
3
(Кнопка GAME и NETWORK отсутствуют.)
Начало работы
Русский
2
3
4
5
6
7
8
9
12
21
20
19
18
17
16
15
14
13
11
10
Кнопка вызова главного меню
4
▲/▼/◄/► Кнопки выбора
5
ENTER/MEMO Кнопка Enter/Memory
SEARCH.M Кнопка поиска cистемы
радиоинформации
(* Кнопка SEARCH.M имеется только в моделях,
продаваемых в странах Европы).
Кнопка выбора «дисплей/режим»
6
Кнопка «стоп»
7
Кнопка «повтор»
8
Кнопки настройки вверх/вниз
9
Кнопки перемотки назад/вперед
Кнопки выбора предустановленной станции вверх/
10
вниз
Кнопки выбора предыдущий/следующий
Кнопка «в случайном порядке»
11
Кнопка «воспроизведение/пауза»
12
Кнопка «возврат»
13
Кнопки регулировки уровня громкости
14
Кнопка вызова меню настройки
15
Кнопка временного отключения звука
16
Кнопка выбора стереорежима
17
Кнопка выбора звукового канала
18
Кнопка регулировки уровня громкости канала
19
Кнопка последовательности тестовых сигналов
20
Кнопка управления тестовым сигналом
21
Кнопка «режим ожидания»
22
85
Page 86

R-607/R-507 АУДИО-/ВИДЕОРЕСИВЕР
Установка
Расположение динамиков
Определите места установки динамиков вашей системы в
соответствии с инструкциями их производителя и обстановки в
комнате для прослушивания. Используйте приведенные ниже
рисунки в качестве руководства для 5.1-канальных систем.
Чтобы создать самое реалистичное объемное звуковое
окружение вы должны разместить динамики по кругу, в
центре которого будет находиться место для прослушивания.
Вы должны наклонить каждый динамик так, чтобы он был
направлен непосредственно на место для прослушивания.
Используйте приведенную ниже схему в качестве руководства.
Установка левого, центрального и правого
динамиков
Разместите центральный динамик наверху или под
телевизором или закрепите его на стене выше или ниже
экрана телевизора или дисплея. Разместите передние левый
и правый динамики по кругу, наклоните их под углом около
30 градусов по отношению к центральному динамику и
направьте по направлению к слушателю.
Установите передний левый, передний правый и центральный
динамики на одной высоте, предпочтительно на высоте
ушей слушателей. Центральный динамик должен находиться
на высоте не более 2 футов (0,6 м) выше или ниже левого
/ правого динамиков. Если вы используете в аудио-/
видеоресивере только два динамика, установите их на
позиции переднего левого и переднего правого динамиков.
Установка динамиков объемного звука
Вы должны установить левый и правый динамики объемного
звука немного сзади от центрального динамика под углом
примерно 110 градусов от него и повернуть их под углом по
направлению к слушателю. Или вы можете установить их
позади слушателя. При этом каждый из динамиков объемного
звука должен быть направлен в противоположную сторону
от передних динамиков. Вы должны установить динамики
объемного звука на расстоянии 2 - 6 футов (0,6 м - 1,8 м)
выше уровня ушей слушателя.
Установка сабвуфера
Поскольку форма комнаты и уровень громкости могут
оказать существенное влияние на характеристики работы
сабвуфера, лучше всего начать экспериментировать
с установкой сабвуфера, чтобы найти место, которое
обеспечивает наилучшие результаты в конкретной комнате
для прослушивания. Следующие правила помогут вам начать
работу:
•Установка сабвуфера рядом со стеной в целом увеличит
уровень низких частот в помещении.
•Установка сабвуфера в углу увеличит до максимума
уровень низких частот в помещении.
•Во многих помещениях установка сабвуфера вдоль той же
плоскости, вдоль которой установлены левый и правый
динамики, может обеспечить лучшую интеграцию звука,
издаваемого сабвуфером, и звука, издаваемого левым и
правым динамиками.
•В некоторых помещениях, наилучшие характеристики
может даже обеспечить установка сабвуфера позади
местоположения слушателя. Хороший способ определить
наилучшее место для сабвуфера - это временно
установить его на место прослушивания и воспроизвести
музыку с высоким уровнем низких частот. Перемещайте
сабвуфер в разные места помещения во время
воспроизведения звука (ваши уши должны находиться в
том месте, где будет находиться сабвуфер). Вы должны
слушать, пока не найдете место, в котором характеристики
низких частот будут наилучшими. Установите сабвуфер в
этом месте.
86
Page 87

Подключения
Внимание
•Перед подключением к аудио-/видеоресиверу
каких-либо разъемов, убедитесь, что кабель
электропитания переменного тока аудио-/
видеоресивера отключен от аудио-/видеоресивера
и от электрической сети. Подключение разъемов
в момент, когда аудио-/видеоресивер подключен
к электрической сети и включен, может повредить
динамики.
Подключение динамиков
Как использовать клеммы АУДИО-/
ВИДЕОРЕСИВЕР, предназначенные для
подключения динамиков
Снимите крышку
1
Вставьте оголенный
2
провод
Затяните крышку
3
Подключение сабвуфера
Используйте одинарный аудиокабель разъема RCA для
подключения разъема Pre-Out аудио-/видеоресивера к
вашему сабвуферу. Более подробную информацию о
подключении смотрите в руководстве по эксплуатации вашего
сабвуфера.
Задняя панель
Русский
Всегда подключайте цветную (+) клемму разъема АУДИО-/
ВИДЕОРЕСИВЕРА к клемме (+) динамика (обычно красный),
и черную клемму (-) разъема АУДИО-/ВИДЕОРЕСИВЕРА к
клемме (-) динамика (обычно черный).
Внимание
•Убедитесь, что оголенные провода (+) и (-) не
соприкасаются друг с другом и не касаются другой
клеммы. Соприкосновение проводов может стать
причиной короткого замыкания, что может повредить
ваш аудио-/видеоресивер.
Подключите динамики, как показано на рисунке.
Сабвуфер
87
Page 88

R-607/R-507 АУДИО-/ВИДЕОРЕСИВЕР
Composite
VIDEO IN
Подключение телевизора
или дисплея
Выходной HDMI-разъем монитора
Если в вашем телевизоре имеется разъем HDMI и у вас
имеются HDMI-устройства, которые являются источниками
видеосигнала, используйте HDMI-кабель (не входит в
комплект поставки) для подключения телевизора к выходному
HDMI-разъему монитора, который находится на аудио-/
видеоресивере.
Данный способ подключения обеспечит наилучшее качество
изображения.
Композитный выходной разъем
видеосигнала монитора
Если в вашем телевизоре отсутствует HDMI-разъем или если
он имеется, но вы
устройства через композитные видеоразъемы
видеокабель для композитного сигнала (не входит в комплект
поставки), чтобы подключить выходной композитный разъем
монитора, который находится на аудио-/видеоресивере, к
композитному видеоразъему вашего ТВ.
Задняя панель
подключили к нему какие-либо другие
, используйте
Задняя панель
Композитный видеосигнал
(не входит в комплект поставки)
ТВ
Примечание
•Экранное меню аудио-/видеоресивера
отображается только через композитный выходной
разъем монитора. Если вы хотите использовать
экранное меню аудио-/видеоресивера, необходимо
подключить композитный выходной разъем
монитора к вашему телевизору, даже если вы не
подключили какие-либо устройства-источники
композитного видеосигнала к аудио-/видеоресиверу.
88
Page 89

Подключения
Подключение устройств,
которые являются источниками
аудио- и видеосигнала
Устройства, которые являются источниками сигнала, - это
устройства, в которых сигнал поступает от воспроизведения
Blu-ray Disc™ или от DVD-плеера, кабельного, спутникового
или HDTV-тюнера и т. д. В вашем аудио-/видеоресивере
имеется несколько различных типов входных разъемов
для устройств, которые являются источниками аудиои видеосигнала: HDMI, композитный видеоразъем,
оптический цифровой аудиоразъем, коаксиальный цифровой
аудиоразъем и аналоговый аудиоразъем.
Каждая кнопка источника сигнала вашего аудио-/
видеоресивера назначена для отдельного входного
аналогового аудиоразъема.
Цифровые входные разъемы не назначены для какихлибо конкретных типов аналоговых входных разъемов.
После выбора устройства-источника сигнала вы можете
использовать ЦИФРОВЫЕ кнопки на пульте дистанционного
управления, чтобы выбрать конкретный входной аудиоразъем
(HDMI, коаксиальный цифровой, оптический цифровой,
аналоговый разъемы), через которые вы хотите подключить
устройство. Примечание: Вы не можете выбрать входной
аудиоразъем для FM-/AM-радио или USB-разъема).
При подключении различных устройств-источников сигнала
заполните поля столбцов «подключенные устройстваисточники сигнала» и «использованные цифровые входные
аудиоразъемы» в таблице ниже. Это облегчит отследить,
какие устройства к каким разъемам вы подключили.
HDMI-устройства
Если в каких-либо из ваших устройств-источников сигнала
имеются HDMI-разъемы, используя эти разъемы вы сможете
обеспечить наилучшее качество воспроизведения видеои аудиосигнала. Так как HDMI-кабель передает цифровой
видео-/аудиосигнал, вам не нужно подключать какие-либо
дополнительные аудиоразъемы при подключении устройства
через HDMI-кабель.
Если у вас имеется ТВ, в котором имеется функция
обратного аудиоканала HDMI-разъема, аудиосигнал можно
подключить к аудио-/видеоресиверу через выходной HDMIразъем монитора обратного аудиоканала. В этом случае не
потребуется дополнительного подключения аудиосигнала к
аудио-/видеоресиверу.
Задняя панель
Русский
HDMI-кабель
(не входит в комплект
поставки)
Если в вашем устройстве-источнике
сигнала имеется HDMI-разъем
89
Page 90

R-607/R-507 АУДИО-/ВИДЕОРЕСИВЕР
Подключение устройств-источников
композитного видеосигнала
Если вам необходимо будет подключить композитные
видеоразъемы от ваших устройств-источников сигнала, в
которых отсутствуют видеоразъемы HDMI, вы также должны
будете подключить аудиосигнал от вашего устройства к
аудио-/видеоресиверу.
Задняя панель
Подключение устройств-источников
аудиосигнала через цифровой оптический
разъем
Если в ваших устройствах-источниках сигнала имеются
цифровые оптические выходные разъемы, подключите их к
цифровым оптическим аудиоразъемам аудио-/видеоресивера.
Задняя панель
Видеокабель для композитного
видеосигнала
(не входит в комплект поставки)
Если в вашем устройстве-
источнике сигнала имеется
композитный видеоразъем
Composite
VIDEO OUT
OPTICAL
OUT
ТВ, DVD-плеер и т.д.
90
Page 91

Подключения
Подключение устройств-источников
аудиосигнала через цифровой
коаксиальный разъем
Если в ваших устройствах-источниках сигнала имеются
цифровые коаксиальные выходные разъемы, подключите
их к цифровым коаксиальным аудиоразъемам аудио-/
видеоресивера.
Задняя панель
Подключение устройств-источников
аудиосигнала через аналоговый разъем
Осуществляйте подключение ваших устройствисточников сигнала через аналоговые аудиоразъемы,
если в них отсутствуют HDMI-разъемы или цифровые
аудиоразъемы. Если вы подключаете источники
видеосигнала к аудиоразъемам «Видео 1» или «Видео 2»
аудио-/видеоресивера, вы также должны подключить
композитный видеоразъем устройства-источника сигнала к
соответствующему композитному видеоразъему.
Задняя панель
Русский
ВЫХОД
OUT
ТВ, DVD-плеер и т.д.
RL
ТВ, DVD-плеер и т.д.
91
Page 92

R-607/R-507 АУДИО-/ВИДЕОРЕСИВЕР
RL
Магнитофоны
Подключите входные разъемы аналогового магнитофона к
аналоговым выходным аудиоразъемам «Tape Out» аудио-/
видеоресивера.
Вы можете записывать любой аналоговый аудиосигнал (за
исключением «Tape In»).
Задняя панель
Видеомагнитофоны
Подключите аналоговый входной видеоразъем
видеомагнитофона к выходному композитному видеоразъему
«Видео 1» аудио-/видеоресивера и входной аудиоразъем
видеомагнитофона к выходному аналоговому аудиоразъему
аудио-/видеоресивера «Видео 1». Вы можете записывать
входной композитный видеосигнал через разъем «Видео 2».
Задняя панель
92
Аналоговый магнитофон
R L
ВХОДНОЙ
АУДИОРАЗЪЕМ
Аналоговый видеомагнитофон
ВХОД
КОМПОЗИТНЫЙ
ВИДЕОРАЗЪЕМ
Page 93

Подключения
Подключение тюнера
антенны
•Подключите FM-антену, которая входит в комплект
поставки, к разъему 75Ω для FM-радио аудио-/
видеоресивера. Для обеспечения лучшего приема
выдвиньте FM-антенну на максимальную длину.
•Согните и сложите основание AM-антенны, которая
входит в комплект поставки, как показано на рисунке и
подключите провода антенны к разъемам «AM» и «Gnd»
аудио-/видеоресивера. При необходимости поверните
антенну, чтобы минимизировать фоновый шум.
Задняя панель
Подключение к электрической
сети переменного тока
Подключите кабель электропитания к входному разъему
электропитания переменного тока аудио-/видеоресивера, а
затем к рабочей розетке переменного тока.
Задняя
панель
Кабель
электропитания
переменного тока
К электрической
розетке
переменного тока.
Примечание
•Перед подключением кабеля электропитания
убедитесь, что напряжение переменного тока,
указанное на задней панели аудио-/видеоресивера,
соответствует напряжению, которое используется в
вашей стране.
Русский
Рамочная AM антенна
Установка батарей в пульт
дистанционного управления
Снимите крышку пульта дистанционного управления, вставьте
две батарейки ААА, которые входят в комплект поставки, как
показано на рисунке и установите на место крышку отсека для
батарей.
Примечание
•Снимите защитную пленку с передней панели
аудио-/видеоресивера, чтобы предотвратить
уменьшение эффективности работы пульта
дистанционного управления.
93
Page 94

Настройка
Включение проектора
Установите главный переключатель питания аудио-/
1
видеоресивера на «On». (Индикатор режима
ожидания будет гореть светиться красным цветом.)
Нажмите на передней панели кнопку «On / Standby».
2
Основной выключатель
электропитания
Индикатор режима
ожидания
Настройка аудио-/
видеоресивера для работы с
вашими динамиками
Вы будете использовать следующие кнопки пульта
дистанционного управления для настройки вашего аудио-/
видеоресивера:
Кнопка
вызова
меню
настройки
Влево /
вправо /
вверх /
вниз
Включите телевизор и выберите входной разъем
1
телевизора, к которому вы подключили композитный
выход для монитора аудио-/видеоресивера.
Подключите аудио- и видеоустройства-источники
сигнала
к разъему страница 89.
Кнопка
«ввод»
Кнопка
«возврат»
Кнопка «вкл. / режим
ожидания»
На пульте дистанционного управления можно только
переключить аудио-/видеоресивер в режим ожидания
или переключить его в рабочий режим в соответствии с
инструкциями ниже. Если на основном блоке нажата кнопка
питания, вы не сможете включить устройство, даже нажав
кнопку питания на пульте дистанционного управления.
Кнопка
включения
электропитания
В режиме ожидания нажмите кнопку «POWER ON».
1
Нажмите кнопку «STANDBY» для включения режима
2
ожидания.
Кнопка
«режим
ожидания»
Примечание
•Хотя можно настроить аудио-/видеоресивер,
используя только дисплей на его передней панели,
но проще использовать систему экранного меню.
Нажмите кнопку «SETUP» на пульте дистанционного
2
управления. На экране телевизора появится меню
настройки аудио-/видеоресивера.
System Setup
1. Speaker Setup
2. HDMI Setup
3. Audio Setting’s
4. Auto Power Control
5. Speakers On/Off
Используйте стрелки на пульте дистанционного
3
управления и кнопку «ENTER» для выбора опции
«Speaker Setup». Появится меню настройка
динамиков.
1. Speaker Setup
a. Speaker Setting’s
b. Crossover
c. Channel Level
d. Speaker Distance
94
Page 95

Настройка
Выберите опцию «Speaker Settings». Появится меню
4
настройки динамиков.
SpeaKer Setting’s1a.
Front
Center
Surrround L/R
Subwoofer
Нажатием кнопок влево и вправо на пульте
5
дистанционного управления выберите опцию «NO»,
«SMALL» или «БОЛЬШОЙ» для позиций переднего
динамика, центрального динамика и динамика
объемного звука в зависимости от того, какие
динамики вы подключили к аудио-/видеоресиверу.
NO:
Выберите эту опцию, если вы не подключили
динамик для этой позиции (недоступно для передних
динамиков).
SMALL:
Выберите этот параметр, если динамик не
может обеспечить чистое и глубокое звучание низких
частот на уровнях громкости, которые соответствуют
уровням громкости сабвуфера. Все низкие частоты в
этом канале не будут подаваться на этот динамик и
будут перенаправлены на сабвуфер (или на передние
динамики, если для сабвуфера выбрана опция «NO»).
Для большинства динамиков (если они не являются
большими по размерам и мощными) необходимо
выбирать опцию «SMALL».
LARGE:
может обеспечить чистое и глубокое звучание низких
частот на уровнях громкости, которые соответствуют
уровням громкости сабвуфера. Все низкие частоты в
этом канале направляются на этот динамик.
Когда вы закончите настройку, нажмите кнопку
«RETURN» на пульте дистанционного управления,
чтобы вернуться в меню настройки динамиков.
Выберите этот параметр, если динамик
< LARGE >
[ LARGE ]
[ LARGE ]
[ YES ]
Выберите опцию «Speaker Distance». На экране
7
отобразится меню дистанции до динамиков.
SpeaKer Distance1d.
Units [ FEET ]
Front L
Center
Front R
Surrround R
Surrround L
Subwoofer
Примечание
•Дисплей устройства может отличаться в
зависимости от модели устройства.
Измерьте расстояние от каждого динамика до вашего
8
места прослушивания. Запишите расстояния.
Нажимайте кнопки со стрелками влево и вправо на
9
пульте дистанционного управления, чтобы изменить
настройки расстояния для каждого динамика и
установить расстояние, которое вы записали в шаге
8. Когда вы закончите, нажмите кнопку «RETURN» на
пульте дистанционного управления, чтобы вернуться
в меню настройки динамиков.
Выберите опцию «Channel Level». Появится меню
10
уровня канала. Нажимая кнопки со стрелками влево
и вправо, установите для тестового сигнала опцию
«Manual» и нажмите кнопку «ENTER» на пульте
дистанционного управления. После того, как на
экране появится обратный отсчет времени, вы будете
слышать тестовый сигнал через передний левый
динамик.
< 10.0ft >
[ 10.0ft ]
[ 10.0ft ]
[ 10.0ft ]
[ 10.0ft ]
[ 10.0ft ]
Channel Level1c.
Русский
Примечание
•Если в вашей системе имеется сабвуфер и вы
установили для передних динамиков опцию
«LARGE», сабвуфер может не воспроизводить звук,
за исключением воспроизведения в форматах Dolby
Digital и DTS, в которых имеется информация для
низкочастотного канала. Если вы установили для
передних динамиков опцию «LARGE» и вы хотите,
чтобы ваш сабвуфер воспроизводил низкие частоты
при воспроизведении всех форматов, установите
для сабвуфера опцию «PLUS» (смотрите ниже).
•Для сабвуфера выберите опцию «YES» (если в
вашей системе имеется сабвуфер), опцию «NO»
(если в вашей системе сабвуфер отсутствует) или
опцию «PLUS» (если в вашей системе имеется
сабвуфер, вы установили для передних динамиков
опцию «LARGE» и вы хотите, чтобы ваш сабвуфер
воспроизводил звук всех форматов).
На данный момент вы можете пропустить настройки
6
«Crossover».
Test Tone < Manual >
Сядьте в основное место для прослушивания и
11
настройте уровень громкости аудио-/видеоресивера,
чтобы тестовый сигнал был установлен на средний
уровень громкости. Обратите внимание на уровень
громкости тестового сигнала, воспроизводимого через
первый динамик. Нажмите кнопку со стрелкой вниз на
пульте дистанционного управления, чтобы тестовый
сигнал переключился на каждый следующий динамик
вашей системы, и обратите внимание на уровень
громкости тестового сигнала на каждом динамике.
По мере переключения тестового сигнала между
12
динамиками нажимайте кнопки со стрелками влево и
вправо на пульте дистанционного управления, чтобы
регулировать уровни громкости каналов, пока уровень
громкости всех каналов не будет установлен на одном
уровне.
После завершения нажмите кнопку «SETUP» на
пульте дистанционного управления, чтобы закрыть
экранное меню.
95
Page 96

Эксплуатация
Эксплуатация аудио-/
видеоресивера
Теперь, когда вы установили компоненты и завершили
базовую конфигурацию, вы готовы начать использование
вашей системы домашнего кинотеатра.
Регулировка уровня громкости
Регулировка уровня громкости осуществляется либо
поворотом регулятора громкости на передней панели (по
часовой стрелке, чтобы увеличить громкость и против часовой
стрелки, чтобы уменьшить громкость) или нажатием кнопок
«Volume» вверх / вниз на пульте дистанционного управления.
Временное отключение звука
Для временного отключения всех динамиков и наушников
нажмите кнопку «временное отключение звука» на пульте
дистанционного управления. Любое воспроизведение, которое
осуществляется в данный момент, будет продолжаться. В
качестве напоминания на дисплее передней панели появится
сообщение «MUTE». Для восстановления звука нажмите
кнопку «временное отключение звука» или кнопку регулировки
громкости.
Прослушивание через наушники
Для индивидуального прослушивания звука подключите
1/4-дюймовый стереоштеккер для наушников к разъему для
наушников на передней панели.
Примечание
•Для получения информации об отключении
динамиков во время прослушивания сигнала через
наушники смотрите страница 94.
Рекомендации по устранению
неисправностей, связанных с
видеосигналом
Если отсутствует изображение:
•Проверьте выбор источника сигнала.
•Проверьте правильность подключения и наличие
подключения всех разъемов.
•Проверьте выбранный входной видеоразъем телевизора /
дисплея.
Дополнительные советы по устранению
неполадок, связанных с разъемом HDMI
•Выключите все устройства (включая телевизор, аудио-/
видеоресивер и все устройства-источники сигналов).
•Отключите кабель HDMI, начиная с кабеля между аудио-/
видеоресивером и телевизором, и далее кабели между
аудио-/видеоресивером и каждым из устройств-источников
сигнала.
•Осторожно повторно подключите кабель от устройстваисточника сигнала к аудио-/видеоресиверу. В последнюю
очередь подключите кабель от аудио-/видеоресивера к
телевизору.
•Включите устройства в следующем порядке: ТВ, аудио-/
видеоресивер устройства-источники сигнала.
Примечание
•В зависимости от конкретных подключенных
компонентов, сложность необходимых подключений
между HDMI-компонентами может привести к
задержкам до одной минуты при завершении некоторых
действий, таких как переключение входных разъемов
или переключение между SD- и HD-каналами.
Выбор источника сигнала
Существует два способа выбрать источник сигнала:
•Поверните ручку выбора входного сигнала «INPUT
SELECTOR» на передней панели.
•Выберите какой-либо источник сигнала, нажав кнопку
выбора источника сигнала на пульте дистанционного
управления.
Аудио-/видеоресивер выберет аналоговые аудио- и
видеоразъемы, назначенные для источника сигнала, а также
все остальные настройки, которые вы сделали во время
установки.
Входные цифровые аудиоразъемы не назначены для какихлибо конкретных аналоговых входных разъемов. После
выбора источника сигнала можно использовать кнопку
выбора входного аудиоразъема (ЦИФРОВОГО) на пульте
дистанционного управления для выбора определенного
входного аудиоразъема (HDMI, коаксиального цифрового,
оптического цифрового, аналогового), сигнал от которого вы
хотите прослушать. (Примечание: Вы не можете выбрать
входной аудиоразъем для кнопки выбора источников сигнала
FM / AM или USB).
На передней панели появится название источника сигнала,
выбранный входной аудиоразъем и режим объемного звука.
Прослушивание FM- и AM-радио
Выберите необходимый источник входного сигнала.
Используйте кнопки настройки вверх / вниз для настройки
радиостанции, которая будет отображаться на дисплее
передней панели.
Для автоматической настройки, нажмите и удерживайте
кнопки настройки вверх / вниз для сканирования станций, пока
не будет найдена станция с приемлемым уровнем сигнала.
Для ручной настройки нажимайте кнопку настройки, пока не
будет найдена нужная радиостанция. При использовании
режима FM-моно можно улучшить качество приема сигнала от
радиостанций со слабым сигналом.
Предустановленные станции
Всего можно заранее настроить 30 радиостанций (в том
числе AM- и FM-радиостанции). После настройки нужной
радиостанции нажмите кнопку «память», и на дисплее
передней панели начнет мигать номер предустановленной
радиостанции. Используйте кнопки на пульте
дистанционного управления для ввода необходимого номера
предустановленной радиостанции.
Для настройки предустановленной радиостанции нажмите
кнопку предустановки вверх / вниз или введите номер
предустановленной радиостанции нажатием цифровых кнопок
на пульте дистанционного управления.
96
Page 97

Эксплуатация
Система радиоинформации
Система радиоинформации посылает информационные
сигналы вместе с общим сигналом вещания.
Эти коды содержат название программы, список типов
программ и радиотекст.
Примечание
•Система радиоинформации доступна только в
моделях, которые продаются в странах Европы.
•Система радиоинформации доступна только в FMдиапазоне.
•Система радиоинформации ищет только
предустановленные станции. Если в памяти нет
сохраненных станций или если тип программы
не может быть найден среди предустановленных
станций, на дисплее отображается «NO PTY».
Прослушивание сигнала от
мультимедийных устройств
через USB-разъем
Ваш аудио-/видеоресивер совместим с разъемами
мультимедийных устройств USB 2.0 или USB 1.1,
поддерживает форматы файловой системы FAT 16 или FAT 32
и совместим со следующими мультимедийными устройствами
в форматах MP3 и WMA:
MP3:
Скорость передачи данных 96 – 320 кбит/с.
•
Рекомендуется фиксированная скорость передачи
данных при дискретизации 44,1 кГц. Переменная скорость
передачи данных также воспроизводится, но время
воспроизведения может отображаться неправильно.
Файлы должны иметь расширение «.mp3».
WMA:
•
Поддерживается максимальное количество папок и файлов
65 536.
Воспроизведение файлов через USBустройство
1
Скорость передачи данных от 64 кбит/с или выше.
ПРИМЕЧАНИЕ: Скорости передачи данных 80 кбит/с и
256 кбит/с не совместимы для данного устройства. Файлы
должны иметь расширение «.wma».
Вставьте USB-накопитель в USB-разъем на передней
панели аудио-/видеоресивера.
Тип
Режим
файла
воспроизведения
Название
песни
Название
альбома
Скорость
передачи данных
Нажимайте кнопки управления воспроизведением на
пульте дистанционного управления для управления
воспроизведением.
Чтобы просмотреть содержимое текущей папки, нажмите
кнопку «RETURN» на пульте дистанционного управления. На
экране появится содержимое папки USB-устройства, которое
будет отображаться в течение 20 секунд.
Нажатием кнопок вверх / вниз и кнопки «ENTER» выделите и
выберите треки.
Режим повторного
воспроизведения
Пройденное
время
Имя
исполнителя
Внимание
•Для предотвращения повреждения или
неисправности, нажмите кнопку «стоп» (■) на пульте
дистанционного управления, кнопку управления
воспроизведением перед извлечением USBустройства из USB-разъема аудио-/видеоресивера.
Выбор режима объемного
звука
Русский
Внимание
•Не подключайте персональный компьютер или
периферийное устройство к USB-разъему. USBконцентраторы не поддерживаются.
Выберите USB в качестве устройства-источника
2
сигнала. На дисплее передней панели появится
надпись «USB». После загрузки содержимого текущей
папки в аудио-/видеоресивер, в экранном меню
появится сообщение о воспроизведении с USBустройства.
Выбор режима объемного звука может быть простым или
сложным, в зависимости от вашей системы и вкусов. Не
стесняйтесь экспериментировать и вы сможете найти
несколько избранных источников сигнала или избранных типов
программ. Вы можете найти более подробную информацию о
режимах объемного звука в разделах «обработка аудиозвука»
и «объемный звук», которые приводятся ниже.
Для выбора режима объемного звука нажмите кнопку выбора
режима объемного звука. При каждом нажатии выбирается
следующий доступный режим объемного звука.
Режимы цифрового объемного звука, такие как Dolby Digital
и DTS, доступны только для специально закодированных
97
Page 98

R-607/R-507 АУДИО-/ВИДЕОРЕСИВЕР
программ, которые передаются через HDTV-разъем, DVDплеер, плеер Blu-Ray дисков и цифровое кабельное или
спутниковое телевидение. Другие режимы объемного звука,
такие как Dolby Режим Pro Logic II может использоваться
для цифровых или аналоговых сигналов с целью
создания различных презентаций с объемным звуком или
использования различного количества динамиков.
Выбор режима объемного звука зависит от количества
динамиков в вашей системе, программ, которые вы смотрите
или слушаете, а также от ваших личных предпочтений.
Расширенные функции
Большая часть регулировки и конфигурации вашего аудио-/
видеоресивера проводится автоматически при небольшом
вмешательстве с вашей стороны. Вы также можете настроить
аудио-/видеоресивер, чтобы он соответствовал вашей системе
и вашим вкусам. В этом разделе мы опишем некоторые из
более продвинутых регулировок, которые доступны для вас.
Обработка аудиосигнала и объемный звук
Звуковые сигналы могут быть закодированы в различных
форматах, которые влияют не только на качество звука, но
и на количество каналов для динамиков и режим объемного
звука. Вы также можете вручную выбрать другой режим
объемного звука, если таковые имеются.
Аналоговые аудиоразъемы
Аналоговые аудиосигналы обычно состоят из двух каналов левого и правого. Ваш аудио-/видеоресивер предлагает
несколько вариантов аналогового воспроизведения:
Стерео:
•
•
•
Цифровые аудиосигналы
Цифровые аудиосигналы обеспечивают большую гибкость
и мощность по сравнению с аналоговыми сигналами
и позволяют кодировать до 5.1 каналов дискретного
информационного канала непосредственно в сигнал.
В результате повышается качество и великолепная
направленность звука, так как информация каждого канала
Если вы хотите получить воспроизведение в
режиме обычного 2-канального воспроизведения, нажмите
кнопку «STEREO». Звук будет выводиться на передние
левый и правый динамики.
5-канальное стерео:
через все динамики системы (например, во время
вечеринки), выберите «5CH STEREO» нажатием кнопки
выбора режима объемного звука. В этом режиме левый
канал воспроизводится через передний левый динамик
и левый динамик объемного звука, а правый канал
воспроизводится через передний правый динамик и
правый динамик объемного звука. Общий моносигнал
воспроизводится через центральный динамик.
Режимы аналогового объемного звука:
видеоресивер может обрабатывать 2-канальные
аудиосигналы для получения многоканального объемного
звука даже при отсутствии кодировки объемного звука в
записи. Среди доступных режимов имеются следующие:
Dolby Pro Logic II, Dolby Pro Logic, DTS Neo: 6, театр,
зал, стадион, клуб и арена. Используйте кнопки выбора
режимов объемного звука, чтобы выбрать один из этих
режимов.
Если вы хотите слышать стереозвук
Ваш аудио-/
передается независимо от других каналов. Высокое
разрешение записи звучит без искажений, особенно на
высоких частотах.
Форматы цифрового объемного звука включают следующие
форматы: Dolby Digital 2.0 (только два канала), Dolby Digital 5.1,
Dolby Digital EX, Dolby Digital Plus, Dolby TrueHD, DTS-HD HighResolution Audio, DTS-HD, DTS 5.1, DTS 96/24, 2-канальный
PCM-режимы для частот 44,1 кГц, 48 кГц, 88,1 кГц, 96 кГц
или 176,4 кГц для многоканальной импульсно-кодовой
модуляции 5.1 или 7.1 каналов. (Ваш аудио-/видеоресивер
будет микшировать дискретный объемный звук 6.1-канальных
и 7.1-канальных записей в левый и правый каналы объемного
звука вашей системы).
Выбор режима объемного звука
Выбор режима объемного звука зависит от формата входного
аудиосигнала, а также от ваших предпочтений. Хотя не все
режимы объемного звука аудио-/видеоресивера бывают
доступны. В таблице ниже приводятся режимы объемного
звука, доступные для данного входного разъема.
Формат
входного
сигнала
Dolby TrueHD
(только
для R-607),
Dolby Digital
Plus (только
для R-607),
Dolby Digital
(7.1-канальный /
5.1-канальный)
Dolby Digital
(2.0 канала)
DTS-HD (только
для R- 607),
DTS, DTS 96/24
PCM
(2-канальный),
аналоговый
(2-канальный)
MP3/WMA
Доступные режимы
объемного звука
Соответствует форматам Dolby
TrueHD (только для R-607) или
режиму Dolby Digital (театр,
зал, стадион, клуб, арена,
5-канальный стереорежим,
а также доступен формат
5.1-канальных программ)
Сюда входят форматы Dolby Pro
Logic II Movie, Dolby Pro Logic II
Music, Dolby Pro Logic II Game,
Dolby Pro Logic
Соответствует режиму DTS
(театр, зал, стадион, клуб, арена
и 5-канальный стереорежим,
а также доступен формат
5.1-канальных программ)
Dolby Pro Logic II Movie, Dolby
Pro Logic II Music, Dolby Pro Logic
II Game, Dolby Pro Logic, DTS
Neo:6 Cinema, DTS Neo:6 музыка,
театр, зал, стадион, клуб, арена
и 5-канальный стереорежим
Dolby Pro Logic II Movie, Dolby
Pro Logic II Music, Dolby Pro Logic
II Game, Dolby Pro Logic, DTS
Neo:6 Cinema, DTS Neo:6 музыка,
театр, зал, стадион, клуб, арена
и 5-канальный стереорежим
98
Page 99

Эксплуатация
Если вы сомневаетесь, проверьте транслируемый сигнал
или прочтите информацию на вашем диске, чтобы получить
более подробную информацию о доступных режимах
объемного звука. Как правило, несущественные разделы
диска, например, трейлеры, дополнительные материалы
или меню диска доступны только в формате Dolby Digital
2.0 (2-канальный) или PCM 2-канальном режиме. Смотрите
раздел аудионастроек в меню диска.
Кроме того, убедитесь, что аудиовыход вашего плеера дисков
установлен на оригинальный битовый поток, а не 2-канальный
PCM-режим. Остановите воспроизведение и проверьте
настройки выходного сигнала плеера.
Настройка уровней громкости каналов
Кроме использования встроенных тестовых сигналов
аудио-/видеоресивера для настройки передних динамиков,
как указано в пункте
видеоресивера
любого канала в любое время, чтобы компенсировать отличия
в каких-либо устройствах-источниках звука в соответствии с
вашим вкусом.
Нажмите кнопку регулировки уровня громкости
1
звукового канала на пульте дистанционного
управления. На дисплее появится сообщение,
отображающее уровень громкости левого канала.
Нажмите кнопки со стрелками вверх и вниз, чтобы
2
отобразить канал, который вы хотите настроить.
Используйте кнопки со стрелками влево и вправо на
3
пульте дистанционного управления для регулировки
уровня громкости канала.
После завершения нажмите кнопку «ВОЗВРАТ».
конфигурация динамиков аудио-/
, вы также можете настроить уровень громкости
Запись
Двухканальные аналоговые и цифровые аудиосигналы,
а также композитные аудиосигналы обычно подаются
через соответствующие выходные разъемы для записи.
Для записи подключите ваш аудио- или видеорекордер к
соответствующим выходным разъемам аудио-/видеоресивера,
как указано в разделе
информации в рекордер и убедитесь, что рекордер включен и
ведет запись во время воспроизведения сигнала источником
сигнала. Полную информацию о записи смотрите в инструкции
по эксплуатации записывающего устройства.
подключения
, вставьте пустой носитель
Примечание
•Аудио-/видеоресивер не преобразует цифровые
сигналы в аналоговые. Запись может производиться
только на устройства, подключенные к входным
аналоговым аудиоразъемам и входным
композитным видеоразъемам.
•Возможность записи сигнала от устройствисточников сигнала в формате HDMI отсутствует.
•Пожалуйста, убедитесь, что вы знаете обо всех
ограничениях, связанных с авторскими правами,
для любых материалов, которые вы записываете.
Несанкционированное копирование материалов,
защищенных авторскими правами, запрещено
законом.
Таймер спящего режима
Таймер спящего режима устанавливает аудио-/видеоресивер
на воспроизведение в течение до 90 минут, а затем
выключается автоматически.
Нажмите кнопку спящего режима на пульте дистанционного
управления и выберите время до отключения устройства,
которое будет отображаться на передней панели дисплея.
Имеется возможность выбрать время «30 min.», «60 min.»,
«90 min.» и «OFF».
После установки таймера на дисплее передней панели будет
отображаться небольшой символ полумесяца.
Если вы нажмете кнопку «SLEEP» после установки
таймера, на дисплее будет отображаться оставшееся время
воспроизведения. Нажмите кнопку «SLEEP» еще раз, чтобы
изменить время воспроизведения.
Перезагрузка процессора
Если аудио-/видеоресивер работает нестабильно после
скачка напряжения, сначала выключите основной
выключатель электропитания на передней панели, а затем
отключите кабель электропитания минимум на 3 минуты.
Снова подключите кабель электропитания и включите
аудио-/видеоресивер. Если это не устраняет неисправность,
перезагрузите процессор аудио-/видеоресивера, как указано
ниже.
Примечание
•При перезагрузке процессора будут удалены все
пользовательские настройки, включая настройки
для динамиков, настройки уровня громкости и
настройки тюнера. После сброса заново введите
все эти параметры из ваших пометок в прилагаемых
листах для записей.
Для перезагрузки процессора аудио-/
видеоресивера необходимо:
Нажмите переключатель «Standby/On», который
1
находится на передней панели, чтобы переключить
устройство в спящий режим (индикатор
электропитания загорится красным цветом).
Нажмите и удерживайте нажатой кнопку
2
«SURROUND» на пульте дистанционного управления,
одновременно нажав и удерживая кнопку «Standby/
On» на передней панели.
Когда на дисплее передней панели появится
3
сообщение «RESET?», нажмите кнопку «BAND».
Когда на дисплее передней панели появится
4
сообщение «ОК?», нажмите кнопку «BAND».
Память
Если аудио-/видеоресивер отключен от сети или происходят
отключения электропитания, в нем будут сохраняться ваши
пользовательские настройки в течение двух недель.
Русский
99
Page 100

Поиск и исправление неисправностей
При появлении неисправностей во время эксплуатации системы пользуйтесь этим руководством по поиску и исправлению
неисправностей до вызова сервисной службы. Если неисправность устранить не удалось, проконсультируйтесь с ближайшим
дилером или в авторизованной независимой компании.
Если устройство не работает нормально из-за внешних помех, таких как статическое электричество, отключите вилку
электропитания из розетки и снова вставьте ее для возврата к нормальному режиму работы устройства.
Симптом Причина Устранение неисправности
Устройство не работает,
когда основной выключатель
электропитания включен.
Загорается
информационный дисплей,
который находится на
передней панели, но
отсутствует звук или
изображение.
Динамики не воспроизводят
звук.
Отсутствует звук во
всех динамиках; На
информационном дисплее
появилось сообщение
«ЗАЩИТА».
Отсутствует звук в
центральных динамиках
или в динамиках объемного
звука.
•Отсутствует электропитание
переменного тока.
•Неустойчивое соединение
входного разъема.
•Включен режим временного
отключения звука.
•Уменьшен уровень громкости.
•Настройки динамиков
установлены на «Off» в меню
настройки.
•Усилитель работает в режиме
защиты по причине возможного
короткого замыкания.
•Усилитель работает в
режиме защиты по причине
возникновения внутренних
неисправностей.
•Неверный режим объемного
звука.
•Передача сигнала
программы производится в
монофоническом режиме.
•Неверная конфигурация
динамика.
•Передача сигнала
программы производится в
стереофоническом режиме.
•Убедитесь, что кабель подачи
электропитания включен в работающую
розетку электрической сети переменного
тока.
•Плотно прижмите все входные разъемы и
разъемы динамиков.
•Нажмите кнопку временного отключения
звука.
•Увеличьте уровень громкости.
•Установите настройки динамиков на «On»
в меню настройки. Смотрите страница
94 для получения дополнительной
информации.
•Проверьте, не запутались ли провода
динамиков в местах подключения к
динамикам и аудио-/видеоресиверу?
•Свяжитесь с вашим местным сервисным
центром.
•Выберите другой режим объемного звука,
не стерео.
•В монофонических программах не
содержится данных для режима объемного
звука.
•Проверьте конфигурацию динамиков в
меню установки.
•Декодер объемного звука может не
создавать сигнал для центрального
канала или для канала объемного звука в
некодированных стереопрограммах.
Устройство не реагирует
на команды пульта
дистанционного управления.
В тюнере присутствует
постоянное жужжание.
100
•Разряжены батареи в пульте
дистанционного управления.
•Не выбран аудио-/
видеоресивер.
•Датчик пульта дистанционного
управления загорожен какимлибо предметом.
•Местные помехи. •Переместите аудио-/видеоресивер или
•Замените батареи в пульте
дистанционного управления.
•Нажмите кнопку «настройка / аудио-/
видеоресивер».
•Убедитесь, что датчик на передней
панели аудио-/видеоресивера находится
в прямой видимости со стороны пульта
дистанционного управления.
антенну подальше от компьютеров,
флуоресцентных ламп, электродвигателей
или других электроприборов.
 Loading...