

Seaga Space Saver Series,SS series Operator's Manual
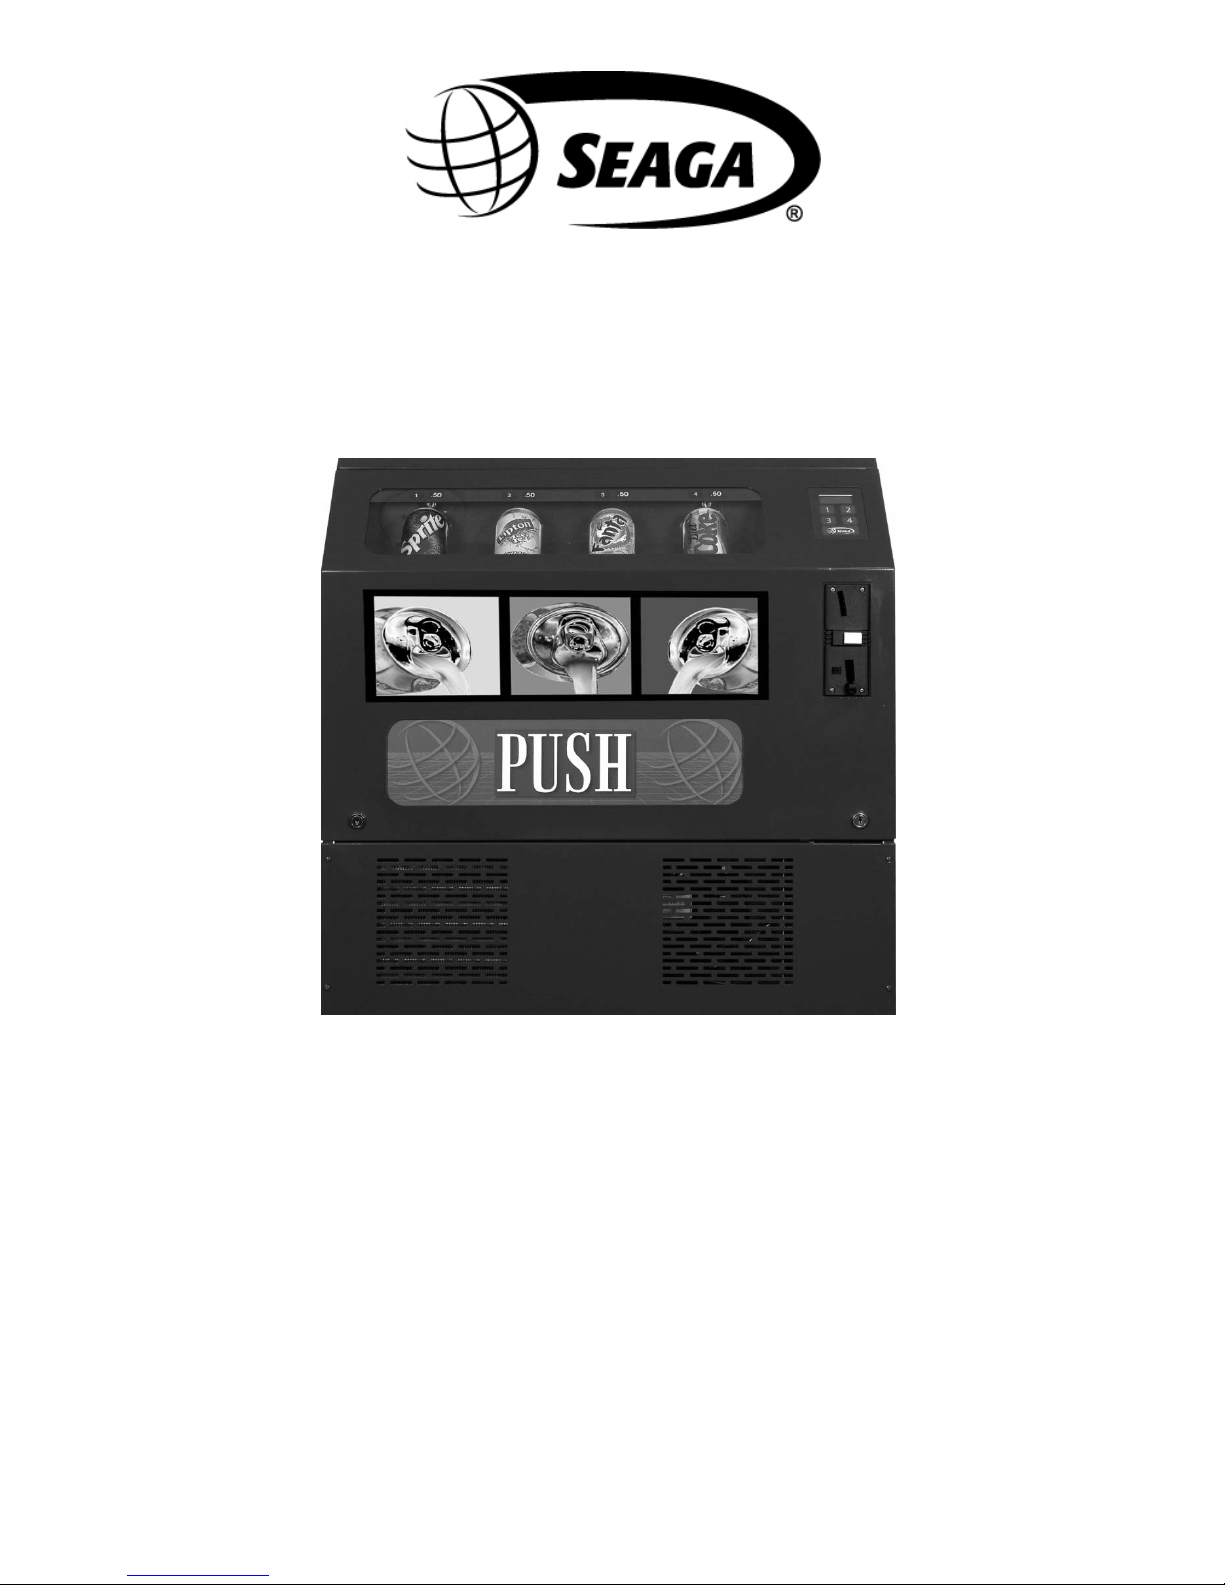
Space Saver Series
Table Top Soda Vendor
Operator’s Manual
1

INTRODUCTION
Congratulations on the purchase of your new SS Series Table Top Soda Vendor. This SS Series Table Top Soda Vendor has been
designed to give you many years of dependable service. It requires little maintenance and is easy to set up and operate.
READ THIS MANUAL COMPLETELY
Your SS Series Table Top Soda Vendor vendor is designed to operate simply and reliably, but to take full advantage of your vendor ,
please read this owner’s manual thoroughly. It contains important information regarding installation and operations, as well as a brief
trouble-shooting guide.
EQUIPMENT INSPECTION
After you have received your vendor and have it out of the box, place it on a secure surface for further inspection. Note: Any damages
that may have occurred during shipping must be reported to the delivery carrier immediately. Reporting damages and the seeking of
restitution is the responsibility of the equipment owner. The factory is willing to assist you in this process in any way possibl e. F eel fr e e
to contact our Customer Care Department with questions you may have on this process. It is important that you keep the original
packaging for your vending machine at least through the warranty period. If your machine needs to be returned for repair, you may
have to purchase this packaging if it is not retained.
Once your have your vendor located, we suggest that you keep this manual for future reference, or you can view this manual online at
www.seagamfg.com
to help you quickly identify a problem and correct it.
. Should any problems occur, refe r to the se ction entitled “COMMON QUESTIONS AND ANSWERS”. It is designed
MANUFACTURER’S WARRANTY
WHAT IS COVERED:
Manufacturer warrants TO THE ORIGINAL PURCHASER ONLY that each item of equipment manufactured is free from defects in
material and workmanship under normal use and service. Manufacturer’s obligation under warranty shall be limited to repair or
repl ac em ent , at o ur pl a nt, of a ny par ts of t he equ ipment , w hic h s hall , wi thi n on e yea r of th e dat e of shi pm ent to th e ori gin al purchase,
be demonstrated to be defective. The original purchaser may obtain repair or replacement of the equipment under warranty by returning
the defective item or entire vendor to the Manufacturer, freight prepaid.
WHAT IS NOT COVERED:
Manufacturer’s warranty obligations DO NOT EXTEND TO OR INCLUDE installation expenses, vandalism, or difficulties resulting from
failure to operate equipment in accordance with Manufacturer’s instructions under competent supervision and difficulties due to
changes in vended products, which are beyond the control of manufacturer.
SPECIAL NOTE: Manufacturer is not responsible for any loss of income due to a vending machine being out of service due to a
warrantable item.
This warranty is in lieu of all the other warranties, expressed or implied, including the warranty of merchantabil ity and fitness or use , and
of all other obligations or liabilities on Manufacturer’s part. Manufacturer neither assumes, nor authorizes any other person to assume
for it, any other liability in connection with the sale of equipment manufactured by itself. This warranty shall not apply to equipment
manufactured or any part thereof which is subject to accident, negligence, alteration, abuse, misuse, or damage in shipment. The term
“or igi nal purc haser”, as used in th is warra nty, shall be deemed to mean that person for whom t he equipment i s originally installed.
Manufacturer is not liable for any incidental, consequential or other damages of any kind whatsoever, directly or indirectly, arising from
the use of the equipment whether based upon theories of contract negligence or tort.
For Service and Customer Care:
8:30 a.m. - 4:00 p.m. CST. Mon thru Fri
815.297.9500 ext 160
815.297.1758 Fax
email: custom er car e@ seag amfg.com
Seaga Manufactur ing, Inc.
700 Seaga Drive
Freeport, IL 61032 U. S.A .
seagamfg.com
For Service and Customer Care:
9:00 a.m. - 5:30 p.m. Mon thru Fri
+44(0)1492 874010
+44(0)1492 874644 Fax
email: info@seaga.co.uk
\
Unit 8, Caebach, Off B uilder s St r eet
Llandudno North W ales LL30 1DR
Seaga UK Ltd.
seaga.co.uk
2
k
The Space Saver Seri es Table Top Soda Vendor
The Standard models are for operation in the North American markets where as the [F] versions are intended for the European and U.K. markets
This Op erator’s Man ual is divid ed into f our (4) main sect ions consis ting of a bri ef descripti on of the Sp ace S aver Bever age Vendor, Service Mode,
Money M ec h anisms and Beverag e C an ven ding uni t
.
IM P ORTANT NO TI CES
REMOVE WIRE TIES ON FRONT OF EACH CHUTE.
Your vendor (s) are intended for indoor use only
Your vendor (s) must be set on a level well-supported location.
Always unload vendor before transporting it.
Do not load your vendor with disfigured or damaged product.
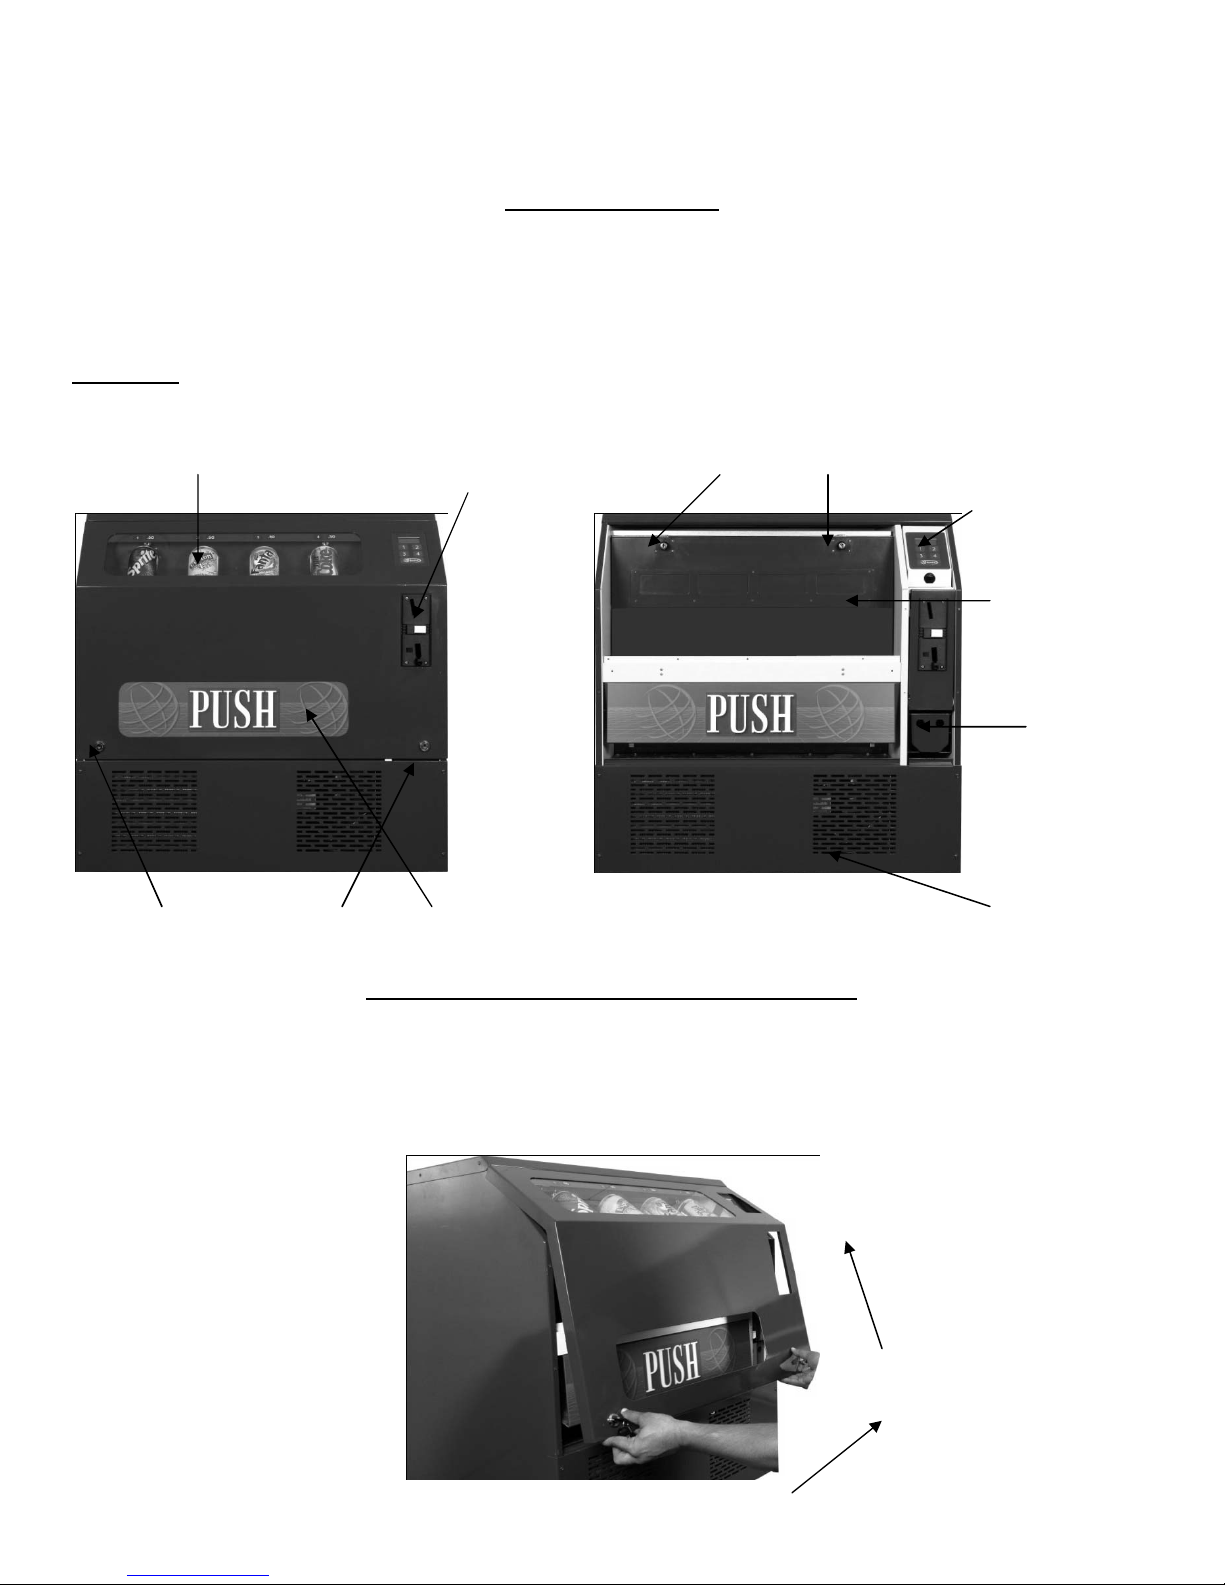
Section 1 Brief Description of your SS series Beverage Vendor
Fig.1
Live Can Dis p lay
Coin Validator
Can Unit Door Locks
LCD and Key Pad
Can Unit Door
Coin Box
Fron t Door Lock s
Product door
Refrigeration
Dec
HOW TO LOCK & UNLOCK THE DOOR OF VENDOR
Your B everage V endor h as 2 loc ks. To op en th e door, u nlock th e right si de lock by turn ing the k ey cloc kwise. T hereaft er open t he left side lock by
turning th e k ey c ount er c loc kwis e. T he door c an now be open ed an d rem oved by r aisin g it f r om b oth the s id es u ntil t h e top edg e disengages from the
Vendor cabinet.
To lock th e d oor , g rasp bot h s id es of d oor ab out h alf w ay d ow n . Engag e th e top of the d oor with th e V end or cabinet wh il e k eep ing the b ottom aw ay f rom
the mach ine. Lower t he bottom of the door ensuring th at the top of th e door remains engaged with the cab inet. Loc k the door by tur ning the left key
clockwise and the ri ght key counter clockwise.
Fig.2
3
LEVELING YOUR VENDOR
Once you have installed your vendor in its proper location, you will need to level it to ensure trouble free operation. The vendor is
provided with 4 threaded levelers. These can be screwed into the bottom of the vendor and can be adjusted up or down as needed to
ensu re a prop er lev el. ( Fig.1)
ELECTRICAL CONNECTION
The Beverage Vendor r equires one 120 VAC 60 Hz grounded outlet
The [F] Beverage Vendor r equir es one 230 VAC 50 Hz grounded out let
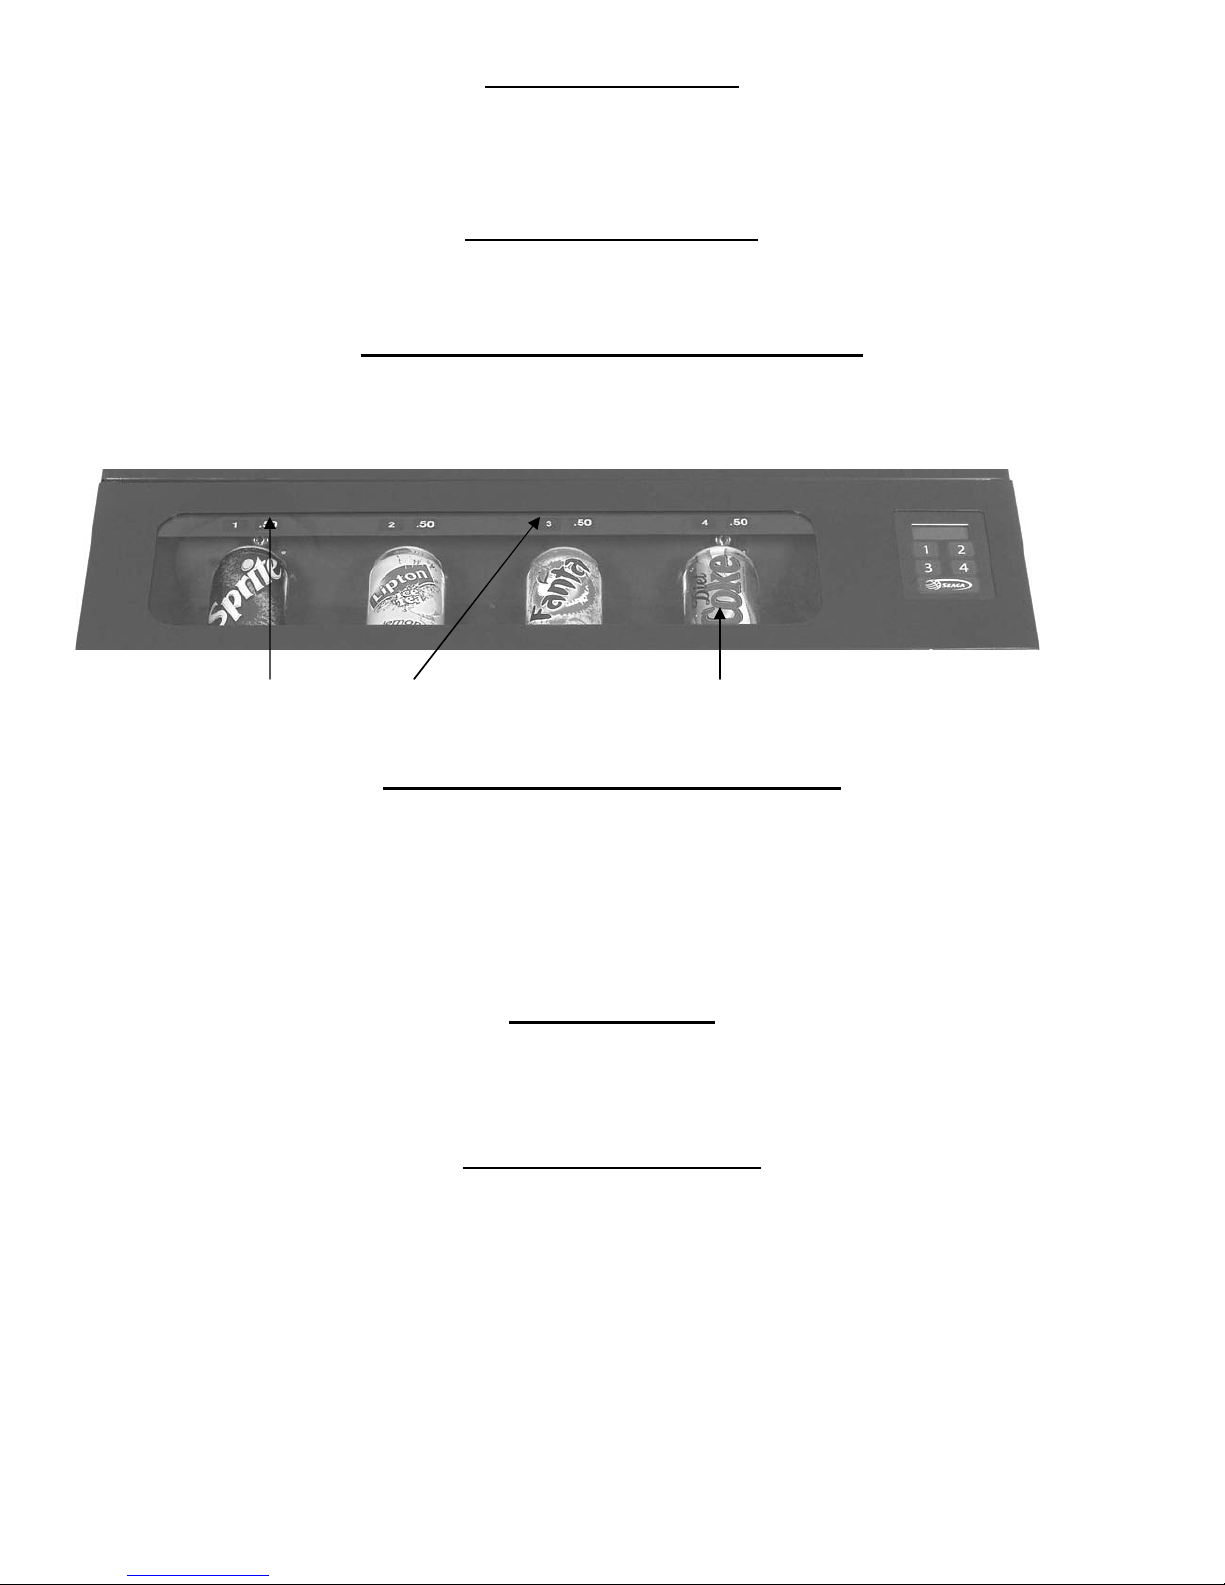
BEVERAGE SELECTION PRICING AND LABELS
The beverage sel ection is 1 to 4 on the keypad. The prices can be set by entering the Service Mode.
Fig.3
Fix Pricing and Labels Live Product Display
PRODUCT VIEWING AND ADVERTISEMENT
Your Beverage vendor f eatures ‘Live’ pr oduct display (Fig.3). This means that your customers will see actual cans of t he
product your vendor is offering.
1). Set-Up of ‘Live’ display
a). Unlock and open the front door.
b). Load product display shelf to correspond wit h its Label.
Note: To present your product in an attr ac tive and professional manner as possible do not load any damaged item s.
DELIVERY SYSTEM
The delivery system of your Beverage v endor c onsi sts of the Keypad, LCD Display and Beverage Can Unit. The customer
inserts money and ent er s their sel ec tion on the Keypad. The selected Driver Motor turns and vends the Can.
KEYPAD AND LCD DISPLAY
The Keypad is a touch sensitive operation. Light pressure will be necessary to activate each number or letter. The
vendor’s Keypad i s used by the customer to make their selecti on, and by the operator to set and test many functi ons of
the vendor. (Fig.4)
4
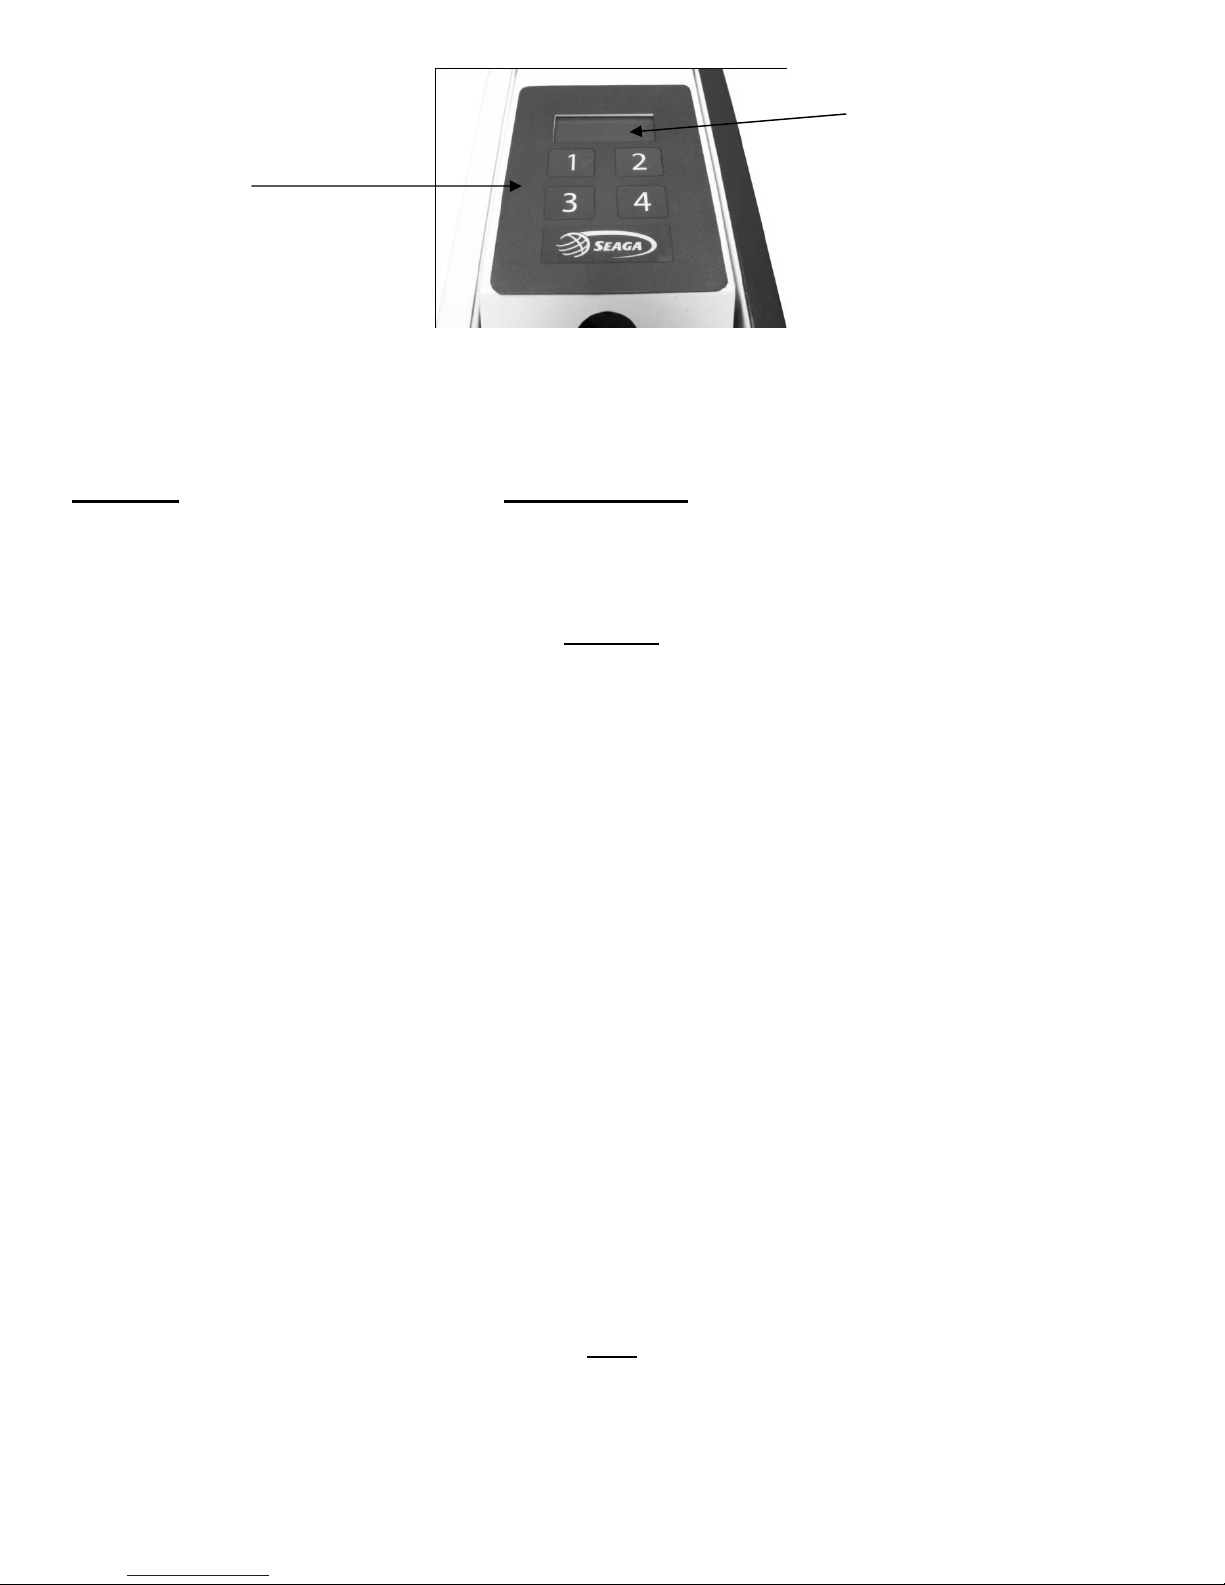
Fig.4
LCD Display
Key P ad
The LCD Display shows the customer the amount of money entered into the vendor, and the cost of their sel ection, it
shows the operator the S ervice Mode function for setting and testing the vari ous f unc tions of the vendor.
Section 2 SERVICE MODE
The operati on of the machi ne can be adjusted by entering service mode by pressing the r ed button on the VMC circuit
board and then acce ssing the a ppropriate operation. Price setting, coi n value setti ng, motor operation and v end-credit
criteri a can be read and adjusted from here. The user can also perform tests for the mot or operat ion through this mode.
Operation
1. Enter Service M ode by pressing the Red B utton on the VMC Circuit board Displays Er. **
Any faults that have occurred will be displ ay ed as a two-digit code**
If there are no errors the Display will automatically go to Audit Mode Au
2. Each Servic e Code can be accessed by repeat pr es sing of the Service Button
Pressing Red Button (AUDIT) Displays Au.—
Pressing Red Button (PRICE SETTING) Displays PS.- Pressing Red Button (COIN VALUE SETTING) Displays Cn.—
Pressing Red Button (CONTROL WORD SETTING) Displays Ct.**
Where ** is current word
Pressing Red Butt on (ASSIGNMENT) Displays AS.**
Where ** is current motor version
Pressing Red Button (APPLICATIONS) Displays AP.—
Pressing Red Button (EXIT Versi on #) Displays F*. ** to 00. 00
3. Service Mode can be exit ed by pr essing t he Red S ervice Button, the Reject button or automaticall y if
the LCD Display has remained idle in servic e m ode for up to 60 seconds.
Notes:
- If a selection button/service button is not pres s ed within 45 seconds then the Display will
automatically exit from Service Mode.
- If a selection button is pr es s ed, t he Dis play will automatically exit f r om Serv ic e Mode 60 seconds aft er
the last button pressed.
- Pressing the reject button also exits the Display from Service Mode
Audit
Within Servic e Code A U (Audit ) r eadings can be t ak en fr om the Display with regards to cash taken, and num ber of
products vended. The following detail s can be obt ained on the Display.
1. Total Cash Taken (up t o 9999.99)
2. Total Product Vended ( up to 9999)
5

3. Individual Produc t Vended (from each selection) up to 999
i. Press the Red Service Butt on repeatedly till the LCD Displays Au.—
You ar e now in A udit Mode
ii. Press Selection 1 to reveal the total cash ($/£/€) and (c/p) taken Displays ****and--. **
iii. Press Selec tion 2 to reveal the total product vended Displays ****
iv. Press Selecti on 3 to reveal the individual produc t vended
The display scrolls thr ough eac h selection displayi ng the quantity vended 1.*** to 12.**
Retur ns to A u— at end of routine.
v. Press Selecti on 4 to clear all the Total Sales Results Displays clr
vi. Press Red Servic e B utt on to scroll to exit or press Reject But ton to exit.
Price Setting
Price Setti ng c an be done by enteri ng S ervice Code PS. Each selection can be allocated any price f r om 00.01 to 99. 99,
and is achieved by insert ing coins to vend amount and alloc ating the amount to each selecti on.
i. Press the Red Service Butt on repeatedly till the LCD Displays PS.—
You ar e now in P r ic e S etting Mode
ii. Insert coins to first desired price (for simplicity set the lowest price first)
iii. Credit will accumulate on the display Displays **. **
iv. Press desired selec tion button to store di spl ay ed c redit to that selection Displ ay s p.set
v. Insert additi onal c oins if required.
vi. Press Red Servic e B utt on to scroll to exit or press Reject Button to exit.
Notes:
- Prices m ay be set fr om 00.01 t o 99.99 (depending upon coin values)
- It is not pos s ible to set a zero price.
- The default price setting is 99. 99
Coin Value Setting
Coin Value setting allows for the changing of v alidator or acceptors with different output maps. The mac hine is capable of
accepting up to 15 different coin values. Val ues can be adjusted from 00.00 to 99.99.
1.Press the Red Servi c e butt on r epeatedly until Displ ay s Cn.—
You ar e now in the Coin Value setting Mode
You f ir s t need to set the value for the coin
2. Press Selection B utt on 1 to increment the --.** Value Di spl ay s 00. **
3. Press Selection B utt on 2 to decrement the --.** Value Displays 00.**
T hat is the cent/pence value set ; now we need t he dollar /euro/pound value
4. Press Selection B utt on 3 to increment the **.— Value Display s **.??
5. Press Selection B utt on 4 to decrement the **.— Value Displays **.??
Now with the value on the display, inser t the coin for which the value must be assigned to.
6. Insert Requi r ed Coin until it is accepted to store value t o that coin
Displays *.set
[Where * represents the coin identity a-l]
7. Repeat steps 3 to 7 till coins are set.
8. Press Red Button to exi t or pr ess Reject Button to exit.
Coin Output Map
No IDENTITY 1 2 3 4 5 6 Default Adjustable
1 A X 01.00 YES
2 B X 00.20 YES
3 C X 02.00 YES
4 D X 00.50 YES
5 E X 00.10 YES
6 F X 00.05 YES
7 G X X 01.00 YES
8 H X X 00.20 YES
9 I X X 02.00 YES
6
 Loading...