

Page 1

MB2001
M
ILLENNIA GUMBALL
Operator’s Manual
Seaga Manufacturing, Inc.
700 Seaga Drive
Freeport, IL USA 61032
www.seagamfg.com
Page 2

INTRODUCTION
Congratulations on the purchase of your new Millennia Gumball. This Millennia Gumball has been designed to give you
many years of dependable service. It requires little maintenance and is easy to set up and operate
READ THIS MANUAL COMPLETELY
Your Millennia Gumball is designed to operate simply and reliably, but to take full advantage of your vendor, please read
this owner's manual thoroughly. It contains important information regarding installation and operations, as well as a brief
troubleshooting guide.
EQUIPMENT INSPECTION
After you have received your Millennia Gumball and have it out of the box, place it on a secure surface for further inspection. Note: Any damages that may have occurred during shipping must be reported to the delivery carrier immediately.
Reporting damages and the seeking of restitution is the responsibility of the equipment owner. The factory is willing to
assist you in this process in any way possible. Feel free to contact our Customer Care Department with any questions you
may have on this process.
Once you have your vendor located, we suggest that you keep this manual for future reference, or you can view this manual online at www
.seagamfg.com. Should any problems occur, refer to the section entitled “COMMON QUESTIONS AND
ANSWERS”. It is designed to help you quickly identify a problem and correct it.
MANUFACTURER’S WARRANTY
WHAT IS COVERED:
Manufacturer warrants TO THE ORIGINAL PURCHASER ONLY that each item of equipment manufactured is free from
defects in material and workmanship under normal use and service. Manufacturer's obligation under this warranty shall
be limited to repair or replacement, at our plant, of any parts of the equipment which shall, within one year of the date of
shipment to the original purchaser, be demonstrated to be defective. The original purchaser may obtain repair or replacement of the equipment under this warranty by returning the defective item or entire vendor to the Manufacturer, freight prepaid.
WHAT IS NOT COVERED:
Manufacturer's warranty obligations DO NOT EXTEND TO OR INCLUDE installation expenses, vandalism, or difficulties
resulting from failure to operate equipment in accordance with Manufacturer's instructions under competent supervision
and difficulties due to changes in vended products which are beyond the control of Manufacturer.
SPECIAL NOTE: Manufacturer is not responsible for any loss of income due to a vending machine being out of service
due to a warrantable item.
This warranty is in lieu of all other warranties, expressed or implied, including the warranty of merchantability and fitness
or use, and of all other obligations or liabilities on Manufacturer's part. Manufacturer neither assumes, nor authorizes any
other person to assume for it, any other liability in connection with the sale of equipment manufactured by itself. This warranty shall not apply to equipment manufactured or any part thereof which is subject to accident, negligence, alteration,
abuse, misuse or damage in shipment. The term "original purchaser," as used in this warranty, shall be deemed to mean
that person for whom the equipment is originally installed.
Manufacturer is not liable for any incidental, consequential or other damages of any kind whatsoever, directly or indirectly,
arising from the use of the equipment whether based upon theories of contract negligence or tort.
Effective 9/01
Seaga Manufacturing, Inc.
700 Seaga Drive
Freeport, IL 61032 U.S.A.
Online: www
.seagamfg.com
For Technical Support & Service
Contact our Customer Care Dept.
8:30 a.m. - 4:00 p.m. CST. Mon thru Fri
815.297.9500 ext 160
815.297.1758 Fax
email: [email protected]
For Parts
Contact our Parts Dept.
8:30 a.m. - 4:00 p.m. CST. Mon thru Fri
815.297.9500 ext 160
815.297.1758 Fax
email: [email protected]
Page 3
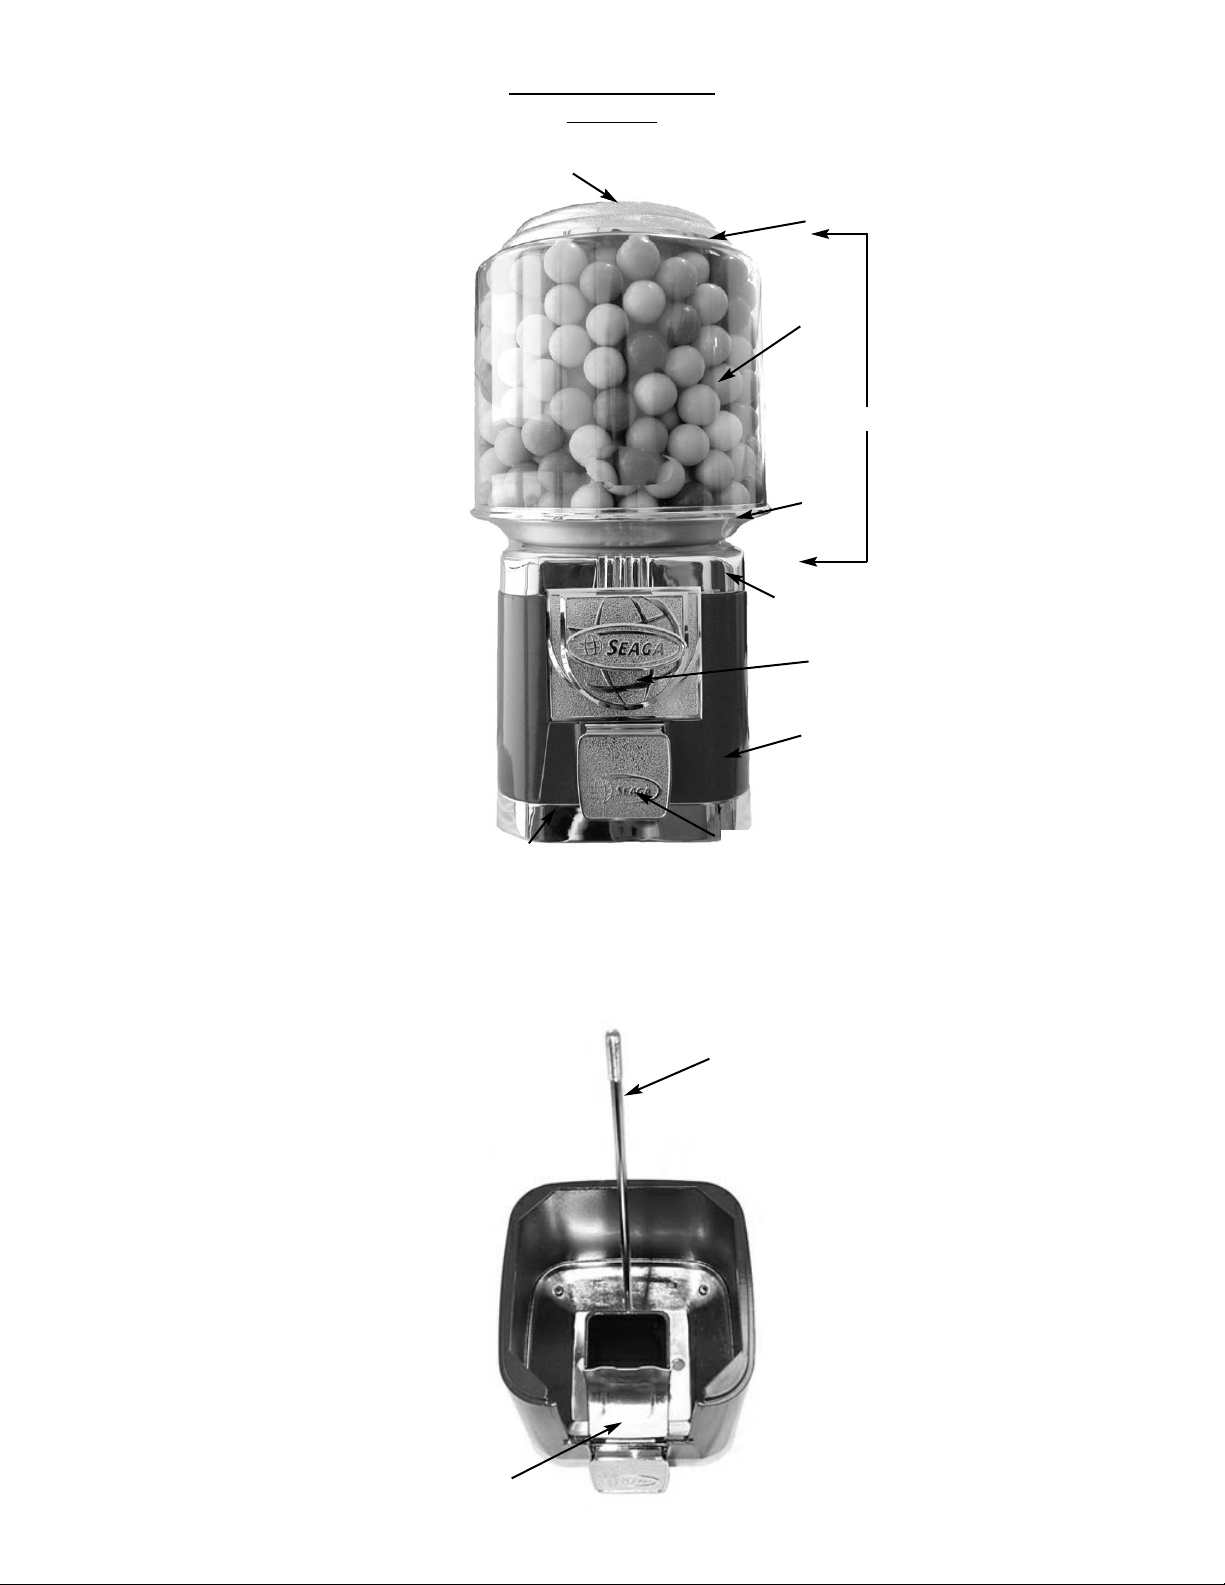
Millennia Gumball
MB2001
(Interior view with Globe
Assembly and Coin
Mechanism removed)
Lock
Globe Lid
Globe
Globe
Base
Hopper
Coin Mechanism
Body
Product Door
Base
Chute Shield
Globe Assembly
Center Rod
Page 4
INITIAL SET-UP
Your Millennia Gumball can set on a counter top or Stand. For Stand assembly refer to STAND ASSEMBLY (Pg. 5)
DELIVERY SYSTEM
Your Millennia Gumball comes standard with a Pan Candy Wheel already installed. Inside the Body of your vendor, you
will find an additional Gumball Wheel assembly that will need to be removed prior to operation.
SPECIAL NOTE: The Gumball Wheel accepts a maximum 1" gumball (850 Count).
INITIAL
SET-UP
Your Millennia Gumball can set on a counter top or Stand. For Stand assembly refer to STAND ASSEMBLY (Pg. 5)
DELIVER
Y SYSTEM
Your Millennia Gumball comes standard with a Pan Candy Wheel already installed. Inside the Body of your vendor, you
will find an additional Gumball Wheel assembly that will need to be removed prior to operation.
SPECIAL NOTE: The Gumball Wheel accepts a maximum 1" gumball (850 Count). Replacement Pan Candy or Gumball
Wheels can be purchased by contacting our Parts Department.
1. To change wheels or wheel settings:
A.) Unlock and open Globe Lid by unscrewing Lock.
B.) Remove the Globe Lid. Note: The Globe is no longer secured to the body.
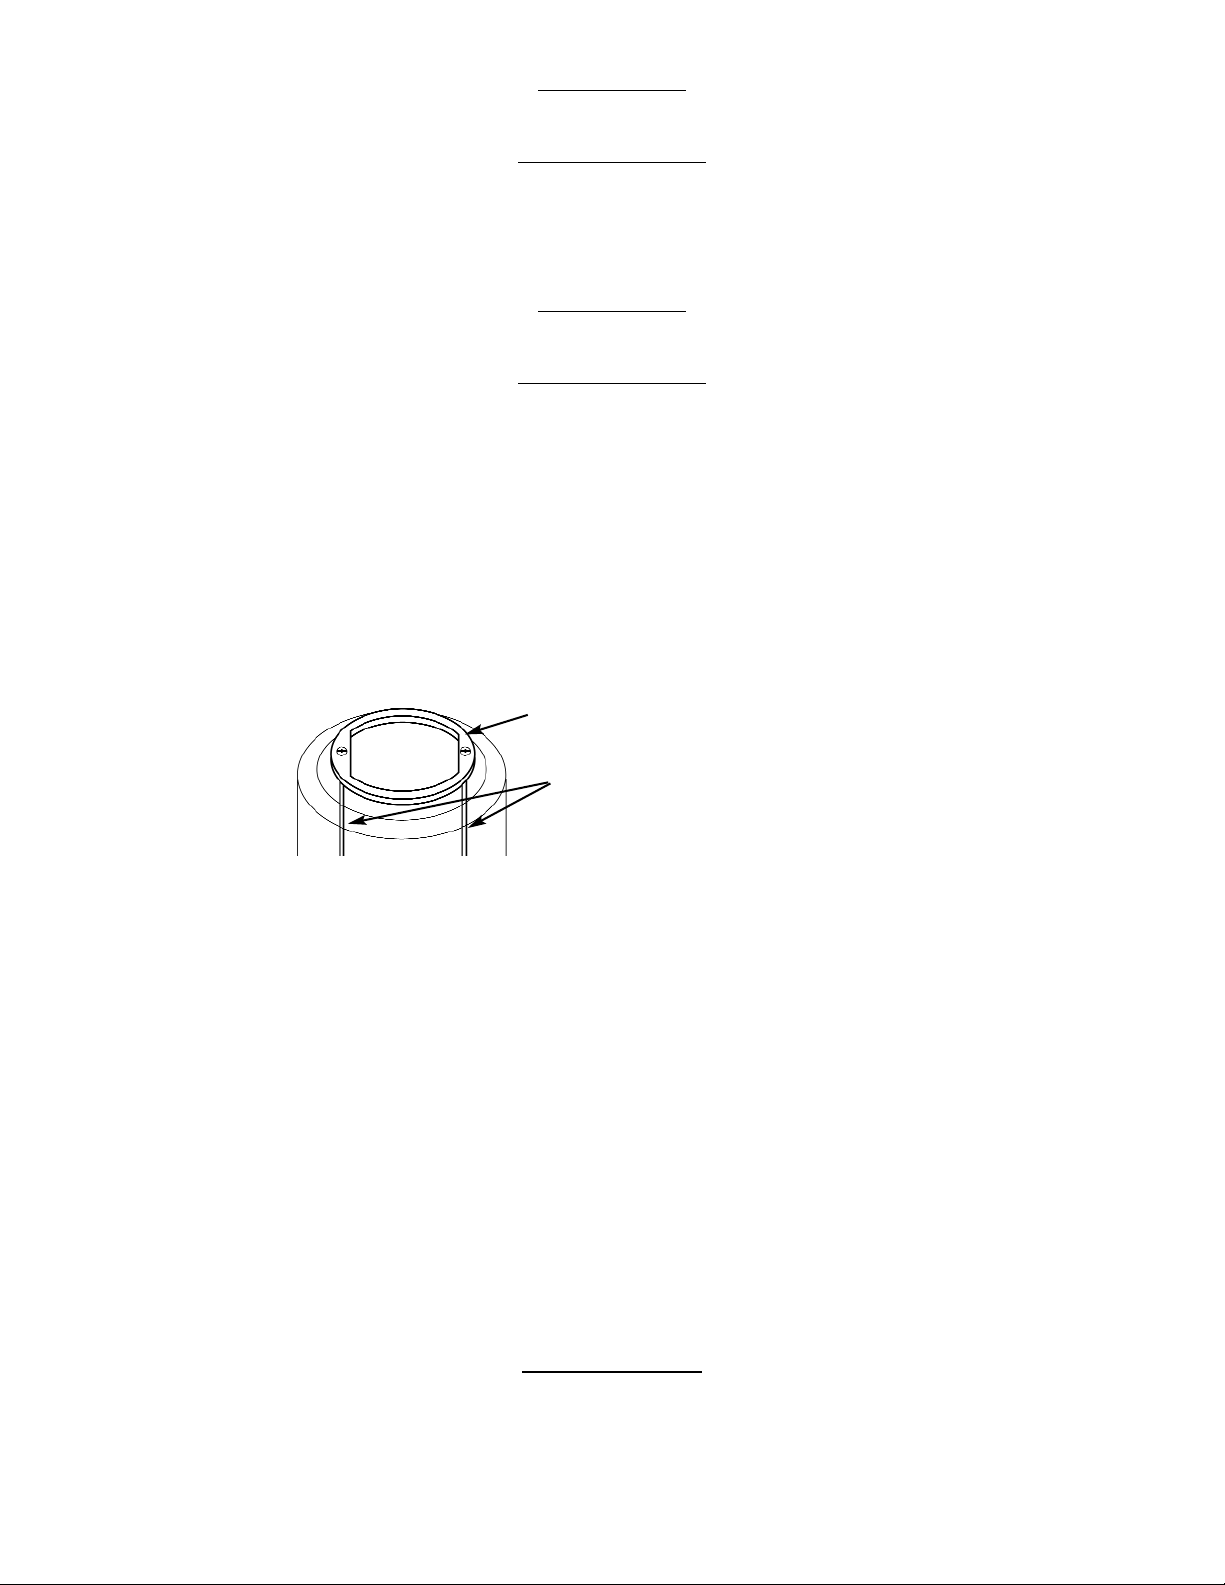
C.) Remove the two (2) Connecting Rods from the Top Ring, and lift Top Ring, Globe, and Globe Base away.
(Fig.1)
D.) Remove Pan Candy Housing from the Hopper.
E.) Lift up the Metal Adjuster Plate and move to the desired wheel setting notch. The notch to the far left is for
the largest vends and the notch to the far right is for the smallest vends. The Metal Adjuster Plate can be
completely removed if desired for vending large product such as Peanut M&M's.
F.) The Pan Candy Wheel and the Gumball Wheel (see next item) have Wheel Alignment Arrows to assist you in
positioning the wheel properly. A wheel alignment arrow should always line up with the Center Screw on the
coin mechanism (see Fig. 4)
G.) For gumballs or capsules, you will need to use the 1 1/16" Gumball Wheel and Housing. The Gumball Wheel
is installed by first inserting the Riser (Fig 3). THE OPENING ON THE RISER MUST FACE THE FRONT OF
THE VENDOR. Next, install Gumball Wheel so that one of the vending holes is positioned over the opening in
the Riser. Install the Gumball Housing so that the springs are facing the Coin Mechanism, or front, of the
vendor. To adjust the Gumball Wheel, remove the Housing. Loosen the three (3) Adjustment Screws on top of
the Gumball Wheel located next to each gumball cavity. Turn the Adjustment Wheel to adjust the opening
according to the product being vended. Remember, nothing larger than a 1" (850 count) gumball or a 1"
capsule can be vended. The springs on the Gumball Housing must be toward the Coin Mechanism or the front
of the vendor.
Special Note: We suggest that you always partially fill the Globe with product and perform at least five (5) test vends.
When your portion vends at the desired setting, continue filling the vendor with product. Replace the lid and install Lock.
Note: Do not over tighten the Lock as only a snug fit is necessary.
COIN MECHANISM
The Coin Mechanism (Fig. 4) can be removed by removing the Globe Lid and lifting off the Globe Assembly. Once the
Globe Assembly is removed, the Coin Mechanism can now be lifted upwards and removed.
1. To Dismantle Coin Mechanism:
A.) Remove Center Screw.
B.) Remove Sprocket.
Top Ring MB104
Connecting
Rod(2) MB112
Figure 1 Looking down into the Globe
Page 5
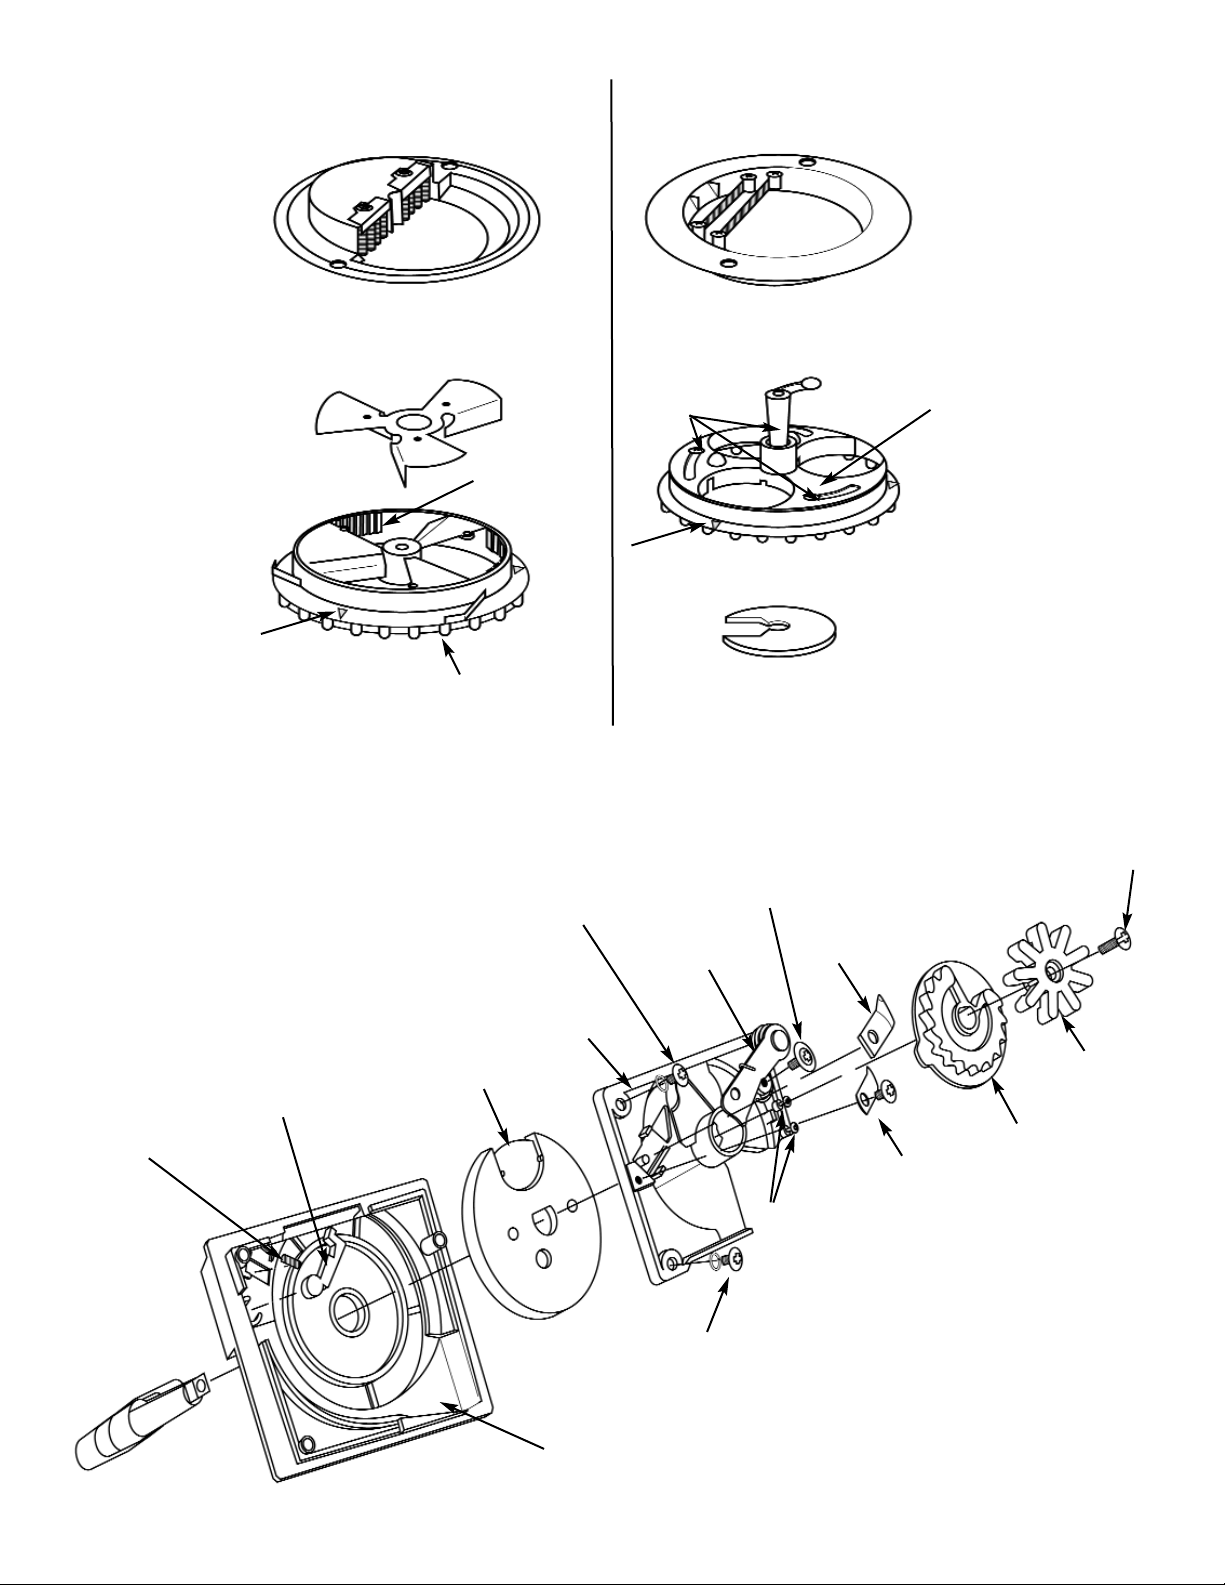
Figure 4 Coin Mechanism Exploded View
Illustration for Adjustment & Maintenance Use Only.
Coin Mechanism Parts Not Sold Separately.
Back
Plate
Coin Wheel
Face Plate
Coin Detector
Coin Detector
Spring
Handle
Sprocket
Ratchet Wheel
Washer
Detector
Washer
Detector
Spring
Mounting
Screw
Hammer
Mounting
Screw
Mounting
Screw
Spring
Stop
Screws
Center Screw
Figure 2 Pan Candy Wheel
Figure 3 Gumball Wheel
Pan Candy Housing
MB116T
Adjuster Plate
MB116B
Pan Candy
Wheel
MB116B
Gumball Housing
MB117T
Adjustment
Screws (3)
Adjustment
Wheel
Gumball
Wheel
MB117B
Riser
MB117R
Wheel Setting
Notches (7)
Wheel Alignment
Arrow
(align with center screw
on coin mechanism)
Candy Wheel
Cogs
Wheel Alignment Arrow
(align with center screw on coin mechanism)
Page 6
C.) Remove three (3) Mounting Screws.
D.) Pull Back Plate away from Face Plate.
E.) Remove jammed coin.
F.) Replace parts in steps A-D in reverse order.
COIN RETRIEV
AL
Your Millennia Gumball's Base accepts the coins. Coins cycled through the Coin Mechanism will fall into the Base. You
do not need to remove product to retrieve coins.
1. To Retrieve Coins.
A.) Unlock and open Globe Lid by unscrewing Lock. Note: Globe Lid is only resting on the Globe.
B.) Lift Globe Assembly, and set aside on a secure surface.
C.) Retrieve coins from Base.
D.) Replace Globe Assembly.
E.) Replace and tighten Lock Note: Do not over tighten the Lock as only a snug fit is necessary.
ST
AND ASSEMBLY (Optional)
Your Millennia Gumball can be mounted on an optional stand. Seaga Manufacturing offers two options for stand mounting,
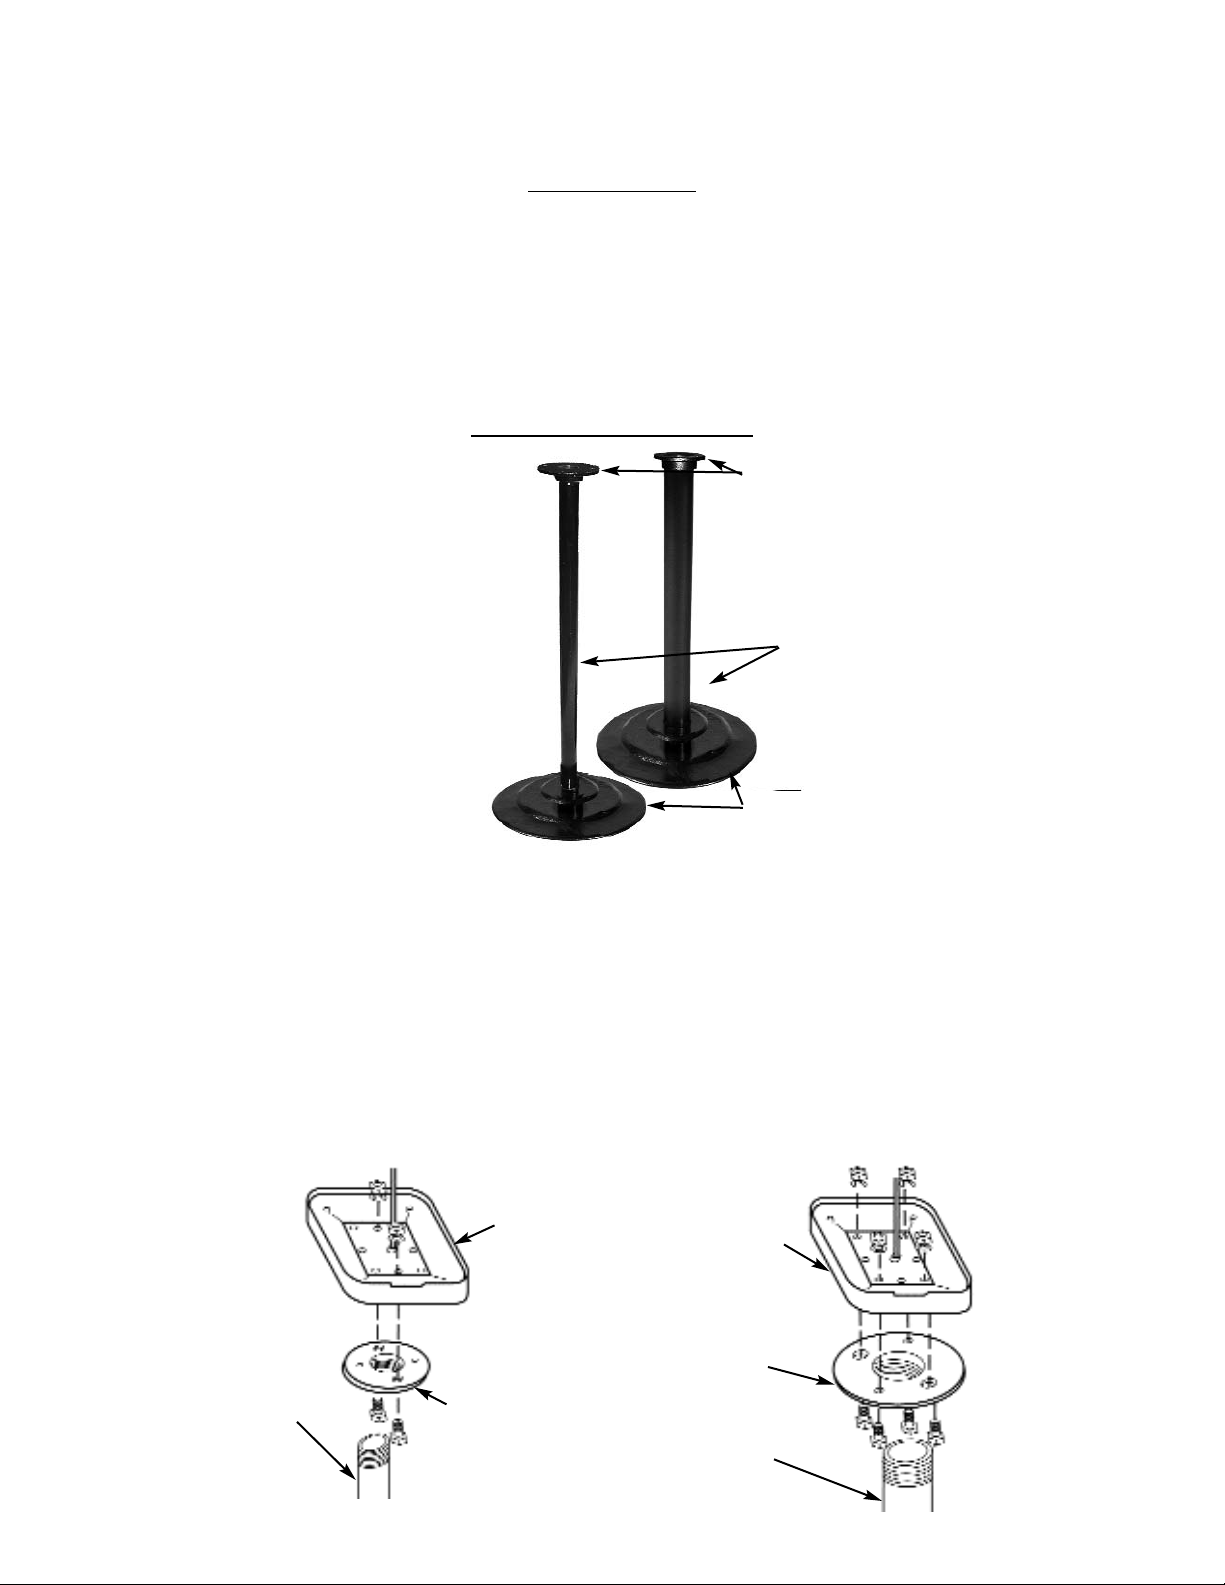
the Titan Heavy Duty Cast Iron Stand and the Hercules Heavy Duty Cast Iron Stand (Fig. 5). Both stands are designed to
mount a wide variety of vendors. This manual provides assembly and mounting instructions for both.
Heavy Duty Cast Iron Stand
The Heavy Duty Cast Iron Stand itself consists of three (3) main parts. The Base, threaded Pedestal Tube, and Threaded
Flange.
1. For Single Mount.
A.) Place the threaded Pedestal Tube into the threaded opening on the pedestal Base and tighten.
B.) Place Threaded Flange onto threaded Pedestal Tube.
Figure 5 Optional Stands
Hercules Heavy
Duty Cast Iron
Stand
ST2000C
Dimensions:
Flange: 5” (12.7 cm)
Tube: 3” (7.6 cm)
Base: 18” (45.7 cm)
Titan
Heavy Duty
Cast Iron
Stand
ST1000C
Dimensions:
Flange: 4” (10.2 cm)
Tube: 1.5” (3.8 cm)
Base: 14.5” (36.8 cm)
Pedestal
Tube
Threaded
Flange
Base
Figure 6 Heavy Duty Cast Iron Stand Single Mounting
Base
Base
Titan Stand
Hercules Stand
Threaded
Pedestal
Tube
Threaded
Pedestal
Tube
Threaded
Flange
Threaded
Flange
Page 7
C.) Secure the pedestal Base and tighten the Threaded Flange by turning clockwise.
D.) Disassemble vendor to free Base. (See: Coin Retrieval)
E.) Align holes in vendor's Base to the large holes in the Threaded Flange. (Fig. 6)
Note: The front of the Base has a notch for the Product Chute.
F.) Insert two (2) bolts from Threaded Flange through Base.
G.) Apply washers and nuts. Tighten. DO NOT OVER TIGHTEN. Over tightening can damage the Base
and void warranty.
H.) Reassemble vendor.
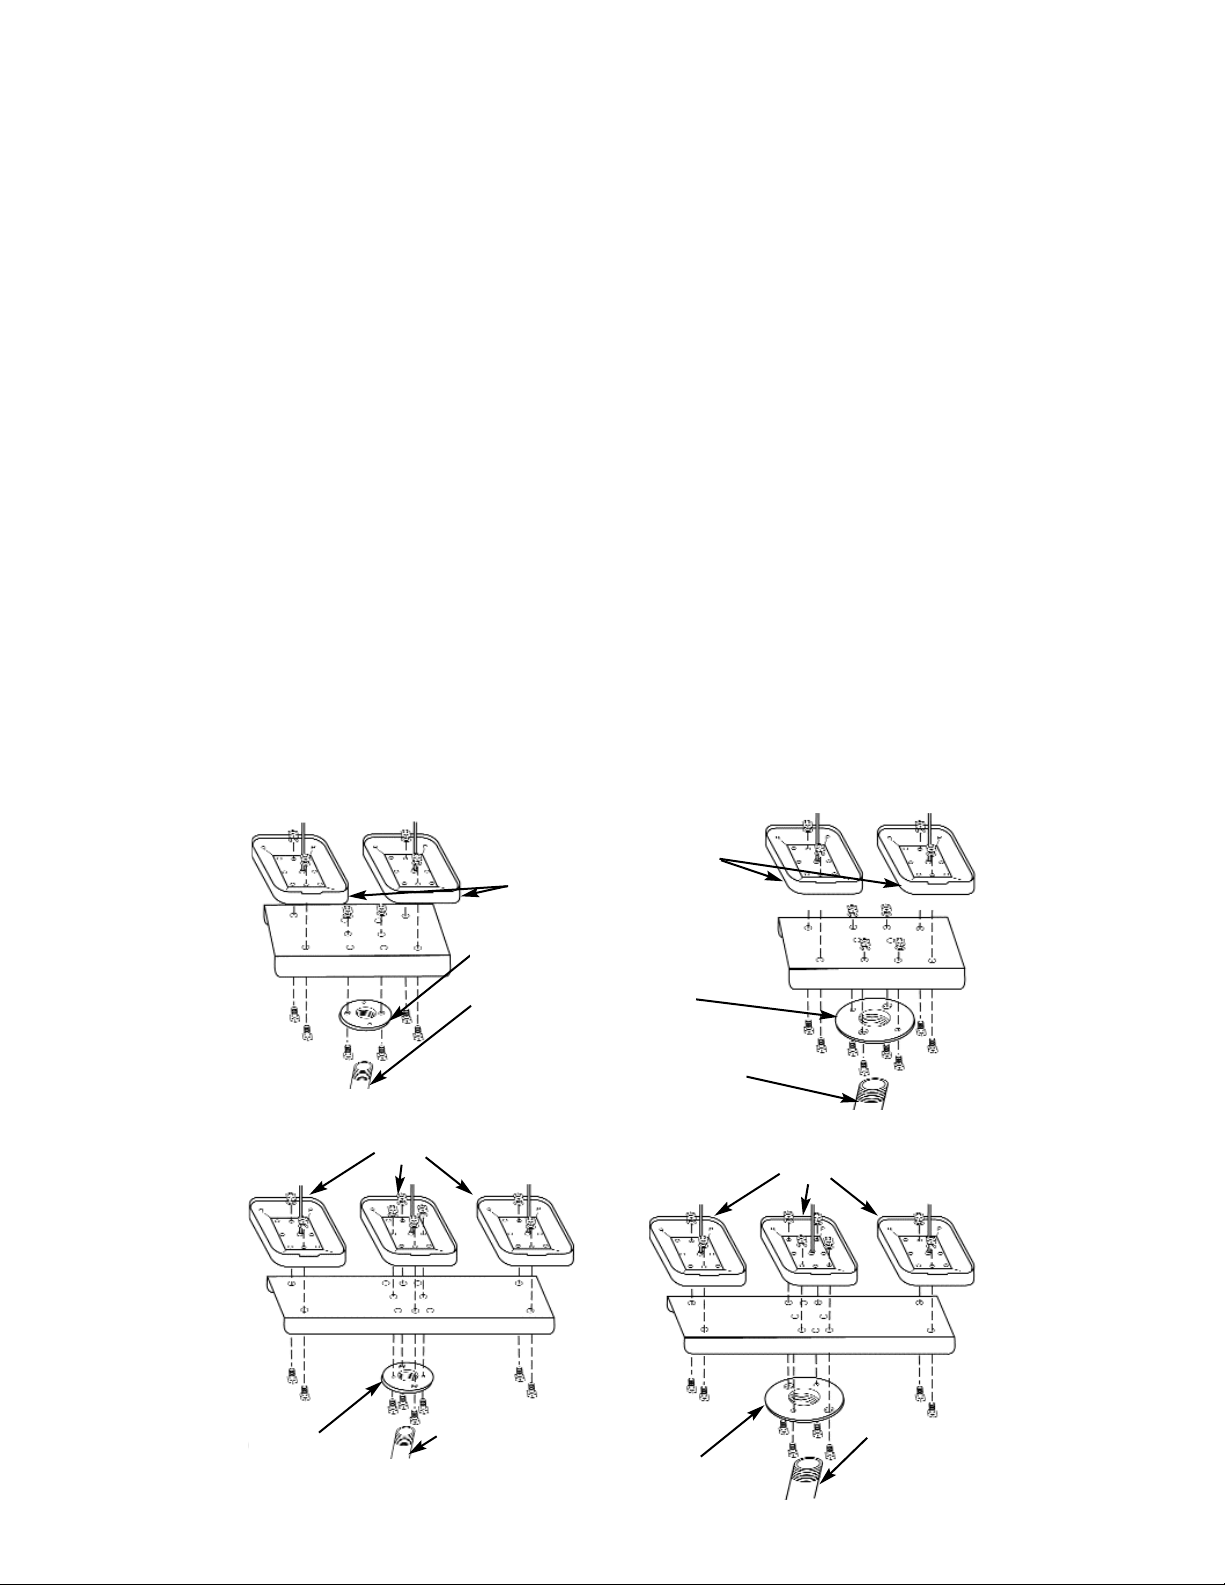
2. For Double Mount.
A.) Complete steps A-D as above.
B.) Place Large Double Bracket on top, and align large holes in Threaded Flange to holes in Large Double
Bracket. (Fig. 7)
C.) Insert Bolts from Threaded Flange up through Large Double Bracket. Apply washers and nuts. Tighten.
D.) Align front and rear most holes in Base to the outer most holes in the Double Bracket. (Fig. 7)
Note: The front of the Base has a notch for the Product Chute.
E.) Insert two (2) bolts (per vendor) up from the Large Double Bracket.
F.) Apply washers and nuts. Tighten. DO NOT OVER TIGHTEN. Over tightening can damage the Base
and void warranty.
G.) Reassemble vendors.
3. For Triple Mount.
A.) Complete steps A-D as above.
B.) Place Triple Bracket on top, and align large holes in Threaded Flange to holes in Triple Bracket. (Fig. 7)
C.) Insert Bolts from Threaded Flange up through Triple Bracket. Apply washers and nuts. Tighten.
D.) Align front and rear most holes in Base to the outer most holes in the Triple Bracket. (Fig. 7)
Note: The front of the Base has a notch for the Product Chute.
E.) Insert two (2) bolts (per vendor) up from the Triple Bracket.
Titan Stand
Titan Stand
Hercules Stand
Hercules Stand
Base
Base
Base
Base
Figure 7 Heavy Duty Cast Iron Stand Double and Triple Mounting
Threaded
Pedestal
Tube
Threaded
Pedestal
Tube
Threaded
Pedestal
Tube
Threaded
Flange
Threaded
Flange
Threaded
Flange
Threaded
Pedestal
Tube
Threaded
Flange
Page 8

F.) Apply washers and nuts. Tighten. DO NOT OVER TIGHTEN. Over tightening can damage the base and void
warranty.
G.) Reassemble vendors.
COMMON QUESTIONS
AND ANSWERS
VENDING
Q: How does my Millennia Gumball actually Vend?
A: Your vendor is a gravity-feed bulk vendor. Gravity feeds the product to the
bottom of the vendor. Maintaining fresh, non-melted product is essential.
Q: Can I always count on a 100% consistent vend?
A: Products that are consistent in size, plain M & M's for example would be more
likely to dispense consistently, products that vary in size such as Runts or Peanut
M & M's will fluctuate. However all products will fluctuate somewhat.
Q: Does the Globe need to be full to vend properly?
A: No. A selection will dispense as long as there is product to vend.
Q: How do I remove product?
A: We recommend that you bring a clean container with you. Remove the Globe
Assembly and pour the product into your clean container. Some product will
remain but this will remove the majority of the product.
Q: How do I set my portion?
A: Refer to the “Delivery System” section of this manual.
Q: What do I do if product becomes "gummed up" in my Millennia Gumball?
A: If your product is melted together scoop or pour out the product from the top.
Remove your dispensing wheel as described in the manual. Your wheel can now
be cleaned, (hot water is recommended) and your product area wiped out. For
severe cases, the entire unit may need to be cleaned. Special Note: The vendor
must be absolutely dry before loading with product.
OPERA
TION
Q: Can I use tokens in my Millennia Gumball?
A: Tokens can be used if they are the exact size and thickness as a coin. Special
mechanisms can be ordered from the Parts Department.
Q: How do I retrieve a bad or incorrect coin from my mechanism?
A: If coin can not be retrieved from mechanism by plucking it from the front, the
mechanism will need to be removed and the coin dumped out. Refer to "Coin
Mechanism" section of manual.
Q: How many coins will my Base hold?
A: The Base will hold approximately 275 coins.
Q: Will slugs work in my Coin Mechanism?
A: As is with all bulk vending machines, the possibility of slugs passing through does
exist. The size of the slug does need to be close to the same size as a coin
for it to vend however.
Q: Will washers work in my Coin Mechanism.
A: The Coin Mechanism is equipped with a washer detector, located on the
back, left side of the mechanism. This detection device will stop most washers,
but is not guaranteed to stop them all.
Q: What do I do if my mechanism rotates backwards.
A: Remove mechanism and determine if the Hammer has not engaged the Ratchet
Wheel. Check for possible loose screws.
Page 9

Q: What do I do if my mechanism rotates fully with an incorrect coin or no coin?
A: Remove the mechanism as described. First check to see if the screws
on the back of the mechanism are tight. If the problem persists the Coin Detector
and Coin Detector Spring may be loose or missing.
Q: Will my mechanism ever require lubrication? If so, how do I lubricate it?
A: Lubricate on an "as needed basis". To do so, you do not need to open the
machine, simply place a coin in the mechanism and rotate the handle ¼
turn. In the Coin Slot place a small drop of lubricating oil on each side of the
exposed Coin Wheel and complete the handle rotation. A couple of rotations may
be necessary to "loosen " up the turning of the mechanism.
MAINTENANCE
Q: How do I clean the outside of my Millennia Gumball?
A: A non lint depositing rag or towel and a little window cleaner will be sufficient to
clean the outside of your Millennia Gumball.
A clean well-stocked machine is an inviting machine!
Q: Can toys and other trinkets be vended from my Millennia Gumball?
A: Capsules that are equivalent up to a 1" gumball (850 Count) and consistently
round can be vended through the Gumball Wheel.
 Loading...