


DE S C R I P T I O N E T IN S TA L L AT I O N
1. Descriptif du thermostat d’ambiance programmable
L’Exabox 7J a été conçu pour vous apporter confort et économies d’énergie.
Il permet de programmer et de réguler votre chauffage selon 3 niveaux de température
-température confort : c’est la température que vous souhaitez pendant vos heures de présence.
-température économique : c’est la température que vous souhaitez pendant vos absences de courte durée ou pendant la nuit.
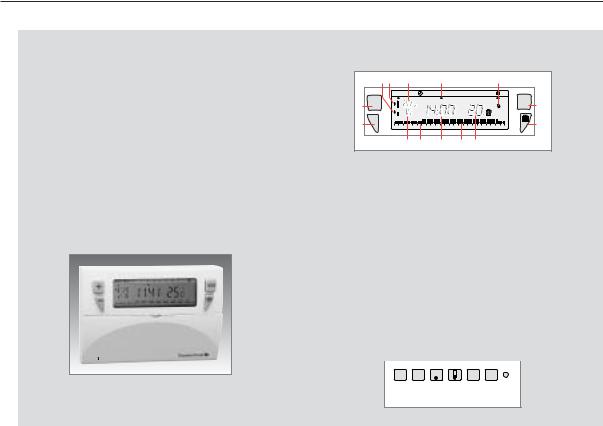
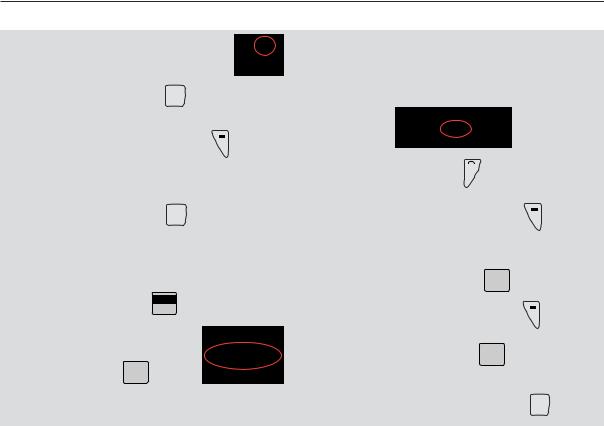
Les touches apparentes et les voyants de l’afficheur
1. |
Touche – pour les réglages |
3. Sélection des modes |
2. |
Touche + pour les réglages |
4. Absence prolongée (vacances) |
|
5 8 |
|
10 |
|
|
|
|
|
11 |
|
|
12 |
|
|
||
|
+ |
Auto Manu |
|
|
|
1 |
2 |
3 |
4 5 |
6 |
7 |
|
|
|||
2 |
|
° c |
|
|
|
|
|
|
|
|
|
|
|
MODE |
3 |
|
|
|
|
|
|
|
|
|
|
|
timer |
|
° c |
||||
|
° c |
|
|
|
|
|
|
|
|
|
|
|||||
|
- |
|
|
|
|
|
|
|
|
|
|
days |
|
|
|
|
1 |
0 1 |
2 |
3 4 |
5 |
6 |
7 |
8 |
9 |
10 |
11 12 |
13 14 15 16 17 18 19 20 21 22 23 24 |
|
4 |
|||
|
|
|
|
7 |
|
6 |
|
|
|
14 |
9 |
13 |
|
|
|
|
-température hors-gel : c’est la température minimale assurée pendant vos absences prolongées. Elle protège votre logement des risques du gel.
Ses 3 programmes préenregistrés et son programme libre vont vous permettre jour par jour d’adapter votre chauffage à votre mode de vie.
Facile d’entretien, votre Exabox 7J est alimenté directement par votre chaudière Saunier Duval.
 box
box
5.Indicateur de température en cours (économique)
6.Visualisation des périodes «économique»
7.Température «économique»
8.Indicateur de température en cours (confort)
9.Visualisation des périodes «confort»
Les touches sous le capot
15.Sélection des jours de la semaine (1 = lundi...)
16.Choix du programme P1 à P4
17.Réglage température confort
18.Réglage température économique
10.Température «confort»
11.Indicateur du jour de la semaine
12.Indicateur d’enclenchement du chauffage
13.Affichage de la température ambiante
14.Affichage de l’heure courante
19.Validation
20.Réglage comptage horaire
21.Touche Reset
DAYS |
PROG |
OK |
0000 |
|
|
1-7 |
P1-P4 |
h |
Res |
||
|
|||||
|
|
|
|
15 16 17 18 19 20 21
9419.560.00/03.01

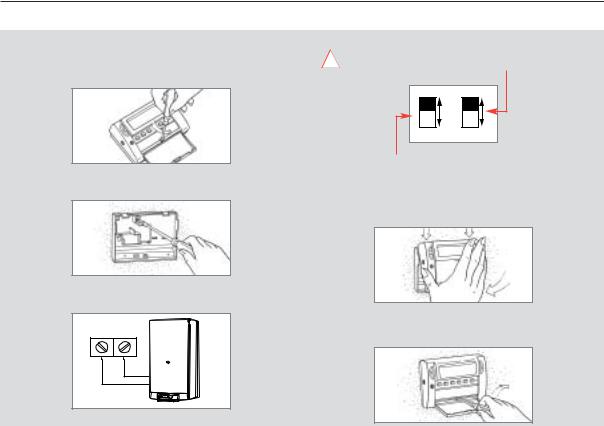
2. Pose du thermostat d’ambiance programmable
L’Exabox 7J doit être installé à environ 1,50 m du sol, sur un mur intérieur, à l’abri du rayonnement solaire et de toute source de chaleur telle que : téléviseur, lampe, courant d’air, etc...
Ouvrez le capot et dévissez la vis
Fixez la plaque sur le mur.
Raccordez l’appareil suivant le schéma ci-dessous.
...
Configurez l’appareil.
Positionnez le commutateur sur «Battery ON pour mettre en ! service la pile de sauvegarde
Prog N Battery ON
2
Prog S Battery OFF
En fonction de votre situation géographique, sélectionnez les programmes de chauffage pré-enregistrés variante Nord ou variante Sud (vour chapitre 6. Programmation).
Accrochez puis clipsez le thermostat d’ambiance programmable.
Revissez la vis puis refermez le capot.
RÉ G L AG E D E L’HE U R E
3. Liaison chaudière - Exabox 7J
Liaison chaudière - Exabox 7J
Votre Exabox 7J fonctionne en liaison directe avec votre chaudière Saunier Duval. Lorsque votre chaudière est éteinte ou en position «été», votre Exabox 7J est éteint et n’affiche que la température ambiante. Toute votre programmation est en mémoire.
Votre Exabox 7J se mettra en marche automatiquement lorsque vous mettrez votre chaudière en position « chauffage ».
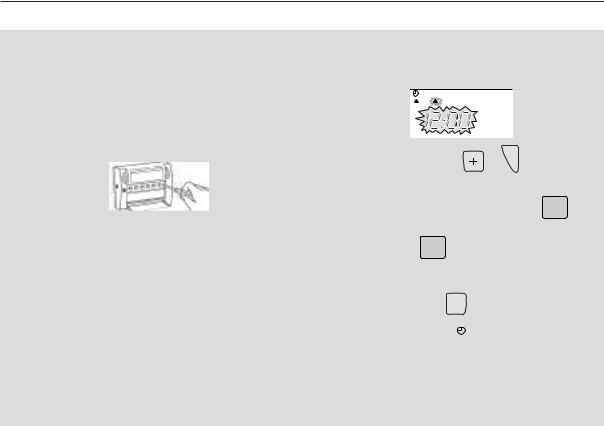
A la première mise en service, avant de commencer la programmation de votre appareil, veuillez abaisser le capot et appuyez sur la touche reset  à l’aide d’une pointe de stylo.
|
|
|
|
|
|
|
|
|
|
Caractéristiques techniques. |
|
|
||
- plage de réglage de la température confort : |
+5 |
à +30°C |
||
- plage de réglage de la température réduite : |
+5 |
à +30°C |
||
- plage de réglage de la température vacances : |
+5 |
à +30°C |
||
- plage d’affichage de la température ambiante : |
0°C à +40°C |
|||
- différentiel statique |
|
<0.3°C |
||
- alimentation : |
via la liaison qui relie l’exabox 7J à la chaudière |
|||
- réserve de marche : |
|
8 ans |
||
- température de fonctionnement : |
–10 à +50°C |
|||
- température de stockage : |
–20°C à +65°C |
|||
- hygrométrie : |
|
|
90% max à 25°C |
|
- degré de protection : |
|
IP30 |
||
- classe d’isolation |
|
|
|
II |
4. Réglage de l’heure
Réglage de l’heure
C’est la première mise en service, vous venez d’appuyer sur la touche reset.
Les inscriptions 12:00 et le pointeur sous le jour 1 (lundi) clignotent.
1 2 3 4 5 6
1. |
Mettez à l’heure par les touches |
ou |
|
(un appui pro- |
|||
|
longé sur la touche accélère le |
|
|
|
|
|
|
|
défilement de l’heure). |
|
|
|
|
|
|
|
|
|
|
|
|
DAYS |
|
2. |
Réglez le jour actuel par appuis successifs sur la touche |
1-7 |
,un |
||||
|
|||||||
|
pointeur apparaît sous le jour correspondant (1 = Lundi, 2 = Mardi, |
||||||
|
etc..). |
OK |
|
|
|
|
|
3. Validez avec la touche |
|
|
|
|
|
||
. |
|
|
|
|
|
||
4.Vous souhaitez modifier l’heure ou le jour :
appuyez sur la touche MODE MODE
jusqu’à l’apparition du pointeur  sous le sigle horloge et procéder comme ci-dessus aux points 1, 2 et 3.
PR O G R A M M AT I O N
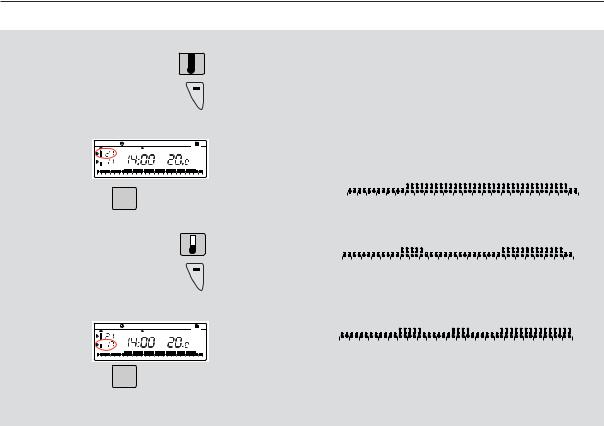
5. Modification des températures pré-réglées
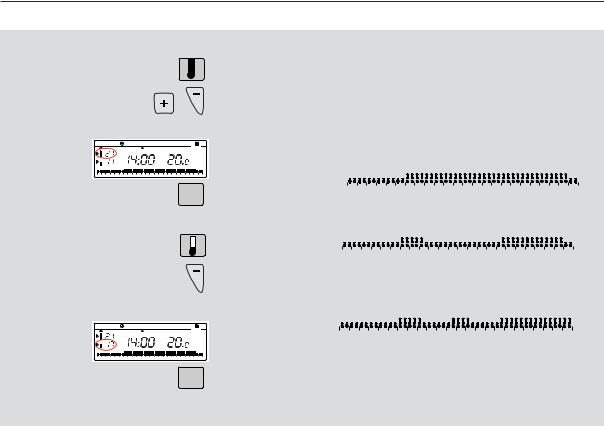
Pour régler la température Confort. ouvrez le capot
Appuyez sur |
|
et appuyez sur |
ou |
jusqu’a ce que vous obteniez la température désirée.
Auto Manu |
|
|
|
1 |
2 |
|
3 |
|
4 |
5 |
|
6 |
7 |
|
|
|
|
|
||||||
|
|
° c |
|
|
|
|
|
|
|
|
|
|
|
|
|
|
|
|
|
|
|
|
|
|
|
|
|
|
|
|
|
|
|
|
|
|
|
|
timer |
|
|
|
|
|
° c |
|
|
|
|
|
|
|
|
|
|
|
|
|
|
|
|
|
|
|
|
|
|
|
|
|
|
|
||
|
|
° c |
|
|
|
|
|
|
|
|
|
|
|
days |
|
|
|
|
|
|
|
|
|
|
|
|
|
|
|
|
|
|
|
|
|
|
|
|
|
|
|
|
|
|
|
|
|
||
0 |
1 |
2 |
3 |
4 |
5 |
6 |
7 |
8 |
9 |
10 |
11 |
12 |
13 |
14 |
15 |
16 |
17 |
18 |
19 |
20 |
21 |
22 |
23 |
24 |
valider
Pour régler la température Réduit.
Appuyez sur
et appuyez sur  ou
ou
jusqu’a ce que vous obteniez la température désirée.
Auto Manu |
|
|
|
1 |
2 |
|
3 |
|
4 |
5 |
|
6 |
7 |
|
|
|
|
|
||||||
|
|
° c |
|
|
|
|
|
|
|
|
|
|
|
|
|
|
|
|
|
|
|
|
|
|
|
|
|
|
|
|
|
|
|
|
|
|
|
|
timer |
|
|
|
|
|
° c |
|
|
|
|
|
|
|
|
|
|
|
|
|
|
|
|
|
|
|
|
|
|
|
|
|
|
|
||
|
|
° c |
|
|
|
|
|
|
|
|
|
|
|
days |
|
|
|
|
|
|
|
|
|
|
|
|
|
|
|
|
|
|
|
|
|
|
|
|
|
|
|
|
|
|
|
|
|
||
0 |
1 |
2 |
3 |
4 |
5 |
6 |
7 |
8 |
9 |
10 |
11 |
12 |
13 |
14 |
15 |
16 |
17 |
18 |
19 |
20 |
21 |
22 |
23 |
24 |
valider
NB. La température est réglable de 5°C à 30°C par pas de 0,5°C.
6. Programmation
Pour programmer votre semaine vous diposez de 4 programmes :
P1, P2, P3 qui sont préenregistrés et non modifiables.
P4 |
qui est libre, vous permet de créer un programme person- |
|
nalisé et différent pour chaque jour de la semaine. |
Les programmes pré-enregistrés P1, P2 et P3 existent en 2 variantes :
NORD
P1 = Température confort de 6h à 23h
Température économique de 23h à 6h.
|
|
|
|
|
|
|
|
|
|
|
|
|
|
|
|
|
|
|
|
|
|
|
|
|
|
|
|
|
|
|
|
|
|
|
|
|
|
|
|
|
|
|
|
|
|
|
|
|
|
|
|
|
|
|
|
|
|
|
|
|
|
|
|
|
|
|
|
|
|
|
|
|
|
|
|
|
|
|
|
|
|
|
|
|
|
|
|
|
|
|
|
|
|
|
|
|
|
0 |
|
1 |
|
2 |
|
3 |
|
4 |
|
5 |
|
6 |
7 |
8 |
9 |
10 |
11 |
12 |
13 |
14 |
15 |
16 |
17 |
18 |
19 |
20 |
21 |
22 |
23 |
24 |
||||||||||||||||||
|
|
|
|
|
|
|
|
|
|
|
|
|
|
|
|
|
|
|
|
|
|
|
|
|
|
|
|
|
|
|
|
|
|
|
|
|
|
|
|
|
|
|
|
|
|
|
|
|
P2 = Température confort de 6h à 8h30 et de 16h30 à 23h00 Température économique de 8h30 à 16h30 et de 23h00 à 6h00.
|
|
|
|
|
|
|
|
|
|
|
|
|
|
|
|
|
|
|
|
|
|
|
|
|
|
|
|
|
|
|
|
|
|
|
|
|
|
|
|
|
|
|
|
|
|
|
|
|
|
|
|
|
|
|
|
|
|
|
|
|
|
|
|
|
|
|
|
|
|
|
|
|
|
|
|
|
|
|
|
|
|
|
|
|
|
|
|
|
|
|
|
|
|
|
|
|
|
0 |
|
1 |
|
2 |
|
3 |
|
4 |
|
5 |
|
6 |
7 |
8 |
9 |
10 |
11 |
12 |
13 |
14 |
15 |
16 |
17 |
18 |
19 |
20 |
21 |
22 |
23 |
24 |
||||||||||||||||||
|
|
|
|
|
|
|
|
|
|
|
|
|
|
|
|
|
|
|
|
|
|
|
|
|
|
|
|
|
|
|
|
|
|
|
|
|
|
|
|
|
|
|
|
|
|
|
|
|
P3 = Température confort de 6h à 8h30 de 11h30 à 13h30 et de 16h30
à 23h00
Température économique de 8h30 à 11h30 de 13h30 à 16h30 et de 23h00 à 6h00.
|
|
|
|
|
|
|
|
|
|
|
|
|
|
|
|
|
|
|
|
|
|
|
|
|
|
|
|
|
|
|
|
|
|
|
|
|
|
|
|
|
|
|
|
|
|
|
|
|
|
|
|
|
|
|
|
|
|
|
|
|
|
|
|
|
|
|
|
|
|
|
|
|
|
|
|
|
|
|
|
|
|
|
|
|
|
|
|
|
|
|
|
|
|
|
|
|
|
0 |
|
1 |
|
2 |
|
3 |
|
4 |
|
5 |
|
6 |
7 |
8 |
9 |
10 |
11 |
12 |
13 |
14 |
15 |
16 |
17 |
18 |
19 |
20 |
21 |
22 |
23 |
|
24 |
|||||||||||||||||
P4 = Programme libre vous permettant de créer 3 périodes en température confort et 3 périodes en température économique et ceci pour chaque jour de la semaine.

SUD
P1 = Température confort de 7h à 23h
Température économique de 23h à 7h.
|
|
|
|
|
|
|
|
|
|
|
|
|
|
|
|
|
|
|
|
|
|
|
|
|
|
|
|
|
|
|
|
|
|
|
|
|
|
|
|
|
0 |
1 |
2 |
3 |
4 |
5 |
6 |
7 |
8 |
9 |
10 |
11 |
12 |
13 |
14 |
15 |
16 |
17 |
18 |
19 |
20 |
21 |
22 |
23 |
24 |
||||||||||||||||
P2 = Température confort de 7h à 9h00 et de 18h00 à 23h00 Température économique de 9h00 à 18h00 et de 23h00 à 7h00.
|
|
|
|
|
|
|
|
|
|
|
|
|
|
|
|
|
|
|
|
|
|
|
|
|
|
|
|
|
|
|
|
0 |
1 |
2 |
3 |
4 |
5 |
6 |
7 |
8 |
9 |
10 |
11 |
12 |
13 |
14 |
15 |
16 |
17 |
18 |
19 |
20 |
21 |
22 |
23 |
24 |
|||||||
P3 = Température confort de 7h à 9h00 de 13h00 à 15h00 et de 18h00
à 23h00
Température économique de 9h00 à 13h00, de 15h00 à 18h00 et de 23h00 à 7h00.
|
|
|
|
|
|
|
|
|
|
|
|
|
|
|
|
|
|
|
|
|
|
|
|
|
|
|
|
|
|
|
|
|
|
0 |
1 |
2 |
3 |
4 |
5 |
6 |
7 |
8 |
9 |
10 |
11 |
12 |
13 |
14 |
15 |
16 |
17 |
18 |
19 |
20 |
21 |
22 |
23 |
24 |
|||||||||
P4 = Programme libre.
!Important : pour basculer les programmes pré-enregistrés de la variante Nord à la vaiante Sud ou vice versa,démontez l’appareil de son socle et utilisez le mini-interrupteur Nord/Sud
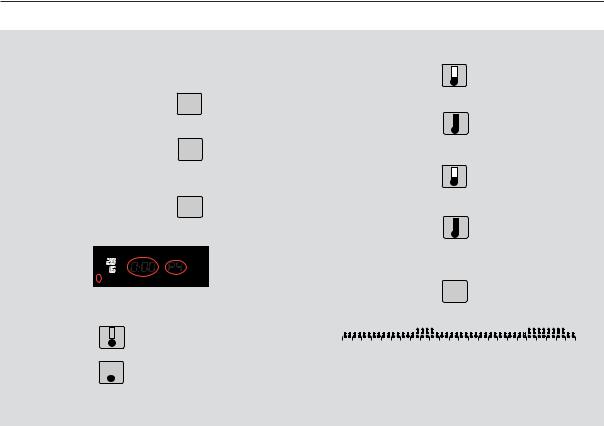
Pour programmer votre semaine sur la base des programmes pré-enregistrés P1, P2 ou P3.
PROG
1. Appuyer sur P1-P4
pour passer en mode programmation.
DAYS
2. Appuyer sur 1-7
jusqu’à l’apparition du pointeur sous le jour que vous souhaitez programmer.
PROG
3. Appuyer sur P1-P4
jusqu’à afficher le programme que vous souhaitez appliquer à ce jour.
4. Appuyer sur OK
pour valider.
Le jour suivant vous est automatiquement proposé.

7. Programmation du programme P4
Programmez vous-même en fonction de vos besoins.
Ce programme P4 peut être différent pour chaque jour de la semaine.
1. Appuyer sur
pour passer en mode programmation.
2. Appuyer sur
jusqu’à l’apparition du pointeur sous le jour que vous souhaitez programmer.
PROG
3. Appuyer sur P1-P4 jusqu’à afficher le programme P4.
Votre afficheur indique 0h00 et le premier thermomètre clignote sur le profil de 24h.
Auto |
|
Manu |
|
|
|
1 |
|
2 |
|
3 |
|
4 |
|
5 |
6 |
|
7 |
|
|
|
|
|
||
|
° c |
|
|
|
|
|
|
|
|
|
|
|
|
|
|
|
|
|
|
|
|
|
|
|
|
° c |
|
|
|
|
|
|
|
|
|
|
|
|
|
|
|
|
|
|
|
|
|
|
|
0 |
1 |
2 |
3 |
4 |
5 |
6 |
7 |
8 |
9 |
10 |
11 |
12 |
13 |
14 |
15 |
16 |
17 |
18 |
19 |
20 |
21 |
22 |
23 |
24 |
Le curseur du bas clignote de 0h00 à 0h30.
Appuyez sur |
|
|
pour avoir la température réduit |
|
|
||
|
|
||
ou |
|
|
|
|
|
|
|
Appuyez sur |
|
|
pour avoir la température confort. |
|
...
Par exemple, vous désirez avoir la température confort de 7h30 à 9h30 puis de 19h00 à 23h00.
Appuyez sur
Plusieurs fois pour obtenir l’horaire 7h30.
Appuyez sur
Plusieurs fois pour obtenir l’horaire 9h30.
Appuyez sur
Plusieurs fois pour obtenir l’horaire 19h00.
Appuyez sur
Plusieurs fois pour obtenir l’horaire 23h00
Pour valider toute la programmation :
OK
appuyez sur
|
|
|
|
|
|
|
|
|
|
|
|
|
|
|
|
|
|
|
|
|
|
|
|
|
|
|
|
|
|
|
|
|
|
|
|
|
|
|
|
|
|
|
|
|
|
|
|
|
|
|
|
|
|
|
|
|
|
|
|
|
|
|
|
|
|
|
|
|
|
|
|
|
|
|
|
|
|
|
|
|
|
|
|
|
|
|
|
|
|
|
|
|
|
|
|
|
|
|
|
|
|
|
|
|
|
|
|
|
|
|
|
|
|
|
|
|
|
|
|
|
|
|
|
|
|
|
|
|
|
|
|
|
|
|
|
|
|
|
|
|
|
|
|
|
|
|
0 |
|
1 |
|
2 |
|
3 |
|
4 |
|
5 |
|
6 |
7 |
8 |
9 |
10 |
11 |
12 |
13 |
14 |
15 |
16 |
17 |
18 |
19 |
20 |
21 |
22 |
23 |
24 |
||||||||||||||||||
|
|
|
|
|
|
|
|
|
|
|
|
|
|
|
|
|
|
|
|
|
|
|
|
|
|
|
|
|
|
|
|
|
|
|
|
|
|
|
|
|
|
|
|
|
|
|
|
|
Vous avez programmé la température confort de 7h30 à 9h30 puis de
19h00 à 23h00.

CHANGEMENT DE CONSIGNE
8. Lecture des programmes
Depuis le mode auto
PROG
Appuyer sur P1-P4
DAYS
Avec 1-7
sélectionnez le jour de 1 à 7 et vérifier le programme sur le profil de 24h en bas de l’afficheur .
Auto Manu |
|
|
|
1 |
|
2 |
|
3 |
|
4 |
|
5 |
6 |
|
7 |
|
|
|
|
|
||||
|
° c |
|
|
|
|
|
|
|
|
|
|
|
|
|
|
|
|
|
|
|
|
|
|
|
|
° c |
|
|
|
|
|
|
|
|
|
|
|
|
|
|
|
|
|
|
|
|
|
|
|
0 |
1 |
2 |
3 |
4 |
5 |
6 |
7 |
8 |
9 |
10 |
11 |
12 |
13 |
14 |
15 |
16 |
17 |
18 |
19 |
20 |
21 |
22 |
23 |
24 |
MODE
Appuyer sur
pour revenir en mode automatique.
Le mode automatique « auto ».
En mode automatique, |
|
Auto M |
|
adapte à votre ryth- |
|
|
|
° c |
|
||
me de vie en réalisant le |
|
vous avez choisis. |
|||
|
|
||||
Le passage en mode |
|
|
|
sur la touche |
|
MODE jusqu’à l’apparition |
|
|
|||
9. Changement temporaire de la consigne
En mode automatique, cette fonction très pratique vous permet de modifier temporairement la température ambiante.
- pour augmenter la température,
appuyez sur  (plusieurs appuis si nécessaire).
- pour abaisser la température,
appuyez sur (plusieurs appuis si nécessaire).
L’indicateur du niveau de température en cours (confort ou économique) se met à clignoter.
Cette modification prendra fin lors du prochain changement de température programmée.
Pour revenir au programme initial,
MODE
appuyez sur
Auto Manu 
 ° c
° c
° c
0 1 2 3 4 5
et replacez le pointeur sous « auto ».
L’arrêt du clignotement de l’indicateur du niveau de température en cours (confort ou économique) marque la fin de la modification temporaire.
|
|
|
|
MO D E VAC A N C E S |
|
10. Changement permanent de la température |
12. Mode absences prolongées, vacances |
||||
11. Comptage des heures de fonctionnement |
|||||
|
|||||
Pour maintenir une température permanente dans |
|
|
Mode absences prolongées, vacances |
||
Auto Manu |
|||||
votre logement (réglable de 5°C à 30°C) sans tenir |
Ce mode met votre logement à l’abri des risques du gel en mainte- |
||||
|
|
||||
compte d’aucune programmation. |
|
° c |
|||
|
|
nant une température minimum réglable dans votre logement durant |
|||
|
|
||||
|
|
|
|
||
|
|
|
|
vos absences (de 1 à 99 jours). |
|
|
|
|
|
||
1. appuyer sur |
MODE |
|
|
Vous pouvez programmer la durée de votre absence pour prévoir la |
|
|
|
|
|
||
remontée en température de votre logement à votre retour.
pour positionner le pointeur sous Manu.
2. appuyez sur  ou
ou
pour régler la température souhaitée.
Auto Manu |
|
|
1 |
|
2 |
|
3 |
|
4 |
|
5 |
|
6 |
7 |
|
|
|
|
|
|||||
|
|
° c |
|
|
|
|
|
|
|
|
|
|
|
days |
|
|
|
|
|
|
|
|
||
|
|
|
|
|
|
|
|
|
|
|
|
|
|
|
|
|
|
|
|
|
|
|||
0 |
1 |
2 |
3 |
4 |
5 |
6 |
7 |
8 |
9 |
10 |
11 |
12 |
13 |
14 |
15 |
16 |
17 |
18 |
19 |
20 |
21 |
22 |
23 |
24 |
|
|
|
|
|
|
|
|
|
|
|
|
|
|
|
|
|
|
|
|
|
|
|
|
|
Pour quitter le mode MANU,
appuyer sur MODE
et repositionner le pointeur sous auto.
Comptage des heures de fonctionnement.
Cette fonction vous permet de connaître le nombre d’heures de fonctionnement de votre chaudière depuis la dernière remise à zéro.
0000
Appuyez sur h |
|
pour connaître le nombre d’heures de |
1 2 3 4 5 6 |
fonctionnement depuis la dernière remise à |
|
zéro. |
timer |
0000
Appuyez sur h |
6 |
7 |
8 |
9 |
10 |
11 |
12 |
13 |
14 |
15 |
16 |
17 |
18 |
pendant 5 sec. pour remettre le compteur à zéro.
1.appuyer sur
2.appuyez sur  ou
ou
pour régler la durée de votre absence en jours (de 1 à 99 jours). La journée en cours compte pour 1.
3. Validez avec |
OK |
|
4. appuyez sur  ou
ou
pour régler le niveau de température souhaité pendant votre absence
OK
5. Validez avec
Restez dans ce mode.
Pour annuler le programme vacances |
MODE . |
et revenir en mode automatique, appuyer sur |
BE S C H R E I B U N G U N D IN S TA L L AT I O N
1. Beschreibung des programmierbaren Raumthermostats
Der Exabox ist entwickelt worden, um für Sie Komfort und Energieeinsparung zu bieten.
Mit diesem Gerät können Sie Ihre Heizung in 3 Temperaturstufen einstellen und programmieren.
-Die "Komforttemperatur" : das ist die Temperatur, die Sie haben möchten, wenn Sie anwesend sind.
-Die "Absenktemperatur" : das ist die Temperatur, die Sie während Ihrer kurzzeitigen Abwesenheit oder während der Nacht haben möchten.
Sichtbare Tasten und Kontrolleuchten des Anzeigeelements.
1. |
Taste „–" für die Einstellung |
3. Wahl der Betriebsart |
2. |
Taste "+" für die Einstellung |
4. Längere Abwesenheit (Urlaub) |
|
5 8 |
|
10 |
|
|
|
|
|
11 |
|
|
12 |
|
|
||
|
+ |
Auto Manu |
|
|
|
1 |
2 |
3 |
4 5 |
6 |
7 |
|
|
|||
2 |
|
° c |
|
|
|
|
|
|
|
|
|
|
|
MODE |
3 |
|
|
|
|
|
|
|
|
|
|
|
timer |
|
° c |
||||
|
° c |
|
|
|
|
|
|
|
|
|
|
|||||
|
- |
|
|
|
|
|
|
|
|
|
|
days |
|
|
|
|
1 |
0 1 |
2 |
3 4 |
5 |
6 |
7 |
8 |
9 |
10 |
11 12 |
13 14 15 16 17 18 19 20 21 22 23 24 |
|
4 |
|||
|
|
|
|
7 |
|
6 |
|
|
|
14 |
9 |
13 |
|
|
|
|
-Die "Frostschutztemperatur": das ist die Mindesttemperatur für die Zeit einer längeren Abwesenheit. Mit dieser Einstellung ist Ihre Wohnung gegen Frost geschützt.
Diese 3 voreingestellten Temperaturwerte und ihre freie Programmierung machen es möglich, Ihre Heizung Tag für Tag an Ihre Lebensweise anzupassen.
Das wartungsfreundliche Exabox Raumthermostat wird direkt über Ihre Saunier Duval Therme gespeist.
 box
box
5. |
Anzeige des Temperaturwertes |
10. Komforttemperatur |
6. |
für den Absenkbetrieb |
11. Anzeige des Wochentags |
Anzeige der Betriebsarten |
12. Anzeige für die Einschaltung |
|
7. |
Absenkbetrieb |
der Heizunganlage |
Absenktemperatur |
13. Umgebungstemperatur |
|
8. |
Anzeige des Temperaturwertes |
14. Anzeige der aktuellen Uhrzeit |
|
für den Komfortbetrieb |
|
9.Anzeige der Betriebsarten Komfortbetrieb
Unter der Abdeckung befindliche Tasten |
|
|
|
|
|
|
||||||||||
15. |
Wahl des Wochentags |
18. |
Einstellung des Wertes der |
|||||||||||||
16. |
(1 = Montag,..) |
|
|
|
19. |
Absenktemperatur |
||||||||||
Wahl des Programms P1 bis P4 |
Bestätigung |
|||||||||||||||
17. |
Einstellung des Wertes der |
20. |
Einstellung des |
|||||||||||||
|
Komforttemperatur |
|
|
|
|
Stundenzählers |
||||||||||
|
|
|
|
|
|
|
|
|
|
|
|
|
|
|||
|
|
|
|
|
|
|
|
|
|
|
|
|
|
|
|
|
|
|
|
|
|
|
|
|
|
|
|
|
|
||||
|
|
|
DAYS |
PROG |
|
|
OK |
0000 |
|
|
|
|
||||
|
|
|
1-7 |
P1-P4 |
|
|
h |
Res |
|
|
||||||
|
|
|
|
|
|
|
|
|
||||||||
|
|
|
|
|
|
|
|
|
|
|
|
|
|
|
|
|
|
|
|
|
|
|
|
|
|
|
|
|
|
|
|
|
|
15 16 17 18 19 20 21
9419.560.00/03.01

2. Einbau des programmierbaren Raumthermostats
Der Exabox ist ca. 1,50 m über dem Boden an einer Innenwand so anzubringen, daß es gegen direkte Sonnenstrahlung und gegen den Einfluß jeglicher Wärmequelle (wie Fernsehgerät, Lampen, Luftzug, usw.) geschützt ist.
KlappenSie die Haube herab und lösen Sie die Schraube.
Befestigen Sie den Sockel an der Wand.
Schließen Sie das Gerät dem folgenden Schema entsprechend an.
...
Gerät einstellen.
Stellen Sie den Schalter auf „Battery ON“, um die ! Speicherbatterie in Betrieb zu nehmen.
Prog N Battery ON
2
Prog S Battery OFF
Wählen Sie jetzt in Anbetracht Ihrer geographischen Lage eines der vorgespeicherten Heizprogramme, Variante „Nord“ oder „Süd“ (siehe Kapitel 6. Gerät programmieren).
Hängen Sie das Raumthermostat an und clipsen Sie es fest.
Ziehen Sie die Schraube wieder an und verschließen Sie die Abdeckung.
EI N S T E L L U N G D E S TAG E S U N D D E R UH R Z E I T
3. Verbindung zwischen Therme und Exabox
Verbindung zwischen Therme und Exabox.
Ihr Exabox Raumthermostat arbeitet in direkter Verbindung mit Ihrer Saunier Duval Therme. Ist Ihre Therme abgeschaltet bzw. wurde sie auf „Sommer“ gesetzt, schaltet sich Ihre Exabox ebenfalls ab, und zeigt lediglich die Raumtemperatur an. Die gesamte Programmierung ist jedoch nach wie vor im Speicher hinterlegt.
Ihr Exabox setzt sich automatisch in Betrieb,sobald Sie Ihre Therme auf „Heizen“ umstellen.
Bei der ersten Inbetriebnahme und bevor Sie mit der Programmierung Ihres Gerätes beginnen, verschließen Sie bitte die Abdeckung, und betätigen Sie die Reset Taste Taste mit der Spitze eines Kugelschreibers.
|
|
|
|
|
|
|
|
Technische Merkmale. |
|
|
|
- Komforttemperatur Einstellbereich: |
+5 |
°C bis +30 °C |
|
- Absenktemperatur Einstellbereich: |
+5 |
°C bis +30 °C |
|
- Frostschutztemperatur Einstellbereich: |
+5 |
°C bis +30 °C |
|
- Umgebungstemperatur Anzeigebereich: |
0 |
°C bis +40 °C |
|
- Statische Schaltdifferenz: |
|
< 0,3 Grad |
|
-Stromversorgung: Über die Leitung, mit der Exabox an die Therme angeschlossen ist.
- Gangreserve: |
8 Jahre |
- Betriebstemperatur : |
-10 à +50°C |
- Lagerungstemperatur: |
-20°C à +65°C |
- Luftfeuchtigkeit : |
90% max à 25°C |
- Schutzgrad: |
IP 30 |
- Isolationsklasse |
II |
4. Einstellung des Tages und der Uhrzeit
Einstellung des Tages und der Uhrzeit.
Es handelt sich um die erste Inbetriebnahme, Sie drücken die Taste " RESET "
Die Anzeige 12:00 und der Zeiger unterhalb des Tages 1 (Montag) blinken.
1 2 3 4 5 6
1. |
Stellen Sie nun mit den Tasten |
oder |
|
|
die Uhrzeit ein. |
|||
|
Beim anhaltenden Drücken dieser Tasten läuft die Zeitanzeige |
|||||||
|
schneller durch. |
|
|
|
|
|
|
|
|
|
DAYS |
|
|
|
|
|
|
2. |
Mit Hilfe der Taste |
1-7 |
, stellen Sie jetzt den Tag ein. Unter dem |
|||||
|
||||||||
|
jeweiligen Tag erscheint dann der Zeiger (1 = Montag,2 = Dienstag, |
|||||||
|
3 = Mittwoch usw.) |
|
|
|
OK |
|||
3. Bestätigen Sie die Einstellung mit der Taste |
||||||||
. |
||||||||
4.Falls Sie die Einstellung des Tages oder der Uhrzeit verändern möchten,
drücken Sie die Taste MODE MODE
bis der Zeiger  unter dem Symbol der Uhr steht. Anschließend gehen Sie ebenso wie in den obigen Punkten 1, 2 und 3 vor.
PR O G R A M M I E R U N G
5. Voreingestellte Temperaturen ändern
Komforttemperatur einstellen. Öffnen Sie die Abdeckung
Drücken Sie die Taste
gefolgt von  oder
oder
bis Sie die gewünschte Temperatur eingestellt haben.
Auto Manu |
|
|
|
1 |
2 |
|
3 |
|
4 |
5 |
|
6 |
7 |
|
|
|
|
|
||||||
|
|
° c |
|
|
|
|
|
|
|
|
|
|
|
|
|
|
|
|
|
|
|
|
|
|
|
|
|
|
|
|
|
|
|
|
|
|
|
|
timer |
|
|
|
|
|
° c |
|
|
|
|
|
|
|
|
|
|
|
|
|
|
|
|
|
|
|
|
|
|
|
|
|
|
|
||
|
|
° c |
|
|
|
|
|
|
|
|
|
|
|
days |
|
|
|
|
|
|
|
|
|
|
|
|
|
|
|
|
|
|
|
|
|
|
|
|
|
|
|
|
|
|
|
|
|
||
0 |
1 |
2 |
3 |
4 |
5 |
6 |
7 |
8 |
9 |
10 |
11 |
12 |
13 |
14 |
15 |
16 |
17 |
18 |
19 |
20 |
21 |
22 |
23 |
24 |
Drücken Sie die zu bestätigen.
Absenktemperatur einstellen.
Drücken Sie die Taste
gefolgt von  oder
oder
bis Sie die gewünschte Temperatur eingestellt haben.
Auto Manu |
|
|
|
1 |
2 |
|
3 |
|
4 |
5 |
|
6 |
7 |
|
|
|
|
|
||||||
|
|
° c |
|
|
|
|
|
|
|
|
|
|
|
|
|
|
|
|
|
|
|
|
|
|
|
|
|
|
|
|
|
|
|
|
|
|
|
|
timer |
|
|
|
|
|
° c |
|
|
|
|
|
|
|
|
|
|
|
|
|
|
|
|
|
|
|
|
|
|
|
|
|
|
|
||
|
|
° c |
|
|
|
|
|
|
|
|
|
|
|
days |
|
|
|
|
|
|
|
|
|
|
|
|
|
|
|
|
|
|
|
|
|
|
|
|
|
|
|
|
|
|
|
|
|
||
0 |
1 |
2 |
3 |
4 |
5 |
6 |
7 |
8 |
9 |
10 |
11 |
12 |
13 |
14 |
15 |
16 |
17 |
18 |
19 |
20 |
21 |
22 |
23 |
24 |
Drücken Sie die bestätigen.
Hinweis. Der Einstellbereich der Temperatur reicht von 5°C bis 30°C, in Schritten von jeweils 0.5°C.
6. Programmierung
Für die Programmierung Ihrer Woche verfügen Sie über 4 Programme :
P1, P2 und P3 sind voreingestellt und können nicht verändert werden.
P4 kann frei programmiert werden und erlaubt Ihnen damit,Ihr persönliches Programm für jeden einzelnen Wochentag zu erstellen.
Die im Gerät vorgespeicherten Programme P1, P2 et P3 existieren in jeweils 2 Varianten:
NORD
P1 = Komforttemperatur von 6h bis 23h.
Absenktemperatur von 23h bis 6h.
|
|
|
|
|
|
|
|
|
|
|
|
|
|
|
|
|
|
|
|
|
|
|
|
|
|
|
|
|
|
|
|
|
|
|
|
|
|
|
|
|
|
|
|
|
|
|
|
|
|
|
|
|
|
|
|
|
|
|
|
|
|
|
|
|
|
|
|
|
|
|
|
|
|
|
|
|
|
|
|
|
|
|
|
|
|
|
|
|
|
|
|
|
|
|
|
|
|
0 |
|
1 |
|
2 |
|
3 |
|
4 |
|
5 |
|
6 |
7 |
8 |
9 |
10 |
11 |
12 |
13 |
14 |
15 |
16 |
17 |
18 |
19 |
20 |
21 |
22 |
23 |
24 |
||||||||||||||||||
|
|
|
|
|
|
|
|
|
|
|
|
|
|
|
|
|
|
|
|
|
|
|
|
|
|
|
|
|
|
|
|
|
|
|
|
|
|
|
|
|
|
|
|
|
|
|
|
|
P2 = Komforttemperatur von 6 bis 8h30 und von 16h30 bis 23h00. Absenktemperatur von 8h30 bis 16h30 und von 23h00 bis 6h00.
|
|
|
|
|
|
|
|
|
|
|
|
|
|
|
|
|
|
|
|
|
|
|
|
|
|
|
|
|
|
|
|
|
|
|
|
|
|
|
|
|
|
|
|
|
|
|
|
|
|
|
|
|
|
|
|
|
|
|
|
|
|
|
|
|
|
|
|
|
|
|
|
|
|
|
|
|
|
|
|
|
|
|
|
|
|
|
|
|
|
|
|
|
|
|
|
|
|
0 |
|
1 |
|
2 |
|
3 |
|
4 |
|
5 |
|
6 |
7 |
8 |
9 |
10 |
11 |
12 |
13 |
14 |
15 |
16 |
17 |
18 |
19 |
20 |
21 |
22 |
23 |
24 |
||||||||||||||||||
|
|
|
|
|
|
|
|
|
|
|
|
|
|
|
|
|
|
|
|
|
|
|
|
|
|
|
|
|
|
|
|
|
|
|
|
|
|
|
|
|
|
|
|
|
|
|
|
|
P3 = Komforttemperatur von 6h bis 8h30,von 11h30 bis 13h30 und von
16h30 bis 23h00.
Absenktemperatur von 8h30 bis 11h30, von 13h30 bis 16h30 und von 23h00 bis 6h00.
|
|
|
|
|
|
|
|
|
|
|
|
|
|
|
|
|
|
|
|
|
|
|
|
|
|
|
|
|
|
|
|
|
|
|
|
|
|
|
|
|
|
|
|
|
|
|
|
|
|
|
|
|
|
|
|
|
|
|
|
|
|
|
|
|
|
|
|
|
|
|
|
|
|
|
|
|
|
|
|
|
|
|
|
|
|
|
|
|
|
|
|
|
|
|
|
|
|
0 |
|
1 |
|
2 |
|
3 |
|
4 |
|
5 |
|
6 |
7 |
8 |
9 |
10 |
11 |
12 |
13 |
14 |
15 |
16 |
17 |
18 |
19 |
20 |
21 |
22 |
23 |
|
24 |
|||||||||||||||||
P4 = Über dieses freie Programm können Sie für jeden einzelnen Wochentag bis zu 3 Zeiträume mit Komforttemperatur und 3 Zeiträume mit Absenktemperatur programmieren.

SUD
P1 = Komforttemperatur von 7h00 bis 23h00.
Absenktemperatur von 23h00 bis 7h00.
|
|
|
|
|
|
|
|
|
|
|
|
|
|
|
|
|
|
|
|
|
|
|
|
|
|
|
|
|
|
|
|
|
|
|
|
|
|
|
|
|
0 |
1 |
2 |
3 |
4 |
5 |
6 |
7 |
8 |
9 |
10 |
11 |
12 |
13 |
14 |
15 |
16 |
17 |
18 |
19 |
20 |
21 |
22 |
23 |
24 |
||||||||||||||||
P2 = Komforttemperatur von 7h00 bis 9h00 und von 18h00 bis 23h00. Absenktemperatur von 9h00 bis 18h00 und von 23h00 bis 7h00.
|
|
|
|
|
|
|
|
|
|
|
|
|
|
|
|
|
|
|
|
|
|
|
|
|
|
|
|
|
|
|
|
0 |
1 |
2 |
3 |
4 |
5 |
6 |
7 |
8 |
9 |
10 |
11 |
12 |
13 |
14 |
15 |
16 |
17 |
18 |
19 |
20 |
21 |
22 |
23 |
24 |
|||||||
P3 = Komforttemperatur von 7h00 bis 9h00, von 13h00 bis 15h00 und von 18h00 bis 23h00.
Absenktemperatur von 9h00 bis 13h00, von 15h00 bis 18h00 und von 23h00 bis 7h00.
|
|
|
|
|
|
|
|
|
|
|
|
|
|
|
|
|
|
|
|
|
|
|
|
|
|
|
|
|
|
|
|
|
|
0 |
1 |
2 |
3 |
4 |
5 |
6 |
7 |
8 |
9 |
10 |
11 |
12 |
13 |
14 |
15 |
16 |
17 |
18 |
19 |
20 |
21 |
22 |
23 |
24 |
|||||||||
P4 = Freie Programm.
!Wichtig: Um vom vorgespeicherten Programm, Variante „Nord“, auf die Variante „Süd“ oder umgekehrt umzuschalten, demontieren Sie das Gerät von seinem Sockel und betätigen Sie den Miniaturschalter Nord/Süd.
Programmierung der aktuellen Woche auf der Grundlage der vorgespeicherten Programme P1, P2 oder P3.
1. Drücken Sie die Taste |
PROG |
P1-P4 |
um in die Betriebsart " programmierung " zu gelangen.
DAYS
2. Jetzt drücken Sie die Taste 1-7
bis der zeiger " " unter dem Wochentag steht, den sie programmieren möchten.
PROG
3. Anschließend ist die Taste P1-P4
zu drücken, bis die gewünschte Programmnummer blinkt.
OK
4. Drücken Sie jetzt die Taste um die Auswahl zu bestätigen.
Anschließend wird ihnen automatisch der folgende Tag angeboten.
7. Programm P4 programmieren
Programmieren Sie selbst nach Ihren individuellen Bedürfnissen.
Dieses Programm P4 kann für jeden einzelnen Wochentag unterschiedlich ausfallen.
1. Drücken Sie die Taste
um in die Betriebsart " programmierung " zu gelangen.
2. Jetzt drücken Sie die Taste
bis der zeiger " " unter dem Wochentag steht, den sie programmieren möchten.
3. Anschließend ist die Taste
zu drücken, bis die Programmnummer P4 blinkt.
Auto |
|
Manu |
|
|
|
1 |
|
2 |
|
3 |
|
4 |
|
5 |
6 |
|
7 |
|
|
|
|
|
||
|
° c |
|
|
|
|
|
|
|
|
|
|
|
|
|
|
|
|
|
|
|
|
|
|
|
|
° c |
|
|
|
|
|
|
|
|
|
|
|
|
|
|
|
|
|
|
|
|
|
|
|
0 |
1 |
2 |
3 |
4 |
5 |
6 |
7 |
8 |
9 |
10 |
11 |
12 |
13 |
14 |
15 |
16 |
17 |
18 |
19 |
20 |
21 |
22 |
23 |
24 |
|
|
|
|
|
|
|
|
|
|
|
|
|
|
|
|
|
|
|
|
|
|
|
|
|
Ihr Display zeigt 0h00 und das erste Thermometer im Profil der 24St blinkt.
Drücken Sie die Taste |
|
|
zum Einstellen der reduzierten Temperatur. |
|
|
||
|
...
Beispiel: Sie wünschen die Komforttemperatur von 7.30 Uhr bis 9.30 Uhr und anschließend wieder von 19.00 Uhr bis 23.00 Uhr.
Drücken Sie mehrmals
bis die Zeit 7h30 angezeigt wird.
Drücken Sie mehrmals
bis die Zeit 9h30 angezeigt wird.
Drücken Sie mehrmals
bis die Zeit 19h00 angezeigt wird
Drücken Sie mehrmals
Bis die Zeit 23h00 angezeigt wird.
Um den gesamten Programmiervorgang zu bestätigen,
OK
drücken Sie die Taste
|
|
|
|
|
|
|
|
|
|
|
|
|
|
|
|
|
|
|
|
|
|
|
|
|
|
|
|
|
|
|
|
|
|
|
|
|
|
|
|
|
|
|
|
|
|
|
|
|
|
|
|
|
|
|
|
|
|
|
|
|
|
|
|
|
|
|
|
|
|
|
|
|
|
|
|
|
|
|
|
|
|
|
|
|
|
|
|
|
|
|
|
|
|
|
|
|
|
|
|
|
|
|
|
|
|
|
|
|
|
|
|
|
|
|
|
|
|
|
|
|
|
|
|
|
|
|
|
|
|
|
|
|
|
|
|
|
|
|
|
|
|
|
|
|
|
|
0 |
|
1 |
|
2 |
|
3 |
|
4 |
|
5 |
|
6 |
7 |
8 |
9 |
10 |
11 |
12 |
13 |
14 |
15 |
16 |
17 |
18 |
19 |
20 |
21 |
22 |
23 |
24 |
||||||||||||||||||
|
|
|
|
|
|
|
|
|
|
|
|
|
|
|
|
|
|
|
|
|
|
|
|
|
|
|
|
|
|
|
|
|
|
|
|
|
|
|
|
|
|
|
|
|
|
|
|
|
oder |
|
|
|
|
|
|
|
Drücken Sie die Taste |
|
zum Einstellen der Komforttemperatur. |
Sie haben jetzt die Komforttemperatur von 7.30 Uhr bis 9.30 Uhr und |
|
|||
|
|
|
anschließend von 19.00 Uhr bis 23.00 Uhr programmiert. |

ÄNDERUNG DER TEMPERATUR
8. Ablesen der Programme |
9. Vorübergehende änderung der Temperatur |
In die automatische Betriebsweise,
drücken Sie die Taste |
PROG |
P1-P4 |
|
Drücken Sie |
DAYS |
1-7 |
um den Tag auszuwählen. Anschließend können Sie die Programmierung an dem Profil der 24h überprüfen.
Auto Manu |
1 2 3 4 5 6 7 |
 ° c
° c
° c
In der Automatische Betriebsweise können Sie über diese sehr praktische Funktion die Umgebungstemperatur zeitweilig ändern.
- Um die Temperatur zu erhöhen,
Drücken Sie die Taste  (gegebenenfalls mehrfach).
- Um die Temperatur zu senken,
drücken Sie die Taste |
|
(gegebenfalls mehrfach). |
0 |
1 |
2 |
3 |
4 |
5 |
6 |
7 |
8 |
9 |
10 |
11 |
12 |
13 |
14 |
15 |
16 |
17 |
18 |
19 |
20 |
21 |
22 |
23 |
24 |
MODE
Drücken Sie die Taste
Die Anzeige des aktuellen Sollwertes der Temperatur (Absenkoder Komforttemperatur) beginnt zu blinken. Diese Änderung wird mit dem nächsten programmierten Temperaturwechsel aufgehoben.
Um zum ursprünglichen Programm zurückzukehren,
Auto Manu 
 ° c
° c
° c
0 1 2 3 4 5
um in die automatische Betriebsweise züruckzukehren.
|
|
|
|
MODE |
Automatische Betriebsweise "auto". |
|
|
|
drücken Sie die taste |
|
|
|
|
|
|
Auto |
bis der zeiger erneut unter „auto“ steht |
||
|
Das Ende der zeitweiligen Änderung der Temperatur wird dadurch |
|||
In der automatischen Betriebsweise |
|
|
paßt sich der Exabox |
|
Ihrem Lebensrythmus an, indem das |
|
° c |
gekennzeichnet, daß die Anzeige aufhört zu blinken. |
|
|
||||
|
|
|
||
von Ihnen gewählte Programm ausgef |
. |
|
||
Um die automatische Betriebsweise einzuschalten,ist die Taste " MODE " zu drücken bis der zeiger unter " auto
BETRIEBSWEISE ” URLAUB”
10.Dauerhafte Temperaturänderung
11.Betriebsstundenzählung
Um eine gleichbleibende Temperatur in Ihrer Wohnung zu halten (die Sie von 5°C bis 30°C einstellen können) ohne irgendwelche Programmierungen zu berücksichtigen.
MODE
1. Drücken Sie die Taste
12. Betriebsweise bei längerer Abwesenheit, Urlaub
Betriebsweise bei längerer Abwesenheit, Urlaub
Auto Manu
In dieser Betriebsweise wird Ihrer Wohnung während einer längeren
 ° c
° c
Abwesenheit (bis zu 99 Tage) gegen Frost geschützt, indem hier eine einstellbare Mindesttemperatur aufrechterhalten wird.
Sie können die Dauer ihrer Abwesenheit programmieren, um für Ihre Rückkehr einen Temperaturanstieg in ihrer Wohnung vorzusehen.
um den zeiger unter Manu zu setzen.
2. Drücken Sie die Tasten  oder
oder
um die gewünschte Temperatur einzustellen.
Um die handgesteuerte Betriebsweise zu verlassen.
Drûcken Sie MODE
Um der Zeiger unter „auto“ zu setzen.
Betriebsstundenzählung.
Diese Funktion dient zum Ablesen der Betriebsstunden Ihrer Therme seit dem letzten Zählerreset.
0000
Drücken Sie die Taste |
h |
|
|
|
|
|
|
|
|
|
|
|
|
||
um die Anzahl der Betriebsstunden seit dem |
|
|
|
|
|
|
|
|
|
|
|
|
|||
letzten Zählerreset abzulesen. |
|
|
|
|
1 |
2 |
|
3 |
|
4 |
|
5 |
|
6 |
|
|
|
|
|
|
|
|
|
|
timer |
|
|
||||
Drücken Sie |
|
|
|
|
|
|
|
|
|
|
|
|
|||
|
|
|
|
|
|
|
|
|
|
|
|
|
|
|
|
0000 |
|
|
|
|
|
|
|
|
|
|
|
|
|
|
|
5 Sekunden lang die Taste |
h |
6 |
7 |
8 |
9 |
10 |
11 |
12 |
13 |
14 |
15 |
16 |
17 |
18 |
|
um den Zähler auf Null zurückzusetzen.
|
Auto Manu |
|
|
1 |
|
2 |
|
3 |
|
4 |
|
5 |
|
6 |
7 |
|
|
|
|
|
|
|||||
|
|
|
° c |
|
|
|
|
|
|
|
|
|
|
|
days |
|
|
|
|
|
|
|
|
|
||
|
|
|
|
|
|
|
|
|
|
|
|
|
|
|
|
|
|
|
|
|
|
|
|
|||
0 |
1 |
2 |
3 |
4 |
5 |
6 |
7 |
8 |
9 |
10 |
11 |
12 |
13 |
14 |
15 |
16 |
17 |
18 |
19 |
20 |
21 |
22 |
23 |
24 |
|
|
|
|
|
|
|
|
|
|
|
|
|
|
|
|
|
|
|
|
|
|
|
|
|
|
|
|
|
|
|
|
|
|
|
|
|
|
|
|
|
|
|
|
|
|
|
|
|
|
|
|
|
|
|
|
|
|
|
|
|
|
|
|
|
|
|
|
|
|
|
|
|
|
|
|
|
|
|
|
|
|
|
1.Drücken Sie die Taste
2.Stellen Sie mit den Tasten  oder
oder
die Anzahl der Tage ihrer Abwesenheit ein (1 bis 99 Tage).Der Laufende Tage gilt dabei als 1.
3. Bestätigen Sie mit der Taste |
OK |
|
4. Stellen Sie mit den Tasten  oder
oder
den für Ihre Abwesenheit gewünschten Sollwert der Temperatur ein.
5. Bestätigen Sie mit der Tast OK
Verbleiben Sie in dieser Betriebsweise.
Um diese Eingabe rückgängig zu machen und in die automatische Betriebsweise zurückzukehren müssen Sie nur die taste MODE drücken.

DE S C R I P T I O N A N D IN S TA L L AT I O N |
|
|
|
|
|
|
|
|
|
||
1. Presentation of the clock thermostat |
|
|
|
|
|
|
|
||||
The Exabox 7D has been designed to offer you comfort and energy |
Description of buttons and display. |
|
|
||||||||
savings. |
1. – button for adjusting settings. |
|
3. Mode selection. |
|
|||||||
It allows you to programme and adjust your heating according to |
2. + button for adjusting settings. |
4. Prolonged absences (holidays). |
|||||||||
|
5 8 |
10 |
|
|
11 |
|
12 |
|
|||
3 temperature levels : |
|
|
|
|
|
||||||
- “comfort” temperature : this is the temperature for your hours of |
|
+ |
Auto Manu |
|
1 |
2 |
3 |
4 5 |
6 7 |
|
|
2 |
° c |
|
|
|
|
|
MODE |
3 |
|||
presence. |
|
|
|
|
|
timer |
° c |
||||
- |
° c |
|
|
|
|
days |
|
|
|||
- “reduced” temperature : this is the temperature for your brief |
1 |
0 1 2 3 4 5 |
6 7 |
8 9 |
10 |
11 12 |
13 14 15 16 17 18 19 20 21 22 23 24 |
4 |
|||
absences or during the night. |
|
|
7 |
6 |
|
14 |
9 |
13 |
|
||
- “frost protection” temperature : this is the minimum temperature |
|
|
|
|
|||||||
|
|
|
|
|
|
|
|
|
|
||
for long absences. It protects your dwelling from the risk of frost. |
5. Indicator for current |
|
|
|
|
10. “Comfort” temperature. |
|||||
3 pre-recorded programs and a blank programme will allow you |
temperature level (reduced). |
|
11. Pointer indicating day of the |
||||||||
6. Viewing of “reduced” periods. |
|||||||||||
to adapt your heating to your life style. |
|
week. |
|
||||||||
No need to replace the batteries,your Exabox 7D is supplied direct- |
7. “Reduced” temperature. |
12. Heating start-up indicator. |
|||||||||||||||
ly by its connection to the boiler “Saunier Duval”. |
8. Indicator for current |
|
|
|
13. Ambient temperature. |
||||||||||||
|
|
|
temperature level (comfort). |
14. Time. |
|
|
|
|
|||||||||
|
|
|
9. Viewing of “comfort” periods. |
|
|
|
|
||||||||||
|
|
|
|
|
|
|
|
|
|
|
|||||||
|
|
|
The buttons under the cover. |
|
|
|
|
|
|
|
|
||||||
|
|
|
15. Days of the week selection. |
18. Reduced temperature setting. |
|||||||||||||
|
|
|
16. P1 to P4 programme |
|
|
|
19. Validation. |
||||||||||
|
|
|
selection. |
|
|
|
20. Hour counter |
||||||||||
|
|
|
|
|
|
||||||||||||
|
|
|
17. Comfort temperature setting. |
21. Reset. |
|
|
|
|
|||||||||
|
box |
|
|
|
|
|
|
|
|
|
|
|
|
|
|
|
|
|
|
|
|
|
|
|
|
|
|
|
|
|
|
|
|
|
|
|
|
|
|
|
|
|
|
|
|
|
|
|
|
|
|
|
|
|
|
|
|
|
|
|
|
|
|
|
|
|
|
|
|
|
|
|
|
|
|
|
DAYS |
PROG |
|
OK |
0000 |
|
|
|
|
||||
|
|
|
|
|
1-7 |
P1-P4 |
|
h |
Res |
|
|
||||||
|
|
|
|
|
|
|
|
|
|
||||||||
|
|
|
|
|
|
|
|
|
|
|
|
|
|
|
|
|
|
|
|
|
|
|
|
|
|
|
|
|
|
|
|
|
|
|
|
15 16 17 18 19 20 21
9419.560.00/03.01
2. Installation of your clock thermostat.
Your Exabox 7D should be installed at least 1,50 m above the ground, on an inside wall protected from direct sun ray and from any heat source such as television, lamp, draughts, etc…
Slide the cover down and unscrew screw.
Fix the base to the wall.
Connect the device according to the diagram below.
...
Important settings.
Put the first micro-switch on BATTERY ON to activate the saving
!battery (to keep your programs on memory when the clock thermostat is OFF).
Prog N Battery ON
2
Prog S Battery OFF
According to your geographical position, select the pre-recorded programmes version North or version South (cf. chapter 6 – programmation).
Replace the product on its base.
Screw it on and close the cover.

TI M E SE T T I N G
3. Link between your boiler and Exabox.
Link between your boiler and Exabox.
Your Exabox 7D operates in direct connection with your boiler.
When your boiler is turned off or in summer mode, your Exabox 7D is OFF and only displays the ambient temperature.
All your programmation is saved on memory.
Your Exabox 7D will automatically switch itself ON when you will turn ON your boiler.
You are putting the device into operation for the first time,before starting your programmation,slide cover down and press RESET with the tip of a pen.
|
|
|
|
|
|
|
|
Technical specifications. |
|
|
|
- adjustment range for comfort temperature : |
+5 to +30°C. |
||
- adjustment range for reduced temperature : |
+5 to +30°C. |
||
- adjustment range for holiday temperature : |
+5 to +30°C. |
||
- display of ambient temperature : |
|
0°C to +40°C. |
|
- static differential |
|
<0.3°C |
|
- supply : |
by the connection to the boiler. |
||
- Saving battery life span : |
|
8 years. |
|
- Operating temperature : |
|
-10 to +50°C. |
|
- Storage temperature : |
|
-20°C to +65°C. |
|
- Hygrometry : |
|
90% max at 25°C |
|
- degree of protection : |
|
IP30. |
|
- insulation class |
|
II. |
|
4. Time setting
Time setting.
Setting current day and time.
You are putting the device into operation for the first time, you have just pressed the “reset” button.
12:00 appears and the pointer flashes under day 1.
1 2 3 4 5 6
1. Set the time using the  / buttons (the numbers run off more quickly when the button is pressed continuously).
2.Set the current day by pressing several times on appears under the corresponding day (1=Monday, 2=Tuesday, etc…)
3. Validate with |
OK |
. |
DAYS |
|
1-7 |
, a pointer |
|
MODE
4.If you wish to change the time or the day, press
until the pointer appears under the clock sign  and continue as above for points 1, 2 and 3.

PR O G R A M M AT I O N
5. Temperature settings. |
6. Programming. |
To set the “ comfort ” temperature. Slide cover down.
Press
Adjust the temperature with  or Until you display the required temperature.
Open the cover.
To programme your device, you have 4 programs at your disposal.
•3 of these programs are pre-recorded and cannot be modified.
•The 4th programme is blank and allows you to create a personalised programme.
The 3 pre-recorded programs exist on version North and on version South :
Auto Manu |
|
|
|
1 |
2 |
|
3 |
|
4 |
5 |
|
6 |
7 |
|
|
|
|
|
||||||
|
|
° c |
|
|
|
|
|
|
|
|
|
|
|
|
|
|
|
|
|
|
|
|
|
|
|
|
|
|
|
|
|
|
|
|
|
|
|
|
timer |
|
|
|
|
|
° c |
|
|
|
|
|
|
|
|
|
|
|
|
|
|
|
|
|
|
|
|
|
|
|
|
|
|
|
||
|
|
° c |
|
|
|
|
|
|
|
|
|
|
|
days |
|
|
|
|
|
|
|
|
|
|
|
|
|
|
|
|
|
|
|
|
|
|
|
|
|
|
|
|
|
|
|
|
|
||
0 |
1 |
2 |
3 |
4 |
5 |
6 |
7 |
8 |
9 |
10 |
11 |
12 |
13 |
14 |
15 |
16 |
17 |
18 |
19 |
20 |
21 |
22 |
23 |
24 |
OK
Confirm with
To set the “reduced” temperature.
Press
Adjust the temperature with  or
or
Auto Manu |
1 2 3 4 5 6 7 |
|
° c |
|
|
|
timer |
° c |
|
|
|
° c |
days |
|
|
|
NORTH
P1 : Comfort temperature from 6h to 23h.
Reduced temperature from 23h to 6h.
|
|
|
|
|
|
|
|
|
|
|
|
|
|
|
|
|
|
|
|
|
|
|
|
|
|
|
|
|
|
|
|
|
|
|
|
|
|
|
|
|
|
|
|
|
|
|
|
|
|
|
|
|
|
|
|
|
|
|
|
|
|
|
|
|
|
|
|
|
|
|
|
|
|
|
|
|
|
|
|
|
|
|
|
|
|
|
|
|
|
|
|
|
|
|
|
|
|
0 |
|
1 |
|
2 |
|
3 |
|
4 |
|
5 |
|
6 |
7 |
8 |
9 |
10 |
11 |
12 |
13 |
14 |
15 |
16 |
17 |
18 |
19 |
20 |
21 |
22 |
23 |
24 |
||||||||||||||||||
P2 : Comfort temperature from 6h to 8h30 and from 16h30 to 23h. Reduced temperature from 8h30 to 16h and from 23h to 6h.
|
|
|
|
|
|
|
|
|
|
|
|
|
|
|
|
|
|
|
|
|
|
|
|
|
|
|
|
|
|
|
|
|
|
|
|
|
|
|
|
|
|
|
|
|
|
|
|
|
|
|
|
|
|
|
|
|
|
|
|
|
|
|
|
|
|
|
|
|
|
|
|
|
|
|
|
|
|
|
|
|
|
|
|
|
|
|
|
|
|
|
|
|
|
|
|
|
|
0 |
|
1 |
|
2 |
|
3 |
|
4 |
|
5 |
|
6 |
7 |
8 |
9 |
10 |
11 |
12 |
13 |
14 |
15 |
16 |
17 |
18 |
19 |
20 |
21 |
22 |
23 |
24 |
||||||||||||||||||
P3 : comfort temperature from 6h to 8h30, from 11h30 to 13h30 and from 16h30 to 23h00.
Reduced temperature from 8h30 to 11h30, from 13h30 to 16h30 and from 23h to 6h.
0 |
1 |
2 |
3 |
4 |
5 |
6 |
7 |
8 |
9 |
10 |
11 |
12 |
13 |
14 |
15 |
16 |
17 |
18 |
19 |
20 |
21 |
22 |
23 |
24 |
Until you display
OK
Confirm with
N.B. These temperatures are adjustable from 5 to 30°C by steps of 0.5°C.
0 |
1 |
2 |
3 |
4 |
5 |
6 |
7 |
8 |
9 |
10 |
11 |
12 |
13 |
14 |
15 |
16 |
17 |
18 |
19 |
20 |
21 |
22 |
23 |
24 |
P4 : Blank programme allowing you to create 3 comfort temperature periods and 3 reduced temperature periods.
 Loading...