

Page 1

DSR 9500AT
DSR 9500AT
Instructions for use
Gebrauchsanweisung. . . . . . . . . . D
Instructions for use. . . . . . . . . . . . GB
Kullanma talimatları . . . . . . . . . . . TU
D
GB
TU
MF68-00258B
REV. 1.1
DIGITAL SATELLITE RECEIVERDIGITAL SATELLITE RECEIVER
Page 2

Page 3

DSR 9500AT
Gebrauc hsan weisung
D
DIGITALER SATELLITENRECEIVER
Page 4

SICHERHEITSANWEISUNGEN
Diese Set-Top-Box (STB) wurde entsprechend internationalen Sicherheitsnormen gefertigt.
Lesen Sie die folgenden empfohlenen Sicherheitsmaßnahmen sorgfältig durch.
ANSCHLUSSWERTE: AC 100-240V, 50/60Hz
ÜBERLASTUNG: Überlasten Sie keine Wandsteckdosen, Verlängerungskabel oder Adapter.
Anderenfalls besteht die Gefahr eines Brands oder elektrischen Schlags.
FLÜSSIGKEITEN: Halten Sie Flüssigkeiten von der Set-Top-Box fern.
REINIGUNG: Ziehen Sie die Set-Top-Box von der Steckdose ab, bevor Sie sie reinigen.
Verwenden Sie ein Tuch, das mit ein wenig Wasser (keine Lösungsmittel)
angefeuchtet ist, um die Außenseite des Geräts zu reinigen.
BELÜFTUNG: Blockieren Sie nicht die Belüftungsöffnungen der Set-Top-Box.
Sorgen Sie für eine unbehinderte Luftzirkulation um die Set-Top-Box.
Stellen Sie die Set-Top-Box niemals an Orten auf, an denen sie direkter
Sonneneinstrahlung ausgesetzt ist. Vermeiden Sie ebenfalls Orte mit
Wärmeentwicklung, z. B. Heizkörper.
Stellen Sie niemals andere elektronische Geräte auf die Set-Top-Box.
Lassen Sie zwischen Set-Top-Box und Wand einen Abstand von
mindestens 30 mm.
DSR 9500A T
D
ZUBEHÖR: Verwenden Sie kein Zubehör, das nicht vom Hersteller empfohlen wird.
Anderenfalls wird das Gerät möglicherweise beschädigt.
ANSCHLUSS AN DEN LNB-KONVERTER DER SATELLITENSCHÜSSEL:
Das LNB-Anschlusskabel verfügt im Kern über einen Spannungsleiter.
Es empfiehlt sich daher, die Set-Top-Box vom Netz zu trennen, bevor Sie
dieses Kabel anschließen oder abtrennen.
ANDERENFALLS KÖNNTE DER LNB-KONVERTER BESCHÄDIGT
WERDEN.
WARTUNG: Versuchen Sie auf keinen Fall, selbst Wartungsarbeiten an diesem Produkt
auszuführen.
Anderenfalls verliert die Garantie ihre Gültigkeit.
Beauftragen Sie einen qualifizierten Fachhändler mit allen Wartungsarbeiten.
GEWITTER: Wenn die Set-Top-Box in einem geographischen Bereich aufgestellt wird, in
dem häufig Gewitter auftreten, sollten unbedingt Schutzvorrichtungen für
den Netzanschluss der Set-Top-Box und die Modemtelefonleitung installiert
werden.
Die Anweisungen der jeweiligen Hersteller zum Geräteschutz, z. B.
Fernsehgerät, Stereoanlage usw., die an die Set-Top-Box angeschlossen
sind, müssen bei Gewittern ebenfalls beachtet werden.
ERDUNG: Der Erdleiter des LNB-Kabels muss direkt an die Systemerde für die
Satellitenschüssel angeschlossen werden. Das Erdungssystem muss den
lokalen Vorschriften entsprechen.
HHiinnwweeiiss : Entsorgen Sie verbrauchte Batterien aus Umweltschutzgründen nur an dafür
vorgesehenen Orten.
D-1
Page 5

DSR 9500A T
INHALTSVERZEICHNIS
Sicherheitsanweisungen. . . . . . . . . . . . . . . . . . . . . . . . . . . . . . . . . 1
Allgemeine Funktionen . . . . . . . . . . . . . . . . . . . . . . . . . . . . . . . . . . 3
Anschliessen der Set-Top Box . . . . . . . . . . . . . . . . . . . . . . . . . . . . 4
Beschreibung . . . . . . . . . . . . . . . . . . . . . . . . . . . . . . . . . . . . . . . . . 6
Frontblende . . . . . . . . . . . . . . . . . . . . . . . . . . . . . . . . . . . . . . . . . . 6
Rückseite . . . . . . . . . . . . . . . . . . . . . . . . . . . . . . . . . . . . . . . . . . . . 7
Fernbedienung . . . . . . . . . . . . . . . . . . . . . . . . . . . . . . . . . . . . . . . . 8
Grundfunktionen . . . . . . . . . . . . . . . . . . . . . . . . . . . . . . . . . . . . . . . 10
Bedienen des Receivers . . . . . . . . . . . . . . . . . . . . . . . . . . . . . . . . . 15
Hauptmenü . . . . . . . . . . . . . . . . . . . . . . . . . . . . . . . . . . . . . . . . . . . 15
1. Installation . . . . . . . . . . . . . . . . . . . . . . . . . . . . . . . . . . . . . . . . 15
1.1 LNB Einstellung . . . . . . . . . . . . . . . . . . . . . . . . . . . . . . . . 16
1.2 Positionierereinstellung. . . . . . . . . . . . . . . . . . . . . . . . . . . . 16
1.2.1 Benutzermodus . . . . . . . . . . . . . . . . . . . . . . . . . . . . . . . 17
1.2.2 Installationsmodus . . . . . . . . . . . . . . . . . . . . . . . . . . . . . 17
1.3 Solarsat-Einstellung . . . . . . . . . . . . . . . . . . . . . . . . . . . . . 18
1.4 Automatisches Scannen. . . . . . . . . . . . . . . . . . . . . . . . . . . 18
1.5 Manuelles Scannen . . . . . . . . . . . . . . . . . . . . . . . . . . . . . . 19
1.6 SMATV-Scannen . . . . . . . . . . . . . . . . . . . . . . . . . . . . . . . . 20
1.7 Lieferzustand wiederherstellen . . . . . . . . . . . . . . . . . . . . . . 20
2. Kanalanordnung . . . . . . . . . . . . . . . . . . . . . . . . . . . . . . . . . . . . 21
2.1 Delete Satellite(Satellit löschen) . . . . . . . . . . . . . . . . . . . . . 21
2.2 Delete Transponder(Transponder löschen). . . . . . . . . . . . . . 21
2.3 Delete Channel(Kanal löschen) . . . . . . . . . . . . . . . . . . . . . . 21
2.4 Delete All Channels(Alle Kanäle löschen) . . . . . . . . . . . . . . . 22
2.5 Delete Scrambled Channels(Verwürfelte Kanäle löschen) . . . 22
2.6 Favorite Channels(Bevorzugte Kanäle). . . . . . . . . . . . . . . . . 22
2.7 Move & Edit Channel(Kanal verschieben und bearbeiten) . . . 23
3. Jugendschutz-Sperre. . . . . . . . . . . . . . . . . . . . . . . . . . . . . . . . 24
3.1 Kanal sperren . . . . . . . . . . . . . . . . . . . . . . . . . . . . . . . . . . 24
3.2 PIN-Code ändern. . . . . . . . . . . . . . . . . . . . . . . . . . . . . . . . 25
4. System Setup . . . . . . . . . . . . . . . . . . . . . . . . . . . . . . . . . . . . . . 26
4.1 Sprachauswahl . . . . . . . . . . . . . . . . . . . . . . . . . . . . . . . . . 26
4.2 OSD Einstellung. . . . . . . . . . . . . . . . . . . . . . . . . . . . . . . . . 26
4.3 Media Setting(Medieneinstellungen) . . . . . . . . . . . . . . . . . . 27
4.4 Time & Timer Setting(Zeit- und T imer-Einstellung) . . . . . . . . 27
4.5 Systeminformationen . . . . . . . . . . . . . . . . . . . . . . . . . . . . . 28
4.6 Software-Upgrade . . . . . . . . . . . . . . . . . . . . . . . . . . . . . . . 28
4.7 Copy Channel Data(Kanaldaten kopieren) . . . . . . . . . . . . . . 28
5. Gemeinsame Schnittstelle . . . . . . . . . . . . . . . . . . . . . . . . . . . . 29
6. Integriertes CryptoWorks. . . . . . . . . . . . . . . . . . . . . . . . . . . . . 30
Fehlersuche. . . . . . . . . . . . . . . . . . . . . . . . . . . . . . . . . . . . . . . . . . . 31
Entsorgung . . . . . . . . . . . . . . . . . . . . . . . . . . . . . . . . . . . . . . . . . . . 31
Technische Daten . . . . . . . . . . . . . . . . . . . . . . . . . . . . . . . . . . . . . . 32
D-2
DIGITALER SATELLIT
Page 6

1. ALLGEMEIN
ALLGEMEINE FUNKTIONEN
4000 PROGRAMMIERBARE KANÄLE
HERUNTERLADEN VON SOFTWARE ÜBER SATELLIT UND PC
HOCHENTWICKELTER PROGRAMMMANAGER EPG
(ELECTRONIC PROGRAM GUIDE)
UNTERSTÜTZUNG MEHRERER SPRACHEN FÜR DIE
BILDSCHIRMANZEIGE
UNTERSTÜTZUNG VON UNTERTITELN UND (BILDSCHIRMUND VBI-)VIDEOTEXT IN MEHREREN SPRACHEN
UNTERSTÜTZUNG VON DiSEqC 1.2
INFRAROTFERNBEDIENUNG MIT VOLLEM
FUNKTIONSUMFANG
SIEBENSEGMENT-LED-DISPLAY
AUTOMATISCHE UND MANUELLE SUCHFUNKTION
KANALANORDNUNG (PROGRAMMIERBAR)
SCART- UND CINCH-AUSGANG
GERINGE LEISTUNGSAUFNAHME
9 FAVORITENLISTEN
AUTOMATISCH AKTUALISIERTER PROGRAMMANAGER EPG
SCHLEIFE FÜR RGB-SIGNAL
DSR 9500A T
D
2. TUNER
3. VIDEO
4. AUDIO
BREITBANDTUNER FÜR DEN FREQUENZBEREICH
950 MHz - 2150 MHz
ZF-AUSGANG MIT GLEICHSTROMSCHLEIFE FÜR
ANALOGRECEIVER
UNTERSTÜTZUNG VON DiSEqC 1.2
UMSCHALTUNG ZWISCHEN 13 V/18 V
STUFENLOSE 22-kHz-KLANGREGELUNG
DVB-S-KONFORM
MPEG-2-FORMAT (MP@ML)
SYMBOLRATE VON 2-45 MS/s
KOMPATIBEL MIT SCPC/MCPC
UNTERSTÜTZUNG DER BILDFORMATE 4:3 (NORMAL) UND
16:9 (BREITBILD)
MODULATORAUSGANG
MPEG 1-AUDIOSCHICHT I UND II
AUDIOMODI MONO, DUAL, STEREO UND JOINT-STEREO
SAMPLING-FREQUENZEN 32 kHz, 44.1 UND 48 kHz
LAUTSTÄRKEREGELUNG UND STUMMSCHALTUNG ÜBER
FERNBEDIENUNG
DIGITALER SPDIF-AUDIOAUSGANG
D-3
Page 7

DSR 9500A T
ANSCHLIESSEN DER SET-TOP BOX
1. AUFSTELLEN DES RECEIVERS
Die STB sollte an einem Ort mit guter Luftzirkulation aufgestellt werden.
Stellen Sie sie nicht in einem vollkommen geschlossenen Schrank auf, in dem keine
Luftzirkulation vorhanden ist. Dies kann zu Überhitzung führen.
Der Aufstellungsort muss gegen direkte Sonneneinstrahlung, übermäßige Feuchtigkeit,
raue äußere Behandlung oder Haustiere geschützt sein.
Stellen Sie keine anderen elektronischen Komponenten auf den Receiver.
Der Aufstellungsort muss so gewählt werden, dass das Antennenkabel problemlos
angeschlossen werden kann.
2. ANSCHLIESSEN DES RECEIVERS AN DIE SATELLITENSCHÜSSEL
Nachdem Sie das Antennensystem installiert haben, schließen Sie das Koaxialkabel
des LNB-Konverters der Antenne an den mit “LNB” gekennzeichneten Anschluss an.
Dieser befindet sich auf der Rückseite der STB.
Alle Kabelanschlüsse müssen manuell festgezogen werden. Verwenden Sie beim
Festziehen der Anschlüsse keinen Schraubenschlüssel. Bei dem Kabel muss es sich
um ein verdrilltes Koaxialkabel mit einem Widerstand von 75 Ohm und einem
F-Stecker handeln.
3. ANSCHLIESSEN DES RECEIVERS AN DAS FERNSEHGERÄT
Es gibt drei Möglichkeiten, um den Receiver an ein Fernsehgerät anzuschließen:
über ein Scart-, HF-, Cinchkabel oder S-Videokabel S-Video bietet die beste
Bildqualität. Schließen Sie das eine Ende des HF-Kabels an die Buchse “TV” auf der
Rückseite der STB und das andere Ende an die HF-Eingangsbuchse des
Fernsehgeräts an. Wenn Sie den Anschluss mithilfe eines Scart-Kabels vornehmen
möchten, schließen Sie es an die mit “TV” gekennzeichnete Scart-Buchse und die
entsprechende Scart-Buchse des Fernsehgeräts an.
4. ANSCHLIESSEN DES ANALOGRECEIVERS
Zum Wiedergeben von Analogkanälen, die über einen Analogreceiver eingespeist
werden, ist die STB mit einem Durchschleifanschluss “LOOP” ausgerüstet.
Verbinden Sie das Koaxialkabel mit diesem Anschluss und dem ZF-Eingang des
Analogreceivers. Wenn sich die STB im Standby-Betrieb befindet, können Sie
Analogkanäle des Analogreceivers einstellen und wiedergeben.
5. ANSCHLIESSEN EINES VIDEOREKORDERS
Für den Anschluss an einen Videorekorder oder DVD-Player befindet sich an der
Rückseite des STB eine SCART-Buchse, die mit “AV2” gekennzeichnet ist.
Sie können den Videorekorder oder DVD-Player mit einem SCART-Kabel an den
Receiver anschließen.
HHiinnwweeiiss : Der Standby-Modus wird unterstützt.
6. ANSCHLIESSEN EXTERNER AUDIO-/STEREOANLAGEN
Zum Anschließen einer externen Audio-/Stereoanlage ist der Receiver mit zwei
Cinchbuchsen auf der Rückseite ausgestattet. Diese sind mit AUDIO L und R für
den linken bzw. rechten Audiokanal gekennzeichnet.
D-4
DIGITALER SATELLIT
Page 8

ANSCHLIESSEN DER SET-TOP BOX
7. DIGITALES AUDIOSYSTEM ANSCHLIESSEN
Verbinden Sie den optischen SPDIF-Anschluss des digitalen Audiosystems über ein
Glasfaserkabel mit dem optischen SPDIF-Anschluss des Receivers.
8. EINSETZEN VON SMARTCARDS FÜR CryptoWorks-DIENSTE
Um verschlüsselte Programme wiedergeben zu können, müssen Sie über das
entsprechende Zugangsmodul und eine gültige Smartcard verfügen. Die Set-Top-Box
verfügt über ein integriertes CryptoWorks-Modul, um CryptoWorks-Programme
wiedergeben zu können.
HHiinnwweeiiss :
Führen Sie die Smartcard so ein, dass der goldfarbene Chip nach unten zeigt.
DSR 9500A T
9. EINSETZEN DES COMMON INTERFACE-ZUGANGSMODULS UND DER
SMARTCARD
Die STB unterstützt Common Interface-Zugangsmodule (CI-CAM) gemäß
DVB-Spezifikation.
Die CI-CAM-Module enthalten einen integrierten intelligenten Kartenleser.
Stecken Sie die Smartcard vorsichtig in das CAM-Modul, so dass der goldfarbene
Chip nach oben zeigt
● Stecken Sie die Smartcard vorsichtig in das CAM-Modul, so dass der goldfarbene Chip nach
oben zeigt
● Schieben Sie das CAM-Modul vorsichtig ein, bis es fest im Steckplatz sitzt.
● Wenn Sie das CAM-Modul herausnehmen möchten, drücken Sie auf die Taste neben dem
CAM-Steckplatz. Das CAM wird aus dem Steckplatz ausgeworfen.
HHiinnwweeiiss :
Anschlüsse
Die folgenden Common Interface-CAM werden zurzeit angeboten:
IRDETO, CONAX, CRYPTOWORKS, VIACCESS, NAGRAVISION, SECA usw.
D
D-5
Page 9

DSR 9500A T
BESCHREIBUNG
Frontblende
123 645 7
1. Mit dieser Taste wird der Receiver ein- und ausgeschaltet
(Standby-Betrieb).
2. , Mit diesen Tasten werden Kanäle umgeschaltet.
3. , Mit diesen Tasten wird die Lautstärke manuell angehoben
und abgesenkt.
4. 7 Siebensegment-Display In diesem LED-Display wird die aktuelle Kanalnummer
angezeigt. Wenn sich der Receiver im Standby-Betrieb
befindet, wird die aktuelle Uhrzeit im Display angezeigt.
5. CA-Modulsteckplatz In diesem Steckplatz können Sie ein CA-Modul eines
Dienstanbieters Ihrer Wahl einsetzen.
6. Infraredsensor Dieser Sensor empfängt die Infrarotbefehle der
Fernbedienung.
7. Smartcard-Steckplatz Der STB ist mit einem eingebauten Decoder für die
CryptoWorks-Verschlüsselungstechnologie ausgestattet.
HHiinnwweeiiss : CA-Module und Smartcards werden nur von Dienstanbietern und
bestimmten Fachgeschäften angeboten, nicht von SAMSUNG.
D-6
DIGITALER SATELLIT
Page 10

Rückseite
DSR 9500A T
BESCHREIBUNG
D
6710 5 9 4
11
1. NETZANSCHLUSS Hier ist das Netzkabel angeschlossen.
Der Eingangsspannungsbereich liegt zwischen 100 V und 240 V
bei einer Frequenz von 50 Hz/60 Hz.
2. LNB An diese Buchse wird das Koaxialkabel des LNB-Konverters der
Satellitenschüssel angeschlossen. Das ZF-Eingangssignal wird in
diese Buchse eingespeist, und der Eingangsfrequenzbereich liegt
zwischen 950 MHz und 2150 MHz. Die Spannungsumschaltung
zwischen 13 V und 18 V erfolgt ebenfalls über diesen Anschluss.
3. LOOP An diese Buchse wird ein Analogreceiver angeschlossen,
Der Receiver ist mit der Buchse “LOOP” ausgestattet.
4. RS 232 DATA PORT An diese Buchse kann ein Computer angeschlossen werden.
Über diese Verbindung werden Daten gelesen und übertragen.
Zum Anschluß eines externen Modems, nur für zukünftige
Anwendungen bestimmt
5. S-VHS Über diese Buchse wird ein STB mit einem Fernsehgerät
verbunden in der benutzung einem S-VHS Kabel.
6. SPDIF An diese Buchse wird ein Digitalverstärker angeschlossen.
7. AV-SCARTS Zum Anschluss an Ihren Fernseher und Videorekorder oder
DVD-Player.
8. 0/12V An diese Buchse wird ein externer LNB-Schalter angeschlossen.
9. VIDEO, AUDIO R/L An diese Cinchbuchsen werden externe Video- und Audiogeräte
angeschlossen.
10. ANT.IN Über diese Buchse werden lokale HF-Kanäle zum Fernsehgerät
durchgeschleift werden.
11. TV An diese Buchse wird ein Fernsehgerät mithilfe eines HF-Kabels
angeschlossen.
8
32
1
D-7
Page 11
DSR 9500A T
BESCHREIBUNG
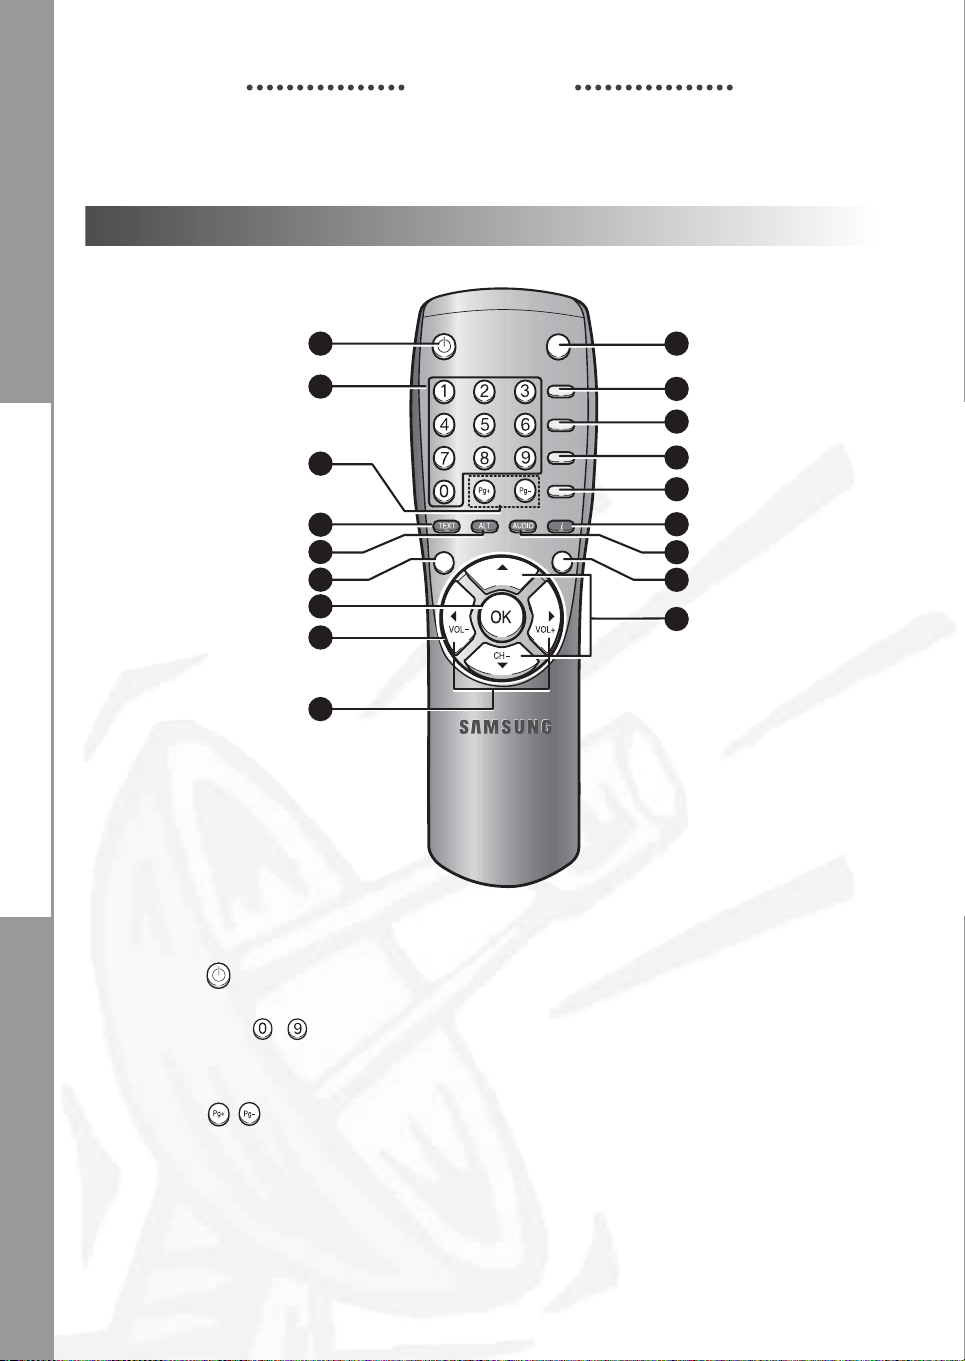
Fernbedienung
10
13
15
16
18
POWER
1
2
3
timer
9
MENU
CH+
TV/RADIO
MUTE
FAV
EPG
LAST
EXIT
4
5
6
7
8
12
11
14
17
HHiinnwweeiiss : Beachten Sie beim Einlegen der Batterien die richtige Polarität (+/-).
1. POWER( ) Mit dieser Taste wird der Receiver eingeschaltet bzw. in den
Standby-Betrieb geschaltet.
2. Zifferntasten ( ~ )
Mithilfe dieser Tasten werden Zahlen eingegeben und ein Kanal
direkt durch Eingabe der entsprechenden Nummer ausgewählt.
3. Pg+/Pg-( , ) Mit diesen Tasten werden Menüseiten nach oben oder unten
durchblättert.
4. TV/RADIO Mit dieser Taste wird zwischen Fernseh- und Radiokanälen
umgeschaltet.
5. MUTE Mit dieser Taste wird die Stummschaltung aktiviert bzw. deaktiviert.
6. FAV Mit dieser Taste können Sie zwischen den Favoritenlisten umschalten.
D-8
DIGITALER SATELLIT
Page 12

BESCHREIBUNG
7. EPG Mit dieser Taste (Electronic Program Guide) wird der Programmmanager für
Radio-und Fernsehprogramme angezeigt.
8. LAST Mit dieser Taste wird der zuletzt eingestellte Kanal ausgewählt.
9. TEXT(GRÜNE) Mit dieser Taste wird der Untertitelmodus ausgewählt.
()
10. ALT(GELBE) Mit dieser Taste wird die Soundtrack-Liste für den aktuellen Dienst ausgewählt.
()
11. AUDIO(BLAUE) Mit dieser Taste werden entweder der linke Audiokanal, der rechte
()
12. INFORMATION TMit dieser Taste wird das Programminformationsfeld auf dem Bildschirm
(ROTE)
13. MENU Mit dieser Taste wird das Menü geöffnet oder das vorherige Menü erneut
14. EXIT Mit dieser Taste wird das Menü geschlossen oder das vorherige Menü
15. OK
16. , Mit diesen Tasten wird der Markierungsbalken zum Auswählen von Optionen i
( , )
17. CH+/CH-( ) Mit diesen Tasten werden Kanäle umgeschaltet.
18. VOL+/VOL-( ) Mit diesen Tasten wird die Lautstärke angehoben oder abgesenkt.
()
()
Diese Taste hat dieselbe Funktion wie die GRÜNE Schaltfläche im Menü.
Wenn die Taste einmal gedrückt wird, werden Untertitel angezeigt.
Sie können die gewünschte Sprache mithilfe der Tasten +/- auswählen.
Drücken Sie diese Taste zwei Mal. Videotext wird auf dem Fernseher angezeigt,
ohne den Fernseher bedienen zu müssen. Videotext kann auf einem Fernseher
angezeigt werden, der diese Funktion von sich aus nicht unterstützt.
Drücken Sie die Taste drei Mal. Videotext steht dann auf dem Fernseher zur
Verfügung. Der Videotext kann dann über die Fernbedienung des Fernsehers
ausgewählt werden.
Diese Taste hat dieselbe Funktion wie die GELBE Schaltfläche im Menü
Wenn die Taste einmal gedrückt wird, wird die Soundtrack-Liste angezeigt.
Wenn die Taste zweimal gedrückt wird, wird die Videotrack-Liste angezeigt.
Der Soundtrack- und der Videotrack-Dienst stehen nicht für jeden Kanal zur
Verfügung, sondern sind vom Dienstanbieter abhängig.
Audiokanal oder beide Audiokanäle zur Wiedergabe ausgewählt.
Diese Taste hat dieselbe Funktion wie die BLAUE Schaltfläche im Menü.
angezeigt.
Diese Taste hat dieselbe Funktion wie die ROTE Schaltfläche im Menü.
Wenn die Taste einmal gedrückt wird, werden Kurzinformationen zum
Programm eingeblendet. Wird die Taste zweimal gedrückt, werden detaillierte
Informationen über den Kanal im Textfeld angezeigt.
eingeblendet.
erneut eingeblendet.
Mit dieser Taste werden Daten in das Menüsystem des Receivers eingegeben
und bestätigt. Mithilfe dieser Taste wird das Element ausgewählt. Wenn diese
Taste während der Wiedergabe einer Sendung gedrückt wird, wird eine Liste
mit Kanälen eingeblendet.
m, Menü verschoben. Darüber hinaus können mithilfe dieser Tasten Kanäle
umgeschaltet und die Lautstärke angehoben oder abgesenkt werden.
Diese Tasten werden verwendet, um die Seiten der Kanalliste nach
oben oder unten zu durchblättern.
DSR 9500A T
D
D-9
Page 13

DSR 9500A T
GRUNDFUNKTIONEN
1. Bildschirmbanner
Bevor Sie Fernsehprogramme wiedergeben können, müssen Sie die Installation
durchführen. Aus diesem Grund werden zu Anfang ausschließlich Menüs angezeigt.
Sobald die Fernsehkanäle programmiert worden sind, wird das folgende Bild (Banner)
angezeigt, wenn Sie von einem Kanal auf einen anderen umschalten:
Status des linken
Audiokanals
● Drücken Sie die Rote Taste (), während Sie eine Sendung wiedergeben.
● Wählen Sie den Kanal aus, indem Sie die Zifferntasten ( ~ ) oder die
Taste / drücken, und drücken Sie die Taste TV/RADIO, um zwischen
Fernseh-und Radiokanälen umzuschalten.
JugendschutzSperre
Programm informationen Aktueller Favoritenkanal Nummer des Soundtracks des aktuellen KanalsSignal status
Kanal nummer Kanal name Status des rechten Audiokanals
CAS-Name
Dieses Bild wird immer angezeigt, wenn Sie auf einen anderen Kanal umschalten.
Wenn Sie die Taste TV/RADIO auf der Fernsehbedienung drücken, wird zwischen
Fernseh-und Radio programmen umgeschaltet.
Detaillierte Programminformationen
● Drücken Sie die Rote Taste ()zweimal, während Sie eine Sendung
wiedergeben.
Zunächst wird das oben beschriebene Bild angezeigt.
Wenn Sie die Rote Taste ()ein zweites Mal drücken, werden detaillierte
Informationen zum aktuellen Programm in einem weiteren Fenster angezeigt, falls es
weitere Informationen gibt. Sind diese Informationen länger als eine Seite, können Sie
über die Taste ( / ) nach oben/unten blätter n.
HHiinnwweeiiss : Dieser Dienst hängt vom jeweiligen Dienstanbieter ab.
2. Regeln der Lautstärke
So ändern Sie die Lautstärke:
● Drücken Sie die Tasten / um die Lautstärke zu ändern.
● Drücken Sie die Taste MUTE, um die Stummschaltung zu aktivieren.
● Drücken Sie erneut die Taste MUTE oder die Tasten / , um die Stummschaltung
aufzuheben.
D-10
DIGITALER SATELLIT
Page 14

GRUNDFUNKTIONEN
3. Auswählen eines Soundtracks
● Drücken Sie die gelbe Taste (), um die
Soundtrack-Liste anzuzeigen.
● Drücken Sie / und um einen Soundtrack
auszuwählen.
DSR 9500A T
4. Auswählen eines Videotracks
● Drücken Sie die gelbe Taste ()zweimal, um
die Videotrack-Liste anzuzeigen.
● Drücken Sie / und , um einen Videotrack
auszuwählen.
5. Dienstliste
● Drücken Sie die Taste , während Sie eine
Sendung wiedergeben.
● Wählen Sie eine Liste aus, indem Sie die Taste
TV/RADIO oder FAV drücken.
Das Symbol hinter dem Kanalnamen
kennzeichnet einen verschlüsselten Kanal und
das Symbol hinter dem Kanalnamen einen
gesperrten Kanal.
● Wählen Sie den Kanal aus, indem Sie / ,
/ drücken.
● Drücken Sie die Taste , um das Programm des ausgewählten Kanals
wiederzugeben.
D
Die farblich codierten Tasten sind den folgenden Dienstlisten zugeordnet.
● Grüne Taste (): Favoritenliste
● Gelbe Taste (): alphabetische Liste
● Blaue Taste (): Anbieterliste
● Rote Taste () : Transponderliste
D-11
Page 15

DSR 9500A T
GRUNDFUNKTIONEN
5.1 Dienstfavoriten
● Drücken Sie die grüne Taste ()auf der
Fernbedienung, um die Favoritenliste anzuzeigen.
● Drücken Sie die grüne Taste (), um zwischen
Gruppen- und Kanalliste umzuschalten.
● Verwenden Sie die Tasten / , / um die
gewünschte Favoritengruppe auszuwählen.
5.2 Alphabetische Liste
● Drücken Sie die gelbe Taste ()auf der
Fernbedienung, um die alphabetische Liste anzuzeigen.
● Drücken Sie die gelbe Taste (), um zwischen
Gruppen- und Kanalliste umzuschalten.
● Verwenden Sie die Tasten / , / um die
gewünschte alphabetische Gruppe auszuwählen.
5.3 Dienstanbieter
● Drücken Sie die blaue Taste ()auf der
Fernbedienung, um die Anbieterliste anzuzeigen.
● Drücken Sie die blaue Taste (), um zwischen
Gruppen- und Kanalliste umzuschalten.
● Verwenden Sie die Tasten / , / um die
gewünschte Anbietergruppe auszuwählen.
5.4 Diensttransponder
● Drücken Sie die rote Taste ()auf der
Fernbedienung, um die Transponderliste anzuzeigen.
● Drücken Sie die rote Taste ()Gruppen-und
Kanalliste umzuschalten.
● Verwenden Sie die Tasten / , / um die
gewünschte Transpondergruppe auszuwählen.
D-12
DIGITALER SATELLIT
Page 16

GRUNDFUNKTIONEN
6. Programminformationen
EPG - Programmmanager Electronic Program Guide
Mithilfe des Programmmanagers Electronic Program Guide
können Sie eine Programmliste für die Kanäle anzeigen.
HHiinnwweeiiss
● Drücken Sie die Taste EPG, während Sie ein Programm
Die Daten werden nur mit Zeitangaben auf dem Bildschirm angezeigt.
Im LED-Display des Receivers wird “EPG” angezeigt.
● Grüne ( ) Taste: Mit der grünen Taste können Sie zum vorherigen Datum gehen.
● Gelbe ( ) Taste: Mit der gelben Taste können Sie zum nächsten Datum gehen.
● Blaue ( ) Taste: Mit der blaue Taste können Sie nach oben blättern, wenn die
● Rote ( ) Taste : Mit der rote Taste können Sie nach unten blättern, wenn die
Auf dem EPG-Bildschirm lässt sich das Zeitintervall durch Drücken folgender Tasten einstellen:
Taste 1: 1 Stunde 30 Minuten Taste 2: 30 Minuten Taste 3: 15 Minuten
●Tasten / : Hiermit wird die Programmliste in Blöcken von 30 Minuten angezeigt.
Drücken Sie die Taste TV/RADIO oder FAV, um die verschiedenen Programmlisten zu durchsuchen.
: 1. Dieser Dienst hängt vom jeweiligen
Dienstanbieter ab.
2. Nachdem der Receiver die GreenwichZeit aus dem Signal ermittelt hat, was
einige Sekunden in Anspruch nimmt,
können die EPG-Daten angezeigt werden.
wiedergeben.
Informationen über mehr als eine Seite gehen.
Informationen über mehr als eine Seite gehen.
DSR 9500A T
D
● Wählen Sie den Kanal mithilfe der Tasten / , / aus, und drücken
Sie die Taste , um das aktuelle Programm dieses Kanals wiederzugeben.
7. Untertitel
Wenn das zurzeit ausgestrahlte Programm untertitelt ist,
können Sie die grüne Taste ()drücken, um die aktuelle
Liste mit den Sprachen für die Untertitelung anzuzeigen.
Wenn für das aktuelle Programm Untertitel verfügbar sind,
wird nach Wechseln des Kanals oder durch Drücken der
rote ( ) Taste im Infobanner [S] angezeigt.
So ändern Sie die Untertitelsprache:
● Drücken Sie die grüne Taste (), um die Liste
mit den Untertitelsprachen anzuzeigen.
● Verwenden Sie die Tasten / , um die gewünschte Untertitelsprache auszuwählen.
●
Drücken Sie die Taste , und anschließend werden die Untertitel in der gewünschten Sprache
angezeigt. Das Menü ist übersichtlich und benutzerfreundlich, damit Benutzer den Receiver
problemlos bedienen können. Das Hauptmenü besteht aus sechs Untermenüs, über die die
verschiedenen Bedienungsvorgänge ausgeführt werden können.
D-13
Page 17

DSR 9500A T
GRUNDFUNKTIONEN
8. Teletext-OSD
Wenn das zurzeit ausgestrahlte Programm
Bildschirmvideotextdaten enthält, können Sie die grüne
Taste ()zweimal drücken, um die aktuelle
Bildschirmvideotextliste anzuzeigen.
So ändern Sie den Bildschirmvideotext:
● Verwenden Sie die Tasten / , um den
gewünschten Bildschirmvideotext auszuwählen.
● Drücken Sie die Taste , und anschließend wird der
gewünschte Bildschirmvideotext angezeigt.
9. Teletext-VBI
Wenn das zurzeit ausgestrahlte Programm
VBI-Videotextdaten enthält, können Sie die grüne
Taste ()dreimal drücken, um die aktuelle
VBI-Videotextliste anzuzeigen.
So ändern Sie den VBI-Videotext
● Verwenden Sie die Tasten / , um den
gewünschten VBI-Videotext auszuwählen.
● Drücken Sie die Taste , und anschließend wird der
gewünschte VBI-Videotext auf dem Bildschirm angezeigt.
10. Audiomodus
Über die Taste AUDIO können Sie zwischen links,
rechts oder Stereo auswählen.
So ändern Sie den Audiomodus:
● Wählen Sie über die Taste AUDIO links, rechts
oder Stereo.
● Drücken Sie die Taste EXIT, um die Auswahl zu
speichern und das Menü zu verlassen.
D-14
DIGITALER SATELLIT
Page 18
BEDIENEN DES RECEIVERS
Hauptmenü
Nachdem Sie das Antennensystem und die STB mit den entsprechenden Anschlüssen
installiert haben, gehen Sie wie folgt vor:
● Stecken Sie den Netzstecker in eine Steckdose, und schalten Sie den Receiver ein.
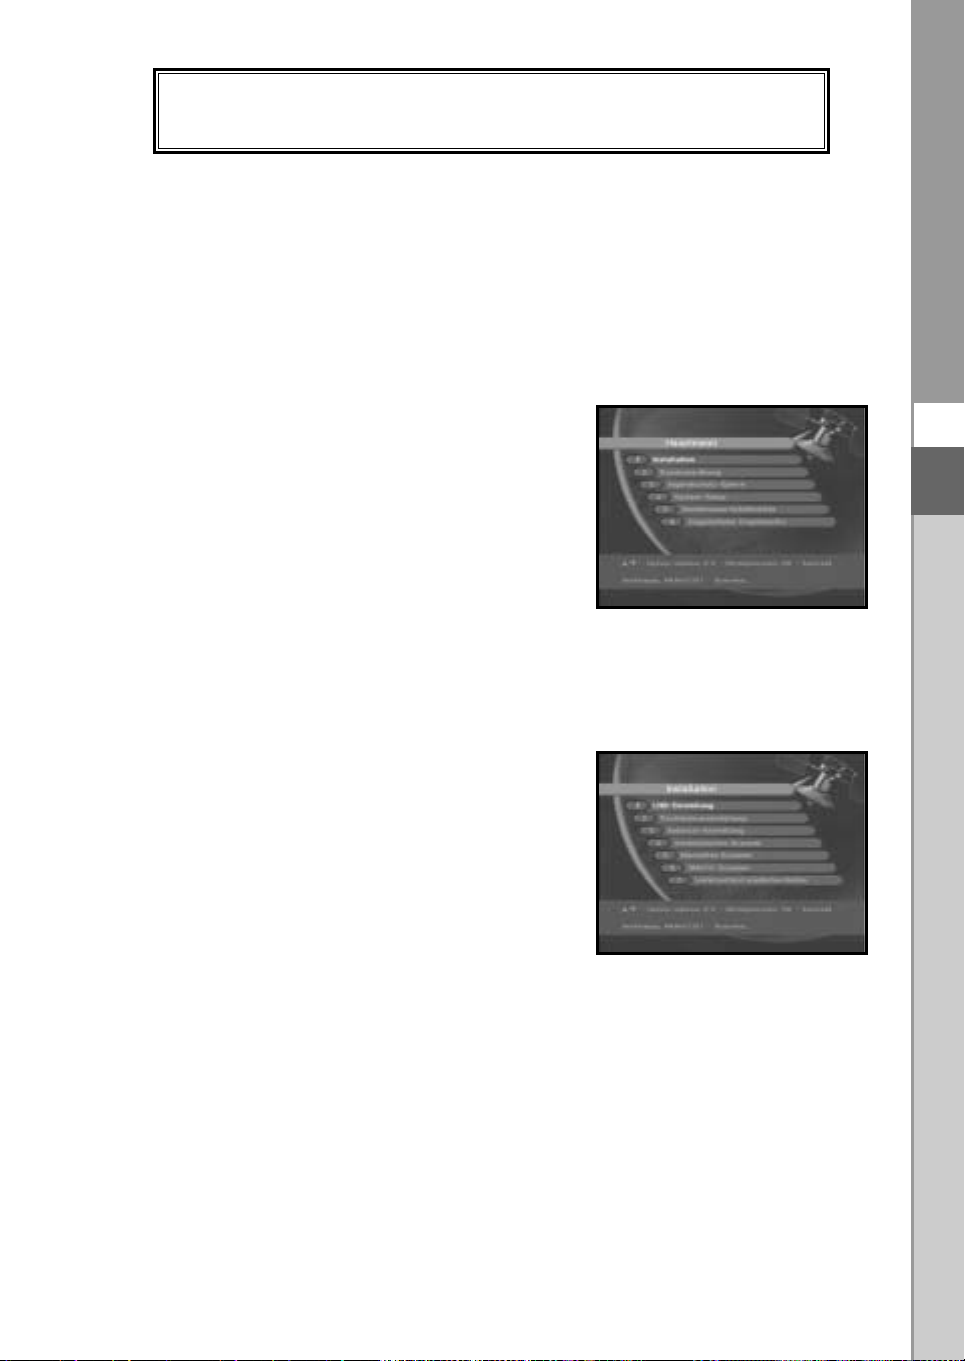
● Drücken Sie die Taste MENU, um das Hauptmenü zu öffnen.
Im LED-Display wird jetzt MENU angezeigt.
Folgendes wird auf dem Bildschirm angezeigt:
DSR 9500A T
Die Untermenüs werden angezeigt.
Für die Untermenüs 1, 2 und 3 benötigen Sie den
PIN-Code.
● Sie müssen die Hilfemitteilungen am unteren
Bildschirmrand beachten!
Bevor Sie mit dem Menü “Installation” beginnen,
müssen Sie im 4. Menü “System-Setup” überprüfen,
ob dort alle Informationen auf Sie zutreffen.
1. Installation
Über dieses Menü können Sie neue Dienste anpassen
und hinzufügen sowie den Status des Receivers anzeigen.
● Wählen Sie Installation im Hauptmenü aus,
um das Untermenü zu öffnen.
● Geben Sie den PIN-Code ein.
Wenn Sie noch keinen eigenen PIN-Code eingegeben
haben, ist der werksseitig vorgegebene PIN-Code 0000
gültig.
D
D-15
Page 19

DSR 9500A T
BEDIENEN DES RECEIVERS
1.1 LNB Einstellung
In diesem Menü können Sie Satelliten- und
LNB-Einstellungen für die Kanalsuche auswählen.
Darüber hinaus können Sie die Einstellungen für den
22-kHz-Ton änder n. Die Parameter, die in diesem Menü
festgelegt werden, sind zum Programmieren der Kanäle
unter den Optionen Automatisches Scannen und
Manuelles Scannen erforderlich.
Die erforderlichen Informationen finden Sie in den
Bedienungsanleitungen für Antenne und LNB.
Sie können aber auch Ihren Fachhändler fragen.
● Wählen Sie unter LNB-Spannung die Einstellung Ein aus.
● Wählen Sie den gewünschten Satelliten aus.
● Wählen Sie die Frequenz aus.
● Wählen Sie den DiSEqC-Modus aus
(Aus, DiSEqC A, DiSEqC B, DiSEqC C, DiSEqC D, Synchronsignal A, Synchronsignal B).
Wenn Sie einen Positionierer verwenden, verwenden Sie diese Option (Ja oder Nein).
Ton 22 kHz: Wenn Sie einen dualen LNB-Konverter oder zwei Antennen verwenden,
die an einen 22-kHz-Schalter angeschlossen sind, und die Einstellung
des 22-kHz-Tonschalters Ein, Aus oder Auto lautet, können Sie
zwischen beiden LNB-Konvertern oder Antennen umschalten.
1.2 Positionierereinstellung
Wenn Sie ein motorbetriebenes DiSEqC 1.2-System verwenden,
können Sie die verfügbaren DiSEqC 1.2-Funktionen nutzen.
● Wählen Sie die Option Satellit aus.
● Wählen Sie alle Transponder des obigen Satelliten aus,
und überprüfen Sie Frequenz, Zeichengeschwindigkeit,
FEC und Polarität.
Fragen Sie bei Problemen Ihren Fachhändler um Rat.
● Wählen Sie unter Menümodus eine der folgenden
Einstellungen aus:
<Benutzermodus>
<Installationsmodus>:In diesem Modus können Sie manuell nach einem Satelliten
: Über diesen Modus werden die Standardfunktionen des
Positionierers aktiviert, die für Anfänger empfohlen werden.
Allgemeine Benutzer verwenden den Benutzermodus.
suchen.
D-16
DIGITALER SATELLIT
Page 20

BEDIENEN DES RECEIVERS
1.2.1 Benutzermodus
● Wählen Sie “Antriebsmodus” aus:
Sie können die Bewegungsart des Positionierers
auswählen: Kontinuierlich, Schritt oder Zeit.
● Positionieren Sie die Antenne in nördlicher, südlicher,
östlicher und westlicher Richtung, und verwenden
Sie die Tasten / ,
um den Motor
/
anzusteuern. Mit der Taste wird die Antenne
nach Westen, mit der Taste nach Osten, mit der
Taste nach Norden und mit der Taste nach
Süden gedreht.
●
Sobald Sie die richtige Antennenposition erreicht haben, wählen Sie Aktuelle Position
speichern aus, und drücken Sie die Taste , um den Antriebsmotor zurückzusetzen.
DSR 9500A T
D
HHiinnwweeiiss
:
Der im Feld Signalstatus angezeigte Wert hat lediglich Informationscharacter.
Die Signalqualität kann ausreichend sein, auch wenn der angezeigte Wert
nicht maximal ist.
● Zu gespeicherter Position gehen.
Wenn die gespeicherte Position erreicht ist, wird auf dem Bildschirm “Anhalten”
angezeigt. Sie können jetzt weitere Bedienungsvorgänge ausführen.
● Wählen Sie Satellitenposition berechnen aus, um die Satellitenposition neu zu
berechnen, und drücken Sie die Taste .
1.2.2 Installationsmodus
Nachdem der Installateur den Zustand des
Positionierers überprüft hat, sollte er dieses Menü
verwenden. Er sollte Limits deaktivieren auswählen,
bevor er den Benutzermodus verwendet.
● Wählen Sie Antrieb und W E aus, und verwenden
Sie die Tasten / , um den Motor anzusteuer n.
Mit der Taste wird die Antenne nach Westen
und mit der Taste nach Osten gedreht.
● Wählen Sie Limits aktivieren aus, um Limit setzen
zu aktivieren .
● Wählen Sie Limits deaktivieren aus, um Limit setzen zu deaktivieren.
● Wählen Sie Positionierer zurücksetzen aus, und drücken Sie die Taste ,
um den Positionierer zurückzusetzen.
D-17
Page 21
DSR 9500A T
BEDIENEN DES RECEIVERS
1.3 Solarsat-Einstellung
Dieses Menü gilt nur für die Solarsat-Antenne.
Wenn Sie dieses Menü öffnen, wird die Meldung
“Dieses Menü gilt nur für die Solarsat Antenne.
Wenn Sie eine Solarsat Antenne haben, drücken
Sie “OK”, ansosten drücken sie “EXIT”.
Sie können die Werte je nach Standort eingeben.
● Verwenden Sie die Tasten / , um Datum und Zeit
einzustellen.
● Verwenden Sie die Tasten / , um horizontal in die
nächste Spalte zu gelangen.
● Verwenden Sie die Tasten
einzelnen Feldern zu gelangen.
, um vertikal zu den
/
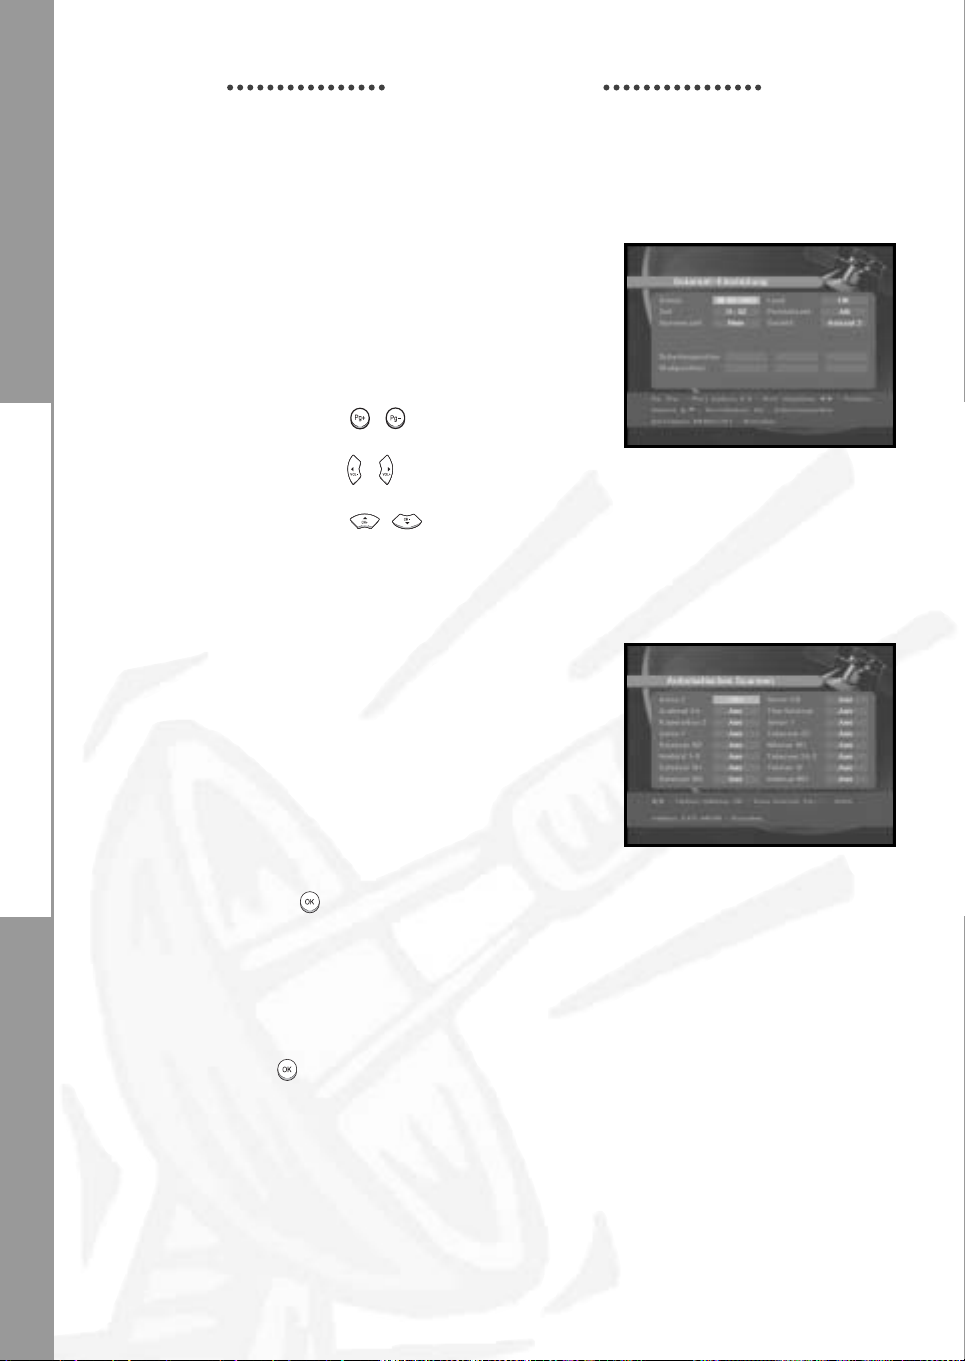
1.4 Automatisches Scannen
Über das Untermenü Automatisches Scannen können Sie
automatisch Kanäle, auf denen nicht gesendet wird, von den
vorprogrammierten Satelliten herunterladen.
So laden Sie Kanäle automatisch herunter:
Sie können für jeden Satelliten die Optionen Alle/Aus/Nur
freie auswählen.
Aus : Es wird keine Suche durchgeführt.
Alle : Es werden alle Kanäle durchsucht.
Nür freie : Es werden nur freie Kanäle durchsucht.
● Drücken Sie die Taste .
Das Menü Automatisches Scannen wird angezeigt.
Alle Kanäle, die sich in der Liste des ausgewählten
Satelliten befinden, werden automatisch heruntergeladen.
Nach Abschluss des Suchvorgangs wird die Meldung
“Suchergebnis des digitalen Receivers”: angezeigt.
Drücken Sie die Taste , um alle Kanäle in der Set-Top-Box zu speichern.
D-18
DIGITALER SATELLIT
Page 22

BEDIENEN DES RECEIVERS
1.5 Manuelles Scannen
Die Set-Top-Box verfügt über die Funktion Manuelles
Scannen, um neue Kanäle und schwache Signale
auswählen zu können. Benutzer können hier die
entsprechenden Kanaldaten eingeben.
Wenn Sie im Menü Installation die Option 5. Manuelles
Scannen auswählen, wird die folgende Bildschirmseite
angezeigt:
● Wählen Sie den Zielsatelliten aus, bei dem die manuelle
Suche durchgeführt werden soll.
● Laden Sie einen Transponder.
Über diese Option können alle Transponder der vorprogrammierten Liste geladen werden,
die im Receiver gespeichert ist.
DSR 9500A T
D
HHiinnwweeiiss
: Wenn Sie einen neuen Transponder bei der Option TR laden über die
Einstellung Neu zur Transponderliste hinzufügen, kann dieser später über das
automatische Scannen verwendet werden; allerdings nur, wenn mindestens ein
Kanal auf diesem neuen Transponder gefunden wird. Drücken Sie zum
Speichern die Taste .
● Geben Sie die Frequenz des gesuchten Transponders ein.
● Geben Sie die Zeichengeschwindigkeit des gesuchten Transponders ein.
● Wählen Sie die Vorwärtsfehlerkorrektur (FEC) des gesuchten Transponders aus.
Sie können die Werte 1/2, 2/3, 3/4, 5/6, 7/8 oder Auto auswählen.
● Wählen Sie die Polarität des gesuchten Transponders aus:
Horizontal/Vertikal/Linkszirkular/Rechtszirkular.
Wenn Sie Horizontal auswählen, liegen 18 V Spannung in der Leitung des
LNB-Konverters an. Wenn Sie Vertikal auswählen, liegen 13 V Spannung in
der Leitung des LNB-Konverters an.
● Wählen Sie unter Scan-Modus die Einstellung Alle oder Nur freie aus.
● Wählen Sie unter Netzwerksuche die Einstellung Ja aus.
Wählen Sie unter Netzwerksuche die Einstellung Ja aus. Durch genaue Ausrichtung auf
den Transponder können Sie eine höhere Anzahl von Kanälen empfangen. Außerdem
kann Provider Name (Dienstanbieter) auf dem Bildschirm angezeigt werden.
● Wählen Sie unter PID-Suche die Einstellung Ja aus. Sie können eine manuelle Suche
durchführen, indem Sie einzelne PID-Werte (Paket-ID) (Video/Audio/PCR) eingeben.
● Nachdem Sie eine Option ausgewählt haben, drücken Sie die Taste , um die Suche
zu starten.
D-19
Page 23

DSR 9500A T
BEDIENEN DES RECEIVERS
1.6 SMATV-Scannen
Falls mehrere Parteien die Antenne und den LNB-Konverter
gemeinsam nutzen, suchen Sie den Dienst im Bereich 950
MHz bis 2150 MHz.
● Wählen Sie unter Suchtyp die Einstellung Automatisch
oder Manuell aus.
● Wählen Sie unter Scan-Modus die Einstellung Alle oder
Nur freie aus.
● Unter Andere Zeichengeschwindigkeit können Sie die
Werte 1 bis 4 auswählen.
HHiinnwweeiiss
: 1. Wenn Sie während des SMATV-Scannens
unter Suchtyp die Einstellung Automatisch
ausgewählt haben, brauchen Sie nur die
gewünschte andere Zeichengeschwindigkeit
(1-4) einzugeben.
2. Wenn Sie während des SMATV-Scannens
unter Suchtyp die Einstellung Manuell
ausgewählt haben, müssen Sie Frequenz
und Zeichengeschwindigkeit eingeben.
Wenn Sie Automatisch auswählen, durchsucht der STB alle verfügbaren Kanäle basierend
auf Symbolraten über ganze Frequenzbereiche hinweg.
Bei der Einstellung Manuell werden Kanäle mit genauen Angaben für Symbolrate und
Frequenz gesucht.
1.7 Lieferzustand wiederherstellen
Über diese Option können die Werkseinstellungen
wiederhergestellt werden, sofern Probleme auftreten,
nachdem Kanal- oder sonstige Daten geändert wurden,
die möglicherweise fehlerhaft sind.
Auf dem Bildschirm wird Folgendes angezeigt:
Wenn Sie bei eingeblendetem Bestätigungsfenster die
Taste drücken, werden die Werkseinstellungen des
Receivers automatisch wiederhergestellt.
HHiinnwweeiiss
: Hiermit werden vorgenommene Einstellungen gelöscht!
D-20
DIGITALER SATELLIT
Page 24

BEDIENEN DES RECEIVERS
2. Kanalanordnung
Das Menü Kanalanordnung umfasst sieben Funktionen:
In diesem Menü können Sie Kanäle aus der Kanalliste
entfernen, die einem bestimmten Satelliten oder
Transponder zugeordnet sind. Außerdem haben Sie
hier die Möglichkeit, eine Favoritenliste zu erstellen
und die Kanalposition zu ändern.
● Geben Sie den PIN-Code ein.
DSR 9500A T
Wenn Sie noch keinen eigenen PIN-Code eingegeben
haben, ist der werksseitig vorgegebene PIN-Code 0000 gültig.
2.1 Delete Satellite <Satellit löschen>
●
Wählen Sie die Satellitenliste aus, die gelöscht werden
soll, indem Sie die rote Taste ()drücken.
● Drücken Sie die Taste zur Bestätigung.
HHiinnwweeiiss
2.2
●
● Drücken Sie die Taste zur Bestätigung.
HHiinnwweeiiss
: Mithilfe dieser Funktion wird nicht der
Satellit, sondern die Liste der Kanäle
gelöscht, die für diesen Satelliten
registriert sind.
Delete Transponder <Transponder löschen>
Wählen Sie die Transponderliste aus, die gelöscht
werden soll, indem Sie die rote Taste ()drücken.
: Mithilfe dieser Funktion wird nicht der
Transponder, sondern die Liste der Kanäle
gelöscht, die für diesen Transponder
registriert sind.
2.3 Delete Channel <Kanal löschen>
D
● Wählen Sie die Kanalliste aus, die gelöscht werden soll,
indem Sie die rote Taste ()drücken.
● Drücken Sie die Taste zur Bestätigung.
D-21
Page 25

DSR 9500A T
BEDIENEN DES RECEIVERS
2.4 Delete All Channels <Alle Kanäle löschen>
Drücken Sie bei eingeblendetem Bestätigungsfenster die
Taste , um alle Kanäle zu löschen, und drücken Sie
MENU/EXIT, um das Fenster zu schließen.
2.5 Delete Scrambled Channels
<Verwürfelte Kanäle löschen>
Drücken Sie bei eingeblendetem Bestätigungsfenster
die Tast , um alle verschlüsselten Kanäle zu löschen,
und drücken Sie MENU/EXIT, um das Fenster zu schließen.
2.6 Favorite Channels <Bevorzugte Kanäle>
Der aktuelle Kanal kann sofort der gewünschten
Favoritengruppe zugeordnet werden. Sie können einen Kanal
auch mehreren Favoritengruppen zuordnen.
● Wählen Sie über die Taste
(FAV1–FAV9) aus.
● Wählen Sie im Fenster mit der Liste der Fernseh- bzw.
Radiosender über die Taste ( / ) oder die Tasten
PG-/PG+
● Drücken Sie die
die gewünschte Kanalliste.
rote Taste ()
den gewählten Kanal der Favoritengruppe zu.
● Drücken Sie zum Bestätigen die Taste .
Sie können die Liste der Fernseh- oder Radiosender ändern, indem Sie die Taste
drücken. Die Favoritenliste können Sie ändern, indem Sie die Taste
● Wenn Sie die Taste
Radioprogrammliste umgeschaltet.
● Wenn Sie die Taste
So löschen Sie Kanäle aus der Favoritengruppe:
● Wählen Sie über die Tasten ( / ) oder
● Drücken Sie die
rote Taste ()
löschen.
FAV
eine Favoritengruppe
, und weisen Sie dann
FAV
TV/RADIO
FAV
drücken, wird eine andere Favoritenliste ausgewählt.
drücken, wird zwischen Fernsehprogramm- und
PG-/PG+
eine Kanalliste.
, um den gewählten Kanal aus der Favoritengruppe zu
drücken.
TV/RADIO
D-22
DIGITALER SATELLIT
Page 26
BEDIENEN DES RECEIVERS
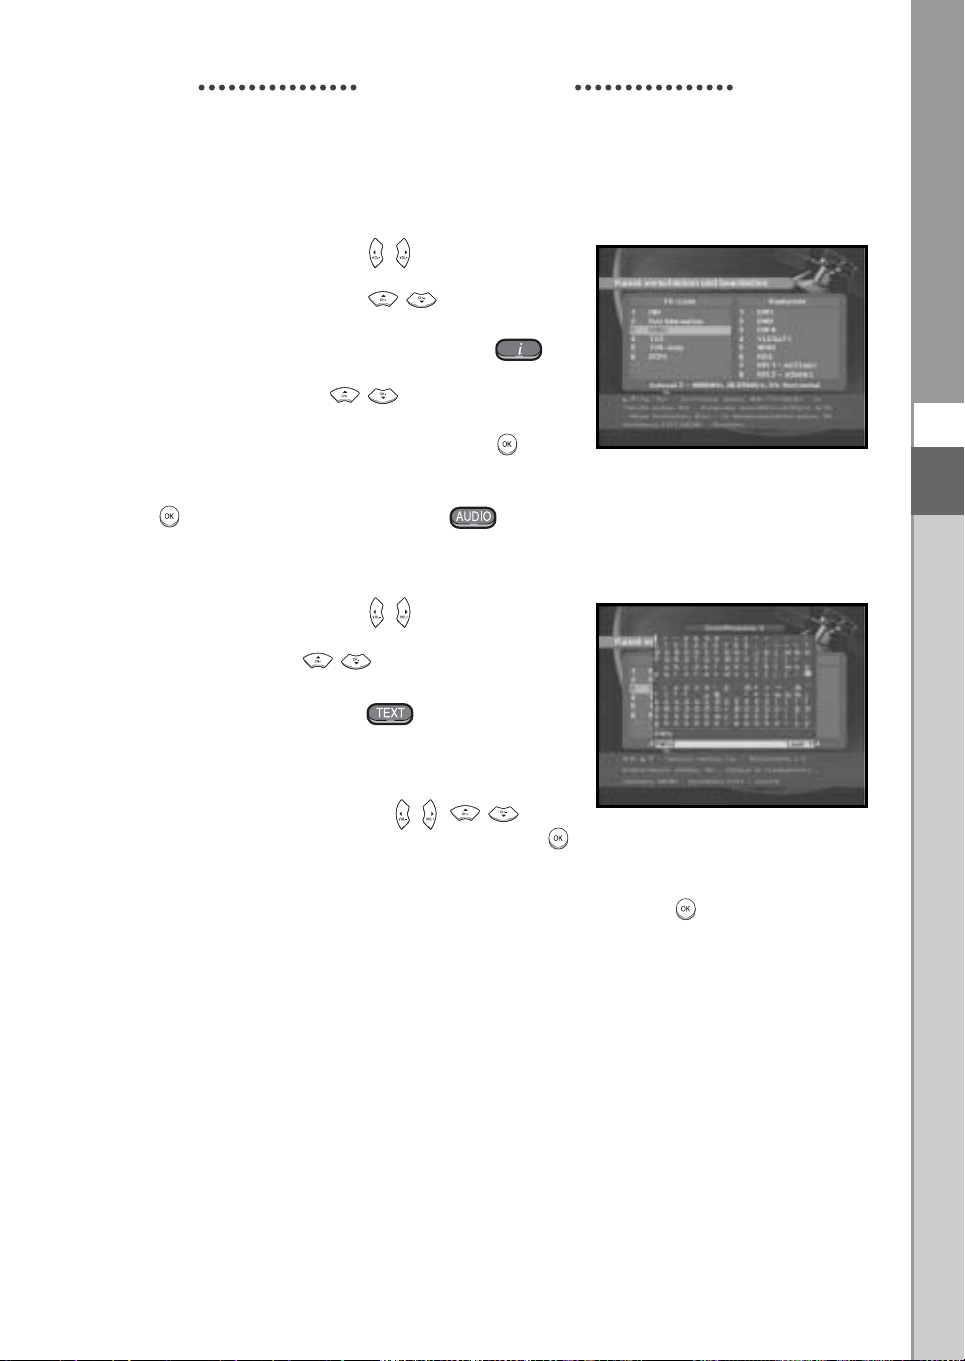
2.7 Move & Edit Channel <Kanal verschieben und bearbeiten>
● Wählen Sie über die Tasten ( / ) die Liste der
Fernseh- bzw. Radiosender.
● Wählen Sie über die Tasten ( / ) oder
die Liste der Fernseh- bzw. Radiosender.
● Wählen Sie durch Drücken der
rote Taste ()
einen Kanal.
● Drücken Sie die Tasten ( / ) oder
die Position des ausgewählten Kanals zu ändern,
und drücken Sie zur Bestätigung die Taste .
● Wenn Sie den Kanal zur ursprünglichen Position
zurückversetzen möchten, drücken Sie nicht auf die
Taste sondern auf die blaue
Taste
So bearbeiten Sie den Namen des Kanals:
PG-/PG+
PG-/PG+
().
, um
DSR 9500A T
D
● Wählen Sie über die Tasten ( / ) die Liste der
Fernseh- bzw. Radiosender.
● Wählen Sie über die ( / ) oder
PG-/PG+
eine
Kanalliste aus.
● Drücken.e die grüne Taste (). Die
Zeichentabelle wird angezeigt.
● Wählen Sie über die Zahlentasten 1–5 die
gewünschte Zeichentabelle.
● Wählen Sie mithilfe der Tasten ( / , / ) das
gewünschte Zeichen, und drücken Sie die Taste , u m das Zeichen zu über nehmen.
HHiinnwweeiiss
● Drücken Sie die Taste
: Mit der Taste
PG-
können Sie Zeichen löschen.
MENU
, und drücken Sie dann die Taste , u m die Daten zu
speichern.
D-23
Page 27

DSR 9500A T
BEDIENEN DES RECEIVERS
3. Jugendschutz-Sperre
Mit der Funktion Jugendschutz-Sperre können Sie
mithilfe eines vierstelligen PIN-Codes (Personal
Identification Number) Kanäle sperren und unerwünschte
Zugriffe auf die DSR 9500A unterbinden.
(Werksseitig ist der PIN-Code 0000 festgelegt.)
Wenn Sie dieses Menü aufrufen, stehen Ihnen zwei
Möglichkeiten zur Verfügung: Sie können einen
gewünschten Kanal sperren und Ihren PIN-Code ändern.
● Geben Sie den PIN-Code ein.
Wenn Sie noch keinen eigenen PIN-Code eingegeben haben,
ist der werksseitig vorgegebene PIN-Code 0000 gültig.
3.1 Kanal sperren
● Wählen Sie den Kanal aus, indem Sie / ,
/, / drücken.
● Wenn Sie die Taste TV/RADIO drücken,
wird zwischen Fernsehprogramm- und
Radioprogrammliste umgeschaltet.
● Sperren Sie den Kanal, indem Sie die rote
Taste ()drücken.
● Drücken Sie die Taste zur Bestätigung.
Nach Eingabe des PIN-Codes bei einem Kanal mit
Jugendschutzsperre können alle Kanäle mit
Jugendschutzsperre angezeigt werden.
Wenn Sie einen PIN-Code eingeben, um auf einen Kanal mit Jugendschutzsperre
Zugriff zu erhalten, wird dieser PIN-Code für alle Kanäle mit Jugendschutzsperre
übernommen.
Sie können also mit einmaliger Eingabe des PIN-Code bequem auf alle Kanäle mit
Jugendschutzsperre zugreifen.
So entsperren Sie einen Kanal:
● Drücken Sie erneut die rote Taste (),
um den Kanal zu entsperren.
D-24
DIGITALER SATELLIT
Page 28

BEDIENEN DES RECEIVERS
3.2 PIN-Code ändern
Wählen Sie die zweite Option PIN-Code ändern aus,
wenn Sie den PIN-Code ändern möchten.
Anschließend wird das folgende Menü angezeigt:
IIm ersten Feld müssen Sie den aktuellen PIN-Code
eingeben und im zweiten Feld den neuen PIN-Code.
Zur Bestätigung müssen Sie den neuen PIN-Code erneut
eingeben.
DSR 9500A T
Beachten Sie, dass der PIN-Code vierstellig sein muss.
DER WERKSSEITIG VORGEGEBENE PIN-CODE LAUTET
0000.
HHiinnwweeiiss : Falls Sie den PIN-Code vergessen sollten,
wenden Sie sich bitte an Ihren Händler oder
Service Provider.
Wenn Sie Ihr Kennwort ändern, merken Sie es sich oder
heben es an einem sicheren Platz auf.
D
D-25
Page 29

DSR 9500A T
BEDIENEN DES RECEIVERS
4. System Setup
Mithilfe dieser Option können Sie die Werkseinstellungen
nach Ihren Anforderungen ändern.
4.1 Sprachauswahl
Mithilfe der Option Sprachauswahl können Sie die
gewünschte Sprache auswählen, die für Bildschirmanzeige,
Soundtrack, Videotext, Untertitel oder EPG verwendet wird.
● Die OSD-Menüs stehen in 19 Sprachen zur Verfügung, um
Benutzern aus verschiedenen Ländern die Bedienung zu
erleichtern.
● Drücken Sie bei geöffnetem Menü Sprachauswahl die
Tasten / , um die Sprache zu ändern, und drücken
Sie anschließend die Taste .
● Die ausgewählte Sprache bezieht sich auf
Bildschirmanzeige, Soundtrack, Videotext oder EPG.
4.2 OSD Einstellung
Hier können Sie T ranspar enzebene und Anzeigedauer auswählen.
● Wählen Sie den OSD-Transparenzgrad aus. Die
Transparenz des On-Screen-Displays kann von 0 bis
100 % betragen. Die Einstellung erfolgt über die
Tasten ( / ) oder PG-/PG+.
: Einstellung in Schritten von 1 %.
PG-/PG+ : Einstellung in Schritten von 10 %.
● Legt fest, wie lange das Informationsfeld auf dem
Bildschirm angezeigt wird.
Die Dauer kann zwischen 0,5 und 60,0 Sekunden liegen.
Die Einstellung erfolgt über die Tasten ( / ) oder PG-/PG+.
: Die Einstellung erfolgt in Schritten von 0,5 Sekunden.
PG-/PG+ : Einstellung in Schritten von 1 Sekunde.
D-26
DIGITALER SATELLIT
Page 30

BEDIENEN DES RECEIVERS
4.3 Media Setting <Medieneinstellungen>
Sie können hier verschiedene gewünschte
Medieneinstellungen vornehmen. Setzen Sie den Cursor
auf dieses Untermenü, und drücken Sie die Taste .
● Drücken Sie die Tasten ( / ), um zu den
Unterpunkten zu gehen, und drücken Sie zum
Auswählen der Option die Tasten ( / ).
● Drücken Sie zum Bestätigen die Taste .
● Drücken Sie die Taste MENU oder EXIT, um das
Menü zu verlassen.
● Wählen Sie Seitenverhältnis-Konvertierung aus: Hier stehen Ihnen die Einstellungen
Letter box, Pan & Screen, Gemischt oder Voll zur Verfügung.
● Wählen Sie Videosignaltyp aus: Hier stehen Ihnen die Einstellungen Kombiniert+RGB
oder Kombiniert zur Verfügung.
● Wählen Sie RF-Kanal aus.
● Wählen Sie das Rundfunksystem aus: B/G, I oder D/K.
DSR 9500A T
D
4.4 Time & Timer Setting <Zeit- und Timer-Einstellung>
● Setzen Sie den Cursor auf dieses Untermenü,
und drücken Sie die Taste .
● Drücken Sie die Tasten / , / , um die
Ortszeit unter Zeitzone zu ändern.
Die Ortszeit hängt von Ihrem Standort ab.
GMT steht für “Greenwich mean time” (Greenwichzeit).
Dies kann nicht geändert werden.
● Drücken Sie die Tasten / , um die
Ereigniswiederholung auszuwählen, die gespeichert
werden soll: Daily, Every Sunday, Every Monday, Every Tuesday, Every Wednesday, Every
Thursday, Every Friday, Every Saturday, Once (Täglich, Jeden Sonntag, Jeden Montag,
Jeden Dienstag, Jeden Mittwoch, Jeden Donnerstag, Jeden Freitag, Jeden Samstag,
Einmalig).
● Drücken Sie die Zifferntasten ( ~ ), um die gewünschte Einschaltzeit einzugeben.
Drücken Sie anschließend die Tasten / , um eine Ausschaltzeit auszuwählen,
die gespeichert werden soll.
● Wählen Sie TV-Programm aus. Anschließend können Sie das gewünschte Programm
festlegen, indem Sie die Tasten / drücken. Wenn Sie die Taste TV/RADIO drücken,
wird zwischen Fernseh- und Radioprogramm umgeschaltet.
● Sie können mit der Timerfunktion tägliche oder wöchentliche Programmeinträge
festlegen. Beachten Sie, dass die weniger häufigen Programmeinträge eine höhere
Priorität besitzen. Wenn Sie z. B. mit der Timerfunktion die Programmeinträge “einmalig”
und “täglich” festlegen, hat der Programmeintrag “einmalig” Vorrang.
D-27
Page 31

DSR 9500A T
BEDIENEN DES RECEIVERS
4.5 Systeminformationen
Wenn Sie sich mit einem Dienstanbieter oder einem
Dienstzentrum in Verbindung setzen müssen, werden Sie
möglicherweise nach Informationen gefragt, die in diesem
Menü enthalten sind. Setzen Sie den Cursor auf dieses
Untermenü, und drücken Sie die Taste .
Folgendes wird auf dem Bildschirm angezeigt.
4.6 Software-Upgrade
Sie können neue Software für diese Set-Top-Box über die
Satelliten ASTRA, Sirius und Hotbird herunterladen und
installieren, sobald sie zur Verfügung steht.
Schalten Sie die Set-Top-Box während des Herunterladens
nicht aus. Wenn eine neue Softwareversion vorliegt, werden Sie
gefragt, ob Sie die alte Software aktualisieren möchten oder
nicht. Wenn Sie die Taste drücken, wird die Aktualisierung
sofort durchgeführt. Wenn keine Aktualisierung möglich ist, wird
die folgende Meldung angezeigt:
“Die Software kann nicht aktualisiert werden.”
Falls keine Aktualisierung erforderlich ist, wird die Meldung
“Keine Software-Aktualisierung notwendig.” angezeigt.
Falls bekannt wird, dass für Samsung-Software ein Transponder gewechselt wird, wählen
Sie über die Taste / den erweiterten Benutzermodus aus. Stellen Sie dann die exakten
Parameter für den neuen Transponder ein.
4.7 Copy Channel Data <Kanaldaten kopieren>
Wenn Sie Kanaldaten von einem Receiver auf einen anderen
kopieren möchten, führen Sie die nachstehenden Anweisungen
aus. Nehmen Sie in der Master-Set-Top-Box die gewünschten
Kanaleinstellungen vor, beispielsweise Favoritenkanäle festlegen,
Kanäle sperren. Stellen Sie die Master-Set-Top-Box und die
Slave-Set-Top-Box zusammen auf.
1. Schließen Sie den Master- und Slave-Receiver an das Netz an.
2. Master-Set-Top-Box (installierter Receiver): Standby-Modus
3. Slave-Set-Top-Box (zu installier ender Receiver): Menümodus
4. Verbinden Sie die beiden Receiver mithilfe eines seriellen
RS232-Kabels (beide Kabelenden sollten über Stecker verfügen).
5. Wählen Sie ‘4. Systemeinstellung’.
6. Drücken Sie die Taste ‘7’ auf der Fernbedienung.
7. Drücken Sie ‘OK’, um den Kopiervorgang zu starten.
HHiinnwweeiiss
: Verwenden Sie diese Funktion nach dem Entfernen der SMART CARD
oder von CAM-Modulen.
D-28
DIGITALER SATELLIT
Page 32

BEDIENEN DES RECEIVERS
5. Gemeinsame Schnittstelle
Diese Set-Top-Box ist mit zwei PCMCIA-Steckplätzen
ausgerüstet, in denen zwei CI-CAM-Module installiert
werden können.
Wenn ein Common Interface-CAM-Modul in einen
PCMCIA-Steckplatz eingesetzt wird, erkennt das
System automatisch den Typ des CAM-Moduls und
zeigt ihn im Hauptmenü an.
Wenn Sie dieses Menü auswählen, können Sie auf
verschiedene Optionen zugreifen, die für den jeweiligen
CAM-Modultyp zur Verfügung stehen, z. B.
Berechtigungen, Vorbuchung, Paketdetails usw.
DSR 9500A T
D
HHiinnwweeiiss
Während der Installion eines CAM kann es zu Bild- und Tonstörungen kommen.
Dies deutet nicht daraufhin, dass der STB defekt ist.
: Das Menü hängt von der Art des eingesteckten CAM ab.
Wenn das Modul noch nicht installiert wurde, wird Nicht installiert
angezeigt.
D-29
Page 33

DSR 9500A T
BEDIENEN DES RECEIVERS
6. Integriertes CryptoWorks
6.1 Allgemeine Infos zur karte
● Card Label (Kartenkennzeichnung)
Zeigt die Bezeichnung der Smartcard an.
● Zusätzliche Informationen
Zeigt die Adresse der Smartcard, Gültigkeitsdatum
und aktuelle Altersbeschränkung an.
● Set Maturity Rating (Altersbeschränkung setzen)
Hier können Sie die Altersbeschränkung einstellen.
Zur Änderung dieser Option wird der korrekte
PIN-Code benötigt.
● Smart Card Pin Code Change (Smartcard PIN-Code ändern)
Hier können Sie den PIN-Code der Smartcard ändern,
aktivieren und deaktivieren.
● Available Program Providers (Verfügbare Programmanbieter)
Hier werden die verfügbaren Programmanbieter angezeigt.
6.2 Vorhand. Berechtigung.
Hier können Sie einen Dienstanbieter auswählen und Informationen zu den verfügbaren
Berechtigungen erhalten.
● Subscription (Abonnement)
Zeigt die Gültigkeitsdauer der einzelnen Dienste an.
● Pay Per View(PPV)
Hier werden PPV-Ereignisse angezeigt, für die Sie im Voraus bezahlt haben.
● Impulse Pay Per View(IPPV)
Sie können Ereignisse während ihrer Ausstrahlung und ohne Vorbestellung bezahlen.
IPPV-Ereignisse werden hier angezeigt. Gegenwärtig werden IPPV-Ereignisse noch
nicht vom STB unterstützt.
D-30
DIGITALER SATELLIT
Page 34

FEHLERSUCHE
Problem Mögliche Ursache Problemlösung
DSR 9500A T
Die LEDs der Frontblende
leuchten nicht. Es liegt keine
Spannung an.
Auf dem Bildschirm wird kein
Bild angezeigt.
Es erfolgt keine
Tonwiedergabe.
Die Fernbedienung
funktioniert nicht.
Die Bildqualität ist schlecht.
Auf dem Bildschirm wird die
Meldung “Signal wird
gesucht” angezeigt.
Das Netzkabel ist nicht
ordnungsgemäß angeschlossen.
Der Receiver befindet sich im
Standby-Modus. Das Scart-Kabel ist
nicht ordnungsgemäß mit dem
Videoausgang des Fernsehgeräts
verbunden.
Am Fernsehgerät wurde der falsche
Kanal oder Videoausgang
ausgewählt.
Das Audiokabel wurde falsch
angeschlossen.
Die Lautstärke wurde auf Null
abgesenkt. Die Stummschaltung ist
aktiviert.
Falsche Bedienung.
Die Batterien sind verbraucht oder
falsch eingelegt.
Die Signalstärke ist zu gering.
Das Antennenkabel ist nicht
angeschlossen oder sitzt nicht fest.
Der LNB-Konverter ist defekt.
Falsche Position der
Satellitenantenne.
Schließen Sie das Netzkabel ordnungsgemäß
an.
Schalten Sie den Receiver ein.
Überprüfen Sie den Anschluss, und stellen Sie
ihn gegebenenfalls ordnungsgemäß her.
Überprüfen Sie den am Fernsehgerät
ausgewählten Kanal und Videoausgang, und
ändern Sie sie gegebenenfalls (siehe
Bedienungsanleitung des Fernsehgeräts).
Überprüfen Sie den Anschluss, und stellen Sie
ihn gegebenenfalls ordnungsgemäß her.
Heben Sie die Lautstärke am Fernsehgerät an.
Drücken Sie die Taste MUTE.
Zielen Sie mit der Fernbedienung direkt auf
den Receiver.
Tauschen Sie die Batterien aus, oder legen Sie
sie ordnungsgemäß ein.
Überprüfen Sie die Signalstärke im Menü
Automatisches Scannen. Korrigieren Sie die
Antennenausrichtung.
Überprüfen Sie den Anschluss, und stellen Sie
ihn gegebenenfalls ordnungsgemäß her.
Tauschen Sie den LNB-Konverter aus.
Überprüfen Sie die Position, und korrigieren
Sie sie gegebenenfalls.
Überprüfen Sie die Signalstärke im Menü
Automatisches Scannen.
D
Auf dem Bildschirm wird die
Fehlermeldung “Kanaldaten
nicht vorhanden” angezeigt.
Auf dem Bildschirm werden
die folgenden Meldungen
angezeigt: “Überprüfen Sie
die Chipkarte.”
“Legen Sie die Chipkarte
ein.”
Der Satellit ist noch nicht
gespeichert.
Die Smartcard ist
- nicht ordnungsgemäß installiert
- nicht installiert.
Führen Sie im Menü Automatisches Scannen
oder Manuelles Scannen eine Suche durch.
(Je nach Modell:)
Überprüfen Sie die Smartcard.
Installieren Sie die Smartcard.
ENTSORGUNG
Das Gerät, das Verpackungsmaterial (beispielsweise Styropor) und die Batterien
dürfen niemals zusammen mit dem Haushaltsabfall entsorgt werden.
Informieren Sie sich über die örtlichen Entsorgungsbestimmungen, und entsorgen
Sie Abfälle gemäß den entsprechenden Verordnungen an den dafür vorgesehenen
Standorten.
D-31
Page 35

DSR 9500A T
TECHNISCHE DATEN
Stromversorgung
Typ : SMPS
Eingangsspannung : AC 100-240V, 50/60Hz
Sicherungswerte : 250 V/T2 A
Tuner
Frequenzbereich : 950 MHz - 2150 MHz
Eingangssignalpegel : -65 bis -25 dBm
Kanalauswahl : PLL-Signalgenerator
Eingangsimpedanz : 75 Ω unsymmetrisch
Steckertyp : F-Buchsenstecker
LNB-Leistungsregelung : 13 V/18 V, 22-kHz-Ton
DiSEqC : Unterstützung der Version 1.2
Demodulator
Typ : QPSK-DEMODULATION (DVB-S)
Symbolrate : 2 - 45 MS/s
Interne FEC : Viterbi-Faltungscode
Codierungsrate: 1/2,2/3,3/4,5/6,7/8
Externe FEC : Reed Solomon-Code (204,188), t = 8
Videodecodierer
Systemdecodierung : MPEG 2 ISO/TEC 13818
(Transportstrom)
Profil und Stufe : MPEG 2, MP@ML (4:2:2)
Datenrate : 1 - 15 Mb/s
Videoformate : 4:3 (Standard) und 16:9 (Breitbild)
Bildauflösung : 720 (h) x 576 (v) x 50 Halbbilder/s
Audiodecodierer
Systemdecodierung : MPEG 1 ISO/TEC 11172-3, Schicht
I und II
Audiomodus : Mono, Dual, Stereo, Joint-Stereo
Sampling-Frequenz : 32, 44.1, 48 kHz
D-32
DIGITALER SATELLIT
Page 36

TECHNISCHE DATEN
AV-Ausgänge
Scart-Buchse TV : VIDEO (CVBS, RGB) , AUDIO R
und L
Scart-Buchse VCR : VIDEO (CVBS) , AUDIO R und L
Cinchbuchse : VIDEO (CVBS) , AUDIO R und L
Digitaler Audioausgang SPDIF
S-VHS : YC p_p 1 Volt(±10%)
HF-Modulator
DSR 9500A T
Modulatorausgang : Kanal 21 - 69
(Kanal 21 voreingestellt)
Videoformat : PAL B/G, K, I
(Kanal PAL B/G voreingestellt)
UHF-Ausgangspegel : 70 ± 5 dBµV
Ausgang : IEC-Stecker
Antennenausgang : IEC-Buchsenstecker
Abstimmverfahren : PLL-Signalgenerator
Serieller Datenanschluss
Standardfrequenz : RS232C, max. 115,2 kB
Anschlusstyp : 9-poliger D-Buchsenstecker
Integriertes Entschlüsselungssystem
CrytoWorks-CAS-System : Schnittstelle und Entschlüsselung
Gemeinsame Schnittstelle
Modultyp : PCMCIA, Typ II x 2
Verfügbares CAM-Modul : VIACCESS, IRDETO,
NAGRAVISION, CRYPTOWORKS,
CONAX, SECA usw.
D
D-33
Page 37

Page 38

DSR 9500AT
Instructions for use
GB
DIGITAL SATELLITE RECEIVER
Page 39

SAFETY INSTRUCTIONS
This STB has been manufactured to satisfy international safety standards.
Please read the following recommended safety precautions carefully.
MAINS SUPPLY: AC 100-240V ~, 50/60Hz
OVERLOADING: Do not overload wall outlets, extension cords or adapters
as this can result in fire or electrical shock.
LIQUIDS: Keep liquids away from the STB.
CLEANING: Before cleaning, disconnect the STB from the wall socket.
Use a cloth lightly dampened with water(no solvents) to
clean the exterior.
DSR 9500A T
VENTILATION: Do not block the STB ventilation holes. Ensure that free airflow
is maintained around the STB. Never store the STB where it is
exposed to direct sunlight or near heating euipment e.g. a
radiator.
Never stack other electronic equipment on top of the STB.
Place the STB at least 30mm from the wall.
ATTACHMENTS: Do not use any attachment that is not recommended by the
manufacturer; it may cause a hazard or damage the equipment.
CONNECTION TO THE SATELLITE DISH LNB:
The LNB connector cable has voltage in its center core. It is
therefore recommended that the STB be disconnected from
the mains power before connecting or disconnecting this cable.
FAILURE TO DO SO COULD DAMAGE THE LNB.
SERVICING: Do not attempt to service this product yourself.
Any attempt to do so will make the warranty invalid.
Refer all servicing to a qualified service agent.
LIGHTNING: If the STB is installed in an area subject to intense lightning
activity, protection devices for the STB mains connector and
modem telephone line are essential.
The individual manufacturer’s instruction for safeguarding other
equipment, such as TV set, Hi-Fi, etc., connected to the STB must
also be followed during lightning storms.
GB
GROUNDING: The ground of the LNB cable must be directly connected to the
system ground for the satellite dish.
The grounding system must comply with local regulations
NNoottee :Dispose the used batteries at designated place for environment protection
GB-1
Page 40

DSR 9500A T
CONTENT
Safety Instructions . . . . . . . . . . . . . . . . . . . . . . . . . . . . . . . . . . . . . 1
General Features. . . . . . . . . . . . . . . . . . . . . . . . . . . . . . . . . . . . . . . 3
Connecting Your STB . . . . . . . . . . . . . . . . . . . . . . . . . . . . . . . . . . . 4
Description . . . . . . . . . . . . . . . . . . . . . . . . . . . . . . . . . . . . . . . . . . . 6
Front Panel. . . . . . . . . . . . . . . . . . . . . . . . . . . . . . . . . . . . . . . . . . . 6
Rear Panel . . . . . . . . . . . . . . . . . . . . . . . . . . . . . . . . . . . . . . . . . . . 7
Remote Control Unit . . . . . . . . . . . . . . . . . . . . . . . . . . . . . . . . . . . . 8
Basic Functions. . . . . . . . . . . . . . . . . . . . . . . . . . . . . . . . . . . . . . . . 10
Operating The Receiver . . . . . . . . . . . . . . . . . . . . . . . . . . . . . . . . . 15
Main Menu. . . . . . . . . . . . . . . . . . . . . . . . . . . . . . . . . . . . . . . . . . . . 15
1. Installation . . . . . . . . . . . . . . . . . . . . . . . . . . . . . . . . . . . . . . . . 15
1.1 LNB Setting. . . . . . . . . . . . . . . . . . . . . . . . . . . . . . . . . . . . 16
1.2 Positioner Setting. . . . . . . . . . . . . . . . . . . . . . . . . . . . . . . . 16
1.2.1 User Mode . . . . . . . . . . . . . . . . . . . . . . . . . . . . . . . . . . . 17
1.2.2 Installer Mode. . . . . . . . . . . . . . . . . . . . . . . . . . . . . . . . . 17
1.3 Solarsat Setting . . . . . . . . . . . . . . . . . . . . . . . . . . . . . . . . . 18
1.4 Auto Scanning. . . . . . . . . . . . . . . . . . . . . . . . . . . . . . . . . . 18
1.5 Manual Scanning . . . . . . . . . . . . . . . . . . . . . . . . . . . . . . . . 19
1.6 SMATV Scanning . . . . . . . . . . . . . . . . . . . . . . . . . . . . . . . . 20
1.7 Reset to Factory Defaults. . . . . . . . . . . . . . . . . . . . . . . . . . 20
2. Channel Organising . . . . . . . . . . . . . . . . . . . . . . . . . . . . . . . . . 21
2.1 Delete Satellite. . . . . . . . . . . . . . . . . . . . . . . . . . . . . . . . . . 21
2.2 Delete Transponder . . . . . . . . . . . . . . . . . . . . . . . . . . . . . . 21
2.3 Delete Channel . . . . . . . . . . . . . . . . . . . . . . . . . . . . . . . . . 21
2.4 Delete All Channel . . . . . . . . . . . . . . . . . . . . . . . . . . . . . . . 22
2.5 Delete Scrambled Channels . . . . . . . . . . . . . . . . . . . . . . . . 22
2.6 Favorite Channels . . . . . . . . . . . . . . . . . . . . . . . . . . . . . . . 22
2.7 Move & Edit Channel . . . . . . . . . . . . . . . . . . . . . . . . . . . . . 23
3. Parental Lock . . . . . . . . . . . . . . . . . . . . . . . . . . . . . . . . . . . . . . 24
3.1 Set Channel Lock. . . . . . . . . . . . . . . . . . . . . . . . . . . . . . . . 24
3.2 Change PIN Code . . . . . . . . . . . . . . . . . . . . . . . . . . . . . . . 25
4. System Setup . . . . . . . . . . . . . . . . . . . . . . . . . . . . . . . . . . . . . . 26
4.1 Language Selection . . . . . . . . . . . . . . . . . . . . . . . . . . . . . . 26
4.2 OSD Setting. . . . . . . . . . . . . . . . . . . . . . . . . . . . . . . . . . . . 26
4.3 Media Settings. . . . . . . . . . . . . . . . . . . . . . . . . . . . . . . . . . 27
4.4 Time &Timer Setting. . . . . . . . . . . . . . . . . . . . . . . . . . . . . . 27
4.5 System Information . . . . . . . . . . . . . . . . . . . . . . . . . . . . . . 28
4.6 Software Upgrade . . . . . . . . . . . . . . . . . . . . . . . . . . . . . . . 28
4.7 Copy Channel Data . . . . . . . . . . . . . . . . . . . . . . . . . . . . . . 28
5. Common Interface . . . . . . . . . . . . . . . . . . . . . . . . . . . . . . . . . . 29
6. Embedded CryptoWorks . . . . . . . . . . . . . . . . . . . . . . . . . . . . . 30
Troubleshooting. . . . . . . . . . . . . . . . . . . . . . . . . . . . . . . . . . . . . . . . 31
Disposal. . . . . . . . . . . . . . . . . . . . . . . . . . . . . . . . . . . . . . . . . . . . . . 31
Technical Specifications . . . . . . . . . . . . . . . . . . . . . . . . . . . . . . . . . 32
GB-2
DIGITAL SATELLITE
Page 41

1. USER SECTION
GENERAL FEATURES
4000 PROGRAMMABLE CHANNELS
SOFTWARE DOWNLOAD VIA SATELLITE & PC(Secured)
ADVANCED ELECTRONIC PROGRAM GUIDE
MULTI LANGUAGE SUPPORTED FOR OSD
SUBTITLE & TELETEXT(OSD & VBI)SUPPORTED
WITH MULTI LANGUAGE
DiSEqC 1.2 SUPPORTED
FULL FUNCTION INFRARED REMOTE CONTROL UNIT
7 SEGMENT LED DISPLAY
AUTO AND MANUAL SCAN FACILITY
CHANNEL ORGANIZING(PROGRAMMABLE)
SCARTS & RCA OUTPUT
LOW POWER CONSUMPTION
9 FAVORITE LISTS
AUTO UPDATED EPG
PASS LOOP FOR RGB SIGNAL
DSR 9500A T
GB
2. TUNER SECTION
3. VIDEO SECTION
4. AUDIO SECTION
950~2150 MHz WIDE BAND TUNER
IF OUTPUT WITH DC PASS LOOP FOR ANALOG RECEIVER
SUPPORTING DiSEqC 1.2 VERSION
13V/18V SWITCHING
22KHz CONTINUOUS TONE CONTROL
DVB-S COMPLIANT
MPEG-2 VIDEO(MP@ML)
2~45 MS/s SYMBOL RATE
COMPATIBLE FOR BOTH SCPC/MCPC
SUPPORTS ASPECT RATIO 4:3(NORMAL) AND
16:9(WIDE SCREEN)
MODULATOR OUTPUT
MPEG 1 AUDIO LAYER I & II
MONO, DUAL, STEREO AND JOINT STEREO AUDIO MODE
32, 44.1 AND 48 kHz SAMPLING FREQUENCIES
VOLUME CONTROL AND MUTE FUNCTION THROUGH
REMOTE CONTROL UNIT
SPDIF DIGITAL AUDIO OUTPUT
GB-3
Page 42

DSR 9500A T
CONNECTING YOUR “STB”
1. LOCATION OF THE RECEIVER
STB
Your
Don’t put in completely enclosed cabinet that will restrict the flow of air,
resulting in overheating.
The location should be safeguarded from direct sunlight,
excess moisture, rough handling or household pets.
Avoid stacking other electronic components on the top of the receiver.
The location should be safely accessible by the cable from your
antenna system.
2. CONNECTING THE RECEIVER WITH DISH SYSTEM
After installing your antenna system, connect the coaxial cable from the
LNB of your antenna to “LNB” terminal marked at the rear
of the
All cable connectors should be finger tightened; do not use any kind
of wrench while tightenning connectors. The cable should be 75ohm
impedance coaxial twisted at the end with an “F” type connector.
should be placed under proper ventilation.
STB
.
3. CONNECTING THE RECEIVER TO TV
To connect the receiver with your television, you can use four methods;
via SCART cable, RF cable, RCA cable or S-VHS cable. S-VHS provides the
better screen quality.
Connect the RF cable to the terminal marked “TV” at the rear panel
of
STB
and its other end to the TV RF input socket.
In the case of connecting your TV through
SCART
connector marked TV to the respective
SCART
SCART
cable, connect the
4. CONNECTING YOUR ANALOG RECEIVER
To facilitate the user using analog receiver to view analog channels,
STB
has been provided with a loop through terminal marked as “
Connect the coaxial cable from this terminal to the IF input terminal of
your analog receiver. Now by keeping the
you will be able to tune and view analog channels from
your analog receiver.
STB
in standby,
5. CONNECTING YOUR VCR
To connect a VCR or DVD player, the STB has been provided with SCART
at the rear marked “AV2”.
Using a SCART connector, the VCR or DVD player can be connected to the receiver.
NNoottee :
This is supported by standby.
6. CONNECTING EXTERNAL AUDIO / HI-FI SYSTEM
To connect any external Audio Hi-Fi system, the receiver has been provided
with two RCA connectors at the back of the receiver,
marked with AUDIO L and R respectively to connect the left and right Audio.
port on the TV.
LOOP
”.
GB-4
DIGITAL SATELLITE
Page 43

CONNECTING YOUR "STB"
7. CONNECTING DIGITAL AUDIO SYSTEM
Connect a fiber optic cable between Optical SPDIF on the receiver and Optical
SPDIF on the Digital Audio System.
8. INSERTING SMARTCARDS FOR CryptoWorks SERVICES
In order to view a scrambled service, you need to have the appropriate
CAM(Conditional Access Module) and a valid Smartcard. This STB has the
Cryptoworks CAS embedded to view Cryptoworks programmes.
NNoottee : Insert the Smartcard with the gold coloured chip facing downwards.
9. INSERTING COMMON INTERFACE CAM AND SMARTCARD
The STB supports Common Interface CAMs under DVB specification.
The CI CAMs include a built-in smart card reader.
● Insert the smart card into the CAM gently with the gold colored chip upwards
● Slide in the CAM gently inside the slot so that it sits in the socket tightly.
● To remove the CAM push the button provided by the side of the CAM slot.
The CAM will be ejected from the socket.
DSR 9500A T
GB
NNoottee :
Connecting Figure
The following Common Interface CAMs are available now:
IRDETO, CONAX, CRYPTOWORKS, VIACCESS, NAGRAVISION,
SECA, Etc.
GB-5
Page 44

DSR 9500A T
DESCRIPTION
Front Panel
123 645
1.
2. ,
3. ,
4. 7
Segment Display This LED display will show the current channel number.
5. CA Module Slot
6. Infrar
7. Smart Card Slot
ed Sensor This is to receive the IR commands from the Remote
NNoottee : CA modules and smart cards are only distributed by service
This key is for turning the receiver on and Standby.
These keys are for changing the channels.
These keys are for increasing and decreasing the volume level
manually.
While the receiver is in Standby mode, the display will
show the current time.
In the slot you can use a CA module from a service provider
of your own choice.
Control Unit.
The STB is equipped with a built in decoder for the Cryptoworks
encryption.
Providers and special distributors, not by SAMSUNG.
7
GB-6
DIGITAL SATELLITE
Page 45

DESCRIPTION
Rear Panel
6710 5 9 4
11
1. AC MAINS This is to plug in the AC mains power cord.
The input AC voltage range is 100V to 240V, 50Hz/60Hz supply.
2. LNB This port is to connect the coaxial cable from LNB of your dish.
The IF input is provided through this port and the input frequency
range is 950-2150 MHz. Also the voltage switching 13V and
18V is passed through this port.
3. LOOP To enable the connection of an Analog receiver,
The receiver is provided with this ‘
4. RS 232 DATA PORT This is for connecting your receiver to a computer for reading
and loading data information.
5. S-VHS This is for connecting STB to your TV by using S-VHS cable.
SPDIF Output for connection to a digital amplifier.
6.
7. AV SCARTS This is for connecting to your AV scarts for TV & VCR or
DVD player.
8. 0/12V This is for connecting to an exter nal LNB switch.
9. VIDEO, AUDIO R/L These RCA connectors are for connecting any external video
and audio.
10. ANT.IN This is for connecting your local RF channels to your TV
through Loop.
11. TV This is for connecting to your TV via RF cable.
8
32
LOOP
’ port.
1
DSR 9500A T
GB
GB-7
Page 46

DSR 9500A T
DESCRIPTION
Remote Control Unit
1
2
3
9
10
13
15
16
18
POWER
timer
MENU
CH+
TV/RADIO
MUTE
FAV
EPG
LAST
EXIT
4
5
6
7
8
12
11
14
17
NNoottee : When inserting batteries, make sure that the polarity(+/-) is correct.
1. POWER( ) This is for switching the receiver ON/STANDBY mode.
2. 0-9 NUMERICAL keys ( ~ )
These keys are to enter numeric values and to select the channel
directly by entering its number.
3. Pg+/Pg-
( , )
These keys are for moving up or down pages on the menu.
4. TV/RADIO This key is for toggleing between the TV channel and Radio channel.
5. MUTE This key is for toggleing between normal & muted audio.
GB-8
DIGITAL SATELLITE
Page 47

DESCRIPTION
6. FAV Use the key to switch between favorite lists.
7. EPG Electronic Program Guide button displays the TV/Radio Program
guide.
8. LAST This key is for calling up directly whatever channel you were
watching from the list.
9. TEXT(GREEN) This key is for selecting the subtitle mode.
()
10. ALT(YELLOW) This key is for selecting the soundtrack list for the current service.
()
This button functions same as the GREEN button on the menu.
Press once and subtitle appears. You can select the language you
want using the channel +/- keys.
Press twice it. Then Teletext will be displayed on TV Screen without
operating anything on TV. This Teletext can be displayed on TV which
doesn’t support Teletext functionality.
Press three times it. Then Teletext will be available on TV.
It means that Teletext can be chosen by TV with TV RCU.
This button functions same as the YELLOW button on the menu.
Press once and sound track appears.
Press twice and video track appears.
The sound and video track services are not provided for every
channel and depend on the conditions the operator is in.
DSR 9500A T
GB
11. AUDIO(BLUE) This key is for changing the Audio to the left, right or both channels,
()
12. INFORMATION This key is for displaying the programe information box in the screen.
(RED)
()
13. MENU This key is for opening up the menu or returning to the previous menu.
14. EXIT This key is for exiting a menu or returning to the previous menu.
15. OK( ) This key is for entering and confirming any data to the receiver in the
16. , These keys are for moving the highlight bar for selecting
( , ) options on the menu, and this button is used to change channels
17. CH+/CH-( ) These keys are for changing channels.
18. VOL+/VOL-( ) These keys are for increasing or decreasing the volume.
This button functions same as the BLUE button on the menu.
This button functions same as the RED button on the menu. Press
once and you can get simple information on the program. Press twice
and you can get detailed information on the channel in text box.
menu system. This key is for selecting the item. Press while viewing
TV and a list of channels is displayed.
and increase or decrease the volume.
These keys are for moving up or down pages on the channel list.
GB-9
Page 48

DSR 9500A T
BASIC FUNCTIONS
1. Display Screen
Before you can view the television program, you must perform the installation.
Therefore you will see only menu images at first.
After the television channels have been programmed, you will see the following
picture(banner) each time you switch channels:
Left Audio Status
● Press the RED ( ) key in view mode.
● Select the channel by pressing NUMERICAL ( ~ ) keys or
Parental Lock Channel Number Channel Name Right Audio Status
CAS Name
Program Information Current Favorite The number of soundtrack in current channelSignal Status
/ keys and select TV/RADIO key to move to TV or
Radio channel.
You will also see this picture each time you change channels.
When you press TV/RADIO key on the Remote Control Unit,
TV and RADIO program are toggled.
Detailed program information
● Press the RED ( ) key twice while you are viewing a program.
First you will see the banner described above.
After the RED ( ) key is pressed in the second time, detailed information for current
program can be displyed on another banner, if there is more information. When this
information is more than one page, / can be used for page up and down.
NNoottee
: This service depends on service provider.
2. Volume Control
To control the volume level :
● Press / keys to adjust the volume level.
● Press MUTE key to turn to silence mode.
● Press MUTE key again or / keys in order to cancel the mute function.
GB-10
DIGITAL SATELLITE
Page 49

BASIC FUNCTIONS
3. Select Soundtrack
● Press YELLOW ( ) key to see
the soundtrack list.
● Press / and key to select one.
4. Select Videotrack
DSR 9500A T
● Press YELLOW ( ) key twice to see
the videotrack list.
● Press / and key to select one.
5. Service List
● Press key to while you are viewing a program.
● Select list by pressing TV/RADIO or FAV key.
The icon behind the channel name symbolises
scrambled channel, and the icon behind the
channel name shows parental lock channel.
● Select the channel by pressing / , / .
● Press key to watch that channel.
The colour key corresponds the following service list.
● GREEN ( ) key - Favorites
● YELLOW ( ) key - Alphabetical
● BLUE ( ) key - Provider
● RED ( ) key - Transponder
GB
GB-11
Page 50

DSR 9500A T
BASIC FUNCTIONS
5.1 Service Favorites
● Press the GREEN ( ) key on the control unit to select
the Favorites list.
● Press the GREEN ( ) key to switch between favorite
list and channel list.
● Use the / , / keys to select a favorite group
that you want..
5.2 Service Alphabetical
● Press the YELLOW ( ) key on the remote control
unit to select the Alphabetical list.
● Press the YELLOW ( ) key to switch between
alphabet list and channel list.
● Use the / , / keys to select a
Alphabetical group that you want.
5.3 Service Provider
● Press the BLUE ( ) key on the remote control
unit to select the Provider list.
● Press the BLUE ( ) key to switch between Provider
list and channel list.
● Use the / , / keys to select a Provider
group that you want.
5.4 Service Transponder
● Press the RED ( ) key on the remote control
unit to select the Transponder list.
● Press the RED ( ) key to switch between
Transponder list and channel list.
● Use the / , / keys to select a
Transponder group that you want.
GB-12
DIGITAL SATELLITE
Page 51

BASIC FUNCTIONS
6. Program Information
EPG-Electronic Program Guide
The electronic program guide gives you imformation
for the channels.
NNoottee
: 1. This service depends on service provider.
2. After receiver recognized the GMT-time
from the signal which takes few seconds,
it can display correct EPG information.
● Press EPG key while you are viewing a program.
This function is displayed on the screen by using only time.
You will see “EPG” in the LED display of the receiver.
● GREEN ( ) key: Green key is for moving back to the previous date.
● YELLOW ( ) key: Yellow key is for moving to the next coming date.
● BLUE ( ) key can be used for page up, if there is more information than one page.
● RED ( ) key can be used for page down, if there is more information than one page.
DSR 9500A T
GB
Time interval can be adjusted by press keys as followings on EPG screen:
1 key: 1 hour and 30 minutes 2 key: 30 minutes 3 key: 15 minutes
With the TV/RADIO or FAV key you can browse among the various programs lists.
● Select the channel by pressing / , / keys and press key to watch this channel.
7. Subtitle
When the current broadcasting program provides
subtitle, press the GREEN ( ) key to see
the current subtitle language list. If Subtitle is available on
current program, [S] is displayed on the banner after
changing program( channel) or pressing RED ( ) key.
To change the subtitle language:
● Press the GREEN ( ) key to see the subtitle
language List.
● Use the / keys to select a subtitle language you want.
● Press the key and then the subtitle language you want is displayed.
The menu display is carefully created and user friendly to assure the easy operation
of the receiver by the user.
GB-13
Page 52

DSR 9500A T
BASIC FUNCTIONS
8. Teletext OSD
When the current broadcasting program provides
Teletext OSD, press the GREEN ( ) key twice
to see the current Teletext OSD list.
To change the Teletext OSD:
● Use the / keys to select a Teletext OSD
you want.
● Press the key and then the Teletext OSD
you want is displayed on the screen.
9. Teletext VBI
When the current broadcasting program provides
Teletext VBI, press the GREEN ( ) key three times
to see the current Teletext VBI list.
To change the Teletext VBI:
● Use the / keys to select a Teletext VBI
you want.
● Press the key and then the Teletext VBI
you want is displayed on the screen.
10. Audio Mode
You can choose a mode among left, right or stereo
using the AUDIO key.
To change the audio mode:
● Press the AUDIO key to select the left, right or stereo.
● Press the EXIT key to save and escape from
this menu.
GB-14
DIGITAL SATELLITE
Page 53

OPERATING THE RECEIVER
Main Menu
After installing your antenna system and STB with appropriate connectors.
● Plug in the AC main power and switch on the receiver.
● Press MENU key to bring up the main menu.
The LED display will show “MENU”.
The following on screen display will appear:
The sub menu topics will be displayed.
For the sub-menus 1, 2 and 3 you need the PIN Code.
● You must follow the help message at the bottom
of the screen!
Before you begin with the “Installation”
menu, you should check in the 4th menu
“System Setup” whether all the information
there is applicable for you.
DSR 9500A T
GB
1. Installation
The menu provides settings for customizing, adding new
services and displaying the status of the receiver.
● Select “Installation” in the main menu mode to
select the sub menu.
● Enter the PIN Code.
If you have not entered your own PIN Code
then the PIN Code 0000 applies, which was
set at the factory.
GB-15
Page 54

DSR 9500A T
OPERA TING THE RECEIVER
1.1 LNB Setting
You can select the satellite and LNB setting conditions
to execute channel search and you can alter the settings
for 22KHz tone. The parameters set in this menu are
needed for programming the channels for the “Auto
scanning” and “Manual scanning”.
The necessary information can be found at your antenna
and LNB brochures, or you can ask your dealer.
● Select LNB power supply “On”.
● Select the desired satellite name.
● Select the LNB type (frequency).
● Select the DiSEqC Mode
(Off, DiSEqC A, DiSEqC B, DiSEqC C, DiSEqC D, Tone Burst A, Tone Burst B)
If you are using a Positioner, select this option. (“Yes” or “No”)
22KHz: In case you are using a dual LNB or two antennas connected to a 22KHz
tone switch box, with the 22 KHz tone switch (“On”, “Off” or “Auto”) you
can switch between both LNB or antennas.
1.2 Positioner Setting
If you have a DiSEqC 1.2 motorized system
which is fully compatible with DiSEqC1.2, then you can
take advantage of the DiSEqC 1.2 functions available.
● Select Satellite.
● Select any transponder from above satellites and
check out the Frequency, Symbol Rate, FEC and Polarity.
In case problems arise, ask your dealer.
● Select from Menu Mode:
“User” mode : Enables control of basic positioner function
recommended for beginners. General user uses “User” mode.
“Installer” mode : This is used to search for the position of a satellite manually.
GB-16
DIGITAL SATELLITE
Page 55

OPERA TING THE RECEIVER
1.2.1 User Mode
● Select Driving Mode:
You have an option to choose the positioner’s
movement type: Continuous, Step or Time.
● Position the antenna with north, south, east
and west and use the / , / key to drive
motor. key drives to west, key drives to east,
key drives to north and key drives to south.
● If you finished driving of motor, select “Store
current Position.” and press key, to reset
new driving motor.
NNoottee
: The level indicated in the “Signal Status” is only for reference.
The signal quality may be adequate even though the level indicated is
not maximum.
● Go to Stored Position.
DSR 9500A T
GB
When the stored position is reached then screen displays “Stop”,
you can now continue with the further operations.
● Select the Calculate Sat Positions to recalculate the satellite position and key.
1.2.2 Installer Mode
After checking the positioner’s state, installer should use this
menu. He should set the “Disable Limits” before using User
mode.
● Select the Drive Motor West/East and use the /
keys to drive motor.
key drives to west and key drives to east.
● Select “Enable Limit”, in order to enable “Set Limit”.
● Select “Disable Limit”, in order to disable “Set Limit”.
● Select “Reset Positioner” and key to reset positioner.
GB-17
Page 56

DSR 9500A T
OPERA TING THE RECEIVER
1.3 Solarsat Setting
This menu is only for the Solarsat antenna.
When you press this menu, you will get this message,
“This menu is only for the Solarsat antenna.
If you have one-press OK, otherwise-press EXIT.”
You can set the value according to your location.
● To set the Value of Date and Time, use the /
keys to change the value.
● Use the / keys to change position.
● Use the / keys to move each filed.
1.4 Auto Scanning
The sub menu “Auto Scanning” will enable download
the channels automatically from the preprogrammed
satellites.
To download channels automatically:
You can select All/Off/Only Free option mode in each
satellite.
Off : No Scan
All : Scan all the channels
Only Free : Scan free channels
● Press key.
Auto Scanning menu will be displayed.
All the channels in the list from the selected satellite will be
automatically downloaded.
After scanning you will see “Your digital receiver found...”.
Then, you should press key to store all channels into STB.
GB-18
DIGITAL SATELLITE
Page 57

OPERA TING THE RECEIVER
1.5 Manual Scanning
To tune-in new channels and weak signals,
the STB has been provided with
the option “Manual Scanning” where the channel data
can be entered by the user.
After selecting the “5. Manual Scanning” from the
Installation Menu, the following screen will be displayed:
● Select the target satellite for manual search.
● Load a transponder.
This option will enable the user to load any
transponder from the preprogrammed list
available within the receiver.
NNoottee
: Especially on New tranpsonder at Load TR,
this new transponder can be added into
transponder list so that you can use it on Auto
Scanning later, only if at least one channel is found
with this new transponder. In order to save it, press key.
DSR 9500A T
GB
● Input the frequency of the transponder you want to find.
● Input the symbol rate of the transponder you want to find.
● Select the FEC(Forward Error Correction)of the transponder
you want to find.
You can select the value of 1/2, 2/3, 3/4, 5/6, 7/8 or Auto.
● Select the polarization of the transponder you want to find.
(Horizontal/Vertical/Circular Left/Circular Right)
In the case of horizontal, 18V and in the case of vertical,
13V are output through LNB line.
● Select Scan Mode “All” or “Only Free”.
● Set “Yes” on Network Search. You can get more channels from transponder using
the homing transponder. Additionally, you can get ‘Provider Name’ on the screen.
● Select PID searching “Yes”. You can manually search by entering individual
PID(Packet Identifier)(Video/Audio/PCR) values.
● After select option, press key to start the scan process.
GB-19
Page 58

DSR 9500A T
OPERA TING THE RECEIVER
1.6 SMATV Scanning
In case that several generations use Antenna and LNB
in common, search the service the from 950 to 2150MHz.
● Select Searching Type “Automatic”or “Manual”.
● Select Scan Mode “All” or “Only Free”.
● You can input alternative symbol rate from 1 to 4
NNoottee
: 1. When your searching type is set to Automatic
during SMATV scanning, you have only to enter
the alternative symbol rate(1~4) you want.
2. When your searching type is set to Manual
during SMATV scanning, you must enter both
frequency and symbol rate.
When you select “Automatic”, STB will search all available
channels based on symbol rates over whole frequencies.
On the other hand, it will scan channels with exact
information for symbol rate and frequency on “Manual”.
1.7 Reset to Factory Defaults
This is to recover the Factory set values in case the user
has encountered some problems after changing any
values of channel data and others which may be in error.
The screen display will be as follows:
At the request window,
if you press key, the receiver will be reset to factory
default settings automatically.
NNoottee
: This cause your previous settings to be deleted!
GB-20
DIGITAL SATELLITE
Page 59

OPERA TING THE RECEIVER
2. Channel Organising
The “Channel Organising” menu has seven functions:
This menu is for removing some channels from channel
list which are related wth designated Satellite or
Transponder. And it provides making favorite list and
moving channel position as you want.
● Enter the PIN Code.
If you have not entered your own PIN Code 0000 applies,
which was set at the factory.
DSR 9500A T
2.1 Delete Satellite
● Select the desired satellite list you want to delete
by pressing RED ( ) key.
● Press key for confirmation.
NNoottee
: This feature doesn’t delete satellite itself but
deletes the lis of channels registered at the
selected Satellite.
2.2 Delete Transponder
● Select the desired transponder list you want to
delete by pressing RED ( ) key.
● Press key for confirmation.
NNoottee
: This feature doesn’t delete transponder itself
but deletes the list of channels registered at the
selected transponder.
2.3 Delete Channel
● Select the desired channel you want to delete by
pressing RED ( ) key.
● Press key for confirmation.
GB
GB-21
Page 60

DSR 9500A T
OPERA TING THE RECEIVER
2.4 Delete All Channel
At the request window, press key to delete
all channels and press MENU / EXIT to exit.
2.5 Delete Scrambled Channels
At the request window, press key to delete
scrambled channels and press MENU / EXIT to exit.
2.6 Favorite Channels
You can immediately register the present channel to the
desired Favorite Group.
In addition, you can register a channel to multiple favorite
groups.
● Select the desired Favorite Group(FAV1~FAV9)
using the FAV key.
● Select the desired channel list using the / or
PG-/PG+ keys at the TV or RADIO list window.
● Press the RED ( ) key and then register the selected
channel at the Favorite Group.
● Then press the key for confirmation.
You can change TV list or Radio list by the TV/RADIO key and
change favorite list by the FAV key.
● When you press the TV/RADIO key, TV list and Radio list are toggled.
● Press the FAV key to select another favorite list.
To delete channels from Favorite Group:
● Select a channel list to delete with / or PG-/PG+ keys.
● Press the RED ( ) key to delete the selected channel from the favorite channels.
GB-22
DIGITAL SATELLITE
Page 61

OPERA TING THE RECEIVER
2.7 Move & Edit Channel
● Select the TV/RADIO list with / keys.
● Select the TV/RADIO list with / or PG-/PG+
keys.
● Select channel by pressing the RED ( ) key.
● Press the / or PG-/PG+ keys to change the
position of the channel you want, and press the
key for confirmation.
● If you want to return the channel to the initial
position, do not press the key but press the
BLUE ( ) key.
To edit Channel Name
● Select the TV/RADIO list with / keys.
● Select a channel list to move to other location with
/or PG-/PG+keys.
● Press GREEN ( ) key. Font Table will be displayed.
● Select desired font table using the Num.1~5 keys.
● Select desired character with / , / and
then press the key to paste character to the string.
DSR 9500A T
GB
NNoottee
: PG- key : Backspace.
● Press the MENU key and then press the key
to save the set data.
GB-23
Page 62

DSR 9500A T
OPERA TING THE RECEIVER
3. Parental Lock
This “Parental Lock” feature sets viewing restrictions
and prevents unauthorized access to your STB
through the PIN (Personal Identification Number),
which is a 4 digit number.
(The factory preset PIN Code : 0000)
On selecting this menu, you will have two options:
to set lock for any desired channel and to change
your PIN value.
● Enter PIN Code.
If you have not entered your own PIN Code then
the PIN Code 0000 applies, which was set at the factory.
3.1 Set Channel Lock
● Select the channel by pressing / , / , / .
● When you press the TV/RADIO key, TV list and Radio list
are toggled.
● Select the channel lock by pressing RED ( ) key.
● Press key for confirmation.
This will lock the channel. Whenever you need to view
the channel, you will have to enter the PIN at the request
window.
After entering PIN Code to able to access a parental locked
channel, it will work on all parental locked channels.
It means that you can access all parental locked
channels with entering PIN Code on any parental locked
channel successfully.
To cancel the lock :
● Press RED ( ) key again in order to cancel the lock.
GB-24
DIGITAL SATELLITE
Page 63

OPERA TING THE RECEIVER
3.2 Change PIN Code
To change the PIN Code, select the second option “Change PIN Code”.
This will take you to the following menu:
In this option, you need to enter the current PIN
Code at the first cursor, and at the second cursor
enter the desired PIN Code.
To confirm, you need to enter the new PIN Code again.
Please remember the PIN Code should be a 4 digit
numerical value.
THE FACTORY PRESET PIN Code : 0 0 0 0.
NNoottee
: If you forget the PIN Code, contact your dealer or service provider.
Once you change password, please do not forget and keep well.
DSR 9500A T
GB
GB-25
Page 64

DSR 9500A T
OPERA TING THE RECEIVER
4. System Setup
This option enables you to change the factory
preset system settings as per your requirements.
4.1 Language Selection
The “Language Selection” option allows the user to
select the desired language of the OSD, Soundtrack,
Teletext, Subtitle or EPG.
● To accommodate user from different regions
speaking different languages, OSD languages are
available 19 languages.
● To select the desired language menu,
press / keys to change language and press .
● The OSD Language, Soundtrack, Teletext, Subtitle,
or EPG will vary according to the selected language.
4.2 OSD Setting
You can set the OSD transparency and the display time.
● Select OSD Transparency level.
The OSD Transparency level from 0 to 100%.
Setting is made with the numeric keys, / keys
or PG-/PG+ keys.
/ keys : Setting in increment of 1%.
PG-/PG+ keys : Setting in increment of 10%.
● Set the display duration of the information(banner)
box displayed in the screen.
The time ranges from 0.5 to 60.0 seconds.
Setting is made with the numeric keys, / keys or PG-/PG+ keys.
/ keys : Adjusting in increment of 0.5sec.
PG-/PG+ keys : Adjusting in increment of 1 sec.
GB-26
DIGITAL SATELLITE
Page 65

OPERA TING THE RECEIVER
4.3 Media Settings
You can set the various media settings you want.
Place the cursor on this sub menu and press .
● Press the / keys to move the sub items and
press the / keys to select the option.
● Press the key to confirm.
● Press the MENU/EXIT keys to exit the menu.
● Select the TV system : PAL, SECAM.
● Select the TV type according to your TV: STANDARD
4: 3 ratio or WIDE SCREEN 16 : 9 ratio type.
● Select the aspect ratio conversion :
Letter box, Pan & Screen, Mixed or Full.
● Select the Video Signal Type : Composite+RGB or Composite.
● Select the RF Channel.
● Select Broadcasting System : B/G, I or D/K.
DSR 9500A T
GB
4.4 Time & Timer Setting
● Place the cursor on this sub menu and press .
● Press the / , / keys to change the Local time
in Time Zone. The local time will be changed
according to your location.
GMT is referred to the standard time of Greenwich.
This cannot be changed.
● Press the / keys to choose event repetition
you want to reserve : Daily, Every Sunday, Every
Monday, Every Tuesday, Every Wednesday,
Every Thursday, Every Friday, Every Saturday, Once.
● Press the Numerical ( ~ ) keys to set the time you want and press
the / keys to choose a switch time you want to reserve.
● Select TV program to set the event program by pressing / keys.
When you press the TV/RADIO key, TV program and Radio program are toggled.
● Even you can set timers on Daily and Every Monday or Every Sunday, etc.
The priority has the repetition event which is less. For example, when you set timers
on Once and daily, “Once” will work in stead of “Daily” at that day.
GB-27
Page 66

DSR 9500A T
OPERA TING THE RECEIVER
4.5 System Information
If you have to contact your service provider or a service
center they might ask for information available from this menu.
Place the cursor on this sub menu and press key.
The following will be the on-screen display.
4.6 Software Upgrade
You can download and upgrade the software of this
STB through ASTRA and Hotbird satellite when
the new software is released.
During downloading don’t turn off the STB.
If there is a new version of software to download,
you are asked if you will update or not.
If you press key, the update starts right away.
In case update is impossible, you get this message
“You can’t update software!” Or in case you don’t
need to update, “You don’t need to update software!” will be displayed.
If you get information that a Transponder is changed to different one for Samsung software,
you should select ‘User Advanced Mode’ at Menu mode by using / key. Then you
should set exact parameters for the new transponder for Samsung.
4.7 Copy Channel Data
If you want to copy the channel data from one receiver
to another, please follow the instruction below.
Please make your own channel data, such as favorite
& lock channel with your own master box.
Then take your master box when you install another box.
1. Plug on both master & slave receivers
2. Master Box(Installed Box) : Stand-by Mode
3. Slave Box(Installing Box) : Menu Mode
4. Connect 2 Boxes with RS232 serial cable
(Both end should have male connector)
5. Select ‘4. System Setup’
6. Press ‘7’ key on RCU
7. Press ‘OK’ to start channel data copy
NNoottee
: Use this function after removing SMART CARD or CAM modules.
GB-28
DIGITAL SATELLITE
Page 67

OPERA TING THE RECEIVER
5. Common Interface
This STB is equipped with two PCMCIA slots,
which enable the use of two CI-CAMS.
When a Common Interface CAM is inserted inside
the PCMCIA slot,
the system detects the type of the CAM automatically
and display in the main menu.
On choosing this menu, you will be able to access
the different options available with the type of the
CAM like authorizations, pre-booking, package
details etc.,
NNoottee
: The menu differs according to each inserted CAM.
If the module has not been installed yet, the phase “Not Installed” will be
accordingly indicated.
During inserting any CAM, you may have distorted video or audio.
It doesn’t mean STB is wrong.
DSR 9500A T
GB
GB-29
Page 68

DSR 9500A T
OPERA TING THE RECEIVER
6. Embedded CryptoWorks
6.1 General Card Information
● Card Label
You can see smart card labe.l
● Additional Information
You can see smart card address, validity date and
current maturity rating.
● Set Maturity Rating
You can set maturity rating. The correct PIN Code
is required to change this option.
● Smart Card Pin Code Change
You can change, enable and disable smart card PIN Code.
● Available Program Providers
You can see available program providers.
6.2 Available Entitlements
You can select a service provider and get the information of available entitlements.
● Subscription
You can see the valid period of each service.
● Pay Per View(PPV)
If you purchased events in advance, the entitlements of PPV events will be displayed.
● Impulse Pay Per View(IPPV)
You can purchase events during the active broadcast of the event without
pre-ordering. The entitlements of IPPV events will be displayed. But the STB doesn’t
support IPPV now and will support it in the near future.
GB-30
DIGITAL SATELLITE
Page 69

TROUBLESHOOTING
Problem Possible cause Solution of the problem
No display LED on Power cord Power cord plug in correctly
the front panel; not plugged in correctly
No power supply
No pictures on the screen Receiver in Standby mode; Set receiver to “On”;
Scart not connected tightly Check connection and correct;
to video output of television;
incorrect channel or video Check channel and video output and
output selected on television correct (TV instruction manual)
No sound Audio cord connected Check connection and correct;
incorrectly;
Loudness level = 0; Increase loudness on television set;
Muting active Press the MUTE key
Remote Control does not incorrect operation; Point remote control
operate directly towards the Receiver.
Batteries dead or inserted Replace batteries or insert correctly
incorrectly
DSR 9500A T
GB
Poor picture quality Signal strength to low Check the signal strength in
the “Auto Scan” menu, correct alignment
of your antenna
On-Screen Error Message Antenna cable not connected Check connection and correct;
“Searching for signal” or not tight;
LNB defective; Change LNB;
incorrect position of the Check position and correct,
satellite antenna; Check the signal strength in
the “Auto Scan” menu
On-Screen Error Message Satellite not yet set Scan of in “Automatic scanning”
“Channel data or “Manual scanning” menu
does not exist.”
On-Screen Error Messages: Smartcard: (depend on model)
“Please check the - not plugged in correctly; Check the Smartcard.
Smartcard”; - not plugged in. “Insert the Smartcard.”
“Please insert the
Smartcard”.
DISPOSAL
The device, packaging material (e.g. Styrofoam) and the batteries
must never be disposed of with household refuse.
Please obtain appropriate information about the regulations in your community,
and dispose of all refuse in accordance with regulations at the separate
locations provided.
GB-31
Page 70

DSR 9500A T
TECHNICAL SPECIFICATIONS
Power supply
Type : SMPS
Input voltage : AC 100-240V, 50/60 Hz
Fuse rating : 250 V/T2 A
Tuner
Freq. Range : 950 ~ 2150 MHz
Input signal level : -65 ~ -25 dBm
Channel selection : PLL frequency synthesizer
Input impedance : 75 Ω unbalanced
Connector type : F type female
LNB power control : 13 V/18 V, 22 kHz tone
DiSEqC : 1.2 supported
Demodulator
Type : QPSK DEMODULATION (DVB-S)
Symbol rate : 2 ~ 45 Ms/s
Inner FEC : Viterbi Convolutional
Coding Rate - 1/2,2/3,3/4,5/6,7/8
Outer FEC : Reed Solomon Coding (204,188), t = 8
Video decoder
System decoding : MPEG 2 ISO/TEC 13818
(transport stream)
Profile and level : MPEG 2 MP@ML (4:2:2)
Data rate : 1~ 15 Mb/s
Video formats : 4:3 (normal) & 16:9 (widescreen)
Picture resolution : 720(H) x 576(V) x 50 fields/sec
Audio Decoder
System decoding : MPEG 1 ISO/TEC 11172~3 layer I & II
Audio mode : mono, dual, stereo, joint stereo
Sampling frequency : 32, 44.1, 48 kHz
GB-32
DIGITAL SATELLITE
Page 71

TECHNICAL SPECIFICATIONS
A/V output
TV SCART : VIDEO (CVBS, RGB), AUDIO R&L
VCR SCART : VIDEO (CVBS), AUDIO R&L
RCA JACK : VIDEO (CVBS), AUDIO R&L
SPDIF Digital Audio Output
S-VHS : YC p_p 1Volt (±10%)
RF modulator
Modulator output : CH 21_69 (preset to CH 21)
Video type : PAL B/G, K, I (preset to PAL B/G)
UHF output level : 70 ± 5 dBµV
Output connector : IEC male
Ant. O/P connector : IEC female
Tuning method : PLL frequency synthesizer
Serial data interface
DSR 9500A T
GB
Standard : RS232C, Max. 115.2 kB
Connector type : 9 pin D-type female
Embedded descrambler
Embedded CryptoWorks : Interface & descramble
Common Interface
Module Type : PCMCIA TYPE II x 2
Available CAM : VIACCESS, IRDETO, NAGRAVISION,
CRYPTOWORKS, CONAX, SECA, Etc.
GB-33
Page 72

Page 73

DSR 9500AT
Kullanma talimatlar›
TU
D‹J‹TAL UYDU ALICI
Page 74

GÜVENL‹K TAL‹MATLARI
Bu STB, uluslararas› güvenlik standartlar›n›n gereklerini karfl›layacak flekilde üretilmifltir.
Lütfen afla¤›daki önerilen güvenlik önlemlerini dikkatlice okuyun.
fiEBEKE BESLEMES‹: AC 100-240V, 50/60Hz
AfiIRI YÜKLENME: Yang›na ya da elektrik çarpmalar›na neden olabilece¤inden
prizlere, uzatma kablolar›na ya da adaptörlere fazla yük
bindirmeyin.
SIVILAR: STB’den s›v›lar› uzak tutun.
TEM‹ZL‹K: Temizlemeden önce STB’yi fiflten çekin.
D›fl yüzeyini temizlemek için suyla (solvent kullanmay›n)
hafifçe nemlendirilmifl bir bez kullan›n.
HAVALANDIRMA: STB’nin havaland›rma deliklerindeki hava ak›fl› engellemeyin.
STB etraf›nda havan›n serbestçe dolaflabildi¤inden emin
olun. STB’yi hiçbir zaman do¤rudan günefl ›fl›¤›na maruz
kalacak yerlere ya da radyatör gibi ›s›tma cihazlar›n›n
yak›n›na koymay›n.
STB’nin üzerine asla baflka elektronik cihazlar koymay›n.
STB’yi duvardan en az 30 mm a盤a yerlefltirin.
DSR 9500AT
TU
EKLER: Üretici taraf›ndan önerilmeyen hiçbir ek kullanmay›n.
Kullanman›z durumunda tehlikelere ya da cihazda hasara
neden olabilir.
ÇANAK ANTEN LNB’S‹NE BA⁄LANTI:
LNB konnektör kablosunun orta telinden elektrik geçmektedir.
Bu nedenle bu kabloyu takarken ya da ç›kart›rken STB’nin
flebeke elektri¤i ile ba¤lant›s›n›n kesilmesi önerilir.
BUNU YAPMADI⁄INIZDA LNB’YE ZARAR VEREB‹L‹RS‹N‹Z.
BAKIM: Üründe kendiniz bak›m ya da onar›m yapmaya çal›flmay›n.
Bu tür giriflimler, garantinin geçersiz kalmas›na neden olacakt›r.
Tüm servis ifllemlerini uzman bir servise yapt›r›n.
fi‹MfiEK: STB, s›k s›k flimflek çakan bir yere tak›lm›flsa, STB elektrik
ba¤lant›s› ve modem telefon hatt› için koruma cihazlar›n›n
kullan›lmas› gerekmektedir.
fiimflekli f›rt›nalarda, TV seti, Hi-Fi cihazlar› vs. gibi STB’ye
ba¤l› di¤er cihazlar›n korunmas› için de ilgili üreticilerin
talimatlar› izlenmelidir.
TOPRAKLAMA: LNB kablosunun toprak ba¤lant›s›, do¤rudan uydu çanak
anteninin sistem topraklamas›na ba¤lanmal›d›r.
Topraklama sistemi, yerel yönetmeliklere uygun olmal›d›r
NNoott : Çevre korumas› için kullan›lm›fl pilleri bu ifl için belirlenen yerlere at›n.
TU-1
Page 75

DSR 9500AT
‹Ç‹NDEK‹LER
Güvenlik Talimatlar› ........................................................................... 1
Genel Özellikler .................................................................................. 3
STB’nizin Ba¤lanmas› ........................................................................ 4
Tan›mlama ......................................................................................... 6
Ön Panel ......................................................................................... 6
Arka Panel ...................................................................................... 7
Uzaktan Kumanda .............................................................................. 8
Temel ‹fllevler ..................................................................................... 10
Al›c›n›n Çal›flt›r›lmas› ......................................................................... 15
Main Menu (Ana Menü) ....................................................................... 15
1. Kurulum ..................................................................................... 15
1.1 LNB Ayar› ........................................................................... 16
1.2 Düzeltici Ayar› ..................................................................... 16
1.2.1 Kullan›c› Konumu .............................................................. 17
1.2.2 Kurucu Konumu ................................................................ 17
1.3 Solaruydu Ayar› ................................................................... 18
1.4 Otomatik Tarama ................................................................. 18
1.5 Manuel Tarama ................................................................... 19
1.6 SMATV Tarama ................................................................... 20
1.7 Fabrika Ç›k›fl De¤erlerine Dönülmesi ..................................... 20
2. Kanal Düzenleme ........................................................................ 21
2.1 Uyduyu Sil .......................................................................... 21
2.2 Transponderi Sil .................................................................. 21
2.3 Kanal› Sil ............................................................................ 21
2.4 Tüm Kanallar› Sil ................................................................. 22
2.5 Kar›flm›fl Kanallar› Sil ........................................................... 22
2.6 Favori Kanallar .................................................................... 22
2.7 Kanal Tafl› & Düzenle .......................................................... 23
3. Ebeveyn Kilidi ............................................................................ 24
3.1 Kanal Kilidi ‘ni Ayarla ........................................................... 24
3.2 PIN Kodunu De¤ifltir ............................................................ 25
4. Sistem Yap›s› ............................................................................. 26
4.1 Dil Seçimi ............................................................................ 26
4.2 OSD Ayar› .......................................................................... 26
4.3 Medya Ayarlar› .................................................................... 27
4.4 Zaman & Zamanölçer Ayar› .................................................. 27
4.5 Sistem Bilgisi ....................................................................... 28
4.6 Yaz›l›m Güncelleme ............................................................. 28
4.7 Kanal Verilerini Kopyala ....................................................... 28
5. Ortak Arabirim ............................................................................ 29
´
6. Katytt. CryptoWorks ................................................................... 30
Sorun Giderme ................................................................................... 31
Atma ............................................................................................................ 31
Teknik Özellikler ................................................................................. 32
¸
TU-2
D‹J‹TAL UYDU A
Page 76

GENEL ÖZELL‹KLER
1. KULLANICI BÖLÜMÜ
4000 PROGRAMLANAB‹L‹R KANAL
UYDU VE PC (Güvenli) ÜZER‹NDEN YAZILIM ‹ND‹RME
GEL‹fiM‹fi ELEKTRON‹K PROGRAM KILAVUZU
OSD ‹Ç‹N ÇOK D‹L DESTE⁄‹
ÇOK D‹L DESTEKL‹ ALT YAZI VE TELETEKST (OSD VE VBI)
DiSEqC 1.2 DESTE⁄‹
TAM ‹fiLEVL‹ KIZILÖTES‹ UZAKTAN KUMANDA B‹R‹M‹
7 SEGMENTL‹ LED EKRAN
OTOMAT‹K VE MANUEL ARAMA ÖZELL‹⁄‹
KANAL DÜZENLEME (PROGRAMLANAB‹L‹R)
SCART VE RCA ÇIKIfiLARI
DÜfiÜK GÜÇ TÜKET‹M‹
9 FAVOR‹ L‹STE
OTOMAT‹K GÜNCELLEfiT‹R‹LEN EPG
RGB S‹NYAL‹ ‹Ç‹N GEÇ‹fi DÖNGÜSÜ
DSR 9500AT
TU
2. TUNER BÖLÜMÜ
3. V‹DEO BÖLÜMÜ
4. SES BÖLÜMÜ
950~2150 MHz GEN‹fi BANT TUNER
ANALOG ALICI ‹Ç‹N DC GEÇ‹fi DÖNGÜSÜYLE ÇIKIfi YAPILIRSA
DiSEqC 1.2 SÜRÜMÜ DESTE⁄‹
13V/18V GEÇ‹fi‹
22KHz SÜREKL‹ TON KONTROLÜ
DVB-S UYUMLU
MPEG-2 VIDEO(MP@ML)
2~45 MS/s SEMBOL HIZI
SCPC/MCPC ‹LE UYUMLU
4:3(NORMAL) VE 16:9 (GEN‹fi EKRAN) EN-BOY ORANI
DESTE⁄‹
MODÜLATÖR ÇIKIfiI
MPEG 1 SES KATMANI I VE II
MONO, Ç‹FT, STEREO VE B‹RLEfi‹K STEREO SES MODLARI
32, 44.1 VE 48 kHz ÖRNEKLEME FREKANSLARI
UZAKTAN KUMANDA ‹LE SES YÜKSEKL‹⁄‹ KONTROLÜ VE
SES KAPATMA ‹fiLEV‹
SPDIF D‹J‹TAL SES ÇIKIfiI
TU-3
Page 77

DSR 9500AT
“STB” BA⁄LANTILARININ YAPILMASI
1. ALICININ KONUMU
STB’nizi iyi havaland›r›lan bir yere yerlefltirmelisiniz.
Hava ak›fl›n› engelleyerek afl›r› ›s›nmaya neden olabilece¤inden tamamen kapal›
dolaplar›n içine yerlefltirmeyin.
Ürünün yerlefltirildi¤i yer do¤rudan günefl ›fl›¤›, afl›r› nem, sert hareketler ve evcil
hayvanlardan korunmal›d›r.
Al›c›n›n üstüne baflka elektronik cihaz koymay›n.
Cihaz, anten sisteminizden gelen kablonun kolayca ulaflabilece¤i bir yere
yerlefltirilmelidir.
2. ALICIYI ÇANAK S‹STEM‹NE BA⁄LAMAK
Anten sisteminizi kurduktan sonra, anteninizin LNB’sinden gelen koaksiyel kabloyu,
STB’nin arkas›ndaki “LNB” iflaretli terminale ba¤lay›n.
Tüm kablo ba¤lant›lar› elle s›k›flt›r›lmal›d›r; konnektörleri s›k›flt›r›rken herhangi bir
anahtar kullanmay›n. Kablo, ucuna “F” tipi konnektör s›k›lm›fl 75 ohm empedansl›
koaksiyel bükülü kablo türünde olmal›d›r.
3. ALICININ TV’YE BA⁄LANMASI
Al›c›y› televizyonunuza ba¤lamak için dört yöntemden birini kullanabilirsiniz: SCART
kablosu, RF kablosu, RCA kablosu ya da S-VHS kablosu S-VHS kablosu daha iyi
görüntü kalitesi sunar.
RF kablosunu, STB’nin arka panelinde bulunan “TV” iflaretli terminale tak›n. Kablonun
di¤er ucunu da TV’nin RF girifl soketine tak›n.
TV ba¤lant›s›n› SCART kablosu ile yap›yorsan›z, TV iflaretli SCART konnektörünü,
TV’nin ilgili SCART yuvas›na tak›n.
4. ANALOG ALICININ BA⁄LANMASI
Kullan›c›n›n, analog al›c› kullanabilmesini sa¤lamak için STB’de “LOOP” iflaretli
terminal üzerinden bir döngü bulunmaktad›r.
Bu terminal ile analog al›c›n›z›n IF girifl terminali aras›na koaksiyel kablo tak›n. Art›k
STB’niz bekleme durumunda oldu¤unda, analog al›c›n›zdan analog kanallar›
ayarlayabilecek ve izleyebileceksiniz.
5. VCR’A BA⁄LANMASI
STB’nin VCR ya da DVD oynat›c›ya ba¤lanabilmesini sa¤lamak için, arka tarafta “AV2
“iflaretli bir SCART ba¤lant› noktas› bulunmaktad›r.
Bir SCART konnektör kullanarak VCR ya da DVD oynat›c›n›z› al›c›ya ba¤layabilirsiniz.
Not: Bu bekleme modunda desteklenmektedir.
6. HAR‹C‹ SES / HI-FI S‹STEM‹N‹N BA⁄LANMASI
Herhangi bir harici Ses Hi-Fi sisteminin ba¤lanmas›na olanak sa¤lamak için al›c›n›n
arka taraf›nda, s›ras›yla sol ve sa¤ Ses ç›k›fllar›n› ba¤lanaca¤› AUDIO L ve R olarak
iflaretli iki RCA konnektörü bulunmaktad›r.
TU-4
D‹J‹TAL UYDU A
Page 78

“STB” BA⁄LANTILARININ YAPILMASI
7. D‹J‹TAL SES S‹STEMLER‹N‹N BA⁄LANMASI
Al›c›n›n üzerindeki Optik SPDIF ba¤lant› noktas› ile Dijital Ses Sistemindeki Optik
SPDIF ba¤lant› noktas› aras›na bir fiber optik kablo tak›n.
8. Cryptowork SERV‹SLER‹ ‹Ç‹N AKILLI KARTLARIN TAKILMASI
fiifrelenmifl bir yay›n› izleyebilmek için, uygun bir CAM’a (Conditional Access
Module - Koflullu Eriflim Modülü) ve geçerli bir Ak›ll› Karta gereksinim
duyulmaktad›r. Bu STB’de, Cryptoworks programlar›n›n izlenmesini sa¤layacak
Cryptoworks CAS dahili olarak bulunmaktad›r.
NNoott : Ak›ll› kart›, alt›n renkli çip afla¤›ya bakacak flekilde tak›n.
9. GENEL ARAYÜZLÜ CAM VE AKILLI KARTLARININ TAKILMASI
Bu STB, DVB spesifikasyonlar›na uygun Genel Arayüzlü CAM’lar›n kullan›m›n›
desteklemektedir.
CI CAM’lar›nda, dahili bir ak›ll› kart okuyucu bulunmaktad›r.
● Ak›ll› kart›, alt›n renkli çipi yukar›ya bakacak flekilde yavaflça CAM’a tak›n
●
CAM’› yavaflça kayd›rarak yuvaya sokun ve sokete s›k›ca oturdu¤undan emin olun.
● CAM’› ç›kartmak için, CAM yuvas›n›n yan taraf›ndan bulunan dü¤meye bas›n.
CAM, soketten ç›kacakt›r.
DSR 9500AT
TU
Ba¤lant› fiekli
NNoott : fiu anda afla¤›daki Genel Arayüz CAM’leri mevcuttur:
IRDETO, CONAX, CRYPTOWORKS, VIACCESS, NAGRAVISION, SECA, Vs.
TU-5
Page 79

DSR 9500AT
AÇIKLAMA
Ön Panel
123 645
1. (GÜÇ) Al›c›y› açmaya ve Bekleme moduna geçirmeye yarayan tufl.
2. (YUKARI), (AfiA⁄I) Kanal de¤ifltirmede kullan›lan tufllar.
3. (SOL), (SA⁄) Ses seviyesini manuel olarak artt›rmak ve azaltmak için
kullan›lan tufllar.
4. 7 Segmentli Ekran Bu LED ekranda geçerli kanal›n numaras› gösterilecektir.
Al›c› Bekleme modundayken, ekranda o anki saat
gösterilecektir.
5. CA Modülü Yuvas› Bu yuvada, kendi tercih etti¤iniz servis sa¤lay›c›n›n CA
modülünü kullanabilirsiniz.
6. K›z›lötesi Sensör Bu, Uzaktan Kumandadan gelen k›z›lötesi komutlar›n
al›nmas› için kullan›l›r.
7. Ak›ll› Kart Yuvas› Bu STB’de, Cryptoworks flifrelemesi için dahili bir dekoder
bulunmaktad›r.
NNoott : CA modülleri ve ak›ll› kartlar SAMSUNG taraf›ndan de¤il
yaln›zca servis sa¤lay›c›lar ve özel da¤›t›c›lar taraf›ndan
sat›lmaktad›r.
7
TU-6
D‹J‹TAL UYDU A
Page 80

Arka Panel
DSR 9500AT
AÇIKLAMA
6710 5 9 4
11
1. AC ELEKTR‹K G‹R‹fi‹ Buraya AC elektrik kablosu tak›l›r.
Girifl AC voltaj aral›¤› 100V - 240V, 50Hz/60Hz’dir.
2. LNB Bu ba¤lant› noktas›, çana¤›n›z›n LNB’sinden gelen
koaksiyel kablonun ba¤lanmas› için kullan›l›r.
IF girifli bu ba¤lant› noktas›ndan sa¤lan›r ve girifl
frekans aral›¤› 950-2150 MHz’dir. Ayr›ca 13V ve
18 V voltaj geçifli de bu ba¤lant› noktas›
üzerinden yap›lmaktad›r.
3. LOOP Analog al›c›n›n ba¤lanmas› içindir.
Al›c›da ‘LOOP’ ba¤lant› noktas› bulunmaktad›r.
4. RS 232 VER‹ BA⁄LANTI NOKTASI Verileri okumak ve yüklemek için al›c›n›z› bir
bilgisayara ba¤larken bu ba¤lant› noktas›n›
kullanabilirsiniz.
5. S-VHS Bu, STB’nizi S-VHS kablosu kullanarak TV’ye
ba¤lamak için kullan›l›r.
6. SPDIF Dijital amplifikatöre ba¤lant› için kullan›lan ç›k›fl.
7. AV SCART’LARI TV, VCR ya da DVD oynat›c› için AV
SCART’lar›n›n ba¤lanmas› için kullan›l›r.
8. 0/12V Harici bir LNB anahtar› takmak için kullan›l›r.
8
32
1
TU
9. VIDEO, AUDIO R/L Bu RCA konnektörleri, her türlü harici video ve
ses cihaz›n›n ba¤lan›lmas›nda kullan›l›r.
10. ANT.IN Bölgenizdeki RF kanallar›n› TV’niz Loop
arac›l›¤›yla ba¤lamak için kullan›l›r.
11. TV Bir RF kablosu ile TV’nizin ba¤lanmas›nda kullan›l›r.
TU-7
Page 81

DSR 9500AT
AÇIKLAMA
Uzaktan Kumanda
NNoott : Uzaktan kumandaya pil takarken, pil kutuplar›n›n (+/-) do¤ru oldu¤undan emin olun.
1. POWER (GÜÇ) ( ) Al›c›y› AÇIK/BEKLEME moduna getirmek için kullan›l›r.
2. 0-9 NUMARA tufllar› ( ~ )
Bu tufllar say›sal de¤erler girmek ve do¤rudan numaras›n›
girerek kanal seçmek için kullan›l›r.
3. Pg+/Pg- ( , ) (Sayfa yukar›/afla¤›)
Bu tufllar, menüde sayfalar› yukar› ya da afla¤› kayd›rmak için
kullan›l›r.
4. TV/RADIO
5. MUTE (SESS‹Z)
Bu tufl TV ve Radyo kanallar› aras›nda geçifl yapmak için kullan›l›r.
Bu tufl, normal ve kapal› ses aras›nda geçifl yapmakta kullan›l›r.
TU-8
D‹J‹TAL UYDU A
Page 82

AÇIKLAMA
DSR 9500AT
6. FAV
7. EPG Elektronik Program K›lavuzu dü¤mesi, TV/Radyo Program
8. LAST (SON) Bu tufl, listeden en son izledi¤iniz kanal›n do¤rudan aç›lmas›
9. MET‹N (YEfi‹L) Bu tufl, altyaz› modunun seçilmesinde kullan›l›r.
10. ALT(SARI) Bu tufl, mevcut servis için parça listesini seçmek için kullan›l›r.
11. AUDIO -SES (MAV‹) Bu tufl, sesi sola, sa¤a ya da her iki kanala birden yönlendirmek
12. B‹LG‹
(KIRMIZI) Bu dü¤me, menüdeki KIRMIZI dü¤me ile ayn› iflleve sahiptir. Bir
13. MENÜ
14. EXIT (ÇIK)
15. OK (TAMAM) ( ) Bu tufl, menü sisteminde verilerin al›c›ya girilmesi ve onaylanmas›nda
16. , Bu tufllar, menüdeki seçeneklerin seçilmesi için seçim
( , )
17. CH+/CH-( ) Kanal de¤ifltirmede kullan›lan tufllar.
18. VOL+/VOL-( ) Ses seviyesini artt›rmak ve azaltmak için kullan›lan tufllar.
Bu tuflu, favori listeleriniz aras›nda geçifl yapmak için kullanabilirsiniz.
k›lavuzunu gösterir.
için kullan›l›r.
Bu dü¤me, menüdeki YEfi‹L dü¤me ile ayn› iflleve sahiptir.
Bir kez bast›¤›n›zda altyaz›lar aç›l›r. +/- tufllar›n› kullanarak
istedi¤iniz dili seçebilirsiniz.
Dü¤meye iki kez bas›n. TV’de hiçbir fleyi kullanmadan TV
ekran›nda Teletekst aç›lacakt›r. Bu Teletekst, Teletekst
özelli¤ini desteklemeyen TV’lerde de gösterilebilir.
Dü¤meye üç kez bas›n. Teletekst TV’de kullan›labilir.
Yani TV’nin uzaktan kumandas› ile Teletekst seçilebilir.
Bu dü¤me, menüdeki SARI dü¤me ile ayn› iflleve sahiptir.
Bir kez bast›¤›n›zda ses parça listesi aç›l›r.
‹ki kez bast›¤›n›zda video listesi aç›l›r.
Ses ve video parça listesi servisleri her kanal taraf›ndan
sunulmamaktad›r ve operatörlerin içinde bulundu¤u koflullara ba¤l›d›r.
için kullan›l›r.
Bu dü¤me, menüdeki MAV‹ dü¤me ile ayn› iflleve sahiptir.
Bu tufl, program bilgisi penceresinin ekranda gösterilmesinde kullan›l›r.
kez bast›¤›n›zda program ile ilgili basit bilgileri al›rs›n›z. ‹ki kez
bast›¤›n›zda, bir metin kutusu içinde kanal hakk›nda ayr›nt›l›
bilgilere ulaflabilirsiniz.
Bu tufl, menünün aç›lmas› ve bir önceki menüye dönmek için kullan›l›r.
Bu tufl, menüden ç›kmak ve bir önceki menüye dönmek için kullan›l›r.
kullan›l›r. Bu tufl, ö¤elerin seçilmesinde kullan›l›r. TV izlerken bu tufla
bast›¤›n›zda kanal listesi görüntülenir.
çubu¤unun hareket ettirilmesinde kullan›l›r. Bu dü¤me ise
kanallar› de¤ifltirmek ve ses yüksekli¤ini artt›rmak ve azaltmak
için kullan›l›r.
Bu tufllar, kanal listesinde sayfalar› yukar› ya da afla¤›
kayd›rmak için kullan›l›r.
TU
TU-9
Page 83

DSR 9500AT
TEMEL ‹fiLEVLER
1. Gösterim Ekran›
Televizyon program›n› izleyebilmeniz için önce kurulumu yapman›z gerekmektedir.
Bu nedenle önce yaln›zca menü görüntülerini görebileceksiniz.
Televizyon kanallar› programland›ktan sonra, her kanal de¤ifltirmenizde afla¤›daki
resimleri (bafll›k) göreceksiniz:
Sol Ses Durumu
● Görünüm modunda iki kez KIRMIZI ( ) tufla bas›n.
● NUMARA ( ~ ) ya da ( / ) tufllar›n› kullanarak kanal› seçin ve TV ya da
Ebeveyn Kilidi Kanal Numaras› Kanal Ad› Sa¤ Ses Durumu
CAS Ad›
Program Bilgisi Mevcut Favori Mevcut kanaldaki parçalar›n say›s›Sinyal Durumu
Radyo kanallar›na geçmek için TV/RADIO (TV/RADYO) tufluna bas›n.
Her kanal de¤ifltirdi¤inizde bu resmi de göreceksiniz.
Uzaktan Kumanda üzerinde TV/RADIO (TV/RADYO) tufluna bast›¤›n›zda, TV ve RADYO
programlar› aras›nda geçifl yap›l›r.
Ayr›nt›l› program bilgisi
● Bir program izlerken iki kez KIRMIZI ( ) tufluna bas›n.
Önce yukar›da aç›klanan bafll›¤› görürsünüz.
KIRMIZI ( ) tufluna ikinci kez bast›¤›n›zda, e¤er mevcut programla ilgili daha fazla
bilgi varsa bu ayr›nt›l› bilgiler, ayr› bir bafll›kta görüntülenir. Bu bilgiler bir sayfada daha
uzun oldu¤unda, sayfay› yukar›/afla¤› kayd›rmak için ( / ) tufllar›n› kullanabilirsiniz.
NNoott : Bu servis, servis sa¤lay›c›ya ba¤l›d›r.
2. Ses Kontrolü
Ses yüksekli¤ini kontrol etmek için :
● ( / ) tufllar›na basarak ses yüksekli¤ini ayarlay›n.
● Sessiz moda geçmek için MUTE (SESS‹Z) tufluna bas›n.
● Sessiz modunu iptal etmek için yeniden MUTE (SESS‹Z) tufluna ya da ( / )
tufllar›na bas›n.
TU-10
D‹J‹TAL UYDU A
Page 84

TEMEL ‹fiLEVLER
3. Ses band›
●
Ses parça listesini görmek için SARI ( ) tufla bas›n.
● ‹stedi¤iniz bir parçay› seçmek için ( / ) ile
hareket edin ve (TAMAM) tufluna bas›n.
4. Görüntü band›
●
Video parça listesini görmek için SARI ( ) tufla bas›n.
● ‹stedi¤iniz bir parçay› seçmek için ( / ) ile
hareket edin ve (TAMAM) tufluna bas›n.
DSR 9500AT
TU
5. Servis Listesi
● Bir program izlerken iki kez (Tamam) tufluna bas›n.
● TV/RADIO (TV/RADYO) ya da FAV (FAVOR‹) tufluna
basarak listeyi seçin.
Kanal isminin arkas›ndaki ( ) simgesi, kanal›n
flifreli oldu¤unu ve ( ) simgesi ise kanal›n
ebeveyn kilitli oldu¤unu gösterir.
● ( / , / ) tufluna basarak kanal› seçin.
● Kanal› izlemek için (Tamam) tufluna bas›n.
Renk tufllar› afla¤›daki ifllevlere karfl›l›k gelmektedir.
● YEfi‹L ( ) tufl - Favoriler
● SARI ( ) tufl - Alfabetik
● MAV‹ ( ) tufl- Sa¤lay›c›
● KIRMIZI ( ) tufl - Transponder
TU-11
Page 85

DSR 9500AT
TEMEL ‹fiLEVLER
5.1 Favoriler Servisi
● Favori listesini seçmek için uzaktan kumanda üzerindeki
YEfi‹L ( ) tufla bas›n.
● Favori listesi ve kanal listesi aras›nda geçifl yapmak için
YEfi‹L ( ) tufla bas›n.
● ‹stedi¤iniz favori grubunu seçmek için ( / , / )
tufllar›n› kullan›n.
5.2 Alfabetik Servisi
● Alfabetik listeyi seçmek için uzaktan kumanda üzerindeki
SARI ( ) tufla bas›n.
● Alfabetik liste ve kanal listesi aras›nda geçifl yapmak için
SARI ( ) tufla bas›n.
● ‹stedi¤iniz Alfabetik grubu seçmek için ( / , / )
tufllar›n› kullan›n.
5.3 Sa¤lay›c› Servisi
● Sa¤lay›c› listesini seçmek için uzaktan kumanda
üzerindeki MAV‹ ( ) tufla bas›n.
● Sa¤lay›c› listesi ve kanal listesi aras›nda geçifl yapmak
için MAV‹ ( ) tufla bas›n.
● ‹stedi¤iniz Sa¤lay›c› grubunu seçmek için
( / , / ) tufllar›n› kullan›n.
5.4 Transponder Servisi
● Transponder listesini seçmek için uzaktan kumanda
üzerindeki KIRMIZI( ) tufla bas›n.
● Transponder listesi ve kanal listesi aras›nda geçifl
yapmak için KIRMIZI ( ) tufla bas›n.
● ‹stedi¤iniz Transponder grubunu seçmek için
( / , / ) tufllar›n› kullan›n.
TU-12
D‹J‹TAL UYDU A
Page 86

TEMEL ‹fiLEVLER
6. Program Bilgisi
EPG-Elektronik Program K›lavuzu
Elektronik program k›lavuzu, kanallarla ilgili bilgiler veriri.
NNoott : 1. Bu servis, servis sa¤lay›c›ya ba¤l›d›r.
2. Al›c›, bir kaç saniye içinde ald›¤› sinyalden
GMT saatini alg›lad›ktan sonra, do¤ru EPG
bilgilerini görüntüleyebilecektir.
● Bir program izlerken iki kez EPG tufluna bas›n.
Bu ifllev, yaln›zca saat kullan›larak ekrana getirilmektedir.
Al›c›n›n LED ekran›nda “EPG” yaz›s›n› göreceksiniz.
● YEfi‹L ( ) tufl: Yeflil tufl, bir önceki güne geri dönmek için kullan›l›r.
● SARI ( ) tufl: Sar› tufl, bir sonraki güne geçmek için kullan›l›r.
● MAV‹ ( ) tufl, birden fazla sayfay› kapsayan bilgi oldu¤unda, sayfay› yukar›
kayd›rmak için kullan›labilir.
● KIRMIZI( ) tufl, birden fazla sayfay› kapsayan bilgi oldu¤unda, sayfay› afla¤›
kayd›rmak için kullan›labilir.
DSR 9500AT
TU
EPG ekran›nda afla¤›da belirtilen tufllara basarak zaman dilimini ayarlayabilirsiniz:
1 tuflu: 1 saat 30 dakika 2 tuflu: 30 dakika 3 tuflu: 15 dakika
TV/RADIO (TV/RADYO) ya da FAV (FAVOR‹) tuflu ile, çeflitli program listelerinde
gezinebilirsiniz.
● ( / , / ) tufllar›na basarak istedi¤iniz kanal› seçin ve tufla basarak bu
kanal› izleyin.
7. Altyaz›
Mevcut yay›n altyaz› sunuyorsa, YEfi‹L ( ) tufla
basarak mevcut altyaz› dil listesini görebilirsiniz. Mevcut
programda Altyaz› oldu¤unda, kanal› de¤ifltirdi¤inizde ya
da KIRMIZI ( ) tufluna bast›¤›n›zda ç›kan bafll›kta
[S] harfi görüntülenir.
Altyaz› dilini de¤ifltirmek için:
● Altyaz› dil listesini görmek için YEfi‹L ( ) tufla
bas›n.
● ‹stedi¤iniz altyaz› dilini seçmek için ( / ) tufllar›n› kullan›n.
● (Tamam) tufluna bast›¤›n›zda, istedi¤iniz altyaz› dili görüntülenir.
Kullan›c›lar›n al›c›dan kolayca yararlanmas›n› sa¤lamak için menüler dikkatlice
haz›rlanm›flt›r ve kolay kullan›ml›d›r.
TU-13
Page 87

DSR 9500AT
TEMEL ‹fiLEVLER
8. Teletekst OSD
Mevcut yay›n Teletekst OSD sunuyorsa, YEfi‹L ( )
tufluna iki kez basarak mevcut Teletekst OSD listesini
görebilirsiniz.
Teletekst OSD’yi de¤ifltirmek için:
● ‹stedi¤iniz Teletekst OSD’yi seçmek için ( / )
tufllar›n› kullan›n.
● (Tamam) tufluna bast›¤›n›zda, ekranda istedi¤iniz
Teletekst OSD görüntülenir.
9. Teletekst VBI
Mevcut yay›n Teletekst VBI sunuyorsa, YEfi‹L ( )
tufluna üç kez basarak mevcut Teletekst VBI listesini
görebilirsiniz.
Teletekst VBI’yi de¤ifltirmek için:
● ‹stedi¤iniz Teletekst VBI’yi seçmek için ( / )
tufllar›n› kullan›n.
● (Tamam) tufluna bast›¤›n›zda, ekranda istedi¤iniz
Teletekst VBI görüntülenir.
10. Ses Modu
AUDIO (SES) tuflunu kullanarak sol, sa¤ ya da stereo ses
modlar›ndan birini seçebilirsiniz.
Ses modunu de¤ifltirmek için:
● AUDIO (SES) tufluna basarak sol, sa¤ ya da stereo
modlar›ndan birini seçin.
● Kaydetmek ve bu menüden ç›kmak için EXIT (ÇIK)
tufluna bas›n.
TU-14
D‹J‹TAL UYDU A
Page 88

ALICININ ÇALIfiTIRILMASI
Main Menu (Ana Menü)
Anten sisteminizi ve uygun ba¤lant›larla birlikte STB’nizi kurduktan sonra.
● AC ana elektrik fiflini tak›n ve al›c›y› aç›k duruma getirin.
● Ana menüyü açmak için MENU (MENÜ) tufluna bas›n.
LED ekranda “MENU” yaz›s› gösterilir.
Ekranda afla¤›dakiler aç›l›r:
Alt menü konular› gösterilir.
1, 2, ve 3. Alt menüler için PIN kodunu girmeniz
gerekmektedir.
● Ekran›n alt›nda verilen yard›m mesaj›n›
uygulamal›s›n›z!
DSR 9500AT
“Installation” (Kurulum) menüsü ile ifle bafllamadan
önce, 4. menü olan “System Setup” (Sistem
Kurulumu) menüsündeki tüm bilgilerin uygun olup
olmad›¤›n› kontrol etmeniz gerekmektedir.
1. Kurulum
Bu menüde kiflisellefltirme, yeni servis ekleme ve
al›c›n›n durumunun gösterimi ile ilgili ayarlar
bulunmaktad›r.
● Alt menüye girmek için ana menüde “Installation”
(Kurulum) seçin.
● PIN Code’unuzu (PIN kodu) girin.
Kendi PIN kodunuz girmediyseniz PIN kodunuz
fabrikada 0000 de¤erine ayarlanm›flt›r.
TU
TU-15
Page 89

DSR 9500AT
ALICININ ÇALIfiTIRILMASI
1.1 LNB Ayar›
Kanal aramas›n› gerçeklefltirmek için uydu ve LNB ayarlar›
koflullar›n› seçebilirsiniz ve 22 KHz tonu ayarlar›n›
de¤ifltirebilirsiniz. Bu menüde ayarlanan parametreler “Auto
scanning” (Otomatik Tarama) ve “Manual scanning”
(Manuel Tarama) seçeneklerinde kanallar›n
programlanabilmesi için gereklidir.
Gerekli bilgileri anten ya da LNB broflürlerinde bulabilir ya
da bayiinize sorabilirsiniz.
● LNB güç kayna¤›n› “On” (Aç›k) duruma getirin.
● ‹stedi¤iniz uydu ad›n› seçin.
● LNB türünü (frekans) seçin.
● DiSEqC Modunu seçin
(Off (kapal›), DiSEqC A, DiSEqC B, DiSEqC C, DiSEqC D, Tone Burst A, Tone Burst B)
Konumland›r›c› kullan›yorsan›z, bu seçene¤i seçin. (“Yes” (Evet) ya da “No” (Hay›r))
22KHz: 22 KHz ton geçifl kutusuna ba¤l› çift LNB ya da iki anten kullan›yorsan›z, 22
KHz ton anahtar› ile (“On” (Aç›k), “Off” (kapal›) ya da “Auto” (Otomatik)) her iki
LNB ve anten aras›nda geçifl yapabilirsiniz.
1.2 Düzeltici Ayar›
E¤er DiSEqC1.2 ile tam uyumlu bir DiSEqC 1.2 motorlu
sisteme sahipseniz, mevcut DiSEqC 1.2 ifllevlerinden
yararlanabilirsiniz.
● Uyduyu seçin.
● Yukar›da belirtti¤iniz uydudan istedi¤iniz transponderi
seçin ve Frequency (Frekans), Symbol Rate (Sembol
H›z›), FEC ve Polarity (Polarite) de¤erlerini kontrol edin.
Sorunla karfl›lafl›rsan›z, bayiinize sorun.
● Menü Modundan afla¤›dakileri seçebilirsiniz:
“User” (Kullan›c›) modu : Yeni bafllayanlar için önerilen teme konumland›r›c› ifllevleri
kontrolünü etkinlefltirir. Kullan›c›lar›n bir ço¤u “User”
(Kullan›c›) modunu kullan›rlar.
“Installer” (Kurucu) modu : Bu, uydunun konumunun manuel olarak aranmas›n›
sa¤lamak için kullan›l›r.
TU-16
D‹J‹TAL UYDU A
Page 90

ALICININ ÇALIfiTIRILMASI
1.2.1 Kullan›c› Konumu
● Hareket Modunu Seçin:
Konumland›r›c›n›n hareket türünü seçme flans›na
sahipsiniz: Continuous (Sürekli), Step (Ad›m Ad›m) ya
da Time (Zamanla).
● Anteni kuzey, güney, do¤u ve bat› olarak
konumland›r›n ve motoru çal›flt›rmak için ( / ,
/ ) tuflunu kullan›n. tuflu bat›ya, tuflu
do¤uya, tuflu kuzeye ve tuflu güneye hareket
ettirir.
● Motoru hareket ettirmeyi tamamlad›ysan›z “Store current Position.” (Mevcut
Konumu Kaydet) seçin ve (Tamam) tufluna basarak yeni hareket motorunu
s›f›rlay›n.
DSR 9500AT
NNoott : “Signal Status” (Sinyal Durumu) alan›nda gösterilen düzey yaln›zca referans için
verilmifltir. Gösterilen düzey maksimumda olmasa bile sinyal kalitesi yeterli
olabilir.
● Kaydedilen Konuma gidin.
Kay›tl› konuma ulafl›ld›¤›nda ekranda “Stop” (Dur) yaz›s› gösterilir; art›k di¤er ifllemlere
geçebilirsiniz.
● Uydunun konumunu yeniden hesaplamak için Calculate Sat Positions (Uydu
Konumlar›n› Hesapla) seçin ve (Tamam) tufluna bas›n.
1.2.2 Kurucu Konumu
Konumland›r›c›n›n durumunu kontrol ettikten sonra
kurucu bu menüyü kullanmal›d›r. User (Kullan›c›)
modunu kullanmadan önce “Disable Limits” (S›n›rlar›
Hizmete Sok) seçmelidir.
● Drive Motor West/East (Motoru Bat›/Do¤u Hareket
ettir) seçin ve ( / ) tufllar›n› kullanarak hareket
ettirin.
( ) tuflu bat›ya, ( ) tuflu do¤uya hareket ettirmenizi
sa¤lar.
● “Set Limit”’yi (Belirlenen Limit) etkinlefltirmek için “Enable Limit” (S›n›rlar› Hizmete
Sok) seçin.
● “Set Limit”’i (Belirlenen Limit) devre d›fl› b›rakmak için “Disable Limit” (S›n›rlar›
Hizmete D›ç› B›rak) seçin.
● Konumland›r›c›y› s›f›rlamak için “Reset Positioner” (Düzenleyiciyi lik Durumuna G)
ve (Tamam) tufluna bas›n.
TU
TU-17
Page 91

DSR 9500AT
ALICININ ÇALIfiTIRILMASI
1.3 Solaruydu Ayar›
Bu menü yaln›zca Solarsat anteni için kullan›l›r.
Bu menüye girdi¤inizde “This menu is only for the
Solarsat antenna. If you have one-press OK, otherwisepress EXIT” (Bu menü yaln›zca Solarsat anteni içindir.
Anteniniz böyleyse Tamam’a aksi takdirde ÇIK’a bas›n)
mesaj› al›rs›n›z.
De¤eri, konumunuza göre ayarlayabilirsiniz.
● Date (Tarih) ve Time (Saat) de¤erlerini ayarlamak için
( / ) tufllar›n› kullanarak ayar› de¤ifltirin.
● Konumu de¤ifltirmek için ( / ) tufllar›n› kullan›n.
● Her bir alana geçmek için ( / ) tufllar›n› kullan›n.
1.4 Otomatik Tarama
“Auto Scanning” (Otomatik Tarama) alt menüsü,
kanallar›n önceden programlanm›fl uydulardan otomatik
olarak indirilmesini sa¤lar.
Kanalar› otomatik olarak indirmek için:
Her uyduda All (Tümü)/Off (Kapal›)/Only Free (Yaln›zca
Serbestler) seçenek modlar›ndan birini seçebilirsiniz.
Off (Kapal›) : Tarama yok
All (Tümü) : Tüm kanallar› tara
Only Free (Yaln›zca Serbestler) : Yaln›zca serbest kanallar› tara
● (Tamam) tufluna bas›n.
Auto Scanning (Otomatik Tarama) menüsü görüntülenir.
Seçilen uydulardan al›nan listelerdeki tüm kanallar otomatik olarak indirilecektir.
Tarama sonras›nda “Your digital receiver found...” (Dijital al›c›n›z bulundu...) mesaj›n›
görürsünüz.
Ard›ndan tüm kanallar› STB’ye kaydetmek için (Tamam) tufluna basman›z
gerekmektedir.
TU-18
D‹J‹TAL UYDU A
Page 92

ALICININ ÇALIfiTIRILMASI
1.5 Manuel Tarama
Yeni kanallar› ve zay›f sinyalleri ayarlamak için, STB’de
kanal verilerinin kullan›c› taraf›ndan girilebilece¤i
“Manual Scanning” (Manuel Tarama) seçene¤i
bulunmaktad›r.
Installation (Kurulum) menüsünde “5. Manual Scanning”
(Manuel Tarama) seçtikten sonra afla¤›daki ekran
görüntülenir:
● Manuel arama yap›lacak hedef uyduyu seçin.
● Bir transponder yükleyin.
Bu seçenek, kullan›c›n›n al›c› içinde önceden programlanm›fl listeden herhangi bir
transponderi yüklemesini sa¤layacakt›r.
NNoott : Özellikle New Transponder at Load TR (Yüklemede Yeni Transponder TR)
seçene¤inde, bu transponder ile en az›ndan bir kanal bulundu¤unda yeni
transponder, transponder listesine eklenerek, daha sonra Auto Scanning’de
(Otomatik Tarama) kullanabilmenizi sa¤lar. Kaydetmek için (Tamam) tufluna
bas›n.
DSR 9500AT
TU
● Bulmak istedi¤iniz transponderin frekans›n› girin.
● Bulmak istedi¤iniz transponderin sembol h›z›n› girin.
● Bulmak istedi¤iniz transponderin FEC (Forward Error Correction - ‹leriye Yönelik Hata
Düzeltme) de¤erini girin.
1/2, 2/3, 3/4, 5/6, 7/8 ya da Auto (Otomatik) de¤erlerinden birini seçebilirsiniz.
● Bulmak istedi¤iniz transponderin polarizasyonunu seçin.
(Horizontal (Yatay) /Vertical (Dikey) /Circular Left (Dairesel Sol) /Circular Right
(Dairesel Sa¤)) LNB hatt›na, yatay seçildi¤inde 18V, dikey seçildi¤inde 13V verilir.
● Scan Mode (Tarama Modu) olarak “All” (Tümü) ya da “Only Free” (Yalnz›ca
Serbestler) seçin.
● Network Search’de (fiebeke Aramas›) “Yes” (Evet) seçin. Güdümlü transponder
kullanarak, transponderden daha fazla kanal elde edebilirsiniz. Ayr›ca ekranda
‘Provider Name’i (Sa¤lay›c› ‹smi) görebilirsiniz.
● PID aramas›n› “Yes” (Evet) olarak ayarlay›n. Ayr› ayr› PID (Paket Tan›mlay›c›)
(Video/Ses/PCR) de¤erlerini girerek manuel olarak da arama yapabilirsiniz.
● ‹stedi¤inizi seçtikten sonra tarama ifllemini bafllatmak için (Tamam) tufluna bas›n.
TU-19
Page 93

DSR 9500AT
ALICININ ÇALIfiTIRILMASI
1.6 SMATV Tarama
Anten ve LNB birçok kuflak cihaz taraf›ndan ortak olarak
kullan›l›yorsa, servisleri 950 ile 2150 MHz aras›nda arat›n.
● Searching Type (Arama Türü) de¤erini “Automatic”
(Otomatik) ya da “Manual” (Manuel) seçin.
● Scan Mode (Tarama Modu) olarak “All” (Tümü) ya da
“Only Free” (Yaln›zca Serbestler) seçin.
● 1-4 aras› alternatif sembol h›z› girebilirsiniz.
NNoott : 1. SMATV taramas› s›ras›nda arama türü olarak
Automatic (Otomatik) seçti¤inizde, yaln›zca
istedi¤iniz alternatif sembol h›z›n› (1~4) girmeniz
yeterlidir.
2. SMATV taramas› s›ras›nda her iki arama türü de
Manual (Manuel) seçildi¤inde, hem frekans› hem
de sembol h›z›n› girmeniz gereklidir.
“Automatic” (Otomatik) seçti¤inizde STB, tüm frekanslarda
sembol h›z›na göre mevcut bütün kanallar› arayacakt›r.
Di¤er yandan “Manual” (Manuel) seçti¤inizde, sembol h›z› ve
frekans için belirlenen tam bilgilere göre kanallar aranacakt›r.
1.7 Fabrika Ç›k›fl De¤erlerine Dönülmesi
Kullan›c›n›n, kanal verileri ya da di¤er verileri hatal›
olabilecek flekilde de¤ifltirdikten sonra sorunlarla
karfl›laflmas› durumunda, Fabrikada belirlenmifl de¤erlere
geri dönmek için bu seçenek kullan›l›r.
Ekranda afla¤›dakiler gösterilir:
‹sten penceresi (Tamam) tufluna basarsan›z, al›c›
otomatik olarak fabrikada girilen varsay›lan de¤erlere geri
dönecektir.
NNoott : Bu durum daha önceki ayarlar›n›z›n silinmesine neden olur!
TU-20
D‹J‹TAL UYDU A
Page 94

ALICININ ÇALIfiTIRILMASI
2. Kanal Düzenleme
“Channel Organising” (Kanal Düzenleme) menüsünde
yedi ifllev bulunmaktad›r:
Bu menü, belirlenmifl Uydu ya da Transponderle iliflkili
kanal listesinden baz› kanallar› silmek için kullan›l›r.
Ayr›ca favori listelerinin oluflturulmas› ve kanallar›
istedi¤iniz konumlara hareket ettirebilmenize de olanak
tan›r.
● PIN Code’unuzu (PIN kodu) girin.
Kendi PIN kodunuz girmediyseniz PIN kodunuz fabrikada 0000 de¤erine ayarlanm›flt›r.
DSR 9500AT
2.1 Uyduyu Sil
● KIRMIZI ( ) tufla basarak silmek istedi¤iniz uydu
listesini seçin.
● Onaylamak için (Tamam) tufluna bas›n.
NNoott : Bu özellik, uydunun kendisini de¤il, seçilen uydu
için kay›tl› kanal listesini siler.
2.2 Transponderi Sil
● KIRMIZI ( ) tufla basarak silmek istedi¤iniz
transponder listesini seçin.
● Onaylamak için (Tamam) tufluna bas›n.
NNoott : Bu özellik, transponderin kendisini de¤il, seçilen
transponder için kay›tl› kanal listesini siler.
2.3 Kanal› Sil
● KIRMIZI ( ) tufla basarak silmek istedi¤iniz kanal›
seçin.
● Onaylamak için (Tamam) tufluna bas›n.
TU
TU-21
Page 95

DSR 9500AT
ALICININ ÇALIfiTIRILMASI
2.4 Tüm Kanallar› Sil
Tüm kanallar› silmek için istek penceresinde (Tamam)
tufluna bas›n ve ç›kmak için MENU / EXIT (MENÜ / ÇIK)
tufluna bas›n.
2.5 Kar›flm›fl Kanallar› Sil
fiifreli kanallar› silmek için istek penceresinde (Tamam)
tufluna bas›n ve ç›kmak için MENU / EXIT (MENÜ / ÇIK)
tufluna bas›n.
2.6 Favori Kanallar
Geçerli kanal› hemen istedi¤iniz Favorite Group’a (Favori
Grubu) kaydedebilirsiniz.
Ayr›ca herhangi bir kanal› birden fazla favori grubuna
kaydedebilirsiniz.
● FAV tuflunu kullanarak istedi¤iniz Favorite Group’u
(Favori Grubu) (FAV1~FAV9) seçin.
● TV ya da RADIO (RADYO) listesi penceresinde
( / ) ya da PG-/PG+ tufllar›n› kullanarak istedi¤iniz
kanal listesini seçin.
● KIRMIZI ( ) tufla bast›¤›n›zda seçti¤iniz kanal Favorite Group’a (Favori Grubu)
kaydedilir.
● Ard›ndan onaylamak için (Tamam) tufluna bas›n.
TV ya da Radyo listesini TV/RADIO (TV/RADYO) tuflu, favori listesini de FAV (FAVOR‹)
tuflu ile de¤ifltirebilirsiniz.
●
TV/RADIO (TV/RADIO) tufluna bast›¤›n›zda, TV listesi ve Radyo listesi aras›nda geçifl yap›l›r.
● Baflka bir favori listesi seçmek için FAV (FAVOR‹) tufluna bas›n.
Favorite Group’daki (Favori Grubu) kanallar› silmek için:
● ( / ) ya da PG-/PG+ tufllar›n› kullanarak silinecek kanal listesini seçin.
● Seçilen kanal› favori kanallardan silmek için KIRMIZI ( ) tufla bas›n.
TU-22
D‹J‹TAL UYDU A
Page 96

ALICININ ÇALIfiTIRILMASI
2.7 Kanal Tafl› & Düzenle
● ( / ) tufllar›n› kullanarak TV/RADIO (TV/RADYO)
listesini seçin.
● ( / ) ya da PG-/PG+ tufllar›n› kullanarak
TV/RADIO (TV/RADYO) listesini seçin.
● KIRMIZI ( ) tufla basarak kanal› seçin.
● ( / ) ya da PG-/PG+ tufllar›na basarak
istedi¤iniz kanal›n konumunu de¤ifltirin ve onaylamak
için (Tamam) tufluna bas›n.
● Kanal› ilk konumuna geri döndürmek için (Tamam)
tufluna de¤ifl, MAV‹ ( ) tufla bas›n.
Kanal Ad›n› düzenlemek için
● ( / ) tufllar›n› kullanarak TV/RADIO (TV/RADYO)
listesini seçin.
● ( / ) ya da PG-/PG+ tufllar›yla, baflka konuma
tafl›nacak kanal listesini seçin.
● YEfi‹L ( ) tufla bas›n. Font Table (Yaz› Tipi
Tablosu) gösterilir.
● Num.1~5 tufllar›n› kullanarak istedi¤iniz yaz› tipi
tablosunu seçin.
● ( / , / ) ile istedi¤iniz karakteri seçin ve karakteri
yazd›¤›n›za yap›flt›rmak için (Tamam) tufluna bas›n.
DSR 9500AT
TU
NNoott : PG- tuflu : Bir önceki karakteri siler.
● Girilen verileri kaydetmek için MENU tufluna, ard›ndan
(Tamam) tufluna bas›n.
TU-23
Page 97

DSR 9500AT
ALICININ ÇALIfiTIRILMASI
3. Ebeveyn Kilidi
“Parental Lock” (Ebeveyn Kilidi) özelli¤i, izleme
k›s›tlamalar› koyar ve 4 basamakl› bir say› olan PIN (Kiflisel
Kimlik Numaras›) kodu ile STB’nize izinsiz eriflilmesini
engeller.
(Fabrikada ayarlanm›fl PIN Kodu : 0000)
Bu menüyü seçti¤inizde, iki seçenek aç›l›r: istedi¤iniz
herhangi bir kanal için kilit koyma ve PIN de¤erini
de¤ifltirme.
● PIN Kodunuzu girin.
Kendi PIN kodunuz girmediyseniz PIN kodunuz fabrikada
0000 de¤erine ayarlanm›flt›r.
3.1 Kanal Kilidi ‘ni Ayarla
● ( / , / , / ) tufluna basarak kanal› seçin.
● TV/RADIO (TV/RADIO) tufluna bast›¤›n›zda, TV listesi ve
Radyo listesi aras›nda geçifl yap›l›r.
● KIRMIZI ( ) tufla basarak kanal kilidini seçin.
● Onaylamak için (Tamam) tufluna bas›n.
Bu ifllem kanal› kilitler. Kanal› izlemek istedi¤inizde, aç›lan
istek penceresine PIN kodunuzu girmeniz gerekecektir.
Ebeveyn kilitli bir kanala girmek için PIN kodunu
girdi¤inizde, tüm ebeveyn kilitli kanallar›n kilidi aç›lacakt›r.
Yani herhangi bir ebeveyn kilitli kanalda PIN kodunuzu
baflar›yla girdi¤inizde, tüm ebeveyn kilitli kanallara
istedi¤iniz gibi girebileceksiniz.
Kilidi iptal etmek için:
● Kilidi iptal etmek için yeniden KIRMIZI ( ) tufla bas›n.
TU-24
D‹J‹TAL UYDU A
Page 98

ALICININ ÇALIfiTIRILMASI
3.2. PIN Kodunu De¤ifltir
PIN kodunu de¤ifltirmek için “Change PIN Code”u (PIN Kodunu De¤ifltir) seçin.
Bunu seçti¤inizde afla¤›daki menü aç›l›r:
Bu seçenekte, ilk imleçte geçerli PIN kodunu ve ikinci
imleçte istedi¤iniz PIN kodunu girmeniz gerekecektir.
Onaylamak için yeni PIN kodunu bir kez daha
girmeniz gerekmektedir.
PIN Kodunun 4 basamakl› bir say›sal de¤er olmas›
gerekti¤ini unutmay›n.
FABR‹KADA AYARLANMIfi PIN Kodu: 0 0 0 0.
DSR 9500AT
NNoott : E¤er PIN kodunuzu unutursan›z, bayiniz veya hizmet sa¤layac›n›z ile temasa
geçiniz. fiifrenizi de¤ifltirdi¤inizde lütfen onu unutmay›n›z ve iyi muhafaza ediniz.
TU
TU-25
Page 99

DSR 9500AT
ALICININ ÇALIfiTIRILMASI
4. Sistem Yap›s›
System Setup (Sistem Yap›s›) seçene¤i, fabrikada
belirlenmifl sistem ayarlar›n›, gereksinimlerinize göre
de¤ifltirebilmenizi sa¤lar.
4.1. Dil Seçimi
“Language Selection” (Dil Seçimi) seçene¤i, kullan›c›n›n
OSD, Ses Parças›, Teletekst, Altyaz› ya da EPG’de
kullan›lacak dili seçmesini sa¤lar.
● Dünyan›n çeflitli yerlerinde farkl› dilleri konuflan
kullan›c›lar›n yararlanabilmesini sa¤lamak için 19 OSD dili
bulunmaktad›r.
● ‹stedi¤iniz dilde menüyü seçmek için ( / ) tufllar›na
basarak dili de¤ifltirin ve (Tamam) tufluna bas›n.
● OSD Dili, Ses Parças›, Teletekst, Altyaz› ya da EPG,
seçilen dile göre de¤iflecektir.
4.2 OSD Ayar›
OSD’nin saydaml›¤›n› ayarlayabilir ve saatin gösterilmesini
seçebilirsiniz.
● OSD saydaml›k seviyesini seçin.
OSD Transparency (Saydaml›k) seviyesi %0 ile %100
aras›nda de¤erler alabilir.
Ayarlama numara tufllar›, ( / ) tufllar› ya da PG-/PG+
tufllar› ile yap›labilir.
( / ) tufllar› : %1’lik ad›mlarla ayarlama
PG-/PG+ tufllar› : %10’luk ad›mlarla ayarlama
● Bilgi (bafll›k) kutusunun ekranda gösterilme süresini
ayarlayabilirsiniz.
Bu süre 0,5 ile 60 saniye aras›nda ayarlanabilir.
Ayarlama numara tufllar›, ( / ) tufllar› ya da PG-/PG+
tufllar› ile yap›labilir.
( / ) tufllar› : 0,5 saniyelik ad›mlarla ayarlama
PG-/PG+ tufllar› : 1 saniyelik ad›mlarla ayarlama
TU-26
D‹J‹TAL UYDU A
Page 100

ALICININ ÇALIfiTIRILMASI
4.3 Medya Ayarlar›
Çeflitli ortam ayarlar›ndan istedi¤inizi düzenleyebilirsiniz.
‹mleci bu alt menünün üstüne getirin ve (Tamam)
tufluna bas›n.
● Alt ö¤eleri hareket ettirmek için ( / ) tufllar›n›,
seçene¤i seçmek için ( / ) tufllar›n› kullan›n.
● Onaylamak için (Tamam) tufluna bas›n.
● Menüden ç›kmak için MENU/EXIT (MENÜ/ÇIK)
tufllar›na bas›n.
● TV system’i (TV sistemi) seçin: PAL, SECAM.
● TV’nize göre TV type’› (TV türünü) seçin: STANDARD 4: 3 oran›nda ya da WIDE
SCREEN (GEN‹fi EKRAN)16 :9 oran›nda.
● Aspect ratio conversion’› (En-boy oran› dönüflümü) seçin:
Letter box (Mektup kutusu), Pan & Screen (Kayd›rma ve Perdeleme), Mixed
(Kar›fl›k) ya da Full (Tam).
● Video Signal Type’› (Video Sinyali Türü) seçin : Composite+RGB (Kompozit+RGB)
ya da Composite (Kompozit).
● RF Channel’› (RF Kanal›) seçin.
● Broadcasting System’i (Yay›n Sistemi) seçin: B/G, I ya da D/K.
DSR 9500AT
TU
4.4 Zaman & Zamanölçer Ayar›
● ‹mleci bu alt menünün üstüne getirin ve (Tamam)
tufluna bas›n.
● Time Zone’da (Zaman Dilimi) Yerel saati de¤ifltirmek
için ( / , / ) tufllar›na bas›n. Yerel saat,
bulundu¤unuz yere göre de¤ifltirilecektir.
GMT, Greenwich standart saatini göstermektedir.
Bu, de¤ifltirilemez.
● ( / ) tufllar›na basarak ay›rmak istedi¤iniz etkinlik
tekrar›n› seçin: Daily (Günlük), Every Sunday (Her
Pazar), Every Monday (Her Pazartesi), Every Tuesday (Her Sal›), Every
Wednesday (Her Çarflamba), Every Thursday (Her Perflembe), Every Friday (Her
Cuma), Every Saturday (Her Cumartesi), Once (Bir kez).
● ‹stedi¤iniz saati ayarlamak için Numara ( ~ ) tufllar›na bas›n ve / tufllar›na
basarak ay›rmak istedi¤iniz açma saatini
seçin.
● ( / ) tufllar›na basarak etkinlik program› için belirleyece¤iniz TV program›n› seçin.
TV/RADIO (TV/RADIO) tufluna bast›¤›n›zda, TV program› ve Radyo program›
aras›nda geçifl yap›l›r.
● Daily (Günlük) ve Every Monday (Her Pazartesi) ya da Every Sunday (Her Pazar)
vs. gibi zamanlay›c› ayarlar› yapt›¤›n›zda bile, öncelik, tekrar süresi k›sa olana
verilir. Örne¤in zamanlay›c›y› Once (Bir kez) ve Daily (Günlük) tekrar için
ayarlad›¤›n›zda, o gün “Daily” (Günlük) yerine “Once” (Bir kez) tekrar› iflletilir.
TU-27
 Loading...