


BD-H8909S
Samsung BD-H8909S, BD-H8900M, BD-H8900N, BD-H8900A, BD-H8900 User Manual
...
E-MANUAL
E-MANUAL
BD-H8500/H8900
BD-H8500M/H8900M
BD-H8500N/H8900N
BD-H8500A/H8900A
BD-H8509S/H8909S
imagine the possibilities
Thank you for purchasing this Samsung product.
To receive more complete service,
please register your product at
www.samsung.com/register

Contents
Connections
Connecting to a TV
Connecting to an Audio System
8 Method 1: Connecting to an HDMI supported AV
receiver
8 Method 2: Connecting to an AV receiver with
Optical input
Connecting to a Network Router
9 Wired Network
10 Wireless Network
Settings
The Home Screen
Picture
12 UHD Output
12 3D Settings
13 3D Blu-ray Playback Mode
13 Screen Size
14 TV Aspect Ratio
14 BD Wise (Samsung Products only)
15 Resolution
16 Resolution according to the output mode
17 DTV Smart Resolution
17 Movie Frame (24fps)
17 Fit Screen Size
18 HDMI Colour Format
18 HDMI Deep Colour
18 Progressive Mode
Sound
19 Digital Output
20 Digital Output Selection
24 PCM Downsampling
24 Dynamic Range Control
25 Downmixing Mode
25 DTS Neo:6 Mode
25 Audio Sync
26 Connected Device
Broadcasting
27 Auto Tuning
27 Auto Tuning
27 Standby Auto Tuning
28 Cable Search
28 Wake-up Timer
28 Aerial
28 Channel List
28 Guide
29 Schedule Manager
29 Edit Channel
29 Edit Favourites
29 Channel Settings
29 Country (Area)
30 Manual Tuning
30 Transfer Channel list
30 Delete CAM operator profile
30 Satellite System
31 Channel Lock
31 Subtitle
31 Primary Subtitle Language
31 Secondary Subtitle Language
31 Audio Language
31 Edit Channel Number
31 Primary Audio Language
32 Secondary Audio Language
32 Programme Rating Lock
32 Data Service
32 Digital Text
32 Teletext Language
32 Primary Teletext Language
32 Secondary Teletext Language
33 RF Bypass Gain
33 Aerial Connection Type
33 Common Interface
Network
34 Network Status
34 Network Settings
35 Wired Network
37 Wireless Network

41 Wi-Fi Direct
42 Content Sharing
42 Multimedia Device Settings
42 Share Hard Drive
42 Set Remote Access
42 Register to Samsung Link
43 Device Name
43 BD-Live Settings
43 BD-Live Internet Connection
43 Delete BD Data
Smart Hub
44 Apps Settings
44 Auto Ticker
44 Channel-Bound Apps
45 VOD Rating Lock
45 Terms & Policy
45 Samsung account Terms and Conditions, Privacy
Policy
45 Reset Smart Hub
System
46 Setup
46 Language
46 Device Manager
47 Keyboard Settings
47 Mouse Settings
48 Clock
48 Storage Device Manager
48 Format Device
48 Check Device
48 Device Performance Test
49 Select Device for Recording
49 Auto Power Off
49 Security
49 BD Parental Rating
49 DVD Parental Rating
49 Change PIN
50 General
50 Advanced Music Copy
50 Menu Transparency
50 Anynet+ (HDMI-CEC)
50 DivX® Video On Demand
Support
51 Remote Management
51 e-Manual
51 Software Update
52 Update Now
53 Auto Update
53 Manage Satellite Channels
53 Update by USB
54 Contact Samsung
54 Reset
Media Play
Playing Commercial Discs
Playing Photos, Videos, and Music
(Multimedia)
56 Playing Media Content Saved on a USB Device
57 Playing Media Content Saved in a Computer/
Mobile Device
58 Allowing Connection with a Mobile Device
Playing Media Content Saved in a Cloud
Service
Samsung Link
Controlling Video Playback
60 Buttons on the Remote Control used for Video
Playback
62 Using the Settings Menu (During the Playback)
64 Using the View & Options Menus
64 Using the View Menu
65 Using the Options Menu
Controlling Music Playback
66 Buttons on the Remote Control used for Music
Playback
66 Using the Options Menu (During the Playback)
67 Using the View & Options Menus (On a file
screen)
67 Using the View Menu
67 Using the Options Menu
68 Repeating Tracks on an Audio CD
68 Shuffling Tracks on an Audio CD
69 Creating a Playlist from an Audio CD
70 Ripping

Playing Photo Contents
71 Using the Tools Menu (During Playback)
72 Using the View & Options Menus
72 Using the View Menu
72 Using the Options Menu
85 Timeshift function
85 Start Timeshift with PLAY button
85 Start Timeshift with PAUSE button
85 Timeshift information
86 Playback control button during Timeshift function is
enabled
86 To stop Timeshift
DTV Functions
Watching TV Channels
73 Using the channel option
73 Using the remote control buttons
74 Using the Tools Button
Watching Pay channels
Channel List
Edit Channel
77 Using the remote control buttons
EPG & Schedule Manager
78 Using the Guide Screen option
78 Setting the Schedule Manger manually
Using the Teletext Service
80 Typical Teletext page
Advanced Function
Recording
81 Checking Available Storage Size
81 Notes on HDD capacity
82 Recording the current TV channel you are
watching
82 To pause recording
82 To stop recording
82 Playback control during recording
83 Watching other channels during Recording a TV
channel
83 Simultaneous Recording
83 Simultaneous Recording of Two TV Channels
84 Watching different TV channels that is not under
recording
84 To stop recording
84 Simultaneous Operation
Playing the Recorded Title
87 Using the View, Filter and Options Menus
87 Using the View Menu
87 Using the Filter Menu
88 Using the Options Menu
Editing the Recorded Title
89 Splitting a Section of a Title (Divide into two)
89 Splitting a Section of a Title (Partial Delete)
Send files
90 Copying Videos, Music or Photos
3D Functions
91 Viewing DTV with the 3D effect
Creating a Samsung Account
Before Using Samsung Apps
Using Films and TV Shows
Using Samsung Apps
95 The Samsung Apps Screen at a Glance
97 Starting an Application
97 The Option Menu
Screen Mirroring
Using the Web Browser
100 Link Browsing and Pointer Browsing
101 The Control Panel at a Glance
102 Using the Keyboard Pop-up
103 Options on the Keyboard Pop-Up
104 Using the Setting Menu
Linking Your Internet Service Accounts to
the product

Appendix
Supported Formats
107 Video File Support
109 Supported Subtitle File Formats
110 Music File Support
111 Picture File Support
111 AVCHD (Advanced Video Codec High Definition)
Troubleshooting
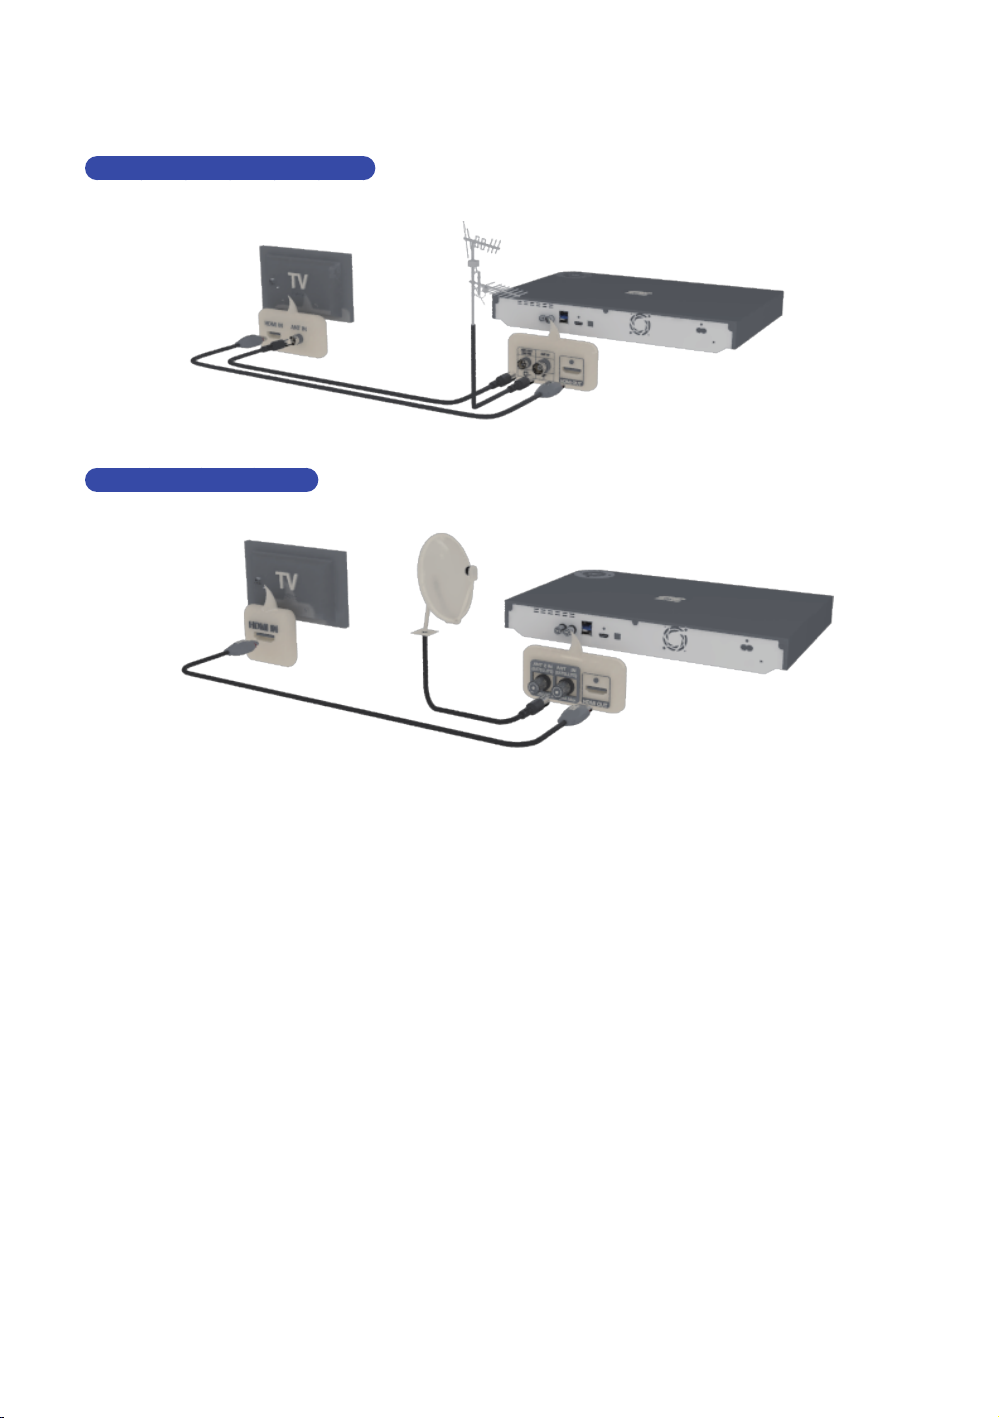
Connecting to a TV
Except for H8509S, H8909S model
For H8509S, H8909S model
" Depending on your model, rear panel may be different. For more details, please refer to
the user manual of product.
" The RF cable connection of this product sends only signals of TV. You must connect
the HDMI cable to watch output from your product.
" If you use an HDMI-to-DVI cable to connect to your display device, you must also
connect the Digital Audio Out on the product to audio system to hear audio.
" Depending on your TV, certain HDMI output resolutions may not work. Please refer to
the user manual of your TV.
" When you connect the product to the TV using the HDMI cable for the first time or to a
new TV, the HDMI output resolution will be automatically set to the highest supported
by the TV.
" A long HDMI cable may cause a screen noise. If this occurs, set HDMI Deep Colour to
Off in the menu.
" If the product is connected to your TV in the HDMI 720p, 1080i, or 1080p output mode,
you must use a High speed (category 2) HDMI cable.

" HDMI outputs only a pure digital signal to the TV. If your TV does not support HDCP
(High-bandwidth Digital Content Protection), random noise appears on the screen.
" Do not connect the power cord until you have made all the other connections. When
you change the connections, turn off all devices before you start.
" If connecting with 2 RF cables from the same satellite dish, you can watch and record
different channels. Twin LNB is recommended. Set "Aerial Connection Type" to "Dual"
in the Broadcasting option.
For H8509S,H8909S model
" If connecting with one RF cable, you cannot view second channel while
recording a channel.
option.
For H8509S,H8909S model
Set "Aerial Connection Type" to "Single" in the Broadcasting
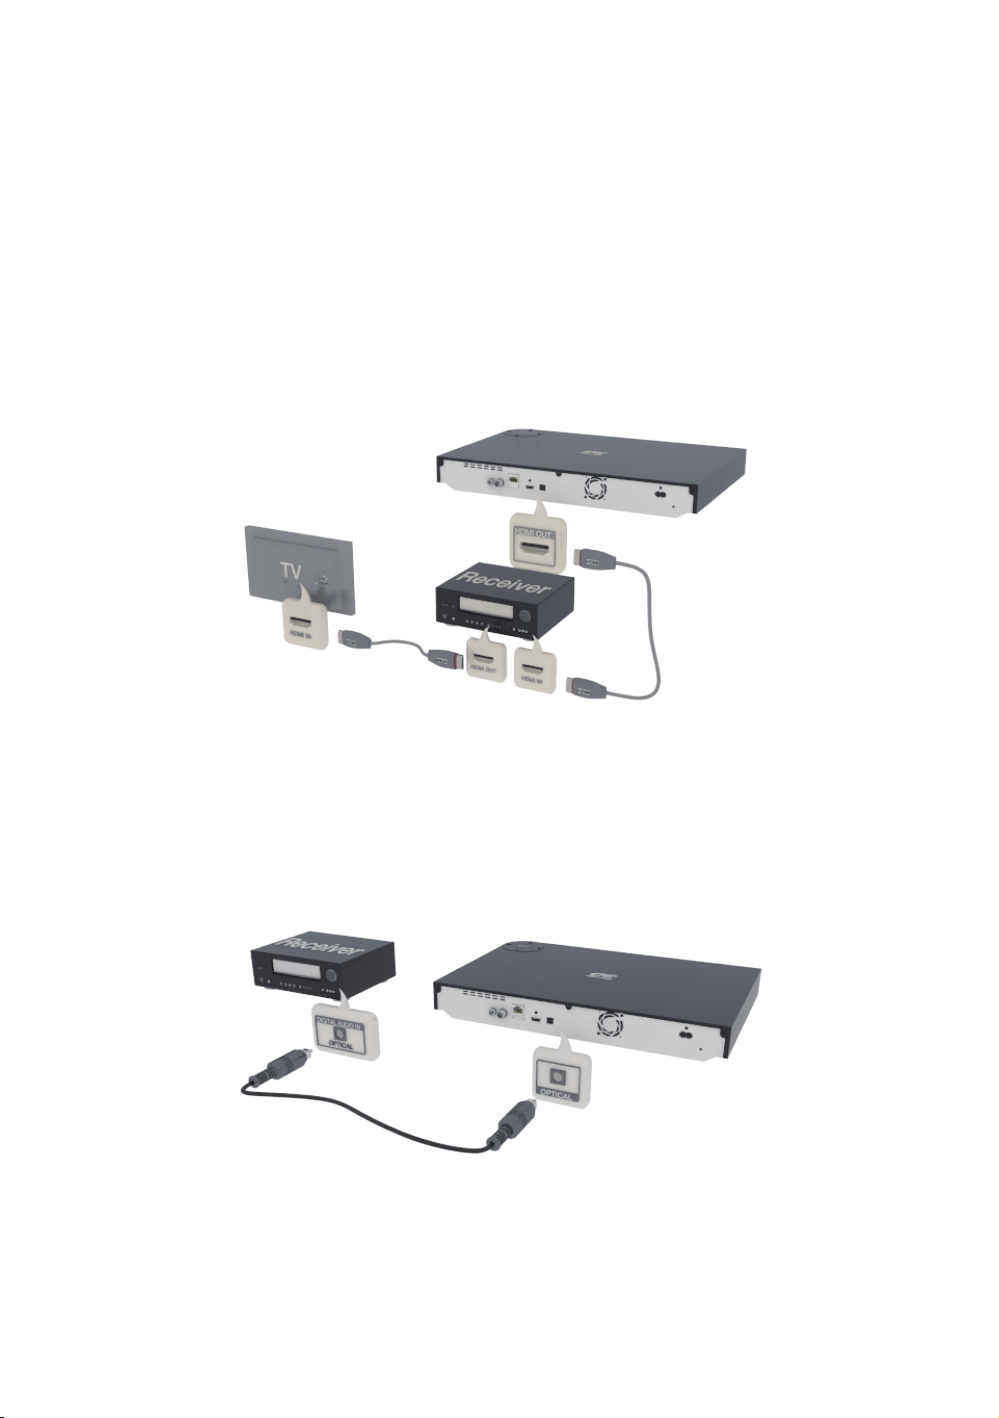
Connecting to an Audio System
Method 1: Connecting to an HDMI
supported AV receiver
Method 2: Connecting to an AV
receiver with Optical input
" After finishing the connections, press the input selector of the connected audio system
and TV until the video signal from the product appears on your TV and you hear the
audio signal through your audio system.
" Do not connect the power cord until you have made all the other connections. When
you change the connections, turn off all devices before you start.
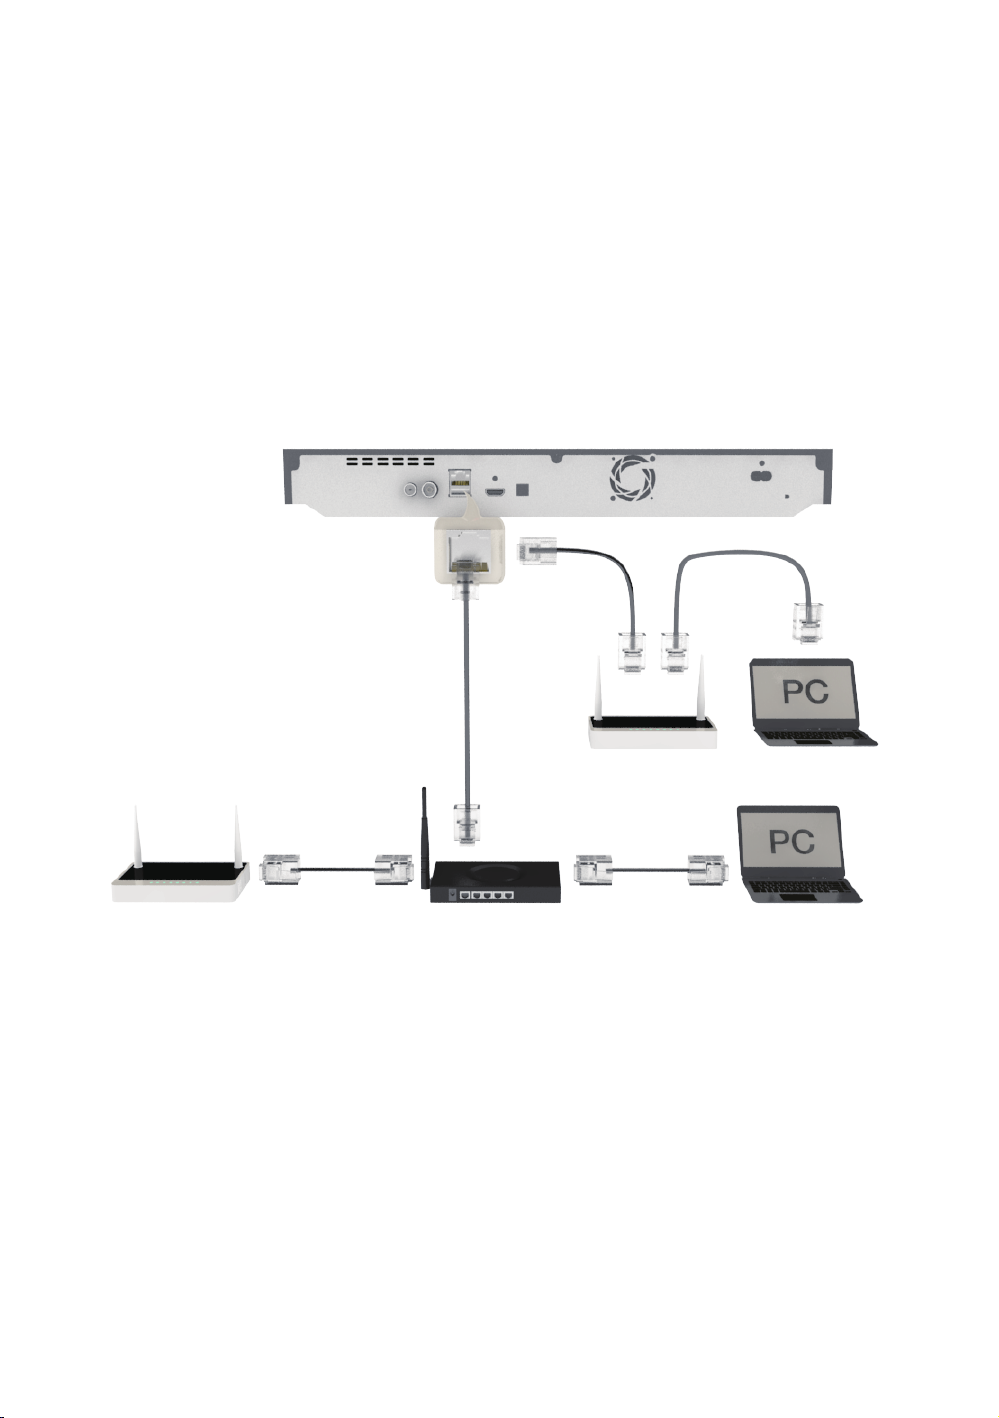
Connecting to a Network
Router
You can connect your product to your network router using one of the methods
illustrated below.
Wired Network
" Internet access to Samsung’s software update server may not be allowed, depending
on the router you use or your ISP’s policy. For more information, contact your ISP
(Internet Service Provider).
" For DSL users, please use a router to make a network connection.
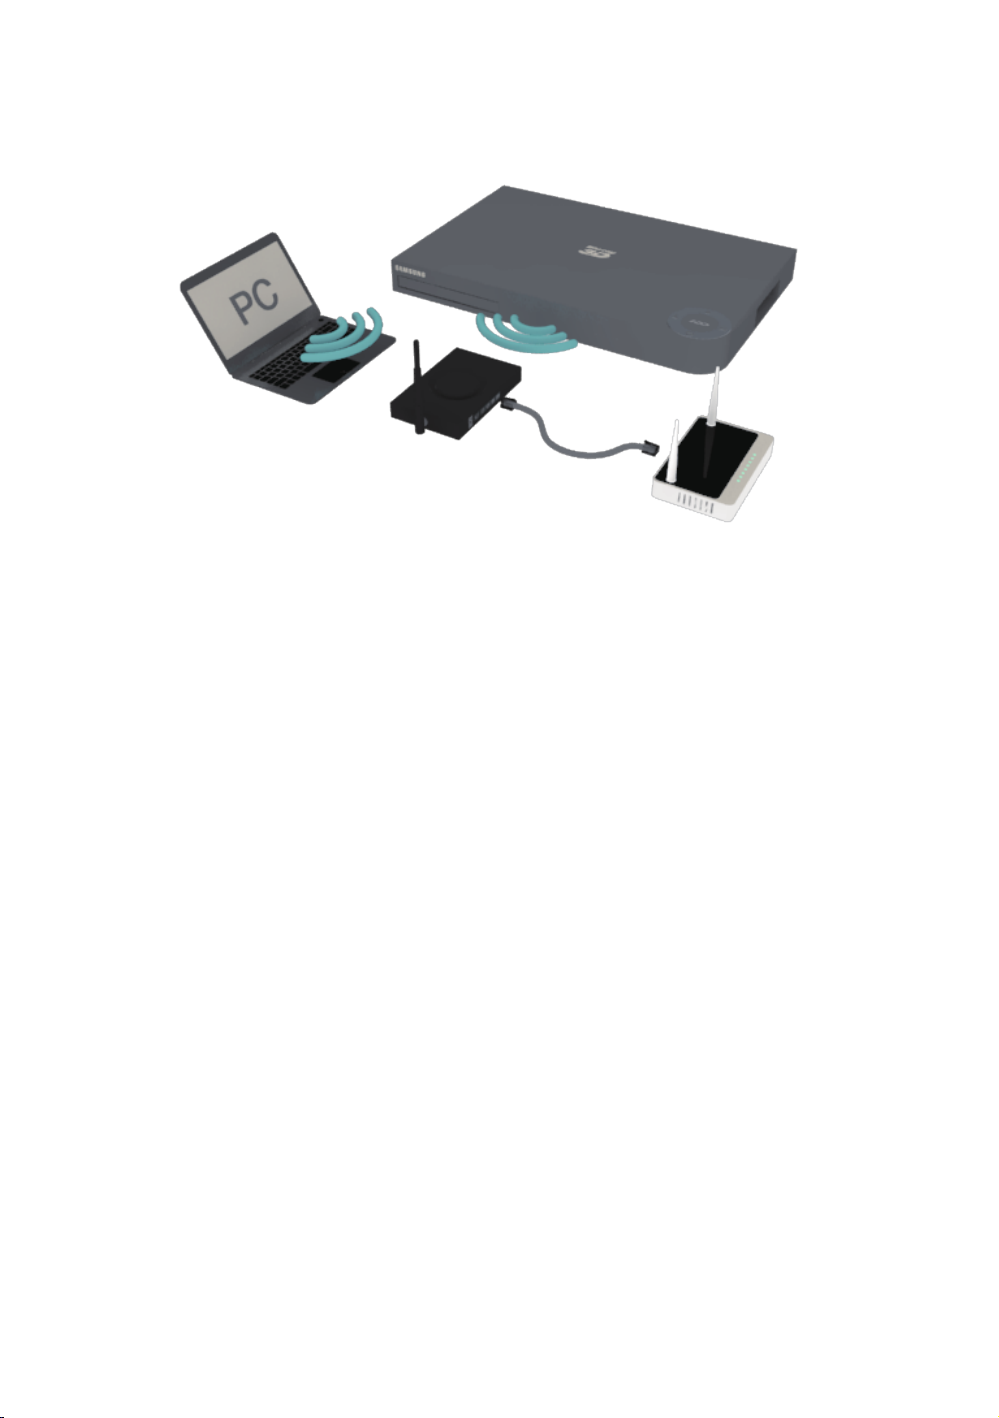
Wireless Network
" If the wireless router supports DHCP, your product can use a DHCP or static IP address
to connect to the wireless network.
" Set your wireless router to Infrastructure mode. Ad-hoc mode is not supported.
" The product supports only the following wireless security key protocols: WEP (OPEN/
SHARED), WPA-PSK (TKIP/AES), WPA2-PSK (TKIP/AES)
" Select a channel on the wireless router that is not currently being used. If the channel
set for the wireless router is currently being used by another device nearby, it will result
in interference and communication failure.
" If you select the Pure High-throughput (Greenfield) 802.11n mode and set the
Encryption type on your router or router to WEP, TKIP or TKIP-AES (WPS2Mixed),
the product will not support a connection in compliance with new Wi-Fi certification
specifications.
" If your router supports WPS (Wi-Fi Protected Setup), you can connect to the network
via PBC (Push Button Configuration) or PIN (Personal Identification Number). WPS will
automatically configure the SSID and WPA key in either mode.
" Wireless LAN, by its nature, may cause interference, depending on the operating
conditions (router performance, distance, obstacles, interference by other radio
devices, etc).
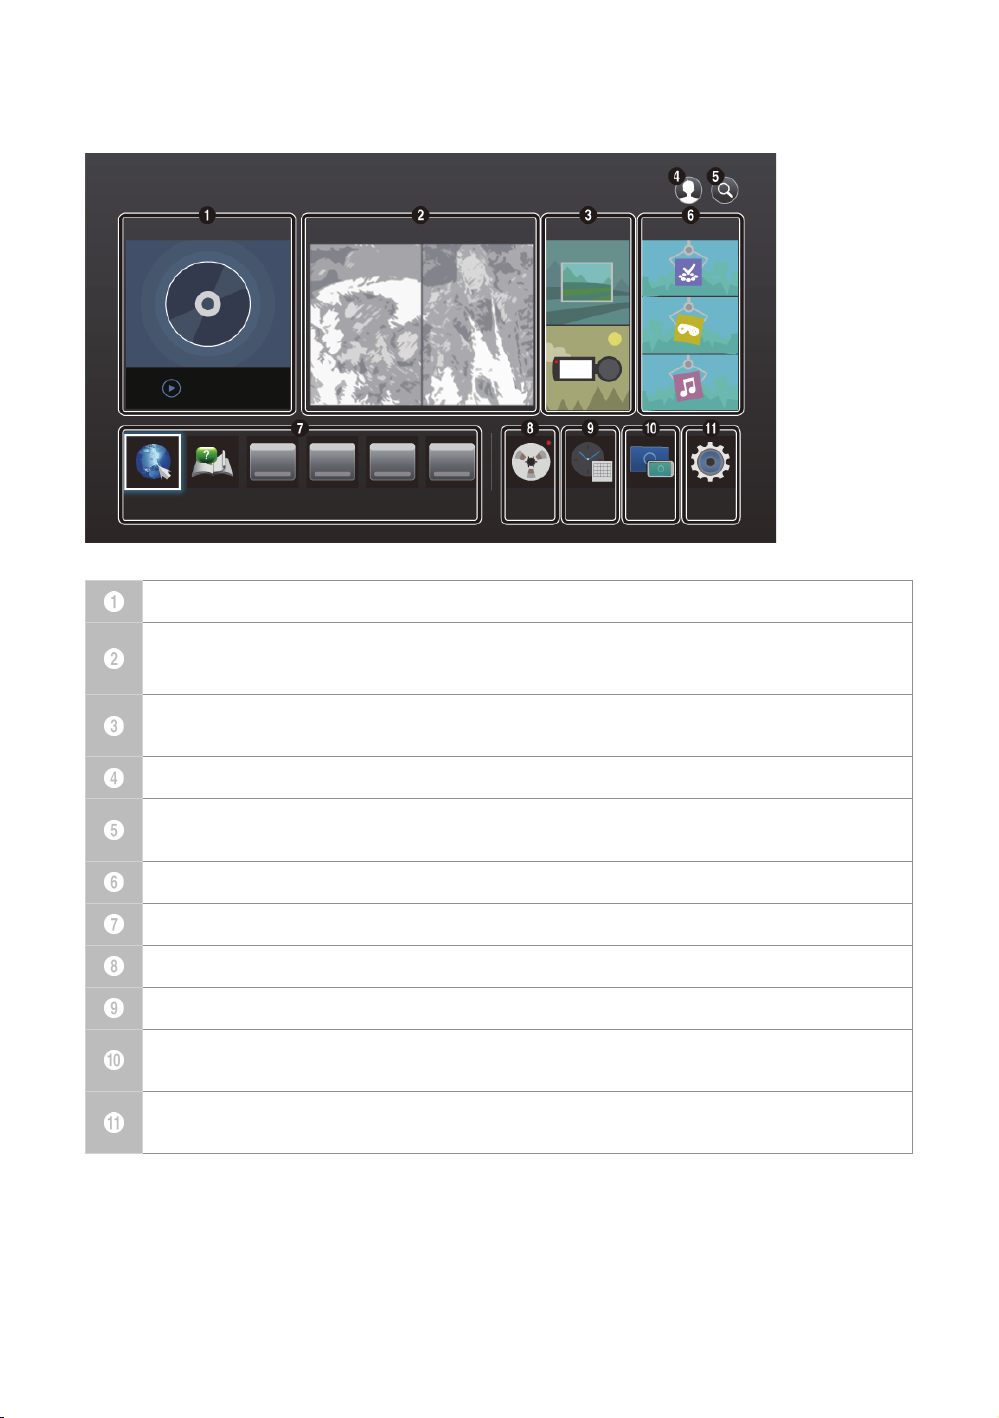
The Home Screen
PLAY DISC FILMS AND TV SHOWS
Audio CD
WebBrowser
e-Manual 3 4 5 6 Recorded TVSchedule
MULTIMEDIA
Manager
SAMSUNG APPS
Screen
Mirroring
Settings
PLAY DISC : Lets you play photos, videos, or music content from Disc.
FILMS AND TV SHOWS : Lets you view Films and TV Shows from the Internet.
" Depending on your country, this menu function may not be supported.
MULTIMEDIA : Lets you play photos, videos, or music content from USB or mobile
devices, or PCs.
Sign In : Lets you log in with your Samsung account.
Search : Lets you search for contents in Films and TV Shows, Apps and YouTube by
entering corresponding search words
SAMSUNG APPS : Gives you access to various for applications you can download.
My Apps : Apps downloaded from My Apps are displayed.
Recorded TV : Access Recorded TV directly.
Schedule Manager : Reserve the desired TV programmes.
Screen Mirroring : Lets you view the screen of your smart phone or android tablet
on a TV you have connected to the product.
Settings : Opens the product's menu. In the menu can set various functions to suit
your personal preferences.
" In the Home menu screen, it will switch to DTV Channel mode after 3 minutes. When
accessing the Settings menu, the screen saver will be activated after 5 minutes. Saves
power by turning off product automatically when no user operation is received for 4
hours. If Auto Power Off menu is set to Off, the power will not turn off automatically.

Picture
Picture
UHD Output Auto
3D Settings
TV Aspect Ratio 16:9 Original
BD Wise Off
Resolution Auto
DTV Smart Resolution Off
Movie Frame (24fps)
Auto
UHD Output
This option outputs HDMI video at UHD (Ultra High definition) resolution. This is
only available when Movie Frame is set to Auto.
To use this feature, you must connect the product to a device that supports UHD
"
resolution and you must have content that plays at 24fs (film speed).
" This device cannot play UHD contents However contents with resolution lower than Full
HD can be up-scaled to UHD.
" For UHD resolution output, only 2160*3840 24 frame rate output is available.
For BD-H89 series
3D Settings
Select whether to play a Blu-ray Disc with 3D contents in 3D Mode.
If you move to the Home or Samsung Apps screen while in 3D mode, the product will
"
switch to 2D mode automatically.

3D Blu-ray Playback Mode
Try Now
Set whether to play 3D Blu-ray disc in 3D or 2D image.
Auto : Automatically detect if a connected TV has 3D capability and play a Blu-
●
ray 3D disc in 3D or 2D accordingly or a 3D only disc in 3D if the TV supports
3D. 3D only discs will not be played if your TV does not support 3D.
3D → 3D : Play 3D only and Blu-ray 3D discs in 3D mode at all times.
●
3D → 2D : Play Blu-ray 3D discs in 2D mode at all times. 3D only discs will not
●
be played.
For some 3D discs, to stop a movie during 3D playback, press the ' button once. The
"
movie stops and the 3D mode option is de-activated. To change a 3D option selection
when you are playing a 3D movie, press the ' button once. The Home Screen menu
appears. Press the ' button again, then select 3D Settings in the Blu-ray menu.
" Depending on the content and the position of the picture on your TV screen, you may
see vertical black bars on the left side, right side, or both sides.
Screen Size
Try Now
Lets you enter the actual screen size of your TV so that the product can adjust
the image according to the screen size and display an optimal 3D image. (For 3D
displays bigger than 116 inches, simply setting it as 116 is a safe choice.)
As the video resolution in 3D play mode is fixed according to the resolution of the
"
original 3D video, you can not change the resolution to your preference.
" Some functions such as BD Wise, screen size adjustment, and resolution adjustment
may not operate properly in 3D play mode.
" You must use a high-speed HDMI cable for proper output of the 3D signal.
" Stay at least three times the width of the screen from the TV when watching 3D
images. For example, if you have a 46 inch screen, stay 138 inches (11.5 feet) from the
screen. Place the 3D video screen at eye level for the best 3D picture.
" When the product is connected to some 3D devices, the 3D effect may not function
properly.
" “Blu-ray 3D” and “Blu-ray 3D” logo are trademarks of the Blu-ray Disc Association.

TV Aspect Ratio
Lets you adjust the output of the product to the screen size of your TV.
16:9 Original : Select when you connect the product to a 16:9 TV screen. The
●
product will display all content in its original aspect ratio. Content formatted
in 4:3 will be displayed with black bars on the left and right.
16:9 Full : Select when you connect the product to a 16:9 TV screen. All content
●
will fill the full screen. Content formatted in 4:3 will be stretched.
4:3 Letter Box : Select when you connect the product to a 4:3 TV screen. The
●
product will display all content in its original aspect ratio. Content formatted
in 16:9 will be displayed with black bars on the top and bottom.
4:3 Pan-Scan : Select when you connect the product to a 4:3 TV screen. 16:9
●
content will have the extreme left and right portions cut off.
Depending on the disc type, some aspect ratios may not be available.
"
" If you select an aspect ratio and option which is different than the aspect ratio of your
TV screen, then the picture might appear to be distorted.
" If you select the 16:9 Original, your TV may display 4:3 Pillarbox (black bars on sides
of picture).
Try Now
BD Wise (Samsung Products
only)
When you connect a Samsung product and a Samsung TV with BD Wise to each
other via HDMI, and BD Wise is on in both the product and TV, the product outputs
video at the video resolution and frame rate of the play contents.
Off : The output resolution stays fixed at the resolution you set previously in
●
the Resolution menu, regardless of the resolution of the disc. See Resolution
below.
On : The product outputs video at the original resolution and frame rate of the
●
play contents.
Try Now

" When BD Wise is on, the Resolution setting automatically defaults to BD Wise and BD
Wise appears in the Resolution menu.
" If the product is connected to a device that does not support BD Wise, you can not use
the BD Wise function.
" For proper operation of BD Wise, set the BD Wise menu of both the product and the TV
to On.
Resolution
Try Now
Set the output resolution of the HDMI video signal.
The number indicates the number of lines of video per frame. The i and p indicate
interlaced and progressive scan, respectively. The more lines, the higher quality.
BD Wise : Automatically sets the resolution to the resolution of the play
●
contents. if you have connected the product via HDMI to a TV with the BD
Wise feature. (The BD Wise menu item appears only if BD Wise is set to On.
See BD Wise above.)
Auto : Automatically sets the output resolution to the connected TV’s maximum
●
resolution.
1080p : Outputs 1080 lines of progressive video.
●
1080i : Outputs 1080 lines of interlaced video.
●
720p : Outputs 720 lines of progressive video.
●
576p/480p : Outputs 576/480 lines of progressive video.
●

Resolution according to the output mode
Blu-ray Disc/E-contents/Digital Contents/DTV/DVD playback
●
For BD-H85 series
Resolution Blu-ray Disc
BD Wise
Auto
1080p 1080p 1080p 1080p
1080i 1080i 1080i 1080i
720p 720p 720p 720p
576p/480p 576p/480p 576p/480p 576p/480p
For BD-H89 series
Resolution Blu-ray Disc
BD Wise
Movie Frame :
Auto
(UHD Output : Auto)
Movie Frame : Off
1080p 1080p 1080p 1080p 1080p
1080i 1080i 1080i 1080i 1080i
720p 720p 720p 720p 720p
576p/480p 576p/480p 576p/480p 576p/480p 576p/480p
Resolution of Blu-ray
Disc
Max. Resolution of TV
input
Resolution of
Blu-ray Disc
Auto
2160p@24F 2160p@24F
Max.
Resolution of
TV input
E-contents/Digital
contents/DTV
1080p 576i/480i
Max. Resolution of TV
input
E-contents/
Digital
contents
1080p 1080p 576i/480i
Max.
Resolution of
TV input
Max. Resolution of TV
DTV DVD
Max.
Resolution of
TV input
DVD
input
Max.
Resolution of
TV input
" If the screen stays blank after you have changed the resolution, remove all discs, and
then press the HOME button on the remote control. Press and hold the ' button on
the top of the product for more than 5 seconds. All settings are restored to the factory
default.
" When the factory default settings are restored, all stored user BD data is deleted.
" The Blu-ray Disc must have the 24 frame feature for the product to use the Movie
Frame (24fps) mode.

DTV Smart Resolution
Use this function to automatically optimise screen resolution for digital broadcasts.
Auto : Screen resolution is automatically optimised for digital broadcast.
●
Off : Turn off DTV Smart Resolution.
●
When you change your TV channel with this function set to Auto, according your TV,
"
the display time of next channels may take longer than the function set to Off.
" DTV smart resolution is activated only when resolution option is set to Auto.
Try Now
Movie Frame (24fps)
Setting the Movie Frame (24fps) feature to Auto lets the play adjust its HDMI
output to 24 frames per second for improved picture quality. You can enjoy the
Movie Frame (24fps) feature only on a TV supporting this frame rate. Movie Frame
is only available when the product is in the 1080p output resolution modes.
Auto : Movie Frame (24fps) functions work.
●
Off : Movie Frame (24fps) functions are off.
●
Fit Screen Size
Set the screen to the optimal size. (Apply Smart Hub, Screen Mirroring only)
If displayed e-Manual page on your TV screen is incomplete and partially hidden, set
"
he Fit Screen Size to Size 1.
Try Now
Try Now

HDMI Colour Format
Set the colour space format for HDMI output, depending on the connected device.
Auto : Automatically set the optimum format supported by the connected
●
display device.
YCbCr (4:4:4) : Recommended when connected to a display that supported
●
YCbCr (4:4:4) because most films are in this format.
RGB (Standard) : Recommended when connected to a display that does not
●
support the YCbCr format. Select this for output of the normal range of RGB
colours.
RGB (Enhanced) : Select this for output of an enhanced range of RGB colours.
●
Not recommended for general use because it will increase the contrast
between black and white.
Try Now
HDMI Deep Colour
Lets you output video from the HDMI OUT jack with Deep colour. Deep colour
provides more accurate colour reproduction with greater colour depth.
Auto : The product outputs video with Deep Colour to a connected TV which
●
supports HDMI Deep Colour.
Off : The picture is output without Deep Colour.
●
Progressive Mode
Lets you improve picture quality when viewing DVDs.
Auto : Select to have the product automatically select the best picture quality
●
for the DVD you’re watching.
Video : Select for the best picture quality from concert or TV show DVDs.
●
Try Now
Try Now

Sound
Sound
Digital Output PCM
PCM Downsampling On
Dynamic Range Control Auto
Downmixing Mode Normal Stereo
DTS Neo:6 Mode Off
Audio Sync 0 ms
Connected Device AV Receiver
Digital Output
You set the Digital Output to match the capabilities of the AV receiver you’ve
connected to the product :
PCM : Choose if you have connected an HDMI supported AV receiver.
●
Bitstream (Unprocessed) : Select if you have connected an HDMI supported AV
●
receiver with Dolby TrueHD and DTS-HD Master Audio decoding capabilities.
Bitstream (Re-encoded DTS) : Choose if you have connected an AV receiver
●
using a Digital Optical input that can decode DTS.
Bitstream (Re-encoded Dolby D) : Select if you don’t have an HDMI supported
●
AV receiver, but have an AV receiver with Dolby Digital decoding capabilities.
Be sure to select the correct Digital Output or you will hear no sound or a loud noise.
"
" If the HDMI device (AV receiver, TV) is not compatible with compressed formats (Dolby
digital, DTS), the audio signal outputs as PCM.
" Regular DVDs do not have BONUSVIEW audio and Navigation Sound Effects.
Try Now

Digital Output Selection
Audio Stream on Blu-ray Disc
Setup Connection Audio source stream Outputs
PCM Up to PCM 7.1ch
Dolby Digital Up to PCM 7.1ch
Dolby Digital Plus Up to PCM 7.1ch
HDMI supported
Avreceiver
PCM PCM PCM 2ch
Optical Dolby TrueHD PCM 2ch
HDMI supported
AV receiver
Bitstream
(Unprocessed)
Optical Dolby TrueHD Dolby Digital
Dolby TrueHD Up to PCM 7.1ch
DTS Up to PCM 6.1ch
DTSHD High Resolution
Audio
DTS-HD Master Audio Up to PCM 7.1ch
Dolby Digital PCM 2ch
Dolby Digital Plus PCM 2ch
DTS PCM 2ch
DTSHD High Resolution
Audio
DTS-HD Master Audio PCM 2ch
PCM PCM
Dolby Digital Dolby Digital
Dolby Digital Plus Dolby Digital Plus
Dolby TrueHD Dolby TrueHD
DTS DTS
DTSHD High Resolution
Audio
DTS-HD Master Audio DTS-HD Master Audio
PCM PCM 2ch
Dolby Digital Dolby Digital
Dolby Digital Plus Dolby Digital
DTS DTS
DTSHD High Resolution
Audio
DTS-HD Master Audio DTS
DTSHD High Resolution
Up to PCM 7.1ch
PCM 2ch
Audio
DTS

Setup Connection Audio source stream Outputs
PCM Re-encoded DTS
Dolby Digital Re-encoded DTS
Dolby Digital Plus Re-encoded DTS
Bitstream (Reencoded DTS)
Bitstream (Re-
encoded Dolby
D)
HDMI supported
AV receiver or
Optical
HDMI supported
AV receiver or
Optical
Dolby TrueHD Re-encoded DTS
DTS Re-encoded DTS
DTSHD High Resolution
Audio
DTS-HD Master Audio Re-encoded DTS
PCM Re-encoded Dolby Digital *
Dolby Digital Re-encoded Dolby Digital *
Dolby Digital Plus Re-encoded Dolby Digital *
Dolby TrueHD Re-encoded Dolby Digital *
DTS Re-encoded Dolby Digital *
DTSHD High Resolution
Audio
DTS-HD Master Audio Re-encoded Dolby Digital *
Re-encoded Dolby Digital *
Audio Stream on DVD
Re-encoded DTS
Setup Connection Audio source stream Outputs
PCM PCM 2ch
HDMI supported
AVreceiver
PCM DTS Up to PCM 6.1ch
Optical Dolby Digital PCM 2ch
HDMI
supportedAV
receiver
Bitstream
(Unprocessed)
Optical Dolby Digital Dolby Digital
Bitstream (Reencoded DTS)
HDMI supported
AV receiver or
Optical
Dolby Digital Up to PCM 5.1ch
PCM PCM 2ch
DTS PCM 2ch
PCM PCM 2ch
Dolby Digital Dolby Digital
DTS DTS
PCM PCM 2ch
DTS DTS
PCM PCM 2ch
Dolby Digital Dolby Digital
DTS DTS

Setup Connection Audio source stream Outputs
PCM PCM 2ch
Bitstream (Re-
encoded Dolby
D)
HDMI supported
AV receiver or
Optical
Dolby Digital Dolby Digital
DTS DTS
Audio Stream of Broadcast
Setup Connection Audio source stream Outputs
Dolby Digital Up to PCM 5.1ch
Dolby Digital Plus Up to PCM 5.1ch
HDMI supported
AVreceiver
PCM HE-AAC Up to PCM 5.1ch
Optical
HDMI supported
AV receiver
Bitstream
(Unprocessed)
Optical
Bitstream (Reencoded DTS)
Bitstream (Re-
encoded Dolby
D)
HDMI supported
AV receiver or
Optical
HDMI supported
AV receiver or
Optical
MPEG1
Layer 2
Dolby Digital PCM 2ch
Dolby Digital Plus PCM 2ch
MPEG1
Layer 2
HE-AAC PCM 2ch
Dolby Digital Dolby Digital
Dolby Digital Plus Dolby Digital Plus**
MPEG1
Layer 2
HE-AAC
Dolby Digital Dolby Digital
Dolby Digital Plus Dolby Digital
MPEG1
Layer 2
HE-AAC
Dolby Digital Re-encoded DTS
Dolby Digital Plus Re-encoded DTS
MPEG1
Layer 2
HE-AAC Re-encoded DTS ***
Dolby Digital Re-encoded Dolby Digital
Dolby Digital Plus Re-encoded Dolby Digital
MPEG1
Layer 2
HE-AAC
Up to PCM 5.1ch
Re-encoded Dolby Digital
Re-encoded Dolby Digital
Re-encoded Dolby Digital
PCM 2ch
PCM 2ch
***
PCM 2ch
***
PCM 2ch
PCM 2ch
***

Definition for Blu-ray Disc
Setup Connection
PCM
Bitstream
(Unprocessed)
Bitstream (Reencoded DTS)
Bitstream (Re-
encoded Dolby
D)
HDMI supported
HDMI supported
HDMI supported
AV receiver or
HDMI supported
AV receiver or
AVreceiver
Optical
AV receiver
Optical
Optical
Optical
Audio source
stream
Any
Any
Any
Any
Outputs
Decodes the main feature audio and
BONUSVIEW audio stream together
into PCM audio and adds Navigation
Sound Effects.
Outputs only the main feature audio
stream so that your AV receiver can
decode the audio bitstream. You
will not hear BONUSVIEW audio or
Navigation Sound Effects.
Decodes the main feature audio and
BONUSVIEW audio stream together
into PCM audio and adds Navigation
Sound Effects, then reencodes the
PCM audio into DTS bitstream.
Decodes the main feature audio and
BONUSVIEW audio stream together
into PCM audio and adds Navigation
Sound Effects, then reencodes
the PCM audio into Dolby Digital
bitstream.
* If the Source Stream is 2ch or mono, "Re-encoded Dolby D" setting is not
applied. Output will be PCM 2ch.
** If the Audio Description is set to On, audio output will be changed Dolby
Digital even if the original broadcast stream is Dolby Digital Plus.
*** If the Audio Description is set to On and sampling rate of less 48kHz, audio
output will be changed PCM even if the Bitstream is selected.

PCM Downsampling
Set whether to use downsampling processing or not.
Off : Select when the AV receiver connected to the product is 96kHz compatible.
●
On : Select when the AV receiver connected to the product is not 96kHz
●
compatible. 96kHz signals will be down converted to 48kHz.
Even when PCM Downsampling is set to Off, some discs will only output
"
downsampled audio through the optical digital outputs.
" If your TV is not compatible with compressed multi-channel formats (Dolby Digital,
DTS), the product may output PCM 2ch downmixed audio even though you set the
digital output as Bitstream (unprocessed/Re-encoded DTS/Re-encoded Dolby D) on
your setup menu.
" If your TV is not compatible with PCM sampling rates over 48kHz, the product may
output 48kHz downsampled PCM audio even though you set PCM Downsampling to
Off.
Try Now
Dynamic Range Control
Set Dynamic Range control option for Dolby Digital, Dolby Digital Plus and Dolby
TrueHD.
Auto : The Dynamic Range will be controlled automatically based on the
●
information provided by the Dolby TrueHD Soundtrack. This setting is same
with "On" for Dolby Digital and Dolby Digital Plus.
Off : You can enjoy original sound without compressing Dynamic Range of the
●
sound.
On : The Dynamic Range is compressed appropriately by boosting low level
●
sound and reducing extremely loud sound.
Try Now

Downmixing Mode
Select Downmix method for stereo output.
Normal Stereo : Downmixes the multi-channel audio into two channel stereo.
●
Choose when connected to equipment that does not support virtual surround
functions such as Dolby Pro Logic.
Surround Compatible : Downmixes multi-channel audio into surround
●
compatible stereo. Choose when connected to equipment that supports virtual
surround functions such as Dolby Pro Logic.
Try Now
DTS Neo:6 Mode
You can enjoy multichannel sound via HDMI output even for 2 channels audio
source.
Off : Outputs a 2-channel audio signal through the front speakers only.
●
Cinema : Select to play 2-channel movie sound over multi-channels.
●
Music : Select to play 2-channel music over multi-channels.
●
If you are using an HDMI supported AV receiver, this option is available when you set
"
Digital Output setup as PCM.
Audio Sync
In some cases when the product is connected to a digital TV, the audio signal may
not synchronize with the video signal. If this occurs, adjust the audio delay time to
match the video signal.
You can set the audio delay time between 0 msec and 250 msec. Adjust it to
●
the optimal setting.
Try Now
Try Now
The audio delay time you specify may not be exact depending on the played content.
"

Connected Device
Try Now
Choose an equipment that you have connected to this product to hear the sound
in addition to your TV. Loudness of DTV Programme will be adjusted according to
your equipment.
AV Receiver : Select this If you use a general AV Receiver / Home Theatre
●
Equipment or a Television to hear sound.
AV Receiver (Offset Mode) : Select this if your case is one of two shown below.
●
If you use THX Certified AV Receiver / Home Theatre Equipment.
–
In case Digital Output is set to Bitstream, and If you feel the Dolby Audio
–
much louder than MPEG1 Layer2 Audio while watching DTV Programme,
select this even if your AV Receiver is not THX Certified one.
Stereo Device : Select this if you use a Stereo Amplifier or Recording Device
●
that support Optical Digital Audio Input as PCM format.
For users whose TV is the only sound-producing device: 1) If the TV does not support
"
Dolby Digital bitstream input via HDMI, no specific setting is required. 2) If the TV
supports Dolby Digital bitstream input via HDMI, set Connected Device to Stereo.
" If the DTV Programme you are watching is produced according to EBU R128, The
Average Loudness between MPEG1 Layer2 Audio, Dolby Digital Audio, Dolby Digital
Plus Audio, HE-AAC Audio can be reduced. If the DTV Programme do not meet the
EBU R128, there may be still some amount of difference of average Loudness between
a TV Programmes.
" Substantial number of AV Receiver / Home Theatre Device decode Dolby Digital /
Dolby Digital Plus with +4dB OFFSET when compared to same encoding level of PCM
input. This kind of product include both THX Certified one and also none THX Certified
one. If user select "AV Receiver (Offset Mode)", the average loudness between Dolby
Digtial / Dolby Digital Plus audio decoded by such a product and MPEG1 Layer2 Audio
decoded by this product will be similar.

Broadcasting
You can configure your TV channels with features such as country and auto tune.
Broadcasting
Auto Tuning
Aerial Terrestrial
Channel List
Guide
Schedule Manager
Edit Channel
Edit Favourites
Auto Tuning
Scans all channels and stores them in the product’s memory.
Try Now
Auto Tuning
Configure auto-tuning settings to scan and store channels.
Standby Auto Tuning
Auto-tune channels while your device is in standby mode.
This menu can be available when country set to Hungary, Finland and Italy and TV
"
mode is Astra HD + or Sky.

Cable Search Option
Configure search settings, such as frequency and symbol rate, for cable network.
Except for H8509S, H8909S, H8500A, H8900A model
Wake-up Timer
Schedule timer to turn the TV on and scan channels automatically.
This menu can be available when country set to Hungary, Finland and Italy and TV
"
mode is Astra HD + or Sky.
Aerial
Selects an appropriate type of aerial for digital broadcasts.
Before your product can begin memorizing the available channels, you must specify
the type of signal source that is connected to the this product.
Channel List
Select this to check the stored channels.
You can see TV channels in several ways.
Guide
Provide programme information for each channels.
Depending on your country, this menu function may not be supported.
"
Except for H8500A, H8900A, H8509S, H8909S model
Try Now
Try Now

Schedule Manager
It can manager lists for schedule viewing or recording.
Depending on your country, this menu function may not be supported.
"
Try Now
Edit Channel
It is provided to edit functions for channel.
Edit Favourites
It is provided to make and edit favourite lists for channel.
Try Now
Try Now
Channel Settings
Country (Area)
Select your country so that the TV can correctly auto-tune the broadcasting
channels.
Password : Enter the desired 4-digit password using the number buttons. 1) Belgium,
"
France, Italy, Norway : You can not set the password to "0000". Please choose other
numbers. 2) Others : Default password is set to 0000.
" Channel Ordering menu can be displayed when the country set to Italy.
Try Now

Manual Tuning
Scans for a channel manually and stores in the product.
When scanning has finished, channels are updated in the channel list.
Try Now
Transfer Channel list
This function can import or export the channel map.
You should connect a USB storage to use this function.
Import from USB : Import channel list from USB.
●
Export to USB : Export channel list to USB.
●
If you set the country to Netherlands and Antenna source set to cable, this menu will
"
not appear.
Delete CAM operator profile
Select this menu to delete the CAM operator profile.
Satellite System
Configure settings for your satellite equipment.
Satellite Selection : Choose one or more satelites for your product.
●
For H8509S, H8909S model
Try Now
Except for H8500A, H8900A model
LNB Power : Enable or disable LNB Power supply from receiver.
●
LNB Settings : Configure parameters for your satelite equipment.
●
SatCR/Unicable Settings : Configure single cable installation.
●
Depending on your country, this menu function may not be supported.
"
Positioner Settings : Configure the settings for your aerial positioner.
●
Reset All Settings : Restrore all settings to defaults.
●
 Loading...