

Page 1
ESA SERIES
ELECTRONIC BALANCE
ESA_AWT35-500064_AE.book
Page 2

Declarations of compliance
United States
This equipment has been tested and found to comply with the limits for a Class
A digital device, pursuant to Part 15 of the FCC Rules. These limits are
designed to provide reasonable protection against harmful interference when
the equipment is operated in a commercial environment. This equipment
generates, uses, and can radiate radio frequency energy and, if not installed
and used in a c c o rd a nc e wi t h t h e instruction manual, may cause harmful
interference to radio communications. Operation of this equipment in a
residential area is likely to cause harmful interference in which case the user
will be required to correct the interference at his own expense.
Canada
This digital apparatus does not exceed the Class A limits for radio noise
emissions from digital apparatus set out in the Radio Interference Regulations
of the Canadian Department of Communications.
’
Le présent appareil numérique n
dépassant les limites applicables aux appareils numériques de la Classe A
prescrites dans le Règlement sur le brouillage radioélectrique edicté par le
ministère des Communications du Canada.
EMC compliance
The following warning may be applicable to your machine.
WARNING: This is a class A product. In a domestic env iron ment this pro duct
may cau se rad io in ter fer enc e i n which case the user may be required to ta ke
adequate measures.
émet pas de bruits radioélectriques
Page 3

Declaration of Conformity
©Avery Weigh-Tronix group of companies 2009. All rights reserved.
No part of this publication may be reproduced, stored in an electronic
retrieval system, or transmitted in any form or by any means, electronic,
mechanical, photocopying, recording or otherwise without the prior
written consent of the copyright owner, or as permitted by law or under
licence. Full acknowledgment of the source must be given.
Salter Brecknell is a registered trade mark of the Avery Weigh-Tronix
group of companies. This publication was correct at the time of going to
print however, Avery Weigh-Tronix reserves the right to alter without
notice the specification, design, price or conditions of supply of any
product or service at any time.
Manufacturer Salter Brecknell
Type ESA
Corresponds to the requirements of the following EC directives:-
Electro Magnetic Compatibility
Low Voltage Directive:
The application harmonised standards
are:
EMC 89/336/EEC
LVD 2006/95/EC
EN60950-1: 2002, EN61000-6-3: 2001
EN61000-6-1:2007
A copy of the original signed Declaration of Conformity is availabl e on
request.
Page 4

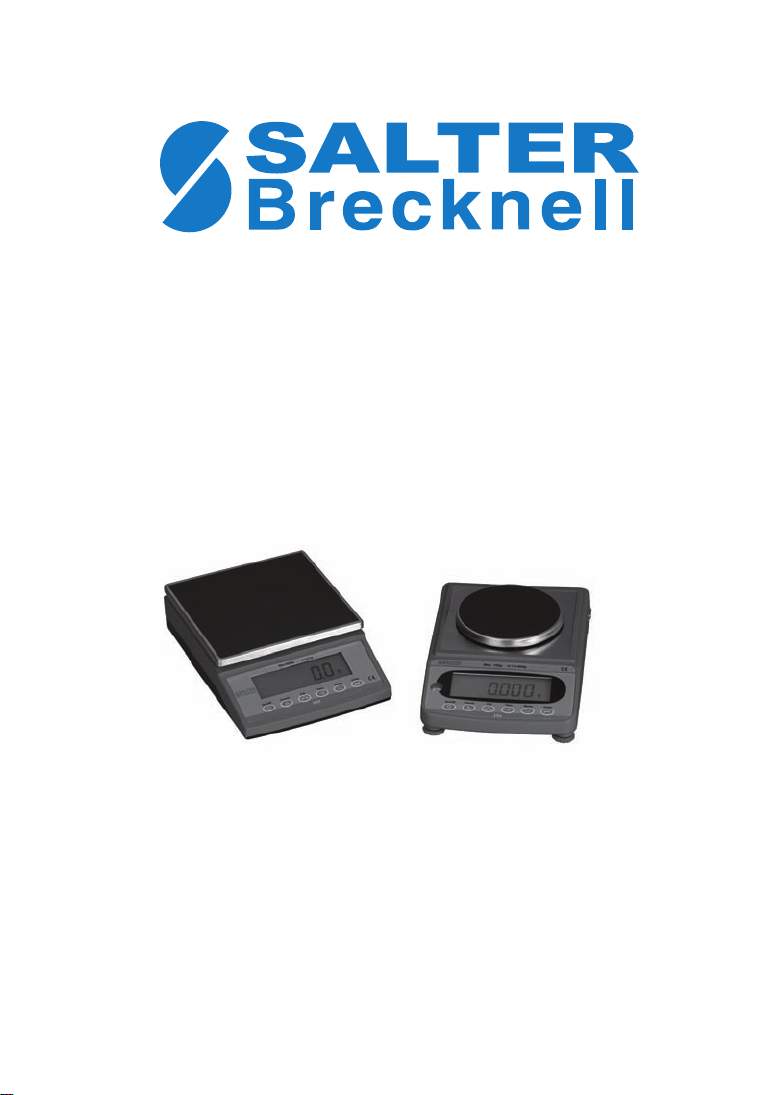
ESA Series Precision Balance
Thank you for purchasing the Model ESA precision balance. Please read all
operating instructions carefully before using and note the following items to
ensure accurate readings.
1.0 Description
• The ESA balances use a high precision load cell and microcomputer for
simple operation with accurate, stable weight readings displayed on the
large liquid crystal display.
• This balance is an excellent choice for laboratory use and educational
applications, however, it is not recommended for use in production lines,
food preparation areas or any other environment where high heat, cold,
humidity or vibration are present.
• Do not overload the balance. This will damage the load cell and void the
warranty.
• Inspect the platter, draft shield, housing and AC adapter regularly for
damage.
• Refer to the troubleshooting chart at the end of this manual for more
details.
• Do not attempt to repair the balance if you have a problem. Contact your
local Salter Brecknell representative.
2.0 Unpacking
Please check the contents of this box carefully. Your ESA balance should
come with one of each of the following:
• Electronic Balance
• Stainless Steel Weighing Platform
• 6V AC Power Adapter
• User Manual
3.0 Installation
• Place the balance on a stable, level surface.
• Level the balance using the adjustable feet and level bubble.
• Remove the protective film from the stainless steel platform.
4
Page 5
• Gently place the weighing platform on the mounting posts on the top of
g/oz
On/Off Count Cal
Tare Mode Units
the base of the balance. The base’s posts should fit easily into the holes
on the bottom of the platform and the platform should be flat and level.
Note: Do not force the platform as this can damage the balance.
nect the AC adapter to the receptacle at the rear of the balance.
• Con
• Connect the AC adapter to an appropriate power outlet.
Note: Y
ou can also operate this unit using batteries instead of the supplied
AC adapter. Batteries are not included with the unit.
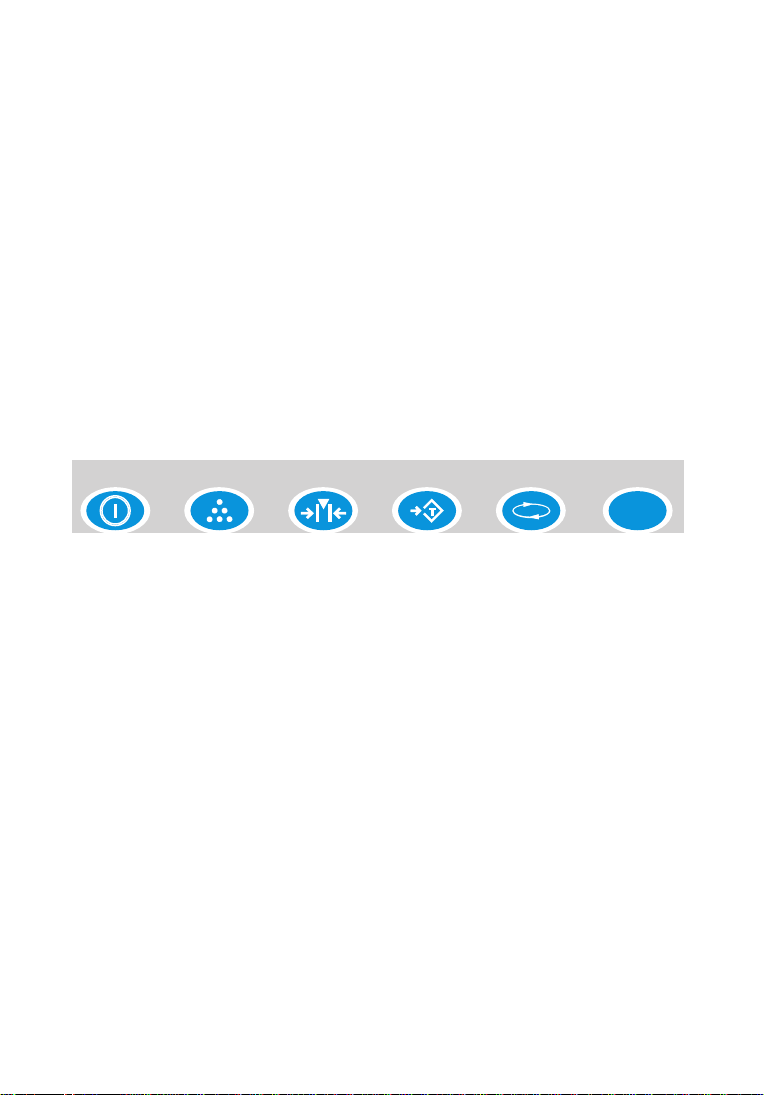
4.0 Key Functions
The following figure shows the front panel with six keys. Each key function is
explained here.
On/Off Turns the balance on or off or returns balance to normal weighin g
mode.
Count Places the balance in piece count mode.
Cal (stands for Calibrate) Enters calibration mode.
Tare Used to tare off, up to 100% of balance capacity, an empty
container and to reset the balance to zero. Use of tare with a
weight or container reduces the scale’s capacity by the tare value
stored. Also works like Enter in some modes.
Mode Toggles the backlight on or off. To extend battery life, turn
backlight off. Also toggles between options in calibration mode.
Units Allows you to scroll through and select from the available units (g,
oz, ozt, dwt, lb) as well as count (ct) and percentage (%).
5
Page 6

5.0 Scale Operation
This section covers the scale operations of weighing and counting.
Note: Always make sure that the balance is on a clean, dry, level and solid
surface.
Simple Weighing
1. Turn the balance on. The balance will go through a series of tests and
then display all zeroes (0’s).
2. Press the Units key until the desired unit of measure is displayed on the
far right of the display.
3. Press the Tare key if the display no longer reads zero.
4. Place item(s) to be weighed on the weighing platform. The weight will
be displayed with the appropriate unit of measure next to it.
5. Remove the item(s) from the balance and repeat steps 2 - 5 to continue
weighing.
Tare Weighing
If you want to do net weighing, such as weighing objects in a container, follow
these steps.
1. Turn the balance on. The balance will go through a series of tests and
then display all zeroes (0’s).
2. Press the Units key until the desired unit of measure is displayed on the
far right of the display.
3. Place the container to be tared on the weighing platform and press the
Tare key. The display should return to zero.
4. Place item(s) to be weighed in the container. The weight will be
displayed with the appropriate unit of measure next to it. The weight
displayed is the net weight and does not include the weight of the
container.
5. Remove the item(s) from the container and repeat steps 3 - 5 to
continue weighing with the same container.
Note: If you
remove the container, the balance will show a negative weight.
Press the Tare key to return the balance to zero.
6
Page 7

General Counting Function
The ESA series will count parts based on the weight of a reference sample of
5, 10, 20, 30, 40 or 50 pieces. For best results, the pie ces used should be of
equal weight. Also, the larger the sample, the more accurate your counts will
be. Once you have created this reference sample, it will remain in memory
until a new sample is recorded, even when the balance if turned off. This
section explains the counting function in further detail.
1. Turn the balance on and allow it to come to zero.
2. Press the Count key. The balance will display “CON pcs”.
Note: If you are using a cont ainer to hold the pieces, place the empty
container on the weighing platform at this point.
3. Press Tare. The balance will display the message “Add 5”.
4. Press Mode until the number of pieces in your sample is displayed. You
can choose from 5, 10, 20, 30, 40 or 50.
5. Place your sample on the platform and press Tare.
6. There will be a short pause and then the balance will show the number
of the sample on the screen.
Note: If
the balance displays the message “PC Err”, the sample size was too
small for the balance and a larger sample will be required.
7. Remove the sample from the balance. The balance is now ready to
t.
coun
8. Add pieces to the balance / container. The balance will show the
number of pieces on the display.
9. Press the Units key to exit piece counting and return to normal
weighing. You can return to piece counting by pressing the Units key
until “pcs” is displayed.
6.0 Calibration
Occasionally, you may need to calibrate your balance with an appropriate
weight. There are two types of calibration possible: sensitivity calibration and
linear calibration. Linear calibration should only be attempted by a qualified
service technician with correct weights. This section explains how to perform
each type of calibration.
7
Page 8

Sensitivity Calibration
1. With the scale in regular weighing mode, press the Tare key to zero the
balance.
2. Press the Cal key.The balance will show “Scale”.
3. Press the Tare key. The balance will display one of the accepted
calibration weights.
Note: T
he balance can only be calibrated in grams.
4. Press the Mode key to
5. Press Tare. The balance will flash “0” briefly and th en flash the
calibration weight.
6. Place the correct amount of weight (in grams) on the platform and press
the Tare key.
7. The calibration weight will continue to flash briefly and then become
stable.
8. Once the weight is stable, remove the weight from the balance. The
scale has now been calibrated and is in regular weigh mode.
9. Press the Tare key if the scale does not return to zero.
toggle between available calibration weights.
Linear Calibration
1. In regular weighing mode, press the Tare key to zero the balance.
2. Press the Cal key. The balance will show “Scale”.
3. Press the Mode key. The balance will show “Line”
4. Press Tare. The balance will flash “0” briefly and th en flash the first
calibration weight.
5. Place the correct amount of weight (in grams) on the platform and press
the Tare key.
6. The balance will flash the next calibration weight.
7. Place the appropriate amount of weight on the weighing platter and
press Tare.
8. The calibration weight will continue to flash briefly and then become
stable.
9. Once the weight is stable, remove the weight from the balance. The
scale has now been calibrated and is in regular weigh mode.
10.Press the Tare key if the scale does not return to zero.
8
Page 9

7.0 Communications & Printing
Balance RS232
connector
Sample PC RS232
connector
RS232 Data
Baud Rate = 9600
Data Bits = 8
Parity = None
Stop Bits = 1
The ESA balances can be connected to a PC or appropriate printer using a
null modem cable (not supplied). The balance will transmit the gross or net
weight and unit or the number of pieces if you are using the piece counting
function.
Connecting to PC
1. Connect the appropriate cable to the 9 pin D connector on the balance.
2. Connect the other end to an available COM port on your PC.
Note: W
Th
Note: All commands are capital letters. There is no carriage return after the
hen connecting to a PC or other device, you must cross the transmit
and receive lines.
3. Start HyperTerminal or similar utility.
e table below shows a list of available commands and their responses.
command.
Table 1: Available Serial Commands
Command Response Command Response
O Off T Tare
M Displays the Counts F Mode
C Cal U Units
9
P Percentage W Return displayed
weight
Page 10

Change Print Settings
You can select either Continuous Print or Print When Stable.
1. Remove all weight (except platter) and power the balance off.
2. Power the balance on.
3. During countdown (9999.99, 8888.88, 7777.77), press the Mode key. The
balance displays F1 A2t.
4. Press the Mode key. The balance displays F2 prt.
5. Press the Tare key. The balance displays either Pt-0 (continuous print)
or Pt-1 (bi-directional communication) Pt-1 is the default.
6. Press the Mode key until balance displays Pt-0.
7. Press the Tare key. The balance displays either PCon (print continuos) or
PStb (print when stable).
8. Press the Mode key to toggle between P2t6 and PCon.
9. Press the Tare key to accept the setting on the display.
10.Press the On/Off key when finished. The balance powers off and the
changes are saved.
11.Connect the balance to the printer or other device.
12.Power the balance on.
Care and Maintenance
Your precision balance does not require a lot of maintenance, however, there
are a few things you can do to keep your balance operating properly.
1. Keep the balance housing and weighing platform clean and free of
debris. Clean with a soft cloth dampened with detergent as necessary.
2. Unplug the AC adapter when not in use.
3. Remove batteries for long term storage. (See the section on battery
replacement.)
Battery replacement
You can expect approximately 15 hours of use when powering the balance
with batteries. Use only alkaline batteries of the correct size and pay close
attention to the markings (+ or -) inside the battery compartment.
Your balance should look similar to one of the two pictured below. Detailed
instructions are for models using screws to hold the lid in place only.
10
Page 11

1. Remove the two screws holding the battery compartment lid on the
bottom of the scale.
2. Gently pry up the battery cover and remove.
3. Insert the correct number of batteries.
4. Replace cover and tighten screws.
5. Return balance to upright position and press the On/Off key to turn the
scale on and resume normal weighing or counting functions.
Error Codes and Troubleshooting
If the scale shows something unexpected, you may be able to resolve it
yourself. Many times, the error can be resolved by powering the scale off and
then back on again. The table on the next page shows some basic
troubleshooting tips to try before calling for service.
11
Page 12

Table 2: Error Codes and Troubleshooting
Problem Cause(s) Solution(s)
Err 0 This typically indicates that the
Err 1 Overweight err or . The sample
Err 2 Underweight error. This error
Err 3 Non-zero error. This indicates
F1 AZT A key was pressed during
F2 Cnt A key was pressed during
Incorrect Weight
Reading
No Display Power adapter not properly
platform is too light.
is too heavy for the balance.
is similar to Err 0 as it
indicates that the platform is
not properly installed.
that there was weight on the
balance during power up.
power up.
power up.
Balance was not set to zero or
was not calibrated.
connected or batteries are
dead.
Ensure that the stainless steel cover is properly in
place. Turn the scale off and remove the platform.
Replace the platform and reapply power. If error
persists, the weight sensor or circuit board may be
faulty and you should contact your distributor.
Remove some of the sample. If sample is within the
balance capacity, balance may need to be calibrated.
Power off the balance and re-seat the platform before
reapplying power to the balance. The balance may
need to be calibrated.
Remove any weight(s) from the platform, turn the
balance off and back on.
Turn the balance off a nd back on again.
Turn the balance off a nd back on again.
Press T are to zero the balance. Calibrate the balance
as necessary.
Reconnect power adapter or replace batteries.
12
Page 13

8.0 Specifications
Table 3: Specifications
MODEL
Capacity &
Resolution
STD Deviation (e)
Linearity (e)
Corner Deviation (e)
Tare Range
Overload Capacity
Stabilization Time
(s)
Applicable
Temperature Range
Power Source
Pan Size
ESA-150
ESA-300
150 x 0.005 g
300 x 0.005 g
AC Adapter (included)or 6 AA
Batteries (not included)
120 mm diameter
ESA-600 ESA-1200 ESA-3000 ESA-6000
600 x 0.01 g 1200 x 0.02 g 3000 x 0.05 g 6000 x 0.1 g
(approx. 4.7 in.)
1
1
1
100%
Maximum Capacity+9e
3 seconds
10° - 35° C
50° - 95° F
AC Adapter(included) or 8 AA Batteries
Batteries are not included.
172 mm x 172 mm
(approx. 6.8 in x 6.8 in)
13
Housing
Dimensions
Net Weight
832 g
1.8 lbs
251 (L) x 172 (W) x 58 (H) mm
(approx. 9.9 x 6.8 x 2.3 in)
1560 g
3.4 lbs
Page 14

UK and EUROPE USA
Salter Brecknell Weighing
P.O. Box 9533
Smethwick
West Midlands B66 2 TE
Tel: +44 (0) 870 444 6132
Fax: +44 (0) 870 010 2241
Email: sales@salterbrecknell.co.uk
Web Site: www.averyweigh-tronix.com
PN AWT35-500064 AE February 2010
Salter Brecknell Weighing Products USA
1000 Armstrong Drive
Fairmont, MN 56031
Toll Free: 800-637-0529
Tel: 507-238-8702
Fax: 507-238-8271
Email: sales@salterbrecknell.com
Web: www.salterbrecknell.com
 Loading...