

Page 1

MF9500
30000113480-01
Operation Manual
for Copier
S
Page 2

INTRODUCTION
This manual describes only copier features. For operation procedures relating to both the basic printer and copier
features, refer to the “Operation manual (for printer operation and general information)”. General information required
for loading paper, adding toner, misfeed removal, and operation of peripheral devices are described in that manual.
Separate manuals are provided for the operation of network scanning and facsimile functions. Refer to the “Operation
manual (for scanner)” and “Operation manual (for facsimile )” for these descriptions.
NOTE
In this manual, American spellings are used.
Original and paper sizes
This machine allows use of standard sizes in both the inch and AB systems.
The standard sizes available in this machine are shown below.
Sizes in the inch system
11 x 17
8-1/2 x 14
8-1/2 x 13
8-1/2 x 11
7-1/4 x 10-1/2
5-1/2 x 8-1/2
Sizes in the AB system
A3
B4
A4
B5
A5
1
Page 3

CONTENTS
Page
INTRODUCTION . . . . . . . . . . . . . . . . . . . . . . . . . . . . . . . . . . . . . . . . 1
CONTENTS . . . . . . . . . . . . . . . . . . . . . . . . . . . . . . . . . . . . . . . . . . . . 2
PART NAMES AND FUNCTIONS
(B/W scanner module/DSPF or SPF) . . . . . . . . . . . . . . . . . . . . . . . . 3
●Exterior . . . . . . . . . . . . . . . . . . . . . . . . . . . . . . . . . . . . . . . . . . . . 3
●Operation Panel . . . . . . . . . . . . . . . . . . . . . . . . . . . . . . . . . . . . . 4
●Touch Panel (basic screen of copy mode) . . . . . . . . . . . . . . . . . . 5
AUTOMATIC DOCUMENT FEEDER . . . . . . . . . . . . . . . . . . . . . . . . . 6
●Acceptable originals . . . . . . . . . . . . . . . . . . . . . . . . . . . . . . . . . . 6
SETTING ORIGINALS . . . . . . . . . . . . . . . . . . . . . . . . . . . . . . . . . . . 7
NORMAL COPYING . . . . . . . . . . . . . . . . . . . . . . . . . . . . . . . . . . . . . 9
●Copying from the automatic document feeder . . . . . . . . . . . . . . . 9
●Automatic two-sided copying from the automatic
document feeder . . . . . . . . . . . . . . . . . . . . . . . . . . . . . . . . . . . . 11
●Copying from the document glass . . . . . . . . . . . . . . . . . . . . . . . 12
●Automatic two-sided copying from the document glass . . . . . . . 14
EXPOSURE ADJUSTMENTS . . . . . . . . . . . . . . . . . . . . . . . . . . . . . 15
REDUCTION/ENLARGEMENT/ZOOM . . . . . . . . . . . . . . . . . . . . . . 16
●Automatic selection (auto image) . . . . . . . . . . . . . . . . . . . . . . . 16
●Manual selection . . . . . . . . . . . . . . . . . . . . . . . . . . . . . . . . . . . . 17
SPECIAL PAPERS . . . . . . . . . . . . . . . . . . . . . . . . . . . . . . . . . . . . . 18
SPECIAL MODES . . . . . . . . . . . . . . . . . . . . . . . . . . . . . . . . . . . . . . 19
●Common operation procedure for using the special functions . . 19
●Margin shift . . . . . . . . . . . . . . . . . . . . . . . . . . . . . . . . . . . . . . . . 20
●Erase . . . . . . . . . . . . . . . . . . . . . . . . . . . . . . . . . . . . . . . . . . . . 21
●Dual page copy . . . . . . . . . . . . . . . . . . . . . . . . . . . . . . . . . . . . . 22
●Pamphlet copy . . . . . . . . . . . . . . . . . . . . . . . . . . . . . . . . . . . . . 23
●Job build . . . . . . . . . . . . . . . . . . . . . . . . . . . . . . . . . . . . . . . . . . 24
●Multi shot . . . . . . . . . . . . . . . . . . . . . . . . . . . . . . . . . . . . . . . . . 25
JOB PROGRAM MEMORY . . . . . . . . . . . . . . . . . . . . . . . . . . . . . . . 26
●Storing a job program . . . . . . . . . . . . . . . . . . . . . . . . . . . . . . . . 26
●Recalling a job program . . . . . . . . . . . . . . . . . . . . . . . . . . . . . . 27
●Deleting a stored job program . . . . . . . . . . . . . . . . . . . . . . . . . . 27
INTERRUPTING A PRINT OR COPY RUN . . . . . . . . . . . . . . . . . . . 28
MISFEED REMOVAL . . . . . . . . . . . . . . . . . . . . . . . . . . . . . . . . . . . . 29
●Misfeed in the scanner module . . . . . . . . . . . . . . . . . . . . . . . . . 29
TROUBLESHOOTING . . . . . . . . . . . . . . . . . . . . . . . . . . . . . . . . . . . 30
SPECIFICATIONS . . . . . . . . . . . . . . . . . . . . . . . . . . . . . . . . . . . . . . 31
●Copier . . . . . . . . . . . . . . . . . . . . . . . . . . . . . . . . . . . . . . . . . . . . 31
●Scanner module . . . . . . . . . . . . . . . . . . . . . . . . . . . . . . . . . . . . 31
KEY OPERATOR PROGRAMS . . . . . . . . . . . . . . . . . . . . . . . . . . . . 32
●Key operator program list . . . . . . . . . . . . . . . . . . . . . . . . . . . . . 32
●Using the key operator programs . . . . . . . . . . . . . . . . . . . . . . . 32
●Setting programs . . . . . . . . . . . . . . . . . . . . . . . . . . . . . . . . . . . . 33
2
Page 4

PART NAMES AND FUNCTIONS
(B/W scanner module/DSPF or SPF)
Exterior
DSPF or SPF exit area
Scanned originals are deposited here.
Document feeding area cover (page 29)
Open to remove misfed originals in this area.
Original guides (page 7)
Adjust to the size of the originals.
Document feeder tray (page 7)
Set the originals here for automatic feeding.
Operation panel (next page)
Use for operation of copier, network scanner, and
facsimile features and for printer configuration
operations.
Document cover
Document scanning windows (DSPF only)
Sheet type originals are scanned here.
Document glass
All originals which cannot be copied from the
document feeder tray must be copied here.
3
Page 5

PART NAMES AND FUNCTIONS
Operation Panel
Touch panel (next page)
The machine status, messages and touch keys are
displayed on the panel. When the machine is in the
standby state, the display will change if the [PRINT]
key, [IMAGE SEND] key or [COPY] key is pressed
to show the current status of these modes.
Mode select keys
Use to select the basic modes of the product.
[COPY] key
Press to select the copy mode and display the basic
screen of the copy mode. (next page)
Even when the machine is busy in another mode,
the basic copy mode screen will appear when the
[COPY] key is pressed. If this key is pressed and
held while the basic screen of the copy mode is
displayed, the total output count will be displayed.
Numeric keys
Use to select the number of copies and to make
numerical entries for setting operations.
[C] key (clear key)
Press to clear a copy quantity entry. If this key is
pressed while the automatic document feeder is
being used, any originals in progress will be
automatically output.
[CA] key (clear all key)
Press to clear all selected settings and return the
machine to the initial settings for the currently
selected mode. Before starting a copy operation,
press the [CA] key first.
[ACC.#-C] key
If the auditing mode has been set, press this key to
close an open account after finishing a copy,
facsimile scanning or network scanning job. For
setting of the auditing mode, see page 6-7 of the
“Operation manual (for printer operation and general
information)”.
[#/P] key (page 26)
Press to select the job memory mode.
[START] key (page 10)
When the indicator is lit, copying, facsimile scanning
and network scanning jobs can be started. Press to
start copying.
4
Page 6

PART NAMES AND FUNCTIONS
Touch Panel (basic screen of copy mode)
When the copy mode key is pressed, this display screen will appear showing the basic copy mode selections.
(For the display screens for other modes, see the respective operation manuals for those modes.)
READY TO SCAN FOR COPY.
SPECIAL MODES
2-SIDED COPY
OUTPUT
Message display
Basic status messages are displayed here.
[INTERRUPT] key display area
When interrupt copy is available, the [INTERRUPT]
key will be displayed here. When an interrupt copy
job is being run, a [CANCEL] key will be displayed
here to be used for canceling the interrupt copy job.
Copy quantity display
Displays the selected number of copies before the
[START] key is pressed or the number of completed
copies after the [START] key is pressed. A single
copy can be made when “0” displayed.
[2-SIDED COPY] key (page 9)
Touch to display the duplex copy mode setting
screen. A highlighted selection on the screen will
indicate the currently selected mode. The setting
screen can be closed by touching the [OK] key on
the setting screen whether or not a selection change
was made.
[OUTPUT] key (page 10)
Touch to display the output mode setting screen. A
highlighted selection on the screen will indicate the
currently selected mode. The setting screen can be
closed by touching the [OK] key on the setting screen
whether or not a selection change was made.
[SPECIAL MODES] key
Touch to display the special modes selection screen.
The functions that can be selected by touching this
key are described on page 19.
A4
1.
2.
3.
4.
ORIGINAL
A4
A4
A3
A4R
A4
AUTO
EXPOSURE
A4
AUTO
PAPER SELECT
100%
COPY RATIO
Paper size display
The display shows the location of the paper trays, the
size of the paper in the trays and the approximate
amount of paper loaded in each tray. The approximate
amount of paper in a tray is indicated by .
For changing the paper size in a tray refer to page
1-16 of the “Operation manual (for printer operation
and general information)”.
Original size display
The original paper size will be displayed when
originals are placed on the document glass or in the
document feeder.
Exposure display and [EXPOSURE] key (page 15)
A touch of the [EXPOSURE] key will open the
exposure selection window. A highlighted key on the
exposure window indicates which exposure mode
(AUTO, TEXT, TEXT/PHOTO or PHOTO) is currently
selected. When an exposure mode other than AUTO
is selected, an exposure level scale will also appear
in the window.
Paper select display and [PAPER SELECT] key
(page 9)
Displays the selected paper size. When the auto
paper select mode has been selected, “AUTO” will
be displayed.
A touch of the [PAPER SELECT] key will open the
paper selection window. When a selection is made,
the selection window will close. To close the window
without making a selection touch the key again
Copy ratio display and [COPY RATIO] key
(page 17)
Displays the selected copy ratio.
Touch to display the reduction and enlargement copy
ratio selection screen.
5
Page 7

AUTOMATIC DOCUMENT FEEDER
Originals set in the automatic document feeder will be automatically fed and copied sequentially.
A B/W scanner module/DSPF will simultaneously scan both sides of originals when two-sided to one-sided or twosided to two-sided copying is being done.
A B/W scanner module/SPF can only scan one side of the original.
Acceptable originals
A stack of up to 50 original sheets (30 original sheets*1 for 8-1/2" x 14" (B4) or larger) of the same size paper can be
set in the document feeder tray provided the stack height is within the limit shown below.
A stack of up to 30 mixed size originals can be set if the width of the originals is the same and the stack height is within
the limit shown below. In this case, however, stapling and duplex will not function and some special functions may not
give the expected result.
*1 For paper heavier than 28 lbs. (105 g/m2), only a stack of up to 15 sheets can be set. Setting 16 or more sheets
may cause incorrect scanning of original and scanned image may become expanded compared with original
itself.
■■
■ Size and weight of acceptable
■■
originals
5-1/2" x 8-1/2"
Original size:
Weight (thickness):
2
g/m
... Weight of a sheet of paper of 1 m
or A5
(148 x 210 mm)
14 lbs. or
50g/m
2
34 lbs. or
11" x 17"
or A3
(297 x 420 mm)
2
128g/m
2
■■
■ Total amount of originals that can be
■■
set in the document feeder tray
Total aggregate thickness must not exceed 1/4" or
6.5 mm (for 14 to 21 lbs. or 50 to 80 g/m
Total aggregate thickness must not exceed 3/16" or
5.0 mm (for 21 to 34 lbs. or 80 to 128 g/m
2
paper).
1/4" or 6.5 mm
or less
2
3/16" or 5.0 mm
or less
Notes on use of the automatic document feeder
●
Use originals within the specified size and weight ranges. Use of originals out of the specified range may cause
an original misfeed.
●
Before loading originals into the document feeder tray, be sure to remove any staples or paper clips.
●
If originals have damp spots from correction fluid, ink or glue from pasteups, be sure they are dried before they
are fed. If not, the interior of the document feeder or the document glass may be soiled.
●
To prevent incorrect original size detection, original misfeeds or smudges on copies, use the following as a
guide for feeding originals.
Transparency film, tracing paper, carbon paper, thermal paper or originals printed with thermal transfer ink
ribbon should not be fed through the document feeder. Originals to be fed through the feeder should not be
damaged, crumpled or folded or have loosely pasted paper on them or cutouts in them. Originals with
multiple punched holes other than two-hole or three-hole punched paper may not feed correctly.
●
When using originals with two or three holes, place them so that the punched edge is at a position other than
the feed slot.
paper).
6
Hole positions
Hole
positions
Hole positions
Page 8

SETTING ORIGINALS
Original size detector
or B4
Original scale
mark
Original scale
mark
8
1
2
/
x
11 or A4
8
1
2
/
x
11R or A4R
8
1
2
/
x
14
11x17 or A3
or B4
5
1
2
/
8
1
2
/
x
or A5
■■
■ When using the automatic document
■■
feeder
Ensure that there is no original on the document
1
glass.
Adjust the original guides to the size of the
2
originals.
Place the originals face down in the document
3
feeder tray.
Set the originals all the way
into the feed slot. Do not
exceed the maximum
height line marked on the
original guide.
■■
■ When using the document glass
■■
Open the document cover, place an original face
down on the document glass, and then gently
close the document cover.
NOTE
Do not place any objects under the original size
detector, because they may damage it or the original
size may not be detected properly.
●
Set an original by aligning its corner with the tip of the
scale ( ) mark at the left rear corner of the glass as
shown in the illustrations.
7
Page 9

SETTING ORIGINALS
■■
■ Standard original setting orientation
■■
Descriptions of functions that follow in this manual assume that originals are oriented as shown.
Document feeder tray Document glass
Place originals in the document feeder tray or on
Top
Top
the document glass so that the top of the original
is positioned to the rear side of the machine. If
not, staples will be incorrectly positioned and
some special features may not give the expected
result.
Bottom
Top
Bottom
■■
■ Automatic copy image rotation - rotation copying
■■
Bottom
Top
Bottom
If the orientation of the originals and copy paper are different, the original image will be automatically rotated 90°
and copied. (When an image is rotated, a message will be displayed.) When enlargement of originals larger than
8-1/2" x 11" or A4 is selected, rotation cannot be done.
[Example]
Orientation of original Orientation of paper Copy after rotation
Face down Face down
●
This function operates in the auto paper select or auto image mode. (Rotation copying can be disabled
with a key operator program. See page 33.)
8
Page 10

NORMAL COPYING
OK
0
AUTO
PAPER SELECT
100
%
A4
TRANSPA
A4
1
X
A4
A3
1.
2.
3.
PLAIN
PLAIN
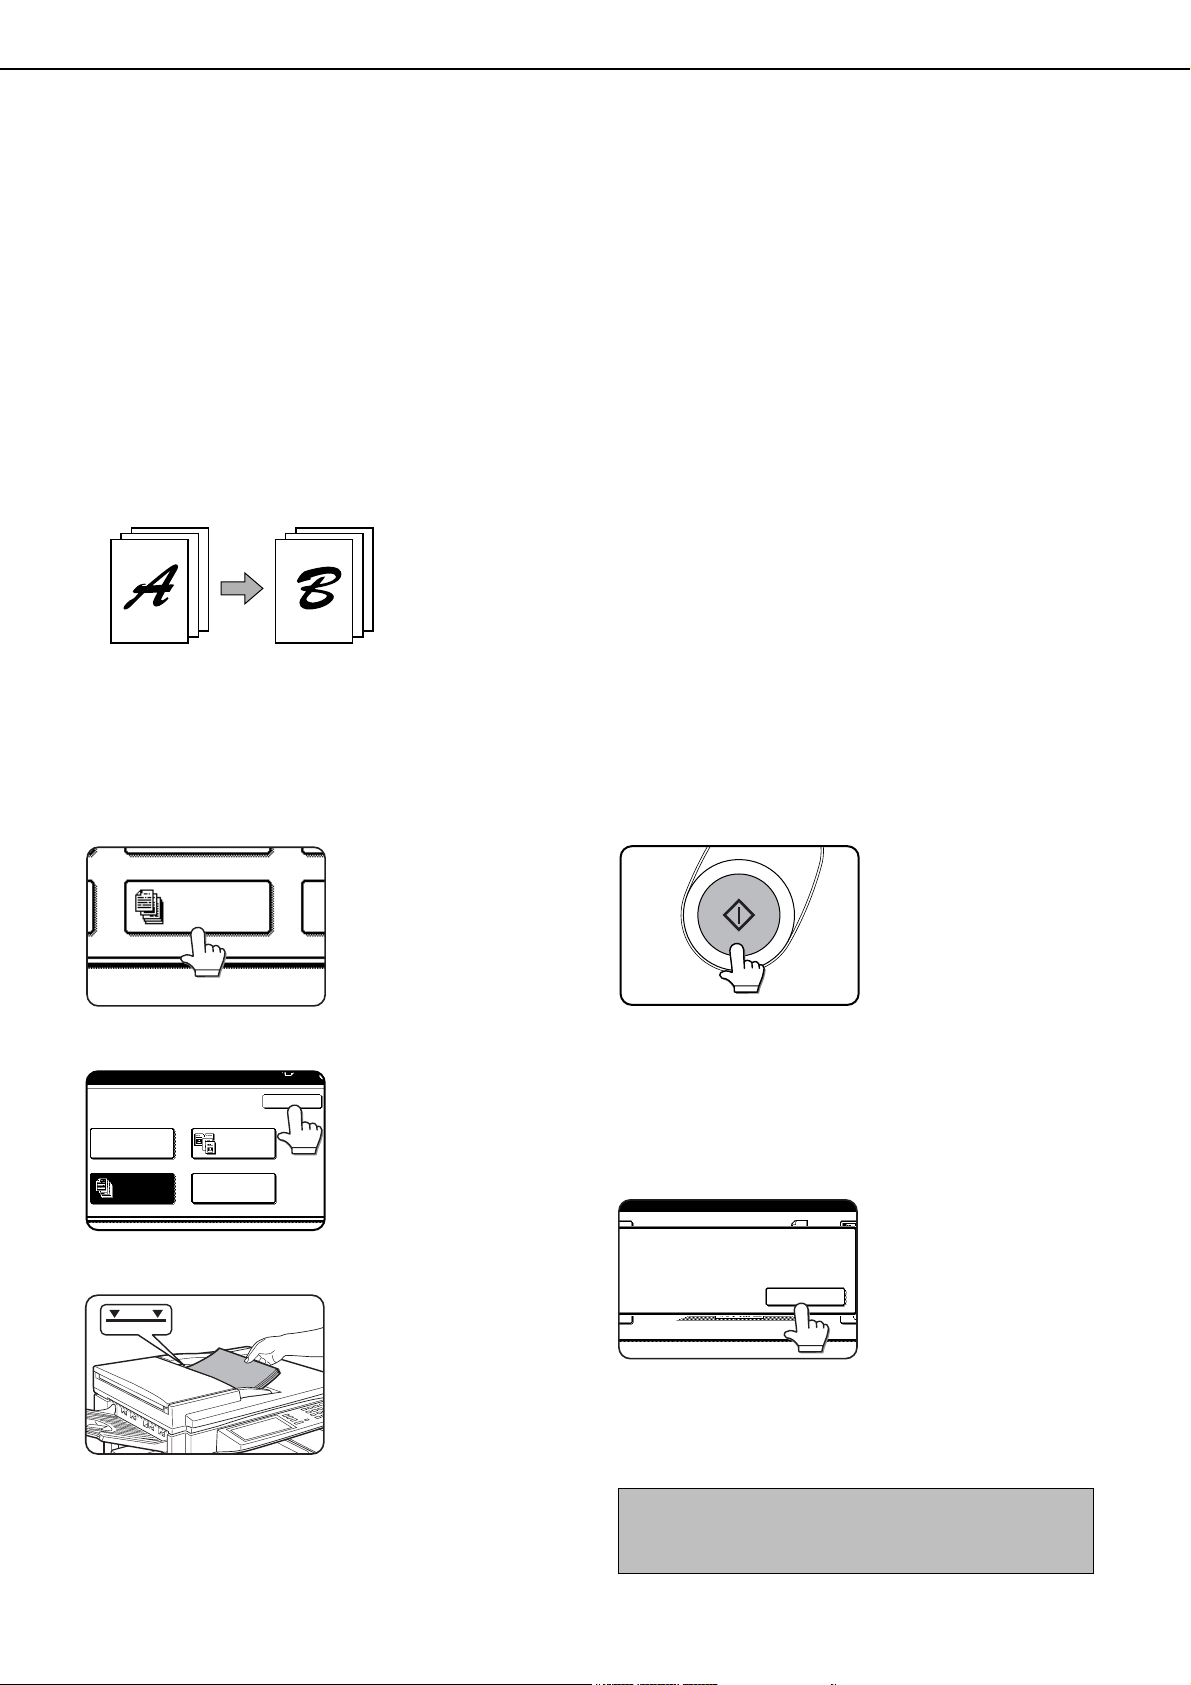
This section describes the normal copying procedure.
Copying from the automatic document feeder
■■
■ 1-sided copies of 1-sided originals
■■
Original Copy
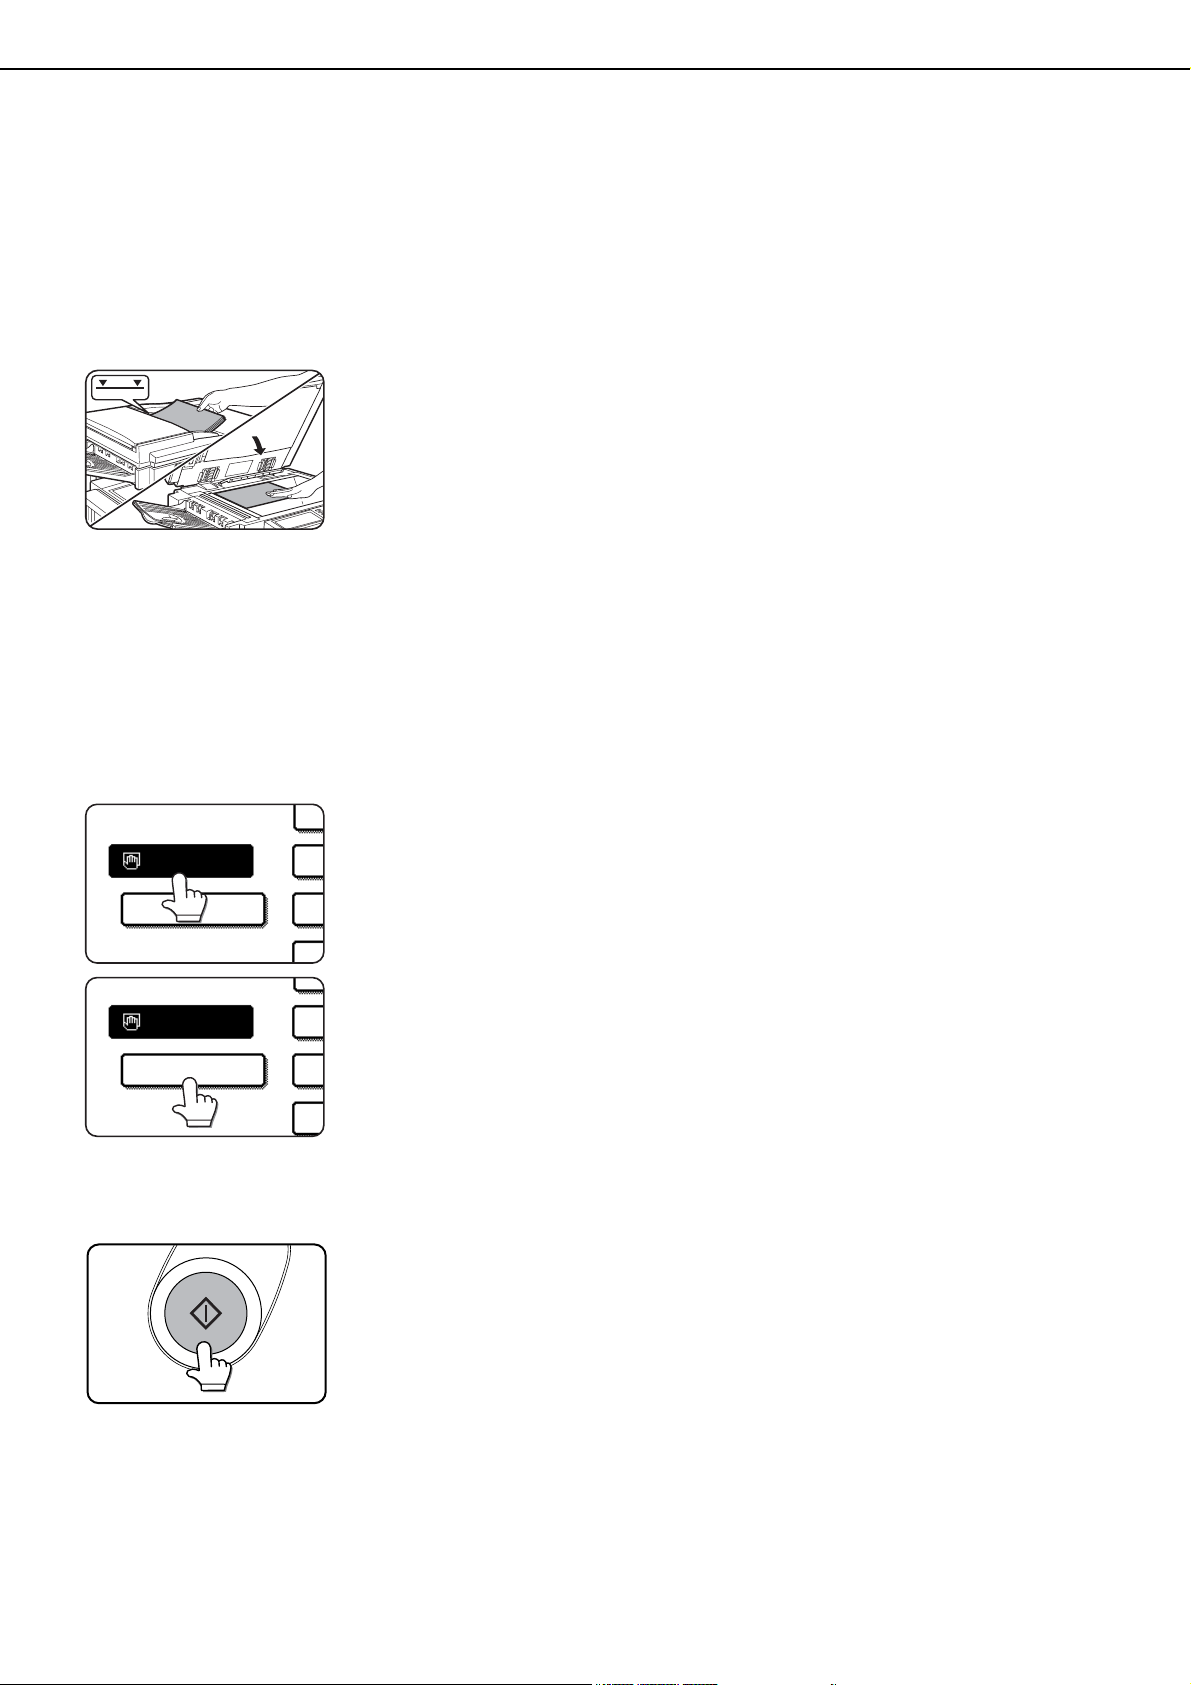
Place the originals in the document feeder tray.
1
(page 7)
Ensure that the 1-sided to 1-sided copy mode
2
is selected.
A4
ORIGINAL
A4
1.
A4
2.
A4
3.
A3
4.
A4R
Touch the [2-SIDED COPY] key.
3
The one-sided to one-sided
mode is selected when no
icon for a two-sided mode
appears in the dashed area
on the display. If the 1-sided
to 1-sided copy mode is
already selected, steps 3 to
5 are not needed.
2-SIDED COPY
OUTPUT
Touch the [1-sided to 1-sided copy] key.
4
The [1-sided to 1-sided] key
will be highlighted.
Touch the [OK] key.
5
Ensure that paper of the same size as the
6
originals is automatically selected. (✼Note)
The selected tray will be
highlighted or the message
“LOAD xxxxxx PAPER.” will
appear. If the message appears, load paper in a paper tray or the bypass tray
with paper of the required
size. Even if the message
above is displayed, copying
can be performed onto the
currently selected paper.
(✼Note) The following requirements must be satisfied.
●
Originals of a standard size (11" x 17", 8-1/2" x 14", 8-1/2"
x 11", 8-1/2" x 11"R, 5-1/2" x 8-1/2", A3, B4, A4, A4R or
A5) are set and the auto paper select function is enabled.
If originals of a size other
than the sizes above are to
be copied, manually select
the desired paper size.
9
Page 11

NORMAL COPYING
Select the desired output mode (see below).
7
The sort mode is the default
2-SIDED COPY
OUTPUT
Use the numeric keys to set the desired number
8
of copies.
mode. To select the group
mode, touch the [OUTPUT]
key, then touch the
[GROUP] key on the output
setting screen, and then
touch the [OK] key on the
setting screen.
Up to 999 can be set.
Use the [C] (clear) key to
cancel an entry if a mistake
has been made.
Press the [START] key.
9
If the [C] key is pressed
while originals are being
scanned, scanning will
stop. If copying had already
started, copying and
scanning will stop after the
original in progress is
output to the original exit
area. In these cases the
copy quantity will be reset
to “0”. If scanning has been
completed but copying is
still in progress, copying
will continue.
NOTE
The 1-sided to 1-sided copying mode is set as the default
in the initial settings. This setting can be changed by a
key operator program (initial status setting ).
Output modes (sort mode and group mode)
[Example] Five sets of copies from three originals
●Sort copy
Five sets of copiesOriginals
●Group copy
Originals
Five copies of each original
When originals are placed in the document feeder tray, a
sort icon will appear on the touch panel and the sort
copy mode will be automatically selected. In this case,
copies will be delivered as shown in the upper illustration
to the left. For output in the group mode as shown in the
lower left illustration, the group mode must be selected
on the output setting screen.
10
Page 12

BIN
CHA
NORMAL COPYING
BINDING
CHANGE
OK
Automatic two-sided copying from the automatic document
feeder
A duplex module must be installed for automatic 1-sided to 2-sided or 2-sided to 2-sided copying. A duplex module is
not needed for 2-sided to 1-sided copying.
Original
Copy
1. Automatic two-sided copying from one-sided
originals
2. Automatic two-sided copying from two-sided
originals
●
This function can only be used when a B/W scanner module/
DSPF (SG-SSM) that supports two-sided scanning is
installed.
3. Automatic one-sided copying from two-sided
originals
●
This function can only be used when a B/W scanner module/
DSPF (SG-SSM) that supports two-sided scanning is
installed. (This function can be used even if a duplex
module (SG-DM1) is not installed.)
Place the originals in the document feeder tray.
1
(page 7)
Touch the [2-SIDED COPY] key.
2
2-SIDED COPY
OUTPUT
Select the desired duplex copy mode.
3
The illustration to the left
shows the screen displayed
when a duplex module and
DSPF are installed.
The image to be copied onto the second side of 2-sided copies
can be inverted so that the resultant 2-sided copies are in
the correct orientation for binding at the top. For top binding,
touch the [BINDING CHANGE] key on the 2-sided copy
selection screen.
Touch the [OK] key.
4
Follow step 6 on page 9 to step 9 on page 10.
11
Page 13

AUTO
PAPER SELECT
100%
A4
TRANSPA
A4
1
X
A4
A3
1.
2.
3.
PLAIN
PLAIN
NORMAL COPYING
Copying from the document glass
When copying originals which cannot be fed from the automatic document feeder such as thick originals, open the
document cover and copy the originals from the document glass
■■
■ 1-sided copies of 1-sided originals
■■
Original Copy
Set an original on the document glass. (page 7)
1
Original size detector
Original scale
mark
1
1
x
/
/
5
8
2
2
or A5
1
x
/
8
2
11 or A4
●
Set an original by aligning its corner with the tip of the
scale (
1
x
/
8
2
14
or B4
or B4
11x17 or A3
) mark at the left rear corner of the glass as shown
Original scale
mark
1
x
/
8
2
11R or A4R
in the illustrations.
Ensure that paper of the same size as the
3
original is automatically selected. (✼Note)
The selected tray will be
highlighted or the message
“LOAD xxxxxx PAPER.” will
appear. If the message
appears, load paper in a
paper tray or the bypass tray
with paper of the required
size. Even if the message
above is displayed, copying
can be performed onto the
currently selected paper.
(✼Note) The following conditions must be satisfied.
●
Originals of a standard size (11" x 17", 8-1/2" x 14", 8-1/2"
x 11", 8-1/2" x 11"R, 5-1/2" x 8-1/2", A3, B4, A4, A4R or
A5) are set and the auto paper select function is enabled.
If originals of a size other
than the sizes above are to
be copied, manually select
the desired paper size.
Ensure that the 1-sided to 1-sided copy mode
2
is selected.
ORIGINAL
A4
1.
A4
2.
A4
3.
A3
4.
A4R
12
A4
The one-sided to one-sided
mode is selected when no
icon for a two-sided mode
appears in the dashed area
on the display. If the 1-sided
to 1-sided copy mode is
already selected, steps 3 to
5 are not needed.
Page 14

NORMAL COPYING
PLACE NEXT ORIGINAL. PRESS [START].
WHEN FINISHED, PRESS [READ-END].
READ-END
Select the desired output mode (see below).
4
When a document is
2-SIDED COPY
OUTPUT
NOTE
If you touch the [SORT] or [GROUP] key, its corresponding
icon will appear on the touch panel. To change the
selection, touch the icon to return the display to the output
setting screen.
Use the numeric keys to set the desired number
5
of copies.
detected on the document
glass, the group mode will
be automatically selected.
To select sort copy, touch
the [OUTPUT] key, then
touch the [SORT] key on the
displayed screen, and then
touch the [OK] key.
Up to 999 can be set.
Use the [C] (clear) key to
cancel an entry if a mistake
has been made.
Press the [START] key.
6
Touch the [READ-END] key.
7
Replace the original with
the next original and press
the [START] key. Repeat this
operation until all originals
have been scanned.
If sort was selected in step
4, go to the next step.
Output mode (sort copy and group copy)
[Example] Five sets of copies from three originals
●●
●
●●
Sort copy
●●
●
●●
Group copy
Originals
When originals are placed in the document feeder tray,
a sort icon will appear on the touch panel and the sort
copy mode will be automatically selected. In this case,
copies will be delivered as shown in the upper illustration
to the left. For output in the group mode as shown in the
lower left illustration, the group mode must be selected
on the output setting screen.
Five sets of copiesOriginals
Five copies of each original
13
Page 15

NORMAL COPYING
BINDING
CHANGE
OK
Automatic two-sided copying from the document glass
A duplex module must be installed for automatic 1-sided to 2-sided or 2-sided to 2-sided copying. A duplex module is
not needed for 2-sided to 1-sided copying.
Original Copy
Place an original on the document glass.
1
(page 7)
Touch the [2-SIDED COPY] key.
2
2-SIDED COPY
OUTPUT
Touch the [1-sided to 2-sided copy] key.
3
The image to be copied onto the second side of 2-sided copies
can be inverted so that the resultant 2-sided copies are in
the correct orientation for binding at the top. For top binding,
touch the [BINDING CHANGE] key on the 2-sided copy
selection screen.
Touch the [OK] key.
4
Follow step 3 on page 12 to step 7 on page 13.
14
Page 16

EXPOSURE ADJUSTMENTS
0
0
PHOTO
1
3
5
Select the exposure mode to be consistent with the type of originals to be copied. The selections are AUTO, TEXT,
TEXT/PHOTO and PHOTO.
■■
■ Automatic exposure adjustment
■■
The automatic exposure
mode is the default initial
setting for this machine. In
AUTO
EXPOSURE
■■
■ Exposure mode selection and
■■
manual exposure adjustment
this mode, the
characteristics of an original
being copied are “read” by
the exposure system, and
exposure adjustments are
made automatically. To
select an exposure mode
more suitable for originals to
be copied or to adjust the
exposure manually, follow
the procedure below.
Touch the [EXPOSURE] key.
1
AUTO
EXPOSURE
Select [TEXT], [TEXT/PHOTO] or [PHOTO] based
2
on the original to be copied.
TEXT
/
PHOTO
TEXT
NOTE
Exposure mode selection
TEXT: This mode is useful for producing dark text
copies with minimum background.
TEXT/PHOTO: This provides the best balance for copying
an original which contains both text and
photos. This mode is also useful for
copying printed photographs.
PHOTO: This mode provides the best copies of
photographs with fine details.
Adjust the exposure level.
3
Touch the key to make
darker copies. Touch the
key to make lighter
copies.
NOTE
Exposure levels in the text mode
1 to 2: Dark originals such as newspaper
3: Normal density originals
4 to 5: Originals written with pencils or light color
characters
After adjusting the exposure, follow any of the copying
procedures.
To return to the automatic exposure mode, touch the
[EXPOSURE] key and select [AUTO]. The automatic
exposure level can be adjusted using a key operator
program. (page 33)
15
Page 17

REDUCTION/ENLARGEMENT/ZOOM
TRANSPA
8
2
1
AUTO
COPY RATIO
PAPER SELEC
Reduction and enlargement ratios can be selected either automatically or manually as described in this section.
●
Automatic selection will enlarge or reduce images based upon the original size and copy paper size to give the best
possible fit of the image to the copy paper.
●
Manual selections can be made in the range of 25% to 400%. There are three preset reduction ratios (25%, 64%
and 77%) and three preset enlargement ratios (121%, 129% and 400%) available for the inch system. There are
four preset reduction ratios (25%, 70%, 81%, 86%) and four preset enlargement ratios (115%, 122%, 141%, 400%)
available for the AB system.
Automatic selection (auto image)
The reduction or enlargement ratio will be selected automatically based on the original size and the selected paper
size.
Place the original in the document feeder tray
1
or on the document glass. (page 7)
The detected original size will be displayed.
Automatic selection can be used only for 11" x 17", 81/2" x 14", 8-1/2" x 11", 8-1/2" x 11"R, 5-1/2" x 8-1/2"
size originals and copy paper in the inch system and
A3, B4, A4, A4R or A5 in the AB system.
Touch the [PAPER SELECT] key and then select
2
the desired paper size.
When the desired paper
A4
1.
1
X
A4
2.
A3
3.
Touch the [AUTO IMAGE] key.
3
PLAIN
PLAIN
AUTO
IMAGE
size key is touched, the
paper size will be
highlighted and the paper
size setting window will be
closed.
If paper of the desired size
is not loaded in any tray,
load paper of the required
size in a paper tray and
enter the paper size.
The [AUTO IMAGE] key will
be highlighted and the best
reduction or enlargement
ratio for the original size and
the selected paper size will
be selected and displayed
in the copy ratio display.
Make all other desired settings such as
4
exposure or the number of copies, and press
the [START] key.
When copying from the
document glass in the sort
mode, touch the [READEND] key after all originals
have been scanned. (step 7
on page 13)
To cancel the auto image mode, touch the [AUTO IMAGE]
key again to clear the highlighted display.
NOTE
If the message “ROTATE ORIGINAL FROM
displayed, change the orientation of the original as
indicated in the message. When the message above is
displayed, copying can be done without changing the
orientation, but the image will not fit the paper correctly.
TO ” is
16
Page 18

Manual selection
OK
AUT
IMAG
10400
%
25
%
PAPER SELECT
REDUCTION/ENLARGEMENT/ZOOM
Place the original in the document feeder tray
1
or on the document glass. (page 7)
NOTE
When the document feeder is being used, the available
copy ratio range is 25% to 200%.
Touch the [COPY RATIO] key.
2
The preset copy ratio keys
100
%
COPY RATIO
Select the desired copy ratio by touching a fixed
3
copy ratio key for reduction or enlargement and
for reduction and
enlargement, the keys for
[ZOOM] and the [100%] key
will be displayed.
touch the [OK] key. Use the and keys to
make fine adjustments as needed.
If the message “IMAGE IS
LARGER THAN THE COPY
PAPER.” appears, image
loss will occur. In this case
either continue with image
loss or change the copy
paper size or copy ratio.
B4 B5
A3 A4
B5 A4
B4 A3
70
115
%
%
100
ZOOM
B5 A5
B4 A4
A5 B5
A4 B4
81
122
%
%
%
A4 B5
A3 B4
B5 B4
A4 A3
86
141
%
%
Make all other desired settings such as
5
exposure or the number of copies and press
the [START] key.
When copying from the
document glass in the sort
mode, touch the [READEND] key after all originals
have been scanned. (step 7
on page 13)
Ensure that the desired paper size has been
4
automatically selected based on the selected
copy ratio or select another size as needed.
86
%
COPY RATIO
If another size paper is
selected, the auto paper
select display will be
cleared.
17
Page 19
SPECIAL PAPERS
COLOR
1.
2.
3.
4.
COLOR
1.
2.
3.
4.
If a bypass tray and a duplex module, a duplex module/bypass tray or a multi purpose drawer*1 is installed, special
papers can be fed. These include transparency film, postcards, labels, envelopes*2, and plain paper.
*1 The upper tray of a stand/3 x 500 sheet paper drawer or a stand/MPD & 2000 sheet paper drawer is equivalent to
the multi purpose drawer.
*2 Envelopes can be set in the multi purpose drawer and in the upper tray of a stand/paper drawer.
Place the original in the document feeder tray
1
or on the document glass. (page 7)
Load the special paper in the bypass tray or in
2
the multi purpose drawer.
For the paper loading instructions see “Loading paper
in the bypass tray” (page 5-3) of the “Operation manual
(for printer operation and general information)” or
“Loading paper in the multi purpose drawer” (page 1-
21) of the “Operation manual (for printer operation and
general information)”.
Touch the [PAPER SELECT] key and then select
3
the bypass tray or the multi purpose drawer.
A4
When loading paper in the
A4
Make all other desired settings such as
4
exposure or the number of copies, and press
the [START] key.
bypass tray, the desired
paper type can be set by
touching the [PAPER TYPE]
key.
When copying from the
document glass in the sort
mode, touch the [READEND] key after all originals
have been scanned. (step 7
on page 13)
18
Page 20

SPECIAL MODE
When the [SPECIAL MODES] key on the basic screen of the copy mode is touched, the special modes screen
containing six special function touch keys will appear. These functions are shown below.
SPECIAL MODES
Margin shift: page 20
Erase: page 21
Dual page copy: page 22
Pamphlet copy: page 23
Job build: page 24
MARGIN SHIFT
PAMPHLET COPY
ERASE
JOB BUILD
Multi shot: page 25
When using the multi shot function, set the original,
select the desired paper, and select one-sided or
two-sided copying before selecting the multi shot
function on the special modes screen.
[OK] key on the special modes screen
Touch the [OK] key, to return to the basic screen of
the copy mode.
DUAL PAGE
COPY
MULTI SHOT
OK
Common operation procedure for using the special functions
Touch the [SPECIAL MODES] key.
1
SPECIAL MODES
2-SIDED COPY
Touch the key for the desired special mode.
2
Example:
To set the margin shift
MARGIN SHIFT
function:
PAMPHLET COPY
Setting procedures for modes requiring setting
screens start on the next page. The dual page
copy and job build functions do not require
setting screens.
19
Page 21

mm
10
(0 1)
SIDE 2
SPECIAL FUNCTIONS
Margin shift
The margin shift function will automatically shift the text or image on the copy paper approximately 1/2" (10 mm) in its
initial setting.
●
One-sided copying
Original
Image shifted
to the right
Image shifted
to the left
The shift direction can be selected from right or left
shift as shown in the illustration.
Margin
Two-sided copying
Original
Image shifted
to the right
or
Margin
Touch the [MARGIN SHIFT] key on the SPECIAL
1
MODES screen.
The margin shift setting
screen will appear.
Image shifted
to the left
MARGIN SHIFT
PAMPHLET COPY
Select the shift direction.
2
Touch a shift direction key
RIGHT LEFT
to select right or left. The
selected key will be
highlighted.
Margin
Margin
Set the shift amount as needed and touch the
3
[OK] key.
OK
CANCEL
SIDE 1
(0 20)
10
mm
Touch the [OK] key on the special modes
4
screen.
OK
Use the key and the
keys to set the shift amount.
The shift amount can be set
from 0" to 1" in 1/8"
increments ( 0 mm to 20
mm in 1 mm increments for
the AB system). If a duplex
module is not installed, the
shift amount setting for the
reverse side is not
displayed.
After adjusting the exposure, follow any of the
copying procedures.
20
To cancel the margin shift function, touch the [CANCEL]
key on the margin shift setting screen.
Page 22
SPECIAL FUNCTIONS
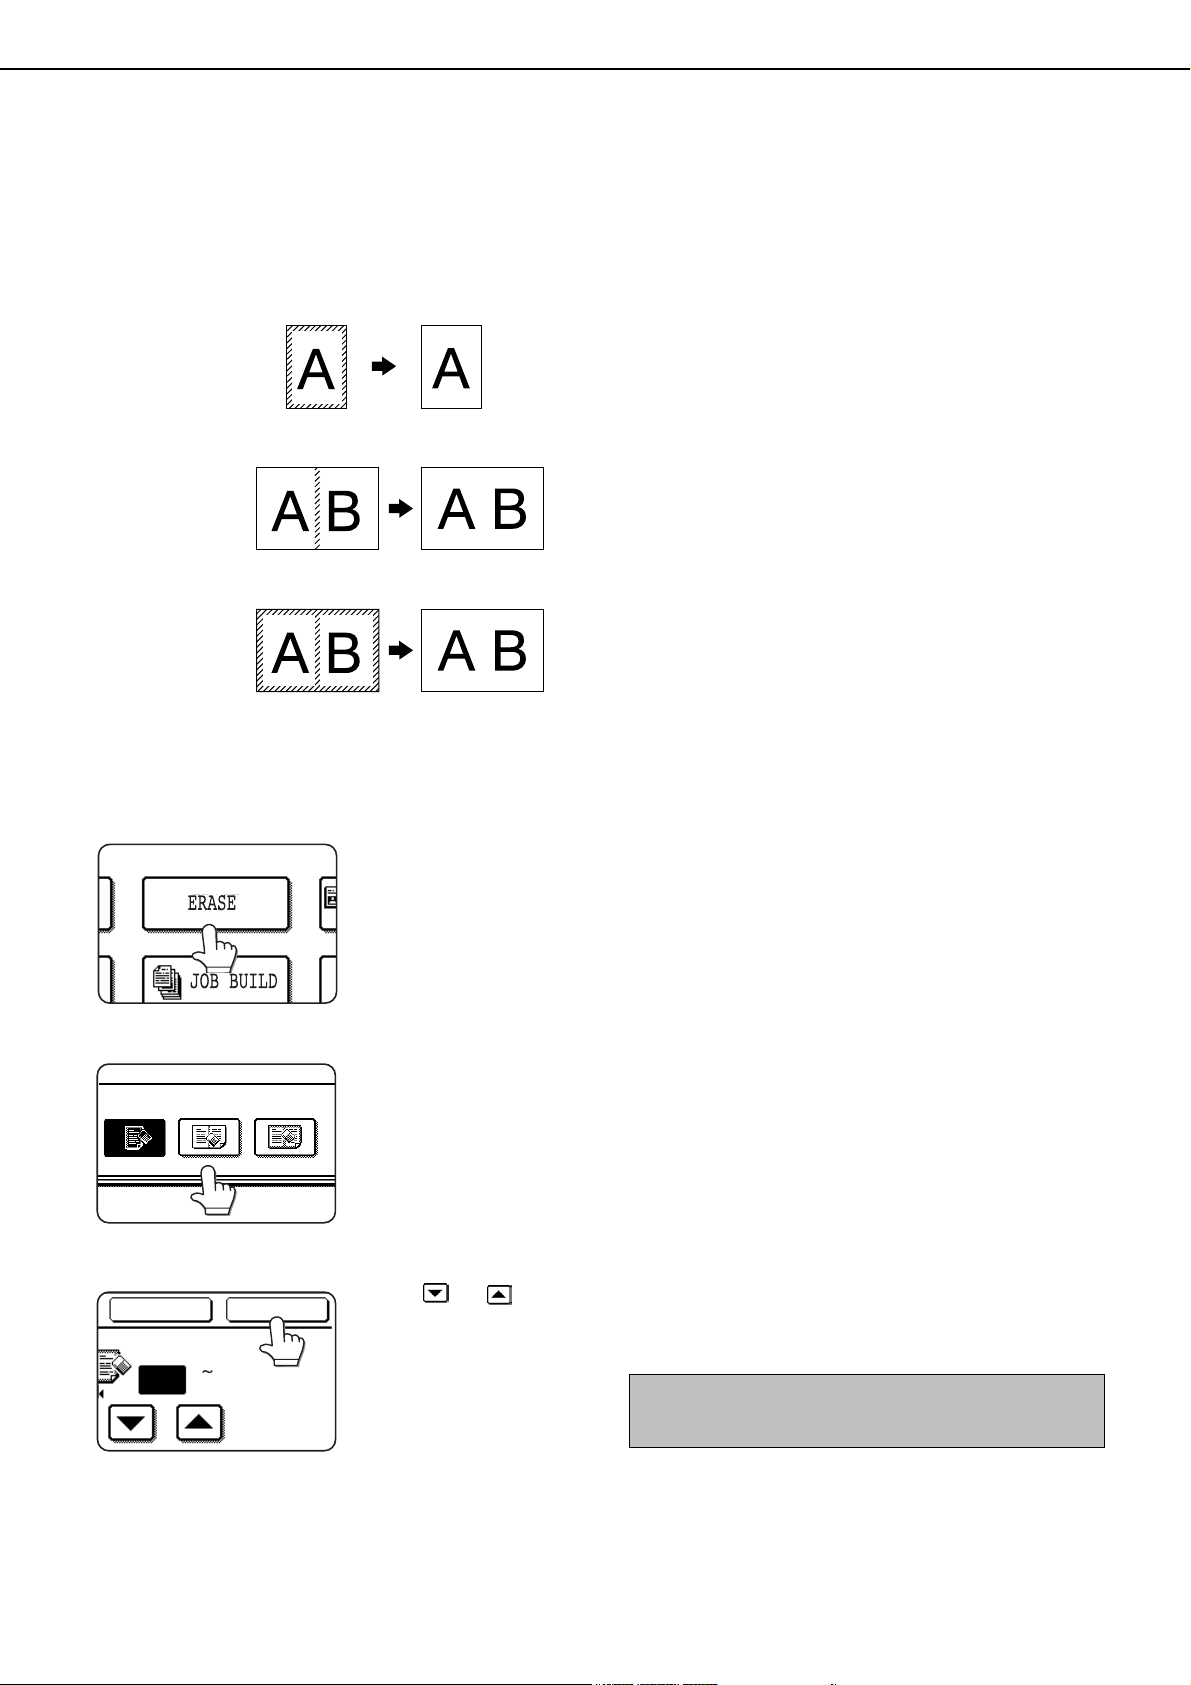
Erase
The erase function is used to erase the shadow lines on copies produced when copying thick originals or books. The
erase modes that can be selected are shown below. The erase width is approximately 1/2" (10 mm) in it’s initial setting.
Original
Touch the [ERASE] key on the SPECIAL MODES
1
screen.
The erase setting screen
will appear.
Copy
Edge erase
Eliminates shadow lines around the edges of copies
caused when thick paper or a book is used as an original.
Center erase
Eliminates shadow lines produced by the bindings of
bound documents.
Edge + center erase
Eliminates shadow lines around the edges of copies and
eliminates the shadow at the center of copies.
Touch the [OK] key on the special modes
4
screen.
After adjusting the exposure, follow any of the
copying procedures.
Select the desired erase mode.
2
ERASE
ERASE
3
EDGE
CENTER
ERASE
Adjust the amount of erase and touch the [OK]
key.
EDGE+CENTER
ERASE
CANCEL OK
EDGE
(0 20)
10
mm
Select one of the three
erase modes. The selected
key will be highlighted.
Use the and keys to
adjust the erase width and
then touch the [OK] key.
To cancel the erase function, touch the [CANCEL] key on
the erase setting screen.
21
Page 23
PAPER SELECT
AUTO
100%
A4
SPECIAL FUNCTIONS
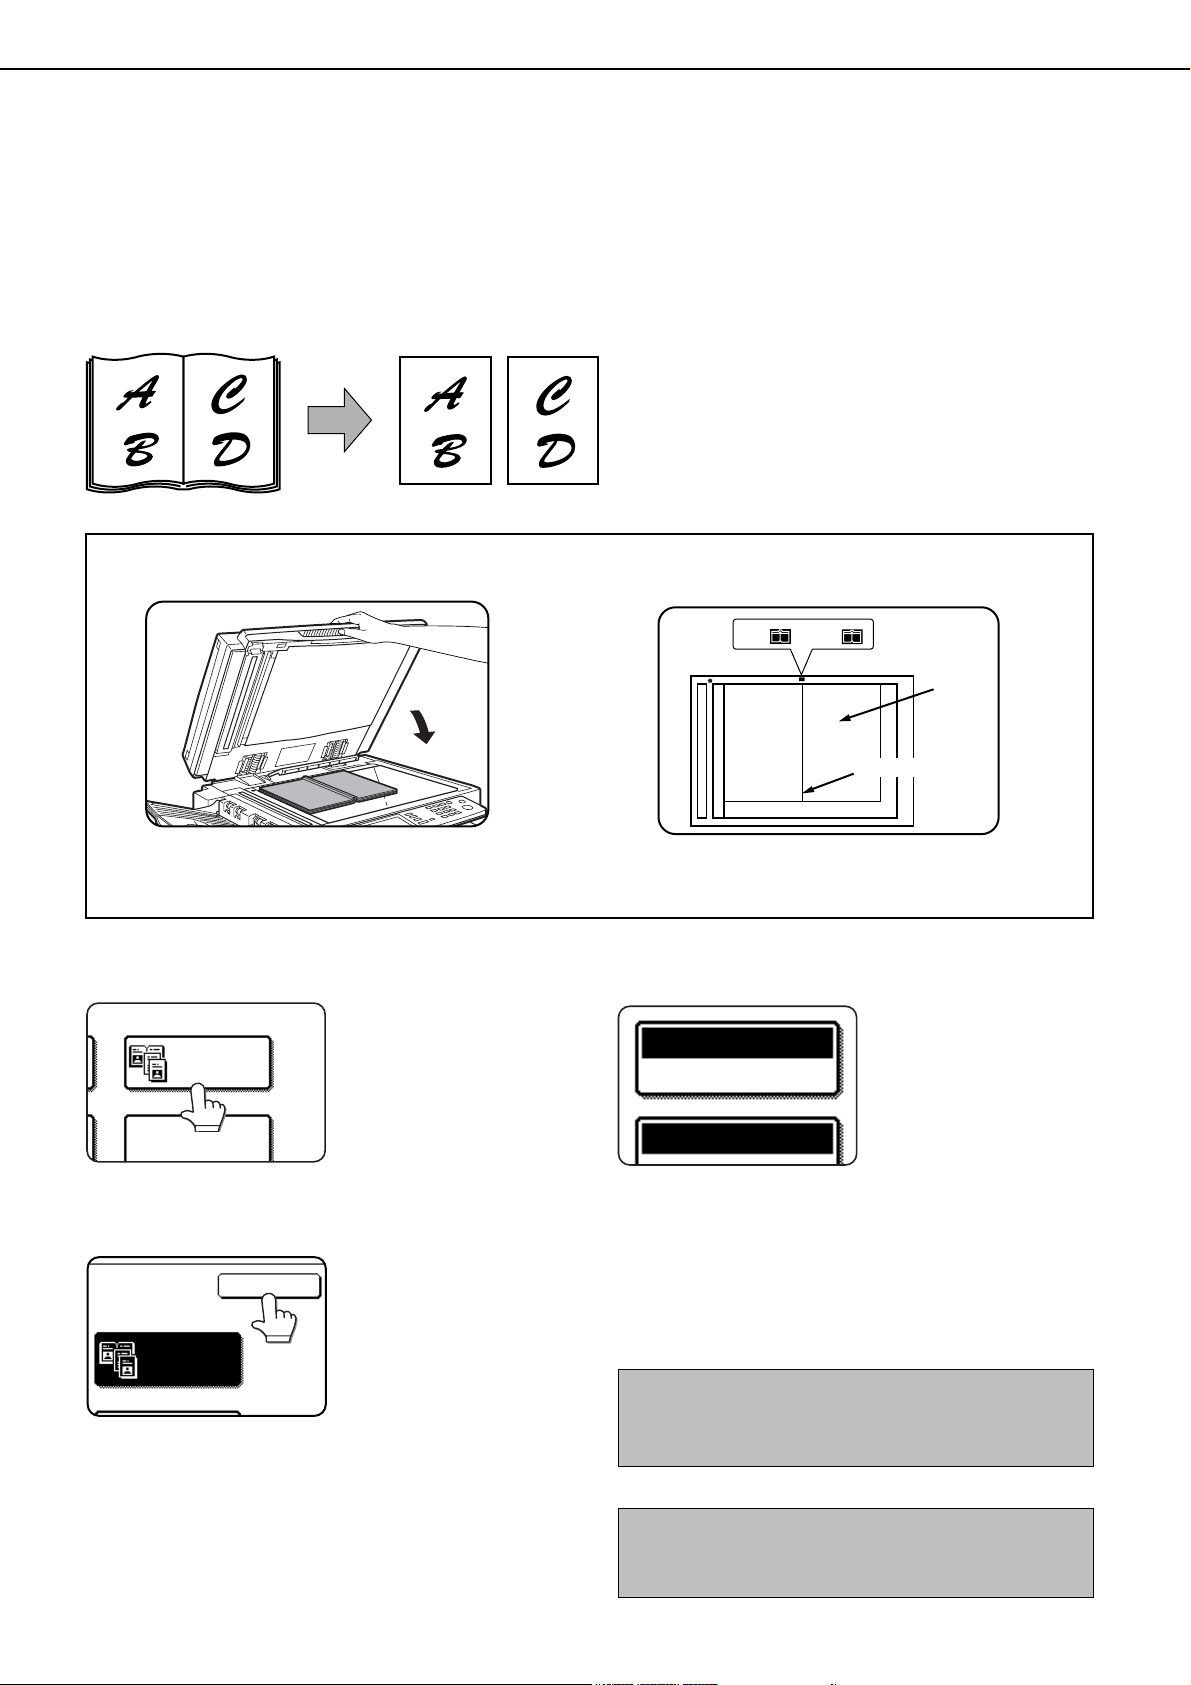
Dual page copy
The dual page copy function produces separate copies of two documents placed side by side on the document glass.
It is especially useful when copying books and other bound documents.
[Example] Copying right and left pages of a book
●
Book original
When copying book originals:
Dual page copy
The dual page copy function can be used with
reduction copying but cannot be used with
enlargement copying.
●
The dual page copy function can be done only from
the document glass. The automatic document feeder
cannot be used with this function.
●
Only 8-1/2" x 11" or A4 paper can be used.
1
x
/
8
Index
2
11 or A4
This page
is copied
first.
When copying a thick book, press down lightly on
the document cover.
Touch the [DUAL PAGE COPY] key on the
1
SPECIAL MODES screen.
The [DUAL PAGE COPY]
key will be highlighted.
DUAL PAGE
COPY
MULTI SHOT
Touch the [OK] key on the special modes
2
screen.
OK
DUAL PAGE
COPY
Place the originals on the document glass.
3
Center line of
original
Ensure that 8-1/2" x 11" or A4 size paper is
4
selected.
If 8-1/2" x 11" or A4 size
paper is not selected, touch
the [PAPER SELECT] key to
select 8-1/2" x 11" or A4
size paper.
After adjusting the exposure, follow any of the
copying procedures. When copying onto two sides
of paper, follow steps 2 to 4 on page 14 and then
follow steps 4 to 7 on page 13.
When copying onto one side of paper, follow steps
4 to 7 on page 13.
To cancel the dual page copy function, touch the [DUAL
PAGE COPY] key on the special modes screen (step 1).
(The highlighted display will be canceled.)
22
NOTE
To erase shadows caused by document binding, use the
edge erase function (page 21).
Page 24
RIGHT
BINDING
PAPER SELECT
AUTO
100%
A3
SPECIAL FUNCTIONS
Pamphlet copy
The pamphlet copy function is used to arrange copies in proper order for eventual center-stapling and folding into a
booklet. Two original pages are copied onto each side of copy paper. Four pages are, therefore, copied onto one sheet.
[Example] Copying eight originals in the pamphlet copy mode
●
Originals (one-sided)
1
2
3
4
5
6
7
Originals (two-sided)
2
4
1
3
5
8
6
7
Left binding
For left to
right turning
8
Right binding
For right to
left turning
Finished copies are
folded in two.
First page
First page
Scan the originals from the first page to the last page.
The order of copying will be automatically adjusted
by the machine.
●
Either left binding (right to left turning) or right binding
(left to right turning) can be selected.
●
Four originals will be copied onto one sheet. Blank
pages may be automatically produced at the end
depending on the number of the originals.
●
When using this function, a duplex module must be
installed.
●
If a saddle stitch finisher is installed, copies can be
stapled in two positions along the center of copies
and folded at the center.
Touch the [PAMPHLET COPY] key on the
1
SPECIAL MODES screen.
The pamphlet copy setting
screen will appear.
PAMPHLET COPY
Designate the type of originals to be copied: 1-
2
sided or 2-sided.
ORIGINAL
1-SIDED 2-SIDED
Select the binding position (left binding or right
3
binding) and touch the [OK] key.
CANCEL
OK
The [2-SIDED] key appears
when a B/W scanner
module/DSPF (SG-SSM) is
installed. Touch this key to
perform automatic twosided scanning of an
original.
LEFT
BINDING
Ensure that the desired paper size has been
6
automatically selected based on the original
size.
To select another size paper,
select the desired size and
touch the [AUTO IMAGE] key.
The appropriate copy ratio will
be selected automatically
based on the original size and
the paper size. (See steps 2
and 3 on page 16.)
Make all other desired settings such as
7
exposure or the number of copies, and press
the [START] key.
[When using the automatic document feeder:]
8
Copying will start after all originals have been scanned.
(The next step is not needed.)
[When using the document glass:]
Replace the original with the next original and press the
[START] key. Repeat this operation until all originals have
been scanned.
Touch the [READ-END] key. (only if the
9
document glass is used)
Touch the [OK] key on the special modes
4
screen.
Copy from the first page to the last page from
5
either the document feeder or the document
glass.
PLACE NEXT ORIGINAL. PRESS [START].
WHEN FINISHED, PRESS [READ-END].
READ-END
When the pamphlet copy function is set, the twosided copying mode will be automatically
selected and cannot be changed.
To cancel the pamphlet copy function, touch the [CANCEL]
key on the pamphlet copy setting screen.
23
Page 25
OK
SPECIAL FUNCTIONS
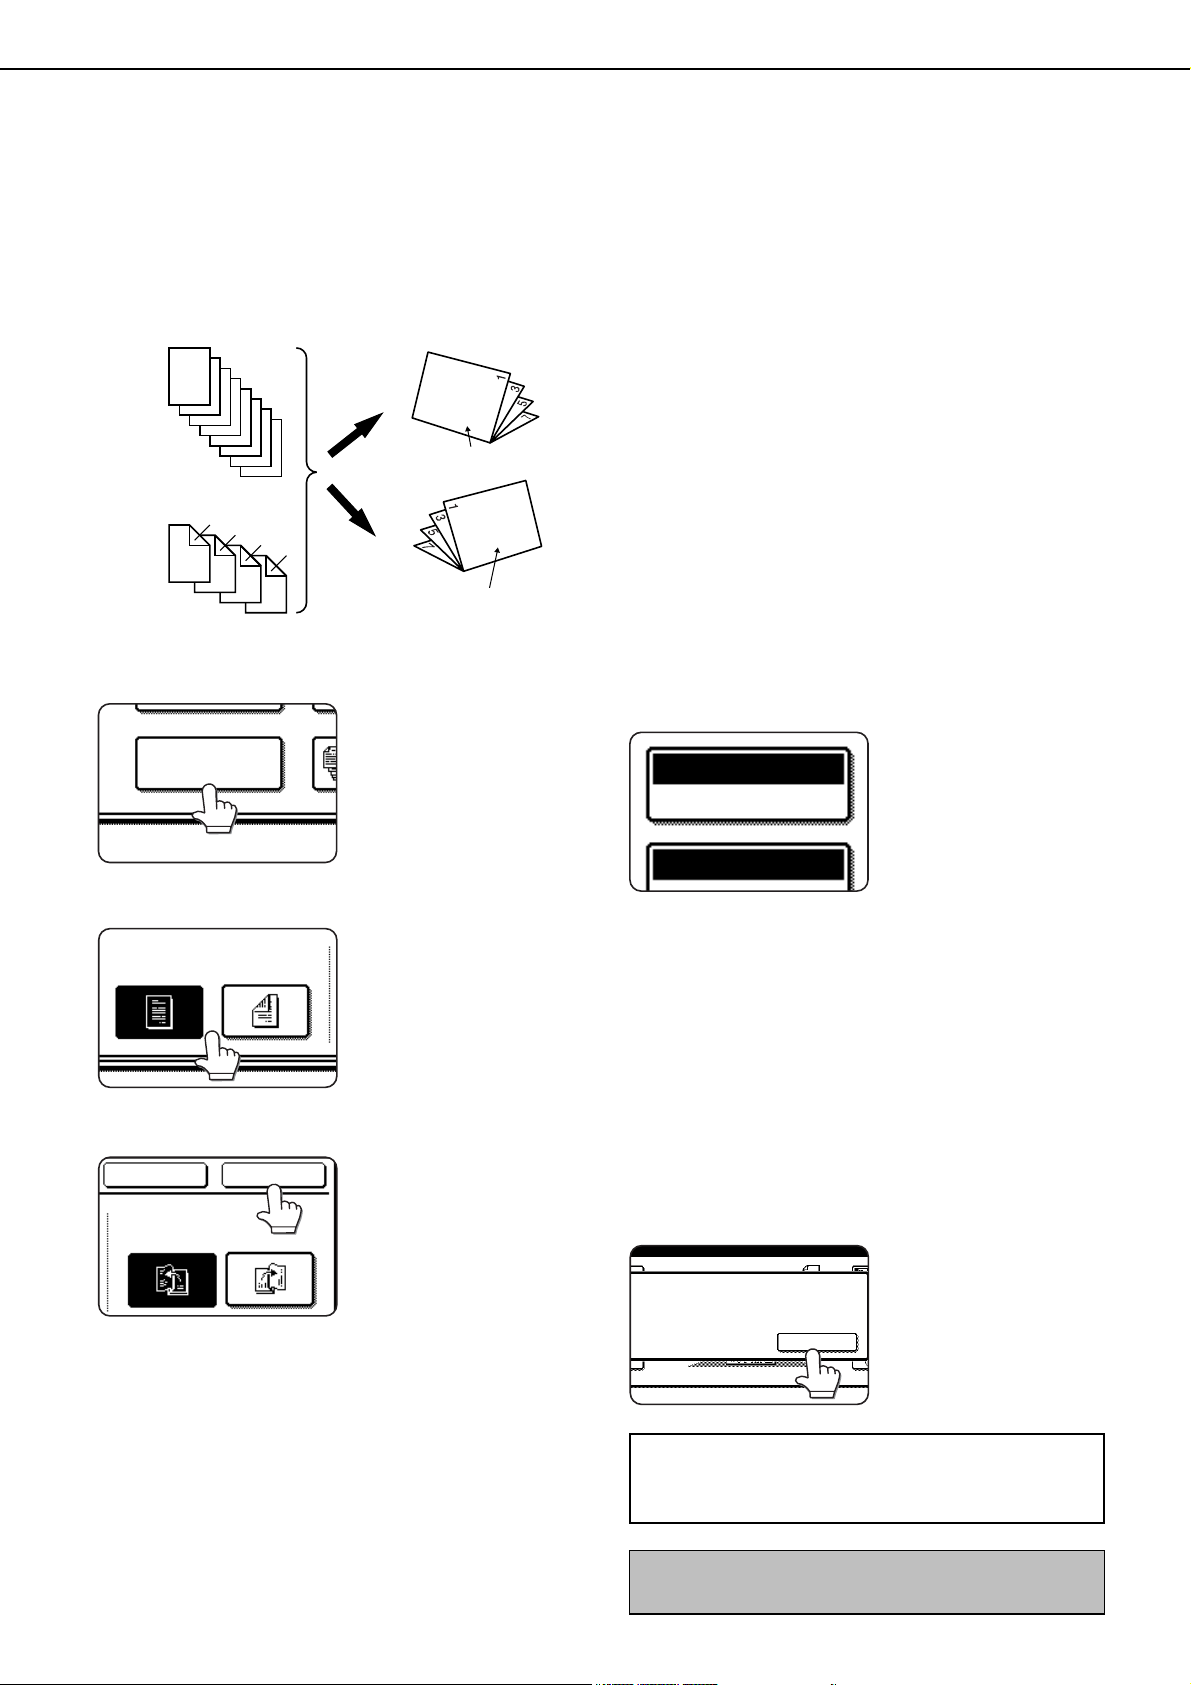
Job build
The number of originals that can be copied into a set of copies in a single run is limited by the capacity of the memory
available*1 for scanned originals. Normally the number of originals is further limited by the number of originals that can
be set into the document feeder tray*2.
The job build function allows scanning and copying of up to 100 originals. For scanning more than 50 originals, the
originals must be separated into sections not exceeding 50 originals, scanned in sections and stored in memory. After
all sections are in memory, they can be copied as a continuous set .
*1 The number of originals that can be copied into a set of copies in a single run is limited by the capacity of the
memory available for scanned originals.
*2 Up to 50 sheets (30 sheets for 8-1/2" x 14" or larger) can be set into the document feeder tray at one time.
[Example] Copying 100 pages of 8-1/2" x 11" or A4 originals
Originals
Page 1
50 sheets
✽
Divide the originals in sections of 50 sheets and scan
the originals starting from the first page of section A and
then scan section B. Be sure to keep the correct page
order when setting section B.
Touch the [JOB BUILD] key on the SPECIAL
1
MODES screen.
Page 51
50 sheets
The [JOB BUILD] key will be
highlighted.
JOB BUILD
Touch the [OK] key on the special modes screen
2
while JOB BUILD is highlighted.
ERASE
JOB BUILD
DUAL PAGE
COPY
MULTI SHOT
Make all other desired settings such as the
4
number of copies, and press the [START] key.
Scanning of originals will
start. After scanning of the
first section of originals (“A
in the example above) is
completed, remove the
scanned originals, place the
next section of originals
(section B in the example)
and press the [START] key.
Repeat this operation until
all blocks of originals have
been scanned.
Touch the [READ-END] key after the last section
5
of originals has been scanned.
Place the first section originals in the document
3
feeder tray. (page 7)
24
PLACE NEXT ORIGINAL. PRESS [START].
WHEN FINISHED, PRESS [READ-END].
READ-END
To cancel the job build function, touch the [JOB BUILD]
key on the special modes screen as in step 1. The
highlighted display will be canceled.
Page 26

SPECIAL FUNCTIONS
Multi shot
The multi shot function is used to copy up to four originals, collectively in a specified order, per sheet of copy paper in
any one of four layout patterns.
[Example] Copying seven originals using the 4 in 1 MULTI SHOT selection in a layout pattern starting from the upper
left to lower right.
●
One-sided copies from
one-sided originals
Copies
One-sided copies from
two-sided originals
When using the multi shot function, place the originals,
select the desired paper size, and select the copying
mode (page 9) before selecting the multi shot function
on the special modes screen.
●
When using the multi shot function, the appropriate
copy ratio will be automatically set based on the
original size, paper size, and the number of originals
to be copied onto one sheet. The minimum reduction
ratio is 25%. Depending on the original size, paper
size, and the number of originals to be copied onto
one sheet, the appropriate copy ratio may be smaller
than 25%. In this case, portions of original images
may not be copied.
Touch the [MULTI SHOT] key on the SPECIAL
1
MODES screen.
The multi shot setting
screen will appear.
MULTI SHOT
Select the number of originals to be copied onto
2
one sheet of copy paper on the multi shot
selection screen.
The orientation of copy
2in1 4in1
Select the layout.
3
LAYOUT
paper and the image of the
originals may be rotated as
needed.
Select the order in which the
originals will be arranged on
the copy.
[When using the automatic document feeder:]
4
Copying will start after all originals have been scanned.
(The next step is not needed.)
[When using the document glass:]
Replace the original with the next original and press the
[START] key. Repeat this operation until all originals have
been scanned.
If scanning is being done from the document
5
glass, touch the [READ-END] key after the last
original has been scanned to start copying.
PLACE NEXT ORIGINAL. PRESS [START].
WHEN FINISHED, PRESS [READ-END].
READ-END
To cancel the multi shot function, touch the [CANCEL] key
on the multi shot setting screen.
25
Page 27

JOB PROGRAM MEMORY
5
1
M NUMBER.
STORE
/
DELETE
1
6
RECALL
ESS PROGRAM NUMBER.
PROGRAMS
STORE
/
234
789
EXPOSURE
AUTO
AUTO
100%
OK
A4
A4
A4
A3
A4R
1.
2.
3.
4.
D PRESS [OK].
Frequently used job programs can be stored in each of ten storage registers. This is convenient for quick job recall
without losing time manually reprogramming each aspect of a job.
●
Selection for functions stored as part of a job program, will not be recalled as part of the program if the function has
been disabled or changed by a key operator program.
●
To exit the job memory mode, press the [CA] (clear all) key on the operation panel or touch the [EXIT] key on the
touch panel.
Storing a job program
Press the [#/P] key on the operation panel to
1
display the [STORE/DELETE] selection screen.
Touch the [STORE/DELETE] key to obtain the
2
storage register screen.
234
789
Touch a number key from 1 to 10 on the storage
3
register screen.
Highlighted storage register
numbers are registers
which already have
programs stored. If a
highlighted number is
selected, a screen will
appear with selections for
deleting the selected
program, storing (replacing
the selected program with a
new one) or canceling to go
back to the STORE/
DELETE screen to select a
different storage register.
Make all copier selections to be stored.
4
TO STORE, MAKE SELECTIONS AND PRESS [OK],
TO DELETE, PRESS [CANCEL].
SPECIAL MODES
2-SIDED COPY
OUTPUT
Touch the [OK] key.
5
A4
CANCEL
1.
A4
2.
A4
3.
A3
4.
A4R
The number of copies
cannot be stored.
The selected settings will be
stored under the register
number selected in step 3.
PAPER SELECT
COPY RATIO
26
Page 28

Recalling a job program
1
6
2
7
3
8
5
10
3
8
4
9
RECALL
STORE/DELETE
Press the [#/P] key.
1
Touch the desired storage register number key
2
to recall the job from memory.
JOB PROGRAM MEMORY
JOB PROGRAMS
PRESS PROGRAM NUMBER.
RECALL
Set the number of copies as needed and press
3
the [START] key.
When a number key is
touched, the selection
screen will be closed and
the stored job program will
be recalled. A number for
which no job program has
been stored cannot be
selected.
Copying will start with the
settings of the recalled job
program.
Deleting a stored job program
Follow steps 1 and 2 in “Storing a job program”
1
on the previous page.
Select a storage register number of the program
2
to be deleted.
If a number key for which no
job program has been
stored is selected, the
screen will change to the
screen of step 4 on the
previous page (for storing a
program). The message “TO
STORE, SELECT AND
PRESS [OK]. TO DELETE,
PRESS [CANCEL].” will
appear. When [CANCEL] is
pressed, the screen will
return to the selection
screen shown to the left.
STORE
/
DELETE
EXIT
Touch the [DELETE] key.
3
When the [DELETE] key is
A JOB PROGRAM HAS BEEN ALREADY STORED.
STORE ANOTHER PROGRAM?
CANCEL DELETE STORE
touched, the screen in step
2 will return and the
program will be deleted. If
the [CANCEL] key is
touched, the screen in step
2 will return but the program
will not be deleted. If no
other programs are to be
deleted, touch the [EXIT]
key on the screen displayed
in step 2 to exit the job
program mode.
27
Page 29

INTERRUPTING A PRINT OR COPY RUN
A4
CANCEL
0
AUTO
TO
100
%
A4
INTERRUPT can be used to temporarily stop a long print or copy job so that another copy job can be run. Only copy
jobs can be run during interrupt.
Place the original in the document feeder tray
1
or on the document glass. (page 7)
Touch the [INTERRUPT] key.
2
INTERRUPT
EXPOSURE
AUTO
PAPER SELECT
AUTO
A4
100
%
When it is possible to interrupt
0
a print or copy job in progress,
the [INTERRUPT] key will
appear as shown in the
illustration.
When the [INTERRUPT]
key is touched in step 2, the
[INTERRUPT] touch key will
be replaced by the
[CANCEL] key as shown in
the illustration. To cancel
interrupt copying at any
time, touch the [CANCEL]
key.
Make all other desired settings such as
3
exposure, paper size and number of copies and
then press the [START] key.
When using the document
glass, replace the original
with the next original and
press the [START] key.
Repeat this operation until
all originals have been
scanned. Then, touch the
[READ-END] key.
PLACE NEXT ORIGINAL. PRESS [START].
WHEN FINISHED, PRESS [READ-END].
READ-END
■ When step 3 is completed, a copy job icon will appear
at the top of the job icon queue at the left side of the
screen and interrupt copying will start. After the
interrupt job is completed, the interrupted job will
automatically resume.
28
Page 30

MISFEED REMOVAL
Misfeed in scanner module
When an original has misfed in the scanner module, remove the misfed original following the procedure below.
NOTES
●
For misfeed removal in the main unit and other peripheral devices, see the “Operation manual (for printer operation and
general information)”.
●
If you press the [INFORMATION] key, detailed information for misfeed removal will be displayed on the touch panel.
Open the document feeding area cover and
1
remove any misfed originals.
Document feeding area
cover
Close the document feeding area cover.
2
Close the cover securely so
that cover clicks into place.
Open the document cover and turn the green
3
rotating knob in the direction of the arrow to
remove any misfed originals.
■ A message may appear indicating the number of
originals which must be returned to the document
feeder tray. Return the originals to the document
feeder tray and press the [START] key.
Close the document cover.
4
29
Page 31

TROUBLESHOOTING
Whenever the machine stops or operation is not possible, check the operation panel display for messages. In most
cases, these messages will give sufficient information to return the machine to an operating condition. In cases where
this information is not enough, check the list below for more information. This section describes problems concerning
copier features. For troubleshooting specific problems related to printer, facsimile, or network scanner features, see
the separate manuals provided for them. For problems related to other peripheral devices, see chapter 5 of the
“Operation manual (for printer operation and general information)”.
Problem
Machine does not
operate.
Copies are too
dark or too light.
Smudges appear
on copies.
Image cannot be
rotated.
Part of original
image is not
copied.
Blank copies
Order of copies
incorrect
Job cancelation
needed
Scanning of
originals is
incomplete.
Check Solution or cause
●
Is the START key indicator off?
●
Is the original image too dark or too
light?
●
Is the exposure mode set to AUTO?
●
Is the exposure mode set to PHOTO?
●
Document glass or document
transport area dirty?
●
Black stripes on copies when the
document feeder is used?
●
Original smudged or blotchy?
●
Is the auto paper select or auto
image function set?
●
Is the original positioned correctly?
●
Is the copy ratio proper for the original
and paper sizes?
●
Is the original placed face down?
●
Is the order of originals correct?
●
Is a message requesting cancelation
of job displayed?
●
Is a message indicating memory is
full displayed?
If the indicator is not on, the machine may be
warming up. Warm-up should be completed in
approximately 80 seconds.
Adjust the exposure in the manual mode. (See page
15.)
The exposure level in the AUTO mode can be
adjusted using a key operator program. Contact
your key operator. (See page 33.)
Cancel the PHOTO exposure mode. (See page 15.)
Clean regularly. (See page 4-12 of the “Operation
manual (for printer operation and general
information)”.)
Clean the original scanning window. (See page
4-12 of the “Operation manual (for printer operation
and general information)”.)
Use a clean original.
Rotation copy functions only if the machine is either
in the auto paper select mode or in the auto image
mode. (See pages 8 and 16.)
Set the original properly. (page 7)
Use the auto image function to select the
appropriate copy ratio based on the original and
copy sizes. (See page 16.)
Place the original face down in the document feeder
tray or on the document glass. (See page 7.)
When using the document glass, set the originals
from the first page one sheet at a time.
When using the automatic document feeder, set
the originals with the first page down.
Press the [CA] (clear all) key to cancel the current
job.
If the data amount exceeds the limit when using
the pamphlet copy or multi shot copy which requires
scanning of all originals, scanning will be canceled
and copying will not be performed. If you install a
hard disk drive, the storage capacity will increase.
30
Page 32

SPECIFICATIONS
Copier
Resolution Scan: 600 dpi or 300 dpi, output: 600 dpi
Gradation Scan: 256 levels, output: 2 levels
Originals Sheets, bound documents
Maximum size: 11" x 17" or A3
Copy sizes Max. 11" x 17" or A3, min. 5-1/2" x 8-1/2" or A5
Image loss: Max 21/64" or 8 mm (leading edge and trailing edge in total), max. 21/
64" or 8 mm (along all other edges in total)
Warm-up time Approx. 80 seconds
First-copy time* 35 copy/min. type: 5.3 seconds
45 copy/min. type: 4.6 seconds
* Paper is fed from paper tray 1, quick scan from document glass (page 33) is set,
the original scanning resolution on the document glass is set to 600 x 300 dpi
and no optional hard disk drive is installed.
Copy ratio Variable: 25 to 400% in 1% increments, total 376 steps
Fixed presets: 25%, 64%, 77%, 100%, 121%, 129%, and 400% for inch system,
25%, 70%, 81%, 86%, 100%, 115%, 122%, 141%, and 400% for AB system
Continuous copy 999 copies; subtractive counter
Copying speed
35 copy/min. type 45 copy/min. type
11" x 17" or A3 17 copies/min. 20 copies/min.
8-1/2" x 14" or B4 20 copies/min. 22 copies/min.
8-1/2" x 11" or A4 35 copies/min. 45 copies/min.
8-1/2" x 11"R or A4R 25 copies/min. 30 copies/min
Scanner module
Name B/W scanner module/DSPF or B/W scanner module/SPF
Type Two-side simultaneous scanning system from the document feeder.
One-sided scanning from the document feeder.
One-sided scanning from the document glass.
Original feed system Automatic continuous feeding
Original exit system Face down output
Original transport system DSPF and SPF: sheet through type (reference position: center), document glass:
reference position is left rear
Original setting direction Face down
Original sizes 5-1/2" x 8-1/2" to 11" x 17" or A5 to A3
Original weight 14 to 34 lbs. or 50 to 128 g/m
Capacity Up to 50 sheets (30 sheets*1 for 8-1/2" x 14" or B4 or larger originals) provided
the total aggregate thickness does not exceed 1/4" or 6.5 mm (14 to 20 lbs. or 50
to 80 g/m2) or 3/16" or 5 mm (21 to 34 lbs. or 80 to 128 g/m2)
Power supply Drawn from the main unit
Dimensions 31-13/16" (W) x 24-3/8" (D) x 7-3/32" (H) or
808 mm (W) x 619 mm (D) x 180 mm (H)
Weight Approx. 43 lbs. or 19.5 kg
*1 For paper heavier than 28 lbs. (105 g/m2), only a stack of up to 15 sheets can be set. If 16 or more sheets are set,
image can not be scanned properly and scanned image can be expanded compared with original itself.
2
31
Page 33

KEY OPERATOR PROGRAMS
This section describes all key operator programs relating only to the copier and facsimile functions. For the key
operator programs which relate to copier, printer and facsimile functions, see the “Operation manual (for printer
operation and general information)”.
Key operator program list
Program name Page
Copy function settings
Initial status settings 33
Exposure adjustment 33
Rotation copy setting 33
Auto paper selection setting 33
600dpi x 600dpi scanning mode 33
Quick scan from document glass 33
Device control
Original size detector setting 34
Disabling of document feeder 34
Using the key operator programs
To use of the key operator programs, follow the procedures described in the “Operation manual (for printer operation
and general information)” on page 6-6. Also read “Supplementary explanation of key operation for key operator programs”
on page 6-6.
32
Page 34

Setting programs
This section describes the setting of programs common
to copier, facsimile and network scanning features. For
programs dedicated to facsimile, network scanning and
programs common to both the copier and printer
features, see their respective manuals.
KEY OPERATOR PROGRAMS
Copy function settings
The following programs can be set in “Copy function
settings”.
●
Initial status settings
●
Exposure adjustment
●
Rotation copy setting
●
Auto paper selection setting
●
600dpi x 600dpi scanning mode
●
Quick scan from document glass
Initial status settings
The copier settings will be reset when the main switch
is turned off, when the [CA] key is pressed or when
the auto clear interval has elapsed. Use this program
to establish new initial settings or to return the initial
settings to the factory default settings. Paper tray,
exposure mode, copy ratio, duplex mode, and output
mode default settings can be made.
NOTE
If a duplex mode other than 1-sided to 1-sided is set as
the default and either the duplex or scanner mode is
disabled*, the default will change to the 1-sided to 1-sided
mode.
* Disable duplex unit (page 6-10 of the “Operation manual
(for printer operation and general information)”)
* Disabling of document feeder (page 34)
Auto paper selection setting
Use this program to set the paper type* for the auto
paper select mode to “Plain paper” or “Plain paper
and recycle paper”.
* Paper type specified in Tray setting of the custom
setting function (page 1-20 of “Operation manual
(for printer operation and general information)”)
600dpi x 600dpi scanning mode
Use this program to change the original scanning
resolution of the automatic document feeder from
600 x 300 dpi to 600 x 600 dpi.
If this mode is set, the copy quality for fine characters
and fine lines will be improved but the original
scanning speed will be slower.
NOTE
If the original scanning speed is more important than higher
resolution, do not set this program.
Quick scan from document glass
Use this program to change the original scanning
resolution on the document glass from 600 x 600dpi
to 600 x 300 dpi.
If you set this program, the first copy time will be
shorter but the copy image will become a little more
coarse.
Exposure adjustment
Use this program to lighten or darken copies in the
automatic exposure mode. The factory setting is “5”.
“1” indicates lighter density and “9” indicates darker
density on the touch panel.
Rotation copy setting
If this program is set, the image of originals will rotate
when the orientation of the originals does not match
that of the copy paper.
(Rotation copy will function only if the auto paper
select or auto image mode has been selected.)
NOTE
For copying from 5-1/2 x 8-1/2 or A5 size originals onto 51/2 x 8-1/2R or A5R paper, this program must be set.
NOTE
If the copy image quality is more important than first copy
time, do not set this program.
33
Page 35

KEY OPERATOR PROGRAMS
Device control
Original size detection and disabling of the document
feeder can be set.
Original size detector setting
This program is used to select the group of original
sizes to be detected. Original size detection from
the document glass can be disabled using the
program CANCEL DETECTION AT DOCUMENT
GLASS.
Detectable original sizes
Group
1 INCH - 1 8-1/2 x 11, 8-1/2 x 11R, A4
2 INCH - 2 8-1/2 x 11,8-1/2 x 11R, A4
3 AB - 1 A3, A4, A4R, A5, 8-1/2 x 11,
4 AB - 2 A3, A4, A4R, A5, 8-1/2 x 11,
Document feeder tray (for automatic document feeding)
Document glass
11 x 17, 8-1/2 x 14,
5-1/2 x 8-1/2
11 x 17, 8-1/2 x 13,
5-1/2 x 8-1/2
B4, B5, B5R 216 x 330
B5, B5R, 216 x 330 B4
If CANCEL DETECTION AT DOCUMENT GLASS
is set, originals will be regarded as EXTRA for all
copier functions and no original size will be
displayed.
Disabling of document feeder
This program is used to prevent use of the automatic
document feeder when the scanner module
malfunctions. In this case scanning can still be done
off the document glass.
34
 Loading...