

Page 1
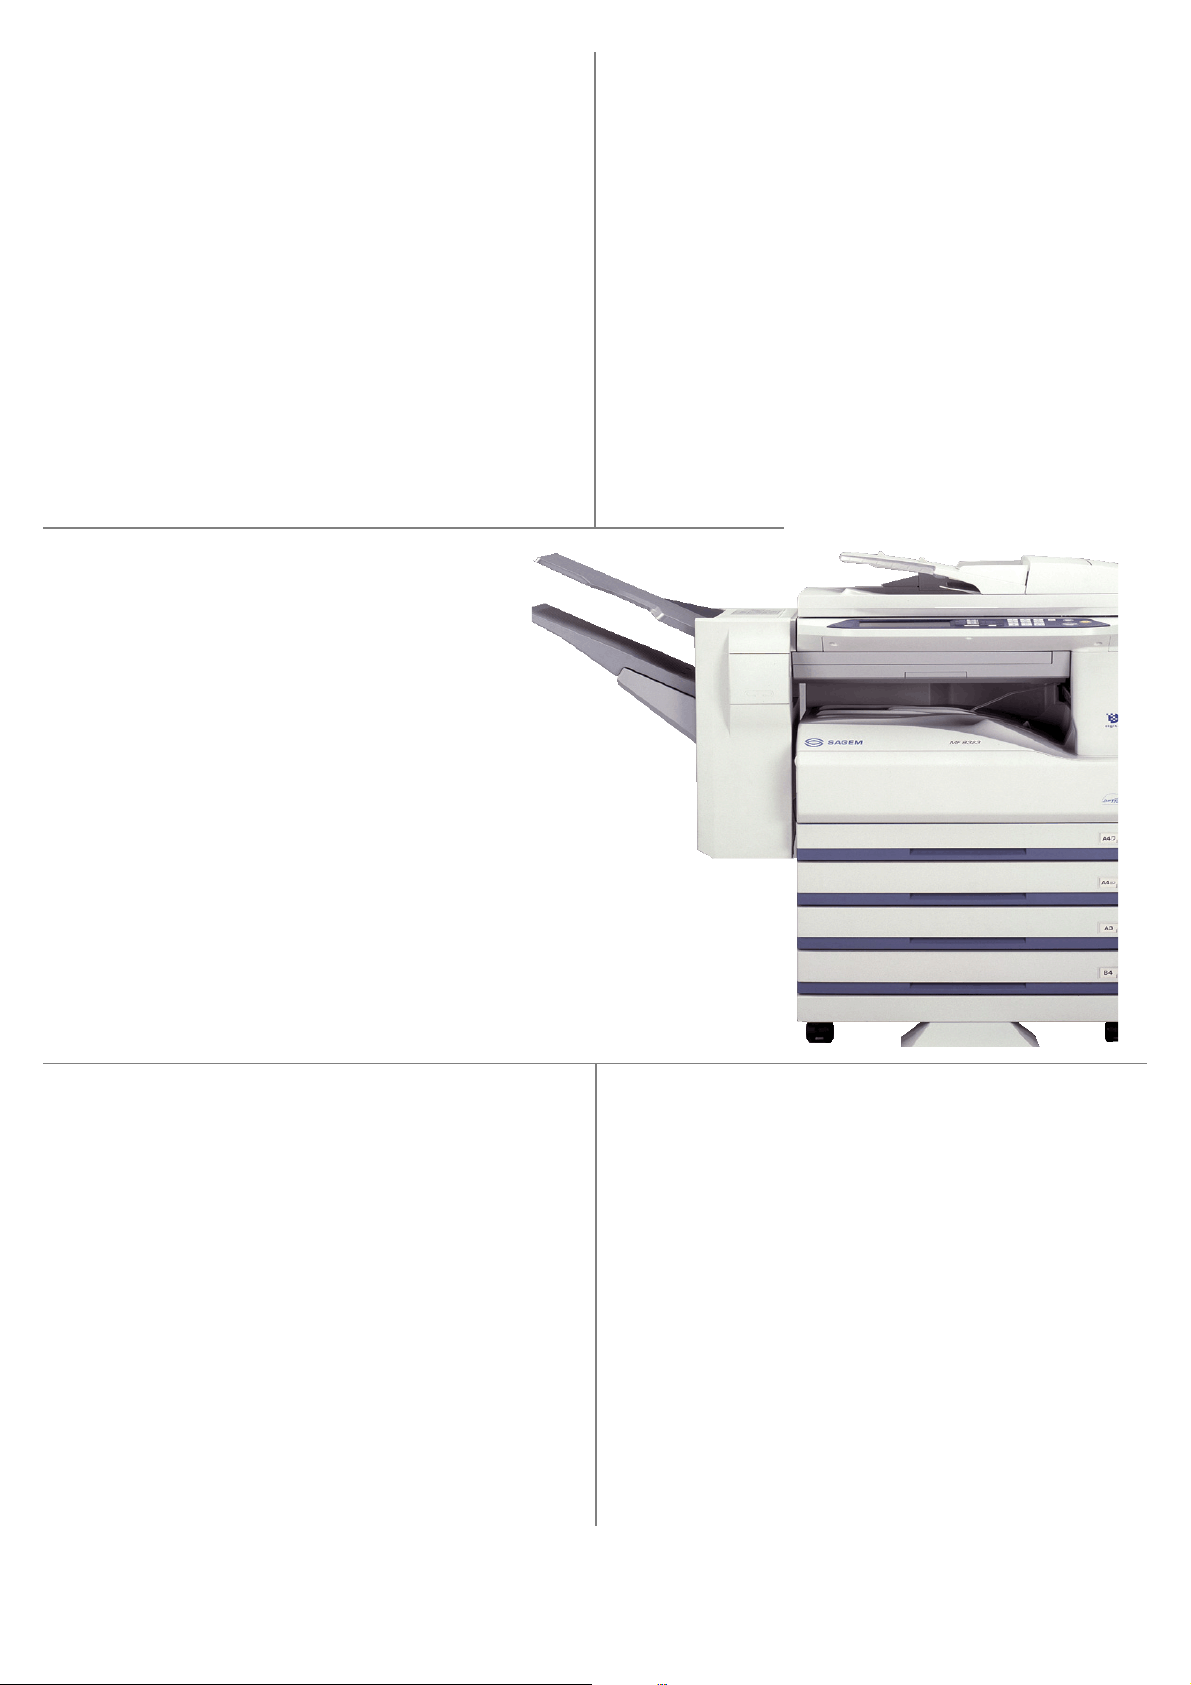
MF9300
Network printer manual
30000113476-0 1
S
Page 2

INTRODUCTION
This manual explains how to install and configure the software that is required for the printer function
of the SAGEM digital multifunctional system SG-DS23/DS27 series. The procedure for viewing the
online manual is also explained.
Note
• The screen images in this manual are mainly for Windows® XP. With other versions of
Windows
• Where "MF-XXXX" appears in this manual, please substitute the name of your model for "XXXX".
For the name of your model, see "PART NAMES AND FUNCTIONS" in the operation manual for
copier.
• This manual refers to the "SAGEM Digital Multifunctional System MF9300 Series Software
CD-ROM" that accompanied the printer expansion kit SG-K11simply as "CD-ROM".
• The PS3 expansion kit (SG-PEK) and print server card (SG-PSC) mentioned in this manual are
options.
®
, some screen images may be different from those in this manual.
Trademark acknowledgments
•Microsoft® Windows® operating system is a trademark or copyright of Microsoft Corporation in the
U.S.A. and other countries.
•Windows
XP are trademarks or copyrights of Microsoft Corporation in the U.S.A. and other countries.
• Acrobat
the Adobe logo, Acrobat, and the Acrobat logo are trademarks of Adobe Systems Incorporated.
• IBM and PC/AT are trademarks of International Business Machines Corporation.
• Macintosh, Power Macintosh, Mac OS, LaserWriter, and AppleTalk are trademarks of Apple
Computer, Inc.
•PostScript
• PCL is a trademark of the Hewlett-Packard Company.
• All other trademarks and copyrights are the property of their respective owners.
®
95, Windows® 98, Windows® Me, Windows NT® 4.0, Windows® 2000, and Windows®
®
Reader Copyright© 1987- 2002 Adobe Systems Incorporated. All rights reserved. Adobe,
®
is a registered trademark of Adobe Systems Incorporated.
SOFTWARE LICENSE
The SOFTWARE LICENSE will appear when you install the software from the CD-ROM. By using all
or any portion of the software on the CD-ROM or in the machine, you are agreeing to be bound by the
terms of the SOFTWARE LICENSE.
Page 3

CONTENTS
SETUP IN A WINDOWS ENVIRONMENT
ABOUT THE SOFTWARE CD-ROM ..................................................................................... 2
BEFORE INSTALLATION ..................................................................................................... 3
● HARDWARE AND SOFTWARE REQUIREMENTS ................................................................... 3
● INSTALLATION ENVIRONMENT AND INSTALLATION PROCEDURE.................................... 3
USING THE MACHINE AS A NETWORK PRINTER ............................................................ 4
● CONNECTING TO A NETWORK ............................................................................................... 4
● SETTING THE IP ADDRESS OF THE MACHINE...................................................................... 5
●
ADDING "MICROSOFT TCP/IP PRINTING" (Windows NT 4.0)
● INSTALLING THE SOFTWARE ................................................................................................. 8
● INSTALLING THE PRINTER ADMINISTRATION UTILITY ...................................................... 16
USING THE MACHINE WITH A PARALLEL OR USB CONNECTION .............................. 17
● INSTALLING THE SOFTWARE ............................................................................................... 17
● CONNECTING TO A COMPUTER ........................................................................................... 25
SHARING THE PRINTER USING WINDOWS NETWORKING .......................................... 26
INSTALLING THE PS DISPLAY FONTS ............................................................................ 28
USING THE PPD FILE......................................................................................................... 29
●
Installing the resident font information for PPD (only when the PPD file is installed in Windows 95/98/Me)
CONFIGURING THE PRINTER DRIVER ............................................................................ 30
HOW TO USE THE ONLINE MANUAL ............................................................................... 31
TROUBLESHOOTING ......................................................................................................... 32
SAFETY STANDARDS........................................................................................................ 34
.................................................................... 7
..... 29
1
Page 4

SETUP IN A WINDOWS ENVIRONMENT
ABOUT THE SOFTWARE CD-ROM
The CD-ROM that accompanies the printer expansion kit contains the following software:
• Printer driver
The printer driver enables you to use the printer function of the machine.
The CD-ROM contains the PCL6 and PCL5 printer drivers*
• Printer Status Monitor*
This allows you to check the status of the network printer on your computer screen.
• Printer Administration Utility*
This is a utility that allows administrators to check the status of the printer and change settings.
• Discover and Link Tool
This is used to configure and check the IP address of the machine, which is used when the
machine is connected to a network.
• SC-Print 2000
This is used to create a port to enable the machine to be used as a network printer in Windows
95/98/Me. SC-Print2000 can be used to create an LPR port (Line Printer Remote port) that
enables printing when the machine is connected to the same network as your computer, or an IPP
port (Internet Printing Protocol port) that enables printing via the Internet.
• Acrobat Reader
Software that allows you to view the online printer manual on your computer.
2
2, 3
1
and the PS printer driver*2.
*1 It is recommended that you use the PCL6 printer driver. If you have a problem printing from older software
using the PCL6 printer driver, use the PCL5e printer driver.
*2 To use the Printer Status Monitor and the Printer Administration Utility, the printer must be connected to a
network running TCP/IP protocol.
*3 If you are installing the Printer Administration Utility in Windows 95, a system file must be updated before
the utility can be installed. For more information, click the "Display README" button in the select
packages window of the installer. (p.16)
2
Page 5
BEFORE INSTALLATION
HARDWARE AND SOFTWARE REQUIREMENTS
Check the following hardware and software requirements before installing the software.
Computer type IBM PC/AT or compatible computer equipped with a USB 2.0/1.1*1, bi-directional
parallel interface (IEEE 1284), or 10Base-T/100Base-TX LAN card
Operating system Windows 95*
Windows NT Workstation 4.0 (Service Pack 5 or later)*
Windows 2000 Professional*
Windows XP Home Edition*
Other hardware requirements An environment that allows any of the above operating systems to fully operate
*1 Compatible with Windows 98, Windows Me, Windows 2000 Professional, Windows XP Professional or
Windows XP Home Edition preinstalled models equipped with a USB interface as standard.
*2 If you are installing the Printer Administration Utility in Windows 95, a system file must be updated before the
utility can be installed. For more information, click the "Display README" button in the select packages
window of the installer. (p.16)
*3 Administrator's rights are required to install the software using the installer.
INSTALLATION ENVIRONMENT AND INSTALLATION
PROCEDURE
2
, Windows 98, Windows Me,
3
, Windows XP Professional*3,
3
3
,
Follow the appropriate installation procedure for your operating system and type of cable as indicated
below.
Cable Operating system Procedure to follow
1. CONNECTING TO A NETWORK (p.4)
LAN
USB
Parallel
Printer sharing
Windows 95/98/Me
Windows NT 4.0
Windows 2000/XP
Windows 98/Me/2000 Installation in Windows 98/Me/2000 (USB cable) (p.20)
Windows XP Installation in Windows XP (USB/parallel cable) (p.17)
Windows 95/98/Me/NT
4.0/2000
Windows XP Installation in Windows XP (USB/parallel cable) (p.17)
Windows 95/98/Me/NT
4.0/2000/XP
2. SETTING THE IP ADDRESS OF THE MACHINE (p.5)
3. Installation in Windows 95/98/Me (network connection) (p.12)
1. CONNECTING TO A NETWORK (p.4)
2. SETTING THE IP ADDRESS OF THE MACHINE (p.5)
3. ADDING "MICROSOFT TCP/IP PRINTING" (Windows NT
4.0) (p.7)
4. Installation in Windows NT 4.0/2000/XP (network connection)
(p.8)
1. CONNECTING TO A NETWORK (p.4)
2. SETTING THE IP ADDRESS OF THE MACHINE (p.5)
3. Installation in Windows NT 4.0/2000/XP (network connection)
(p.8)
Installation in Windows 95/98/Me/NT 4.0/2000 (parallel cable)
(p.22)
SHARING THE PRINTER USING WINDOWS NETWORKING
(p.26)
3
Page 6
USING THE MACHINE AS A
NETWORK PRINTER
This section explains how to configure the machine settings and install the software that enables the
machine to be used as a network printer.
Caution
• The following explanations are for a Windows environment on a TCP/IP network.
• To use the machine in other environments, the print server card is required. See the "Print
Server Card User's Manual" on the CD-ROM that accompanied the print server card.
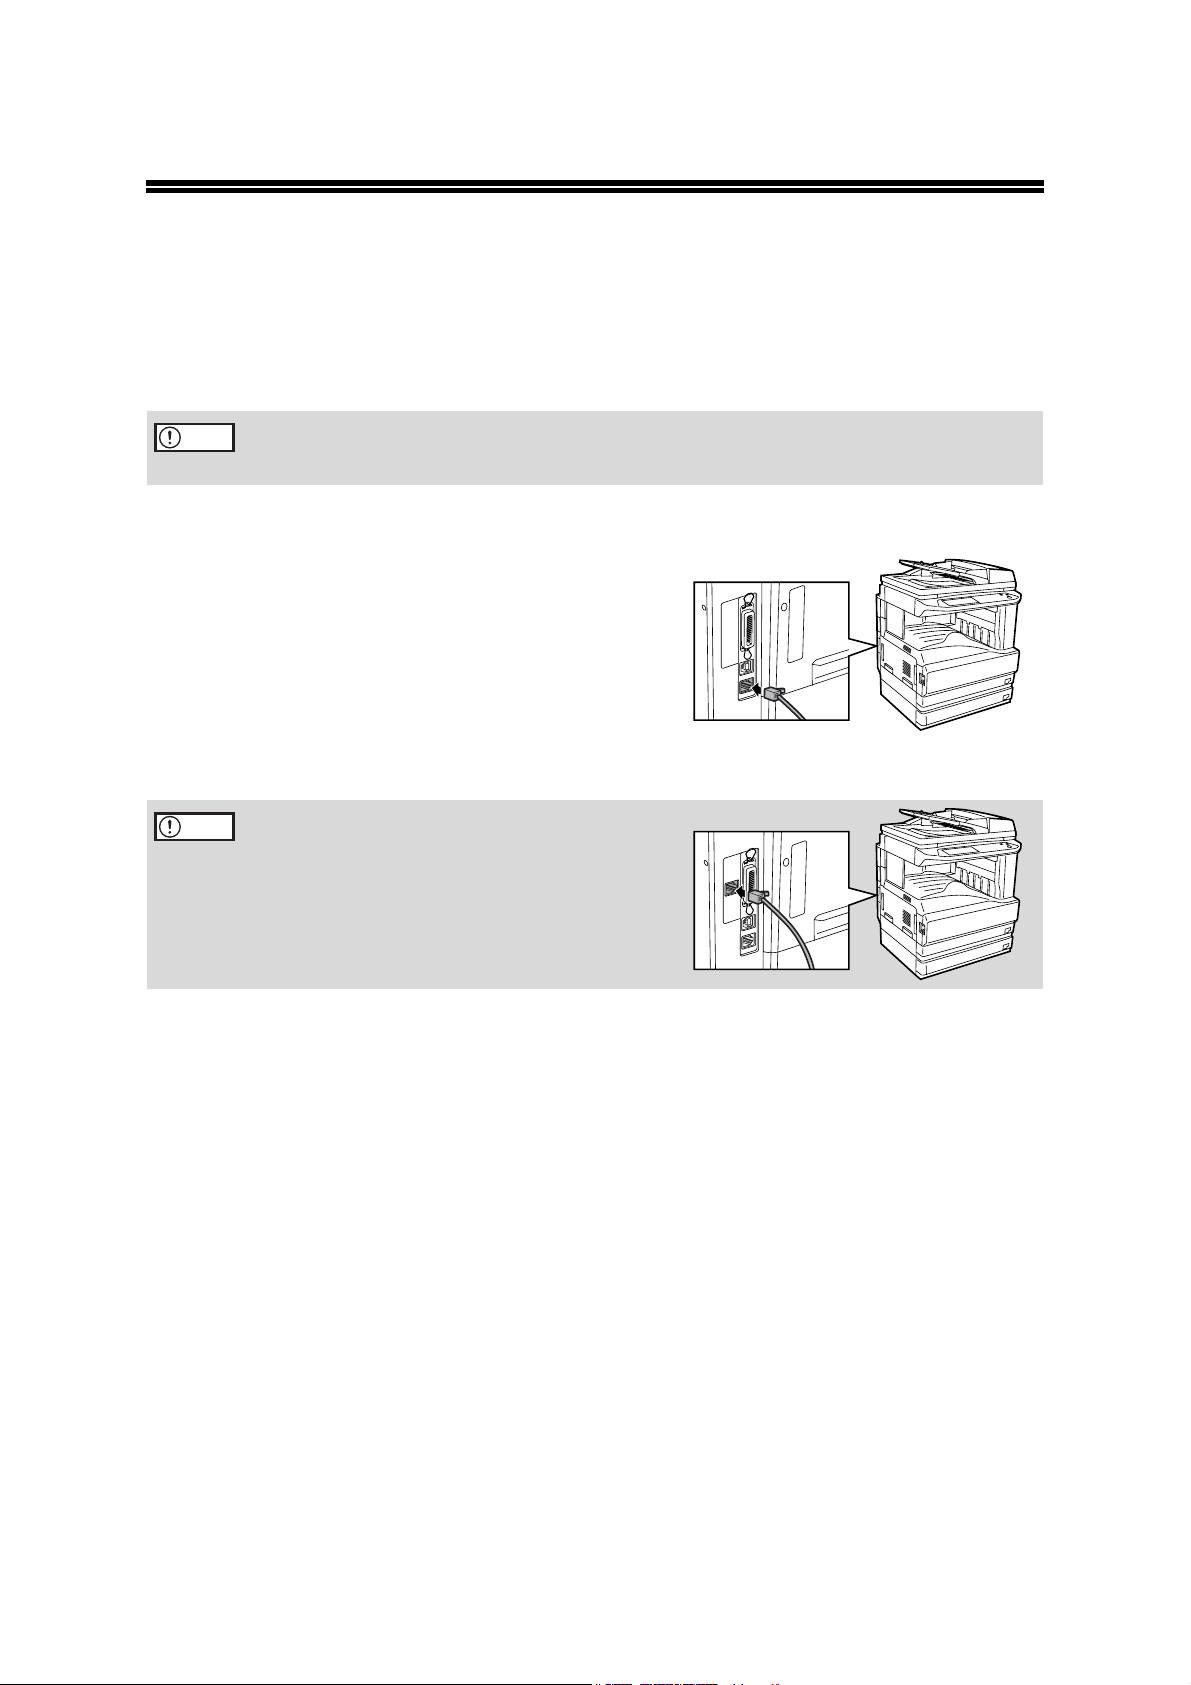
CONNECTING TO A NETWORK
Insert the LAN cable into the LAN port on the machine.
Use a network cable that is shielded.
Caution
If your machine has the optional print server card
SG-PSC installed, you must use the Network port
indicated in the picture.
4
Page 7
USING THE MACHINE AS A NETWORK PRINTER
SETTING THE IP ADDRESS OF THE MACHINE
Before installing the printer driver, be sure to set the IP address of the machine. Consult your network administrator
for the correct IP address, subnet mask, and default gateway to be entered.
assign an IP address to the machine, the following procedure is not necessary.
assigned to the machine by DHCP, see "Checking the IP address when DHCP is used" (p.6).)
Caution
If a print server card is installed, use "NICManager" to set the IP address ("NICManager" is
on the "User Software" CD-ROM that accompanied the print server card). For more
information, see the "Print Server Card User's Manual" on the CD-ROM.
If a DHCP server will automatically
(To check the IP address
Make sure that the LAN cable is
1
connected to the machine and then
turn on the machine.
Insert the CD-ROM into your computer's
2
CD-ROM drive.
Click the "start" button, click "My
3
Computer" ( ), and then double-click
the CD-ROM icon ( ).
In Windows 95/98/Me/NT 4.0/2000,
double-click "My Computer" and then
double-click the CD-ROM icon.
Double-click the "Tool" folder.
4
Double-click the "Setup" icon ( ).
5
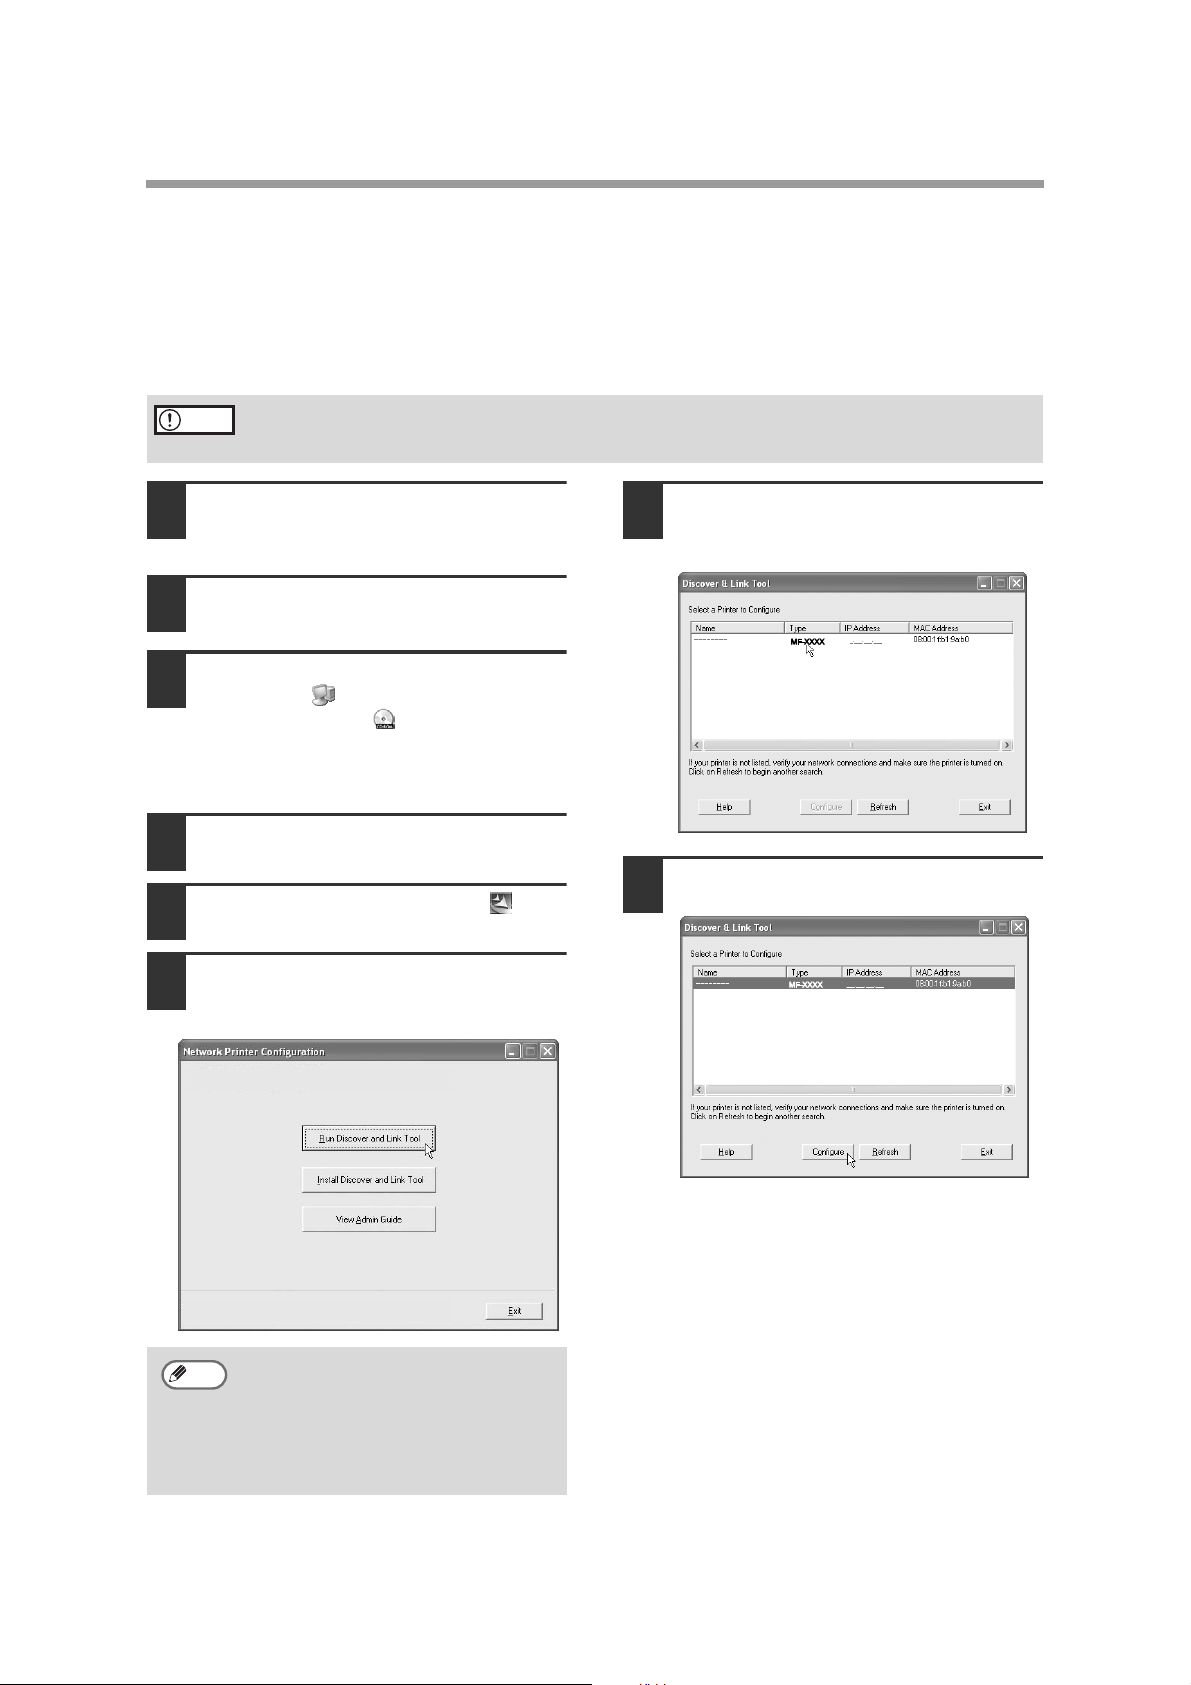
Click the "Run Discover and Link Tool"
6
button.
The Discover and Link Tool starts.
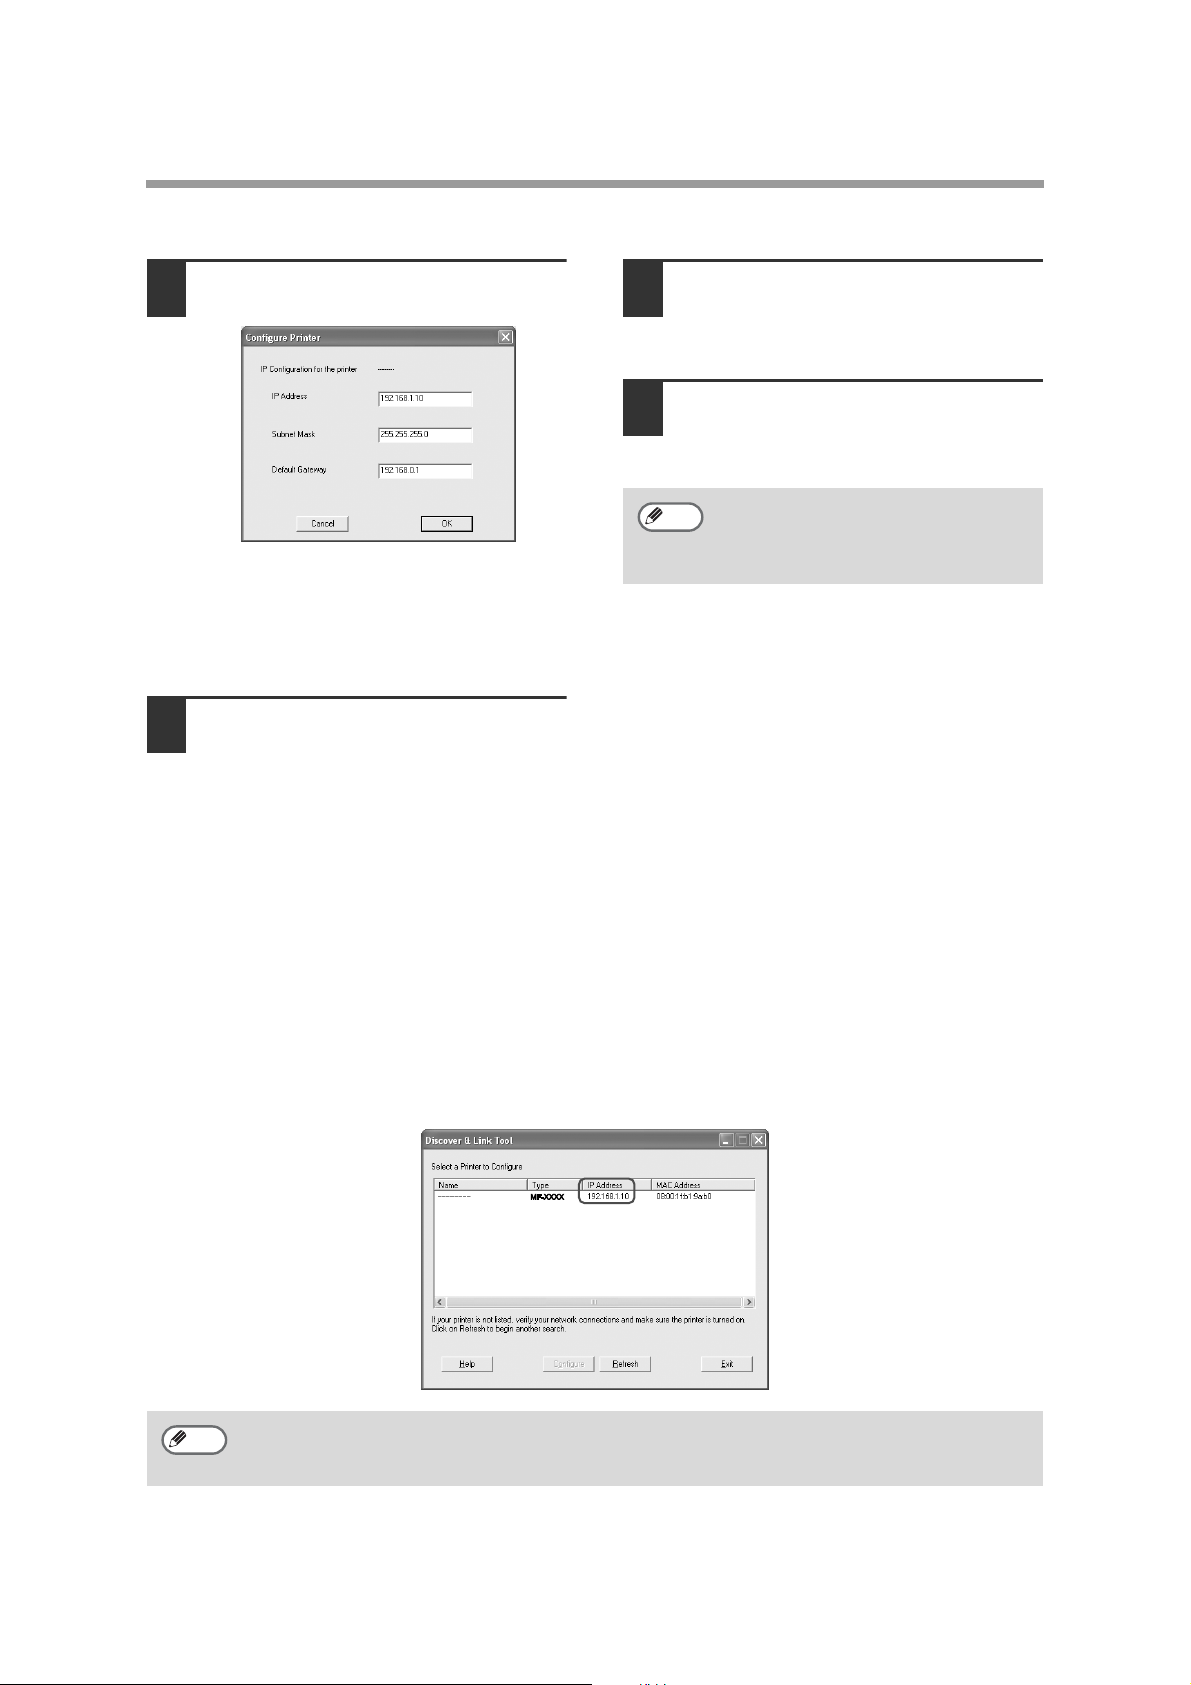
The printer or printers connected to the
7
network will be detected. Click the
printer to be configured (the machine).
Click the "Configure" button.
8
SAGEM
Note
• To view the administrator's guide,
click the "View Admin Guide" button.
This guide provides detailed
instructions for configuring settings.
• To install the "Discover and Link
Tool", click the "Install Discover and
Link Tool" button.
5
Page 8
USING THE MACHINE AS A NETWORK PRINTER
Enter the IP address, subnet mask, and
9
default gateway.
The settings in the above window are
examples. Be sure to ask your network
administrator for the correct IP address,
subnet mask, and default gateway to be
entered.
Click the "OK" button.
10
The Web page in the machine opens in
your Web browser to let you configure the
machine name and other settings.
For detailed explanations of the
procedures for configuring settings, click
"Help" in the menu frame.
When you have completed the settings,
quit your Web browser.
Restart the machine.
11
Power off the machine and then power it
back on.
Click the "Refresh" button.
12
The IP address that you entered will
appear. Make sure that it is correct.
Note
The completes the IP address settings.
If you are using Windows NT 4.0, go to page 7.
If you are using Windows 2000/XP, go to page 8.
If you are using Windows 95/98/Me, go to page 12.
If you wish to change the name of the
machine, double click the displayed
name. The Web page in the machine
will appear.
Checking the IP address when DHCP is used
If DHCP is being used, write down the IP address that appears in the window of step 7 on page 5, as
you will need to enter and/or check the IP address at several points in the procedures on the following
pages.
Note
6
If the machine is used in a DHCP environment, the machine's IP address may change
automatically. If this happens, printing will no longer be possible. In this event, use a WINS server
or do not use the machine in a DHCP environment.
Page 9

USING THE MACHINE AS A NETWORK PRINTER
ADDING "MICROSOFT TCP/IP PRINTING" (Windows NT 4.0)
To use the machine as a network printer in Windows NT 4.0, "TCP/IP Protocol" and "Microsoft TCP/IP
printing" must be installed in your computer. Check to make sure these components are installed. If
they are not installed, see Windows NT 4.0 Help to install them.
7
Page 10
USING THE MACHINE AS A NETWORK PRINTER
INSTALLING THE SOFTWARE
Installation in Windows NT 4.0/2000/XP (network connection)
Insert the CD-ROM into your computer's
1
CD-ROM drive.
Click the "start" button, click "My
2
Computer" ( ), and then double-click
the CD-ROM icon ( ).
In Windows NT 4.0/2000, double-click "My
Computer" and then double-click the
CD-ROM icon.
Double-click the "setup" icon ( ).
3
Note
4
5
6
If the language selection screen
appears after you double click the
"setup" icon, select the language that
you wish to use and click the "Next"
button. (Normally the correct language
is selected automatically.)
The License Agreement window will
appear. Make sure that you understand
the contents of the license agreement,
and then click the "Yes" button.
Read the message in the "Welcome"
window and then click the "Next" button.
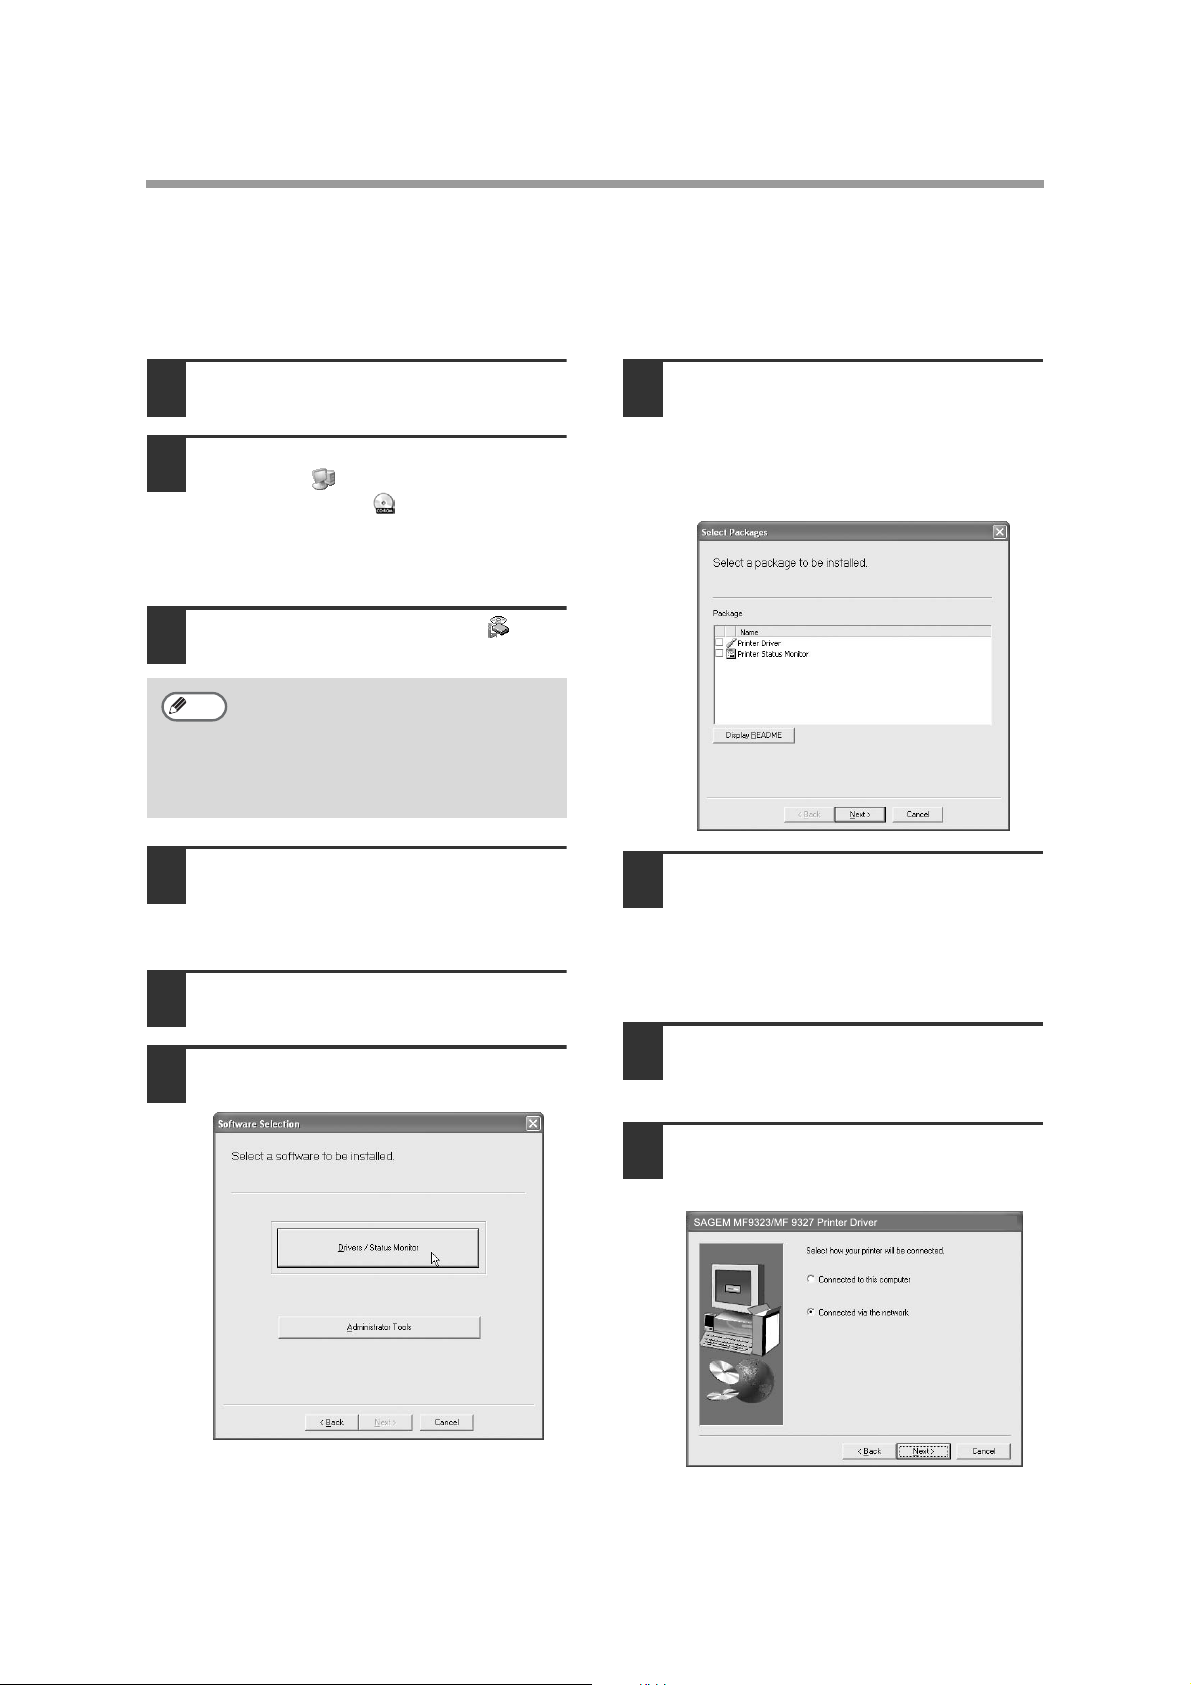
Click the "Drivers/Status Monitor"
button.
Select the checkboxes of the software
7
packages to be installed and then click
the "Next" button.
Click the "Display README" button to
show information on packages that are
selected.
Check the packages on the screen, and
8
then click the "Start" button.
The software packages to be installed will
be displayed on the screen. If an incorrect
package is displayed, click the "Back"
button and select the correct packages.
Begin installation of the printer driver (if
9
"Printer Driver" was selected in Step 7).
Follow the on-screen instructions.
When you are asked how the printer is
10
connected, select "Connected via the
network" and click the "Next" button.
8
Page 11
USING THE MACHINE AS A NETWORK PRINTER
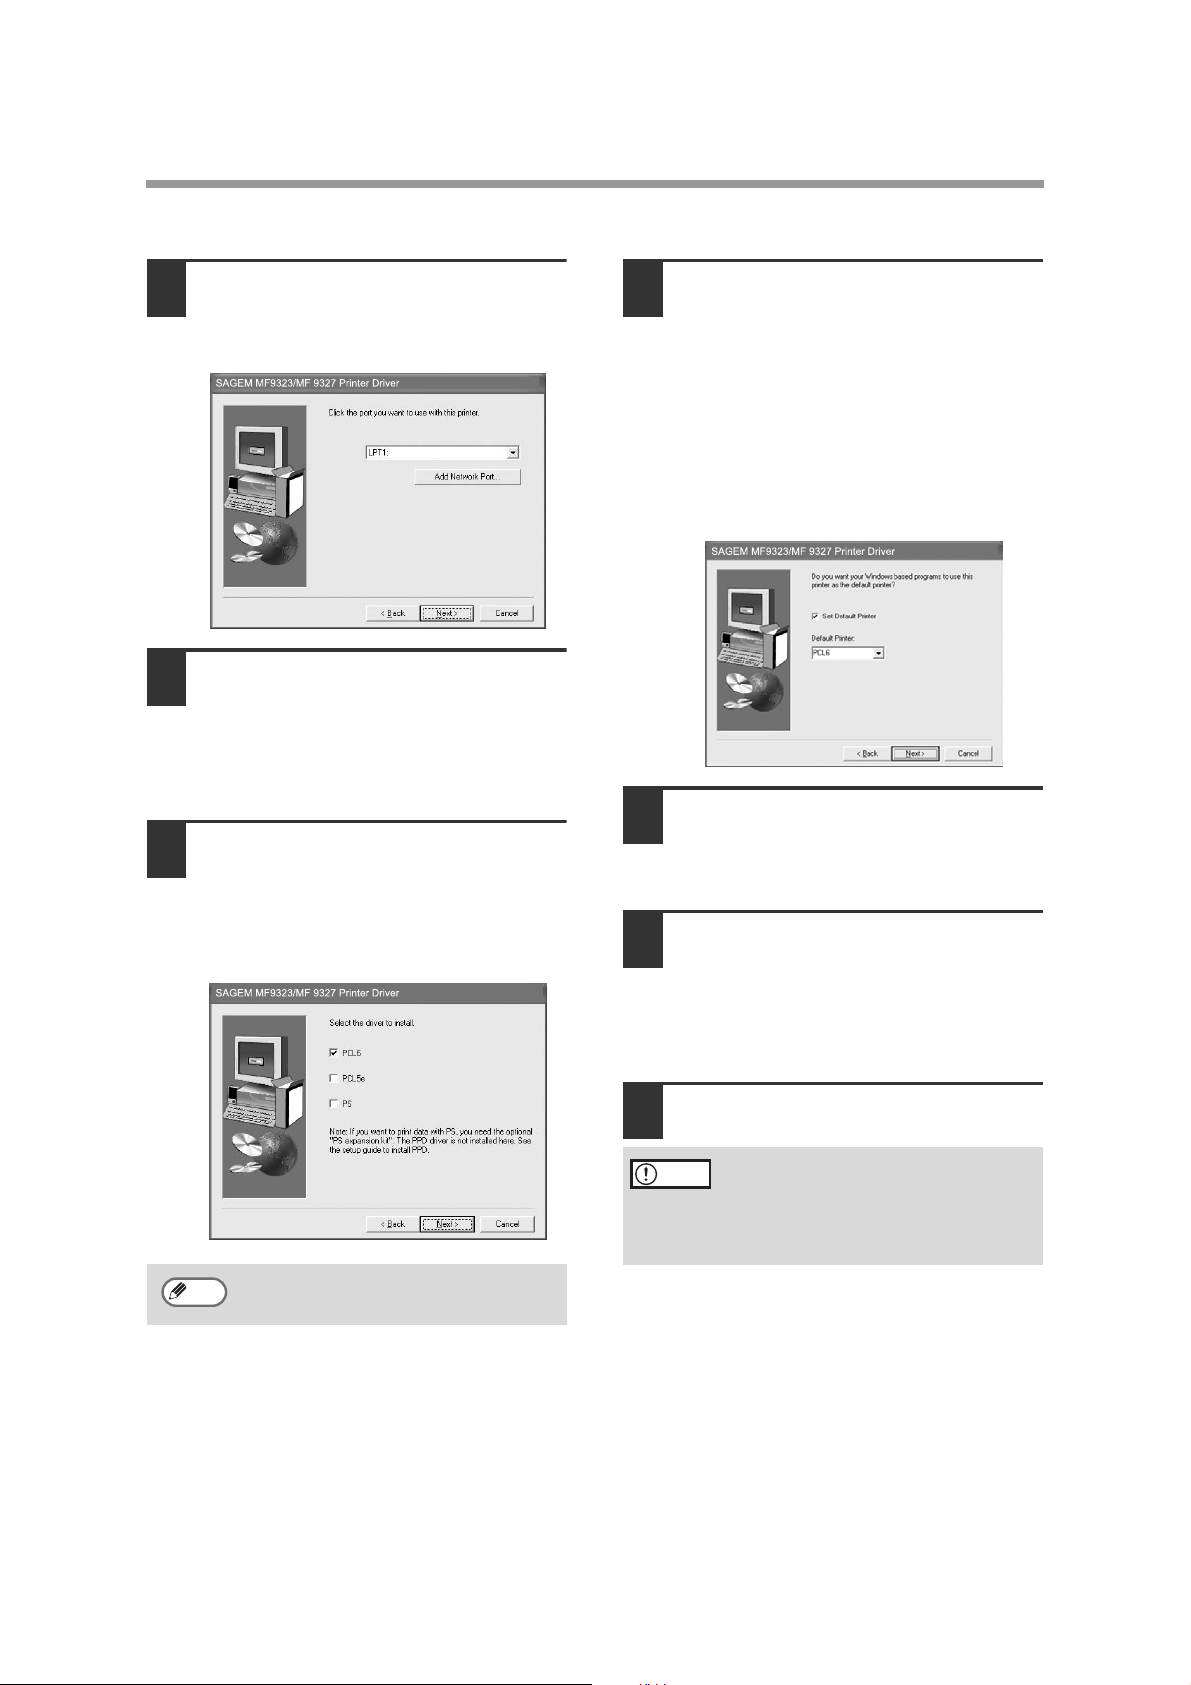
Select any port (such as LPT1) and
11
click the "Next" button.
The port settings are configured after
installation. (Beginning from step 21.)
When the model selection window
12
appears, select model name of your
machine and click the "Next" button.
For the model name of your machine, see
"PART NAMES AND FUNCTIONS" in the
operation manual for copier.
When the printer driver selection
13
window appears, select the printer
driver to be installed and click the
"Next" button.
Select the checkboxes of the printer
drivers to be installed.
Select whether or not you wish the
14
printer to be your default printer and
click the "Next" button.
If you are installing multiple printer drivers,
the following window will appear. Select
the printer that you wish to use as your
default printer.
If you do not wish to use any of the
printers as the default printer, click the
"Set Default Printer" checkbox to remove
the checkmark.
When the window for entering a printer
15
name appears, click the "Next" button.
If you wish to change the printer name,
enter the desired name.
When the display font installation
16
window appears, select whether or not
you wish to install the display font and
click the "Next" button.
To install the display font, select the "PCL
Display Font" checkbox.
Note
To use the PS printer driver, the PS3
expansion kit must be installed.
Click the "Next" button.
17
Begin installation of the printer driver.
Caution
If you are running Windows 2000/XP
and a warning message appears
regarding the Windows logo test or
digital signature, be sure to click
"Continue Anyway" or "Yes".
9
Page 12
USING THE MACHINE AS A NETWORK PRINTER
When "The installation of the SAGEM
18
software is complete" appears, click
the "OK" button.
Begin the installation of the Printer
19
Status Monitor (if "Printer Status
Monitor" was selected in Step 7).
Follow the on-screen instructions.
Click the "Finish" button when the
message informs you that setup is
successful.
When the "Finish" screen appears,
20
click the "Close" button.
When "After Windows system restarts,
connect the interface cable to the PC"
appears, click the "OK" button.
Note
If you are using Windows NT 4.0, this
completes the installation procedure.
Check the items indicated at the end of page 11
and install any components or configure any
settings that are necessary.
After the installation, a message
prompting you to restart your computer
may appear. In this case, click the
"Yes" button to restart your computer.
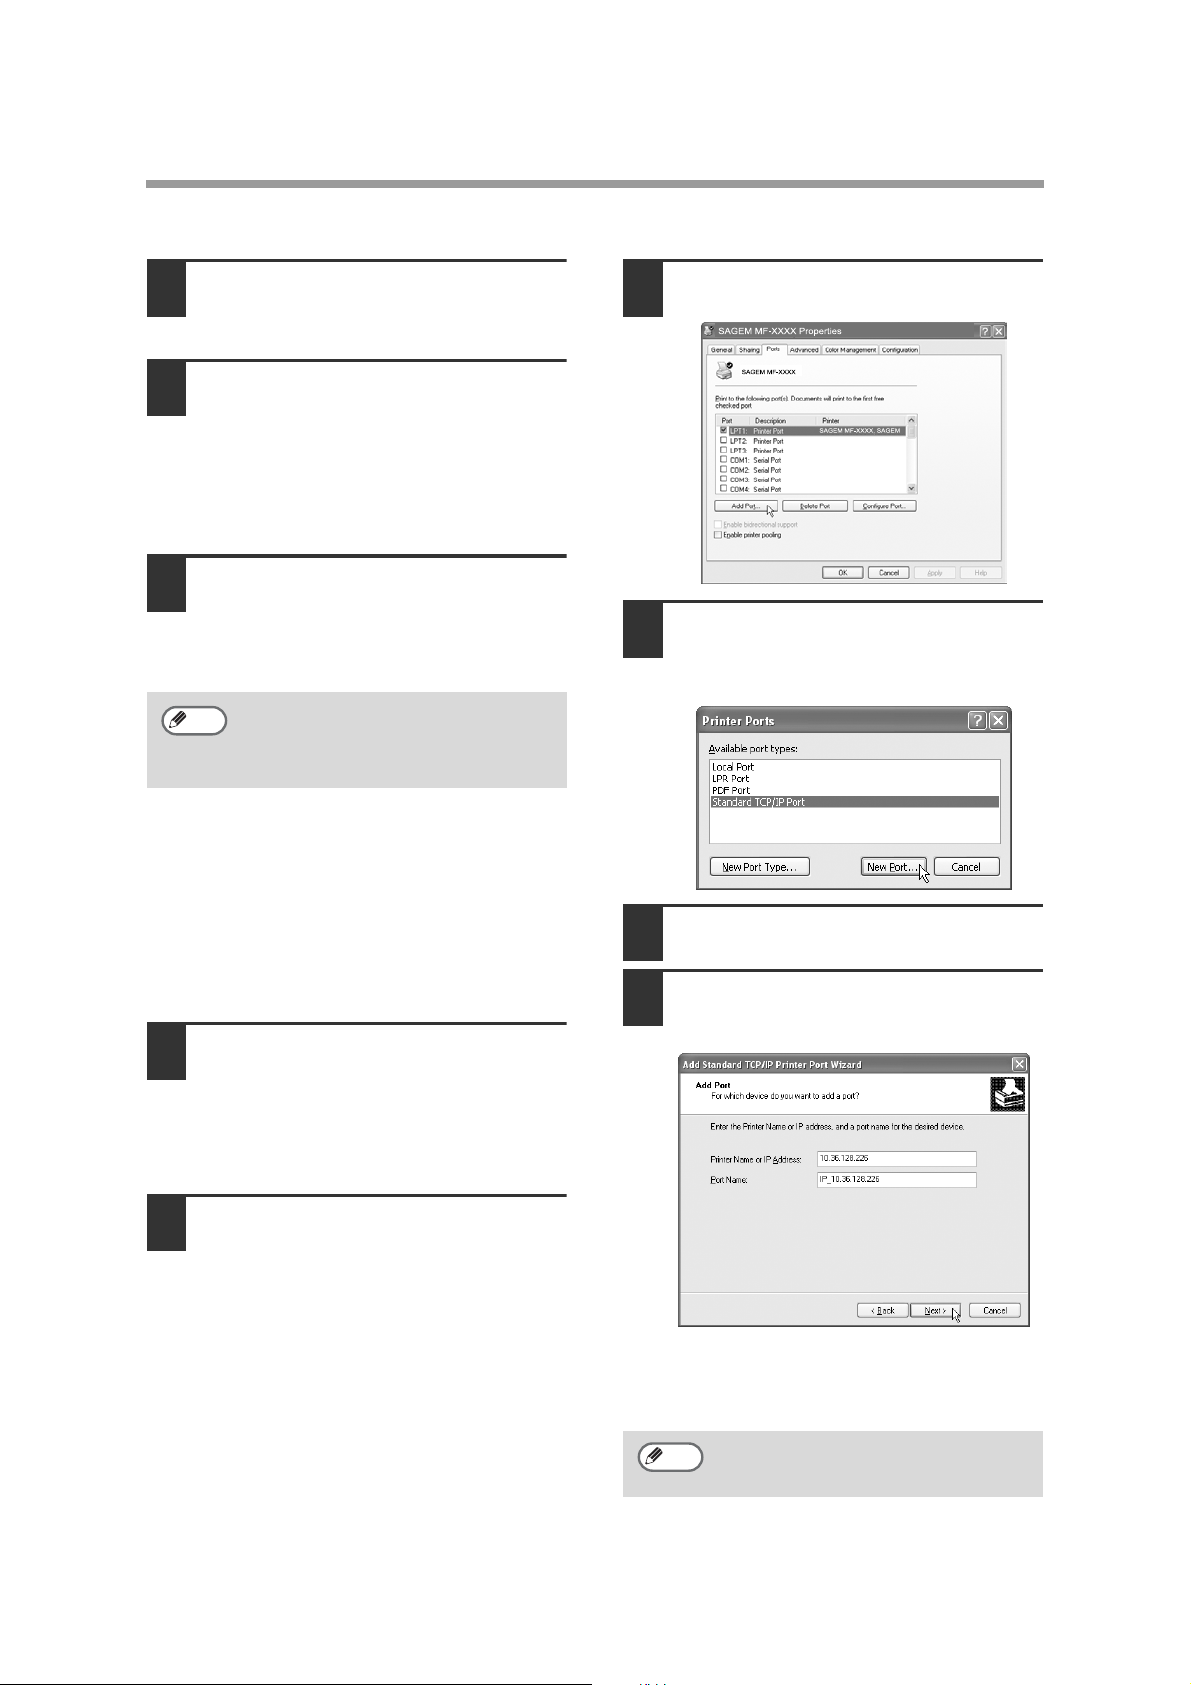
Click the "Ports" tab and click the "Add
23
Port" button.
Click "Standard TCP/IP Port" and click
24
the "New Port" button.
"Add Standard TCP/IP Printer Port
Wizard" starts.
Click the "Next" button.
25
If you are using Windows 2000/XP, configure
the port setting next.
Click the "start" button, click "Control
21
Panel", click "Printers and Other
Hardware", and then click "Printers and
Faxes".
In Windows NT 4.0/2000, click the "Start" button,
select "Settings", and then click "Printers".
Click the "SAGEM MF-XXXX" printer
22
driver icon and select "Properties"
from the "File" menu.
10
Enter the IP address in "Printer Name
26
or IP Address:" and then click the
"Next" button.
Enter the IP address of the machine that
you previously wrote down. The IP
address [10.36.128.226] is shown as an
example in the above window.
Note
"IP_(entered IP address)" is
automatically entered in "Port Name:".
You can change the name if desired.
Page 13

USING THE MACHINE AS A NETWORK PRINTER
Select "Custom" and click the "Settings"
27
button.
Select "LPR" in "Protocol", enter "lp"
28
in "Queue Name", and then click the
"OK" button.
Be sure to enter "lp" in lower case letters.
Make sure that a checkmark appears
32
by the printer port for which you
entered the IP address (example:
10.36.128.226) in Step 26, and then
click the "Apply" button.
The printer port changes to the network
port created in step 26.
This completes the installation of the
software.
• If you installed the printer driver, configure the
printer driver settings as explained in
"CONFIGURING THE PRINTER DRIVER"
(p.30).
• If you installed the PS printer driver, the PS
display font can be installed from the
"SG-PEK" CD-ROM that accompanied the
PS3 expansion kit. (p.28)
Click the "Next" button.
29
Click the "Finish" button.
30
Click the "Close" button in the "Printer
31
Ports" window.
11
Page 14

USING THE MACHINE AS A NETWORK PRINTER
Installation in Windows 95/98/Me (network connection)
If you will be using the machine as a network printer in Windows 95/98/Me, first use SC-Print2000 to
create a port and then install the software.
First, create a port.
Insert the CD-ROM into your computer's
1
CD-ROM drive.
Double-click "My Computer" ( ), and
2
then double-click the CD-ROM icon ( ).
Double-click the "Scprint" folder and
3
double-click the "EnglishA" folder.
Double-click "Scpinst.exe" ( ).
4
Click the "Next" button.
5
The License Agreement window will
6
appear. Make sure that you understand
the contents of the license agreement,
and then click the "Yes" button.
Select the directory where you wish to
7
install SC-Print2000 and click the
"Next" button.
Make sure that "Print by using LPR
10
(Line Printer Remote)" is selected and
click the "Next" button.
Enter the IP address in "IP address or
11
host name".
Enter the IP address of the machine that
you previously wrote down. The IP
address [10.36.128.226] is shown as an
example in the above window.
You can also click the "Search" button and
select an IP address.
Click the "Next" button.
8
Begin installation of the SC-Print 2000.
Select "Yes" and click the "Finish"
9
button.
12
Note
12
Make sure that "Port name of the print
server" is "lp (SG-PSC)".
Click the "Next" button.
Page 15

USING THE MACHINE AS A NETWORK PRINTER
In the window for setting the
13
destination print port name, make sure
that ":lp" appears at the end of the IP
address and click the "Next" button.
Note
14
Any name can be entered in
"Destination print port name"
(maximum of 38 characters).
A window appears to let you check your
entries. Make sure that the entries are
correct and then click the "Finish" button.
If any of the entries are incorrect, click the
"Back" button to return to the appropriate
window and correct the entry.
The License Agreement window will
16
appear. Make sure that you understand
the contents of the license agreement,
and then click the "Yes" button.
Read the message in the "Welcome"
17
window and then click the "Next" button.
Click the "Drivers/Status Monitor"
18
button.
Select the checkboxes of the software
19
packages to be installed and then click
the "Next" button.
Click the "Display README" button to
show information on packages that are
selected.
Next, install the software.
Double-click the "setup" icon ( ) in
15
the CD-ROM drive.
Note
If the language selection screen
appears after you double click the
"setup" icon, select the language that
you wish to use and click the "Next"
button. (Normally the correct language
is selected automatically.)
13
Page 16

USING THE MACHINE AS A NETWORK PRINTER
Check the packages on the screen, and
20
then click the "Start" button.
The software packages to be installed will
be displayed on the screen. If an incorrect
package is displayed, click the "Back"
button and select the correct packages.
Begin installation of the printer driver (if
21
"Printer Driver" was selected in Step 19).
Follow the on-screen instructions.
When you are asked how the printer is
22
connected, select "Connected via the
network" and click the "Next" button.
When the port selection window
23
appears, select the port name you
created in step 13 and click the "Next"
button.
When the printer driver selection window
25
appears, select the printer driver to be
installed and click the "Next" button.
Select the checkboxes of the printer
drivers to be installed.
Note
26
To use the PS printer driver, the PS3
expansion kit must be installed.
Select whether or not you wish the
printer to be your default printer and
click the "Next" button.
If you are installing multiple printer drivers, the
following window will appear. Select the printer
that you wish to use as your default printer.
If you do not wish to use any of the printers
as the default printer, click the "Set Default
Printer" checkbox to remove the checkmark.
When the model selection window
24
appears, select model name of your
machine and click the "Next" button.
For the model name of your machine, see
"PART NAMES AND FUNCTIONS" in the
operation manual for copier.
14
When the window for entering a printer
27
name appears, click the "Next" button.
If you wish to change the printer name,
enter the desired name.
Page 17

When the display font installation
28
window appears, select whether or not
you wish to install the display font and
click the "Next" button.
To install the display font, select the "PCL
Display Font" checkbox.
Click the "Yes" button.
29
When "The installation of the SAGEM
30
software is complete" appears, click
the "OK" button.
Begin the installation of the Printer
31
Status Monitor (if "Printer Status
Monitor" was selected in Step 19).
Follow the on-screen instructions.
Click the "Finish" button when the
message informs you that setup is
successful.
USING THE MACHINE AS A NETWORK PRINTER
When the "Finish" screen appears,
32
click the "Close" button.
When "After Windows system restarts,
connect the interface cable to the PC"
appears, click the "OK" button.
Note
This completes the installation of the
software.
• If you installed the printer driver, configure the
printer driver settings as explained in
"CONFIGURING THE PRINTER DRIVER"
(p.30).
• If you installed the PS printer driver, the PS
display font can be installed from the
"SG-PEK" CD-ROM that accompanied the
PS3 expansion kit. (p.28)
After the installation, a message
prompting you to restart your
computer may appear. In this case,
click the "Yes" button to restart your
computer.
15
Page 18

USING THE MACHINE AS A NETWORK PRINTER
INSTALLING THE PRINTER ADMINISTRATION
UTILITY
Insert the CD-ROM into your computer's
1
CD-ROM drive.
Click the "start" button, click "My
2
Computer" ( ), and then double-click
the CD-ROM icon ( ).
In Windows 95/98/Me/NT 4.0/2000,
double-click "My Computer" and then
double-click the CD-ROM icon.
Double-click the "setup" icon ( ).
3
Note
4
5
If the language selection screen
appears after you double click the
"setup" icon, select the language that
you wish to use and click the "Next"
button. (Normally the correct language
is selected automatically.)
The License Agreement window will
appear. Make sure that you understand
the contents of the license agreement,
and then click the "Yes" button.
Read the message in the "Welcome"
window and then click the "Next" button.
Select the "Printer Administration
7
Utility" checkbox and click the "Next"
button.
Click the "Display README" button to
show information on packages that are
selected.
Note
If you are installing the Printer
Administration Utility in Windows 95, a
system file must be updated before
the utility can be installed. For more
information, click the "Display
README" button.
Click the "Administrator Tools" button.
6
16
Follow the on-screen instructions.
8
Page 19

USING THE MACHINE WITH A
PARALLEL OR USB CONNECTION
INSTALLING THE SOFTWARE
Note
If an error message appears, follow the on-screen instructions to solve the problem. After the
problem is solved, the installation procedure will continue. Depending on the problem, you may
have to click the "Cancel" button to exit the installer. In this case, reinstall the software from the
beginning after solving the problem.
Installation in Windows XP (USB/parallel cable)
The USB or parallel cable must not be
1
connected to the machine. Make sure
that the cable is not connected before
proceeding.
If the cable is connected, a Plug and Play
window will appear. If this happens, click
the "Cancel" button to close the window
and disconnect the cable.
Note
2
3
4
The cable will be connected in step 15.
Insert the CD-ROM into your computer's
CD-ROM drive.
Click the "start" button, click "My
Computer" ( ), and then double-click
the CD-ROM icon ( ).
Double-click the "setup" icon ( ).
Click the "Drivers/Status Monitor" button.
7
Select the checkboxes of the software
8
packages to be installed and then click
the "Next" button.
Click the "Display README" button to show
information on packages that are selected.
The License Agreement window will
5
appear. Make sure that you understand
the contents of the license agreement,
and then click the "Yes" button.
Read the message in the "Welcome"
6
window and then click the "Next" button.
Note
If the machine is connected to your
computer with a USB cable or parallel
cable, the Printer Status Monitor
cannot be used.
17
Page 20

USING THE MACHINE WITH A PARALLEL OR USB CONNECTION
Check the packages on the screen, and
9
then click the "Start" button.
The software packages to be installed will
be displayed on the screen. If an incorrect
package is displayed, click the "Back"
button and select the correct packages.
Begin installation of the printer driver (if
10
"Printer Driver" was selected in Step 8).
Follow the on-screen instructions.
When you are asked how the printer is
11
connected, select "Connected to this
computer" and click the "Next" button.
Follow the on-screen instructions.
13
Caution
14
If the following screen appears while
the files are being copied (the
message may appear more than once),
click the "Continue Anyway" button.
When "The installation of the SAGEM software
is complete" appears, click the "OK" button.
When the "Finish" screen appears,
click the "Close" button.
When "After Windows system restarts,
connect the interface cable to the PC"
appears, click the "OK" button.
When the display font installation
12
window appears, select whether or not
you wish to install the display font and
click the "Next" button.
To install the display font, select the "PCL
Display Font" checkbox.
Note
15
After the installation, a message
prompting you to restart your computer
may appear. In this case, click the
"Yes" button to restart your computer.
Connect the interface cable to the
machine and your computer (p.25).
• If you are using a USB cable, make
sure the machine's power is turned on
and then connect the cable.
• If you are using a parallel cable, turn
off the power of the machine and your
computer, connect the cable, turn on the
power of the machine, and then turn on
your computer.
Windows will detect the machine and the
Plug and Play screen will appear.
18
Page 21

USING THE MACHINE WITH A PARALLEL OR USB CONNECTION
Begin installation of the PCL6 printer
16
driver.
"SAGEM MF-XXXX" will appear in the
"Found New Hardware Wizard" dialog
box. Select "Install the software
automatically (Recommended)" and click
the "Next" button. Follow the on-screen
instructions.
Caution
After completing the above steps, repeat the
installation procedure from step 1 if you are
installing the PCL5e or PS printer driver.
1.
Repeat the installation procedure from step 1.
2. In the screen of step 8, select only the
"Printer Driver" checkbox.
3. When the select printer driver to install
screen appears, remove the checkmark from
"PCL6" and select the checkbox of the
printer driver that you wish to install
("PCL5e" or "PS").
If a warning window appears
regarding the "Windows logo test",
be sure to click the "Continue
Anyway" button.
This completes the installation of the software.
• If you installed the printer driver, configure the
printer driver settings as explained in
"CONFIGURING THE PRINTER DRIVER"
(p.30).
• If you installed the PS printer driver, the PS
display font can be installed from the
"SG-PEK" CD-ROM that accompanied the
PS3 expansion kit. (p.28)
4. When the installer finishes, perform steps 15
and 16. A plug and play screen will appear
and installation of the selected printer driver
will begin.
19
Page 22

USING THE MACHINE WITH A PARALLEL OR USB CONNECTION
Installation in Windows 98/Me/2000 (USB cable)
The USB cable must not be connected
1
to the machine. Make sure that the cable
is not connected before proceeding.
If the cable is connected, a Plug and Play
window will appear. If this happens, click
the "Cancel" button to close the window
and disconnect the cable.
Note
2
3
4
Note
5
6
The cable will be connected in step 16.
Insert the CD-ROM into your computer's
CD-ROM drive.
Double-click "My Computer" ( ), and
then double-click the CD-ROM icon ( ).
Double-click the "setup" icon ( ).
If the language selection screen
appears after you double click the
"setup" icon, select the language that
you wish to use and click the "Next"
button. (Normally the correct language
is selected automatically.)
The License Agreement window will
appear. Make sure that you understand
the contents of the license agreement,
and then click the "Yes" button.
Read the message in the "Welcome"
window and then click the "Next" button.
Select the checkboxes of the software
8
packages to be installed and then click
the "Next" button.
Click the "Display README" button to show
information on packages that are selected.
Note
9
10
If the machine is connected to your
computer with a USB cable or parallel
cable, the Printer Status Monitor
cannot be used.
Check the packages on the screen, and
then click the "Start" button.
The software packages to be installed will
be displayed on the screen. If an incorrect
package is displayed, click the "Back"
button and select the correct packages.
Begin installation of the printer driver (if
"Printer Driver" was selected in Step 8).
Follow the on-screen instructions.
Click the "Drivers/Status Monitor" button.
7
20
When you are asked how the printer is
11
connected, select "Connected to this
computer" and click the "Next" button.
Page 23

USING THE MACHINE WITH A PARALLEL OR USB CONNECTION
When the interface selection screen appears,
12
select "USB" and click the "Next" button.
When the display font installation
13
window appears, select whether or not
you wish to install the display font and
click the "Next" button.
To install the display font, select the "PCL
Display Font" checkbox.
Follow the on-screen instructions.
14
Caution
In Windows 2000, if the following
screen appears while the files are being
copied (the message may appear more
than once), click the "Yes" button.
Make sure that the power of the
16
machine is turned on, and then
connect the USB cable. (p.25)
Windows will detect the machine and the
Plug and Play screen will appear.
Follow the instructions in the Plug and
17
Play screen that appears in your
version of Windows to begin the
installation.
After completing the above steps, repeat the
installation procedure from step 1 if you are
installing the PCL5e or PS printer driver.
1.
Repeat the installation procedure from ste
2. In the screen of step 8, select only the
"Printer Driver" checkbox.
3. When the select printer driver to install
screen appears, remove the checkmark from
"PCL6" and select the checkbox of the
printer driver that you wish to install
("PCL5e" or "PS").
p 1.
When "The installation of the SAGEM
software is complete" appears, click the
"OK" button.
When the "Finish" screen appears,
15
click the "Close" button.
When "After Windows system restarts,
connect the interface cable to the PC"
appears, click the "OK" button.
Note
After the installation, a message
prompting you to restart your
computer may appear. In this case,
click the "Yes" button to restart your
computer.
4. When the installer finishes, perform steps 16
and 17. A plug and play screen will appear
and installation of the selected printer driver
will begin.
This completes the installation of the software.
• If you installed the printer driver, configure the
printer driver settings as explained in
"CONFIGURING THE PRINTER DRIVER"
(p.30).
• If you installed the PS printer driver, the PS
display font can be installed from the
"SG-PEK" CD-ROM that accompanied the
PS3 expansion kit. (p.28).
21
Page 24

USING THE MACHINE WITH A PARALLEL OR USB CONNECTION
Installation in Windows 95/98/Me/NT 4.0/2000 (parallel cable)
The USB or parallel cable must not be
1
connected to the machine. Make sure that the
cable is not connected before proceeding.
If the cable is connected, a Plug and Play
window will appear. If this happens, click
the "Cancel" button to close the window
and disconnect the cable.
Note
2
3
4
Note
5
6
7
The cable will be connected in step 22.
Insert the CD-ROM into your computer's
CD-ROM drive.
Double-click "My Computer" ( ), and
then double-click the CD-ROM icon ( ).
Double-click the "setup" icon ( ).
If the language selection screen
appears after you double click the
"setup" icon, select the language that
you wish to use and click the "Next"
button. (Normally the correct language
is selected automatically.)
The License Agreement window will
appear. Make sure that you understand
the contents of the license agreement,
and then click the "Yes" button.
Read the message in the "Welcome"
window and then click the "Next" button.
Click the "Drivers/Status Monitor"
button.
Select the checkboxes of the software
8
packages to be installed and then click
the "Next" button.
Click the "Display README" button to show
information on packages that are selected.
Note
9
10
If the machine is connected to your
computer with a USB cable or parallel cable,
the Printer Status Monitor cannot be used.
Check the packages on the screen, and
then click the "Start" button.
The software packages to be installed will
be displayed on the screen. If an incorrect
package is displayed, click the "Back"
button and select the correct packages.
Begin installation of the printer driver (if
"Printer Driver" was selected in Step 8).
Follow the on-screen instructions.
If you are using Windows 95/NT 4.0, go to
step 13.
22
Page 25

USING THE MACHINE WITH A PARALLEL OR USB CONNECTION
When you are asked how the printer is
11
connected, select "Connected to this
computer" and click the "Next" button.
When the interface selection screen
12
appears, select "Parallel" and click the
"Next" button.
Note
14
15
If "LPT1" does not appear, another
printer or peripheral device is using
LPT1. In this case continue the
installation, and after the installation is
finished, change the port setting so
that the machine can use LPT1. This
procedure is explained in "Another
printer is using the parallel port (when
using a parallel cable)" on page 32.
When the model selection window
appears, select model name of your
machine and click the "Next" button.
For the model name of your machine, see
"PART NAMES AND FUNCTIONS" in the
operation manual for copier.
When the printer driver selection
window appears, select the printer
driver to be installed and click the
"Next" button.
Select the checkboxes of the printer
drivers to be installed.
Select the printer port and click the
13
"Next" button.
Select "LPT1" for the printer port.
Note
To use the PS printer driver, the PS3
expansion kit must be installed.
23
Page 26

USING THE MACHINE WITH A PARALLEL OR USB CONNECTION
Select whether or not you wish the
16
printer to be your default printer and
click the "Next" button.
If you are installing multiple printer drivers,
the following window will appear. Select
the printer that you wish to use as your
default printer.
If you do not wish to use any of the
printers as the default printer, click the
"Set Default Printer" checkbox to remove
the checkmark.
When the window for entering a printer
17
name appears, click the "Next" button.
If you wish to change the printer name,
enter the desired name.
When the display font installation
18
window appears, select whether or not
you wish to install the display font and
click the "Next" button.
To install the display font, select the "PCL
Display Font" checkbox.
When the "Finish" screen appears,
21
click the "Close" button.
When "After Windows system restarts,
connect the interface cable to the PC"
appears, click the "OK" button.
Note
22
This completes the installation of the
software.
• If you installed the printer driver, configure the
printer driver settings as explained in
"CONFIGURING THE PRINTER DRIVER"
(p.30).
• If you installed the PS printer driver, the PS
display font can be installed from the
"SG-PEK" CD-ROM that accompanied the
PS3 expansion kit. (p.28)
After the installation, a message
prompting you to restart your
computer may appear. In this case,
click the "Yes" button to restart your
computer.
Turn off the power of the machine and
your computer, and connect the
machine to your computer with the
parallel cable. (p.25)
After connecting the machine to your
computer, turn on the power of the
machine and then start up your computer.
Follow the on-screen instructions.
19
When "The installation of the SAGEM
20
software is complete" appears, click
the "OK" button.
24
Page 27

USING THE MACHINE WITH A PARALLEL OR USB CONNECTION
CONNECTING TO A COMPUTER
Follow the procedure below to connect the machine to your computer.
Interface cables for connecting the machine to your computer are not included with the machine.
Please purchase the appropriate cable for your computer.
Interface cable
USB cable
Shielded twisted pair cable, high-speed transmission equivalent (9 feet (3 m) max.)
If the machine will be connected using a USB 2.0 interface, please purchase a USB cable that
supports USB 2.0.
Parallel cable
IEEE 1284-Shielded type bi-directional parallel interface cable (9 feet (3 m) max.)
Caution
• USB is available on a PC/AT compatible computer that was originally equipped with USB
and had Windows 98, Windows Me, Windows 2000 Professional, Windows XP
Professional or Windows XP Home Edition preinstalled.
• Do not connect the interface cable before installing the printer driver. The interface cable
must be connected during installation of the printer driver.
CONNECTING A USB CABLE
Insert the cable into the USB port on
1
the machine.
Insert the other end of the cable into
2
your computer's USB port.
Note
The cable can also be inserted into a
USB 1.1 port. However, performance
will be the same as USB 1.1.
CONNECTING A PARALLEL
CABLE
Ensure that your computer and the
1
machine are turned off.
Insert the cable into the parallel port on
2
the machine and fasten with the clasps.
Insert the other end of the cable into
3
your computer's parallel port.
25
Page 28

SHARING THE PRINTER USING
WINDOWS NETWORKING
If the machine will be used as a shared printer on a network, follow these steps to install the printer
driver in the client computer.
Note
To configure the appropriate settings in the print server, see the operation manual or help file of
your operating system.
"Print server" as explained here is a computer that is directly connected to the machine, and a
"Client" is any other computer that is connected to the same network.
Click the "start" button, click "My
1
Computer" ( ), and then double-click
the CD-ROM icon ( ).
In Windows 95/98/Me/NT 4.0/2000,
double-click "My Computer", and then
double-click the CD-ROM icon.
Double-click the "setup" icon ( ).
2
Note
3
4
5
If the language selection screen
appears after you double click the
"setup" icon, select the language that
you wish to use and click the "Next"
button. (Normally the correct language
is selected automatically.)
The License Agreement window will
appear. Make sure that you understand
the contents of the license agreement,
and then click the "Yes" button.
Read the message in the "Welcome"
window and then click the "Next" button.
Click the "Drivers/Status Monitor"
button.
Select the "Printer Driver" checkbox
6
and click the "Next" button.
Check the packages on the screen, and
7
then click the "Start" button.
The software packages to be installed will
be displayed on the screen. If an incorrect
package is displayed, click the "Back"
button and select the correct packages.
Begin installation of the printer driver.
8
Follow the on-screen instructions.
26
Page 29

SHARING THE PRINTER USING WINDOWS NETWORKING
When you are asked how the printer is
9
connected, select "Connected via the
network" and click the "Next" button.
For the port to be used, select the
10
machine set as a shared printer, and
click the "Next" button.
You can also click the "Add Network Port"
button and select the printer to be shared
(the machine) by browsing the network in
the window that appears.
When the printer driver selection
12
window appears, select the printer
driver to be installed and click the
"Next" button.
Be sure to select the same printer driver
as the printer driver used in the print
server (the machine).
Follow the on-screen instructions.
13
When the "Finish" screen appears,
14
click the "Close" button.
When "After Windows system restarts,
connect the interface cable to the PC"
appears, click the "OK" button.
Note
11
If the shared printer does not appear in the
list, check the settings in the printer server.
When the model selection window
appears, select model name of your
machine and click the "Next" button.
For the model name of your machine, see
"PART NAMES AND FUNCTIONS" in the
operation manual for copier.
Note
This completes the installation of the
software.
• If you installed the printer driver, configure the
printer driver settings as explained in
"CONFIGURING THE PRINTER DRIVER"
(p.30).
• If you installed the PS printer driver, the PS
display font can be installed from the
"SG-PEK" CD-ROM that accompanied the
PS3 expansion kit. (p.28)
After the installation, a message
prompting you to restart your
computer may appear. In this case,
click the "Yes" button to restart your
computer.
27
Page 30

INSTALLING THE PS DISPLAY
FONTS
The fonts used by the PS printer driver are contained in the "SG-PEK" CD-ROM that accompanied the
PS3 expansion kit (option). Install these fonts as needed for the PS printer driver.
Insert the PS3 expansion kit SG-PEK
1
CD-ROM into your computer's CD-ROM
drive.
If your computer is configured for auto
start on the CD-ROM, proceed to step 4.
Click the "start" button, click "My
2
Computer" ( ), and then double-click
the CD-ROM icon ( ).
In Windows 95/98/Me/NT 4.0/2000,
double-click "My Computer", and then
double-click the CD-ROM icon.
Double-click the "setup" icon ( ).
3
Note
If the language selection screen
appears after you double click the
"setup" icon, select the language that
you wish to use and click the "Next"
button. (Normally the correct language
is selected automatically.)
Select the "PS Display Font" checkbox
4
and click the "Next" button.
Caution
Do not select "PS Printer Driver".
The PS printer driver for the
machine should only be installed
from the CD-ROM that accompanies
the SG-K11 printer expansion kit.
28
Follow the on-screen instructions.
5
Page 31

USING THE PPD FILE
The PPD file enables the machine to print using the standard PS driver of the operating system, and
can be used when the optional PS3 expansion kit SG-PEK is installed. Install the PPD file as needed.
Use the Add Printer Wizard in Windows to install the PPD file.
Be sure to read the Readme file before installing the PPD file. The Readme file is in the "EnglishA" or
"English" folder. For the location of the folder, see step 4.
Click the "start" button, click "Control
1
Panel", click "Printers and Other
Hardware", and then click "Printers and
Faxes".
In operating systems other than Windows
XP, click the "Start" button, select
"Settings", and then click "Printers".
Insert the CD-ROM into your computer's
2
CD-ROM drive.
Click "Add a printer" in "Printer Tasks".
3
In Windows 95/98/Me/NT 4.0/2000,
double-click the "Add Printer" icon.
The "Add Printer Wizard" will appear.
Follow the on-screen instructions.
4
When you are asked to specify the path of
the PPD file, enter the path as follows.
(Substitute the letter of your CD-ROM
drive for "R" in the following paths.)
Operating system PPD file path
Windows 95/98/Me R:\Drivers\Printer
\EnglishA\PPD\9XME
Windows NT 4.0 R:\Drivers\Printer
\EnglishA\PPD\NT40
Windows 2000/XP R:\Drivers\Printer
\EnglishA\PPD\2KXP
* In regions other than the U.S., enter "English"
instead of "EnglishA".
Installing the resident font information for PPD (only
when the PPD file is installed in Windows 95/98/Me)
If you have installed the PPD file in Windows 95/98/Me and will use the resident font, you must install
resident font information for PPD. Follow the procedure below to install the resident fonts information.
Note
1
2
3
• If you are using Windows 2000 or Windows XP, the resident font information is automatically
installed when the PPD file is installed.
• Before installing the resident font information, be sure to install the PPD file.
Insert the CD-ROM into your computer's
CD-ROM drive.
Double-click "My Computer" ( ), and
then double-click the CD-ROM icon
().
Double-click the "Drivers" folder, the
"Printer" folder, the "EnglishA" folder
(for regions other than the U.S.,
double-click the "English" folder), the
"PPD" folder, the "9XME" folder, and
"PFMSetup.exe".
Follow the on-screen instructions.
4
After the resident font information has
5
been installed, restart your computer.
Note
If printer resident fonts cannot be
specified from the application
software, the resident font information
has not been installed or the
information is not correct. In this case,
reinstall the resident font information.
29
Page 32

CONFIGURING THE PRINTER DRIVER
After installing the printer driver, you must configure the printer driver settings appropriately for the
number of paper trays on the machine and the size of paper loaded in each tray.
Click the "start" button, click "Control
1
Panel", click "Printers and Other Hardware",
and then click "Printers and Faxes".
In operating systems other than Windows
XP, click the "Start" button, select
"Settings", and then click "Printers".
Click the "SAGEM MF-XXXX" printer
2
driver icon and select "Properties"
from the "File" menu.
If you are using Windows NT 4.0/2000/XP,
go to step 4.
In Windows 95/98/Me, click the "Setup"
3
tab.
Click the "Configuration" tab and set
4
the printer configuration based on the
options that have been installed.
Set the printer configuration properly.
Otherwise, printing may not take place
correctly.
Click the "Set Tray Status" button and
5
set the size and type of paper loaded in
each tray.
Select a tray from the "Paper source"
menu, set the size of paper loaded in the
tray from the "Set Paper Size" menu, and
select the type of paper from the "Set
Paper Type" menu. Repeat for each of the
trays.
Click the "OK" button in the "Set Tray
6
Status" window.
Click the "OK" button in the printer
7
properties window.
30
Note
If the machine is used as a network
printer, you can click the "Auto
Configuration" button to automatically
configure the settings based on the
detected machine status.
Page 33

HOW TO USE THE ONLINE MANUAL
The online manual provides detailed instructions for operating the machine as a printer. View the
online manual to use the printer function after the initial setup is completed.
Note
1
2
Note
To view the online manual, your computer must have Acrobat Reader 5.0 or later. If you do not
have Acrobat Reader, follow the instructions in "Installing Acrobat Reader" to install it.
Insert the CD-ROM into your computer's
CD-ROM drive.
Click the "start" button, click "My
Computer" ( ), and then double-click
the CD-ROM icon ( ).
In Windows 95/98/Me/NT 4.0/2000,
double-click "My Computer" and then
double-click the CD-ROM icon.
• If you will be viewing the online manual repeatedly, you may find it convenient to copy this online
manual file to your computer.
• The online manual can be printed out using Acrobat Reader. SAGEM recommends printing out
the sections which you refer to regularly.
Installing Acrobat Reader
Insert the CD-ROM into your computer's
1
CD-ROM drive.
Click the "start" button, click "My
2
Computer" ( ), and then double-click
the CD-ROM icon ( ).
In Windows 95/98/Me/NT4.0/2000,
double-click "My Computer" and then
double-click the CD-ROM icon.
Double-click the "Manual Network
3
Printer MF9300 EN.pdf" file.
The online manual will appear.
Double-click the "Acrobat" folder, and
3
then double-click the executable file.
Follow the on-screen instructions to install
Acrobat Reader.
31
Page 34

TROUBLESHOOTING
If the software does not install correctly, check the following items on your computer.
To remove the software, see "Removing the software" in the online manual.
Troubleshooting information can also be found in the README files for each of the software programs.
To view a README file, click the "Display README" button in the "Select Packages" screen.
Printer driver cannot be
installed (Windows 2000/XP)
If the printer driver cannot be installed in
Windows 2000/XP, follow these steps to check
your computer's settings.
Click the "start" button and then click
1
"Control Panel".
In Windows 2000, click the "Start" button,
select "Settings", and then click "Control
Panel".
Click "Performance and Maintenance",
2
and then click "System".
In Windows 2000, double-click the
"System" icon.
Click the "Hardware" tab and then click
3
the "Driver Signing" button.
Check "What action do you want
4
Windows to take?" ("File signature
verification" in Windows 2000).
Another printer is using the parallel
port (when using a parallel cable)
If another printer is using the parallel port and
printing is not possible using the machine,
follow the steps below to change the port
setting of the other printer driver, and make
sure that the port of the printer driver for the
machine is set to LPT1.
Click the "start" button, click "Control
1
Panel", click "Printers and Other Hardware",
and then click "Printers and Faxes".
In Windows 95/98/Me/NT 4.0/2000, click
the "Start" button, select "Settings", and
then click "Control Panel".
In Windows 95/98/Me/NT 4.0/2000, click
2
the "Start" button, select "Settings",
and then click "Control Panel".
Click the "Ports" tab.
3
In Windows 95/98/Me, click the "Details" tab.
If the option "Block" has been selected, it
will not be possible to install the printer
driver. Select the option "Warn" and then
install the printer driver as explained in
"INSTALLING THE SOFTWARE".
32
Select "FILE:" in the "Print to the
4
following port" list box, and click the
"OK" button.
Click the "SAGEM MF-XXXX" printer
5
driver icon and select "Properties"
from the "File" menu.
Click the "Ports" tab.
6
In Windows 95/98/Me, click the "Details" tab.
Select "LPT1" in the "Print to the
7
following port" list box, and click the
"OK" button.
Note
In the event that you need to use the
other printer, repeat the above steps to
set the port of the machine to "FILE:",
and change the port setting of the
other printer back to "LPT1".
Page 35

TROUBLESHOOTING
The printer driver cannot be
correctly installed by Plug and
Play (Windows 2000/XP)
In Windows 2000/XP, if the printer driver cannot
be correctly installed by Plug and Play (for
example, Plug and Play takes place without
copying the required files for the printer driver
installation), follow these steps to remove
unneeded devices and then install the printer
driver as explained in "INSTALLING THE
SOFTWARE".
Click the "start" button, click "Control
1
Panel", and then click "Performance
and Maintenance".
In Windows 2000, click the "Start" button,
select "Settings", and then click "Control
Panel".
Click "System", click the "Hardware"
2
tab, and click the "Device Manager"
button.
Note
3
In Windows 2000, double-click the
"System" icon, click the "Hardware"
tab, and click the "Device Manager"
button.
Click the ( ) icon beside "Other
devices".
Plug and play screen does not
appear (when using a USB
cable)
If the Plug and Play screen does not appear
after you connect the machine to your computer
with a USB cable and turn on the machine,
follow the steps below to verify that the USB
port is available.
Click the "start" button, click "Control
1
Panel", and then click "Performance
and Maintenance".
In Windows 98/Me/2000, click the "Start"
button, select "Settings", and then click
"Control Panel".
Click "System", click the "Hardware" tab,
2
and click the "Device Manager" button.
"Universal Serial Bus controllers" will
appear in the list of devices.
Note
• In Windows 98/Me, double-click the
"System" icon and click the "Device
Manager" tab.
• In Windows 2000, double-click the
"System" icon, click the "Hardware"
tab, and click the "Device Manager"
button.
• If the "System" icon does not appear
in Windows Me, click "view all
Control Panel options".
If "SAGEM MF-XXXX" appears, select
and delete it.
Note
4
If "Other devices" does not appear,
close the "Device Manager" window.
Install the software as explained in
"INSTALLING THE SOFTWARE".
Click the ( ) icon beside "Universal
3
Serial Bus controllers".
Two items should appear: your controller
chipset type and Root Hub. If these items
appear, you can use the USB port. If the
"Universal Serial Bus controllers" shows a
yellow exclamation point or does not
appear, you must check your computer
manual for USB troubleshooting or contact
your computer manufacturer.
Once you have verified that the USB
4
port is enabled, install the software as
explained in "INSTALLING THE
SOFTWARE".
33
Page 36

SAFETY STANDARDS
This is a Class A product. In a domestic environment this product may cause radio
interference in which case the user may be required to take adequate measures.
The CE mark logo label is affixed on an equipment in case that the directives
described in the above sentence are applicable to the product. (This sentence is
not applicable in any country where the above directives are not required.)
Shielded cables must be used with this equipment to maintain compliance with
standards.
34
Page 37

SAFETY STANDARDS
WARNING:
FCC Regulations state that any unauthorized changes or modifications to this equipment not
expressly approved by the manufacturer could void the user is authority to operate this equipment.
Note:
This equipment has been tested and found to comply with the limits for a Class A digital device,
pursuant to part 15 of the FCC Rules. These limits are designed to provide reasonable protection
against harmful interference when the equipment is operated in a commercial environment. This
equipment generates, uses, and can radiate radio frequency energy and, if not installed and used
in accordance with the instruction manual, may cause harmful interference to radio
communications.
Operation of this equipment in a residential area is likely to cause harmful interference in which
case the user will be required to correct the interference at his own expense.
Notice for Users in Canada
This Class A digital apparatus complies with Canadian ICES-003.
Cet appareil numérique de la classe A est conforme à la norme NMB-003 du Canada.
35
 Loading...