

Rover 75 Saloon, MG ZT Tourer, 75 Tourer, MG ZT Saloon, MG ZT-T Owner's Handbook Manual

1
Before you Drive
Driving Controls
Audio System
Maintenance
Emergency Information
1
2
2
3
3
4
4
5
5
6
Technical Data
6
7
Introduction
Introduction© MG Rover Group Limited 2003All rights reserved. No part of this publication may be reproduced, stored in a retrieval system or transmitted in any form, electronic, mechanical, recording or other means without prior written permission from MG Rover Group Limited.Publication Part No. RCL 0524 LAN (3rd Edition)English01/2003As part of the MG Rover Group environmental policy, this publication is printed on paper made from chlorine free pulp .
THE OWNER'S HANDBOOK
This handbook describes all of the MG Rover models and standard
equipment specifications within the model range. Some of the
information, therefore, may not apply to your particular car.
For your convenience, the handbook is divided into subject or
activity-based sections. These are listed on the previous page and
are mostly self-explanatory. However, if you experience difficulty
in locating a specific item or piece of information, you should
consult the alphabetical index near the back of the book.
You should also be aware that the final (Service History) section of
this handbook is, in effect, a separate publication, which enables a
record to be kept of the routine services and inspections carried out
on the car. This section also provides a facility for the dealer to
record brake fluid and coolant changes, and the fitting of any major
replacement components needed during the life of the car.
Finally, always remember that if you have any queries, concerning
the operation or specification of your car, your MG Rover dealer
will be glad to advise you.
© MG Rover Group Limited 2003
All rights reserved. No part of this publication may be reproduced, stored
in a retrieval system or transmitted in any form, electronic, mechanical,
recording or other means without prior written permission from MG
Rover Group Limited.
Publication Part No. RCL 0548LAN
English 01/2003
As part of the MG Rover Group environmental policy, this publication is
printed on paper made from chlorine free pulp.
SYMBOLS USED
The following symbols used within the handbook call your
attention to specific types of information.
This warning symbol identifies procedures that must be
followed precisely, or information that must be considered with
great care, in order to reduce the risk of personal injury or serious
damage to the car.
This recycling symbol identifies those items that must be disposed of
safely in order to prevent unnecessary damage to the environment.
This symbol identifies those features that can be adjusted or disabled/
enabled by an MG Rover dealer
* An asterisk appearing within the text, identifies features or items
of equipment that are either optional, or are only fitted to some
vehicles in the model range.
STATUS AT TIME OF PRINTING
MG Rover operate a policy of constant product improvement and
therefore reserve the right to change specifications without notice
at any time. Whilst every effort is made to ensure complete
accuracy of the information in this handbook, no liabilities for
inaccuracies or the consequences thereof, including loss or damage
to property, or injury to persons, can be accepted by the
manufacturer or the dealer who supplied the handbook, except in
respect of personal injury caused by the negligence of the
manufacturer or dealer.
2
Introduction
SECURITY CARD
The security card contains important emergency information. It is
ESSENTIAL that you keep the card safe from theft and ensure that
it is passed to the new owner if you sell the car.
• VIN (vehicle identification number): This number is unique to
your vehicle and is essential proof of its specification. The
number can also be found in various locations around the
vehicle (see ‘IDENTIFICATION NUMBERS’, page 212).
• Locking wheel nut number: If your vehicle has locking
wheel nuts, you will have been provided with a special wheel
nut adaptor to remove them. Quote this number if a
replacement adaptor is required.
• Radio serial number: This unique number is stamped into
the case of the audio unit, and is proof of the unit’s specification
and your ownership in the event of theft.
• Radio security code number: This unique code must be
entered into the radio whenever the power supply has been
disconnected. Without this code, the radio unit will not
operate.
Never leave the security card inside the car when it is left
unattended. Keep the card on your person in case of
emergencies.
IMPORTANT
When the time comes to sell your car, please remember to pass this
handbook and the Security Card to the new owner. Both must be
considered part of the car and essential to its operation.
IN AN EMERGENCY
IMPORTANT
Remember the breakdown safety code
If a breakdown occurs while travelling:
• Wherever possible, consistent with road safety and traffic
conditions, the car should be moved off the main thoroughfare,
preferably into a lay-by. If a breakdown occurs on a motorway,
pull well over to the inside of the hard shoulder.
• Switch on hazard lights.
• If possible, position a warning triangle or a flashing amber light at
an appropriate distance from the vehicle to warn other traffic of
the breakdown, (note the legal requirements of some countries).
• Consider evacuating passengers through nearside doors onto the
verge as a precaution in case your vehicle is accidentally struck by
other traffic.
3


1
Before you Drive
6 Controls
7 Locks & Alarm
17 Seats
21 Seat Belts
25 Child Restraints
27 Airbag SRS
33 Steering Column
34 Mirrors
36 Windows
37 Sunroof
38 Heating & Ventilation
46 Parking Heater
53 Interior Equipment
59 In-Car Telephones
60 Load Carrying - Saloon
62 Load Carrying - Tourer
69 Towing
1
Before you Drive
Controls
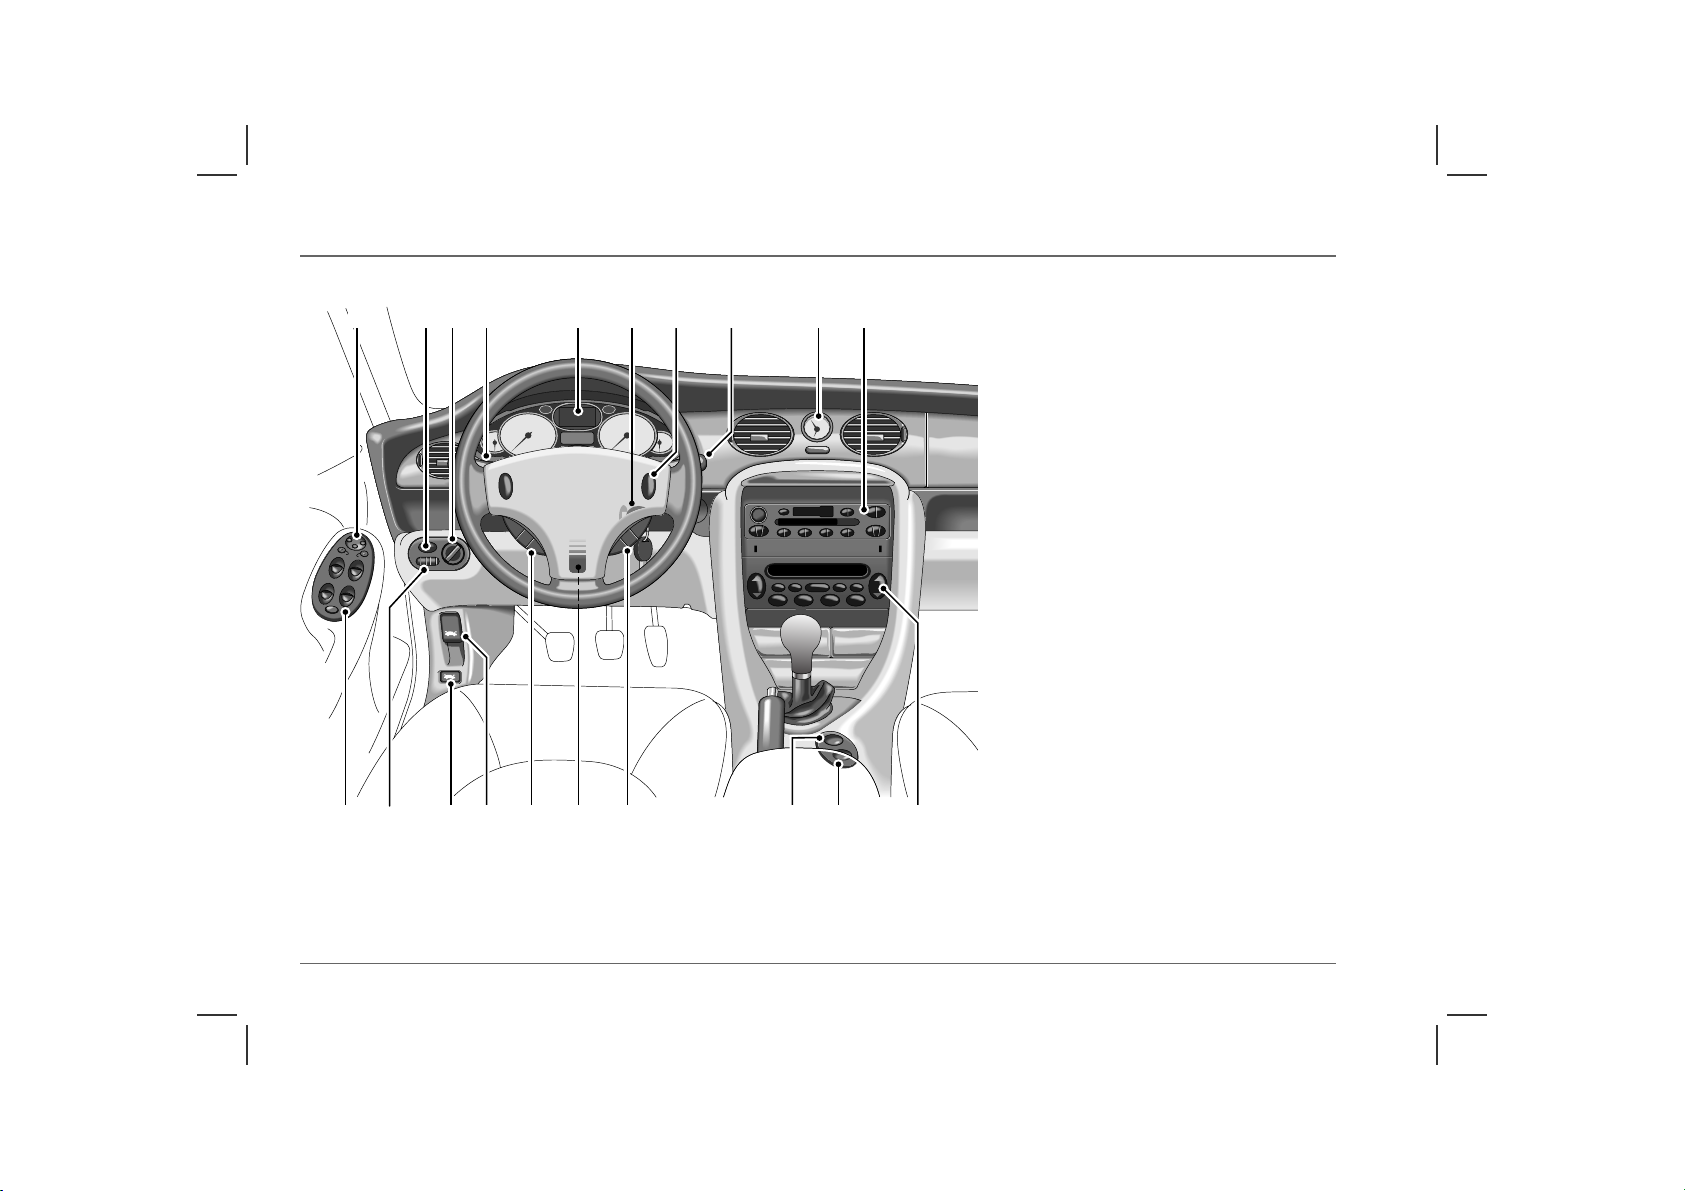
1 2 3 4 5 6 7
Controls
8 9 10
1. Mirror controls
2. Front
* and rear fog light switches
3. Main lighting switch
4. Direction indicators
5. Instrument panel
6. Starter switch
7. Horn
8. Wiper/washer controls
9. Clock
10. Heating/air conditioning controls
11. Audio system
12. Interior door locking switch
13. Hazard warning lights switch
14. Cruise control switches
*
15. Steering column adjustment lever
16. Remote audio controls
17. Bonnet release
18. Boot release (saloon models)
19. Instrument dimmer control
20. Electric window controls
HB0229b
6
1113 121415161720 1819

Locks & Alarm
Locks & Alarm
KEYS AND HANDSETS
You have been supplied with two remote handsets with integral
keys which operate all locks.
Keep the spare handset key in a safe place - NOT IN THE
VEHICLE!
The keys supplied with your car are programmed to your security
system - they CANNOT be re-programmed and the engine
cannot be started without a key programmed to your car. If a key
is lost or broken, a replacement can only be ordered from an MG
Rover dealer.
NOTE: MG Rover dealers do not stock spare keys, time has to be
allowed for replaceme nts to be programmed to y our security system and then
delivered to the dealer.
If you lose a key, contact your MG Rover dealer; a key reported
lost will be deactivated. If the key is recovered, your dealer can
have it reactivated.
ALARM SYSTEM
Your car is fitted with a sophisticated electronic anti-theft alarm
and engine immobilisation system. There are also a number of
additional security features, some of which are selectable options.
In order to ensure maximum security and operating convenience,
you are strongly advised to gain a full understanding of the features
and alternatives available, by thoroughly reading this section of the
handbook.
NOTE: FOR MAXIMUM SECURITY ALWAYS
SUPERLOCK THE VEHICLE USING THE REMOTE
HANDSET (except when passengers are to be left inside the car).
ENGINE IMMOBILISATION
Engine immobilisation is an important aspect of the security
system, it is designed to safeguard the vehicle from theft, should
the driver forget to lock the doors and prevents the engine from
being started unless the GENUINE handset key is inserted into the
starter switch. Engine immobilisation is automatic whenever any
of the following conditions occur:
• Three seconds after the starter switch has been turned off.
• If the key is removed from the starter switch.
The engine will be re-mobilised automatically whenever
the genuine handset key is inserted into the starter switch
and turned to the first position.
1
7
Locks & Alarm
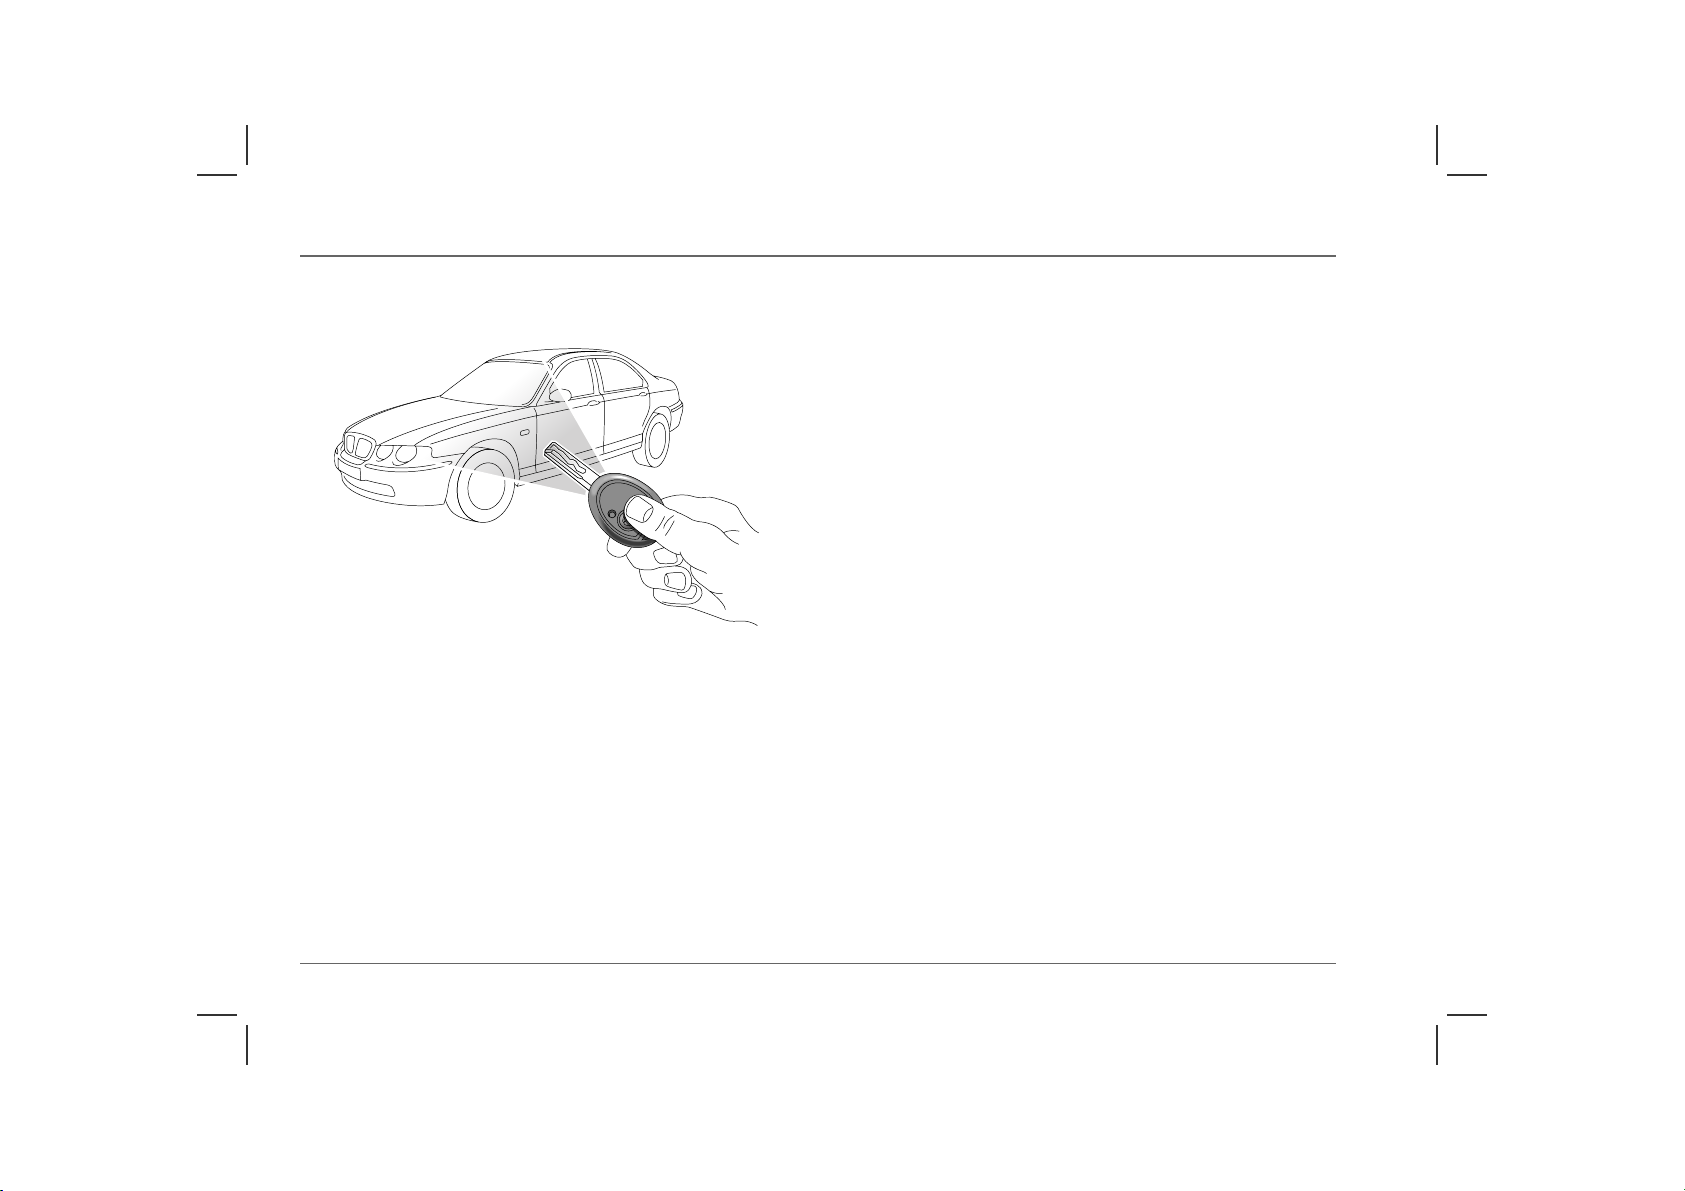
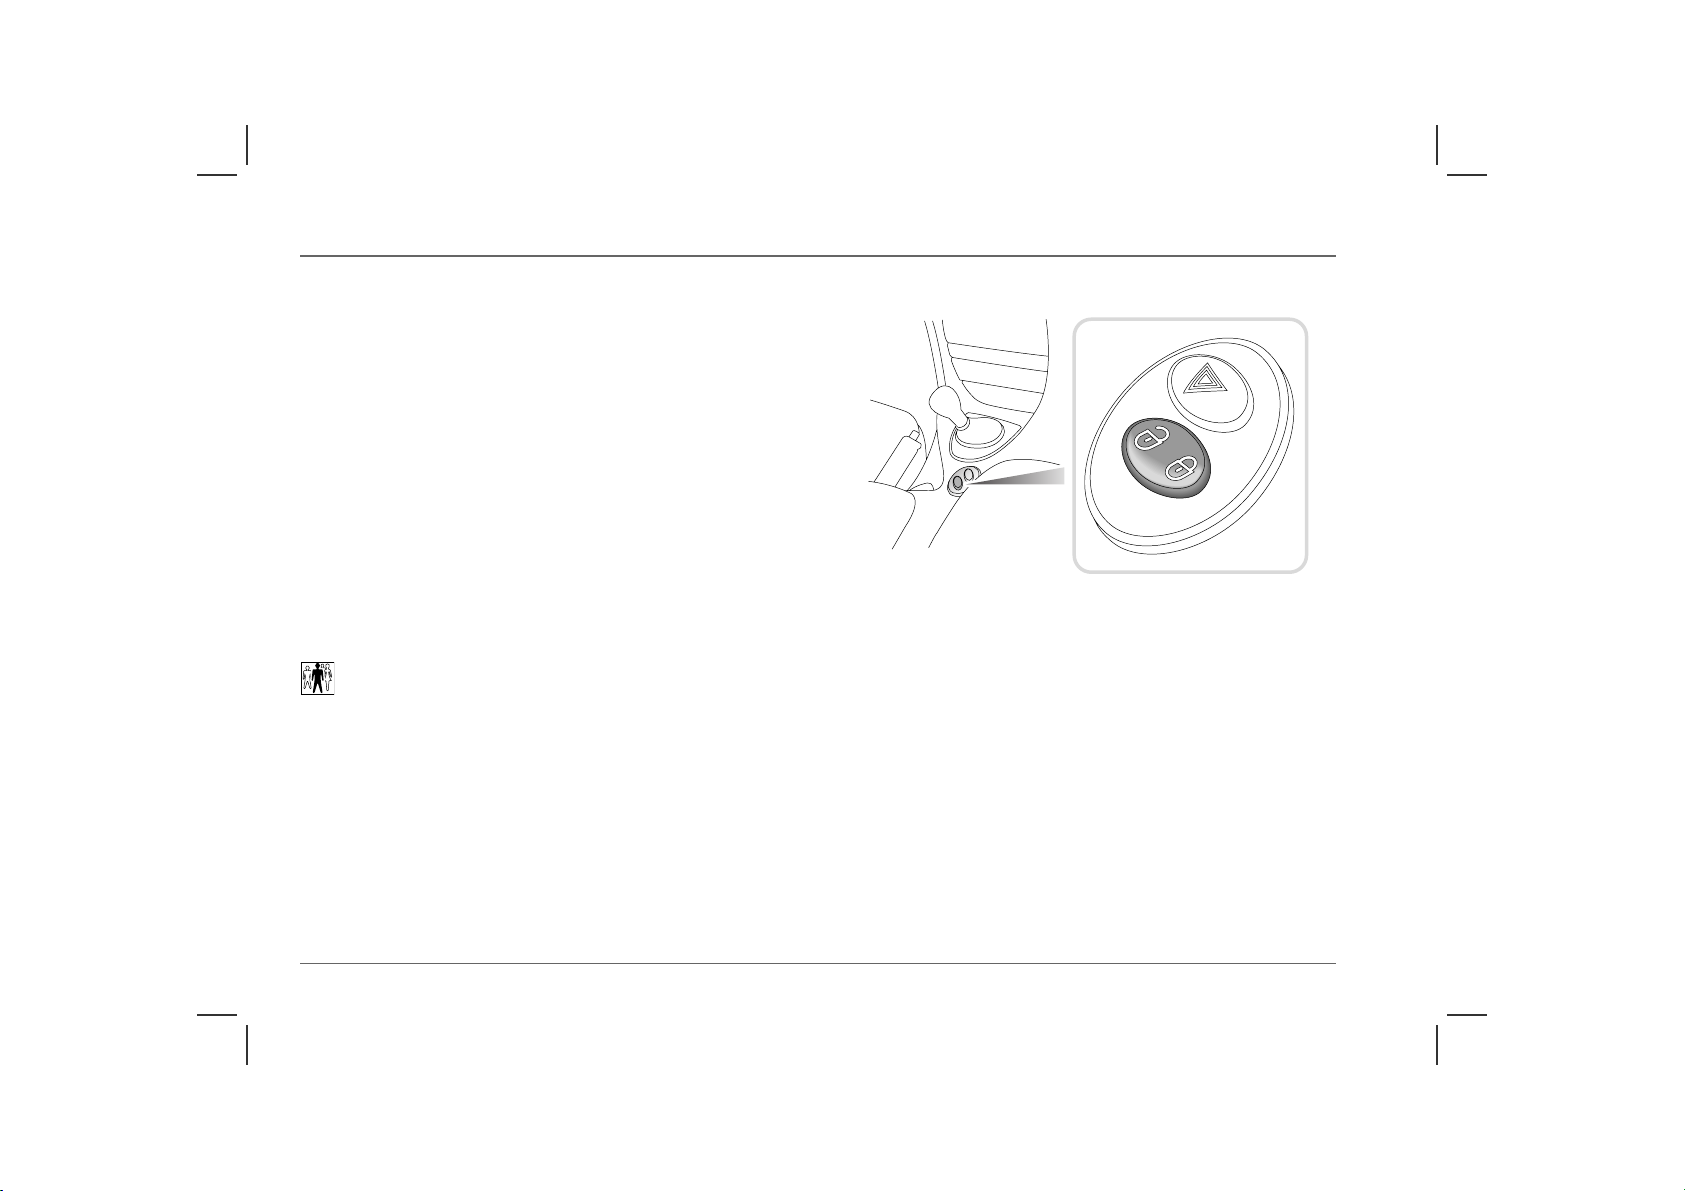
LOCKING THE CAR AND ARMING THE ALARM
Using the remote handset
H2698b
While it is not necessary to point the handset at the car, the handset
must be within range when the buttons are pressed. Note that the
operating range may vary depending upon handset battery
condition and may sometimes be limited by physical and
geographical factors beyond your control. From a security point of
view, it may not be wise to unlock unless you are close enough to
visually confirm that the doors have locked.
Locking
With the remote handset:
1. Shut the doors, bonnet and luggage compartment.
2. Press the lock (padlock symbol) button once:
• all doors are superlocked (see ‘Superlocking’, page 9)
• perimetric alarm activated (protects the doors, bonnet
and luggage compartment)
• interior space protection activated
3. The direction indicator lights flash three times to confirm that
the car is securely locked and the anti-theft alarm indicator
light (in the instrument panel) starts to flash.
With the key:
1. Insert the key and turn the door lock towards the rear of the
car:
• all doors locked (not superlocked)
• perimetric alarm activated (protects the doors, bonnet
and luggage compartment)
• NO INTERIOR SPACE PROTECTION
2. The direction indicator lights flash three times to confirm that
the car is securely locked and the anti-theft alarm indicator
light (in the instrument panel) starts to flash.
*
8

Locks & Alarm
Superlocking
For safety, NEVER use Superlocking if passengers are to
remain inside the car - in an emergency they would not be able
to escape. Also, on cars fitted with interior space protection, any
movement from inside the car would activate the alarm.
Provided all the doors are fully closed, the superlocking feature is
activated automatically whenever the car is locked using the
remote handset. Superlocking immobilises the interior door
handles, thereby preventing an intruder from gaining entry by
smashing a window and reaching inside the car to operate the door
handles.
Mislock
If the driver's door is not fully closed when the handset lock button
is pressed, the alarm sounder or vehicle horn will sound once,
indicating a mislock. In this case, none of the doors will lock and
the alarm system will not be armed.
If a passenger door, bonnet or the luggage compartment is not fully
closed when the handset lock button is pressed, the alarm sounder
or vehicle horn will sound once, indicating a mislock. However,
the ‘partial arming’ attributes of the security system will enable as
much of the system to be armed as possible (all fully closed door,
bonnet or luggage compartment apertures will be protected, but
an open door will not!). As soon as the open aperture is closed, the
system will automatically revert to an armed state.
NOTE: If a mislock occurs as a result of an open door, the superlocking
and interior space protection features will not be activated, until the door is
closed and the locking process is repeated.
Anti-theft alarm indicator light
The light provides information about the status of the alarm
system, as follows:
• When the alarm is armed:
The light flashes RAPIDLY while the alarm is arming itself.
After ten seconds, the light adjusts to a slower frequency and
continues to flash as an anti-theft deterrent until the alarm is
disarmed.
• When the alarm is partially armed: (mislock)
The light flashes SLOWLY for 10 seconds, then flashes as an
anti-theft deterrent (as above) until the alarm is disarmed.
• When the alarm has been triggered:
If the light flashes after the car is unlocked, this indicates that
the alarm has been triggered during the driver’s absence. The
light will flash for up to one minute or until the starter switch
is turned on.
If the alarm sounds
If the alarm is triggered, the alarm sounder or vehicle horn will
sound for 30 seconds before switching off and resetting itself to the
same protection status that existed prior to the alarm being
triggered.To silence the alarm, press either button on the remote
handset, or lock/unlock the door using the key.
1
9
Locks & Alarm
Unlocking
With the remote handset:
• Press the unlock button once. This will disarm the alarm and
unlock the driver's door only (see ‘Single point entry’).
• Press the unlock button twice to disarm the alarm and unlock
ALL the doors.
In either case, the direction indicator lights flash once and the
interior lights illuminate.
With the key:
• Turn the key in the driver's door lock towards the front of the
car to disarm the alarm and unlock the driver's door only (see
‘Single point entry’).
• Turn the key twice (or press the interior locking button), to
unlock ALL the doors.
Single point entry
This feature can be disabled by an MG Rover dealer.
This is a personal security feature, which enables the driver's door
alone to be unlocked, leaving the other doors in a locked state. It
can be operated by the remote handset as follows:
Press the unlock button once (or turn the key in the driver’s door
lock towards the front of the car) to unlock the driver’s door. Press
the unlock button (or turn the key) a second time to unlock the
remaining doors.
Interior locking switch
H2781a
This is a personal security feature which allows the driver to lock
(or unlock) all the doors from inside the car (while driving or with
the car stationary). Press the closed padlock symbol on the switch
to lock (the alarm will not be armed), and the open padlock
symbol to unlock.
NOTE: The locking switch will not operate the locks if the alarm has been
armed.
10
Locks & Alarm
Interior door handles and door sill locking buttons
From inside the car, each door can be individually locked by
depressing the appropriate door sill button. However, doors
cannot be unlocked by raising the sill button.
Use the door handles to unlock, as follows:
1. First operation of the door handle unlocks the door.
2. Second operation of the door handle opens the door.
Speed-related locking
Speed related locking can be selected or deselected by an MG Rover
dealer.
This feature locks all the doors automatically when the road speed
exceeds 4 km/h and the boot or tailgate when speed has reached
10 km/h. Similarly, the door, boot (or tailgate) locks will unlock
automatically when the car has slowed to the same speeds.
This feature is not selectable by the driver, and operation of the
door locks by any other means (interior locking switch on the
centre console, for example) will disable the speed-related locking
function for the remainder of the journey, or until the starter
switch is turned off and on again.
*
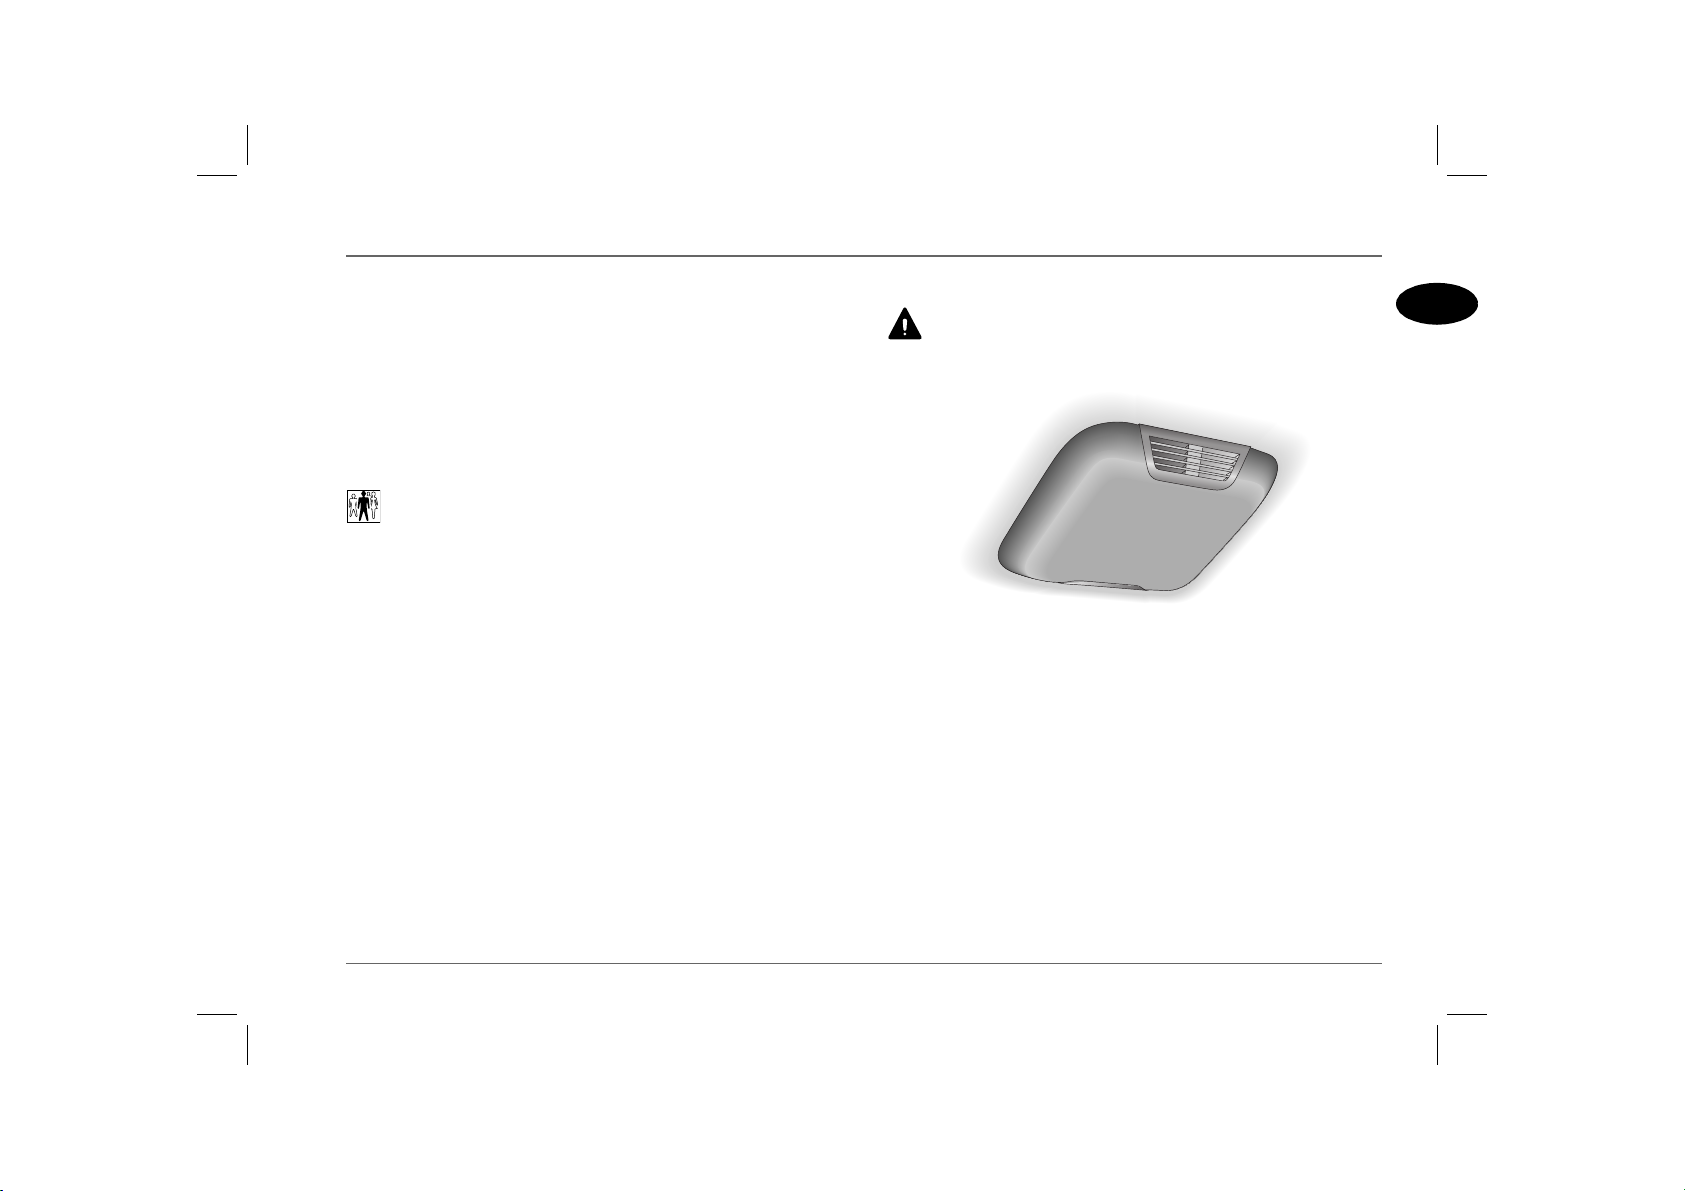
Interior space protection
Never activate interior space protection if passengers or
animals are to be left inside the car - any movement will
activate the alarm.
HB0494
Interior space protection (ultrasonics) is designed to protect the
interior of the car from intrusion (entry by a thief through a
smashed window, for example). Ultrasonic sensors, mounted on
the roof lining, monitor the interior space and activate the alarm if
air movement is detected in the passenger compartment.
NOTE: Interior space protection cannot be activated if a door, window or
sunroof is open, or if the starter switch is turned on.
Using the handset: Interior space protection is activated
automatically whenever the remote handset is used to set the
alarm.
Key operation: Using the key to set the alarm will NOT activate
interior space protection.
*
1
11

Locks & Alarm
LUGGAGE COMPARTMENT (Saloon models)
Do not drive with the luggage compartment open, as poisonous
exhaust gases will enter the car.
HB0511
To open, turn the key clockwise in the lock or, from inside the
car, press the release button in the driver's footwell. The luggage
compartment and interior lights switch on automatically when the
boot lid is opened.
The luggage compartment is automatically locked when the boot
lid is closed.
NOTE: The interior release button is not operational when the alarm
system is armed.
For convenience, with the alarm system armed, the luggage
compartment can be unlocked and opened USING THE KEY,
without activating the alarm (the rest of the car will remain
protected and the engine immobilised during this process). The
alarm will automatically rearm as soon as the boot lid is closed.
12
Locks & Alarm
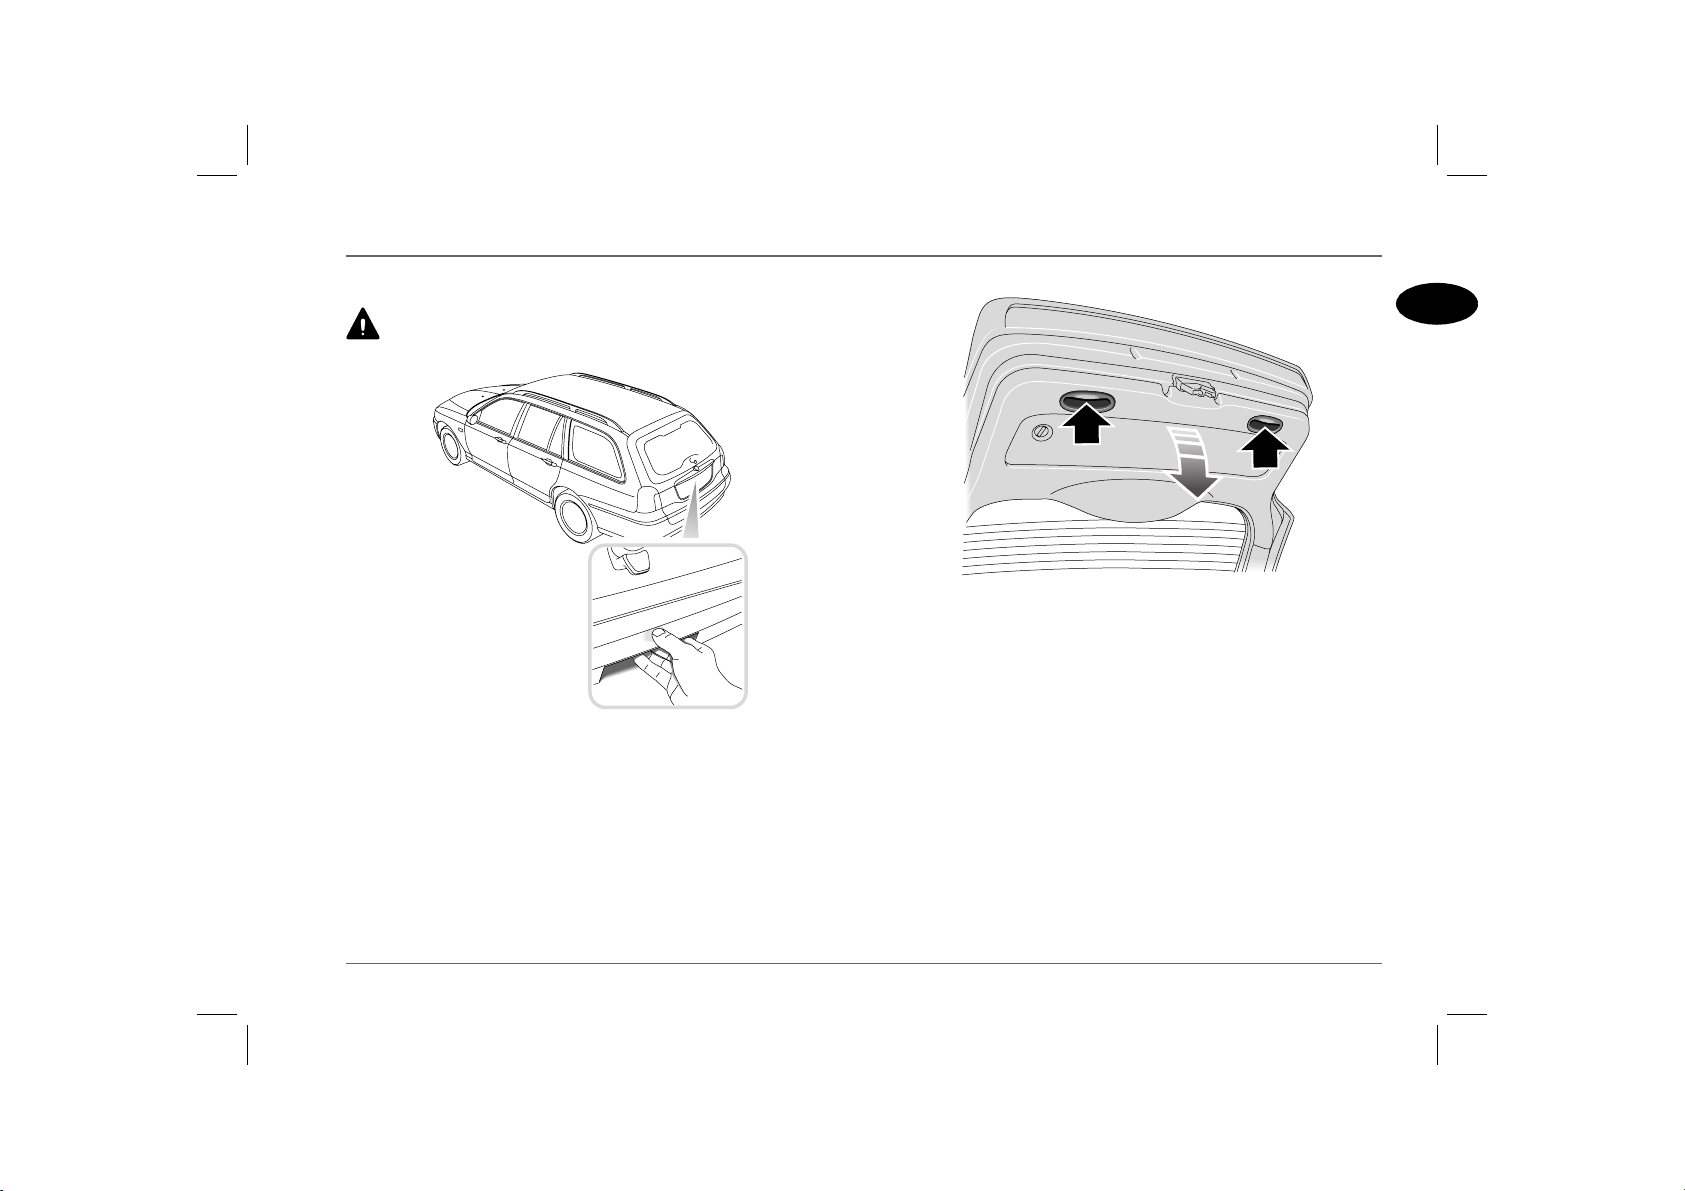
TAILGATE (Tourer models)
Do not drive with the tailgate open, as poisonous exhaust gases
will enter the car.
HB0510a
The tailgate and tailgate window are included in the car's central
locking system and lock/unlock automatically in tandem with the
doors.
To open the tailgate, the central door locking system must be
unlocked (press the unlock button on the handset twice, or turn
the door key to the unlock position twice). Operate the release
catch concealed in the underside of the tailgate trim applique
feature (see inset).
1
HB0037
When closing the tailgate, use the two hand grips set into the trim
panel on the inside of the tailgate (arrowed in illustration) to pull
the tailgate down. When the tailgate is partially closed, release the
hand grips and apply light downward pressure on the outside of the
tailgate below the number plate to close.
NOTE: The luggage compartment and interior lights illuminate
automatically when either the tailgate or tailgate window are opened.
NOTE: On cars equipped with speed-related locking, if the car has
stopped abruptly, and the starter switch is immediately turned off, the
speed-related locking control unit may not have had time to unlock the
tailgate - if this occurs, turn the starter switch on again for a few seconds
and then the tailgate can be opened as normal.
13

Locks & Alarm
Tailgate window
Do not drive with the tailgate window open, as poisonous
exhaust gases will enter the car.
HB0031b
The tailgate window should only be opened when the tailgate is
closed. With the central door locking system unlocked (handset
unlock button pressed twice, or door key turned to the unlock
position twice), operate the switch concealed beneath the rear
wiper mounting to open (see illustration).
Tailgate emergency release
HB0500
If the battery is disconnected or discharged, the tailgate can be
opened manually as follows:
• Fold the rear seat cushion forward to gain access to the
loadspace.
• Remove the loadspace cover cassette, see‘LOADSPACE
COVER’, page 66.
• Twist the two turnbuckles a quarter turn anti-clockwise to
release the tailgate storage cover.
• Lever out plastic tab and pull to release the tailgate.
14
Locks & Alarm
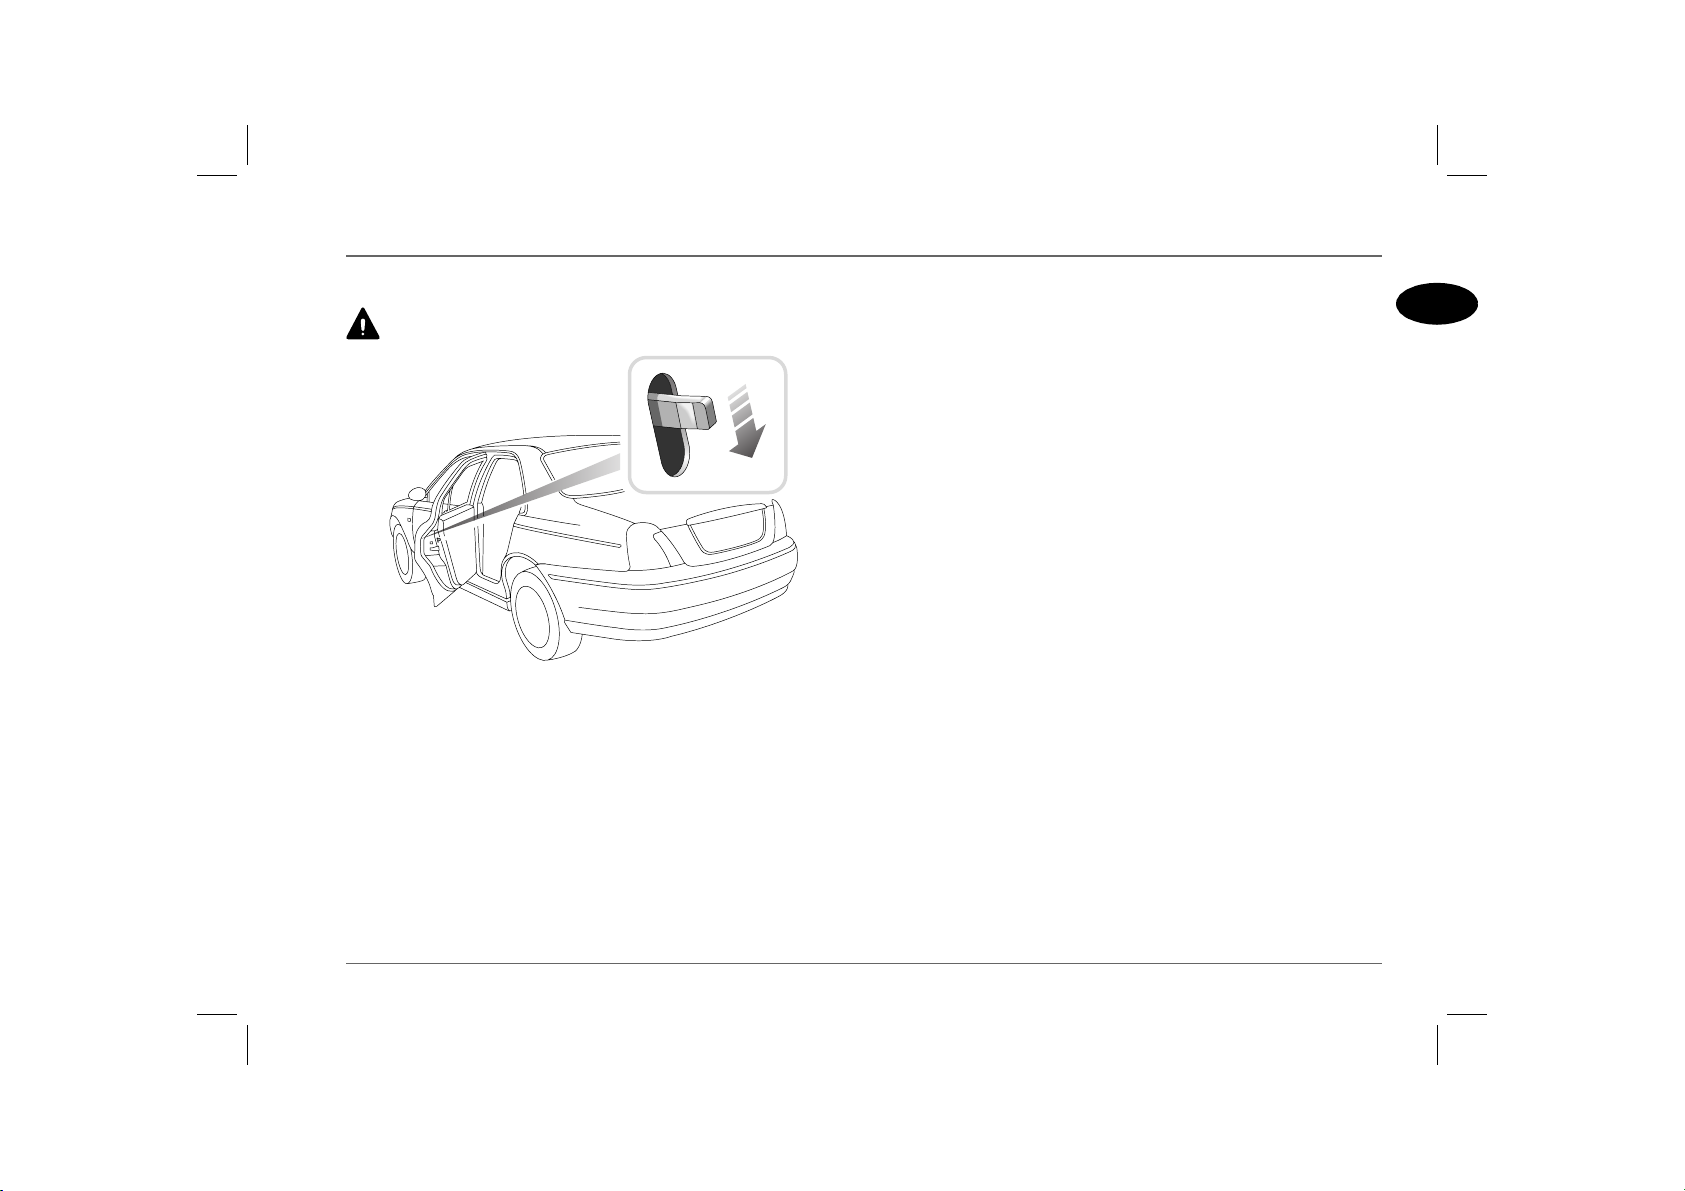
CHILD-PROOF LOCKS
NEVER leave children unsupervised in the car.
H2691
Move the locking levers on the rear doors down to engage the
child locks.
With the child-proof locks engaged, the rear doors cannot be
opened from inside the car, thereby avoiding the risk of a door
being opened accidentally while the car is moving.
1
15
Locks & Alarm
REMOTE HANDSET BATTERY
The handset contains delicate electronic circuits and must be
protected from impact and water damage, high temperatures
and humidity, direct sunlight and the effects of solvents, waxes and
abrasive cleaners.
1
H2692a
The handset battery should last for approximately three years
dependent upon use. It is recommended that you fit an MG Rover
YWK10003 or a Panasonic CR2032 replacement battery.
When the battery needs replacing it will be apparent from a
gradual deterioration in range and performance.
On cars fitted with a message centre, a warning icon and message
will be displayed when the battery needs replacing (see ‘Handset
(key) battery low - RED’, page 87).
2
3
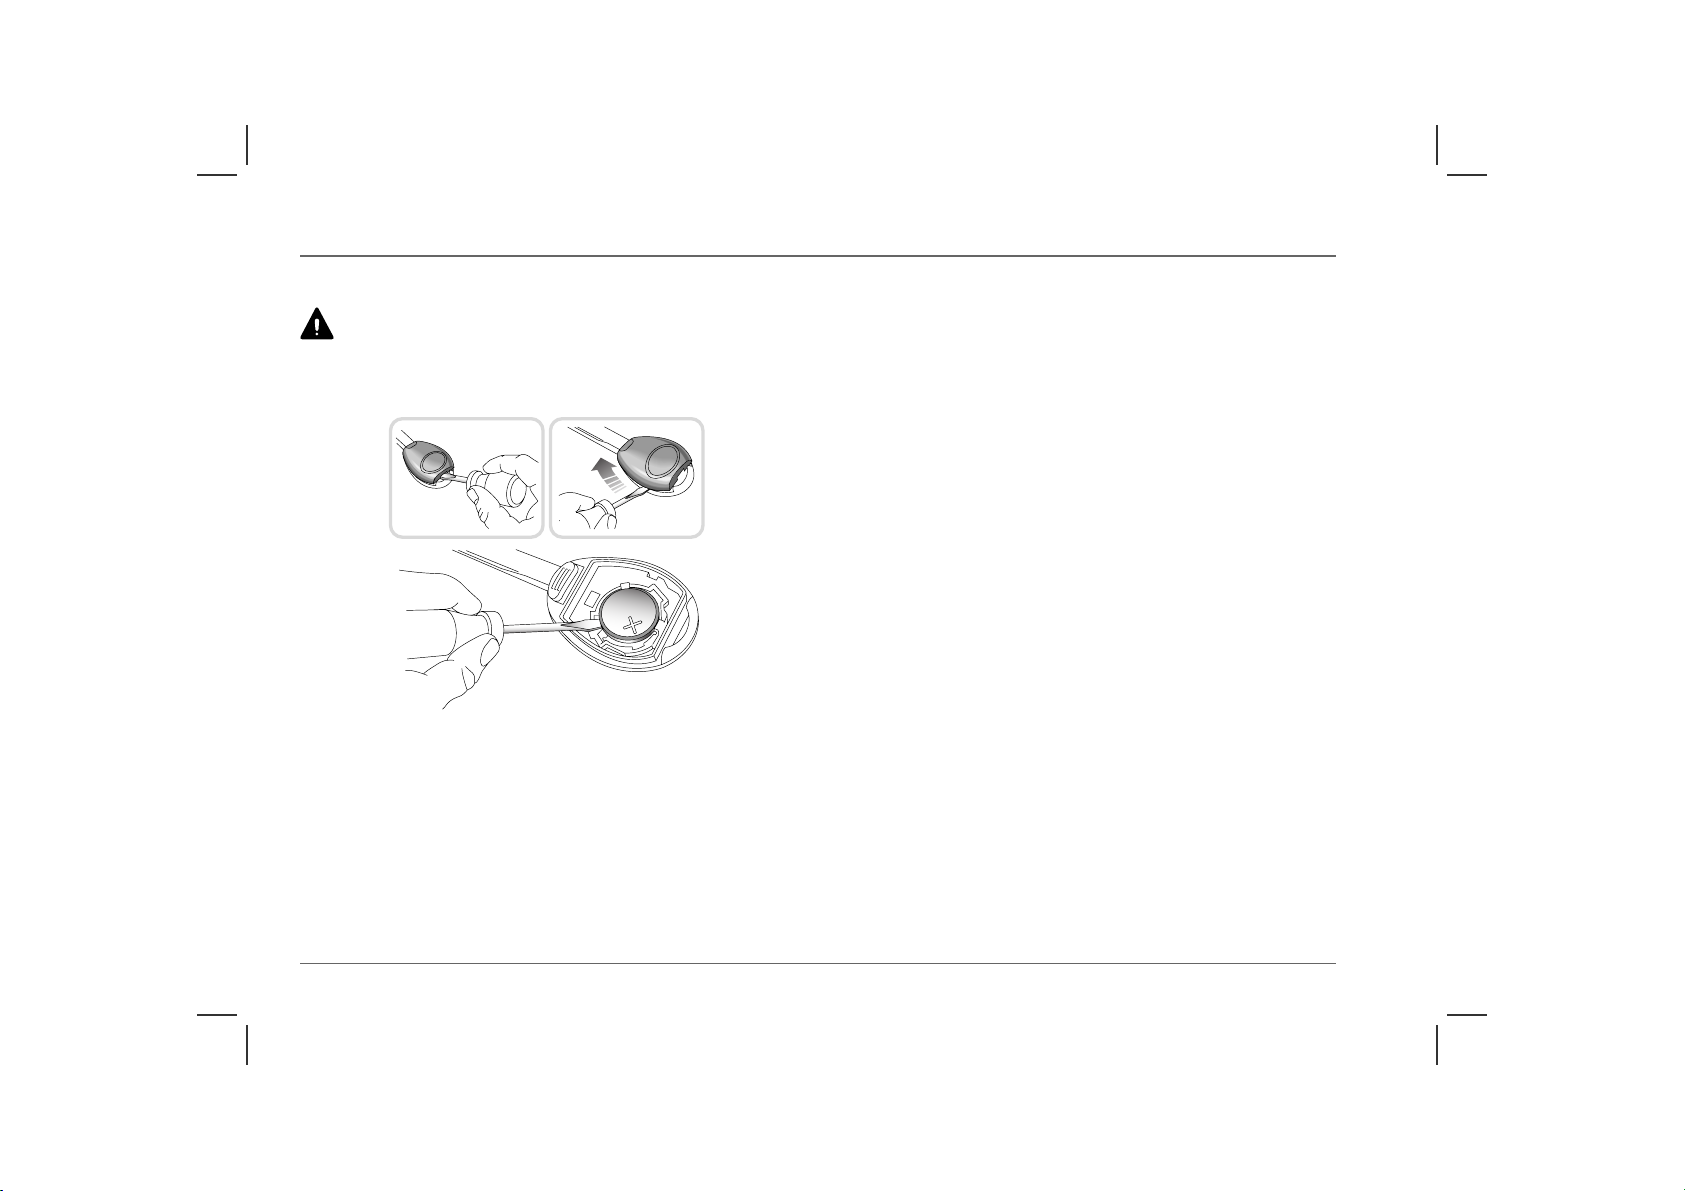
Battery replacement
1. Insert the blade of a small flat-bladed screwdriver into the slot
at the rear of the handset and prise the rear of the back
upwards.
2. Insert the screwdriver blade horizontally into the side of the
handset and then slide it towards the key. Lift off the back of
the handset.
3. Use the screwdriver to prise the battery from its mounting,
taking care to avoid touching the circuit board or the metal
battery contacts.
NOTE: Finger marks will adversely affect battery life; if possible,
avoid touching the flat surfaces of the battery and wipe them clean
before fitting.
4. Fit the new battery, ensuring that correct polarity is
maintained (‘+’ side facing up).
5. Press the two halves of the handset firmly together and ensure
that both halves are fully joined to prevent dirt or moisture
from entering the handset.
6. To resynchronise the handset, operate either button four
times in quick succession. On the fourth press the door should
lock or unlock, confirming resynchronisation.
The handset is now ready for use.
Handset re-synchronisation
If the handset fails to arm or disarm the alarm, this may be because
the coded signal transmitted by the handset, is no longer
synchronised with the receiver unit in the starter switch.
To re-synchronise the handset, hold the handset in close proximity
to the car and operate either handset button at least four times in
quick succession.
16
Seats
CORRECT SEATING POSITION
To avoid the risk of loss of control and personal injury, DO
NOT adjust the seats while the car is moving.
The driver and front passenger seats should be positioned as far
rearward as practical. Ideally the seat should be positioned so that
the steering wheel can be held with the arms slightly bent and the
seat back in a nearly upright position.
Take care when adjusting the height of the driver's seat - a rear
seat passenger's feet might become trapped when lowering the
seat rearwards.
DO NOT allow front seat occupants to travel with the seat
backs reclined steeply rearwards. Optimum benefit is obtained
from the seat belt with the backrest angle set to approximately 25°
from the upright (vertical).
Head restraints are designed to restrain rearward movement of the
head in the event of an accident or sudden stop - a properly
adjusted head restraint can considerably reduce the risk of neck and
head injuries.
Make sure your driving position is comfortable and enables you to
maintain full control of the vehicle. A properly adjusted seat helps
reduce the risk of injury from sitting too close to an inflating
airbag.
Your car is fitted with side impact airbags. Refer to the Airbag
SRS section of this handbook before fitting seat covers, or
carrying out any repair or retrimming operations to the seat or seat
covers.
Seats
HEAD RESTRAINTS
Adjust the head restraint so that the cushion is level with the
back of the head - NOT THE NECK!
H3248
Raise or lower the restraint until the cushion is level with the back
of the head.
To lower the restraint, depress the button (arrowed) and push the
restraint downwards. To raise the restraint, pull the restraint
upwards without depressing the button.
On some models the angle of the restraint can be adjusted. Tilt the
restraint to ensure it is as close to the back of the head as possible.
To remove the head restraint, depress the button on the left hand
mounting and pull the restraint upwards.
1
17
Seats
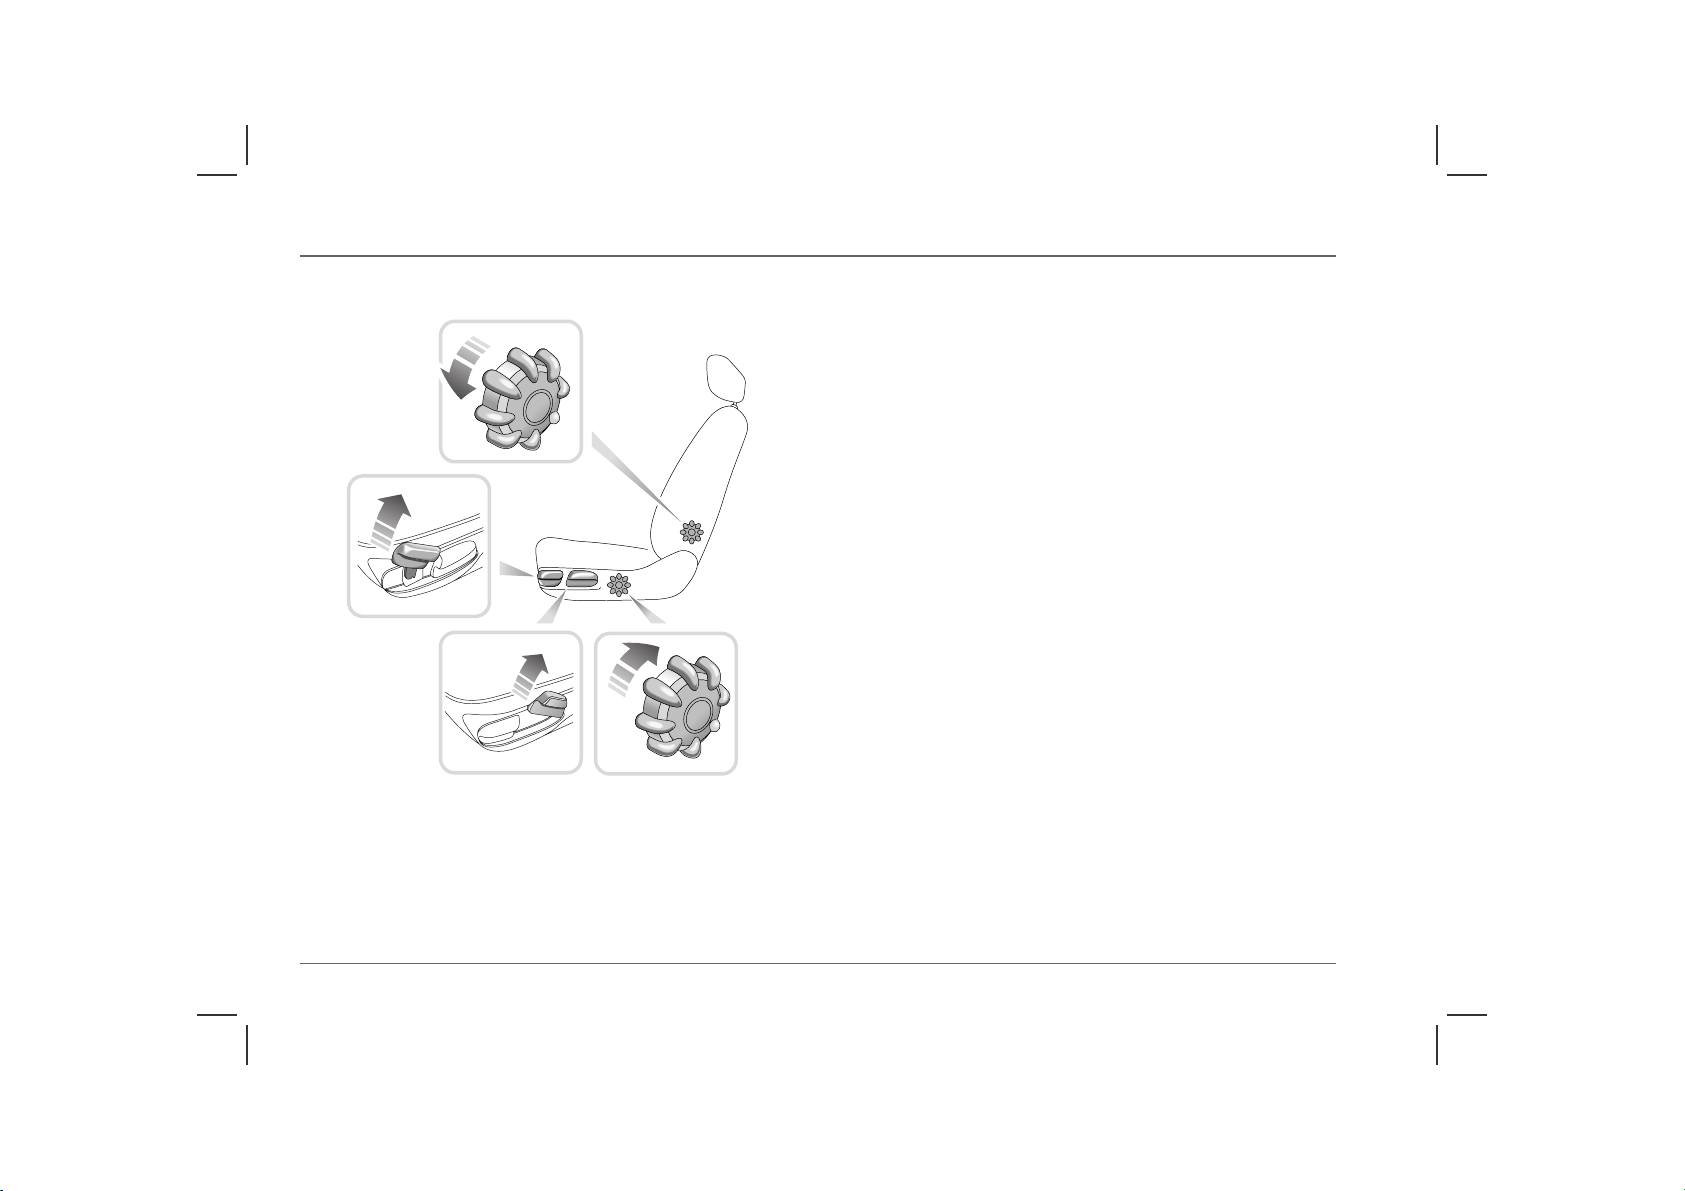
MANUALLY OPERATED FRONT SEATS*
4
1
2
HB0230
3
1. Forward/rearward adjustment
Lift the lever and slide the seat into position. Make sure the seat is
locked in position before driving.
2. Height adjustment (Driver's seat only)
Lift the lever and apply weight to lower the seat rearwards, or
allow the seat to rise forwards, as required.
3. Backrest adjustment
Rotate the handwheel to adjust.
4. Lumbar support adjustment
Rotate the handwheel to adjust.
*
18
Seats
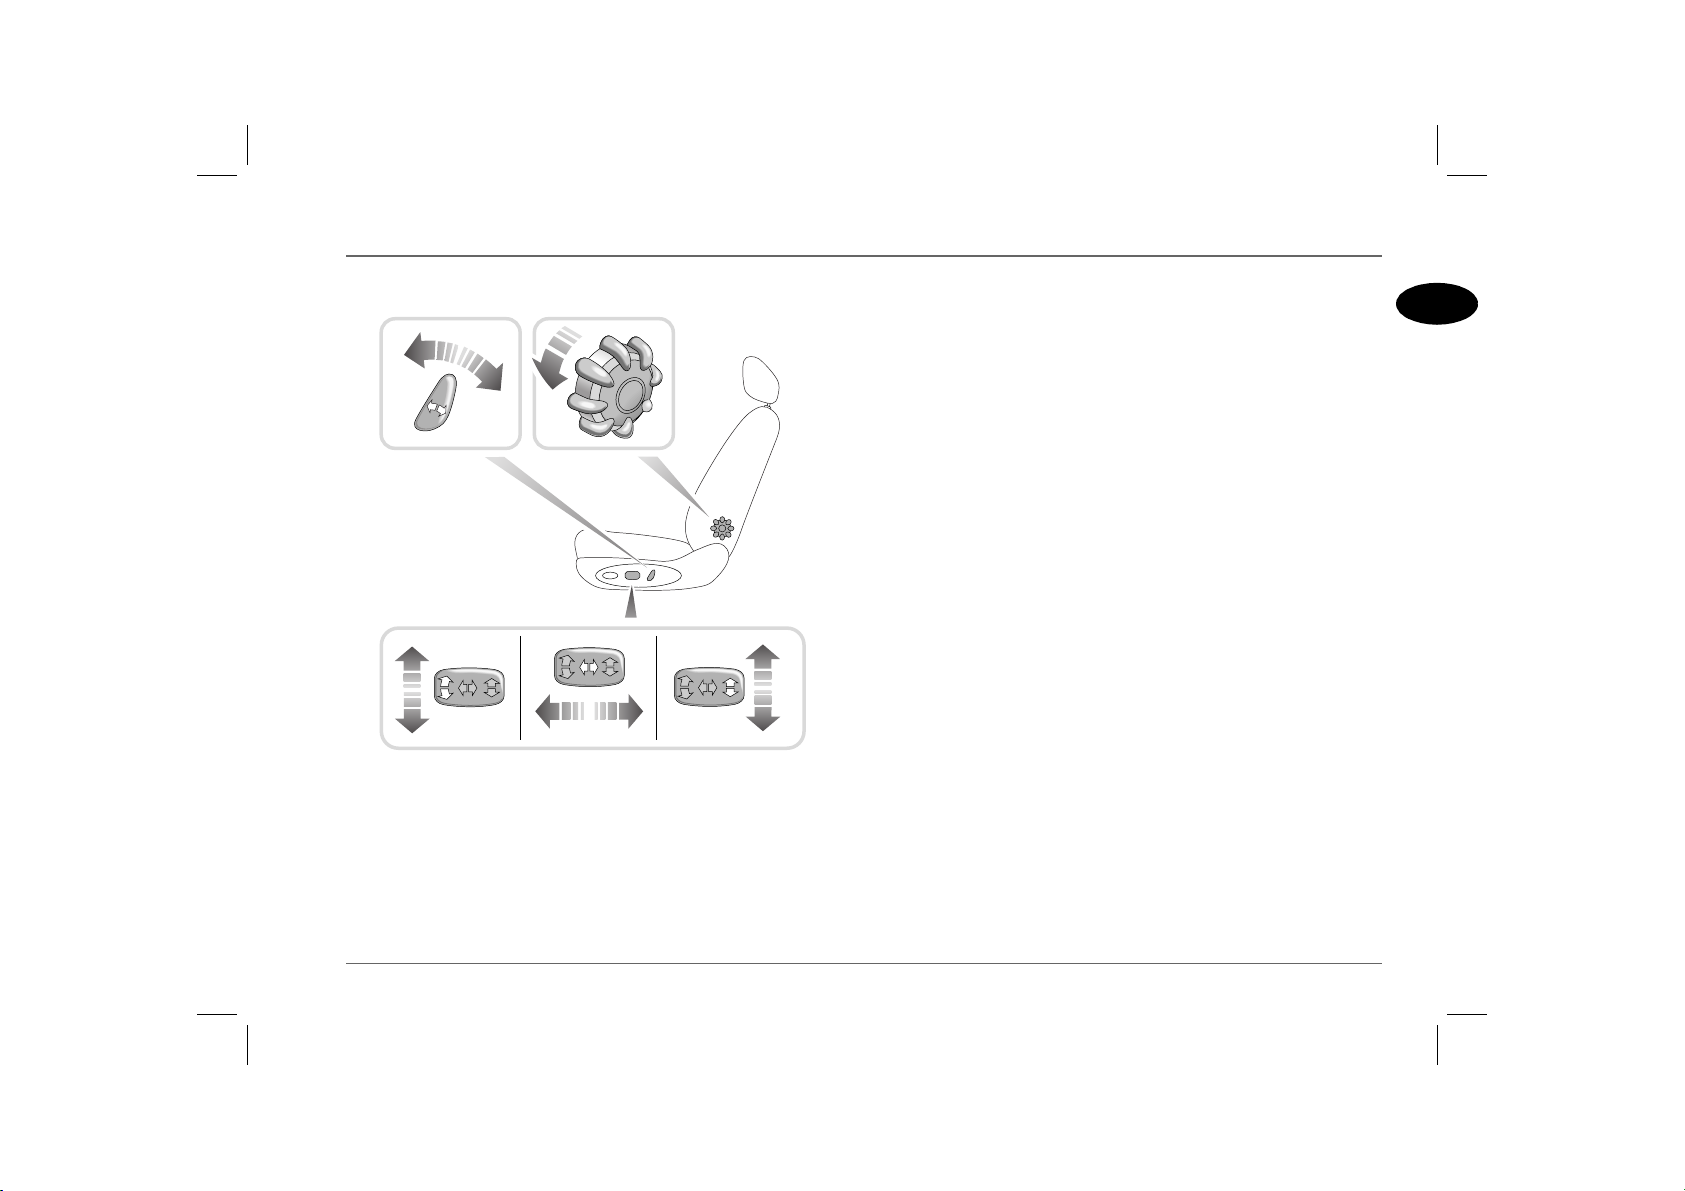
POWER-OPERATED FRONT SEATS*
54
2
HB0231
13
1. Forward/rearward adjustment
Push and hold the switch forwards or rearwards to move the seat.
2. Seat cushion angle (Driver's seat only)
Push the front of the switch up or down to tilt the seat cushion.
3. Seat cushion height (Driver's seat only)
Push the switch up or down to raise or lower the cushion.
4. Backrest adjustment
Twist the switch forward or backwards until the desired angle is
achieved.
5. Lumbar support
Rotate the handwheel to adjust.
Heated seats
For information on operating the heated front seats, see ‘Heated
seats*’, page 45.
*
1
19
Seats
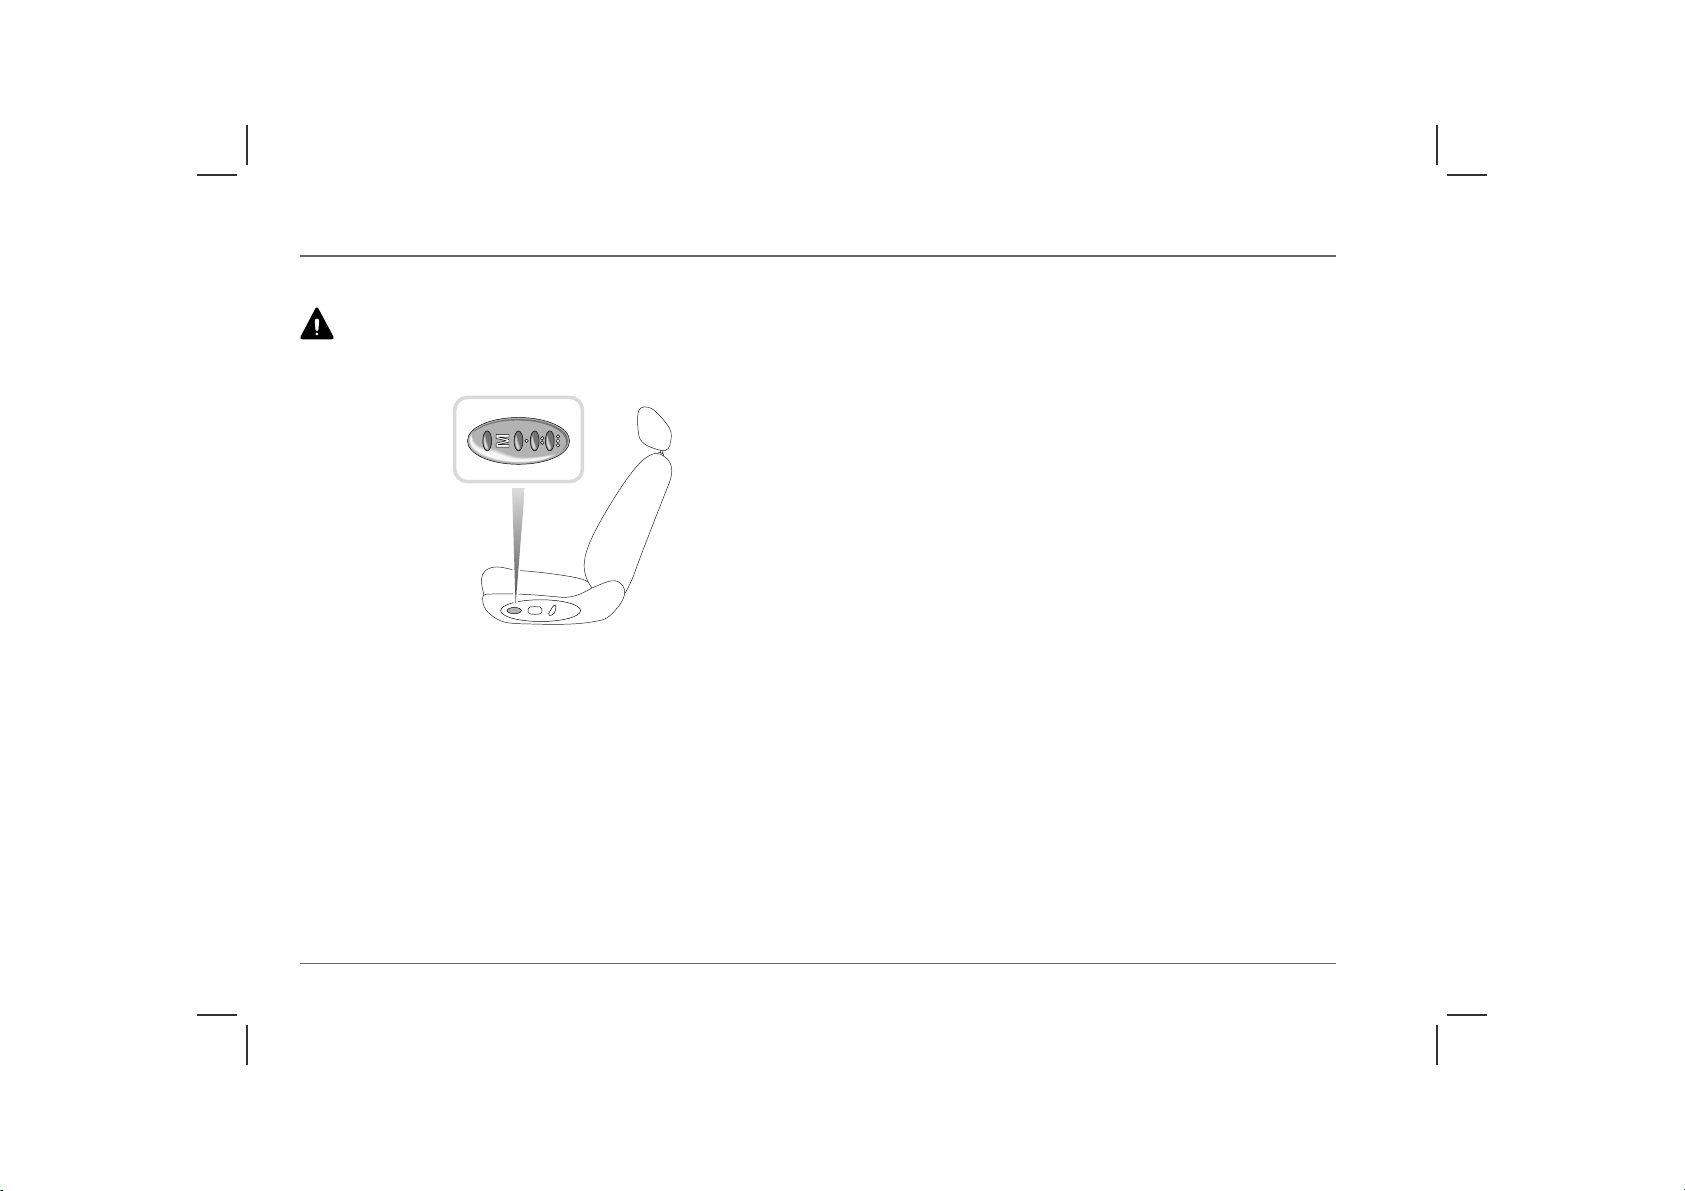
DRIVER'S SEAT MEMORY FACILITY*
Before activating the seat memory and lazy seat functions,
ensure that the area immediately surrounding the seat is clear
of obstructions and that all occupants are clear of moving parts.
H2826a
Your car can memorise three different driver seating positions. To
store the positions in the system memory, the starter switch must
be turned to the first or second position.
Adjust the seat to the required position and store the settings by
pressing and holding the memory store switch (‘M’) and, with the
memory store switch still depressed, press and release one of the
pre-set buttons (‘I’, ‘II’ or ‘III’). Finally, release the memory store
switch; a single chime will sound to confirm that the operation was
successful.
NOTE: If the car is in motion, the pre-set will need to be pressed and held
for the seat to move. This is to prevent inadvertent operation of the memory
pre-sets, which could cause the seat to move into a position in which the
driver is unable to drive safely.
To recall a stored position after the seat has been moved by another
driver, open the driver’s door and press the appropriate memory
pre-set button. The seat will return to the position stored by that
memory pre-set, a double chime will sound to confirm that the
operation is complete.
Lazy seats
The lazy seat facility enables the handsets to be used to recall seat
positions, when you unlock the doors.
Press and hold the handset unlock button to move the driver's seat
to the position stored in pre-set 1. An alternative driver's setting
can be programmed using pre-set 2. As before, position the seat
and programme pre-set 2 then, when the spare handset is used to
activate ‘Lazy seats’, the seat position stored in pre-set 2 will be
selected.
NOTE: Operation of the lazy seat facility will be cancelled if the driver’s
door is opened.
20

Seat Belts
Seat Belts
SEAT BELT SAFETY
The seat belts fitted to your vehicle are intended for use by adult
sized occupants. Each belt should be used by one occupant only.
Observe the following precautions:
• DO make sure ALL passengers are securely strapped in at all
times - even for the shortest journeys.
• ALWAYS adjust seat belts to eliminate any slack in the
webbing. DO NOT slacken the webbing by holding the belt
away from the body - to be fully effective, the seat belt must
remain in full contact with the body at all times.
• ALWAYS fit the lap strap as low on the hips as possible (never
across the abdomen), and ensure that the diagonal belt passes
across the shoulder without slipping off or pressing on the neck.
• DO NOT wear seat belts over hard, sharp or fragile items in
clothing, such as pens, keys, spectacles etc.
• Always replace a seat belt assembly that has withstood the strain
of a severe vehicle impact, or if the webbing shows signs of
fraying.
• Where possible use the seat belts to secure large items of
luggage that are to be carried on the seats - in the event of an
accident, unsecured items become flying missiles capable of
causing serious injury.
• DO NOT use a seat belt that is twisted or obstructed in any
way that could impede its smooth operation.
• DO NOT allow front seat occupants to travel with the seat
backs reclined steeply rearwards. Optimum benefit is obtained
from the seat belt with the seat back angle set to approximately
25° from the upright (vertical) position.
• DO NOT allow foreign matter (particularly sugary food and
drink particles) to enter the seat belt locks - such substances can
render the locks inoperative.
• In most countries, all occupants are required by law to wear a
seat belt, unless they have been issued with a medical
exemption certificate.
• During pregnancy, women should wear the lap belt across the
hips below the baby, with the diagonal belt passing across the
shoulder, between the breasts and to one side of the baby - if in
doubt, consult a doctor.
The airbag supplementary restraint system (SRS) is designed
to add to the overall effectiveness of the seat belts. It does not
replace them. SEAT BELTS MUST ALWAYS BE WORN!
1
21
Seat Belts
SEAT BELTS
Ensure that all seat belts are worn correctly - an improperly
worn seat belt increases th e risk of death or serious inj ury in the
event of a collision. Read the instructions below and the advice
contained under the heading ‘Seat belt safety’ on a previous page.
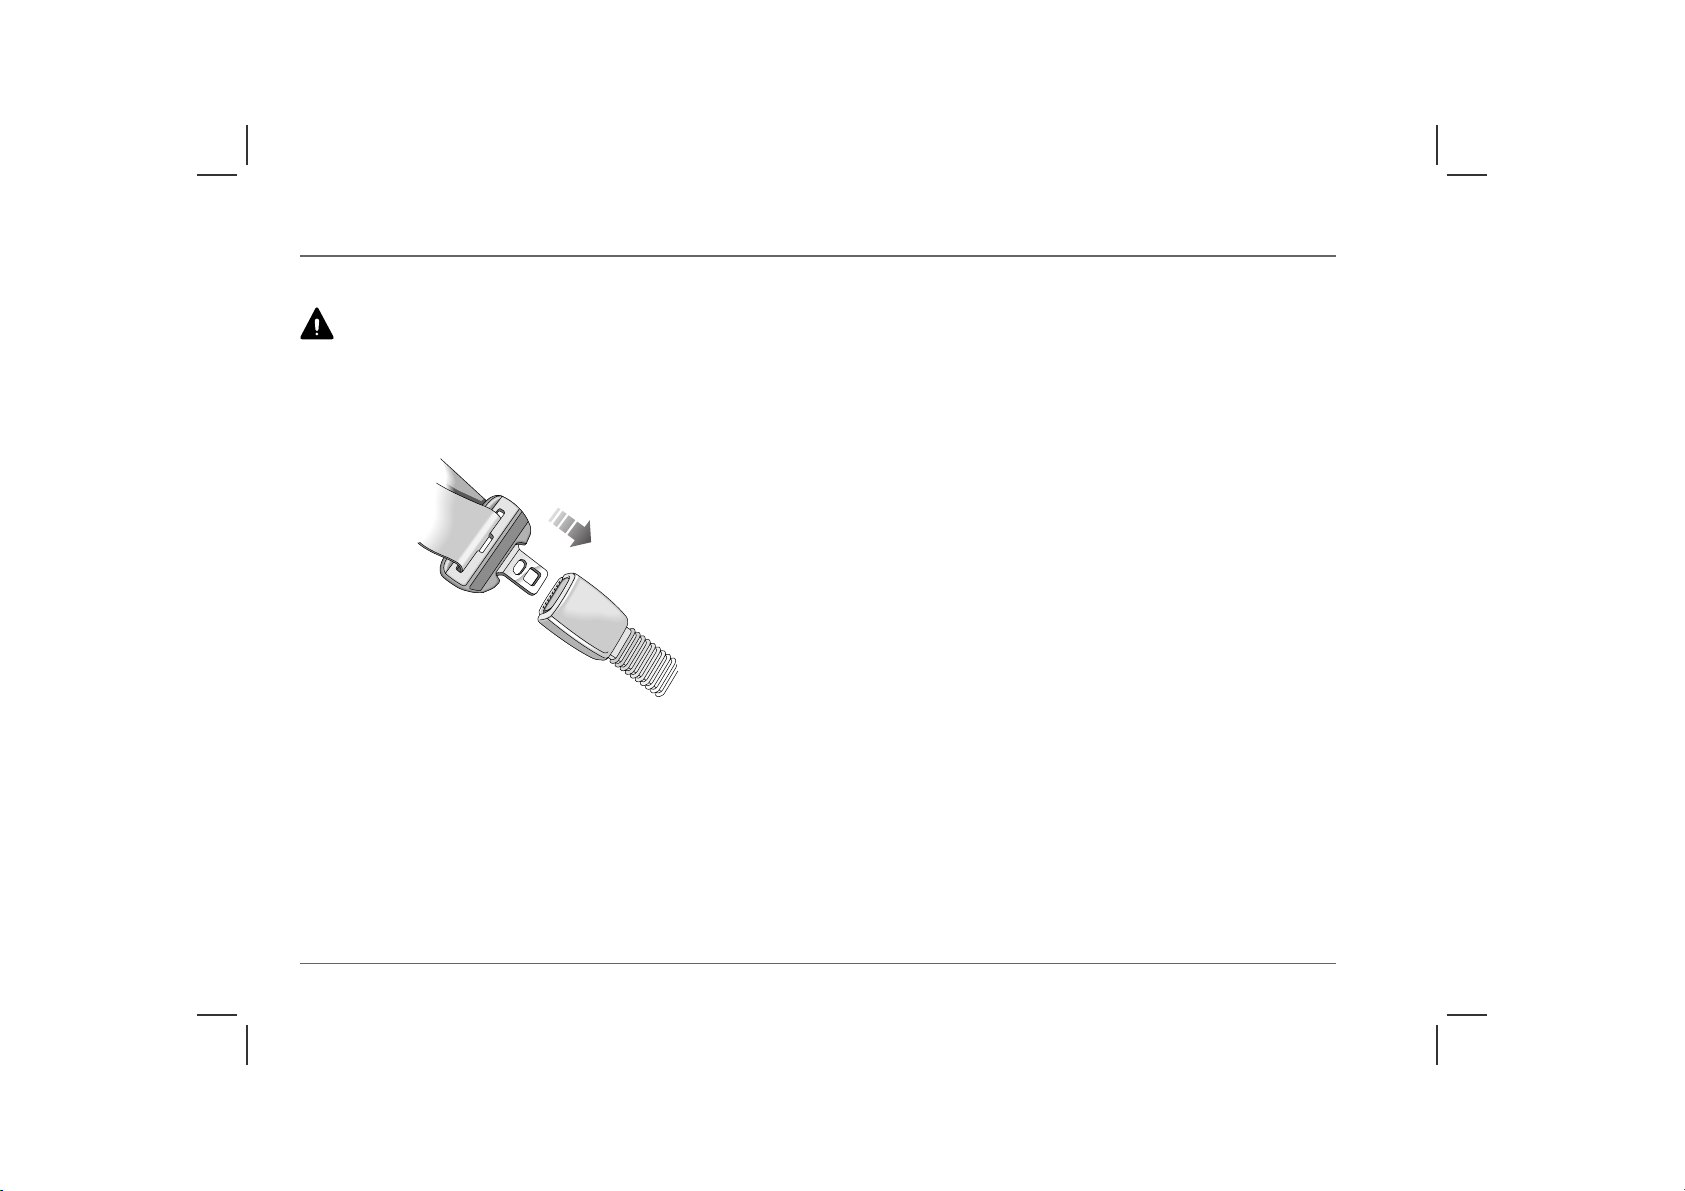
Fastening the belt
H2731
Pull the seat belt steadily over the shoulder and across the chest
and, ensuring the webbing is not twisted, insert the metal tongue
plate into the buckle nearest the wearer - a ‘click’ indicates that the
belt is securely locked.
NOTE: Where possible, rear seat passengers should adjust their position
to enable the seat belt webbing to cross the shoulder without pressing on the
neck.
Seat belts are designed to bear upon the bony structure of the body
(pelvis, chest and shoulders) and can only be worn safely with the
seats in a near-upright position; DO NOT allow the front
passenger to travel with the seat steeply reclined (see ‘Seating
positions’, page 28).
Releasing the belt
Press the red button on the seat belt buckle.
Upper anchorage height adjustment
To reduce the likelihood of injury in an accident, the height of the
front seat belt upper anchorage adjusts automatically as the seat is
moved either forwards or backwards. The height CANNOT BE
ADJUSTED MANUALLY!
22

Seat Belts
SEAT BELT PRE-TENSIONERS
The seat belt pre-tensioners will only be activated once and
then MUST BE REPLACED by an MG Rover dealer.
Failure to replace the pre-tensioners will reduce the efficiency of the
car's front restraint systems.
The seat belt pre-tensioners activate in conjunction with the airbag
SRS to provide additional protection in the event of a severe
frontal, rear or side impact on the vehicle (see ‘HOW THE
AIRBAG SRS OPERATES’, page 29). The pre-tensioners
automatically retract the seat belts. This reduces any slack in both
the lap and diagonal portions of the belts, thereby reducing
forward movement of the belt wearer in the event of a severe
collision.
NOTE: The seat belt pre-tensioners will NOT be activated by minor
impacts.
The airbag SRS warning light on the instrument panel, will alert
you to any malfunction of the seat belt pre-tensioners (see ‘Airbag
SRS warning light’, page 31).
NOTE: After any impact, always have the seat belts and pre-tensioners
checked and, if necessary, replaced by an MG Rover dealer.
If the pre-tensioners have been activated, the seat belts will still
function as restraints, and must be worn in the event that the
vehicle remains in a driveable condition.
Disposing of vehicles
If you sell your car, be sure to inform the new owner that the
vehicle is fitted with pre-tensioners, and make the new owner
aware that the pre-tensioners must be examined and replaced by
qualified personnel after a period of 15 years.
If your car is to be scrapped, unactivated pre-tensioners are
potentially very dangerous and must be safely deployed in a
controlled environment by qualified personnel, before it is
scrapped.
1
23

Seat Belts
CARING FOR SEAT BELTS
Always replace a seat belt assembly where the webbing shows
signs of fraying.
Regularly inspect the belt webbing for signs of fraying, cuts and
wear; also pay particular attention to the condition of the fixing
points and adjusters.
Do not bleach or dye the webbing and avoid contaminating the
webbing with polish, oil or chemicals (see ‘CLEANING THE
INTERIOR’, page 211).
Three tests for checking seat belts
1. With the seat belt fastened, give the webbing nearest the
buckle a quick pull - the buckle should remain securely
locked.
2. With the seat belt unfastened, unreel the webbing to the limit
of its travel. Check that unreeling is free from snags and
snatches and further check the webbing for visual signs of
wear or fraying.
Allow the webbing to retract, checking that retraction is
smooth, continuous and complete.
3. With the webbing half unreeled, hold the tongue plate and
give it a quick forward pull - the mechanism must lock
automatically and prevent any further unreeling.
If a seat belt should fail any of these tests, contact your dealer
immediately.
24
Child Restraints
Child Restraints
CHILD SEATS
Children are more likely to receive injuries from inflating airbags
than taller occupants (see ‘AIRBAG SUPPLEMENTARY
RESTRAINT SYSTEM (SRS)’, page 27). For this reason, it is
recommended that children should always be seated in the rear of
the vehicle, in a child safety seat or restraint system appropriate to
their age and size. A table on the following page outlines the
seating positions suitable for use with a child safety seat or restraint
system. The range of safety seats approved for use in your car is
listed in the MG Rover accessories brochure, which is available
from your MG Rover dealer.
For optimum protection, it is recommended that children
weighing up to 13 kg (or approximately 18 months of age) are
restrained in an MG Rover-approved rear facing child seat in an
outer rear seating position.
All infant and child restraint systems are designed to be secured in
the car by means of a standard seat belt.
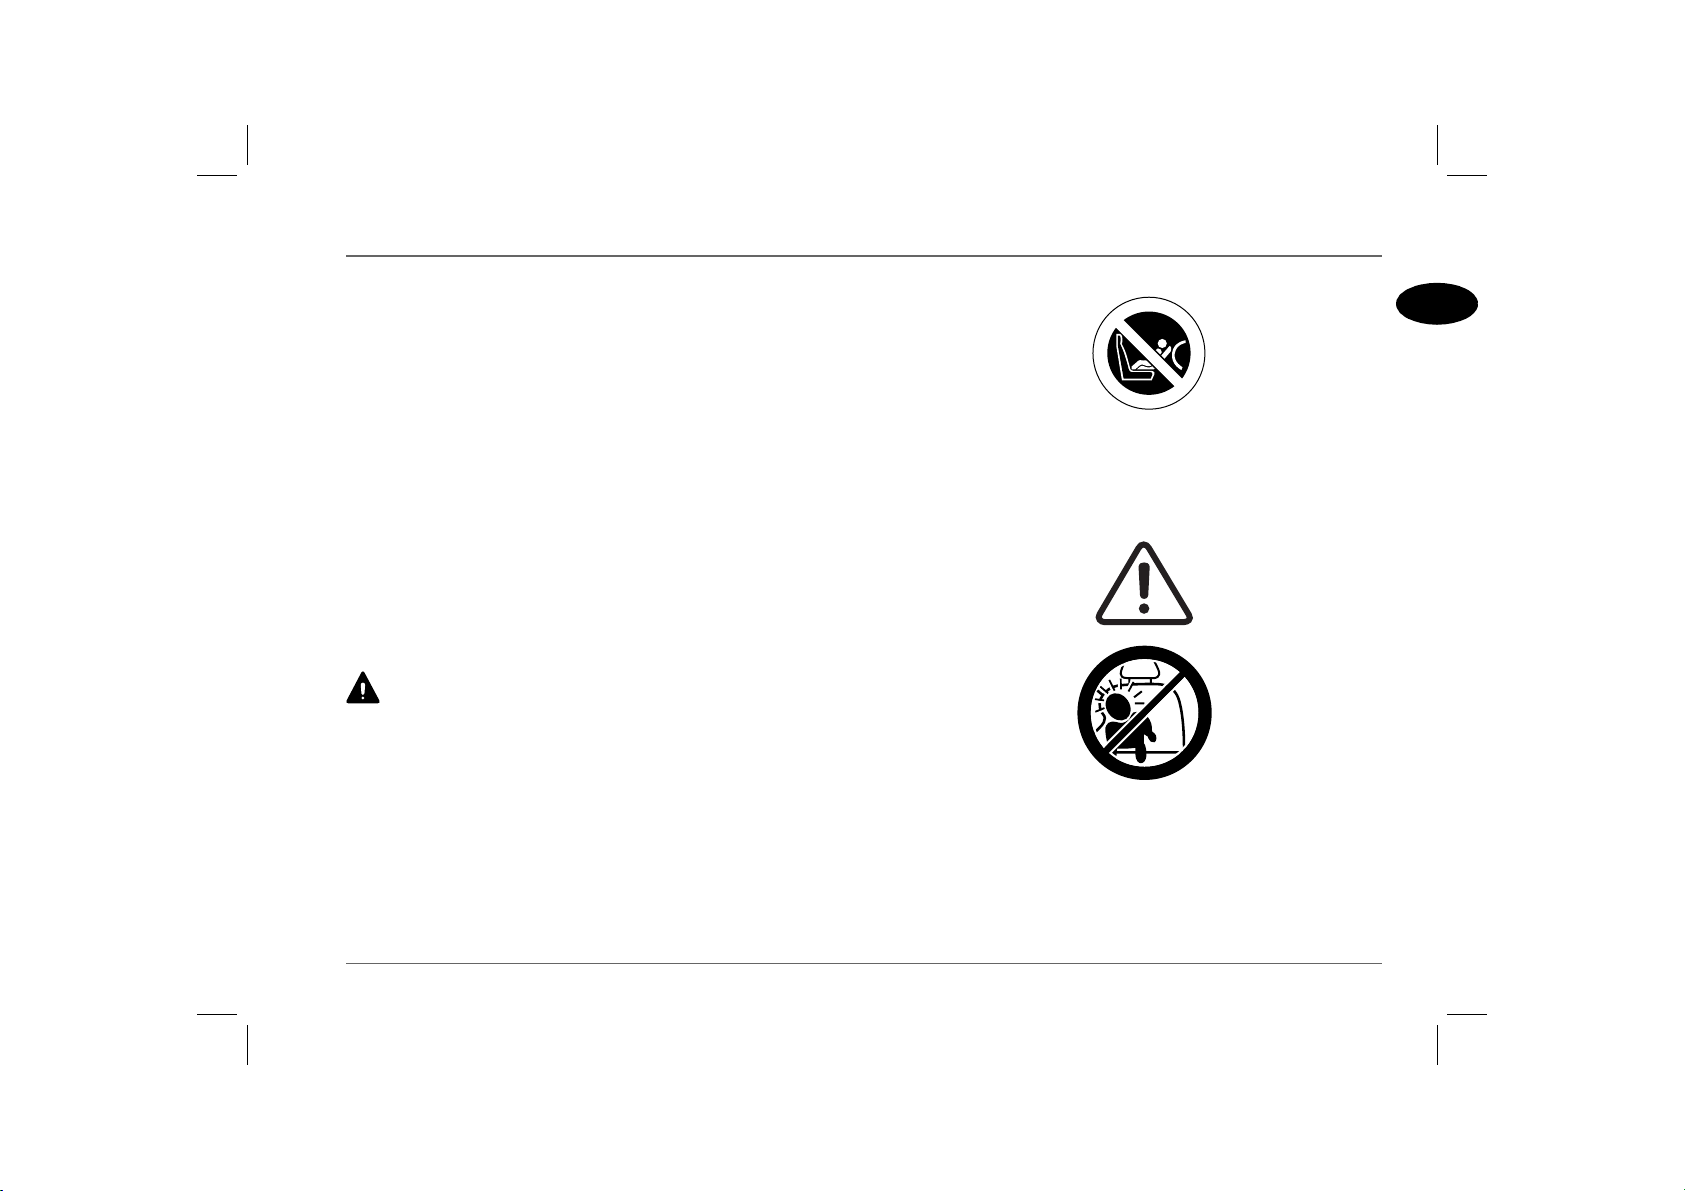
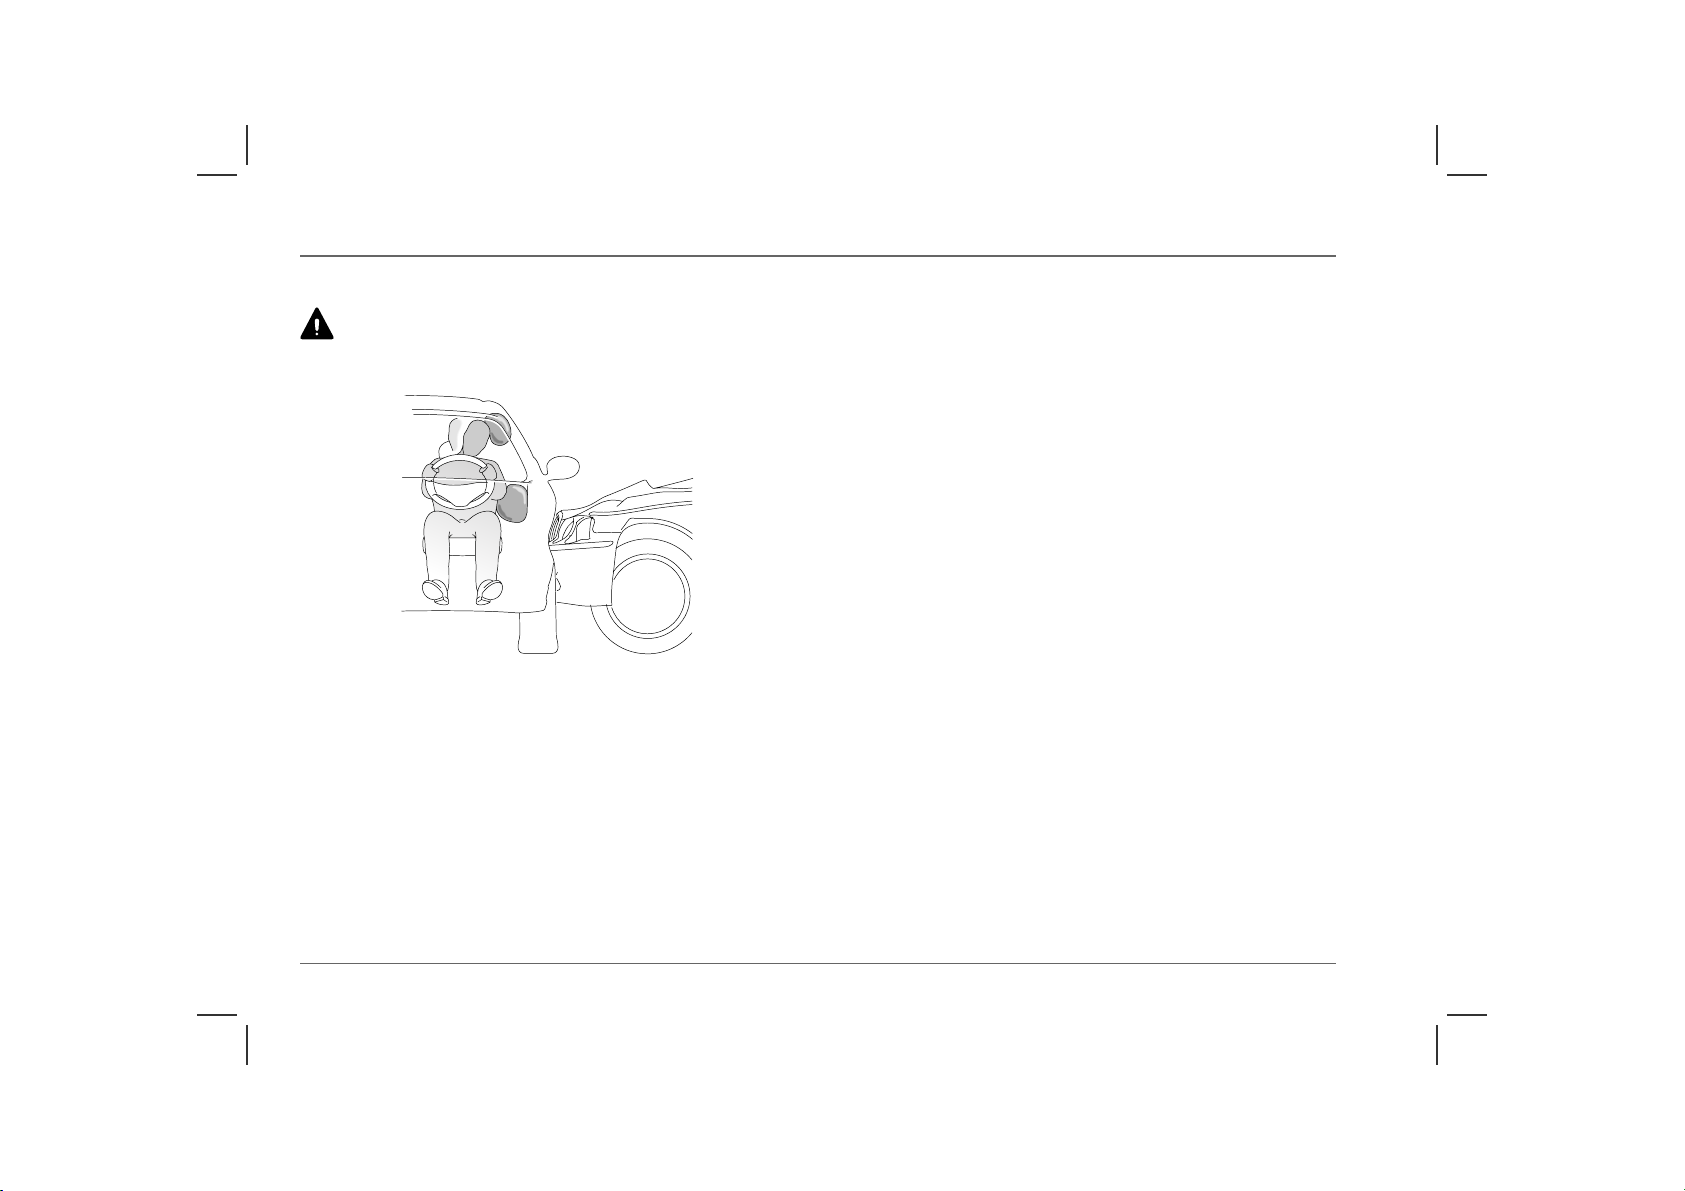
DO NOT install a rearward facing child seat in the front
passenger seat - an inflating airbag could impact with the seat.
Failure to follow this advice could result in serious injury, or even
death for the child.
When installing and using any infant or child restraint system,
always follow the manufacturer's instructions. Failure to properly
secure the child restraint system can endanger the child in a
collision or sudden stop and cause injury to other passengers.
B
A
R
G
I
A
HB0233
The above symbol affixed to the fascia panel of your car, warns
against the use of a REAR FACING child seat in the front
passenger seat. This type of child seat could cause serious injury to
your child in the event of an airbag deployment.
I
R
A
B
A
E
G
D
I
S
HB0235
If it is necessary for a child to travel in the front, it is essential that
the vehicle seat is set fully rearwards and that the child is seated in
a FRONT FACING child safety seat, which prevents any part of
the child’s head coming into close proximity with the side airbag
(note the warning label shown above).
1
25
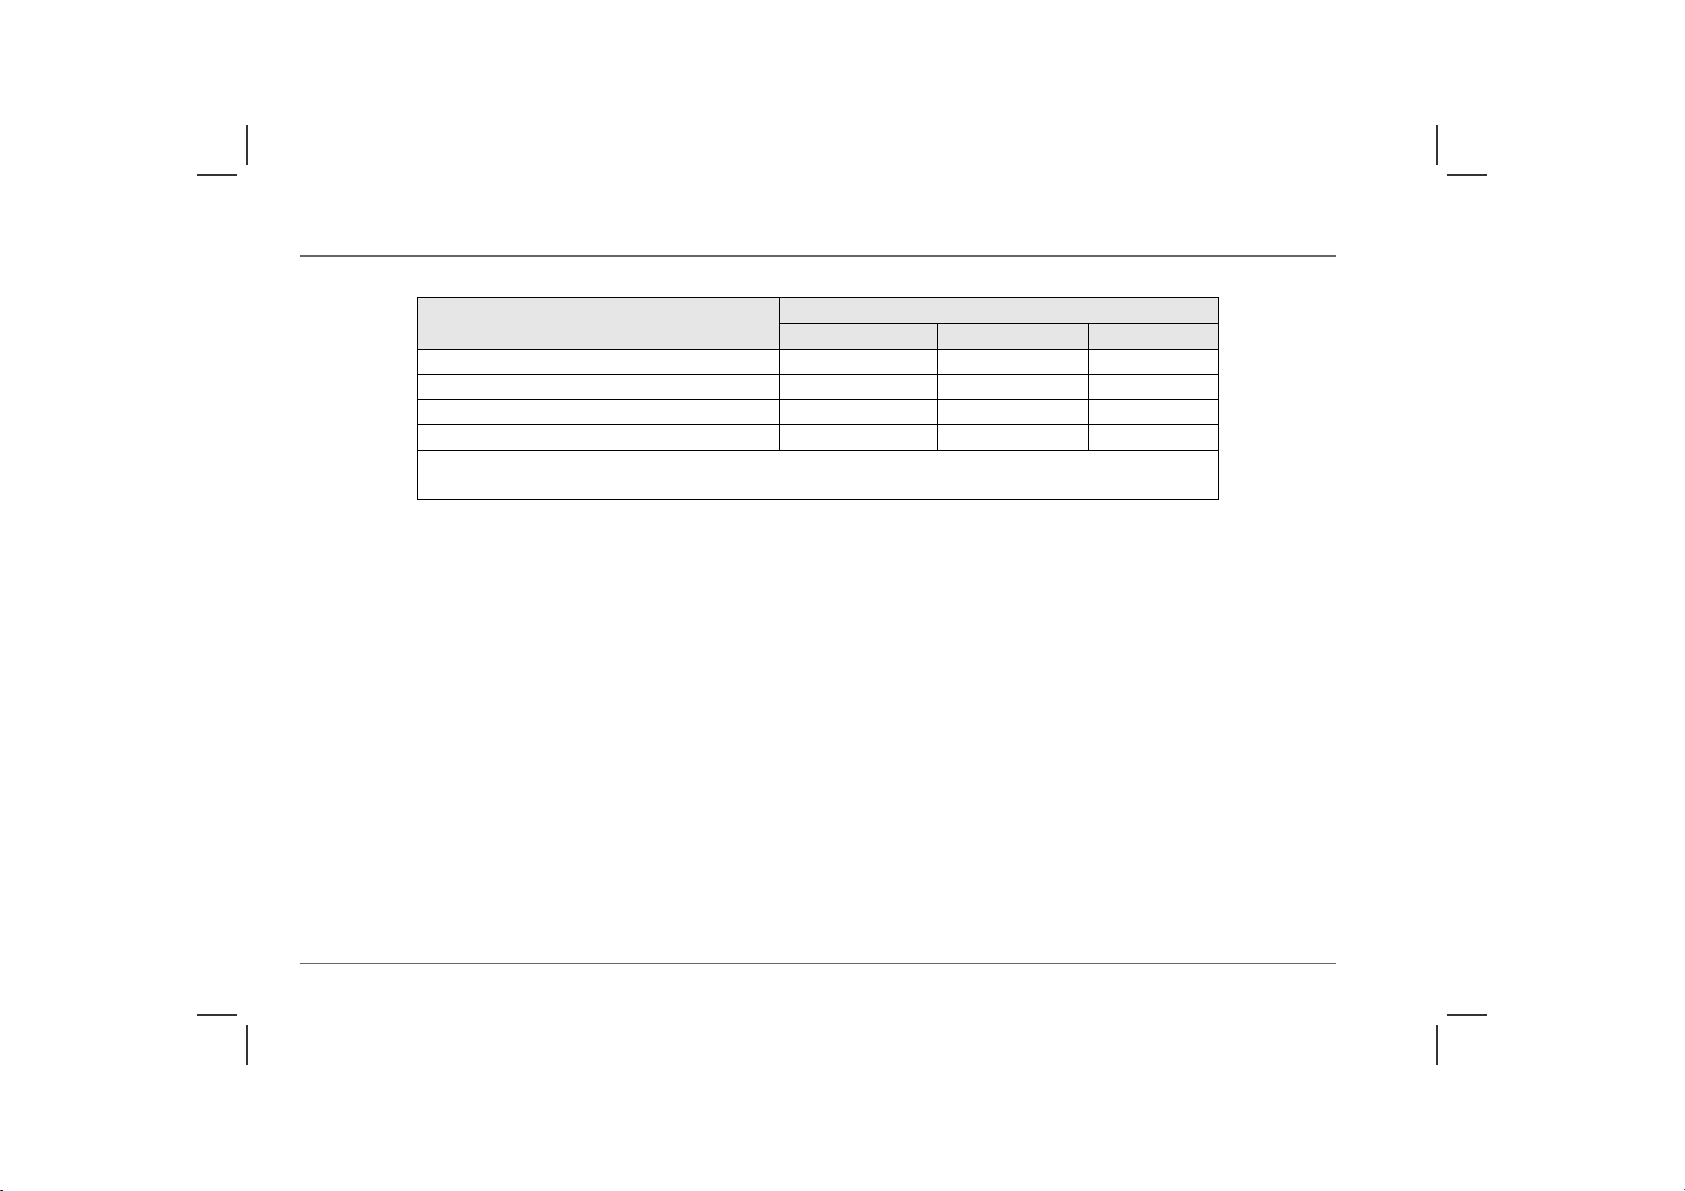
Child restraint seating options
Mass Group Seating Positions
(As indicated on child safety seat packaging)
0 = Up to 10 kg (0 - 9 months) X U U
0+ = Up to 13 kg (0 - 18 months) X U U
I = 9 to 18 kg (9 months - 4 years) X U U
II & III = 15 to 36 kg (4 - 12 years) X U X
U = Suitable for ‘Universal’ category restraints approved for this mass group.
X = Seat position NOT suitable for children of this mass group.
Child Restraints
Front Passenger Rear Outboard Rear Centre
26
Airbag SRS
Airbag SRS
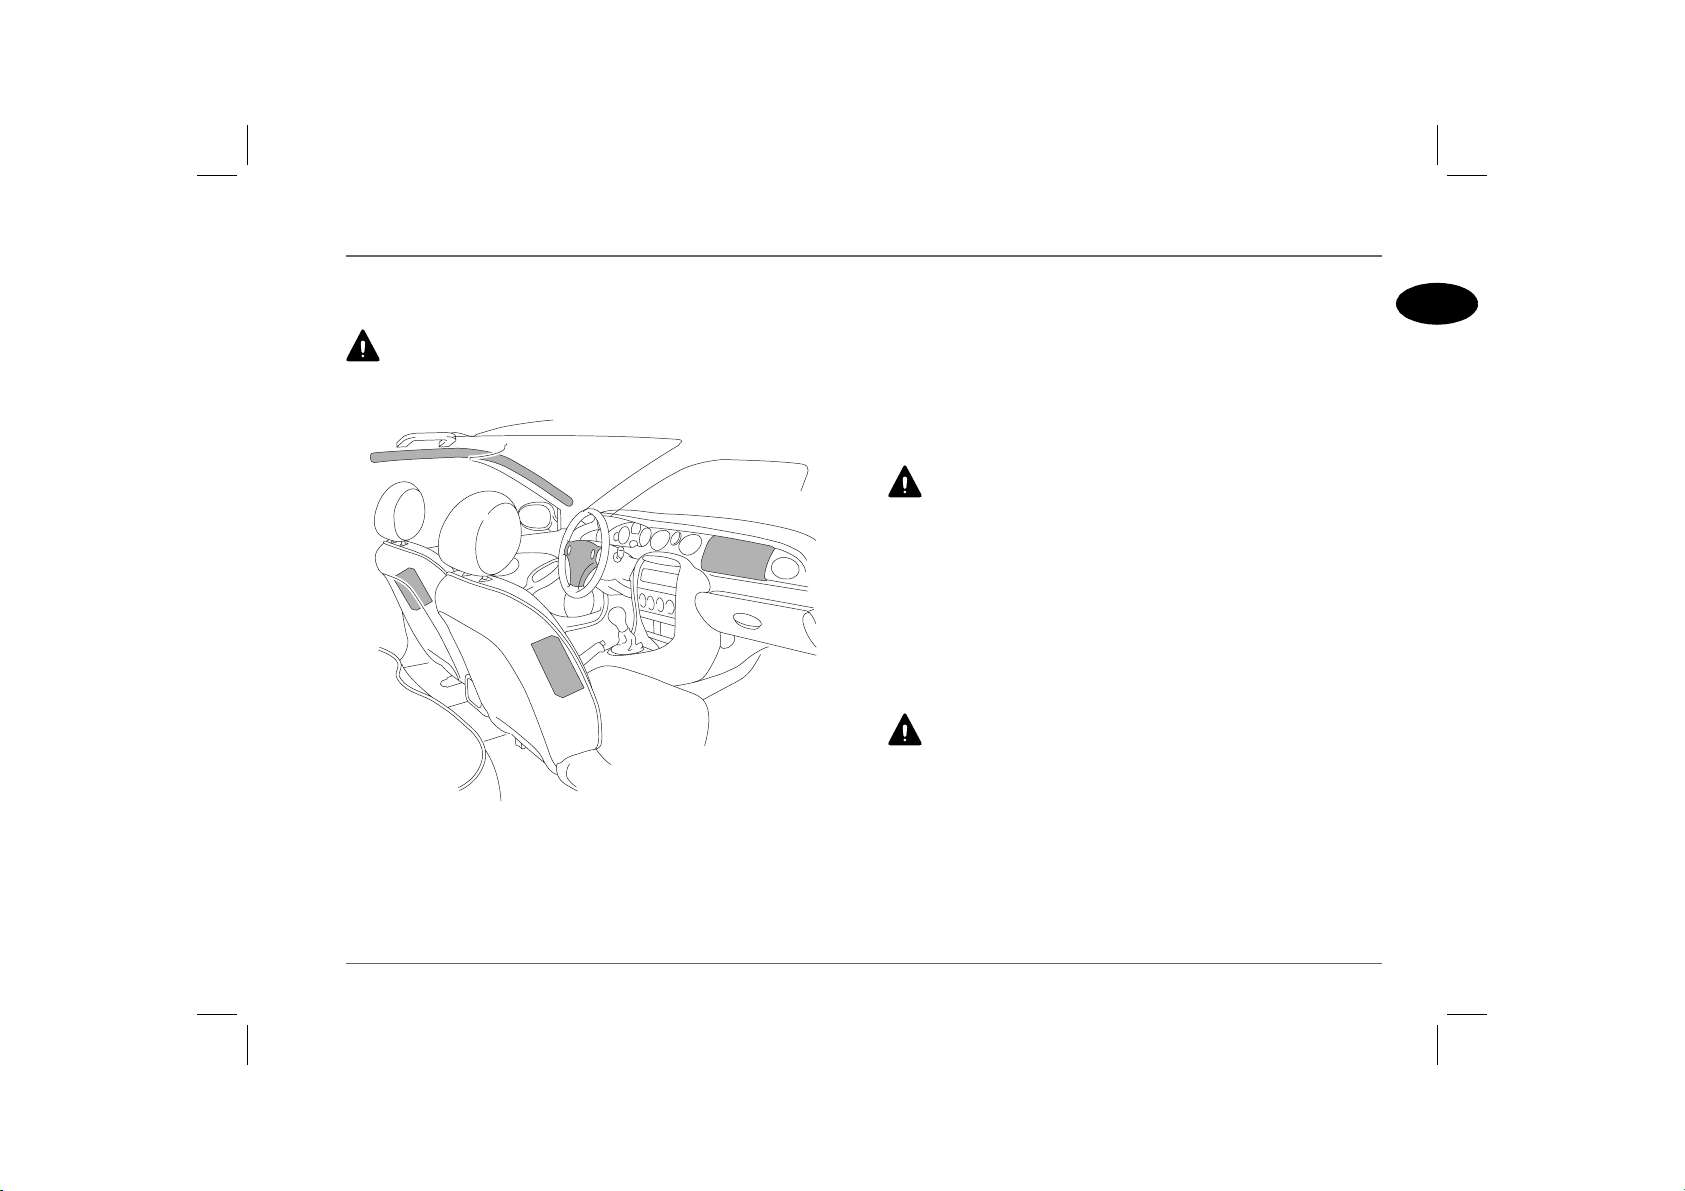
AIRBAG SUPPLEMENTARY RESTRAINT SYSTEM (SRS)
The airbag SRS provides ADDITIONAL protection in a
severe impact only. It does not replace the need to wear a seat
belt.
H2797b
The airbag SRS incorporates front and side airbags for both the
driver and front seat passenger.
NOTE: Inflation and deflation of the front and side airbags takes place
very quickly and will not protect against the effects of secondary impacts that
may occur.
Provided the front seat occupants are correctly seated, with seat
belts properly worn, the airbags will provide additional protection
to the chest and facial areas in the event of the car receiving a
severe frontal impact, and to the side of the body facing the impact,
if a severe side collision occurs.
Side head impact protection (where fitted) will afford additional
protection to the side of the head facing the impact, in the event
of a severe side collision.
Do not allow a front seat passenger to obstruct the operation of
the airbag by placing feet, knees or any other part of the person,
or any other objects in contact with, or in close proximity to, an
airbag module.
The front airbags are located in the centre pad of the steering
wheel and in the fascia panel above the glovebox. Side airbags are
positioned in the backrest padding on the outward side of both
front seats. The side head impact protection airbags (if fitted) are
situated behind the roof lining and front pillar finishers (where
shown).
DO NOT attach or position items on, or close to the roof
lining or front pillar and ‘B’ post finishers, or to an airbag
cover (steering wheel centre pad or fascia panel), which could
interfere with the inflation of the airbag or, if the airbag inflates, be
propelled inside the car causing injury to the occupants.
1
27

Airbag SRS
Airbag deployment
To ensure correct deployment of the airbags, it is essential that
obstructions are not allowed to intervene between an airbag and
the occupant. The following are examples of the type of
obstructions that could either, impede correct operation of the
airbags, or jeopardise personal safety in the event of an airbag
deployment:
• Accessories attached to or obscuring an airbag cover, including
the roof lining, front pillar and ‘B’ post finishers and the part of
the front seat containing the side airbag or the pillar between
front and rear doors.
• Items of hand luggage, or other objects placed on an airbag
cover.
• Feet, knees or any other part of the anatomy in contact with,
or in close proximity to, a front airbag cover.
• Items on the shelf below the front passenger airbag that are
likely to impede airbag operation in the event of an impact.
• Head, arms or any part of the anatomy in contact with, or in
close proximity to, a side airbag.
• Items of clothing or cushions draped over the part of the front
seat containing the airbag or hanging from the grab handle
attached to the roof.
• Non-approved seat covers fitted over a front seat (in particular,
be aware that seat covers approved for other cars will NOT be
suitable for this car). If in doubt, seek advice from an MG
Rover dealer.
Seating positions
To minimise the risk of accidental injury from inflating
airbags, seat belts should be correctly worn at all times. In
addition, both driver and front seat passenger should adjust their
seat to provide the maximum practical distance from the front
airbags, and also ensure that a gap is maintained between the upper
torso and the side of the vehicle, to enable unobstructed inflation of
the side airbags.
In order to provide optimum protection in the event of a severe
impact, it is necessary for the airbags to deploy with considerable
speed.
An inflating airbag can cause facial abrasions and other injuries if
the occupant is too close to the airbag at the time of its
deployment.
28
Airbag SRS
HOW THE AIRBAG SRS OPERATES
In the event of a collision, the airbag control unit monitors the rate
of deceleration or acceleration induced by the collision, to
determine whether the airbags should be deployed.
NOTE: The airbag SRS is not designed to operate as a result of rear
collisions, minor frontal or side impacts, or if the car overturns; nor will it
operate as a result of heavy braking or driving over bumps and potholes.
Operation of the airbag SRS is dependent entirely on the rate at
which the car's passenger compartment changes speed as a result of
a collision. The circumstances affecting different collisions (vehicle
speed, angle of impact, type and size of object hit, for example),
vary considerably and will affect the rate of acceleration or
deceleration accordingly.
It follows, therefore, that significant superficial damage can occur
without the airbags deploying or, conversely, that a relatively small
amount of structural damage may cause the airbags to be deployed.
In the case of a severe frontal collision, both front airbags will be
deployed. In the case of a severe side collision, only the side airbag
and side head impact protection airbag on the impact side of the
vehicle will inflate. However, there may also be impact conditions
whereby one set of side and both front airbags deploy at the same
time, or where front and side airbags respond separately as a result
of a secondary impact occurring after the initial collision has taken
place.
An inflating airbag can cause facial abrasions and other
injuries. Minimise the risk of injury by ensuring that front seat
occupants are wearing their seat belts and are seated correctly, with
the seat as far back as is practical.
1
H2798a
Airbag inflation is virtually instantaneous and occurs with
considerable force, accompanied by a loud noise. The inflated bag,
together with the seat belt restraint system, limit the movement of
a front seat occupant, thereby reducing the risk of injury to the
head and upper torso.
NOTE: After inflation, some airbag components are hot - DO NOT
touch until they have cooled.
When an airbag inflates, a fine powder is released. This is not an
indication of a malfunction, however, the powder may cause
irritation to the skin and should be thoroughly flushed from the
eyes and any cuts or abrasions of the skin. After inflation, front and
side airbags deflate immediately (side head protection airbags
deflate slowly). This provides a gradual cushioning effect for the
occupant and also ensures that the driver's forward vision is not
obscured.
29
Airbag SRS
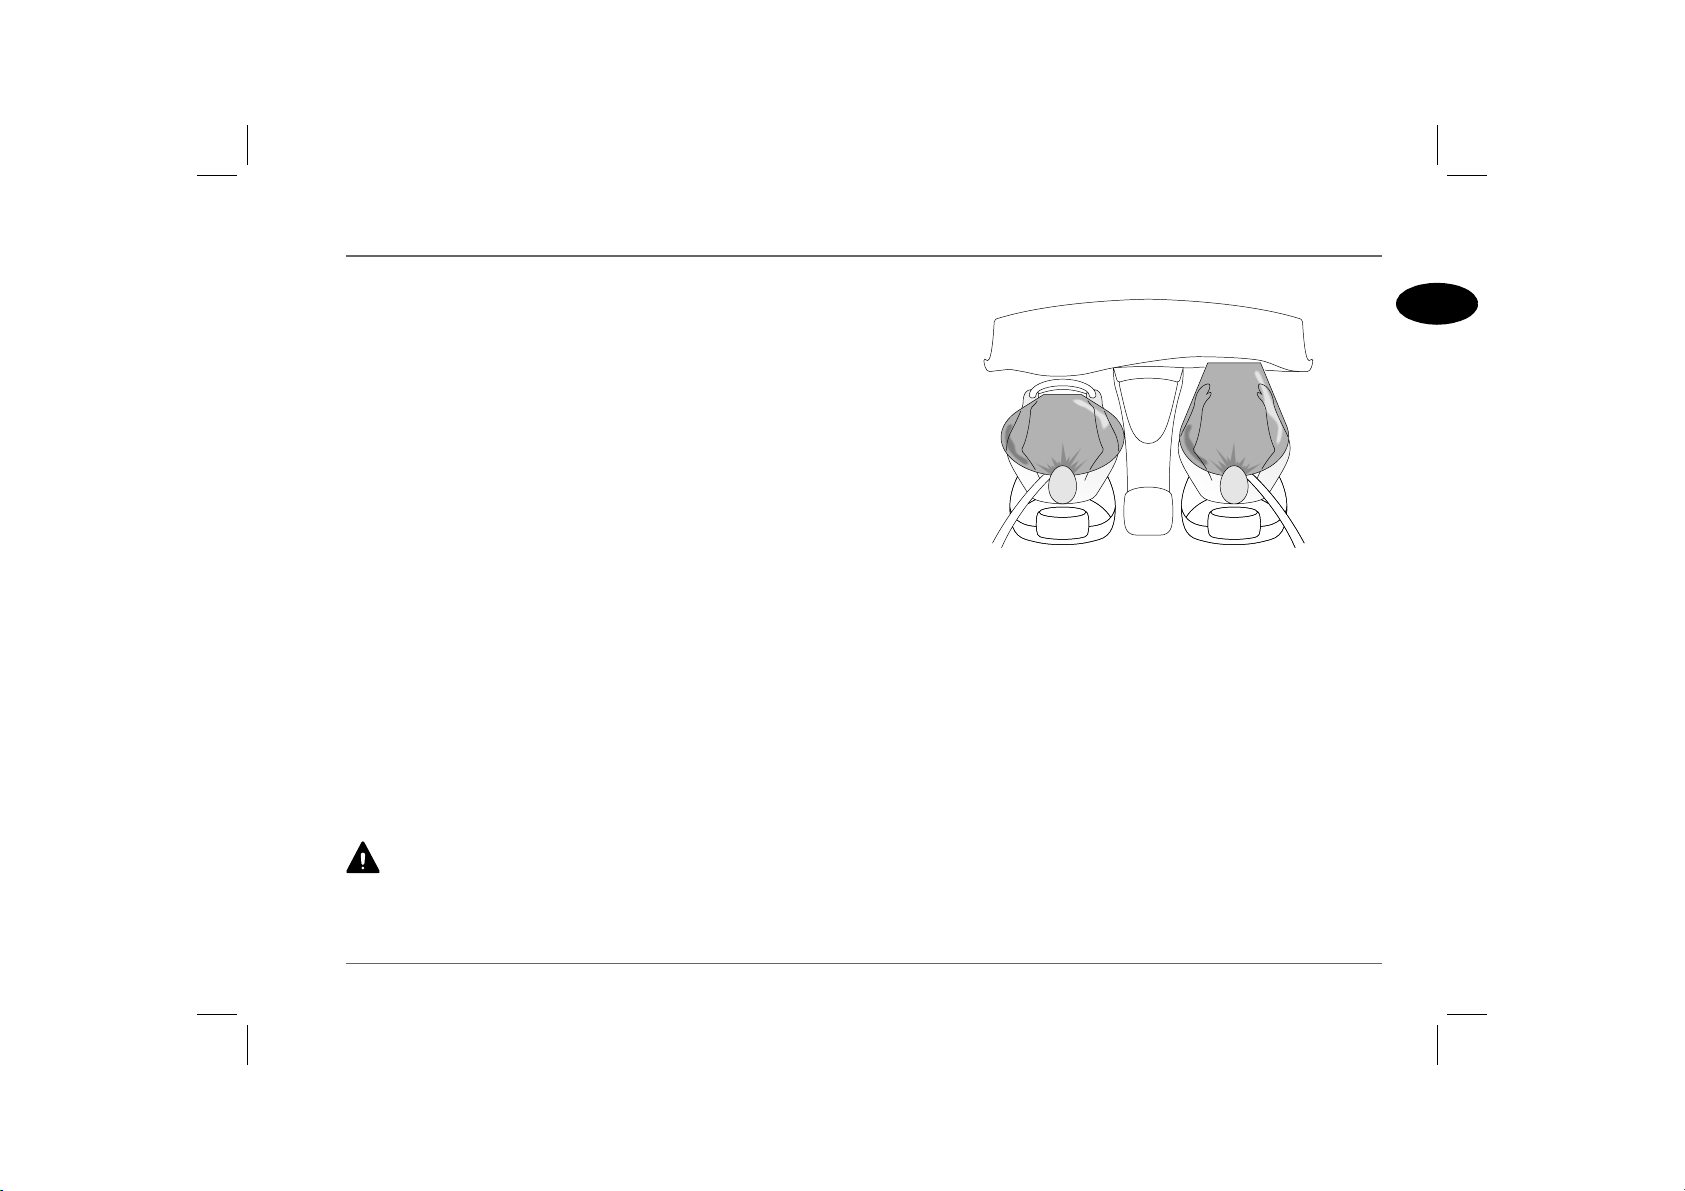
Side airbags
Ensure that a gap is maintained between the upper torso and
the side of the vehicle, to enable unobstructed inflation of the
side airbags.
H2799b
Side airbags are designed to protect the thorax region of the torso
and will only deploy in the event of a severe side impact. They will
NOT inflate as a result of frontal or rear impacts only.
In the event of a severe side collision, the airbag on the impact side
of the car breaks through the seat covering, rapidly inflating to
form a cushion between the occupant and the side of the car. The
airbag on the non-impact side of the car will not be deployed
Note that a part of the outer side of the seat trim (identified by the
woven ‘airbag’ label) is specially constructed to enable the airbag
to deploy.
NOTE: The manufacture and materials of the seat are critical to the
performance of the airbag. For this reason, non-approved seat covers must
NEVER be fitted, and it is recommended that any repair or replacement
to the front seats be carried out by an MG Rover dealer (see ‘SERVICE
INFORMATION’, page 32).
30
 Loading...