

Rover DISCOVERY 2004 Owner Manual

Owner's Handbook
Publication Part No. LRL0650NAS
© Land Rover 2003
All rights reserved. No part of this publication may be reproduced, stored in a retrieval system or transmitted in any form, electronic, mechanical,
recording or other means without prior written permission from Land Rover.
As part of Land Rover environmental policy, this publication is printed on paper made from chlorine free pulp.

Introduction
Congratulations on acquiring your new Land Rover Discovery. Please take the time to become
acquainted with your vehicle by reading this handbook, which, together with the other books in your
literature pack, provides information you will need to derive maximum pleasure from owning and
driving your new vehicle.
For your convenience, the handbook is divided into sections, each dealing with a particular aspect of
driving or caring for the vehicle. These are listed on the contents page and you will find it worthwhile
to take a little time to read each one, and get to know your Discovery as soon as you possibly can.
The more you understand before you drive, the greater the satisfaction once you are seated behind
the steering wheel.
*An asterisk appearing within the text, identifies features or items of equipment that are either
optional, or are only fitted to some vehicles in the model range.
IMPORTANT
The specification of each vehicle will vary according to territorial requirements and also from model
to model within the vehicle range. Some of the information published in this handbook, therefore,
may not apply to your particular vehicle.
Land Rover operates a policy of constant product improvement and therefore reserves the right to change specifications without
notice at any time. Whilst every effort is made to ensure complete accuracy of the information in this handbook, no liabilities for
inaccuracies or the consequences thereof can be accepted by the manufacturer or the retailer, except in respect of personal injury
caused by the negligence of the manufacturer or the retailer.
2

Contents
Quick Overview
Facia Controls . . . . . . . . . . . . . . . . . . . . . . .5
Information System . . . . . . . . . . . . . . . . . .6
Lights & Indicators . . . . . . . . . . . . . . . . . . .7
Wipers & Washers . . . . . . . . . . . . . . . . . . .8
Binnacle Switches . . . . . . . . . . . . . . . . . . . .9
Facia Switches. . . . . . . . . . . . . . . . . . . . . .10
Air Conditioning Controls . . . . . . . . . . . . .11
Audio System Controls . . . . . . . . . . . . . . .12
Navigation System Controls . . . . . . . . . . .13
Gas Station Information
Fuel Filler . . . . . . . . . . . . . . . . . . . . . . . . .14
Opening The Hood. . . . . . . . . . . . . . . . . . .14
Tire Pressures . . . . . . . . . . . . . . . . . . . . .15
Before You Drive
Reporting Safety Defects. . . . . . . . . . . . . .19
Auto Safety Hotline . . . . . . . . . . . . . . . . . .19
California Proposition 65 Warning . . . . . . .19
Before You Drive . . . . . . . . . . . . . . . . . . . .20
Controls & Instruments
Keys & Handsets . . . . . . . . . . . . . . . . . . .29
Facia Controls . . . . . . . . . . . . . . . . . . . . . .30
Locks & Alarms . . . . . . . . . . . . . . . . . . . .32
Seats . . . . . . . . . . . . . . . . . . . . . . . . . . . . .39
Seat Belts . . . . . . . . . . . . . . . . . . . . . . . . .47
Child Restraints . . . . . . . . . . . . . . . . . . . .52
Airbag SRS . . . . . . . . . . . . . . . . . . . . . . . .57
Steering Column . . . . . . . . . . . . . . . . . . . .63
Door Mirrors . . . . . . . . . . . . . . . . . . . . . . .64
Instruments . . . . . . . . . . . . . . . . . . . . . . .65
Warning Lights . . . . . . . . . . . . . . . . . . . . .67
Audible Warnings . . . . . . . . . . . . . . . . . . .72
Lights & Indicators . . . . . . . . . . . . . . . . . .73
Wipers & Washers . . . . . . . . . . . . . . . . . .76
Horn . . . . . . . . . . . . . . . . . . . . . . . . . . . . .79
Electric Windows . . . . . . . . . . . . . . . . . . .80
Sunroof . . . . . . . . . . . . . . . . . . . . . . . . . . .82
Air Conditioning . . . . . . . . . . . . . . . . . . . .84
Heated Screens . . . . . . . . . . . . . . . . . . . . .89
Interior Equipment . . . . . . . . . . . . . . . . . .90
Interior Mirror & Compass . . . . . . . . . . . .97
Rear Door & Step . . . . . . . . . . . . . . . . . .101
Loadspace Cover . . . . . . . . . . . . . . . . . .102
In-Car Telephones . . . . . . . . . . . . . . . . . .103
Audio System . . . . . . . . . . . . . . . . . . . . .104
Land Rover HomeLink® . . . . . . . . . . . . .106
Driving & Operating
Starting & Driving . . . . . . . . . . . . . . . . . .111
Catalytic Converter . . . . . . . . . . . . . . . . .116
Fuel Filling . . . . . . . . . . . . . . . . . . . . . . . .118
Automatic Transmission . . . . . . . . . . . . .122
Transfer Gearbox . . . . . . . . . . . . . . . . . .125
Cruise Control . . . . . . . . . . . . . . . . . . . . .129
Brakes . . . . . . . . . . . . . . . . . . . . . . . . . . . 131
Traction Control . . . . . . . . . . . . . . . . . . .135

Contents
Hill Descent Control . . . . . . . . . . . . . . . .136
Active Cornering Enhancement . . . . . . . .138
Self-levelling Suspension . . . . . . . . . . . .140
Park Distance Control . . . . . . . . . . . . . . .143
Towing . . . . . . . . . . . . . . . . . . . . . . . . . .144
Load Carrying . . . . . . . . . . . . . . . . . . . . .150
Off-Road Driving
Off-Road Driving . . . . . . . . . . . . . . . . . . .155
Driving Techniques . . . . . . . . . . . . . . . . .159
On-Road Driving
On-Road Driving . . . . . . . . . . . . . . . . . . .167
Owner Maintenance
Maintenance . . . . . . . . . . . . . . . . . . . . . .173
Hood Opening . . . . . . . . . . . . . . . . . . . . .177
Engine Compartment . . . . . . . . . . . . . . .178
Engine Oil . . . . . . . . . . . . . . . . . . . . . . . .179
Air Cleaner . . . . . . . . . . . . . . . . . . . . . . .182
Spark Plugs . . . . . . . . . . . . . . . . . . . . . . .183
Cooling System . . . . . . . . . . . . . . . . . . . .184
Brakes . . . . . . . . . . . . . . . . . . . . . . . . . . .186
Power Steering . . . . . . . . . . . . . . . . . . . .187
Active Cornering Enhancement . . . . . . . .188
Washers . . . . . . . . . . . . . . . . . . . . . . . . .189
Wiper Blades . . . . . . . . . . . . . . . . . . . . . .190
Battery . . . . . . . . . . . . . . . . . . . . . . . . . . .191
Tires . . . . . . . . . . . . . . . . . . . . . . . . . . . .194
Cleaning & Vehicle Care . . . . . . . . . . . . .198
Identification Numbers . . . . . . . . . . . . . .201
Parts & Accessories . . . . . . . . . . . . . . . .203
Technical Data
Lubricants & Fluids . . . . . . . . . . . . . . . . 237
Capacities . . . . . . . . . . . . . . . . . . . . . . . 238
Engines . . . . . . . . . . . . . . . . . . . . . . . . . 239
Electrical System . . . . . . . . . . . . . . . . . . 240
Steering . . . . . . . . . . . . . . . . . . . . . . . . . 241
Dimensions . . . . . . . . . . . . . . . . . . . . . . 242
Vehicle Weights . . . . . . . . . . . . . . . . . . . 243
Towing Weights . . . . . . . . . . . . . . . . . . 244
Wheels & Tires . . . . . . . . . . . . . . . . . . . 245
Emergency Information
Wheel Changing . . . . . . . . . . . . . . . . . . .207
Emergency Starting . . . . . . . . . . . . . . . . .212
Towing the Vehicle . . . . . . . . . . . . . . . . .214
Fuses . . . . . . . . . . . . . . . . . . . . . . . . . . . .216
Bulb Replacement . . . . . . . . . . . . . . . . . .223
Quick Overview
Quick Overview
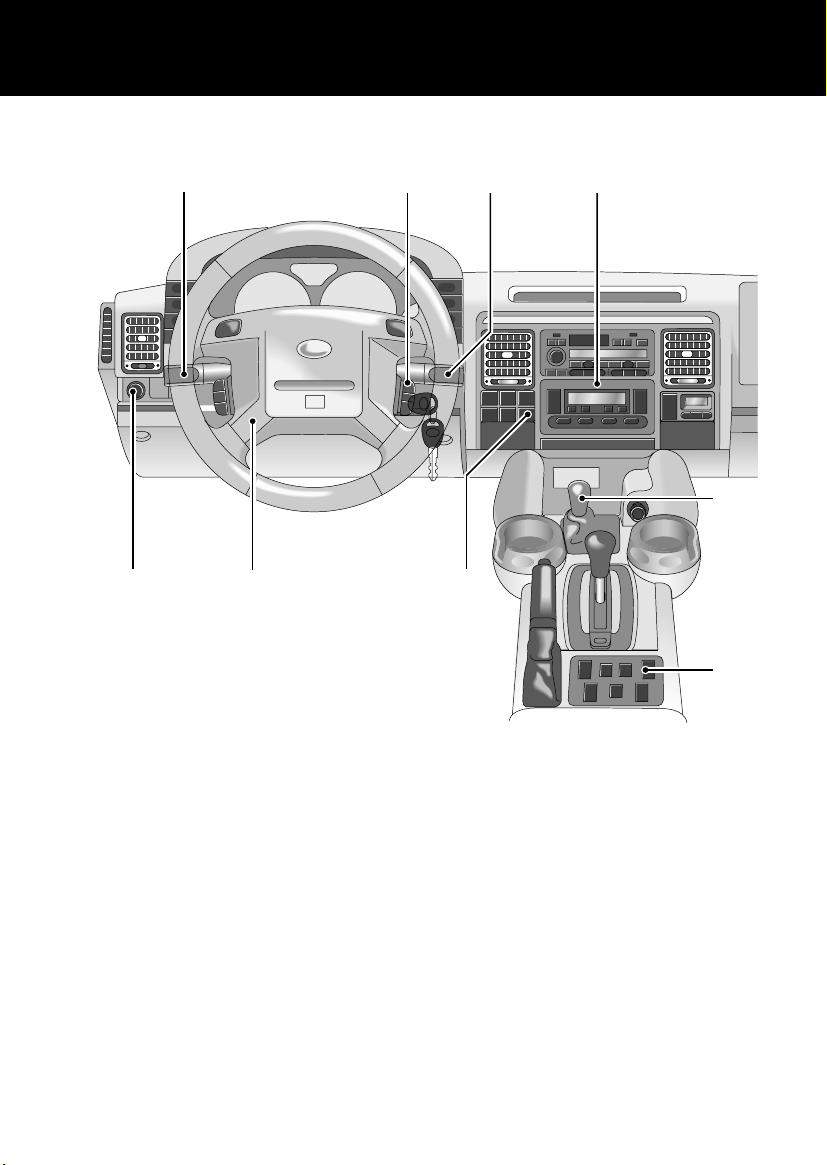
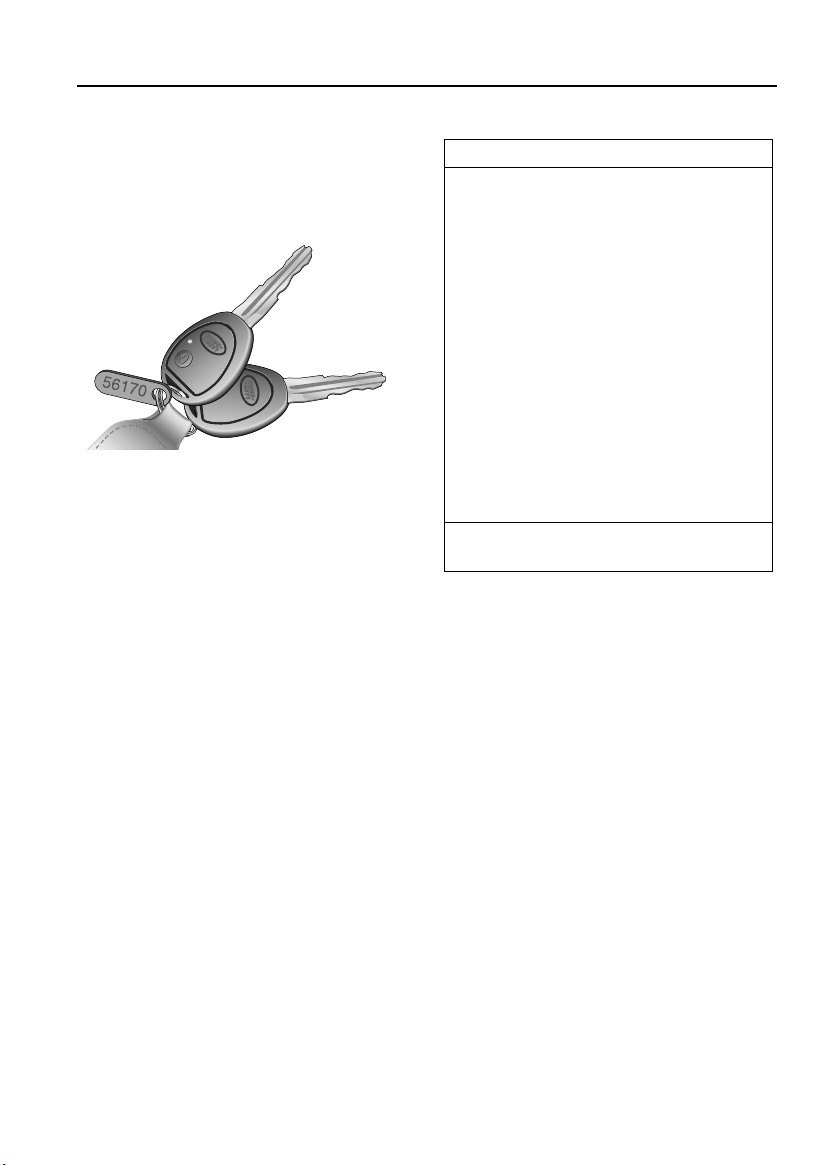
FACIA CONTROLS
Quick Overview
23 41
5
789
H5174
1. Lighting and direction indicator controls
2. Cruise control switches
*
3. Windshield wiper/washer controls
4. Heater/air conditioning controls
6. Electric window switches
7. Facia panel switches
8. Steering column height adjuster
9. Electric mirror adjuster
5. Transfer gear/differential lock* lever
NOTE: This is a brief overview of the facia controls. For further details please refer to ‘FACIA
CONTROLS’, page 30
5
6
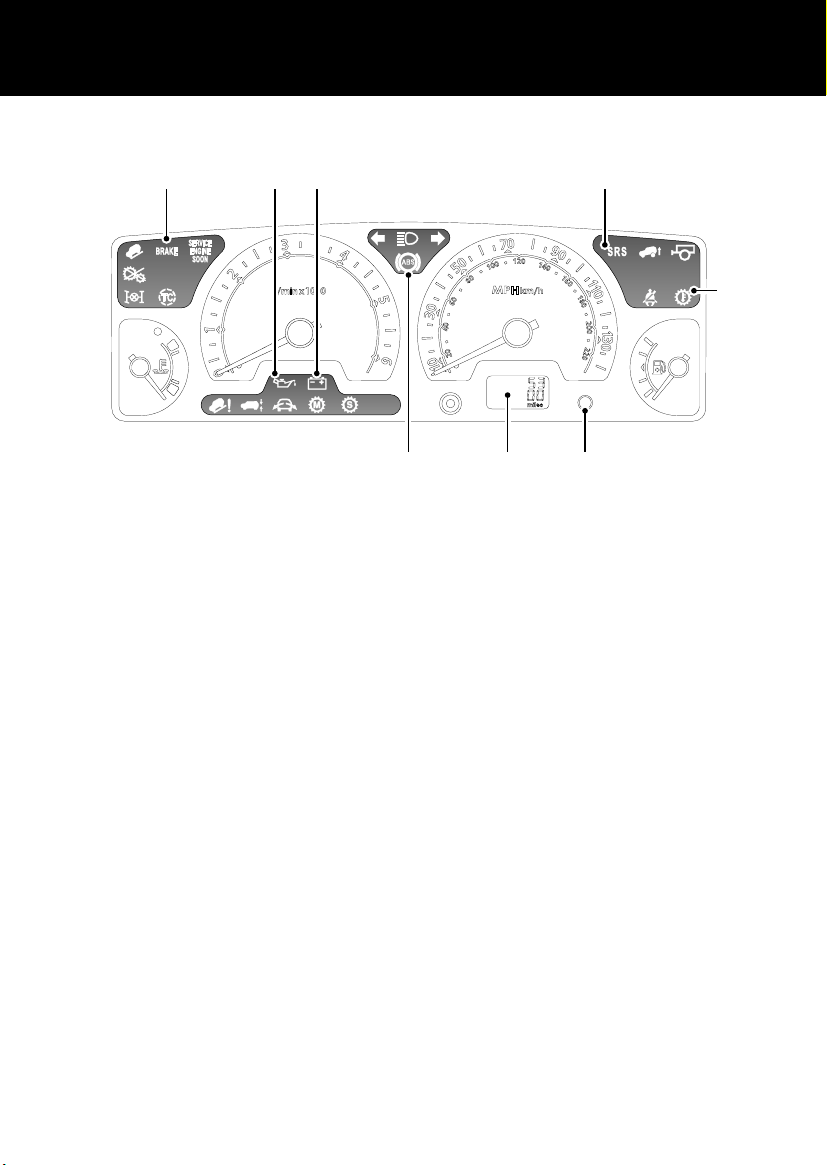
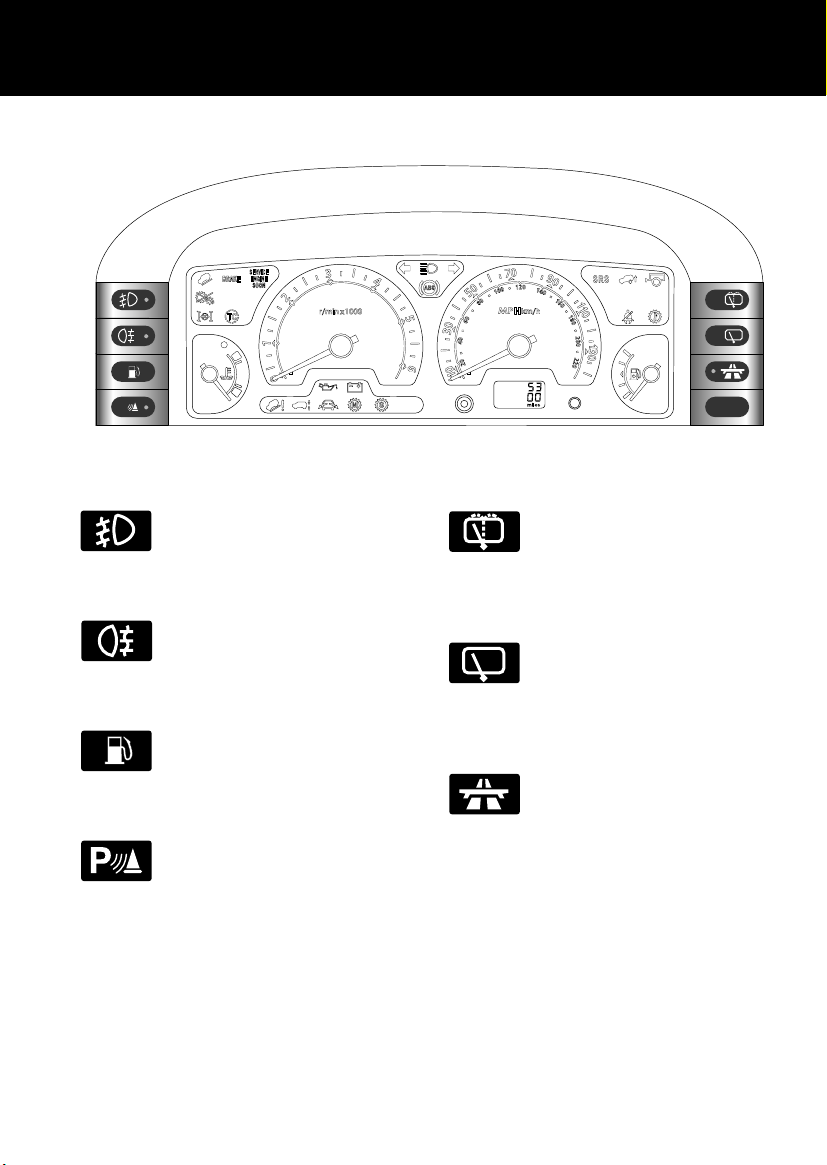
INFORMATION SYSTEM
Quick Overview
321
4
5
8 7 6
H5175
1. Handbrake/low brake fluid (RED).
2. Low oil pressure (RED).
3. Battery charging (RED).
4. Supplemental restraint system - airbags
(RED).
5. Transmission oil temperature (RED)
NOTE: If a warning light remains on or illuminates whilst driving, stop the vehicle and refer to the
relevant section of this handbook for advice.
NOTE: This is a brief overview of the warning lights, for more information concerning warning light
functionality, please refer to ‘WARNING LIGHTS’, page 67.
*.
6. Trip recorder reset button.
7. Total distance (odometer), trip recorder
and automatic gearbox selector lever
position..
8. Anti-lock braking system (AMBER).
6
Quick Overview
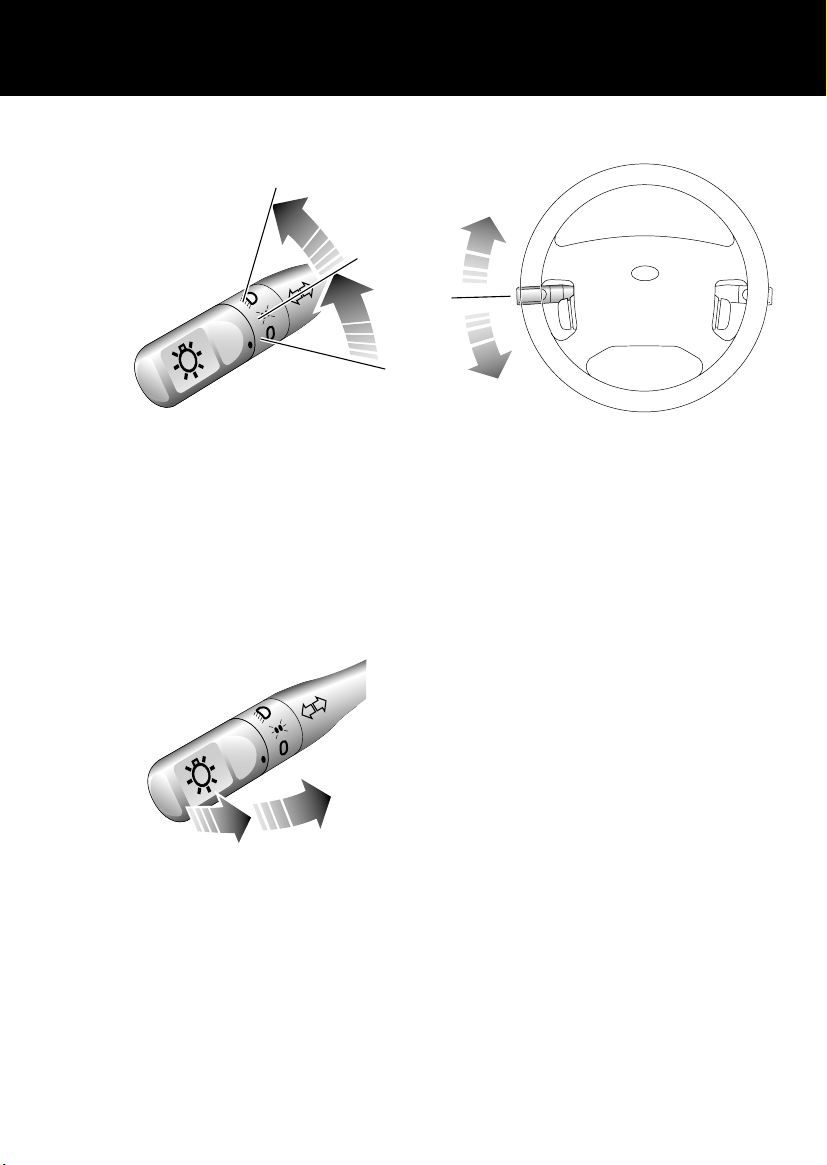
LIGHTS & INDICATORS
2
1
H2448
1. Side, tail and instrument panel lights
2. Headlights
Daylight running lights
The headlights illuminate automatically, when
the starter switch is turned to position ‘II’.
Headlight main and dipped beams
*
Direction indicators
H2582
Move the lever DOWN to indicate a LEFT turn,
and UP to indicate a RIGHT turn.
NOTE: For further information concerning
operation of the lights, please refer to
‘DIRECTION INDICATORS’, page 73 and
‘LIGHTS’, page 73.
H2449
Pull the lever fully towards the steering wheel to
change headlight beams.
To flash headlights, pull the lever part way up
and release.
7
Quick Overview
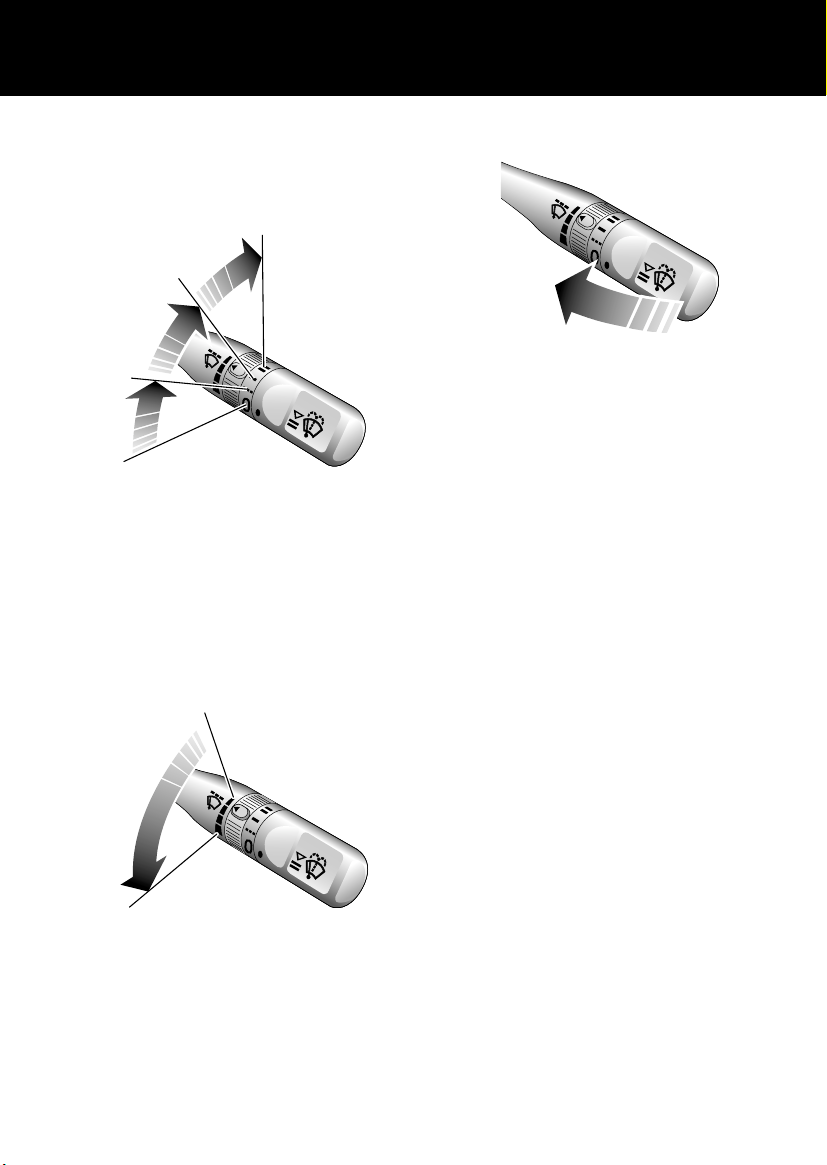
WIPERS & WASHERS
The wipers and washers will only operate when
the starter switch is turned to position ‘I’ or ‘II’.
3
2
1
H2450
1. Intermittent wipe
2. Normal speed wipe
3. Fast speed wipe
Single wipe
Pull the lever down and release immediately.
Variable delay (intermittent wipe)
Windshield washers
H2452
Pull the lever towards the steering wheel. The
windshield wipers will operate in conjunction
with the washers.
Headlight washers
When the headlights are illuminated, the
headlight washers operate automatically in
conjunction with every third operation of the
windshield washers.
NOTE: For further information concerning
operation of the wipers and washers, please
refer to ‘WINDSHIELD WIPERS’, page 76.
*
H2451
Rotate the switch to vary the delay between
wipes.
8
BINNACLE SWITCHES
P
H4441
Quick Overview
Front fog lights*
Operation and function of the front
fog lights are described under ‘FOG
LIGHTS’, page 74.
Rear fog guard lights
Operation and function of the rear
fog guard lights are described
under ‘FOG LIGHTS’, page 74.
Fuel flap release
Operation of the fuel flap release is
described under ‘FUEL FILLING’,
page 122.
Parking aid
Operation and function of the
parking aid system as described
under ‘USING THE PARK
DISTANCE CONTROL’, page 145
Rear window wash/wipe
The functions of the wash/wipe
switch are described under ‘REAR
WINDOW WIPER AND WASHER’,
page 78.
Rear window wiper
The functions of the rear window
wiper switch are described under
‘REAR WINDOW WIPER AND
WASHER’, page 78.
Cruise control
Operation and functions of the
cruise control switch are described
under ‘CRUISE CONTROL’,
page 131.
9
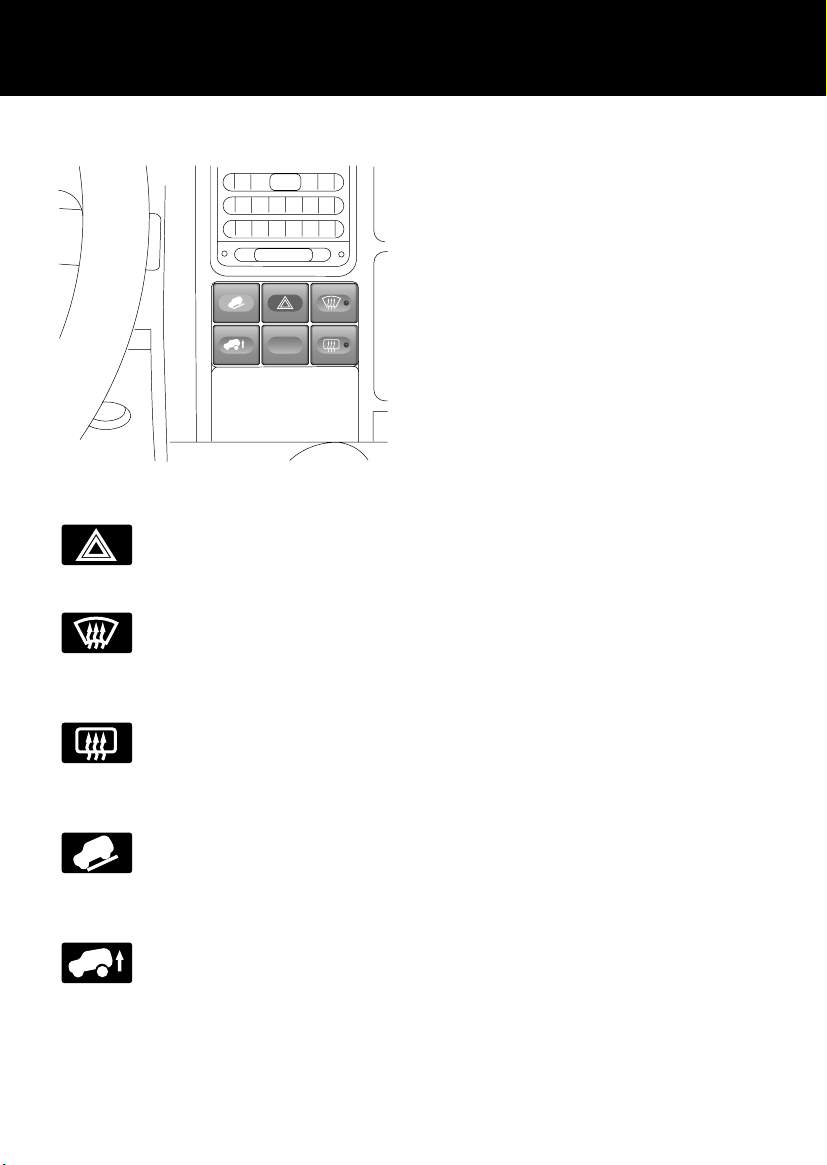
FACIA SWITCHES
H4392
Hazard warning lights
Press to operate (see ‘HAZARD
WARNING LIGHTS’, page 75).
Heated windshield*
Press to operate (see ‘HEATED
WINDSHIELD AND REAR
WINDOW’, page 89).
Quick Overview
Heated rear window
Press to operate (see‘HEATED
WINDSHIELD AND REAR
WINDOW’, page 89).
Hill descent control (HDC)
Press to select hill descent control
(see ‘HILL DESCENT CONTROL’,
page 138).
Off-road suspension mode
Press to raise or lower the
suspension to or from off-road
height (see ‘SELF-LEVELLING
SUSPENSION*’, page 142).
*
10
Quick Overview
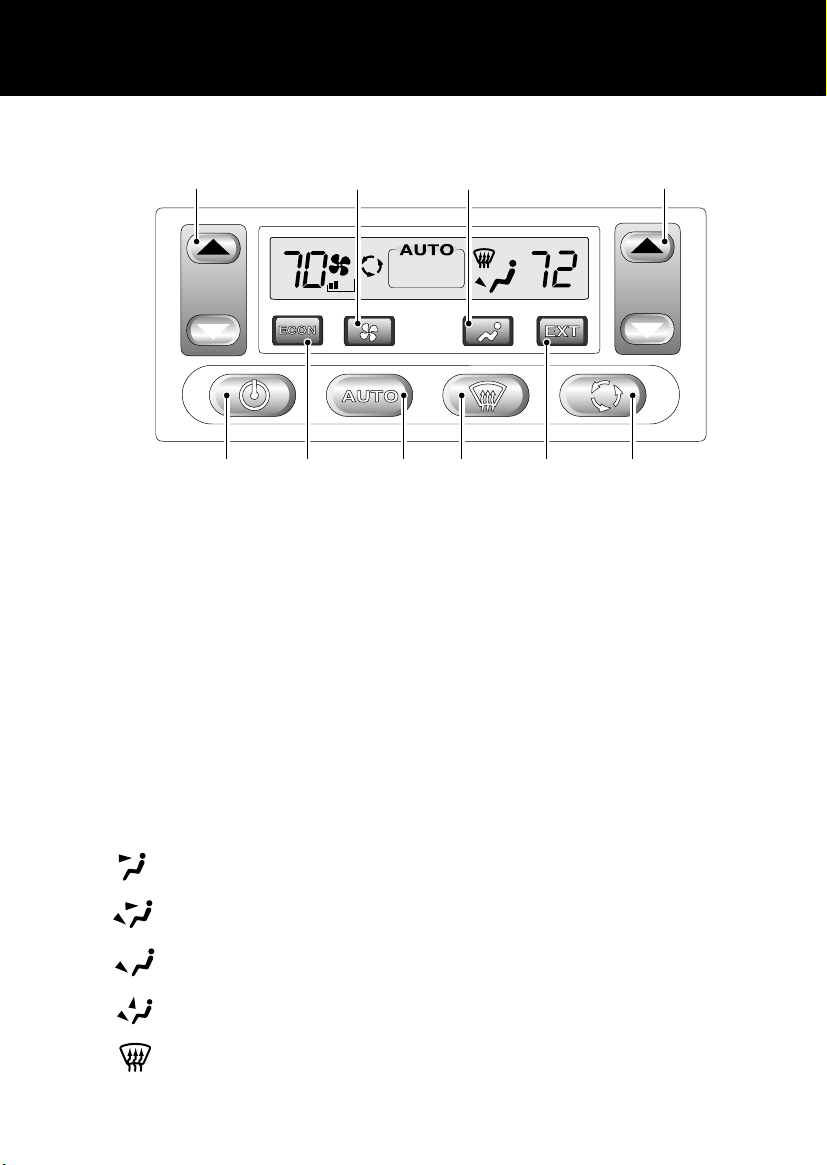
AIR CONDITIONING CONTROLS
2762
TEMP
H4726
1. Auto mode: Press for fully automatic
operation.
2. Temperature control: Press to set
individual left and right hand
temperatures.
3. Defrost mode: Press to defrost or demist
the windshield.
4. Economy mode: Press to shut down the
air conditioning. The controls can then be
used as a conventional heater.
5. On/off control: Press to switch on or off.
6. Blower button: Press to adjust blower
speed.
7. Air distribution control: Press the button
to adjust.
Face level vents
Foot and face level vents
Foot level vents
Foot level, windshield and side
window vents
Windshield and side window vents
983145
8. External temperature: Press to display
the external temperature.
9. Air recirculation: Press to prohibit entry
of air from outside the vehicle - some
settings override recirculation after a
given time.
NOTE: For more information concerning the
operation of the climate control system, see
‘AIR CONDITIONING CONTROLS’, page 85.
11
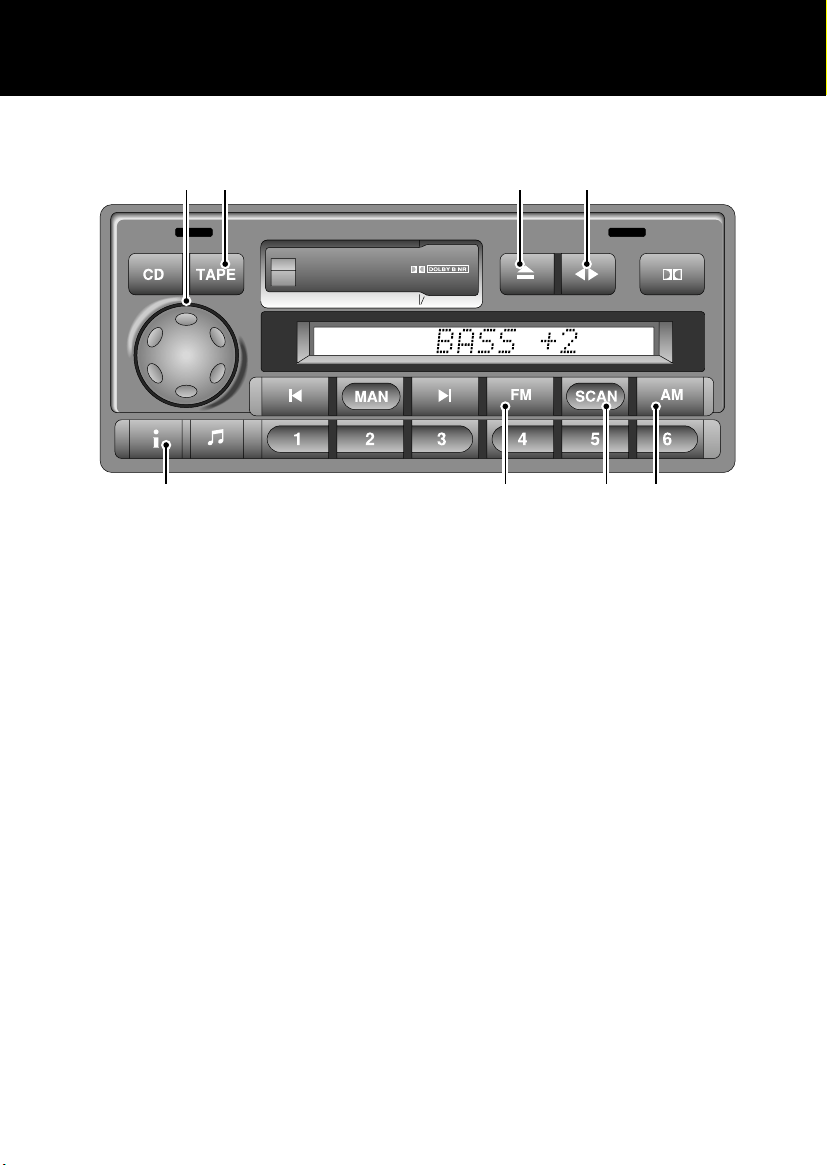
AUDIO SYSTEM CONTROLS
1 6 7 8
Quick Overview
TRAFFIC
NEWS
ICE 1332
5 4 32
1. On/off/volume control
2. FM selector
3. AM selector
4. Scan button
5. Traffic/news information
6. Tape mode
7. Eject
8. Tape reverese
12
Quick Overview
TP
CD
Rad
Nav
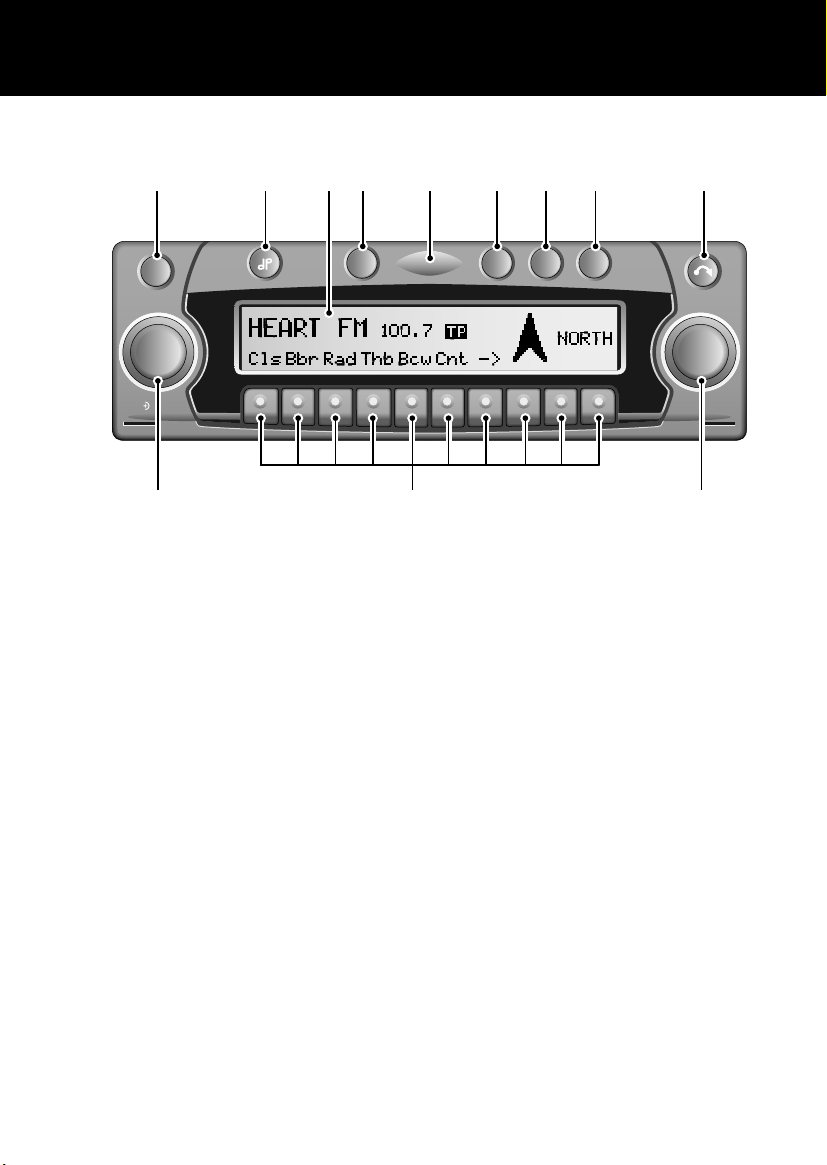
NAVIGATION SYSTEM CONTROLS
1 2 4 5 6 7 8 9
ON
Info
NAVISYS
3
TP
NAVIGATION SYSTEM
CD
Rad
Nav
OK
1112 10
ICE 0223
1. On/off
2. Tone
3. Display
4. Traffic programme
5. Security light
6. CD mode selection
NOTE: Please refer to your ‘In-Car Entertainment’ and ‘Navigation’ handbooks for further details.
NOTE: Some music CD manufacturers are using data encryption to 'copy-protect' their recordings
and prevent the production of pirate copies. These CDs differ from the internationally agreed CD
audio standard, RedBook, a standard that serves as the operating basis for all CD players and
changers.
7. Radio mode selection
8. Navigation mode selection
9. Display/CD eject
10. Right rotary control
11. Multifunction buttons
12. Left rotary/volume control
Copy-protected CDs may not play in your Audio unit or CD changer or may be played subject to
various limitations, e.g., sound quality may be impaired.
If you do experience a problem, try the CD in other players before contacting the CD vendor.
13
Gas Station Information
Gas Station Information
Gas Stati on Info rmati on
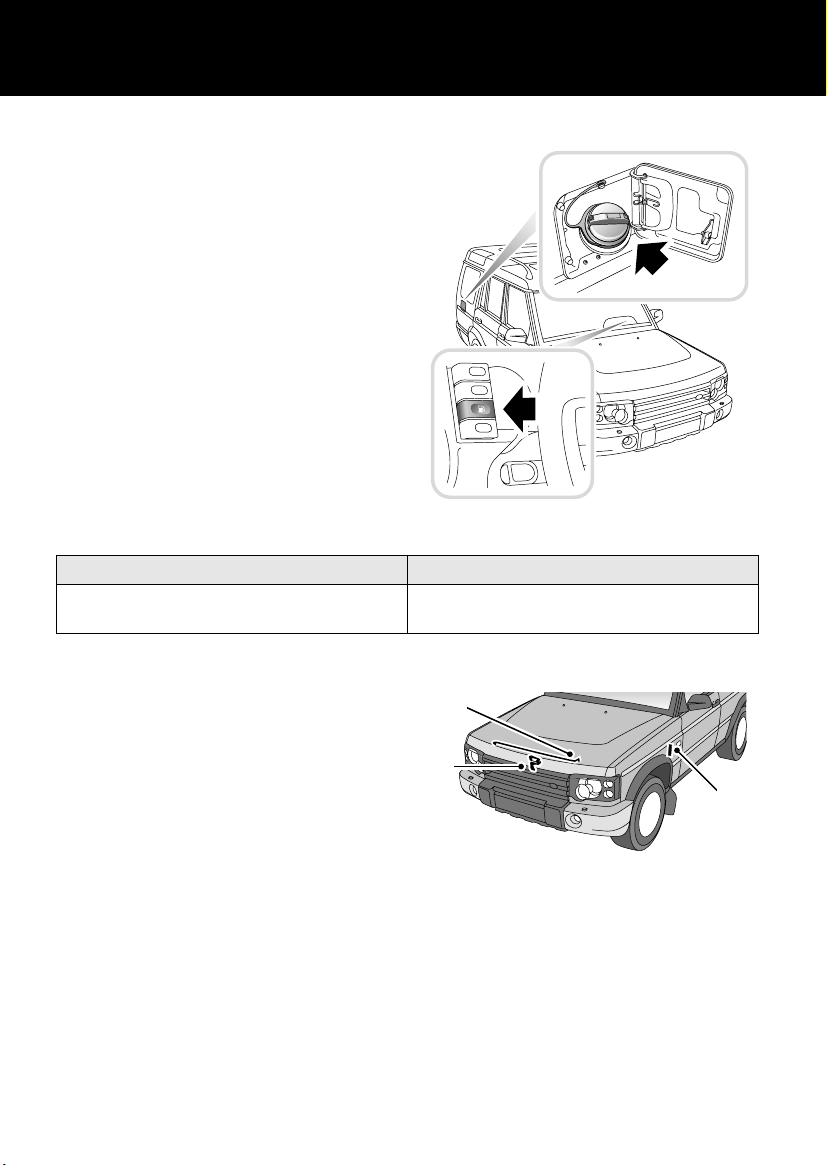
FUEL FILLER
The fuel filler is located in the rear right-hand
quarter panel. With the starter switch turned to
position ‘0’ or ‘I’, press the binnacle switch to
release the filler flap.
The filler cap is designed to allow the fuel tank
to vent during the first half turn. Carefully
loosen the cap one half turn until resistance is
felt, and allow fuel tank pressure to be released.
Once the pressure is released (hissing has
stopped), it is safe to fully remove the filler cap.
When replacing, tighten the cap clockwise until
you hear the fuel cap ratchet click at least three
times.
H5049
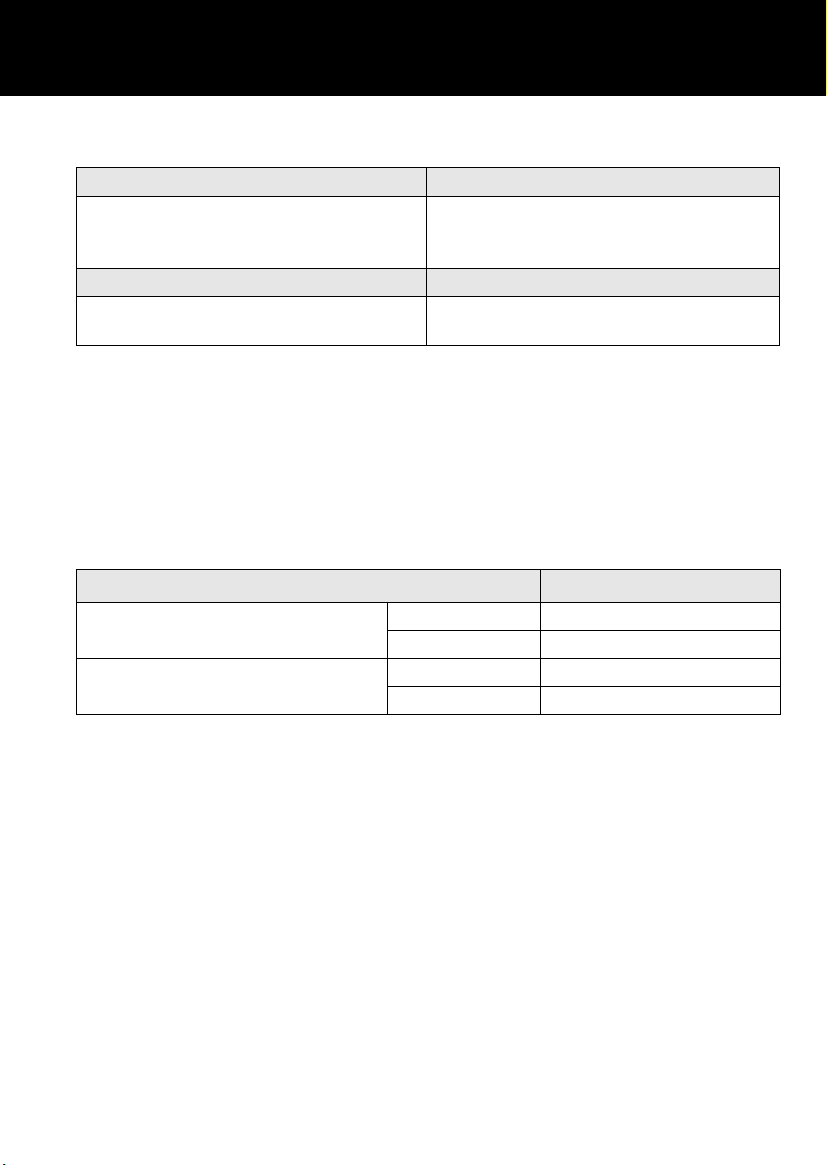
Fuel type
V8 gasoline engine Premium unleaded gasoline with a CLC or AKI
octane rating of 90 or 92 (95 or 96 RON)
NOTE: For more detailed information, see ‘FUEL
FILLING’, page 122.
OPENING THE HOOD
1. From inside the vehicle, pull the hood
release handle located on the left-hand
side below the facia.
2. Lift hood safety catch near center of
under-hood.
3. Prop on support stay.
3
2
1
H5051
NOTE: For more detailed information, see
‘HOOD OPENING’, page 179.
14
Engine oil top up
Cooling system top up
Gas Station Information
Use Castrol 10W/40 engine oil meeting
specification ACEA A2, If Castrol 10W/40 is
not available, Castrol 10W/30 can be used.
50% mix of fresh water and anti-freeze, see
‘LUBRICANTS AND FLUIDS’, page 239.
NOTE: For more detailed information, see
‘LUBRICANTS AND FLUIDS’, page 231.
Loading condition
Normal operating conditions Front 30 lbf/in2 (211 kPa)
Vehicle loaded to maximum gross
vehicle weight
NOTE: For more detailed information, see
‘WHEELS & TYRES’, page 236.
TIRE PRESSURES
Air pressure naturally increases in warm tires
(after the vehicle has been driven for a while). If
you have to check warm tires, you should
expect the pressures to have increased between
4 to 6 lbf/in
circumstance, NEVER let air out of the tires in
order to match the recommended pressures.
Rear 38 lbf/in2 (262 kPa)
Front 30 lbf/in
Rear 46 lbf/in2 (322 kPa)
2
(30 and 40 kPa). In this
Pressure - lbf/in2 (kPa)
2
(211 kPa)
15

16
Before You Drive
REPORTING SAFETY DEFECTS . . . . . . . . . . . . . . 19
CALIFORNIA PROPOSITION 65 WARNING . . . . . 19
BEFORE YOU DRIVE . . . . . . . . . . . . . . . . . . . . . . 20
WARNINGS IN THIS HANDBOOK. . . . . . . . . . . . . 20
SYMBOLS USED . . . . . . . . . . . . . . . . . . . . . . . . . 20
PASSPORT TO SERVICE . . . . . . . . . . . . . . . . . . . 21
WARNING LABELS ATTACHED TO THE VEHICLE 21
GEARBOX SELECTOR LEVER LABELS. . . . . . . . . 21
SUN VISOR LABELS . . . . . . . . . . . . . . . . . . . . . . 22
PASSENGER AIRBAG LABEL. . . . . . . . . . . . . . . . 23
ENGINE COMPARTMENT LABELS. . . . . . . . . . . . 24
ANTI-THEFT PRECAUTIONS . . . . . . . . . . . . . . . . 25
IN AN EMERGENCY. . . . . . . . . . . . . . . . . . . . . . . 25
BREAKING-IN . . . . . . . . . . . . . . . . . . . . . . . . . . . 26
17

18

Before You Drive
Before You Drive
REPORTING SAFETY DEFECTS
If you believe that your vehicle has a defect
which could cause a crash, or could cause
injury or death, you should immediately inform
the National Highway Traffic Safety
Administration (NHTSA) in addition to notifying
Land Rover North America Inc.
If NHTSA receives similar complaints, it may
open an investigation and if it finds that a safety
defect exists in a group of vehicles, it may order
a recall and remedy campaign.
However, NHTSA cannot become involved in
individual problems between you, your retailer
or Land Rover North America.
Auto safety hotline
To contact NHTSA, you may either call the Auto
Safety HOTLINE toll free at 1-800-424-9393 (or
202-366-0123 in the Washington, D.C. area) or
write to: NHTSA, U.S. Department of
Transportation, Washington, DC 20590. You
can also obtain other information about motor
vehicle safety from the HOTLINE.
CALIFORNIA PROPOSITION 65 WARNING
WARNING
Engine exhaust, some of its constituents and
certain vehicle components contain or emit
chemicals known to the State of California to
cause cancer and birth defects or other
reproductive harm. In addition, certain fluids
contained in vehicles and certain products of
component wear contain or emit chemicals
known to the State of California to cause
cancer, and birth defects or other
reproductive harm.
WARNING
Battery posts, terminals and related
accessories contain lead and lead
compounds. Wash hands after handling.
19
Before You Drive
BEFORE YOU DRIVE WARNINGS IN THIS HANDBOOK
Your Discovery has a higher ground
clearance and hence, a higher center of
gravity than ordinary passenger cars, to
enable the vehicle to perform in a wide
variety of off-road applications. An
advantage of the higher ground clearance
is a better view of the road allowing you
to anticipate problems.
The vehicle is not designed for cornering
at the same speed as conventional
passenger cars any more than a
low-slung sports car is designed to
perform satisfactorily under off-road
conditions. If at all possible, avoid sharp
turns or abrupt maneuvers. As with other
vehicles of this type, failure to operate
the Discovery correctly may result in loss
of control or vehicle rollover. For
important safety information, be sure to
read the ‘On-Road’ and ‘Off-Road’ driving
guidelines given later in this handbook.
WARNING
Safety warnings are included in this
handbook. These indicate a procedure which
must be followed precisely in order to avoid
the possibility of personal injury or serious
damage to the vehicle.
SYMBOLS USED
The following symbols used within the
handbook call your attention to specific types of
information.
This recycling symbol identifies items
that must be disposed of safely in order to
prevent unnecessary damage to the
environment.
This symbol identifies features that can be
adjusted or disabled/enabled by a Land
Rover retailer
20
Before You Drive
PASSPORT TO SERVICE
The Passport to Service book included in your
literature pack contains important vehicle
identification information, details of your
entitlement under the terms of the Land Rover
warranty, as well as useful consumer advice.
Most important of all, however, is the section
on maintenance. This outlines the servicing
requirements for your vehicle and also includes
the service record slips, which the retailer
should sign and stamp to certify the routine
services have been carried out.
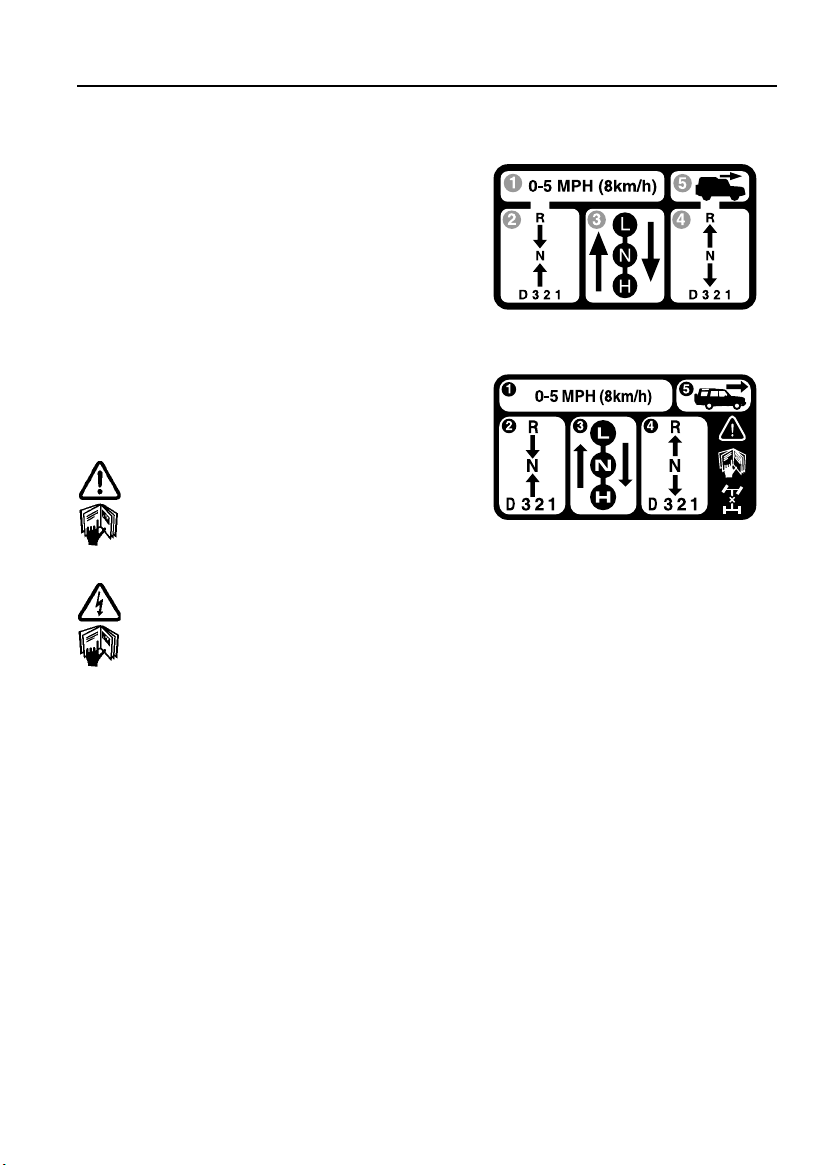
WARNING LABELS ATTACHED TO THE
VEHICLE
Warning labels attached to your
vehicle bearing this symbol mean: DO
NOT touch or adjust components until
you have read the relevant
instructions in the handbook.
Warning labels showing this symbol
indicate that the ignition system
utilizes very high voltages. DO NOT
touch any ignition components while
the starter switch is turned on!
NOTE: Always read warning information labels.
GEARBOX SELECTOR LEVER LABELS
H4693
H4760
(For Differential Lock equipped vehicles).
Information concerning the operation of the
transfer gearbox with the automatic gearbox is
printed on the center console. This is important
information and must be understood fully with
reference to the ‘TRANSFER GEARBOX’,
page 121 of this handbook, before using the
transfer gearbox.
21
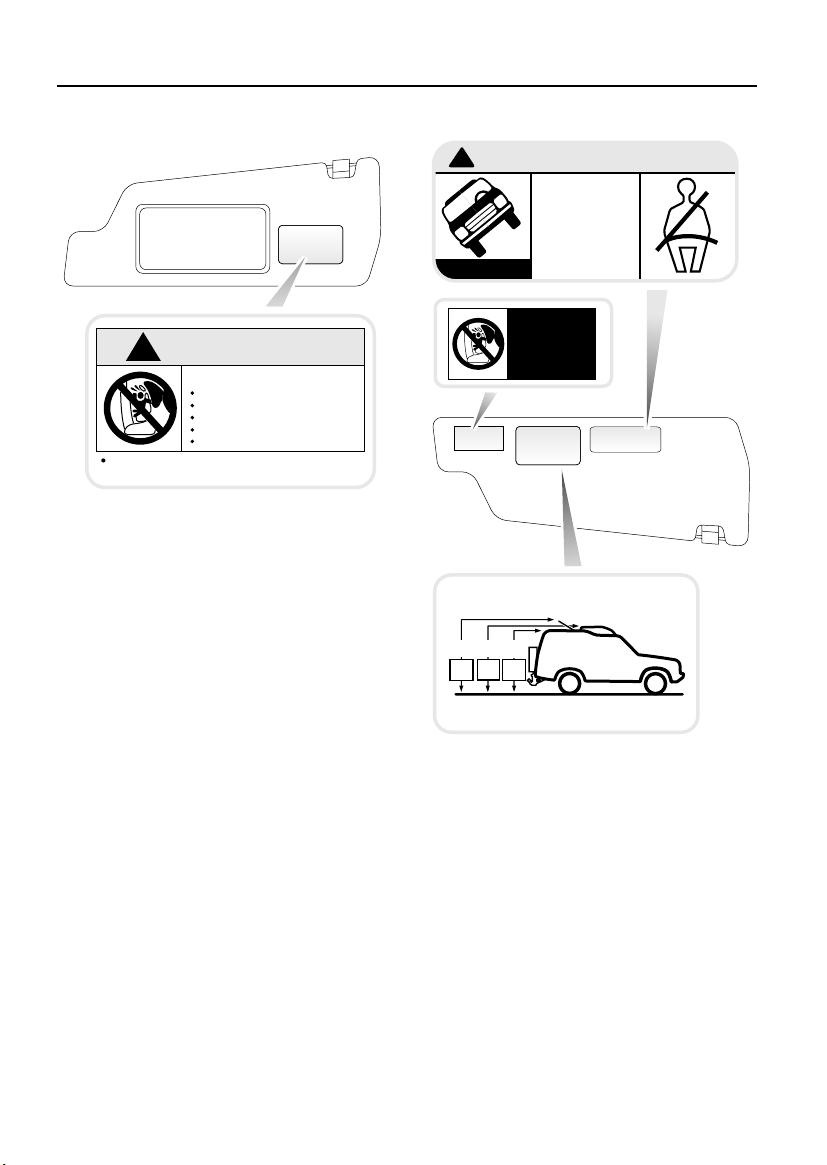
SUN VISOR LABELS
Before You Drive
!
WARNING
DEATH or SERIOUS INJURY can occur
Children 12 and under can be killed by the air bag
The BACK SEAT is the SAFEST place for children
NEVER put a rear-facing child seat in the front
Sit as far back as possible from the air bag
The airbag system must be serviced 10 years from the date of manufacture
H2662A
ALWAYS use SEAT BELTS and CHILD RESTRAINTS
shown on the certification plate
Information concerning the airbag SRS is
attached to the sun visor as illustrated above.
WARNING:
!
1980
2015
mm
mm
78.0
79.5
INS
INS
HIGHER ROLLOVER RISK
Avoid Abrupt Maneuvers
and Excessive Speed.
Always Buckle Up.
See Owner's Manual
For Further Information
AIR BAG
WARNING
FLIP VISOR OVER
1940
mm
76.5
INS
H3056A
Also note the labels affixed to the outer side of
the sun visor, which detail the vehicle's
standard ride height, both with and without an
open sunroof, and alert owners to the need to
be aware of the higher rollover risk, associated
with a utility vehicle of this type (see also the
relevant warning earlier in this section).
22
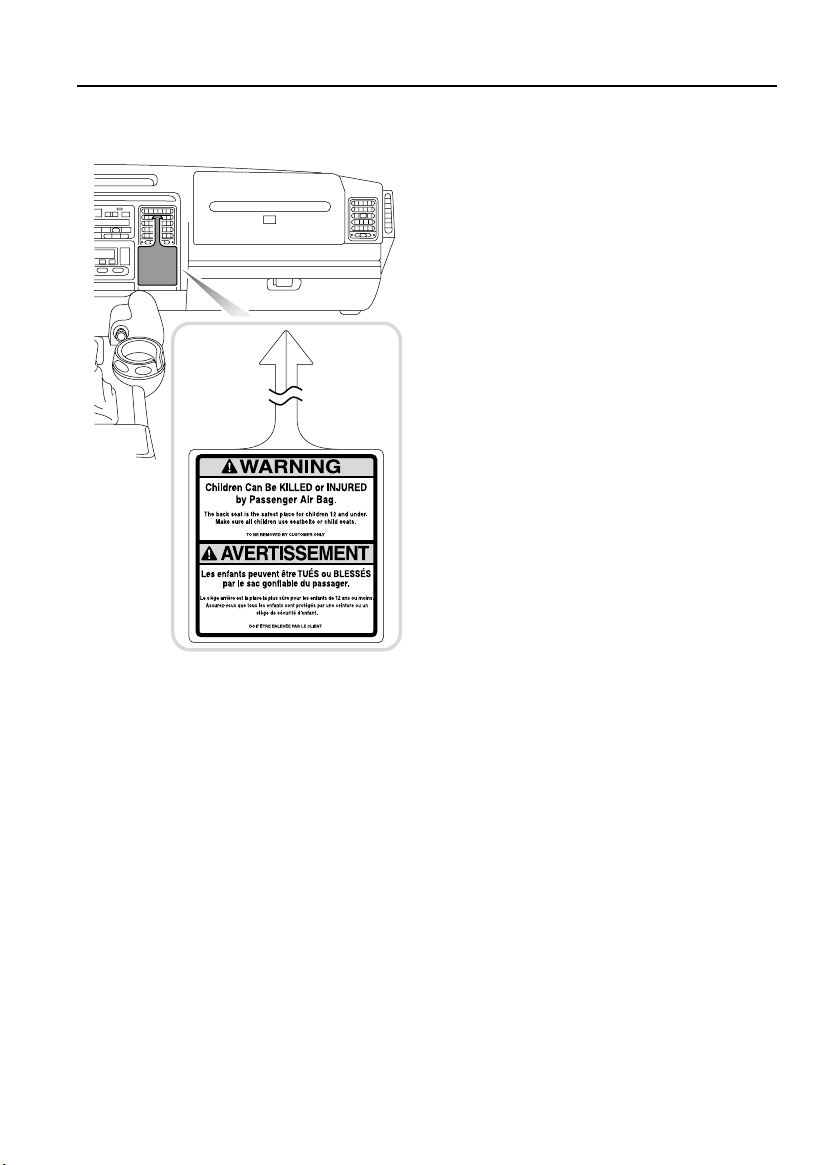
PASSENGER AIRBAG LABEL
Before You Drive
H5255
Information concerning the passenger airbag is
attached to the passenger airbag cover on the
facia as illustrated above, (see ‘AIRBAG
SUPPLEMENTARY RESTRAINT SYSTEM
(SRS)’, page 57).
23

Before You Drive
PAG OIL
ND 8
+
LAND ROVER
SAE
639
J
CF3 CH2F
R134a
A/C
700g –25g
(
25 –1oz)
780g –25g
(
32 –1oz)
SYSTEM TO BE SERVICED BY QUALIFIED PERSONNEL.
VEHICLE EMISSION CONTROL INFORMATION
DISPLACEMENT : 278 CU IN./4.6 LITER
EXHAUST ECS : SFI/2TWC/2HO2S(2)
SPARK PLUG GAP : 0.038-041 ION. / 0.95-1.05 MM
CAUTION
LAND ROVER
TEST GROUP : 4LRXT04.6001
EVAP.FAMILY : 4LRXE0124001 ( 86.130-96 procedures)
NO ENGINE ADJUSTMENT REQUIRED
CATALYST
THIS VEHICLE CONFORMS TO U.S. EPA REGULATIONS APPLICABLE
TO GASOLINE FUELED 2004 MODEL YEAR NEW LIGHT-DUTY TRUCKS
AND STATE OF CALIFORNIA REGULATIONS APPLICABLE TO 2004
H5254
MODEL YEAR NEW LEV MEDIUM-DUTY VEHICLES
(
(
180ml
6.3 fl oz
180ml
6.3fl oz)
(
B
A
C
EPA APPROVED
I/M TESTING EXEMPTION
LOADED I/M TESTING OF
PERMANENT FOUR WHEEL DRIVE
OR TRACTION CONTROL EQUIPPED
VEHICLES MUST BE CONDUCTED ON
A FOUR WHEEL DRIVE SPEED
SYNCHRONISED DYNAMOMETER
OTHERWISE A NON LOADED TEST
PROCEDURE MUST BE PERFORMED
OBD II CERTIFIED
VACUUM ROUTING DIAGRAM
CHARCOAL
CANISTER
SASV
VACUUM RESERVOIR
BAC100000
FUEL TANK
BRAKE
SERVO
PURGE
VALVE
TADJUM
SWITCH
SASV
ENGINE COMPARTMENT LABELS
Various labels are fixed inside the engine
compartment, the number, position and
content of which may vary from model to
model. The following illustration locates labels
of specific importance and is included for
guidance only.
A. Air conditioning label
B. Keep clear of rotating parts
C. Emission control label
24

Before You Drive
ANTI-THEFT PRECAUTIONS
While it may be difficult to deter the
‘professional’ car thief, the majority of thefts are
carried out by unskilled opportunists.
Therefore, take vehicle security very seriously
and ALWAYS adopt this simple ‘four point’ drill
whenever you leave your vehicle - even for just
a few minutes:
1. Fully close all the windows (and the
sunroof).
2. Remove your valuable belongings (or hide
them out of sight).
3. Remove the starter key.
4. Superlock the vehicle using the remote
handset.
Thieves are attracted by ‘vulnerable’ vehicles.
Even if you have followed the ‘four point’ drill,
there is still much you can do to make your
vehicle a less inviting target.
BE SAFE - NOT SORRY!
• Park where your vehicle can be easily seen
by householders and passers-by.
• At night, park in well lit areas and avoid
deserted or dimly-lit side streets.
• NEVER leave the keys in the vehicle.
• Do not keep important documents (or spare
keys) in the vehicle - these are a real bonus
for the thief.
IN AN EMERGENCY
IMPORTANT INFORMATION
Remember the breakdown safety code
If a breakdown occurs while travelling:
• Wherever possible, consistent with
road safety and traffic conditions, the
vehicle should be moved off the main
thoroughfare, preferably onto the
shoulder as far as possible. If a
breakdown occurs on a motorway, pull
well over to the inside of the hard
shoulder.
• Switch on hazard lights.
• If possible, position a warning triangle
or a flashing amber light at an
appropriate distance from the vehicle to
warn other traffic of the breakdown,
(note the legal requirements of some
areas).
• Consider evacuating passengers
through the doors facing away from
traffic, to a safe area away from the
vehicle as a precaution in case your
Discovery is accidentally struck by
another vehicle.
25

Before You Drive
BREAKING-IN
Proper breaking-in will have a direct bearing on
the reliability and smooth running of your
vehicle throughout its life.
In particular, the engine, gearbox, brakes and
tires need time to ‘bed-in’ and adjust to the
demands of everyday motoring. During the first
500 miles (800 km), it is essential to drive with
consideration for the running-in process and
heed the following advice:
• LIMIT maximum road speed to 70 mph (110
km/h) or 3,000 rev/min. Initially, drive the
vehicle on a light throttle and only increase
engine speeds gradually once the
breaking-in distance has been completed.
• DO NOT operate at full throttle or allow the
engine to labor in any gear.
• AVOID fast acceleration and heavy braking
except in emergencies.
26
Controls & Instruments
Keys & Handsets
KEYS AND HANDSETS. . . . . . . . . . . . . . . . . . . . . 29
Facia Controls
FACIA CONTROLS . . . . . . . . . . . . . . . . . . . . . . . . 30
Locks & Alarms
ALARM SYSTEM . . . . . . . . . . . . . . . . . . . . . . . . . 32
REMOTE HANDSET BATTERY . . . . . . . . . . . . . . . 36
CHILD-PROOF LOCKS . . . . . . . . . . . . . . . . . . . . . 37
DOOR LOCKING CUT-OFF SWITCH . . . . . . . . . . . 37
ALARM OR HANDSET DIFFICULTIES. . . . . . . . . . 38
Seats
SITTING CORRECTLY . . . . . . . . . . . . . . . . . . . . . 39
POWER OPERATED FRONT SEATS . . . . . . . . . . . 39
HEAD RESTRAINTS. . . . . . . . . . . . . . . . . . . . . . . 41
FOLDING ARMRESTS . . . . . . . . . . . . . . . . . . . . . 42
HEATED FRONT SEATS . . . . . . . . . . . . . . . . . . . . 42
FOLDING THE REAR SEATS. . . . . . . . . . . . . . . . . 43
OCCASIONAL REAR SEATS. . . . . . . . . . . . . . . . . 44
Seat Belts
SEAT BELT SAFETY . . . . . . . . . . . . . . . . . . . . . . . 47
WEARING SEAT BELTS CORRECTLY. . . . . . . . . . 48
PREGNANT WOMEN . . . . . . . . . . . . . . . . . . . . . . 49
FRONT SEAT BELT PRE-TENSIONERS . . . . . . . . 50
SERVICE INFORMATION . . . . . . . . . . . . . . . . . . . 51
CARING FOR SEAT BELTS. . . . . . . . . . . . . . . . . . 51
Child Restraints
CHILD RESTRAINTS FOR SMALL CHILDREN AND
BABIES . . . . . . . . . . . . . . . . . . . . . . . . . . . . . . . . 52
CHILD RESTRAINTS FOR LARGER CHILDREN . . 52
‘LATCH’ TYPE CHILD RESTRAINTS. . . . . . . . . . . 54
TETHER STRAP ANCHORAGES. . . . . . . . . . . . . . 55
Airbag SRS
AIRBAG SUPPLEMENTARY RESTRAINT SYSTEM
(SRS). . . . . . . . . . . . . . . . . . . . . . . . . . . . . . . . . . 57
HOW THE AIRBAG SRS WORKS . . . . . . . . . . . . . 59
CHILD SEATS. . . . . . . . . . . . . . . . . . . . . . . . . . . . 61
SERVICE INFORMATION . . . . . . . . . . . . . . . . . . . 61
27

Steering Column
STEERING COLUMN ADJUSTMENT . . . . . . . . . . 63
Door Mirrors
EXTERIOR MIRRORS . . . . . . . . . . . . . . . . . . . . . 64
Instruments
INSTRUMENT PANEL . . . . . . . . . . . . . . . . . . . . . 65
PANEL ILLUMINATION. . . . . . . . . . . . . . . . . . . . 66
Warning Lights
WARNING LIGHTS . . . . . . . . . . . . . . . . . . . . . . . 67
Audible Warnings
AUDIBLE WARNINGS . . . . . . . . . . . . . . . . . . . . . 72
Lights & Indicators
DIRECTION INDICATORS . . . . . . . . . . . . . . . . . . 73
LIGHTS . . . . . . . . . . . . . . . . . . . . . . . . . . . . . . . . 73
FOG LIGHTS . . . . . . . . . . . . . . . . . . . . . . . . . . . . 74
HAZARD WARNING LIGHTS. . . . . . . . . . . . . . . . 75
Wipers & Washers
OPERATING . . . . . . . . . . . . . . . . . . . . . . . . . . . . 76
WINDSHIELD WIPERS . . . . . . . . . . . . . . . . . . . . 76
WINDSHIELD WASHER . . . . . . . . . . . . . . . . . . . 77
HEADLIGHT WASHERS . . . . . . . . . . . . . . . . . . . 78
REAR WINDOW WIPER AND WASHER . . . . . . . 78
Horn
HORN . . . . . . . . . . . . . . . . . . . . . . . . . . . . . . . . . 79
Electric Windows
ELECTRIC WINDOW CONTROLS . . . . . . . . . . . . 80
CLOCK . . . . . . . . . . . . . . . . . . . . . . . . . . . . . . . . 91
COIN TRAY . . . . . . . . . . . . . . . . . . . . . . . . . . . . . 91
CIGAR LIGHTER . . . . . . . . . . . . . . . . . . . . . . . . . 92
ASHTRAYS . . . . . . . . . . . . . . . . . . . . . . . . . . . . . 92
CD AUTOCHANGER* . . . . . . . . . . . . . . . . . . . . . 93
AUXILIARY POWER SOCKET . . . . . . . . . . . . . . . 94
CUP HOLDERS . . . . . . . . . . . . . . . . . . . . . . . . . . 94
CUBBY BOX . . . . . . . . . . . . . . . . . . . . . . . . . . . . 96
SUN VISOR VANITY MIRROR ILLUMINATION . . 96
Interior Mirror & Compass
INTERIOR REAR-VIEW MIRROR . . . . . . . . . . . . 97
COMPASS FUNCTION. . . . . . . . . . . . . . . . . . . . . 97
COMPASS ZONES. . . . . . . . . . . . . . . . . . . . . . . . 99
Rear Door & Step
REAR DOOR . . . . . . . . . . . . . . . . . . . . . . . . . . . 101
REAR STEP. . . . . . . . . . . . . . . . . . . . . . . . . . . . 101
Loadspace Cover
LOADSPACE COVER . . . . . . . . . . . . . . . . . . . . . 102
In-Car Telephones
IN-CAR TELEPHONES. . . . . . . . . . . . . . . . . . . . 103
Audio System
RADIO AERIAL . . . . . . . . . . . . . . . . . . . . . . . . . 104
AUDIO SYSTEM . . . . . . . . . . . . . . . . . . . . . . . . 104
HEADPHONE CONTROLS . . . . . . . . . . . . . . . . . 105
RADIO REMOTE CONTROLS. . . . . . . . . . . . . . . 105
Land Rover HomeLink®
HOMELINK® TRANSMITTER . . . . . . . . . . . . . . 107
Sunroof
ELECTRIC SUNROOF . . . . . . . . . . . . . . . . . . . . . 82
Air Conditioning
VENTILATION . . . . . . . . . . . . . . . . . . . . . . . . . . . 84
AIR CONDITIONING CONTROLS . . . . . . . . . . . . . 85
GENERAL NOTES . . . . . . . . . . . . . . . . . . . . . . . . 88
Heated Screens
HEATED WINDSHIELD AND REAR WINDOW . . . 89
Interior Equipment
FRONT INTERIOR & LOADSPACE LIGHTS . . . . . 90
REAR INTERIOR LIGHTS . . . . . . . . . . . . . . . . . . 90
GLOVEBOX LIGHT . . . . . . . . . . . . . . . . . . . . . . . 90
28
Keys & Handsets
Controls & Instruments
Keys & Handsets
KEYS AND HANDSETS
You have been supplied with two remote
handsets with integral keys which operate all
locks.
H5032
The key number is stamped on a tag attached to
the key ring. Check that the key number has
been entered in the space provided on your
Security card.
If required, additional handsets can be
programmed into the system by your retailer.
If the remote handset is lost, contact a Land
Rover retailer, who can supply replacement
units.
NOTE: Keep the security card and the spare
handset in a safe place - NOT IN THE VEHICLE!
IMPORTANT INFORMATION
The handset complies with part 15 of the
FCC rules. Operation is subject to the
following conditions:
• This device may not cause harmful
interference.
• This device must accept any
interference received, including
interference that may cause undesired
operation. This applies to both alarm
receivers and handset transmitters.
Any changes or modifications to the
handset not expressly approved by the
manufacturer or Land Rover North
America could void the user's authority to
operate the equipment.
Transmitter FCC ID: N5FVALTX3
Receiver FCC ID: N5VALTR3
29
Facia Controls
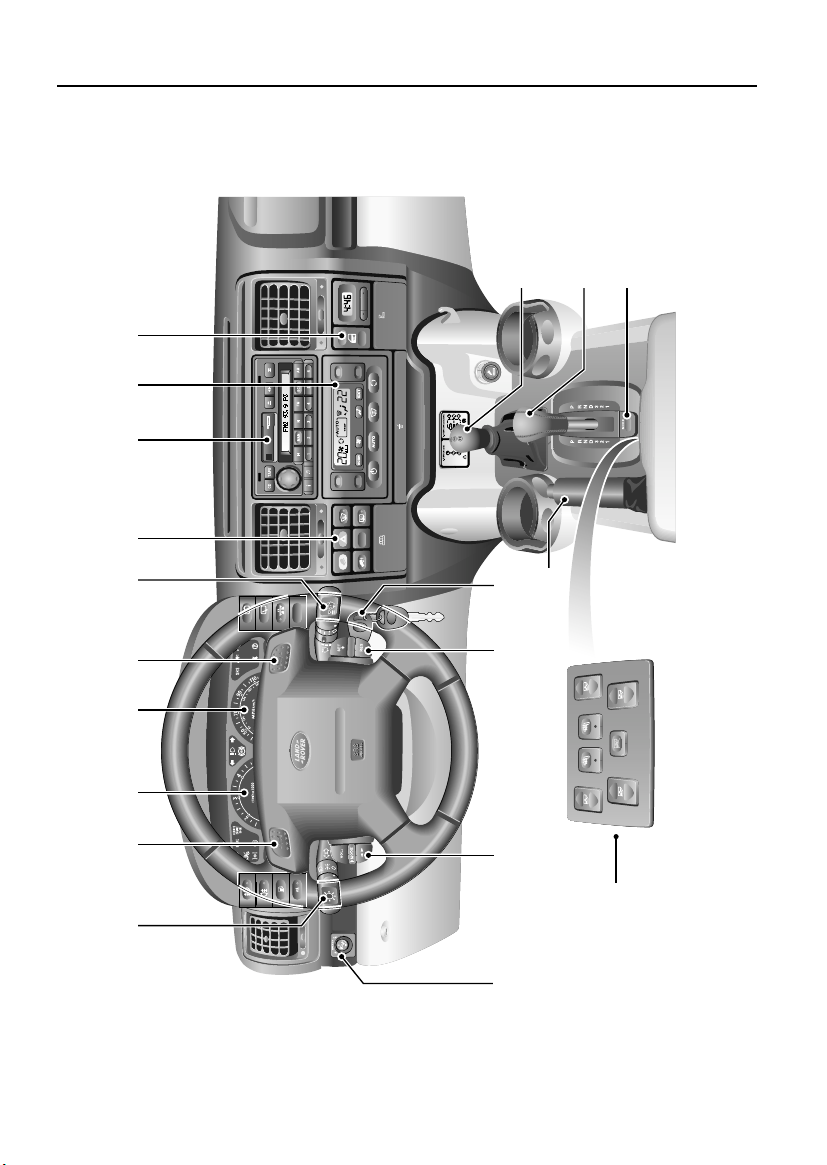
FACIA CONTROLS
Facia Controls
10
987652 43
11
TRAFFIC
NEWS
121413
1517 16
P
P
19
1
18
H5011
30
 Loading...