


Rollei Prego 70
Hinweise zum Gebrauch Instructions for use Istruzíoní per l’uso

Gratulation zum Kauf der Rollei Prego 70. Um die vielfältigen Möglichkeiten dieser Kamera optimal nutzen zu können, empfiehlt es sich, diese Anleitung vor Gebrauch sorgfältig zu lesen.
Empfehlung aus dem Vorbeugungsprogramm der Kriminalpolizei:
Wer seine Wertsachen dauerhaft kennzeichnet, fotografiert und auflistet, verdirbt Hehlern den Absatz und erspart sich unnötigen Ärger.
Bitte beachten
Die Rollei Prego 70 löst nicht aus,
›wenn keine Batterie eingelegt oder die Batterie leer ist.
›wenn die Kamera ausgeschaltet ist.
›während des Zoomens oder Filmrückspulens.
(Das Rückspulen stoppt, wenn die Kamera ausgeschaltet wird.)
›wenn der zurückgespulte Film noch in der Kamera ist.
›solange der Blitz noch nicht aufgeladen ist.
Ein integrierter Mikrocomputer steuert die Prego 70 elektronisch. In seltenen Fällen kann es durch starke elektrische oder magnetische Felder zu Störungen kommen. Nach Entfernen der Batterien für 2 – 3 Minuten und erneutem Einsetzen sollten die Störungen behoben sein.
Thank you for buying a Rollei Prego 70.Pleasereadtheseinstructionscarefully before using the camera so that you will be able to make full use of all its functions.
Excerpt from preventive police recommendations:
Marking, photographing and listing your valuables will make it difficult for thieves to sell them should they ever be stolen – and save you a lot of trouble.
2 |
D |
GB |

Please note
The shutter of your Rollei Prego 70 will not work...
›if no batteries are loaded or if the batteries are exhausted;
›if the camera is switched off;
›during zooming or film rewinding (rewinding stops when the camera is switched off);
›if the rewound film is left in the camera;
›during charging of the flash unit. Your Prego 70 is electronically controlled by an integral microcomputer. Very strong electrical or magnetic fields may, in rare cases, cause problems. Should this happen, remove the batteries for 2 – 3 minutes and replace them. This should correct the problem.
Grazie per aver acquistato una Rollei Prego 70. Vi preghiamo di leggere attentamente queste istruzioni prima di utilizzare la fotocamera, per poterne sfruttare tutte le funzioni.
Estratto delle raccomandazioni preventive di polizia
Contrassegnare, fotografare ed elencare i propri oggetti di valore renderà più difficile per i ladri rivenderli, evitando al derubato un mucchio di complicazioni.
Note
L’otturatore della Rollei Prego 70 non funziona…
›se nella fotocamera non ci sono le batterie oppure se queste ultime sono esaurite;
›se è chiuso il copriobiettivo;
›quando è attivato il tasto zoom oppure durante il riavvolgimento della pellicola (il riavvolgimento si arresta quando viene chiuso il copriobiettivo);
›se la pellicola non viene tolta dall’apparecchio dopo il riavvolgimento;
›se il lampeggiatore è in fase di carica.
La vostra Prego 70 è comandata elettronicamente da un microcomputer incorporato. Pur trattandosi di una evenienza improbabile, essa potrebbe non funzionare in presenza di forti campi elettrici o magnetici. In tal caso togliere le batterie dalla fotocamera e rimetterle nel relativo vano dopo 2 o 3 minuti. Ciò dovrebbe eliminare il problema.
I 3

INHALTSVERZEICHNIS
Vorbereitung
Allgemeines Bezeichnung der Teile LCD-Monitor Dioptrienkorrektur
Anbringen d. Trageschlaufe Batterieeinlegen Batteriekontrolle Filmeinlegen Kurzanleitung
Fotografieren
Kamerahaltung
Fotografieren Schärfespeicher Sucherinformationen Filmrückspulen Datums-/Titeleinbelichtung Wahl der Blitzfunktion Wahl der Selbstauslöserfunktionen
›2
›6
›12
›14
›14
›16
›16
›18
›20
›22
›24
›28
›30
›32
›34
›38
›40
Spezielle Aufnahmefunktionen
Anti-Rotaugen-Blitz |
› 42 |
Blitz aus |
› 44 |
Tageslicht-Aufhellblitz |
› 46 |
Aufhellblitz u. Gegenlichtkorr. |
› 48 |
Aufhellblitz u. |
› 50 |
Rotaugenreduzierung |
|
Selbstauslöser |
› 52 |
Doppel-Selbstauslöser |
› 54 |
2 s Auslöseverzögerung |
› 56 |
Intervallbelichtung |
› 58 |
Nahaufnahmen |
› 60 |
Panorama-Aufnahmen |
› 62 |
„Unendlich“-Einstellung |
› 64 |
IR-Fernauslöser (Zubehör) |
› 64 |
Sonstiges |
› 66 |
Pflege und Aufbewahrung |
|
Allgemeine Hinweise |
› 68 |
Fehlersuche |
› 70 |
Technische Daten |
› 72 |
CONTENTS
Getting ready
General Components LCD panel
Eyesight correction Attaching the wrist strap Loading the battery Checking battery power Loading film
Brief instructions
Taking pictures
Holding the camera properly Shooting procedure Locking focus
Viewfinder display Rewinding the film
Imprinting the date or a caption Selecting a flash mode Selecting a self-timer function
›2
›8
›12
›14
›15
›16
›17
›18
›20
›22
›24
›28
›30
›32
›34
›38
›40
4 |
D |
GB |

Advanced functions
Anti-red-eye flash Flash OFF Daylight fill flash
Fill-in/Backlight compensation Fill-in/Anti-red-eye preflash Self-timer
Double self-timer 2-second delay Interval timer Close-ups Panoramic pictures Infinity focus
IR remote control (optional accessory)
Miscellaneous
Camera care and storage General information Troubleshooting
Specifications
›42
›44
›46
›48
›50
›52
›54
›56
›58
›60
›62
›64
›65
›66
›68
›70
›72
INDICE
Preparazione
Cenni generali Componenti Display LCD Correzione diottrica
Attacco della cinghia Inserimento delle batterie Controllo della carica delle batteria Caricamento della pellicola Brevi istruzioni
Ripresa
Come deve essere tenuta la fotocamera Come si scattano le foto Blocco della messa a fuoco Display nel mirino
Riavvolgimento della pellicola Stampa della data o di
un sottotitolo
Selezione di un modo flash Selezione di una funzione autoscatto
I
›3
›10
›13
›15
›15
›17
›17
›19
›21
›23
›25
›29
›31
›33
›35
›39
›41
Funzioni Avanzate
Preflash per riduzione effetto “occhi rossi”
Flash escluso
Flash di rischiaramento luce diurna Fill-in/Compensazione
del controluce Fill-in/Flash per riduzione effetto “occhi rossi” Autoscatto
Doppio autoscatto Ritardo di 2 secondi Riprese intervallate Macro-opnamen Riprese panoramiche Messa a fuoco all’infinito Telecomando IR (accessorio opzionale)
Varie
Cura della fotocamera Precauzioni
Ricerca ed eliminazione dei guasti
Specifiche
›43
›45
›47
›49
›51
›53
›55
›57
›59
›61
›63
›65
›65
›67
›69
›71
›73
5

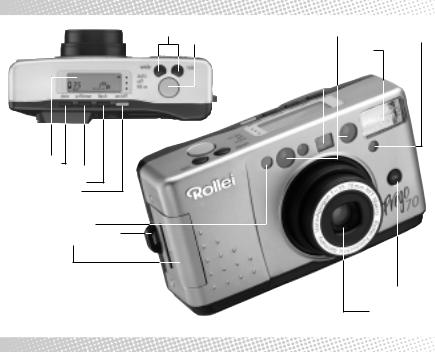
BEZEICHNUNG DER TEILE
LCD-Monitor Datentaste date
Selbstauslösertaste selftimer Blitzfunktionstaste flash Kameraschalter on/off
IR-Fernauslösesensor
Trageschlaufenöse
Batteriefachdeckel
6
Autofokusfenster |
|
|
Selbstauslöser-/ |
|||
Sucherfenster |
|
|
|
Anti-Rotaugen-LED |
||
|
|
|
|
Blitz |
|
|
Belichtungssensor
Unendlich-Taste
Objektiv
D
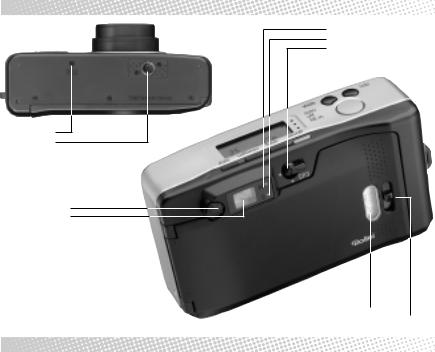
BEZEICHNUNG DER TEILE
Autofokus-Kontroll-LED (grün)
Blitz-Kontroll-LED (rot)
Panorama-Schalter
Rückspultaste
Stativgewinde
Dioptrienkorrektur
Suchereinblick
D 7

COMPONENTS
LCD-panel date button selftimer button flash button
Master switch on/off
IR remote-control sensor Wrist-strip eyelet Battery-chambercover
8
|
|
|
|
|
Autofocus window |
|
|
Self-timer-LED |
||||||
|
|
|
|
release |
Viewfinder window |
|
Anti-red-eye-LED |
|||||||
|
|
|
|
|
Exposure sensor |
|
Built-in-flash |
|
|
|||||
|
|
|
|
|
|
|
|
|
|
|||||
|
|
|
|
|
|
|
|
|
|
|||||
|
|
|
|
|
|
|
|
|
|
|||||
|
|
|
|
|
|
|
|
|
|
|
|
|
|
|
|
|
|
|
|
|
|
|
|
|
|
|
|
|
|
|
|
|
|
|
|
|
|
|
|
|
|
|
|
|
|
|
|
|
|
|
|
|
|
|
|
|
|
|
|
|
|
|
|
|
|
|
|
|
|
|
|
|
|
|
|
|
|
|
|
|
|
|
|
|
|
|
|
|
|
|
|
|
|
|
|
|
|
|
|
|
|
|
|
|
|
|
|
|
|
|
|
|
|
|
|
|
|
|
|
|
|
|
|
|
|
|
|
|
|
|
|
|
|
|
Infinity button
Lens
GB
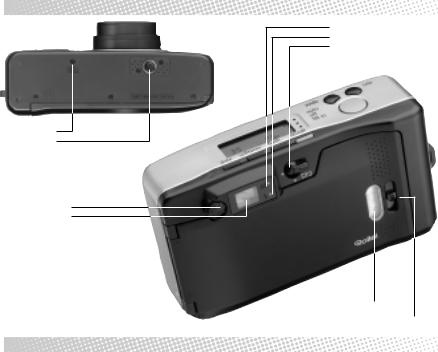
COMPONENTS
Autofocus indicator (green)
Flash indicator (red)
Panorama switch
Rewind button
Tripod socket
Eyesight correction
Viewfinder window
GB 9
COMPONENTI
|
Finestrella dell’ aotofocus |
|
di scatto |
Finestra dell’ mirino |
|
otturatore |
|
|
|
|
|
Display-LCD
Tasto per date
Tasto dell’ autoscatto selftimer
Tasto del modo flash
Copriobiettivo on/off
Sensore dell’ esposimetro
Occhiello per cinghia di trasporto
Coperchio del vano batterie
LED dell’ autoscatto/ “occhi rossi”
Flash
Tasto per messa a fuoco all’infinito Obiettivo
10 |
I |
COMPONENTI
Spia autofocus (verde) Spia flash (rosso) Interruttore per
modo panoramico
Tasto di riavvolgimento
Attaco per stativo
Correzione diottrica
Oculare del mirino
I |
11 |
LCD-MONITOR |
LCD-MONITOR |
|||||||||
|
|
|
|
|
|
|
|
|
|
|
|
|
|
|
|
|
|
|
|
|
|
|
|
|
|
|
|
|
|
|
|
|
|
|
|
|
|
|
|
|
|
|
|
|
|
|
|
|
|
|
|
|
|
|
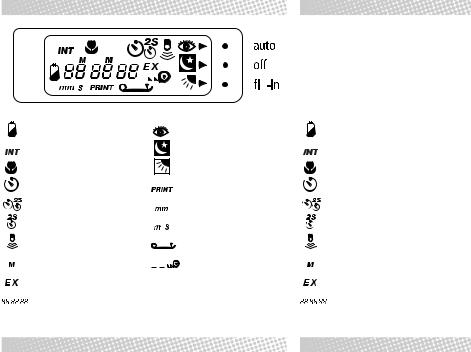
Batteriekontrolle |
Anti-Rotaugen-Funktion |
Battery check |
Intervallbelichtung INT |
Langzeitbelichtung/Flash off |
Interval timer |
Makrofunktion |
Gegenlichtkorrektur |
Macro mode |
Selbstauslöser |
Datum/Titel-Einbelichtung |
Self-timer |
Doppel-Selbstauslöser |
Brennweiteneinheit (mm) |
Double self-timer |
2s-Auslöseverzögerung |
Minuten (m), Sekunden (s) |
2-sec-delay |
Fernauslöserfunktion |
Rückwand offen-Symbol |
Remote-control function |
Monat |
Filmtransportsymbol / |
Month |
Bildzählwerk |
Rückspulanzeige / |
Exp. compensation display |
Brennweitenanzeiger / |
Filmladekontrolle |
Exposure counter/Focal length |
D |
|
GB |
Daten (Jahr/Monat/Tag/Zeit) |
|
(year/month/day/time) |
12

LCD-MONITOR
Anti-red-eye-function |
Batterij-controle |
Anti-rode-ogen-funktie |
Time exposure/Flash off |
Interval-opnamen |
Lange tijden/Flash off |
Backlight compensation |
Makro-functie |
Tegenlichtcorrectie |
Date / caption imprinting |
Zelfontspanner |
Datum/titel-meefotograferen |
Affichages des focales (mm)/ |
Dubbele-zelfontspanner |
Aanduiding brandpuntafstand (mm) |
Minutes (m), Secondes (s) |
2s-ontspan-vertraging |
Minuten (m), seconden (s) |
„Back open“ icon |
Afstandsbedienings-functie |
Symbool Achterwand open |
Film-advance icon / |
Maand |
Filmtransport-symbool / |
Rewind indicator / |
Beeldenteller |
Terugspoel-aanduiding / |
Film loading check |
Aanduidingbrandpuntafstand/ |
Controle aanweezigheid film |
|
I |
13 |
|
Data (Jaar/maand/dag/tijd) |
|
DIOPTRIENKORREKTUR |
|
|
EYESIGHT CORRECTION |
|
|
|
|
|
|
|
|
|
|
|
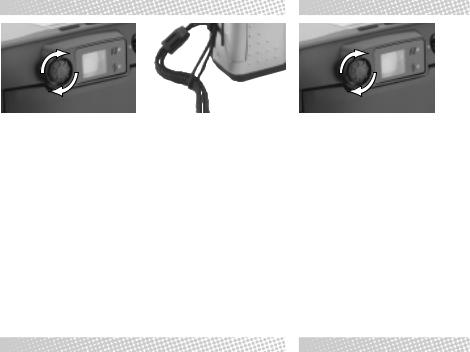
Dioptrienkorrektur |
Anbringen der Trageschlaufe |
Eyesight correction |
Zur Anpassung das Suchers bei Kurzoder Weitsichtigkeit.
»Am Rädchen drehen, bis das Sucherbild scharf erscheint.
To correct the eyepiece power for shortor far-sightedness.
»Turn dial until viewfinder image appears sharp.
14 |
D |
GB |
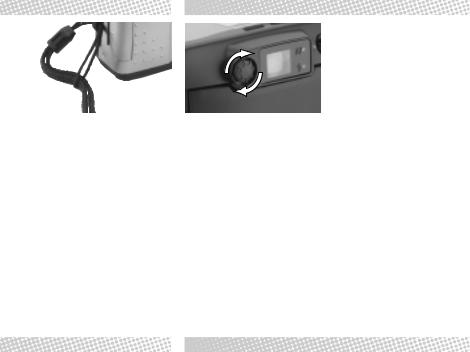
CORREZIONE DIOTTRICA
|
|
|
|
|
Attaching the wrist strap |
|
|
|
|
Correzione diottrica |
Attaco della cinghia di trasporto |
|||
|
Correzione diottrica per adattamento |
|
||
alla capacità visiva.
»Girare la ghiera finchè l’immagine nel mirino non appare nitida.
I |
15 |
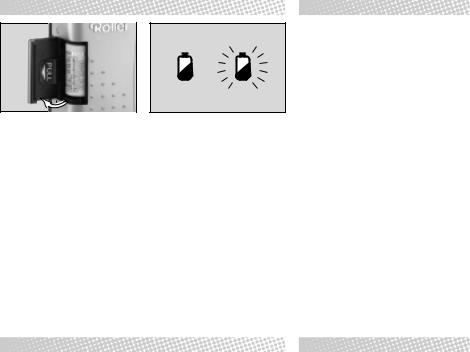
BATTERIE EINLEGEN
Batterie Einlegen
»Batteriefach öffnen.
»Neue Batterie einlegen und auf die richtige Polung achten.
»Batteriefachdeckel zudrücken, bis er mit einem Klicken einrastet.
Bitte beachten
»Nur Lithium-Batterien des Typs CR 2 verwenden.
Nach 3 Min. ohne Betätigung schaltet die Rollei Prego automatisch ab, um Energie zu sparen.
›Bei längerem Nichtgebrauch der Kamera empfiehlt es sich, die Batterie zu entnehmen und separat aufzubewahren.
16 D
Batteriekontrolle
1.Kein Symbol – Batterie in Ordnung
2.Symbol erscheint – Batterie geht zu Ende. Ersatz-Batterie bereithalten.
3.Symbol blinkt – Batterie leer, Auslö-
sen nicht mehr möglich. Neue Batterie einsetzen.
»Das LCD-Symbol zeigt den Batteriezustand.
Bitte beachten
»Batterie nur bei ausgeschalteter Kamera wechseln.
»Bei Kälte oder auf Reisen
Ersatzbatterien mitnehmen.
Bei niedrigen Temperaturen läßt die Batterieleistung nach. Mit normaler Temperatur erreicht die Batterie wieder ihre alte Leistung.
LOADING THE BATTERIES
Loading the batteries
»Open the battery chamber.
»Insert new battery with positive and negative poles correctly positioned.
»Close battery-camber cover until it clicks into place.
Please note
» Use only type CR 2 lithium batteries. The camera will shut off automatically 3 min after use to conserve power.
›If you are planning not to use the camera for some time, remove the batteries and store them separately.
GB

Checking battery power
1.No symbol / sufficient battery power.
2.Symbol appears/battery weak. Keep spares ready.
3.Symbol blinks/ battery exhausted, shutter locked. Inserta fresh battery.
»The LCD symbol shows the current battery status.
Please note
»Change battery only with the camera switched off.
»Always keep spare batteries ready on trips or in cold weather.
Battery power declines at low temperatures. However, the batteries will recover as the temperature goes back to normal.
INSERIMENTO DELLE BATTERIE
Inserimento delle batterie
»Aprire il vano batterie.
»Inserire nuove batterie rispettandone la polarità.
»Chiudere il coperchio del vano batterie facendolo scattare in posizione.
Note
» Usare solo batterie al litio CR 2. La fotocamera si spegnerà automaticamente se non sarà stata utilizzata per oltre 3 minuti, per non far scaricare le batterie.
›Se la fotocamera non dovrà essere utilizzata per un certo periodo, togliere le batterie e conservarle a parte
Controllo della carica delle batterie
1.Nessun simbolo – la carica è sufficiente
2.Appare il simbolo – batterie deboli. Tenere pronte batterie di scorta.
3.Il simbolo lampeggia –batterie esaurite, l’otturatore risulta bloccato.
Inserire due batterie nuove.
»Il simbolo su LCD indica lo stato di carica delle batterie.
Note
»La fotocamera deve essere spenta quando si sostituiscono le batterie
»Avere sempre a disposizione batterie nuove quando si è in viaggio oppure quando si lavora a
temperature molto rigide.
La potenza delle batterie si riduce se le temperatura sono basse, ma si ripristina quando la temperatura torna a livelli normali.
I |
17 |
FILMEINLEGEN |
LOADING FILM |
|
|
|
|
|
|
|
|
|
|
|
|
|
|
|
|
|
|
|
|
|
|
|
|
|
|
|
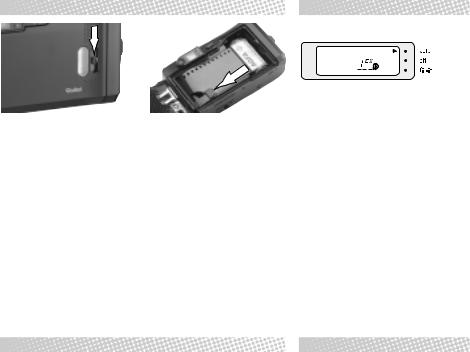
Filmeinlegen |
Bitte beachten |
Loading film |
||||||
1. |
Entriegelungsknopf nach unten |
› |
Mit DX-codierten Filmen stellt die |
1. |
Push release button down and open |
|||
|
schieben, Rückwand aufklappen. |
|
Kamera die Empfindlichkeit im Be- |
|
camera back. |
|||
2. |
Filmpatrone in das Filmfach legen. |
|
reich von ISO 50–3200 automa- |
2. |
Gently place film cartridge in film |
|||
3. |
Führen Sie den Filmanfang bis zur |
› |
tisch ein. |
|
compartment. |
|||
|
Markierung „Filmtip“ – Perforation |
Filme ohne DX-Code werden wie |
3. |
Extend the film leader up to the |
||||
|
liegt vor dem Sensor. Der Film muß |
|
ISO 100 belichtet. |
|
mark “film tip” – perforation in front |
|||
|
flach auf der Führung liegen. |
» Film nie im direkten Sonnenlicht |
|
of the sensor. The film should be |
||||
4. |
Rückwand zudrücken, bis sie mit |
|
wechseln. |
|
flat on the film guides. |
|||
|
einem Klicken einrastet. Dann spult |
› Bei falsch eingelegten Film erscheint |
4. |
Close camera back until it clicks |
||||
|
die Kamera den Film automatisch |
|
im LCD-Monitor das E-Symbol und |
|
into place. The camera will now |
|||
|
bis Bild 1 vor. |
|
der Auslöser wird blockiert. In die- |
|
advance the film to the first frame. |
|||
5. |
Danach erscheint im LCD-Monitor |
|
sem Fall Film erneut einlegen. |
5. |
The display shown appears in the |
|||
|
die abgebildete Anzeige. |
|
|
|
|
LCD panel. |
||
18 |
D |
GB |

CARICAMENTE DELLA PELLICOLA
Please note
›If DX-coded film is used, the camera will automatically set the film speed within a range of ISO 50/18° to 3200/36° .
» Never change film in direct sunlight.
›In the case of a loading error, E appears in the LCD, and the shutter remains locked. Repeat the loading procedure.
Caricamente della pellicola
1.Premere il pulsante di sblocco e aprire il dorso della fotocamera.
2.Inserire con cautela il caricatore nell’apposito vano.
3.Tirare la testa della pellicola fino all‘indicazione „Filmtip“ – la perforazione è situata prima del sensore. La pellicola deve essere ben distesa sulla guida.
4.Chiudere il dorso facendolo scattare in posizione. La pellicola avanzerà automaticamente fino al primo fotogramma.
5.Sul display LCD appare il segno indicato.
Note
›Con pellicole a codifica DX la fotocamera regola automaticamen-
te la sensibilità della pellicola nell’ambito di ISO 50/18° – 3200/ 36° .
›Mai caricare la pellicola alla luce diretta del sole.
»Mai caricare la pellicola alla luce diretta del sole.
› In caso di caricamento non corretto, sul display LCD appare E e l’otturatore risulta bloccato. Ripetere la procedura di caricamento.
I |
19 |

KURZANLEITUNG |
|
BRIEF INSTRUCTION |
|
|
|
|
|
|
Kurzanleitung
»ON/OFF Taste betätigen, das Objektiv fährt in seine 35mm-Weit- winkelstellung und die LCD-Anzei- ge erscheint.
»Zum Ausschalten wieder Taste ON/ OFF drücken.
›Das Objektiv bewegt sich dann automatisch in die Ruhestellung.
›Wenn die Kamera länger als 3 Minuten nicht benutzt wird, schaltet sie sich automatisch aus.
»Durch den Sucher Motiv anvisieren und mit den Zoomtasten den gewünschten Bildausschnitt wählen.
»Für größere Abbildung entfernter Motive oder Nahaufnahmen auf T
(Tele) (1) drücken, für Weitwinkelaufnahmen auf W (Weitwinkel) (2).
›Während des Zoomens zeigt der LCD-Monitor folgende Brennweiten: 35, 40, 45, 50, 55, 60, 65, 70mm.
Brief instruction
»Set master switch to ON. The lens moves to its 38mm wide-angle position, and the LCD appears.
»To turn the camera off, return master
switch to OFF .
›The lens and the flash will then automatically return to their rest positions.
›The camera automatically shuts off 3 min after use.
20 |
D |
GB |
BREVI ISTRUZIONI
»Look through the viewfinder and frame your picture using the zoom button.
»To zoom in on far subjects or for close-ups press T (Telephoto) (1), for wide angles W (2).
»During zooming, the following focal lengths appear in the LCD panel: 35, 40, 45, 50, 55, 60, 65, 70mm.
Brevi istruzioni
»Aprire il copriobiettivo facendolo scattare. L’obiettivo assume la configurazione grandangolare 38 mm ed appare il display LCD.
»Per spegnere l’apparecchio, chiudere lentamente il copriobiettivo.
›L’obiettivo e il flash rientreranno automaticamente.
›La fotocamera si spegnerà automaticamente se non sarà stata utilizzata per oltre tre minuti; il copriobiettivo però rimarrà aperto.
»Guardare nel mirino e traguardare il soggetto usando il tasto zoom.
»Per aumentare l’ingrandimento con soggetti lontani o in riprese ravvicinate, premereT (teleobiettivo)
(1), oppure W (grandangolare) (2).
›Durante la regolazione zoom appariranno sul display LCD le seguenti focali: 35, 40, 45, 50, 55, 60, 65, 70mm.
I |
21 |
KAMERAHALTUNG |
HOLDING THE CAMERA PROPERLY |
|
|
|
|
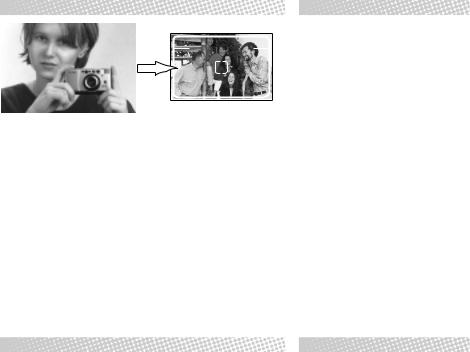
Kamerahaltung |
Bitte beachten |
Holding the camera properly |
» Kamera ruhig und fest mit beiden |
» Objektiv, Autofokusund Belich- |
» Hold the camera steady with both |
Händen halten, besonders bei Tele, |
tungssensor-Fenster sowie den |
hands to avoid camera shake, |
um nicht zu verwackeln. |
Blitz nicht durch Finger, herabhän- |
above all at longer focal lengths. |
» Langsam, nicht ruckartig den Aus- |
gende Haare oder der Trage- |
» Press shutter release gently and |
löser drücken. |
schlaufe verdecken. |
slowly. Do not jerk. |
» Ellbogen möglichst am Körper ab- |
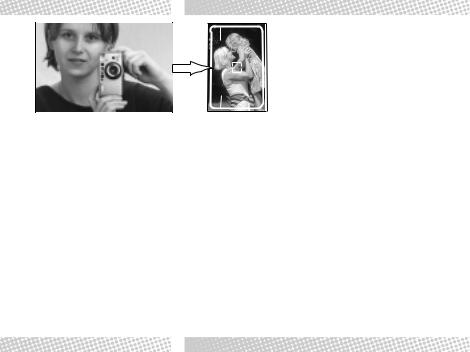
» Bei Hochformataufnahmen sollte |
» Try to support both elbows against |
stützen. |
der Blitz oben sein. |
your body. |
» Kamera nahe ans Auge halten, da- |
|
» Keep your eye close to the |
mit das ganze Bild zu überblicken |
|
viewfinder eyepiece for optimum |
ist. |
|
coverage of the viewfinder area. |
22 |
D |
GB |
COME DEVE ESSERE TENUTA LA FOTOCAMERA
Please note
»Make sure not to cover up the lens, autofocus and exposure-meter windows nor the flash with your fingers, hair or the wrist strap.
»For vertical pictures, the flash should be at the top.
Come deve essere tenuta la fotocamera
»Tenere la fotocamera ben ferma con entrambe le mani per evitare immagini mosse, soprattutto quando si riprende con focali lunghe.
»Premere leggermente e lentamente il pulsante di scatto.
»Cercare di tenere entrambi i gomiti aderenti al corpo.
»Traguardare il soggetto attraverso il mirino.
I
Note |
|
» Bisogna fare |
attenzione che |
l’obiettivo, |
le finestrelle |
dell’esposimetro e dell’autofocus, nonché il flash non vengano accidentalmente ostruiti da dita, capelli o cinghia della fotocamera.
»Per le immagini in formato verticale, il flash deve trovarsi nella parte superiore.
23
 Loading...