


Rollei AFM 35
Operating Instructions
1

GENERAL
Congratulations on your sophisticated new 35 mm camera!
Please read these instructions carefully before using your camera, so you will be able to make optimum use of its many features.
2
Precautions
›Do not tamper with the camera’s internal components. High-voltage circuits may pose a health hazard.
Also, tampering will invalidate your warranty.
›Should the camera be damaged, do not touch any internal components to avoid an electric shock.
›Should the camera get wet, remove the battery for the same reason.
Battery notes
›The camera will work only with a battery properly loaded.
›Load the battery with the proper polarity.
›Batteries must not be recharged, short-circuited or opened, thrown into a fire,
exposed to humidity or liquids, disposed of with household garbage. Keep batteries away from children!

GENERAL
The shutter of your camera will not release, if …
›no battery is loaded or the battery is exhausted;
›the lens cover is closed (camera OFF);
›the film is being rewound.
Your camera is electronically controlled by a microprocessor. In rare cases, strong electrical or magnetic fields may give rise to malfunctions. In this case remove the battery for 2 – 3 minutes. The camera should again function normally after reloading the battery.
Preventive police recommendation:
Marking your valuables, photographing and cataloging them will make it more difficult for thieves to sell them and may save you a lot of trouble.
3

CONTENTS
Getting ready
Controls Description of parts LCD panel Viewfinder frame Loading the battery Testing the battery
Preparing your camera for shooting Loading film
Removing the film Mid-roll rewind
Picture taking
Switching the camera on/off Holding the camera Shooting on full auto Purpose of viewfinder LEDs When autofocus might fail Releasing the shutter Focus lock
Depth of field Aperture-priority AE Purpose of viewfinder LEDs Flash range
4
›5
›6
›8
›9
›10
›11
›12
›13
›14
›14
›15
›16
›17
›17
›18
›18
›19
›20
›21
›22
›24
Flash modes |
› 25 |
Autoflash |
› 25 |
Red-eye reduction |
› 26 |
Flash off |
› 27 |
Fill flash |
› 27 |
Backlight compensation |
› 28 |
Slow sync (night flash) |
› 29 |
Self-timer |
› 30 |
Bulb exposures |
› 31 |
Setting a bulb exposure |
› 31 |
Automatic exposure bracketing (AEB)/ |
› 32 |
exposure compensation |
|
Retaining your bracketing amount |
› 35 |
Manual focusing |
› 35 |
Selecting the date format |
› 36 |
Setting the date |
› 37 |
Miscellaneous |
› 38 |
Camera care and storage |
|
Troubleshooting |
› 40 |
Specifications |
› 43 |
AE program diagram |
› 45 |
Aperture-priority AE diagram |
› 46 |
Lens cross section |
› 47 |
Depth-of-field table |
› 50 |

CONTROLS
Primary functions of components
Control |
Purpose |
|
|
Main dial |
Master switch (see p. 15) |
|
Programmed AE (see p. 17) |
|
Aperture-priority AE (see p. 21) |
|
|
Focusing dial |
Autofocus (p. 17)/manual focus selector (p. 35) |
|
|
Button (7) |
Flash-mode selector (see p. 25) |
|
|
[AEB/± ] button |
Bracketing selector (see p. 32) |
|
Exposure-compensation selector (p. 31) |
|
|
( /BULB) button |
Activating the self-timer (see p. 30) |
|
or a bulb exposure (see p. 31) |
|
|
SET button |
Setting the date (see p. 37) and the date format (see p. 36), |
SEL-Taste |
respectively |
|
|
Button (21) |
Mid-roll rewind (see p. 14) |
|
|
5
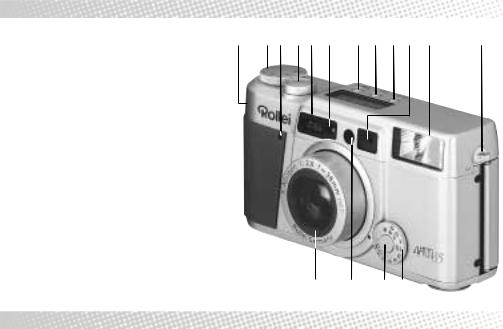
DESCRIPTION OF PARTS
1 |
Strap lug |
1 2 3 4 5 6 7 8 9 10 11 |
(1) |
2 |
Main dial (ON/OFF, programmed and |
|
|
|
aperture-priority AE) |
|
|
3Self-timer lamp
4Shutter release
5Autofocus window
6Exposure-meter window
7Flash button
8 Bracketing/
exposure-compensation button (AEB/± )
9Self-timer/
bulb-exposure button (BULB)
10Viewfinder window
11Flash unit
12Focusing dial
13Focusing-dial release
14AF-LED
15Automatically retracting lens
15 |
14 |
13 12 |
6

DESCRIPTION OF PARTS |
|
|
|
|
|
|
16 |
Viewfinder eyepiece |
25 |
Take-up spool |
|
|
|
17 |
Focus indicator |
26 |
Film-leader mark |
|
|
|
18 |
Red warning LED |
27 |
Battery-compartment cover |
21 |
||
19 |
Date select button (SEL) |
28 |
Camera back |
17 |
19 |
|
20 |
Date set button (SET) |
29 |
Pressure plate |
16 18 20 |
|
|
21 |
Mid-roll rewind button |
30 |
Film type window |
|
||
22Camera-back release
23Film-cartridge compartment
241/4" tripod socket
30 29 28 27 26 25 24 23 22
7
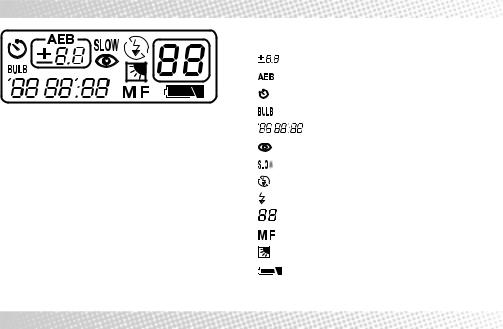
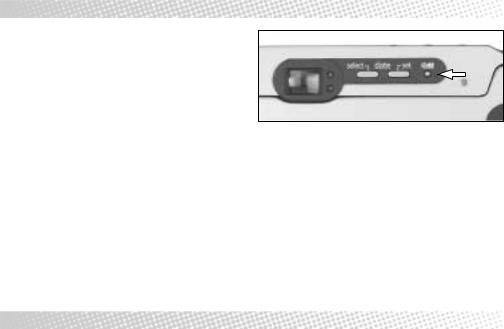
LCD PANEL
LCD panel
AEB compensation in EV
AEB mode
Self-timer
Bulb exposure
Date imprint
Anti-red-eye mode
Slow sync
Flash OFF
Flash ON
Frame counter
Manual focusing
Backlight compensation
Battery status
8

VIEWFINDER FRAME
2
1
AEB 3 MF 4
The viewfinder
This is your guide to what will be recorded on film.
1Autofocus frame
The camera will automatically focus on the subject detail covered by this frame.
2Parallax marks
These mark the upper and left frame lines of your picture at distances between 0.4 m and 0.9 m.
3AEB (automatic exposure bracketing)
This appears in the AEB mode as you press the shutter release halfway.
4MF (manual focusing)
This appears when you press the shutter release halfway with autofocusing disabled.
The minimum focusing distance is 0.4 m.
Please note that at distances between 0.4 and 0.9 m so-called parallax will cause the viewfinder to show a slightly different frame from the one recorded on film. This is why parallax marks serve as upper and lefthand frame lines at this distance. In other words, the actual frame will shift to the bottom and right. Be sure to make allowance for this effect.
9
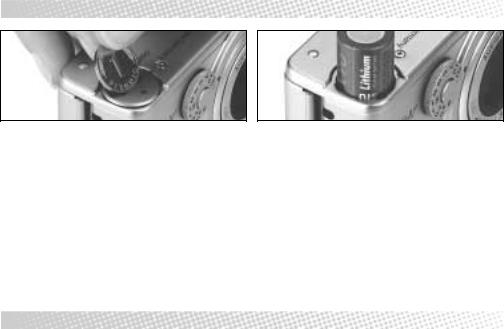
LOADING THE BATTERY
Loading the battery
Your camera is designed for use of a type CR2 or CR2/ DL 3V lithium battery with an average capacity of around 360 exposures.
Please do NOT load any film as long as there is no battery in the camera.
Before shooting, be sure to check the battery status (see p. 11).
The date and hour have to be reset after loading a new battery (see p.37).
When traveling and shooting at low temperatures, it is advisable to carry a spare battery.
10
›Open the battery-compartment cover with a coin.
›Load the battery with due regard to the polarity marks (+) and (-).
›Align the symbols, and tighten the cover with the aid of a coin.
TESTING THE BATTERY
Battery notes
›Should the battery fail during rewinding, load a new one and repeat rewinding by pressing button (21). In this case, it is possible that a figure will be blinking in the frame counter instead of “E” after rewinding. However, you may open the camera back as soon as the figure in the frame counter starts blinking.
Note:
Battery power drops at low temperatures. It is therefore advisable to carry a spare battery when shooting in cold climate.
1 2 3
Testing the battery
When you switch the camera on, a battery icon will appear on the LCD. The different icons have the following meaning:
1 Sufficient power
2 Low power. Change battery.
3Blinking: Battery exhausted; shutter cannot be released.
Note:
Be sure to test your battery before shooting.
You can easily change the battery with a film in the camera. You will only have to reset the date and hour thereafter.
11
PREPARING YOUR CAMERA FOR SHOOTING
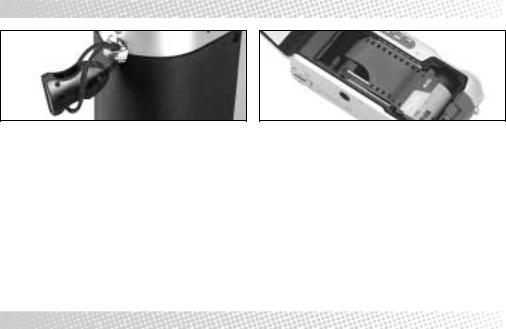
Attaching the wrist strap
›Thread the thin end of the strap through the camera’s strap lug and pull the long end through the loop.
Loading film
Your camera has been designed for the use of DXcoded 35mm film (size 135). These films allow the camera to set the film speed automatically.
Suitable film speeds:
ISO 50/18° , 100/21° , 200/24° , 400/27° , 800/30° , 1600/33° , 3200/36° .
When you load a non-DX-coded film or one whose speed varies from the values given above, the camera will default to ISO 100/21° .
12

LOADING FILM
›Push the camera-back release as shown, and open the back.
›A battery must be loaded BEFORE you load a film.
›Be sure NOT to open the camera back as long as there is a film in the camera that has not been rewound.
›Be absolutely sure to avoid force when opening or closing the camera back.
›Normally, the shutter cannot be released when the camera back is open. However, should this become indispensable, the shutter can be released if the camera-back release is pressed down at the same time.
›Load a film cartridge.
›Pull the film leader out until it reaches the corresponding mark at the opposite side of the camera.
›Close the camera back. The film will now be automatically wound up to the first frame.
›Please make sure that the cartridge lip makes contact with the film guides before closing the camera back.
›Should the film leader reach beyond the mark on the left-hand side of the camera, remove the cartridge and rewind the film slightly by hand.
›With the camera back closed, you may read the type and speed of the film loaded through the corresponding window in the back.
›Switch the camera on and check the frame-counter reading.
›Remember that the shutter cannot be released as long as the frame counter does not read “1” because the film has not been properly wound up to the first frame. In this case, open the camera back and load the film again.
Notes:
Never change films in direct sunlight.
If you exceed the nominal number of exposures per roll, the last frame may be cut off during processing, or the date may not be properly imprinted.
13
REMOVING THE FILM/MID-ROLL REWIND
Removing the film
After the last frame, the camera will rewind the film automatically. The frame counter then reads “E” (for “empty”).
›Before opening the camera back, make sure that there is no more rewinding sound and that the frame counter reads “E”. Premature opening of the camera back may damage the camera and expose at least part of your film.
›Push the camera-back release in the direction of the arrow and open the camera.
›Remove the film cartridge.
›Should you switch your camera off without removing the rewound film, the lens will not retract. This is why you should always remove the film immediately after rewinding.
14
Mid-roll rewind
Press button (21) if you wish to rewind a film that is only partially exposed.
› After rewinding, the frame counter will read “E”.

SWITCHING THE CAMERA ON/OFF
Switching the camera on
›Turn the main dial to “P”. The lens cover will open.
›If you do not use any of the camera’s functions for five minutes, it will switch off automatically. To switch it on again, simply press the shutter release halfway. Alternatively, you may turn the main dial to OFF and back to the desired setting.
Switching the camera off
›Turn the main dial to OFF. The lens cover will close, and the liquid-crystal display will go dead.
15
HOLDING THE CAMERA
Holding your camera properly
›Grasp your camera firmly with both hands to avoid camera shake.
›If possible, brace your elbows against your body.
›Keep the camera close to your eye so you can see the entire viewfinder frame.
›The camera will focus automatically over a range of 0.4 m to infinity (∞ ).
›Press the shutter release SOFTLY, without jerking.
16
Please note
›Do not obstruct the lens, autofocus and exposuremeter windows and the flash with your fingers, hair or the wrist strap.
›For shots in vertical format, make sure that the flash unit is on top to obtain natural illumination.
›Frame your subject so that the AF area is on top of the most important detail of your picture.
 Loading...