


1. Key features
Video Resolution: 4K@60FPS, 4K@30FPS, 1440P@30FPS, 1080P@120FPS, 1080P@60FPS, 720P@240FPS, 720P@120FPS
Image Resolution: 20MP
2’’ TFT touch screen
3.8V/1100mAh removable Lithium-ion battery
Support Wi-Fi connection
Support 2.4G RF Remote Controller
Support MicroSD Card up to 64 GB
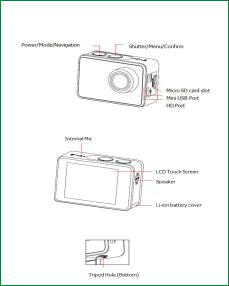
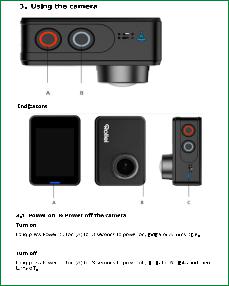
2. Camera description

3.2 Insert a Memory Card
Insert a MicroSD card into the SD card slot.
NOTE:
1.We suggest to use Class 10 (or higher) Micro SD cards for s smooth recording. Lower Class of the Micro SD Cards may cause the video blur or frame drops.
2.There is only one correct direction to insert the SD Card into the slot. Do not force the card into the card slot as it may damage both the SD Card and camera.
3.A new Micro SD Card should be formatted before using.
3.3 Charge the battery
Before using the AC 560 TOUCH for the first time, please fully charge the battery.
1.Connect the AC 560 TOUCH with an USB-charger or USB-device by Mini USB cable.
2.Charging Indicator B turns red during charging.
3.A complete empty battery takes approximately 2.5 hours to get fully charged. The red indicator turns off after the battery is fully charged.
4.When the battery is going to run empty, the red indicator B blinks twice a second.
5.Some functions, such as Wi-Fi, are unavailable if the battery is in lower condition.
3.4Insert camera into the waterproof case
1.Ensure the case is dry and clean.
2.Insert the camera and make sure the lens fits neatly in the lens cavity.
3.Close the locking clamps.
4.The waterproof case can be mounted, using the accessories in the box.
3.5 Record a video
Press Shutter button (B) when powered on, LED B turns green and keep blinking twice a second; Press Shutter button (B) again to stop, and the LED B light turns off.
3.6 Shoot a single picture
Press Shutter button (B) once to shoot a single picture, LED B flashes green.
3.7 Mode Shift
1. Main mode shift (A)
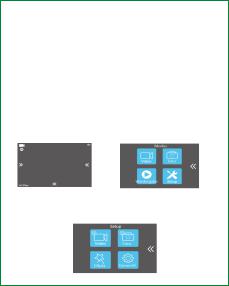
When powered on, short press on button A to shift among Video Recording - Photo Shot - PlaybackSetting, pause to confirm on current mode.
You can easily access this menu with touch operation by touch the left arrow.
2. Main mode shift (B)
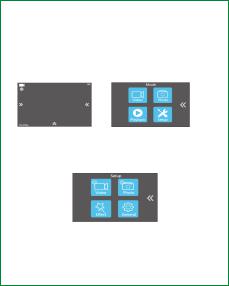
When powered on, long press on button B for 3 seconds to enter Setup menu: Video - Photo - Effect - General.
4. Setup your camera
Long press on Button B to enter Setup ”Video - Photo - Effect - General”, press Button A to navigate and press Button B to confirm. Long press on Button B again to exit.
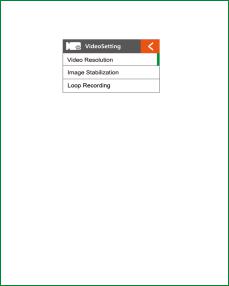
4.1Video SETUP
Press Power Button (A) once to navigate, press Shutter Button (B) to Enter/Confirm selection.
Video Resolution
To set the video resolution.
Image Stabilization
To activate/deactivate the digital image stabilization. Image stabilization can’t be activated on 4K@60fps, 1080p@120fps, 720p@240fps, 720p@120fps.
Loop Recording
This allows to record continuously using footage intervals. The camera will delete the oldest loop recording file and replace with the latest recording when the MicroSD card is full.
Time Lapse Interval
This allows to record one frame at the set time interval of Off/0.5 Sec/1 Sec/3 Sec/5 Sec/10 Sec/30 Sec/60 Sec. The final video file will be stored.
Time Lapse Duration
To determine the video Timelapse duration of “Unlimited/5 Min/ 10 Min/ 15 Min/ 20 Min/ 30 Min/ 60 Min, only available when Time Lapse Photo Interval activate.

Slow Motion Movie
This allows to record the action at a faster rate than usual or replayed at a slower rate than usual. This feature is only available on 1280x 720p@120fps.
Fast Motion Movie
This allows to record the action at a slower rate than usual or replayed with a faster rate than usual. This feature is not available when Time lapse is activated.
Wind Noise Reduction
To reduce the wind noise during video recording.
Scene Mode
To set different scene modes: Manual, Water, Riding, Winter, Diving, Night.
You can easily access this mode with touch operation by touching the right arrow.
Date Stamp
To define if the Date/Time mark is displayed on top of the videos.
Auto Low Light
To use for recording in low light condition.
4.2Photo Setting
Press Power Button (A) once to navigate, press Shutter Button (B) to Enter/Confirm selection.

Resolution
To set the image resolution.
Time Lapse Interval
This allows you to shoot a continuous sequence of photos with the following intervals Off/0.5 Sec/1 Sec/3 Sec/5 Sec/10 Sec/30 Sec/60 Sec.
Time Lapse Duration
To determine the photo Time lapse duration of “Unlimited/5 Min/ 10 Min/ 15 Min/ 20 Min/ 30 Min/ 60 Min (only available when Time Lapse Photo Interval activated).
Photo Burst
This allows you to take 3 shots/1s, 7 shots/2s, 15 shots/4s, 30 shots/8s.
Timer
When this mode is enabled, it lets you set intervals of 3 Sec, 5 Sec, 10 Sec when a single photo is taken after clicking the Record button.
Date Stamp
To define if the Date/Time mark is displayed at the top of the photos.
Scene Mode
To set different scene modes: Manual, Outdoor, Indoor, Portrait, Landscape, Night.
You can easily access this modes with touch operation by touching the right arrow.
Picture Quality
To set the picture quality.
Long Exposure
To use a long-duration shutter speed to sharply capture the stationary elements of images.
4.3Effect Setting
Press Power Button (A) once to navigate, press Shutter Button (B) to Enter/Confirm selection.
AE Meter
To define which image areas are used to calculate the correct exposure.
FILTER
To filter natural light to change image effects.
White Balance
Factory default is Auto. If you switch Auto OFF, please adjust white balance when lighting condition changes.
EV
This allows user to set the light exposure value.
ISO
This is the measurement of the sensor’s sensitivity to light.
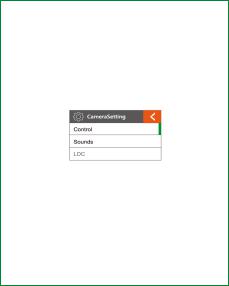
4.4GENERAL SETTING
Control
This allows user to set the microphone volume, Speaker volume, LCD Brightness.
Sounds
Turns sound of Shutter, Boot-up, Beep OFF or ON.
LDC
To correct the distortion of the wide-angle lens.
FOV
To set the lens wide angle, Super Wide, Wide, Medium, Narrow.

Power Frequency
Selecting the correct light frequency will avoid the possibility for strobing.
WIFI
Selecting to turn on or turn off the Wi-Fi function.
RF
Turn OFF or turn ON the remote control function.
Date & Time
This allows user to adjust the date &time.
Screen Saver
This will determine if the LCD will turn off after 1 min, 3 min, 5 min. Press any key to turn the screen on.
Select OFF to keep the screen always ON.
Auto Power OFF
The camera turns OFF when not in use after a specified time.
Quick Record
The camera records automatically once power on.
USB
MSDC
Use the USB cable to connect the camera to your computer, the camera will turn on automatically. Enter into storage mode and your camera is used as an external storage device. Alternatively, you can remove the MicroSD card and use a card reader (not included) to achieve the same result.
1. Select the file(s) you want to transfer to your computer by highlighting them.

2.Either drag the files to the desired place on your computer (this will make a copy of the file on your computer) OR right-click the file, select “Copy” and right-click in the desired place in your computer and select “Paste”.
Note: You can also transfer entire folders of pictures / videos to your computer.
UVCMJPG
The Camera can be used as a PC camera (webcam).
Reset WiFi Setting
To reset the Wi-Fi to factory default.
LANGUAGE
To select the device languages.
Format Card
This is to format the MicroSD card. Choosing to format the card will permanently erase all data on the card.
System
Factory Reset
To reset the camera to factory default settings.
System Info
To show the information of the system.
Card Info
To show the capacity and free space of the MicroSD card.
Note: You can easily access some settings such as Beep, Mic, Speaker, RF and Wi-Fi with touch operation by touching the upper arrow.
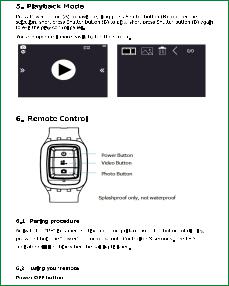
Radio frequency remote control: 2.400GHz - 2.4835 GHz; Transmission power: 1.6mW

Press the Power OFF button and hold on for 3 seconds to turn off the camera, the
LED indicator turns off accordingly.
Video Record
Press the video button once to start recording, the LED indicator flickers twice also,
press the Video button again to stop.
Taking a photo
Press the Photo button once to take a single picture, the LED indicator of the remote
flickers twice.
6.3Replace a new button battery
Like any battery, the one in the AC 560 TOUCH remote will eventually become empty. When it does, the red LED indicator flickers once per second. You need to replace with a new battery.
How to replace a button battery?
Step 1 |
|
Step 2 |
|
Step 3 |
1.Buy a button cell with model No. CR2032.
2.Screw the round cap at the bottom of remote, see above pictures for reference.
3.Remove the old battery.
4.Insert the new battery into the slot with the flat surface up.
7.Wi-Fi Setup
The AC 560 TOUCH allows full camera control, live previewing and playback of photos/videos on most Smart phones and Tablets.

a.Download the App “Rollei AC550/560 Touch” from “Google Play Store” or from the Apple “App Store”.
b.Activate Wi-Fi in the GENERAL SETUP MENU.
Note: You can easily access the Wi-Fi setting with touch operation by swiping up
c.Go to the Wi-Fi settings on your Phone, you will see “AC 560 TOUCH-XXXXXX” in the list of available Wireless networks. “XXXXX” is a placeholder for the individual number of the camera.
Note: You can change the Wi-Fi name in the menu setting.
d.Connect your Phone to the “AC 560 TOUCH-XXXXXX” via Wi-Fi. The default WiFi Password for the AC 560 TOUCH is: 1234567890.
Note: You can change the Wi-Fi password in the menu setting.
e.Open the app “Rollei AC550/560 Touch”
Important: Before connecting camera via Wi-Fi, you need to download the “Rollei AC550/560 Touch” App on your smart phone or tablet.
8.Saving and Viewing Options
Connecting to TV
You can display the camera LCD screen on a TV screen.
Note: You will need an extra Micro HDMI to HDMI cable, which is not included in the standard package.
Turn the camera on;
Connect Mini HDMI end to the port on camera and HDMI end to HDMI port on the TV;
Select the right source on the TV.
Cautions
Do not drop the camera.

Do not place heavy objects on the camera.
Keep the camera away from water and liquids (unless equipped with waterproof case). This may cause malfunction.
Recharge the battery via the USB cable.
The camera should not be in heat over 55°C.
Do not use the camera when it is low power.
Do not use the camera while it is in charging.
Do not attempt to open the case of the camera or modify it in any way. If the camera has been detached, the warranty will be void.
Disposal
Dispose of packaging: For disposal, separate packaging into different types. Cardboard and board must be disposed of as paper and foil must be recycled.
Disposal of Waste Electrical and Electronic Equipment and/or Battery by users in private households in the European Union.
This symbol on the product or on the packaging indicates that this cannot be disposed of as a household waste. You must dispose of your waste equipment and/or battery by handling it over to the applicable take-back
scheme for the recycling of electrical and electronic equipment and/or battery. For more information about recycling of this equipment and/or battery, please contact your city office, the shop where you purchased the equipment or your household waste disposal service. The recycling of materials will help to conserve natural resources and ensure that it is recycled in a manner that protects human health and environment.
Battery warning
Never dismantle, crush, or pierce the battery, or allow the battery to shortcircuit. Do not expose battery being placed in high temperature environment, if battery leaks or bulges, stop continue to use.
Always charge using the charger. Risk of explosion if battery is replaced by an incorrect type.
Keep the battery out of reach of children.
Batteries may explode if exposed to naked fire. Never dispose of batteries in a fire.
Disposed of used batteries observing local regulations.
Before disposing the device, please remove the battery.

The Rollei GmbH & Co. KG herewith declare, that the action camera "Rollei Actioncam 560 Touch" complies with the directive 2014/53/EU:
2011/65/EC RoHs Directive 2014/53/EU RED-Directive
The complete text of the EU Declaration of Conformity can be downloaded at the following Internet address: www.rollei.com/EGK/ac560Touch

1. Hauptfunktionen
Videoauflösung: 4K@60FPS, 4K@30FPS, 1440P@30FPS, 1080P@120FPS, 1080P@60FPS, 720P@240FPS, 720P@120FPS
Bildauflösung: 20MP
2'' TFT-Touchscreen
3.8V/1100mAh wechselbarer Lithium-Ionen-Akku
Unterstützt Wi-Fi-Verbindung
Unterstützt 2.4G RF Fernbedienung
Unterstützt MicroSD-Karten bis zu 64 GB Speicherkapazität
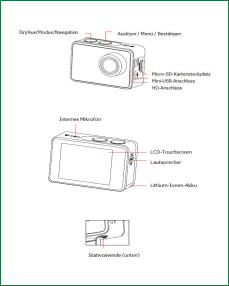
2. Kamerabeschreibung


3.2Speicherkarte einlegen
Stecken Sie eine MicroSD-Karte in den SD-Kartenslot.
HINWEIS:
1.Wir empfehlen die Verwendung von Micro-SD-Karten der Klasse 10 (oder höher) für eine reibungslose Aufnahme. Eine geringere Klasse von Micro-SD-Karten kann zu Unschärfen oder Bildausfällen führen.
2.Es gibt nur eine korrekte Ausrichtung, um die SD-Karte in den Steckplatz einzuführen. Drücken Sie die Karte nicht mit Gewalt in den Kartenschlitz, da dies sowohl die SD-Karte als auch die Kamera beschädigen kann.
3.Eine neue Micro SD Karte sollte vor dem Gebrauch formatiert werden.
3.3Akku laden
Vor der ersten Verwendung der AC 560 TOUCH sollten Sie den Akku vollständig aufladen.
1.Verbinden Sie die AC 560 TOUCH mit einem USB-Ladegerät oder USB-Gerät über ein Mini-USB-Kabel.
2.Die Ladeanzeige B leuchtet während des Ladevorgangs rot.
3.Ein komplett leerer Akku benötigt ca. 2,5 Stunden, um voll aufgeladen zu werden. Die rote Kontrolllampe erlischt, wenn der Akku vollständig geladen ist.
4.Wenn der Akku leer ist, blinkt die rote Anzeige B zweimal pro Sekunde.
5.Einige Funktionen, wie z. B. Wi-Fi, sind nicht verfügbar, wenn sich der Akku in einem niedrigeren Zustand befindet.
3.4Kamera in das wasserdichte Gehäuse einsetzen
1.Stellen Sie sicher, dass das Gehäuse trocken und sauber ist.
2.Setzen Sie die Kamera ein und stellen Sie sicher, dass das Objektiv ordnungsgemäß in der Objektivaussparung sitzt.
3.Schließen Sie die Sicherungsklemmen.
4.Das wasserdichte Gehäuse kann mit Hilfe des Zubehörs in der Box montiert werden.
3.5Ein Video aufnehmen
Drücken Sie den Auslöser (B) beim Einschalten, LED B leuchtet grün und blinkt zweimal pro Sekunde; drücken Sie den Auslöser (B) erneut, um anzuhalten und die LED B leuchtet dann nicht mehr.
3.6Ein einzelnes Bild aufnehmen
Drücken Sie den Auslöser (B) einmal, um ein einzelnes Bild aufzunehmen, LED B blinkt grün.
3.7Moduswechsel
1. Hauptmodusumschaltung (A)
Wenn das Gerät eingeschaltet ist drücken Sie kurz die Taste A, um zwischen Videoaufzeichnung - Fotoaufnahme - Wiedergabe - Einstellung zu wechseln, stoppen Sie bei der richtigen Anzeige, um den aktuellen Modus zu bestätigen.
Sie können dieses Menü ganz einfach durch Berühren des Pfeils nach links aufrufen.
2. Hauptmodusumschaltung (B)
Drücken Sie beim Einschalten die Taste B 3 Sekunden lang, um das Setup-Menü aufzurufen: Video - Foto - Effekt - Generell.
4. Einrichten der Kamera
Drücken Sie lange auf Taste B, um das Setup "Video - Foto - Effekt - Generell" aufzurufen, drücken Sie Taste A, um zu navigieren und drücken Sie Taste B, um zu bestätigen. Drücken Sie die Taste B erneut lange, um den Vorgang zu beenden.
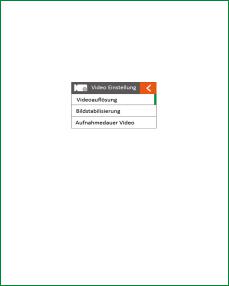
4.1Video-SETUP
Drücken Sie den Ein-/Ausschalter (A) einmal, um zu navigieren. Drücken Sie den Auslöser (B), um die Auswahl zu bestätigen.
Videoauflösung
Einstellen der Videoauflösung.
Bildstabilisierung
Aktivieren/Deaktivieren der digitalen Bildstabilisierung. Die Bildstabilisierung kann bei 4K@60FPS, 1080P@120FPS, 720P@240FPS, 720P@120FPS nicht aktiviert werden.
Aufnahmedauer Video
Diese ermöglicht die kontinuierliche Aufnahme von Filmmaterial in Intervallen von 1/3/3/5 Minuten. Die Kamera löscht die älteste Loop-Aufnahmedatei und ersetzt sie durch die neueste Aufnahme, wenn die MicroSD-Karte voll ist.
Zeitrafferintervall
Dies ermöglicht die Aufnahme eines Bildes im eingestellten Zeitintervall von Aus/0,5 Sek/1 Sek/3 Sek/5 Sek/10 Sek/30 Sek/60 Sek. Die endgültige Videodatei wird gespeichert.
Zeitrafferdauer
Zur Bestimmung der Video-Zeitrafferdauer von Unbegrenzt/5 Min/ 10 Min/ 15 Min/ 20 Min/ 30 Min/ 60 Min ist nur verfügbar, wenn Zeitraffer-Foto-Intervall aktiviert ist.
Superzeitlupe
Dies ermöglicht es, die Aktion schneller als üblich aufzuzeichnen oder langsamer als üblich wiederzugeben. Diese Funktion ist nur bei 1280x 720p@120fps verfügbar.
Zeitrafferfilm
Dies erlaubt es, die Aktion langsamer als üblich aufzuzeichnen oder mit einer schnelleren Geschwindigkeit als üblich wiederzugeben. Diese Funktion ist nicht verfügbar, wenn Zeitraffer aktiviert ist.
Windgeräusch-Red.
Zur Reduzierung der Windgeräusche während der Videoaufzeichnung.
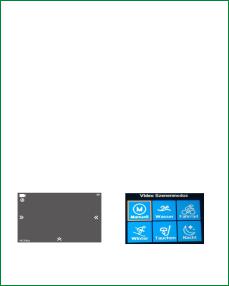
Motivprogramm
Zum Einstellen verschiedener Szenenmodi: Manuell, Wasser, Reiten, Winter, Tauchen, Nacht.
Sie können in diesen Modus durch Berühren des rechten Pfeils leicht gelangen.
Datumstempel
So legen Sie fest, ob das Datum/Uhrzeit-Zeichen oben auf den Videos angezeigt wird.
Auto Low Light
Zur Verwendung bei Aufnahmen bei schlechten Lichtverhältnissen.
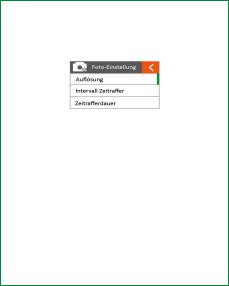
4.2Foto Einstellung
Drücken Sie den Ein-/Ausschalter (A) einmal, um zu navigieren. Drücken Sie den Auslöser (B), um die Auswahl zu bestätigen.
Auflösung
Die Bildauflösung einzustellen.
Intervall Zeitraffer
So können Sie eine fortlaufende Sequenz von Fotos mit folgenden Intervallen aufnehmen: Aus/0,5 Sek/1 Sek/3 Sek/5 Sek/10 Sek/30 Sek/60 Sek.
Zeitrafferdauer
Zur Bestimmung der Zeitrafferdauer von Unbegrenzt/5 Min/ 10 Min/ 15 Min/ 20 Min/ 30 Min/ 60 Min (nur bei aktiviertem Zeitraffer-Foto-Intervall möglich).
Serienbildaufnahme
Damit können Sie 3 Aufnahmen/1s, 7 Aufnahmen/2s, 15 Aufnahmen/4s, 30 Aufnahmen/8s machen.
Selbstauslöser
Ist dieser Modus aktiviert, dann können Sie Intervalle von 3 Sekunden, 5 Sekunden und 10 Sekunden einstellen, wenn ein einzelnes Foto aufgenommen wird, nachdem Sie auf die Schaltfläche Aufnehmen geklickt haben.
Datumstempel
Um festzulegen, ob das Datum/Uhrzeit-Zeichen oben auf den Fotos angezeigt wird.
Motivprogramm
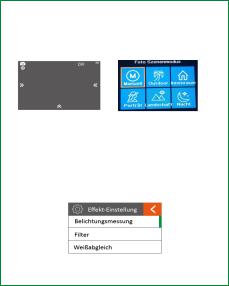
Zum Einstellen verschiedener Szenenmodi: Manuell, Draußen, Innen, Portrait, Landschaft, Nacht.
Sie können diese Modi ganz einfach durch Berühren des rechten Pfeils aufrufen.
Bildqualität
Zur Einstellung der Bildqualität.
Langzeitbelichtung
Lange Verschlusszeit, um ein Motiv bei weniger Licht scharf aufnehmen zu können.
4.3Effekt-Einstellung
Drücken Sie den Ein-/Ausschalter (A) einmal, um zu navigieren. Drücken Sie den Auslöser (B), um die Auswahl zu bestätigen.
Belichtungsmessung
Um festzulegen, welche Bildbereiche zur Berechnung der richtigen Belichtung verwendet werden.
Filter
Um natürliches Licht zu filtern, um Bildeffekte zu verändern.
Weißabgleich
Die werkseitige Voreinstellung ist Auto. Wenn Sie Auto AUS schalten, stellen Sie bitte den Weißabgleich ein, wenn sich die Lichtverhältnisse ändern.
EV
Dies erlaubt dem Benutzer, den Belichtungswert festzulegen.
ISO
Dies ist die Messung der Lichtempfindlichkeit des Sensors.
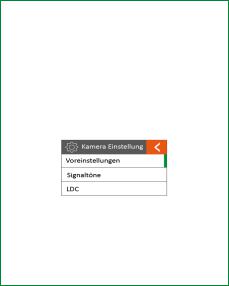
4.4ALLGEMEINE EINSTELLUNG
Voreinstellungen
Hier können Sie die Mikrofonlautstärke, die Lautsprecherlautstärke und die LCDHelligkeit einstellen.
Töne
Schaltet den Ton des Auslösers, des Bootvorgangs, des Pieptons AUS oder EIN.
 Loading...