


Rollei dsx410
Gebrauchsanleitung
Instruction Manual

Contents
Read First . . . . . . . . . . . . . . . . . . . . . . . . . . . . . . . . . . . . . . . . . . . . . . . . . .6
Unpack the Camera . . . . . . . . . . . . . . . . . . . . . . . . . . . . . . . . . . . . . . . .10
Quick Start . . . . . . . . . . . . . . . . . . . . . . . . . . . . . . . . . . . . . . . . . . . . . . .11
Chapter 1 : Getting Started . . . . . . . . . . . . . . . . . . . . . . . . . . . . . . . . .13
Camera Parts . . . . . . . . . . . . . . . . . . . . . . . . . . . . . . . . . . . . . . . . . . . . .13 Set Up . . . . . . . . . . . . . . . . . . . . . . . . . . . . . . . . . . . . . . . . . . . . . . . . . . .16 Attaching the Wrist Strap . . . . . . . . . . . . . . . . . . . . . . . . . . . . . . . . .16 Inserting the Batteries & the Memory Card . . . . . . . . . . . . . . . . . . . .17 Using the AC Adaptor . . . . . . . . . . . . . . . . . . . . . . . . . . . . . . . . . . . .18 Turning on Power . . . . . . . . . . . . . . . . . . . . . . . . . . . . . . . . . . . . . . .19 Selecting the Language . . . . . . . . . . . . . . . . . . . . . . . . . . . . . . . . . . .20 Setting the Date and Time . . . . . . . . . . . . . . . . . . . . . . . . . . . . . . . . .21
Chapter 2 : Taking Pictures & Recording Video Clips . . . . . . . . . .22
Using the LCD Display . . . . . . . . . . . . . . . . . . . . . . . . . . . . . . . . . . . . .22
Changing the Contents on the LCD Monitor . . . . . . . . . . . . . . . . . . .23
Using Zoom . . . . . . . . . . . . . . . . . . . . . . . . . . . . . . . . . . . . . . . . . . . . . .24
Optical Zoom . . . . . . . . . . . . . . . . . . . . . . . . . . . . . . . . . . . . . . . . . .24
Digital Zoom . . . . . . . . . . . . . . . . . . . . . . . . . . . . . . . . . . . . . . . . . . .24
Taking Still Pictures . . . . . . . . . . . . . . . . . . . . . . . . . . . . . . . . . . . . . . . .25
Using Auto Focus . . . . . . . . . . . . . . . . . . . . . . . . . . . . . . . . . . . . . . .26
Using Focus Lock . . . . . . . . . . . . . . . . . . . . . . . . . . . . . . . . . . . . . . . .26
Using Still Mode . . . . . . . . . . . . . . . . . . . . . . . . . . . . . . . . . . . . . . . .27
Taking a Series of Pictures . . . . . . . . . . . . . . . . . . . . . . . . . . . . . . . . .28
Using Macro Mode . . . . . . . . . . . . . . . . . . . . . . . . . . . . . . . . . . . . . .29
Setting Exposure Compensation . . . . . . . . . . . . . . . . . . . . . . . . . . . .30
Using Quick View . . . . . . . . . . . . . . . . . . . . . . . . . . . . . . . . . . . . . . .31
Using Self-timer . . . . . . . . . . . . . . . . . . . . . . . . . . . . . . . . . . . . . . . . .32
Using Built-in Flash . . . . . . . . . . . . . . . . . . . . . . . . . . . . . . . . . . . . . .33
3

Contents
Recording Video Clips . . . . . . . . . . . . . . . . . . . . . . . . . . . . . . . . . . . . . .34
Using the Capture Menu . . . . . . . . . . . . . . . . . . . . . . . . . . . . . . . . . . . .35
Setting Image Size . . . . . . . . . . . . . . . . . . . . . . . . . . . . . . . . . . . . . . .36
Setting Image Quality . . . . . . . . . . . . . . . . . . . . . . . . . . . . . . . . . . . .37
Setting White Balance . . . . . . . . . . . . . . . . . . . . . . . . . . . . . . . . . . . .38
Setting Sensitivity . . . . . . . . . . . . . . . . . . . . . . . . . . . . . . . . . . . . . . .39
Setting Exposure Area . . . . . . . . . . . . . . . . . . . . . . . . . . . . . . . . . . .40
Setting Auto Focus Area . . . . . . . . . . . . . . . . . . . . . . . . . . . . . . . . . .41
Setting Sharpness . . . . . . . . . . . . . . . . . . . . . . . . . . . . . . . . . . . . . . .42
Adjusting Saturation . . . . . . . . . . . . . . . . . . . . . . . . . . . . . . . . . . . . .43
Setting Style . . . . . . . . . . . . . . . . . . . . . . . . . . . . . . . . . . . . . . . . . . .44
Chapter 3: Reviewing Images and Video Clips . . . . . . . . . . . . . . .45
Using the LCD Display . . . . . . . . . . . . . . . . . . . . . . . . . . . . . . . . . . . . . .45 Using Playback . . . . . . . . . . . . . . . . . . . . . . . . . . . . . . . . . . . . . . . . . . . .46 Using Index Display . . . . . . . . . . . . . . . . . . . . . . . . . . . . . . . . . . . . . .47 Activating Digital Enlargement . . . . . . . . . . . . . . . . . . . . . . . . . . . . .48 Using the Playback Menu . . . . . . . . . . . . . . . . . . . . . . . . . . . . . . . . . . .49 Deleting All Pictures . . . . . . . . . . . . . . . . . . . . . . . . . . . . . . . . . . . . .50 Displaying a Slide Show . . . . . . . . . . . . . . . . . . . . . . . . . . . . . . . . . . .51 Recording Audio Clips for Still Images . . . . . . . . . . . . . . . . . . . . . . . .52 Setting DPOF . . . . . . . . . . . . . . . . . . . . . . . . . . . . . . . . . . . . . . . . . . .53 Folder . . . . . . . . . . . . . . . . . . . . . . . . . . . . . . . . . . . . . . . . . . . . . . . .55 Protecting Pictures and Video Clips . . . . . . . . . . . . . . . . . . . . . . . . . .56 Copying the Images & Video Clips . . . . . . . . . . . . . . . . . . . . . . . . . . .57 Moving the Images & Video Clips . . . . . . . . . . . . . . . . . . . . . . . . . . .58
Chapter 4: Installing the Software . . . . . . . . . . . . . . . . . . . . . . . . . .59
Windows System Requirements . . . . . . . . . . . . . . . . . . . . . . . . . . . . . .59
Mac OS Requirements . . . . . . . . . . . . . . . . . . . . . . . . . . . . . . . . . . . . . .59
Installing the Software . . . . . . . . . . . . . . . . . . . . . . . . . . . . . . . . . . . . .60
Installing the Driver . . . . . . . . . . . . . . . . . . . . . . . . . . . . . . . . . . . . . .60
Installing the Application (Windows) . . . . . . . . . . . . . . . . . . . . . . . . .62
4

Installing the Application (Macintosh) . . . . . . . . . . . . . . . . . . . . . . . |
.64 |
Using the Application . . . . . . . . . . . . . . . . . . . . . . . . . . . . . . . . . . . . . . |
68 |
Digital Image . . . . . . . . . . . . . . . . . . . . . . . . . . . . . . . . . . . . . . . . . . . |
68 |
PhotoImpression . . . . . . . . . . . . . . . . . . . . . . . . . . . . . . . . . . . . . . . . |
69 |
VideoImpression . . . . . . . . . . . . . . . . . . . . . . . . . . . . . . . . . . . . . . . . |
70 |
Chapter 5: Uploading, Printing, and Displaying Images . . . . . . . |
72 |
Uploading to a Computer . . . . . . . . . . . . . . . . . . . . . . . . . . . . . . . . . . . |
72 |
Printing Images . . . . . . . . . . . . . . . . . . . . . . . . . . . . . . . . . . . . . . . . . . . |
73 |
Displaying images on a TV . . . . . . . . . . . . . . . . . . . . . . . . . . . . . . . . . . |
74 |
Chapter 6: Adjusting the Camera Settings . . . . . . . . . . . . . . . . . . . |
75 |
Using the Set Up Menu . . . . . . . . . . . . . . . . . . . . . . . . . . . . . . . . . . . . . |
75 |
Formatting the Memory Card . . . . . . . . . . . . . . . . . . . . . . . . . . . . . . |
76 |
Formatting the Built-in Memory . . . . . . . . . . . . . . . . . . . . . . . . . . . . . |
76 |
Setting Power Saving Function . . . . . . . . . . . . . . . . . . . . . . . . . . . . . |
77 |
Setting Camera Sound . . . . . . . . . . . . . . . . . . . . . . . . . . . . . . . . . . . |
78 |
Setting TV System . . . . . . . . . . . . . . . . . . . . . . . . . . . . . . . . . . . . . . . |
79 |
Setting LCD Brightness . . . . . . . . . . . . . . . . . . . . . . . . . . . . . . . . . . . |
80 |
Customizing Your Start-up Screen . . . . . . . . . . . . . . . . . . . . . . . . . . . |
81 |
Setting the Start-up Sound . . . . . . . . . . . . . . . . . . . . . . . . . . . . . . . . |
82 |
Resetting Your Camera . . . . . . . . . . . . . . . . . . . . . . . . . . . . . . . . . . . |
83 |
Trouble Shooting . . . . . . . . . . . . . . . . . . . . . . . . . . . . . . . . . . . . . . . . . . |
84 |
Specifications . . . . . . . . . . . . . . . . . . . . . . . . . . . . . . . . . . . . . . . . . . . . . |
86 |
5

Read First
Before using the camera, please make sure that you read and understand all the following safety precautions. Always ensure that the camera is operated correctly. The safety precautions will instruct you in the safe and correct operation of the camera and its accessories, preventing injuries or damage to yourself, other persons and equipment.
In the following pages, the term "equipment" refers mainly to the camera and its power supply accessories.
 WARNINGS
To prevent possible injury, please observe the following warnings when using this product.
•Do not aim the viewfinder at the sun or other intense light.
Aiming at the sun through the viewfinder could injure your eyesight.
•Do not use the flash too close to eyes
Using the flash too close to your subject’s eyes can injure the eyesight. Especially, remain at least one meter (39 inches) away from infants when you use the flash.
• Do not place camera strap around neck
The strap could result in suffocation when accidentally wound around neck.
• Do not open or disassemble
Disassembling the equipment may cause high-voltage electrical shock. Interior inspections, modifications and repairs should be conducted by qualified service staff. Please take the product to an authorized service center for inspection.
6

• Turn off immediately when malfunction
If you notice unusual smell or smoke coming from the equipment, please unplug the AC adaptor and remove the battery immediately. Proceed swiftly with caution to avoid burns. Take the equipment to an authorized service center for inspection.
• Unplug the adaptor when the camera is not in use
If you use the adaptor as the power source, unplug the adaptor when the camera is not in use to prevent fire and other dangers. Continuous use over a long time may lead to overheating, deformation and fire.
Battery
Observe the following instruction when handling battery used in this product. Improper use of battery may lead to leakage or explosion.
•Recharge only Li-ion rechargeable batteries. We suggest you use batteries that meet the requirements of UL.
•Check battery polarity before inserting. Do not attempt to insert the battery upside down or backward.
•Do not disassemble or short circuit the battery.
•Do not expose battery to fire or excessive heat.
•Do not immerse or contact with water or other liquids.
•Stop using the battery immediately if noticing any deformation or changes in color.
•Do not put the batteries along with metal objects such as coins, keys or hairpins in your pocket.
•Keep battery out of the reach of children. Seek medical attention right away if a child swallows a battery.
7

Read First
 CAUTIONS
Observe and exercise the following cautions to avoid damage and keeping your camera in an optimum working status.
• Keep Dry
This camera is not waterproof, and may malfunction when immersed in water, or any liquids to enter the interior of the camera
• Away from Moisture, Salt or Dust
Wipe off salt or dust with a slightly dampened soft cloth after using your camera at the beach or seaside, then, dry your camera thoroughly.
• Away from Strong Magnetic Fields
Never put the camera too close to any equipment producing strong electromagnetic fields, such as electric motor. Strong electromagnetic fields could lead to camera malfunctions or interfere the data recording.
• Avoid Intense Heat
Do not use or store the equipment under sunlight or high temperatures. Such exposure could lead to the leakage of the batteries or deformation of the casing.
•Avoid rapid temperature change
Rapidly moving the equipment between hot and cold temperatures may form water droplets on its exterior and interior. To prevent the condensation, place the equipment in its carry case or a plastic bag before exposing it to a rapid temperature change.
•Do not drop
Strong shock or vibration of dropping could cause malfunction. Keep the strap around your wrist when carrying the camera.
8

• Do not unplug or remove the battery when processing data
When images data are being recorded or deleted from memory cards, cutting off power could result in data loss or damage the internal circuitry or memory.
• Carefully handle the lens and all moving parts
Be careful not to apply too much force to the lens, memory card, battery or the jack cover. These parts are not designed to take extra force than regular use.
• Battery
In low temperature circumstances, the battery’s capacity may decrease significantly due to the inactive chemical reaction. When taking pictures in cold weather, keep a warm backup battery on hand.
Should the battery terminals become dirty, wipe them with a dry, clean cloth or use an eraser to remove the stain.
• Memory cards
Turn off the power before inserting or removing the memory card. Otherwise, the memory card could become unstable.
Memory cards may getting hot during use, remove memory card from the camera with care.
Digital Camera dsx410
Tested To Comply With FCC Standards
FOR HOME OR OFFICE USE
This mark on your camera certifies that this camera meets the requirements of the EU (European Union) concerning interference causing equipment regulations. CE stands for Conformité Européenne (European Conformity).
This device complies with Part 15 of the FCC Rules. Operation is subject to the following two conditions: (1) This device may not cause harmful interference, and (2) this device must accept any interference recieved, including interference that may cause undesired operation.
This Class B digital apparatus complies with Canadian ICES-003.
Do not remove the ferrite cores form the cables.
9

Unpack the Camera
Digital camera x 1 Li-ion battery x 1 Camera case x 1 Camera wrist strap x 1 Video cable x 1
USB cable x 1
Driver software CD-ROM x 2 User guide x 1
Warranty card x 1
10
Quick Start
1 Insert a Li-ion battery. See page 17.
2 |
Insert a SD card. See page 17. |
|
3 |
Turn on the camera. See page 19. |
|
|
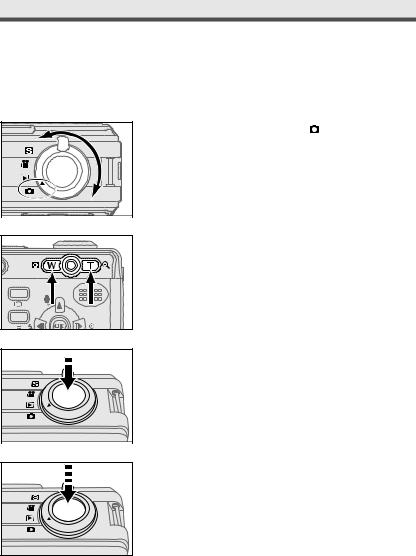
Rotate the mode dial to |
and frame your |
4 subjects with the viewfinder or the LCD |
||
|
monitor. |
|
11
Quick Start
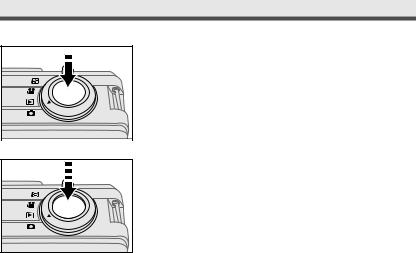
5 Slightly press the shutter release button halfway down and hold it to set the focus and exposure.
6 Press the shutter release button all the way down to take the picture.
12
Chapter 1
Getting Started
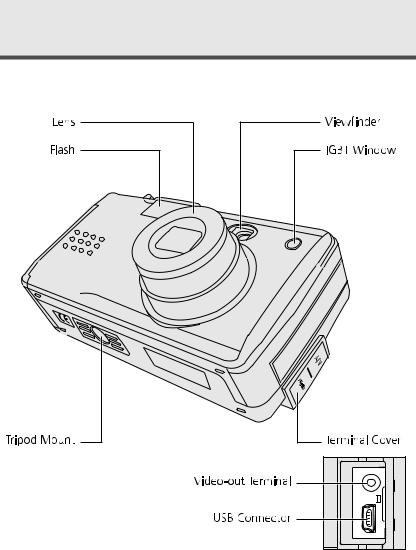
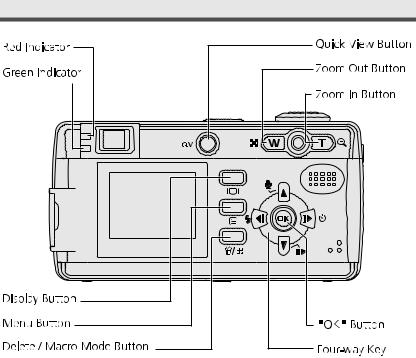
Camera Parts
13

Chapter 1: Getting Started
Set Up Mode

 Movie Mode
Playback Mode
 Still Mode
14
Camera Parts
Green Indicator |
Red Indicator |
Status |
|
On |
------ |
The camera works normally |
|
|
|
The camera is busy (flash |
|
Blinking |
------ |
charging, process recording, |
|
loading) and cannot be |
|||
|
|
||
|
|
operated. |
|
|
|
|
|
------ |
Blinking |
Warnings and errors such as |
|
failure in operation. |
|||
|
|
||
On |
On |
AE, AF success |
15
Chapter 1: Getting Started
.Set Up
Attaching the Wrist Strap
1 Insert the small loop of the wrist strap into the strap mount, and then insert the long loop of the wrist strap into the small loop of the strap.
2 Tighten the wrist strap to the strap mount.
16
. Set Up
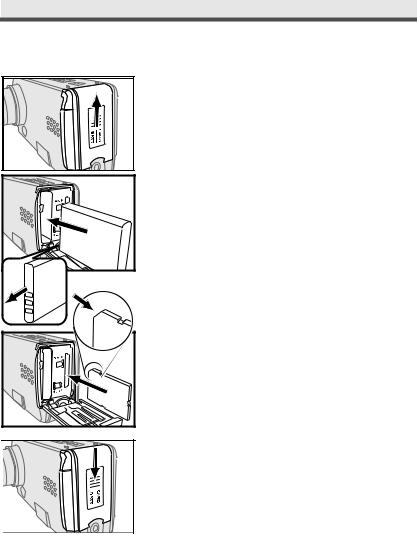
Inserting the Battery & the Memory Card
1
2
3
Put the camera upside down with the front
of the camera facing you.
Open the battery / memory card door by
pushing it upwards.
Install a Li-ion battery.
4 |
5 |
Inserting a SD card and make sure it is in
place.
Close the battery/ memory card door by
pushing it downwards.
Note 1: To save the battery power, use the viewfinder, instead of the LCD monitor to take the picture. Besides, you can also activate the power saving function. See page 77.
Note 2: Be sure to close the battery/ memory card door firmly, or you can't turn on the camera.
17
.Chapter 1: Getting Started
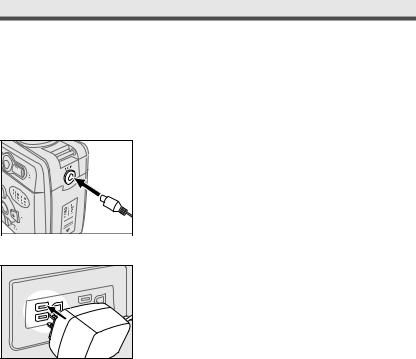
Using the AC Adaptor
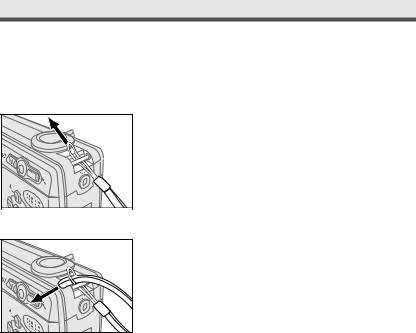
When reviewing pictures or operating the camera indoors, you can use the AC adaptor as the power source to save the battery power.
1 |
Connect the AC adaptor connector to the AC adaptor terminal of the camera.
2 Connect the other end of the AC adaptor to the electrical outlet.
18

. Set Up
Turning on Power
Press the power button on the top of the camera to turn the camera on.
Note: To turn off the camera, press the power button again.
19
.Chapter 1: Getting Started
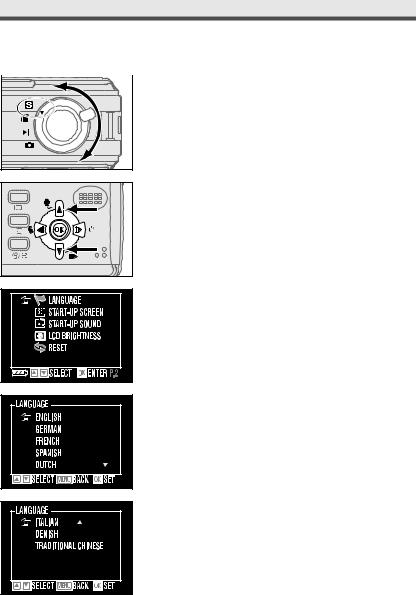
Selecting the Language
1 |
Rotate the mode dial to  "Set up".
2 Scroll through the menu by using 
 on the four-way key and move to "Language". Enter the submenu by pressing"OK".
3 |
20 |
Select the language you need and then press "OK" to confirm the setting.
. Set Up
Setting the Date and Time
Set the date and time so that they appear correctly when you’re reviewing the images with your camera.
1 |
Rotate the mode dial to  "Set up".
2 Scroll through the menu by using  on the four-way key and move to "Date/Time". Enter the submenu by pressing "OK".
|
|
|
Move to the item you want to adjust by |
||
|
|
|
3 using |
on the four-way key, and adjust |
|
|
|
|
the value of the item by pressing |
on |
|
|
|
|
the four-way key. |
|
|
|
|
|
|
|
|
4 Press "OK" to confirm the setting.
Note: Date and time do not appear when you print your pictures.
21
Chapter 2
Taking Pictures and Recording Video Clips
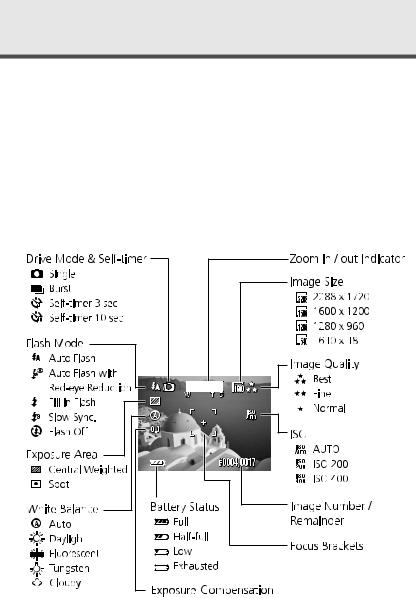
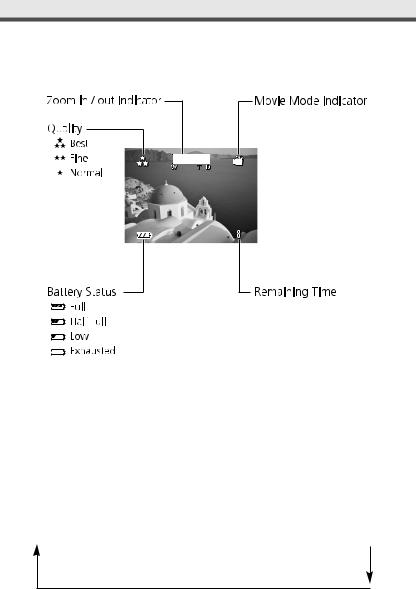
Using the LCD Display
When you turn the camera on, the LCD monitor turns on automatically. With the LCD monitor, you can frame images that you want to take or record as video clips. You can also view the menus of each mode. The following figure gives you the information of the icons appearing on the LCD monitor.
Note: You may not see the LCD display clearly when using the LCD monitor
. under intense light, such as sunlight. You can adjust the LCD brightness to improve the situation. See page 80.
Still Mode
22
. Using the LCD Display
Movie Mode
. Changing the Contents on the LCD Monitor
Press  button in
  , or
, or 
 mode to change the status of the indicators on the LCD monitor in the following order:
Indicators On  Indicators Off
  LCD Monitor Off
23
Chapter 2: Taking Pictures and Recording Video Clips
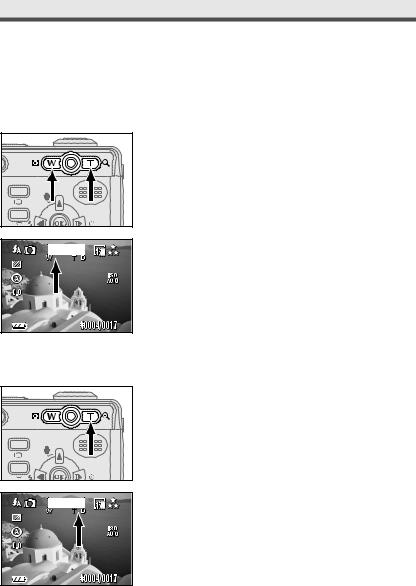
Using Zoom
.This camera provides you with 3x optical zoom and 2x digital zoom.
Optical Zoom
1 |
Press "W/T" buttons to zoom out and zoom in.
2
. Digital Zoom
You can see the icon of "W/T" on the LCD monitor.
1 |
2
Press "Tele" button to it's maximum (3x).
Press "Tele" button again to activate digital zoom function.
24
Taking Still Pictures
.Taking Still Pictures
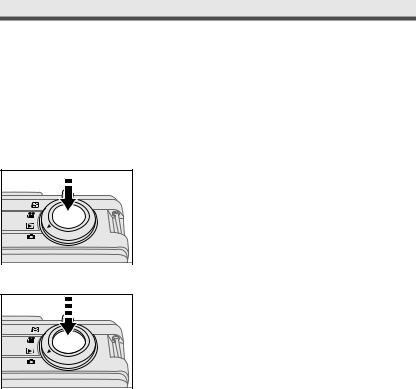
Using Auto Focus
Press the shutter release button halfway down to set the focus and exposure. The camera will automatically focus on the subject in the center of the frame.
1 Frame your subject with the viewfinder or the LCD monitor. Slightly press the shutter release button halfway down and hold it to set the focus and exposure.
2 Press the shutter release button all the way down to take the picture.
Note: If the focus lock fails, Red and Green Indicator beside the viewfinder will be blinking.
25
.Chapter 2: Taking Pictures and Recording Video Clips
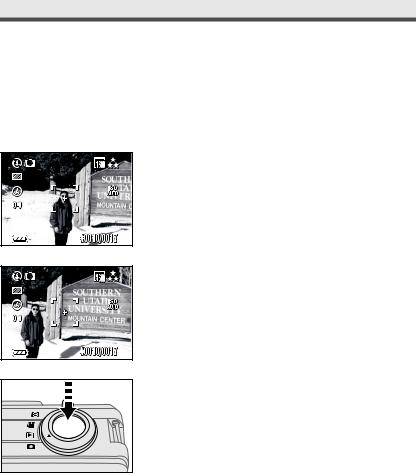
Using Focus Lock
If your subject is not in the center of the frame, the picture may be out of focus when you press the shutter release button halfway down. Focus lock allows you to focus on an off-center subject.
1 Frame your subjects in the center of the frame with the viewfinder or the LCD monitor. Slightly press the shutter release button halfway down and hold it to set the focus and exposure.
2 Keep pressing the shutter release button halfway down and recompose your picture.
3 Press the shutter release button all the way down to take the picture.
26
. Taking Still Pictures
Using Still Mode
Still mode allows you to take still pictures.
1 Rotate the mode dial to |
"Still Mode". |
2 Frame your subjects with the viewfinder or the LCD monitor by moving the camera or using W/T buttons.
3 Slightly press the shutter release button halfway down and hold it to set the focus and exposure.
4 Press the shutter release button all the way down and take the picture.
27
 Loading...