


170° Ultrawide angle
WiFi
Synchro
Shot Function
HD output interfaces
Dynamic HD recording
digital zooming
Low-lux shooting
Glass-lens
Waterproof housing and lens-protected design
Camera with installation interfaces housing-free light and convenient
Laser indicator
Cyclic recording
Remote controller with back clips and binding interfaces
Built-in dual-microphone recording and external microphones
Ultralow and high-temperature environments

Contents
Precautions ....................................................................................................................................... |
2 |
Preface.............................................................................................................................................. |
2 |
Warranty........................................................................................................................................... |
2 |
Overview........................................................................................................................................... |
2 |
Features ............................................................................................................................................ |
3 |
Structure........................................................................................................................................... |
4 |
Use and Installation.......................................................................................................................... |
4 |
Preparations ..................................................................................................................................... |
5 |
Parameter Settings ........................................................................................................................... |
7 |
Operations...................................................................................................................................... |
10 |
Storage and Play of a File............................................................................................................... |
16 |
Package List .................................................................................................................................... |
16 |
Technical Specifications.................................................................................................................. |
17 |
Precautions for the Waterproof housing ....................................................................................... |
18 |
Precautions for the 3M Dual-side Sponge Rubber ......................................................................... |
18 |
Notice ............................................................................................................................................. |
18 |
License Statement .......................................................................................................................... |
19 |
EN DE ES
PT
IT
EL
FR NL PL CZ RU HU SV FI NO
DA
EN DE ES
PT
IT
EL FR NL PL CZ RU
HU
SV
FI
NO DA
Precautions
When using the Rollei 5S WiFi video camera, adhere to the following precautions:
1.Do not drop, knock or shake the video camera.
2.Do not put the video camera close to an object that generates strong magnetic field, such as a magnet or a motor. Do not put the video camera close to an object that emits powerful radio waves, for example, an antenna. Strong magnetic field may cause faults on the video camera or damage the image / voice data.
3.Do not expose the video camera to high temperature or direct sunshine.
4.Do not put the memory card close to an object that generates strong magnetic field, such as a television set, a speaker, or a magnet. Do not put the memory card in a place where static electricity is easily generated.
5.Stop recharging the battery immediately when over heat, smoke, or peculiar smell occurs during recharging.
6.Keep the video camera out of reach of children during recharging, because the power cable may cause asphyxia or electrical shock on children.
7.Store the video camera in a cool, dry, and dust-free place.
Preface
Thank you for purchasing Rollei 5S WiFi series compact high-definition (HD) digital video camera, which has the following characteristics: Ultra small size and integrated structure / User-friendly interfaces / Easy operations / Hand-free shooting to facilitate shooting of real scenarios at any time and place / Superior recording performance thanks to dynamic HD shooting technologies, providing you with exciting video shooting experience
This manual describes how to install and use the Rollei 5S WiFi video camera. It also provides information about use, operations, installation precautions, and technical specifications of the Rollei 5S WiFi video camera. Before using the Rollei 5S WiFi video camera, read and understand this manual carefully and keep it properly for future use. Designed to meet the professional requirements, the Rollei 5S WiFi video camera will serve you in a long term.
Warranty
This product has been certified by certification bodies for compliance with related safety regulations and specifications issued by the federal communications commission (FCC) and council of Europe (CE).
Overview
The Rollei 5S WiFi video camera is a compact high-end HD digital camera intended for professional applications. It provides the following functions: Performs industry-leading HD digital shooting / Stores voice data / Displays images in real time / Performs video recording / Takes pictures / Displays time / Provides laser indication / Performs wireless remote control / Performs 10X digital zooming / Connects to an external special-purpose microphone / Performs USB 2.0 high-speed data transmission / Recharges the battery in USB mode / Accessories are available to facilitate shooting at any time and place. Multiple patents of invention and technology are integrated in the Rollei 5S WiFi video camera.
Dispose of properly. Recycle it for a greener earth!
-2-

Features
The Rollei 5S WiFi video camera has the following features:
●Provides 170° ultra-wide-angel f/2.8 lens.
●Provides a special-purpose HD lens, which supports 1080P, 1080i, 960P, 720P and 480P video recording.
●Takes 8M pixels pictures in 3200x2400 resolution .
●Performs 10X digital zooming.
●Performs shooting in multiple modes, such as single-key capturing.
●Provides unique fast-shot feature, up to 10 photos per second.
●Synchro Shot function: take one picture during the recording process.
●Provides an independent voice recording function for long-time voice recording.
●Provides a built-in G-sensor for starting recording automatically when the speed changes.
●Provides the remote control function.
●Connects to an external TFT screen to view the video recording and playback.
●Provides better video effects in multiple video output modes (NTSC system):
− 1080P (1920x1080P) 30 frames / second |
− |
1080i (1920x1080i) 60 frames / second |
||
− |
960P |
(1280x960P) 30 frames / second |
|
|
− |
720P |
(1280x720P) 30 frames / second |
− |
720P (1280x720P) 60 frames / second |
− |
480P |
(848x480P) 60 frames / second |
− |
480P (848x480P) 120 frames / second |
●Detects power level of the battery and free capacity of the memory card.
●Supports external T-flash (TF) cards for storage, up to 32 GB capacity.
●Performs dynamic high-speed video recording, with light and shade environment transient response.
●Detects light in three modes to meet exposure requirements in different scenarios.
●Provides night shooting mode with contrast and ISO enhancements, improving the clearness and sharpness of night scenarios.
●Laser indicating and turn off automatically after 20 seconds.
●Provides HDMI and AV output interfaces for easy connecting to HD monitor or TV set to view record files.
●Records video programs in MOV format to facilitate playback on a PC and uploading to video-sharing websites.
●Provide high color fidelity to present more clear and natural video pictures.
●A wireless remote controller can remotely control the Rollei 5S WiFi video camera for video recording, stopping and shooting. Provides a unique code paring function to avoid interferences from other remote controllers.
●Supports playback, deleting files and other operations on the local video camera.
●Supports 1/4X,1/2X,2X,4X,8X,and16X fast forwarding, fast rewinding, and playback.
●Supports RTC time settings and time overlapping.
●Supports USB 2.0.
●Provides a built-in microphone for high-quality recording.
●Supports connecting to an external microphone (special-purpose microphone only).
●Provides a 1/4-inch general-purpose interface to facilitate extension of accessories.
●Provides multiple types of sport accessories for sport recording.
●Provides shockproof features to withstand mild drop or knock.
●Provides an IP68 waterproof housing, withstanding a diving depth of 60 meters, and two-types of rear-cover designs.
●Provides automatic standby for power saving, and supports automatic saving of audio and video data.
EN DE ES
PT
IT
EL FR NL PL CZ RU
HU
SV
FI
NO DA
-3-
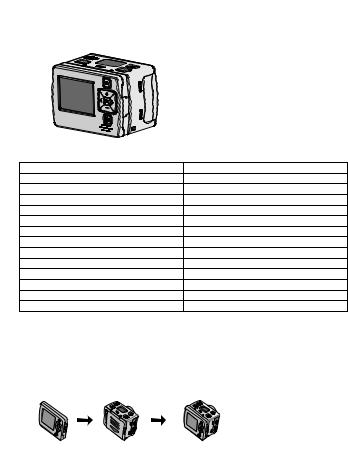
Structure
EN |
|
|
|
|
DE |
|
|
|
|
ES |
|
|
|
|
PT |
|
|
|
|
IT |
|
|
|
|
EL |
|
|
|
|
FR |
|
|
|
|
NL |
|
|
|
|
PL |
|
|
|
|
CZ |
|
|
|
|
RU |
|
|
|
|
HU |
|
|
|
|
SV |
1. TFT screen |
2. Menu key |
||
FI |
||||
NO |
3. Upward key |
4. Leftward key |
||
DA |
5. Downward key |
6. Playback key |
||
|
7. OK key |
8. TFT screen lock knob |
||
|
9. Wrist strap hole |
10. |
Buzzer |
|
|
11. |
SD card slot |
12. |
Rightward key |
|
13. |
AV out/Audio in |
14. |
Record key |
|
15. |
Video/Audio indicator (Green) |
16. |
Power switch |
|
17. |
Microphone |
18. Operating/Recharging indicator (Red) |
|
|
19. |
LCD segment screen |
20. |
Shutter key |
|
21. |
Stop key |
22. |
Lens |
|
23. |
Video/Photo indicator (Green) |
24. |
Laser indicator |
|
25. |
HDMI output |
26. |
USB output interface |
|
27. |
Threaded interface |
|
|
Use and Installation
1.Installing the Rollei 5S WiFi Video camera
The Rollei 5S WiFi video camera can be hand-held or used with hand-free accessories. It can be installed at your desired place or after being equipped with a waterproof housing, placed in water for shooting underwater sceneries.
How to install the Rollei 5S WiFi video camera |
||
(1). Assemble the TFT screen onto the video camera |
||
TFT screen |
video camera |
Assemble the TFT screen onto the video camera |
-4-
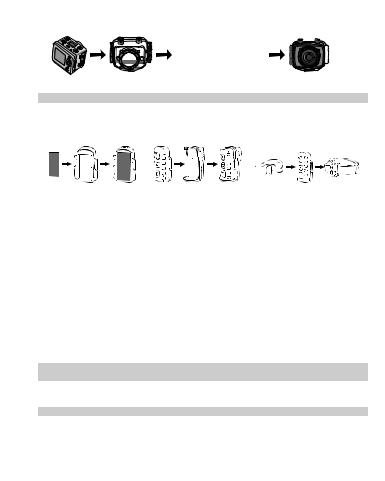
(2). Put the Rollei 5S WiFi video camera into the waterproof housing |
||
video camera |
Waterproof |
Put the video camera into |
|
housing |
the waterproof housing |
** To remove the TFT screen, press the PUSH snap button and then remove it.** |
||
2.Installing the Remote Controller
The Rollei 5S WiFi video camera is equipped with an independent remote controller, which can
be placed at different positions, depending on the accessories.
(1). Velcro (2). Back clip (3). Binding strap (provided by users)
Preparations |
|
||
Before using the Rollei 5S WiFi |
video camera, complete the following preparations: |
||
Power on the Rollei 5S WiFi |
video camera and check the power level. |
||
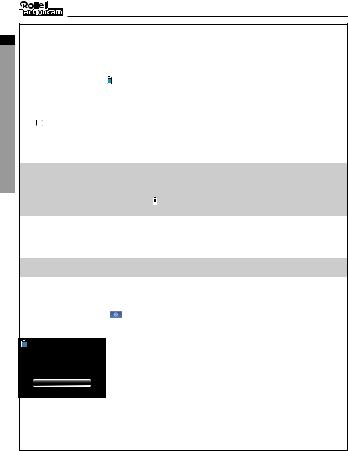
Turn the power switch to the “ON” position to initiate the system. After the red indicator is on, the |
|||
corresponding symbols on the LCD screen turns on and then the system enters the preview state. On |
|||
the LCD segment screen, you can find the following information: |
|||
A |
Recording mode: The current recording mode is displayed on the LCD segment screen. The icon |
||
|
” |
“ indicates the video mode, whereas the icon ” “ indicates audio mode. |
|
B |
Photo mode: The ” “ (shooting) icon is displayed on the screen. |
||
CPower symbol: The ” “(power supply) icon is displayed in the upper-right corner. When the system is working, this icon is constantly on. If this icon disappears, it indicates the Rollei 5S WiFi video camera is in power-off or standby state.
DVideo recording duration: In the medium row of the LCD segment screen displays the duration of
the current recording video, for example, 005:20. In the preview state, press the “Video“key once to display the duration of the video recording, and press the “Stop“key once to hide the duration.
Note: The duration for video recording on the LCD segment screen is synchronously displayed with that on the TFT screen.
EBattery capacity indication: The ”  ”(battery capacity) icon is displayed in the bottom-left corner. This icon indicates the battery level when the video camera is powered on. The more bars the power indicator has, the more power the battery has.
Note: When the video camera is in the standby or power-off state, the power icon is not displayed.
FUSB connection mode: The “ ”(USB mode) icon indicates whether the video camera has been connected to a computer. When the video camera is powered on and connected to a computer, this icon is lit with the green indicator on the left side blinking slowly. When the video camera is not connected to a computer, this icon is not displayed.
EN DE ES PT
IT
EL FR NL PL CZ RU
HU SV FI NO DA
-5-
EN DE ES
PT
IT
EL FR NL PL CZ RU
HU SV FI NO DA
GTF card capacity indication: The ”  “ (TF card capacity) icon is displayed in the bottom-right corner, indicating the available space of the TF card. The more bars the power indicator has, the more free space you have. If the TF card is full, the green indicator on the left side is constantly on.
At this time, on the TFT screen, you can find the following information:
AWorking mode: The ” “ (Video recording) symbol is displayed in the upper-left corner, indicating that the video camera is Ffor video recording.
BBattery capacity: The ”  “(battery power) symbol is displayed in the upper-left corner, indicating the battery level.
CVideo resolution: The resolution icon in the bottom-left corner indicates the current video recording resolution.
DAvailable storage capacity: If a memory card is available upon power-on of the video camera, the ” ” (free space of the memory card) icon is displayed in the bottom-right corner.
EThere is no response for “<” and “>” keys in the preview state.
FWhen using the supplied USB cable to recharge the battery in power off , the “Working/recharging red indicator” on the top of the video camera blinks slowly. The red indicator will be constantly on
upon full recharging. The recharging time lasts for about 3.5 hours. Note:
a.Before using the video camera, check whether the battery has sufficient power. If the power level is low, use the USB cable supplied with the video camera to recharge the battery. The ” Working / recharging red indicator ” blinks slowly during the recharging. Upon full recharging, the red indicator is constantly on, and the “  ” (battery power) symbol is displayed on the TFT screen.
b.Except USB cable, it is ok to recharge the battery with any 5V/2A power adapter.
 Loading...