

Page 1
Page 2

Page 3

Introduction
Full-edged Piano Performance
The FP-7F features the SuperNATURAL piano sound generator and the PHA III Ivory Feel-S keyboard.
You’ll enjoy full-edged piano performances with richly expressive piano sounds and a keyboard that allows you to express every nuance of your
musical inspiration.
Functions for Even More Playing Enjoyment
Looper (p. 60)
This lets you layer your performance with a looper rhythm, and play it back repeatedly.
The recorded phrases can also be saved in USB memory (sold separately) and used with the Audio Key function.
Session Partner (p. 44)
This provides a realistic-sounding accompaniment for your performance, letting you enjoy the sensation of playing a session with a backing band.
Microphone (p. 76)
By connecting a microphone (sold separately), you’ll be able to easily add harmony using the Looper or Session Partner function.
Audio Key (p. 31)
Allows you to play back audio les that you’ve saved on USB memory (sold separately) while you perform.
You can also switch between audio les at the desired timing.
Registrations (p. 49)
Favorite settings, such as your choice of sounds and Session Partner settings, can be saved as a “registration” and easily recalled.
Conventions in this Manual
• Text enclosed in square brackets [ ] indicates the name of a button or a knob, such as the [DISPLAY] button.
• Lines that begin with an asterisk * are cautionary statements that you must be sure to read.
• The numbers of pages that you can turn to for additional, related information are given like this: (p. **).
• The explanations in this manual include illustrations that depict what should typically be shown by the display. Note, however, that your unit
may incorporate a newer, enhanced version of the system (the names of tones, rhythms, looper rhythms, etc.), so what you actually see in the
display may not always match what appears in the manual.
Before using this unit, carefully read the sections entitled: “USING THE UNIT SAFELY” (p. 6), and “IMPORTANT NOTES” (p. 8). These sections provide important
information concerning the proper operation of the unit. Additionally, in order to feel assured that you have gained a good grasp of every feature provided
by your new unit, Owner’s manual should be read in its entirety. The manual should be saved and kept on hand as a convenient reference.
Copyright © 2010 ROLAND CORPORATION
All rights reserved. No part of this publication may be reproduced in any form without the written permission of ROLAND CORPORATION.
Roland is a registered trademark of Roland Corporation in the United States and/or other countries.
3
Page 4

Contents
USING THE UNIT SAFELY . . . . . . . . . . . . . . . . . . . . . . . . . . . . . 6
IMPORTANT NOTES . . . . . . . . . . . . . . . . . . . . . . . . . . . . . . . . . 8
Panel Descriptions . . . . . . . . . . . . . . . . . . . . . . . . . . . . . . . . . 10
Front Panel . . . . . . . . . . . . . . . . . . . . . . . . . . . . . . . . . . . . . . . . . . . . . . 10
Rear Panel . . . . . . . . . . . . . . . . . . . . . . . . . . . . . . . . . . . . . . . . . . . . . . . 12
Other Connectors . . . . . . . . . . . . . . . . . . . . . . . . . . . . . . . . . . . . . . . . 13
Before You Play . . . . . . . . . . . . . . . . . . . . . . . . . . . . . . . . . . . . 14
Getting Ready to Play . . . . . . . . . . . . . . . . . . . . . . . . . . . . . . . . . . . . 14
Connecting the AC adaptor . . . . . . . . . . . . . . . . . . . . . . . . . 14
Turning the Power On/O . . . . . . . . . . . . . . . . . . . . . . . . . . . 14
Adjusting the Volume . . . . . . . . . . . . . . . . . . . . . . . . . . . . . . . 15
Adjusting the Volume Balance between Your
Keyboard Performance and the Accompaniment . . . . 15
Attaching the Music Rest . . . . . . . . . . . . . . . . . . . . . . . . . . . .16
Connecting Pedals . . . . . . . . . . . . . . . . . . . . . . . . . . . . . . . . . . . . . . .17
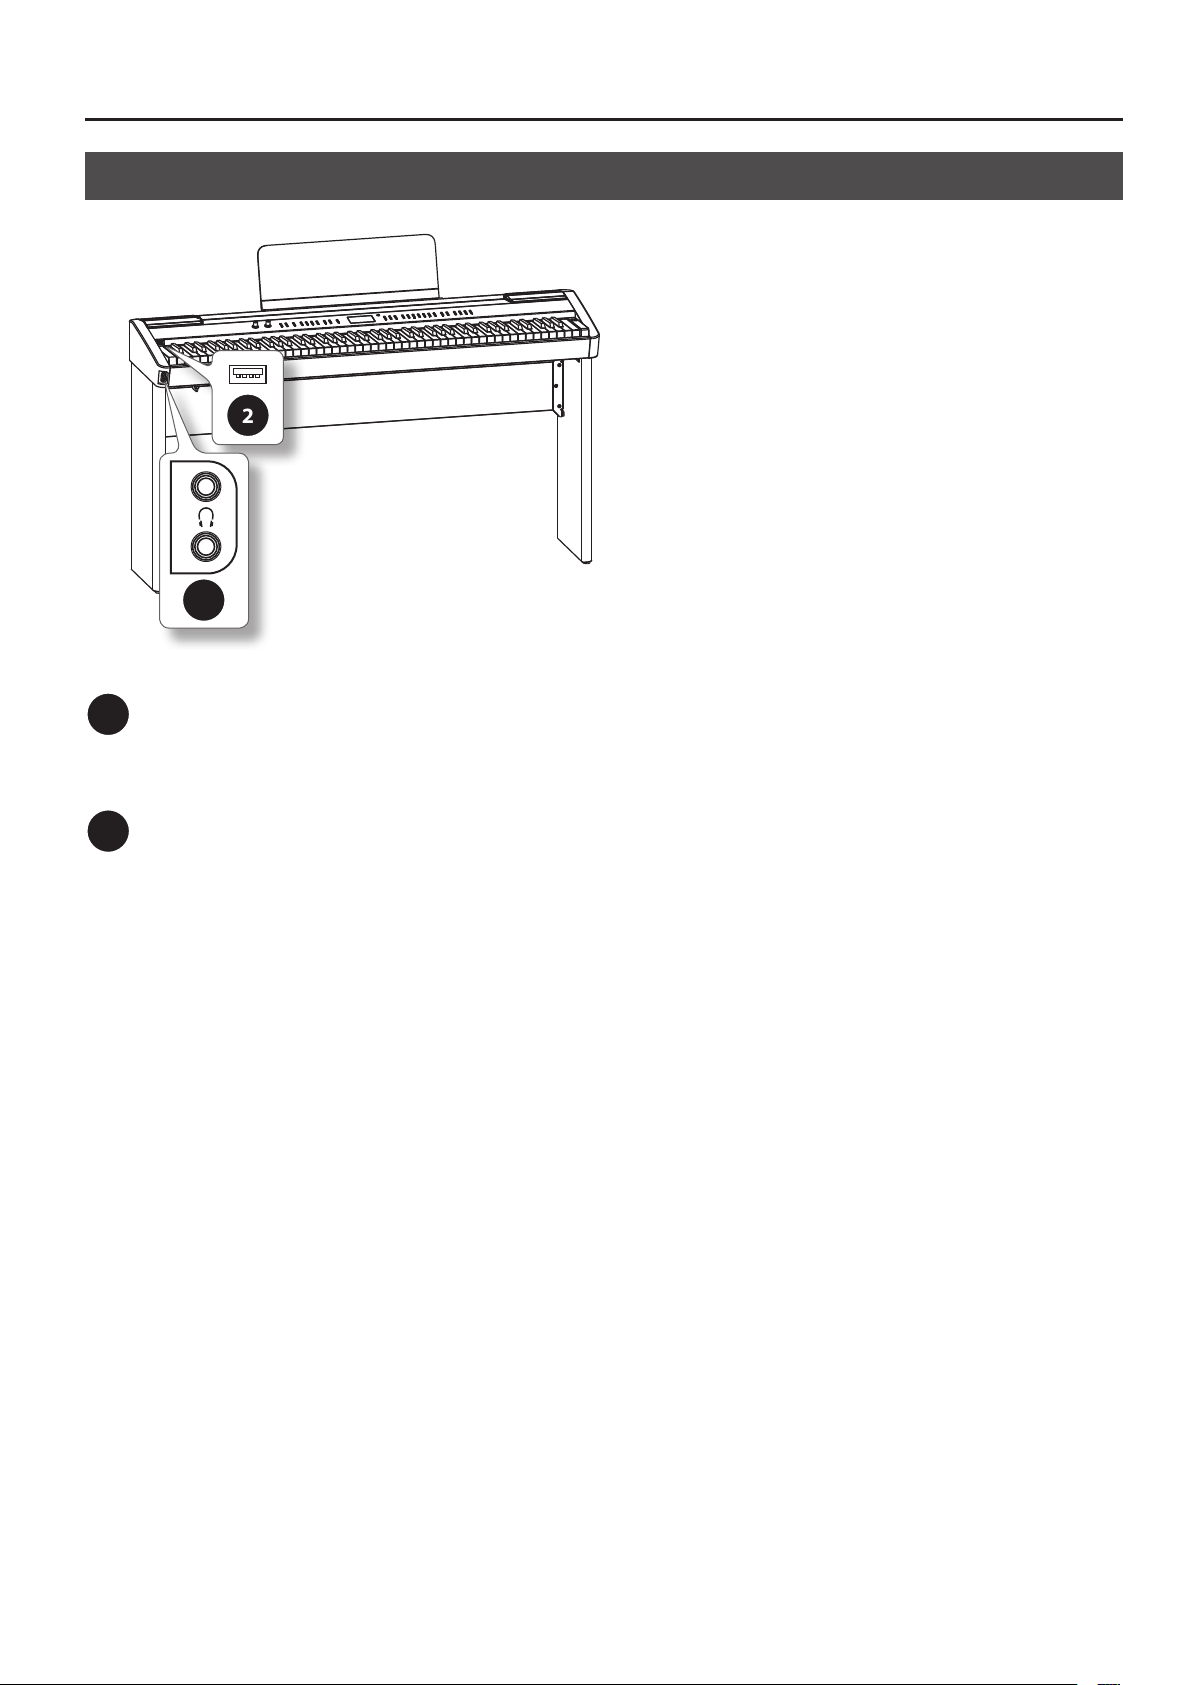
Using Headphones . . . . . . . . . . . . . . . . . . . . . . . . . . . . . . . . . . . . . . .18
Adjusting the Display Brightness . . . . . . . . . . . . . . . . . . . . . . . . .18
Listening to the Demo Songs . . . . . . . . . . . . . . . . . . . . . . . . . . . . . 19
Performing . . . . . . . . . . . . . . . . . . . . . . . . . . . . . . . . . . . . . . . . 20
Performing Various Sounds . . . . . . . . . . . . . . . . . . . . . . . . . . . . . . . 20
Performing with the Metronome . . . . . . . . . . . . . . . . . . . . . . . . . 21
Changing the Metronome’s Time Signature . . . . . . . . . . 22
Changing the Metronome Tempo . . . . . . . . . . . . . . . . . . .22
Changing the Metronome’s Volume . . . . . . . . . . . . . . . . . 23
Adding a Count-in to Synchronize Your Performance .23
Adding Reverberation (Reverb Eect) . . . . . . . . . . . . . . . . . . . . .24
Changing the Depth of the Reverb Eect . . . . . . . . . . . .24
Adjusting the Tone Quality (Equalizer) . . . . . . . . . . . . . . . . . . . .25
Selecting the Equalizer Number . . . . . . . . . . . . . . . . . . . . .25
Playing Two Tones Layered (Dual Play) . . . . . . . . . . . . . . . . . . . . 26
Playing Two Dierent Tones in the Right and Left Sides
of the Keyboard (Split Play) . . . . . . . . . . . . . . . . . . . . . . . . . . . . . . . 27
Changing the Right-hand Tone and Left-hand Tone . .28
Changing the Point at which the Keyboard is Divided
(Split Point) . . . . . . . . . . . . . . . . . . . . . . . . . . . . . . . . . . . . . . . . . 29
Changing the Pitch of the Keyboard or the Song Playback
(Transpose) . . . . . . . . . . . . . . . . . . . . . . . . . . . . . . . . . . . . . . . . . . . . . .30
Performing with Audio Files (Audio Key) . . . . . . . . . . . . . . . . . .31
Loading an Audio File Set . . . . . . . . . . . . . . . . . . . . . . . . . . .31
Performing with Audio Files . . . . . . . . . . . . . . . . . . . . . . . . . 32
Creating a Personalized Piano Sound (Piano Designer) . . . .34
Piano Designer Settings . . . . . . . . . . . . . . . . . . . . . . . . . . . . .35
Simulating the Way that Sounds are Created on an Organ
(Tone Wheel) . . . . . . . . . . . . . . . . . . . . . . . . . . . . . . . . . . . . . . . . . . . .36
Disabling the Buttons (Panel Lock) . . . . . . . . . . . . . . . . . . . . . . . . 40
Listening to Songs . . . . . . . . . . . . . . . . . . . . . . . . . . . . . . . . . 41
Playing Back Songs . . . . . . . . . . . . . . . . . . . . . . . . . . . . . . . . . . . . . .41
Playing All Songs Successively (Play All) . . . . . . . . . . . . . . . . . . .42
Adjusting the Song Tempo . . . . . . . . . . . . . . . . . . . . . . . . . . . . . . .42
Changing the Playback Key (Playback Transpose) . . . . . . . . . 43
Performing Along with Rhythm (Session Partner) . . . . 44
What is Session Partner?. . . . . . . . . . . . . . . . . . . . . . . . . . . . . . . . . .44
Performing with Session Partner . . . . . . . . . . . . . . . . . . . . . . . . . .44
Selecting a Rhythm . . . . . . . . . . . . . . . . . . . . . . . . . . . . . . . . . . . . . .45
Adding Variation to the Rhythm . . . . . . . . . . . . . . . . . . . . . . . . . . 46
Creating an Original Chord Progression Pattern . . . . . . . . . . .47
Changing the Number of Measures for Recording a
Chord Progression . . . . . . . . . . . . . . . . . . . . . . . . . . . . . . . . . . 48
Registering Your Favorite Performance Settings . . . . . 49
What is a Registration? . . . . . . . . . . . . . . . . . . . . . . . . . . . . . . . . . . . 49
Storing Your Performance Settings (Registration) . . . . . . . . . . 50
Recalling a Registration . . . . . . . . . . . . . . . . . . . . . . . . . . . . . . . . . .51
Recording Your Performance . . . . . . . . . . . . . . . . . . . . . . . 52
Recording Your Keyboard Performance . . . . . . . . . . . . . . . . . . . 52
Recording Your Performance with Session Partner . . . . . . . .54
Erasing a Recorded Performance . . . . . . . . . . . . . . . . . . . . . . . . .55
Saving a Recorded Song (Save Song) . . . . . . . . . . . . . . . . . . . . .56
Deleting a Saved Song (Delete Song) . . . . . . . . . . . . . . . . . . . . . 58
Recording a Layered Performance (Looper) . . . . . . . . . 60
What is the Looper? . . . . . . . . . . . . . . . . . . . . . . . . . . . . . . . . . . . . . . 60
Recording a Phrase . . . . . . . . . . . . . . . . . . . . . . . . . . . . . . . . . . . . . . . 61
Erasing a Phrase . . . . . . . . . . . . . . . . . . . . . . . . . . . . . . . . . . . . . . . . .63
Detailed Settings for Various Functions . . . . . . . . . . . . . 64
Basic Operation in Function Mode . . . . . . . . . . . . . . . . . . . . . . . . 64
Keyboard Settings (Key Touch) . . . . . . . . . . . . . . . . . . . . . . . . . . . 66
Adjusting the Keyboard Sensitivity (Key Touch) . . . . . .66
Making Fine Adjustments to the Keyboard Touch
Sensitivity (Key Touch Oset) . . . . . . . . . . . . . . . . . . . . . . . . 66
Tuning Settings (Tuning) . . . . . . . . . . . . . . . . . . . . . . . . . . . . . . . . .66
Matching the Pitch with Other Instruments
(Master Tuning) . . . . . . . . . . . . . . . . . . . . . . . . . . . . . . . . . . . . . 66
Adjusting the Tuning (Temperament). . . . . . . . . . . . . . . .66
Specifying the Keynote (Temperament Key) . . . . . . . . . 66
Looper Settings (Looper) . . . . . . . . . . . . . . . . . . . . . . . . . . . . . . . . .67
Select the Parts that Will Play (Part Select) . . . . . . . . . . .67
Saving Phrases (Save Looper Phrase) . . . . . . . . . . . . . . . . 67
Session Partner Settings (Session Partner) . . . . . . . . . . . . . . . .67
Select the Parts that Will Play (Part Select) . . . . . . . . . . .67
Turning the Intro and Ending On/O
(Intro/Ending Sw) . . . . . . . . . . . . . . . . . . . . . . . . . . . . . . . . . . . 67
Selecting the Chord Progression for the Rhythm
(Chord Prog. Pattern) . . . . . . . . . . . . . . . . . . . . . . . . . . . . . . .
Specifying the Root Note for the Chord Progression
(Chord Prog. Root) . . . . . . . . . . . . . . . . . . . . . . . . . . . . . . . . . . 67
Fixing the Chord Progression Pattern
(Chord Prog. Fix) . . . . . . . . . . . . . . . . . . . . . . . . . . . . . . . . . . . .68
Turning the Rhythm’s Chord Progression On/O
(Auto Chord Prog. Sw) . . . . . . . . . . . . . . . . . . . . . . . . . . . . . .68
Registration Settings (Registration) . . . . . . . . . . . . . . . . . . . . . . .68
Saving a Registration Set (Save Regist. Set) . . . . . . . . . .68
Loading a Registration Set You Saved
(Load Regist. Set) . . . . . . . . . . . . . . . . . . . . . . . . . . . . . . . . . . . 69
67
4
Page 5
Contents
Deleting a Registration Set You Saved
(Delete Regist. Set) . . . . . . . . . . . . . . . . . . . . . . . . . . . . . . . . . .69
Copying a Registration Set (Copy Regist. Set) . . . . . . . . 70
Using a Pedal to Switch Registrations (Pedal Shift) . . .70
Microphone Settings (Mic) . . . . . . . . . . . . . . . . . . . . . . . . . . . . . . .71
Turning the Microphone Input On/O (Mic Sw) . . . . . .71
Adding Reverberation to Your Voice (Mic Reverb) . . . .71
Changing How Harmony is Applied (Harmony Type) .71
Adjusting the Volume of the Harmony
(Harmony Level) . . . . . . . . . . . . . . . . . . . . . . . . . . . . . . . . . . . .71
Editing the Equalizer Settings (Equalizer) . . . . . . . . . . . . . . . . .71
Adjusting the Dual Play Volume Balance (Dual Balance) . . .72
Adjusting the Volume (Master Gain) . . . . . . . . . . . . . . . . . . . . . .72
Specifying What the Transpose will Aect
(Transpose Mode) . . . . . . . . . . . . . . . . . . . . . . . . . . . . . . . . . . . . . . . . 72
Changing the Pitch of the Tone in Octave Steps
(Octave Shift) . . . . . . . . . . . . . . . . . . . . . . . . . . . . . . . . . . . . . . . . . . . . 72
Pedal Settings (Pedal) . . . . . . . . . . . . . . . . . . . . . . . . . . . . . . . . . . . .72
Changing How the Pedal Eects Are Applied
(Damper Pedal Part) . . . . . . . . . . . . . . . . . . . . . . . . . . . . . . . .
Changing How the Pedals Work
(FC1 Pedal Func/FC2 Pedal Func) . . . . . . . . . . . . . . . . . . . .73
Performance Settings (Composer) . . . . . . . . . . . . . . . . . . . . . . . .73
Playing Back with the Right-hand Part Muted
(Right Track Mute) . . . . . . . . . . . . . . . . . . . . . . . . . . . . . . . . . .73
Playing Back with the Left-hand Part Mute
(Left Track Mute) . . . . . . . . . . . . . . . . . . . . . . . . . . . . . . . . . . . . 73
Playing Back with the Accompaniment Part Muted
(Accomp Track Mute) . . . . . . . . . . . . . . . . . . . . . . . . . . . . . . .73
Decreasing the Playback Volume of Sounds in the
Center (Center Cancel) . . . . . . . . . . . . . . . . . . . . . . . . . . . . . . 74
Using a Specic Part’s Sound as a Guide
(Mute Volume) . . . . . . . . . . . . . . . . . . . . . . . . . . . . . . . . . . . . . . 74
Switching the Display of Lyrics On/O (Lyrics) . . . . . . .74
Changing the Display Language for Song Titles and
Lyrics (Song Language) . . . . . . . . . . . . . . . . . . . . . . . . . . . . . 74
Setting the Type of CD to be Played Back
(CD/Audio Type) . . . . . . . . . . . . . . . . . . . . . . . . . . . . . . . . . . . . 74
Remembering Your Settings (Memory Backup) . . . . . . . . . . . . 75
Restoring the Factory-set Condition (Factory Reset) . . . . . . .75
72
Copying a Song (Copy Song) . . . . . . . . . . . . . . . . . . . . . . . .81
Connecting to Audio Equipment . . . . . . . . . . . . . . . . . . . . . . . . .82
Having Audio from an External Device be Sounded
Through the FP-7F . . . . . . . . . . . . . . . . . . . . . . . . . . . . . . . . . . 82
Connecting Speakers to the FP-7F and Outputting
Sounds . . . . . . . . . . . . . . . . . . . . . . . . . . . . . . . . . . . . . . . . . . . . .
Connecting to MIDI Devices . . . . . . . . . . . . . . . . . . . . . . . . . . . . . .83
Connecting a MIDI Sequencer to the FP-7F . . . . . . . . . .83
Producing Sounds from a MIDI Sound Module by
Playing the FP-7F . . . . . . . . . . . . . . . . . . . . . . . . . . . . . . . . . . . 83
Preventing Doubled Notes When Connected to a
Sequencer (Local Control) . . . . . . . . . . . . . . . . . . . . . . . . . . .84
Changing the MIDI Transmit Channel
(MIDI Transmit Ch.). . . . . . . . . . . . . . . . . . . . . . . . . . . . . . . . . .84
Transmitting Recorded Performance Data to a MIDI
Device (Composer MIDI Out) . . . . . . . . . . . . . . . . . . . . . . . .
Transmitting Tone Selection Data
(Regist. Tx PC Ch./Regist. PC/Regist. Bank MSB/
Regist. Bank LSB) . . . . . . . . . . . . . . . . . . . . . . . . . . . . . . . . . . .85
Connecting a Computer . . . . . . . . . . . . . . . . . . . . . . . . . . . . . . . . . .85
Changing the USB Driver Settings (USB Driver) . . . . . . . 85
Using the V-LINK Function . . . . . . . . . . . . . . . . . . . . . . . . . . . . . . . . 86
Specifying the V-LINK Transmit Channel
(V-LINK Transmit Ch.) . . . . . . . . . . . . . . . . . . . . . . . . . . . . . . .86
82
84
Troubleshooting . . . . . . . . . . . . . . . . . . . . . . . . . . . . . . . . . . . 87
Error Messages . . . . . . . . . . . . . . . . . . . . . . . . . . . . . . . . . . . . 90
Stored Items . . . . . . . . . . . . . . . . . . . . . . . . . . . . . . . . . . . . . . . 91
Tone List . . . . . . . . . . . . . . . . . . . . . . . . . . . . . . . . . . . . . . . . . . 92
Rhythm List (Session Partner) . . . . . . . . . . . . . . . . . . . . . . 95
Chord Progression Pattern List . . . . . . . . . . . . . . . . . . . . . 96
Looper Rhythm List . . . . . . . . . . . . . . . . . . . . . . . . . . . . . . . . 98
Internal Song List . . . . . . . . . . . . . . . . . . . . . . . . . . . . . . . . . . 99
Chord Fingering List . . . . . . . . . . . . . . . . . . . . . . . . . . . . . . 100
Connections with Other Equipment . . . . . . . . . . . . . . . . 76
Connecting a Microphone . . . . . . . . . . . . . . . . . . . . . . . . . . . . . . . .76
Adding Harmony to Your Voice . . . . . . . . . . . . . . . . . . . . . . 76
Adjusting the Volume of the Harmony . . . . . . . . . . . . . . . 76
Connecting External Media . . . . . . . . . . . . . . . . . . . . . . . . . . . . . . .77
Connecting a CD Drive . . . . . . . . . . . . . . . . . . . . . . . . . . . . . . 77
Connecting USB Memory . . . . . . . . . . . . . . . . . . . . . . . . . . .77
Formatting Memory (Format Media) . . . . . . . . . . . . . . . . . 78
Switching the External Memory Setting
(Ext. Memory Mode) . . . . . . . . . . . . . . . . . . . . . . . . . . . . . . . .
Playing Back Songs From External Media . . . . . . . . . . . . 78
Changing the Tempo of an Audio File or Music CD . . . 80
Saving a Recorded Performance to USB Memory
(Save Song) . . . . . . . . . . . . . . . . . . . . . . . . . . . . . . . . . . . . . . . . .80
Deleting a Song from USB Memory (Delete Song) . . . . 80
78
Registration List . . . . . . . . . . . . . . . . . . . . . . . . . . . . . . . . . . 101
Main Specications . . . . . . . . . . . . . . . . . . . . . . . . . . . . . . . 102
Index . . . . . . . . . . . . . . . . . . . . . . . . . . . . . . . . . . . . . . . . . . . . 104
5
Page 6
About WARNING and CAUTION Notices
ALWAYS OBSERVE THE FOLLOWING
Used for instructions intended to alert the
user to the risk of death or severe injury
should the unit be used improperly.
Used for instructions intended to alert the
user to the risk of injury or material
damage should the unit be used
improperly.
* Material damage refers to damage or
other adverse eects caused with
respect to the home and all its
furnishings, as well to domestic animals
or pets.
About the Symbols
The symbol alerts the user to important instructions or
warnings.The specic meaning of the symbol is
determined by the design contained within the triangle. In
the case of the symbol at left, it is used for general
cautions, warnings, or alerts to danger.
The symbol alerts the user to items that must never be
carried out (are forbidden). The specic thing that must
not be done is indicated by the design contained within
the circle. In the case of the symbol at left, it means that
the unit must never be disassembled.
The symbol alerts the user to things that must be
carried out. The specic thing that must be done is
indicated by the design contained within the circle. In the
case of the symbol at left, it means that the power-cord
plug must be unplugged from the outlet.
Do not disassemble or modify
Do not open (or modify in any way) the unit or its AC adaptor.
Do not repair or replace parts by yourself
Do not attempt to repair the unit, or replace parts within
it (except when this manual provides specic instructions
directing you to do so). Refer all servicing to your retailer,
the nearest Roland Service Center, or an authorized Roland
distributor, as listed on the “Information” page.
Do not use or store in the following types of locations
• Subject to temperature extremes (e.g., direct sunlight
in an enclosed vehicle, near a heating duct, on top of
heat-generating equipment); or are
• Damp (e.g., baths, washrooms, on wet oors); or are
• Exposed to steam or smoke; or are
• Subject to salt exposure; or are
• Humid; or are
• Exposed to rain; or are
• Dusty or sandy; or are
• Subject to high levels of vibration and shakiness.
Use only a stand that is recommended
This unit should be used only with a stand that is recommended by Roland.
Do not place in an unstable location
When using the unit with a rack or stand recommended by
Roland, the rack or stand must be carefully placed so it is
level and sure to remain stable. If not using a rack or stand,
you still need to make sure that any location you choose for
placing the unit provides a level surface that will properly
support the unit, and keep it from wobbling.
Connect the AC adaptor to an outlet of the correct voltage
Be sure to use only the AC adaptor supplied with the unit.
Also, make sure the line voltage at the installation matches
the input voltage specied on the AC adaptor’s body. Other
AC adaptors may use a dierent polarity, or be designed
for a dierent voltage, so their use could result in damage,
malfunction, or electric shock.
Use only the included power cord
Use only the attached power-supply cord. Also, the supplied
power cord must not be used with any other device.
Do not bend the power cord or place heavy objects on it
Do not excessively twist or bend the power cord, nor place
heavy objects on it. Doing so can damage the cord, producing severed elements and short circuits. Damaged cords are
re and shock hazards!
Avoid extended use at high volume
This unit, either alone or in combination with an amplier
and headphones or speakers, may be capable of producing
sound levels that could cause permanent hearing loss. Do
not operate for a long period of time at a high volume level,
or at a level that is uncomfortable. If you experience any
hearing loss or ringing in the ears, you should immediately
stop using the unit, and consult an audiologist.
Do not allow foreign objects or liquids to enter the unit, and
do not place containers of liquid on the unit
Do not place containers containing liquid (e.g., ower vases)
on this product. Never allow foreign objects (e.g., ammable objects, coins, wires) or liquids (e.g., water or juice) to
enter this product. Doing so may cause short circuits, faulty
operation, or other malfunctions.
6
Page 7
USING THE UNIT SAFELY
Turn o the power if an abnormality or malfunction occurs
Immediately turn the power o, remove the AC adaptor
from the outlet, and request servicing by your retailer, the
nearest Roland Service Center, or an authorized Roland
distributor, as listed on the “Information” page when:
• The AC adaptor, the power-supply cord, or the plug has
been damaged; or
• If smoke or unusual odor occurs
• Objects have fallen into, or liquid has been spilled onto
the unit; or
• The unit has been exposed to rain (or otherwise has
become wet); or
• The unit does not appear to operate normally or exhibits a
marked change in performance.
Do not allow children to use without supervision
In households with small children, an adult should provide
supervision until the child is capable of following all the
rules essential for the safe operation of the unit.
Do not drop or subject to strong impact
Protect the unit from strong impact.
(Do not drop it!)
Do not share an outlet with an unreasonable number of
other devices
Do not force the unit’s power-supply cord to share an outlet
with an unreasonable number of other devices. Be especially careful when using extension cords the total power
used by all devices you have connected—to the extension
cord’s outlet must never exceed the power rating (watts/
amperes) for the extension cord. Excessive loads can cause
the insulation on the cord to heat up and eventually melt
through.
Do not use overseas
Before using the unit in a foreign country, consult with your
retailer, the nearest Roland Service Center, or an authorized
Roland distributor, as listed on the “Information” page.
Grasp the plug when connecting or disconnecting the power
cord
Always grasp only the plug on the AC adaptor cord when
plugging into, or unplugging from, an outlet or this unit.
Periodically wipe the dust o the AC adaptor plug
At regular intervals, you should unplug the AC adaptor and
clean it by using a dry cloth to wipe all dust and other accumulations away from its prongs. Also, disconnect the power
plug from the power outlet whenever the unit is to remain
unused for an extended period of time. Any accumulation
of dust between the power plug and the power outlet can
result in poor insulation and lead to re.
Manage cables for safety
Try to prevent cords and cables from becoming entangled.
Also, all cords and cables should be placed so they are out
of the reach of children.
Do not stand or place heavy objects on this device
Never climb on top of, nor place heavy objects on the unit.
Do not connect or disconnect the AC adaptor with wet hands
Never handle the AC adaptor or its plugs with wet hands
when plugging into, or unplugging from, an outlet or this
unit.
Cautions when moving this device
If you need to move the instrument, take note of the precautions listed below. At least two persons are required to
safely lift and move the unit. It should be handled carefully,
all the while keeping it level. Make sure to have a rm grip,
to protect yourself from injury and the instrument from
damage.
• Check to make sure the knob bolts securing the unit to
the stand have not become loose. Fasten them again
securely whenever you notice any loosening.
• Disconnect the AC adaptor.
• Disconnect all cords coming from external devices.
• Remove the music stand.
Place in a well ventilated location
The unit and the AC adaptor should be located so their
location or position does not interfere with their proper
ventilation.
Use only the specied stands
This (FP-7F) for use only with Roland stand KSC-44. Use with
other stands is capable of resulting in instability causing
possible injury.
Check safety before using a stand
Even if you observe the cautions given in the owner’s
manual, certain types of handling may allow this product to
fall from the stand, or cause the stand to overturn. Please be
mindful of any safety issues before using this product.
Unplug the AC adaptor from the AC outlet before cleaning
Before cleaning the unit, turn o the power and unplug the
AC adaptor from the outlet (p. 14).
If there is a possibility of lightning strike, disconnect the AC
adaptor from the AC outlet
Whenever you suspect the possibility of lightning in your
area, disconnect the AC adaptor from the outlet.
Keep small items out of the reach of children
Should you remove the music rest attachment screws and
the ground terminal screw, keep them in a safe place out of
children’s reach, so there is no chance of them being swallowed accidentally.
7
Page 8

IMPORTANT NOTES
Power Supply
• Do not connect this unit to same electrical outlet that is being used by an
electrical appliance that is controlled by an inverter (such as a refrigerator,
washing machine, microwave oven, or air conditioner), or that contains
a motor. Depending on the way in which the electrical appliance is used,
power supply noise may cause this unit to malfunction or may produce
audible noise. If it is not practical to use a separate electrical outlet,
connect a power supply noise lter between this unit and the electrical
outlet.
• The AC adaptor will begin to generate heat after long hours of consecutive
use. This is normal, and is not a cause for concern.
• Before connecting this unit to other devices, turn o the power to all units.
This will help prevent malfunctions and/or damage to speakers or other
devices.
Placement
• Using the unit near power ampliers (or other equipment containing large
power transformers) may induce hum. To alleviate the problem, change
the orientation of this unit; or move it farther away from the source of
interference.
• This device may interfere with radio and television reception. Do not use
this device in the vicinity of such receivers.
• Noise may be produced if wireless communications devices, such as
cell phones, are operated in the vicinity of this unit. Such noise could
occur when receiving or initiating a call, or while conversing. Should you
experience such problems, you should relocate such wireless devices so
they are at a greater distance from this unit, or switch them o.
• Do not expose the unit to direct sunlight, place it near devices that
radiate heat, leave it inside an enclosed vehicle, or otherwise subject it to
temperature extremes. Also, do not allow lighting devices that normally
are used while their light source is very close to the unit (such as a piano
light), or powerful spotlights to shine upon the same area of the unit for
extended periods of time. Excessive heat can deform or discolor the unit.
• When moved from one location to another where the temperature and/or
humidity is very dierent, water droplets (condensation) may form inside
the unit. Damage or malfunction may result if you attempt to use the unit
in this condition. Therefore, before using the unit, you must allow it to
stand for several hours, until the condensation has completely evaporated.
• Do not allow rubber, vinyl, or similar materials to remain on this unit for
long periods of time. Such objects can discolor or otherwise harmfully
aect the nish.
Maintenance
• For everyday cleaning wipe the unit with a soft, dry cloth or one that has
been slightly dampened with water. To remove stubborn dirt, use a cloth
impregnated with a mild, non-abrasive detergent. Afterwards, be sure to
wipe the unit thoroughly with a soft, dry cloth.
• Never use benzine, thinners, alcohol or solvents of any kind, to avoid the
possibility of discoloration and/or deformation.
Repairs and Data
• Please be aware that all data contained in the unit’s memory may be lost
when the unit is sent for repairs. Important data should always be backed
up USB memories, or written down on paper (when possible). During
repairs, due care is taken to avoid the loss of data. However, in certain
cases (such as when circuitry related to memory itself is out of order), we
regret that it may not be possible to restore the data, and Roland assumes
no liability concerning such loss of data.
Additional Precautions
• Please be aware that the contents of memory can be irretrievably lost as
a result of a malfunction, or the improper operation of the unit. To protect
yourself against the risk of loosing important data, we recommend that
you periodically save a backup copy of important data you have stored in
the unit’s memory on USB memories.
• Unfortunately, it may be impossible to restore the contents of data that
was stored in the unit’s memory or USB memories once it has been lost.
Roland Corporation assumes no liability concerning such loss of data.
• Use a reasonable amount of care when using the unit’s buttons, sliders, or
other controls; and when using its jacks and connectors. Rough handling
can lead to malfunctions.
• Never strike or apply strong pressure to the display.
• When connecting / disconnecting all cables, grasp the connector itself—
never pull on the cable. This way you will avoid causing shorts, or damage
to the cable’s internal elements.
• To avoid disturbing your neighbors, try to keep the unit’s volume at
reasonable levels. You may prefer to use headphones, so you do not need
to be concerned about those around you.
• The sound of keys being struck and vibrations produced by playing an
instrument can be transmitted through a oor or wall to an unexpected
extent. In particular, when using headphones, please take care not to
cause annoyance to others nearby.
• Do not allow objects to remain on top of the keyboard. This can be the
cause of malfunction, such as keys ceasing to produce sound.
• Do not paste stickers, decals, or the like to this instrument. Peeling such
matter o the instrument may damage the exterior nish.
• Depending on the material and temperature of the surface on which you
place the unit, its rubber feet may discolor or mar the surface.
You can place a piece of felt or cloth under the rubber feet to prevent this
from happening. If you do so, please make sure that the unit will not slip or
move accidentally.
• Do not put anything that contains water (e.g., ower vases) on this unit.
Also, avoid the use of insecticides, perfumes, alcohol, nail polish, spray
cans, etc., near the unit. Swiftly wipe away any liquid that spills on the unit
using a dry, soft cloth.
8
• When you need to transport the unit, package it in the box (including
padding) that it came in, if possible. Otherwise, you will need to use
equivalent packaging materials.
• Do not apply undue force to the music rest while it is in use.
• Use only the specied expression pedal (EV-5; sold separately). By
connecting any other expression pedals, you risk causing malfunction
and/or damage to the unit.
• Some connection cables contain resistors. Do not use cables that
incorporate resistors for connecting to this unit. The use of such cables
can cause the sound level to be extremely low, or impossible to hear. For
information on cable specications, contact the manufacturer of the cable.
Page 9
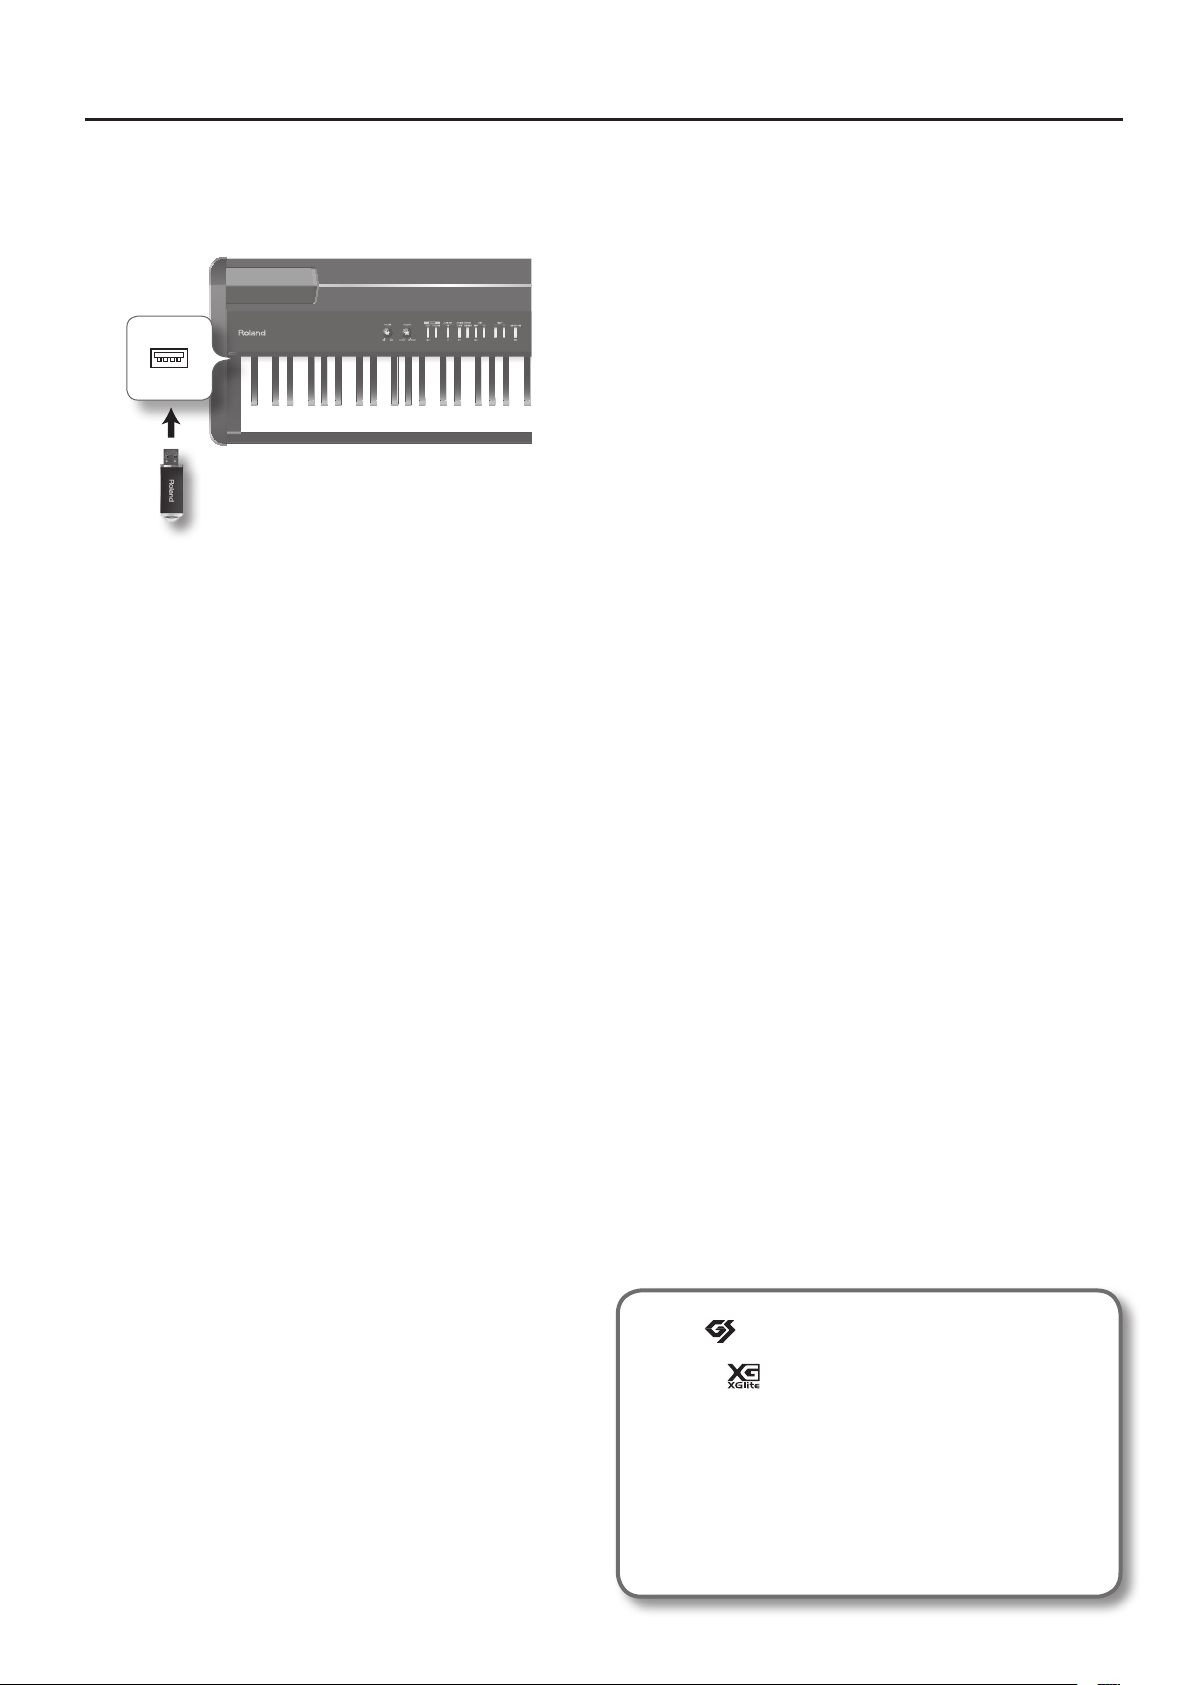
Before Using USB Memories
Using USB Memories
• Carefully insert the USB memories all the way in—until it is rmly in place.
External
memory
connector
USB memory
• Never touch the terminals of the USB memories. Also, avoid getting the
terminals dirty.
• USB memories are constructed using precision components; handle the
USB memories carefully, paying particular note to the following.
• To prevent damage to the USB memories from static electricity, be sure
to discharge any static electricity from your own body before handling
the USB memories.
• Do not touch or allow metal to come into contact with the contact
portion of the USB memories.
• Do not bend, drop, or subject USB memories to strong shock or
vibration.
• Do not keep USB memories in direct sunlight, in closed vehicles, or
other such locations.
• Do not allow USB memories to become wet.
• Do not disassemble or modify the USB memories.
IMPORTANT NOTES
Copyright
• Recording, duplication, distribution, sale, lease, performance, or broadcast
of copyrighted material (musical works, visual works, broadcasts, live
performances, etc.) belonging to a third party in part or in whole without
the permission of the copyright owner is forbidden by law.
• Do not use this unit for purposes that could infringe on a copyright held
by a third party. We assume no responsibility whatsoever with regard to
any infringements of third-party copyrights arising through your use of
this unit.
Care of the Ivory Feel-S keyboard
• Do not write on the keyboard with any pen or other implement, and do
not stamp or place any marking on the instrument. Ink will seep into the
surface lines and become unremovable.
• Do not ax stickers on the keyboard. You may be unable to remove
stickers that use strong adhesives, and the adhesive may cause
discoloration.
• To remove stubborn dirt, use a commercially available keyboard cleaner
that does not contain abrasives. Start by wiping lightly. If the dirt does
not come o, wipe using gradually increasing amounts of pressure while
taking care not to scratch the keys.
* GS ( ) is a registered trademark of Roland Corporation.
* XGlite (
Yamaha Corporation.
* All product names mentioned in this document are trade-
marks or registered trademarks of their respective owners.
* MMP (Moore Microprocessor Portfolio) refers to a patent
portfolio concerned with microprocessor architecture, which
was developed by Technology Properties Limited (TPL).
Roland has licensed this technology from the TPL Group.
) is a registered trademark or a trademark of
9
Page 10
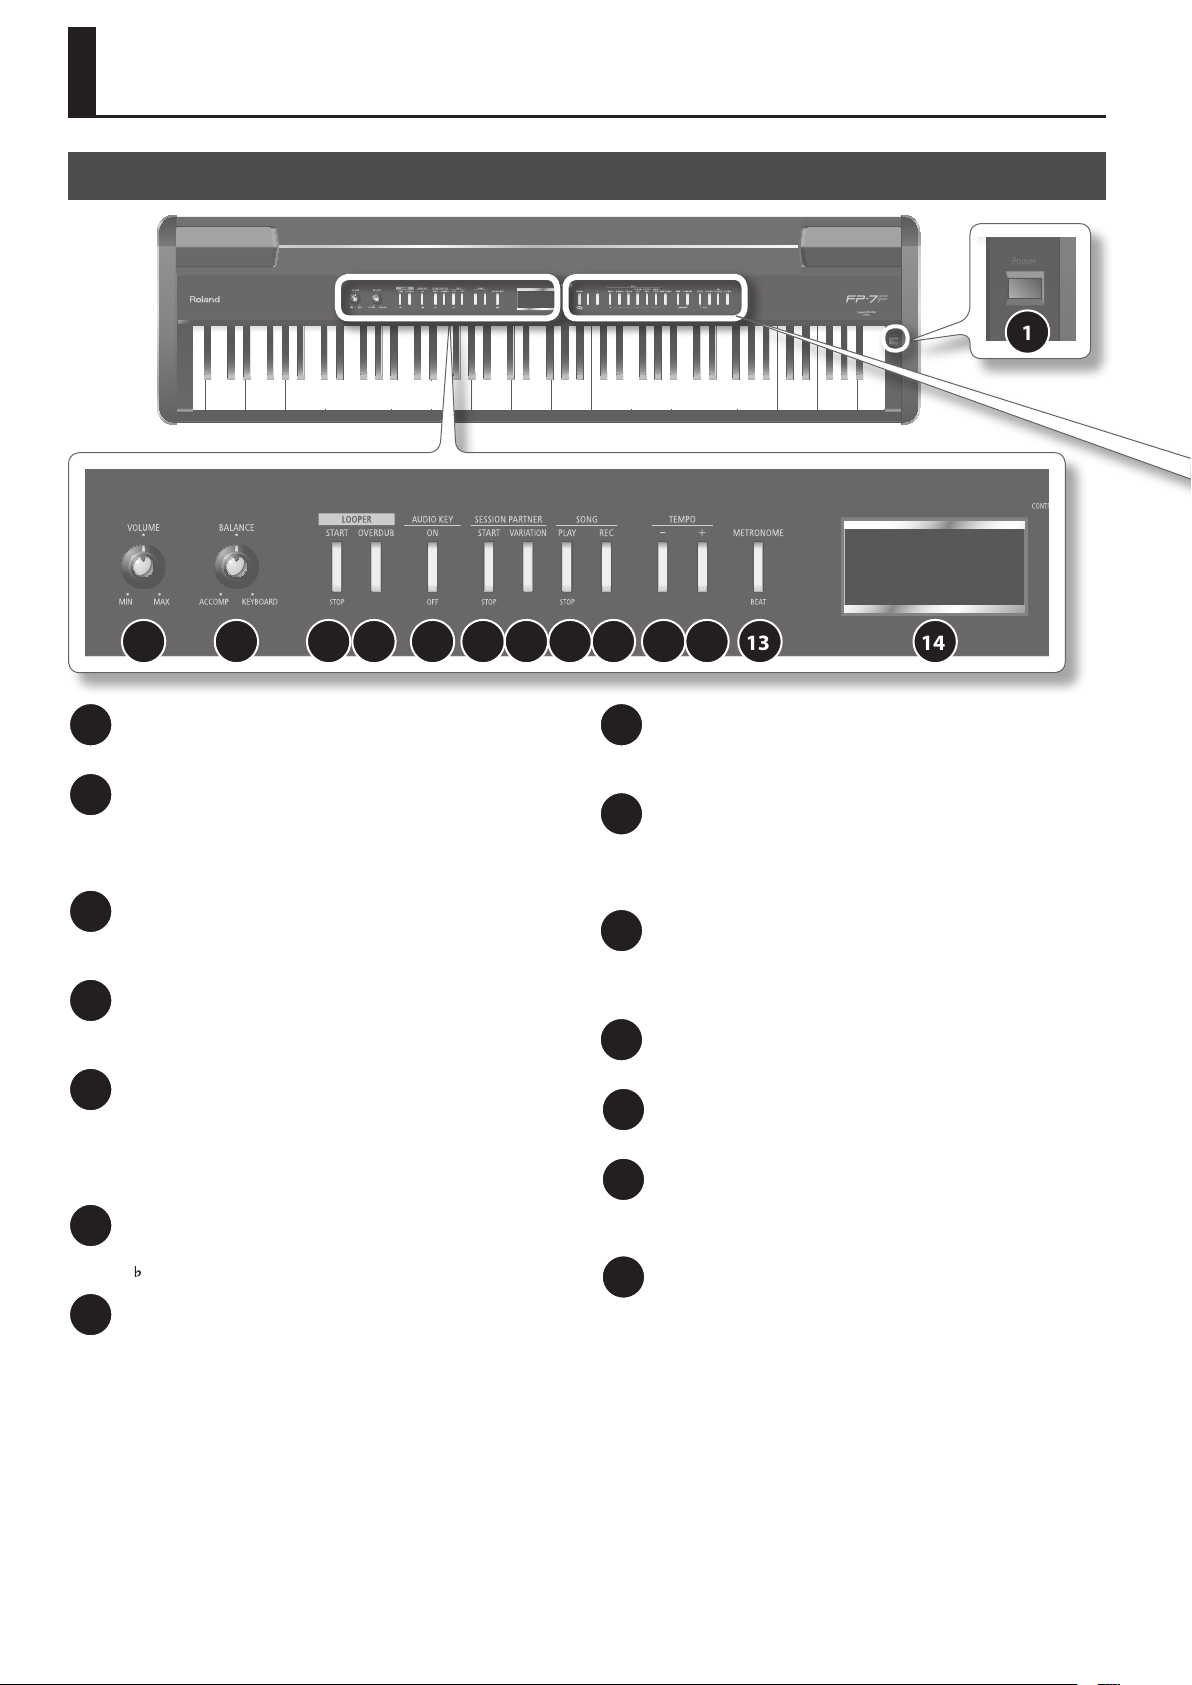
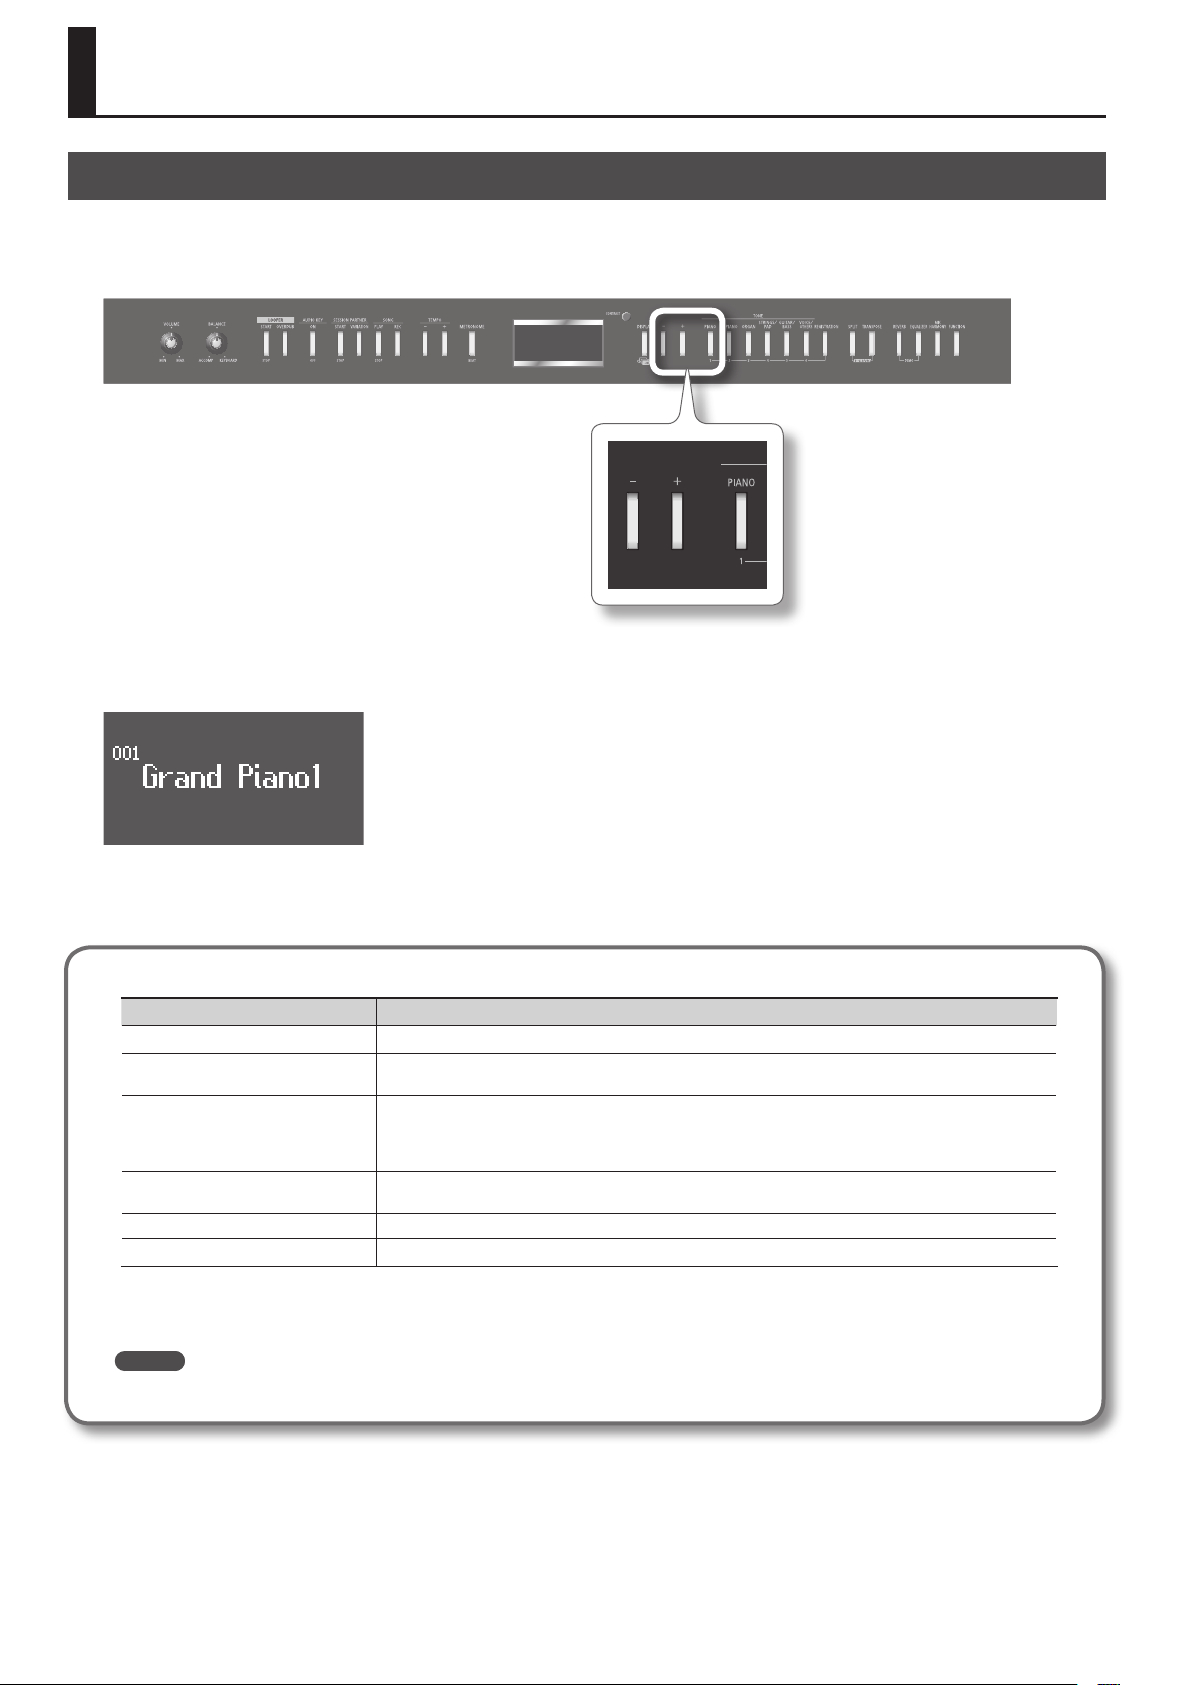
Panel Descriptions
Front Panel
2 3 4 5 6 7 8 9 10 11 12 13 14
1
[POWER] switch
1
Turns the power on/o (p. 14).
[VOLUME] knob
2
Adjusts the overall volume of the FP-7F (p. 15).
If headphones are connected, this adjusts the headphone volume
(p. 18).
[BALANCE] knob
3
Adjusts the volume balance between the keyboard performance
and the accompaniment (Song, Session Partner, Audio Key) (p. 15).
LOOPER [START/STOP] button
4
Starts/stops recording or loop playback (p. 61) with the Looper
function.
LOOPER [OVERDUB] button
5
This button switches you between overdubbing and loop playback
when using the Looper function (p. 61).
If you hold down the [DISPLAY] button and press this button, the
phrase recorded by the Looper function will be erased (p. 63).
AUDIO KEY [ON/OFF] button
6
Allows you to play an audio le by pressing a key in the range of
B 0–B1 (p. 31).
SESSION PARTNER [START/STOP] button
7
This button starts/stops Session Partner playback. By starting
Session Partner, you can produce an accompaniment in a style such
as jazz or rock (p. 44).
SESSION PARTNER [VARIATION] button
8
This button switches the accompaniment pattern of the rhythm to
the variation accompaniment pattern (p. 46).
SONG [PLAY/STOP] button
9
Plays/stops a recorded performance, internal song, or a song saved
in internal memory or USB memory (p. 53).
Also used to start the recording of a performance (p. 52).
SONG [REC] button
10
Press this button when you want the sound of your own
performance or the Session Partner performance to be recorded on
the FP-7F (p. 52).
TEMPO [-] button
11
Slows down the song tempo (p. 42).
TEMPO [+] button
12
Speeds up the song tempo (p. 42).
[METRONOME] button
13
Turns the metronome on/o (p. 21).
You’ll also use this button to set the time signature (p. 22).
Display
14
Shows information such as the tone name, song number, and
tempo.
10
Page 11
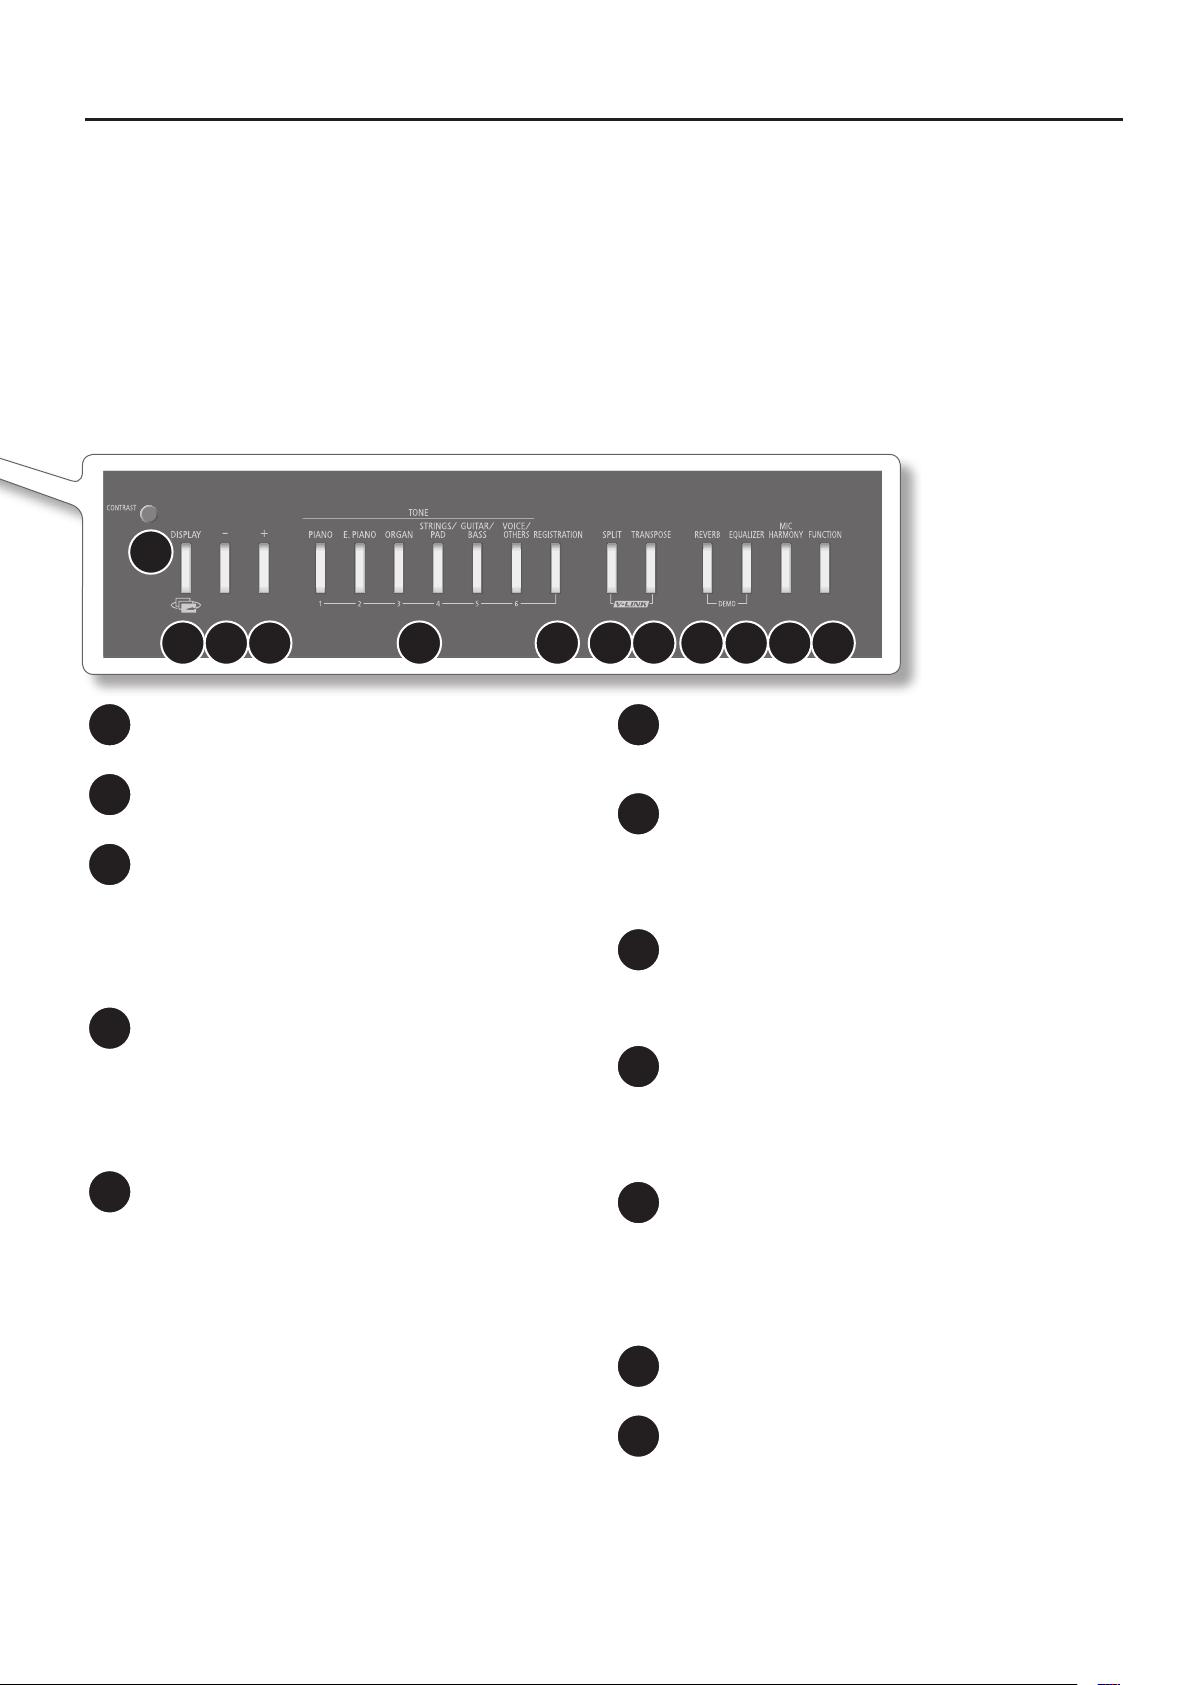
15
16 17 18 19 20 21 22 23 24 25 26
Panel Descriptions
[CONTRAST] knob
15
Adjusts the brightness of the screen (p. 18).
[DISPLAY] button
16
Returns you to the previous screen, or cancels an operation.
[-] button
17
Selects sounds or edits a function’s setting.
By pressing the [-] button and [+] button simultaneously, you can
reset the setting to its default value.
If the song select screen is shown and a song is playing, you can
rewind by holding down this button.
[+] button
18
Selects sounds or edits a function’s setting.
By pressing the [-] button and [+] button simultaneously, you can
reset the setting to its default value.
If the song select screen is shown and a song is playing, you can
fast-forward by holding down this button.
TONE buttons
19
Select the type (tone group) of sound to play on the keyboard (p. 20).
If the [REGISTRATION] button is lit, TONE buttons [1]–[6] operate as
registration select buttons (p. 49).
In some screens, pressing the [PIANO] button will conrm an
operation or take you to the next screen. In such cases, the [PIANO]
button will blink.
[REGISTRATION] button
20
Stores the tone selection and Session Partner settings as a
“registration” (p. 49).
[SPLIT] button
21
Allows you to play dierent tones in the left and right zones of the
keyboard (p. 27).
By holding down this button and pressing the [TRANSPOSE]
button, you can turn the V-LINK function on/o (p. 86).
[TRANSPOSE] button
22
Transposes the pitch of the keyboard or song (p. 30).
By holding down this button and pressing the [SPLIT] button, you
can turn the V-LINK function on/o (p. 86).
[REVERB] button
23
Applies reverberation to the sound, creating the impression that
you are performing in a concert hall (p. 24).
By holding down this button and pressing the [EQUALIZER] button,
you can listen to the demo songs (p. 19).
[EQUALIZER] button
24
Turns the equalizer on/o (p. 25).
You can use the equalizer to adjust the tone quality by boosting or
cutting just the low or high range.
By holding down this button and pressing the [REVERB] button, you
can listen to the demo songs (p. 19).
[MIC HARMONY] button
25
This button switches the Mic Harmony on/o (p. 76).
[FUNCTION] button
26
Takes you to Function mode, where you can modify sound settings
and functions (p. 64).
By holding down the [FUNCTION] button for several seconds, you
can disable the panel buttons (Panel Lock) so that they will not
operate (p. 40).
11
Page 12
Panel Descriptions
Rear Panel
1
5
MIDI connectors
1
Connect an external MIDI device here to transfer performance data
(p. 83).
USB (MIDI) connector
2
Connect your computer for transferring performance data (p. 85).
MIC INPUT jack
3
Connect your microphone here (p. 76).
This instrument is equipped with TRS type jacks. Wiring diagrams
for these jacks are shown below. Make connections after rst
checking the wiring diagrams of other equipment you intend to
connect.
TIP
RING
SLEEVE
MIC [VOLUME] knob
4
Adjusts the volume of the microphone connected to the MIC INPUT
jack (p. 76).
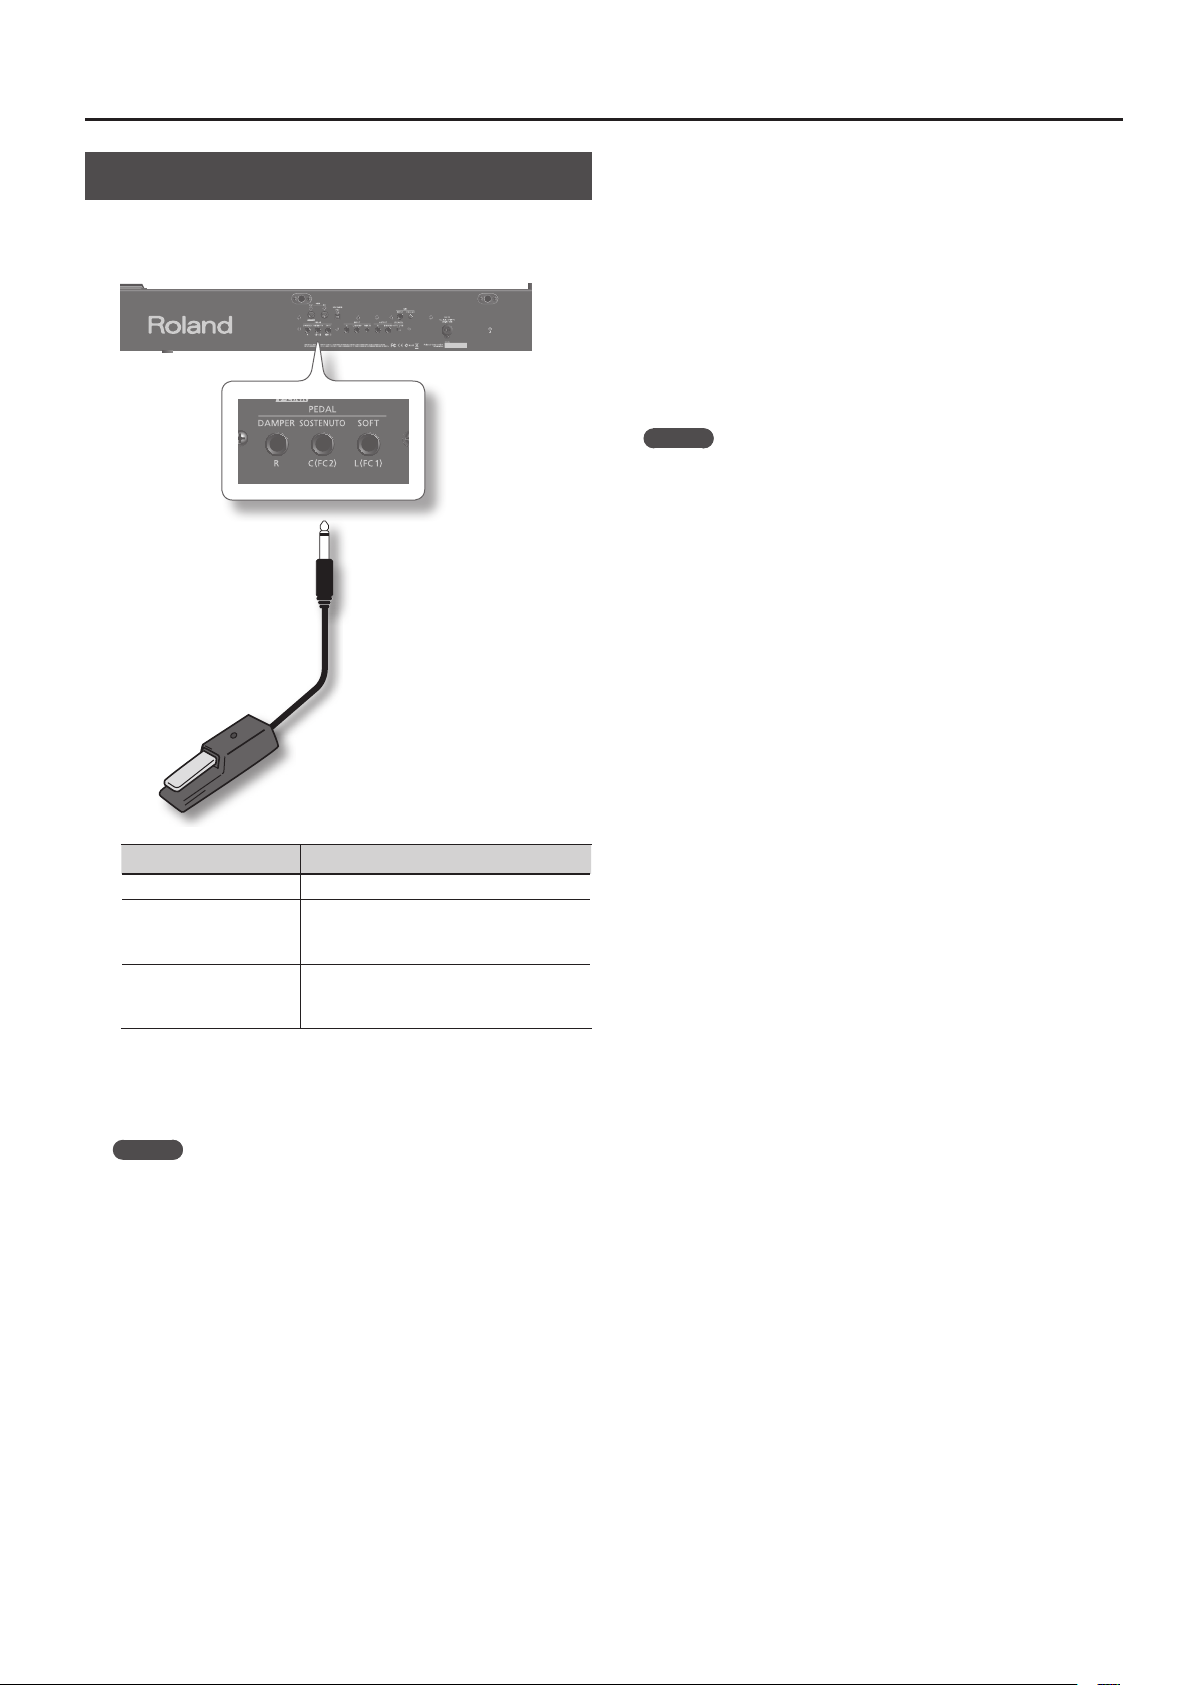
PEDAL jacks
5
Connect the included pedal (DP series) or a separately available
pedal (RPU-3) here (p. 17).
2
6 87
3
4
9 10
[SPEAKER] switch
8
This switch turns the internal speaker on/o (p. 82).
DC IN jack
9
Connect the included AC adaptor here (p. 14).
Grounding terminal
10
Depending on the circumstances of a particular setup, you may
experience a discomforting sensation, or perceive that the surface
feels gritty to the touch when you touch this device, microphones
connected to it, or the metal portions of other objects. This is due
to an innitesimal electrical charge, which is absolutely harmless.
However, if you are concerned about this, connect the ground
terminal (see gure) with an external ground. When the unit is
grounded, a slight hum may occur, depending on the particulars
of your installation. If you are unsure of the connection method,
contact the nearest Roland Service Center, or an authorized Roland
distributor, as listed on the “Information” page.
Unsuitable places for connection
• Water pipes (may result in shock or electrocution)
• Gas pipes (may result in re or explosion)
• Telephone-line ground or lightning rod (may be dangerous in
the event of lightning)
INPUT jacks
6
Connect an audio device or another electronic music instrument
here, so that its sound can be heard through the FP-7F’s speakers
(p. 82).
OUTPUT jacks
7
Connect these to your external speaker system.
These allow the FP-7F’s sound to be heard from the connected
speakers (p. 82).
12
Page 13
Other Connectors
2
1
Panel Descriptions
PHONES jacks
1
Connect your headphones here (p. 18).
The FP-7F allows you to use two sets of headphones
simultaneously.
External memory connector
2
Connect your USB memory here.
Songs saved on USB memory can be played back (p. 78), and songs
you recorded on the FP-7F can be saved to USB memory (p. 80).
13
Page 14
Before You Play
Getting Ready to Play
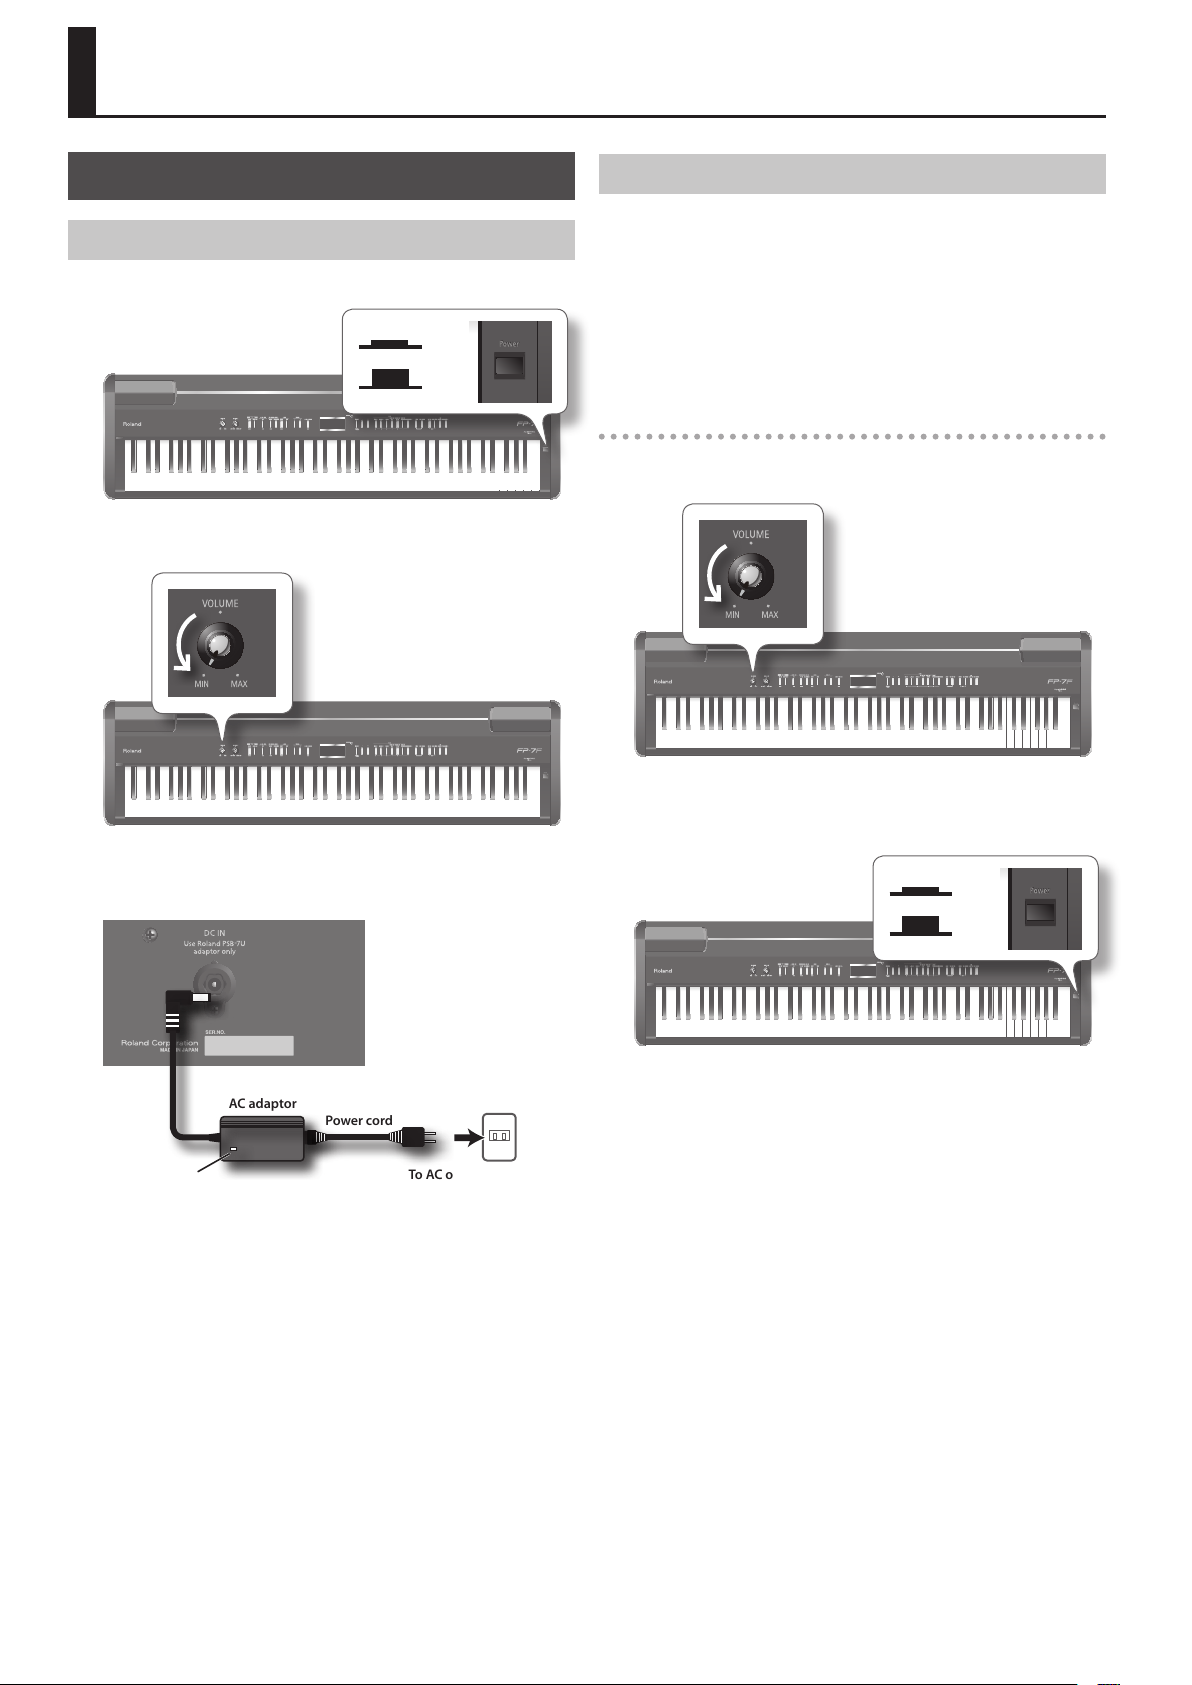
Connecting the AC adaptor
1. Make sure that the [POWER] switch is o (outward position).
On
O
2. Turn the [VOLUME] knob all the way toward the left to
minimize the volume.
Turning the Power On/O
* Once the connections have been completed, turn on power to your
various devices in the order specied. By turning on devices in
the wrong order, you risk causing malfunction and/or damage to
speakers and other devices.
* Always make sure to have the volume level turned down before
switching on power. Even with the volume all the way down, you
may still hear some sound when the power is switched on, but this is
normal, and does not indicate a malfunction.
Turning the power on
1. Turn the [VOLUME] knob all the way toward the left to
minimize the volume.
3. Connect the included AC adaptor to the DC IN jack located
on the FP-7F’s rear panel, and plug the power cord into an
electrical outlet.
AC adaptor
Indicator
Place the AC adaptor so the side with the indicator (see illustration)
faces upwards and the side with textual information faces downwards.
The indicator will light when you plug the AC adaptor into an AC
outlet.
Power cord
To AC outlet
2. Press the [POWER] switch to turn it on.
The power will turn on, and buttons such as the TONE buttons will
light.
On
O
3. Use the [VOLUME] knob to adjust the volume (p. 15).
Now you can play the keyboard to produce sound.
* This unit is equipped with a protection circuit. A brief interval (a
few seconds) after power up is required before the unit will operate
normally.
14
Page 15
Before You Play
Turning the Power O
1. Turn the [VOLUME] knob all the way toward the left to
minimize the volume.
2. Press the [POWER] switch to turn it o.
The power will turn o.
On
O
Adjusting the Volume
Here’s how to adjust the volume of the sounds you play from the
keyboard, or the volume of songs played back from internal memory
or USB memory.
If headphones are connected, this adjusts the headphone volume.
1. Turn the [VOLUME] knob to adjust the overall volume.
Play the keyboard to produce sound while you adjust the volume.
Turning the knob toward the right will increase the volume, and
turning it toward the left will decrease the volume.
Adjusting the Volume Balance between Your Keyboard Performance and the Accompaniment
Here’s how to adjust the volume balance between the sound of
your keyboard performance and the accompaniment (Song, Session
Partner, or Audio Key).
1. Turn the [BALANCE] knob to adjust the volume balance.
Turning the knob toward the left (toward “ACCOMP”) will decrease the
volume of your keyboard performance.
Turning the knob toward the right (toward “KEYBOARD”) will decrease
the volume of the accompaniment.
MEMO
If you want to adjust the volume of the microphone, use the MIC
[VOLUME] knob (p. 76).
* The volume of phrases recorded using the Looper (p. 60) cannot be
adjusted.
15
Page 16
Before You Play
Attaching the Music Rest
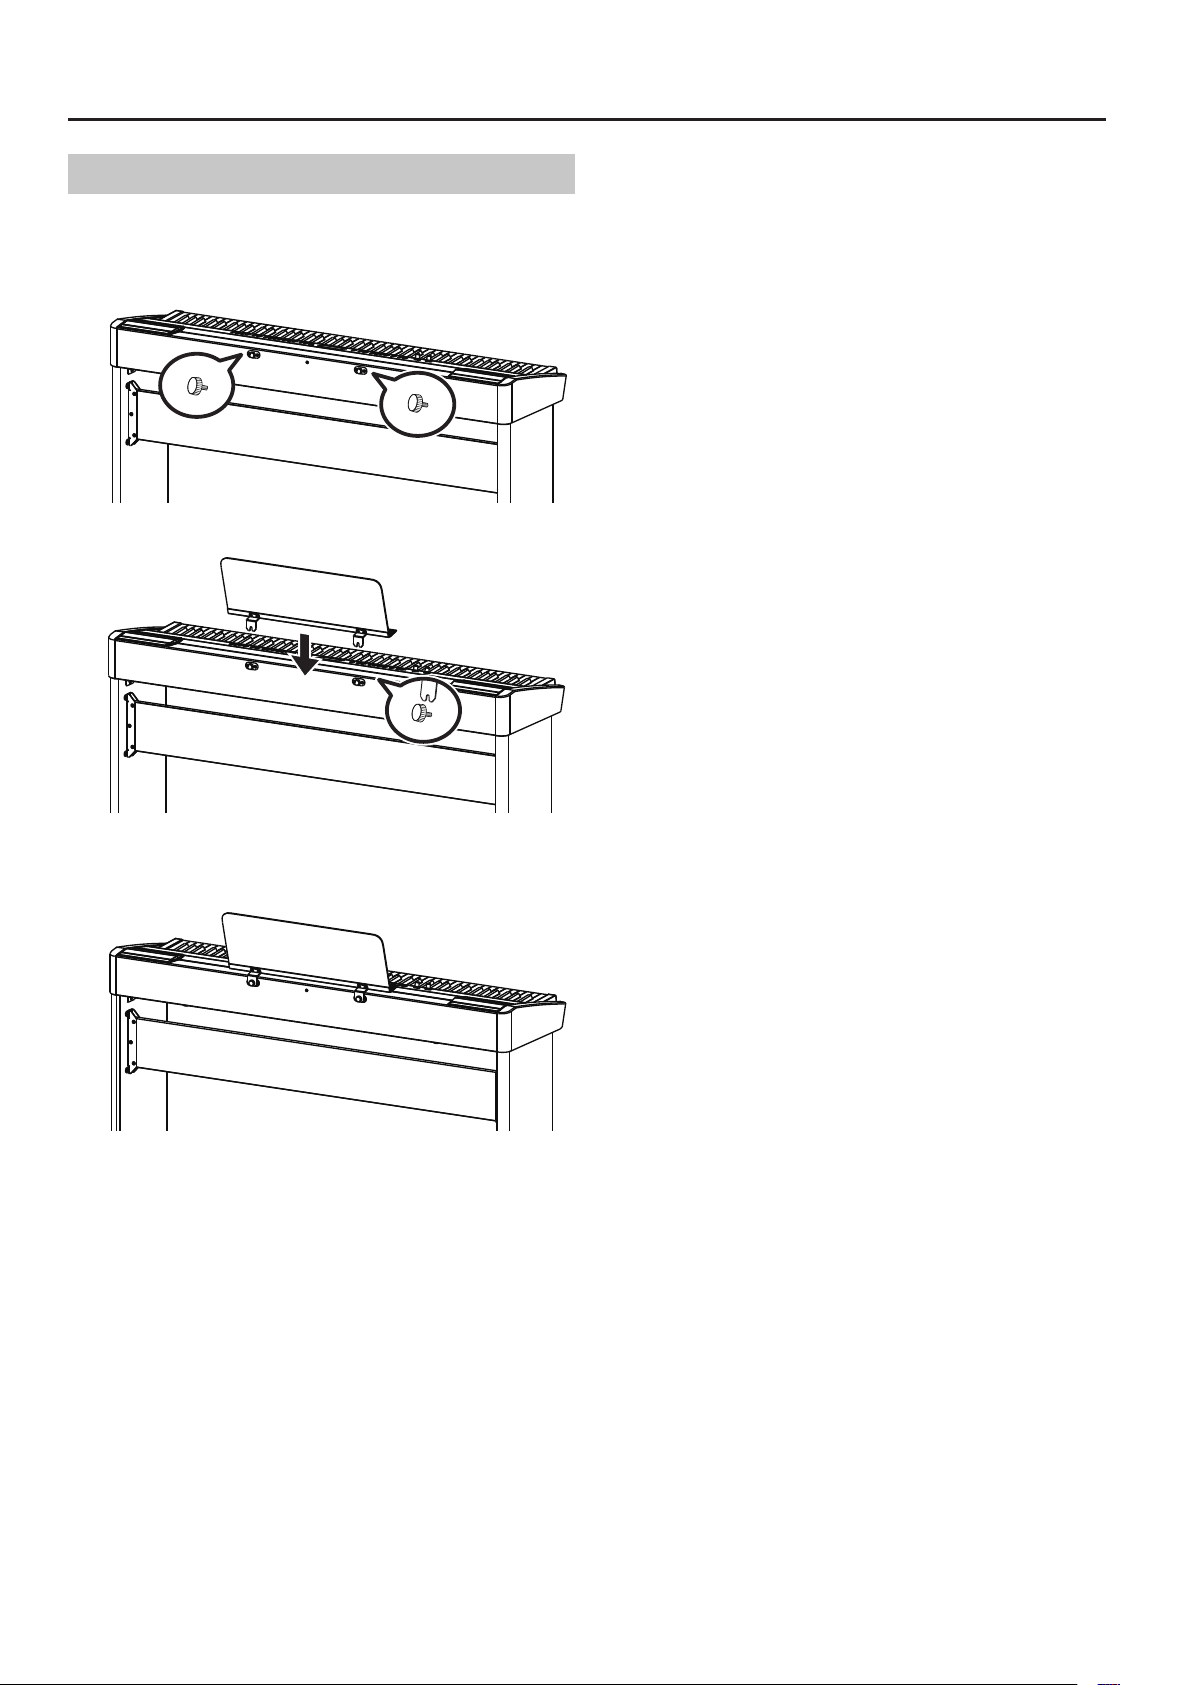
Here’s how to attach the included music rest.
1. Loosen the music rest attachment screws located on the
back of the piano (two locations).
2. Place the music rest between the screws and the chassis.
3. While using one hand to support the music rest, tighten
the screws (two locations) to fasten the music rest rmly in
place.
When attaching the music rest, you must use your hand to support it
rmly so that it does not fall. Be careful not to pinch your hand.
To remove the music rest, support it with one hand while you loosen
the screws. Remove the music rest, and then securely retighten the
screws.
* Don’t apply excessive force to the installed music rest.
* When attaching the music rest, you must use the music rest attach-
ment screws that were attached to the piano.
* Should you remove the music rest attachment screws, keep them
in a safe place out of children’s reach, so there is no chance of them
being swallowed accidentally.
16
Page 17
Before You Play
Connecting Pedals
Connect the included pedal to one of the PEDAL jacks.
The function of the pedal will depend on the jack to which it’s
connected.
Pedal
Damper pedal
Use this to sustain the sound.
While you hold down the damper pedal, notes will be sustained even if
you take your ngers o the keyboard. This is the same function as the
right pedal of an acoustic piano.
The included pedal will detect a continuous value, so the amount
by which you press the pedal will smoothly control the depth of the
damper pedal eect.
On an acoustic piano, pressing the damper pedal allows other strings
to resonate sympathetically with the notes you play, producing a rich
and spacious resonance. The FP-7F simulates this natural damper
resonance.
MEMO
Set the switch on the included pedal to “Continuous” when the pedal
is connected.
Sostenuto pedal
The notes you are pressing when this pedal is depressed will be
sustained. This is the same function as the center pedal of an acoustic
piano.
Soft pedal
Use this to soften the sound.
When you play the keyboard while holding down the soft pedal,
the sound will be softer than normal for the same keyboard playing
strength. This is the same function as the left pedal of an acoustic
piano.
The included pedal will detect a continuous value, so the amount by
which you press the pedal will smoothly control the depth of the soft
pedal eect.
Connected Jack Operation
DAMPER/R jack The pedal will operate as a damper pedal.
SOSTENUTO/C (FC2) jack
SOFT/L (FC1) jack
* Unplugging a pedal cord from the unit while the power is on may
cause the pedal’s eect to be applied without stopping. The power
of the FP-7F must be turned o before inserting or removing a pedal
cord.
The pedal will operate as a sostenuto pedal.
Alternatively, you can assign a dierent
function (p. 70, p. 73).
The pedal will operate as a soft pedal.
Alternatively, you can assign a dierent
function (p. 70, p. 73).
MEMO
• If you connect the separately available RPU-3 pedal, allows you to
enjoy piano performances at their fullest, since you can use three
pedals.
• You can connect an expression pedal to the SOSTENUTO/C (FC2)
jack or SOFT/L (FC1) jack, and use it to control the FP-7F’s volume
p. 73).
(
Use only the specied expression pedal (EV-5; sold separately).
By connecting any other expression pedals, you risk causing
malfunction and/or damage to the unit.
• With the pedal connected to the SOSTENUTO/C (FC2) jack or the
SOFT/L (FC1) jack, it can be assigned other functions as well (p. 70, p.
72, p. 73).
17
Page 18
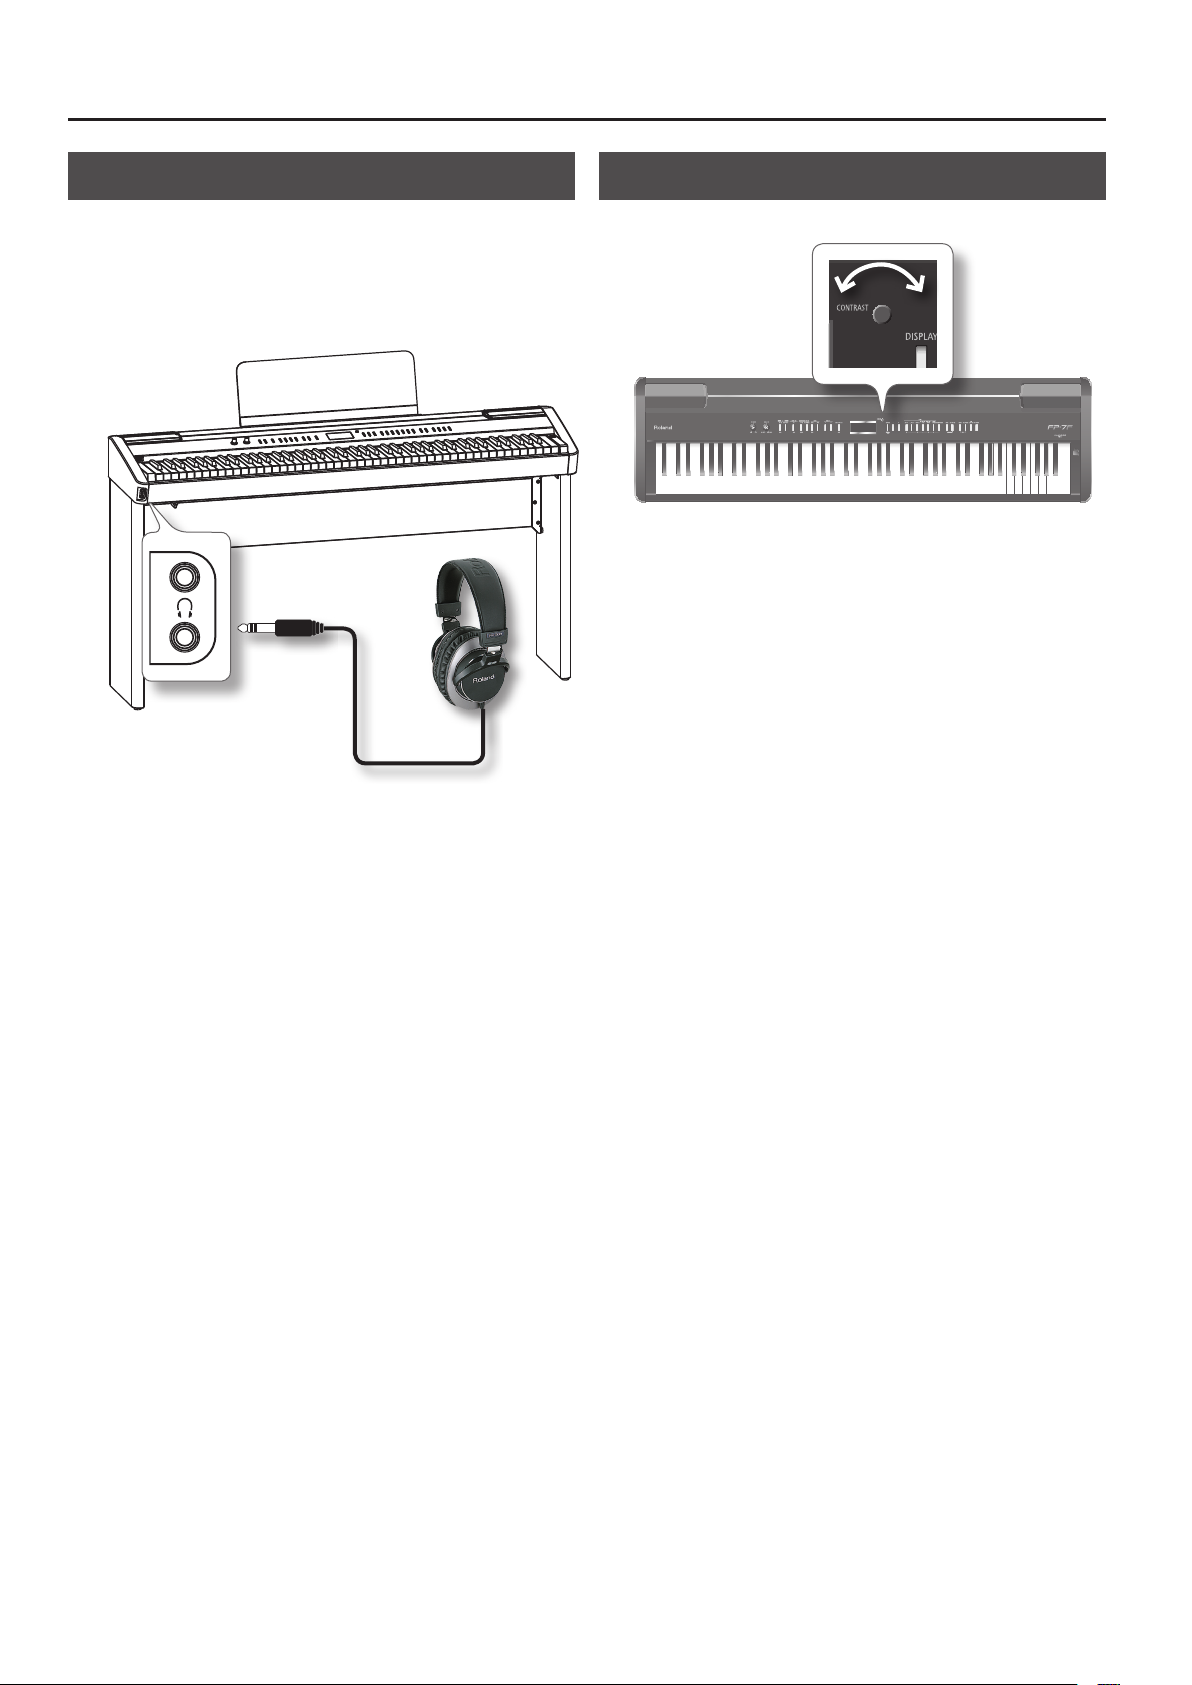
Before You Play
Using Headphones
If you use headphones, you’ll be able to play even at night without
being heard by others nearby.
Since the FP-7F has two headphone jacks, two people can use
headphones simultaneously.
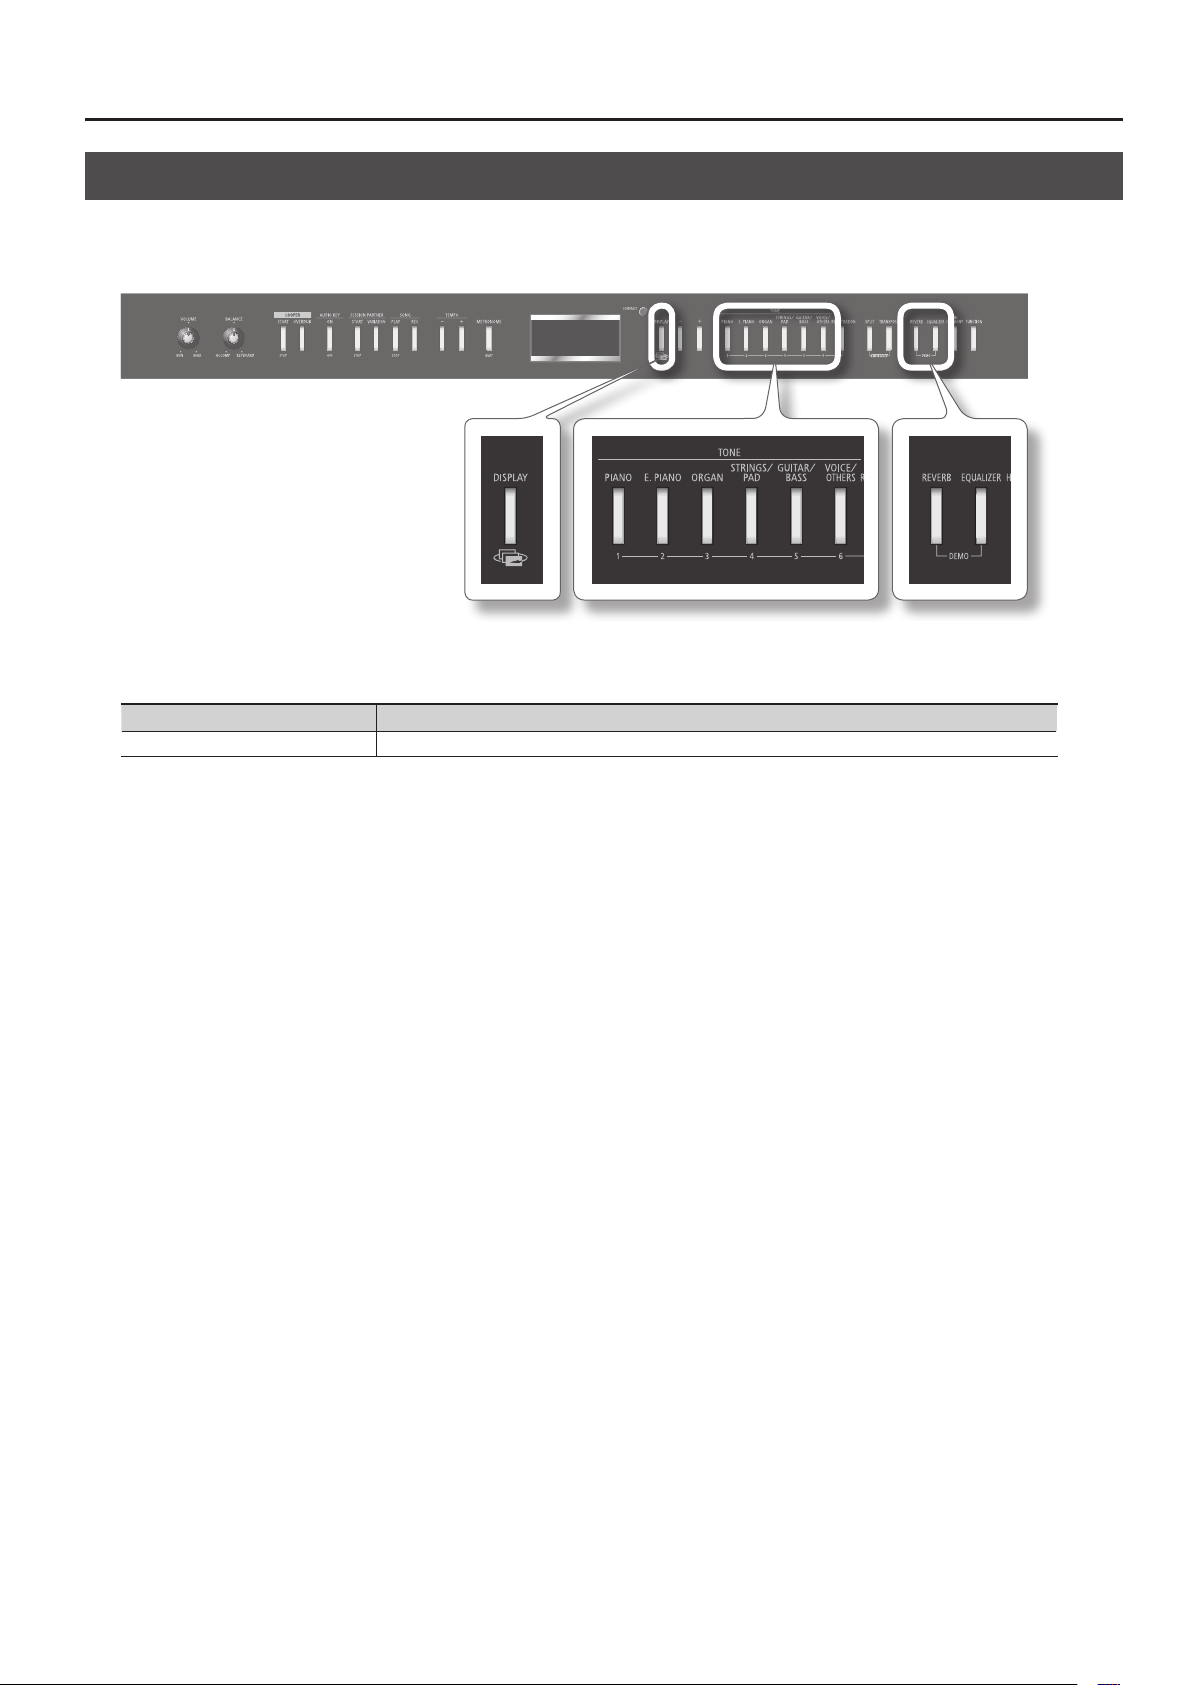
Adjusting the Display Brightness
Here’s how to adjust the brightness of the FP-7F’s display.
1. Turn the [CONTRAST] knob to adjust the brightness of the
display.
* You may see vertical lines in the screen, but this is due to the struc-
ture of a liquid crystal display, and does not indicate a malfunction.
By using the [CONTRAST] knob to adjust the contrast of the screen,
you can minimize these lines.
* The contrast of the screen may be aected by the temperature.
1. Connect your headphones to the PHONES jack.
If headphones are connected, sound will not be heard from the FP-7F’s
speakers.
2. Use the [VOLUME] knob (p. 15) to adjust the headphone
volume.
* To prevent damage to the cord’s internal conductors, avoid rough
handling. When using headphones, mainly try to handle either the
plug or the headset.
* Your headphones may be damaged if the volume of a device is
already turned up when you plug them in. Minimize the volume
before you plug in the headphones.
* Excessive input will not only damage your hearing, but may also
strain the headphones. Please enjoy music at an appropriate
volume.
* Use headphones that have a stereo 1/4” phone plug.
18
Page 19
Before You Play
Listening to the Demo Songs
Here’s how to listen to the demo songs. The FP-7F provides six demo songs.
* You can’t play back the demo songs if your recorded performance has not been saved. You must rst save or delete your recorded performance (p.
56, p. 58).
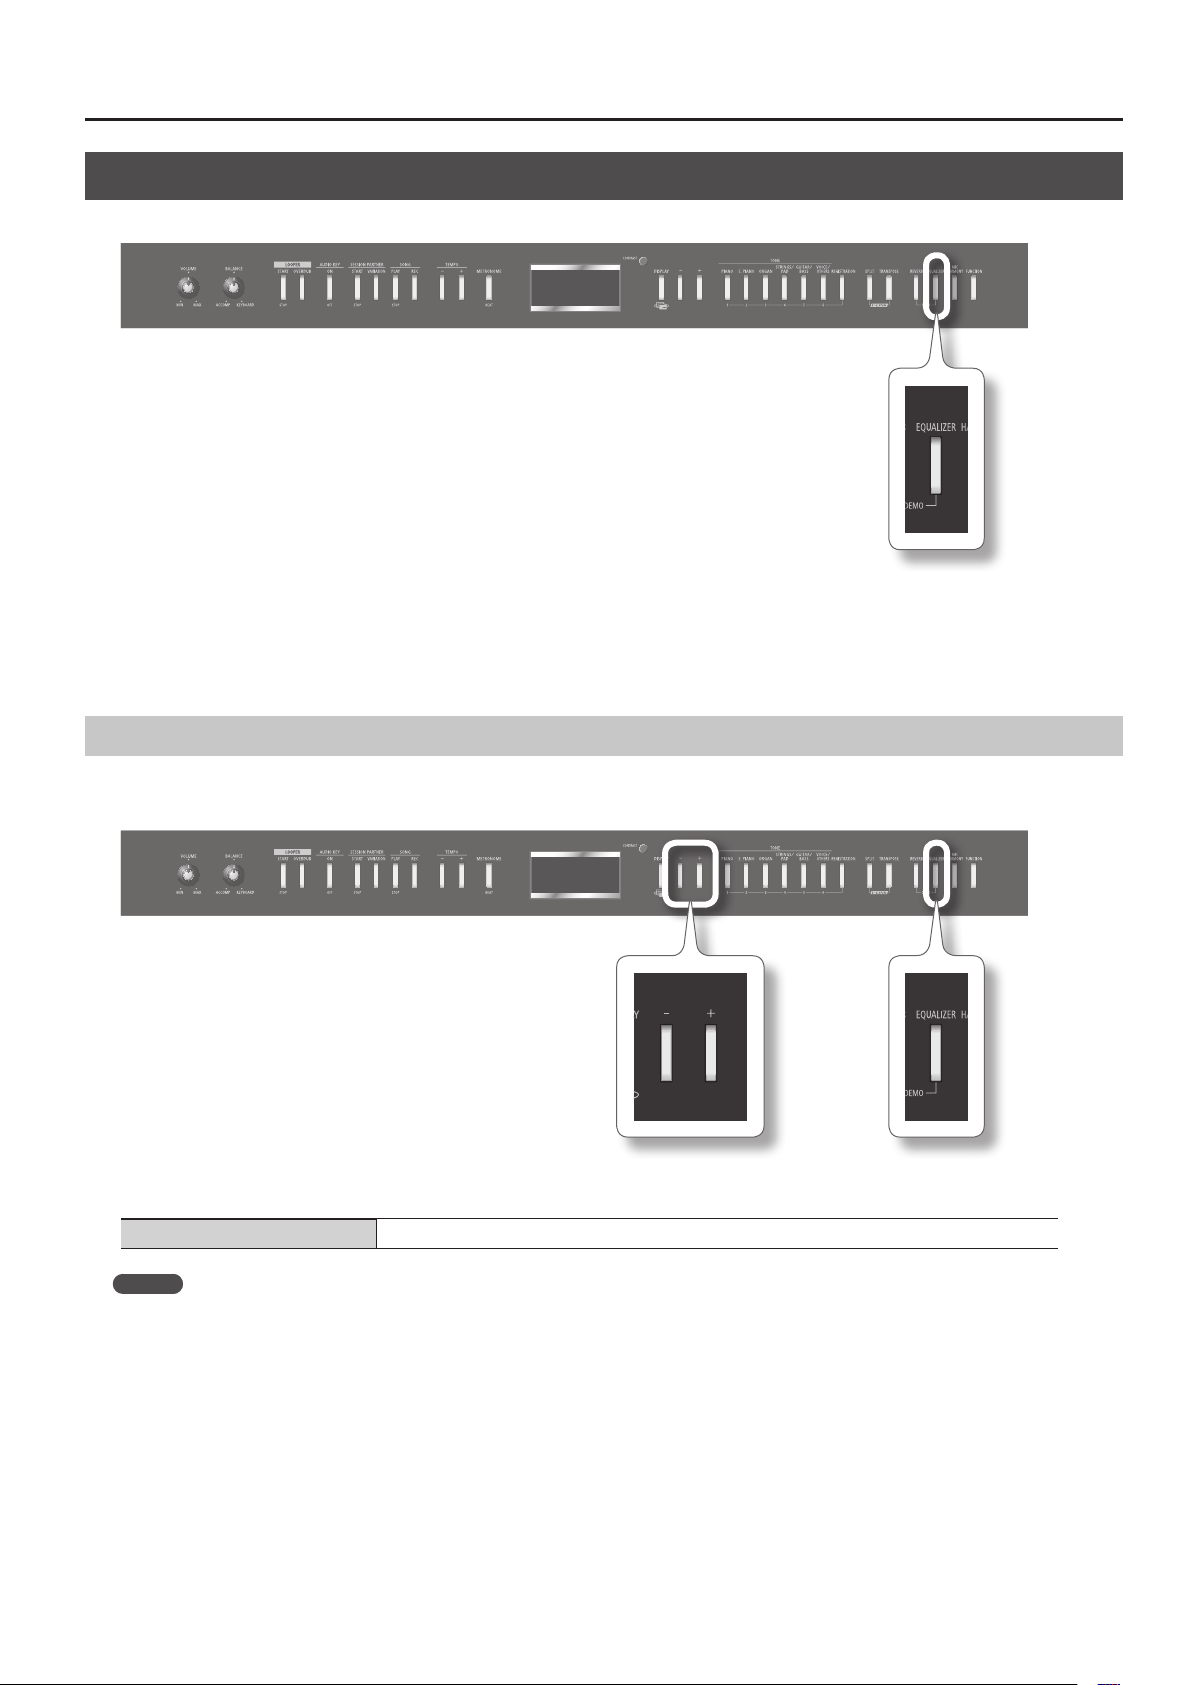
1. Hold down the [REVERB] button and press the [EQUALIZER] button.
The TONE buttons will blink.
Button assigned to each demo song Demo content
TONE buttons Demo songs for the tones of each button
* All rights reserved. Unauthorized use of this material for purposes other than private, personal enjoyment is a violation of applicable laws.
* The performance data for the demo songs is not output from the MIDI OUT connector.
2. Press one of the buttons to which a demo song is assigned.
The demo songs will play consecutively, starting with the song whose button you pressed. The button corresponding to the currently playing demo
song will blink.
When the last demo song has nished playing, playback will continue from the rst demo song.
3. To stop playback, press the blinking button.
4. Press the [DISPLAY] button to end the demo.
The indicators for the TONE buttons will return to their original state.
19
Page 20
Performing
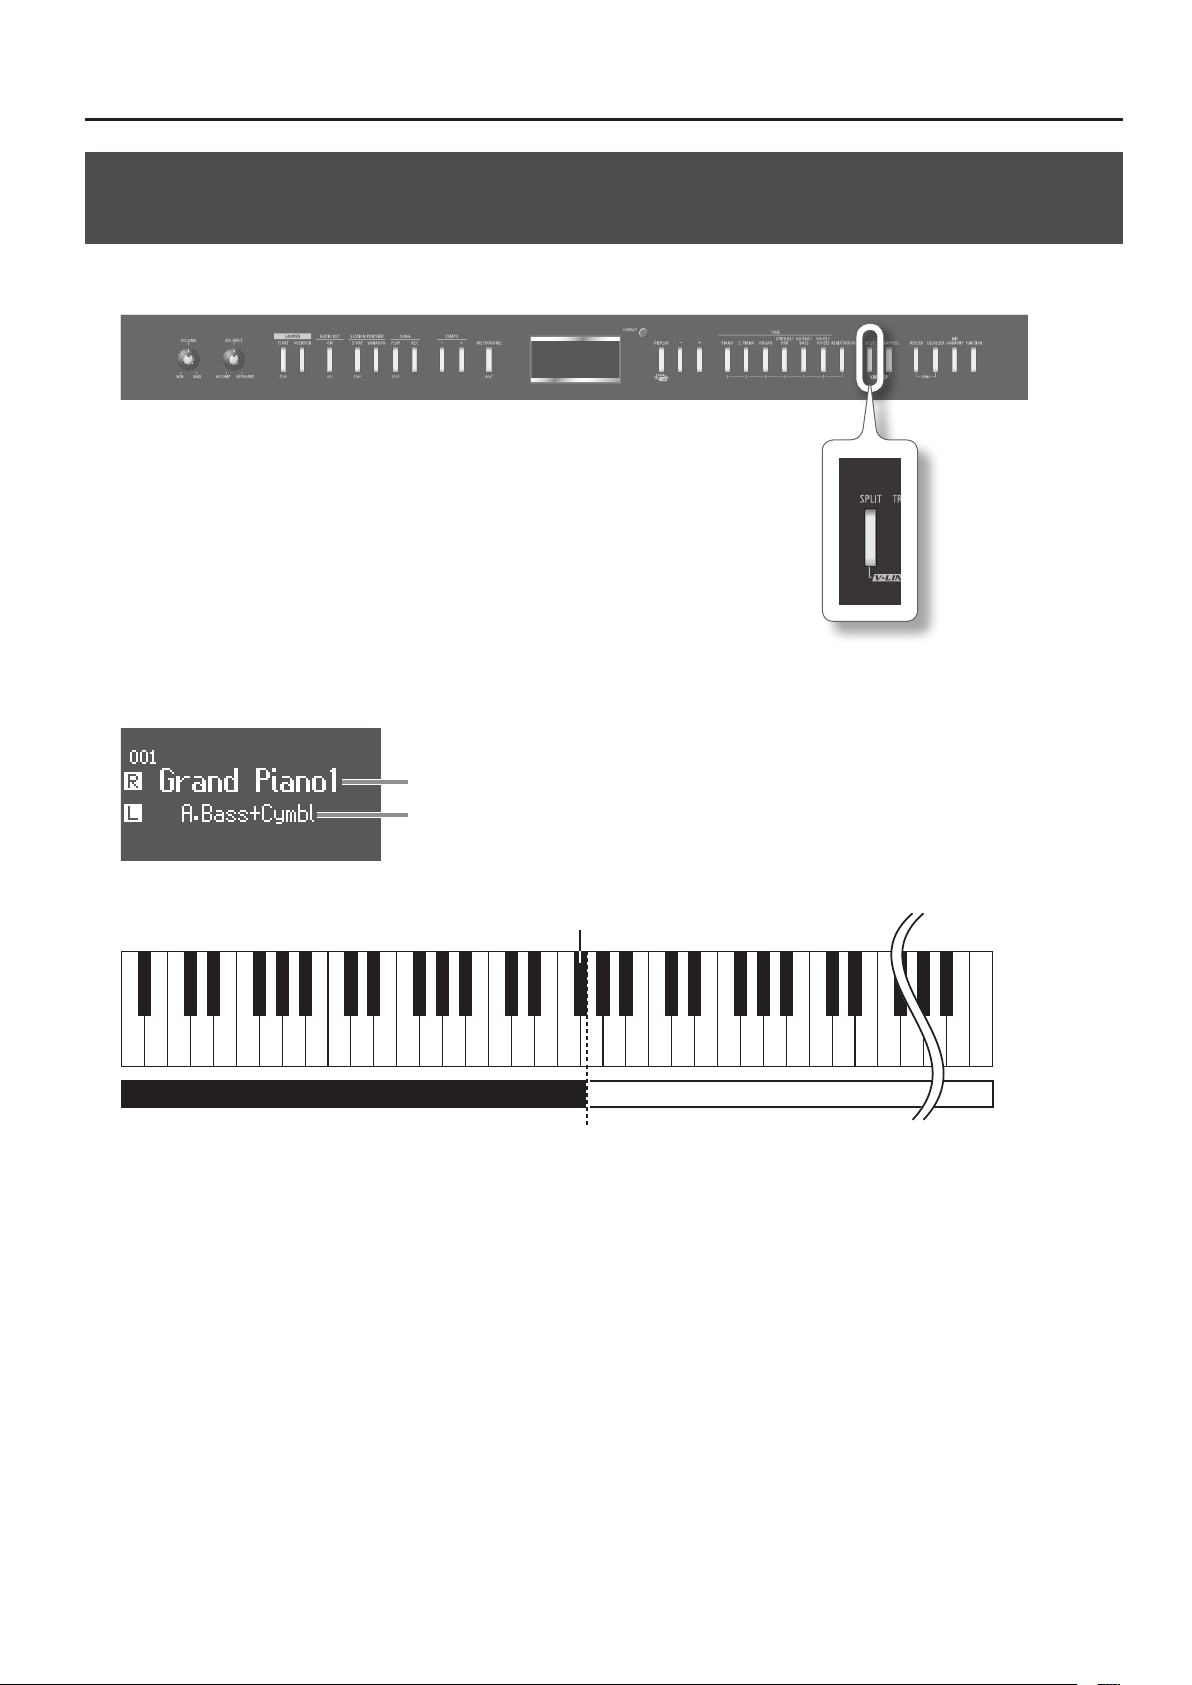
Performing Various Sounds
The FP-7F lets you enjoy performing with piano sounds and other types of sounds (a total of more than 300).
These sounds are called “Tones.” The tones are organized into six groups, and each group is assigned to a TONE button.
Let’s start by performing with a piano tone.
1. Press the [PIANO] button.
The number and name of the currently selected tone is shown.
2. Press the [-] or [+] button.
A dierent tone will be changed.
About the available tones
Button Explanation
[PIANO] button Allows you to select various instruments, including grand pianos, honky-tonk pianos, and historical instruments.
[E. PIANO] button
[ORGAN] button
[STRINGS/PAD] button
[GUITAR/BASS] button Allows you to select guitar or bass tones.
[VOCAL/OTHERS] button This button selects vocal, brass, and GM2 tones.
* For some tones, there are keys that produce no sound.
* Some eects (p. 24) will no longer be applied if you add Harmony (p. 76); this may cause the tone to sound dierently.
MEMO
For details on the tones, refer to “Tone List” (p. 92).
Allows you to select various electric piano sounds used in pop or rock, as well as the sound of instruments played
using mallets.
Allows you to select organ tones. If you select one of the “TW-Organ 1–6” tones, the screen will show the state of
the harmonic bars (p. 37).
If you’ve selected a tone to which the rotary eect is applied, pressing the [ORGAN] button will switch the speed
of the rotary eect.
Allows you to select the sounds of string instruments such as violins, as well as other instruments used in
orchestras, which are appropriate when used for Dual play with a piano sound.
20
Page 21
Performing with the Metronome
You can sound the metronome while you play.
You can also change the metronome’s volume and time signature.
If a song is playing, the metronome will sound according to the song’s tempo and time signature.
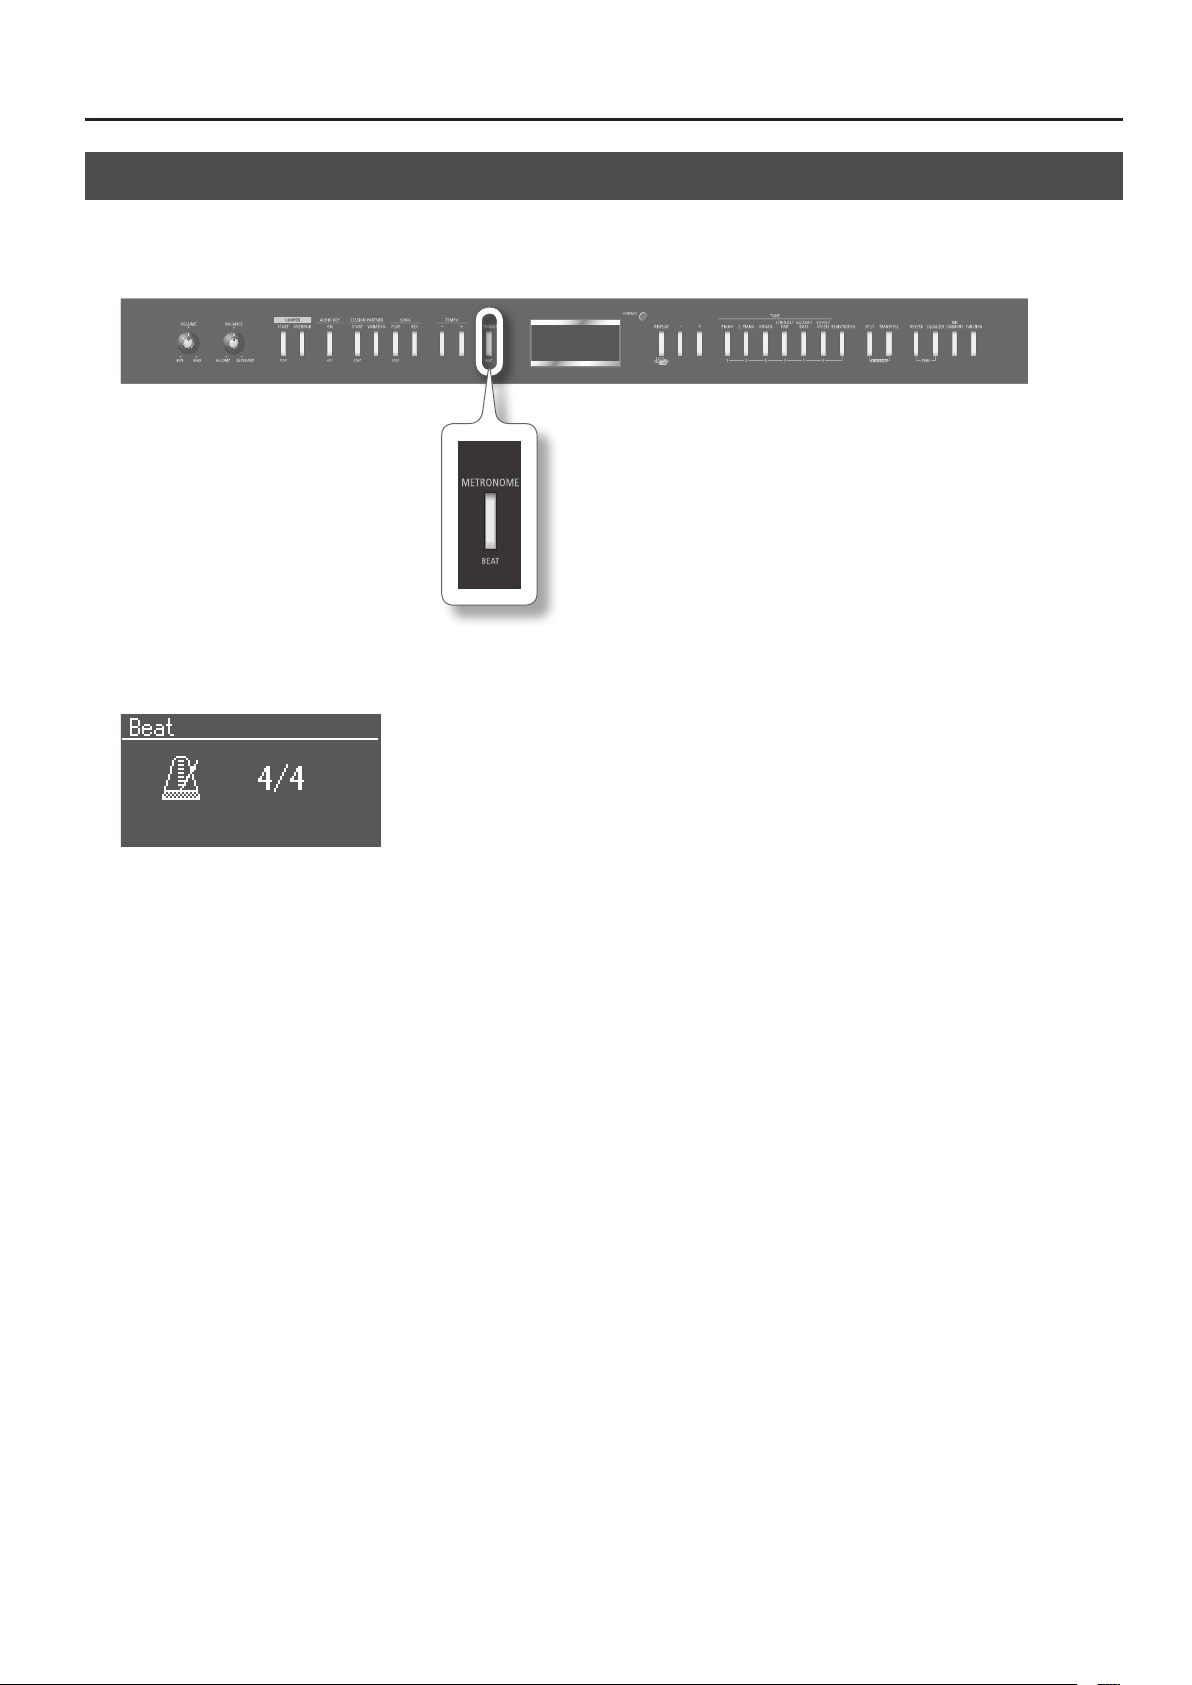
1. Press the [METRONOME] button.
The [METRONOME] button will blink, and the Beat screen will appear.
Performing
The [METRONOME] button will blink red and green in keeping with the currently selected time signature.
Red indicates the downbeat and green indicates the weak beats.
Press the [METRONOME] button once again to stop the metronome.
21
Page 22
Performing
Changing the Metronome’s Time Signature
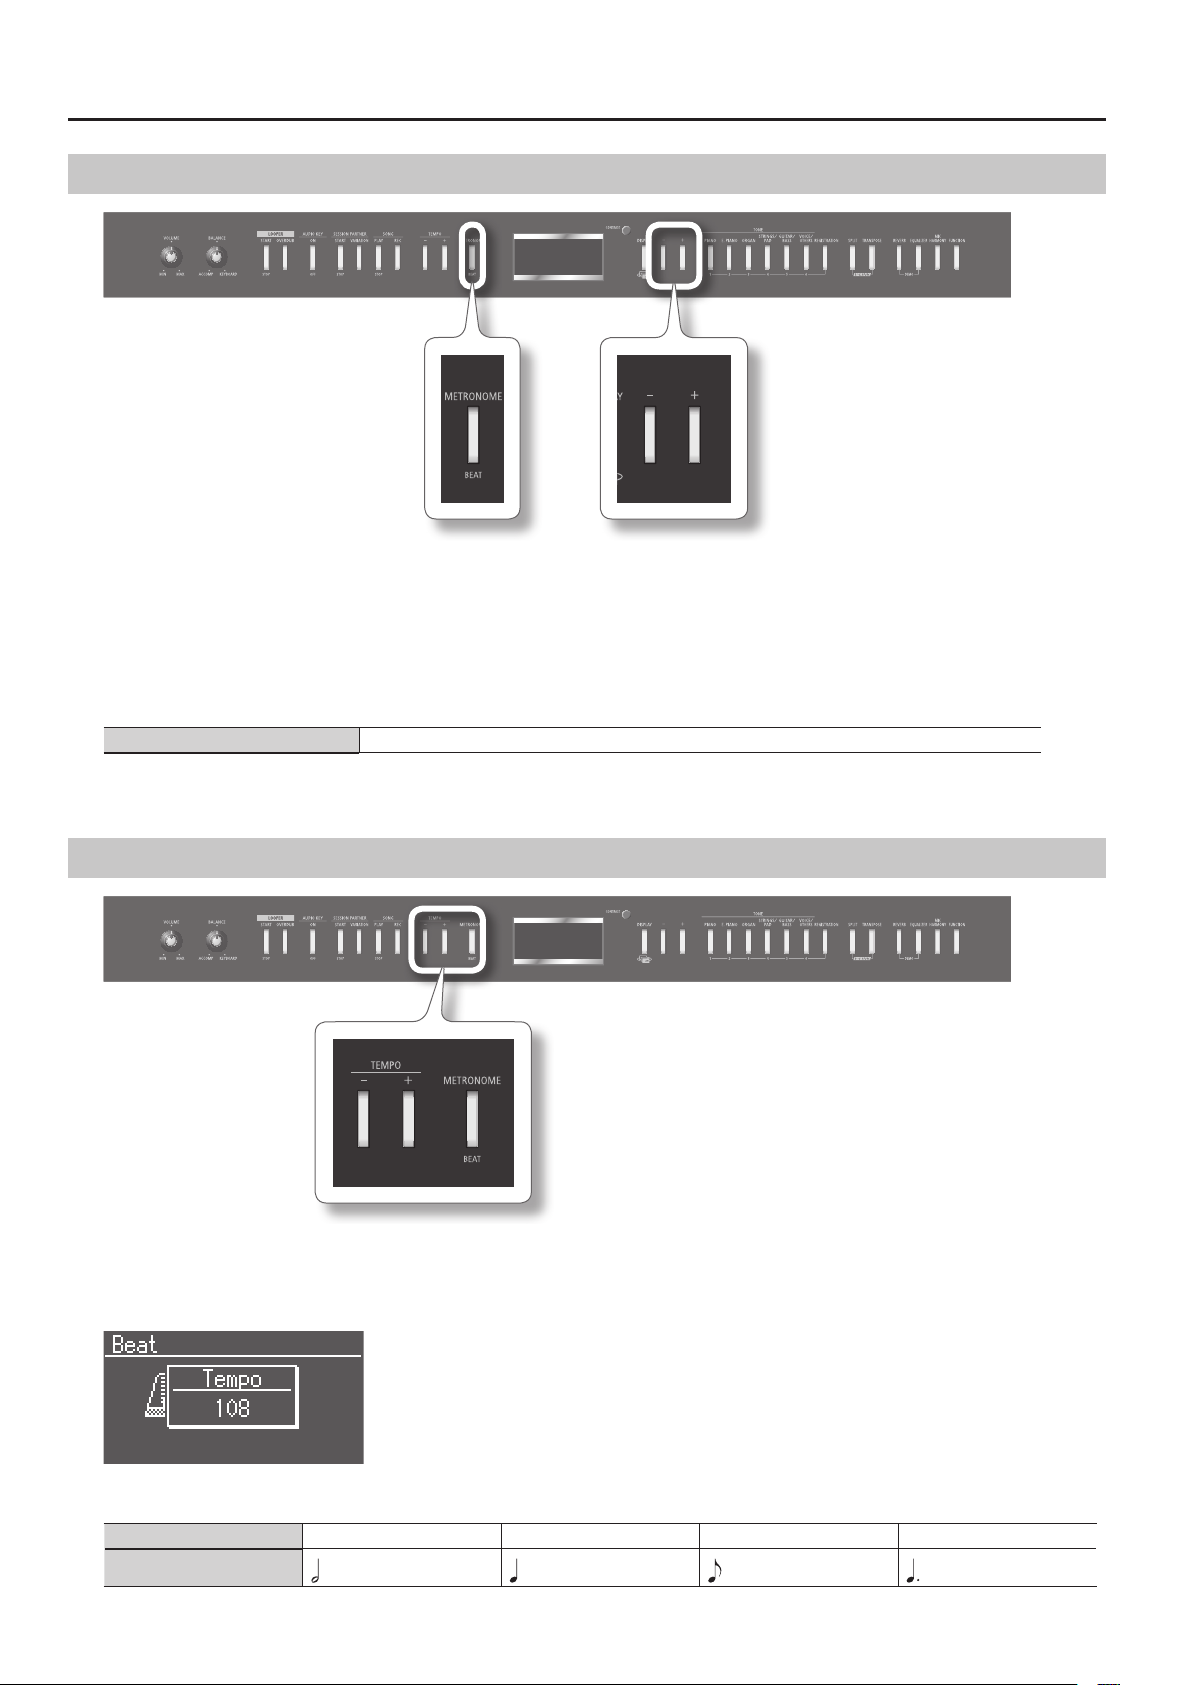
1. Press the [METRONOME] button.
The metronome will sound.
2. Press the [-] or [+] button.
With the “0/4” setting, only weak beats will be sounded.
When you record your performance, it will be recorded using the time signature you specify here.
When you play back a song, the metronome’s time signature will be set to the time signature of that song.
Available time signatures 2/2, 0/4, 2/4, 3/4, 4/4, 5/4, 6/4, 7/4, 3/8, 6/8, 9/8, 12/8
* You can’t change the metronome’s time signature while a song is playing.
Changing the Metronome Tempo
1. Press the [METRONOME] button.
The metronome will sound.
2. Press the TEMPO [-] or TEMPO [+] button.
Correspondence between beat and tempo display
Beat 2/2 0/4, 2/4, 3/4, 4/4, 5/4, 6/4, 7/4 3/8 6/8, 9/8, 12/8
22
Tempo
= 5–250
= 10–500 = 20–999 = 7–333
Page 23
Changing the Metronome’s Volume
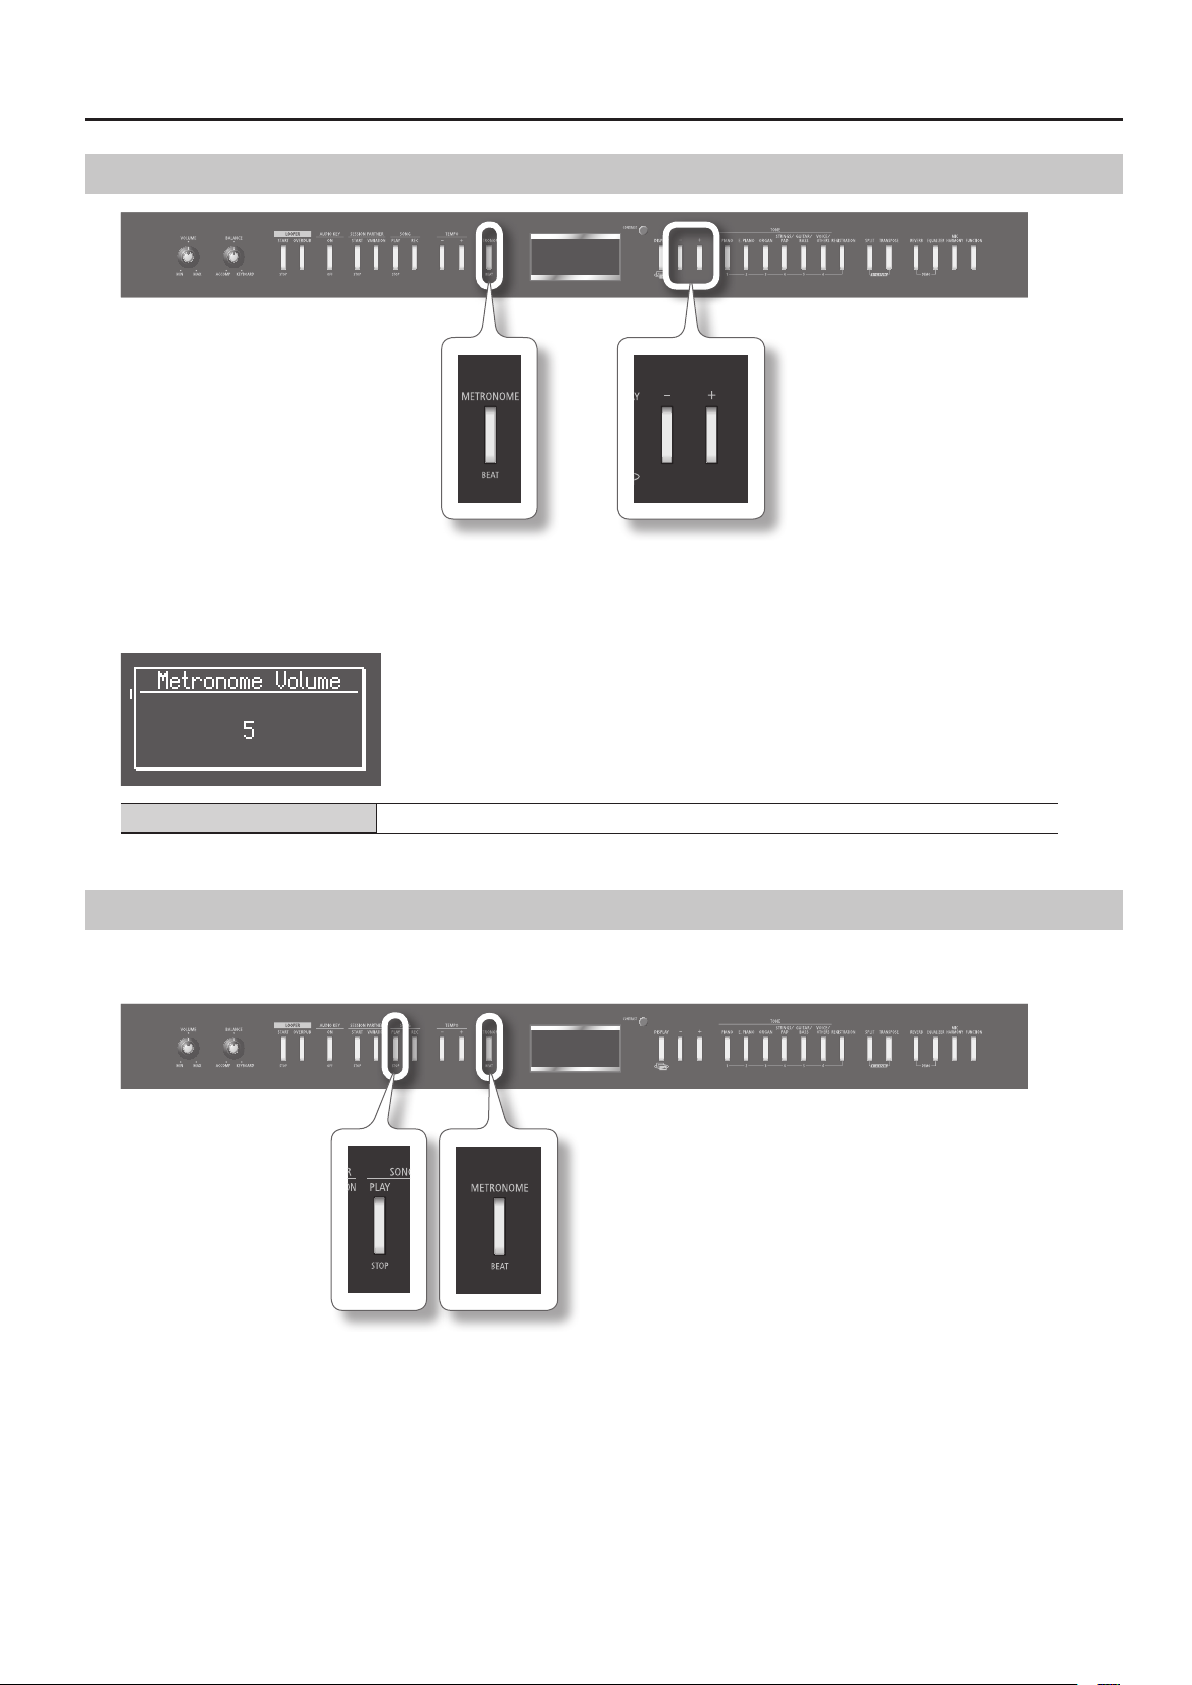
1. Hold down the [METRONOME] button and press the [-] or [+] button.
The display will show the volume of the metronome.
If the metronome’s volume is set at “0,” you won’t hear the metronome.
Performing
Metronome volume range 0–10
Adding a Count-in to Synchronize Your Performance
By adding a “count-in” before the song starts, you can ensure that you begin playing at the appropriate time.
If you’re performing along with a song, sounding a count-in will make it easier for you to synchronize your performance with the song.
1. Press the [METRONOME] button.
The metronome will sound.
2. Press the SONG [PLAY/STOP] button.
A two-measure count will sound before the song starts playing.
23
Page 24
Performing
Adding Reverberation (Reverb Eect)
You can add a pleasant reverberation to the sounds you play from the keyboard, creating the impression that you are performing in a concert hall.
This is called the “reverb eect.”
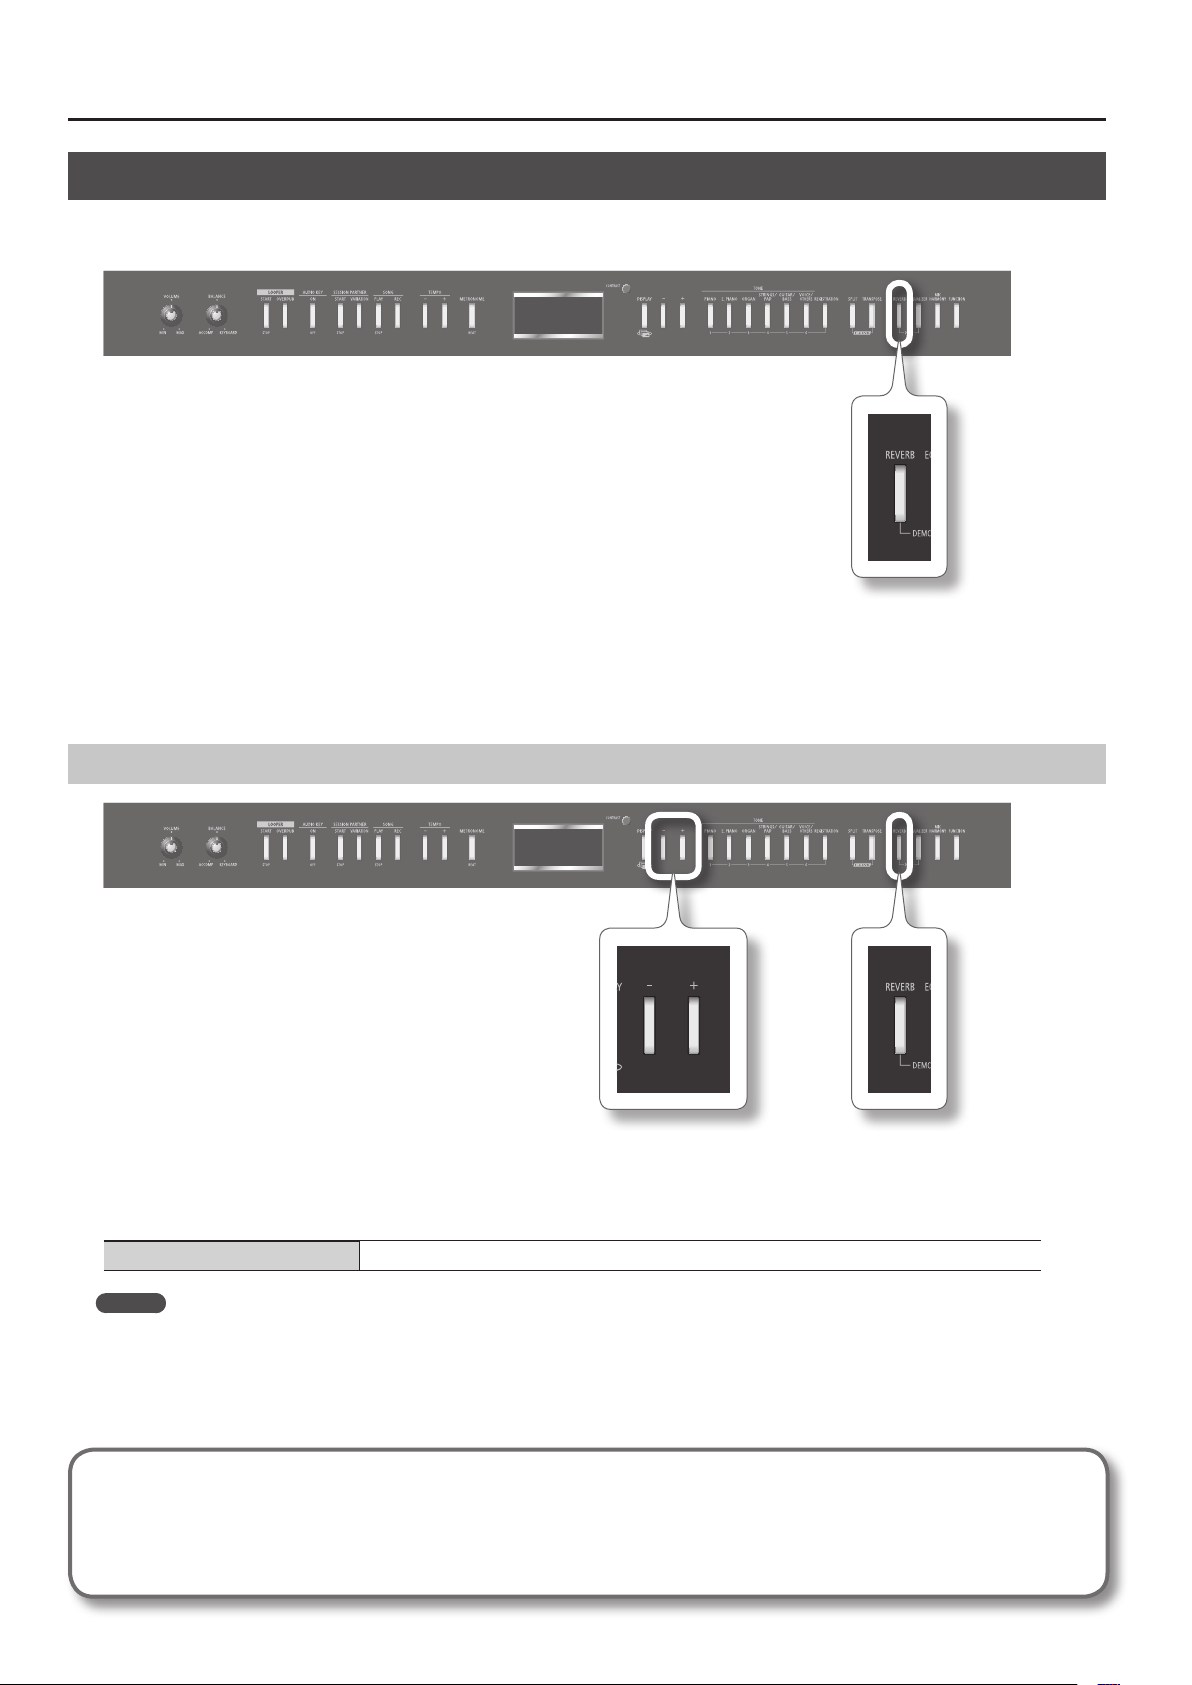
1. Press the [REVERB] button.
The [REVERB] button will light.
If you press the [REVERB] button once again, the button will go out and the reverb eect will be cancelled.
Changing the Depth of the Reverb Eect
1. Hold down the [REVERB] button and press the [-] or [+] button.
The display will indicate the reverb depth setting.
Higher values produce deeper reverb.
Reverb depth range 1–10
MEMO
The modied setting will return to its original value when you turn o the power.
If desired, you can have the setting be retained even while the power is turned o (p. 49).
* The reverb depth cannot be set individually for each tone. The same depth of reverb is applied to each tone.
* The reverb depth for a song being played back will not change.
What are eects?
In addition to reverb, the FP-7F provides various other eects that can modify the sound.
An eect suitable for each tone will be selected.
* For some tones, no eect is applied.
24
Page 25
Adjusting the Tone Quality (Equalizer)
You can use the equalizer to adjust the sound’s tone quality.
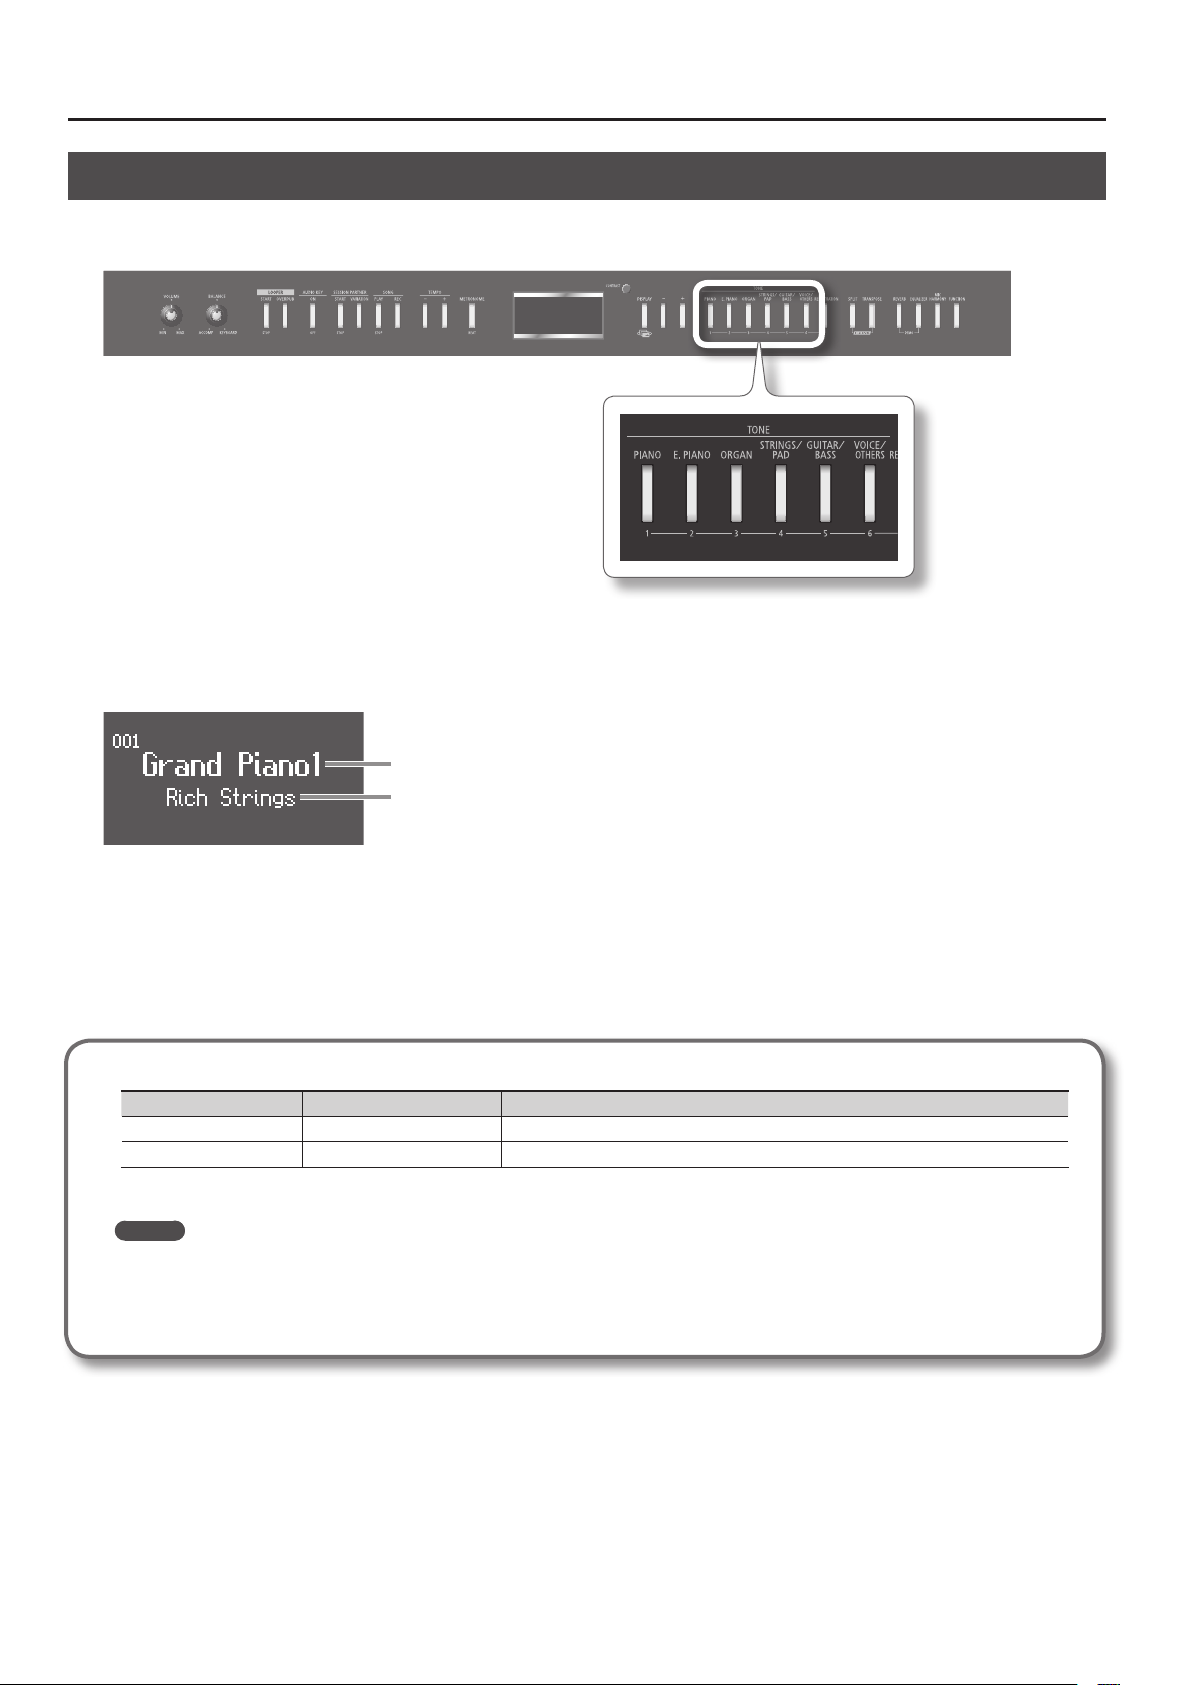
1. Press the [EQUALIZER] button.
The [EQUALIZER] button will light.
If you press the [EQUALIZER] button once again, the button will go out and the equalizer will turn o.
Performing
Selecting the Equalizer Number
Here’s how to change the tone quality by switching the equalizer settings.
The FP-7F provides four dierent settings.
1. Hold down the [EQUALIZER] button and use the [-] [+] buttons to select an equalizer number.
Setting 1–4
MEMO
You can make detailed adjustments to the equalizer settings.
For details, refer to “Editing the Equalizer Settings (Equalizer)” (p. 71).
25
Page 26
Performing
Playing Two Tones Layered (Dual Play)
You can play two tones simultaneously from a single key. This is called “Dual Play.”
As an example, here’s how to layer piano and strings tones.
1. Hold down the [PIANO] button and press the [STRINGS/PAD] button.
Both buttons will light.
When you play the keyboard, you’ll hear the piano and strings tones layered.
Tone 1
Tone 2
When you press any TONE button, Dual Play will be cancelled, and only the sound of the button you pressed will be heard.
* You can’t use Dual Play simultaneously with Split Play.
About the tones
Tone name Corresponding button How to select a tone
Tone 1 TONE button at the left Press the [-] or [+] button.
Tone 2 TONE button at the right Hold down the tone 2 button (the lit TONE button at the right) and press the [-] or [+] button.
* For some combinations of tones, the eect will not be applied to tone 2, causing it to sound dierently.
MEMO
• You can adjust the volume balance of the two tones (p. 72).
• You can shift the pitch of tone 2 in steps of an octave (p. 72).
• When you press the damper pedal while using Dual Play, the eect will be applied to both tone 1 and tone 2. If desired, you can have the
eect be applied to only one of the tones (p. 72).
26
Page 27
Playing Two Dierent Tones in the Right and Left Sides of the Keyboard
(Split Play)
You can play dierent tones in the right and left sides of the keyboard, divided at a specic key.
This is called “Split Play,” and the location at which the keyboard is divided is called the “split point.”
1. Press the [SPLIT] button.
The split screen will appear.
Performing
Right-hand tone
Left-hand tone
When split is turned on, the keyboard settings will be as follows.
Split Point (upon power-up: F#3, included in left-hand zone)
A0 B0 C1 D1 E1F1G1
When you press the [SPLIT] button once again to turn it o, Split Play will be cancelled.
A1 B1 C2 C3 C4 C5 B7 C8
…
Left-hand tone Right-hand tone
27
Page 28
Performing
Changing the Right-hand Tone and Left-hand Tone
Changing the Right-hand Tone
1. Press the TONE button.
The number and name of the currently selected right-hand tone will appear.
2. Press the [-] or [+] button.
A dierent tone will be changed.
Changing the Left-hand Tone
1. Hold down the [SPLIT] button and press the TONE button.
The number and name of the currently selected left-hand tone will appear.
2. Hold down the [SPLIT] button and press the [-] or [+] button.
A dierent tone will be changed.
MEMO
You can shift the pitch of the left-hand tone in steps of an octave (p. 72).
28
Page 29
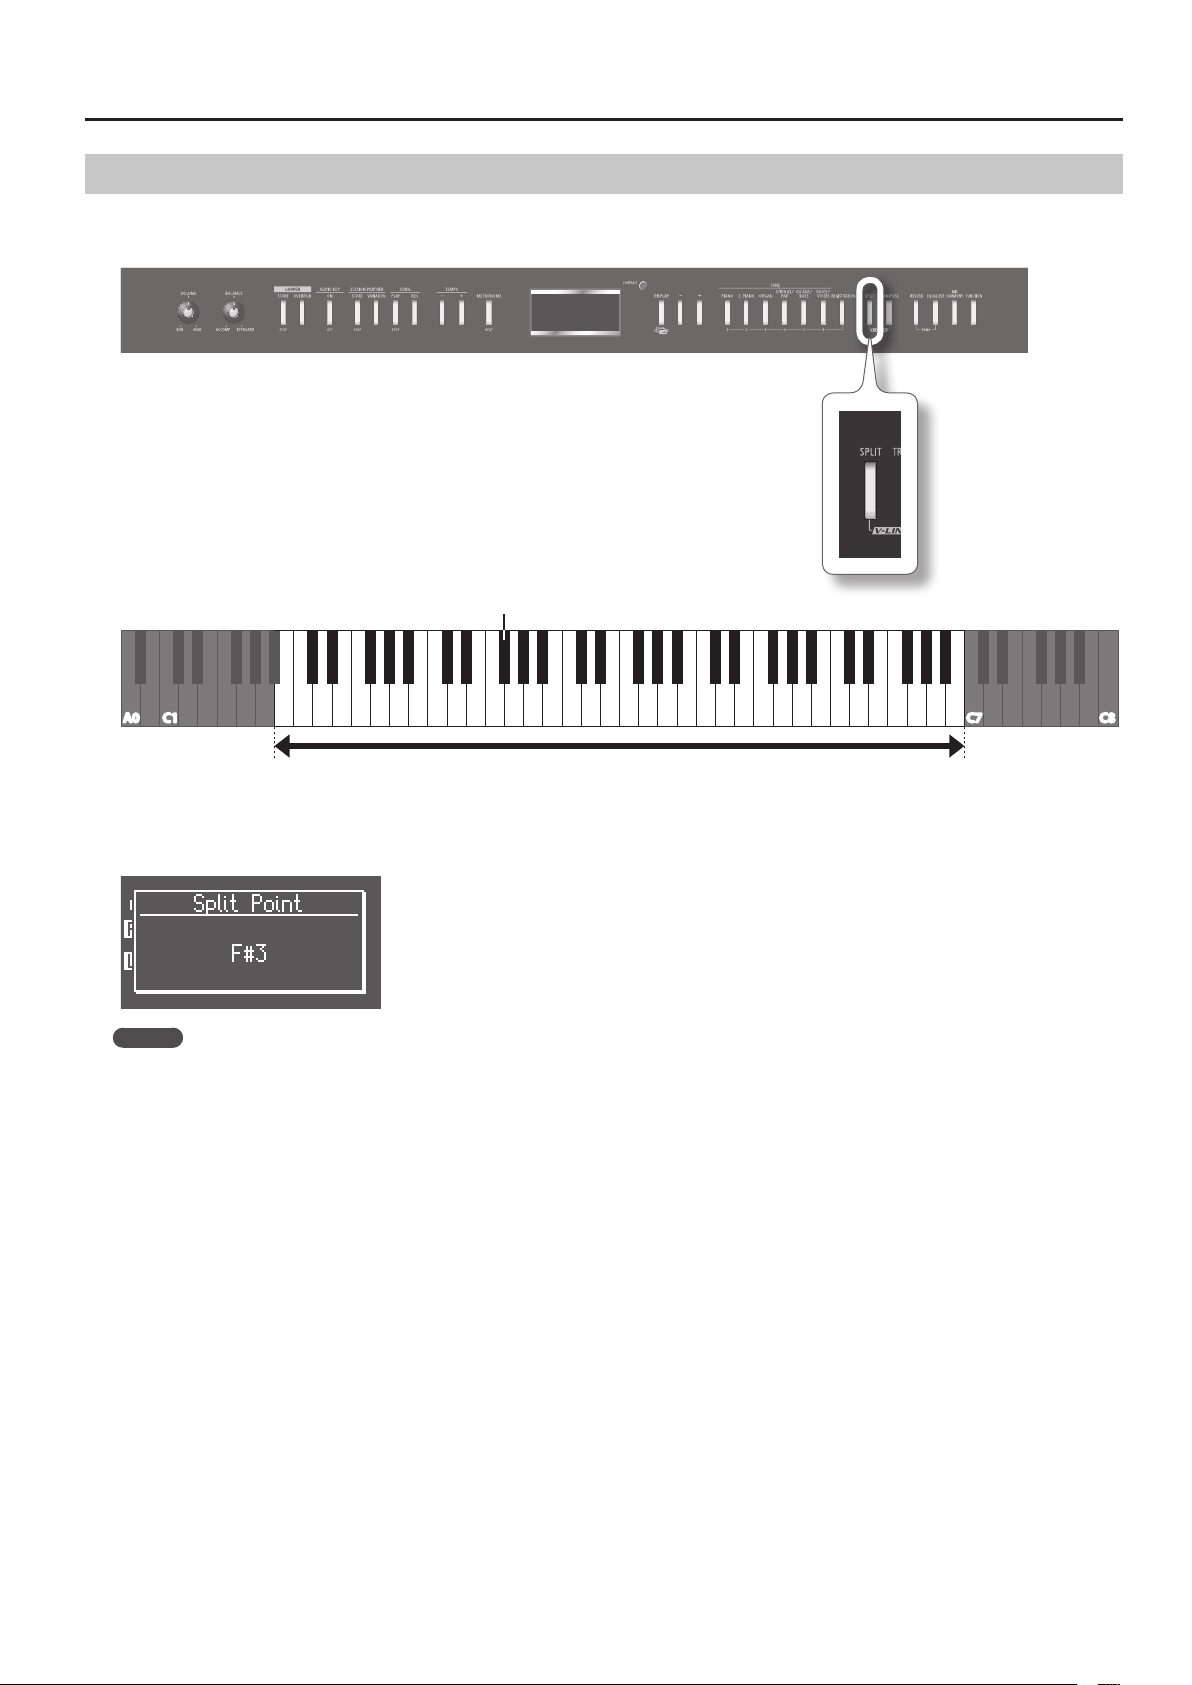
Changing the Point at which the Keyboard is Divided (Split Point)
You can change the split point (the key at which the keyboard is divided).
The split point can be set to any value from B1 through B6.
Split point (upon power-up: F#3, included in left-hand zone)
Performing
C1 C3 C4 C5
A0
B1 C2 C6 C7 C8B6
Range in which the Split Point can be assigned (B1–B6)
1. Hold down the [SPLIT] button and press the key that you want to be the split point.
The key you pressed will be assigned as the split point, and will appear in the display.
MEMO
The modied setting will return to its original value when you turn o the power.
If desired, you can have this setting be retained even while the power is turned o (p. 49).
29
Page 30
Performing
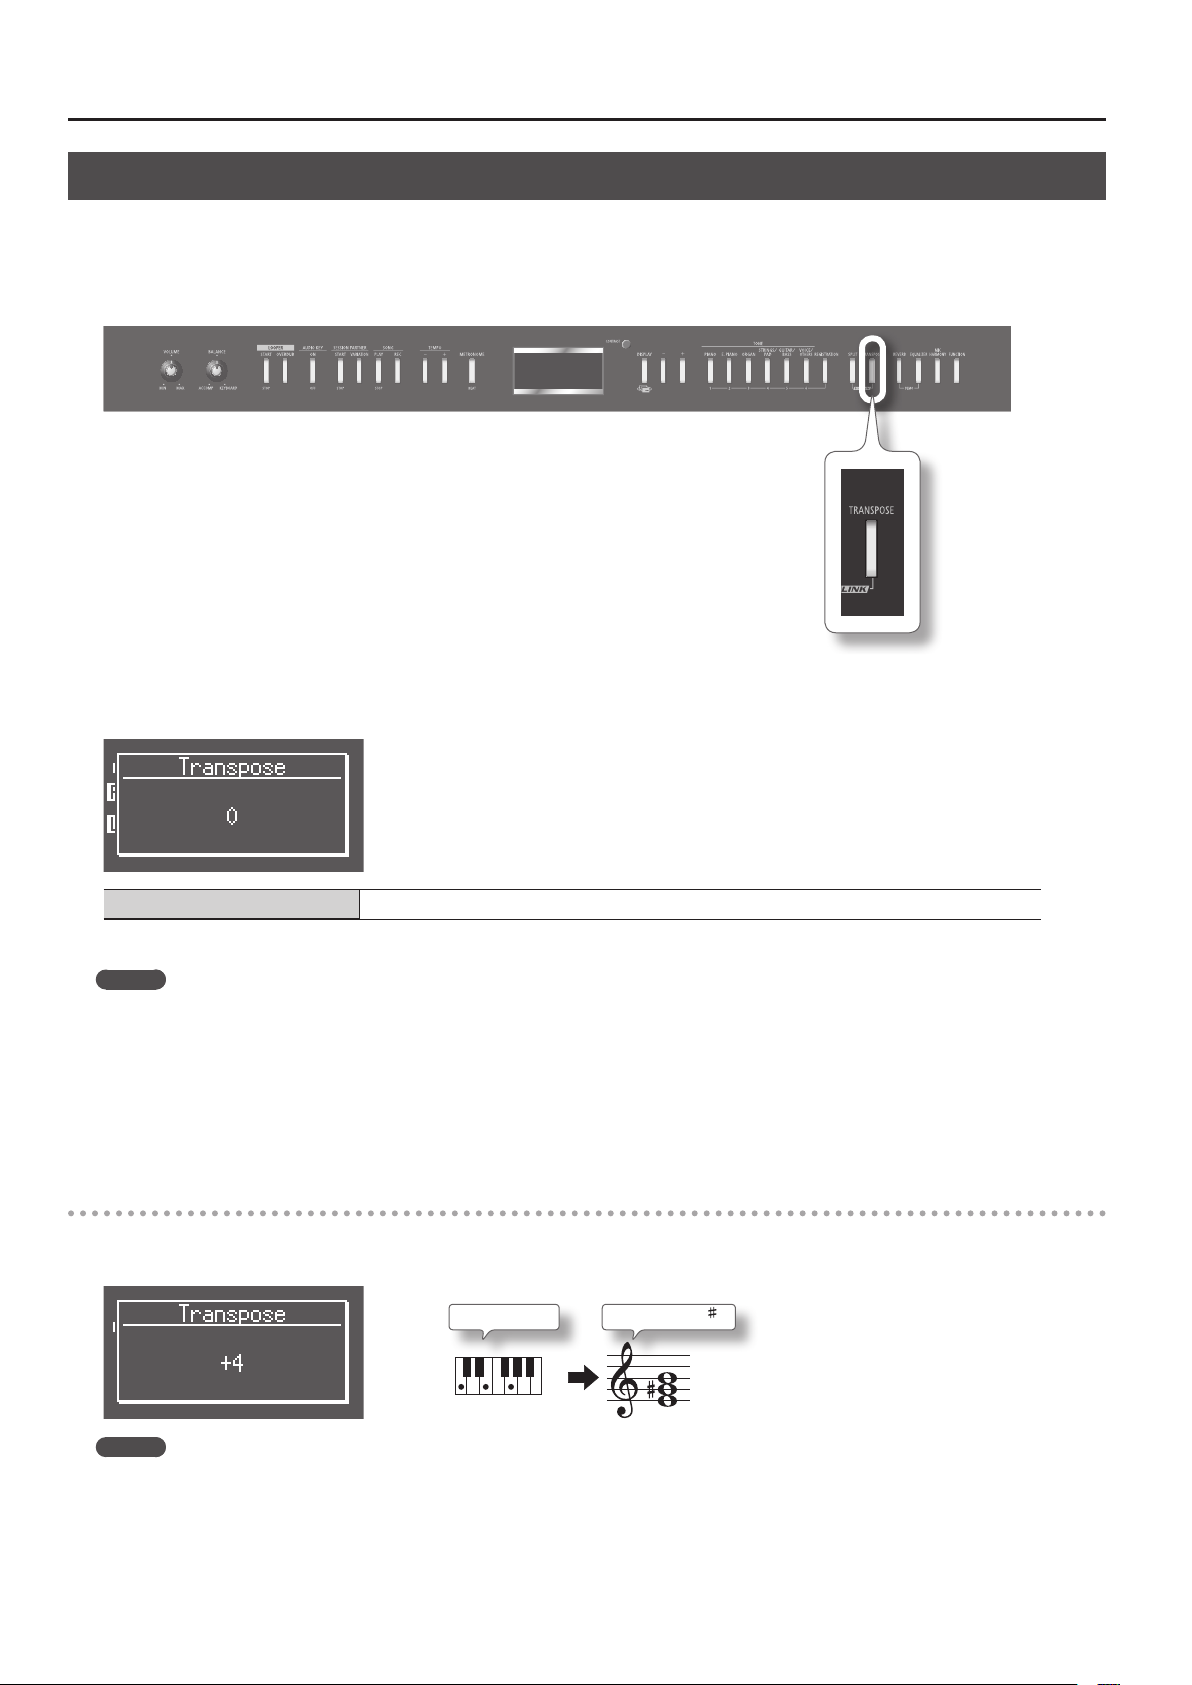
Changing the Pitch of the Keyboard or the Song Playback (Transpose)
The “Transpose” function lets you shift the pitch of the keyboard.
You can use the Transpose function to easily do the following things.
• Perform at a pitch that’s comfortable for a singer without changing the notes you read (your keyboard ngering).
• Perform a song written in a dicult key (i.e., with numerous sharps or ats) in a key that’s easier for you to play.
1. Hold down the [TRANSPOSE] button and press the note that’s the tonic of the key to which you want to transpose.
The transposition setting is shown while you hold down the [TRANSPOSE] button.
Transposition range -6–0–5 (semitone steps)
The [TRANSPOSE] button will light if the setting is anything other than 0.
MEMO
• You can also change the setting by holding down the [TRANSPOSE] button and pressing the [-] or [+] button.
• By holding down the [TRANSPOSE] button and pressing both the [-] and [+] buttons simultaneously, you can reset the transposition setting to 0 (the
original value).
• You can use the [TRANSPOSE] button to turn the Transpose function on/o (if the transposition setting is anything other than “0”).
• The FP-7F allows you to choose whether to transpose just the keyboard, both the keyboard and the song, or just the song.
When the FP-7F is shipped from the factory, this is set to transpose the keyboard and the song simultaneously. If the Transpose Mode (p. 72) is set to
“Song,” the Transpose function will not aect the pitch of the keyboard.
Example: The song is written in the key of E, and you want to play it in the position of C
1. Hold down the [TRANSPOSE] button and press the E note (the tonic note of the key of E).
Starting from the tonic note of the key of C (i.e., the C note), the tonic of the key of E is four chromatic steps higher, so the display will indicate “+4.”
If you play C E G
MEMO
The transposition setting will return to “0” when you switch songs or turn o the power.
30
It will sound E G
B
Page 31

Performing with Audio Files (Audio Key)
The FP-7F lets you play audio les while you perform. This is the “Audio Key” function.
The Audio Key function assigns audio les to keys in the range of B
You can assign favorite phrases to keys, and trigger them at the appropriate moment during your performance.
MEMO
You can also use the Audio Key function in the following ways.
• Perform using phrases (p. 60) you’ve saved to USB memory.
• If you prepare audio les for each section of the song, such as the intro, main theme, break, and ending, you’ll be able to freely change the
structure of the song as you perform.
• If you assign an audio song to each key, you’ll be able to switch among audio songs by pressing keys.
0–B1, allowing you to play back the audio les by pressing the corresponding key.
Performing
Loading an Audio File Set
1. Hold down the AUDIO KEY [ON/OFF] button and press the [-] or [+] button to select an “audio le set.”
When you release the button, the audio le set will be loaded, and the Audio Key function will turn on.
A screen like the following will appear.
MEMO
The FP-7F contains built-in audio le set: “Internal Demo.” Such Audio File Set can only be selected when USB memory is not connected.
Loading audio les from your computer
Before you continue, you’ll need to install “Audio Key Utility 3” on your computer, and prepare a set of audio les that can be played back on the
FP-7F.
MEMO
• You can download “Audio Key Utility 3” from the Roland website (http://www.roland.com/).
For details on installing and using “Audio Key Utility 3,” refer to “Audio Key Utility 3 Quick Guide” which is included in the downloaded le.
• If the connected USB memory does not contain an audio le set created by “Audio Key Utility 3,” the audio les located on the root level (top
level) of the USB memory will be assigned to each key for playback. To load these les, choose “External Root” in the Audio File Set selection
screen.
31
Page 32

Performing
Performing with Audio Files
If the Audio Key function is on, you’ll be able to play audio les by pressing a key.
Indication (Playback mode) Explanation
O
OW
L
LW
STOP When you press this key, the audio le will stop playing.
* If no audio le is assigned to the B 0–B1 keys, nothing is shown in the graphic in the screen.
1. Play a key B 0–B1.
The audio le assigned to that key will play.
One-shot Now
When you press the key, the audio le will play only once. The audio le will play immediately when you press the
key.
One-shot Wait
When you press the key, the audio le will play only once.
With this setting, pressing the key while another audio le is playing will reserve the audio le to be played next.
When the currently playing audio le has nished, the reserved audio le will play.
Loop Now
When you press the key, the audio le will play repeatedly.
The audio le will play immediately when you press the key.
Loop Wait
When you press the key, the audio le will play repeatedly.
With this setting, pressing the key while another audio le is playing will reserve the audio le to be played next.
When the currently playing audio le has nished, the reserved audio le will play.
B 0–B1
If you press the B0 key, a screen like the following will appear.
The key in the screen whose audio le is playing will change color.
The screen also shows the name and remaining time of the currently playing audio le.
The key that is playing an audio le
Name of the audio le
Remaining time of the audio le
32
Page 33

While an audio le plays, keys assigned as “OW” and “LW” can be reserved as the audio le to be played next.
If you’ve pressed the B0 key and then press the E1 key to reserve the audio le to be played next, a screen like the following will appear.
Key of the currently playing audio le
Key of the next-played audio le
Name of the currently playing audio le
Remaining time of the currently playing audio le
* The border of the reserved audio le will be shown with a thicker border in the screen.
2. Press the A0 key.
The audio le will stop playing.
Performing
A0
33
Page 34

Performing
Creating a Personalized Piano Sound (Piano Designer)
The FP-7F lets you create your own piano sound by adjusting settings such as the sympathetic resonance of the piano strings. This function is called
“Piano Designer.”
1. Enter Function mode, and choose “Piano Designer” (p. 64).
2. Press the [PIANO] button.
MEMO
To access the Piano Designer screen directly without entering Function mode, select the “Grand Piano1” tone, and then hold down the [DISPLAY]
button and press the [PIANO] button.
3. Use the [-] [+] buttons to select the item you want to edit (p. 35).
4. Press the [PIANO] button.
An edit screen for the items will appear.
Pressing the [DISPLAY] button will take you back to the Piano Designer screen.
5. Use the [-] [+] buttons to edit the setting.
6. Repeat steps 3–5 to create your own personalized piano sound.
7. Press the [FUNCTION] button to exit function mode.
MEMO
The edited settings will return to their original values when you turn o the power.
If desired, you can have these settings be retained even while the power is turned o (p. 75).
34
Page 35

Piano Designer Settings
Parameter Value Explanation
Lid 0–6
Damper Resonance O, 1–10
Hammer Noise -2–0–2
Hammer Response O, 1–10
Duplex Scale O, 1–10
String Resonance O, 1–10
Key O Resonance O, 1–10
Cabinet Resonance O, 1–10
Damper Noise O, 1–10
Stretch Tuning
O, Preset,
User (User: -50–0–+50)
Performing
Adjusts the extent to which the lid of the grand piano is open.
Lower values produce a softer sound.
Higher values produce a brighter sound.
This adjusts the damper resonance of the acoustic piano sound (the sympathetic vibration
produced in strings other than those actually played when you press the damper pedal).
Higher settings will make the sympathetic vibration louder.
This adjusts the sound produced when the hammer of an acoustic piano strikes the string.
Higher settings will produce a louder sound of the hammer striking the string.
This adjusts the time from when you play a key until the piano sound is heard.
Higher settings will produce slower response.
This adjusts the sympathetic vibrations of an acoustic piano’s Duplex Scale.
Higher settings will make the sympathetic vibration louder.
This adjusts the string resonance of the acoustic piano sound (the sympathetic vibrations of
strings for previously played notes that occur when you play another note).
Higher settings will make the sympathetic vibration louder.
This adjusts sympathetic vibrations such as an acoustic piano’s key-o sound (the subtle sound
that occurs when you release a note).
Higher settings will make the sympathetic vibration louder.
Adjusts the body resonance of the grand piano itself.
Higher values will produce a larger body resonance.
This adjusts the damper noise of the acoustic piano sound (the sound of the damper releasing
the strings when you press the damper pedal).
* If Damper Resonance is turned “O,” damper noise will not be heard.
This lets you specify the amount of “stretch tuning,” a tuning method specically for pianos, in
which the high range is tuned slightly sharper, and the low range is tuned slightly atter.
If you select “Preset,” a standard tuning curve created for the FP-7F will be used.
If you select “User,” you’ll be able to edit the stretched tuning yourself. Play the key whose pitch
you want to adjust, then use the [-] or [+] buttons to adjust its pitch.
What is the Duplex Scale?
The Duplex Scale is a system of sympathetically vibrating strings sometimes included in grand pianos.
These sympathetically vibrating strings are not struck directly with hammers, but sound by vibrating in sympathy with the vibrations of other
strings. By resonating with the overtones, these strings add richness and brilliance to the sound. These sympathetic strings are added only to
the high register above approximately C4. Since they do not have a damper (a mechanism that stops them from sounding), they will continue
sounding even after you play a note and then release it to stop the sound of the string that was actually struck.
35
Page 36

Performing
Simulating the Way that Sounds are Created on an Organ (Tone Wheel)
On the FP-7F, you can use the [ORGAN] button to select one of the “TW-Organ 1–6” tones to play tones that simulate the way in which sound is
produced by an organ.
On a tone wheel organ, you can create original sounds by sliding nine harmonic bars (drawbars) forward or backward to change their relative balance.
Each bar is assigned a dierent footage, and this footage determines the pitch of the sound. 8’ is the footage that forms the basic pitch of the sound;
this is the center around which you create the tone.
By assigning the footage to the TONE buttons, you can simulate the way in which these harmonic bars are used to create the sound.
What’s the feet?
“Feet” is a term that began as a measurement of the length of the pipes in a pipe organ.
The pipes that produce the basic pitch (fundamental) for each note are considered to be “8 feet” in length.
Therefore, a pipe producing a pitch one octave below that of the reference of 8’ (eight feet) would be 16’; for one octave above the reference, the
pipe would be 4’, and to take the pitch up yet another octave it would be shortened to 2’.
The pitches of the harmonic bars are related as follows.
When the middle C (C4) note is pressed,
each harmonic bar will sound the following notes.
one octave
below
On tone wheel organs, the high-pitched footage for a portion of the high range, and the low-pitched footage for a portion of the low range are
“folded-back” in units of one octave.
Folding back the high-frequency portion prevents the high-frequency sounds from being unpleasantly shrill, and folding back the lowfrequency portion prevents the sound from becoming “muddy.”
On the FP-7F faithfully simulates this characteristic.
5th root 8th 12th 15th 17th 19th 22nd
8’ =
36
Page 37

Selecting the Type of Tone Wheel Organ
1. Press the [ORGAN] button so it’s lit.
2. Use the [-] [+] buttons to select one of the “TW-Organ 1–6” tones.
The tone wheel organ screen will appear.
Tone wheel organ tone number
Performing
Percussion settings (p. 38)
Harmonic bar (footage) status
Selecting the Footage to Adjust the Volume (Edit Tone Wheel)
1. Enter Function mode, and choose “Edit Tone Wheel” (p. 64).
2. Press the [PIANO] button.
3. Use the [-] [+] buttons to select the tone wheel organ tone that you want to edit.
4. Press the [PIANO] button.
The TW Edit screen will appear.
MEMO
• After selecting one of the “TW-Organ 1–6” tones, you can go to the TW Edit screen without entering Function mode by holding down the [DISPLAY]
button while you press the [ORGAN] button.
• Pressing the [DISPLAY] button will take you back to the previous screen.
37
Page 38

Performing
5. Press one of the TONE buttons, the [REGISTRATION] button, the [SPLIT] button, or the [TRANSPOSE] button to select the footage
for which you want to edit the volume.
Footage
Adjusting the Volume of a Footage
1. Use the [-] [+] buttons to adjust the volume of the selected footage.
The screen will indicate the volume as you adjust it.
Volume of each footage
Adding Sparkle to the Sound (Percussion)
Percussion adds an attack-type sound to the beginning of the note to give the sound more crispness.
The attack sound changes according to the value.
The percussion on tone wheel organs did not apply to all notes that were played.
When notes were played legato (smoothly and connectedly), percussion was applied only to the rst-played note. When notes were played staccato
(articulating each note separately), percussion was applied to all notes. This method is referred to as single trigger algorithm, and is a very important
element in organ performance. On the FP-7F faithfully simulates this characteristic.
1. Press the [REVERB] button.
Move the cursor to the switch that selects the percussion type.
2. Use the [+] [-] buttons to select the percussion type.
Setting Explanation
O Percussion will not sound.
2nd Percussion sounds at a pitch one octave above that of the key pressed.
3rd Percussion sounds at a pitch an octave and a fth above that of the key pressed.
* The Percussion is applied only to the Upper Tone.
* When percussion is on, the 1’ pitch will not be produced.
38
Page 39

Adjusting the Rate at which the Percussion Decays
1. Press the [EQUALIZER] button.
Move the cursor to the switch that selects the speed at which the percussion sound will decay.
2. Use the [+] [-] buttons to select the speed at which the percussion sound will decay.
Setting Explanation
Slow
Fast
Pressing the [DISPLAY] button will take you back to the previous screen.
The percussion sound will disappear slowly.
The percussion will have a more gentle attack.
The percussion sound will disappear quickly.
The percussion will have a sharper attack.
Performing
39
Page 40

Performing
Disabling the Buttons (Panel Lock)
The Panel Lock function lets you disable all buttons.
In this state, the settings will not change even if you inadvertently touch a button while performing.
1. Hold down the [FUNCTION] button for several seconds.
Panel Lock will be activated.
A “lock” symbol is shown in the upper right of the display, and the panel will be locked.
To cancel Panel Lock, hold down the [FUNCTION] button once again for several seconds.
Panel Lock will also be cancelled when you turn o the power.
* If you activate Panel Lock while a song is playing or recording, playback or recording will stop.
* Under the following circumstances, Panel Lock cannot be activated.
• When the instrument is in Function mode (p. 64)
• When you’re in the demo song screen
• When something is being played by Session Partner
• When the Looper is being used
• When Audio Key is being used
40
Page 41
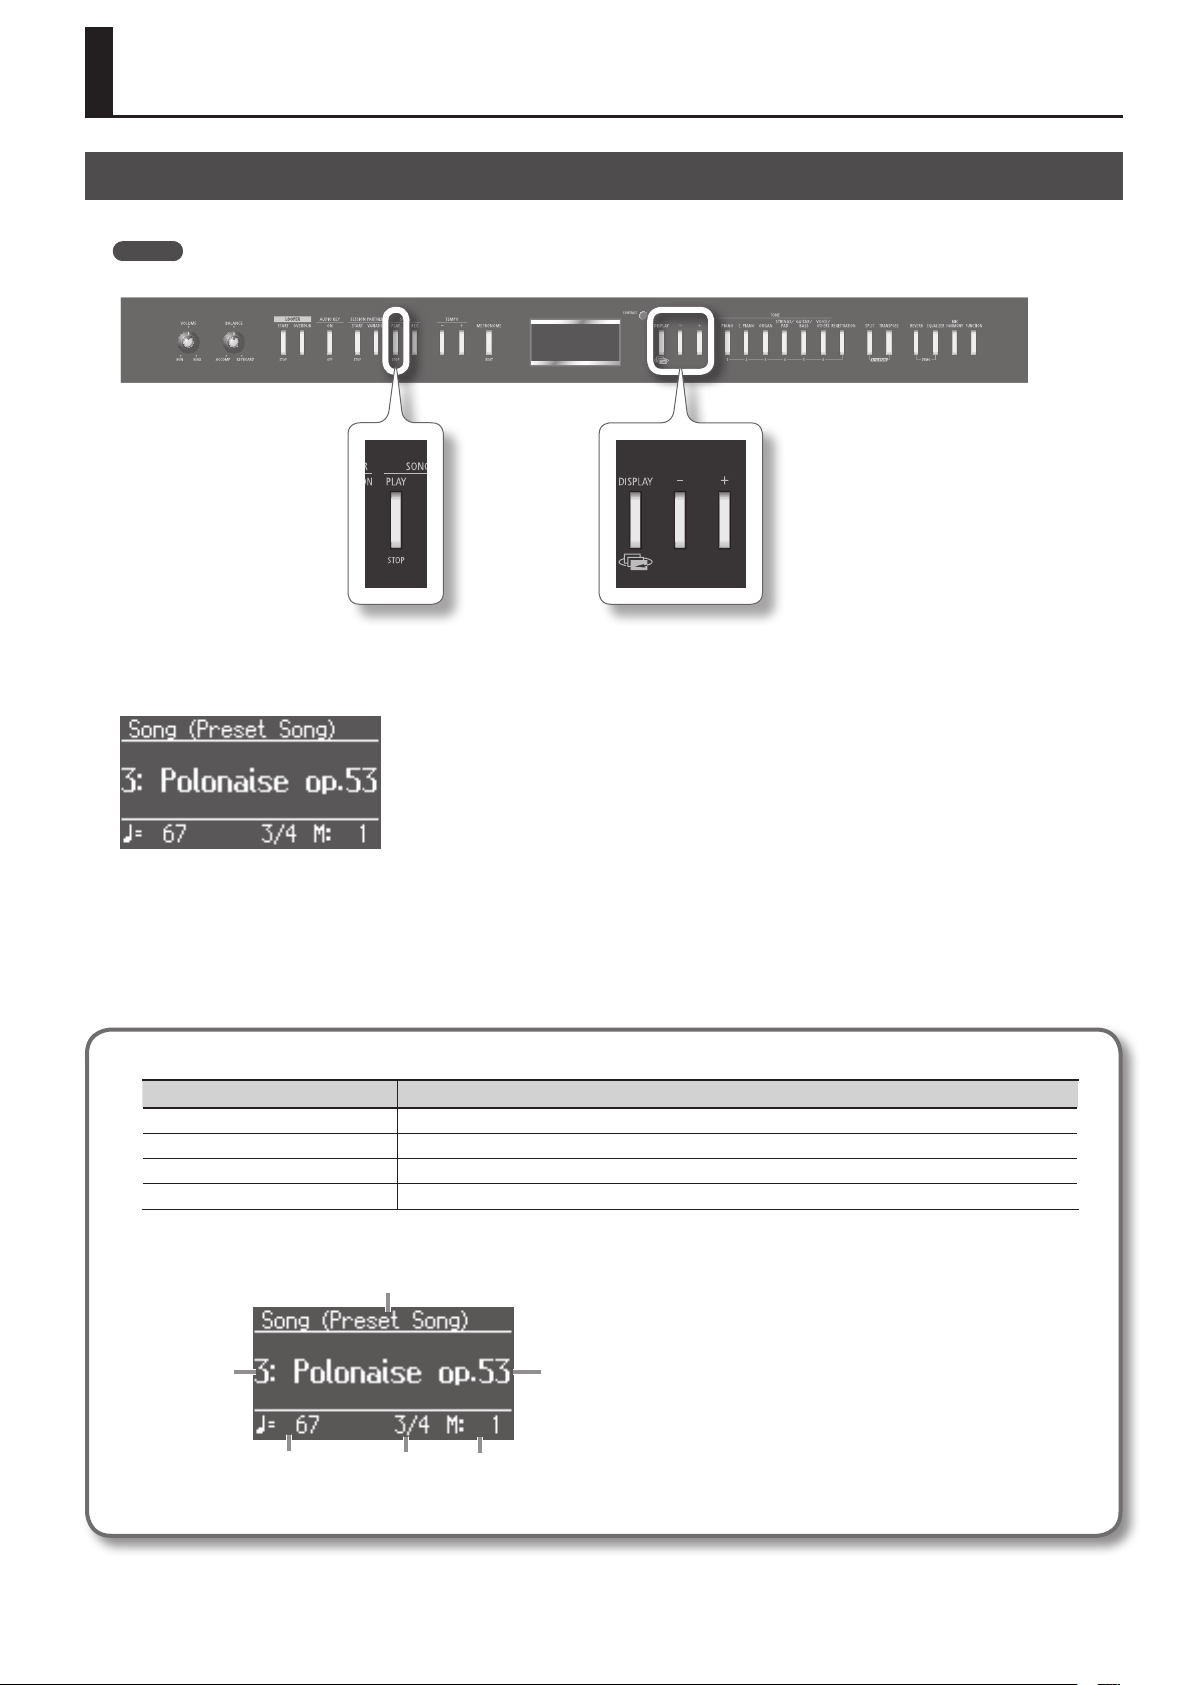
Listening to Songs
Playing Back Songs
Here’s how to listen to the built-in songs. The FP-7F provides seventy four built-in songs.
MEMO
You can also play songs from a separately available CD drive or USB memory (p. 78).
1. Press the [DISPLAY] button a number of times to access the SONG screen.
2. Use the [-] [+] buttons to select a song.
3. Press the SONG [PLAY/STOP] button.
Playback will stop when the end of the song is reached.
To pause the playback, press the SONG [PLAY/STOP] button once again.
When you then press the SONG [PLAY/STOP] button, playback will resume from where you paused.
* All rights reserved. Unauthorized use of this material for purposes other than private, personal enjoyment is a violation of applicable laws.
Fast-forward and rewind
Operation Button
To beginning of next song Press the [+] button.
To beginning of song Press the [-] button.
Fast-forward Hold down the [+] button for several seconds during playback.
Rewind Hold down the [-] button for several seconds during playback.
Explanation of the display
Media
Song number
Song name
Tempo Time signature Measure number
“PU” is shown as the measure number
if the song starts on a weak beat.
41
Page 42
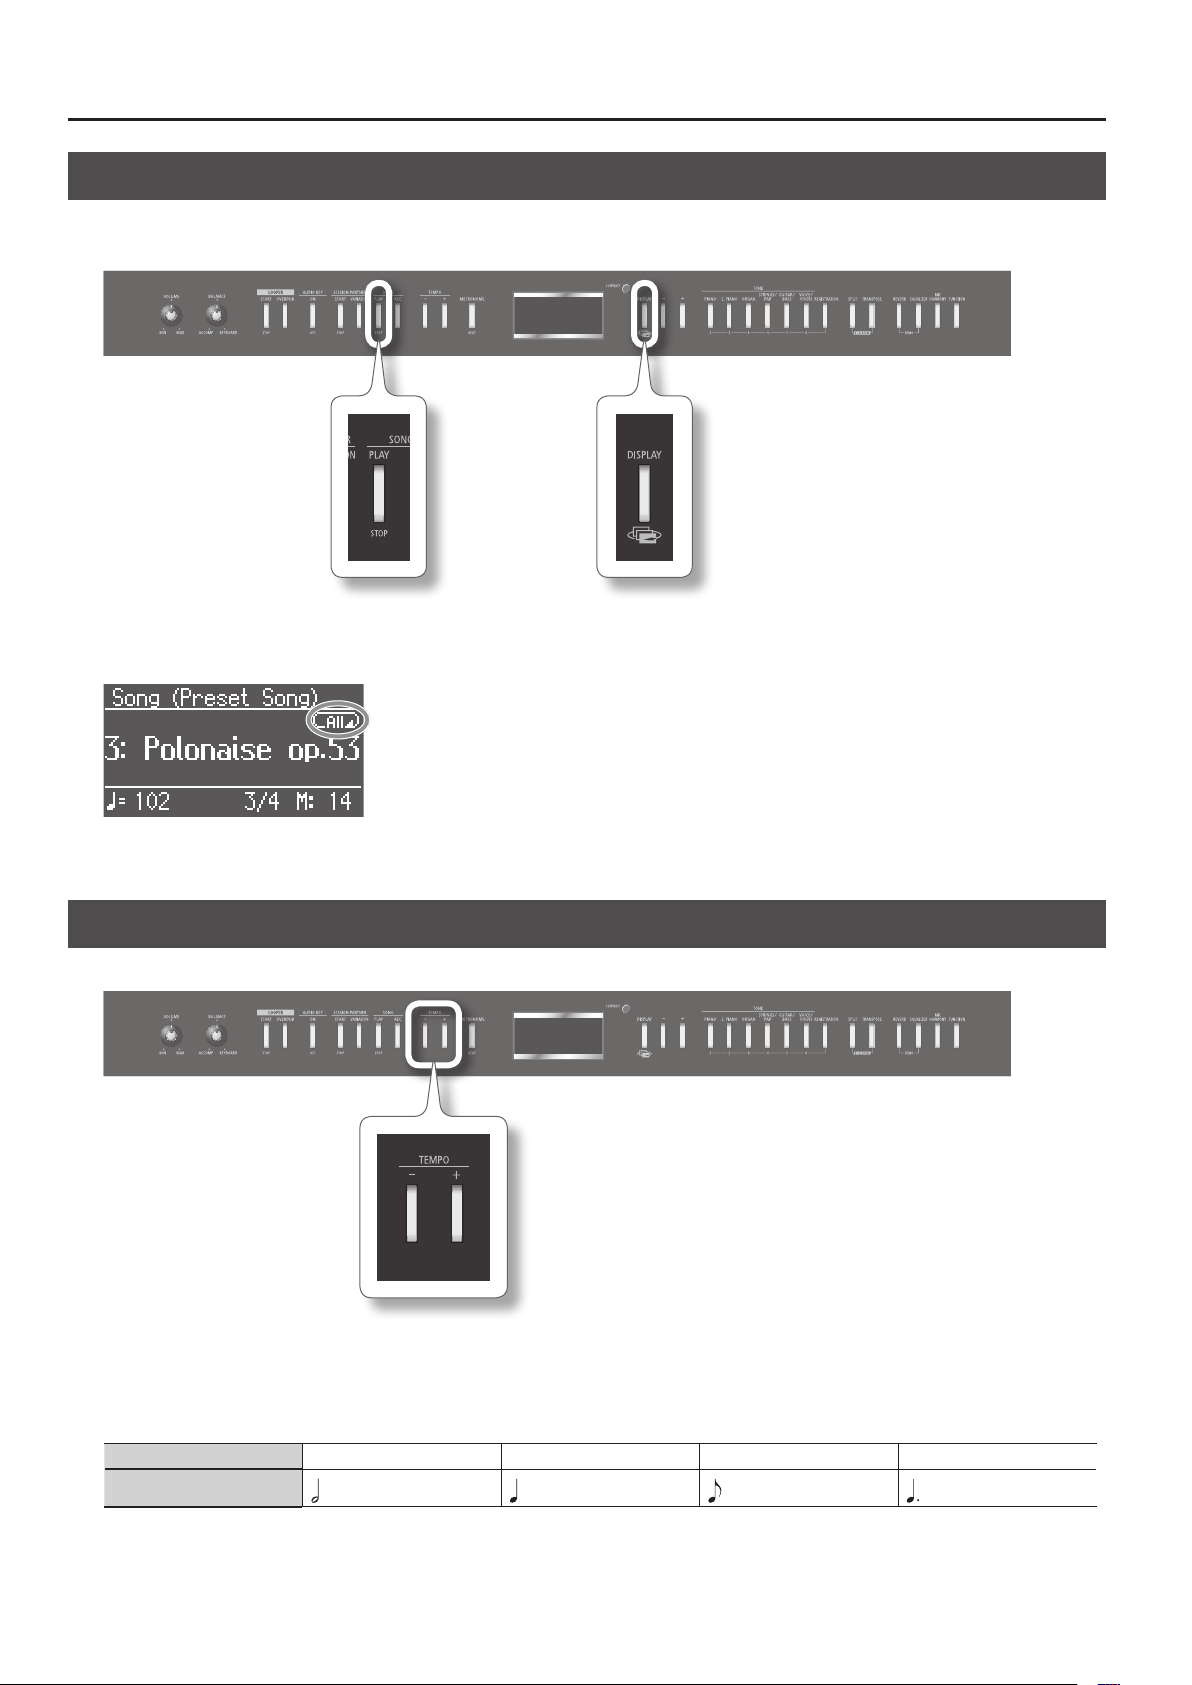
Listening to Songs
Playing All Songs Successively (Play All)
Here’s how to play all the built-in songs (or all the songs in internal memory, or all the songs in USB memory) repeatedly in succession.
This function is called “Play All.”
1. Hold down the [DISPLAY] button and press the SONG [PLAY/STOP] button.
Play All will be activated, and an icon will appear in the screen.
* Play All will turn o when you stop playback or turn o the power.
Adjusting the Song Tempo
You can adjust the tempo at which the song plays.
1. Press the TEMPO [-] or TEMPO [+] button.
The tempo will change.
Correspondence between beat and tempo display
Beat 2/2 0/4, 2/4, 3/4, 4/4, 5/4, 6/4, 7/4 3/8 6/8, 9/8, 12/8
42
Tempo
= 5–250
= 10–500 = 20–999 = 7–333
Page 43

Changing the Playback Key (Playback Transpose)
You can change the key in which the song plays. This function is called “Playback Transpose.”
1. Play back the song (p. 41).
2. Hold down the [TRANSPOSE] button and press the [-] or [+] button.
The song’s key will change in semitone steps.
Listening to Songs
Transposition range -6–0–5 (semitone steps)
The playback transposition setting is displayed while you hold down the [TRANSPOSE] button.
If the setting is anything other than 0, the [TRANSPOSE] button will be lit.
The playback transposition setting will return to “0” when you select another song.
MEMO
• To reset the playback transposition setting to the original value (0), hold down the [TRANSPOSE] button and press both the [-] and [+] buttons
simultaneously.
• You can use the [TRANSPOSE] button to turn the Playback Transpose function on/o (if the transposition setting is anything other than “0”).
• The FP-7F lets you to choose whether to transpose just the song, both the keyboard and the song, or just the keyboard (p. 72). With the factory
settings, both the keyboard and song will be transposed simultaneously.
* The Playback Transpose function will not be applied if the Transpose Mode (p. 72) is set to “keyboard.”
* The Playback Transpose function does not work with respect to an Audio Key audio le or a Looper phrase.
* The tone quality of the sound may change if you use the Playback Transpose function when playing back a music CD song or an audio le.
* If you use the Playback Transpose function while a song from a music CD or an audio le is being played back, the Harmony will be turned o.
43
Page 44

Performing Along with Rhythm (Session Partner)
What is Session Partner?
“Session Partner” is a function that provides an accompaniment in a style such as jazz or rock.
This realistic-sounding accompaniment lets you enjoy performing as though you’re playing with a backup band.
Session Partner lets you do the following things.
• Make the chords progress automatically while you play along with Session Partner (p. 44).
• Use your left hand (the left-hand zone of the keyboard) to specify the chords, allowing you to perform with the desired chord progression (p. 68).
• Perform with your own original chord progression (p. 47).
Performing with Session Partner
Here’s how you can perform with Session Partner.
1. Press the SESSION PARTNER [START/STOP] button.
The SESSION PARTNER [START/STOP] button will light, and the performance will start with an intro.
The SESSION PARTNER [VARIATION] button will blink during the intro.
The display will indicate the chord. The chords will progress automatically; go ahead and play a melody as desired.
Rhythm Number
Rhythm Name
The chord that will be played next
The chord that’s playing now
Tempo
The chord name indication will be highlighted slightly before the chord changes.
Beat
Stopping the Session Partner Performance
1. Press the SESSION PARTNER [START/STOP] button.
Session Partner will play an ending, and then stop.
The SESSION PARTNER [VARIATION] button will blink while the ending is playing. When Session Partner has stopped, the SESSION PARTNER [START/
STOP] button will go out.
The performance will stop immediately if you press the SESSION PARTNER [START/STOP] button once again during the intro or ending.
* You can’t use the Audio Key function or the Looper function while performing with Session Partner.
MEMO
By turning Intro/Ending Sw (p. 67) “O,” you can perform without adding an intro or ending.
44
Page 45

Performing Along with Rhythm (Session Partner)
Selecting a Rhythm
Here’s how to select a dierent rhythm that’s suitable for the song you’re playing.
What is a Rhythm?
The FP-7F contains built-in “Rhythms” for musical styles such as jazz and rock.
Each of these rhythms combines elements that create the distinctive atmosphere of that musical style; they are the basis of the accompaniment
produced by Session Partner.
Each rhythm consists of the following three elements.
• Drums
• Bass
• Accomp (accompaniment other than drums and bass)
1. Press the [DISPLAY] button a number of times to access the SESSION PARTNER screen.
The display will show the number and name of the rhythm.
2. Use the [-] [+] buttons to select a rhythm.
For details on the available rhythms, refer to “Rhythm List (Session Partner)” (p. 95).
MEMO
• You can press the TEMPO [-] or TEMPO [+] button to change the rhythm’s tempo.
• You can choose which rhythm parts will sound (p. 67).
45
Page 46

Performing Along with Rhythm (Session Partner)
Adding Variation to the Rhythm
Each rhythm provides two accompaniment patterns; the original accompaniment pattern and a more colorful variation accompaniment pattern.
A ll-in (a short phrase) will be inserted when the accompaniment pattern changes, making your song more expressive. For example, it’s eective to
use the quieter original pattern during the rst half of the song, and then switch to the variation pattern later in the song as the energy level builds up.
1. Press the SESSION PARTNER [VARIATION] button to switch the accompaniment pattern.
SESSION PARTNER [VARIATION] button Explanation
Unlit The original accompaniment pattern will play.
Lit The variation accompaniment pattern will play.
The SESSION PARTNER [VARIATION] button will blink while the ll-in is playing.
What’s a “Fill-In”?
A short improvisational phrase inserted at the bar line is called a “Fill-In.” The phrase best suited to the selected Rhythm is played.
46
Page 47

Performing Along with Rhythm (Session Partner)
Creating an Original Chord Progression Pattern
Session Partner contains chord progression pattern data suitable for each rhythm, but you can also create your own original chord progression pattern.
1. Hold down the SESSION PARTNER [START/STOP] button and press the SONG [REC] button.
The SESSION PARTNER [START/STOP] button and the SONG [REC] button will blink, and the FP-7F will enter recording-standby mode.
A screen like the following will appear.
To exit recording-standby mode, you can press the SESSION PARTNER [START/STOP] button or the SONG [REC] button.
2. To start recording your chord progression, use the left-hand zone of the keyboard to specify chords.
The chord you press is shown in the display. The intro will not play at this time.
You can store up to sixteen chords.
3. Press the SESSION PARTNER [START/STOP] button to stop recording your chord progression.
The recorded chord progression is recorded in “User Chord.” To select a recorded chord progression, press the [-] button when chord progression
pattern number 1 is displayed, and select “User Chord” (p. 67).
MEMO
• Each chord progression pattern can be up to sixteen measures long. When the FP-7F is shipped from the factory, it is set so that a chord progression
of up to eight measures can be recorded. Recording will stop automatically when you exceed the currently specied number of measures.
A maximum of sixteen chords can be stored.
If you want to change the number of measures for the chord progression to be recorded, refer to “Changing the Number of Measures for Recording
a Chord Progression” (p. 48).
• If desired, you can keep the chord progression pattern from changing even when you switch rhythms. Refer to “Fixing the Chord Progression Pattern
(Chord Prog. Fix)” (p. 68).
• Your original chord progression pattern will not play correctly if you play it using a time signature that’s dierent from when you recorded it.
• Your original chord progression patterns can be saved in a Registration (p. 49).
* The chord progression you record will be lost when you turn o the power. If you want to keep it, save it in a Registration (p. 50).
Switching Chord Progression Patterns while You Perform
If you switch registrations while Session Partner is playing, the chord progression pattern will also change. By switching chord progression patterns,
you can easily perform with accompaniment for an entire song.
For example, store the chord progression pattern for melody “A” in registration 1-1, and store the chord progression pattern for melody “B” in
registration 1-2. Then, while Session Partner plays, switch the registration from 1-1 to 1-2 at the right moment. The chord progression used by Session
Partner will switch from the melody “A” pattern to the melody “B” pattern.
47
Page 48

Performing Along with Rhythm (Session Partner)
Changing the Number of Measures for Recording a Chord Progression
When creating your own original chord progression pattern, you can specify the number of measures for which the chord progression will be recorded.
When the power is turned on, this is set to eight measures.
1. Hold down the SESSION PARTNER [START/STOP] button and press the SONG [REC] button.
A screen like the following will appear.
2. Press the [+] button.
The screen shows the number of measures for which the chord progression will be recorded.
3. Use the [-] [+] buttons to select the desired number of measures.
Number of measures 4, 8, 12, 16
4. To start recording, specify the desired chord in the left-hand zone of the keyboard.
Press the SESSION PARTNER [START/STOP] button to stop recording.
48
Page 49

Registering Your Favorite Performance Settings
What is a Registration?
You can save favorite settings such as the tones you’ve selected, the Dual Play or Split Play setting, and the Session Partner settings.
Each set of these settings is called a “Registration.”
You can use the [REGISTRATION] button to store 30 registrations. The 30 registrations you’ve saved are collectively called a “registration set.”
Five registrations can be saved in each of the six buttons [1]–[6].
Variation
1
1-1 2-1 3-1 4-1 5-1 6-1
2
1-2 2-2 3-2 4-2 5-2 6-2
3
1-3 2-3 3-3 4-3 5-3 6-3
4
1-4 2-4 3-4 4-4 5-4 6-4
5
1-5 2-5 3-5 4-5 5-5 6-5
30 registrations
=
Registration set
MEMO
• You can save registration sets to the FP-7F’s internal memory or to separately available USB memory (p. 68).
• For more about the settings saved in a registration, refer to “Items Stored in a Registration” (p. 91).
Saving or Loading Registrations
Registrations saved on the FP-7F can be saved and loaded as follows (p. 68).
USB memoryFP-7F
Registration sets
Registrations
you can recall by
pressing a button
Tones and Session Partner
settings, etc.
Write
Registration sets
Save
Load
Save
Load
Copy
Internal memory
Registration sets
49
Page 50

Registering Your Favorite Performance Settings
Storing Your Performance Settings (Registration)
You can use the [REGISTRATION] button to store your performance settings.
With the factory settings, recommended performance settings have already been stored. If you want to create an original registration, we suggest that
you start with registrations 6-1 through 6-5.
MEMO
For more about the settings saved in a registration, refer to “Items Stored in a Registration” (p. 91).
Choosing where to Store the Registration
1. Make the desired Session Partner settings and choose the desired tone(s).
2. Hold down the [REGISTRATION] button and press one of the [1]–[6] buttons, then press the [-] [+] buttons to which you want to
assign the settings.
When you release the [REGISTRATION] button, a screen like the following will appear.
Variation number
Button number
MEMO
When this screen is displayed, you can press the [PIANO] button or the [E. PIANO] button to select the button at which you want to store the
registration and the variation number. At this time, you can also use the [+] [-] buttons to change the storage destination.
Renaming the Registration
1. Rename the registration (p. 57).
If you decide not to store the registration, press the [DISPLAY] button.
Storing the Registration
* Be aware that when you store your registration, the registration that was previously stored at that location will be lost.
1. Press the [REGISTRATION] button.
Your performance settings will be stored.
The [REGISTRATION] button will change from blinking to lit.
* Never turn o the power while the screen indicates “Executing...”
MEMO
• To select a registration that you’ve stored, refer to “Recalling a Registration” (p. 51).
• You can return the stored contents to their factory-set condition. Refer to “Restoring the Factory-set Condition (Factory Reset)” (p. 75).
• Registrations stored on the FP-7F can be saved (p. 68) and copied (p. 70).
50
Page 51
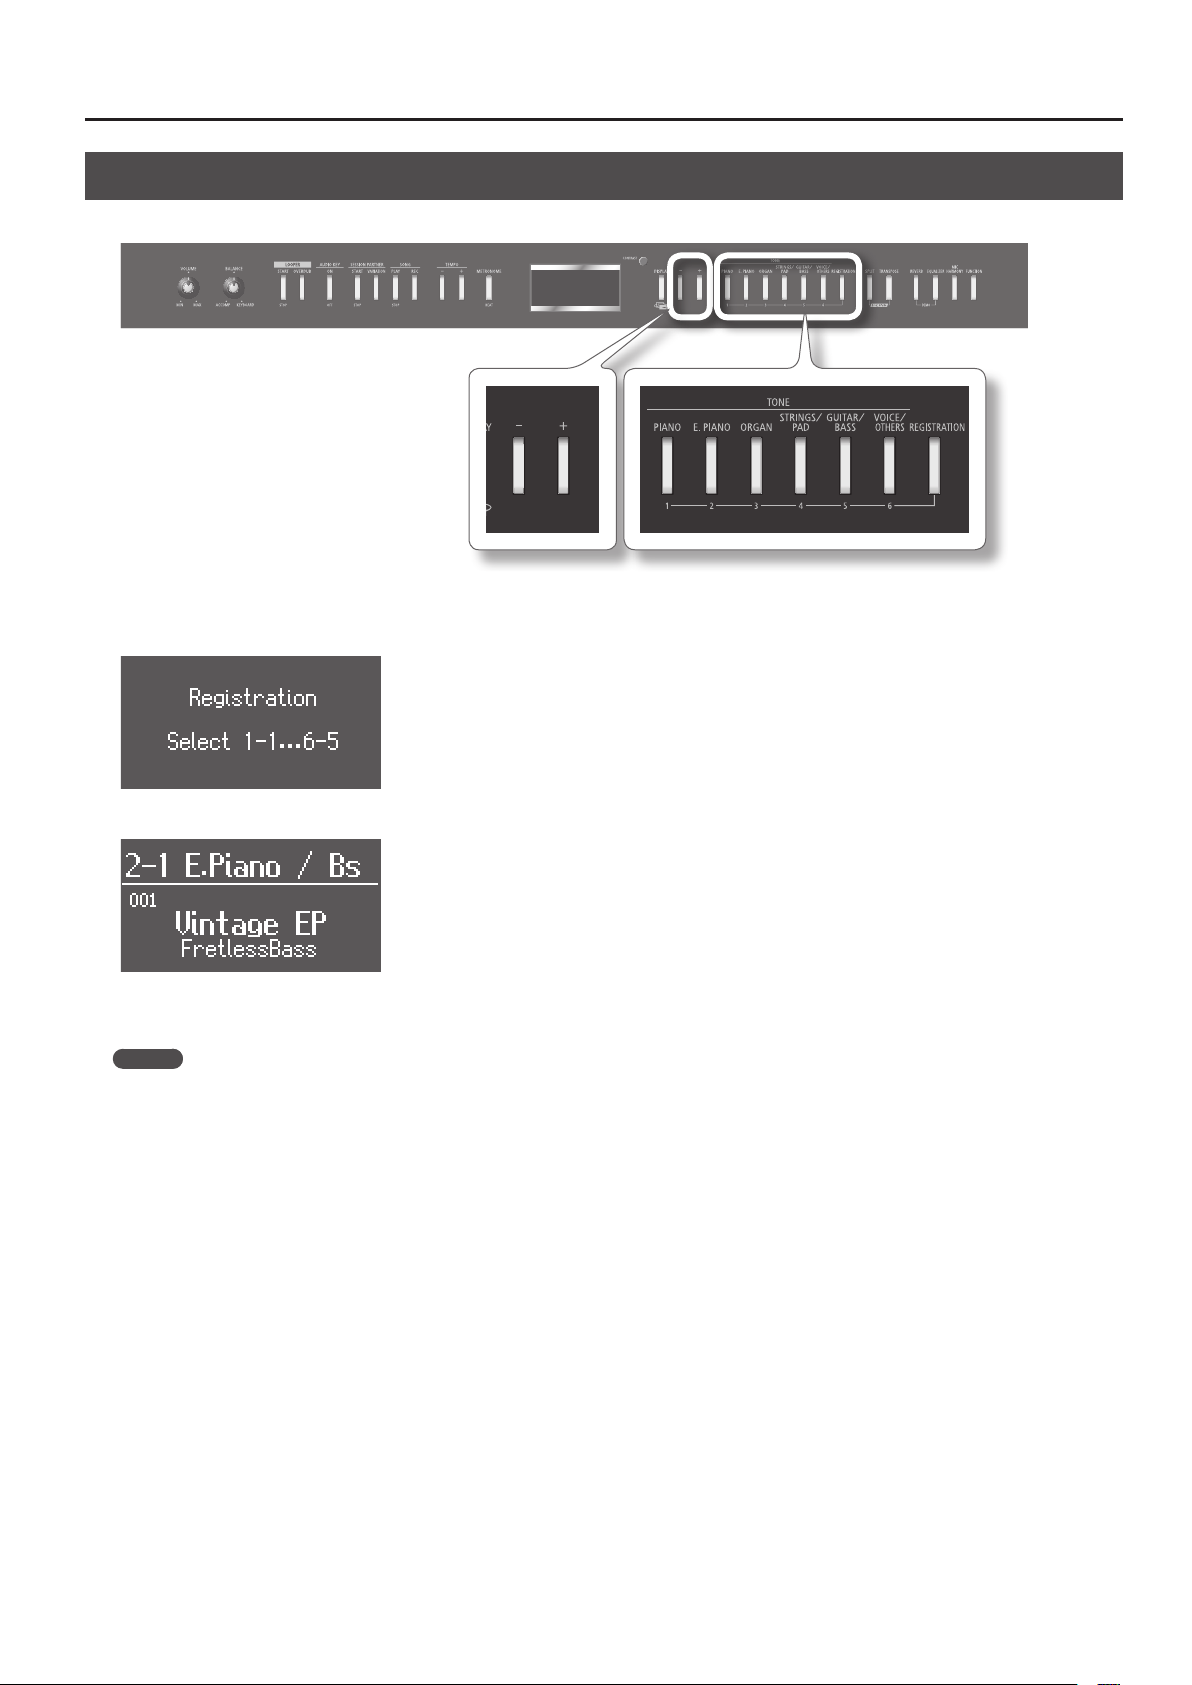
Registering Your Favorite Performance Settings
Recalling a Registration
It’s easy to recall settings you’ve stored using the [REGISTRATION] button.
1. Press the [REGISTRATION] button.
The rst time you press the [REGISTRATION] button after turning on the power, a screen like the following will appear.
2. Use the [1]–[6] buttons to choose the button in which the desired registration is saved.
3. Use the [-] [+] buttons to select the registration variation.
The performance settings will change.
MEMO
• You can use a pedal to recall registrations (p. 70).
• A set of registrations that you’ve saved in internal memory or on USB memory can be loaded to the [REGISTRATION] button (p. 69).
51
Page 52

Recording Your Performance
Recording Your Keyboard Performance
It’s easy to record your performance.
You can play back a recorded performance to evaluate your own playing, or to play along with the recorded performance.
If the following screen appears
If you attempt to select another song or record a new song without saving your recorded performance, a conrmation message will appear.
If it’s OK to erase the recorded performance Press the TEMPO [+] button.
If you want to save the recorded performance
Press the TEMPO [-] button to store the recorded performance into internal memory or USB memory (p.
56, p. 80).
Preparing to Record
1. Select the tone you want to play (p. 20).
Sound the metronome if desired (p. 21).
2. Press the SONG [REC] button.
The display will indicate “New Song.”
The SONG [REC] button will light, the SONG [PLAY/STOP] button will blink, and the FP-7F will enter recording-standby mode.
If you decide not to record, press the SONG [REC] button once again.
3. Set the tempo and time signature of the song (p. 21, p. 42).
52
Page 53

Recording Your Performance
Starting and Stopping Recording
1. Press the SONG [PLAY/STOP] button or play the keyboard.
You’ll hear a two-measure count (the measure number in the lower right of the display will indicate “-2” and then “-1”), and recording will start.
When recording starts, the SONG [PLAY/STOP] button and SONG [REC] button will light.
MEMO
If you started recording by playing the keyboard, the count will not be sounded.
2. Press the SONG [PLAY/STOP] button or SONG [REC] button.
Recording will stop.
Listening to the Recorded Performance
1. Press the [DISPLAY] button a number of times until “New Song” appears in the display.
2. Press the [-] button.
You’ll return to the beginning of the recorded performance.
3. Press the SONG [PLAY/STOP] button.
The recorded performance will play back.
Playback will stop when you press the SONG [PLAY/STOP] button once again.
MEMO
If you press the SONG [PLAY/STOP] button while the metronome is sounding, a two-measure count-in will be sounded before playback begins.
* The recorded performance will be lost when you turn o the power. If you want to keep your recorded performance, you must save it to internal
memory or USB memory (p. 56, p. 80).
* You can’t play back another song if a recorded performance exists. You must either delete (p. 55) or save (p. 56) it before you can play back another
song.
53
Page 54

Recording Your Performance
Recording Your Performance with Session Partner
You can easily record session performances to the session partner.
Preparing to Record
1. Select the tone you want to play (p. 20).
2. Select a rhythm (p. 44).
3. Press the SONG [REC] button.
The display will indicate “New Song.”
The SONG [REC] button will light, the SONG [PLAY/STOP] button will blink, and the FP-7F will enter recording-standby mode.
If you decide not to record, press the SONG [REC] button once again.
4. Specify the tempo of the song (p. 42).
Starting and Stopping Recording
1. Press the SESSION PARTNER [START/STOP] button.
The rhythm will start playing, and recording will begin at the same time.
When recording starts, the SONG [PLAY/STOP] button and SONG [REC] button will light.
MEMO
• For information concerning internal Rhythms and Chord Progression Patterns, refer to “Rhythm List (Session Partner)” (p. 95) and “Chord Progression
Pattern List” (p. 96).
• When carrying out recording using the chords you specify from keyboard (p. 68), recording will start when you specify a chord using keys in the
left-hand section of the keyboard.
2. Press the SONG [PLAY/STOP] button or SONG [REC] button.
Recording will stop.
54
Page 55

Recording Your Performance
Listening to the Recorded Performance
1. Press the [DISPLAY] button a number of times until “New Song” appears in the display.
2. Press the [-] button.
You’ll return to the beginning of the recorded performance.
3. Press the SONG [PLAY/STOP] button.
The recorded performance will play back.
Playback will stop when you press the SONG [PLAY/STOP] button once again.
MEMO
If you press the SONG [PLAY/STOP] button while the metronome is sounding, a two-measure count-in will be sounded before playback begins.
* The recorded performance will be lost when you turn o the power. If you want to keep your recorded performance, you must save it to internal
memory or USB memory (p. 56, p. 80).
* You can’t play back another song if a recorded performance exists. You must either delete (p. 55) or save (p. 56) it before you can play back another
song.
Erasing a Recorded Performance
Here’s how to erase a recorded performance.
1. Hold down the [DISPLAY] button and press the SONG [REC] button.
A conrmation message will appear.
If you decide not to delete the performance, press the TEMPO [-] button.
2. Press the TEMPO [+] button.
The recorded performance will be erased.
55
Page 56

Recording Your Performance
Saving a Recorded Song (Save Song)
Here’s how to save your recorded performance in internal memory.
If you’ve recorded a song, but then switch o the FP-7F without saving it, your recorded song will be lost. You must save your recorded song in internal
memory if you want to keep it.
MEMO
You can also save your performance on USB memory (sold separately) (p. 80).
Preparing to Save
1. Press the [FUNCTION] button.
You’ll enter function mode.
2. Use the [-] [+] buttons to select “File Menu.”
3. Press the [PIANO] button.
The File Menu screen will appear.
4. Use the [-] [+] buttons to select “Save Song.”
5. Press the [PIANO] button.
The song rename screen will appear.
56
Page 57

Renaming the Song
Operation Button
Change characters Press the [-] or [+] buttons.
Select the character to change Press the [PIANO] button or [E. PIANO] button.
Switch the type of characters Press the [ORGAN] button.
Insert a character Press the [STRINGS/PAD] button.
Delete a character Press the [GUITAR/BASS] button.
Recording Your Performance
1. Use the buttons listed above to edit the name.
You can press the [DISPLAY] button to return to the File Menu screen.
2. Hold down the [VOICE/OTHERS] button to conrm the name.
The song save-destination select screen will appear.
Selecting the Song Save-destination and Saving
1. Use the [-] [+] buttons to select “Internal Memory.”
2. Press the [PIANO] button.
The cursor will move to the save-destination song number.
3. Use the [-] [+] buttons to select a save-destination.
No song has been saved at song numbers whose name eld indicates “Empty.” Select a song number at which no song has been saved.
If you want to delete an unwanted song and replace it with the song you’re saving, choose the song number that contains the unwanted song.
4. Press the [PIANO] button.
The song will be saved.
* Never turn o the power while the screen indicates “Executing...”
57
Page 58

Recording Your Performance
Deleting a Saved Song (Delete Song)
Here’s how to delete a song that you saved in internal memory.
MEMO
You can also delete songs that were saved on USB memory (sold separately) (p. 80).
Preparing to Delete
1. Press the [FUNCTION] button.
You’ll enter function mode.
2. Use the [-] [+] buttons to select “File Menu.”
3. Press the [PIANO] button.
The File Menu screen will appear.
4. Use the [-] [+] buttons to select “Delete Song.”
5. Press the [PIANO] button.
58
Page 59
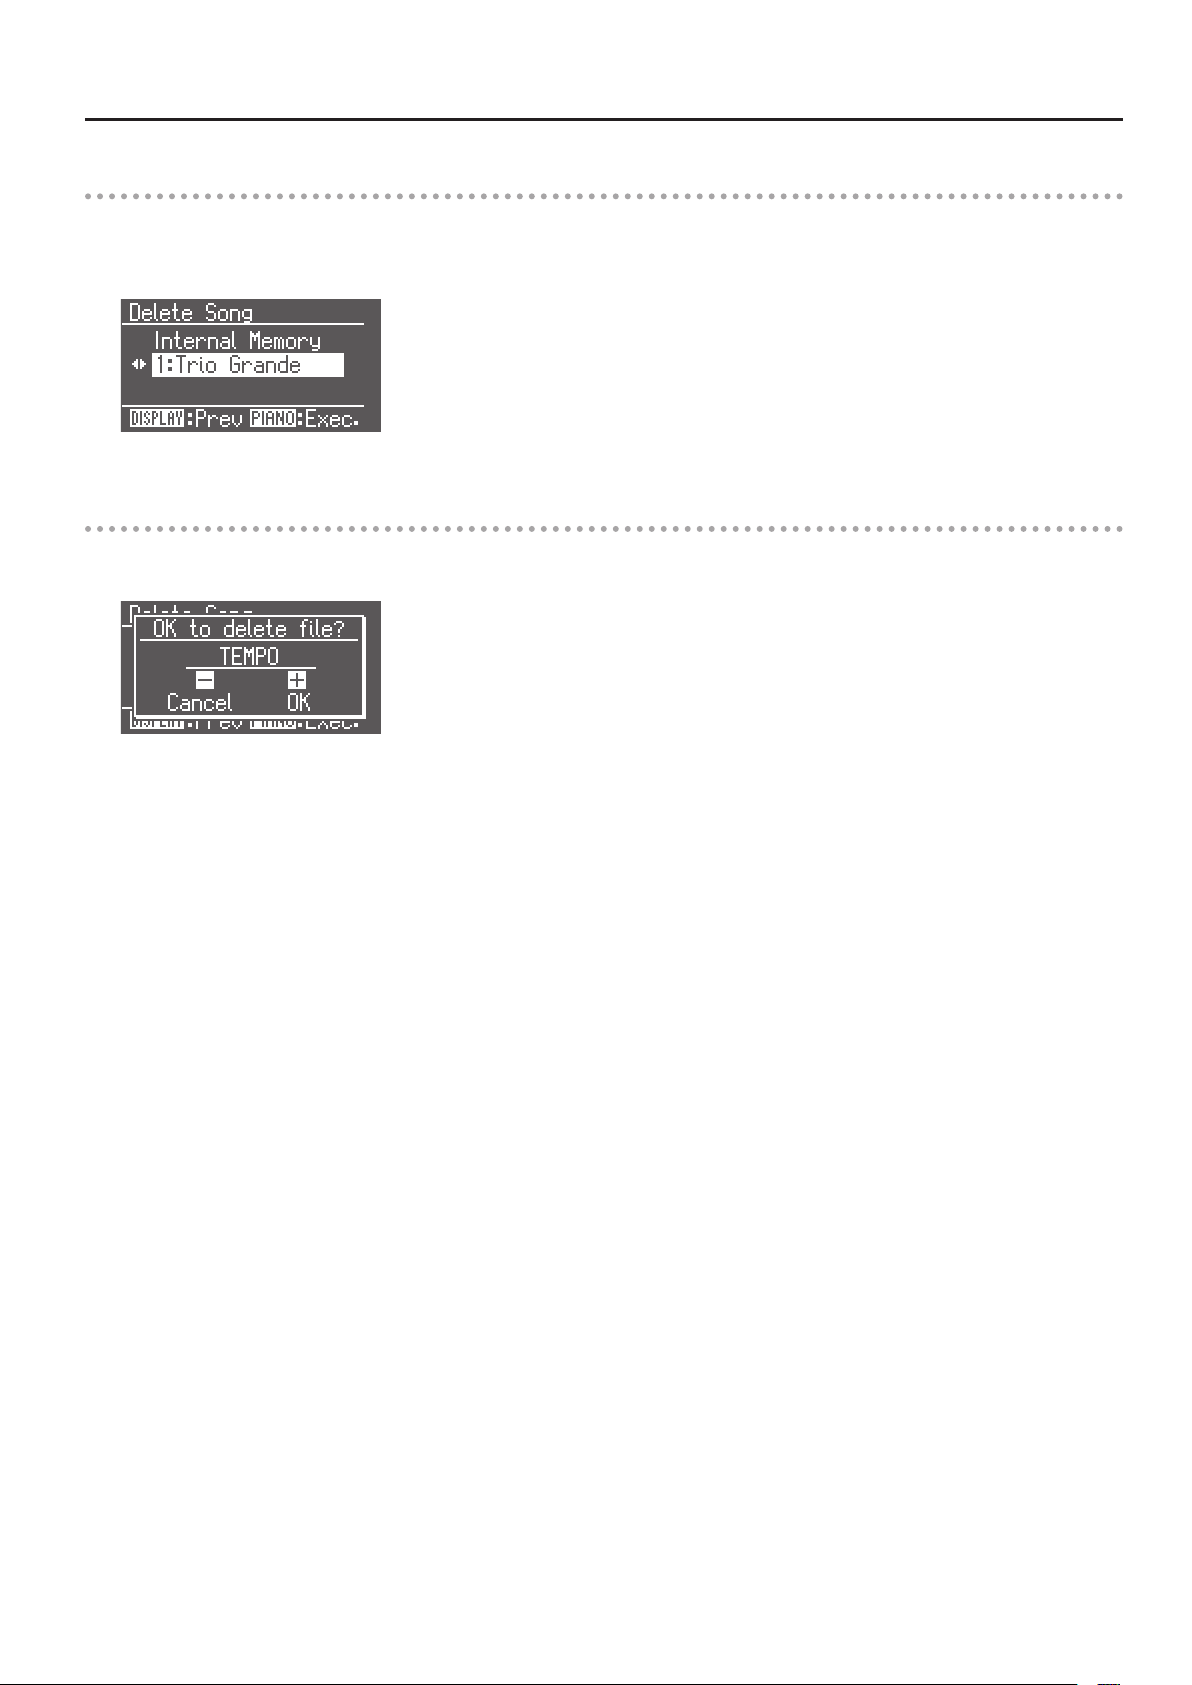
Selecting the Song to Delete
1. Use the [-] [+] buttons to select “Internal Memory.”
2. Press the [PIANO] button.
The cursor will move to the number of the song to be deleted.
3. Use the [-] [+] buttons to select the song that you want to delete.
Deleting the Song
1. Press the [PIANO] button.
A conrmation message will appear.
Recording Your Performance
If you decide not to delete the song, press the TEMPO [-] button.
2. Press the TEMPO [+] button.
The selected song will be deleted.
* Never turn o the power while the screen indicates “Executing...”
59
Page 60

Recording a Layered Performance (Looper)
What is the Looper?
The FP-7F oers a feature that lets you record what you play on the keyboard and overdub other sound onto it (such as vocals sung into a microphone).
The resulting recordings can be played back repeatedly. This is called the “Looper” function.
For example, you could start by recording an accompaniment that uses a strings sound. Next, you could record the melody using a piano sound,
adding it to the music you previously recorded. And, just like that, you’ve created a performance that sounds like an ensemble.
Looper Workow
Phrases (a total of 60 seconds worth can be recorded)
Intro
Overdub
An intro is played automatically upon start of a recording; when recording is stopped, an ending is played automatically.
The recordable time is approximately 60 seconds for all phrases (intro, main, ending).
Main
Overdub/
Repeated playback
Looper rhythm
Ending
Overdub
What are Phrases?
Keyboard performances and vocals from a microphone that have been recorded using the Looper function are known as “Phrases.”
Each phrase consists of the following three elements.
• Intro
• Main
• Ending
What is a Looper Rhythm?
Each of the Looper rhythms includes an appropriate chord progression, a tempo, and measure number data.
When you record a phrase using the Looper, performance will be based on the selected Looper rhythm data.
By adding harmony to the sound from the microphone, you can sing with harmony that’s appropriate for the Looper rhythm’s chord
progression.
Each looper rhythm consists of the following two elements.
• Drums
• Bass
MEMO
If you save the recorded phrase on USB memory, you’ll also be able to use it with the Audio Key function (p. 31).
* You can’t do the following while using the Looper.
• Play back or record a song
• Session Partner
• Audio Key
• Transpose
• Change the time signature
• Change the tempo
60
Page 61

Recording a Layered Performance (Looper)
Recording a Phrase
Here’s how to record a phrase.
If Using a Microphone
1. Connect your microphone (p. 76).
2. Adjust the microphone volume (p. 76).
3. If desired, turn on the microphone harmony (p. 76).
MEMO
Since the Looper records the sound by overdubbing, noise from the microphone might be more obtrusive.
If such noise is a problem, you can assign a pedal to switch the microphone input on/o (p. 72), and turn on the microphone input only when you
need to record the sound from the microphone.
Select a Looper Rhythm
1. Press the [DISPLAY] button a number of times to access the LOOPER screen.
2. Use the [-] [+] buttons to select the desired looper rhythm.
For more about the available looper rhythms, refer to “Looper Rhythm List” (p. 98).
* Since changing the Looper rhythm’s tempo will change the length of the phrase, it might not t within the available Looper recording time.
MEMO
You can choose which looper rhythm parts will sound (p. 67).
If the following screen appears
A conrmation message may appear if you attempt to select a dierent Looper rhythm or use a function other than the Looper before you’ve
saved the recorded phrase.
If it’s OK to erase the recorded phrase Press the TEMPO [+] button.
If you want to save the recorded phrase Press the TEMPO [-] button to store the recorded phrase into USB memory (p. 67).
61
Page 62

Recording a Layered Performance (Looper)
Start Overdubbing
Intro
Overdub Overdub/
Main
Repeated playback
Ending
Overdub
1. Press the LOOPER [START/STOP] button.
The LOOPER [START/STOP] button will light, and the intro will start overdubbing.
The looper rhythm will also begin sounding at the same time.
Looper Rhythm Number
Highlighted while the intro section is playing
Highlighted while the main section is playing
Highlighted while the ending section is playing
Shown if a recorded performance exists
Looper Rhythm Name
Currently playing location
Chord to be played next
Currently playing chord
Tempo
When the intro has nished being overdubbed, overdubbing of the main section will start.
The main section will continue being overdubbed for the number of measures of the Looper rhythm.
Time signature
2. Press the LOOPER [OVERDUB] button.
The LOOPER [OVERDUB] button will light, and repeated playback will begin.
Pressing the LOOPER [OVERDUB] button toggles you between overdubbing and repeated playback.
3. Press the LOOPER [START/STOP] button.
The ending will be overdubbed, and then overdubbing will stop.
If you want to stop immediately, press the LOOPER [START/STOP] button.
* If you stop during overdubbing, part of the phrase might not be preserved.
MEMO
• If you’re not satised with the phrase you recorded, and would like to re-record it, erase the phrase as described in “Erasing a Phrase” (p. 63).
• If you assign the pedal function to “Looper Start/Stop” or “Looper Overdub,” you’ll be able to operate the Looper using the pedal (p. 73).
• You can save the recorded phrase in USB memory (p. 80) and use it with the Audio Key function (p. 31).
62
Page 63

Erasing a Phrase
Here’s how to erase the recorded phrase.
1. Hold down the [DISPLAY] button and press the LOOPER [OVERDUB] button.
A conrmation message will appear.
Recording a Layered Performance (Looper)
If you decide not to erase the phrase, press the TEMPO [-] button.
2. Press the TEMPO [+] button.
The phrase will be erased.
* Once a phrase has been erased, it cannot be recovered. If you want to keep the phrase, save it on USB memory (p. 80).
63
Page 64

Detailed Settings for Various Functions
Basic Operation in Function Mode
In Function mode you can make detailed settings for various performance and recording functions.
Entering Function mode
1. Press the [FUNCTION] button.
The [FUNCTION] button will light, and you’ll enter Function mode.
2. Use the [+] [-] buttons to select the item that you want to edit, and press the [PIANO] button.
Repeat this step to select the setting that you want to edit.
Pressing the [DISPLAY] button will take you back to the previous screen.
Editing the Setting
1. Use the [-] [+] buttons to change the value of the setting.
By pressing the [-] [+] buttons simultaneously, you can revert to the factory-set value.
Pressing the [DISPLAY] button will take you back to the previous screen.
If you want to continue editing other settings, return to step 2 of “Entering Function mode” and select the setting that you want to edit.
2. Press the [FUNCTION] button.
The [FUNCTION] button’s indicator will go out, and you’ll exit Function mode.
MEMO
• Settings you modify will return to their original value when you turn o the power.
• For some settings, you can specify that they be stored in memory even while the power is turned o. For details on the settings that can be stored,
refer to “Stored Items” (p. 91).
64
Page 65

Settings you can change
Detailed Settings for Various Functions
Item Setting Page
Lid
Damper Resonance
Hammer Noise
Hammer Response
Piano Designer
Key Touch
Tuning
Looper
Session Partner
File Menu
Registration
Mic
Edit Tone Wheel p. 37
Equalizer p. 71
Dual Balance p. 72
Master Gain p. 72
Transpose Mode p. 72
Octave Shift p. 72
Pedal
Duplex Scale
String Resonance
Key O Resonance
Cabinet Resonance
Damper Noise
Stretch Tuning
Key Touch p. 66
Key Touch Oset p. 66
Master Tuning p. 66
Temperament p. 66
Temperament Key p. 66
Part Select p. 67
Save Looper Phrase p. 67
Part Select p. 67
Intro/Ending Sw p. 67
Chord Prog. Pattern p. 67
Chord Prog. Root p. 67
Chord Prog. Fix p. 68
Auto Chord Prog. Sw p. 68
Save Song p. 56, p. 80
Copy Song p. 81
Delete Song p. 58, p. 80
Format Media p. 78
Save Regist. Set p. 68
Load Regist. Set p. 69
Delete Regist. Set p. 69
Copy Regist. Set p. 70
Pedal Shift p. 70
Mic Sw p. 71
Mic Reverb p. 71
Harmony Type p. 71
Harmony Level p. 71
Damper Pedal Part p. 72
FC1 Pedal Func
FC2 Pedal Func
p. 35
p. 73
Item Setting Page
Right Track Mute p. 73
Left Track Mute p. 73
Accomp Track Mute p. 73
Composer
MIDI
USB Driver p. 85
Ext. Memory Mode p. 78
Memory Backup p. 75
Factory Reset p. 75
Center Cancel p. 74
Mute Volume p. 74
Lyrics p. 74
Song Language p. 74
CD/Audio Type p. 74
Local Control p. 84
MIDI Transmit Ch. p. 84
Composer MIDI Out p. 84
V-LINK Transmit Ch. p. 86
Regist. Tx PC Ch.
Regist. PC
Regist. Bank MSB
Regist. Bank LSB
p. 85
65
Page 66

Detailed Settings for Various Functions
Keyboard Settings (Key Touch)
Adjusting the Keyboard Sensitivity (Key Touch)
You can change the touch sensitivity, or response of the keys.
You can adjust the keyboard touch as appropriate for the playing
strength of the person who is performing.
Setting Explanation
Fixed
Super Light
Light
Medium
Heavy
Super Heavy
Making Fine Adjustments to the Keyboard
Touch Sensitivity (Key Touch Oset)
The sound plays at one set volume, regardless of
the force used to play the keys.
This setting produces the lightest keyboard
touch.
You can achieve fortissimo ( ) play with a less
forceful touch than usual, so the keyboard feels
lighter. This setting makes it easy to play, even
for children.
This sets the standard keyboard touch. You can
play with the most natural touch. This is the
closest to the touch of an acoustic piano.
You have to nger the keyboard more forcefully
than usual in order to play fortissimo (), so the
keyboard touch feels heavier. Dynamic ngering
adds even more feeling to what you play.
This setting produces the heaviest keyboard
touch.
Adjusting the Tuning (Temperament)
You can play classical music such as baroque pieces using their original
tuning.
Most modern songs are composed and played with the assumption
that equal temperament (the most common tuning in use today) will
be used, but when classical music was composed, there were a wide
variety of other tuning systems in existence.
Playing a composition with its original tuning lets you enjoy the
sonorities of the chords that the composer originally intended.
Setting Explanation
Equal
Just Major
Just Minor
Arabic This tuning is suitable for the music of Arabia.
Kirnberger
Meantone
Pythagorean
Werckmeister
In this tuning, each octave is divided into twelve
equal steps. Every interval produces about the
same amount of slight dissonance.
This tuning eliminates ambiguities in the fths
and thirds. It is unsuited to playing melodies
and cannot be transposed, but is capable of
beautiful sonorities.
The Just tunings dier from major and minor
keys. You can get the same eect with the minor
scale as with the major scale.
This is an improvement of the Meantone and
Just tunings that provides a high degree of
freedom of modulation. Performances are
possible in all keys (III).
This scale makes some compromises in just
intonation, enabling transposition to other keys.
This tuning, devised by the philosopher Pythagoras, eliminates dissonance in fourths and
fths. Dissonance is produced by third-interval
chords, but melodies are euphonious.
This temperament combines the Meantone and
Pythagorean tunings. Performances are possible
in all keys (rst technique, III).
This lets you make further detailed adjustments to the keyboard
sensitivity as appropriate for the strength of your ngers.
Setting Explanation
-10–0–9
Higher settings will produce a heavier playing
feel.
Tuning Settings (Tuning)
Matching the Pitch with Other Instruments (Master Tuning)
When playing ensemble with other instruments and in other such
instances, you can match the standard pitch to another instrument.
The standard pitch generally refers to the pitch of the note that’s
played when you nger the middle A key. For a cleaner ensemble
sound while performing with one or more other instruments, ensure
that each instrument’s standard pitch is in tune with that of the other
instruments. This tuning of all the instruments to a standard pitch is
called “master tuning.”
Setting 415.3 Hz–440.0 Hz–466.2 Hz
MEMO
When the instrument is shipped from the factory, this is set to
“440.0 Hz.”
Specifying the Keynote (Temperament Key)
When playing with tuning other than equal temperament, you need
to specify the temperament key for tuning the song to be performed
(that is, the note that corresponds to C for a major key or to A for a
minor key).
If you choose an equal temperament, there’s no need to select a
temperament key.
Setting C–B
66
Page 67

Detailed Settings for Various Functions
Looper Settings (Looper)
Select the Parts that Will Play (Part Select)
Here you can select the looper rhythm parts that will be played by the
Looper.
Setting Explanation
Drums & Bass Drums, Bass
Drums Drums only
Saving Phrases (Save Looper Phrase)
Here’s how to save recorded phrases to USB memory as an audio le
set.
A saved audio le set can be used with Audio Key (p. 31).
* You can’t save phrases while the Looper is in use.
1. Enter Function mode, and choose “Save Looper Phrase” (p. 64).
2. Press the [PIANO] button.
The Looper phrases will be saved to USB memory.
* Never turn o the power while “Executing...” appears in the screen.
* Saving the data can take several minutes.
MEMO
By making use of Audio Key Utility (p. 31), you can change the name
of a stored audio le set or save it on your personal computer.
Session Partner Settings (Session Partner)
Select the Parts that Will Play (Part Select)
Here you can select the rhythm parts that will be played by Session
Partner.
Setting Explanation
Drums, Bass & Accomp
Drums & Bass Drums, Bass
Drums Drums only
Turning the Intro and Ending On/O
(Intro/Ending Sw)
This is an on/o setting for the intro and ending played by Session
Partner.
If this setting is “O,” no intro or ending will play when you press the
SESSION PARTNER [START/STOP] button.
Setting Explanation
On An intro and ending will play.
O No intro or ending will play.
Drums, Bass, Accomp (accompaniment other
than drums and bass)
Selecting the Chord Progression for the Rhythm (Chord Prog. Pattern)
Here you can select the chord progression pattern for the currently
selected rhythm.
Setting Explanation
A chord progression pattern that you yourself
User Chord
1–61
recorded. “User Chord” will appear only if there
is a chord progression pattern that you’ve
created (p. 47).
The chord progressions for each of these
patterns are listed on “Chord Progression
Pattern List” (p. 96).
Specifying the Root Note for the Chord Progression (Chord Prog. Root)
Here you can specify the root note of the rst chord in the currently
selected chord progression pattern.
Setting
, D, E , E, F, F , G, A , A, B , B
C, C
67
Page 68

Detailed Settings for Various Functions
Fixing the Chord Progression Pattern (Chord Prog. Fix)
For each rhythm, Session Partner has information about the chord
progression pattern suitable for that rhythm.
Here you can specify whether Session Partner will automatically switch
to a chord progression suitable for the rhythm when you switch the
rhythm.
Setting Explanation
On
O
The chord progression pattern will not change
when you switch the rhythm.
When you switch the rhythm, the chord
progression will change to one that is suitable
for the selected rhythm.
Turning the Rhythm’s Chord Progression
On/O (Auto Chord Prog. Sw)
Here you can specify whether the rhythm will follow the chord
progression pattern or the chords you specify from the keyboard.
Setting Explanation
On
O
The rhythm performance will follow the
specied chord progression pattern.
Split mode (p. 30) will automatically be selected,
allowing you to specify chords in the left-hand
zone of the keyboard.
* The left-hand zone of the keyboard will not
play the left-hand tone. If you press Split
once again, full-keyboard chord detection
mode will be selected.
Registration Settings (Registration)
Saving a Registration Set (Save Regist. Set)
Here’s how the 30 registrations stored at the [REGISTRATION] button
can be saved as a single set to the FP-7F’s internal memory or to USB
memory.
If you’re saving to USB memory, connect your USB memory to the
external memory connector.
1. Enter Function mode and choose “Registration” (p. 64).
2. Press the [PIANO] button.
3. Use the [-] [+] buttons to choose “Save Regist. Set.”
4. Press the [PIANO] button.
5. Rename the registration set (p. 57).
6. Use the [-] [+] buttons to specify the save destination media.
Indication Explanation
Internal Memory Internal memory
External Memory USB memory
7. Press the [PIANO] button.
MEMO
• You can also change the Auto Chord Prog. Sw setting by holding
down the SESSION PARTNER [START/STOP] button and using the
SESSION PARTNER [VARIATION] button.
• If the Auto Chord Prog. Sw is “O,” the SESSION PARTNER [START/
STOP] button starts blinking; Session Partner is standing by for
playback. When you enter a chord from the keyboard, the rhythm
will start playing. To stop playback, press the SESSION PARTNER
[START/STOP] button once again.
• When entering chords from the keyboard, you don’t have to
continue holding down the chord. The accompaniment will keep
using the same chord until you specify the next chord.
• Instead of pressing all notes in the chord, you can use a simplied
ngering to specify the chords. Refer to “Chord Fingering List” (p. 100)
for more about how to specify chords.
• You can play the left-hand tone while specifying the chords with
your left hand. Press the [SPLIT] button to turn it o, and then
press the [SPLIT] button once again so it’s lit. When you play in the
left-hand zone of the keyboard, you’ll hear the left-hand tone.
8. Use the [-] [+] buttons to specify the save-destination
number.
If a registration set name is shown for a number, a registration set has
already been saved in that number.
If you choose a number at which a registration set has already been
saved, the existing registration set will be overwritten and lost. If you
don’t want to lose the saved registration set, choose a number for
which “(Not Used)” is shown in the save-destination eld.
9. Press the [PIANO] button.
The registration set will be saved.
* Never turn o the power while the display indicates “Executing...”
MEMO
• If desired, you can reset the contents saved at the [REGISTRATION]
button to their factory-set condition. Refer to “Restoring the
Factory-set Condition (Factory Reset)” (p. 75).
• For details on how to select a saved registration set, refer to
“Loading a Registration Set You Saved (Load Regist. Set)” (p. 69).
68
Page 69

Detailed Settings for Various Functions
Loading a Registration Set You Saved (Load Regist. Set)
Here’s how an entire set of registrations you saved in internal memory
or USB memory can be loaded back to the [REGISTRATION] button.
If you want to load a registration set that was saved on USB memory,
connect your USB memory to the external memory connector.
* Note that when you load a registration set, all of the settings that
were stored at the [REGISTRATION] button will be overwritten and
lost.
1. Enter Function mode and choose “Registration” (p. 64).
2. Press the [PIANO] button.
3. Use the [-] [+] buttons to choose “Load Regist. Set.”
4. Press the [PIANO] button.
5. Use the [-] [+] buttons to specify the save destination media.
Indication Explanation
Internal Memory Internal memory
External Memory USB memory
6. Press the [PIANO] button.
Deleting a Registration Set You Saved (Delete Regist. Set)
Here’s how to delete a registration set that’s been saved in internal
memory or USB memory.
1. Enter Function mode and choose “Registration” (p. 64).
2. Press the [PIANO] button.
3. Use the [-] [+] buttons to choose “Delete Regist. Set.”
* You won’t be able to execute the following steps if there is no
registration set saved in internal memory, or if no USB memory is
connected.
4. Press the [PIANO] button.
5. Use the [-] [+] buttons to select the media that you want to
delete.
Indication Explanation
Internal Memory Internal memory
External Memory USB memory
6. Press the [PIANO] button.
7. Use the [-] [+] buttons to select a registration set that you
want to load.
8. Press the [PIANO] button.
The registration set will be loaded.
* Never turn o the power while the display indicates “Executing...”
7. Use the [-] [+] buttons to select a registration set that you
want to delete.
8. Press the [PIANO] button.
The registration set you selected will be deleted.
* Never turn o the power while the display indicates “Executing...”
69
Page 70

Detailed Settings for Various Functions
Copying a Registration Set (Copy Regist. Set)
Registration sets you saved in internal memory can be copied to USB
memory.
Conversely, registration sets you saved on USB memory can also be
copied to internal memory.
1. Enter Function mode and choose “Registration” (p. 64).
2. Press the [PIANO] button.
3. Use the [-] [+] buttons to choose “Copy Regist. Set”
* You won’t be able to execute the following steps if there is no
registration set saved in internal memory, or if no USB memory is
connected.
4. Press the [PIANO] button.
5. Use the [-] [+] buttons to select the copy-source media.
Indication Explanation
Internal Memory Internal memory
External Memory USB memory
Using a Pedal to Switch Registrations (Pedal Shift)
You can assign a pedal to successively switch registrations. Each time
you press the pedal, you will switch to the next registration.
Setting Explanation
Pressing a pedal connected to the
O
FC 1
FC 2
SOSTENUTO/C (FC2) jack or SOFT/L (FC1) jack
will not switch registrations. The functions
assigned to the SOSTENUTO/C (FC2) jack and
SOFT/L (FC1) jack will be available for use (p. 73).
The pedal connected to the SOFT/L (FC1) jack
can be used only for switching registrations. In
this case, the function assigned to the SOFT/L
(FC1) jack cannot be used.
The pedal connected to the SOSTENUTO/C (FC2)
jack can be used only for switching registrations.
In this case, the function assigned to the
SOSTENUTO/C (FC2) jack cannot be used.
6. Press the [PIANO] button.
7. Use the [-] [+] buttons to select a registration set that you
want to copy.
If you select “All,” all registration sets will be copied.
8. Press the [PIANO] button.
9. Use the [-] [+] buttons to select the copy-destination
number.
If you select a number in which a registration set has already been
saved, then execute the copy, the previously saved registration set will
be deleted. If you don’t want to delete the saved registration set, select
a number for which “Not Used” is shown, then carry out the copy.
You won’t be able to execute the copy if the save-destination memory
is full. Delete unneeded data before you execute the copy.
10. Press the [PIANO] button.
The registration set will be copied.
* Never turn o the power while the display indicates “Executing...”
70
Page 71

Detailed Settings for Various Functions
Microphone Settings (Mic)
Turning the Microphone Input On/O
(Mic Sw)
You can use this setting to temporarily turn the microphone input o.
Setting Explanation
On Turns the microphone input on.
O Turns the microphone input o.
* This will automatically turn “On” when you connect a microphone,
and will automatically turn “O” when you disconnect the microphone.
* You can’t turn this “On” if a microphone is not connected.
MEMO
You can assign the microphone Input On/O function to a pedal
(p. 73).
Adding Reverberation to Your Voice (Mic Reverb)
Here you can add reverberation to your voice from the microphone.
Reverberation can improve the sound of your vocals.
Setting Explanation
O, 1–10 Higher values produce deeper reverb.
* Mic reverb will not be applied if the reverb eect is o (p. 25).
MEMO
The amount of microphone reverb will depend on the depth of the
reverb eect.
Changing How Harmony is Applied (Harmony Type)
Here you can change the way in which harmony is applied.
Setting Explanation
Duet
Trio
Quartet
Adjusting the Volume of the Harmony (Harmony Level)
This setting adjusts the volume of the harmony.
Setting Explanation
0–10
One voice of harmony will be added to your
voice.
Two voices of harmony will be added to your
voice.
Three voices of harmony will be added to your
voice.
Increasing the value will make the harmony
sound louder.
Editing the Equalizer Settings (Equalizer)
You can use the equalizer to modify the tonal character of the sound
by boosting or reducing just the low-frequency or high-frequency
range of the sound.
1. Enter Function mode, and choose “EQUALIZER” (p. 64).
2. Press the [PIANO] button.
3. Use the [-] [+] buttons to select the equalizer number that
you want to edit.
4. Press the [PIANO] button.
5. Use the [-] [+] buttons to select the equalizer item that you
want to edit.
6. Press the [PIANO] button.
If you press the [DISPLAY] button, the cursor will return to the item.
7. Use the [-] [+] buttons to edit the setting.
Indication Setting Explanation
High Gain -12–+12 dB
High Freq 1.25 k–16 k (Hz)
High Mid
Gain
High Mid Freq 16–16 k (Hz)
High Mid Q 0.5, 1.0, 2.0, 4.0, 8.0
Low Mid Gain -12–+12 dB
Low Mid Freq 16–16 k (Hz)
Low Mid Q 0.5, 1.0, 2.0, 4.0, 8.0
Low Gain -12–+12 dB
Low Freq 100–1 k (Hz)
-12–+12 dB
Adjusts the level of the highfrequency range.
Frequency point in the highfrequency range. Generally, this
changes the level at and over this
frequency.
Adjusts the level of the mid- to
high-frequency range.
Frequency point in the mid- to
high-frequency range. This changes
the level of the specied bandwidth
centered on this frequency.
Changes the bandwidth of the
mid- to high-frequency range. The
bandwidth aected by the controls
narrows as the value increases.
Adjusts the level of the lowfrequency range to midrange.
Frequency point in the low-frequency range to midrange. This changes
the level of the specied bandwidth
centered on this frequency.
Changes the bandwidth of the lowfrequency range to midrange. The
bandwidth aected by the controls
narrows as the value increases.
Adjusts the level of the lowfrequency range.
Frequency point in the lowfrequency range. Generally, this
changes the level at and below this
frequency.
* Sounds may become distorted as the Gain level increases.
71
Page 72

Detailed Settings for Various Functions
Adjusting the Dual Play Volume Balance (Dual Balance)
You can adjust the volume balance between the two tones (tone 1 and
tone 2) used for Dual Play (p. 26).
Setting
9-1 (tone 1 is louder)–9-9 (same volume)–
1-9 (tone 2 is louder)
Adjusting the Volume (Master Gain)
If you are playing the FP-7F through a connected external system,
there may be cases in which the volume from your external system
is too low even when the FP-7F’s volume is turned to the maximum
setting.
In such cases, you can adjust the master gain setting as follows.
Adjusting the master gain will also aect the volume of the internal
speakers and headphones.
Setting -12–0–12 dB
* The sound may distort if you increase the volume excessively.
Pedal Settings (Pedal)
Changing How the Pedal Eects Are Applied
(Damper Pedal Part)
When you press the damper pedal during Dual play or Split play, the
pedal eect is normally applied to both tones, but you can also select
the tone to which the eect is to be applied.
Setting Explanation
Right & Left All enabled
Right
Left
Applied only to the Tone 1 (in dual mode)/
Right-hand Tone (in split mode)
Applied only to the Tone 2 (in dual mode)/
Left-hand Tone (in split mode)
Specifying What the Transpose will
Aect (Transpose Mode)
This setting species what the transpose will aect.
You can use the transpose to change the pitch of both the song and
the keyboard, the pitch of only the song, or the pitch of only the
keyboard.
Setting Explanation
Keyboard Keyboard notes, Transpose (p. 30)
Song Song playback, Playback Transpose (p. 43)
Keyboard & Song Keyboard notes and song playback
Changing the Pitch of the Tone in Octave Steps (Octave Shift)
You can change the pitch of the Tone 2 in Dual Play (p. 20) and Lower
tone in Split Play (p. 30) an octave at a time. Altering the pitch in
one-octave units in this way is called “Octave Shift.”
For example, you can raise the pitch of the Lower Tone to the same
pitch of the Upper Tone in Split Play.
Setting -2–0–+2
72
Page 73

Detailed Settings for Various Functions
Changing How the Pedals Work (FC1 Pedal Func/FC2 Pedal Func)
You can change the functions that are assigned to the pedals
connected to the SOFT/L (FC1) jack and SOSTENUTO/C (FC2) jack.
Setting Explanation
Soft
Sostenuto
Looper Start/Stop
Looper Overdub
Mic Sw Turns the microphone input on/o.
Harmony Sw The pedal will turn the Harmony on/o.
Expression
Play/Stop
Session Partner
Start/Stop
Leading Bass
Bend Up Pitch rises by pressing the pedal.
Bend Down Pitch lowers by pressing the pedal.
Modulation Vibrato is added by pressing the pedal.
* If a pedal connected to the FP-7F is set so it switches registrations,
that pedal will be dedicated to the switching of registrations. The
pedal function you’ve assigned here will be ignored (p. 70).
What is the leading bass function?
The function that sounds the lowest note of a ngered chord as
the bass tone is called “Leading Bass.”
Sets function to soft pedal.
* This can only be set with respect to a pedal
connected to the SOFT/L (FC1) jack.
Sets function to sostenuto pedal.
* This can only be set with respect to a pedal
connected to the SOSTENUTO/C (FC2) jack.
The pedal will have the same function as the
LOOPER [START/STOP] button.
The pedal will have the same function as the
LOOPER [OVERDUB] button.
Allows control of the volume. You will nd it convenient to connect a separately sold expression
pedal (EV-5). You cannot change volume of the
Session Partner or recorded performance.
The pedal will have the same function as the
SONG [PLAY/STOP] button.
You can start/stop Session Partner by pressing
the pedal instead of pressing SESSION PARTNER
[START/STOP] button.
Allows control the on/o of leading bass
function. It is turned on while having stepped
on the pedal.
Performance Settings (Composer)
Playing Back with the Right-hand Part Muted (Right Track Mute)
This lets you carry out playback while muting the right-hand part of
the internal song or the SMF music les.
This is a convenient way to practice along with a song one hand at a
time.
Setting Explanation
No sound will be heard.
Mute
On The sound will be heard.
- - - - No data exists.
* The setting will be “On” when you switch to a dierent song.
What is a Mute?
You can “mute” a specic part so that it will not be heard.
Playing Back with the Left-hand Part Mute (Left Track Mute)
This lets you carry out playback while muting the left-hand part of the
internal song or the SMF music les.
This is a convenient way to practice along with a song one hand at a
time.
Setting Explanation
Mute
On The sound will be heard.
- - - - No data exists.
* You can change the Mute Volume (p. 74) so
that the part will play back at a low volume,
allowing you to use it as a guide for your
own playing.
No sound will be heard.
* You can change the Mute Volume (p. 74) so
that the part will play back at a low volume,
allowing you to use it as a guide for your
own playing.
* The setting will be “On” when you switch to a dierent song.
Playing Back with the Accompaniment Part Muted (Accomp Track Mute)
This lets you play back while muting the accompaniment part of the
internal song or the SMF music les.
Setting Explanation
No sound will be heard.
Mute
On The sound will be heard.
- - - - No data exists.
* The setting will be “On” when you switch to a dierent song.
* You can change the Mute Volume (p. 74) so
that the part will play back at a low volume,
allowing you to use it as a guide for your
own playing.
73
Page 74

Detailed Settings for Various Functions
Decreasing the Playback Volume of Sounds in the Center (Center Cancel)
You can decrease the volume of sounds (vocals, some melodic
instruments, etc.) heard at the center of the stereo sound eld when
playing an audio le or a music CD song.
Setting Explanation
On The volume of the melody or vocal will decrease.
O Center Cancel will not be used.
* The Center Cancel setting will be cancelled when you select a
dierent song.
* For some songs, this function might not completely eliminate
the sounds heard from the middle. Also, the tone quality may be
aected by this function.
* Turning on the Center Cancel will turn o the Harmony.
Using a Specic Part’s Sound as a Guide
(Mute Volume)
This setting lets you specify that when the Right Track Mute (p. 73), Left
Track Mute (p. 73), or Accomp Track Mute (p. 73) setting is set to “Mute,” the
muted part is played at a lower volume, rather than being completely
silenced. This allows you to play a specic part at a lower volume, so
you can use it as a guide while you play along.
Setting Explanation
0–10 Higher values make the sound louder
Setting the Type of CD to be Played Back (CD/Audio Type)
The FP-7F may be unable to correctly recognize the type of CD being
used. In such instances, you can specify the type of CD manually.
Setting Description
Auto The CD type is detected automatically
Type A General CDs for Player Piano contain audio and
Type B
Stereo
* Note that some commercial player piano CDs cannot be played back
on the FP-7F.
MIDI data, and the data format may vary from
one CD to the next. If the CD’s data format does
not match the FP-7F’s settings, a “beep” will
sound. Certain general Piano player CDs may
not be playable on the FP-7F.
Commercial Audio CD (CDs other than those
designed for use with the player piano)
Switching the Display of Lyrics On/O (Lyrics)
Here you can specify whether lyrics will be shown in the display when
you play back song data that contains lyrics.
Setting Explanation
On Lyrics will be displayed.
O Lyrics will not be displayed.
The factory setting is “On.”
Changing the Display Language for Song Titles and Lyrics (Song Language)
You can choose the language in which song titles and lyrics are
displayed.
Setting Explanation
English Lyrics are displayed in English.
Japanese Lyrics and song titles are displayed in Japanese.
* If this is set to “English,” the characters might not be shown correctly
when you view Japanese lyrics or song titles. Similarly, if this is set
to “Japanese,” English lyrics and song titles might not be shown
correctly.
74
Page 75

Detailed Settings for Various Functions
Remembering Your Settings (Memory Backup)
The settings you edit in Function mode will return to their default state
when you turn o the power. However, if desired, you can have these
settings be retained even while the power is turned o.
This is called the “Memory Backup” function.
1. Enter Function mode and choose “Memory Backup” (p. 64).
2. Press the [PIANO] button.
If you decide not to carry out the Memory Backup, press the TEMPO [-]
button.
3. Press the TEMPO [+] button.
Memory Backup will be carried out.
When Memory Backup is complete, the Function mode menu screen
will appear.
* Never turn o the power while settings are being stored.
MEMO
For details on the items that are stored, refer to “Items Stored by
Memory Backup” (p. 91).
Restoring the Factory-set Condition (Factory Reset)
The settings stored by Memory Backup as well as the registration
settings can be restored to their factory-set condition. This function is
called “Factory Reset.”
* When you execute Factory Reset, all settings you’ve stored up to
that point will revert to the factory-set condition.
MEMO
Even if you execute this operation, songs and registration sets
stored in internal memory will not be lost.
If you want to erase all songs and registration sets from internal
memory, refer to “Formatting Memory (Format Media)” (p. 78).
1. Enter Function mode, and choose “Factory Reset” (p. 64).
2. Press the [PIANO] button.
If you decide not to execute Factory Reset, press the TEMPO [-] button.
3. Press the TEMPO [+] button.
Factory Reset will be executed.
* Never turn o the power while Factory Reset is being executed.
When Factory Reset is complete, the following screen will appear.
4. Turn the power o, then on again (p. 14).
75
Page 76

Connections with Other Equipment
Connecting a Microphone
By connecting a separately sold microphone, you can enjoy karaoke or
perform as a singer/instrumentalist.
The sound from the microphone can also be recorded using the
Looper function (p. 61).
Microphone
Adding Harmony to Your Voice
This lets you add harmony to your voice from the microphone.
Suitable harmony will be generated according to the chord data of the
song or the chords you play on the keyboard.
In the following cases, chord data will be assigned automatically.
• Harmony will be generated according to the chord data detected from
your keyboard performance.
• When you perform using Session Partner, the harmony will be
generated according to the chord progression pattern of the selected
rhythm.
• When recording a phrase with the Looper, the harmony will be
generated according to the chord progression pattern of the selected
Looper rhythm.
• If you’re singing along while playing back a song that contains chord
data, harmony will be added based on the chord data in the song.
1. Press the [MIC HARMONY] button.
The [MIC HARMONY] button will light.
If you press the [MIC HARMONY] button once again, the button will go
out and the harmony eect will be cancelled.
* Some eects (p. 24) and Piano Designer will no longer be applied
when you add harmony; this may cause the tone to sound dierently.
* The Audio Playback Transpose, Center Cancel, and Piano Designer
features cannot be used at the same time that Harmony is used.
1. Connect your microphone to the MIC INPUT jack.
The microphone input will turn on.
A “mic” symbol could be shown in the lower left of the display when
you connect a microphone.
2. Turn the MIC [VOLUME] knob to adjust the microphone
volume.
MEMO
You can apply harmony (p. 76) or Mic Reverb (p. 71) to your voice from
the microphone.
* Please be aware of the volume when using this during the night or
early morning.
* Lower the volume before connecting a microphone to the FP-7F.
* If the volume is excessive, you may hear noise from the speakers.
* Howling could be produced depending on the location of micro-
phones relative to speakers. This can be remedied by:
1. Changing the orientation of the microphone(s).
2. Relocating microphone(s) at a greater distance from speakers.
3. Lowering volume levels.
MEMO
• You can alter the way in which harmonies are added (p. 71).
• You can assign a pedal to turn the harmony on/o (p. 73).
Adjusting the Volume of the Harmony
1. Hold down the [MIC HARMONY] button and use the [-] [+]
buttons.
The display will indicate the volume of the harmony.
76
Page 77

Connections with Other Equipment
Connecting External Media
By connecting separately sold external media (CD drive, USB memory)
you’ll be able to do the following things.
Device What you can do
• Play back music CDs
CD drive
USB memory
* Before using a new USB memory, you must format (initialize) it on
the FP-7F. For details, refer to “Formatting Memory (Format Media)”
(p. 78).
* CDs that contain both music tracks and data will not play correctly.
SMF Music Files
SMFs (Standard MIDI Files) use a standard format for music le
that was formulated so that les containing music le could
be widely compatible, regardless of the manufacturer of the
listening device. An enormous variety of music is available,
whether it be for listening, for practicing musical instruments,
for Karaoke, etc.
VIMA TUNES
VIMA TUNES is a Roland specication for music les that
contains image and lyric data, allowing you to enjoy songs with
lyrics and images simultaneously. When data bearing the “VIMA
TUNES” logo is played back on a device that bears the same
logo, lyrics can be shown on the screen of a connected external
display or television, letting you enjoy karaoke or watch a slide
show.
* This instrument (FP-7F) is not able to play back VIMA TUNES
images.
• Play back SMF music le
• Play back songs on VIMA CD-ROMs (VIMA
TUNES) (sold by Roland)
• Play back SMF music le
• Save performance data
• Play back audio les
• Save/load registration sets
• Save the phrase recorded by the Looper
• Load an Audio Key audio le set
Connecting a CD Drive
Connect your CD drive to the external memory connector.
If you’re using a stand, attach the CD drive using the holes located on
the bottom panel of the FP-7F, as shown in the illustration below.
Using a Phillips screwdriver,
remove the rubber foot on
the left side and toward the
front on the underside of
the FP-7F
Detach the headphones
hook and reattach it at the
location shown in the gure
For details on installation and connections, refer to the owner’s manual
of your CD drive.
* Use a CD drive sold by Roland. We cannot guarantee operation if any
other CD drive is used.
* You cannot play back CD-R/RW disks to which audio tracks have
been added or CDs containing both audio tracks and data (CD
Extra).
* The FP-7F is capable of playing back only commercial CDs that
conform the ocial standards-those that carry the “COMPACT DISC
DIGITAL AUDIO” logo.
* The usability and sound quality of audio discs that incorporate
copyright protection technology and other non-standard CDs
cannot be guaranteed.
* For more detailed information on audio discs featuring copyright
protection technology and other non-standard CDs, please consult
the disc vendor.
* You cannot save songs and styles to CDs, and you cannot delete
songs or styles recorded to CDs. Furthermore, you cannot format
CDs.
Connecting USB Memory
Connect your USB memory to the external memory connector, as
shown in the illustration below.
External
memory
connector
USB memory
* Carefully insert the USB memories all the way in—until it is rmly in
place.
* Use USB memory sold by Roland. We cannot guarantee operation if
any other USB memory is used.
77
Page 78
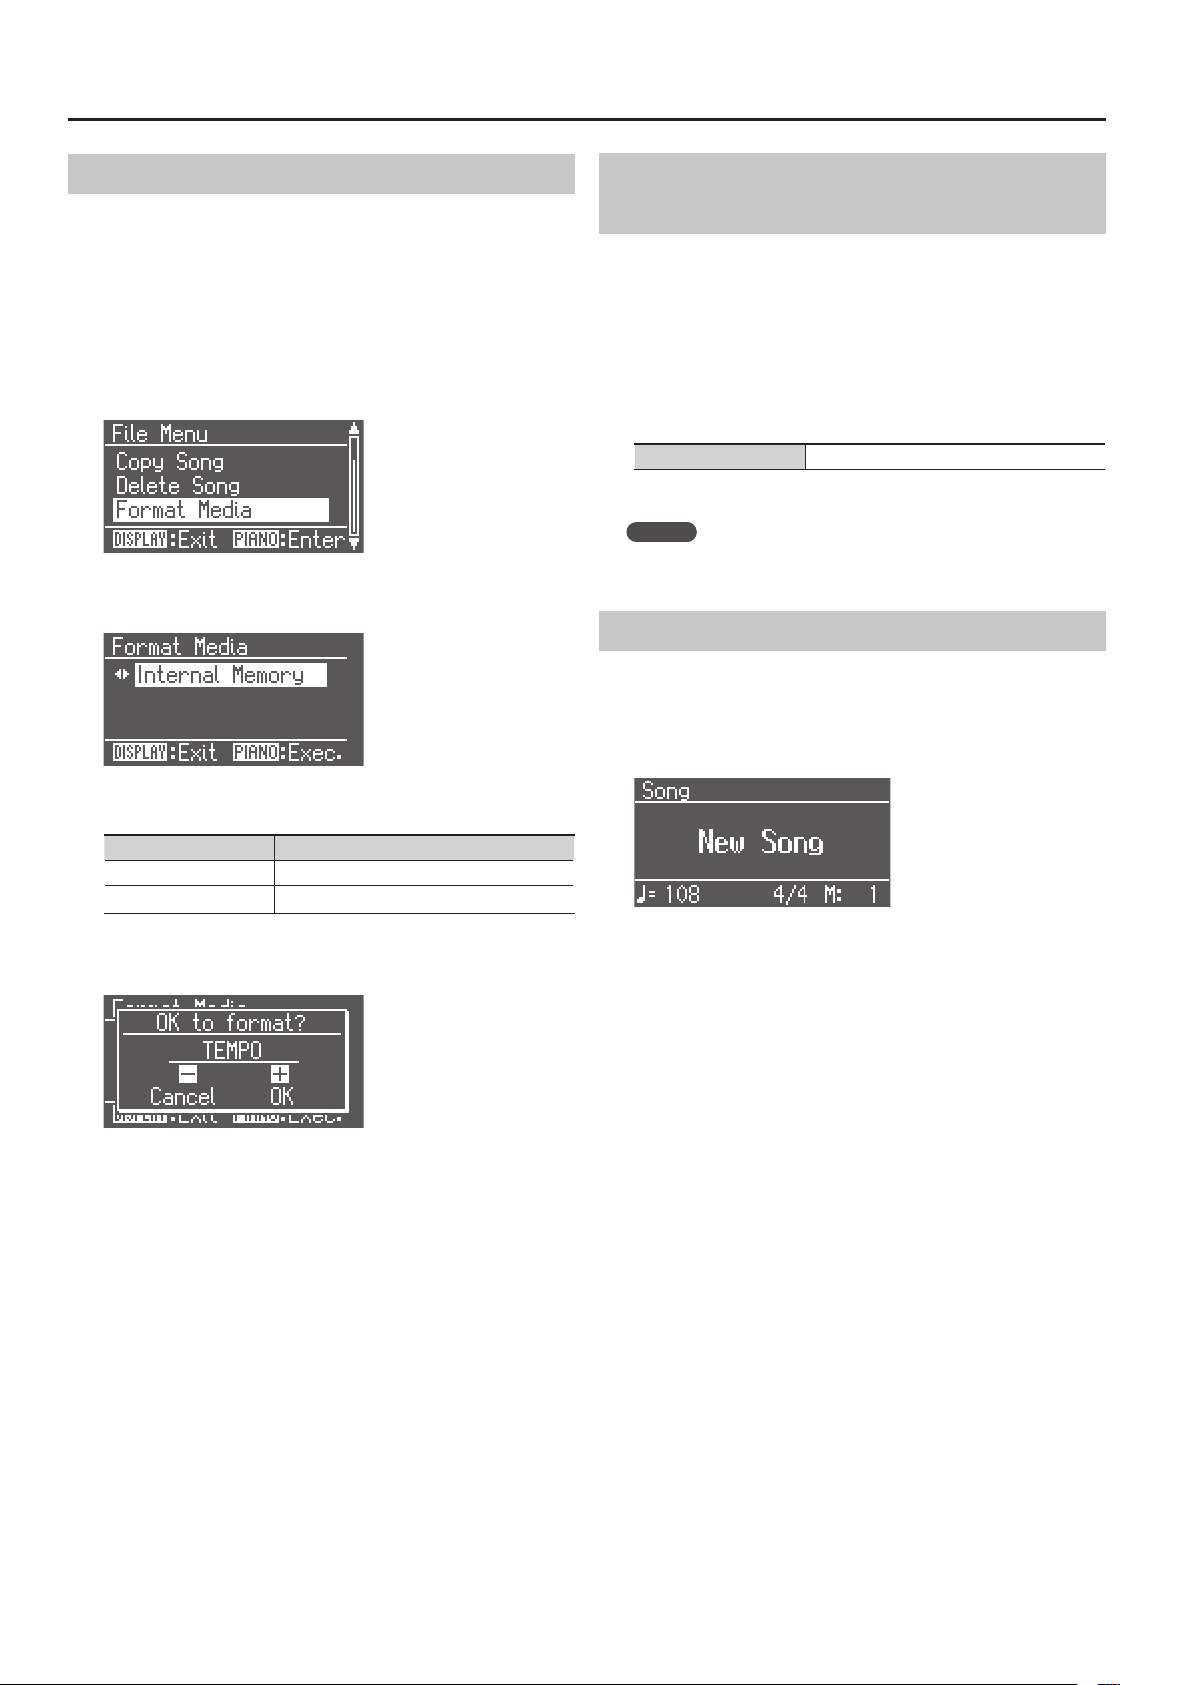
Connections with Other Equipment
Formatting Memory (Format Media)
This operation will erase the entire contents of internal memory or USB
memory.
* Please be aware that everything stored in internal memory or USB
memory will be erased when you format it.
* Before using a new USB memory with the FP-7F for the rst time,
you must format the USB memory.
1. Enter Function mode, and choose “File Menu” (p. 64).
2. Press the [PIANO] button.
3. Use the [-] [+] buttons to select “Format Media.”
4. Press the [PIANO] button.
Switching the External Memory Setting (Ext. Memory Mode)
In some cases when USB memory is connected to the external
memory connector, it may take an excessive length of time for data to
be read, or data might not be read successfully. If this occurs, you may
be able to solve the problem by switching the external memory mode
setting.
1. Enter Function mode and choose “Ext. Memory Mode” (p. 64).
2. Press the [PIANO] button.
3. Use the [-] [+] buttons to choose the mode.
Setting Mode 1, Mode 2
4. Turn the power o, then on again (p. 14).
MEMO
This setting is remembered even while the power is turned o.
Playing Back Songs From External Media
Here’s how to play back songs from external media (CD/USB memory).
1. Connect external media that contains songs.
2. Press the [DISPLAY] button a number of times to access the
SONG screen.
5. Use the [-] [+] buttons to choose the memory that you want
to format.
Indication Setting
Internal Memory Internal memory
External Memory USB memory
6. Press the [PIANO] button.
A conrmation message will appear.
If you decide not to proceed with the format, press the TEMPO [-]
button.
7. Press the TEMPO [+] button.
All contents of the selected memory will be erased.
* Never turn o the power while the display indicates “Executing...”
* Even if you format the internal memory, settings not associated
with internal memory will not be initialized. If you want to return
the other settings (those that are not included in the contents of
internal memory) to their factory-set state, execute the Factory
Reset operation (p. 75).
* Do not disconnect the USB memory while USB memory is being
formatted.
3. Select the song that you want to play.
Refer to “Selecting a song,” below.
4. Press the SONG [PLAY/STOP] button.
For details on operations during playback, refer to “Playing the song”
(p. 41).
78
Page 79

Selecting a song
1. When the SONG screen displayed, press the [-] [+] buttons to choose a song.
Order in which Memories Are Selected
Connections with Other Equipment
1. The song to be
newly recorded
2. Songs from CD or
USB memory
* This cannot be selected if
nothing is connected to the
external memory connector.
3. Songs from internal
memory
* This cannot be selected if
there are no songs.
4. Internal songs
Select a memory
Select a memory
Select a memory
Select a song
Select a song
Select a song
Display Description
External Memory USB memory
CD CD-ROM
Music CD Music CD
Shown for audio les
Selecting a song within a folder
1. Use the [-] [+] buttons to select a folder.
2. Press the SONG [PLAY/STOP] button.
3. Use the [-] [+] buttons to select a song.
To exit the folder, select “Up” and press the SONG [PLAY/STOP] button.
* If a single folder contains more than 500 les or folders, some of the les or folders might not be
displayed.
79
Page 80

Connections with Other Equipment
Changing the Tempo of an Audio File or Music CD
You can change the tempo of an audio le or a music CD song.
1. Play back an audio le or music CD (p. 78).
2. Press the TEMPO [-] or TEMPO [+] button.
Setting 75–100–125(%)
MEMO
The tempo will return to “100” when you reselect a song or turn o
the power.
Saving a Recorded Performance to USB Memory (Save Song)
Here’s how to save a recorded performance to USB memory.
Prepare for Saving
1. Enter Function mode and choose “File Menu” (p. 64).
2. Press the [PIANO] button.
3. Use the [-] [+] buttons to choose “Save Song.”
3. Use the [-] [+] buttons to specify the save destination.
No song has been saved at song numbers for which “Empty” appears in
the song title eld. Choose an empty song number.
If you want to erase an unwanted song and replace it with the song
you’re saving, choose the song number that contains the unwanted
song.
4. Press the [PIANO] button.
* Never turn o the power while the display indicates “Executing...”
Deleting a Song from USB Memory (Delete Song)
Here’s how to delete a song that you saved on USB memory.
Prepare for Deletion
1. Enter Function mode and choose “File Menu” (p. 64).
2. Press the [PIANO] button.
3. Use the [-] [+] buttons to choose “Delete Song.”
4. Press the [PIANO] button.
Rename the Song
5. Rename the song (p. 57).
Select the Save Destination and Save the Song
1. Use the [-] [+] buttons to select either “External Memory.”
2. Press the [PIANO] button.
4. Press the [PIANO] button.
Select the Song for Deletion
1. Use the [-] [+] buttons to choose “External Memory.”
2. Press the [PIANO] button.
3. Use the [-] [+] buttons to select the song that you want to
delete.
80
Page 81

Connections with Other Equipment
Delete the Song
1. Press the [PIANO] button.
A conrmation message will appear.
If you decide not to delete the song, press the TEMPO [-] button.
2. Press the TEMPO [+] button.
The selected song will be deleted.
* Never turn o the power while the display indicates “Executing...”
Copying a Song (Copy Song)
Here’s how a song saved in internal memory can be copied to USB
memory. Alternatively, a song saved on USB memory can be copied to
internal memory.
Prepare for Copying
1. Enter Function mode and choose “File Menu” (p. 64).
2. Press the [PIANO] button.
3. Use the [-] [+] buttons to choose “Copy Song.”
4. Press the [PIANO] button.
5. Use the [-] [+] buttons to select the copy-destination
number.
No song is saved at song numbers for which “Empty” appears for the
song title. Select a song number that does not contain a song.
Copy the Song
1. Press the [PIANO] button.
The selected song will be copied.
* Audio les cannot be copied.
* Never turn o the power while the display indicates “Executing...”
Save and Copy
A song you’ve recorded can be saved in internal memory or
USB memory.
Songs saved in internal memory can be copied to external
memory, such as USB memory.
FP-7F
Recorded song
Save
Save
USB memory
(sold separately)
Select the Song to Be Copied
1. Use the [-] [+] buttons to select the copy-source media.
Indication Setting
Internal Memory Internal memory
External Memory USB memory
2. Press the [PIANO] button.
3. Use the [-] [+] buttons to select the song that you want to
copy.
If you choose “All,” all songs in the copy source (excluding audio les)
will be copied.
4. Press the [PIANO] button.
Internal memory
1
2
3
4
Copy
81
Page 82

Connections with Other Equipment
Connecting to Audio Equipment
If you connect the FP-7F to powered speakers or to an audio system
that has line input jacks, you’ll be able to hear the FP-7F’s sound from
your powered speakers or audio system. If you connect your portable
audio player or other audio playback device to the FP-7F, you’ll be able
to hear its sound via the FP-7F.
Use audio cables (sold separately) to make connections.
* To prevent malfunction and/or damage to speakers or other devices,
always turn down the volume, and turn o the power on all devices
before making any connections.
* When connection cables with resistors are used, the volume level
of equipment connected to the INPUT jacks may be low. If this
happens, use connection cables that do not contain resistors.
Having Audio from an External Device be Sounded Through the FP-7F
INPUT jack
Connecting Speakers to the FP-7F and Outputting Sounds
OUTPUT jack
1/4” plug
Amplied speakers,
Audio system, etc.
Input jacks
Output jack
or
Digital audio player, etc.
1. Turn the volume all the way down on the FP-7F and on the
audio device.
2. Turn o the power to the FP-7F and audio device.
3. Use audio cables (sold separately) to make the connection.
4. Switch on the connected audio device.
5. Switch on the FP-7F.
6. Adjust the volume level on the FP-7F and the connected
audio device.
The sounds from the connected audio device are played by the FP-7F.
MEMO
Adjust the volume by using the controls of your audio device.
Turning O the Power
1. Turn the volume all the way down on the FP-7F and on the
audio device you’re about to connect.
2. Turn o the FP-7F.
3. Turn o the connected audio device.
1. Turn the volume all the way down on the FP-7F and on the
speaker.
2. Turn o the power to the FP-7F and speakers.
3. Use audio cables (sold separately) to make the connection.
4. Switch on the FP-7F.
5. Switch on the connected speakers.
6. Adjust the volume level on the FP-7F and the connected
speakers.
When you play the FP-7F’s keyboard, the sound is played from the
connected speakers.
Turning O the Power
1. Turn the volume all the way down on the FP-7F and on the
speakers you’re about to connect.
2. Turn o the connected speakers.
3. Turn o the FP-7F.
MEMO
• Sound will still be heard from the FP-7F’s internal speakers even if
you connect external speakers.
If you don’t want to hear the internal speakers, turn the [SPEAKER]
switch “O” so that sound will be heard only from the external
speakers.
• The FP-7F is designed so that when you connect headphones,
the sound is optimized for listening through headphones. For this
reason, the sound heard from speakers connected to the FP-7F
will be dierent depending on whether or not headphones are
connected.
* If headphones are connected, no sound will be heard from the
FP-7F’s speakers even if the [SPEAKER] switch is in the “On” position.
* If you connect the FP-7F to an external device (such as an external
speaker) in monaural, it may sound dierently than when using a
stereo connection.
82
Page 83

Connections with Other Equipment
Connecting to MIDI Devices
By connecting an external MIDI device and exchanging performance
data, you can control one device from the other.
For instance, you can output sound from the other instrument or
switch Tones on the other instrument.
What’s MIDI?
MIDI, short for “Musical Instrument Digital Interface,” was
developed as a universal standard for the exchange of
performance data between electronic instruments and
computers.
Connecting a MIDI Sequencer to the FP-7F
MIDI connectors
Producing Sounds from a MIDI Sound Module by Playing the FP-7F
MIDI connectors
MIDI cable
MIDI cable
MIDI sequencer
* When the FP-7F is connected to a MIDI sequencer, set it to “Local
O” (p. 84).
MIDI device
Making the Connection
1. Turn the volume all the way down on the FP-7F and on the
MIDI device.
2. Switch o the power to the FP-7F and the MIDI device.
3. Use a MIDI cables (sold separately) to connect the MIDI
connectors to each other.
4. Switch on the power to the FP-7F and the connected MIDI
device.
5. Adjust the volume level on the FP-7F and the connected
MIDI device.
6. You should also set the MIDI transmit channel as needed.
MEMO
For details on the MIDI transmit channel, refer to “Changing the
MIDI Transmit Channel (MIDI Transmit Ch.)” (p. 84).
83
Page 84

Connections with Other Equipment
Preventing Doubled Notes When Connected to a Sequencer (Local Control)
If you connect the FP-7F to a MIDI sequencer, turn o the Local Control
setting as described below.
Since most sequencers have their “thru” function turned on, the data
from your keyboard performance and the notes played back by the
sequencer will arrive at the sound generator by the two routes marked
(1) and (2) in the illustration. This will cause notes to be doubled or
interrupted. To prevent this, turn Local Control o so that route (1) will
be disconnected.
(1) Local On
Sound
Generator
Each note played
is sounded twice
MIDI
IN
MIDI
OUT
Local On
The keyboard and sequencer are connected to the internal sound
generator.
Sound is emitted
Sound Generator
Local On
Local O
The keyboard and sequencer are not connected to the internal sound
generator.
Playing the keyboard or playing back a song will not produce sound.
No sound produced
Sound Generator
Local O
Sequencer
MIDI
OUT
Memory
MIDI
IN
(2) Soft Thru On
Changing the MIDI Transmit Channel (MIDI Transmit Ch.)
Here’s how to specify the MIDI channel that the FP-7F will use for
transmission.
MIDI uses sixteen “MIDI channels,” numbered 1–16. If MIDI devices are
connected and set to the same MIDI channel, you can use one device
to play or switch sounds on the other device.
The FP-7F receives all channels, 1–16.
1. Enter Function mode and choose “MIDI” (p. 64).
2. Press the [PIANO] button.
3. Use the [-] [+] buttons to choose “MIDI Transmit Ch.”
4. Press the [PIANO] button.
5. Use the [-] [+] buttons to change the setting.
Setting (channel) O, 1–16
MEMO
If you choose “O,” the keyboard’s performance data will not be
transmitted.
Transmitting Recorded Performance Data to a MIDI Device (Composer MIDI Out)
The performance data you’ve recorded on the FP-7F can be
transmitted to a connected MIDI device or computer.
1. Enter Function mode and choose “MIDI” (p. 64).
2. Press the [PIANO] button.
3. Use the [-] [+] buttons to choose “Composer MIDI Out.”
4. Press the [PIANO] button.
5. Use the [-] [+] buttons to turn the setting on or o.
Setting Explanation
On Performance data will be transmitted.
O Performance data will not be transmitted.
1. Enter Function mode and choose “MIDI” (p. 64).
2. Press the [PIANO] button.
3. Use the [-] [+] buttons to choose “Local Control.”
4. Press the [PIANO] button.
5. Use the [-] [+] buttons to turn the setting on or o.
Setting Explanation
On
O
Local Control is on. The keyboard and sequencer
are connected to the internal sound generator.
Local Control is o. The keyboard and sequencer
are disconnected from the internal sound
generator. Playing the keyboard or playing back
a song will not produce sound.
84
Page 85

Connections with Other Equipment
Transmitting Tone Selection Data (Regist. Tx PC Ch./Regist. PC/Regist. Bank MSB/Regist. Bank LSB)
When you switch registrations, program change, bank select MSB, and
bank select LSB messages will be transmitted to a MIDI device. You can
also specify the transmit channel.
1. Enter Function mode and choose “MIDI” (p. 64).
2. Press the [PIANO] button.
3. Use the [-] [+] buttons to select the item that you want to
edit.
Item Setting Explanation
Regist. Tx PC Ch. O, 1–16
Regist. PC 001 (00)–128 (7F)
Regist. Bank MSB,
Regist. Bank LSB
000 (00)–127 (7F)
5. Press the [PIANO] button.
The edit screen for that item will appear.
6. Use the [-] [+] buttons to change the setting.
You can press the [DISPLAY] button to return to the previous screen.
7. Repeat steps 3–6 to make the desired settings.
Species the program
change transmit channel.
Species the program
change number.
Species the bank select
MSB/LSB.
Connecting a Computer
The following become possible once you connect a USB cable
(available separately) between the USB connector on the FP-7F’s left
end of the bottom panel and the USB connector of your computer.
• You can use the FP-7F to play sounds from SMF music les played back
with MIDI software.
• By exchanging MIDI data with sequencer software, you can save songs
recorded with the FP-7F to your computer, and enjoy a variety of
musical control and editing features.
USB (MIDI) connector
Computer
USB cable
USB connector
* Refer to the Roland website for system requirements.
Roland website: http://www.roland.com/
Changing the USB Driver Settings (USB Driver)
Normally, you don’t need to install a driver in order to connect the
FP-7F to your computer. However, if some problem occurs, or if the
performance is poor, using the Roland original driver may solve the
problem.
Specify the USB driver you want to use, and then install the driver.
1. Enter Function mode and choose “USB Driver” (p. 64).
2. Press the [PIANO] button.
3. Press the [-] or [+] button to select the USB driver you want
to use.
Setting Explanation
Generic
Original
4. Turn on the power once again.
MEMO
• This setting is remembered even when the power is turned o.
• For details on downloading and installing the Roland original driver,
refer to the Roland website.
Roland website: http://www.roland.com/
Choose this if you want to use the standard USB
driver that was included with your computer.
Normally, you should use this mode.
Choose this if you want to use a USB driver
downloaded from the Roland website.
85
Page 86

Connections with Other Equipment
Using the V-LINK Function
Connecting the FP-7F to a V-LINK compatible image device allows you to control the images with the FP-7F.
* To prevent malfunction and/or damage to speakers or other devices, always turn down the volume, and turn o the power on all devices before
making any connections.
V-LINK
V-LINK ( ) is a function that allows music and images to be performed together. By using MIDI to connect two or more V-LINK
compatible devices, you can easily enjoy performing a wide range of visual eects that are linked to the expressive elements of a music
performance.
1. Hold down the [SPLIT] button and press the [TRANSPOSE] button.
When the V-LINK function is on, the V-LINK icon is shown in the upper left of the display.
You can control images using the twelve keys at the left end of the keyboard.
A0 B0 C1 D1 E1 F1 G1
A0–G#1
* While V-LINK is switched on, no sound is produced when you press any of the twelve keys at the left end of the keyboard.
To cancel V-LINK, hold down the [SPLIT ] button and press the [TRANSPOSE] button.
Specifying the V-LINK Transmit Channel (V-LINK Transmit Ch.)
Here’s how to specify the channel on which messages used to control video will be sent.
1. Enter Function mode and choose “MIDI” (p. 64).
2. Press the [PIANO] button.
3. Use the [-] [+] buttons to choose “V-LINK Transmit Ch.”
4. Press the [PIANO] button.
5. Use the [-] or [+] button to edit the setting.
Setting 1–16
86
Page 87

Troubleshooting
If you suspect a malfunction, please read this section rst.
Problem Cause/Action Page
Power will not turn on Is the AC adaptor connected correctly? P. 14
Buttons don’t work
Nothing is shown in the screen
Vertical stripes appear in the screen/
Color is faded at the edge of the screen
Pedal does not work, or remains stuck
Can’t read or write USB memory
A buzzing sound is heard from an external
device
The volume level of the instrument
connected to the INPUT jacks is too low
Could Panel Lock be activated?
Deactivate Panel Lock.
The FP-7F uses a liquid crystal screen; if the temperature is below zero degrees centigrade, characters
might not appear in the screen. This does not indicate a malfunction.
These occur due to the nature of a liquid crystal display, and do not indicate a malfunction.
By adjusting the screen contrast you can make these artifacts less noticeable.
Is the pedal connected correctly?
Insert the plug all the way into the pedal jack.
Could you be using a pedal made by another manufacturer?
Use the included pedal or the RPU-3.
The pedal eect may remain stuck if you disconnect the pedal cord while the power is on.
Switch o the FP-7F’s power before you connect or disconnect the pedal cord.
If you’ve assigned the soft pedal or sostenuto pedal as a registration select switch, or assigned it to some
other function, the pedal won’t operate as a Soft pedal or Sostenuto pedal.
Are you using Roland USB memory (sold separately)?
Operation cannot be guaranteed if any other USB memory is used.
If you’re unable to read or write USB memory, change the Ext Memory setting. P. 78
Could you be powering your external equipment from two or more electrical outlets?
If external equipment is connected, it must be powered from the same electrical outlet.
Could you be using a connection cable that contains a resistor?
Use a connection cable that does not contain a resistor.
P. 40
—
P. 18
P. 17
—
—
P. 70
—
—
—
No sound
Problem Cause/Action Page
Could the FP-7F’s volume or the volume of a connected device be minimized? P. 15
Could headphones be connected?
Could a plug have been left in the headphone jack?
No sound will be output from the speakers if headphones or any other device is connected to the
headphone jack.
No sound
No sound when you play back a song
No sound from the left-hand zone of the
keyboard
No sound
(when a MIDI device is connected)
No sound from the microphone
Could the [BALANCE] knob be turned all the way toward “ACCOMP” or “KEYBOARD”? P. 15
Could the [SPEAKER] switch be “OFF”?
If the [SPEAKER] switch is “OFF,” sound will not be heard from the built-in speakers.
Could the Local Control setting be “O ”?
If Local Control is turned o, no sound will be heard when you play the keyboard. Turn Local Control
“On.”
Could the Local Control setting be “O ”?
If Local Control is turned o, no sound will be heard when you play back a song. Turn Local Control “On.”
Could V-LINK be on?
If V-LINK is on, the lowest twelve keys are used to control images, and will not produce sound.
Are all devices powered up?
Are the MIDI cables connected correctly?
Does the MIDI transmit channel match the setting of the connected device? P. 84
Could the MIC [VOLUME] knob be set to the minimum? P. 76
Could Mic Sw be set to “O”? P. 71
Could the switch of the microphone itself be turned o? —
P. 18
P. 12
P. 84
P. 84
P. 86
P. 83
87
Page 88

Troubleshooting
Sound does not play correctly
Problem Cause/Action Page
The maximum simultaneous polyphony is 128 notes.
Not all the notes you play are heard
Keyboard or song pitch is incorrect
Two sounds are heard when you play the
keyboard
Pressing the [STRINGS/PAD], [GUITAR/
BASS], or [VOICE/GM2] button causes
other tones to be heard
Eect not applied
Reverberation is heard even when the
reverb eect is switched o
Sound changes abruptly at a certain note
in the upper range
A “whining” noise is heard
Something wrong with low-frequency
sounds/Buzzing resonance occurs
When using Dual Play or when performing along with a song or rhythm, or when making heavy use of
the damper pedal, it is possible for the performance data to exceed the polyphony, causing some of the
notes you play to be omitted.
Could you have made transpose settings? P. 24
Is the master tuning setting appropriate? P. 66
Is the temperament setting appropriate? P. 66
Is the stretch tuning setting appropriate? P. 35
Could the FP-7F be set to Dual Play? P. 26
If an external sequencer is connected, set the FP-7F to the Local O state, and turn your sequencer’s Soft
Thru setting o.
The [STRINGS/PAD], [GUITAR/BASS], and [VOICE/GM2] buttons can also function in selecting “recommended tones.”
With the FP-7F’s factory settings, if you connect a commercially available CD-ROM drive to the external
memory connector, then select a song from a VIMA CD-ROM (VIMA TUNES), suitable tones for the
song will automatically be assigned to the [STRINGS/PAD], [GUITAR/BASS], and [VOICE/GM2] buttons,
allowing you to select appropriate tones by pressing these buttons.
When you’re using Dual Play or Split Play, and the two tones use dierent eects, no eect will be
applied to tone 2 (when using Dual Play) or the left-hand tone (when using Split Play).
Since the FP-7F’s piano sounds faithfully simulate the depth and resonance of an acoustic piano, this
may sound like reverberation even when the reverb eect is o.
On an acoustic piano, the top one and a half octaves of notes will sound until they decay naturally,
regardless of the damper pedal. The tone quality of these notes will also be dierent.
The FP-7F faithfully simulates this and other characteristics of an acoustic piano. The range that is
unaected by the damper pedal will change depending on the transposition setting.
If you hear this in the headphones:
Some brilliant and sharply dened piano sounds contain signicant high-frequency components, which
may sound like a metallic resonance has been added. This is due to the faithful simulation of a piano’s
actual characteristics, and does not indicate a malfunction.
You can adjust this resonance by editing the following settings.
• Duplex Scale setting (p. 35)
• String Resonance setting (p. 35)
• Reverb depth (p. 25)
If you don’t hear this in headphones:
Some other reason may be responsible (e.g., resonance in the FP-7F itself). Please contact your dealer or
Roland Service Center.
If you don’t hear this in headphones:
When performing at a high volume, the speakers or an object near the FP-7F might resonate. It is also
possible for uorescent lights or glass doors in the room to resonate. For the low notes in particular, this
is more likely to occur at high volume. To minimize such resonance, take the following measures.
• Locate the speakers 10–15 cm away from the wall.
• Lower the volume.
• Move the resonating object farther away.
If you hear this in headphones:
Some other reason may be responsible. Please contact your dealer or Roland Service Center.
At high volumes, the sound may be distorted due to the way in which you are playing. If so, reduce the
volume.
—
P. 84
—
P. 26
P. 27
—
—
—
—
P. 15
88
Page 89

Song does not play correctly
Problem Cause/Action Page
Can’t play a song
A specic instrument within the song is
not heard
Song tempo is unstable
Can’t see the song names on USB memory
Could the screen indicate “OK to erase Song?”?
You can’t play back a built-in song if recorded performance data remains in internal memory. Delete the
performance data before you play back the song.
Is Track Mute on?
Muted parts will not be heard.
If there is an excessive amount of performance data when playing a song from USB memory, the tempo
might become unstable.
If the song name data in the le is blank or consists only of spaces, the song name will not be displayed. —
Is the le name extension “MID”?
If the le name extension is wrong, the le cannot be handled as song data.
Can’t record or play back
Problem Cause/Action Page
Your recorded performance was lost
Can’t play back a song saved on USB
memory
When you turn o the FP-7F’s power, the recorded performance will be lost. The lost performance
cannot be recovered.
Save the recorded performance to internal memory before you turn o the power.
Is the le name extension “MID”?
If the le name extension is wrong, the le cannot be handled as song data.
Problems with audio les
Problem Cause/Action Page
Is the audio le in a format supported by the FP-7F?
Can’t play an audio le
Can’t record along with an audio le/
Can’t copy an audio le to internal memory
To be playable, audio les must be in the following format.
• File name extension is “.wav”
• 16-bit linear sampling
• Sampling rate is 44.1 kHz
The FP-7F does not allow recording using audio les, and cannot be used to copy audio les into internal
memory.
Troubleshooting
P. 55
P. 73
—
—
P. 56
—
—
—
MEMO
Functions that cannot be used with audio le playback
• Reverb (P. 24)
• Save to internal memory (P. 56)
Problems with Audio Key
Problem Cause/Action Page
Could you be using Session Partner or Looper?
Can’t use the Audio Key function
You can’t use the Audio Key function while using Session Partner or Looper.
The Audio Key function cannot be used while playing or recording a song. —
—
8989
Page 90

Error Messages
Indication Meaning
Error: 1 The music le you attempted to save is read-only. It cannot be saved.
Error: 2
Error: 10 External media is not inserted. Insert external media, and try the operation once again.
Error: 11
Error: 14
Error: 15 The le could not be read. This data format is not supported by the FP-7F.
Error: 16
Error: 18 This audio format is not supported. Please use WAV format 44.1 kHz 16-bit linear audio les.
Error: 30 The FP-7F has insucient storage space.
Error: 40
Error: 41 A MIDI cable was disconnected. Connect the MIDI cable correctly.
Error: 43 An error occurred during MIDI communication. Check the MIDI cable and the connected MIDI device.
Error: 51
Error: 65
An error occurred while writing. It may be that the protect tab of the external media is in the “Protect (write prohibit)”
position, or that the external media has not been formatted.
There is insucient free space at the save destination. Either insert other external media, or delete unwanted data
(song data, registration sets) and try the operation again.
An error occurred while reading. It may be that the external media is damaged. Insert other external media and try the
operation again. Alternatively, format the external media.
The data could not be read fast enough during song playback. In some cases you may be able to play back if you wait
several seconds and then press the SONG [PLAY/STOP] button once again.
Too much MIDI data was transmitted by an external MIDI device all at once, and the FP-7F was unable to process it.
Reduce the amount of data being transmitted by the external MIDI device.
The system may have malfunctioned. Try the operation again. If this indication still appears after trying the operation
several times, contact Roland Service Center.
Excessive current ow occurred in the external memory connector. Verify that there is no malfunction in the external
media, and then turn the power o, then on again.
* External media: USB memory, CD-ROM, etc.
90
Page 91

Stored Items
Items Stored in a Registration
Stored Item Explanation Page
— Selected tone P. 20
— Dual performance On/O P. 26
— Tone 1/Tone 2 (Dual performance) P. 26
— Split performance On/O P. 27
— Right-hand tone/Left-hand tone (Split performance) P. 27
— Split point P. 29
— Speed of the rotary eect for organ sounds P. 20
— Transpose’s on or o, its value, and Transpose mode P. 30
— Reverb button’s on or o, and the depth of reverb P. 24
Key Touch Key touch P. 66
Key Touch Oset Key touch oset P. 66
Session Partner Settings for Session Partner (including chord progressions) P. 44
Edit Tone Wheel Settings for each Tone Wheel Organ P. 36
Dual Balance Dual balance P. 72
Transpose Mode Transpose mode P. 72
Octave Shift Octave shift P. 72
Damper Pedal Part Setting for the Damper Pedal part P. 72
FC1 Pedal Func FC1 pedal function
FC2 Pedal Func FC2 pedal function
MIDI Transmit Ch. MIDI transmit channel P. 84
Regist. Tx PC Ch.
Regist. PC
Regist. Bank MSB
Regist. Bank LSB
Program Change data P. 85
P. 73
Items Stored by Memory Backup
Stored Item Explanation Page
Piano Designer Piano designer P. 34
Master Tuning Master tuning P. 66
Temperament Temperament P. 66
Temperament Key Temperament key P. 66
Equalizer On/o status of the equalizer, number of the selected equalizer, values of the various settings P. 71
Lyrics Lyrics display on/o setting P. 74
Song Language Song name, selection of the language in which lyrics are to be displayed P. 75
CD/Audio Type CD/Audio type P. 74
V-LINK Transmit Ch. V-LINK transmit channel P. 86
Settings Stored Immediately When Edited
Stored Item Explanation Page
Ext. Memory Mode External Memory Mode P. 85
USB Driver USB driver setting P. 78
91
Page 92

Tone List
PIANO
No. Tone name
001 Grand Piano1
002 Piano + Str.
003 Grand Piano2
004 Piano + Pad
005 Grand Piano3
006 MagicalPiano
007 Rock Piano
008 Piano+Choir
009 Honky-tonk
010 Harpsichord
011 Coupled Hps.
E.PIANO
No. Tone name
001 Vintage EP
002 Pop E.Piano
003 '60s E.Piano
004 FM E.Piano
005 '70s E.Piano
006 Stage Phaser
007 E.Grand
008 Clav.
009 Vibraphone
010 Marimba
011 Celesta
012 Mallet Isle
013 Morning Lite
014 EP Belle
015 Ballad Bells
ORGAN
No. Tone name
001 TW-Organ 1
002 TW-Organ 2
003 TW-Organ 3
004 TW-Organ 4
005 TW-Organ 5
006 TW-Organ 6
007 Combo Jz.Org
008 Ballad Organ
009 Gospel Spin
010 Full Stops
011 Mellow Bars
012 Light Organ
013 Lower Organ
014 Purple Spin
015 '60s Organ
016 ChurchOrgan1
017 ChurchOrgan2
018 Nason t 8'
019 Accordion
STRINGS/PAD
No. Tone name
001 Rich Strings
002 OrchestraStr
003 Velo Strings
004 DecayStrings *1
005 SynthStrings
006 Soft Pad
007 Glass Pad
008 Silky Way
009 Lunar Strngs
010 Dcy ChoirPad *1
011 Orchestra
012 OrchestraBrs
013 Harp
014 Violin
015 Cello
016 Pizzicato Str
GUITAR/BASS
No. Tone name
001 Nylon-str.Gt
002 Steel-str.Gt
003 Clean Guitar
004 Jazz Guitar
005 Overdrive Gt
006 AcousticBass
007 A.Bass+Cymbl
008 FingeredBass
009 FretlessBass
010 Slap Bass
011 Synth Bass
012 Thum Voice
VOICE/OTHERS
No. Tone name
001 Aerial Choir
002 Jazz Scat
003 Female Aahs
004 Angels Choir
005 Beauty Vox
006 Male Aahs
007 Harpvox
008 Decay Choir *1
009 Alto Sax
010 Tenor Sax
011 BrassSection
012 Flute
013 ChamberWinds
GM2
No. Tone name
014 STANDARD Set
015 ROOM Set
016 POWER Set
017 ELEC.Set
018 ANALOG Set
019 JAZZ Set
020 BRUSH Set
021 ORCH.Set
022 SFX Set
023 Piano 1
024 Piano 1w
025 Piano 1d
026 Piano 2
027 Piano 2w
028 Piano 3
029 Piano 3w
030 Honky-tonk
031 Honky-tonk w
032 E.Piano 1
033 Detuned EP 1
034 Vintage EP
035 '60s E.Piano
036 E.Piano 2
037 Detuned EP 2
038 St.FM EP
039 EP Legend
040 EP Phase
041 Harpsichord
042 Coupled Hps.
043 Harpsi.w
044 Harpsi.o
045 Clav.
046 Pulse Clav.
047 Celesta
048 Glockenspiel
049 Music Box
050 Vibraphone
No. Tone name
051 Vibraphone w
052 Marimba
053 Marimba w
054 Xylophone
055 TubularBells
056 Church Bell
057 Carillon
058 Santur
059 Organ 1
060 TremoloOrgan
061 '60s Organ
062 Organ 2
063 Perc.Organ 1
064 Chorus Organ
065 Perc.Organ 2
066 Rock Organ
067 Church Org.1
068 Church Org.2
069 Church Org.3
070 Reed Organ
071 Pu Organ
072 Accordion 1
073 Accordion 2
074 Harmonica
075 Bandoneon
076 Nylon-str.Gt
077 Ukulele
078 Nylon Gt o
079 Nylon Gt 2
080 Steel-str.Gt
081 12-str.Gt
082 Mandolin
083 Steel+Body
084 Jazz Guitar
085 Hawaiian Gt
086 Clean Guitar
087 Chorus Gt 1
088 Mid Tone Gt
089 Muted Guitar
090 Funk Guitar1
091 Funk Guitar2
092 Chorus Gt 2
093 Overdrive Gt
094 Guitar Pinch
095 DistortionGt
096 Gt Feedback1
097 Dist.Rtm Gt
098 Gt Harmonics
099 Gt Feedback2
100 AcousticBass
101 FingeredBass
102 Finger Slap
103 Picked Bass
104 FretlessBass
105 Slap Bass 1
92
Page 93

Tone List
No. Tone name
106 Slap Bass 2
107 Synth Bass 1
108 WarmSyn.Bass
109 Synth Bass 3
110 Clav.Bass
111 Hammer
112 Synth Bass 2
113 Synth Bass 4
114 RubberSyn.Bs
115 Attack Pulse
116 Violin
117 Slow Violin
118 Viola
119 Cello
120 Contrabass
121 Tremolo Str.
122 PizzicatoStr
123 Harp
124 Yang Qin
125 Timpani
126 Strings
127 Orchestra
128 '60s Strings
129 Slow Strings
130 Syn.Strings1
131 Syn.Strings3
132 Syn.Strings2
133 Choir 1
134 Choir 2
135 Voice
136 Humming
137 Synth Voice
138 Analog Voice
139 OrchestraHit
140 Bass Hit
141 6th Hit
142 Euro Hit
143 Trumpet
144 Dark Trumpet
145 Trombone 1
146 Trombone 2
147 Bright Tb
148 Tuba
149 MuteTrumpet1
150 MuteTrumpet2
151 French Horn1
152 French Horn2
153 Brass 1
154 Brass 2
155 Synth Brass1
156 Synth Brass3
No. Tone name
157 AnalogBrass1
158 Jump Brass
159 Synth Brass2
160 Synth Brass4
161 AnalogBrass2
162 Soprano Sax
163 Alto Sax
164 Tenor Sax
165 Baritone Sax
166 Oboe
167 English Horn
168 Bassoon
169 Clarinet
170 Piccolo
171 Flute
172 Recorder
173 Pan Flute
174 Bottle Blow
175 Shakuhachi
176 Whistle
177 Ocarina
178 Square Lead1
179 Square Lead2
180 Sine Lead
181 Saw Lead 1
182 Saw Lead 2
183 Doctor Solo
184 Natural Lead
185 SequencedSaw
186 Syn.Calliope
187 Chier Lead
188 Charang
189 Wire Lead
190 Solo Vox
191 5th Saw Lead
192 Bass+Lead
193 Delayed Lead
194 Fantasia
195 Warm Pad
196 Sine Pad
197 Polysynth
198 Space Voice
199 Itopia
200 Bowed Glass
201 Metallic Pad
202 Halo Pad
203 Sweep Pad
204 Ice Rain
205 Soundtrack
206 Crystal
207 Synth Mallet
No. Tone name
208 Atmosphere
209 Brightness
210 Goblins
211 Echo Drops
212 Echo Bell
213 Echo Pan
214 Star Theme
215 Sitar 1
216 Sitar 2
217 Banjo
218 Shamisen
219 Koto
220 Taisho Koto
221 Kalimba
222 Bagpipe
223 Fiddle
224 Shanai
225 Tinkle Bell
226 Agogo
227 Steel Drums
228 Woodblock
229 Castanets
230 Taiko
231 Concert BD
232 Melodic Tom1
233 Melodic Tom2
234 Synth Drum
235 TR-808 Tom
236 Elec.Perc.
237 Reverse Cym.
238 Gt FretNoise
239 Gt Cut Noise
240 BsStringSlap
241 Breath Noise
242 Fl.Key Click
243 Seashore
244 Rain
245 Thunder
246 Wind
247 Stream
248 Bubble
249 Bird 1
250 Dog
251 Horse Gallop
252 Bird 2
253 Telephone 1
254 Telephone 2
255 DoorCreaking
256 Door
257 Scratch
258 Wind Chimes
No. Tone name
259 Helicopter
260 Car Engine
261 Car Stop
262 Car Pass
263 Car Crash
264 Siren
265 Train
266 Jetplane
267 Starship
268 Burst Noise
269 Applause
270 Laughing
271 Screaming
272 Punch
273 Heart Beat
274 Footsteps
275 Gun Shot
276 Machine Gun
277 Laser Gun
278 Explosion
Tones indicated by “*1” are suitable for playing layered with a piano tone.
* In the tone group “Voice/Others” when you hold down the [-] or [+] button to switch tone in succession, the tones will stop changing at number
014 and number 023. To select the next sound, release the [-] or [+] button, then press it again.
9393
Page 94

Tone List
STANDARD Set
27 High-Q
28
29
31 Sticks
33 Metronome Click
35
C2 36
38 Snare Drum
40
41
43 Low Tom 1
45 Mid Tom 2
47
C3 48
50 High Tom 1
52
53
55 Splash Cymbal
57 Crash Cymbal 2
59
C4 60
62 Mute High Conga 1
64
65
67 High Agogo
69 Cabasa
71
C5 72
74 Long Guiro [EXC3]
76
77
79 Open Cuica [EXC4]
81 Open Triangle [EXC5]
83
C6 84
86 Mute Surdo [EXC6]
88
Slap
Scratch Push [EXC7]
30 Scratch Pull [EXC7]
32 Square Click
34 Metronome Bell
Kick Drum 2
Kick Drum 1
37 Side Stick
39 Hand Clap
Electric Snare 3
Low Tom 2
42 Closed Hi-Hat 1 [EXC1]
44 Pedal Hi-Hat 1 [EXC1]
46 Open Hi-Hat 1 [EXC1]
Mid Tom 1
High Tom 2
49 Crash Cymbal 1
51 Ride Cymbal 1
Chinese Cymbal 1
Ride Bell 1
54 Tambourine
56 Cowbell
58 Vibraslap
Ride Cymbal 2
High Bongo 1
61 Low Bongo 1
63 Open High Conga
Low Conga
High Timbale
66 Low Timbale
68 Low Agogo
70 Maracas
Short High Whistle [EXC2]
Long Low Whistle [EXC2]
73 Short Guiro [EXC3]
75 Claves
High Woodblock
Low Woodblock
78 Mute Cuica [EXC4]
80 Mute Triangle [EXC5]
82 Shaker
Jingle Bell
Bar Tree
85 Castanets
87 Open Surdo [EXC6]
-----
* -----: No sound.
* [EXC]: will not sound simultaneously with other percussion instruments of the same number.
94
Page 95

Rhythm List (Session Partner)
No. Rhythm name
1 Rock Pop 5 108
2 Street Pop 57 100
3 8-Beat Pop 1 55 108
4 Piano Ballad 58 84
5 Organ Ballad 10 75
6 R&B Ballad 41 60
7 Acoustic 12 92
8 StraightRock 54 136
9 S.8-Bt Rock2 59 115
10 Loose Rock 13 174
11 Guitar Funk 19 104
12 8-Beat Funk 16 108
13 Fusion 21 95
14 8-Bt Fusion1 23 113
15 Jazz 35 136
16 Fast Jazz 1 36 128
17 Latin Pop 47 150
18 Latin Fusion 48 125
19 Motown 3 95
20 Guitar Pop 60 82
21 16-Beat Pop 14 116
22 8-Bt Shue 28 96
23 Pop 17 100
24 S.Pop 17 100
25 Contemporary 23 93
26 Medium Pop 24 86
27 S.Medium Pop 24 86
28 8-Beat Pop 2 14 126
29 S.8-Bt Pop 2 14 126
30 Piano Pop 52 116
31 Country Pop 27 98
32 Shue 28 116
33 S.Shue 28 116
34 Smooth Pop 53 88
35 6/8 Ballad 61 216
36 Ballad 39 82
37 Gt Ballad 12 80
38 E.Piano Bld 40 67
39 808 Ballad 42 65
40 New Age Bld 43 66
41 Piano Waltz 50 90
42 8-Beat Rock1 52 128
43 8-Beat Rock2 19 106
44 8-Beat Rock3 29 140
45 S.8-Bt Rock3 29 140
46 16-BeatRock1 53 142
47 16-BeatRock2 54 86
48 Bounce Rock 11 105
49 S.BounceRock 11 105
50 16-BeatFunk1 24 120
51 16-BeatFunk2 38 110
52 Slow Funk 33 85
53 Contemp Funk 16 103
54 Rhythmic Gt 20 100
55 '70s Soul 22 96
Chord progression
pattern number
Tempo
No. Rhythm name
56 8-Bt Fusion2 25 112
57 16-Bt Fusion 21 124
58 Jazz Brush 37 60
59 Fast Jazz 2 34 220
60 W Time Feel 36 140
61 S.WTime Feel 36 140
62 Scat Swing 37 120
63 Piano Jazz 38 110
64 Jazz Waltz 56 90
65 Fast Bossa 47 110
66 Bossa Nova 48 125
67 Salsa 45 92
68 Latin 46 116
69 S.Latin 46 116
70 Mambo 45 92
71 Beguine 49 105
72 Hip Hop 18 98
73 808 Hip Hop 25 102
74 S.808 HipHop 25 102
75 Euro Dance 15 135
76 Honky Pop 32 185
77 S.Honky Pop 32 185
78 Boogie 33 170
79 Gospel 30 120
80 Gospel Shout 31 150
Chord progression
pattern number
Tempo
95
Page 96

Chord Progression Pattern List
It is the Chord Progression Pattern List by each measure. These are basic chord progression pattern from No. 1 to No. 10, and these are suitable chord
progression for the internal rhythm from No. 11 to No. 62.
Accompaniment
No.
pattern
1 Original/Variation C Am Dm7 G7 C Am Dm7 G7
2 Original/Variation Am G F E7 Am G F E7
3 Original/Variation CM7 Am7 Dm7 G7 CM7 Am7 Dm7 G7
4 Original/Variation Dm7 G7 CM7 Am7 Dm7 G7 CM7 A7
5 Original/Variation C Bm7 Em7 Am F G Csus4 C
6 Original/Variation Dm7 G7 CM7 FM7
7 Original/Variation C7 F7 C7
8 Original/Variation CM7
9 Original/Variation C Am7 Dm7 G7sus4
10 Original/Variation C C/B Am Am/G F G C
Original C C7sus4 F
11
Variation Am E7 C7 F Fm6 Em7 F G
Original Dm G7 C A7 Dm G7 Am D7
12
Variation F G C C7sus4 F G Am A7
Original Am
13
Variation D
Original C
14
Variation C7sus4 C7
Original Am
15
Variation C
Original F
16
Variation Dm C Dm C
Original C Gm7 FM7
17
Variation FM9 F/G C Am7 FM9 F/G
Original C
18
Variation C G7 C G7 C G7 C
Original C Am7 Dm7 G7 C Am7 Dm7 G7
19
Variation FM7
Original Am7 D7 Am7 D7 Am7 D7 Am7 F/G
20
Variation C
Original CM9
21
Variation
Original CM9
22
Variation FM9 G6 FM9 G6 FM9 G6 FM9 G6 CM9 F/G
Original C
23
Variation Dm7 G7 C Am7 Dm7 G7 C
Original C
24
Variation FM7
Original Am7 D7 Am7 D7 Gm7 C7 Gm7
25
Variation Am7 D7sus4 Am7 D7 FM7
Original CM7
26
Variation C F Dm G C F G C
Original C Am C Am C Am F G
27
Variation C G F G C G F G7
Original C
28
Variation FM7 G7 C
Original C
29
Variation F Am G7 Dm7 F Am7 G7
Original C
30
Variation F
Original C
31
Variation C C7 G F7 G7 F7 G7
Original C
32
Variation F C F G
Original A7 D7 A7
33
Variation C F C C7 F7
1 2 3 4 5 6 7 8 9 10 11 12 13 14 15 16
E7 Am7 A7
5
Bm7
F7 C7 G7 F7 C7 G7
Cdim Dm9 G7 CM7 Dm9 CM7 Cdim Dm9 G7 CM7
C C7sus4 F Fm6
7sus4
B
G Am F D
C D F G
F7 C
E 7
B7 C7sus4 C7
7sus4
B
D Am G
B
B
C Gm7 C
B
CM7 Am7 FM7 Fm7 F/G
Am7 C F/G
CM9
M7
A
M9 B 9 A M9 B 9
A
dim
F
A M7
Am9 CM9 Am9 FM9 G6
FM7 C F/G
G G7 C C7 F C Am7 Dm7 G C C7
G FM7 G FM7 G G7 C F/G
Am7 Dm7 G7
G C G
Fm7 C
C/G A7 D7
C
F
B
C Gm7 F F/G
7
B
B
CM9
A M7
9
E7
F7sus4 F7 G7sus4 G7
FM7 G7 C
dim
C
F G
D7 A7 E7 D7 A7 E7
Chord progression
E 7 B
A 7sus4 B 7sus4
G
E
B
Gm C
F/G
7
B
C Gm7
B
FM9 F/G
9
E7
Am7
B M7
Dm7 G7
G7
F C F C F C G7
C A7 D7 G7 C G7
96
Page 97

Chord Progression Pattern List
Accompaniment
No.
pattern
Original F C7 Am7 C7 F7
34
Variation A7
Original C6
35
Variation C6
Original C
36
Variation C F C C7 F7
Original C
37
Variation Em7
Original CM9
38
Variation FM9 F/G CM9 Am9
Original C
39
Variation F G7 C C7 F G7 Am F/G
Original CM7
40
Variation FM7 G7 CM7
Original Cm7 Fm7 Cm7 Fm7 Cm7 Fm7 Cm7 Fm7
41
Variation Ddim
Original Gm
42
Variation
Original C Dm Dm7/G C F Em7
43
Variation C Bm7 Em9 A7 Am D7 Dm9 G7sus4
Original C Am F G C Am F G
44
Variation F
Original C G7
45
Variation F C G7 C7 F C G7 C
Original Am E7 Am E7 Am E7 Dm7 E7
46
Variation Am E7 Am E7 Dm7 G7 Bm7 E7
Original DM7
47
Variation DM7
Original C
48
Variation F Fm C F Fm G7sus4 G7
Original C
49
Variation C G7 C G7 Dm7 G7 C
Original C
50
Variation Dm
Original C G7
51
Variation C G7
Original C
52
Variation FM7 C FM7 C
Original Cm CmM7 Cm7 F7 Cm
53
Variation Cm CmM7 Cm7 F7
Original D C/D G/D
54
Variation
Original C Cmaj7 C6 Cmaj7 C C Dm DmM7 Dm DmM7 Dm7 DmM7 Dm G C C
55
Variation Dm G C C Dm G Am Am Dm G Am Am Dm G C C
Original Fm7
56
Variation
57 Original/Variation F C Dm
58 Original/Variation D A A7 D G D A D
59 Original/Variation D D Bm Bm G A Bm Bm
60 Original/Variation Am E G D F C Dm E F C E7 Am F C Dm E7
61 Original/Variation Am C D F Am C E E Am C D F Am E Am Am
1 2 3 4 5 6 7 8 9 10 11 12 13 14 15 16
7
B
D7 G7 C7
Dm7 G7 Dm7 G7 C6 Am Am9 Dm7 G(11) C6 F/G
Dm7 G7 Dm7 G7 C6 Am
C7 F C G7 F7 C G7
F C F
Dm7 G7 Em7
9
A7
dim
C
9
G7
D7 Gm7 C7
6
E
m7 5
C
dim
E
(D dim)
Bm D
m7
F
7
B
m7 E 7 A
B
F/G CM9 C9 FM9 F/G
Gm7 C Gm7
Dm7 G7 CM7
Ddim
G7 9
Am7 5
CM7
Bm7 Am7 GM7
CM7 C7 F CM7
Em7 A7 Dm7 G7 C
D7 Gm
Em Dm C Em Am F F/G G7
C G7 C
D6 Dm7 G7 C
F C G7
A
D7 C G7
E
Am C Am
/D
B
C 7 F m7
Fm7
B 7
C (D ) F
B
C
dim
5 G7 9
Dm7
C dim
FM7 G7 C C7
Ddim
G7 9
E M7
F m9
D7 Gm Gm
F9 Em9
Fm7 5
C G7
E
7
A
G7 Cm F7
7
A
D C/D G/D
Bm G A7
Fm7
B 7
B
F C Dm
Chord progression
F/C C7
Dm7
aug
A
C A7 D7 G7 C G7
Dm7 G7
CM7 F/G
Dm7 G7
Ddim
G7 9
Am7 5
C 7(D 7)
Gm7
D7
D
E
E 9
Em9 A7
G G7 G G7 C
F
A
G7
E
G7
B /D
5
C7 Fm7
C7
B
F C Dm
B 7
Fm7
G(11) C6 C6
Dm7 Fm C
dim
C
Fm7
B 7
F C Dm
B
B 7
C7 Fm
B
9797
Page 98

Looper Rhythm List
Looper rhythm
No.
name
1 Pop 1 C F G7 C 108
2 Pop 2 F Dm Gm C7 120
3 R&B 1 Am G F E7 85
4 R&B 2 Cm Fm G7 Cm 108
5 Dance 1 Am Am Dm Dm 138
6 Dance 2 Em Dm Em F 132
7 Rock 1 A D G C 118
8 Rock 2 Gm Gm Gm C 172
9 Blues 1 F7 F7 F7 F7
10 Blues 2 G7 C7 G7 G7 C7 C7 G7 E7 A7 D7 G7 Daug 116
11 Gospel C F C F G C D7 G7 143
12 Ballad 1 Am G F C/E Dm C B E7 88
13 Ballad 2 F Gm7 C7 Fmaj7 75
14 Funk F7
15 Swing Jazz 1 Fm7
16 Swing Jazz 2 Cmaj7 Cmaj7 D7 D7 Dm7 G7 Cmaj7 G7 170
17 Brush Swing Fmaj7
18 Afro-Cuban Cm Cm Cm Fm Fm Cm Gm Cm 200
19 Bossa Nova Fmaj7 Fmaj7 G7 G7 Gm7 C7 Fmaj7 C7 140
20 Salsa D A A7 D7 G D E7 A7 94
21 2-Bars Cm7 Gm7 120
22 4-Bars A D E7 A 120
23 8-Bars G Gmaj7 G7 C Cm G A7 D7 120
24 12-Bars F7 F7 F7 F7
25 16-Bars F
26 3-Beat 1 D Dmaj7 D7 G Gm D E7 A7 120
27 3-Beat 2 Am Dm7 Gm7 C7 A7/G
1 2 3 4 5 6 7 8 9 10 11 12 13 14 15 16
B
7 B 7
F7 F7
7
B
7 E maj7 A maj7
B
Am7 D7 Gm7 Am7
maj7
B
Am Dm
B
B 7 B 7
Dm7 G7 Cm C7 130
7 B 7
B
Am Gm C7 F
B
D7/F
Chord progression
F7 F7 C7
F7 F7 C7
B m7 E 7
F7 F7 C7
G7/F C7/E
Am7
Tempo
F7 C7 60
B 7
F7 C7 120
B 7
F7 C7 120
B 7
Am Dm Gm C7 F C7 120
B
5/
Dm7
E
Gm7
5/
C7 Am7 D7 Gm7 C7 120
D
56
98
Page 99

Internal Song List
No. Song name Composer
1 Swan-derful Samba * John Maul
2 Amazing Grace Traditional
3 Polonaise op.53 Fryderyk Franciszek Chopin
4 Valse, op.34-1 Fryderyk Franciszek Chopin
5 Nocturne No.20 Fryderyk Franciszek Chopin
6 My Pleasure * Masashi Hirashita
7 La Fille aux Cheveux de Lin Claude Achille Debussy
8 La Campanella Franz Liszt
9 Trio Grande * John Maul
10 Scherzo No.2 Fryderyk Franciszek Chopin
11 Étude, op.10-12 Fryderyk Franciszek Chopin
12 Sonate No.15 Wolfgang Amadeus Mozart
13 Liebesträume 3 Franz Liszt
14 Étude, op.10-3 Fryderyk Franciszek Chopin
15 Je te veux Erik Satie
16 Valse, op.64-1 Fryderyk Franciszek Chopin
17 Golliwog’s Cakewalk Claude Achille Debussy
18 Fantaisie-Impromptu Fryderyk Franciszek Chopin
19 Arabesque 1 Claude Achille Debussy
20 An der schönen, blauen Donau Johann Strauss, Sohn
21 Auf Flügeln des Gesanges Felix Mendelsshon
22 Mazurka No.5 Fryderyk Franciszek Chopin
23 Gymnopédie 1 Erik Satie
24 Étude, op.25-1 Fryderyk Franciszek Chopin
25 Clair de Lune Claude Achille Debussy
26 Étude, op.10-5 Fryderyk Franciszek Chopin
27 Dr. Gradus ad Parnassum Claude Achille Debussy
28 Grande Valse Brillante Fryderyk Franciszek Chopin
29 La prière d’une Vierge Tekla Badarzewska
30 Course en Troïka Peter Ilyich Tchaikovsky
31 To The Spring Edvard Hagerup Grieg
32 Valse, op.64-2 Fryderyk Franciszek Chopin
33 Radetzky Marsch Johann Baptist Strauss
34 Träumerei Robert Alexander Schumann
35 Moments Musicaux 3 Franz Peter Schubert
36 Prélude, op.28-15 Fryderyk Franciszek Chopin
37 Harmonious Blacksmith Georg Friedrich Händel
38 Ungarische Tänze 5 Johannes Brahms
39 Türkischer Marsch Ludwig van Beethoven
40 Nocturne No.2 Fryderyk Franciszek Chopin
41 Frühlingslied Felix Mendelsshon
42 Präludium Johann Sebastian Bach
43 Jägerlied Felix Mendelsshon
44 Passepied Claude Achille Debussy
45 Für Elise Ludwig van Beethoven
46 Türkischer Marsch Wolfgang Amadeus Mozart
47 Ständchen Franz Peter Schubert
48 Humoreske Antonín Dvořák
49 Blumenlied Gustav Lange
50 Alpenglöckchen Theodor Oesten
51 Menuett G dur Ludwig van Beethoven
52 Venezianisches Gondellied Felix Mendelsshon
53 Alpenabendröte Theodor Oesten
54 Farewell to the Piano Ludwig van Beethoven
55 Brautchor Wilhelm Richard Wagner
No. Song name Composer
56 Forget-Me-Not Heinrich Lichner
57 Wiener Marsch Carl Czerny
58 Le Coucou Louis Claude Daquin
59 Menuett G dur Johann Sebastian Bach
60 Spinnerlied Albert Ellmenreich
61 Gavotte François Joseph Gossec
62 Heidenröslein Gustav Lange
63 Zigeuner Tanz Heinrich Lichner
64 La Cinquantaine Gabriel Marie
65 Csikos Post Hermann Necke
66 Dolly’s Dreaming Awakening Theodor Oesten
67 La Violette Louis Streabbog
68 Fröhlicher Landmann Robert Alexander Schumann
69 Sonatine op.36-1 Muzio Clementi
70 Sonatine op.20-1 Friedrich Kuhlau
71 Sonatine No.5 Ludwig van Beethoven
72 Late Night Chopin * John Maul
73 Fly Free * John Maul
74 L’éveil de l’amour * Masashi Hirashita
* Songs marked by an asterisk “*” are original songs composed for the
Roland Corporation. The copyrights to these songs are owned by the
Roland Corporation.
* All rights reserved. Unauthorized use of this material for purposes
other than private, personal enjoyment is a violation of applicable
laws.
99
Page 100

Chord Fingering List
symbol: Indicates the constituent notes of chords.
symbol: Chords shown with an “ ” can be played by pressing just the key marked with the “ ”.
* “Turning the Rhythm’s Chord Progression On/O (Auto Chord Prog. Sw)” (p. 68)
100
 Loading...