

Page 1
Contents
Introduction . . . . . . . . . . . . . . . . . . . . . . . . . . . . . . . . . . . . . . . . . . . . . 2
Attaching the Straps . . . . . . . . . . . . . . . . . . . . . . . . . . . . . . . . . . . 2
Adjusting the Bass Strap . . . . . . . . . . . . . . . . . . . . . . . . . . . . . . . 2
Connecting the AC Adaptor . . . . . . . . . . . . . . . . . . . . . . . . . . . . 3
Installing Batteries . . . . . . . . . . . . . . . . . . . . . . . . . . . . . . . 4
Turning On the Power . . . . . . . . . . . . . . . . . . . . . . . . . . . . . . . . . 4
Auto O Setting. . . . . . . . . . . . . . . . . . . . . . . . . . . . . . . . . . 5
Listening to the Demo Songs . . . . . . . . . . . . . . . . . . . . . . . . . . . 5
Connecting Headphones . . . . . . . . . . . . . . . . . . . . . . . . . . . . . . 5
Restoring the Factory Settings (FACTORY ALL RESET) . . . . 5
Performing . . . . . . . . . . . . . . . . . . . . . . . . . . . . . . . . . . . . . . . . . . . . . . 6
Adjusting the Sensitivity of the Bellows . . . . . . . . . . . . . . . . . 6
Adjusting the Volume . . . . . . . . . . . . . . . . . . . . . . . . . . . . . . . . . . 6
Adjusting the Balance . . . . . . . . . . . . . . . . . . . . . . . . . . . . 6
Selecting an Accordion Set . . . . . . . . . . . . . . . . . . . . . . . . . . . . . 7
Selecting an Accordion Sound for the Right-Hand
Keyboard
Selecting an Accordion Sound for the Left-Hand Button
Keyboard . . . . . . . . . . . . . . . . . . . . . . . . . . . . . . . . . . . . . . . . . . . . . 8
Adding Depth and Richness to the Sound . . . . . . . . . . . . . . . 8
Changing the Note Layout of the Left-Hand Button
Keyboard and Right-Hand Keyboard (FR-4xb) . . . . . . . . . . . 8
Left-Hand Button Keyboard and Right-Hand Keyboard
(FR-4xb) Note Layout . . . . . . . . . . . . . . . . . . . . . . . . . . . . . . . . . . 9
Playing Non-Accordion Sounds . . . . . . . . . . . . . . . . . . . . . . . . . . 10
Selecting an Orchestral Sound for the Right-Hand
Keyboard
Selecting an Organ Sound for the Right-Hand Keyboard . 11
. . . . . . . . . . . . . . . . . . . . . . . . . . . . . . . . . . . . . . . . . . . . . 7
. . . . . . . . . . . . . . . . . . . . . . . . . . . . . . . . . . . . . . . . . . . . . 10
Selecting an Orchestral Sound Not Assigned to a
Register Button . . . . . . . . . . . . . . . . . . . . . . . . . . . . . . . . . . 10
Returning to Accordion Sounds . . . . . . . . . . . . . . . . . . . 10
Selecting an Organ Sound Not Assigned to a
Register Button . . . . . . . . . . . . . . . . . . . . . . . . . . . . . . . . . . 11
Returning to Accordion Sounds . . . . . . . . . . . . . . . . . . . 11
Selecting an Orchestral Sound for the Left-Hand Button
Keyboard (Bass Rows) . . . . . . . . . . . . . . . . . . . . . . . . . . . . . . . . . . 12
Selecting an Orchestral Sound Not Assigned to a
Register Button . . . . . . . . . . . . . . . . . . . . . . . . . . . . . . . . . . 12
Returning to Accordion Sounds . . . . . . . . . . . . . . . . . . . 12
Selecting an Orchestral Sound for the Left-Hand Button
Keyboard (Chord Rows) . . . . . . . . . . . . . . . . . . . . . . . . . . . . . . . . 13
Selecting an Orchestral Sound Not Assigned to a
Register Button . . . . . . . . . . . . . . . . . . . . . . . . . . . . . . . . . . 13
Returning to Accordion Sounds . . . . . . . . . . . . . . . . . . . 13
Saving and Recalling Favorite Sounds and Settings
(User Programs) . . . . . . . . . . . . . . . . . . . . . . . . . . . . . . . . . . . . . . . . . 14
Saving a User Program . . . . . . . . . . . . . . . . . . . . . . . . . . . . . . . . . 14
Recalling a User Program . . . . . . . . . . . . . . . . . . . . . . . . . . . . . . . 14
Using the USB Audio Player . . . . . . . . . . . . . . . . . . . . . . . . . . . . . . 15
Getting Ready to Use the FR-4x as an Audio Player . . . . . . . 15
Selecting a Song from a USB Flash Drive . . . . . . . . . . . . . . . . 15
Playing a Song from a USB Flash Drive . . . . . . . . . . . . . . . . . . 15
Appendix . . . . . . . . . . . . . . . . . . . . . . . . . . . . . . . . . . . . . . . . . . . . . . . . 16
Panel Descriptions . . . . . . . . . . . . . . . . . . . . . . . . . . . . . . . . . . . . . 16
Securing the Cable . . . . . . . . . . . . . . . . . . . . . . . . . . . . . . . 19
Main Specications . . . . . . . . . . . . . . . . . . . . . . . . . . . . . . . . . . . . 19
USING THE UNIT SAFELY . . . . . . . . . . . . . . . . . . . . . . . . . . . . . . . . . 20
IMPORTANT NOTES . . . . . . . . . . . . . . . . . . . . . . . . . . . . . . . . . . . . . . 20
Owner’s Manual (this document)
Read this rst. It explains the basic things you need to know in
order to use the FR-4x.
PDF Manual (download from the Web)
5 Reference Manual
This explains all functions of the unit.
5 MIDI Implementation
This is detailed information about MIDI messages.
Before using this unit, carefully read “USING THE UNIT SAFELY” and “IMPORTANT NOTES” (the leaet “USING THE UNIT SAFELY” and the Owner’s
Manual (p. 20)). After reading, keep the document(s) where it will be available for immediate reference.
Copyright © 2016 ROLAND CORPORATION
To obtain the PDF manual
1.
Enter the following URL in your computer.
http://www.roland.com/manuals/
I
2.
Choose “FR-4x” as the product name.
Page 2
Introduction
Attaching the Straps
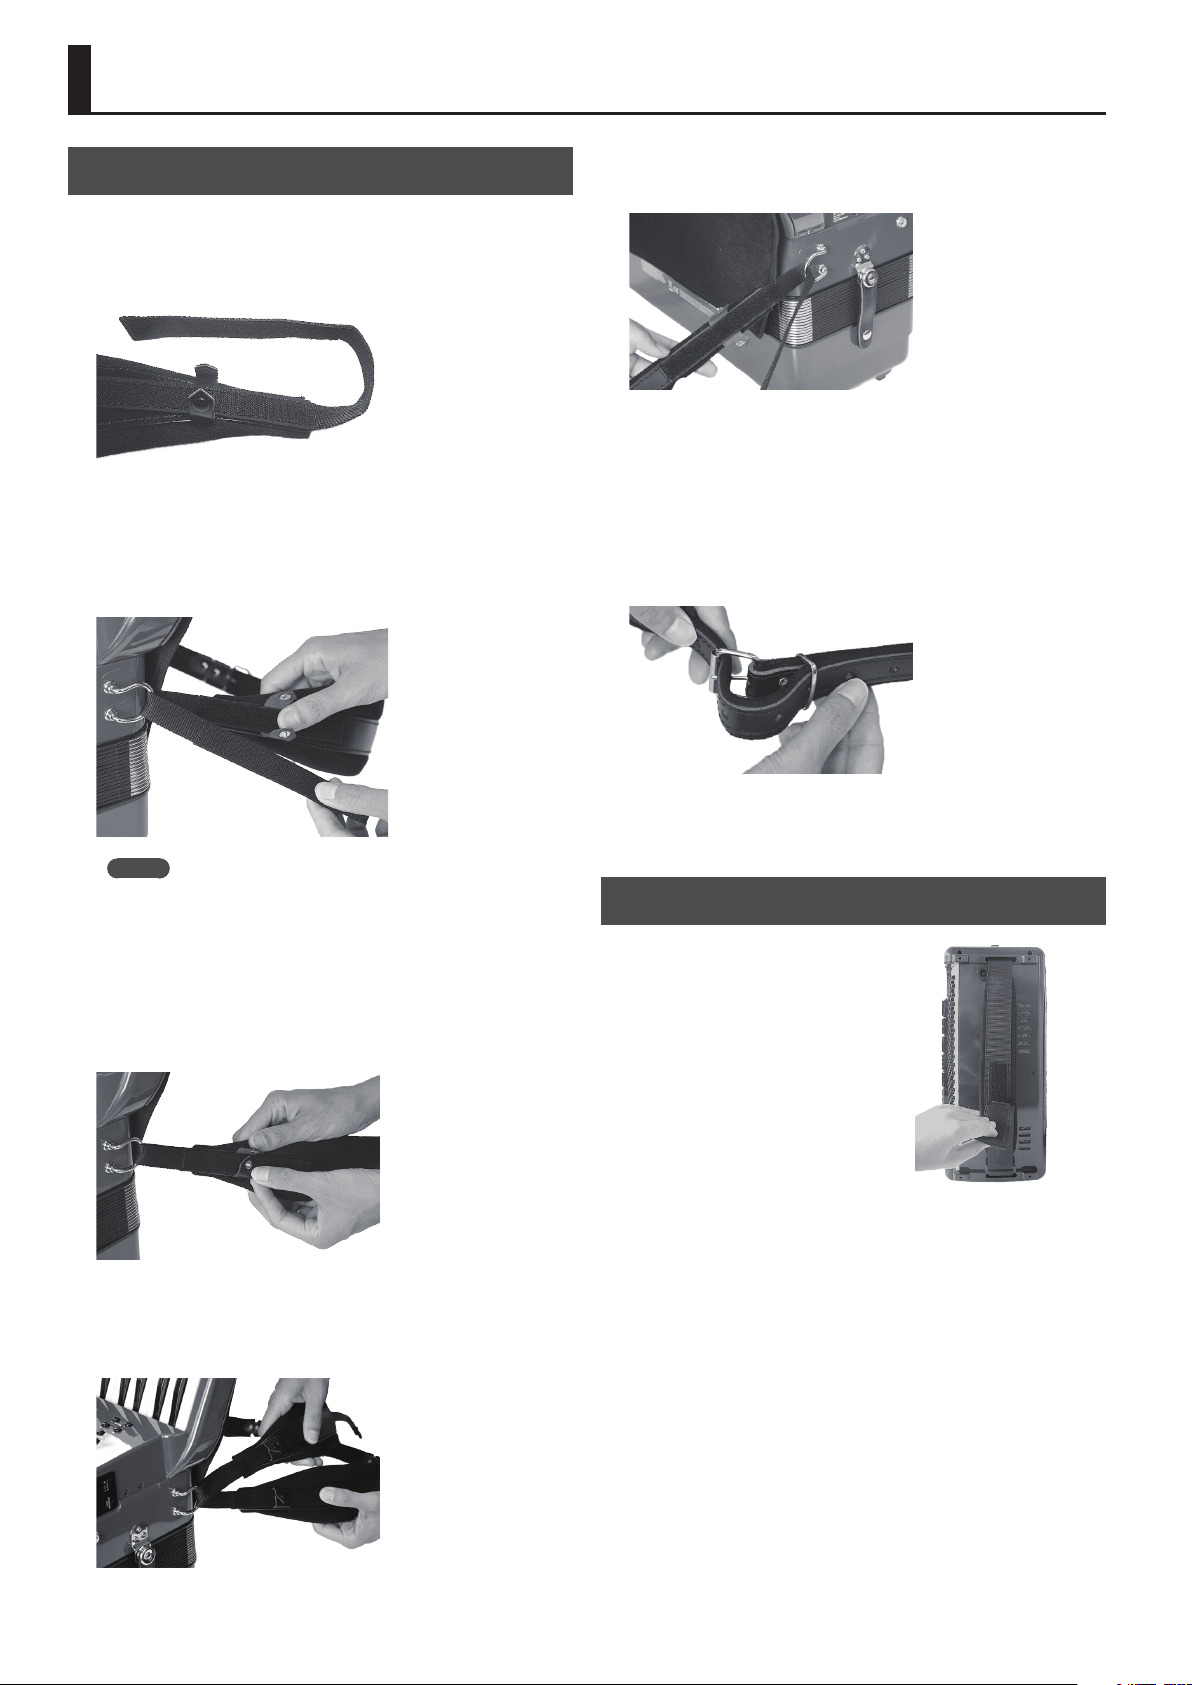
1.
Remove the strap.
The FR-4x comes with two shoulder straps that have Velcro
fasteners on each end.
2.
Place the FR-4x in a stable location.
3.
Pass one strap through the holder ring on the
display side.
7.
Pass the opposite end of the strap through the
holder ring on the side of the jacks.
8.
Place the Velcro fastener together to secure the
strap.
9.
Firmly press together the entire surface of the Velcro
fastener so that the strap does not come loose.
10.
Use the buckle to adjust the length of the shoulder
strap.
MEMO
The two straps are of dierent lengths. Attach the shorter strap
to the left shoulder side.
4.
Place the Velcro fasteners together to secure the
strap.
5.
Firmly press together the entire surface of the Velcro
fastener so that the strap does not come loose.
6.
In the same way, attach the other strap by repeating
steps 3–5.
The ends of the straps will be as shown in the illustration.
11.
In the same way, attach the other strap by repeating
steps 7–10.
Adjusting the Bass Strap
On the left-hand button keyboard
side, there is a belt through which
you can pass your left hand to open
and close the bellows.
Use the Velcro fastener to adjust
the length of the bass strap as
appropriate for the size of your
hand.
2
Page 3
Connecting the AC Adaptor
* To prevent malfunction and equipment failure, always turn
down the volume, and turn o all the units before making any
connections.
* We recommend that you keep batteries installed in the unit
even though you’ll be powering it with the AC adaptor. That
way, you’ll be able to continue a performance even if the cord of
the AC adaptor gets accidentally disconnected from the unit.
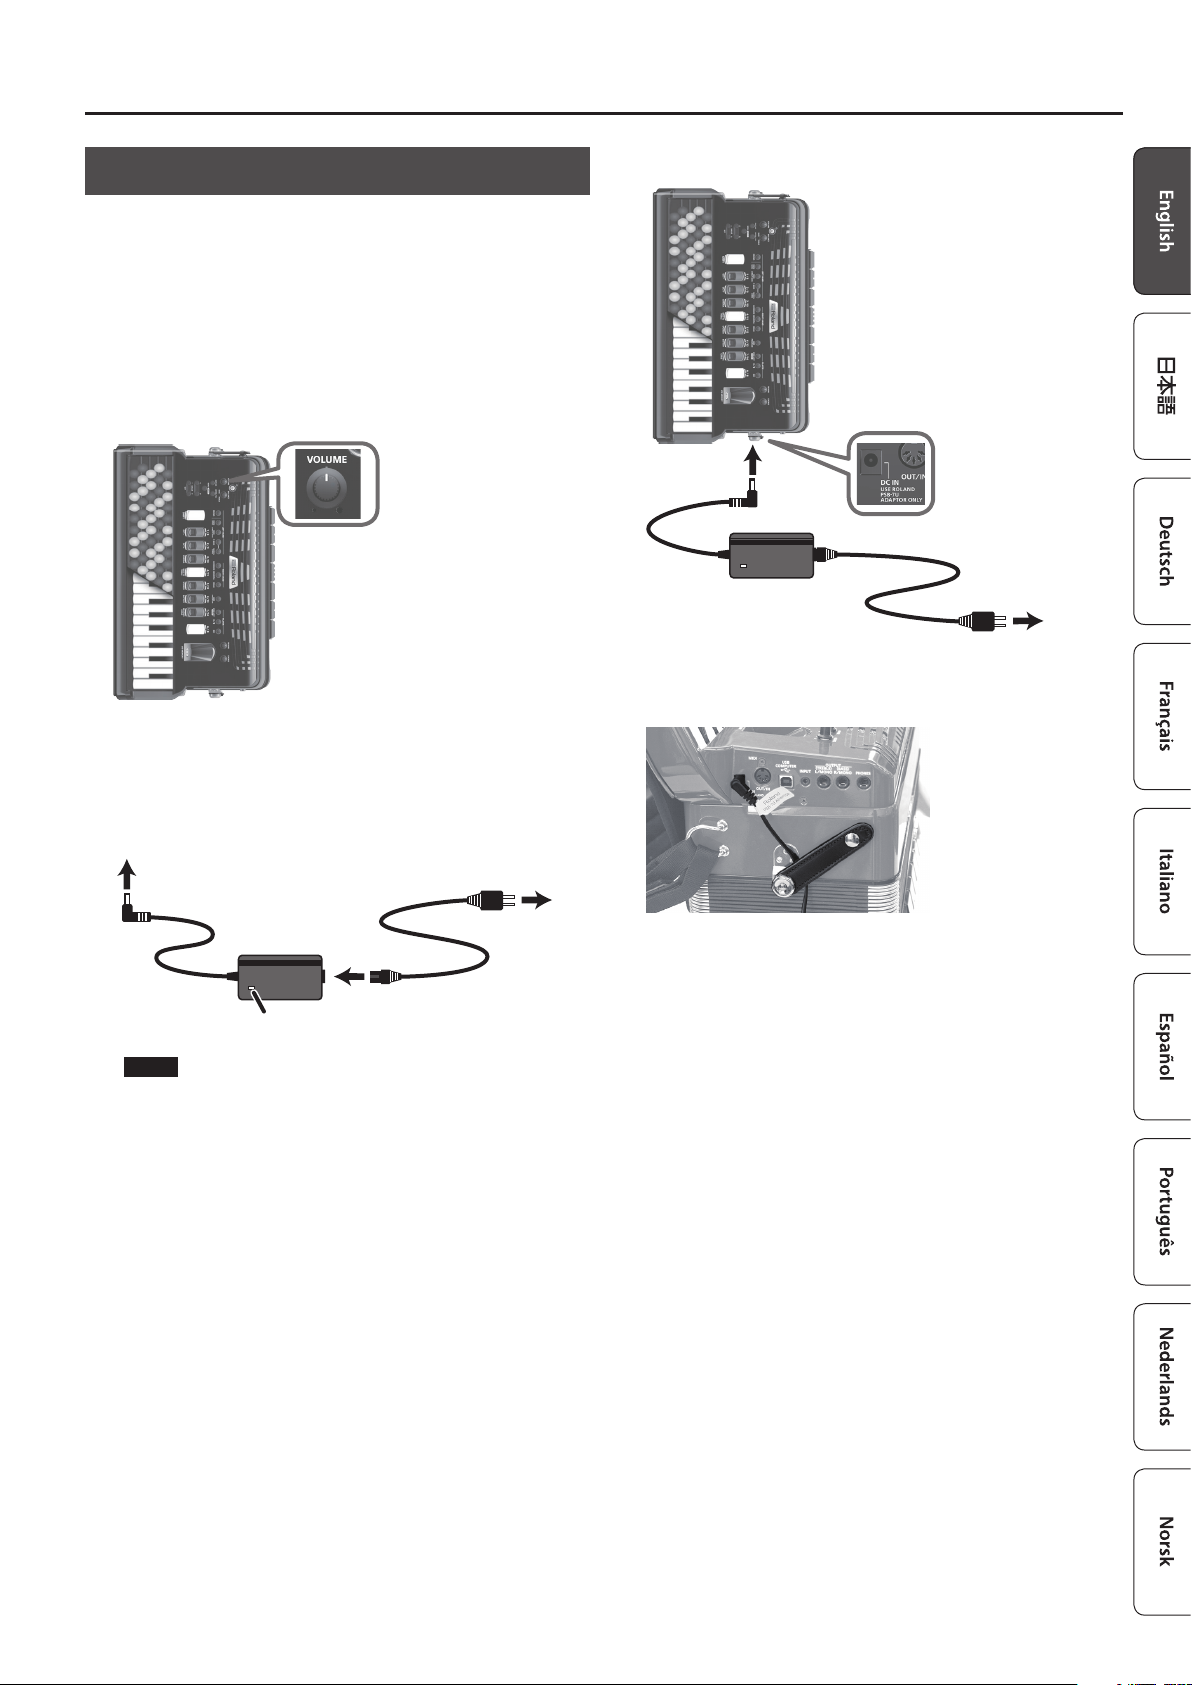
1.
Turn the [VOLUME] knob all the way to the left to
minimize the volume.
Introduction
3.
Connect the AC adaptor to the FR-4x’s DC IN jack.
Power Cord
2.
Connect the included power cord to the AC adaptor.
* Place the AC adaptor so the side with the indicator (see
illustration) faces upwards and the side with textual information
faces downwards. The indicator will light when you plug the AC
adaptor into an AC outlet.
AC Outlet
AC adaptor
Power Cord
Indicator
NOTE
Be sure to use the AC adaptor supplied with the unit (PSB-7U).
AC adaptor
4.
Use the bellows clip to secure the cord of the AC
AC Outlet
adaptor.
* To prevent the inadvertent disruption of power to your unit
(should the plug be pulled out accidentally), and to avoid
applying undue stress to the jack, anchor the power cord using
the bellows clip, as shown in the illustration.
5.
Plug the power cord into a power outlet.
To use the FR-4x with batteries, see “Installing Batteries” (p. 4).
3
Page 4
Introduction
Installing Batteries
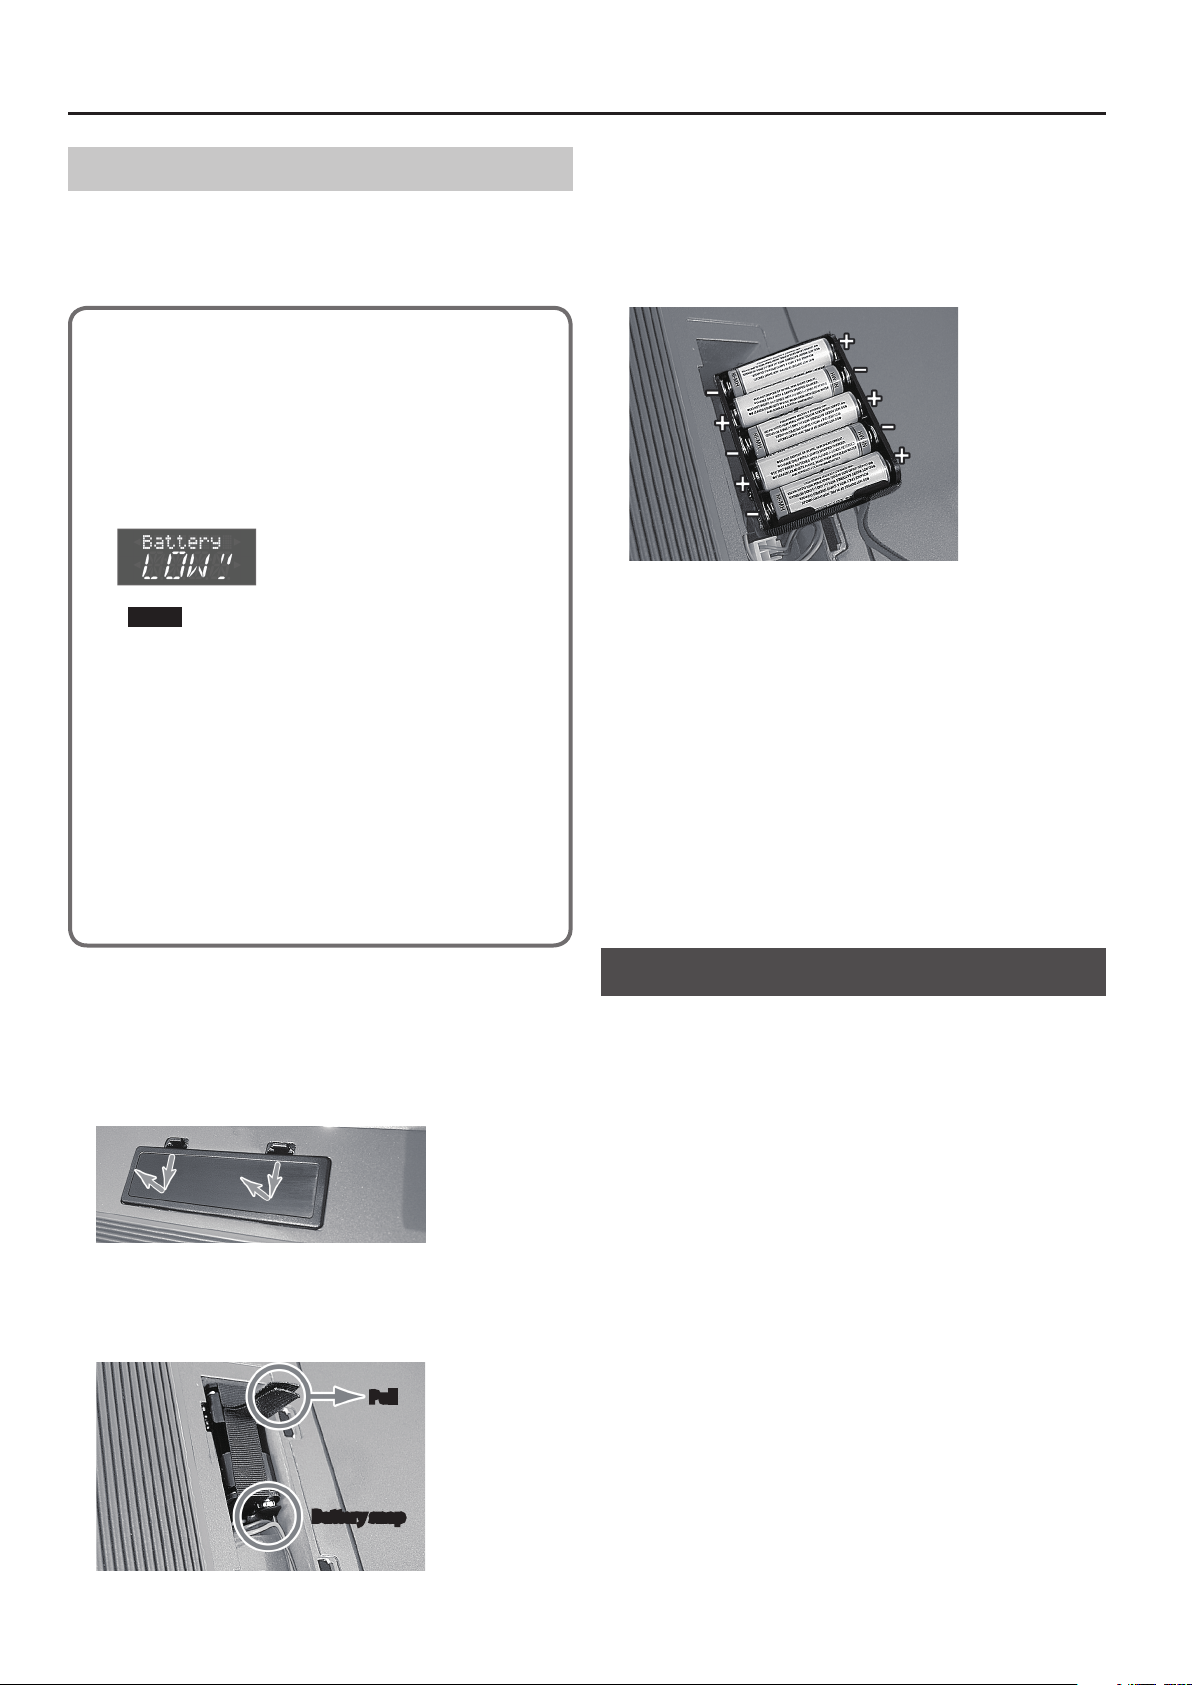
If you install ten AA rechargeable nickel-metal hydride batteries,
you’ll be able to perform without connecting the AC adaptor. By
using the FR-4x with its built-in speaker on battery power, you can
play it like an acoustic accordion without connecting a cable.
About the batteries that can be used
5 When using rechargeable nickel-metal hydride batteries
(2000 mAh batteries), you can use the instrument
for approximately ve hours if the speaker is on, or
approximately nine hours if the speaker is o (operating
time depends on the conditions of use).
5 When the batteries run low, the display indicates
“Battery Low.”
NOTE
Do not use alkaline batteries or zinc-carbon batteries.
4.
Remove the battery snap of the cord from the
battery holder.
5.
Insert ten rechargeable nickel-metal hydride
batteries into the battery holder.
Insert each battery correctly in accordance with the “+” “-” polarity
markings.
6.
Connect the battery snap to the battery holder.
7.
Insert the battery holder into the FR-4x’s battery
case.
About battery handling
Improper handling of batteries, rechargeable batteries, or
chargers can cause hazards such as electrolyte leakage,
overheating, ignition, or bursting.
Before use, you must read and observe all of the cautions
included with the batteries, rechargeable batteries, or
charger, and use them as directed.
* Rechargeable batteries and chargers must be used only in
the combination of rechargeable battery and charger that
is specied by the manufacturer.
* Power-o the FR-4x when installing or removing batteries.
1.
Remove the cushion from the back of the FR-4x.
2.
Remove the battery case cover.
While pressing downward on the two knobs of the cover, pull it
toward yourself.
3.
Pull the end of the belt that is wrapped around the
battery holder, and remove the battery holder from
the battery case.
Pull
Battery snap
8.
Attach the battery case cover, and attach the
cushion.
* If you handle batteries improperly, you risk explosion and uid
leakage. Make sure that you carefully observe all of the items
related to batteries that are listed in “USING THE UNIT SAFELY”
and “IMPORTANT NOTES” (leaet “USING THE UNIT SAFELY” and
Owner’s manual (p. 20)).
* The batteries will not be charged even if you connect the AC
adaptor when rechargeable batteries are installed in the FR-4x.
You must use a commercially available charger to charge
rechargeable batteries.
Turning On the Power
1.
Turn the [VOLUME] knob all the way to the left to
minimize the volume.
If you connect the FR-4x to an amplifier, etc., set its volume to the
minimum value as well.
2.
Press the [L] button.
The [L] button lights.
* Before turning the unit on/o, always be sure to turn the
volume down. Even with the volume turned down, you might
hear some sound when switching the unit on/o. However, this
is normal and does not indicate a malfunction.
3.
Turn the [VOLUME] knob clockwise to set the
volume to an appropriate level.
4.
Adjust the volume of the connected audio system
(if connected).
* The power to this unit will be turned o automatically after a
predetermined amount of time has passed since it was last used
for playing music, or its buttons or controls were operated (Auto
O function).
If you do not want the power to be turn o automatically,
disengage the Auto O function (p. 5).
4
Page 5
NOTE
5 Any settings that you are in the process of editing will be lost
when the power is turned o. If you have any settings that
you want to keep, you should save them beforehand.
5 To restore power, turn the power on again.
Turning o the power
1.
Turn the [VOLUME] knob all the way to the left to
minimize the volume.
If you connected the FR-4x to an amplifier, etc., set its volume to
the minimum value as well.
2.
Hold down the [L] button until the indications in the
display disappear.
Release your finger, and the power will turn off.
Introduction
Listening to the Demo Songs
Several demo songs are built into the FR-4x.
1.
Hold down the [SONG LIST] button.
The demo songs begin playing.
2.
To change demo songs, use the VALUE [-] [+]
buttons.
3.
When you press the [EXIT] button or the [SONG
LIST] button, playback stops and you return to the
previous screen.
Connecting Headphones
Auto O Setting
This parameter allows you to specify how long the FR-4x should
wait before switching itself off while you are not using it.
If you don’t want to use this function, turn it “OFF.”
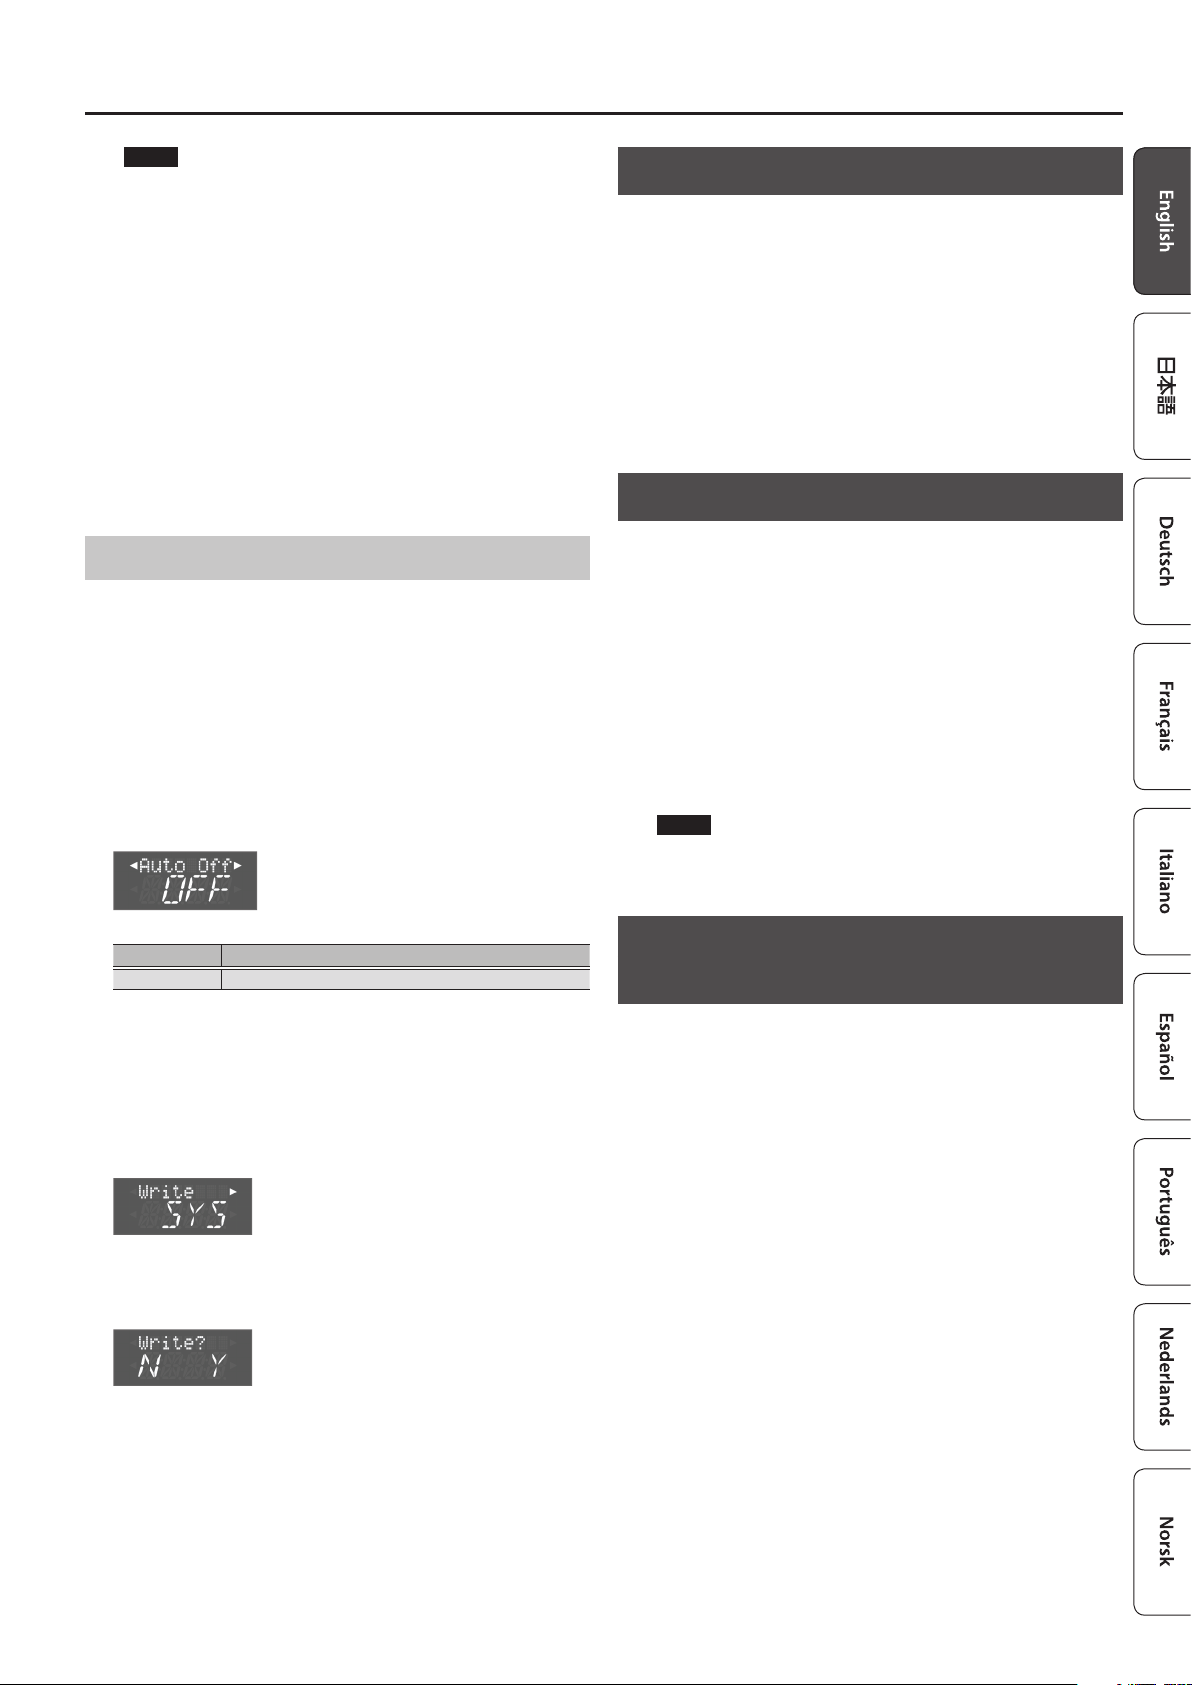
1.
Press the [MENU/WRITE] button.
2.
Use the cursor [K] [J] buttons to select “System,” and
then press the [ENTER/YES] button.
3.
Use the cursor [K] [J] buttons to select “Auto O.”
4.
Use the VALUE [-] [+] buttons to edit the value.
Parameter Value
Auto O OFF, 10 (min), 30 (min), 240 (min)
This setting is lost when the FR-4x is powered-off.
If you want to keep the setting, save the system settings as follows.
5.
Long-press the [MENU/WRITE] button.
The Write screen appears.
6.
Use the VALUE [-] [+] buttons to select “SYS.”
The FR-4x has one jack for plugging in headphones. This allows you
to play without having to worry about bothering others around
you, even at night.
1.
Plug the headphones into the PHONES jack located
on the FR-4x’s connection panel.
Use stereo headphones.
The FR-4x’s speakers are switched off when you connect
headphones.
If desired, you can make the FR-4x’s speakers stay on even if
headphones are connected.
&
[SHIFT] + [5/12] button (p. 17)
NOTE
If headphones are connected, do not place the FR-4x with its
jacks downward.
Restoring the Factory Settings (FACTORY ALL RESET)
Here’s how to restore all of the FR-4x’s settings to their factory-set
state.
1.
Press the [MENU/WRITE] button.
2.
Use the cursor [K] [J] buttons to select “Utility,” and
then press the [ENTER/YES] button.
7.
Press the cursor [J] button.
A confirmation message appears.
8.
Press the [ENTER/YES] button to save.
When saving is finished, the screen indicates “Complete.”
If you decide to cancel, press the [EXIT/NO] button.
9.
Press the [EXIT/NO] button several times to return to
the previous screen.
3.
Use the cursor [K] [J] buttons to select “FctryALL.”
4.
To restore the settings of the FR-4x to their factoryset state, press the [ENTER/YES] button.
A message is displayed during the factory reset process; when
finished, the screen indicates “Complete.”
If you decide to cancel, press the [EXIT/NO] button.
5.
Press the [EXIT/NO] button several times to return to
the previous screen.
5
Page 6
Performing
Adjusting the Sensitivity of the Bellows
Like acoustic accordions, the FR-4x/FR-4xb produce sound when
you use your left hand to open and close (expand and contract) the
bellows. In general, sound is not produced unless you move the
bellows.
On the FR-4x/FR-4xb, you can adjust the sensitivity of the bellows
to your preference.
To adjust the sensitivity of the bellows, you’ll use the bellows
resistance regulator located at the side of the left-hand bellows
strap, and a setting within the FR-4x (bellows curve).
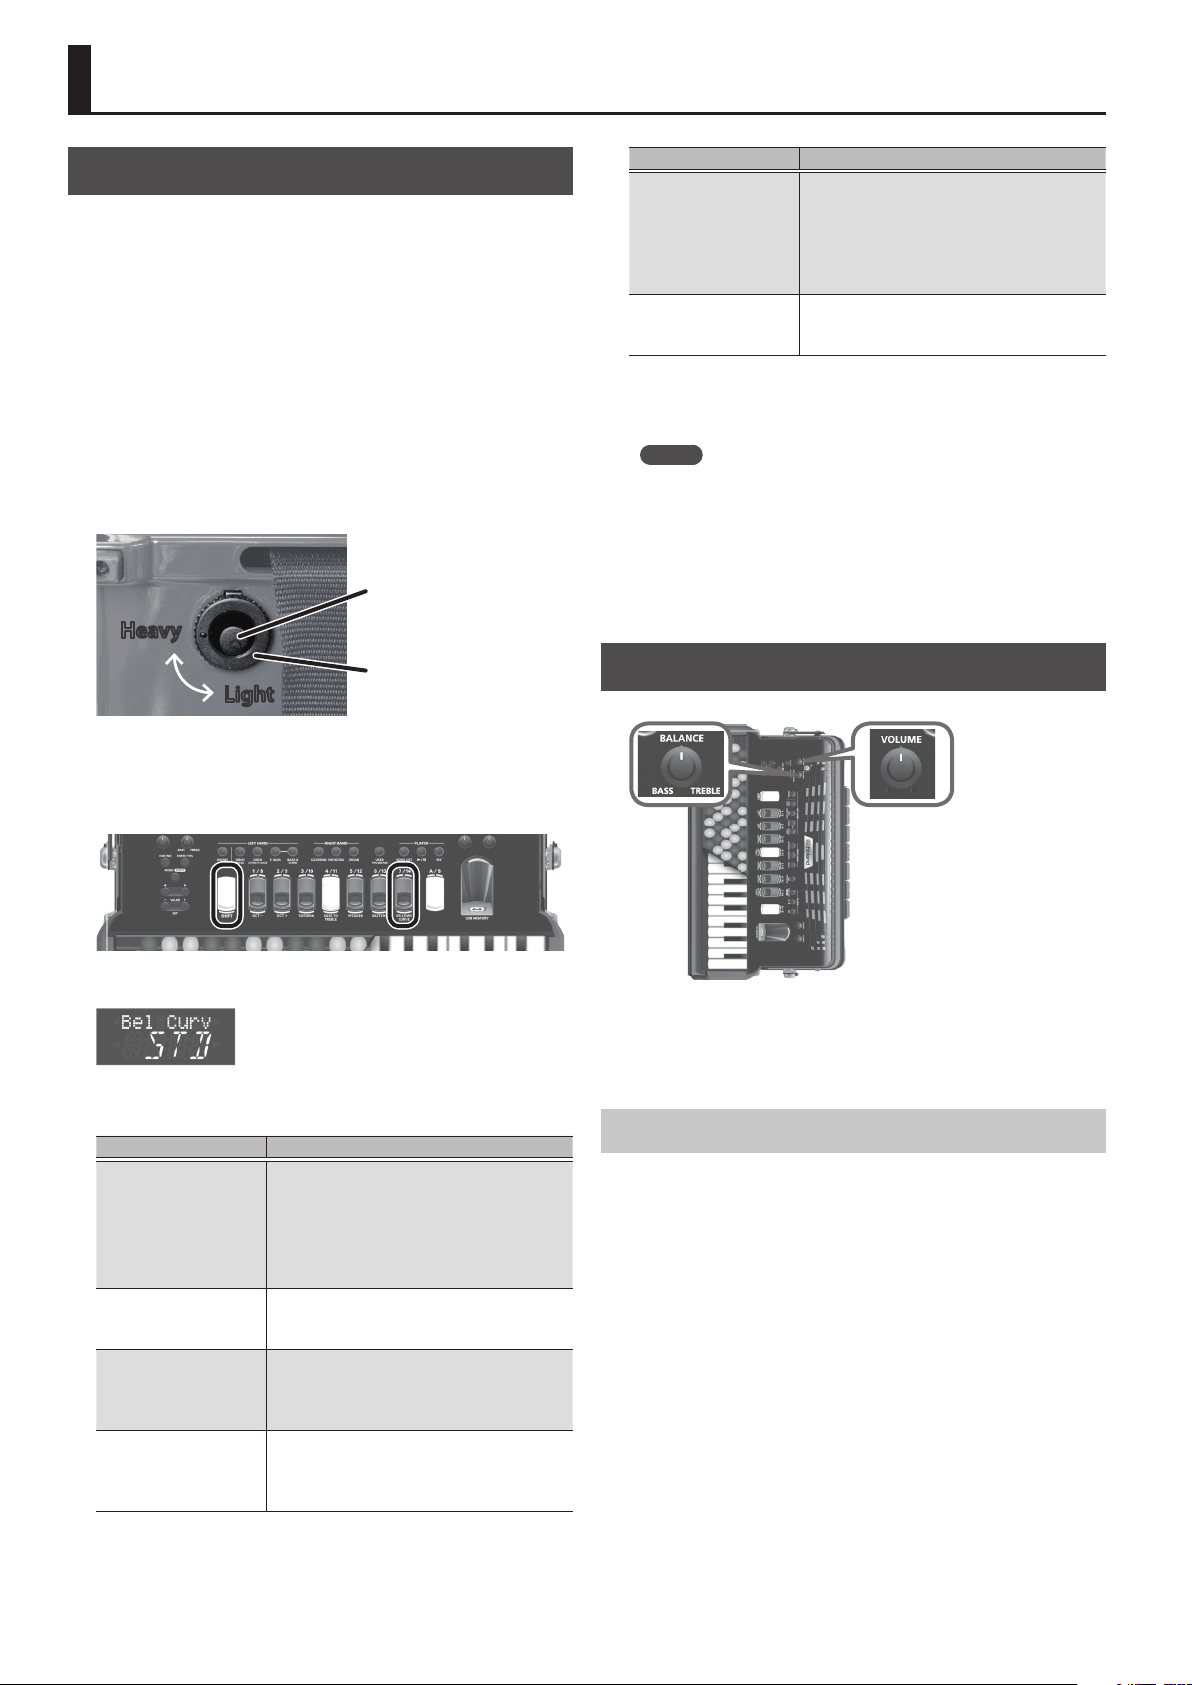
1.
Use the bellows resistance regulator to adjust the
resistance of the bellows to being opened or closed.
Turning the bellows resistance regulator changes the resistance
when opening or closing the bellows.
Air button
Heavy
Bellows resistance
Light
regulator
Value Explanation
Although the bellows must be moved
strongly to obtain volume change, this
HEVY (Heavy)
X-HV (X-Heavy)
4.
Press the [EXIT] button to return to the previous
setting allows a broad range of nuances to
be added. This setting allows easy playing
when the bellows resistance regulator is
set to a heavy setting.
This setting requires the bellows to be
moved even more strongly than the
“Heavy” setting.
screen.
MEMO
The bellows curve setting is automatically saved when you turn
o the power.
Air button
Pressing the air button lets you open or close the bellows quickly.
Use this if the bellows are open when you’ve finished playing.
Adjusting the Volume
Next, change the internal setting (bellows curve) as follows.
2.
Hold down the [SHIFT] button and press the righthand register [7/14] button.
The following screen appears.
3.
Use the VALUE [-] [+] buttons to change the value.
Value Explanation
The volume is xed, regardless of bellows
FIX.L (Fixed Low)
FIX.M (Fixed Med)
FIX.H (Fixed High)
X-LT (X-Light)
LIGT (Light)
STD (Standard)
movement. This is convenient when you
want to play without moving the bellows.
“Fixed Low” is a low volume, “Fixed High”
is a high volume, and “Fixed Med” is an
intermediate volume.
Adequate volume change can be
obtained by moving the bellows even
more gently than the “Light” setting.
Volume change can be obtained even by
moving the bellows gently. This setting
allows easy playing when the bellows
resistance regulator is set to a light setting.
This is the standard setting. This setting
allows easy playing when the bellows
resistance regulator is set to a medium
setting.
To change the volume, turn the [ VOLUME] knob located at the
right-hand keyboard side.
Turn the knob toward the right to increase the volume, or toward
the left to decrease it.
Adjusting the Balance
Turn the [BALANCE] knob to change the volume balance between
the right-hand keyboard (TREBLE) and the left-hand button
keyboard (BASS).
Normally, you’ll leave this in the center.
6
Page 7
Selecting an Accordion Set
When you switch the accordion set, the sounds of the right-hand
keyboard and left-hand button keyboard will all change.
If we use the analogy of an acoustic accordion, this is like switching
to a different accordion.
Go ahead and compare different accordion sets to find your
favorites.
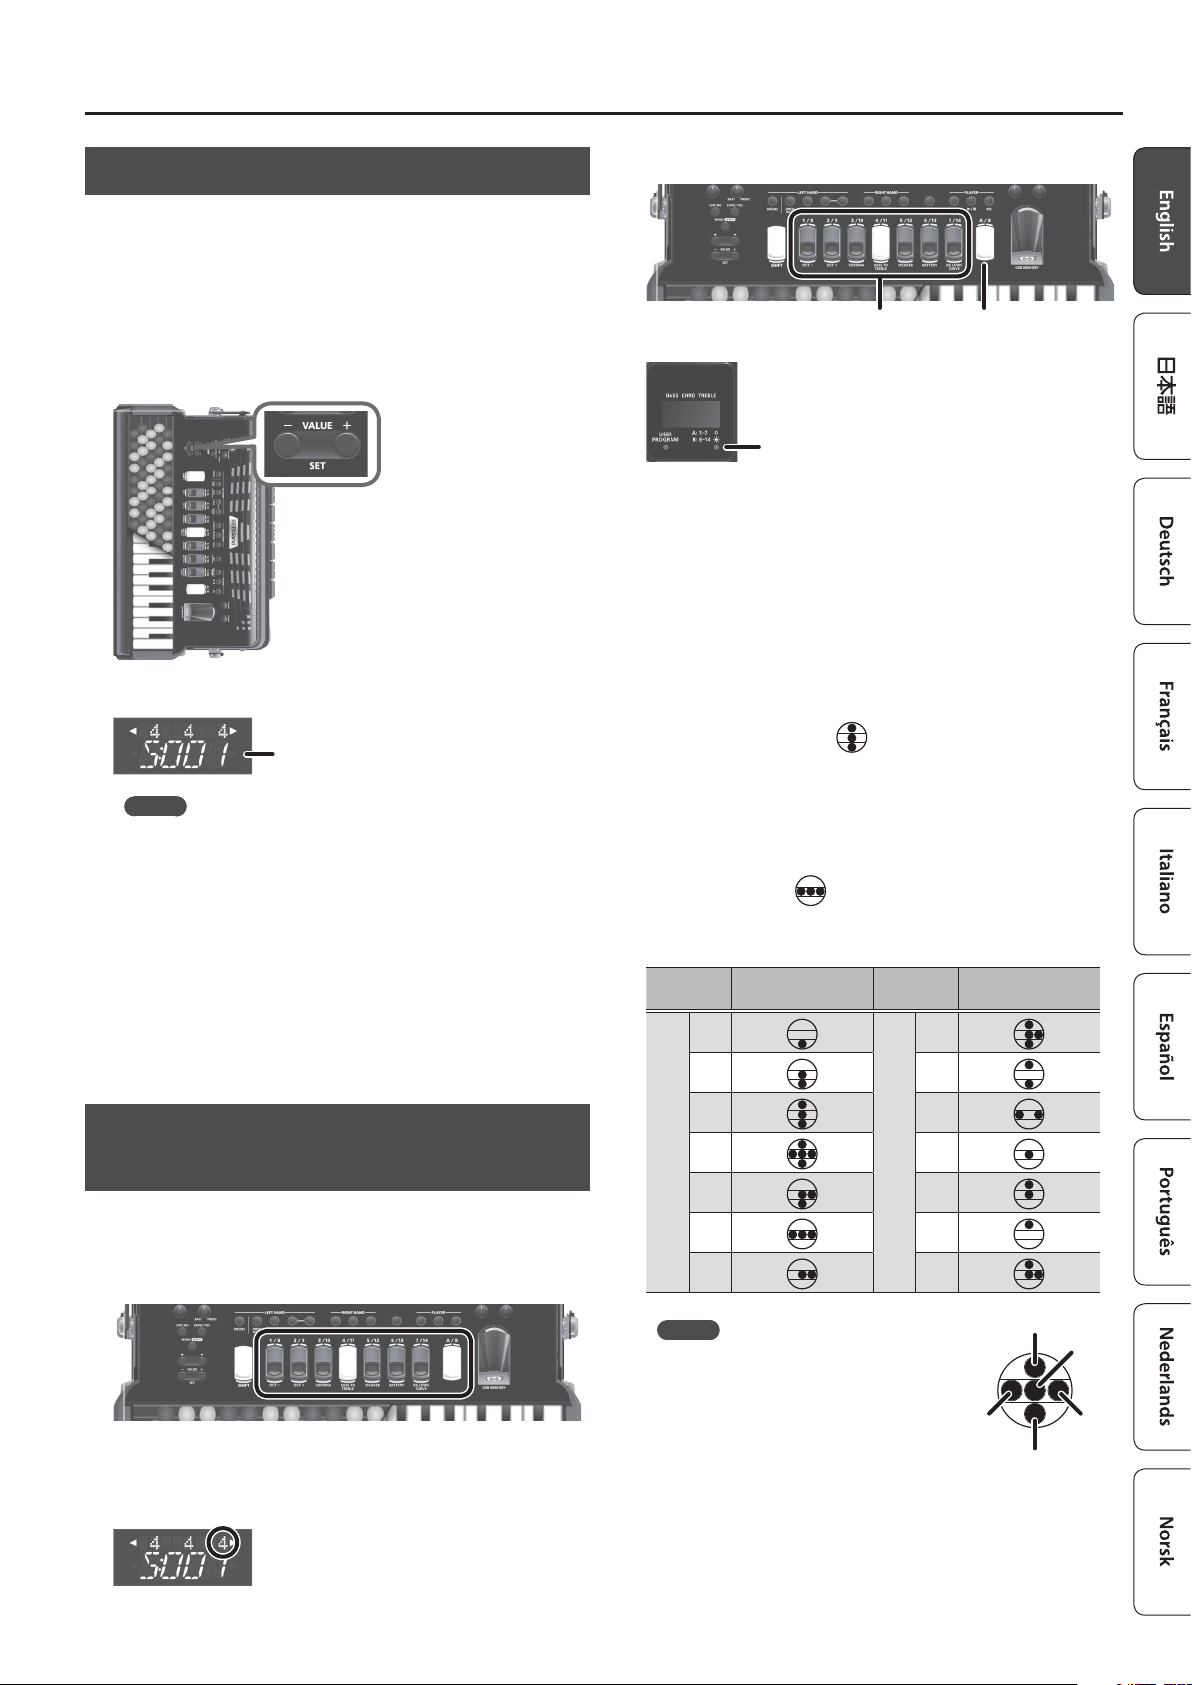
1.
Press the VALUE [-] [+] buttons.
The set changes each time you press a button.
Accordion set number
MEMO
If you hold down the [SHIFT] button and press a [-] [+] button,
the value changes in steps of 10. If you hold down one of the [-]
[+] buttons and press the other button, the value increases or
decreases more quickly.
The FR-4x contains 100 sets, and when shipped from the factory,
several sets are already provided.
You can select and play the built-in sets, or create sets to your own
preference and save them.
&
For a list of the sets that are included when the FR-4x is shipped
from the factory, refer to “Reference Manual” (PDF).
Performing
The right-hand (treble) provides 14 registers for each accordion set.
[A/B] buttonRegister buttons
A: Select 1–7 (LED unlit)
B: Select 8–14 (LED lit)
By pressing the [A/B] button you can switch the seven register
buttons between selecting registers 1–7 (the LED in the lower right
of the display is unlit) or selecting registers 8–14 (the LED in the
lower right of the display is lit).
About the reeds played by right-hand accordion sounds
On acoustic accordions, metal reeds vibrate to produce the sound.
On a V-accordion, the sound of the reeds is produced electronically.
The round marks shown below indicate the reeds that are played
by that sound.
The vertical arrangement (
octaves.
5 Upper row: 4’ reed (high region, one octave above the 8’ reed)
5 Middle row: 8’ reed (middle region)
5 Lower row: 16’ reed (low region, one octave below the 8’ reed)
The “ ’ ” symbol following the number is read as “feet.”
The horizontal dots (
The reeds of slightly differing pitch are available only for the middle
region reed (8’ reed).
Register
number
Reed combination
1
2 9
) indicates reeds of different
) indicate reeds of slightly differing pitch.
Register
number
Reed combination
8
Selecting an Accordion Sound for the Right-Hand Keyboard
Select the accordion sound that is played by the right-hand
keyboard.
1.
Press a right-hand register button.
The sound of the button you pressed is selected.
The number at the right edge of the upper line in the display
changes to the number of the button that you pressed.
3 10
4 11
A
5 12
6 13
7 14
MEMO
Reed combinations dier slightly for
each accordion set.
B
8’-
4’
8’
8’+
16’
7
Page 8
Performing
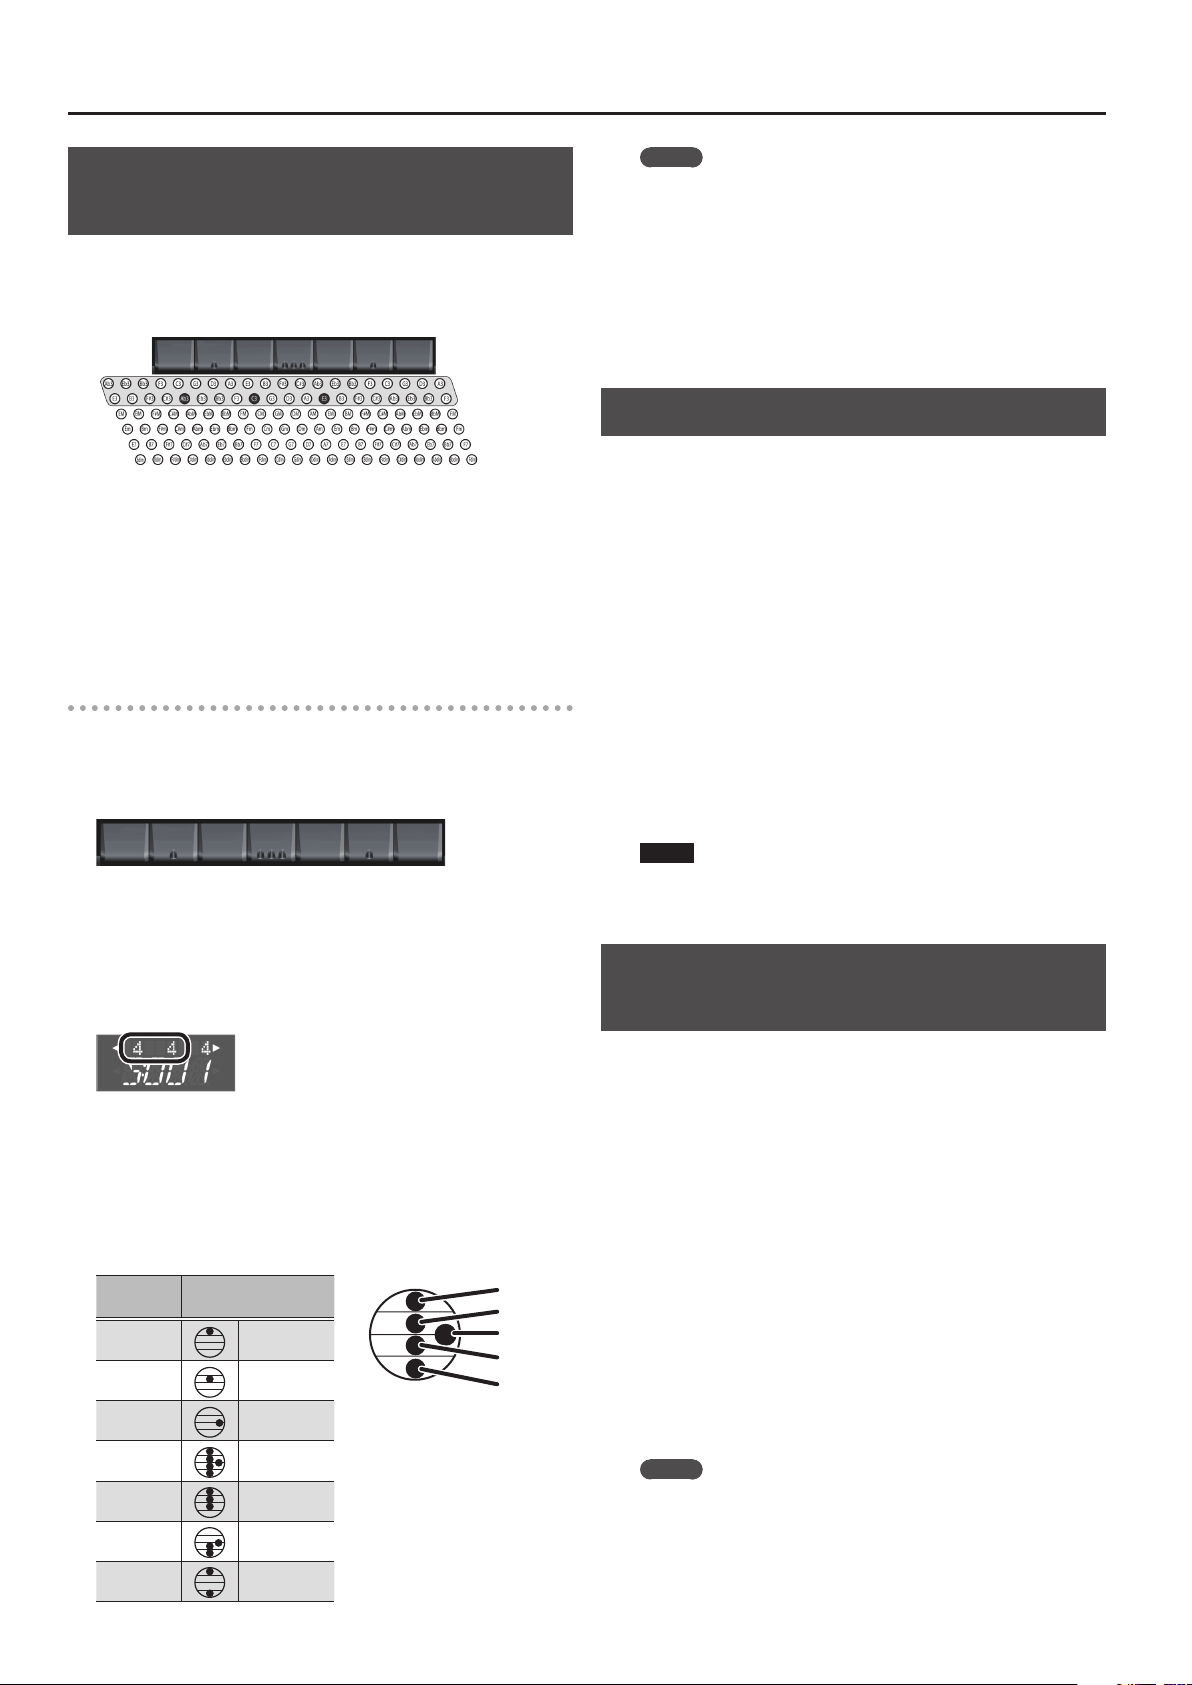
Selecting an Accordion Sound for the LeftHand Button Keyboard
The left-hand button keyboard plays bass and chords.
The two rows of buttons enclosed by gray shading play bass, and
the remaining buttons play chords.
Bass rows
Chord rows
MEMO
Reed combinations dier slightly for each accordion set.
For the left-hand button keyboard, you can also select a Free Bass
mode for advanced players as an alternative to the standard bass
mode typically used for performing. These two modes each have a
different arrangement of left-hand button keyboard.
&
For details on the Free Bass mode, refer to the “Reference
Manual” (PDF).
Adding Depth and Richness to the Sound
Some of the bass rows have reference caps with concave tops
to help you determine the position of the bass and chord rows
without looking at them.
At the factory, these reference caps are installed on the three black
buttons shown in the above illustration, but if you prefer, you can
remove these and reinstall them elsewhere if another location is
more convenient for you.
&
“Reference Manual” (PDF)
Selecting a sound
Here’s how to select the accordion sound that’s played by the lefthand button keyboard.
1.
Press a left-hand register button.
[7] [6] [5] [4] [3] [2] [1]
* The numbers shown on the left-hand register buttons in the
illustration above are for explanatory purposes; they do not
exist on the actual instrument.
The register of the button you pressed is selected, and the number
in the display changes to the number of the button you pressed.
The numbers of the bass row and the chord row both change.
[REVERB] knob
This produces acoustic ambience that is reminiscent of a
performance in a concert hall, adding depth to the sound.
Turning the knob toward the right makes the effect stronger. If the
knob is turned all the way to the left, no reverb is applied.
[CHORUS] knob
This produces a sound reminiscent of multiple units of the same
instrument playing in unison.
Turning the knob toward the right makes the effect stronger. If the
knob is turned all the way to the left, no chorus is applied.
Reverb and chorus apply to both the right-hand and left-hand
sounds.
* You can choose the types of reverb and chorus.
&
“Reference Manual” (PDF)
NOTE
Depending on the type of sound and the settings, it might be
dicult to detect the result of applying reverb or chorus.
Changing the Note Layout of the Left-Hand Button Keyboard and Right-Hand Keyboard (FR-4xb)
Here’s how to specify the number of rows of the left-hand button
keyboard that play bass and the note layout of the right-hand
keyboard.
About the reeds played by the left-hand accordion sound
In the left hand (bass), there are seven registers for each
accordion set.
The reeds played by the left-hand accordion sound are as follows.
The vertical arrangement indicates the pitch of the reed sound.
Register
number
8
Reed combination
1
2
3
4
5
6
7
2’
4’
8-4’
16’/8’/84’/4’/2’
8’/4’/2’
16’/8’/8-4’
16’/2’
2’
4’
8-4’
8’
16’
1.
Press the [MENU] button.
2.
Use the cursor [K] [J] buttons to select “System,” and
then press the [ENTER/YES] button.
3.
Use the cursor [K] [J] buttons to select either
“TrblMode” (right-hand keyboard) or “B&C Mode”
(left-hand button keyboard).
4.
Use the VALUE [-] [+] buttons to change the value.
&
“Treble Mode (TrblMode) (FR-4xb only)” (“Reference Manual”
(PDF))
&
“Bass & Chord Mode (B&C Mode)” (“Reference Manual” (PDF))
Press the [EXIT/NO] button several times to return to the previous
screen.
MEMO
This setting is remembered even if you turn o the power. It is
not initialized even if you execute a Factory Reset.
Page 9
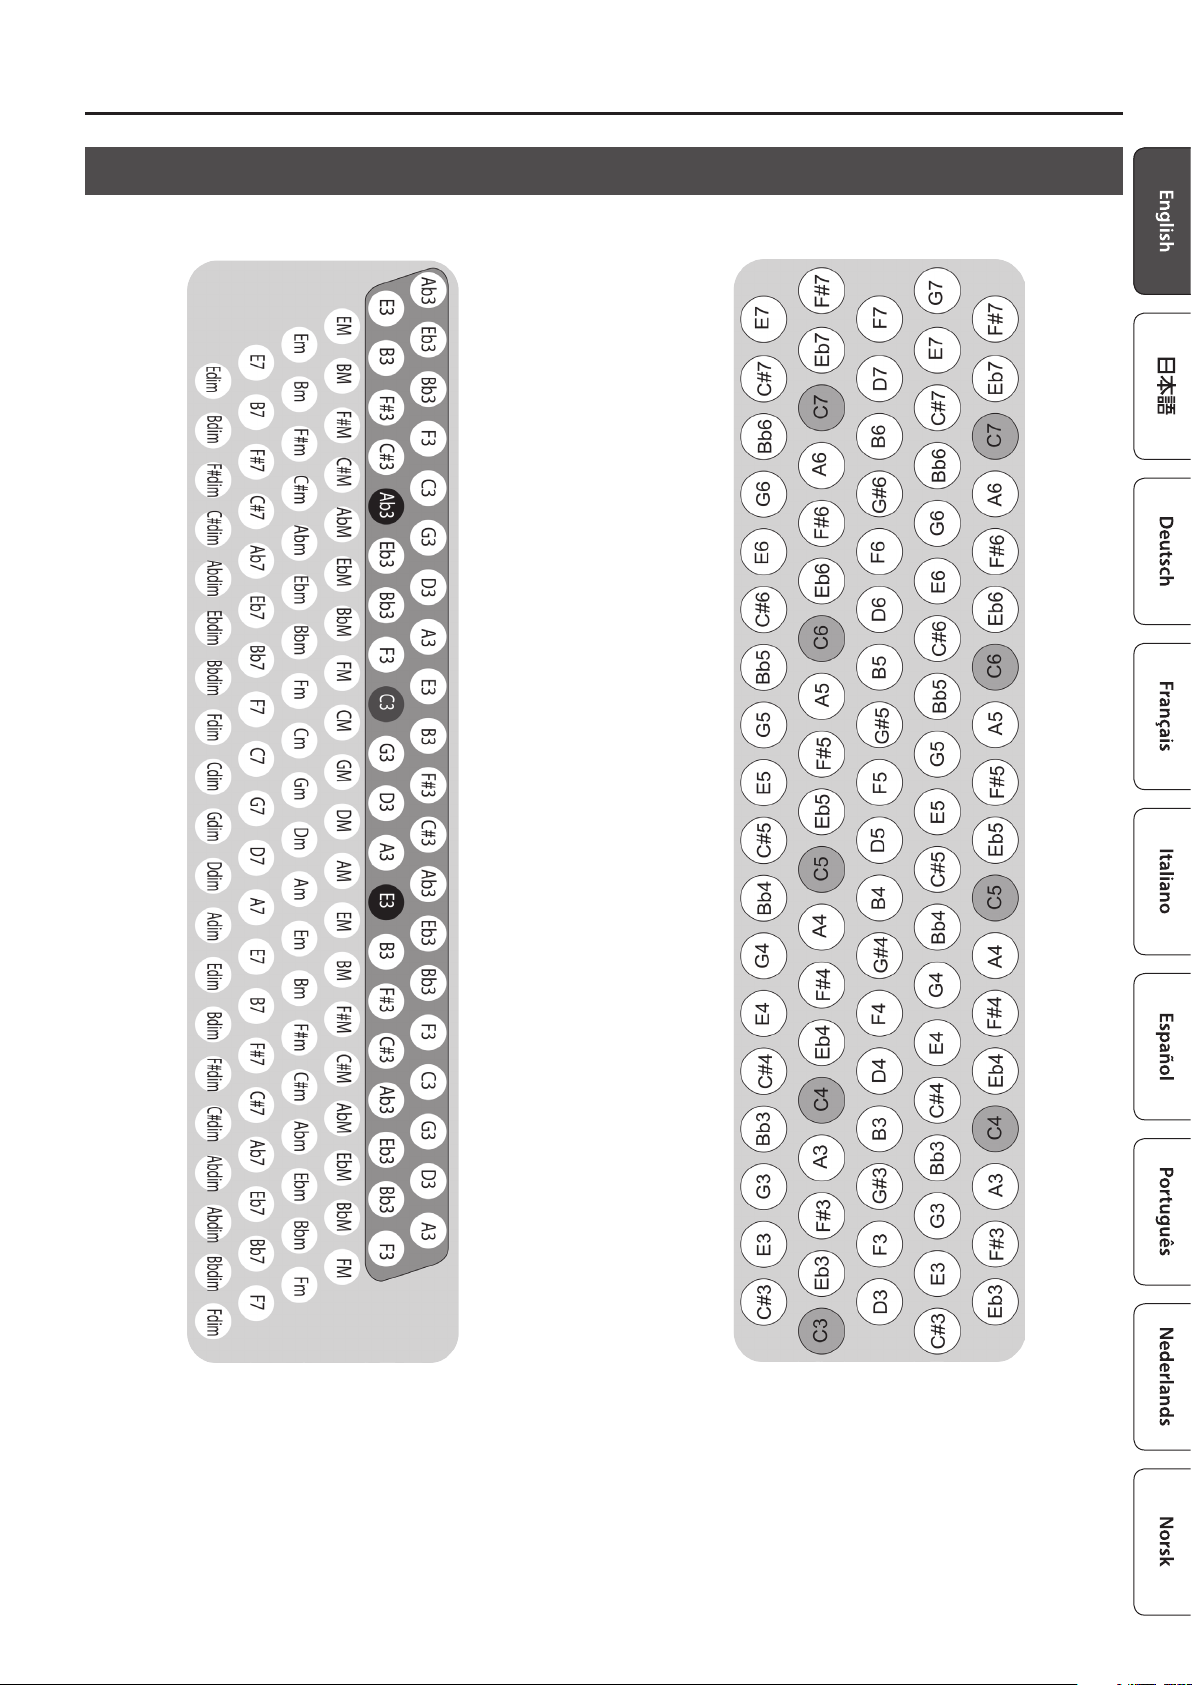
Left-Hand Button Keyboard and Right-Hand Keyboard (FR-4xb) Note Layout
Performing
Left-hand button keyboard
Back as seen from the performer
(connection jack side)
Two bass rows (default setting)
Right-hand keyboard (FR-4xb)
C-Gri Europe (default setting)
Front as seen from the performer
(display side)
5 On the left-hand button keyboard, the buttons enclosed in dark gray shading are the bass rows, and the others are chord rows.
* You can also extend the bass rows to be three rows.
&
“Reference Manual” (PDF)
5 On the FR-4xb, you can also change the note layout of the right-hand keyboard.
&
“Reference Manual” (PDF)
9
Page 10
Playing Non-Accordion Sounds
In addition to accordion sounds, the FR-4x/FR-4xb contain
orchestral sounds such as trombone, flute, and piano, as well as
organ sounds.
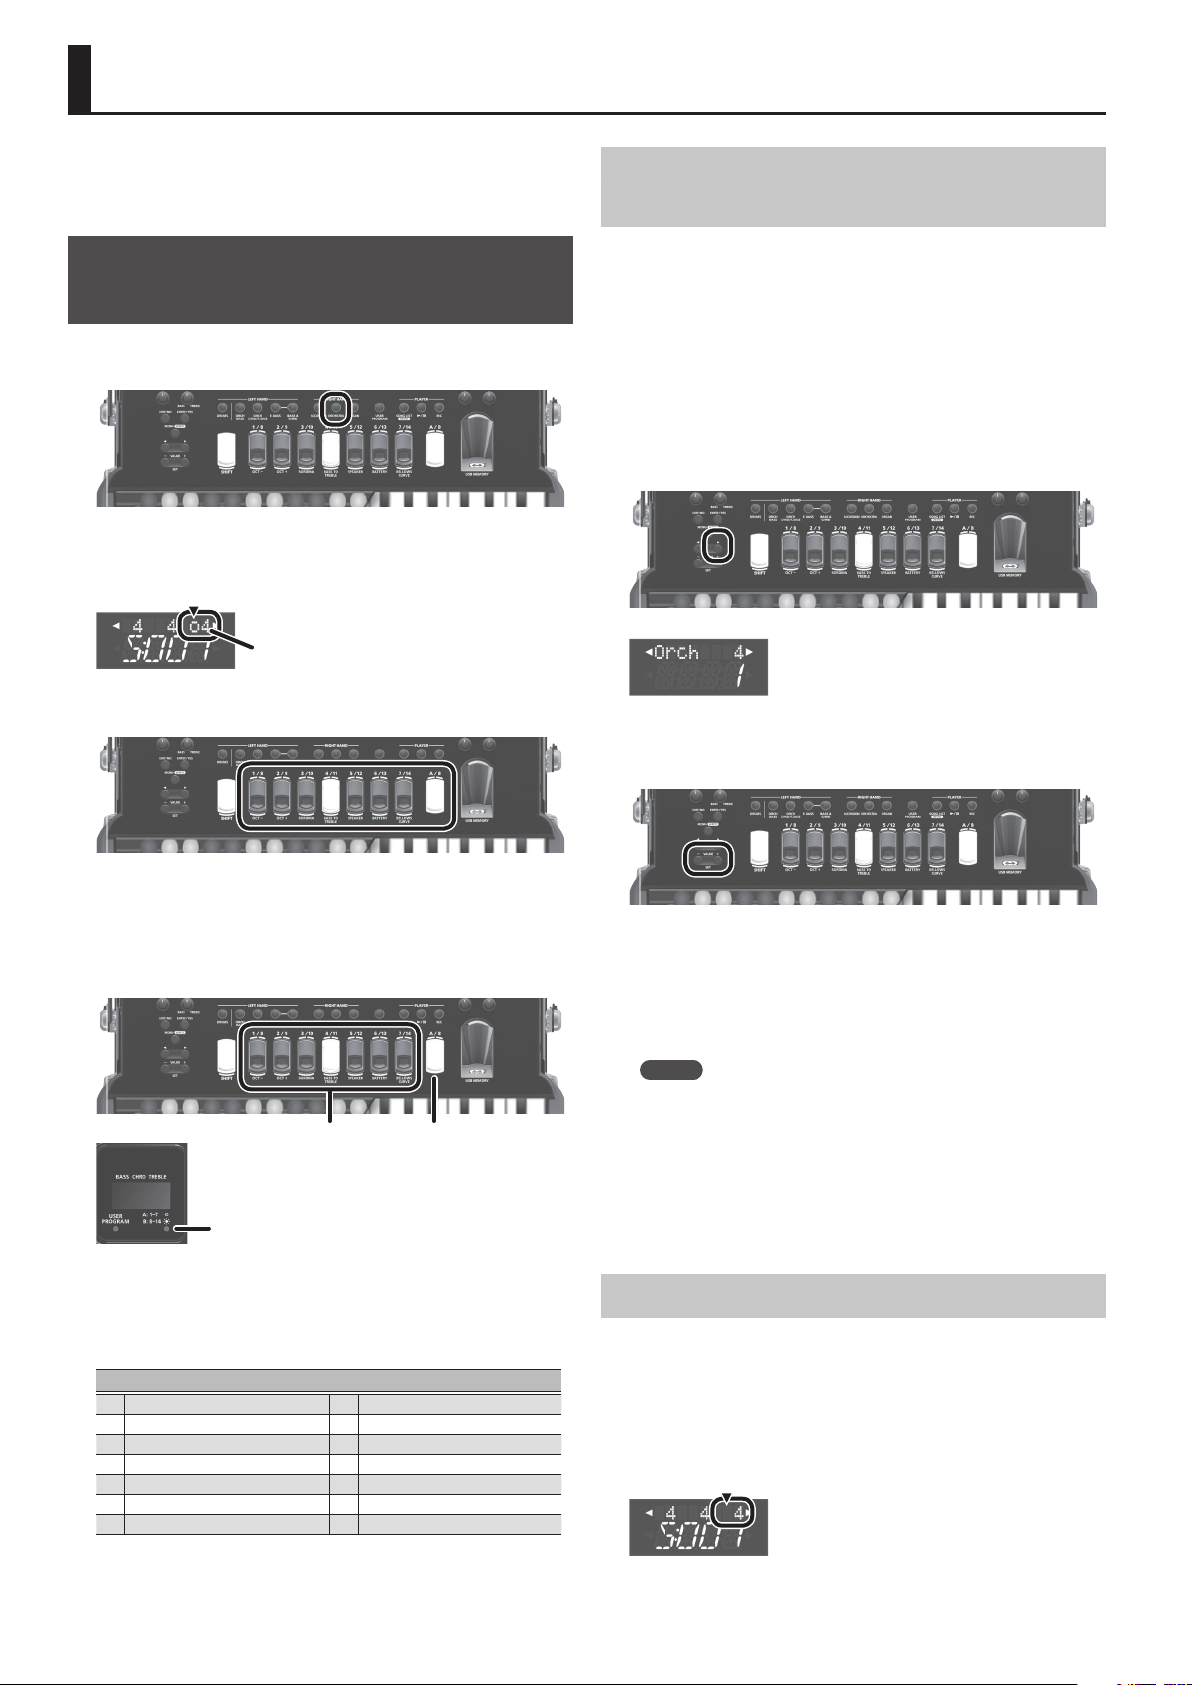
Selecting an Orchestral Sound for the Right-Hand Keyboard
1.
Press the [ORCHESTRA] button.
An “o” is shown in the display at the position marked in the
illustration, indicating that an orchestral sound is selected for the
right-hand keyboard.
Register number
2.
Press a right-hand register button.
Selecting an Orchestral Sound Not Assigned to a Register Button
The FR-4x/FR-4xb contain more than 150 orchestral sounds. To
select an orchestral sound that’s not assigned to a register button,
proceed as follows.
&
For details on the tone name, refer to the “Reference Manual”
(PDF).
1.
If the [ORCHESTRA] button is not lit, press the
[ORCHESTRA] button to make it light.
2.
Press the cursor [J] button several times to access
the orchestral sound select screen.
3.
Use the VALUE [-] [+] buttons to switch orchestral
sounds.
The orchestral sound of the button you pressed is selected; the
number at the far right of the top line in the display changes to the
number of the button that you pressed.
You can use the right-hand register buttons to instantly switch
between 14 orchestral sounds.
[A/B] buttonRegister buttons
A: Select 1–7 (LED unlit)
B: Select 8–14 (LED lit)
By pressing the A/B button, you can switch the seven register
buttons between selecting sounds 1–7 (the LED in the lower right
of the display is unlit) and selecting sounds 8–14 (the LED in the
lower right of the display is lit).
ORCHESTRA sounds
1
Natural Piano (NatrlPno)
2
Pure EP
3
Steel Drums (SteelDrm)
4
Vibraphone (Vibe)
5
Mid Pipe
6
Harmonica
7
Flamenco Guitar (Flmnc Gt)
8
Clean Solid Guitar (ClnSolid)
9
Symphonic Strings (SynphStr)
10
Jazz Scat 3 (Jz Scat3)
11
Octave Brass (OctBrass)
12
Tenor Sax 2 (Ten Sax2)
13
Clarinet
14
Flute 1
4.
When you’ve selected a sound, press the cursor
[K] button several times to return to the previous
screen.
You can also return to the previous screen by pressing the [EXIT]
button.
MEMO
You can use the above procedure to assign any desired
orchestral sound to the currently selected register button.
However, this setting is lost when you turn o the power or
perform another operation.
You can save your favorite settings and recall them instantly.
&
“Saving and Recalling Favorite Sounds and Settings
(User Programs)” (p. 14)
Returning to Accordion Sounds
1.
Press the [ACCORDION] button.
The character at the location shown in the illustration disappears
from the display.
The number at the far right of the top line in the display is the
register number of the last-selected accordion sound.
Indication disappears
10
Page 11
Playing Non-Accordion Sounds
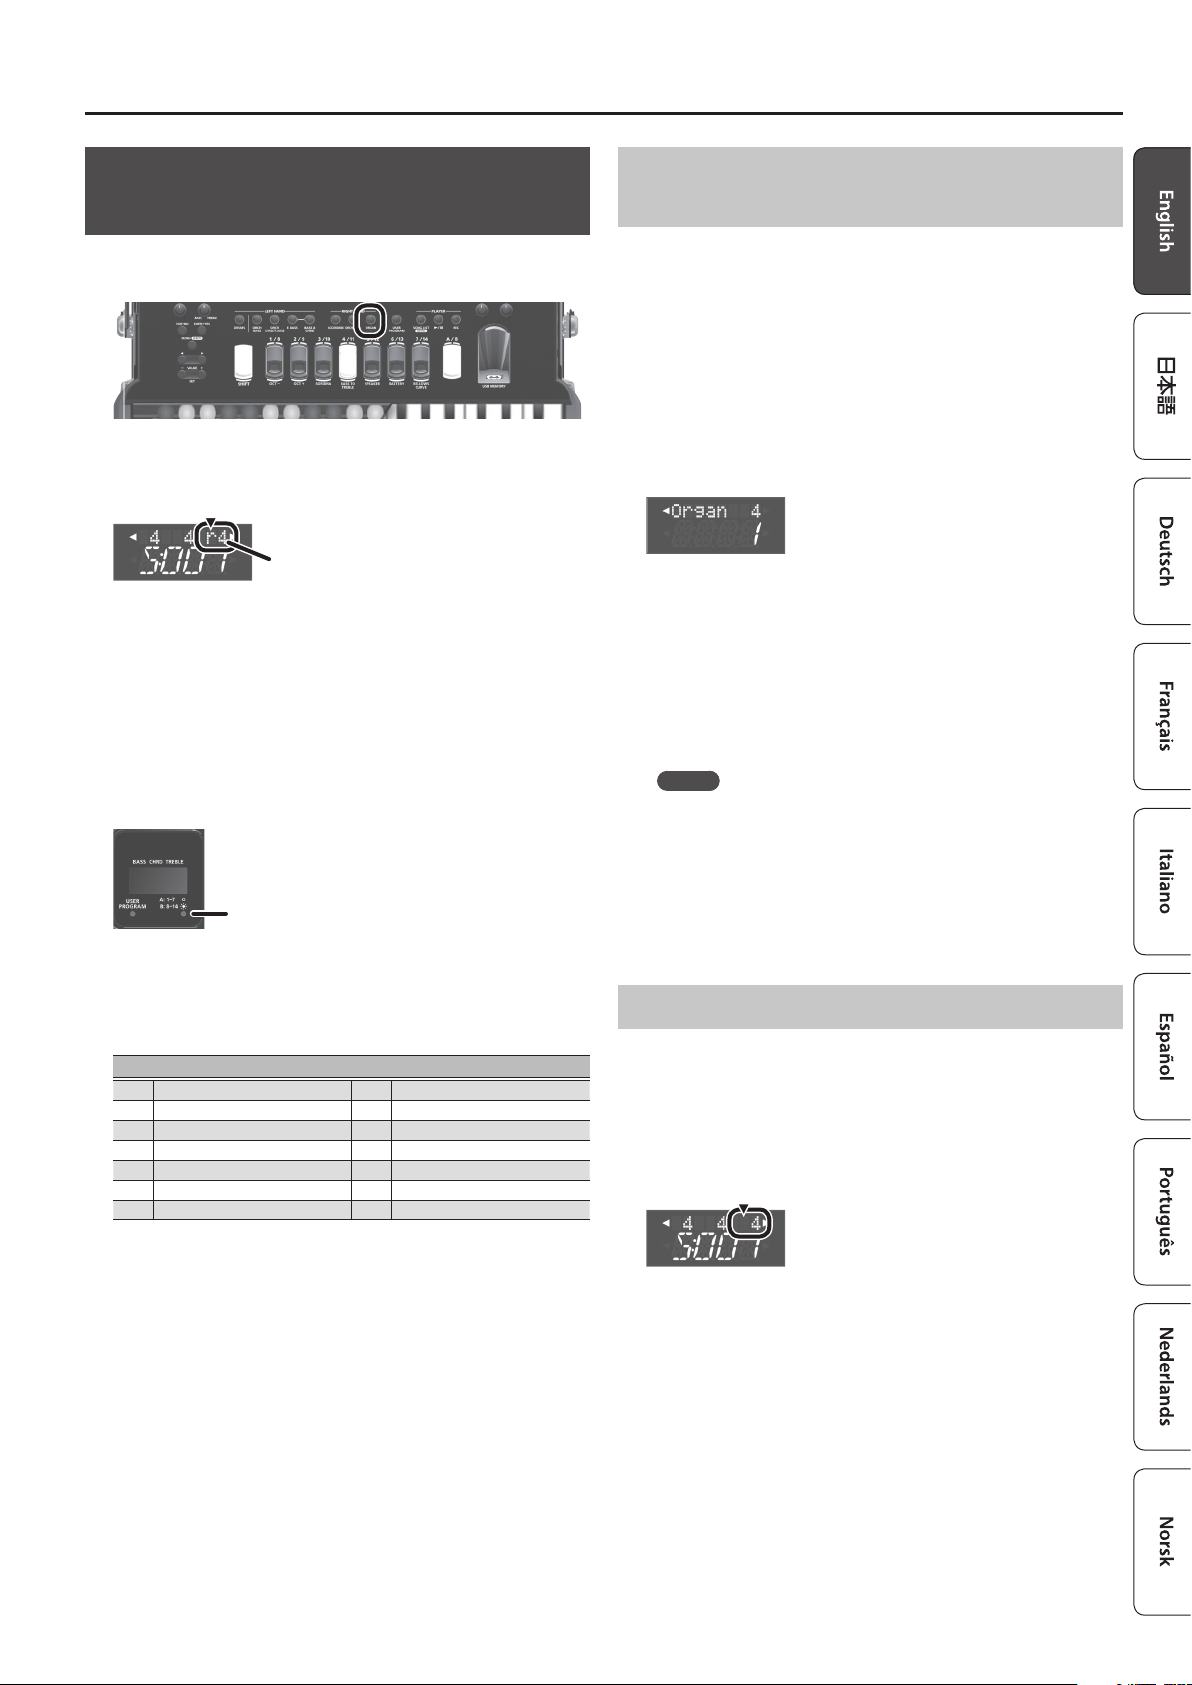
Selecting an Organ Sound for the RightHand Keyboard
1.
Press the [ORGAN] button.
In the display, an “r” appears in the position shown by the
illustration, indicating that an organ sound is selected for the righthand keyboard.
Register number
2.
Press a right-hand register button.
The organ sound of the button you pressed is selected, and the
number at the far right of the top line in the display changes to the
number of the button that you pressed.
You can use the right-hand register buttons to instantly switch
between seven different organ sounds.
By once again pressing the button of the organ sound that you
selected, you can switch the speed of the rotary effect between fast
and slow.
A: Select 1–7 (LED unlit)
B: Select 8–14 (LED lit)
By pressing the A/B button, you can switch the seven register
buttons between recalling sounds 1–7 (the LED in the lower right
of the display is unlit) and recalling sounds 8–14 (the LED in the
lower right of the display is lit).
Selecting an Organ Sound Not Assigned to a Register Button
The FR-4x/FR-4xb contain 32 different organ sounds.
To select an organ sound that's not assigned to a register button,
proceed as follows.
&
For details on the tone name, refer to the “Reference Manual”
(PDF).
1.
If the [ORGAN] button is not lit, press the [ORGAN]
button to make it light.
2.
Press the cursor [J] button several times to access
the organ sound select screen.
3.
Use the VALUE [-] [+] buttons to switch organ
sounds.
4.
When you’ve selected a sound, press the cursor
[K] button several times to return to the previous
screen.
You can also return to the previous screen by pressing the [EXIT]
button.
MEMO
You can use the above procedure to assign any desired organ
sound to the currently selected register button.
However, this setting is lost when you turn o the power or
perform another operation.
You can save your favorite settings and recall them instantly.
&
“Saving and Recalling Favorite Sounds and Settings
(User Programs)” (p. 14)
Returning to Accordion Sounds
ORGAN sounds
1 TYPLJAZZ 8 BOSSA
2 JZBALLAD 9 LATIN
3 DISTORT 10 LATINVAR
4 FULLDRAW 11 HOUSPERC
5 OVD2ndPR 12 ROCK
6 POPULAR 13 CHURCH
7 LIGHTJAZ 14 BLUES
1.
Press the [ACCORDION] button.
The character at the location shown in the illustration disappears
from the display.
The number at the far right of the top line in the display is the
register number of the last-selected accordion sound.
Indication disappears
11
Page 12
Playing Non-Accordion Sounds
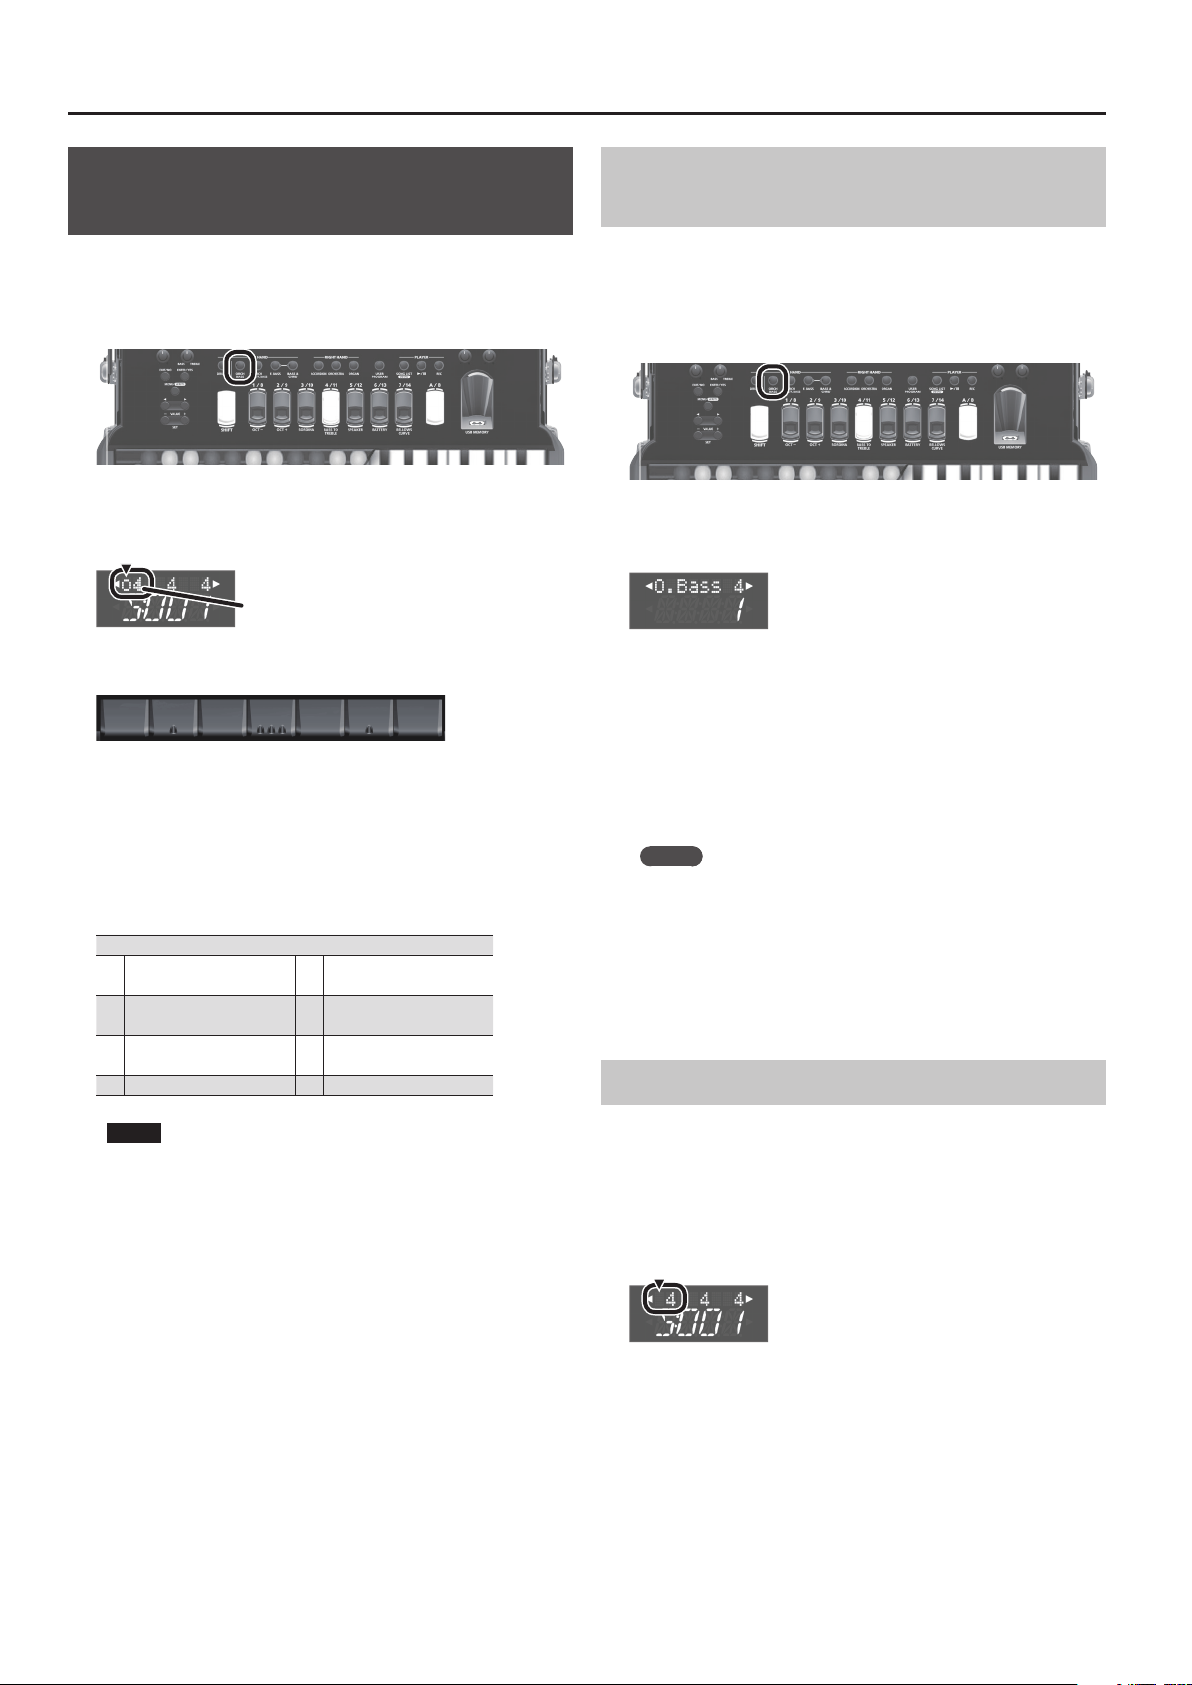
Selecting an Orchestral Sound for the LeftHand Button Keyboard (Bass Rows)
Here’s how to select an orchestral sound for the bass rows of the
left-hand button keyboard.
1.
Press the [ORCH BASS] button.
An “o” is shown in the display at the position marked in the
illustration, indicating that an orchestral sound is selected for the
left-hand bass rows.
Register number
2.
Press a left-hand register button.
[7] [6] [5] [4] [3] [2] [1]
* The numbers shown in the above illustration of the left-hand
register buttons are for explanatory purposes; they do not exist
on the actual instrument.
The orchestral sound of the button you pressed is selected for
the bass rows, and the number in the left of the upper line of the
display changes to the number of the button you pressed.
The sound of the chord rows does not change at this time.
Orchestral sound (bass rows)
XV Acoustic Bass
1
(XVAcBass)
2 Bowed Bass (Bowed) 6
Fingered Bass 1
3
(FingrBs1)
4 JAZZORGAN
Picked Bass 1
5
(PickdBs1)
Fretless Bass 1
(FrtlsBs1)
7 Tuba Mix
Selecting an Orchestral Sound Not Assigned to a Register Button
An internal orchestral sound can also be selected for the left-hand
register buttons.
1.
If the [ORCH BASS] button is not lit, press the [ORCH
BASS] button to make it light.
2.
Press the cursor [K] button several times to access
the bass rows sound selection screen.
3.
Use the VALUE [-] [+] buttons to switch orchestral
sounds.
4.
When you’ve chosen a sound, press the cursor
[J] button several times to return to the previous
screen.
You can also return to the previous screen by pressing the [EXIT]
button.
MEMO
You can use the above procedure to assign any desired
orchestral sound to the currently selected register button.
However, this setting is lost when you turn o the power or
perform another operation.
You can save your favorite settings and recall them instantly.
&
“Saving and Recalling Favorite Sounds and Settings
(User Programs)” (p. 14)
Returning to Accordion Sounds
NOTE
While the bass rows are selected, you can’t use the left-hand
register buttons to select a sound for the chord rows.
12
1.
Press the [ORCH BASS] button once again.
The character at the location shown in the illustration disappears
from the display, and you’ll return to accordion sounds.
The number at the left of the top line in the display is the register
number of the last-selected accordion sound.
Indication disappears
Page 13
Playing Non-Accordion Sounds
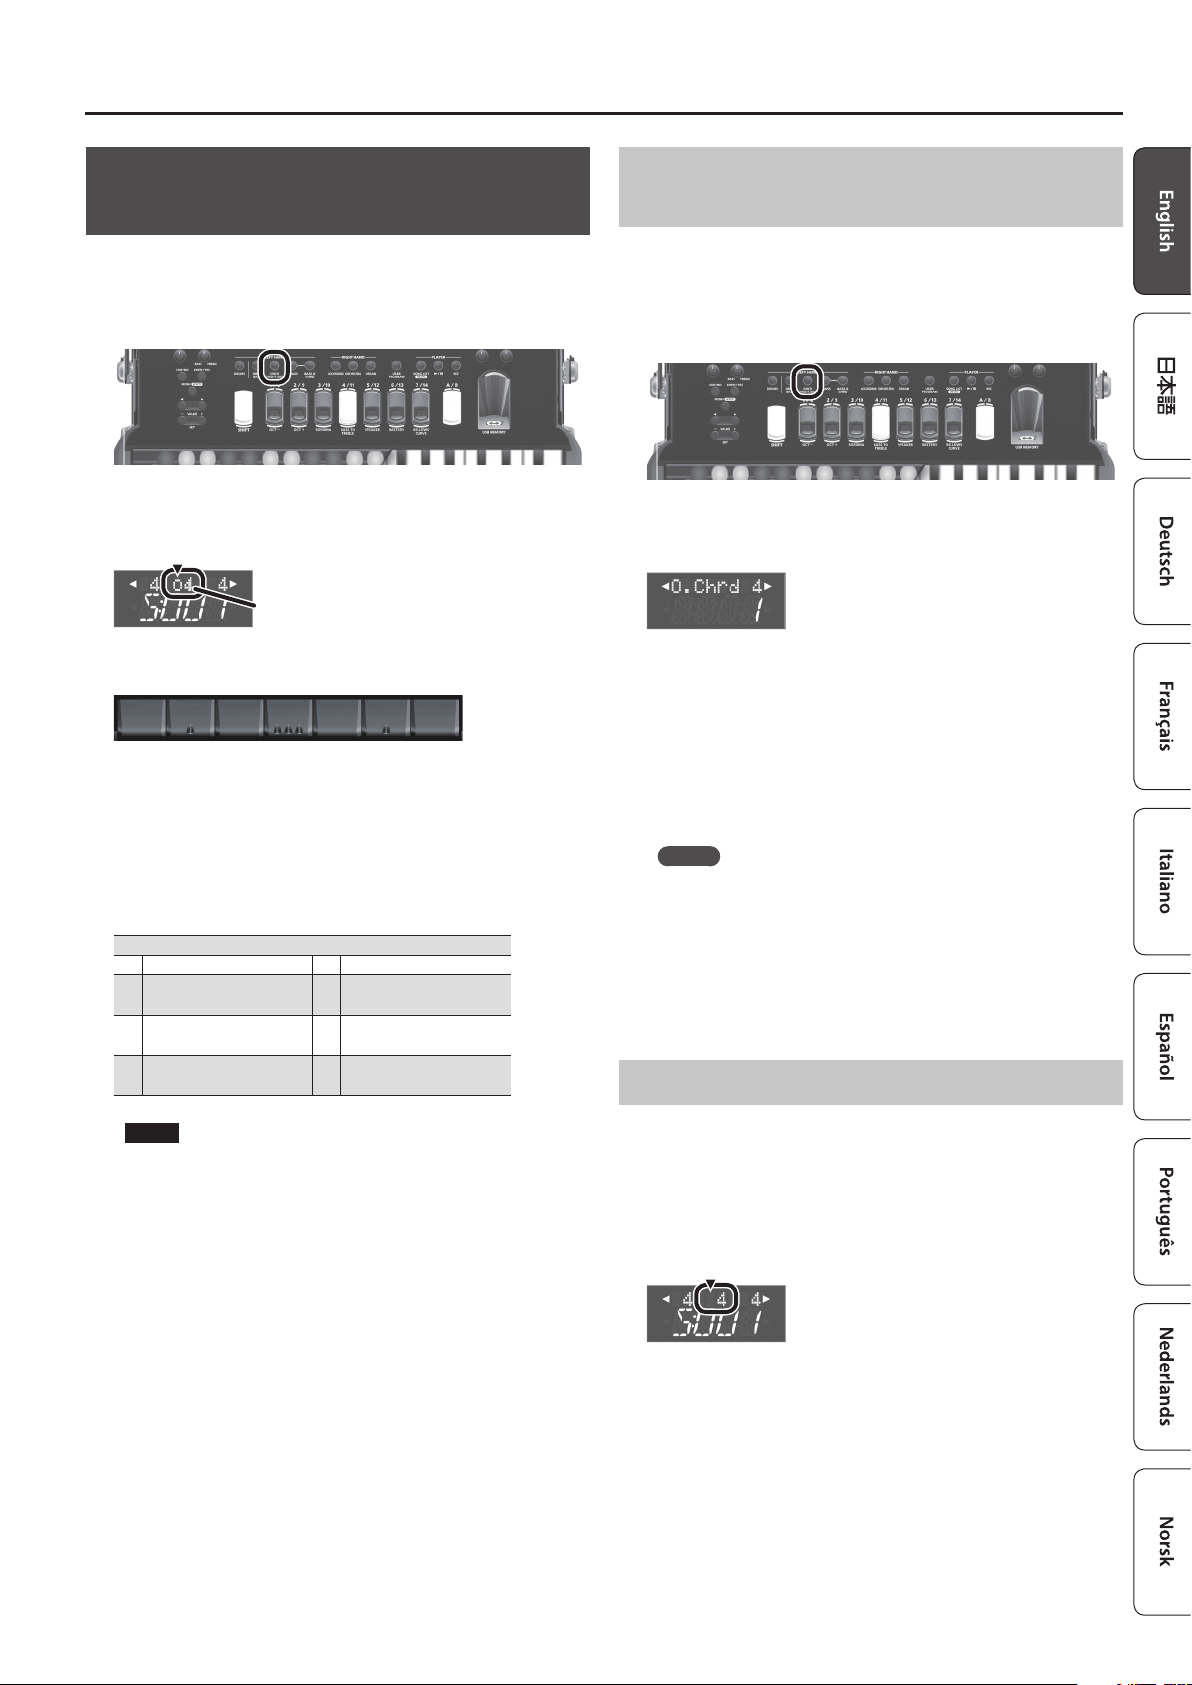
Selecting an Orchestral Sound for the LeftHand Button Keyboard (Chord Rows)
Here’s how to select an orchestral sound for the chord rows of the
left-hand button keyboard.
1.
Press the [ORCH CHRD/F.BASS] button.
An “o” is shown in the display at the position marked in the
illustration, indicating that an orchestral sound is selected for the
left-hand chord rows.
Register number
2.
Press a left-hand register button.
[7] [6] [5] [4] [3] [2] [1]
* The numbers shown in the above illustration of the left-hand
register buttons are for explanatory purposes; they do not exist
on the actual instrument.
The orchestral sound of the button you pressed is selected for the
chord rows, and the number in the center of the top line of the
display changes to the number of the button that you pressed.
The sound of the bass rows does not change at this time.
ORCH sounds (chord rows)
1 Nylon Guitar (Nylon Gt) 5 Pure EP
2 OVD2ndPR 6
3 Pad Voices (PadVoice) 7
Velocity Strings
4
(Velo Str)
Tamburica Bassprim
Tremolo (TamBPtrl)
Natural Piano
(NatrlPno)
Selecting an Orchestral Sound Not Assigned to a Register Button
An internal orchestral sound can also be selected for the left-hand
register buttons.
1.
If the [ORCH CHRD/F.BASS] button is not lit, press
the [ORCH CHRD/F.BASS] button to make it light.
2.
Press the cursor [K] button several times to access
the chord rows sound selection screen.
3.
Use the VALUE [-] [+] buttons to switch orchestral
sounds.
4.
When you’ve chosen a sound, press the cursor
[J] button several times to return to the previous
screen.
You can also return to the previous screen by pressing the [EXIT]
button.
MEMO
You can use the above procedure to assign any desired
orchestral sound to the currently selected register button.
However, this setting is lost when you turn o the power or
perform another operation.
You can save your favorite settings and recall them instantly.
&
“Saving and Recalling Favorite Sounds and Settings
(User Programs)” (p. 14)
Returning to Accordion Sounds
NOTE
While chord rows is selected, you can’t use the left-hand
register buttons to select a sound of the bass rows.
1.
Press the [ORCH CHRD/F.BASS] button once again.
The character at the location shown in the illustration disappears
from the display, and you’ll return to accordion sounds.
The number in the center of the display is the register number of
the last-selected accordion sound.
Indication disappears
13
Page 14
Saving and Recalling Favorite Sounds and Settings (User Programs)
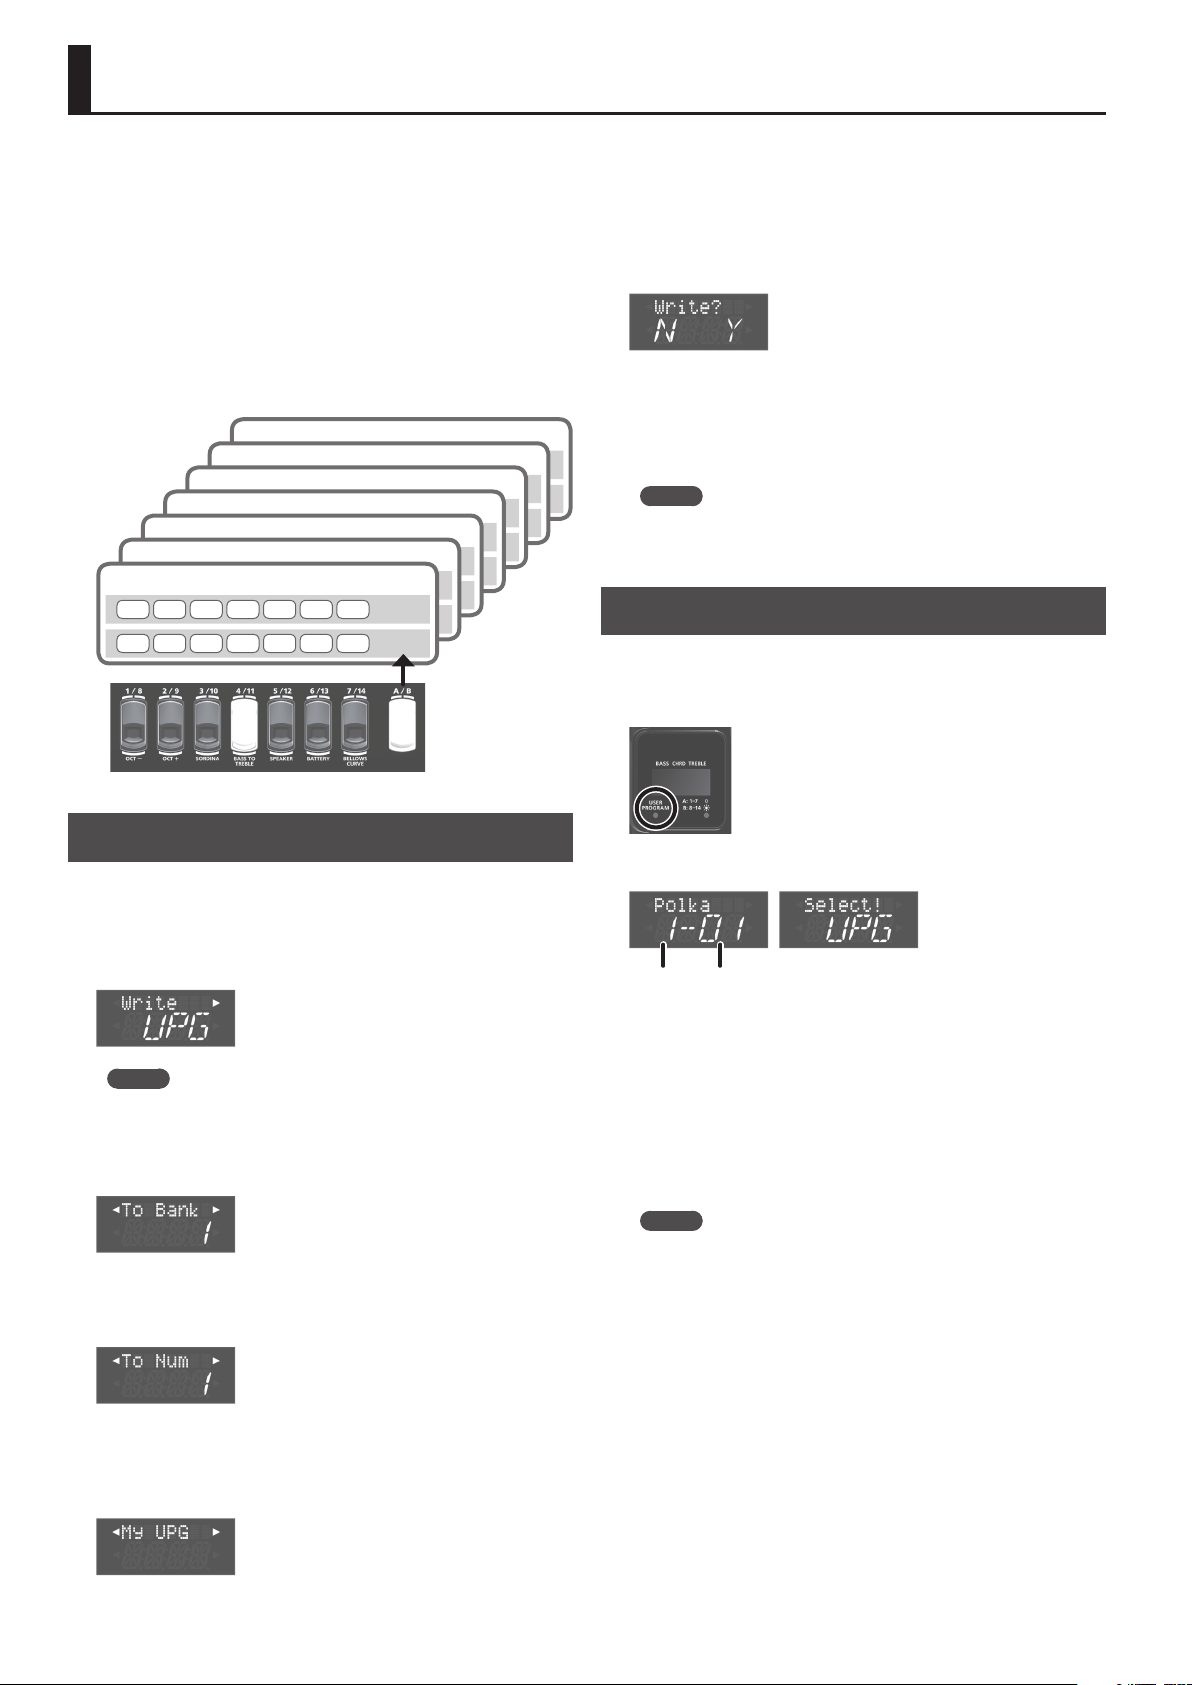
On the FR-4x/FR-4xb you can save your favorite sounds and
settings, and recall them instantly.
The saved data is called a “user program.”
This is convenient when you want to quickly switch between
favorite sounds during a live performance.
The FR-4x can store up to 98 user programs.
You can store 14 user programs in each of seven groups, and use
the right-hand register buttons to recall these 14 user programs.
By switching groups you can switch the 14 user programs that are
recalled by the register buttons. On the FR-4x, these groups are
called “banks.”
Bank 7
Bank 6
Bank 5
Bank 4
Bank 3
Bank 2
Bank 1
1 2 3 4 5 6 7
8 9 10 11 12 13 14
1 2 3 4 5 6 7
1 2 3 4 5 6 7
8 9 10 11 12 13 14
1 2 3 4 5 6 7
8 9 10 11 12 13 14
8 9 10 11 12 13 14
1 2 3 4 5 6 7
1 2 3 4 5 6 7
8 9 10 11 12 13 14
1 2 3 4 5 6 7
8 9 10 11 12 13 14
8 9 10 11 12 13 14
A
A
B
A
B
A
B
B
A
A
B
A
B
B
Use the cursor [K] [J] buttons and VALUE [-] [+] buttons to enter a
name.
6.
Use the cursor [J] button to move the cursor to the
far right, and then press the cursor [J] button again.
A confirmation message appears.
7.
Press the [ENTER/YES] button to save the user
program.
When saving is complete, the display indicates “Complete.”
If you decide to cancel, press the [EXIT/NO] button.
MEMO
Factory-default initialized settings are saved in several of the
user programs, but you can overwrite these.
Recalling a User Program
1.
Press the [USER PROGRAM] button.
The “USER PROGRAM” indicator below the display is lit.
Saving a User Program
1.
Select a desired accordion sound or orchestral
sound.
2.
Long-press the [MENU/WRITE] button.
MEMO
If the lower line of the display does not indicate “UPG,” use the
VALUE [-] [+] buttons to make the display indicate “UPG.”
3.
Press the cursor [J] button.
Use the VALUE [-] [+] buttons to select the save-destination bank.
4.
Press the cursor [J] button.
The display changes; now you can recall user programs.
If no user program has
been selected after
turning the power on,
Bank Number
2.
Use the cursor [K] [J] buttons to switch to the bank
the display indicates
“Select! UPG.”
in which the user program you want to recall is
saved.
3.
Press a right-hand register button to recall a user
program.
You can also use the VALUE [–] [+] buttons to switch between user
programs.
MEMO
To return from the state of recalling user programs to the
normal state, press the [USER PROGRAM] button once again.
The “USER PROGRAM” indicator below the display goes dark.
At this time, the lower line of the display indicates “W.A.” When
you re-select an accordion set, this switches to the selected set
number.
Use the VALUE [-] [+] buttons to select the save-destination
number.
5.
Press the cursor [J] button several times.
14
Page 15
Using the USB Audio Player
You can play back audio files from a USB flash drive
(sold separately). In advance, use your computer to save the audio
files that you want to play on the USB flash drive.
By using this function, you can perform while playing back a song.
Getting Ready to Use the FR-4x as an Audio Player
1.
Using your computer, copy the audio song to your
USB ash drive (sold separately).
NOTE
5 Use a commercially available USB ash drive or a USB ash
drive sold by Roland. However, we cannot guarantee that all
commercially available USB ash drives will work with this
unit.
5 Never turn o the power or remove the USB ash drives or
the power cord while the USB ash drive’s access indicator is
blinking.
2.
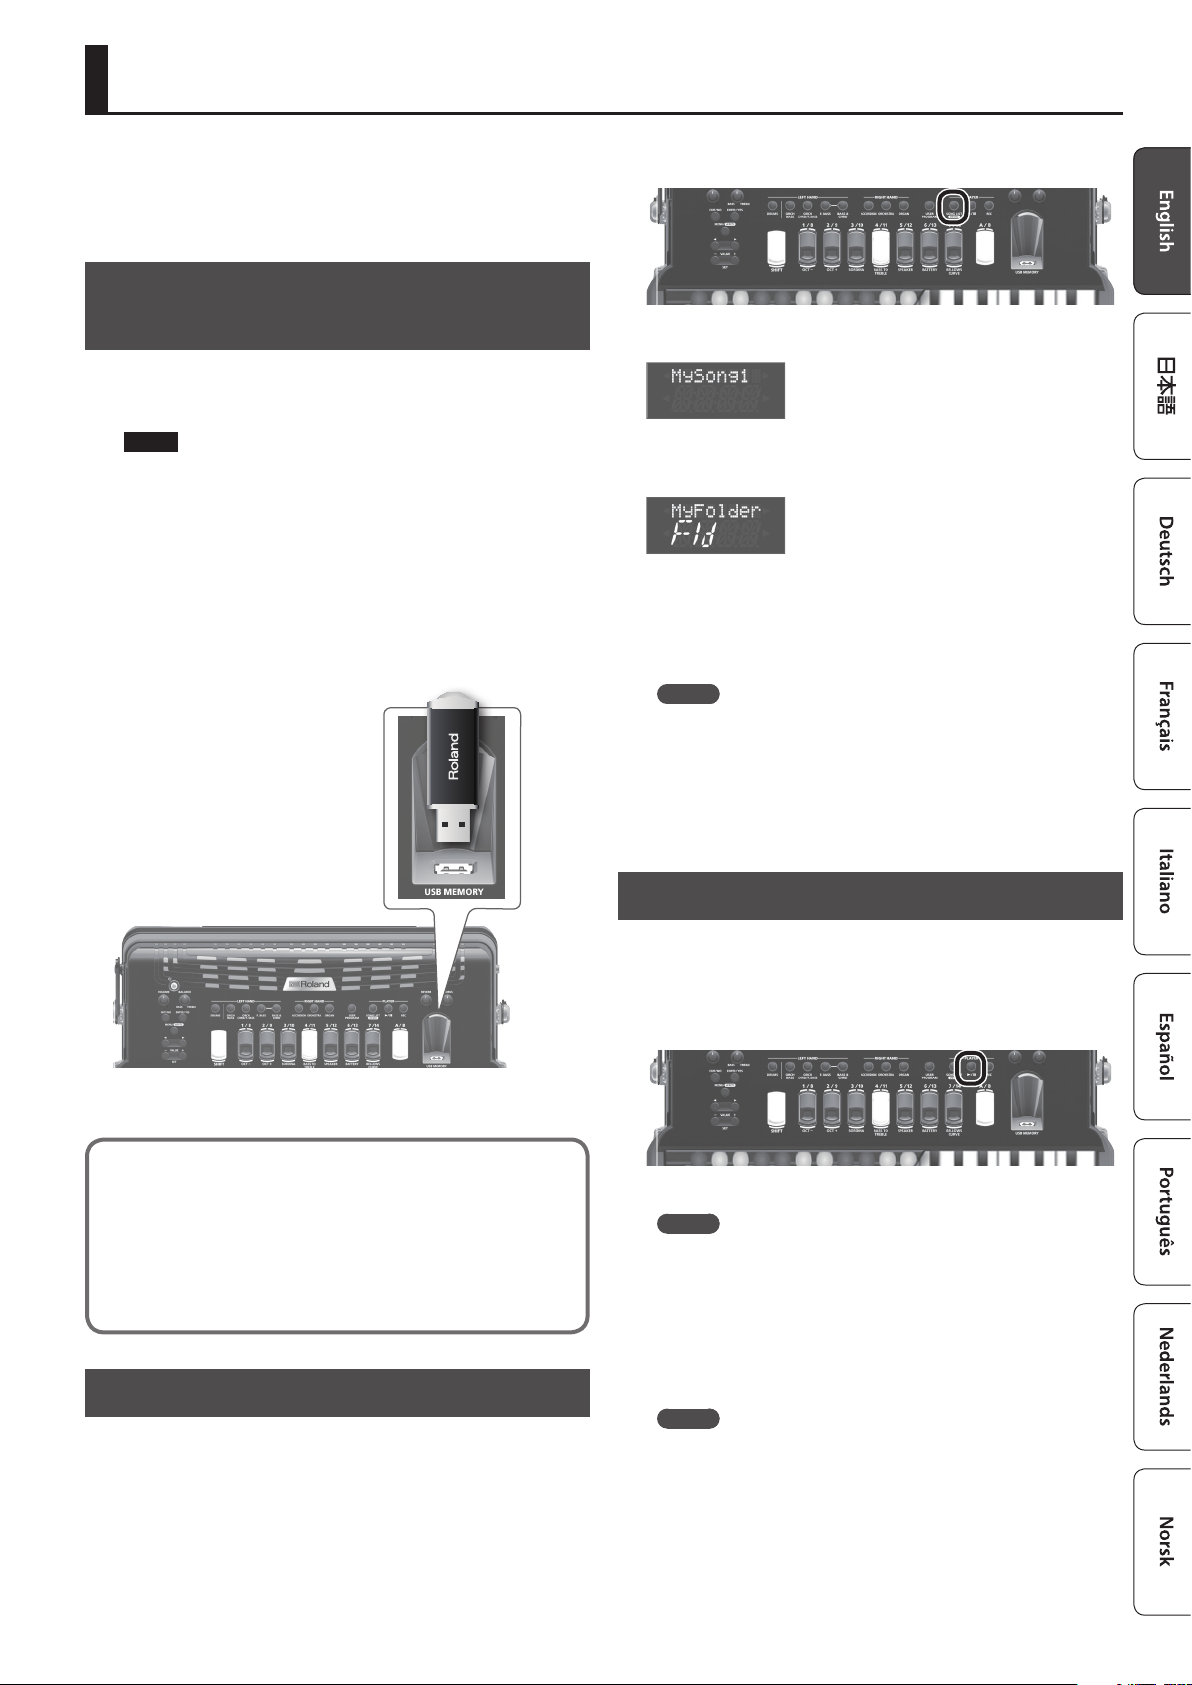
Connect your USB ash drive to the FR-4x’s USB
MEMORY port.
2.
Press the [SONG LIST] button.
The display shows the contents of the USB flash drive.
If the lower line of the display shows “Fld,” the upper line shows the
name of the folder.
3.
Use the VALUE [-] [+] buttons to select the song that
you want to play back.
The name of the selected song is shown in the upper line of the
display.
MEMO
If the song that you want to select is inside a folder, select that
folder and press the [ENTER] button to open the contents of
that folder.
Pressing the [EXIT] button takes you back to the next level up.
If you continue pressing the [EXIT] button, you’ll return to the
main screen.
The FR-4x can play back MP3 files or WAV files.
&
“Reference Manual” (PDF)
Note when playing audio les
Performing while playing back MP3 data places a processing
load on the FR-4x, and may cause problems with the
keyboard performance.
If this occurs, you might be able to solve the problem by
using a WAV file instead of MP3 data.
Selecting a Song from a USB Flash Drive
1.
Connect your USB ash drive (sold separately) to the
FR-4x’s USB MEMORY port.
Playing a Song from a USB Flash Drive
1.
Select a song from the USB ash drive.
&
“Selecting a Song from a USB Flash Drive” (p. 15)
2.
Press the [r] button to play back the song.
The [r] button indicator is lit, and song playback starts.
MEMO
The playback volume of an audio le can be adjusted by “A.
FileLv (Audio File Level).”
&
“Reference Manual” (PDF)
3.
Press the [r] button once again to pause the
song.
The indicator goes dark.
MEMO
If the song’s playback position is at 1 second or later, you can
press the VALUE [-] button to return the playback position to
the beginning.
15
Page 16
Appendix
Panel Descriptions
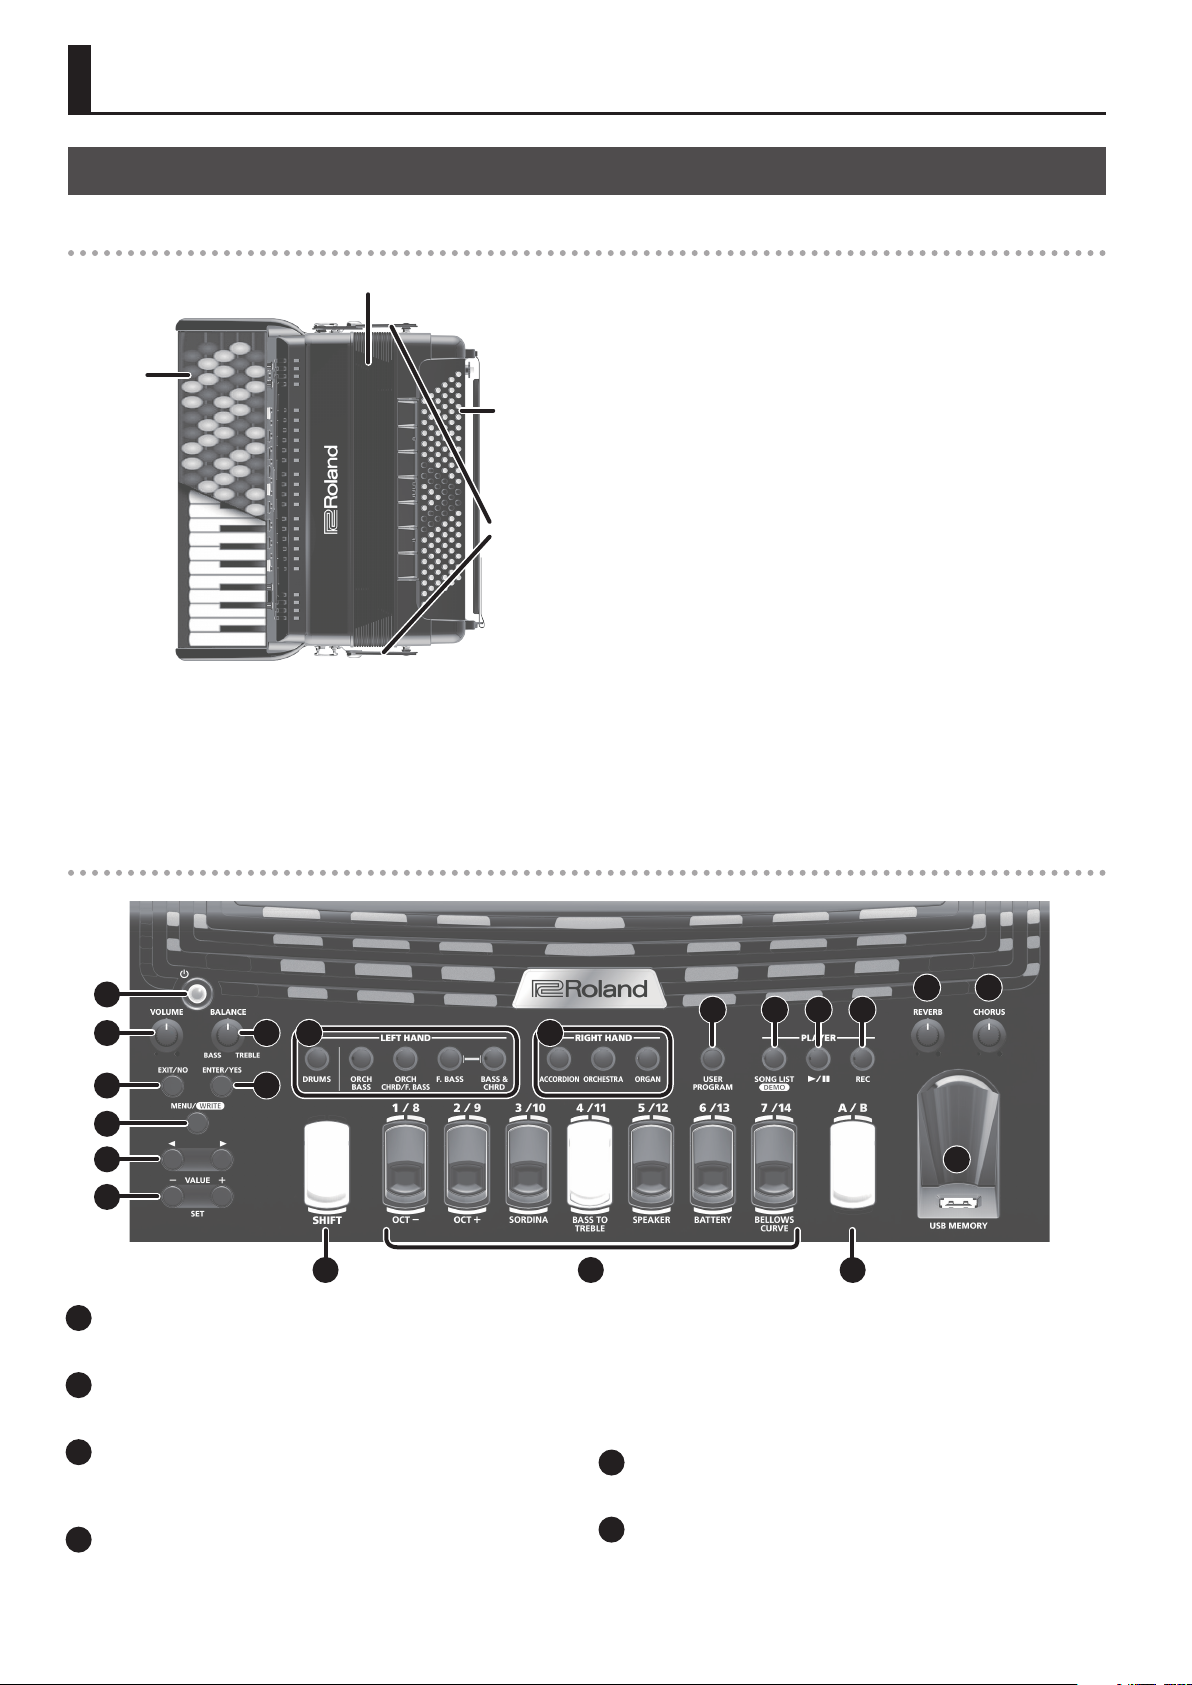
The sections of your FR-4x
Bellows
Righthand
keyboard
section
Right-hand keyboard section
This section is normally used for playing the melody.
The FR-4x’s right-hand keyboard sectionn is velocity sensitive.
Left-hand
keyboard
section
Bellows
clip
Left-hand keyboard section
This section normally plays accompaniment parts.
The left-hand button keyboard has two modes.
In Bass and Chord mode, two or three rows of buttons play bass
and the remaining buttons play chords.
In Free Bass mode, two rows of buttons play bass and the
remaining buttons play melody using the Free Bass button layout.
The left-hand button keyboard is velocity-sensitive.
Bellows
By moving the bellows you can add expression and dynamics
to the sound. A variety of performance techniques are possible,
including "bellows shake" (rapidly opening and closing the
bellows).
The bellows’ inertia can be set with the resistance regulator and air
button.
When playing or carrying the instrument, please be careful not to
get your fingers pinched between the movable part and the panel.
In places where small children are present, make sure that an adult
provides supervision and guidance.
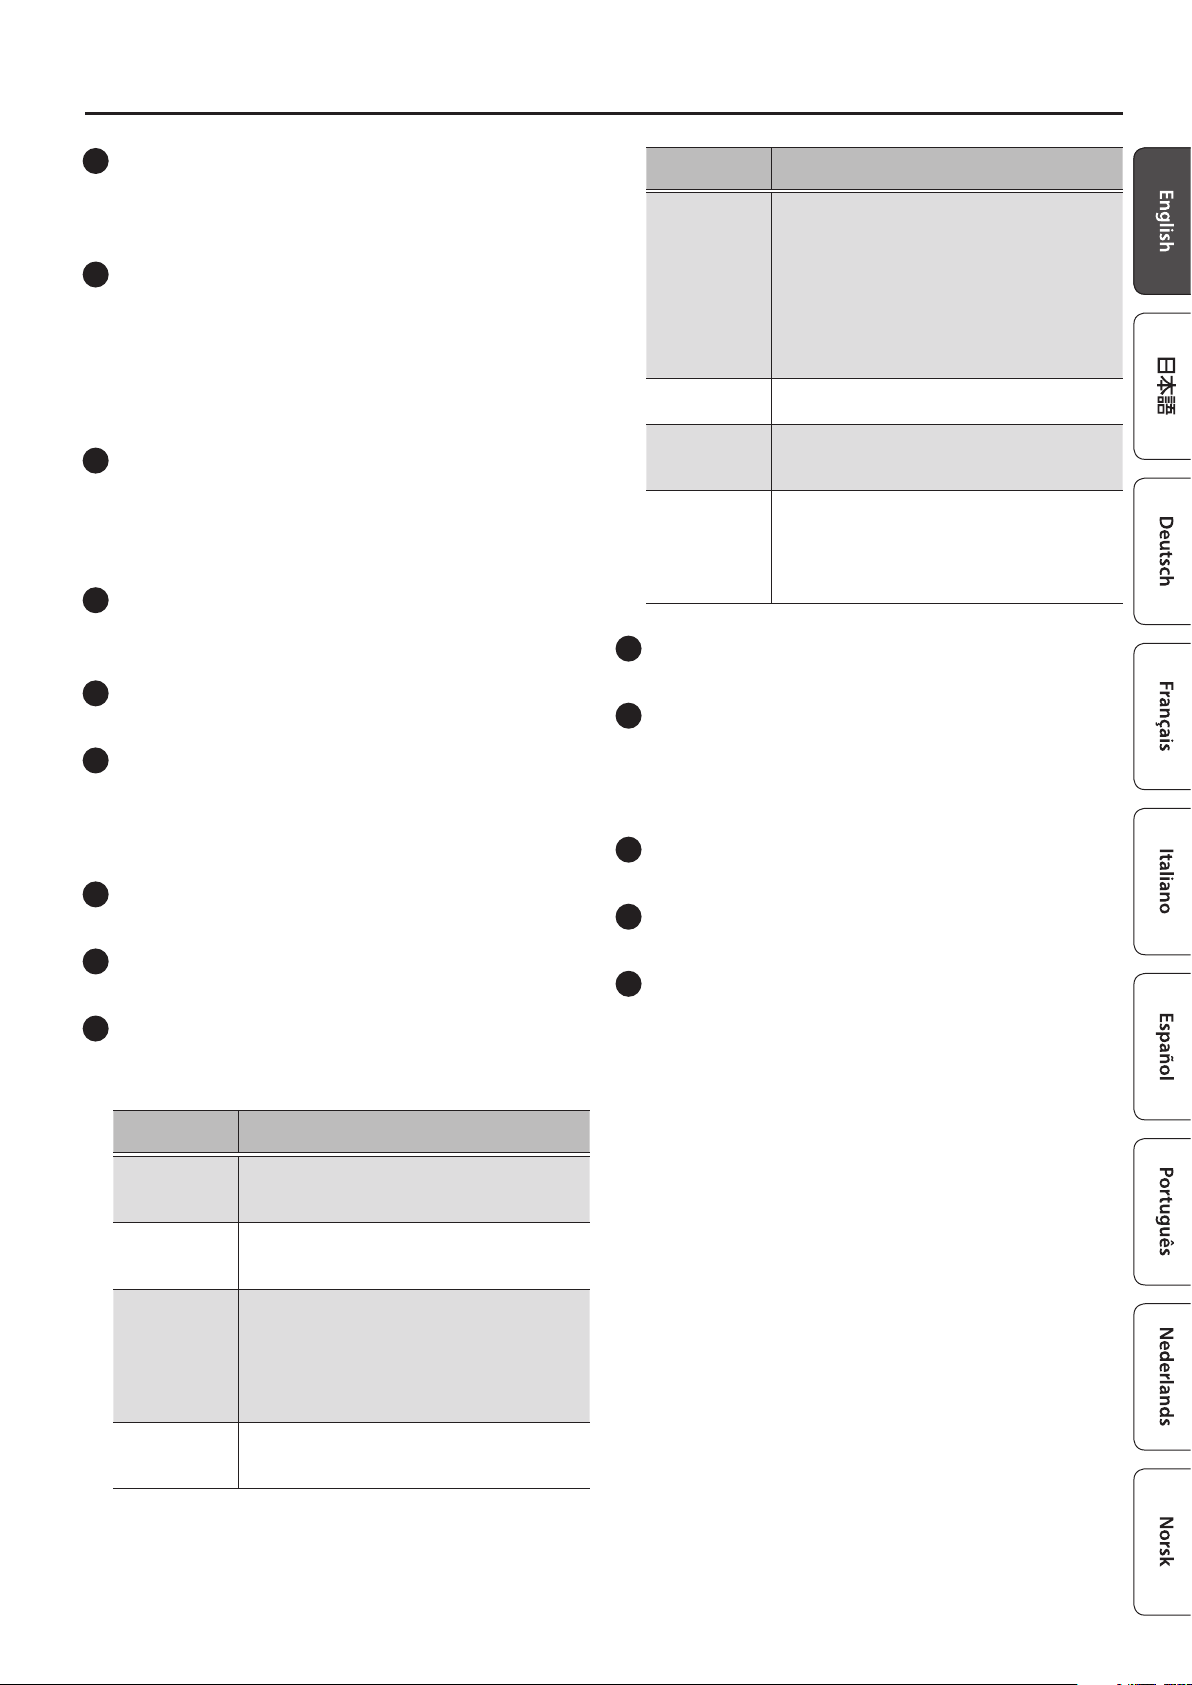
Right-hand keyboard section
1
2 3
4
6
7
8
1 [L
] button
This turns the power on/off.
2
[VOLUME] knob
Adjusts the overall volume of the FR-4x.
3
[BALANCE] knob
Adjusts the volume balance of the right-hand keyboard and lefthand button keyboard.
4
[EXIT/NO] button
Returns to the main screen.
16
9 10
5
15 16 17
18 19
11 12 13 14
20
In a menu screen, press this once to return to the screen of a higher
level.
In a menu screen, continuing to press this button takes you directly
back to the main screen.
In some screens, this button cancels the function that’s being
executed.
5
[ENTER/YES] button
Confirms a value or executes an operation.
6
[MENU/WRITE] button
Displays the MENU screen.
By continuing to press this button, you can save a user program or
set, or various settings.
Page 17
Appendix
7
Cursor [K] [J] buttons
Switch between screens.
In the main screen, these buttons switch to the orchestral sound or
organ sound selection screen.
8
VALUE [-] [+] buttons (SET [-] [+] buttons)
Change sounds or values.
In the main screen, these buttons switch accordion sets.
If you hold down the [SHIFT] button and use the [-] [+] buttons, the
selection or value changes in units of ten.
If you press a [-] [+] button while holding down the other button,
the change becomes faster.
9
LEFT HAND part
Switch the sounds of the part played by the left hand.
DRUMS, ORCH BASS, ORCH CHRD/F.BASS, F.BASS, BASS & CHRD
For more about DRUMS and F.BASS, refer to “Reference Manual”
(PDF).
10
RIGHT HAND part
Switch the sounds of the part played by the right hand.
ACCORDION, ORCHESTRA, ORGAN
11
[USER PROGRAM] button
Recalls user program (p. 14).
12
[SONG LIST] button
Displays songs saved on a USB flash drive (p. 15).
By long-pressing the [SONG LIST] button you can play back the
demo songs. To stop the demo song, press the [SONG LIST] button
once again (p. 5).
13 [r
14
15
] button
Plays back a song, or pauses the currently-playing song.
[REC] button
Records your performance.
[SHIFT] button
You can access various functions by holding down the [SHIFT]
button and pressing another button.
Button to press
simultaneously
[5/12] button
[6/13] button
[7/14] button
Cursor [K] [J]
buttons
16
Right-hand register buttons
Select the register that is played by the right-hand keyboard.
17
[A/B] button
Two banks of sounds, A (1–7) and B (8–14) are assigned to the righthand register buttons.
Press the [A/B] button to switch between bank A (1–7) and bank B
(8–14).
18
[REVERB] knob
Adjusts the amount of reverb.
19
[CHORUS] knob
Adjusts the amount of chorus.
20
USB MEMORY port
Connect a USB flash drive (separately sold) here.
Explanation
SPEAKER:
Turns the speakers on/o each time you press
the button.
“O”: Internal speaker is o.
“On”: Internal speaker is on. However, the
speaker turns o if you connect headphones.
“On+Phones”: The internal speaker stays on even
if headphones are connected.
BATTERY:
Displays the remaining battery capacity.
BELLOWS CURVE:
Shows a screen where you can specify the
response to bellows movement.
Transpose:
Transposes the range of the right-hand keyboard
in semitone steps.
To reset this setting to “0,” press the cursor [K] [J]
buttons simultaneously.
Button to press
simultaneously
[1/8] button
[2/9] button
[3/10] button
[4/11] button
Explanation
OCT-:
Lowers the range of the right-hand keyboard by
one octave.
OCT+:
Raises the range of the right-hand keyboard by
one octave.
SORDINA:
Turns the sordina eect on/o.
On an acoustic accordion, this closes the
wooden resonance chamber inside the
instrument. The FR-4x simulates this eect
electronically.
BASS TO TREBLE:
Lets you play the bass part using the right-hand
keyboard.
17
Page 18
Appendix
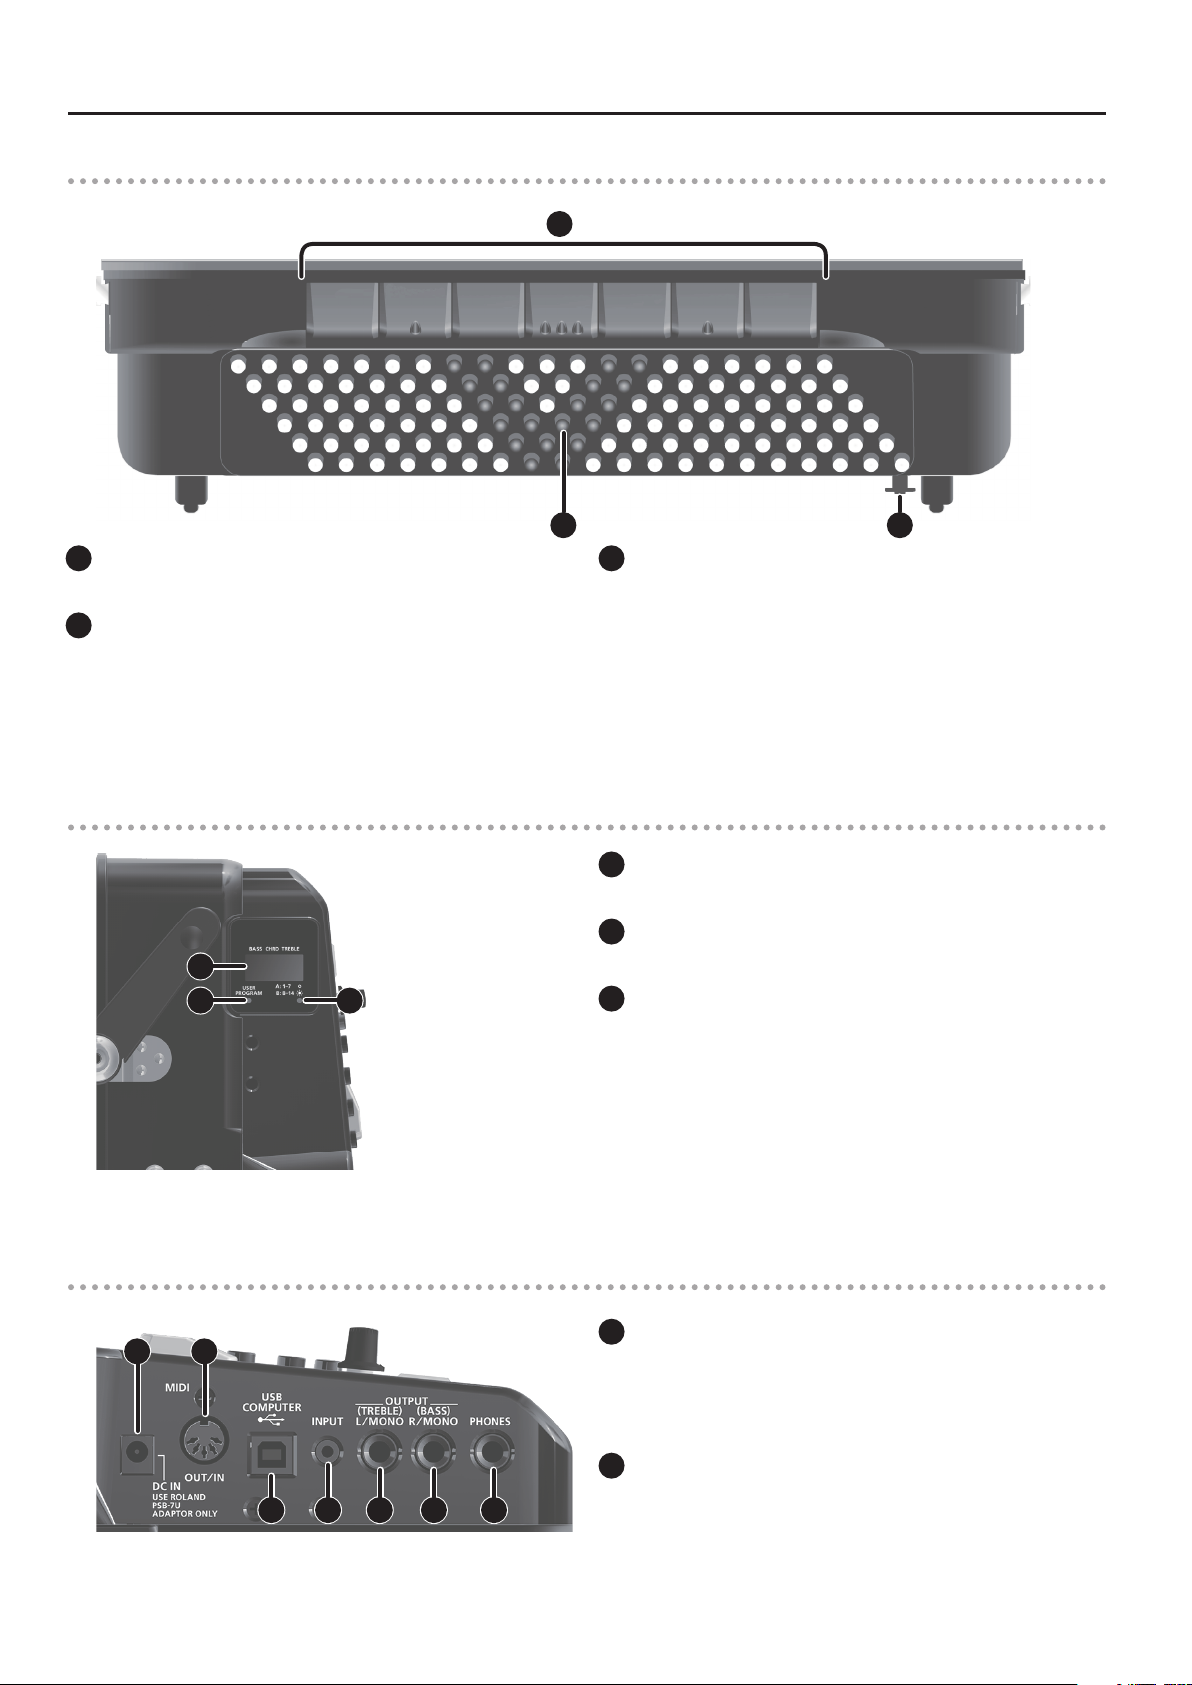
Left-hand button keyboard section
21
Left-hand register buttons
Select the register that is played by the left-hand keyboard.
22
Left-hand button keyboard
These 120 buttons are used to play bass notes and chords (they are
velocity-sensitive). They also allow you to play drum sounds.
21
23 22
23
Bellows resistance regulator and air button
The bellows resistance regulator allows you to specify the bellows’
inertia (the force needed to push and pull it).
By pressing the air button you can purge the air that still remains in
the bellows after playing (p. 6).
Display
24
25 26
Connection panel
27 28
24
Display
Shows information related to your operations.
25
[USER PROGRAM] indicator
This is lit if a user program is selected.
26
[A: 1-7/B: 8-14] indicator
This is unlit if a bank A sound is selected for the right-hand register
buttons, and lit if a bank B sound is selected. Use the [A/B] button
to switch between banks A and B.
27
DC IN jack
Connect the included AC adaptor here.
By installing separately sold rechargeable nickel-metal hydride
batteries (10 batteries), you can use the instrument without an AC
adaptor.
18
29 30 31 32 33
28
MIDI OUT/IN jack
This connector transmits or receives MIDI data. You can switch it
between input and output.
&
“Reference Manual” (PDF)
Page 19
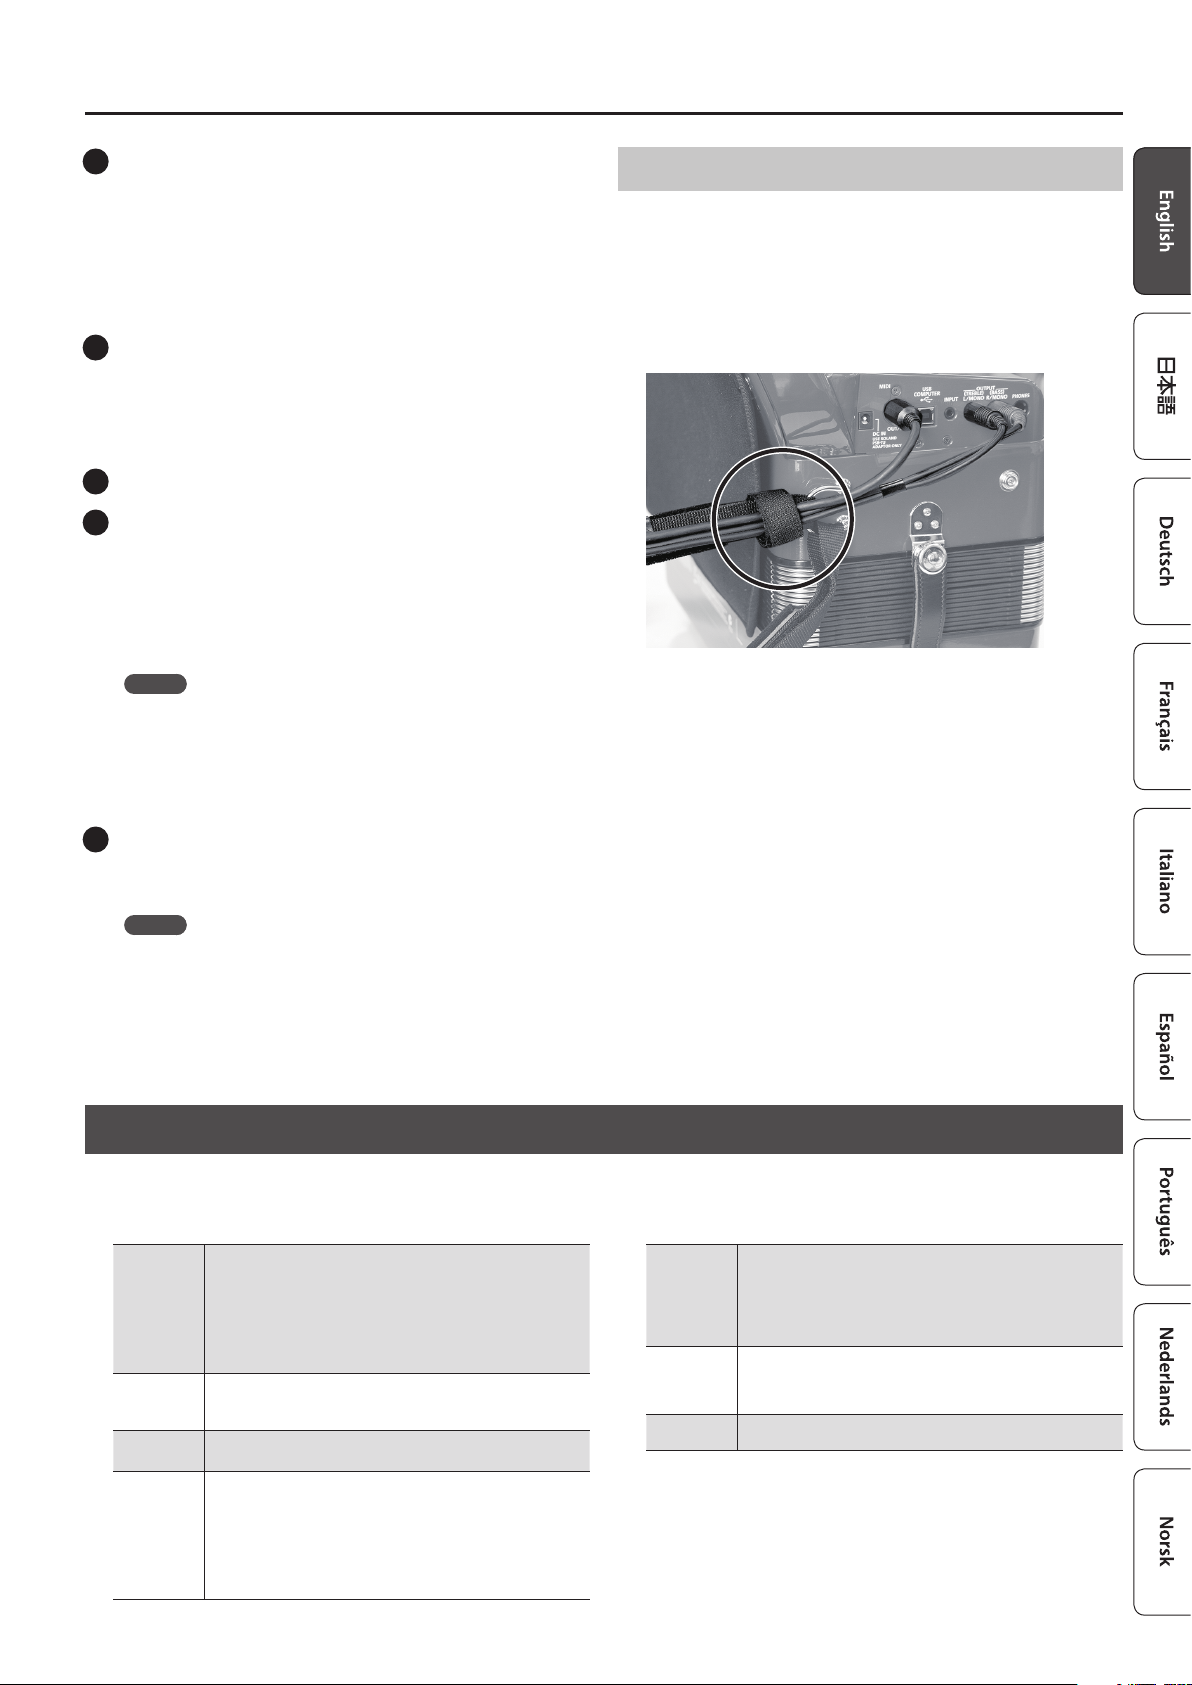
29
USB COMPUTER (O) port
This port can be connected to one of your computer’s USB ports.
Please use a commercially available USB cable.
In order to use the FR-4x with your computer, you’ll need to
download the driver from the following URL and install it.
For details on installation, refer to the following URL.
&
http://www.roland.com/support/
30
INPUT jack
Devices such as an audio player can be connected to this jack via a
stereo mini-plug.
* To adjust the volume, use the controls of the connected
device (e.g., audio player).
31
OUTPUT L/MONO (TREBLE) jack
32
OUTPUT R/MONO (BASS) jack
These jacks can be connected to an amplifier, a mixing console or
a wireless system. If you use both connectors, the FR-4x’s output
is stereo. In that case the signals of the right-hand keyboard
section are transmitted to the L/MONO jack, while the R/MONO
jack transmits the bass (and chord) signal. If you only use one jack
(connected to the “L” or “R” jack), the FR-4x’s output is mono.
MEMO
5 On the FR-4x, connecting to these jacks does not mute the
internal speakers.
5 By holding down the [SHIFT] button and pressing the [5/12]
button you can turn the speakers on/o (p. 17). Switching o
the FR-4x’s speakers allows you to save battery power.
Appendix
Securing the Cable
Proceed as follows to ensure that a MIDI cable–or an audio cable–
doesn’t come loose while you are playing.
Your FR-4x comes with an attachment strip that allows you to
secure optional MIDI as well as audio cables to the right strap.
1.
Wind the attachment strip around the cable and the
strap.
33
PHONES jack
This is where you can connect stereo headphones.
Connecting a pair of headphones mutes the internal speakers.
MEMO
You can change a setting so that the internal speakers produce
sound even when headphones are connected (p. 17).
Main Specications
Roland FR-4x: V-Accordion
Roland FR-4xb: V-Accordion
Piano-type
Right-hand keyboards: 37 keys (with velocity)
Keyboards
Power
Supply
Current
Draw
Dimensions
Left-hand button keyboards: 120 buttons (with velocity)
Button-type
Right-hand button keyboards: 92 buttons (with velocity)
Left-hand button keyboards: 120 buttons (with velocity)
AC adaptor
Batteries (ten AA rechargeable nickel-metal hydride
batteries)
2000 mA
Piano-type:
481 (W) x 270 (D) x 430 (H) mm
18-15/16 (W) x 10-11/16 (D) x 16-15/16 (H) inches
Button-type:
470 (W) x 240 (D) x 390 (H) mm
18-9/16 (W) x 9-1/2 (D) x15-3/8 (H) inches
Weight
(excluding
strap, AC
adaptor and
batteries)
Accessories
Options
* This document explains the specications of the product at the
time that the document was issued. For the latest information,
refer to the Roland website.
Piano-type: 8.9 kg/19 lbs 10 oz
Button-type: 8.6 kg/19 lbs
Owner’s Manual, AC adaptor, Power cord, Reference caps
for left-hand button keyboard, Reference caps for righthand button keyboard (FR-4xb only), Accordion cover,
Strap, attachment strip
USB ash drive, Soft case for accordion, Headphones, MIDI
foot controller (FC-300)
19
Page 20
USING THE UNIT SAFELY
WARNING
Concerning the Auto O function
The power to this unit will be
turned o automatically after a
predetermined amount of time
has passed since it was last used
for playing music, or its buttons or controls
were operated (Auto O function). If you
do not want the power to be turned o
automatically, disengage the Auto O
function (p. 5).
Use only the supplied AC adaptor and the
correct voltage
Be sure to use only the AC adaptor
supplied with the unit. Also,
make sure the line voltage at the
installation matches the input
voltage specied on the AC adaptor’s body.
Other AC adaptors may use a dierent
polarity, or be designed for a dierent
voltage, so their use could result in damage,
malfunction, or electric shock.
IMPORTANT NOTES
WARNING
Use only the supplied power cord
Use only the attached power cord.
Also, the supplied power cord must
not be used with any other device.
CAUTION
Take care so as not to get ngers pinched
When handling the following
moving parts, take care so as not
to get ngers, toes, etc., pinched.
Whenever a child uses the unit,
an adult should be on hand to provide
supervision and guidance.
• Bellows (p. 16)
• Bellows clip (p. 16)
CAUTION
Keep small items out of the reach of children
To prevent accidental ingestion
of the parts listed below, always
keep them out of the reach of small
children.
• Included Parts/Removable Parts
Reference caps for left-hand button
keyboard
Reference caps for right-hand button
keyboard (FR-4xb only)
Power Supply: Use of Batteries
• If operating this unit on batteries, please
use AA rechargeable Ni-MH batteries.
Placement
• Do not allow objects to remain on top
of the keyboard. This can be the cause
of malfunction, such as keys ceasing to
produce sound.
• Depending on the material and
temperature of the surface on which you
place the unit, its rubber feet may discolor
or mar the surface.
Repairs and Data
• Before sending the unit away for repairs,
be sure to make a backup of the data
stored within it; or you may prefer to write
down the needed information. Although
we will do our utmost to preserve the data
stored in your unit when we carry out
repairs, in some cases, such as when the
memory section is physically damaged,
restoration of the stored content may be
impossible. Roland assumes no liability
concerning the restoration of any stored
content that has been lost.
Additional Precautions
• Any data stored within the unit can be
lost as the result of equipment failure,
incorrect operation, etc. To protect
yourself against the irretrievable loss
of data, try to make a habit of creating
regular backups of the data you’ve stored
in the unit.
• Roland assumes no liability concerning
the restoration of any stored content that
has been lost.
20
• Never strike or apply strong pressure to
the display.
• Do not use connection cables that contain
a built-in resistor.
• Do not use excessive force to operate the
bellows.
Using External Memories
• Please observe the following precautions
when handling external memory devices.
Also, make sure to carefully observe all the
precautions that were supplied with the
external memory device.
• Do not remove the device while
reading/writing is in progress.
• To prevent damage from static
electricity, discharge all static electricity
from your person before handling the
device.
Intellectual Property Right
• It is forbidden by law to make an audio
recording, video recording, copy or
revision of a third party's copyrighted work
(musical work, video work, broadcast, live
performance, or other work), whether
in whole or in part, and distribute, sell,
lease, perform or broadcast it without the
permission of the copyright owner.
• Do not use this product for purposes that
could infringe on a copyright held by a
third party. We assume no responsibility
whatsoever with regard to any
infringements of third-party copyrights
arising through your use of this product.
• The copyright of content in this product
(the sound waveform data, style data,
accompaniment patterns, phrase data,
audio loops and image data) is reserved by
Roland Corporation.
• Purchasers of this product are permitted
to utilize said content (except song data
such as Demo Songs) for the creating,
performing, recording and distributing
original musical works.
• Purchasers of this product are NOT
permitted to extract said content in
original or modied form, for the purpose
of distributing recorded medium of said
content or making them available on a
computer network.
• MMP (Moore Microprocessor Portfolio)
refers to a patent portfolio concerned
with microprocessor architecture, which
was developed by Technology Properties
Limited (TPL). Roland has licensed this
technology from the TPL Group.
• MPEG Layer-3 audio compression
technology is licensed from Fraunhofer IIS
Corporation and THOMSON Multimedia
Corporation.
• Roland and V-Accordion are either
registered trademarks or trademarks of
Roland Corporation in the United States
and/or other countries.
• Company names and product names
appearing in this document are registered
trademarks or trademarks of their
respective owners.
Page 21

MEMO
Page 22
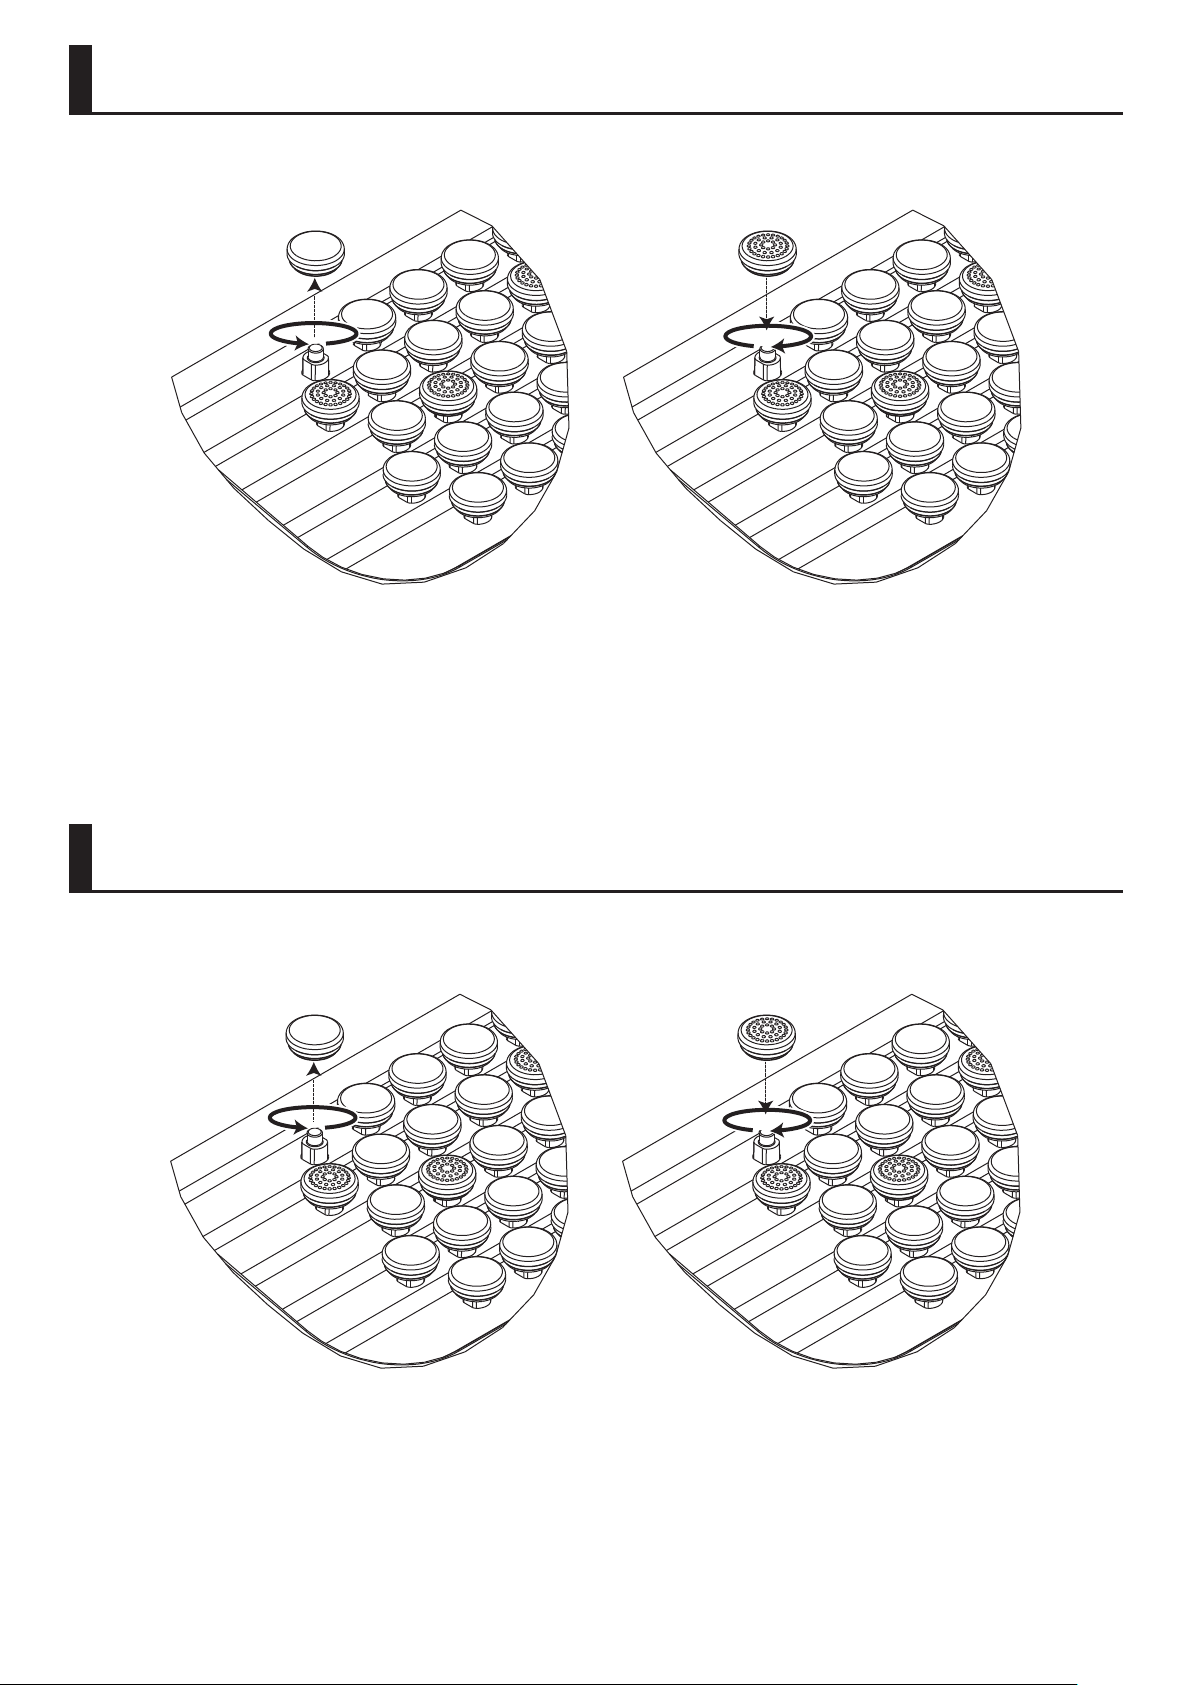
Reference Cap
To do this, rst remove the button you wish to replace by turning it counterclockwise, then install the new button and screw it clockwise.
リファレ ン ス ・ キャップ
ボタンを付け替えるには、交換 するボタンを左に回して取りはずし、新しいボタンを取り付けて右に回して固定します。
Page 23

For the USA
DECLARATION OF CONFORMITY
Compliance Information Statement
Model Name :
Type of Equipment :
Responsible Party :
Address :
Telephone :
FR-4X, FR-4XB
Digital Accordion
Roland Corporation U.S.
5100 S. Eastern Avenue Los Angeles, CA 90040-2938
(323) 890-3700
Page 24

* 5 1 0 0 0 5 3 9 8 7 - 0 1 *
 Loading...