

Page 1

Page 2

Look What You Can Do!
Play the Piano
Play various sounds
The FP-50 features 372 dierent tones for you to enjoy.
You can freely select and perform using these tones.
Play two layered tones
You can layer two tones on a single key.
Play dierent tones with your left and right hands
You can divide the keyboard into left and right zones, and select a dierent tone for each zone.
Sound a metronome
You can sound a metronome.
Playing with Accompaniment
Play along with a rhythm
The FP-50 features 90 dierent rhythms that can accompany you as you play.
Lets you enjoy performing as though you’re playing with a backup band.
Page 14
Page 14
Page 15
Page 16
Page 19
Play along with a song
The FP-50 has 30 built-in songs.
You can select a song and play along with it.
Record Songs
Record your performances
You can record your performances.
When playing with an accompaniment, you can record both the accompaniment and your
performance.
Use your computer to create a CD of a song you recorded
A song you’ve recorded can be copied to your computer, and written to a CD.
Before using this unit, carefully read the sections entitled: “USING THE UNIT SAFELY” (p. 57) and “IMPORTANT NOTES” (p. 59). These sections provide
important information concerning the proper operation of the unit. Additionally, in order to feel assured that you have gained a good grasp
of every feature provided by your new unit, Owner’s manual should be read in its entirety. The manual should be saved and kept on hand as a
convenient reference.
Copyright © 2013 ROLAND CORPORATION
All rights reserved. No part of this publication may be reproduced in any form without the written permission of ROLAND CORPORATION.
Page 24
Page 28
Page 22
2
Page 3

Designing Sounds
Look What You Can Do!
Operation Guide Getting Ready Performing Recording Registrations Settings
Add reverberation to the sound
You can add reverberation (ambience) to create the sensation of performing in a
concert hall.
Adjust the tone color (equalizer)
You can use the equalizers to adjust the sound’s tone color.
Live Performance Features
Transpose the pitch of the keyboard or song
You can transpose the pitch of the keyboard, allowing you to change the key of your
performance quickly and easily.
Page 17
Page 17
Page 18
Recall performance settings
You can save the settings related to your performance and recall them anytime, easily.
Convenient Functions
Adjust the keyboard touch
You can adjust the touch sensitivity of the keys.
Disable the buttons
The “Panel Lock function” lets you prevent sounds or settings from being changed when buttons are pressed
inadvertently.
Connect to a Wireless LAN
You can use a WNA1100-RL wireless USB adapter (sold separately) to connect to a wireless LAN and use wireless
applications, such as the iPhone app.
Page 18
Page 35
Page 43
Page 29
Appendix
3
Page 4

Contents
Look What You Can Do! . . . . . . . . . . . . . . . . . . . . . . . . . . . . . . . . . . . . . . . . . . . 2
Operation Guide . . . . . . . . . . . . . . . . . . . . . . . . . . . . . . . . . . . . . . . . . . . . . . . . . 6
Panel Descriptions . . . . . . . . . . . . . . . . . . . . . . . . . . . . . . . . . . . . . . . . . . . . . .10
Getting Ready . . . . . . . . . . . . . . . . . . . . . . . . . . . . . . . . . . . . . . . . . . . . . . . . . .12
Using a Stand . . . . . . . . . . . . . . . . . . . . . . . . . . . . . . . . . . . . . . . . . . . . . . . . . .12
Turning the Power On and O . . . . . . . . . . . . . . . . . . . . . . . . . . . . . . . . . .13
Turning the Power On . . . . . . . . . . . . . . . . . . . . . . . . . . . . . . . . . . . .13
Turning the Power O . . . . . . . . . . . . . . . . . . . . . . . . . . . . . . . . . . . .13
Listening to the Demos . . . . . . . . . . . . . . . . . . . . . . . . . . . . . . . . . . . . . . . . .13
Performing . . . . . . . . . . . . . . . . . . . . . . . . . . . . . . . . . . . . . . . . . . . . . . . . . . . . .14
Performing with Various Sounds . . . . . . . . . . . . . . . . . . . . . . . . . . . . . . . .14
Switching Tones . . . . . . . . . . . . . . . . . . . . . . . . . . . . . . . . . . . . . . . . . .14
Performing with Two Layered Tones (Dual Play). . . . . . . . . . . .14
Playing Dierent Tones with the Right and Left Hands
(Split Play) . . . . . . . . . . . . . . . . . . . . . . . . . . . . . . . . . . . . . . . . . . . . . . .15
Performing with the Metronome . . . . . . . . . . . . . . . . . . . . . . . . . . . . . . .16
Changing the Metronome’s Tempo. . . . . . . . . . . . . . . . . . . . . . . .16
Changing the Metronome’s Time Signature . . . . . . . . . . . . . . .16
Changing the Metronome’s Volume . . . . . . . . . . . . . . . . . . . . . . .16
Adjusting the Sound to Your Taste . . . . . . . . . . . . . . . . . . . . . . . . . . . . . .17
Adding Reverberation (Ambience) . . . . . . . . . . . . . . . . . . . . . . . .17
Adjusting the Tone Color (Equalizer) . . . . . . . . . . . . . . . . . . . . . .17
Adjusting the Keyboard Response
Shifting the Pitch (Transpose) . . . . . . . . . . . . . . . . . . . . . . . . . . . . . . . . . . .18
Adding Accompaniment to Your Performance . . . . . . . . . . . . . . . . . . . .19
Playing Along with a Rhythm . . . . . . . . . . . . . . . . . . . . . . . . . . . . . . . . . . .19
Selecting and Playing a Rhythm . . . . . . . . . . . . . . . . . . . . . . . . . .19
Adding an Intro . . . . . . . . . . . . . . . . . . . . . . . . . . . . . . . . . . . . . . . . . .19
Adding an Ending . . . . . . . . . . . . . . . . . . . . . . . . . . . . . . . . . . . . . . . .20
Adding Variation to the Rhythm . . . . . . . . . . . . . . . . . . . . . . . . . .20
Inserting a Fill-In . . . . . . . . . . . . . . . . . . . . . . . . . . . . . . . . . . . . . . . . .20
Selecting Specied Rhythm Parts . . . . . . . . . . . . . . . . . . . . . . . . .21
Starting the Rhythm by Playing a Chord (Sync Start) . . . . . . .21
Holding the Last Chord (Chord Hold) . . . . . . . . . . . . . . . . . . . . . .21
Playing Along with a Song . . . . . . . . . . . . . . . . . . . . . . . . . . . . . . . . . . . . . .22
Selecting and Playing a Song . . . . . . . . . . . . . . . . . . . . . . . . . . . . .22
Playing Songs Consecutively (All Song Play) . . . . . . . . . . . . . . .22
Adjusting the Song’s Tempo . . . . . . . . . . . . . . . . . . . . . . . . . . . . . .23
Lower the Level of an Audio File’s Central Sound
(Center Cancel) . . . . . . . . . . . . . . . . . . . . . . . . . . . . . . . . . . . . . . . . . . .23
Transposing an Audio File (Audio Transpose) . . . . . . . . . . . . . .23
Recording Your Performances . . . . . . . . . . . . . . . . . . . . . . . . . . . . . . . . . . .24
SMF Recording . . . . . . . . . . . . . . . . . . . . . . . . . . . . . . . . . . . . . . . . . . . . . . . . .24
Audio Recording . . . . . . . . . . . . . . . . . . . . . . . . . . . . . . . . . . . . . . . . . . . . . . .25
Setting the Save Destination and Song Name . . . . . . . . . . . . . . . . . . .26
Converting an SMF Recording into an Audio Recording . . . . . . . . . .27
Burning an Audio Recording (WAV le) onto a CD . . . . . . . . .28
(Key Touch) . . . . . . . . . . . . . . . . . . . .18
Saving Performance Settings (Registrations) . . . . . . . . . . . . . . . . . . . . .29
What Is a Registration? . . . . . . . . . . . . . . . . . . . . . . . . . . . . . . . . . . . . . . . . .29
Recalling a Registration . . . . . . . . . . . . . . . . . . . . . . . . . . . . . . . . . . . . . . . . .29
Saving Current Settings into a Registration . . . . . . . . . . . . . . . . . . . . . .30
Saving a Registration Set (Save Registration Set) . . . . . . . . . . . . . . . .30
Loading a Saved Registration Set (Load Registration Set) . . . . . . . .31
Copying a Saved Registration Set (Copy Registration Set) . . . . . . . .31
Deleting a Saved Registration Set (Delete Registration Set) . . . . . .32
Convenient Functions . . . . . . . . . . . . . . . . . . . . . . . . . . . . . . . . . . . . . . . . . . .33
Making the Power Automatically Turn O After a Time
(Auto O) . . . . . . . . . . . . . . . . . . . . . . . . . . . . . . . . . . . . . . . . . . . . . . . . . . . . . .33
Retaining Settings After Power-o (Memory Backup) . . . . . . . . . . . .33
Copying a Saved Song (Copy Song) . . . . . . . . . . . . . . . . . . . . . . . . . . . . .34
Deleting a Saved Song (Delete Song) . . . . . . . . . . . . . . . . . . . . . . . . . . .34
Disabling the Buttons (Panel Lock) . . . . . . . . . . . . . . . . . . . . . . . . . . . . . .35
Restoring the Factory Settings (Factory Reset) . . . . . . . . . . . . . . . . . . .35
Reformatting Memory (Format Media) . . . . . . . . . . . . . . . . . . . . . . . . . .36
Detailed Function Settings (Function Mode) . . . . . . . . . . . . . . . . . . . . . . 37
How to Use Function Mode . . . . . . . . . . . . . . . . . . . . . . . . . . . . . . . . . . . . .37
Matching the Pitch with Other Instruments
(Master Tuning) . . . . . . . . . . . . . . . . . . . . . . . . . . . . . . . . . . . . . . . . . .37
Changing the Tuning System (Temperament) . . . . . . . . . . . . .37
Specifying a Song’s Tonic (Temperament Key) . . . . . . . . . . . . .37
Personalizing Your Piano (Piano Tone) . . . . . . . . . . . . . . . . . . . . .38
Specifying What to Transpose (Transpose Mode) . . . . . . . . . .38
Adjusting the Dual Play Volume Balance (Dual Balance) . . . .38
Adjusting the Split Play Volume Balance (Split Balance) . . . .38
Changing the Pitch of the Tone in Octave Steps
(Octave Shift) . . . . . . . . . . . . . . . . . . . . . . . . . . . . . . . . . . . . . . . . . . . .38
Chord Recognition When Split Is On
(Split-On Chord Recognition) . . . . . . . . . . . . . . . . . . . . . . . . . . . . .39
Changing How the Pedal Eects Are Applied
(Damper Pedal Part) . . . . . . . . . . . . . . . . . . . . . . . . . . . . . . . . . . . . . .39
Changing the Function of the Center Pedal
(Center Pedal Function) . . . . . . . . . . . . . . . . . . . . . . . . . . . . . . . . . . .39
Changing How the Pedal Eects Are Applied
(Center Pedal Part) . . . . . . . . . . . . . . . . . . . . . . . . . . . . . . . . . . . . . . .39
Changing the Function of the Left Pedal (Left Pedal) . . . . . . .40
Changing How the Pedal Eects Are Applied
(Left Pedal Part) . . . . . . . . . . . . . . . . . . . . . . . . . . . . . . . . . . . . . . . . . .40
Using a Pedal to Switch Registrations (Pedal Shift) . . . . . . . . .40
Selecting the Recording Format (Recording Mode) . . . . . . . .40
Sending Tone-Change Information
(Transmit MIDI Information) . . . . . . . . . . . . . . . . . . . . . . . . . . . . . .40
Preventing Doubled Notes When Connected to a
Sequencer (Local Control) . . . . . . . . . . . . . . . . . . . . . . . . . . . . . . . .41
MIDI Transmit Channel Settings (MIDI Transmit Channel) . .41
Controlling Video Equipment (Visual Control Mode) . . . . . . .41
Specifying the Visual Control Channel (Visual Control
Channel) . . . . . . . . . . . . . . . . . . . . . . . . . . . . . . . . . . . . . . . . . . . . . . . . .42
Changing the USB Flash Drive Mode
(USB Memory Mode) . . . . . . . . . . . . . . . . . . . . . . . . . . . . . . . . . . . . .42
4
Page 5

Contents
About the Wireless LAN Function . . . . . . . . . . . . . . . . . . . . . . . . . . . . . . . .43
What Is Wireless LAN Function? . . . . . . . . . . . . . . . . . . . . . . . . . . . . . . . . .43
Basic Connection Method (Connect by WPS) . . . . . . . . . . . . . . . . . . . .43
Wireless LAN Function Settings . . . . . . . . . . . . . . . . . . . . . . . . . . . . . . . . .44
Status Indication . . . . . . . . . . . . . . . . . . . . . . . . . . . . . . . . . . . . . . . . .44
Connecting to a Wireless LAN Access Point That You
Select (Select AP) . . . . . . . . . . . . . . . . . . . . . . . . . . . . . . . . . . . . . . . . .44
Other Settings (Option) . . . . . . . . . . . . . . . . . . . . . . . . . . . . . . . . . . .45
Connecting in Ad-Hoc Mode . . . . . . . . . . . . . . . . . . . . . . . . . . . . . .45
Troubleshooting . . . . . . . . . . . . . . . . . . . . . . . . . . . . . . . . . . . . . . . . . . . . . . . . 46
Error Messages . . . . . . . . . . . . . . . . . . . . . . . . . . . . . . . . . . . . . . . . . . . . . . . . .49
Saved Settings . . . . . . . . . . . . . . . . . . . . . . . . . . . . . . . . . . . . . . . . . . . . . . . . . .49
Tone List . . . . . . . . . . . . . . . . . . . . . . . . . . . . . . . . . . . . . . . . . . . . . . . . . . . . . . .50
Registration List . . . . . . . . . . . . . . . . . . . . . . . . . . . . . . . . . . . . . . . . . . . . . . . .50
Internal Song List . . . . . . . . . . . . . . . . . . . . . . . . . . . . . . . . . . . . . . . . . . . . . . .51
Rhythm List . . . . . . . . . . . . . . . . . . . . . . . . . . . . . . . . . . . . . . . . . . . . . . . . . . . . .52
Chord Fingering List . . . . . . . . . . . . . . . . . . . . . . . . . . . . . . . . . . . . . . . . . . . .53
Main Specications . . . . . . . . . . . . . . . . . . . . . . . . . . . . . . . . . . . . . . . . . . . . .55
Operation Guide Getting Ready Performing Recording Registrations Settings
Index . . . . . . . . . . . . . . . . . . . . . . . . . . . . . . . . . . . . . . . . . . . . . . . . . . . . . . . . . . .56
USING THE UNIT SAFELY . . . . . . . . . . . . . . . . . . . . . . . . . . . . . . . . . . . . . . . . .57
IMPORTANT NOTES . . . . . . . . . . . . . . . . . . . . . . . . . . . . . . . . . . . . . . . . . . . . .59
Information about the and icons
These icons identify settings that can be stored in memory and recalled when power comes back on.
: Registration
: Internal memory
Settings return to their default values as soon as you turn o the power.
By using the Memory Backup function or registration sets, you can make sure the changes you’ve made to these settings are retained.
Page 29
Page 33
Appendix
5
Page 6

Operation Guide
Switching Tones
Describing this area
Switching tones
Press one of the TONE buttons, and then press the [–] [+] buttons.
Page 14
Layering two tones (Dual Play)
Press any two TONE buttons simultaneously.
MEMO
When using Dual Play, you can
adjust the volume balance by
pressing the [
Press two buttons
Changing the tones
Tone 1
(Left-side button)
Tone 2
(Right-side button)
Press the [–] [+] buttons.
Hold down the right-most of the lit TONE button, and
then use the [–] [+] buttons.
[KEYBOARD ] button while holding
down the TONE button.
Page 14
BACKING] or
Display
The display shows information such as the tone name, rhythm
name, song name, tempo, and time signature.
Tone Name
Song Name
Rhythm Name
Selecting Variation Tones/Adjusting the Settings
You can select tone variations, rhythms, and songs, and adjust
various settings.
• Hold down the [–] [+] buttons if you want the value to continue
changing.
• To rapidly raise the value, hold down the [+] button and press the
[–] button.
• To rapidly reduce the value, hold down the [–] button and press
the [+] button.
• To return the setting to its default value, press the [–] and [+]
buttons simultaneously.
Saving your current temperament settings, equalizer settings, and related settings into memory (Memory Backup)
Temperament settings, equalizer settings, and other settings reset to their defaults when power o.
By using the Memory Backup function, you can make sure the changes you’ve made to settings are retained in internal memory.
In this manual, the “
” icon indicates settings retained by the Memory Backup function.
1. Press the [SONG] and [RHYTHM] buttons simultaneously.
2. Use the [ ] [ ] (SLOW/FAST) buttons to select “Backup.”
3. Press the [METRONOME] button.
Page 33
4. Press the [ ] (FAST) button to select “Y (Yes).”
REFERENCE
6
For details on the settings that can be stored, refer to “Items Stored by Memory Backup” (p. 49).
Page 7

Operation Guide
Playing Dierent Tones with the Right and Left Hands (Split Play)
You can split the keyboard in two, and play one tone
with your left hand and another tone with your right
hand.
Turning the split feature on
Press the [SPLIT] button.
MEMO
When using Split Play, you can adjust the volume balance by pressing
the [
BACKING] or [KEYBOARD ] button while holding down the
TONE button.
Changing the tones
Right-Hand Tone
Left-Hand Tone
Changing the keyboard’s split point
Hold down the [SPLIT] button and press the key at the desired split
point.
1. Press the desired TONE button.
2. Press the [–] [+] buttons.
1. Hold down the [SPLIT ] button and press the desired
TONE button.
2. Hold down the [SPLIT ] button and press [–] [+]
buttons to select the desired tone.
Page 15
Disabling the Buttons (Panel Lock)
Locking the panel
Hold down the [TRANSPOSE] button until “Lock”
appears in the display.
Unlocking the panel
Hold down the [TRANSPOSE] button until “Lock” disappears.
Page 35
Changing the Key (Transpose)
Use this feature to shift the pitch of the keyboard
and songs.
Turning the transpose feature on
Press the [TRANSPOSE] button so it’s lit.
Changing the transposition interval
While holding down the [TRANSPOSE] button, press the [–] [+]
buttons or play the note.
Page 18
Operation Guide Getting Ready Performing Recording Registrations Settings
Recalling Performance Settings (Registration)
You can use the registration feature to save the current performance settings into a “registration” that you can recall whenever you
wish.
Each registration holds a full set of tone settings, rhythm settings, and other performance-related values.
In this manual, the “
Recalling a registration
1. Press the [SPLIT] and [TRANSPOSE] buttons
simultaneously.
2. Press one of the number buttons, from [1] to [4], to select
the registration.
3. Press the [–] [+] buttons to select the registration
variation.
” icon indicates settings that are saved into registration memory.
Saving current settings into a registration
1. Set the desired performance settings: tone, rhythm, and
so on.
2. While holding down the [SPLIT] and [TRANSPOSE]
buttons simultaneously, press a button from [1] to [4] to
select the registration and then press the [–] [+] buttons
to select the registration variation.
3. Release the [SPLIT] and [TRANSPOSE] buttons.
REFERENCE
For details on the settings that can be stored, refer to “Settings Saved in Registrations” (p. 49).
Page 29
Appendix
7
Page 8

Operation Guide
Describing this area
Selecting a Song
Access the song screen, and select a song.
Selecting a song
Page 22
1. Press the [SONG] button to access the song screen.
Song Name
Category
Song Number
2. Press the [–] [+] buttons to select a song.
Selecting a song from a USB ash drive
1. Press the [SONG] button to access the song
screen.
2. Hold down the [SONG] button and press the [–]
button to select the “S” category.
3. Press [–] [+] buttons to select a song.
Selecting a Rhythm
Access the rhythm screen, and select a rhythm.
Page 19
1. Press the [RHYTHM] button to access the rhythm screen.
Rhythm Name
MEMO
You can display the
chord of the current
rhythm by pressing the
[RHYTHM] button in the
rhythm screen.
Category
Rhythm Number
2. Press the [–] [+] buttons to select the desired rhythm.
Adjusting the Overall Volume
Adjust the sound’s volume.
MaxMin
Adjusting the Volume Balance
Balance the keyboard loudness with the loudness of the
accompanying rhythm and song.
To make the backing stand
out...
To make the keyboard
dominate...
The current balance setting is shown in the display.
(Accompaniment)
Press the [
Press the [KEYBOARD
KeyboardBacking
BACKING] button.
] button.
8
Page 9

Operation Guide
Operation Guide Getting Ready Performing Recording Registrations Settings
Changing the Tempo and Time Signature
You can adjust the tempo of the metronome and
the song.
Changing the tempo
Press the [ ] [ ] (SLOW/FAST) buttons.
Changing the time signature
Hold down the [METRONOME] button and press the [ ] [ ]
(SLOW/FAST) buttons.
Page 16
Playing Songs and Recording Performances
Here’s how to control recording and playback (when the [SONG] button
is lit).
Using the Metronome
Try using the metronome.
Turning the metronome on
Press the [METRONOME] button so it’s lit.
Adjusting the metronome’s volume
Hold down the [METRONOME] button and press the [–] [+]
buttons.
Playing a Rhythm
Playing a rhythm (when the [RHYTHM] button is
lit).
Page 16
Page 19
Return to the beginning of the song
Play/Stop
Engage recordingstandby mode
Record
Rewind
Fast-forward
Hold down the [
and press the [ ] button.
Press the [
With playback stopped, press the [REC] button.
While in recording-standby mode, press the
] button.
[
Press the [
Press the [
] button
] button.
] button.
] button.
Playing through all songs (All Song Play)
Hold down the [SONG] button and press the [ ] button.
Making a new recording
1. Select the desired tone(s).
2. Press the [SONG] button.
3. Press the [REC] button.
4. Press the [ ] button to start recording.
5. Press the [ ] button to stop recording.
Page 22
Page 24
Play/Stop Press the [START/STOP] button.
Add the intro
Add an ending
Add some variation to
the rhythm
Press the [INTRO/ENDING] button, and then
play the rhythm.
While the rhythm is playing, press the [INTRO/
ENDING] button.
Press the [VARIATION] button.
Recording a rhythm together with your keyboard play
1. Select the desired tone(s).
2. Select the desired rhythm.
3. Press the [REC] button.
4. Press the [ ] button to start recording.
5. Press the [ ] button to stop recording.
Page 24
Appendix
9
Page 10

Panel Descriptions
Music Rest
Attach the included music rest as shown below.
[ ] Switch
Turns the power on
and o.
Page 13
Insert into the holes
USB MEMORY Port
You can use USB ash drives to do all of the following.
• Play WAV les and standard MIDI les (SMF
les) copied from your computer.
• Make audio recordings of your FP-50
performances.
• Play these audio recordings at your
computer, or burn them to CDs or other
media.
• Save/load registration sets.
• By connecting a wireless USB adapter
(WNA1100-RL; sold separately), you can
use wireless-connectivity applications,
such as the iPhone app.
* Carefully insert the USB ash drives all the way in—until it is rmly in place.
* Use a USB ash drive sold by Roland. We cannot guarantee operation if any other
USB ash drive is used.
Page 22
Page 25
Page 28
Page 30
Page 43
Rear side
Front Panel
Use these buttons and
sliders to control the FP-50.
Page 6
Headphone Jack
Connect your headphones (sold
separately) here.
* To prevent malfunction and equipment failure, always turn down the volume, and turn o all the units before making any connections.
* When connection cables with resistors are used, the volume level of equipment connected to the INPUT jack may be low. If this happens, use
connection cables that do not contain resistors.
10
Page 11

Panel Descriptions
PEDAL Jacks
Connect pedals to these jacks.
Each jack controls a dierent pedal function.
Pedal Jack Explanation
DAMPER/R jack Acts as a damper pedal.
SOSTENUTO/C jack By default, acts as a sostenuto pedal.
SOFT/L jack By default, acts as a soft pedal.
MEMO
• When connecting the included pedal, set the pedal’s side switch
to “Continuous.”
• If you wish, you can assign dierent functions to the pedals
connected to the SOSTENUTO/C and SOFT/L jacks (p. 39).
• The separately available RPU-3 pedal allows you to enjoy piano
performances at their fullest, since you can use three pedals.
• Use only the specied expression pedal (EV-5,
EV-7; sold separately). By connecting any
other expression pedals, you risk causing
malfunction and/or damage to the unit.
Operation Guide Getting Ready Performing Recording Registrations Settings
Damper pedal
Use this to sustain the sound.
While you hold down the damper pedal, notes will be sustained even if
you take your ngers o the keyboard. You can control the amount of
sustain applied by the way you press the pedal.
On an acoustic piano, pressing the damper pedal allows other strings
to resonate sympathetically with the notes you play, producing a rich
and spacious resonance. The FP-50 simulates this natural damper
resonance.
Sostenuto pedal
The notes you are pressing when this pedal is depressed will be
sustained.
Soft pedal
Use this to soften the sound.
When you play the keyboard while holding down the soft pedal,
the sound will be softer than normal for the same keyboard playing
strength. This is the same function as the left pedal of an acoustic
piano. You can control how soft the sound will be by the way you press
the pedal.
INPUT Jack
MIDI Connectors
Connect these jacks to external
MIDI devices.
This is a stereo miniature
phone type jack. Use it to
connect to an audio player
or similar source, so that you
can play the source’s sound
through the FP-50.
Adjust the volume, as
necessary, from the source side.
OUTPUT Jacks
If you connect these jacks to amplied
speakers, the sound of FP-50 will be heard
through them.
DC IN Jack
Connect the included AC adaptor here.
Place the AC adaptor so
the side with the indicator
(see illustration) faces
upwards and the side with
textual information faces
downwards.
The indicator will light when
you plug the AC adaptor
into an AC outlet.
Appendix
11
Page 12

Getting Ready
Using a Stand
Be careful not to pinch your ngers when setting up the stand.
Please use one of the following Roland stands to support your FP-50: KSC-44, KS-G8, KS-18Z, or KS-12.
Refer to the following when using a stand.
KSC-44
Refer to the KSC-44 Owner’s Manual.
KS-G8
Align the back panel
of the FP-50 with
the rubber base of
the stand
KS-18Z
Align the front of the
FP-50 with the front
of the stand
Adjust the stand
to the lowest
level
Adjust the
stand to a level
no higher than
the second
level from the
bottom
Place the FP-50 so that
its rubber feet are on the
inner side of the stand
Top view
Adjust the width of the stand so
that the rubber feet of the FP-50
straddle the stand
Top view
12
KS-12
Adjust the
stand to a level
no higher than
the second
level from the
bottom
Adjust the width of the stand
so that the rubber feet of
the FP-50 t into the holes
provided for the rubber feet
Top view
Page 13

Getting Ready
Turning the Power On and O
Turning the Power On
NOTE
Once everything is properly connected (p. 10), be sure to follow
the procedure below to turn on their power. If you turn on
equipment in the wrong order, you risk causing malfunction or
equipment failure.
1. Move the [VOLUME] slider all the way to the left to
minimize the volume.
Minimize the volume.
2. Press the [ ] switch.
Listening to the Demos
Here’s how to listen to the demo songs.
1. While holding down any TONE button, press the
[ ] button.
Demo playback starts.
MEMO
The tone used for the demo song depends on which TONE
button you press.
When the last demo has nished, playback starts again from the
rst demo.
2. To terminate demo play, press the [ ] button.
* The demo songs are for your personal enjoyment only.
Unauthorized use is a violation of applicable laws.
* No data for the music that is played will be output from the MIDI
OUT connector.
Operation Guide Getting Ready Performing Recording Registrations Settings
The unit turns on and a TONE button along with other buttons light
up.
* This unit is equipped with a protection circuit. A brief interval (a
few seconds) after turning the unit on is required before it will
operate normally.
3. Move the [VOLUME] slider to adjust the volume (p. 8).
* Before turning the unit on/o, always be sure to turn the volume
down. Even with the volume turned down, you might hear some
sound when switching the unit on/o. However, this is normal
and does not indicate a malfunction.
Turning the Power O
1. Move the [VOLUME] slider all the way to the left to
minimize the volume.
2. Press and hold the [ ] switch until the display turns o.
The unit turns o.
Concerning the Auto O function
The power to this unit will be turned o automatically after a
predetermined amount of time has passed since it was last used
for playing music, or its buttons or controls were operated (Auto
O function). If you do not want the power to be turned o
automatically, disengage the Auto O function (p. 33).
• Any settings that you are in the process of editing will be lost
when the power is turned o. If you have any settings that you
want to keep, you should save them beforehand.
• To restore power, turn the power on again.
Appendix
13
Page 14

Performing
: Indicates settings saved in registrations (p. 29).
: Indicates settings retained by the Memory Backup function (p. 33).
Performing with Various Sounds
In addition to piano sounds, the FP-50 lets you enjoy performing
with many other sounds (372 dierent tones).
These sounds are called “Tones.” The tones are organized into four
groups, and each group is assigned to a TONE button.
Switching Tones
Let’s start by performing with a piano tone.
1. Press the [PIANO] button to select the tone group.
The currently selected tone number and tone name are displayed.
Performing with Two Layered Tones (Dual Play)
You can play two tones simultaneously from each note of the
keyboard. This feature is called “Dual Play.”
As an example, here’s how to layer piano and strings tones.
1. Hold down the [PIANO] button and press the [STRINGS]
button.
Both buttons will light.
When you play the keyboard, you’ll hear both the piano and the
strings tones.
Tone
name
Tone 1
Tone 2
Corresponding
button
The left-most of the
lit TONE buttons
The right-most of the
lit TONE buttons
How to select tones
Press the [–] [+] buttons.
While holding down the TONE button
for Tone 2, and press the [–] [+] buttons.
Tone groups
Button Explanation
[PIANO] button
[E. PIANO] button
[STRINGS] button
[OTHER] button
REFERENCE
For details on the tones, refer to “Tone List” (p. 50).
Allows you to select various historical instruments,
including grand pianos, or harpsichords.
Allows you to select various electric piano sounds
used in pop or rock, as well as the sound of
instruments played using mallets.
Allows you to select the sounds of string instruments such as violins, as well as other instruments
used in orchestras, which are appropriate when
used for Dual Play with a piano sound.
This button selects organ, vocal, brass, and GM2
tones.
If you’ve selected a tone to which the rotary eect
is applied, pressing the [OTHER] button will switch
the speed of the rotary eect.
2. Use the [–] [+] buttons to select the tone variation.
* For some tones, there are keys that produce no sound.
MEMO
When playing a tone that uses tremolo or has a vibrating quality,
you can adjust the speed of the modulation by holding down
the current TONE button and pressing the [
buttons.
] [ ] (SLOW/FAST)
* You can’t use Dual Play simultaneously with Split Play (p. 15).
* For some combinations of sounds, the eect is not applied to
tone 2, and this may aect how the tone sounds.
2. To exit Dual Play, press one of the TONE buttons.
MEMO
• You can adjust the volume balance of the two tones (p. 38).
• You can shift the pitch of tone 2 in steps of an octave (p. 38).
• When you press the damper pedal while using Dual Play, the
eect will be applied to both tone 1 and tone 2. If desired, you
can have the eect be applied to only one of the tones (p. 39).
14
Page 15

Performing
Playing Dierent Tones with the Right
and Left Hands (Split Play)
You can play dierent tones in the left and right sides of the
keyboard, divided at a certain key.
This feature is called “Split Play,” and the key at which the keyboard
is divided is called the “Split Point.”
1. Press the [SPLIT] button.
The [SPLIT] button will light, and the split screen appears.
When Split is turned on, the keyboard settings will be as follows.
Split Point (Power-up default: F#3)
…
C1 D1A0 B0 C2 C3 C4 C5 C8
Left-hand tone Right-hand tone
2. To exit Split Play, press the [SPLIT] button once again.
Changing the left-hand tone
1. Hold down the [SPLIT] button and press the TONE button.
The number and name of the tone currently selected for the lefthand zone are shown.
2. Hold down the [SPLIT] button and press the [–] [+]
buttons.
A dierent tone is selected.
MEMO
You can shift the pitch of the left-hand tone in steps of an octave
(p. 38).
Operation Guide Getting Ready Performing Recording Registrations Settings
MEMO
You can adjust the volume balance of the right-hand and lefthand tones (p. 38).
Changing the right-hand tone
1. Press the TONE button.
The number and name of tone currently selected for the right-hand
zone are shown.
Changing the split point
Range in which you can specify the split point (B1–B6)
C1 C3A0
Split point (Power-up: F#3, included in left-hand zone)
1. Hold down the [SPLIT] button and press the key that you
want to be the split point.
The key you pressed becomes the new split point, and that key will
be shown in the display.
B1 C2 C7 C8B6
2. Press the [–] [+] buttons.
A dierent tone is selected.
Appendix
15
Page 16

Performing
Performing with the Metronome
You can sound the metronome while you play.
You can also change the metronome’s tempo and time signature.
If a song or rhythm is playing, the metronome will sound according
to the song or rhythm’s tempo and time signature.
1. Press the [METRONOME] button.
The [METRONOME] button will blink, and the metronome will
sound.
The [METRONOME] button will blink red and green according to the
currently selected time signature; red indicates the strong beats,
and green indicates the weak beats.
2. To stop the metronome, press the [METRONOME] button
once again.
Changing the Metronome’s Tempo
Changing the Metronome’s Time Signature
1. While holding down the [METRONOME] button, use the
[ ] [ ] (SLOW/FAST) buttons.
If you select “0/4,” only the weak beats will sound.
When you record your performance, it will be recorded using the
time signature you specify here.
When you play back a song or rhythm, the metronome’s time
signature will be set to the time signature of that song or rhythm.
Value
2/2, 0/4, 2/4, 3/4, 4/4, 5/4, 6/4, 7/4, 3/8, 6/8, 9/8,
12/8
1. Press the [METRONOME] button.
The metronome will sound.
2. Press the [ ] [ ] (SLOW/FAST) buttons.
* You can’t change the metronome’s time signature while a song
or rhythm is playing.
Changing the Metronome’s Volume
1. While holding down the [METRONOME] button, press the
[–] [+] buttons.
The display will indicate the metronome’s volume.
16
Value Explanation
0–10
If the metronome’s volume is set at “0,” you won’t
hear the metronome.
Page 17

Adjusting the Sound to Your Taste
The FP-50 lets you add reverberation or modify the tone color.
Adding Reverberation (Ambience)
You can add a pleasant reverberation to the sounds of the FP-50,
producing the impression that you are performing in a concert hall.
This eect is called “Ambience.”
1. Press the [SONG] and [RHYTHM] buttons simultaneously.
2. Press the [ ] [ ] (SLOW/FAST) buttons to choose
“Ambience.”
3. Use the [–] [+] buttons to adjust the value.
Value Explanation
OFF, 1–10 Higher values apply deeper ambience.
4. Press the [SONG] and [RHYTHM] buttons simultaneously
to nish.
* The ambience depth cannot be set individually for each tone.
The same amount of ambience is applied to each tone.
Adjusting the Tone Color (Equalizer)
You can use the equalizer to adjust the sound’s tone color.
You can use the equalizer to modify the tone color by boosting or
reducing just the low-frequency or high-frequency range of the
sound.
Performing
2. Use the [ ] [ ] (SLOW/FAST) buttons to select “EQ SW.”
3. Use the [–] [+] buttons to adjust the value.
Value Explanation
ON Equalizer is on.
OFF Equalizer is o.
4. Use the [ ] [ ] (SLOW/FAST) buttons to select “EQ Edit.”
5. Press the [METRONOME] button.
The equalizer screen appears.
6. Press the [ ] [ ] (SLOW/FAST) buttons to choose an
equalizer parameter.
Parameter Value Explanation
EQ Lo Gn
(Equalizer Low
Gain)
EQ Lo Fq
(Equalizer Low
Freq)
EQ LM Gn
(Equalizer
Low-Mid Gain)
EQ LM Fq
(Equalizer
Low-Mid Freq)
EQ LM Q
(Equalizer
Low-Mid Q)
EQ HM Gn
(Equalizer
High-Mid Gain)
EQ HM Fq
(Equalizer
High-Mid Freq)
EQ HM Q
(Equalizer
High-Mid Q)
EQ Hi Gn
(Equalizer High
Gain)
EQ Hi Fq
(Equalizer High
Freq)
-12–+12 dB
100–1 k (Hz)
-12–+12 dB
16–16 k (Hz)
0.5, 1.0, 2.0,
4.0, 8.0
-12–+12 dB
16–16 k (Hz)
0.5, 1.0, 2.0,
4.0, 8.0
-12–+12 dB
1.25–16 k (Hz)
Adjusts the level of the low-frequency
range.
Frequency point in the low-frequency
range.
This changes the level at and under
the specied bandwidth.
Adjusts the level of the low-to
mid-frequency range.
Frequency point in the low- and
mid-frequency range.
This changes the level of the
specied bandwidth centered on this
frequency.
Changes the bandwidth of the lowand mid-frequency range.
The bandwidth aected narrows as
the value increases.
Adjusts the level of the mid- to
high-frequency range.
Frequency point in the mid- and
high-frequency range.
This changes the level of the
specied bandwidth centered on this
frequency.
Changes the bandwidth of the midand high-frequency range.
The bandwidth aected narrows as
the value increases.
Adjusts the level of the highfrequency range.
Frequency point in the highfrequency range.
This changes the level at and over the
specied bandwidth.
Operation Guide Getting Ready Performing Recording Registrations Settings
1. Press the [SONG] and [RHYTHM] buttons simultaneously.
7. Use the [–] [+] buttons to change the setting.
* Sounds may become distorted as the gain level increases.
8. Press the [REC] button to return to the previous screen.
9. Press the [SONG] and [RHYTHM] buttons simultaneously
to nish.
Appendix
17
Page 18

Performing
Adjusting the Keyboard
Response
The way in which the keyboard responds to your playing strength
can be adjusted to your personal taste.
1. Press the [SONG] and [RHYTHM] buttons simultaneously.
2. Use the [ ] [ ] (SLOW/FAST) buttons to select “Key Touch.”
(Key Touch)
Shifting the Pitch (Transpose)
“Transpose” means to shift the pitches of songs and the keyboard.
The Transpose function makes it easy to do the following.
• You can use unchanged ngering to accompany a singer who is
singing in a key dierent than the original music.
• A song written in a dicult key with numerous sharps (
For example, if the song is written in E major but you want to play it
using the ngering of the key of C major, you would set Transpose
to “4.”
If you play C E G It will sound E G B
MEMO
• With the factory settings, both the song and the keyboard will
• You can also transpose audio les (p. 23).
) can be performed in a key that’s easier for you to play.
ats (
be transposed. If you want to transpose only the keyboard or
only the song, make the appropriate setting as described in
“Specifying What to Transpose (Transpose Mode)” (p. 38).
) or
3. Use the [–] [+] buttons to adjust the value.
Value Explanation
FIX (Fixed)
L2 (Super Light) This setting produces the lightest keyboard touch.
L1 (Light)
M (Medium)
H1 (Heavy)
H2 (Super Heavy)
The sound plays at one set volume, regardless of
the force used to play the keys.
You can achieve fortissimo () play with a less
forceful touch than “Medium,” so the keyboard
feels lighter. This setting makes it easy to play,
even for children.
You can play with the most natural touch. This is
the closest to the touch of an acoustic piano.
You have to nger the keyboard more forcefully
than “Medium” in order to play fortissimo (), so
the keyboard touch feels heavier. Dynamic ngering adds even more feeling to what you play.
This setting produces the heaviest keyboard
touch.
4. Press the [SONG] and [RHYTHM] buttons simultaneously
to nish.
1. Press the [TRANSPOSE] button.
The [TRANSPOSE] button will light.
2. While holding down the [TRANSPOSE] button, press the
[–] [+] buttons.
The display will indicate the amount of transposition.
Value Explanation
-6–0–+5
(semitone steps)
Positive (+) values raise the pitch in semitone
steps, and negative (-) values lower the pitch in
semitone steps.
18
MEMO
You can also specify this value by holding down the
[TRANSPOSE] button and playing the note that is the tonic of
the key to which you want to transpose.
* If you select a dierent song, the transposition setting will be
canceled.
3. To cancel the transposition, press the [TRANSPOSE]
button once again.
The [TRANSPOSE] button will go out.
Page 19

Adding Accompaniment to Your Performance
4. Press the [START/STOP] button.
Playing Along with a Rhythm
Let’s look at how to set up and play rhythm backings.
About the FP-50’s rhythm
The FP-50 can automatically match its rhythmic
accompaniment to the chords that you play on the
keyboard. This feature is called “rhythm.”
The FP-50 contains 90 built-in rhythms in various musical
styles, such as jazz and rock.
Rhythms include not only drum sounds, but also
accompaniments featuring instruments such as piano,
guitar, bass, and strings.
You can also add intros and endings to your rhythms, and
insert ll-ins. These features make it easy to develop eective
and expressive rhythmic accompaniment.
Rhythm Flow
The FP-50 starts playing the selected rhythm.
When you play a chord, the rhythm performs according to the chord
you play.
To turn rhythm play o, press the [START/STOP] button once again.
REFERENCE
For details on the available rhythms, refer to “Rhythm List” (p. 52).
MEMO
• It’s not necessary to strike all the notes of each chord. The FP-50
recognizes various alternative chord voicings (p. 39).
• You can display the chord of the current rhythm by pressing the
[RHYTHM] button in the rhythm screen.
However, in some chords, may become the abbreviated.
Operation Guide Getting Ready Performing Recording Registrations Settings
Intro
MEMO
You can limit the rhythm part to drums, or select other
parts for the rhythm (p. 21).
Accompaniment
Selecting and Playing a Rhythm
Here’s how to select a rhythm, start it, and play along with it.
1. Press the [RHYTHM] button.
The [RHYTHM] button will light and the rhythm screen appears.
Ending
Adding an Intro
Here’s how to add an intro to the rhythm.
1. Press the [INTRO/ENDING] button.
The [INTRO/ENDING] button will light.
2. Play a rhythm.
Now you’ll hear the intro rst, followed by the rhythm.
When the intro is completed, the [INTRO/ENDING] button will go
out.
MEMO
The intro will last longer if the Variation feature is enabled (if the
[VARIATION] button is lit).
2. Hold down the [RHYTHM] button, and press the [–] [+]
buttons to select the category.
Rhythm Name
Category
Rhythm Number
3. Press the [–] [+] buttons to select a rhythm.
Appendix
1919
Page 20

Adding Accompaniment to Your Performance
Adding an Ending
Here’s how to add an ending to the rhythm.
1. Play a rhythm.
2. Press the [INTRO/ENDING] button.
The ending will play, and then the rhythm will stop.
MEMO
The ending will last longer if the Variation feature is enabled (if
the [VARIATION] button is lit).
Adding Variation to the Rhythm
Two rhythm accompaniment patterns are available: the
original accompaniment pattern and a more colorful variation
accompaniment pattern.
Performers often nd it eective to start with the more laid back
original pattern, then switch to the variation as energy builds
during the latter part of the song.
Inserting a Fill-In
You can insert a short phrase, called a “ll-in,” to your
accompaniment.
Fill-ins help add variety to your performances.
1. Hold down the [VARIATION] button and press the [–] [+]
buttons.
Value Explanation
ON Insert the ll-in.
OFF Do not insert the ll-in.
The [VARIATION] button blinks while the ll-in is playing.
1. Press the [VARIATION] button to switch the
accompaniment pattern.
[VARIATION] button Explanation
Unlit The original accompaniment pattern is playing.
Lit The variation accompaniment pattern is playing.
What’s a “Fill-In”?
A short improvisational phrase inserted at the transition is
called a “Fill-In.” The ll-in best suited to the selected Rhythm
is played.
20
Page 21

Adding Accompaniment to Your Performance
Selecting Specied Rhythm Parts
As an example, proceed as follows to select a drum-only rhythm
part.
1. Press the [SONG] and [RHYTHM] buttons simultaneously.
2. Use the [ ] [ ] (SLOW/FAST) buttons to select “Rhy.Part.”
3. Press the [–] [+] buttons to adjust the value.
Value Explanation
ALL Play all parts.
DR+B
BASS Play only the bass part.
DRUM Play only the drum part.
4. Press the [SONG] and [RHYTHM] buttons simultaneously
to nish.
Play only the drum and bass parts.
Starting the Rhythm by Playing a Chord (Sync Start)
You can have the rhythm start playing when you press a key.
1. Hold down the [START/STOP] button and press the [–] [+]
buttons.
Value Explanation
ON The rhythm starts playing when you press a key.
OFF
The rhythm does not start playing when you press
a key.
Holding the Last Chord (Chord Hold)
When you play a chord, the rhythm performs according to the
chord you play, and the chord continues to sound until you press
another chord. This feature is called “Chord Hold.”
Operation Guide Getting Ready Performing Recording Registrations Settings
1. Hold down the [INTRO/ENDING] button and press the [–]
[+] buttons.
Value Explanation
ON
OFF
Continue chord’s rhythm until you play another
cord.
All parts play while you hold down the chord.
When you lift ngers o keys, the drum part
continues but all other parts stop.
You can create a jazz four verse by having the
drums play by themselves, feature the piano
accompaniment, etc.
Appendix
21
Page 22

Adding Accompaniment to Your Performance
Playing Along with a Song
You can play the keyboard along with a song.
Selecting and Playing a Song
Listen to the available songs. The FP-50 comes with 30 built-in
songs.
You can also play songs stored on USB ash drives (sold separately).
* No data for the music that is played will be output from the MIDI
OUT connector.
1. Press the [SONG] button.
The [SONG] button will light and the song screen appears.
MEMO
If the metronome is on, a two-bar count-in precedes the song
start.
Using the Buttons
[ ] button
] button
[
] button
[
[
] button +
[ ] button
Fast-forwards the song.
Rewinds the song.
Starts or stops song play.
Starts or stops recording.
Returns to the start of the song. (While holding
down the [
button.)
] button, press the [ ]
Playing a WAV or MIDI (SMF) le stored on
your computer
WAV/SMF
2. Hold down the [SONG] button and press the [–] [+]
buttons to select the category.
Song Name
Category
Category Explanation
S (USB) Songs saved on a USB ash drive
U (User) Songs saved in internal memory
A (Preset) Songs built into the FP-50
Song Number
3. Now use the [–] [+] buttons to select a song.
MEMO
If you wish to select a song stored in a folder on a USB ash
drive, you can navigate as follows.
• To move to a dierent folder: Use the [–] [+] buttons to select
the desired folder, and then press the [
• To select a song within the folder: Use the [–] [+] buttons.
• To move out of a folder: Press the [–] button to select “(Fld.Up),”
and then press the [
* The screen accurately displays up to 499 les and subfolders
within each folder. If the folder exceeds this limit, some items
may be missing from the display.
] (Play/Stop) button.
] button.
4. Press the [ ] button to start the song.
The song plays out, and then playback stops.
You can pause the song by pressing the [
again.
You can then restart by pressing the [
] button once
] button.
1. Copy the song data to a USB ash drive.
2. Connect the USB ash drive into the FP-50’s USB
MEMORY port.
3. At the song screen, select “S” as the category.
4. Select the desired song from the list on the display.
Supported song formats
The FP-50 can play data stored in the following formats.
• SMF formats 0/1
• Roland Piano Digital format (i-format)
• Audio les: WAV format, 44.1 kHz, 16-bit linear
Playing Songs Consecutively (All Song Play)
You can consecutively play back all of the built-in songs, the songs
saved in internal memory, or the songs saved on a USB ash drive.
This is called “All Song Play.”
1. Hold down the [SONG] button and press the [–] [+]
buttons to select the category.
2. Hold down the [SONG] button and press the [ ]
button.
“All Songs Play” mode is selected, and the [ ] button starts
blinking.
* To cancel “All Song Play” mode, stop the playback or turn o the
power.
22
Page 23

Adding Accompaniment to Your Performance
Adjusting the Song’s Tempo
Here’s how to change a song’s tempo.
1. Press the [ ] [ ] (SLOW/FAST) buttons.
MEMO
The adjustable range for an audio le is 75–100–125%.
2. To return the tempo to its original setting, press the [ ]
(SLOW) and [ ] (FAST) buttons simultaneously.
Lower the Level of an Audio File’s Central Sound (Center Cancel)
This feature lets you reduce the loudness of the central sound of the
audio. You can use it, for example, to reduce the level of a melody or
vocal, so that you can perform the part yourself.
* This feature does not work perfectly with every song. In some
cases it may be unable to fully eliminate the central sound, or
may alter the recording’s tone quality.
* Damper Resonance (p. 38) is not applied while Center Cancel is on.
Transposing an Audio File
(Audio Transpose)
The selected audio le can be transposed for playback.
* In some cases, transposition (a transpose setting other than 0)
may cause a change in the song’s tone quality.
* If you select a dierent song, the audio transposition setting will
be reset.
1. Press the [SONG] and [RHYTHM] buttons simultaneously.
2. Use the [ ] [ ] (SLOW/FAST) buttons to select “AudTrans.”
3. Press the [–] [+] buttons to adjust the value.
Value Explanation
-6–0–+5
(semitone steps)
4. Press the [SONG] and [RHYTHM] buttons simultaneously
to nish.
MEMO
You can also change the Audio Transpose setting by holding
down the [TRANSPOSE] button and pressing one of the [
(SLOW/FAST) buttons.
Sets the transposition amount, in semitones.
Positive values transpose the pitch upward;
negative values transpose it downward.
] [ ]
Operation Guide Getting Ready Performing Recording Registrations Settings
1. Press the [SONG] and [RHYTHM] buttons simultaneously.
2. Use the [ ] [ ] (SLOW/FAST) buttons to select “C Cancel.”
3. Use the [–] [+] buttons to adjust the value.
Value Explanation
ON Lower the central sound when playing.
OFF Play normally.
4. Press the [SONG] and [RHYTHM] buttons simultaneously
to nish.
Appendix
23
Page 24

Recording Your Performances
It’s easy to record a performance.
You can play back a recorded performance to check your playing, or
to play along with it.
The FP-50 can record performances into both MIDI les (SMF les)
and audio les.
SMF and audio recording
File Type Explanation
A collection of data describing everything that happened while the music was played will be recorded.
SMF recording
Audio recording
* SMFs (Standard MIDI Files) use a standard format for music le
that was formulated so that les containing music le could be
widely compatible, regardless of the manufacturer of the listening
device. An enormous variety of music is available, whether it be
for listening, for practicing musical instruments, for Karaoke, etc.
Such data will include information about which keys
(pitches) were played, for how long, what amount of
force was applied, etc.
* In most cases you should use SMF recording.
An audio le stores actual sound data. You can easily
play these recordings on your computer.
* In order to use audio recording, you must connect
a USB ash drive (sold separately) to the USB
MEMORY port (p. 10).
4. Press the [REC] button.
The display shows the message “New Song.”
The [REC] button lights up, the [
FP-50 enters recording-standby mode.
If you decide not to record, press the [REC] button once again.
MEMO
If you selected a previous recording in step 2, press the [+]
button.
] button blinks, and the
Starting and stopping recording
1. Press the [ ] button.
You’ll hear a two-measure count-in (the measure number in the
display shows “-2” and then “-1”), and then recording starts.
When recording starts, the [REC] and [
MEMO
You can also initiate recording by hitting a key on the keyboard.
If you start this way, recording starts immediately (without the
count-in).
] buttons light.
SMF Recording
Here’s how to record your performance as an SMF le.
Preparing to record
1. Select the tone that you want to play on the keyboard
(p. 14).
2. If desired, you can select an accompaniment to be played
while you’re recording.
MEMO
Refer to “Selecting and Playing a Song” (p. 22) if you want to select
a song, or “Selecting and Playing a Rhythm” (p. 19) if you want to
select a rhythm.
* You cannot record an audio le as an accompaniment.
3. Start the metronome if desired (p. 16).
2. Press the [ ] button.
Recording stops, and the save conrmation screen appears.
MEMO
• While a rhythm is playing, you can press the [INTRO/ENDING]
button to start playing the ending and stop recording.
• If you want to check your performance, press the [
button in the save conrmation screen to start playback.
Saving a recorded performance
* If you want to save to a USB ash drive (sold separately), plug
the drive into the USB MEMORY port before proceeding.
1. Press the [ ] (FAST) button.
If a USB drive is present in the USB MEMORY port, the recording is
saved into the drive. Otherwise the recording is saved into internal
memory.
By default, the recorded song is given the name “Song” followed by
a free song number.
NOTE
Do NOT turn o the power or disconnect the USB ash drive
while “Working.” is displayed.
MEMO
You can select where the recording will be saved and assign a
name to your recording (p. 26).
]
24
Page 25

Recording Your Performances
Erasing a recorded performance
1. Press the [ ] (SLOW) button.
A conrmation message appears.
If you decide not to delete the performance, press the [ ] (SLOW)
button once again.
2. Press the [ ] (FAST) button.
The recording is erased.
Listening to a recorded performance
1. Press the [ ] button.
Playback starts from the beginning of the recorded performance.
Audio Recording
Here’s how to record your performance as audio data. The recorded
song can be used on your computer.
* In order to use audio recording, you must connect a USB ash
drive (sold separately) to the USB MEMORY port (p. 10).
Preparing to record
1. Connect a USB ash drive (sold separately) to the USB
MEMORY port (p. 10).
* Audio data cannot be saved into internal memory.
2. Hold down the [REC] button and press the [–] [+] buttons
to select “Audio.”
Operation Guide Getting Ready Performing Recording Registrations Settings
3. Select the tone that you want to play on the keyboard.
(p. 14)
4. If desired, you can select an accompaniment to be played
while you’re recording.
MEMO
Refer to “Selecting and Playing a Song” (p. 22) if you want to select
a song, or “Selecting and Playing a Rhythm” (p. 19) if you want to
select a rhythm.
* You cannot record an audio le as an accompaniment.
5. Start the metronome if desired (p. 16).
6. Press the [REC] button.
The display shows the message “New Song.”
The [REC] button lights up, the [
FP-50 enters recording-standby mode.
If you decide not to record, press the [REC] button once again.
MEMO
If you select a song in step 4 that has already been recorded,
press the [+] button.
] button blinks, and the
25
Appendix
Page 26

Recording Your Performances
Starting and stopping recording
1. Press the [ ] button.
Recording starts and the [REC] and [ ] buttons light.
2. Press the [ ] button.
Recording stops, and the save conrmation screen appears.
MEMO
• When an ending is playing and the rhythm stops, or when
performing until the end of a song, recording continues so that
the nal sustained sound is recorded, and therefore recording
does not stop automatically.
• If you want to check your performance, press the [
button in the save conrmation screen to start playback.
Saving a recorded performance
1. Press the [ ] (FAST) button.
The recording is saved on the USB ash drive.
By default, the recorded song is given the name “AUDIO.”
Setting the Save Destination and Song Name
You can select the save destination and song name for your
recording.
1. Conrm that the save conrmation screen is displayed,
and press the [METRONOME] button.
2. Press the [–] [+] buttons to select the desired storage
location.
Display Storage location
U (User) Internal memory
S (USB) USB ash drive
* Audio data cannot be saved in internal memory.
* “S (USB)” is available only if a USB ash drive (sold separately) is
]
connected to the USB MEMORY port.
3. Press the [ ] (FAST) button.
The selection screen appears, so that you can set the destinationside song number for the recording.
NOTE
Do NOT turn o the power or disconnect the USB ash drive
while “Working.” is displayed.
MEMO
You can select the save location and song name for your
recording (p. 26).
Erasing a recorded performance
1. Press the [ ] (SLOW) button.
A conrmation message appears.
If you decide not to erase the performance, press the [ ] (SLOW)
button once again.
2. Press the [ ] (FAST) button.
The recording is erased.
Listening to a recorded performance
1. Press the [ ] button.
Playback starts from the beginning of the recorded performance.
4. Press the [–] [+] buttons to select the song number at the
save destination.
If a song name is displayed when you select a song number, a song
has already been saved in that number. If you select a song number
that already contains a song, the recorded song will be overwritten.
If you do not want to overwrite the previously recorded song, select
a song number that displays “(Empty)” as the song name.
5. Press the [ ] (FAST) button.
The Entry screen appears, where you can enter the desired song
name.
6. Change the song name.
Button Operation
[–] [+] buttons Change the character.
[
] [ ] (SLOW/FAST)
buttons
* Note that character availability varies according to whether you
are saving an SMF le or an audio le.
If you decide not to save the song, press the [REC] button.
Select the character to change.
26
7. Press the [METRONOME] button.
The song is saved.
NOTE
Do NOT turn o the power or disconnect the USB ash drive
while “Working.” is displayed.
Page 27

Converting an SMF Recording into an
Recording Your Performances
7. Press the [ ] button.
The song plays back, and conversion begins.
Operation Guide Getting Ready Performing Recording Registrations Settings
Audio Recording
Converting from SMF to audio allows you to listen to the recordings
on your computer. You can also use your computer to burn the
song to a music CD, or upload it to the Internet.
Copying an audio recording to
your computer
Use computer software (such as
iTunes) to burn song onto CDs.
WAV
Songs recorded on the FP-50 can be moved or
copied to your computer using a USB ash drive.
To listen an audio recording, just connect the USB ash drive
to your computer and then select and start the song.
To listen to an SMF recording on your computer, you should
rst convert it into an audio (WAV) le.
The FP-50 converts SMF les into 16-bit, 44.1 kHz WAV les.
You can use your computer to burn the audio les onto a CD,
or upload them to the Internet.
Page 28
MEMO
If, during conversion, you play the FP-50 (using its keyboard or
by controlling it with an external MIDI device) or those sounds
will also be converted.
NOTE
• Do NOT turn o the power or disconnect the USB ash drive
while conversion is in progress.
• Note that some SMF les may fail to produce perfect audio
conversions.
8. Press the [ ] button.
Song playback stops, and the FP-50 converts the section that was
just played. A conrmation message asks whether to save or erase
the le.
9. Choose whether to save or erase the converted le (p. 26).
1. Connect a USB ash drive (sold separately) to the USB
MEMORY port (p. 10).
* Audio data cannot be saved into internal memory.
2. Press the [SONG] button.
3. Select the song that you want to convert (p. 22).
4. Hold down the [REC] button and press the [–] [+] buttons
to select “Audio.”
5. Press the [REC] button.
The display shows the message “New Song.”
The [REC] button lights up, the [
FP-50 enters recording-standby mode.
If you decide not to record, press the [REC] button once again.
] button blinks, and the
6. Press the [+] button and select the song again you
selected in step 3.
Appendix
27
Page 28

Burning an Audio Recording (WAV le) onto a CD
After saving an audio recording to a USB ash drive,
you can copy the recording to your computer and
burn it to a CD. If you want to burn a CD from a song
that you recorded as an SMF, you must rst convert
it to audio (WAV le) (p. 27).
WAV
To burn music from your computer to a CD, you will
need to use appropriate software, such as “iTunes.”
For instructions, refer to the user manual or online
help for the software you are using.
Copying a recorded song to your computer
1. Connect the USB ash drive
containing the song to your
computer.
If you’re using Windows, a
“Removable disk” icon will appear in “Computer.” If you’re using
Mac OS X, a “NO NAME” icon will appear on the desktop.
2. Double-click the icon.
The screen lists the contents of the USB drive.
The list includes the audio recording of the song (as a WAV le).
Using iTunes to burn the song to CD
The following explanation uses iTunes 10 for Windows. If you’re
using a dierent version or other software, refer to its online help or
owner’s manual.
Songs recorded on the FP-50 can be
copied to your computer using a USB
ash drive.
Use computer software (such as
iTunes) to burn the song to a CD.
3. Copy the song (WAV le) that you want to burn to your
computer’s desktop or another location where you can
easily nd it.
Copy to desktop
5. Select the playlist that you created in step 2, then open
the [File] menu and click [Burn Playlist to Disc].
1. From the Start menu, click [All Programs] - [iTunes].
2. From the iTunes [File] menu, click [New Playlist] to create
a playlist.
New playlist
3. From the desktop (or other location) where you copied
it, drag and drop the song (WAV le) to add it to the
playlist you just created in step 2.
Drag & drop
4. Insert a blank CD-R into your computer.
6. Enter the appropriate settings in the disc-creation dialog
box, and then click the [Burn] button.
28
Page 29

Saving Performance Settings (Registrations)
What Is a Registration?
You can use the [1]–[4] buttons as registration buttons, and save
settings such as those for the tones you’ve selected, the Dual Play or
Split Play setting, and Rhythm settings.
Each set of these settings is called a “Registration.”
After saving these registrations, you can recall them instantly
during a performance.
The FP-50 has four registration buttons ([1]–[4]), and you can save
ve dierent registrations under each button. This means that you
can save as many as 20 registrations.
An entire group of 20 registrations is called a “Registration Set.”
5
Variation
4
3
2
1
1-5 2-5 3-5 4-5
1-1 2-1 3-1 4-1
20 registrations
Registration Set
=
Recalling a Registration
You can easily recall settings you’ve saved as registrations using the
[1]–[4] buttons.
1. Press the [SPLIT] and [TRANSPOSE] buttons
simultaneously.
The rst time you access the registration screen after turning on the
power, a screen like the following will appear.
2. Press a number button ([1]–[4]) to choose the location
where the desired registration is saved.
Operation Guide Getting Ready Performing Recording Registrations Settings
MEMO
• Within this manual, the “
saved in a registration.
• For more about the settings saved in a registration, refer to
“Settings Saved in Registrations” (p. 49).
• You can save registration sets to the FP-50’s internal memory or
to a USB ash drive (sold separately; p. 30).
” icon identies settings that are
Variation
Button number
3. Press the [–] [+] buttons to select the registration
variation.
The settings change accordingly.
MEMO
• You can also use a pedal to recall registrations (p. 40).
• You can reload registration sets that you’ve saved to internal
memory or a USB ash drive (p. 31).
2929
Appendix
Page 30
Saving Performance Settings (Registrations)
Saving Current Settings into a Registration
Saving Performance Settings as Registrations (Buttons [1]–[4]).
With the factory settings, recommended performance settings have
already been stored. If you want to create an original registration,
we suggest that you start with registrations 4-1 through 4-5.
NOTE
When you save a registration into a location, it will overwrite any
registration already stored at that location.
1. Set the desired performance settings: tone, rhythm, and
so on.
2. While holding down the [SPLIT] and [TRANSPOSE]
buttons simultaneously, press a button from [1] to [4] to
select the registration.
Saving a Registration Set (Save Registration Set)
You can save all registrations held in registration memory ([1]–[4])
into a registration set in internal memory or on a USB ash drive.
* If you’re saving to a USB ash drive, connect your USB ash drive
to the USB MEMORY port before proceeding.
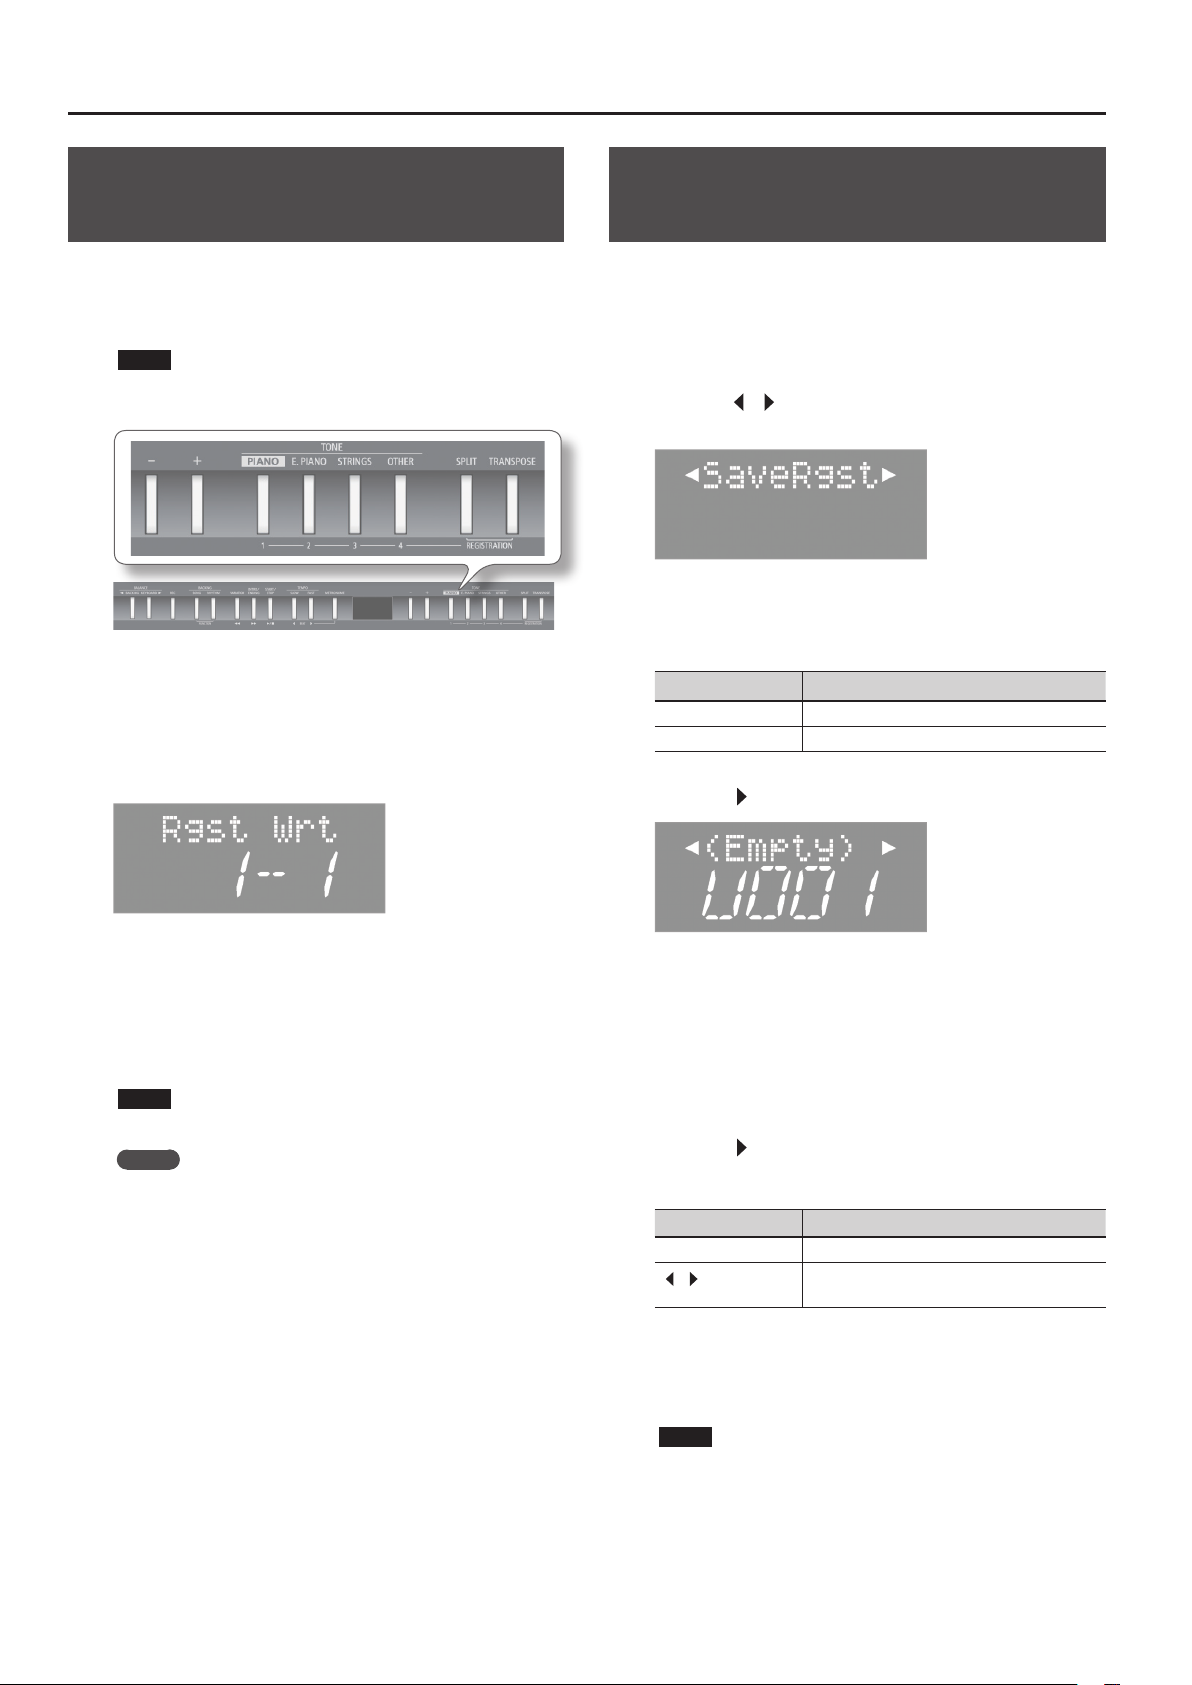
1. Press the [SONG] and [RHYTHM] buttons simultaneously.
2. Press the [ ] [ ] (SLOW/FAST) buttons to select
“SaveRgst.”
3. Press the [METRONOME] button.
4. Press the [–] [+] buttons to select the destination memory.
Display Explanation
U (User) Internal memory
S (USB) USB ash drive
5. Press the [ ] (FAST) button.
3. While continuing to hold down the [SPLIT] and
[TRANSPOSE] buttons simultaneously, press a button the
[–] [+] buttons to select a registration variation.
4. Release the [SPLIT] and [TRANSPOSE] buttons.
The performance settings are saved.
NOTE
Do NOT turn o the power while “Working.” is displayed.
MEMO
You can reset all registrations to their factory defaults. For
details, refer to “Restoring the Factory Settings (Factory Reset)”
(p. 35).
6. Press the [–] [+] buttons to select the destination number.
If you see a registration name next to the number, the number is
already in use.
If you choose to save to a used number, your new registration will
replace the existing registration.
If you don’t want to erase an existing registration, save to a number
where the name column shows “(Empty).”
7. Press the [ ] (FAST) button.
8. Renaming the registration set.
Button Operation
[–] [+] buttons Change the character.
[
] [ ] (SLOW/FAST)
buttons
If you decide to cancel, press the [REC] button.
Select the character to change.
9. Press the [METRONOME] button.
The registration set is saved.
NOTE
Do NOT turn o the power while “Working.” is displayed.
10. Press the [SONG] and [RHYTHM] buttons simultaneously
to nish.
30
Page 31

Loading a Saved Registration Set (Load
Saving Performance Settings (Registrations)
8. Press the [ ] (FAST) button.
The registration set will be loaded into buttons [1]–[4] .
Operation Guide Getting Ready Performing Recording Registrations Settings
Registration Set)
Load a registration set from internal memory or a USB ash drive
into the registration buttons ([1]–[4]).
* If you want to load a registration set from a USB ash drive,
connect your USB ash drive to the USB MEMORY port before
proceeding.
NOTE
Note that when you load a registration set, it will overwrite (and
erase) all of the registrations already in registration memory.
If you wish to retain your existing registrations, save them to
internal memory or a USB ash drive.
1. Press the [SONG] and [RHYTHM] buttons simultaneously.
2. Press the [ ] [ ] (SLOW/FAST) buttons to select
“LoadRgst.”
3. Press the [METRONOME] button.
4. Press the [–] [+] buttons to select the destination memory.
Display Explanation
U (User) Internal memory
S (USB) USB ash drive
NOTE
Do NOT turn o the power while “Working.” is displayed.
9. Press the [SONG] and [RHYTHM] buttons simultaneously
to nish.
Copying a Saved Registration Set (Copy Registration Set)
You can copy saved registration sets from internal memory to a USB
ash drive, or from a USB ash drive to internal memory.
1. Connect a USB ash drive (sold separately) to the USB
MEMORY port (p. 10).
2. Press the [SONG] and [RHYTHM] buttons simultaneously.
3. Press the [ ] [ ] (SLOW/FAST) buttons to select
“CopyRgst.”
* The following steps are not available if there are no registration
sets saved in internal memory,or if there is no USB ash drive is
connected.
4. Press the [METRONOME] button.
5. Press the [ ] (FAST) button.
6. Use the [–] [+] buttons to select the registration set you
want to load.
7. Press the [METRONOME] button.
A conrmation message appears.
If you decide to cancel, press the [ ] (SLOW) button.
5. Use the [–] [+] buttons to select the copy source and
destination memory locations.
Display Explanation
U
S
U
S
Copy from internal memory to a USB ash drive.
Copy from a USB ash drive to internal memory.
6. Press the [ ] (FAST) button.
7. Use the [–] [+] buttons to select the registration set to be
copied.
If you select “ALL,” all registration sets will be copied.
The registration sets will be copied to numbers in which no
registration set is saved, starting with the number you selected as
the copy-destination.
31
Appendix
Page 32

Saving Performance Settings (Registrations)
8. Press the [ ] (FAST) button.
Deleting a Saved Registration Set (Delete Registration Set)
Here’s how to delete a saved registration set from internal memory
or USB ash drive.
9. Press the [–] [+] buttons to select the copy-destination
number.
If you see a registration name next to the number, the number is
already in use.
If you choose to copy to a used number, your new registration will
replace the existing registration.
If you don’t want to erase an existing registration, save to a number
where the name column shows “(Empty).”
If you decide to cancel, press the [REC] button.
10. Press the [METRONOME] button.
The registration set is copied.
NOTE
Do NOT turn o the power while “Working.” is displayed.
11. Press the [SONG] and [RHYTHM] buttons simultaneously
to nish.
1. Press the [SONG] and [RHYTHM] buttons simultaneously.
2. Press the [ ] [ ] (SLOW/FAST) buttons to select “Del Rgst.”
* The following steps are not available if there are no registration
sets saved in internal memory, or if no USB ash drive is
connected.
3. Press the [METRONOME] button.
4. Press the [–] [+] buttons to select the memory where the
set you want to delete is located.
Display Explanation
U (User) Internal memory
S (USB) USB ash drive
5. Press the [ ] (FAST) button.
6. Press the [–] [+] buttons to select the registration set that
you want to delete.
7. Press the [METRONOME] button.
A conrmation message appears.
If you decide to cancel, press the [ ] (SLOW) button.
8. Press the [ ] (FAST) button.
The selected registration set is deleted.
NOTE
Do NOT turn o the power while “Working.” is displayed.
9. Press the [SONG] and [RHYTHM] buttons simultaneously
to nish.
32
Page 33

Convenient Functions
Making the Power Automatically
Turn O After a Time (Auto O)
With the factory settings, the unit’s power will automatically be
switched o a certain amount of time after you stop playing or
operating the unit.
If you don’t need the power to turn o automatically, set “Auto O”
to the “OFF” setting as described below.
MEMO
This setting is automatically saved in the FP-50.
1. Press the [SONG] and [RHYTHM] buttons simultaneously.
2. Press the [ ] [ ] (SLOW/FAST) buttons to select “Auto O.”
3. Press the [–] [+] buttons to adjust the value.
Value Explanation
OFF The power will not turn o automatically.
10
30 (default)
240
The power will automatically turn o if no
operation is performed for 10 minutes.
The power will automatically turn o if no
operation is performed for 30 minutes.
The power will automatically turn o if no
operation is performed for 240 minutes (4 hours).
Retaining Settings After Powero (Memory Backup)
Temperament settings, equalizer settings, and other settings reset
to their default values when the FP-50 is turned on.
You can automatically restore the desired settings if you save them
in internal memory.
MEMO
In this manual, the “
Memory Backup function.
REFERENCE
For a list of settings saved by Memory Backup, see “Items Stored
by Memory Backup” (p. 49).
1. Press the [SONG] and [RHYTHM] buttons simultaneously.
2. Press the [ ] [ ] (SLOW/FAST) buttons to select “Backup.”
3. Press the [METRONOME] button.
A conrmation message appears.
” icon indicates settings retained by the
Operation Guide Getting Ready Performing Recording Registrations Settings
4. Press the [SONG] and [RHYTHM] buttons simultaneously
to nish.
If you decide to cancel, press the [ ] (SLOW) button.
4. Press the [ ] (FAST) button to select “Y” (Yes).
Memory Backup will be carried out.
NOTE
Do NOT turn o the power while “Working.” is displayed.
5. Press the [SONG] and [RHYTHM] buttons simultaneously
to nish.
3333
Appendix
Page 34

Convenient Functions
Copying a Saved Song (Copy Song)
You can copy a saved song from internal memory to a USB ash
drive, or from a USB ash drive to internal memory.
* Audio les cannot be copied.
1. Connect a USB ash drive (sold separately) to the USB
MEMORY port (p. 10).
2. Press the [SONG] and [RHYTHM] buttons simultaneously.
3. Press the [ ] [ ] (SLOW/FAST) buttons to select
“CopySong.”
9. Press the [–] [+] buttons to select the copy-destination
number.
If a song name is displayed when you select a song number, a song
has already been saved in that number. If you select a song number
that already contains a song, the recorded song will be overwritten.
If you do not want to overwrite the previously recorded song, select
a song number that displays “(Empty)” as the song name.
If you decide to cancel, press the [REC] button.
10. Press the [METRONOME] button.
The selected song is copied.
NOTE
Do NOT turn o the power or disconnect the USB ash drive
while “Working.” is displayed.
11. Press the [SONG] and [RHYTHM] buttons simultaneously
to nish.
4. Press the [METRONOME] button.
The copy song screen appears.
5. Use the [–] [+] buttons to select the source memory and
the destination memory.
Display Explanation
U
S
U
S
Copy from internal memory to a USB ash drive.
Copy from a USB ash drive to internal memory.
6. Press the [ ] (FAST) button.
7. Press the [–] [+] buttons to select the song to copy.
MEMO
If you select “ALL,” the FP-50 will copy all songs (other than audio
les) from the source side.
8. Press the [ ] (FAST) button.
Deleting a Saved Song (Delete Song)
Here’s how to delete a song that you saved into internal memory or
on a USB ash drive.
* If you want to delete a song from a USB ash drive, connect it to
the USB MEMORY port before proceeding.
1. Press the [SONG] and [RHYTHM] buttons simultaneously.
2. Press the [ ] [ ] (SLOW/FAST) buttons to select “Del
Song.”
3. Press the [METRONOME] button.
The delete song screen appears.
4. Press the [–] [+] buttons to select the memory that holds
the song you want to delete.
Display Explanation
U (User) Internal memory
S (USB) USB ash drive
34
5. Press the [ ] (FAST) button.
Page 35

6. Press the [–] [+] buttons to select the song that you want
to delete.
Convenient Functions
Restoring the Factory Settings
Operation Guide Getting Ready Performing Recording Registrations Settings
7. Press the [METRONOME] button.
A conrmation message appears.
If you decide to cancel, press the [ ] (SLOW) button.
8. Press the [ ] (FAST) button.
The selected song is deleted.
NOTE
Do NOT turn o the power or disconnect the USB ash drive
while “Working.” is displayed.
9. Press the [SONG] and [RHYTHM] buttons simultaneously
to nish.
Disabling the Buttons (Panel Lock)
The Panel Lock feature disables all buttons.
You can use this feature to protect against accidental button
presses during a performance.
1. Hold down the [TRANSPOSE] button until “Lock” appears
in the display.
The Panel Lock feature disables all buttons.
(Factory Reset)
Use this feature to return all settings stored in Memory Backup (p. 33)
to their factory values. This feature is called “Factory Reset.”
NOTE
A factory reset returns all of your saved settings to their factory
values.
MEMO
Songs and registration sets that are saved in the internal
memory or on a USB ash drive are not erased when you
execute a factory reset.
If you want to erase all songs and registration sets from internal
memory or from a USB ash drive, refer to “Reformatting
Memory (Format Media)” (p. 36).
1. Press the [SONG] and [RHYTHM] buttons simultaneously.
2. Press the [ ] [ ] (SLOW/FAST) buttons to select “FctReset.”
3. Press the [METRONOME] button.
The factory reset screen appears.
2. To unlock the panel, hold down the [TRANSPOSE] button
until “Lock” disappears.
Panel lock is also canceled when the FP-50 is turned o.
* If you activate Panel Lock while a song or rhythm is playing,
playback will stop.
* Under the following circumstances, Panel Lock cannot be
activated.
• When the FP-50 is in Function mode (p. 37).
• When recording a performance
If you decide to cancel, press the [ ] (SLOW) button.
4. Press the [ ] (FAST) button.
The memory is reset to its factory values.
Once the memory has been reset, “END” is displayed.
NOTE
Do NOT turn o the power while “Working.” is displayed.
5. Turn the power o, then on again (p. 13).
Appendix
35
Page 36

Convenient Functions
Reformatting Memory (Format
6. Press the [ ] (FAST) button.
The memory is formatted.
Media)
You can completely erase all songs that were saved in
internal memory or on a USB ash drive.
NOTE
• All data saved in internal memory or on the USB ash
drive will be erased when you initialize the media.
This erased data cannot be recovered. Please recheck
the content of the memory before formatting it.
• If you’re using new USB ash drive (sold separately) with the
FP-50 for the rst time, you’ll need to initialize (format) the USB
ash drive before using it. The FP-50 can’t use USB ash drive
that has not been initialized.
• If you see “Error” on the screen, please refer to “Error Messages”
(p. 49).
• If you want to reformat a USB drive, please connect it to the USB
MEMORY port before proceeding.
MEMO
Formatting the internal memory will not erase settings that are
stored elsewhere.
If you wish to erase these other settings, perform a factory reset
(p. 35).
1. Press the [SONG] and [RHYTHM] buttons simultaneously.
2. Press the [ ] [ ] (SLOW/FAST) buttons to select “Format.”
NOTE
Do NOT turn o the power or disconnect the USB ash drive
while “Working.” is displayed.
7. Press the [SONG] and [RHYTHM] buttons simultaneously
to nish.
3. Press the [METRONOME] button.
The format media screen appears.
4. Press the [–] [+] buttons to select the memory you want to
format.
Display Explanation
User Internal memory
USB USB ash drive
5. Press the [METRONOME] button.
A conrmation message appears.
If you decide to cancel, press the [ ] (SLOW) button.
36
Page 37

Detailed Function Settings (Function Mode)
How to Use Function Mode
You can use Function Mode to congure performance and recording settings.
1. Press the [SONG] and [RHYTHM] buttons simultaneously.
FP-50 enters Function Mode.
2. Press the [ ] [ ] (SLOW/FAST) buttons to select the setting you want to change.
MEMO
Depending on the item you select, an additional screen may be displayed.
3. Press the [–] [+] buttons to adjust the value.
A description of the setting and its value are displayed.
To change other settings, repeat steps 2 and 3.
4. Press the [SONG] and [RHYTHM] buttons simultaneously to nish.
MEMO
Settings return to their default values as soon as you turn o the power.
You can save any changes you’ve made by using registrations (p. 29) and the
Memory Backup function (p. 33).
Parameter Value Explanation
KeyTouch
(Key Touch)
Ambience
Lets you adjust how the keyboard responds to the performer’s playing force.
REFERENCE
You can add a pleasant reverberation to the sounds of the FP-50, producing the impression that you are performing in a concert hall.
REFERENCE
For details, refer to “Adjusting the Keyboard Response (Key Touch)” (p. 18).
For details, refer to “Adding Reverberation (Ambience)” (p. 17).
Operation Guide Getting Ready Performing Recording Registrations Settings
: Indicates settings saved in registrations (p. 29).
: Indicates settings retained by the Memory Backup function (p. 33).
Tuning
(Master Tuning)
Temprmnt
(Temperament)
Matching the Pitch with Other Instruments (Master Tuning)
When playing ensemble with other instruments and in other such instances, you can match the reference pitch with another instrument.
The reference pitch generally refers to the pitch of the note that’s played when you nger the middle A key. For a cleaner ensemble sound
while performing with one or more other instruments, ensure that each instrument’s standard pitch is in tune with that of the other
instruments.
415.3–440.0–466.2 Hz
Changing the Tuning System (Temperament)
You can play classical music such as baroque pieces using their original tuning.
Most modern songs are composed and played with the assumption that equal temperament (the most common tuning in use today) will
be used, but when classical music was composed, there were a wide variety of other tuning systems in existence. Playing a composition
with its original tuning lets you enjoy the sonorities of the chords that the composer originally intended.
EQU (Equal)
MAJ (Just (Major))
MIN (Just (Minor))
PYTH (Pythagorean)
KIRN (Kirnberger)
MEAN (Meantone) This scale makes some compromises in just intonation, enabling transposition to other keys.
(Werckmeister)
WERC
ARB (Arabic) This tuning is suitable for the music of Arabia.
In this tuning, each octave is divided into twelve equal steps. Every interval produces about the same amount
of slight dissonance.
This tuning eliminates ambiguities in the fths and thirds. It is unsuited to playing melodies and cannot be
transposed, but is capable of beautiful sonorities.
The Just tunings dier from major and minor keys. You can get the same eect with the minor scale as with the
major scale.
This tuning, devised by the philosopher Pythagoras, eliminates dissonance in fourths and fths.
Dissonance is produced by third-interval chords, but melodies are euphonious.
This is an improvement of the Meantone and Just tunings that provides a high degree of freedom of modulation. Performances are possible in all keys (III).
This temperament combines the Meantone and Pythagorean tunings. Performances are possible in all keys
(rst technique, III).
Tmpr Key
(Temperament Key)
Specifying a Song’s Tonic (Temperament Key)
When playing with tuning other than equal temperament, you need to specify the temperament key for tuning the song to be performed
(that is, the note that corresponds to “Do” for a major key or to “La“ for a minor key).
If you choose an equal temperament, there’s no need to select a temperament key.
C–B
Appendix
3737
Page 38

Detailed Function Settings (Function Mode)
Parameter Value Explanation
Personalizing Your Piano (Piano Tone)
Lets you personalize your piano sound by adjusting various elements that aect the sound: the piano’s physical strings, the
resonance produced by the pedals, the sound of hammers striking the strings, and more.
Stretch
(Stretch Tuning)
Dmpr Res
(Damper Resonance)
Strg Res
(String Resonance)
KO Res
(Key O Resonance)
Cabinet
(Cabinet Resonance)
Sound Brd
(Soundboard Behavior)
OFF, ON
OFF, 1–10
OFF, 1–10
OFF, 1–10
OFF, 1–10
OFF, 1–10
For details about how to make function
mode settings, see p. 37.
This lets you specify the amount of “stretch tuning,” a tuning method specically for pianos, in which the high
range is tuned slightly sharper, and the low range is tuned slightly atter.
If you select “ON,” a standard tuning curve created for the FP-50 will be used.
This adjusts the damper resonance of the acoustic piano sound (the sympathetic vibration produced in strings
other than those actually played when you press the damper pedal).
Higher settings will make the sympathetic vibration louder.
This adjusts the string resonance of the acoustic piano sound (the sympathetic vibrations of strings for
previously played notes that occur when you play another note).
Higher settings will make the sympathetic vibration louder.
This adjusts sympathetic vibrations such as an acoustic piano’s key-o sound (the subtle sound that occurs
when you release a note).
Higher settings will make the sympathetic vibration louder.
Adjusts the body resonance of the grand piano itself.
Higher values will produce a larger body resonance.
When you play a chord, this setting improves the clarity of the individual notes in the chord, creating a more
beautiful resonance.
Higher settings produce a clearer resonance.
Trnspose
(Transpose Mode)
Dual Bal
(Dual Balance)
SplitBal
(Split Balance)
Oct Shft
(Octave Shift)
Rhy.Part
(Rhythm Part)
Specifying What to Transpose (Transpose Mode)
This setting species what the transpose will aect. You can use the transpose to change the pitch of both the song and the keyboard, the
pitch of only the song, or the pitch of only the keyboard.
KBD Keyboard only
SONG Song play only
BOTH Both keyboard play and song play
Adjusting the Dual Play Volume Balance (Dual Balance)
You can adjust the volume balance between the two tones (tone 1 and tone 2) used for Dual Play (p. 14).
MEMO
9-1 (tone 1 is louder)–9-9 (same volume)–1-9 (tone 2 is louder)
During Dual play, you can also adjust the volume balance between tone 1 and tone 2 by holding down the TONE button
and pressing the [ BACKING] or [KEYBOARD ] button.
Adjusting the Split Play Volume Balance (Split Balance)
You can adjust the volume balance between the two tones (right-hand tone and left-hand tone) used for Split Play (p. 15).
MEMO
9-1 (left-hand tone is louder)–9-9 (same volume)–1-9 (right-hand tone is louder)
During Split play, you can also adjust the volume balance between the right-hand tone and left-hand tone by holding
down the TONE button and pressing the [
BACKING] or [KEYBOARD ] button.
Changing the Pitch of the Tone in Octave Steps (Octave Shift)
You can change the pitch of the Tone 2 in Dual Play (p. 14) and Left-hand tone in Split Play (p. 15) an octave at a time.
Altering the pitch in one-octave units in this way is called “Octave Shift.”
For example, you can raise the pitch of the Left-hand tone to the same pitch of the Right-hand tone in Split Play.
-2–0–+2 (octave)
You can select a drum-only rhythm part.
REFERENCE
For details, refer to “Selecting Rhythm Parts” (p. 21).
38
Page 39

For details about how to make function
mode settings, see p. 37.
Detailed Function Settings (Function Mode)
Parameter Value Explanation
Chord Recognition When Split Is On (Split-On Chord Recognition)
Sets how the FP-50 recognizes rhythm chords while Split Play is on.
SplOnRcg
(Split On Chord
Recognize)
MEMO
STD Normal chord recognition.
INT
When Split Play is o, chords are recognized as follows.
While the damper pedal is not pressed, the FP-50 recognizes a chord when 3 or more keys are struck.
While the damper pedal is pressed, the FP-50 recognizes a chord when 1–5 keys are struck.
Play chords even when basic chord tones are missing. Allows you to generate chords with very simple
keyboard playing.
REFERENCE
Allows you to specify chords with very simple keyboard playing.
Major: Just play the chord root.
Minor: Play the root and a black key to the left of the root.
Seventh: Play the root and a white key to the left of the root.
Minor Seventh: Play the root and both a white key and a black key to the left of the root.
EQ Sw
(Equalizer Switch)
EQ Edit
(Equalizer Edit)
EASY
Turns the equalizer on and o.
REFERENCE
Modies the tone color by boosting or attenuating dierent frequency ranges.
REFERENCE
For details, refer to “Adjusting the Tone Color (Equalizer)” (p. 17).
For details, refer to “Adjusting the Tone Color (Equalizer)” (p. 17).
Changing How the Pedal Eects Are Applied (Damper Pedal Part)
DPdl Prt
(Damper Pedal Part)
When you press the pedal connected to the DAMPER/R jack during Dual Play or Split Play, the pedal eect is normally applied to both tones,
but you can also select the tone to which the eect is to be applied.
R+L All enabled
R Applied only to the Tone 1 (in Dual Play mode)/Right-hand Tone (in Split Play mode)
L Applied only to the Tone 2 (in Dual Play mode)/Left-hand Tone (in Split Play mode)
Operation Guide Getting Ready Performing Recording Registrations Settings
For details about chord ngering, see “Chord Fingering List” (p. 53).
CPdl Fnc
(Center Pedal Function)
Changing the Function of the Center Pedal (Center Pedal Function)
Use this feature to change the function of the pedal connected to the SOSTENUTO/C jack.
SOST (Sostenuto) *1 Sets function to sostenuto pedal.
SOFT *2 Sets function to soft pedal.
EXPR (Expression) *3
ST.SP (Start/Stop)
IN.EN (Intro/Ending) *4 The pedal will have the same function as the [INTRO/ENDING] button.
VARI (Variation) *4 The pedal will have the same function as the [VARIATION] button.
RES.S
(Rhythm Reset/Start) *4
HOLD (Chord Hold) *4 Turns chord holding on and o.
FILL (Fill-In) *4 Inserts a ll-in.
L.BSS (Leading Bass)
B. UP (Bend Up) *3 Pitch rises when pedal is depressed.
B.DWN (Bend Down) *3 Pitch is lowered when pedal is depressed.
MOD (Modulation) *3 Vibrato is added when pedal is depressed.
*1 Only works on the Center Pedal Function.
*2 Only works on the Left Pedal Function.
*3 Works only on the tone set as the corresponding pedal part (CPdl Prt or LPdl Prt).
*4 Available when using a rhythm.
Allows control of the volume. You may nd it convenient to connect an expression pedal (EV-5: sold separately).
Does not change the volume of rhythm play or recorded performance play.
When the [RHYTHM] button is lit: Starts and stops rhythm play (same function as the [START/STOP] button).
When the [SONG] button is lit: The pedal will have the same function as the [
When you depress the pedal, the selected rhythm begins playing from the top.
This is convenient when you lose the beat or forget where you are in the song.
Allows control of the on/o of leading bass function. It is turned on while the pedal is depressed.
What is the leading bass function?
The function that sounds the lowest note of a ngered chord as the bass tone is called “Leading Bass.”
* The Leading Bass feature is always on while Split is o.
] button.
CPdl Prt
(Center Pedal Part)
Changing How the Pedal Eects Are Applied (Center Pedal Part)
When you press the pedal connected to the SOSTENUTO/C jack during Dual Play or Split Play, the pedal eect is normally applied to both
tones, but you can also select the tone to which the eect is to be applied.
R+L All enabled
R Applied only to the Tone 1 (in Dual Play mode)/Right-hand Tone (in Split Play mode)
L Applied only to the Tone 2 (in Dual Play mode)/Left-hand Tone (in Split Play mode)
Appendix
39
Page 40

Detailed Function Settings (Function Mode)
Parameter Value Explanation
For details about how to make function
mode settings, see p. 37.
LPdl Fnc
(Left Pedal Function)
LPdl Prt
(Left Pedal Part)
Rgst.Pdl
(Registration Pedal Shift)
AudTrans
(Audio Transpose)
C Cancel
(Center Cancel)
Changing the Function of the Left Pedal (Left Pedal)
Use this feature to change the function of the pedal connected to the SOFT/L jack.
REFERENCE
For a list of available functions, refer to “Changing the Function of the Center Pedal (Center Pedal Function)” (p. 39).
Changing How the Pedal Eects Are Applied (Left Pedal Part)
When you press the pedal connected to the SOFT/L jack during Dual Play or Split Play, the pedal eect is normally applied to both tones,
but you can also select the tone to which the eect is to be applied.
R+L All enabled
R Applied only to the Tone 1 (in Dual Play mode)/Right-hand Tone (in Split Play mode)
L Applied only to the Tone 2 (in Dual Play mode)/Left-hand Tone (in Split Play mode)
Using a Pedal to Switch Registrations (Pedal Shift)
You can assign a pedal to successively switch registrations. Each time you press the pedal, you will switch to the next registration.
OFF
L.PDL
C.PDL
The selected audio le can be transposed for playback.
* For some songs, an audio transpose setting other than 0 may aect the tone quality of the sound.
REFERENCE
You can minimize the playback of sounds located in the center of the sound eld (e.g., vocals or melody instruments) of the selected audio
le.
* For some songs, sounds located in the center might not disappear completely, or the tone color of the sound might be aected.
REFERENCE
For details, refer to “Transposing an Audio File (Audio Transpose)” (p. 23).
For details, refer to “Lower the Level of an Audio File’s Central Sound (Center Cancel)” (p. 23).
Pressing a pedal connected to the SOFT/L jack or SOSTENUTO/C jack will not switch registrations. The
functions assigned to the SOFT/L jack and SOSTENUTO/C jack will be available for use (p. 39).
The pedal connected to the SOFT/L jack can be used only for switching registrations. In this case, the function
assigned to the SOFT/L jack cannot be used.
The pedal connected to the SOSTENUTO/C jack can be used only for switching registrations. In this case, the
function assigned to the SOSTENUTO/C jack cannot be used.
Selecting the Recording Format (Recording Mode)
Rec Mode
(Recording Mode)
CopySong (Copy Song)
Del Song (Delete Song)
SaveRgst
(Save Regist. Set)
LoadRgst
(Load Regist. Set)
CopyRgst
(Copy Regist. Set)
Del Rgst
(Delete Regist. Set)
Format (Format Media)
Select whether performances are recorded in SMF format or audio format.
MEMO
SMF
Audio Record as audio data. The recorded song can be used in your computer.
Use this function to copy a song from internal memory to a USB ash drive, or from a USB ash drive to internal memory.
REFERENCE
Use this function to delete a song from internal memory or a USB ash drive.
REFERENCE
You can save all registrations held in registration memory ([1]–[4]) into a registration set that is saved in internal memory or to a USB ash
drive.
REFERENCE
Load a registration set from internal memory or a USB ash drive into the registration buttons ([1]–[4]).
REFERENCE
Copy a saved registration set from internal memory to a USB ash drive, or from a USB ash drive to internal memory.
REFERENCE
Delete a saved registration set from internal memory or a USB ash drive.
REFERENCE
Formats internal memory or a USB ash drive, deleting all songs stored in that memory.
REFERENCE
You can also switch the recording mode by holding down the [REC] button and pressing the [–] [+] buttons.
Record as MIDI data. This data holds information about each note played (its pitch, duration, force, etc.). It does
not hold any actual audio data.
For details, refer to “Copying a Saved Song (Copy Song)” (p. 34).
For details, refer to “Deleting a Saved Song (Delete Song)” (p. 34).
For details, refer to “Saving a Registration Set (Save Registration Set)” (p. 30).
For details, refer to “Loading a Saved Registration Set (Load Registration Set)” (p. 31).
For details, refer to “Copying a Saved Registration Set (Copy Registration Set)” (p. 31).
For details, refer to “Deleting a Saved Registration Set (Delete Registration Set)” (p. 32).
For details, refer to “Reformatting Memory (Format Media)” (p. 36).
Sending Tone-Change Information (Transmit MIDI Information)
When you switch registrations, the FP-50 simultaneously transmits the following: Program Change, Bank Select MSB, and Bank Select LSB.
You can also set the transmit channel.
RgstTxCh (Regist. Tx Ch.) OFF, 1–16 Sets the Program Change transmit channel.
Rgst.MSB
(Regist. Bank MSB)
Rgst.LSB
(Regist. Bank LSB)
Rgst.PC (Regist. PC) 1 (00)–128 (7F) Sets the Program Change number.
0 (00)–127 (7F) Sets the Bank Select MSB/LSB.
0 (00)–127 (7F) Sets the Bank Select MSB/LSB.
40
Page 41

For details about how to make function
mode settings, see p. 37.
Detailed Function Settings (Function Mode)
Parameter Value Explanation
Preventing Doubled Notes When Connected to a Sequencer (Local Control)
When you have a MIDI sequencer connected, set this parameter to Local O.
Since most sequencers have their Thru function turned on, notes you play on the
keyboard may be sounded in duplicate, or get dropped. To prevent this, you can
LocalCtl
(Local Control)
enable the “Local O ” setting, so that the keyboard and internal sound generator
are disconnected.
OFF
ON
Local Control is o.
The keyboard and composer are disconnected from the internal sound generator. Playing the keyboard will
not produce sound.
Local Control is on.
The keyboard and composer are connected to the internal sound generator.
MIDI Transmit Channel Settings (MIDI Transmit Channel)
MIDI Ch
(MIDI Transmit Channel)
This setting species the MIDI channel on which the FP-50 will transmit.
MIDI uses sixteen “MIDI channels,” which are numbered 1 through 16. By connecting MIDI devices and specifying the appropriate MIDI
channel for each device, you can play or select sounds on those devices.
The FP-50 will receive all sixteen channels (1–16).
1–16
Local Control
Sound Generator
MIDI
In
MIDI
Out
MIDI
sequencer
Operation Guide Getting Ready Performing Recording Registrations Settings
VC Mode
(Visual Control Mode)
Controlling Video Equipment (Visual Control Mode)
Visual Control is a function that lets you control images along with your performance. If you’ve set Visual Control mode to MVC or V-LINK,
playing the keyboard of the FP-50 will control the images produced by the Visual Control device connected to the FP-50 using a MIDI cable.
OFF Visual Control is o.
MVC MIDI Visual Control mode is selected.
VLNK V-LINK mode is selected.
What is MIDI visual control?
MIDI Visual Control is an internationally-used recommended practice that was added
to the MIDI specication so that visual expression could be linked with musical
performance. Video equipment that is compatible with MIDI Visual Control can
be connected to electronic musical instruments via MIDI in order to control video
equipment in tandem with a performance.
What is V-LINK?
V-LINK is Roland’s proprietary specication that allows visual expression to be
linked with musical performance.
Video equipment that is compatible with V-LINK can be connected to electronic
musical instruments via their MIDI ports, making it easy to enjoy a variety of visual
eects that are linked with the performance.
Connection examples
Connect a MIDI cable from the FP-50’s MIDI Out connector (p. 11) to the MIDI In connector of your Visual
Control compatible device.
* You’ll need a MIDI cable (sold separately) in order to connect the FP-50 to a device that supports Visual Control.
Visual control function chart
Playing the lowest 12 keys of the FP-50 (A0–G#1) will transmit the following MIDI messages.
Visual Control Function Transmitted MIDI Message Operation on FP-50
Switch images
CC0 (Bank Select): 0–4 Play black keys
Program Change: 1–7 Play white keys
MIDI OUT connector
MIDI IN connector
Visual Control
compatible
equipment
Appendix
41
Page 42

Detailed Function Settings (Function Mode)
Parameter Value Explanation
For details about how to make function
mode settings, see p. 37.
VC Ch
(Visual Control Channel)
USB Mode
(USB Memory Mode)
Auto O
Backup
(Memory Backup)
FctReset
(Factory Reset)
Wireless
Specifying the Visual Control Channel (Visual Control Channel)
Here’s how to specify the channel on which messages used to control video will be sent (Visual Control Channel).
1–16 Sets the MIDI channel used to transmit MIDI messages to the controlled video device.
Changing the USB Flash Drive Mode (USB Memory Mode)
In some cases, when USB ash drive is connected to the USB MEMORY port, it may take longer for data to be loaded, or data may fail to be
loaded successfully. If this occurs, you may be able to solve the problem by changing the USB ash drive setting.
Normally, there is no need to make this setting.
MEMO
With the factory settings, the unit’s power will automatically be switched o a certain amount of time after you stop playing or operating
the unit.
If you don’t want the power to turn o automatically, change the “Auto O ” setting to “OFF.”
REFERENCE
MEMO
The FP-50 settings return to their factory defaults when you turn o the power. But if you backup the current settings into internal memory,
they will be restored the next time the power comes on.
REFERENCE
A factory reset returns all Function Mode settings to their factory defaults.
REFERENCE
You can easily use popular wireless applications, such as the iPhone app, with the FP-50. To enable wireless use, just connect the WNA1100RL wireless USB adapter (sold separately) to the USB MEMORY port.
REFERENCE
MEMO
This setting is automatically saved in the FP-50.
For details, refer to “Making the Power Automatically Turn O After a Time (Auto O)” (p. 33).
This setting is automatically saved in the FP-50.
For details, refer to “Retaining Settings After Power-o (Memory Backup)” (p. 33).
For details, refer to “Restoring the Factory Settings (Factory Reset)” (p. 35).
For details, refer to “Wireless LAN” (p. 43).
This setting is automatically saved in the FP-50.
42
Page 43

About the Wireless LAN Function
What Is Wireless LAN Function?
By connecting a wireless USB adapter (WNA1100-RL; sold
separately) to the FP-50, you can use wireless-connectivity
applications, such as the iPhone app.
iPhone, etc.
What you need to use wireless LAN
*1 Note that your wireless LAN access point should support the
WPS standard. If it doesn’t, you can connect by following the
procedure in “Connecting to a Wireless LAN Access Point That
You Select (Select AP)” (p. 44).
*2 The ability to connect with all kinds of wireless LAN access
points is not guaranteed.
*3 If you’re unable to connect to the wireless LAN access point, try
connecting using Ad-Hoc mode (p. 45).
*4 In some countries, the Wireless USB Adapter is not sold due to
regulations concerning radio-frequency equipment.
For information on whether the Wireless USB Adapter can be
used in your country, please contact the nearest Roland Service
Center, or an authorized Roland distributor, as listed on the
“Information” page.
Wireless LAN access point
(e.g., wireless LAN router)
Wireless LAN Wireless LAN
A wireless USB adapter (WNA1100-RL; sold separately) *4
Wireless LAN access point (e.g., wireless LAN router) *1 *2 *3
iPhone, etc.
FP-50
Wireless USB Adapter
(WNA1100-RL; sold
separately)
Basic Connection Method (Connect by WPS)
The rst time you connect to a wireless network using WPS, you
must go through the following procedure.
This procedure is necessary only the rst time you connect. (Once
you’ve joined the network, the procedure is no longer needed.)
What is WPS?
This is a standard that makes it easy to make security
settings when connecting to a wireless LAN access point. We
recommend that you use WPS when connecting to a wireless
LAN access point.
1. Connect your wireless USB adapter (WNA1100-RL; sold
separately) to the USB MEMORY port.
2. Press the [SONG] and [RHYTHM] buttons simultaneously.
3. Press the [ ] [ ] (SLOW/FAST) buttons to select “Wireless,”
and then press the [METRONOME] button.
4. Press the [ ] [ ] (SLOW/FAST) buttons to select “Connect,”
and then press the [METRONOME] button.
5. Press the [ ] [ ] (SLOW/FAST) buttons to select “WPS,” and
then press the [METRONOME] button.
The screen shows “Proceed?”
6. Perform the WPS operation on your wireless LAN access
point (e.g., press the WPS button on your wireless LAN
access point).
For details on the WPS functionality of your wireless LAN access
point, refer to the documentation for your wireless LAN access
point.
Operation Guide Getting Ready Performing Recording Registrations Settings
7. Press the [ ] (FAST) button of the FP-50.
If connection is successful, the display will show “Success.”
If not successful, please refer to “Problems when connecting to a
wireless LAN” (p. 48).
8. Press the [REC] button to return to function mode.
NOTE
Note that the device running the application you want to use
(such as your iPhone) must be connected to the same network.
MEMO
• The rst time you connect with WPS, your connection
information will be saved. From the second time on, connection
is automatic.
• A factory reset will erase all connection data. If you perform a
factory reset, you have to repeat the connection procedure to
reestablish a connection.
This completes the setup. You can now use your
wireless application, such as the iPhone app.
Appendix
4343
Page 44

About the Wireless LAN Function
Wireless LAN Function Settings
You can view and change your wireless settings.
MEMO
These settings are automatically retained in memory.
Basic operation
1. Press the [SONG] and [RHYTHM] buttons simultaneously.
2. Press the [ ] [ ] (SLOW/FAST) buttons to select “Wireless.”
3. Press the [METRONOME] button.
4. Press the [ ] [ ] (SLOW/FAST) buttons to select the
desired menu, and then press the [METRONOME] button.
Menu Explanation
Status This shows the wireless LAN status.
Connect Connect to a wireless LAN access point.
Option Make setting for wireless ID or Ad-Hoc mode (p. 45).
In the explanations below, arrows indicate the selection
sequence (For example: “Wireless” ¦ “Status”).
Status Indication
This shows the wireless LAN status.
Connecting to a Wireless LAN Access Point That You Select (Select AP)
This method lets you connect by choosing a wireless LAN access
point from the list that is displayed.
* Wireless standards 802.11g/n (2.4 GHz) and authentication
methods WPA/WPA2 are supported.
1. Select “Wireless” ¦ “Connect” ¦ “Select AP,” and then
press the [METRONOME] button.
The select access point screen appears.
• An asterisk (*) marks the currently connected access point.
2. Press the [–] [+] buttons to select the wireless LAN
access point you want to connect to, and then press the
[METRONOME] button.
• You will be connected to the selected wireless LAN access point.
• If you’re using this wireless LAN access point for the rst time,
you’ll proceed to the Passphrase screen.
• If this is a wireless LAN access point to which you have
connected in the past, just press the [METRONOME] button and
you’ll be connected. Once successfully connected, “Success”
appears.
1. Select “Wireless” ¦ “Status.”
The status screen appears.
Display Explanation
Signal level:
_ o 0
Strong
Signal level:
_ o o
Middle
Signal level:
_ _ _
Weak
Not Conn
NotAvail The wireless USB adapter is not inserted.
FP-50
SSID
Currently connected to the wireless LAN access
point.
Three bars are used to indicate the signal level
(the strength of the connected wireless LAN
access point’s radio signal).
The identier (name) of the connected wireless
LAN access point is shown.
The wireless USB adapter is inserted, but not
connected to a wireless LAN access point.
Ad-Hoc mode (p. 45)
The Ad-Hoc SSID is shown. Press the [
button to display the Ad-Hoc key.
For details, refer to “Connecting in Ad-Hoc Mode”
(p. 45).
] (Fast)
2. Press the [ ] (FAST) button to display the IP address.
Passphrase screen (PASS)
3. Enter your passphrase for this wireless LAN, and then
press the [METRONOME] button.
Entering the passphrase
Press the [
character position. Press the [–] [+] buttons to change the
character.
* Do NOT insert a space at the end of the passphrase.
If connection is successful, “Success” appears on the screen.
If not successful, please refer to “Problems when connecting to a
wireless LAN” (p. 48).
4. Press the [REC] button to return to function mode.
] [ ] (SLOW/FAST) buttons to select the desired
44
Page 45

About the Wireless LAN Function
Other Settings (Option)
Make settings for Wireless ID or Ad-Hoc mode.
1. Select “Wireless” ¦ “Option.”
2. Press the [ ] [ ] (SLOW/FAST) buttons to select the
parameter you want to change.
3. Press the [–] [+] buttons to change the value.
Parameter Explanation
ID (Wireless ID)
Ad-Hoc
Species the nal digits of the
and Ad-Hoc SSID (
instrument in the wirelessly connected app.
Normally, you should specify “0,” but if you have
more than one of the same instrument, you can set
the Wireless ID in the range of 1–99 to change the
device name and Ad-Hoc SSID for each instrument,
as follows.
If wireless ID = 0, then “FP-50” (default).
If wireless ID = 1, then “FP-50_1.”
:
If wireless ID = 99, then “FP-50_99.”
Species the channel (1–11) for Ad-Hoc mode.
Normally, you won’t need to change the channel.
Try changing the channel only if you have
problems connecting.
FP-50
FP-50
) that will be shown as the
’s device name
1. Select “Wireless” ¦ “Option” ¦ “Ad Hoc” and then press
the [METRONOME] button.
2. Press the [ ] (FAST) button to set Ad-Hoc mode to “ON.”
* If you decide to quit without connecting, press the [ ] (SLOW)
button.
3. When Ad-Hoc mode starts, the Ad-Hoc SSID appears on
the display. Press the [ ] (FAST) button to display the
Ad-Hoc key (a 5-digit number). Write down the value and
save it.
The Ad-Hoc key is the ve-digit number shown
on the screen.
Each piano has a dierent number.
MEMO
• The Ad-Hoc SSID appears as the “Wireless ID” setting in the
options screen.
• You can also see the Ad-Hoc SSID and Ad-Hoc key in the status
screen.
Operation Guide Getting Ready Performing Recording Registrations Settings
Connecting in Ad-Hoc Mode
Here’s how to connect in Ad-Hoc mode.
What is Ad-Hoc mode?
Ad-Hoc mode lets you connect the FP-50 directly to an
iPhone or other wireless device without using a wireless
LAN access point. This is a convenient way to use the FP-50
with an iPhone or other wireless device if you’re in a location
where the wireless LAN access point you normally use is
unavailable, such as when you’re away from home.
iPhone, etc.
Wireless USB Adapter
Wireless LAN
Limitations
The iPhone or other wireless device connected in Ad-Hoc mode
will be unable to communicate with the Internet or with another
wireless device. However, an iPhone or other wireless device
that has cellular capability will be able to connect to the Internet
via the cellular connection.
Please be aware that if you use a cellular connection for Internet
connectivity, you may incur costs depending on your rate plan.
(WNA1100-RL; sold separately)
FP-50
4. An iPhone or other wireless device can be connected
by selecting the Ad-Hoc SSID displayed in the screen
indicated above. (Example: iPhone [Settings] ¦ [Wi-Fi] ¦
[Select Network] to select the above Ad-Hoc SSID (FP-50).
When the password entry screen appears, enter the
above-mentioned Ad-Hoc key.)
For details on how to connect to a wireless LAN from an iPhone or
other device, refer to the owner’s manual of that device.
5. Press the [REC] button to return to function mode.
6. After ending your Ad-Hoc connection, go back to iPhone
[
Settings] ¦ [Wi-Fi] ¦ [Select Network] and restore the
original values.
Checking the MAC address
The MAC address is indicated on the bottom of the wireless
USB adapter (WNA1100-RL; sold separately).
Appendix
45
Page 46

Troubleshooting
If you suspect a malfunction, please read this section rst.
Problem Cause/Action Page
Power will not turn on Is the AC adaptor connected correctly? p. 10
With the factory settings, the unit’s power will automatically be switched o a certain amount of time
Power turns o on its own
Buttons don’t work
Screen display is irregular when power is
turned on/o
Pedal does not work, or remains stuck
Can’t read or write USB ash drive
A buzzing sound is heard from an external
device
The volume level of the instrument
connected to INPUT jack is too low
after you stop playing or operating the unit.
If you don’t need the power to turn o automatically, turn the “Auto O ” setting “OFF.”
Could Panel Lock be activated?
Deactivate Panel Lock.
Since the FP-50 uses a liquid-crystal display, you may nd that it is unable to display letters or other
things in environments where temperatures go below 0 degrees Celsius (32 degrees Fahrenheit). This
does not indicate a malfunction.
Is the pedal connected correctly?
Insert the plug all the way into the pedal jack.
Could you be using a pedal made by another manufacturer?
Use the included pedal or the RPU-3.
The pedal eect may remain stuck if you disconnect the pedal cord while the power is on.
Switch o the FP-50’s power before you connect or disconnect the pedal cord.
If you’ve assigned the soft pedal or sostenuto pedal as a registration select switch, or assigned it to some
other function, the pedal won’t operate as a Soft pedal or Sostenuto pedal.
Are you using Roland USB Flash Memory (sold separately)?
We cannot guarantee operation if any other USB ash drive is used.
If you’re unable to read from or write to a USB ash drive, change the USB Memory Mode setting. p. 42
Could you be powering your external equipment from two or more electrical outlets?
If external equipment is connected, it must be powered from the same electrical outlet.
Could you be using a connection cable that contains a resistor?
Use a connection cable that does not contain a resistor.
p. 33
p. 35
–
p. 11
–
–
p. 40
–
–
–
No sound
Problem Cause/Action Page
Could the FP-50’s volume or the volume of a connected device be minimized? p. 8
Could headphones be connected?
Could a plug have been left in the headphone jack?
No sound will be output from the speakers if headphones or any other device is connected to the
No sound
No sound when you play back a song
No sound from the left-hand zone of the
keyboard
No sound (when a MIDI device is connected)
headphone jack.
Is the Volume Balance setting set so that the accompaniment is louder than the keyboard? p. 8
Could the Local Control setting be “OFF”?
The Local Control is set to “OFF,” no sound will be heard when you play the keyboard. Set Local Control to
“ON.”
Could the Local Control setting be “OFF”?
The Local Control is set to “OFF,” no sound will be heard when you play back a song. Set Local Control to
“ON.”
Could the Visual Control mode be set to “MVC” or “VLNK”?
If the mode is set to “MVC” or “VLNK,” the lowest twelve keys are used to control images, and do not
produce sound.
Are all devices powered up?
Are the MIDI cables connected correctly?
Does the MIDI Transmit Channel match the setting of the connected device? p. 40
Sound does not play correctly
p. 10
p. 41
p. 41
p. 41
p. 10
Problem Cause/Action Page
The maximum simultaneous polyphony is 128 notes.
Not all the notes you play are heard
Keyboard or song pitch is incorrect
When using Dual Play or when performing along with a song or rhythm, or when making heavy use of
the damper pedal, it is possible for the performance data to exceed the polyphony, causing some of the
notes you play to be omitted.
Could you have made Transpose settings? p. 18
Is the Master Tuning setting appropriate? p. 37
Is the Temperament setting appropriate? p. 37
Is the Stretch Tuning setting appropriate? p. 38
46
–
Page 47

Troubleshooting
Problem Cause/Action Page
Two sounds are heard when you play the
keyboard
Pressing the [E. PIANO], [STRINGS], or
[OTHER] button causes other tones to be
heard
Eect not applied
Reverberation remains even if you turn o
the Ambience eect
Sound changes abruptly at a certain note in
the upper range
A “whining” noise is heard
Something wrong with low-frequency
sounds/Buzzing resonance occurs
Could the FP-50 be set to Dual Play? p. 14
When the FP-50 is connected to an external sequencer, set the Local Control to “OFF.” Alternatively, the
sequencer could be set so its Soft Thru feature is o.
The [E. PIANO], [STRINGS], and [OTHER] buttons can also function in selecting “recommended tones.”
With the factory settings, when you select a song from VIMA TUNES, tones which match the song will be
assigned automatically to the [E. PIANO], [STRINGS], and [OTHER] tone buttons.
When you’re using Dual Play or Split Play, and the two tones use dierent eects, no eect will be applied
to tone 2 (when using Dual Play) or the left-hand tone (when using Split Play).
The FP-50’s piano sound faithfully simulates the depth and resonance of an acoustic piano, and this may
give the impression of reverberation even if you’ve turned o the Ambience eect.
On an acoustic piano, the top one and a half octaves of notes will sound until they decay naturally,
regardless of the damper pedal. The tone quality of these notes will also be dierent.
FP-50 faithfully simulate this characteristic of acoustic pianos. The range that is unaected by the damper
pedal will change depending on the Transpose setting.
If you hear this in headphones:
Some brilliant and sharply dened piano sounds contain signicant high-frequency components, which
may sound like a metallic resonance has been added. This is due to the faithful simulation of a piano’s
actual characteristics, and does not indicate a malfunction.
You can adjust this resonance by editing the following settings.
• String Resonance setting (p. 38)
• Ambience Depth setting (p. 17)
If you don’t hear this in headphones:
Some other reason may be responsible (e.g., resonance in the FP-50 itself). Please contact your dealer or
Roland Service Center.
If you don’t hear this in headphones:
Performing at high volumes may cause the speakers or objects near the FP-50 to resonate. It is also
possible for uorescent lights or glass doors in the room to resonate. For the low notes in particular, this is
more likely to occur at high volume. To minimize such resonance, take the following measures.
• Locate the speakers 10–15 cm away from the wall.
• Lower the volume.
• Move the resonating object farther away.
If you hear this in headphones:
Some other reason may be responsible. Please contact your dealer or Roland Service Center.
At high volumes, the sound may be distorted due to the way in which you are playing. If so, adjust the
equalizer settings or reduce the volume.
p. 41
–
p. 14
p. 15
–
–
–
–
p. 8
p. 17
Operation Guide Getting Ready Performing Recording Registrations Settings
Song does not play correctly
Problem Cause/Action Page
Is the data format compatible with the FP-50?
To be playable, audio les must be in the following format.
Can’t play a song
Song tempo is unstable
Can’t see the song names on USB ash drive
Can’t play back a song saved on USB ash
drive
• SMF formats 0/1
• Roland Piano Digital format (i-format)
• Audio les: WAV format, 44.1 kHz, 16-bit linear
If there is an excessive amount of performance data when playing a song from a USB ash drive, the
tempo might become unstable.
If the song name data in the le is blank or consists only of spaces, the song name will not be displayed. –
Is the le name extension “MID”?
If the le name extension is wrong, the le cannot be handled as song data.
Song names that contain characters other than letters, numbers, and certain symbols will not be
displayed properly.
Is the le name extension “MID”?
If the le name extension is wrong, the le cannot be handled as song data.
Can’t record
Problem Cause/Action Page
Can’t record audio
Is a USB ash drive connected to the USB MEMORY port?
In order to use audio recording, you must connect a USB ash drive (sold separately) to the USB MEMORY
port.
–
–
–
–
–
p. 25
Appendix
47
Page 48

Troubleshooting
Problems with audio les
Problem Cause/Action Page
Can’t record along with an audio le/Can’t
copy an audio le to internal memory
The FP-50 does not allow recording using audio les, and cannot be used to copy audio les into internal
memory.
MEMO
Functions that cannot be used with audio le playback
• Ambience (p. 17)
• Save to internal memory (p. 33)
• Copy song (p. 34)
• Save song
Problems when connecting to a wireless LAN
* For problems related to communication, refer also to the owner’s manual of your wireless LAN access point.
* For details on operating your wireless LAN access point, refer to its owner’s manual.
Problem Cause/Action Page
• Check that your wireless LAN access point supports the WPS standard.
If your wireless LAN access point does not support WPS, connect using the procedure described in
“Connecting to a Wireless LAN Access Point That You Select (Select AP)” (p. 44).
• The FP-50 does not support the 802.11a and 802.11b wireless standards. Please use 802.11g or 802.11n
(both at 2.4 GHz).
• WEP authentication is not supported. Please use WPA or WPA2 authentication.
• Be sure that your wireless LAN access point is set to use DHCP.
Cannot connect to wireless LAN
“Error 46” appears on the display and the
FP-50 cannot connect to the wireless LAN
access point
Connection is unstable
The FP-50 does not appear among the
instruments connected to your application
(such as the iPhone app)
The iPhone cannot connect to the Internet
• If the FP-50 cannot connect to a wireless LAN access point that it previously could connect to, make
sure the “Connecting in Ad-Hoc mode” (p. 45) setting is set to “OFF.”
• You may not be able to connect to the wireless network depending on the condition of the wireless
signal. In this case, refer to the procedure described in “Connecting to a Wireless LAN Access Point That
You Select (Select AP)” (p. 44) and try selecting and connecting to the wireless LAN access point again.
• The FP-50 remembers a limited amount of information about network connections. Once the limit is
reached, data from new connections may overwrite older data.
All connection data will be erased if you perform a factory reset.
If network connection information is erased, repeat the connection procedure and connect again.
The access point is not supported. Please use WPA or WPA2 authentication. p. 43
Wireless communications may be unstable if the condition of the wireless signal is poor.
If the wireless communications are unstable, responsiveness may deteriorate and audio drop-outs may
occur.
The following may solve the trouble.
• Move the FP-50 and the wireless LAN access point closer to each other.
• Change the channel setting on the wireless LAN access point.
• Is the FP-50 turned on?
• Is a wireless USB adapter (WNA1100-RL) connected to the FP-50’s USB MEMORY port?
• Is the FP-50 connected to the wireless LAN?
• Are the FP-50 and the iPhone connected to the same network (i.e., the same wireless LAN access point)?
• Is the wireless LAN access point set to allow communication among the devices connected to it?
Refer to the wireless LAN’s documentation for information about the relevant settings.
• Is the wireless LAN access point connected to the Internet?
• Could you be connected in Ad-Hoc mode?
The iPhone or other wireless device connected in Ad-Hoc mode will be unable to communicate with
the Internet or with another wireless device. However, an iPhone or other wireless device that has
cellular capability will be able to connect to the Internet via the cellular connection. Please be aware
that if you use a cellular connection for Internet connectivity, you may incur costs depending on your
rate plan.
–
p. 43
p. 43
p. 43
p. 43
48
Page 49

Error Messages
Display Meaning
Error 1 The music le you attempted to save is read-only. It cannot be saved.
Error 2
Error 10 No USB ash drive connected. Connect a USB ash drive and try the operation again.
Error 11
Error 14
Error 15 The le could not be read. The data format is not compatible with the FP-50.
Error 16
Error 18 This audio format is not supported. Please use WAV format, 44.1 kHz, 16-bit linear audio les.
Error 30 The FP-50’s internal memory is full.
Error 40
Error 41 A MIDI cable was disconnected. Connect the MIDI cable correctly.
Error 43 An error occurred during MIDI communication. Check the MIDI cable and the connected MIDI device.
Error 46 The access point is not supported. Please use WPA or WPA2 authentication.
Error 51
Error 65
An error occurred while writing. It may be that the protect tab of the external media is in the “Protect (write prohibit)” position, or that the
external media has not been formatted.
There is insucient free space at the save destination. Either connect a dierent USB ash drive, or delete unwanted data (song data, registration
sets) and try the operation again.
An error occurred while reading. The USB ash drive may be damaged. Connect a dierent USB ash drive and try the operation again. You may
also format the USB ash drive (p. 36).
The data could not be read fast enough during song playback. After waiting several seconds, you may be able to play back the song by pressing
the [
The FP-50 cannot deal with the excessive MIDI data sent from the external MIDI device. Reduce the amount of data being transmitted by the
external MIDI device.
The system may have malfunctioned. Try the operation again. If this indication still appears after trying the operation several times, contact
Roland Service Center.
The USB MEMORY port was subjected to excessive current. Verify that there is no malfunction in the USB ash drive, and then turn the power o,
then on again (p. 13).
] button once again.
Saved Settings
Operation Guide Getting Ready Performing Recording Registrations Settings
Settings Saved in Registrations
Setting Explanation Page
– Selected tone p. 14
– Dual play on/o p. 14
– Tone 1/Tone 2 (Dual play) p. 14
– Split play on/o p. 15
–
– Split point p. 15
–
– Ambience on/o and depth p. 17
–
– Rotary eect’s pulse speed p. 14
Modulation Speed Speed of sound modulation p. 14
KeyTouch Key touch p. 18
Rhythm Rhythm settings p. 19
Dual Bal Dual balance p. 38
SplitBal Split Balance p. 38
Ambience Ambience on/o and depth p. 17
AudTrans Audio transpose p. 23
Trnspose Transpose mode p. 38
Oct Shft Octave shift p. 38
SplOnRcg Recognize split on chord recognize p. 39
DPdl Prt Setting for the damper pedal part p. 39
CPdl Prt Setting for the center pedal part p. 39
CPdl Fnc Function of the center pedal p. 39
LPdl Prt Setting for the left pedal p. 40
LPdl Fnc Function of the left pedal p. 40
MIDI Ch MIDI transmit channel p. 41
RgstTxCh
Rgst.PC
Rgst.MSB
Rgst.LSB
Right-hand tone/Left-hand tone (Split
play)
Transpose’s on or o, its value, and
Transpose mode
The Volume Balance between Your
Keyboard Performance and the
Accompaniment
Program change data p. 40
p. 15
p. 18
p. 8
Items Stored by Memory Backup
Setting Explanation Page
Tuning Master tuning p. 37
Temprmnt Temperament p. 37
Tmpr Key Temperament key p. 37
Equalizr Equalizer on/o and equalizer settings p. 17
Stretch Stretch tuning p. 38
Dmpr Res Damper resonance p. 38
Strg Res String resonance p. 38
KO Res Key o resonance p. 38
Cabinet Cabinet resonance p. 38
Sound Brd Soundboard behavior p. 38
VC Ch
Visual Control channel
Settings Stored Immediately When Edited
Setting Explanation Page
USB Mode USB ash drive settings p. 42
Auto O Auto o p. 33
Wireless Wireless LAN settings p. 43
p. 42
Appendix
4949
Page 50

Tone List
PIANO
No. Tone name
1 Concert
2 Ballade
3 Bright
4 Dreamy
5 Piano+EP
6 Pno+Str
7 Pno+Pad
8 Pno+Cho
9 Magical
10 Comp Pno
11 Rock Pno
12 Ragtime
13 Harpsi
14 C.Harpsi
E. PIANO
No. Tone name
1 Trem. EP
2 ChorusEP
3 PhaserEP
4 Tine EP
5 Vib. EP
6 DrivenEP
7 RotaryEP
8 Reed EP
9 TwinklEP
10 BrightEP
11 Woody EP
No. Tone name
12 FM EP
13 Pop EP
14 E.Grand
15 Clav.
16 Wah Clav
17 PhaseClv
18 Vib
19 Marimba
20 Celesta
21 Mlt Isle
22 Mrng Lit
23 Fantasia
24 EP Belle
25 Balad Bl
STRINGS
No. Tone name
1 SymphStr
2 Rich Str
3 Orch Str
4 Velo Str
5 Decy Str
6 Syn Str1
7 Syn Str2
8 Soft Pad
9 Glas Pad
10 Slky Way
11 Lunr Str
12 Dcy C.Pd
No. Tone name
13 Orchstra
14 Orch Brs
15 Harp
16 Violin
17 Cello
18 Pizz Str
OTHER
No. Tone name
1 TW-Org 1
2 TW-Org 2
3 TW-Org 3
4 TW-Org 4
5 TW-Org 5
6 TW-Org 6
7 Jazz Org
8 Balad Or
9 Gspl Spn
10 Full Stp
11 Melw Bar
12 Lite Org
13 Lowr Org
14 Prpl Spn
15 ‘60s Org
16 Church 1
17 Church 2
18 Nasn Flt
19 Acordion
20 SymphCho
21 Aerl Cho
No. Tone name
22 Jz Scat
23 Fem Aahs
24 Angl Cho
25 Beau Vox
26 Male Aah
27 Harpvox
28 Decy Cho
29 TrnceSyn
30 Jump Brs
31 AfricaBr
32 SynPhrs1
33 SynPhrs2
34 Nylon Gt
35 Steel Gt
36 Clean Gt
37 Jazz Gt
38 Ovrdv Gt
39 Ac. Bass
40 Bass+Cym
41 Fingr Bs
42 Frtls Bs
43 Slap Bs
44 Syn Bass
45 Thum Vo
46 Alto Sax
47 Ten Sax
48 Brs Sect
49 Flute
50 Cham Win
51–315 GM2
Registration List
The recommended settings were stored in the instrument when it shipped from the factory.
No. Registration name
1-1 Piano + Str.
1-2 Piano+EPiano
1-3 Gt + SoftPad
1-4 Winds + Str.
1-5 Lead + Pad
2-1 DreamPno/Pad
2-2 Vib. / BsCym
2-3 Piano / Pad
2-4 CleanGt / Bs
2-5 Brass / E.Bs
3-1 DanceSession
3-2 Jazz Session
3-3 R&B Session
MEMO
Registration from 4-1 to 4-5 include the “Basic Registration.” Use this when creating registration from scratch.
50
No. Registration name
3-4 BossaEP Ses
3-5 ’70sEP Ses
4-1 FP REGIST.
4-2 FP REGIST.
4-3 FP REGIST.
4-4 FP REGIST.
4-5 FP REGIST.
Page 51

Internal Song List
No. Song name Composer
001 Midsummer * Masashi Hirashita
002 The Nutcracker “Waltz of the Flowers” (Jazz Arrangement) * Peter Ilyich Tchaikovsky, Arranged by Masashi Hirashita
003 The Marriage of Figaro “Overture” Wolfgang Amadeus Mozart
004 Floral Pursuits * Léo Delibes, Arranged by John Maul
005 Swan-derful Samba * Peter Ilyich Tchaikovsky, Arranged by John Maul
006 My Pleasure * Masashi Hirashita
007 Barcarolle Fryderyk Franciszek Chopin
008 Zhavoronok Mikhail Ivanovich Glinka, Arranged by Mily Alexeyevich Balakirev
009 Valse, op.34-1 Fryderyk Franciszek Chopin
010 Polonaise op.53 Fryderyk Franciszek Chopin
011 Nocturne No.20 Fryderyk Franciszek Chopin
012 Die Forelle Franz Peter Schubert, Arranged by Franz Liszt
013 Reets dans l’Eau Claude Achille Debussy
014 La Fille aux Cheveux de Lin Claude Achille Debussy
015 La Campanella Franz Liszt
016 Scherzo No.2 Fryderyk Franciszek Chopin
017 Liebesträume 3 Franz Liszt
018 Étude, op.10-3 Fryderyk Franciszek Chopin
019 Je te veux Erik Satie
020 Fantaisie-Impromptu Fryderyk Franciszek Chopin
021 Clair de Lune Claude Achille Debussy
022 Nocturne No.2 Fryderyk Franciszek Chopin
023 Für Elise Ludwig van Beethoven
024 Late Night Chopin * Fryderyk Franciszek Chopin, Arranged by John Maul
025 Fly Free * John Maul
026 L’éveil de l’amour * Masashi Hirashita
027 Wedding Song * John Maul
028 Yesterday’s Dream * John Maul
029 Windy Afternoon * Masashi Hirashita
030 Scrambled Egg * Masashi Hirashita
Operation Guide Getting Ready Performing Recording Registrations Settings
* Songs marked by an asterisk “*” are original songs composed for the Roland Corporation. The copyrights to these songs are owned by the Roland
Corporation.
* No data for the music that is played will be output from the MIDI OUT connector.
* All rights reserved. Unauthorized use of this material for purposes other than private, personal enjoyment is a violation of applicable laws.
Appendix
5151
Page 52

Rhythm List
Pop Rock
No. Rhythm name
A.001 GldMedBt
A.002 Fnk’sWay
A.003 EasyBld
A.004 Sky Beat
A.005 HomeBeat
A.006 AcBallad
A.007 GldSlwBt
A.008 Blue Pop
A.009 JessieBt
A.010 GoldBeat
A.011 US She
A.012 Stmin’Pp
A.013 AzngGsp
A.014 6_8 Bld
A.015 LovSlRck
A.016 UnplgdPp
A.017 UnplgdBd
A.018 ColLivBd
A.019 AcoPop
A.020 SpringRk
A.021 Joe’sRk
A.022 BreakyRk
A.023 ElctroRk
Disco Dance
No. Rhythm name
B.001 Sevnties
B.002 EdgDisco
B.003 VlreGpsy
B.004 JamiroDn
B.005 GldDisco
B.006 SuvDisco
B.007 Dancin’
B.008 Hitmix
B.009 ClbHouse
B.010 HrdTechn
B.011 BabyBeat
B.012 BrthRap
B.013 NowHiphp
Jazz Blues
No. Rhythm name
C.001 OgnJzFst
C.002 BluEysBn
C.003 OgnSwMed
C.004 GldSwing
C.005 MidSlSwg
C.006 BgBndSlw
C.007 BgBndMed
C.008 Swig Mdm
C.009 JzGtrSwg
C.010 SlwJzWlz
C.011 CoolSoul
C.012 Soul
C.013 CoolBls
C.014 Go!Rck’n
C.015 BlueBog
C.016 Rck’nSlw
Ball Room
No. Rhythm name
D.001 ItValzer
D.002 GldWnWz
D.003 GldSlwWz
D.004 MoonWltz
D.005 PlcaDsco
D.006 GldTango
D.007 GldFxtrt
D.008 QickStep
D.009 GldRhumb
D.010 Beguine
D.011 GoldCha
D.012 Go!Twist
D.013 GldSamba
D.014 GldBossa
Latin World1
No. Rhythm name
E.001 Th’sMmbo
E.002 OchChaCh
E.003 Go!Salsa
E.004 CubaSlsa
E.005 AcoSamba
E.006 JazzBos
E.007 FastBos
E.008 PpRggBr
E.009 Samba
Tradit World2
No. Rhythm name
F.001 CtrRock
F.002 LvReggae
F.003 CtrFlyer
F.004 GospelSf
F.005 Ska
F.006 SouTwang
F.007 StmtrCtr
F.008 Psnpolka
F.009 Psnwalzr
F.010 CntryBld
F.011 CtrBeat
F.012 CntryPop
F.013 6_8March
F.014 US March
F.015 OchWaltz
52
Page 53

Chord Fingering List
C C# D E E F
symbol: Indicates the constituent notes of chords.
symbol: Chords shown with an “ ” can be played by pressing just the key marked with the “ .”
* These may dier from the chord notation shown in the display.
CM7 C#M7 DM7 E M7 EM7 FM7
C7 C#7 D7 E 7 E7 F7
Cm C#m Dm E m Em Fm
Operation Guide Getting Ready Performing Recording Registrations Settings
Cm7 C#m7 Dm7 E m7 Em7 Fm7
CmM7 C#mM7 DmM7 E mM7 EmM7 FmM7
Cdim C#dim Ddim E dim Edim Fdim
Cm7 ( 5 )
Caug C#aug Daug E aug Eaug Faug
Dm7 ( 5 ) Em7 ( 5 )
Fm7 ( 5 )E m7 ( 5 )C#m7 ( 5 )
Csus4 C#sus4 Dsus4 E sus4 Esus4 Fsus4
C7sus4 C#7sus4 D7sus4 E 7sus4 E7sus4 F7sus4
C7/13 C#7/13 D7/13 E 7/13 E7/13 F7/13
Appendix
5353
Page 54
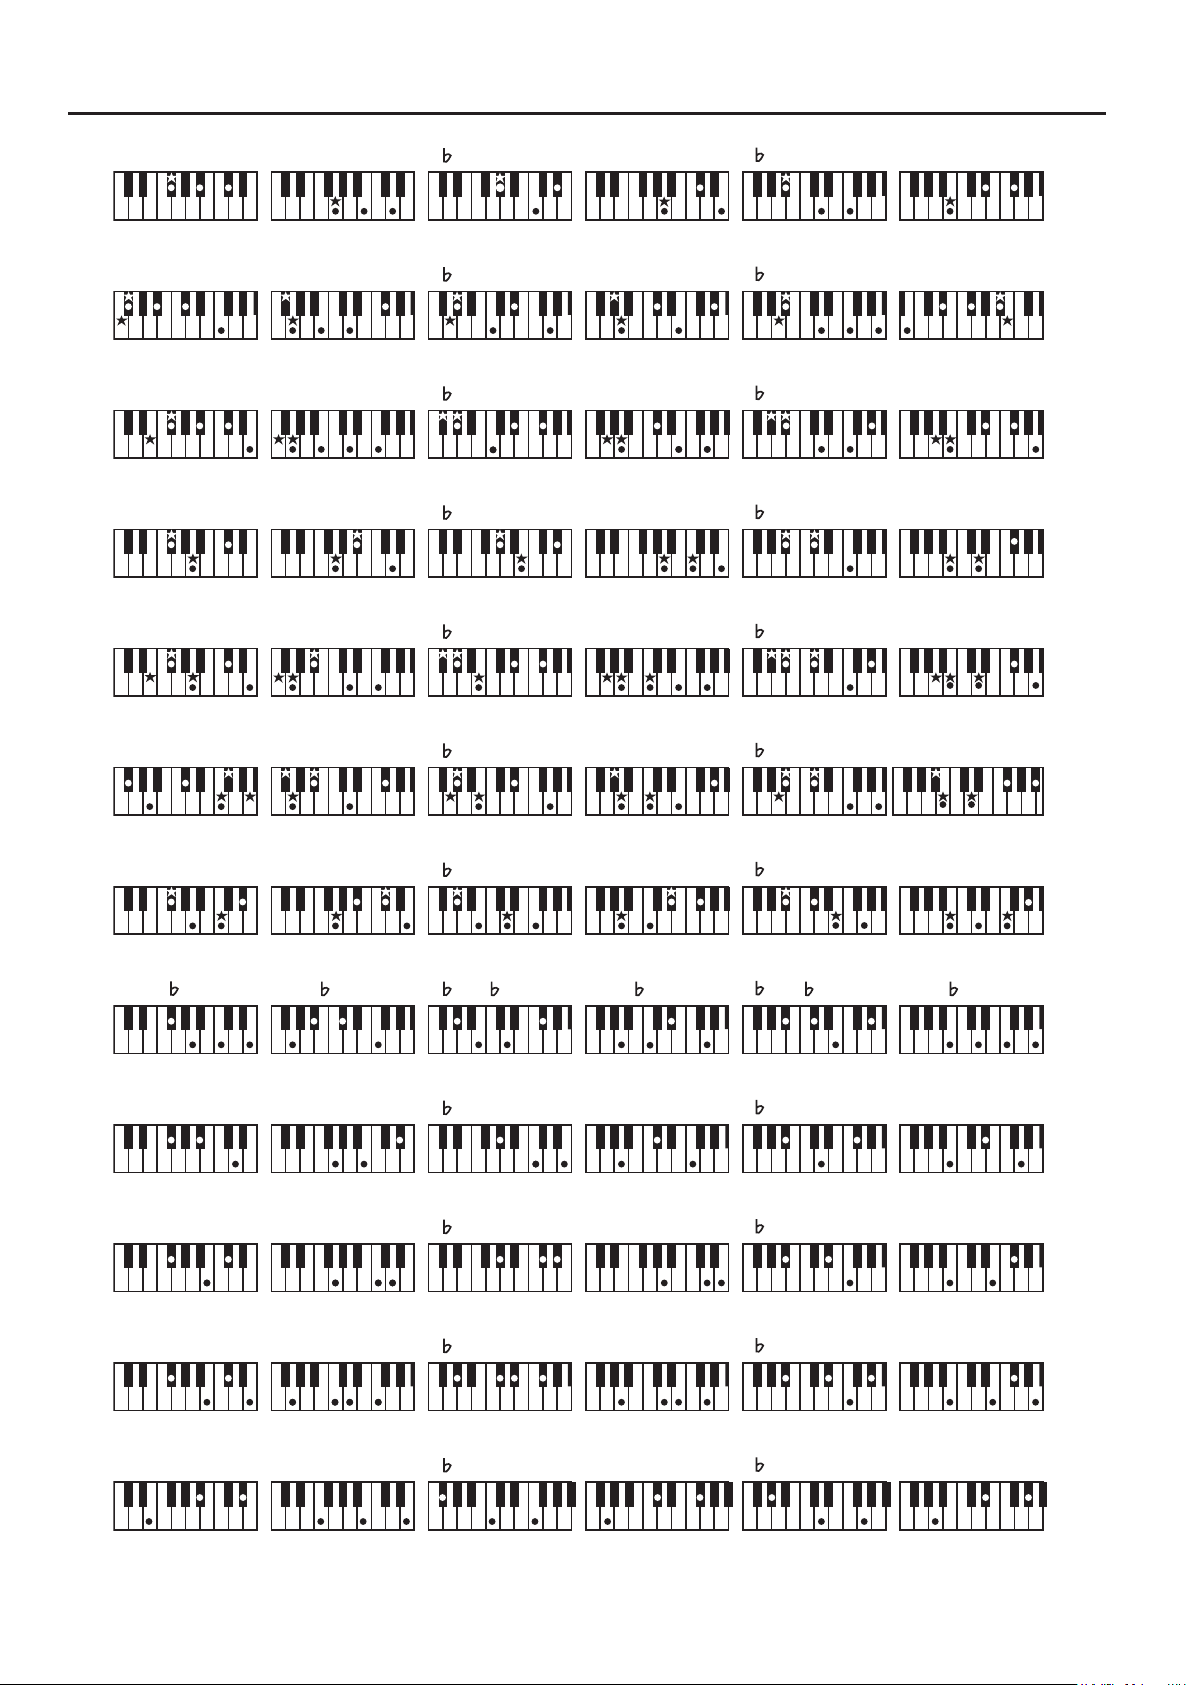
Chord Fingering List
F# G A A B B
F#M7 GM7 A M7 AM7 B M7 BM7
F#7 G7 A 7 A7 B 7 B7
F#m Gm A m Am B m Bm
F#m7 Gm7 A m7 Am7 B m7 Bm7
F#mM7 GmM7 A mM7 AmM7 B mM7 BmM7
F#dim Gdim A dim Adim B dim Bdim
Gm7 ( 5 ) Am7 ( 5 ) Bm7 ( 5 )
F#aug Gaug A aug Aaug B aug Baug
F#sus4 Gsus4 A sus4 Asus4 B sus4 Bsus4
B m7 ( 5 )A m7 ( 5 )F#m7 ( 5 )
F#7sus4 G7sus4 A 7sus4 A7sus4 B 7sus4 B7sus4
F#7/13 G7/13 A 7/13 A7/13 B 7/13 B7/13
54
Page 55
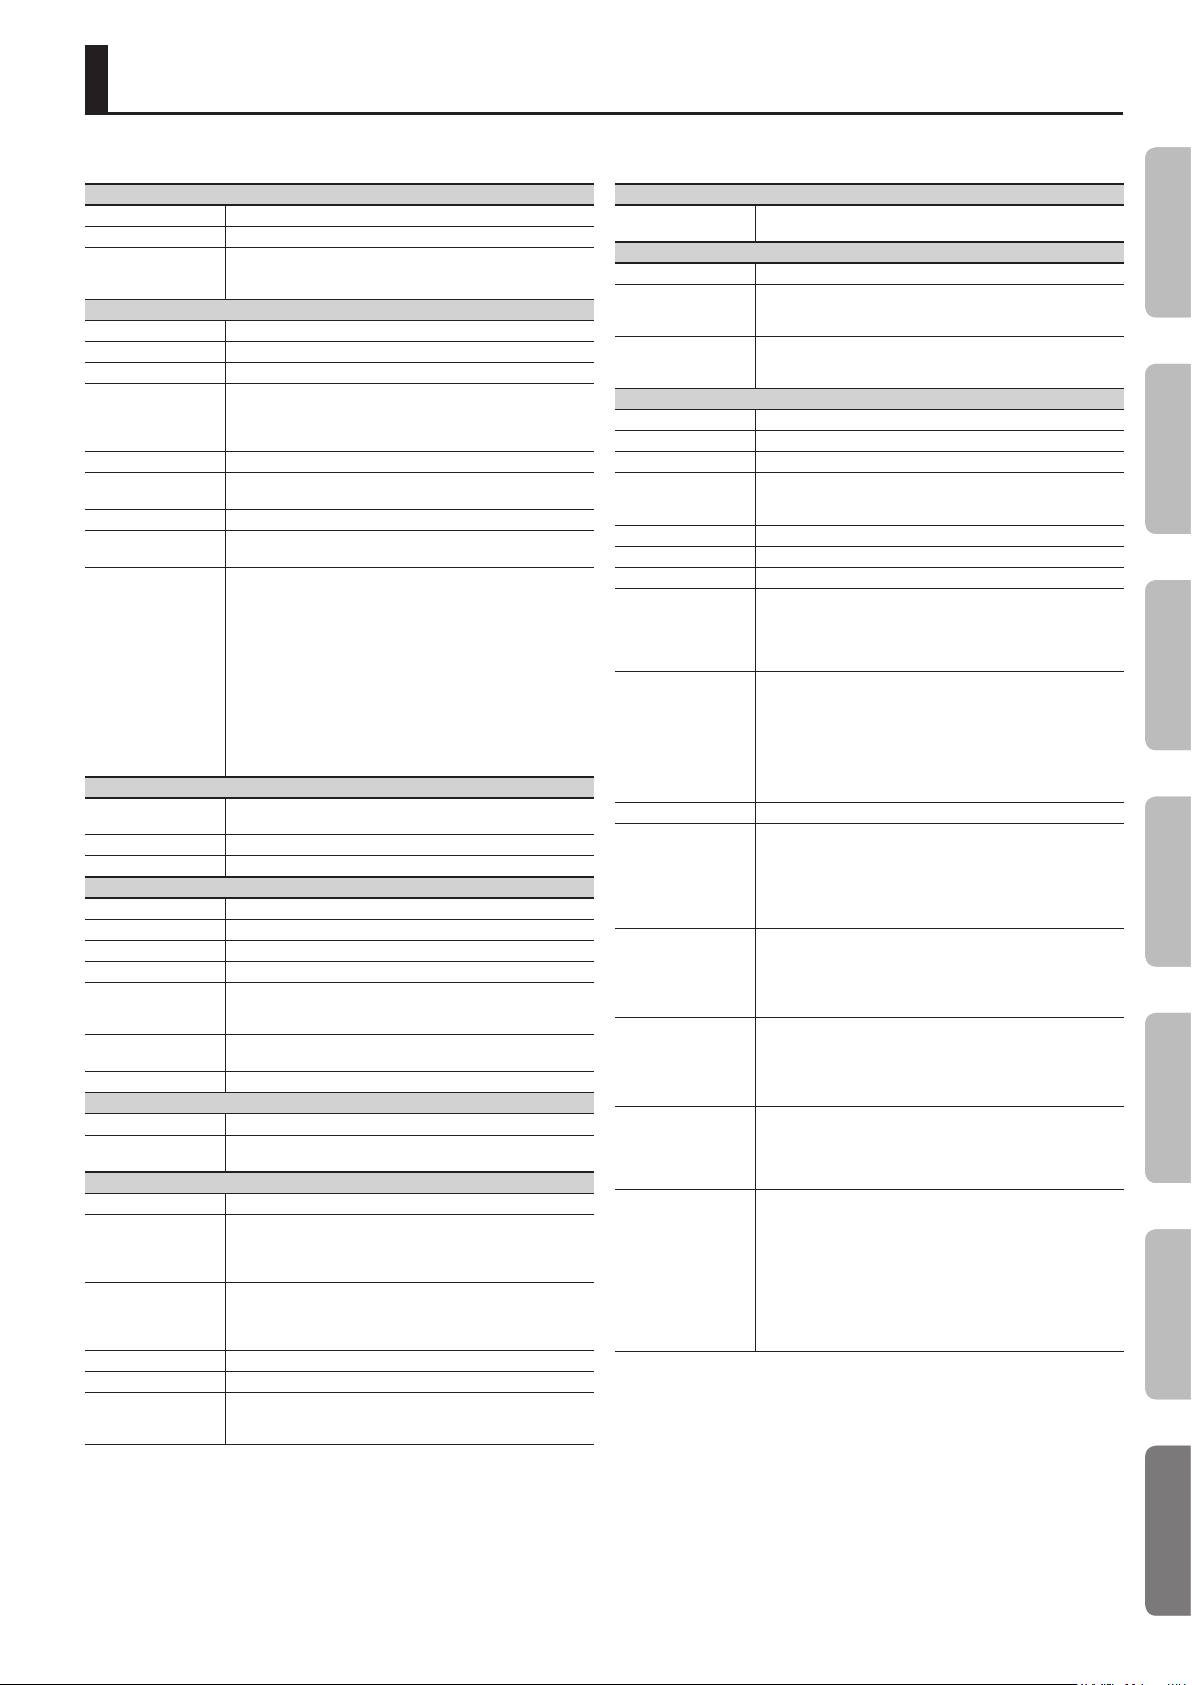
Main Specications
Roland FP-50: Digital Piano
Keyboard
Keyboard 88 keys (Ivory Feel-G Keyboard with Escapement)
Touch Sensitivity Key Touch: 5 levels, Fixed Touch
Keyboard Modes
Sound Generator
Piano Sound SuperNATURAL Piano Sound
MIDI Format Conforms to GM2/GS/XG Lite
Max. Polyphony 128 voices
Tones
Temperaments 8 types, selectable temperament key
Stretched Tuning
(Only for piano tones)
Master Tuning 415.3–466.2 Hz (adjustable in increments of 0.1 Hz)
Transpose
Eects
Metronome
Tempo
Beat 2/2, 0/4, 2/4, 3/4, 4/4, 5/4, 6/4, 7/4, 3/8, 6/8, 9/8, 12/8
Volume 11 levels
SMF Recorder
Parts 2 parts (Keyboard, Accompaniment)
Save Format Standard MIDI Files (Format 0)
Songs 1 song
Note Storage Approx. 30,000 notes
Controls
Tempo
Resolution 120 ticks per quarter note
Rhythm
Rhythms
Controls
Audio
Playable format Audio les ( WAV format, 44.1 kHz, 16-bit linear)
Recording
(when using sold
separately USB Flash
Memory)
Recording format
(when using sold
separately USB Flash
Memory)
Transpose Playback Transpose: -6–+5 (in semitones)
Tempo Audio Playback Speed: 75–125 %
Controls
Whole
Dual (volume balance adjustable)
Split (split point, volume balance adjustable)
Grand Piano: 14 tones
E. Piano: 25 tones
Strings: 18 tones
Other: 315 tones (including 8 drum sets, 1 SFX set)
On
O
Key Transpose: -6–+5 (in semitones)
Playback Transpose: -6–+5 (in semitones)
Ambience (O, 1–10)
Equalizer (4-band digital equalizer)
Only for piano tones:
Soundboard Behavior (O, 1–10)
Cabinet Resonance (O, 1–10)
Damper Resonance (O, 1–10)
String Resonance (O, 1–10)
Key O Resonance (O, 1–10)
Only for organ tones:
Rotary (Slow/Fast)
Only for some tones:
Modulation speed (1–127)
Quarter note = 10–500 (When rhythm function turns on: Quarter
note = 20–250)
Song Select, Play/Stop, Rec, Rewinding, Fast-forwarding,
Beginning of song/Previous song, Next song, Tempo, All songs
play, Count-in
Quarter note = 10 to 500 (When rhythm function turns on: Quarter
note = 20–250)
90 types x 2 variations
Start/Stop, Sync Start, Intro/Ending, Fill In, Variation, Chord Hold,
Leading Bass, Rhythm Part
Keyboard
SMF data
Audio les (WAV format, 44.1 kHz, 16-bit linear)
Song Select, Play/Stop, Rec, Rewinding, Fast-forwarding,
Beginning of song/Previous song, Next song, Tempo, All songs
play, Center Cancel
Internal Memory
Save Format
External Memory
External Storage USB Flash Memory
Playable Song Format
Save Format
Others
Internal Songs 30 songs
Registrations 20 Registrations (capable of pedal shift)
Rated Power Output 12 W x 2
Volume Level (SPL)
Speakers (8 x 12 cm) x 2
Display Custom LCD
Controls Volume (slider)
Other Functions
Connectors
Power Supply AC adaptor
Power Consumption
Dimensions
Weight
Accessories
Options
(sold separately)
Standard MIDI Files (Format 0)
Registration Set Files (Roland original format)
Standard MIDI Files (Format 0, 1)
Roland original format (i-Format)
Audio Files (WAV format, 44.1 kHz, 16-bit linear)
Standard MIDI Files (Format 0)
Audio Files (WAV format, 44.1 kHz, 16-bit linear)
Registration set les (Roland original format)
98 dB
* This gure was measured according to the method that is based
on Roland’s technical standard.
Panel Lock
V-LINK
MIDI Visual Control
Tone Demo
Roland Wireless Connect
DC IN jack
PEDAL (DAMPER/R, SOFT/L *, SOSTENUTO/C *) jacks : 1/4-inch
phone type (* assignable)
INPUT jack: Stereo miniature phone type
OUTPUT (L/Mono, R) jacks: 1/4-inch phone type
USB MEMORY port: USB Type A
MIDI (IN, OUT) connectors
PHONES jack: Stereo 1/4-inch phone type
9 W (9–31 W)
9 W: Average power consumption while piano is played with
volume at center position
6 W: Power consumption immediately after power-up;
nothing being played
31 W: Rated power consumption
1,343 (W) x 313 (D) x 125 (H) mm
52-7/8 (W) x 12-3/8 (D) x 4-15/16 (H) inches
1,343 (W) x 405 (D) x 927 (H) mm
52-7/8 (W) x 16 (D) x 36-1/2 (H) inches
(FP-50 with dedicated stand KSC-44 and music rest)
16.5 kg
36 lbs 5 oz
28.9 kg
63 lbs 12 oz
(FP-50 with dedicated stand KSC-44 and music rest)
Owner’s Manual
AC adaptor
Power cord
Music rest
Damper pedal (capable of continuous detection)
Dedicated Stand: KSC-44
Keyboard Stand: KS-18Z, KS-G8, KS-12
Carrying Bag: CB-88RL
Pedal Unit: RPU-3
Damper Pedal: DP-10
Pedal Switch: DP-2
Expression Pedal: EV-5, EV-7
USB Flash Memory (*)
* Use USB Flash memory sold by Roland. We cannot guarantee
operation if other products are used.
Operation Guide Getting Ready Performing Recording Registrations Settings
* In the interest of product improvement, the specications and/or appearance of this unit are subject to change without prior notice.
Appendix
5555
Page 56

Index
Symbols
[ ] switch . . . . . . . . . . . . . . . . . . . . . . . . . . . . . . . . . . . . . 13
[–] [+] buttons . . . . . . . . . . . . . . . . . . . . . . . . . . . . . . . . . . . 6
[
] button . . . . . . . . . . . . . . . . . . . . . . . . . . . . . . . . 9, 22
[
] button . . . . . . . . . . . . . . . . . . . . . . . . . . . . . . . . 9, 22
[
] button . . . . . . . . . . . . . . . . . . . . . . . . . . . . . . . 9, 22
] [ ] (SLOW/FAST) buttons . . . . . . . . . . . . . . . . . . 9, 16
[
A
AC adaptor . . . . . . . . . . . . . . . . . . . . . . . . . . . . . . . . . . . . . 11
Ad-Hoc Mode . . . . . . . . . . . . . . . . . . . . . . . . . . . . . . . . . . . 45
All Song Play . . . . . . . . . . . . . . . . . . . . . . . . . . . . . . . . . . . . 22
Ambience . . . . . . . . . . . . . . . . . . . . . . . . . . . . . . . . . . . . . . 17
Audio recording . . . . . . . . . . . . . . . . . . . . . . . . . . . . . . . . 25
Audio Transpose . . . . . . . . . . . . . . . . . . . . . . . . . . . . . . . . 23
AudTrans . . . . . . . . . . . . . . . . . . . . . . . . . . . . . . . . . . . . . . . 23
Auto O . . . . . . . . . . . . . . . . . . . . . . . . . . . . . . . . . . . . . . . . 33
B
[ BACKING] button . . . . . . . . . . . . . . . . . . . . . . . . . . . . . . 8
Backup . . . . . . . . . . . . . . . . . . . . . . . . . . . . . . . . . . . . . . . . . 33
BALANCE . . . . . . . . . . . . . . . . . . . . . . . . . . . . . . . . . . . . . . . . 8
BEAT . . . . . . . . . . . . . . . . . . . . . . . . . . . . . . . . . . . . . . . . . . . . 16
C
C Cancel . . . . . . . . . . . . . . . . . . . . . . . . . . . . . . . . . . . . . . . . 23
Center Cancel . . . . . . . . . . . . . . . . . . . . . . . . . . . . . . . . . . . 23
Center Pedal Function . . . . . . . . . . . . . . . . . . . . . . . . . . . 39
Center Pedal Part . . . . . . . . . . . . . . . . . . . . . . . . . . . . . . . 39
Chord
Fingering . . . . . . . . . . . . . . . . . . . . . . . . . . . . . . . . . . . 53
Chord Hold . . . . . . . . . . . . . . . . . . . . . . . . . . . . . . . . . . . . . 21
Computer . . . . . . . . . . . . . . . . . . . . . . . . . . . . . . . . . . . . . . 28
Converting to audio . . . . . . . . . . . . . . . . . . . . . . . . . . . . . 27
Copy
Registration Set . . . . . . . . . . . . . . . . . . . . . . . . . . . . . 31
Song. . . . . . . . . . . . . . . . . . . . . . . . . . . . . . . . . . . . . . . . 34
CopyRgst . . . . . . . . . . . . . . . . . . . . . . . . . . . . . . . . . . . . . . . 31
CopySong . . . . . . . . . . . . . . . . . . . . . . . . . . . . . . . . . . . . . . 34
CPdl Fnc . . . . . . . . . . . . . . . . . . . . . . . . . . . . . . . . . . . . . . . . 39
CPdl Prt . . . . . . . . . . . . . . . . . . . . . . . . . . . . . . . . . . . . . . . . . 39
D
Damper pedal . . . . . . . . . . . . . . . . . . . . . . . . . . . . . . . . . . 11
Damper Pedal Part . . . . . . . . . . . . . . . . . . . . . . . . . . . . . . 39
DAMPER/R jack . . . . . . . . . . . . . . . . . . . . . . . . . . . . . . . . . 11
DC IN jack . . . . . . . . . . . . . . . . . . . . . . . . . . . . . . . . . . . . . . 11
Delete
Registration Set . . . . . . . . . . . . . . . . . . . . . . . . . . . . . 32
Song. . . . . . . . . . . . . . . . . . . . . . . . . . . . . . . . . . . . . . . . 34
Del Rgst . . . . . . . . . . . . . . . . . . . . . . . . . . . . . . . . . . . . . . . . 32
Del Song. . . . . . . . . . . . . . . . . . . . . . . . . . . . . . . . . . . . . . . . 34
DEMO . . . . . . . . . . . . . . . . . . . . . . . . . . . . . . . . . . . . . . . . . . 13
Demo song . . . . . . . . . . . . . . . . . . . . . . . . . . . . . . . . . . . . . 13
Display . . . . . . . . . . . . . . . . . . . . . . . . . . . . . . . . . . . . . . . . . . 6
DPdl Prt . . . . . . . . . . . . . . . . . . . . . . . . . . . . . . . . . . . . . . . . 39
Dual Bal . . . . . . . . . . . . . . . . . . . . . . . . . . . . . . . . . . . . . . . . 38
Dual Balance . . . . . . . . . . . . . . . . . . . . . . . . . . . . . . . . . . . . 38
Dual Play . . . . . . . . . . . . . . . . . . . . . . . . . . . . . . . . . . . . . 6, 14
E
Ending . . . . . . . . . . . . . . . . . . . . . . . . . . . . . . . . . . . . . . . . . 20
[E. PIANO] button . . . . . . . . . . . . . . . . . . . . . . . . . . . . . . . 14
EQ Edit . . . . . . . . . . . . . . . . . . . . . . . . . . . . . . . . . . . . . . . . . 17
EQ SW . . . . . . . . . . . . . . . . . . . . . . . . . . . . . . . . . . . . . . . . . . 17
Equalizer . . . . . . . . . . . . . . . . . . . . . . . . . . . . . . . . . . . . . . . 17
F
Factory Reset . . . . . . . . . . . . . . . . . . . . . . . . . . . . . . . . . . . 35
Factory Settings . . . . . . . . . . . . . . . . . . . . . . . . . . . . . . . . . 35
FctReset . . . . . . . . . . . . . . . . . . . . . . . . . . . . . . . . . . . . . . . . 35
Fill-In . . . . . . . . . . . . . . . . . . . . . . . . . . . . . . . . . . . . . . . . . . . 20
Format . . . . . . . . . . . . . . . . . . . . . . . . . . . . . . . . . . . . . . . . . 36
Format Media . . . . . . . . . . . . . . . . . . . . . . . . . . . . . . . . . . . 36
FUNCTION . . . . . . . . . . . . . . . . . . . . . . . . . . . . . . . . . . . . . . 37
Function Mode . . . . . . . . . . . . . . . . . . . . . . . . . . . . . . . . . 37
56
H
Headphone Jack . . . . . . . . . . . . . . . . . . . . . . . . . . . . . . . . 10
I
INPUT jack . . . . . . . . . . . . . . . . . . . . . . . . . . . . . . . . . . . . . . 11
Intro . . . . . . . . . . . . . . . . . . . . . . . . . . . . . . . . . . . . . . . . . . . . 19
[INTRO/ENDING] button . . . . . . . . . . . . . . . . . . . . . . . 9, 19
K
[KEYBOARD ] button. . . . . . . . . . . . . . . . . . . . . . . . . . . . . 8
Key Touch . . . . . . . . . . . . . . . . . . . . . . . . . . . . . . . . . . . . . . 18
L
Left Pedal Function . . . . . . . . . . . . . . . . . . . . . . . . . . . . . 40
Left Pedal Part . . . . . . . . . . . . . . . . . . . . . . . . . . . . . . . . . . 40
Load
Registration Set . . . . . . . . . . . . . . . . . . . . . . . . . . . . . 31
LoadRgst . . . . . . . . . . . . . . . . . . . . . . . . . . . . . . . . . . . . . . . 31
Local Control . . . . . . . . . . . . . . . . . . . . . . . . . . . . . . . . . . . 41
LocalCtl . . . . . . . . . . . . . . . . . . . . . . . . . . . . . . . . . . . . . . . . . 41
LPdl Fnc . . . . . . . . . . . . . . . . . . . . . . . . . . . . . . . . . . . . . . . . 40
LPdl Prt . . . . . . . . . . . . . . . . . . . . . . . . . . . . . . . . . . . . . . . . . 40
M
MAC address . . . . . . . . . . . . . . . . . . . . . . . . . . . . . . . . . . . . 45
Master Tuning . . . . . . . . . . . . . . . . . . . . . . . . . . . . . . . . . . 37
Memory Backup . . . . . . . . . . . . . . . . . . . . . . . . . . . . . . 6, 33
Metronome . . . . . . . . . . . . . . . . . . . . . . . . . . . . . . . . . . . 9, 16
Volume . . . . . . . . . . . . . . . . . . . . . . . . . . . . . . . . . . . . . 16
[METRONOME] button . . . . . . . . . . . . . . . . . . . . . . . . 9, 16
MIDI Transmit Channel . . . . . . . . . . . . . . . . . . . . . . . . . . 41
MIDI Visual Control . . . . . . . . . . . . . . . . . . . . . . . . . . . . . . 41
Music rest. . . . . . . . . . . . . . . . . . . . . . . . . . . . . . . . . . . . . . . 10
O
Octave Shift . . . . . . . . . . . . . . . . . . . . . . . . . . . . . . . . . . . . 38
Oct Shft . . . . . . . . . . . . . . . . . . . . . . . . . . . . . . . . . . . . . . . . 38
[OTHER] button . . . . . . . . . . . . . . . . . . . . . . . . . . . . . . . . . 14
OUTPUT jacks . . . . . . . . . . . . . . . . . . . . . . . . . . . . . . . . . . . 11
P
Panel Lock . . . . . . . . . . . . . . . . . . . . . . . . . . . . . . . . . . . . 7, 35
Part . . . . . . . . . . . . . . . . . . . . . . . . . . . . . . . . . . . . . . . . . . . . . 21
PEDAL jacks . . . . . . . . . . . . . . . . . . . . . . . . . . . . . . . . . . . . . 11
Pedal Shift . . . . . . . . . . . . . . . . . . . . . . . . . . . . . . . . . . . . . . 40
[PIANO] button . . . . . . . . . . . . . . . . . . . . . . . . . . . . . . . . . 14
Piano Tone . . . . . . . . . . . . . . . . . . . . . . . . . . . . . . . . . . . . . . 38
Power . . . . . . . . . . . . . . . . . . . . . . . . . . . . . . . . . . . . . . . . . . 13
R
[REC] button . . . . . . . . . . . . . . . . . . . . . . . . . . . . . . 9, 24, 27
Rec Mode . . . . . . . . . . . . . . . . . . . . . . . . . . . . . . . . . . . . . . . 40
Recording . . . . . . . . . . . . . . . . . . . . . . . . . . . . . . . . . . . . 9, 24
Audio . . . . . . . . . . . . . . . . . . . . . . . . . . . . . . . . . . . . . . . 25
SMF . . . . . . . . . . . . . . . . . . . . . . . . . . . . . . . . . . . . . . . . 24
Recording Mode . . . . . . . . . . . . . . . . . . . . . . . . . . . . . . . . 40
Reformatting Memory . . . . . . . . . . . . . . . . . . . . . . . . . . 36
Registration . . . . . . . . . . . . . . . . . . . . . . . . . . . . . . . . . . . . . 29
Recall . . . . . . . . . . . . . . . . . . . . . . . . . . . . . . . . . . . . . . . 29
Save . . . . . . . . . . . . . . . . . . . . . . . . . . . . . . . . . . . . . . . . 30
Registrations . . . . . . . . . . . . . . . . . . . . . . . . . . . . . . . . . . . . . 7
Registration Set . . . . . . . . . . . . . . . . . . . . . . . . . . . . . . . . . 29
Copy. . . . . . . . . . . . . . . . . . . . . . . . . . . . . . . . . . . . . . . . 31
Delete . . . . . . . . . . . . . . . . . . . . . . . . . . . . . . . . . . . . . . 32
Load . . . . . . . . . . . . . . . . . . . . . . . . . . . . . . . . . . . . . . . . 31
Save . . . . . . . . . . . . . . . . . . . . . . . . . . . . . . . . . . . . . . . . 30
Rgst.LSB . . . . . . . . . . . . . . . . . . . . . . . . . . . . . . . . . . . . . . . . 40
Rgst.MSB . . . . . . . . . . . . . . . . . . . . . . . . . . . . . . . . . . . . . . . 40
RgstPC. . . . . . . . . . . . . . . . . . . . . . . . . . . . . . . . . . . . . . . . . . 40
Rgst.Pdl . . . . . . . . . . . . . . . . . . . . . . . . . . . . . . . . . . . . . . . . . 40
RgstTxCh . . . . . . . . . . . . . . . . . . . . . . . . . . . . . . . . . . . . . . . 40
Rhy. Part . . . . . . . . . . . . . . . . . . . . . . . . . . . . . . . . . . . . . . . . 21
Rhythm . . . . . . . . . . . . . . . . . . . . . . . . . . . . . . . . . . . . . . . . . 19
Play . . . . . . . . . . . . . . . . . . . . . . . . . . . . . . . . . . . . . . . 9, 19
Select . . . . . . . . . . . . . . . . . . . . . . . . . . . . . . . . . . . . . 8, 19
[RHYTHM] button . . . . . . . . . . . . . . . . . . . . . . . . . . . . . . . . 8
S
Save
Registrations . . . . . . . . . . . . . . . . . . . . . . . . . . . . . . . . 30
Registration Set . . . . . . . . . . . . . . . . . . . . . . . . . . . . . 30
Settings . . . . . . . . . . . . . . . . . . . . . . . . . . . . . . . . . . . . . 33
SaveRgst . . . . . . . . . . . . . . . . . . . . . . . . . . . . . . . . . . . . . . . . 30
SMF recording . . . . . . . . . . . . . . . . . . . . . . . . . . . . . . . . . . 24
Converting audio . . . . . . . . . . . . . . . . . . . . . . . . . . . 27
SOFT/L jack . . . . . . . . . . . . . . . . . . . . . . . . . . . . . . . . . . . . . 11
Soft pedal . . . . . . . . . . . . . . . . . . . . . . . . . . . . . . . . . . . . . . 11
Song . . . . . . . . . . . . . . . . . . . . . . . . . . . . . . . . . . . . . . . . . . . 22
Copy. . . . . . . . . . . . . . . . . . . . . . . . . . . . . . . . . . . . . . . . 34
Delete . . . . . . . . . . . . . . . . . . . . . . . . . . . . . . . . . . . . . . 34
Name . . . . . . . . . . . . . . . . . . . . . . . . . . . . . . . . . . . . . . . 26
Play All. . . . . . . . . . . . . . . . . . . . . . . . . . . . . . . . . . . . 9, 22
Playback . . . . . . . . . . . . . . . . . . . . . . . . . . . . . . . . . . 9, 22
Select . . . . . . . . . . . . . . . . . . . . . . . . . . . . . . . . . . . . . 8, 22
Tempo . . . . . . . . . . . . . . . . . . . . . . . . . . . . . . . . . . . . . . 23
Transpose . . . . . . . . . . . . . . . . . . . . . . . . . . . . . . . . . . . 18
[SONG] button . . . . . . . . . . . . . . . . . . . . . . . . . . . . . . . . . . . 8
SOSTENUTO/C jack . . . . . . . . . . . . . . . . . . . . . . . . . . . . . . 11
Sostenuto pedal . . . . . . . . . . . . . . . . . . . . . . . . . . . . . . . . 11
SplitBal . . . . . . . . . . . . . . . . . . . . . . . . . . . . . . . . . . . . . . . . . 38
Split Balance . . . . . . . . . . . . . . . . . . . . . . . . . . . . . . . . . . . . 38
[SPLIT] button . . . . . . . . . . . . . . . . . . . . . . . . . . . . . . . . 7, 15
Split Play. . . . . . . . . . . . . . . . . . . . . . . . . . . . . . . . . . . . . . 7, 15
Split Point . . . . . . . . . . . . . . . . . . . . . . . . . . . . . . . . . . . . . . 15
SplOnRcg . . . . . . . . . . . . . . . . . . . . . . . . . . . . . . . . . . . . . . . 39
Stand . . . . . . . . . . . . . . . . . . . . . . . . . . . . . . . . . . . . . . . . . . . 12
[START/STOP] button . . . . . . . . . . . . . . . . . . . . . . . . . . . . . 9
[STRINGS] button . . . . . . . . . . . . . . . . . . . . . . . . . . . . . . . 14
Sync Start . . . . . . . . . . . . . . . . . . . . . . . . . . . . . . . . . . . . . . . 21
T
Temperament . . . . . . . . . . . . . . . . . . . . . . . . . . . . . . . . . . . 37
Tempo . . . . . . . . . . . . . . . . . . . . . . . . . . . . . . . . . . . . . . . . 9, 16
TEMPO . . . . . . . . . . . . . . . . . . . . . . . . . . . . . . . . . . . . . . . . . 16
Temprmnt . . . . . . . . . . . . . . . . . . . . . . . . . . . . . . . . . . . . . . 37
Time Signature . . . . . . . . . . . . . . . . . . . . . . . . . . . . . . . . 9, 16
Tmpr Key . . . . . . . . . . . . . . . . . . . . . . . . . . . . . . . . . . . . . . . 37
Tone . . . . . . . . . . . . . . . . . . . . . . . . . . . . . . . . . . . . . . . . . . . . . 6
Designing. . . . . . . . . . . . . . . . . . . . . . . . . . . . . . . . . . . 38
Select . . . . . . . . . . . . . . . . . . . . . . . . . . . . . . . . . . . . . . . 14
TONE buttons . . . . . . . . . . . . . . . . . . . . . . . . . . . . . . . . . . . . 6
Tone Color . . . . . . . . . . . . . . . . . . . . . . . . . . . . . . . . . . 17, 37
Transmit MIDI Information . . . . . . . . . . . . . . . . . . . . . . 40
Transpose . . . . . . . . . . . . . . . . . . . . . . . . . . . . . . . . . . . . 7, 18
Audio le . . . . . . . . . . . . . . . . . . . . . . . . . . . . . . . . . . . 23
[TRANSPOSE] button . . . . . . . . . . . . . . . . . . . . . . . . . . 7, 18
Transpose Mode . . . . . . . . . . . . . . . . . . . . . . . . . . . . . . . . 38
Trnspose . . . . . . . . . . . . . . . . . . . . . . . . . . . . . . . . . . . . . . . . 38
Tuning . . . . . . . . . . . . . . . . . . . . . . . . . . . . . . . . . . . . . . . . . . 37
U
USB Memory Mode . . . . . . . . . . . . . . . . . . . . . . . . . . . . . 42
USB MEMORY port . . . . . . . . . . . . . . . . . . . . . . . . . . . . . . 10
USB Mode . . . . . . . . . . . . . . . . . . . . . . . . . . . . . . . . . . . . . . 42
V
[VARIATION] button . . . . . . . . . . . . . . . . . . . . . . . . . . . 9, 20
VC Ch . . . . . . . . . . . . . . . . . . . . . . . . . . . . . . . . . . . . . . . . . . . 42
VC Mode. . . . . . . . . . . . . . . . . . . . . . . . . . . . . . . . . . . . . . . . 41
Visual Control Channel . . . . . . . . . . . . . . . . . . . . . . . . . . 42
Visual Control Mode. . . . . . . . . . . . . . . . . . . . . . . . . . . . . 41
V-LINK . . . . . . . . . . . . . . . . . . . . . . . . . . . . . . . . . . . . . . . . . . 41
Volume . . . . . . . . . . . . . . . . . . . . . . . . . . . . . . . . . . . . . . . . . . 8
Balance . . . . . . . . . . . . . . . . . . . . . . . . . . . . . . . . . . . . . . 8
Metronome . . . . . . . . . . . . . . . . . . . . . . . . . . . . . . . . . 16
W
Wireless Communication . . . . . . . . . . . . . . . . . . . . . . . . 43
Wireless LAN . . . . . . . . . . . . . . . . . . . . . . . . . . . . . . . . . . . . 43
WPS . . . . . . . . . . . . . . . . . . . . . . . . . . . . . . . . . . . . . . . . . . . . 43
Page 57

USING THE UNIT SAFELY
Operation Guide Getting Ready Performing Recording Registrations Settings
About WARNING and CAUTION Notices
Used for instructions intended to alert the
user to the risk of death or severe injury
should the unit be used improperly.
Used for instructions intended to alert the
user to the risk of injury or material
damage should the unit be used
improperly.
* Material damage refers to damage or
other adverse effects caused with
respect to the home and all its
furnishings, as well to domestic animals
or pets.
ALWAYS OBSERVE THE FOLLOWING
WARNING
Concerning the Auto O function
The power to this unit will be
turned o automatically after a
predetermined amount of time
has passed since it was last used
for playing music, or its buttons or
controls were operated (Auto O
function). If you do not want the
power to be turned o automatically,
disengage the Auto O function (p. 33).
Do not disassemble or modify by yourself
Do not open (or modify in any way)
the unit or its AC adaptor.
Do not repair or replace parts by yourself
Do not attempt to repair the unit,
or replace parts within it (except
when this manual provides specic
instructions directing you to do so).
Refer all servicing to your retailer, the
nearest Roland Service Center, or an
authorized Roland distributor, as listed
on the “Information” page.
Do not use or store in the following types of locations
• Subject to temperature extremes
(e.g., direct sunlight in an enclosed
vehicle, near a heating duct, on top
of heat-generating equipment); or
are
• Damp (e.g., baths, washrooms, on
wet oors); or are
• Exposed to steam or smoke; or are
• Subject to salt exposure; or are
• Humid; or are
• Exposed to rain; or are
• Dusty or sandy; or are
• Subject to high levels of vibration
and shakiness.
Use only stand that is recommended
This unit should be used only with a
stand that is recommended by Roland.
Do not place in an unstable location
When using the unit with a stand
recommended by Roland, the stand
must be carefully placed so it is level
and sure to remain stable. If not
using a stand, you still need to make
sure that any location you choose
for placing the unit provides a level
surface that will properly support the
unit, and keep it from wobbling.
About the Symbols
The symbol alerts the user to important instructions or
warnings.The specific meaning of the symbol is
determined by the design contained within the triangle. In
the case of the symbol at left, it is used for general
cautions, warnings, or alerts to danger.
The symbol alerts the user to items that must never be
carried out (are forbidden). The specific thing that must
not be done is indicated by the design contained within
the circle. In the case of the symbol at left, it means that
the unit must never be disassembled.
The symbol alerts the user to things that must be
carried out. The specific thing that must be done is
indicated by the design contained within the circle. In the
case of the symbol at left, it means that the power-cord
plug must be unplugged from the outlet.
WARNING
WARNING
Precautions regarding placement of this unit on a
stand
Be sure to follow the instructions in
the Owner’s Manual carefully when
placing this unit on a stand (p. 12).
If it is not set up properly, you risk
creating an unstable situation which
could lead to the unit falling or the
stand toppling, and may result in
injury.
Use only the supplied AC adaptor and the correct
voltage
Be sure to use only the AC adaptor
included with the unit. Also, make
sure the line voltage at the installation
matches the input voltage specied
on the AC adaptor’s body. Other AC
adaptors may use a dierent polarity,
or be designed for a dierent voltage,
so their use could result in damage,
malfunction, or electric shock.
Use only the supplied power cord
Use only the attached power-supply
cord. Also, the supplied power cord
must not be used with any other
device.
Do not bend the power cord or place heavy objects
on it
Do not excessively twist or bend the
power cord, nor place heavy objects
on it. Doing so can damage the cord,
producing severed elements and
short circuits. Damaged cords are re
and shock hazards!
5757
Appendix
Page 58

USING THE UNIT SAFELY
WARNING
Avoid extended use at high volume
This unit, either alone or in
combination with an amplier and
headphones or speakers, may be
capable of producing sound levels
that could cause permanent hearing
loss. Do not operate for a long period
of time at a high volume level, or at
a level that is uncomfortable. If you
experience any hearing loss or ringing
in the ears, you should immediately
stop using the unit, and consult an
audiologist.
Don’t allow foreign objects or liquids to enter unit;
never place containers with liquid on unit
Do not place containers containing
liquid (e.g., ower vases) on this
product. Never allow foreign objects
(e.g., ammable objects, coins, wires)
or liquids (e.g., water or juice) to enter
this product. Doing so may cause
short circuits, faulty operation, or
other malfunctions.
Turn o the unit if an abnormality or malfunction
occurs
Immediately turn the unit o, remove
the AC adaptor from the outlet, and
request servicing by your retailer, the
nearest Roland Service Center, or an
authorized Roland distributor, as listed
on the “Information” page when:
• The AC adaptor, the power-supply
cord, or the plug has been damaged;
or
• If smoke or unusual odor occurs; or
• Objects have fallen into, or liquid has
been spilled onto the unit; or
• The unit has been exposed to rain
(or otherwise has become wet); or
• The unit does not appear to operate
normally or exhibits a marked
change in performance.
Adults must provide supervision in places where
children are present
When using the unit in locations
where children are present, be careful
so no mishandling of the unit can
take place. An adult should always be
on hand to provide supervision and
guidance.
Do not drop or subject to strong impact
Protect the unit from strong impact.
(Do not drop it!)
WARNING
Do not share an outlet with an unreasonable number
of other devices
Do not force the unit’s powersupply cord to share an outlet with
an unreasonable number of other
devices. Be especially careful when
using extension cords—the total
power used by all devices you have
connected to the extension cord’s
outlet must never exceed the power
rating (watts/amperes) for the
extension cord. Excessive loads can
cause the insulation on the cord to
heat up and eventually melt through.
Do not use overseas
Before using the unit in a foreign
country, consult with your retailer, the
nearest Roland Service Center, or an
authorized Roland distributor, as listed
on the “Information” page.
CAUTION
Place in a well ventilated location
The unit and the AC adaptor should
be located so their location or position
does not interfere with their proper
ventilation.
Use only the specied stand (s)
This unit is designed to be used in
combination with specic stands
(model: KSC-44, KS-G8, KS-18Z, KS-12)
manufactured by Roland. If used in
combination with other stands, you
risk sustaining injuries as the result
of this product dropping down or
toppling over due to a lack of stability.
Evaluate safety issues before using stands
Even if you observe the cautions given
in the owner’s manual, certain types
of handling may allow this product to
fall from the stand, or cause the stand
to overturn. Please be mindful of any
safety issues before using this product.
Grasp the plug when connecting or disconnecting the
AC adaptor
Always grasp only the plug on the
AC adaptor cord when plugging into,
or unplugging from, an outlet or this
unit.
Periodically clean the AC adaptor’s plug
At regular intervals, you should
unplug the AC adaptor and clean
it by using a dry cloth to wipe all
dust and other accumulations away
from its prongs. Also, disconnect the
power plug from the power outlet
whenever the unit is to remain unused
for an extended period of time. Any
accumulation of dust between the
power plug and the power outlet can
result in poor insulation and lead to
re.
CAUTION
Manage cables for safety
Try to prevent cords and cables from
becoming entangled. Also, all cords
and cables should be placed so they
are out of the reach of children.
Avoid climbing on top of the unit, or placing heavy
objects on it
Never climb on top of, nor place heavy
objects on the unit.
Do not connect or disconnect the AC adaptor with wet
hands
Never handle the AC adaptor or its
plugs with wet hands when plugging
into, or unplugging from, an outlet or
this unit.
Cautions when moving this unit
If you need to move the instrument,
take note of the precautions listed
below. At least two persons are
required to safely lift and move the
unit. It should be handled carefully, all
the while keeping it level. Make sure
to have a rm grip, to protect yourself
from injury and the instrument from
damage.
• Check to make sure the knob bolts
securing the unit to the stand have
not become loose. Fasten them
again securely whenever you notice
any loosening.
• Disconnect the AC adaptor.
• Disconnect all cords coming from
external devices.
• Remove the music rest.
Unplug the AC adaptor from the outlet before
cleaning
Before cleaning the unit, turn it o
and unplug the AC adaptor from the
outlet (p. 11).
If there is a possibility of lightning strike, disconnect
the AC adaptor from the outlet
Whenever you suspect the possibility
of lightning in your area, disconnect
the AC adaptor from the outlet.
Take care not to get burned
The area shown in the illustration may
become hot, so take care to avoid
burns.
58
Page 59

IMPORTANT NOTES
Power Supply
• Do not connect this unit to same electrical outlet that is being used
by an electrical appliance that is controlled by an inverter or a motor
(such as a refrigerator, washing machine, microwave oven, or air
conditioner). Depending on the way in which the electrical appliance
is used, power supply noise may cause this unit to malfunction or may
produce audible noise. If it is not practical to use a separate electrical
outlet, connect a power supply noise lter between this unit and the
electrical outlet.
• The AC adaptor will begin to generate heat after long hours of
consecutive use. This is normal, and is not a cause for concern.
• To prevent malfunction and equipment failure, always make sure
to turn o the power on all your equipment before you make any
connections.
Placement
• Using the unit near power ampliers (or other equipment containing
large power transformers) may induce hum. To alleviate the problem,
change the orientation of this unit; or move it farther away from the
source of interference.
• This device may interfere with radio and television reception. Do not
use this device in the vicinity of such receivers.
• Noise may be produced if wireless communications devices, such as
cell phones, are operated in the vicinity of this unit. Such noise could
occur when receiving or initiating a call, or while conversing. Should
you experience such problems, you should relocate such wireless
devices so they are at a greater distance from this unit, or switch them
o.
• Do not expose the unit to direct sunlight, place it near devices that
radiate heat, leave it inside an enclosed vehicle, or otherwise subject
it to temperature extremes. Excessive heat can deform or discolor the
unit.
• When moved from one location to another where the temperature
and/or humidity is very dierent, water droplets (condensation) may
form inside the unit. Damage or malfunction may result if you attempt
to use the unit in this condition. Therefore, before using the unit, you
must allow it to stand for several hours, until the condensation has
completely evaporated.
• Do not allow objects to remain on top of the keyboard. This can be the
cause of malfunction, such as keys ceasing to produce sound.
• Depending on the material and temperature of the surface on which
you place the unit, its rubber feet may discolor or mar the surface.
You can place a piece of felt or cloth under the rubber feet to prevent
this from happening. If you do so, please make sure that the unit will
not slip or move accidentally.
• Do not put anything that contains water on this unit. Also, avoid the
use of insecticides, perfumes, alcohol, nail polish, spray cans, etc., near
the unit. Swiftly wipe away any liquid that spills on the unit using a dry,
soft cloth.
Maintenance
• For everyday cleaning wipe the unit with a soft, dry cloth or one that
has been slightly dampened with water. To remove stubborn dirt, use a
cloth impregnated with a mild, non-abrasive detergent. Afterwards, be
sure to wipe the unit thoroughly with a soft, dry cloth.
• Never use benzine, thinners, alcohol or solvents of any kind, to avoid
the possibility of discoloration and/or deformation.
Repairs and Data
• Please be aware that all data contained in the unit’s memory may be
lost when the unit is sent for repairs. Important data should always be
backed up USB ash drives, or written down on paper (when possible).
During repairs, due care is taken to avoid the loss of data. However, in
certain cases (such as when circuitry related to memory itself is out of
order), we regret that it may not be possible to restore the data, and
Roland assumes no liability concerning such loss of data.
Additional Precautions
• Please be aware that the contents of memory can be irretrievably lost
as a result of a malfunction, or the improper operation of the unit.
To protect yourself against the risk of loosing important data, we
recommend that you periodically save a backup copy of important
data you have stored in the unit’s memory on USB ash drives.
• Unfortunately, it may be impossible to restore the contents of data that
was stored in the unit’s memory or USB ash drives once it has been
lost. Roland Corporation assumes no liability concerning such loss of
data.
• Use a reasonable amount of care when using the unit’s buttons, sliders,
or other controls; and when using its jacks and connectors. Rough
handling can lead to malfunctions.
• Never strike or apply strong pressure to the display.
• When disconnecting all cables, grasp the connector itself—never pull
on the cable. This way you will avoid causing shorts, or damage to the
cable’s internal elements.
• To avoid disturbing others nearby, try to keep the unit’s volume at
reasonable levels. You may prefer to use headphones, so you do not
need to be concerned about those around you.
• The sound of keys being struck and vibrations produced by playing
an instrument can be transmitted through a oor or wall to an
unexpected extent. Please take care not to cause annoyance to others
nearby.
• When you need to transport the unit, package it in the box (including
padding) that it came in, if possible. Otherwise, you will need to use
equivalent packaging materials.
• Do not apply undue force to the music rest while it is in use.
• Use only the specied expression pedal (EV-5, EV-7; sold separately). By
connecting any other expression pedals, you risk causing malfunction
and/or damage to the unit.
• Some connection cables contain resistors. Do not use cables that
incorporate resistors for connecting to this unit. The use of such cables
can cause the sound level to be extremely low, or impossible to hear.
For information on cable specications, contact the manufacturer of
the cable.
• The explanations in this manual include illustrations that depict what
should typically be shown by the display.
Note, however, that your unit may incorporate a newer, enhanced
version of the system (e.g., includes newer sounds), so what you
actually see in the display may not always match what appears in the
manual.
Operation Guide Getting Ready Performing Recording Registrations Settings
5959
Appendix
Page 60

IMPORTANT NOTES
Using USB ash drives
• Carefully insert the USB ash drives all the way in—until it is rmly in
place.
• Never touch the terminals of the USB ash drives. Also, avoid getting
the terminals dirty.
• USB ash drives are constructed using precision components; handle
the memories carefully, paying particular note to the following.
• To prevent damage to the USB ash drives from static electricity, be
sure to discharge any static electricity from your own body before
handling the USB ash drives.
• Do not touch or allow metal to come into contact with the contact
portion of the USB ash drives.
• Do not bend, drop, or subject USB ash drives to strong shock or
vibration.
• Do not keep USB ash drives in direct sunlight, in closed vehicles, or
other such locations.
• Do not allow USB ash drives to become wet.
• Do not disassemble or modify the USB ash drives.
Care of the keyboard
• Do not write on the keyboard with any pen or other implement, and do
not stamp or place any marking on the instrument. Ink will seep into
the surface lines and become unremovable.
• Do not ax stickers on the keyboard. You may be unable to remove
stickers that use strong adhesives, and the adhesive may cause
discoloration.
• To remove stubborn dirt, use a commercially available keyboard
cleaner that does not contain abrasives. Start by wiping lightly. If the
dirt does not come o, wipe using gradually increasing amounts of
pressure while taking care not to scratch the keys.
Copyrights/Licence/Trademark
• It is forbidden by law to make an audio recording, video recording,
copy or revision of a third party’s copyrighted work (musical work,
video work, broadcast, live performance, or other work), whether in
whole or in part, and distribute, sell, lease, perform, or broadcast it
without the permission of the copyright owner.
• Do not use this product for purposes that could infringe on a copyright
held by a third party. We assume no responsibility whatsoever with
regard to any infringements of third-party copyrights arising through
your use of this product.
• The copyright of content in this product (the sound waveform data,
style data, accompaniment patterns, phrase data, audio loops and
image data) is reserved by Roland Corporation.
• Purchasers of this product are permitted to utilize said content for
the creating, performing, recording and distributing original musical
works.
• Purchasers of this product are NOT permitted to extract said content
in original or modied form, for the purpose of distributing recorded
medium of said content or making them available on a computer
network.
• MMP (Moore Microprocessor Portfolio) refers to a patent portfolio
concerned with microprocessor architecture, which was developed
by Technology Properties Limited (TPL). Roland has licensed this
technology from the TPL Group.
• XGlite (
Corporation.
• Microsoft product screen shot(s) reprinted with permission from
Microsoft Corporation.
• Roland, GS, and SuperNATURAL are either registered trademarks or
trademarks of Roland Corporation in the United States and/or other
countries.
• Company names and product names appearing in this document are
registered trademarks or trademarks of their respective owners.
• Microsoft, Windows, Windows Vista, and DirectX are either registered
trademarks or trademarks of Microsoft Corporation.
• iPhone and iTunes are either registered trademarks or trademarks of
Apple Inc.
) is a registered trademark or a trademark of Yamaha
60
Page 61

Page 62

For EU Countries
For China
Page 63

For the U.K.
IMPORTANT: THE WIRES IN THIS MAINS LEAD ARE COLOURED IN ACCORDANCE WITH THE FOLLOWING CODE.
BLUE:
BROWN:
As the colours of the wires in the mains lead of this apparatus may not correspond with the coloured markings identifying
the terminals in your plug, proceed as follows:
The wire which is coloured BLUE must be connected to the terminal which is marked with the letter N or coloured BLACK.
The wire which is coloured BROWN must be connected to the terminal which is marked with the letter L or coloured RED.
Under no circumstances must either of the above wires be connected to the earth terminal of a three pin plug.
This product complies with the requirements of EMC Directive 2004/108/EC.
NEUTRAL
LIVE
For EU Countries
For the USA
FEDERAL COMMUNICATIONS COMMISSION
RADIO FREQUENCY INTERFERENCE STATEMENT
This equipment has been tested and found to comply with the limits for a Class B digital device, pursuant to Part 15 of the
FCC Rules. These limits are designed to provide reasonable protection against harmful interference in a residential
installation. This equipment generates, uses, and can radiate radio frequency energy and, if not installed and used in
accordance with the instructions, may cause harmful interference to radio communications. However, there is no guarantee
that interference will not occur in a particular installation. If this equipment does cause harmful interference to radio or
television reception, which can be determined by turning the equipment off and on, the user is encouraged to try to correct the
interference by one or more of the following measures:
– Reorient or relocate the receiving antenna.
– Increase the separation between the equipment and receiver.
– Connect the equipment into an outlet on a circuit different from that to which the receiver is connected.
– Consult the dealer or an experienced radio/TV technician for help.
This device complies with Part 15 of the FCC Rules. Operation is subject to the following two conditions:
(1) this device may not cause harmful interference, and
(2) this device must accept any interference received, including interference that may cause undesired operation.
This equipment requires shielded interface cables in order to meet FCC class B limit.
Any unauthorized changes or modifications not expressly approved by the party responsible for compliance could void the user’s
authority to operate the equipment.
For Canada
NOTICE
This Class B digital apparatus meets all requirements of the Canadian Interference-Causing Equipment Regulations.
AVIS
Cet appareil numérique de la classe B respecte toutes les exigences du Règlement sur le matériel brouilleur du Canada.
For C.A. US (Proposition 65
WARNING
This product contains chemicals known to cause cancer, birth defects and other reproductive harm, including lead.
)
Page 64

* 5 1 0 0 0 3 1 9 6 0 - 0 2 *
 Loading...