


 Loading...
r®
Owner’s Manual

For EU Countries
This product complies with the requirements of European Directive EMC 2004/108/EC.
For the USA
FEDERAL COMMUNICATIONS COMMISSION RADIO FREQUENCY INTERFERENCE STATEMENT
This equipment has been tested and found to comply with the limits for a Class B digital device, pursuant to Part 15 of the FCC Rules. These limits are designed to provide reasonable protection against harmful interference in a residential installation. This equipment generates, uses, and can radiate radio frequency energy and, if not installed and used in accordance with the instructions, may cause harmful interference to radio communications. However, there is no guarantee that interference will not occur in a particular installation. If this equipment does cause harmful interference to radio or television reception, which can be determined by turning the equipment off and on, the user is encouraged to try to correct the interference by one or more of the following measures:
—Reorient or relocate the receiving antenna.
—Increase the separation between the equipment and receiver.
—Connect the equipment into an outlet on a circuit different from that to which the receiver is connected.
—Consult the dealer or an experienced radio/TV technician for help.
This device complies with Part 15 of the FCC Rules. Operation is subject to the following two conditions:
(1)This device may not cause harmful interference, and
(2)This device must accept any interference received, including interference that may cause undesired operation.
Unauthorized changes or modification to this system can void the users authority to operate this equipment. This equipment requires shielded interface cables in order to meet FCC class B Limit.
For Canada
NOTICE
This Class B digital apparatus meets all requirements of the Canadian Interference-Causing Equipment Regulations.
AVIS
For C.A. US (Proposition 65)
WARNING
This product contains chemicals known to cause cancer, birth defects and other reproductive harm, including lead.
For the USA
DECLARATION OF CONFORMITY
Compliance Information Statement
Model Name : |
AX-Synth |
Type of Equipment : |
Shoulder Synthesizer |
Responsible Party : |
Roland Corporation U.S. |
Address : |
5100 S. Eastern Avenue, Los Angeles, CA 90040-2938 |
Telephone : |
(323) 890-3700 |
For the U.K.
IMPORTANT: THE WIRES IN THIS MAINS LEAD ARE COLOURED IN ACCORDANCE WITH THE FOLLOWING CODE.
BLUE: NEUTRAL
BROWN: LIVE
As the colours of the wires in the mains lead of this apparatus may not correspond with the coloured markings identifying the terminals in your plug, proceed as follows:
The wire which is coloured BLUE must be connected to the terminal which is marked with the letter N or coloured BLACK. The wire which is coloured BROWN must be connected to the terminal which is marked with the letter L or coloured RED. Under no circumstances must either of the above wires be connected to the earth terminal of a three pin plug.

r
Shoulder Synthesizer
Owner’s Manual
Thank you and congratulations on your choice of the Roland AX-Synth Shoulder Synthesizer. Fitted with a powerful sound engine, the AX-Synth represents the next generation of Roland’s legendary AX-series of shoulder keyboards, with sounds derived from Roland’s latest synthesizers.
With its support for battery and wireless audio use and its stylish design, the AX-Synth allows keyboardists and other musicians to take center stage with mesmerizing keyboard solos, basslines, etc. In addition, the AX-Synth can be used to control MIDI sound modules, function as input device for your computer-based DAW, to control samplers, etc.
To avoid confusion, let’s agree to…
•…use the word “button” for all keys on the front panel, and only use “key” when referring to the AX-Synth’s keyboard.
•…use “sequencer” when referring to both hardware sequencers and computers with sequencer software.
•…talk about “MIDI instruments” to signify both isolated (“monotimbral”) instruments and parts/timbres/voices/multi channels of a multitimbral module or synth.
The explanations in this manual include illustrations that depict what should typically be shown by the display. Note, however, that your unit may incorporate a newer, enhanced version of the system (e.g., includes newer sounds), so what you actually see in the display may not always match what appears in the manual.
Before using this unit, carefully read the sections entitled: “USING THE UNIT SAFELY” on p. 4 and “Important notes” on p. 6. These sections provide important information concerning the proper operation of the unit. Additionally, in order to feel assured that you have gained a good grasp of every feature provided by your new unit, this owner’s manual should be read in its entirety. The manual should be saved and kept on hand as a convenient reference.
Copyright ©2009 ROLAND EUROPE. All rights reserved.
No part of this publication may be reproduced in any form without the written permission of Roland Europe s.p.a.

Used for instructions intended to alert the user to the risk of death or severe injury should the unit be used improperly.
Used for instructions intended to alert the user to the risk of injury or material damage should the unit be used improperly.
* Material damage refers to damage or other adverse effects caused with respect to the home and all its furnishings, as well to domestic animals or pets.
• Do not open (or modify in any way) the instrument, and avoid damaging the AC adapter.
•Do not attempt to repair the instrument, or replace parts within it (except when this manual provides specific instructions directing you to do so). Refer all servicing to your retailer, the nearest Roland Service Center, or an authorized Roland distributor, as listed on the “Information” page.
•If you do not use the AX-Synth as a shoulder keyboard,
make sure you always have it placed so it is level and sure to remain stable. Never place it on stands that could wobble, or on inclined surfaces.
• Never use or store the AX-Synth in any of the following locations:
• Subject to temperature extremes (e.g., direct sunlight in an enclosed vehicle, near a heating duct, on top of heat-generating equipment); or are
•Damp (e.g., baths, washrooms, on wet floors); or are
•Exposed to steam or smoke; or are
•Subject to salt exposure; or are
•Humid; or are
•Exposed to rain; or are
•Dusty; or are
•Subject to high levels of vibration.
•Make sure you always have the unit placed so it is level and sure to remain stable. Never place it on stands that could wobble, or on inclined surfaces.
•Be sure to use only the AC adaptor supplied with the unit.
Also, make sure the line voltage at the installation matches the input voltage specified on the AC adaptor's
body. Other AC adaptors may use a different polarity, or
be designed for a different voltage, so their use could result in damage, malfunction, or electric shock.
• Use only the attached power-supply cord. Also, the supplied power cord must not be used with any other device.
•Do not excessively twist or bend the adaptor cord, nor place heavy objects on it. Doing so can damage the cord, producing severed elements and short circuits. Damaged cords are fire and shock hazards!
The symbol alerts the user to important instructions or warnings.The specific meaning of the symbol is determined by the design contained within the triangle. In the case of the symbol at left, it is used for general cautions, warnings, or alerts to danger.
The  symbol alerts the user to items that must never be carried out (are forbidden). The specific thing that must not be done is indicated by the design contained within the circle. In the case of the symbol at left, it means that the unit must never be disassembled.
The ● symbol alerts the user to things that must be carried out. The specific thing that must be done is indicated by the design contained within the circle. In the case of the symbol at left, it means that the powercord plug must be unplugged from the outlet.
•This instrument, either alone or in combination with an amplifier and headphones or speakers, may be capable of producing sound levels that could cause permanent hear-
ing loss. Do not operate for a long period of time at a high volume level or at a level that is uncomfortable. If you experience any hearing loss or ringing in the ears, you should immediately stop using the AX-Synth and consult an audiologist.
•Do not allow any objects (e.g., flammable material, coins,
pins); or liquids of any kind (water, soft drinks, etc.) to penetrate the AX-Synth.
•Immediately turn the power off, disconnect the adaptor from the outlet, and request servicing by your retailer, the nearest Roland Service Center, or an authorized Roland distributor, as listed on the “Information” page when:
•The AC adaptor, the power-supply cord, or the plug has been damaged; or
•If smoke or unusual odor occurs
•Objects have fallen into, or liquid has been spilled onto the unit; or
•The unit has been exposed to rain (or otherwise has become wet); or
•The unit does not appear to operate normally or exhibits a marked change in performance.
•In households with small children, an adult should pro-
vide supervision until the child is capable of following all the rules essential for the safe operation of the unit.
• Protect the AX-Synth from strong impact. Do not drop it!
•Do not force the unit's power-supply cord to share an outlet with an unreasonable number of other devices. Be especially careful when using extension cords—the total
power used by all devices you have connected to the extension cord's outlet must never exceed the power rating (watts/amperes) for the extension cord. Excessive loads can cause the insulation on the cord to heat up and eventually melt through.
•Before using the AX-Synth in a foreign country, consult
with your retailer, the nearest Roland Service Center, or an authorized Roland distributor, as listed on the “Information” page.
4
•Batteries must never be heated, taken apart, or thrown into fire or water.
•DO NOT play a CD-ROM disc on a conventional audio CD player. The resulting sound may be of a level that could cause permanent hearing loss. Damage to speakers or other system components may result.
•Never expose Ni-MH batteries to excessive heat such as sunshine, fire or the like.
rAX-Synth Owner’s Manual
• The AX-Synth and the AC adaptor should be located so that their location or position does not interfere with its proper ventilation.
• Always grasp only the plug on the AC adaptor cord when plugging into, or unplugging from, an outlet or this unit.
• At regular intervals, you should unplug the AC adaptor
and clean it by using a dry cloth to wipe all dust and other accumulations away from its prongs. Also, disconnect the
power plug from the power outlet whenever the unit is to remain unused for an extended period of time. Any accumulation of dust between the power plug and the power outlet can result in poor insulation and lead to fire.
• Try to prevent cords and cables from becoming entangled. Also, all cords and cables should be placed so they are out of the reach of children.
• Never climb on top of, nor place heavy objects on the AX-Synth.
• Never handle the AC adaptor or its plugs with wet hands when plugging into, or unplugging from, an outlet or this unit.
• Before moving the AX-Synth, disconnect the AC adaptor and all cords coming from external devices.
• Before cleaning the unit, turn off the power and unplug the AC adaptor from the outlet (see p. 13).
• Whenever you suspect the possibility of lightning in your area, disconnect the AC adaptor from the outlet.
• If used improperly, batteries may explode or leak and cause damage or injury. In the interest of safety, please read and observe the following precautions.
•Carefully follow the installation instructions for batteries, and make sure you observe the correct polarity.
•Avoid using new batteries together with used ones. In addition, avoid mixing different types of batteries.
•Remove the batteries whenever the unit is to remain unused for an extended period of time.
•If a battery has leaked, use a soft piece of cloth or paper towel to wipe all remnants of the discharge from the battery compartment. Then install new batteries. To avoid inflammation of the skin, make sure that none of the battery discharge gets onto your hands or skin. Exercise the utmost caution so that none of the discharge gets near your eyes. Immediately rinse the affected area with running water if any of the discharge has entered the eyes.
•Never keep batteries together with metallic objects such as ballpoint pens, necklaces, hairpins, etc.
•Used batteries must be disposed of in compliance with whatever regulations for their safe disposal that may be observed in the region in which you live.
5

Important notes
Important notes
In addition to the items listed under “USING THE UNIT SAFELY” on p. 4, please read and observe the following:
Power supply
•The AX-Synth can be operated using 8 rechargeable AA-type Ni-MH batteries or the supplied adaptor. Be careful to insert the batteries the right way around. If you prefer to use the adaptor, be sure to use the enclosed Roland PSB-1U model.
•Do not connect this unit to same electrical outlet that is being used by an electrical appliance that is controlled by an inverter (such as a refrigerator, washing machine, microwave oven, or air conditioner), or that contains a motor. Depending on the way in which the electrical appliance is used, power supply noise may cause this unit to malfunction or may produce audible noise. If it is not practical to use a separate electrical outlet, connect a power supply noise filter between this unit and the electrical outlet.
•The AC adaptor will begin to generate heat after long hours of consecutive use. This is normal, and is not a cause for concern.
•The use of an AC adaptor is recommended as the unit’s power consumption is relatively high. Should you prefer to use batteries, please use the rechargeable AA-type Ni-MH type.
•When installing or replacing batteries, always turn off the power on this unit and disconnect any other devices you may have connected. This way, you can prevent malfunction and/or damage to speakers or other devices.
•Before connecting the AX-Synth to other devices, turn off the power to all units. This will help prevent malfunctions and/or damage to other devices.
Placement
•Using the unit near power amplifiers (or other equipment containing large power transformers) may induce hum. To alleviate the problem, change the orientation of this unit; or move it farther away from the source of interference.
•This device may interfere with radio and television reception. Do not use this device in the vicinity of such receivers.
•Noise may be produced if wireless communications devices, such as cell phones, are operated in the vicinity of this unit. Such noise could occur when receiving or initiating a call, or while conversing. Should you experience such problems, you should relocate such wireless devices so they are at a greater distance from this unit, or switch them off.
•Do not expose the AX-Synth to direct sunlight, place it near devices that radiate heat, leave it inside an enclosed vehicle, or otherwise subject it to temperature extremes. Excessive heat can deform or discolor the instrument.
•When moved from one location to another where the temperature and/or humidity is very different, water droplets (condensation) may form inside the AX-Synth. Damage or malfunction may result if you attempt to use the AX-Synth in this condition. Therefore, before using the AX-Synth, you must allow it to stand for several hours, until the condensation has completely evaporated.
•Do not allow objects to remain on top of the keyboard. This can be the cause of malfunction, such as keys ceasing to produce sound.
•Depending on the material and temperature of the surface on which you place the unit, its rubber feet may discolor or mar the surface.
You can place a piece of felt or cloth under the rubber feet to prevent this from happening. If you do so, please make sure that the unit will not slip or move accidentally.
Maintenance
•For everyday cleaning wipe the AX-Synth with a soft, dry cloth or one that has been slightly dampened with water. To remove stubborn dirt, use a mild, non-abrasive detergent. Afterwards, be sure to wipe the instrument thoroughly with a soft, dry cloth.
•Never use benzene, thinners, alcohol or solvents of any kind, to avoid the possibility of discoloration and/or deformation.
Repairs and data
•Please be aware that all data contained in the instrument’s memory may be lost when it is sent for repairs. Important data should always be backed up using the Bulk Dump function (see p. 29). In certain cases (such as when circuitry related to memory itself is out of order), we regret that it may not be possible to restore the data. Roland assumes no liability concerning such loss of data.
Additional precautions
•Please be aware that the contents of memory can be irretrievably lost as a result of a malfunction, or the improper operation of the unit. To protect yourself against the risk of losing important data, we recommend that you periodically save a backup copy of important data you have stored in the unit's memory (see p. 29).
•Unfortunately, it may be impossible to restore the contents of data that was stored in the AX-Synth’s memory once it has been lost. Roland Europe assumes no liability concerning such loss of data.
•Use a reasonable amount of care when using the AX-Synth’s buttons, sliders, or other controls; and when using its jacks and connectors. Rough handling can lead to malfunctions.
•When connecting/disconnecting all cables, grasp the connector itself—never pull on the cable. This way you will avoid causing shorts, or damage to the cable’s internal elements.
•To avoid disturbing your neighbors, try to keep the AX-Synth’s volume at reasonable levels. You may prefer to use headphones, so you do not need to be concerned about those around you (especially when it is late at night).
•When you need to transport the unit, package it in the box (including padding) that it came in, if possible. Otherwise, you will need to use equivalent packaging materials.
•The usable range of D Beam controller will become extremely small when used under strong direct sunlight. Please be aware of this when using the D Beam controller outside.
•Use a reasonable amount of care when using the instrument’s buttons, other controls, and jacks/connectors. Rough handling can lead to malfunctions.
•Never strike or apply strong pressure to the display.
Handling CD-ROMs
•Avoid touching or scratching the shiny underside (encoded surface) of the CD-ROM. Damaged or dirty CD-ROM discs may not be read properly. Keep your discs clean using a commercially available CD cleaner.
Precautions for batteries
•Never use alkaline or zinc-carbon batteries.
•The temperature range for use of the batteries depends on the battery type being used. Please see the documentation that came with the batteries.
•Do not use or store batteries at high temperature, such as in strong direct sunlight, in cars during hot weather or directly in front of heaters. This may cause battery fluid leakage, impaired performance and shorten the batteries’ service life.
•Do not splash fresh or saltwater on a battery or allow the terminals to become damp. This may cause heat generation and formation of rust on the battery and its terminals.
•If newly purchased batteries exhibit rust, generate heat or seem abnormal in any other way, do not use them. Take them back to your dealer.
•Keep the batteries out of reach of babies or small children.
6

•Be sure to carefully instruct any person on the proper way of handling batteries.
•Never dispose of the battery in a fire. Never heat it. Doing so may melt the insulation, damage the gas release vents or protective devices, cause combustion through chemical reaction with generated hydrogen, ejection of battery fluid, bursting or fire.
•Do not use batteries with the positive (+) and negative (–) terminals reversed, as this may drain the batteries or cause abnormal chemical reactions.
•Do no strike or drop the batteries. Strong impact can cause leakage of battery fluid, heat generation, bursting or fire.
•Never try to connect several batteries in parallel as this may cause leakage of battery fluid, heat generation, bursting or fire.
•Do not alter or remove protective mechanisms or other parts. Never disassemble the batteries.
•If any fluid from a battery comes in contact with the eyes, flush the eyes immediately, washing them thoroughly with clean water from a tap or other source and consult a doctor. Strong alkaline fluid can damage the eyes and lead to permanent loss of eyesight.
•If skin or clothing comes in contact with any fluid from a battery, wash the area immediately with clean water from a tap. Battery fluid can cause skin damage.
•When a battery is no longer usable, dispose of it in accordance with all applicable local laws and regulations.
•If a battery leaks fluid, changes color or shape or changes in any other way, do not use it, otherwise it may cause heat generation, bursting or fire.
Battery handling
•Incorrect handling of batteries, rechargeable batteries, or a battery charger can cause leakage, overheating, fire, or explosion. Before use, you must read and strictly observe all of the precautions that accompany the batteries, rechargeable batteries, or battery charger. When using rechargeable batteries and a charger, use only the combination of rechargeable batteries and charger specified by the battery manufacturer.
Strap holder precaution
•Never unscrew the strap pins to avoid damaging the AX-Synth’s plastic housing, which eventually compromises overall stability and safety.
•To avoid dropping the unit and damaging it or causing injuries to yourself or other people, be sure to double-check whether the supplied strap is securely attached to the two pins before using the AX-Synth.
•Roland Europe recommends installing commercially available strap locks for guitar to guard against damage and injuries caused by the strap coming loose while your are playing.
rAX-Synth Owner’s Manual
Copyright
•Microsoft and Windows are registered trademarks of Microsoft Corporation.
•Apple and Macintosh are registered trademarks of Apple Inc.
•Mac OS is a trademark of Apple Inc.
7

Important notes
Contents
USING THE UNIT SAFELY . . . . . . . . . . . . . . . . . . . . . . . . . . . . . . . . . . . . . . . . . . . . . . . . . . . . 4 Important notes . . . . . . . . . . . . . . . . . . . . . . . . . . . . . . . . . . . . . . . . . . . . . . . . . . . . . . . . . . . 6
1. The AX-Synth in a nutshell . . . . . . . . . . . . . . . . . . . . . . . . . . . . . . . . . . . . . . . . . . . . . . . 9
2. Panel descriptions . . . . . . . . . . . . . . . . . . . . . . . . . . . . . . . . . . . . . . . . . . . . . . . . . . . . . 10
Front panel . . . . . . . . . . . . . . . . . . . . . . . . . . . . . . . . . . . . . . . . . . . . . . . . . . . . . . . . . . . . . . . . . . . . . . 10 Bottom panel . . . . . . . . . . . . . . . . . . . . . . . . . . . . . . . . . . . . . . . . . . . . . . . . . . . . . . . . . . . . . . . . . . . . 11
Connection panel (rear) . . . . . . . . . . . . . . . . . . . . . . . . . . . . . . . . . . . . . . . . . . . . . . . . . . . . . 12
3. Making connections . . . . . . . . . . . . . . . . . . . . . . . . . . . . . . . . . . . . . . . . . . . . . . . . . . . 13
Connecting the AC adaptor . . . . . . . . . . . . . . . . . . . . . . . . . . . . . . . . . . . . . . . . . . . . . . . . . . . . . . . . 13 Inserting or replacing batteries . . . . . . . . . . . . . . . . . . . . . . . . . . . . . . . . . . . . . . . . . . . . . . . . . . . . . 13 Connecting the AX-Synth. . . . . . . . . . . . . . . . . . . . . . . . . . . . . . . . . . . . . . . . . . . . . . . . . . . . . . . . . . 14 Using headphones . . . . . . . . . . . . . . . . . . . . . . . . . . . . . . . . . . . . . . . . . . . . . . . . . . . . . . . . . . . . . . . . 16 Powering up . . . . . . . . . . . . . . . . . . . . . . . . . . . . . . . . . . . . . . . . . . . . . . . . . . . . . . . . . . . . . . . . . . . . . 17
4. Playing the AX-Synth . . . . . . . . . . . . . . . . . . . . . . . . . . . . . . . . . . . . . . . . . . . . . . . . . . 18
Selecting ‘regular’ Tones . . . . . . . . . . . . . . . . . . . . . . . . . . . . . . . . . . . . . . . . . . . . . . . . . . . . . . . . . . . 18 Selecting ‘SuperNATURAL’ and ‘SPECIAL’ Tones . . . . . . . . . . . . . . . . . . . . . . . . . . . . . . . . . . . . . . . 19 Grouping frequently-used Tones (FAVORITE) . . . . . . . . . . . . . . . . . . . . . . . . . . . . . . . . . . . . . . . . . 19
5. Using the AX-Synth’s performance functions . . . . . . . . . . . . . . . . . . . . . . . . . . . . . . . 21
Master Tune . . . . . . . . . . . . . . . . . . . . . . . . . . . . . . . . . . . . . . . . . . . . . . . . . . . . . . . . . . . . . . . . . . . . . 21 Transpose . . . . . . . . . . . . . . . . . . . . . . . . . . . . . . . . . . . . . . . . . . . . . . . . . . . . . . . . . . . . . . . . . . . . . . . . 21 Shifting the keyboard pitch in octave steps . . . . . . . . . . . . . . . . . . . . . . . . . . . . . . . . . . . . . . . . . . 22 Using the Modulation Bar . . . . . . . . . . . . . . . . . . . . . . . . . . . . . . . . . . . . . . . . . . . . . . . . . . . . . . . . . 22 Using the Touch Controller . . . . . . . . . . . . . . . . . . . . . . . . . . . . . . . . . . . . . . . . . . . . . . . . . . . . . . . . 22 Aftertouch . . . . . . . . . . . . . . . . . . . . . . . . . . . . . . . . . . . . . . . . . . . . . . . . . . . . . . . . . . . . . . . . . . . . . . . 23 Using the D Beam controller . . . . . . . . . . . . . . . . . . . . . . . . . . . . . . . . . . . . . . . . . . . . . . . . . . . . . . . 23 Portamento . . . . . . . . . . . . . . . . . . . . . . . . . . . . . . . . . . . . . . . . . . . . . . . . . . . . . . . . . . . . . . . . . . . . . . 24 Sustaining notes. . . . . . . . . . . . . . . . . . . . . . . . . . . . . . . . . . . . . . . . . . . . . . . . . . . . . . . . . . . . . . . . . . 25
6. Editing Tone settings. . . . . . . . . . . . . . . . . . . . . . . . . . . . . . . . . . . . . . . . . . . . . . . . . . . 26
Editing the volume and Reverb Send levels. . . . . . . . . . . . . . . . . . . . . . . . . . . . . . . . . . . . . . . . . . . 26
7. Using the AX-Synth as MIDI controller . . . . . . . . . . . . . . . . . . . . . . . . . . . . . . . . . . . . 27
MIDI messages that can be transmitted/received . . . . . . . . . . . . . . . . . . . . . . . . . . . . . . . . . . . . . 27 Activating the AX-Synth’s MIDI transmission . . . . . . . . . . . . . . . . . . . . . . . . . . . . . . . . . . . . . . . . . 27 Setting the MIDI transmit channel . . . . . . . . . . . . . . . . . . . . . . . . . . . . . . . . . . . . . . . . . . . . . . . . . . 27 Transmitting Program Change numbers . . . . . . . . . . . . . . . . . . . . . . . . . . . . . . . . . . . . . . . . . . . . . 28 Using the Bulk Dump function . . . . . . . . . . . . . . . . . . . . . . . . . . . . . . . . . . . . . . . . . . . . . . . . . . . . . 29
8. Using the AX-Synth’s USB port. . . . . . . . . . . . . . . . . . . . . . . . . . . . . . . . . . . . . . . . . . . 31
General considerations . . . . . . . . . . . . . . . . . . . . . . . . . . . . . . . . . . . . . . . . . . . . . . . . . . . . . . . . . . . . 31 Making the settings for the USB driver . . . . . . . . . . . . . . . . . . . . . . . . . . . . . . . . . . . . . . . . . . . . . . 32
9. About V-LINK . . . . . . . . . . . . . . . . . . . . . . . . . . . . . . . . . . . . . . . . . . . . . . . . . . . . . . . . . 33
How to use V-LINK. . . . . . . . . . . . . . . . . . . . . . . . . . . . . . . . . . . . . . . . . . . . . . . . . . . . . . . . . . . . . . . . 33
10. Additional functions . . . . . . . . . . . . . . . . . . . . . . . . . . . . . . . . . . . . . . . . . . . . . . . . . . . 34
Battery-related functions . . . . . . . . . . . . . . . . . . . . . . . . . . . . . . . . . . . . . . . . . . . . . . . . . . . . . . . . . . 34 Loading the factory settings . . . . . . . . . . . . . . . . . . . . . . . . . . . . . . . . . . . . . . . . . . . . . . . . . . . . . . . 34 Checking the AX-Synth’s firmware version . . . . . . . . . . . . . . . . . . . . . . . . . . . . . . . . . . . . . . . . . . . 34
11. Appendix . . . . . . . . . . . . . . . . . . . . . . . . . . . . . . . . . . . . . . . . . . . . . . . . . . . . . . . . . . . . 35
Troubleshooting . . . . . . . . . . . . . . . . . . . . . . . . . . . . . . . . . . . . . . . . . . . . . . . . . . . . . . . . . . . . . . . . . . 35 Control Change list . . . . . . . . . . . . . . . . . . . . . . . . . . . . . . . . . . . . . . . . . . . . . . . . . . . . . . . . . . . . . . . 36 Tone list . . . . . . . . . . . . . . . . . . . . . . . . . . . . . . . . . . . . . . . . . . . . . . . . . . . . . . . . . . . . . . . . . . . . . . . . . 37
12. Specifications. . . . . . . . . . . . . . . . . . . . . . . . . . . . . . . . . . . . . . . . . . . . . . . . . . . . . . . . . 39
13. MIDI implementation chart. . . . . . . . . . . . . . . . . . . . . . . . . . . . . . . . . . . . . . . . . . . . . . 40
14. Index. . . . . . . . . . . . . . . . . . . . . . . . . . . . . . . . . . . . . . . . . . . . . . . . . . . . . . . . . . . . . . . . 41
8

rAX-Synth Owner’s Manual
 1. The AX-Synth in a nutshell
High-quality Internal sound source
A “shoulder synthesizer”, the AX-Synth comes with 256 high-quality sounds specially selected for solo performances, 4 SuperNATURAL™ sounds (Violin, Cello, Shakuhachi, Trombone) and 4 SPECIAL sounds (Trumpet, Sax, Strings and Jazz Scat).
Cable-free live operation possible
The AX-Synth can be powered by 8 rechargeable AAtype Ni-MH batteries with a battery life of about 6 hours. If combined with a commercially available wireless system, it allows you to play wherever you like, to follow the singer or any other musician on stage, etc., with no cables to pay attention to.
It even provides an attenuator switch to adapt its output level to the input sensitivity of the wireless system you are using.
Convenient studio operation
An AC adaptor and the USB port allow the AX-Synth to be used with a computer. Dedicated editor and librarian software is also available. The “AX-Synth Editor” software, which includes librarian software, can be downloaded free of charge from Roland’s website: http://www.Roland.com.
All performance controls within reach
The AX-Synth provides control functions that are conveniently and ergonomically built into its neck. The AX-Synth puts you in control of your sound: key velocity sensitivity, a D Beam controller, an AFTERTOUCH knob, a modulation bar, a TOUCH CONTROLLER ribbon, a PORTAMENTO button, a HOLD button and a BENDER MODE button are built in.
The D Beam controller can be set to transmit almost any control change message (CC) you may ever need. Finally, the AX-Synth sports a FOOT PEDAL socket to which you can connect a DP-series hold pedal.
In-depth programming with the ‘AX-Synth editor’
The AX-Synth comes with dedicated editor and librarian software that allows you to modify (and save) all aspects of the internal sounds. Combined with this intuitive software, the AX-Synth becomes a fully-fledged synthesizer.
9
Panel descriptions
 2. Panel descriptions
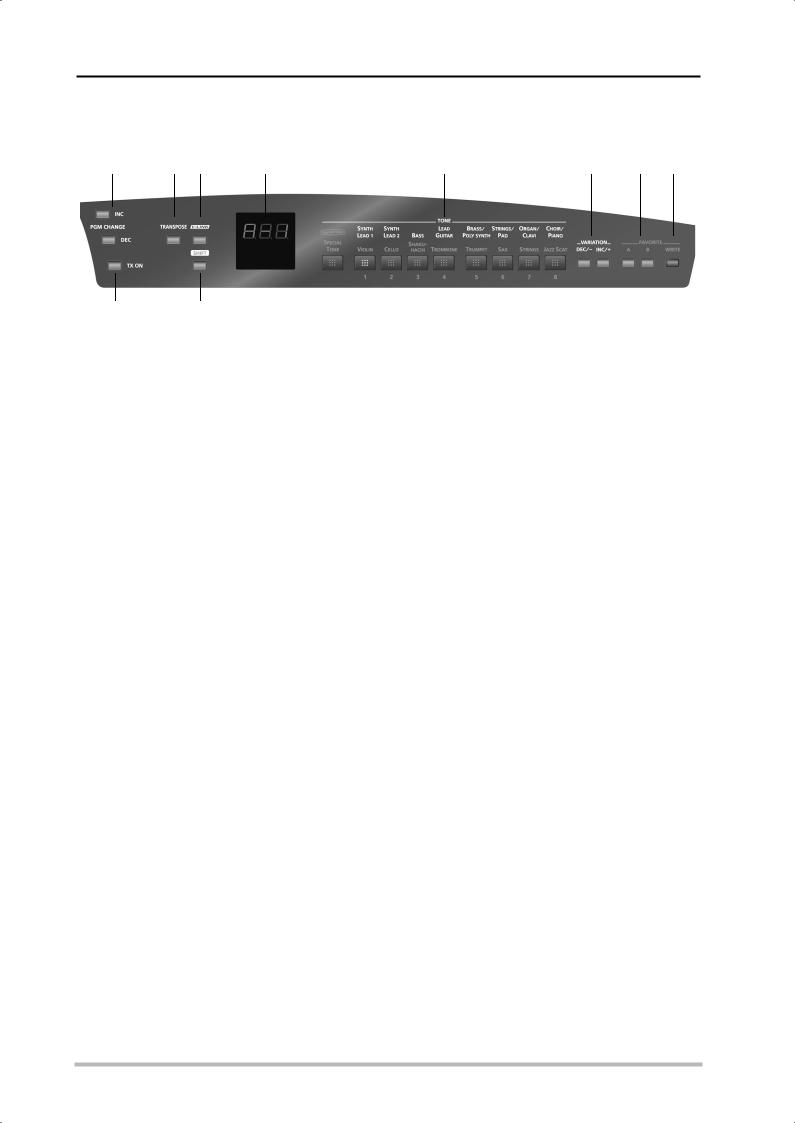
Front panel
A C D F
B E
APGM CHANGE INC & DEC buttons
These buttons are used to transmit program change messages on the selected MIDI channel. They work in a sequential fashion (incremental or decremental). Program change numbers can also be entered directly, however (see p. 28).
BTX ON button
This button is used to enable (button lights) or disable
the transmission of MIDI messages. Pressing it while holding down the [SHIFT] button allows you to use the keys in the highest octave (NUMERIC KEYPAD) and the keys in the lowest octave (TX MIDI CHANNELS) for numeric entry of program change or MIDI channel numbers.
CTRANSPOSE button
Press this button to display the current transposition
interval. Holding it while pressing the OCTAVE/VARIATION [+]/[–] buttons allows you to set the interval in semi-tone steps.
DV-LINK button
Press this button to activate the AX-Synth’s V-LINK control function (see p. 33).
ESHIFT button
Pressing this button allows you to select the secondary (hidden) function of some of the other buttons.
FDisplay
This three-character display keeps you posted about the selected Tone, mode or the parameter value you set.
GTONE buttons
These buttons are used to select the desired Tone family, SuperNATURAL, SPECIAL or FAVORITE Tone (the button you press lights blue).
HVARIATION DEC/– & INC/+ buttons
These buttons allow you to select a Tone from the active Tone family (see above) in a sequential fashion.
This function can also be assigned to the OCTAVE/ VARIATION [+]/[–] buttons (page 18).
G H I J
A third, usually faster, way to select Tones is by holding down [SHIFT] while using the keys in the highest
octave (NUMERIC KEYPAD).
IFAVORITE A, B buttons
These buttons allow you to select the corresponding bank of “favorite” Tones.
JWRITE button
The [WRITE] button is used to assign the desired Tones to the 16 memories of FAVORITE banks “A” and “B” and to save all settings you change.
10
rAX-Synth Owner’s Manual
‘Neck’ (control) section
Front view
M
K L N O
Rear view
P Q R
KVOLUME knob
This knob allows you to set the AX-Synth’s overall output volume.
LAFTER TOUCH knob
This knob sends channel aftertouch messages for the notes you are playing (see p. 23).
MOCTAVE/VARIATION (TRANSPOSE) buttons
These buttons are used to transpose the AX-Synth’s keyboard in steps of one octave (see p. 22).
You can also use these buttons to select Tone variations (see p. 18).
OD Beam controller & PITCH, FILTER & ASSIGNABLE buttons
This controller allows you to influence the pitch or timbre of the notes you play, or to create unique effects by moving one hand up/down or left/right above the two “eyes”.
The buttons to its left allow you to assign the desired function to the D Beam controller (see p. 24).
PPORTAMENTO button
This button allows you to switch the Portamento function on and off.
If you hold down [TRANSPOSE] while pressing one of these buttons, the pitch changes in semi-tone steps.
NMODULATION BAR/TOUCH CONTROLLER
Press the modulation bar to add modulation to the notes you are playing. Behind the modulation bar lies the ribbon strip. Slide your finger towards the left or right on this ribbon to change the pitch of the notes.
QBENDER MODE button
This button allows you to specify how the TOUCH CONTROLLER ribbon works.
Note: This function is not available for the SuperNATURAL Tones.
RHOLD button
This button allows you to hold the notes you are playing (see p. 25).
Bottom panel
S S T S S
S Strap pins |
T Battery compartment |
This is where you can attach the ends of the supplied strap. Choose any two pins.
This is where you can insert AA-type Ni-MH batteries.
11

Panel descriptions
Connection panel (rear)
U V
UOUTPUT R & L/MONO sockets
These 1/4” sockets need to be connected to the inputs of a keyboard amplifier, mixer, etc. To take advantage of the AX-Synth mobility factor, consider using a commercially available wireless system.
Note: If you can/want to use only one channel on your external amplifier, connect the L/MONO socket to its input. For optimum sound quality, we recommend working in stereo, though.
Note: Be sure to only use wireless transmitters that comply with local radio regulations.
VATT ON/OFF switch
If you are using 1/4” cables to connect the AX-Synth to an amplifier, etc., slide this switch to the “OFF” position.
If you notice distortion while using a wireless system, slide this switch to the “ON” position to reduce the level of the AX-Synth’s audio output signal.
Note: Be sure to only use wireless transmitters that comply with local radio regulations.
WPHONES socket
This is where you can connect a pair of optional headphones (Roland RH-25, RH-50, RH-200, RH-300, etc.).
XCord hook (1)
This hook is intended to secure the MIDI cable connected to the MIDI OUT socket when you are using the AX-Synth as a shoulder keyboard. This is a safeguard against accidental disconnection.
YMIDI OUT, IN sockets
Connect the MIDI IN socket to the device that should transmit MIDI messages to the AX-Synth. Connect the MIDI OUT socket to the MIDI instrument you wish to control with your AX-Synth.
ZUSB port
Connect this port to a free USB port on your computer using an “A—B”-type USB cable.
aFOOT PEDAL socket
This is where you can connect an optional Roland DP-series pedal.
Note: Though you can also connect an expression pedal, any pedal you connect will act as Hold pedal.
a c
W X Y Z b d
bPOWER switch
Set this switch to the ON position to switch the AX-Synth on. Select the OFF position to power off your AX-Synth.
If you need to turn off the power completely (when using the supplied AC adapter), first turn off the power switch, then disconnect the AC adapter’s power from the wall outlet.
cDC IN socket
This is where you can connect the supplied PSB-1U adaptor.
dCord hook (2)
If you connect the supplied adaptor to the DC IN socket, be sure to wind its cable around this hook as a safeguard against accidental disconnection.
12

rAX-Synth Owner’s Manual
 3. Making connections
Note: To prevent malfunction and/or damage to speakers or other devices, always turn down the volume, and turn off the power on all devices before making any connections.
Note: When audio cables with resistors are used, the AX-Synth’s volume level may be low. If this happens, use connection cables that do not contain resistors.
Connecting the AC adaptor
The AX-Synth can be powered either by 8 AA-type Ni-MH batteries or the supplied AC adaptor.
(1)Make sure that the [POWER] switch is in the “OFF” position.
(2)Turn the [VOLUME] knob to the lowest setting to minimize the volume.
Note: Be sure to use only the supplied AC adaptor. Using any other type may cause malfunction or electric shock.
Note: If the AX-Synth is to remain unused for an extended period of time, unplug the adaptor.
(3)Connect the included power cord to the AC adaptor.
The indicator will light when you plug the AC adaptor into an AC outlet.
|
|
|
|
|
|
AC adaptor |
|
|
Power cord |
||
|
|
|
|
|
|
|
|
|
|
|
|
|
|
|
|
|
|
|
|
|
|
|
|
|
|
|
|
|
|
|
|
|
|
|
|
Indicator
to an AC outlet
Place the AC adaptor so the side with the indicator (see illustration) faces upwards and the side with textual information faces downwards.
Note: Depending on your region, the included power cord may differ from the one shown above.
(4)Connect the AC adaptor to the DC IN jack on the AX-Synth’s rear panel, and then plug the AC adaptor into an electrical outlet.
To prevent inadvertent disruption of power to your unit (should the plug be pulled out accidentally), and to avoid applying undue stress to the AC adaptor jack, anchor the power cord using the cord hook, as shown in the illustration.
AX-Synth rear panel
Cord hook
Inserting or replacing batteries
Eight AA batteries are required to run the AX-Synth on battery power. We recommend the use of rechargeable AA-type Ni-MH batteries. With these batteries you can expect about 6 hours of continuous operation, although this depends on how the AX-Synth is being used.
Note: If you plan to use batteries, please disconnect the AC adaptor from the AX-Synth.
Note: If batteries are installed, disconnecting or reconnecting the AC adaptor’s power cord or the adaptor plug from the AX-Synth’s DC IN socket while the power is on will cause the AX-Synth to turn off. You must turn off the power before connecting or disconnecting the power cord or AC adaptor.
Note: Avoid using new batteries together with old ones. In addition, avoid mixing different types of batteries (e.g. regular carbon and alkaline batteries).
Note: When replacing batteries, be sure to insert them correctly (ensure correct polarity).
Note: Remove the batteries whenever the AX-Synth is to remain unused for an extended period of time.
(1)Switch off the AX-Synth.
(2)Remove the battery cover located on the bottom of the instrument.
(b)Lift up.
(a) Press the tabs forward.
Note: When turning the AX-Synth upside-down, get a bunch of newspapers or magazines, and place them under the four corners or at both ends to prevent damage to the buttons and controls. Also, you should try to orient the unit so no buttons or controls get damaged.
Note: When turning the AX-Synth upside-down, handle with care to avoid dropping it, or allowing it to fall or tip over.
13

Making connections
(3)Insert 8 rechargeable AA-type Ni-MH batteries into the compartment (4 on either side), taking care to orient them in accordance with the “+” and “–” indications.
(4) Close the AX-Synth’s battery compartment.
Connecting the AX-Synth
Connecting the AX-Synth to an amplifier, mixer, etc., using cables
The AX-Synth needs to be connected to audio equipment, such as a keyboard amplifier, a mixing console, active speakers, etc.
(1)Connect the OUTPUT jacks on the AX-Synth’s rear panel to the input jacks of your external device.
INPUT L & R
Battery charge indication
If, while using batteries, three flashing dots appears in the display, the remaining battery power is low. Replace the batteries at your earliest convenience. Three constantly lit dots mean that you need to replace the batteries right away (or use the supplied adaptor).
Note: The AX-Synth cannot recharge your batteries.
Note: The battery charge indication is only an approximation.
Note about rechargeable batteries
Certain batteries can be recharged several times before they need to be replaced with a new ones. Note that it is normal for the batteries to last increasingly shorter as time goes by. At the end of their life cycle, they may only last one hour, for example. But that is a gradual process.
Please choose unbalanced (mono) cables with 1/4” jacks at one end (for the AX-Synth). The connectors at the other end need to match the input sockets of the device to which you are connecting the AX-Synth.
Note: If your amplifier is monaural, you only need to connect the L/MONO socket.
(2) Set the ATT switch to the “OFF” position.
Note: You can also connect headphones to the PHONES socket, in which case you do not need to establish an audio connection.
14
Loading...